A tree wall painting can totally change the mood of a room—like bringing in a little pocket of nature without moving a single piece of furniture. I’m sharing my favorite tree wall painting ideas from classic, calming looks to bold, artsy statements you can make your own.
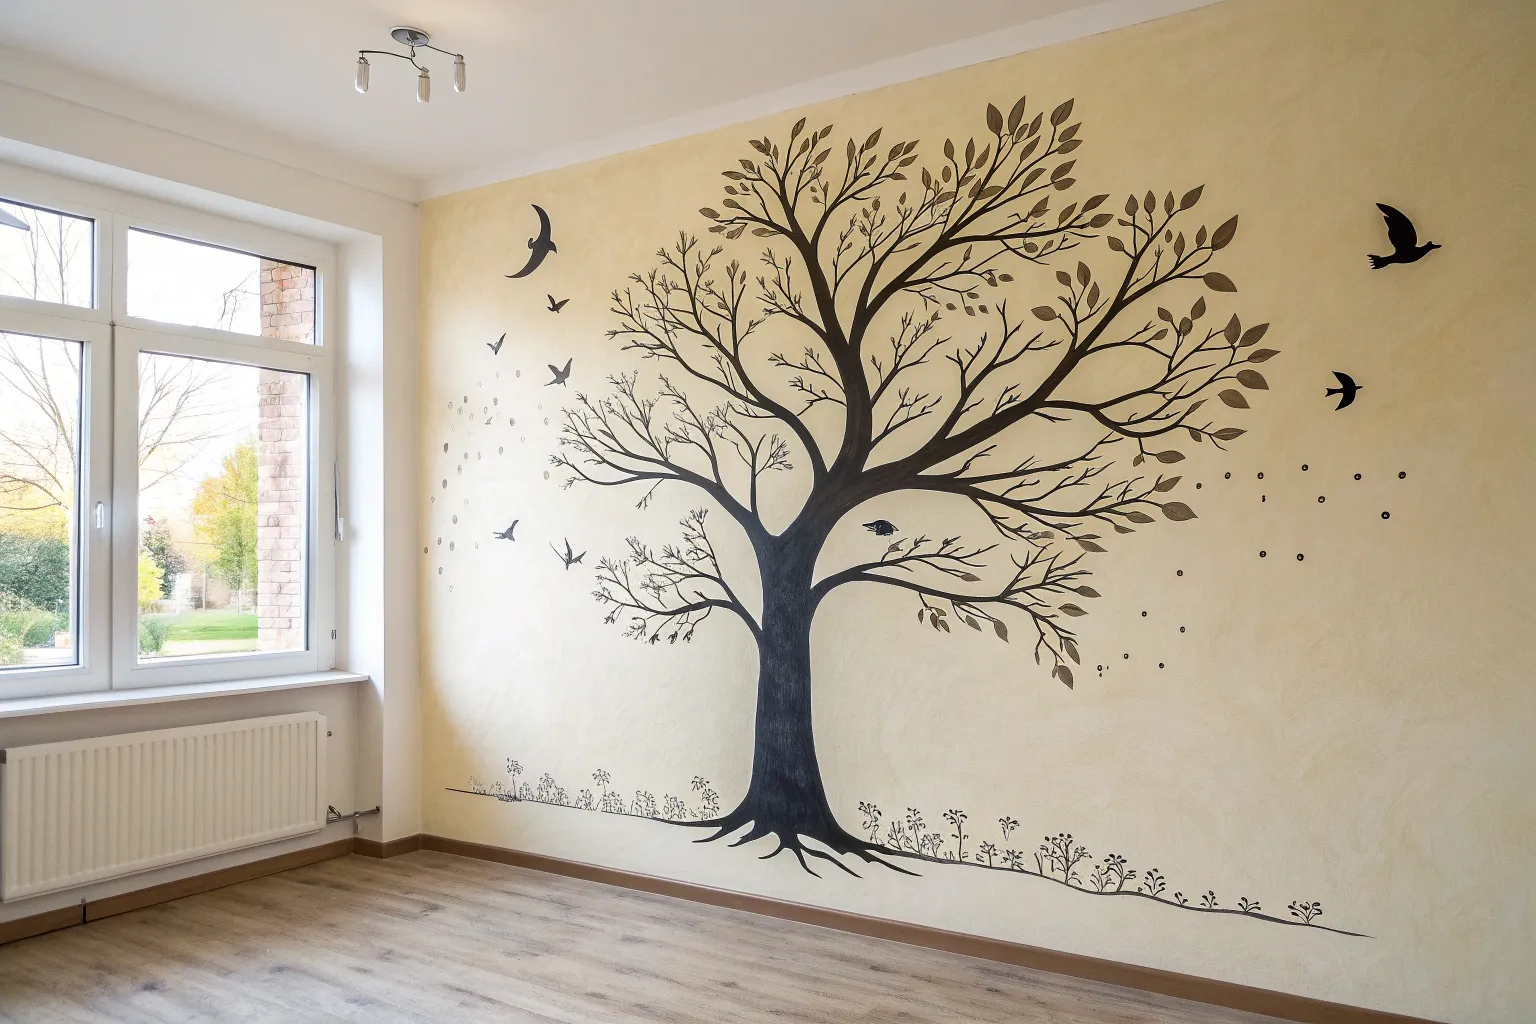
Classic Tree Silhouette Feature Wall

Transform a blank corner of your room into a peaceful forest scene with this striking silhouette mural. The high-contrast design pairs a bold, nearly black trunk against warm yellow walls, creating a stunning focal point that feels both classic and contemporary.
Step-by-Step Guide
Materials
- Warm yellow interior wall paint (base coat)
- Dark charcoal or soft black acrylic latex paint (eggshell or satin finish)
- Painter’s tape
- Chalk or a light pencil
- Small angled sash brush (1.5 – 2 inch)
- Medium round artist’s brush
- Fine liner brush (for leaves and grass)
- Drop cloth
- Step ladder
- Reference image of a tree silhouette
Step 1: Preparation and Base
-
Clear and prep the area:
Move furniture away from the wall, specifically the bed and nightstand seen in the inspiration photo. Lay down a drop cloth to protect the carpet from any potential drips. -
Inspect the surface:
Ensure your wall gets wiped down with a damp cloth to remove dust. If you need to change your base color to match the warm beige-yellow shown here, apply two coats of your chosen base paint and let it cure for at least 24 hours. -
Sketch the main structure:
Using a piece of chalk or a very light pencil, loosely sketch the trunk’s position. Start the trunk off-center near the floor to anchor the composition, then flare it out as you move upward. -
Map out primary branches:
Draw the main thick branches extending outward and upward. Aim for a ‘Y’ structure where the trunk splits, ensuring the branches reach towards the ceiling and spread wide across the wall.
Step 2: Painting the Structure
-
Outline the trunk:
Dip your angled sash brush into the dark charcoal paint. Carefully cut in the edges of the trunk at the base, creating a slightly uneven, organic line where the roots meet the ‘ground’. -
Fill the core:
Fill in the trunk and the thickest parts of the main branches. Use smooth, long strokes to ensure solid coverage without obvious brush marks. I like to apply two thin coats here rather than one thick one. -
Extend the limbs:
Switch to your medium round artist’s brush. Extend the lines from your thick branches into thinner secondary branches. Keep your hand loose to create natural, wavy growth patterns rather than straight lines. -
Add twig details:
Using the tip of the round brush, paint the finest twigs at the ends of the branches. Let some crisscross slightly to create density, but keep the overall look airy. -
Create the root line:
At the very bottom of the wall, paint a low, undulating horizon line connected to the trunk to suggest the ground. Add small vertical flicks along this line to represent grass blades.
Steady Hand Trick
Rest your pinky finger against the wall to stabilize your hand while painting fine twigs. This acts as a pivot point and prevents shaky lines.
Step 3: Adding Foliage and Detail
-
Practice leaf shapes:
Before hitting the wall, practice the leaf motif on a piece of paper. The style here uses clusters of small, detached oval shapes or simple line-art leaves rather than solid blobs. -
Start the lower leaves:
Using your fine liner brush, begin painting leaves on the lower hanging branches. Group them in twos or threes attached to short stems. -
Build the canopy:
Move up the ladder to work on the higher sections. In this style, the leaves are somewhat sparse; avoid overcrowding them so the branch structure remains visible. -
Add texture to leaves:
For visual interest, paint some leaves as solid silhouettes and others as simple outlines or with tiny interior veins. This variation adds a delicate, illustrative quality. -
Paint the ground details:
Return to the base of the tree. Use the liner brush to paint tiny stylized plants or mushrooms popping up from the grass line, just like the small circular shrub details seen in the example. -
Refine edges:
Step back to view the whole wall. Look for any shaky lines on the trunk or branches and smooth them out with the small brush. -
Final touch-ups:
Check for any spots where the yellow wall shows through the dark paint unevenly. Dab a little extra paint on these areas to ensure a solid, crisp silhouette.
Add a Little Magic
Once the paint is fully dry, hide a tiny painted bird or owl silhouette on one of the upper branches for a charming hidden detail.
Once the paint finishes curing, move your furniture back in and enjoy sleeping beneath your tranquil new canopy


Soft Watercolor-Style Tree Canopy
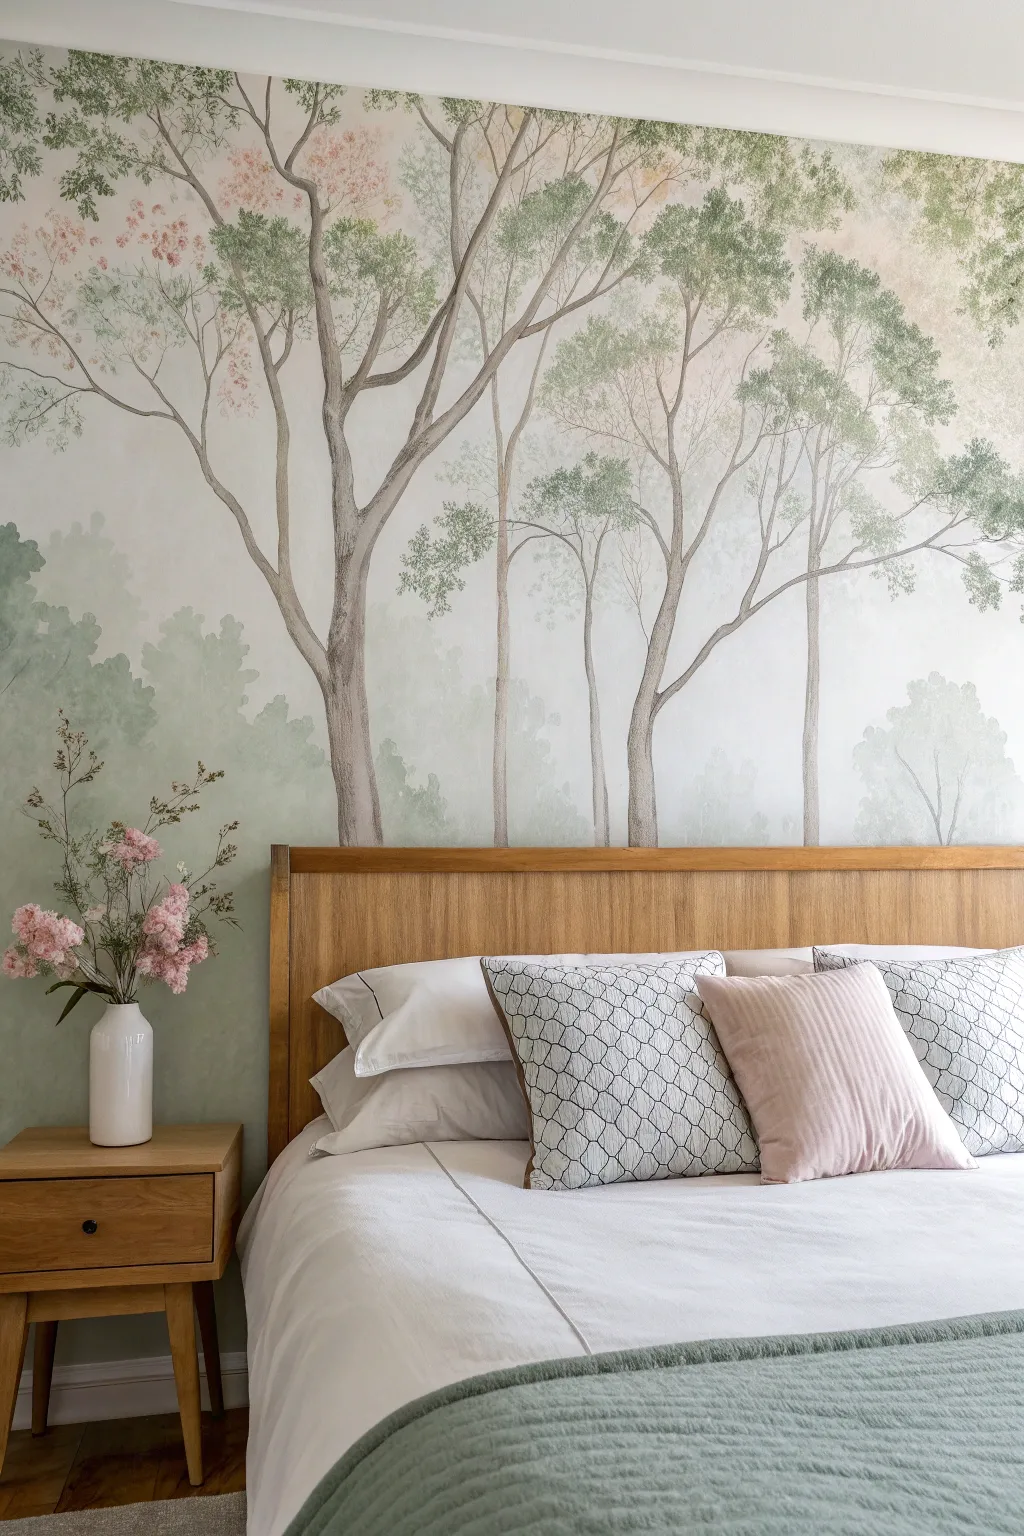
Transform a plain wall into a serene woodland retreat with this soft, watercolor-style mural technique. By layering diluted acrylics and using a wet-in-wet approach, you can achieve the dreamy atmospheric depth found in misty forest landscapes.
Step-by-Step
Materials
- Matte white interior wall paint (base)
- Acrylic paints (Payne’s Grey, Raw Umber, Olive Green, Sap Green, Titanium White, Soft Rose)
- Acrylic glazing medium
- Large sponge or sea sponge
- Wide soft-bristle brush (3-4 inch)
- Assorted round brushes (sizes 6, 10, and 12)
- Rigger or liner brush for fine branches
- Spray bottle with water
- Multiple mixing containers or buckets
- Drop cloths and painter’s tape
- Ladder
Step 1: Preparation and Background Atmosphere
-
Prep the surface:
Begin by cleaning your wall thoroughly to remove dust and grease. Tape off the ceiling line, baseboards, and any adjacent walls with painter’s tape. Lay down drop cloths to protect your floor. -
Apply the base coat:
Roll on a fresh coat of matte white or very pale off-white paint. This provides a clean canvas and ensures the translucent layers you add later will glow correctly. -
Mix the mist color:
In a bucket, mix a very diluted wash of Titanium White with a tiny drop of Olive Green and Grey. You want a milky consistency, almost like skim milk, using water and glazing medium to extend the drying time. -
Create the low-lying fog:
Using a large sponge or wide brush, apply this misty wash to the lower third of the wall in irregular clouded shapes. While the paint is still wet, mist it with your spray bottle to encourage drips and soft edges, blurring the transition into the white wall above.
Step 2: Painting the Distant Forest
-
Mix the background green:
Create a ghost-like green by mixing Titanium White, a small amount of Payne’s Grey, and Olive Green. This shade should be significantly lighter and flatter than your foreground colors will be. -
Block in distant tree shapes:
Using a diluted version of this mix, paint soft, amorphous tree shapes in the background layer. Keep the edges extremely fuzzy; I often use a damp sponge to dab these shapes onto the wall rather than brushing them. -
Blend into the mist:
As you move down the wall with these background trees, let them fade out into the lower misty section. Use a clean, damp brush to drag the bottom edges downward until they disappear into the fog. -
Add the first canopy layer:
Mix a slightly stronger, sage-green tone. Paint vague clusters of leaves near the top third of the wall, overlapping your ghost trees. These shouldn’t be detailed leaves, just suggestions of foliage masses.
Pro Tip: The Dripping Technique
Keep a dry rag handy. If the spray bottle creates a drip that runs too far down the wall, gently blot it immediately. Controlled drips add character; uncontrolled rivers ruin the illusion.
Step 3: Foreground Trees and Details
-
Sketch the main trunks:
With a diluted Raw Umber and a round brush, lightly sketch the positions of your main foreground trees. Focus on creating elegant, Y-shaped branching structures that reach all the way to the ceiling. -
Paint the trunk base color:
Mix Raw Umber with Payne’s Grey and a little Glazing Medium. Fill in the trunks, keeping the paint semi-translucent. The goal is a watercolor look, so avoid solid, opaque coverage. -
Add texture to the bark:
While the trunk is damp, lift off some paint with a dry rag to create texture. Then, use a smaller brush to add darker, thin vertical lines for bark striations on the shadowed side of the trees. -
Extend the branches:
Switch to your rigger or liner brush. Extend thin, delicate branches outward from the main trunks. Remember that branches get thinner as they move away from the trunk and tend to reach upwards toward the light. -
Stipple the main foliage:
Mix a Sap Green with a touch of Umber for a natural, earthy finish. Using an old, splayed bristle brush or a natural sponge, lightly stipple clusters of leaves onto the ends of your branches. -
Soften the foliage clumps:
Immediately after stippling, lightly mist the foliage with water from your spray bottle. This causes the acrylic to bloom slightly, mimicking the soft diffusion seen in watercolor paintings. -
Add flowering accents:
Mix a delicate Soft Rose pink with plenty of white. In sparse, focused areas—particularly near the top left—dab gentle spots of color to suggest flowering branches. -
Final atmospheric wash:
Once everything is completely dry, you may want to push some trees further back. Apply an extremely thin glaze of white and water over select background trees to make them appear more distant.
Level Up: Metallic Shimmer
Mix a tiny amount of iridescent pearl medium into your final mist glaze. It will catch the light subtly, giving the morning fog a magical, shimmering quality.
Step back and enjoy the peaceful, misty atmosphere you’ve brought into your room.


Tree Branches Over the Bed
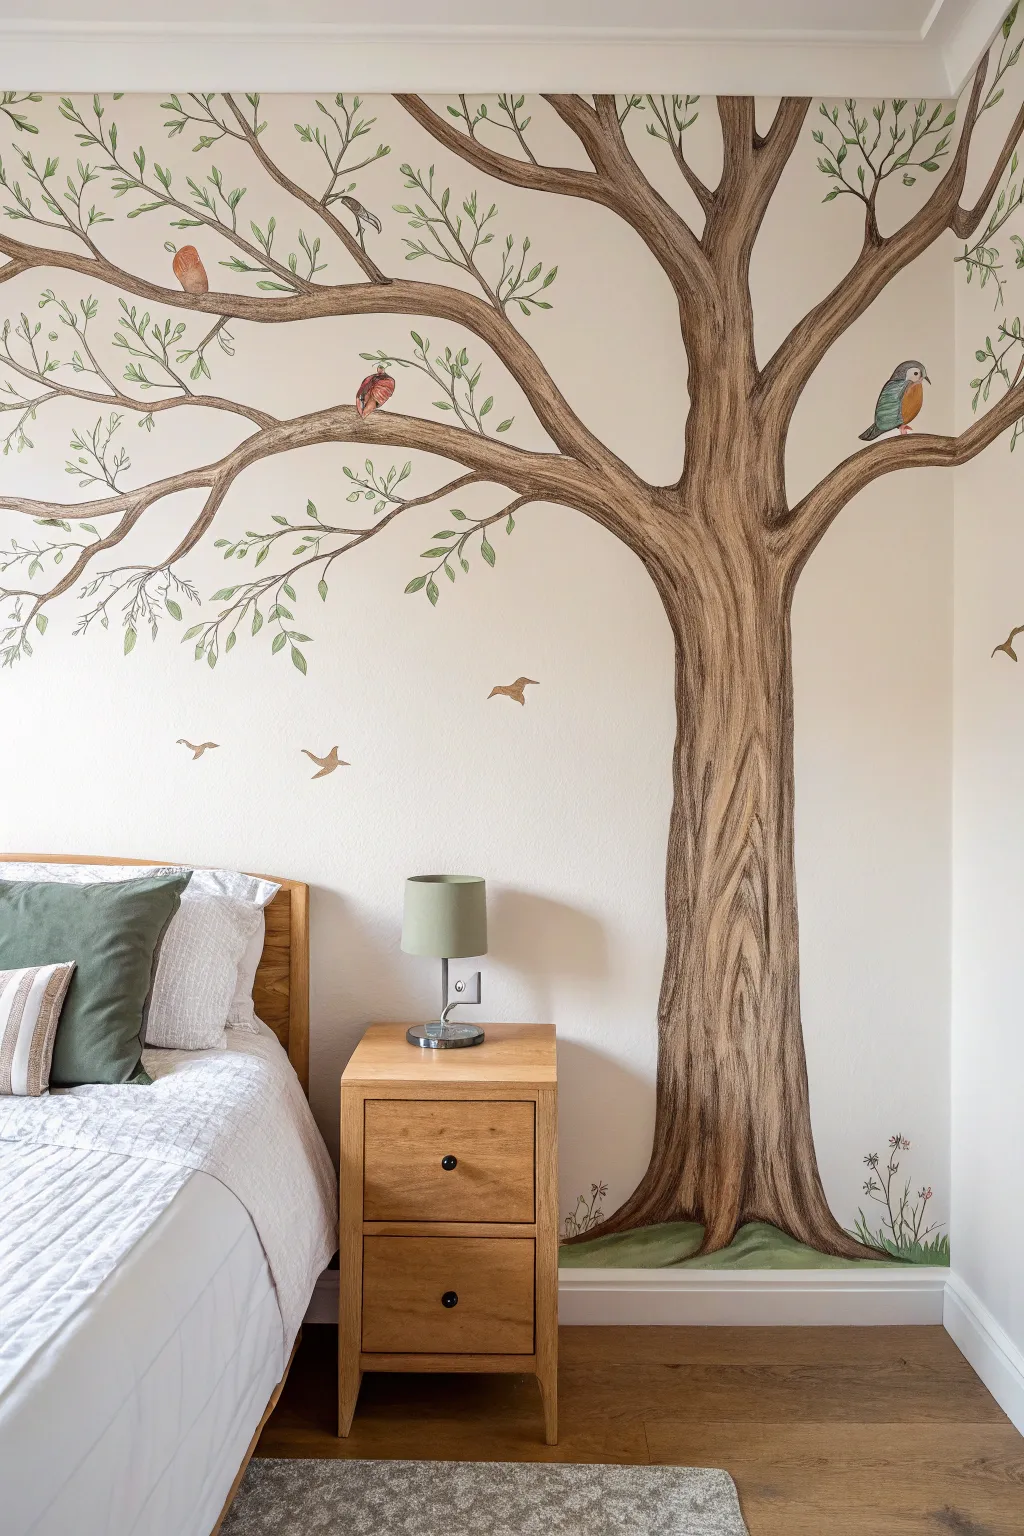
Transform a bedroom corner into a storybook forest with this charming, floor-to-ceiling tree mural. The design features a sturdy, textured trunk that reaches up and extends graceful branches over the bed, complete with playful birds and soft foliage.
Detailed Instructions
Materials
- Interior latex paint (Eggshell finish: Cream/Off-white for base)
- Acrylic paints (Browns: Umber, Sienna, Ochre; Greens: Sage, Olive, Leaf Green; Accents: Red, Blue, Grey)
- Pencil and large eraser
- Painter’s tape
- Assorted brushes: 2-inch angular brush, 1-inch flat brush, round liner brush (sizes 2 and 4)
- Mixing palette or plastic plates
- Drop cloths
- Step ladder
- Warm water and rags
Step 1: Preparation & Sketching
-
Prepare the workspace:
Clear the corner of furniture, including the nightstand and bed if possible. Lay down drop cloths to protect the flooring and tape off the baseboards with painter’s tape. -
Map out the trunk:
Using a pencil, lightly sketch the outline of the tree trunk. Position the base in the corner, allowing the roots to spread slightly along the floor line. -
Extend the branches:
Draw the main branches reaching upward and outward. specifically extending a long, thick bough horizontally to the left so it will hang over the bed area. -
Add detail elements:
Sketch smaller offshoot branches, little tufts of leaves, and the rough placement of the three flying birds and the perched birds. Don’t worry about perfect details yet; these are just guides.
Step 2: Painting the Tree Structure
-
Mix the base brown:
Create a mid-tone brown by mixing Burnt Sienna with a touch of white latex base. This will be the main body color of the tree. -
Fill in the trunk:
Use the 2-inch angular brush to fill in the trunk and thickest branches. Use long, vertical strokes to mimic the natural grain of wood. -
Paint the branches:
Switch to the 1-inch flat brush to paint the thinner branches extending to the left and right. Taper your strokes at the ends so the branches come to natural points. -
Add shadows:
While the base coat is tacky but not fully wet, mix a Dark Umber. Run this color along the underside of the branches and the right side of the trunk to create dimension. -
Create bark texture:
Mix a lighter tan color. Using a smaller brush, paint thin, wavy vertical lines up the trunk and along the twisting grain of the wood. This streaky look gives the bark its realistic, illustrative quality.
Natural Flow
When painting branches, slightly roll the brush between your fingers as you pull the stroke. This creates natural twists and turns rather than stiff, straight lines.
Step 3: Leaves & Foliage
-
Paint the stems:
Load a #4 round brush with a brownish-green mix. Paint delicate stems connecting your pencil-sketched leaf clusters to the main branches. -
Block in leaves:
Using a Sage Green, paint the individual leaves. Keep the shapes simple—almond or tear-drop shapes works best for this style. -
Layer lighter greens:
For depth, add strokes of a lighter Leaf Green to the tips or tops of the leaves that would be catching the ‘sunlight.’ -
Ground the tree:
Paint a small, soft hill of green at the very base of the trunk where it meets the floorboard, anchoring the tree in a patch of grass. -
Add wildflowers:
Use the fine liner brush to dab tiny red and white flowers onto narrow stems rising from the grass patch at the base.
Interactive Art
Build a small wooden birdhouse or install a real hook on a sturdy painted branch to hang a lantern or a framed photo for a mixed-media 3D effect.
Step 4: Birds & Final Details
-
Paint the perched birds:
Fill in the bird shapes on the branches. Use a soft blue-grey for the bird on the right and a warm reddish-brown for the bird on the left. -
Add bird wings and beaks:
Once the bird bodies are dry, use the smallest liner brush to add wing details in a darker shade and tiny triangular beaks. -
Paint the flying birds:
Paint the silhouettes of the three flying birds in the distance using a soft brown or tan. Keep them simple and swift-looking. -
Review and refine:
Step back to view the mural as a whole. I find this is the best time to spot any gaps in the bark texture or areas where the branches need a slightly smoother connection to the trunk. -
Erase guidelines:
Once the paint is completely cured (wait at least 4-6 hours), gently erase any visible pencil lines.
Now you have a serene, nature-inspired focal point that brings the outdoors right to your bedside


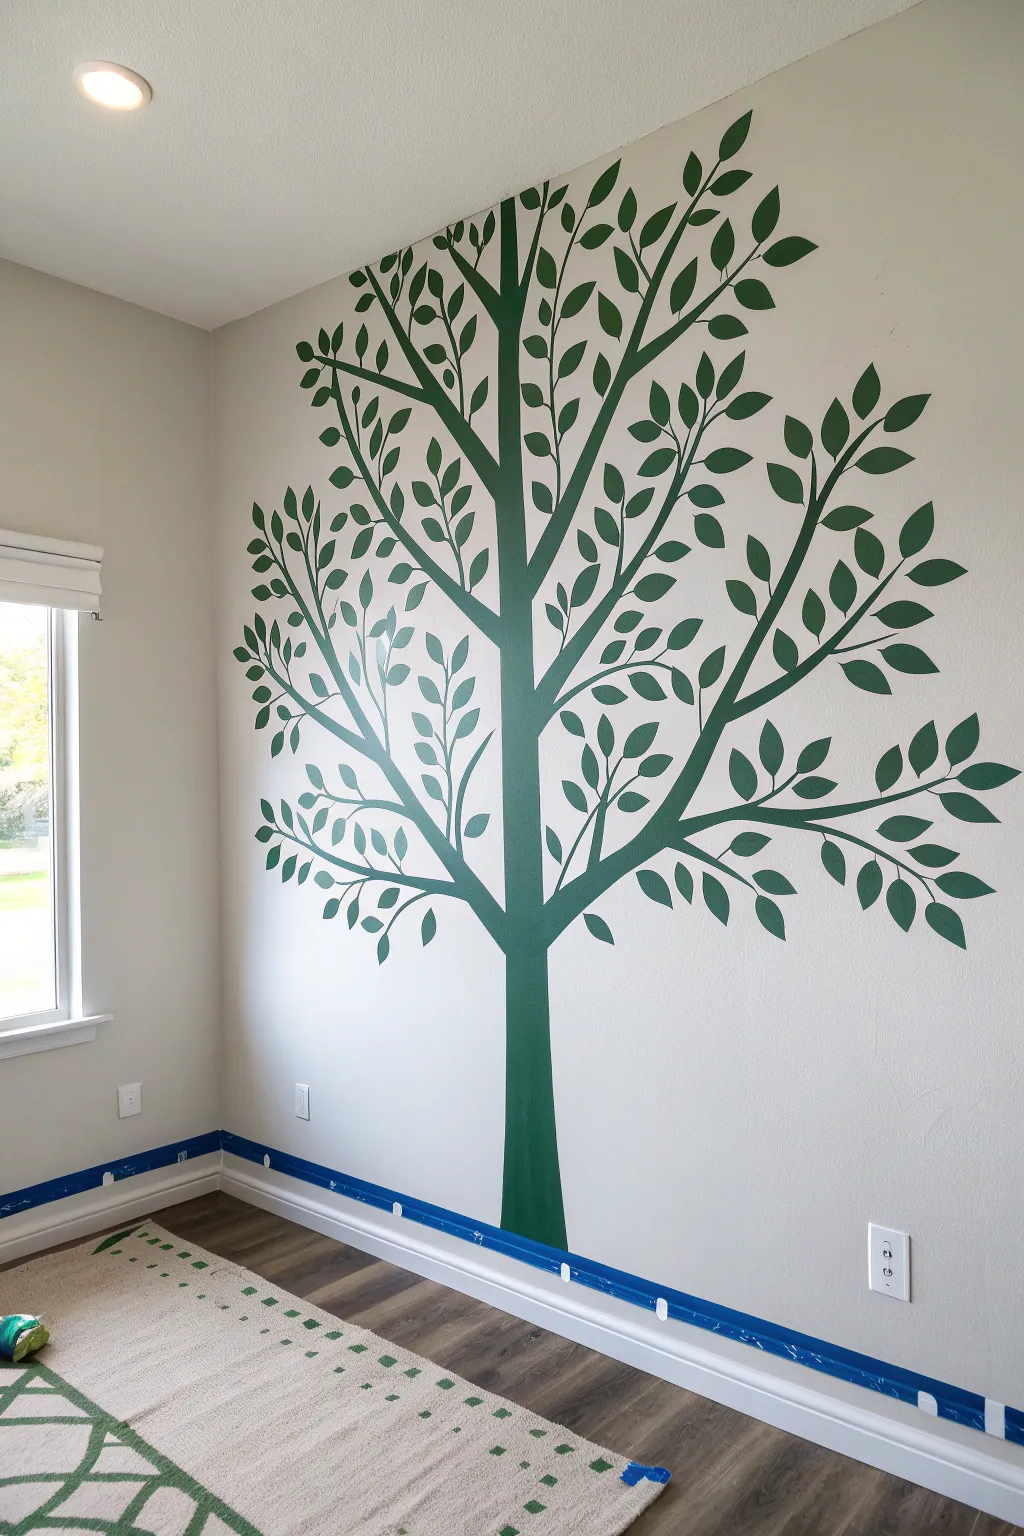
Tree Mural Behind the Sofa
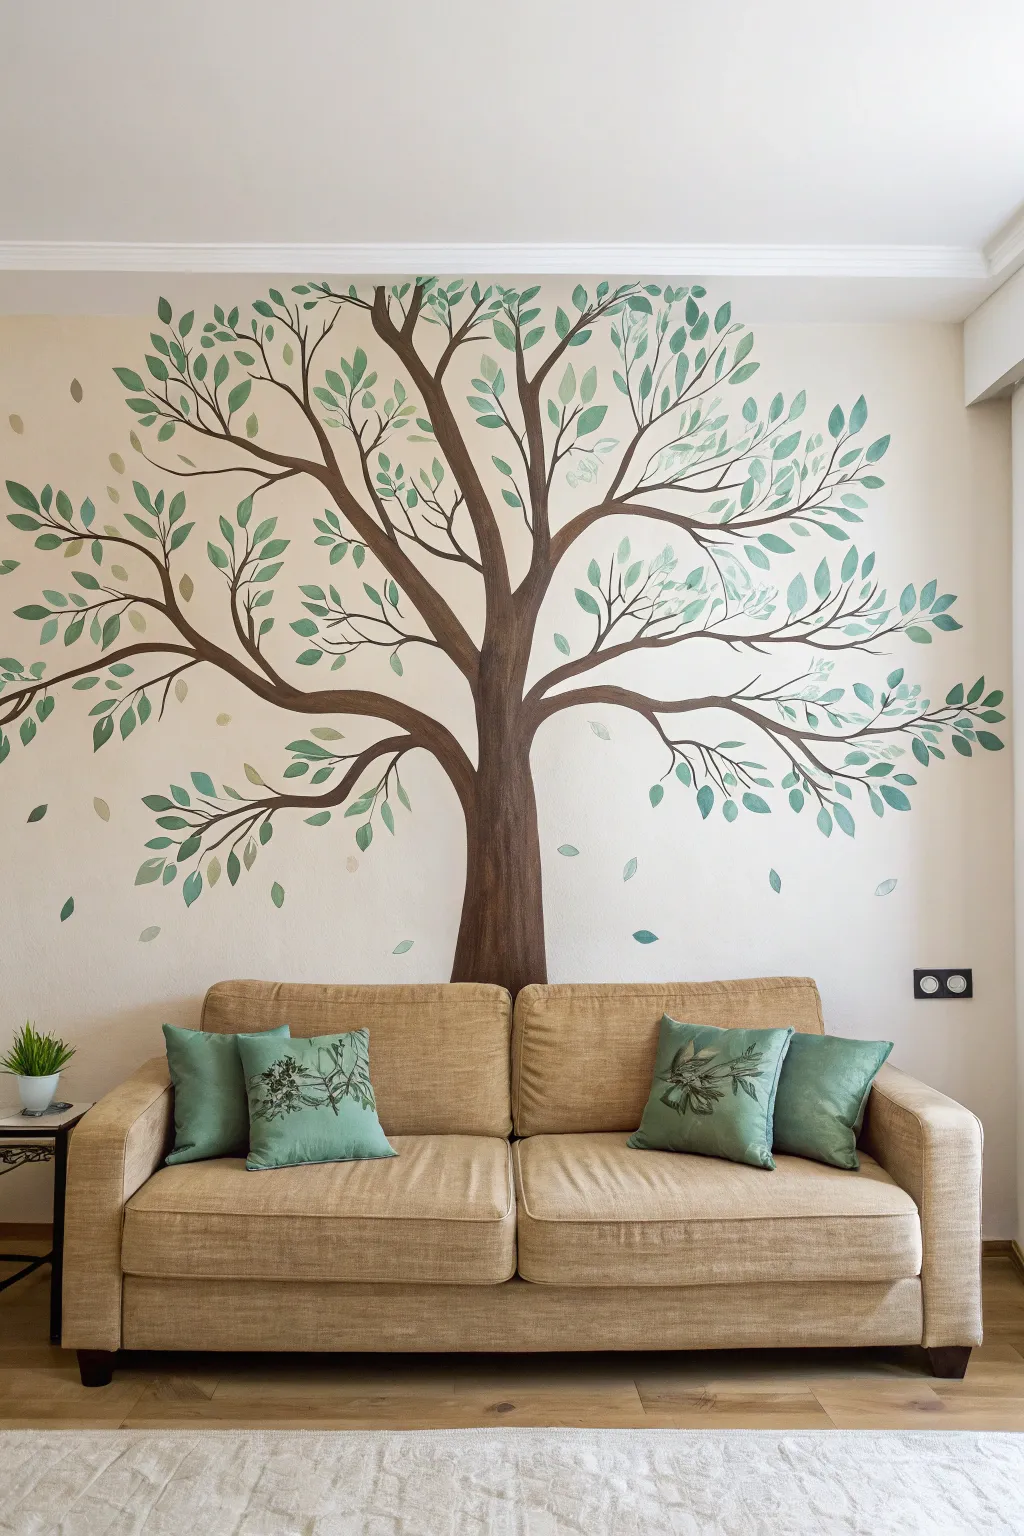
Transform a blank wall into a serene focal point with this sweeping tree mural that frames your sofa perfectly. Its organic lines and soft green foliage bring the calming influence of nature indoors without overwhelming the space.
Step-by-Step Guide
Materials
- Latex interior paint (Dark Brown for trunk)
- Latex interior paint (Sage Green and Mint Green for leaves)
- Pencil and eraser
- Chalk (optional for sketching)
- 1-inch angled sash brush
- 3-inch flat brush (for filling trunk)
- Small round brushes (sizes 4 and 6)
- Drop cloth
- Painters tape
- Paper plates or palette
- Step ladder
Step 1: Planning and Sketching
-
Prepare the workspace:
Move the sofa away from the wall to give yourself plenty of room to maneuver. Lay down a drop cloth to protect your flooring and tape off the ceiling line or baseboards if necessary. -
Visualize the placement:
Stand back and decide where the trunk should originate. In the image, the trunk is centered behind the sofa, rising straight up before branching out. Mark the center point lightly with a pencil. -
Sketch the main trunk:
Using a pencil or a piece of white chalk (which wipes off easily), lightly draw the outline of the trunk. Keep the base wide and taper it gradually as you move upward toward the ceiling line. -
Map out primary branches:
Sketch three to four main branches extending from the top of the trunk. Let them curve naturally—some reaching toward the corners of the room, others arching gently downwards like a canopy. -
Add secondary branches:
Draw smaller, thinner branches splitting off from your main limbs. Vary the length and direction to mimic nature’s randomness. Don’t worry about perfection; organic shapes are forgiving.
Fixing Wobbly Lines
If a branch edge looks shaky, don’t panic. Wait for it to dry fully, then use a small artist’s brush and your original wall color to cut back into the line and sharpen the edge.
Step 2: Painting the Structure
-
Outline the trunk:
Load your 1-inch angled sash brush with the dark brown paint. Carefully paint along your pencil outlines for the trunk to create a crisp edge. -
Fill in the trunk:
Switch to a larger flat brush to fill in the body of the trunk. Use long, vertical strokes to simulate the texture of bark. -
Paint the main branches:
Return to the angled brush or a smaller round brush to paint the thickest parts of the main branches. Ensure the connection points to the trunk flow smoothly rather than looking like stick-figure attachments. -
Detail the thin twigs:
Use a size 4 or 6 round brush for the delicate tips of the branches. A little water mixed into your paint can help the brush glide more smoothly for these fine lines. -
Check for consistency:
Step back to the other side of the room. Look for any branches that seem too thick or abrupt, and refine their tapering while the paint is still workable.
Step 3: Adding the Foliage
-
Practice leaf shapes:
Before hitting the wall, practice painting simple leaf shapes on a piece of cardboard. A simple press-and-lift motion with a round brush creates a perfect almond-shaped leaf. -
Start with darker leaves:
Dip a round brush into your Sage Green paint. Begin adding leaves along the branches, grouping them in clusters of two or three. Keep the orientation random—some pointing up, some down. -
Vary the density:
Concentrate more leaves near the tips of the branches and fewer near the trunk. This creates an airy, realistic canopy effect. -
Layer in lighter tones:
Once the darker green is tacky or dry, switch to the Mint Green paint. Add fresh leaves overlapping some of the darker ones to create depth and dimension. -
Add falling leaves:
Paint a few solitary leaves ‘floating’ in the empty space below the branches. This adds a whimsical sense of movement, as if a gentle breeze is blowing through the room. -
Final touches:
Inspect the mural for any pencil marks still showing and gently erase them. Touch up any wall color if paint accidentally went outside your lines.
Adding Texture
Mix a tiny amount of white or lighter brown into your trunk color and dry-brush a few vertical streaks. This gives the bark subtle highlights and makes it look less flat.
Now move your sofa back into place and enjoy the peaceful atmosphere of your new indoor garden
BRUSH GUIDE
The Right Brush for Every Stroke
From clean lines to bold texture — master brush choice, stroke control, and essential techniques.
Explore the Full Guide
Corner-Wrapping Tree Trunk Illusion
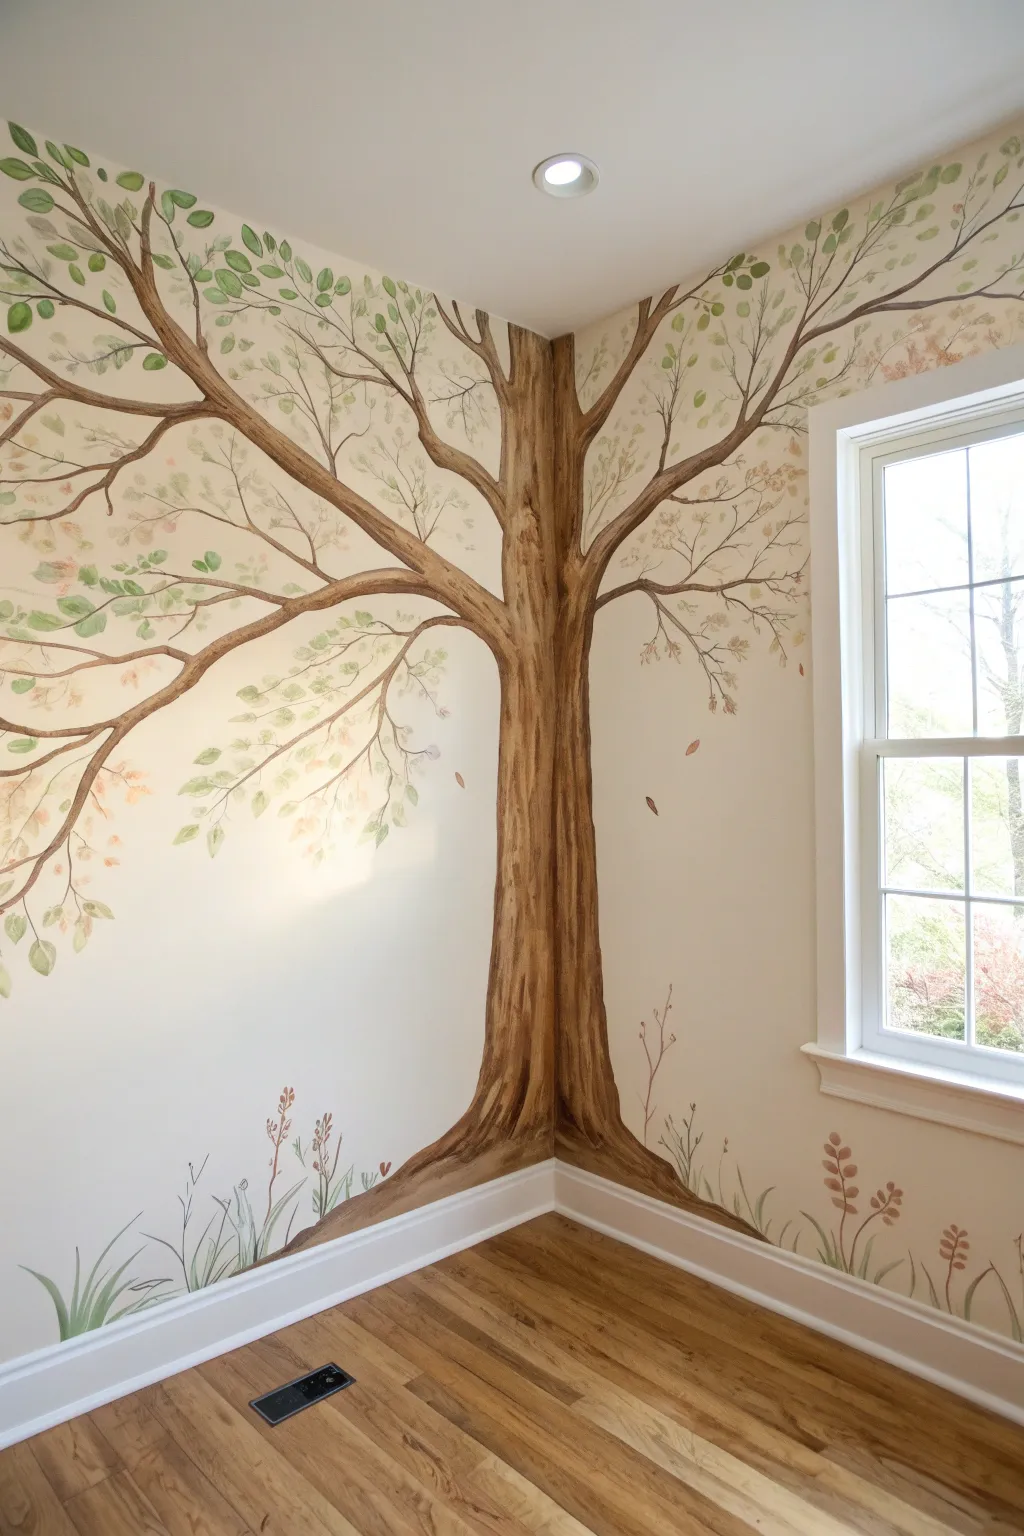
Transform an ordinary room corner into an enchanted forest nook by painting a tree trunk that wraps directly around the angle. This clever use of perspective creates a subtle 3D illusion, with branches reaching out across two walls to hug the space.
Step-by-Step Tutorial
Materials
- Interior latex wall paint (base color)
- Acrylic craft paints (dark brown, medium brown, tan/cream, olive green, sage green, burnt orange)
- Assorted brushes (2-inch sash brush for trunk, round brushes sizes 4-8 for details)
- Pencil and eraser
- Painter’s tape
- Step ladder
- Drop cloths
- Paper plate or palette
- Water cup and rags
Step 1: Preparation and Sketching
-
Prepare the space:
Clear the corner of furniture and lay down drop cloths to protect your flooring. If your base wall color needs refreshing, apply a coat of neutral interior latex paint (like the cream color shown) and let it dry completely before starting the mural art. -
Map out the trunk width:
Using a pencil, lightly mark the width of the tree base at the floor level. The trunk should be centered directly in the corner, extending about 6-8 inches out onto each wall. -
Sketch the main trunk lines:
Draw vertical lines extending up the corner from your base marks. Allow these lines to be organic and slightly wavy rather than perfectly straight. As you reach eye level and above, let the trunk taper slightly inward before branching out near the ceiling. -
Outline primary branches:
Sketch 3-4 major branches extending from the main trunk. Ensure at least one large branch reaches far to the left and another to the right, crossing over the window frame trim if applicable. Keep the lines fluid and tapering toward the ends.
Step 2: Painting the Structure
-
Block in the base color:
Mix a medium brown acrylic paint with a little bit of water to improve flow. Using a 2-inch brush, fill in the entire trunk and the thickest parts of the branches. Don’t worry about texture yet; just get good solid coverage. -
Add dark shadows:
While the base coat is dry to the touch, load a smaller flat brush with dark brown paint. Paint long, vertical streaks along the very center of the corner (the crease) to deepen the shadow, and along the outer edges of the trunk to create roundness. -
Create bark texture:
Mix a tan or cream color with your medium brown. Using a dry-brush technique—wiping most paint off the brush first—drag vertical strokes up the trunk. This highlights the ‘high points’ of the bark and instantly adds dimension. -
Extend the smaller branches:
Switch to a round brush (size 6 or 8). Using dark brown paint thinned slightly with water, paint the secondary branches extending from your main limbs. Use a light hand and lift the brush as you pull away to create fine, tapered tips.
Natural Flow Tip
When painting branches, hold the brush by the end of the handle, not near the bristles. This reduces control slightly, resulting in shakier, more organic lines that look like real wood.
Step 3: Adding Foliage and Details
-
Layer the leaves:
Start with a sage green color. Use a small round brush to dab simple leaf shapes along the branches. Group them in clusters of three or five rather than spacing them evenly, which looks unnatural. -
Add color variation:
Mix a darker olive green and add a second layer of leaves behind the first ones to create depth. I find it helps to rotate the brush slightly between strokes to vary the leaf angles. -
Incorporate subtle warmth:
For an autumnal or whimsical feel, mix a touch of burnt orange or muted pink with white. Add these soft accent leaves sparingly near the ends of the delicate twigs. -
Paint falling leaves:
Paint a few single leaves floating in the open space between the trunk and the window. This adds movement and emphasizes the ‘breeze’ in the scene.
Seasonal Switch
Make the mural interactive! Instead of painting all the leaves, use hook-and-loop dots or removable adhesive putty to attach fabric leaves that you can change from green to orange/red.
Step 4: Grounding and Finishing
-
Sketch the ground cover:
At the very bottom where the trunk meets the baseboard, lightly sketch varied heights of grass blades using your pencil. -
Paint grass blades:
Using your thinnest round brush and sage green paint, use quick, upward flicking motions to paint the grass. Press down at the start of the stroke and lift up quickly to get a sharp point. -
Add wildflowers:
Dip the tip of a small brush into the burnt orange or reddish-brown paint. Add tiny dots or small stalks among the grass blades to represent wildflowers growing at the tree’s base. -
Refine the edges:
Step back and view the mural from across the room. If any branch connections look too disjointed, use the medium brown paint to smooth out the transition points. -
Final clear coat (optional):
If this is in a high-traffic kids’ room or hallway, apply a matte clear acrylic sealer over the painted areas once completely dry to protect your work from scuffs.
Enjoy the peaceful atmosphere your new corner tree brings to the room
Minimal Line Art Tree Outline
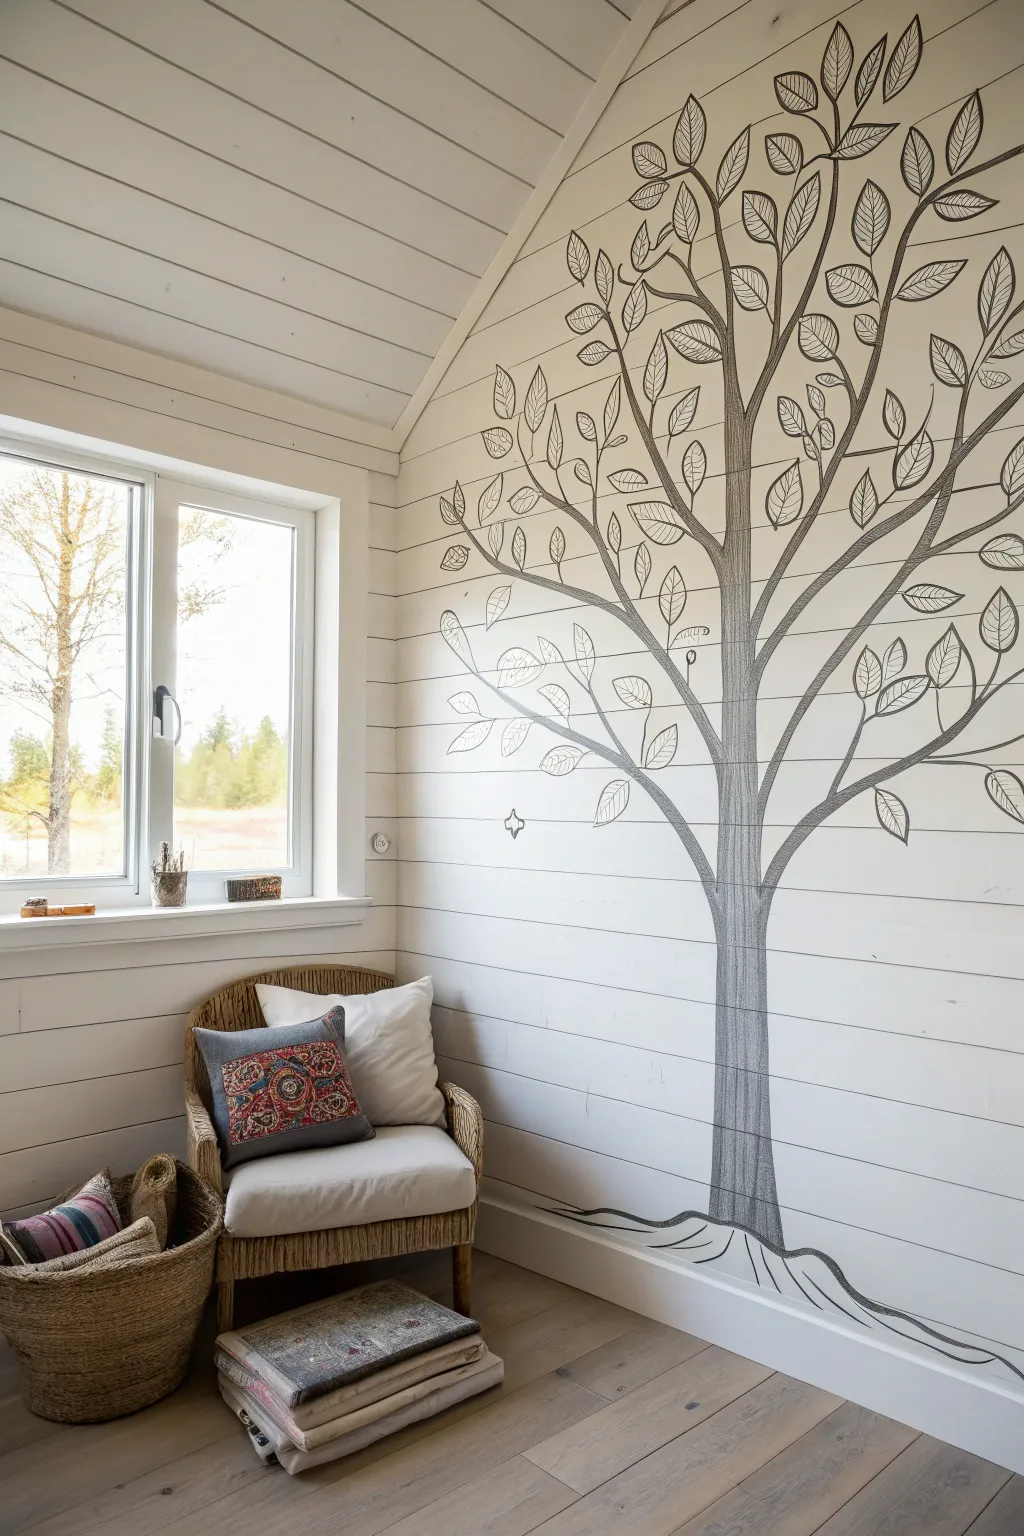
Transform a blank corner into a serene focal point with this elegant, sketch-style tree mural. The beauty of this design lies in its simplicity, utilizing the horizontal lines of shiplap or wood paneling as a subtle grid for your drawing while keeping the overall aesthetic light and airy.
Step-by-Step
Materials
- High-quality interior wall paint (charcoal or soft black)
- Pencil (HB or lighter) for sketching
- Large eraser
- Assorted artist brushes (filbert sizes 4 and 8, round liner size 2)
- Small roller and tray (for wall prep)
- Painter’s tape
- Drop cloth
- Ladder or sturdy step stool
- Reference image of a tree silhouette
Step 1: Preparation and Planning
-
Prepare the surface:
Ensure your wall surface is clean and dry. Since this design works beautifully on shiplap, use a damp cloth to wipe down the grooves where dust tends to settle. If you are painting over a dark color, apply a fresh coat of warm white or off-white base paint first to let the dark line art pop. -
Protect the area:
Lay down a drop cloth at the base of the wall to catch any drips. Use painter’s tape to mask off the floor trim and any adjacent window frames, like the one often found near reading nooks. -
Visualize the scale:
Stand back and look at the wall to determine the height of your tree. The trunk should anchor firmly at the floor level (or just above the baseboard) and the canopy should reach near the ceiling peak to maximize the vertical impact.
Shiplap Struggles?
Painting over grooves? Don’t drag the brush across. Instead, stamp the bristles gently into the gap to connect the line, then continue the stroke on the board surface.
Step 2: Sketching the Framework
-
Mark anchor points:
Using your pencil lightly, mark the center point for the base of the trunk. Then, move up the wall and mark where the main branches should diverge. On shiplap walls, I find it helpful to use the horizontal grooves to ensure my symmetry isn’t drifting too far off. -
Draw the trunk outline:
Sketch the two vertical lines of the trunk. Keep them mostly straight but allow for a subtle natural curve. The base should flare out slightly to suggest roots gripping the ground. -
Branch out:
Extend the lines upward, splitting the trunk into two or three main limbs. Remember that tree branches generally get thinner as they move away from the center. Keep your pencil strokes loose and light so they are easy to correct. -
Add secondary branches:
From your main limbs, draw smaller offshoots. Aim for ‘Y’ shapes rather than ‘T’ shapes for a more organic look. Vary the angles so the tree doesn’t look too stiff or manufactured. -
Sketch the leaves:
Instead of drawing hundreds of individual leaves, sketch simplified leaf shapes—ovals with pointed tips. Group them loosely at the ends of the twig lines. The ‘line art’ style relies on outlining these shapes rather than filling them in, so ensure the spacing feels open.
Pro Tip: Steady Hand
Rest your pinky finger against the wall to stabilize your hand while painting detailed leaves. This acts as a pivot point and prevents shaky lines.
Step 3: Painting the Design
-
Prepare your paint:
Pour a small amount of charcoal or soft black paint into a cup. You want a fluid consistency; if the paint is too thick, it will drag on the wall texture. You can add a tiny drop of water or glazing medium to improve flow. -
Outline the trunk:
Start with a size 8 filbert brush. Paint the long vertical lines of the trunk. Use steady, confident strokes. If the shiplap has deep grooves, use the brush tip to dab paint into the recess so the line doesn’t break visually. -
Fill the roots:
At the bottom, paint the flared root lines. You can make these lines slightly thicker to ground the image visually. -
Paint main branches:
Move upwards to the thicker branches. As the branch tapers, switch to a smaller size 4 brush to maintain control over the line width. -
Detail the twigs:
Switch to your size 2 liner brush for the finest branches. Hold the brush loosely by the handle, not the ferrule, to allow for more natural, less rigid movement. -
Outline the leaves:
Carefully trace your pencil leaf sketches with the liner brush. Keep the pressure light to create thin, elegant outlines. You can add a single center vein line to some leaves for detail, but leave most as simple open shapes. -
Add internal texture:
To give the trunk a bit of volume without shading, paint very faint, thin vertical lines inside the trunk outline. These mimic bark texture while maintaining the illustrative style.
Step 4: Finishing Touches
-
Step back and assess:
Walk to the other side of the room. Look for any branches that seem too sparse or areas where the line weight is inconsistent. -
Refine lines:
Go back in with your liner brush to touch up any shaky edges or to deepen the black in areas where the paint coverage might be thin. -
Clean up:
Once the paint is completely dry (give it at least an hour), use your large eraser to gently remove any visible pencil marks. Be careful not to scrub too hard over the painted lines.
Enjoy the calm atmosphere your new artistic mural brings to the room

PENCIL GUIDE
Understanding Pencil Grades from H to B
From first sketch to finished drawing — learn pencil grades, line control, and shading techniques.
Explore the Full Guide
Cherry Blossom Tree Accent Wall
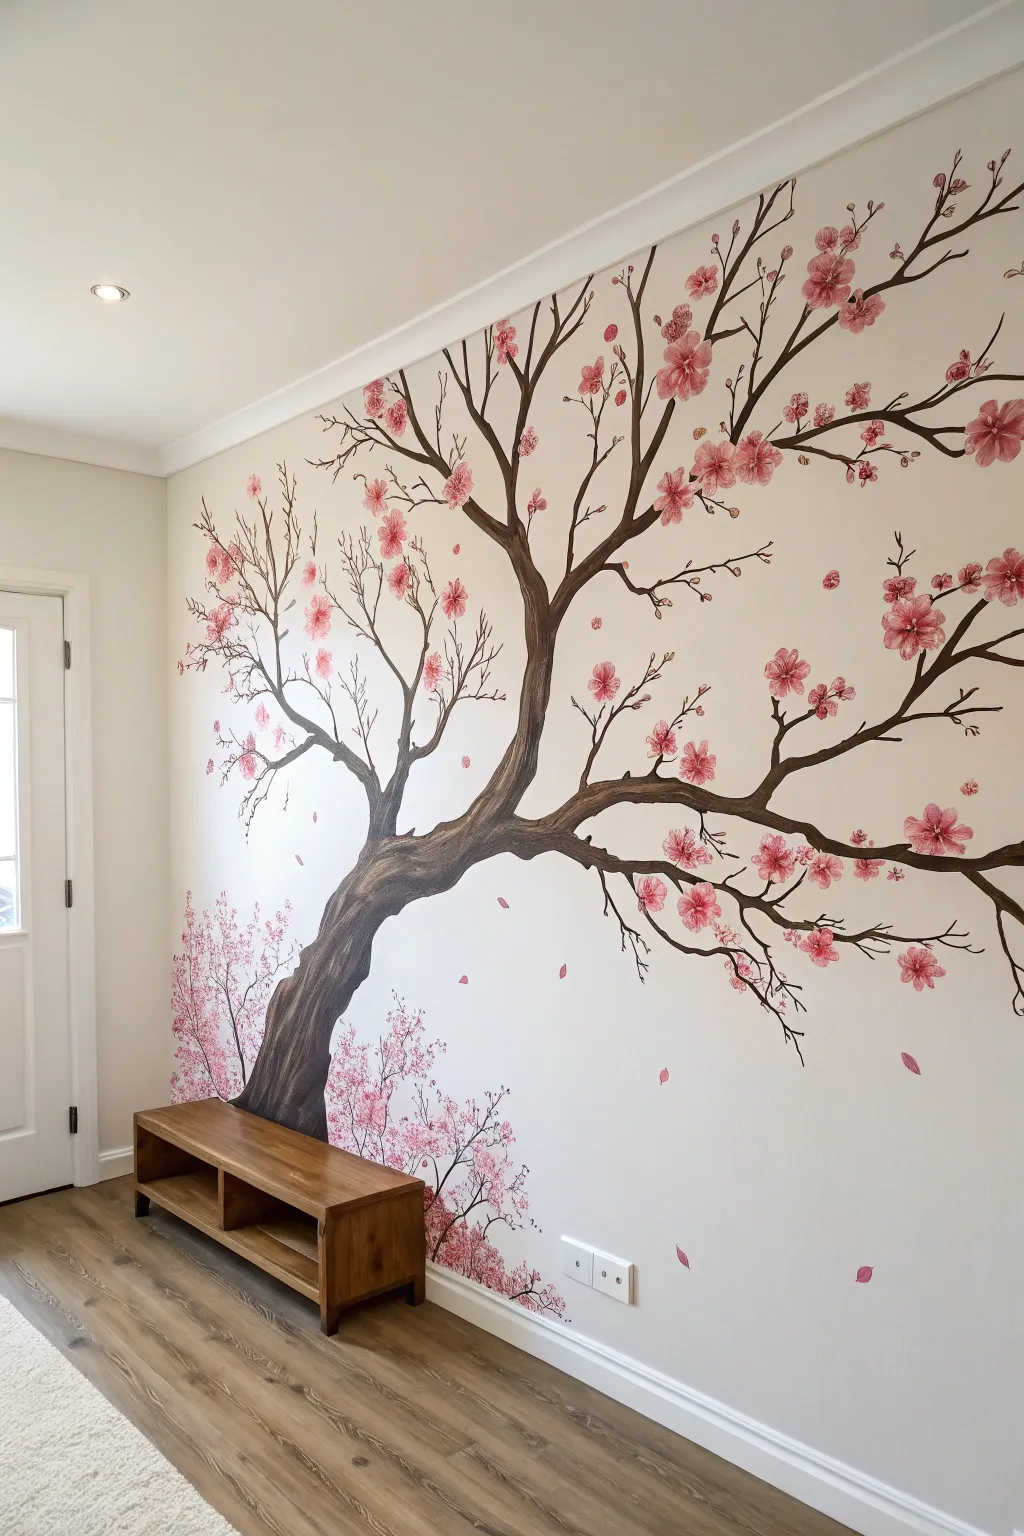
Transform a plain white wall into a serene spring landscape with this stunning cherry blossom tree mural. The sweeping dark branches and vibrant pink blooms create a focal point that is both dramatic and peaceful, perfect for a bedroom or reading nook.
Detailed Instructions
Materials
- Interior semi-gloss or satin wall paint (dark brown/espresso)
- Interior semi-gloss or satin wall paint (bright pink)
- Interior semi-gloss or satin wall paint (pale pink or white for mixing)
- 2-inch angled sash brush (for trunk outline)
- Assorted round artist brushes (sizes 4, 8, and 10)
- Fine liner brush (size 1)
- Pencil
- Eraser
- Drop cloths
- Painter’s tape
- Step ladder
- Paper plate or palette
- Water cup and rags
Step 1: Planning and Preparation
-
Prepare the workspace:
Clear furniture away from the wall or cover it completely with drop cloths. Tape off the baseboards, ceiling line, and adjacent walls to protect them from stray brushstrokes. -
Sketch the main shape:
Using a pencil, lightly sketch the main outline of the tree trunk. Start from the bottom left corner, creating a thick base that curves gently upward and to the right. -
Map out primary branches:
Extend lines from the main trunk to represent the largest branches. Let them reach toward the top right corner and the ceiling, keeping the lines organic and irregular rather than perfectly straight. -
Refine the composition:
Step back to view the sketch from a distance. Make adjustments to ensure the tree feels balanced on the wall, adding smaller sub-branches that fan out into empty spaces.
Natural Flow
When painting branches, hold the brush loosely at the end of the handle. Just like nature, a shaky or uneven hand actually creates more realistic, organic-looking twigs than perfect straight lines.
Step 2: Painting the Structure
-
Fill the trunk base:
Dip your 2-inch angled brush into the dark brown paint. Fill in the large trunk area at the bottom, using long, vertical strokes to mimic the texture of bark. -
Extend the main branches:
Continue using the angled brush or switch to a size 10 round brush for slightly narrower sections. Paint the thickest parts of the main branches, tapering them as they move away from the trunk. -
Create medium branches:
Switch to a size 8 round brush. Paint the secondary branches that split off from the main ones, ensuring the connections look seamless and natural like a real tree. -
Add fine twigs:
Use a size 4 round brush or a fine liner brush for the delicate tips. Paint thin, wispy twigs at the ends of the branches, letting some cross over each other for a realistic, tangled look. -
Detail the bark:
Once the brown paint is tacky but not fully dry, drag a mostly dry brush with a tiny bit of lighter brown or grey (or your wall color mixed in) vertically along the trunk to create dimension and texture.
Metallic Magic
Mix a small amount of gold metallic acrylic paint into the center of your largest blossoms. It catches the sunlight beautifully and adds a subtle, luxurious shimmer to the mural.
Step 3: Blossoming the Tree
-
Mix your pinks:
On your palette, pour out your bright pink paint. Create a second shade by mixing bright pink with a little white to get a softer, pastel pink. Keep the original bright pink separate for depth. -
Start the main clusters:
Using a size 8 round brush, dab clusters of the darker pink paint near the ends of the twigs. Use a stippling motion or simple five-petal shapes to suggest flowers. -
Layer lighter blooms:
While the dark pink is still wet, dip a clean brush into the lighter pink mixture. Apply this over and around the dark pink clusters to create highlights and volume within the flower bunches. -
Add individual details:
Switch to a size 4 brush. Paint individual petals and distinct flowers floating slightly away from the main clusters to make the tree look lush and full. -
Paint falling petals:
Scull a few single distinct petals drifting down the wall below the branches. This adds movement and captures the fleeting beauty of cherry blossom season. -
Create the center details:
I like to use a fine liner brush with a tiny dot of dark red or brown to add the stamens in the center of the largest, most defined flowers for extra realism. -
Add lower foliage:
Near the base of the trunk (where it meets the floor or furniture), stipple a density of pink and light pink spots to represent fallen blossoms or low-growing flowering bushes. -
Final touches:
Step back again to assess the overall balance. Fill in any sparse areas with a few extra twigs or small flower buds until the wall feels complete.
Remove your tape and enjoy the perpetual spring in your new customized space
Autumn Tree With Falling Leaves
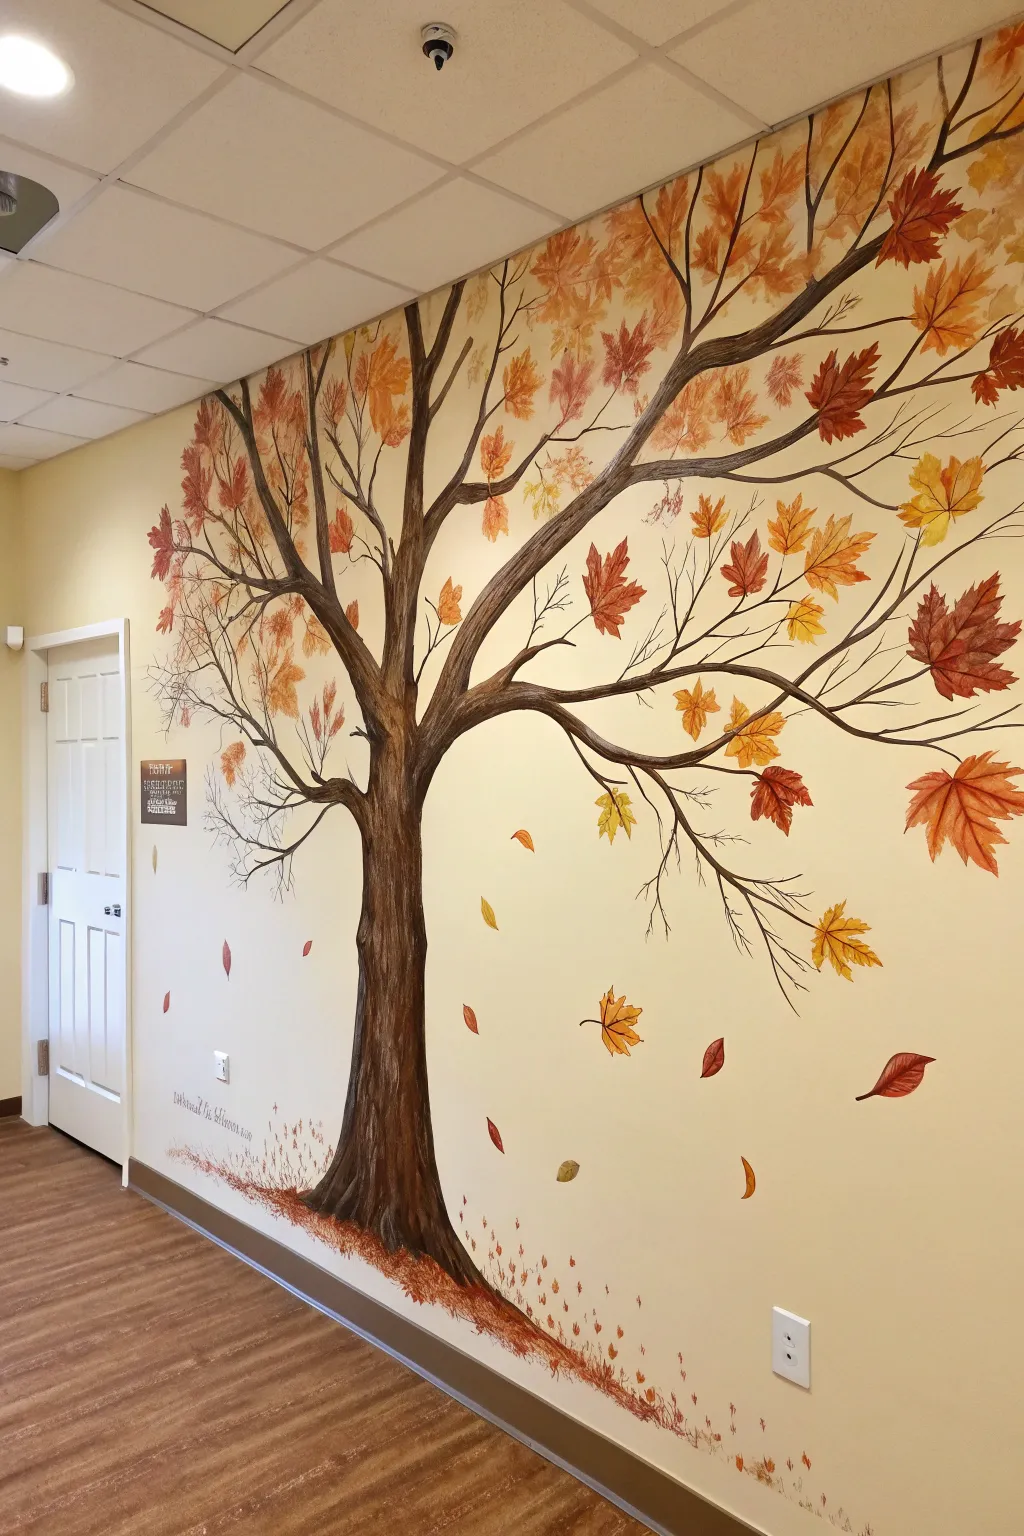
Bring the warmth of fall indoors with this sweeping tree mural that transforms a plain wall into an autumnal escape. The realistic bark texture combined with drifting leaves creates a sense of gentle movement and seasonal change.
Step-by-Step Tutorial
Materials
- Interior latex wall paint (base color, beige/cream)
- Acrylic paint set (Dark brown, Burnt Umber, Raw Sienna, Yellow Ochre, Cadmium Orange, Red, White)
- Large flat brush (2-3 inch) for the trunk base
- Medium filbert brush for branches
- Small round brush for details and twigs
- High-quality pencil
- Painter’s tape and drop cloth
- Stepladder
- Sea sponge (optional for texture)
- Medium grit sandpaper
Step 1: Planning and Sketching
-
Prepare the workspace:
Clear the area against the wall and lay down your drop cloth. Tape off baseboards, electrical outlets, and door frames to protect them from stray brushstrokes. -
Draft the trunk shape:
Using a light pencil, sketch the outline of the tree trunk. Start wide at the base, flaring it out slightly into ‘roots’ along the floor, and taper it upward toward the ceiling. Don’t worry about perfect symmetry; nature is pleasantly irregular. -
Map the main branches:
Extend 3-4 major branches from the top of the trunk. Let them reach out like arms, curving gently toward the ceiling and corners. Keep the pencil lines faint so they are easier to cover later. -
Fill in the canopy:
Sketch smaller secondary branches splitting off from the main ones. Getting thinner as you move outward is key for realism.
Branch Balance
Step back frequently! It’s easy to get tunnel vision. Viewing from a distance ensures your branches don’t look lopsided or too heavy on one side.
Step 2: Painting the Structure
-
Base coat the trunk:
Mix a dark brown acrylic with a touch of black. Use the large flat brush to fill in the trunk outline. Apply paint in vertical strokes to mimic the natural grain of wood. -
Create bark texture:
While the base coat is still slightly tacky, mix a lighter brown (Burnt Umber) and streak it vertically over the dark base. I like to use a dryer brush here to let the underlying dark color peek through. -
Add highlights to the wood:
Mix a tan or Raw Sienna shade. Using a smaller brush, add thin, uneven vertical lines on the side of the tree where your imaginary light source hits. This gives the trunk roundness and dimension. -
Paint the branches:
Switch to a medium filbert brush for the main branches. Use the same dark brown base, but seamlessly blend in your lighter brown highlights as you move outward. Remember that branches cast shadows on themselves, so keep the undersides darker. -
Extend into fine twigs:
Use a small round brush with slightly watered-down dark paint to create the finest twigs at the very ends. A shaky hand actually helps here to make them look organic and woody.
Step 3: Adding Foliage
-
Mix your autumn palette:
Prepare separate piles of deep red, bright orange, golden yellow, and brown on your palette. Don’t overmix them; slightly marbled paint on the brush creates beautiful variegated leaves. -
Start with canopy leaves:
Begin painting singular maple-shaped leaves attached to the branch tips. Start with the darker colors (reds and browns) near the center of the tree to create depth. -
Layer lighter leaves:
Paint lighter orange and yellow leaves overlapping some of the darker ones. Vary the sizes—some large and fully open, others smaller or seen from the side. -
Add floating leaves:
Paint several leaves disconnected from the tree, appearing to drift downward through the open space. Angle them differently to simulate tumbling in the wind. -
Paint the ground accumulation:
At the base of the trunk along the baseboard, paint a collection of fallen leaves. Group them densely near the ‘roots’ and scatter them thinly as they move away from the tree. -
Detail the veins:
Once the leaf shapes are fully dry, take your smallest liner brush and a diluted dark brown paint. Carefully add a central vein and a few side veins to the larger leaves for realistic detail.
Mixed Media Magic
Glue actual dried, pressed leaves onto the wall among the painted ones for incredible 3D texture, sealing them with a matte varnish.
Step 4: Final Touches
-
Add ground shading:
Lightly dry-brush some reddish-brown paint along the very bottom of the wall to simulate the ‘duff’ or forest floor beneath the fallen leaves. -
Incorporate shadows:
Mix a transparent gray glaze (water and a tiny drop of black). Paint very faint shadows under a few of the falling leaves to make them pop off the wall surface. -
Review and refine:
Step back to the other side of the room. Look for any bald spots in the canopy or branches that end too abruptly and fill them in. -
Clean up:
Remove the painter’s tape slowly. If any paint seeped under, touch it up with your original wall color.
Your room now holds the permanent beauty of a crisp October afternoon


Birds and Nests in the Tree Branches
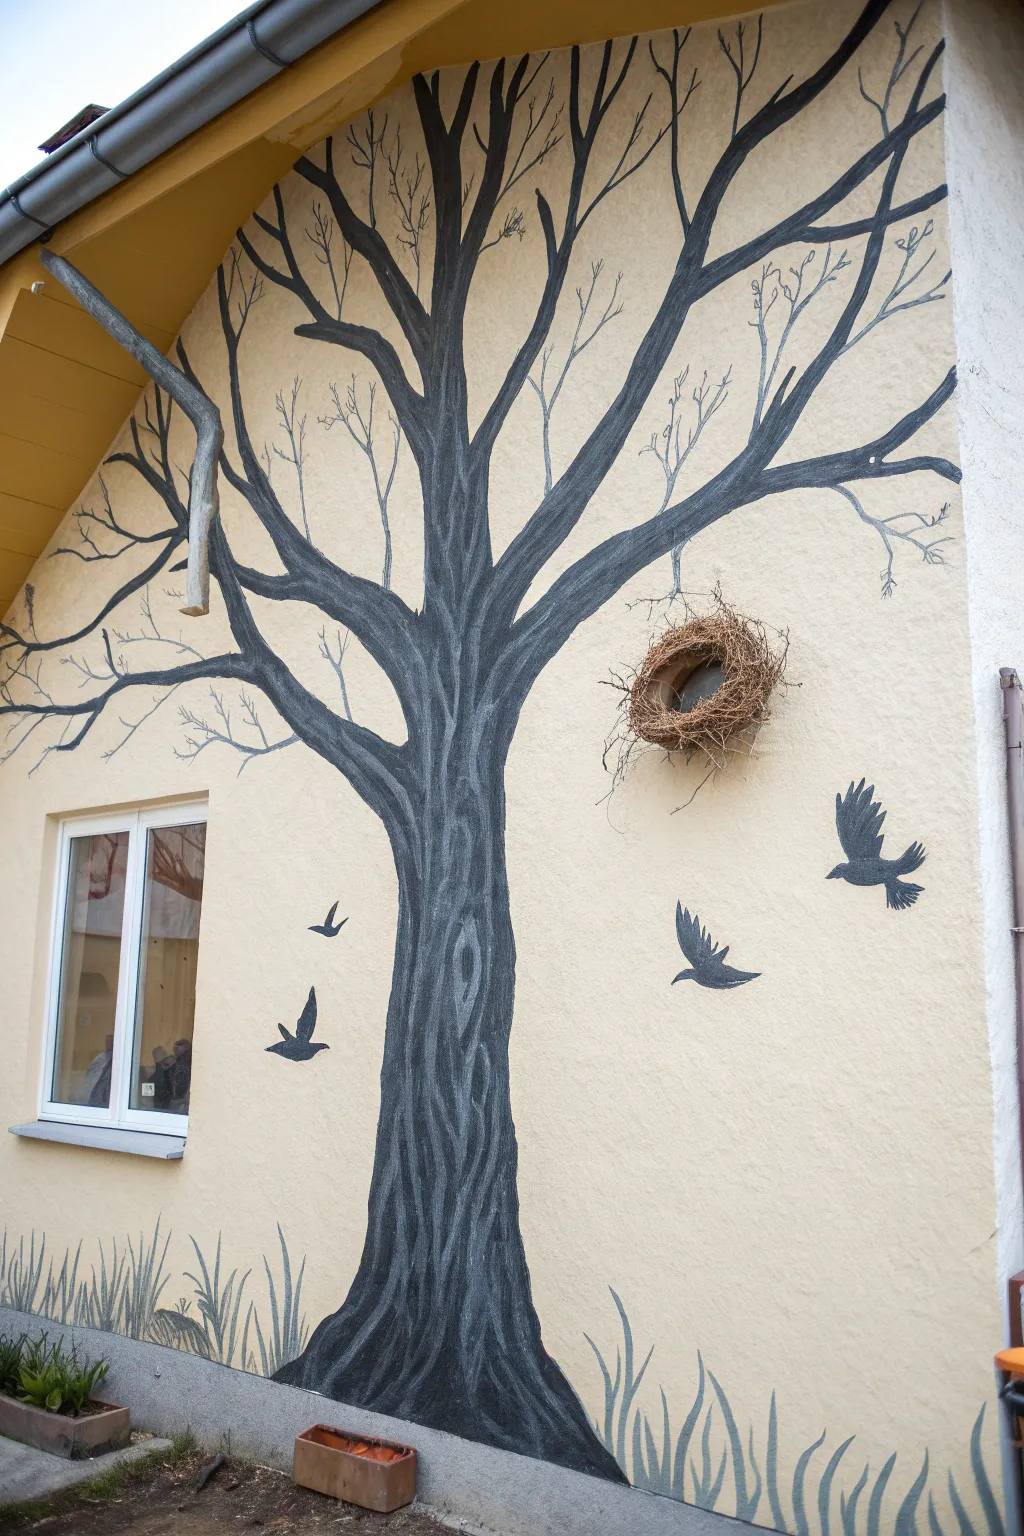
Bring nature right up to your doorstep with this striking mixed-media mural that combines painted silhouettes with a real tactile element. An imposing, leafless tree stretches across the stucco, hosting painted birds in flight and a genuine-looking 3D nest for a surprising pop of realism.
Step-by-Step
Materials
- Exterior masonry paint (cream base coat, optional)
- Exterior acrylic paint (black, dark grey, light grey, green)
- Wide paintbrushes (2-3 inch)
- Detail brushes (round and flat)
- Chalk or carpenter’s pencil
- Dried twigs, vines, and straw
- Strong exterior construction adhesive or wire mounting hardware
- Circular wooden base or wire frame for the nest
- Ladder
- Drop cloth
Step 1: Preparation and Mapping
-
Prep the Surface:
Begin by cleaning the exterior wall thoroughly to remove dust and cobwebs. If your existing wall color isn’t the desired warm cream shade shown, apply a fresh base coat of exterior masonry paint and let it cure completely. -
Protect the Area:
Lay down a drop cloth at the foot of the wall to catch any drips, and tape off the window edges and window sill with painter’s tape to keep lines sharp. -
Sketch the Trunk:
Using chalk or a carpenter’s pencil, lightly sketch the main outline of the tree trunk. Position the base so it anchors the composition, sweeping upward and slightly to the right to follow the wall’s natural space. -
Outline the Branches:
Extend your sketch lines upward to create the major branches. Make sure they fan out naturally, with some reaching all the way to the roofline or gutters, mimicking the reach of an old oak or elm.
Step 2: Painting the Tree
-
Block in the Darkest Values:
Load a medium-sized brush with black exterior acrylic paint. Fill in the core of the trunk and the undersides of the main branches, establishing the deepest shadows first. -
Add Grey Textures:
While the black is still tacky or just after drying, brush on dark grey strokes vertically along the trunk. This creates the illusion of furrowed bark. -
Highlight the Bark:
Switch to a lighter grey paint. Use sketchy, broken vertical lines to highlight the ridges of the bark, giving the tree volume and roundness rather than a flat silhouette look. -
Extend Fine Branches:
Using a thinner round brush, paint the smaller twigs and branches extending from the main limbs. Let your hand shake slightly as you paint these to create organic, knotty lines rather than perfect curves. -
Refine the Tips:
For the very ends of the branches, dilute your black paint slightly for smoother flow and use your smallest brush to create delicate, wispy tips.
Uneven Texture?
Stucco can be tricky to paint. If your lines look jagged, use a stiff-bristled brush and a stippling (dabbing) motion to push paint into the crevices for solid coverage.
Step 3: The Flying Birds
-
Position the Birds:
Mark the spots for your flying birds with chalk. Place them at varying heights to create a sense of movement and dynamic flow around the tree. -
Paint the Silhouettes:
Fill in the bird shapes with solid black paint. Focus on the wing shapes—some arched up, some gliding flat—to distinguish individual movement. -
Detail Feathers:
Use the very tip of a fine brush to pull small strokes outward from the wing edges, simulating jagged flight feathers against the sky.
Pro Tip: Shadow Play
Paint a faint, translucent grey shadow slightly below and to the right of your painted birds. This subtle detail adds incredible depth and makes the birds pop off the wall.
Step 4: Ground cover
-
Sketch Grass Blades:
Near the foundation, sketch varying heights of grass blades overlapping the base of the trunk. -
Paint the Grass:
Using a grey-green or muted grey tone, paint long, fluid strokes upward from the ground. Lift the brush at the end of each stroke to taper the grass to a fine point. -
Layering:
Paint some grass blades in front of the tree trunk base and some behind to ground the tree in the scene.
Step 5: The 3D Nest Installation
-
Construct the Nest Base:
Form a circular base using a wire frame or a small wooden disc. Weave dried vines, twigs, and straw around this form until you have a dense, realistic nest shape. -
Identify the Anchor Point:
Choose a spot on a painted branch that looks strong enough to ‘hold’ the nest, ideally at a fork in the branches or a sturdy horizontal section. -
Attach the Nest:
Secure the nest to the wall using strong, weather-resistant construction adhesive. For extra security on uneven stucco, you may need to drill a small pilot hole and use a screw or wire loop hidden inside the nest structure. -
Blend the Edges:
Once the nest is mounted, I like to glue a few extra loose twigs around the attachment point to hide any adhesive or hardware, making it look like the nest was built directly onto the painted branch.
Step back and admire how the blend of paint and natural materials transforms your exterior wall into a unique piece of living art
Ombre Background Behind a Tree Silhouette
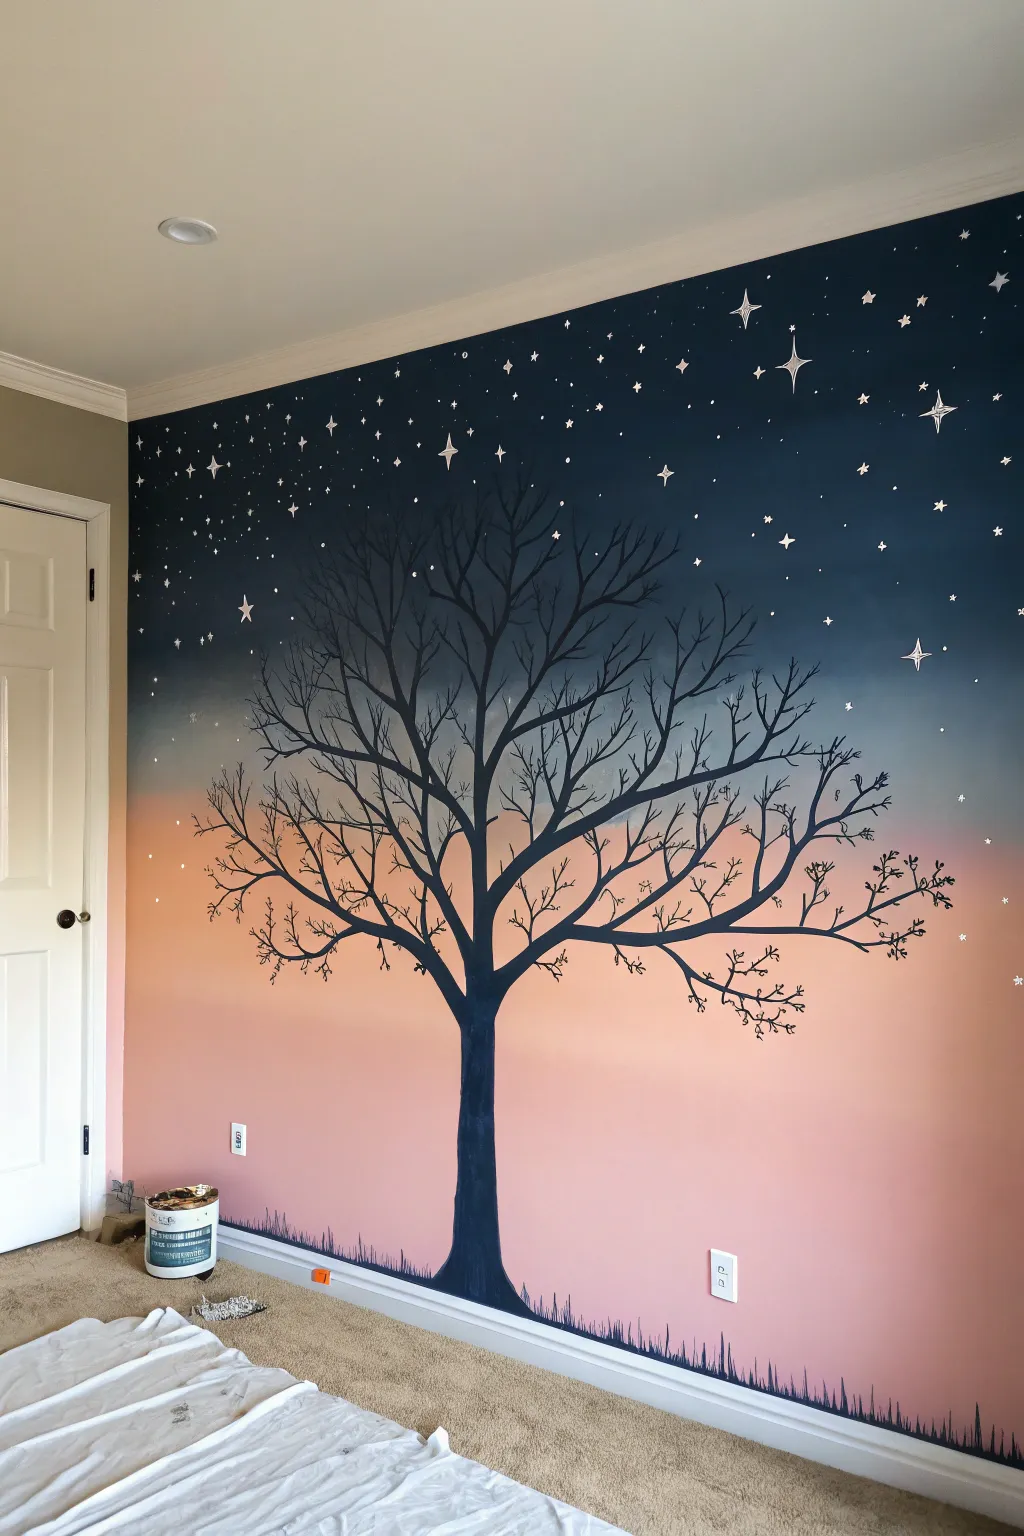
Transform a plain wall into a twilight dreamscape with this stunning ombre mural. The fade from deep navy to soft peach creates the perfect backdrop for a striking, hand-painted tree silhouette reaching toward the stars.
Step-by-Step Guide
Materials
- Latex interior paint (Deep Navy, Medium Blue, Peach/Salmon)
- Black acrylic or latex paint for the tree
- White acrylic paint for stars
- Large painter’s rollers and trays
- Wide blending brush or dry sponge
- Large angled sash brush
- Small round detail brush (size 2 or 4)
- Chalk or pencil for sketching
- Painter’s tape
- Drop cloths
- Ladder or step stool
Step 1: Creating the Ombre Sky
-
Prep the workspace:
Begin by clearing the room or moving furniture to the center. Lay down drop cloths to protect your carpet and tape off the baseboards, ceiling line, and adjacent walls with painter’s tape to ensure crisp edges. -
Apply the bottom color:
Start by rolling the peach or salmon color onto the bottom third of the wall. Don’t worry about a perfect straight line at the top; an uneven edge actually helps with blending later. -
Apply the middle hue:
While the bottom section is still slightly tacky or wet, roll your medium blue paint across the middle third of the wall. Leave a small gap of a few inches between the blue and peach initially. -
Apply the top color:
Roll the deep navy paint onto the top third of the wall, cutting in carefully along the ceiling line with a brush first. Similar to the section below, leave a small gap between the navy and the medium blue. -
Wet blend the lower transition:
Now, working quickly before the paint dries, use a large blending brush or a slightly damp sponge to merge the peach and medium blue. Use X-shaped strokes to feather the colors together, creating a muddy, soft transition rather than a hard stripe. -
Blend the upper transition:
Repeat the blending process for the transition between the medium blue and the deep navy. Use a clean brush or sponge to mix the two wet paints directly on the wall until the gradient looks smooth. -
Let the background cure:
Allow the entire ombre wall to dry completely, preferably overnight. If the colors look patchy after drying, you may need to repeat the process with a second coat for full opacity.
Step 2: Painting the Tree Silhouette
-
Sketch the trunk:
Using a piece of chalk, lightly sketch the outline of the tree trunk centered on the wall. Make the base wide and flared, tapering as it goes up. -
Outline the main branches:
Sketch the primary branches radiating from the trunk. Focus on creating a balanced structure that spreads wide across the ‘sky’ area. -
Fill in the trunk:
Using your black paint and a medium-sized angled brush, carefully fill in the trunk and the thickest parts of the main branches. Paint with smooth, vertical strokes to mimic the grain of wood if visible. -
Extend the branches:
Switch to a smaller brush. Follow your chalk lines to paint the main branches, ensuring they taper naturally—thick near the trunk and thinner as they extend outward. -
Add secondary branches:
Freehand smaller branches splitting off from the main ones. Think of ‘Y’ shapes intersecting; nature is rarely perfectly straight, so add slight bends and wobbles for realism. -
Paint the fine twigs:
Using your smallest liner brush, add the finest twigs at the very ends of the branches. I find that holding the brush loosely near the end of the handle helps create these delicate, organic lines. -
Add the grass line:
Along the very bottom of the wall, paint irregular, short vertical strokes with black paint to simulate grass growing around the base of the tree. -
Touch up density:
Step back and look at the tree. If any areas look too sparse or bald, add a few more thin intersecting twigs to fill the negative space.
Blend Like a Pro
Keep a misting bottle of water handy. If the latex paint dries too fast while blending the ombre sections, a light mist will reactivate it for smoother mixing.
Step 3: Adding the Stars
-
Map out major stars:
With white paint and a small detail brush, paint a few large, four-pointed ‘shining’ stars in the upper navy section. Paint a cross shape, then curve the inner corners slightly inward. -
Add medium stars:
Dot several medium-sized stars around the upper sky using the tip of a round brush. Try to keep them random rather than in a grid pattern. -
Create distant stars:
For the tiniest, most distant stars, dip the bristles of a toothbrush or stiff brush into white paint and flick it (splatter technique) gently onto the upper wall. Practice on cardboard first to control the spray.
Glow in the Dark
Mix transparent glow-in-the-dark medium into your white star paint. Use it for the final star layer so the night sky lights up when the lights go out.
Peeling off the tape reveals your crisp edges and completes your peaceful night scene
Tree Stencil Look With Crisp Edges
Bring the calming presence of nature indoors with this bold, graphic tree mural that mimics the clean look of a professional vinyl decal. Using a clever taping method and a projection technique allows you to achieve razor-sharp edges and perfect symmetry without needing advanced artistic skills.
Detailed Instructions
Materials
- Projector (digital or overhead)
- Pencil / Eraser
- Deep green interior latex paint (satin or semi-gloss)
- Small angled sash brush (1.5 – 2 inch)
- Small foam roller and tray
- Painter’s tape (blue or green)
- Artist’s liner brush (for tight corners)
- Drop cloth
- Ladder or step stool
- Wall cleaner / damp cloth
Step 1: Preparation & Setup
-
Clear and Clean:
Begin by removing any furniture from the wall area and wiping down the surface with a damp cloth to remove dust. A clean wall ensures your paint adheres properly and your lines stay crisp. -
Tape the Trim:
Apply a strip of high-quality painter’s tape along the top edge of your baseboards to protect them from drips. Press the edge down firmly with your thumb or a putty knife to create a seal. -
Project Your Image:
Set up your projector facing the wall directly. Load a high-contrast silhouette image of a tree (similar to the reference photo). Adjust the distance until the tree fills the wall space, centering the trunk between any outlets or fixtures if possible.
Step 2: Tracing the Design
-
Outline the Trunk:
Starting at the base, lightly trace the vertical lines of the trunk with a pencil. Keep your hand steady, but don’t worry if the lines are faint; you just need a guide. -
Map the Branches:
Work your way up the wall, tracing the major branches extending from the trunk. Pay attention to the junctions where branches split, ensuring they look natural and fluid. -
Detail the Leaves:
Trace the individual leaf shapes. Since this is a stylized design, the leaves are simple pointed ovals. I find it helpful to only mark the tip and the base of the leaf if I’m confident, but tracing the whole shape is safer. -
Double Check:
Turn off the projector and step back. Look for any missed spots or lines that feel wobbly. Fix these freehand with your pencil now before paint touches the wall.
Use an Extender
Add a paint conditioner like Floetrol to your latex paint. It slows drying time and levels out brush marks, making the finished tree look like a giant seamless decal.
Step 3: Painting the Mural
-
Outline with a Brush:
Pour a small amount of deep green paint into a manageable container. Using your angled sash brush or a smaller artist brush, carefully paint the outline of the trunk and larger branches. This technique, called ‘cutting in,’ creates your crisp edge. -
Fill the Trunk:
Once the edges are defined, use a small foam roller or a larger brush to fill in the body of the trunk. The foam roller helps minimize brush strokes for that flat, sticker-like finish. -
Focus on Leaf Clusters:
Move to the branches. Outline a cluster of leaves first, then fill them in immediately while the paint is wet to ensure a smooth blend. -
Manage the Edges:
For the sharp tips of the leaves, switch to a fine liner brush. Pull the brush from the center of the leaf out toward the tip to get a perfect point. -
Work Top to Bottom:
Start painting the highest leaves and branches first. This prevents your hand or arm from accidentally smudging wet paint on the lower sections as you work. -
Second Coat Application:
Depending on your paint color, the green might look streaky after one coat. Let the first layer dry to the touch (usually 1-2 hours) and apply a second coat, focusing on getting solid, opaque coverage.
Uneven Edges?
If your hand shakes while outlining, use a “mahl stick” or rest your hand on a clean, dry paint stick held against the wall to stabilize your movement for cleaner lines.
Step 4: Finishing Touches
-
Clean Up Edges:
Inspect your work closely. If any green paint strayed outside the lines, wait for it to dry completely, then touch it up with the original wall color using a tiny brush. -
Remove Tape:
While the paint is still slightly tacky (or fully dry, scoring with a knife first), slowly peel the painter’s tape off the baseboards at a 45-degree angle to reveal a sharp line at the floor. -
Final Cure:
Allow the mural to cure for at least 24 hours before placing furniture back against the wall to prevent scuffs.
Now you have a stunning, nature-inspired focal point that completely transforms the room
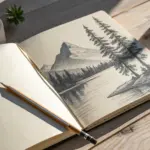
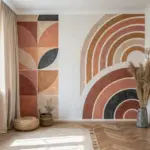
Abstract Geometric Tree Wall Painting
Transform a plain wall into a stunning focal point with this abstract, stained-glass inspired tree mural. Using sharp geometric lines and an earthy palette of rusts and greens, this project brings nature indoors with a modern twist.
Step-by-Step Tutorial
Materials
- Painter’s tape (0.25-inch and 1-inch widths)
- Interior latex paint (white base for wall)
- Sample pots of latex paint (Rust, Forest Green, Teal, Sage, Tan/Beige)
- Small angled sash brush (1.5 inch)
- Small foam rollers or craft brushes
- Pencil
- Eraser
- Level
- Utility knife or box cutter
- Plastic drop cloths
- Damp rag
Step 1: Preparation and Mapping
-
Prepare the surface:
Begin by ensuring your wall is clean and free of dust. If the current wall color isn’t the desired grout line color (white in the photo), paint the entire wall white first and let it cure for at least 24 hours. This white base will become the crisp lines between your geometric shapes later. -
Sketch the skeleton:
Using a pencil, lightly sketch the basic stick-figure shape of your tree. Start with a vertical line for the trunk and branch out in a V-shape for the main boughs. This doesn’t need to be perfect; it just guides your tape placement. -
Tape the trunk outline:
Apply your painter’s tape to outline the main trunk and the primary heavy branches. I like to use wider tape here if I want a thicker definition, but standard width works too. Press the edges down firmly. -
Create the geometric canopy:
Start applying long strips of tape diagonally across the upper wall area to create intersecting triangles. Don’t worry about making them uniform; a mix of large and small triangles creates a more organic, fractured look. -
Refine the trunk geometry:
Inside the trunk outline, add diagonal tape lines to break the vertical space into smaller triangles, mimicking the multifaceted style of the canopy. -
Seal the tape edges:
This is crucial for textured walls: Paint a thin layer of your base wall color (white) over the edges of all the tape. This seals the tape and prevents colored paint from bleeding underneath, ensuring super crisp lines.
Textured Wall Fix
If you have heavy knockdown texture, caulk the tape edges instead of painting them. Use a clear, paintable caulk to seal the gaps before applying color.
Step 2: Applying Color
-
Plan your palette:
Before painting, mark each triangle with a small dot of the color you intend to paint it. Alternatively, label them ‘R’ for rust, ‘G’ for green, etc. Distribute the colors randomly so no two adjacent shapes share the same hue. -
Paint the rust tones:
Start with your rust/terracotta color. Use a small angled brush to cut in the corners of the designated triangles, then fill the centers. Two light coats provide better coverage than one heavy one. -
Apply the dark greens:
Move on to your darkest forest green or deep teal. Paint the marked sections, being careful not to get paint on the neighboring tape where a different color will go. -
Fill in lighter shades:
Continue the process with your sage green and tan/beige colors. These lighter shades act as highlights and give depth to the geometric form. -
Touch up coverage:
Inspect your work. If the texture of the wall is showing through too much, dab a little extra paint into the crevices or apply a final topcoat to ensure solid opacity.
Step 3: The Reveal
-
Remove tape carefully:
While the paint is still slightly tacky (not fully cured), begin peeling off the tape. Pull it slowly at a 45-degree angle away from the painted edge. -
Clean up lines:
If any paint did manage to bleed or if a piece of dried paint peeled up, use a tiny artist’s brush and your white base paint to touch up the ‘grout’ lines. -
Erase pencil marks:
Once the paint is completely dry (give it a few hours), gently erase any visible pencil marks that might be sitting in the white spaces between shapes.
Metallic Accent
Swap one of the beige or tan colors for a metallic gold or copper paint. It catches the light and adds a glamorous shimmer to the geometric design.
Enjoy the graphic impact of your new modern art piece


Have a question or want to share your own experience? I'd love to hear from you in the comments below!