
A tree house drawing is basically instant story: you get nature, architecture, and a little bit of childhood magic all in one scene. Below are my favorite tree house drawing ideas—starting with the classics and drifting into some delightfully weird, imaginative territory.
Classic Backyard Tree House

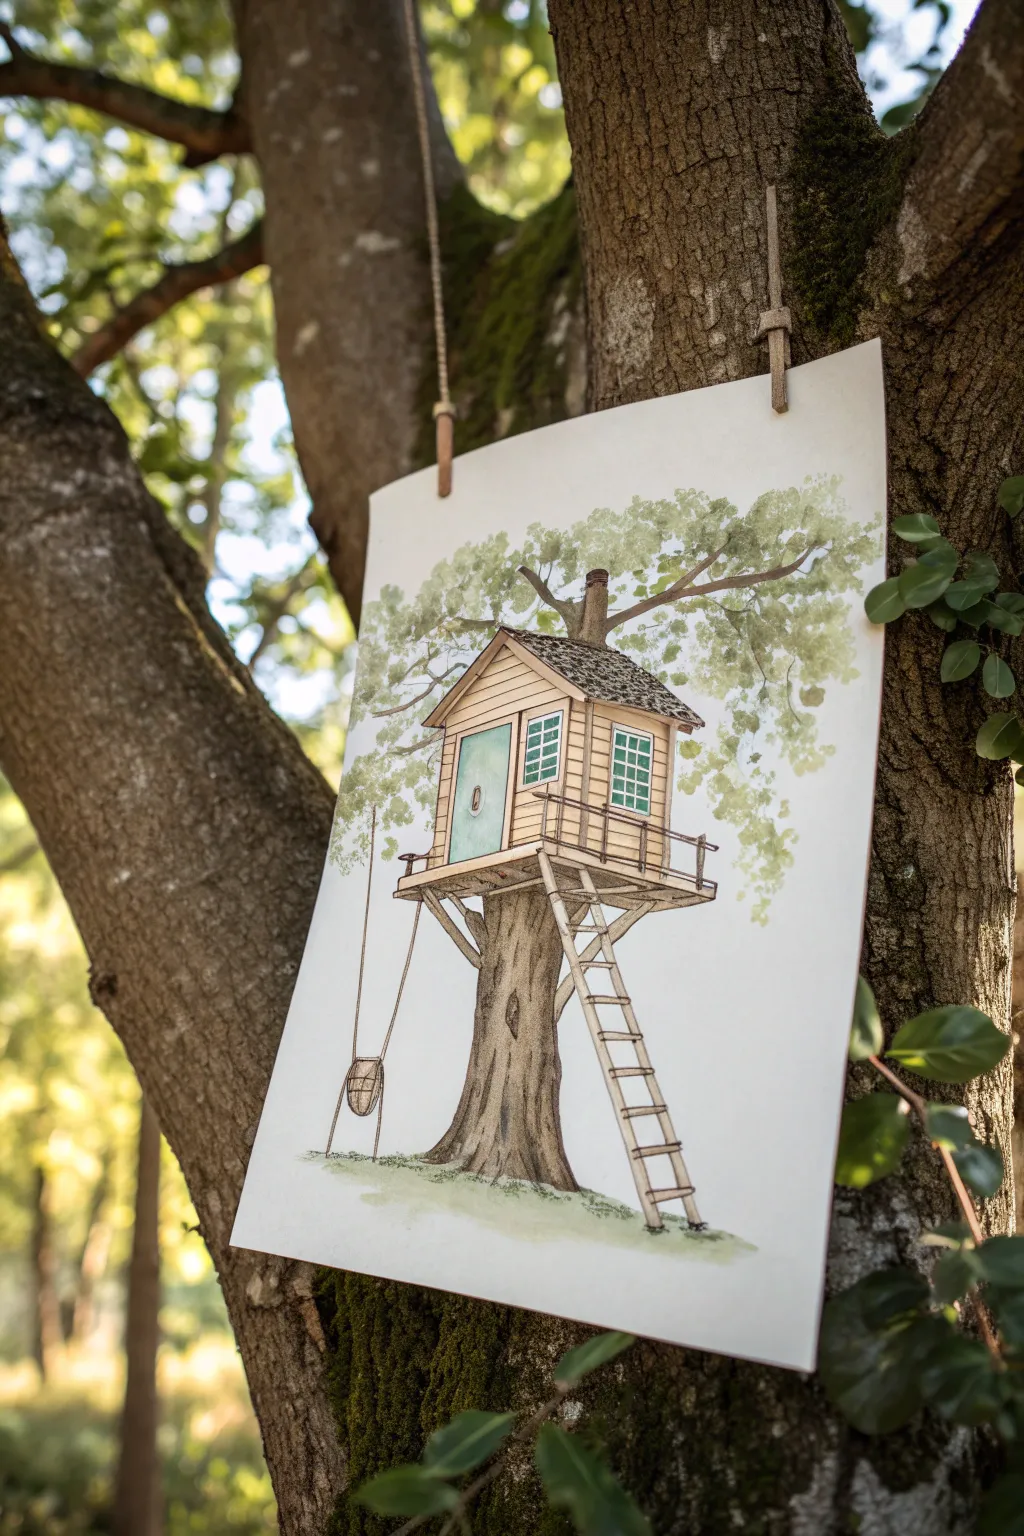
This charming illustration captures the nostalgia of childhood forts with crisp ink lines and detailed wood textures. You’ll create a classic tree house perched on a sturdy trunk, complete with a tire swing and rustic ladder.
Step-by-Step Tutorial
Materials
- Spiral-bound sketchbook (creamy or off-white paper)
- HB graphite pencil
- Kneaded eraser
- Fine liner pens (sizes 0.1, 0.3, and 0.5)
- Ruler (optional, for straight lines)
- Orange colored pencil (for staging, as seen in photo)
Step 1: Planning and Sketching
-
Establish the Trunk:
Begin with your HB pencil, drawing a strong, thick trunk near the bottom center of the page. Let the trunk branch into a ‘V’ shape slightly above the halfway point to cradle the house structure. -
Block in the House Shape:
Draw a cube-like shape resting in the crotch of the tree. Add a pitched roof on top, extending the eaves slightly over the edges for a realistic overhang. -
Detail the Perspective:
Sketch a small porch extension on the left side of the house shape. Use light guidelins to ensure your vertical lines are parallel and your horizontal lines converge slightly if you want a formal perspective look. -
Add Structural Features:
Draw diagonal support beams extending from the trunk out to the corners of the house floor. Lightly sketch the ladder leaning against the right side of the tree. -
Placement of Fun Elements:
Hang two vertical lines from the left underside of the deck for the swing ropes, and sketch a simple rectangular seat at the bottom. Don’t forget to roughly outline the door and window positions on the house facade.
Step 2: Inking the Structure
-
Outline the Main Forms:
Switch to a 0.5 fine liner. Carefully go over the main outline of the house, the roof, and the deck railing. Keep your hand steady but allow for slight unevenness to suggest rough-hewn wood. -
Define the Tree Bark:
Using a 0.3 pen, draw vertical contour lines up the trunk. Make these lines wavy and broken to simulate rugged bark texture, concentrating more lines on the shaded left side. -
Siding and Roof Shingles:
With the 0.1 pen, draw thin horizontal lines across the walls for siding. I like to keep these very light. For the roof, draw darker horizontal lines for the main ridge and structure. -
Window and Door Details:
Ink the window panes and door frame with the 0.3 pen. Darken the interior of the window slightly to show depth, but leave some white space for reflections. -
Inking the Ladder and Swing:
Trace over your pencil lines for the ladder rungs and the swing. Add tiny connecting hardware details, like hooks or knots, where the ropes meet the wood.
Straight Lines, Naturally
Don’t use a ruler for ink! Hand-drawing the straight architectural lines gives the treehouse a rustic, organic charm.
Step 3: Texture and Shading
-
Shadows Under the Eaves:
Use the 0.3 pen to add hatching (closely spaced diagonal lines) underneath the roof overhangs. This instantly adds dimension and pops the roof forward. -
Deepening the Trunk Shadows:
Return to the tree trunk with your 0.5 pen. Add cross-hatching to the darkest areas, specifically right under the floorboards where the tree meets the house. -
Draw the Tree Canopy:
Instead of drawing individual leaves, use the 0.1 pen to create branching twig structures sprouting from behind the roof. Add small, scattered scribbles or jagged loops to suggest clusters of leaves or buds. -
Grounding the Scene:
At the base of the trunk, use quick, upward flicks of your 0.1 pen to create tufts of grass. Vary the height of the grass blades for a natural look. -
Final Texture Touches:
Add small dots or stippling on the ground area to suggest dirt or gravel. Re-emphasize the dark shadow inside the open doorway to create a sense of mystery. -
Cleanup:
Wait at least 10-15 minutes for the ink to cure fully. Gently erase all remaining pencil guidelines with the kneaded eraser to reveal the crisp black and white drawing.
Ink Smudging?
Place a scrap piece of paper under your drawing hand. This protects the paper oils and prevents your palm from dragging wet ink.
Now you have a cozy hideaway captured forever on paper.


Tree House With Rope Ladder
Capture the magic of childhood with this charming mixed-media illustration featuring a classic wooden treehouse nestled in a sturdy oak. This project combines loose watercolor washes with crisp ink detailing to create a piece that feels both nostalgic and fresh.
Detailed Instructions
Materials
- Cold press watercolor paper (A3 or 11×14 inches)
- HB pencil and quality eraser
- Waterproof fine liner pens (0.1, 0.3, and 0.5 sizes)
- Watercolor paints (pans or tubes)
- Round watercolor brushes (size 4, 8, and a small detail brush)
- Two jars of water
- Paper towels
- Wooden clips and twine (for display)
Step 1: Sketching the Structure
-
Establish the Trunk:
Begin by lightly sketching the main trunk of the tree in the center of your paper. Make the base wider and divide it into two main branches near the top third of the page to cradle the house. -
Position the Platform:
Draft a square platform resting securely in the fork of the branches. Extend the sides slightly past the trunk width to create a walkway area. -
Raise the Walls:
Draw the basic box shape of the cabin on top of the platform. Stick to simple perspective; sketch a peaked roof and ensure the front face is slightly angled toward the viewer. -
Add Structural Details:
Sketch the ladder leaning against the trunk, leading up to the platform. Add the vertical railing posts and the horizontal rails around the balcony. -
Include Windows and Doors:
Place a rectangular door on the left side of the cabin face and two multi-pane windows to its right. Don’t press too hard with your pencil, as these lines need to be faint. -
Swing into Action:
On the far left branch, draw two long vertical lines dropping down to form a rope swing. Sketch a simple basket or seat at the bottom.
Step 2: Inking the Outline
-
Outline the House:
Using a 0.5 pen, go over the main lines of the house, platform, and roof. Use a ruler if you want perfect straightness, but a steady freehand line adds more character. -
Texturize the Tree:
Switch to a 0.3 pen for the tree trunk. Instead of straight lines, use broken, wavy strokes to suggest rough bark texture, focusing on the edges and shadowy areas. -
Detail the Siding:
With your 0.1 pen, draw horizontal lines across the house walls to create the look of wood siding. Keep these lines light and not perfectly continuous. -
Finish Small Details:
Ink the window panes, the door frame, and the swing. Once the ink is totally dry—give it a few minutes—gently erase all your pencil marks.
Muddy Colors?
If your greens bloom into the browns too much, let the trunk dry completely before painting any leaves that touch it. This keeps the colors distinct.
Step 3: Applying Watercolor
-
Paint the Trunk:
Mix a diluted sepia or raw umber. Apply a light wash to the entire trunk. While it’s still damp, drop concentrated brown paint along the sides to create a rounded, 3D effect. -
Color the Cabin:
Use a warm yellow ochre or pale beige for the wood siding. Keep the wash uneven to simulate weathered wood. -
Add Roof Texture:
Paint the roof with a dark grey or charcoal mix. I like to use a dabbing motion here rather than smooth strokes to suggest shingles or roofing grit. -
Pop of Color:
Paint the door a soft teal or mint green. Use the same color, perhaps slightly diluted, for the window frames to tie the design together. -
Create the Foliage:
Mix a sap green with plenty of water. Using a larger brush, dab loose, cloud-like shapes around the upper branches. Don’t fill it in completely; leave plenty of white space for an airy feel. -
Deepen the Greens:
While the first green layer is still slightly wet, drop in a darker olive green near the branches to suggest density and shadow within the leaves. -
Ground the Tree:
Add a quick wash of green at the base of the trunk to suggest grass. Let the paint fade out naturally into the white of the paper.
Level Up: Hidden Life
Add tiny details inside the windows, like a silhouette of a cat or a glowing lantern, to make the house look inhabited and cozy.
Hang your masterpiece using wooden clips and twine for a rustic display that matches the artwork’s vibe


Wraparound Platform Tree House
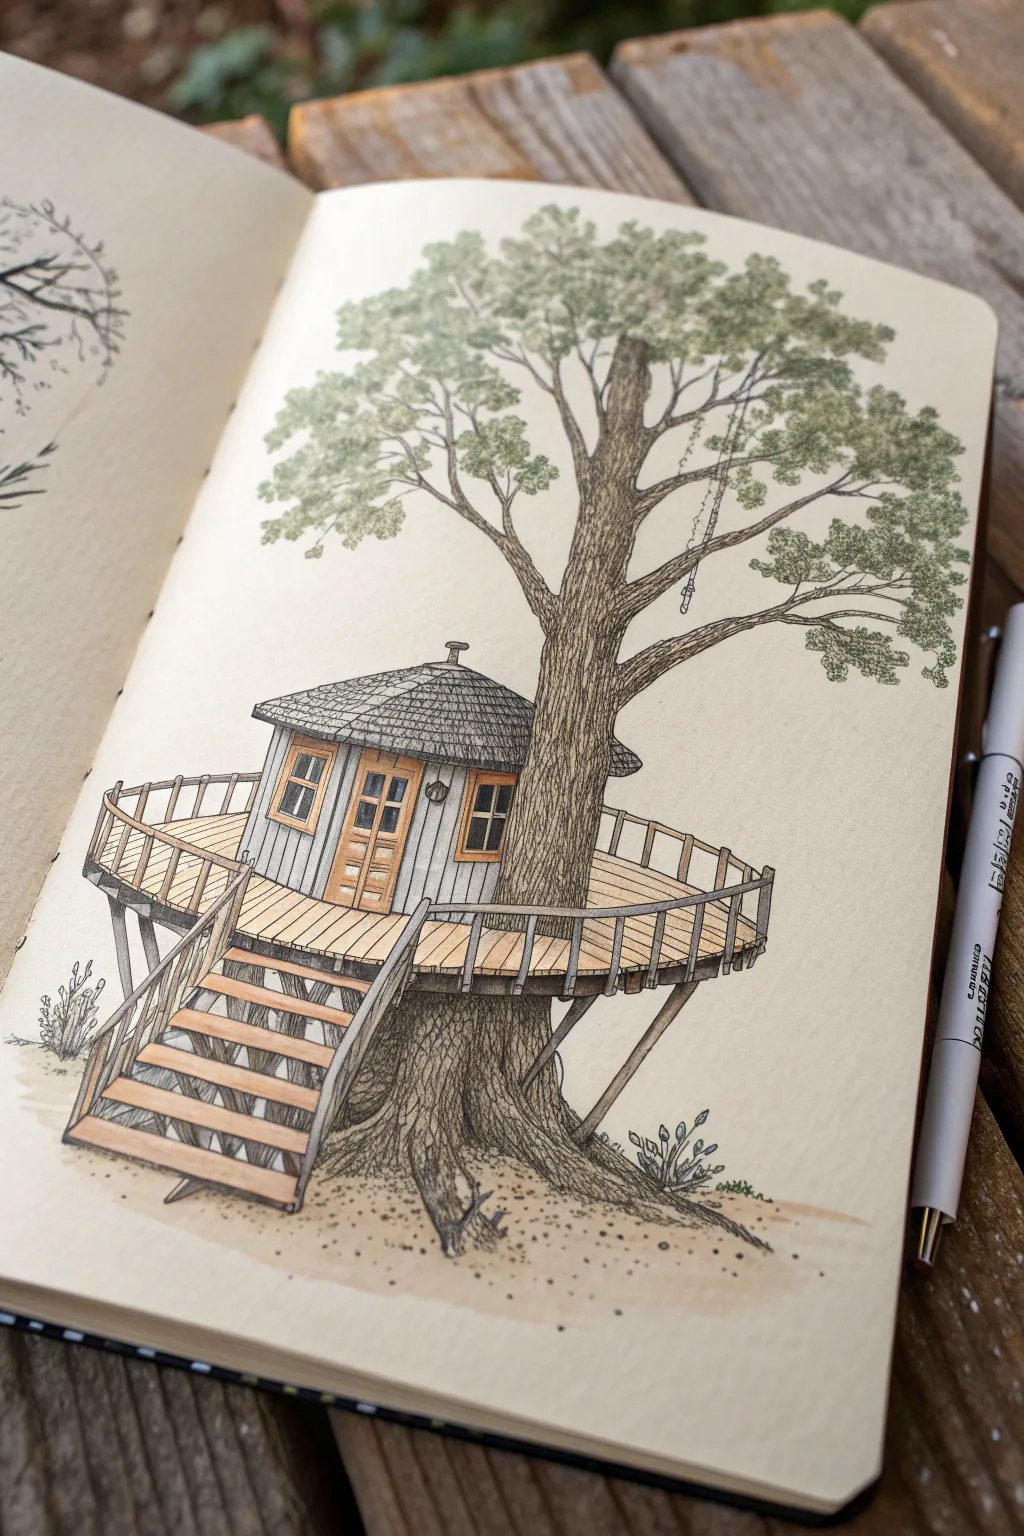
Capture the magic of childhood hideaways with this charming pen and ink illustration of a tree house hugging an old oak. This project combines precise architectural lines with organic textures, perfect for practicing perspective and natural forms in your sketchbook.
How-To Guide
Materials
- Sketchbook (heavyweight paper recommended)
- HB Graphite pencil
- Kneaded eraser
- Fine liner pens (sizes 0.1, 0.3, and 0.5)
- Ruler
- Colored pencils or light watercolor wash (browns, greens, grey)
- White gel pen (optional for highlights)
Step 1: Laying the Groundwork
-
Establish the trunk:
Begin with your HB pencil by sketching two slightly curved vertical lines near the center of your page to form the massive trunk. Widen the base considerably to show the roots anchoring into the ground. -
Branch structure:
About two-thirds up the page, split the trunk into two major -
Define the platform level:
Draw an ellipse around the trunk where the tree starts to branch out. This flattened circle will become the floor of your wraparound deck; ensure the front curve dips lower than the back to create proper perspective. -
House placement:
Sketch a simple box shape sitting on top of the platform ellipse, tucked slightly behind the main trunk. Add a triangular or conical shape on top for the roof.
Pro Tip: Bark Flow
When drawing bark lines, imagine water flowing down the tree. Let lines curve around knots and branches to make the trunk look round and 3D, not flat.
Step 2: Constructing the Tree House
-
Platform detailing:
Refine your ellipse into a deck. Using your ruler, draw the vertical support posts for the railing along the outer edge. Connect them with a curved top rail that follows the oval shape of the floor. -
Drafting the stairs:
Draw a staircase extending from the front left of the deck down to the ground. Start with two parallel diagonal lines for the stringers, then gently sketch horizontal lines across them for the treads. -
House features:
Add details to the cabin structure. Draw a door slightly off-center and flank it with two windows. Sketch vertical lines on the walls to suggest wood paneling or siding. -
Roof texture:
On the roof cone, draw concentric curved lines that bow slightly downward, then cross them with radial lines to create a shingled tile effect. -
Support beams:
Don’t forget the supports underneath. Sketch angled beams connecting the underside of the deck back to the main tree trunk for structural logic.
Step 3: Inking and Texturing
-
Outline the structure:
Switch to a 0.5 fine liner. Carefully go over the main lines of the house, the deck railing, and the stairs. Use a ruler for the straight architectural lines to contrast with the organic tree later. -
Bark texture:
Using a 0.3 or 0.1 pen, start inking the tree trunk. Instead of straight lines, use squiggly, broken vertical strokes that flow around the form of the tree to simulate rough bark. -
Root details:
At the base, let your pen lines flare out. Add knot holes and swirling lines where the roots disappear into the soil to give the tree weight and age. -
Leafy canopy:
For the leaves, switch to stippling or tiny looping scribbles with your finest pen. Create clusters of foliage at the ends of the branches, keeping them airy rather than solid blocks. -
Clean up:
Once the ink is completely dry—give it a full minute—gently erase the underlying graphite sketch with your kneaded eraser.
Troubleshooting: Wonky Deck
If your platform looks tilted, check the railing posts. They must be perfectly vertical (straight up and down), regardless of the curve of the deck floor.
Step 4: Adding Color
-
Wood tones:
Take a light brown colored pencil or watercolor wash. Fill in the deck planks, the staircase treads, and the door details. I like to leave small streaks of white paper showing to suggest light hitting the wood. -
Grey siding:
Color the walls of the cabin a soft, cool grey. Keep the pressure light so the vertical ink lines remain visible. -
Roof shading:
Use a darker grey or slate blue for the roof shingles. Apply slightly more pressure on the right side of the roof to indicate shadow, assuming the light source is coming from the left. -
Tree coloring:
Wash a desaturated brown over the trunk. Add a second layer of brown on the right side of the trunk and under the deck to deepen the shadows and create volume. -
Foliage and ground:
Lightly dab a sage or olive green over the leaf clusters. Finish by adding a sandy beige color around the roots for the ground, stippling a few dots for loose dirt.
Now you have a cozy, architectural retreat living right inside your sketchbook page


Tree House With Tire Swing
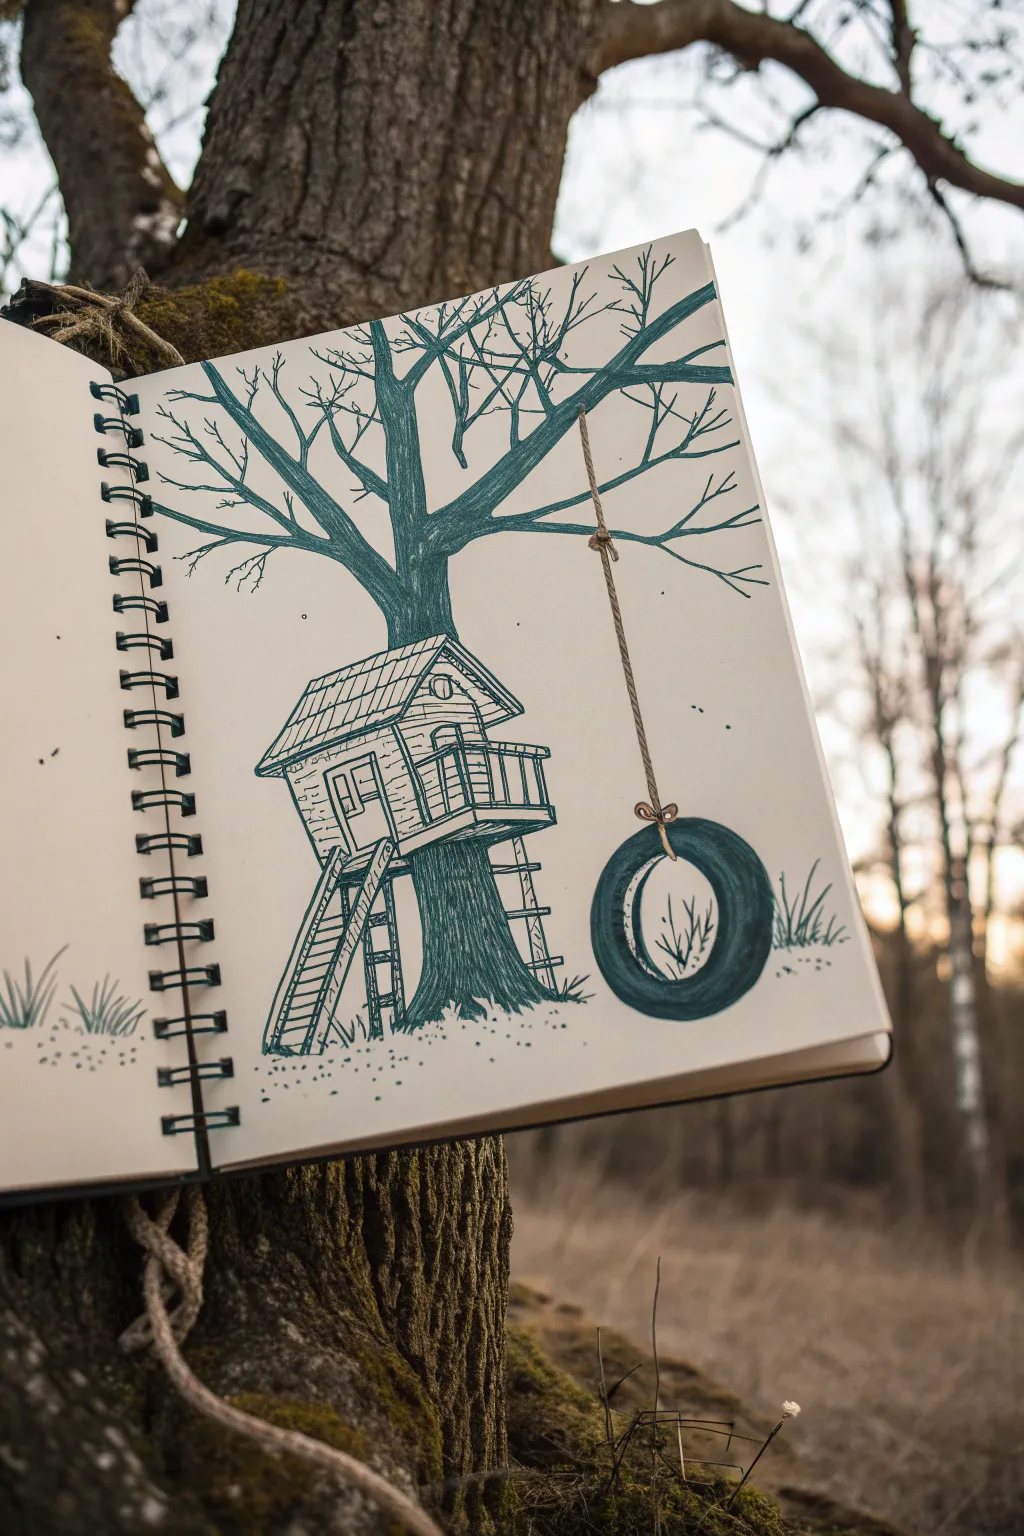
Capture the magic of childhood with this charming illustration featuring a cozy treehouse and a classic tire swing. Using fine liners and simple cross-hatching techniques, you’ll create a nostalgic scene that feels right at home in your sketchbook.
Step-by-Step Guide
Materials
- Sketchbook (cream or off-white paper preferred)
- Pencil (HB or H for light sketching)
- Eraser
- Dark teal or forest green fine liner pen (0.3mm)
- Dark teal or forest green fine liner pen (0.5mm or 0.8mm)
- Ruler (optional)
Step 1: Laying the Foundations
-
Sketch the trunk:
Start lightly with your pencil. Draw a thick, sturdy trunk positioned slightly to the left of the center. Let the base flare out into roots that anchor the tree to the ground. -
Add the main branches:
Extend the trunk upward, branching it out into a Y-shape. Draw a long, horizontal branch extending far to the right side of the page—this is crucial for holding the tire swing later. -
Draft the house shape:
Nestle a small house structure right into the crotch of the main branches. Sketch a simple pitched roof and a boxy main cabin. Don’t worry about details yet, just get the perspective right. -
Outline the deck and ladder:
Draw a small platform extending from the front of the house with a simple railing. Then, sketch a long, slightly wonky ladder leading from the ground up to the house’s entrance. -
Position the tire swing:
Draw a vertical line dropping down from the long right branch. At the bottom, sketch a large oval shape for the tire. Make sure the tire hangs lower than the treehouse platform for visual balance.
Uneven Lines?
Don’t panic if your lines wobble! Natural elements like trees and old wood look better with organic imperfections. Embrace the shake for added rustic texture.
Step 2: Inking simple lines
-
Ink the tree outline:
Switch to your thicker (0.5mm) teal pen. Trace the outline of the trunk and the main branches. Use somewhat jagged, uneven lines to mimic the natural texture of bark. -
Draw the finer branches:
Using the thinner (0.3mm) pen, add many smaller branches stemming from the main boughs. Let these taper off into thin twigs that reach towards the top and edges of the page. -
Define the treehouse:
Go over your pencil lines for the house. Use the ruler here if you want crisp lines for the siding and roof, or freehand it for a rustier look. I prefer freehanding to keep the charm. -
Detail the roof:
Draw horizontal lines across the roof, then add small vertical ticks to suggest shingles or corrugated metal. -
Ink the ladder and railing:
Carefully ink the ladder rungs and the deck railing. Double up your lines to give the wood some thickness.
Step 3: Adding Texture and Depth
-
Texture the bark:
Using the thinner pen, draw vertical, slightly curved lines running up the trunk and along the main branches. Vary the length and spacing to create a believable bark texture. -
Shade the trunk:
Add density to your bark lines on the shadowed side of the tree (usually underneath the branches and the house) to create volume. -
Detail the tire swing:
Ink the tire shape with the thicker pen. Fill in the sides of the tire solidly, leaving the top surface lighter to show dimension. Draw the rope texture with small, twisted diagonal hash marks. -
Add wood grain:
On the side of the treehouse, draw horizontal lines for siding. Add tiny dots or short dashes to simulate wood grain and nail heads. -
Ground the scene:
At the base of the tree and under the ladder, draw small tufts of grass using quick, upward flicks of your pen. Add a few stippled dots to suggest dirt.
Pro Tip: Rope Detail
When drawing the swing rope, don’t draw straight lines. Use short, spiraling S-curves that stack on top of each other to mimic twisted hemp texture.
Step 4: Final Touches
-
Enhanse shadows:
Look for areas where objects overlap, like where the ladder meets the ground or the roof overhangs the wall. Add extra hatching here to deepen the contrast. -
Erase pencil marks:
Wait until the ink is completely dry—give it a good few minutes to avoid smudges. Then, gently erase all your initial pencil guidelines. -
Add atmospheric dots:
Sprinkle a few tiny dots in the empty air around the treehouse and swing. This adds a bit of whimsy and prevents the background from feeling too empty.
Now you have a peaceful little hideaway captured right on the page
BRUSH GUIDE
The Right Brush for Every Stroke
From clean lines to bold texture — master brush choice, stroke control, and essential techniques.
Explore the Full Guide
A-Frame Roof Tree House
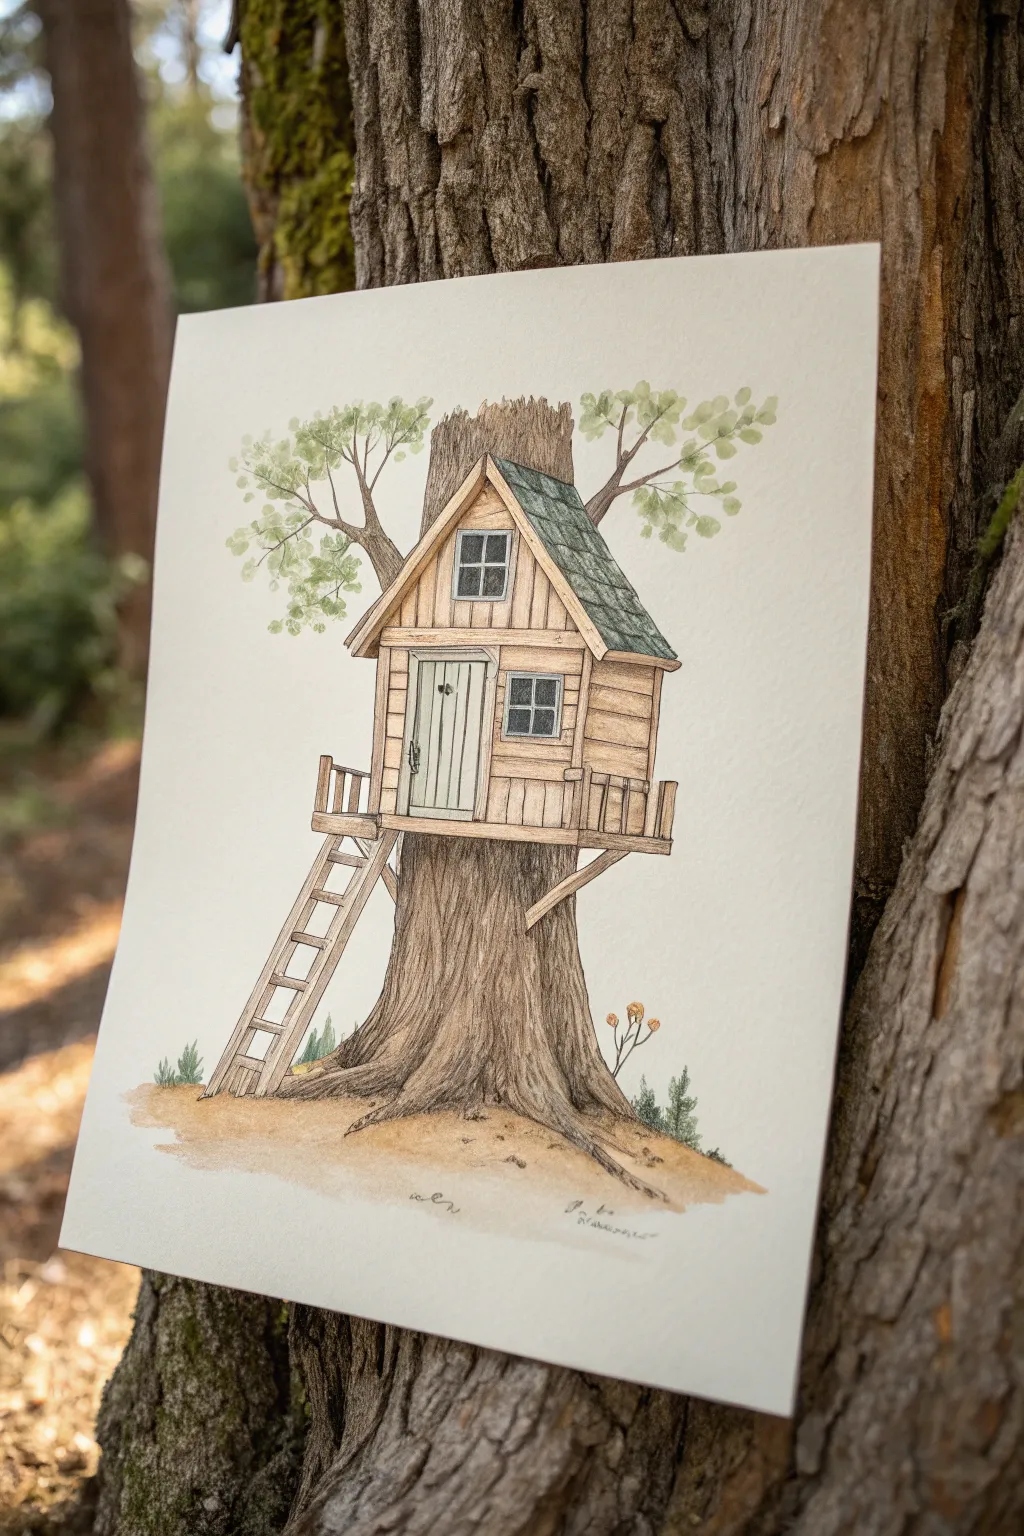
Capture the charm of a forest getaway with this detailed ink and watercolor illustration, featuring a cozy A-frame cabin perched atop a textured tree stump. The combination of precise pen lines and soft watercolor washes creates a lovely balance between architectural structure and organic nature.
Step-by-Step
Materials
- Heavyweight watercolor paper (hot or cold press)
- HB graphite pencil
- Kneaded eraser
- Fineliner pens (sizes 0.1, 0.3, and 0.5, waterproof)
- Watercolor paints (Burnt Sienna, Yellow Ochre, Sap Green, Payne’s Grey, Burnt Umber)
- Small round watercolor brushes (sizes 2 and 4)
- Ruler
- Clean water and paper towels
Step 1: Pencil Sketching
-
Block in the main shapes:
Start by lightly sketching the large trunk base roughly in the center bottom of your page. Above it, draw a simple box shape for the cabin base and a tall triangle for the roof to establish the A-frame silhouette. -
Add structural details:
Using your ruler, refine the straight lines of the house siding, the rectangular door, and the window frames. Sketch the balcony railing extending out to the sides and the angled ladder leading up from the ground. -
Sketch the organic elements:
Draw the swooping root flare at the bottom of the trunk. Add rough outlines for the branches extending from behind the roof and lightly indicate the foliage clusters.
Step 2: Inking the Outline
-
Outline the structure:
Switch to a 0.5 fineliner to ink the main perimeter of the treehouse. Use a ruler for the long, straight lines of the siding and roof to keep the architecture looking sturdy. -
Detail the wood texture:
With a finer 0.1 pen, draw the horizontal planks on the siding. Don’t make the lines perfectly continuous; break them occasionally to suggest aged wood. -
Ink the tree bark:
For the tree trunk using a 0.3 pen, use long, vertical flowing lines that follow the contour of the roots. I like to add some knots and wavy interruptions to make the bark look realistic. -
Finalize the foliage:
Use stippling or small, scalloped motions with your 0.1 pen to outline the leaves in the canopy behind the house. Ink the small tufts of grass and the tiny flower near the roots. -
Erase pencil marks:
Wait until the ink is completely dry to avoid smudging, then gently lift all graphite lines with your kneaded eraser.
Ink Smearing?
Ensure your pen is archival and waterproof. If you’re unsure, test it on a scrap piece of paper, let it dry for 5 minutes, and brush water over it before starting your main piece.
Step 3: Watercolor Application
-
Base wash for the wood:
Mix a diluted wash of Yellow Ochre and a touch of Burnt Sienna. Apply this loosely to the cabin siding, the door, and the ladder, keeping the color light and airy. -
Paint the tree trunk:
Create a mix of Burnt Umber and Payne’s Grey. Paint the trunk using vertical strokes, letting the paint pool slightly in the shadowed areas near the roots and under the house platform. -
Color the roof:
Mix Sap Green with a little Payne’s Grey to get a muted, mossy slate color. Carefully fill in the roof shingles, perhaps lifting a little pigment from the center of the roof for a highlighted effect. -
Add foliage greens:
Use a fresh Sap Green diluted with water to dab color onto the leaf clusters. Keep the edges soft and don’t worry about staying perfectly inside the ink lines. -
Ground the image:
Mix a watery light brown wash and sweep it horizontally across the bottom of the trunk to create the sandy ground layer.
Add Magical Details
Try painting a faint yellow glow in the windows for a nighttime look, or add a tiny rope swing hanging from one of the upper branches for extra character.
Step 4: Shading and Finishing
-
Deepen shadows:
Once the first layers are dry, mix a darker brown to brush simple shadows under the eaves of the roof and beneath the balcony to give the structure dimension. -
Enhance the bark:
Use a semi-dry brush with dark brown paint to add texture over the initial bark wash, emphasizing the vertical grooves. -
Tint the windows:
Apply a very pale, watery wash of Payne’s Grey or blue to the window panes to suggest glass reflection without making them too dark. -
Final touches:
Add tiny dabs of color to the small flowers at the base and check the overall contrast. If the wood siding looks too flat, add a second, thin glaze of brown to the bottom edge of individual planks.
Allow your beautiful woodland dwelling to dry completely before framing or displaying it
Cozy Cottage Tree House
Capture the magic of childhood hideaways with this charming mixed-media illustration featuring a cozy cottage perched high in a tree. Combining precise ink lines with soft watercolor washes creates a delightful balance between architectural structure and organic nature.
Step-by-Step Tutorial
Materials
- Spiral-bound sketchbook (heavyweight paper suitable for light washes)
- Graphite pencil (HB or 2B)
- Kneadable eraser
- Fine liner pens (black, waterproof, sizes 0.1, 0.3, and 0.5)
- Watercolor set (pan or tube)
- Small round watercolor brush (size 4 or 6)
- Cup of water and paper towels
Step 1: Pencil Structure
-
Map the trunk:
Begin by sketching the main trunk of the tree. Let the base curve outward into the roots, making it wider at the bottom and tapering slightly as it goes up. -
Branch out:
Draw two primary branches splitting off from the main trunk in a ‘Y’ shape. These will serve as the support beams for your cottage structure. -
Block the cottage:
Lightly sketch a cube shape resting on the branches. Add a peaked triangle on top for the roof line, ensuring the perspective looks like you are viewing it slightly from below. -
Add architectural details:
Sketch a rectangular balcony jutting out from the front. Add a railing, a small door behind the railing, and a window on the side wall. -
Roof tiles and chimney:
Draw slightly curved horizontal lines across the roof, then add vertical dashes to create individual shingles. Don’t forget a small, rectangular chimney peeking out the top. -
Garden elements:
At the base of the tree, sketch a few simple flower stems with leaves and a small wooden trellis or ladder leaning against the trunk.
Smudge Alert
If your fineliner smears when you add watercolor, your pen isn’t truly waterproof. Test pens on a scrap page first, or do the watercolor washes first and ink over them once dry.
Step 2: Inking the Outlines
-
Define the structure:
Using a 0.3 or 0.5 fineliner, go over your main pencil lines for the house and tree trunk. Use confident, continuous strokes for the house walls to make them look sturdy. -
Texture the bark:
Switch to a finer 0.1 pen for the tree bark. Draw vertical, wavy lines that follow the contour of the trunk. I find that lifting the pen at the end of each stroke creates a natural, tapered look. -
Wood grain details:
On the house siding and balcony, draw thin vertical lines to suggest wooden planks. Add tiny knots or imperfections to give the wood character. -
Roof shingles:
Ink the roof tiles with slightly wobbly lines to suggest handmade clay or wooden shingles. Make the bottom edges of the tiles slightly thicker to show dimension. -
Floral accents:
Ink the flowers at the base with loose, organic shapes. Don’t worry about botanical accuracy; simple round shapes work perfectly for this style. -
Erase guidelines:
Once the ink is completely dry (wait at least 5 minutes to prevent smudging), gently erase all visible pencil marks with your kneadable eraser.
Step 3: Watercolor Wash
-
Base tonal wash:
Dilute a warm brown or beige heavily with water. Apply a very light wash over the tree trunk and the wooden siding of the house. -
Roof color:
Mix a terracota or burnt orange color. Paint the roof shingles, allowing the color to pool slightly at the bottom of each row for natural shading. -
Shadows and depth:
Using a darker brown or sepia, paint the shadowed side of the tree trunk (usually the right side) and underneath the balcony to ground the structure. -
Window and door:
Use a pale blue for the window glass, leaving a tiny white spot for reflection. Paint the door and window frames in a contrasting warm tone like ochre. -
Greenery details:
Dab soft green onto the leaves at the base and add a wash of green for the grass beneath the tree. You can also add a faint, watery green cloud shape in the background as distant foliage. -
Floral pops:
Finish by touching the flower heads with a concentrated bit of orange or red paint to make them stand out against the muted earthy tones.
Make Retractable
Draw a rope ladder rolled up and hanging from the balcony instead of a fixed ladder to make the treehouse feel more like a secret, secluded hideout.
Now you have a charming little hideaway preserved forever in your sketchbook.

PENCIL GUIDE
Understanding Pencil Grades from H to B
From first sketch to finished drawing — learn pencil grades, line control, and shading techniques.
Explore the Full Guide
Tree House With Spiral Staircase

This charming sketchbook project features a sturdy tree wrapped in a spiral staircase leading to a cozy treetop cottage. Using fine liners for crisp details and colored pencils for soft, natural textures, you’ll create an inviting fantasy dwelling right on the page.
How-To Guide
Materials
- Sketchbook or drawing paper (mixed media weight preferred)
- HB or 2B graphite pencil
- Kneaded eraser
- Fine liner pens (sizes 0.1, 0.3, and 0.5, black)
- Colored pencils (Browns, Greens, Terracotta, Yellows)
- Ruler (optional, for the house structure)
Step 1: Drafting the Structure
-
Outline the Trunk:
Start by lightly sketching a wide, slightly tapered tree trunk in the center of your page. Flare the base out significantly to show roots gripping the ground, and split the top into thick, reaching branches. -
Position the Treehouse:
Identify a ‘crook’ in the upper branches on the left side. Sketch a simple rectangular box shape here for the main cabin, adding a slanted roof on top. -
Spiral the Staircase Guide:
Draw faint, parallel curving lines that wrap around the trunk, starting from the ground and winding upward to meet the base of the cabin. This establishes the path for your stairs. -
Sketch the Door and Details:
At the base of the trunk, draw a small, arched doorway. Add details to the cabin, such as a window and the platform supporting it. -
Refine the Foliage:
Sketch cloud-like, bumpy shapes around the ends of the upper branches to represent the canopy of leaves.
Curve Perspective
When drawing the spiral stairs, make the steps ‘flatten’ as they wrap behind the tree. This perspective trick sells the illusion of the stairs winding around a cylinder.
Step 2: Inking the Lines
-
Outline the Tree Bark:
Using a 0.3 pen, trace the main outline of the tree. Add vertical, slightly wiggly lines running up the trunk to suggest rough bark texture. -
Define the Staircase:
Carefully ink the spiral staircase. Draw the individual steps as small rectangles, and use a steady hand to draw the railing posts and the curved handrail. A 0.1 pen is great for these finer details. -
Ink the Architecture:
Go over the pencil lines for the treehouse cabin, the tiled roof, and the arched door at the base. Add small details like wood grain on the door and window panes. -
Detail the Leaves:
Use a stippling motion or small, tight scribbles with a 0.1 pen to outline the foliage masses, giving them a leafy, textured edge rather than a solid line. -
Add Environmental Elements:
Draw small tufts of grass at the base of the roots and sketch a faint, bare sapling to the right of the main tree for balance. -
Erase Pencil Marks:
Once the ink is completely dry, gently run your kneaded eraser over the entire drawing to remove the graphite guidelines.
Waxy Buildup?
If your colored pencils stop laying down pigment, the paper tooth might be clogged. Lightly cross-hatch instead of pressing harder to build color without slickness.
Step 3: Adding Color and Texture
-
Base Tone the Bark:
Use a light brown colored pencil to shade the entire tree trunk. Keep your strokes vertical to follow the direction of the wood grain. -
Deepen the Shadows:
Take a darker brown and shade the sides of the trunk and the area directly underneath the spiral staircase to create dimension and cast shadows. -
Color the Foliage:
Employ a circular scribbling motion with an olive green pencil to fill in the leaf canopies. I like to layer a slightly darker green near the bottom of each leaf clump for depth. -
Warm Up the Woodwork:
Color the staircase steps, the door, and the cabin walls with a golden-yellow or light ochre pencil to make them stand out from the tree bark. -
Roof and Accents:
Use a terracotta or reddish-brown pencil for the roof tiles. Add slate blue or grey for the window glass. -
Grounding the Scene:
Lightly shade the grass at the base with soft greens. You can extend this color faintly outward to create a sense of ground without drawing a hard horizon line. -
Final Touches:
Review the drawing and strengthen any ink lines that may have been faded by the colored pencil wax, particularly on the staircase railing.
Now you have a whimsical hideaway captured in your sketchbook, ready for any imaginary inhabitants to move in
Rainy-Day Tree House Sketch
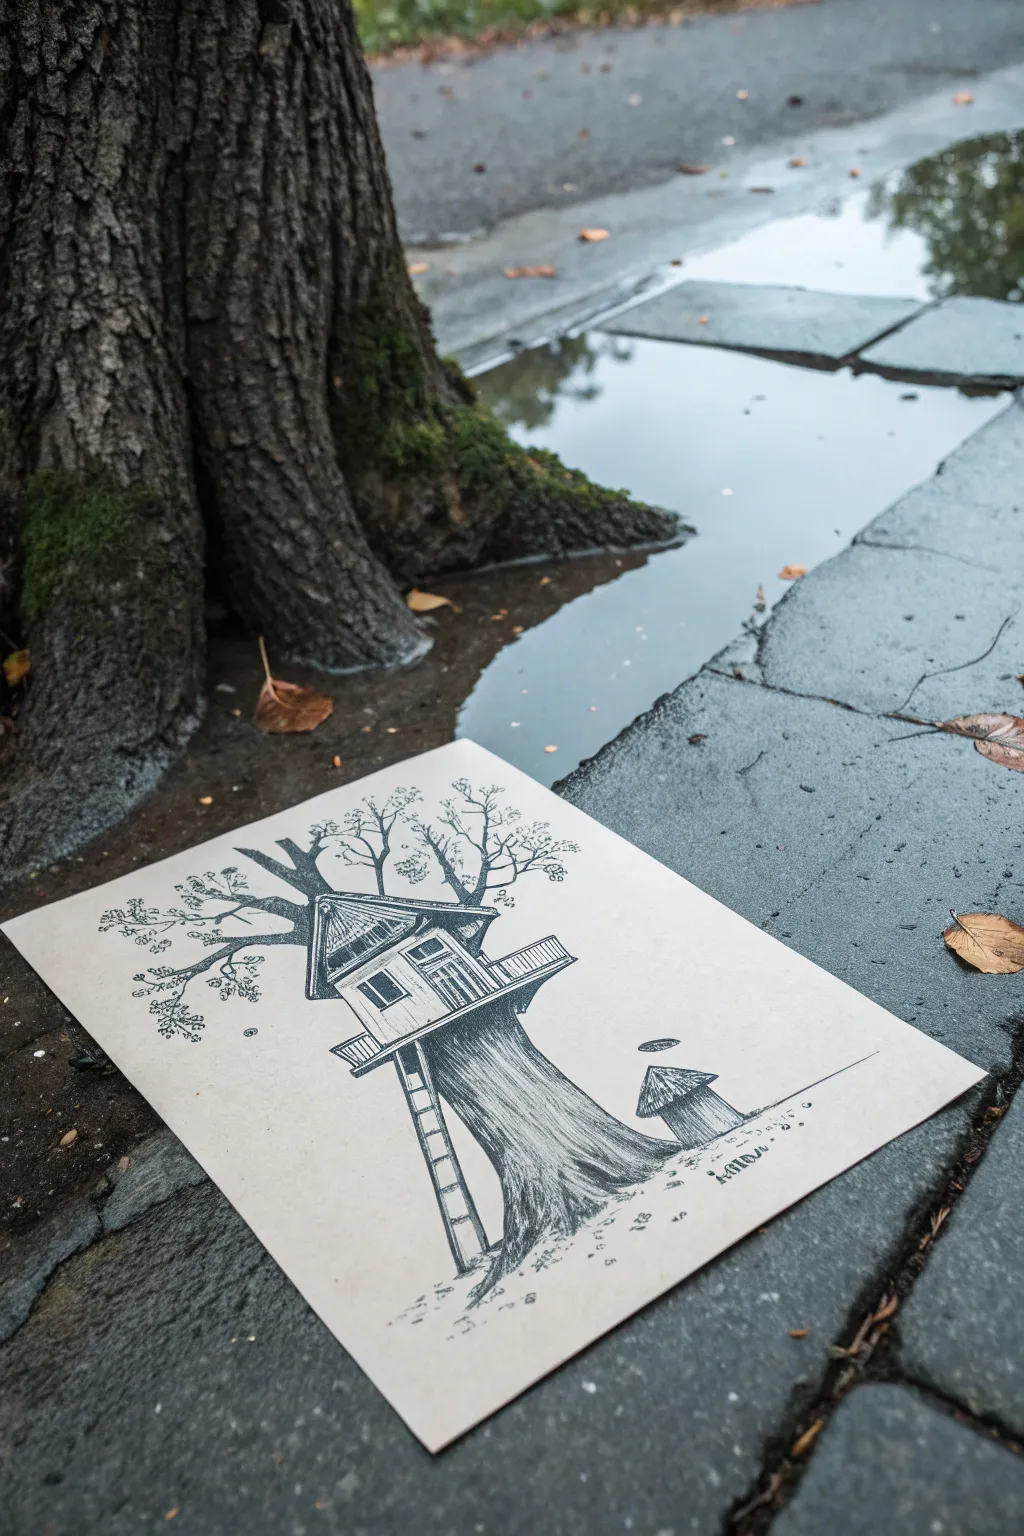
This charming, illustrative sketch captures the whimsical nature of a treehouse nestled securely in a thick trunk. Using fine liner pens, you’ll create rich textures that mimic bark and wood grain, resulting in a cozy architectural drawing.
Step-by-Step Tutorial
Materials
- Heavyweight drawing paper or mixed media paper (A4 or similar size)
- HB Graphite pencil
- Kneaded eraser
- Fine liner pens (sizes 0.1, 0.3, and 0.5)
- Ruler (optional, for the ladder)
- Blending stump (optional)
Step 1: Pencil Underdrawing
-
Base of the tree:
Begin by sketching the large, flared base of the tree trunk near the bottom center of your paper. Make the roots spread out wide to ground the drawing, suggesting age and stability. -
Trunk extension:
Extend two vertical lines upward from the base, curving them slightly as they rise. Near the top third of the paper, branch these lines out into a ‘Y’ shape to form the main support forks. -
House structure:
Nestle a small, rectangular house shape right into the crotch of the ‘Y’. Draw a simple pitched roof that overhangs slightly on the sides. -
Adding the deck:
Sketch a wrap-around balcony or deck protruding from the front of the house. Use simple parallel lines to indicate the railing. -
Branch placement:
Draw lighter, thinner lines extending from the main trunk forks to create the canopy. Let these branches twist and turn organically above and behind the roof. -
Ladder detail:
Add a long, leaning ladder on the left side. It should start at the ground level and reach all the way up to the edge of the deck. -
Small dwelling:
To the right of the main tree, sketch a tiny, secondary hut or mushroom-shaped structure on the ground level for balance.
Don’t Rush the Ink
Make your bark lines flow in the direction the tree grows. If the lines are too straight, the tree looks flat. Curved lines create roundness.
Step 2: Inking the Structure
-
House outlines:
Switch to a 0.3 fine liner. Carefully go over the pencil lines of the treehouse structure, defining the roof, walls, and deck railings with crisp, clean strokes. -
Windows and door:
Draw the window frames and the door. I find that thickening the shadow side of the window frames adds immediate depth. -
Trunk texture contours:
Using a 0.5 pen, outline the main shape of the tree trunk. Don’t use a straight line; instead, use a slightly jagged, broken line to suggest rough bark texture. -
Ladder definition:
Ink the ladder with the 0.3 pen. Make the rungs look slightly organic, perhaps like gathered branches rather than milled lumber.
Step 3: Texturing and Shading
-
Bark shading:
Switch to your finest 0.1 pen essential for the detail work. Draw vertical, flowing contour lines down the length of the trunk. Let these lines follow the curve of the roots at the bottom. -
Deepening shadows:
Add cross-hatching to the shaded side of the trunk (typically the right side or under the house) to create volume. The denser the lines, the darker the shadow. -
Roof texture:
Use horizontal or diagonal hatching on the roof to mimic shingles or wooden planks. Leave small white gaps to represent highlights. -
Canopy leaves:
For the upper branches, use a stippling technique (tiny dots) or small, scribbled loops to suggest clusters of leaves without drawing individual ones. Keep this sparse to maintain an airy feel. -
Grounding the image:
Add some scribbled grass tufts and loose stippling around the base of the roots and the small hut to ground the scene. -
Final Cleanup:
Wait at least 15 minutes to ensure the ink is completely dry. Gently erase all remaining pencil marks with your kneaded eraser to reveal the crisp black-and-white contrast.
Add a Pop of Color
Once the ink is totally dry, use a watercolor wash in muted greens or browns over the leaves and trunk for a soft, storybook journal look.
You now have a timeless architectural sketch ready to be framed or gifted.


Snowy Tree House Winter Scene
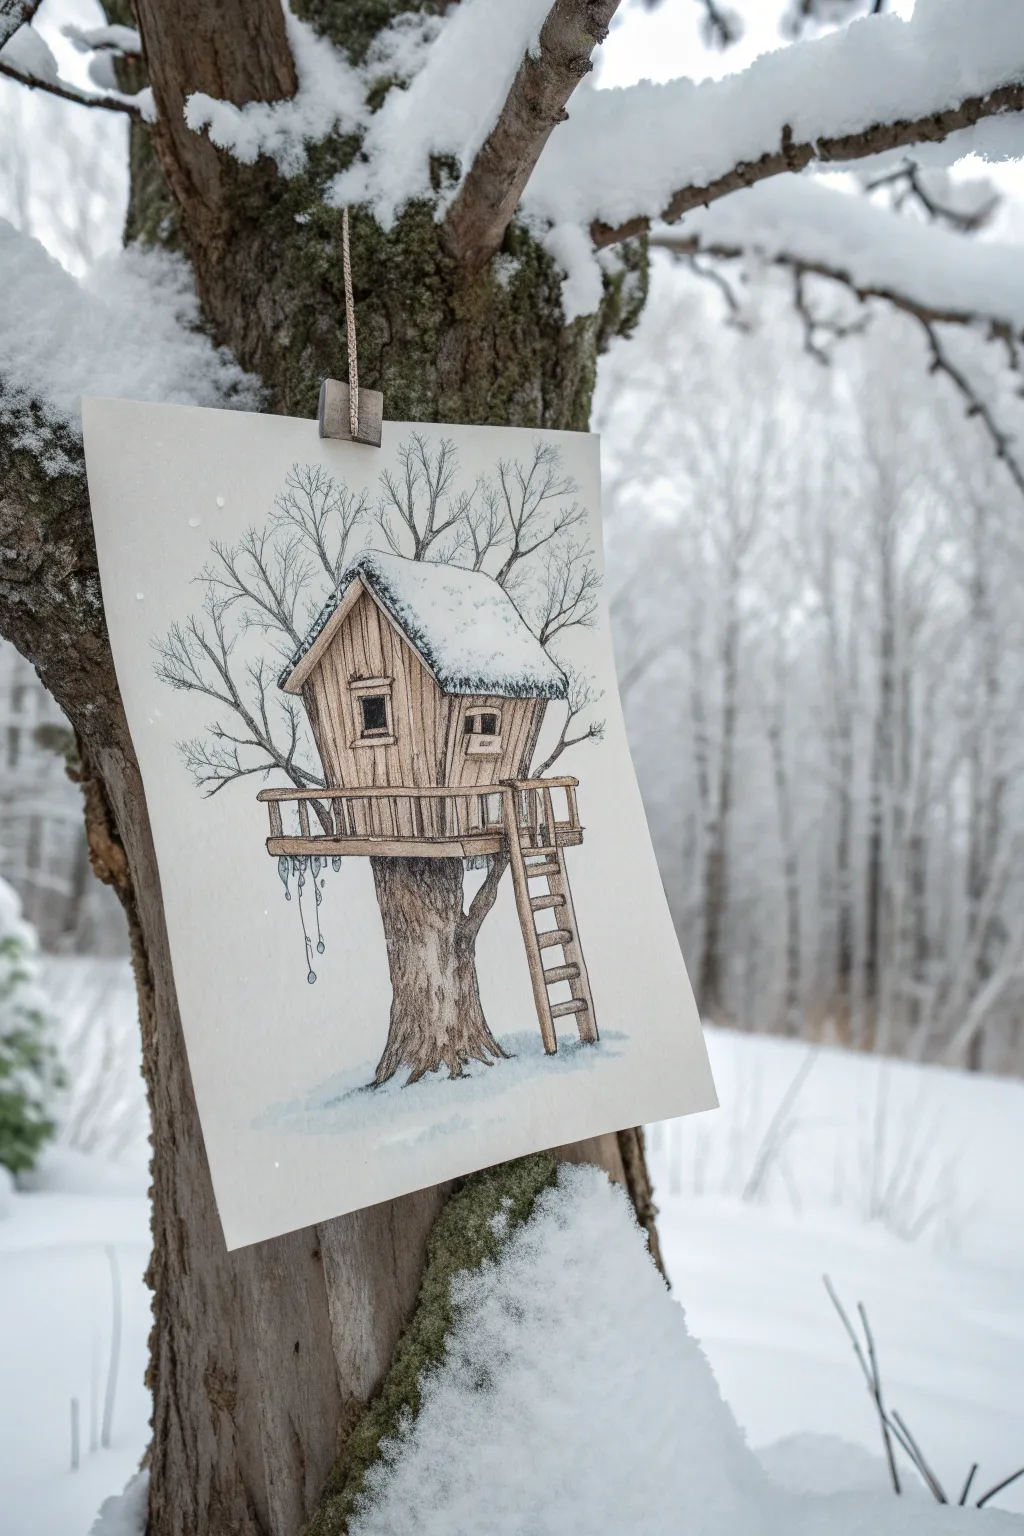
Capture the quiet magic of winter with this detailed illustration of a cozy wooden treehouse perched amongst bare branches. This project combines precise linework with soft shading to create a textured, nostalgic scene perfect for a seasonal art card.
How-To Guide
Materials
- Heavyweight drawing paper or mixed media paper (smooth texture)
- H or HB pencil for initial sketching
- Kneaded eraser
- Fine liner pens (0.1mm, 0.3mm, and 0.5mm sizes, black waterproof ink)
- Alcohol markers or watercolors (warm browns, cool greys, light blue)
- White gel pen or gouache
- Ruler
Step 1: Structural Foundations
-
Map the Composition:
Begin by lightly sketching a central vertical line for the main tree trunk. About a third of the way up, draw a horizontal line to mark where the treehouse platform will sit. This ensures your structure feels balanced on the paper. -
Shape the Trunk:
Flesh out the tree trunk around your guide line. Give the base a slight flare to suggest roots anchoring it into the ground, and taper the trunk slightly as it goes up towards the platform. -
Outline the House:
Draw the basic geometric shapes of the treehouse. Start with a rectangular base for the walls sitting on the platform, and add a simple triangular prism for the pitched roof. Don’t worry about details yet; just get the proportions right. -
Add the Platform and Ladder:
Sketch a wrap-around deck extending slightly wider than the house. Draw a long, leaning ladder on the right side connecting the ground to the deck. Add a railing around the deck using simple vertical strokes. -
Branching Out:
From behind the house and the sides of the main trunk, sketch the main skeletal branches reaching upwards. Keep these lines organic and somewhat jagged to mimic winter growth.
Branch Tip
When drawing winter branches, think of the letter ‘Y’. Tree limbs almost always split into two smaller sections. Repeating this ‘Y’ shape is the quickest way to natural branches.
Step 2: Inking and Details
-
Refine the Woodwork:
Switch to your 0.3mm fine liner. Go over the house outline, but instead of straight lines, use slightly wobbly strokes to suggest rough-hewn timber. Draw vertical planks on the walls, leaving small gaps for the windows. -
Snow-Capped Roof:
Outline the roof shape, but keep the top edges soft and rounded to represent a thick layer of accumulated snow. Let the snow hang slightly over the eaves, looking heavy and thick. -
Texture the Bark:
Using the 0.1mm pen, add texture to the tree trunk. Use long, vertical, broken lines that follow the curve of the tree. I find that bunching these lines closer together on the shadowed sides creates immediate volume. -
Windows and Railings:
Ink the small square windows. Darken the interior panes completely with the 0.5mm pen to create depth. Carefully ink the railing posts and the ladder rungs, giving them a slight wood grain texture. -
Winter Canopy:
Ink the branches with the 0.1mm pen. As you move away from the trunk, let the lines become thinner and more delicate. Add plenty of tiny, twiggy offshoots to create that dense, intricate winter tree silhouette. -
Icicles and Details:
Draw small, jagged shapes hanging from the bottom of the platform to represent icicles. Add a few small droplets falling from them to suggest a slow melt.
Step 3: Shading and Atmosphere
-
Base Wood Tones:
Once the ink is fully dry, erase your pencil distinct. Apply a wash of warm light brown or tan marker to the house walls, the deck, and the ladder. Keep the application somewhat streaky to enhance the wood effect. -
Shadowing the Timber:
Use a darker brown to add shadows under the eaves, beneath the windows based on the light source, and under the deck platform. This separates the planes of the building. -
Tree Trunk Depth:
Color the tree trunk with a desaturated brown or grey-brown. Layer darker tones on the sides of the trunk to make it look cylindrical. Leave the center slightly lighter. -
Snow Shadows:
Snow isn’t just white; it reflects the sky. Use a very pale blue or cool grey to add shading to the side of the snowy roof and the snow gathered at the base of the tree. This makes the white paper look brighter by comparison. -
Final Highlights:
Use a white gel pen to add sharp highlights to the top edges of the railing and the ladder rungs where snow might catch. You can also add tiny white dots in the air for falling snowflakes.
Ink Smearing?
If your fine liner smears when you apply marker or watercolor, stop immediately. Check if your pen is labeled ‘waterproof’ or ‘archival’. If not, do the coloring first, then line over it.
Now you have a serene winter hideaway captured on paper to pin up on your inspiration board
Hollow-Trunk Hideout Tree House
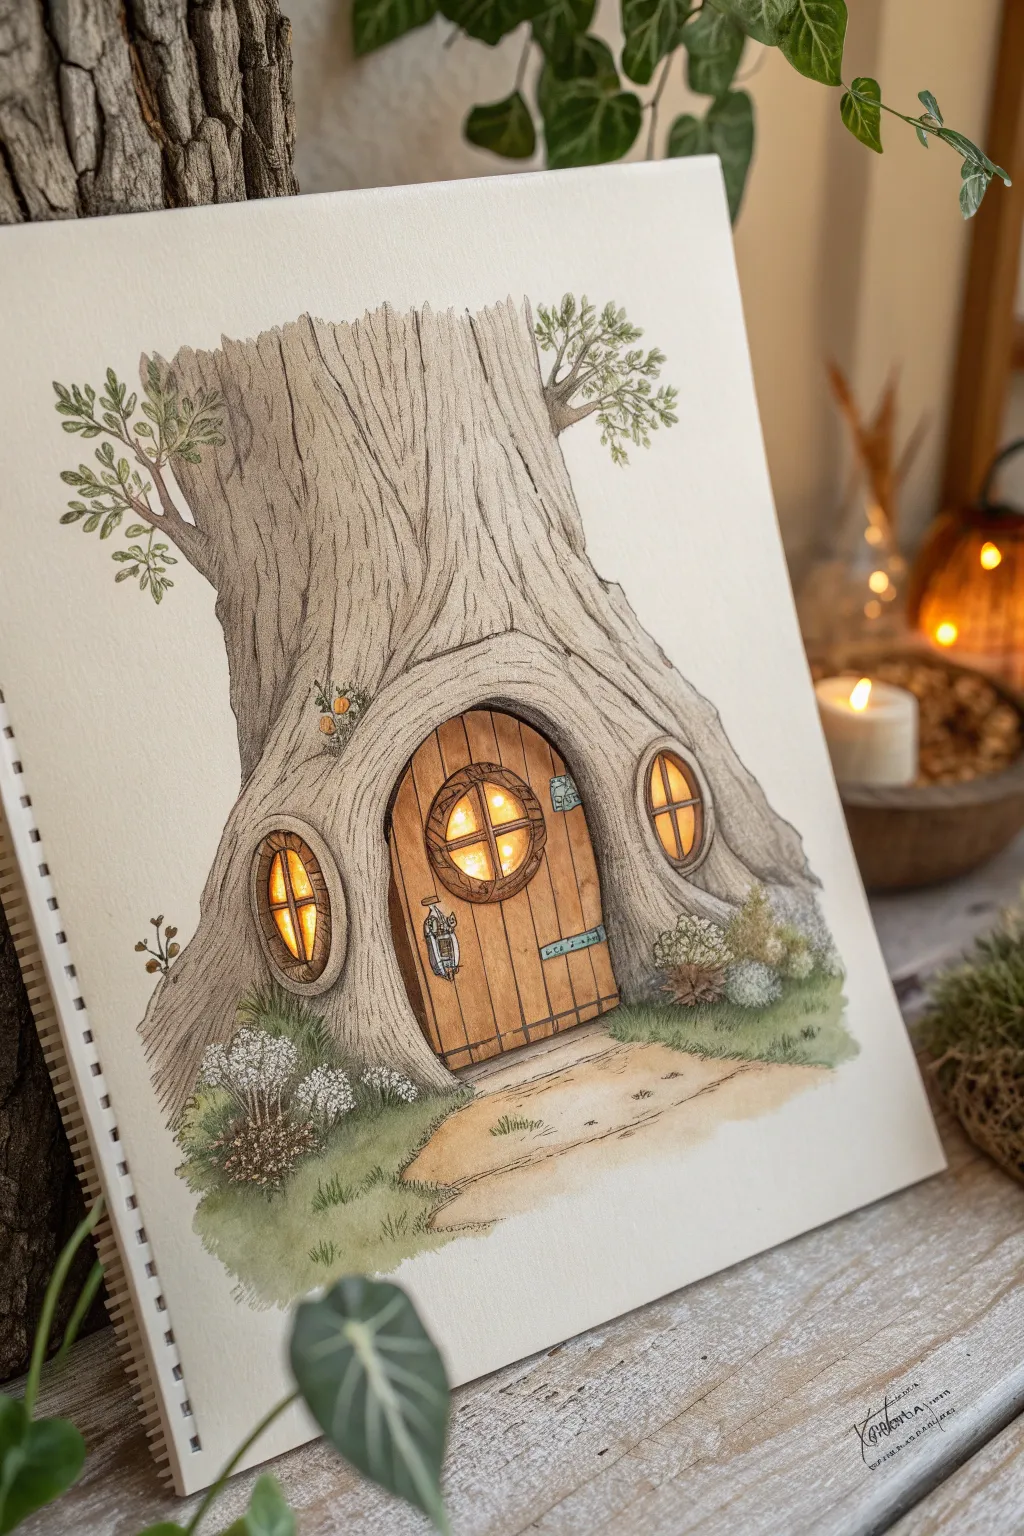
This charming illustration captures the cozy magic of a tree trunk turned into a tiny home, complete with warm, glowing windows and intricate bark textures. Using ink and watercolors, you’ll learn how to build up organic wood grain patterns and create a soft, inviting light source.
Step-by-Step Tutorial
Materials
- Hot-pressed watercolor paper (smooth texture)
- Micron pens or waterproof fineliners (sizes 005, 01, 03)
- Pencil (HB) and kneadable eraser
- Watercolor paints (Sepia, Burnt Umber, Yellow Ochre, Cadmium Yellow, Sap Green)
- Small round brushes (size 2 and 4)
- White gel pen
Step 1: Sketching the Structure
-
Map the silhouette:
Begin lightly with your HB pencil. Draw a wide, sturdy base that tapers slightly as gets taller, branching off at the top. The overall shape should feel grounded and ancient, not perfectly straight. -
Create the hollow:
In the center of the trunk base, sketch a large archway for the door. Flank this main entrance with two smaller, organic oval shapes on the roots for the side windows. -
Add architectural details:
Sketch a wooden plank door inside the central arch. Add a circular window within the door itself, and draw grid lines for the panes on all three windows. -
Design the bark flow:
Lightly trace the direction of the bark. Instead of straight lines, draw flowing curves that wrap around the window bumps and knot holes to give the tree volume.
Drawing Wood Texture
Don’t draw straight lines from top to bottom. Break lines frequently and wiggle your pen slightly. Imagine water flowing over rocks; let lines divert around knots.
Step 2: Inking the Foundation
-
Outline the main form:
Switch to your 03 fineliner. Trace the outer edges of the tree and the main structural lines of the door frame and windows. Keep your line slightly broken or jittery to mimic natural wood texture. -
Detail the planks:
Use the 01 pen to draw the vertical planks of the door. Add tiny nail heads and the decorative hinges and door handle. -
Texture the bark:
This is the most critical step for realism. with the 005 pen, draw long, flowing, interrupted lines running vertically up the trunk. Let the lines curve around the ‘swelling’ of the root base where the windows sit. -
Add shading with ink:
Where the bark overlaps or tucks under a root, use stippling (tiny dots) or short hatching lines with the 005 pen to create deep shadows before we even touch the paint. -
Draw the foliage:
Sketch small clusters of leaves on the upper branches and little tufts of grass and shrubs around the base of the trunk using quick, jagged strokes.
Step 3: Watercolor Wash & Glow
-
First wood layer:
Dilute Burnt Umber with plenty of water for a pale, tea-colored wash. Paint the entire bark surface, avoiding the window glass areas. Keep the wash uneven to suggest weathering. -
Deepen the bark:
While the first layer is still slightly damp, drop concentrated Sepia into the shadowed areas: under the window ledges, the edges of the trunk, and the deep creases of the bark. -
Paint the door:
Use a mix of Yellow Ochre and Burnt Umber for the door planks. It should be slightly warmer and richer than the grey-brown of the tree bark to make it stand out. -
Create the window glow:
For the light, start with a wash of pure Cadmium Yellow in the center of the window panes. Let this fade outward toward the frames. -
Intensify the light:
I like to add a tiny touch of orange to the very edges of the glass panes once the yellow is dry. This creates a cozy, candle-lit gradient effect. -
Ground the house:
Paint the pathway leading to the door with a very pale sand color (diluted Yellow Ochre). Soften the edges with water so it fades into the white of the paper.
Fixing “Flat” Windows
If your windows look dull, the paint might be too opaque. Lift some color with a damp clean brush in the center of the pane to bring back the white paper’s brightness.
Step 4: Final Flourishes
-
Greenery details:
Paint the grass and leaves with Sap Green. Vary the intensity—some pale and watery, some dark and concentrated—to create depth in the foliage. -
Atmospheric touches:
Once everything is bone dry, take your white gel pen and add tiny highlights to the window glass and the metal door handle to make them sparkle. -
Shadow reinforcement:
As a final step, use the 01 pen to re-darken any bark lines that got washed out by the watercolor, ensuring the texture remains crisp.
Now you have a whimsical, glowing tree dwelling ready to welcome its tiny inhabitants
Fantasy Turret Tree House
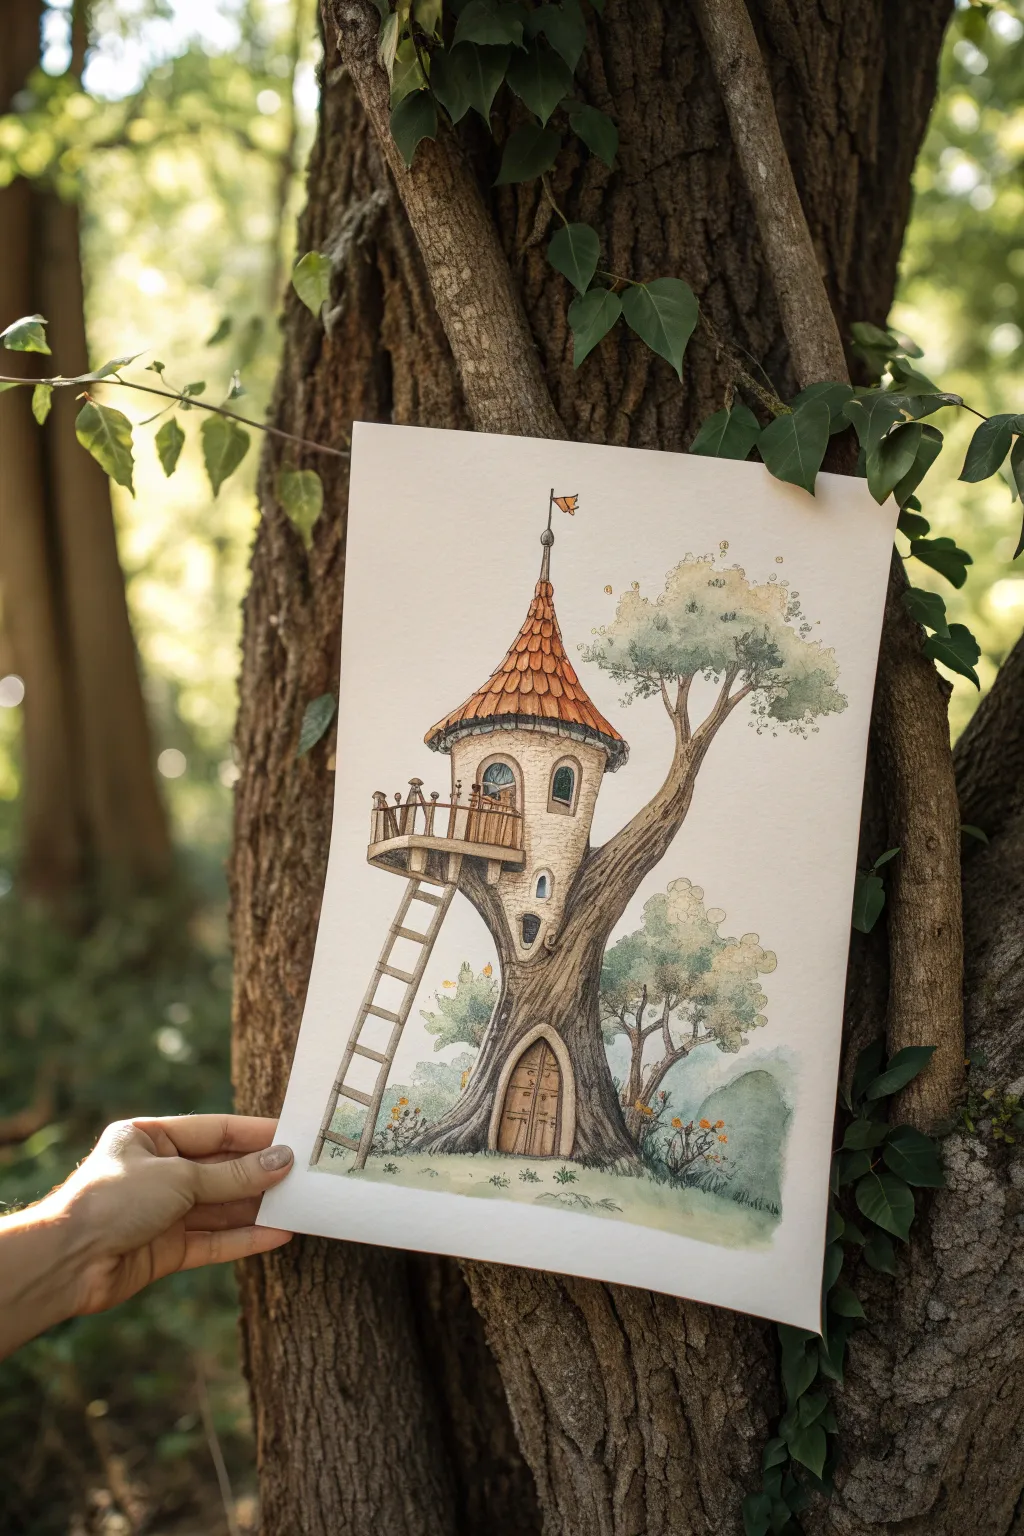
Capture the magic of a fairytale forest with this delicate watercolor and ink illustration. This project combines precise pen work with soft washes to create a charming, solitary tower nestled seamlessly into a gnarled tree trunk.
Step-by-Step
Materials
- Hot press watercolor paper (smooth texture)
- H or HB pencil for sketching
- Kneadable eraser
- Waterproof fine liner pens (0.1mm, 0.3mm, 0.5mm, brown and black)
- Watercolor paints (Burnt Sienna, Yellow Ochre, Sap Green, Payne’s Grey, Sepia)
- Small round brushes (size 2 and 4)
- White gel pen (optional for highlights)
Step 1: Pencil Structure
-
Establish the Trunk:
Begin by lightly sketching a wide, sturdy base for the tree trunk in the lower center of your page. Curve the lines inward as you go up to create a ‘waist’ before the trunk expands again to hold the house structure. -
Draft the Turret Shape:
Drawing directly out of the top of the trunk, sketch a cylinder for the main room. Top it with a tall, slightly curved triangle to represent the conical roof, adding a small flag pole at the very peak. -
Add Architectural Elements:
Sketch a wrap-around balcony about halfway up the cylinder. Draw a simple arched door at the very base of the tree roots and a ladder leaning against the left side, connecting the ground to the balcony. -
Branch Placement:
Extend a large, thick branch growing out from the right side of the trunk, reaching upward and outward. Sketch loose, cloud-like shapes around the tips of this branch and in the background to indicate foliage.
Ink Smearing?
Check your pen label! Make sure it says ‘waterproof’ or ‘archival.’ If unsure, test the pen on a scrap paper and run a wet brush over it before using it on your main art.
Step 2: Inking the Details
-
Outline the House:
Switch to a 0.3mm brown or sepia fine liner. Trace the main lines of the house, keeping your hand relaxed to give the wood a slightly organic, imperfect feel. -
Detail the Roof Tiles:
Using a 0.1mm pen, draw rows of U-shaped or scalloped tiles on the roof. Start from the bottom eave and work your way up to the peak, letting the tiles get slightly smaller near the top. -
Texture the Bark:
Use vertical, flowing distinct lines to draw the bark texture on the trunk. Follow the curvature of the tree; imagine the lines flowing like water around the door frame and knot holes. -
Refine the Foliage:
Ink the leafy areas using stippling (lots of small dots) or tiny, scribbly loops. Don’t draw every leaf; just suggest the texture around the edges of the cloud-shapes you sketched. -
Erase Pencil Lines:
Once you are absolutely certain the ink is dry, gently run your kneadable eraser over the entire drawing to lift the graphite guidelines.
Step 3: Watercolor Washes
-
Base Tone for the Tree:
Mix a watery wash of Sepia and a touch of Payne’s Grey. Paint the tree trunk, keeping the center slightly lighter to suggest roundness and volume. -
Painting the Roof:
Use Burnt Sienna for the roof tiles. I like to dab slightly more pigment at the bottom edge of each tile row while the paint is still wet to create subtle shadows without needing a second layer. -
Treehouse Walls:
Keep the walls of the turret very pale—use a dilute wash of Yellow Ochre or a creamy beige. Avoid painting it solid; leave some white paper showing for a sun-bleached look. -
Foliage and Background:
Wet the paper in the leafy areas first, then drop in watery Sap Green and touches of yellow. Let the color bloom outward softly to create that dreamy, out-of-focus canopy look. -
Ground and Grass:
Brush a horizontal wash of pale green mixed with plenty of water across the bottom to ground the tree. Add tiny vertical flicks of green while damp to suggest grass blades.
Natural Texture
When painting the bark, lift out some pigment with a dry brush or paper towel while the paint is still wet to create instant highlights and uneven texture.
Step 4: Final Definition
-
Deepen Shadows:
Once the first layers are dry, mix a darker version of your brown. Paint thin shadows under the roof eaves, beneath the balcony, and inside the doorway to create depth. -
Window Details:
Fill the small window panes with a dark, cool grey or blue. If you have a white gel pen, add a tiny dot to one corner of the window once dry to look like a reflection. -
Final Ink Touches:
Revisit the drawing with your 0.1mm pen. Strengthen any lines that got lost under the paint, particularly the wood grain on the door and the rungs of the ladder.
Frame this charming little dwelling or scan it to use as a unique greeting card design
Woodland Animal Tree House Home
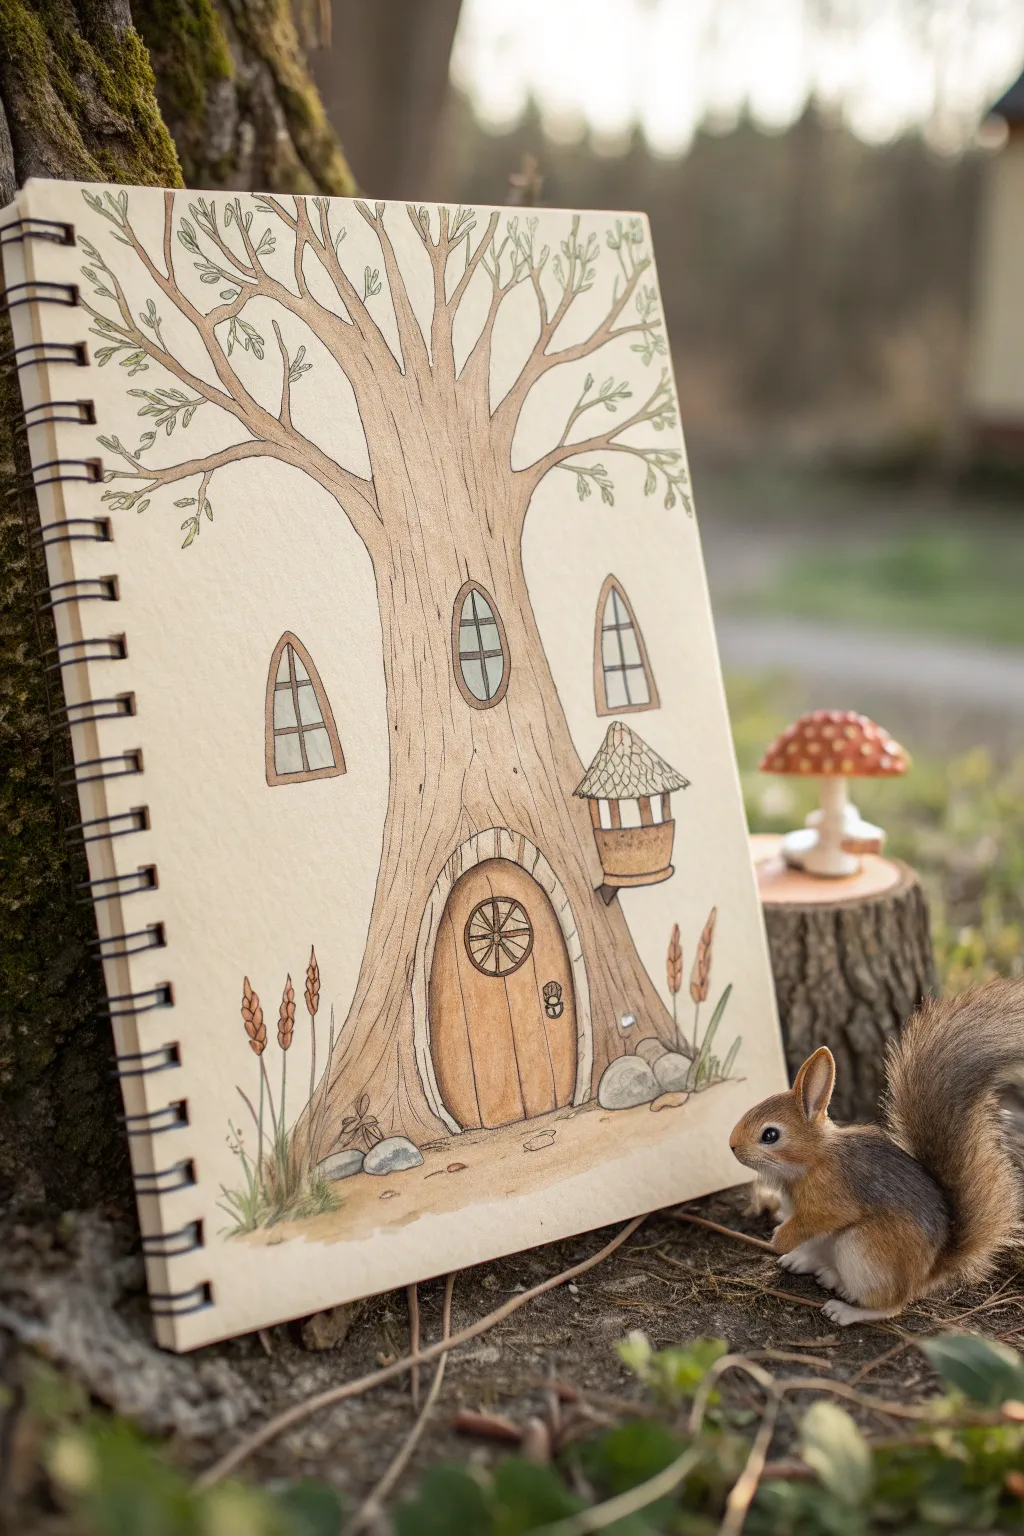
Create a charming storybook illustration featuring a tree transformed into a cozy woodland dwelling. This drawing combines architectural elements with organic textures, perfect for a nature journal or sketchbook.
Step-by-Step Guide
Materials
- Spiral-bound sketchbook (mixed media or heavyweight drawing paper)
- HB or 2B graphite pencil for sketching
- Kneadable eraser
- Fine liner pens (black, sizes 01 and 03)
- Colored pencils (browns, greens, greys, warm yellow)
- Watercolor paints (optional light wash for background)
- White gel pen (for highlights)
Step 1: Drafting the Structure
-
Establish the Trunk:
Start by lightly sketching the main trunk of the tree centered on your page. Flare the base out wide to create a sense of stability and room for the door, then taper it gently as it rises. -
Branch Out:
Draw large branches extending from the top of the trunk. Keep them fairly symmetrical but introduce small kinks and curves to make the tree look organic and old. -
Add Secondary Branches:
Split the main branches into smaller, thinner twigs reaching toward the top edge of the paper. These should be delicate and numerous. -
Sketch the Doorway:
At the base of the trunk, draw a large arched shape for the entrance. Sketch a smaller arch inside it for the wooden door frame to create depth. -
Place Windows and Balcony:
Add two arched windows higher up on the trunk. On the right side, just below the window, sketch a small, cone-roofed birdhouse shape attached to the tree—this acts as a whimsical balcony.
Uneven Ink Lines?
If your hand shakes or lines vary in thickness, embrace it! Organic subjects like bark and old wood look better with wiggly, imperfect lines than with ruler-straight ones.
Step 2: Inking the Outlines
-
Define the Tree Outline:
Using a 03 fine liner, carefully trace the outer edges of your tree and branches. Keep your hand relaxed to allow for slight wobbles that mimic natural bark. -
Detail the Bark Textures:
Switch to a finer 01 pen. Draw long, vertical lines running up the trunk. Let the lines break and curve around the windows and door frame to show how the wood grain flows around these obstacles. -
Ink Architectural Features:
Outline the windows, drawing the panes with a steady hand. For the door, draw vertical planks and add a circular window with a spoke design near the top. Don’t forget the tiny door handle. -
Add Surrounding Elements:
At the base of the tree, sketch in some simple rocks and tall, stalk-like plants or wheat stems on either side. These ground the illustration. -
Leaf Details:
Add small clusters of leaves to the ends of the twiggy branches. Keep them simple—just small loops or ovals—to maintain the clean, illustrative style.
Add a Resident
Draw a tiny squirrel peaking out of the top window or sitting on the balcony to bring the house to life and add a storytelling element.
Step 3: Coloring and Shading
-
Base Tone for the Tree:
Use a light brown or beige colored pencil to fill in the entire tree trunk. Keep the pressure light and even to create a smooth base layer. -
Shadows and Depth:
Take a medium brown pencil and shade the sides of the trunk, the underside of the branches, and the area around the door frame. This gives the tree a rounded, 3D appearance. -
Wooden Door Texture:
Color the door a richer, warmer brown or golden ocher. Press harder near the edges of the planks to emphasize the separation between boards. -
Window Accents:
Use a very pale grey or blue for the window glass. Leave tiny areas white to suggest reflection, or use a white gel pen later. -
Balcony and Rocks:
Color the roof of the small balcony with a textured grey or slate blue. Use cool greys for the rocks at the base, blending in a touch of brown for earthiness. -
Greenery and Ground:
Lightly color the leaves with a sage green. For the ground, create a soft, sandy path leading to the door using beige and light yellow pencils. -
Final Touches:
Add a few rusty orange tones to the tall grass stalks. I like to do a final pass with the fine liner to darken any lines that got obscured by the wax of the pencils.
Now you have a cozy little forest home ready for imaginative inhabitants.
Surreal Floating-Branch Tree House
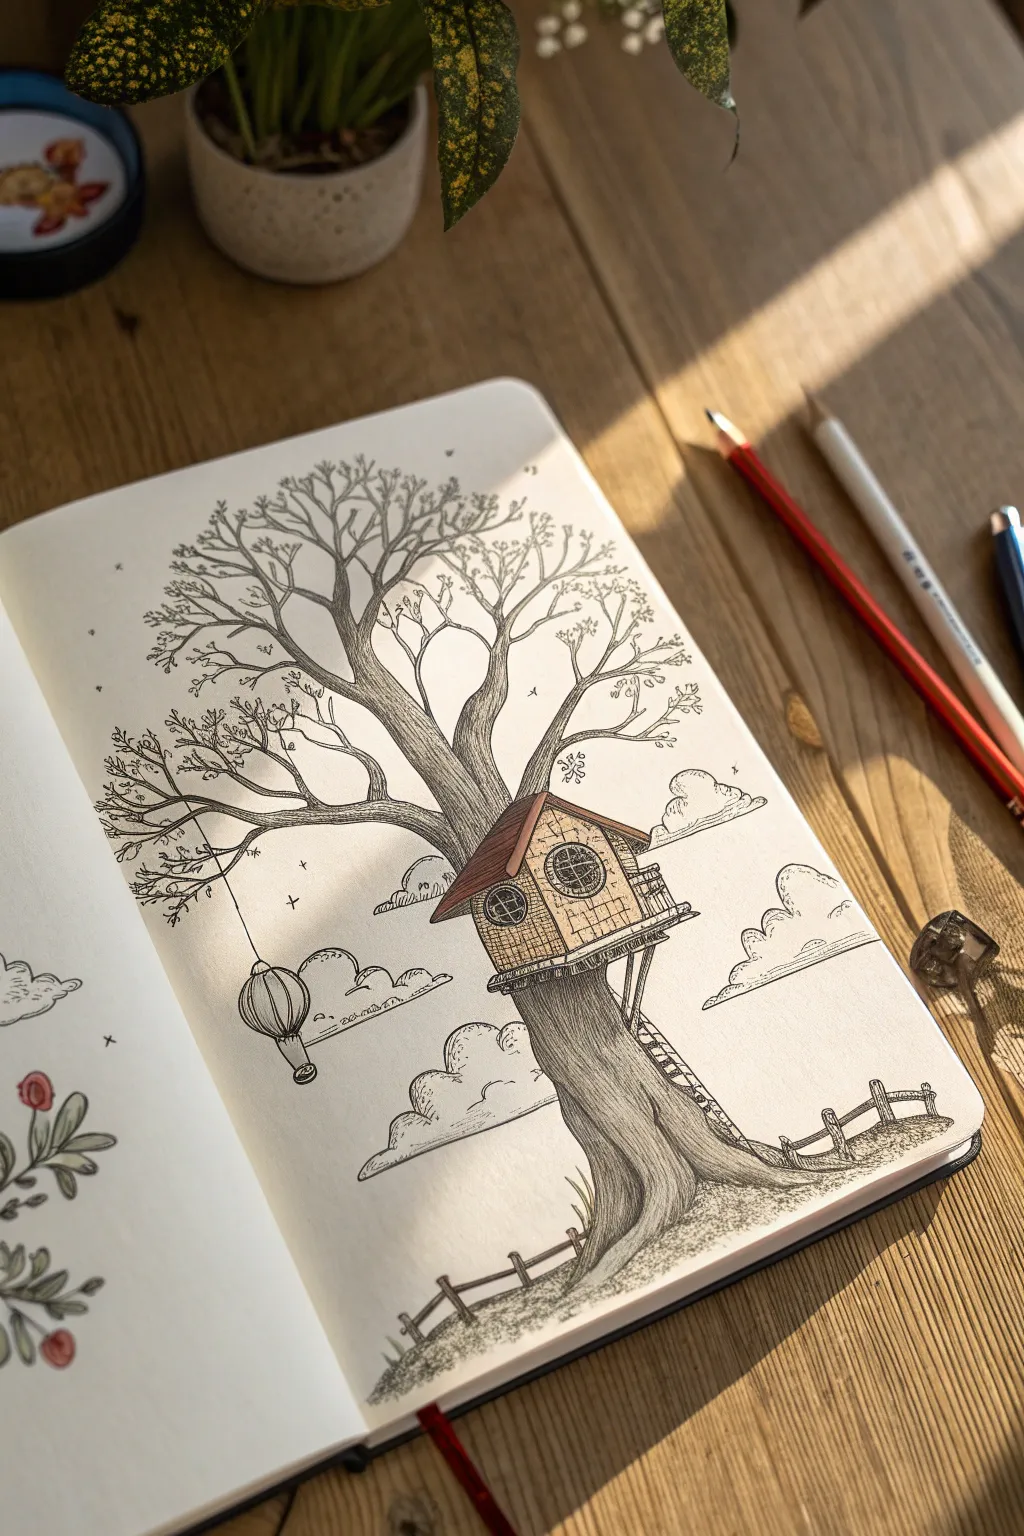
This charming illustration captures a cozy, slightly surreal treehouse nestled in the crook of an old tree. The combination of delicate ink lines and subtle colored pencil shading gives it a warm, storybook feel perfect for your sketchbook.
Step-by-Step Tutorial
Materials
- Fine-grain sketchbook paper
- HB graphite pencil for sketching
- Kneadable eraser
- Fine liner pens (sizes 0.1, 0.3, and 0.5)
- Brown colored pencils (light ochre used here)
- White gel pen (optional for highlights)
Step 1: Penciling the Structure
-
Establish the trunk base:
Start with your graphite pencil. Draw the main trunk of the tree rising from the bottom right, curving slightly towards the center. Make the base wide and organic, suggesting roots gripping the ground. -
Outline the treehouse:
Where the trunk ends, sketch a simple house shape. Think of a classic geometric house: a square base with a triangular roof. Position it so it looks like the tree is cradling it. -
Add the upper branches:
Extend large, sprawling branches upward from behind the house. Fan them out widely to fill the upper portion of the page. Keep the lines wavy and natural rather than stiff and straight. -
Sketch secondary elements:
Lightly draw the rolling hills in the background, the small wooden fence at the bottom, and pufffy cloud shapes floating around the tree. -
Place whimsical details:
Add a string hanging from a left-side branch holding a lantern or balloon shape. Sketch a small ladder leading up to the house platform.
Ink Control
For better branch control, pull the pen toward your body rather than pushing it away. This helps create naturally tapering lines for twigs.
Step 2: Inking the Outlines
-
Ink the main contours:
Switch to a 0.3 fine liner. Carefully go over your pencil lines for the tree trunk, the house outline, and the main branches. Don’t worry if lines aren’t perfectly straight; wobble adds character. -
Detail the house structure:
Draw the siding of the house using horizontal lines. Outline the two circular windows—one on the front face and one on the angled side—and add grid lines for the panes. -
Define the branches:
Use a finer 0.1 pen for the smaller twigs and upper branches. Let these lines taper off delicately at the ends to show the fineness of the growth. -
Ink the landscape:
Outline the clouds with bumpy, irregular curves. Ink the fence posts and rails, drawing grass tufts at the base of the posts. -
Erase pencil guides:
Once the ink is completely dry, gently run your kneadable eraser over the entire drawing to remove the graphite sketch underneath.
Step 3: Texturing and Shading
-
Texture the bark:
Using the 0.1 pen, draw long, flowing vertical lines up the tree trunk. Curve them around the form of the tree to create volume and simulate bark texture. -
Add cross-hatching:
Deepen the shadows on the right side of the trunk and under the house platform using diagonal cross-hatching marks. This grounds the structure. -
Detail the leaves:
Keep the foliage sparse. Draw tiny, scattered leaf shapes or small clusters on the tips of the branches to suggest it’s perhaps spring or autumn. -
Shade the house:
Take your brown colored pencil and lightly shade the walls of the house. Apply a little more pressure near the roofline to create a shadow cast by the eaves. -
Color the roof:
Use a slightly darker brown or reddish-brown pencil for the roof to separate it visually from the walls. Keep the coloring soft and textured. -
Stipple the ground:
I like to create ground texture using stippling. Make clusters of dots with your pen at the base of the tree and along the fence line to simulate dirt and grass. -
Final shading touches:
Add very light horizontal shading lines on the shaded side of the clouds and the hanging lantern to give them dimension without overwhelming the drawing.
Creative Twist
Make it magical by drawing small stars hanging from the branches instead of leaves, or turn the hanging lantern into a tiny glowing planet.
Enjoy seeing your little imaginary hideaway come to life on the page


Have a question or want to share your own experience? I'd love to hear from you in the comments below!