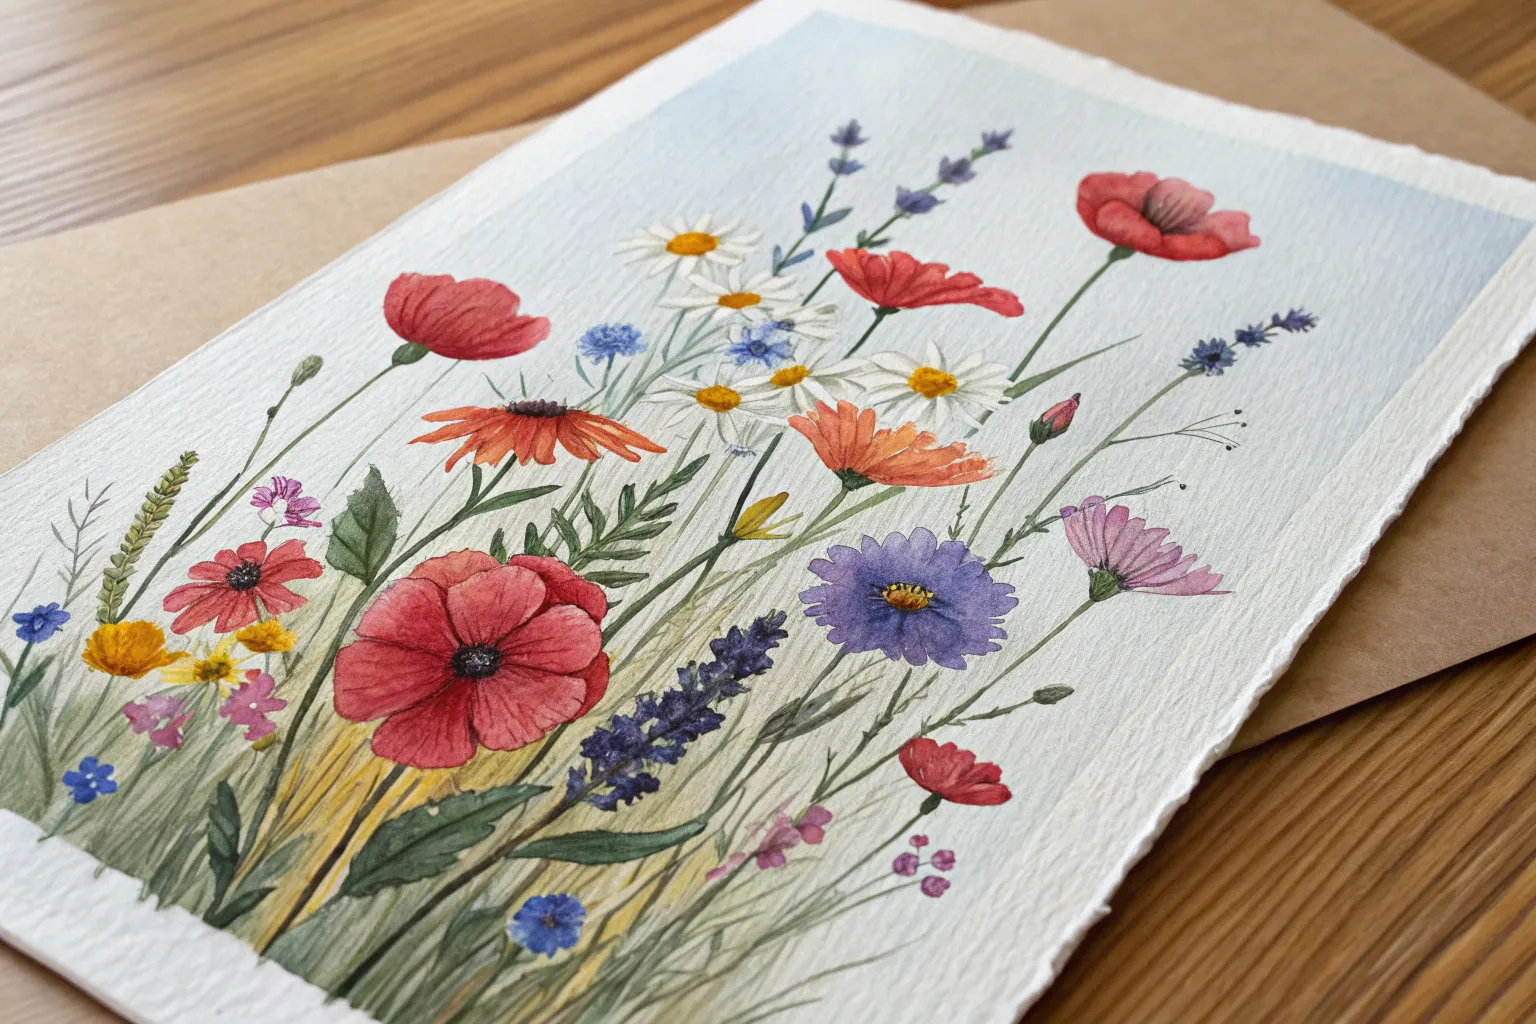
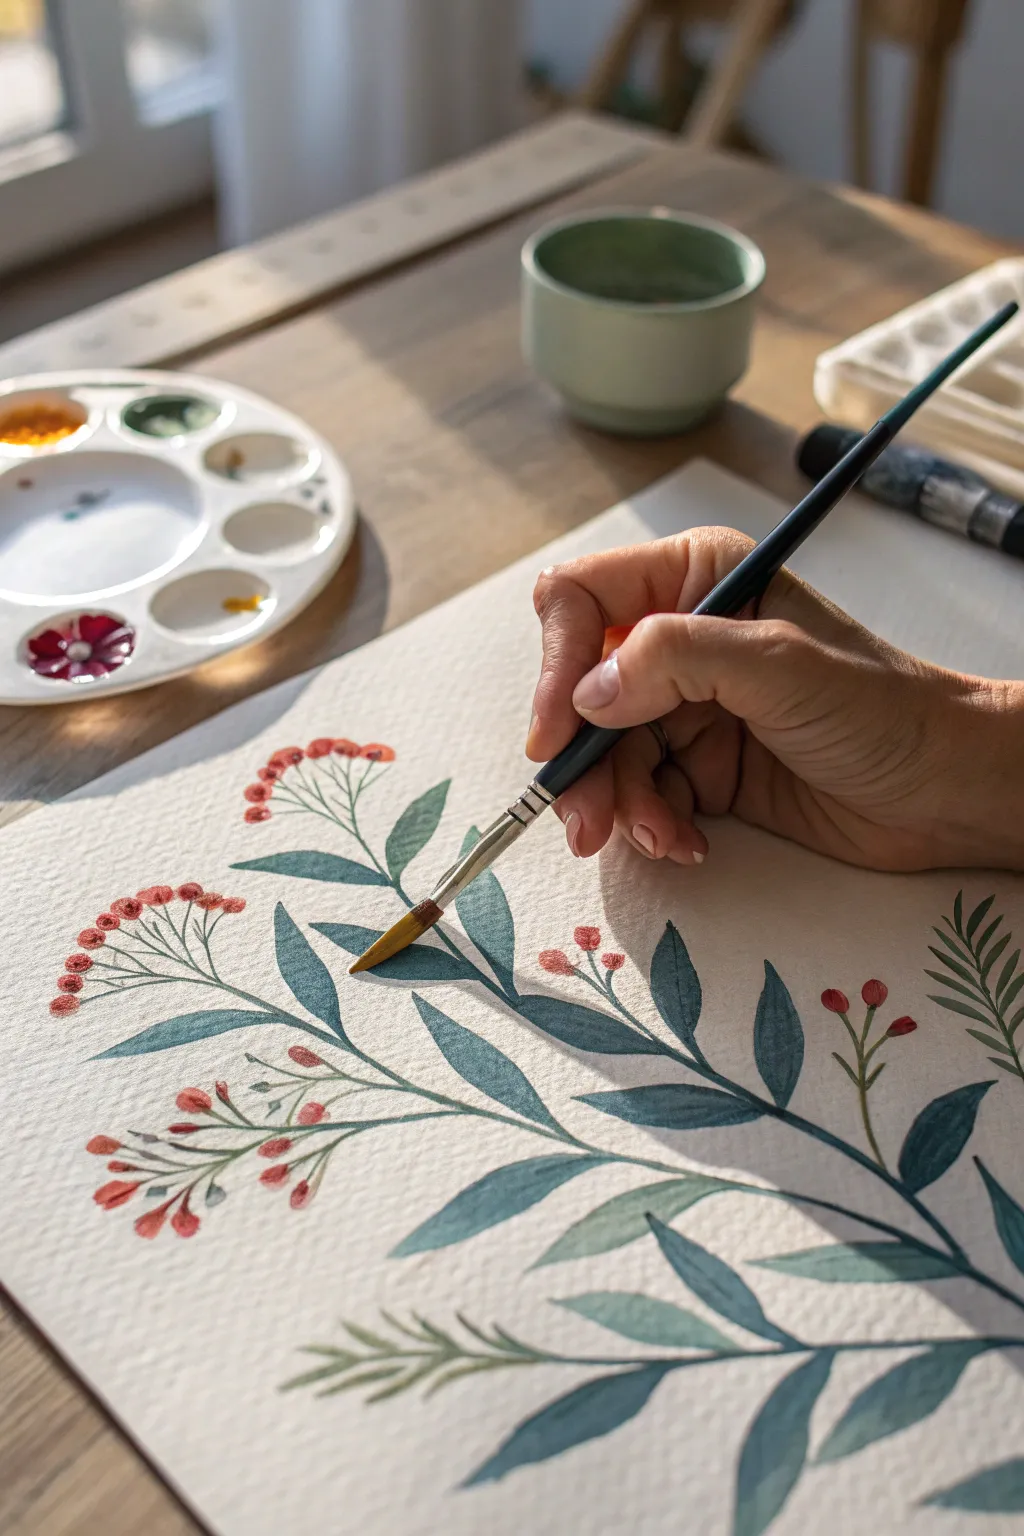
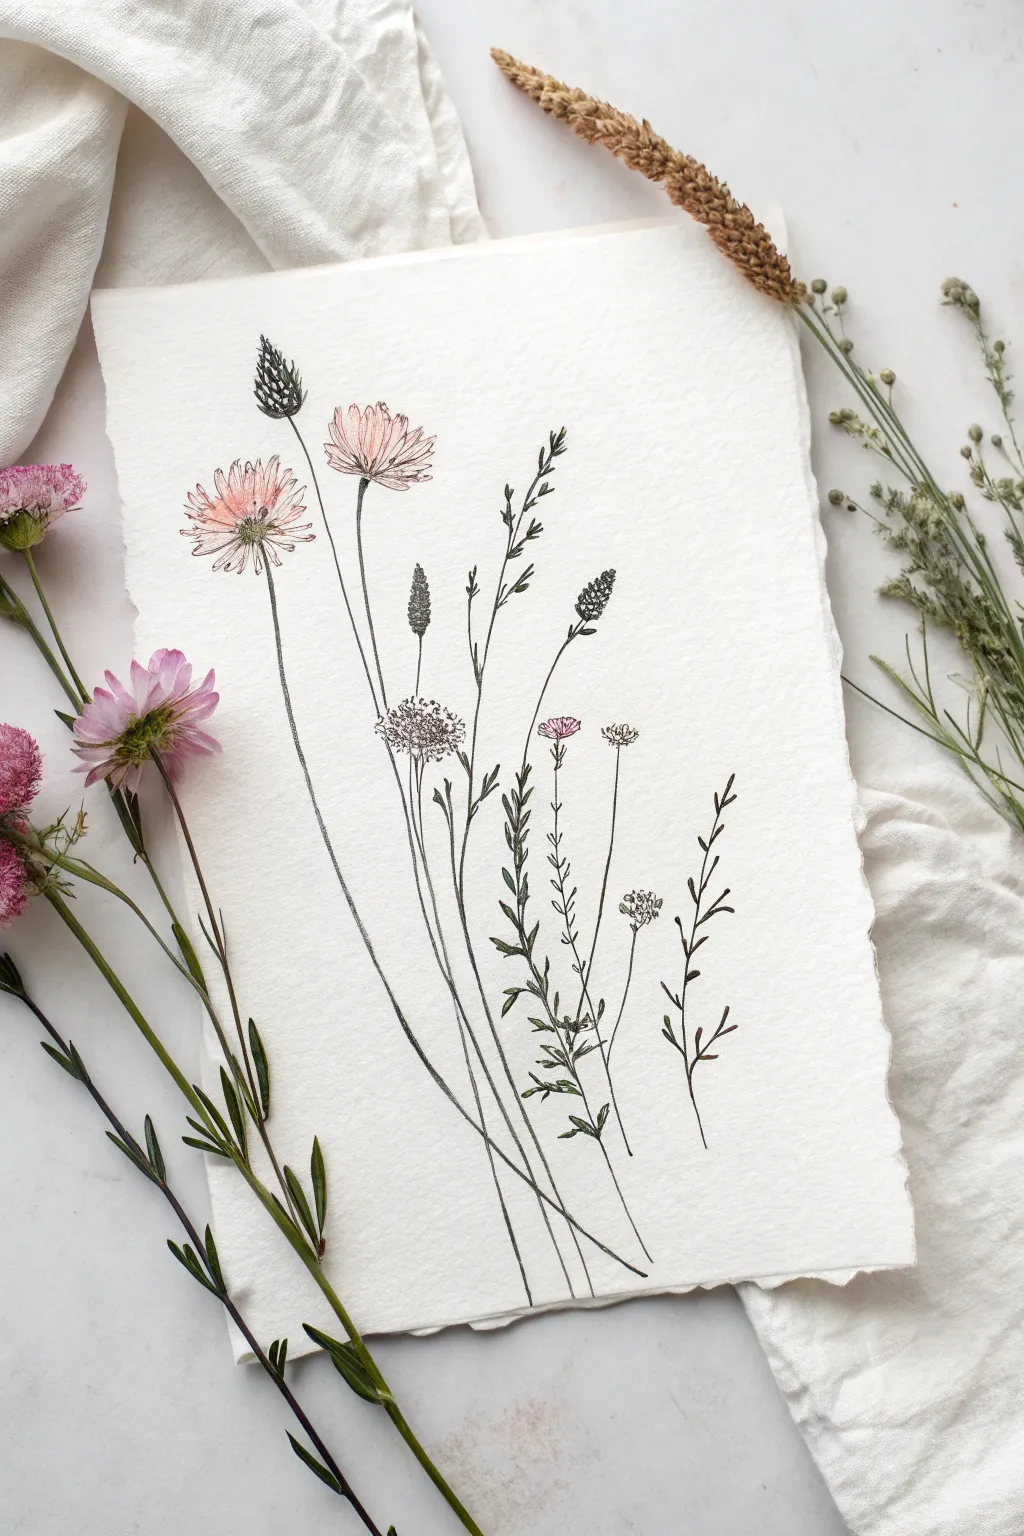
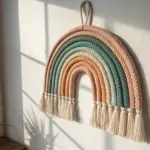
Wildflowers are my favorite subject when I want something joyful, forgiving, and full of movement. These wildflower painting ideas will help you capture that messy, sun-soaked meadow energy without getting stuck chasing perfect petals.
Loose Watercolor Wildflower Meadow
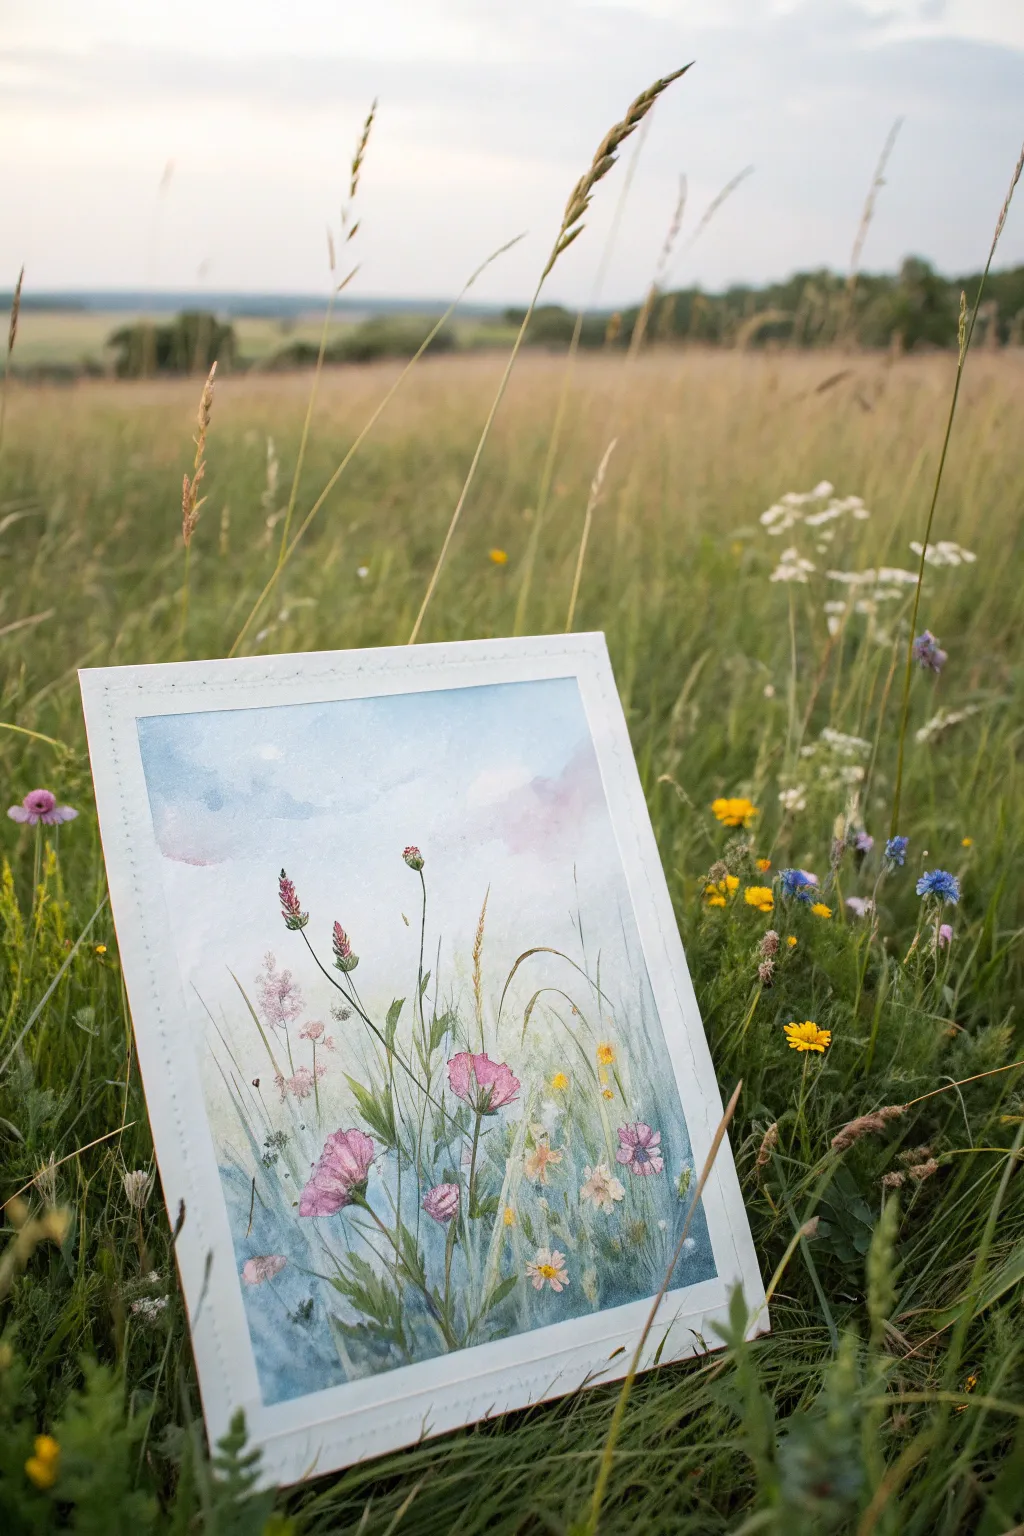
Capture the delicate beauty of a summer field with this loose, atmospheric watercolor painting. The soft washes of blue and pink create a dreamy backdrop for the structured, swaying wildflowers in the foreground.
How-To Guide
Materials
- Cold press watercolor paper (approx. 300 gsm)
- Watercolor paints (Cerulean Blue, Ultramarine, Alizarin Crimson, Sap Green, Burnt Sienna, Yellow Ochre)
- Masking tape
- Round brushes (sizes 8 and 2)
- Rigger or liner brush
- Jar of clean water
- Paper towels
- White gouache (optional for highlights)
Step 1: Setting the Atmosphere
-
Prepare the Paper:
Begin by taping down all four edges of your watercolor paper to a board. This creates the crisp white border seen in the example and prevents the paper from buckling when wet. -
Wet-on-Wet Sky:
Using your large round brush, wet the entire upper two-thirds of the paper with clean water. The surface should glisten but not have standing puddles. -
Applying Blue Tones:
Load the brush with a watery mix of Cerulean Blue. Gently touch the wet paper near the top, allowing the pigment to bloom and spread downwards naturally. -
Adding Soft Clouds:
While the sky fits still wet, drop in hints of very diluted Alizarin Crimson or a soft purple mix near the horizon line to suggest distant, hazy clouds. Tilt the board slightly to let colors merge without hard edges. -
Grounding the Scene:
While the sky area is drying, move to the bottom third. Apply a varied wash of Cerulean Blue mixed with a touch of Sap Green to create a cool, shadowy base for the foliage. -
First Drying Phase:
Let this initial layer dry completely. The paper must be bone-dry before you start adding defined stems, or they will blur into the background.
Clean Lines
If paint bleeds under your tape, ensure you press the tape edges firmly with a bone folder or spoon before painting. Use painter’s tape specifically for delicate surfaces.
Step 2: Cultivating the Flora
-
Drafting Major Stems:
Switch to a smaller round brush (size 2). Mix Sap Green with a little Burnt Sienna for a natural olive tone. Paint delicate, curving lines moving upward to establish the main positions of your tallest flowers. -
Painting Pink Blooms:
Mix a vibrant pink using Alizarin Crimson and plenty of water. Paint loose, cup-shaped blossoms on several of your stems. Keep the edges ragged and natural, leaving small white spaces within the petals for light. -
Adding Spiky Clover:
Using a slightly darker magenta mix, create the elongated, spiky flower heads (like clover or bistort) shown on the left side. Use short, stippling strokes to mimic texture. -
Layering Grasses:
Load your rigger or liner brush with a thin, watery green. Use quick, flicking motions from the bottom upwards to create fine blades of grass that overlap the colorful blooms. -
Depth and Shadow:
Mix a darker, cooler green (add a touch of blue to your green mix). Paint shorter, denser foliage at the very bottom of the painting to anchor the composition and create depth. -
Painting Seed Heads:
Using a mix of Burnt Sienna and Yellow Ochre, paint the small, rounded seed heads on tall, thin stalks. I like to keep these very delicate so they look like they are swaying in the wind. -
Yellow Accents:
Dot in small clusters of Yellow Ochre or lemon yellow among the greenery to represent tiny wildflowers or buttercups.
Make it Shine
Mix a tiny amount of iridescent medium into your final splatter layer. It adds a subtle shimmer that catches the light like morning dew on a meadow.
Step 3: Final Flourishes
-
Splatter Texture:
Load a brush with watery blue or green paint and tap it against your finger to splatter tiny droplets over the foliage area. This mimics pollen, seeds, or magical atmosphere. -
White Highlights:
If you have white gouache, add tiny opaque dots to the centers of the pink flowers or highlight the tips of the grass blades for extra dimension. -
The Reveal:
Once the painting is 100% dry, carefully peel away the masking tape at a 45-degree angle to reveal your clean, crisp edges.
Frame your meadow in a simple white frame or lean it on a shelf to bring a breath of fresh air indoors


Classic Poppies in Tall Grass
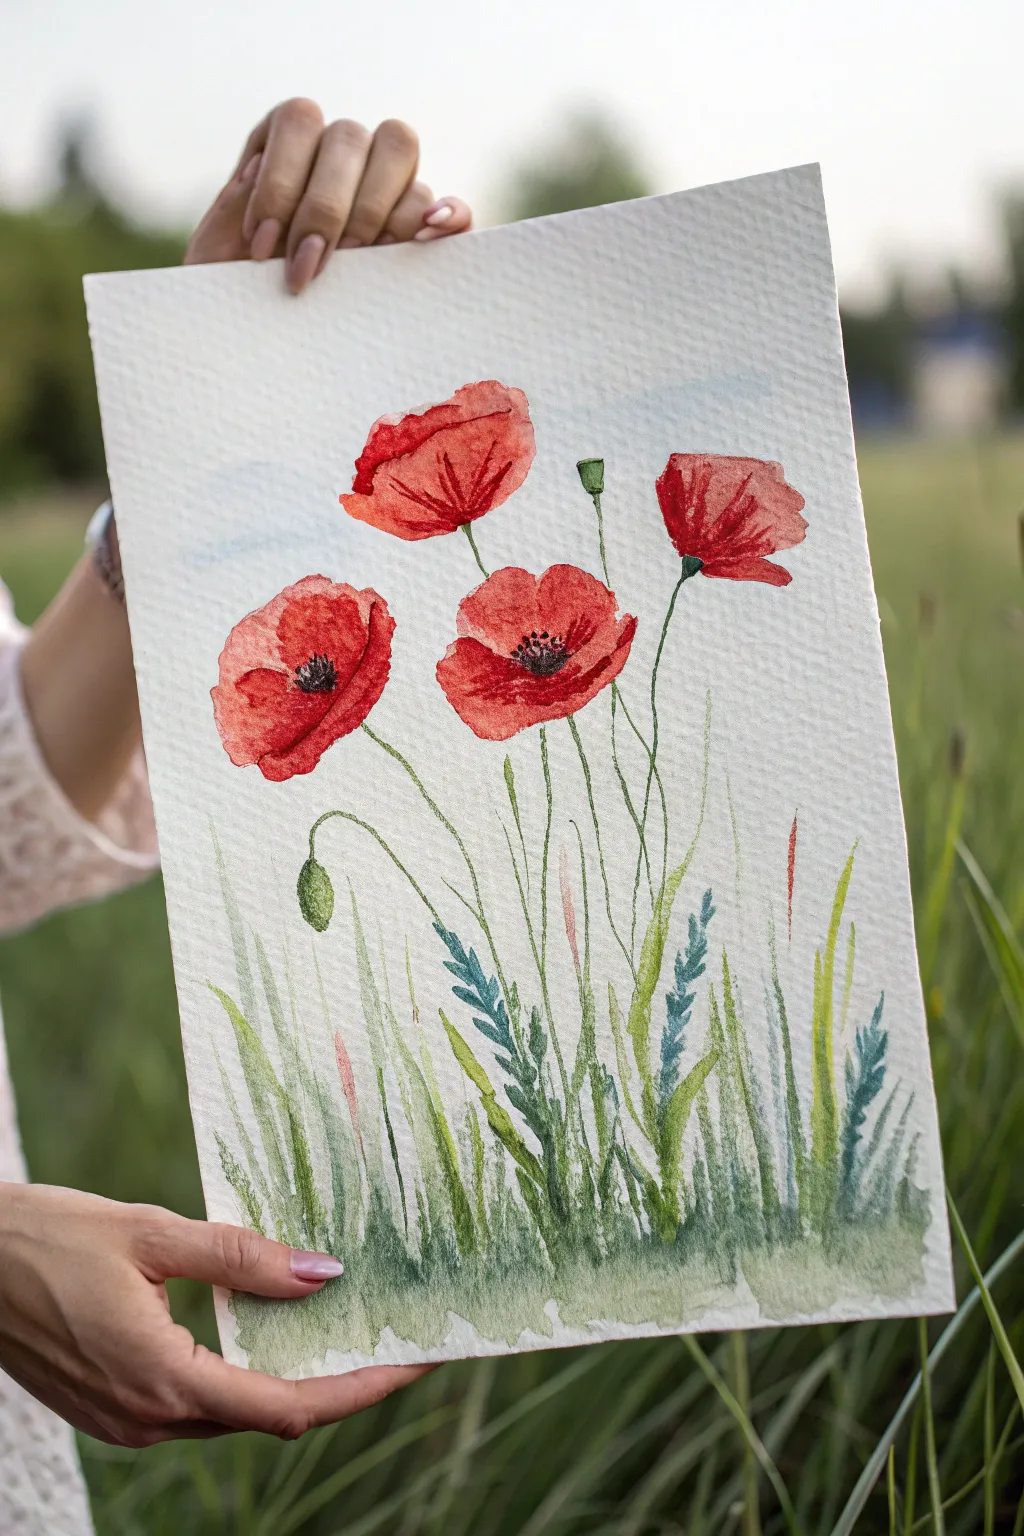
Capture the delicate translucency of red poppies swaying in a summer breeze with this airy watercolor study. Using wet-on-wet techniques and loose brushstrokes, you will build vibrant blooms amongst a field of textured grasses.
Step-by-Step Tutorial
Materials
- Cold press watercolor paper (300 gsm)
- Watercolor paints (Cadmium Red, Alizarin Crimson, Sap Green, Olive Green, Payne’s Grey, Cerulean Blue)
- Round brushes (sizes 4, 8, and a rigger/liner brush)
- Clean water jar
- Paper towels
- Pencil (HB or H) and kneaded eraser
Step 1: Sketch and Background
-
Light Sketching:
Begin by very lightly sketching the general oval shapes of the four main poppy heads. Add simple curved lines for the stems to establish the flow of the composition, but keep your pencil pressure minimal so graphite doesn’t smudge later. -
Mapping the Leaves:
Indicate the position of a few key grass blades and one or two unopened poppy buds. You don’t need to draw every blade of grass; just map out the main clusters at the bottom third of the paper. -
Sky Wash:
Prepare a very dilute mix of Cerulean Blue. Using your larger round brush, lay down a faint wash in the upper section of the paper, carefully painting around the flower shapes. -
Softening Edges:
While the blue wash is still wet, drop in a tiny amount of clean water near the edges to create soft, cloud-like blooms. Let this background layer dry completely before moving to the flowers.
Step 2: Painting the Blooms
-
First Petal Layer:
Mix a juicy puddle of Cadmium Red. Start with the top-left poppy, painting the upper petals with a wet brush. Leave small slivers of white paper unpainted to represent sunlight hitting the petal edges. -
Adding Depth:
While the red is still damp, drop in a slightly more concentrated Alizarin Crimson near the base of the petals. This creates a natural shadow where the petals meet the center. -
Continuing the Flowers:
Repeat this process for the other three open flowers. Vary the shape of each bloom slightly—some facing sideways, others more open—to keep the composition dynamic. -
Defining Petals:
Once the initial wash is semi-dry, use a smaller brush with a thicker red mixture to define overlapping petals. Glazing semi-transparent layers over dry paint adds richness to the color. -
The Dark Centers:
Mix a dense black using Payne’s Grey and a touch of Crimson. When the red petals are mostly dry, stipple the dark centers into the middle of the open blooms. Allow the edges to bleed slightly into the red for a soft look.
Stem Stability
To paint long, steady stems, hold your brush higher up on the handle and lock your pinky finger on the paper for stability. Pull the stroke down towards your body rather than pushing up.
Step 3: Stems and Greenery
-
Base Green Layer:
Mix a light wash of Sap Green and dab it loosely along the bottom edge of the paper to create a grassy foundation. Let the top edge of this wash be uneven to suggest varying grass heights. -
Drawing Stems:
Using a liner brush or the tip of your size 4 round brush, pull long, slender stems from the flower heads down to the grass. Keep your hand loose and let the lines wobble slightly for an organic feel. -
Adding Buds:
Paint the small, droopy bud on the left and the upright seed pod near the top using a mix of Olive Green. Add a tiny dot of red at the tip of the bud to show the flower is about to burst open. -
Painting Grass Blades:
Load your brush with varying shades of green—some yellow-green, some blue-green. Using quick, upward flicking motions, paint individual blades of grass rising from the bottom wash. -
Blue Accents:
I like to mix a muted blue-green to add variety to the foliage. Paint a few fern-like or wheat-like stalks among the grass blades to add textural interest. -
Darker Values:
Mix a dark green using Olive Green and a touch of neutral tint. Paint a few darker grasses in the foreground and near the base to push the lighter grasses forward and create depth. -
Final Details:
Check the poppy centers again. If they need more definition, add tiny dots of pure black or dark grey to mimic the stamens. Add a few very fine, hairy textures to the stems with a dry brush if desired.
Salt Texture
While the bottom grass wash is still wet, sprinkle a tiny pinch of table salt into the green paint. Once dry, brush it off to reveal unique crystal-like textures in your meadow.
Step back and admire your airy garden of poppies, perfectly captured on paper.


Soft Horizon Field Under Open Sky
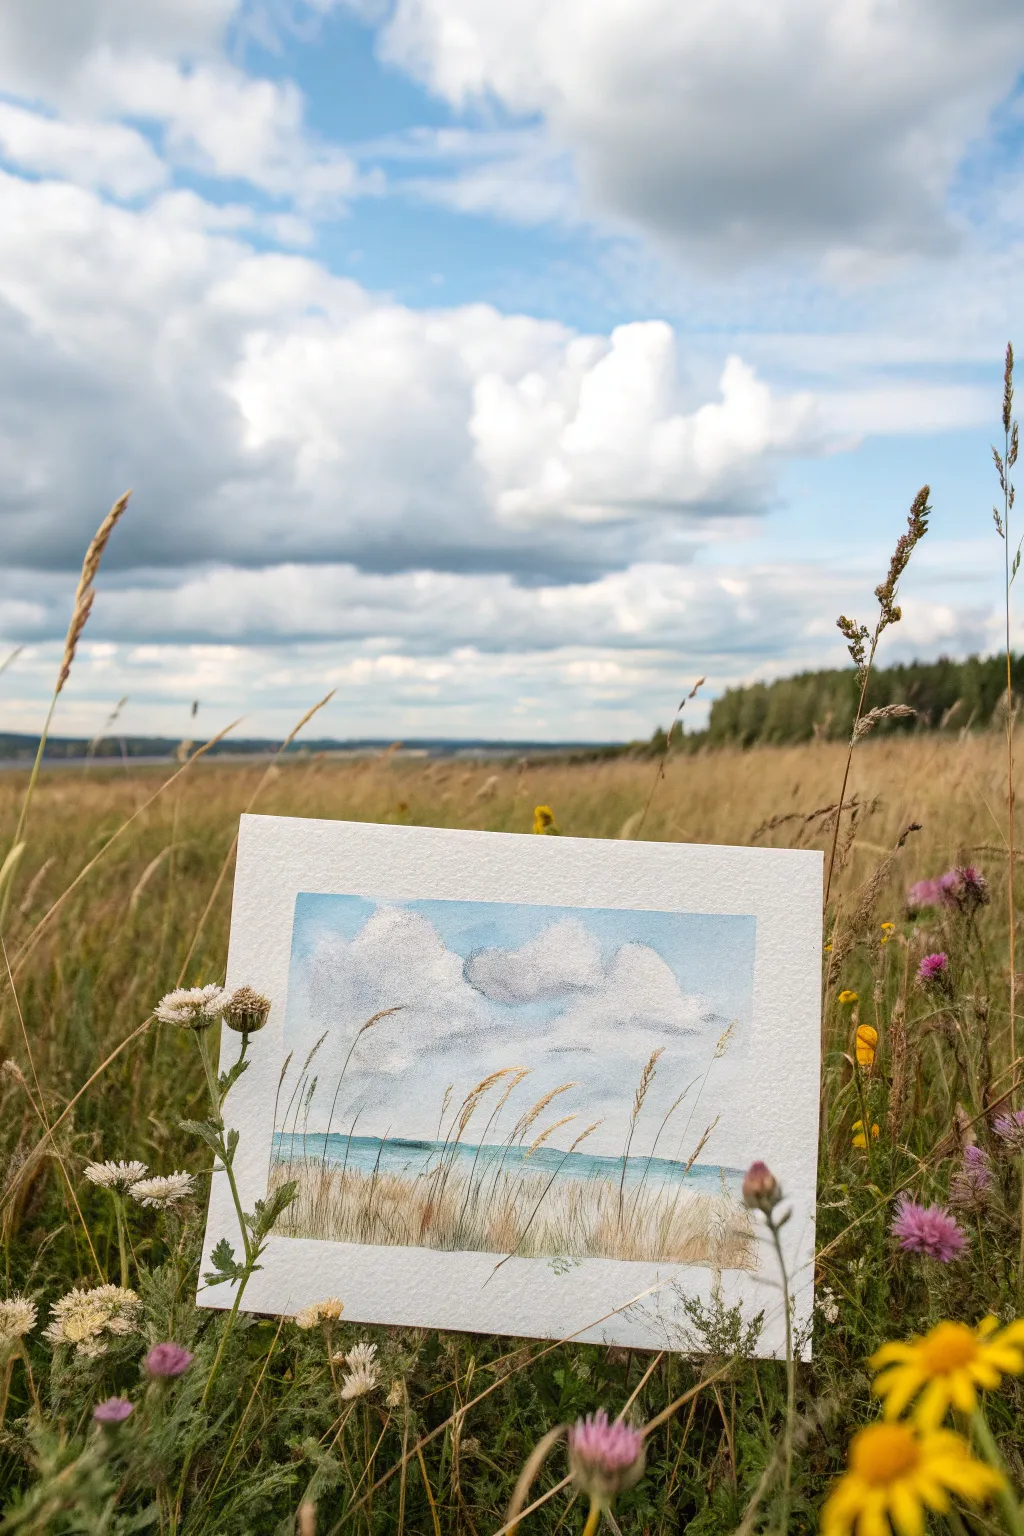
Capture the breezy stillness of a summer meadow with this delicate watercolour landscape. This project focuses on mastering soft cloud formations and layering fine, dry-brush grasses over a gentle horizon.
Step-by-Step
Materials
- Cold press watercolour paper (140lb/300gsm), taped down
- Watercolour paints: Cerulean Blue, Cobalt Blue, Paynes Grey, Yellow Ochre, Burnt Sienna, Sap Green
- Round brushes: Size 8 or 10 for washes, Size 0 or 1 liner for details
- Clean water and paper towels
- Masking fluid (optional, but helpful)
- Pencil for light sketching
Step 1: Drafting and Sky Wash
-
Establish the Horizon:
Begin by lightly sketching a low horizon line about one-third of the way up from the bottom of your paper. Don’t press too hard; you want the graphite to disappear under the paint later. -
Outline Clouds:
Very faintly sketch the rounded, puffy shapes of the cumulus clouds. These will dominate the upper two-thirds of the composition. -
Prepare the Sky Colour:
Mix a generous puddle of Cerulean Blue with plenty of water to create a light, airy sky blue. -
Paint the Blue Sky:
Using your larger round brush, paint the blue areas around your sketched clouds. Soften the edges where the blue meets the white cloud shape with a clean, damp brush to create a fuzzy, organic transition. -
Create Cloud Shadows:
While the sky dries slightly, mix a very dilute grey using a touch of Cobalt Blue and Paynes Grey. I like to drop this shadow colour into the bottom curves of the white clouds to give them volume and weight.
Soft Edges
To keep fluffy clouds looking soft, wet the paper with clean water first inside the cloud shape, then touch grey paint to the wet area so it blooms naturally.
Step 2: The Horizon and Ground
-
Paint the Distant Water:
Once the sky is dry, mix a stripe of teal or muted turquoise for the water line right at the horizon. Paint a thin, steady band across the paper. -
Add the Far Shore:
While the water layer is still damp, drop in a very thin line of dark green mixed with a bit of blue along the top edge of the water to suggest distant land or a tree line. -
Base Layer for the Field:
For the sandy foreground, use a wash of Yellow Ochre and a tiny touch of Burnt Sienna. Apply this starting from the bottom edge, fading it out as you approach the blue water line. -
Let it Dry Completely:
This is crucial: allow the entire paper to become bone dry before moving to the grassy details, otherwise, your fine lines will bleed.
Step 3: Detailing the Grasses
-
Mix Grass Colours:
Create a few puddles of paint for the dried grasses: a pure Yellow Ochre, a brownish mix with Burnt Sienna, and a darker olive green for variety. -
Start with Short Strokes:
Using your finest liner brush, paint short, vertical strokes near the bottom to create a dense texture of ground cover. -
Paint Tall Stalks:
Load your liner brush with the ochre mix. Using a flicking motion from the wrist, paint long, sweeping curves extending from the bottom almost up to the sky area. -
Vary the Direction:
Ensure the grass blades tip in different directions—some leaning right, some left—to mimic the effect of a gentle breeze. -
Add Seed Heads:
At the very tips of your tallest stalks, create small, textured dots or dashes to represent the seed heads of wheat or wild oats. -
Darken for Depth:
Switch to your darker brown or green mix. Paint a few select blades of grass in between the lighter ones to create depth and separation. -
Dry Brush Texture:
Wipe most of the moisture off your brush and drag it lightly over the bottom area to create a scratchy, organic texture that looks like sand and dense vegetation.
Make it Yours
Add tiny speckles of purple or yellow flicked from a toothbrush into the foreground grass to suggest hidden wildflowers blooming in the field.
Remove the tape carefully to reveal your crisp white border and enjoy your serene landscape


Layered Meadow for Easy Depth
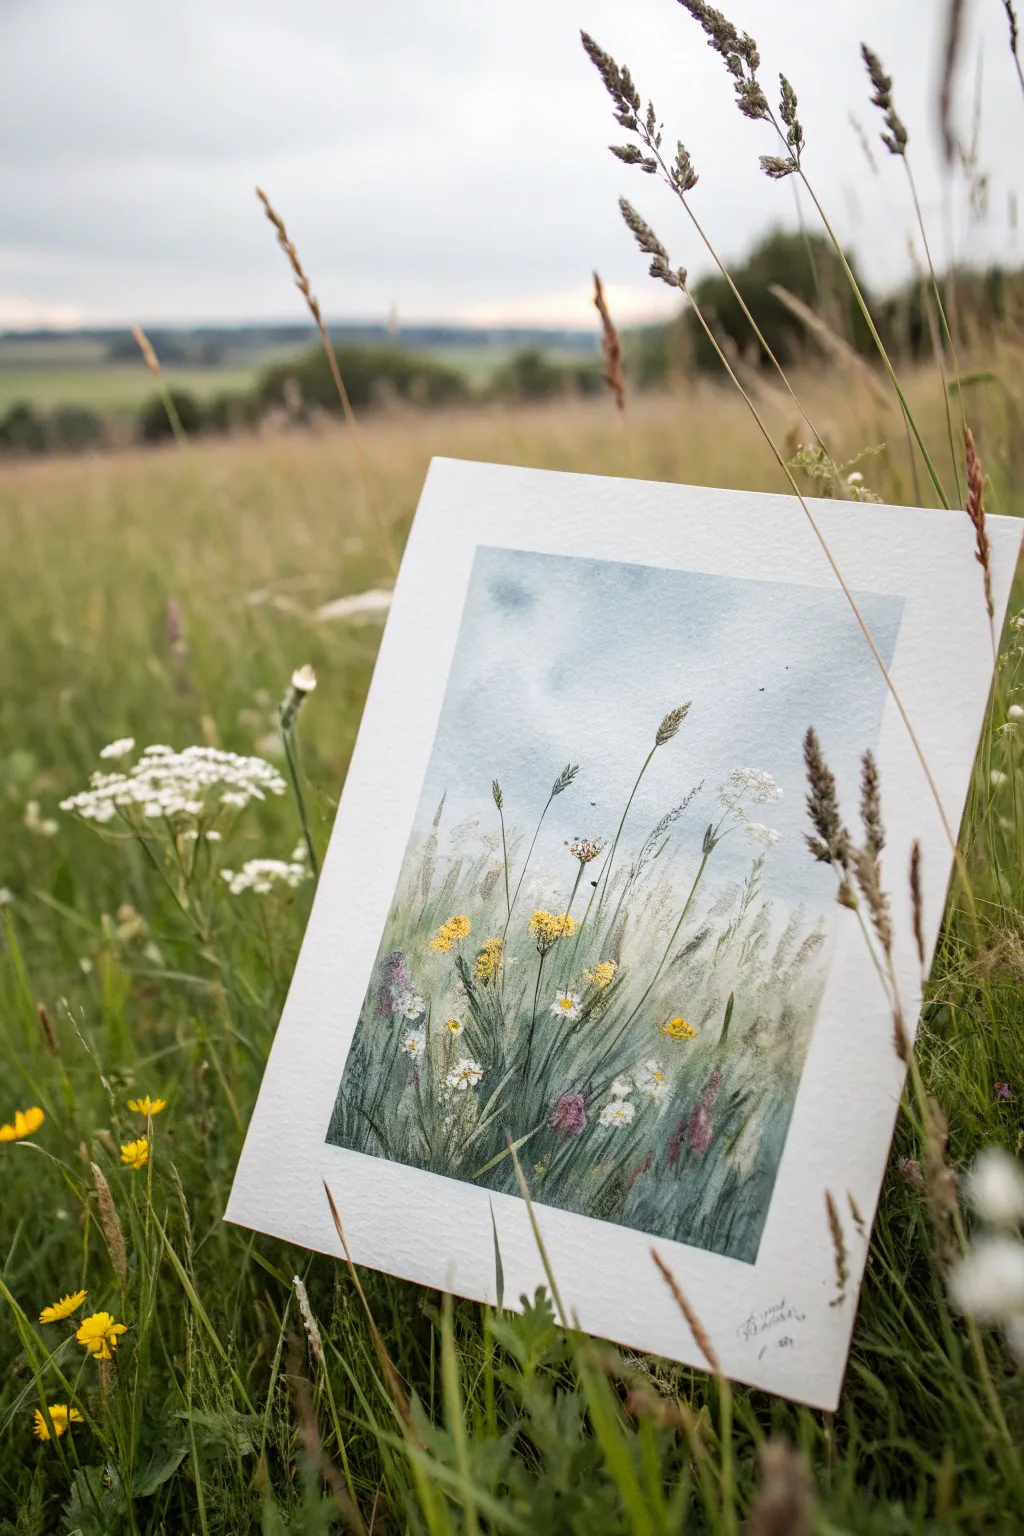
Capture the serene beauty of a wildflower field with this delicate painting that emphasizes depth through layering. By building up washes and fine details, you’ll create a soft, atmospheric background that makes the foreground blooms gently pop.
Detailed Instructions
Materials
- Cold-press watercolor paper (300 gsm)
- Watercolor paints (Indigo, Sap Green, Yellow Ochre, Burnt Sienna, Alizarin Crimson)
- White gouache paint
- Masking tape
- Round brushes (sizes 8, 4, and 00 for details)
- Jar of clean water
- Paper towels
- Mixing palette
Step 1: Setting the Scene
-
Tape your borders:
Begin by taping the edges of your watercolor paper to a board. This creates the crisp white border seen in the example and keeps the paper flat while you work with wet washes. -
Sketch the horizon:
Using a very light pencil touch, draw a low horizon line about one-third of the way up the paper. Sketch a few faint vertical lines to guide where your tallest grasses will eventually go. -
Paint the sky wash:
Mix a watery wash of Indigo with plenty of water to get a soft, cloudy blue. Using your largest round brush (size 8), apply this to the sky area using a wet-on-wet technique, letting the color fade slightly as it reaches the horizon. -
Create soft clouds:
While the sky is still damp, lift out some pigment with a clean, thirsty brush or dab gently with a paper towel to create soft, white cloud shapes.
Muddy colors?
If your greens look dull, stop mixing too many colors at once. Let layers fully dry before adding new ones on top to keep the colors fresh and distinct.
Step 2: Building the Middle Ground
-
Base layer for grass:
Mix a pale, desaturated green using Sap Green and a touch of Burnt Sienna. Apply a loose, vertical wash from the bottom edge up to the horizon line. Keep this layer very light and misty. -
Add distant texture:
While the base grass layer is nearly dry but still cool to the touch, tap in slightly darker green spots near the bottom to suggest density without defining individual blades yet. -
Let it dry completely:
Pause here and ensure the paper is bone dry. This is crucial so your next layers of crisp grass blades don’t bleed into the background.
Step 3: Detailing the Foreground
-
Paint mid-ground stalks:
Switch to your size 4 brush. Mix a medium-strength green and paint thin, vertical strokes reaching up from the bottom. Vary their heights and angles slightly to mimic the chaotic growth of a meadow. -
Introduce darks:
Mix Indigo into your green to create a deep shadow color. Paint shorter, darker grass blades at the very bottom of the painting to anchor the composition and add weight. -
Paint the tall grasses:
I like to use a rigger brush or a size 00 for this part. Load it with a mix of Burnt Sienna and Green. Using a flicking motion, paint the long, elegant stems that reach high into the sky area. -
Add seed heads:
At the tips of your tallest brown stems, dab small, textured dots or elongated diamond shapes to represent the wheat-like seed heads shown in the reference. -
Create yellow blooms:
Mix Yellow Ochre with a tiny bit of opaque white gouache if needed for opacity. Dot clusters of small yellow flowers amongst the green stalks, varying their size to suggest distance. -
Add white wildflowers:
Using pure white gouache and your finest brush, paint delicate umbel shapes—like tiny umbrellas—floating on thin stems. These should overlap the blue sky for nice contrast. -
Include purple accents:
Mix Alizarin Crimson with a touch of blue for a muted purple. Add a few small, vertical brushstrokes low in the grass to represent clover or thistle-like flowers. -
Final fine details:
With your smallest brush and almost black-green paint, add extremely fine lines for the thinnest stalks and tiny leaves to sharpen the foreground focus. -
Sign and reveal:
Once everything is perfectly dry, sign your name in the corner with a fine pen or brush. Slowly peel away the masking tape at a 45-degree angle to reveal your crisp edges.
Natural flow
Hold your paintbrush near the end of the handle when painting the tall grasses. This looseness creates more organic, sweeping lines than a choked grip.
Now you have a tranquil meadow scene ready to frame or gift
BRUSH GUIDE
The Right Brush for Every Stroke
From clean lines to bold texture — master brush choice, stroke control, and essential techniques.
Explore the Full Guide
One-Brushstroke Leaves and Stems
Master the art of creating elegant, flowing foliage with just a single touch of your brush in this simple yet stunning watercolor study. We will capture the movement of wildflowers using elongated leaves and delicate berry clusters in a soothing teal and terracotta palette.
How-To Guide
Materials
- Cold press watercolor paper (300 gsm)
- Round watercolor brush (size 6 or 8 with a good point)
- Watercolor paints (Teal or Pthalo Green mixed with a touch of Burnt Sienna)
- Watercolor paints (Terracotta, Red Ochre, or Rust for the berries)
- Palette for mixing
- Two jars of water
- Paper towel
Step 1: Planning the Flow
-
Visualize the composition:
Before putting brush to paper, look at your blank sheet. Imagine two main stems rising from the bottom right corner, curving gently upwards and outwards towards the left and top edges. This asymmetrical balance creates movement. -
Mix your leaf green:
Create a moody, muted green by mixing a cool green (like Viridian or Teal) with a small amount of warm brown or Burnt Sienna. Test the color on a scrap paper; it should be dark and rich, not neon. -
Prepare the berry color:
In a separate well, mix a warm, earthy red. A mix of Red Ochre or a standard Red dulled with a tiny bit of Complementary Green works perfectly. Keep this wash slightly more saturated.
Fixing Broken Lines
If your stem line breaks or skips, don’t re-paint the whole line. Just touch the dry brush to the gap with a tiny bit of water to reconnect the pigment flow smoothly.
Step 2: Painting the Foliage
-
Start the main stem:
Load your brush with the green mix. Starting from the bottom right, paint the primary stem using the very tip of the brush. Keep the pressure light to ensure a thin, delicate line. -
Curve the stem:
Let the line waver slightly as you pull it upwards diagonally across the page. Nature isn’t perfectly straight, so a little organic wobble adds character. -
Add secondary branches:
Branch off from the main stem at varied intervals. These offshoots should be thinner and shorter, serving as anchors for your leaf clusters. -
Execute the one-stroke leaf:
To paint a leaf, start at a branch with the tip of the brush. As you pull away, gradually increase pressure to widen the belly of the brush on the paper, creating the leaf’s body. -
Taper the leaf end:
As you near the end of the leaf shape, lift the brush slowly while continuing the stroke. The bristles will snap back to a point, creating a naturally tapered tip. -
Vary leaf direction:
Paint leaves in pairs or alternating patterns along the stems. Change the angles slightly so some point up and others droop down, mimicking gravity’s effect. -
Layering the second stem:
Create a second, smaller stem system originating near the first one at the bottom. I find painting this one slightly lighter or darker adds lovely depth to the composition. -
Adding texture:
While the leaves are still wet, you can drop a tiny amount of darker pigment into the base of a few leaves to create a natural gradient as they dry.
Step 3: Blooming Details
-
Switch to berry color:
Rinse your brush thoroughly. Pick up your terracotta or rust red mixture. The consistency should be like milk—not too watery. -
Paint berry stems:
Using a very dry brush tip with faint green residue (or a very pale mix), draw tiny, spider-leg stems radiating from the ends of your main branches. -
Dot the berries:
Place small, round dabs of red paint at the ends of these tiny stems. Vary the pressure to make some berries larger and some mere specks. -
Cluster formation:
Group these berries in loose, umbrella-like shapes (umbels). Leave small white gaps between some berries to keep the cluster feeling airy. -
Softening edges:
If a berry looks too stiff, touch it with a clean, damp brush to soften one side, giving it a rounder volume. -
Adding fern accents:
For visual variety, use your green mix to add a few fern-like fronds near the bottom or side. Use short, repetitive ticking strokes along a central vein. -
Final assessment:
Step back and look at the negative space. If a large area looks too empty, add a floating leaf or a tiny detached berry cluster to balance the weight.
Pro Tip: Leaf Shape
Rotate your paper, not your hand! Turning the paper allows you to pull the brush stroke towards your body every time, giving you much better control over the leaf taper.
Allow your painting to dry completely before framing your delicate botanical study
Sunset Wildflower Field in Warm Neutrals
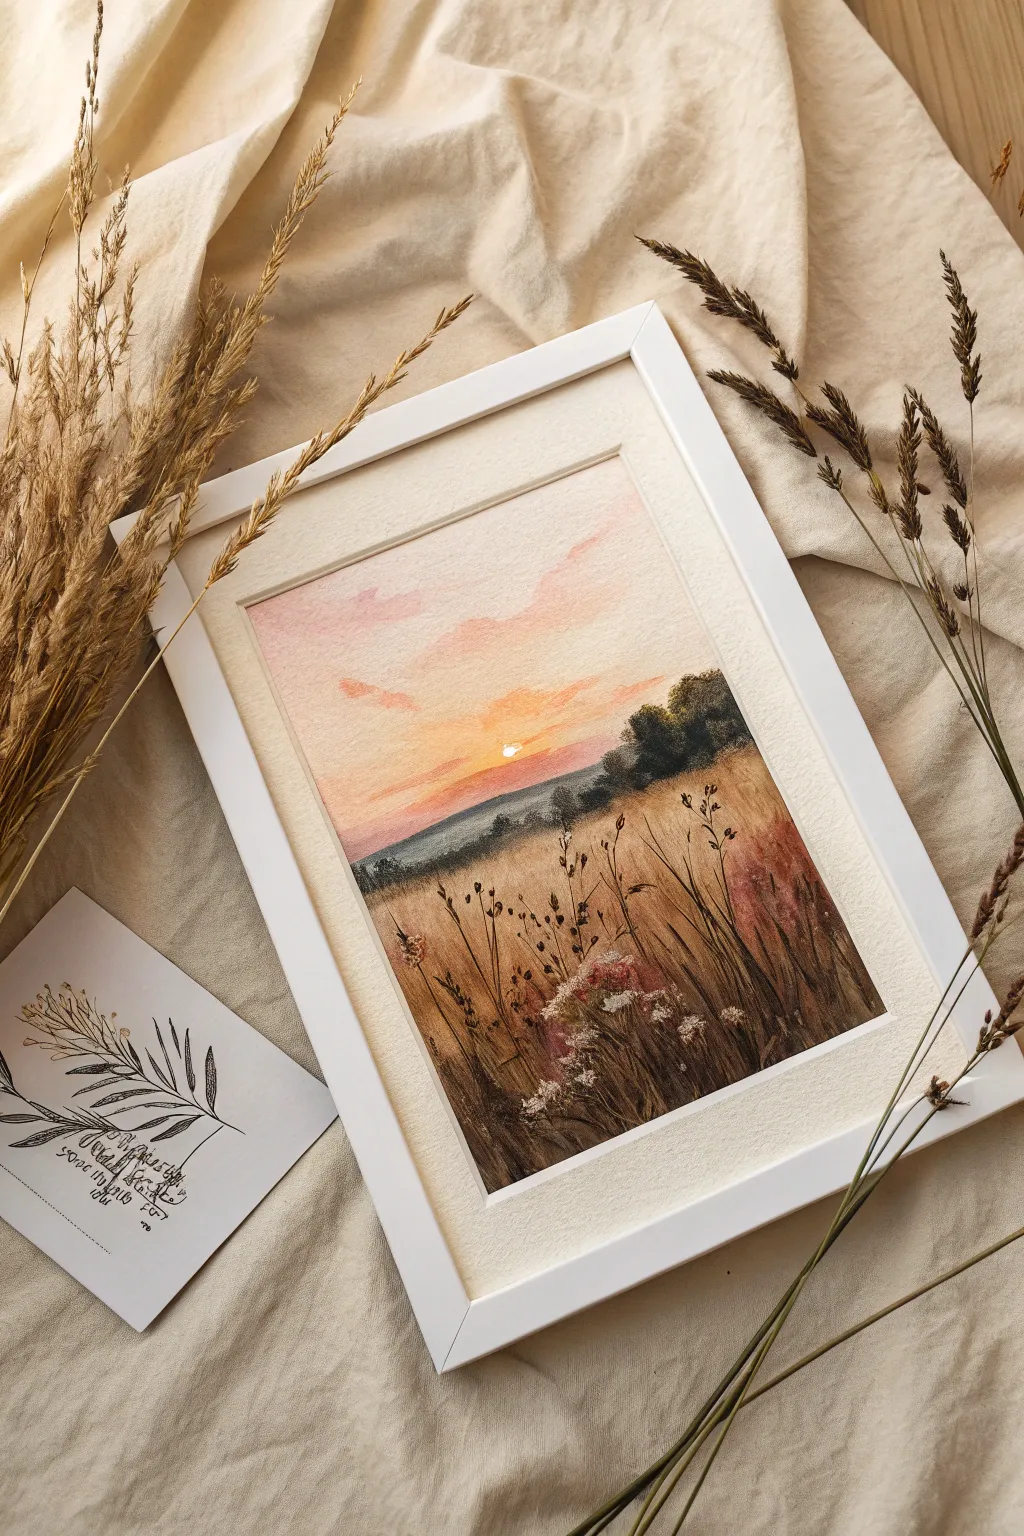
Capture the serene beauty of a golden hour meadow with this watercolor landscape, featuring soft sunset hues melting into a textured field of dried grasses. The warm neutral palette and delicate silhouettes create a cozy, nostalgic atmosphere perfect for modern rustic decor.
Step-by-Step Tutorial
Materials
- Cold press watercolor paper (300 gsm)
- Watercolor paints (Alizarin Crimson, Yellow Ochre, Burnt Sienna, Indigo, Sepia, Payne’s Grey)
- White opacity additive (Gouache or Bleed Proof White)
- Masking fluid (optional)
- Large flat wash brush (3/4 inch)
- Round brushes (sizes 4, 8, and a script liner)
- Old toothbrush for splatter
- Pencil and kneaded eraser
- Paper towels and two jars of water
Step 1: Setting the Sky
-
Establish the horizon:
Lightly sketch a low horizon line about one-third of the way up from the bottom of your paper. Keep your pencil pressure very light so the graphite doesn’t show through the transparent layers later. -
Pre-wet the sky area:
Using your large flat brush and clean water, thoroughly wet the paper above the horizon line. You want an even sheen, not puddles, to prepare for a wet-on-wet technique. -
Apply the sunset glow:
While the paper is wet, drop in a watery mix of Yellow Ochre near the horizon where the sun will sit. Immediately blend upward with a soft pink made from diluted Alizarin Crimson. -
Add cloud definition:
While the pink layer is still damp but losing its sheen, dab in slightly thicker mixtures of red-orange to suggest soft cloud formations drifting across the sky. Let the edges bloom naturally. -
Reserve the sun:
Before the area dries completely, use a clean, thirsty brush or a small piece of paper towel to lift out a distinct circle of white paper just above the horizon line to represent the setting sun. -
Dry completely:
Allow this sky layer to dry fully. If the paper feels cool to the touch, it’s still damp. I often use a hair dryer on a low setting here to speed things up.
Pro Tip: Scratching Out
While the dark grass paint is still damp, use a credit card edge or palette knife to scratch thin lines. This pushes pigment aside, creating light-colored stalks instantly.
Step 2: The Distant Landscape
-
Paint the horizon line:
Mix a muted purple-grey using Indigo and a touch of Burnt Sienna. Paint a horizontal band right at the horizon line, letting the top edge blur slightly into the sky for atmospheric perspective. -
Suggest distant trees:
While that band is still wet, drop in darker concentrations of Payne’s Grey and Sepia on the right side to form the soft, rounded shapes of distant trees. -
Build the tree mass:
Strengthen the shadows on the lower right side of the tree line with a highly pigmented dark mix, grounding the forest area.
Troubleshooting: Muddy Colors
If your field looks muddy, you likely overworked the wet layers. Let each glaze dry completely before adding the next. Patience preserves the transparency and glow.
Step 3: The Wildflower Field
-
Base wash for the field:
Wet the entire bottom section of the paper. Apply a wash of Yellow Ochre and Burnt Sienna, keeping it lighter near the horizon and gradually darkening as you move toward the bottom foreground. -
Create texture:
While the field wash is damp, splatter clean water droplets and a few specks of dark brown paint onto the bottom third. This creates blooms and texture that mimic chaotic undergrowth. -
Darken the foreground:
Once the initial wash is dry, glaze a darker mix of Sepia and Burnt Sienna over the bottom corners to create depth and frame the composition. -
Paint main stalks:
Switch to your script liner brush. Mix a dark, inky brown and paint thin, confident lines stretching from the bottom edge upward. Vary the height and curve of these grass stalks. -
Add dried seed heads:
Using a size 4 round brush, dab small, irregular clusters of dark brown at the tips of some stalks to create dried flower heads and seed pods. -
Incorporate opaque details:
Mix a little white gouache with pale pink or lavender water. Use this opaque mixture to paint soft, fluffy flower heads in the mid-ground, overlapping the dark stalks slightly. -
Final highlights:
Using pure white gouache on a liner brush, add tiny highlights to the edges of the closest grasses and seed pods to show where the setting sun catches them.
Frame your piece in a simple white mat to let those warm, earthy tones truly shine

PENCIL GUIDE
Understanding Pencil Grades from H to B
From first sketch to finished drawing — learn pencil grades, line control, and shading techniques.
Explore the Full Guide
Misty Morning Meadow in Cool Pastels
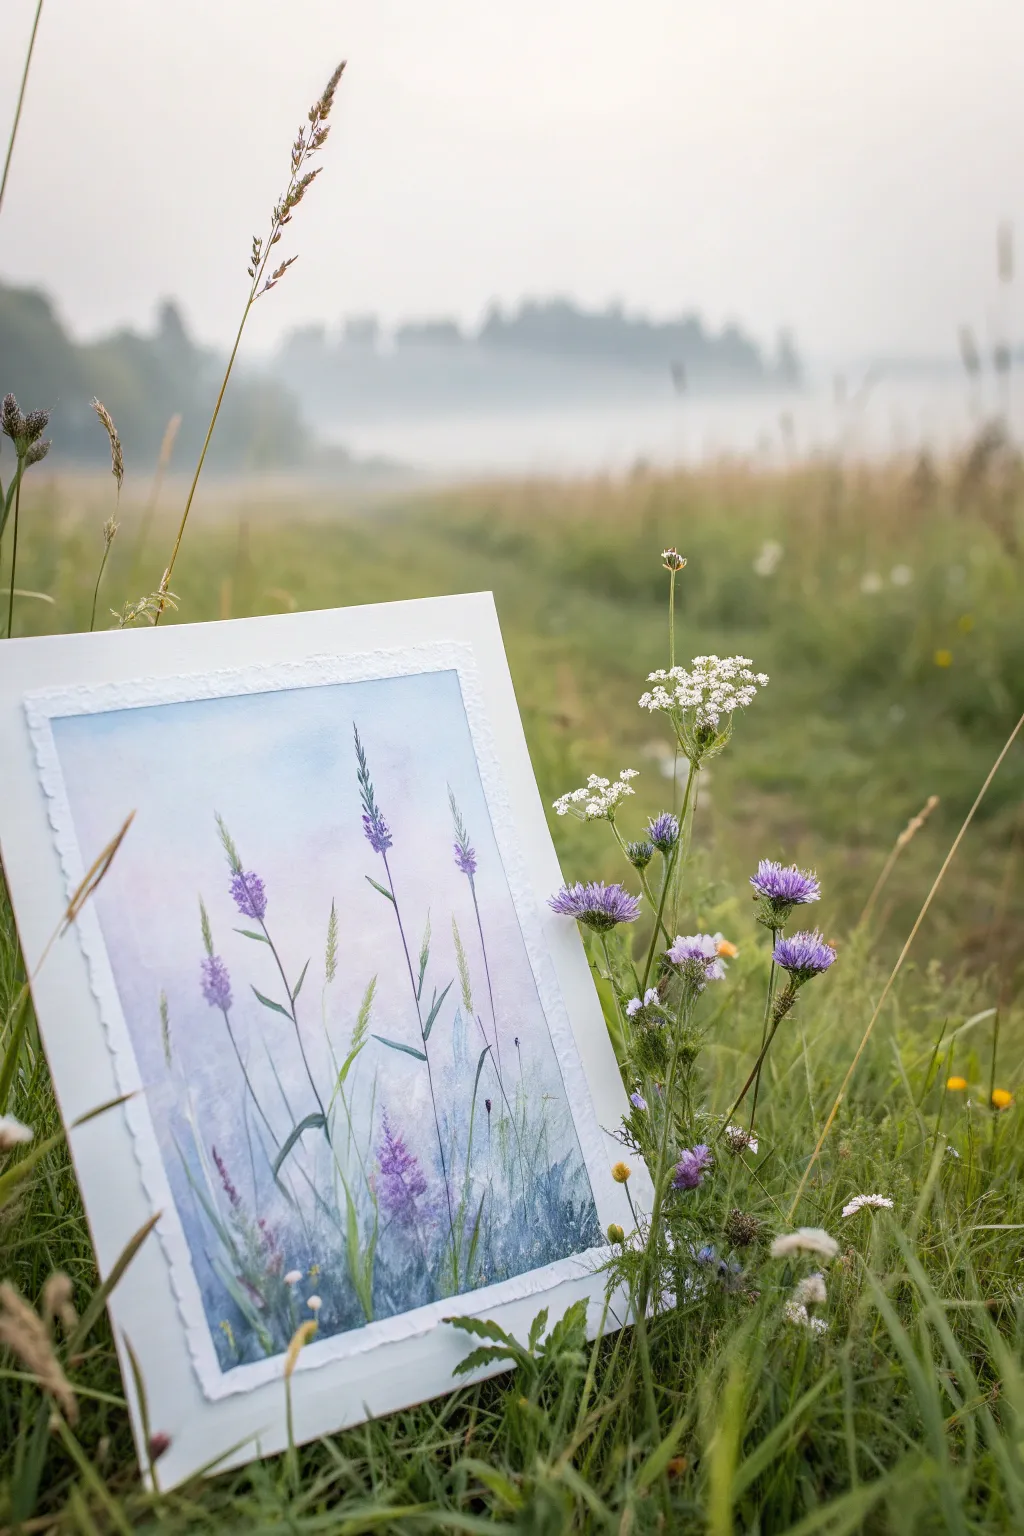
Capture the serene hush of dawn in this watercolor project, featuring soft purple wildflowers rising from a fog-kissed meadow. The key to this piece is layering cool pastels to create an atmospheric depth that feels both airy and grounded.
Step-by-Step
Materials
- Cold press watercolor paper (140lb/300gsm)
- Masking tape
- Drawing board
- Watercolor paints: Lavender, Ultramarine Blue, Sap Green, Lemon Yellow, Hooker’s Green, and a hint of Scarlet Lake
- Large flat wash brush (1 inch)
- Round brushes (sizes 4 and 8)
- Rigger or liner brush
- Clean water jar
- Paper towels
- White gouache (optional)
Step 1: Setting the Atmosphere
-
Prepare the surface:
Begin by taping down your cold press paper to a sturdy board. This prevents buckling and leaves you with that crisp, clean white border seen in the reference. -
Pre-wet the paper:
Using your large flat brush, apply a clean water wash across the entire paper surface. You want it shiny and damp, but not dripping wet. -
Mix the sky gradient:
create a very dilute mixture of Ultramarine Blue with a tiny touch of Lavender. Start at the top and wash it downwards, letting it fade almost to white as you reach the middle of the page. -
Introduce morning warmth:
While the paper is still damp, drop a very faint, watery hint of Scarlet Lake or faint pink into the middle section to suggest a soft sunrise glow behind the mist. -
Establish the misty base:
Mix a cool, grayish-blue using Ultramarine and a touch of Sap Green. Apply this loosely at the bottom third of the paper, letting the wet-on-wet technique soften the edges upward to create the effect of ground fog. -
First drying phase:
Allow this initial background layer to dry completely. The paper should be flat and room temperature to the touch before proceeding.
Step 2: Building the Meadow
-
Drafting ghost stems:
Switch to your size 8 round brush. Mix a very watery, pale green. Paint a few vertical, wavy lines rising from the bottom mist to establish distant grass stalks. -
Adding soft foliage:
While these ghost stems are damp, touch the paper lightly with a slightly darker green to suggest soft leaves or seed heads that are out of focus. -
Painting primary stems:
Once the ‘ghost’ layer is dry, mix a stronger Sap Green. Use the tip of your brush to paint three or four main stems that reach varying heights, angling them slightly as if swaying in a breeze. -
Creating the purple spikes:
Load your size 4 round brush with a mix of Lavender and Ultramarine. Use a stippling motion—tapping the brush tip—to create the cone-shaped flower heads at the top of your main stems. -
Refining flower shapes:
Add concentration to the flowers by dropping slightly darker purple pigment near the bottom of each flower cone while the paint is still wet, giving them volume and shadow. -
Painting tall grasses:
Mix Lemon Yellow with Sap Green for a fresher color. Paint thin, tall blades of grass that intersect and weave behind the purple flowers. -
Texturing the grass tips:
At the very tips of these yellow-green grasses, use a dry-brush technique (remove excess moisture from your brush) to lightly flick upward, mimicking the feathery texture of seed heads.
Tape Removal Trick
To ensure a perfect edge, heat the masking tape gently with a hair dryer for a few seconds before peeling. This softens the adhesive so the paper doesn’t rip.
Step 3: Final Details
-
Adding the foreground:
Near the bottom edge, paint short, overlapping strokes of darker blues and greens to ground the composition and hide the start of the stems. -
Defining leaves:
Use your rigger brush to add thin, crisp leaves branching off the main flower stems. Keep your wrist loose to ensure the lines look organic rather than stiff. -
Splatter texture:
Load a brush with clean water or very pale blue paint and tap it against another brush handle over the bottom area. This creates subtle blooms that look like dew or texture in the mist. -
Highlights (optional):
If you lost visible light areas, use a tiny amount of opaque white gouache to add highlights to the tips of the grass or the tops of the purple flowers. -
The reveal:
Wait for the painting to be 100% bone dry. Carefully peel away the masking tape at a 45-degree angle to reveal your crisp edges.
Deckle Edge Effect
Instead of taping, tear the edges of your watercolor paper against a ruler before painting. Mount the finished piece on slightly larger cardstock to showcase the texture.
Place your finished painting near natural light to see the transparency of the layers truly shine.
Lavender-Inspired Wildflower Spikes
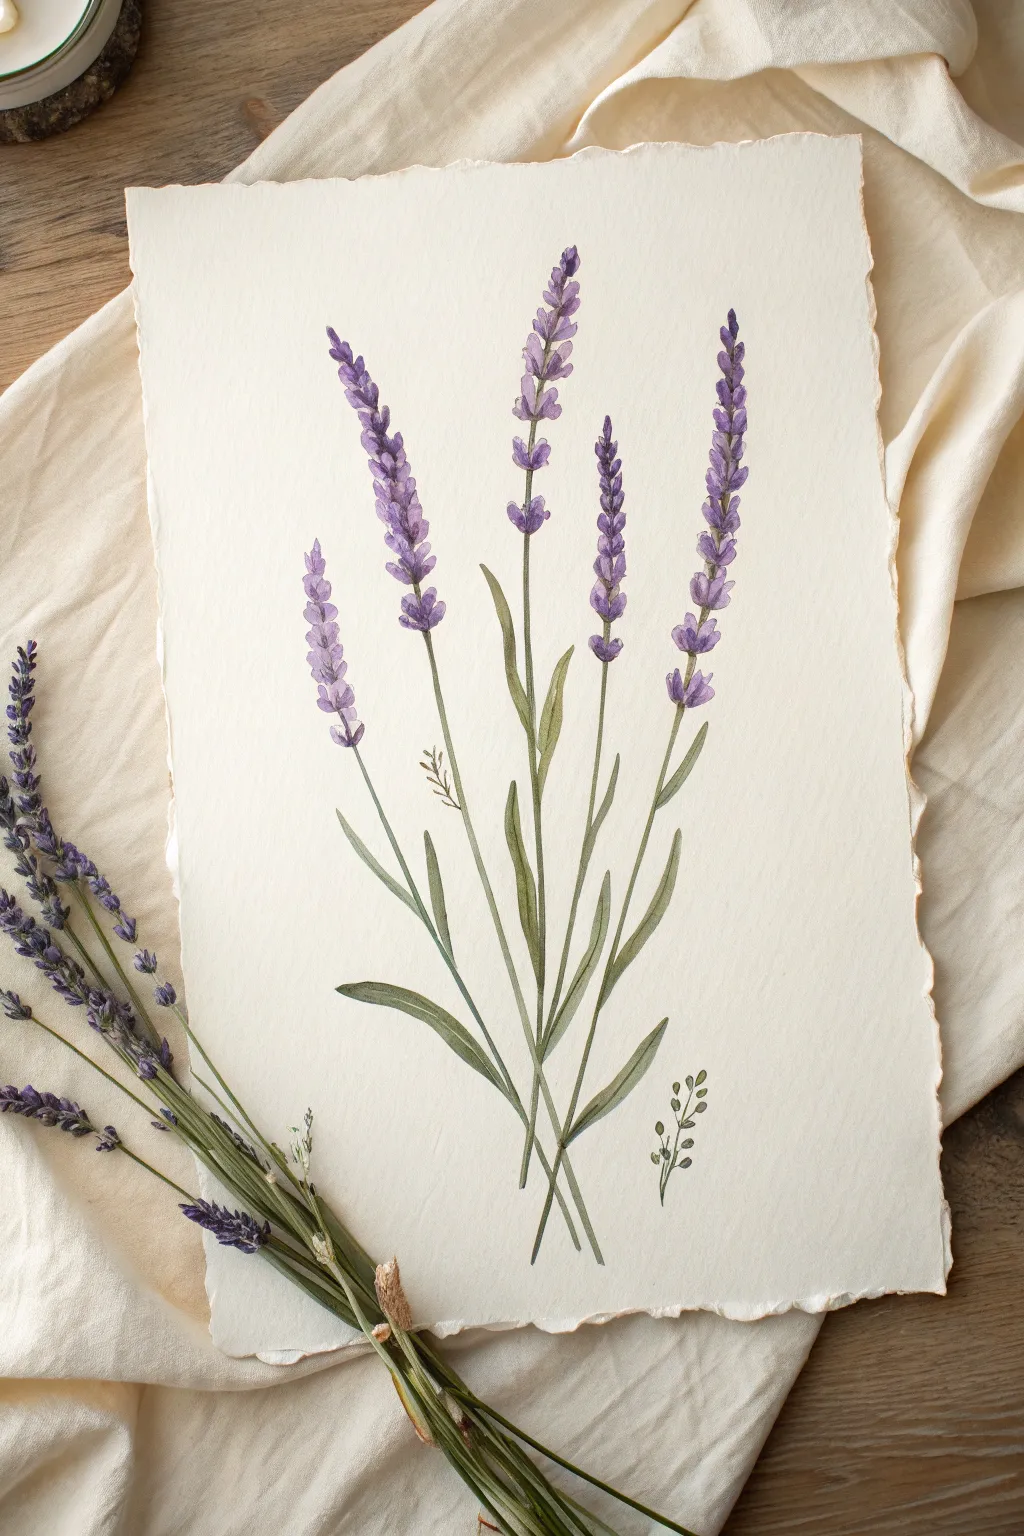
Capture the delicate beauty of summer fields with this botanical watercolor study of elongated purple flower spikes. The graceful composition emphasizes slender stems and clustered blooms, painted on textured deckle-edged paper for an authentic, vintage herbarium feel.
Step-by-Step
Materials
- Cold press watercolor paper (deckle edge preferred)
- Watercolor paints (Violet, Ultramarine Blue, Sap Green, Olive Green)
- Round brushes (sizes 2, 4, and 6)
- Pencil (HB or H)
- Kneaded eraser
- Two jars of water
- Paper towel
Step 1: Planning the Composition
-
Lightly Map the Stems:
Begin by sketching five main stem lines lightly with your H or HB pencil. Fan them out from a central imaginary gathering point near the bottom, creating a natural, bouquet-like spread with varying heights. -
Outline Flower Clusters:
At the top of each stem, faintly mark the length of the flower heads. Don’t draw individual petals yet; just indicate the elongated oval shapes where the purple blooms will reside. -
Sketch the Leaves:
Draw long, slender lance-shaped leaves emerging from the lower stems. Aim for fluidity here—let some overlap the stems or curve gently outward to create movement. -
Soften the Sketch:
Take your kneaded eraser and gently roll it over the entire drawing. You want the graphite lines to be barely visible, acting only as a faint guide so they don’t show through the translucent watercolor.
Muddy Purple Problem?
If your purple blooms look muddy, clean your water jar immediately. Purple is sensitive to dirty water. Also, let the green stems dry completely before painting purple blooms nearby to prevent bleeding.
Step 2: Painting the Purple Blooms
-
Mix Your Lavender Hue:
Create a custom purple mix using Violet and a touch of Ultramarine Blue to cool it down. Dilute it with water until you have a medium-light consistency. -
Start the Flower Tips:
Using a size 4 brush, dab small, teardrop-shaped marks at the very top of your tallest stem. Keep these marks loose and somewhat separated to mimic the airy nature of the flower spike. -
Build the Clusters:
Work your way down the stem, grouping your dabs into small ‘whorls’ or clusters. Leave tiny gaps of white paper between the clusters to represent light hitting the petals. -
Vary the Intensity:
While the paint is still damp, drop in a slightly more concentrated version of your purple mix into the bottom of some flower clusters. This creates instant shadow and volume without overworking. -
Adding Variation:
Repeat this process for the other four flower spikes. I like to vary the water ratio for each stem slightly so some appear softer and more distant, while others are bold and crisp. -
The Tiny Side Sprig:
Near the bottom right, paint the tiny, separate bud stem using very small dots of diluted green and faintest purple, as seen in the reference image.
Adding Metallic Magic
For a magical twist, mix a tiny amount of iridescent watercolor medium into your final purple details. The flowers will shimmer subtly when catch the light.
Step 3: Stems and Foliage
-
Mix Greens:
Combine Sap Green with a little Olive Green to get a natural, herbal tone. Ensure the mixture is fluid but not too watery. -
Connect the Blooms:
Using your size 2 or 4 brush, carefully paint the main stems. Start from the base of the lowest purple blooms and pull the brush smoothly downward. The line doesn’t need to be perfectly straight; a jagged or wavy stem looks more organic. -
Connecting the Clusters:
Use the very tip of your brush to draw hair-thin lines connecting the separated flower clusters to the main stem. -
Painting Leaves:
Switch to a size 6 brush for the leaves. Press down at the base of the leaf to widen the stroke, then lift progressively as you pull outward to create a sharp, tapered tip. -
Layering Greens:
Once the initial green layer is dry, glaze a slightly darker green (add a touch of blue to your mix) over the shadowed sides of the leaves or where stems overlap. -
Dry Bush Element:
Using a very fine brush and a brownish-green mix, add the small, dried twiggy element near the center-left stem for textural contrast.
Step 4: Final Touches
-
Evaluate and Refine:
Step back and look at the composition. If any flower spikes look too pale, add a few tiny, dark purple dots to define individual florets. -
Enhance Textures:
If you wish to enhance the botanical look, use a dry brush technique with slightly darker paint to suggest subtle veins on the larger leaves.
Allow your beautiful botanical study to dry flat completely before framing or displaying on a clipboard


Black-Eyed Susan Color Pop
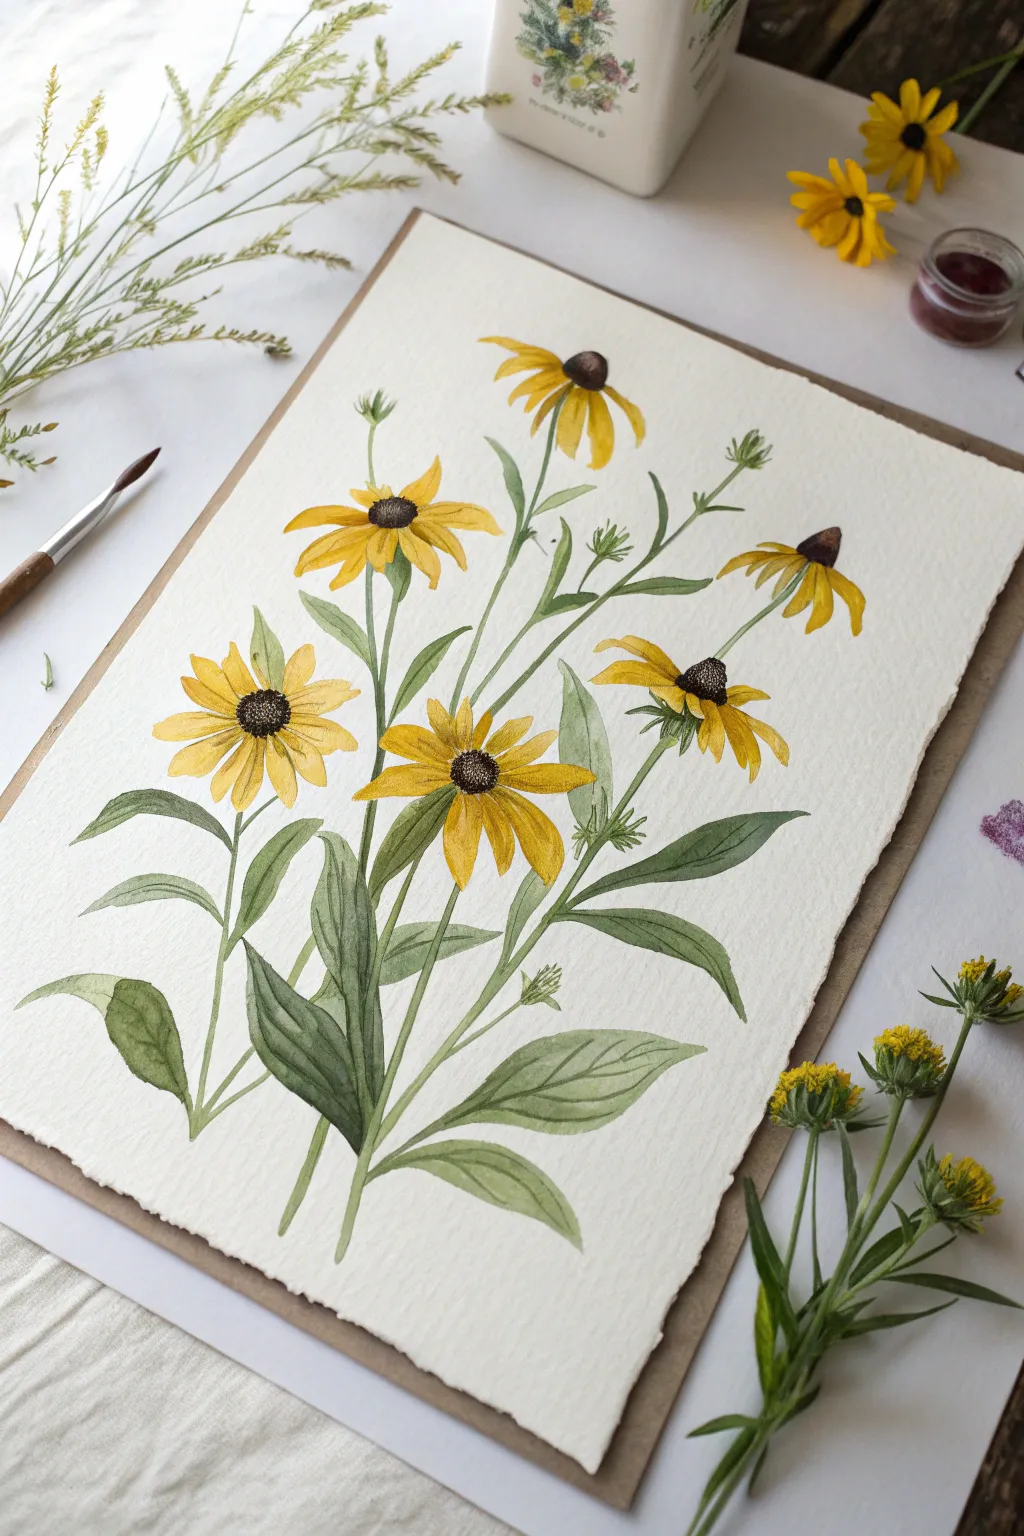
Capture the sunny warmth of late summer with this cheerful botanical watercolor study. Using transparent washes and textured paper, you will build up vibrant yellow petals and lush green foliage for a composition that feels plucked straight from a meadow.
How-To Guide
Materials
- Cold press watercolor paper (with deckled edge for effect)
- Watercolor paints (Cadmium Yellow, Yellow Ochre, Burnt Sienna, Burnt Umber, Sap Green, Perylene Green)
- Round watercolor brushes (Size 2, 6, and 8)
- Pencil (HB or H for light lines)
- Kneaded eraser
- Two jars of water
- Paper towels or cloth
- Masking tape (optional, to secure paper)
Step 1: Sketching the Composition
-
Establish the Stems:
Begin with a very light pencil sketch. Draw several curving, vertical lines to establish the main stems, letting them fan out slightly from a central point at the bottom to create a balanced bouquet shape. -
Place the Flower Heads:
At the top of your stems, sketch the cone shapes for the flower centers. Vary their angles—some facing straight on (circular centers), some side-facing (domed shapes), and others nodding downwards. -
Outline the Petals:
Draw the ray florets (petals) extending from the centers. Keep them loose and slightly irregular; some should curve back while others droop forward. Don’t worry about perfect symmetry, as nature is rarely perfect. -
Add Leaves and Buds:
Sketch long, lance-shaped leaves along the lower stems. Add a few small, unopened flower buds on thin stems to fill any gaps in the upper composition. -
Clean Up Lines:
Gently roll a kneaded eraser over your sketch to lift excess graphite. You want ghost lines that are just visible enough to guide your painting but won’t show through the yellow paint.
Loose is Lovely
Don’t try to paint every single petal perfectly. Leaving some rough edges and white space makes the flowers look like they are fluttering in a breeze.
Step 2: Painting the Blooms
-
Base Yellow Wash:
Load a size 6 brush with a transparent mix of Cadmium Yellow. Paint the petals of the most open flowers, leaving tiny slivers of white paper between some petals to define them. -
Adding Warmth:
While the first wash is still damp, drop in touches of Yellow Ochre near the base of the petals where they meet the center cone. Let the colors bleed naturally for a soft gradient. -
Painting the Cones:
Mix Burnt Sienna with a touch of Burnt Umber. Using the tip of a smaller brush, dab in the cone centers. I prefer to use a stippling motion here to mimic the rough texture of the seed head. -
Deepening Values:
Once the centers are semi-dry, add darker brown (Burnt Umber) to the shadowed side of the cones to give them dimension and a 3D dome shape. -
Refining Petals:
After the yellow petals are fully dry, use a slightly darker yellow-orange mix to paint simple vein lines or cast shadows where one petal overlaps another.
Muddy Yellows?
Ensure your brush is totally clean before picking up yellow paint. Even a tiny trace of green or brown residue can turn vibrant yellow into a dull mustard color.
Step 3: Creating the Greenery
-
First Green Wash:
Mix Sap Green with plenty of water for a fresh, light tone. Paint inside your leaf outlines, starting with the stems and flowing into the leaves. Keep the wash fluid and continuous. -
Varied Tones:
While the green is wet, charge in a bit of Perylene Green or a darker mix into the lower parts of the leaves and the shadowed sides of the stems. -
Painting the Calyx:
Use a detail brush to paint the small, spiky green sepals (the calyx) underneath the flower heads where the petals join the stem. This small detail adds significant realism. -
Painting Buds:
For the unopened buds, use the green mix to paint the closed bracts, perhaps leaving a tiny peek of yellow at the very top. -
Leaf Veins:
Let the greenery dry completely. Mix a slightly translucent dark green. Using a size 2 brush or a rigger, paint fine central veins on the larger leaves. -
Final Contrast:
Evaluate your painting for contrast. If the flower centers look flat, add tiny dots of very dark brown or almost-black mix to the texture. If needed, glaze a thin shadow layer on the underside of overlapping leaves.
Now mount your artwork or display it as is to enjoy these perennial blooms all year round
Pollinators Dancing Through Wildflowers
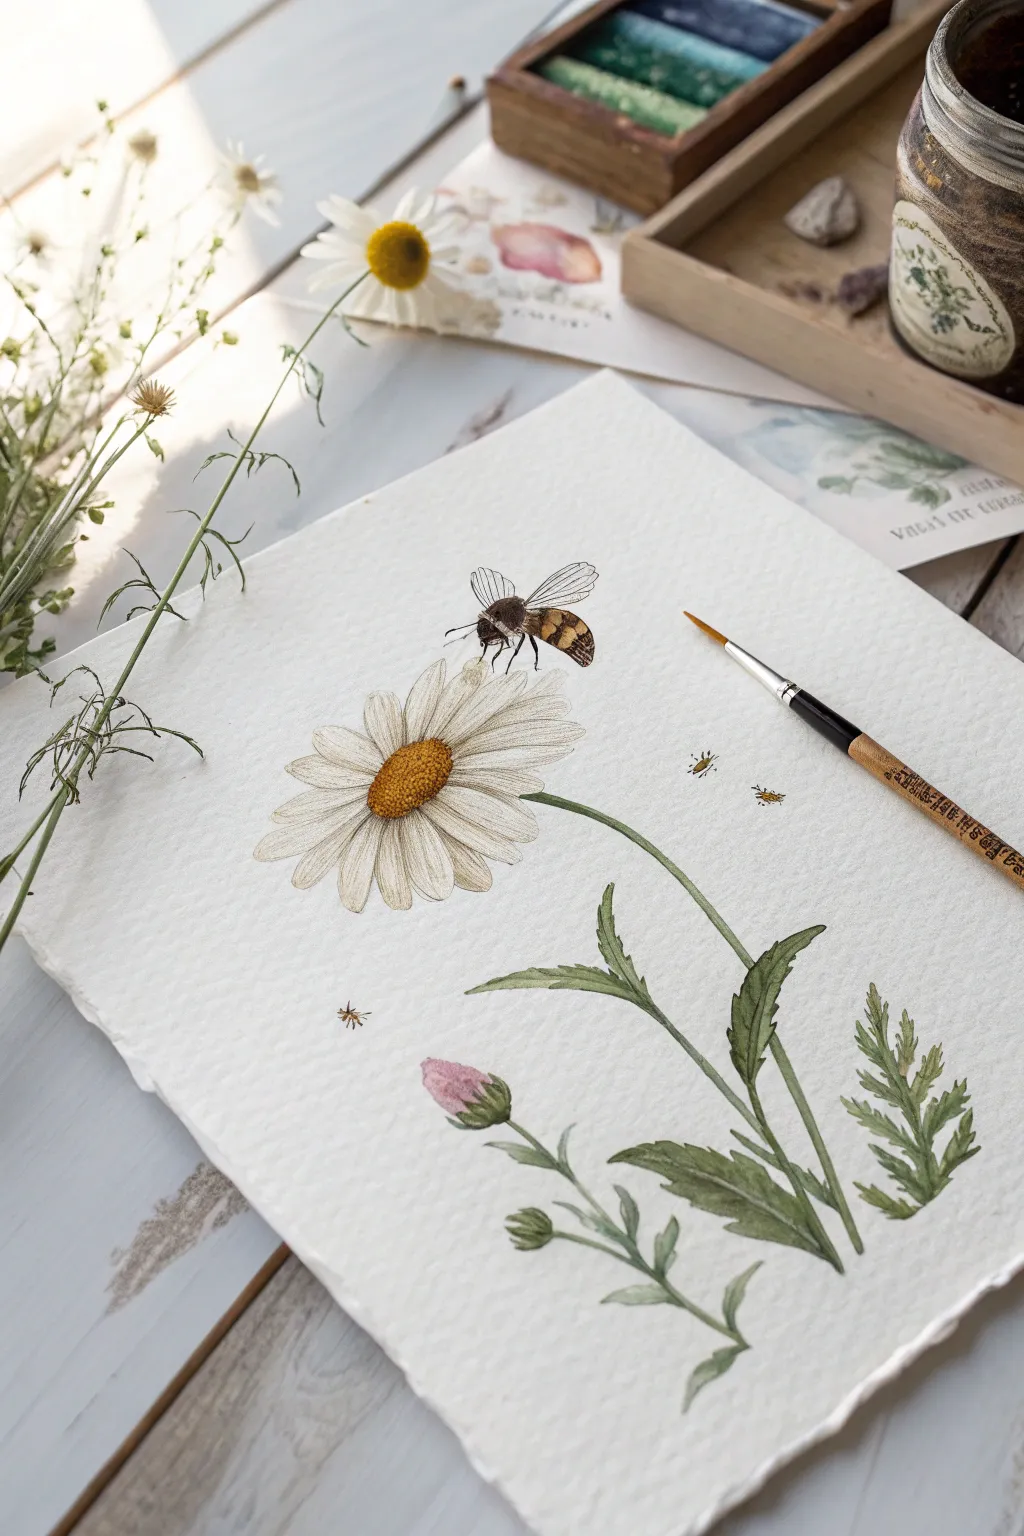
Capture the delicate moment of a bee approaching a wildflower in this gentle botanical illustration. Using soft watercolor washes and fine details, you’ll create a piece that feels both scientifically observed and whimsically light.
Detailed Instructions
Materials
- Cold-press watercolor paper (300gsm, textured)
- Watercolor paints (Yellow Ochre, Burnt Sienna, Sap Green, Indigo, Lemon Yellow, Sepia)
- Round watercolor brushes (Size 4 for washes, Size 0 or 00 for details)
- Graphite pencil (HB or 2H)
- Kneaded eraser
- Clean water jar
- Paper towel
Step 1: Sketching the Composition
-
Initial outline:
Begin by lightly sketching the main stem of the daisy, curving it gently to the right. Add a simple oval at the top for the flower center and sketch faint guidelines for the radiating petals. -
Adding foliage:
Draw the jagged, fern-like leaves extending from the lower stem. Keep your pencil pressure very light so the graphite doesn’t show through the transparent paint later. -
Bud details:
Sketch a small, unopened bud near the base of the stem, ensuring the sepals cup the pinkish top section securely. -
Placing the pollinator:
Position the bee hovering just above the petals. Break the bee down into three shapes: a round head, a fuzzy thorax, and a segmented abdomen. Add outline wings extended in flight. -
Refining lines:
Clean up your sketch with a kneaded eraser, lifting away any heavy lines until only faint guides remain.
Loose Shadows
Don’t outline every single petal. Leaving some edges undefined where the white paper meets the background creates a glowing, airy effect.
Step 2: Painting the Flower
-
Petal wash:
Dilute a tiny amount of Indigo or Payne’s Grey until it is nearly clear water. Paint the shadows on the white petals, focusing on where they overlap and meet the center, leaving the highlights pure white. -
Flower center base:
Mix Yellow Ochre with a touch of Lemon Yellow. Paint the domed center of the daisy, stippling the paint slightly to suggest texture rather than a solid flat wash. -
Deepening the center:
While the yellow is damp-dry (not soaking), drop in Burnt Sienna on the shaded side (usually the bottom left) to create volume and roundness. -
Texture details:
Once the center is fully dry, take a Size 0 brush with concentrated Burnt Sienna or Sepia and dot tiny points across the surface to mimic the disc florets.
Step 3: Greenery and Stem
-
Stem base layer:
Load your Size 4 brush with a watery Sap Green. Paint the long, slender stem in one continuous stroke if possible to avoid harsh overlap lines. -
Leaf variation:
Paint the serrated leaves using the same green, but drop in touches of Indigo or a darker green near the veins while the paint is still wet to add depth. -
Pink bud:
Paint the tip of the unopened bud with a soft wash of Alizarin Crimson or rose, letting it bleed gently into the green base of the sepals.
Muddy Greens?
If your leaves look dull, mix your own greens using the yellow and blue from your palette instead of using green straight from the tube.
Step 4: The Bee and Fine Details
-
Bee thorax:
Mix a warm brown using Burnt Sienna and Sepia. Paint the fuzzy thorax area, using tiny, short brushstrokes to simulate hair texture. -
Abdomen stripes:
Paint the abdomen with alternating bands of Yellow Ochre and dark Sepia. Keep the edges soft to maintain the look of fuzziness. -
Wing transparency:
For the wings, use extremely watered-down grey. Outline the shape and add a few very faint veins inside; remember that insect wings are transparent, so keep this minimal. -
Legs and antennae:
Switch to your smallest brush (00). Mix a dark, inky black-brown and carefully paint the delicate legs hanging down and the antennae. -
Final touches:
Add tiny speckles or flying insects in the background with the tip of your brush to give the piece a loose, organic atmosphere.
Allow your painting to dry completely before erasing any remaining visible pencil marks to avoid smearing the pigment
Backlit Wildflowers in Silhouette
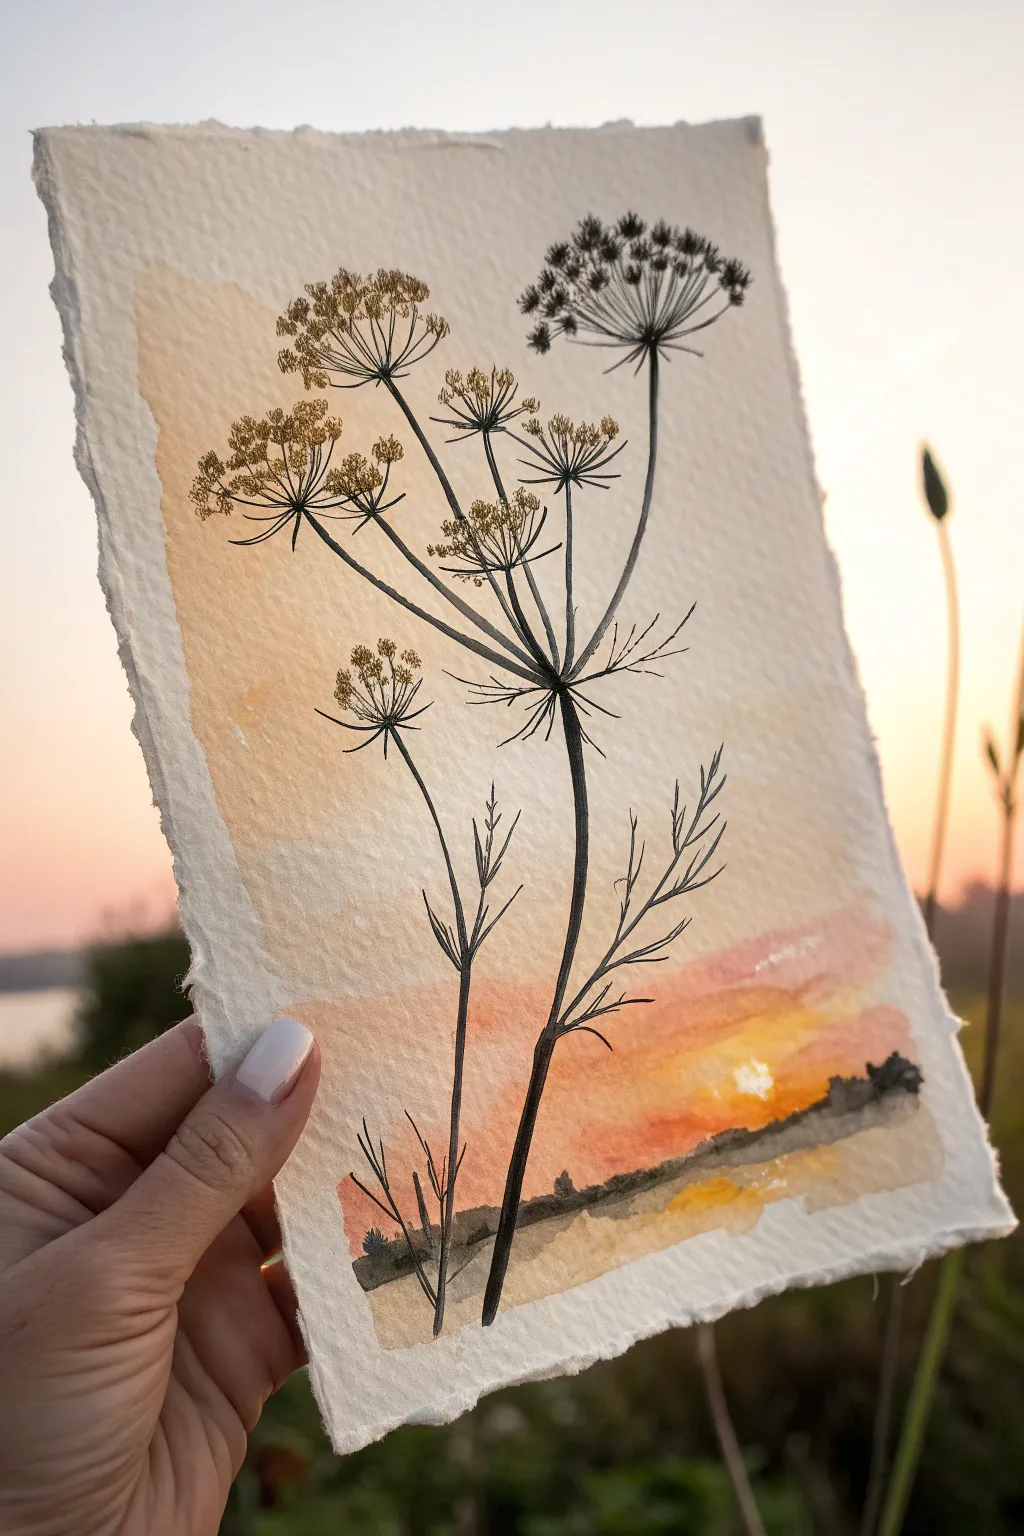
Capture the delicate drama of wildflowers against a setting sun with this mixed-media project. By combining soft watercolor washes with crisp ink detailing, you’ll create a striking silhouette effect that glows with warmth.
Step-by-Step Guide
Materials
- Cold-pressed watercolor paper (300gsm/140lb) with a rough, deckled edge
- Watercolor paints (Cadmium Orange, Alizarin Crimson, Yellow Ochre, Burnt Umber)
- Black waterproof fine liner pens (0.1mm and 0.5mm)
- Round watercolor brush (size 6 or 8)
- Clean water and mixing palette
- Paper towel
- Pencil (HB) and kneadable eraser
Step 1: Preparing the Golden Hour Sky
-
Wet the paper:
Begin by taping down your paper or holding it flat. Use your large round brush to apply a very light, even glaze of clean water across the entire surface of the paper. You want it damp, not soaking wet. -
Establish the light source:
While the paper is still damp, drop a small amount of diluted Yellow Ochre near the lower right quadrant. This will serve as the glowing sun; leave the very center almost pure white for maximum brightness. -
Build the sunset gradient:
Mix a soft wash of Cadmium Orange and gently paint horizontal strokes across the middle section of the paper, letting it bleed naturally into the yellow area below. -
Add evening hues:
While the orange is still wet, introduce a touch of Alizarin Crimson to your brush. Apply this to the lower third of the paper, creating horizontal streaks that suggest low-hanging clouds catching the last light. -
Create the upper atmosphere:
For the top portion of the sky, dilute a tiny bit of Burnt Umber with plenty of water to create a neutral, warm tone. Wash this over the top half of the painting, blending it seamlessly down into the orange. -
Ground the scene:
Mix a stronger wash of Burnt Umber and a touch of black. Paint a loose, uneven horizon line near the bottom edge. Let the paint diffuse slightly into the wet sky to suggest distant trees or hills. -
Allow to dry completely:
This step is crucial. The paper must be bone dry before you begin the ink work. I like to let this dry naturally to preserve the soft gradients, but a hairdryer on a low setting works if you’re impatient.
Step 2: Drawing the Silhouette
-
Draft the main stems:
Using an HB pencil with a very light hand, sketch the primary vertical line for the main stem. It should start near the bottom center and curve gently as it rises, avoiding a rigid straight line. -
Map the flower heads:
Lightly mark the positions of the main flower umbels (the umbrella-like clusters). Place the largest one roughly in the upper third, slightly off-center, and a smaller secondary flower head below it. -
Ink the main stalk:
Switch to your 0.5mm pen. Trace your pencil line for the main stem, thickening it slightly near the base and where the branches diverge. Use confident, smooth strokes. -
Draw the radiating spokes:
From the center of your top flower head, draw straight lines radiating outward like the spokes of a bicycle wheel. These should vary slightly in length to create a natural, organic shape. -
Add the florets:
At the end of each spoke, switch to the 0.1mm pen to draw tiny clusters of dots or small dashes. These represent the individual seed heads or flowers. Keep them dense to ensure they stand out against the background. -
Detail the lower blooms:
Repeat the process for the lower, smaller flower clusters. Because these are silhouette forms, you don’t need to draw every petal—just the suggestion of mass and texture is enough. -
Add organic leaves:
Draw feathery, fern-like leaves branching off the lower stem. Use quick, jagged strokes to mimic the fine, segmented nature of umbellifer foliage. -
Refine the foreground:
At the very bottom, draw a few stray blades of grass or smaller weeds overlapping the horizon line. This integrates the plant into the landscape. -
Color the seed heads:
Mix a semi-opaque greenish-gold color (Yellow Ochre plus a tiny dot of black). Carefully paint over the inked floret clusters to give them body and a dried, autumnal look. -
Final touches:
Once the ink is fully dry, gently erase any visible pencil marks. Step back and thicken any stem lines that feel too fragile compared to the heavy flower heads.
Bleeding Lines?
If ink bleeds into the paint, your paper wasn’t dry enough. Wait longer or use a hairdryer. If it happens, thicken the line slightly to hide the feathering.
Natural Stems
Don’t use a ruler for stems! A slight wobble or curve makes the plant look organic and alive. Nature rarely produces perfectly straight lines.
Now you have a serene botanical study that perfectly captures the quiet beauty of a summer evening
Rainy Wildflower Meadow With Splatter Drops
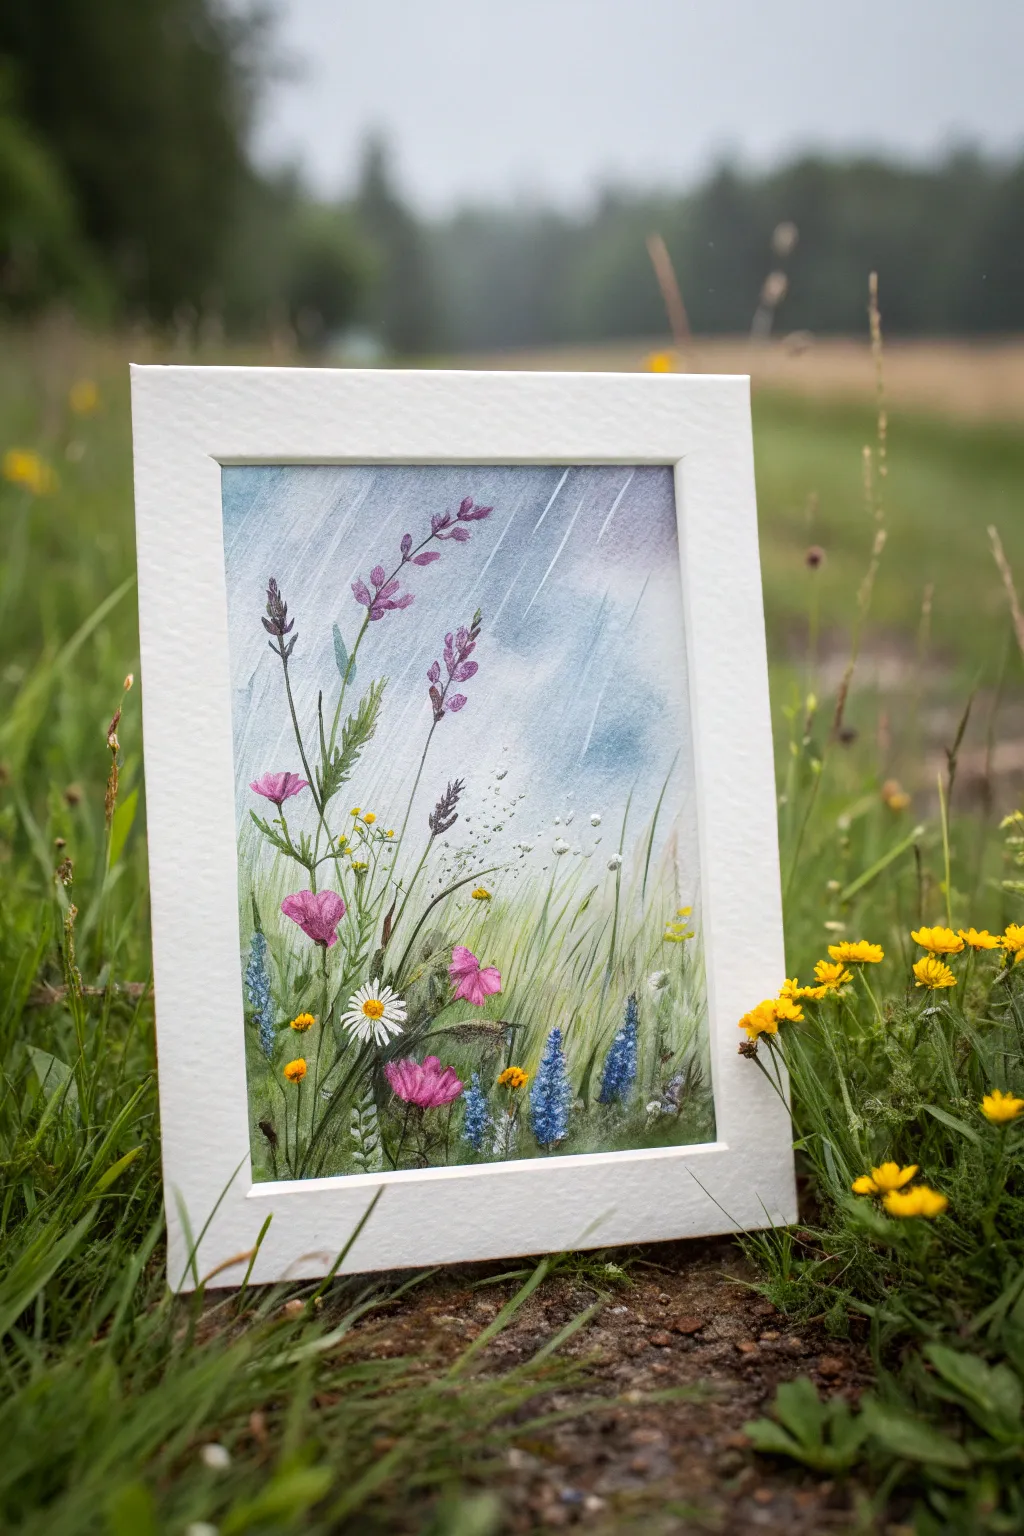
Capture the serene beauty of a summer storm passing over a field of wildflowers with this atmospheric watercolor tutorial. You’ll learn to create soft rain streaks and delicate splatter effects to bring a sense of movement and weather to your floral scene.
Detailed Instructions
Materials
- Cold press watercolor paper (300 gsm)
- Watercolor paints (Ultramarine Blue, Sap Green, Magenta, Yellow Ochre, Burnt Sienna, Payne’s Grey)
- White gouache or white ink
- Masking tape
- Flat wash brush (3/4 inch)
- Round brushes (sizes 2, 4, and 8)
- Rigger or liner brush
- Clean water jars
- Paper towels
- Old toothbrush (optional for splatters)
Step 1: Setting the Scene
-
Prepare the Surface:
Begin by taping down all four edges of your watercolor paper to a board. This ensures a clean white border and prevents the paper from buckling during heavy washes. -
Sketch the Composition:
Lightly sketch the main vertical stems of the tallest flowers using an H pencil. Keep the lines faint; you just need a general guide for where the pink cosmos and purple salvia will stand. -
Wet-in-Wet Sky:
Wet the entire upper two-thirds of the paper with clean water. The sheen should be glossy but not puddling. -
Paint the Storm:
Drop in a wash of Ultramarine Blue mixed with a touch of Payne’s Grey. Let the color flow naturally, keeping it darker at the top left and fading to almost clear water as you reach the horizon line. -
Create Rain Streaks:
While the sky is still damp (not soaking wet), take a clean, slightly damp flat brush. Drag it diagonally from top-left to bottom-right to lift out pigment, creating soft, ghostly streaks of rain.
Muddy Greens?
If your grass looks muddy, let layers dry completely between coats. Start with yellow-greens and finish with blue-greens to keep colors distinct.
Step 2: Layering the Meadow
-
Base Greenery:
Mix a watery Sap Green with a drop of Yellow Ochre. Using your size 8 round brush, paint loose, upward sweeping strokes for the background grass, letting them overlap the bottom of your sky wash. -
Tall Stems:
Once the sky involves is dry, switch to a rigger or size 2 brush. Mix a darker green (Sap Green + Burnt Sienna) and paint thin, decisive lines for the flower stems, varying their heights and curvature. -
Purple Spires:
For the tall purple flowers (likely salvia or lupine), mix Ultramarine and Magenta. Dab small, irregular dots up the sides of the tallest stems, making them smaller at the tip and fuller at the base. -
Pink Blooms:
Using pure Magenta with plenty of water, paint the open petals of the cosmos-style flowers. Keep the shapes loose and organic, leaving tiny gaps of white paper for highlights. -
Blue Accents:
Add the lower bluebells or cornflowers near the bottom right using a concentrated Ultramarine. Use short, stabbing strokes to mimic the clustered texture of these blooms.
Level Up: Salt Texture
Sprinkle table salt onto the wet foreground grass wash. Let it dry completely before brushing it off to create a crystalized, frosty texture.
Step 3: Details & Atmosphere
-
Deepening Values:
Mix a dark green using Sap Green and Payne’s Grey. Paint shorter, darker blades of grass in the foreground corners to create depth and frame the lighter center. -
The Daisy Centerpiece:
If you didn’t use masking fluid, use thick white gouache to paint the petals of the daisy. Add a dot of Yellow Ochre mixed with Burnt Sienna for the center button. -
Rain Splatter:
Load a brush (or toothbrush) with clean water and tap it sharply over the painting while the flower layers are slightly damp. This creates ‘blooms’ or textured watermarks that look like raindrops hitting the scene. -
White Highlights:
Use a small detail brush dipped in white gouache to add highlights to the pink petals and tiny white seed heads floating among the grass. -
Reinforcing the Rain:
I like to take white gouache diluted slightly with water and use a liner brush to paint very thin, long diagonal lines over parts of the dark background to emphasize the falling rain. -
Final Contrast:
Add tiny touches of darkest green or brown at the very base of the stems to ground the plants.
Peel off the tape carefully to reveal your crisp edges and enjoy your stormy meadow scene
Ink Outline With Loose Color Blooms
Capture the fragile beauty of a summer meadow with this elegant mixed-media piece. By combining precise fine-liner ink details with soft, loose washes of watercolor, you’ll create a composition that feels both botanical and wonderfully breezy.
Step-by-Step Tutorial
Materials
- Heavyweight watercolor paper (300gsm, cold press with deckle edge)
- Fine liner pens (sizes 005 and 01, black waterproof ink)
- Watercolor paints (Sap Green, Alizarin Crimson, Olive Green, Burnt Umber)
- Round watercolor brush (size 4)
- Detail brush (size 0 or 2)
- Pencil (HB or H)
- Kneadable eraser
- Paper towel
- Water cups
Step 1: Sketching the Composition
-
Plan the Arrangement:
Begin by lightly sketching the main vertical stems with your HB pencil. Arrange them in a fan-like shape, originating from a central point at the bottom center of the paper, but spreading out naturally as they rise. -
Position the Heads:
Mark small circles or ovals where the flower heads will go. Place the two largest blooms (the pink cosmos-like flowers) on the left side, slightly staggered in height. Place a taller, cone-shaped bud near the top center and smaller sprigs on the right. -
Refine the Shapes:
Add very faint guidelines for the petals and the smaller leaves along the stems. Keep your pencil pressure extremely light so graphite doesn’t show through the translucent watercolor later. -
Clear Guidelines:
Gently roll a kneadable eraser over your sketch. You want to lift up most of the graphite, leaving only the faintest ghost of an image to guide your ink work.
Keep it Loose
Resist the urge to color inside the lines perfectly. Letting the watercolor spill over the ink edges creates that effortless “sketchbook” aesthetic seen in the photo.
Step 2: Inking the Botanicals
-
Start with the Main Stems:
Using your 01 fine liner, draw the long, slender stems. Don’t make the lines perfectly straight; add subtle wobbles and breaks to mimic organic growth. A slightly shaky hand actually helps here. -
Outline the Pink Petals:
Switch to the finer 005 pen for the flower heads. For the two main blooms on the left, draw the petals with jagged, notched outer edges. Keep the lines near the center broken or dotted to suggest texture. -
Detail the Centers:
Stipple (dot) the center of the flowers densely. Leave a tiny bit of white space in the very middle to suggest light hitting the pollen. -
Draw the Buds and Seed Heads:
For the dark, cone-shaped buds (like the one at the top left), use small, overlapping scale-like strokes. This creates the texture of a knapweed or thistle bud before it blooms. -
Add Leafy Texture:
Move to the central grassy stems. Instead of outlining full leaves, use short, quick dashes and flicks along the stem to represent narrow foliage and grass seeds. This keeps the look airy. -
Create the Right-Side Sprigs:
For the smaller plants on the right, draw tiny, teardrop-shaped leaves in pairs. Keep these elements simple and sparse to balance the visual weight of the larger flowers on the left. -
Final Ink Touches:
Add a few disconnected floating lines or dots near the top of the stems to suggest movement or loose seeds. -
Dry and Erase:
Wait at least 15 minutes to meaningful ensure the ink is bone dry. Gently erase any remaining pencil marks completely.
Splatter Texture
Load a toothbrush with diluted paint and flick tiny speckles over the paper. This mimics pollen and adds an organic feel that ties the isolated stems together.
Step 3: Adding the Color Wash
-
Mix a Soft Pink:
Dilute Alizarin Crimson with plenty of water to create a very pale, transparent pink wash. Test it on a scrap paper first; it should be barely there. -
paint the Main Blooms:
Using the size 4 brush, apply the pink wash to the two main flower heads. I prefer to paint slightly outside the ink lines in some spots and leave white space inside others for a loose, painterly effect. -
Deepen the Centers:
While the pink is still slightly damp, drop a slightly more saturated mix of pink and a tiny touch of brown into the center of the flowers. Let it bleed outward naturally. -
Mix a Muted Green:
Combine Sap Green with a touch of Olive Green and plenty of water. You want a natural, earthy green, not a bright synthetic one. -
Tint the Stems:
Using the detail brush, run a very thin line of the green wash along the ink lines of the stems. Don’t worry if the line breaks or misses the ink occasionally; this imperfection adds charm. -
Add Leaf Accents:
Dab the green mixture onto the small grassy leaves and the base of the flower buds. Vary the pressure to make some leaves darker and others lighter. -
Shadow the Buds:
Mix a tiny amount of Burnt Umber with indigo or black to make a dark grey. Carefully dab this into the darkest areas of the textured seed heads and buds to give them volume. -
Final Assessment:
Stand back and look at the balance. If any area looks too pale, add a second transparent glaze of color, but be careful not to overwork it. The beauty is in the simplicity.
Once the paint is fully dry, frame your botanical study in a simple wood frame to highlight the delicate details
Abstract Dot-Bloom Wildflowers
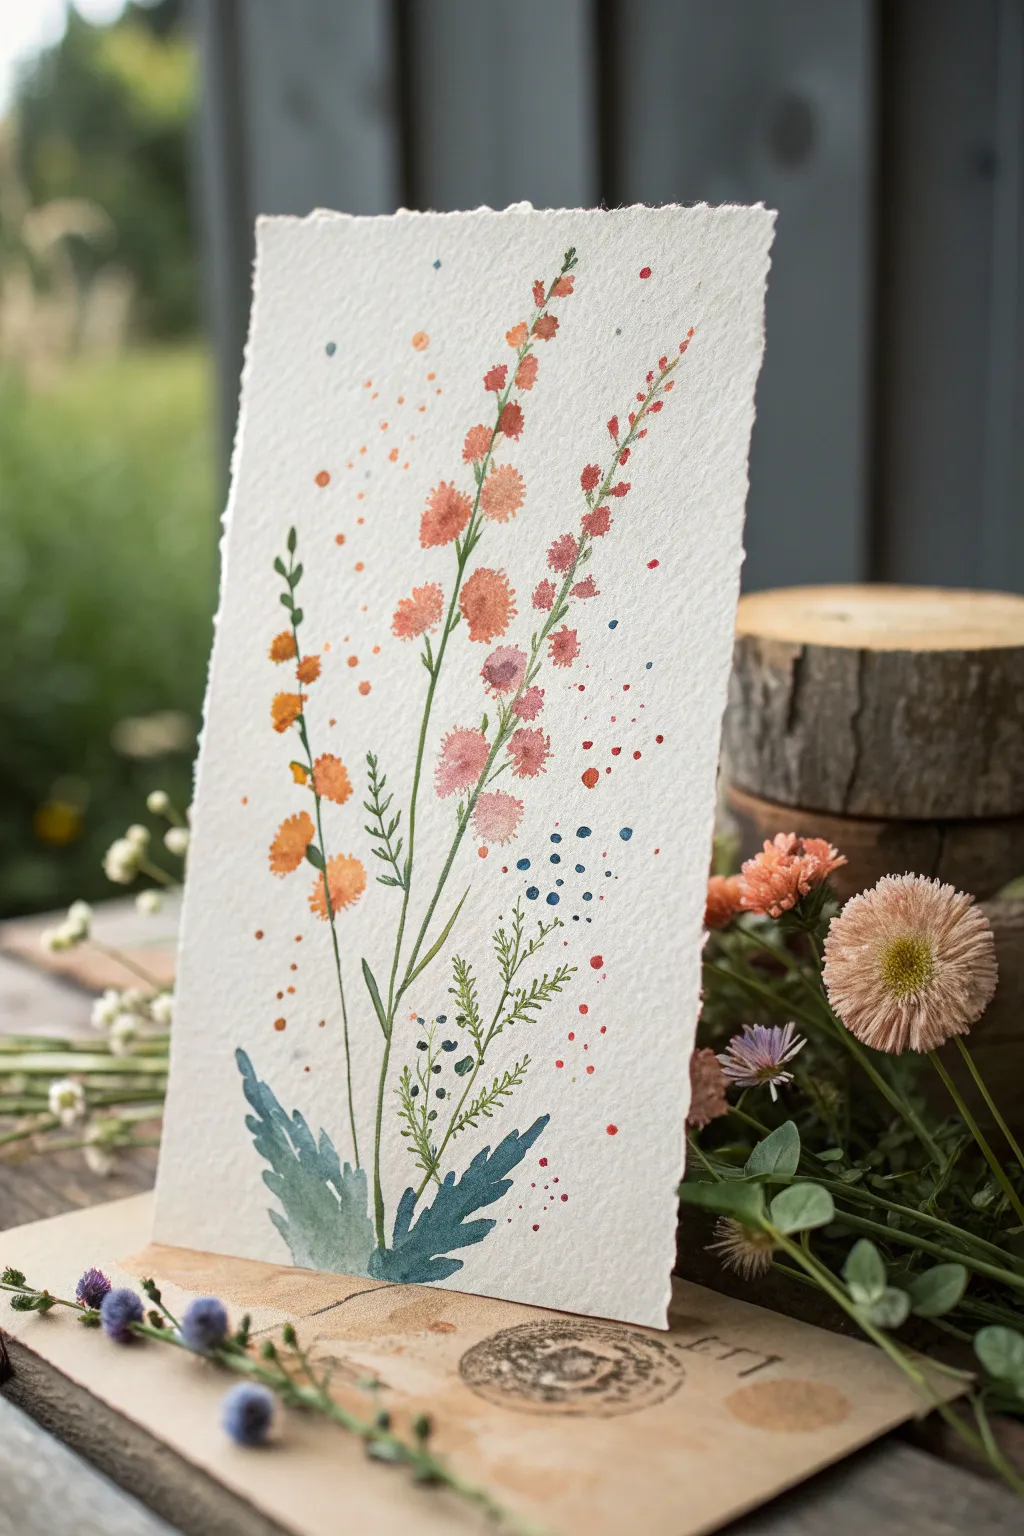
Capture the whimsical essence of a summer meadow with this loose, expressive watercolor project. Using a mix of wet-on-wet blending and playful splatter techniques, you’ll create vertical sprays of blooms that feel both delicate and untamed.
How-To Guide
Materials
- Heavyweight watercolor paper (300gsm cold press with deckle edge recommended)
- Watercolor paints (Sap Green, Burnt Sienna, Orange, Alizarin Crimson, Indigo)
- Round brushes (sizes 2, 4, and 8)
- Small rigger or liner brush
- Palette for mixing
- Two jars of water
- Paper towels
- Old toothbrush (optional for splatter)
Step 1: Planning and Base Stems
-
Observe the Composition:
Notice how the composition is vertical and slightly off-center. Visualize three main stem lines rising from the bottom center, fanning out slightly as they reach the top. -
Mix Your Greens:
Prepare a natural, muted green by mixing Sap Green with a touch of Burnt Sienna or Indigo. This keeps the foliage from looking too artificial. -
Paint Main Stems:
Using your size 2 brush or a liner brush, paint three fine, vertical lines. Let your hand wobble slightly; nature rarely produces perfect straight lines. These will be the spines for your flowers. -
Add Leafy Base:
At the very bottom where the stems converge, use the larger size 8 brush to paint broad, jagged leaves. Press the belly of the brush down and lift sharply to create the pointed tips, using a blue-green mix for depth.
Controlled Splatter
To prevent paint from splattering where you don’t want it, use scrap paper to mask off the bottom leaves or the white background areas while you tap the brush.
Step 2: Creating the Blooms
-
Mix Floral Colors:
Prepare puddles of watery paint in orange, coral pink (Alizarin Crimson + Orange), and a rusty red. Keep them fluid but pigmented. -
Start the Left Stalk:
For the leftmost flower, dab small, irregular clusters of vibrant orange along the upper half of the stem. Leave small gaps between clusters to keep it airy. -
Paint the Central Stalk:
The central flower uses larger, rounder bloom shapes. Load your size 4 brush with a watery peach-pink mix and touch the paper gently, letting the pigment pool. -
Add Color Variation:
While the central blooms are still damp, drop in a tiny amount of darker red or concentrated orange into the wet centers. Watch the colors bleed and blend naturally. -
Paint the Right Stalk:
For the tall, slender stalk on the right, use tiny dabs of reddish-pink. Make these marks smaller and narrower than the others, tapering off to tiny dots at the very top tip.
Step 3: Foliage Details
-
Add Side Shoots:
Switch back to your liner brush and the green mix. Draw thin, branching lines coming off the main stems to connect your floral clusters. -
Paint Fern-like Leaves:
Near the bottom half of the composition, paint delicate, fern-like fronds. Use the tip of your smallest brush to flick outward from the stem, creating feathery textures. -
Darken the Base:
Once the broad base leaves are semi-dry, glaze a darker layer of indigo-green over the bottom-most area to anchor the painting visually.
Rustic Edge
If you don’t have deckle-edge paper, you can tear thick watercolor paper against a ruler to create that beautiful, fibrous, hand-torn vintage look.
Step 4: Splatter and Texture
-
Prepare for Splatter:
This style relies on ‘controlled chaos.’ Load a medium brush with watery orange paint. -
Apply Warm Splatters:
Hold the brush over the painting and tap the handle against a finger to shower fine dots over the blooms. Focus the density near the flower heads. -
Add Cool Accents:
Clean your brush and repeat the splatter process with a deep blue or teal color. Keep these dots sparse and focused lower down or near the leaves to balance the warmth. -
Create ‘Floating’ Pollen:
Using the tip of a small brush, manually paint a few deliberate, larger dots in orange and red around the upper flowers to simulate floating pollen or seeds. -
Final Assessment:
Step back and look at the spread of dots. If an area looks too empty, add a small splash. If the stems look disconnected, draw a faint line to join them. -
Dry Completely:
Let the artwork lay flat until fully dry to prevent the wet splatters from running.
Display your meadow abstract on a small wooden easel or mount it to a handmade card for a lovely botanical gift
Limited-Palette Wildflowers in Monochrome
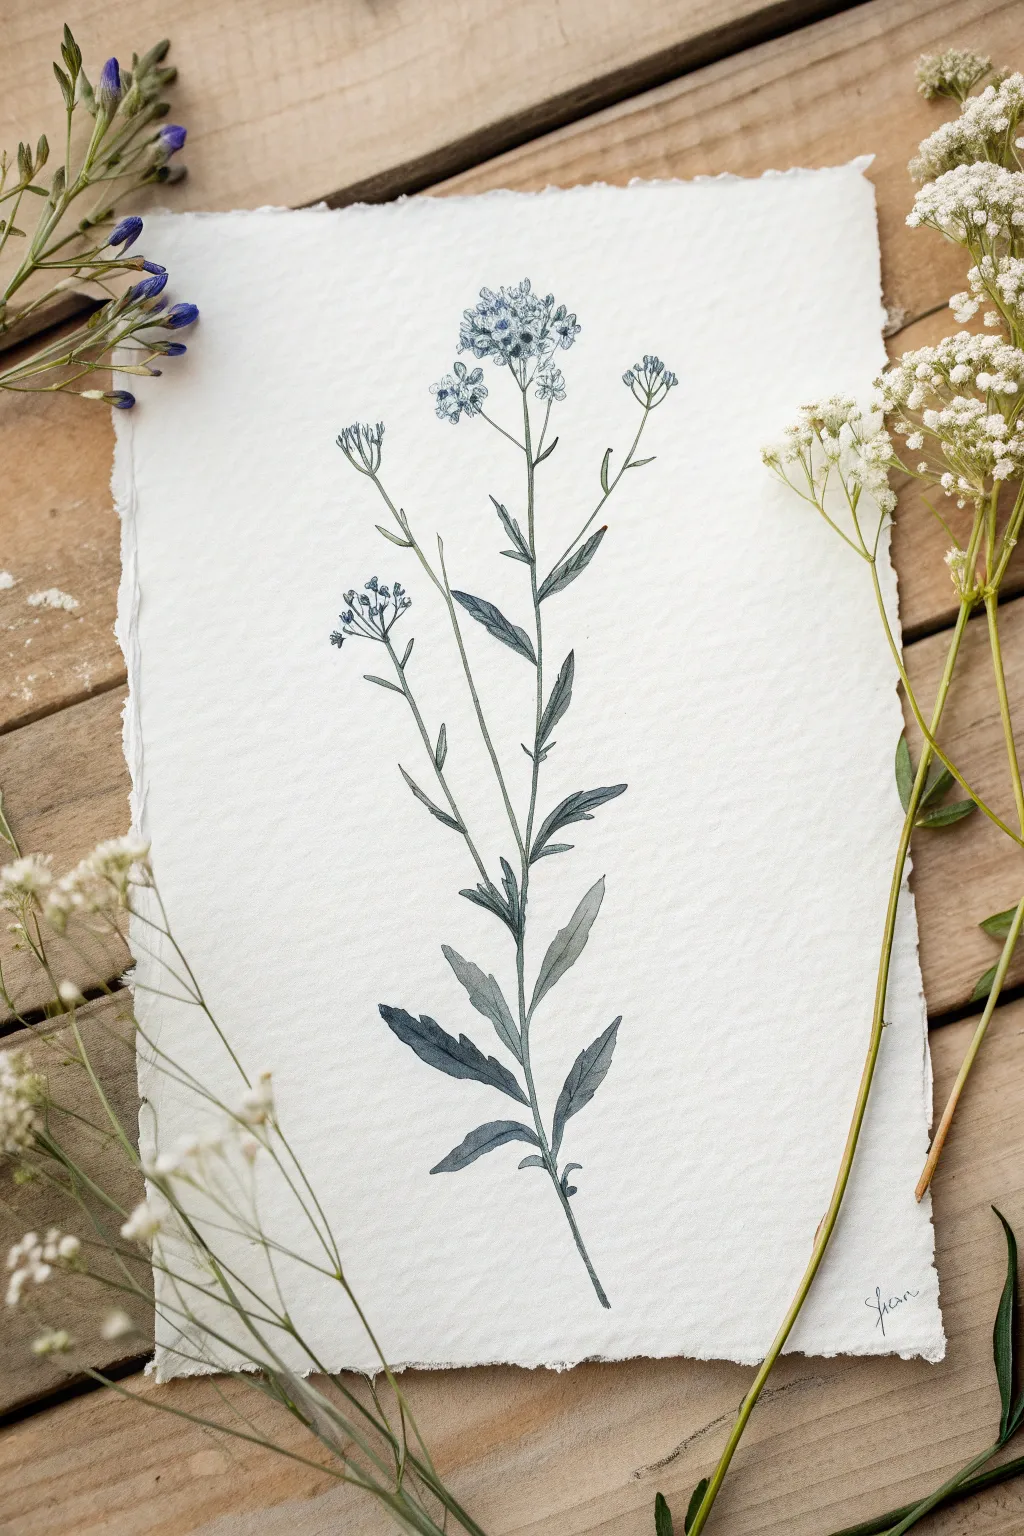
Capture the delicate beauty of a tall wildflower stem using a limited monochromatic palette of soft slate blues and greys. This project focuses on utilizing the texture of deckle-edge paper to give your botanical study a vintage, scientific illustration feel.
Step-by-Step
Materials
- Cold press watercolor paper (deckle edge heavily preferred)
- Pencil (HB or H)
- Kneaded eraser
- Indigo watercolor paint
- Payne’s Grey watercolor paint
- Ultramarine Blue watercolor paint (optional for tint)
- Round brushes (sizes 2 and 4)
- Fine liner brush (size 0 or 00)
- Jar of water
- Paper towels
Step 1: Sketching the Structure
-
Establish the main stem:
Begin by lightly drawing a central, slightly curved line down the middle of your paper to act as the primary stem. Let it lean naturally to one side rather than being perfectly straight. -
Add branching stems:
From the main stem, sketch thin, upward-reaching branches on alternating sides. Keep the angles acute, pointing sharply upward, as typical wildflowers like this grow. -
Outline leaf placements:
Sketch narrow, lance-shaped leaves growing from the lower to middle sections of the stem. The leaves should appear larger at the bottom and gradually become smaller as they ascend. -
Draft the flower clusters:
At the tips of your branches, lightly sketch loose, rounded shapes to indicate where the tiny flower clusters will sit. Don’t draw individual petals yet, just the general mass. -
Refine the sketch:
Gently refine the leaf shapes to have slightly jagged or serrated edges. Use your kneaded eraser to lift almost all the graphite until only a faint ghost image remains.
Step 2: Painting the Foliage
-
Mix your base color:
Create a watery mix of Indigo and a touch of Payne’s Grey. You want a cool, muted blue-grey that isn’t too saturated. Test the shade on a scrap piece of paper first. -
Paint the main stem:
Using your size 2 brush, carefully paint the main stem. Use the very tip of the brush to keep the line thin and elegant, varying the pressure slightly to create organic thickness. -
Wash in the leaves:
Fill in the leaf shapes with a light wash of your blue-grey mix. Start from the stem and pull the color outward toward the leaf tip. -
Add depth to leaves:
While the leaves are still damp, drop a slightly more concentrated mix of the same pigment into the base of the leaves (where they meet the stem) to create a natural shadow gradient. -
Define leaf edges:
Once the initial wash is dry, use the tip of the brush to carefully darken the serrated edges of the leaves and paint the central vein line.
Paper Choice Matters
For that authentic botanical specimen look, use 100% cotton paper with a heavy grain. Hand-tearing the edges creates a lovely ‘deckled’ effect.
Step 3: Detailing the Blooms
-
Create the flower texture:
Dilute your paint mix even further so it is very pale. Use a stippling motion (dotting) with the size 2 brush to create the clusters of florets at the top of the stems. -
Define individual florets:
Switch to your fine liner brush. With a darker, less diluted mix, paint tiny four or five-petal shapes within the dried stippled areas. Keep these loose and suggestive rather than perfect. -
Connect the blooms:
Use the liner brush to draw hair-thin stems specifically connecting the flower clusters back to the main branches. -
Enhance contrast:
Identify areas where leaves overlap or stems cross. Add a small stroke of your darkest Indigo mix here to separate the forms visually. -
Final stem details:
Check the connection points where branches meet the main stem. I like to add a tiny darker ‘V’ shape at these joints to make the plant look structurally sound. -
Signature or text:
If desired, sign your name small and subtly near the bottom right stem using the fine liner brush and the same paint mix for harmony.
Muddy Colors?
Monochrome relies on value control. If your painting looks flat, wait for it to fully dry, then glaze a very dark, concentrated layer only in the deepest shadows.
Allow the paper to dry completely flat before framing your elegant botanical study
Wildflower Meadow From a Top-Down View
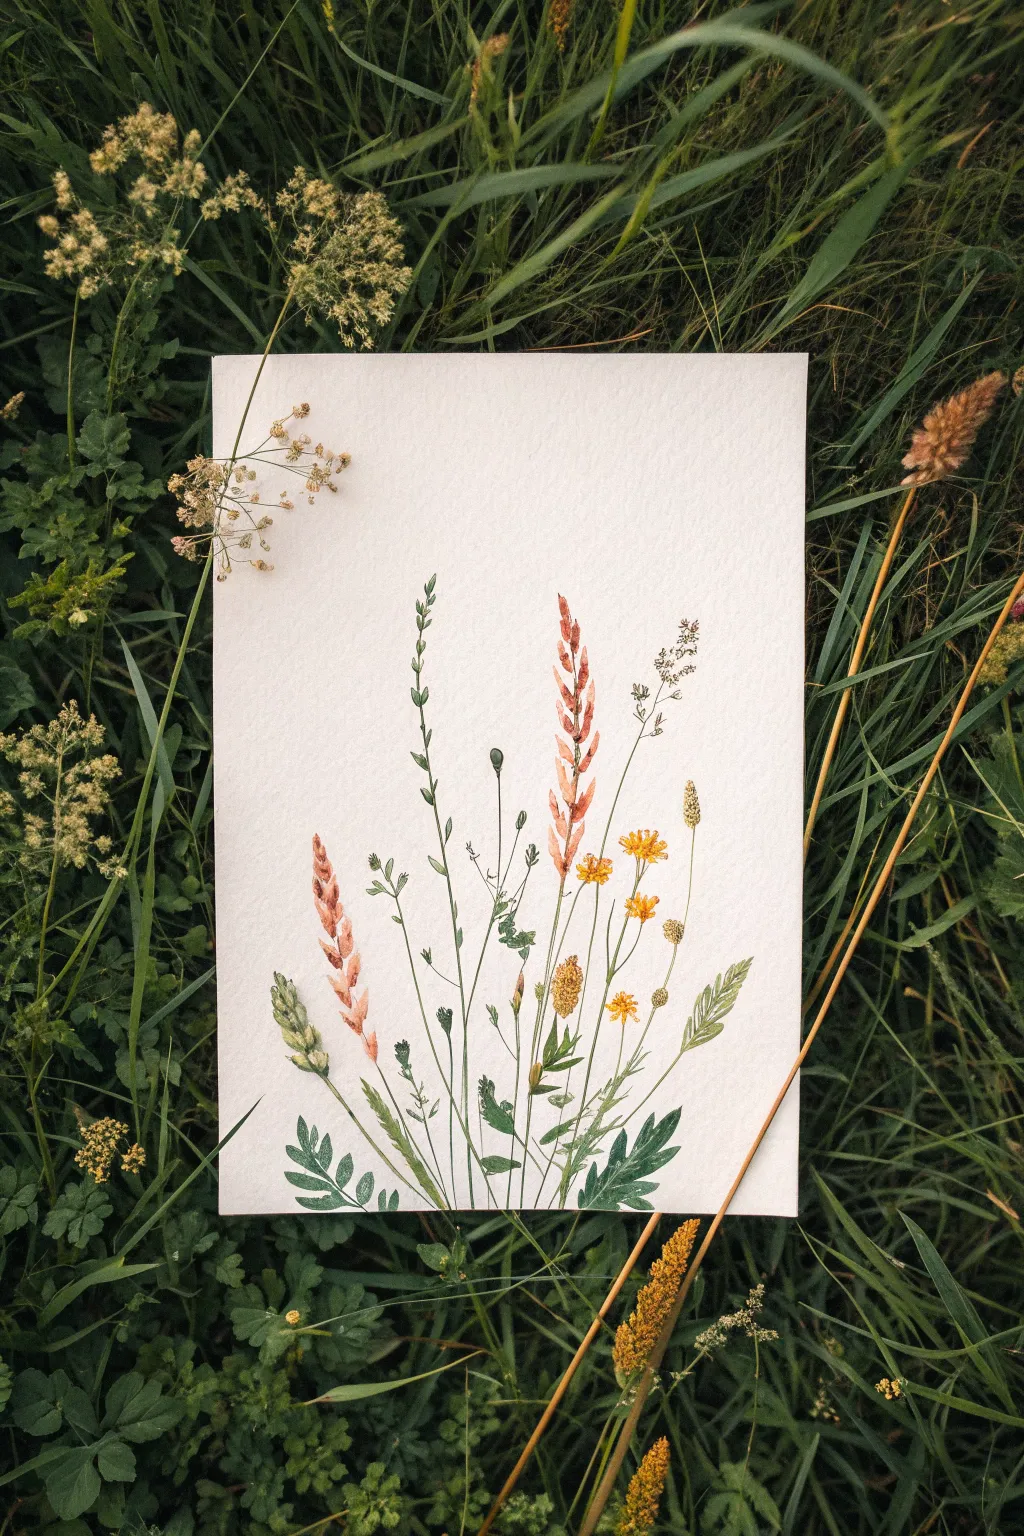
Capture the fragile beauty of a summer field with this vertically oriented watercolor study, featuring a gentle arrangement of grasses, rusty spires, and tiny yellow blooms. The airy composition mimics a freshly picked bouquet laid flat, focusing on botanical accuracy and soft, earthy hues.
How-To Guide
Materials
- Cold press watercolor paper (300 gsm)
- Watercolor paints (Sap Green, Burnt Sienna, Yellow Ochre, Cadmium Yellow, Payne’s Grey, Alizarin Crimson)
- Round brushes (sizes 0, 2, and 4)
- HB pencil for sketching
- Kneaded eraser
- Paper towels
- Water jars
Step 1: Sketching the Composition
-
Plan the stems:
Begin with a very light pencil sketch on your vertical paper. Draw faint, curving lines emerging from the bottom center, radiating outward slightly like a fan. These will be the spines for your various plants. -
Map the flowers:
Mark the positions of the main floral elements. Sketch elongated cone shapes for the reddish lupine-like flowers and small circles for the yellow blooms. Keep these outlines extremely faint so graphite doesn’t smudge into the yellow paint later. -
Detail the leaves:
Add the shapes of the foliage near the base. Sketch the fern-like leaves on the sides and the thinner, grass-like blades in the center. Use a kneaded eraser to lift any lines that look too heavy.
Step 2: Painting the Rusty Spires
-
Mix the color:
Create a warm, rusty coral shade by mixing Burnt Sienna with a touch of Alizarin Crimson and a drop of Yellow Ochre. It should look earthy, not neon. -
Base layer for spires:
Using a size 2 brush, paint the individual florets of the tall, spiked flowers. Start at the top of the bloom and work down, using small, tear-drop shaped dabs. Leave tiny white gaps between some dabs to keep it airy. -
Add dimension:
While the paint is still slightly damp, touch the bottom of each little floret with a slightly more concentrated mix of Burnt Sienna or Payne’s Grey to create a shadow effect.
Muddy Greens?
If your stems look dull, clean your water jar. Green is easily polluted by red or brown pigments on your brush. Mixing with fresh yellow restores vibrancy.
Step 3: Painting the Yellow Blooms
-
Apply yellow wash:
Mix a bright Cadmium Yellow with a hint of Yellow Ochre. Paint the small circular flower heads scattered on the right side of the composition. -
Define the centers:
Once the yellow is dry, use a tiny amount of orange or light brown on the tip of your size 0 brush to dot the centers of these flowers, giving them depth.
Go Smaller
For the finest stems, switch to a rigger brush or even a 000 size. The thinner the lines, the more delicate and realistic the wildflower illusion becomes.
Step 4: Greenery and Stems
-
Mix green variations:
Prepare two puddles of green: a fresh, yellowish Sap Green for new growth and a cooler, darker green mixed with Payne’s Grey for shadows and mature leaves. -
Draw the stems:
Using a rigger brush or a size 0 round brush, pull long, extremely thin stems from the flowers down to the base. Use a shaky hand intentionally here to make the stems look organic and natural. -
Paint the broad leaves:
For the fern-like leaves at the bottom left and right, use the size 4 brush. Press the belly of the brush down to create the wide part of the leaf and lift up for the tip. Use the darker green mix here. -
Add delicate details:
Switch to your smallest brush to add tiny leaves along the stems of the rusty flowers. These should just be quick, gestural flicks of the brush.
Step 5: Final Touches
-
Add texture to the seeds:
For any dried seed pods or grass heads (like the one on the far left), use a dry brush technique. Remove most moisture from your brush and scumble a brownish-green pigment to create a rough texture. -
Connect the base:
Ensure all stems meet naturally at the bottom. You can add a few extra wispy blades of grass in a very pale, watery green to fill any empty gaps at the base of the bouquet. -
Review and refine:
Step back and look at the balance. If any area looks too flat, subtle glazing with a darker tone can add instant volume without reworking the whole piece.
Allow the painting to dry fully before erasing any remaining visible pencil marks to avoid smearing the pigment


Have a question or want to share your own experience? I'd love to hear from you in the comments below!