A painted TV stand is one of my favorite quick-win makeovers because it instantly changes the whole mood of a living room. If your media console feels dated, a fresh color and finish can turn it into a piece you actually want to show off.
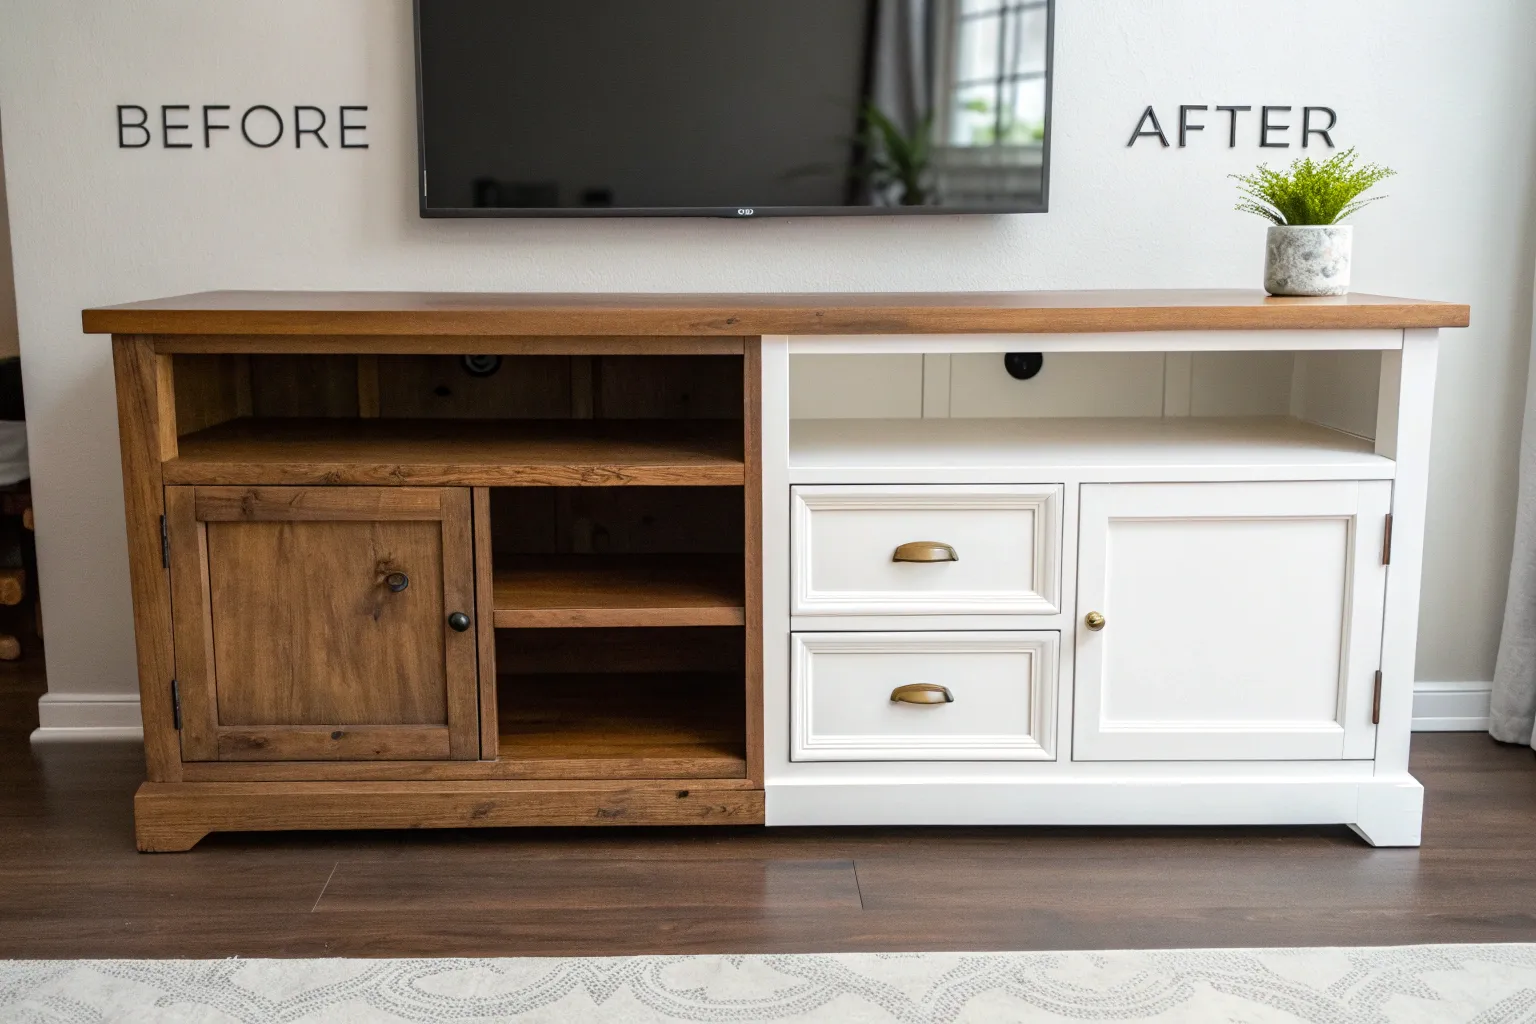
Classic Crisp White Makeover
Transform a dated or dark wood TV stand into a bright, airy focal point with this classic white finish. This project delivers a clean, modern farmhouse look that seamlessly blends with neutral decor while offering plenty of concealed storage.
Detailed Instructions
Materials
- Wooden TV stand (raw or previously finished)
- Medium-grit sandpaper (120-grit)
- Fine-grit sandpaper (220-grit)
- Tack Cloth
- High-quality bonding primer (oil-based or stain-blocking water-based)
- White semi-gloss or satin enamel paint
- Synthetic bristle angled paintbrush (2-inch)
- Mini foam roller or velour roller
- Screwdriver or drill
- Wood filler (if repairing old hardware holes)
- Painter’s tape
- Drop cloths
- New black hardware (knobs and hinges)
Step 1: Preparation & Disassembly
-
Clear and Clean:
Begin by removing all items from the TV unit, including electronics and decor. Wipe the entire piece down with a damp cloth and mild degreaser to remove dust, grime, and oils. -
Remove Hardware:
Using a screwdriver or drill, carefully remove all doors, drawers, knobs, hinges, and shelf supports. Place hardware in labeled bags if you plan to reuse any inner mechanisms. -
Fill Imperfections:
Inspect the surfaces for scratches or old handle holes you wish to relocate. Apply wood filler generously to these spots, letting it dry completely according to the package instructions. -
Sanding the Surface:
Scuff sand the entire unit—including the detached doors—with 120-grit sandpaper. You don’t need to strip it to bare wood, just remove the glossy sheen to help the primer stick. -
Dust Removal:
Vacuum up the sanding dust thoroughly. Follow up by wiping everything down with a tack cloth to ensure a perfectly clean surface for painting.
Step 2: Priming
-
Tape Off Areas:
Use painter’s tape to mask off any areas you don’t want painted, such as the back panel if it’s not being updated, or adjacent floor areas if painting in place. -
Apply Primer:
Apply a coat of high-quality bonding primer. Use a brush for corners and detailed moldings, and a foam roller for the large flat surfaces like the top and sides for a smooth finish. -
Check for Bleed-Through:
Allow the primer to dry. If you see yellow or pink stains bleeding through (common with older wood tannins), apply a second coat of stain-blocking primer to seal them in. -
Light Sanding:
Once the primer is fully cured, lightly sand the surfaces with 220-grit sandpaper to knock down any brush strokes or bumps. Wipe clean with a tack cloth.
Smooth Finish Secret
Add a paint conditioner like Floetrol to your white acrylic paint. It extends drying time and levels out brush marks for a factory-like finish.
Step 3: Painting & Finishing
-
First Coat of White:
Stir your white enamel paint thoroughly. Use your angled brush to paint the recessed panels of the doors and the interior corners of the shelving first. -
Rolling Flat Surfaces:
Immediately follow the brush work by rolling the flat areas—top, sides, and door frames—with a mini roller. This technique, often called ‘tipping off,’ helps smooth out brush marks. -
Drying Time:
Let the first coat dry for at least 4-6 hours, or as recommended by the paint manufacturer. Painting over tacky paint can ruin the texture, so patience is key here. -
Second Coat:
Apply a second coat using the same method. I tend to use a lighter hand on the second coat to avoid drips. Two coats are usually sufficient, but a third thin coat may be needed for full opacity. -
Curing:
Allow the paint to cure for at least 24-48 hours before reassembling. White paint shows imperfections easily, so ensuring it’s hard prevents premature scratches.
Sticky Doors?
If doors stick after painting, sand the edges where they meet slightly more than the front, or rub a clear candle wax on the contact points.
Step 4: Reassembly
-
Install Black Hardware:
Attach the new black contrasting hinges and knobs. The stark contrast between the black metal and crisp white paint is what defines this specific look. -
Reattach Doors:
Carefully screw the cabinet doors back onto the frame. Adjust the hinges as needed to ensure the doors hang straight and the gap between them is even. -
Style the Shelves:
Place your electronics back into the open shelf area. Use cable management ties behind the unit to keep cords hidden for that clean, organized appearance seen in the photo.
Enjoy the fresh, modern vibe your renewed TV stand brings to your living space


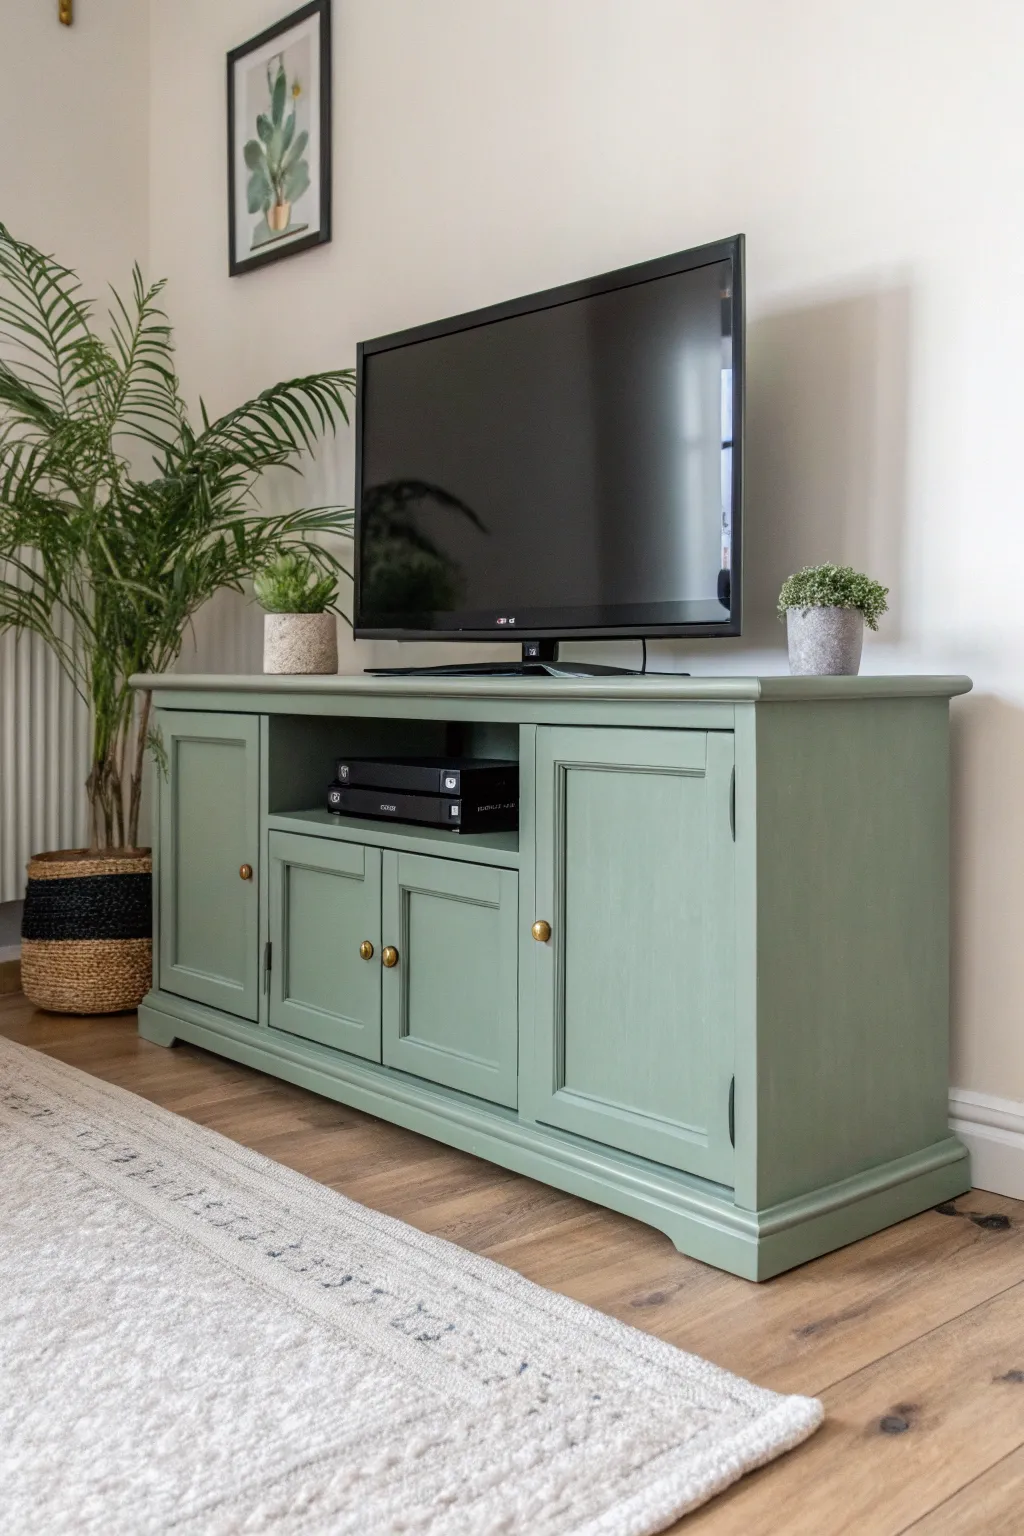
Soft Greige for a Calm Neutral Look
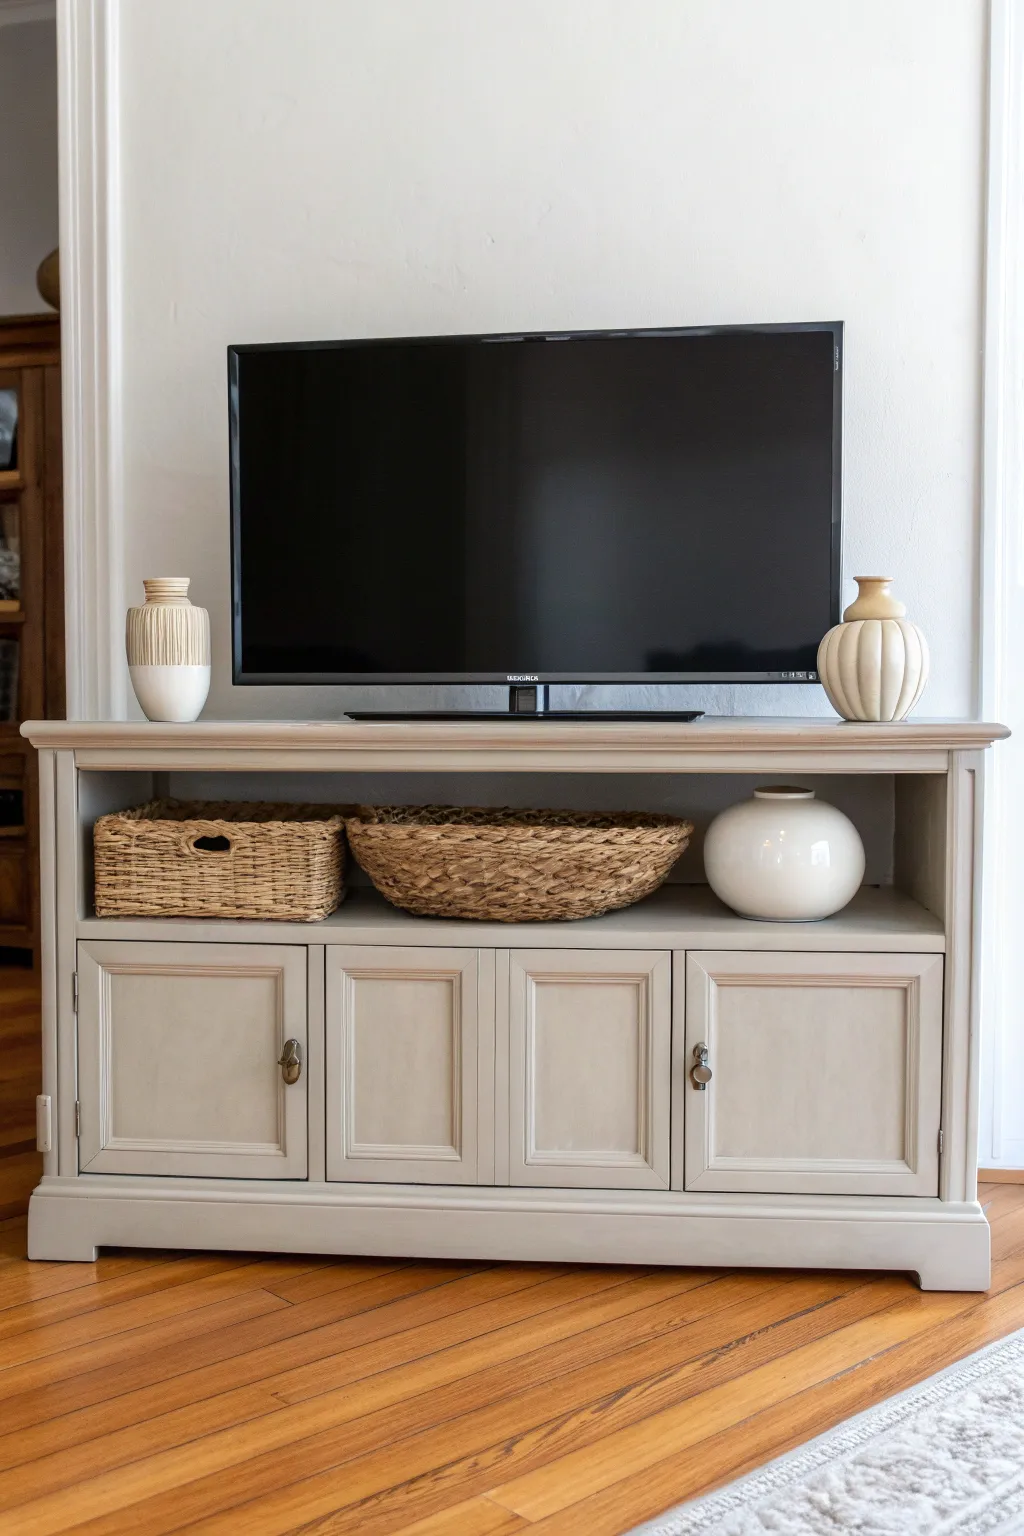
Transform a dated or basic wooden TV console into a soothing focal point with a custom greige finish. This soft, neutral tone bridges the gap between warm beige and cool grey, perfect for creating a calm, modern living space.
How-To Guide
Materials
- Wooden TV stand or buffet
- Medium-grit sandpaper (120-grit)
- Fine-grit sandpaper (220-grit)
- Sander (optional, for larger surfaces)
- Tack cloth
- High-quality bonding primer
- Greige furniture paint (satin or eggshell finish)
- 2-inch angled synthetic brush
- 4-inch foam roller and tray
- Small artist brush
- Screwdriver
- Painter’s tape
- Drop cloth
- Mild degreasing cleaner
Step 1: Preparation
-
Clear and Clean:
Begin by removing everything from the TV stand, including drawers and shelves if they are removable. Wipe down the entire piece with a mild degreasing cleaner to remove years of dust, oils, and furniture polish. -
Remove Hardware:
Using a screwdriver, carefully take off all knobs, handles, and hinges. Place these small parts and their screws in a labeled bag so nothing gets lost during the painting process. -
Protect Your Space:
Lay down a drop cloth in a well-ventilated area to protect your floors. If you can’t remove the backing or glass panels, tape them off precisely with painter’s tape. -
Scuff Sanding:
Use 120-grit sandpaper to give the entire piece a thorough scuff sand. You don’t need to strip it to bare wood; just roughen the glossy finish so the new paint has something to grip. -
Dust Removal:
Vacuum up the sanding dust, then wipe the surface with a tacky cloth. It is crucial to get every speck of dust off to ensure a smooth final finish.
Floetrol Secret
Add a paint conditioner like Floetrol to your latex paint. It slows drying time, allowing brush strokes to level out essentially disappearing for a sprayed-on look.
Step 2: Priming
-
Apply Primer:
Using your foam roller for flat surfaces and an angled brush for corners, apply a coat of high-quality bonding primer. This prevents bleed-through and ensures durability. -
Address Drips:
Check for drips along edges and smooth them out immediately before the primer sets. Let the primer dry completely according to the manufacturer’s instructions, usually overnight. -
Light Sanding:
Once dry, lightly glide over the primed surface with 220-grit sandpaper to knock down any raised grain or brush marks. Wipe away the dust with a tack cloth again.
Hardware Refresh
For a cohesive modern look, spray paint your old hardware matte black or brushed brass while your furniture paint dries. It’s an instant upgrade without buying new.
Step 3: Painting
-
First Coat – Edges:
Start with your greige paint. Use the angled brush to cut in around corners, inside detailing on doors, and other tricky spots where a roller won’t reach. -
First Coat – Surfaces:
Switch to highest-density foam roller for the large flat areas like the top, sides, and door panels. Roll in long, smooth strokes to avoid start-stop marks. -
Dry Time:
Allow the first coat to dry fully. It might look a bit streaky or translucent at this stage, but resist the urge to touch it up while it’s wet. -
Second Coat:
Apply a second coat using the same method: brush the details first, then roll the flat surfaces. I like to work relatively quickly here to keep a ‘wet edge’ for the smoothest finish. -
Detail Check:
Inspect the piece for any missed spots or heavy pooling of paint in the corners of the recessed door panels. Use a small artist brush to carefully fix any imperfections. -
Final Cure:
Let the paint cure for at least 24 to 48 hours before handling heavily. While it may feel dry to the touch sooner, curing ensures the finish hardens properly. -
Reassembly:
Reattach your hardware and slide the drawers back in. If you painted the drawer sides, rub a little candle wax on the tracks to help them glide smoothly.
Enjoy the serenity your newly refreshed furniture brings to your living room


Moody Charcoal for a Modern Edge
Transform a dated or basic wooden console into a sophisticated mood piece with this deep charcoal finish. The matte, slightly distressed texture gives it a lived-in modern edge that anchors any living room space.
Step-by-Step Guide
Materials
- Wooden TV stand or console
- Degreaser or TSP substitute
- Sandpaper (120 and 220 grit)
- Tack cloth
- Primer (stain-blocking)
- Charcoal grey chalk-style or mineral paint
- High-quality synthetic brush (angled sash)
- Small foam roller (optional for flat areas)
- Matte clear coat or furniture wax
- New hardware (knobs and pulls)
- Screwdriver
- Wood filler (if filling old hardware holes)
Step 1: Preparation
-
Remove Hardware:
Begin by removing all doors, drawers, and existing hardware. Keep the screws and hinges in labeled bags so reassembly is easy later. -
Clean Thoroughly:
Wipe down the entire piece with a degreaser or TSP substitute. This step is crucial to remove oils and furniture polish that could prevent paint adhesion. -
Address Imperfections:
If you are changing the hardware style and the holes don’t match, fill the old holes with wood filler. Let it dry completely. -
Scuff Sanding:
Using 120-grit sandpaper, give the entire piece a light scuff sand. You don’t need to strip it to bare wood, just rough up the shiny surface to give the primer something to grip. -
Dust Removal:
Vacuum up the sanding dust, then wipe everything down with a tack cloth to ensure a perfectly clean surface.
Step 2: Priming and Painting
-
Apply Primer:
Apply a coat of stain-blocking primer. This is especially important if your original piece has a red or orange wood tone, as it prevents bleed-through. -
Light Sanding:
Once the primer is dry, lightly run 220-grit sandpaper over the surface to smooth out any brush strokes, then wipe clean. -
First Coat:
Apply your first coat of charcoal paint. Use a high-quality synthetic brush to cut in corners and detailed molding first. -
Rolling Flat Surfaces:
For the top and side panels, I prefer to use a small foam roller immediately after brushing the edges to create a smooth, self-leveled finish. -
Dry Time:
Allow the first coat to dry according to the manufacturer’s instructions, usually 2-4 hours. -
Second Coat:
Apply a second coat of paint for full, opaque coverage. The dark charcoal color needs depth, so don’t rush this layer. -
Check Coverage:
Inspect the piece in good lighting. If you see any holidays (skipped spots) or unevenness, a light third coat might be necessary.
Pro Tip: Interior Painting
Don’t forget the inside of the open shelving area. Painting the back panel black or charcoal helps electronics and cords disappear into the shadows.
Step 3: Finishing Touches
-
Distressing (Optional):
For the look in the photo, lightly distress the edges using 220-grit sandpaper. Focus on corners and raised details where wear would naturally occur, revealing just a hint of wood underneath. -
Clean Up:
Wipe away all sanding dust thoroughly with a fresh tack cloth. -
Seal the Finish:
Apply a matte clear coat or clear furniture wax. Two thin coats offer better protection than one thick one, especially for the top surface where the TV sits. -
Reassemble:
Once the sealer has cured (usually 24 hours for light use), reattach the doors and drawers. -
Install Hardware:
Install your new knobs or pulls to complete the update.
Troubleshooting: Sticky Drawers
If painted drawers stick, rub a plain candle or beeswax along the wooden runners and sides to help them glide smoothly without scraping off paint.
Enjoy the sleek, updated presence this piece now brings to your entertainment area


Navy Blue Statement Console
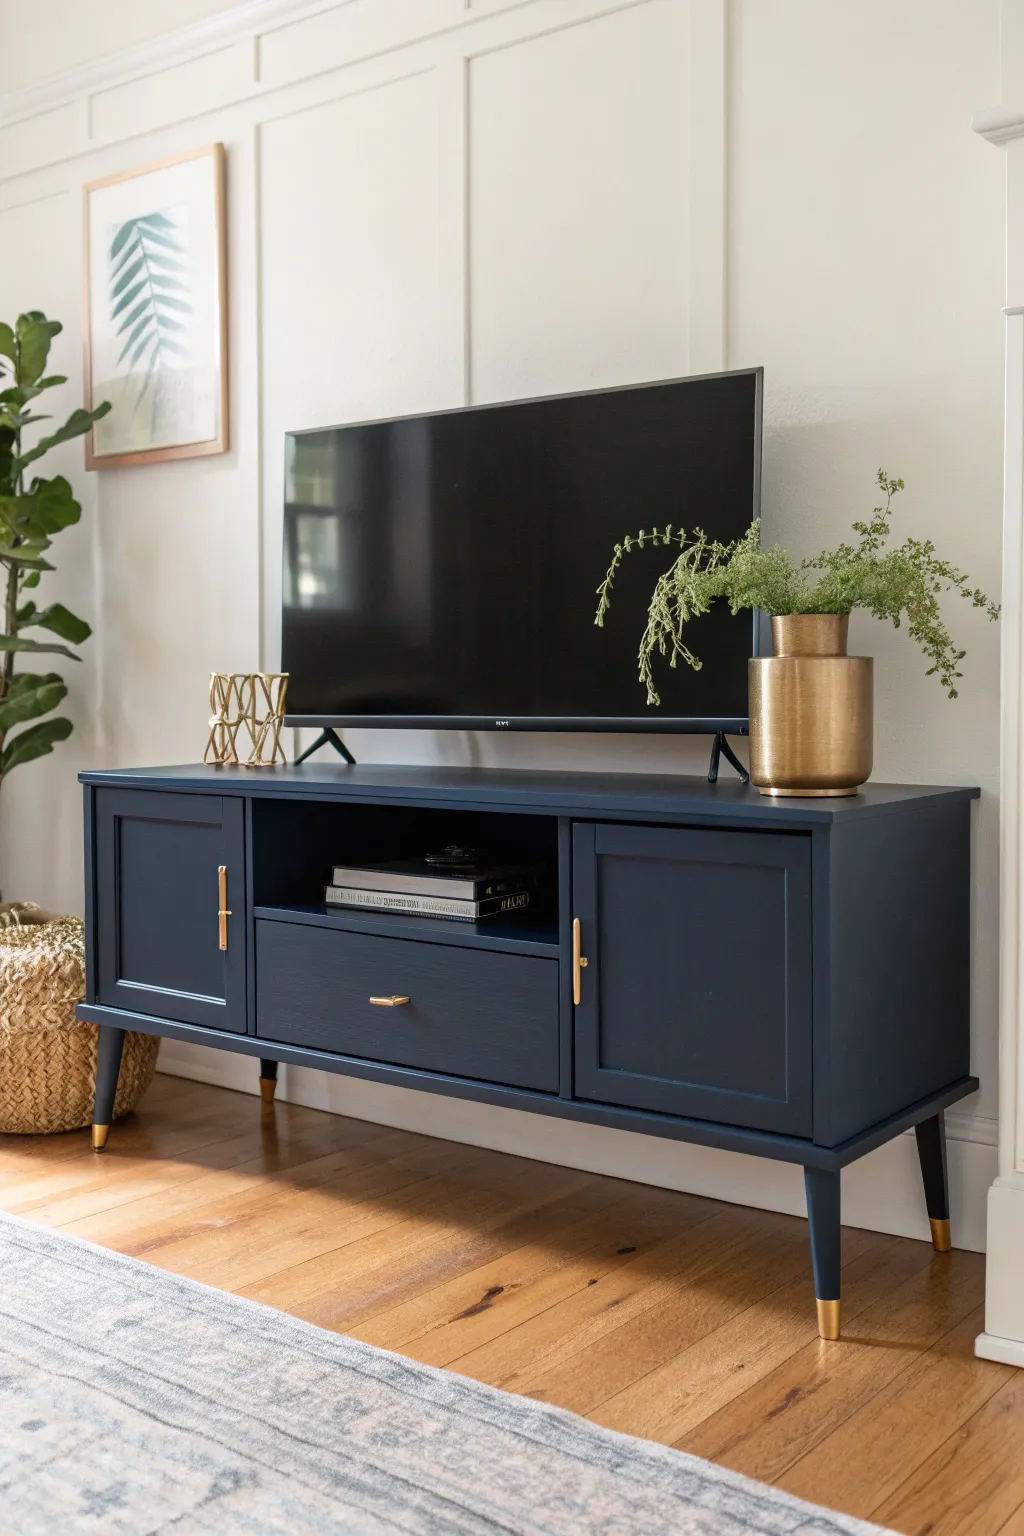
Transform a dated or basic media console into a sophisticated statement piece with this rich navy finish and elegant gold accents. The deep blue tone paired with brushed brass hardware creates a high-end look that anchors any living room.
Detailed Instructions
Materials
- Wooden media console or buffet
- Sanding block or orbital sander (120 and 220 grit)
- Painter’s tape
- TSP or degreaser cleaner
- High-quality bonding primer
- Navy blue furniture paint (satin or semi-gloss finish)
- Gold spray paint (metallic finish)
- Synthetic angled paint brush (2 inch)
- Small foam roller
- Modern gold drawer pulls and knobs
- Drop cloths
- Screwdriver
Step 1: Preparation & Dismantling
-
Clear Your Workspace:
Set up your workspace in a well-ventilated area, laying down drop cloths to protect your floors from dust and paint drips. -
Remove Hardware:
Using a screwdriver, carefully remove all existing knobs, handles, and hinges. Place the screws in a labelled bag so they don’t get lost. -
Take Out Drawers and Doors:
Pull out the drawers and unscrew the cabinet doors. Painting these pieces separately ensures a professional finish without drips or stuck edges. -
Clean Thoroughly:
Wipe down the entire piece with TSP or a strong degreaser to remove years of oils, dust, and furniture polish. This step is critical for paint adhesion. -
Sand Surfaces:
Scuff sand all surfaces with 120-grit sandpaper to remove the old glossy finish. You don’t need to strip it to bare wood, just create a grippy surface for the primer. -
Dust Off:
Vacuum up the sanding dust and follow up with a tack cloth or damp rag to ensure the surface is completely clean and smooth.
Sticky Drawer Fix
If painted drawers stick, rub a plain candle or block of paraffin wax along the wooden runners. The wax acts as a dry lubricant, helping drawers glide smoothly without damaging the paint job.
Step 2: Painting & Dipping
-
Tape the Legs:
Measure about 3-4 inches up from the bottom of each leg. Apply painter’s tape tightly around the leg at this mark to create a crisp line for the gold ‘dipped’ look. -
Apply Primer:
Roll or brush on a coat of bonding primer. If your console is dark wood, I often suggest a grey-tinted primer to help the navy blue cover better. -
Light Sanding:
Once the primer is fully dry, lightly hand-sand with 220-grit paper to smooth out any brush strokes or raised grain. -
First Coat of Navy:
Apply your first coat of navy blue paint. Use an angled brush for corners and details, then quickly smooth out flat areas with a foam roller for a factory-like finish. -
Dry and Repeat:
Let the first coat dry according to the can’s instructions. Apply a second coat to ensure full, opaque coverage. -
Spray Paint the Feet:
Cover the painted upper legs with paper or plastic to protect them. Spray the exposed bottom section of the legs (below the tape line) with metallic gold spray paint.
Elevate the Interior
For a thoughtful surprise, line the inside of the drawers or the back panel of the open shelving with a patterned contact paper or wallpaper that complements the navy blue exterior.
Step 3: Assembly & Finishing
-
Remove Tape:
Carefully peel off the painter’s tape from the legs while the gold paint is slightly tacky to prevent peeling the edge. -
Seal the Paint:
If your paint doesn’t have a built-in topcoat, apply a clear polycrylic sealer to protect the surface from scratches and wear. -
Replace Hardware:
Install your new gold pulls and knobs. This modern hardware is what truly elevates the piece from basic to designer. -
Reassemble Doors:
Reattach the cabinet doors and slide the drawers back into place, checking that everything aligns correctly. -
Final Polish:
Wipe away any fingerprints from the installation process with a soft cloth before moving the console into position.
Step back and admire how this bold color choice has completely revitalized your space with minimal cost
BRUSH GUIDE
The Right Brush for Every Stroke
From clean lines to bold texture — master brush choice, stroke control, and essential techniques.
Explore the Full Guide
Two-Tone Base and Wood Top
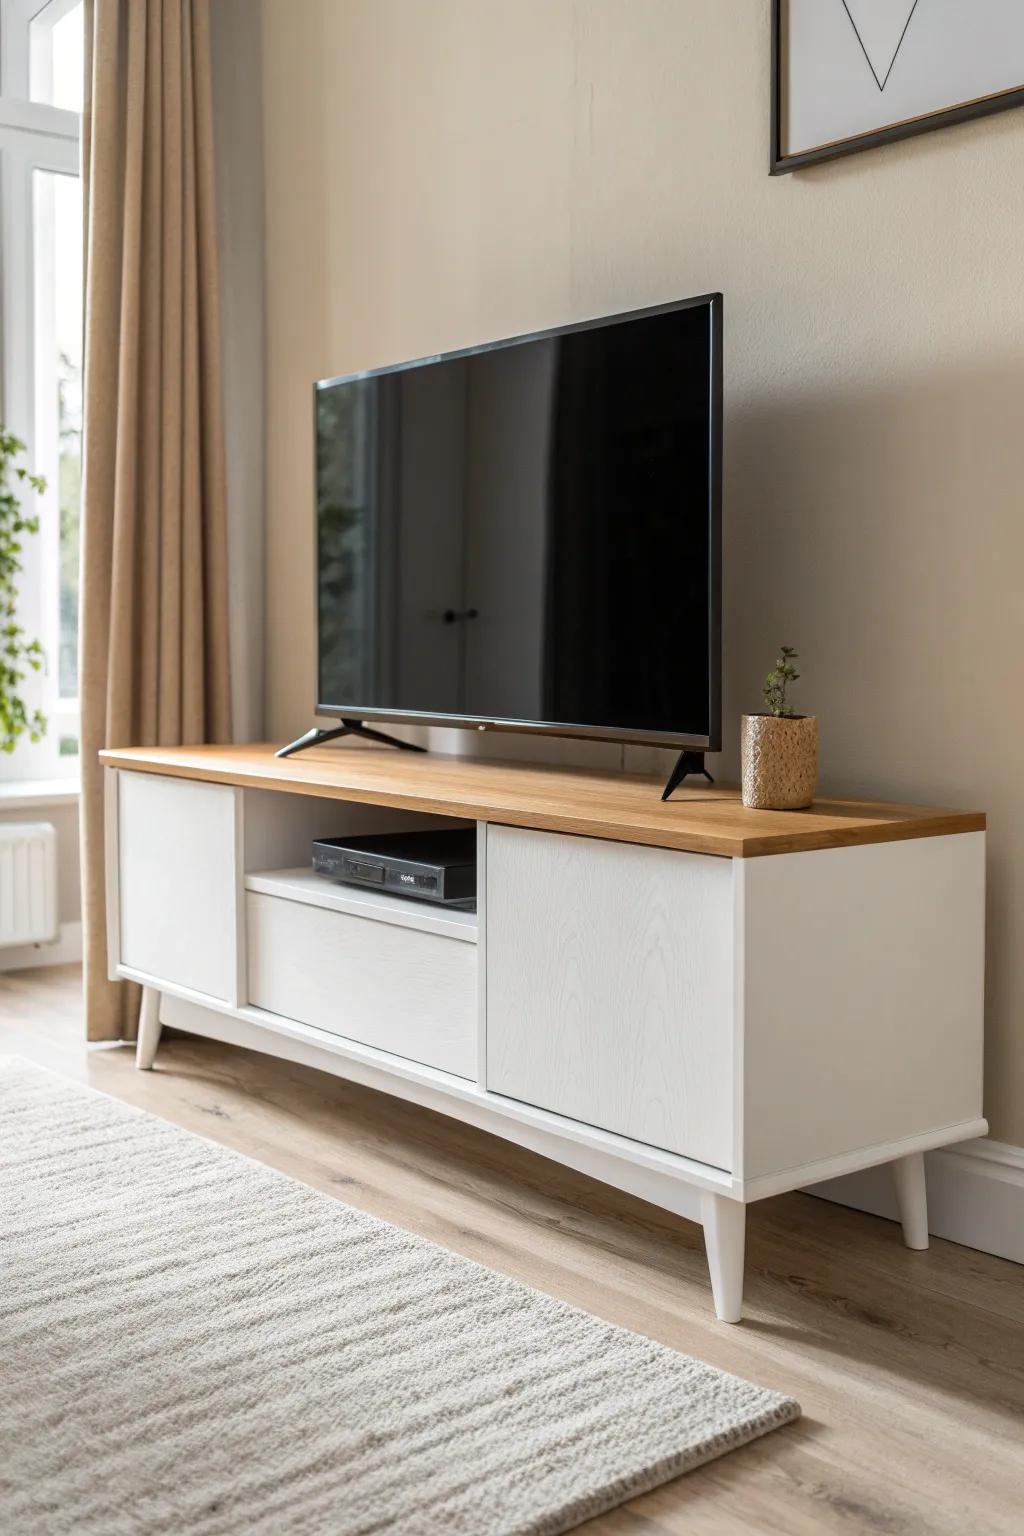
Transform a plain or dated media console into a fresh, Scandinavian-style masterpiece with this high-contrast makeover. By combining a crisp, white painted base with a warm, natural wood top, you achieve a timeless look that brightens any living space.
How-To Guide
Materials
- Wooden TV stand (solid wood or veneer)
- Orbital sander
- Sandpaper discs (80, 120, and 220 grit)
- Tack cloth
- Painter’s tape (high quality)
- Example: Zinsser B-I-N Primer (shellac-based)
- Example: Benjamin Moore Advance Paint in White (Satin or Semi-Gloss)
- Foam roller and tray
- Angled synthetic paintbrush (2-inch)
- Wood stain (optional, e.g., Golden Oak)
- Water-based polyurethane (matte or satin finish)
- Screwdriver or drill
Step 1: Preparation and Disassembly
-
Remove hardware and components:
Begin by removing all drawers and unhinging the cabinet doors from the main unit. Unscrew any existing handles or knobs and set them aside in a labeled bag so nothing gets lost. -
Clean the surfaces:
Wipe down the entire piece with a degreaser or a mixture of warm water and TSP substitute. This removes oils and furniture polish that could prevent the paint and finish from adhering properly. -
Sand the top down to raw wood:
Using an orbital sander with 80-grit paper, sand the top surface to remove the old finish. I find it satisfying to watch the old varnish disappear, revealing the raw grain beneath. Progress to 120-grit, then finish with 220-grit for a buttery smooth texture. -
Scuff sand the base:
For the parts you intend to paint (the legs, sides, and door fronts), you don’t need to strip to bare wood. simply scuff sand with 120-grit sandpaper to rough up the glossy surface and create ‘teeth’ for the primer. -
Remove dust:
Vacuum up all the sanding dust from both the unit and the workspace. Wipe every surface with a tack cloth to ensure absolutely no debris remains.
Pro Tip: Grain Direction
When sanding the top, always move your sander with the grain of the wood, not against it or in swirls. This prevents unsightly cross-grain scratches that show up vividly once you apply the clear coat.
Step 2: Staining and Sealing the Top
-
Mask off the base:
Apply painter’s tape just below the lip of the top surface to protect the area destined for white paint. Press the tape edges down firmly with a credit card to prevent bleed-through. -
Apply stain (optional):
If you want to alter the tone of the raw wood, apply your chosen stain with a lint-free rag now, wiping away excess after a few minutes. If you love the natural color, you can skip straight to sealing. -
Seal the wood top:
Apply a coat of water-based polyurethane using a high-quality brush or foam applicator. Water-based formulas keep the wood light and won’t yellow over time like oil-based ones. -
Sand and re-coat:
Once the first coat is dry, lightly hand-sand with 220-grit paper to knock down any raised grain. Apply a second and third coat of poly for a durable, drink-coaster-ready finish.
Step 3: Painting the Base
-
Protect the finished top:
Once the top is fully cured (give it 24 hours just to be safe), cover it entirely with plastic or kraft paper and tape off the edge where the wood meets the base. -
Apply primer:
Roll or brush a coat of shellac-based primer onto the cabinet box, doors, drawer fronts, and legs. This type of primer is excellent for blocking bleed-through stains from old tannins. -
Sand the primer:
After the primer dries, give it a quick, light sanding with fine-grit paper to smooth out any brush strokes or roller stipple. Wipe clean with a tack cloth. -
Paint the first coat:
Using a foam roller for flat surfaces and an angled brush for corners and legs, apply your first coat of white paint. Thin coats are better than thick ones to avoid drips. -
Paint the second coat:
Allow the first coat to dry according to the can’s instructions, then apply a second coat for full, opaque coverage. Don’t forget the edges of the doors and drawers.
Troubleshooting: Bleed Through
If pink or yellow stains appear through your white primer, stop painting. The old finish is bleeding tannins. Switch to a shellac-based primer specifically meant for stain blocking before continuing.
Step 4: Reassembly
-
Remove tape:
Carefully peel away the painter’s tape while the final coat is still slightly tacky. Pulling at a 45-degree angle helps ensure a crisp line without peeling up any dried paint. -
Let it cure:
Patience is key here. Let the paint cure for at least 48 to 72 hours before reattaching hardware; paint can feel dry to the touch but still be soft enough to dent. -
Reattach doors and drawers:
Screw the hinges back onto the doors and mount them to the cabinet. Slide the middle drawer back onto its tracks. -
Adjust alignment:
Check that the gaps around the doors and drawers are even. Use the adjustment screws on the hinges to tweak the door positions until they sit perfectly square.
Enjoy styling your bright, modernized focal point with a few simple plants or minimal decor
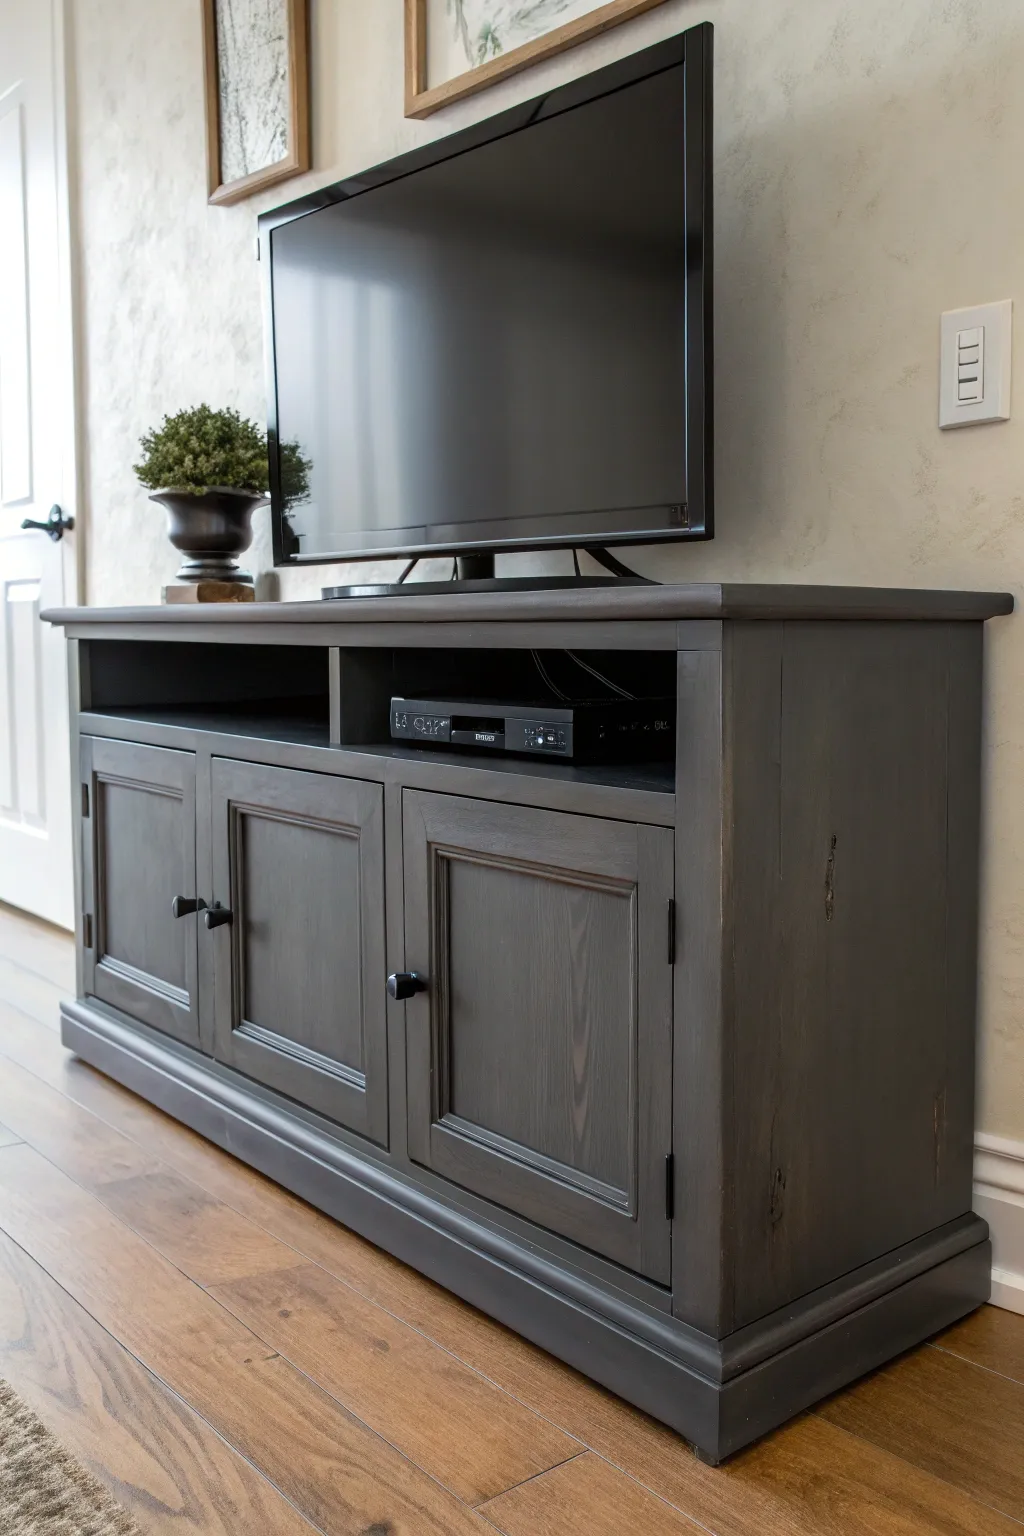
Matte Black for a Sleek Minimal Finish
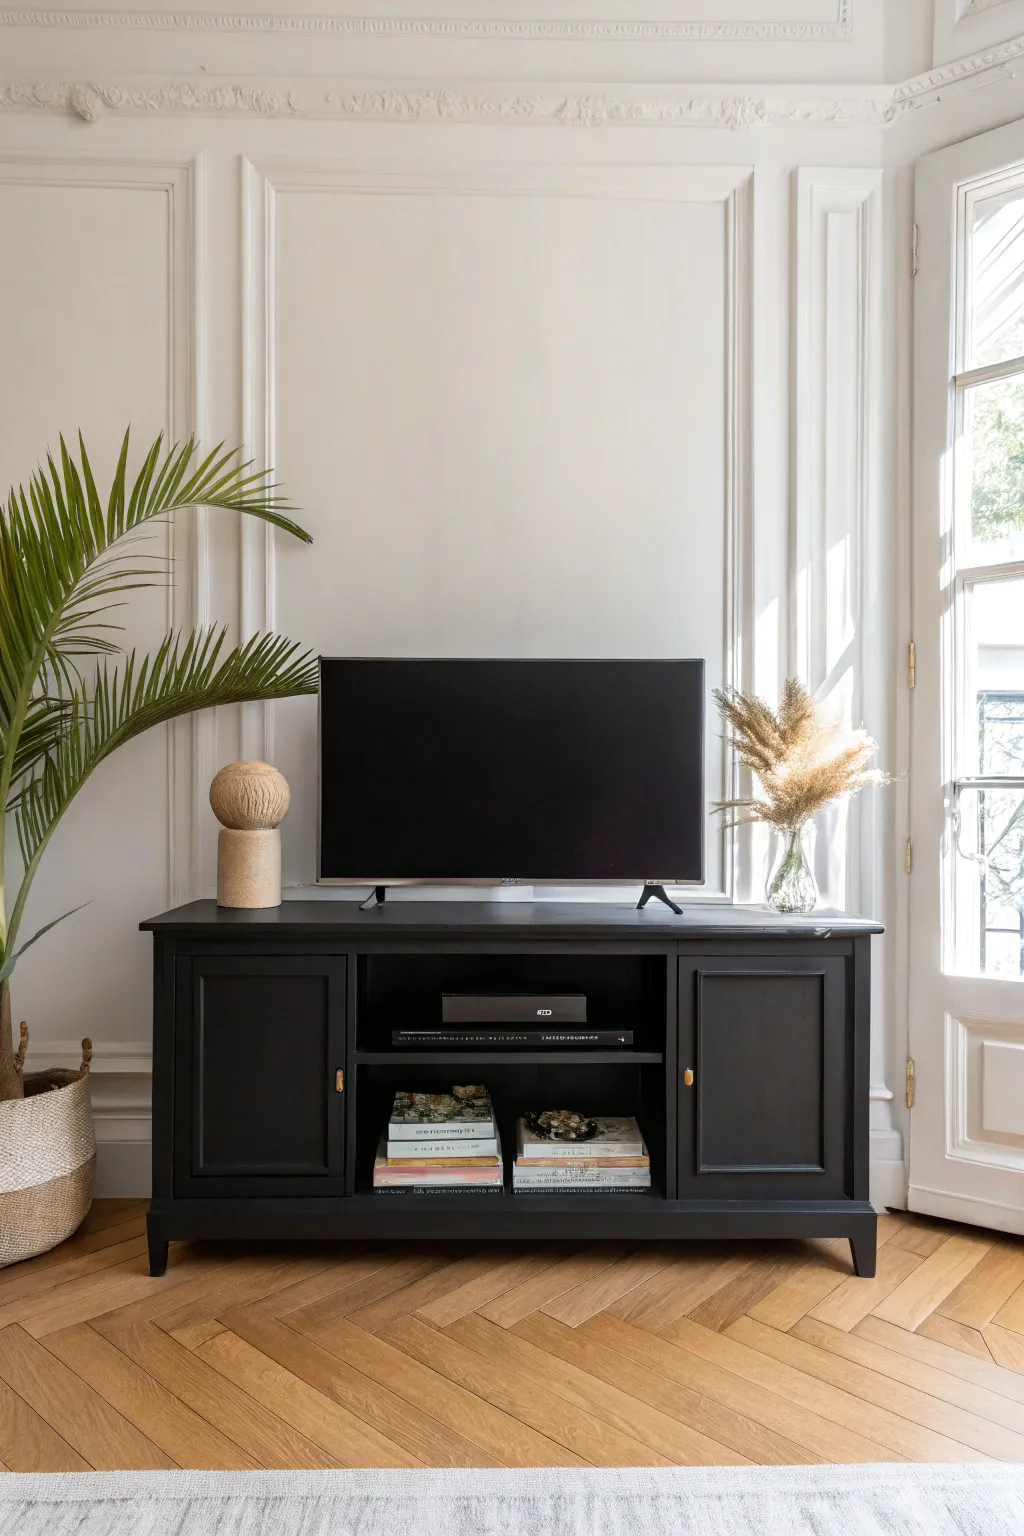
Transform a dated or basic wooden console into a sophisticated focal point with this matte black finish. This project creates a sleek, modern look that emphasizes clean lines while hiding imperfections in the original wood.
Detailed Instructions
Materials
- Wooden TV stand or buffet
- Degreasing cleaner (e.g., TSP)
- Medium-grit sandpaper (120-150 grit)
- Fine-grit sandpaper (220-300 grit)
- Wood filler (if repairing)
- Painter’s tape
- High-quality stain-blocking primer
- Ultra-matte black chalk or mineral paint
- High-density foam roller
- Angled synthetic bristle brush (2-inch)
- Clear matte protective topcoat (polycrylic or wax)
- Drop cloth
- Screwdriver
Step 1: Preparation & Cleaning
-
Clear and unscrew:
Begin by removing all items from your furniture piece. Using a screwdriver, carefully detach all hardware, including knobs, handles, and hinges. Place these small parts in a labeled bag so they don’t get lost. -
Deep clean the surface:
Wipe down the entire piece with a degreasing cleaner like TSP or a strong dish soap solution. This removes built-up oils or furniture polish that could prevent the new paint from adhering properly. -
Fill imperfections:
Inspect the surfaces for scratches or dings. Apply a small amount of wood filler to these areas, smoothing it out with a putty knife. Let it dry completely according to the package instructions. -
Scuff sand the wood:
Using medium-grit sandpaper (around 120-150 grit), sand the entire surface. You aren’t trying to strip it bare, but rather to rough up the existing finish to give the primer something to grip. -
Remove dust:
Vacuum up the sanding dust thoroughly. Follow up with a damp tack cloth or microfiber rag to ensure the surface is completely debris-free.
Pro Tip: Tint Your Primer
Ask the paint store to tint your primer grey. It provides far better coverage for black paint than white primer, often saving you a whole coat of expensive top paint.
Step 2: Priming & Painting
-
Apply the primer:
Roll or brush on a coat of high-quality stain-blocking primer. I like to use a grey-tinted primer if possible, as it helps transition the wood to black more easily than white primer. -
Dry and lightly sand:
Allow the primer to dry fully. Once dry, run a piece of fine-grit sandpaper (220 grit) lightly over the surface to smooth out any brush strokes or raised grain. -
Paint the corners:
Open your matte black paint. Using your angled synthetic brush, start by painting the corners, crevices, and the interior edges of the shelving area where a roller can’t reach. -
Roll the flat surfaces:
For the large flat areas (top, sides, and doors), use a high-density foam roller. This tool is essential for achieving that smooth, stroke-free finish seen in the photo. -
First coat drying time:
Let this first coat dry completely. Matte paints can dry quickly to the touch, but giving it the full recommended time ensures durability. -
Apply the second coat:
Repeat the cutting-in and rolling process for a second coat. This layer should provide full opacity and a rich, deep black color. -
Check for coverage:
Inspect the piece in good lighting. If you see any patchy areas, apply a light third coat just to those spots, feathering the edges to blend.
Troubleshooting: Streaky Finish
If you see streaks in your matte topcoat, you likely overworked it. Apply liquid topcoats quickly in long passes and do not go back over wet areas once they start to tack up.
Step 3: Sealing & Finishing
-
Choose your topcoat:
To maintain the flat look while adding protection, select an ultra-matte polycrylic or clear furniture wax. Glossy finishes will ruin the specific aesthetic shown in the image. -
Apply protection:
Apply the topcoat in thin, even layers. If using wax, buff it gently with a lint-free cloth after it hazes over. If using polycrylic, use a fresh foam roller for a seamless application. -
Cure time:
Let the piece sit undisturbed for at least 24-48 hours before placing heavy objects like a TV on top. The paint needs time to cure and harden. -
Reattach hardware:
Retrieve your hardware. If you kept the original gold knobs, polish them up; otherwise, this is a great time to swap them for new brass pulls to match the photo’s contrast. -
Final assembly:
Screw the doors back onto their hinges and adjust them so they hang straight. Place your shelves back in the center unit.
Enjoy the sleek transformation and the dramatic anchor this piece now provides for your living space

PENCIL GUIDE
Understanding Pencil Grades from H to B
From first sketch to finished drawing — learn pencil grades, line control, and shading techniques.
Explore the Full Guide
Warm Creamy White for Cozy Rooms
Transform a basic or thrifted media console into this serene, Scandi-inspired focal point. The soft, warm white finish paired with natural wood accents creates an airy brightness that instantly cozies up a living space.
Step-by-Step Tutorial
Materials
- Wooden media console (with drawers)
- Medium-grit sandpaper (120-grit)
- Fine-grit sandpaper (220-grit)
- Tacky cloth
- Painter’s tape
- Stain-blocking primer
- Warm creamy white furniture paint (satin or semi-gloss)
- Clear matte polyurethane topcoat
- Small foam roller
- Angled sash brush (2-inch)
- Screwdriver
- Wood stain (light oak or pecan)
- Lint-free rags
- Drop cloth
Step 1: Preparation & Sanding
-
Disassemble hardware:
Begin by removing all drawers from the unit. Unscrew the legs and any existing knobs or pulls, placing the hardware in a labeled bag so nothing gets lost during the renovation. -
Clean surfaces:
Wipe down the entire piece with a damp cloth and mild degreaser to remove dust, old furniture polish, or grime. A clean surface is crucial for paint adhesion. -
Sand the body:
Using 120-grit sandpaper, thoroughly sand all surfaces you intend to paint. You aren’t trying to remove all previous finish, just ‘scuffing’ it enough to create a tooth for the primer to grip. -
Sand the legs:
Since we want the legs to remain natural wood, sand them completely down to bare wood if they have an old finish. Use the 120-grit paper until the old color is gone. -
Smooth things out:
Do a final pass over everything with 220-grit sandpaper to ensure a silky smooth base. Follow this by wiping everything down with a tacky cloth to remove every speck of dust.
Step 2: Staining & Priming
-
Tape off accents:
If your unit has a wooden base trim like the one in the photo, create a sharp line with painter’s tape along the bottom edge where the white body will meet the natural wood trim. -
Stain the wood elements:
Apply your light oak or pecan stain to the bare wood legs and the bottom trim using a lint-free rag. Wipe away excess stain quickly to keep the tone light and natural. -
Prime the body:
Apply a coat of stain-blocking primer to the main body and drawer fronts. Use a brush for corners and the foam roller for flat surfaces to avoid brush marks. -
Let primer cure:
Allow the primer to dry completely according to the can’s instructions. If the grain raises or feels rough, lightly sand with fine-grit paper and wipe clean again.
Smooth Operator
Between paint coats, lightly sand with a brown paper bag instead of sandpaper. It buffs the paint smooth without removing opacity.
Step 3: Painting & Finishing
-
First coat of cream:
Stir your warm creamy white paint thoroughly. Begin applying the first coat using the angled brush to cut in corners and inside the open shelving cubby. -
Roll the flat surfaces:
Immediately follow the brush work with your foam roller on the drawer fronts, top, and sides. Keep a wet edge to ensure a seamless finish. -
Dry and repeat:
Allow the first coat to dry (usually 2-4 hours). Apply a second coat using the same technique. I find that light colors often need a third thin coat for full opacity. -
Seal the paint:
Once the paint has cured for at least 24 hours, apply a clear matte polyurethane topcoat to the painted surfaces for durability against scratches. -
Seal the wood:
Don’t forget to apply a coat of sealer to the stained legs and trim as well to protect the raw wood from moisture. -
Update hardware:
While the sealer dries, clean your original knobs. If they match the wood tone, simply re-attach them. If not, consider swapping them for round wood knobs stained to match the legs. -
Reassembly:
Screw the legs back onto the base and slide the drawers back into their tracks. Remove any remaining painter’s tape slowly at a 45-degree angle.
Custom Twist
Line the back of the open shelf cubby with a peel-and-stick wallpaper featuring a subtle linen texture for hidden depth.
Now you have a beautifully refreshed console ready to anchor your living room with warmth
Chalky Matte Finish for an Easy Refresh
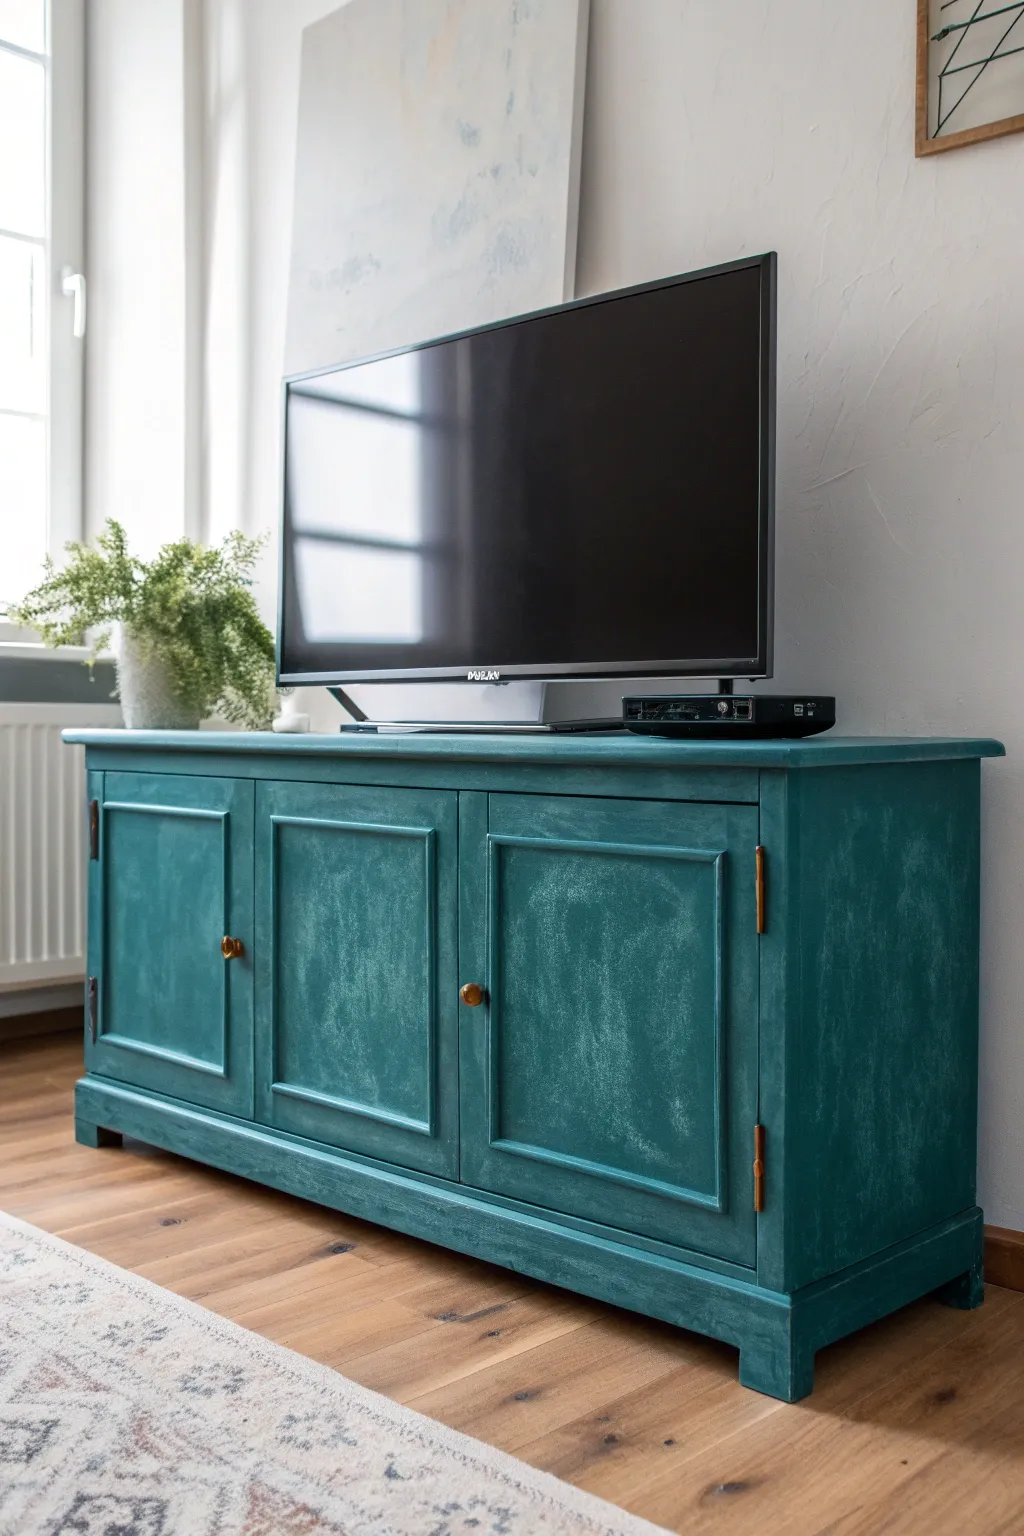
Transform a tired wooden sideboard into a stunning focal point with a rich, matte teal finish that feels both vintage and velvety. This project uses chalk-style paint to achieve that signature textured look without extensive prep work.
Detailed Instructions
Materials
- Wooden TV stand or sideboard
- Degreaser cleaner (TSP substitute)
- Sandpaper (120 and 220 grit)
- Deep teal chalk-style paint
- Dark or clear furniture wax (optional for protection)
- Oval chalk paint brush (medium size)
- Small artist brush for corners
- Lint-free rags
- Masking tape
- Drop cloth
- Screwdriver
Step 1: Preparation
-
Remove Hardware:
Begin by removing all knobs, handles, and hinges using a screwdriver. Keep these screws and pieces together in a ziplock bag so nothing gets lost during the process. -
Clean Thoroughly:
Wipe down the entire piece with a degreaser or TSP substitute. Old furniture often has built-up oils or wax that will repel paint, so scrub well and let it dry completely. -
Light Scuffing:
Although chalk paint adheres well, I always give the surface a quick scuff with 120-grit sandpaper. You aren’t stripping the finish, just creating ‘tooth’ for the new paint to grab onto. -
Dust Removal:
Vacuum up the sanding dust and follow with a tack cloth or damp rag to ensure a pristine surface. -
Tape Edges:
Apply masking tape to any internal areas, drawer slides, or back panels that you want to keep unpainted.
Brush Technique
For that textured look, brush in random, multi-directional strokes rather than straight lines. This creates subtle depth that catches the light beautifully on matte finishes.
Step 2: Painting
-
First Coat Application:
Dip your oval brush into the teal chalk paint. Apply the first coat using long, even strokes in the direction of the wood grain. Don’t worry if it looks streaky; coverage improves later. -
Tackle the Details:
Use a smaller artist brush to push paint into the recessed corners of the door molding panels where the large brush might miss. -
Allow to Dry:
Let the first coat dry for about an hour. Chalk paint dries quickly, but humidity can affect this. -
Sand for Smoothness:
Once dry, lightly run a piece of 220-grit sandpaper over the flat surfaces to knock down any high ridges or brush hairs. -
Second Coat Coverage:
Apply a second coat of teal paint. This layer should provide full opacity. Use a slightly lighter touch to minimize deep brush marks while maintaining that hand-painted texture. -
Check for Holidays:
Inspect the piece from different angles to spot any ‘holidays’—patches where the original wood still peeks through—and touch them up.
Step 3: Finishing Touches
-
Distress (Optional):
If you want the raised edges to show a bit of wear, gently sand the corners and molding edges with 220-grit sandpaper until the wood beneath acts as a highlight. -
Clean Up Dust:
Wipe the entire piece down with a dry, lint-free cloth to remove all sanding dust before sealing. -
Apply Wax:
Using a wax brush or clean rag, massage a clear furniture wax into the paint. This deepens the color and seals the porous chalk finish. -
Buff to Sheen:
Allow the wax to cure for about 15 minutes, then buff it vigorously with a clean cotton cloth to achieve a soft, satin sheen. -
Reinstall Hardware:
Once the wax is fully set (usually 24 hours is best before heavy handling), screw your knobs and hinges back into place.
Bleed-Through Blues
If yellow or pink stains seep through your teal paint, the old wood tannins are bleeding. Stop painting and apply a shellac-based primer over the stain before repainting.
Now you have a beautifully updated piece that anchors your room with color and character


Light Blue Coastal-Inspired Color
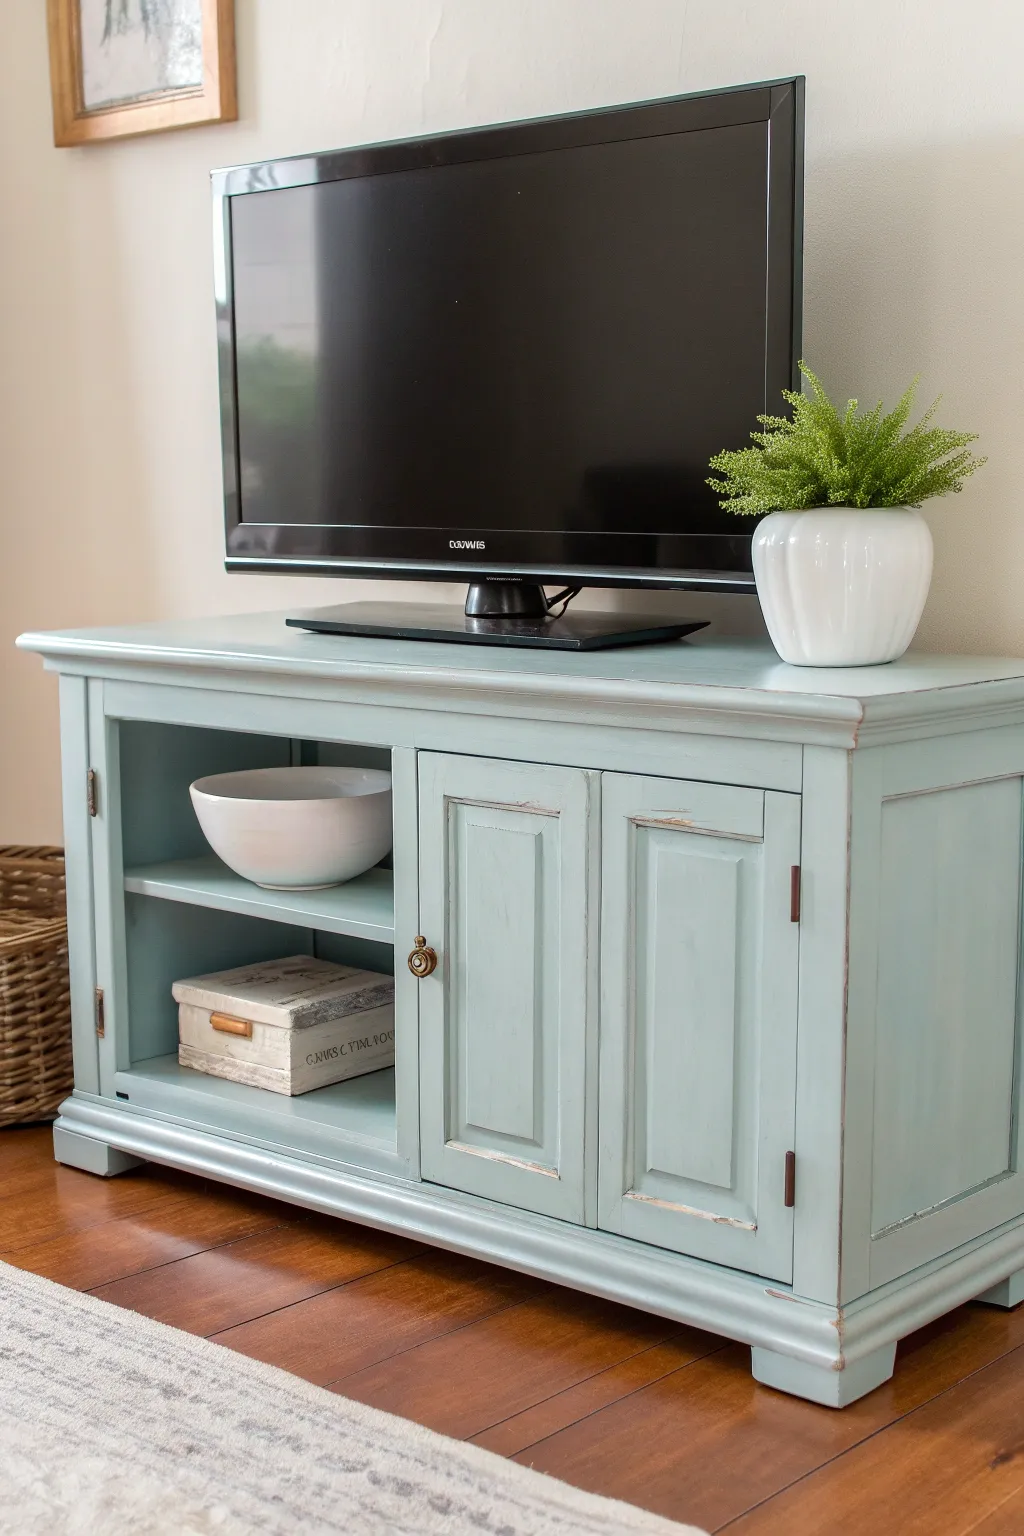
Bring the breezy, relaxed vibe of a seaside cottage into your living room with this refreshing furniture makeover. Using a soft robin’s egg blue chalk-style paint and strategic distressing, you can transform a standard wooden cabinet into a charming focal point that feels both vintage and airy.
Step-by-Step
Materials
- Wooden TV stand (raw or previously finished)
- Chalk-style paint in light aqua or robin’s egg blue
- Clear furniture wax
- Dark antique wax (optional for deeper aging)
- Medium-grit sandpaper (120-150 grit)
- Fine-grit sandpaper (220 grit)
- Clean lint-free rags
- Paintbrush (synthetic oval or round chalk paint brush)
- Wax brush or staining pad
- Drop cloths
- Screwdriver (for hardware removal)
- Mild cleaner or TSP substitute
Step 1: Preparation
-
Clear and clean:
Begin by removing all items from your TV stand, including any shelves that aren’t fixed. Wipe down the entire piece with a mild cleaner or TSP substitute to remove dust, grease, and years of grime. A clean surface ensures your paint adheres properly. -
Remove hardware:
Use a screwdriver to take off all knobs, pulls, and hinges if possible. Place them in a labeled bag so nothing gets lost. Painting without hardware installed gives a much cleaner, professional finish. -
Light sanding:
Even with chalk-style paint, a quick scuff sand helps. Run 120-grit sandpaper lightly over the surfaces to roughen up any glossy varnish. Wipe away the sanding dust completely with a damp rag.
Uneven Distressing?
If you sanded off too much paint, simply touch up that spot with a small artist’s brush, let dry, and gently re-sand. It’s very forgiving.
Step 2: Painting
-
First coat application:
Dip your brush into the light aqua paint. Apply the first coat using long, smooth strokes following the grain of the wood. Don’t worry if it looks slightly streaky deeply opaque coverage often comes with the second layer. -
Tackle the nooks:
Pay special attention to recessed panels on the doors and the interior shelving area. Dab paint into corners to ensure full coverage, then smooth it out to avoid pooling or drips. -
Dry time:
Let this first coat dry completely, usually about 1-2 hours depending on humidity. Use this time to wash your brush or take a break. -
Second coat for depth:
Apply a second coat of paint. This layer builds the rich color and hides the original wood tone completely. Keep your strokes even to minimize brush marks. -
Final dry:
Allow the piece to dry thoroughly, preferably overnight. The paint needs to be fully set before you start the distressing process, or it might peel away in chunks rather than sand off smoothly.
Add Texture
For a driftwood effect, mix a little gray paint with water (50/50) and brush it over the dried blue paint before waxing, then wipe back excess.
Step 3: Distressing & Finishing
-
Target high-traffic areas:
Take your 120 or 150-grit sandpaper and gently sand the edges, corners, and raised details. Imagine where wear would naturally occur over time—around the door frames, table edges, and near handles. -
Create natural wear:
Vary your pressure. Sand a bit harder in some spots to reveal the raw wood underneath, and lighter in others for a subtle fade. I like to step back occasionally to make sure the distressing looks balanced across the whole piece. -
Smooth the surface:
Once you’re happy with the distressed look, lightly go over the remaining flat painted surfaces with fine 220-grit sandpaper. This ‘polishes’ the chalk paint, making it feel silky smooth to the touch. -
Clean up dust:
Vacuum up the sanding dust and wipe the furniture down with a tack cloth or slightly damp rag. You need a dust-free surface for waxing. -
Apply clear wax:
Load a wax brush or lint-free rag with clear furniture wax. Massage it into the paint in small sections, working it into the pores of the paint to seal and protect it. -
Buff to finish:
Let the wax sit for about 10-15 minutes, then buff it vigorously with a clean, dry cloth. This buffs the wax to a beautiful, soft sheen that enhances the color. -
Reinstall hardware:
Screw the hardware back into place. If your old hardware doesn’t match the new look, consider spray painting the knobs in a matte black or antique brass for contrast.
Step back and admire how this fresh coat of paint has completely revitalized your space with coastal charm
Sage Green for a Soft Organic Feel
Transform a tired wooden unit into a calming focal point with a coat of soft sage green paint. This project creates an organic, modern-farmhouse look that feels both grounded and refreshing.
Step-by-Step Tutorial
Materials
- Solid wooden TV stand (used or thrifted)
- Medium-grit sandpaper (120-grit)
- Fine-grit sandpaper (220-grit)
- Sugar soap or TSP cleaner
- High-quality bonding primer
- Sage green furniture paint (eggshell or satin finish)
- Synthetic angled brush (2-inch)
- Small foam roller
- Small flat artist’s brush
- Brass knobs (small round style)
- Screwdriver
- Wood filler (if needed)
- Tack cloths
- Clear matte varnish (water-based)
Step 1: Preparation & Cleaning
-
Remove hardware:
Begin by unscrewing all existing knobs, hinges, and handles. Store the screws in a labelled bag so you don’t lose them, especially if you plan to reuse the hinges. -
Clean thoroughly:
Scrub the entire piece with sugar soap or TSP cleaner to remove years of grease, dust, and furniture polish. This step is crucial for paint adhesion. -
Sand the surfaces:
Use 120-grit sandpaper to scuff the entire surface. You don’t need to strip it to bare wood, just create a ‘key’ for the primer to grip. -
Fill imperfections:
Inspect the wood for deep scratches or old hardware holes you won’t be using. Apply wood filler, let it dry, and sand flush. -
Remove dust:
Vacuum up the sanding dust and wipe the piece down with a tack cloth to ensure a perfectly smooth surface.
Sticky Doors?
If doors stick after painting, sand the inner edges slightly. Paint adds thickness, so creating a tiny clearance gap prevents rubbing and chipping later.
Step 2: Priming & Painting
-
Apply primer:
Using your synthetic angled brush for corners and a foam roller for flat areas, apply an even coat of bonding primer. Let this dry completely according to the tin’s instructions. -
Light sanding:
Once the primer is dry, lightly hand-sand with 220-grit paper to smooth out any brush marks or raised grain. -
Paint the first coat:
Stir your sage green paint thoroughly. Start by cutting in the intricate edges, panels, and corners with the angled brush. -
Roll the flat surfaces:
Immediately follow the brush work by using the foam roller on the large flat surfaces like the top, sides, and door fronts to achieve a smooth, spray-like finish. -
Paint the difficult spots:
Use a small flat artist’s brush to get paint inside the open shelving area or tight corners where the roller won’t fit. -
Allow to dry:
Let the first coat dry for several hours. Don’t rush this; if the paint is tacky, the next coat will drag. -
Apply second coat:
Repeat the painting process for a second coat to ensure rich, opaque colour coverage. Check for drips immediately.
Step 3: Finishing Touches
-
Seal the paint:
For high-traffic surfaces like the top of the stand, apply two thin coats of clear matte varnish using a clean brush. This protects against scratches from the TV base. -
Reattach doors:
Once the unit is fully cured (ideally waiting 24 hours), screw the hinges back onto the cabinet doors and reattach them to the frame. -
Install new hardware:
Attach the small brass knobs. The contrast of gold against sage green really brings out that sophisticated, organic feel. -
Style the unit:
Place your TV and add greenery, like a potted plant next to the screen, to complement the new colour scheme.
Add Texture
For a rustic vibe, line the back of the open cubby shelf with beadboard wallpaper before painting, or swap the inner door panels for caning or rattan mesh.
Enjoy the calm atmosphere your newly refreshed furniture brings to your living space
Distressed Edges for Vintage Charm
Bring instant character to your living room with this perfectly aged TV stand makeover that balances farmhouse warmth with vintage charm. By layering creamy off-white paint over a dark base and strategically distressing the edges, you’ll create a piece that looks like it has countless stories to tell.
Detailed Instructions
Materials
- Wooden TV stand (dark wood finish preferred as a base)
- Sandpaper (120 and 220 grit)
- TSP substitute or degreaser
- Clean rags
- Cream or off-white chalk-style paint
- High-quality synthetic bristle brush (2-inch)
- Small artist brush for tight corners
- Clear furniture wax
- Dark antique wax (optional for deeper aging)
- Wax brush or lint-free cloth
- Masking tape
- Screwdriver for hardware removal
Step 1: Preparation & Cleaning
-
Remove Hardware:
Begin by taking off all knobs, pulls, and hinges using your screwdriver. Place all screws and hardware in a labeled baggie so nothing gets lost during the painting process. -
Clean Thoroughly:
Wipe down the entire piece with a TSP substitute or a strong degreaser. This step is crucial to remove years of furniture polish, oils, and dust that could prevent the new paint from adhering properly. -
Light Sanding:
Scuff sand the entire surface lightly with 120-grit sandpaper. You aren’t trying to strip the old finish completely, just creating a ‘tooth’ for the new paint to grip. Wipe away all sanding dust with a damp rag. -
Tape Off Interiors:
If you want to keep the inside of the shelf area or cabinet interiors unpainted, apply masking tape neatly along the inner edges to ensure crisp lines.
Too Much Distressing?
If you sanded off too much paint and the bare wood patch looks unnatural, simply dab a little bit of the cream paint back over that spot, let it dry, and re-distress it gently with lighter pressure.
Step 2: Painting & Coverage
-
First Coat Application:
Dip your synthetic brush into the cream chalk paint. Apply the first coat using long, smooth strokes following the direction of the wood grain. Don’t worry if coverage looks a bit streaky; chalk paint often needs two coats. -
Mind the Grooves:
Use the tip of your brush or a smaller artist brush to push paint into the recessed panels of the doors and the detailed molding under the top shelf. Ensure no drips collect in these corners. -
Dry Time:
Allow the first coat to dry completely, typically about 1-2 hours depending on humidity. It should feel dry to the touch and not tacky before proceeding. -
Second Coat:
Apply a second coat of paint for full, opaque coverage. I find this second layer really solidifies the rich, creamy color. Let this coat dry thoroughly, preferably overnight, to ensure the paint cures slightly before we start distressing.
Step 3: Distressing & Finishing
-
Targeted Distressing:
Take your 120-grit sandpaper and focus on the natural wear points. Rub firmly along the sharp edges of the top surface, the corners of the cabinet doors, and the raised molding details. -
Reveal the Base:
Continue sanding these areas until the dark original wood shows through the creamy paint. Vary the pressure—heavier on corners and lighter along straight edges—to mimic natural wear and tear over time. -
Surface Smoothing:
Switch to 220-grit sandpaper and very lightly run it over the flat painted surfaces. This knocks down any brush strokes and makes the paint feel buttery smooth without removing the color. -
Clean Up Dust:
Vacuum up the sanding dust and wipe the piece down with a lint-free cloth or tack cloth. It is vital that no dust remains before waxing. -
Apply Clear Wax:
Load your wax brush with a small amount of clear furniture wax. Work in small sections, massaging the wax into the paint in circular motions to seal and protect the finish. -
Buffing:
After the wax has hazed over (usually 15-20 minutes), use a clean, soft cloth to buff the surface vigorously. This creates a beautiful, subtle sheen and hardens the protective layer. -
Reattach Hardware:
Once the wax is fully buffed and dry, screw the hinges and knobs back into place. The dark hardware usually contrasts beautifully against the new light finish.
Add Dimension
Mix a tiny amount of dark wax with clear wax and brush it specifically into the deep crevices of the door panels for an shadowed, antique effect that highlights the molding.
Now you have a stunning focal point that combines modern function with timeless, rustic aesthetic
Glazed Finish for Extra Depth
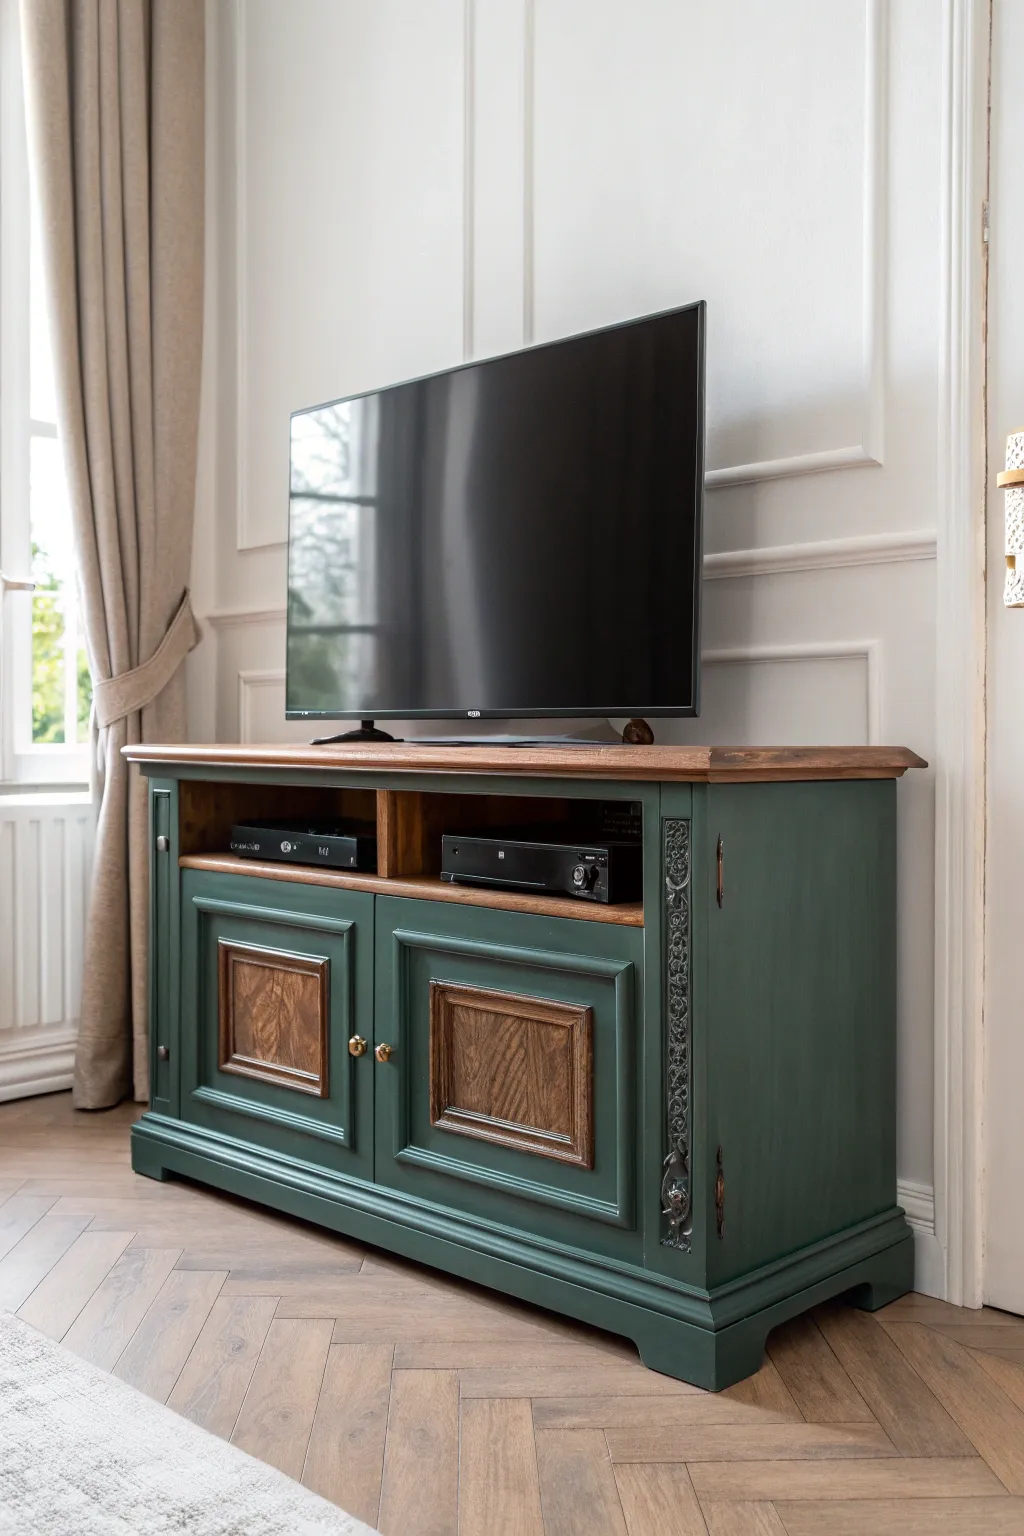
Transform a standard wooden media console into a focal point by combining rich, forest-green paint with exposed natural wood accents. This two-tone finish uses a dark glaze to settle into carvings and corners, creating an antique look that feels both historic and modern.
Step-by-Step
Materials
- Wooden TV stand (solid wood preferred)
- Sandpaper (80, 150, and 220 grit)
- Painter’s tape
- Adhesion primer
- Deep green chalk-style or mineral paint
- Dark wood stain (walnut or espresso)
- Dark antique glaze
- Polyurethane topcoat (satin finish)
- Paintbrushes (synthetic angle sash and flat)
- Lint-free staining rags
- Screwdriver (for hardware removal)
- Tack cloth
Step 1: Preparation & Stripping
-
Remove hardware:
Begin by removing all doors, drawers, knobs, handles, and hinges. Store the screws and hardware in labeled bags so nothing gets lost during the renovation process. -
Clean surface:
Wipe down the entire piece with a degreaser or TSP alternative to remove years of furniture polish, dust, and oils. -
Identify wood zones:
Decide exactly which parts will remain natural wood. For this look, mark off the top surface and the inset panels on the cabinet doors. -
Sand the wood accents:
Sand the top surface and door panels down to raw wood using 80-grit sandpaper if there is a thick existing finish, followed by 150 and 220 grit for smoothness. You want to completely remove the old finish here. -
Scuff sand the body:
For the areas you plan to paint (the frame, legs, and trim), lightly scuff sand with 150-grit paper. You don’t need to reach raw wood, just roughen the surface for paint adhesion. -
Remove dust:
Vacuum up all sanding dust and wipe the piece down thoroughly with a tack cloth to ensure a flaw-free base.
Step 2: Staining & Painting
-
Stain the accents:
Apply your chosen dark wood stain to the raw wood top and door center panels using a lint-free rag. Wipe away excess stain after a few minutes and let it dry completely according to the can’s instructions. -
Tape off areas:
Once the stain is dry, carefully apply painter’s tape to protect the stained wood edges where they meet the areas intended for paint. -
Prime the frame:
Apply a coat of high-quality adhesion primer to the body of the cabinet. This is crucial if the original finish was glossy. Let the primer cure fully. -
First coat of green:
Paint the primed areas with your deep green chalk or mineral paint. Use a high-quality synthetic brush to minimize brush strokes, working in the direction of the wood grain. -
Second coat:
After the first coat is dry to the touch, apply a second coat for full opacity. Pay special attention to the ornate carved details on the sides. -
Detail sanding:
Once the paint is fully dry, lightly sand over the carved details with 220-grit paper if you want a subtle distressed look, revealing just a hint of wood on the high points.
Glaze too dark?
If the glaze looks too heavy or muddy, immediately wipe it with a damp cloth. If it has started to dry, use a bit of the clear topcoat on a rag to ‘erase’ and lift the excess glaze.
Step 3: Glazing & Protection
-
Apply clear coat first:
I like to apply a thin layer of clear topcoat over the paint before glazing. This allows the glaze to glide over the surface rather than soaking in instantly, giving you more control. -
Apply the glaze:
Brush the dark antique glaze specifically into the crevices, corners, and the ornate carvings on the stiles. -
Wipe back:
Immediately wipe off the glaze with a damp shop towel or rag. Leave the dark pigment sitting in the recessed areas to create shadow and depth, but clean the flat surfaces. -
Seal the top:
Apply at least three coats of satin polyurethane to the stained wood top, sanding lightly with very fine grit (320 or 400) between coats for a durable, tabletop finish. -
Seal the body:
Finish the painted and glazed sections with two coats of protective sealer (wax or polycrylic), removing the tape carefully before the final coat dries completely. -
Reassemble:
Once everything has cured for at least 24 hours, reattach the doors and hardware to complete your custom furniture update.
Upgrade Hardware
Instead of reusing the old handles, swap them for antique brass knobs or cup pulls. The warmth of brass contrasts beautifully with deep green paint and dark wood.
Enjoy the sophisticated warmth this custom two-tone piece brings to your living space
Hardware Swap to Match the Paint Color
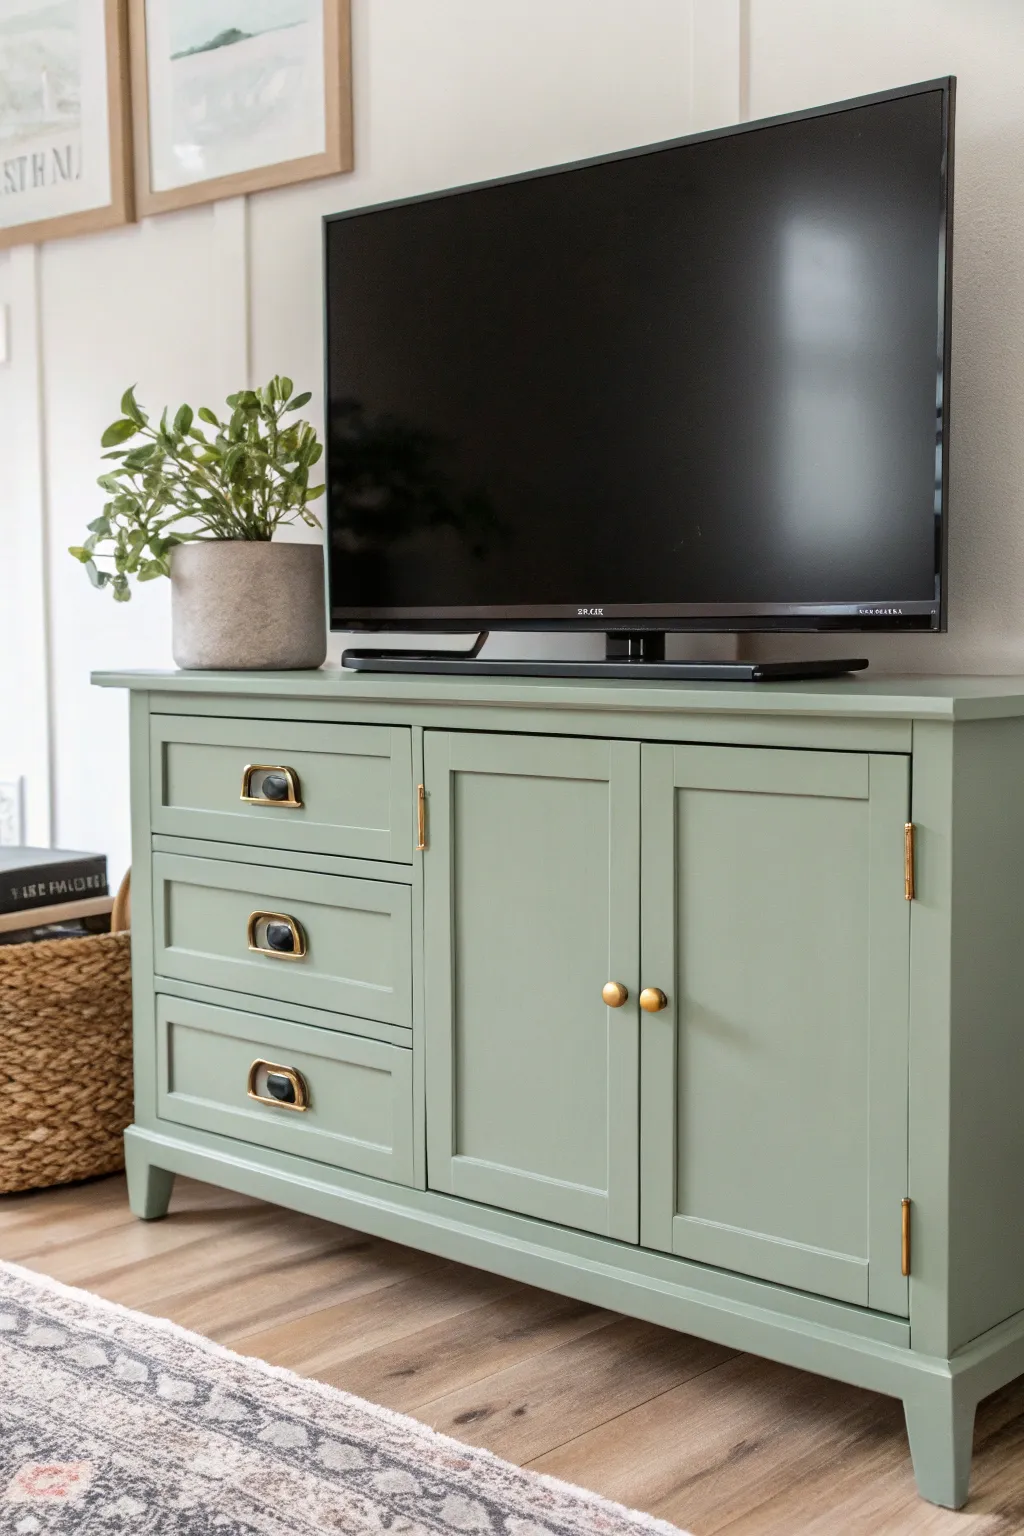
This project transforms a standard media console into a sophisticated focal point using a soft, earthy sage tint and carefully curated hardware. The combination of muted green paint with warm brass and oil-rubbed bronze details creates a timeless, transitional look perfect for living rooms.
How-To Guide
Materials
- Wooden media console or buffet
- Sage green furniture paint (e.g., satin or semi-gloss finish)
- High-quality bonding primer
- Sandpaper (120 and 220 grit)
- Tack cloth
- Paint rollers (foam or microfiber)
- Angled sash brush (2 inch)
- Wood filler
- Screwdriver or drill
- Tape measure
- New hardware: 3 vintage-style cup pulls (brass/bronze mix)
- New hardware: 2 round brass knobs
- New hardware: 4 brass surface-mount hinges (optional)
Step 1: Preparation and Disassembly
-
Remove hardware:
Begin by removing all existing knobs, pulls, and hinges. If you are keeping any original hinges, bag them clearly so they don’t get lost, but for this look, we are swapping everything to match. -
Detach doors and drawers:
Pull the drawers completely out of the unit. Unscrew the cabinet doors. This makes painting infinitely easier and ensures a cleaner finish without drips. -
Clean surfaces:
Thoroughly clean the entire piece with a degreaser or TSP substitute to remove oils, dust, and old wax. This step is critical for paint adhesion. -
Fill old holes:
If your new hardware has different hole spacing than the old set, fill the old screw holes with wood filler. Overfill slightly as it shrinks when drying. -
Sand and smooth:
Once the filler is dry, sand it flush. Then, scuff sand the entire piece (body, doors, drawer fronts) with 120-grit sandpaper to break the existing finish.
Step 2: Priming and Painting
-
Apply primer:
Roll or brush on a coat of high-quality bonding primer. This blocks stains and gives the sage paint a sold foundation. Let it dry according to the can’s instructions. -
Light sanding:
After the primer is dry, run 220-grit sandpaper lightly over the surfaces to knock down any raised grain or dust nibs. Wipe clean with a tack cloth. -
First coat of color:
Using a high-density foam roller for flat areas and an angled brush for corners, apply the first coat of sage green paint. Work in long, smooth strokes to minimize texture. -
Dry and repeat:
Allow the first coat to dry completely. I prefer to wait overnight to play it safe, but follow your paint brand’s recoat time. Apply a second coat for full, opaque coverage. -
Inspect and touch up:
Check for any thin spots or missed edges under bright light. A third light coat might be necessary on the drawer fronts for durability.
Sticky Drawers?
If painted drawers stick, rub a plain candle or beeswax along the wooden runners and the sides of the drawer box to help them glide smoothly again.
Step 3: Installing the Hardware
-
Measure for new pulls:
For the three drawers, find the exact center of each drawer front. Measure the center-to-center distance of the new cup pull screws and mark the new hole locations clearly. -
Drill drawer holes:
Drill pilot holes for the cup pulls at your marked spots. Place a scrap piece of wood behind the drawer front while drilling to prevent the wood from splintering on the exit side. -
Attach cup pulls:
Secure the vintage-style cup pulls. These mixed-metal pulls (brass frames with dark center inserts) add the character that defines this specific look. -
Install door knobs:
Mark and drill holes for the round brass knobs on the cabinet doors. Position them comfortably high on the door frame styles. -
Attach hinges and reassemble:
Install the new brass surface-mount hinges onto the doors and cabinet frame. Hang the doors carefully, ensuring they sit level, and slide the drawers back into place.
Pro Tip: Hardware Height
When installing knobs on cabinet doors, align the center of the knob with the top horizontal rail of the door frame for optimal visual balance.
Now you have a fully refreshed, custom-looking console ready to anchor your living space with quiet elegance
Painted Inside Shelves and Cubbies
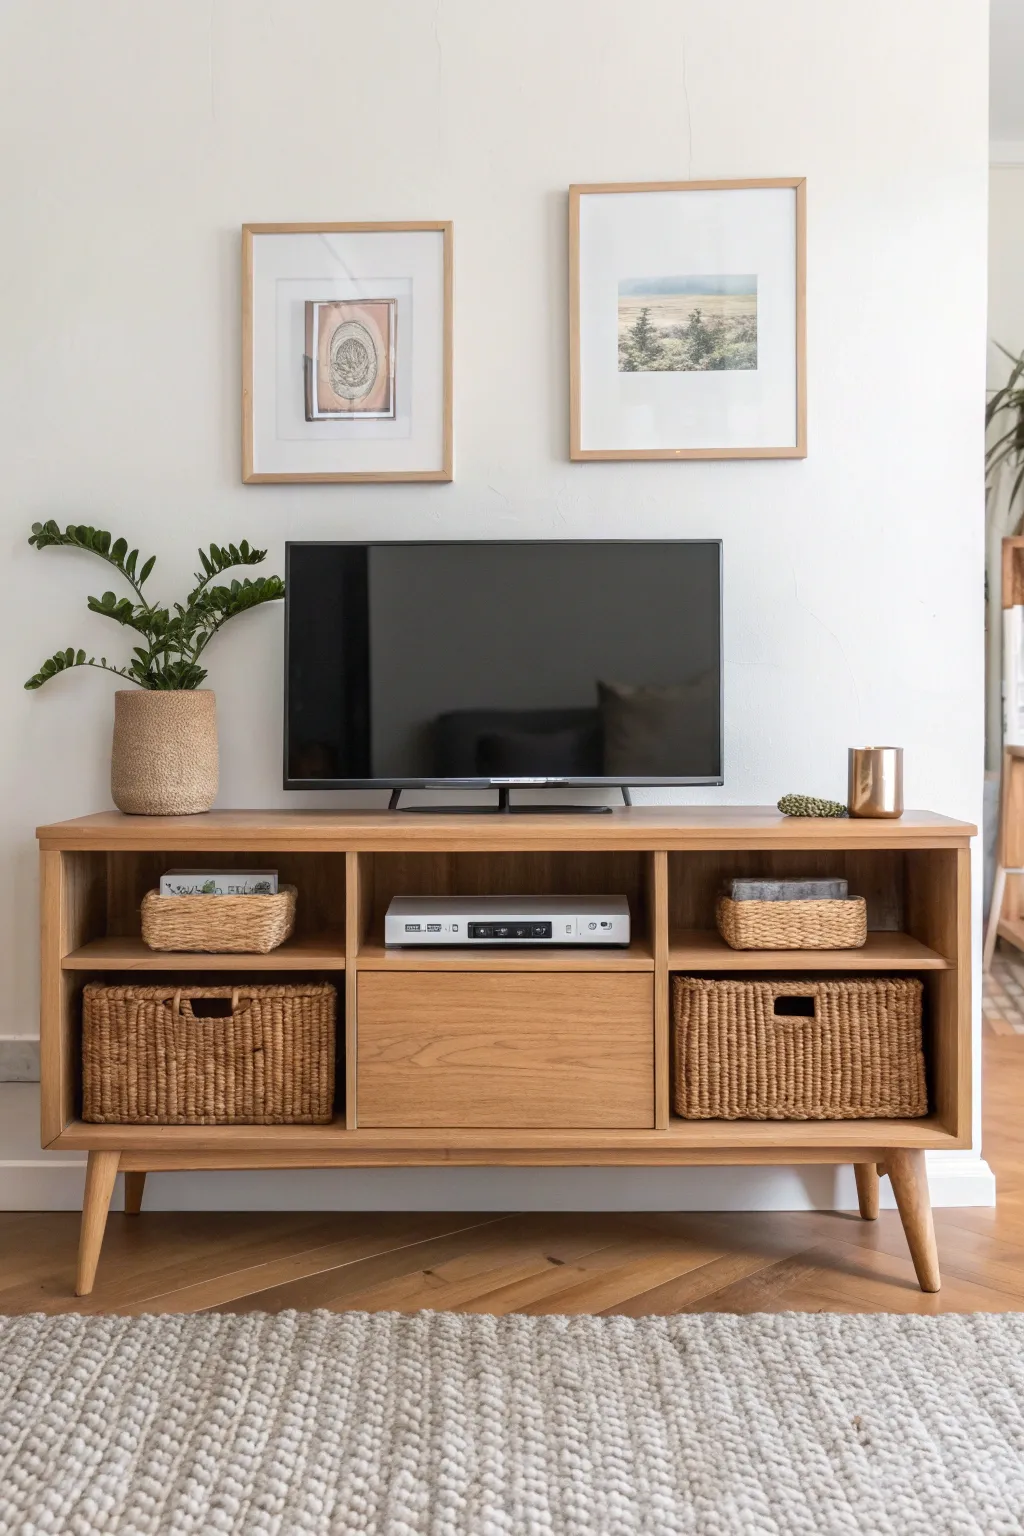
Although this TV stand shines with its natural wood finish, recreating this look with a subtle painted interior adds depth and sophistication. By leaving the exterior wood natural while painting just the inner back panels or shelf bottoms in a muted tone, you achieve a custom, high-end feel without losing the warmth of the grain.
Step-by-Step Tutorial
Materials
- Solid wood or veneer TV console (mid-century style preferred)
- Sandpaper (120 and 220 grit)
- Painter’s tape (high quality)
- Primer suitable for wood surfaces
- Satin finish paint (soft taupe, charcoal, or warm gray)
- Small foam roller
- Angled sash brush (1.5 inch)
- Clear matte polyurethane topcoat
- Tack cloth
- Drop cloth
Step 1: Preparation
-
Clean the surface:
Begin by removing all drawers, baskets, and electronics from the console. Wipe down the entire unit thoroughly with a mild degreaser to remove any oils or dust that might interfere with adhesion. -
Sand the interior:
Focus your sanding efforts only on the specific interior sections you plan to paint—typically the back panel and the sides of the cubbies. Scuff sand lightly with 120-grit paper to create a tooth for the primer. -
Protect the exterior:
This is the most critical step for a clean look. Carefully apply painter’s tape along the front edges of the shelves and the inner corners where the shelf meets the side panels if you want to keep the sides wood. -
Double-check lines:
Run your fingernail or a putty knife firmly along the edge of the tape to seal it tight. This prevents paint bleed and ensures that crisp, professional line between the painted interior and the natural wood exterior.
Bleeding Lines?
If paint bled under the tape, wait for it to dry fully. Then, gently scrape the excess paint away with a razor blade or sharp utility knife for a crisp edge.
Step 2: Prime and Paint
-
Apply primer:
Using the angled brush for corners and the foam roller for flat surfaces, apply a thin coat of primer to the designated interior areas. Avoid overloading the brush to prevent drips. -
Sand the primer:
Once the primer is completely dry, very lightly sand it with 220-grit paper to smooth out any brush strokes or texture. Wipe away the dust with a tack cloth. -
First coat of paint:
Stir your chosen satin paint well. I prefer a soft taupe to mimic shadows without being too stark. Apply the first coat using the roller for a smooth, spray-like finish on the back panels. -
Cut in corners:
While the paint is wet, use your small angled brush to carefully get into the deep corners of the cubbies, blending smoothly into the rolled sections. -
Dry and recoat:
Allow the first coat to dry according to the manufacturer’s instructions. Apply a second coat to ensure solid, opaque coverage, especially if you are painting over a dark wood grain. -
Remove tape:
While the second coat is still slightly tacky (not fully dry), slowly peel back the painter’s tape at a 45-degree angle. This helps ensure the paint film doesn’t lift with the tape.
Step 3: Finishing Touches
-
Protect the natural wood:
If the exterior wood needs refreshing, lightly sand it with 220-grit paper. Apply a clear matte polyurethane to seal and protect the natural wood tone, matching the low-sheen look of the image. -
Seal the painted areas:
For extra durability against sliding baskets, apply a coat of clear poly over your dried paint. Let this cure for at least 24 hours before putting anything back on the shelves. -
Reassemble drawers:
Slide the central wooden drawer back into place. Ensure the glides are clean and functioning smoothly. -
Style properly:
Place natural woven baskets in the lower side cubbies and smaller trays on the upper shelves to replicate the balanced, organic texture seen in the inspiration photo. -
Final wipe down:
Give the entire piece one last wipe with a microfiber cloth to remove any stray dust or fingerprints from the assembly process.
Add Wallpaper Accent
Instead of paint, use peel-and-stick wallpaper with a subtle geometric pattern on the back panel for unexpected texture.
Enjoy the refined balance of natural warmth and modern color in your newly refreshed media console
High-Gloss Lacquered Look
Transform a basic wooden TV stand into a sleek, high-end centerpiece with this glossy finish technique. The result is a smooth, reflective surface that mimics the look of expensive lacquered furniture without the hefty price tag.
Step-by-Step
Materials
- Unfinished or old wooden TV stand
- High-grit sandpaper (220 and 400 grit)
- Orbital sander
- Tack cloth
- High-adhesion primer (oil-based recommended)
- High-gloss enamel paint (in a warm taupe or off-white)
- Foam rollers (high density)
- High-quality angled sash brush
- Paint sprayer (optional but recommended for smoothest finish)
- Clear polyurethane topcoat (glossy)
- Screwdriver
- Wood filler
- Painter’s tape
- Drop cloth
Step 1: Preparation & Sanding
-
Disassemble hardware:
Begin by removing all drawers from the unit. Use your screwdriver to take off any handles, knobs, or hinges, labeling them in small bags so reassembly is easy later. -
Clean surface:
Wipe down the entire piece with a degreaser or mild soap and water to remove dust, oils, and grime. Let it dry completely. -
Fill imperfections:
Inspect the stand for deep scratches or dents. Apply wood filler to these areas with a putty knife, smoothing it out as much as possible. -
Initial sanding:
Using an orbital sander with 220-grit paper, sand the entire exterior and the drawer fronts. You want to scuff the surface to help the primer stick, not necessarily strip it down to raw wood unless the current finish is peeling. -
Dust removal:
Vacuum up the sanding dust, then wipe every surface thoroughly with a tack cloth. Even a single speck of dust can ruin a high-gloss finish.
Floetrol Secret
Add a paint conditioner like Floetrol to your latex enamel. It slows drying time, allowing the paint to self-level and eliminate brush marks.
Step 2: Priming for Smoothness
-
Apply primer:
Apply a coat of high-adhesion primer. I prefer oil-based primer for glossy projects because it levels out beautifully. Use a foam roller for flat surfaces and a brush for corners. -
Sand the primer:
Once the primer is fully dry, lightly sand it by hand with 400-grit sandpaper. This step is crucial for knocking down any brush strokes or texture. -
Second clean:
Wipe the piece down again with a new tack cloth to remove the fine powder from sanding the primer.
Step 3: Applying the Gloss
-
First coat of paint:
Stir your high-gloss enamel paint gently to avoid creating bubbles. Apply the first coat using a high-density foam roller or a paint sprayer. Keep the coat thin and even. -
Dry and sand:
Allow the paint to cure according to the can’s instructions (usually 24 hours). Lightly sand flat surfaces with wet/dry 400-grit sandpaper to remove any nibs. -
Second coat:
Apply a second thin coat of enamel. If you are brushing, maintain a ‘wet edge’ to avoid lap marks. If spraying, keep your motion consistent. -
Assess coverage:
Check your coverage. High-gloss finishes often require three thin coats rather than two thick ones to achieve that deep, reflective quality.
Level Up: Hardware
Swap standard hardware for sleek matte black pull tabs or brushed brass cylinder knobs to modernize the silhouette instantly.
Step 4: Finishing Touches
-
Clear coat application:
For ultimate durability and shine, apply a clear gloss polyurethane topcoat. This acts as a protective shell over your color. -
Final cure:
Let the piece cure undisturbed for at least 48 to 72 hours. Paint hardens over time, so be gentle with it during this period. -
Reassemble:
Once fully cured, screw the hardware back onto the drawers. If you painted the interior tracks, apply a little wax to help them slide smoothly. -
Style the unit:
Slide the drawers back into their slots and place your unit in position.
Now you have a stunning, professional-looking piece that brightens the room with its reflective sheen
Color-Blocked Doors for Bold Contrast
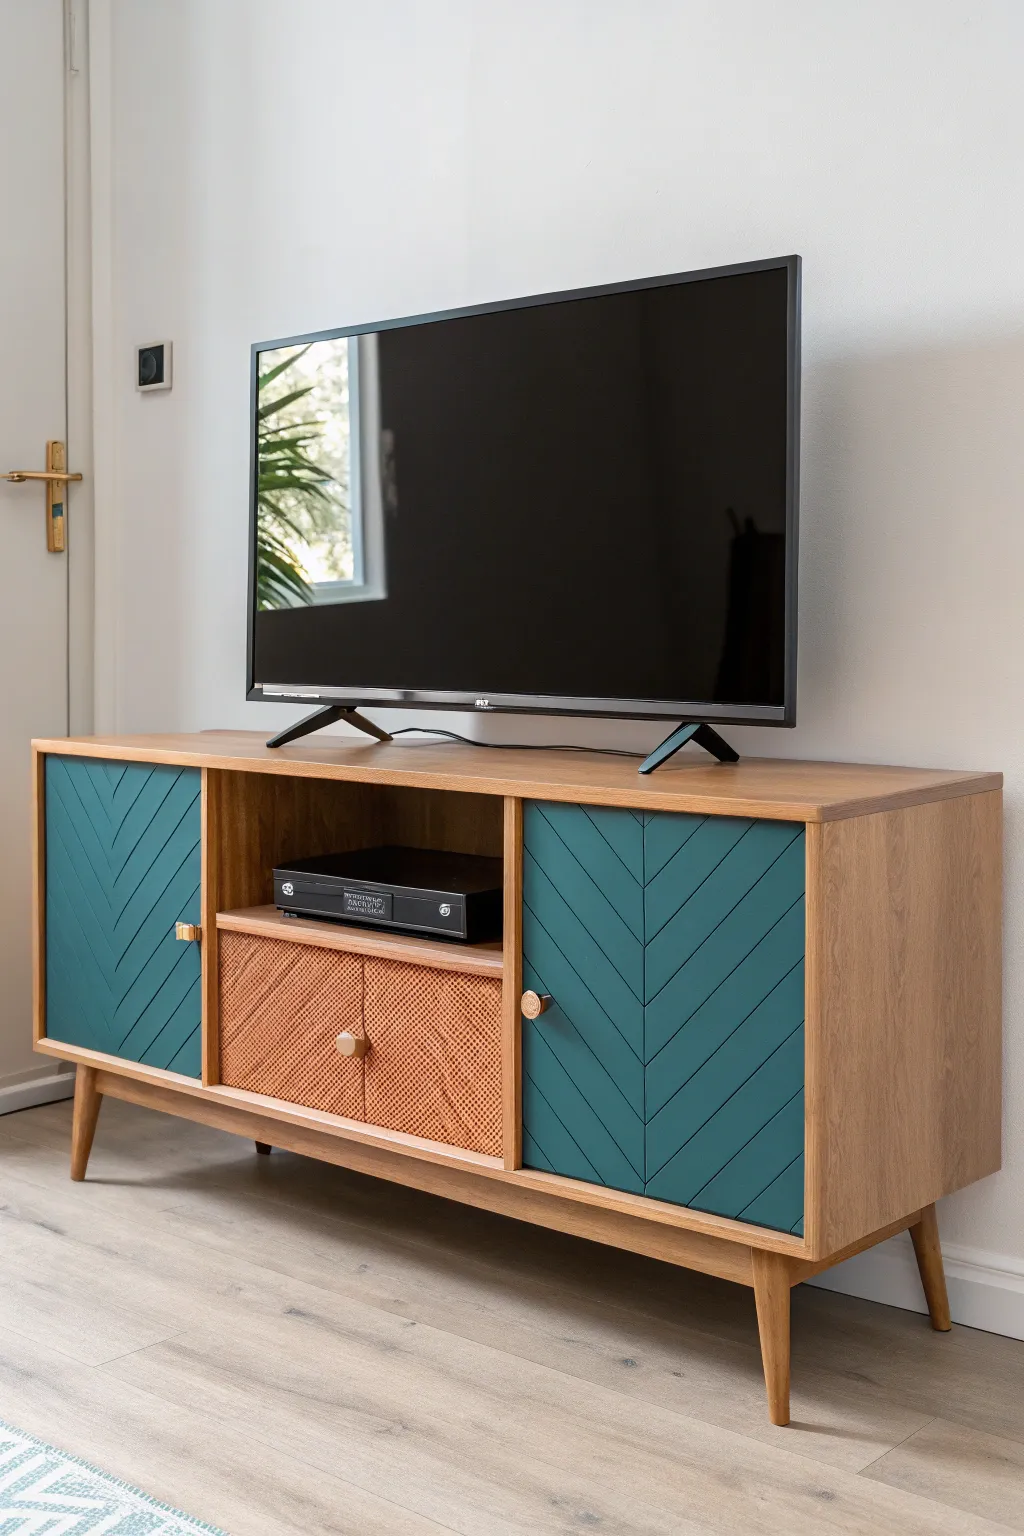
Transform a standard wooden media console into a statement piece by adding a splash of bold color to textured doors. This project highlights the beautiful interplay between natural wood grain and a rich, matte teal finish, perfect for a mid-century modern vibe.
Step-by-Step Guide
Materials
- Wooden TV stand with grooved or textured doors
- Sandpaper (120 and 220 grit)
- Painter’s tape
- Liquid deglosser or TSP substitute
- High-quality bonding primer
- Interior furniture paint (Teal/Dark Cyan)
- Small foam roller
- 2-inch angled sash brush
- Small artist’s brush
- Polycrylic topcoat (Matte or Satin finish)
- Screwdriver
- Drop cloth
Step 1: Preparation and Disassembly
-
Remove hardware:
Begin by removing the cabinet doors from the console using a screwdriver. Take off any knobs, handles, or hinges and store them in a labeled bag so nothing gets lost during the process. -
Clean surfaces:
Wipe down the doors thoroughly with a TSP substitute or a liquid deglosser to remove oils, dust, and furniture wax. A clean surface is crucial for paint adhesion. -
Protect the edges:
If your doors have wooden edges you want to keep unpainted, apply painter’s tape carefully along the sides. Run your fingernail along the tape edge to ensure a tight seal prevents bleed-through. -
Light sanding:
Scuff sand the front of the doors with 120-grit sandpaper. You aren’t trying to remove the existing finish completely, just creating a ‘tooth’ for the primer to grab onto. -
Clear the dust:
Vacuum up the sanding dust and wipe the doors with a tack cloth or a damp lint-free rag. Ensure no dust remains in the chevron grooves.
Uneven Grooves?
If paint pools in the chevron corners, use a dry artist brush to wick away excess paint immediately. Pooling leads to cracking later.
Step 2: Priming and Painting
-
Apply primer:
Using a brush, apply a thin coat of bonding primer. Work the primer into the grooves first, then smooth out the flat surfaces. Let this dry according to the manufacturer’s instructions. -
Sand the primer:
Once dry, lightly sand the primed surface with 220-grit sandpaper to smooth out any brush strokes. Wipe away the dust again. -
First coat of grooves:
Open your teal paint. I like to start with the difficult parts first, so use your angled sash brush or a small artist brush to paint inside the chevron grooves. Don’t let paint pool in the corners. -
Roll the flats:
While the paint in the grooves is still wet, use a small foam roller to apply paint to the flat triangular sections of the door. This ensures a smooth, factory-like finish without brush marks. -
Dry and assess:
Allow the first coat to dry completely. Don’t rush this step or the paint might lift when you apply the next layer. -
Second coat:
Repeat the process: brush the grooves and roll the flat surfaces. Two thin coats are always better than one thick coat for durability. -
Touch-ups:
Inspect the doors under good lighting. Use a small artist’s brush to touch up any missed spots inside the deep grooves or along the edges.
Step 3: Finishing Touches
-
Apply topcoat:
Once the paint has cured for at least 24 hours, apply a clear Polycrylic topcoat. Use a fresh foam roller for the flats and a brush for grooves to seal and protect your work. -
Remove tape:
Carefully peel off the painter’s tape. Pulling it at a 45-degree angle while the topcoat is slightly tacky can help keep the lines crisp. -
Reinstall hardware:
Screw the hinges back onto the doors and reattach your knobs or handles. If you want a fresh look, this is a great time to swap in new brass or matte black hardware. -
Reassemble:
Mount the doors back onto the TV stand. Adjust the hinge screws as needed to ensure the doors sit level and open smoothly.
Cane Webbing Contrast
For a trendier look, replace the center drawer panel with natural cane webbing to complement the teal doors and add texture.
Enjoy the satisfaction of your newly customized, modern media console knowing you created it yourself
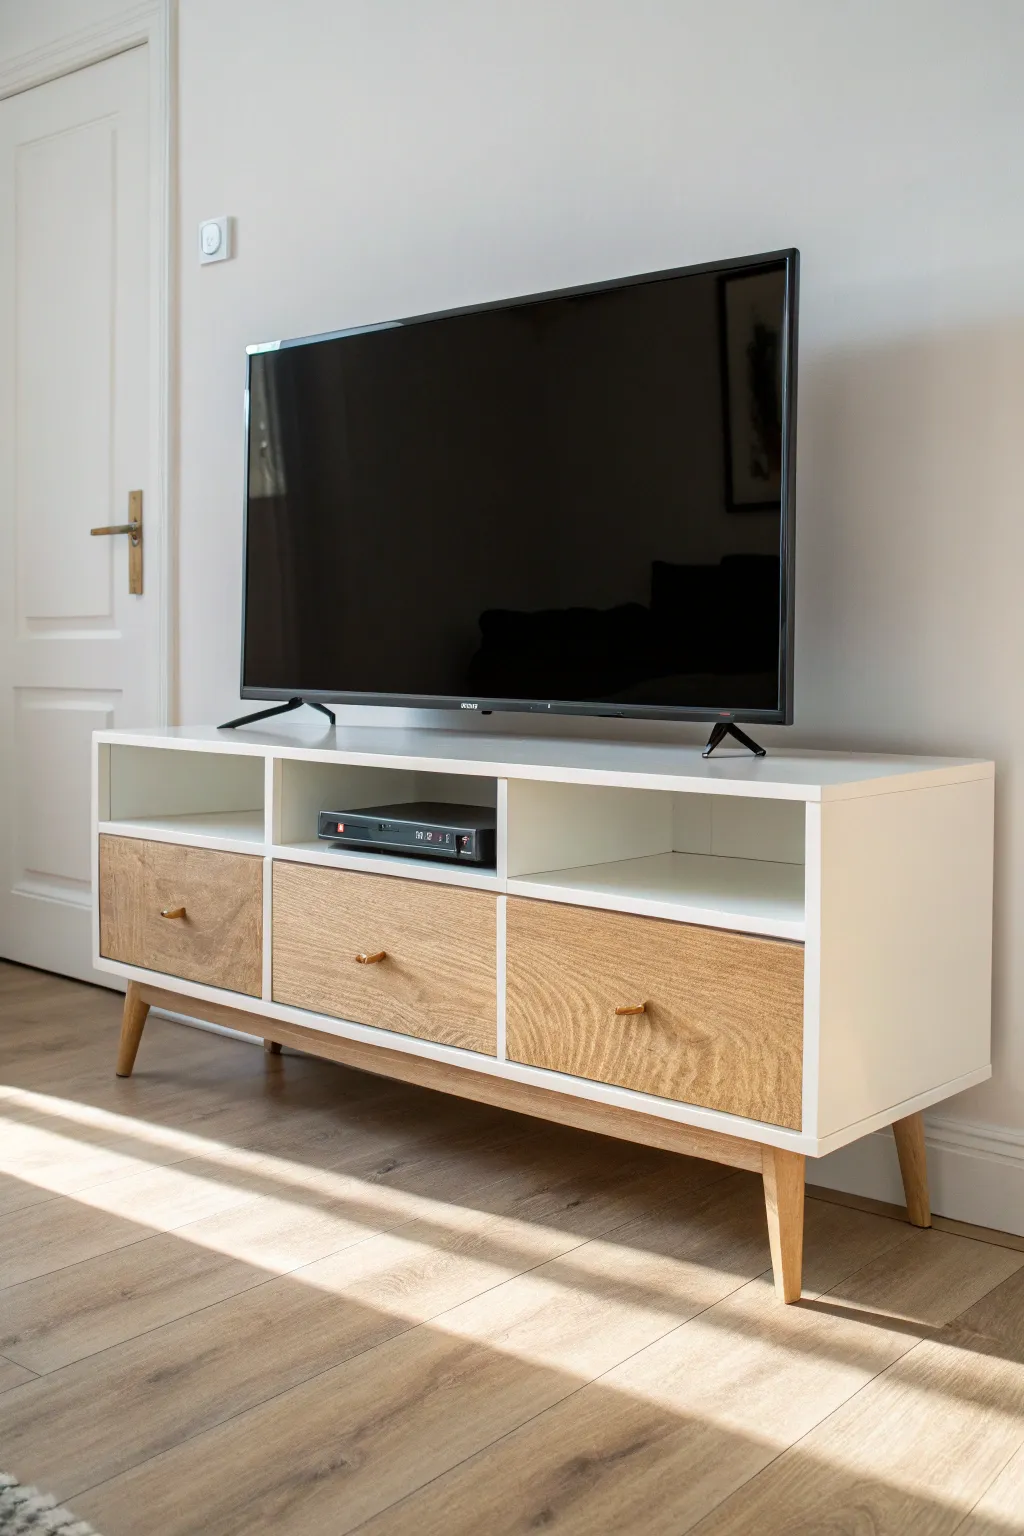
Geometric Tape Pattern on Drawer Fronts

Transform a plain IKEA-style TV unit into a mid-century modern statement piece with this clever tape-resist painting technique. The resulting pattern features crisp triangles in muted mustard and slate blue against a clean white background, adding instant personality to your living room storage.
Step-by-Step
Materials
- TV stand with flat-front drawers/doors
- Sandpaper (120 and 220 grit)
- Painter’s tape (high quality, 0.5 inch width recommended)
- White primer (appropriate for laminate or wood)
- White semi-gloss paint (base color)
- Mustard yellow latex or acrylic paint
- Slate blue/grey latex or acrylic paint
- Small foam roller
- Angled sash brush (1.5 inch)
- Small craft paintbrush
- Clear polyurethane topcoat
- Ruler or straight edge
- Pencil
- Screwdriver
Step 1: Preparation and Base Coat
-
Disassemble the fronts:
Begin by removing the specific drawers or cabinet doors you plan to paint from the main unit. This is much easier than trying to paint vertically. -
Remove hardware:
Unscrew any existing knobs or handles and set them aside in a labeled bag so you don’t lose the screws. -
Clean surfaces:
Wipe down the fronts thoroughly with a degreaser or mild soap and water to remove any oils or dust. -
Sand for adhesion:
Using 120-grit sandpaper, lightly scuff the surface of the doors. You don’t need to strip it bare, just create enough ‘tooth’ for the primer to stick. -
Prime the surface:
Apply a coat of high-quality primer using your foam roller. If the original surface is dark laminate, you might need two coats to block the color. -
Apply the white base:
Once the primer is dry, roll on your white base coat. This will serve as the background color for your pattern and the lines between the triangles. -
Second coat:
Allow the first coat to dry completely according to the can’s instructions, then apply a second coat for a perfectly opaque, smooth finish.
Seal Tape Like a Pro
Always paint over the tape edge with your base color first. It fills any tiny air gaps, ensuring your colored lines will be perfectly crisp when you peel.
Step 2: Creating the Geometric Pattern
-
Plan your grid:
Measure the height and width of your door. Using a pencil and ruler, lightly mark a grid of squares or rectangles as guides for your triangles. -
Mark diagonals:
Draw diagonal lines through your grid boxes to create the triangle shapes. It helps to sketch this on paper first to visualize the alternating direction of the triangles. -
Tape the lines:
Apply painter’s tape along your pencil lines. The tape represents the white space that will remain between the colored triangles. -
Seal the edges:
Press the tape down firmly. I like to paint a very thin layer of the *base white paint* over the tape edges first; this seals them and prevents the colored paint from bleeding under. -
Paint color A:
Using a small brush, fill in the designated triangles with your slate blue paint. Be mindful of your pattern plan so you don’t paint two adjacent triangles the same color. -
Paint color B:
Fill the alternating triangles with the mustard yellow paint. -
Second coat of colors:
Let the colored paint dry to the touch, then apply a second coat if the colors look streaky or transparent. -
The reveal:
While the paint is still slightly tacky (not fully cured), carefully peel off the tape at a 45-degree angle to reveal your crisp white lines.
Peeling Paint Problem?
If paint lifts when removing tape, you waited too long or the tape is too sticky. Score the edge gently with a craft knife before pulling carefully.
Step 3: Finishing Touches
-
Touch ups:
Check for any small bleeds or mistakes. Use a tiny artist’s brush and the base white paint to correct any jagged edges. -
Seal the deal:
Once the paint has cured for at least 24 hours, apply two thin coats of clear polycrylic to protect your artwork from scratches. -
Reassembly:
Reattach your hardware and slide the drawers or doors back into the TV stand.
Enjoy the sleek, custom look of your new media console knowing you created that design yourself
Soft Ombre Fade Across the Front
This project transforms a standard media console by applying a delicate gradient fade across three wood drawer fronts, creating a cohesive yet dynamic look. The result is a modern, airy piece where the wood tones gently shift from light to slightly darker, adding depth without overpowering the room.
Step-by-Step Guide
Materials
- Wooden TV stand (with unfinished or sandable drawer fronts)
- White furniture paint (satin or semi-gloss)
- Water-based wood stain (light oak tone)
- Water-based wood stain (medium walnut tone)
- Clear matte polyurethane topcoat
- Orbital sander with 120 and 220-grit discs
- Tack cloth
- Foam brushes
- Lint-free cotton rags
- Painter’s tape
- Drop cloth
- Screwdriver (for hardware removal)
Step 1: Preparation and Disassembly
-
Remove hardware and drawers:
Begin by pulling out all three drawers from the console unit. Use your screwdriver to carefully detach the handles or knobs. -
Detach legs:
If your unit has removable legs like the one shown, unscrew them now. This makes painting the frame much easier and prevents drips on the natural wood parts. -
Sand the frame:
Use 120-grit sandpaper to scuff the main body of the TV stand. You don’t need to remove the old finish entirely, just create a rough surface for the paint to grip. -
Sand the drawer fronts:
For the drawer faces, you need to strip them down to raw wood to accept the stain properly. Start with 120-grit to remove old varnish, then smooth everything out with 220-grit. -
Clean surfaces:
Wipe down the entire unit and drawer fronts with a tack cloth to remove every speck of dust.
Step 2: Painting the Frame
-
Tape off edges:
Apply painter’s tape to the inside tracks or any areas you want to keep paint-free. -
Apply the first coat:
Roll or brush on your white furniture paint. Maintain a wet edge to avoid brush marks. -
Sand lightly between coats:
Once the first coat is completely dry, do a very light sanding with high-grit paper to knock down any bumps. -
Apply final coats:
Apply a second and third coat of white paint until you have opaque, consistent coverage. Let this cure fully while you work on the wood.
Practice Makes Perfect
Before touching the drawers, test your stains on a scrap piece of similar lumber or the back of a drawer front to ensure the gradient looks correct.
Step 3: Creating the Soft Fade
-
Plan the gradient:
Line up your three drawer fronts in order. The left will be the lightest, the middle a blend, and the right the darkest. -
Stain the left drawer:
Apply the ‘Light Oak’ stain to the first drawer face using a foam brush. Wipe off the excess almost immediately with a rag for a very pale, natural look. -
Stain the right drawer:
Apply the ‘Medium Walnut’ stain to the third drawer face. Let it sit for about 2-3 minutes to deepen slightly before wiping off the excess. -
Mix the middle tone:
In a small disposable cup, I like to mix equal parts of the Light Oak and Medium Walnut stains. Stir well. -
Stain the middle drawer:
Apply your custom mix to the center drawer. Wipe it back to reveal the grain, checking it against the left and right drawers to ensure it sits perfectly in between them visually. -
Stain the legs:
Stain the wooden legs using your custom middle-mix or the darker tone, depending on which anchors the piece better for your taste.
Blob Control
If the stain absorbs unevenly or creates splotches, apply a wood conditioner first to ensure the soft wood accepts the color consistently.
Step 4: Finishing and Assembly
-
Seal the wood:
Once the stain is 100% dry, apply a clear matte polyurethane to the drawer fronts and legs. Two coats provide the best durability. -
Reattach legs:
Screw the legs back onto the painted white frame. -
Install hardware:
Reattach your drawer pulls. Considering adding leather tabs or simple wood toggles to match the natural aesthetic. -
Insert drawers:
Slide the drawers back into their slots, ensuring they are in the correct order to reveal the subtle gradient effect.
This refined piece now offers a custom, designer touch to your living space with barely any heavy lifting
Textured Slats or Flutes Highlighted by Paint
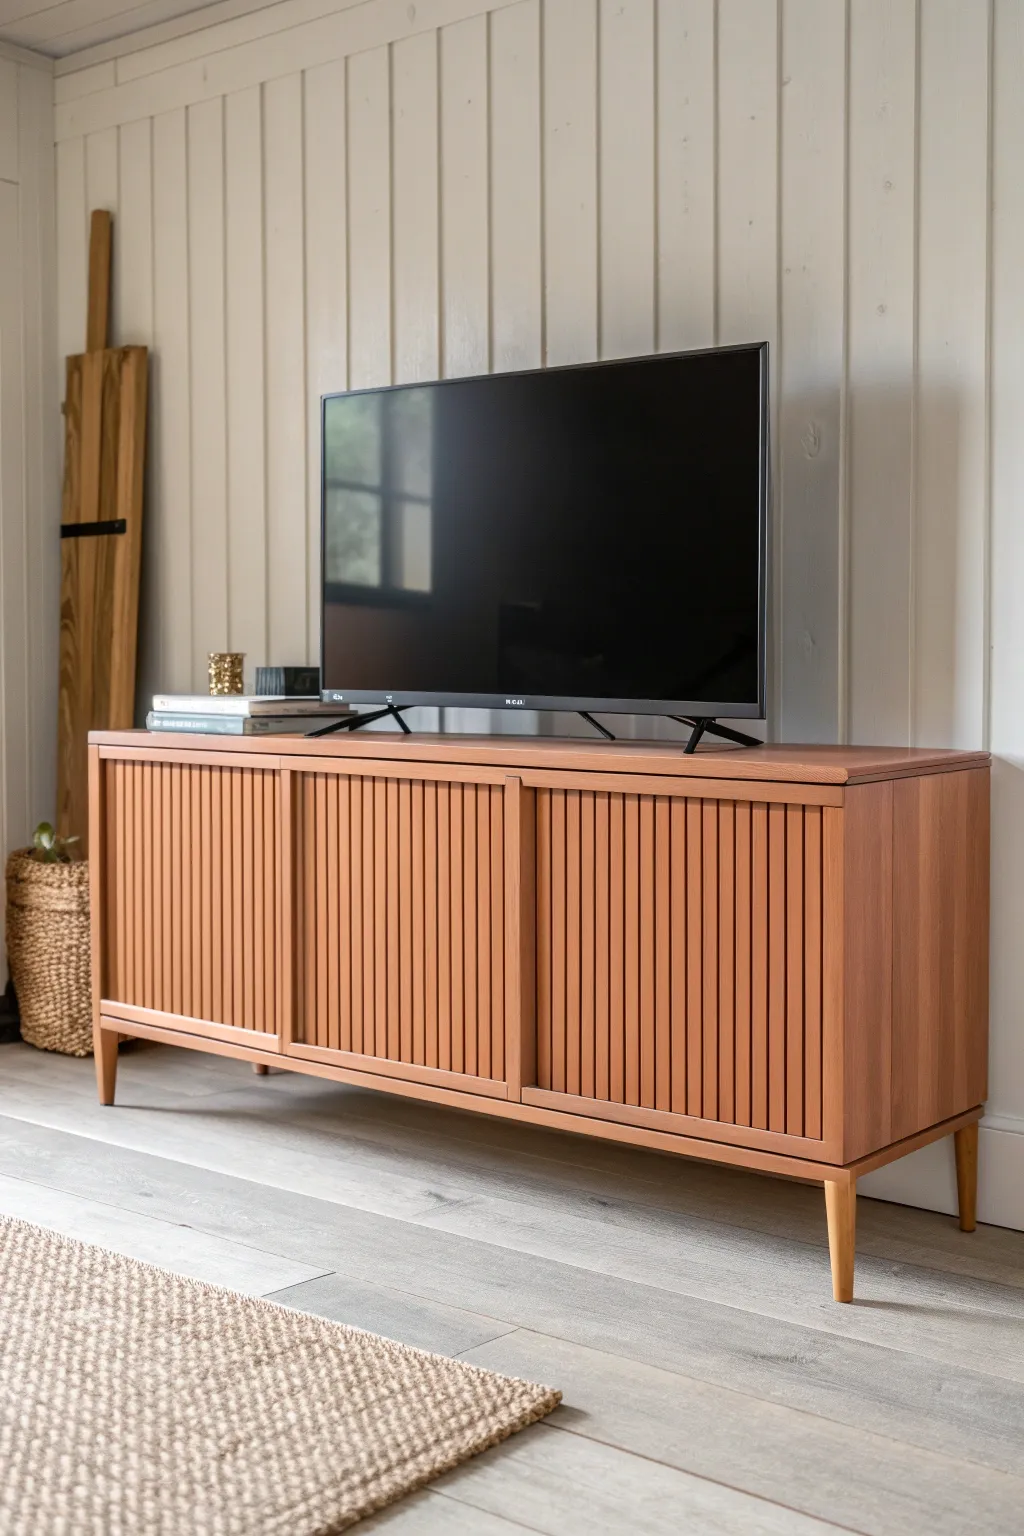
Transform a plain flat-pack sideboard into a high-end designer dupe by adding architectural texture and a warm, earthy finish. This project uses evenly spaced wood slats to create a trendy tambour effect, completely changing the character of the piece.
Step-by-Step Tutorial
Materials
- Flat-front TV stand or sideboard
- Half-round pine molding or flat lattice trim (enough to cover door fronts)
- Construction adhesive (Liquid Nails or similar)
- Pin nailer or finishing nails
- Wood filler
- Medium and fine-grit sandpaper (120 and 220 grit)
- Primer (bonding primer recommended for laminate)
- Chalk-style or mineral paint in a terracotta/rust color
- Polycrylic topcoat (matte finish)
- Saw (miter or circular)
- Painter’s tape
- Measuring tape
- Spacer (like a coin or piece of tile)
Step 1: Preparation & Cutting
-
Measure the doors:
Before buying your trim, carefully measure the height and width of the cabinet doors or drawer fronts you plan to cover. You’ll need enough trim pieces to cover the width with small gaps in between. -
Prep the surface:
Remove the doors from the cabinet and take off any hardware. Lightly scuff-sand the existing finish with 120-grit sandpaper to give the adhesive something to grip. -
Clean thoroughly:
Wipe down the doors with a damp cloth or a degreaser to remove all dust and oils. This step is crucial for adhesion. -
Cut the trim:
Set up a stop block on your miter saw to ensure every single slat is cut to the exact same length. Cut enough half-round molding pieces to cover all the doors. -
Sand the cuts:
Briefly sand the cut ends of your molding pieces to remove any splintering or roughness before you attach them.
Groove Control
Don’t overload your brush when painting the slats. Too much paint will pool in the gaps and ruin the crisp fluted effect.
Step 2: Assembly
-
Dry fit the layout:
Lay your cut slats onto the door fronts without glue first. This helps you calculate exactly how to space them so you don’t end up with a weird sliver of wood at the end. -
Start the first piece:
Apply a bead of construction adhesive to the back of your first slat. Align it perfectly flush with the edge of the door. Use a pin nailer to secure it in place while the glue dries. -
Use a spacer:
To ensure uniform gaps, place a spacer (like a nickel or a thin piece of scrap wood) next to the first slat before positioning the second one. -
Continue the pattern:
Repeat the glue, space, and nail process across the entire face of the door. Check periodically with a square to make sure your lines are staying straight. -
Allow to cure:
Once all slats are attached, let the doors sit horizontally for at least 24 hours to allow the construction adhesive to fully cure.
Step 3: Painting & Finishing
-
Fill the gaps:
If you used nails, fill the tiny holes with wood filler. I find it easiest to slightly overfill them and sand it smooth later. -
Final sand:
Sand the wood filler flush and run 220-grit paper over the wood slats to ensure they are buttery smooth. -
Prime the piece:
Apply a coat of bonding primer to the entire unit, including the new wood slats and the original cabinet frame. Use a brush to get into the grooves of the slats. -
Apply the first coat of paint:
Using a high-quality angled sash brush, paint the slats first, working the terracotta color deep into the crevices. Use a foam roller for the flat top and sides to avoid brush strokes. -
Apply the second coat:
After the first coat is dry, apply a second coat for full opacity. Check for drips that might gather at the bottom of the slats and wipe them away immediately. -
Seal the finish:
Once the paint is fully cured, apply two thin coats of matte polycrylic. This protects the finish without adding unwanted shine, keeping that modern earthy look. -
Reassemble:
Reattach the doors to the cabinet frame. You may need to adjust the hinges slightly to account for the added weight of the wood slats.
Mix It Up
For a two-tone look, leave the legs natural wood or paint the top surface a contrasting charcoal gray.
Enjoy the sophisticated texture this custom piece brings to your living space
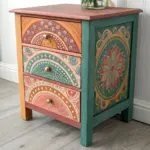


Have a question or want to share your own experience? I'd love to hear from you in the comments below!