I love how a simple stone can turn into a tiny pocket universe with a few layers of color and some well-placed stars. These space rock painting ideas are meant to feel totally doable, whether you’re craving a classic galaxy effect or something a little weirder and more playful.
Classic Sponge-Blended Galaxy Rock
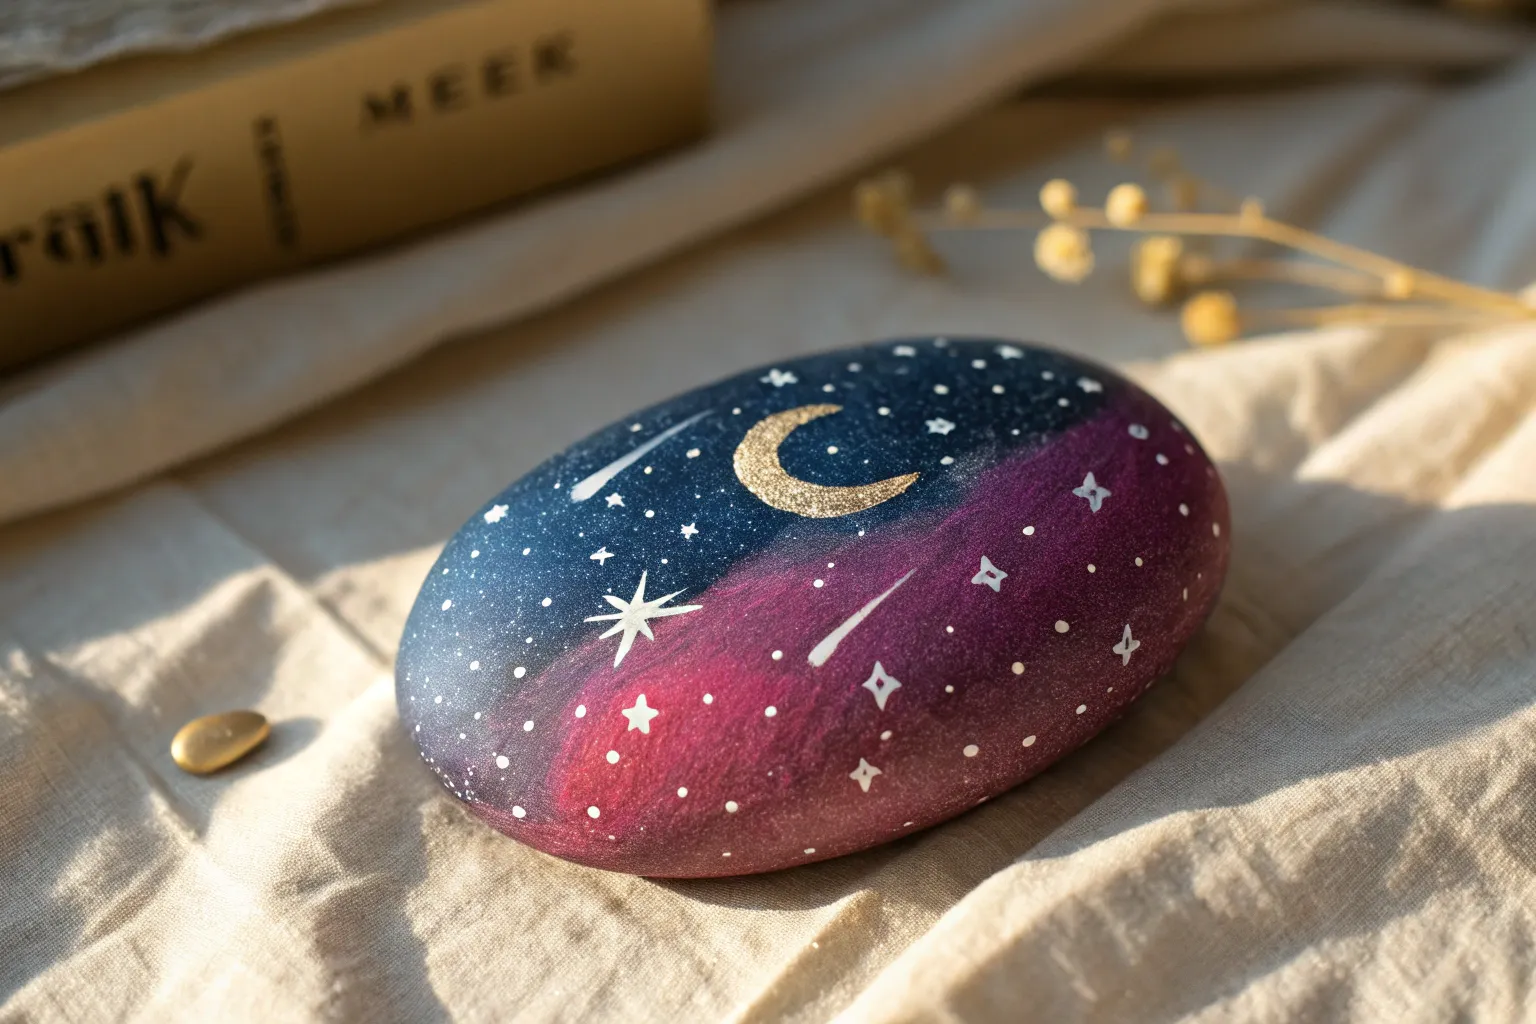
Capture the mysteries of the universe on a simple river stone with this vibrant galaxy painting tutorial. By blending deep blues, purples, and blacks, you’ll create a stunning cosmic backdrop perfect for a scattering of bright white stars.
Step-by-Step
Materials
- Smooth, oval river rock (cleaned and dried)
- Black acrylic paint (base coat)
- Acrylic paints: Navy blue, teal/turquoise, magenta, violet, white
- Small cosmetic makeup sponge or kitchen sponge wedge
- Fine detail paintbrush (size 0 or 00)
- Old toothbrush (optional for splattering)
- High-gloss varnish or sealer (spray or brush-on)
- Palette or paper plate
Step 1: Preparing the Void
-
Clean the canvas:
Wash your rock thoroughly with soap and water to remove any dirt or oils. Let it dry completely in the sun or with a hair dryer to ensure the paint adheres properly. -
Apply the base:
Paint the entire top surface of the rock with a solid coat of black acrylic paint. You want a deep background for your colors to pop against. -
Dry and repeat:
Allow the first black coat to dry fully. If the rock’s natural color shows through, apply a second coat for full opacity.
Step 2: Building the Nebula
-
Prepare your sponges:
Cut your sponge into small, manageable wedges if it’s large. You’ll need distinct corners for different colors. -
Start with blue:
Dip a sponge corner into navy blue paint and dab off the excess on your palette. Lightly sponge a diagonal cloud shape across the upper right section of the rock. -
Add the teal glow:
While the navy is still slightly tacky, dab a bit of teal or turquoise right next to it, blending the edges where they meet to create a soft transition. -
Introduce the magenta:
On the opposite diagonal side (lower left area), sponge on your magenta paint. Allow it to fade out toward the black edges. -
Deepen with violet:
Blend a little violet paint into the space between the magenta and the black background to create depth and a smoother gradient. -
Re-establish the darks:
If your colors got too widespread, take a fresh piece of sponge with black paint and gently dab around the outer edges to frame the galaxy again.
Muddy colors?
If colors blend into gray, let layers dry between applications. Sponging wet-on-wet creates smooth blends, but too much overworking creates mud
Step 3: Creating Starlight
-
Mix watery white:
On your palette, mix a small amount of white paint with a drop of water. You want an ink-like consistency that flows easily from a brush. -
Splatter stars:
For the tiniest distant stars, dip a stiff brush or toothbrush into the watered-down white. Run your thumb over the bristles to flick a fine mist of specks onto the rock. -
Hand-paint larger stars:
Using your fine detail brush and undiluted white paint, carefully dot larger, specific stars in the empty black spaces and over the colored nebula clouds. -
Draw the starbursts:
Select a few bright spots to turn into ‘flares.’ Paint a thin vertical line through a dot, then cross it with a horizontal line. Add a tiny ‘X’ in the center for extra sparkle. -
Dry completely:
Let the rock sit undisturbed until all paint is dry to the touch. The thick white dots make take longer than the sponge layers. -
Seal the galaxy:
Finish by applying a coat of high-gloss varnish. I find this essential because it makes the dark colors look wet and deep, just like space.
Brightening Tip
For neon-bright nebulas, sponge a layer of white paint first where you want the colors to be, let it dry, then sponge the color on top
Once the varnish cures, you will have a mesmerizing piece of the cosmos to hold in your hand


Star Splatter Night Sky Rock
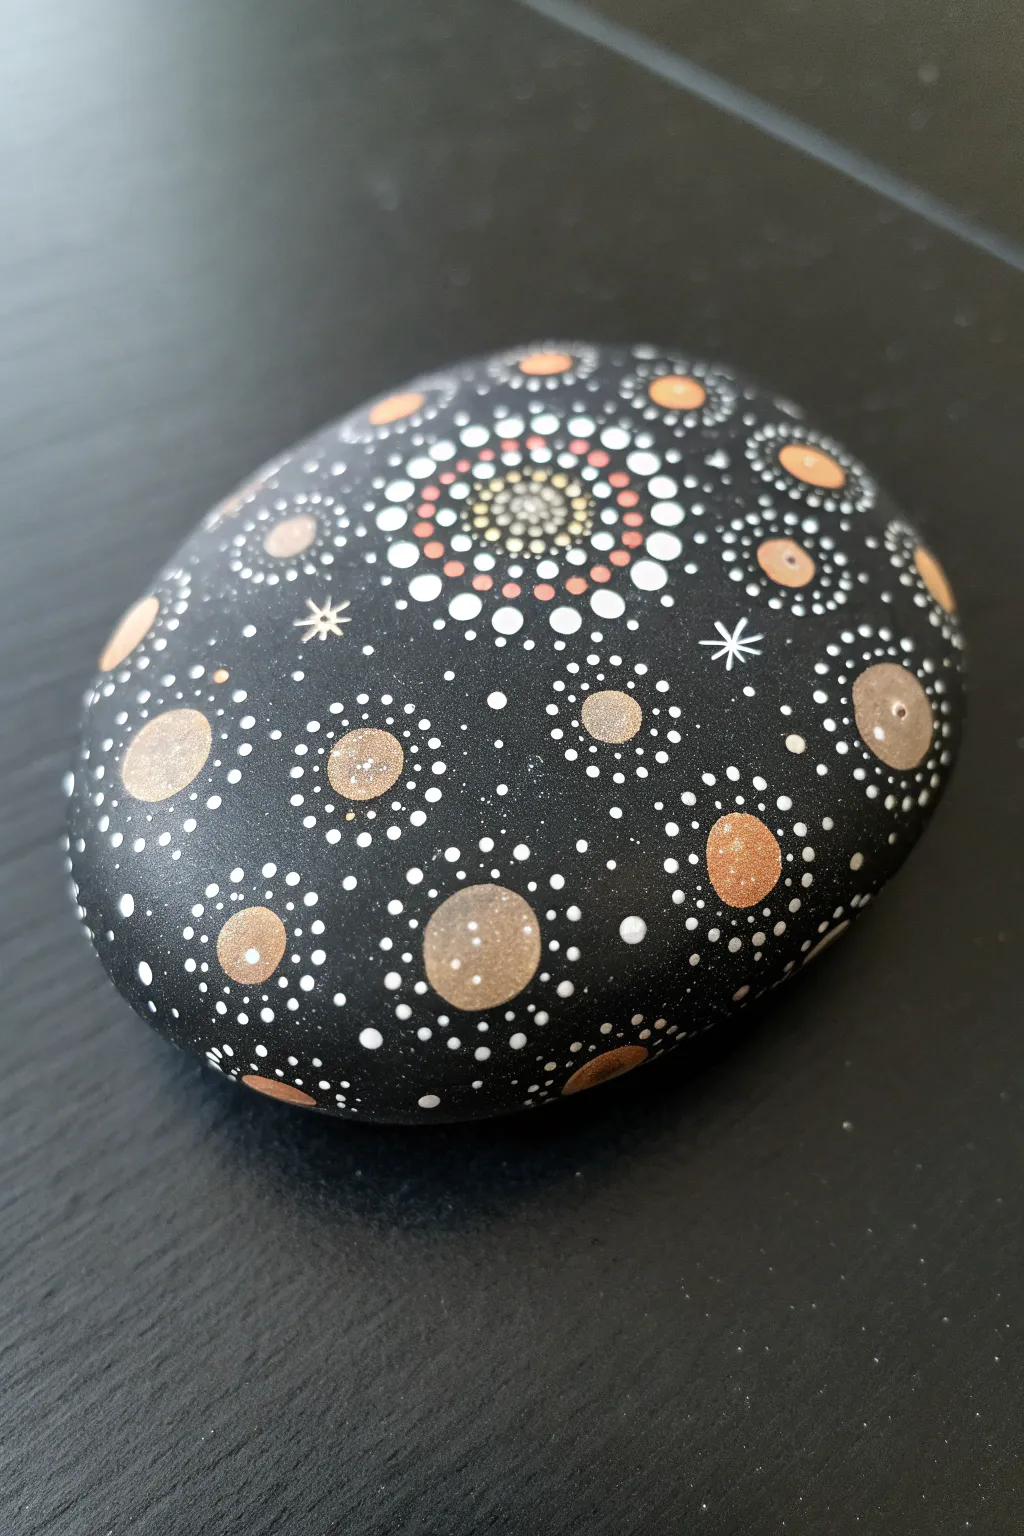
This soothing project transforms a simple smooth rock into a stylized galaxy using the art of dot painting. The combination of precision mandala techniques with a space theme creates a mesmerizing piece that feels both grounded and celestial.
Detailed Instructions
Materials
- Smooth, round river rock (approx. 3-4 inches diameter)
- Black acrylic paint (matte or satin finish)
- Multi-surface acrylic paints: White, Metallic Gold/Bronze, Pale Peach/Salmon
- Set of dotting tools (various sizes from stylus to flat-end acrylic rods)
- Fine detail paintbrush (size 00 or 000)
- Gloss varnish or sealer
Step 1: Preparation & Background
-
Clean the surface:
Begin by thoroughly washing your rock with warm soapy water to remove any dirt or oils. Let it dry completely. A clean surface ensures your base coat sticks properly without peeling later. -
Apply the base coat:
Paint the entire top surface of the rock with black acrylic paint. You may need two coats to get a solid, opaque coverage. Allow the first coat to dry before adding the second to avoid lifting the paint. -
Establish the center:
Once the black base is bone dry, locate the approximate center of the rock. Using a medium-sized dotting tool, place a single white dot right in the middle. This will be the anchor for your central mandala sun.
Step 2: Painting the Central Star
-
First ring of radiance:
Switch to a smaller dotting tool. create a circle of tiny gold dots immediately surrounding your central white dot. Keep them tight and evenly spaced. -
Expanding the core:
Create a second ring using slightly larger dots in white. Place each new dot in the ‘valley’ between the gold dots of the previous ring (this is often called ‘inter-locking’ or ‘brick-laying’ your dots). -
Adding color warmth:
For the third ring, use the pale peach color. Select a tool size slightly larger than the previous ring. Place these dots aligned with the white dots from the second ring. -
Radiating outward:
Continue expanding the central motif with a ring of larger white dots. The pattern should look like an exploding star or a flower at this stage. -
Final central layer:
Finish the main central element with a ring of spaced-out white dots that are slightly separated from the previous ring to create an airy feeling.
Perfect Paint Consistency
For perfectly round dots that don’t leave peaks, mix a tiny drop of pouring medium or water into your acrylics. The paint should be fluid like heavy cream.
Step 3: Creating the Galaxy Field
-
Placing the planets:
Randomly scatter about 8-10 large dots around the rest of the black surface using your largest dotting tool. Vary the colors between metallic gold, bronze, and the pale peach tone. Leave plenty of black space between them. -
Adding the orbital rings:
Dip a small dotting tool in white paint. Carefully walk dots around each of the large ‘planet’ dots you just painted. To ‘walk the dots,’ dip your tool once, place the first dot, and continue tapping dots around the circle without re-dipping; they will naturally get smaller as the paint runs out. -
Second orbital layer:
For some of the larger planets, add a second ring of even tinier white dots outside the first ring to create depth and complexity. -
Filling the void:
Use your smallest stylus tool (or a toothpick) to fill the empty black areas with tiny white speckles. These represent distant stars. Don’t overfill; the black negative space is important for contrast.
Fixing Wobbly Dots
If you smudge a dot or place it incorrectly, don’t wipe it! Let it dry completely, paint over it with a dab of black base color, dry again, and then retry the dot.
Step 4: Fine Details & Finishing
-
Drawing starbursts:
Using your fine detail brush and white paint, paint two or three small four-pointed stars (cross shapes) in the open black spaces. Keep the lines very thin and crisp. -
Top dots:
To give the design a 3D effect, place a smaller dot on top of the larger planet dots once they are dry. For example, place a tiny white dot in the center of a large gold dot, or a gold dot inside a peach one. I find this creates a nice highlight effect. -
Final drying:
Allow the stone to sit undisturbed for at least 24 hours. The thick layers of the dots take much longer to dry than standard brush strokes. -
Seal the artwork:
Apply a coat of gloss varnish over the entire stone. This protects the paint from chipping and makes the metallic gold pop against the deep black background.
Display your finished galaxy stone on a desk or plant stand to bring a little bit of the cosmos indoors


Ringed Planet Centerpiece Rock
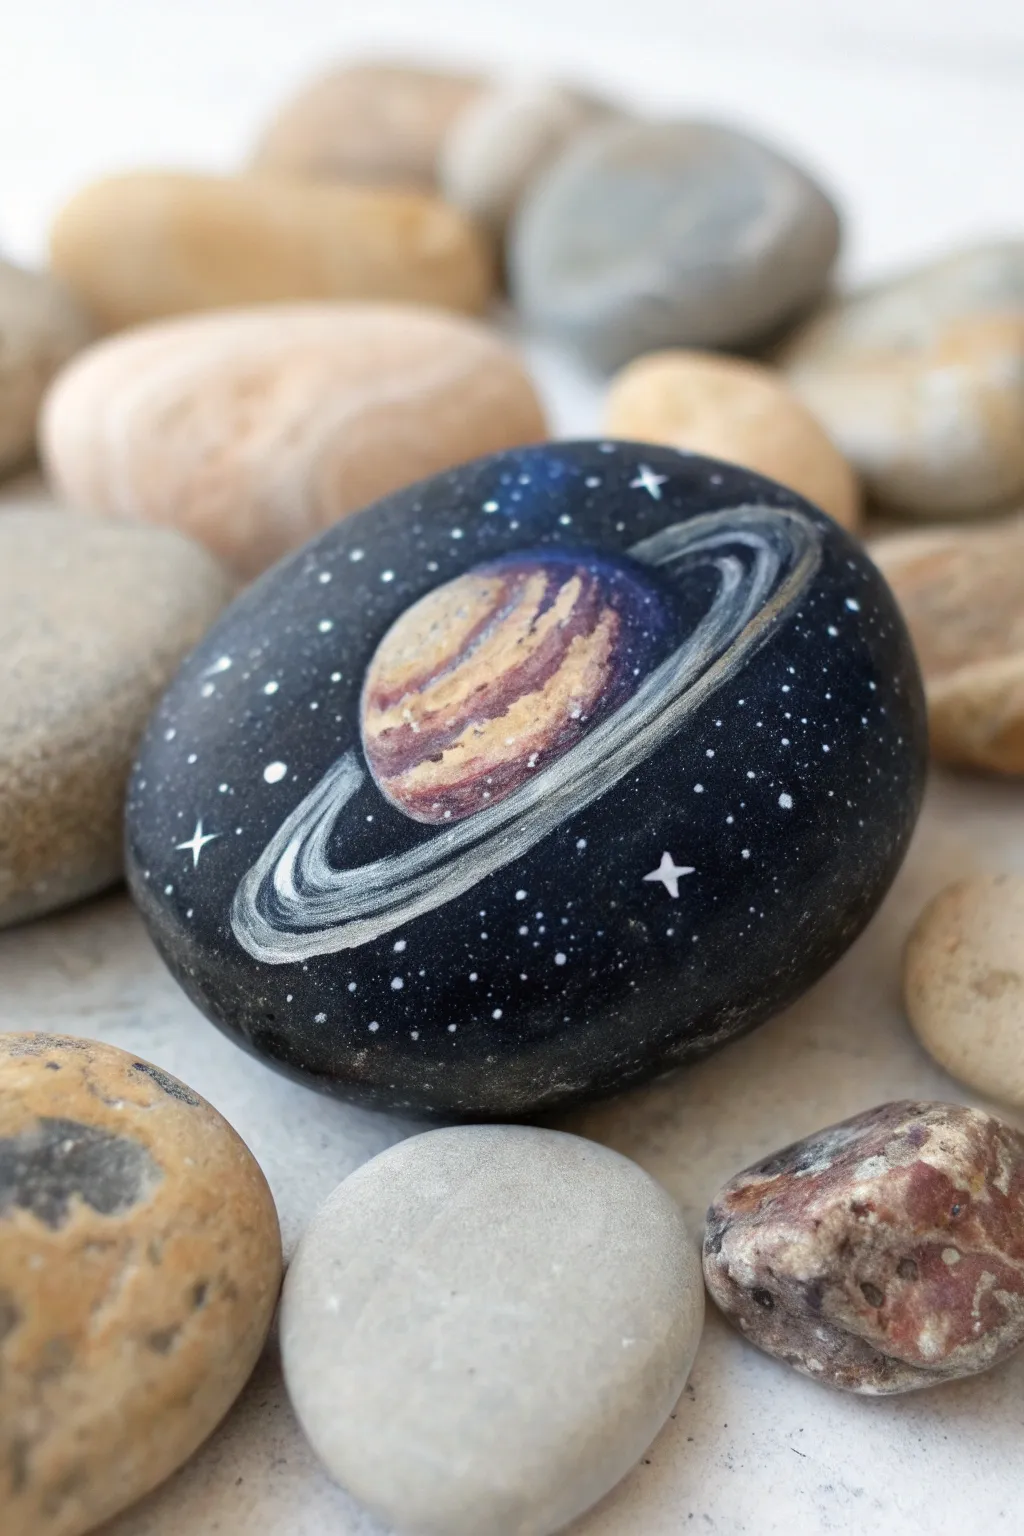
Transform a smooth river stone into a window to the cosmos with this stunning ringed planet design. The contrast between the deep space background and the warm, creamy bands of the planet creates a focal point that really draws the eye.
Step-by-Step Guide
Materials
- Smooth, rounded river rock (palm-sized)
- Black acrylic paint (matte base)
- Titanium White acrylic paint
- Burnt Sienna or Golden Ochre acrylic paint
- Purple or Deep Violet acrylic paint
- Flat base coat brush
- Fine liner brush (size 0 or 00)
- Small round brush (size 1 or 2)
- Gloss varnish or sealer
Step 1: Preparing the Void
-
Clean the surface:
Begin by washing your stone with warm soapy water to remove any dirt or oils that might prevent the paint from sticking. Let it dry completely. -
Base coat application:
Using your flat brush, paint the entire top surface of the rock with black acrylic paint. You want a solid, opaque background, so I usually apply two coats, letting the first one dry fully before adding the second. -
Faint galaxy haze:
Mix a tiny drop of purple with plenty of water to make a thin glaze. Lightly dab this in the center where the planet will go, creating a subtle color variation behind the main subject.
Wobbly Rings?
If your hand shakes while painting the rings, try resting your wrist on a stable object like a coffee mug. Painting quickly often yields smoother curves than going slow.
Step 2: Painting the Planet
-
Outline the sphere:
With a small round brush and a mix of white and burnt sienna, paint a circle slightly off-center. It doesn’t need to be perfectly white; a creamy base works best here. -
Establish shadow:
While the base is still slightly tacky, blend a touch of purple into the bottom right and top left edges of the sphere to create a spherical shadow effect. -
Layering the bands:
Switch to your fine liner brush. Mix burnt sienna with white to create a tan shade and paint curved horizontal stripes across the planet’s face. -
Adding deep contrast:
Paint thinner stripes of undiluted burnt sienna or even a mix of purple and brown between the tan bands. These dark bands give the gas giant its stormy, textured look. -
Highlighting:
Add very thin, broken lines of pure white on the upper curves of the lighter bands to indicate where the light hits the atmosphere.
Step 3: Creating the Rings
-
Drafting the ring shape:
Load your fine liner brush with watered-down white paint. Carefully sketch a wide, flat oval that encircles the planet. The back part of the ring should disappear behind the planet. -
Thickening the rings:
Go over your sketch with opaque white paint. Make the front section of the rings (the part crossing in front of the planet) slightly thicker and brighter than the sides. -
Adding ring details:
Paint a very fine black line through the middle of the white ring sections to separate them into multiple tracks. This ‘negative space’ adds incredible realism. -
Shadow casting:
Where the ring crosses in front of the planet, paint a thin, transparent line of dark grey or black on the planet’s surface just below the ring to show the shadow cast by the rings.
Cosmic Depth
Mix a tiny amount of glitter or metallic silver paint into your varnish before sealing. This adds a subtle shimmer that changes as you hold the rock up to the light.
Step 4: Starry Finish
-
Flicking the stars:
Dip an old toothbrush or a stiff bristled brush into watered-down white paint. Gently flick the bristles to spray tiny specks of ‘stars’ across the black background. -
Major stars:
Use the tip of a toothpick or your smallest liner brush to place distinct white dots for larger, brighter stars. -
Adding twinkle:
For the brightest stars, paint a tiny cross or four-pointed star shape to make them twinkle. -
Sealing the work:
Once the paint is completely dry (give it at least an hour), apply a coat of gloss varnish to protect the artwork and make the colors pop.
Place this little celestial body on your desk or in a planter for an out-of-this-world touch


Cosmic Sunset Silhouette Rock
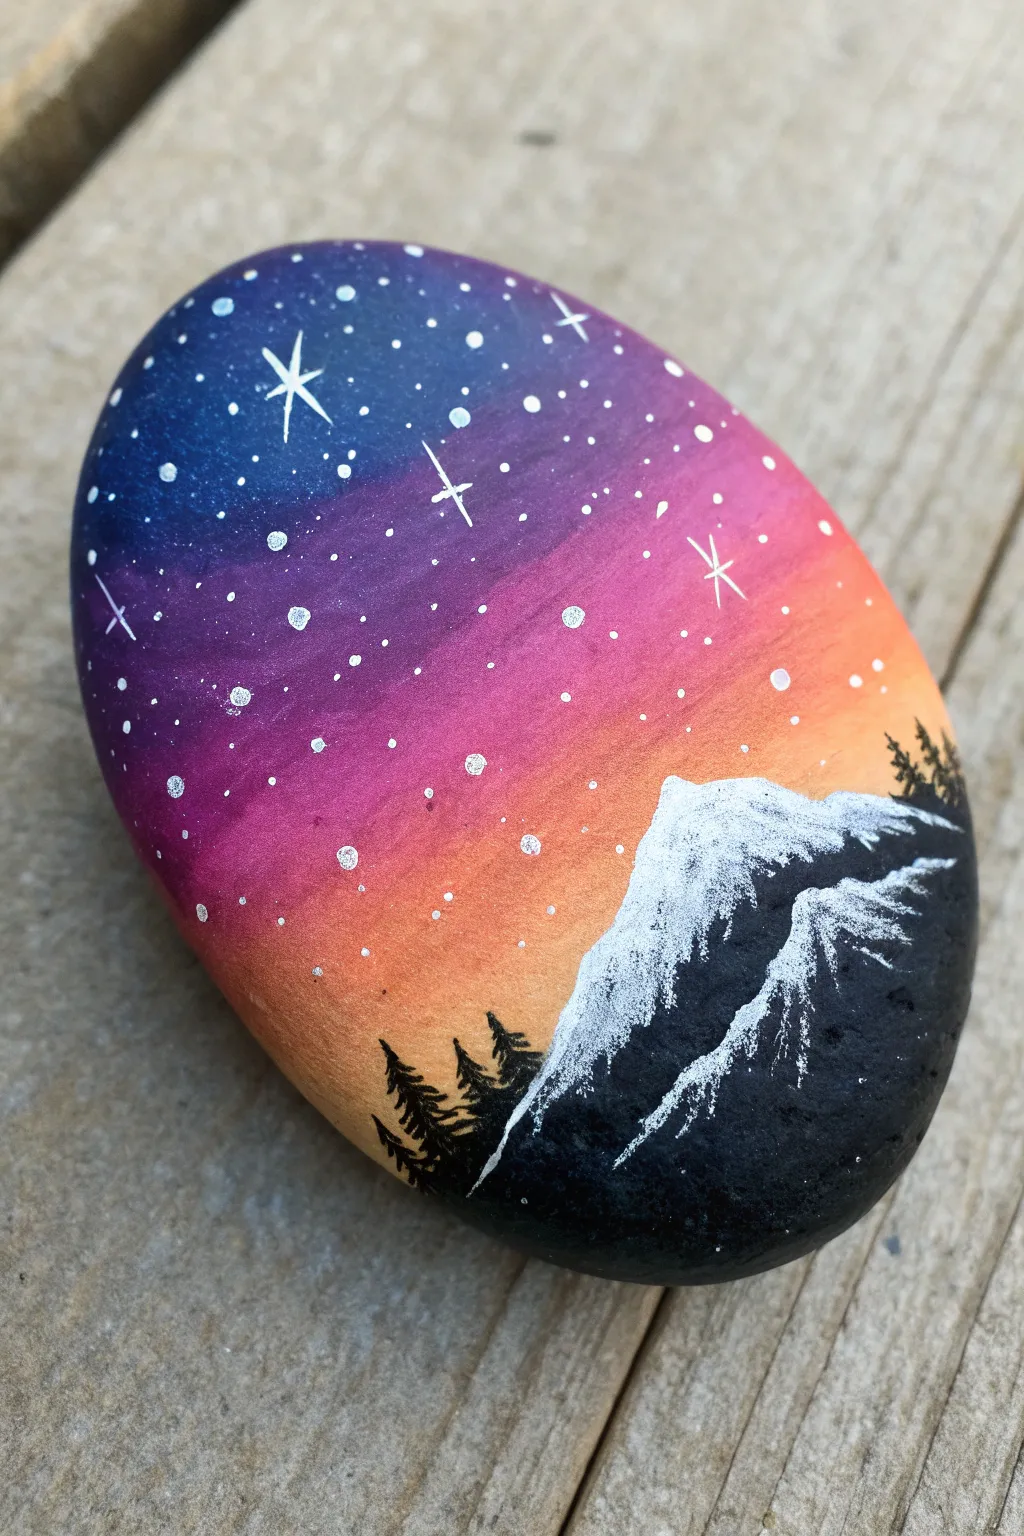
Capture the magic of twilight fading into night on a smooth stone canvas. This project blends a vibrant sunset gradient with stark black silhouettes, creating a stunning piece of miniature art perfect for garden decor or paperweights.
Step-by-Step Guide
Materials
- Smooth, oval river rock (cleaned and dried)
- Acrylic paints (dark blue, violet, magenta, orange, black, white)
- Wide flat brush for blending
- Fine liner brush (00 or 000 size)
- Small round brush
- Palette or paper plate
- Cup of water
- Paper towels
- Clear acrylic sealer (spray or brush-on)
- Old toothbrush (optional for stars)
Step 1: Creating the Background Gradient
-
Prepare the Surface:
Begin with a clean, dry rock. If your rock is very dark or rough, you might want to paint a base coat of white acrylic first to make the colors pop, though it’s not strictly necessary on lighter stones. -
Apply the Night Sky:
Load your flat brush with dark blue paint. Cover the top third of the rock’s surface, painting in smooth, horizontal strokes to ensure even coverage. -
Transition to Purple:
Without cleaning your brush thoroughly, pick up some violet paint. Blend this into the bottom edge of the blue section, working your way down into the middle third of the rock. -
Add the Sunset Hues:
Clean your brush and switch to magenta or hot pink. Blend this into the violet area, then immediately transitioning into bright orange for the bottom third of the sky. Keep your strokes horizontal to mimic atmospheric layers. -
Refine the Blend:
While the paint is still slightly wet, use a barely damp brush to feather the lines between colors. You want a seamless ombre effect where blue melts into purple, then pink, and finally orange. -
Let it Dry:
Allow the background gradient to dry completely before moving on. This is crucial to prevent the black silhouette from turning muddy.
Smooth Blending Trick
If acrylics dry too strictly while blending the sky, mix a tiny drop of retarder medium or water into your colors to keep them workable longer.
Step 2: Painting the Silhouette
-
Outline the Mountain:
Using black acrylic paint and a small round brush, paint a jagged diagonal line representing the mountain slope. Position it so it covers the bottom right corner of the rock. -
Fill the Landscape:
Fill in the entire area below your mountain line with solid black paint. Ensure it is opaque; you may need a second coat after the first one dries. -
Add Texture to the Peak:
Once the black is dry, take a very small amount of white paint on a dry brush. Lightly drag it down the ‘sunny’ side of the mountain peak to create the illusion of snow or highlighted crags. -
Paint Pine Trees:
Switch to your fine liner brush. Along the lower left edge and the right side of the mountain slope, paint tiny vertical lines for tree trunks. -
Detail the Branches:
Using the very tip of the liner brush, dab tiny horizontal strokes starting from the top of each trunk, getting slightly wider as you move down to create the pine tree shape.
Step 3: Adding the Cosmos
-
Create Distant Stars:
Dip the handle end of a paintbrush or a toothpick into white paint. Gently dot tiny stars throughout the blue and purple sections of the sky. -
Paint Larger Stars:
Using your fine liner brush, paint a few larger, specific stars. For a twinkling effect, paint a small cross or four-pointed shape on the biggest ones. -
Optional Splatter:
I sometimes like to use an old toothbrush with watered-down white paint to flick a fine mist of ‘stardust’ over the darker blue section for depth. -
Seal the Artwork:
Once the entire design is bone dry (give it at least an hour), apply a coat of clear acrylic sealer. This protects the paint from chipping and gives the rock a professional, glossy finish.
Wobbly Lines?
If your fine lines for the stars or trees feel shaky, try resting your pinky finger on a dry part of the rock to stabilize your hand while painting detail.
Place your celestial masterpiece on a desk or shelf to enjoy a permanent view of the stars
BRUSH GUIDE
The Right Brush for Every Stroke
From clean lines to bold texture — master brush choice, stroke control, and essential techniques.
Explore the Full Guide
Tiny Constellation Map Rock
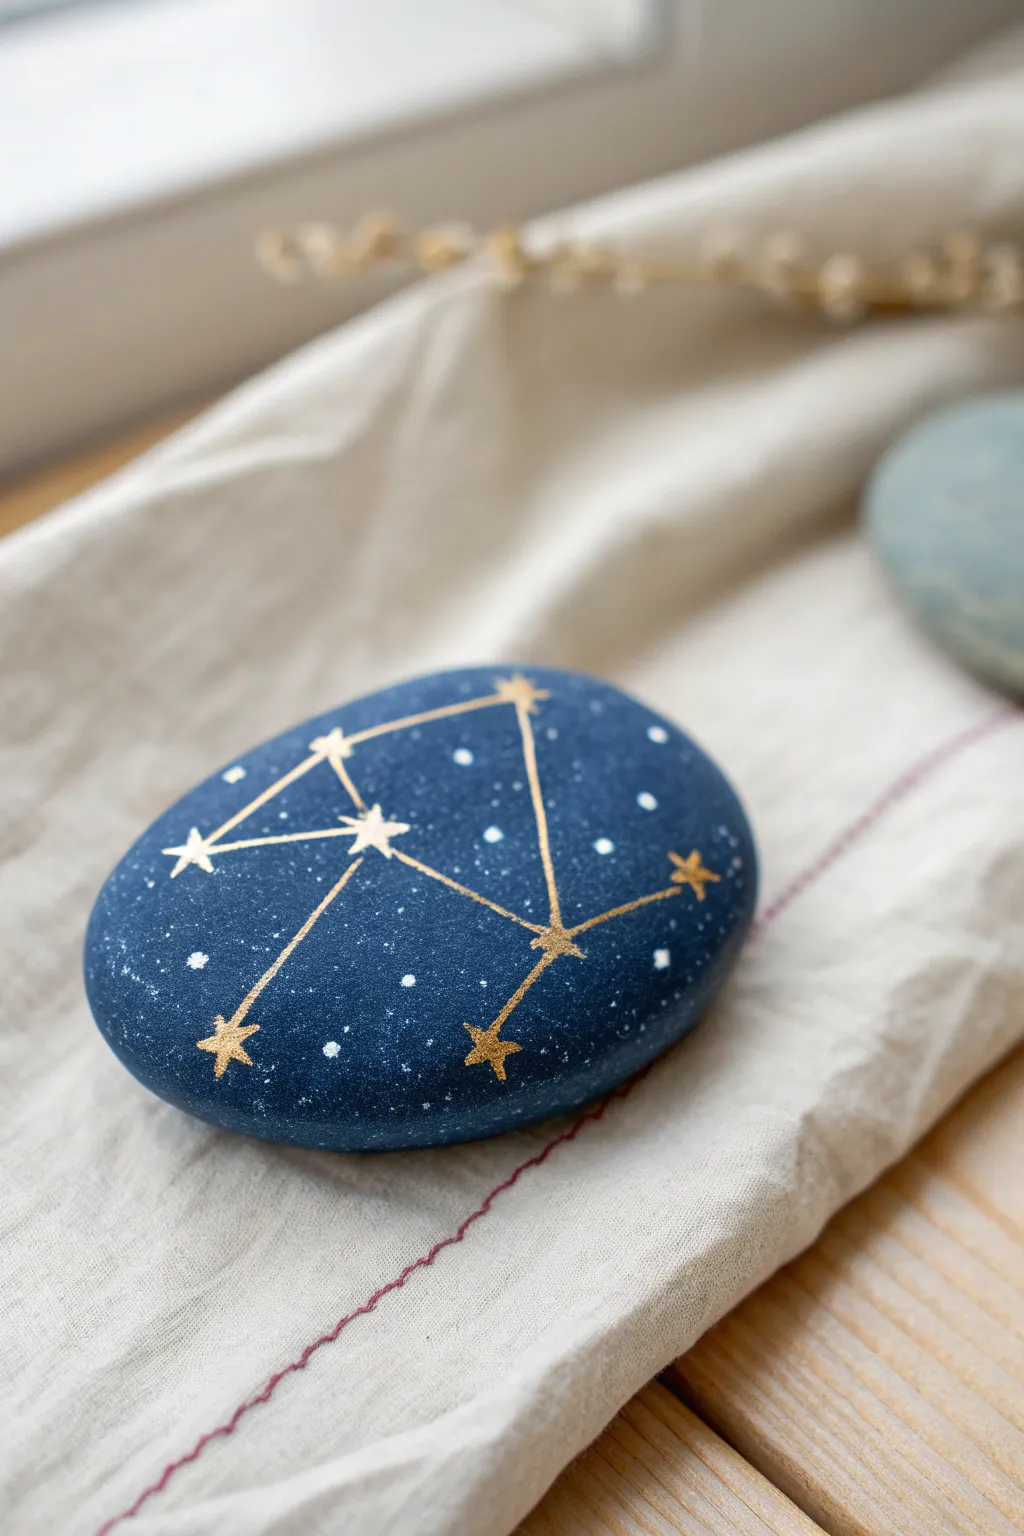
Transform a simple smooth river rock into a handheld piece of the night sky with this elegant project. Using deep midnight hues and touches of metallic gold, you’ll map out your favorite zodiac sign or star cluster on a beautiful natural canvas.
Step-by-Step Tutorial
Materials
- Smooth, oval river rock (palm-sized)
- Acrylic paint (Deep Navy Blue, Black, White)
- Metallic Gold acrylic paint or paint pen
- Flat paintbrush (medium size)
- Fine detail brush (liner brush)
- Old toothbrush
- Pencil or white charcoal pencil
- Matte or satin varnish spray
- Cup of water and paper towels
Step 1: Preparing the Night Sky
-
Clean the surface:
Begin by thoroughly washing your rock with soap and water to remove any dirt or oils. Let it dry completely before starting, as moisture trapped in the stone can ruin the paint later. -
Base coat mixing:
Squeeze out a generous amount of Deep Navy Blue acrylic paint. To give it that endless space depth, mix in a tiny drop of Black. You want a color that is almost black but clearly reads as blue in the light. -
Apply the background:
Using your flat paintbrush, coat the entire top surface and sides of the rock with your navy mixture. Use long, smooth strokes to minimize texture. Let this layer dry to the touch. -
Second coat:
Apply a second coat of the navy mixture to ensure full opacity. Stone is porous and tends to absorb the first layer, so this second pass ensures a solid, rich color foundation. -
Create distant stars:
Dilute a small drop of white acrylic paint with water until it has an inky consistency. Dip an old toothbrush into this mixture, aim it at the rock, and run your thumb across the bristles to flick tiny speckles onto the dark surface. Keep the splatter light for a subtle effect. -
Add larger stars:
Dip the very tip of your fine detail brush (or even a toothpick) into undiluted white paint. Gently dot a few larger, distinct stars randomly across the surface to create variety in your galaxy. -
Dry thoroughly:
Allow the background and star speckles to dry completely. This is crucial because any wet paint will smear when you try to draw the constellation lines on top.
Starry Splatter Tip
Test your toothbrush splatter on a piece of scrap paper first. This clears excess paint blobs and ensures a fine mist before you aim at the rock.
Step 2: Mapping the Constellation
-
Plan your design:
Choose a constellation shape you love. It helps to look up a simple line diagram of the constellation beforehand. Lightly sketch the main star points onto the rock using a pencil or white charcoal pencil to guide your spacing. -
Paint the main stars:
Switch to your metallic gold paint or use a gold paint pen. Identify where the ‘anchor’ stars of the constellation are based on your sketch. Paint small five-pointed stars at these intersections using the fine detail brush. -
Connect the lines:
With the gold paint (or marker), draw thin, straight lines connecting the star points. I find it easiest to pull the brush toward me rather than pushing it away to keep the lines steady and straight. -
Refine the stars:
Go back over your gold stars. You can make the central stars slightly larger or add tiny rays extending from the center to make them twinkle more noticeably against the dark background. -
Add subtle highlights:
For extra dimension, you can add a microscopic dot of white paint to the very center of the largest gold stars. This mimics the intense brightness of a star’s core.
Step 3: Finishing Touches
-
Inspect the edges:
Check the sides of the rock. If the gold lines need to wrap slightly around the curve for a 3D effect, extend them now. Also touch up any navy blue areas if your handling rubbed the paint off. -
Erase guidelines:
If any of your initial pencil or charcoal sketch marks are still visible, gently wipe them away with a barely damp cotton swab once the gold paint is 100% dry. -
Seal the artwork:
Once you are certain everything is dry (give it an hour just to be safe), take the rock to a well-ventilated area. Spray it with a light coat of matte or satin varnish to protect the paint from chipping and to unify the sheen.
Make It Personal
Creating a gift? Paint the recipient’s zodiac constellation on the front, and write their birthdate in tiny gold numbers on the underside of the stone.
Place your finished constellation stone on a windowsill or desk to enjoy a little piece of the cosmos every day
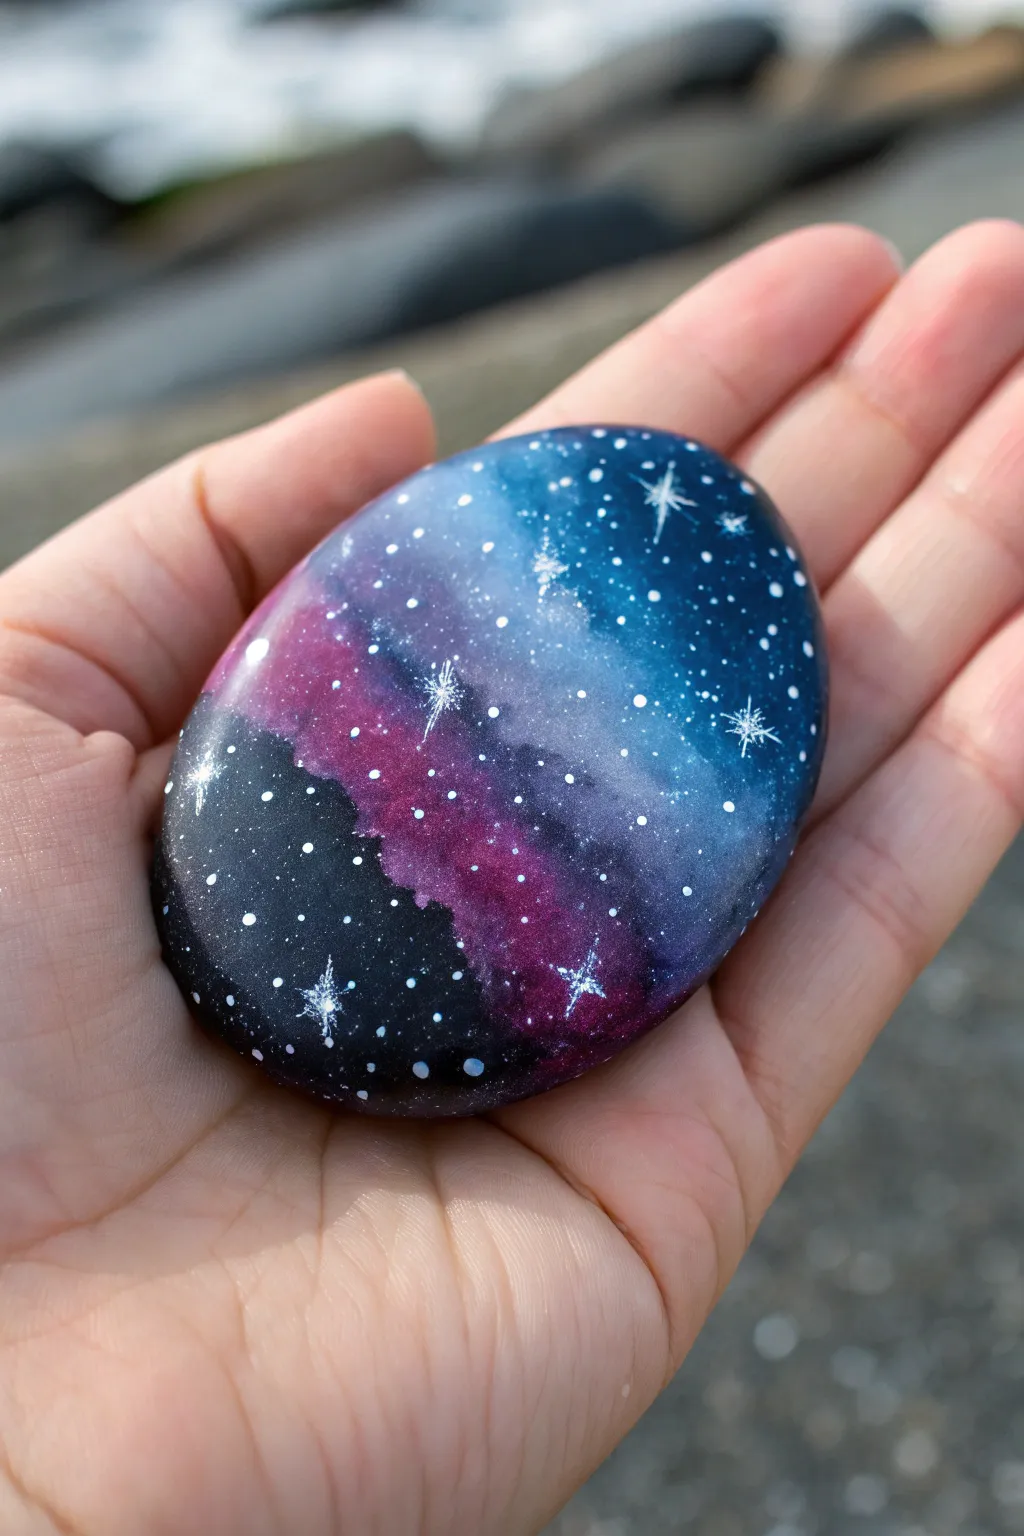
Milky Way Band Across the Stone
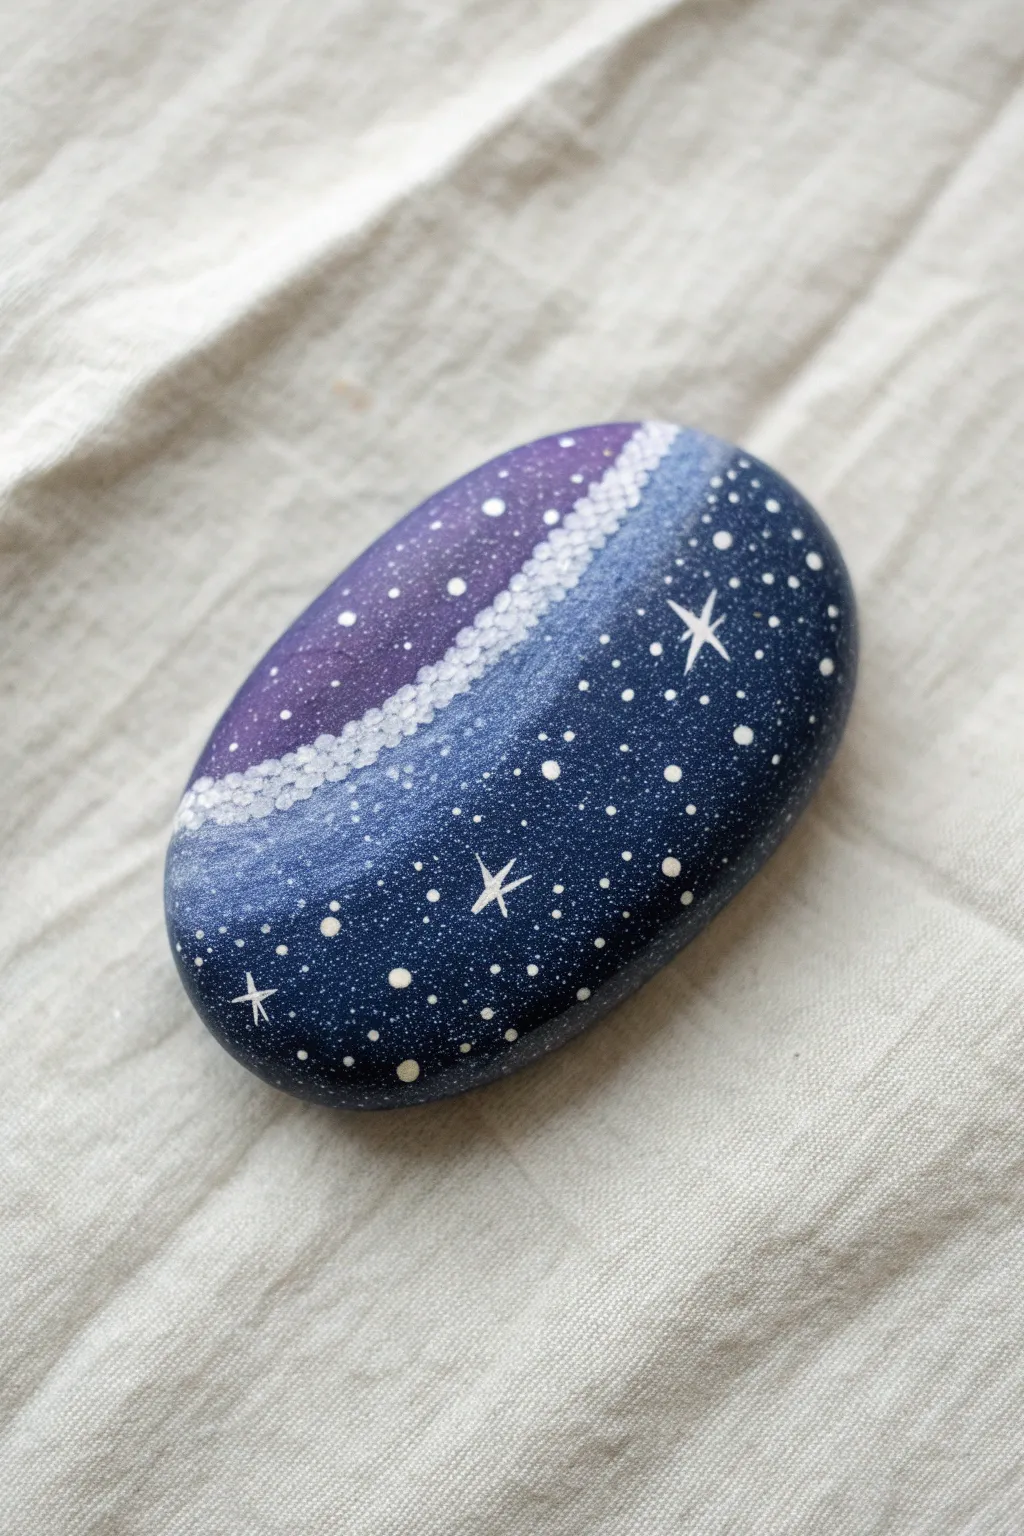
This project transforms a simple oval stone into a pocket-sized deep space scene, featuring a shimmering band of stippled stars across a deep blue and purple nebula. It captures the depth of the galaxy using clever layering of acrylics and precise dot work.
Step-by-Step Guide
Materials
- Smooth oval stone (river rock)
- Black acrylic paint (base coat)
- Deep blue acrylic paint (navy or midnight blue)
- Purple acrylic paint (violet or plum)
- Light blue acrylic paint
- Titanium white acrylic paint
- Sponge dabber or small piece of kitchen sponge
- Fine detail brush (size 0 or 00)
- Medium flat brush
- Dotting tool or toothpick
- Matte or glossy clear sealant spray
Step 1: Base and Nebula
-
Clean the surface:
Begin by washing your stone with warm soapy water to remove any dirt or oils. Let it dry completely in the sun or with a cloth. -
Apply base coat:
Paint the entire top surface of the stone with black acrylic paint. This provides a dark depth for the stars to shine against. Let this layer dry fully. -
Sponge the main blue:
Take a small piece of sponge and dip it lightly into deep navy blue paint. Dab off the excess on paper, then sponge it over about two-thirds of the stone, creating a soft, textured cloud. -
Add purple section:
Using a clean section of the sponge, apply purple paint to the remaining third of the stone. Gently overlap the purple with the navy blue to create a seamless, blended transition between the colors. -
Highlight the Milky Way path:
Mix a tiny amount of white with light blue. Use the sponge to tap a diagonal band right where the purple and navy sections meet. This lighter band will serve as the foundation for your dense star cluster. -
Soften the edges:
With a mostly dry sponge, gently tap around the edges of your highlighted band to ensure it fades naturally into the darker background rather than having a hard line.
Fixing “Blobby” Stars
If a painted star looks too thick or blobby, wait for it to dry completely. Then, touch up the edges with your dark background color to sharpen the points back to a fine tip.
Step 2: Stars and Details
-
Start the star cluster:
Dip a fine dotting tool or the very tip of a brush handle into white paint. Begin placing tiny dots densely along the light blue band you sponged earlier. -
Layer the density:
Concentrate your dots in the center of the band, making them very close together—almost touching—to create a glowing white core. -
Scatter background stars:
Move outwards from the band into the deep blue and purple areas. Place these dots much further apart and vary the pressure to create different sizes of distant stars. -
Create ‘spatter’ stars:
For a fine dusting of micro-stars, load an old stiff brush or toothbrush with watered-down white paint. Run your thumb across the bristles to flick tiny specks across the darkest parts of the stone. -
Paint major stars:
Select 3 or 4 spots for bright, ‘hero’ stars. Use your fine detail brush to paint a small white cross shape at these locations. -
Refine star shapes:
Elongate the vertical and horizontal lines of your crosses slightly, tapering them to sharp points so they look like twinkling four-point stars. -
Add final highlights:
Once the major stars dry, add a tiny extra dot of thick white paint right in the center of the cross to make them pop. -
Seal the artwork:
Allow the paint to cure for at least 24 hours. Finish by spraying a clear coat over the rock to protect the paint from chipping and to deepen the contrast of the colors.
Add Spectral Color
For a magical touch, mix a tiny drop of iridescent medium or metallic silver into your white paint for the Milky Way band. It will catch the light dynamically.
Place your finished galaxy stone on a desk or shelf to add a little cosmic wonder to your day

PENCIL GUIDE
Understanding Pencil Grades from H to B
From first sketch to finished drawing — learn pencil grades, line control, and shading techniques.
Explore the Full Guide
Bright Nebula Cloud Color Pops
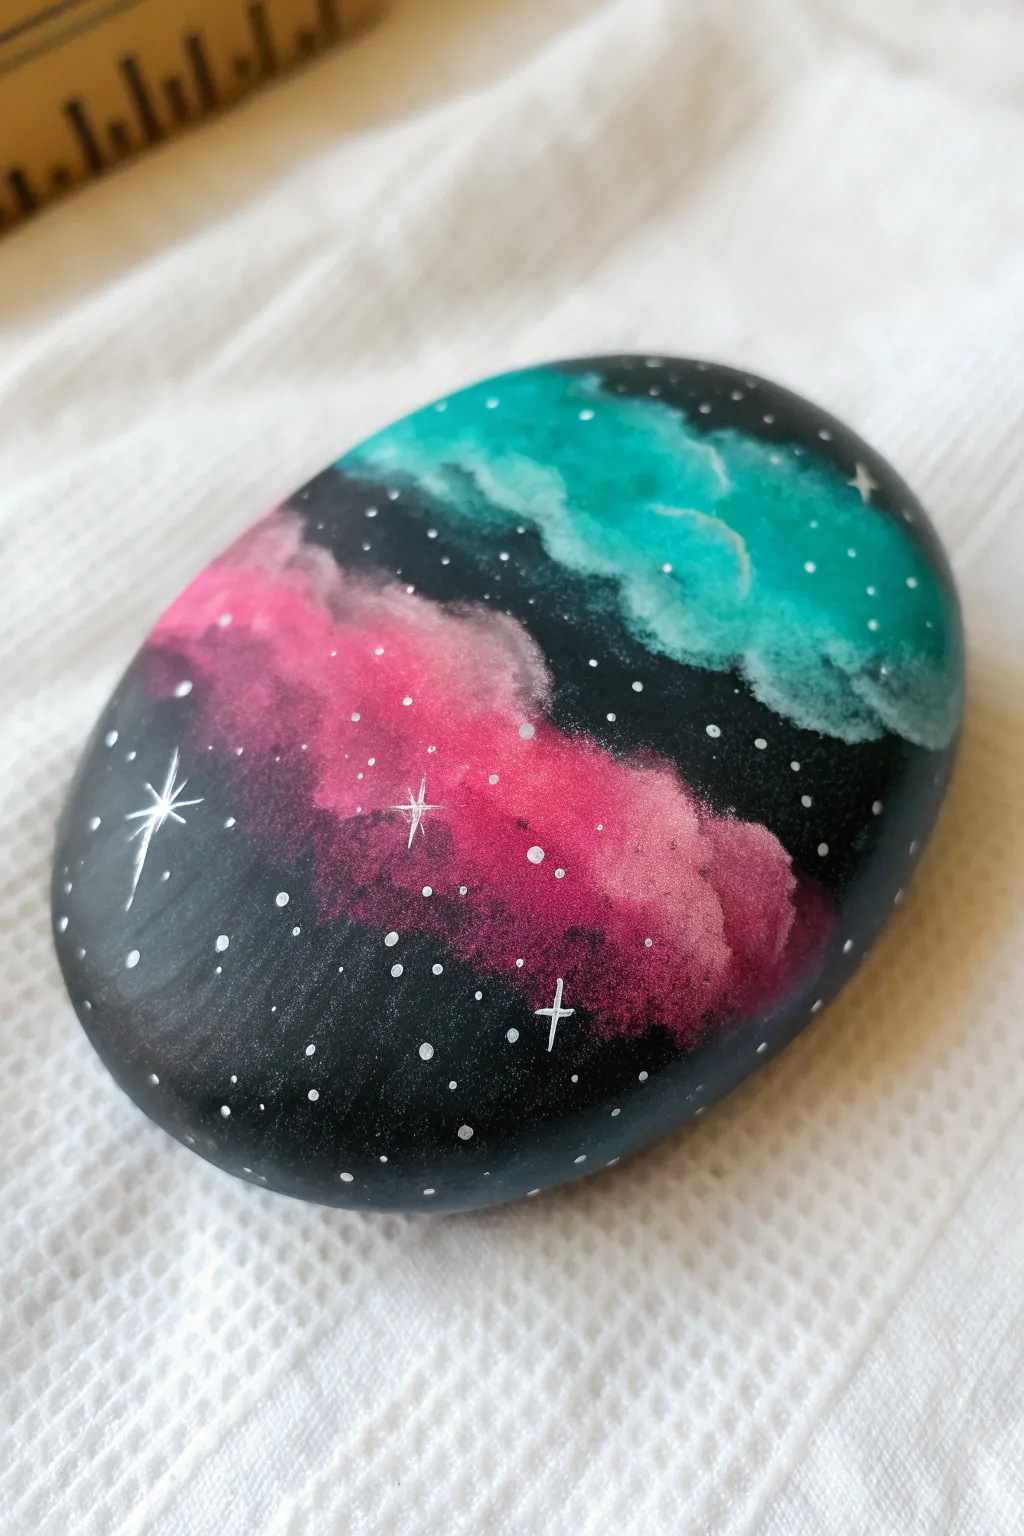
Transform a simple smooth stone into a window to the cosmos with this stunning galaxy design. By contrasting deep blacks with bright pops of pink and teal, you’ll create a nebula effect that practically glows against the dark background.
Step-by-Step Tutorial
Materials
- Smooth, oval river rock (tumbled stones work best)
- Black acrylic paint (matte or satin)
- Titanium white acrylic paint
- Magenta or bright pink acrylic paint
- Teal or turquoise acrylic paint
- Medium flat brush
- Small kitchen sponge or cosmetic wedge
- Fine liner brush (size 0 or 00)
- Toothbrush or stiff bristle brush
- Clear acrylic sealer (spray or brush-on)
- Palette or paper plate
- Water cup and paper towels
Step 1: Preparing the Void
-
Clean and Dry:
Begin by washing your stone with warm soapy water to remove any dirt or oils. Scrub gently, rinse thoroughly, and let it dry completely before applying any paint. -
Base Coat Application:
Using a medium flat brush, apply a layer of black acrylic paint to the entire top surface of the rock. Smooth out your brushstrokes as you go. -
Second Coat:
Once the first layer is dry to the touch, apply a second coat of black for an opaque, solid finish. Let this dry completely—any wetness will muddy your colors later.
Cloud Control
If your sponge leaves distinct square shapes, tear the edges of the sponge off before painting. Rough, torn edges create much softer, organic cloud shapes than sharp cuts.
Step 2: Creating the Nebulas
-
Prepare Sponges:
Cut a small kitchen sponge or cosmetic wedge into two small pieces, roughly the size of a fingertip. One will be for the pink cloud, the other for the teal. -
Dab the Pink Cloud:
Load one sponge piece lightly with magenta paint; dab excess off on your palette until the texture looks dry. Gently sponge a jagged, diagonal cloud shape across the lower-left section of the rock. -
Build Pink Intensity:
While the first layer is tacky, reload the sponge with a tiny bit more pink and mix in a drop of white. Dab this lighter pink into the center of your cloud shape to create a glowing core. -
Dab the Teal Cloud:
Using the second clean sponge piece, pick up your teal paint. Dab a second diagonal cloud shape in the upper-right section, roughly parallel to the pink one but leaving a gap of black space between them. -
Highlight the Teal:
Just like before, mix a speck of white into your teal paint. Sponge this brighter highlight into the center of the teal cloud, blending outward so the edges remain soft and the center looks luminous. -
Softening Edges:
If your cloud edges look too harsh, use a barely damp, clean sponge to lightly tap the boundaries where the color meets the black, fading them into the background.
Cosmic Depth
Add a faint layer of deep purple or dark blue underneath the pink and teal clouds before sponging the main colors. This transition color makes the black void feel deeper.
Step 3: Adding the Stars
-
Loading the Spatter Brush:
Thin down a small amount of white acrylic paint with a few drops of water until it has an ink-like consistency. Loading this onto an old toothbrush or stiff bristle brush works perfectly. -
Creating the Galaxy Dust:
Hold the brush over the rock and flick the bristles with your thumb to spray fine speckles across the surface. I aim for the black spaces primarily, but letting some overlap the colored clouds adds depth. -
Painting Larger Stars:
Dip the handle end of a paintbrush or a dotting tool into undiluted white paint. Add a few specific, larger dots in empty black areas to represent closer stars. -
Drawing Star Flares:
Using your finest liner brush and slightly thinned white paint, locate 2-3 of your largest white dots. carefully pull a long, thin vertical line through the dot, followed by a shorter horizontal line to create a cross shape. -
Adding Flare Details:
For the largest star flare, add two tiny diagonal lines interacting with the center dot, making it sparkle. Keep your hand light so the lines taper off beautifully.
Step 4: Finishing Touches
-
Final Inspection:
Look closely at your nebula clouds. If the white splatter obscured too much color, you can go back with a very dry sponge and lightly tap transparent color back over the stars. -
Sealing the Artwork:
Allow the entire stone to cure for at least 24 hours. Once fully dry, apply a coat of clear acrylic sealer or gloss varnish to protect the paint and make the galaxy colors pop.
Place your finished galaxy stone on a desk or in a garden planter to add a little starlight to your day
Comet and Shooting Star Trails
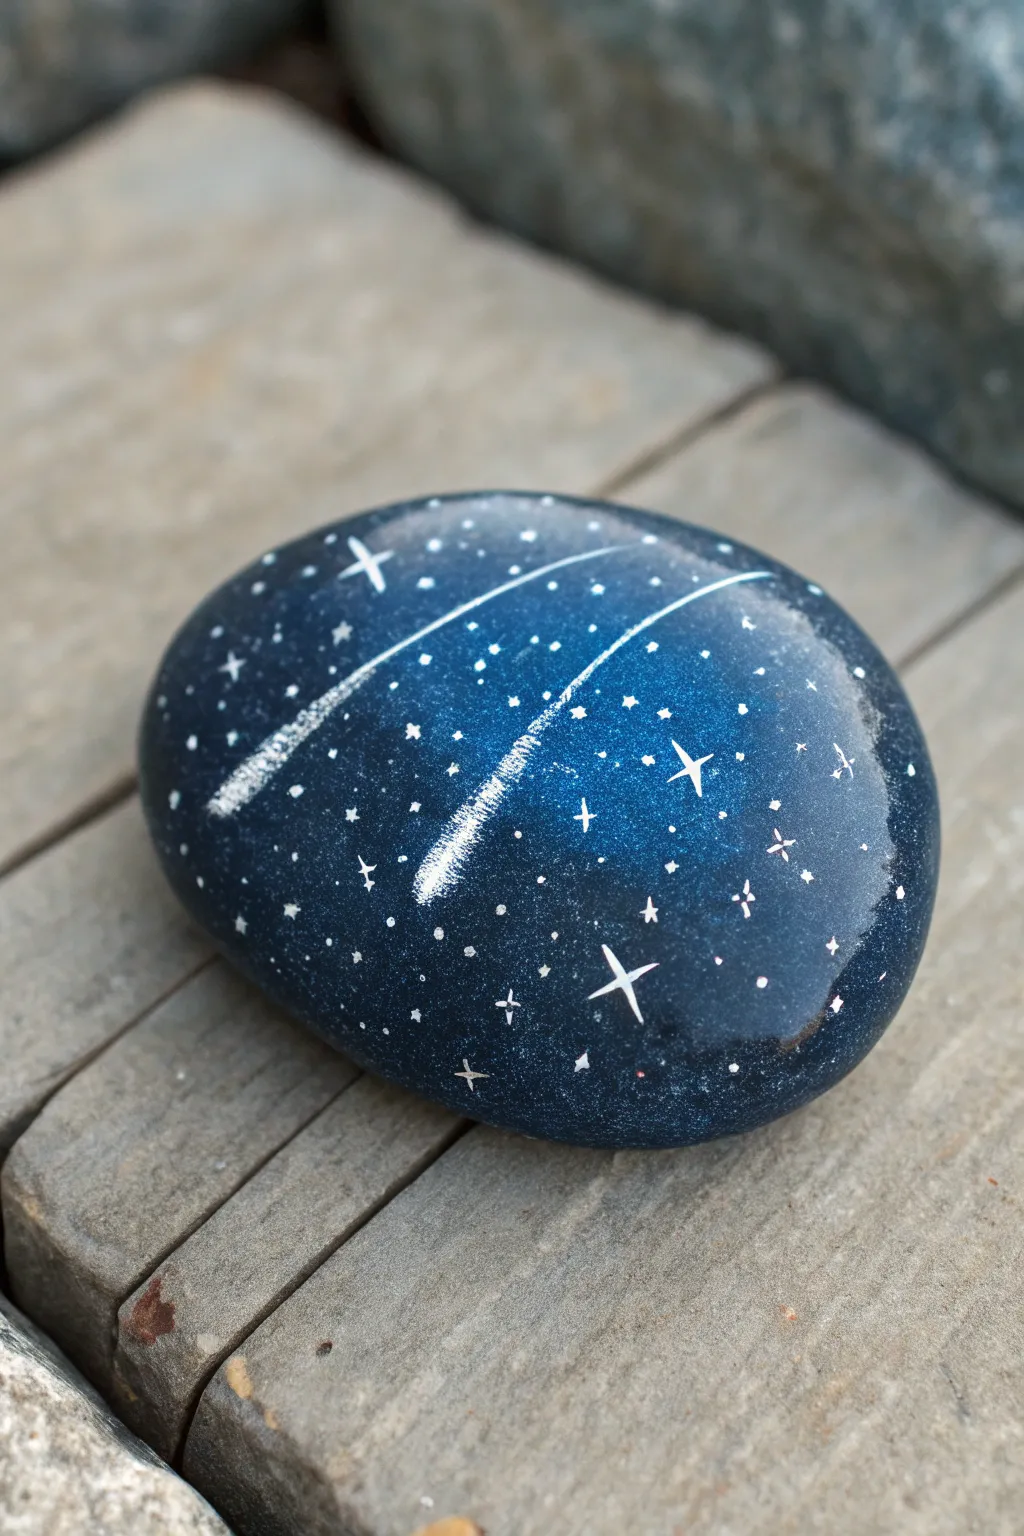
Capture the magic of a meteor shower in the palm of your hand with this shimmering galaxy rock. Featuring a deep, glittering blue background and striking white comet trails, this design turns an ordinary stone into a piece of the night sky.
Step-by-Step Guide
Materials
- Smooth oval river rock
- Acrylic paint (black, dark blue, white)
- Metallic blue or glitter acrylic paint
- Fine glitter (silver or holographic)
- Flat paintbrushes
- Fine detail paintbrush (liner brush)
- Dotting tool or toothpick
- Gloss varnish or sealer (spray or brush-on)
- Palette or small dish for mixing
- Water cup and paper towels
Step 1: Preparing the Night Sky
-
Clean the canvas:
Start by scrubbing your chosen rock with warm soapy water to remove any dirt or oils. Let it dry completely before starting to ensure the paint adheres properly. -
Base coat:
Apply a solid layer of black acrylic paint over the entire top surface of the rock. This dark base is crucial for making the galaxy colors pop later. Allow this to dry fully. -
Deep space blue:
Using a sponge or a soft flat brush, dab dark blue paint over the black base. Don’t cover it completely; leave some patchy black areas showing through for depth. -
Adding shimmer:
While the blue layer is still slightly tacky or just after it dries, apply a coat of metallic blue or glitter paint over the entire surface. This gives the background that nebulous, deep-space shimmer. -
Fine glitter dusting:
For extra sparkle similar to the reference photo, you can sprinkle a tiny pinch of very fine silver glitter onto the wet paint, or mix it into your varnish later.
Dry Brush Secret
For the misty comet tail, test your dry brush on a scrap paper first. It should leave barely any paint—just a dusty, scratchy mark.
Step 2: Creating the Shooting Stars
-
Planning the trajectory:
Visualize where your two main shooting stars will go. They should curve gently across the upper half of the rock, moving from left to right. -
Painting the main heads:
Load a small brush with bright white paint. press down firmly to create the ‘head’ of the comet, then lift the brush quickly as you drag it back to create a tapered start to the tail. -
Dry-brushing the tails:
Wipe most of the white paint off your brush until it is almost dry. I find this technique works best for the misty trail effect. -
Extending the streaks:
Lightly drag the dry brush from the head of the comet backwards along the curved path. The paint should look scratchy and fading, not a solid white line. -
Adding the guide line:
Using a very fine liner brush and thinned white paint, draw a distinct, thin line extending from the faint tail all the way across the rock. This represents the long path of the meteor.
Glow in the Dark
Mix glow-in-the-dark powder into your white paint for the stars and comet heads. It will look normal by day but light up when the lights go out.
Step 3: Starry Details
-
Painting large stars:
Switch to your finest detail brush. Paint several four-pointed stars (cross shapes) scattered around the rock. Make the center point slightly thicker and the arms taper out. -
Adding medium stars:
Use a small dotting tool or the back of a paintbrush handle dipped in white paint to place medium-sized dots randomly in the empty spaces. -
Creating distant stars:
Use a toothpick or a very fine pin to add tiny pinprick stars. Group some of them together in clusters to mimic natural constellations. -
Highlighting the comets:
Go back to your shooting star heads. Add a tiny dot of pure, thick white right at the front center of the comet head to make it the brightest point on the rock. -
Protecting the art:
Once all paint is completely dry (give it a few hours), apply a clear gloss varnish. This will seal the paint and make the glitter and metallic blue shine brilliantly like polished glass.
Place this celestial stone on your desk or in a planter to enjoy a clear night sky view anytime you like


Aurora Glow Over a Space Horizon
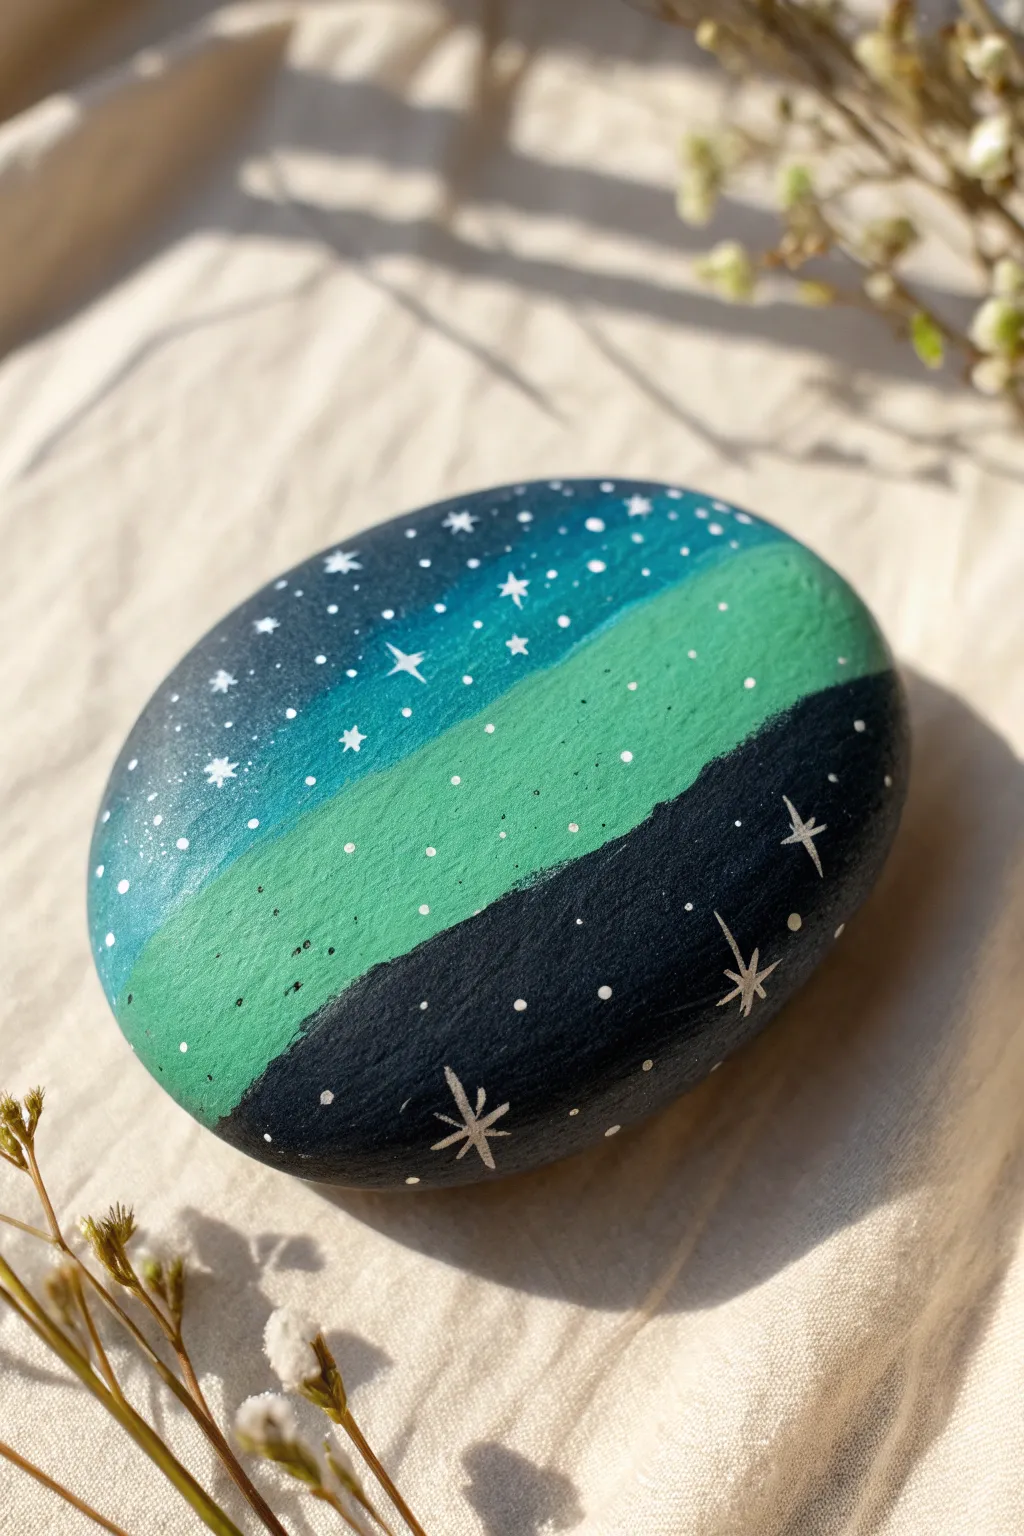
Capture the magic of the northern lights right in the palm of your hand with this layered rock painting. By blending distinct bands of teal, mint, and black, you’ll create a striking celestial backdrop for a field of delicate stars.
Step-by-Step Tutorial
Materials
- Smooth, oval river rock
- Acrylic paint (black, white, mint green, teal/dark blue)
- Flat paintbrush (medium size)
- Fine liner brush (size 0 or 00)
- Dotting tool or toothpick
- Spray varnish or sealant (gloss or matte)
Step 1: Base Layers
-
Clean the surface:
Begin by washing your rock with warm, soapy water to remove any dirt or oils. Dry it thoroughly with a towel or let it air dry completely before you start painting. -
Paint the top band:
Using your medium flat brush, load up a deep teal or dark blue paint. Paint the top third of the rock’s surface, creating a slightly curved line at the bottom edge of this section. -
Apply the middle band:
While the top band is still drying, rinse your brush and pick up a bright mint green. Paint the middle section of the rock, slightly overlapping the wet teal paint above to create a soft transition, but keep the main body of color distinct. -
Paint the bottom silhouette:
Clean your brush again and switch to black acrylic paint. Cover the bottom third of the rock, curving the line upward slightly to mimic a rolling hill or horizon. Ensure the bottom edge is opaque and smooth. -
Let it dry:
Allow these base layers to dry completely. If the colors look streaky or the rock shows through, apply a second coat to each section following the same steps.
Step 2: Starry Details
-
Prepare white paint:
Put a small amount of white acrylic paint on your palette. Add a tiny drop of water to thin it slightly, making it the consistency of heavy cream; this helps create sharper lines. -
Dot the sky:
Dip a dotting tool or the tip of a toothpick into the thinned white paint. Gently tap small dots across the teal and mint sections to create distant stars. Vary the pressure to make some dots tiny and others slightly larger. -
Add foreground dots:
Continue the dotting process into the black section at the bottom. The contrast of white against black really makes the design pop. -
Paint the larger stars:
Switch to your fine liner brush. Identify a few spots in the teal sky and the black ground where you want feature stars. Paint a simple vertical line about a quarter-inch long. -
Cross the stars:
Paint a horizontal line crossing through the center of your vertical line to form a cross shape. -
add diagonal rays:
Carefully paint smaller diagonal lines originating from the center of the cross outward. I like to keep these shorter than the main cross lines for a twinkling effect. -
Highlight the horizon:
Using the very tip of your tiny brush, add a few extra-small sparkles or dots right along the border where the black paint meets the mint green to integrate the layers.
Uneven Lines?
If your stars look blobby, your paint might be too thick. Add a tiny drop of water to improve flow, and wipe excess paint off the brush before touching the rock to keep lines crisp.
Step 3: Finishing Touches
-
Check for gaps:
Look over the rock for any accidental smudges or areas that need a touch-up. Use a damp brush to clean up edges if necessary. -
Final dry time:
Allow the white star details to dry completely. This usually takes about 15 to 20 minutes, depending on how thick the paint is. -
Seal the artwork:
Once fully dry, spray the rock with a clear acrylic sealer. This protects the paint from chipping and gives the night sky a beautiful sheen.
Make it Sparkle
For a magical finish, mix a tiny bit of silver glitter paint into your white acrylic before painting the stars. It adds a subtle shimmer when the light hits the finished rock.
Your shimmering aurora stone is now ready to use as a paperweight or a lovely garden decoration
Playful UFO Beam Scene Rock
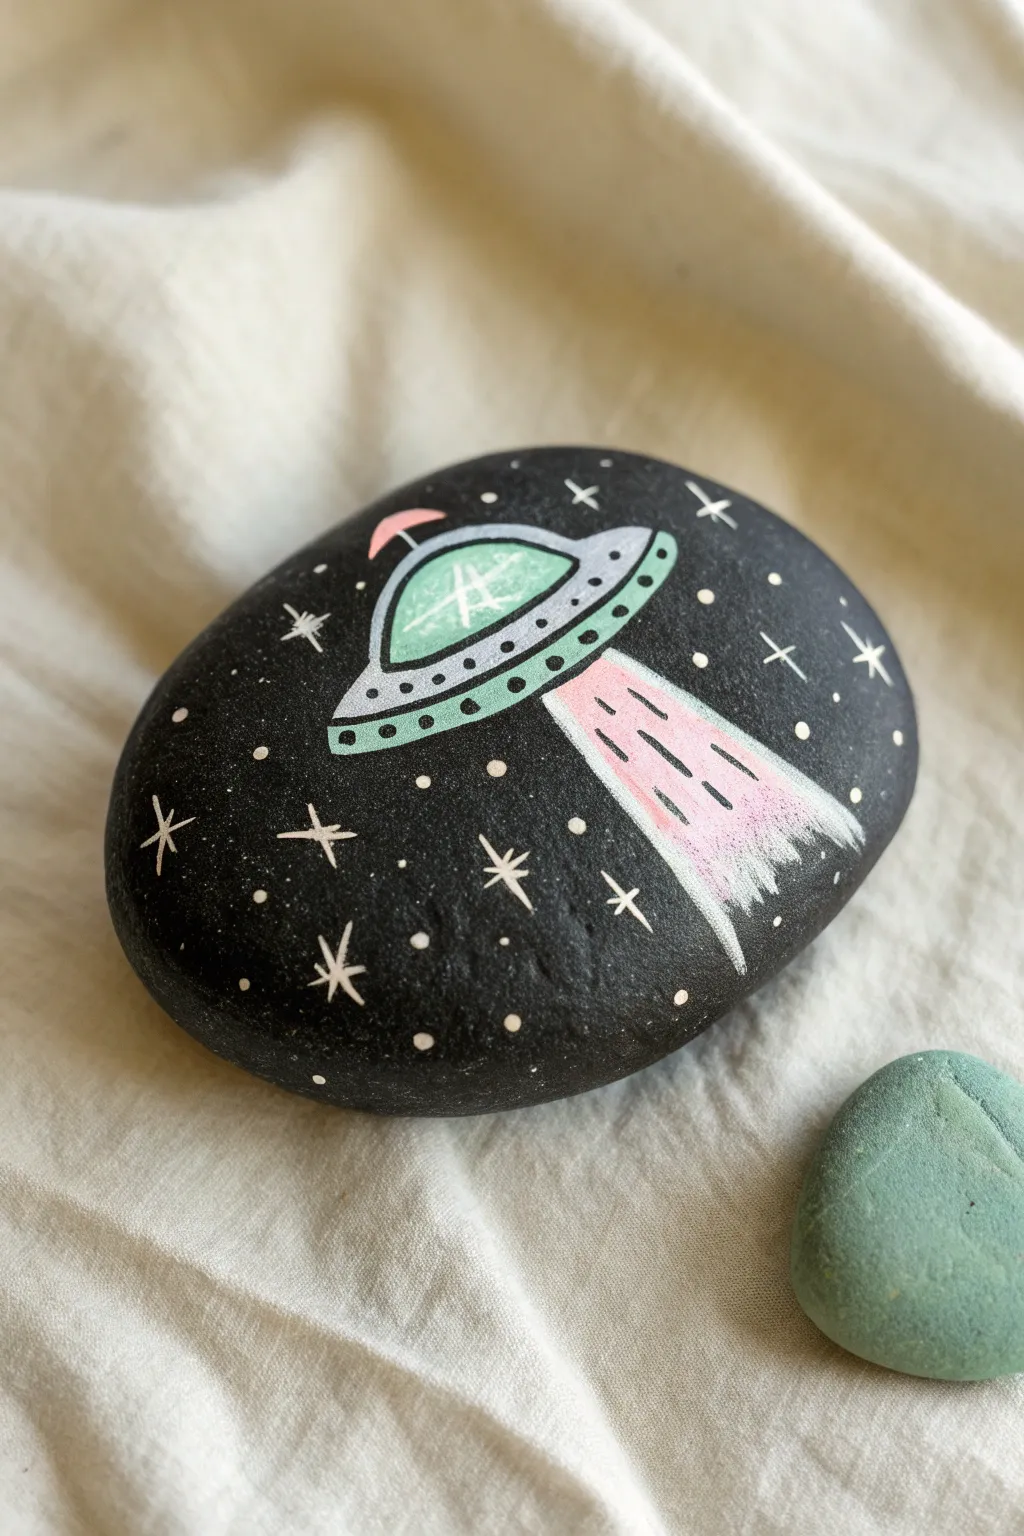
This whimsical painted stone features a retro-style flying saucer beaming down a mysterious pink light against a starry night sky. The contrast between the matte black background and the pastel spaceship makes for a striking, cosmic decoration.
How-To Guide
Materials
- Smooth, rounded river rock (medium size)
- Black acrylic paint (matte finish works best)
- Wide flat paintbrush
- Fine detail paintbrush (size 0 or 00)
- Acrylic paint markers (Posca or similar) or acrylic paints: Mint Green, Light Grey, Pastel Pink, and White
- Spray sealer or varnish (matte or satin)
- Pencil for sketching (optional)
Step 1: Preparing the Void
-
Clean surface:
Begin by washing your rock with warm soapy water to remove any dirt or oils. Let it dry completely before starting. -
Base coat:
Using a wide flat brush, paint the entire top surface of the rock with black acrylic paint. You want a solid, opaque background. -
Second layer:
Allow the first coat to dry for about 10-15 minutes. If you can still see the stone through the paint, apply a second coat for deep, cosmic coverage.
Beam Me Up
For a glowing beam effect, mix a tiny drop of neon pink into your pastel pink paint, or layer a translucent white glaze over the top.
Step 2: Drafting the UFO
-
Outline the shape:
Once the black base is bone dry, lightly sketch the UFO shape using a pencil. Draw a flattened oval for the saucer rim and a smaller semi-circle on top for the cockpit dome. -
Paint the saucer body:
Fill in the main saucer rim shape with light grey paint. It may need two thin coats to stand out against the black. -
Add the dome:
Paint the semi-circle dome on top of the grey rim using a mint green or teal color. -
Top antenna:
Add a tiny pink semi-circle floating slightly above the mint dome, and connect it with a very thin white or grey line.
Paint Transparency?
If your light colors (like the mint or grey) look streaky over the black base, paint those shapes pure white first as a primer, then add the color on top.
Step 3: The Tractor Beam
-
Base beam shape:
Using pastel pink paint, draw a cone shape extending downwards from the center of the grey saucer. Make the edges slightly uneven for a shimmering light effect. -
Fading effect:
While the pink is still slightly wet, or using a dry-brush technique, feather the bottom edges of the beam so it looks like it’s fading into the darkness rather than ending abruptly. -
Motion lines:
Add a few broken, vertical dashes of darker pink or white inside the beam area to suggest movement and energy.
Step 4: Cosmic Details
-
Saucer details:
Once the grey paint is dry, use a fine black pen or very thin black paint to outline the saucer rim and the dome. -
Window dots:
Add a row of small black dots horizontally across the grey rim of the spaceship. -
Dome highlight:
Paint a thin white cross-hatch or sparkle symbol on the mint green dome to simulate a glass reflection. -
Starry background:
Dip the handle end of a paintbrush into white paint and dot it randomly around the black background to create distant stars. -
Twinkling stars:
Use your finest brush to paint a few four-pointed cross stars scattered among the dots. vary their sizes for depth. -
Final touches:
Check for any areas that need a touch-up of black paint to clean up the edges of your UFO. -
Seal it:
Wait at least 24 hours for all paint layers to cure fully, then apply a spray varnish to protect your intergalactic art from chipping.
Place your finished rock in a garden pot or on a desk for a daily reminder that the truth is out there
Mini Solar System Orbit Diagram
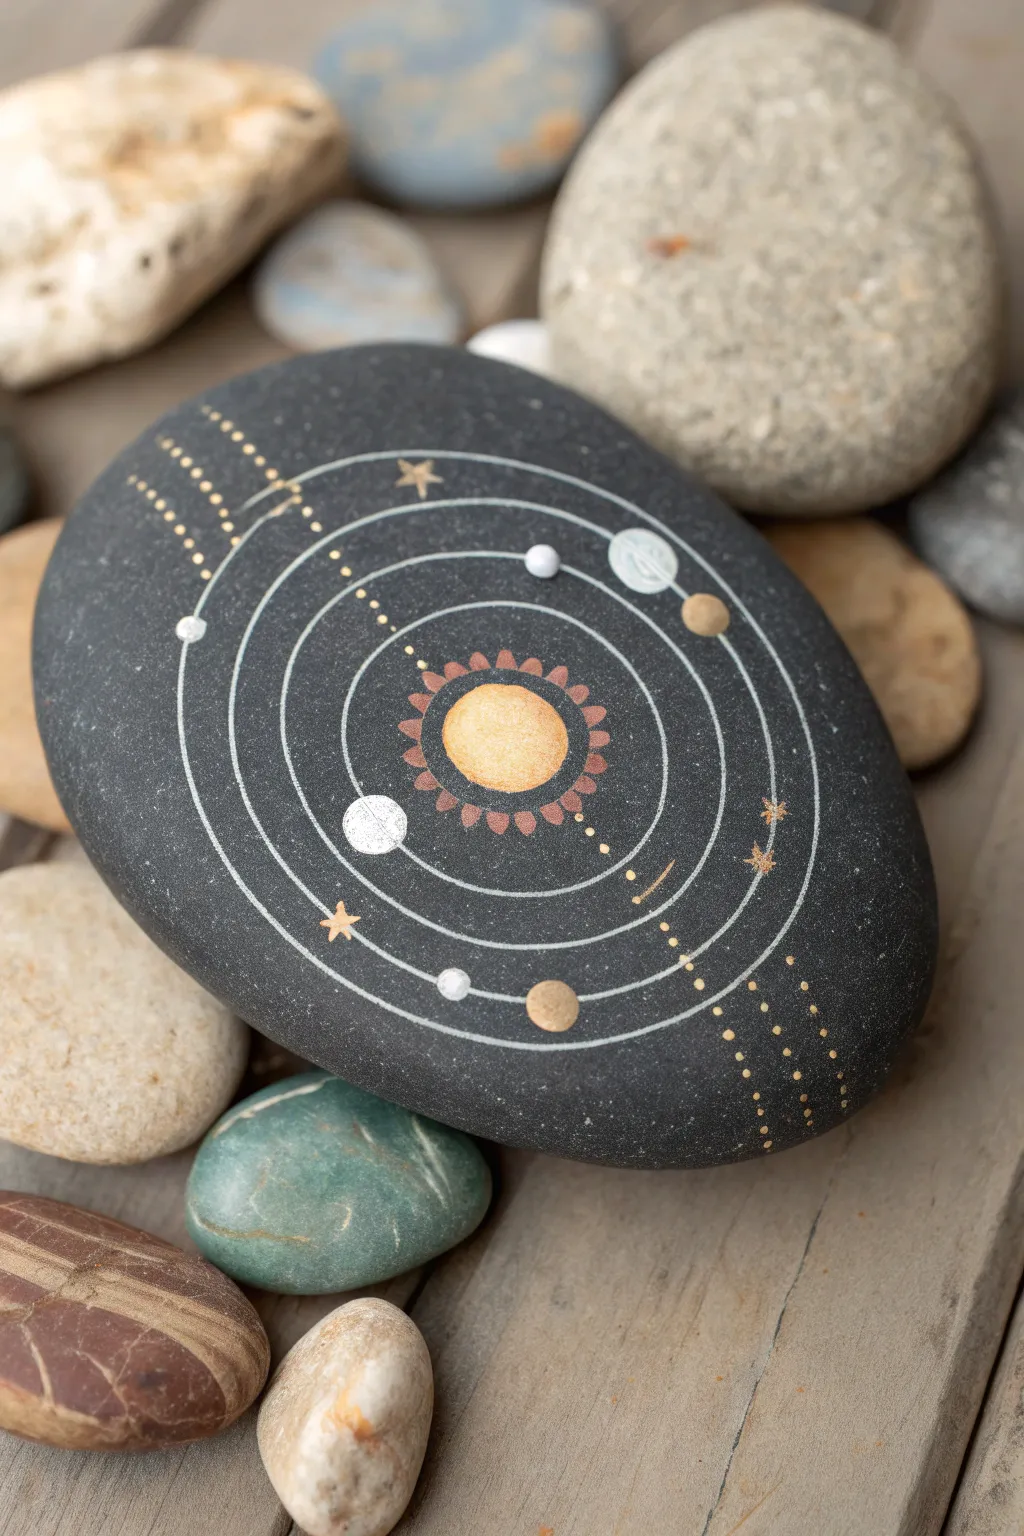
Transform a smooth river stone into a stunning cosmic map featuring delicate planetary orbits and a radiant central sun. This project combines geometric precision with artistic flair, resulting in a sophisticated piece of decor perfect for a desk or shelf.
Detailed Instructions
Materials
- Large, smooth, dark grey or black river rock (flat surface is best)
- White acrylic paint or paint pen (extra fine tip)
- Metallic gold acrylic paint or paint pen
- Metallic copper or bronze acrylic paint
- Silver acrylic paint
- Compass or circle stencils (various small sizes)
- Fine detail paintbrush (size 00 or 000)
- Dotting tools (various sizes)
- Pencil for sketching
- Matte or satin varnish sealer
Step 1: Preparing the Canvas
-
Clean the stone:
Wash your rock thoroughly with warm soapy water to remove any dirt or oils. Let it dry completely before starting. -
Base coat (optional):
If your rock isn’t naturally dark enough, apply a coat of matte black or dark grey acrylic paint to create a deep space background. Allow this to dry fully. -
Mark the center:
Find the approximate center of your stone. Using a pencil, lightly mark a small dot where your sun will go; this will be the anchor for all your concentric circles.
Wobbly Lines?
If you make a mistake on a circle, don’t wipe it! Let the paint dry completely, then gently scratch the error away with a toothpick or paint over it with black.
Step 2: Mapping the System
-
Sketch the orbits:
Using a compass or circle stencils, very lightly sketch four concentric circles around your center point with a pencil. Spacing doesn’t need to be perfect, but try to keep them relatively distinct. -
Paint the orbit lines:
With an extra-fine tip white paint pen or a liner brush, carefully trace over your pencil lines. I find that resting my pinky finger on the table helps stabilize my hand for smoother curves. -
Draw the radial lines:
Add the straight lines extending outward from the orbits. Using a ruler or steady hand, draw two parallel lines exiting the top left and three dashed lines exiting the bottom right, creating a diagrammatic feel. -
Add dashed details:
Enhance the scientific look by adding small gold dots along the radial lines you just painted, extending past the outermost orbit.
Step 3: Creating the Celestial Bodies
-
Paint the sun’s core:
In the very center, paint a solid circle using bright metallic gold paint. This should be larger than any of the planets. -
Add solar flares:
Using a copper or bronze color, paint small, petal-like shapes around the gold sun. Keep them close together to form a corona effect. -
Place the planets:
Select points along your white orbit rings to place your planets. Use a mix of dotting tools to create different sizes representing various celestial bodies. -
Color code the planets:
Paint the planets using white, silver, and gold. For visual interest, make one planet larger with a swirled pattern (like Jupiter) using diluted white paint on a grey dot. -
Add planetary details:
For the metallic planets, layer a second coat of gold or copper once the first dot is dry to ensure they pop against the dark stone.
Glow Effect
Mix a tiny amount of glow-in-the-dark medium into your white paint for the orbit lines. Your solar system will faintly illuminate when the lights go out.
Step 4: Finer Details & Finishing
-
Intersperse stars:
Using your smallest dotting tool or a toothpick, place tiny gold and white dots randomly in the empty spaces between orbits to represent distant stars. -
Draw distinct stars:
Paint a few larger, four-pointed or five-pointed stars using gold paint. Place these sparingly to avoid overcrowding the design. -
Highlight the diagram:
Go back over your straight radial lines with small gold dots, layering them over the white lines for a complex, charted look. -
Clean up sketch lines:
Once the paint is 100% dry, gently erase any visible pencil marks that weren’t covered by paint. -
Seal the artwork:
Apply a layer of matte or satin varnish to protect your painting from chipping. A matte finish looks particularly nice as it mimics the natural texture of the stone.
Place your finished cosmic stone on your desk as a reminder of the order and beauty of the universe
Textured Meteorite and Space Dust Rock
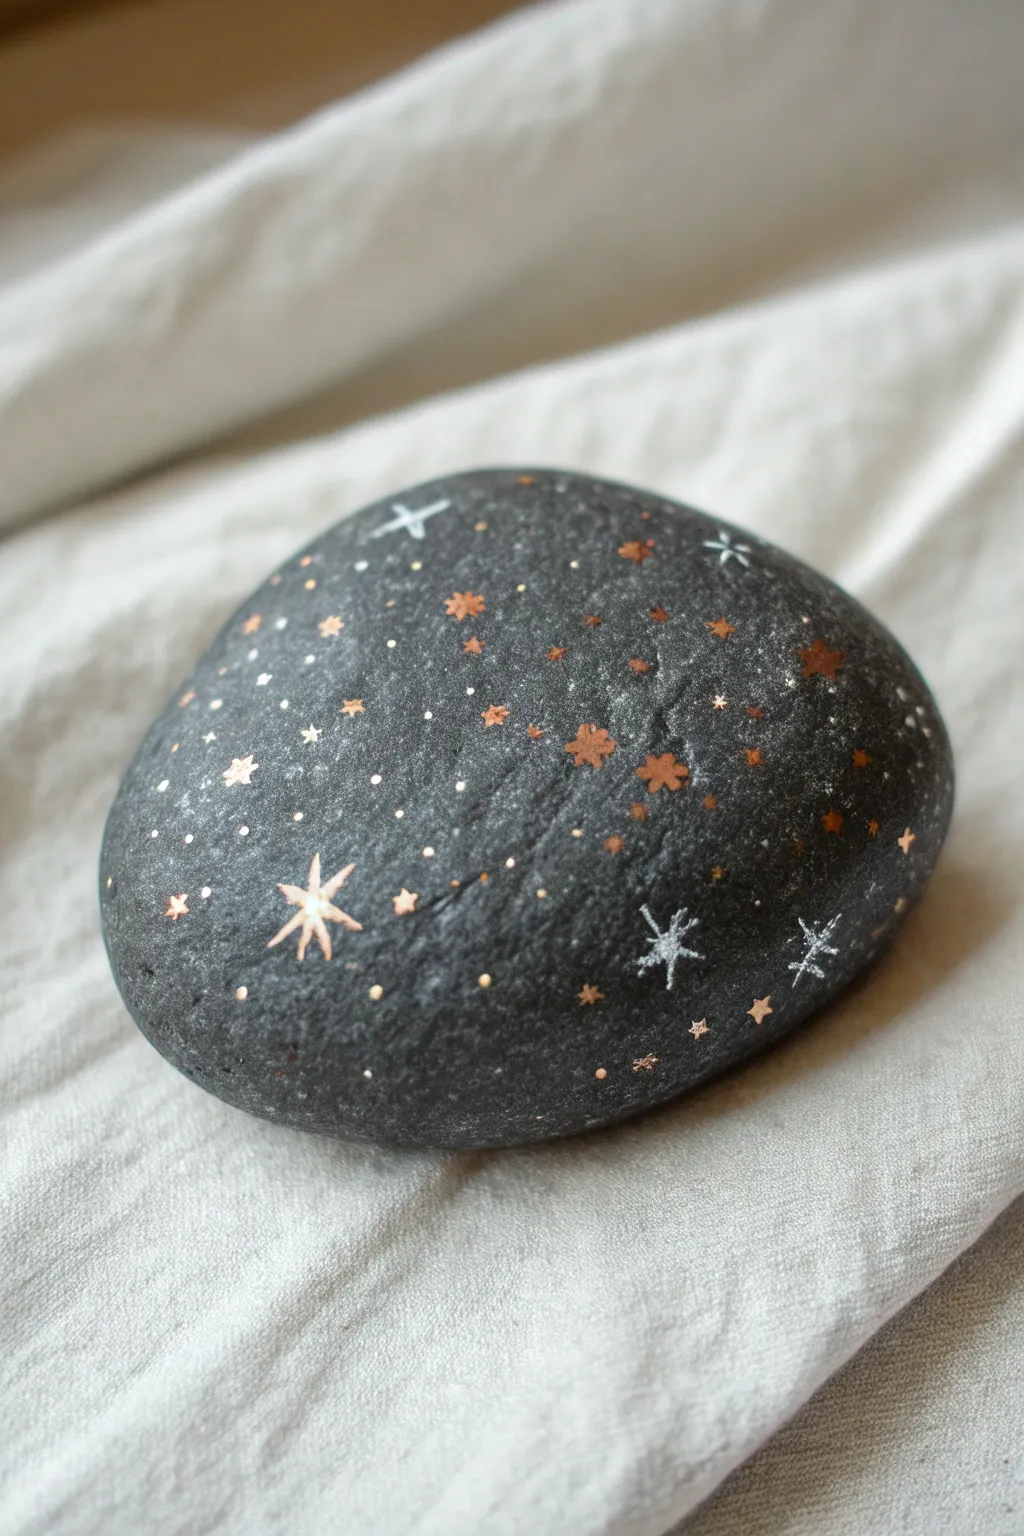
Transform an ordinary dark stone into a fragment of the cosmos with this elegant, minimal design. Using the stone’s natural texture as a backdrop, you’ll create a galaxy of shimmering stars using metallic pens for a sophisticated finish.
Step-by-Step
Materials
- Smooth, dark grey or black river rock (matte finish preferred)
- Metallic copper or rose gold paint pen (fine tip, 0.7mm)
- Metallic silver or white paint pen (fine tip, 0.7mm)
- Matte spray varnish (optional, for sealing)
- Paper towel or scrap paper for testing flow
Step 1: Preparation & Base
-
Select the perfect stone:
Choose a rock that is naturally dark grey or black. The texture is important here; a slightly pitted or matte surface looks more like a meteorite than a perfectly polished stone. -
Clean surface thoroughly:
Wash the stone with warm soapy water and a stiff brush to remove any dirt or oils. Let it dry completely for several hours or overnight to ensure paint adhesion. -
Optional base coat:
If you can’t find a naturally dark stone, you can apply a thin wash of dark grey acrylic paint mixed with a little water, but keeping the natural stone visible is best for this specific look.
Star Shine Tip
Make your larger stars twinkle by adding a tiny dot of the opposite color (silver on copper) right in the center of the star shape.
Step 2: Creating the Galaxy
-
Prime your pens:
Shake your metallic paint pens vigorously. Press the nibs down on a scrap piece of paper until the ink flows smoothly. You want crisp lines, not blobs. -
Place anchor stars:
Using the copper or rose gold pen, draw three or four small 5-point stars scattered across the surface. These will be the focal points of your galaxy. -
Add silver accents:
Switch to your silver or white pen. draw a few simple ‘cross’ stars (a vertical line crossed by a horizontal one) and perhaps a six-pointed starburst. -
Create distant star clusters:
With the copper pen again, add groups of tiny dots. I find it looks most natural if you cluster them slightly rather than spacing them perfectly evenly. -
Layer in the dust:
Use the very tip of the silver pen to add even smaller micro-dots between your larger stars. This mimics the look of distant space dust. -
Add variance:
Draw a few tiny ‘plus sign’ stars in copper to bridge the gap between the large stars and the simple dots. -
Check the balance:
Step back and look at the stone. Ensure the ‘galaxy’ wraps slightly around the curve of the rock so it doesn’t look like a flat sticker on top. -
Fill empty voids:
If any area looks too empty, add a single copper dot or a tiny silver speck. The design should feel dense but delicate. -
Let it cure:
Allow the paint to dry completely. Metallic ink can sometimes take a bit longer to set than standard acrylics, so give it at least 30 minutes.
Step 3: Finishing Touches
-
Seal the artwork:
To protect your galaxy without making it look like plastic, spray a light coat of matte varnish over the stone. Avoid glossy finishes, as they will compete with the metallic shine of the stars.
Glow Up
Mix a tiny amount of glow-in-the-dark medium with clear varnish and dab it onto the silver stars for a galaxy that lights up at night.
Place your petite meteorite on a desk or shelf to add a touch of cosmic wonder to your space
Black Hole Swirl Illusion Rock
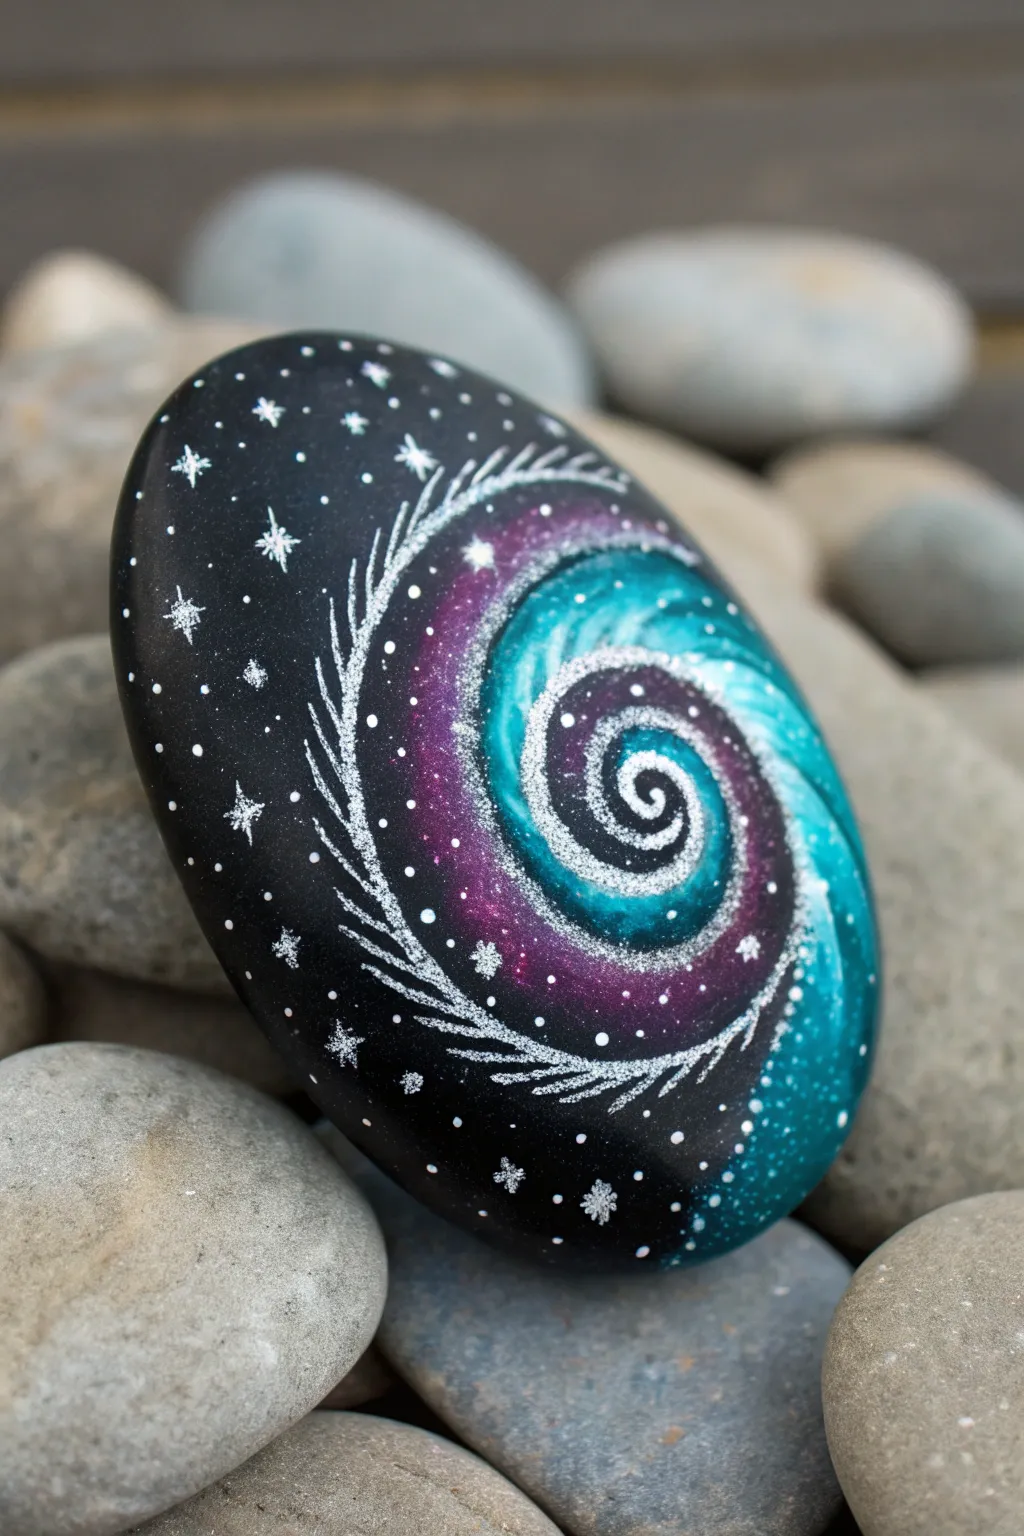
Transform a simple smooth stone into a window to deep space with this mesmerizing black hole spiral. The design features layers of shimmering teal and magenta swirling together, framed by delicate stardust trails and sparkling constellations.
How-To Guide
Materials
- Smooth, oval-shaped river rock (cleaned and dried)
- Black acrylic paint (or gesso)
- Acrylic paints: Teal/Turquoise, Magenta/Deep Purple, White
- Fine glitter paint or metallic shimmer medium (silver or iridescent)
- Fine detail brushes (sizes 0 and 00)
- Medium flat brush for base coating
- Dotting tools (or toothpicks)
- Gloss varnish or resin for sealing
- Palette and water cup
Step 1: Setting the Void
-
Base Coat:
Start by painting your entire rock with a solid coat of black acrylic paint. You may need two coats to ensure complete coverage so no stone texture shows through. Let this dry completely. -
Drafting the Spiral:
Using a very faint pencil line or a thin brush with slightly watered-down white paint, lightly sketch a large oval spiral shape in the center of the rock. This will serve as your guide for the galaxy’s rotation.
Step 2: Building the Cosmic Core
-
The Inner Glow:
Load a small brush with bright teal or turquoise paint. Starting from the very center of your spiral guide, paint a tight curl, gradually widening the stroke as you move outward. -
Adding Depth:
While the teal is still slightly wet, mix a tiny drop of white into it on your palette to create a lighter turquoise. Highlight the top curve of the inner spiral to create a 3D tubular effect. -
The Magenta Transition:
Clean your brush and switch to the deep purple or magenta paint. Paint a band that hugs the outer edge of the teal spiral. Blend the boundary slightly where the two colors meet to create a smooth, nebulous transition. -
Deepening the Purple:
Paint a second, darker purple band outside the magenta one. Let this fade into the black background, making sure the edges aren’t too harsh. -
Glitter Glaze:
Once the colored layers are dry to the touch, apply a thin layer of glitter paint or iridescent medium over the teal and purple sections. This adds that essential cosmic shimmer.
Wobbly Lines?
If your fine lines are shaky, try thinning the paint with a drop of water to an ink-like consistency. It flows much smoother than thick paint.
Step 3: Creating the Stardust Trails
-
Defining the Swirls:
Using your finest detail brush (size 00) and white paint, carefully paint thin, curved lines following the flow of the spiral. Break these lines up; they shouldn’t be solid, but rather look like flowing streams of gas. -
Feathering the Edges:
On the outermost curve of the spiral, use short, quick brushstrokes flicking outward. This creates the feathery, ‘event horizon’ look seen in the reference image, suggesting movement and speed. -
Brightening the Center:
Add a crisp white line spiraling right into the center of the teal section. This high-contrast highlight defines the shape and draws the eye inward. -
Micro-Details:
Mix a very watery white paint. Dip your brush and lightly stipple faint white dots over the colored nebula sections to look like distant clusters of stars caught in the pull.
Cosmic Glow Up
Use glow-in-the-dark acrylic paint for the white stars and the central spiral highlight. It creates a stunning effect when the lights go out.
Step 4: The Starfield Background
-
Placing Major Stars:
Using a dotting tool or the tip of a brush handle, place distinct white dots in the black negative space around the spiral. Vary the sizes for a realistic depth of field. -
Drawing Twinkles:
Select a few larger dots to turn into twinkling stars. With your finest brush, drag a tiny amount of paint outward from the center dot in a cross shape (up, down, left, right). -
Diagonal Flares:
For the largest stars, add smaller diagonal lines between the main cross points to create an eight-pointed glimmer effect. -
Distant Galaxies:
Using an old toothbrush or a stiff bristled brush, flick a microscopic spray of white paint (thinned with water) across the black areas to create the tiniest, most distant background stars.
Step 5: Final Touches
-
Cleaning Up:
If any white splatter landed on your main spiral where you don’t want it, simply touch it up with a bit of colored paint once dry. -
Sealing the Universe:
Allow the rock to cure for at least 24 hours. Finish with a high-gloss varnish or a coat of resin. The glossy finish will deepen the black and make the metallic colors pop significantly.
Display your new celestial masterpiece on a desk or plant pot to add a touch of galactic wonder to your space


Have a question or want to share your own experience? I'd love to hear from you in the comments below!