When I’m short on time but still craving that buttery, blendable magic, I reach for small oil painting projects. Tiny surfaces keep things playful and doable—perfect for practicing one idea at a time without overthinking it.
Single Fruit Study
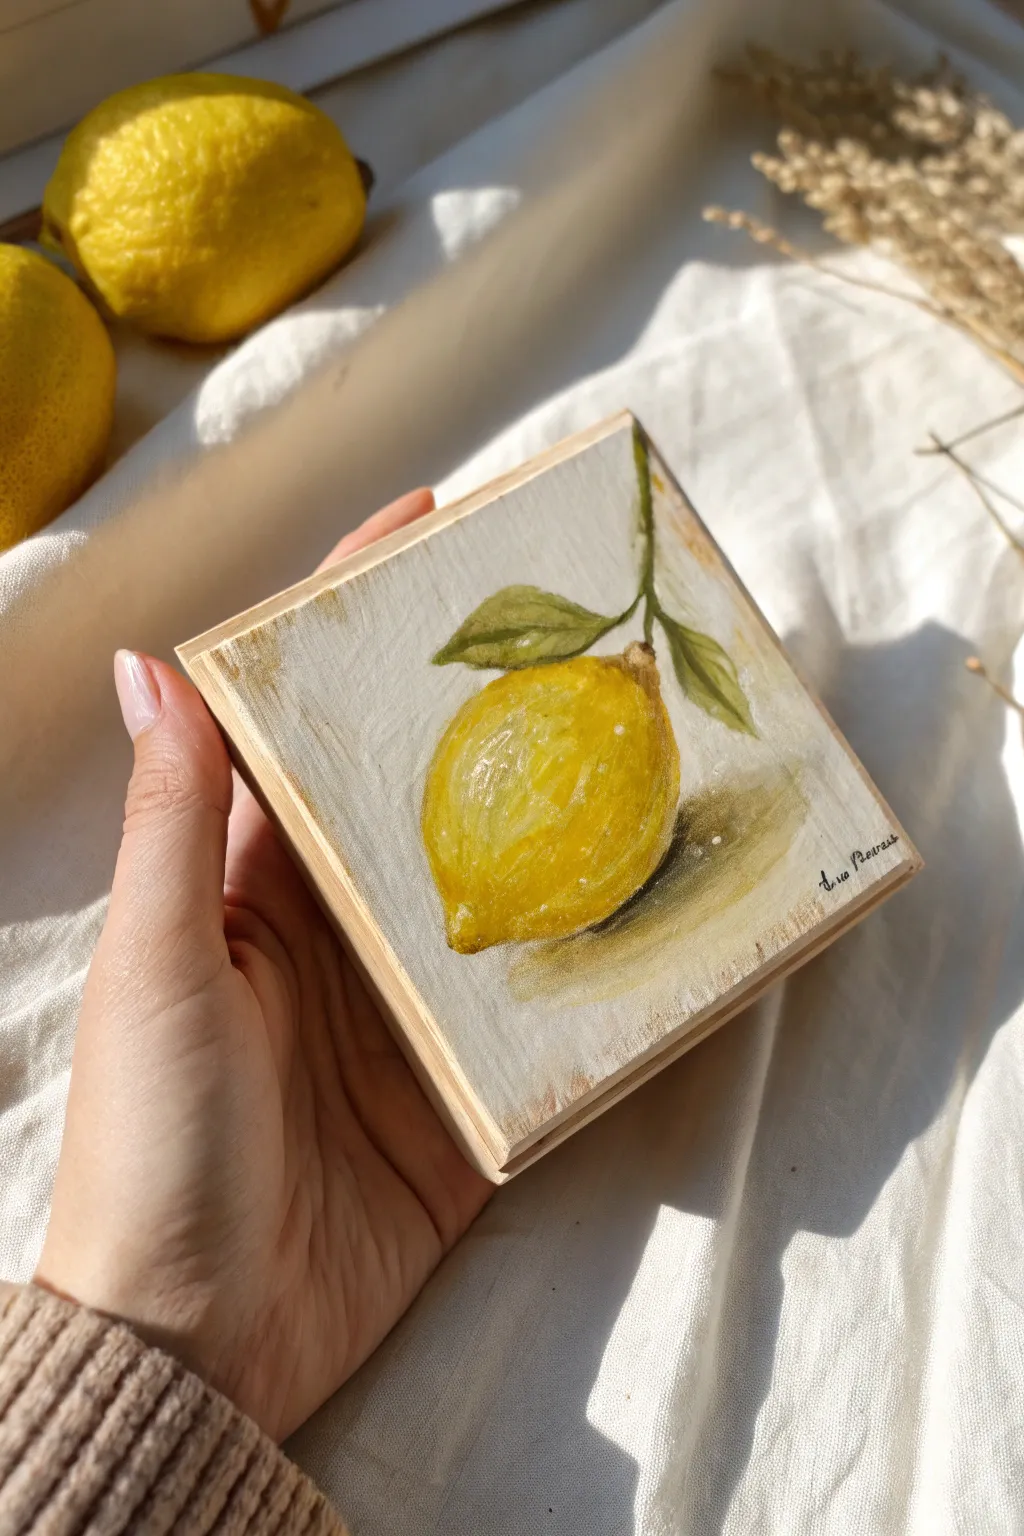
Capture the zest and vibrance of citrus with this charming oil painting on a chunky wood block. This project focuses on texture and light, turning a simple yellow lemon into a dimensional, sunlit centerpiece against a creamy background.
Step-by-Step Guide
Materials
- Small, thick wooden block or cradled wood panel (approx. 4×4 or 5×5 inches)
- Gesso (white or clear)
- Oil paints: Cadmium Yellow, Lemon Yellow, Yellow Ochre, Burnt Umber, Sap Green, Titanium White
- Small flat brushes (synthetic or hog bristle)
- Fine liner brush for details
- Palette knife
- Odorless mineral spirits or painting medium
- Paper towels
- Palette
Step 1: Preparation & Base
-
Prime the wood:
Wood is porous, so seal your block with two coats of gesso. Sand lightly between coats for a smooth surface, but leave slight brush texture if you prefer a rustic look. -
Tone the background:
Mix Titanium White with a tiny dot of Yellow Ochre and Burnt Umber to create a warm, creamy off-white. Apply this broadly across the entire face of the block, leaving visible vertical brushstrokes for texture. -
Sketch the outline:
Using a thin wash of Burnt Umber and a small brush, lightly sketch the oval shape of the lemon in the center. Add a stem extending upwards and two leaves branching out to the right.
Step 2: Blocking In Color
-
Apply the mid-tone yellow:
Mix a pure Cadmium Yellow. Load your flat brush and fill in the majority of the lemon shape, avoiding the very brightest highlight spot on the upper left and the shadowed bottom area. -
Establish the shadows:
Mix Cadmium Yellow with a touch of Yellow Ochre and a tiny bit of Sap Green to create a dirty, greenish-yellow shadow tone. Paint this along the bottom curve of the lemon. -
Create the cast shadow:
Mix a transparent wash of Burnt Umber and Sap Green. Paint the cast shadow on the surface beneath the lemon, blurring the edges into the background while the paint is still wet to keep it soft. -
Block in the leaves:
Use Sap Green mixed with a little Yellow Ochre for the leaves. Paint the shapes simply at first, ensuring the stem connects naturally to the top of the fruit.
Zest Texture Trick
For realistic peel texture, let the base yellow layer set for about 30 minutes until tacky. Then, gently drag a dry brush over it to lift tiny peaks of paint.
Step 3: Building Form & Detail
-
Deepen the fruit contour:
Blend the shadow tone on the fruit upwards into the mid-tone yellow. Use a clean, dry brush to feather the edges so the transition is gradual, mimicking the roundness of the fruit. -
Add the stem nub:
At the top of the lemon where the stem attaches, dab a small mixture of Burnt Umber and Yellow Ochre to create the textured ‘button’ of the fruit. -
Brighten the lemon:
Mix Lemon Yellow with a touch of White. Apply this to the upper left quadrant of the lemon, blending it outward. This creates the illuminated, sun-hit side of the fruit. -
Texture the peel:
Using the tip of a small round brush, stipple tiny dots of pure yellow and yellow-white highlight into the paint. This impasto technique mimics the bumpy texture of citrus zest. -
Refine the leaves:
Add a central vein to the leaves using a darker green mix. Add a few highlights to the leaf edges with a lighter green (Sap Green + White) to show the light catching them. -
Connect the stem:
Use a liner brush with Burnt Umber to define the thin wooden stem, connecting it convincingly to the green leaves and the fruit.
Muddy colors?
Yellow turns green easily if mixed with black. Use Burnt Umber or a tiny touch of purple to darken your yellow shadows without creating an unwanted lime green.
Step 4: Final Highlights & Assessing
-
Add the darkest accents:
Strengthen the darkest part of the cast shadow right underneath the lemon with a very small amount of Burnt Umber. -
The main highlight:
With a clean brush, place a few distinct dabs of pure Titanium White on the upper left curve of the lemon. I prefer to leave these strokes unblended so they sit on top and catch the eye. -
Background refinement:
If the background got messy, cut back in with your cream mixture to tidy up the edges of the lemon and leaves, sharpening the silhouette. -
Sign and dry:
Add your signature in the bottom corner with thinned paint and a liner brush. Let the oil paint cure in a dust-free area for several days to a week before handling.
Once dry, this sunny little block is ready to brighten up a bookshelf or kitchen counter


Loose Mini Bouquet in a Jar
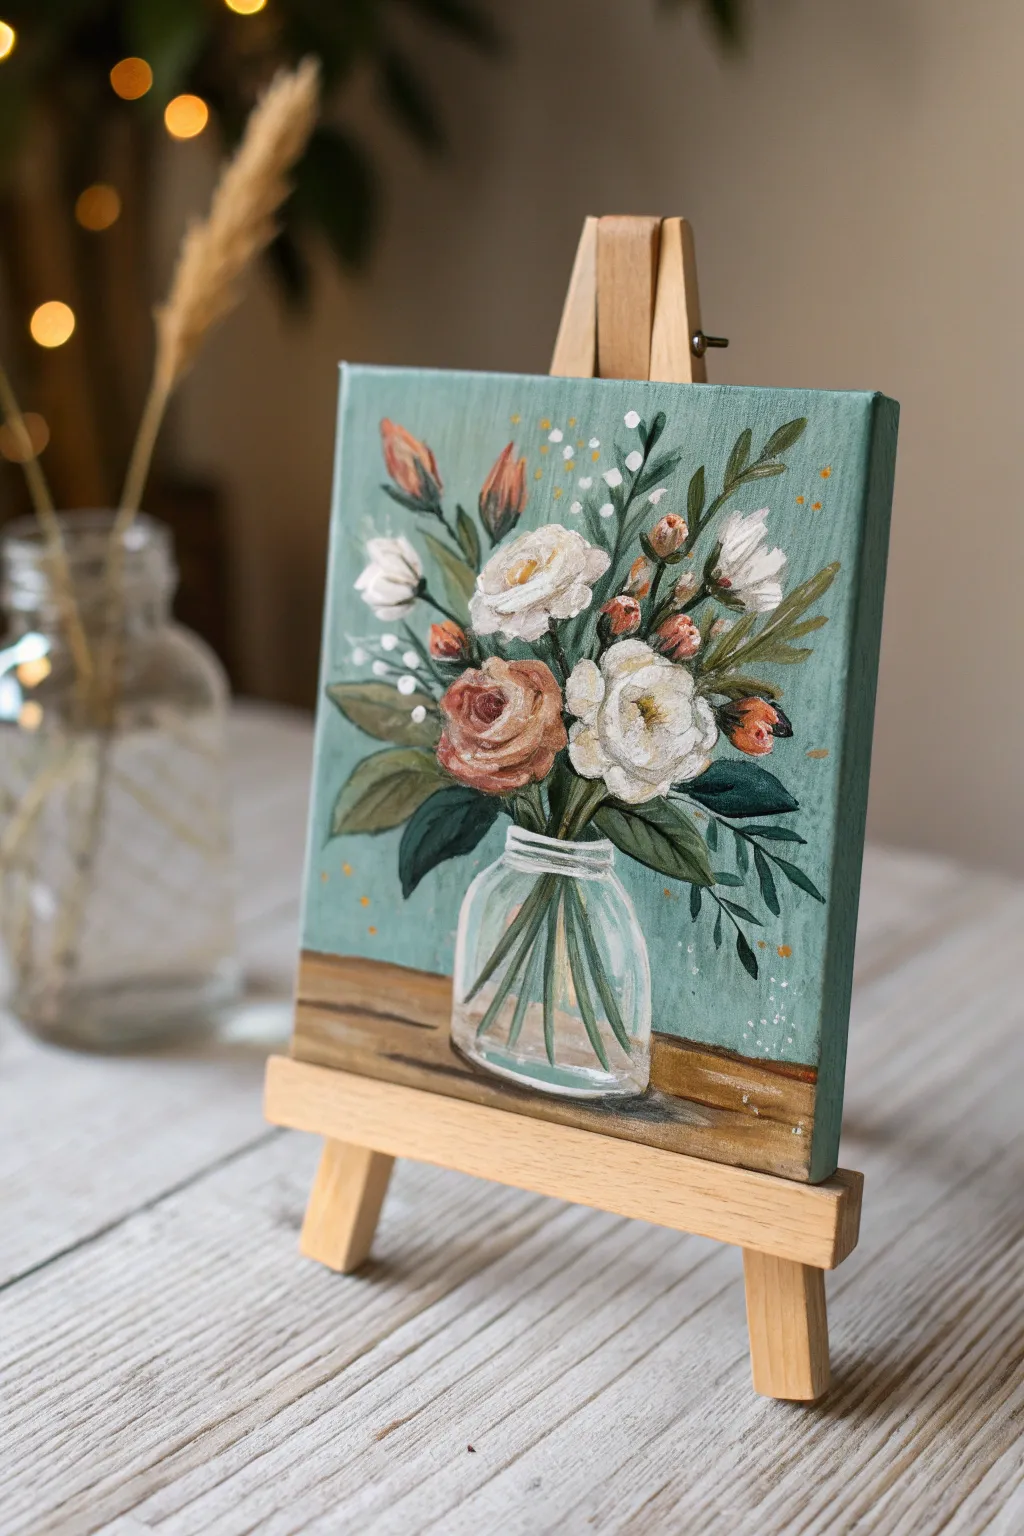
Capture the charm of a rustic floral arrangement with this cozy mini oil painting featuring cream and peach roses in a glass jar. The soothing sage-teal background makes the white petals pop, creating a lovely piece of decor for any small nook.
Step-by-Step Guide
Materials
- Small square canvas (e.g., 6×6 inch)
- Oil paints (Titanium White, Burnt Umber, Yellow Ochre, Sap Green, Viridian, Cadmium Red or Burnt Sienna)
- Brushes (assorted sizes: small filbert, small flat, and a fine liner brush for details)
- Palette knife
- Palette (wood or tear-off paper)
- Solvent (turpentine or mineral spirits) and a jar
- Medium (Linseed oil to improve flow)
- Rags or paper towels
- Mini tabletop easel (optional, for display)
Step 1: Setting the Scene
-
Tone the canvas:
Begin by applying a thin wash of Burnt Umber mixed with plenty of solvent to tone your white canvas. Wipe it back with a rag so it’s a light, warm tan. This prevents white specks from showing through later. -
Map the composition:
Using a small brush and thinned Burnt Umber, sketch the basic shapes. Draw a simple jar shape in the bottom center and rough circles where the main flower heads will sit. Don’t worry about perfection; these lines will be covered. -
Mix the background color:
Create the signature background shade by mixing Titanium White, a touch of Sap Green, a tiny bit of Viridian, and a speck of Yellow Ochre to warm it up. Aim for a soft, muted sage-teal. -
Apply the background:
Paint around your sketch lines, filling in the background space. Use crisscross strokes to give the background some texture and energy, rather than painting it completely flat.
Muddy colors?
If your white flowers are turning grey or green from the background paint, let the background layer dry to the touch (usually 2-3 days) before painting the flowers on top.
Step 2: Blocking In
-
Paint the table surface:
Mix Burnt Umber with Yellow Ochre and a little White to create a wood tone. Paint the horizontal strip at the bottom for the table. Add darker brown streaks horizontally to suggest wood grain. -
Establish greenery:
Mix a dark green using Sap Green and a touch of Burnt Umber. Block in the leaves, tucking them around the flower circles. Vary the direction of your strokes to make the leaves look like they are exploding outward. -
Block in the flower shapes:
For the white flowers, mix Titanium White with a tiny bit of Yellow Ochre for a creamy base. Fill in the main flower shapes roughly. For the peach rose, mix White with Burnt Sienna and a touch of Red.
Step 3: Refining the Flowers
-
Shadows on white flowers:
Mix a soft grey-beige using White and a tiny dot of Burnt Umber. Apply this to the lower and inner parts of the white rose petals to create depth and a cup-like shape. -
Highlights on white flowers:
Load your brush with pure Titanium White. Apply thick, confident strokes to the tops of the petals where the light hits. I like to let the paint sit right on top of the previous layers for texture. -
Detailing the peach rose:
Deepen the color in the center of the peach rose with a mix of Cadmium Red and Burnt Umber. Add lighter peach highlights (mixed with more White) to the outer edges of the petals to define the spiral. -
Adding buds:
Paint small teardrop shapes for the buds using the peach mix and white mix. Add little green casings at the bottom of each bud using your liner brush.
Make it Pop
Use a palette knife to apply the final pure white highlights on the flower petals. This impasto technique adds physical texture that catches the room’s light.
Step 4: The Glass Jar
-
Defining the glass:
The jar is mostly transparent, so let the background color show through. Using a small brush, outline the rim and the sides with a very light grey-green mix to suggest the glass thickness. -
Painting stems inside:
Paint the stems inside the jar using a muted green (Sap Green + White). Make these lines slightly blurry or broken to mimic the distortion of stems seen through water and glass. -
Water line and reflections:
Add a thin, horizontal ellipse near the top of the stems for the water line. Use pure White to add sharp, vertical highlights on the jar’s shoulder and base to simulate glossy glass.
Step 5: Final Details
-
Adding filler flowers:
Use the tip of a small round brush or a dotting tool to add tiny white dots and small clusters of berries (using Burnt Sienna/Red) around the bouquet to act as filler baby’s breath or buds. -
Darkest darks:
Mix your darkest green (Green + Umber + touch of Blue maybe). Add deep shadows right underneath the flower heads and where leaves overlap to make the bouquet look 3D. -
Magic dust:
Using a somewhat dry brush with pale yellow or gold-tinted paint, stipple a few random specks in the background area to give a magical, pollen-like atmosphere.
Allow your painting to dry fully for several days before displaying it on a mini easel to brighten up your desk

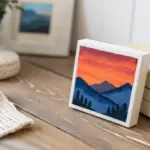

Sunset Sky With Dark Silhouettes
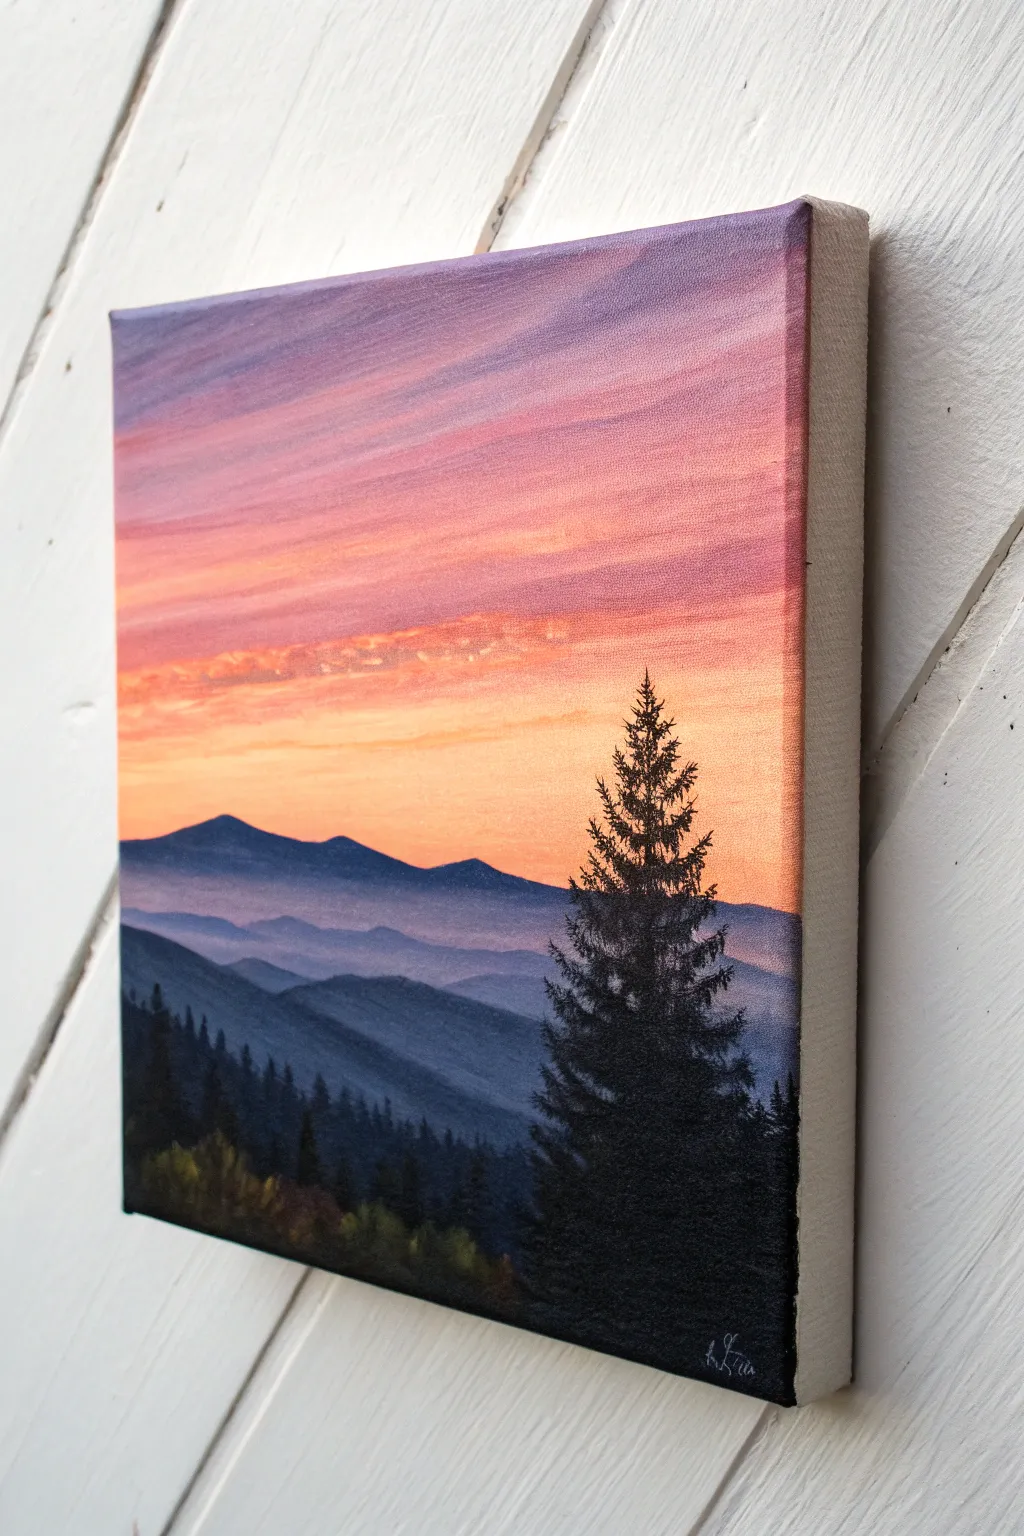
Capture the serene beauty of twilight with this small-scale oil painting, featuring a vibrant gradient sky and layered mountain mists. The striking contrast between the glowing backdrop and the crisp, dark pine silhouette creates instant depth and drama.
Step-by-Step Tutorial
Materials
- Small square canvas (e.g., 6×6 or 8×8 inch)
- Oil paints (Titanium White, Cadmium Yellow, Alizarin Crimson, Ultramarine Blue, Ivory Black, Burnt Umber)
- Flat synthetic brushes (various sizes)
- Small fan brush or liner brush (for trees)
- Palette knife
- Palette for mixing
- Solvent (Gamsol or similar)
- Lint-free rags or paper towels
Step 1: Painting the Sky Gradient
-
Prime the background:
Begin by applying a very thin layer of liquid white or a white base coat across the entire upper two-thirds of the canvas. This will help your sky colors blend smoothly. -
Mix the upper sky color:
On your palette, mix a soft violet using Titanium White, a touch of Alizarin Crimson, and a tiny hint of Ultramarine Blue. Apply this to the top edge of the canvas using a large flat brush. -
Transition to pink:
Mix a rosy pink shade using Titanium White and Alizarin Crimson. Paint a horizontal band just below the violet, blending the seam gently where the two colors meet while the paint is still wet. -
Add the sunset glow:
Create a warm orange-yellow using Cadmium Yellow and a speck of Alizarin Crimson. Apply this band below the pink, pulling it down to where you want your mountains to begin. -
Blend the gradient:
With a clean, dry blending brush, gently sweep back and forth horizontally across the color transitions. Use a light touch to soften the hard lines without muddying the colors together completely. -
Create wispy clouds:
Load a small flat brush with a slightly lighter, warmer pink mix. Use gentle, horizontal strokes to suggest thin, stretched clouds drifting across the upper sky. Keep these subtle so they don’t overpower the gradient.
Clean Beams
For the smoothest sky gradient, wipe your blending brush on a rag after every few strokes. This prevents dragging too much dark color up into your light yellow zone.
Step 2: Layering the Mountains
-
Mix the distant mountain color:
Combine Ultramarine Blue with White and a tiny dot of Black to create a hazy, pale blue-grey. This atmospheric perspective makes the furthest mountains look recessive. -
Paint the furthest ridge:
Using a medium flat brush, paint the silhouette of the most distant mountain range right over the bottom of your sunset sky. Keep the top edge smooth and rolling. -
Add mist effects:
While the mountain paint is wet, blend a little white into the bottom edge of this mountain shape to create a misty, foggy separation before the next ridge starts. -
Darken the mix for mid-ground:
Add slightly more Blue and a touch of Alizarin Crimson to your previous mountain mix to darken it. Paint the next ridge of mountains, overlapping the misty base of the first one. -
Create the nearest ridge:
Mix Ultramarine Blue, Alizarin Crimson, and a bit more Black for a deep, dark purple-blue. Paint the closest large hill shape in the lower left, creating a solid base for the foreground. -
Suggest faraway trees:
On the mid-ground ridges, use a very small brush to tap tiny vertical irregularities along the ridge line. This implies a distant forest texture without needing perfect detail.
Too Muddy?
If your mountains are blending into the sky too much, let the sky layer dry to the touch (1-2 days) before painting the mountains over it. This keeps the edges crisp.
Step 3: The Foreground Silhouette
-
Prepare the darkest mixture:
Mix Ivory Black with a small amount of Burnt Umber and Blue. You want a color that reads as black but has chromatic depth. -
Establish the main tree trunk:
Using a liner brush or the edge of a small flat brush, paint a thin vertical line on the right side of the canvas where the main pine tree will stand. It doesn’t need to be perfectly straight. -
Stipple the pine foliage:
I like to use a small fan brush or a beaten-up bristle brush for this. Load it with the dark mix and tap gently, starting narrow at the top and getting wider towards the bottom to form the pine branches. -
Fill the bottom foreground:
Use the dark black-brown mix to fill in the bottom right corner and the area beneath the large tree. Dab the brush to create the texture of bushes and undergrowth. -
Add left-side details:
On the lower left hill, paint small vertical spikes using the dark mix to represent distant pine trees along that ridge line. -
Highlight the undergrowth:
Mix a tiny bit of Yellow and Burnt Umber into your dark mix to create a subtle olive-green tone. Lightly tap this onto the very bottom bushes to suggest faint light catching the tops of the foliage.
Allow the painting to dry in a dust-free area for several days before varnishing to seal in those vibrant sunset hues


Mini Seascape Wave
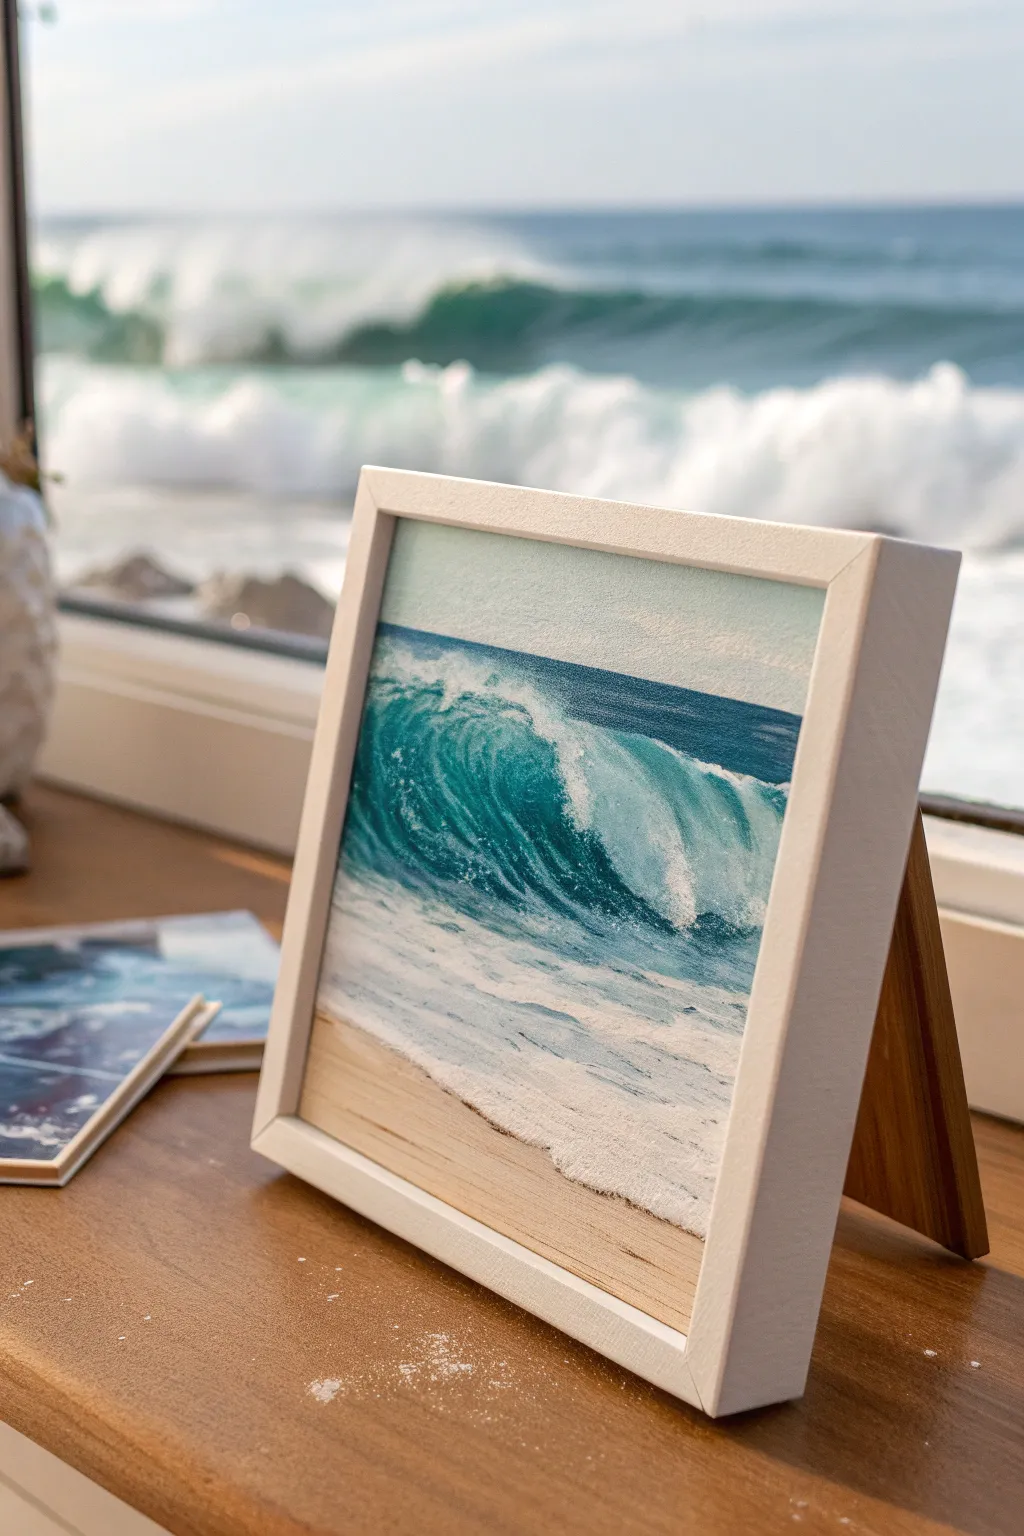
Capture the raw energy of the ocean in a compact format with this petite seascape oil painting. This project focuses on rendering the translucent curl of a wave and the foamy rush of water meeting the sand.
Step-by-Step
Materials
- Small square canvas panel or wood panel (approx. 6×6 inches)
- White or light wood floating frame
- Oil paints: Titanium White, Ultramarine Blue, Phthalo Green (Blue Shade), Burnt Umber, Yellow Ochre
- Flat synthetic brushes (sizes 4 and 6) for blocking in
- Small round or detail brush (size 0 or 1) for foam
- Palette knife
- Odorless mineral spirits or solvent
- Lint-free rag
- Palette
Step 1: Setting the Scene
-
Prime the Surface:
If you are using raw wood, apply two coats of gesso, sanding lightly between layers. If using a canvas panel, ensure it is clean and dust-free. -
Establish the Horizon:
Mix a small amount of Ultramarine Blue with a touch of Titanium White. Using a flat brush, paint a straight horizon line about two-thirds up the canvas to define the sky area. -
Paint the Sky:
Fill the sky area with a very pale blue-grey mix. Keep the brushstrokes horizontal and soft, blending them smoothly so the focus remains entirely on the water below. -
Block in the Sand:
Mix Titanium White, a small amount of Yellow Ochre, and a tiny dot of Burnt Umber. Apply this beige mixture to the bottom fifth of the painting to represent the wet sand.
Muddy Waters?
If your white foam mixes too much with the blue wave, producing a light blue mush, stop. Let the blue layer dry to the touch (usually 24-48 hours) before applying the crisp white details on top.
Step 2: Building the Wave Form
-
Deep Ocean Blue:
Create a dark teal by mixing Phthalo Green with Ultramarine Blue. Paint a horizontal band just below the horizon line, representing the deep, distant water. -
Drafting the Wave Shape:
Using the same dark teal mix, sketch the curve of the crashing wave in the center. The shape should look like a sideways ‘C’ or a hook, rising from the right and crashing towards the left. -
Adding the Translucency:
Mix a vibrant turquoise using Phthalo Green, a little Ultramarine Blue, and Titanium White. Paint the inner curve of the wave (the ‘eye’ of the wave) where the sunlight shines through the water. -
Blending the Gradient:
While the paint is still wet, gently blend the dark teal top of the wave into the lighter turquoise center. Use a clean, dry brush to soften the transition so it looks like a smooth curve of water.
Make it Sparkle
Once the painting is fully dry, you can apply a gloss varnish only to the wave section and leave the sand matte. This contrast mimics the wet, reflective quality of the ocean against the dull sand.
Step 3: Texturing the Water
-
Shadows Under the Wave:
Mix a darker version of your teal with a tiny bit of Burnt Umber. Apply this shadow directly under the curling lip of the wave and in the trough where the wave meets the flat water. -
Foreground Water:
Paint the area between the wave and the sand with a mix of Titanium White and a very small amount of blue. Use horizontal strokes to suggest rushing, shallow water. -
Adding Sea Foam Base:
Load a round brush with generous Titanium White. Stipple (tap repeatedly) along the top crest of the wave where it breaks, creating the chaotic, fluffy texture of sea foam.
Step 4: Defining Details
-
Cascading Foam:
Drag clean white paint downwards from the crest into the turquoise curve. Use dry, broken brushstrokes to mimic gravity pulling the foam down the face of the wave. -
Rushing Water Texture:
In the foreground white water, add thin streaks of pale blue-grey horizontally. This adds movement and shows the separation between different surges of foam headed toward the beach. -
The Shoreline Edge:
Where the white foam meets the beige sand, paint an irregular, jagged line. Add a thin, translucent wash of brownish-grey underneath the foam edge to cast a shadow on the sand. -
Spray and Mist:
I like to take a very small amount of white paint on a dry brush and lightly scumble (scrub) over the top edge of the wave against the dark background water to simulate mist spraying into the air. -
Final Highlights:
Apply thick dabs of pure Titanium White on the brightest parts of the crashing lip for emphasis. Let the painting dry completely for several days before framing.
Place your finished piece in its frame near a window to let natural light enhance those translucent turquoise tones
BRUSH GUIDE
The Right Brush for Every Stroke
From clean lines to bold texture — master brush choice, stroke control, and essential techniques.
Explore the Full Guide
Cloud Study in a Limited Palette
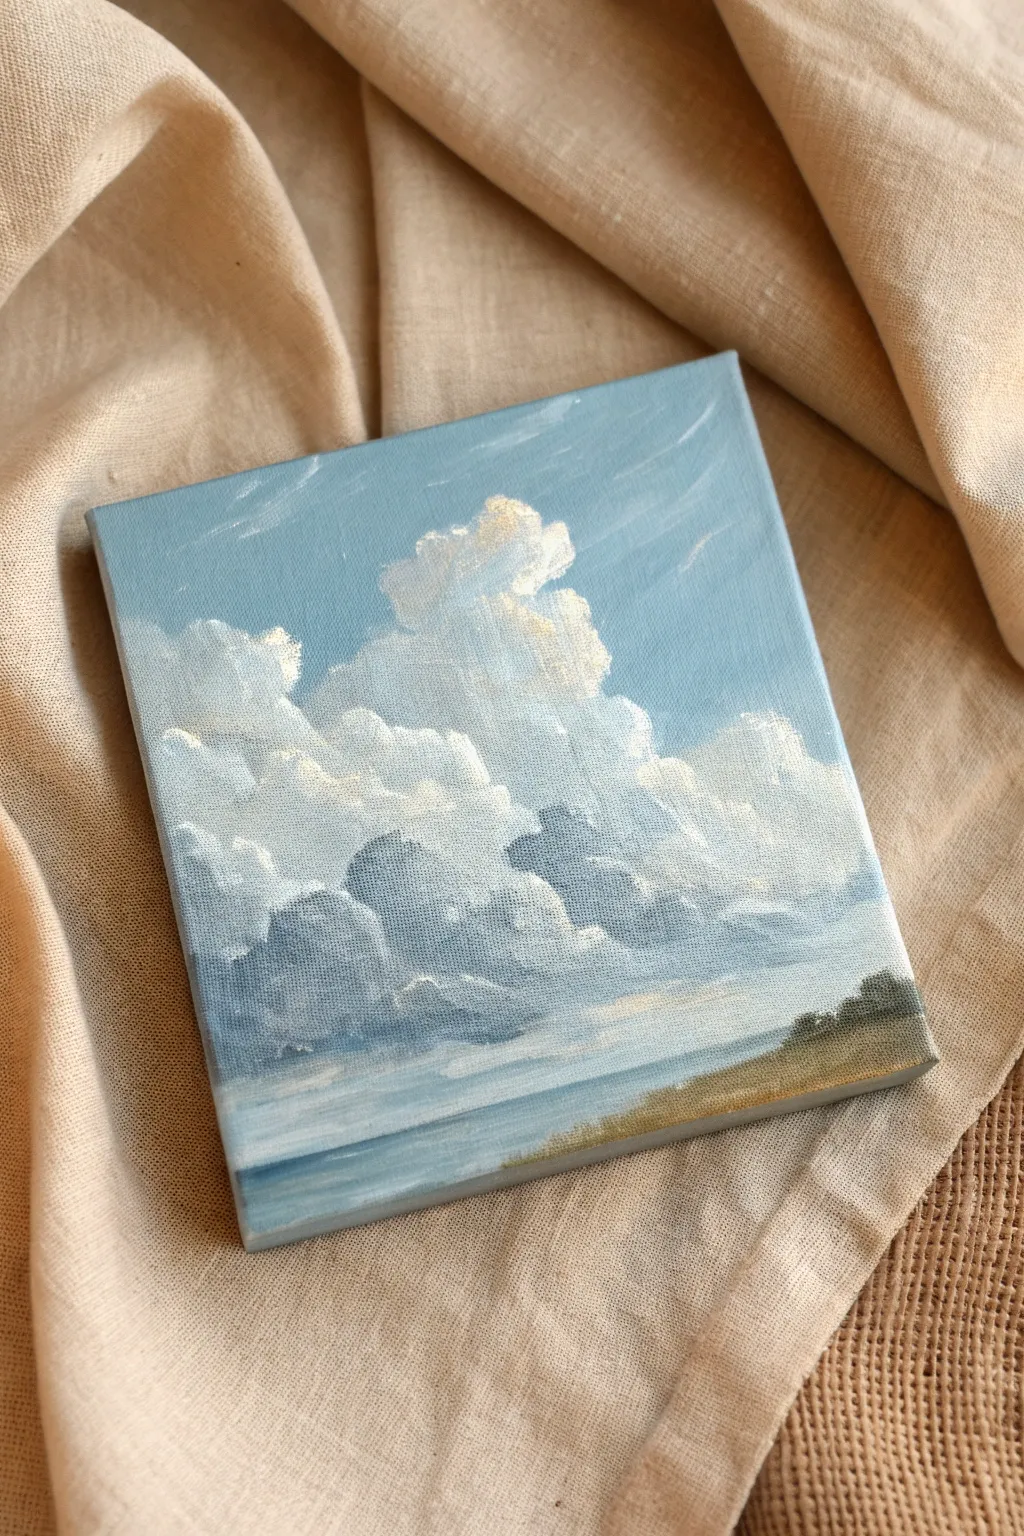
This charming study focuses on capturing the grandeur of towering clouds on a small scale, using a restrained color palette to create harmony. The soft, pillowy textures contrast beautifully with the simple, grounded landscape below, making it a perfect exercise for mastering cloud volume.
Step-by-Step Guide
Materials
- Small square canvas (e.g., 6×6 or 8×8 inches)
- Oil paints: Titanium White, Ultramarine Blue, Cerulean Blue, Burnt Umber, Yellow Ochre
- Flat shader brush (size 6 or 8)
- Small round brush (size 2)
- Filbert brush (size 4)
- Palette knife for mixing
- Odorless mineral spirits or turpentine
- Lint-free rag or paper towels
Step 1: Setting the Atmosphere
-
Prime the sky:
Begin by explicitly mixing a sky blue tone using Cerulean Blue, a touch of Ultramarine, and a generous amount of Titanium White. Cover the upper two-thirds of the canvas with this mix using your flat shader brush, keeping the strokes horizontal and smooth. -
Gradient effect:
While the paint is wet, add a tiny bit more white to your mixture and blend it into the lower portion of the sky area. This creates an atmospheric perspective, making the sky look lighter as it approaches the horizon. -
Rough in the land:
Mix a muted dark shade using Burnt Umber and a dab of Ultramarine Blue to create a deep, earthy green-grey. With the corner of your flat brush, sketch a low, sloping horizon line in the bottom third of the canvas, angling slightly upward to the right.
Keep it Fluffy
Avoid over-blending your clouds, which can make them look flat. Leave visible brushstrokes and use a ‘scumbling’ circular motion to keep the texture airy and voluminous.
Step 2: Building the Cloud Structure
-
Map the shapes:
Using a thinned mixture of your sky blue and a little white (so it’s just barely visible), lightly outline the general shape of the main cloud mass. Think of it as a pyramid shape that is taller in the center and tapers off to the sides. -
Establish shadows:
Mix a ‘shadow grey’ using Ultramarine Blue, a touch of Burnt Umber, and enough White to make it a mid-tone grey-blue. Using the filbert brush, block in the bottom and shadowed sides of the clouds, focusing on the lower middle section where the clouds look heaviest. -
Mid-tone transitions:
Create a transition color by mixing your shadow grey with a bit more white and the original sky blue. Apply this above the darkest shadows, scumbling the paint in circular motions to soften the edges between the dark underbelly and the lighter tops. -
First light application:
Take pure Titanium White with a tiny touch of Yellow Ochre to warm it up. Apply this to the top-most puffs of the clouds where the sun would hit directly. Don’t worry about perfect blending yet; just place the blocks of light.
Golden Hour Glow
To change the time of day, mix a tiny amount of Cadmium Orange or Alizarin Crimson into your white highlights. This creates a warm, sunset-leaning atmosphere on the cloud peaks.
Step 3: Refining and Blending
-
Softening edges:
Wipe your filbert brush clean. Gently tap and blend the boundaries where the white highlights meet the mid-tone blues. Use a light touch to keep the paint from becoming muddy; you want to create a fluffy, cotton-like texture. -
Deepening contrast:
Go back in with your darkest grey-blue shadow mix. Reinforce the deepest crevices near the bottom of the cloud formation to add volume. I find that deepening these shadows makes the whites pop significantly more. -
wispy details:
Using a dry, clean brush, lightly drag some of the white paint from the cloud edges out into the blue sky. This creates the look of wind-blown vapor or ‘mares’ tails’ separating from the main cloud. -
Texturing the mass:
Add small, circular dabs of pure white on the very peaks of the internal cloud shapes. Use a loaded brush so the paint sits slightly raised on the canvas (impasto) to catch real light.
Step 4: Ground and Water
-
Painting the water:
Mix a muted blue-grey using Ultramarine, White, and a dot of Burnt Umber. Paint the area below the distant horizon line using horizontal strokes to simulate calm water. -
Reflecting the sky:
Add a few streaks of lighter blue/white into the water area to suggest the reflection of the sky and clouds above. Keep these strokes somewhat blurred. -
Foreground terrain:
Mix Yellow Ochre with a little Burnt Umber and White to create a sandy, grassy tone. Paint the foreground land wedge on the bottom right, stippling the brush to suggest grass texture. -
Dark foliage accents:
Using your small round brush and a dark mix of Ultramarine and Burnt Umber (almost black), dab in small bushy shapes along the edge where the land meets the water on the right side. -
Final highlights:
Add tiny touches of light yellow-green (Ochre + Blue + White) to the tops of the bushes and the grass to indicate sunlight hitting the landscape.
Step back and admire how a few simple colors can create such a vast sense of space on a tiny canvas
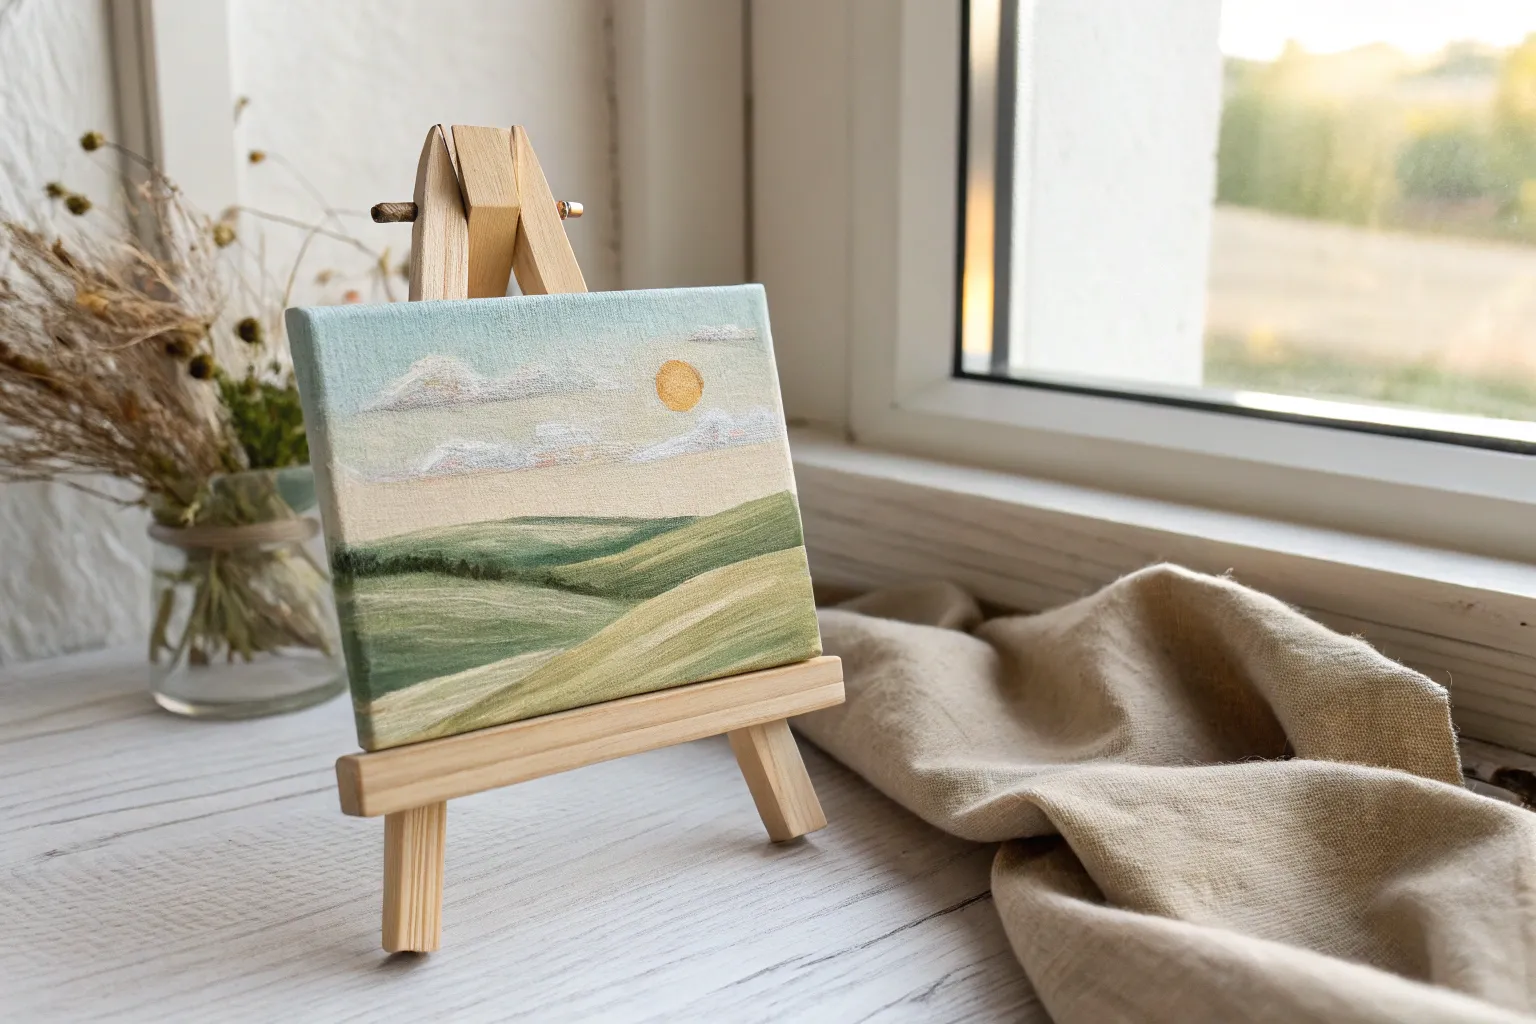
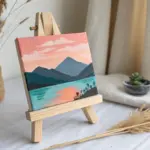
Tiny Mountains With Misty Layers
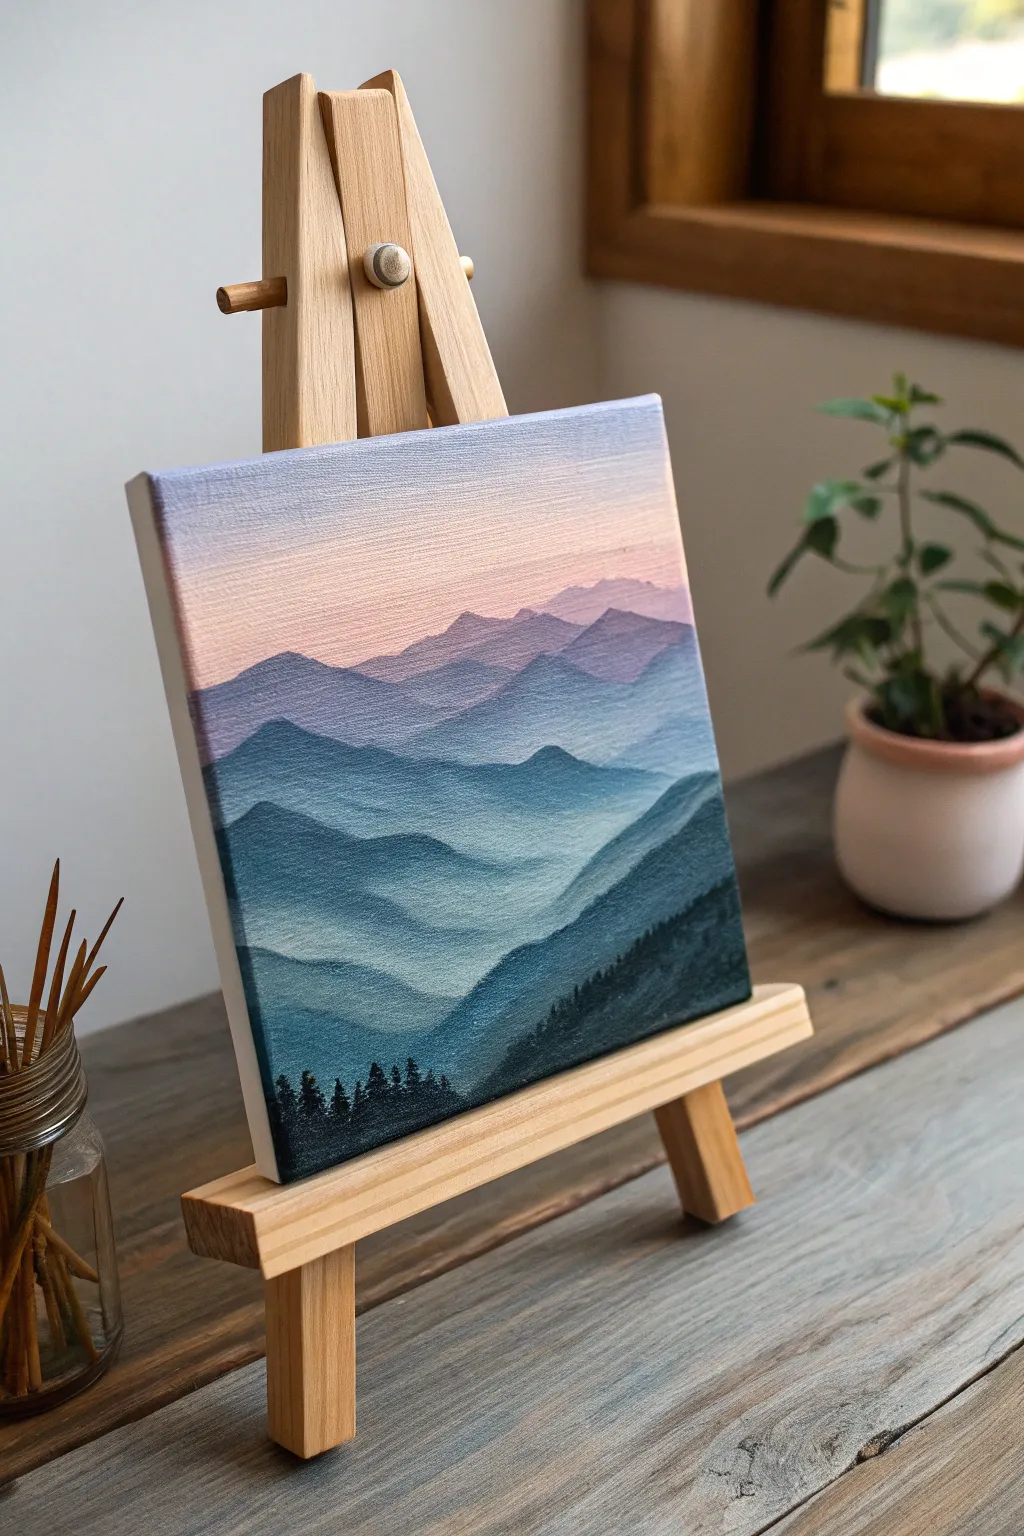
Capture the serenity of distant peaks with this miniature landscape study that relies on atmospheric perspective. By gradually darkening your colors as you move down the canvas, you will create a stunning illusion of depth and distance on a small scale.
How-To Guide
Materials
- Small square canvas (e.g., 6×6 or 8×8 inches)
- Oil paints: Titanium White, Ultramarine Blue, Phthalo Blue, Alizarin Crimson, Ivory Black
- Soft synthetic flat brushes (sizes 2, 4, 6)
- Small liner brush (size 00)
- Palette knife
- Palette paper or glass palette
- Odorless mineral spirits or brush cleaner
- Lint-free rags or paper towels
Step 1: Painting the Sky Gradient
-
Mix the sky colors:
Begin by preparing two distinct mixtures for your sky. Create a very pale, cool white with a tiny touch of Ultramarine Blue, and separately, a soft, warm pink using Titanium White and a dot of Alizarin Crimson. -
Apply the top blue:
Using your largest flat brush (size 6), paint a horizontal band of the pale blue mixture across the top quarter of the canvas. Keep the paint application smooth and relatively thin. -
Apply the bottom pink:
Wipe your brush clean, then pick up the pale pink mixture. Paint the area below the blue, bringing it down to roughly the midway point of the canvas. -
Blend the transition:
While the paint is still wet, use a clean, dry brush to gently sweep back and forth where the blue and pink meet. I like to use very light pressure here to create a seamless, soft violet transition without muddying the colors.
Fixing Muddy Colors
If your mountains start looking gray or muddy, clean your brush thoroughly. Residual opposite colors (like orange or red in the blue) kill the vibrancy of the mist.
Step 2: Creating the Mountain Layers
-
Mix the furthest mountain color:
For the most distant peaks, mix a pale lavender. Combine a large amount of Titanium White with small touches of Alizarin Crimson and Ultramarine Blue. It should be just slightly darker than your sky. -
Paint the first range:
Using a size 4 flat brush, paint the silhouette of the furthest mountain range right over the dry(ish) bottom of the sky. Keep the edges ragged and natural, avoiding perfect pyramids. -
Fade the bottom edge:
As you paint down from the peak line, add a little more white to your brush or thin the paint slightly so the bottom of this mountain layer fades into mist. This adds essential atmospheric perspective. -
Mix the second layer color:
Darken your lavender mixture slightly by adding a bit more Ultramarine Blue and a tiny speck of Phthalo Blue. This layer should look cooler and more distinct than the one behind it. -
Paint the second range:
Apply this new color in a mountain shape that overlaps the first layer. Ensure the peaks of this new range sit lower on the canvas than the previous ones. -
Create the third layer color:
Prepare a distinct teal-blue tone. Mix Titanium White, Phthalo Blue, and a touch of Ivory Black to desaturate it. This will be the first of the more defined, bluish ranges. -
Shape the third range:
Paint this layer slightly below the lavender ones. Use the edge of your flat brush to create interesting ridges and slopes, letting the color fade slightly as you pull it downward. -
Mix a deeper mid-tone:
Add more Phthalo Blue and a little less white to your teal mixture. The goal is to step down in value—getting darker each time you move forward in the composition. -
Paint the fourth range:
Apply this darker blue layer, creating a swooping valley shape or a prominent ridge that cuts across the canvas. Focus on the sharp top edge; the bottom can remain somewhat blended. -
Mix the dark foreground color:
For the nearest large hill, mix Ultramarine Blue, Phthalo Blue, and Ivory Black. Use very little white here; you want a deep, shadowy tone. -
Paint the foreground slope:
Paint a large, sloping shape in the bottom right corner, extending towards the left. This anchors the painting and provides contrast.
Step 3: Adding Final Details
-
Mix the darkest shadow:
Create almost-black paint by mixing Phthalo Blue and Ivory Black. This will be used for the silhouette details. -
Start the treeline:
Switch to your size 00 liner brush or the very corner of a small flat brush. Along the ridge of the dark foreground slope, begin tapping in tiny vertical marks. -
Detail the trees:
Vary the height of your taps to simulate pine trees. Make some taller and pointed, and group them naturally rather than spacing them like a picket fence. -
Add texture to the foreground:
Using a slightly dry brush with the dark mixture, lightly scumble (scrub) some texture into the main body of the foreground hill to suggest dense forest vegetation without painting every tree. -
Paint the canvas edges:
Since this is a gallery-wrapped canvas, take your leftover colors and extend the painting around the sides. Match the sky color on top and the dark mountain colors on the bottom for a finished look.
Pro Tip: Atmospheric Haze
To make the mist look real, gently dry-brush a tiny amount of pure white glaze at the very base of the distant mountains before painting the layer in front of them.
Let your painting dry for several days before displaying it on a mini easel to enjoy your serene view

PENCIL GUIDE
Understanding Pencil Grades from H to B
From first sketch to finished drawing — learn pencil grades, line control, and shading techniques.
Explore the Full Guide
Row of Simple Bottles

This charming mini-canvas project captures a row of stylized bottles in soft, earthy tones, perfect for a minimalist aesthetic. The translucent effect is achieved through careful layering and blending, creating a calm and sophisticated piece of decor.
Step-by-Step
Materials
- Small square wrapped canvas (approx. 6×6 inch)
- Oil paints: Titanium White, Burnt Umber, Yellow Ochre, Tera Verte or Sage Green, Burnt Sienna
- Paint thinner or odorless mineral spirits
- Medium (like linseed oil or Liquin) for glazing
- Synthetic bright brushes (sizes 2 and 4)
- Small round detail brush (size 0 or 1)
- Palette for mixing
- Lint-free rag
Step 1: Preparation and Sketching
-
Pre-tone the canvas:
Begin by applying a very thin wash of Burnt Umber and White mixed with plenty of thinner over the entire canvas. This kills the stark white and provides a warm, neutral undertone. Wipe it back with a rag so it’s faint and dries quickly. -
Sketch the composition:
Using a small round brush dipped in thinned Burnt Umber, lightly sketch the outlines of four bottles. Vary their heights and widths—make the second one from the left the tallest and widest, and the first one quite short. -
Establish the horizon:
Draw a straight horizontal line near the bottom third of the canvas to create the ledge or table surface where the bottles sit.
Step 2: Blocking In Colors
-
Mix the background color:
Create a pale, warm off-white by mixing Titanium White with a tiny touch of Yellow Ochre and Burnt Umber. Paint the entire background area above the table line, carefully cutting in around your bottle sketches. -
Paint the table surface:
Mix a medium grey-brown using Burnt Umber, White, and a touch of Burnt Sienna. Fill in the bottom strip of the canvas, using horizontal brushstrokes to suggest a flat surface. -
Block in the first bottle:
For the short bottle on the far left, mix a pale greenish-grey using White and a speck of Terra Verte. Apply this flatly inside the outline. -
Paint the tall bottle:
Mix a warm beige for the large second bottle using White and Yellow Ochre. Fill in the shape, keeping the paint relatively thin. -
Color the third bottle:
Create a muted sage green for the third bottle by mixing Terra Verte with White and a tiny bit of Burnt Umber to desaturate it. -
Fill the final bottle:
For the bottle on the far right, mix Burnt Sienna with White to create a soft terracotta or salmon pink tone.
Muddy colors?
If your bottle colors are getting muddy when you add shadows, wipe your brush clean between every single color change. Oil paint retains pigment deep in the bristles.
Step 3: Creating Translucency and Depth
-
Blend the edges:
With a clean, dry brush, very softly blur the edges of the bottles slightly into the background while the paint is still wet. This softens the look and helps mimic glass. -
Add shadows:
Mix a slightly darker version of each bottle’s base color. Apply this darker tone down the right side of each bottle neck and body to create a cylindrical form. I find blending this line inwards creates a lovely roundness. -
Refine the surface:
Add a darker stripe of Burnt Umber along the table line right underneath the bottles, blending it slightly outward to anchor them to the surface. -
Add cork details:
Using a small flat brush and a mixture of Yellow Ochre and Burnt Sienna, paint small rectangular ‘corks’ at the top of each bottle neck. -
Paint the bottle lips:
Add a tiny, thin line of the cork color just below the cork itself to represent the glass rim of the bottle opening.
Glass Effect Tip
To make the bottles look more translucent, mix a tiny bit of the background wall color into the center of each bottle. This simulates seeing the wall *through* the glass.
Step 4: Finishing Touches
-
Highlights:
Mix pure Titanium White with a little medium to make it flow smoothly. Paint a vertical highlight streak on the left side (the light source side) of each bottle. -
Refine outlines:
Using your smallest round brush and thinned Burnt Umber paint, re-establish any lost outlines very faintly. Use broken lines rather than solid ones to keep the style illustrative and loose. -
Texture the table:
Dry brush a little bit of lighter grey-brown horizontally across the foreground table area to simulate wood grain or texture. -
Final assessment:
Step back and check your values. If any bottle looks too flat, add a touch more shadow on the right side or a brighter highlight on the left. -
Paint the sides:
The image shows a gallery-wrapped look, so continue the background color and the table line around the edges of the canvas for a polished finish.
Let the painting dry for several days in a dust-free area before displaying it on your miniature easel
Mini Cabin Under a Big Sky
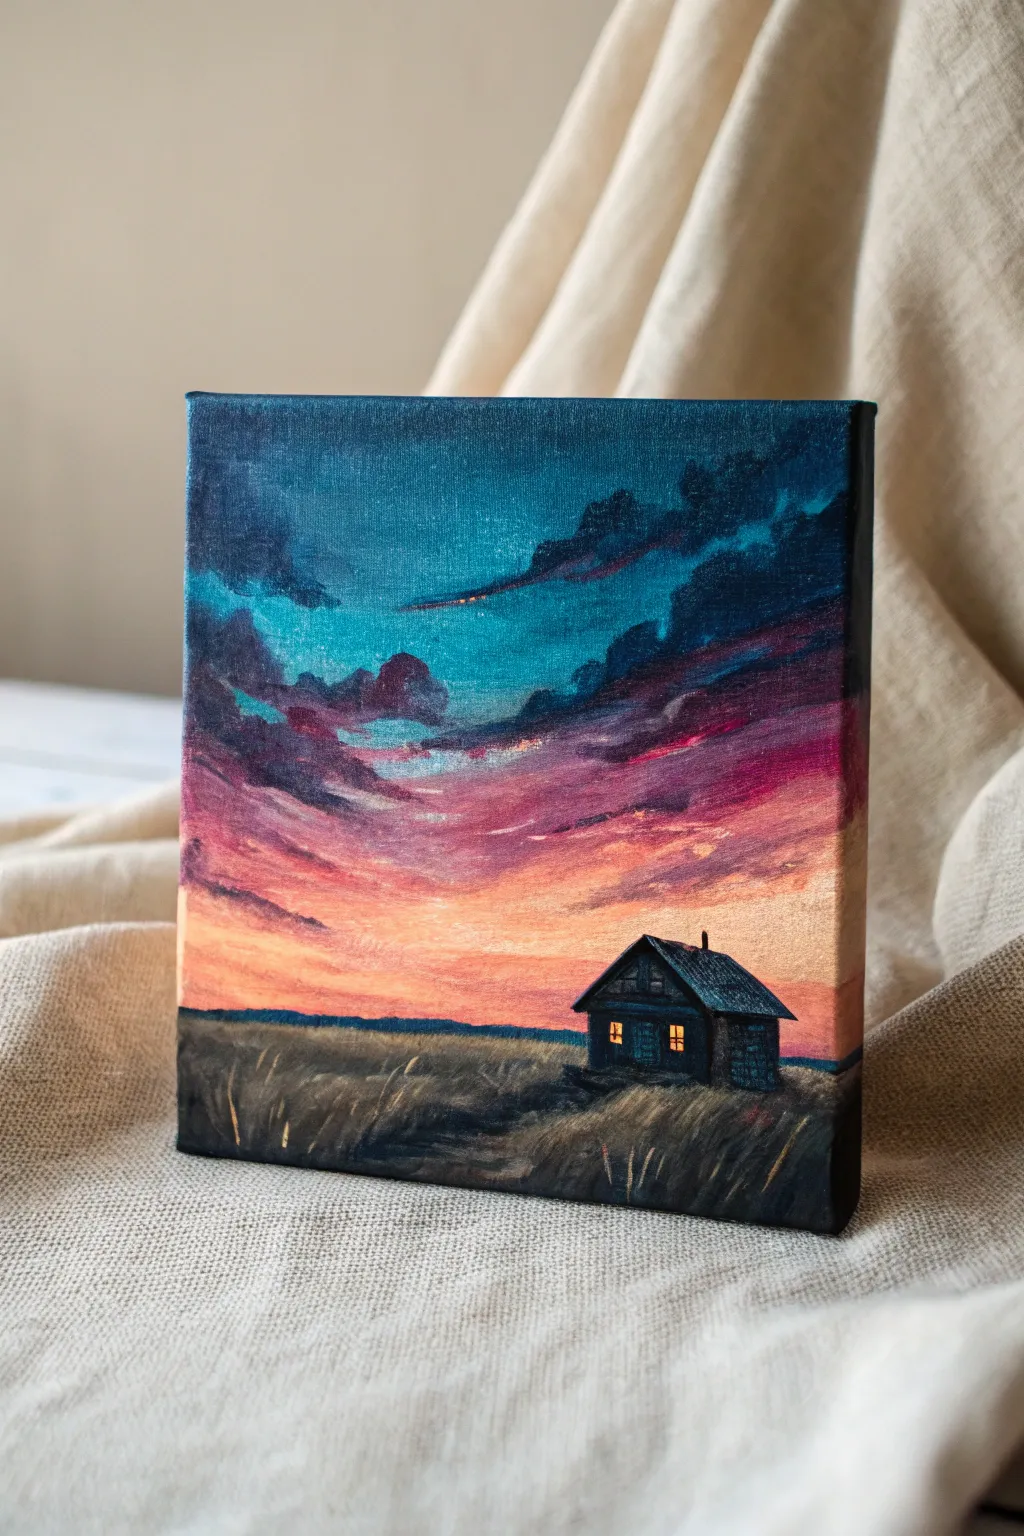
Capture the quiet solitude of a small cabin nestled beneath a dramatic, sweeping sunset in this oil painting project. The vibrant gradient of the sky contrasts beautifully with the dark, moody foreground, creating a scene that feels both vast and intimate.
How-To Guide
Materials
- Small stretched canvas (e.g., 4×4 or 6×6 inches)
- Oil paints: Phthalo Blue, Dioxazine Purple, Alizarin Crimson, Cadmium Orange, Cadmium Yellow, Titanium White, and Burnt Umber
- Brushes: Small flat shader (size 4), round brush (size 2), and a fine liner brush (size 00)
- Palette knife for mixing
- Odorless mineral spirits or turpentine
- Medium (like linseed oil or Liquin)
- Palette (wood or glass)
- Paper towels or rag
Step 1: Setting the Sky’s Foundation
-
Prime the gradient:
Begin by envisioning the horizontal bands of color. Mix a deep Phthalo Blue with a touch of Dioxazine Purple for the very top edge of the canvas. Apply this dark mixture confidently across the top. -
Transition to teal:
Mix Titanium White into your Phthalo Blue to create a vibrant teal. Blend this directly below the dark top band while the paint is still wet to create a soft, seamless transition. -
Introduce the violet layer:
Clean your brush thoroughly. Mix Alizarin Crimson with a tiny bit of blue and white to create a moody plum color. Apply this in the middle section, allowing the edges to feather into the teal above. -
Create the sunset glow:
Moving downward, mix Cadmium Orange with Titanium White and a dot of Crimson. Paint this band below the violet layer, letting the colors meet and mingle slightly on the canvas. -
Paint the horizon light:
For the area nearest the horizon line, use Cadmium Yellow mixed with plenty of White and a hint of Orange. This should be your brightest value, suggesting the sun just below the edge of the world.
Muddy Clouds?
If your clouds turn grey while blending into the orange sky, stop! Clean your brush completely. Layer the dark clouds over the orange only after the background is slightly tacky to avoid mixing.
Step 2: Sculpting the Clouds
-
Mix shadow tones:
Create a dark, stormy purple-grey using your Blue, Purple, and a touch of Burnt Umber. This will be the base color for the heavy clouds. -
Place the upper clouds:
Using the corner of a flat brush, dab in irregular cloud shapes into the teal and violet sections. Keep the edges soft and organic rather than perfectly round. -
Add lower cloud streaks:
Switch to a smaller round brush. Paint long, horizontal streaks of the dark cloud color across the orange sunset zone, suggesting movement and wind. -
Highlight the cloud edges:
Mix a bright pink-orange highlight color. With a careful touch, apply this to the bottom edges of the upper clouds where the setting sun would catch them.
Step 3: Painting the Foreground and Cabin
-
Block in the ground:
Mix Burnt Umber with Phthalo Blue to create a near-black darkness. Using the flat brush, fill in the bottom third of the canvas, creating a slightly uneven horizon line to mimic rolling terrain. -
Construct the cabin shape:
Using the same dark mixture, paint the silhouette of the cabin. Start with a simple triangle for the roof and a rectangle for the base, positioned slightly off-center to the right. -
Detail the roof:
Lighten your dark mixture with a little white and blue to make a cool grey. Use the distinct edge of your flat brush to add light strokes to the roof, indicating texture or moonlight reflection. -
Add grass texture:
Using an older, splayed brush or a fan brush, drag upwards from the bottom edge using various shades of dark brown and grey-brown to simulate tall, dry grasses in the foreground. -
Highlight the grass:
Mix a warm ochre color using Yellow, Orange, and a tiny bit of Brown. With a fine liner brush or the very tip of your round brush, flick in individual stalks of grass catching the last light of day.
Starry Night Twist
Let the sky dry completely, then use an old toothbrush to flick tiny speckles of thinned white paint over the darker top section. This transforms the scene into a twilight starry sky.
Step 4: Final Details
-
Illuminate the windows:
This is my favorite part; mix Cadmium Yellow with a dot of Orange and pure White. Use your smallest liner brush to paint two tiny rectangles in the cabin for windows. Go thick with the paint here to make it really glow. -
Add window frames:
Once the yellow is tacky or dry, carefully paint a thin cross over the yellow rectangles with your dark umber mixture to create the window panes. -
Paint the chimney:
Add a tiny vertical stroke on the roof for a chimney using the dark silhouette color. -
Final highlights:
Add a few final bright yellow-orange strokes to just the tips of the grass nearest the cabin to tie the light source together.
Step back and admire how a few simple colors can create such a vast and peaceful atmosphere on a tiny canvas


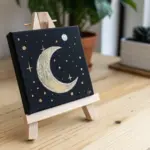
Moonlit Night Sky Study
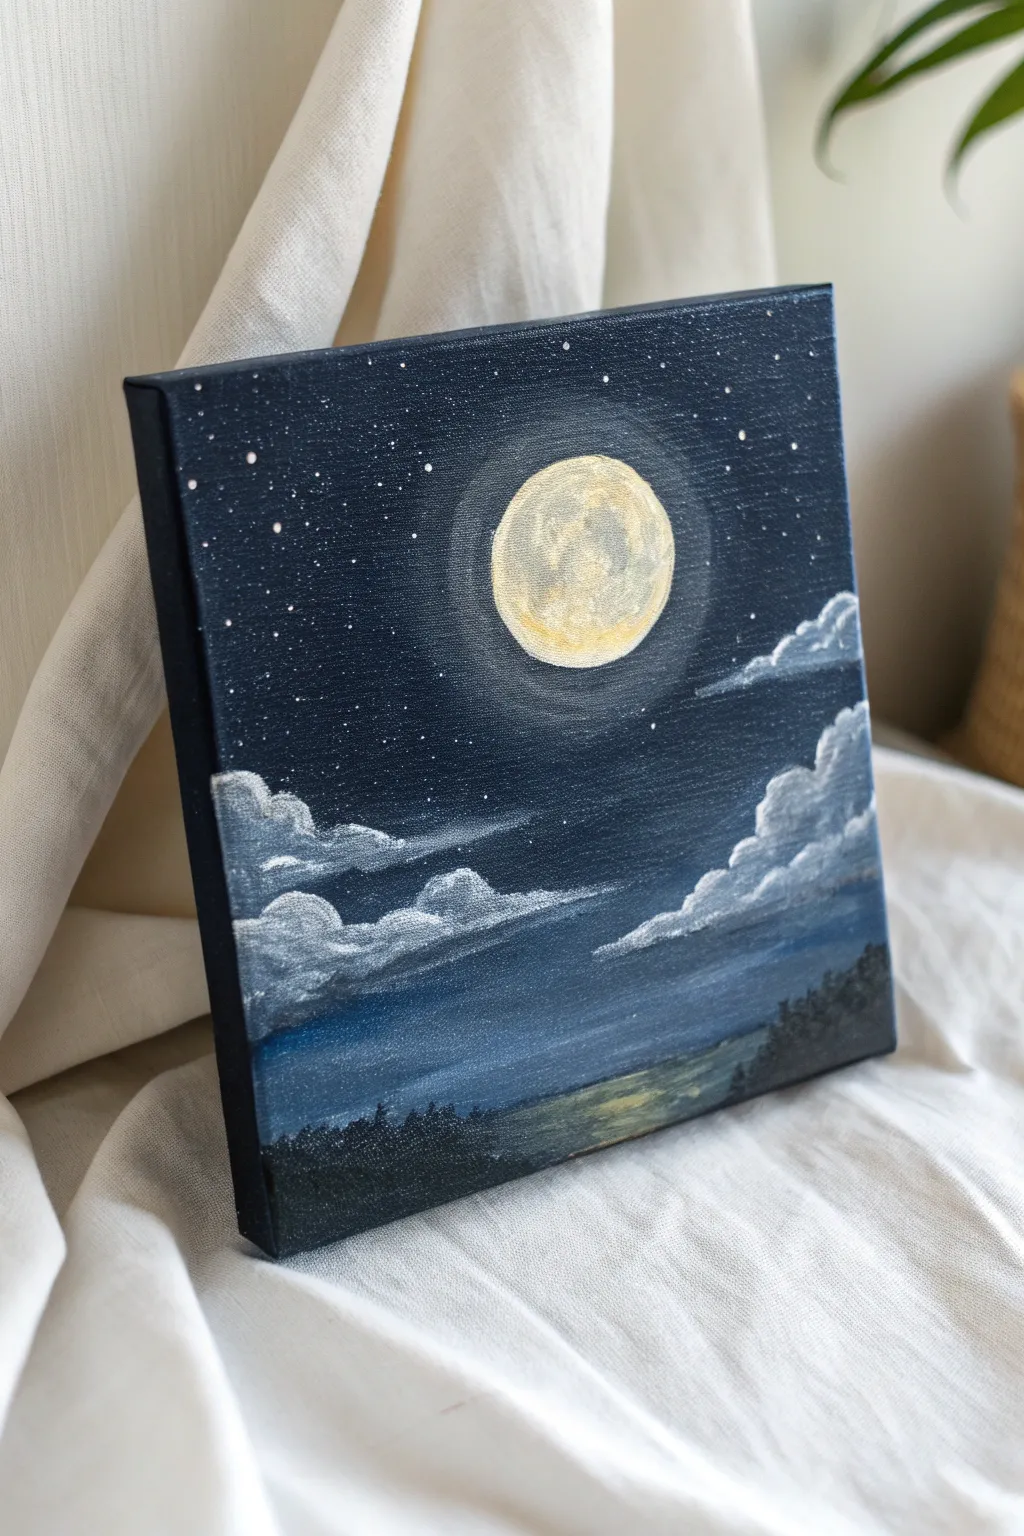
Capture the serene beauty of a moonlit evening with this compact oil painting study. The rich indigo sky and luminous full moon create a striking contrast that is perfect for practicing light effects and soft cloud blending.
Detailed Instructions
Materials
- Small square stretched canvas (e.g., 6×6 or 8×8 inches)
- Oil paints: Titanium White, Ultramarine Blue, Prussian Blue, Lamp Black, Yellow Ochre, Alizarin Crimson (tiny amount)
- Flat brushes (medium and small)
- Filbert brush (small)
- Detail round brush (size 0 or 00)
- Palette knife and palette
- Odorless mineral spirits or turpentine
- Lint-free rag or paper towels
Step 1: Sky Gradient
-
Prime the canvas:
If your canvas isn’t pre-primed, apply gesso. Since we want a deep night sky, you can even tone the canvas with a thin wash of burnt umber and let it dry completely to avoid staring at stark white. -
Mix the darkest blue:
On your palette, mix a generous amount of Prussian Blue with a touch of Lamp Black. We want a deep, midnight blue that isn’t quite pure black. -
Paint the upper sky:
Using a medium flat brush, apply this dark mixture to the top third of the canvas, ensuring you cover the edges of the canvas as well for a finished look. -
Create the mid-tone:
Mix Ultramarine Blue with a little Titanium White and a tiny dot of Alizarin Crimson to create a rich, slightly lighter twilight blue. Apply this to the middle section of the canvas. -
Blend the gradient:
With a clean, dry brush, gently sweep back and forth where the dark upper sky meets the mid-tone to create a seamless transition. Keep your strokes horizontal. -
Lighten the horizon:
Mix more Titanium White into your mid-tone blue to create the lightest sky color. Paint the bottom third of the sky area, blending it softly upwards into the mid-tone.
Step 2: The Moon & Halo
-
Position the moon:
While the blue paint is still tacky, use a rag or a clean brush dipped in solvent to wipe away a circular area where the moon will sit. This reveals the white canvas and keeps the moon bright. -
Paint the glow:
Mix a very thin, translucent glaze of Titanium White and a tiny bit of thinner. Scumble this in a circle around the empty moon spot, blending it outward into the dark blue sky to create a soft atmospheric halo. -
Fill the moon:
Mix Titanium White with a barely-there touch of Yellow Ochre. Fill in the moon circle with a small filbert brush. It should be thick and opaque. -
Add lunar texture:
Take a tiny bit of light gray (white + black) or muted ochre. Dab it softly onto the moon’s surface to mimic craters and uneven terrain. Don’t overblend; keep it slightly textured.
Muddy Colors?
If your white moon turns blue while painting, stop! Let the blue background dry to the touch (usually 2-3 days) before painting the white moon on top to keep it crisp.
Step 3: Clouds & Landscape
-
Block in cloud shapes:
Mix a blue-gray shade (Ultramarine + White + a touch of Black). Using a filbert brush, tap in the rough shapes of the clouds on the left and right sides, keeping the edges fluffy. -
Highlight the clouds:
The light source is the moon, so mix firm Titanium White. Apply bright highlights specifically to the top edges of the clouds facing the moon. I suggest using a tapping motion for a fluffy texture. -
Blend cloud shadows:
Soften the bottom edges of the clouds into the background shy using a clean, soft brush. The bottoms should disappear into the darkness, while the tops remain crisp. -
Paint the horizon line:
Mix a very dark, near-black green using Prussian Blue and Yellow Ochre (or just black with a hint of green). Block in a low, uneven silhouette across the bottom to represent distant trees and land. -
Add subtle reflection:
If there is water or a clearing depicted at the bottom right, glaze a tiny amount of yellow-white horizontally near the horizon line to suggest moonlight reflecting on the ground.
Make it Sparkle
Use an old toothbrush dipped in thinned white paint to flick tiny stars onto the canvas. Practice on paper first to control the splatter size!
Step 4: Finishing Touches
-
Add stars:
Thin down pure Titanium White with thinner until it is inky. Using your smallest detail brush, dot tiny stars throughout the upper dark section of the sky. -
Refine the moonlight:
Add a final, pure white dot to the brightest part of the moon and re-touch the brightest highlight on the nearest cloud to maximize contrast.
Step back and admire how simply placing light against dark can create such a luminous atmosphere.
Water Lily or Floating Leaf
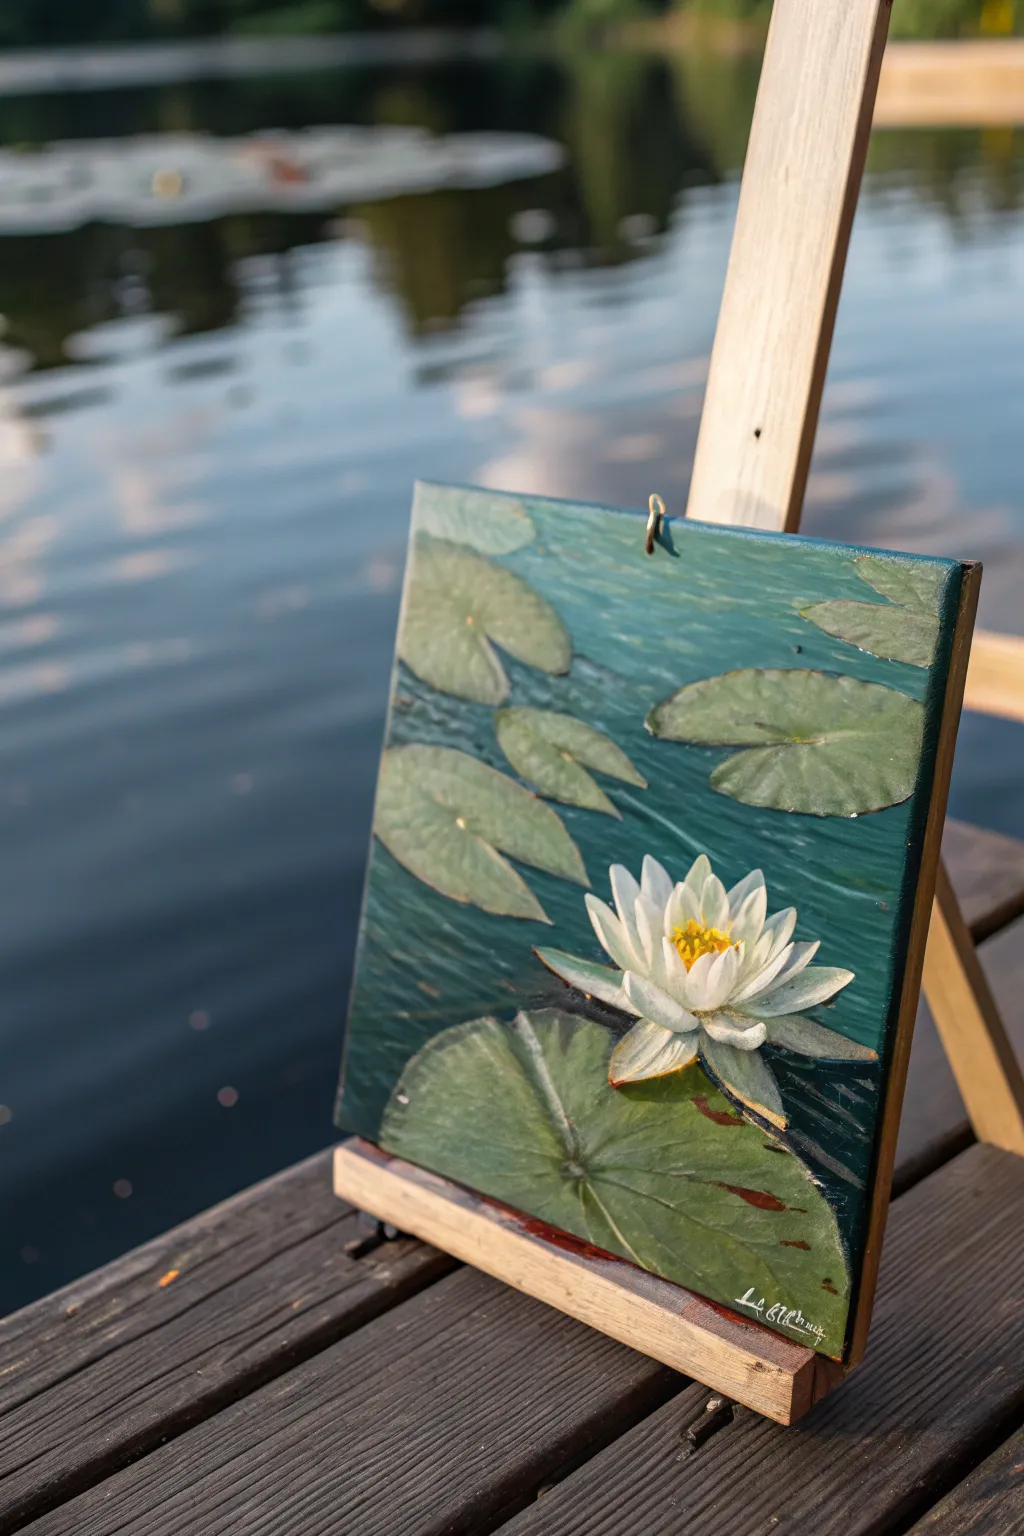
Capture the tranquil beauty of a pond surface with this intimate study of a water lily and its pads. Using rich oils, you will build layers of deep water tones to make the bright white petals and vibrant green leaves truly pop.
Step-by-Step
Materials
- Small square canvas panel (e.g., 6×6 or 8×8 inches)
- Oil paints: Phthalo Blue, Sap Green, Titanium White, Cadmium Yellow, Burnt Umber, Alizarin Crimson
- Flat brushes (sizes 4 and 8)
- Round detail brush (size 1)
- Palette knife for mixing
- Odorless mineral spirits or turpentine
- Medium (optional, like Liquin for faster drying)
- Paper towels or rag
- Small easel (optional)
Step 1: Planning and Background
-
Sketch the composition:
Begin by lightly sketching the placement of the lily pads and the main flower using a thin wash of Burnt Umber and a small round brush. Place your main flower slightly off-center for a more dynamic composition, and outline the large oval shapes of the pads surrounding it. -
Mix your water tones:
Create a deep, murky water color by mixing Phthalo Blue with a touch of Sap Green and a tiny bit of Burnt Umber. You want a dark, rich teal that will contrast heavily with the bright flower later. -
Block in the water:
Using your larger flat brush, fill in the negative space around the leaves and flower with your dark water mix. Use horizontal strokes to mimic the surface tension of water. -
Add depth to the water:
While the paint is still wet, mix a slightly lighter version of the water color using a bit of White. Streak this gently into the background in horizontal lines to suggest ripples and movement, but keep it subtle.
Step 2: Painting the Lily Pads
-
Base coat the leaves:
Mix a base green for the lily pads using Sap Green and a little Burnt Umber to tone it down. Fill in the leaf shapes with a flat brush, ensuring you cover the sketch lines. -
Add leaf variations:
Lily pads aren’t uniform. Mix a lighter, warmer green by adding Cadmium Yellow and a touch of White to your base green. Apply this to the parts of the leaves that would catch the sunlight, usually the edges facing the light source. -
Create shadows on the pads:
Mix a darker shadow green using Sap Green and Phthalo Blue. I prefer to apply this near the center of the pads where the stem connects, and underneath any overlapping leaves to create separation. -
Define the veins:
With a fine round brush and a light green mix, paint faint, radiating lines from the center of the large foreground pad to suggest veins. Keep these soft; you can blend them slightly with a clean, dry brush so they aren’t too stark. -
Adding imperfections:
Real nature isn’t perfect. Dab a tiny bit of reddish-brown (Alizarin Crimson mixed with Green) on the edges or centers of a few leaves to simulate natural decay or spots.
Muddy colors?
If your white petals turn green while painting near the leaves, stop! Wipe your brush completely clean or use a separate brush for the light colors to keep the white crisp.
Step 3: The Water Lily Flower
-
Block in the shadow petals:
Start the flower by painting the outer, lower petals first. Mix Titanium White with a tiny dot of blue or grey to create a cool shadow white. Paint the petal shapes that sit closest to the water. -
Paint the mid-tone petals:
Using pure Titanium White, paint the next layer of petals rising upward. Use distinct, confident strokes with a filbert or small flat brush to mimic the curve of the petals. -
Highlight the tips:
Load your brush with thick Titanium White and apply it to the very tips and top edges of the central petals. Impasto strokes here will catch the light and make the flower appear three-dimensional. -
The vibrant center:
Mix Cadmium Yellow with a little White. Dab this into the very center of the bloom. Use a stippling motion with a small round brush to create the pollen-heavy texture. -
Deepen the center contrast:
To make the yellow pop, place tiny dots of orange or dark yellow near the base of the stamens where they meet the white petals.
Level Up: Morning Dew
Add tiny droplets of water on the large foreground leaf. Use a dot of dark green for the shadow and a tiny spec of pure white for the highlight to create a 3D dew effect.
Step 4: Final Details and Reflection
-
Refine the water contact:
Darken the water immediately underneath the lily pads and the flower with a mix of Blue and Umber. This ‘contact shadow’ grounds the objects so they look like they are floating on the surface, not hovering above it. -
Add water reflections:
If you see space, drag a little bit of the green or white paint vertically downwards into the water area directly below the objects, blurring it softly to suggest a reflection. -
Review and sign:
Step back and check your values. If the white flower doesn’t stand out enough, darken the water around it further. Once dry to the touch, add your signature in a contrasting color, perhaps in the bottom right corner.
Enjoy the peaceful process of bringing this little pond scene to life.
Tiny Bird on a Branch
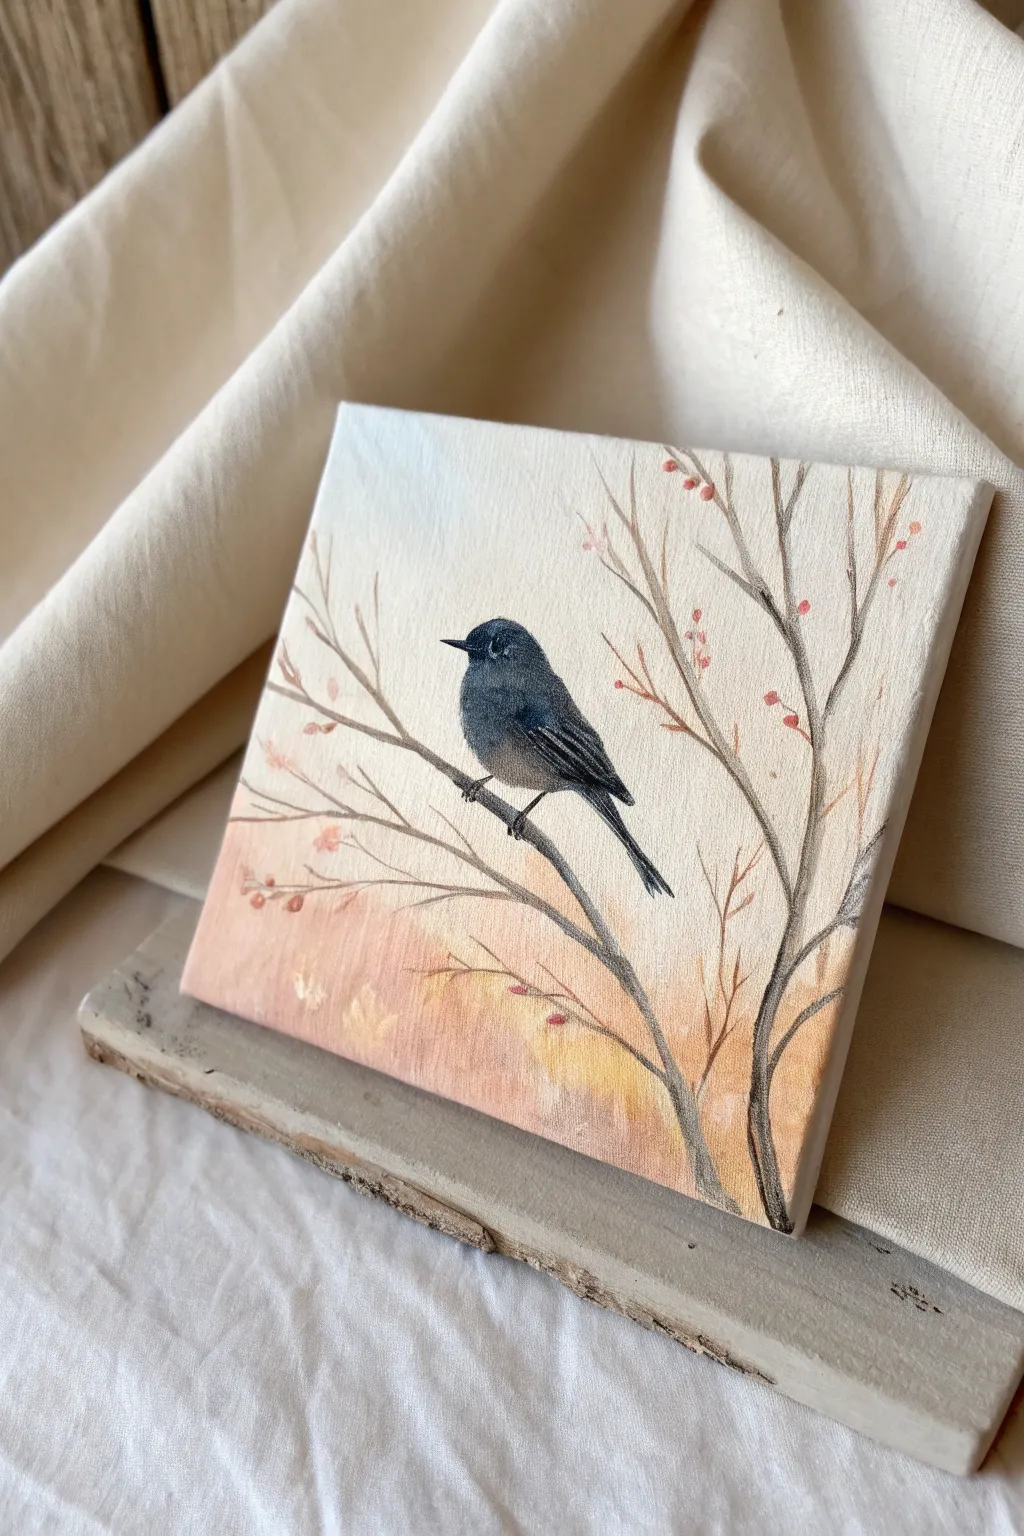
This delicate project captures the quiet stillness of a tiny gray songbird perched amidst winter branches. Using a soft pastel gradient background and precise brushwork, you’ll create a piece that feels both serene and beautifully detailed.
Step-by-Step Guide
Materials
- Small canvas panel or stretched canvas (approx. 6×6 inches)
- Oil paints: Titanium White, Ivory Black, Burnt Umber, Yellow Ochre, Cadmium Red (or Alizarin Crimson), Ultramarine Blue
- Odorless mineral spirits or turpentine
- Linseed oil or painting medium
- Brushes: Flat shader (size 4), Round brush (size 2), Detail liner brush (size 00 or 1)
- Palette
- Paper towels or rag
Step 1: Setting the Atmosphere
-
Prep the canvas:
Begin by ensuring your canvas surface is clean. If it’s very rough, you might want to apply a layer of gesso and sand it down for a smoother painting surface, which helps with small details like the bird’s feathers. -
Mix the sky gradient:
On your palette, mix a large amount of Titanium White with a tiny touch of Yellow Ochre and a speck of Burnt Umber to create a warm, creamy off-white. For the lower section, mix white with a little Cadmium Red and Yellow Ochre to make a soft peachy-pink. -
Apply the upper background:
Using the flat shader brush, paint the top two-thirds of the canvas with your creamy off-white mixture. Use horizontal strokes to ensure even coverage. -
Apply the lower background:
While the top is still wet, paint the bottom third with the peachy-pink mixture. Clean your brush, then gently blend the area where the two colors meet. I like to use a soft, dry brush here to feather the transition so no hard line remains. -
Add background warmth:
Mix a slightly darker version of the peach color using a bit more Burnt Umber. Dab this loosely into the bottom corners and lower edge to create a sense of depth suggesting distant foliage. -
Dry time:
Allow this background layer to dry significantly. Since we are painting fine branches on top, a semi-dry or tacky surface prevents the brown paint from turning muddy.
Mahl Stick Magic
For steady hands on tiny details like the beak or eye, rest your painting hand on a ‘mahl stick’ (or a clean ruler) bridged over the canvas to avoid smudging wet paint.
Step 2: Structuring the Branches
-
Mix the branch color:
Combine Burnt Umber with a touch of Ivory Black. Add a drop of thinning medium (like linseed oil) to make the paint flow smoothly off a smaller brush. -
Paint the main trunk:
Starting from the bottom right corner, use your round brush to pull a curved line upwards and slightly to the left. Let the line taper and become thinner as it reaches the top third of the canvas. -
Add the perch:
Extend a secondary branch out to the left from the main trunk. This will be where the bird sits. Keep the pressure light at the end of the stroke so the branch tips look delicate. -
Fill in smaller twigs:
Switch to your detail liner brush. Create thin, wispy twigs branching off the main stems. Vary the direction, crossing some over others to create a natural, tangled look. -
Highlight the wood:
Mix a lighter brown using your branch color and some white. Carefully paint thin highlights on the upper right side of the main branches to suggest a light source.
Step 3: The Tiny Bird
-
Block in the shape:
Mix a dark gray using Ultramarine Blue, Ivory Black, and a little White. With the size 2 round brush, block in the basic oval shape of the bird’s body on the left branch, oriented slightly diagonally. -
Define the head and tail:
Refine the silhouette by rounding out the head and pulling the paint down into a long, slender tail that extends below the branch. -
Add shadows:
Deepen your gray mixture with more Black. Paint the wing area and the underside of the tail to give the bird volume and distinguish the wing feathers from the body. -
Paint the highlights:
Mix a lighter cool gray. Gently brush this onto the top of the head, the shoulder, and the upper back. This contrast is what makes the bird look round rather than flat. -
Wing details:
Using the liner brush and a very dark gray (almost black), paint fine parallel lines on the wing to suggest individual flight feathers. -
Beak and eye:
Paint a very small, sharp triangle for the beak in black. Add a tiny dot for the eye. A microscopic speck of pure white in the eye adds the ‘catchlight’ that brings the bird to life. -
Feet details:
Use the liner brush with dark gray to paint tiny claws gripping the branch. They should curve naturally around the wood.
Muddy Background?
If your branches are picking up the background color, the base layer is too wet. Stop and let it dry for 24 hours, or gently wipe the area and apply thicker paint for the branch.
Step 4: Final Flourishes
-
Add berries:
Mix a soft red using Cadmium Red, white, and a touch of Burnt Umber (so it isn’t too bright). Dot small berries randomly on the ends of the finest twigs throughout the composition. -
Final check:
Step back and look at the balance. If the bottom feels too empty, lightly scumble a bit of pale yellow-orange near the bottom edge to suggest out-of-focus leaves.
Once the oils have fully cured, consider framing this little gem without glass to let the texture shine
Micro Pet Portrait Crop
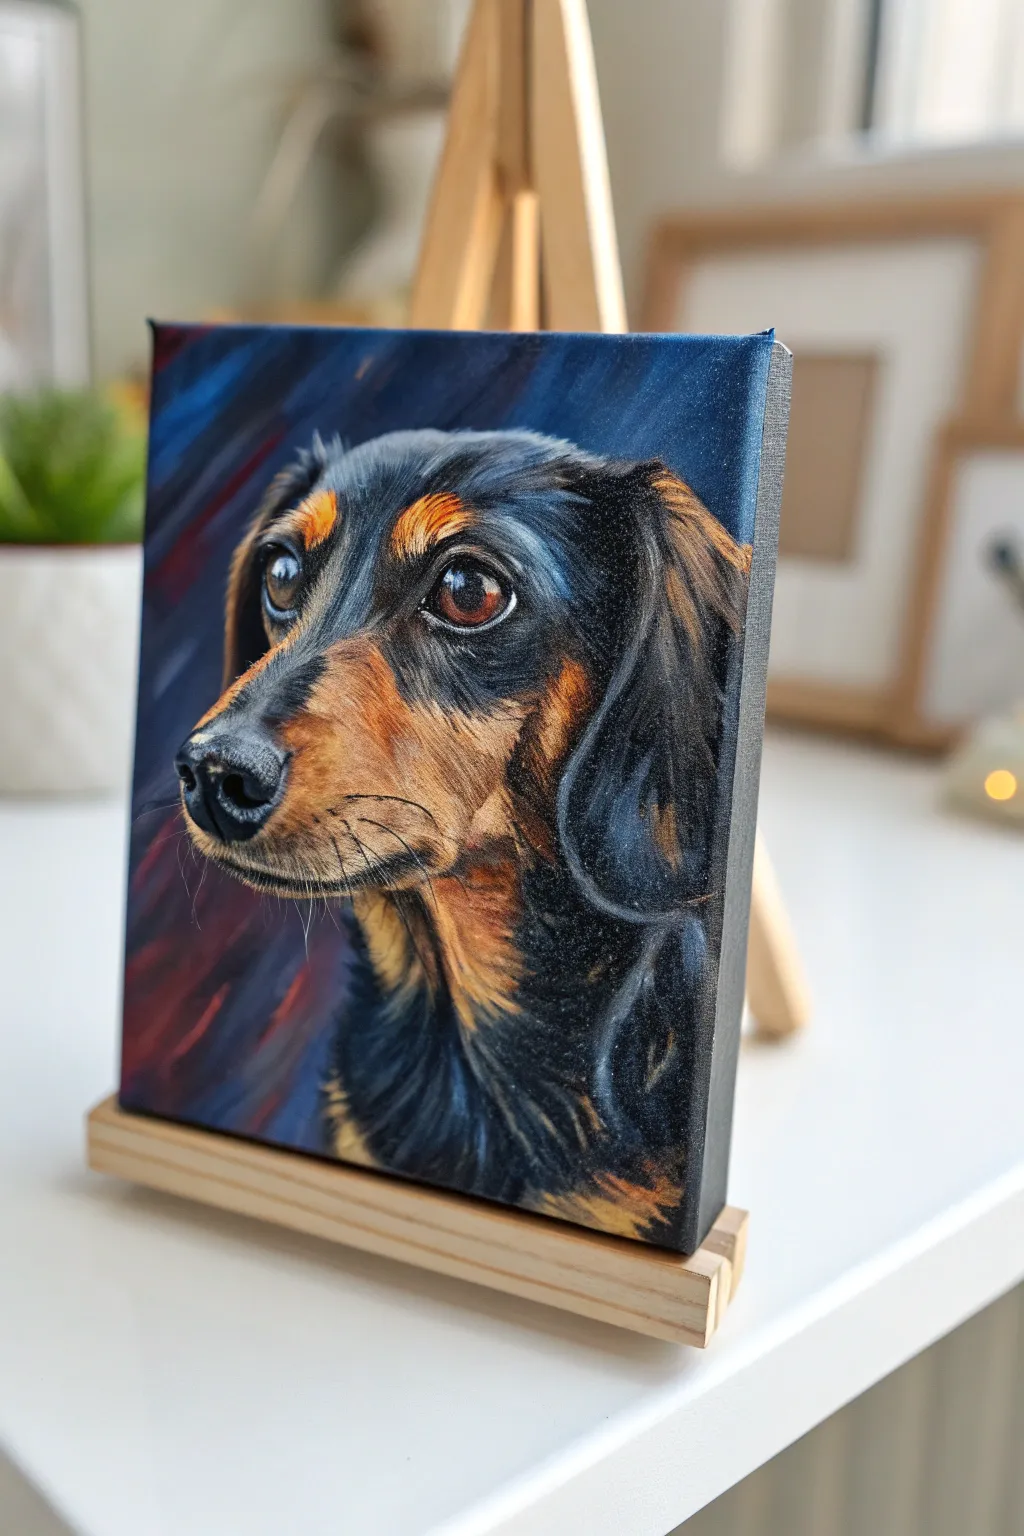
Capture the soulful expression of a beloved pet with this intimate, close-cropped oil painting tutorial. Focus on the rich contrast between the sleek black fur and warm tan markings, set against a moody, abstract background.
How-To Guide
Materials
- Small stretched canvas or canvas board (approx. 5×7 or 6×6 inches)
- Oil paints: Titanium White, Ivory Black, Burnt Umber, Burnt Sienna, Yellow Ochre, Ultramarine Blue, Alizarin Crimson
- Synthetic hog bristle brushes (flats and filberts sizes 2-4)
- Fine synthetic sable detail brushes (rounds sizes 00 and 0)
- Odorless mineral spirits or turpentine
- Liquin or linseed oil medium
- Palette and palette knife
- Small wooden display easel
Step 1: Preparation and Base Layers
-
Sketch the composition:
Using a thin wash of Burnt Umber and turpentine, lightly sketch the outline of the dog’s head. Focus on the large shapes: the triangular snout, the floppy ear, and the precise placement of the eye. Don’t worry about fur details yet. -
Block in dark values:
Mix a deep, cool black using Ivory Black and a touch of Ultramarine Blue. Apply this to the darkest areas of the fur—the top of the head, the neck shadows, and the pupil. Keep the paint thin but opaque. -
Establish the background:
While the dark fur is wet, mix Ultramarine Blue, Alizarin Crimson, and a touch of Ivory Black for the background. Paint loose, diagonal strokes around the subject. Adding a tiny bit of white to some strokes creates that streaky, out-of-focus bokeh effect. -
Map the tan markings:
Mix Burnt Sienna with a little Yellow Ochre. Block in the classic tan eyebrow spots, the side of the muzzle, and the chest area. Keep the edges where the tan meets the black soft and feathery. -
First eye layer:
Fill the iris area with a dark brown mix (Burnt Umber + Alizarin Crimson). Let this base layer setup dry until it is tacky or touch-dry before moving to details.
Eye Depth Trick
Add a tiny touch of crimson alizarin to the corner of the eye (tear duct) and the heavily shadowed area above the eye. It makes the animal look alive and warm.
Step 2: Building Form and Fur Texture
-
Create mid-tones on the black fur:
Mix Ivory Black with a touch of Titanium White and Blue to make a cool dark grey. Using a small filbert brush, stroke in the direction of hair growth on the forehead and ear to suggest glossiness without painting individual hairs. -
Refine the tan areas:
Lighten your tan mix with more Yellow Ochre and White. Apply this to the bridge of the nose and the cheekbone to create volume. Use short, flicking strokes to blend it slightly into the surrounding black fur. -
Deepen the shadows:
Revisit your darkest black layers. If they have sunk in and look dull, glaze a fresh layer of Ivory Black and medium over the deepest crevices, like the nostril and under the ear flap. -
Paint the nose structure:
Use a mix of black and grey to paint the nose leather. Unlike the fur, use a stippling motion (tapping the brush tip) to mimic the bumpy texture of the nose, highlighting the top edge where the light hits. -
Develop the eye:
Paint a crescent of lighter amber (Burnt Sienna + Yellow Ochre) at the bottom of the iris to show refracted light. Ensure the pupil remains pitch black.
Step 3: Fine Details and Highlights
-
Detail the eye reflection:
This is crucial for life. Place a small, crisp dot of Titanium White overlapping the pupil and iris. Ad a tiny blue-grey reflection on the opposite side to suggest the curvature of the eyeball. -
Texture the fur:
Switch to your size 0 or 00 liner brush. Mix a light grey-blue. Carefully paint individual hairs on the highlighted parts of the black fur—especially the top of the head and the ear curve. Keep your paint fluid with a little medium. -
Highlight the tan fur:
Clean your fine brush and mix a pale cream color. Add fine hair strokes to the eyebrow, heavy muzzle, and chest. Pay attention to direction; muzzle hair grows outward and down. -
Add whiskers:
Dilute some black paint until it’s very inky. With a swift, confident motion, pull the brush outward from the muzzle to create the whiskers. Add a few light-colored whiskers on the chin for contrast. -
Final adjustments:
Check your edges. Soften the fur edges against the background so the dog doesn’t look like a cutout. Let the painting dry completely before varnishing. -
Display:
Once dry and varnished, place the canvas on a mini easel to complete the intimate portrait look.
Paint the Edges
Wrap the dark background color around the sides of the canvas. This gallery-wrap style makes the small piece look finished and professional without needing a frame.
Enjoy the process of bringing this little character to life on your canvas
Four Tiny Paintings for the Seasons
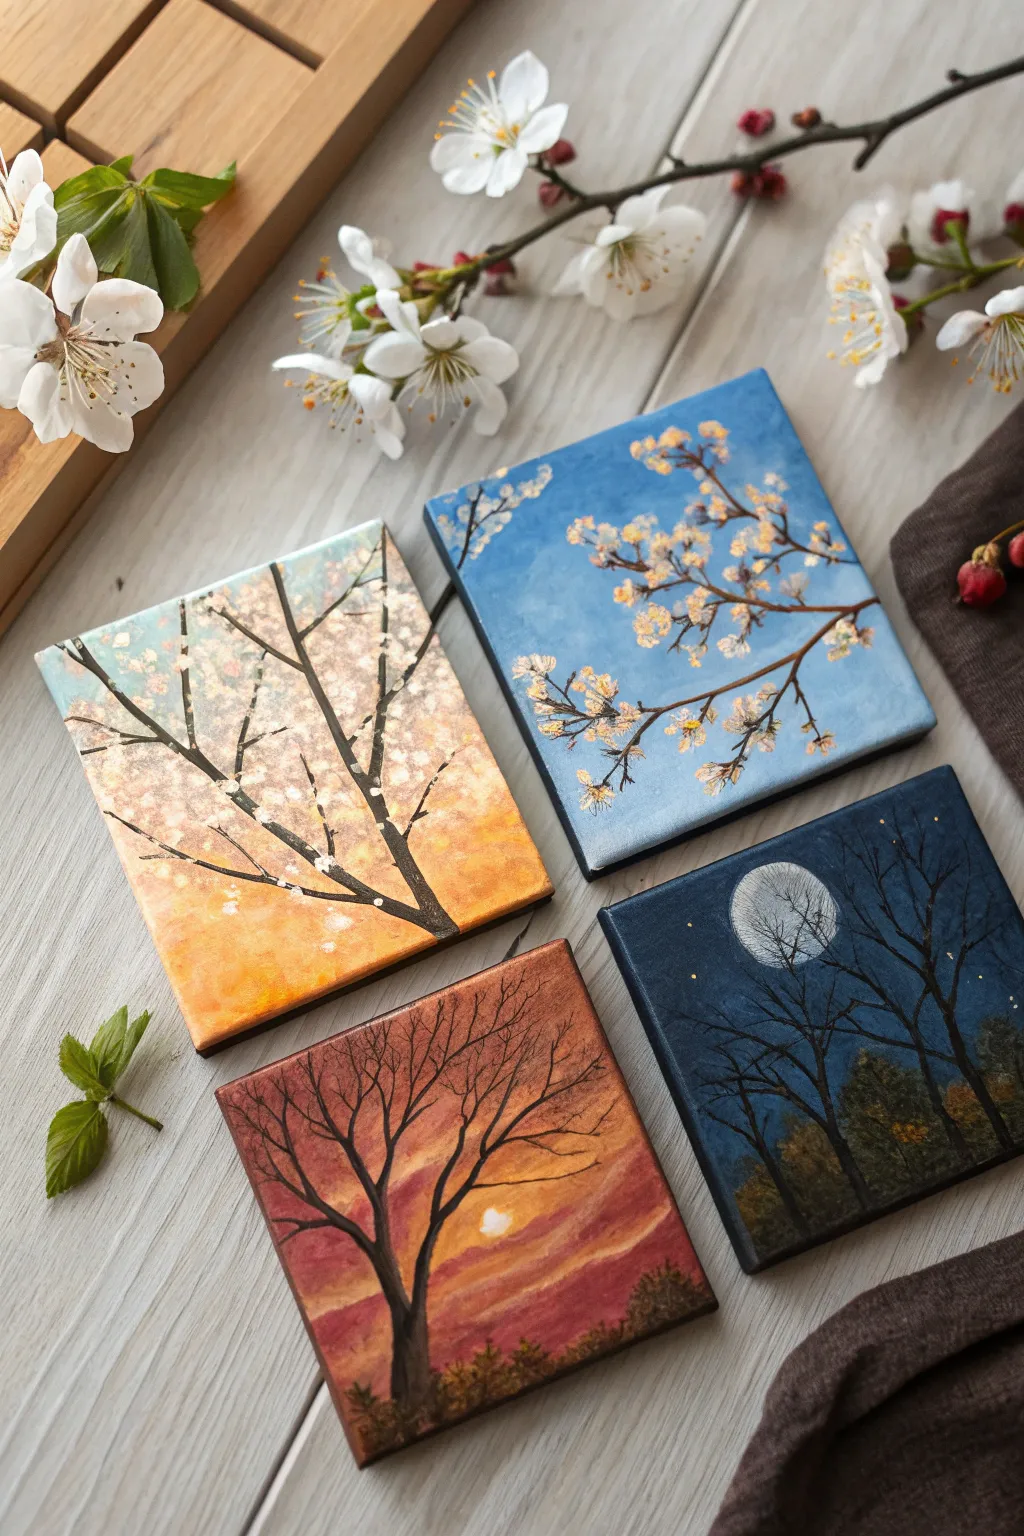
Capture the passing of time with this charming set of four miniature landscapes, each representing a different season and time of day. Using a small format allows you to focus on simple silhouettes and vibrant sky gradients for a cohesive gallery wall effect.
Step-by-Step Guide
Materials
- 4 mini square canvases (approx. 4×4 inches)
- Oil paints (Titanium White, Pthalo Blue, Cadmium Yellow, Cadmium Red, Burnt Umber, Ivory Black, Sap Green)
- Small flat brush (size 4 or 6)
- Fine liner or detail brush (size 0 or 00)
- Palette knife for mixing
- Paper towels and solvent/medium
Step 1: Painting the Spring Sky
-
Base layer:
Begin with the first canvas for ‘Spring.’ Mix Pthalo Blue with plenty of Titanium White to create a soft, airy blue. Cover the entire canvas with a smooth, even coat using your flat brush. -
Branch structure:
This is where I like to switch to a fine liner brush thinning down Burnt Umber with a touch of medium. Paint a main branch entering from the right side, splitting into delicate, reaching twigs. -
Blossom clusters:
Mix Titanium White with a tiny speck of yellow or orange for warmth. Dot this thickly onto the branches using the tip of a small brush to create clusters of white cherry blossoms. -
Adding depth:
Add tiny dots of pure white on top of the blossom clusters for highlights, and a few stray petals floating in the blue space.
Branch Control
To get razor-thin branches, mix a drop of linseed oil or solvent into your dark paint until it flows like ink. Roll your liner brush into a sharp point.
Step 2: The Golden Dawn
-
Gradient background:
For the second canvas, create a gradient. Start with a pale blue-white at the top left, blending into a warm orange and yellow mix at the bottom right to simulate a sunrise. -
Tree silhouette:
Using Burnt Umber darkened with a little black, paint a tree trunk starting from the bottom center, branching outward into a V-shape. -
Abstract foliage:
Instead of detailed leaves, use a dappling technique. Mix white with touches of pink and orange. Stipple these colors loosely around the branches to suggest light filtering through morning mist and leaves. -
Light effects:
Add small touches of pure white where the sun hits the branches to enhance the backlit morning effect.
Make It 3D
Don’t stop the paint at the edge! Continue your sky colors and tree branches around the sides of these thick canvases for a finished look without a frame.
Step 3: Autumn Twilight
-
Sunset backdrop:
On the third canvas, paint horizontal strokes. Use a deep rusty red at the bottom, blending upward into lighter peach and orange tones, creating a moody sunset sky. -
Distant hills:
Mix a dark brownish-red and paint a low, rolling hill line at the very bottom. Keep the edges soft to suggest distance. -
Bare branches:
Paint a large, central tree silhouette using dark brown. Focus on creating many fine, intricate branches that reach all the way to the top edge, showcasing the skeleton of the tree. -
The sun detail:
Place a small, soft circle of pale yellow or white just above the horizon line, partially obscured by the tree trunk, to represent the setting sun. -
Foreground texture:
Dab a little dark green and brown at the base of the tree to suggest low bushes or grass in shadow.
Step 4: Winter Moon
-
Night sky:
Cover the final canvas in a deep midnight blue (Pthalo Blue mixed with Ivory Black). Make the center slightly lighter where the moon will sit. -
The moon:
Paint a circle of Titanium White in the upper center. While wet, mix in a tiny amount of grey to create crater textures. -
Silhouetted forest:
Paint several vertical tree trunks rising from the bottom edge using almost pure black. These should be thinner and straighter than the other trees. -
Canopy details:
Add fine branches crossing over the moon face. This creates immediate depth and contrast. -
Starry finish:
Use a toothpick or total dry brush to flick or dot tiny specks of white and gold into the dark sky for stars.
Allow your miniature gallery to dry fully before displaying them together to showcase the full cycle of nature


Have a question or want to share your own experience? I'd love to hear from you in the comments below!