A laundry room mural is my favorite way to turn a practical, sometimes windowless space into a little pocket of joy you actually want to stand in while the cycle runs. The trick is choosing a design that plays nicely with tight layouts—think accent wall energy, forgiving patterns, and colors that feel fresh and clean.
Soft Botanical Accent Wall
Transform a utilitarian space into a serene retreat with this large-scale botanical mural that mimics the softness of watercolor painting. The oversized leaves and gentle green tones create an airy, organic feel perfect for brightening up a laundry room.
Step-by-Step Tutorial
Materials
- Latex wall paint (white eggshell base)
- Acrylic paints or interior latex samples (sage green, forest green, olive, warm brown)
- Glazing medium or water (to thin paint)
- Large angled sash brush (2-3 inch)
- Medium round watercolor-style synthetic brushes
- Small liner brush
- Pencil and eraser
- Painter’s tape
- Drop cloth
- Paper plate or palette
- Projector (optional but recommended)
Step 1: Preparation and Planning
-
Prepare the surface:
Begin by removing any outlet covers and patching holes. Clean the wall thoroughly with a mild detergent and water solution to remove dust or laundry lint, ensuring a pristine canvas. -
Apply the base coat:
Roll on two coats of a crisp eggshell white or very pale off-white latex paint. Let this base cure fully (at least 24 hours) so your mural work doesn’t lift the underlying paint. -
Sketch the layout:
To achieve the flowing composition shown, lightly sketch main stem lines using a pencil. If you aren’t confident freehanding, project a botanical line drawing onto the wall and trace the major shapes lightly. Focus on creating vertical movement with varying heights.
Watercolor Illusion
Keep a misting spray bottle handy. Lightly misting the wall before applying paint helps acrylics bloom and bleed just like real watercolor on paper.
Step 2: Painting the Stems
-
Mix the stem color:
On your palette, mix a warm brown with a touch of olive green. Add glazing medium or water until the consistency is slightly runny, like ink, to allow for long, fluid strokes. -
Paint main branches:
Using a medium round brush, paint the primary stems starting from the bottom and working upward. Apply slightly more pressure at the base of the stem and lift off as you reach the tip to taper the line naturally. -
Add secondary twigs:
Branch off from your main stems with thinner lines. Keep these movements loose and slightly irregular to mimic real organic growth rather than stiff straight lines.
Step 3: Creating the Leaves
-
Prepare greens:
Create three distinct puddles of green: a light sage, a medium olive, and a deeper forest green. Mix each with a significant amount of glazing medium (ratio of about 1:1 or 1:2 paint to medium) to achieve that sheer, watercolor transparency. -
Block in base shapes:
Dip your large angled brush into the lightest sage mix. Paint the leaf shapes with confident, sweeping strokes. Because of the glaze, the paint should look translucent; don’t worry about perfect coverage. -
Layering tone:
While the first layer is tacky but not fully dry, brush the medium olive tone into the lower half or center of select leaves. The wet glaze will help the colors bleed softly into each other, creating a gradient effect. -
Adding depth:
Use the darkest forest green sparingly. Apply it near where the leaf meets the stem or in the ‘shadow’ areas of overlapping leaves. Soften any hard edges with a clean, slightly damp brush. -
Varying the species:
For the fern-like fronds seen in the background, use a more diluted, pale green wash. Use quick, feathery strokes outward from a central vein to contrast with the broader leaves.
Hard Edges?
If a paint edge dries unauthorized and too harsh, scrub it gently with a damp magic eraser to soften the line back into a hazy, dreamlike finish.
Step 4: Detailing and Refining
-
Connect leaves to stems:
Once the leaves are dry, use your small round brush and the brown stem mixture to paint the petioles (small stems) connecting each leaf back to the main branch. -
Add veining:
Mix a slightly darker version of your green. With a liner brush, paint thin central veins on the larger leaves. Keep the line broken or faint in areas to maintain the soft watercolor illusion. -
Review and touch up:
Step back to view the wall as a whole. I prefer to look for empty pockets that feel unbalanced and fill them with faint, ‘ghost’ leaves using very watered-down paint to add depth without clutter. -
Protect the work:
Since this is a laundry room with potential humidity, seal your mural once fully cured (after 48-72 hours) with a clear, matte water-based polycrylic sealer.
Now you can enjoy the calming atmosphere of your hand-painted botanical garden every time you do the laundry


Oversized Wildflower Sketch Mural
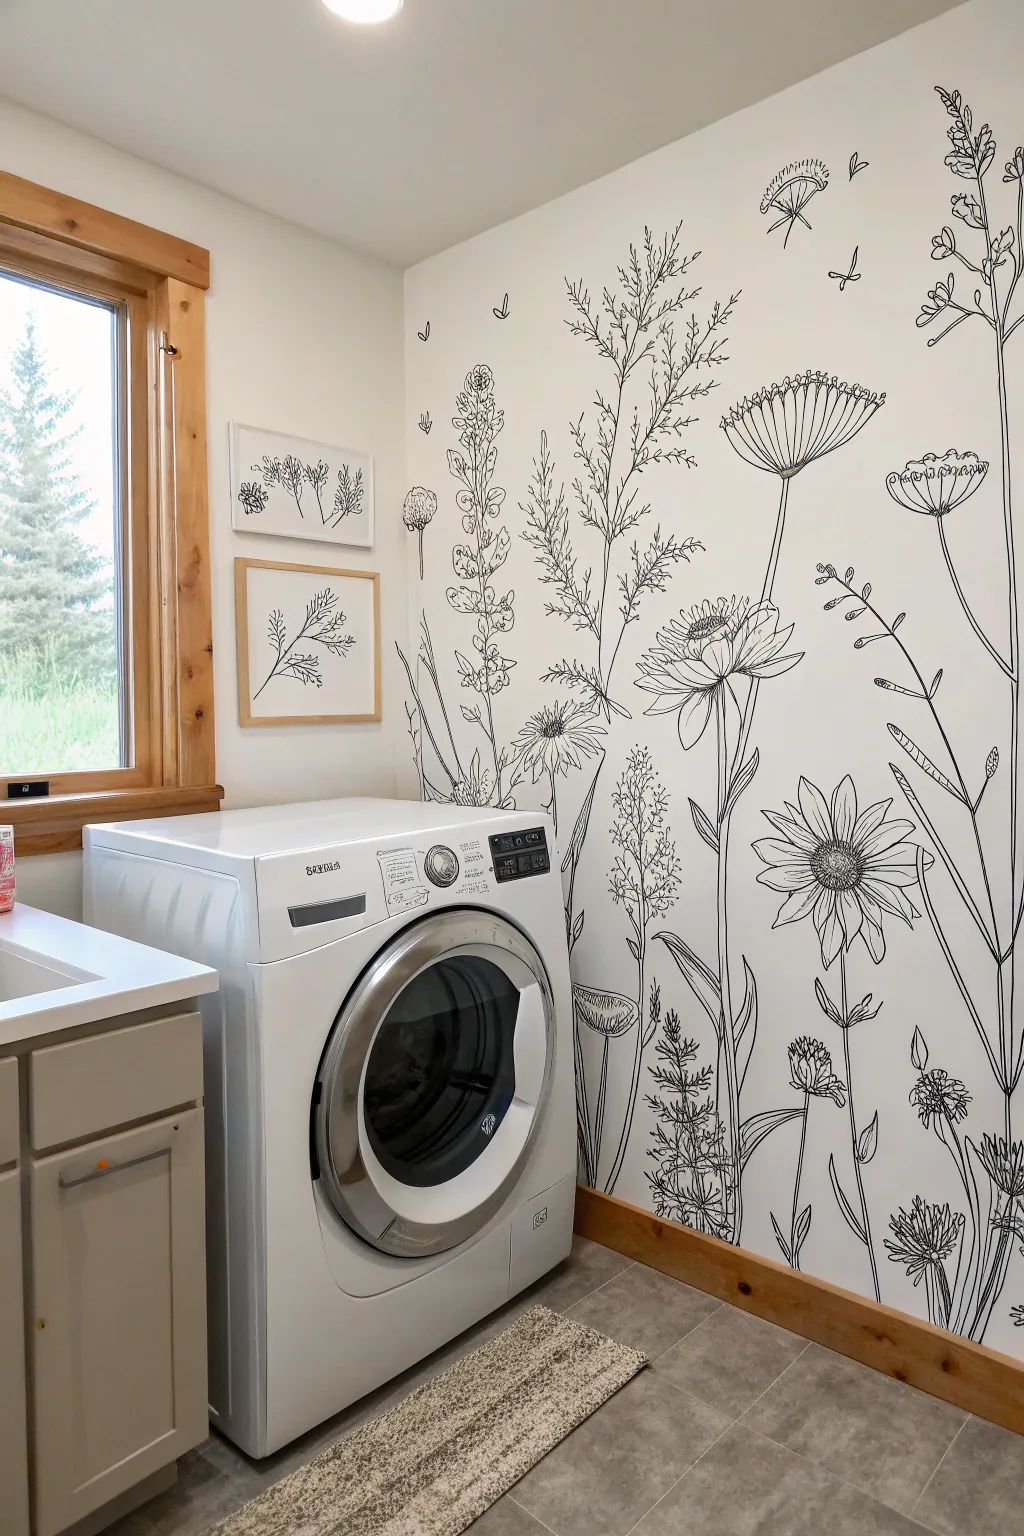
Transform a utilitarian laundry space into a serene meadow with this oversized botanical line art mural. By simplifying nature’s complexity into striking black outlines, you create a sophisticated feature wall that feels airy and open.
Detailed Instructions
Materials
- Interior latex paint (white base)
- Black acrylic paint or high-quality paint marker pens
- Pencil and eraser
- Projector (optional but recommended)
- Painter’s tape
- Drop cloth
- Various round brushes (sizes 2, 4, 6)
- Digital botanical reference images
- Clear matte sealer (optional)
Step 1: Preparation and Layout
-
Clean the canvas:
Start by thoroughly cleaning the wall with a damp cloth and mild soap to remove any dust or laundry lint. Let it dry completely before proceeding. -
Apply the base coat:
If your wall isn’t already a crisp, bright white, roll on two coats of high-quality white interior latex paint. This ensures the black lines will pop with maximum contrast. -
Protect the perimeter:
Apply painter’s tape along the baseboards, ceiling line, and adjacent trim. Lay down a drop cloth to catch any accidental drips or marker splatters. -
Select your specimens:
Curate a collection of wildflowers to feature. Look for variety in height and texture—mix tall grasses, broad daisies, delicate Queen Anne’s lace, and feathery stems. -
Establish the composition:
Using a pencil, lightly mark horizontal zones on the wall. Place the tallest plants in the background and shorter, fuller blooms near the bottom to anchor the design visually.
Don’t Smudge!
Work from top to bottom and left to right (if you’re right-handed) to avoid dragging your hand through wet ink. Creating a DIY ‘mahl stick’ to rest your hand on helps stabilize shaky lines.
Step 2: Sketching the Outline
-
Project the design:
For the most professional look, project your chosen botanical illustrations onto the wall. Adjust the projector distance until the flowers are oversized—larger than life scale is key to this look. -
Trace major stems:
Lightly trace the primary vertical lines of the stems first. Focus on capturing the natural curve and sway of the plants rather than making them perfectly straight. -
Add floral heads:
Sketch the basic shapes of the flower heads—ovals for daisies, inverted triangles for umbels. Keep these pencil lines faint as guidelines only. -
Fill in the foliage:
Draw in the leaves attached to the main stems. Vary the angles and overlap some leaves behind stems to create a sense of depth. -
Review the flow:
Step back and look at the entire wall. Add small floating petals or butterflies in empty negative spaces to balance the composition.
Add Dimension
Mix just a hint of dark grey into your black paint for distant background flowers. This creates an atmospheric perspective, making the pure black foreground plants pop even more.
Step 3: Inking the Mural
-
Prepare your medium:
If using paint, thin your black acrylic slightly with water for fluidity. If using paint markers, shake them well and prime the nib on a piece of scrap cardboard. -
Line the stems:
Start from the bottom and work upward, tracing over your pencil lines with a steady hand. Use thicker strokes for the main stalks to give them visual weight. -
Detail the blooms:
Switch to a finer brush or smaller marker tip for the flower petals. Use quick, confident strokes to mimic the texture of petals rather than outlining them rigidly. -
Add textual elements:
For centers of flowers like sunflowers or daisies, use stippling (small dots) or cross-hatching to create darker shading and intricate detail within the line work. -
Incorporate movement:
Add subtle, thin lines extending from the flower heads to suggest wind measurement or stamens, enhancing the sketchy, organic feel. -
Clean up artwork:
Once the ink is fully dry (give it at least an hour), use a clean eraser to gently remove any visible pencil guidelines. -
Optional sealing:
Because laundry rooms can be humid, applying a thin coat of clear matte sealer over the mural can protect your artwork from moisture and scrubbing.
Now your laundry chores will feel like a walk through a quiet summer garden


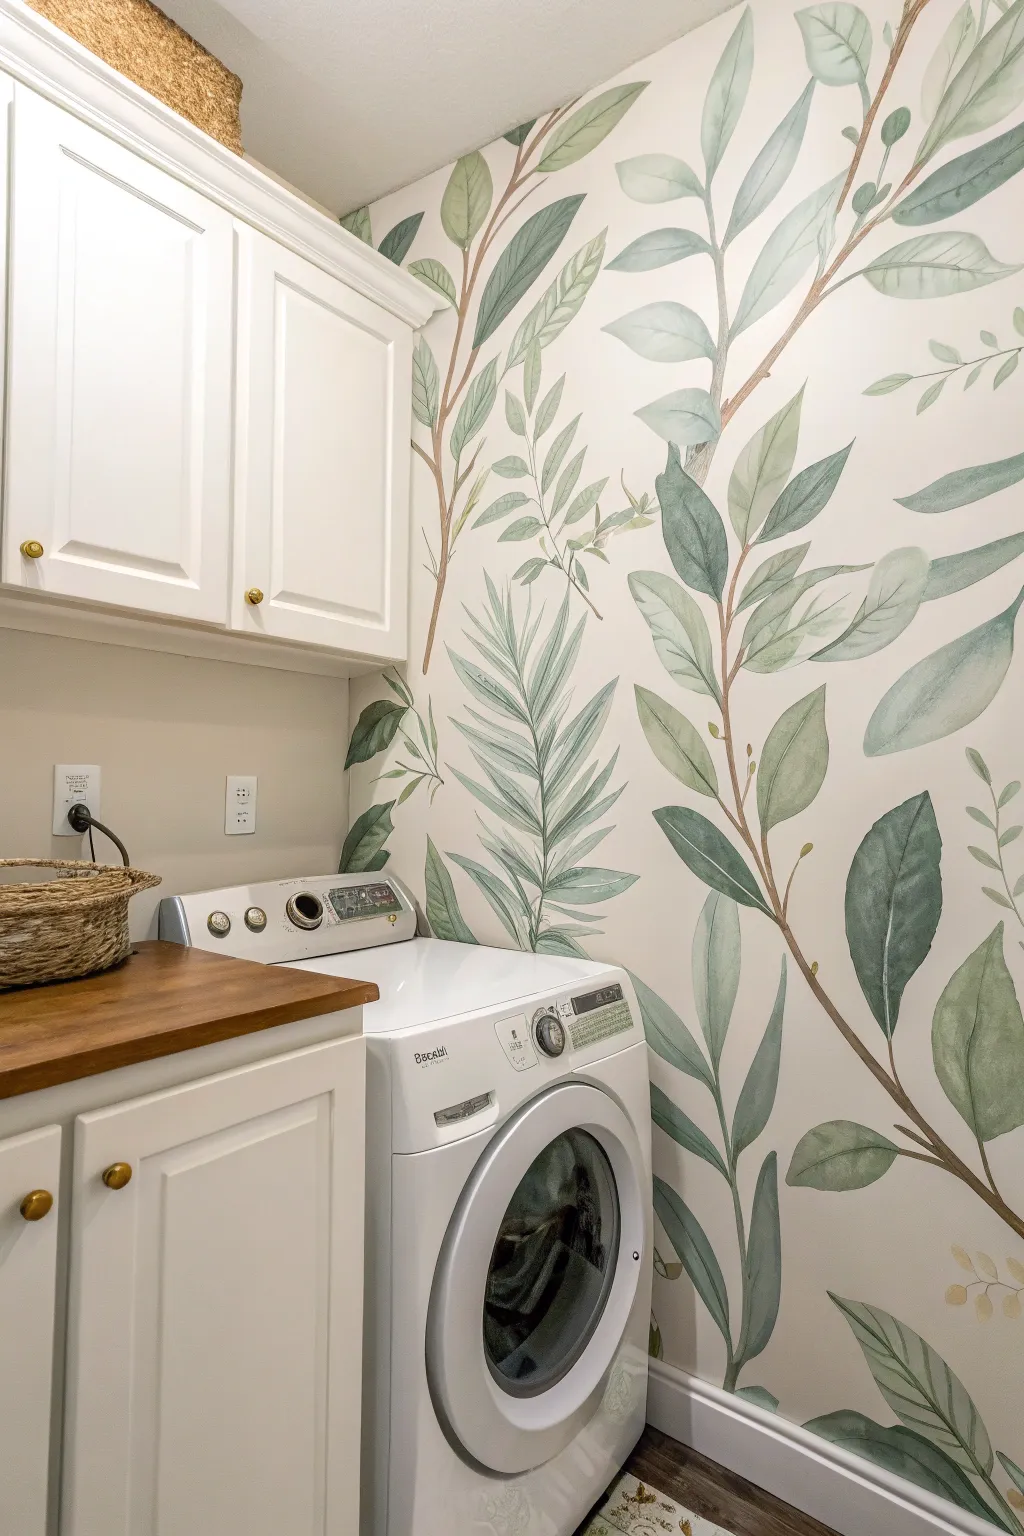
Repeating Leaf Pattern Like Wallpaper
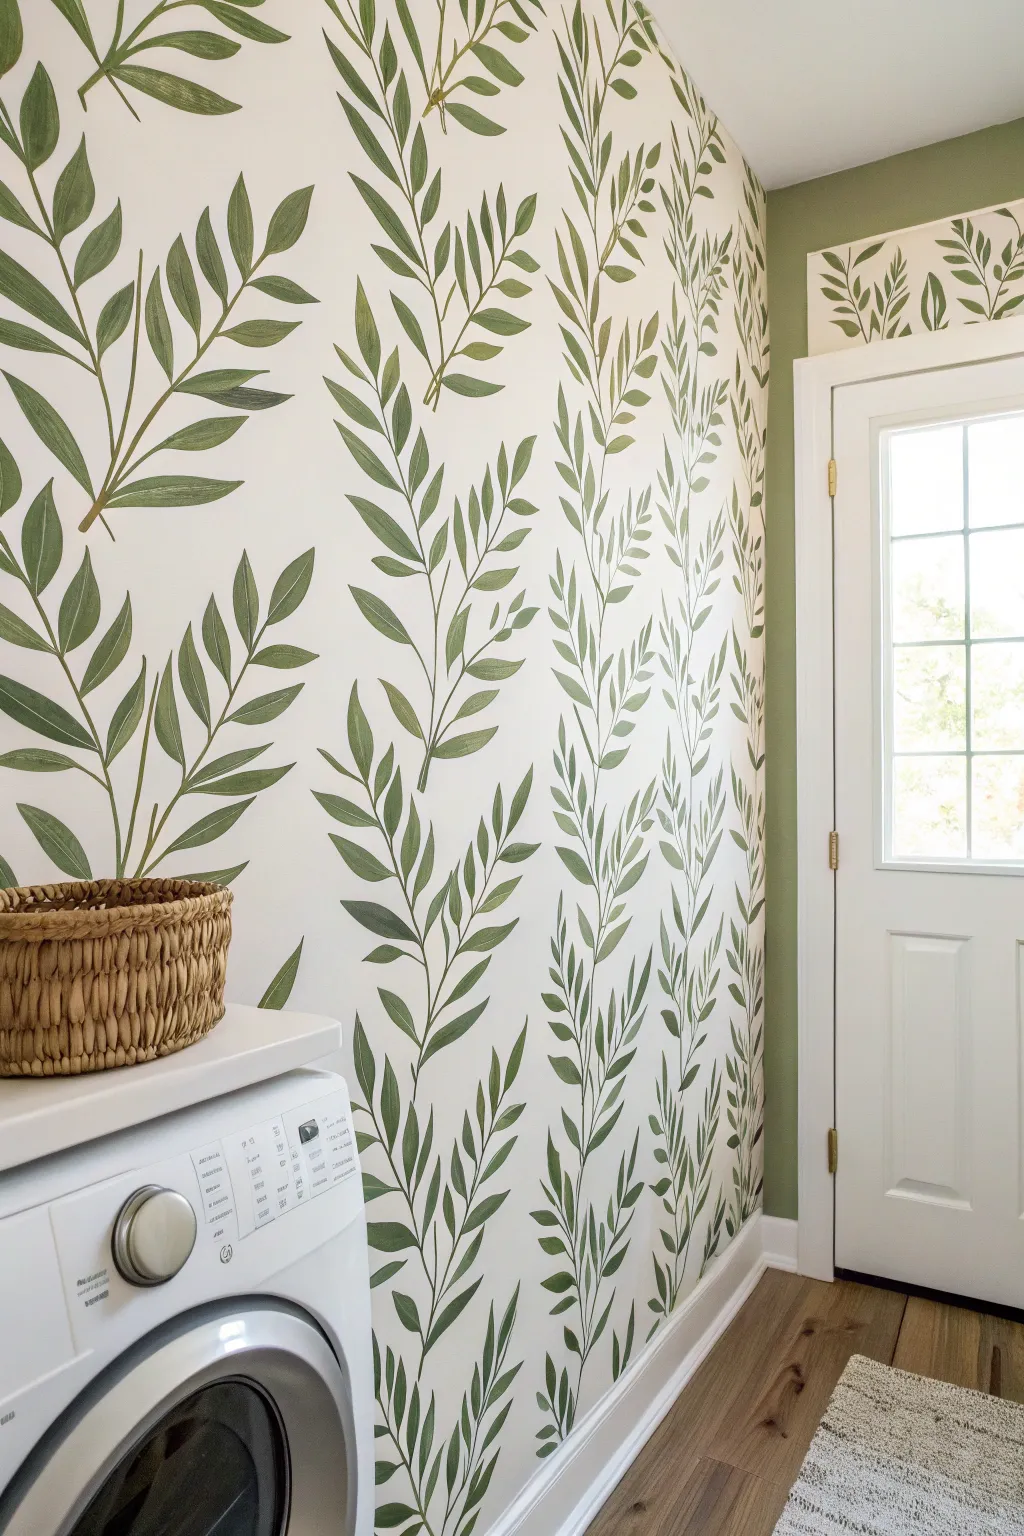
Transform a plain laundry room wall into a botanical sanctuary with this hand-painted leaf mural that mimics the look of high-end wallpaper. This repeating vine pattern brings organic verticality and a fresh pop of green to your space without the hassle of hanging paper.
Step-by-Step Tutorial
Materials
- Satin finish interior wall paint (Olive Green)
- Round watercolor brushes (sizes 6 and 8)
- Pencil
- Cardstock or thick paper (for stencil)
- Painter’s tape
- Level
- Tape measure
- Small roller and tray (for touch-ups)
- Step ladder
- Drop cloth
Step 1: Preparation and Planning
-
Clean and clear:
Before you begin, move appliances like washers and dryers away from the wall if possible, or cover them completely with a drop cloth. Wipe down the wall surface with a damp cloth to remove dust and lint. -
Create your template:
Draw a long, curving vine shape with alternating leaves on a piece of cardstock. The vine section should be about 12-18 inches tall. Cut this shape out carefully to use as your specialized tracing template. -
Establish vertical guides:
To keep your ‘wallpaper’ straight, use a level to lightly draw faint vertical pencil lines from floor to ceiling. Space these lines about 10-12 inches apart, depending on how dense you want your foliage.
Natural Variation
Mix a tiny drop of white or dark green into your paint tray occasionally. Subtle color shifts make the leaves look hand-painted and deeper.
Step 2: Drafting the Design
-
Trace the first column:
Starting at the bottom left corner near the baseboard, place your cardstock template along the first vertical guideline. Lightly trace around it with a pencil. -
Continue upward:
Move the template up, flipping it horizontally or slightly rotating it to create a natural, organic flow that isn’t too rigid. Connect the bottom of the new trace to the top of the previous one to form a continuous vine. -
Review the repeat:
Step back after tracing the first column. The goal is an organic look, so it shouldn’t look perfectly stamped. -
Fill the wall:
Repeat this process for each vertical guideline across the entire wall. I find it helpful to stagger the starting height of the leaves on adjacent columns so the pattern doesn’t look like a grid. -
Connect the gaps:
Sketch in small, freehand stems or extra leaves to bridge any awkward gaps between your traced vines.
Step 3: Painting the Foliage
-
Load your brush:
Dip a size 6 or 8 round brush into your olive green paint. The paint should be fluid but not dripping—if it feels too thick, mix in a tiny splash of water. -
Paint the stems first:
Start by carefully painting over your pencil lines for the main central stems. Keep a steady hand and apply consistent pressure. -
Fill in the leaves:
For the leaves, start at the base near the stem. Press the brush down to widen the stroke for the leaf belly, then lift up as you reach the tip to create a sharp point. -
Add variance:
Don’t aim for solid, flat color on every single leaf. Allowing the brush texture to show slightly mimics the look of watercolor or block-printed wallpaper. -
Work in sections:
Paint one vertical vine column at a time, moving from top to bottom to avoid smudging your fresh work with your hand or arm. -
Detailing:
Go back with your smaller brush to add tiny stems connecting the leaves to the main vine, ensuring everything looks anchored.
Shaky Hands?
Don’t worry about perfect lines. Wobbly edges actually enhance the “block print” aesthetic. If a dribble happens, wipe it instantly with a damp Q-tip.
Step 4: Refining and Finishing
-
Check for consistency:
Step back frequently to ensure the color density looks balanced across the whole wall. If some leaves look too faint, add a second coat of green. -
Erase guidelines:
Once the paint is completely dry (wait at least 4 hours), gently erase any visible pencil marks from your vertical guidelines or template tracings. -
Touch up backgrounds:
If you accidentally got green paint outside the lines, use a small artist brush and your original wall color to tidy up the edges. -
Final inspection:
Look closely at areas near the ceiling and baseboards. Use a small angled brush to ensure the leaves look like they naturally continue off the edge of the wall.
Now you have a stunning custom feature wall that brings life to your daily chores without the commitment of wallpaper


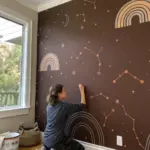
Painted Clothesline With Sentimental Items
Transform a plain laundry wall into a storybook scene with this charming line-art mural featuring rolling hills and a playful clothesline effect. By combining simple hand-painted illustrations with a physical wire installation, you create a delightful, interactive piece of art that makes chore day feel a little lighter.
Detailed Instructions
Materials
- Interior wall paint (white or eggshell base)
- Black acrylic paint pen (medium tip)
- Black acrylic paint (small jar)
- Thin round artist brush (size 2 or 4)
- Pencil and eraser
- Bubble level or laser level
- Measuring tape
- Picture hanging wire or thin galvanized steel cable
- Two screw-in eye hooks or wall anchors
- Wire cutters
- Wooden clothespins
- Baby socks, onesies, or small garments for display
- Optional: Colored acrylic paints for flower accents
Step 1: Planning the Landscape
-
Prepare the canvas:
Begin with a clean, dry wall. If your current paint is dark or bold, apply a fresh coat of warm off-white or cream interior paint to serve as your background. Let this cure fully for at least 24 hours before drawing. -
Mark the horizon line:
Decide the height of your main horizon line. It should sit comfortably above your washer and dryer but below eye level. Lightly sketch a long, horizontal line with a pencil, allowing it to dip slightly to create rolling hills rather than a rigid straight line. -
Sketch the mountains:
Above your horizon line, penciling in simple geometric mountain peaks. Keep the lines clean and minimal. Vary their heights to add visual interest, and draw a second, higher horizon line above them to suggest distant layering. -
Add sky elements:
Near the top of the wall, lightly sketch playful, cloud shapes with scalloped edges. Add a simple circle for the sun with radiating lines. I like to keep these shapes deliberately ‘doodly’ to maintain that storybook illustration charm.
Uneven Lines?
If your paint pen skips or creates shaky lines, switch to a thin round brush (size 2) and black fluid acrylics. The brush naturally smooths out jitters for a fluid look.
Step 2: Painting the Line Work
-
Outline the hills:
Using a medium-tip black acrylic paint pen, carefully trace over your pencil lines for the hills and horizon. Shake the pen well before starting to ensure a consistent, bold black line without streakiness. -
Define the background:
Trace the mountain peaks and the upper background lines. Maintain a steady hand, but don’t worry about perfection; slight wobbles add to the hand-drawn aesthetic. -
Ink the sky details:
Go over your clouds and sun. For the sun, you might want to fill the center with a soft yellow wash or stipule some tiny dots inside for texture before outlining it in black. -
Create the foreground features:
Below the main horizon line, sketch and then paint simple house shapes or fence posts. Use vertical lines to create the siding of the house and small arches for windows. -
Add botanical details:
Draw vertical stems rising from the hills. Add leaves and simple flower heads—tulips, daisies, or abstract blooms. Vary the height of the stems so they look organic. -
Add soft color accents:
If you want a pop of color, mix a very watered-down acrylic wash in pink, yellow, or soft green. Gently fill in select flower petals or the sun, keeping the color translucent like a watercolor painting. Let this dry completely.
Interactive Art
Paint ‘phantom’ clothes directly onto the wall behind the real wire, like socks or shirts blowing in the wind, to blend the 2D and 3D elements seamlessly.
Step 3: Installing the Clothesline
-
Measure the wire height:
Determine where your physical clothesline will sit. It should run parallel to your painted horizon lines but with a slight, natural droop. Mark two points on opposite ends of the wall. -
Install the hooks:
Drill pilot holes at your marked spots. Screw in sturdy eye hooks or wall anchors securely. If you are going into drywall without a stud, ensure you use appropriate drywall anchors to support the weight of the clothes. -
Cut the wire:
Measure the distance between your hooks and add about 6-8 inches of extra length. Cut your galvanized wire or picture hanging cable to size using wire cutters. -
Secure the line:
Thread one end of the wire through the first eye hook and twist it tightly back around itself to secure. Repeat on the other side. Leave a little bit of slack in the line so it mimics a real, weighted clothesline. -
Style the scene:
Clip wooden clothespins onto the wire. Hang small, lightweight items like colorful baby socks, a vintage towel, or a child’s shirt. Spacing them out allows the painted mural behind to peek through.
Step back and admire how a simple line drawing and a piece of wire turned a functional space into a playful gallery
BRUSH GUIDE
The Right Brush for Every Stroke
From clean lines to bold texture — master brush choice, stroke control, and essential techniques.
Explore the Full Guide
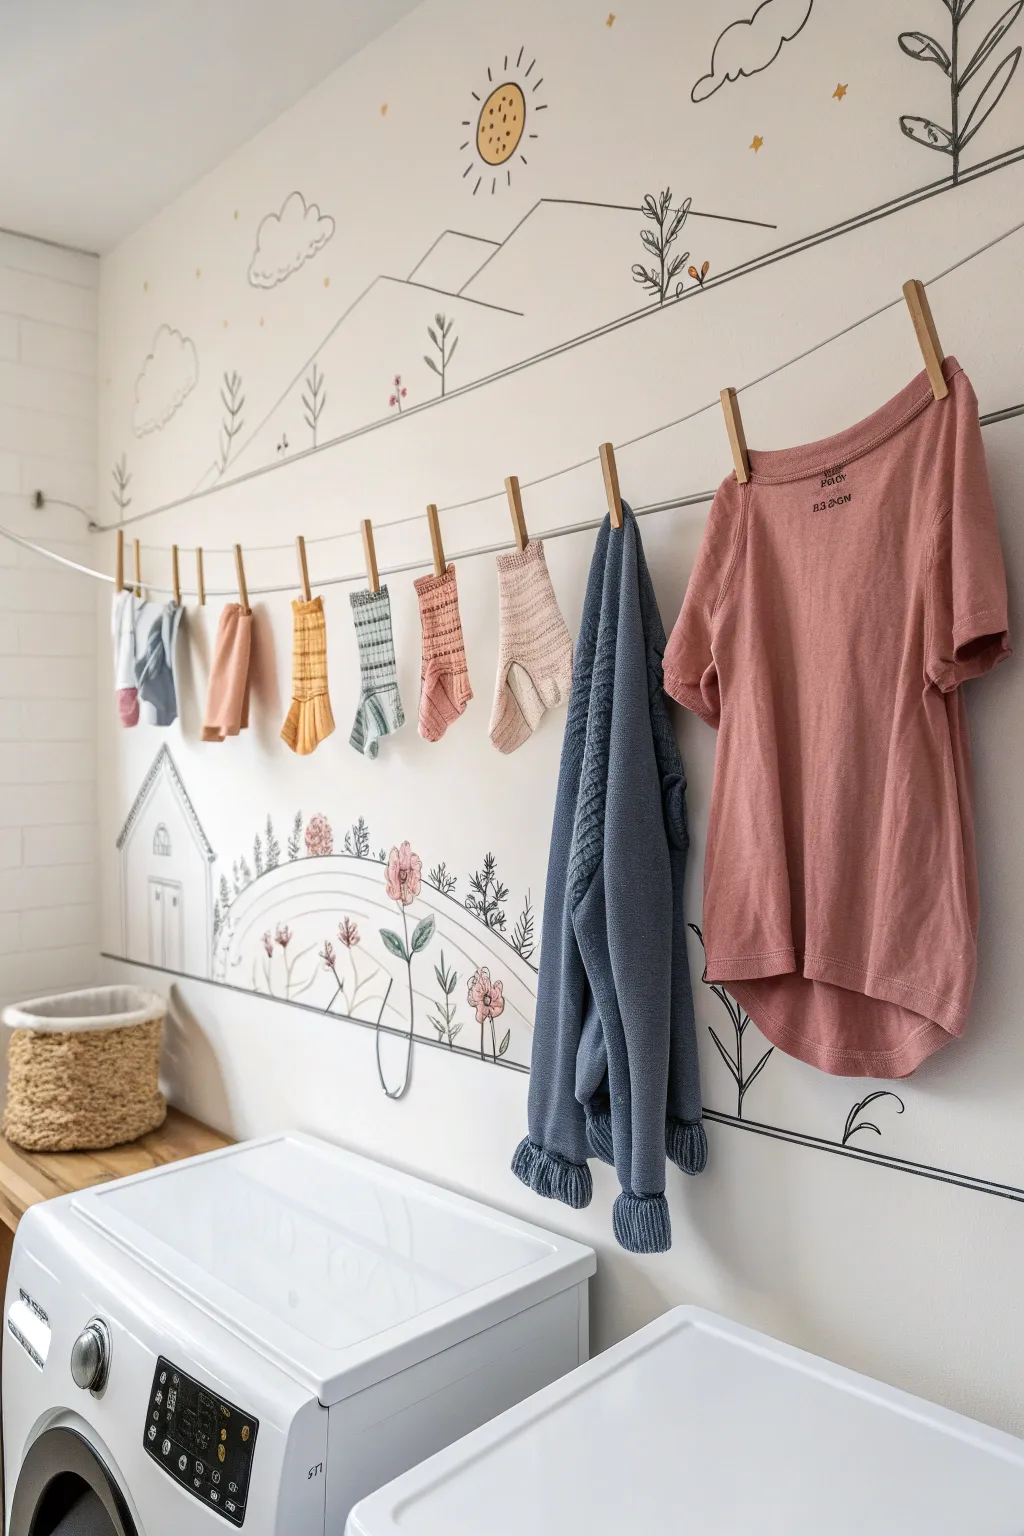
Sunny Citrus Grove Print
Bring the warmth of a Mediterranean summer into your laundry room with this vibrant citrus mural painting. The stylized leaves and textured oranges create a fresh, organic focal point that brightens up even the most mundane chores.
How-To Guide
Materials
- Large stretched canvas (36″ x 60″ or similar)
- Acrylic paints: Titanium White, Unbleached Titanium (cream), Sap Green, Hooker’s Green, Phthalo Green, Cadmium Orange, Cadmium Yellow Medium, Burnt Sienna
- Gesso (optional, for priming)
- Wide flat brush (2-3 inch)
- Medium round brush (size 6 or 8)
- Fine liner brush (size 0 or 1)
- Pencil and eraser
- Palette or paper plates
- Water cup and paper towels
Step 1: Preparation and Background
-
Prime the Surface:
If your canvas isn’t pre-primed, apply two coats of gesso, sanding lightly between coats for a smooth finish that takes detail well. -
Mix the Base Color:
Create a warm, creamy background shade by mixing Titanium White with a generous amount of Unbleached Titanium and a tiny dot of Burnt Sienna to knock back the brightness. -
Paint the Background:
Using the wide flat brush, cover the entire canvas with your cream mixture. Use long, even strokes to ensure full coverage, but don’t worry if subtle brush textures remain; they add character. -
Sketch the Composition:
Once the background is completely dry, lightly sketch the main winding stems with a pencil. Start from the bottom corners and let them meander upward, creating a natural, vine-like flow.
Uneven Coverage?
If your oranges lookstreaky, don’t keep brushing wet paint. Let the first layer dry completely, then apply a second coat. Yellows and oranges are naturally translucent pigments.
Step 2: Painting the Foliage
-
Placement of Leaves:
Sketch broad leaf shapes attached to your stems. Aim for variety—some clusters should be dense, others sparse, with leaves facing different directions to create movement. -
Mix Green Tones:
Prepare three green mixtures: a dark shadow green (Hooker’s Green + tiny bit of black or red), a mid-tone true green (Sap Green), and a lighter highlighting green (Sap Green + White). -
Block in Leaves:
Using your medium round brush, fill in the leaf shapes with your mid-tone green. Don’t worry about veins yet; just get the solid shapes established. -
Add Leaf Depth:
While the paint is still slightly tacky or just after drying, paint the halves of some leaves with the darker green to suggest shadows and folding. -
Connect the Stems:
Go back over your pencil lines for the stems using the dark green mix and a smaller brush, ensuring all floating leaves are firmly connected to the vine.
Step 3: Adding the Citrus
-
Outline the Fruit:
Pencil in circles and ovals for your oranges. Place them sporadically, often hanging heavily from the tips of branches or nestled in leaf crooks. -
Base Coat the Oranges:
Mix Cadmium Orange with a little Cadmium Yellow. Paint solid circles where you placed the fruit. You may need two coats for full opacity. -
Create Texture:
I find that stippling works best here. Take a clean brush with a slightly lighter orange mix and dab it repeatedly onto the fruit to create that pitted citrus skin texture. -
Add Shadows:
Mix a tiny bit of Burnt Sienna into your orange paint to create a shadow tone. Paint a crescent shape on the bottom/side of each fruit to give it roundness and weight. -
Highlight the Fruit:
Add a small dab or curve of pale yellow-orange on the upper side of each fruit where the light would naturally hit.
Make It Pop
Mix a tiny amount of metallic gold paint into your orange highlight color. It won’t look glittery, but it will catch the light beautifully and give the fruit a sun-kissed glow.
Step 4: Detailed Finish
-
Leaf Veining:
Using the fine liner brush and your darkest green (or even a dark teal mix), paint delicate central veins and branching capillaries on every leaf. -
Refine Edges:
Check the edges of your leaves and fruit. If the background paint needs touch-ups to crisp up lines, do that now with your small brush and leftover background cream paint. -
Add Stem Details:
Add tiny brown or dark green caps where the fruit connects to the stem (the calyx) to anchor the oranges physically to the plant. -
Final Assessment:
Step back about five feet to view the whole canvas. Add any final highlights or strengthen stems that look too thin from a distance.
Hang your new masterpiece in the laundry room to enjoy a permanent splash of sunshine while you fold
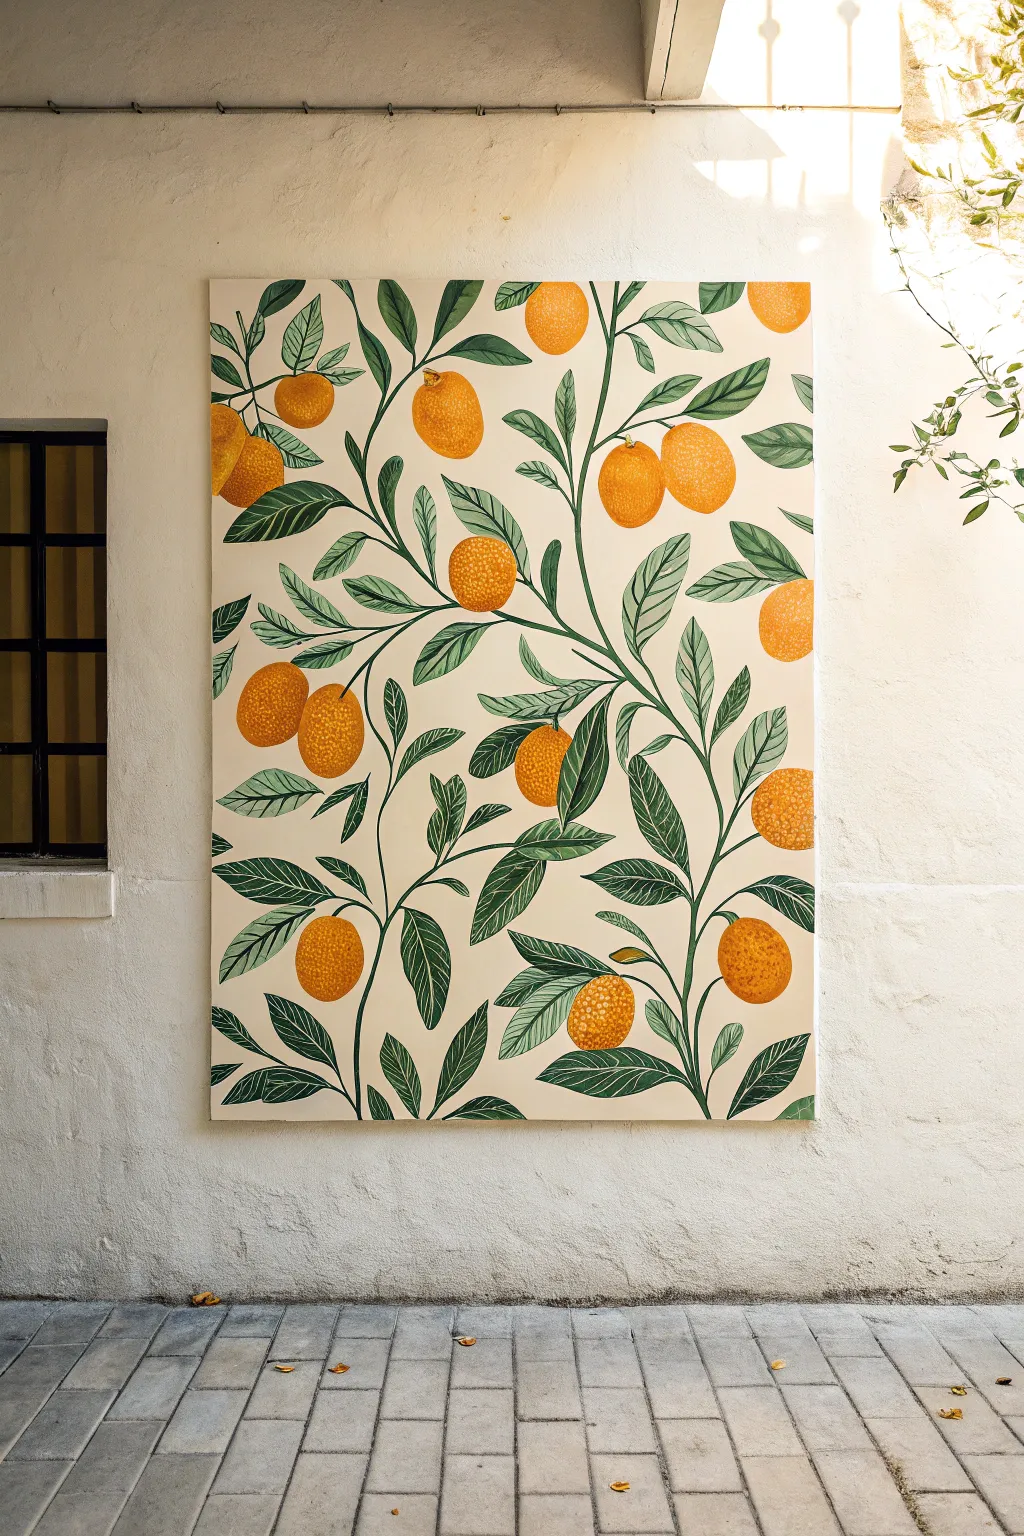
Classic Black-and-White Laundry Doodles
Transform a plain laundry room wall into a playful, oversized sketchbook with this graphic black-and-white grid mural. The design features charmingly imperfect squares containing simple, laundry-themed icons like hangers, baskets, and geometric shapes, creating a modern yet handmade aesthetic.
Step-by-Step
Materials
- White interior wall paint (satin or eggshell finish)
- Black paint marker (wide chisel tip)
- Black paint marker (medium round tip)
- Pencil
- Long level (24-inch or longer)
- Measuring tape
- Ladder or step stool
- Eraser (white vinyl is best)
- Sketch paper and pen for planning
- Painter’s tape (optional)
Step 1: Planning and Preparation
-
Prepare the Wall:
Ensure your base wall is clean and painted with a fresh coat of white paint if necessary. A satin or eggshell finish provides a smooth surface that allows the paint markers to glide easily without bleeding too much. -
Map Out the Grid:
Measure the total width and height of your wall to determine the best size for your squares. For the look in the photo, squares appear to be roughly 12 to 14 inches wide. Calculate how many columns and rows will fit evenly. -
Sketch Icon Ideas:
Before touching the wall, grab a sketchbook and brainstorm simple laundry doodles. Think hangers, t-shirts, socks, irons, clothespins, stars, and abstract shapes. Create a ‘library’ of about 15-20 designs you can repeat or rotate.
Ink Flow Pro Tip
Store paint markers horizontally when not in use. If the ink flows too fast on the vertical wall, press the tip on a piece of cardboard first to unload excess paint.
Step 2: Drawing the Grid
-
Mark Grid Points:
Using your measuring tape and pencil, lightly mark the corners of your squares across the wall. Start from the center and work outward to ensure the partial squares at the edges are symmetrical. -
Draw Vertical Lines:
Use a long level to draw light pencil guidelines connecting your vertical marks from floor to ceiling. Keep the pressure very light so the graphite doesn’t smudge later. -
Draw Horizontal Lines:
Connect your horizontal marks using the level. You should now have a faint pencil grid covering the entire wall. -
Trace Grid with Marker:
Take your wide chisel-tip black paint marker and trace over your pencil grid lines. Don’t worry about using a straightedge here; a slightly wobbly, hand-drawn line adds to the charm giving it that ‘doodled’ notebook feel. -
Add Dashed Accents:
For visual variety, trace some grid lines as dashed lines rather than solid ones. I like to do this randomly or at specific intersections to break up the rigidity of the grid.
Step 3: Adding the Illustrations
-
Draft Icons in Pencil:
Lightly sketch your chosen icons into the squares using pencil. Alternate between bold shapes (like a filled-in star) and linear drawings (like a hanger) to balance the visual weight across the wall. -
Outline Main Shapes:
Use the medium round-tip paint marker to trace your pencil sketches. Start with the simpler shapes like the lightning bolts and hangers to get comfortable with the ink flow on the vertical surface. -
Fill in Solid Areas:
Switch back to the wider chisel-tip marker to fill in larger dark areas, such as the solid stars or thick stripes on the shirt icons. Work slowly to ensure solid, opaque coverage. -
Add Fine Details:
Use the finer edge of your marker to add small details, like the ‘stitching’ lines on pockets, buttons on shirts, or the tiny bubbles around a soap bottle icon. -
Incorporate Text:
If you wish, add small hand-lettered words like ‘CLEAN’ or ‘WASH’ in a loose, handwritten font underneath a few icons, just as seen under the star in the example.
Level Up: 3D Elements
Install simple black hooks or a towel bar directly over the mural at specific grid intersections to make the art functional and interactive.
Step 4: Finishing Touches
-
Embellish Intersections:
At the corners where grid lines meet, add tiny decorative flares—like small ‘x’ marks, dots, or mini starbursts—to enhance the notebook doodle vibe. -
Let Ink Cure:
Allow the paint marker ink to dry completely for at least 24 hours. Oil-based markers can take a bit of time to fully set on wall paint. -
Erase Pencil Marks:
Gently erase any visible pencil guidelines. Be careful around the black ink; make sure it is totally dry to avoid smearing gray graphite into your crisp white background. -
Touch Up:
Step back and look for any uneven lines or spots where the black isn’t opaque enough. Do a final pass with your markers to perfect the contrast.
Now you have a custom, playful backdrop that makes laundry day feel a little more creative

PENCIL GUIDE
Understanding Pencil Grades from H to B
From first sketch to finished drawing — learn pencil grades, line control, and shading techniques.
Explore the Full Guide
Sky Ceiling With Floating Clouds
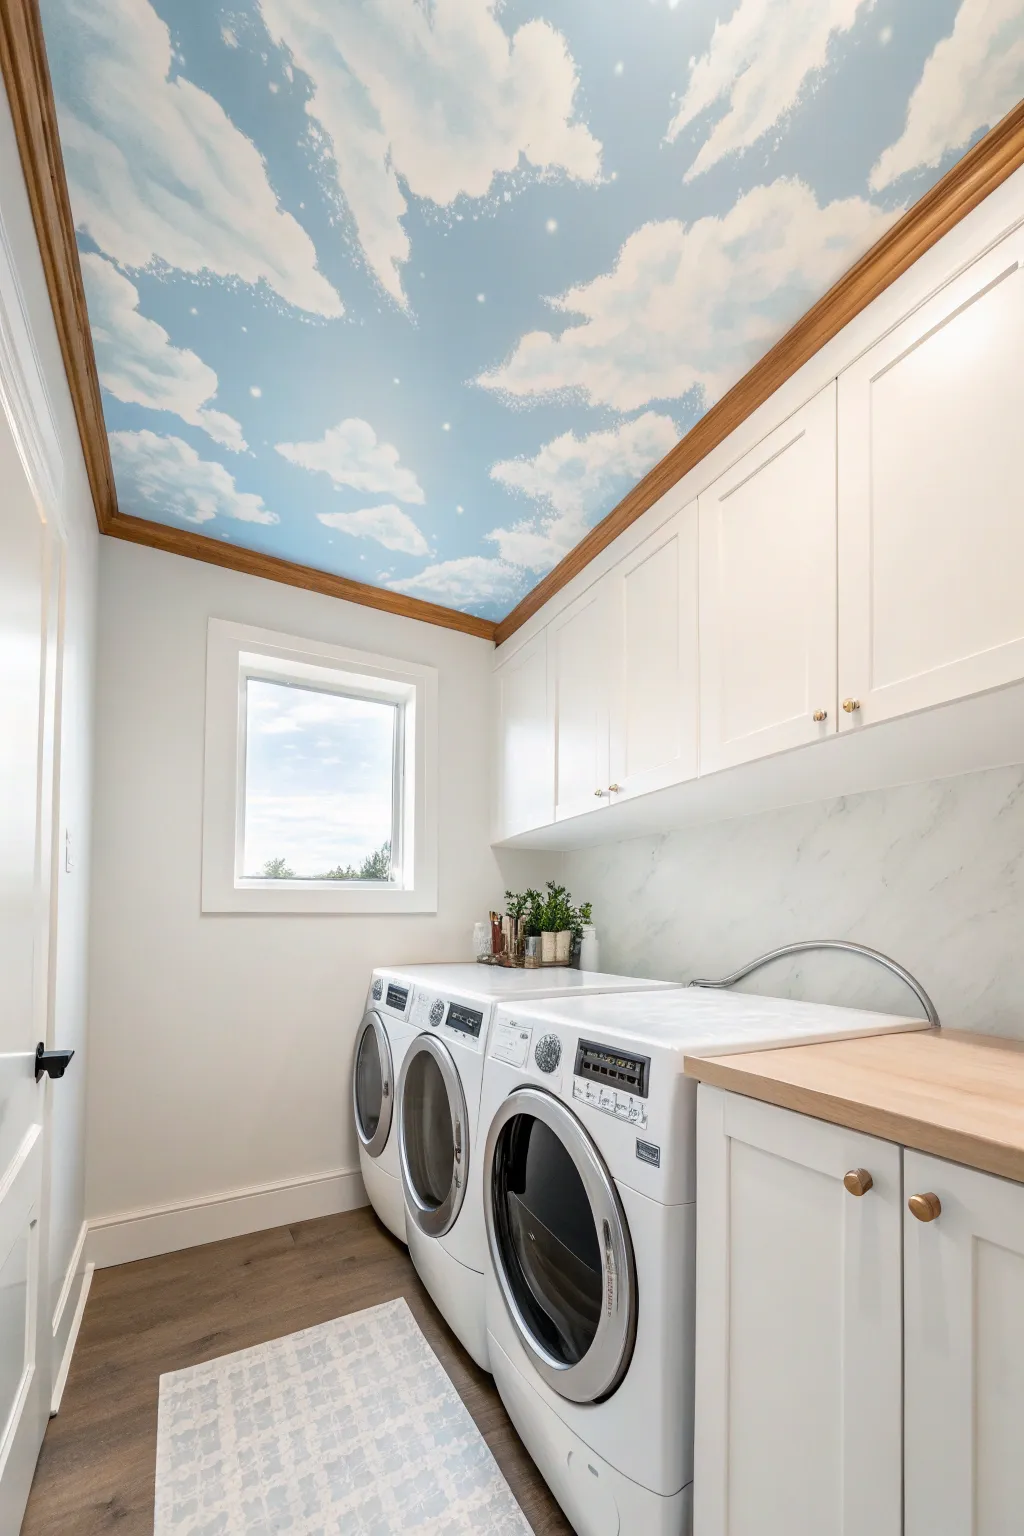
Transform a mundane laundry room ceiling into a bright, airy escape with this trompe-l’oeil sky mural. By layering soft blues and fluffy whites, you’ll create the illusion of an endless summer day right inside your home.
Detailed Instructions
Materials
- Interior latex paint (sky blue satin finish)
- Interior latex paint (bright white flat or eggshell finish)
- Acrylic glaze liquid
- Silver iridescent paint or metallic additive
- Good quality painter’s tape (blue or green)
- Drop cloths
- Paint roller and extension pole
- Large sea sponge or specialized wool sponge
- Assorted soft bristle brushes (2-3 inch for blending)
- Small artist detail brush
- Clean rags
- Ladder
- Mixing tray and liners
Step 1: Preparation and Base Coat
-
Clear and Protect:
Remove any light fixtures or smoke detectors from the ceiling. Cover the washer, dryer, countertops, and floor completely with drop cloths to protect them from overhead drips. -
Tape the Perimeter:
Apply painter’s tape carefully along the top edge of the wooden crown molding or wall trim. Press the edges down firmly to prevent paint bleed. -
Cut In the Edges:
Using an angled sash brush, cut in the perimeter of the ceiling with your chosen sky blue base color, extending out about 3 inches from the trim. -
Roll the Base:
Use a roller on an extension pole to paint the entire rest of the ceiling with the sky blue. Apply two coats if necessary to ensure a solid, even color without streaks. -
Let it Dry:
Allow the blue base coat to dry completely overnight before starting any cloud work.
Step 2: Creating the Clouds
-
Mix the Cloud Glaze:
In a mixing tray, combine one part white paint with four parts acrylic glaze. This translucency is key for creating depth rather than flat white blobs. -
Sponge the First Shapes:
Dampen your sea sponge and dip it lightly into the glaze mixture. Blot excess onto a paper towel, then lightly dab organic, irregular cloud shapes onto the ceiling. -
Establish Flow:
I like to work diagonally across the ceiling to mimic wind direction. group your cloud clusters so they drift naturally rather than spotting them evenly like polka dots. -
Soften the Edges:
While the glaze is still wet, take a dry soft-bristled brush and gently whisk the edges of your sponged shapes to blur them into the blue background. -
Build the Brights:
Dip a smaller section of the sponge into undiluted white paint. Dab this onto the ‘upper’ edges of your cloud shapes to simulate sunlight hitting the tops. -
Blend the Highlights:
Use a clean softening brush to feather the bright white down into the glazed body of the cloud, creating a smooth transition from bright top to hazy bottom. -
Connect the Shapes:
Use very faint, almost dry-brush strokes of glaze to create wisps connecting larger cloud formations, adding realism.
Too Heavy-Handed?
If a cloud becomes too opaque or blob-like, don’t panic. While it’s wet, dab it with a clean, damp rag to lift the paint, or let it dry and wash over it with a thinned layer of the blue base color.
Step 3: Adding the Sparkle Details
-
Mix the Star Paint:
Pour a small amount of silver iridescent paint onto a plate or palette. If it’s too thick, thin it slightly with water. -
Plot the Stars:
Identify open patches of blue sky between the clouds where you want to add magical glimmer. -
Paint Small Glints:
Using your smallest artist brush, paint tiny four-point stars or simple dots in the open blue areas. Keep them random and sparse. -
Highlight Cloud Edges:
Very lightly dragging the side of a brush with the metallic paint along the absolute brightest white crests of the clouds adds a subtle sun-kissed shimmer. -
Final Inspection:
Step down from the ladder and view the ceiling from the doorway. If any clouds look too heavy, lightly dry-brush a little blue base color over them to push them back. -
Clean Up:
Once the paint is dry to the touch, slowly peel away the painter’s tape at a 45-degree angle to reveal crisp lines against the dark wood trim.
Pro Tip: Perspective
Make clouds larger closer to your main viewing point (the door) and slightly smaller on the far side of the room. This trick of perspective makes the ceiling feel higher.
Enjoy the breezy, open atmosphere this ceiling brings to your laundry space
Terrazzo-Style Confetti Wall
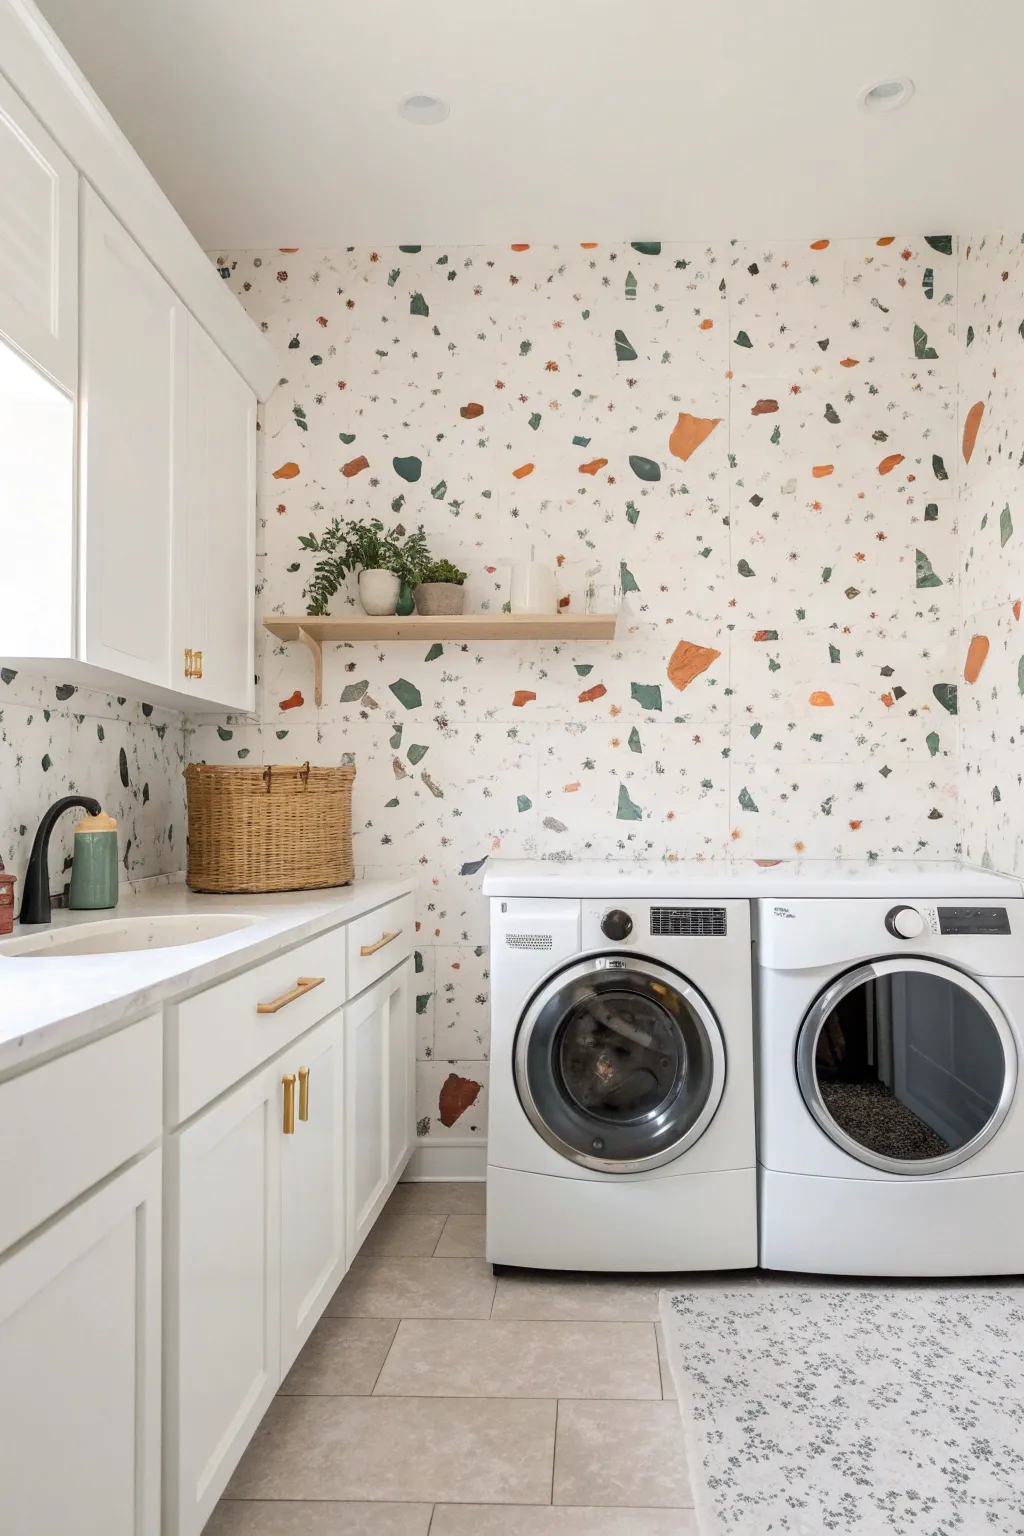
Transform a plain laundry room into a vibrant, modern space with this hand-painted terrazzo mural. The playful, confetti-like pattern adds energy and warmth using earthy tones of terracotta and sage green against a crisp white background.
Step-by-Step Guide
Materials
- White latex wall paint (eggshell or satin finish)
- Orange-terracotta acrylic or latex paint
- Dark forest green acrylic or latex paint
- Sage green acrylic or latex paint
- Small flat artist brushes (1/2 inch to 1 inch)
- Small angular sash brush
- Painter’s tape
- Drop cloths
- Small roller and tray (for base coat)
- Pencil
- Paint mixing palette or small disposable cups
- Clean rags or paper towels
Step 1: Preparation & Base Coat
-
Clear and protect:
Remove any existing shelving, artwork, or outlet covers from the walls. Pull the washer and dryer away from the wall if possible, or cover them thoroughly with drop cloths to protect them from splatters. -
Prep the surface:
Wipe down the walls with a damp cloth to remove dust and lint, which is common in laundry rooms. Patch any holes with spackle and sand smooth once dry. -
Apply the base color:
Roll on two coats of fresh white paint to create a clean, bright canvas. An eggshell or satin finish works best here as it’s durable enough for a utility space but not too shiny. Allow the paint to cure fully overnight before starting the pattern.
Shape Variety
Don’t overthink the shapes! Real terrazzo is random. Mix sharp triangles with soft, rounded pebbles and jagged shards to make the texture look authentic.
Step 2: Painting the Terrazzo Shapes
-
Plan your palette:
Pour small amounts of your terracotta, forest green, and sage green paints into small cups. You want these colors easily accessible as you’ll be switching between them frequently. -
Start with the largest shapes:
Beginning with the terracotta orange, paint random, uneven shard-like shapes across the wall. Use a small flat artist brush to create varied forms—some triangular, some roughly rectangular, and some just organic blobs. -
Vary the spacing:
Keep the large orange shapes spread out significantly. Avoid clustering them; you want plenty of ‘breathing room’ for the other colors and the smaller confetti pieces. -
Add the dark green accents:
Switch to your dark forest green paint. Create shapes similar in size to the orange ones, but rotate your brush strokes so they angle differently. I like to place these in the larger gaps left by the first color. -
Introduce the sage mid-tones:
Using the sage green, add a third layer of medium-sized shapes. These should be scattered casually to bridge the gap between the bold orange and the dark green. -
Step back and assess:
Frequently step back about five feet from the wall to look for bald spots or areas that look too heavy. The beauty of terrazzo is its random distribution, but it still needs a sense of balance.
Metallic Pop
For a luxe twist, add a fourth color of metallic gold or copper paint. Add just a few tiny flecks sparingly to catch the light without overwhelming the design.
Step 3: Adding Detail & Confetti
-
Create the confetti effect:
Now, go back to your orange paint with a smaller brush. Dab tiny, irregular flecks and dots around the larger shapes. These mimic the smaller aggregate found in real terrazzo. -
Layer small green flecks:
Repeat the previous step with the dark green paint. Add tiny specks, sometimes quite close to the orange shapes but not touching them. This creates visual density. -
Finish with sage micro-details:
Finally, sprinkle in the smallest sage green dots. These tiny marks help soften the contrast between the white background and the darker main shapes. -
Refine the edges:
Inspect your shapes up close. If any look too perfectly round or brush-stroked, use a slightly damp brush to gently push the wet paint into sharper, more jagged edges for a realistic stone-chip look. -
Check corners and edges:
Ensure the pattern flows naturally into corners and right up to the ceiling line. Paint half-shapes at the edges where the wall meets the ceiling or adjacent walls to make the pattern feel continuous like wallpaper.
Step 4: Finishing Touches
-
Dry and cure:
Allow the pattern paint to dry completely for at least 24 hours. Acrylic art paints dry quickly, but latex house paint takes longer to cure hard. -
Reinstall fixtures:
Once the paint is fully dry, reinstall your floating shelf and move the washer and dryer back into place. -
Style the space:
Add potted plants (real or faux) to the shelf to echo the green tones in the wall, and place a woven basket nearby to complement the warm terracotta hues.
Enjoy your fresh, energetic laundry room that turns a chore space into a creative retreat


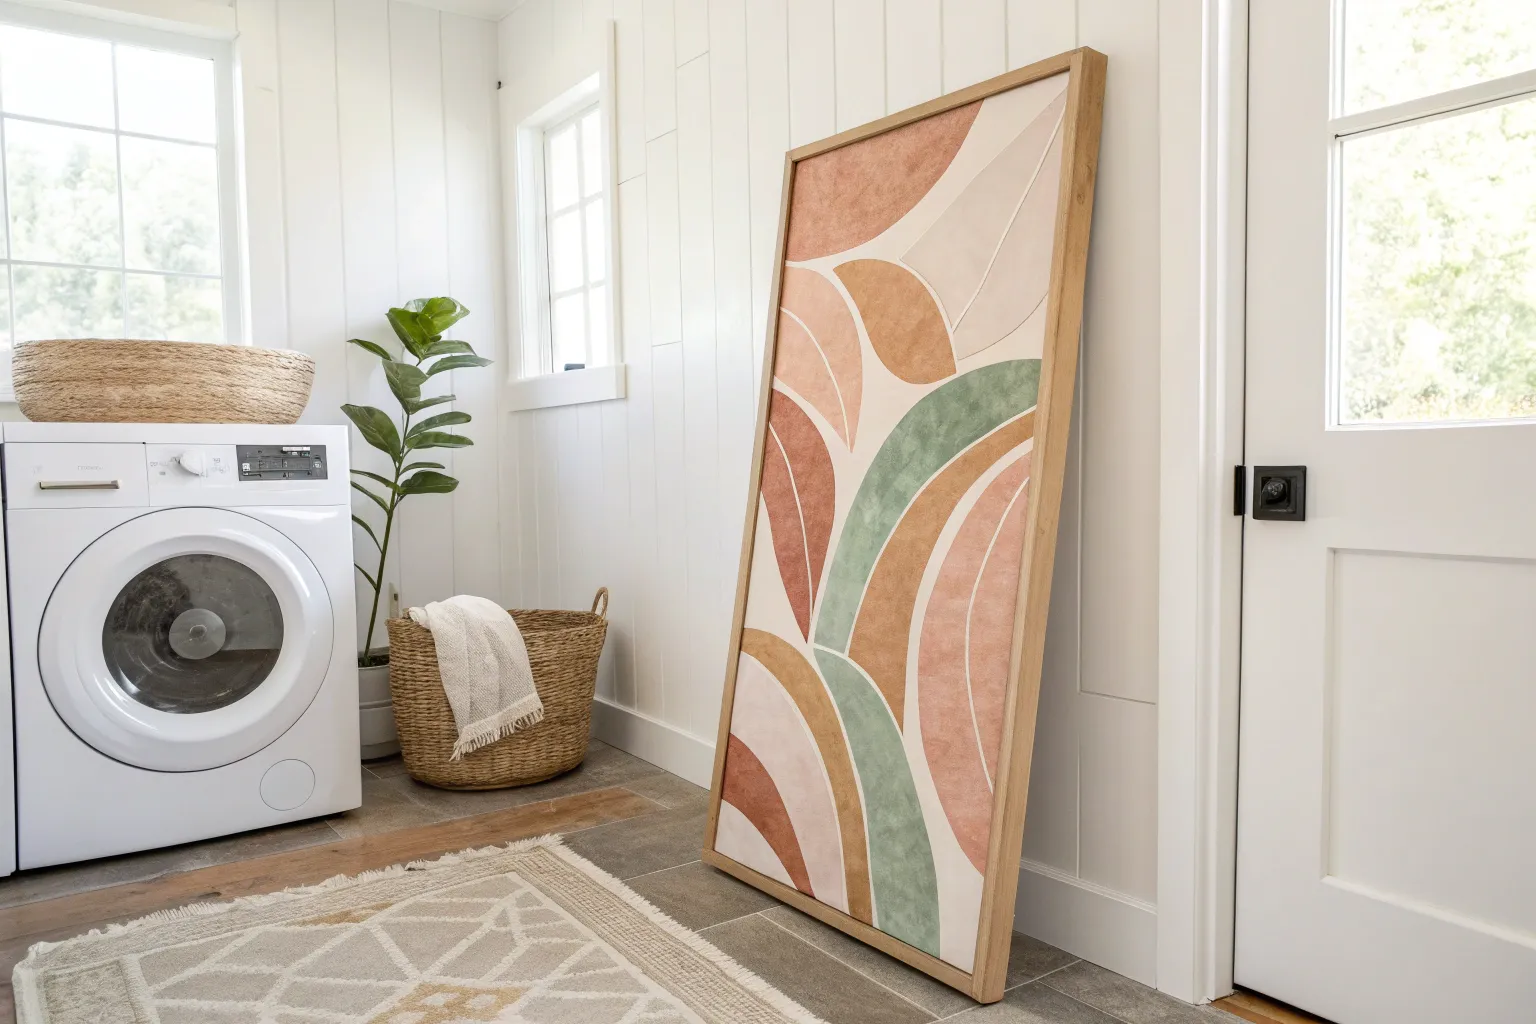
Minimal Geometric Blocks Behind Machines
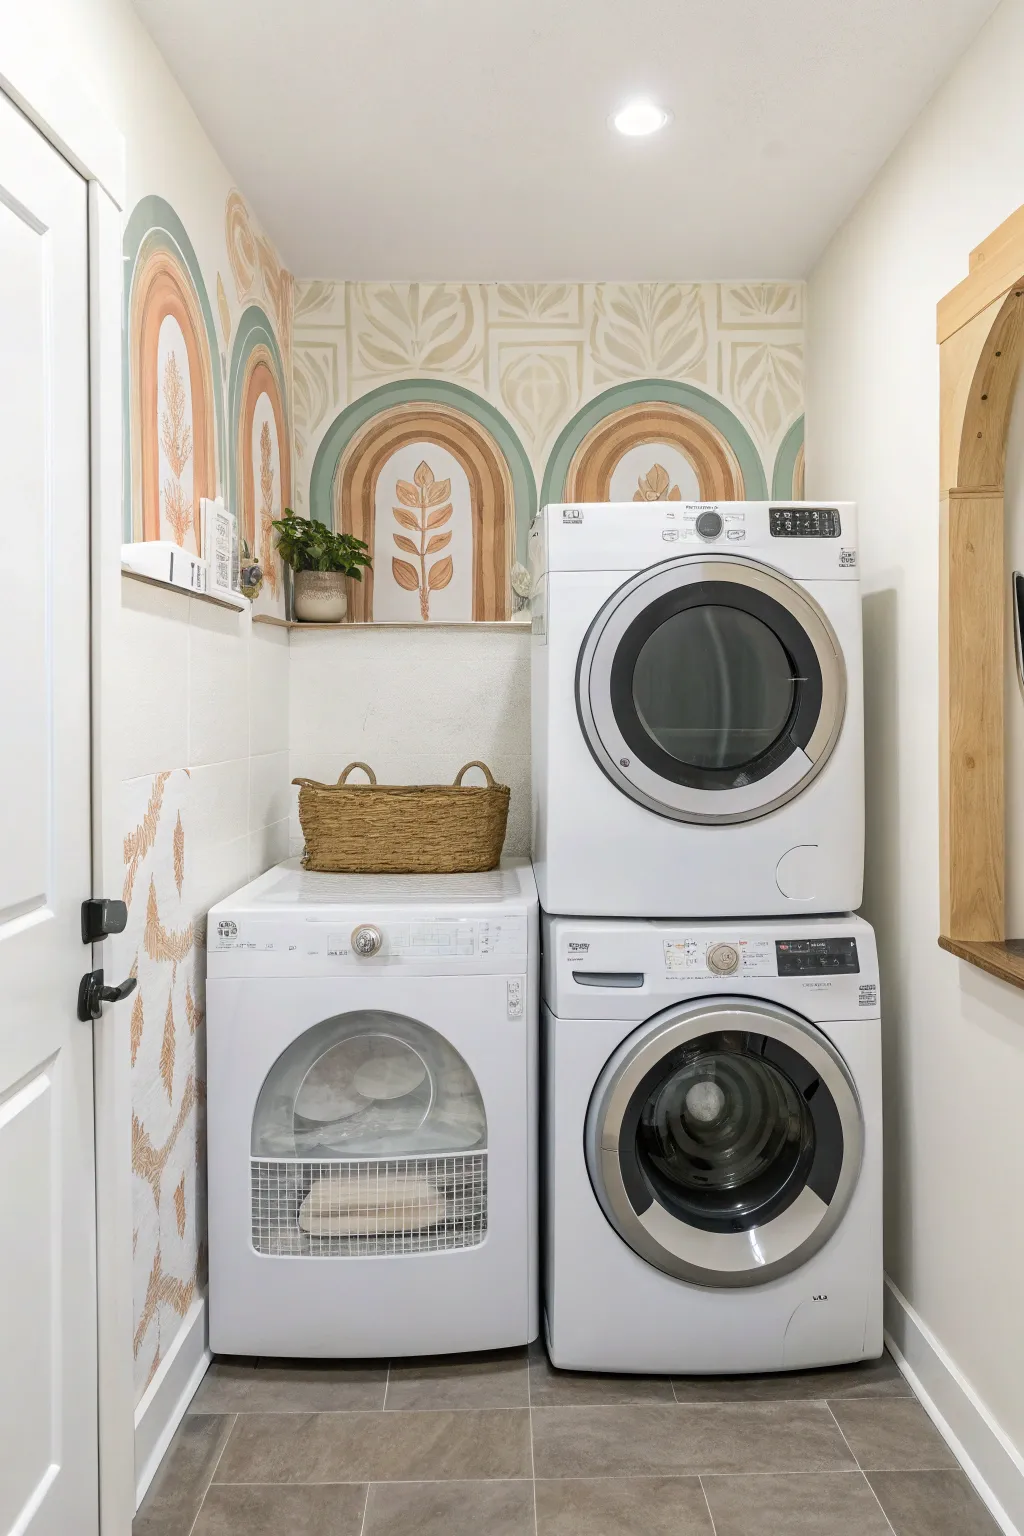
Transform a utilitarian laundry space into a serene retreat with this earthy, arch-motif mural. Featuring soft sage greens, terracotta oranges, and organic leaf patterns, this project adds warmth and personality behind your machines.
How-To Guide
Materials
- Latex interior wall paint (White/Cream base)
- Sample pots of latex paint (Sage green, Terracotta, Mustard yellow, Beige)
- Painter’s tape (multi-surface)
- Pencil
- String and thumb tack (for drawing arches)
- Large level (2-4 ft)
- Small angled sash brush (1.5 – 2 inch)
- Small foam roller and tray
- Fine detail artist brushes (Round #4 and #6)
- Cardstock or stencil film (optional for repetitive patterns)
- Drop cloth
Step 1: Preparation & Layout
-
Clear and clean:
Begin by moving your washer and dryer out of the way to access the full wall. Clean the wall surface thoroughly with mild soap and water to remove any dust or lint, ensuring a pristine canvas for your paint. -
Base coat application:
If your wall isn’t already a fresh white or cream, roll on a coat of your base color. This neutral background is crucial for the muted earth tones to pop correctly. Let this dry completely, preferably overnight. -
Mark the center lines:
Determine how many arches you want. In the image, there are three distinct arch zones. Use a level and pencil to lightly draw a vertical centerline for each intended arch. Spacing them evenly is key for a balanced look. -
Draw the arches:
Create a simple compass by tying a piece of string to a pencil. Pin the other end of the string to your centerline at the point where the straight sides of the arch should transition into the curve. Keep the string taut and swing the pencil to draw perfect semi-circles. Adjust the string length to draw the concentric inner and outer lines for the rainbow effect. -
Extend the legs:
Use your large level to draw straight vertical lines down from the ends of your semi-circles to the floor (or to the shelf line, if you have wainscoting). This completes the arch shapes.
Pro Tip: Steady Hand Hack
Mix a tiny amount of calm-drying ‘glaze medium’ or water into your latex paint for the detail work. It improves flow, making it easier to drag long, smooth lines for stems and arch curves.
Step 2: Painting the Arches
-
Tape the edges:
For crisp lines on the straight vertical sections, apply painter’s tape along your pencil marks. Press the edges down firmly to prevent bleed. -
Cutting in the curves:
Since you can’t tape the curves easily, use your small angled sash brush to carefully hand-paint the curved tops of the arches. I find that holding the brush like a pencil and using my pinky as a stabilizer against the wall helps keep my hand steady. -
Fill in the bands:
Paint the first band of the arch in sage green, the middle in terracotta, and the inner accents in mustard or beige. Work on one color at a time across all arches to ensure consistency. Use the small foam roller for the straight vertical sections to get a smooth, brush-stroke-free finish. -
Remove tape and touch up:
Peel off the tape while the paint is still slightly tacky to avoid pulling up any dried film. Once dry, use a small artist brush to touch up any festive little slips or uneven edges.
Step 3: Adding Botanical Details
-
Sketch the central stems:
Inside the smallest, central arch space, lightly sketch a vertical line for the main stem of your botanical motif. Then, sketch the leaf shapes branching off symmetrically. -
Paint the inner leaves:
Using a #6 round artist brush and your terracotta or golden-brown paint, fill in the leaf shapes. Use a ‘press and lift’ motion: press the belly of the brush down for the wide part of the leaf and lift up as you reach the tip. -
Add vein details:
Once the solid leaf shapes are dry, mix a slightly lighter version of your leaf color (add a drop of white paint). Use the #4 fine brush to paint a thin central vein and smaller branching veins on each leaf for dimension. -
Create the background pattern stencil:
To recreate the subtle, stylized leaf pattern seen in the beige background areas, draw a simple abstract leaf shape on cardstock and cut it out. This ensures your repetitive background pattern stays uniform. -
Paint the background pattern:
Mix a very subtle beige or off-white color—it should be just a shade or two darker than your wall color. Use your stencil to trace or guide your painting in the negative spaces around and above the arches. Fill these in with a flat brush for a ‘block print’ look. -
Final inspection:
Step back and look at the mural as a whole. Check for any patchy areas that need a second coat, especially with the lighter colors which can sometimes be translucent. Erase any visible pencil marks gently.
Level Up: Texture Play
Instead of flat paint for the inner botanical leaves, use a metallic gold or copper acrylic paint. It will catch the light and add a surprising shimmer to your laundry routine.
Slide your machines back into place and enjoy a view that makes laundry day feel a little less like a chore
Hand-Lettered Laundry Routine Mural
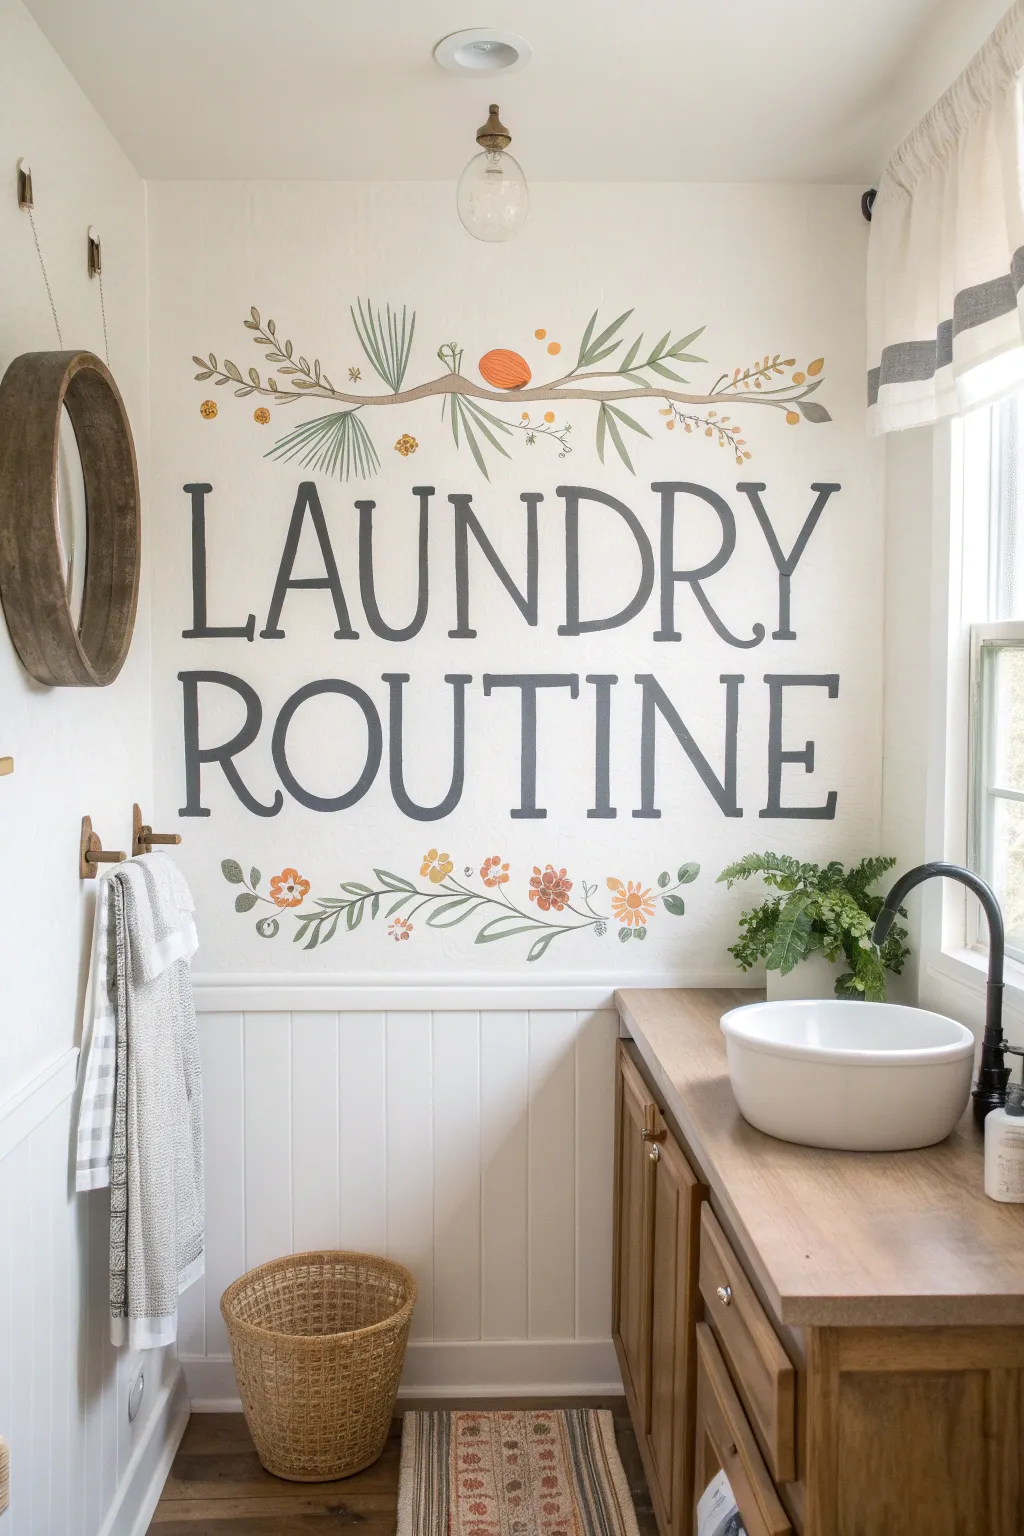
Transform a blank laundry room wall into a charming focal point with this hand-lettered text and botanical mural. The design balances bold, classic typography with delicate watercolor-style sprigs for a look that feels both vintage and fresh.
Step-by-Step Guide
Materials
- Latex wall paint (white or cream for base)
- Acrylic craft paints (dark grey, sage green, olive green, muted orange, burnt yellow, brown)
- Pencil
- Large eraser
- Level and measuring tape
- Printer and paper (for stencils)
- Painter’s tape
- Small flat brush (for lettering)
- Round detail brushes (sizes 2 and 4)
- Filbert brush (optional, for leaves)
Step 1: Planning and Layout
-
Prepare the Surface:
Begin with a clean, dry wall. If your wall has a heavy texture, sanding it lightly can help your brush strokes glide more smoothly, but for standard orange peel texture, a good clean is sufficient. Apply a fresh coat of creamy white base paint if needed to make the artwork pop. -
Define the Workspace:
Measure the width of your wall to find the exact center point. Mark this lightly with a pencil at the height where you want the middle of your mural to sit. -
Create Guidelines:
Using a level and a long ruler, draw two horizontal baselines across the wall where the bottom of the words ‘LAUNDRY’ and ‘ROUTINE’ will rest. Space them about 4-6 inches apart to allow the text to breathe. -
Draft the Text:
You can freehand the letters if you are confident, but for precision, print out the words in a serif font like Times New Roman or Garamond at a large scale. Tape the papers to the wall to check spacing. -
Transfer the Design:
Use the graphite transfer method: rub pencil all over the back of your printed papers, tape them back in place, and trace the outline of the letters firmly. This leaves a faint pencil guide on the wall.
Steady Your Hand
Use a mahl stick or simply rest your pinky finger against the wall as a pivot point. This stabilizes your hand while painting long straight lines or fine details.
Step 2: Lettering
-
Outline the Letters:
Load a small flat brush with dark grey acrylic paint. A pure black can be too harsh, so a charcoal or dark slate grey softens the look. Carefully paint the perimeter of each letter, keeping your hand steady. -
Fill in the Forms:
Once the outlines are established, fill in the centers of the thick downstrokes. I find using a slightly larger flat brush here speeds up the process and provides smoother coverage. -
Refine the Serifs:
Switch to your smallest round brush to sharpen the serifs (the little feet) and thin cross-strokes of the letters. Crisp corners make the mural look professional. -
Double Check:
Step back about five feet to look for any uneven edges or translucent spots. Apply a second coat to any areas that look patchy.
Uneven Texture?
If painting on a textured wall results in bleeding edges, use a tiny artist brush to touch up the background color around the letters for crisp, sharp lines.
Step 3: Botanical Details
-
Sketch the Branches:
Lightly sketch a curved, bowing branch above the word ‘LAUNDRY’ and a gentle, upward-curving vine below ‘ROUTINE’. Ensure they are roughly symmetrical but retain an organic feel. -
Paint the Main Stems:
Mix a soft brown with a touch of grey. Using a round brush, paint the main branch structure. Vary the pressure on your brush to create thick and thin sections, mimicking natural wood. -
Add Needle Clusters:
For the pine-style greenery at the top, use a thin liner brush and sage green paint. Use quick, flicking motions upward and outward to create clusters of fine needles. -
Paint Broad Leaves:
Using an olive green, add the broader, flatter leaves. Press the belly of a round brush down and lift as you pull away to create a tapered leaf shape naturally. -
Add Floral Accents:
Mix muted orange and burnt yellow paints. Dot small clusters along the bottom vine to create stylized flowers. Keep the paint somewhat watery for a softer, watercolor-like effect. -
Detail the Flowers:
Once the flower blobs are dry, use a tiny amount of white or dark brown to add centers or simple petal definitions. Keep this loose and illustrative rather than realistic. -
Final Touches:
Add tiny berries or buds using the tip of your smallest brush in contrasting colors like rust or mustard yellow to fill any empty visual gaps.
Step 4: Cleanup
-
Erase Guide Lines:
Allow the paint to cure for at least 24 hours. Gently erase any visible pencil lines, being careful not to rub vigorously over the fresh paint. -
Protect the Work:
If your laundry room gets very humid, consider applying a coat of clear matte water-based sealer over the mural to protect it from moisture.
Step back and admire how this custom artwork brings personality and warmth to your daily chores.
Trompe l’Oeil Tile Illusion

Transform plain drywall into a stunning, high-gloss tiled sanctuary without laying a single ceramic square. This trompe l’oeil mural uses clever taping and glaze techniques to mimic the depth, sheen, and irregularities of handmade subway tiles.
How-To Guide
Materials
- High-quality painter’s tape (1/4 inch width)
- Painter’s tape (1 inch width)
- Laser level or long spirit level
- Pencil
- Base wall paint (white or off-white eggshell)
- Satin or semi-gloss latex paint (deep royal blue)
- Satin or semi-gloss latex paint (crisp white)
- Clear high-gloss acrylic topcoat or polyurethane
- Small angled sash brush
- 4-inch foam roller
- Artist liner brush (size 1 or 2)
- Dark grey glazing liquid or translucent paint (for grout detail)
- Sea sponge or rag (optional for texture)
Step 1: Preparation & Mapping
-
Base Coat Application:
Begin by painting the entire wall surface with your chosen ‘grout’ color. In this design, a clean off-white eggshell works perfectly as the foundation since it will peek through as the grout lines later. -
Measure the Grid:
Once the base is fully cured (give it at least 24 hours), determine your tile size. A classic subway tile is often 3×6 inches, but a slightly larger 4×8 inch scale feels modern and allows for easier painting. -
Mark Horizontal Lines:
Set up your laser level to project horizontal guide lines up the wall. Using a pencil, lightly mark the horizontal intervals tailored to your chosen tile height. -
Apply Horizontal Tape:
Run long strips of 1/4-inch painter’s tape across the wall over your pencil marks. Press the edges firmly to seal them to prevent paint bleed. -
Mark Vertical Offsets:
For the classic running bond pattern, you need staggered vertical lines. Mark the vertical grout lines, ensuring every other row aligns perfectly with the one two rows above it. -
Apply Vertical Tape:
Place short vertical strips of the 1/4-inch tape between the horizontal lines. Be sure to cut these cleanly so they don’t overlap messy onto the horizontal tape, keeping the intersections sharp. -
Define the Wainscoting:
Decide on the height of your blue wainscoting section. Apply a strip of wider 1-inch tape directly above the top row of blue ’tiles’ to separate the upper white section from the lower blue section.
Insider Secret
Don’t aim for perfection with the gloss coat. Natural brush strokes or roller texture in the clear coat actually mimics the surface waviness of hand-fired artisan tiles.
Step 2: Painting the Tiles
-
Seal the Tape:
Lightly brush a small amount of your base grout color over the tape edges. This clever trick seals the tape so any seepage is the same color as the grout, keeping your final lines crisp. -
Paint the Blue Section:
Using a 4-inch foam roller, apply the deep royal blue paint to the lower section. Work in small sections to maintain a wet edge. -
Add Subtle Variation:
While the blue paint is still wet, I like to lightly dab a few random tiles with a slightly lighter or darker blue mix using a rag. This creates the ‘handmade’ glaze variation seen in artisanal tiles. -
Paint the White Section:
Clean your roller or grab a fresh one, then apply the crisp white satin paint to the upper section of the wall. -
Second Coats:
Depending on the opacity of your paint, apply a second coat to both sections to ensure rich, solid color coverage. -
The Decorative Border:
For the decorative listello band between colors, hand-paint small circle or arch motifs using an artist liner brush. Keep the design simple, mimicking the repeating pattern of a ceramic border tile.
Step 3: Finishing Touches
-
Remove the Tape:
Carefully peel off all the tape while the paint is slightly tacky but not fully wet. Pull the tape at a 45-degree angle away from the paint edge. -
Faking shadows:
To enhance the 3D effect, mix a very dilute dark grey glaze. Use a tiny liner brush to paint a thin shadow line along the bottom and right side of each ’tile’ inside the grout line. -
Faking Highlights:
Conversely, paint a very fine, translucent white line along the top and left side of the blue tiles. This push-pull of shadow and highlight creates the bevel illusion. -
Gloss Topcoat:
This is crucial for the ceramic look. Roll a coat of clear high-gloss acrylic over the entire painted area. The shine reflects light just like real glazed ceramic.
Level Up: Aged Grout
Instead of stark white grout lines, follow up by brushing an antiquing glaze into the gaps and wiping it back immediately. This gives the ‘grout’ a lived-in, historic look.
Step back and admire how a flat surface has been transformed into a dimensional, architectural feature
Vintage Wash-Day Poster Collage
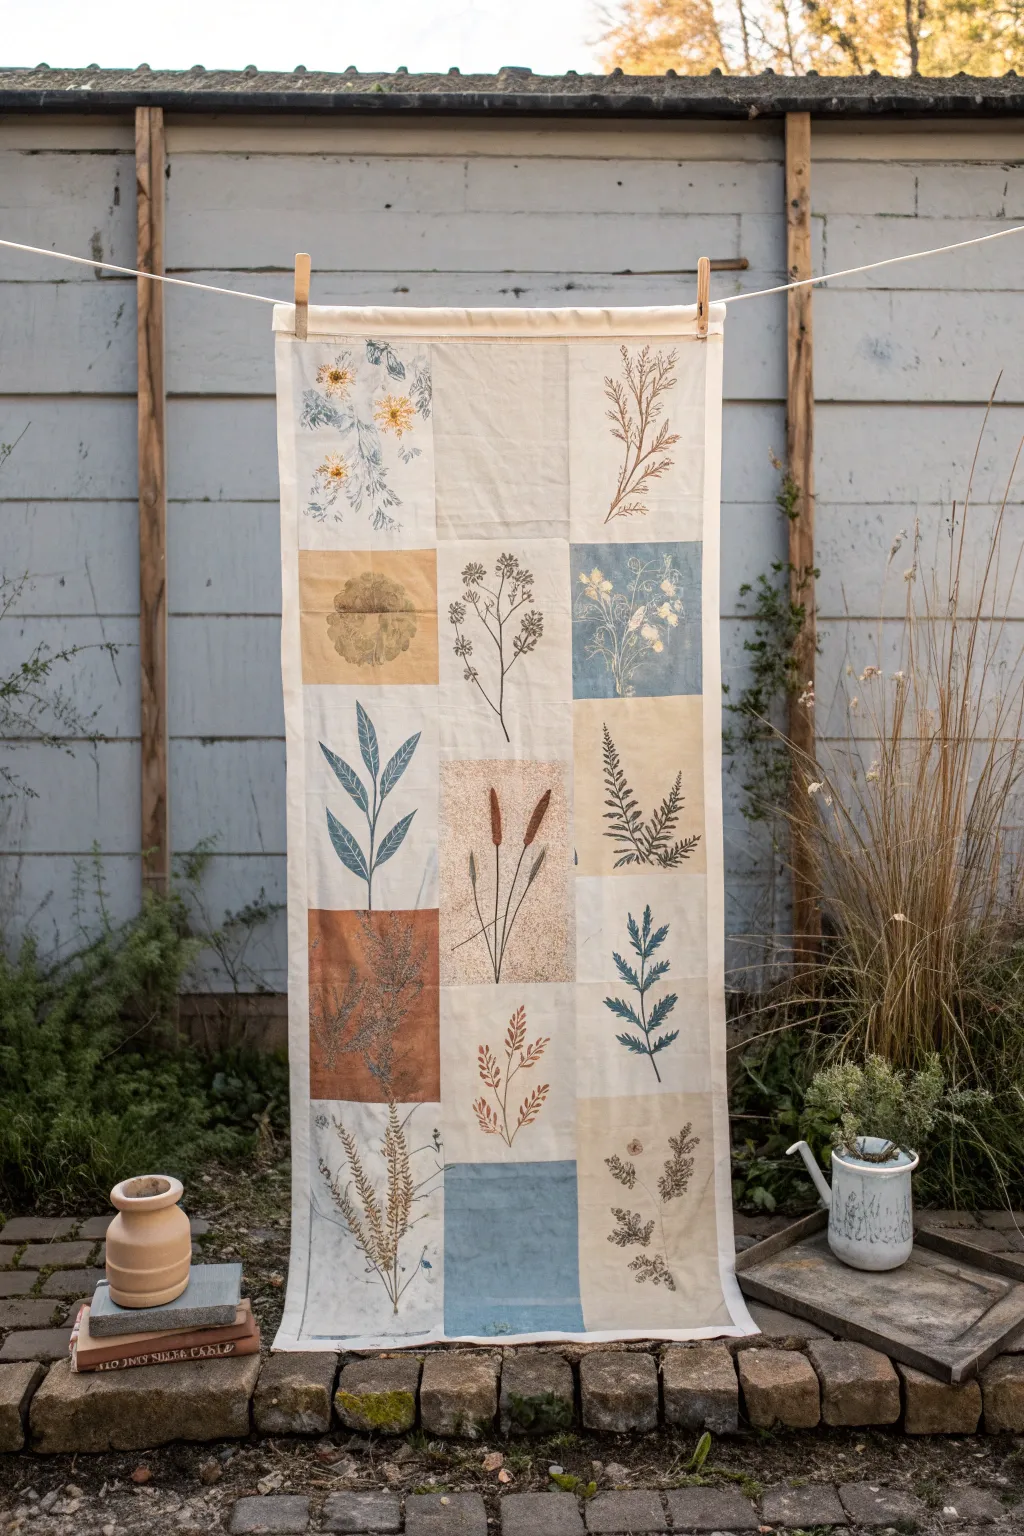
Bring the calming beauty of a vintage herbarium into your home with this nature-inspired fabric banner that mimics the look of sun-bleached cyanotypes and botanical illustrations. This mixed-media project combines block printing and fabric staining to create a soft, rustic tapestry perfect for adding texture to a laundry room or garden shed.
Step-by-Step Guide
Materials
- Cotton muslin fabric (approx. 2 yards)
- Fabric scraps in muted tones (yellow ochre, rust, pale blue)
- Fabric block printing ink (dark blue, brown, rusty orange, sage green)
- Linoleum carving block and carving tools
- Brayer (rubber roller)
- Plexiglass or glass sheet (for rolling ink)
- Fabric medium (optional, for thinning acrylics if not using specialized ink)
- Sewing machine and thread (cream color)
- Wooden dowel (for hanging casing, if desired)
- Fabric scissors
- Iron and ironing board
Step 1: Planning and Preparation
-
Design your grid:
Sketch out a 3-column grid on paper first to balance your colors. The reference banner has alternating blocks of plain cream muslin and colored fabric squares (blues, ochres, browns) to create a checkerboard effect. -
Cut fabric squares:
Cut your cotton muslin and colored fabrics into uniform squares. For the scale shown here, 8-inch or 10-inch squares work well. You will need roughly 18 squares total for a similar length. -
Create your botanical stamps:
Using your linoleum block, carve simple botanical designs. Focus on single stems, fern fronds, or seed pods. You can draw them directly onto the block with a pencil before carving away the negative space. -
Test prints:
Always do a test print on a scrap of muslin. I like to check how much ink the fabric absorbs versus paper, as fabric often requires a slightly juicier application of ink.
Natural Texture Pro Tip
For a truly vintage look, tea-stain some of your cream muslin squares before printing. Dip them in strong brewed black tea for 10 minutes to get an aged, antique parchment tone.
Step 2: Printing the Botanicals
-
Apply ink to the block:
Squeeze a small line of fabric ink onto your glass sheet. Roll the brayer back and forth until the ink sounds ‘sticky’ like velcro, then roll it evenly onto your carved lino block. -
Print the first set:
Place your inked block face down onto a cream muslin square. Apply firm, even pressure with the heel of your hand or a clean brayer. Carefully peel the block back to reveal the design. -
Vary the colors:
Switch ink colors for different squares. Use dark blue ink on the cream fabric for a high-contrast look, and try brown or rust ink on the colored fabric squares to maintain an earthy palette. -
Create ‘negative’ space effects:
For the blue squares that look like cyanotypes, paint a square of fabric entirely with diluted blue fabric paint, leaving the botanical shape unpainted (using a stencil), or print with white opaque ink on blue fabric. -
Heat set the ink:
Allow all printed squares to dry completely (usually 24 hours). Once dry, heat set the ink by ironing the back of the fabric for several minutes according to the ink manufacturer’s instructions.
Step 3: Assembly and Finishing
-
Arrange the layout:
Lay all your printed squares on the floor. Rearrange them until you are happy with the distribution of colors and botanical shapes, ensuring no two identical prints sit right next to each other. -
Sew columns first:
Sew the squares together into three long vertical strips first. Use a standard ¼-inch seam allowance. Press the seams open with an iron so the banner will hang flat. -
Join the columns:
Pin the three vertical strips together, matching the corners of the squares carefully. Sew them together to form the full banner sheet. -
Add a border or hem:
Fold the outer edges over twice (about ¼ inch each fold) and stitch a clean hem all the way around the perimeter to prevent fraying. -
Create the top casing:
Fold the top edge over about 2 inches to create a channel. Stitch across the bottom of this fold, leaving the ends open. This pocket allows you to slide a dowel or rod through for hanging, or you can simply peg it up as shown. -
Final press:
Give the entire piece one final press with the iron, paying special attention to the intersections where four squares meet, to ensure everything lies perfectly smooth.
Troubleshooting Ink
If your prints look patchy or faint, your fabric might have sizing (chemicals) on it. Wash and dry your fabric before cutting and printing to ensure the fibers accept the ink fully.
Hang your botanical tapestry in a sunny spot and enjoy the quiet, organic atmosphere it brings to your space
Watercolor Ombre Fresh-Air Gradient
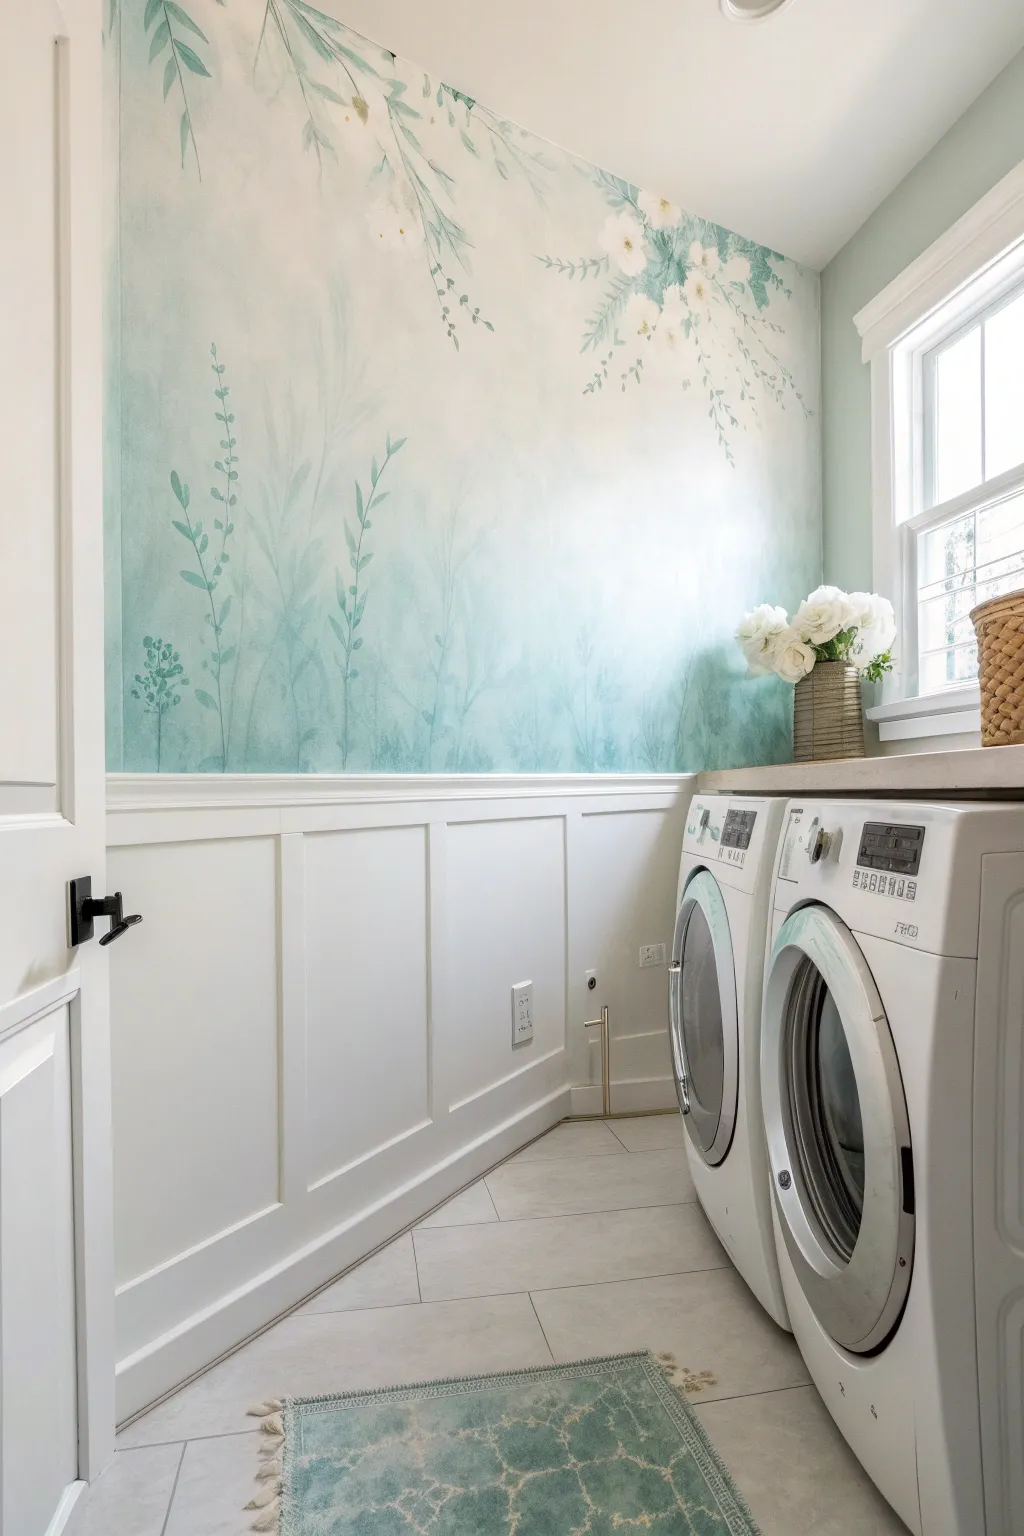
Transform your laundry room into a serene, airy escape with this stunning watercolor-style mural featuring an ombre gradient and delicate botanical silhouettes. The soft transition from deep teal to misty white creates an illusion of height and freshness perfect for utility spaces.
Detailed Instructions
Materials
- Interior latex paint (Deep teal/sage green for base)
- Interior latex paint (White for blending)
- Glaze medium (clear)
- Large sea sponge or wool sponge
- Wide softness-blending brush (4-inch)
- Assorted round artist brushes (sizes 4, 8, and 12)
- Fine liner brush
- Painter’s tape
- Drop cloths
- Plastic trays for mixing
- Water spray bottle
- Pencil
- Paper towels
Step 1: Preparation & Ombre Base
-
Protect the space:
Begin by taping off the top of your wainscoting or baseboards with painter’s tape to ensure sharp lines. Cover your laundry machines and floor with drop cloths. -
Mix your glazes:
Create three custom mixes in separate trays: one with your pure teal paint, one with a 50/50 mix of teal and white, and one primarily white with a touch of teal. Add clear glaze medium to each—roughly 1 part paint to 4 parts glaze—to extend drying time and increase transparency. -
Apply the bottom layer:
Using the sea sponge, dab the darkest teal glaze mixture along the bottom grid of the wall, working in small sections about 2-3 feet wide. Keep the application irregular and cloud-like rather than uniform. -
Start the transition:
While the bottom layer is still wet, introduce the 50/50 mid-tone mix just above it. Use a clean damp sponge to blur the line where the two colors meet, dabbing softly to mesh them together. -
Fade to white:
Continue moving upwards with the lightest white-teal mix. As you near the ceiling, transition to almost pure white glaze or simply drag the remaining pigment upwards until it fades completely into the existing wall color. -
Soften the blend:
Spritz the wall very lightly with water if the paint feels tacky. Take your dry, wide blending brush and gently sweep it in crisscross ‘X’ motions over the transition areas to eliminate hard sponge marks and create that dreamy, misty look. -
Allow to cure:
Let the ombre background dry completely, ideally overnight, as the glaze extends the drying time significantly.
Fixing Hard Edges
If your ombre blend dries with harsh lines, mist the area with water and lightly scrub with a damp sea sponge. You can overlay a very thin wash of glaze to re-blend.
Step 2: Painting the Botanicals
-
Plan your composition:
Lightly sketch the main stems of your floral elements using a pencil. I like to have stems originating from both the bottom (growing up) and the top (hanging down) to frame the space dynamically. -
Paint main stems:
Mix a small amount of the original deep teal paint with a drop of water to improve flow. Using a size 8 round brush, paint long, fluid lines following your pencil sketches. Vary the pressure to make the stems thicker at the base and thinner at the tips. -
Add ‘ghost’ leaves:
Create a very watered-down wash of the teal color. Paint large, loose leaf shapes in the background areas. These should look faint and distant, adding depth behind the sharper foreground plants. -
Paint foreground leaves:
Switch back to your more opaque teal mixture. With the size 4 brush, add detailed leaves to your main stems. Use a ‘press and lift’ motion: touch the tip to the wall, press down to widen the belly of the brush, and lift up to create a point. -
Create hanging vines:
For the upper section, paint delicate vines drooping downward from the ceiling line. Keep these leaves slightly smaller and airier to maintain the feeling of height. -
Add white floral accents:
Dip a clean brush into pure white paint. Near the top vines, dab clusters of simple four or five-petal flowers. Don’t worry about perfect realism; impressionistic blotches work beautifully here. -
Detail the flowers:
Once the white petals are tacky or dry, use a fine liner brush with the dark teal paint to add tiny dots or stamens to the center of each flower cluster. -
Refine the details:
Step back and look for empty spots. Add tiny sprigs, distinct dots for berries, or extra thin branches using your liner brush to balance the composition. -
Cleanup:
Gently peel away the painter’s tape while the paint is fully dry to reveal your crisp edges perfectly framing your new art.
Level Up: Metallic Pop
Mix a small amount of gold or pearlescent paint into your white flower centers for a subtle shimmer that catches the light when the laundry room is in use.
Enjoy the calming atmosphere your new botanical masterpiece brings to laundry day
Giant Soap Bubbles And Suds Dreamscape
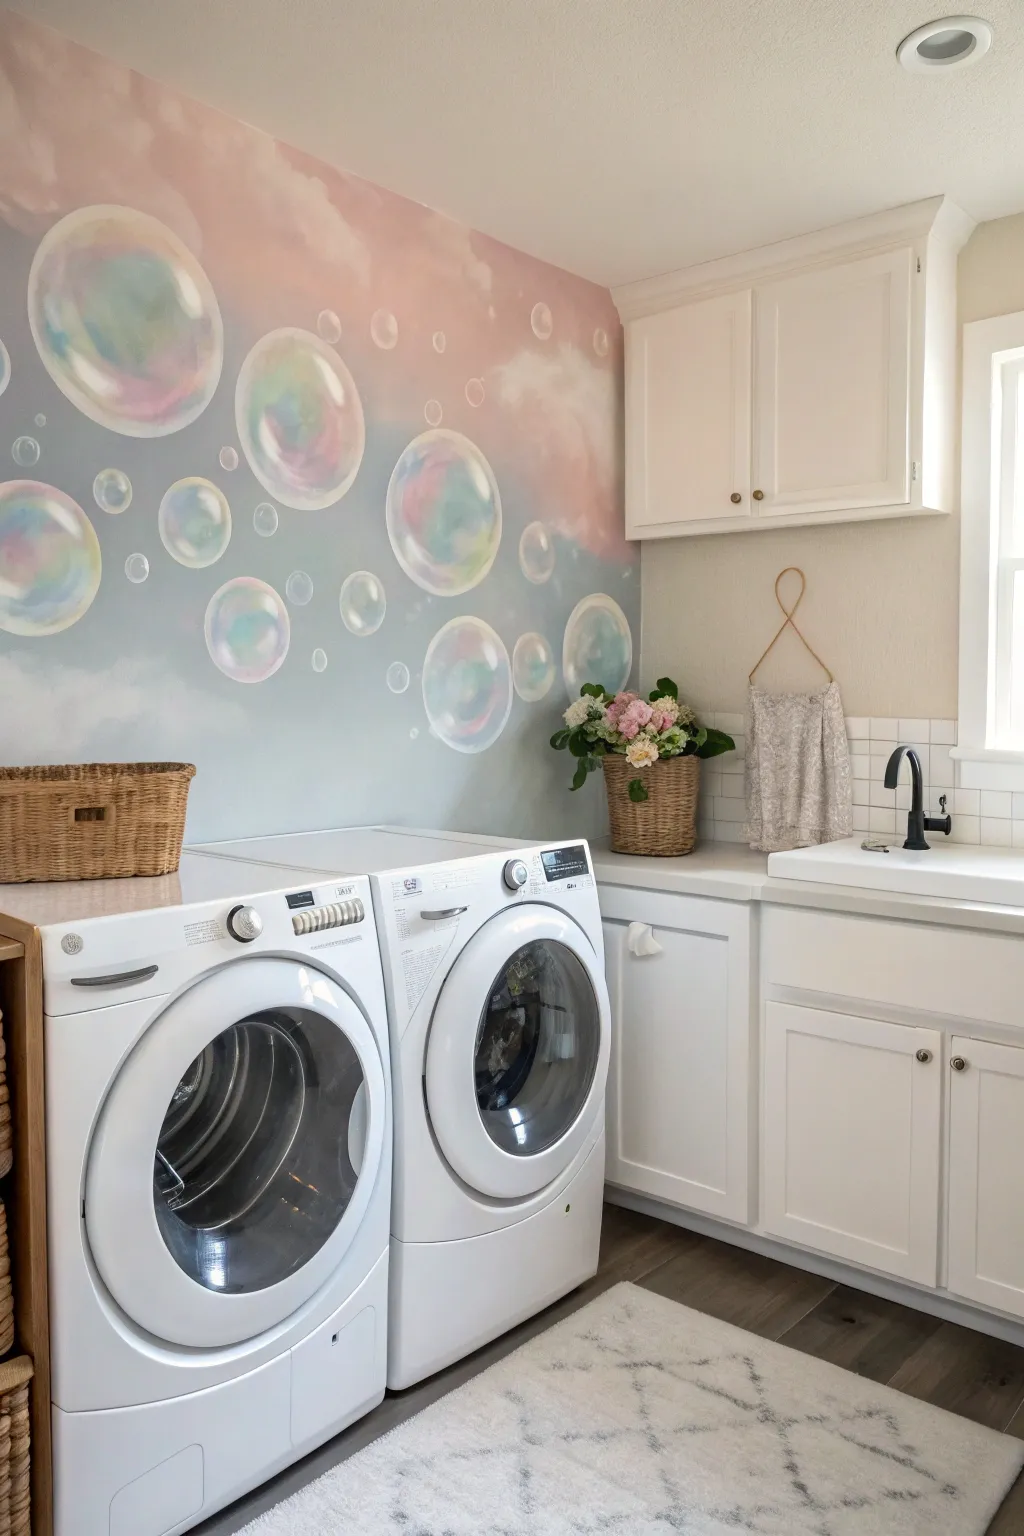
Transform your laundry space into a whimsical escape with this ethereal mural featuring translucent, iridescent bubbles floating through a soft pastel sky. Using gentle blending techniques and carefully layered highlights, you’ll create a sense of depth and lightness that mimics real soap suds.
Step-by-Step Tutorial
Materials
- Latex wall paint (White, Soft Sky Blue, Pale Peach/Pink, Lavender)
- Acrylic craft paints (White, iridescent medium, metallic pearl, light turquoise, magenta, yellow)
- Large blending brushes or natural sea sponge
- Assorted sizes of round objects for tracing (plates, bowls, lids) or a compass
- Pencil and eraser
- Fine detail brush (liner brush)
- Medium round brush
- Glazing liquid or water for thinning
- Painter’s tape and drop cloth
- Paper towels
Step 1: Setting the Sky Scene
-
Prep the canvas:
Begin by clearing the wall area and taping off baseboards, adjacent walls, and any cabinetry. Lay down your drop cloth to protect the flooring. -
Establish the gradient:
Start by painting the upper right corner with your Pale Peach or Pink latex paint. While still wet, paint the lower left section with the Soft Sky Blue. Use a large, damp blending brush to merge the two zones in the middle, creating a seamless transition from blue to pink. -
Add soft clouds:
Mix a small amount of white paint with a touch of glazing liquid to make it translucent. Dip a sea sponge or a scrunched-up lint-free rag into this mixture and dab lightly to create cloud wisps. Soften the edges with a clean, dry brush to make them look dreamy and out of focus. -
Dry completely:
Let the background layer cure fully before moving on, usually for at least 4-6 hours, to prevent the layout lines from smudging into wet paint.
Step 2: Mapping the Bubbles
-
Plan the composition:
Using your assorted round objects (plates, bowls, etc.), arrange a pleasing composition on the floor first if helpful, then lightly trace circles onto the dry wall with a pencil. Vary the sizes significantly, placing larger bubbles near the edges and smaller ones clustered together for depth. -
Clean up lines:
Keep your pencil marks very faint. If any lines are too dark, gently lift some graphite with a kneaded eraser so it won’t show through the translucent paint layers later.
Pro Tip: Perfect Circles
Don’t stress if your hand-painted circles aren’t perfect. A slightly wobbly edge actually looks more like a real, liquid soap bubble than a rigid geometric shape.
Step 3: Painting the Iridescence
-
Define the edges:
Use a medium round brush and a thinned white acrylic paint (glaze consistency) to outline each circle. Widen the line in some areas and break it in others to mimic light hitting a spherical surface. -
Layer the rainbow:
Dilute your turquoise, magenta, and yellow acrylics deeply with water or glazing medium until they are barely tinted water. Paint curved, crescent shapes inside the bubbles, hugging the inner contours. Let colors overlap slightly to create secondary greens and purples. -
Blend the interior:
While the glazes are tacky, use a soft, dry brush to gently sweep the inner edges of your color crescents towards the center of the bubble, fading them into the background color. The center of the bubble should remain mostly transparent. -
Add pearlescence:
Mix a bit of metallic pearl paint or iridescent medium with a drop of water. Apply this over the color bands you just painted to give the bubbles that signature soapy shimmer.
Level Up: 3D Sparkle
Once the paint is dry, adhere tiny clear rhinestones or use clear glitter glue on the brightest highlight points. It catches the actual room light beautifully.
Step 4: Highlights and Details
-
Create reflections:
Where the ‘light source’ hits the bubble (usually top left or right), paint a crisp, bright white curved line or comma shape. Add a smaller, fainter reflection on the opposite bottom side. -
Add window reflections:
For extreme realism, use your fine liner brush to paint distorted little squares or window shapes in white on the surface of the largest bubbles, mimicking the room’s reflection. -
Enhance the outlines:
Go back over the outer rims with a mix of white and your darkest blue. Keep the line extremely thin and broken—solid outlines will make them look like stickers rather than floating spheres. -
Step back and adjust:
Check the mural from a distance. If any bubble feels too flat, add a touch more white glaze to the center to increase the cloudy opacity slightly relative to the background.
Enjoy the breezy, clean atmosphere your new bubble mural brings to laundry day


Have a question or want to share your own experience? I'd love to hear from you in the comments below!