Aztec-inspired painting is such a fun mix of bold geometry, powerful symbolic motifs, and those juicy earthy colors that somehow still feel modern. Here are my favorite Aztec painting ideas to help you create something that feels graphic, meaningful, and totally display-worthy.
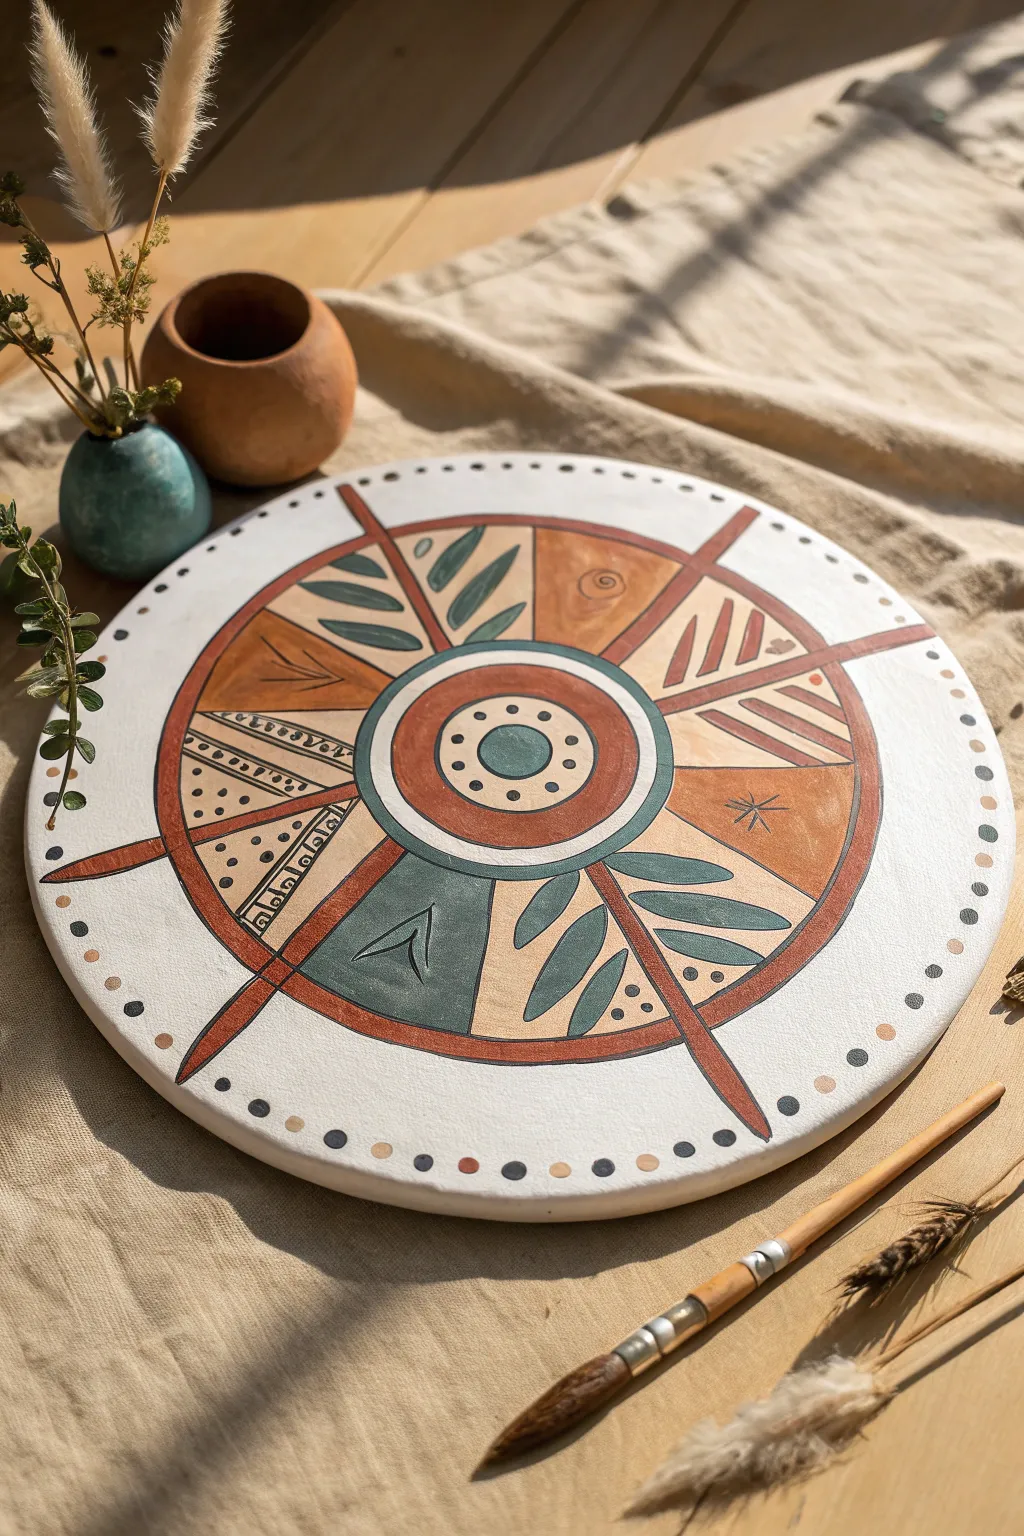
Aztec Sun Stone Centerpiece
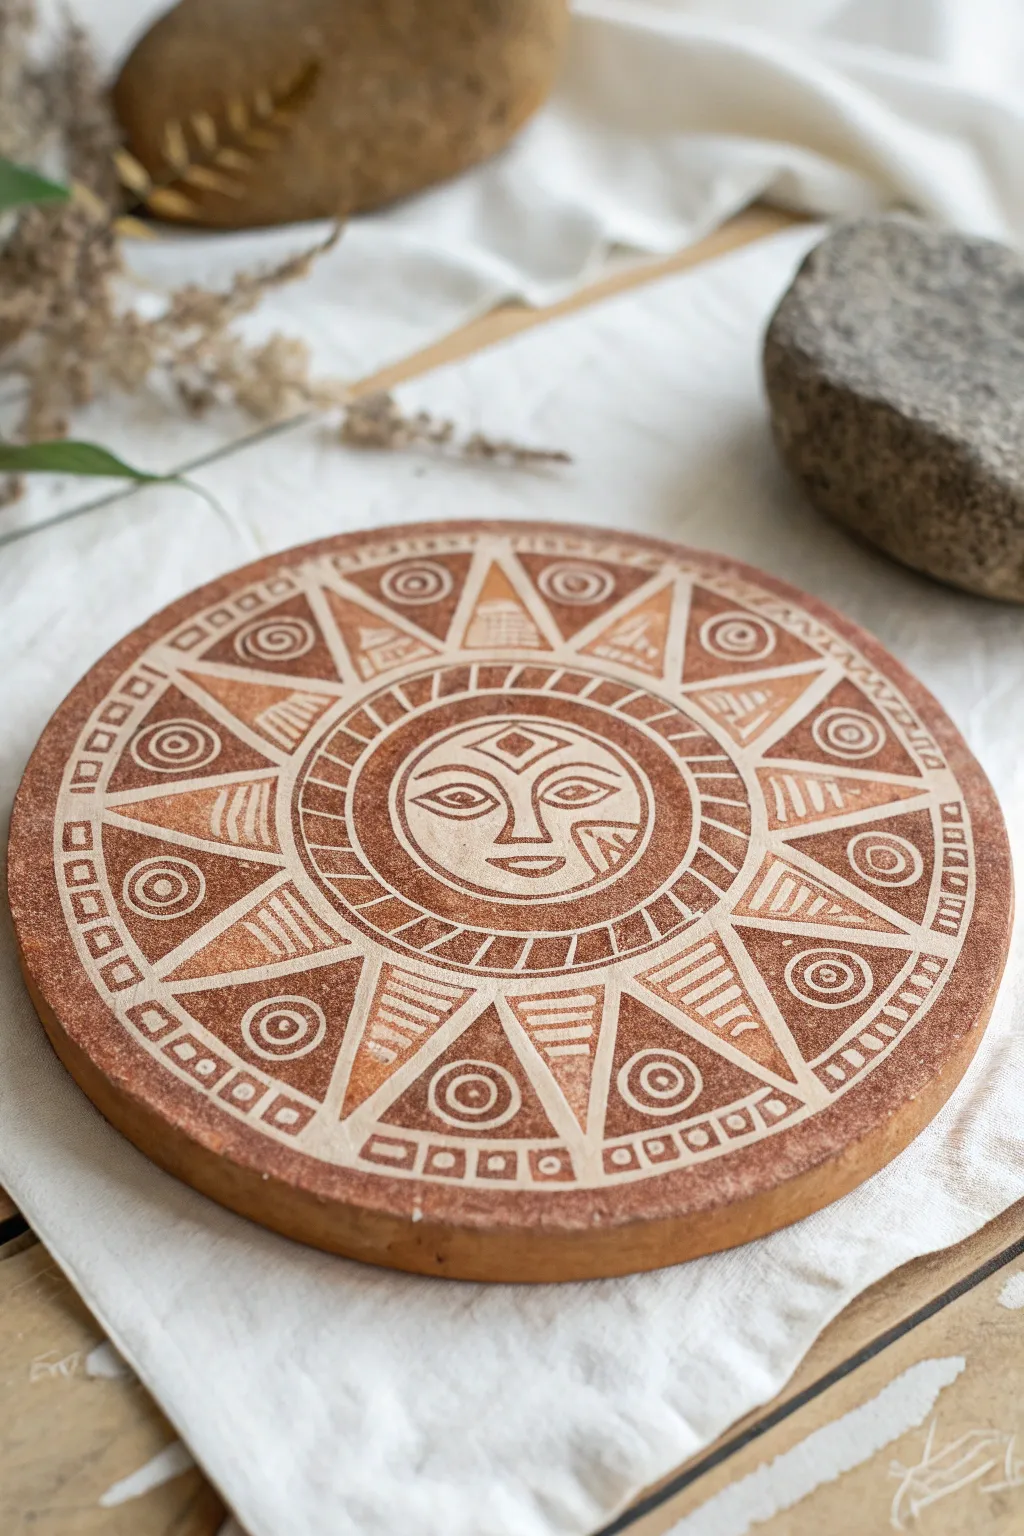
This striking centerpiece channels the ancient energy of Aztec motifs with a warm, earthy terracotta finish. By combining simple carving techniques with strategic painting, you’ll create a textured sun relief that feels like a discovered artifact.
Step-by-Step
Materials
- Round wooden plaque or stiff cardboard circle (approx. 8-10 inches)
- Air-dry clay (terracotta color preferred) or white clay
- Acrylic paint: Terracotta/burnt sienna, burnt umber, and cream/off-white
- Rolling pin
- Clay carving tools or a linoleum cutter set
- Compass and ruler
- Fine-grit sandpaper
- Matte spray varnish
Step 1: Base Preparation
-
Roll the Clay:
Begin by rolling out your air-dry clay to an even thickness of about 1/4 inch. If you are using a wooden base for extra stability, lightly wet the wood and press the clay firmly onto it, smoothing the edges flush with the wood. -
Smooth the Surface:
Dip your fingers in a little water and run them over the surface to remove any fingerprints or ridges. You want a perfectly flat, smooth canvas for your carving work. -
Establish Guidelines:
Using a compass, lightly scribe a small circle in the exact center for the face, a second larger circle around that for the sun rays, and a final ring near the edge for the border pattern. Do not press hard; these are just guides. -
Initial Drying:
Let the clay sit for about 30-60 minutes. You want it to be ‘leather hard’—firm enough to hold detail without turning to mush, but soft enough to carve easily.
Step 2: Carving the Design
-
Draft the Central Face:
Using a needle tool, lightly sketch the sun face in the center circle. Focus on geometric shapes: almond eyes, a triangular nose flair, and a simple smiling mouth. -
Carve the Face:
Use a small loop tool or V-gouge to carve out the negative space around the facial features. You want the eyes, nose, and cheeks to remain raised while removing the background. -
Create the Rays:
In the middle ring, use a ruler to mark out eight large triangular points radiating outward. Carve the outlines of these triangles deeply. -
Detail the Rays and Gaps:
Inside the triangular rays, carve horizontal hatching lines. In the gaps between the rays, carve small circles or spirals. This contrast between straight lines and curves is key to the Aztec aesthetic. -
Carve the Border:
For the outer rim, carve a repeating pattern of small squares or rectangles. Keep the spacing consistent to give it a structured, architectural look.
Clean Lines Tip
When carving leather-hard clay, keep a damp brush nearby. Brush away the little clay crumbs as you work to keep your lines crisp and prevent debris from drying inside the grooves.
Step 3: Finishing Surface
-
Full Cure:
Allow the clay to dry completely. This usually takes 24-48 hours depending on humidity. The clay will lighten significantly in color. -
Sand and Refine:
Once bone dry, take fine-grit sandpaper and gently sand the top surface. This flattens the raised areas and removes any sharp burrs left from carving. -
Base Coat Painting:
Paint the entire piece with a terracotta or burnt sienna acrylic paint. If you used terracotta clay, you might skip this, but painting ensures an even color tone. -
The Whitewash Technique:
Mix a small amount of cream or off-white paint with water to create a thin wash. Brush this over the entire piece, ensuring it gets into all the carved grooves. -
Wipe Back:
Immediately use a damp cloth or paper towel to wipe the surface. I like to work quickly here so the white paint stays trapped in the carved recesses but is removed from the raised ‘terracotta’ surfaces. -
Adding Depth:
For an aged look, dab a tiny bit of burnt umber paint on a dry brush or sponge and gently stipple it around the outer edges or random spots to simulate weathering. -
Final Varnish:
Protect your work with a coat of matte spray varnish. This seals the paint and gives the piece a finished, professional quality suitable for display.
Jewel Tone Flair
For a less traditional look, paint the recessed areas in turquoise and deep gold instead of cream. This mimics the semi-precious stones often found in real Aztec mosaic art.
Now you have a timeless, handcrafted artifact ready to bring warmth and history to your table setting


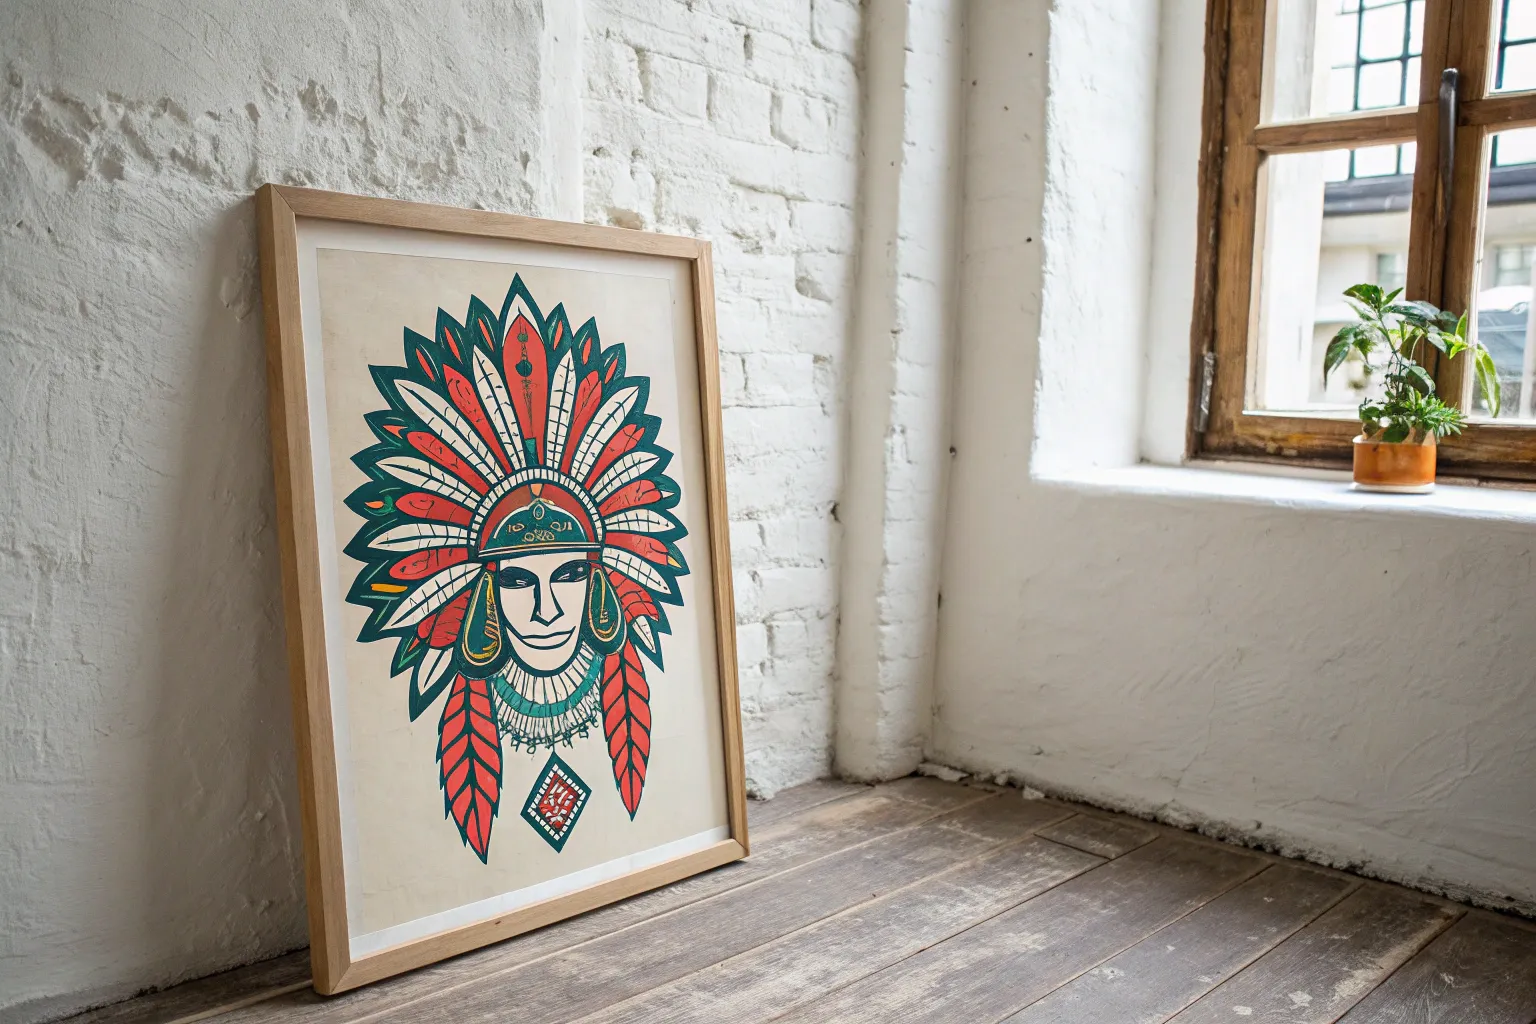
Feathered Headdress Portrait
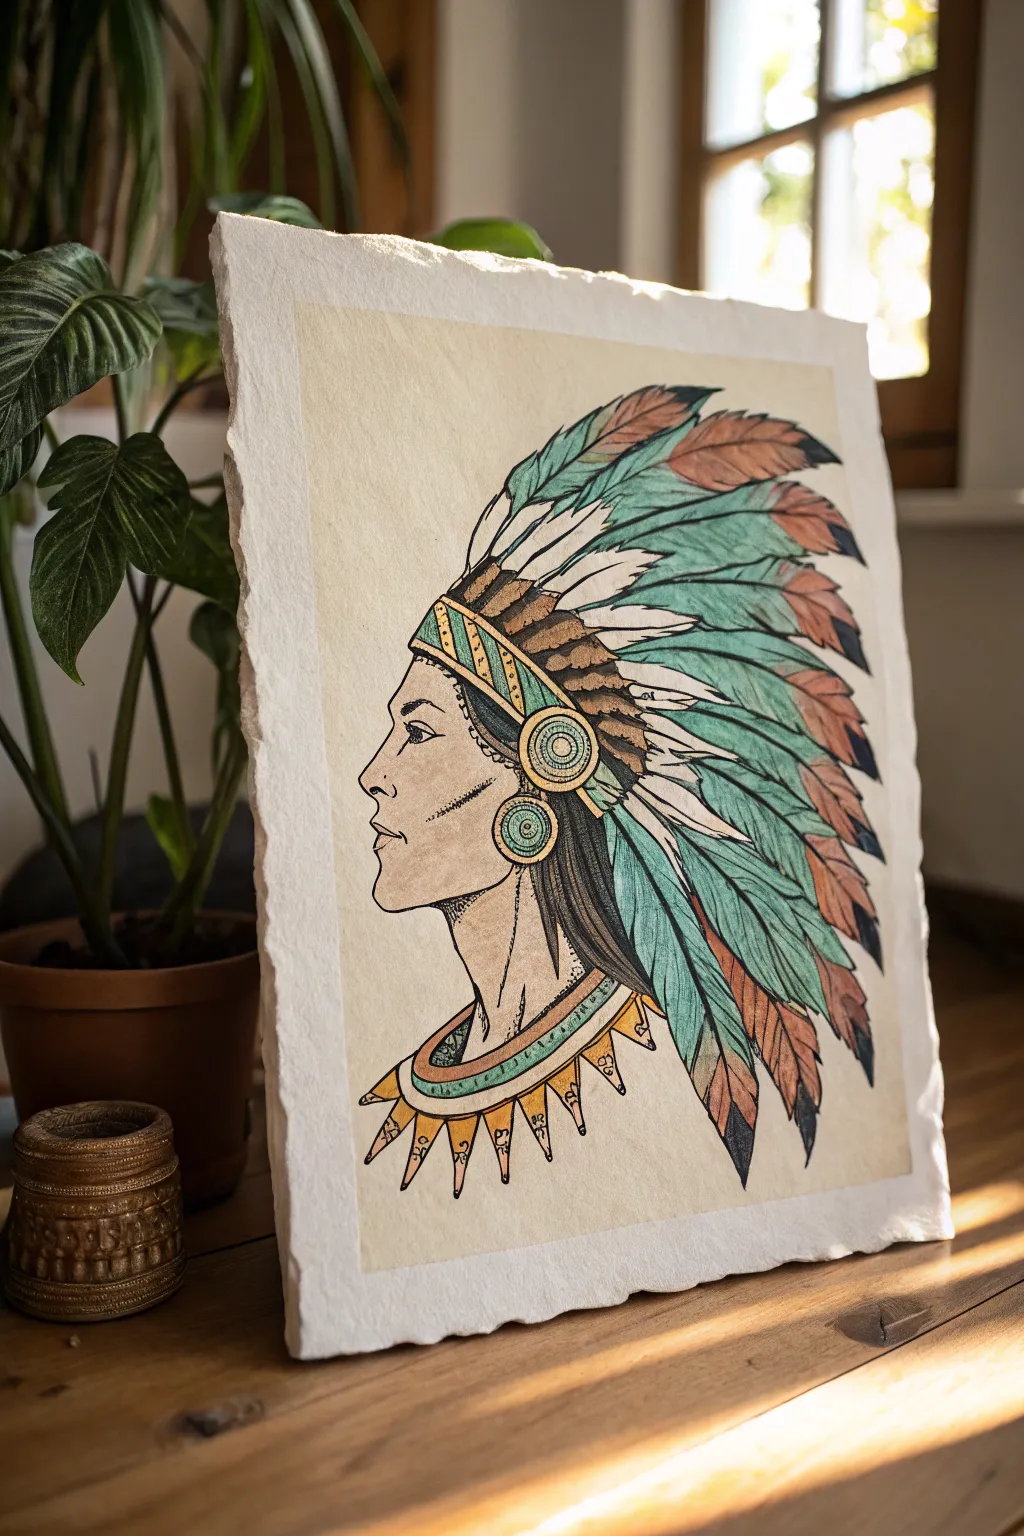
Capture the regal elegance of this feathered headdress portrait using a blend of precise ink work and soft watercolor washes. The finished piece features a distinctive textured paper edge and warm, earthy tones that evoke a sense of history and tradition.
Step-by-Step Guide
Materials
- Heavyweight cold-press watercolor paper with deckled edges (300 gsm or higher)
- H or HB pencil for sketching
- Kneadable eraser
- Waterproof fine liner pens (sizes 0.1, 0.3, and 0.5)
- Watercolor paints (Turquoise, Burnt Sienna, Yellow Ochre, Payne’s Grey, Black)
- Small and medium round watercolor brushes
- Gold metallic paint or ink (optional)
- Masking tape
Step 1: Conceptual Sketching
-
Paper preparation:
If your paper doesn’t already have deckled edges, you can create them by dampening a ruler, placing it along the edge you want to tear, and carefully ripping the paper against it for that rustic look. -
Establish the profile:
Lightly sketch the profile of the face using your H pencil. Start with a simple oval for the head, then refine the nose, chin, and neck structure. Keep the lines faint so they are easy to erase later. -
Map the headdress anchor:
Draw the headband sitting just above the eyebrows. It should look like a structured band wrapping around the forehead, with circular ear ornaments positioned just below the temple and behind the jaw. -
Sketch the feather flow:
Outline the majestic sweep of feathers extending backward. I find it helpful to draw the central spine of the main feathers first to get the curve right, then fill in the shapes. -
Detail the collar:
Add the decorative collar around the neck, including the triangular geometric shapes hanging from the bottom edge.
Uneven Ink Flow?
If your fine liner skips on the textured paper, slow down your stroke speed. Don’t press harder, as this can damage the nib; just let the ink flow more deliberately into the paper’s tooth.
Step 2: Inking the outlines
-
Main contour lines:
Using a 0.5 fine liner, carefully trace the main profile of the face and the outer edges of the headdress feathers. Use confident, smooth strokes. -
Internal details:
Switch to a 0.3 pen for the details inside the headband, the circular ear flares, and the individual segments of the collar. -
Feather texture:
With the 0.1 pen, draw the internal veins of the feathers. Add delicate hatching lines radiating from each feather’s spine to suggest barbs and texture. -
Hair flow:
Ink the hair flowing down the back of the neck. Use long, sweeping lines with the 0.1 pen to create the illusion of straight, dark strands. -
Clean up:
Once the ink is completely dry—give it at least 15 minutes to be safe—gently erase all your pencil guides with the kneadable eraser.
Step 3: Adding Color
-
Skin tone wash:
Mix a very diluted wash of Yellow Ochre and a tiny touch of Burnt Sienna. Apply this lightly to the face and neck, keeping it subtle to resemble aged parchment. -
Turquoise feathers:
Paint the main body of the feathers with a watery Turquoise. Let the color pool naturally in some areas to create variation in depth. -
Earthy accents:
Use Burnt Sienna for the tips of the feathers and the smaller feathers near the headband. Blend the transition where the turquoise meets the brown while the paint is still damp for a soft gradient. -
Headband and jewelry:
Paint the headband stripes with alternating Green and Ochre. Use the same Ochre for the circular ear ornaments and the collar triangles. -
Hair shadows:
Paint the hair dark brown or black. Leave tiny slivers of white paper showing between some strands to act as highlights. -
Deepening contrast:
Once the first layer is dry, come back with a slightly more concentrated Turquoise and Sienna to add shadows where feathers overlap. -
Metallic highlights:
For a special touch, add small dots or lines of gold metallic paint to the jewelry and headband details to catch the light.
Make It Look Ancient
Before painting, lightly stain your entire paper with tea or weak coffee and let it dry. This creates an authentic, aged parchment background that enhances the historical vibe.
Display your finished portrait in a floating frame to show off those beautiful deckled edges


Jaguar Warrior Pattern Armor
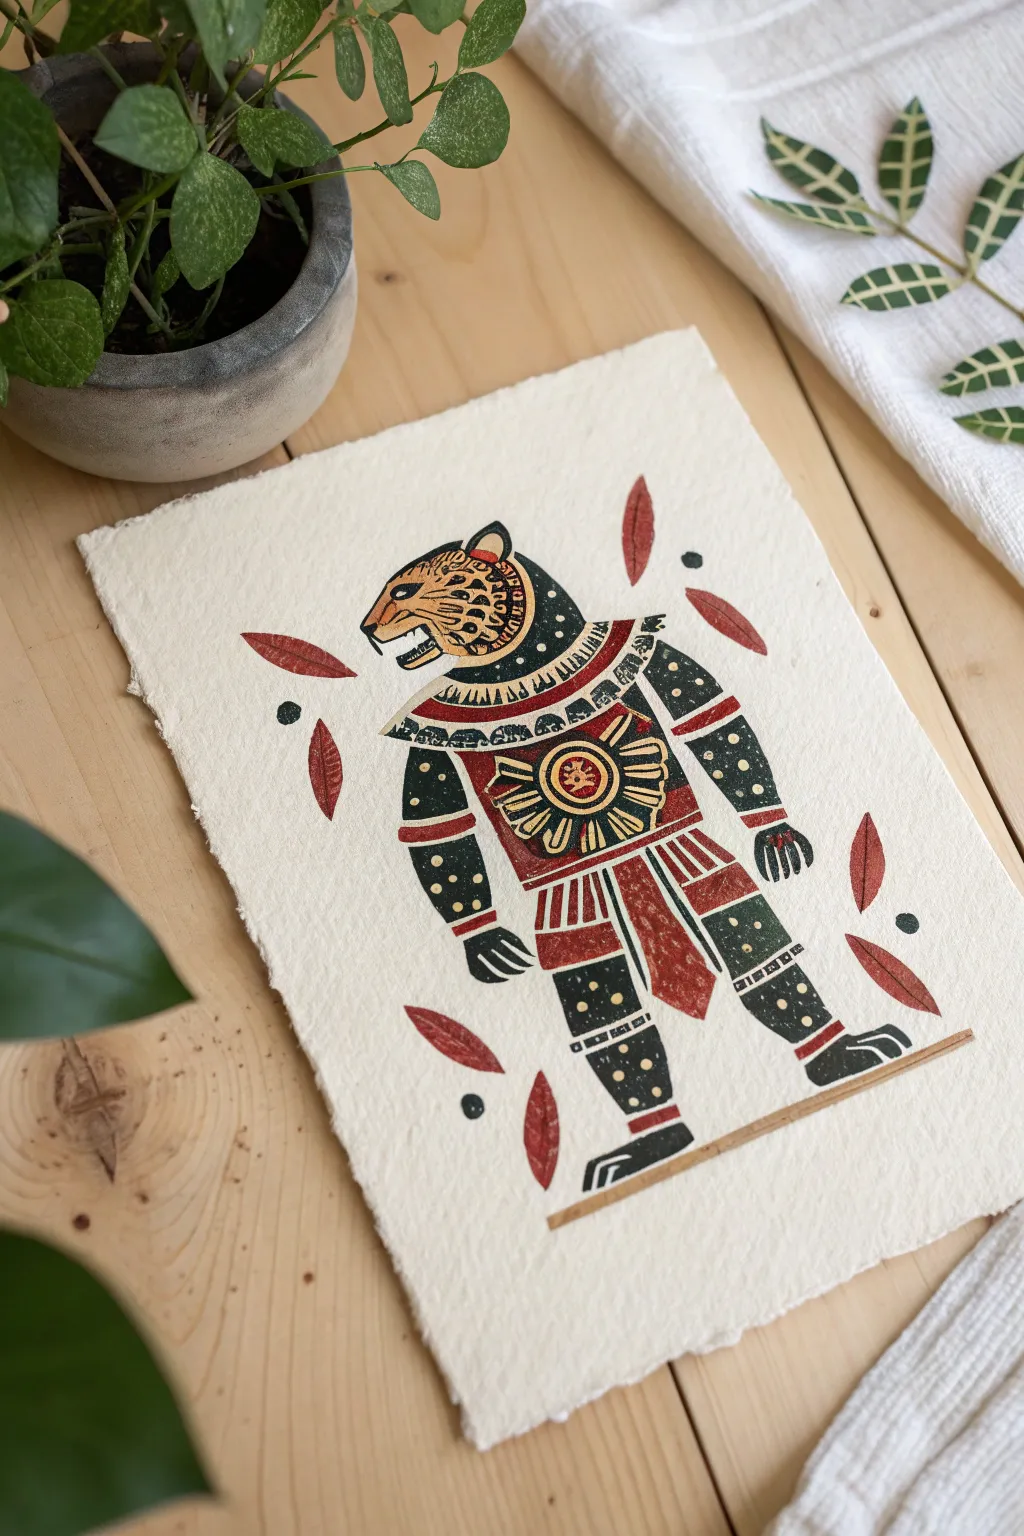
Capture the fierce elegance of Aztec mythology with this stylized Jaguar Warrior illustration. Using bold, geometric shapes and an earthy palette of crimson, obsidian, and gold, you’ll create a piece that feels both ancient and refreshingly modern on handmade paper.
Detailed Instructions
Materials
- Heavyweight handmade cotton rag paper (deckled edge)
- Black ink or gouache
- Deep red/terracotta gouache or acrylic paint
- Mustard yellow or gold gouache
- Fine liner brushes (sizes 0 and 00)
- Medium flat brush
- Pencil and eraser
- Ruler
- Matte varnish (optional)
Step 1: Drafting the Warrior
-
Plan the composition:
Begin by lightly marking the center of your paper. Sketch a vertical axis to align the figure’s posture, ensuring enough negative space remains at the top and bottom for the decorative leaves. -
Block out the main shapes:
Sketch the warrior’s silhouette using simple geometric forms. Use rectangles for the torso and legs, and circles for the shoulder joints. Draw the head profile facing left, focusing on the jaguar mask shape rather than facial details. -
Refine the armor details:
Pencil in the specific armor segments: the segmented collar, the circular chest shield (chimalli), the loincloth, and the greaves on the legs. Keep your lines clean and deliberate. -
Add floating elements:
Sketch the tear-drop shaped leaves and small dot motifs floating around the warrior. These should frame the figure loosely, adding movement to the static pose.
Stamp for Texture
For a truly authentic block-printed look, carve the basic leaf shapes out of a rubber eraser and stamp them onto the paper instead of painting them by hand.
Step 2: Applying the Base Colors
-
Paint the black foundations:
Using your black ink or gouache, fill in the jaguar head, the arms, the legs, and the collar sections. I find that working top-to-bottom prevents smudging the wet ink with your hand. -
Fill the red armor sections:
Mix a deep terracotta red. Paint the skirt strips, the collar bands, and the loincloth. Also, fill in the floating leaf shapes surrounding the warrior with this same rich hue. -
Paint the golden accents:
Use your mustard yellow or gold paint to block in the central sun shield on the chest and the base color for the jaguar’s face mask. Let this layer dry completely before moving to fine details.
Step 3: Ornamentation and Patterning
-
Detail the Jaguar mask:
With a 00 brush and black ink, paint small, curved spots on the yellow mask area to mimic jaguar fur. Add the eye and the sharp teeth in the open mouth area. -
Decorate the collar:
On the black collar section, paint tiny white or cream triangles pointing downward. On the red bands, use thin black lines to create separation and definition. -
Embellish the limbs:
Add small yellow dots to the black sections of the arms and legs. Try to keep the spacing consistent to give the impression of studded leather armor. -
Detail the sun shield:
Using red paint, add the rays radiating from the center of the yellow chest shield. Add a small motif in the very center circle to represent the solar deity. -
Add texture to the skirt:
On the red skirt panels, use white or cream paint to add vertical stripes or small geometric borders at the hem. This mimics the woven texture of traditional Aztec textiles.
Antique the Paper
Before painting, lightly brush the edges of your handmade paper with diluted tea or coffee. This ages the artwork, making it look like a recovered codex page.
Step 4: Final Touches
-
refine the floating elements:
Add a central spine line to each floating red leaf using a slightly darker red or thin black line. Add the small black dots scattered near the leaves for balance. -
Ground the figure:
Paint a thin horizontal line in brown or dull gold beneath the warrior’s feet to give him a solid ground to stand on. -
Clean up edges:
Check the silhouette for any uneven edges. Use your black ink to sharpen the claws on the hands and feet. -
Erase and seal:
Once the paint is bone dry, gently erase any visible pencil marks. If desired, apply a light matte varnish to protect the pigments.
Step back and admire how the bold geometry brings this ancient warrior to life on the page


Codex-Style Flat Figure Scene
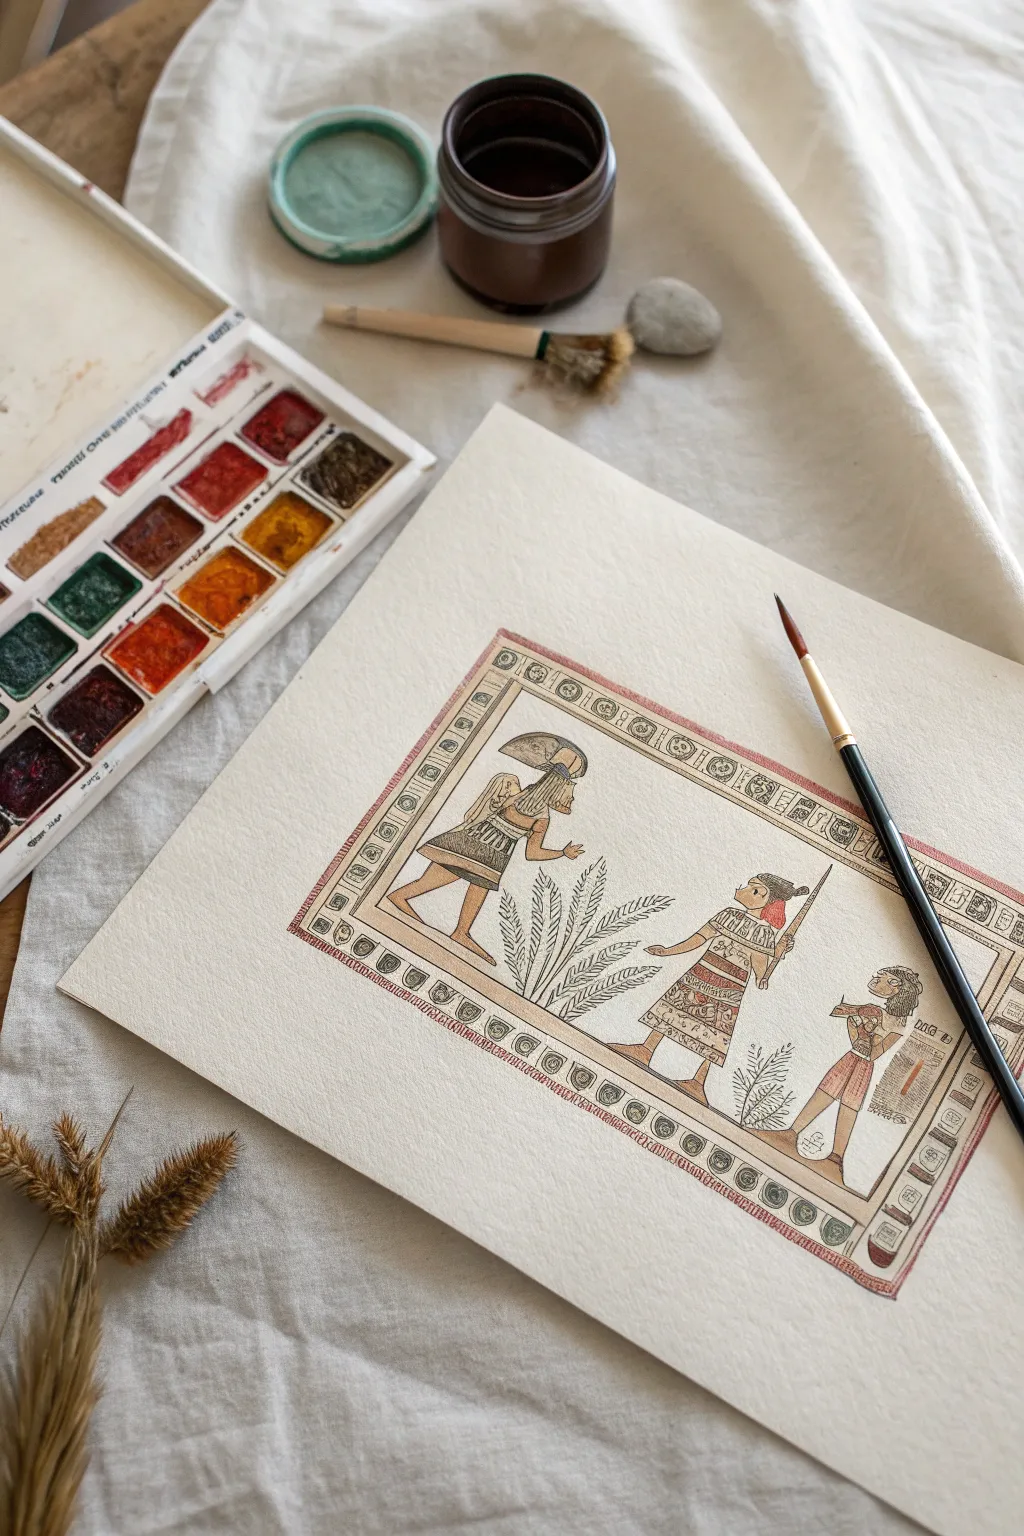
Transport your sketchbook back in time by recreating this stylized historical scene inspired by Mesoamerican codices. Using warm earth tones and precise linework, you’ll capture the distinct profile figures and decorative borders typical of ancient manuscripts.
How-To Guide
Materials
- Cold-pressed watercolor paper (heavyweight, roughly 300gsm)
- Watercolor paint set (essential colors: Burnt Sienna, Yellow Ochre, Alizarin Crimson, Sap Green, Ivory Black)
- Fine liner brush (size 0 or 00) for details
- Round brush (size 4 or 6) for washes
- Pencil (HB) and kneaded eraser
- Ruler
- Jar of clean water
- Paper towels for blotting
Step 1: Drafting the Composition
-
Frame outline:
Begin by using your ruler to draw a large rectangular frame in the center of your paper. Leave a generous margin of white space around the outside to mimic a museum-quality print. -
Internal border guides:
Inside the main rectangle, lightly sketch a second, smaller rectangle about half an inch inward. This channel will become your decorative glyph border. -
Sketching the figures:
Lightly pencil in the three figures. Start with the central figure holding a spear, then the figure on the left bending forward, and finally, the smaller figure on the right. Focus on the distinctive ‘flat’ perspective—torso facing front, head and limbs in profile. -
Adding organic elements:
Draw the central plant motif between the two main figures. Sketch long, fern-like fronds radiating upward from the ground line to separate the narrative space. -
Border details:
Fill the border channel with repeating geometric shapes and simplified glyphs like circles, squares, and stepped patterns. Don’t worry about perfect symmetry; slight variations add to the hand-drawn historical feel.
Step 2: Applying Base Colors
-
Skin tones:
Mix a wash of Yellow Ochre with a tiny touch of Burnt Sienna. Using your round brush, gently fill in the skin areas of all three figures. Keep the wash flat and even. -
Garment base layers:
For the clothing, create a dilute wash of Burnt Sienna for the loincloths and wraps. Apply this color while ensuring it doesn’t bleed into the wet skin tone areas. -
Border background:
Mix a very pale, watery wash of Yellow Ochre or a creamy beige. Fill in the background of your decorative border and the main scene background to give the paper an aged, parchment-like appearance. -
Plant life:
Using a desaturated Sap Green (mix with a little brown to dull it), carefully paint the fern leaves in the center. I prefer to use the tip of the round brush here to taper the leaves naturally. -
Red accents:
Paint the decorative red stripe surrounding the outer edge of the border using Alizarin Crimson or a red oxide hue.
Uneven lines?
If your fine lines look shaky, try exhaling slowly as you pull the brush across the paper. Using a rigger brush (long hairs) can also help stabilize ink flow for long lines.
Step 3: Detailed Line Work & Patterns
-
Mixing the ink hue:
Instead of pure black, mix Ivory Black with a bit of Burnt Umber to create a warm, sepia-toned ‘ink’ color. Load your fine liner brush with this concentrated mixture. -
Outlining characters:
Carefully trace over your pencil lines for the figures. Use confident strokes to define their profiles, limbs, and clothing edges. The line weight should be consistent, similar to a pen. -
Clothing patterns:
Add the intricate geometric patterns to the clothing. Paint small triangles, stripes, and dots on the loincloths and capes using your liner brush and the sepia mix. -
Defining the border:
Outline the glyphs inside the border frame. Outline the circles and small squares you sketched earlier, ensuring they stand out against the pale wash. -
Textural details:
Add fine hatching lines to the plant fronds to suggest texture. You can also add very small, decorative glyphs or ‘speech scroll’ shapes near the mouths of the figures if space allows.
Make it authentic
Research actual Mixtec or Aztec month signs (like Rabbit, Reed, or Flint) and replace the generic geometric shapes in the border with these real historical symbols.
Step 4: Final Touches
-
Deepening contrast:
Once the first layer of outlines is dry, go back in with a slightly darker mix to emphasize key areas like the hair or the weapons held by the figures. -
Border shading:
Add a very sheer glaze of brown over specific sections of the border pattern to create a rhythm of light and dark segments. -
Aged paper effect:
If the background feels too clean, lightly splatter a few tiny drops of watered-down brown paint across the image to simulate age spots or foxing on old parchment. -
Cleanup:
Wait until the painting is completely bone-dry. Gently erase any visible pencil sketch lines that weren’t covered by paint, particularly around the outer margins.
Allow the finished piece to dry flat overnight to prevent the paper from buckling before framing your historical reproduction
BRUSH GUIDE
The Right Brush for Every Stroke
From clean lines to bold texture — master brush choice, stroke control, and essential techniques.
Explore the Full Guide
Aztec Glyph Border Frame
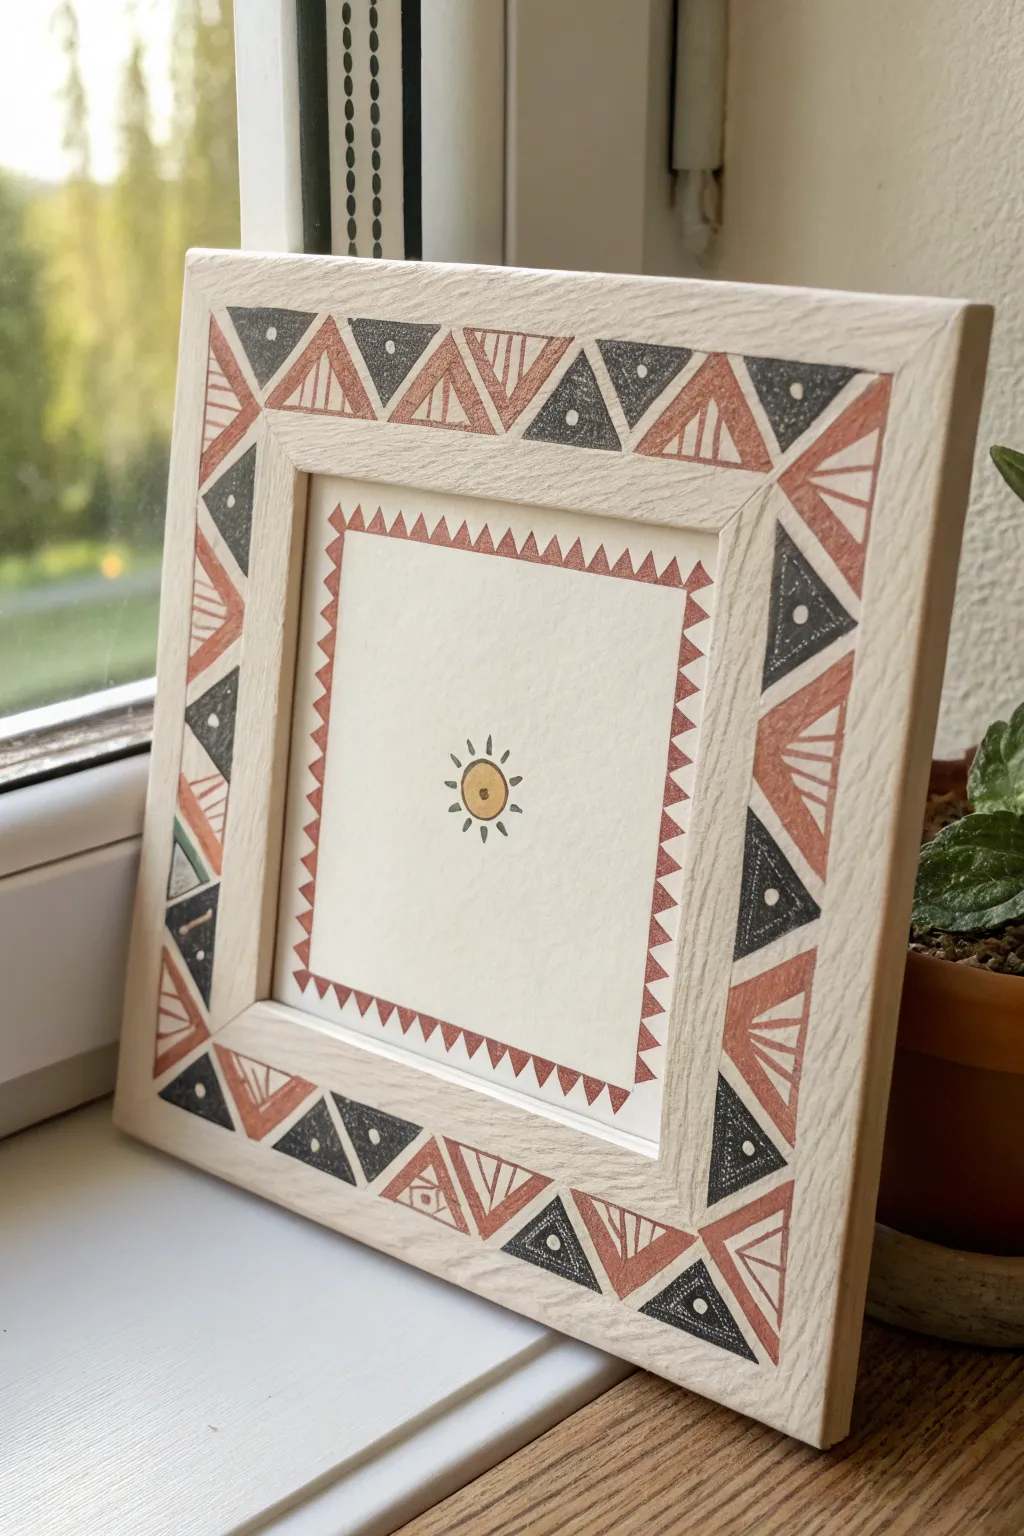
This charming project transforms a simple wooden frame into a piece of geometric art inspired by Aztec motifs. The combination of earthy terracotta tones and bold black triangles creates a striking border around a minimalist sun glyph.
Step-by-Step
Materials
- Unfinished wooden square photo frame (wide flat border)
- White acrylic paint or gesso
- Terracotta or rust-colored acrylic paint
- Black fine-liner pen or acrylic paint marker
- Small round paintbrush
- Pencil and eraser
- Ruler
- Thick painting paper or cardstock (cut to fit frame)
- Gold or yellow paint pen (for the sun)
Step 1: Base Preparation
-
Prime the frame:
Begin by removing the glass and backing from your wooden frame. Coat the entire front surface of the wood with white acrylic paint. You may need two coats to ensure the wood grain is fully covered and you have a smooth, bright canvas. -
Cut the insert:
While the frame dries, measure the frame’s opening and cut a piece of thick watercolor paper or cardstock to fit snugly inside. -
Plan the grid:
On the dry white frame, use a pencil and ruler to lightly mark a zig-zag line that spans the entire width of the frame border. This will create the top and bottom boundaries for your triangle runner.
Clean Lines Tip
If you struggle with steady hands, use painter’s tape to mask off the edges of your triangles before painting. It guarantees crisp, professional points.
Step 2: Painting the Frame Pattern
-
Draft the triangles:
Using your pencil marks as a guide, draw a continuous series of alternating triangles within the zig-zag border. The points should touch the inner and outer edges of the frame. -
Paint the terracotta triangles:
Select alternating triangles to be filled with the terracotta paint. I like to use a small flat brush here to get sharp, clean edges along the pencil lines. -
Ink the black triangles:
Once the paint is dry, use a black fine-liner or paint marker to fill in the remaining alternating triangles. The contrast against the white background is essential for this look. -
Add line details:
Inside the terracotta triangles, use a white gel pen or very fine brush with white paint to draw vertical stripes or smaller internal triangles for texture. -
Create dot accents:
On the black triangles, use the white pen again to add a single dot or small circle in the center of each shape to mimic traditional beadwork.
Step 3: Creating the Central Motif
-
Outline the inner border:
Take your cut paper insert and lightly draw a square about an inch from the edge. Along this line, draw a small sawtooth or zig-zag pattern facing inward. -
Fill the sawtooth border:
Carefully fill in this jagged border with your terracotta paint or a matching marker. Keep the triangles small and uniform. -
Draw the sun:
Find the exact center of the paper. Draw a small circle using the gold or yellow paint pen. -
Add sun rays:
Use your black fine-liner to outline the yellow sun circle. Then, draw short, straight lines radiating outward to create the rays. -
Final assembly:
Once everything is completely dry, place the glass back into the frame (optional, as the texture looks great without it), insert your artwork, and secure the backing.
Go Bigger
Scale this up by using a larger frame and adding a second row of triangles or diamonds to the pattern for a more complex, layered border design.
Place your finished piece near a window where the natural light can highlight the geometric details and the sunny center
Stepped Fret Geometric Abstract
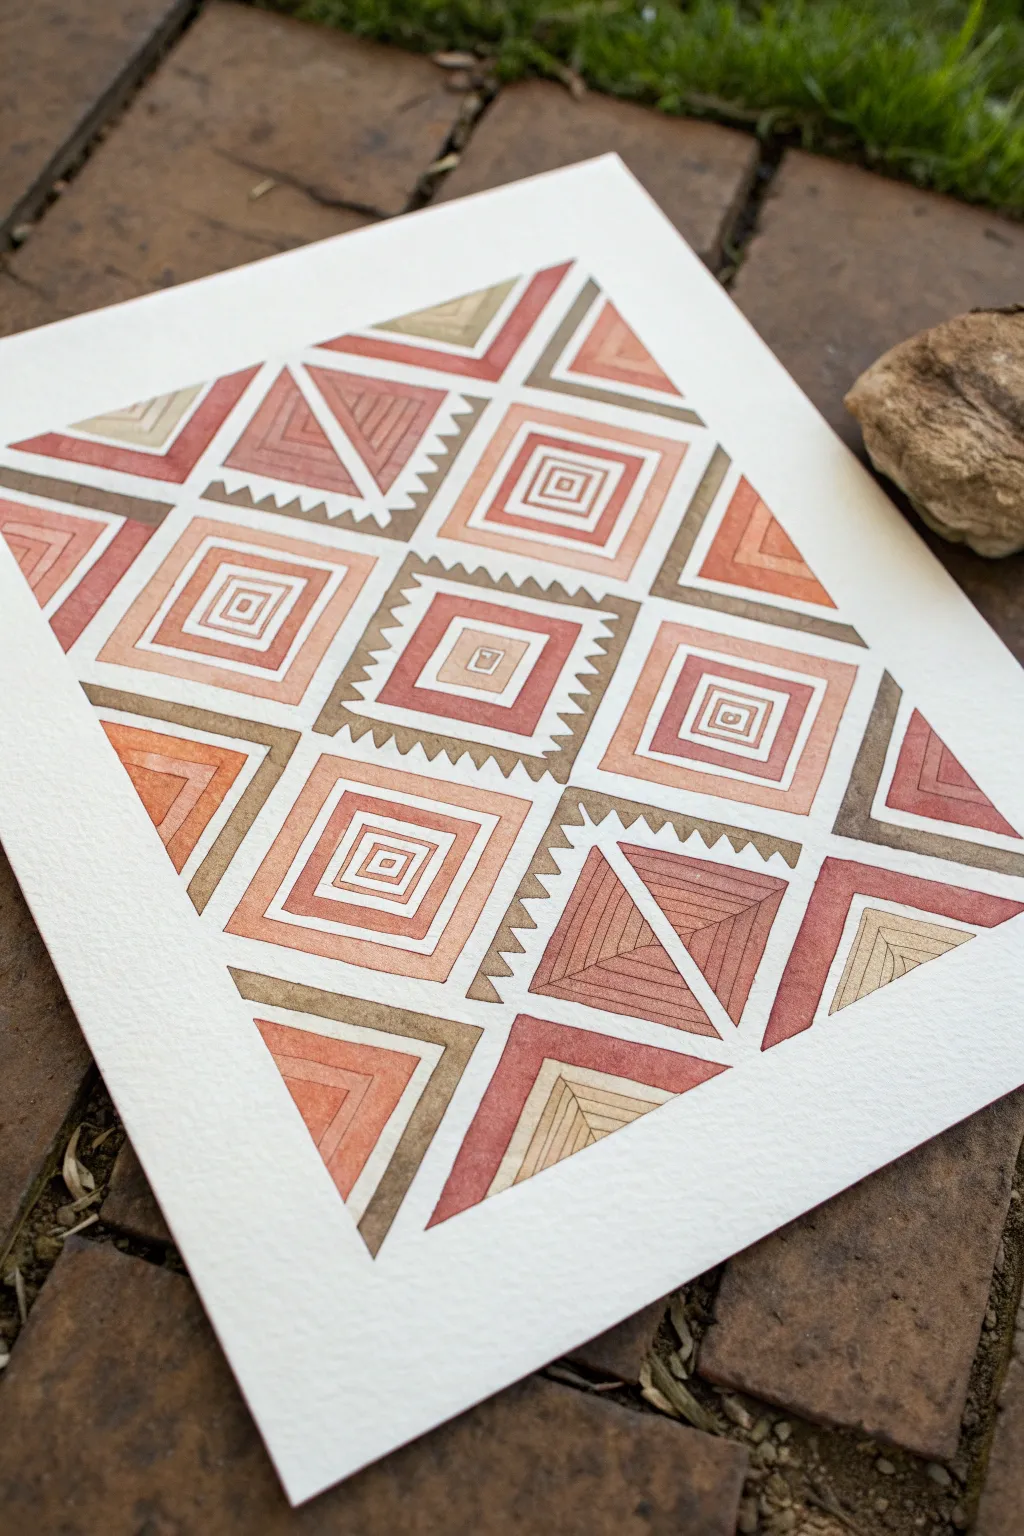
Follow along to create this warm, Southwest-inspired geometric pattern that plays with varying shades of terracotta, ochre, and sepia. The design features a pleasing rhythm of nested squares, triangles, and stepped fret motifs laid out on a clean white background.
Step-by-Step Tutorial
Materials
- Cold press watercolor paper (140lb/300gsm)
- Watercolor paints (terracotta, burnt sienna, yellow ochre, raw umber)
- Ruler
- Pencil (HB or H)
- Fine liner brush (size 0 or 1)
- Flat shader brush (small, size 4)
- Compass or square tool (optional but helpful)
- Eraser (kneaded is best)
- Masking tape
Step 1: Drafting the Layout
-
Tape down the paper:
Begin by taping your watercolor paper to a board or table surface using masking tape. This prevents the paper from buckling when wet and creates a clean border. -
Establish the main grid:
Using your ruler and pencil, lightly draw a 3×4 grid of squares. The exact size is up to you, but 2-inch or 3-inch squares work well for this level of detail. Leave a small, consistent gap of white space between each square. -
Fill the diagonal triangles:
In the corner squares and alternating middle squares, draw a range of nested triangles. For some, draw a diagonal line cutting the square in half, then echo that shape inward. -
Draft the concentric squares:
In alternating grid spaces, draw concentric squares. Start from the outer edge and work inward, creating a ‘tunnel’ effect. Keep your lines light so they don’t show through the paint later. -
Add the stepped fret borders:
Around select central squares, sketch a jagged, saw-tooth border. This ‘stepped fret’ motif is classic to the style. Make sure the points of the teeth face outward.
Wobbly Lines?
If your straight lines are shaky, try painting short, confident strokes rather than one long drag. You can also use the edge of a flat brush like a stamp for straight edges.
Step 2: Painting the Motifs
-
Mix your palette:
Prepare three distinct puddles of color: a deep reddish-brown (terracotta), a sandy beige or yellow ochre, and a darker, cooler brown like raw umber. Keep the washes relatively transparent. -
Start with the lightest tones:
Fill in the smallest, innermost shapes first using the yellow ochre mixture. I find starting from the center helps prevent smudging the wet paint with my hand. -
Block in the triangles:
Switch to your terracotta mix. Carefully paint the triangular sections, alternating between solid fills and lined textures. Use the fine liner brush to keep the edges crisp against the white paper. -
Paint the concentric square bands:
For the square tunnel designs, paint alternating bands of terracotta and white space. Ensure each band has fully dried before painting a neighbor if you decide to place colors side-by-side, though this design relies on white separation. -
Detail the corner accents:
Use the raw umber mix to paint the triangular corners that frame the central designs. These often anchor the corners of the grid blocks.
Step 3: Refining Borders and Details
-
Execute the saw-tooth edges:
Using your smallest brush and the raw umber paint, carefully fill in the saw-tooth or stepped borders you sketched earlier. This requires a steady hand; brace your wrist on a dry part of the table. -
Add linear texture:
Go back into the larger solid shapes (like the big triangles) and add fine parallel lines using a slightly darker version of the base color. This mimics woven textile patterns. -
Adjust values:
Look at the composition as a whole. If some terracotta areas look too pale, add a second glaze of color over them to deepen the contrast against the ochre sections. -
Check the white gaps:
The negative space is crucial here. Ensure the white lines separating the shapes remain clean. If you accidentally painted over a line, you can lift the paint gently with a damp clean brush if it’s still damp. -
Clean up:
Once the paint is completely bone-dry, gently erase any visible pencil marks with a kneaded eraser. Be careful not to scrub the paint, just lift the graphite. -
Reveal:
Peel off the masking tape slowly at a 45-degree angle to reveal your crisp white border.
Design Consistency
To keep the pattern balanced, mirror your color choices. If the top left corner is terracotta, paint the bottom right corner the same shade to create symmetry.
Step back and appreciate the geometric harmony you have created with this structured yet organic piece

PENCIL GUIDE
Understanding Pencil Grades from H to B
From first sketch to finished drawing — learn pencil grades, line control, and shading techniques.
Explore the Full Guide
Temple Wall Mural Texture
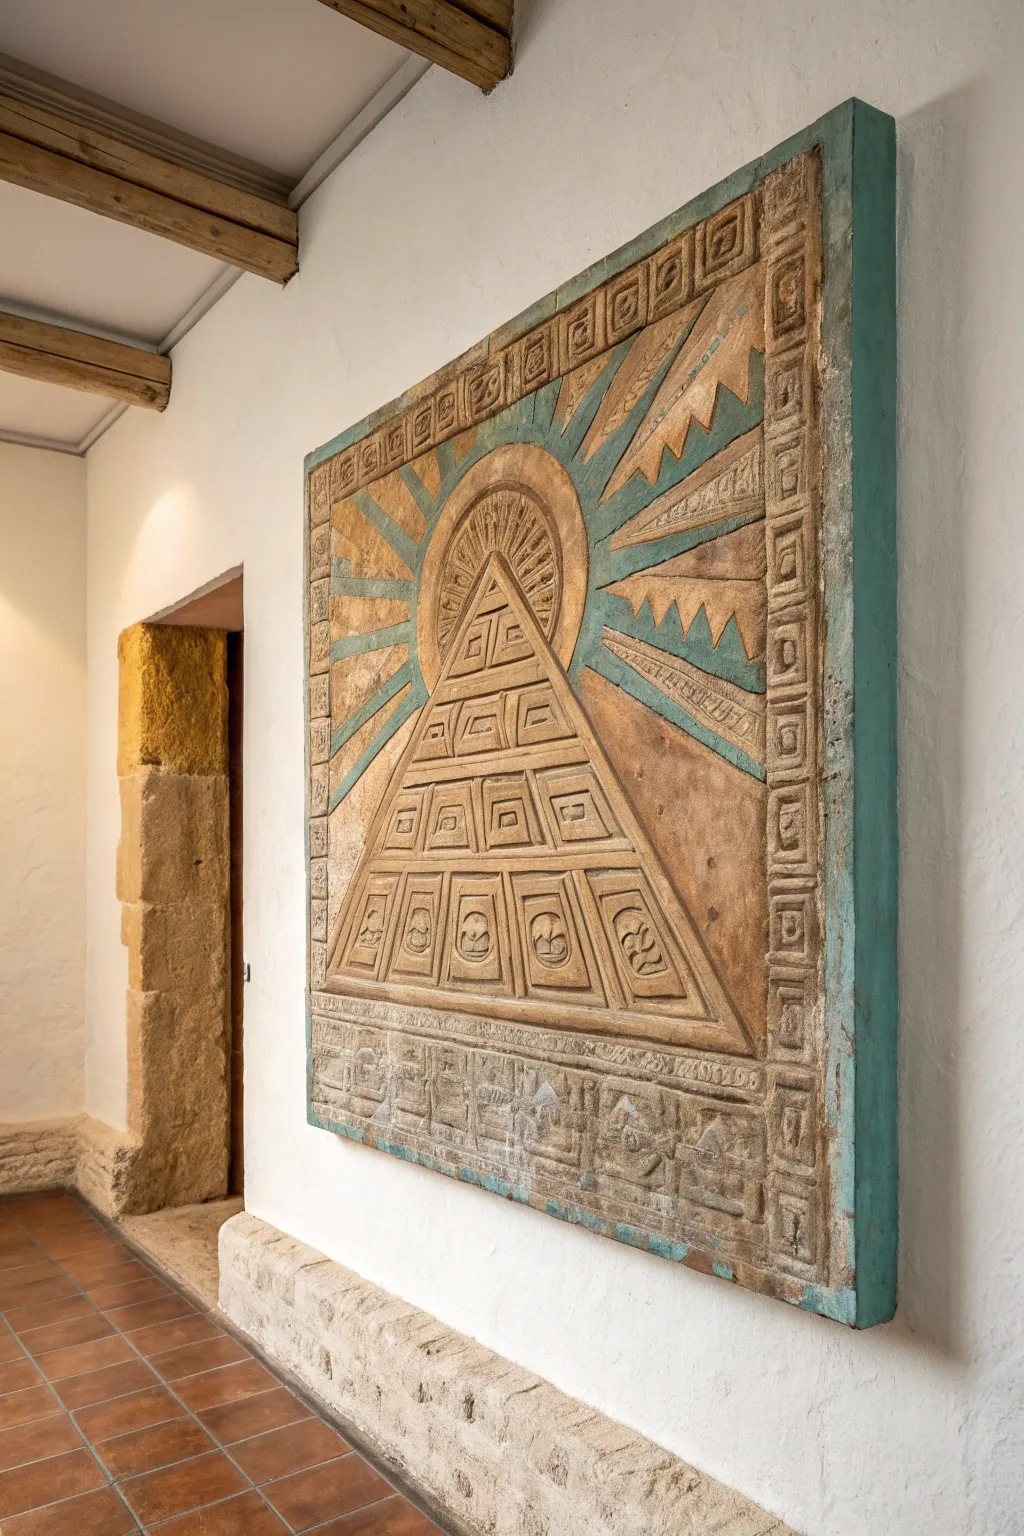
Transform a plain wall with this striking, textural mural that mimics the look of an ancient carved stone tablet. Using foam and specialized painting techniques, you’ll create a lightweight, 3D relief featuring a stylized pyramid and sunburst motif that feels like a heavy archaeological treasure.
Step-by-Step Guide
Materials
- High-density insulation foam board (1-2 inch thick)
- Utility knife or hot wire foam cutter
- Construction adhesive (foam-safe)
- Joint compound or plaster of Paris
- Large wooden panel or plywood (for backing)
- Acrylic paints (sand, terracotta, ochre, teal, charcoal)
- Sea sponge and textured rollers
- Carving tools or dull pencils
- Fine and medium grit sandpaper
- Matte sealant spray
Step 1: Base Construction & Carving
-
Prepare the Backing:
Cut your plywood or wooden panel to the desired size of your mural. Frame the edges with strips of wood to create a box-like depth, painting the outer sides a deep teal or weathered turquoise to match the photo’s border. -
Sketch the Design:
On your high-density foam board, sketch out the central pyramid, the radiating sun rays, and the intricate border patterns. Use a ruler to ensure the pyramid steps and geometric frames are precise. -
Rough Cut the Relief:
Using a utility knife or hot wire cutter, carefully cut out the main shapes. You aren’t cutting all the way through; instead, cut at an angle (beveling) to create the raised pyramid tiers and the recessed areas between the sun rays. -
Carve the Details:
With a dull pencil or specialized carving tool, press firmly into the foam to inscribe the smaller symbols inside the pyramid steps and the repeating geometric motifs in the outer border. The foam will compress, leaving a clean, indented line. -
Add Texture:
To remove the smooth, synthetic look of the foam, gently roll a textured stone roller over the surface or press a crumpled ball of aluminum foil into the ‘stone’ areas to create pits and imperfections. -
Mount to Backing:
Apply foam-safe construction adhesive to the back of your carved foam piece and press it firmly onto your wooden backing board. Let this cure according to the adhesive instructions.
Step 2: Plastering & Priming
-
Apply Joint Compound:
Dilute your joint compound slightly with water until it resembles pancake batter. Brush a thin, even coat over the entire foam structure. This hard shell protects the foam and provides an authentic plaster feel. -
Smooth and Sand:
Once the compound is fully dry, lightly sand high spots with fine-grit sandpaper. You want to keep some texture, so don’t polish it smooth, but remove any obvious brush strokes. -
Base Coat:
Paint the entire relief with a base coat of sandy beige or warm cream acrylic paint. Ensure you get the paint into every carved groove and crevice.
Melting Foam?
Check your spray paint and adhesives! Standard spray paint propellant eats Styrofoam. Ensure you actully seal the foam completely with joint compound first, or use water-based acrylics only.
Step 3: Faux Finish Painting
-
Apply the Wash:
Mix a darker brown or ochre paint with water to create a glaze. Brush this liberally over the piece, then immediately wipe the high points with a rag. The dark color will remain in the carved recesses, highlighting the symbols. -
Add Terracotta Tones:
Dry-brush a terracotta or rusty orange color onto the flat planes of the pyramid and the background sections. Use a very dry brush and light pressure to build up color slowly, mimicking baked earth. -
Teal Accents:
Using a small brush, carefully paint the recessed areas between the sun rays and the outer edge of the frame with a weathered teal or turquoise paint. I like to blot this paint while wet to make it look uneven and aged. -
Simulate Aging:
Mix a charcoal grey wash and flick tiny specks of it onto the mural using an old toothbrush. Focus heavier application near the bottom and corners to simulate dirt accumulation and ancient patina. -
Highlighting:
Once all layers are dry, take a creamy white paint and very lightly dry-brush just the sharpest edges of the pyramid steps and the border relief to make the details pop. -
Seal the Work:
Finish the piece with two coats of matte sealant spray. This unifies the sheen of the different paints and protects your faux stone from dust and handling.
Pro Tip: Ancient Texture
Mix a handful of fine sand into your base coat paint. When dry-brushed later, the sand grains catch the light and create a convincing sandstone grit that feels real to the touch.
Now you have a stunning, historically inspired centerpiece that looks heavy enough to require a crane but hangs easily on any wall
Serpent Motif With Geometric Scales
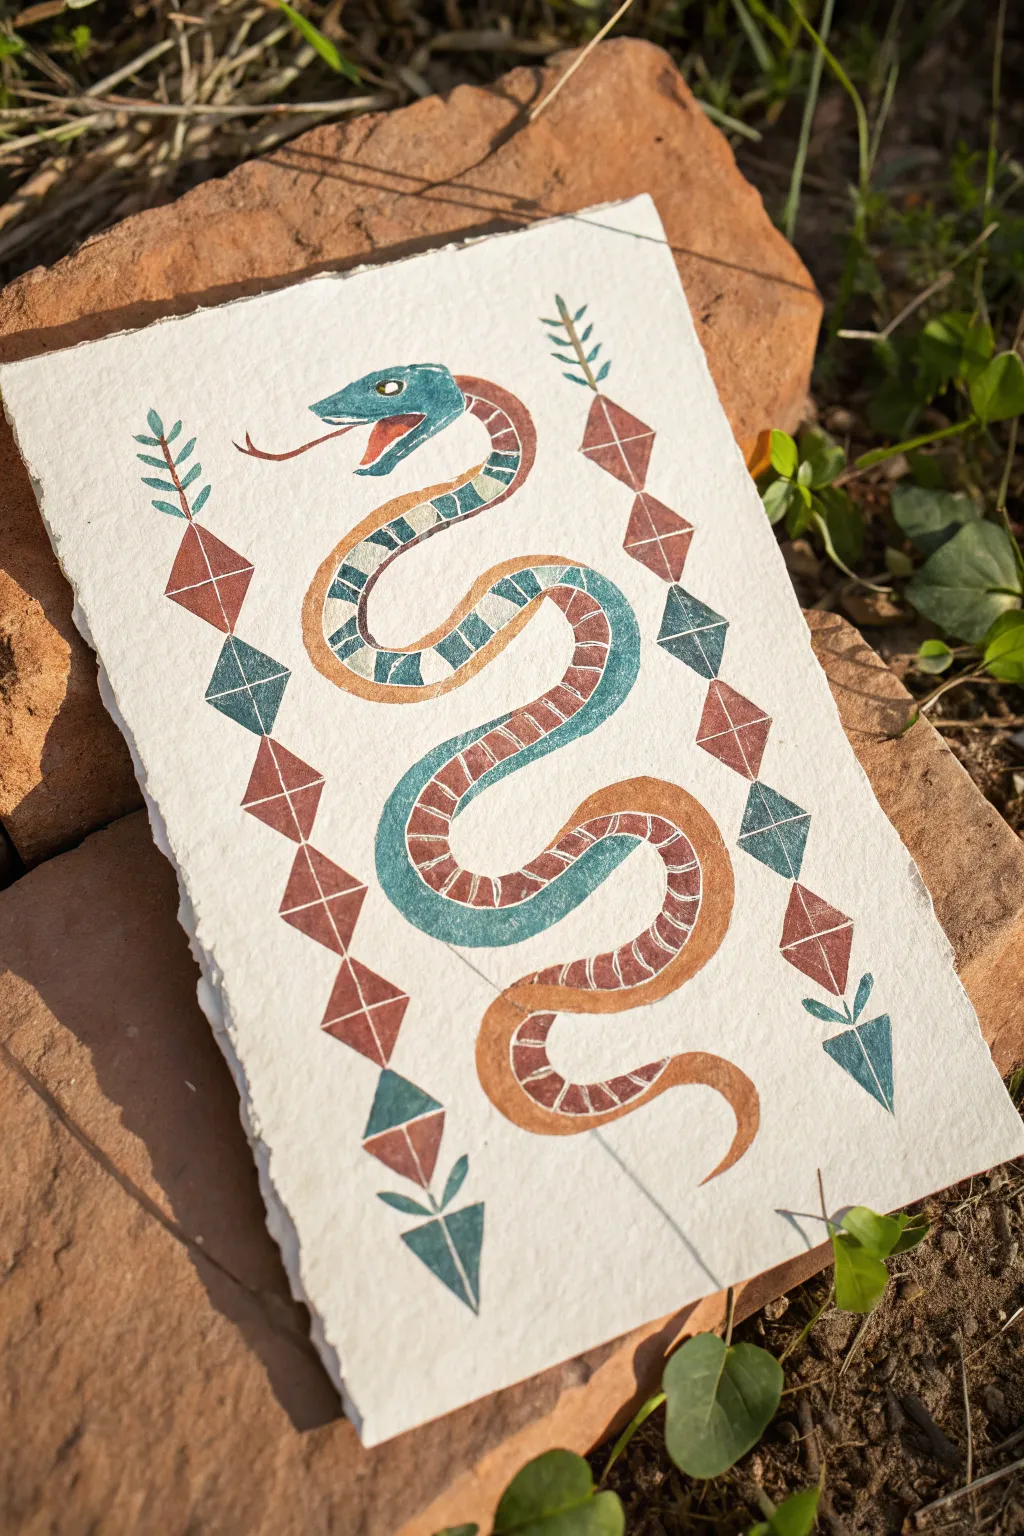
This project captures the mythic elegance of Mesoamerican art through a stylized, coiled serpent adorned with geometric scales. Using earthy tones on textured handmade paper, you’ll create a piece that feels both ancient and refreshingly modern.
Detailed Instructions
Materials
- Heavyweight handmade paper (deckle edge recommended)
- Pencil (HB or lighter)
- Kneadable eraser
- Gouache or matte acrylic paints (burnt sienna, teal/turquoise, terracotta, off-white)
- Small round brushes (size 2 and 4)
- Very fine liner brush (size 0 or 00)
- Mixing palette
- Cup of water
- Paper towels
Step 1: Drafting the Design
-
Center the Form:
Begin by lightly sketching main ‘S’ curve of the snake’s body in the center of your paper. Keep the curves wide and uniform to allow space for the internal patterns later. -
Define the Outline:
Flesh out the snake’s thickness. The body should taper slightly towards the tail but remain fairly consistent in width through the midsection. Add the triangular head at the top left, with an open jaw. -
Sketch the Borders:
On the left and right sides of the snake, lightly draw vertical guidelines. Along these lines, sketch the stacked diamond shapes and arrow-fletching details that frame the central figure. -
Map the Scales:
Inside the snake’s body, draw segmentation lines. These don’t need to be perfectly evenly spaced; a little variation adds to the hand-painted folk aesthetic.
Step 2: Blocking in Color
-
Mix the Earth Tone:
On your palette, mix a burnt sienna or terracotta shade. Dilute it slightly with water so it flows smoothly but remains opaque. -
Paint the Underbelly:
Using a size 4 brush, fill in the bottom edge or ‘underbelly’ strip of the snake’s body with your terracotta mix. This creates a continuous ribbon of color that grounds the design. -
Mix the Teal:
Create a muted teal or turquoise color. If your paint is too bright, add a tiny dot of the terracotta color to desaturate it and make it harmonize with the brown. -
Fill the Head and Body Segments:
Paint the head solid teal. Then, alternating between your teal and terracotta mixes, fill in the segments along the top half of the snake’s body. Leave very thin gaps between colors if you like, or let them touch. -
Paint the Border Symbols:
Move to the side decorations. Paint the diamonds in an alternating pattern of teal and terracotta. Use the tip of the brush to keep the points sharp.
Clean Lines Pro Tip
For the tiny white details, load your liner brush with paint and then roll the tip on your palette to create a needle-point shape before touching paper.
Step 3: Detailing and Refining
-
Add Leaf Motifs:
At the top and bottom of the side borders, paint the stylized leaf or feather shapes using the teal mix. Press down on the brush and lift up quickly to create the tapered end. -
Create the Tongue:
Mix a small amount of pale red or pinkish-brown. With your finest liner brush, paint a forked tongue extending from the snake’s mouth. -
Outline the Segments:
Once the base colors are completely dry, mix an off-white or cream color. This works best if the paint is creamy, almost like yogurt consistency. -
Paint the Scale Dividers:
Using the liner brush and the off-white paint, carefully draw thin lines separating the colored segments on the snake’s back. This mimics the look of traditional mosaic or stonework. -
Add Texture Lines:
Paint short, curved white hatch marks inside the terracotta underbelly strip. These should follow the curve of the snake’s body. -
Detail the Diamonds:
Add white cross-hatching or simple ‘X’ lines through the center of the border diamonds. This simple addition instantly makes the geometric shapes feel intricate. -
Final Facial Features:
Paint a small white circle for the eye on the teal head. Once dry, add a tiny black dot for the pupil to bring the serpent to life. -
Cleanup:
Wait until the painting is bone dry. Gently erase any visible pencil lines that weren’t covered by the gouache, being careful not to rub the texture off the paper.
Antique Finish Level Up
Make a very watery wash of tea or diluted brown ink and speckle it over the final dried piece with a toothbrush to simulate aged parchment.
Frame your finished serpent in a simple wood frame to highlight the beautiful texture of the handmade paper


Aztec Shield Design Painting
Embrace ancient artistry with this Aztec-inspired shield design, featuring warm terracotta tones, deep teal accents, and striking geometric patterns. This project transforms a simple wooden round into a stunning piece of wall decor that feels both historical and perfectly modern.
Step-by-Step Guide
Materials
- 12-inch wooden round or canvas board
- Gesso or white acrylic primer
- Acrylic paints: Terra Cotta, Deep Teal, Cream/Off-White, Black
- Medium flat brush (approx. 1 inch)
- Small round brush (size 2 or 4)
- Fine liner brush (size 0 or 00)
- Compass or round objects for tracing
- Ruler
- Pencil and eraser
- Matte varnish (optional)
Step 1: Base Preparation & Sketching
-
Prime the Surface:
Begin by coating your wooden round with gesso. I like to apply two thin coats, sanding lightly in between, to create a smooth, stone-like texture for the paint. -
Establish the Center:
Find the exact center of your circle. Use a compass to draw a small central circle (about 1.5 inches wide) and a larger ring around it (about 3 inches wide). -
Divide the Space:
Using a ruler, lightly draw two intersecting lines through the center to divide the circle into four equal quadrants. These will serve as guide rails for your main structural lines later. -
Draw the Rays:
Sketch four prominent diagonal lines radiating from the center ring to the edge, creating a large ‘X’ shape. These will become the thick, rust-red dividing bars visible in the design. -
Draft the Quadrant Details:
In the spaces between your ‘X’ structure, lightly sketch different geometric motifs. One section should have leaf-like shapes, another triangular wedges, and another striped patterns.
Step 2: Blocking in Color
-
Apply the Cream Background:
Paint the outer rim and any negative space within the design with your Cream or Off-White paint. This provides a neutral backdrop that makes the earth tones pop. -
Paint the Central Rings:
Fill the innermost circle with Deep Teal. Next, paint the wide ring surrounding it with Terra Cotta, leaving a thin gap of white between them if possible (or paint over it later). -
Create the Radiating Bars:
Using your flat brush, paint the four main diagonal bars in Terra Cotta. Ensure the edges are crisp and straight. -
Fill Geometric Sections:
Work through the quadrants one by one. Paint the large triangular wedges in alternating Terra Cotta and Deep Teal. Let the paint dry completely before moving to adjacent sections to avoid smearing.
Wobbly Lines?
If your hand shakes while doing the long straight lines, use the edge of a ruler as a guide, but raise it slightly off the surface with coins so paint doesn’t bleed under.
Step 3: Adding Details & Linework
-
Outline the Structure:
Switch to your fine liner brush and black paint mixed with a tiny drop of water for flow. Carefully outline the central circles and the long terracotta bars. -
Paint Leaf Motifs:
In the quadrant dedicated to nature shapes, use the round brush to paint simple, elongated leaf forms in Deep Teal. Once dry, outline them thinly in black. -
Add Striped Patterns:
For the striped section, paint thin parallel lines in Terra Cotta. Allow some to be solid blocks and others to be outlines. -
Detail the Triangles:
On the terracotta triangles, use your liner brush to add small black dots, stars, or parallel lines to create texture and visual interest. -
Decorate the Rim:
Around the outer edge of the white board, paint a series of small dots. Alternate the colors between Black, Terra Cotta, and Deep Teal for a rhythmic border.
Make it Ancient
Mix a tiny amount of brown paint with water to create a ‘wash.’ Lightly brush this over the dried white areas and wipe it off quickly to create an aged, parchment look.
Step 4: Finishing Touches
-
Refine the Lines:
Step back and check your black outlines. If any lines look shaky, tidy them up by carefully painting over the edges with the background color. -
Add Center Details:
In the very center teal circle, add a ring of small white or cream dots to draw the eye inward. -
Seal the Work:
Once the paint is fully cured (give it at least a few hours), apply a clear matte varnish to protect the surface and unify the sheen.
Hang your finished shield with pride and enjoy the warmth these earth tones bring to your space
Four Directions Color Map
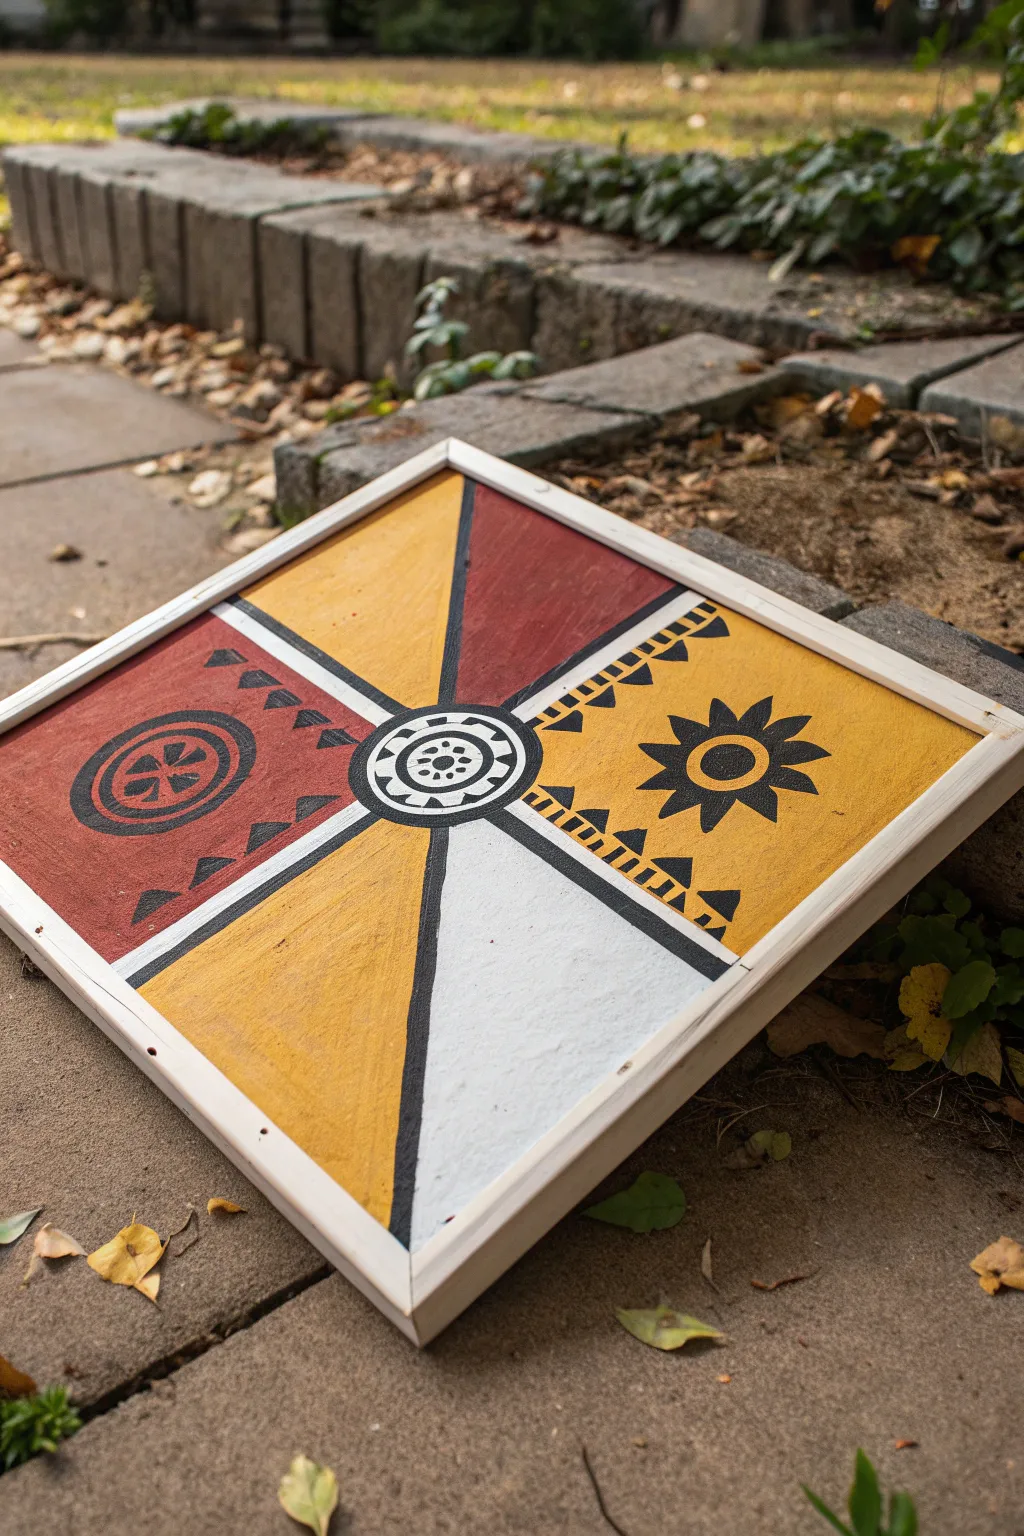
This striking geometric artwork uses bold sections of earthy red, mustard yellow, and crisp white to create a balanced composition inspired by traditional motifs. The centered radial design and sharp black outlines give it a powerful, distinct look perfect for a rustic or bohemian space.
How-To Guide
Materials
- Square wood panel (approx. 12×12 inches)
- Simple pine lattice strips (for the frame)
- Acrylic paints: Terra Cotta, Mustard Yellow, Titanium White, Carbon Black
- Ruler or straight edge
- Compass or round objects for tracing
- Pencil and eraser
- Painter’s tape (optional but helpful)
- Flat shader brushes (medium and small)
- Fine liner brush (size 0 or 1)
- Wood glue
- Sandpaper (220 grit)
Step 1: Preparation & Base Layout
-
Prepare the surface:
Begin by lightly sanding your wood panel to ensure a smooth painting surface. Wipe away any dust with a damp cloth or tack cloth before proceeding. -
Prime the background:
Apply a base coat of white acrylic paint across the entire panel. This ensures your yellow and red tones will pop rather than sinking into the wood grain. Let this layer dry completely. -
Find the center:
Use your ruler to draw diagonal lines from corner to corner. Where they cross is your exact center point. -
Draft the central medallion:
Using a compass or a small jar lid, draw a circle about 2-3 inches in diameter in the center. Draw a smaller circle inside that one for the inner ring detail. -
Create the segments:
Draw four lines radiating from the central circle to the outer edges. Don’t go straight to the corners; instead, offset the lines slightly to create dynamic, uneven triangular sections as seen in the reference.
Steady Hand Trick
For the straight black dividing lines, use a ruler simply as a raised hand-rest (bridge) rather than tracing against it, to prevent paint from bleeding underneath.
Step 2: Blocking in Color
-
Paint the red sections:
Identify the two large sections that will be red (top and left in the reference). Using a flat brush, fill these areas with terra cotta paint. You may need two coats for full opacity. -
Paint the yellow sections:
Clean your brush and fill the corresponding yellow sections (right and bottom-left) with your mustard yellow paint. Be careful near the pencil lines to keep edges crisp. -
Paint the white section:
Fill the remaining bottom-right triangular section with fresh titanium white paint. Even though the primer is white, a fresh topcoat adds texture and brightness. -
Paint the central medallion base:
Paint the background of the outer ring of the central circle white, and leave the very center for later detailing.
Step 3: Adding Details & Motifs
-
Outline the main divisions:
Once the color blocks are bone dry, use a small flat brush or a steady liner brush with black paint to go over your initial pencil division lines. Make these lines thick and bold. -
Draft the symbols:
Lightly sketch the internal symbols with pencil: a sunburst on the right yellow panel, a circular shield motif on the left red panel, and the jagged borders. -
Paint the black sunburst:
Using your fine liner brush and black paint, carefully fill in the sun shape on the right. Start with the center circle, then pull the point of your brush outward for the rays. -
Add the red section details:
Paint the concentric circle motif on the left red panel. Add the small black triangles along the divider lines, ensuring the tips point inward. -
Detail the center:
Refine the central medallion with black paint. Add a thick black outline, paint the inner circle design, and add small dots around the white ring using the backend of your paintbrush. -
Create the jagged border:
On the yellow section to the right, paint the intricate border pattern that runs parallel to the black divider lines. Take your time with the small rectangular dashes.
Make it Weathered
After the paint dries, lightly sand the entire surface with fine-grit sandpaper to distress the paint and expose bits of wood for an authentic aged artifact look.
Step 4: Finishing Touches
-
Touch up edges:
Check the perimeter of your painting. If any paint spilled over the sides, sand it off or paint the edges a solid color for a clean look. -
Prepare the frame:
Measure your pine lattice strips to fit flush against the sides of your wood panel. Cut them to length. I find painting the frame white before attaching it creates a nice contrast. -
Attach the frame:
Apply a thin bead of wood glue to the back of your frame strips and press them firmly against the edges of the panel. You can use masking tape to hold them in place while the glue sets. -
Seal the work:
Once all paint and glue is completely dry, brush on a clear matte varnish to protect the surface from dust and fading.
Hang your new geometric panel in an entryway or living room to add a warm, handcrafted focal point to the space
Sun Rays and Symbolic Animals
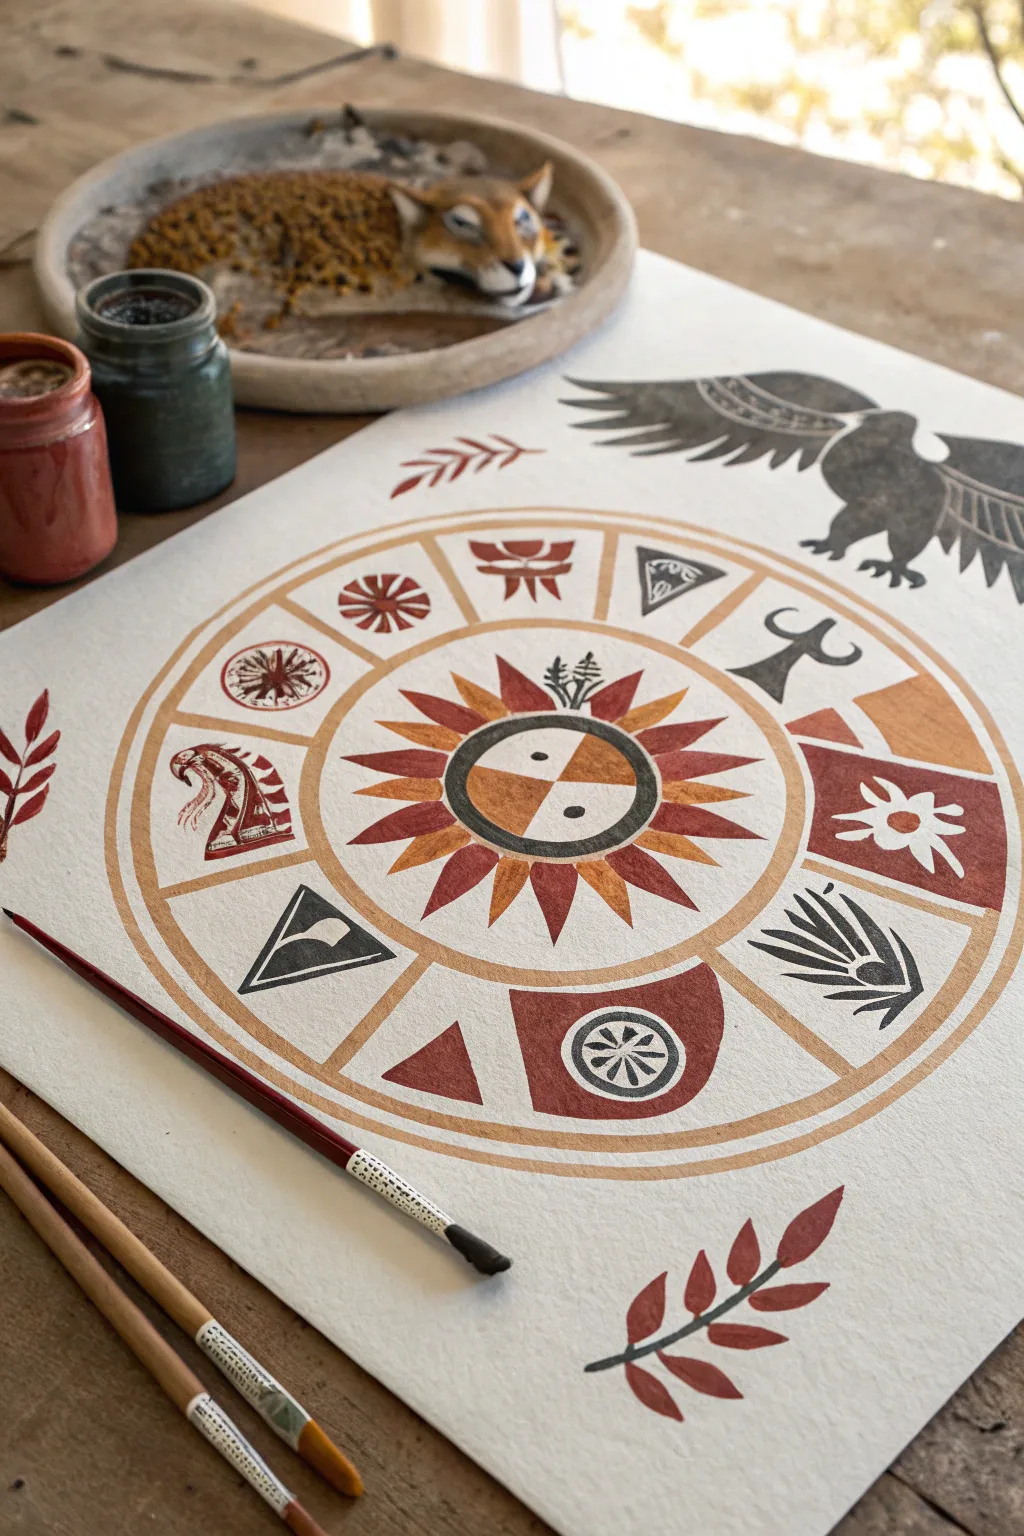
Embrace the earthy tones and geometric precision of this Aztec-inspired sun design. This project combines structured radial patterns with organic animal motifs, all rendered on textured paper for an authentic, aged look.
Step-by-Step Tutorial
Materials
- Heavyweight watercolor paper or mixed media art board (rough texture)
- Gouache paints (burnt sienna, ochre, terracotta, charcoal black, white)
- Pencil and eraser
- Compass and ruler
- Fine liner brushes (sizes 0 and 2)
- Flat shader brush (size 6)
- Mixing palette
- Masking tape
Step 1: Drafting the Geometry
-
Establish the center:
Tape your paper to your work surface to prevent buckling. Locate the exact center of your paper and mark it lightly with a pencil. -
Draw the concentric circles:
Using a compass, draw four concentric circles. The innermost will be the sun face, followed by the ray layer, then the segmented symbol ring, and finally the outer border. -
Divide the segments:
Use a ruler and protractor to divide the third ring (the symbol layer) into twelve distinct sectors. Radiate these lines outward from the center, keeping them light. -
Sketch the central motif:
Inside the innermost circle, sketch a yin-yang style division or a simple bisected circle, adding two small circles for eyes. -
Add the sun rays:
In the second ring, sketch sharp, triangular rays pointing outward. Alternate their sizes slightly to create a dynamic, radiating effect.
Gouache Consistency
Keep your gouache creamy, like melted ice cream. If it’s too thick, lines will crack; too thin, and the rich earthy colors won’t pop against the paper.
Step 2: Sketching the Symbols
-
Outline the sector symbols:
Fill the twelve sectors with varied motifs. Incorporate a serpent head, a sunburst within a square, a stylized plant, and abstract geometric shapes like triangles and semicircles as seen in the reference. -
Draw the guardian eagle:
In the upper right corner outside the main circle, lightly sketch a soaring eagle with spread wings. Focus on the silhouette first, then add feather details. -
Add floral accents:
Sketch simple, leafy branches in the bottom right and middle left areas to balance the composition.
Make It Ancient
Before painting, lightly stain your paper with strong tea or coffee and let it dry. This creates a parchment-like effect that enhances the historical vibe.
Step 3: Base Colors and The Sun
-
Mix your palette:
Prepare your gouache paints. You need a warm palette: mix burnt sienna with a touch of red for terracotta, use pure yellow ochre, and dilute charcoal black for the dark greys. -
Paint the central face:
Paint the bisected center circle. Use charcoal black for the outer ring and one half of the face, and warm terracotta for the other half, leaving the small eye circles distinct. -
Fill the sun rays:
Use your size 2 brush to fill the triangular rays. Alternate between deep red-orange and bright ochre for a vibrant, flickering quality.
Step 4: Filling the Symbol Ring
-
Paint the dividers:
Use a pale ochre wash to paint the circular bands and the dividing lines between the twelve sectors. I like to keep this paint rather thin so the paper texture shows through. -
Block in geometric backgrounds:
For sectors that have colored backgrounds (like the square sunburst or the semicircle), fill in the solid terracotta or dark red standard shapes first. -
Detail the icons:
Switch to your size 0 liner brush. Carefully paint the individual symbols—the black serpent, the grey plants, and the red abstract forms. Steady your hand against the table for these fine lines.
Step 5: Final Elements
-
Paint the eagle:
Fill in the eagle silhouette with a charcoal grey. Once the base layer is dry, use a lighter grey or white to add the scalloped feather details on the wings. -
Color the leaves:
Paint the floating leaf motifs using the deep red-terracotta mix. Use a single stroke for each leaf, pressing down and lifting up to create the tapered shape. -
clean up outlines:
Erase any visible pencil marks that haven’t been covered by paint. If needed, sharpen any fuzzy edges on the geometric shapes with a tiny amount of fresh paint.
Step back and admire how the geometric order balances with the vibrant, earthy spirit of your Aztec sun wheel
Turquoise and Gold Mosaic Effect
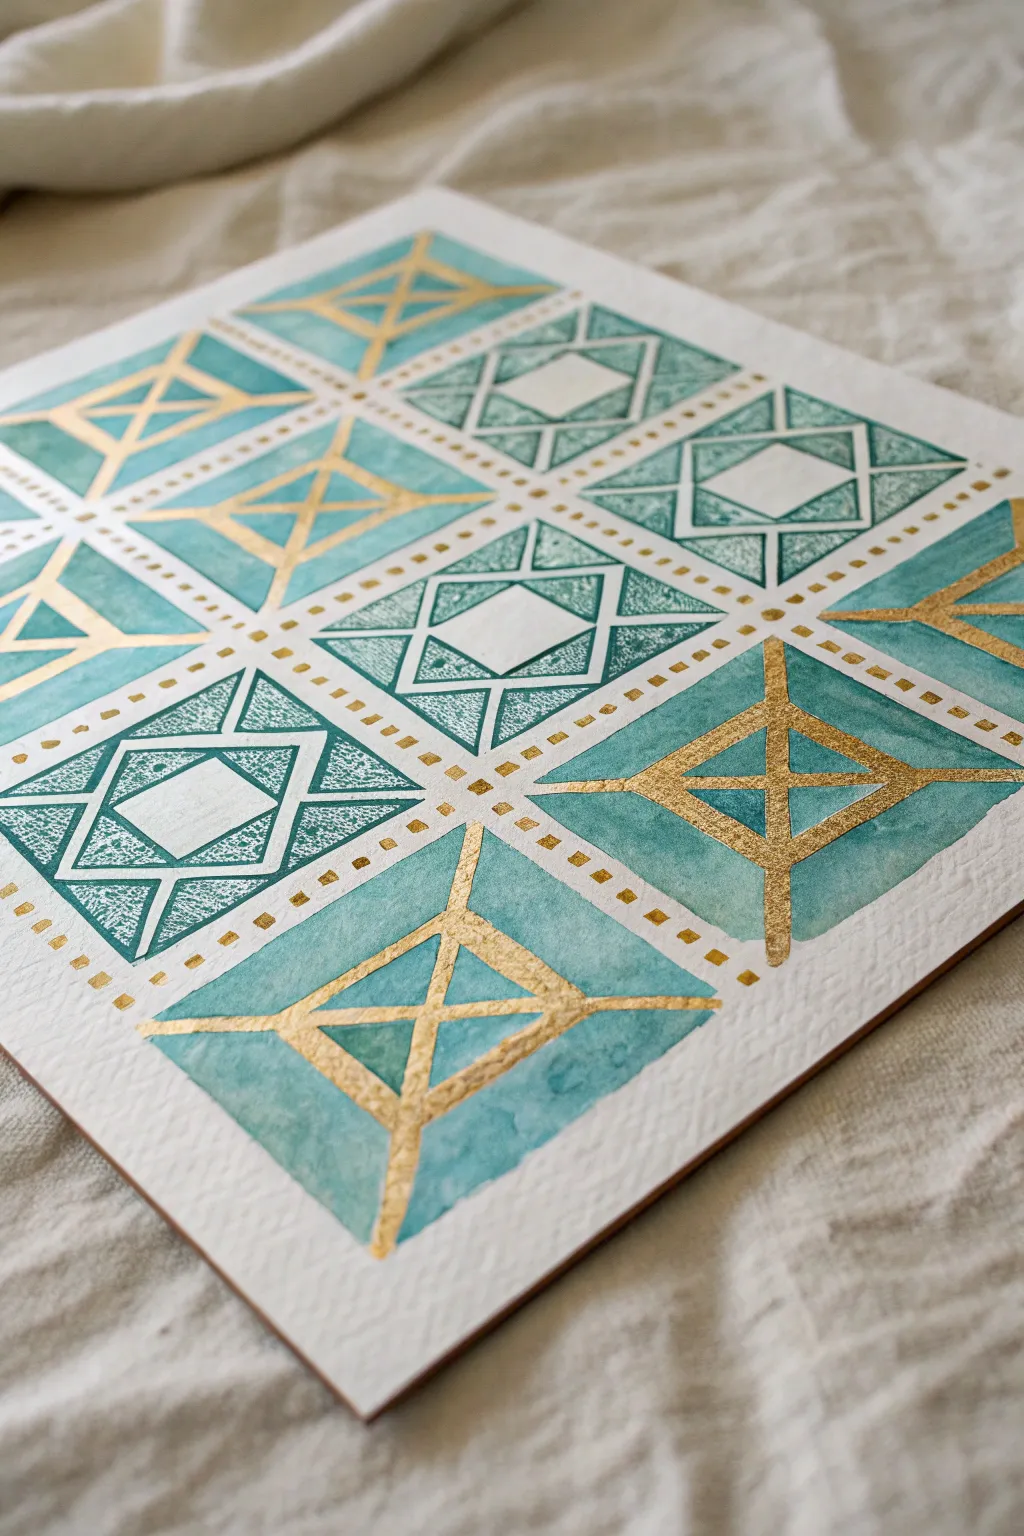
This elegant watercolor project combines calming turquoise washes with striking gold metallic accents to create a faux-mosaic effect. The alternation between solid gold linework and intricate negative space patterns gives the piece a sophisticated, modern Aztec feel.
Step-by-Step Guide
Materials
- Cold press watercolor paper (300 gsm or heavier)
- Turquoise watercolor paint
- Gold metallic watercolor paint or gold gouache
- Masking fluid (drawing gum) with an applicator or old brush
- Ruler and pencil
- Fine round brush (size 1 or 2)
- Medium flat brush
- Painter’s tape or wash tape
- Eraser (kneaded preferred)
Step 1: Preparation & Masking
-
Grid Layout:
Begin by lightly sketching a 3×3 grid on your watercolor paper using a ruler and pencil. Ensure each square is equal in size, leaving a small, uniform gap between them to act as the ‘grout’ lines. -
Define the Patterns:
Lightly sketch the internal designs. For the intricate diamond squares, draw a diamond in the center and triangles in the corners. For the gold cross squares, mark the center point and the diagonal lines. -
Apply Masking Fluid:
This is a crucial step. Use masking fluid to block out the white lines in the ‘diamond’ squares. Carefully outline the central diamond and the geometric borders. Let this dry completely until it feels rubbery to the touch. -
Tape the Edges:
Secure the paper to your workspace with painter’s tape to prevent buckling and create a crisp white border around the entire artwork. -
Mask the Grout Lines:
If you have thin wash tape or masking tape, apply it over the pencil grid lines between the squares. This protects the white space between your painted tiles.
Uneven Gold Lines?
If your gold lines feel shaky, use a ruler as a guide. Turn the ruler upside down so the edge hovers slightly above the paper to prevents paint from bleeding under it.
Step 2: Painting the Turquoise
-
Mix Your Color:
Prepare a watery mix of turquoise paint. You want a semi-transparent consistency that allows the paper’s texture to show through, characteristic of watercolor. -
Paint the Diamond Squares:
Paint the wash over the areas with the masking fluid. The fluid will resist the paint, preserving the white lines underneath. Aim for an uneven, textured application to mimic stone or tile. -
Paint the Cross Squares:
Fill the alternating squares (where the gold crosses will go) with a solid wash of turquoise. I like to let the paint pool slightly in corners for natural variation, but keep it relatively flat. -
Dry Completely:
Allow the entire turquoise layer to bone dry. Use a hairdryer on a low, cool setting if you are impatient, but air drying is safest to keep the masking fluid intact. -
Remove Masking Fluid:
Gently rub away the dried masking fluid with your finger or a rubber cement pick. You should reveal crisp white geometric lines within the turquoise squares.
Step 3: Gilded Details
-
Prepare the Gold:
Activate your gold pan watercolor with water or mix your gold gouache to a creamy, opaque consistency. It needs to be thick enough to cover the turquoise without bleeding. -
Draw the Gold Crosses:
Using your fine round brush, paint the ‘X’ shape over the solid turquoise squares. Start from the corners and pull toward the center. Add a vertical and horizontal line intersecting the center to complete the star-like shape. -
Add Dotted Accents:
Dip the tip of your brush (or use a stylus) into the gold paint. Carefully add a row of small gold dots along the white ‘grout’ lines separating the squares. This ties the composition together. -
Refine Edges:
If the gold lines look too thin or shaky, go over them once more to build opacity and sharpness. -
Final Cleanup:
Once the gold is entirely dry, gently erase any remaining visible pencil marks. Peel off the border tape slowly, pulling away from the painting at a 45-degree angle.
Masking Magic
Don’t shake your masking fluid bottle before use, or you’ll get bubbles. Instead, gently roll the bottle between your hands to mix it smoothly.
Step back and admire the interplay of matte turquoise and shimmering gold as the light catches your new artwork
Minimal Aztec Linework on Solid Color
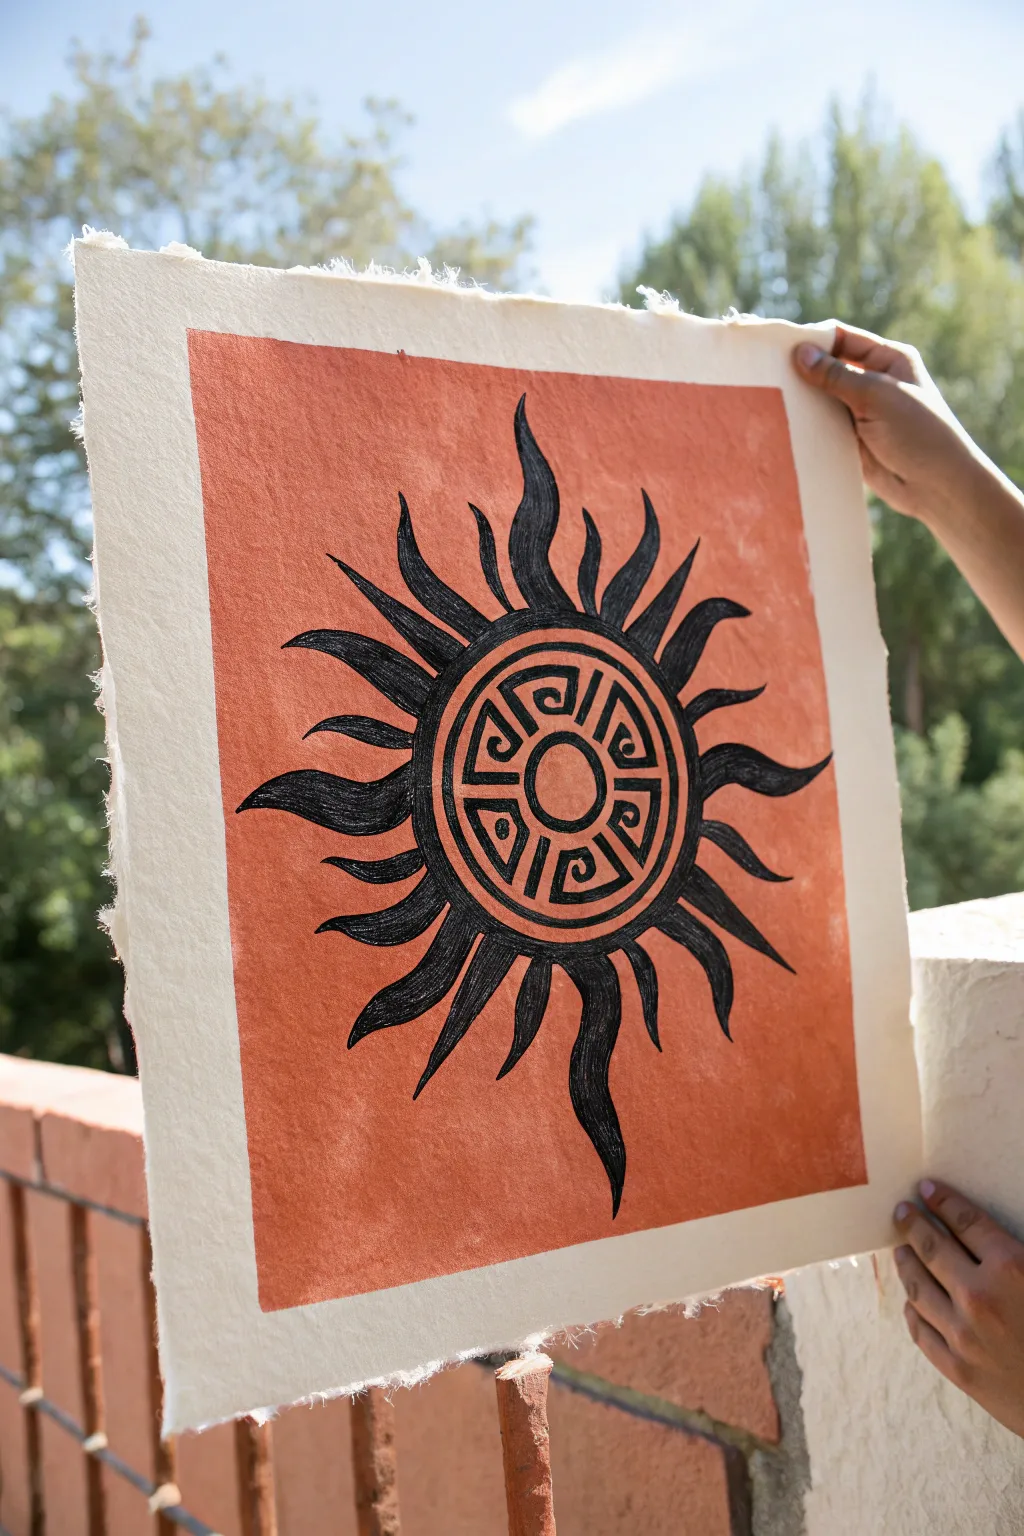
Capture the warmth of ancient artistry with this striking project featuring bold black linework against a vibrant rust-colored background. The texture of handmade paper adds an authentic, aged feel that perfectly complements the minimalist Aztec-inspired sun design.
Detailed Instructions
Materials
- Heavyweight handmade cotton rag paper with deckle edges (approx. 11×14 inches)
- Rust or terracotta acrylic paint (matte finish)
- Black ink pen or fine liner (archival quality, waterproof)
- Black brush pen or small round paintbrush with black acrylic ink
- Wide flat paintbrush (1.5 – 2 inches)
- Ruler
- Pencil
- Compass or circular object (approx. 3-4 inches diameter)
- Painter’s tape or masking tape
- Eraser
Step 1: Preparing the Background
-
Mask the Border:
Begin by deciding on the size of your colored background. Leave a generous margin of the natural paper exposed—about 2 to 3 inches on all sides. Use painter’s tape to create a crisp rectangular boundary for your painting area, pressing the edges down firmly to prevent bleed-through. -
Apply the Base Color:
Dip your wide flat brush into the rust or terracotta paint. Apply an even coat within the taped area. Because handmade paper is absorbent, you don’t need to dilute the paint much; a rich, opaque layer looks best. Brush in one consistent direction—either vertically or horizontally—for a clean finish. -
Let it Dry completely:
Allow the paint to dry fully. This is crucial because drawing on damp paper will tear the fibers and ruin your pen tips. Wait at least 30-45 minutes, or use a hair dryer on a cool setting if you’re impatient. -
Reveal the Edge:
Once the paint is bone-dry to the touch, very slowly peel back the painter’s tape at a 45-degree angle. This reveals the sharp contrast between the painted rectangle and the creamy, textured paper border.
Tape Trick
Before applying tape to the paper, stick it to your clothes once or twice to reduce tackiness. This prevents it from tearing the delicate handmade paper fibers upon removal.
Step 2: Drafting the Design
-
Find the Center:
Using your ruler and a light pencil touch, lightly mark the absolute center of your painted rectangle. This will anchor your sun motif. -
Draw the Inner Circles:
Use a compass to draw the central circle of the sun. Create three concentric rings: a small inner circle, a middle ring for the geometric pattern, and the outer boundary ring. If you don’t have a compass, tracing jar lids or cups works perfectly here. -
Sketch the Rays:
Lightly sketch the wavy, flame-like rays radiating outward. Aim for an organic, flowing look rather than perfect symmetry. Notice how the rays in the example curve slightly clockwise, giving the sun a sense of motion. -
Draft the Aztec Pattern:
Inside the middle ring you drew earlier, sketch the geometric ‘step’ or ‘spiral’ motifs. These are repetitive blocky shapes. Take your time spacing them out so they fit evenly around the circle.
Step 3: Inking the Sun
-
Outline the Center:
Switch to your black ink pen or fine liner. Carefully trace the concentric circles first. A steady hand is key here, but slight wobbles add to the handmade charm. -
Fill the Geometric Pattern:
Ink the Aztec designs within the central ring. Use the fine liner to outline the shapes, and then fill in the negative space (the background behind the spirals) with solid black ink to make the pattern pop. -
Outline the Rays:
Trace your penciled sun rays with the fine liner to establish their shape. Ensure the points of the rays are sharp and the curves are smooth. -
Fill the Rays – Part 1:
For filling the large black areas of the rays, I prefer switching to a brush pen or a small paintbrush with black acrylic ink. This covers the textured paper surface much better than a marker and saves time. -
Fill the Rays – Part 2:
Work ray by ray, filling them in with solid black. Be careful near the tips to maintain that sharp point. The texture of the paper might show through slightly, creating a lovely ‘stone-rubbing’ effect. -
Refine the Edges:
Go back over the edges where the rays meet the central circle with your fine liner to ensure the connection points look crisp and intentional.
Add Metallic Flair
For a stunning accent, replace the black ink in the center ring with gold leaf or gold metallic paint. It creates a regal contrast against the matte terracotta background.
Step 4: Final Touches
-
Check for Gaps:
Inspect the solid black areas. The heavy paper texture often leaves tiny white/orange speckles. You can leave these for texture or dab them with your ink for a solid, opaque look. -
Erase Pencil Marks:
Wait until the black ink is completely dry—give it a good 15 minutes to be safe. Then, gently erase any visible pencil guidelines. Rub softly to avoid damaging the paint layer. -
Flatten the Paper:
If the acrylic paint caused the paper to buckle slightly, place the finished (and dry) piece under a heavy book overnight to flatten it out perfectly.
Now you have a piece of history-inspired art ready to bring warmth to your walls
Aztec Skull Symbol Study
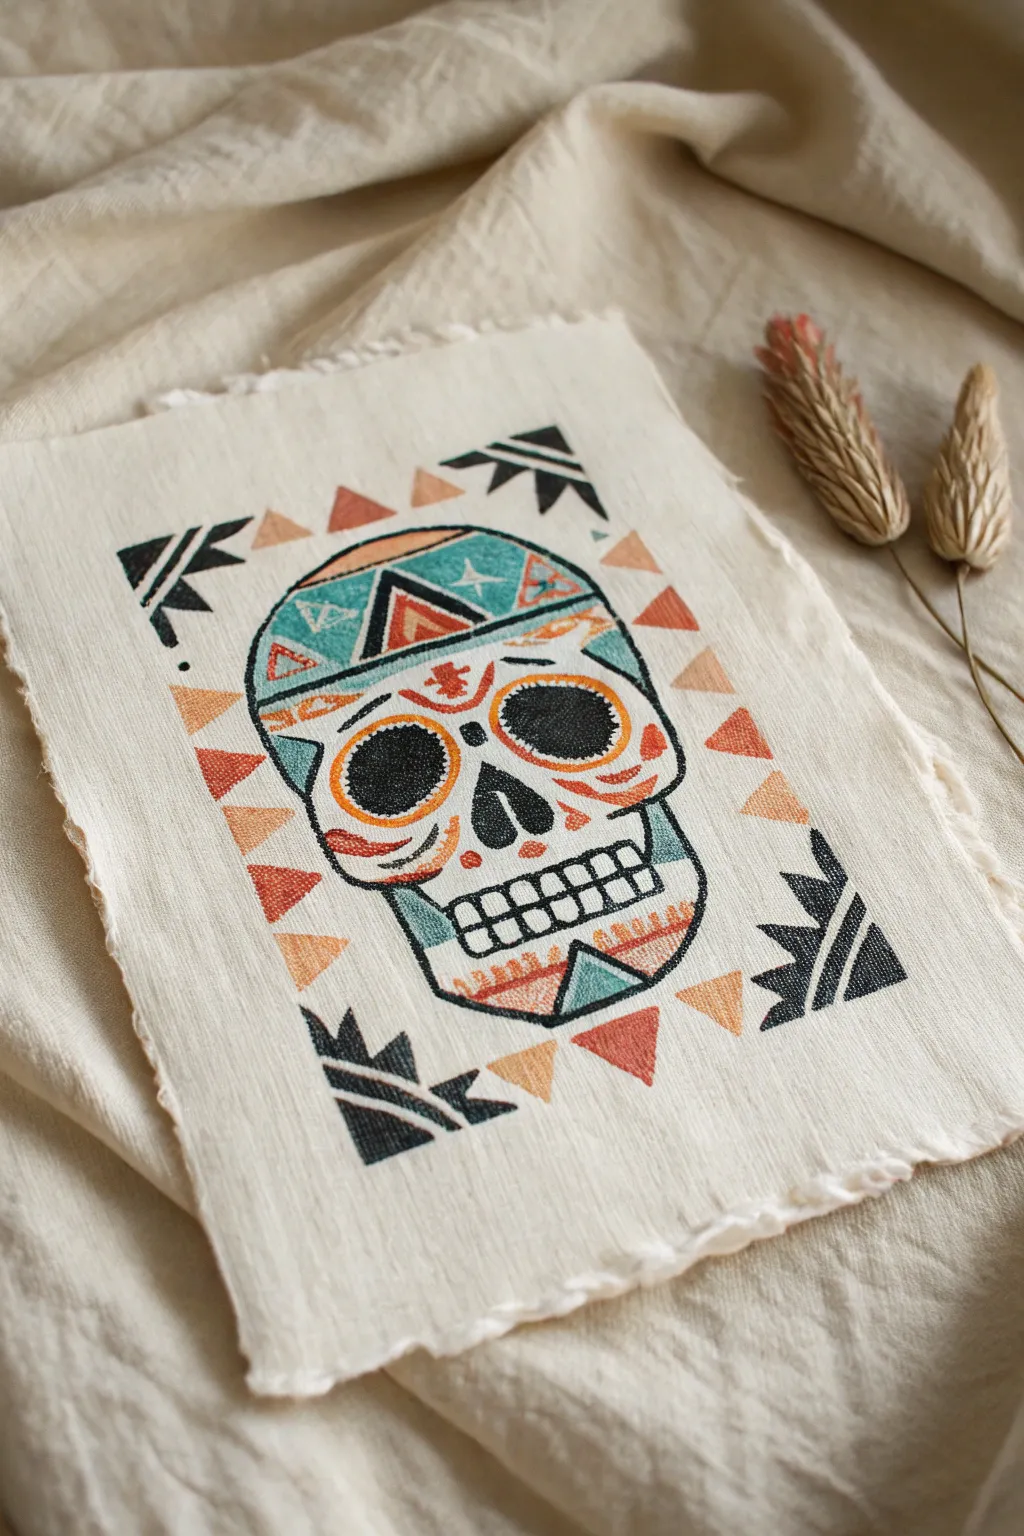
This rustic yet vibrant artwork combines the bold geometry of Aztec-inspired design with texture-rich printing techniques. The result is a striking skull motif on raw-edged fabric, perfect for framing or sewing into a larger textile piece.
Step-by-Step Tutorial
Materials
- Unbleached linen or calico fabric (medium weight)
- Soft-cut linoleum block or carving rubber
- Linoleum carving tools (V-gouge and U-gouge)
- Fabric ink or block printing ink (Black, Teal, Rust Orange, Peach)
- Brayer (rubber roller)
- Pencil and tracing paper
- Glass pane or acrylic sheet (for rolling ink)
- Small paintbrush (for touch-ups)
- Ruler
Step 1: Preparation and Transfer
-
Prepare the fabric canvas:
Cut your piece of linen or calico to approximately 8×10 inches. Don’t worry about neat edges; gently pull at the loose threads on all four sides to create a raw, frayed fringe effect which adds to the rustic charm. -
Draft the design:
On a piece of paper, sketch your skull design. Focus on symmetry. The skull should have large, rounded eye sockets, a triangular nose cavity, and a grid-like mouth. Incorporate geometric bands across the forehead and chin using triangles and diamonds. -
Transfer to block:
Place tracing paper over your sketch and trace the lines with a soft pencil. Flip the tracing paper graphite-side down onto your carving block. Rub the back firmly to transfer the image. Remember, the image will print in reverse, so this flipping step is crucial.
Stamp Sharpness
If your carved lines look messy, shallow carving is usually the culprit. Make sure your cuts are deep and steep-sided to prevent ink from pooling in the grooves.
Step 2: Carving the Block
-
Carve the outlines:
Using a fine V-gouge tool, carefully carve along the pencil lines. You want to remove the ‘white space’ and leave the design raised. Start with the main outline of the skull. -
Detail the interior:
Switch to a smaller gouge for intricate details like the teeth grid and the specific geometric shapes inside the forehead band. Carve away the areas inside the eye sockets that you want to remain fabric-colored, leaving the rim raised. -
Carve the border elements:
Don’t forget the floating geometric shapes around the skull. Carve out the corner arrows and the triangular sawtooth border thatframes the central skull. -
Clear the background:
Use a wide U-gouge to clear away all the large background areas of the block that shouldn’t print. Ensure you carve deep enough so the background ridges don’t pick up ink.
Level Up: Vintage Wash
After the ink is fully cured, lightly dampen the fabric with strong black tea and let it air dry. This tints the linen a deeper beige for an aged, archaeological look.
Step 3: Inking and Printing
-
Prepare the ink palette:
Squeeze a small amount of black fabric ink onto your glass pane. Roll the brayer back and forth until the ink sounds ‘sticky’ and has a velvety texture. -
Ink the main outlines:
This project works best with a multi-step inking process or selective painting. To mimic the example, roll black ink carefully over the details like the eyes, nose, teeth, and corner arrows. Wipe away any stray ink that gets on the colored sections with a cloth. -
Apply accent colors:
For the teal forehead band and cheek details, use a small sponge or a paintbrush to dab fabric ink directly onto the raised block surface. Repeat this with the rust and peach colors for the triangles and decorative markings. -
Test print:
Do a test print on a scrap piece of fabric first. Press the block face down purely to check if your colors are distinct and if you missed carving any background spots. -
Final Print:
Re-ink your block with the black and colored sections. Place your prepared frayed linen flat on a hard surface. Center the block over the fabric and press down firmly. -
Apply pressure:
While the block is down, use a clean brayer, a barren, or the back of a large spoon to rub in circular motions over the back of the block. This ensures the ink transfers deep into the fabric weave. -
The reveal:
Hold one corner of the fabric down and slowly peel the block away from the opposite corner. Lift it straight up to avoid smudging the design.
Step 4: Finishing Touches
-
Touch ups:
If the print looks a bit too faded in areas like the solid black eyes, use a fine paintbrush and a tiny bit of ink to fill in the gaps directly on the fabric. The texture of the linen will naturally create some gaps, which is desirable, so don’t fill it in completely solid. -
External details:
To get the sharp triangles bordering the skull (the orange and peach ones), you may find it easier to use a simple triangular stencil or freehand paint them now to ensure they align perfectly with the printed skull. -
Set the ink:
Allow the print to dry completely, usually for 24 hours. Once dry, heat set the fabric ink by ironing the reverse side of the fabric on a cotton setting for 3-5 minutes.
Your stylized Aztec skull is now ready to be displayed as a unique piece of wall art
Night-and-Day Duality Panel
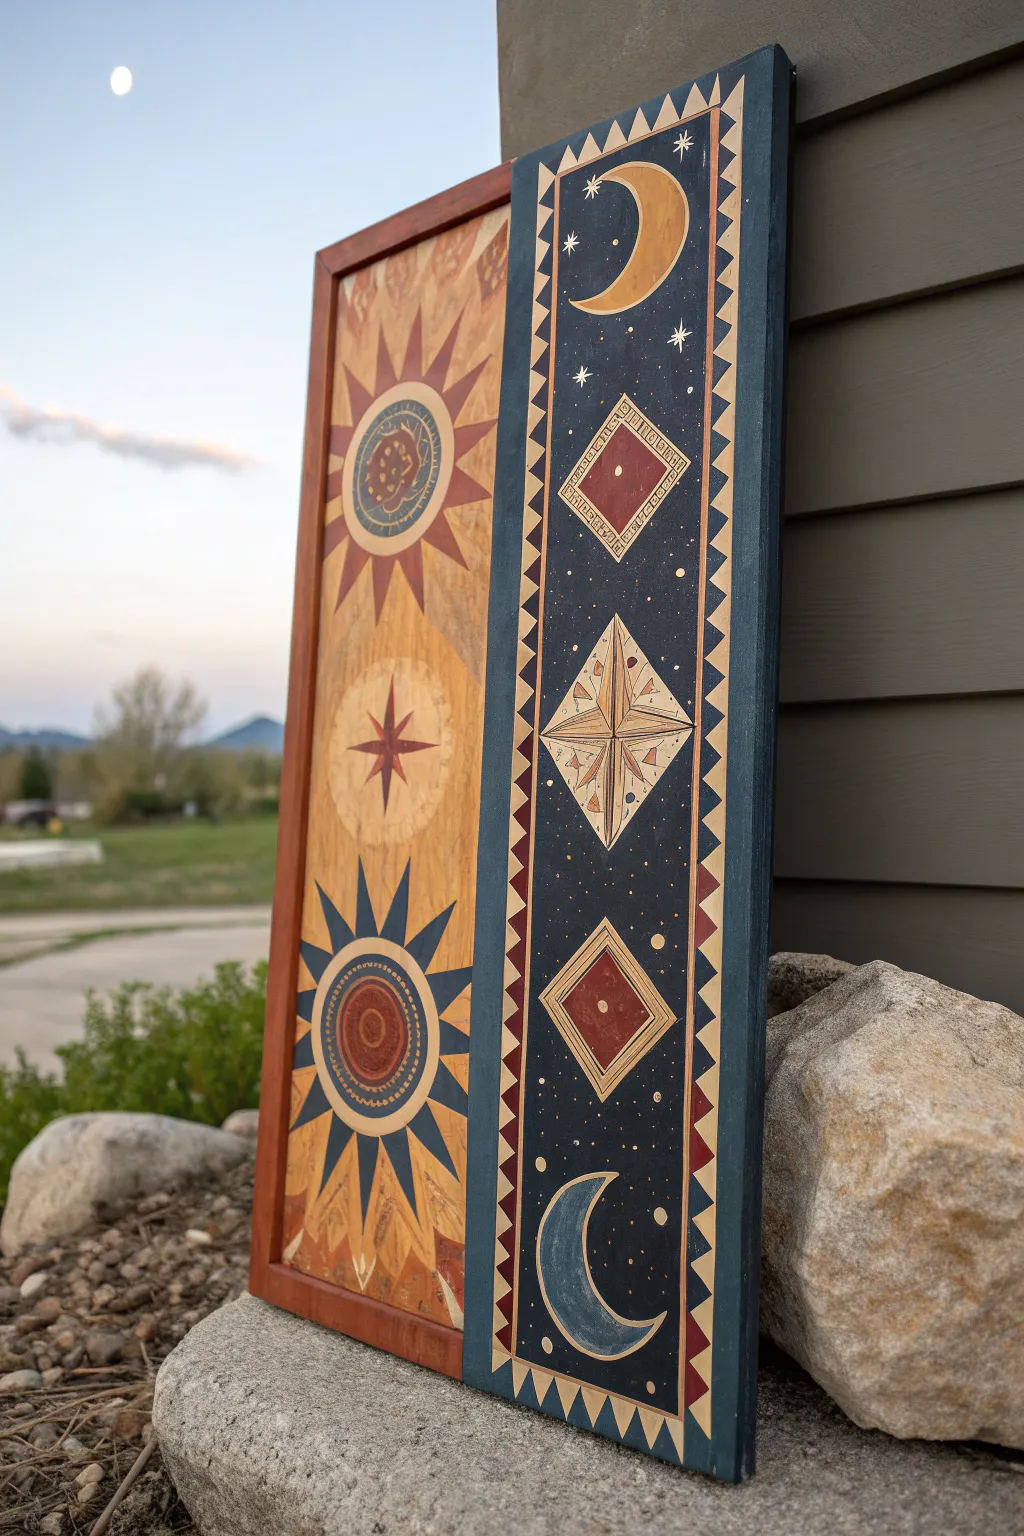
This striking dual-paneled painting captures the eternal dance of night and day in a style reminiscent of folk art and Aztec-inspired geometric designs. With its warm, sun-soaked wood tones on one side and deep, starry blues on the other, this piece brings a balanced cosmic energy to any space.
Detailed Instructions
Materials
- Large rectangular wooden board or plywood (approx. 12×36 inches)
- Wooden trim pieces (for the frame)
- Wood stain (warm honey or pecan shade)
- Acrylic paints (navy blue, gold, deep red, cream, burnt sienna, light blue)
- Painter’s tape (various widths)
- Ruler or straight edge
- Compass or circle templates
- Sandpaper (medium and fine grit)
- Detail brushes (liner brush, flat shader)
- Matte or satin clear sealant spray
Step 1: Preparation and Background
-
Prepare the surface:
Begin by sanding your wooden board until it is perfectly smooth. Wipe away any dust with a tack cloth or slightly damp rag to ensure a clean surface for staining and painting. -
Stain the wood:
Apply a coat of warm wood stain to the entire board. Let the natural grain show through, as this will serve as the background for the ‘Day’ side. Allow this to dry completely according to the manufacturer’s instructions. -
Mask the divide:
Measure the board to find the vertical center line. Apply painter’s tape to cover the left side (the Day side), ensuring a sharp, straight line down the middle. Press the tape edges down firmly to prevent bleed-under. -
Paint the night sky:
Paint the exposed right half of the board with a deep navy blue acrylic. You may need two thin coats to get opacity that completely covers the wood grain. This creates your ‘Night’ background.
Step 2: Constructing the Borders
-
Frame the night:
Once the blue paint is dry, remove the center tape. Now, carefully use painter’s tape to mask off a vertical strip along the right edge of the blue section. This will be the decorative border. -
Paint border triangles:
Using a small flat brush and cream or gold paint, hand-paint a series of small triangles along the outer edge of the blue night panel. Keeping them uniform creates that rhythmic, geometric look seen in the original. -
Add inner border details:
Mirror the border pattern on the inner edge where the blue meets the stained wood. I find using a small stencil or a triangular stamp made from a sponge speeds this up and keeps the shapes consistent.
Clean Lines?
If paint bleeds under your tape, let it dry completely. Then, use a small angled brush with the base color (wood stain or navy blue) to carefully touch up and sharpen the edge.
Step 3: Designing the Day Side
-
Draft the suns:
On the stained wooden side, use a compass to lightly pencil in three distinct circles stacked vertically. The top and bottom circles should be larger for the main suns, with a smaller focal point in the middle. -
Paint the top sun:
For the top sun, paint a ring in cream and fill the center with a swirling, textured pattern in deep red and brown. Add triangular rays extending outward using a semi-transparent red wash so the wood grain still peeks through. -
Create the central star:
In the middle position, paint a simple four-point star or compass rose using deep red. Keep the lines sharp and elongate the vertical points slightly. -
Finish the bottom sun:
The bottom sun is bold; paint alternating rays of navy blue and the background wood tone. Create a central hub with concentric rings of cream, red, and blue dots for intricate detail.
Add Dimension
Mix a tiny amount of metallic gold paint into your yellow ochre for the top moon. It will catch the light subtly and make the night side truly shimmer.
Step 4: Designing the Night Side
-
Draft the moon and stars:
On the blue side, lightly pencil your layout: a crescent moon at the top and bottom, separated by geometric diamond shapes in the center column. -
Paint the top moon:
Paint the top crescent moon in a solid gold ochre. Keep the curve smooth and elegant. -
Detail the central diamonds:
Paint the two central diamond shapes. The top diamond is a simple red square turned on its point with a decorative border. The larger, central diamond shape should be intricate, resembling a simplified star or lantern with cream lines. -
Paint the bottom moon:
For the bottom crescent, use a light steel blue or grey. This creates a nice visual weight and contrasts with the gold moon at the top. -
Add the stars:
Using a fine liner brush or the tip of a toothpick, dot the background with tiny specks of white and gold to create distant stars. Add a few larger, six-pointed stars near the moons for emphasis.
Step 5: Framing and Finishing
-
Attach the trim:
Cut your wooden trim pieces to fit the perimeter of the board. Stain them a reddish-brown hue that complements the central sun motifs. -
Secure the frame:
Glue or nail the trim to the edges of the main board. This frames the artwork and gives it a finished, substantial feel. -
Seal the artwork:
Once all paint is fully dry—usually after 24 hours—spray the entire piece with a clear matte sealant. This protects the intricate paintwork and evens out the sheen between the raw wood and painted sections.
Hang your finished piece where the natural light can play across the textures of the wood and paint
Layered Feather Texture Sampler
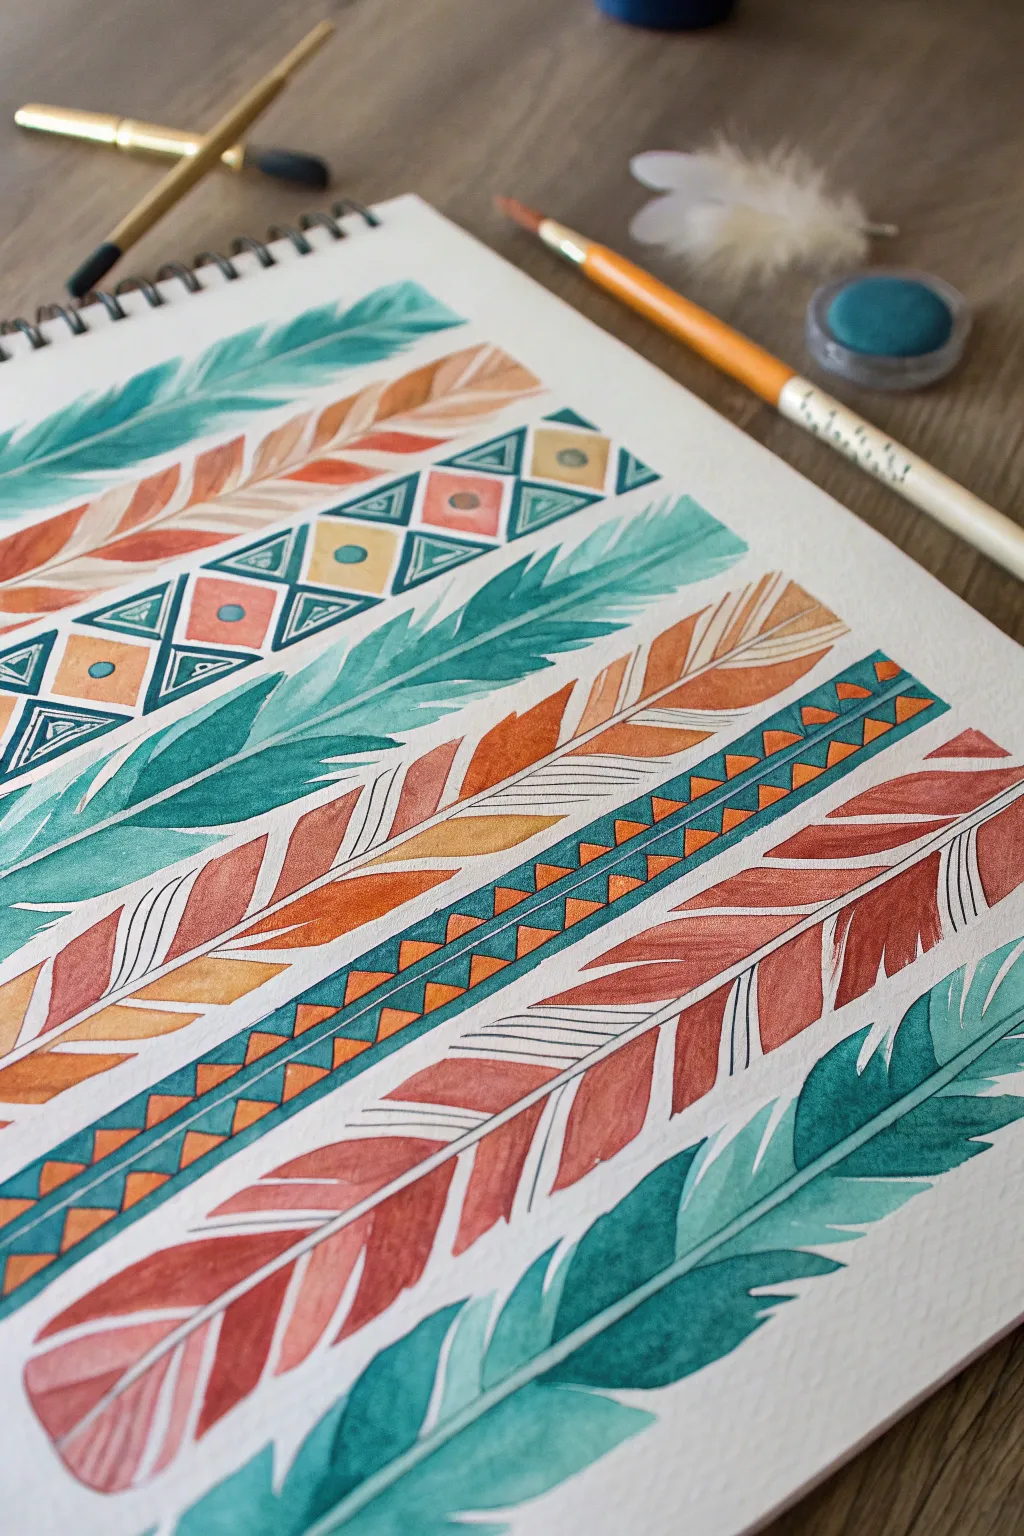
This vibrant watercolor study combines the organic flow of feathers with structured geometric Aztec motifs. It’s a perfect exercise for practicing brush control and exploring complementary color palettes like teal and rust orange.
Step-by-Step Tutorial
Materials
- Cold press watercolor paper or sketchbook (300 gsm)
- Watercolor paints (Teal/Turquoise, Rust/Burnt Orange, Yellow Ochre)
- Round brushes (flats not needed): Size 6 for fills, Size 0 or 00 for details
- Pency (HB or H) for light sketching
- Ruler
- Jar of clean water
- Palette for mixing
Step 1: Planning and Sketching
-
Grid lines:
Begin by lightly drawing horizontal guidelines across your page with a ruler. Space them out vertically to create “lanes” for each feather and pattern band. Keep about an inch of height for each band. -
Sketch the feather shapes:
Within the alternating lanes intended for feathers, lightly sketch the central quill (rachis). Then, draw the curved outline of the vanes, tapering them towards the tip. Don’t worry about individual barbs yet; just get the main leaf-like shape. -
Sketch the geometric bands:
In the remaining lanes, use your ruler to sketch the geometric patterns. For the second band from the top, draw a series of squares divided into triangles. For the fourth band, sketch a long rectangle filled with a zigzag line to create repeating triangles.
Step 2: Painting the Feathers
-
Mix your teal:
Create a watery mix of turquoise or teal green. It should be semi-transparent to allow for layering later. -
First feather layer:
Using your size 6 brush, paint the top and third bands (the teal feathers). Start from the central quill and swoop outward, lifting the brush at the end of each stroke to create a tapered, feathery edge. -
Orange feather base:
Mix a warm rust orange. Paint the second feather down (the orange one). Instead of a solid block, paint individual chunky segments angling away from the center to suggest the barbs separation. -
Bottom feather details:
For the large bottom feather, start with a lighter wash of rust. Once dry, stroke on darker rust lines to define individual barbs, leaving tiny gaps of white paper or lighter wash showing through for texture. -
Teal feather glazing:
Go back to your now-dry teal feathers. With a slightly more concentrated teal mix, paint thin, sweeping lines over the base layer to define the barbs further, adding depth and shadow near the quill.
Pro Tip: Negative Space
Don’t paint the quill! Leave a thin sliver of unpainted white paper down the center of each feather. This negative space creates a glowing, crisp spine without needing white paint.
Step 3: Geometric Pattern Work
-
Diamond band base:
Focus on the geometric band with diamonds and triangles. Paint the larger triangular sections in teal. Use the tip of your brush carefully to keep edges sharp. -
Adding warmth:
Once the teal dries, fill the alternate shapes (the inner diamonds) with yellow ochre and rust orange. Let the colors touch only if you want a bleed effect; otherwise, wait for sections to dry. -
Zigzag pattern:
For the lower geometric band, painting the background triangles in teal first is easiest. I find it helps to rotate the paper to get the best angle for these small shapes. -
Zigzag details:
Fill the alternating triangles in the zigzag band with rust orange. Ensure the tips of the triangles are crisp. -
Fine line work:
Using your smallest brush (size 0), outline the geometric shapes in a dark teal or a mixed indigo if you want extra contrast, though the example keeps outlines minimal and clean.
Troubleshooting: Bleeding Colors
If your geometric shapes are bleeding into each other, you are working too fast. Paint non-adjacent shapes first (like every other triangle) and let them dry before filling the gaps.
Step 4: Final Details
-
Fine white lines:
If you lost the white of the paper for the feather quills (the center stems), you can use a tiny bit of white gouache or a white gel pen to re-establish them cleanly. -
Pattern accent dots:
Add the tiny center dots to the diamond pattern band using the very tip of your small brush and a concentrated rust color. -
Clean up:
Once the paint is completely bone dry, gently erase any visible pencil guidelines that distract from the design.
Now you have a beautiful page of patterns that looks like a textured tapestry sample
Desert Landscape With Aztec Symbols
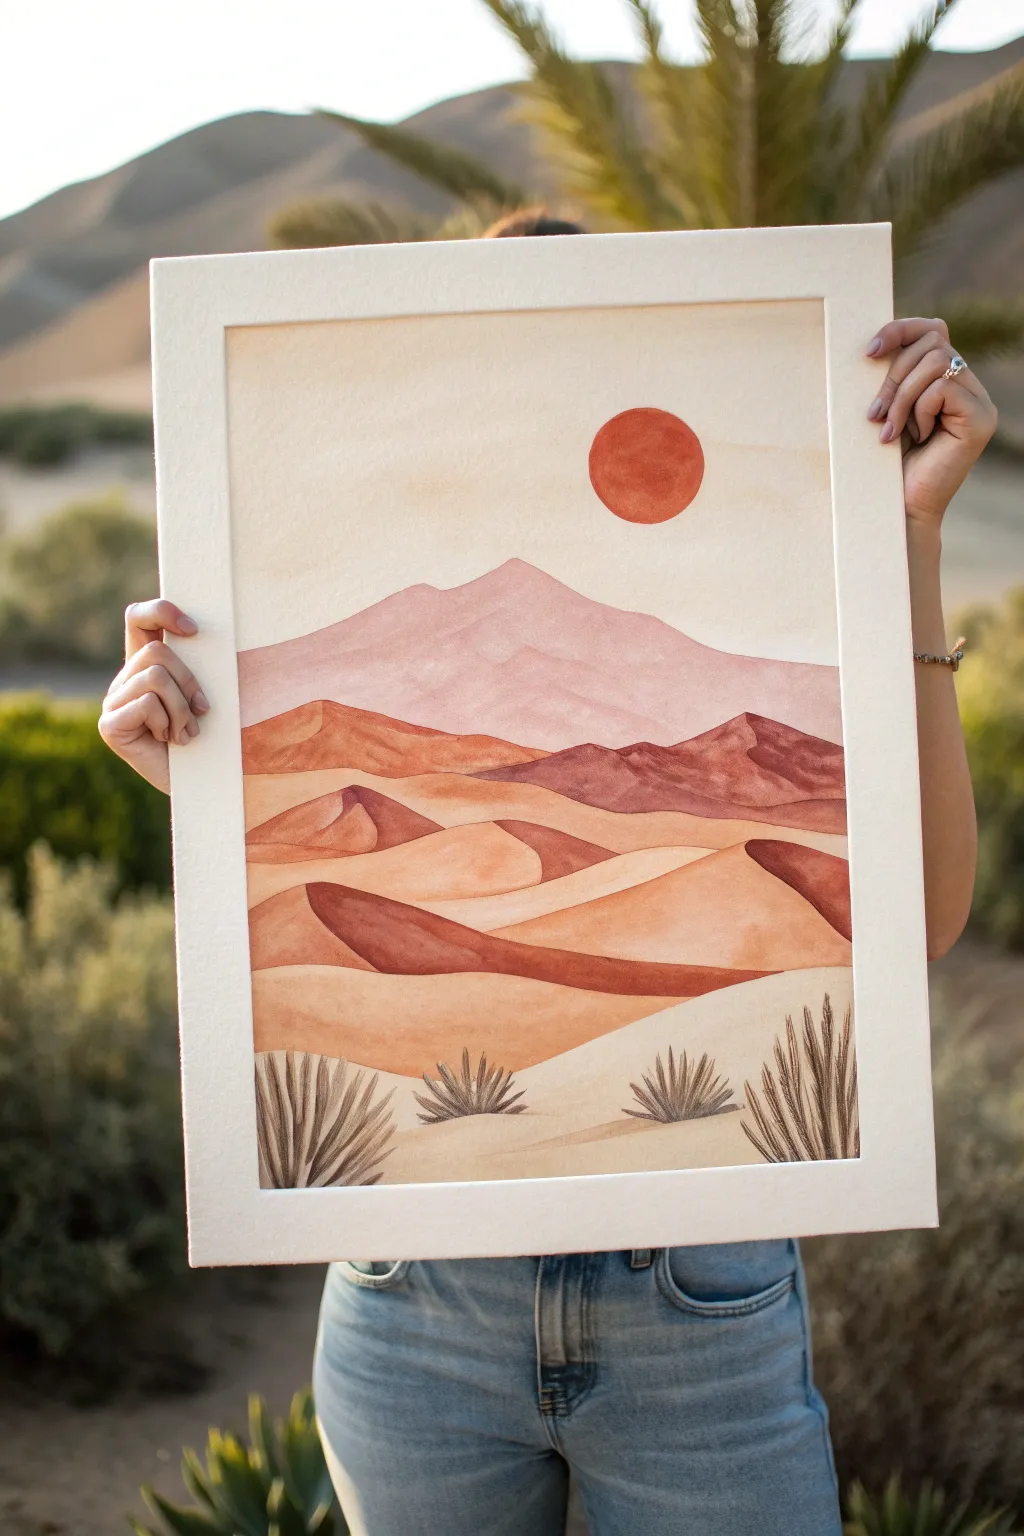
This serene watercolor painting captures the warm, minimalist beauty of a desert landscape with soft, rolling dunes and a striking sun. The layered composition creates depth through varying shades of terracotta, blush, and deep sienna, making it a perfect piece for modern, earthy decor.
How-To Guide
Materials
- Cold-pressed watercolor paper (140lb/300gsm)
- Watercolor paints (Terracotta, Yellow Ochre, Burnt Sienna, Alizarin Crimson, Purple)
- Round watercolor brushes (Size 4, 8, and a fine liner)
- Painter’s tape or masking tape
- Pencil and eraser
- Jar of clean water
- Palette for mixing
- Paper towels
Step 1: Preparation & Sketching
-
Tape the edges:
Secure your watercolor paper to a hard board or table using painter’s tape on all four sides. This creates a crisp clean border and prevents the paper from buckling when wet. -
Draft the composition:
Lightly sketch the outlines of your landscape with a pencil. Start with a horizon line about a third of the way down, then draw overlapping wavy shapes for the sand dunes below it. Add a perfect circle for the sun in the upper right sky. -
Outline the mountains:
Above the dunes but below the sun, sketch the jagged but soft silhouette of a mountain range. Keep your pencil lines very faint so they don’t show through the final paint.
Pro Tip: Crispy Edges
To prevent paint from bleeding under the tape, run a bone folder or the back of your fingernail firmly along the tape’s inner edge before you start painting.
Step 2: Painting the Sky & Mountains
-
Wash the sky:
Prepare a very dilute wash of warm beige or pale ochre. Apply this to the sky area, carefully painting around the circle of the sun. Keep the wash uneven for an organic feel, or use a ‘wet-on-wet’ technique for softness. -
Paint the sun:
Mix a saturated Terracotta or Burnt Orange color. While the sky is dry (to prevent bleeding), carefully fill in the sun circle. Aim for a solid, opaque look or let the water create natural texture as it dries. -
Base layer for mountains:
Mix a dusty pink using Alizarin Crimson and a touch of white or water. Paint the mountain shape. While it’s still damp, drop in a slightly purpler hue at the peaks or valleys to suggest shadows and dimension.
Level Up: Texture Pop
Add salt to the wet paint on the dunes! Sprinkling coarse salt while the wash is still wet creates beautiful, sandy starburst textures once dried and brushed off.
Step 3: Layering the Dunes
-
Furthest dunes:
Start with the dunes closest to the mountains. Mix a medium terracotta shade. Paint the first strip of dunes, ensuring the mountain layer is completely dry first so the colors don’t run. -
Creating separation:
As you move forward to the next dune layer, alternate your color mixes slightly. Use more Burnt Sienna or add a touch of brown to darken specific areas. This contrast helps visually separate the overlapping hills. -
Adding shadows:
For the dunes in the mid-ground, paint the main shape in a lighter ochre, then immediately add a darker, concentrated strip of reddish-brown along the bottom or side curve to mimic a shadow cast by the dune’s crest. -
Foreground sands:
The closest dunes should be the lightest and warmest. Use a watered-down Yellow Ochre or beige. Paint these large sweeping shapes at the bottom, leaving plenty of water to create soft, sandy textures. -
Let it dry completely:
Before adding the final details, wait for the entire painting to be bone dry. If the paper feels cool to the touch, it still holds moisture. Patience here ensures crisp lines later.
Step 4: Final Details
-
Mix a dark detail color:
Create a dark, contrasting color for the vegetation. A mix of Burnt Umber and a tiny bit of black or dark green works well to create a deep, earthy charcoal tone. -
Paint the agave plants:
Using your fine liner brush or the tip of a small round brush, paint small clusters of spiky plants in the foreground. Start from a central point at the base and flick the brush outward and upward. -
Vary the sizes:
I like to vary the size of these plants to create perspective. Make the ones at the very bottom edge larger and more detailed, and perhaps add a few smaller, simpler ones slightly further back. -
Remove the tape:
Once the plant details are fully dry, slowly peel off the painter’s tape. Pull it away from the painting at a 45-degree angle to ensure a sharp, clean white border.
Now you have a warm, serene desert landscape ready to bring a touch of the Southwest to your walls
Modern Neon Aztec Pattern Remix
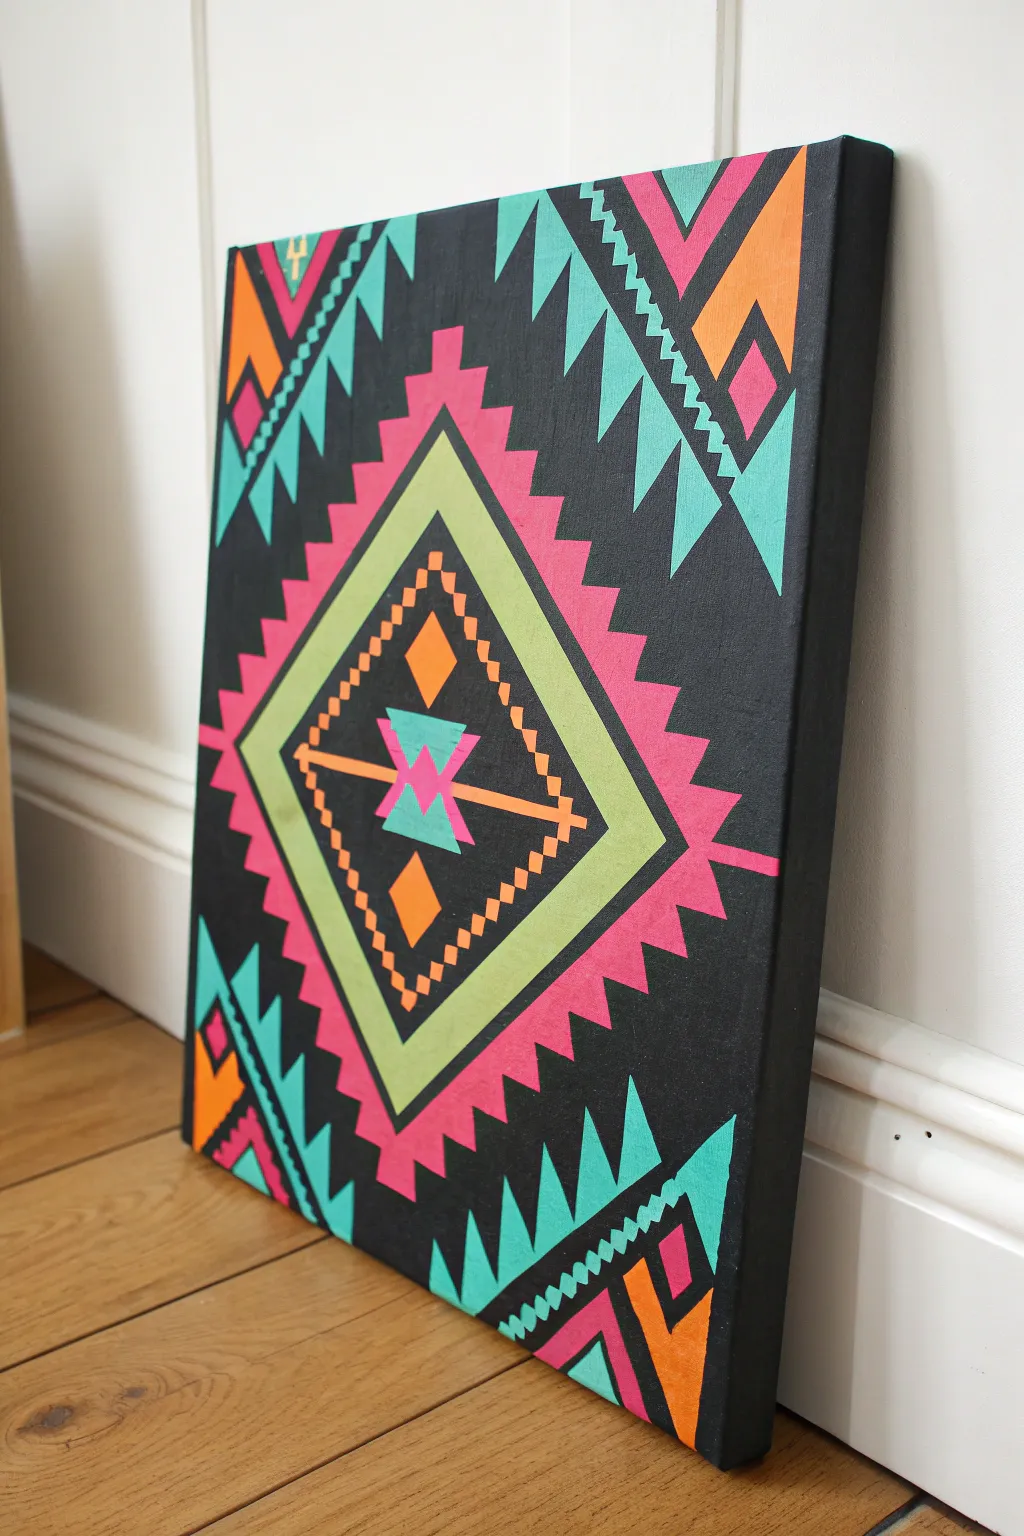
Transform a blank canvas into a striking statement piece with this vibrant, geometric Aztec-inspired design. The sharp lines and bold black background make the neon pinks, cyans, and oranges pop for a distinctly modern aesthetic.
Detailed Instructions
Materials
- Rectangular stretched canvas (e.g., 16×20 inches)
- Black gesso or heavy body black acrylic paint
- Acrylic paints: Neon Pink, Bright Orange, Cyan/Turquoise, Lime Green
- Painter’s tape or masking tape (multiple widths: 1/4 inch, 1/2 inch, 1 inch)
- Ruler or T-square
- Pencil and eraser
- Flat shader brushes (assorted sizes)
- Small fine-liner brush for touch-ups
- Palette
- Water cup and paper towels
Step 1: Canvas Preparation & Base
-
Prime the Surface:
Begin by coating your entire canvas with black gesso or black acrylic paint. Ensure you cover the sides as well for a professional, finished look. -
Double Coat for Opacity:
Let the first layer dry completely, then apply a second coat of black. You want a deep, solid matte background with no white canvas peeking through. -
Find the Center:
Once the black base is bone dry, measure the width and height of the canvas. Mark the exact center point lightly with a pencil.
Sharp Lines Secret
For ultra-crisp edges on the straight diamond bands, apply painter’s tape, then paint a thin layer of BLACK first to seal the tape edge before applying the neon color.
Step 2: Drafting the Design
-
Map the Central Diamond:
Using your center point as a guide, draw a large diamond shape that fills most of the central space. Leave about 2-3 inches of border space around the edges. -
Create Inner Layers:
Draw concentric diamonds inside your main shape. You will need evenly spaced bands for the pink zigzag, the green solid band, and the central motif. -
Sketch the Zigzags:
Along the outermost diamond line, sketch a ‘stepped’ or pixelated zigzag pattern rather than a straight diagonal line. Use a ruler to keep the steps uniform in size. -
Detail the Corners:
In the four corners of the canvas outside the main diamond, sketch the triangular Aztec motifs, mirroring them so the top left matches the bottom right, and so on. -
Draft the Center Icon:
Inside the very center of the diamond, sketch the small geometric totem shape: a vertical line with horizontal crossbars and small triangles.
Make It Glow
Turn this into a party piece by painting over the neon colors with UV-reactive clear gel or using fluorescent paints that glow under blacklight.
Step 3: Painting the Neon Layers
-
Start with the Pink Band:
Load a flat brush with Neon Pink. Carefully paint the large stepped diamond border. You may need two to three coats to get that vibrant pop against the black background. -
Fill the Green Diamond:
Moving inward, paint the smooth diamond band with Lime Green. Use a piece of tape as a guide if you struggle with straight edges, or steady your hand against the canvas. -
Add Cyan Accents:
Paint the serrated triangles in the corners using Cyan paint. I usually rotate the canvas while doing this to get the best angle for my brush strokes. -
Paint Corner Details:
Fill in the secondary triangles and accent lines in the corners with Neon Pink and Bright Orange, following your sketched mirror pattern. -
Create the Orange Blocks:
Paint the small, pixel-like square trail that runs just inside the green diamond band using Bright Orange. A small square-tipped brush is perfect for stamping these shapes. -
Execute the Center Motif:
Paint the geometric elements in the very center: Cyan triangles, Orange diamonds, and the Pink cross-bar.
Step 4: Refining and Finishing
-
Clean Up Edges:
Inevitably, some neon paint might slip onto the black background. Switch to a small liner brush with black paint. -
Sharpen the Lines:
Carefully trace along the edges of your bright shapes with the black paint to ‘cut in’ and make every line razor-sharp and crisp. -
Check for Opacity:
Inspect your neon colors under good light. If any black shows through the brushstrokes, dab on one final thin layer of color for maximum brightness. -
Erase Visible Guides:
If any pencil marks are still visible in the unpainted black areas, gently remove them with a high-quality eraser. -
Sign and Side Check:
Sign your artwork in the corner (perhaps in gold or cyan!) and do a final check to ensure the black paint on the sides of the canvas is solid.
Hang your new masterpiece in a well-lit spot to let those contrasting colors truly shine.


Have a question or want to share your own experience? I'd love to hear from you in the comments below!