If you love the idea of capturing an entire year in one artwork, four seasons compositions are the sweetest way to do it. I’m sharing my favorite drawing and painting ideas that make the seasonal shift super clear, while still feeling cohesive and satisfying to create.
Four Separate Canvases as One Year
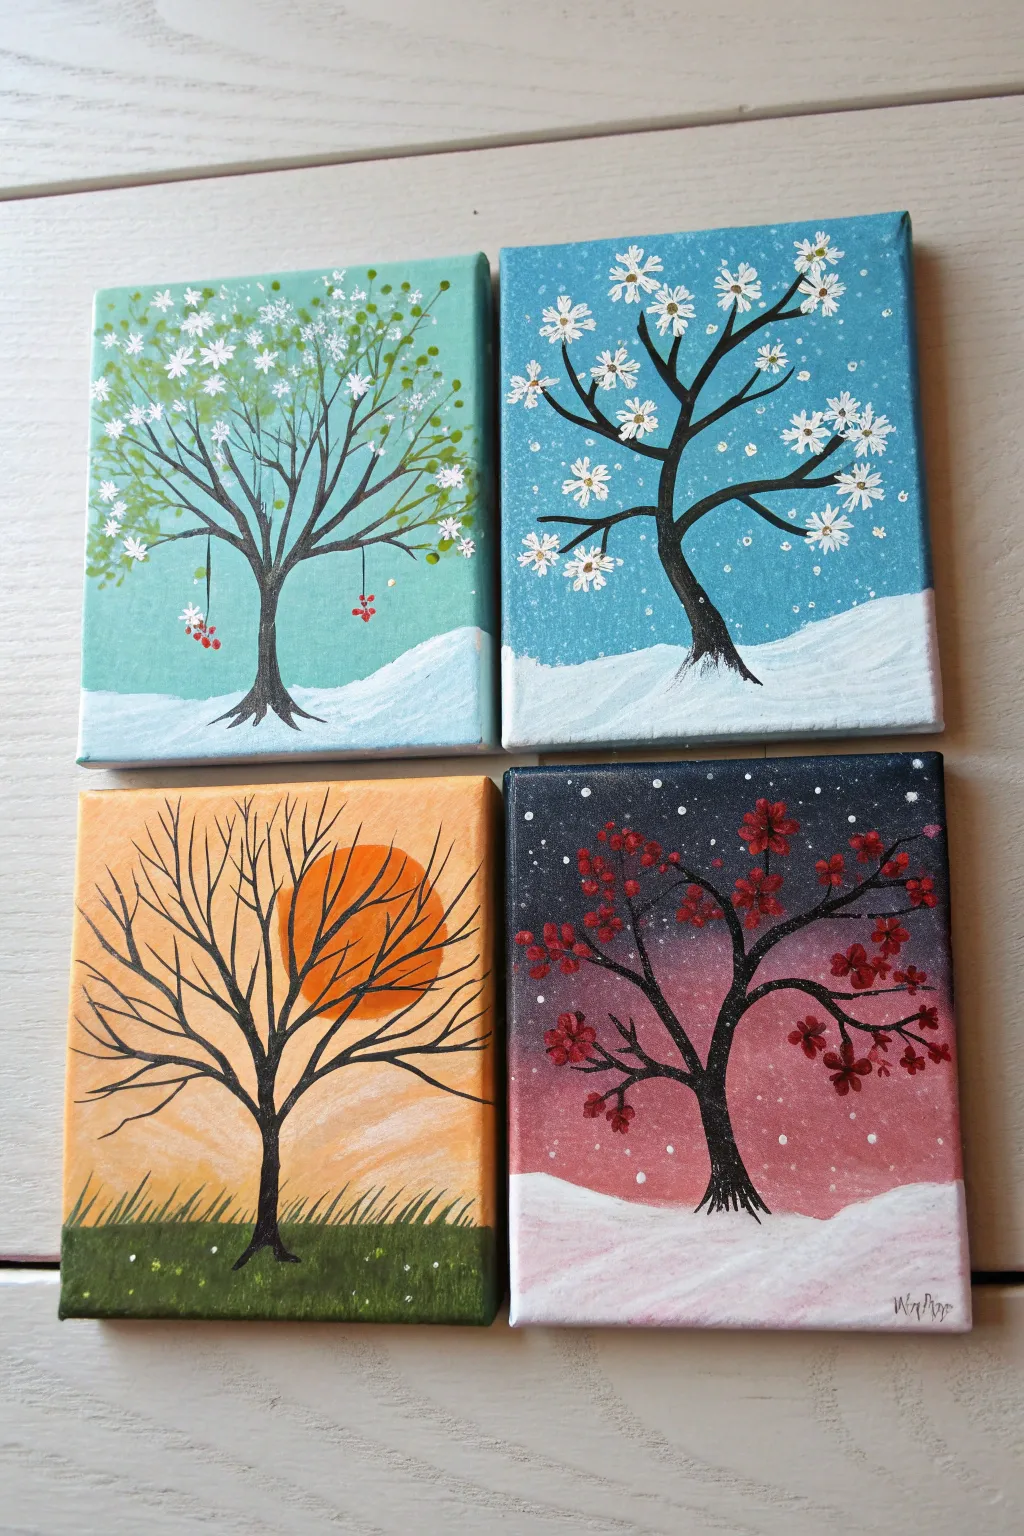
Celebrate the passing of time with this set of four charming mini-canvases, each capturing a distinctive seasonal mood through changing leaves and atmospheric backgrounds. This project uses simple silhouettes and dappled brushwork to create a cohesive yet varied gallery wall display.
Step-by-Step Tutorial
Materials
- 4 Small square canvases (approx. 4×4 or 6×6 inches)
- Acrylic paints (Teal, light blue, white, black, orange, yellow, red, dark blue/navy, purple)
- Flat shader brush (medium)
- Fine liner brush (for branches)
- Small round brush or Q-tips (for flowers/leaves)
- Palette or paper plate
- Cup of water and paper towels
Step 1: Preparing the Backgrounds
-
Spring Teal Sky:
Start with the first canvas (Spring). Mix a soft teal using light blue, a touch of green, and white. Paint the upper two-thirds of the canvas with this fresh color, ensuring smooth horizontal strokes. -
Snowy Winter Day:
For the second canvas (Winter Day), paint the sky a slightly deeper, crisp blue. While the blue is wet, blend a tiny bit of white near the bottom of the sky area to create an atmospheric gradient. -
Golden Autumn Sunset:
On the third canvas (Autumn), create a warm gradient. Start with pale yellow at the horizon line and blend upwards into orange at the top. While wet, paint a large circle slightly off-center using a deeper orange to represent the setting sun. -
Winter Night Sky:
For the final canvas (Winter Night), paint a gradient starting with pinkish-white at the horizon, blending up into deep purple, and finishing with dark navy or black at the very top to simulate a twilight sky. -
Adding the Ground:
Once the sky sections are dry, paint the ground. For the two winter scenes and the spring scene, paint snowy white hills at the bottom. For the autumn scene, use a muddy green or dark olive color to represent grass in the evening light.
Keep it Fluid
Add a tiny drop of water to your black paint for the tree branches. This improves the flow and helps you achieve those sharp, pointy twig ends.
Step 2: Painting the Tree Silhouettes
-
Drafting the Trunks:
Using a fine liner brush and black paint slightly thinned with water, paint the trunk of a tree in the center of each canvas. Ensure the roots anchor firmly into the ground area. -
Extending Branches:
Pull branches outward from the main trunk. For a natural look, use a flicking motion with your wrist to make the tips of the branches taper to a fine point. -
Varying the Shapes:
Make each tree slightly unique but clearly related. The autumn tree can be thinner and more barren, while the spring tree might have fuller, upward-reaching boughs. -
Adding Grass Details:
On the autumn canvas specifically, use the liner brush to flick tiny black strokes upwards from the ground to create the silhouette of tall grass blades against the sunset.
Glitter Finish
Once fully dry, apply a layer of glitter glaze or iridescent medium over the snow areas for a magical, frost-like shimmer.
Step 3: Seasonal Details
-
Spring Blossoms:
On the first teal canvas, use a small round brush to dab white spots all over the branches. Add tiny green dots interspersed among them for emerging leaves, and paint a few hanging red ornaments or berries for a pop of contrast. -
Winter Day Snowflakes:
For the blue winter canvas, look at painting stylized white flowers or large snowflakes on the branches. Use a dotting tool or the back of your brush to add yellow centers to these snowflake-flowers for a whimsical touch. -
Autumn Barrenness:
Leave the autumn tree mostly bare to emphasize the structural beauty of the branches against the sun. You can add one or two subtle falling leaves if you feel the composition needs movement. -
Winter Night Plums:
On the night sky canvas, dab rich red and crimson clusters onto the branches to create winter berries or plum blossoms. The dark red pops beautifully against the pink-to-black gradient. -
Atmospheric Snow:
Dip an old toothbrush or stiff brush into watered-down white paint. Gently flick it over the two winter canvases (blue and black backgrounds) to create a splatter effect resembling falling snow.
Hung together in a square grid, your new masterpieces will tell the story of a full year in a single glance


Silhouette Tree With Four Seasonal Skies
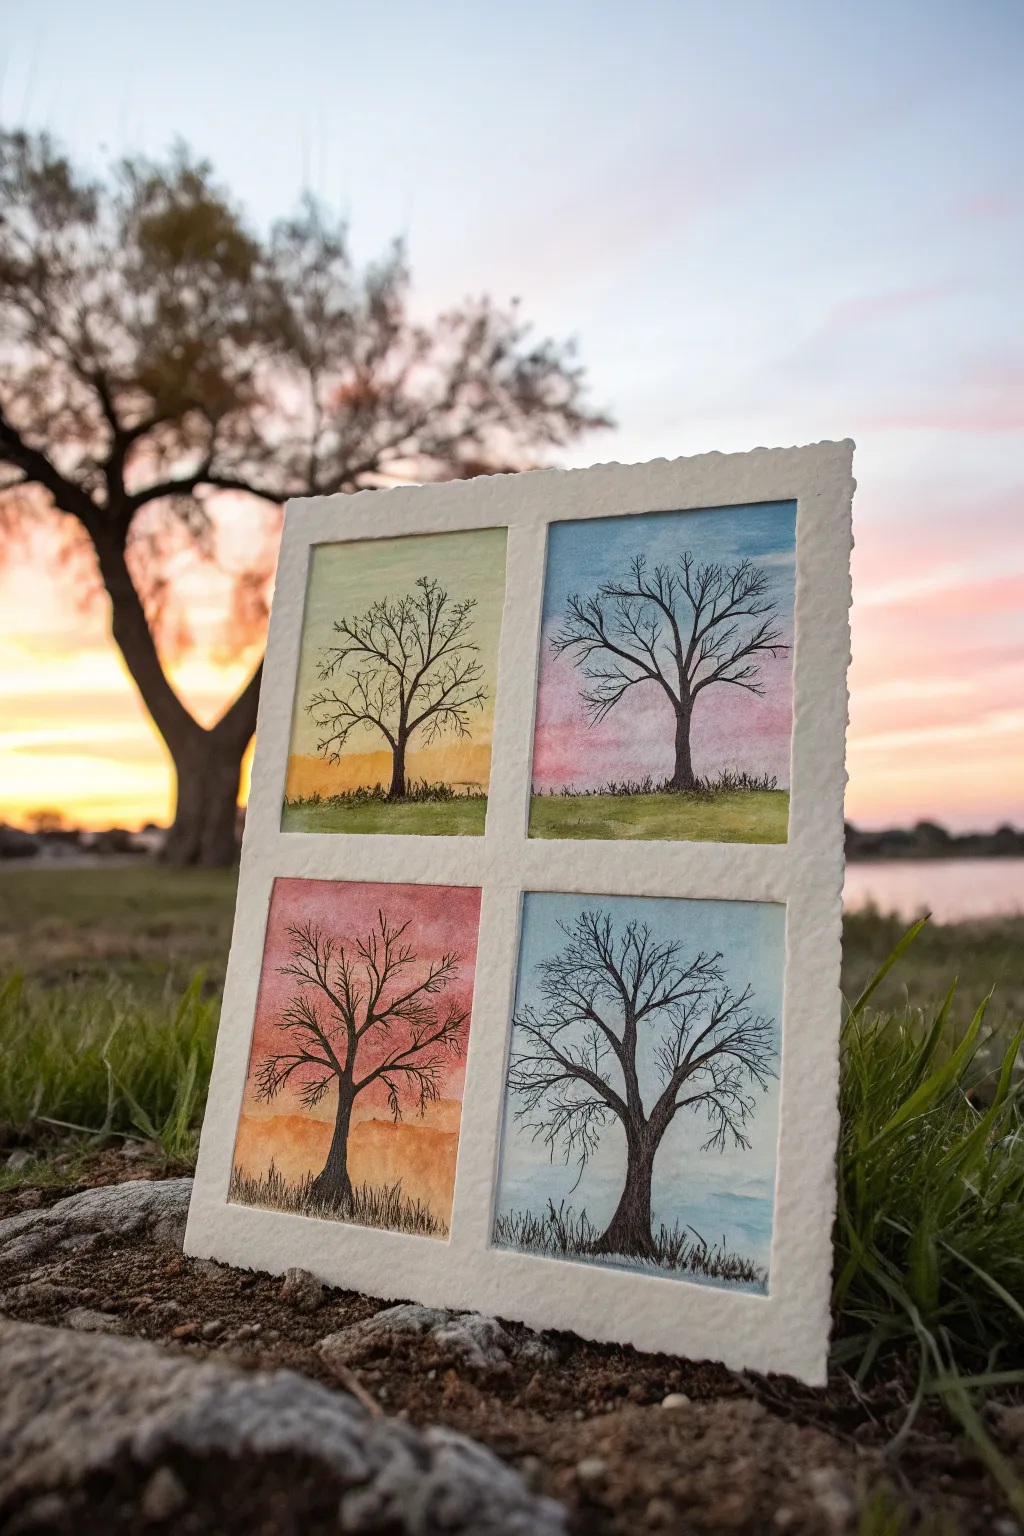
This charming watercolor project captures the same skeletal tree silhouetted against four distinct atmospheric backdrops, creating a beautiful study of light and color. The four-pane window effect frames each sky individually while maintaining a cohesive theme across the textured paper.
Step-by-Step Guide
Materials
- Cold press watercolor paper (deckled edge optional but recommended)
- Pencil and ruler
- Painter’s tape or masking tape (1/4 inch width)
- Watercolor paints (Yellow Ochre, Burnt Sienna, Alizarin Crimson, Cerulean Blue, Sap Green, Ultramarine)
- Round watercolor brushes (size 6 and size 2)
- Fine liner pen (black, waterproof, size 01 or 03)
- Clean water and paper towels
Step 1: Preparation & Grid
-
Prepare the paper:
Begin with a rectangular sheet of cold press watercolor paper. If your paper doesn’t have a deckled edge, you can tear the edges carefully against a ruler to achieve that rustic, handmade look. -
Tape the grid:
Using your ruler, find the center of the paper both vertically and horizontally. Place a strip of masking tape directly across the horizontal center and another across the vertical center to create four equal quadrants. -
Create the border:
Tape off the outer borders of your paper, ensuring the width matches your center cross so the frames look uniform. Press all tape down firmly to prevent paint bleeding.
Bleeding Lines?
If your perfectly straight tape lines have paint bleed underneath, wait for it to dry, then use a white gel pen or opaque white gouache to carefully paint over the mistake and restore the crisp edge.
Step 2: Painting the Skies
-
Top Left (Morning/Spring):
In the top-left quadrant, start by wetting the paper slightly. Apply a wash of pale yellow at the horizon line, blending upward into a very soft blue-green. Keep it light and airy. -
Top Right (Dusk/Winter):
For the top-right panel, paint a soft gradient starting with a muted pink at the bottom, blending into a cool blue at the top. This transition creates a chilly, winter-evening feel. -
Bottom Left (Sunset/Autumn):
Create a vibrant sunset in the bottom-left box. Start with a rich orange near the bottom and blend it upward into a warm reddish-pink. Allow the colors to remain saturated for dramatic effect. -
Bottom Right (Overcast/Cold):
For the final quadrant, use a monochromatic palette. Apply a wash of cool blue, perhaps mixed with a tiny touch of grey, keeping the sky relatively uniform but slightly lighter near the horizon. -
Adding ground layers:
Once the skies are damp but not soaking, add a suggestion of ground to each panel. Use green for the top two panels and the bottom right, and a warm brownish-orange for the sunset panel. Keep the horizon lines consistent across the row. -
Let it dry completely:
This is crucial: allow the paint to dry fully before moving on. The paper must be bone dry, or the ink in the next steps will bleed.
Seasonal Variation
Instead of bare branches in every panel, try adding tiny stippled leaves: bright green for spring, dark green for summer, orange for autumn, and leave the winter tree bare to distinctively mark the seasons.
Step 3: Drawing the Silhouette Trees
-
Outline the trunks:
Using your waterproof fine liner pen, draw the main trunk in the center of the first quadrant. Repeat this shape in the other three quadrants, trying to keep the size and placement as identical as possible. -
Add main branches:
Draw two or three primary branches extending from the trunk, reaching toward the upper corners. I find it helpful to look at the other squares constantly to ensure the tree’s ‘skeleton’ remains consistent. -
Fill in the secondary branches:
Begin adding smaller branches that split off from the main ones. Use a jagged, natural line rather than perfectly straight strokes to mimic the texture of bark and wood. -
Create fine twigs:
Switch to a lighter touch to add the tiniest twigs at the very ends of the branches. These should be delicate and plentiful to give the tree a full, intricate crown. -
Darken the trunk:
Go back over the main trunk and thickest branches with the pen, adding vertical hatching or stippling to create shadow and visual weight. The base of the tree should be the darkest point. -
Add ground texture:
At the base of each tree, use short, quick upward flicking motions with your pen to simulate grass blades. Vary the height slightly to make it look wild and natural.
Step 4: Finishing Touches
-
Remove the tape:
Very slowly peel back the masking tape at a 45-degree angle. This reveals the crisp white borders that separate your four seasons. -
Final inspection:
Check your grass lines where the tape used to be; you may want to add a few tiny pen strokes to extend the grass slightly so it doesn’t look like an unnatural hard stop against the white border.
Enjoy the rhythm of repeating the tree shape against the changing moods of your watercolor skies


Seasonal Color Coding in Every Quadrant
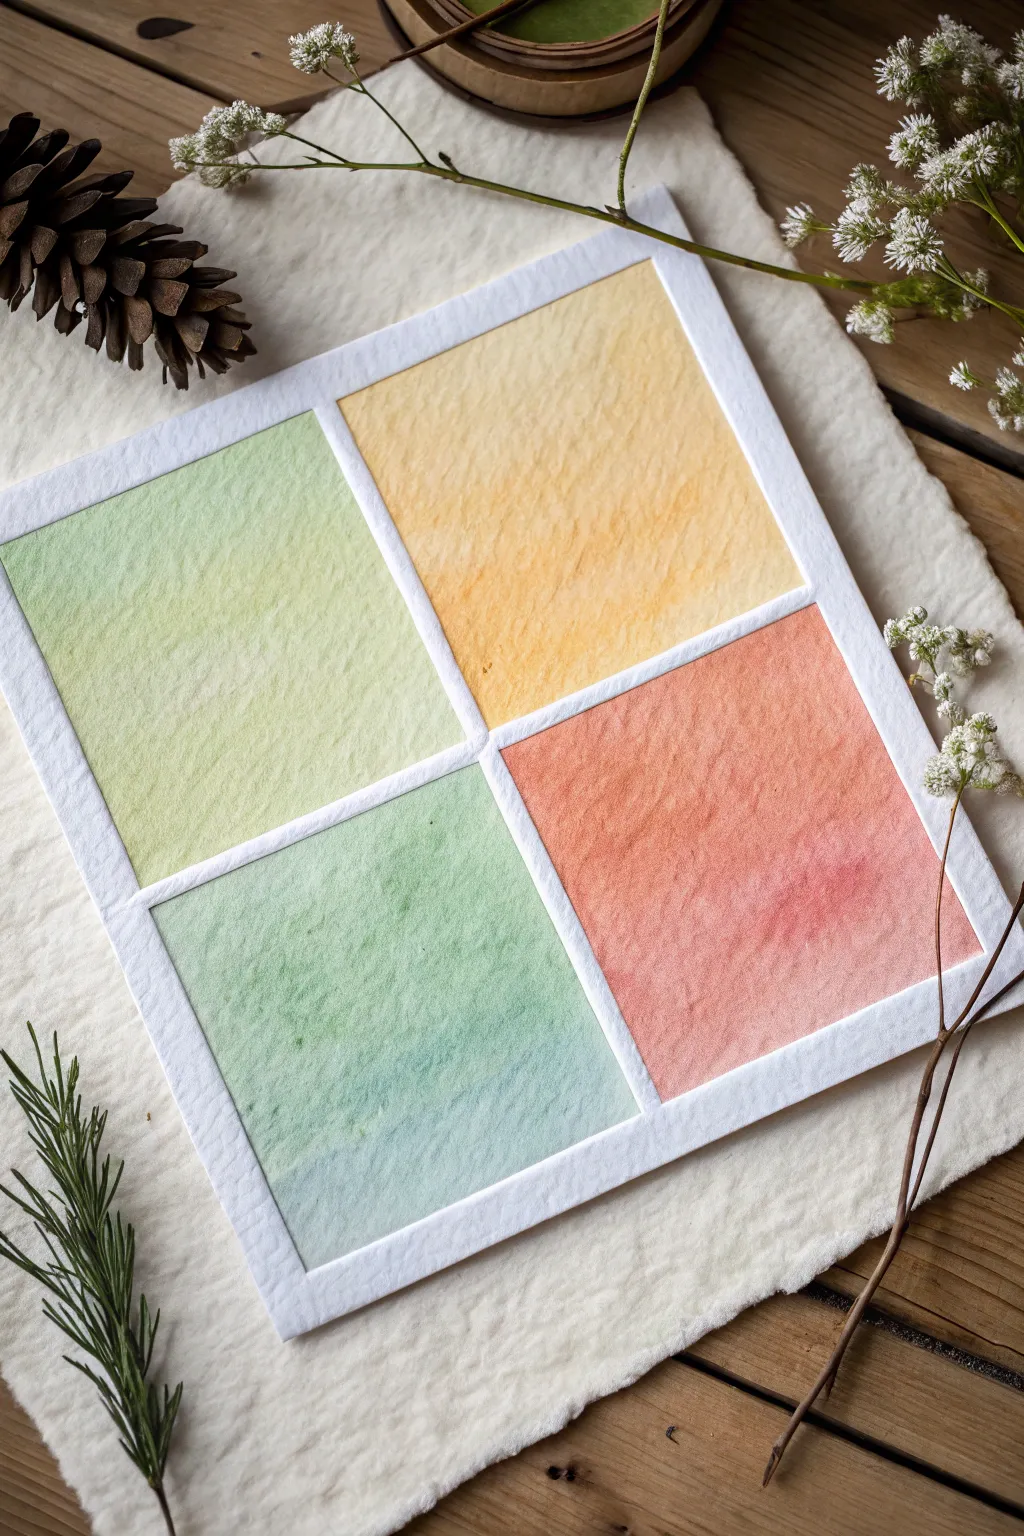
Capture the essence of the changing calendar year with this minimalist watercolor study. By isolating the dominant hues of each season into soft, textured gradients, you’ll create a serene and balanced piece of wall art.
Detailed Instructions
Materials
- Cold press watercolor paper (300 gsm or heavier)
- White artist tape or masking tape (1/4 inch width)
- Watercolor paints (Sap Green, Lemon Yellow, Cadmium Orange, Alizarin Crimson, Cerulean Blue, Viridian)
- Flat shader brush (size 10 or 12)
- Round brush (size 6)
- Clean water jar
- Paper towels
- Ruler
- Pencil
Step 1: Preparation & Layout
-
Measure and mark:
Begin with a square sheet of textured watercolor paper. Using your ruler and a pencil, lightly mark the exact center point of the paper. -
Create the grid:
Lay down strips of artist tape across the horizontal and vertical center lines to create four equal quadrants. Ensure the tape intersects perfectly in the middle. -
Border taping:
Frame the outer edges of your square with the same tape. Press down firmly on all tape edges, especially the inner cross, to prevent paint from bleeding underneath.
Tape Sealing Secret
Before painting, run a slightly damp brush with clear water over the tape edges. This activates the adhesive and creates a tighter seal against leaks.
Step 2: Painting the Seasons
-
Spring: Top Left:
Start with the top-left quadrant. Pre-wet the paper with clean water until it glistens slightly but isn’t pooling. -
Spring gradient:
Load your flat brush with a dilute wash of Sap Green. Apply it to the bottom of the square, then gradually mix in Lemon Yellow as you move upward, creating a fresh, budding transition. -
Summer: Top Right:
Move clockwise to the top-right quadrant for summer. Again, wet the paper first for a wet-on-wet technique. -
Summer warmth:
Start with Lemon Yellow at the top and blend it downward into a warm, diluted Cadmium Orange. Aim for a distinct texture by letting the paint settle into the paper’s grain. -
Autumn: Bottom Right:
Proceed to the bottom-right section. This quadrant should feel richer and heavier. -
Autumn hues:
Apply a base of geometric Cadmium Orange, then drop in touches of Alizarin Crimson while the wash is still wet. Tilt the paper slightly to help the colors meld organically without over-brushing. -
Winter: Bottom Left:
Finish with the bottom-left quadrant representing winter’s chill. Wet the remaining square thoroughly. -
Winter cool tones:
Mix Cerulean Blue with a tiny hint of Viridian. Apply this cool wash, keeping the color denser at the bottom and fading it out almost to white at the top to mimic frost.
Metallic Accents
Once dry, use a fine-tip gold paint pen to outline the squares or add tiny dot details to the center of the grid for a sophisticated finish.
Step 3: Refining & Finishing
-
Enhancing texture:
I like to wait until the shine has just left the paper, then gently dab a clean, dry brush or a crumpled tissue onto areas that look too flat. This lifts a little pigment and emphasizes the paper’s tooth. -
Let it dry:
Allow the painting to dry completely. The paper must be bone-dry to the touch before you attempt to remove the tape. -
The reveal:
Slowly peel back the tape at a 45-degree angle, pulling away from the painted areas. This technique minimizes the risk of tearing the paper fibers. -
Finishing touches:
Erase any visible pencil marks remaining in the white alleys between the squares. Use a clean, damp brush to tidy up any slight bleeds if necessary.
Enjoy the calm harmony of your completed seasonal color study


Cozy Cottage in Spring, Summer, Autumn, Winter
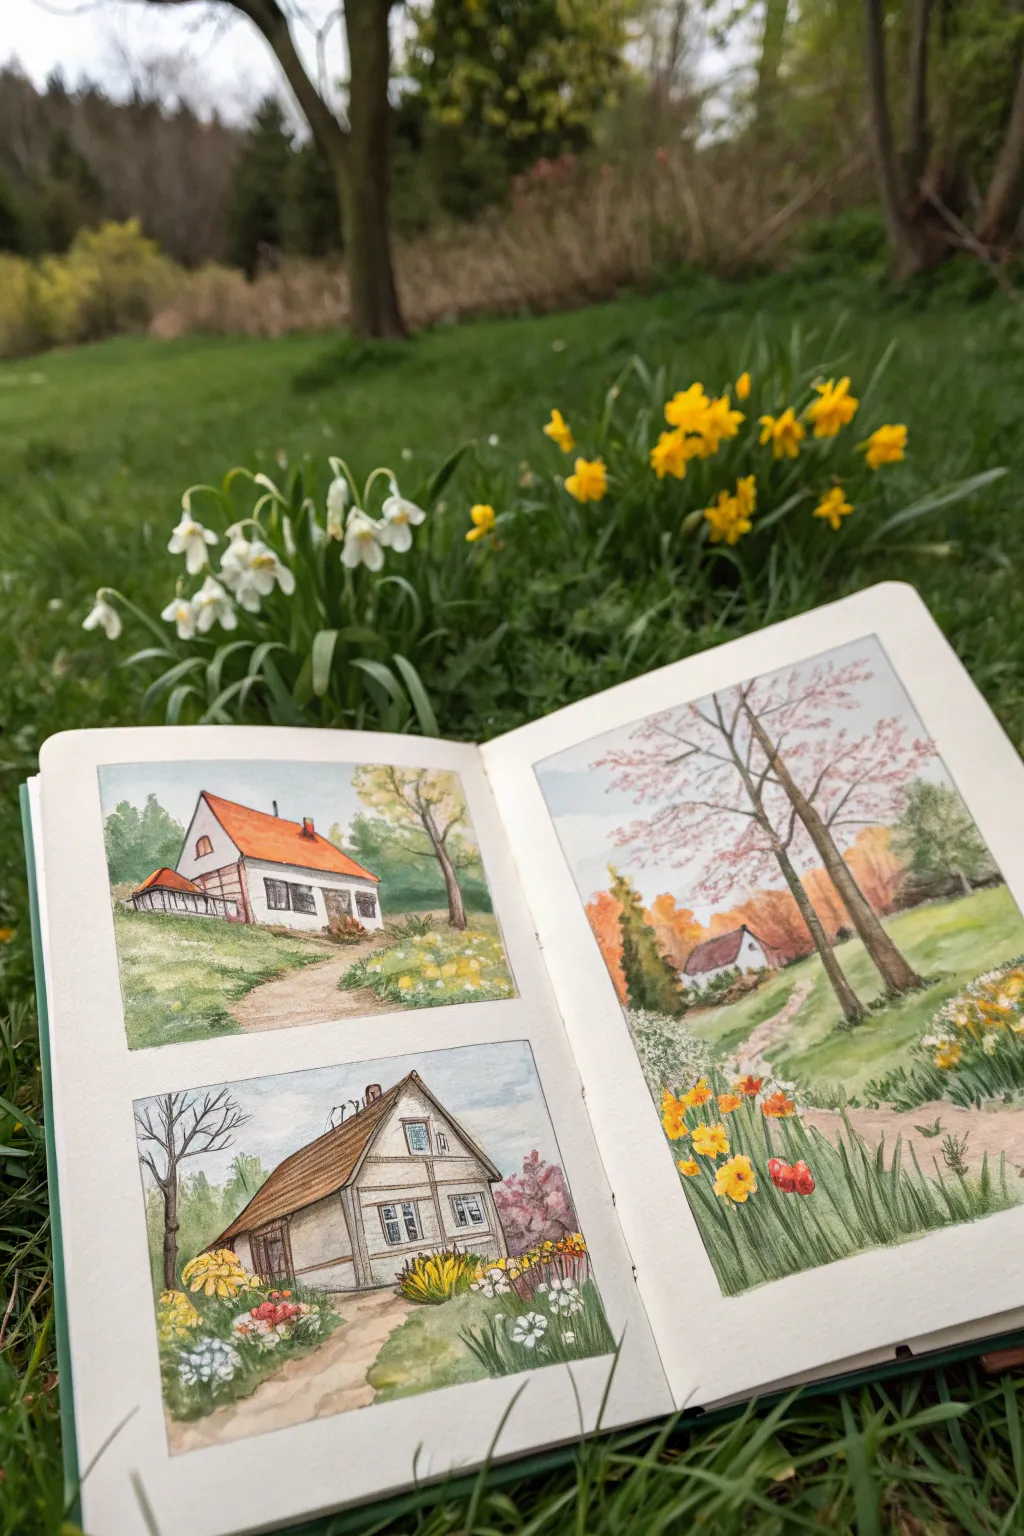
Capture the passing of time with these delicate watercolor and ink illustrations of a charming rural cottage. This spread features three distinct vignettes showing the same or similar rustic homes surrounded by the shifting colors of spring, summer, and autumn.
Step-by-Step
Materials
- Watercolor sketchbook (cold press paper recommended)
- Pencil (HB or H)
- Waterproof fine liner pens (black or brown, 0.1mm and 0.3mm)
- Watercolor paint set
- Small round brushes (size 2 and 4)
- White gouache or gel pen (optional for highlights)
- Water cup and paper towel
Step 1: Planning and Sketching
-
Layout the page:
Visualize your sketchbook spread. The left page will hold two smaller rectangular panels stacked vertically. The right page will feature one large, vertical panel that spans most of the sheet. Lightly mark the borders of these boxes with a pencil. -
Sketch the upper left cottage:
In the top-left box, draw a small cottage with a steep orange roof sitting on a grassy hill. Add a simple tree to the right and a suggestion of a forest in the background. Keep your lines faint. -
Sketch the lower left cottage:
In the bottom-left box, draw a closer view of a half-timbered house. Focus on the structural beams and a sloping roof. Sketch large clumps of flowers in the foreground and a bare tree to the left. -
Sketch the right-side landscape:
On the right page, sketch a winding dirt path leading toward a distant white cottage. Draw two prominent trees in the foreground reaching up through the composition, their branches crisscrossing the sky.
Muddy colors?
Work light to dark. If your greens and reds are mixing into brown, let the first layer dry completely before painting adjacent contrasting colors.
Step 2: Inking the Structure
-
Outline the architecture:
Using a 0.1mm waterproof pen, carefully trace the visible lines of the houses. Use broken, shaky lines for the timber beams to suggest aged wood texture. -
Define the trees:
Ink the tree trunks and branches. I like to use slightly thicker lines for the foreground trees on the right page to make them pop. Add small scribbles for leaves or pine textures in the background. -
Add nature details:
Stipple or draw small circles for the flower clusters in the foregrounds. Ink the grass blades near the bottom edges of each frame to frame the scene.
Step 3: Painting: Left Page
-
Wash the sky and grass:
Start with the top panel. Wet the paper slightly and drop in a very pale blue for the sky. Paint the hill with a mix of sap green and yellow ochre. -
Color the first cottage:
Paint the roof with a vibrant orange-red. Use a diluted brown-grey for the shadowed side of the white walls to create dimension. -
Paint the bottom panel:
For the lower scene, use a warmer, earthier palette. Paint the roof brown and the timber beams a dark sepia. Wash the path in a soft beige. -
Detail the garden:
Dab yellow, white, and red into the flower clumps. Let the colors bleed slightly for a soft, impressionistic look. Use a darker green to paint the leaves around the blooms.
Seasonal Shift
Change the mood by altering the sky washes. Use cool grey for a winter panel or a bright, saturated cyan for high summer.
Step 4: Painting: Right Page
-
Create the autumnal atmosphere:
On the large right panel, use a wet-on-wet technique for the sky, blending pale blue with hints of pink near the horizon. Wash the distant trees in soft oranges and browns. -
Paint the foreground trees:
Mix a dark brown with a touch of purple for the main tree trunks. Paint them carefully, avoiding the areas where you sketched delicate pink blossoms or leaves. -
Add the foliage:
Dab pale pink and light red onto the tree branches to suggest cherry blossoms or early autumn leaves. Paint the foreground grass with vertical strokes of green and teal. -
Enhance the path:
Layer a sandy brown color onto the winding path, leaving irregular white spaces to suggest light hitting the dirt.
Step 5: Final Touches
-
Deepen shadows:
Once dry, use a small brush with dark green or indigo to paint shadows under the eaves of the houses and at the base of the grass clumps. -
Add white highlights:
If you lost any brightness in the flowers or on the path, use a small amount of white gouache or a gel pen to bring back those sparkles. -
Clean up borders:
If painting went outside your initial pencil borders, you can either embrace the loose edge or use white gouache to tidy up the rectangular frames.
Close your sketchbook and enjoy your collection of peaceful seasonal homes
BRUSH GUIDE
The Right Brush for Every Stroke
From clean lines to bold texture — master brush choice, stroke control, and essential techniques.
Explore the Full Guide
Same City Corner All Year Long
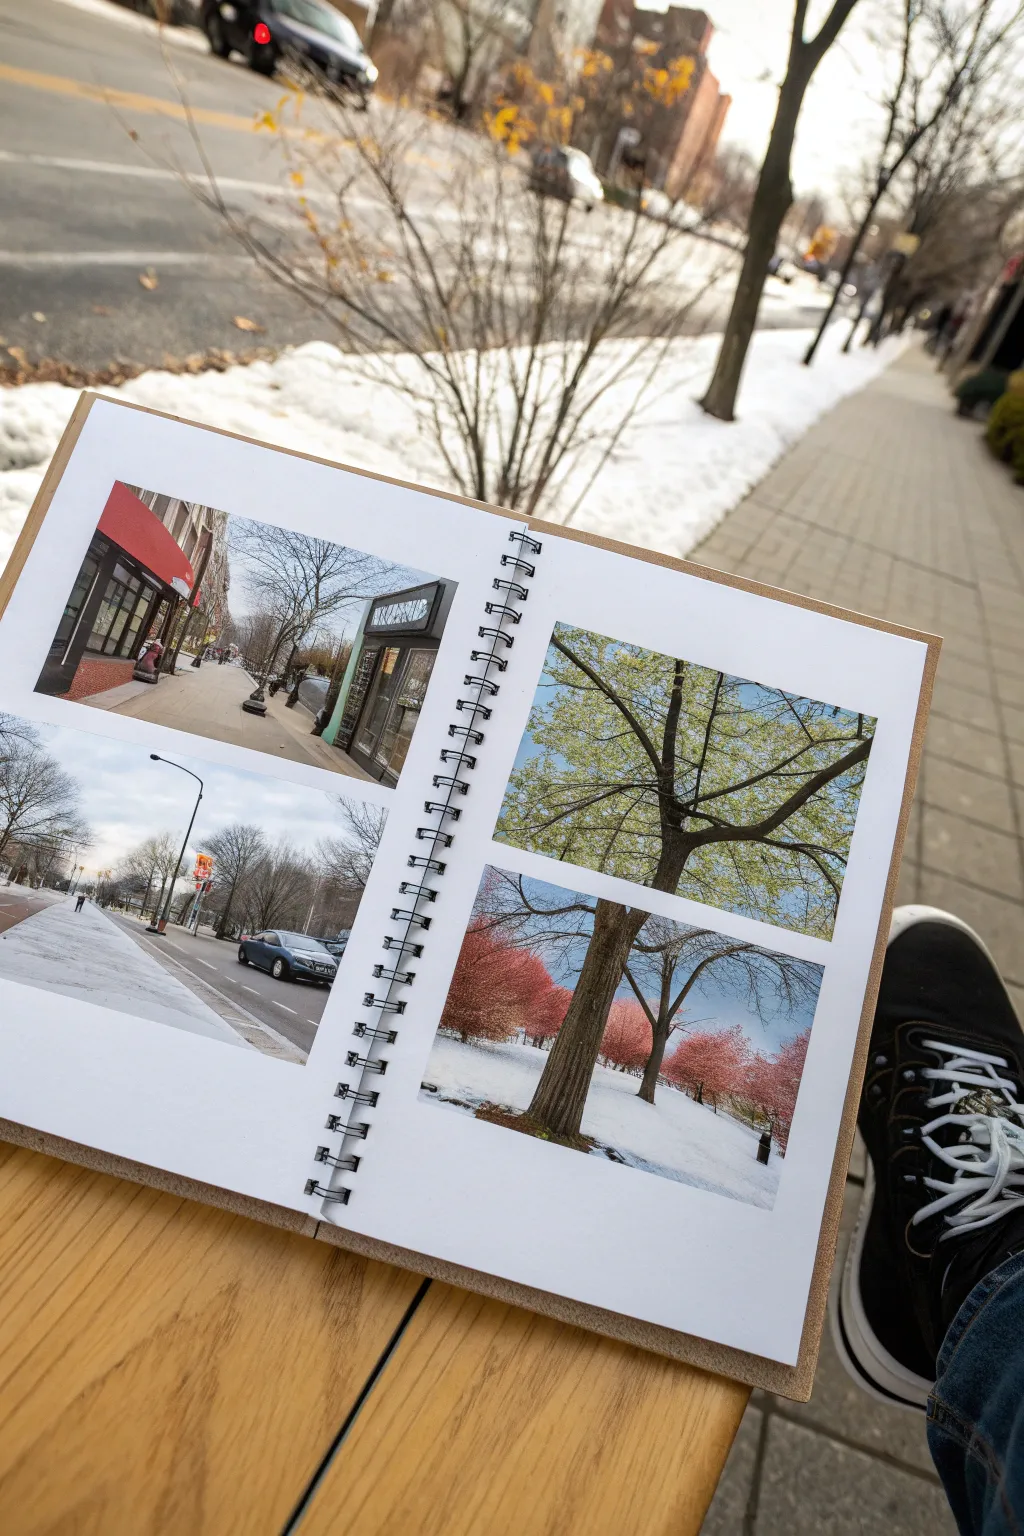
Capture the passage of time by documenting a single location across all four seasons in a spiral-bound journal. This project combines photography and simple layout design to create a poignant visual story of change and continuity.
Detailed Instructions
Materials
- A spiral-bound sketchbook or photo album (landscape orientation preferred)
- Digital camera or smartphone
- Photo printer or access to a printing service
- Glossy or matte photo paper
- Scissors or a craft knife
- Double-sided tape or photo adhesive squares
- Ruler
- Pencil
Step 1: Planning and Photography
-
Scout your location:
Choose a spot in your city or neighborhood that you can easily return to year-round. Look for distinct landmarks like interesting trees, storefronts, or streetlights that anchor the frame. -
Capture the first season:
Take your first photo. Note exactly where you stood and the angle of your camera. I find it helpful to save this reference shot on my phone to align future photos perfectly. -
Complete the cycle:
Return to the exact same spot during the peak of the subsequent three seasons. Ideally, capture a snowy winter, a blooming spring, a lush summer, and an autumn scene. -
Select your best shots:
Review your collection and choose one definitive image for each season. Ensure the perspective is consistent across all four to maximize the effect.
Step 2: Printing and Layout
-
Resize your images:
Using photo editing software, resize your four images so they will fit comfortably on your sketchbook pages. A standard 4×6 inch size usually works well for medium sketchbooks. -
Print photos:
Print your selected images on high-quality photo paper. Matte paper gives a nice artistic feel, while glossy will make the colors pop more vividly. -
Trim the edges:
Use scissors or a craft knife and ruler to trim any white borders from your prints, ensuring clean, sharp edges. -
Arrange the composition:
Open your sketchbook to a fresh spread. Place the photos on the pages without gluing them down yet to determine the best arrangement. A 2×2 grid works beautifully. -
Mark placement:
Once you are happy with the spacing, lightly mark the corners of where each photo will sit with a pencil.
Consistency Is Key
Use a tripod or steady surface at the exact same height each time you visit. Even a slight change in angle can disrupt the flow of the transition.
Step 3: Assembly
-
Apply adhesive:
Apply double-sided tape or photo adhesive squares to the back of the first photo. Focus especially on the corners to prevent peeling later. -
Mount the first photo:
Carefully align the photo with your pencil marks and press it firmly onto the page. Start with the top-left image. -
Continue mounting:
Repeat the process for the remaining three photos, maintaining consistent spacing between them. The gap between photos acts as a frame, so try to keep it uniform. -
Smooth it out:
Gently rub over each photo with a clean, soft cloth to ensure the adhesive bonds well and to remove any fingerprints. -
Erase guidelines:
carefully erase any visible pencil marks around the edges of your photos. -
Add context (optional):
If you wish, write the date or season next to each photo in small, neat handwriting, or leave it purely visual for a minimalist look.
Aligning Photos
If your photos look crooked, use a clear plastic ruler to align the horizon lines across the pages before sticking them down definitively.
Now you have a timeless record of your favorite corner of the world changing through the year
Four Seasons Wreath in Quadrants
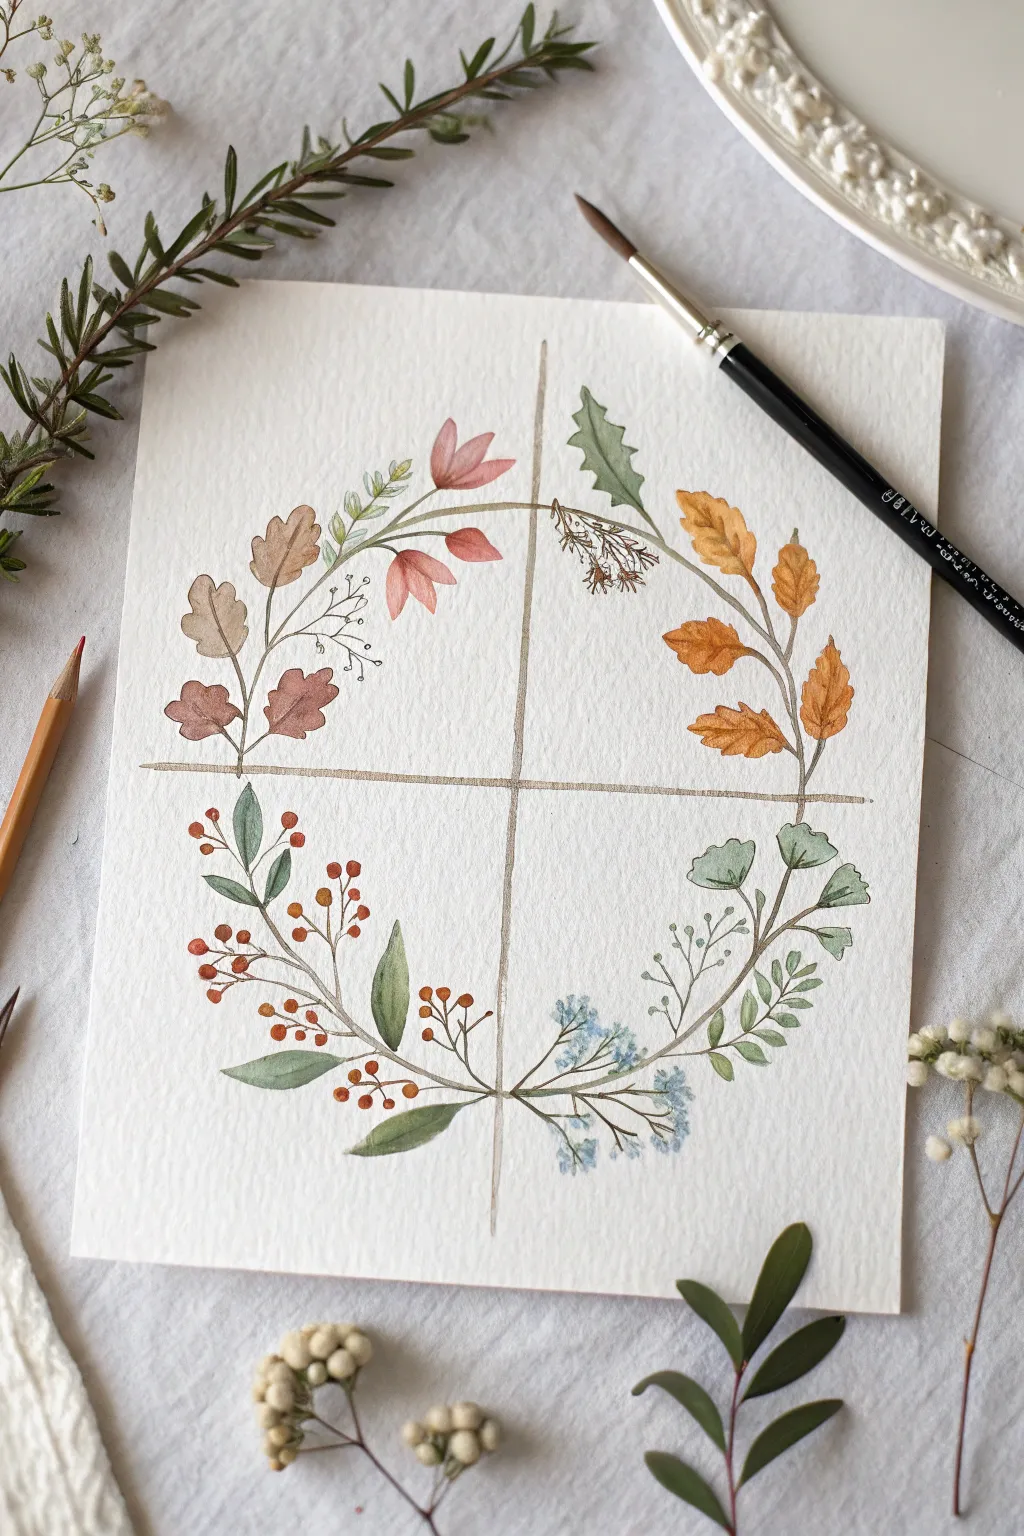
Capture the fleeting beauty of all four seasons in a single, harmonious composition with this delicate watercolor wreath. By dividing your paper into quadrants, you’ll paint distinct botanical elements that represent the changing year, from spring blossoms to winter berries.
How-To Guide
Materials
- Cold press watercolor paper (300 gsm)
- Watercolor paints (pan or tube set)
- Round watercolor brushes (sizes 2 and 4)
- Pencil (HB or H)
- Ruler
- Kneaded eraser
- Jar of clean water
- Paper towel or cloth
- Warm brown or gold watercolor pencil (optional)
Step 1: Structure and Sketching
-
Mark the center:
Find the center of your watercolor paper using a ruler. Lightly mark this spot, as it will be the anchor for your entire design. -
Draw the quadrant lines:
Using a ruler, draw a vertical line and a horizontal line that intersect at your center mark. Keep these pencil lines extremely light, just enough to guide you, creating four equal rectangles. -
Sketch the circle guide:
Lightly sketch a circle that passes through all four quadrants. You can use a compass or trace a round object like a bowl to ensure it’s symmetrical. -
Define the stems:
Along the circle line you just drew, sketch the main stems for each season. They should meet near the center lines but don’t need to touch perfectly. Let them curve naturally rather than looking like stiff sticks. -
Outline the leaves and flowers:
Sketch the specific botanicals for each section: oak leaves for autumn (top right), holly and berries for winter (bottom left), buds and small flowers for spring (bottom right), and larger pink blooms for summer (top left).
Step 2: Painting the Seasons
-
Paint the divider lines:
Mix a diluted, warm earth tone—like a raw umber or sepia. Using your size 2 brush (or a gold watercolor pencil), carefully paint over your initial pencil cross lines to create the permanent structure. -
Start with Autumn (Top Right):
Mix varied shades of burnt sienna, yellow ochre, and orange. Paint the oak leaves, dropping in slightly different hues while the paint is wet to create a natural, mottled look. -
Add Autumn details:
While the leaves are drying, paint the stems and fine twigs in a dark brown. Add tiny, wispy branches extending inward toward the center of the wreath. -
Paint Winter (Bottom Left):
For the winter section, use a deep sage or olive green for the leaves. I like to keep these strokes fairly simple to contrast with the berries. -
Add berries:
Using a vibrant red or burnt orange, dab in small circles for the berries. Connect them to the main stem with very thin brown lines using the tip of your smallest brush. -
Paint Spring (Bottom Right):
Mix a soft, cool blue for the tiny flower clusters (like forget-me-nots) and a pale mint green for the small, rounded leaves. Keep the paint watery and transparent here to reflect the lightness of spring. -
Paint Summer (Top Left):
Create a dusty pink or coral shade. Paint the larger bell-shaped flowers, letting the color fade slightly at the edges. Add green leaves that are slightly warmer and more vibrant than the winter foliage.
Uneven Watercolors?
If you get hard edges or ‘blooms’ inside your leaves, your brush has too much water. Dry your brush on a paper towel before dipping into paint to control the flow better.
Step 3: Refining Details
-
Deepen the shadows:
Once the base layers are completely dry, mix slightly darker versions of your greens and browns. Add subtle veins to the larger leaves and darken the undersides of the berries to give them volume. -
Connect the quadrants:
Ensure the stems in the center of the composition meet the cross-lines gracefully. You can add tiny extra twigs or leaves near the center point to make the transitions feel organic rather than abrupt. -
Erase guidelines:
Wait until the painting acts completely bone-dry—this is crucial to avoid smudging. Gently use your kneaded eraser to lift any visible pencil marks from your initial sketch.
Go Metallic
For a magical touch, re-trace the central cross lines and add tiny veins to the leaves using metallic gold watercolor paint or a gold gel pen after the paint dries.
Now you have a timeless piece of art that celebrates the cycle of nature on a single page.

PENCIL GUIDE
Understanding Pencil Grades from H to B
From first sketch to finished drawing — learn pencil grades, line control, and shading techniques.
Explore the Full Guide
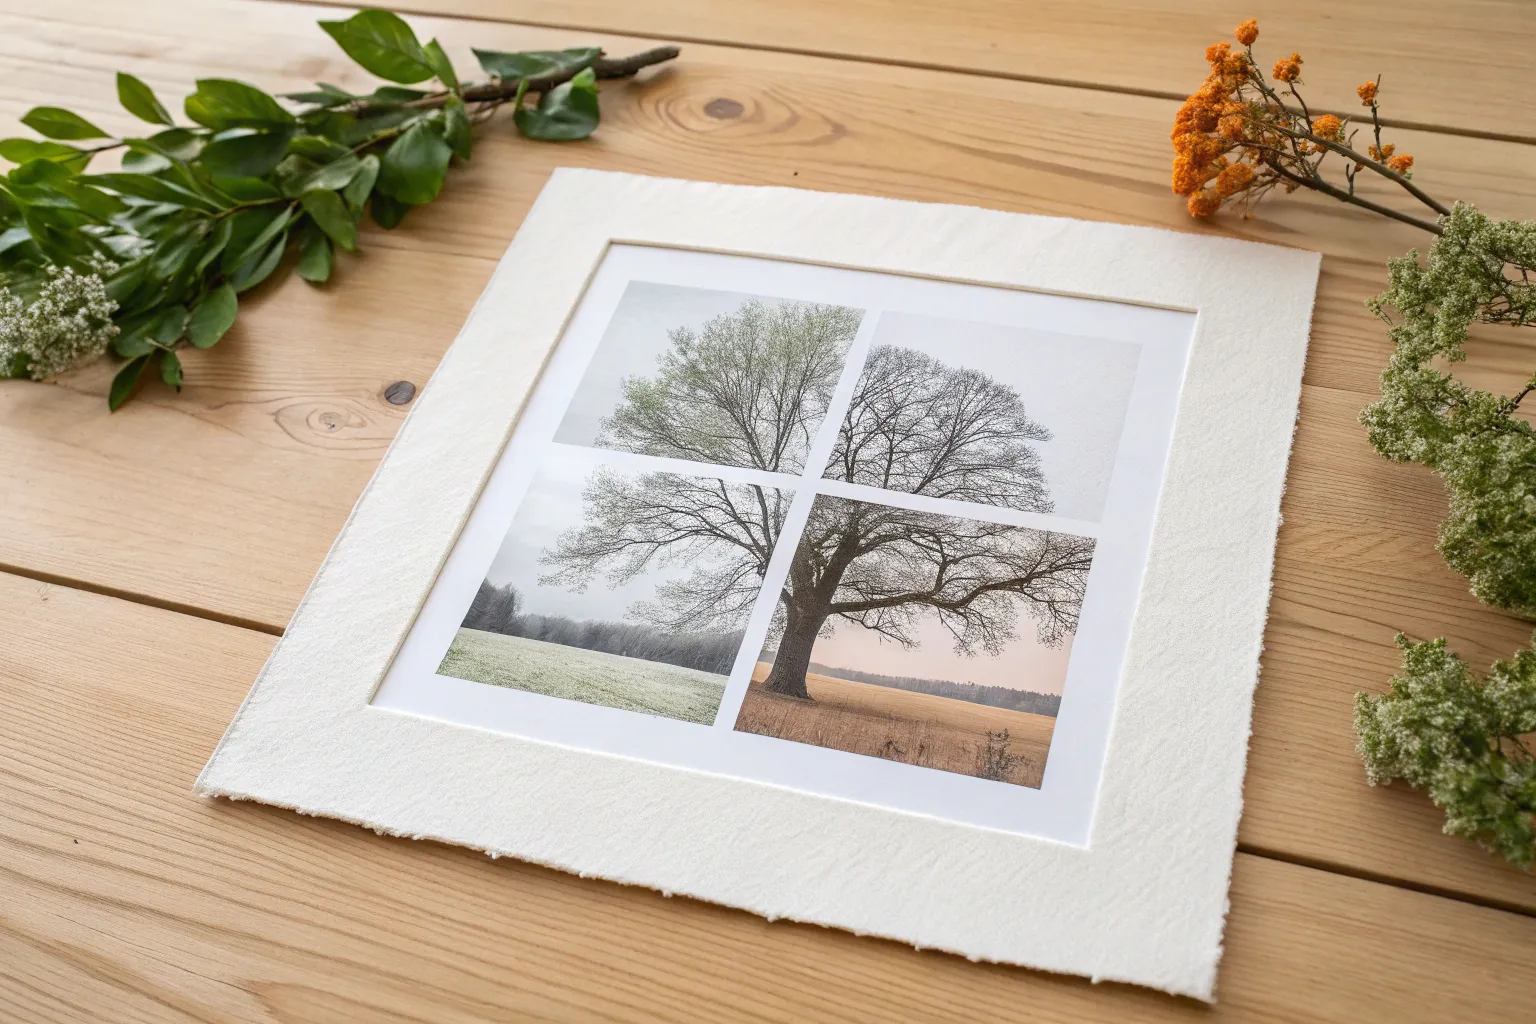
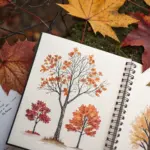
Minimal Line Drawing With Seasonal Washes
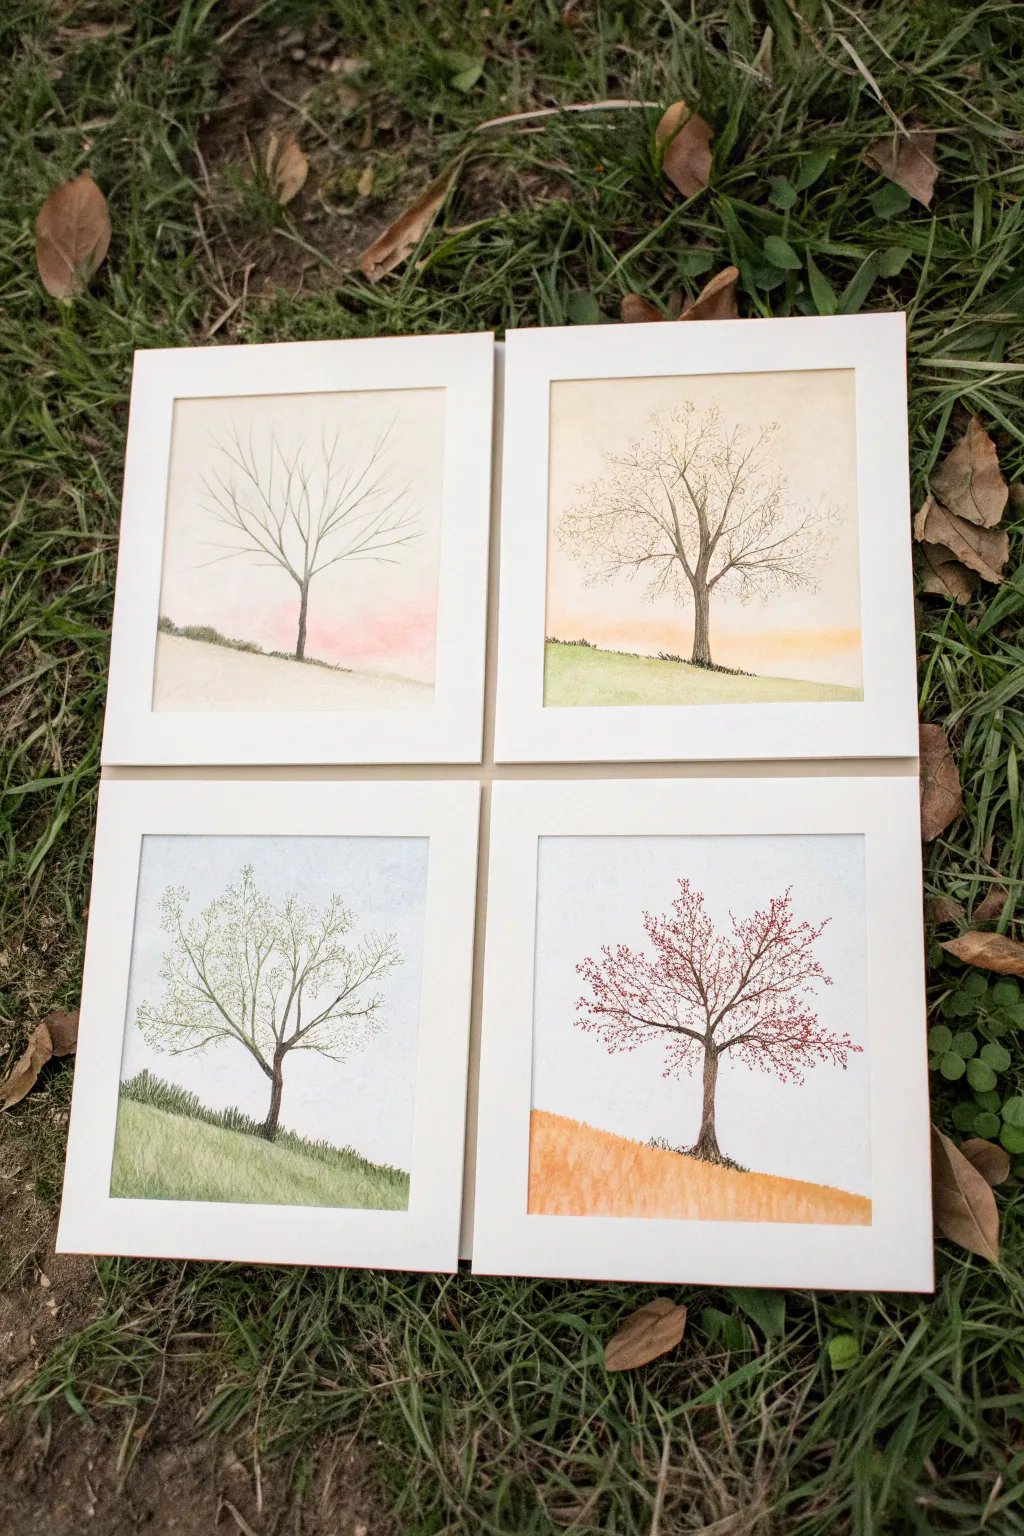
Capture the passing of time with this delicate set of four watercolor and ink illustrations. By repeating the same tree structure against changing color palettes, you create a cohesive and meditative gallery of nature’s subtle shifts.
How-To Guide
Materials
- 4 sheets of cold press watercolor paper (cut to 5×5 inch squares)
- Fine liner ink pens (sizes 0.1 and 0.3, waterproof/archival black ink)
- Watercolor paints (Sap Green, Burnt Sienna, Yellow Ochre, Alizarin Crimson, Cerulean Blue, Payne’s Grey)
- Round watercolor brushes (size 2 and size 6)
- Pencil and eraser
- Ruler
- Paper towels and water jar
- 4 square photo mats or card stock frames
Step 1: Planning and Sketching
-
Prepare the paper:
Cut your watercolor paper into four equal squares. Lightly mark a border about half an inch from the edge if you plan on framing them later, or use masking tape to secure the edges to your work surface. -
Establish the horizon:
On each square, draw a faint pencil line for the hill slope. Vary the angle slightly for visual interest, but keep the tree’s position consistent—slightly off-center to the right looks natural. -
Outline the trunk structure:
Lightly sketch the main trunk and primary branches in pencil first. Aim for a Y-shape that splits and splits again. I find it helpful to draw the ‘skeleton’ of the tree on all four squares simultaneously to ensure they look like the same specimen.
Ink Smearing?
Verify your pen is labeled ‘waterproof’ or ‘archival.’ If unsure, test it on a scrap piece of paper, let it dry for 10 minutes, and run a wet brush over it before starting your main art.
Step 2: Inking the Skeleton
-
Trace the trunk:
Using the 0.3 fine liner, carefully go over your pencil lines for the main trunk. Add small, jagged textural marks along the bark to simulate roughness, rather than a perfectly smooth line. -
Branch out:
Switch to the finer 0.1 pen for the upper branches. Use a shaky hand intentionally here; organic growth is never perfectly straight. Let the branches taper off into nothing at the tips. -
Detail the ground:
Add tiny vertical hatching or stippling right at the base of the trunk where it meets the ground line. This roots the tree so it doesn’t look like it’s floating. -
Erase pencil marks:
Wait at least 15 minutes to ensure the ink is totally bone dry, then gently erase all visible graphite measurement lines.
Pro Tip: Light Sources
Keep your light source consistent across all four panels. If the right side of the tree is shadowed in winter, it should be shadowed in summer too for visual harmony.
Step 3: Applying Seasonal Colors
-
Winter (Top Left): Minimal hues:
For the winter scene, dilute a tiny drop of Alizarin Crimson with lots of water for a barely-there pink wash near the horizon. Keep the sky mostly white. Paint the ground with a very pale wash of raw umber or grey, leaving the tree perfectly bare. -
Spring (Top Right): Budding warmth:
Mix a soft yellow-orange wash for the sky horizon. Paint the grass a fresh, light yellow-green. Once the branches are dry, use a damp brush to dab tiny, faint spots of pale yellow-green among the twigs to suggest emerging buds. -
Summer (Bottom Left): Full foliage:
Paint a cool blue sky wash, fading as it goes down. Use a vibrant Sap Green for the hill, adding darker green streaks for grass texture. Using a stippling motion with your brush, apply leafy clusters of mid-green over the branches, keeping them somewhat transparent. -
Autumn (Bottom Right): Vibrant change:
Create a bold orange wash for the hill using Burnt Sienna and Yellow Ochre. For the leaves, stipple dots of red and rust orange onto the branches. Let some dots ‘fall’ and land on the ground beneath the tree.
Step 4: Final Touches and Framing
-
Deepen the shadows:
Once all paint is dry, use the 0.1 pen to add extra definition to the tree bark on the shadowed side (usually the right side) to give the trunk volume. -
Enhance ground texture:
For the Summer and Spring panels, sketch tiny grass blades with your pen over the dried watercolor wash to add crisp detail to the foreground. -
Mount artwork:
Clean up any paint edges. Place each painting behind a square mat or mount them onto folded cardstock to complete the professional gallery look shown in the photo.
Display your four panels together to enjoy the full cycle of nature on your wall
Abstract Four Seasons Map With Shapes
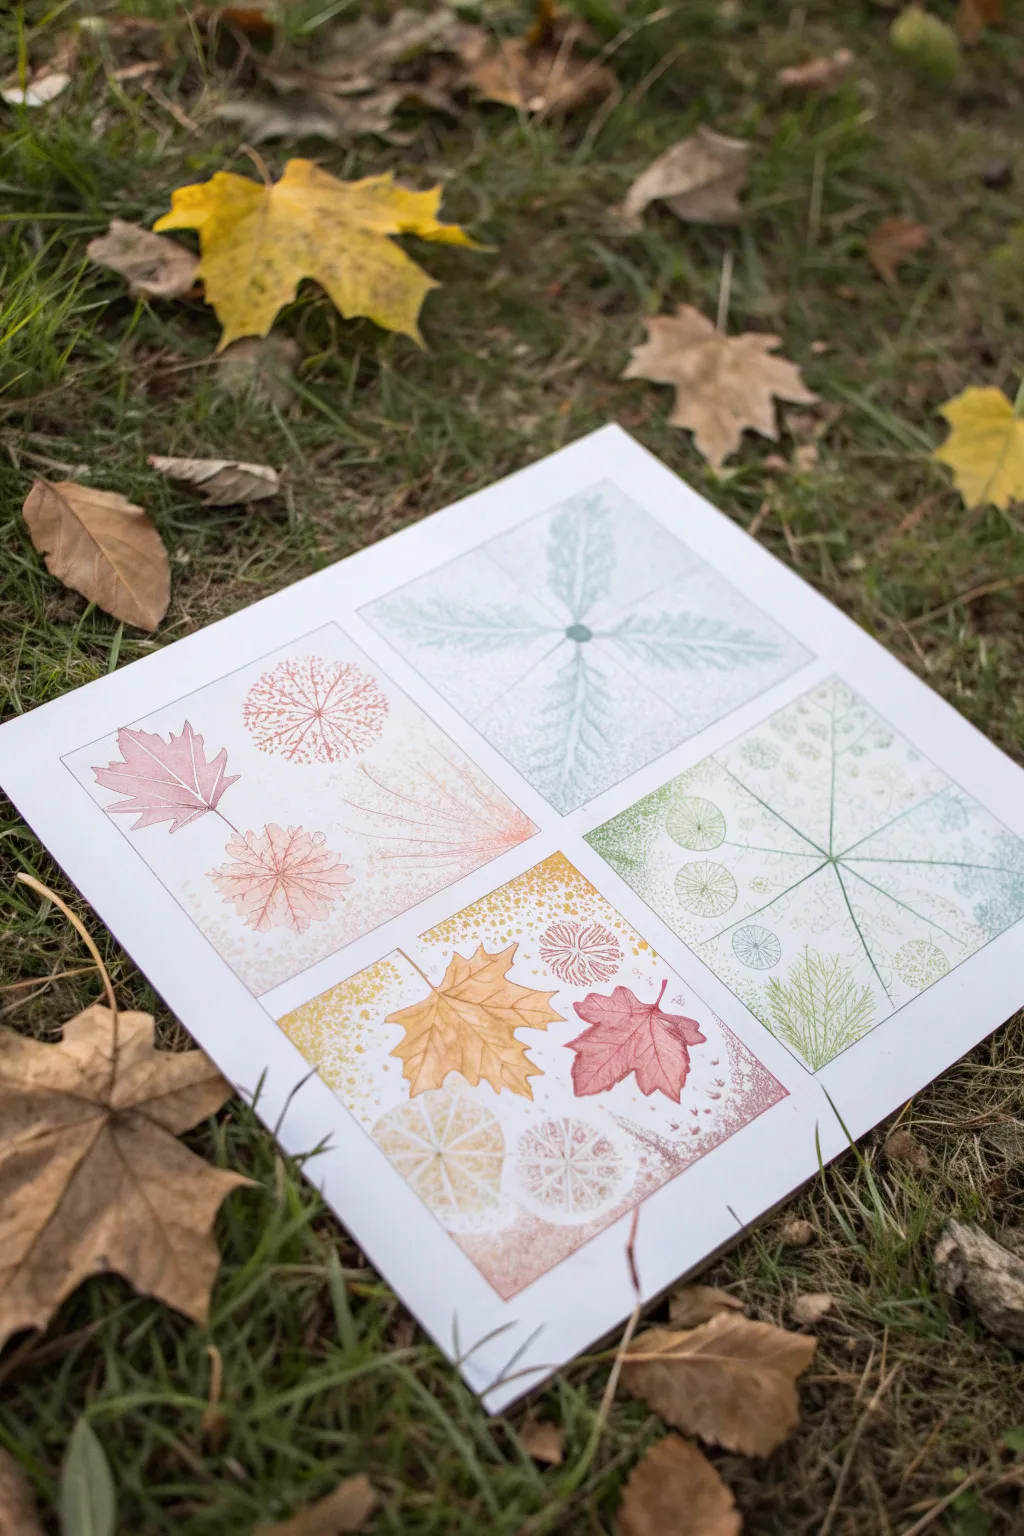
Celebrate the changing year with this delicate four-panel composition that captures the essence of each season through botanical silhouettes and textures. By dividing a single sheet into quadrants, you’ll explore different color palettes—from icy winter blues to warm autumnal golds—using simple stenciling and texturing techniques.
Detailed Instructions
Materials
- Heavyweight white drawing paper or mixed media paper (square format)
- Ruler
- Pencil and eraser
- Colored pencils, pastels, or watercolor pencils (Winter/Spring sections)
- Acrylic paints or stamping ink (Autumn/Summer sections)
- Natural leaves (variety of shapes and sizes)
- Textured blending tools (sponges, textured fabric, or stippling brushes)
- Fine liner pens (optional for details)
Step 1: Setting the Structure
-
Prepare the canvas:
Begin with a clean, square sheet of heavyweight paper. Using a ruler and a light pencil touch, find the exact center of the page. -
Divide into four:
Draw faint lines connecting the center point to the four corners of the paper. This creates four triangular quadrants, one for each season. -
Draw the frame:
Lightly sketch a square border inside the paper’s edge to frame your composition. The diagonal lines you just drew should extend from the center to the corners of this inner square.
Use Nature’s Tools
Instead of drawing every leaf, place a real leaf under your paper and rub over it with colored pencil or crayon to capture intricate vein details instantly.
Step 2: Winter (Top Quadrant)
-
Establish the palette:
Select icy blue, teal, and soft grey tones for the top triangle. -
Create the frost texture:
Place a long, serrated leaf (like a dandelion or thistle leaf) vertically in the center of the quadrant. Using the rubbing technique or light stippling around the leaf edge, create a negative space silhouette in pale blue. -
Add horizontal motion:
Repeat the process with leaves extending horizontally from the center point, using a slightly darker teal to suggest depth. The texture should look frosty and granular, which works well with colored pencil rubbings or dry pastel.
Step 3: Spring (Right Quadrant)
-
Switch to fresh greens:
For the right-hand triangle, move to a palette of light greens, mint, and soft turquoise. -
Outline the skeleton:
Draw faint, thin lines radiating from the center point outward. These act as the stems for your spring foliage. -
Texture the foliage:
Instead of solid shapes, use a stippling technique or a textured sponge to dab green pigment in circular dandelion-like shapes along the stems. Keep the application airy and light to represent new growth. -
Detail the edges:
Add small, fern-like details near the outer corners using a sharper pencil or fine liner in a fresh grassy green.
Create Harmony
Let one color from each season ‘bleed’ slightly into the next quadrant (e.g., a touch of yellow in the green spring section) to make the transition feel organic.
Step 4: Summer (Left Quadrant)
-
Warm up the colors:
Transition to the left quadrant using warm pinks, soft reds, and rusty oranges. -
Create floral bursts:
Draw or stamp circular, firework-like flower heads. Use fine lines radiating from a central dot to mimic allium or dandelion seed heads in full bloom. -
Layer leaves:
In the background, lightly sketch the veins of a large leaf structure spanning the quadrant, blending a very soft pink wash or shading over it to unify the summer section.
Step 5: Autumn (Bottom Quadrant)
-
Apply rich earth tones:
Focus on the bottom triangle with gold, amber, and deep maroon colors. -
Leaf prints:
This is the ideal spot for a direct print. Apply a thin layer of autumn-colored paint to the back of a maple or oak leaf and press it firmly near the center. -
Add splatter effects:
Dip a stiff brush or toothbrush into diluted yellow or gold paint. Run your thumb over the bristles to gently speckle the background, mimicking falling leaves and pollen. -
Finalize bottom details:
Use a stamp or a textured object (like the cross-section of a fruit or a patterned sponge) to add circular geometric elements in the corners, grounding the composition.
Step 6: Finishing Touches
-
Clean the boundaries:
Once all mediums are completely dry, use an eraser to gently clean up the original pencil guidelines separating the quadrants. -
Connect the center:
If the center point looks disjointed, add a small, dark dot or a tiny unified motif right in the middle where all four seasons meet to tie the map together.
Take a moment to admire how the four distinct palettes come together to form a complete cycle of nature


Have a question or want to share your own experience? I'd love to hear from you in the comments below!