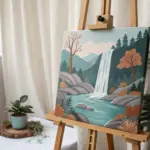
There’s something totally addictive about painting the northern lights—you get that big, magical glow without needing a ton of detail. These easy northern lights painting ideas are all about simple shapes, bold contrast, and quick techniques that look way fancier than they are.
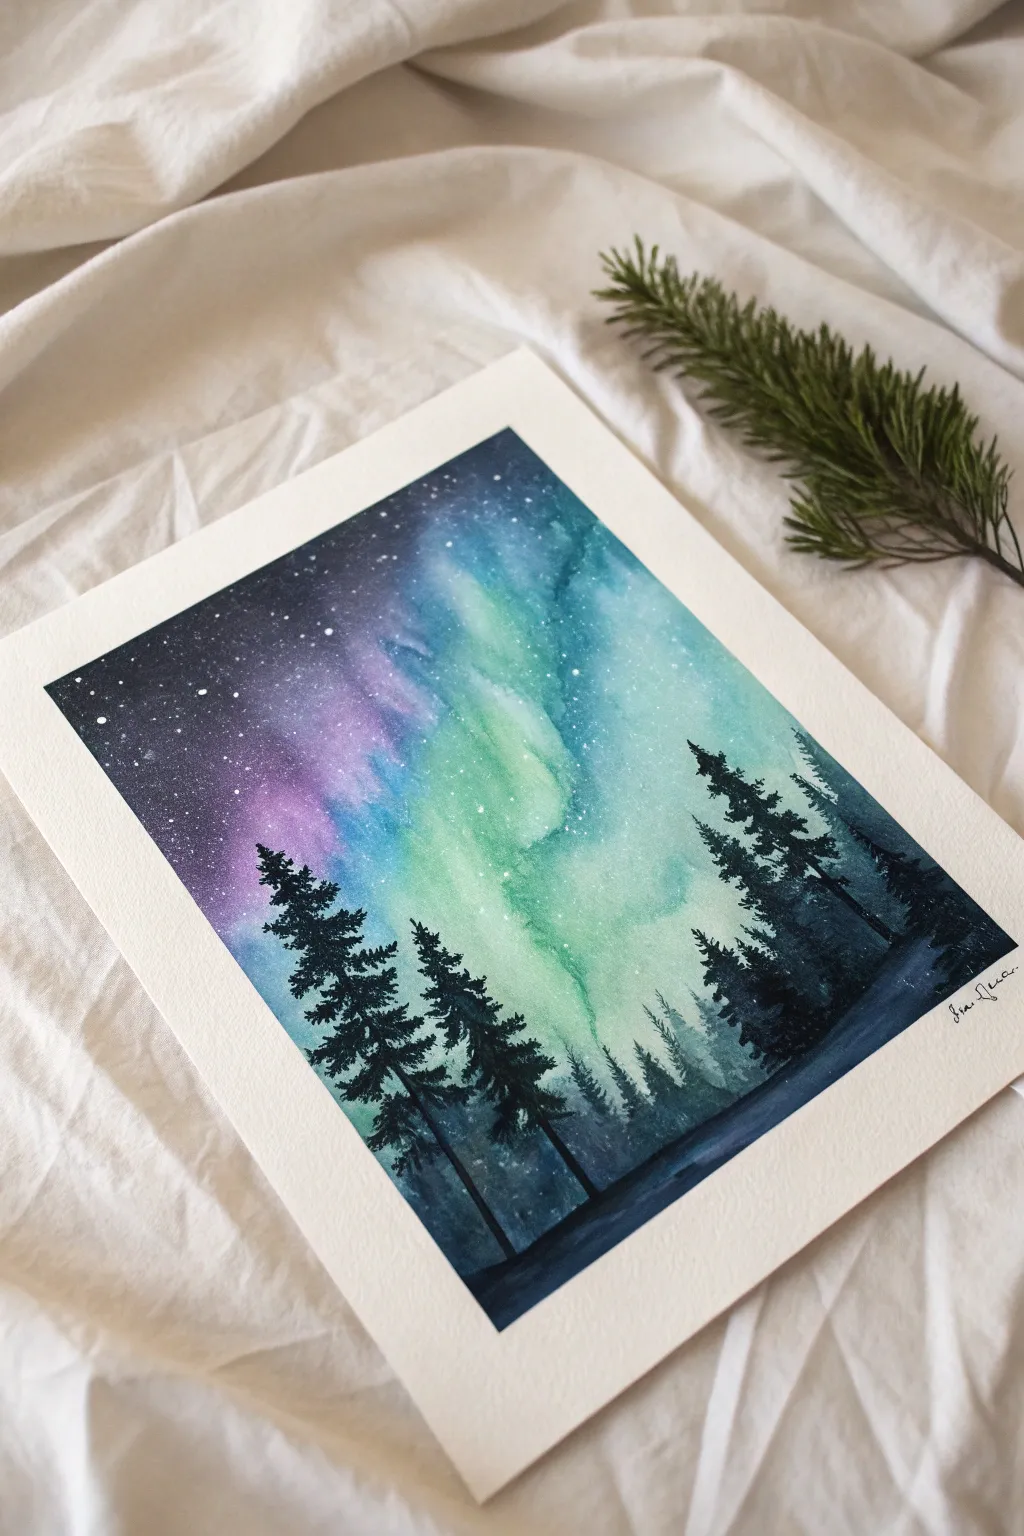
Classic Aurora Over Pine Tree Silhouettes
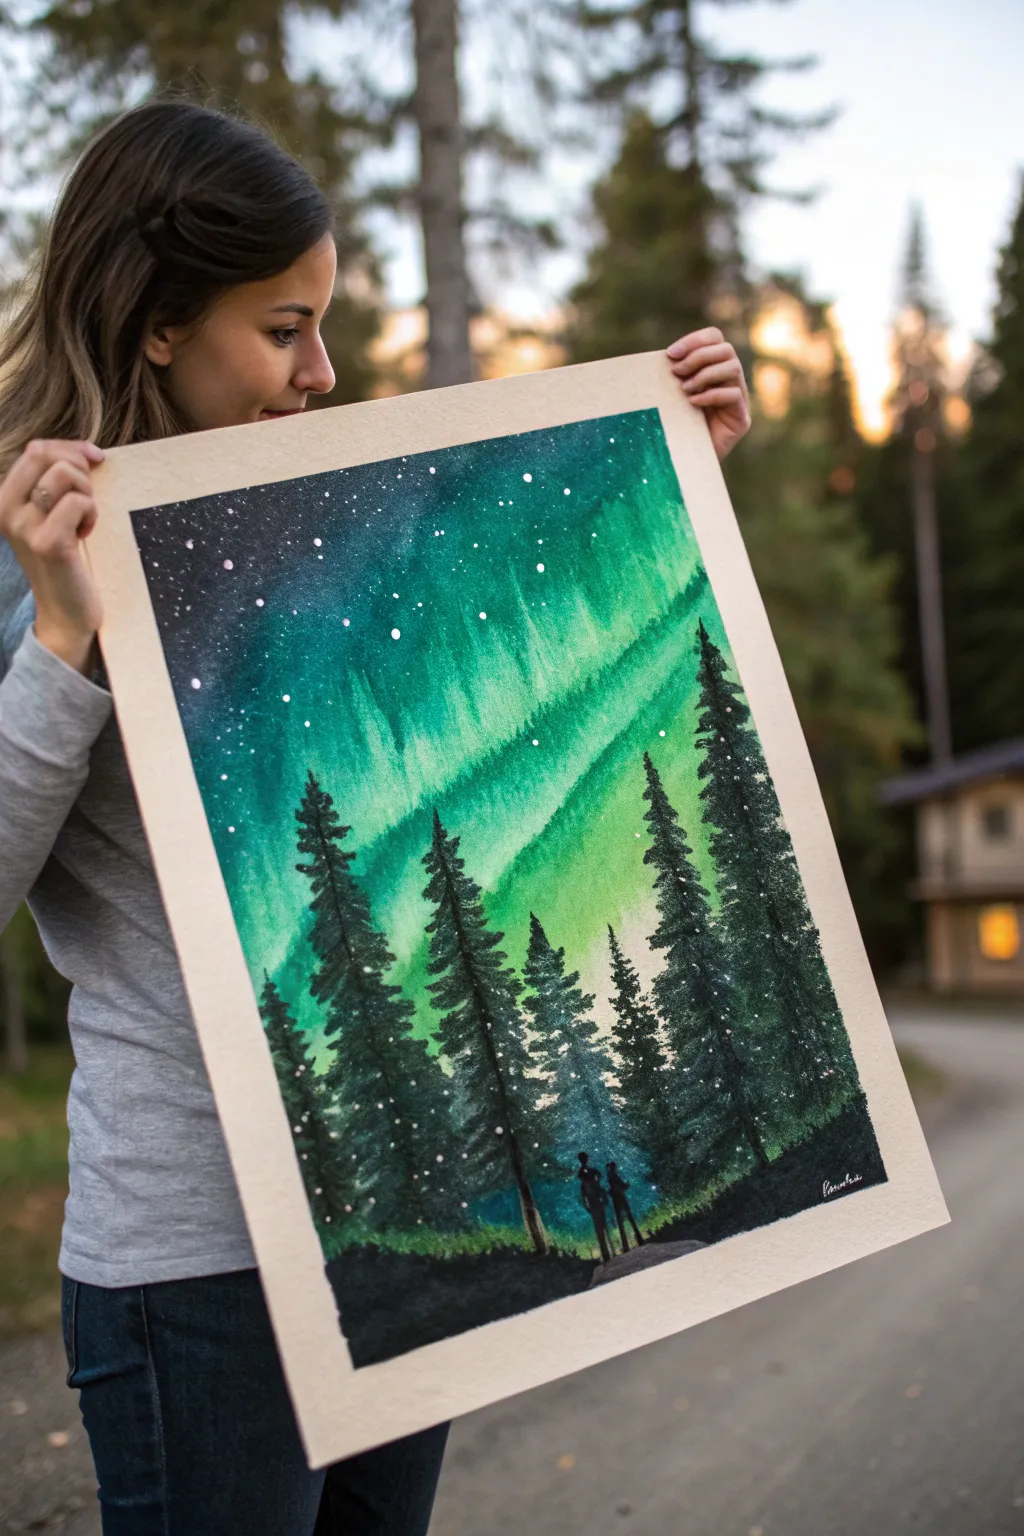
Capture the ethereal beauty of the Aurora Borealis dancing above a silent forest with this evocative watercolor project. The rich, vibrant greens contrast beautifully against deep, dark pines, creating a scene that feels both vast and intimate.
Step-by-Step
Materials
- High-quality cold press watercolor paper (A3 or similar size)
- Masking tape or painter’s tape
- Watercolor paints (Emerald Green, Sap Green, Phthalo Green, Indigo, Black)
- White gouache or white acrylic ink
- Large flat wash brush
- Medium round brush
- Small liner brush or detail brush
- Old toothbrush (for splatter)
- Two jars of water
- Paper towels
- Hairdryer (optional, for speeding up layers)
Step 1: Setting the Sky
-
Prepare the workspace:
Tape down all four edges of your paper to a sturdy board. This prevents the paper from buckling when we add heavy washes of water and creates that crisp, professional white border seen in the final piece. -
Wet-on-wet base:
Using your large flat brush, apply a clean coat of water across the entire upper two-thirds of the paper. We want a sheen, but no puddles, to help the colors flow seamlessly. -
The first emerald wash:
Load your brush with a bright, luminous Emerald Green. Start applying broad, vertical strokes from the middle of the sky, sweeping upwards and slightly diagonally. Leave some areas lighter to suggest the twisting ribbons of light. -
Deepening the night:
While the paper is still damp, introduce Indigo or a mix of Blue and Black to the top corners and edges. Blend this dark starry void downwards into the green, allowing the colors to bleed naturally but keeping the center bright. -
Creating the streaks:
To get those defined vertical aurora pillars, use a damp, clean brush to ‘lift’ paint out in vertical lines within the green section. Alternatively, add concentrated Phthalo Green in vertical strokes for contrast.
Muddy Sky Fix
If your green and black blend into a gray mess, stop immediately. Let the paper dry completely, then add a fresh glaze of pure color on top. Don’t overwork wet paint!
Step 2: Stars and Atmosphere
-
Let it dry completely:
This is crucial. The sky must be bone dry before moving on, or your stars will blossom into fuzzy blobs. I usually use a hairdryer on a low setting here to speed things up. -
Splattering stars:
Dilute a small amount of white gouache or acrylic ink with water. Dip an old toothbrush into it, point it at the painting, and run your thumb across the bristles to spray fine white specks across the darker upper sky. -
Adding larger stars:
Take a small detail brush or a toothpick dipped in the white paint and specifically place a few slightly larger, brighter stars in the darkest sections of the sky for emphasis.
Step 3: The Silent Forest
-
Mixing the darkest shadow:
Mix a very dense black. You can use straight black paint, but mixing Indigo and Burnt Umber creates a richer, more natural ‘chromatic black’ that looks less flat. -
Painting the tree line structure:
Using a medium round brush, paint a jagged, uneven horizon line across the bottom. This doesn’t need to be detailed yet; it just establishes the ground where the forest stands. -
Starting the prominent pines:
Switch up the height of your trees to create visual interest. Paint a vertical line for the trunk of the tallest tree on the right first to anchor the composition. -
Texturing the branches:
Use a stippling or dabbing motion with the tip of your brush to create pine needles. Start narrow at the top of the tree trunk and sweep outwards and downwards as you move toward the base, making the tree wider at the bottom. -
Filling the forest:
Repeat this process for the other trees, varying their heights and thickness. Ensure the trees on the left side balance the heavy group on the right, but keep the center area slightly more open.
Adding Magic
Mix a tiny pinch of iridescent watercolor medium or glitter into your white star paint. The stars will subtly catch the light when viewed from different angles.
Step 4: Final Details
-
Foreground figures:
Using your smallest detail brush and the thick black mixture, carefully paint two tiny silhouettes near the bottom center. Keep their shapes simple—just heads and shoulders suggests enough form. -
Grounding shadows:
Darken the ground beneath the trees and figures to ensure they feel rooted. You can drag the brush horizontally to create the texture of uneven terrain. -
The reveal:
Once the entire painting is completely dry to the touch, slowly peel away the masking tape at a 45-degree angle to reveal your clean white border.
Now you have a stunning window into the arctic night sky, ready to frame or gift to a fellow dreamer.


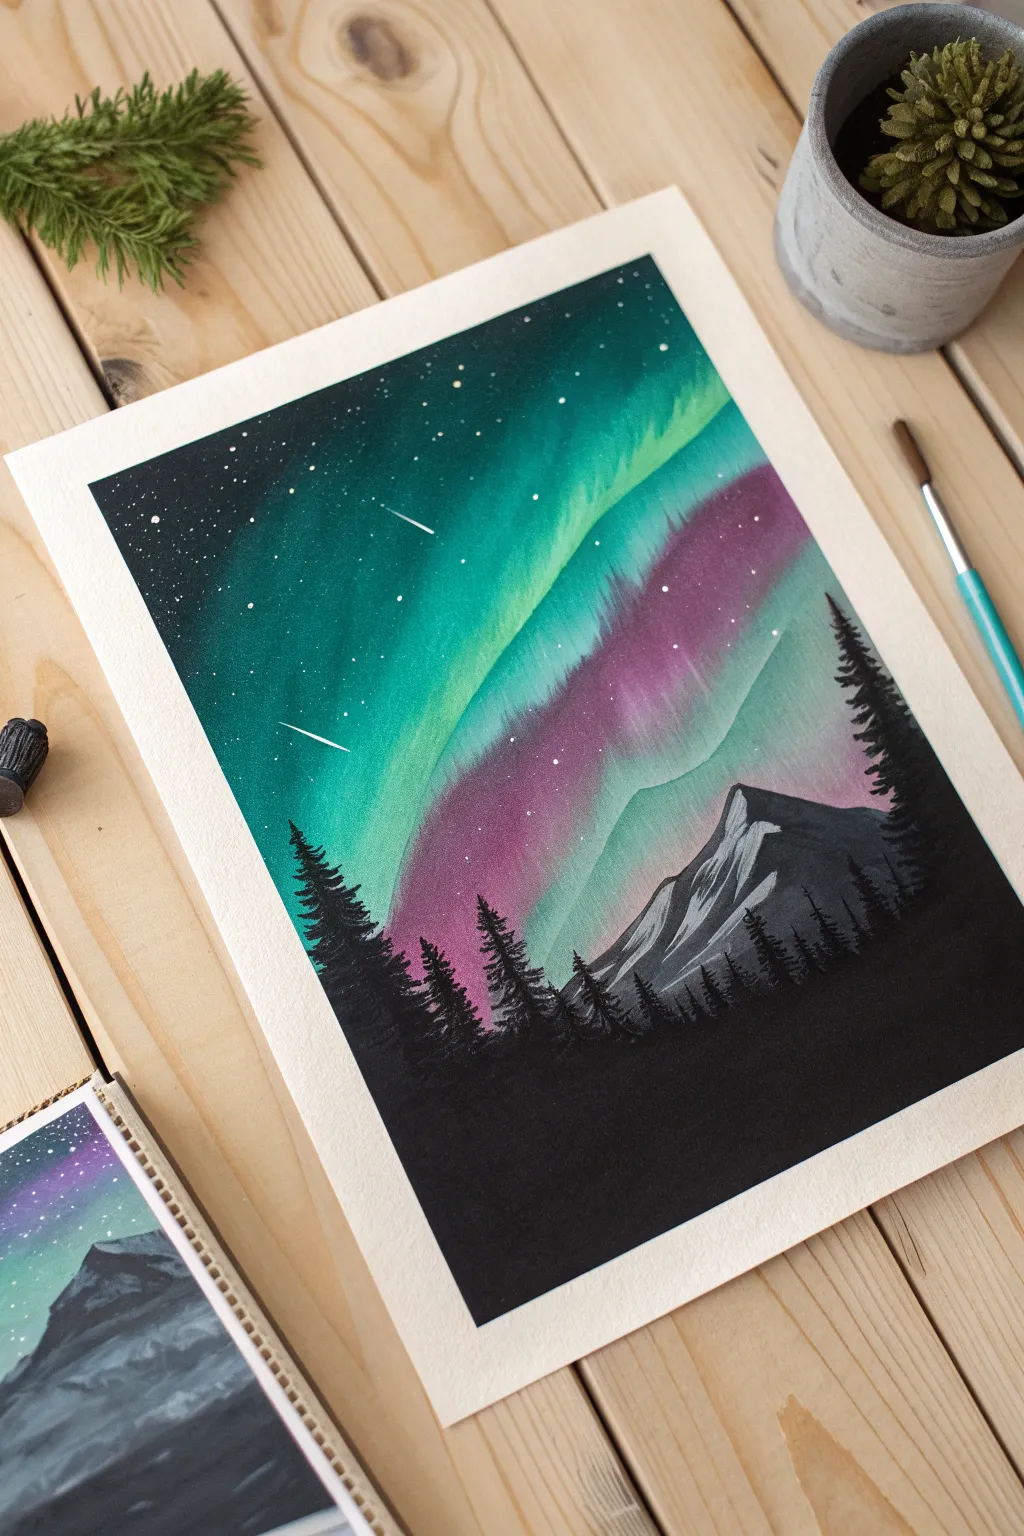
Simple Mountains Under Northern Lights
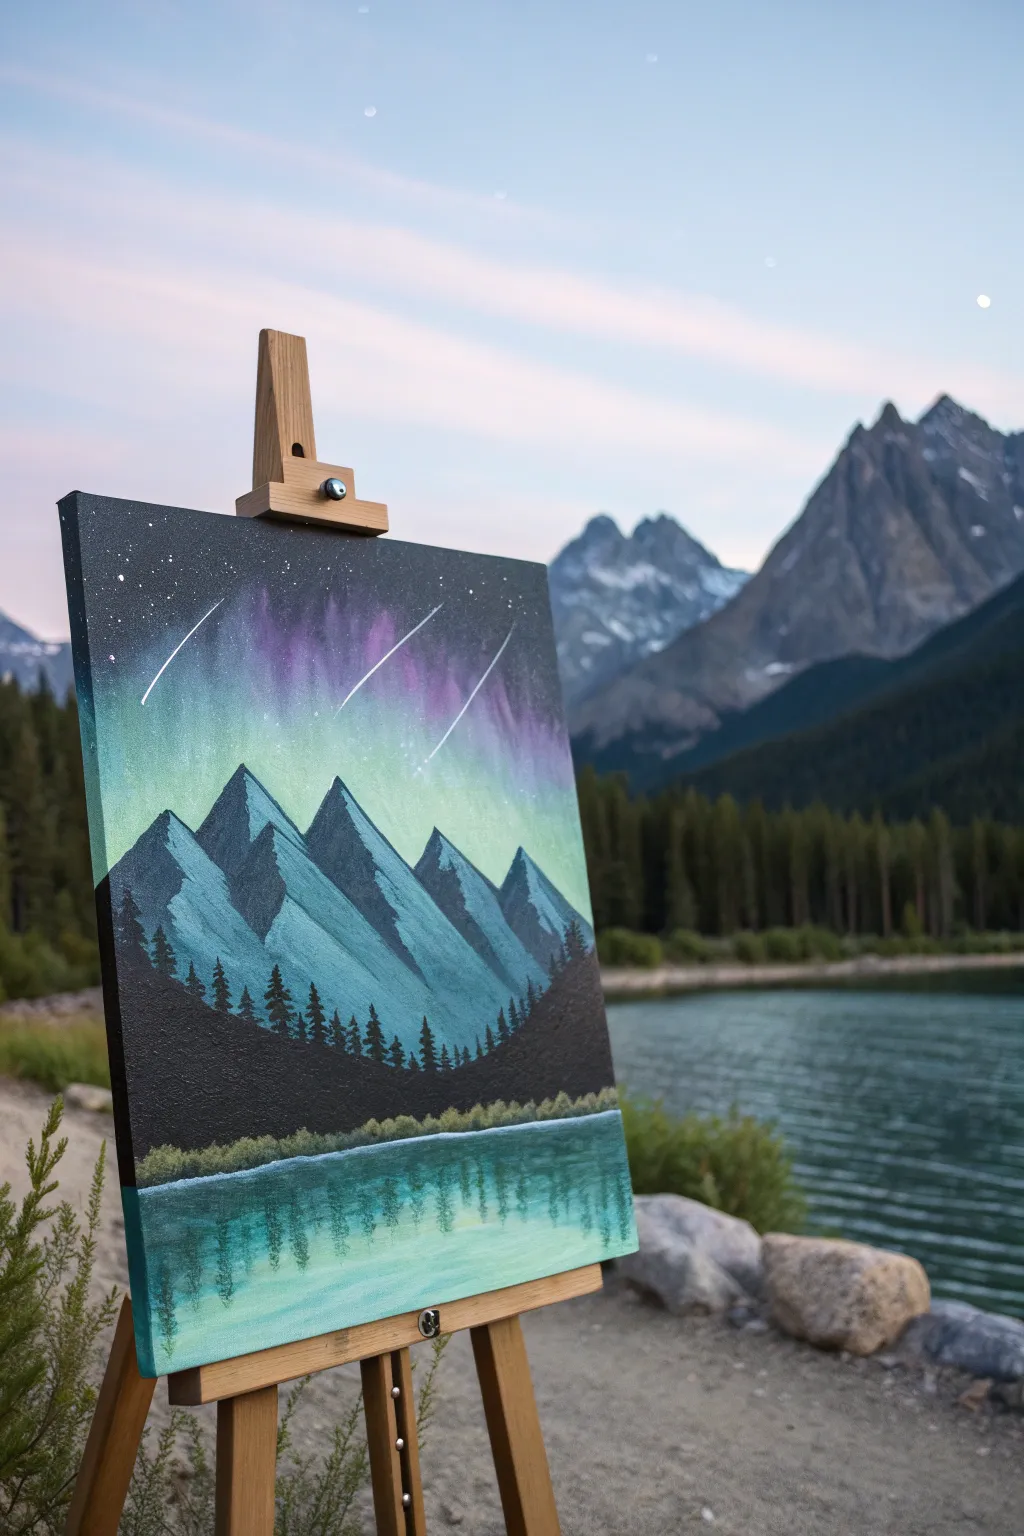
Capture the magic of the polar skies with this vibrant landscape featuring sharp, stylized peaks and shimmering northern lights. This acrylic painting balances bold geometric shapes with soft, blended starlight for a striking finish.
How-To Guide
Materials
- Canvas panel or stretched canvas (11×14 or similar)
- Acrylic paints: Black, Titanium White, Phthalo Blue (or Turquoise), Purple/Violet, bright Green
- Flat shader brushes (1 inch and 1/2 inch)
- Small round detail brush
- Fan brush (optional, for trees)
- Cup of water and paper towels
- Palette or paper plate
- Ruler (optional)
Step 1: Setting the Sky
-
Prime the background:
Begin by painting the entire upper two-thirds of the canvas with a solid coat of black acrylic paint. This dark base is crucial for making the aurora colors pop later. -
Create the aurora glow:
While the black is dry, sponge or brush on patches of purple and teal in the upper sky area. Use a dry brush technique to blend the edges softly into the black background, creating a hazy, ethereal effect. -
Add streak details:
Load a clean brush with a mix of white and bright green. Drag vertical, wavy lines swiftly downward from the purple areas to mimic the dancing curtains of light. Keep these strokes somewhat translucent. -
Paint the stars:
Dip an old toothbrush or stiff brush into watered-down white paint. Flick the bristles to spray a fine mist of stars across the black sky. Add three distinct diagonal white lines for shooting stars.
Step 2: Constructing the Mountains
-
Outline the peaks:
Using a medium blue mixed with a touch of white, paint five or six sharp, triangular mountain shapes across the middle of the canvas. Ensure the peaks vary in height for visual interest. -
Define the shadows:
Once the base blue shape is dry, imagine the light source is coming from the right. Paint the left side of each mountain triangle with a slightly darker shade of blue or by mixing in a tiny bit of black. -
Add snow caps:
On the right-facing slopes of the mountains, use white paint mixed with a hint of light blue. Drag the paint downward loosely to create textured, rugged snow-capped ridges. -
Refine the edges:
Use a small brush to clean up the peaks, ensuring they are sharp and crisp against the aurora sky background.
Starry Sky Tip
For the shooting stars, use a ruler to guide your brush. This ensures the trails are perfectly straight and dynamic rather than shaky.
Step 3: Foreground and Reflection
-
Paint the dark forest:
Across the bottom of the mountains, paint a solid black silhouette of a rolling hill. Tap the brush vertically along the top edge to create the suggestion of tiny pine tree tips. -
Detailed tree line:
On the far left and right edges, paint larger, more distinct pine trees climbing up the sides of the mountains to frame the composition. -
Establish the lake base:
Fill the bottom third of the canvas with a horizontal blend of turquoise and white. Use long, horizontal strokes to establish the water’s surface. -
Create water reflections:
While the lake paint is still wet, stroke downward using colors from your mountains and trees—dark greens and blues. Pull these colors straight down into the water area. -
Blur the reflection:
Gently drag a clean, dry brush horizontally across the vertical reflections you just painted. This ‘cuts’ the reflection and gives it that realistic, watery shimmer. -
Final foliage shoreline:
Dab a mix of light green and yellow along the very top edge of the water, separating the black forest silhouette from the blue lake. This highlights the shoreline vegetation.
Level Up: Metallic Pop
Mix a tiny amount of iridescent mixing medium or metallic silver paint into your aurora colors for a sky that literally shimmers in the light.
Step back and admire your serene mountain landscape under the dancing lights


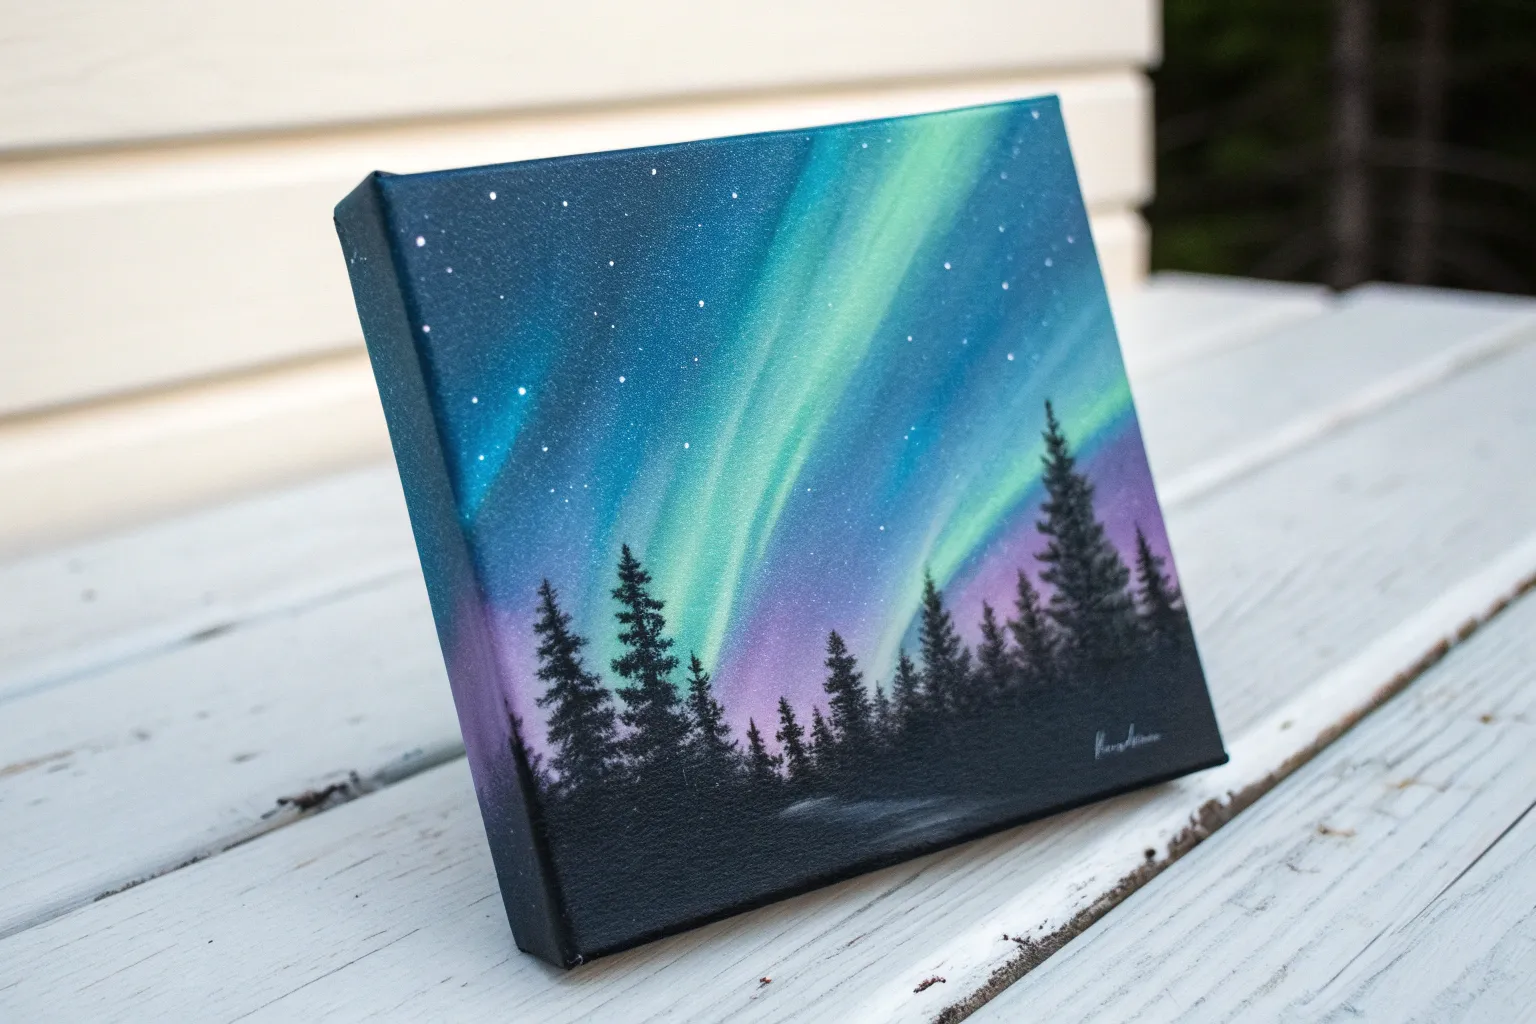
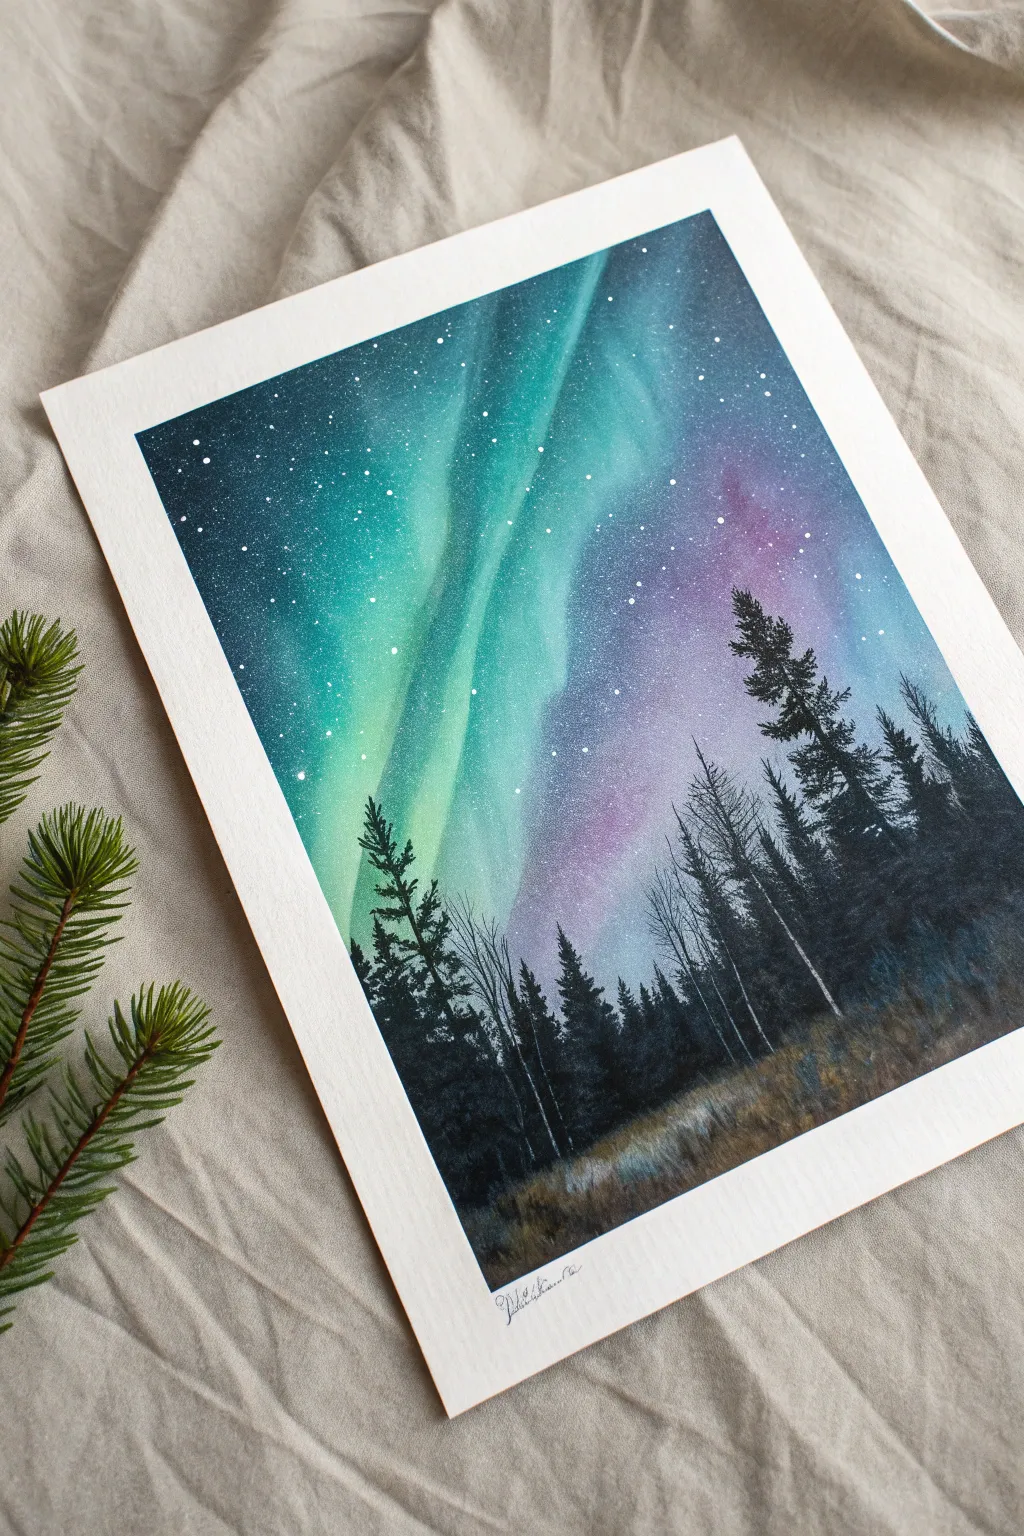
Two-Color Aurora for a No-Stress Palette
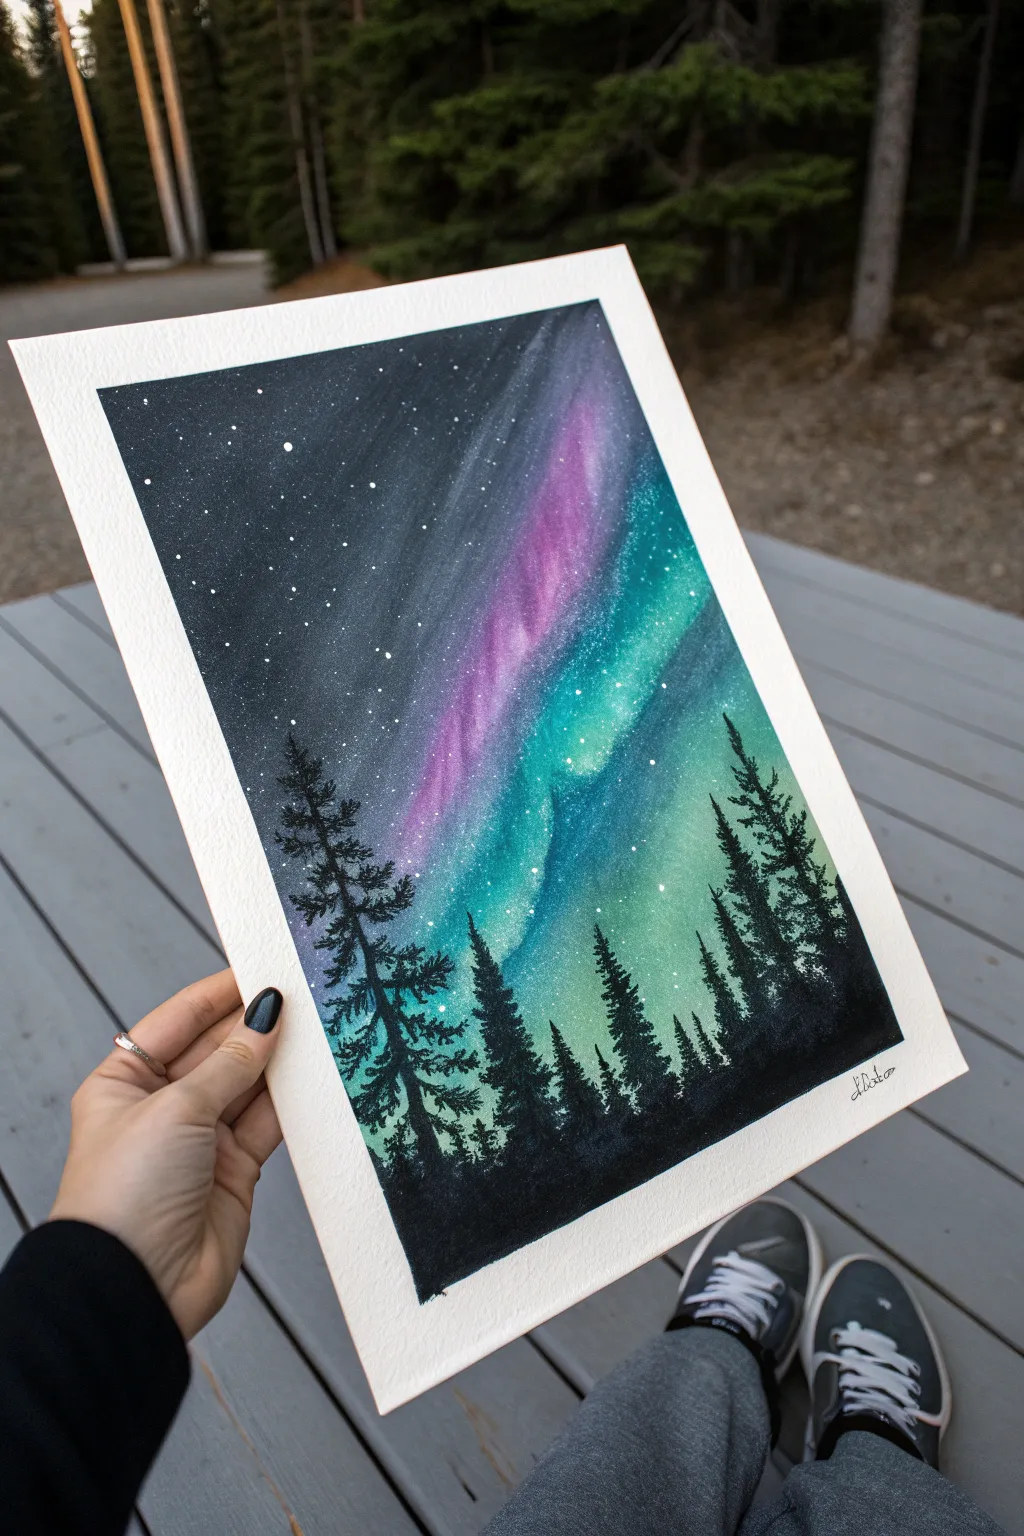
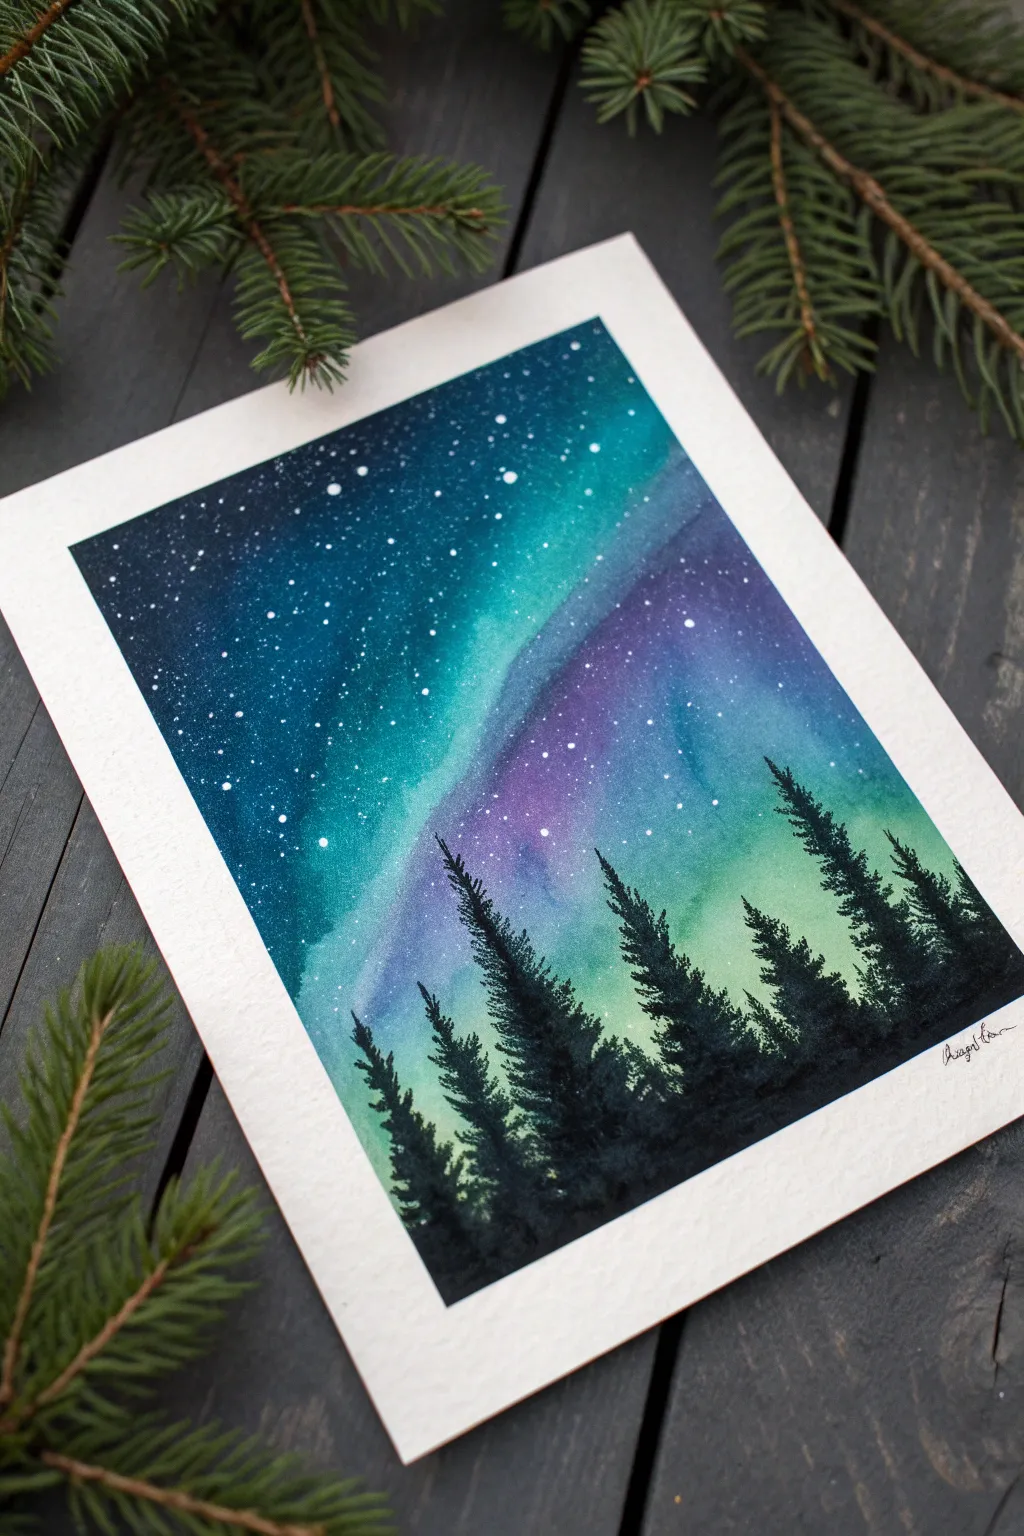
Capture the magic of the northern sky with this surprisingly simple painting that relies on just two main colors blending together. The striking contrast between the vibrant, glowing sky and the crisp evergreen silhouettes makes this piece look far more complex than it actually is.
Step-by-Step Tutorial
Materials
- Cold Press Watercolor Paper (140lb/300gsm)
- Masking tape or Washi tape
- Watercolor paints (Turquoise/teal, Magenta/purple, Indigo/Black)
- White Gouache or White Gel Pen
- Medium round brush (size 8 or 10)
- Small detail brush (size 0 or 1)
- Old toothbrush (optional for stars)
- Clean water and paper towels
Step 1: Setting the Stage
-
Tape it down:
Begin by taping your watercolor paper to a board or table. Ensure the tape is pressed down firmly along the edges to create that crisp white border later. -
Wet the paper:
Using your medium brush and clean water, apply a light, even coat of water to the entire paper surface. This wet-on-wet technique is crucial for the soft blends needed for the sky.
Step 2: Painting the Sky
-
Start with turquoise:
Load your brush with a vibrant turquoise or teal watercolor. Start painting diagonal streaks from the bottom right, moving upwards towards the left. -
Add the purple:
While the paper is still wet, introduce a magenta or deep purple shade. Lay this color down adjacent to your teal streaks, allowing the edges to touch and bleed into one another naturally. -
Create the deep night:
Mix a very dark indigo or black watercolor. Apply this to the top left corner and upper edges of the painting, blending it gently into the purple and teal to simulate the vast darkness of space. -
Enhance the glow:
If your colors look too pale, dab in more concentrated pigment while the paper is still damp. I find that deepening the indigo at the very top really makes the bright colors pop. -
Let it dry completely:
This is the hardest part—patience. Let the sky layer dry completely. If you touch it and it feels cool, it’s not ready. It needs to be bone dry before the next step.
Pro Tip: Lift the light
While the sky is wet, use a clean, thirsty brush to lift pigment out in flowing lines. This creates brighter ‘white’ streaks in your aurora
Step 3: Creating the Stars
-
Prepare the stars:
Dilute a small amount of white gouache with water until it reaches a milky consistency. -
Splatter technique:
Dip an old toothbrush or a stiff brush into the white paint. Run your thumb across the bristles to flick tiny speckles across the sky. -
Add prominent stars:
For larger, brighter stars, use a detail brush or a white gel pen to place specific individual dots, perhaps creating a constellation or two.
Troubleshooting: Blooms?
If you get cauliflower-like edges in the sky, you added water when the paper was drying. Embrace it as fancy cloud texture or paint over it
Step 4: The Forest Silhouette
-
Mix the blackest black:
Create a thick, opaque mixture of black paint. Gouache works great here for opacity, but concentrated watercolor works too. -
Establish the ground:
Paint an uneven, jagged horizon line across the bottom third of the paper to represent the forest floor. -
Start the tree trunks:
Using your smallest detail brush, paint thin vertical lines rising from the ground. Vary the heights to make the forest look natural. -
Add branches:
Starting from the top of a trunk, use a stippling or tapping motion to create branches. Keep the top branches narrow and widen the tree as you move down. -
texture the trees:
Ensure the trees aren’t perfect triangles; leave some gaps and make the edges rough to mimic pine needles. -
Create depth:
Paint some smaller, shorter trees in between the tall ones to fill in the gaps and create a dense forest feel. -
Final dry:
Allow the black silhouettes to dry completely to avoid smudging.
Step 5: Finishing Touches
-
The satisfying reveal:
Carefully peel away the masking tape. Pull the tape away from the center of the painting at a 45-degree angle to prevent tearing the paper.
Step back and admire your own slice of the polar night sky


S-Curve Northern Lights Brushstrokes
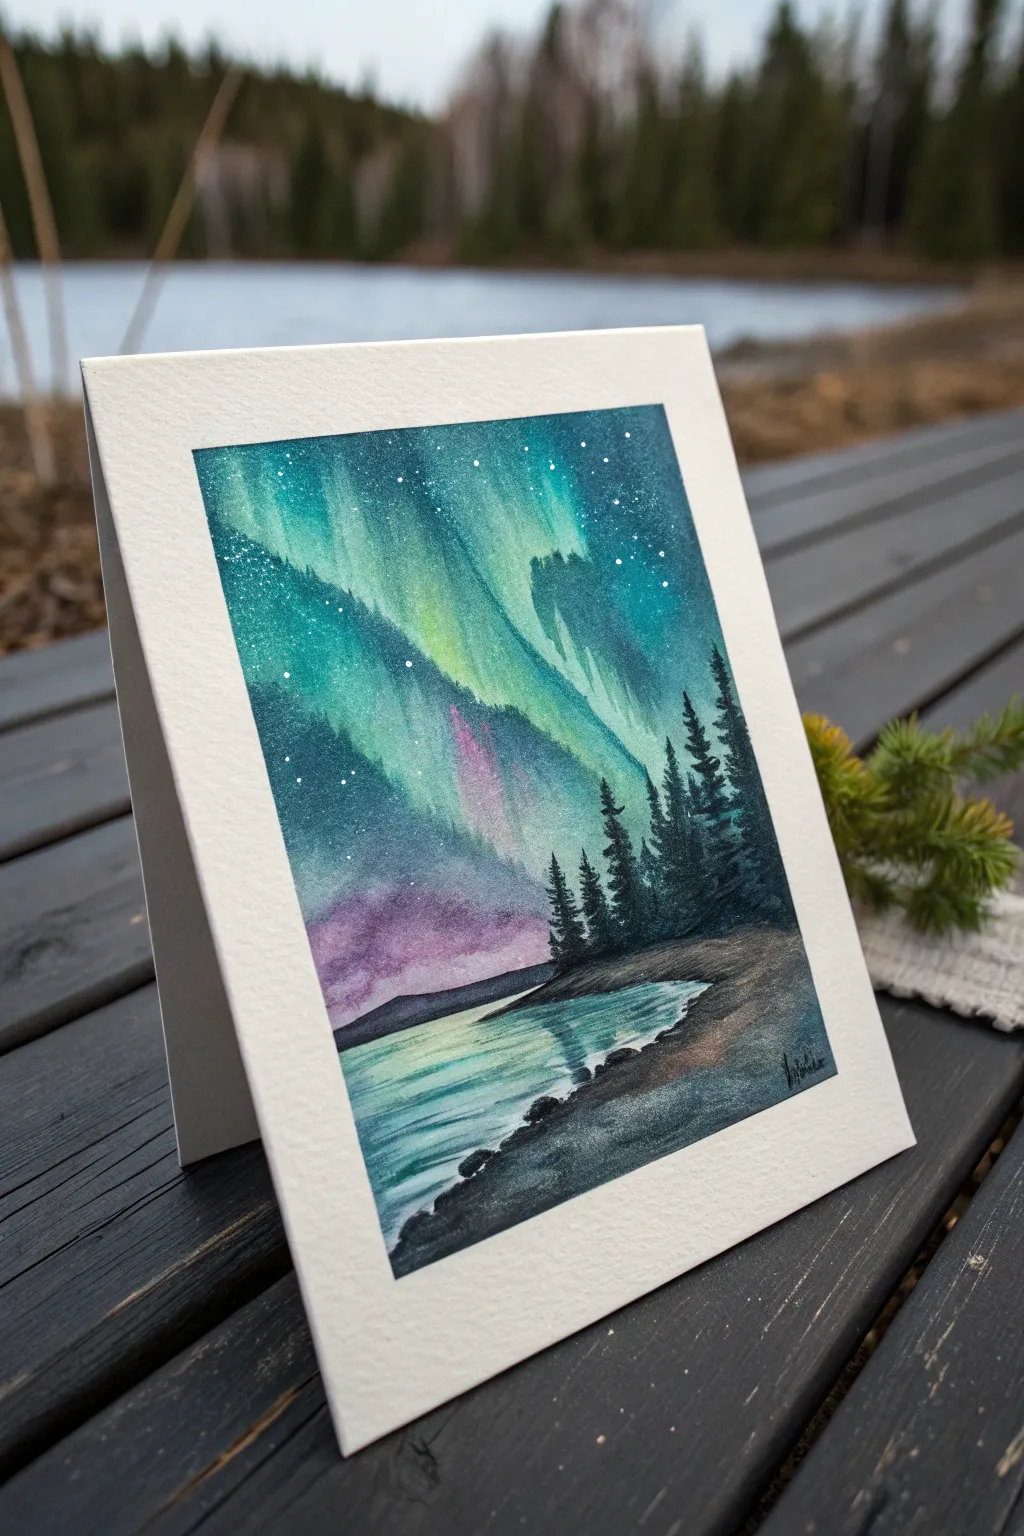
Capture the magic of the polar night with this stunning watercolor card featuring vibrant northern lights sweeping across the sky in a dramatic S-curve. The contrast between the glowing heavens and the dark, silhouetted forest creates a striking scene perfect for greeting cards or framed gifts.
Step-by-Step
Materials
- Cold press watercolor paper (cut to folded card size)
- Watercolor paints (Phthalo Blue, Phthalo Green, Indigo, Magenta, Purple)
- White gouache or white gel pen
- Masking tape
- Round watercolor brushes (size 6 or 8 for washes, size 2 for details)
- Old toothbrush (optional for spatter)
- Two jars of water
- Paper towels
Step 1: Setting the Sky
-
Prepare the workspace:
Begin by taping down your watercolor paper on all four sides to a board. Use masking tape to create a clean, crisp white border around your painting area, pressing the edges down firmly to prevent leaks. -
Pre-wet the paper:
Using your larger round brush and clean water, wet the entire sky area of the paper. Avoid the bottom third where the lake and land will go for now. The paper should be glistening but not forming puddles. -
Establish the S-curve:
Load your brush with a bright Phthalo Green or Turquoise. While the paper is still wet, paint a sweeping S-shape starting from the top left and curving down toward the right horizon. Let the paint naturally bleed into the wet paper to create soft edges. -
Add depth to the lights:
Introduce hints of yellow or lighter green into the center of your S-curve while it’s still damp. This creates the ‘glow’ effect that makes the aurora look luminous against the darker sky. -
Paint the night sky:
Mix a dark, rich color using Indigo and Phthalo Blue. Carefully paint around your green S-curve, filling in the upper corners and edges of the sky. I like to let the dark blue touch the wet green edge just slightly so they blend softly without turning muddy. -
Introduce purple hues:
Near the bottom of the aurora swirl, just above where the horizon will be, drop in some Magenta or Purple. Allow this to blend upward into the green and blue for that characteristic multi-colored shimmering effect. -
Create the stars:
While the sky is drying but slighty damp, you can lift tiny dots of paint with a dry brush or wait until it’s bone dry to splatter white gouache. For this project, a dry splatter technique often works best for a starry look.
Starry Night Trick
Cover the bottom landscape area with a scrap piece of paper before flicking white paint for stars. This prevents ‘stars’ from accidentally appearing on your trees or inside the dark lake water.
Step 2: Grounding the Scene
-
Paint the distant mountains:
Once the sky is completely dry, mix a sheer, watery wash of Purple and Indigo. Paint a low, rolling mountain range across the horizon line. Keep this layer faint to simulate atmospheric perspective. -
Begin the lake reflection:
Wet the lake area below the mountains. Mirror the colors from the sky above into the water. Place Phthalo Green reflections directly under the aurora, and darker blues at the edges, using horizontal strokes to mimic ripples. -
Darken the foreground water:
As you move toward the bottom of the card, deepen the blue tones in the water. The bottom edge should be nearly as dark as the night sky to anchor the composition. -
Paint the shoreline:
Using a dark mix of Sepia or Burnt Umber with Indigo, paint the rocky shoreline on the right side. Start wide at the bottom right corner and taper it off as it recedes into the distance.
Level Up: Metallic Touch
Mix a tiny amount of iridescent watercolor medium or silver metallic paint into your green aurora wash. When the card catches the light, the northern lights will literally shimmer!
Step 3: Silhouettes and Details
-
Mix the darkest dark:
Create a near-black color by mixing Indigo with Burnt Umber or a tiny touch of Black. You want this pigment to be thick and creamy, with very little water. -
Paint the trees:
Switch to your size 2 detail brush. Along the right-hand shoreline, paint a cluster of pine trees. Start with a vertical line for the trunk, then use a stippling motion to dab on branches, getting wider at the base of the tree. -
Vary tree heights:
Ensure the trees have different heights to look natural. The tallest trees should be nearest to the viewer in the foreground, with smaller trees receding toward the horizon line. -
Add shoreline details:
Using the same dark mixture, define the edge where the water meets the land. Paint a few small, jagged rocks protruding into the water to break up the smooth line of the shore. -
Final highlights:
Once everything is fully dry, you can use a white gel pen or thin white gouache to add a few sharper, brighter stars in the darkest parts of the blue sky for extra sparkle. -
Reveal the border:
Carefully peel away the masking tape at a 45-degree angle away from the painting. This reveals the crisp white border that makes the card look professional and finished.
Once dry, simply fold your card, and you have a handmade masterpiece ready to share.
BRUSH GUIDE
The Right Brush for Every Stroke
From clean lines to bold texture — master brush choice, stroke control, and essential techniques.
Explore the Full Guide
Sponge-Blend Aurora Glow on a Dark Sky
Capture the ethereal magic of the northern lights using simple sponge blending techniques to create soft, glowing transitions of color against a star-speckled void. This approach creates a smooth, diffused look that perfectly mimics the dancing lights of the aurora borealis over a serene mountain landscape.
Detailed Instructions
Materials
- High-quality watercolor paper or canvas board (size A3 or similar)
- Acrylic paints (Phthalo Blue, Dioxazine Purple, Magenta, Emerald Green, Titanium White, Mars Black)
- Small natural sea sponge or kitchen sponge (cut into pieces)
- Flat shader brush (size 8)
- Small round detail brush (size 1)
- Old toothbrush (for stars)
- Masking tape
- Palette or paper plate
- Water cup and paper towels
Step 1: Setting the Night Sky
-
Prepare your surface:
Begin by taping down the edges of your paper to a board or table to create a crisp, clean border. This border will frame your artwork beautifully once peeled away. -
Create the base darkness:
Mix Mars Black with a tiny touch of Phthalo Blue. Using a large brush or sponge, cover the entire upper two-thirds of the canvas. This doesn’t need to be perfectly solid; slight variations add atmospheric depth. -
Add the first glow layer:
While the black is still slightly tacky but mostly dry, dampen a sponge piece and load it with Phthalo Blue. Dab lightly around the edges and center of the sky to create a deep, midnight blue haze. -
Introduce the stars:
Dilute a small amount of Titanium White paint with water until it has an ink-like consistency. Dip an old toothbrush into this mixture and flick the bristles with your thumb to spray a fine mist of stars across the dark sky. -
Highlight bright stars:
For a few prominent stars, use your smallest detail brush to dot tiny points of pure white in random clusters, giving variation to the galaxy.
Step 2: Blending the Aurora
-
Start the green curtain:
Load a clean, barely damp sponge with Emerald Green mixed with a lot of White. Starting from the horizon line (just below the sky section), drag the sponge upwards in diagonal, wavy strokes. -
Soften the edges:
Before the green paint dries, use a clean, dry section of the sponge to gently dab the edges of your strokes. This diffuses the paint, making it look like light rather than solid pigment. -
Layering the pinks:
Mix Magenta with White to create a soft pink. Sponge this color above and slightly overlapping the green sections, blending the transition area carefully so it creates a soft gradient rather than a hard line. -
Deepening the purple:
Near the top of your aurora pillars, blend in a mix of Dioxazine Purple and White. I like to let this fade upward into the black background, suggesting the lights are reaching high into the atmosphere. -
Intensify the core:
Once the first layers are dry, go back over the brightest parts of the green and pink with a more pigmented (less watery) mix to make the center of the aurora pop.
Sponge Dampness Matters
Always squeeze your sponge until it’s barely damp before loading paint. Too much water will cause the acrylics to become runny and ruin the soft, hazy effect of the aurora.
Step 3: Grounding the Scene
-
Paint the distant mountains:
Mix Black, White, and a dot of Blue to make a slate grey. Using the flat brush, paint the silhouette of distant mountains beneath the aurora. Keep the shapes jagged but relatively low on the horizon. -
Add snow caps:
With the detail brush and Titanium White, trace the ridges and peaks of the mountains. Drag the paint slightly downward on one side of the peaks to simulate snow catching the light. -
Create the lake reflection:
Below the mountains, paint a thin strip of blue-grey across the canvas for the lake. Add horizontal streaks of lighter white-blue to suggest the water reflecting the sky’s light. -
Establish the foreground hill:
Mix Black with a touch of brown or green for a very dark foreground color. Paint a sloping hill rising from the bottom right corner towards the left, covering the bottom portion of the lake. -
Plant the forest:
Using the dark foreground mix and a small round brush (or fan brush sideways), dab vertical lines for tree trunks on the hill. Tap horizontal branches getting wider toward the bottom of each tree to form distinct pines. -
Texture the grass:
Dry brush a lighter brown-green mix horizontally across the foreground hill to create the texture of tufted grass or low brush. -
Final reveal:
Wait for the entire painting to be completely dry, then slowly peel away the masking tape at a 45-degree angle to reveal clear, professional edges.
Level Up: Silhouette Detail
For sharper tree silhouettes, switch to a dark black ink pen or marker after the paint dries. This allows for incredibly fine pine needles that a brush might miss.
Step back and admire your personal window into the arctic night sky.
Easy Star Splatter Over the Northern Lights
Capture the magic of an arctic evening with this vibrant watercolor project that balances bold color blending with delicate details. The finished piece features sweeping ribbons of turquoise and purple northern lights dancing over a stark evergreen silhouette.
Step-by-Step Tutorial
Materials
- High-quality watercolor paper (cold press, at least 140lb/300gsm)
- Painter’s tape or masking tape
- Watercolor paints (Indigo, Turquoise, Violet/Purple, Phthalo Blue, Sap Green)
- Large flat wash brush or mop brush
- Medium round brush
- Small liner or rigger brush (for details)
- White gouache or white ink
- Two jars of water (one clean, one dirty)
- Paper towels
- Old toothbrush or stiff bristle brush
Step 1: Setting the Stage
-
Secure Your Paper:
Begin by taping down all four edges of your watercolor paper to a board or table with painter’s tape. This prevents the paper from buckling during the heavy wash and creates a crisp, clean white border when you finish. -
Wet on Wet Intro:
Use your large flat brush to apply a generous layer of clean water across the entire upper 3/4 of the paper. The paper should look glossy and reflective but shouldn’t have standing puddles.
Pro Tip: Masking The Trees
Cover the bottom area with a scrap piece of paper while flicking the stars. This keeps your future forest floor free of white speckles before you paint the black silhouette.
Step 2: Painting the Aurora Sky
-
Lay Down the First Color:
Load your medium brush with a vibrant Turquoise. While the paper is still wet, paint a diagonal, sweeping band from the bottom left quadrant toward the upper right. Because the paper is wet, the edges will soften beautifully. -
Add the Purple Hues:
Next to the turquoise band, introduce a stroke of Violet or Purple. Allow the colors to bleed into each other slightly on the paper. I find gently tilting the board helps them mingle naturally without becoming muddy. -
Deepen the Night Sky:
Mix a strong Indigo or Phthalo Blue. Apply this dark color to the upper left corner and the areas surrounding your bright aurora bands. The contrast is what makes the lights glow, so don’t be afraid to go dark here. -
Touch Up the Horizon:
Near the bottom of your sky area (where the trees will eventually go), blend in a lighter wash of Sap Green mixed with a little Turquoise to suggest the aurora fading near the horizon. -
Dry Completely:
This is crucial: let the painting dry 100%. If the paper is cool to the touch, it’s still damp. If you paint trees too soon, they will bleed into blobs.
Step 3: Creating the Stars
-
Prepare the Splatter:
Squeeze a small amount of white gouache or ink onto your palette. Dilute it with just a drop of water until it has the consistency of heavy cream. -
Splatter Technique:
Load an old toothbrush or a stiff brush with the white mixture. Hold it over the dark blue sections of the sky and use your thumb to flick the bristles, spraying fine ‘stars’ onto the paper. -
Manual Stars:
For a few larger, brighter stars, use a small detailing brush to manually dot a few specific spots in the darkest blue areas. -
Let the Stars Set:
Allow the gouache to dry completely. This usually takes only a few minutes, but you don’t want to smudge your stars while painting the trees.
Troubleshooting: Caulindlowers
If weird textures or blooms appear in your sky, you introduced water when the paper was drying. Let layers dry completely before re-wetting to avoid these ‘back-runs.’
Step 4: Painting the Forest Silhouette
-
Mix Your Black:
Mix a deep, dark color for the trees. You can use Black, or mix Indigo with Burnt Umber for a richer, more natural dark tone. It needs to be fairly thick, not too watery. -
Establish the Tree Lines:
Using a small round brush or liner brush, paint vertical lines of varying heights along the bottom third of the paper. These will be the trunks of your pine trees. -
Paint the Tops:
Start at the very top of a trunk line. Use just the tip of your brush to tap small, horizontal strokes, creating the pointed tip of the fir tree. -
Work Down the Tree:
move down the trunk, making your horizontal tapping strokes gradually wider. Leave small gaps between branches so the aurora background peeks through. -
Fill the Density:
As you reach the bottom of the trees, merge the branches into a solid dark mass to create a dense forest floor. -
Vary the Heights:
Ensure your trees are different heights and widths to look natural. Some should taller and overlap the aurora, while others can be shorter background fillers.
Step 5: Final Touches
-
Add Tiny Details:
If any tree tops look too blunt, use your finest liner brush to pull a tiny, sharp vertical line from the top to create a delicate peak. -
The Reveal:
Once the black paint is fully dry, slowly peel off the masking tape at a 45-degree angle. This reveals the crisp white border that frames your artwork instantly. -
Sign Your Work:
Use a pen or your smallest brush to sign your name in the bottom corner of the white border or the painting itself.
Peeling that tape back is the most satisfying part, revealing a crisp window into your own personal northern landscape

PENCIL GUIDE
Understanding Pencil Grades from H to B
From first sketch to finished drawing — learn pencil grades, line control, and shading techniques.
Explore the Full Guide
Tape-Off a Crisp Horizon and Clean Border
Master the art of clean lines and ethereal skies with this watercolor tutorial featuring a vibrant aurora display. The contrast between bright, taped-off borders and the loose, flowing colors of the northern lights creates a professional and polished finish.
Detailed Instructions
Materials
- Cold press watercolor paper
- Painter’s tape or masking tape
- Watercolor paints (Indigo, Phthalo Blue, Turquoise, Violet, Black)
- White gouache or white ink
- Flat wash brush (1 inch)
- Round brushes (sizes 4 and 8)
- Old toothbrush (optional for stars)
- Board or clipboard
- Water cups and paper towels
Step 1: Preparation and Sky Base
-
Secure the Borders:
Begin by taping down all four edges of your watercolor paper to a board. Ensure the tape is pressed down firmly, especially along the inner edge, to prevent paint from seeping underneath and ruining your crisp border. -
Wet the Paper:
Using your large flat wash brush, apply a generous layer of clean water to the entire sky area, stopping roughly where you want your horizon line to be. The paper should be glisten, but not hold puddles. -
Lay Down the Aurora Glow:
While the paper is wet, load your brush with a bright turquoise or emerald green. Swipe diagonal, sweeping motions across the center of the sky to create the base of the aurora. -
Add Deep Sky Colors:
Around the green streaks, start dropping in darker colors like Phthalo Blue and Indigo. Let the dark blue touch the wet green paint so they blend naturally, but try not to overwork the area where they meet to keep the colors vibrant. -
Integrate Purple Hues:
Add touches of violet on the edges of the green and blue transition zones. This creates that magical, shifting color effect common in northern lights displays.
Step 2: Creating Striations and Stars
-
Lift Out Streaks:
While the sky is still damp, rinse your brush, dry it slightly on a paper towel, and gently lift out vertical streaks within the green areas. This creates the ‘curtain’ effect of the aurora. -
Darken the Night Sky:
Deepen the corners and the very top of the sky with your darkest Indigo or a mix of Blue and Black to emphasize the glowing lights in the center. -
Splatter the Stars:
Once the sky is completely dry, mix white gouache with a tiny bit of water. Tap a loaded brush against another handle or flick an old toothbrush to spray fine white specks across the darkest parts of the sky. -
Add Larger Stars:
Use a small detail brush or a dip pen with white ink to manually place a few larger, brighter stars for variety.
Tape Bleeding?
If paint seeps under the tape, wait until completely dry. Use a slightly damp, clean brush or a magic eraser sponge to gently lift the unwanted pigment, or cover with white gouache.
Step 3: Landscape Elements
-
Paint Distant Mountains:
Mix a watery, pale blue-grey wash. Paint silhouette shapes of distant mountains along the horizon line. Keep this layer light to push these mountains into the background. -
Define the Lake Color:
Below the mountains, paint the lake area with deep blue and black, reflecting the darkness of the night sky. I often leave a few horizontal streaks lighter to suggest water reflections. -
Dry Completely:
It is crucial to let the mountain and lake layers dry fully before starting the foreground to prevent the trees from bleeding into the background.
Pro Tip: Lifting Technique
For more dramatic light beams, lift color while wet using a clean, damp flat brush. Wipe the brush on a towel after every single stroke to keep the lifted area bright white.
Step 4: Foreground and Trees
-
Paint the Foreground Land:
Mix a dark green-black color. Paint the immediate foreground at the bottom of the paper, using a scumbling motion (scrubbing rough texture) to mimic grassy terrain. -
Start the Pine Trees:
Switch to a smaller round brush (size 4) loaded with thick black or dark Indigo paint. Draw a straight vertical line for the trunk of your first tree. -
Flesh Out the Foliage:
Starting from the top of the trunk, dab your brush left and right in a downward zigzag pattern, getting wider as you go down, to create the pine branches. Vary the heights of the trees for interest. -
Add Grass Details:
Use the very tip of your smallest brush to flick upward strokes in the foreground, creating tall grasses and reeds along the water’s edge. -
The Reveal:
Wait until the painting is bone dry. Slowly peel the tape away at a 45-degree angle, away from the painting, revealing your perfectly crisp white border.
Step back and admire your stunning night landscape framed by those satisfyingly clean edges
Wet-on-Wet Watercolor Northern Lights Wash
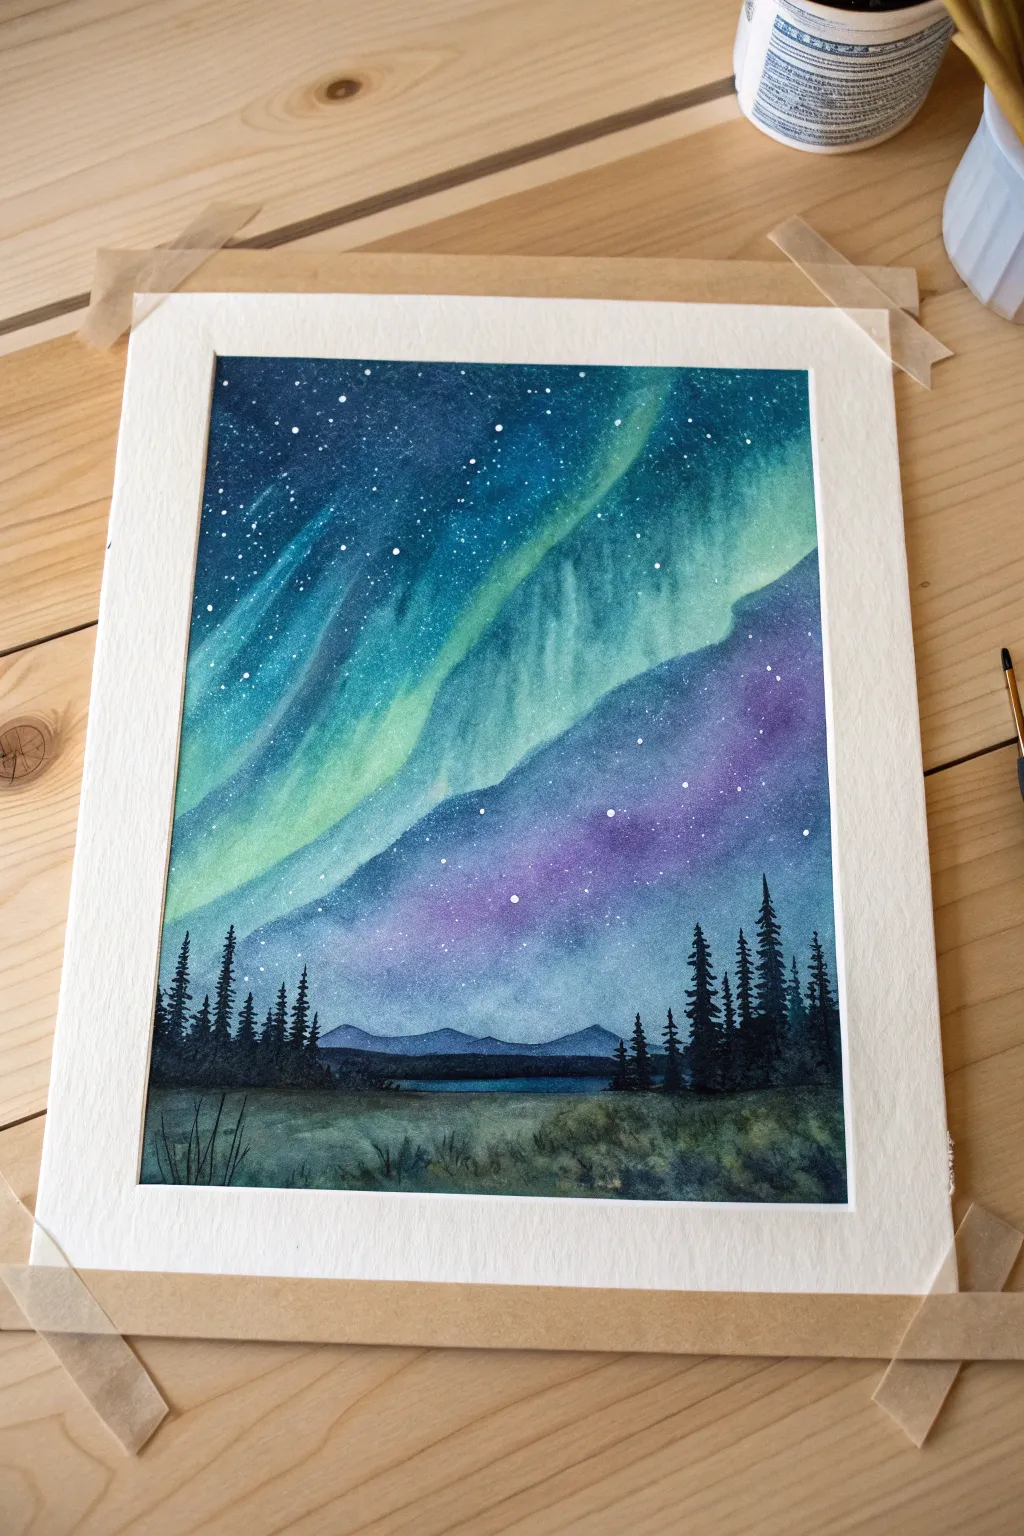
Capture the magic of an arctic night with this vibrant watercolor project. Using wet-on-wet techniques, you will blend emerald greens and deep indigos to create a glowing sky, anchored by a silhouette of majestic pine trees.
Step-by-Step Guide
Materials
- Cold press watercolor paper (300gsm/140lb)
- Masking tape
- Watercolor paints (Indigo, Purple/Violet, Teal, Phthalo Green, Black)
- Large flat wash brush
- Medium round brush
- Small detail brush
- White gouache or white ink
- Two jars of water
- Paper towels
- Clean toothbrush or stiff brush (for splattering)
Step 1: Preparing the Sky
-
Secure the paper:
Tape down all four edges of your watercolor paper to a board or table. This creates a clean white border and prevents buckling while we use heavy washes. -
Wet the surface:
Using your large flat brush and clean water, apply an even coat of water over the entire paper. The surface should glisten but not have puddles. -
Establish the aurora path:
Load your medium brush with a light, watery mix of Phthalo Green or Teal. Gently paint a diagonal, winding swoosh across the center of the wet paper, letting the pigment bloom naturally. -
Add secondary colors:
While the paper is still wet, drop in hints of softer teal or aquatic blue just outside the main green streak to creating a glowing transition zone.
Step 2: Deepening the Atmosphere
-
Darken the corners:
Mix a strong, saturated Indigo. Apply this to the top left and bottom right corners, blending inward toward the green light but not touching it directly. -
Introduce purple tones:
Add patches of Violet or Purple into the Indigo areas, particularly on the left side, to give the night sky richness and depth. -
Blend the transition:
With a clean, slightly damp brush, gently soften the edges where the dark blue/purple meets the lighter teal/green area so there are no harsh lines. -
Intensify the darkness:
While the wash is damp (not soaking), dab concentrated Indigo or Payne’s Gray into the very outer corners to act as the deepest part of the night sky. -
Create texture:
I like to tilt the board slightly to let gravity help the pigments drift and mix, creating organic, cloud-like movements in the sky. -
Allow to dry:
Let the painting dry completely. This step is crucial; the paper must be bone dry before adding stars or trees to prevent bleeding.
Bloom Control
If your paint starts spreading too fast into the green light, dry your brush on a paper towel and “lift” the excess pigment out creating soft clouds.
Step 3: Stars and Silhouettes
-
Splatter stars:
Dilute a small amount of white gouache with water. Load an old toothbrush or stiff brush, and flick the bristles to spray fine white specks across the upper dark sections of the sky. -
Hand-paint larger stars:
Use your smallest detail brush and the white gouache to pinpoint a few larger, brighter stars for variety. -
Paint the horizon:
Mix a very dark shade using Indigo and Black. Paint a low, uneven horizon line at the bottom third of the paper. -
Start the tree trunks:
Using the tip of a small round brush, draw thin vertical lines rising from the horizon line to varying heights. -
Foliage texture:
Stipple or dab the brush horizontally along the trunks, starting narrow at the top and getting wider toward the bottom, to create the pine branches. -
Layering trees:
Paint some trees slightly lighter (more water in the mix) in the background to create atmospheric perspective, then layer darker, sharper trees in the foreground. -
Ground the scene:
Ensure the bottom of the trees blends seamlessly into the dark horizon line you painted earlier. -
Final reveal:
Once the paint is completely dry to the touch, carefully peel away the masking tape at a 45-degree angle to reveal your crisp white border.
Snowy Trees
Add tiny touches of white gouache on the tops of a few pine branches to mimic freshly fallen snow reflecting the aurora light.
Now you have a stunning aurora borealis captured forever on paper


Salt Texture for Sparkly Aurora Effects
Capture the ethereal magic of the Northern Lights with this watercolor project that uses simple household salt to create a dazzling, starry texture. The result is a vibrant dance of teal, emerald, and violet lights soaring above a quiet, shadowed forest.
Step-by-Step Tutorial
Materials
- Cold press watercolor paper (140lb/300gsm)
- Watercolor paints (Phthalo Blue, Phthalo Green, Dioxazine Purple, Indigo, Burnt Umber, Lamp Black)
- Large round brush (size 10 or 12)
- Small round detail brush (size 2 or 4)
- Table salt
- White gouache or white gel pen
- Masking tape
- Two jars of water
- Paper towels
Step 1: Setting the Sky
-
Prepare your canvas:
Tape down all four edges of your watercolor paper to a board or table. This ensures clean white borders and prevents the paper from buckling heavily during the wet-on-wet process. -
Wet the paper:
Using your large round brush and clean water, thoroughly wet the entire upper three-quarters of the paper where the sky will be. The paper should glisten but not have standing puddles. -
Lay the first light wash:
Start by dropping in your lightest colors first. Load your brush with a watery mix of Phthalo Green and sweep it diagonally across the wet paper, creating the central ribbons of the aurora. -
Introduce the purple:
While the paper is still wet, add touches of Dioxazine Purple adjacent to the green. Allow the edges to touch and blend naturally on the paper, but try not to overwork them, or they might turn muddy. -
Deepen the night sky:
Mix a strong concentration of Indigo and Phthalo Blue. Apply this dark mixture to the top corners and edges of the sky, working inward toward the colored ribbons to create contrast.
Timing the Salt
If you add salt when the wash is too wet, it dissolves. If too dry, nothing happens. Wait for the ‘satin’ stage—damp but not glossy reflecitve.
Step 2: Creating Texture & Stars
-
Sprinkle the salt:
Wait until the paint has lost its initial watery sheen but is still damp—this is crucial. Sprinkle table salt sparingly over the darkest blue and purple areas. The salt will push the pigment away, creating star-like blooms. -
Splatter stars:
Dilute a tiny bit of white gouache with water. Tap your brush against another handle to splatter fine white droplets across the sky for brighter, sharper stars. -
Let it dry completely:
Here I prefer to step away for at least an hour or use a hairdryer on a low setting. The paper must be bone dry before you touch it again. -
Remove the salt:
Once totally dry, gently rub the salt crystals off the paper with your fingertips or a clean, dry cloth.
Step 3: The Forest Silhouette
-
Paint the ground layer:
Mix Burnt Umber with a touch of Indigo to create a dark, muted earth tone. Paint the bottom quarter of the paper, using upward strokes to simulate tall grass and undergrowth. -
Start the tree trunks:
Switch to your small detail brush. Using a thick mix of Lamp Black and Indigo, paint thin vertical lines for the tree trunks, varying their heights and spacing. -
Add evergreen branches:
Starting from the top of each trunk, use a stippling or tapping motion to create the pine boughs. Keep the tops narrow and widen the tree as you move downward. -
Layer the trees:
Paint some trees lighter (more water) and some darker (more pigment). The lighter, greyish trees will look further away, while the darkest black trees will appear closest to the viewer. -
Define the foreground:
Add a few darker grasses and small shrubs at the very bottom edge to ground the scene and add depth to the forest floor. -
Final reveal:
Ensure the bottom section is completely dry, then slowly peel away the masking tape at a 45-degree angle to reveal your crisp white border.
Muddy Colors?
Work quickly wet-on-wet. If purple and green mix too much, they turn brown. Keep them slightly separated or use blue as a buffer color between them.
Now you have a stunning northern lights landscape ready to frame or gift
Gouache Aurora on Black Paper
Capture the magic of the northern lights with this vibrant gouache painting that glows against a night sky. The smooth blends of teal, emerald, and violet create a dreamy atmosphere, grounded by silhouetted pines and a snowy mountain peak.
Step-by-Step
Materials
- Heavyweight watercolor or mixed media paper
- Gouache paints (Black, White, Turquoise/Teal, Emerald Green, Violet/Purple)
- Flat wash brush (3/4 inch or 1 inch)
- Medium round brush (size 6 or 8)
- Small liner brush (size 0 or 1)
- Masking tape
- Palette for mixing
- Two cups of water
- Paper towels
Step 1: Preparation and Base Layer
-
Secure the borders:
Begin by taping down all four edges of your paper to a flat board or table using masking tape. Press the edges of the tape firmly to ensure crisp, clean white borders when you peel it off later. -
Mix the sky colors:
Prepare your palette with generous amounts of turquoise, emerald green, and a deep violet. You will want the paint to be creamy and opaque, not too watery. -
Paint the aurora bands:
Using your flat wash brush, paint diagonal, sweeping strokes across the middle of the paper. Start with the bright turquoise on the left, blending into emerald green in the center. -
Add the purple tones:
While the green is still slightly damp, introduce the violet paint on the right side and lower section of the sky area. Use soft, upward sweeping motions to blend the edges where the purple meets the green, creating a soft transition. -
Darken the night sky:
Mix a very dark shade using black with a touch of blue or violet. Paint the upper left corner and the far right edges, blending carefully into your colored aurora bands so the light appears to fade into darkness.
Step 2: Creating the Glow and Stars
-
Refine the blends:
Clean your flat brush and use it slightly damp (but clean) to soften any harsh lines between the colors. You want the aurora to look like shifting curtains of light. -
Add vertical streaks:
Using a clean, dry flat brush, gently pull dry-brush strokes upward through the wet paint in a few spots. This lifts a tiny bit of pigment and creates the vertical ‘pillar’ texture characteristic of northern lights. -
Paint the shooting stars:
Switch to your liner brush and white gouache. Paint two or three very fine, short lines diagonally across the green section to represent shooting stars. Make sure the ‘head’ is slightly thicker than the tail. -
Splatter the stars:
Dilute a small amount of white gouache with water until it is minimal and fluid. load a brush or toothbrush and gently tap it over the handle of another brush to mist tiny white stars across the dark upper corners of the sky.
Smooth Blends
Work quickly while the gouache is wet to get seamless blends. If the paint dries too fast, mist the paper lightly with a spray bottle to keep it workable.
Step 3: Landscapes and Details
-
Outline the mountain:
Use a round brush with slightly watered-down black paint to sketch the triangular outline of a mountain peak in the lower right quadrant. Fill in the shape with solid black gouache. -
Add mountain highlights:
Mix a light grey (white with a speck of black). Using your small brush, paint rugged, jagged shapes on the left side of the mountain peak to suggest snow catching the ambient light. -
Start the treeline background:
With solid black paint, create a low, jagged horizon line across the bottom of the paper. Use small, vertical dabs to suggest distant treetops. -
Paint the prominent trees:
Using the tip of your round brush or a detailed liner brush, paint larger pine trees on the left and right foreground. Start with a vertical line for the trunk. -
detail the pine branches:
Starting from the top of the trunk, use a zig-zag motion that gets wider as you go down to create the pine branches. I find usually dapping the brush creates a more natural, organic needle texture than painting straight lines. -
Fill the foreground:
Ensure the entire bottom area below the trees is filled with solid, opaque black paint to ground the composition. -
Final touch:
Once everything is completely dry, slowly and carefully peel off the masking tape at a 45-degree angle to reveal your crisp white border.
Muddy Colors?
If your green and purple mix into a brown mess, let one layer dry completely before glazing the second color over top, instead of wet-blending them.
This striking contrast between the vibrant sky and dark silhouette makes for a stunning piece to hang on your wall.
Northern Lights With a Snowy Foreground Glow
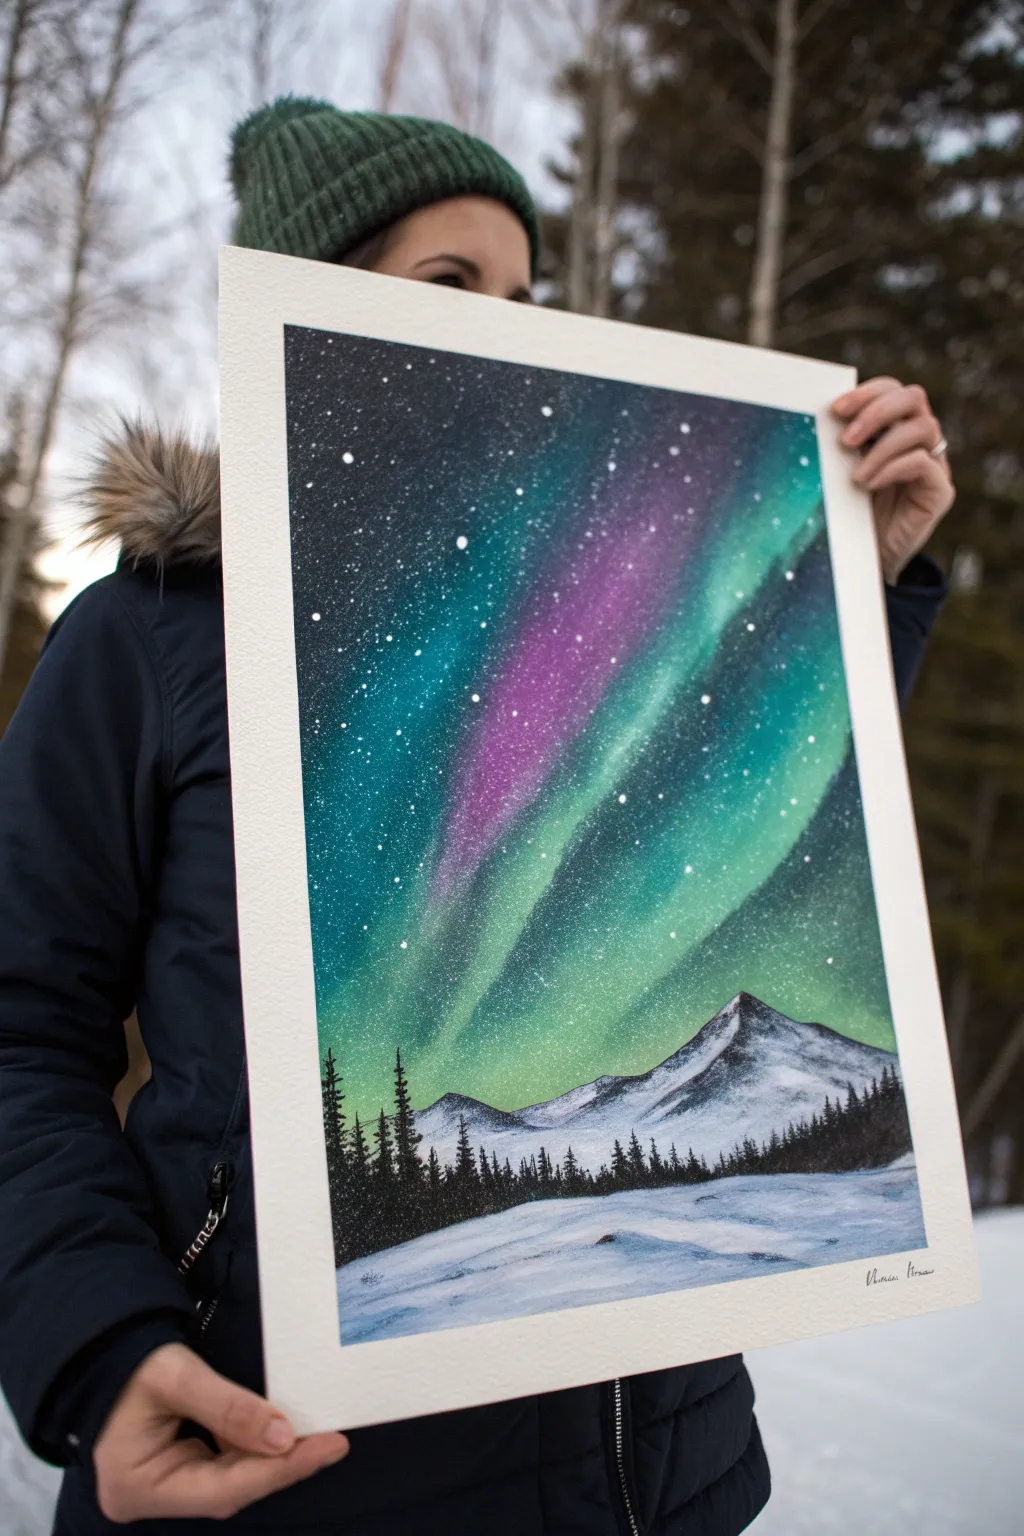
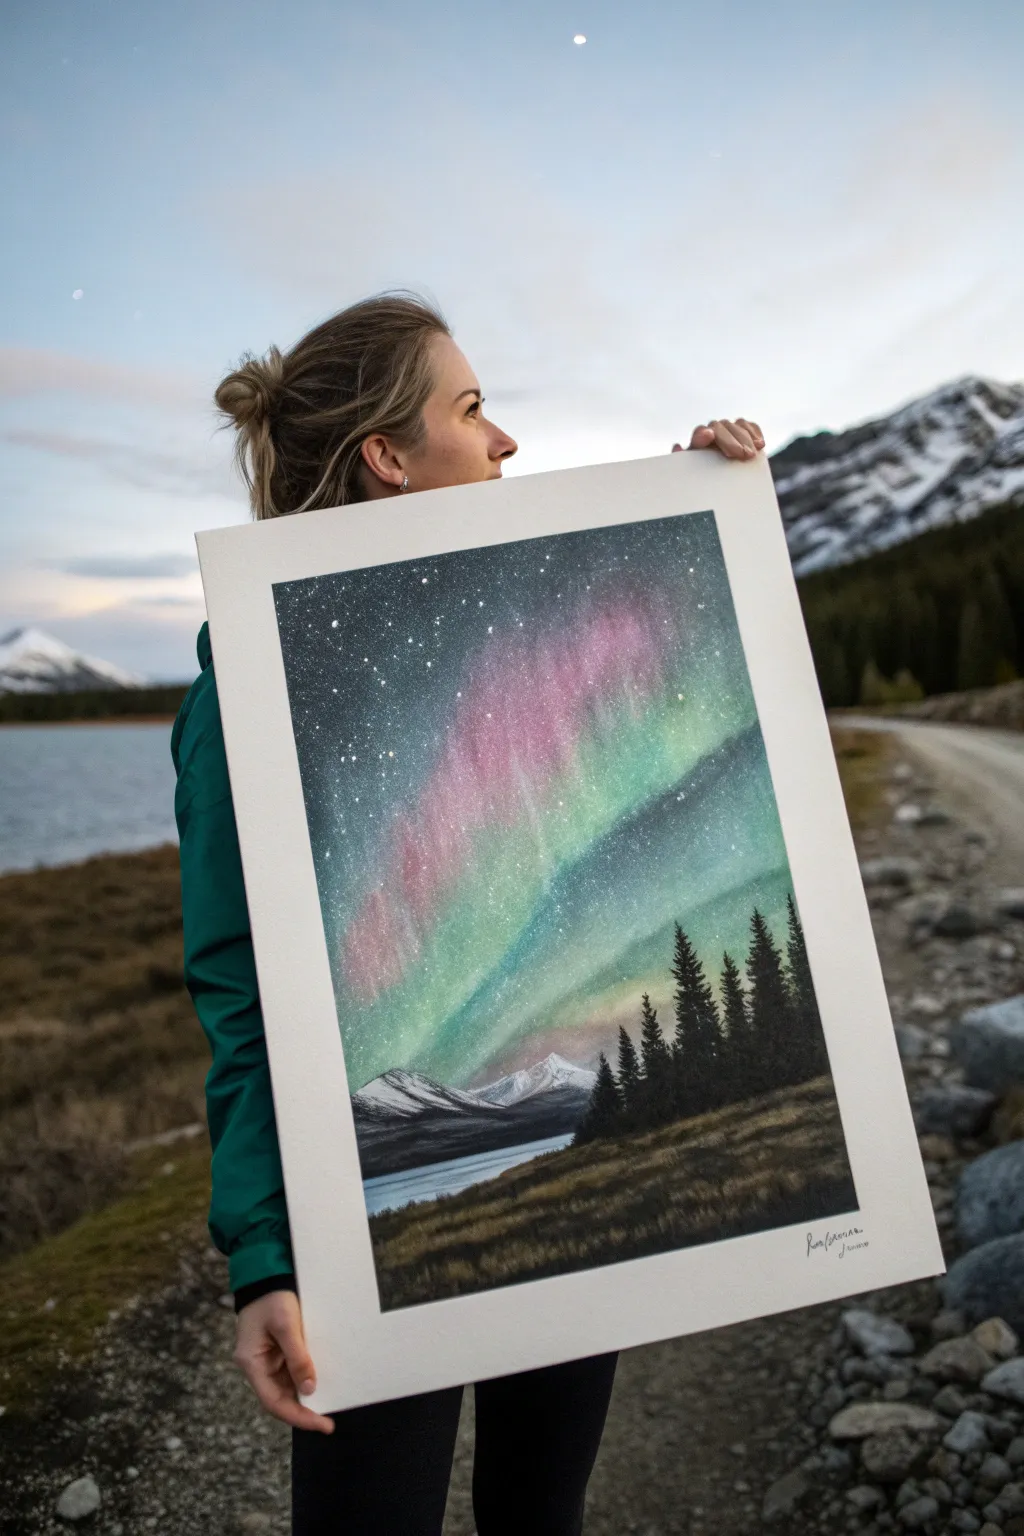
This vibrant piece captures the magic of the aurora borealis dancing over a serene, snow-covered mountain landscape. The striking contrast between the deep, starry sky and the crisp white snow creates a captivating winter scene that feels both vast and intimate.
Detailed Instructions
Materials
- Textured art paper or pastel card (heavyweight)
- Soft pastels (Black, Prussian Blue, Teal/Turquoise, Magenta/Purple, White)
- Pastel pencils (Black, Dark Green, White)
- Blending tools (fingers, sponge applicators, or paper stumps)
- Painter’s tape
- Fixative spray (workable)
- A toothbrush or stiff bristle brush (for stars)
Step 1: Setting the Scene
-
Prepare your canvas:
Begin by taping down the edges of your paper to a hard surface. This creates that crisp, professional white border seen in the photo and keeps the paper from shifting. -
Sketch the horizon:
Lightly sketch a low horizon line about one-third of the way up from the bottom. Mark the placement of the large mountain peak on the right side, ensuring it has a sloped, natural triangular shape.
Clean Colors Only
Wipe your fingers or blending tools continuously. Blending the dark sky black into the bright yellow-green or teal aurora will result in a muddy grey mess instantly.
Step 2: The Aurora Sky
-
Apply the base darkness:
Start at the very top corners of your paper with black pastel. Transition downward into Prussian Blue, leaving the central vertical area empty for now. Blend these dark colors smoothly to create a deep night sky vignette. -
Lay down the aurora colors:
In the open central area, apply vertical streaks of magenta or purple. Flank these purple streaks with generous amounts of teal or turquoise, letting them overlap slightly with the dark blue edges. -
Blend the lights:
Using a clean finger or sponge tool for each color family, blend the vertical streaks upwards. Soften the edges where the teal meets the dark blue sky, but try to keep vertical motion to mimic the structure of light curtains. -
Add intensity:
Go back over the brightest parts of the aurora with a fresh layer of teal and a touch of white pastel right at the center of the streaks to make them glow. Blend gently. -
Create the starry expanse:
Load a stiff brush or toothbrush with watered-down white gouache or heavy white pastel dust. Flick the bristles to spatter tiny stars across the entire sky area, concentrating more speckles in the darker corners.
Tape Tearing Paper?
If your tape is ripping the paper upon removal, blast it with a hairdryer on warm for a few seconds first. This softens the adhesive for a clean, damage-free release.
Step 3: Mountains and Trees
-
Define the mountain:
Fill the mountain shape with white pastel. Use the side of the pastel stick to drag texture downwards, mimicking snow clinging to rock faces. -
Shadow the peaks:
Using a dark grey or black pastel pencil, add shadows to the left side of the mountain ridges to give it 3D form. Keep the right slopes brighter to reflect the surrounding ambient light. -
Paint the tree line foundation:
At the base of the mountains, draft a dark, solid horizontal band using black pastel. This serves as the dense forest background. -
Detail the trees:
Switch to a black pastel pencil or charcoal pencil. Draw vertical lines for individual tree trunks rising from the dark band, then scribble short, downward-angled strokes to create the pine branches. Vary the heights to keep it natural. -
Add distant trees:
On the far left and right edges, make the trees slightly taller and more detailed to suggest they are closer to the viewer, creating a sense of depth.
Step 4: The Snowy Foreground
-
Lay the snow base:
Fill the bottom foreground area heavily with white pastel. Use broad horizontal strokes to cover the paper tooth. -
Add cold shadows:
Take a very light blue or faint purple pastel and gently streak horizontal shadows across the white snow. This suggests uneven terrain and drifts rather than a flat surface. -
Refine the edges:
Clean up the transition line where the trees meet the snow. You can pull a little bit of the dark tree pigment down into the snow to create cast shadows. -
Final touches:
Remove the painter’s tape slowly, pulling away from the center of the artwork to prevent tearing. Spray with a fixative if using pastels to prevent smudging.
Hang this piece where it can catch natural light to really show off those glowing textures
Aurora Above a Cozy Cabin Silhouette
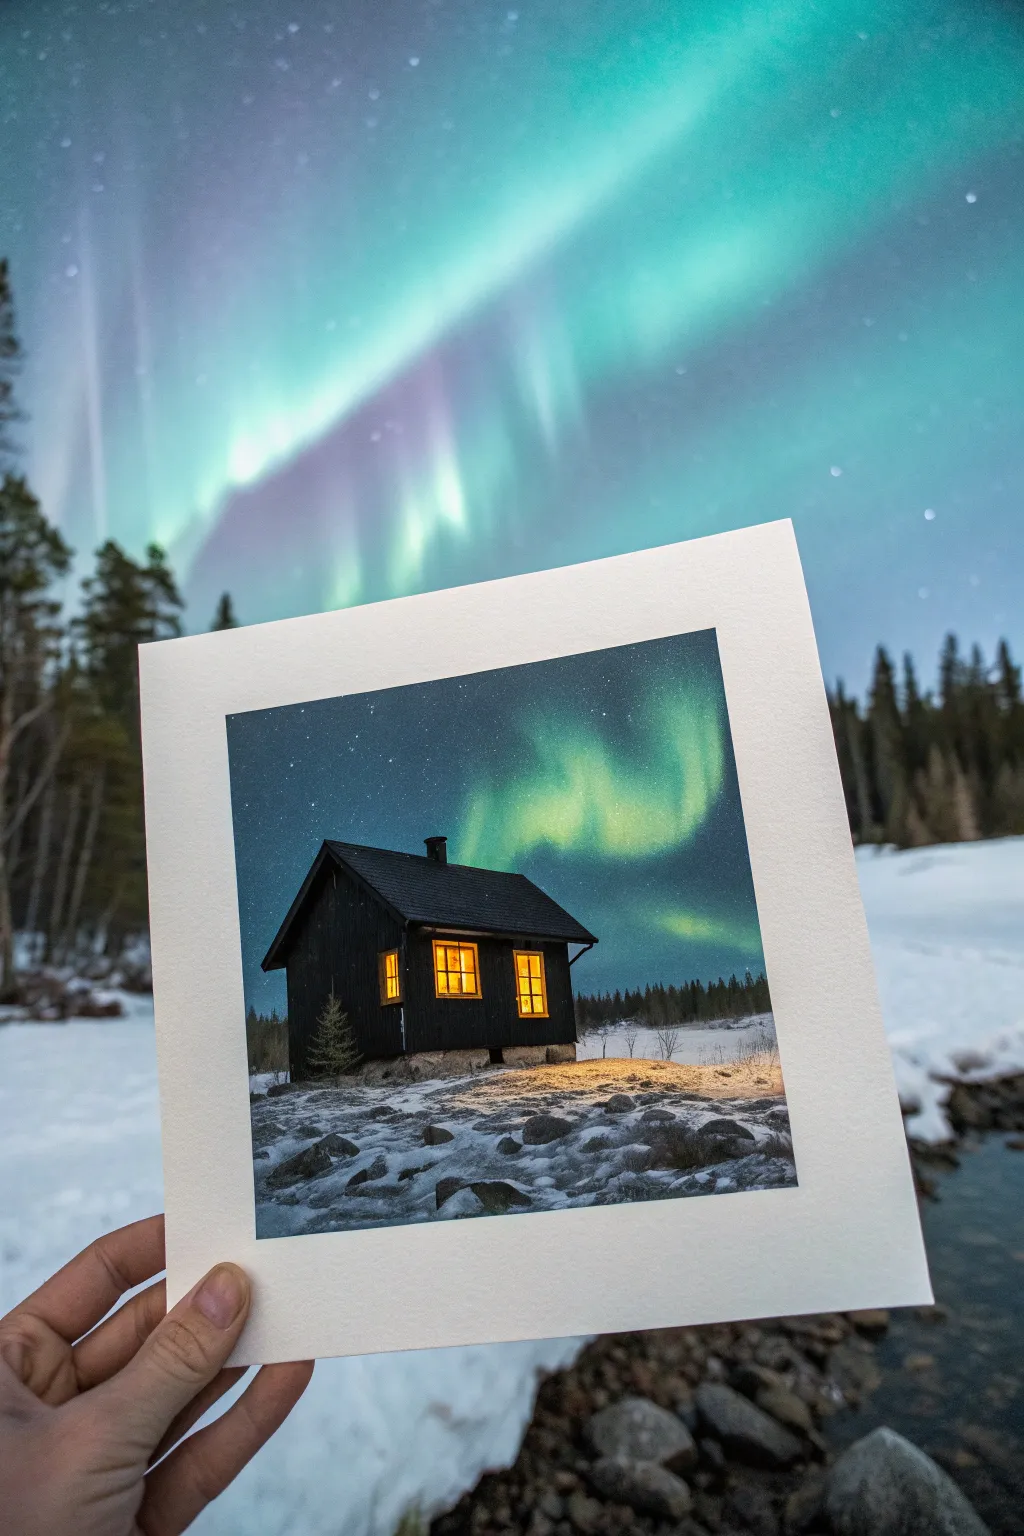
Capture the magic of a winter night with this stunning acrylic painting featuring a cozy cabin silhouette against a vibrant northern lights display. The contrast between the dark structure and the ethereal green sky creates a captivating focal point perfect for wall art or greeting cards.
How-To Guide
Materials
- Square watercolor paper or canvas board (6×6 inch)
- Acrylic paints (Phthalo Green, Prussian Blue, Titanium White, Lamp Black, Cadmium Yellow, Burnt Sienna)
- Painter’s tape
- Flat wash brush (3/4 inch)
- Round brush (size 4)
- Detail liner brush (size 00)
- Old toothbrush (for stars)
- Palette for mixing
- Cup of water and paper towels
Step 1: Sky and Aurora Base
-
Prepare the Surface:
Tape down the edges of your square paper to a board to keep it flat and create a crisp white border, ensuring the tape is pressed down firmly to prevent leaks. -
Create the Night Sky:
Start by mixing Prussian Blue with a tiny touch of black. Using the flat wash brush, paint the upper third and sides of the sky area, leaving the center somewhat irregular and lighter. -
Blend the Horizon:
While the blue is still wet, mix Phthalo Green with a little white to create a glowing teal. Blend this into the bottom area of the sky, pulling it slightly upward into the dark blue to start the gradient. -
Paint the Aurora Shape:
Load a clean brush with a brighter mix of Phthalo Green and Titanium White. Using vertical, sweeping strokes, paint wavy curtains of light in the center gap, softening the edges with a dry brush to make it look wispy. -
Add Vivid Highlights:
Take almost pure white with the tiniest hint of green and add jagged, vertical streaks right in the center of your green curtains to represent the brightest part of the aurora. -
Splatter Contrast Stars:
Let the background dry completely. water down a small amount of white paint, load an old toothbrush, and gently flick the bristles with your thumb to spray tiny stars across the upper dark blue sections.
Aurora Glow Tip
For a ‘neon’ effect, paint the aurora area white first, let it dry, then glaze transparent bright green over it. This makes the color pop.
Step 2: The Cabin and Foreground
-
Sketch the Cabin:
Lightly sketch the outline of the cabin with a pencil; ensure perspective lines on the roof slant appropriately to give the building dimension. -
Block in the Cabin:
Using the round brush and Mars Black, fill in the entire shape of the cabin, including the roof and chimney. Don’t worry about the windows yet; just create a solid silhouette. -
Paint the Snowy Ground:
Mix white with a tiny dot of blue-grey. Paint the foreground area, dabbing the brush to create texture that resembles uneven snow and icy patches. -
Shadows and Rocks:
Switch to a smaller brush and mix grey with black. Paint small, irregular rock shapes in the snowy foreground, making sure to anchor them with darker shadows underneath. -
Texture the Cabin Walls:
Mix a dark charcoal grey (black plus a dot of white). With a very dry detail brush, drag faint vertical lines down the black cabin walls to suggest wooden siding texture. -
Roof Details:
Using the same charcoal grey mix, paint thin horizontal lines across the roof to mimic shingling or texture, keeping them subtle so the roof remains mostly dark.
Step 3: Golden Light and Finish
-
Base the Windows:
Mix Cadmium Yellow with Titanium White. Carefully paint square shapes for the windows over the dried black paint; you may need two coats for opacity. -
Add Window Warmth:
Glazing a tiny bit of pure orange or Burnt Sienna in the center of the yellow squares adds a warm, glowing depth, suggesting a fire inside. -
Window Frames:
Use your finest liner brush and pure black paint to carefully draw the cross-bars (muntins) and frames within the yellow glows. -
Cast the Light:
Mix a very translucent wash of yellow-orange. Lightly glaze the snow directly in front of the cabin to show the light spilling out from the windows. -
Final Trees:
With the liner brush and black paint, add a small pine tree next to the cabin and a distant tree line on the horizon using tiny vertical dabs. -
Reveal:
Once absolutely everything is dry to the touch, slowly peel away the painter’s tape at a 45-degree angle to reveal your crisp white border.
Clean Lines
If you struggle with painting straight window frames, use a fine-tip black permanent marker or pen after the yellow paint has fully dried.
Enjoy the peaceful atmosphere of your new winter nightscape painting
Northern Lights Through a Big Moon Window
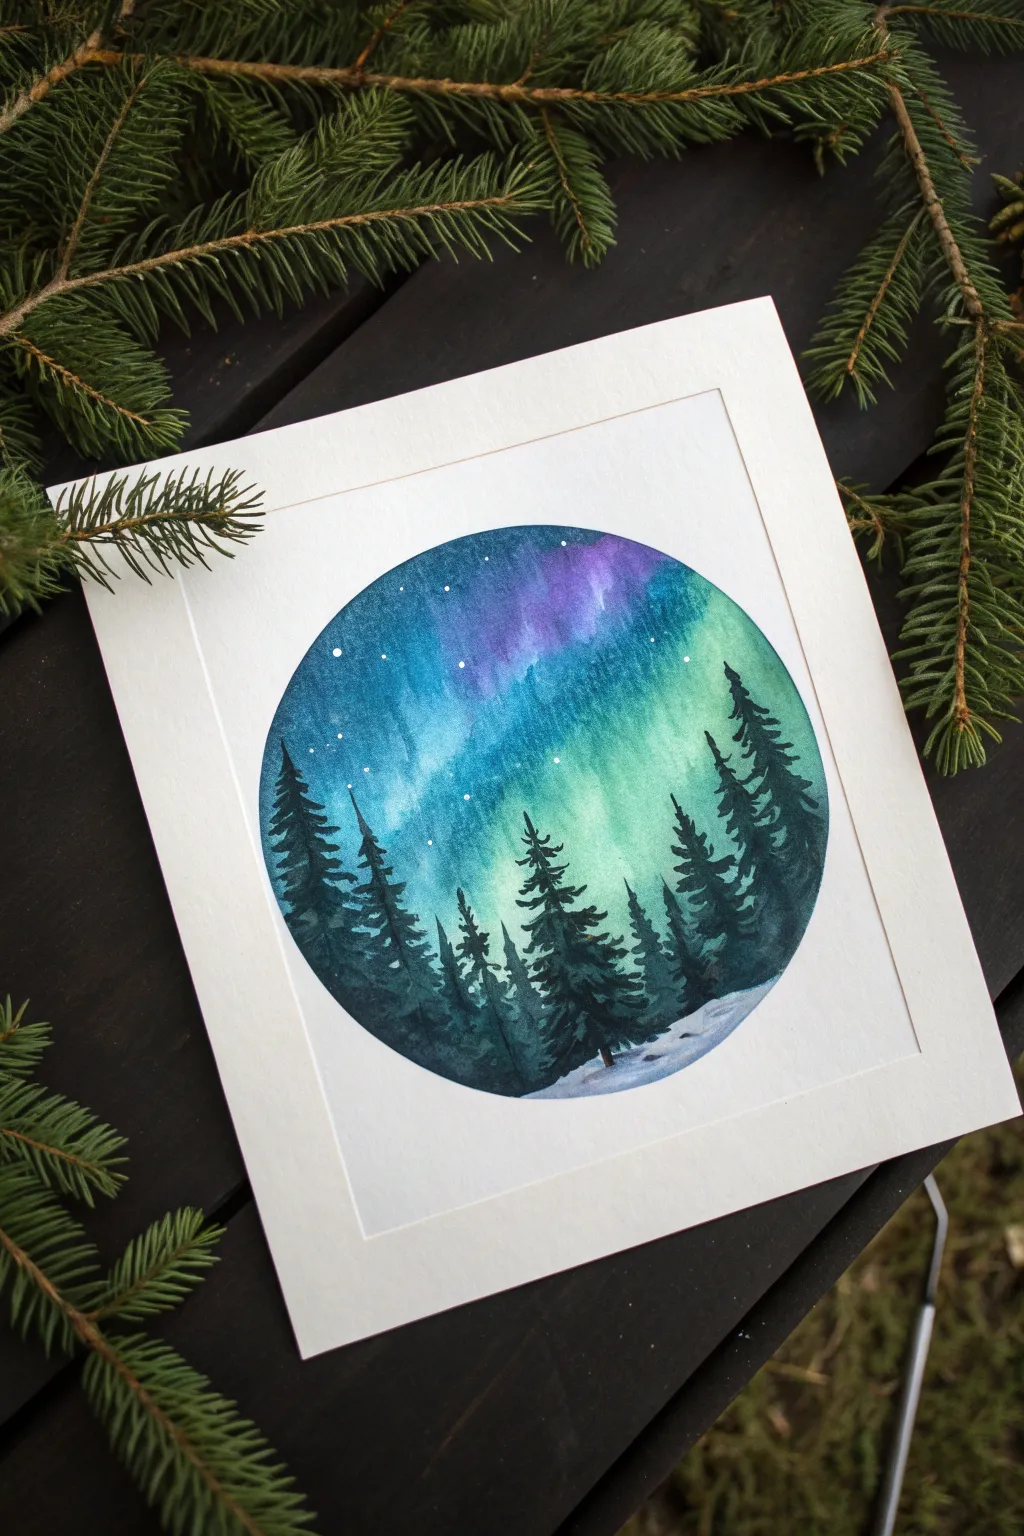
Capture the magic of the polar night in a charming circular format with this watercolor project. This design combines the ethereal glow of the aurora borealis with the sharp, grounding shapes of a winter forest silhouette.
Step-by-Step Guide
Materials
- Cold press watercolor paper (300 gsm)
- Painter’s tape or masking tape
- Compass or a round object (like a bowl) to trace
- Pencil and eraser
- Watercolor paints (Indigo, Teal/Phthalo Green, Violet/Purple, Black/Payne’s Grey)
- White gouache or white gel pen
- Round brushes (sizes 6 and 2)
- Fine liner brush or rigger brush
- Clean water and paper towels
- Paper framing mat (optional, for display)
Step 1: Preparation & Sky Base
-
Create the boundary:
Begin by lightly tracing a perfect circle in the center of your watercolor paper using a compass or a bowl. This will be the window for your landscape. -
Mask the circle:
Carefully apply masking tape around the exterior of your circle to protect the white paper border, or simply paint carefully within the line. For the cleanest edge, you can use masking fluid over the circle line, let it dry, and paint freely. -
Wet the paper:
Using your larger round brush, wet the entire area inside the circle with clean water. The paper should be glistering but not holding puddles. -
Apply the green glow:
While the paper is wet, drop in a vibrant teal or emerald green paint near the center and right side of the circle. Let the pigment bloom and spread naturally into the wet paper. -
Add the night sky:
Introduce a deep indigo or dark blue to the top left and outer edges of the circle. Allow this dark color to touch the green gently, creating a soft, blended transition. -
Infuse violet hues:
Drop a small amount of violet or purple into the upper section where the blue meets the green to create that characteristic magical aurora gradient. -
Strengthen the contrast:
While the paint is still damp, darken the very top edges with more indigo or a touch of Payne’s Grey to make the colors pop. -
Create light pillars:
With a clean, slightly damp brush, gently lift out vertical streaks of paint from the bottom of the sky upwards to mimic the vertical pillars of light often seen in auroras.
Muddy Skies?
If your green and violet are mixing into brown mud, let the first color dry slightly before adding the next, or leave a tiny clear water gap that closes naturally.
Step 2: Stars & Forest Silhouette
-
Dry completely:
Allow the sky layer to dry fully. If the paper feels cool to the touch, it is still wet; wait until it is room temperature or use a hair dryer. -
Splatter stars:
Load a toothbrush or stiff brush with white gouache diluted slightly with water. Flick the bristles to spray tiny white stars across the upper dark portion of the sky. -
Add specific stars:
Use a white gel pen or a fine brush with white gouache to place a few larger, brighter stars intentionally among the splatter. -
Mix the tree color:
Prepare a very dark, opaque mixture for the trees. I prefer mixing indigo with black or sepia rather than using straight black, as it adds richness. -
Paint the tree trunks:
Using a fine liner brush, paint thin vertical lines starting from the bottom third of the circle upwards. Vary the heights to create a natural-looking forest line. -
Add pine branches:
Switch to a size 2 round brush. Starting at the top of a trunk, use small dabbing motions to create pine branches that slant downwards, getting wider as you move down the trunk. -
Build the forest density:
Continue painting trees across the foreground. Make the trees on the sides taller to frame the composition, leaving slightly shorter trees in the center. -
Fill the forest floor:
Connect the bottoms of the trees with dark paint, but leave a small, uneven sliver of white paper or very pale blue wash at the very bottom to represent snow on the ground. -
Refine details:
Use your finest brush to add tiny tops to the trees and fill in any gaps in the foliage that look too sparse. -
Final reveal:
Once the painting is bone dry, carefully peel away your masking fluid or tape to reveal the crisp circular edge.
Snow Shadows
Add a very diluted wash of indigo to the white snow area at the bottom right. It creates soft shadows, making the snow look deep and dimensional.
Place a clean white mat over your finished piece to enhance the circular window effect and display your winter masterpiece
Tiny Northern Lights Postcards You Can Batch Paint
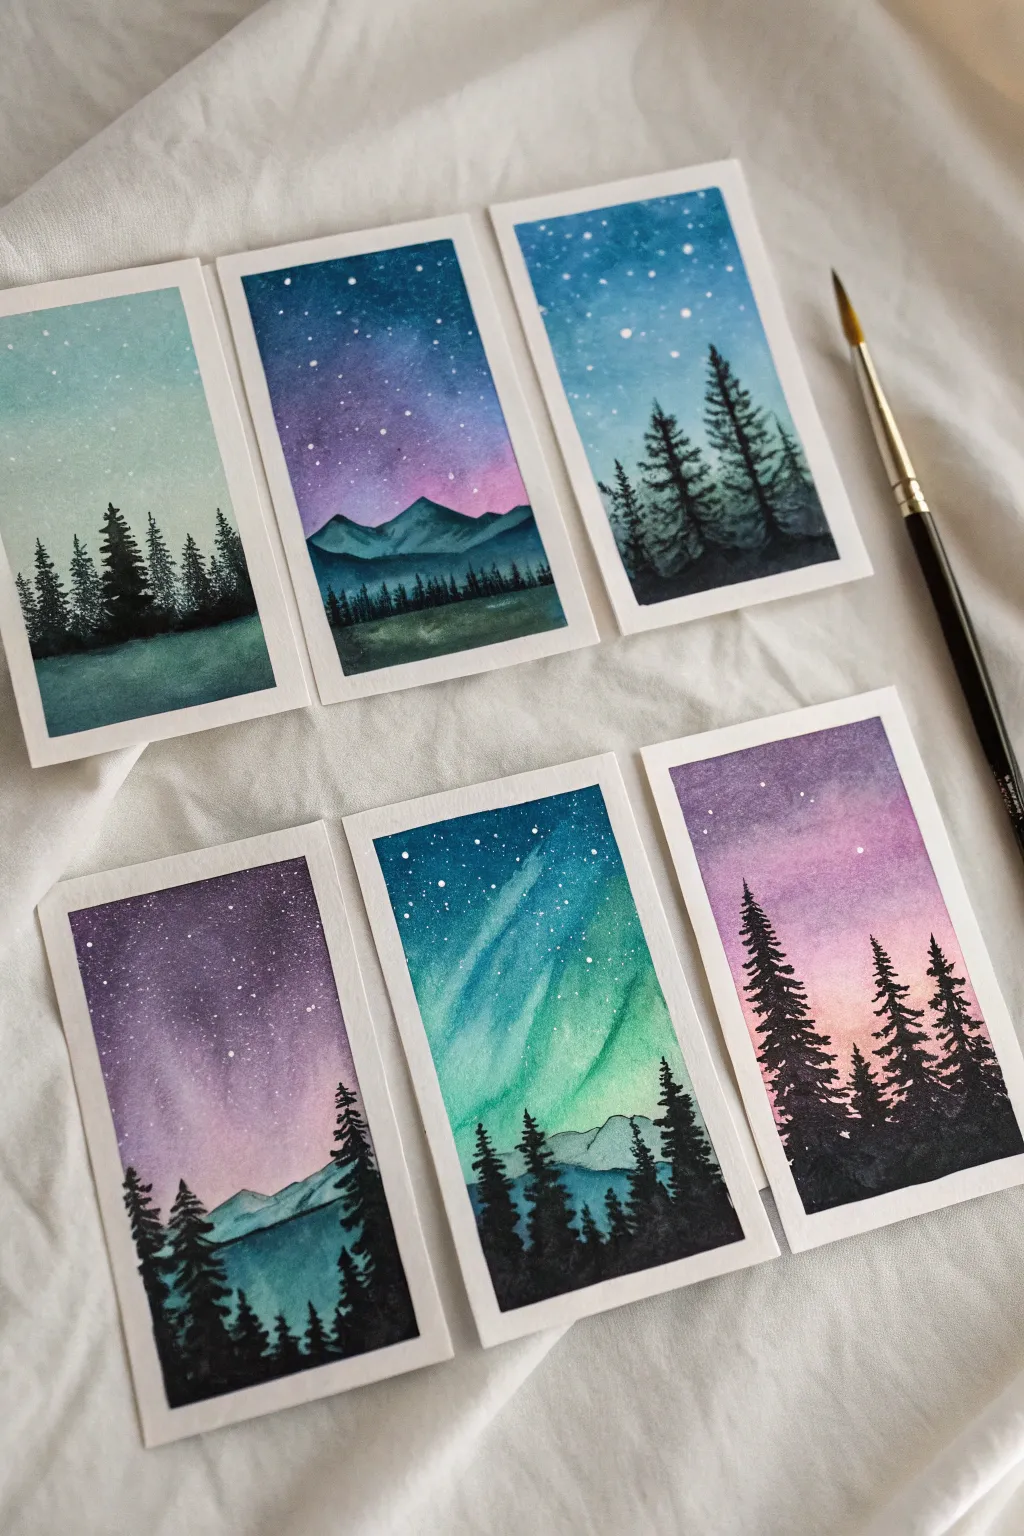
Capture the magic of the polar skies with this set of six miniature watercolor postcards, perfect for gifts or framing. By working on several pieces at once, you’ll create a cohesive gallery of galaxy-inspired night scenes featuring starry skies and silhouetted forests.
Step-by-Step Tutorial
Materials
- Cold press watercolor paper (cut into 6 small rectangles, approx. 3×5 inches)
- Watercolor paints (indigo, violet, magenta, turquoise, teal, black)
- Masking tape or washi tape
- Watercolor brushes (medium round for washes, fine liner for details)
- White gouache or white gel pen
- Jar of clean water
- Paper towels
- stiff brush or toothbrush (for splatter)
Step 1: Setting the Stage
-
Prepare the paper:
Cut your watercolor paper into identical small rectangles. Tape down all four edges of each piece onto a hard board or table surface to create a crisp white border and prevent buckling while you paint. -
Pre-wet the sky:
Choose one postcard to start with. Using your medium round brush and clean water, thoroughly wet the upper two-thirds of the paper where the sky will be, ensuring an even sheen without puddles.
Tape Tricks
To keep your paper from tearing when removing tape, heat the tape briefly with a hairdryer first. This softens adhesive for a clean, damage-free peel.
Step 2: Painting the Sky
-
Lay the base colors:
While the paper is wet, drop in your lightest colors first—patches of teal, magenta, or violet—allowing them to bloom and spread naturally. -
Deepen the night:
Immediately add darker shades like indigo or deep blue around the edges and corners of the sky, blending them gently into the lighter center colors to create a glowing tunnel effect. -
Create variation:
For the aurora streaks (like the bottom center example), use a damp, clean brush to lift out diagonal swoops of paint while the wash is still wet, or paint distinct bands of green against a dark blue background. -
Repeat the process:
Move on to the next postcard while the first one settles. Experiment with different color combinations for each sky—try a purple-pink sunset gradient for one and a cool teal-blue starry night for another. -
Add the stars:
Once the sky layers have lost their shine but aren’t fully bone dry, load a toothbrush or stiff brush with white gouache. Flick the bristles to spray a fine mist of stars over the upper portion of the paintings. -
Highlight specific stars:
Use a white gel pen or a fine brush to dot in a few larger, brighter stars to create depth among the splatter field. -
Let it dry significantly:
Allow all the sky layers to dry completely. The paper must be warm to the touch and flat before you add the silhouette details, otherwise the black paint will bleed.
Bleeding Lines?
If your black trees are fuzzy, the sky wasn’t dry enough. Wait longer between layers, or use a hairdryer on the ‘cool’ setting to speed up drying.
Step 3: Adding the Landscape
-
Paint distant mountains:
If your design includes mountains (like the bottom left example), mix a watered-down indigo or grey. Paint jagged shapes across the lower third, overlapping the bottom of the sky. -
Establish the ground line:
Using concentrated black watercolor or gouache, paint a solid uneven line across the very bottom of the card to establish the forest floor or foreground. -
Start the pine trees:
With a fine liner brush or the very tip of your round brush, draw a thin vertical line upward from the ground to serve as a tree trunk. -
Detail the branches:
Starting at the top of the trunk, use a zig-zag motion to dab on branches, making them wider and denser as you move down toward the base of the tree. -
Create a forest cluster:
Repeat the tree process, varying the heights. I like to overlap the trees slightly, grouping tall ones with shorter ones to make the forest feel organic and dense. -
Fill the silhouette:
Ensure the bottom area where the trees meet the ground is solid black, filling in any gaps to ground the scene heavily. -
Final touches:
Check for any light spots in your silhouettes and darken them. Once everything is 100% dry, carefully peel away the masking tape at a 45-degree angle to reveal the crisp white borders.
Display your collection together for a stunning panoramic effect, or send them as personalized notes to friends
Geometric Northern Lights With Triangle Mountains
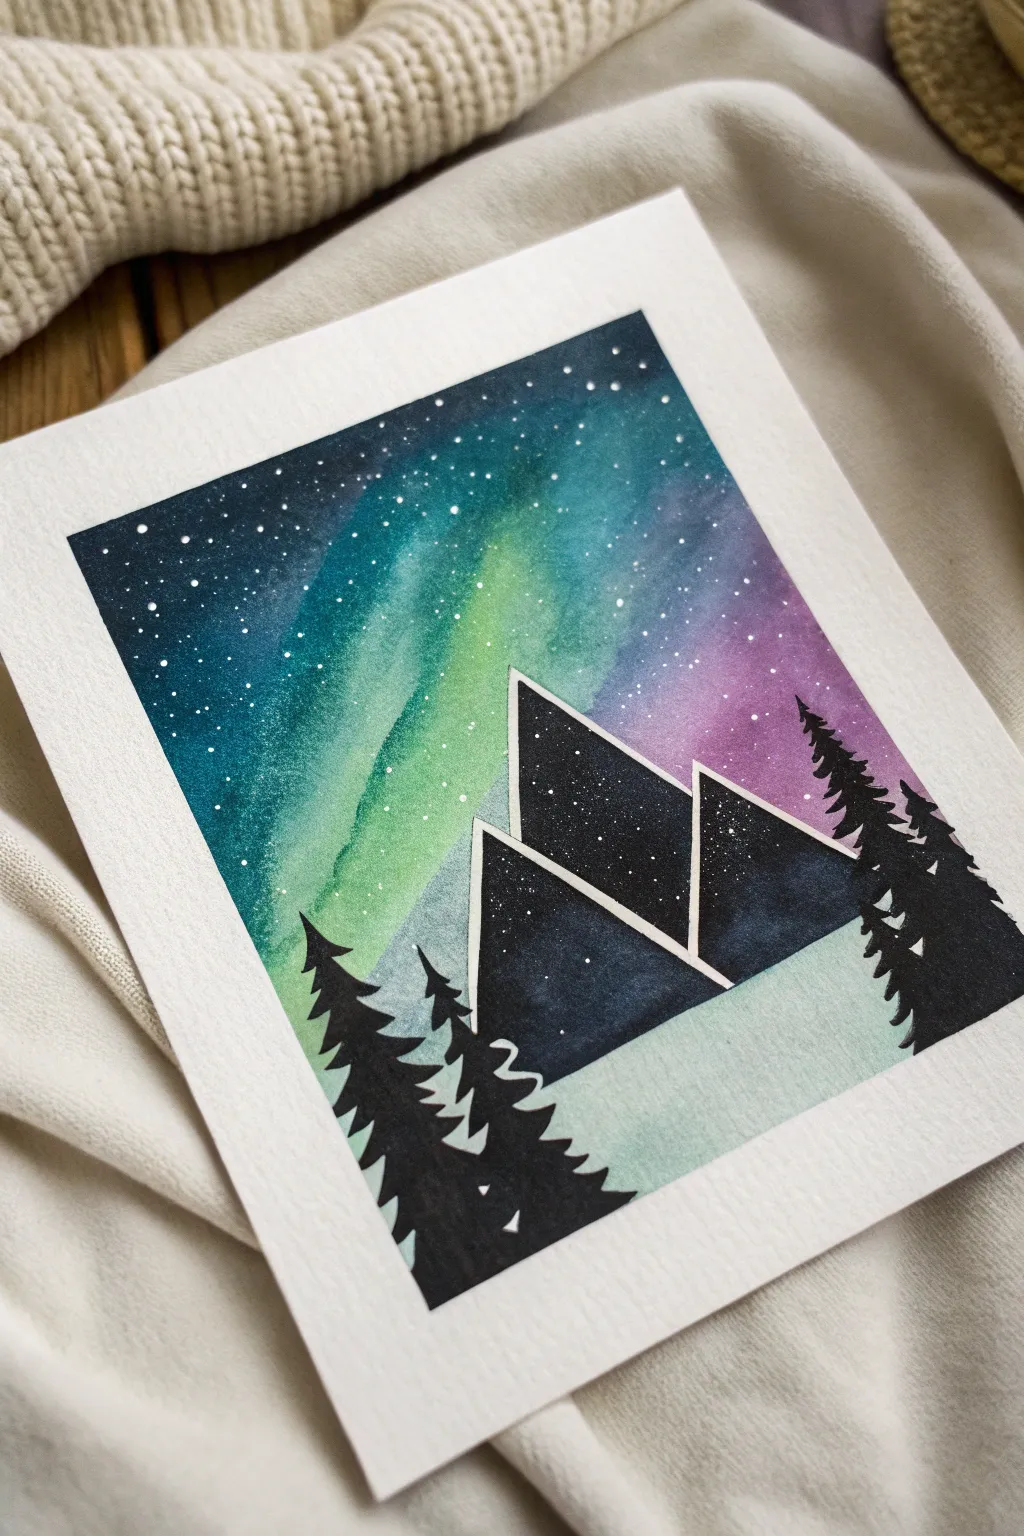
This stunning watercolor project contrasts the fluid, organic beauty of the northern lights with striking, crisp geometric mountains. The result is a modern, graphic take on a classic landscape that looks far more complex than it actually is.
Step-by-Step Guide
Materials
- Cold press watercolor paper (300 gsm)
- Painter’s tape or washi tape
- Watercolor paints (Indigo, Phthalo Blue, Emerald Green, Purple/Magenta)
- White gouache or white gel pen
- Flat wash brush (large)
- Round brush (size 4 or 6)
- Black waterproof fine liner pen (optional)
- Black watercolor or India ink
- Jar of clean water
- Paper towels
- Pencil and ruler
Step 1: Setting the Sky
-
Define the mountain boundaries:
Before painting anything, lightly sketch three large overlapping triangles in the lower third of your paper using a pencil and ruler. These will be your geometric mountains. -
Masking the foreground:
Carefully apply painter’s tape along the top edges of your pencil triangles. This masking step prevents the sky colors from bleeding into your crisp mountain shapes. Ensure the edges are pressed down firmly. -
Prepare the paper:
Using your large flat brush, wet the entire sky area above the tape with clean water. The paper should be glistering with a sheen, but not swimming in puddles. -
Lay down the green streak:
While the paper is wet, load your brush with Emerald Green water-downed slightly. Paint a diagonal, sweeping streak across the center of the sky, letting the wet-on-wet technique diffuse the edges softly. -
Add the deep blues:
Working while the green is still damp, apply Phthalo Blue or a deep teal to the areas surrounding the green streak. Allow the blue to touch the green gently so they blend without turning muddy. -
Intensify the night sky:
At the very top corners and edges of the paper, drop in your darkest Indigo or concentrated Paynes Grey. This creates a vignette effect that makes the aurora grasp the viewer’s attention. -
Hint of purple:
On the right side, adjacent to the green and blue, add a wash of Purple or Magenta. I find this creates a lovely transition color that adds magical warmth to the cold sky. -
Creating stars:
Wait for the sky to dry completely. Dilute white gouache with a tiny bit of water on your brush, hold it over the paper, and tap the handle against another brush to splatter tiny stars across the galaxy.
Crisp Edge Secret
Running a hair dryer over your masking tape before painting slightly melts the adhesive, creating a tighter seal and preventing paint from bleeding under.
Step 2: Geometric Mountains
-
Remove the tape:
Once the sky is bone dry, strictly peel away the masking tape to reveal the clean white paper triangles underneath. -
Plan the white borders:
The charm of this piece lies in the white negative space borders. You can either eyeball this or use thin washi tape to mask off a small border inside your pencil lines to separate the mountains from the sky and each other. -
Fill the first mountain:
Fill the largest central triangle with a very dark wash of Indigo or Black watercolor. Be careful to leave a thin white sliver unpainted along the edges where the mountains overlap. -
Paint the side peaks:
Paint the remaining two triangles with similar dark tones. You can vary the darkness slightly to distinguish depth, but aim for a near-black silhouette look. -
Starry mountains:
To give the mountains a transparent, ethereal quality, splatter a small amount of white gouache over the dark triangle shapes once they are dry, mimicking the stars seeing ‘through’ the mountains.
Step 3: Foreground Details
-
Add the snowy base:
Mix a very watery, pale wash of blue-green paint. Apply this to the bottom sliver of the paper underneath the triangles to suggest a snowy or icy foreground base. -
Drafting the trees:
Using a thin detail brush loaded with undiluted black paint or ink, start painting silhouette pine trees on the left and right edges of the composition. -
Tree structure:
Start with a vertical line for the trunk, then use quick, jagged strokes moving downward and outward to create the branches. Keep the tops pointy and the bottoms wider. -
Layering trees:
Create depth by painting smaller trees slightly behind the larger foreground trees. Ensure the black paint is fully opaque for a high-contrast finish. -
Final touches:
Inspect your white borders. If paint bled over your lines anywhere, you can tidy them up carefully using a white gel pen or opaque white gouache.
Blooms appearing?
If you get cauliflower-like backruns in the sky, you likely added water to paint that was already drying. Embrace them as clouds or wait until fully dry to glaze over.
Peel off the final border tape to reveal your crisp, modern winter landscape
Surreal Northern Lights Inside a Snow Globe Scene
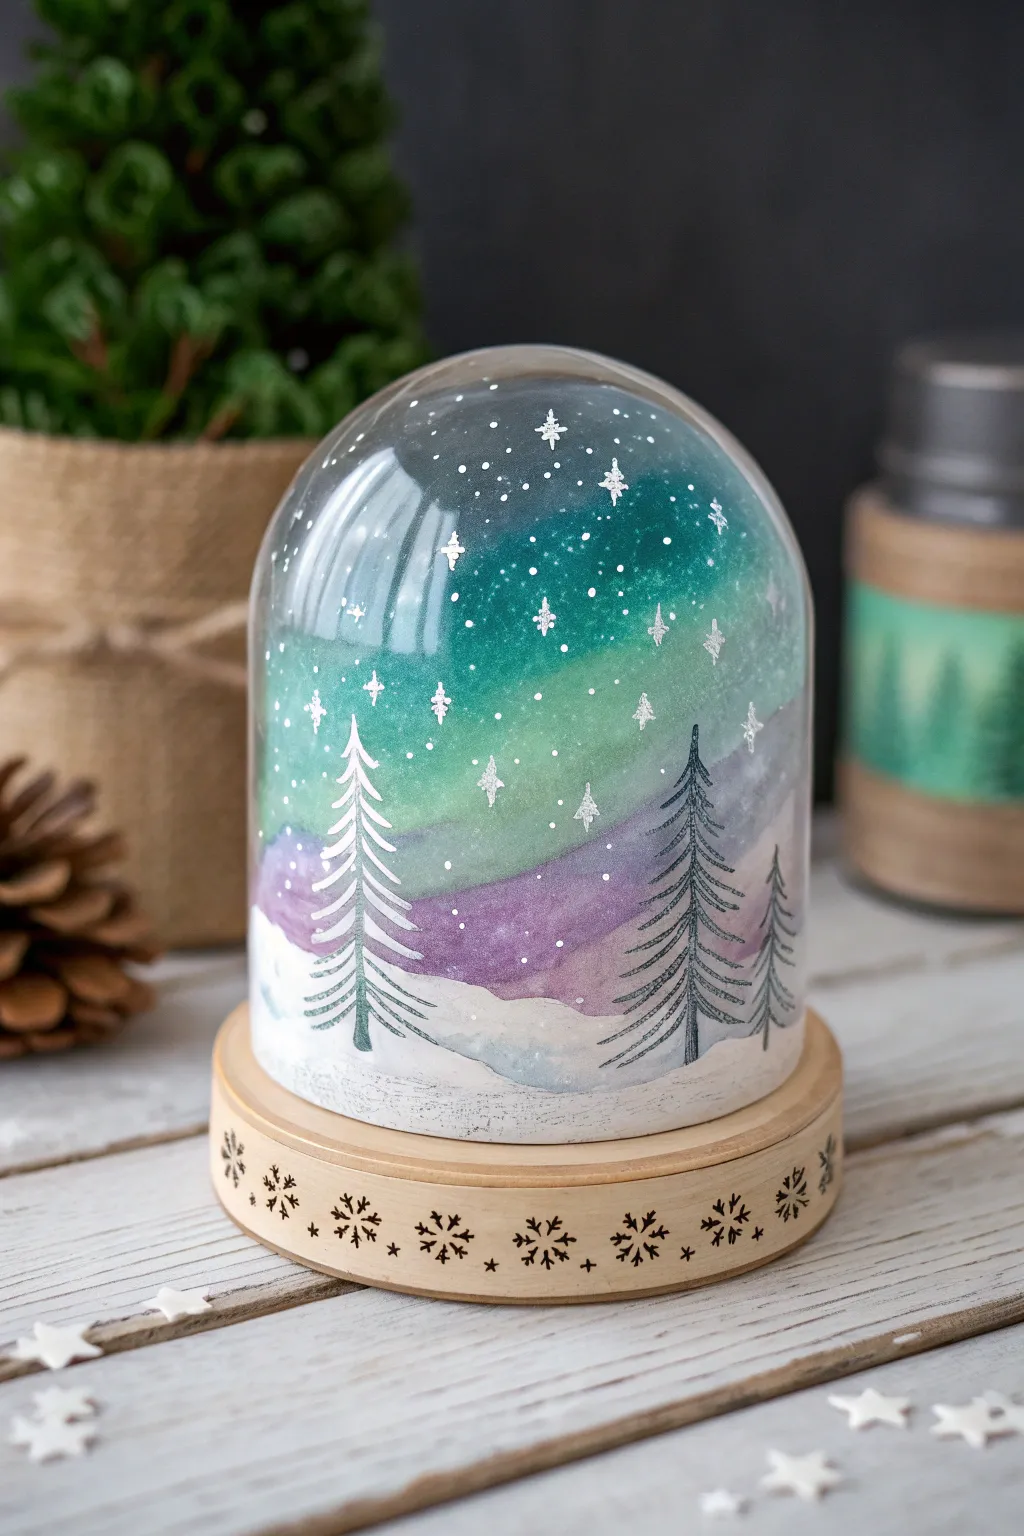
Capture the magic of the polar skies inside a charming glass dome, creating a miniature winter wonderland that glows on your shelf. This project combines simple watercolor blending with glass-encased presentation for a truly surreal decorative piece.
Step-by-Step Tutorial
Materials
- Glass cloche or dome with wooden base
- Heavyweight watercolor paper (cut to fit the dome’s curve)
- Watercolor paints (Emerald Green, Teal, Deep Violet, Indigo)
- White opacity paint (gouache or acrylic)
- Fine liner pen (black, waterproof)
- Silver gel pen or metallic marker
- Round brushes (sizes 4 and 8)
- Small fine-point brush (size 0 or 1)
- Pencil and eraser
- Wood burning tool or brown permanent marker
- Adhesive tape or glue dots
Step 1: Preparing the Canvas
-
Measure and cut:
Begin by measuring the circumference and height of your glass dome. Cut a piece of watercolor paper that will fit snugly inside, creating a curved backdrop. It’s helpful to cut it slightly larger than needed and trim down for a perfect fit. -
Sketch the horizon:
Lightly sketch a rolling hill line near the bottom third of the paper to designate the snowy ground. Above this, faintly outline the sweeping curves where your aurora bands will flow.
Uneven Watercolors?
If your sky dries with hard water lines (blooms), re-wet the entire sky area gently with a clean brush and lift excess pigment with a tissue to smooth the transition.
Step 2: Painting the Aurora Sky
-
Wet-on-wet technique:
Brush clean water over the sky area of your paper, stopping just above the snowy ground. The paper should be glistening but not forming puddles. -
Apply the greens:
While the paper is wet, drop in your teal and emerald green paints. Let them spread naturally, guiding them slightly in diagonal, waving motions to mimic dancing lights. -
Add deep contrasts:
Introduce deep violet and indigo near the bottom of the sky and the top edges. This creates depth and makes the green lights appear brighter by contrast. -
Blend the transitions:
Use a clean, damp brush to soften the edges where the colors meet. You want the northern lights to look ethereal and misty, not like hard stripes. -
Create the snowy ground:
Paint a very diluted wash of violet or pale blue along the bottom snow area to suggest shadows, leaving plenty of white paper showing for high brightness. -
Drying time:
Allow the watercolor layer to dry completely. If you proceed while it’s damp, your next layers of detail will bleed and lose their crispness.
Pro Tip: Depth of Field
Make the black trees slightly smaller and lighter in color than you think necessary; this pushes them visually into the distance, making the dome feel more spacious.
Step 3: Adding Details and Trees
-
Paint the stars:
Using white gouache or acrylic on a fine brush (or a toothpick), dot tiny stars across the sky. I like to concentrate them in the darker areas for better visibility. -
Draw foreground trees:
With a fine black brush or waterproof pen, draw the skeletal shapes of pine trees on the right side. Use short, downward strokes to create the needle texture. -
Add the frosted tree:
On the left side, paint a white pine tree using your opaque white paint. This creates a beautiful contrast and suggests a frost-covered tree catching the light. -
Enhance with sparkle:
Use a silver gel pen or metallic paint to add larger, four-pointed start shapes and highlight tips of the trees for a magical shimmer.
Step 4: Decorating the Base
-
Mark the pattern:
On the side of the wooden base, lightly pencil in a repeating pattern of snowflakes. -
Burn or draw the design:
Carefully trace over your snowflake designs. A wood burning tool gives an authentic rustic look, but a brown permanent marker works excellently for a simpler, safer alternative. -
Final assembly:
Curve your dried painting and insert it into the glass dome. If necessary, use a small glue dot to secure the overlapping edges at the back before placing the dome onto the decorated base.
Place your finished snow globe near a light source to watch the northern lights shimmer within the glass


Have a question or want to share your own experience? I'd love to hear from you in the comments below!