A fan brush looks a little odd at first, but it’s basically a shortcut to the juicy textures we all want—think grass, pine needles, and airy clouds. Here are my go-to fan brush painting ideas that make the most of those splayed bristles, from classic landscapes to a few fun surprises.
Beach Dune Grass
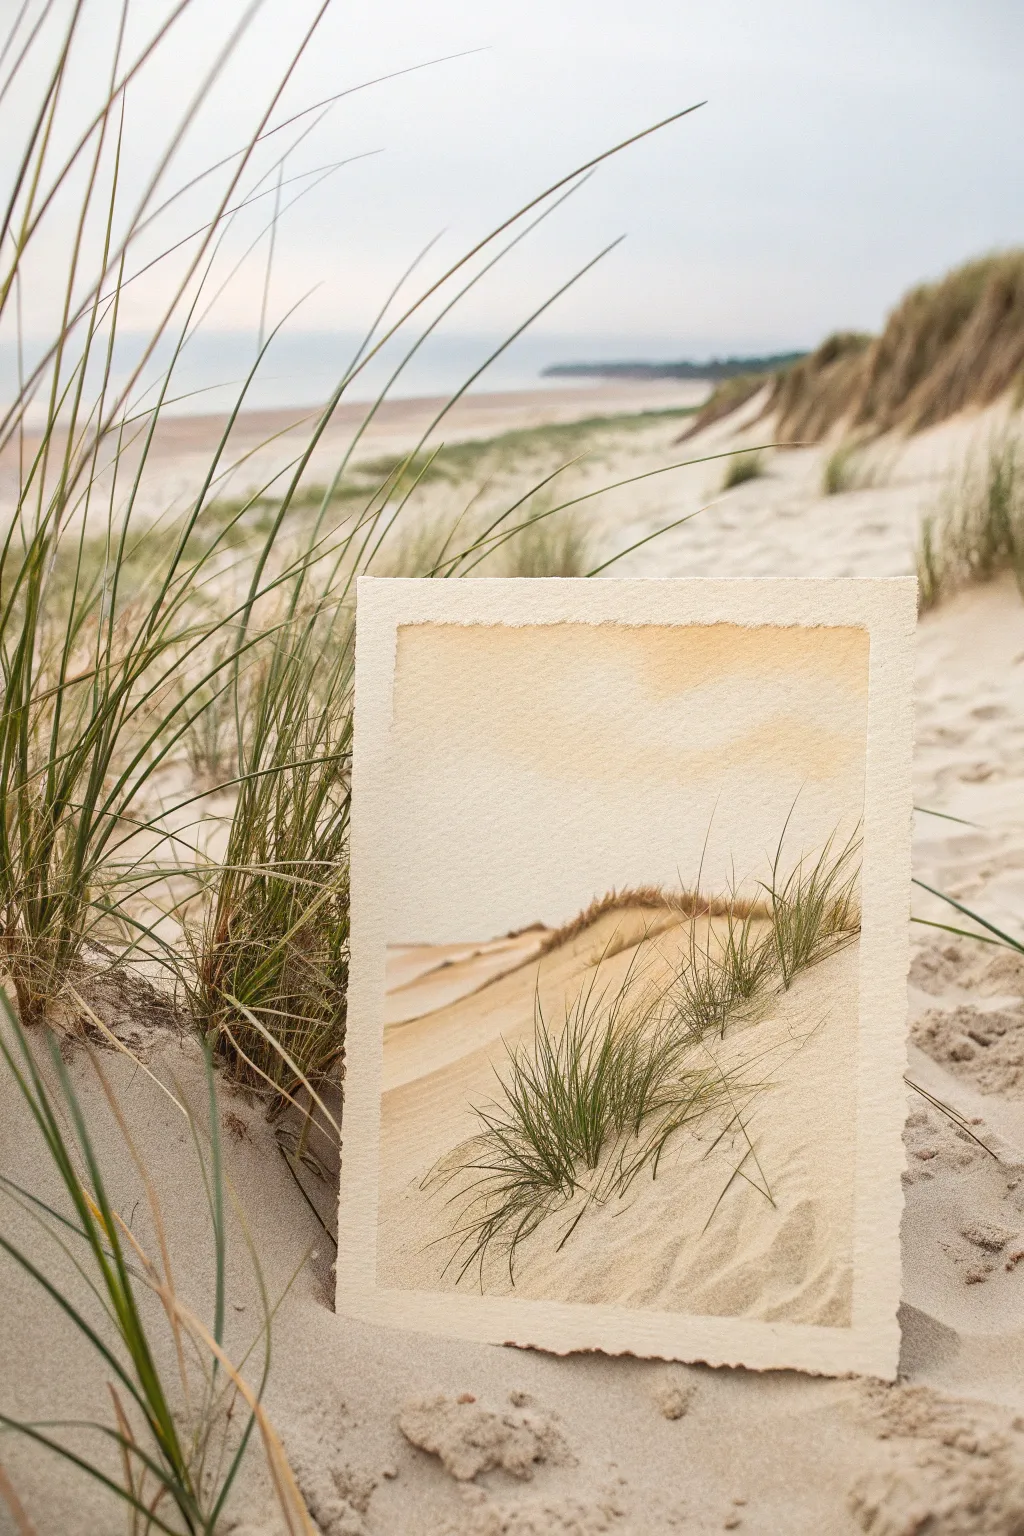
Capture the serenity of a coastal walk with this soft, textured watercolor landscape. Using a fan brush allows you to effortlessly mimic the sweeping movement of marram grass dancing in a sea breeze.
Detailed Instructions
Materials
- Cold pressed watercolor paper (300 gsm)
- Masking tape (for borders)
- Watercolor paints: Yellow Ochre, Burnt Sienna, Burnt Umber, Sap Green, Payne’s Grey
- Large flat brush or wide wash brush
- Small to medium fan brush (hog hair or synthetic)
- Small round detail brush (size 2 or 4)
- Palette for mixing
- Two jars of water
- Paper towels
Step 1: Setting the Scene
-
Prep the Surface:
Tape down all four edges of your watercolor paper to a board. This creates the crisp white border seen in the final piece and prevents buckling. -
Initial Sketch:
Lightly sketch the horizon of the sand dune using an HB pencil. Keep the line flowing diagonally from the lower left to the upper right to create visual interest. -
Sky Wash:
Mix a very dilute wash of Yellow Ochre with plenty of water. Using your large flat brush, apply this wash to the sky area. -
Soft Clouds:
While the sky is still damp, lift out a few soft cloud shapes using a clean, thirsty paper towel to reveal the white of the paper. -
Dune Base Layer:
Mix a creamy wash of Yellow Ochre with a tiny touch of Burnt Sienna. Paint the sand dune area below your pencil line, keeping the application loose. -
Creating Depth:
While the dune wash is still wet, drop in slightly darker concentrated mix of Burnt Sienna near the bottom right corner and along the ridge line to suggest shadows.
Muddy Grass fix
If your grass clumps look like blobs, your paint is too wet. Blot the fan brush on a paper towel before painting to separate the bristles for fine lines.
Step 2: Building Texture
-
Dry Time:
Allow the base layers to dry completely. If the paper is cool to the touch, it is still wet. -
Distant Grasses:
Load the very tips of your fan brush with a mix of Burnt Sienna and a hint of Burnt Umber. Tap the brush gently along the top ridge of the dune to create short, distant stubble. -
Mid-ground Texture:
Using the side of the fan brush, scumble a dry-brush texture of Burnt Umber diagonally down the slope of the dune. This mimics wave patterns in the sand. -
Mixing Green:
Prepare a natural grass green by mixing Sap Green with a little Yellow Ochre and a touch of Burnt Sienna to knock back the brightness.
Step 3: Fan Brush Grasses
-
Loading the Brush:
Dip your fan brush into the green mixture. You want the bristles to separate slightly, not clump together in a solid block. -
The Flicking Motion:
Starting at the base of a grass clump, flick the brush upward and outward quickly. The brush should barely kiss the paper at the end of the stroke to create fine tips. -
Varying Angles:
Paint the main clumps of grass in the foreground. I find rotating the brush handle slightly between strokes helps the grass look more organic and windblown. -
Adding Shadows:
Mix Payne’s Grey into your green to create a shadowed grass color. Add a few strokes near the base of the thickest clumps to ground them. -
Detail Work:
Switch to your small round brush. Paint single, long blades of grass extending higher than the fan brush strokes to break up the uniformity. -
Sand Ripples:
Use a very watery Burnt Umber and the round brush to paint faint, wavy lines in the foreground sand, suggesting wind ripples. -
Final Touches:
Add a few tiny darker specks in the sand for debris or pebbles using a dry brush technique. -
The Reveal:
Once absolutely bone dry, carefully peel away the masking tape at a 45-degree angle to reveal your clean, crisp edges.
Level Up: Magic Dust
Sprinkle a tiny pinch of salt onto the wet sand wash in the foreground. As it dries, it creates a unique crystal texture that looks exactly like real sand.
Frame your dune landscape with a wide matte to enhance that airy coastal feeling you have captured


Evergreen Pine Trees
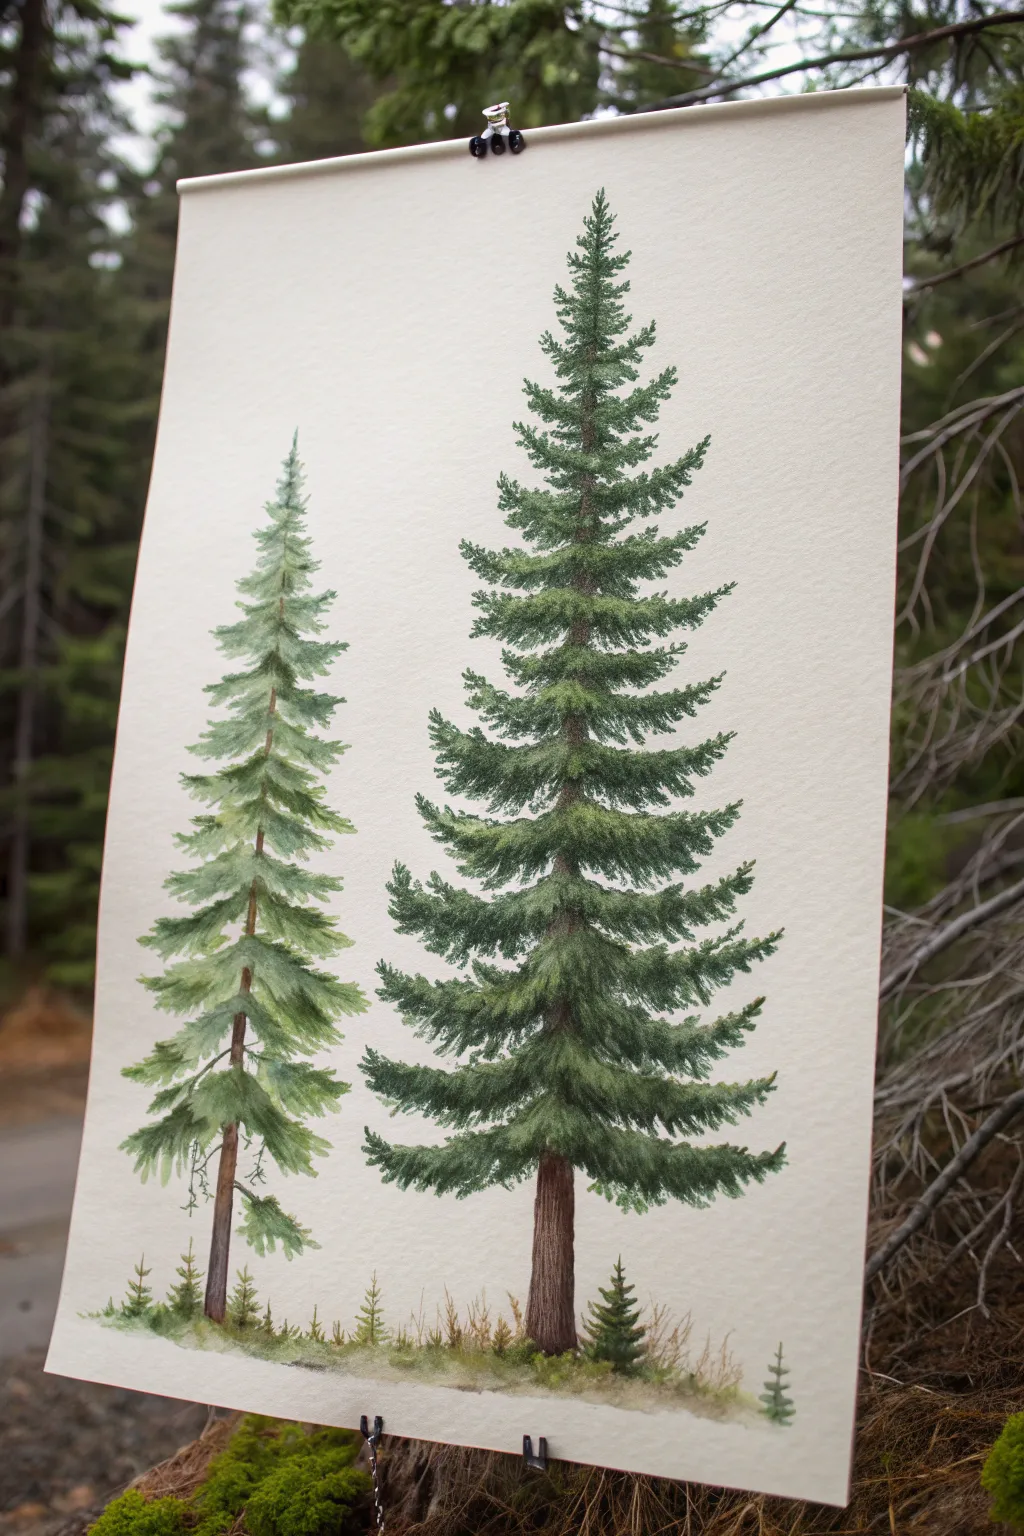
Capture the majestic beauty of the forest with this detailed watercolor study of two evergreen trees. By layering shades of green and utilizing the unique texture of a fan brush, you’ll create realistic foliage that feels both soft and structured.
Step-by-Step
Materials
- Cold press watercolor paper (140lb/300gsm)
- Watercolor paints (Sap Green, Hooker’s Green, Burnt Umber, Payne’s Gray, Yellow Ochre)
- Fan brush (size 2 or 4)
- Round brush (size 4 or 6 for trunks)
- Small liner brush (for fine branches)
- Clean water and mixing palette
- Paper towels
- Pencil (HB or lighter) for sketching
Step 1: Structure and Foundation Test
-
Practice your strokes:
Before touching your final paper, take a scrap piece and practice loading your fan brush. Dip usually just the tips into the paint, then tap it lightly to separate the bristles. This separation is crucial for creating individual needle effects rather than solid blobs. -
Sketch the framework:
Lightly sketch a vertical line for the trunk of the large tree on the right and the thinner tree on the left. Mark the top point and the width of the bottom branches to guide your shape, ensuring the right tree is taller and wider at the base. -
Paint the trunks:
Mix Burnt Umber with a touch of Payne’s Gray to create a deep, bark-like brown. Using your round brush, paint the central trunks. For the left tree, keep the trunk visible and segmented; for the right tree, paint a solid, thickening line that fades slightly as it goes up, knowing much of it will be covered by foliage.
Brush Maintenance
Rinse your fan brush frequently. If paint builds up near the ferrule, the bristles will clump together, ruining the delicate needle effect. Keep the bristles separated for the best texture.
Step 2: The Thinner Tree (Left)
-
Mix lighter greens:
Prepare a mix of Sap Green and a little Yellow Ochre. This lighter, fresher green will serve as the sunlit tips of the branches. -
Start the top foliage:
Using the corner of your fan brush, tap tiny, upward-facing strokes at the very peak of the left tree. Keep these sparse to mimic the delicate growth at the top. -
Build downward branches:
Work your way down the trunk. For this specific tree variety, angle your fan brush strokes slightly downward to create a weeping or heavy-branched look. Leave gaps along the trunk so the brown bark peeks through. -
Add depth:
While the first layer is still slightly damp, mix a darker green using Hooker’s Green and Payne’s Gray. Carefully add this shadow color near the trunk and underneath the main branch clusters to give the tree volume.
Add Winter Mist
To create a misty, atmospheric look, lift some color near the bottom of the trees with a clean, damp paper towel before the paint fully dries, softening the base into the background.
Step 3: The Majestic Pine (Right)
-
Establish the crown:
Switch to your main green mix. Start at the very apex of the right-hand tree, using just the tip of the fan brush to create a sharp, triangular top. -
Layer the main branches:
Move down the tree, tapping the fan brush horizontally. As you descend, allow the strokes to get wider. Use a ‘tap and lift’ motion: press the brush down to deposit paint, then lift effectively to leave textured edges that look like needles. -
Create distinct layers:
I find it helpful to leave small slivers of white paper between horizontal layers of branches. This separation prevents the tree from becoming a solid green triangle and suggests air circulation. -
Darken the core:
Mix a very dark, near-black green. While your previous layers are drying, tuck this dark shadow deep inside the tree near the trunk line. This pushes the lighter outer branches forward visually. -
Texture the outer tips:
Reload your brush with a fresher, lighter green mix. Lightly tap the very edges of the branches you’ve already painted to simulate new growth catching the light.
Step 4: Ground cover and Details
-
Ground the trees:
Mix a watery wash of greens and browns. Using horizontal sweeping strokes at the base of the trunks, create a soft forest floor. Don’t overwork this; let it be loose and grassy. -
Miniature saplings:
Using the very corner of your fan brush or a small round brush, paint the tiny saplings at the bottom. Use the same tapping technique but on a micro scale—a few dots for the top and wider taps for the base. -
Dry grass accents:
Take your liner brush with a diluted Burnt Umber or Yellow Ochre. paint varying vertical flicks rising from the ground wash to represent dried tall grasses or weeds. -
Final trunk details:
Once the foliage is fully dry, use the liner brush and dark brown paint to reinforce any parts of the trunk that got lost or need more definition, especially on the thinner left tree.
Step back and admire your serene forest scene, noting how the fan brush texture brings your evergreens to life

Leafy Canopies With Stippling
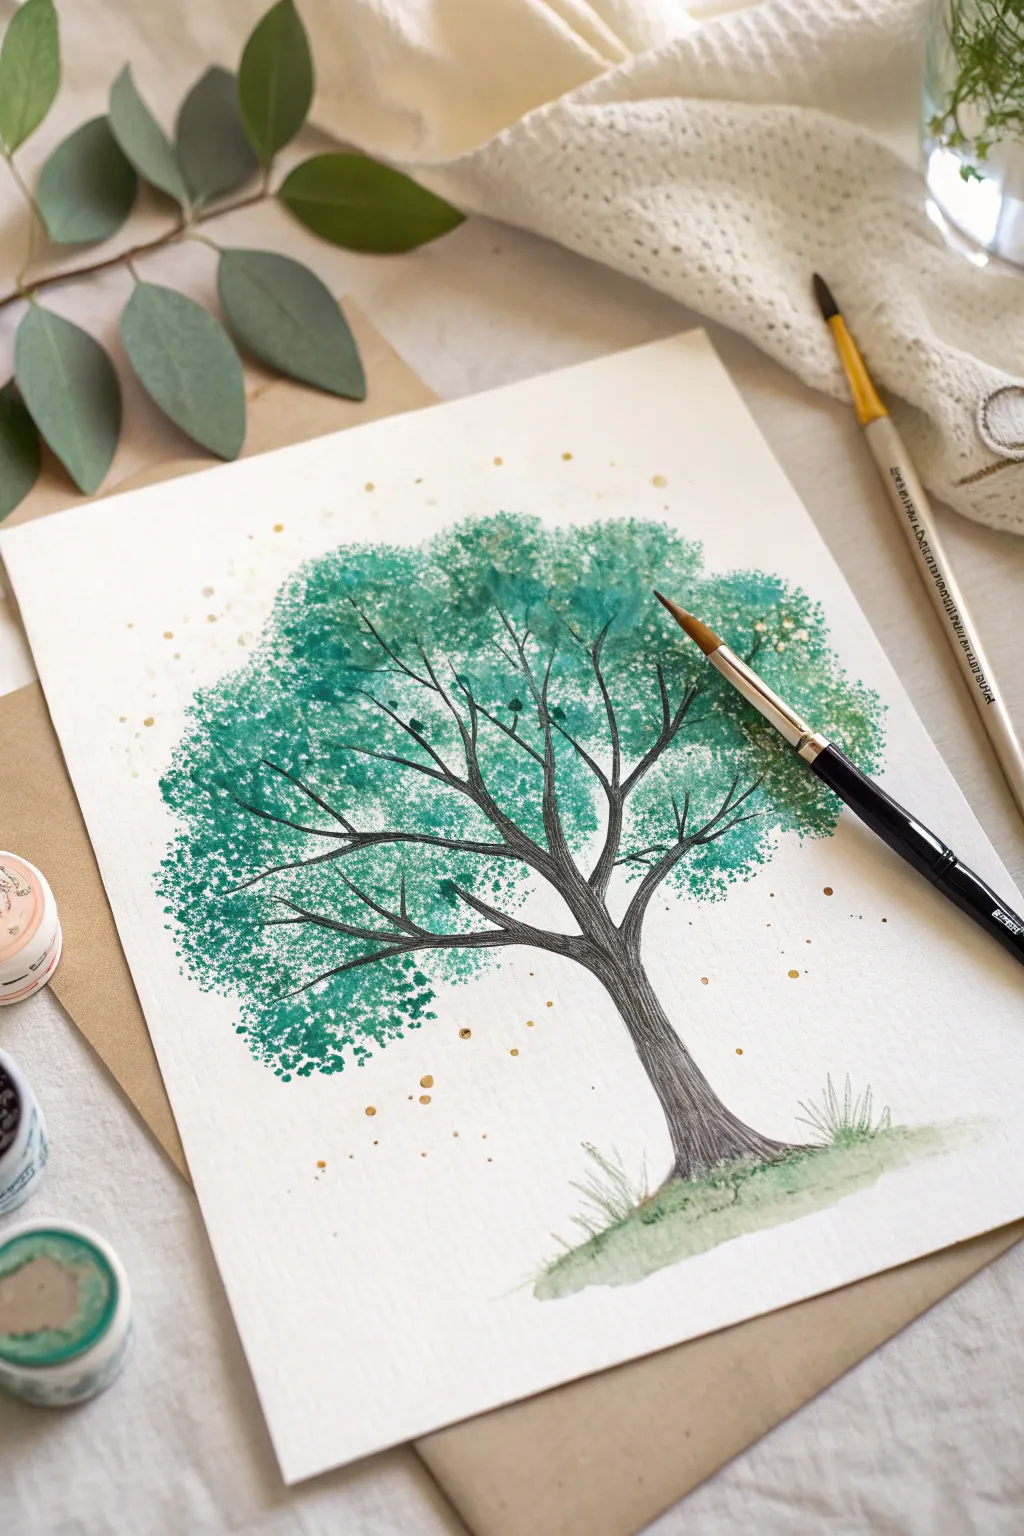
Capture the ethereal beauty of a lush tree using a simple stippling technique that builds incredible texture without needing to paint individual leaves. This project combines loose watercolor washes with precise stippling to create a canopy that feels both dense and airy.
Detailed Instructions
Materials
- Cold press watercolor paper (A4 or 9×12 inch)
- Fan brush (size 2 or 4)
- Round brush (size 4 or 6 for the trunk)
- Small liner brush (for fine branches)
- Watercolor paints (Teal, Viridian Green, Burnt Umber, Paynes Grey)
- Liquid gold watercolor or gold ink
- Paper towels
- Two jars of water
- Pencil (HB or H)
Step 1: Planning and Foundation
-
Sketch the framework:
Begin by lightly sketching the main trunk and primary branches with an HB pencil. Keep the lines faint, just enough to guide your painting, as you don’t want graphite showing through the translucent watercolor. -
Mix trunk colors:
Prepare a dark, woody mix using Burnt Umber and Paynes Grey. You want a saturated consistency that isn’t too watery, allowing for crisp edges on the bark. -
Paint the trunk base:
Using your medium round brush, fill in the main trunk. Start from the bottom and pull the paint upwards, lifting pressure as you reach where branches begin to split. -
Extend main branches:
Switch to a smaller brush to taper the branches outward. Let the paint naturally fade or break in places; these gaps will later be obscured by foliage.
Separating Bristles
If your fan brush clumps up when wet, pinch the bristles carefully with your fingers to separate them into small groups before dipping into paint for distinct leafy marks.
Step 2: Creating the Canopy
-
Load the fan brush:
Dampen your fan brush and load it with a mix of Teal and Viridian Green. The brush shouldn’t be soaking wet; blot it slightly on a paper towel so the bristles separate a bit. -
Stipple the first layer:
Hold the fan brush perpendicular to the paper and gently tapping the tips onto the paper. Start at the outer edges of your sketched canopy to establish the tree’s overall shape circles. -
Vary the pressure:
Continue tapping inwards towards the trunk. Vary your pressure to create clusters of leaves—harder taps for dense areas, lighter taps for airy sections. -
Add color depth:
While the first layer is still slightly damp, introduce a darker teal or a touch of Paynes Grey to your mix. Stipple this darker shade near the center and under the branch masses to create shadow and volume. -
Soften distinct edges:
If any stippled marks look too uniform, rinse your brush, dry it almost completely, and gently disturb the wet paint in just a few areas to soften the texture. -
Let it breathe:
Leave white space showing between your leaf clusters. This negative space is crucial for making the tree look realistic and preventing the canopy from becoming a solid blob.
Step 3: Refining Details
-
Connect the branches:
Once the foliage is mostly dry, use your liner brush and the dark trunk color to paint thin, intricate branches weaving through the leaves. Some lines should disappear behind the green stippling. -
Add bark texture:
With a barely damp liner brush and concentrated dark brown paint, dragging vertical lines up the trunk to mimic rough bark texture. -
Ground the tree:
Dilute some of your green leafy mix with water. Brush a soft, grassy wash at the base of the trunk, flicking the brush upward rapidly to suggest blades of grass. -
Deepen the grass:
Add a few touches of undiluted green at the very bottom of the trunk to show where the tree meets the earth.
Seasonal Shift
Change the mood entirely by swapping the teal palette for burnt sienna, orange, and reds to create a vibrant autumn version of this same tree structure.
Step 4: Finishing Touches
-
Prepare the gold splice:
Mix a small amount of gold watercolor or ink until it has a fluid, milky consistency. -
Apply the magic dust:
Load a round brush with the gold, hold it over the painting, and tap the handle against another brush to splatter fine gold specks across the canopy and background. -
Final assessment:
Step back and check the balance. If the canopy feels top-heavy, add a few more stippled leaves to the lower branches. -
Final drying:
Allow the piece to dry completely flat for at least an hour before framing to ensure the gold splatter doesn’t run.
Now you have a serene, nature-inspired piece that looks intricate but relies on simple, rhythmic motions


Palm Fronds From a Center Point

Capture the organic elegance of a tropical palm frond with this focused study on light and shadow. Using the unique bristles of a fan brush allows you to create effortless, tapered leaf segments that naturally radiate from a central spine.
How-To Guide
Materials
- Heavyweight watercolor paper or canvas board (9×12 inches)
- Fan brush (size 4 or 6)
- Round brush (size 2 or 4) for details
- Watercolor or gouache paints: Sap Green, Viridian, Indigo, Lemon Yellow
- Palette for mixing
- Jar of clean water
- Paper towels
- Pencil (HB or H) for light sketching
Step 1: Planning and Structure
-
Sketch the spine:
Begin by lightly sketching the central vein (rachis) of the palm leaf. Draw a gentle, curved line starting from the bottom right corner and arching toward the upper left. This line will serve as the anchor for all your leaves. -
Define the boundaries:
Very faintly mark the outer tips of where the longest fronds will reach. This ensures your composition stays centered and doesn’t run off the edge of the canvas unexpectedly. -
Mix your base green:
On your palette, create a mid-tone green by mixing Sap Green with a touch of Lemon Yellow. Specifically for this project, I like to keep the paint consistency slightly fluid—like heavy cream—so it flows smoothly off the bristles.
Wet Edge Control
For sharper edges on your leaves, ensure your fan brush isn’t dripping wet. Blot excess water on a paper towel after rinsing so the bristles stay stiff and separate.
Step 2: Painting the Fronds
-
Load the fan brush:
Wet your fan brush and load it generously with your mixed mid-tone green. Ensure the bristles are separated slightly, not clumped together, to achieve that fibrous texture. -
Start at the top:
Begin with the topmost leaf segment. Place the chisel edge of the fan brush against the top of your pencil spine line. Press down gently and pull outward and upward, lifting the brush gradually as you reach the tip to create a sharp point. -
Work down the left side:
Move down the left side of the spine. For each leaf segment, start at the spine. Drag the brush outward to the left, angling the strokes slightly upward. Use the full width of the fan brush near the spine and rotate slightly to taper the end. -
Vary the lengths:
As you move down the stem, make the strokes slightly longer and broader, then shorten them again near the very bottom. This variance creates the natural oval shape of a palm frond. -
Work down the right side:
Repeat the process on the right side of the spine. Aim to stagger these leaves slightly relative to the left side so they don’t look perfectly symmetrical or artificial. -
Add color variation:
While the first layer is still damp, mix a darker green using Viridian and a tiny touch of Indigo. Use the corner of your fan brush to drop this darker color into the base of the leaves near the spine. -
Introduce light tones:
Rinse your brush and pick up some Lemon Yellow mixed with a tiny bit of water. glaze over the tips of the upper leaves to simulate sunlight hitting the frond. -
Dry the base layer:
Let this initial layer of green dry completely. If the paper feels cool to the touch, it still holds moisture. Be patient here to prevent muddy colors later.
Step 3: Refining and Detailing
-
Strengthen the shadows:
Mix a deep, concentrated shadow green using Sap Green and Indigo. Switch to your round brush or use the very edge of the fan brush. -
Define the spine:
Paint a thin, confident line down the central spine proper, covering your original pencil mark. Make it thicker at the base and hairline-thin at the top. -
Add overlaps:
Look for gaps between your main fan brush strokes. Paint thin, dark slivers of leaves peeking out from behind the main fronds. This adds depth and volume to the painting. -
Sharpen the tips:
If any of your fan brush strokes ended too bluntly, use the small round brush with the mid-tone green to extend and sharpen the very tips of the leaves into fine points. -
Create texture:
Using a ‘dry brush’ technique with very little dark paint on your fan brush, lightly drag texture lines lengthwise down the larger leaves to suggest veins and fibrous material. -
Final assessment:
Step back and look at the overall balance. If one side feels too heavy, add a small, light-colored leaf segment to the opposite side to balance the visual weight.
Tropical Twist
Try painting the background a very pale, watery pink or peach before starting the green leaf. This complementary color scheme makes the green pop vibrantly.
Allow your painting to dry fully before framing it or displaying it on an easel
BRUSH GUIDE
The Right Brush for Every Stroke
From clean lines to bold texture — master brush choice, stroke control, and essential techniques.
Explore the Full Guide
Wildflower Meadow Texture
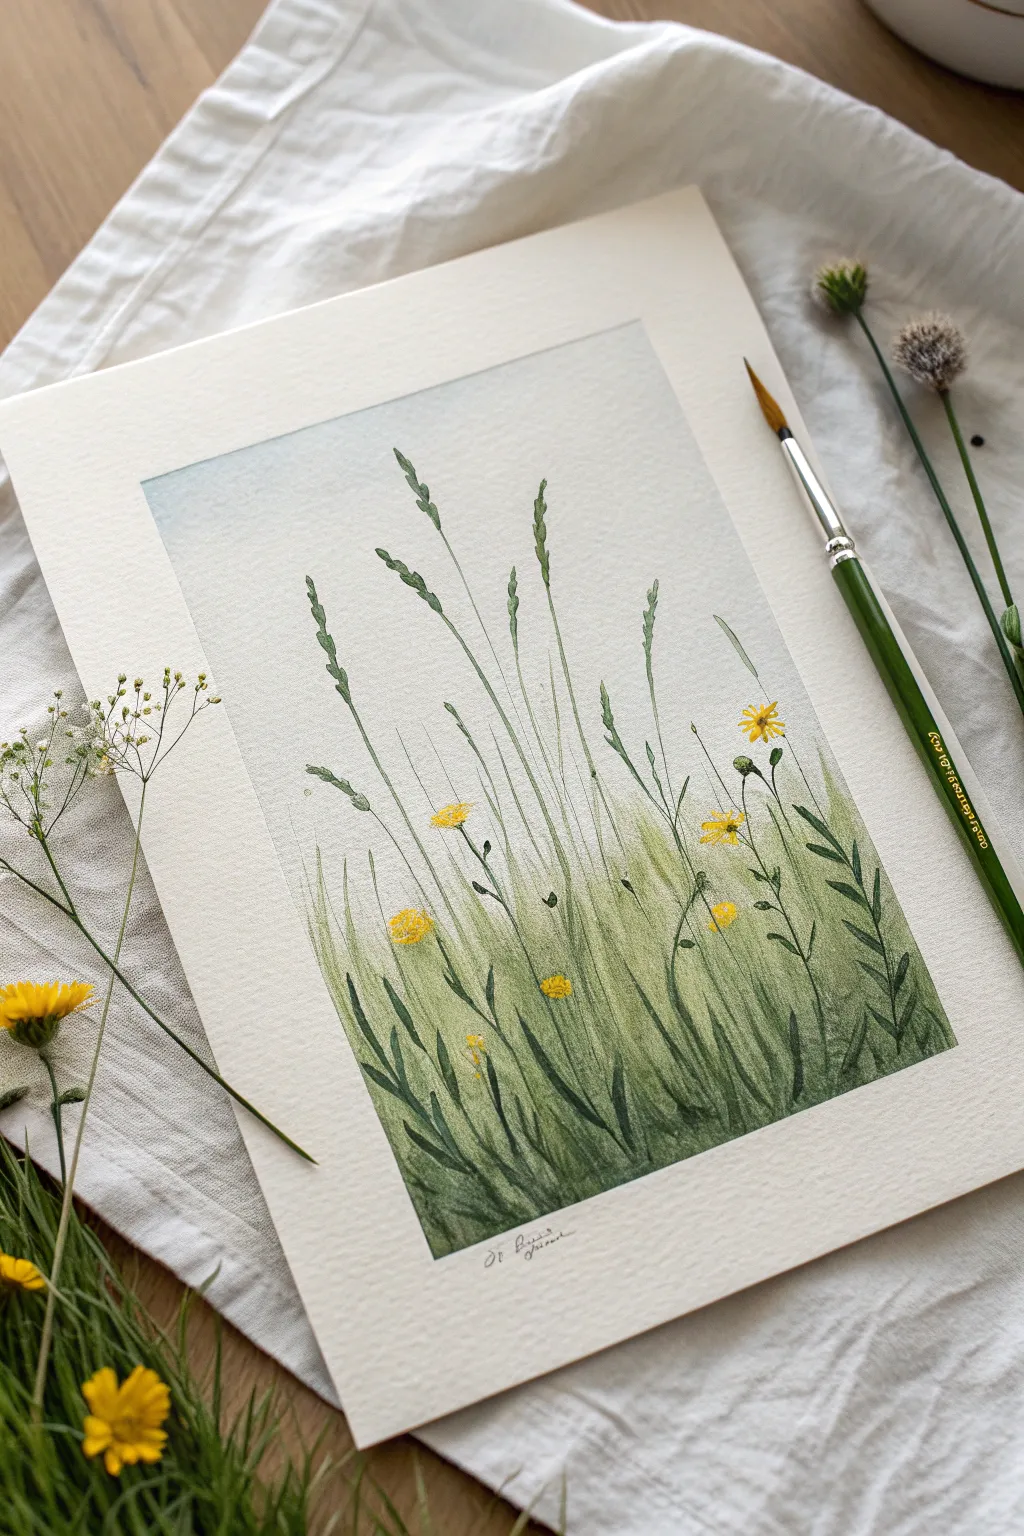
Capture the airy lightness of a summer meadow with this delicate watercolor study featuring swaying grasses and bright touches of yellow. Using simple layering techniques, you’ll build up a realistic depth that makes the foliage feel lush yet weightless.
Step-by-Step Guide
Materials
- Cold-press watercolor paper (300gsm)
- Watercolor paints (Sap Green, Olive Green, Hooker’s Green, Lemon Yellow, Cadmium Yellow, Indigo/Payne’s Grey, light blue)
- Fan brush (size 2 or 4)
- Round rigger or liner brush (size 0 or 1)
- Small flat brush or wash brush
- Masking tape
- Water jars
- Paper towels
Step 1: Preparation & Sky Wash
-
Tape the borders:
Secure your watercolor paper to a board using masking tape. Create a clean rectangular border, leaving a generous white margin around the painting area as seen in the reference. -
Sketch the horizon:
Lightly sketch a very faint horizon line about one-third of the way up from the bottom. This doesn’t need to be straight; a slight undulation looks more natural. -
Mix the sky wash:
Prepare a very dilute, watery mix of light blue. You want this to be extremely pale, almost translucent. -
Apply the background:
Using a flat brush, apply the pale blue wash starting from the top and fading out as you reach the middle of the paper. Let the bottom half remain mostly white or extremely faint. -
Initial drying:
Allow this background layer to dry completely before starting on any foliage to prevent the green from bleeding into the sky.
Too Much Water?
If your grass blades are bleeding into blurry blobs, your paper is too wet. Let it dry completely, then switch to a ‘dry brush’ technique with less water on your liner brush for crisp lines.
Step 2: Building the Grass Base
-
Base layer texture:
Load a fan brush with a watery mix of Sap Green and a touch of Yellow. The paint shouldn’t be too thick. Lightly flick the brush upward from the bottom edge to create the first layer of soft, blurry grass. -
Varied heights:
Continue using the fan brush, varying the height of your strokes. Some should reach the middle of the paper, while others stay low to build density at the base. -
Adding depth:
While the first layer is still slightly damp but not soaking, mix a slightly darker green (add a tiny bit of blue or darker green). Add more upward strokes with the fan brush, focusing on the bottom third to create shadow and density. -
Dry completely:
Let these background grass layers dry fully. This is crucial for the crisp details coming next.
Step 3: Defining Details
-
Switch brushes:
Pick up your rigger or fine liner brush. This tool is essential for the long, elegant stalks that give the painting its character. -
Paint tall stalks:
Using a mix of Olive Green and Indigo for a deeper tone, paint several tall, thin stalks reaching high into the sky area. Keep your hand loose and let the stems curve naturally. -
Add seed heads:
At the tops of the tallest stalks, use small, jagged dabs of paint to create the textured seed heads of the wild grasses. Vary the pressure to make some segments thicker than others. -
Broad leaves:
Mix a darker, more saturated green. Paint sharper, blade-like leaves in the foreground. Press down at the start of the stroke and lift up quickly to create a tapering point. -
Varying greens:
I like to slightly alter my green mix every few strokes—adding a bit more yellow or a drop of brown—to keep the meadow looking organic and not uniform. -
Mid-ground texture:
Add smaller, thinner lines in the mid-ground using a lighter green to bridge the gap between the detailed foreground and the blurry background.
Pro Tip: The Rigger wiggles
When painting the tall grass stalks with a rigger brush, hold the brush handle near the end and twist it slightly as you pull up. This creates natural, organic curves instead of stiff, straight lines.
Step 4: Floral Accents & Finishing
-
Yellow blooms:
Load a small round brush with opaque Cadmium Yellow. Paint small flower heads scattered among the tall grasses. Use simple dab motions rather than trying to paint perfect petals. -
Flower centers:
If you wish, add a tiny dot of orange or light brown to the center of the larger yellow flowers for dimension. -
Connecting stems:
Use your liner brush and a diluted green to draw very thin, delicate stems connecting these floating yellow flowers to the ground. -
Final adjustments:
Step back and look at the composition. If the bottom looks too light, gently glaze a dark green wash over the very bottom edge to grounding the scene. -
Reveal:
Once the paper is bone dry, carefully peel away the masking tape at a 45-degree angle to reveal your crisp, clean borders. -
Sign it:
Sign your name lightly in pencil or fine pen in the bottom white margin for a professional gallery look.
Enjoy the peaceful process of watching your meadow grow one blade at a time
Pine Needle Branch Close-Up
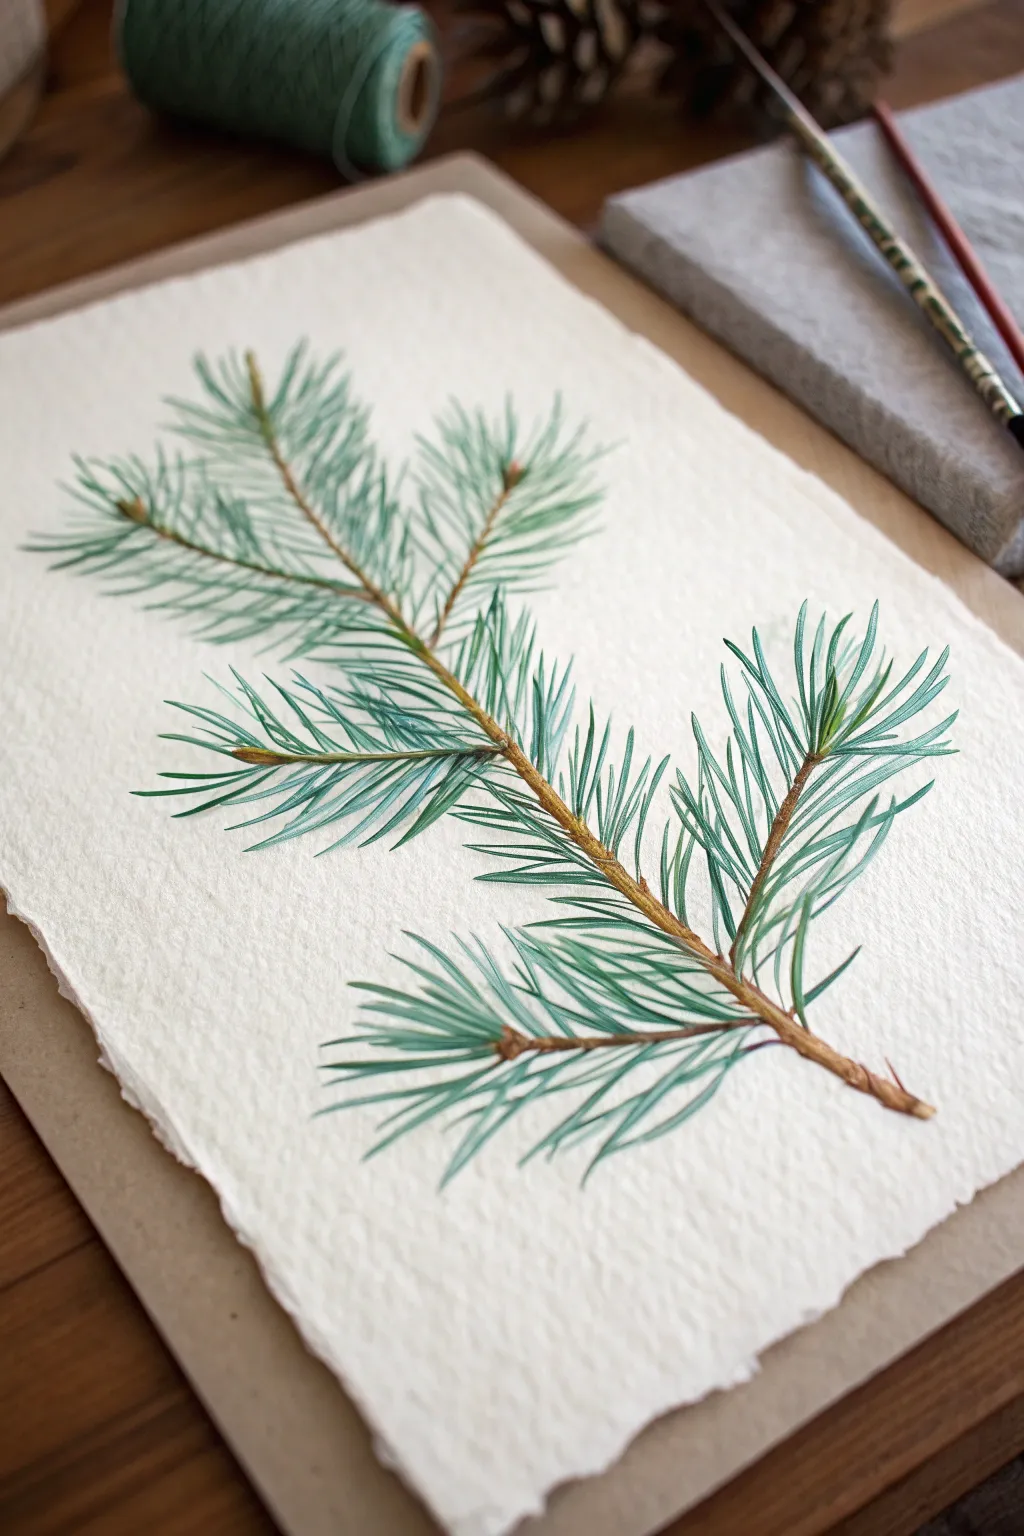
Capture the delicate structure of a pine branch with this detailed watercolor study. The rough texture of the deckle-edged paper perfectly complements the organic flow of the needles, creating a piece that feels both rustic and refined.
Step-by-Step
Materials
- Cold press watercolor paper (deckle edge preferred, 300lb for texture)
- Round brush (size 4 or 6)
- Rigger or liner brush (size 0 or 1)
- Fan brush (small stiffness optional)
- Watercolor paints: Burnt Sienna, Yellow Ochre, Sap Green, Phthalo Green/Viridian, Indigo
- Palette for mixing
- Two jars of water
- Paper towels
- Pencil (HB or H)
Step 1: Planning and Structure
-
Sketch the spine:
Begin by lightly sketching the main central branch with your pencil. Draw a diagonal line starting from the bottom right and curving gently upward towards the top left. This serves as the anchor for your entire composition. -
Add offshoot branches:
Sketch smaller lines branching off the main stem. Place them at slightly irregular intervals on alternating sides to mimic natural growth, rather than perfect symmetry. -
Mix the branch color:
Create a warm, woody brown by mixing Burnt Sienna with a touch of Yellow Ochre. Add a tiny drop of Indigo if you want to darken the mixture for shadowed areas. -
Paint the main stem:
Using your round brush, paint the main branch. Vary the pressure on your brush to create a line that is thicker at the base and tapers toward the top. While the paint is wet, drop in a slightly darker brown on the underside to suggest roundness.
Needles muddy?
If your greens are blending into a blob, let the first layer dry completely before adding the second. Crisp lines rely on dry underlying layers.
Step 2: Developing the Foliage
-
Mix the needle green:
Prepare a rich, cool green. Mix Sap Green with Phthalo Green or Viridian. I like to have a separate puddle where I add a little Indigo to create a shadow green for depth. -
Fan brush technique:
Load a fan brush with your lighter green mixture. Ensure the bristles are separated, not clumped. Gently flick the brush outward from the branch stems to create the initial soft base of needles. This establishes the direction of growth. -
Refining with a liner:
Switch to your rigger or liner brush. This is where the magic happens. Dip into your primary green mix and paint individual needles, pulling swift, confident strokes outward from the branch. Let the lines taper naturally at the ends. -
Layering for density:
Continue adding needles, overlapping the fan brush texture. Vary the length of your strokes, making the needles near the tips of the branches slightly shorter and those near the base longer. -
Adding shadow tones:
Pick up your darker, indigo-infused green. Paint a second layer of needles interspersed among the first, focusing closer to the branch stem. This creates volume and prevents the branch from looking flat.
Step 3: Refining Details
-
Connect the needles:
Use a fine round brush with the brown branch color to touch up the connection points where the needle clusters meet the wood. Ensure the transition looks organic, adding small ‘knobs’ or buds where necessary. -
Highlighting buds:
At the very tips of the smaller branches, use pure Burnt Sienna or a reddish-brown to paint tiny, pointed buds. This adds a pop of warmth against the cool greens. -
Dry brushing texture:
Once the main branch is dry, drag a barely-damp brush with dark brown paint along the wood grain. This dry-brush technique enhances the texture, making the bark look rough and realistic. -
Softening edges:
Inspect your needle tips. If any look too harsh or blunt, use a clean, damp brush to gently soften the ends, or paint a very fine, faint line extending them to a sharp point. -
Final assessment:
Step back and look at the overall balance. If the branch looks too sparse in areas, add a few more dark needles. Let the painting dry completely before erasing any visible pencil marks.
Winter Frost
Mix a tiny amount of white gouache with water and flick it lightly over the dry painting to simulate a dusting of winter snow or frost.
Frame your pine study in a simple wood frame to let the textured paper and organic subject shine

PENCIL GUIDE
Understanding Pencil Grades from H to B
From first sketch to finished drawing — learn pencil grades, line control, and shading techniques.
Explore the Full Guide
Soft Clouds and Haze
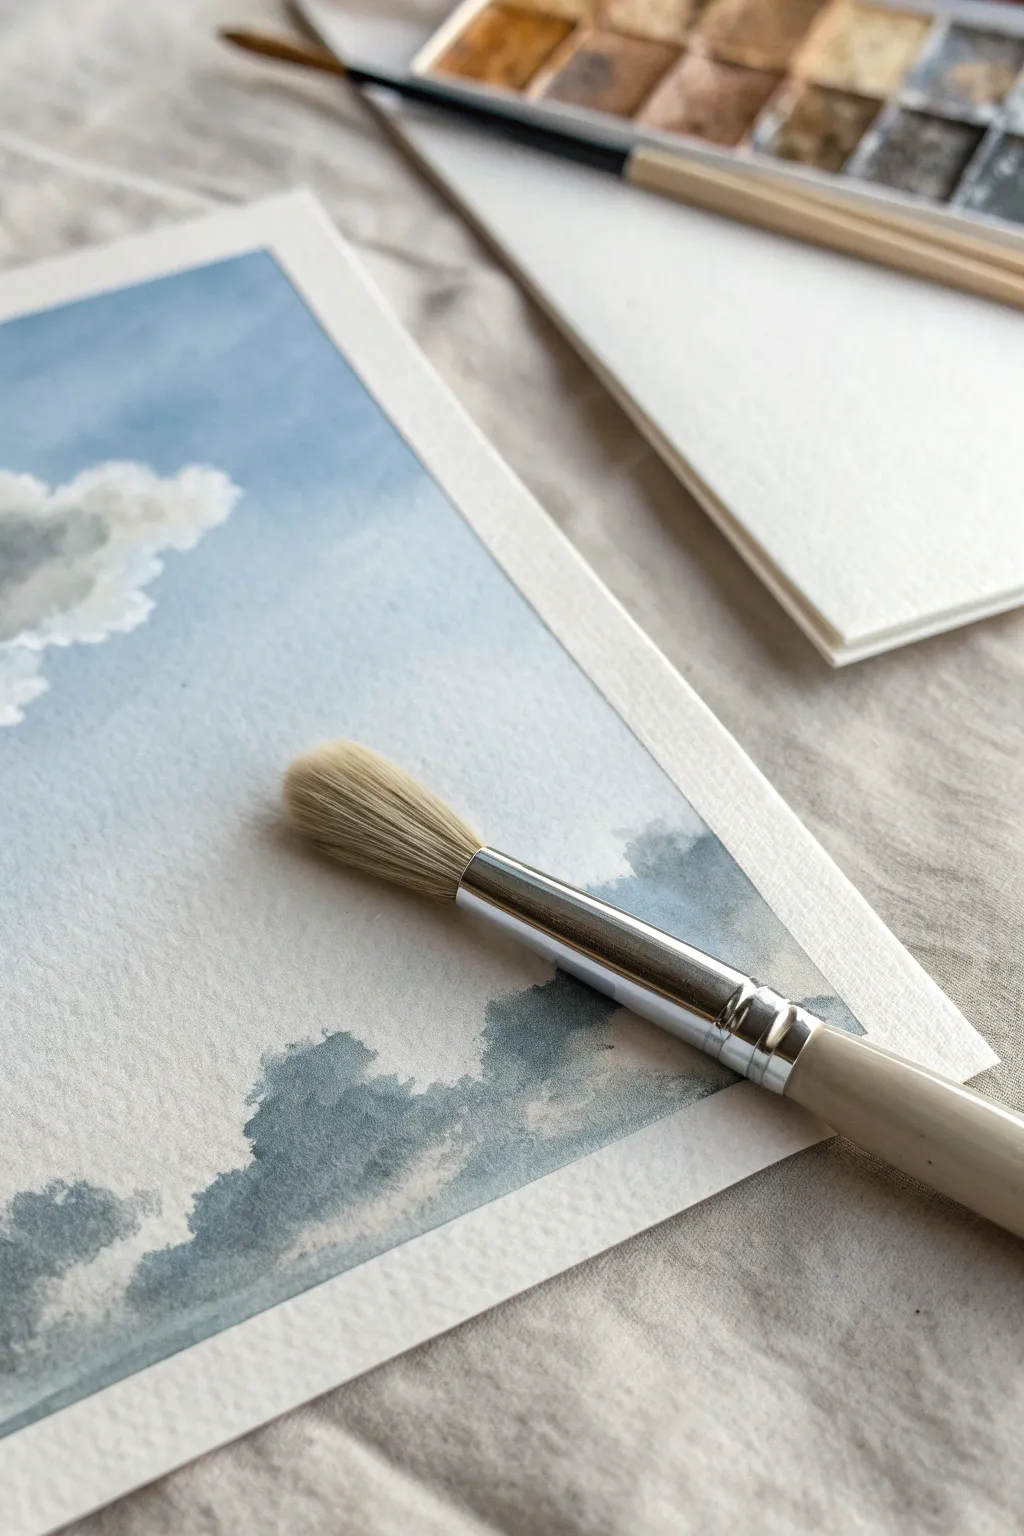
Capture the serene beauty of a drifting sky with this soft watercolor study. This project focuses on building delicate layers of blue and grey to create fluffy, dimensional clouds that seem to float right off the textured paper.
Detailed Instructions
Materials
- Cold-pressed watercolor paper (300 gsm)
- Watercolor paints (Cerulean Blue, Cobalt Blue, Payne’s Grey, Raw Umber)
- Soft synthetic round brush (size 10 or 12)
- Small fan brush (optional, for softening)
- Clean water jar
- Paper towels or cloth
- Palette for mixing
- Masking tape
Step 1: Preparation and Sky Base
-
Secure Your Paper:
Begin by taping down all four edges of your watercolor paper to a board. Use masking tape to create a clean, crisp border around your painting and to prevent the paper from buckling when wet. -
Mix Your Sky Blue:
On your palette, mix a generous puddle of Cerulean Blue with plenty of water. You want a very light, airy wash color. I find keeping the mixture watery helps avoiding hard edges later. -
Wet the Paper:
Before adding pigment, use a clean, large brush to brush clear water across the entire top two-thirds of the paper where the sky will be. -
Apply the First Wash:
While the paper is glistening but not soaking wet, load your round brush with the pale blue mix. Paint horizontal strokes across the top, letting the color fade naturally as you move downward. -
Leave White Spaces:
As you paint firmly near the top, start lifting your brush pressure lower down to leave random, irregular white shapes. These unpainted areas will become the brightest highlights of your clouds.
Edge Control
Use two brushes simultaneously: one loaded with paint and one clean and damp. Paint a stroke, then immediately use the clean brush to soften one side of it.
Step 2: Building Cloud Structure
-
Prepare Shadow Tones:
Mix a small amount of Payne’s Grey with a touch of Cobalt Blue. Keep this mix diluted; clouds are water vapor, not solid objects, so the shadows should remain subtle. -
Define the Undersides:
While the blue sky is still slightly damp (but not wet), gently tap the grey mixture along the bottom edges of your white cloud shapes. This technique, ‘charging,’ lets the grey bleed slightly into the blue. -
Softening Edges:
Rinse your brush and dab it on a towel so it is just damp. Run this clean, damp brush along the top edges of the grey shadows to soften harsh lines, blending them into the white paper. -
Deepen the Blue:
Mix a slightly stronger concentration of Cobalt Blue. Carefully paint into the negative spaces between the clouds to make the white shapes pop forward. -
Dry Completely:
Let this first layer dry completely. The paper should feel flat and room temperature to the touch before proceeding.
Step 3: Refining and Haze
-
Mix a Rolling Haze Color:
Create a slate blue-grey by mixing Payne’s Grey with a tiny hint of Raw Umber or brown to warm it up slightly. This will be for the heavier banks of clouds at the bottom. -
Wet the Bottom Horizon:
Brush clean water across the bottom third of your painting, overlapping slightly with your previous sky work. -
Paint the Lower Bank:
Drop your slate mixture into the wet are at the bottom. Use a dabbing motion to create the irregular, billowy texture of cumulus clouds. -
Connect the layers:
Allow some of this darker bottom pigment to drift upward, connecting with the faint shadows established in the upper section. -
Fan Brush Trick:
If you have a dry fan brush, fairly lightly whisk it over the wet edges of the bottom clouds. This helps feather the edges perfectly to look like distant mist. -
Enhance Contrast:
Once semi-dry, use a smaller round brush with concentrated Payne’s Grey to darken the very bottom ‘belly’ of the lowest clouds for dramatic volume. -
Final White Check:
Assess your whites. If you lost too much bright white, you can carefully re-wet an area and lift pigment with a thirsty brush or paper towel. -
Remove Tape:
Ensure the painting is 100% bone dry. Slowly peel the masking tape away at a 45-degree angle to reveal your crisp white border.
Golden Hour Glow
Before painting the blue sky, add faint washes of yellow ochre or pale pink near the horizon line to simulate a sunrise or sunset atmosphere.
Enjoy the peaceful atmosphere your new cloudscape brings to the room
Ocean Foam and Wave Spray
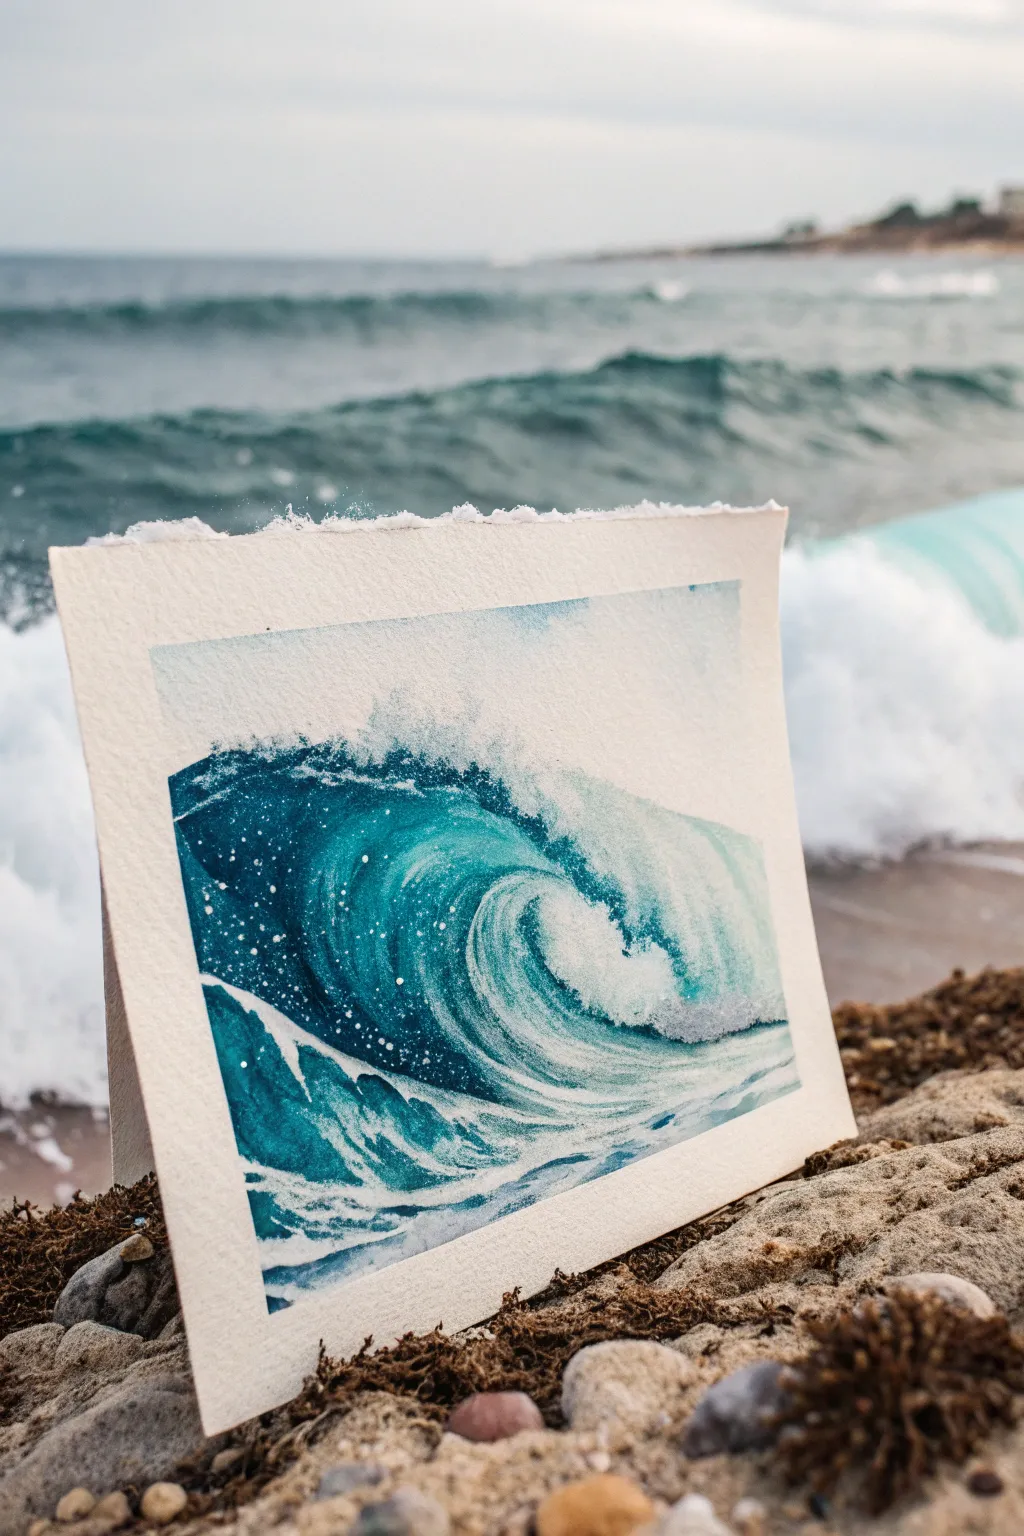
Capture the raw power and movement of the ocean with this dynamic watercolor wave study. By combining wet-on-wet techniques with the distinct texture of a fan brush, you will recreate the frothy spray and deep teal transparency of a curling breaker.
Step-by-Step Tutorial
Materials
- Cold press watercolor paper (block or taped sheet)
- Watercolor paints: Phthalo Blue, Phthalo Green, Indigo, White Gouache
- Large round brush
- Small liner or detail brush
- Fan brush (hog bristle or stiff synthetic)
- Masking fluid (optional)
- Paper towels
- Board or easel
Step 1: Planning and Foundation
-
Light Sketching:
Begin by lightly sketching the outline of the wave with a hard pencil (like an H or HB). Map out the curve of the barrel, the horizon line, and the messy, foamy foreground, keeping lines faint so they disappear under the paint. -
Masking Highlights:
If you want to preserve the purest white of the paper for the brightest foam, apply masking fluid along the top crest of the wave and the splashing spray. You can use an old brush or a splatter technique for this. -
Pre-wetting the Sky:
Using clean water and a large brush, wet the area above the horizon line. Drop in a very faint wash of diluted blue-grey for the sky, letting it fade near the ocean surface.
Step 2: Building the Barrel
-
Mixing the Teal:
Create a vibrant turquoise mix using Phthalo Blue and a touch of Phthalo Green. This needs to be transparent and luminous, so use plenty of water. -
Applying the Base Wash:
Paint the main body of the wave, following the curve of the water. Leave the bottom area (where the foam will be) and the crest largely unpainted or very pale. -
Deepening the Shadows:
While the first layer is still damp, drop in stronger pigment—mix Indigo into your teal—right under the curl of the wave. Allow this dark color to bleed slightly upward into the lighter teal to create a rounded, 3D effect. -
Defining the Tunnel:
Paint the darkest part of the wave inside the ‘tunnel’ or tube. This should be almost pure Indigo or a dark teal mix to show the depth where the light doesn’t reach.
Pro Tip: Tooth of the Paper
Use rough grain paper instead of cold press if you want effortless foam. The deep texture catches the brush, creating white sparkles automatically.
Step 3: Creating Texture and Spray
-
Lifting Out Light:
Before the paint dries completely, use a clean, thirsty brush to lift out subtle streaks along the curve of the wave, suggesting the movement of water being pulled upward. -
Preparing the Gouache:
Squeeze out some white gouache. You want a creamy consistency—not too watery, but fluid enough to move. -
Fan Brush Splatter:
Load the tips of your fan brush with white gouache. Hold it perpendicular to the paper near the wave’s crest and tap the handle to send a fine mist of spray over the top. -
Drifting Foam:
Using the side of the fan brush, gently drag thick white gouache along the top edge of the wave to mimic the heavy, breaking foam.
Level Up: Salt Texture
Sprinkle table salt into the wet indigo area at the bottom of the wave while drying. It creates starburst patterns that mimic churning bubbles.
Step 4: Foreground and Details
-
Turbulent Water:
For the choppy water in front of the wave, mix a medium-value teal. Paint loose, horizontal strokes, leaving plenty of white paper gaps to represent foam. -
Connecting the Foam:
Use a detail brush with white gouache to paint the webbing of foam patterns on the surface of the wave curve. Keep these lines breaking and organic, not continuous. -
Fan Brush Scumbling:
Charge your fan brush with semi-dry white paint and ‘scumble’ (lightly drag) it across the rough paper texture in the foreground area. This catches the tooth of the paper and looks exactly like sea foam. -
Adding Contrast:
Go back in with your dark indigo mix and sharpen the boundary between the white foam and the deep water under the wave to make the white pop. -
Final Spray:
Add one last layer of fine splatter, focusing on where the wave hits the flat water, to unify the scene.
Let your painting dry completely before carefully peeling off any tape to reveal those crisp, professional edges


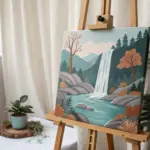
Waterfall Mist and Splash
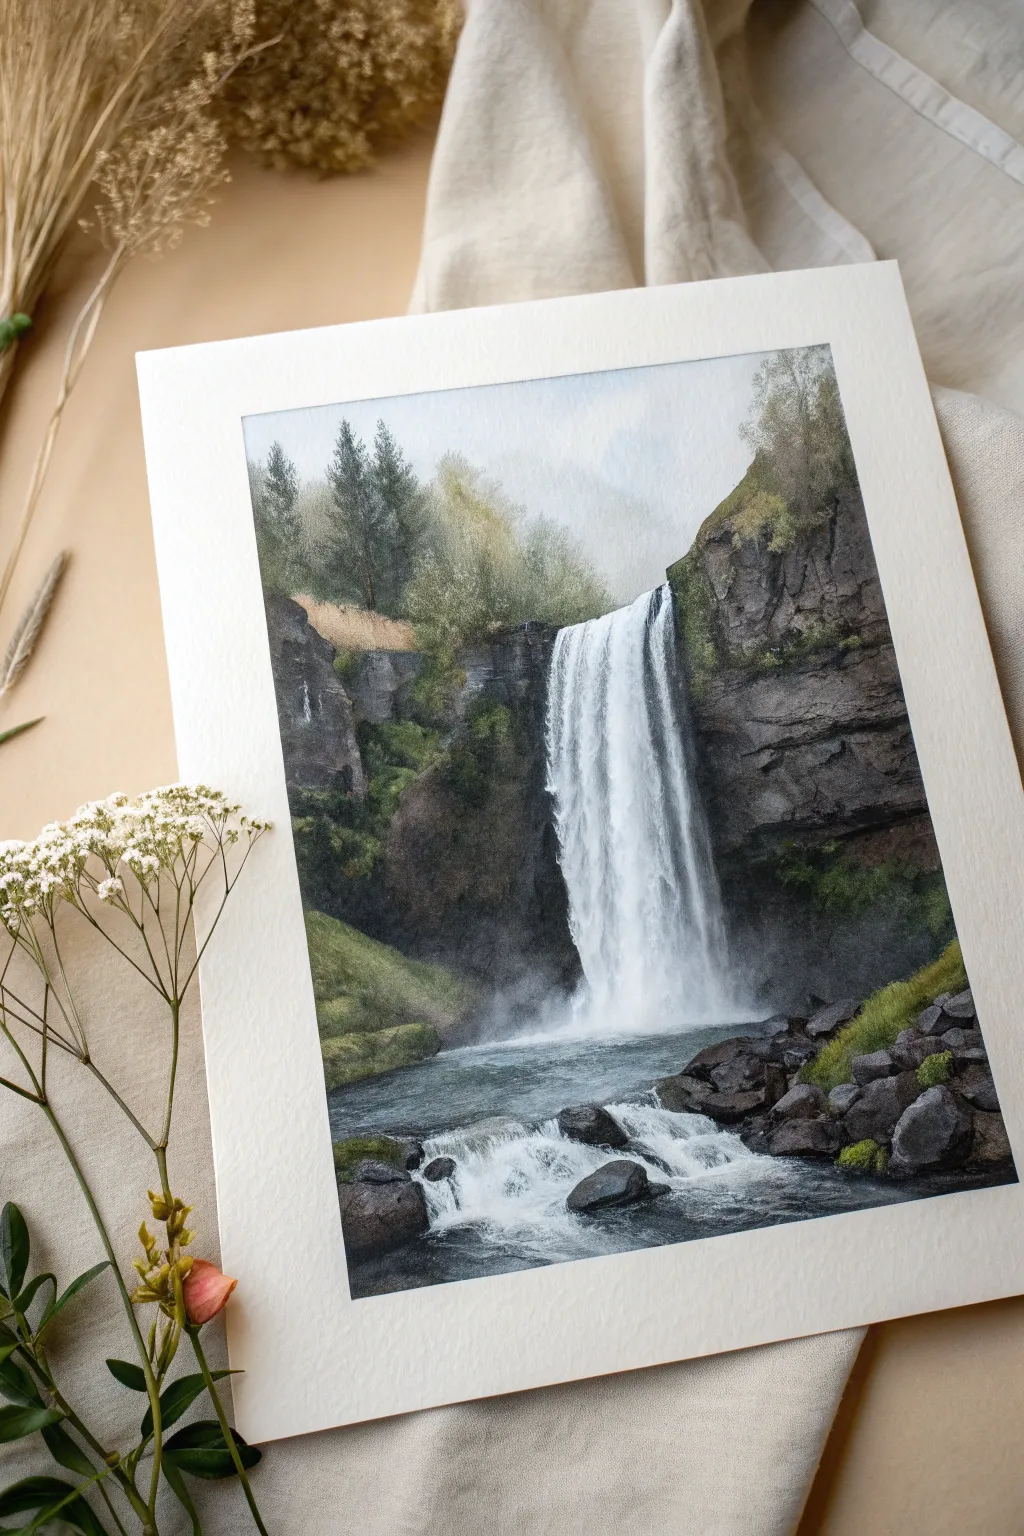
Capture the raw power and serene beauty of nature with this moody waterfall scene. Using the unique texture of a fan brush, you will learn to create wispy mists, rushing currents, and the dramatic spray at the cliff’s base.
How-To Guide
Materials
- Cold Press Watercolor Paper (140lb/300gsm)
- Watercolor Paints (Indigo, Paynes Gray, Sap Green, Burnt Umber, Yellow Ochre)
- White Gouache (for highlights and intense spray)
- Fan Brush (Medium size)
- Round Brushes (Size 4 and 8)
- Flat Brush (1 inch for washes)
- Masking Fluid (optional)
- Paper Towels
- Two containers of water
Step 1: Setting the Scene
-
Sketch the Composition:
Lightly sketch the main cliff edges and the vertical path of the waterfall using an HB pencil. Keep lines faint so they disappear under the paint later. -
Sky and Distance:
Wet the sky area and apply a very pale wash of Indigo mixed with water. While wet, drop in faint shapes of distant trees using a dilute Sap Green and Gray mix, letting them blur into the background fog. -
Mid-ground Trees:
Using a size 8 round brush, paint the evergreen trees atop the cliff. Use a mix of Sap Green and Paynes Gray. Keep the tops sharp but soften the bottom edges where the trees meet the mist. -
Cliff Foundations:
Block in the darker cliff faces on either side of the falls. Use Burnt Umber mixed with Indigo for a deep, rocky tone. Apply the paint unevenly to suggest jagged rock textures.
Too Much Paint?
If your waterfall looks too solid, lift out paint while it’s wet with a thirsty brush or paper towel. Regain whites later with opaque gouache if needed.
Step 2: The Fan Brush Technique
-
Loading the Brush:
Load your fan brush with clean water, then pick up a small amount of diluted Indigo or grayish-blue paint. The brush should be damp, not dripping. -
Creating the Fall:
Starting near the top lip of the waterfall, drag the fan brush vertically downward. Use the separate bristles to create the streaky, falling water effect. Leave plenty of white paper showing for the brightest water. -
Adding Shadows:
While the water area is still slightly damp, introduce darker bluish-gray vertical strokes with the fan brush edge to add depth and shadow within the falling column. -
The Misty Base:
At the bottom of the main fall, use a clean, damp fan brush to scrub and soften the paint, creating a cloud of mist where the water hits the pool.
Add Depth
Glaze a transparent layer of purple-grey over the shadowed parts of the cliff once fully dry. This deepens the darks without losing the rock texture underneath.
Step 3: Rocks and Foreground
-
Defining Cliff Details:
Once the initial cliff wash is dry, use a smaller round brush with a thick mixture of Paynes Gray and Burnt Umber to paint distinct cracks, crevices, and horizontal strata lines in the rock face. -
Mossy Accents:
Mix a vibrant Sap Green with a touch of Yellow Ochre. Dab this onto the cliff ledges and the grassy slope on the left to show moss and vegetation. -
The River Pool:
Paint the water at the bottom using horizontal strokes of dark Indigo and Green. Leave gaps of white paper for the churning foam and rapids. -
Foreground Boulders:
Paint the large rocks at the very bottom right using a solid dark mix. Create dimension by adding shadows on the side facing away from the light.
Step 4: Final Atmosphere
-
Intense Splash:
This is the fan brush’s moment to shine. Dip the very tips into thick White Gouache. Lightly stipple or splatter paint at the base of the waterfall to create dynamic spray and foam. -
River Dragging:
I like to take that same white gouache on the fan brush and lightly drag it horizontally across the dark river water to suggest rushing rapids and foam trails. -
Highlighting Rocks:
Add tiny touches of white or light gray to the top edges of the wet rocks in the foreground to make them look slick and reflective. -
Softening Edges:
Check the distant trees again. If they dried too sharply, gently scrub them with a damp clean brush to push them back into the atmospheric mist.
Step back and admire the powerful movement and atmosphere you have captured in your landscape
Snowy Branch Highlights
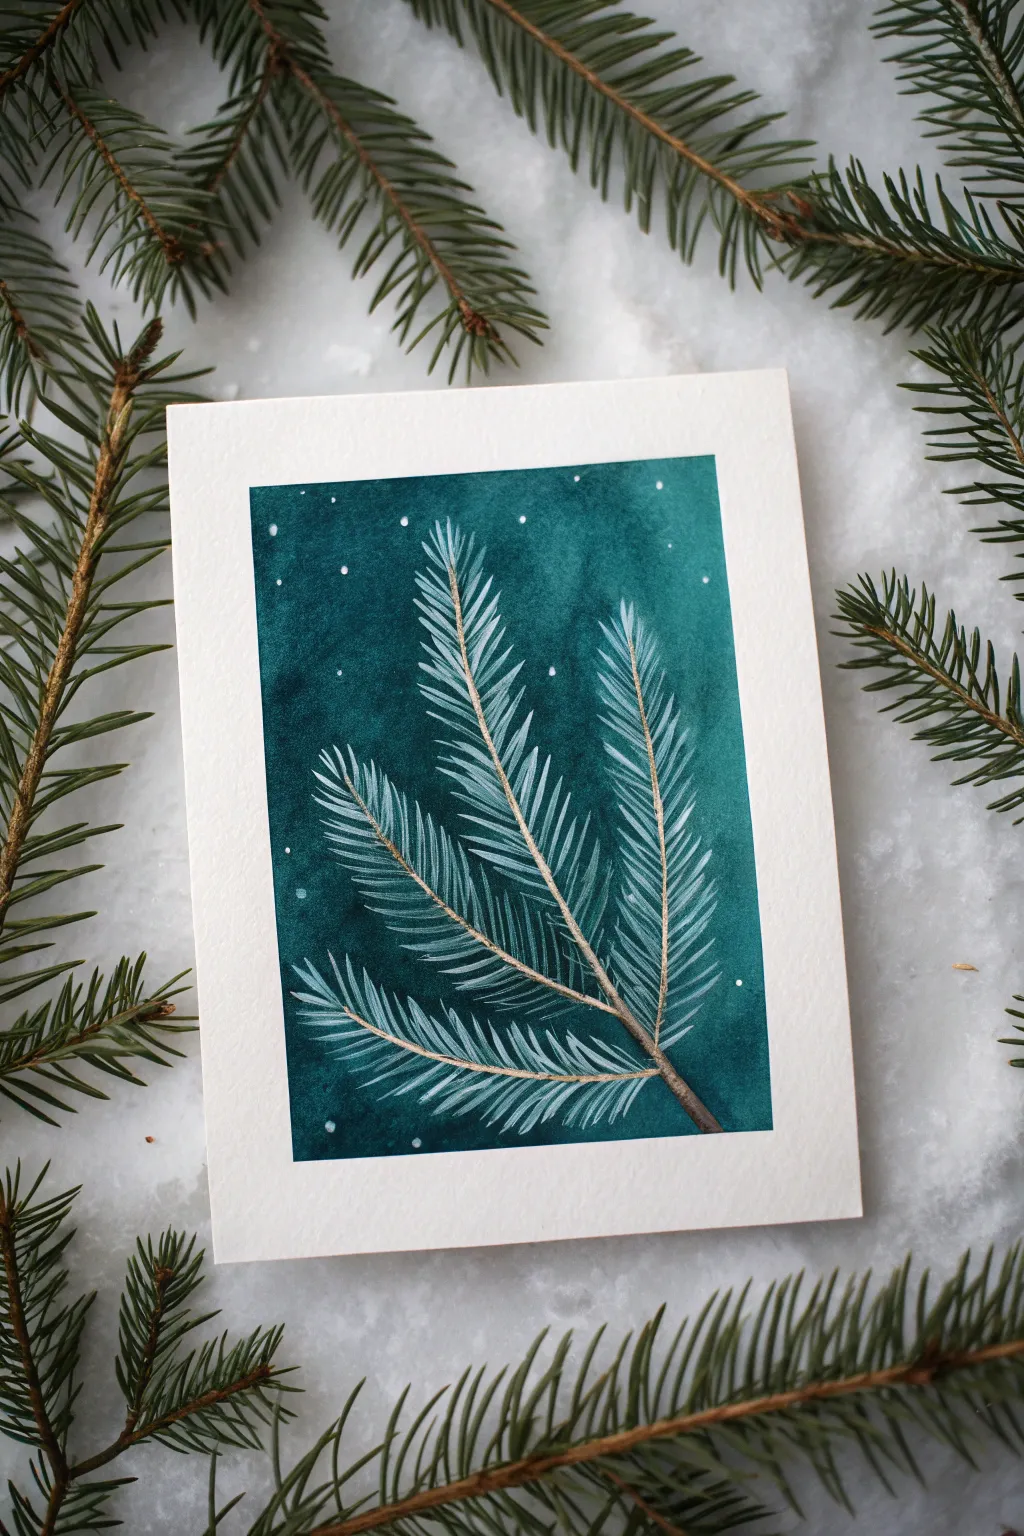
Capture the serene beauty of a winter forest with this striking watercolor and gouache study. Using a fan brush creates airy, delicate pine needles that pop against a deep, moody teal background.
Step-by-Step Tutorial
Materials
- Cold press watercolor paper (cut to 5×7 or similar card size)
- Painter’s tape or masking tape
- Watercolor paints: Phthalo Blue, Phthalo Green, Indigo
- White gouache or white acrylic ink
- Large flat brush or wash brush
- Fan brush (small to medium size)
- Small round detail brush (size 1 or 2)
- Palette for mixing
- Paper towels
- Two jars of water
Step 1: Setting the Scene
-
Tape the borders:
Begin by taping down your watercolor paper to a board or hard surface. Create a clean border of about half an inch on all sides. Run your fingernail or a bone folder along the inner edge of the tape to prevent paint from seeping underneath. -
Mix the background color:
On your palette, mix a generous amount of deep teal. Combine Phthalo Blue and Phthalo Green, then deepen it significantly with Indigo or a touch of Payne’s Grey. You want a rich, dark jewel tone that will contrast sharply with the white details later. -
Paint the wash:
Using a large flat brush, apply clean water to the paper first to dampen it slightly. Then, load your brush with the dark teal mix and paint the entire rectangular area. Aim for a bit of texture—it doesn’t need to be perfectly flat; slight variations in value add atmospheric depth. -
Let it dry completely:
This is the most critical step for a crisp result. Allow the background wash to dry 100%. If the paper is cool to the touch, it is still wet. You can speed this up with a hair dryer on a low setting.
Fan Brush Control
If your fan brush is creating thick blobs instead of fine lines, the paint is too thick. Add a drop of water. Test the stroke on a scrap piece of paper before touching your artwork.
Step 2: Structural Elements
-
Outline the branch:
Switch to your small round detail brush. Mix a brown shade using Burnt Umber or by neutralizing your teal with a bit of orange/red. Paint the main central stem and the smaller offshoot branches. Keep these lines thin and organic, tapering them as they extend outward. -
Add first layer of needles:
Mix a lighter version of your teal background color (add a little water). Using just the tip or corner of your fan brush, gently tap or flick along the branch lines to suggest shadowed needles. This creates a subtle base layer so the bright white doesn’t look like it’s floating in a void.
Step 3: The Fan Brush Technique
-
Prep the white paint:
Squeeze out fresh white gouache onto your palette. Dilute it slightly with water until it has the consistency of heavy cream. It needs to flow off the bristles but remain opaque. -
Load the fan brush:
Dip the tips of your fan brush into the white gouache. You don’t want the brush sopping wet; wipe excess paint onto a paper towel if the bristles are clumping together too much. You want them separated to create individual needle strokes. -
Paint the top needles:
Starting at the tip of the top-most branch, touch the fan brush to the paper and flick outward and downward. The shape of the brush does the work for you, creating multiple lines at once. Work your way down the stem. -
Handle the side branches:
Rotate your paper or your hand to address the side branches. Repeat the flicking motion, ensuring the needles angle slightly forward toward the tip of the branch rather than sticking straight out at 90 degrees. -
Vary lightness:
As you work, let the paint run out slightly on the brush before reloading. This creates natural variation, with some needles looking bright and frosty, and others fading slightly into the background.
Muddy Background?
If the white gouache is turning blue/green, your background wash wasn’t dry enough. Let it dry completely, then re-apply the white. Gouache is opaque and should cover dark colors easily.
Step 4: Refining Details
-
Emphasize the stem:
Once the white needles are dry, take your small round brush and re-state the brown branch line in a few places where it might have been obscured. I like to add a tiny highlight of light brown or gold ochre on the top edge of the branch for dimension. -
Add singular needles:
Use the small round brush with white gouache to add single, sharp needles here and there. The fan brush is great for volume, but hand-painting a few distinct needles at the tips adds realism and sharpness. -
Create falling snow:
Load your round brush with watery white gouache. Hold it over the paper and tap the handle against another brush to splatter tiny droplets. Focus these ‘snowflakes’ more densely at the top of the painting. -
Paint distinct stars:
Use the tip of your smallest brush to manually dot a few larger snowflakes or stars in the background for variety in size. -
Remove tape:
Wait until every drop of paint is bone dry. Slowly peel the tape away at a 45-degree angle, pulling away from the painting to reveal your crisp white borders.
Now you have a stunning winter card ready to gift or frame.
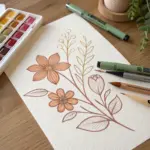
Ferns and Woodland Floor
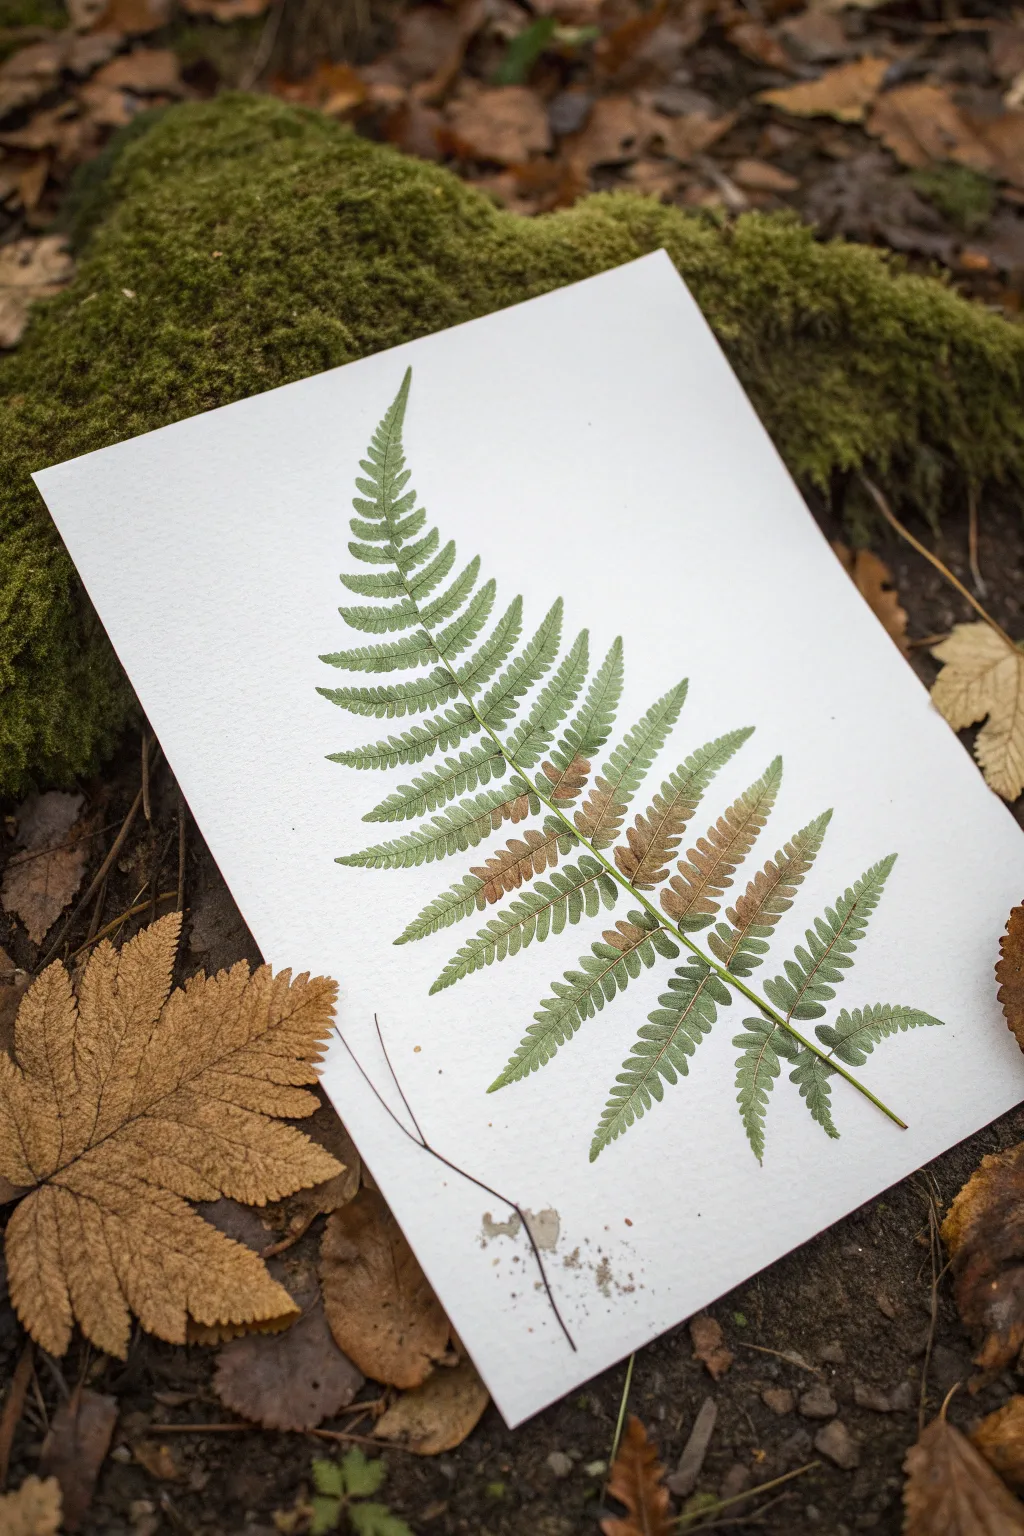
Capture the fleeting beauty of autumn with this watercolor fern illustration, where vibrant summer greens transition into warm, rusty browns. The unique bristles of a fan brush make creating the feathery leaflets surprisingly intuitive and satisfying.
Step-by-Step Guide
Materials
- Cold press watercolor paper (300 gsm)
- Fan brush (size 2 or 4)
- Small round detail brush (size 0 or 1)
- Watercolor paints (Sap Green, Hooker’s Green, Burnt Sienna, Raw Umber)
- Palette for mixing
- Paper towels
- Pencil (HB or H)
- Eraser
Step 1: Planning the Frond
-
Map the spine:
Begin by lightly sketching a single, curved line down the center of your paper to represent the main stem (rachis) of the fern. Give it a gentle ‘S’ curve or arch to make it feel organic rather than rigid. -
Mark leaflet positions:
Along this central spine, sketch very faint guide lines extending outward on both sides. These should start longer at the bottom and gradually become shorter as you move towards the tip, forming a triangular, tapering shape overall.
Muddy Colors?
If your green and brown merge into a dull grey, let the green layer dry completely before adding brown glazes on top, rather than wet-on-wet blending.
Step 2: Painting the Green Leaflets
-
Prepare your greens:
Mix a watery Sap Green with a touch of Hooker’s Green. You want the paint to be fluid enough to flow off the brush bristles but pigmented enough to leave a clear mark. -
Load the fan brush:
Dip just the tips of your fan brush into the green mixture. Dab it once on a paper towel to remove excess water; the bristles should be separated, not clumped together. -
Stamp the top leaflets:
Starting near the top of the fern, use the corner of the fan brush to gently press down shapes for the smallest leaflets. The texture of the brush will naturally mimic the jagged edges of a fern leaf. -
Work downwards:
As you move down the stem, use more of the brush header to create longer leaflets. Press and lift in a consistent rhythm, angling the leaves slightly upward. -
Vary the saturation:
Dip your brush back into water occasionally without adding more paint to create lighter, more translucent leaves near the edges.
Step 3: Transitioning to Autumn Hues
-
Mix the brown tone:
Create a rusty autumn color by mixing Burnt Sienna with a tiny dot of Raw Umber. It should look warm and earthy. -
Blend on the brush:
Load one side of your fan brush with green and the other side with the brown mix. This allows the colors to separate and blend naturally on the paper. -
Paint the middle section:
Apply the leaflets in the middle section of the fern. Let the brown mingle with the green on the paper to show the ‘turning’ of the leaf. I find this creates the most realistic gradient. -
Finish the lower fronds:
For the largest bottom leaves, switch almost entirely to the brown mixture, perhaps keeping just a hint of green at the base where the leaflet attaches to the spine.
Try Embossing
Before painting, use a stylus to press the veins into the paper. Paint will pool in the grooves, creating darker, precise lines automatically.
Step 4: Defining the Stem and Details
-
Paint the central rachis:
Switch to your fine detail round brush. Load it with a concentrated mix of Hooker’s Green and Raw Umber to get a dark, shadowed green. -
Connect the leaves:
Carefully trace over your initial pencil line, starting from the tip and thickening the line slightly as you reach the base. Ensure the stem connects to the base of each leaflet pair. -
Add the central veins:
Using the very tip of the fine brush, paint a hairline vein running down the center of each individual leaflet. Use a lighter green for the top leaves and a brownish tone for the bottom ones. -
Refine the edges:
If any leaflets look too formless, use the detail brush to add tiny serrated edges or definitive points to them. -
Add splatter texture:
To mimic the earthy nature of the forest floor, load a brush with watered-down brown paint and tap it against your finger to flick tiny speckles near the base of the stem.
Now step back and admire how a customized tool creates such natural complexity with minimal effort
Autumn Leaf Confetti
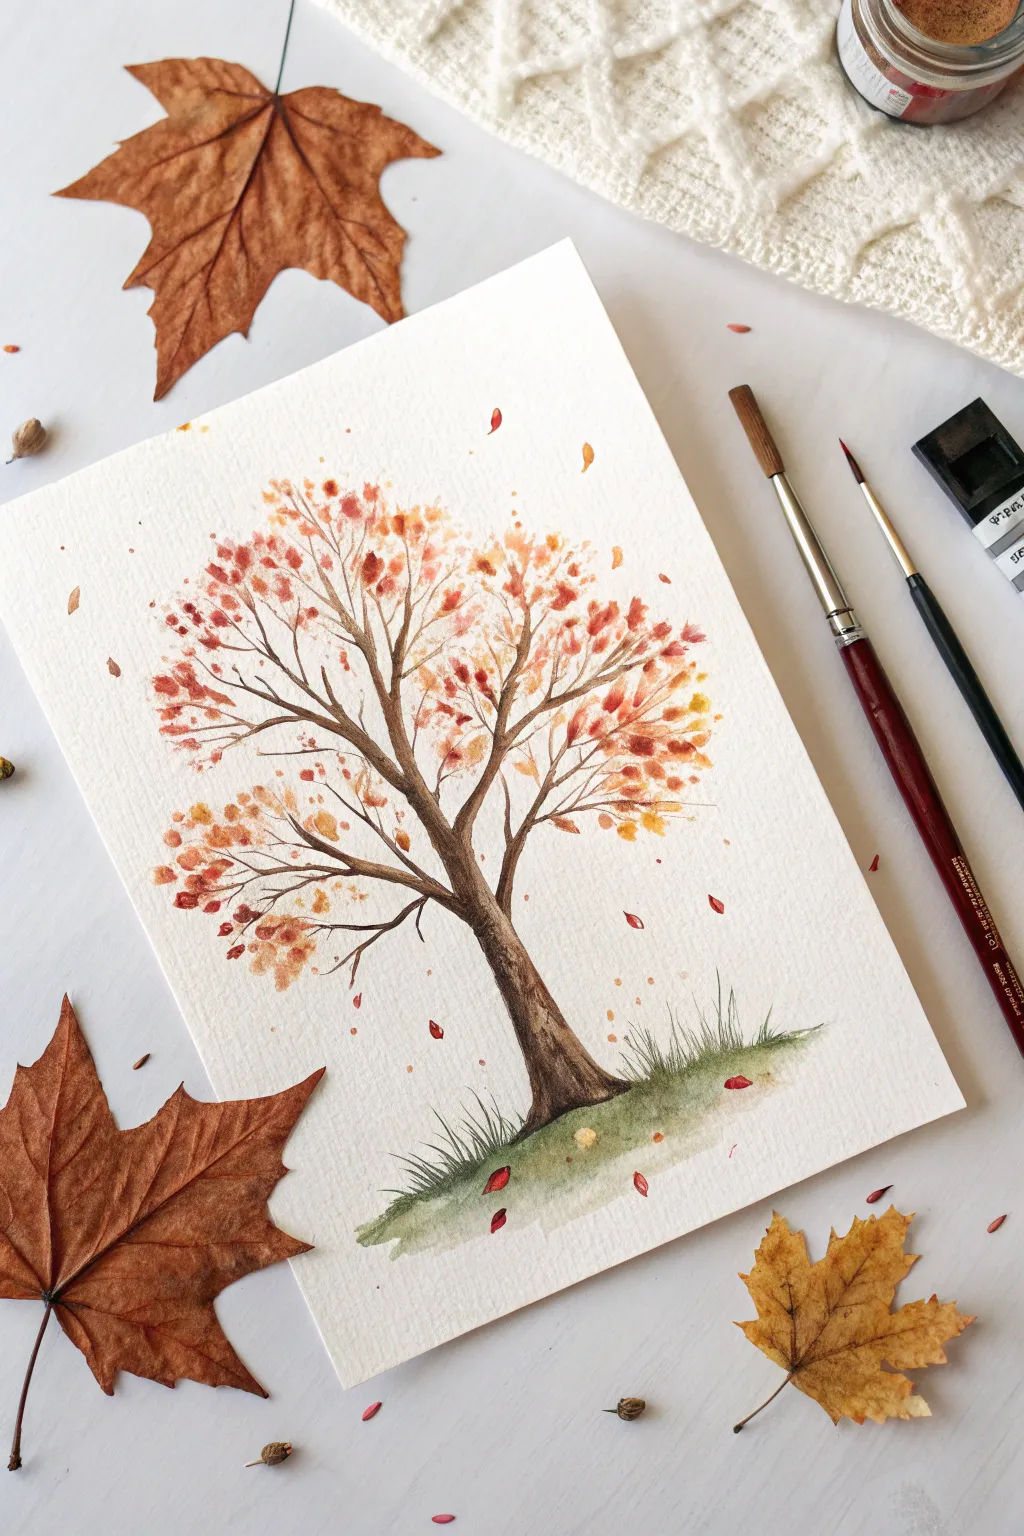
Capture the fleeting beauty of fall with this delicate watercolor tree, featuring scattered leaves that seem to dance in the wind. Using simple brush strokes and warm, earthy tones, you’ll create a serene seasonal masterpiece perfect for framing.
Detailed Instructions
Materials
- Cold press watercolor paper (approx. 5×7 or A5)
- Watercolor paints (burnt umber, sepia, cadmium orange, alizarin crimson, sap green, yellow ochre)
- Round brush (size 4 or 6)
- Fine liner brush (size 0 or 1)
- Fan brush (small/medium)
- Pencil (HB) and eraser
- Jar of clean water
- Paper towels
Step 1: Sketching and Trunk Base
-
Light Outline:
Begin by lightly sketching the main trunk of the tree in the center of your paper. Keep your lines very faint so they won’t show through the translucent watercolor later. -
Base Color Application:
Mix a watery wash of burnt umber and sepia. Using your round brush, fill in the trunk shape, starting from the bottom and working upward. -
Building Texture:
While the paint is still slightly damp, drop in concentrated sepia along the left side of the trunk to create a shadow and rounded effect. -
Root Structure:
Extend the paint slightly at the base of the trunk to suggest roots gripping the ground, letting the color fade naturally into the white of the paper.
Natural Texture
For realistic bark texture, lift out a few tiny lines of wet paint on the trunk using a thirstry, dry brush or the corner of a paper towel.
Step 2: Branching Out
-
Main Branches:
Switch to your fine liner brush. Pull paint from the top of the trunk outward to create the primary branches. Remember that branches get thinner as they move away from the trunk. -
Secondary Twigs:
Add smaller twigs branching off the main ones. Use a ‘Y’ shape technique where one branch splits into two smaller ones. Vary the lengths and directions for a natural, organic look. -
Color Variation:
I like to mix a tiny touch of faint orange into the brown for the upper branches, suggesting sunlight hitting the finer wood. -
Drying Time:
Let the branch structure dry completely before moving on to the leaves to prevent the colors from muddying.
Golden Hour Glow
Add a very light wash of yellow ochre or metallic gold watercolor over the dried leaves on the right side to mimic warm sunset light hitting the tree.
Step 3: Foliage and Ground
-
Preparing the Fan Brush:
Load your fan brush with a mix of cadmium orange and yellow ochre. You want the bristles to be separate, not clumped together. -
Stippling Leaves:
Lightly tap the tips of the fan brush onto the ends of your branches. Rotate your hand slightly between taps to create random, natural clusters of leaves. -
Adding Depth:
While the yellow-orange layer is wet, dab in spots of alizarin crimson or a deep rust red near the center of the leaf clusters to add volume and shadow. -
Falling Leaves:
Use the tip of a round brush or the corner of the fan brush to paint single, detached leaf shapes floating in the air around the tree. -
Ground Wash:
Mix a subtle wash of sap green with a touch of brown. Paint a soft, uneven patch of ground at the base of the tree. -
Grass Detail:
Using the fine liner with a slightly darker green mix, flick quick, upward strokes from the ground wash to create tufts of grass. -
Fallen Foliage:
Add a few specks of your red and orange paint onto the green ground area to represent fallen leaves resting in the grass. -
Final Splatter:
Load a brush with watery red paint and tap it against another brush over the paper to create tiny speckles that mimic distant falling leaves or debris.
Allow your painting to dry flat completely before erasing any remaining pencil marks to reveal your crisp autumn scene
Field Rows and Prairie Wind
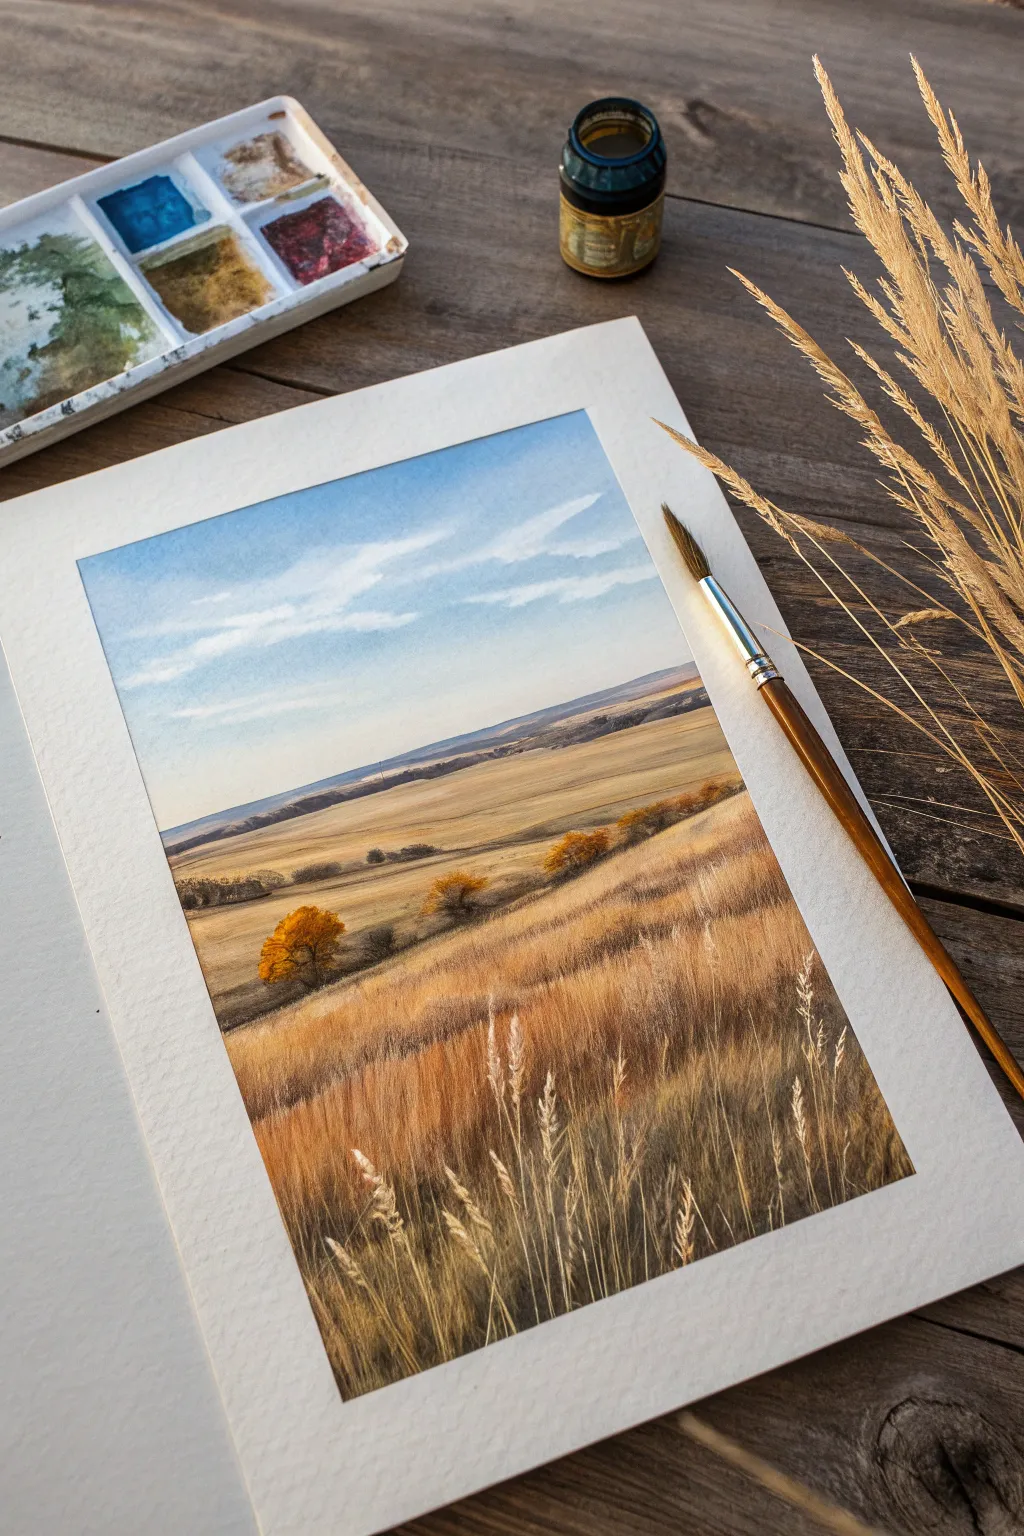
Capture the serene transition from summer to autumn with this sweeping landscape of golden grasses and distant hills. This project uses soft washes for the sky and strategic brushwork to create the illusion of wind rippling through long prairie rows.
How-To Guide
Materials
- Cold Press Watercolor Paper (140lb/300gsm)
- Watercolor Paints (Cerulean Blue, Burnt Sienna, Yellow Ochre, Raw Umber, Sepia, Sap Green)
- Masking Tape
- Flat Wash Brush (1-inch)
- Round Brush (Size 6 or 8)
- Fan Brush (Medium size)
- Rigger or Liner Brush
- Mixing Palette
- Two Water Containers
- Paper Towels
Step 1: Setting the Scene
-
Tape the Edges:
Secure your watercolor paper to a board or table using masking tape along all four edges. This creates a crisp white border and prevents the paper from buckling when wet. -
Sketch the Horizon:
Lightly sketch the horizon line about two-thirds of the way down the paper. Add faint indications of rolling hills in the background and the general slope of the foreground field. -
Wet-on-Wet Sky:
Pre-wet the sky area with clean water using your large flat brush. Ensure the sheen is even but not puddling. -
Painting the Sky Gradient:
Mix a watery wash of Cerulean Blue. Start at the top edge and brush horizontally, diluting the mix with more water as you move downward toward the horizon to create a natural atmospheric fade. -
Lifting Clouds:
While the sky is still damp, crumple a clean paper towel or use a thirsty brush to lift out pigment, creating soft, elongated cloud shapes that stretch horizontally across the sky. -
Drying Time:
Allow the sky section to dry completely before proceeding to the landscape to avoid bleeding.
Step 2: Middle Ground and Distance
-
Distant Hills:
Mix a very pale purple-grey using Cerulean Blue and a touch of Sepia. Paint the furthest strip of land along the horizon line. Keep edges soft to suggest atmospheric perspective. -
Golden Field Base:
Mix Yellow Ochre with a hint of Burnt Sienna. Apply a flat wash to the entire field area, sweeping your brush horizontally to mimic the lay of the land. -
Adding Depth to Fields:
While the field wash is still damp, drop in slight touches of diluted Raw Umber in horizontal strips to suggest distant furrows or shadows in the plain. -
Defining the Slope:
Mix a slightly stronger Raw Umber. Paint the shadowed side of the foreground slope, establishing the main diagonal line where the closer hill meets the flat plain.
Muddiness Prevention
If your grass colors start looking muddy, let the paper dry completely between the yellow-ochre layer and the darker sepia layer. Wet-on-wet grass can blur into blobs.
Step 3: Foreground Textures
-
Scumbling Texture:
Once the base layer is dry, take a semi-dry round brush with Burnt Sienna and Raw Umber. Scumble (drag the side of the brush) along the foreground hill to create the rough texture of dry earth. -
Painting the Shrubs:
Mix a vibrant orange using Yellow Ochre and Burnt Sienna. Paint the small clusters of shrubs along the mid-ground slope. Keep the shapes organic and slightly rounded. -
Shading the Shrubs:
Add dark accents to the bottom right of the shrubs using Sepia to ground them and give them volume. -
Fan Brush Grasses:
Load your fan brush with a mix of Burnt Sienna and Yellow Ochre. Make sure the bristles are slightly separated. Flick the brush upward in the foreground to create dense patches of tall, dry grass. -
Varying Grass Tones:
Clean the fan brush and reload with a darker Sepia mix. Add a second layer of grass strokes interspersed with the lighter ones to create depth and shadow within the foliage.
Golden Hour Glow
Glaze a very thin, watery layer of transparent orange or warm yellow over the entire foreground once it is dry. This unifies the grass colors and creates a sunset effect.
Step 4: Final Details
-
Detailing Singular Stalks:
Switch to your rigger or liner brush. Dip it into opaque white gouache or a creamy mix of Yellow Ochre. Paint individual, distinct stalks of wheat or grass in the immediate foreground. -
Adding Seed Heads:
At the tip of these singular stalks, dab tiny, textured specks to represent seed heads catching the light. -
Final Shadows:
Add very thin, dark lines at the base of the tallest grass clumps to anchor them to the ground. -
Reveal the Border:
Once the painting is 100% dry to the touch, slowly peel away the masking tape at a 45-degree angle to reveal your crisp white borders.
Step back and admire the depth you have created in your peaceful prairie landscape
Sunset Gradient Blending
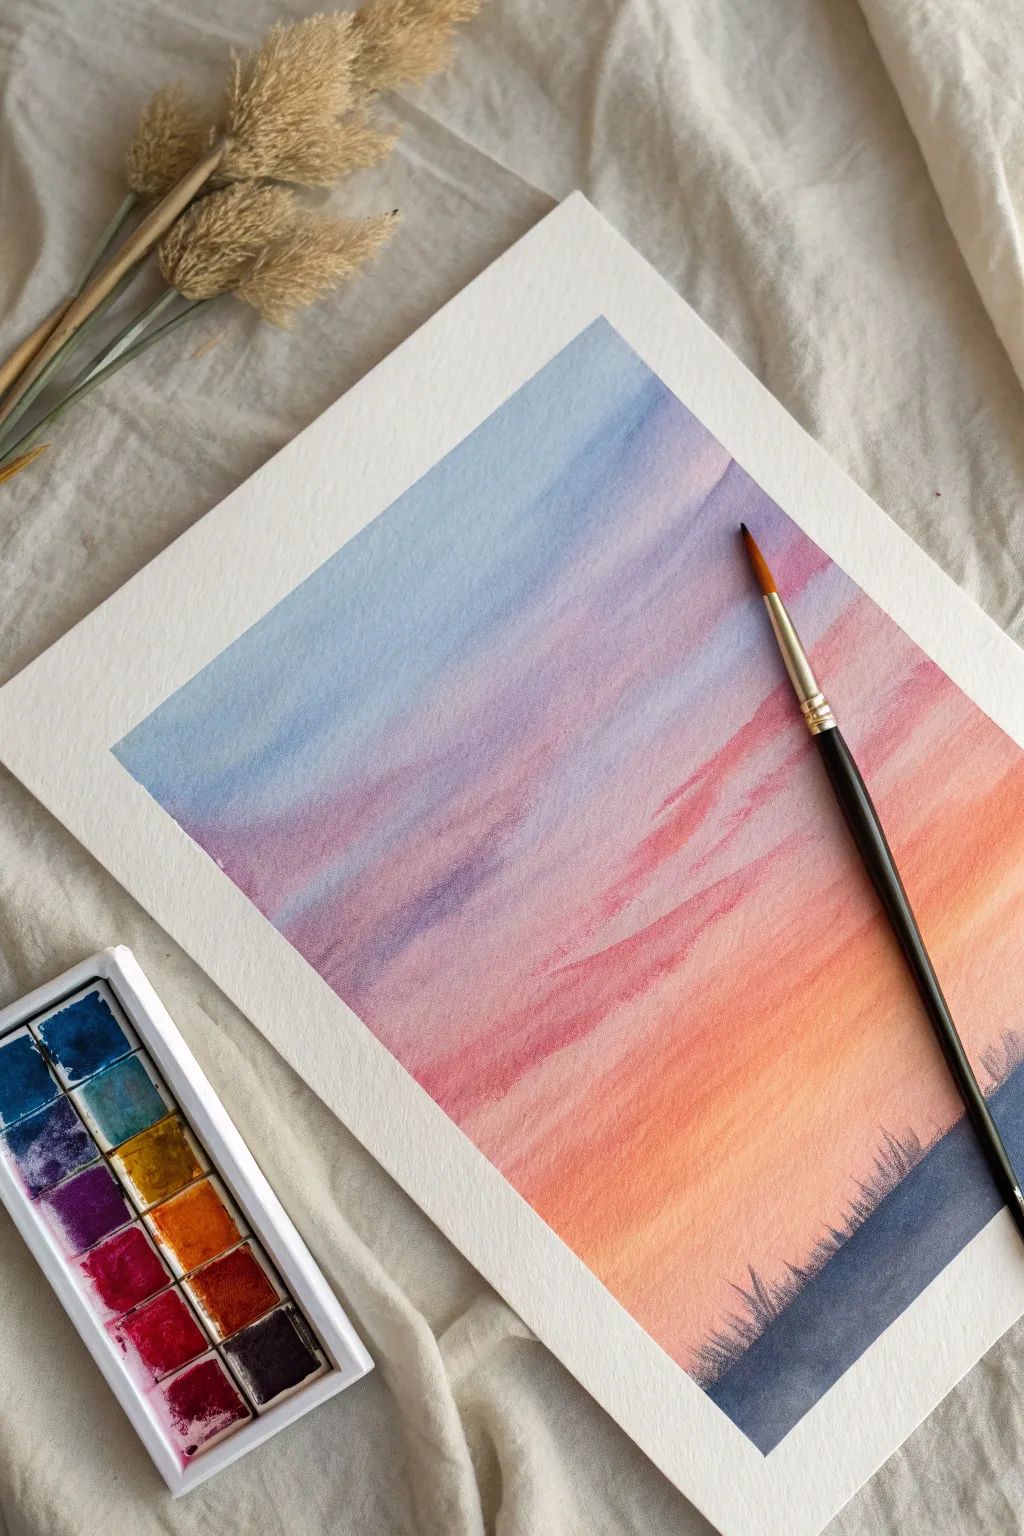
Capture the ethereal beauty of dusk with this soft, blended watercolor gradient. This tutorial guides you through creating a seamless transition from cool blue skies to warm, glowing horizons, finished with a crisp silhouette.
Detailed Instructions
Materials
- Cold press watercolor paper (block or taped down sheet)
- Watercolor paints (Cerulean Blue, Dioxazine Purple, Alizarin Crimson, Cadmium Orange, Lemon Yellow, Payne’s Grey)
- Clean water jar
- Paper towels
- Flat wash brush (1 inch or similar)
- Round brush (size 6 or 8)
- Blower dryer (optional)
- Masking tape
Step 1: Preparation & Sky Base
-
Secure the edges:
Begin by taping down all four edges of your watercolor paper to a board or table. This creates that crisp white border seen in the original and helps prevent the paper from buckling when wet. -
Mix your palette:
Prepare your colors in separate wells before you start painting. You will need a watery mix of Cerulean Blue, a soft Purple, a warm Pinkish-Red, and a sunny Orange-Yellow gradient. Having these ready is crucial for working wet-on-wet. -
Wet the paper:
Using your flat wash brush and clean water, apply a generous, even layer of water across the entire area of the paper where the sky will be. The paper should glisten but not have standing puddles. -
Apply the blue:
Load your brush with the Cerulean Blue mix. Starting at the very top left corner, paint a diagonal band of blue, allowing the wet paper to soften the edges immensely. -
Transition to purple:
While the blue is still wet, rinse your brush slightly and pick up your Purple mix. Apply this right next to the blue, blending them gently where they meet to create a soft lavender transition.
Step 2: Building the Gradient
-
Introduce pink tones:
Moving downwards diagonally, introduce your Alizarin Crimson wash. Use long, sweeping diagonal strokes that follow the angle of your previous colors. Let the pink bleed slightly upwards into the purple. -
Add the orange glow:
Clean your brush well and switch to your Cadmium Orange. Paint this below the pink section, keeping your strokes loose and fluid. I find tilting the board slightly helps the colors flow naturally into one another. -
Brighten the horizon:
Near the bottom right corner, blend in your Lemon Yellow with the orange. This represents the brightest part of the sunset and should feel warm and luminous. -
Deepen the upper sky:
While the paper is still damp (but not soaking), go back to the top left with a slightly more concentrated blue to deepen the contrast against the white paper. -
Intensify the streakiness:
Using a slightly drier brush with purple or deep pink paint, drag a few streaks across the middle section. Because the paper is drying, these strokes will hold their shape better, creating the look of wispy clouds. -
Let it dry completely:
This is non-negotiable—let the painting dry fully. The paper must be bone dry before you add the silhouette, or the dark paint will bleed into your beautiful sunset. Use a hair dryer on low heat if you’re impatient.
Troubleshooting: Blooms
Cauliflower-like blooms happen if you add water to drying paint. If you see one forming, use a thirsty (damp, clean) brush to gently lift the excess water immediately.
Step 3: The Final Silhouette
-
Mix a dark hue:
Create a very concentrated, creamy mixture of Payne’s Grey and a touch of Dioxazine Purple. You want this paint to be opaque and dark, not watery. -
Paint the ground slope:
Using your round brush, paint the sloping ground in the bottom right corner. Ensure the top edge is somewhat crisp but natural, not ruler-straight. -
Fill the silhouette:
Fill in the rest of the bottom corner with your dark mixture, ensuring solid coverage right up to the tape line. -
Flick the grass blades:
With the very tip of your round brush (or a liner brush if you have one), use quick, upward flicking motions to pull paint from the wet hill upwards. This creates the fine blades of grass along the ridge. -
Vary the grass:
Make sure some grass blades are taller and some shorter, crossing over each other slightly to look organic. Avoid making them look like a picket fence. -
Final dry and reveal:
Allow the dark paint to dry completely. Once dry, carefully peel away the masking tape at a 45-degree angle away from the painting to reveal your clean, sharp borders.
Pro Tip: Angle Your Board
Tape your paper to a moveable board. Tilting the board while the wash is wet helps gravity do the blending work for you, creating smoother color transitions.
Enjoy the peaceful satisfaction of peeling off that tape to see your glowing sunset landscape
Fireworks and Light Bursts
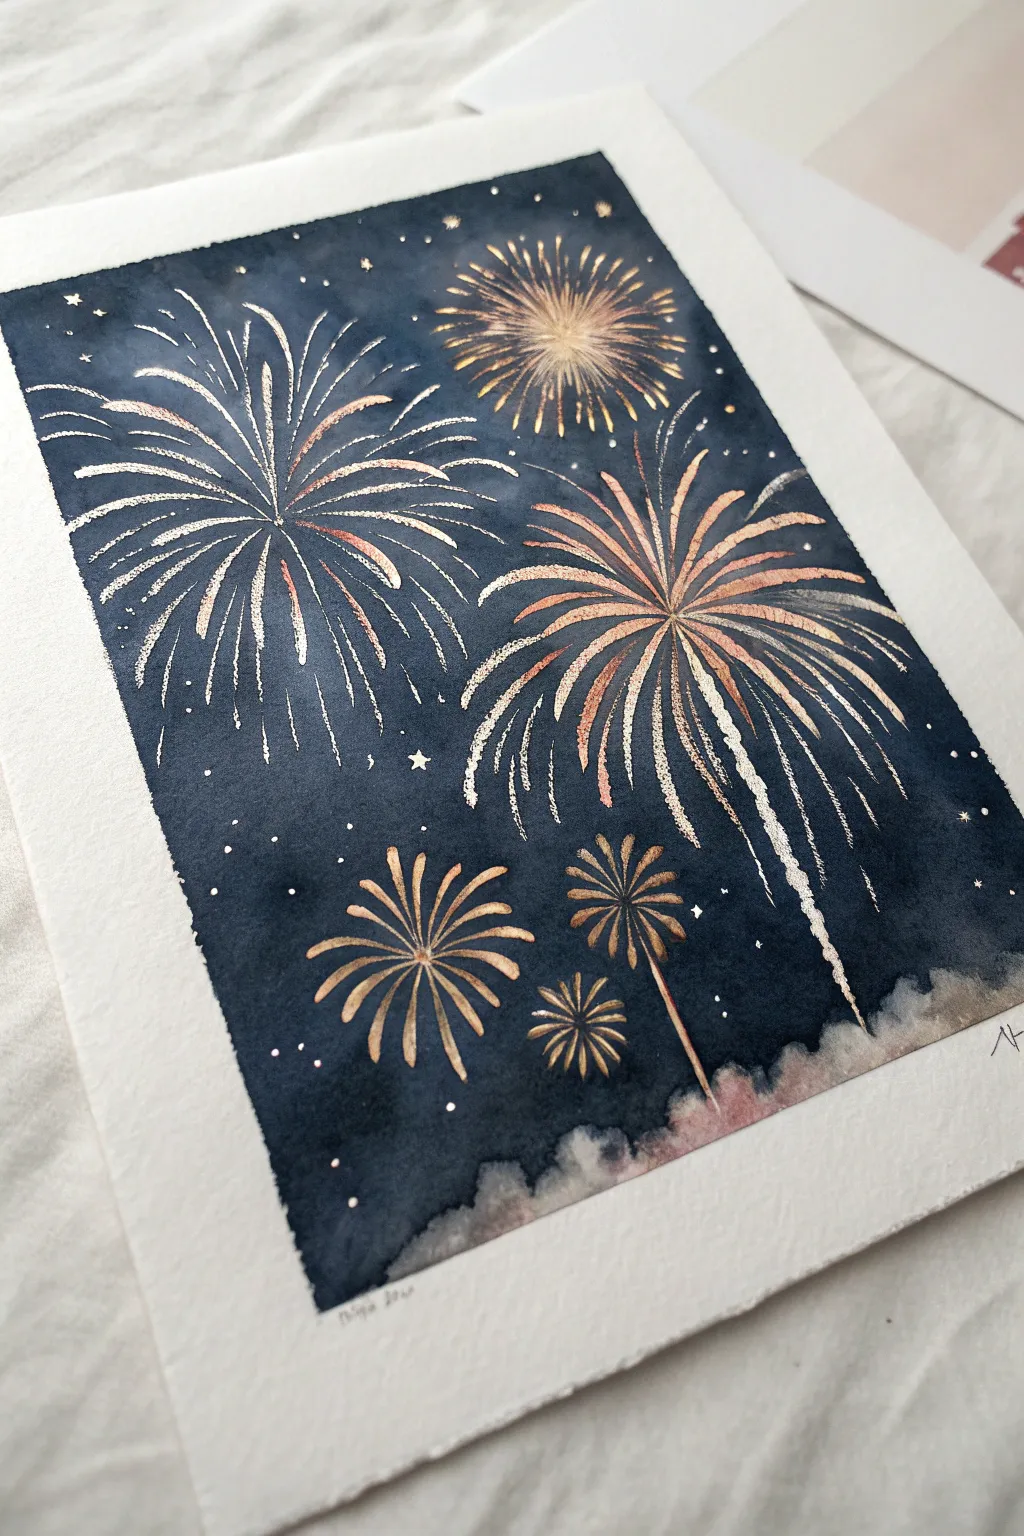
Capture the magic of a celebration with this striking watercolor and metallic ink painting. The deep indigo background provides the perfect dramatic stage for shimmering gold and copper fireworks to burst forth using simple brush techniques.
Step-by-Step
Materials
- Cold press watercolor paper (block or taped down)
- Indigo or Payne’s Gray watercolor paint
- Metallic watercolor paints or ink (Gold, Copper, Bronze)
- White gouache or opaque white ink
- Large flat wash brush or hake brush
- Fan brush (size 2 or 4)
- Fine liner brush (size 0 or 00)
- Paper towels
- Two jars of water
Step 1: Setting the Midnight Stage
-
Prepare the paper:
Begin by taping down your watercolor paper or using a block to prevent buckling. Wet the entire surface evenly with clean water using a large wash brush, ensuring the paper has a consistent sheen but no puddles. -
Mix the night sky:
Load your large brush with a heavy concentration of Indigo or Payne’s Gray. You want a very dark, saturated value to contrast against the metallic details later. -
Apply the background wash:
Start at the top of the paper and paint downwards using broad, horizontal strokes. As you reach the bottom third, dilute your paint slightly with water to create a subtle gradient, leaving the very bottom edge uneven and slightly lighter to suggest smoke or atmosphere. -
Create texture:
While the wash is still wet, drop in tiny amounts of clean water or concentrated dark pigment in random spots. This creates blooms and texture that mimic a hazy, smoke-filled sky. -
Let it dry completely:
This is crucial. The background must be bone dry before adding the metallic layer. Use a hairdryer on a low setting if you need to speed up the process, but patience yields result.
Step 2: Painting the Main Fireworks
-
Prepare metallic paints:
Activate your metallic gold, copper, and bronze paints. They should be creamy and opaque, not too watery, to stand out against the dark background. -
Test the fan brush:
Dip the tips of your fan brush into the gold paint. Test on a scrap piece of paper: the bristles should be separated, not clumped together, to create individual lines. -
Position the first burst:
Choose a focal point for your largest firework. Place the fan brush on the paper and flick it outward in a radial pattern, mimicking the explosion of light. -
Layer the colors:
I like to clean the brush and switch to copper or bronze for the inner or outer rays of the same firework. Overlap the strokes slightly to give the burst dimension and depth. -
Create secondary bursts:
Repeat this process for two or three smaller fireworks in different areas of the sky. Vary the colors—make one predominantly bronze and another bright gold—to keep the composition interesting. -
Add falling embers:
Using the corner of the fan brush or a liner brush, paint curved, trailing lines falling from the main bursts to show gravity pulling the sparks down.
Make it Sparkle
For extra brilliance, use ink instead of watercolor for the fireworks. Metallic calligraphy ink sits on top of the paper better and shines brighter than standard watercolor pans.
Step 3: Stars and Details
-
Paint lower explosions:
Switch to a liner brush for the smaller, flower-like fireworks near the bottom. Paint these stroke by stroke, radiating from a distinct center point. -
Add stems:
Draw thin, straight lines extending downwards from these smaller lower fireworks to suggest they are shooting up from the ground. -
Add highlights:
Mix a tiny amount of white gouache with your gold paint. Use your fine liner brush to add bright highlights to the center of the explosions where the light would be most intense. -
Sprinkle the stars:
Dip a toothbrush or stiff brush into gold or white paint and tap it gently over the paper to create a field of distant stars. Keep the splatter fine and controlled. -
Draw specific stars:
Hand-paint a few larger, four-pointed stars using the tip of your liner brush to balance the composition. -
Finalize bottom smoke:
If the bottom edge looks too stark, gently scrub the dried edge with a slightly damp, clean brush to soften it, blending a tiny bit of the metallic pigment into the dark wash for a smoky effect.
Dull Metallic Paint?
If your gold looks dull on the dark paper, it’s too transparent. Mix a tiny drop of white gouache into your metallic paint to increase opacity without losing the shimmer.
Step back and admire your dazzling night sky as the metallic pigments catch the light
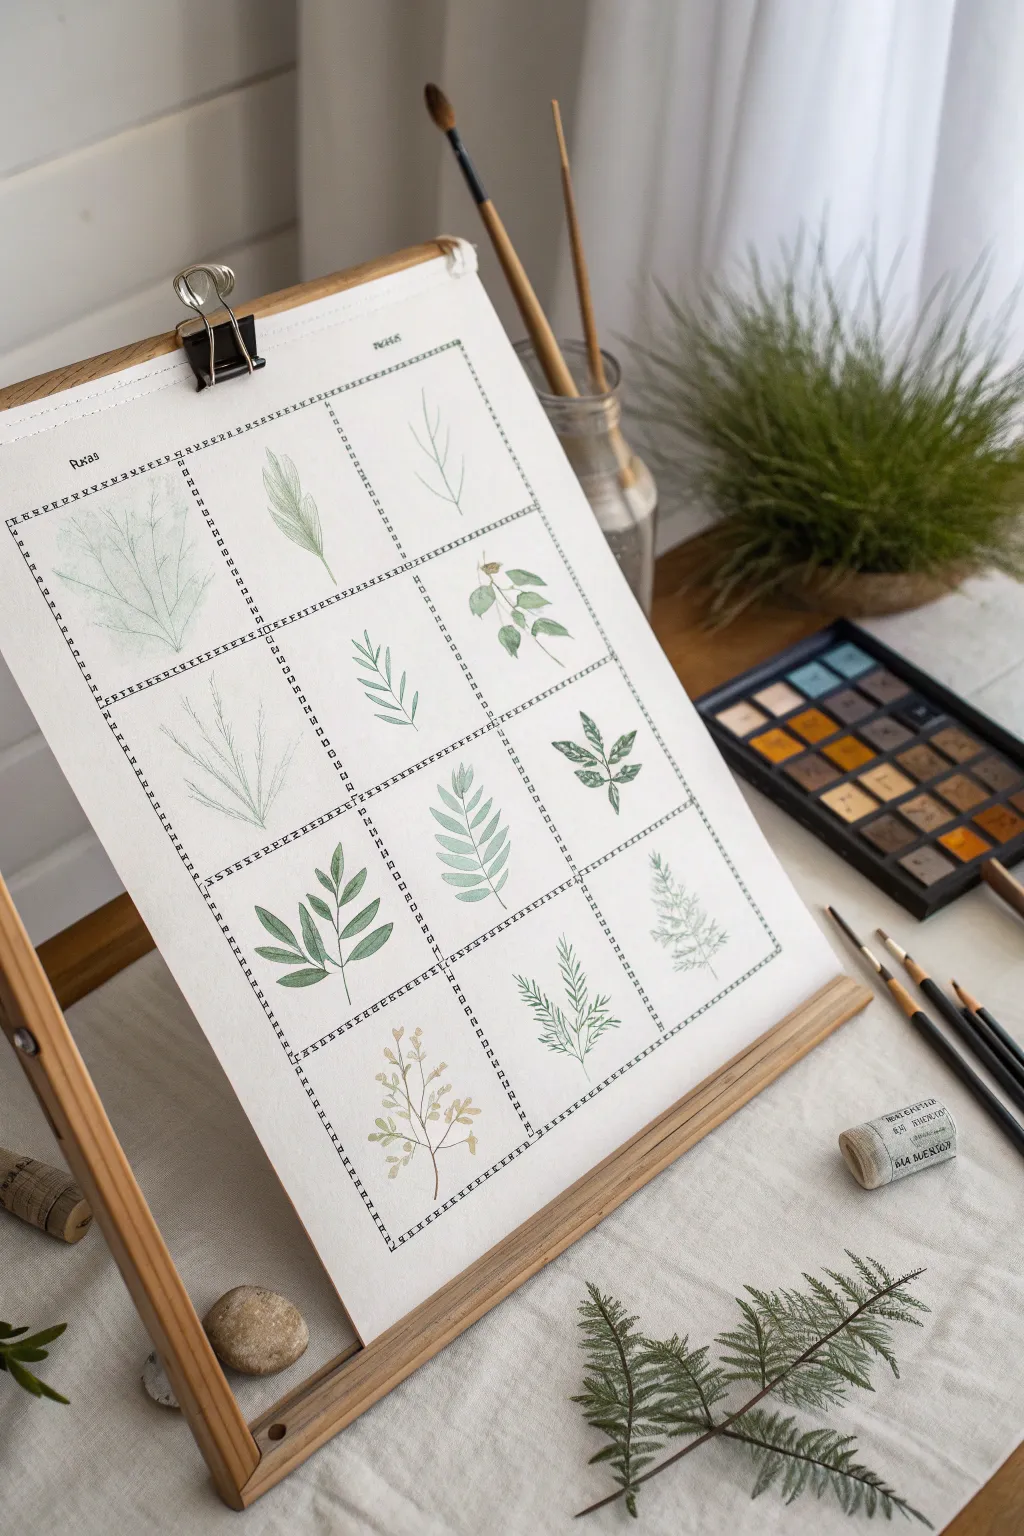
Fan Brush Stroke Sampler Page

Master the versatility of your fan brush with this structured sampler page featuring twelve distinct botanical studies. This exercise grid helps you explore everything from wispy grass textures to broad leaf shapes in a beautiful, muted color palette.
Step-by-Step Guide
Materials
- Hot press watercolor paper (9×12 inches)
- Watercolor paints (Olive Green, Sap Green, Burnt Umber, Yellow Ochre, Payne’s Grey)
- Fan brush (size 2 or 4)
- Small round brush (size 0 or 1) for stems/details
- Ruler
- Pencil (H or HB)
- Black fine-liner pen (waterproof)
- Easel or backing board
- Masking tape or binder clip
- Water jar and paper towels
Step 1: grid setup
-
Secure the paper:
Mount your watercolor paper to a sturdy backing board or easel using a large binder clip at the top or masking tape along the edges to keep it flat. -
Measure the layout:
Using your ruler and a light pencil touch, measure out a 3×4 grid structure. Leave a consistent margin around the border of the paper. -
Draw the grid lines:
Instead of solid lines, use a fine-liner pen to create a decorative border. Draw small, evenly spaced tick marks or a ‘dashed’ track pattern along your pencil guides to frame each box. -
Erase guidelines:
Once the ink is completely dry, gently erase the underlying pencil marks to leave a clean, crisp framework for your painting.
Pro Tip: Moisture Control
For distinct bristle marks (like grass or pine needles), blot your fan brush on a paper towel before painting. Too much water will cause the bristles to clump together.
Step 2: painting row one
-
First square: Wispy fern:
In the top-left box, load a damp fan brush with very dilute green. Touch only the very tips of the bristles to the paper and fan them outward to create a soft, ghost-like fern structure. -
Second square: Single broad leaf:
For the middle top box, practice a twisting stroke. Press the fan brush flat, then twist your wrist as you lift to create a single, textured leaf shape that tapers at the end. -
Third square: Branching twig:
Use the edge of the fan brush (holding it vertically) to pull thin lines for the stem, then switch to a small round brush to add tiny, minimal leaves.
Troubleshooting: Blobby Leaves
If your leaf shapes lack definition, switch to a synthetic fan brush. Natural hair brushes are softer and hold more water, while synthetic bristles are stiffer and offer more precision.
Step 3: painting row two
-
Fourth square: Grass textures:
Revisit the first column. Use a ‘flick’ motion with a semi-dry fan brush to create long, upward strokes that mimic tall, thin grasses overlapping each other. -
Fifth square: Compound leaves:
Paint a central stem with your round brush. Then, using the corner of your fan brush, stamp small, teardrop shapes along both sides of the stem. -
Sixth square: Hanging foliage:
Mix a darker green. Paint a drooping branch, then dab the fan brush irregularly along the stem to create clusters of leaves that look like they are hanging down naturalistically.
Step 4: painting row three
-
Seventh square: Broad symmetry:
Create a sturdy central stalk. Use the full width of the fan brush to press and drag outward from the center, creating thick, symmetrical leaves. -
Eighth square: Fern frond:
Paint a curved spine. Load the brush with variegated green and press the bristles flat perpendicular to the spine, moving up the stalk to create a ladder-like fern pattern. -
Ninth square: Variegated texture:
Experiment with two colors on the brush at once. Paint a simple twig with opposite leaves, letting the colors blend naturally on the paper for a mottled look.
Step 5: painting row four
-
Tenth square: Alternating leaves:
Using a more opaque mixture, paint stiff, upright leaves that alternate left and right up the stem, focusing on sharp, pointed tips. -
Eleventh square: Berry branch:
Paint a delicate brownish stem. Switch to a warm yellow-green or ochre to dab small, round leaf clusters that resemble berries or buds. -
Twelfth square: Needle texture:
I like to use a ‘dry brush’ technique here. Fan the bristles out and drag them lightly in short bursts to replicate the prickly texture of a pine or cedar branch.
Fill in any remaining titles at the top of your columns and enjoy your completed reference guide for future botanical works


Have a question or want to share your own experience? I'd love to hear from you in the comments below!