When I’m craving something dramatic but still simple to pull off, I reach for a black and blue palette and let the contrast do the heavy lifting. These ideas lean into moonlight, midnight skies, and bold silhouettes—perfect for that cozy, mysterious vibe.
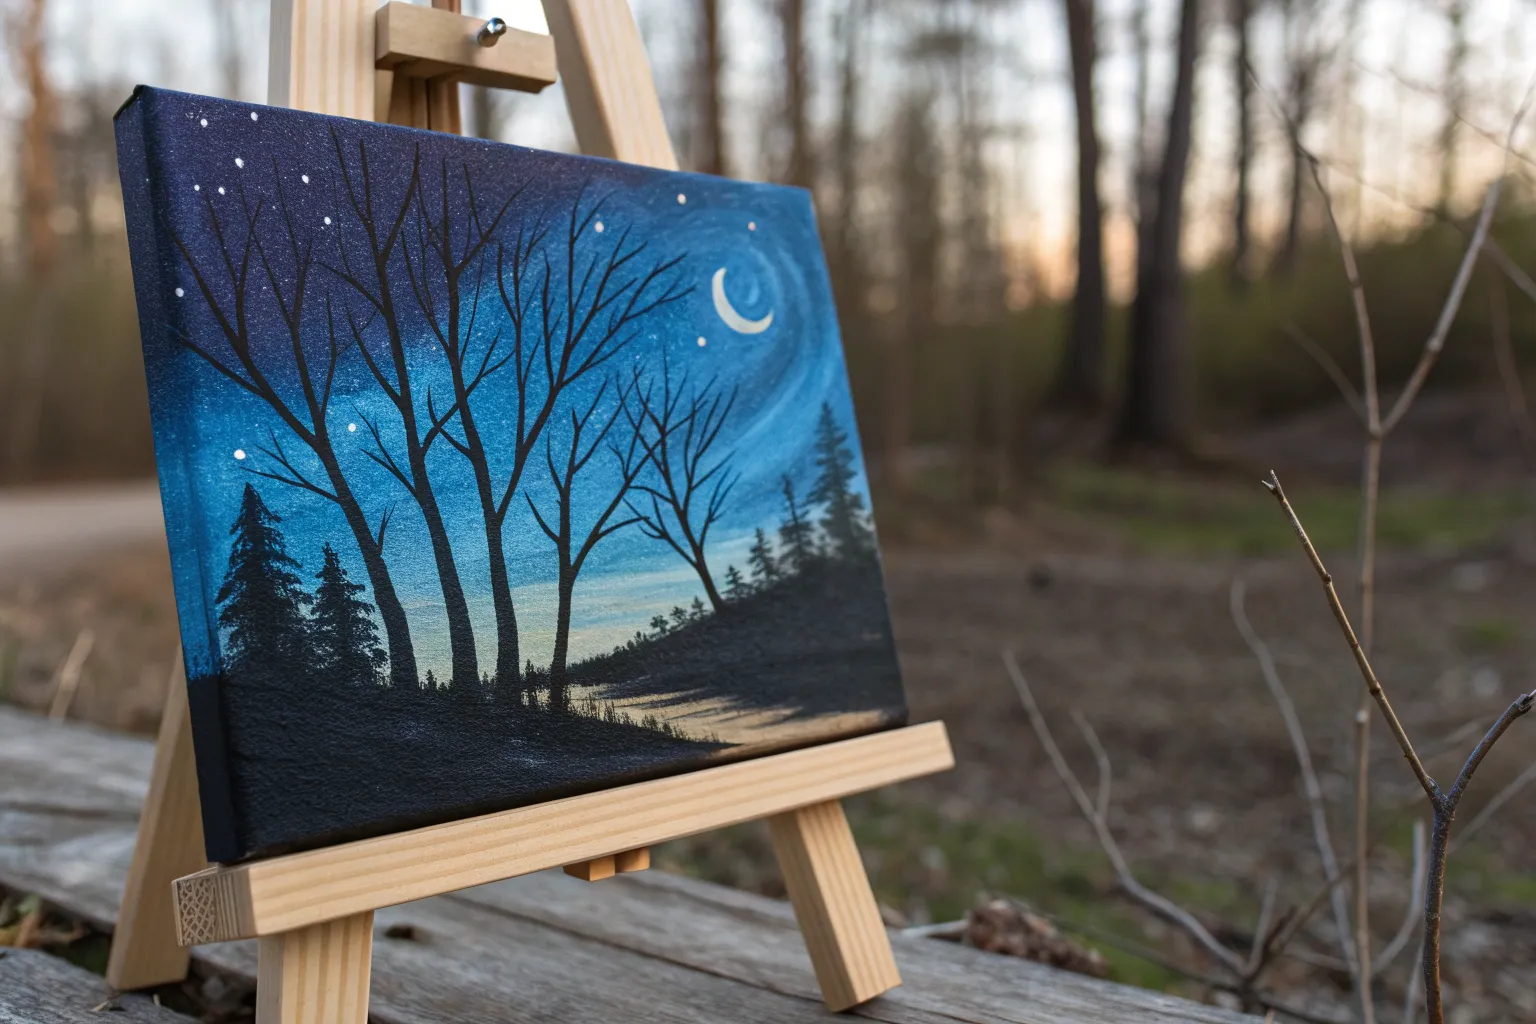
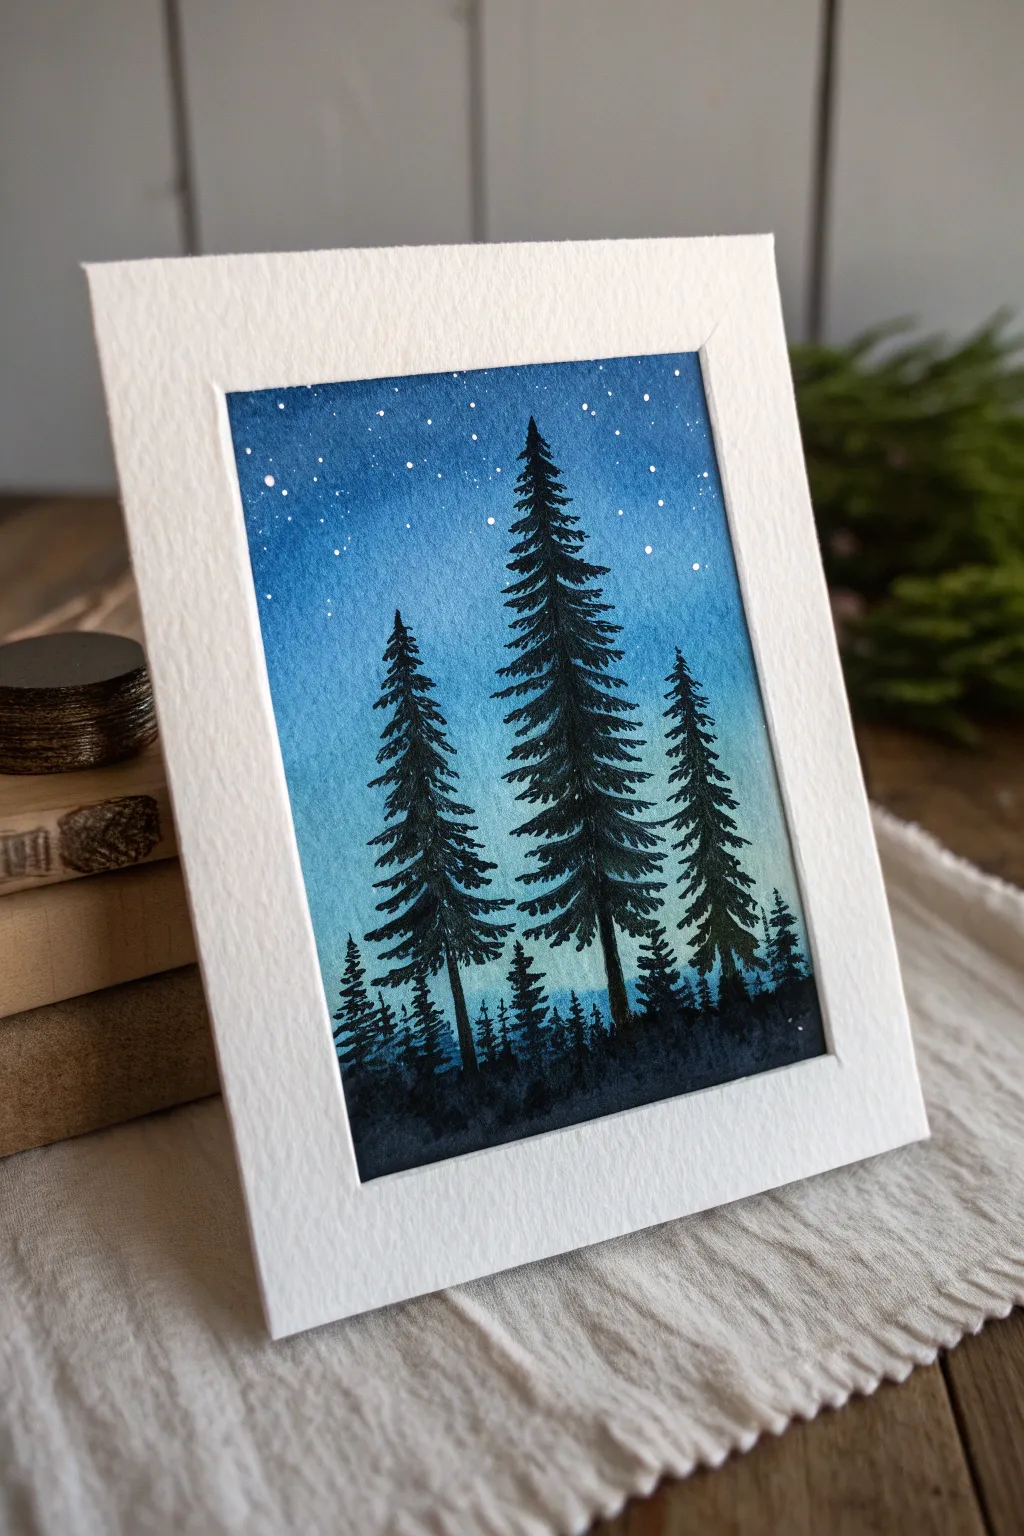
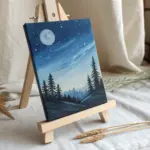
Moonlit Sky Gradient
Capture the serene magic of a moonlit night with this atmospheric watercolor piece. Using a simple palette of deep indigos and blacks, you’ll create a glowing luminous moon surrounded by infinite stars and grounded by a silent, shadowed forest.
Detailed Instructions
Materials
- Cold press watercolor paper (deckle edge optional)
- Masking fluid
- Indigo watercolor paint
- Payne’s Grey watercolor paint
- Ivory Black watercolor paint
- Titanium White gouache or opaque watercolor
- Old paintbrush (for masking fluid)
- Large wash brush
- Round brush (size 4 or 6)
- Small detail brush (size 0 or 1)
- Painter’s tape or board for stretching paper
- Clean water jar
- Salt (optional for texture)
Step 1: Preparation and Masking
-
Secure the paper:
Begin by taping down your watercolor paper to a board. This prevents buckling when you apply heavy washes of water and paint later on. -
Outline the moon:
Lightly trace a perfect circle near the center of the paper using a pencil. A small lid or roll of tape works perfectly as a stencil. -
Apply masking fluid:
Using an old brush that you don’t mind ruining, carefully apply masking fluid to fill in the entire moon circle. This will protect the white paper underneath while we paint the dark sky. -
Await drying:
Allow the masking fluid to dry completely. It should feel rubbery and not tacky to the touch before you proceed with any paint.
Rubbery Rescue
Coat your brush bristles with bar soap before dipping it into masking fluid. This creates a barrier that makes cleaning the rubbery fluid off your brush much easier afterward.
Step 2: Creating the Night Sky
-
Wet-on-wet base:
Brush clean water over the entire paper surface around the masked moon. The paper should be glisten evenly, but not have standing puddles. -
First wash of Indigo:
Load a large brush with diluted Indigo. Start applying it at the top corners, working your way down. Keep the area immediately around the moon slightly lighter to create a glowing effect. -
Deepening the darkness:
While the paper is still wet, drop in concentrated Indigo and Payne’s Grey into the corners and edges. I like to let the colors bleed naturally to create that seamless atmospheric look. -
Adding texture:
Create the milky way effect by lifting a little pigment near the bottom right with a damp, clean brush, or sprinkle a tiny pinch of salt into the wet paint for star-like textures. -
Let it dry:
Allow this first layer to dry completely. The paper must be bone dry, or the next layer will lift the previous one. -
Second dark layer:
Re-wet the dark sections carefully and add a layer of Ivory Black mixed with Indigo to the outer edges and the very top, creating a deep vignette that frames the center.
Step 3: Stars and Moon Details
-
The splatter technique:
Mix a creamy consistency of white gouache. Load a brush, hold it over the dry painting, and tap the handle against another brush to splatter tiny white stars across the dark sky. -
Specific stars:
Use a detail brush to manually place a few larger, brighter stars in areas that look bare. -
Remove the mask:
Once the sky is 100% dry, gently rub off the masking fluid with your finger or a rubber cement pickup to reveal the crisp white circle. -
Painting the craters:
Dilute a very small amount of Payne’s Grey with plenty of water. Using a size 4 brush, paint soft, irregular grey patches on the moon’s surface to represent the ‘seas’ or maria. -
Softening moon edges:
While the grey patches are damp, soften their edges with a clean, damp brush so the moon looks textured but not harsh.
Glow Up
After removing the mask, lightly scrub the sky’s inner edge with a damp stiff brush. This pulls a tiny bit of blue into the white moon, creating a soft ‘halo’ glow.
Step 4: The Forest Silhouette
-
Mixing the forest color:
Mix a thick, opaque solution of Ivory Black and Indigo. You want this to be the darkest value on your painting. -
Painting the tree line:
Using your medium round brush, paint an uneven, jagged line across the bottom third of the paper. Vary the heights to make the forest look natural. -
Adding distinct trees:
Switch to your smallest detail brush. Pull fine vertical lines upward from your black mass to create the tips of pine trees. -
Detailing branches:
Use a light flickering motion to add downward-sloping branches to the tree tips. Ensure the trees on the sides are taller to frame the composition.
Peel off your tape carefully to reveal those crisp edges that contrast beautifully against your dark night sky


Pine Tree Silhouettes
Capture the serene solitude of a winter forest with this striking watercolor card. The contrast between the deep, inky silhouettes and the glowing gradient sky creates a peaceful night scene perfect for any occasion.
Step-by-Step
Materials
- Cold press watercolor paper (cut to 5×7 inches or card size)
- Watercolor paints (Indigo, Prussian Blue, Turquoise or Cerulean)
- Black gouache or waterproof black ink
- White gel pen or white gouache
- Flat shader brush (3/4 inch)
- Round synthetic brushes (size 4 and size 0/liner)
- Masking tape
- Two jars of water
- Paper towels
Step 1: Setting the Scene
-
Prepare your paper:
Tape your watercolor paper down to a hard board using masking tape on all four sides. This prevents the paper from buckling when wet and creates a crisp white border if you aren’t using a pre-cut aperture card. -
Mix your sky colors:
Prepare three pools of blue paint on your palette. Start with a deep Indigo for the top, a mid-tone Prussian Blue for the middle, and a watered-down Turquoise or Cerulean for the horizon line. -
Wet the paper:
Using your large flat brush, apply a layer of clean water across the entire paper surface. The sheen should be even, but not puddling.
Branch Technique Tip
Don’t overthink the pine needles. Use a dry-brush technique (less water, sticky paint) to create rough, organic textures that naturally resemble pine bough tips.
Step 2: Painting the Sky Gradient
-
Start at the top:
While the paper is still damp, load your flat brush with the darkest Indigo mix. Apply it across the top third of the paper using horizontal strokes. -
Blend downward:
Switch to the mid-tone Prussian Blue without washing the brush too thoroughly. Apply this below the Indigo, overlapping slightly to encourage the colors to bleed and blend together on their own. -
Create the glow:
Rinse your brush and load it with the lightest Turquoise mix. Paint the bottom third of the sky, blending it upwards into the mid-tone blue. -
Soften the horizon:
Add just a touch of water to fading out the very bottom, creating a soft, misty look where the trees will eventually stand. Let this layer dry completely before moving on.
Level Up: Snow Dusting
Once the black trees are fully dry, use a white gel pen to add tiny dashes of ‘snow’ sitting on the top edges of the widest branches for a winter vibe.
Step 3: Creating the Stars
-
Flick the stars:
Once the sky is bone dry, load a stiff brush or a toothbrush with diluted white gouache. Gently tap the handle against a finger to flick tiny speckles across the upper sky. -
Add larger stars:
Use a white gel pen or a fine liner brush with white gouache to dot in specific, slightly larger stars to create variety in the constellation density.
Step 4: Painting the Silhouettes
-
Map the main trees:
Using a size 4 round brush and thick black gouache (or very concentrated Indigo), paint three vertical lines to establish the trunks of the main foreground trees. Make the center one tallest and the others varying heights. -
Start the foliage:
Starting at the very top of the center tree, use the tip of your brush to tap in tiny, jagged shapes for the tree leader. -
Widen the branches:
Work your way down the trunk, using a zig-zag motion. I like to press harder on the brush as I move lower to create wider, heavier branches. -
Shape the silhouette:
Ensure the branches curve slightly upward at the tips and leave small gaps of sky showing through the foliage so the tree doesn’t look like a solid triangle. -
Paint remaining giants:
Repeat this process for the other two large trees. Vary the spacing of their branches slightly so they don’t look like carbon copies of each other. -
Add the background forest:
Switch to a smaller size 0 or liner brush. Paint a row of much smaller, less detailed trees along the horizon line between the large trunks. -
Ground the scene:
Use diluted black paint to tap in a fuzzy, textured area at the very bottom, connecting all the tree bases into a dark, shadowy forest floor. -
Mist the bottom:
While the bottom forest floor is still slightly wet, drop in tiny amounts of water to create ‘blooms’ that look like mist rising among the roots.
Peel off the tape carefully to reveal those crisp edges and enjoy your serene nightscape


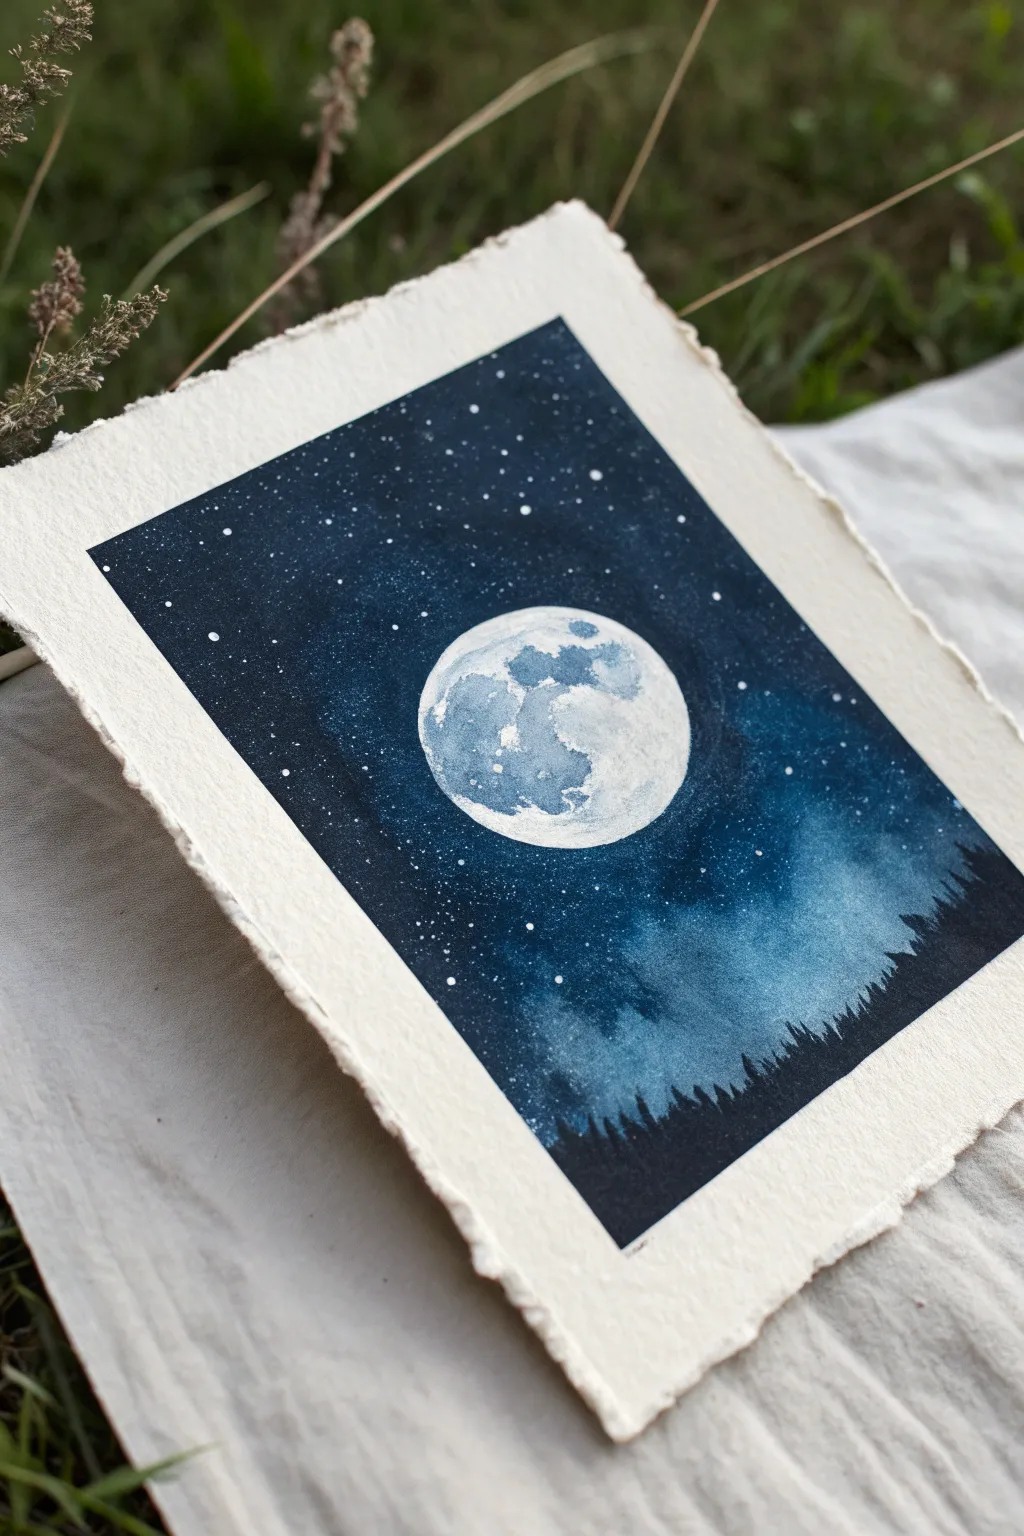
Full Moon Over a Lake
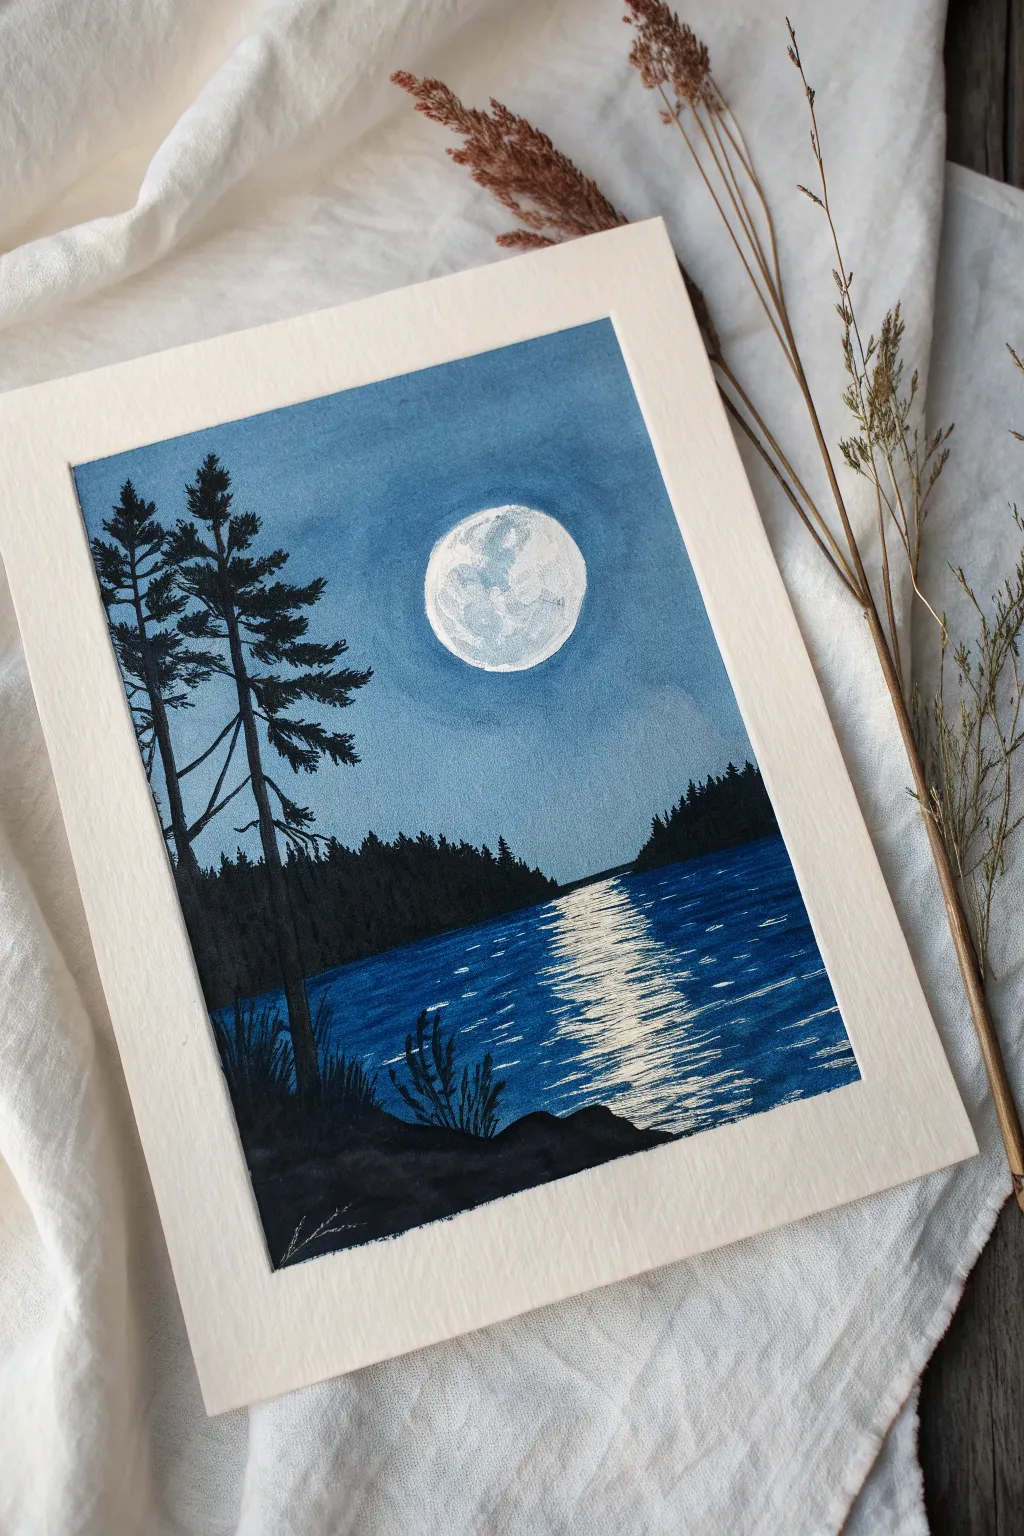
Capture the serene beauty of a moonlit night with this high-contrast landscape painting. Using a limited palette of deep blues, blacks, and bright whites, you’ll create a striking scene featuring a glowing moon, shimmering water reflections, and stark pine tree silhouettes.
Step-by-Step Tutorial
Materials
- Watercolor paper or mixed media paper (heavyweight, cold press)
- Masking tape (for borders)
- Acrylic paints: Phthalo Blue, Ultramarine Blue, Mars Black, Titanium White
- Flat wash brush (1-inch)
- Round brush (medium, size 4 or 6)
- Fine liner brush (size 0 or 00)
- Palette for mixing
- Cup of water
- Paper towels
Step 1: Setting the Scene
-
Prepare the canvas:
Tape down all four edges of your paper to a flat surface using masking tape. This secures the paper and creates that crisp, professional white border seen in the example. -
Sketch the composition:
Lightly sketch a horizontal line about one-third of the way up from the bottom for the horizon. Then, trace a circle for the moon in the upper center using a small cup or freehand. -
Mix the sky color:
Create a mid-tone blue by mixing Phthalo Blue with a touch of Titanium White and a tiny drop of Black to desaturate it slightly. You want a cool, moody night sky color. -
Paint the sky:
Using the flat wash brush, paint the entire sky area around the moon circle. I like to dampen the paper slightly first for a smoother application, but keep the paint opaque. -
Add the halo effect:
While the blue paint is still wet, carefully blend a lighter shade (more white added) immediately around the moon’s edge to create a soft glow.
Dry Brush for Sparkle
For the most realistic water reflection, wipe most of the white paint off your brush first. Use a ‘dry brush’ horizontal motion to let the paper texture create natural sparkles.
Step 2: The Moon and Water
-
Fill the moon:
Once the sky is dry, paint the moon circle with pure Titanium White. Let it dry completely. -
Add moon craters:
Mix a very watery, pale grey. Dab this onto the white moon in random, blotchy patterns to suggest craters and surface texture. -
Paint the water base:
Mix a darker, richer blue for the lake using Ultramarine Blue and a little Black. Paint the water section horizontally below the horizon line. -
Create the reflection path:
While the blue water paint is still tacky, take a clean, slightly damp flat brush with Titanium White. Drag the brush horizontally back and forth down the center of the lake. -
Refine the shimmer:
Use a smaller round brush with white paint to add distinct horizontal dashes on top of the reflection path, making them brighter and more concentrated near the center. -
Add water ripples:
Mix a light blue color and add small horizontal dashes in the dark water areas to suggest movement and ripples catching ambient light.
Uneven Paint Coverage
If your sky looks streaky, apply a second coat of the blue mixture once the first is dry. Adding a touch of white to the mix usually improves opacity and smoothness.
Step 3: Silhouettes and Details
-
Paint the distant tree line:
Using pure Mars Black and a medium round brush, paint an uneven, jagged line along the horizon. Focus on making different heights to mimic distant pine tops. -
Create the foreground land:
Paint a solid black, undulating shape at the very bottom of the paper for the near shore. This anchors the composition. -
Add main tree trunks:
Switch to your fine liner brush. Paint two or three tall, thin lines rising from the left foreground, reaching nearly to the top of the paper. These are your main tree trunks. -
Detail the branches:
Using short, flicking strokes with the liner brush, add branches extending from the trunks. Make them denser at the bottom and sparser near the top. -
Add pine needles:
Stipple or dab small clusters of black leaves onto the branches to give the trees volume and the characteristic pine silhouette. -
Include foreground grasses:
At the base of the trees and along the bottom shoreline, use quick upward flicks to paint tall grass and small shrubs. -
Reveal the border:
Once the painting is 100% dry to the touch, slowly peel away the masking tape at a 45-degree angle to reveal your clean edges.
Frame this piece behind glass to enhance the contrast between the deep blues and the bright moonlit details

Star-Spattered Galaxy Swirl
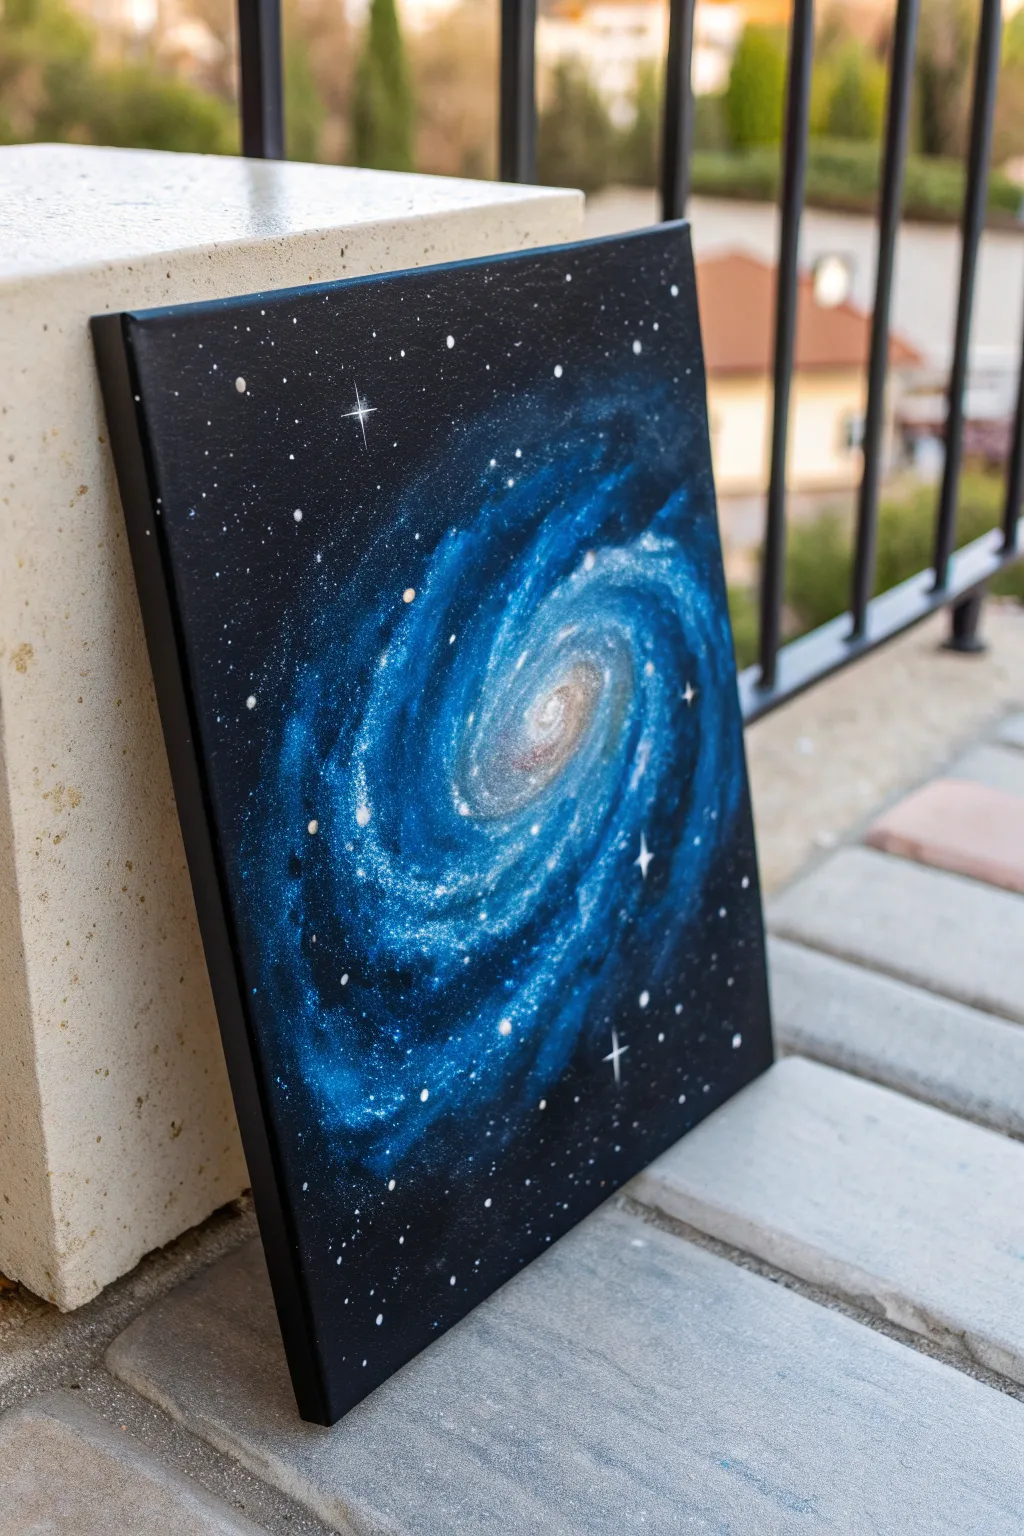
Capture the mesmerizing depth of deep space with this striking spiral galaxy painting. Using a limited palette of black, blue, and white, you’ll learn to layer acrylics to create luminous nebulas and sparkling star fields.
Step-by-Step
Materials
- Rectangular stretched canvas (e.g., 12×16” or similar)
- Black gesso or black acrylic paint
- Acrylic paints: Phthalo Blue (or Ultramarine), Titanium White, tiny bit of Burnt Umber (optional)
- Small sponge or very stiff stippling brush
- Set of brushes: 1″ flat brush, medium round brush, fine liner brush
- Old toothbrush (for splattering)
- Palette or paper plate
- Water cup and paper towels
Step 1: Setting the Void
-
Prime the Surface:
Begin by covering your entire canvas with black gesso or black acrylic paint. Use the large flat brush to ensure even coverage. -
Paint the Edges:
Don’t forget to paint the sides of the canvas black as well, giving the artwork a professional, finished look without needing a frame. -
Full Dry:
Let this base layer dry completely. It must be matte and solid before you start adding the galaxy details.
Muddy Galaxy Fix
If your blues are turning grey or muddy against the black, let the layer dry completely. Apply a fresh layer of blue over the dry paint to restore vibrancy.
Step 2: Creating the Spiral Structure
-
Mix Your Mid-Tone:
On your palette, mix your chosen blue with a very small amount of white to create a medium royal blue. -
Draft the Shape:
Using a dry sponge or a stiff brush with very little paint on it (dry brushing), lightly sketch the main spiral shape. Start from the center and sweep outwards in a curved motion. -
Build the Blue Base:
Go over your sketched spiral arms with the sponge, dabbing gently to create a textured, cloudy effect. Keep the paint translucent so the black background shows through slightly. -
Deepen the Shadow:
Add pure dark blue to the outer edges of the spiral arms to create depth and blend them into the black void.
Step 3: Illuminating the Core
-
Lighten the Mix:
Add more white to your blue mixture to create a light sky blue. Dab this concentrated color towards the center of the spiral and along the ‘spines’ of the arms. -
The Galactic Core:
For the very center, mix white with a tiny dot of brown or orange to create a warm, glowing off-white. If you don’t have brown, pure white works too, but a warm tone adds realism. -
Blend Outward:
Using a clean, dry soft brush, gently blend the edges of the bright center outward into the blue arms to create a glowing transition. -
Highlighting Arms:
Use the sponge with nearly pure white paint to tap highlights onto the brightest parts of the swirling gas clouds. Use a light hand here; less is more.
Pro Tip: Depth trick
Apply the white star splatter in two rounds: once before the final highlights, and once after. The ‘buried’ stars create incredible 3D illusion.
Step 4: Starlight and Details
-
Prepare Splatter Paint:
Mix white paint with a little water until it has the consistency of heavy cream or ink. -
Create the Star Field:
Dip an old toothbrush into the thinned white paint. Test it on a paper towel first, then flick the bristles with your thumb to spray fine mist over the galaxy. -
Control the Chaos:
Concentrate the splatter more heavily along the painted blue spiral arms and leave the outer black corners relatively sparse. -
Add Major Stars:
Using your finest liner brush or even a toothpick, dot larger individual stars randomly around the composition. -
Paint Star Flares:
Select 3 or 4 larger dots to turn into twinkling stars. Paint a thin vertical line through the dot, followed by a shorter horizontal line, creating a cross shape. -
Final Adjustments:
Step back and look at the whole piece. If the center needs more punch, add one final dab of pure white right in the middle while the paint is still slightly tacky.
Hang your new celestial masterpiece on a well-lit wall to really make those white highlights pop against the dark background
BRUSH GUIDE
The Right Brush for Every Stroke
From clean lines to bold texture — master brush choice, stroke control, and essential techniques.
Explore the Full Guide
Ocean Waves at Midnight
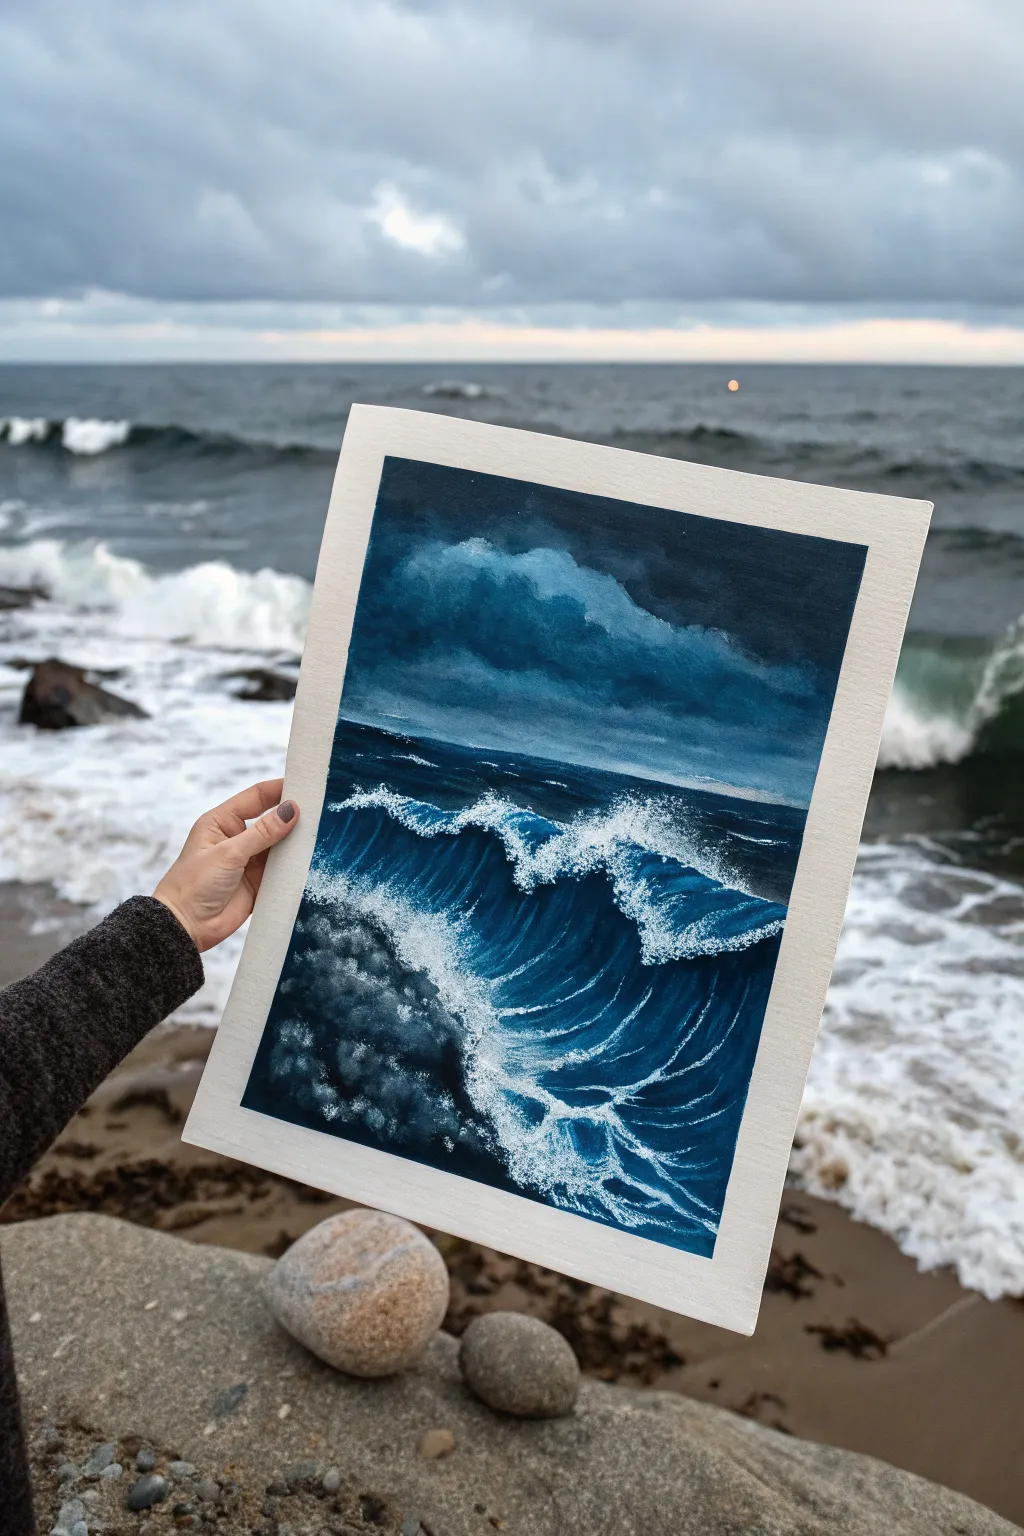
Capture the raw power of a stormy sea with this moody painting that uses a limited palette of deep blues and blacks to dramatic effect. You will learn to build contrasting layers of crashing waves against a brooding sky, finishing with crisp white foam details.
Step-by-Step Tutorial
Materials
- Heavyweight watercolor paper or canvas pad (approx. 9×12 inches)
- Masking tape
- Acrylic paints: Phthalo Blue, Ultramarine Blue, Mars Black, Titanium White, and a touch of Turquoise
- Flat shader brushes (large and medium)
- Round detail brushes (size 0 and 2)
- Old toothbrush (optional for spray)
- Fan brush (optional)
- Palette and water cup
- Paper towels
Step 1: Setting the Scene
-
Prepare your surface:
Tape down all four edges of your paper to a sturdy board. This creates that crisp, professional white border seen in the photo and prevents the paper from buckling under heavy paint layers. -
Establish the horizon:
Mix a dark, stormy grey-blue using Phthalo Blue and Mars Black with a tiny bit of white. Paint a straight horizon line about one-third of the way up from the bottom of the paper. -
Paint the sky base:
Using a large flat brush, fill the sky area (the top two-thirds) with a gradient. Start with almost pure black mixed with deep blue at the very top, gradually adding a tiny amount of white as you move toward the horizon line. -
Create cloud texture:
While the sky base is slightly tacky, mix a lighter slate blue. Use a scumbling motion—scrubbing the brush in small circles—to create the heavy, rolling cloud bank just above the horizon. Keep the edges soft and diffused.
Dry Brush Perfection
For realistic sea foam, ensure your brush has very little paint on it. Wipe it on a paper towel first; the scratchy texture mimics aerated water perfectly.
Step 2: Building the Deep Water
-
Base coat the ocean:
For the water below the horizon, mix your deepest, darkest ocean color using Phthalo Blue and Black. Fill the entire bottom section, but brush the paint in the direction of the water’s movement—horizontal near the horizon, and curved upward where the wave will crash. -
Define the wave shape:
Use a medium flat brush to map out the main crashing wave. I find it helpful to look for the ‘C’ shape of the barrel; paint lighter blue highlights (Ultramarine and White) along the curve to show where the water is thin and translucent. -
Deepen the shadows:
Reinforce the trough of the wave—the area directly under the curling lip—with almost pure black. This high contrast is crucial for making the wave look hollow and powerful. -
Add distant movement:
On the darker water near the horizon, use a smaller brush to paint thin, horizontal streaks of slightly lighter blue. These represent smaller swells in the distance.
Level Up: Gloss Finish
Once fully dry, apply a high-gloss varnish to just the wet part of the wave (the dark blue barrel) to make it look permanently wet and reflective.
Step 3: The Crash and Foam
-
Block in the main foam:
Switch to Titanium White. Using a round brush or a worn-out flat brush, stipple (dab repeatedly) the white paint along the top crest of the wave where it is breaking. Don’t make a solid line; keep it irregular and fluffy. -
Create the spillover:
Drag the white paint down the face of the wave in broken, jagged lines to simulate gravity pulling the foam down. Let the blue underneath show through these gaps. -
Detail the foreground splash:
In the bottom left corner where the wave hits the ‘rocks’ or churns up, create a chaotic cloud of foam. Use a dabbing motion with a dry brush to get a misty, aerated look rather than solid white blobs. -
Add rock shadows:
If you want the suggestion of submerged rocks in the foreground foam, glaze a translucent mixture of watery black and blue over parts of the lower white foam once it is dry. -
Refine the wave lip:
Use your smallest detail brush to paint sharp, thin veins of foam stretching across the dark, curved barrel of the wave. These lines should follow the curve of the water.
Step 4: Final Atmosphere
-
Mist and spray:
Dilute a little white paint with water. Load an old toothbrush or stiff bristle brush and gently flick tiny speckles over the crashing area to create sea spray. A little goes a long way here. -
Highlight the distance:
Add a few very faint, thin white lines on the distant horizon waves to suggest whitecaps far out at sea. -
The peel:
Once the painting is 100% dry, carefully peel away the masking tape at a 45-degree angle to reveal your crisp clean edges.
Now you have a dynamic seascape that brings the intensity of a midnight storm right into your home studio
Mountain Ridge in Blue Haze
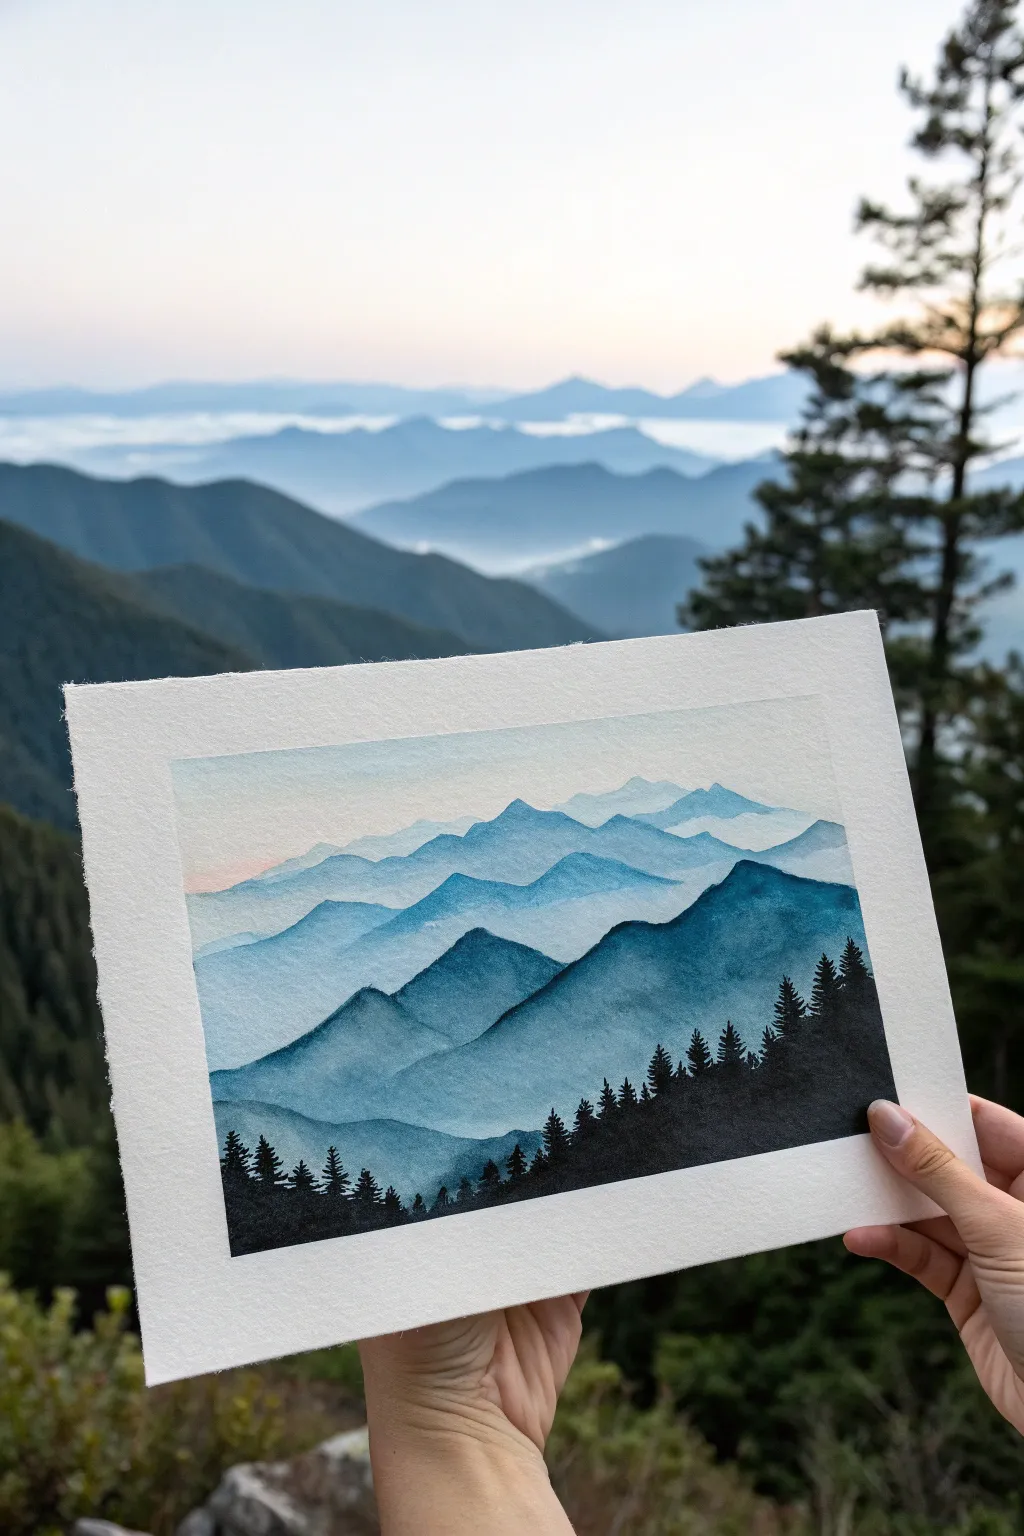
Capture the serene beauty of distant peaks with this atmospheric watercolor landscape. Using layers of translucent blue washes, you will build depth and distance, finishing with a striking silhouette of pines in the foreground.
Step-by-Step
Materials
- Cold press watercolor paper (140lb/300gsm)
- Watercolor paints (Indigo, Prussian Blue, Payne’s Gray, touch of Alizarin Crimson)
- Flat wash brush (large)
- Round brush (size 6 or 8)
- Detail brush (size 0 or 1)
- Painter’s tape
- Drawing board or hard surface
- Two jars of water
- Paper towels
Step 1: Setting the Scene
-
Secure the paper:
Tape down all four edges of your watercolor paper to your board using painter’s tape. This creates that clean, crisp white border you see in the photo and prevents the paper from buckling when wet. -
Light sketch:
Using a hard pencil (like a 2H), very lightly sketch five or six wavy lines across the paper. These will guide your mountain ridges. Keep the lines faint so they disappear under the paint later. -
Sky wash:
Wet the sky area (the top quarter of the paper) with clean water. Drop in a very dilute wash of pale blue mixed with a tiny hint of crimson to create a soft, barely-there dawn glow near the horizon.
Clean Edges Only
If you get ‘cauliflower’ blooms in your gradient washes, you likely added water back into drying paint. Once a wash starts to lose its sheen, don’t touch it again until totally dry.
Step 2: Building the Distant Ranges
-
First ridge:
Mix a very watery, pale blue wash. While the sky is dry, paint the most distant mountain ridge—the one highest up on your paper. Use the round brush to carefully follow the top edge, then pull the color down, fading it out with water as you go lower to create mist. -
Dry completely:
Let this first layer dry completely. This is crucial; if it’s damp, the next layer will bleed into it and you’ll lose the defined edge. -
Second ridge:
Mix a slightly more saturated blue. Paint the next ridge down, overlapping the faded bottom of the first one. Again, keep the top edge sharp and distinct, but soften the bottom edge with clean water. -
Third ridge variety:
For the third layer, add a tiny touch of Indigo to your mix. Paint the next range of peaks. Try to vary the shape of the mountain tops so they don’t look like identical waves.
Atmospheric Depth
Remember the golden rule of atmospheric perspective: things get lighter, bluer, and less detailed the further away they are. Keep your background layers very watery.
Step 3: Deepening Values
-
Middle ground contrast:
As you move closer to the bottom of the page, decrease the water and increase the pigment. For the fourth ridge, mix a strong Prussian Blue. Paint the shape, letting the color settle into the texture of the paper. -
Texture technique:
I like to tilt the board slightly while the paint is wet on these middle layers. This encourages the pigment to settle at the bottom of the wash, enhancing the misty valley effect. -
Fifth ridge:
Mix a deep, dark blue using Prussian Blue and Payne’s Gray. Paint the second-to-last ridge. This should be significantly darker than the previous ones to jump the perspective forward. -
Final drying time:
Ensure the entire paper is bone dry before proceeding to the foreground. Use a hairdryer on a low setting if you are impatient, but be careful not to melt the tape.
Step 4: The Foreground Silhouette
-
Mix the darkest dark:
Create a near-black mixture using Indigo and a lot of pigment. Test it on scrap paper; it should be opaque and bold. -
Base of the slope:
Paint the solid black shape of the nearest hill at the bottom right, sloping upwards. Fill in the bottom area solidly. -
Tree trunks:
Switch to your smallest detail brush. Along the top edge of this black slope, paint tiny vertical lines of varying heights to serve as tree trunks. -
Adding foliage:
With the tip of the detail brush, use a stippling or dabbing motion to add branches to the trunks. Start narrow at the top and get wider at the base, creating little triangles for pine trees. -
Varying density:
Make some trees taller and some shorter. Group some tightly together and leave others slightly separated to mimic a natural forest line. -
The reveal:
Wait until the black paint is completely dry. Slowly peel off the painter’s tape at a 45-degree angle, away from the painting, to reveal your crisp white border.
Now you have your own serene mountain vista ready to frame or gift

PENCIL GUIDE
Understanding Pencil Grades from H to B
From first sketch to finished drawing — learn pencil grades, line control, and shading techniques.
Explore the Full Guide
City Skyline After Dark
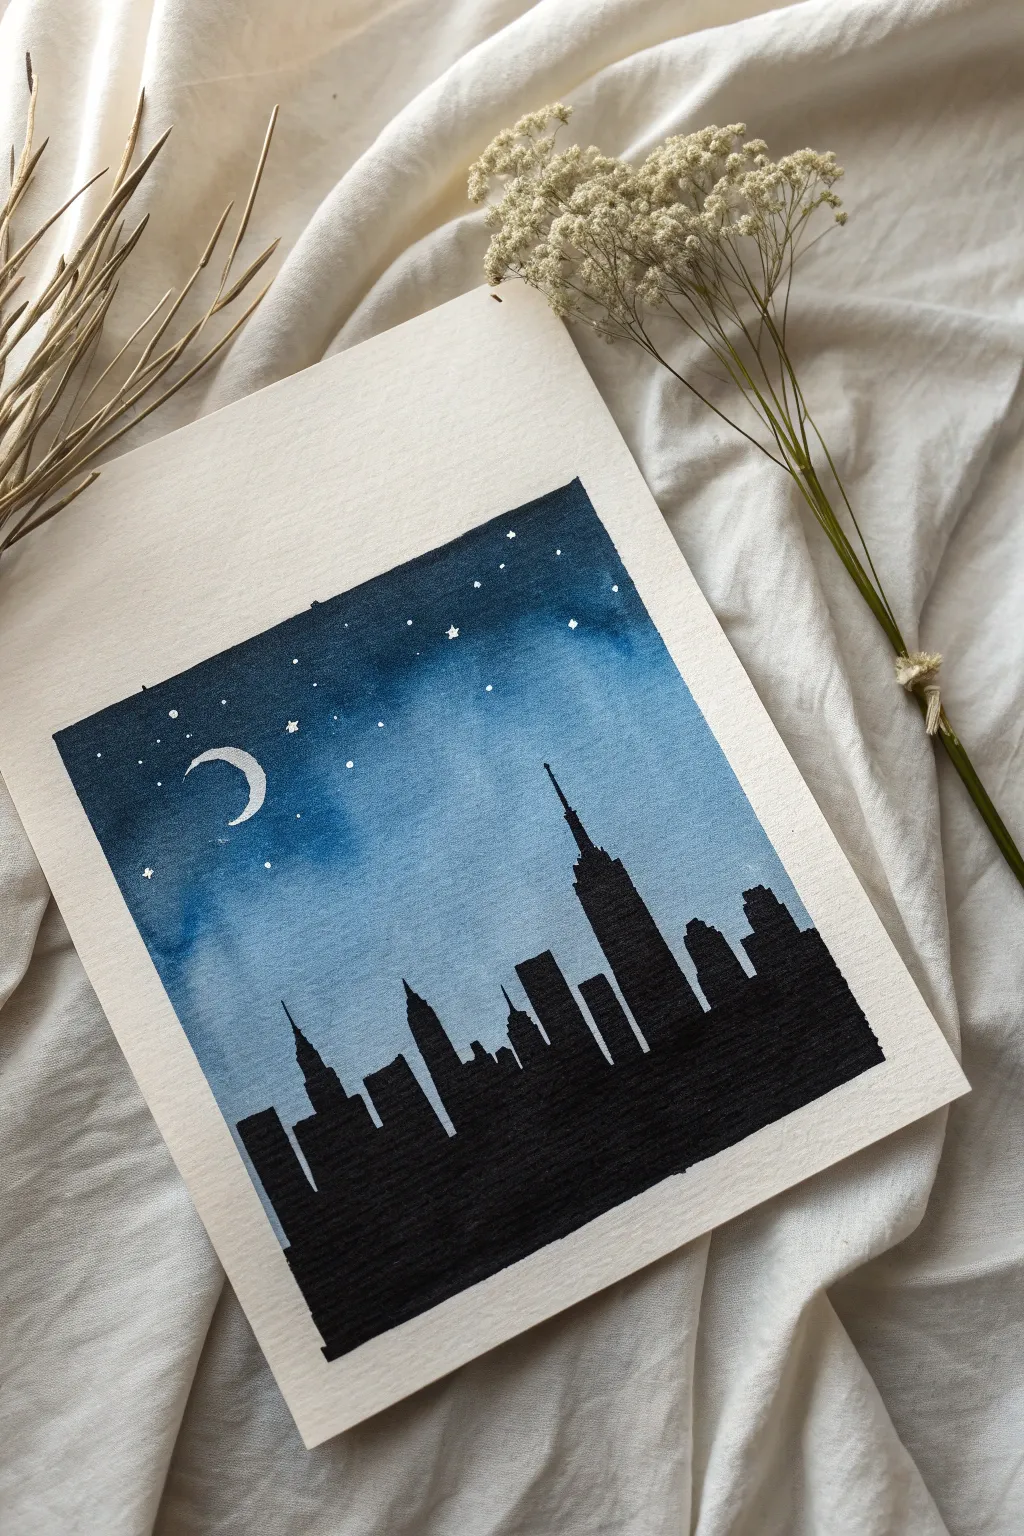
Capture the serene beauty of a city after hours with this atmospheric watercolor and ink project. The contrast between the moody, washing blue sky and the crisp black architecture creates a striking piece that looks deceptively complex.
How-To Guide
Materials
- Cold press watercolor paper (approx. 5×7 inches)
- Masking tape or painter’s tape
- Watercolor paints (Indigo, Prussian Blue, or Ultramarine)
- Round watercolor brush (size 6 or 8)
- Black waterproof fine liner pen (0.5mm or 0.8mm)
- Thick black permanent marker or black acrylic paint
- White gel pen or white gouache
- Clean water and paper towel
- Pencil and eraser
Step 1: Setting the Scene
-
Prepare the canvas:
Secure your watercolor paper to a hard surface using masking tape on all four sides. Press the edges down firmly to ensure a clean white border later. -
Mix your blues:
Prepare a puddle of deep blue watercolor paint. I usually mix Indigo with a touch of Prussian Blue to get that deep, midnight navy hue. -
Pre-wet the paper:
Using your clean brush, apply a very light coat of clear water to the upper two-thirds of the paper where the sky will be.
Tape Technique
To prevent the tape from ripping your paper upon removal, stick the tape to your clothes once or twice before applying it. This reduces the tackiness.
Step 2: Painting the Midnight Sky
-
Start dark at the top:
Load your brush with the darkest blue mix and apply it horizontally across the very top of the taped area. -
Create the gradient:
Dip your brush in water to dilute the pigment slightly, then paint the next strip down, overlapping the wet edge of the first strip to blend them. -
Fade to light:
Continue working downwards, adding more water to your brush with each pass. The blue should fade into a very pale wash or nearly white paper about two-thirds of the way down. -
Smooth the transition:
If you see harsh lines, use a damp, clean brush to gently sweep back and forth across the transition area while it’s still wet. -
Let it dry completely:
This is crucial; the paper must be bone dry before you add the silhouette. If it feels cool to the touch, it’s still damp.
Step 3: Building the City
-
Sketch the outline:
Lightly sketch the tops of the buildings with a pencil. Vary the heights—include a tall skyscraper like the Empire State Building off-center for visual interest. -
Outline the silhouette:
Use your fine liner pen to trace the top edge of your building sketch. Be precise with the antennas and stepped roofs. -
Fill in the shapes:
Switch to a thicker black marker or use black acrylic paint to fill in the buildings completely. The black needs to be opaque and solid. -
Square off the base:
Extend the black color all the way down to the bottom tape line, ensuring a solid foundation of darkness.
Bleeding Lines?
If paint seeps under the tape, cover the mistake with white gouache or acrylic. If black ink bleeds into the sky, turn that spot into a larger cloud or star.
Step 4: Celestial Details
-
Add the moon:
Using a white gel pen or a fine brush with white gouache, draw a small crescent moon in the upper left, within the darker part of the sky. -
scatter the stars:
Dot tiny points of white randomly across the blue sky. Vary the pressure to create different sized stars. -
Add twinkle:
Select three or four dominant stars and draw tiny crosses or four-pointed shapes to make them twinkle. -
Final reveal:
Once everything is dry, slowly peel away the masking tape at a 45-degree angle to reveal the crisp white border.
Now you have a stunning piece of midnight art ready to frame
Lonely Figure Under the Moon
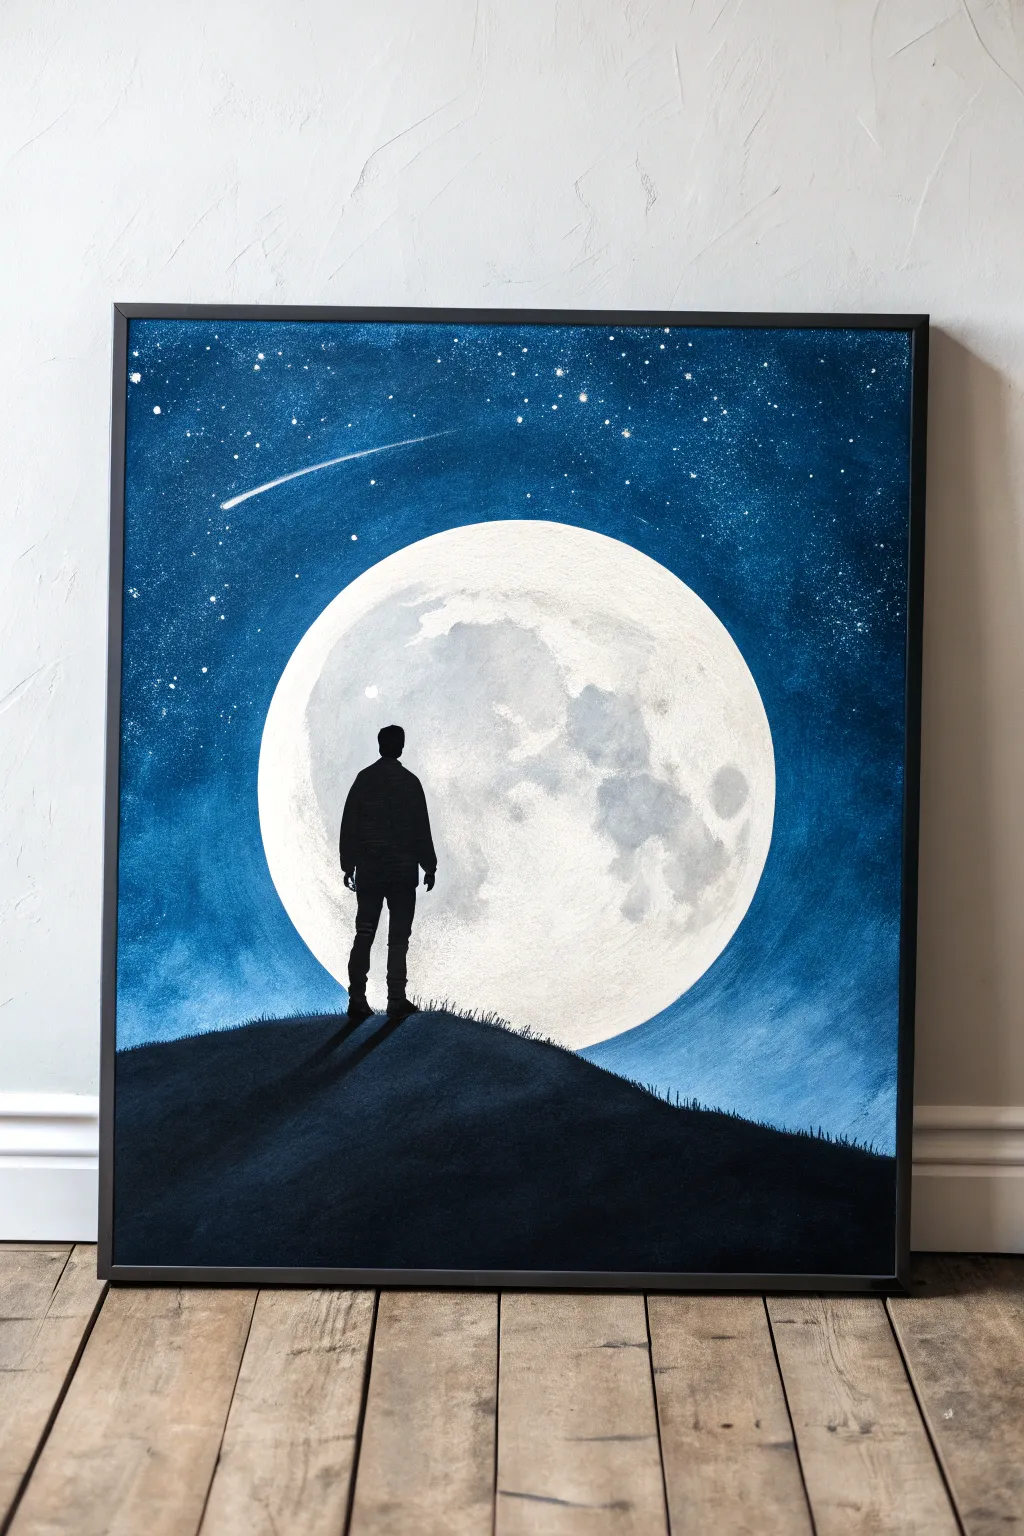
Capture the quiet wonder of the night sky with this striking acrylic painting featuring a lone figure against a massive, glowing moon. The high contrast between the deep cobalt blues and the stark silhouette creates a dramatic, atmospheric piece perfect for beginners.
Detailed Instructions
Materials
- Stretched canvas or canvas board (16×20 inches suggested)
- Acrylic paints: Mars Black, Titanium White, Phthalo Blue, Ultramarine Blue
- Large flat brush or sponge brush
- Medium round brush
- Small liner brush or detail brush
- Old toothbrush (for stars)
- Round object for tracing (plate or bowl) or a compass
- Pencil
- Palette and water cup
- Paper towels
Step 1: Setting the Scene
-
Outline the Composition:
Begin by placing your round object near the center of the canvas to trace the moon. Position it slightly lower than the absolute center to leave room for the sky above. Lightly trace the circle with a pencil. -
Sketch the Horizon:
Draw a curved line near the bottom third of the canvas to represent the hill. This line should overlap the bottom portion of your moon circle, as if the hill is in the foreground. -
Add the Figure:
Lightly sketch the silhouette of the person standing on top of the hill. Keep the shape simple—focus on the outline of the head, shoulders, and legs. Don’t worry about internal details like facial features, as this will be painted solid black later.
Star Control
If you accidentally get stars on your black silhouette or inside the moon, simply paint over them with the background color once the flecks are dry.
Step 2: Painting the Sky
-
Base Night Layer:
Mix a small amount of black into your Phthalo Blue to create a deep midnight blue. Apply this color to the outer edges and top corners of the canvas using your large flat brush. -
Creating the Glow:
Clean your brush and switch to pure Phthalo Blue as you move inward toward the moon. Then, mix Phthalo Blue with a touch of white to create a lighter, glowing blue immediately surrounding the moon’s outline. -
Blending the Gradient:
While the paint is still wet, use smooth, circular strokes to blend the dark edges into the lighter center. The transition should be seamless, radiating outward from the moon. -
Adding Stars:
Once the blue background is dry, dilute a small amount of Titanium White with water until it’s inky. Dip an old toothbrush into this mixture and flick the bristles with your thumb to spray tiny white specks across the blue areas. Avoid the moon circle. -
Shooting Star Detail:
Using a liner brush and pure white paint, create a small shooting star in the upper left quadrant. Paint a tiny dot for the head and drag the brush quickly to create a fading tail.
Moon Masking
For a perfectly crisp moon edge, cut a circle from paper or masking tape and adhere it to the canvas before painting the blue sky. Peel it off to reveal the white circle.
Step 3: The Moon
-
Base Moon Color:
Fill in the moon circle with a solid coat of Titanium White. You may need two coats to ensure it is opaque and covers any blue that might have accidentally crossed the line. -
Adding Craters:
Mix a very light grey using white and a tiny speck of black. Use a dry brush technique or a sponge to dab irregular, cloudy shapes onto the moon’s surface to mimic craters and lunar maria. -
Refining Texture:
Soften the edges of your grey patches with a clean, slightly damp brush so they aren’t too harsh. The goal is a subtle, mottled texture rather than distinct shapes.
Step 4: The Silhouette
-
Blocking the Hill:
Use Mars Black to fill in the hill area at the bottom. Ensure the top edge of the hill is crisp where it overlaps the moon. -
Painting the Figure:
Switch to a small round brush and carefully fill in your sketched figure with solid black. Pay attention to the edges of the form, keeping them sharp against the bright moon background. -
Adding Shadows:
Paint a long, subtle shadow extending from the figure’s feet down the hill. Since the light source (the moon) is behind him, the shadow should come forward toward the viewer. -
Grassy Texture:
Using the tip of your smallest brush or a fan brush turned on its side, flick tiny vertical strokes along the top ridge of the hill to create the appearance of grass blades silhouetted against the light. -
Final Touches:
Check for any areas where the black paint looks thin and apply a second coat if necessary to ensure a true, opaque silhouette. I like to step back at this point to make sure the contrast really pops.
Hang your new masterpiece in a spot where it can remind you to take a moment and look up at the stars


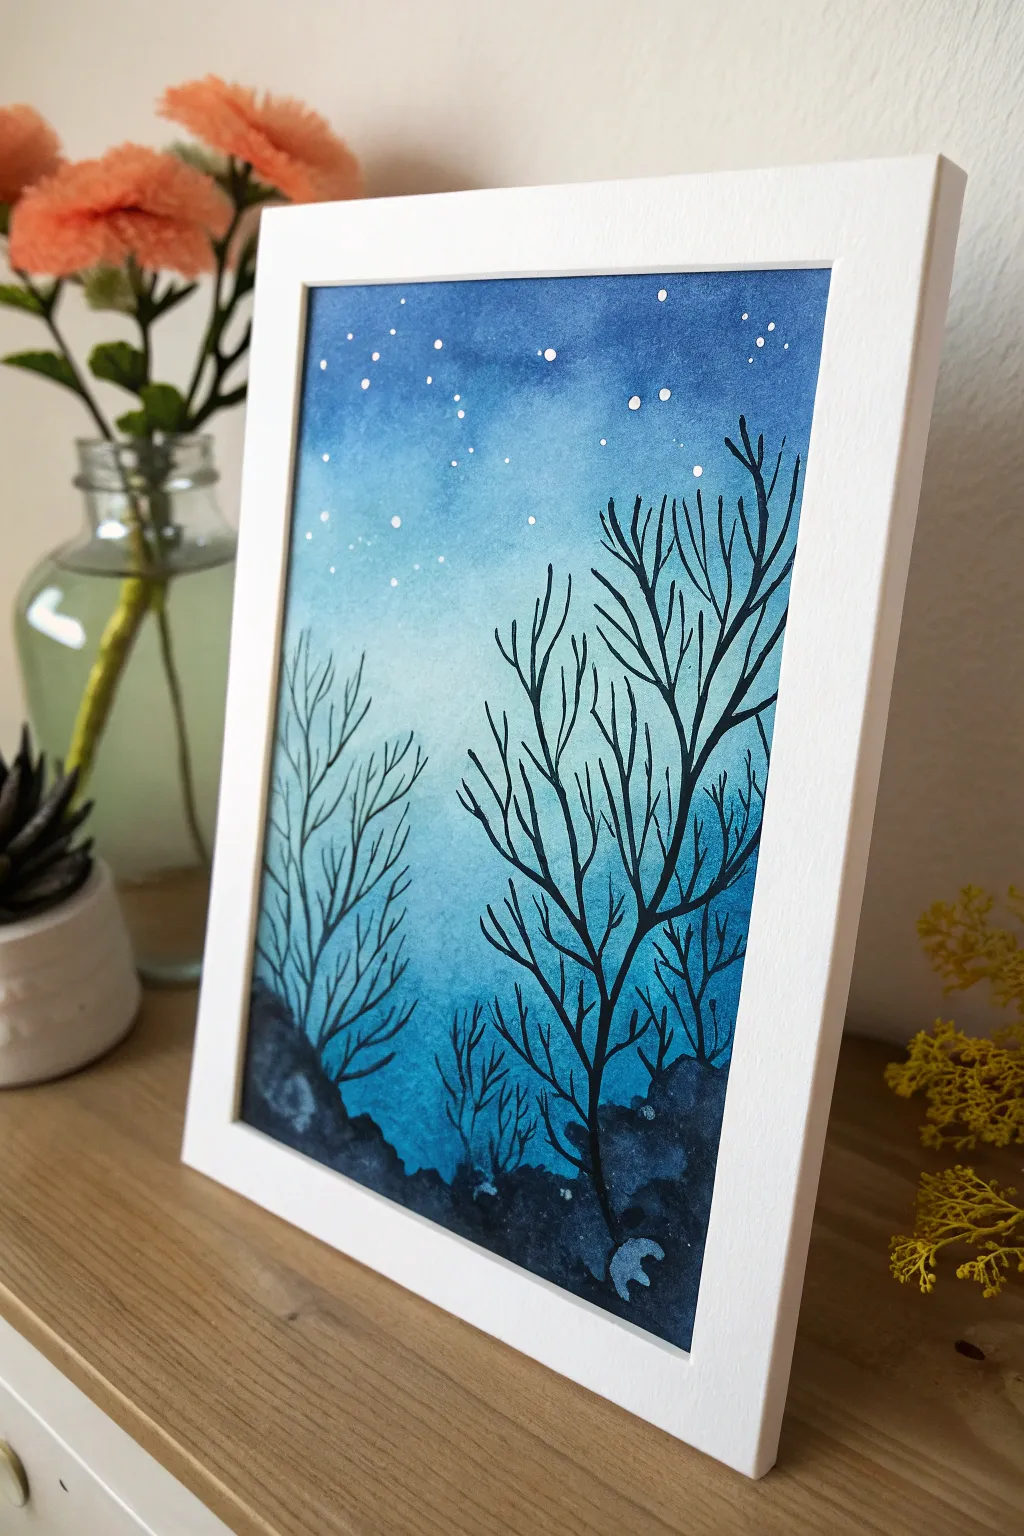
Birds Crossing a Blue Night
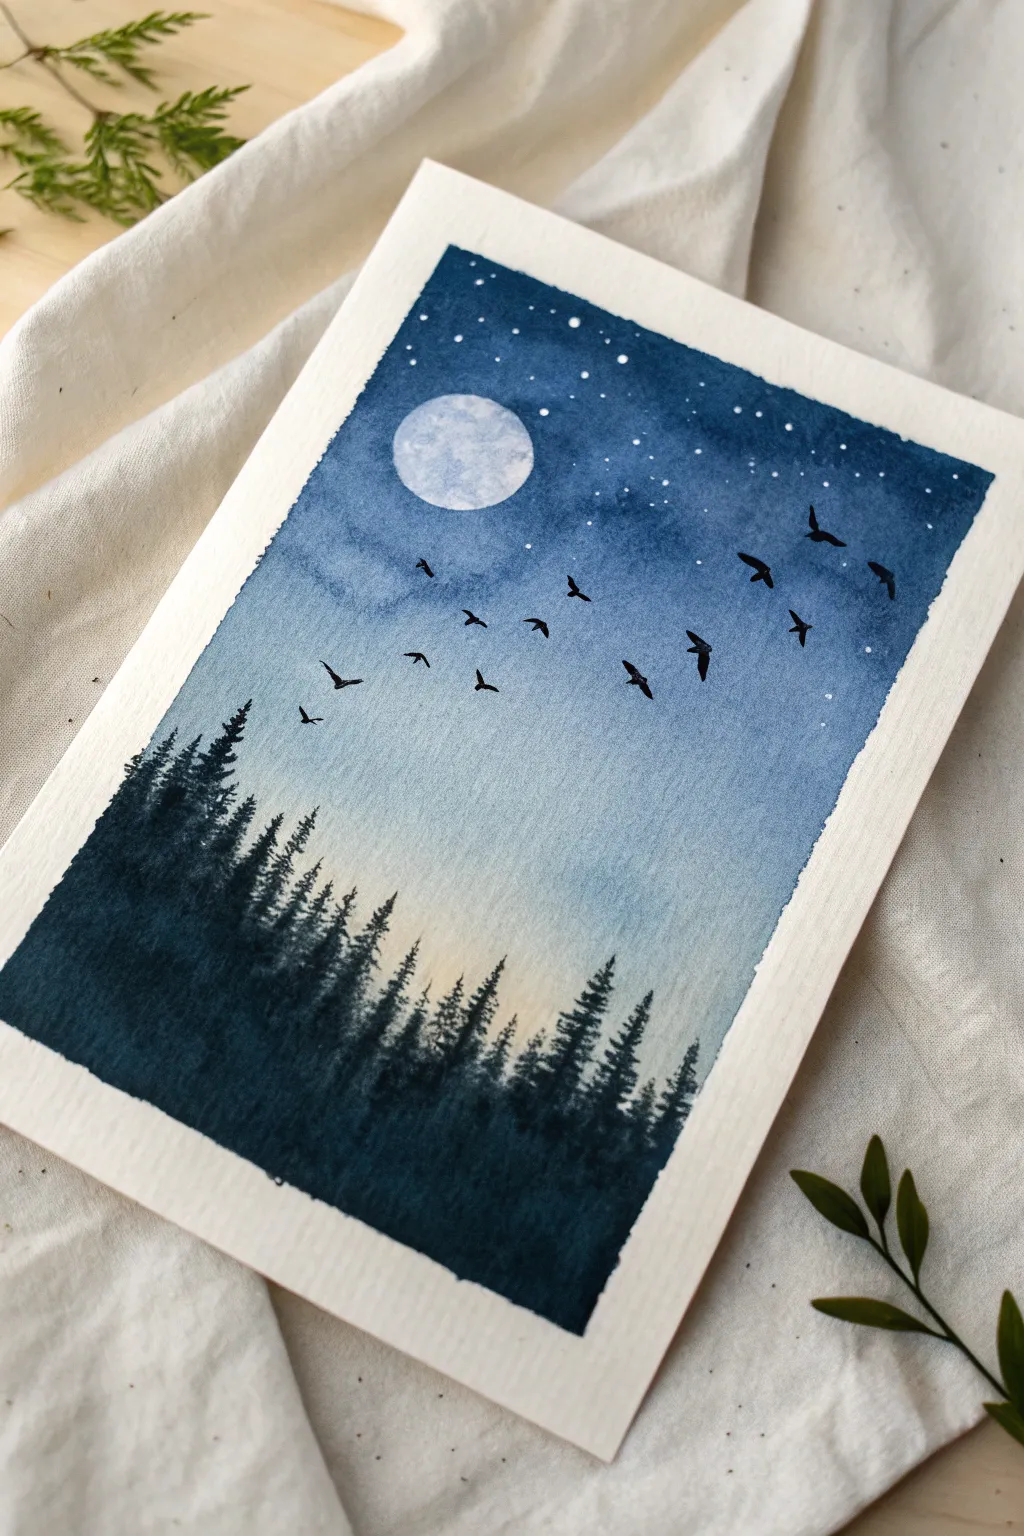
Capture the serene beauty of a moonlit forest with this atmospheric watercolor painting. The design features a gradient wash of deep indigo fading into a soft mist, framed by silhouetted pines and soaring birds.
Step-by-Step Tutorial
Materials
- Cold press watercolor paper (300 gsm)
- Masking tape
- Watercolor paints (Indigo, Payne’s Grey, Black)
- White opacity gouache or white gel pen
- Round brushes (large size 10-12 for washes, small size 0-2 for details)
- Old toothbrush (optional for stars)
- Paper towels
- Two jars of water
Step 1: Setting the Sky
-
Tape the Edges:
Before you begin, secure your watercolor paper to a board or table using masking tape along all four edges. This creates that crisp, clean white border seen in the final piece and prevents the paper from buckling when wet. -
Prepare the Gradient:
Mix a generous amount of Indigo paint with a little water. You want a strong, dark saturation for the top of the sky, but keep a separate puddle of very diluted, watery blue ready for the lower section. -
Create the Moon:
Using a clean, damp brush, paint a circle where you want the moon to be. Lift distinct pigment away or leave this circle completely dry and white if you prefer a starker look. For a softer textured moon, wet the circle and drop in tiny hints of very diluted grey-blue. -
Start the Wash:
With your large round brush, apply the dark Indigo paint at the very top of the paper. Use horizontal strokes to lay down the color smoothly. -
Blend Downward:
As you move down the paper, gradually clean your brush in water and pick up the lighter, diluted blue mix. Blend the dark top section downwards so it fades seamlessly into a very pale, almost white blue near the bottom third of the paper. -
Let it Dry:
If you want a slight misty texture, you can dab the wet paint gently with a crumpled paper towel. Otherwise, let the background wash dry completely before moving on. The paper must be bone-dry.
Step 2: Stars and Details
-
Flick the Stars:
Mix a small amount of white gouache with a drop of water until it has a milky consistency. Dip an old toothbrush or a stiff bristled brush into it and use your thumb to flick fine spray over the dark, upper part of the sky. -
Add Bigger Stars:
For prominent stars, dip a fine-tip brush or use a white gel pen to dot specific points in the dark blue area. Vary the sizes slightly for a natural clustered look.
Fixing “Blooms”
If water drops back into semi-dry paint, it creates cauliflower-like blooms. Fix this by waiting for it to dry, then scrubbing gently with a damp brush to soften the hard edge before repainting.
Step 3: Forest Silhouettes
-
Mix the Darkest Tone:
Prepare a mixture of Indigo and Black, or pure Payne’s Grey. The consistency should be thicker and less watery than your sky wash to ensure sharp details. -
Map the Tree Line:
Using a medium brush, paint an uneven, jagged freehand line across the bottom section where the sky is lightest. This establishes the dense forest floor. -
Paint Pine Trees:
Switch to a smaller brush. Start pulling vertical lines up from the forest mass. Use a dabbing motion to add branches to these lines, starting narrow at the top and getting wider towards the base to form pine shapes. -
Vary the Heights:
Make sure your trees are different heights. Some should poke high into the light blue mist, while others remain lower, creating depth and realism. -
Anchor the Bottom:
Fill in the very bottom edge of the paper with solid black or your darkest blue mix to ground the forest and cover any gaps between the trees.
Moon Texture
While the moon area is still damp, drop a tiny grain of table salt onto it. Let it dry completely and brush the salt off. This creates subtle craters and texture on your moon’s surface.
Step 4: Flight of the Birds
-
Draft the Flock:
Once the trees are dry, visualize where the birds will fly. A diagonal curve across the sky usually looks dynamic. I find lightly marking dots with a pencil can help spacing. -
Paint the Wings:
Using your finest detail brush (size 0 or 00) and black paint, create small ‘V’ or ‘M’ shapes. Press down slightly for the body and lift up for the thin wingtips. -
Add Variation:
Ensure the birds vary in shape—some banking left, some gliding flat, some flapping upward. This movement brings the still landscape to life. -
Final Reveal:
Wait until every part of the painting is completely dry to the touch. Carefully peel off the masking tape at a 45-degree angle to reveal your clean white borders.
Frame your moonlit landscape to enjoy a peaceful view of nature anytime you walk by
Blue Aurora Over Black Forest
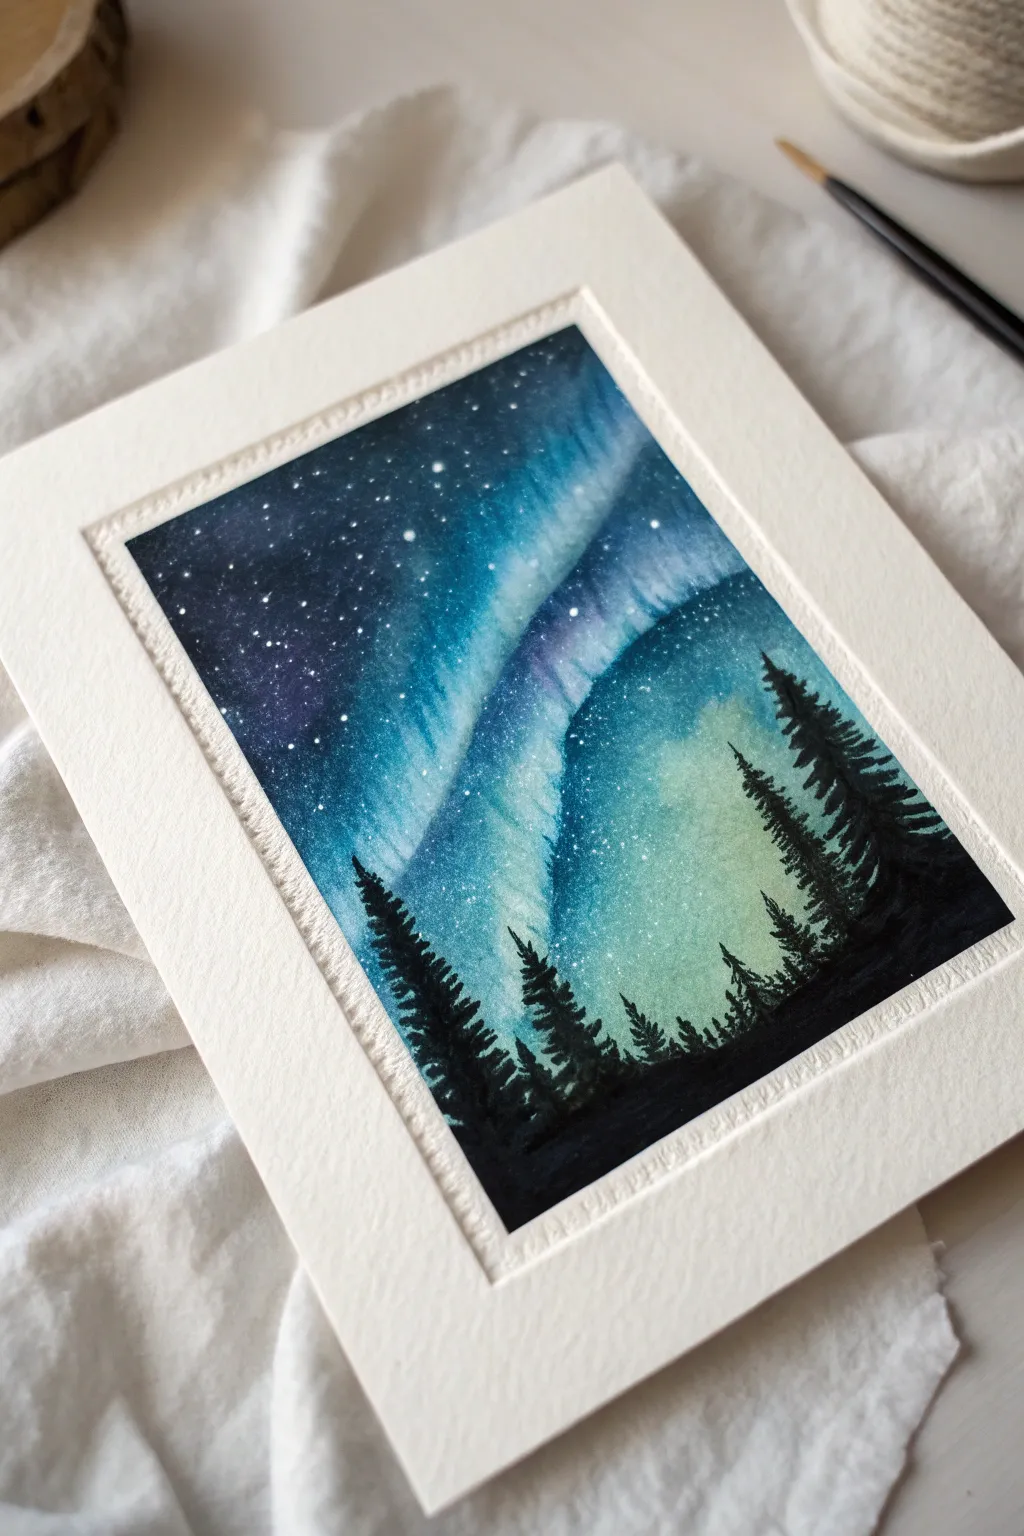
Capture the magic of the northern lights with this stunning watercolor project. By blending deep indigos with vibrant teals and a sharp black silhouette, you’ll create a striking, high-contrast night sky scene.
How-To Guide
Materials
- Cold Press Watercolor Paper (140lb/300gsm)
- Watercolor Paint (Phthalo Blue, Prussian Blue, Turquoise, Violet, Black)
- White Gouache or White Gel Pen
- Painter’s Tape
- Flat Wash Brush (3/4 inch)
- Round Brushes (Size 6 and Size 2)
- Jars of Water
- Paper Towels
- Hairdryer (Optional)
Step 1: Setting the Sky Scale
-
Secure the Paper:
Begin by taping down all four edges of your watercolor paper to a board or table. Press the tape firmly to ensure clean, crisp borders once you peel it off later. -
Pre-wet the Sky Area:
Using your large flat wash brush and clean water, apply a generous, even coat of water across the entire paper surface. The paper should glisten but not have standing puddles. -
Lay Down the Aurora Base:
While the paper is still wet, load a round brush with a vibrant Turquoise or Teal. Paint a sweeping, curved band diagonally across the center of the paper, letting the wet surface diffuse the edges naturally.
Muddy colors?
If your blue and turquoise are turning gray where they meet, you are overworking the blend. Let the wet paper do the mixing for you and stop brushing.
Step 2: Deepening the Night
-
Add Depth Around the Aurora:
Mix a strong Phthalo Blue. Apply this to the areas immediately surrounding your lighter turquoise band, blending gently where they meet so there is no hard line. -
Darken the Corners:
To create the illusion of deep space, drop concentrated Indigo or a mix of Prussian Blue and Black into the top left and top right corners. Let this pigment flow downward slightly into the mid-blue areas. -
Introduce Violet Accents:
While everything is still damp, dab small amounts of Violet into the transition zones between the deep blue and the bright teal. This adds richness and complexity to the aurora effect. -
Lift Highlights:
I like to take a clean, slightly damp brush and gently lift pigment from the center of the aurora band. This restores some whiteness and makes the lights appear to glow brighter. -
Dry Completely:
Allow the background wash to dry completely. This is crucial; if the paper is cool to the touch, it is still wet. Use a hairdryer on low heat if you strictly need to speed this up.
Level Up: Salt Texture
While the initial sky wash is still wet, sprinkle a pinch of table salt into the dark blue areas. When dry, brush it off to create starry, icy textures.
Step 3: Stars and Sparkle
-
Mix the Stars:
Dilute a small amount of white gouache with water until it reaches a creamy consistency similar to melted ice cream. -
Splatter Effect:
Load a brush with the white mixture and tap the handle against another brush over the dark blue sections of the sky. This creates a beautifully randomized field of distant stars. -
Add Large Stars:
For the brighter, closer stars, use a fine-tip paintbrush or a white gel pen to place specific white dots. Group a few together to mimic constellations.
Step 4: The Dark Forest
-
Paint the Horizon:
Switch to your smaller round brush (Size 6) and load it with concentrated Black watercolor or ink. Paint an uneven, wavy line across the bottom third of the paper to establish the ground. -
Start the Tree Trunks:
Using a fine brush (Size 2), draw thin vertical lines extending upward from the ground. Vary their heights, making some taller and some shorter for a natural look. -
Add Branches:
Starting from the top of a trunk, paint short, downward-sloping scribbles or dashes. Widen the branches as you move down the tree to create the classic conical pine shape. -
Fill the Foreground:
Once individual trees are defined, darken the mass of ground below them to ensure it is solid black, anchoring the composition. -
Dry and Reveal:
Wait for the black paint to dry completely to avoid smudging. Then, carefully peel away the painter’s tape at a 45-degree angle to reveal your crisp white border.
Frame your mini masterpiece in a white mat to really make those deep blues pop against the wall
Rainy Window Reflections
Capture the moody elegance of a rainy night with this abstract window pane effect. Using simple layering techniques, you’ll create a stunning piece where rivulets of water seem to slide down deep, dark glass.
Step-by-Step Guide
Materials
- Large canvas (e.g., 18×24 inches or larger)
- Acrylic paints: Phthalo Blue, Prussian Blue, Mars Black, Titanium White
- Wide flat brush (2-3 inch)
- Medium round brush
- Fine liner brush
- Spray bottle with water
- Sponge or rag
- Palette for mixing
- Wooden floating frame (optional, for finishing)
Step 1: Setting the Atmosphere
-
Prepare the canvas:
Start with a clean, primed canvas. If you want a smoother finish like glass, apply a coat of gesso and sand it lightly once dry. -
Mix the base darks:
On your palette, create a deep, midnight mixture using Mars Black and a touch of Prussian Blue. It should be almost black but with a cool undertone. -
Paint the upper gradient:
Using your wide flat brush, apply this dark mixture to the top third of the canvas. Use horizontal strokes for better blending later, ensuring full coverage. -
Introduce the blue:
Mix Prussian Blue with a little Phthalo Blue. While the top section is still wet, start painting the middle section, blending upwards into the black to create a smooth transition. -
Brighten the bottom:
For the bottom third, add a tiny amount of Titanium White to your blue mix to create a distinct, glowing blue. Blend this seamlessly into the middle section so there are no hard lines. -
Check the blend:
Step back and look at your gradient. It should look like a night sky or a dark window, fading from pitch black at the top to a rich electric blue at the bottom. Let this base layer dry completely.
Step 2: Creating the Rain Effect
-
Prepare a glaze:
Mix a small amount of Titanium White with water or glazing medium until it’s very thin and translucent. It should look like milky water. -
Apply vertical streaks:
Dip your wide brush into the glaze and lightly drag it vertically from top to bottom. This creates the subtle suggestion of condensation or weeping glass. -
Soften the streaks:
Before the glaze dries, use a dry, soft brush or a rag to gently wipe down some areas, making the streaks uneven and more natural. -
Mix the droplet color:
Create a mix of white with just a hint of blue. This needs to be fluid but opaque enough to stand out against the dark background. -
Create main rivulets:
Using a fine liner brush, paint thin vertical lines starting from the top. Let your hand shake slightly or vary the pressure to make the lines waver like natural water paths. -
Add gravity:
At the bottom of some lines, press slightly harder to create a small accumulation of water, mimicking how drops slide down a pane. -
The spray technique:
For scattered droplets, load a stiff brush with watered-down white paint and flick the bristles to spatter tiny dots across the upper half of the canvas. -
Enhance specific drops:
Select a few of the spattered dots and use your liner brush to extend them downwards into long, thin tails, connecting them to the vertical rhythm of the painting.
Gravity does the work
For realistic drips, hold the canvas upright and touch a loaded, watery brush to the canvas top. Let the paint naturally run down.
Step 3: Finishing Touches
-
Deepen the contrast:
If the rain lines look too bright, lightly glaze over the bottom section with a very diluted Phthalo Blue to push them back into the ‘glass’. -
Highlighting:
Add tiny dots of pure Titanium White to the top of the largest raindrops to simulate light reflecting off the water. -
Dry completely:
Allow the painting to dry overnight. The varying thicknesses of paint need to set fully before framing. -
Varnish:
Apply a high-gloss varnish. This is crucial for this piece, as it mimics the reflective quality of wet glass and deepens the dark blues. -
Frame it:
Place the artwork into a light oak floating frame. The contrast between the natural wood and the cool, dark painting enhances the modern aesthetic.
Dynamic Lighting
Add a few streaks of pale yellow or muted neon pink near the bottom to suggest city lights reflecting in the wet window.
Hang your new masterpiece near a light source to let the glossy finish catch the eye
Abstract Black-to-Blue Vignette
Capture the mysterious depths of the ocean or the vastness of space with this striking abstract painting. Using a dramatic gradient from cyan to midnight blue, this project focuses on smooth blending and directional light to create a powerful sense of movement and depth.
Detailed Instructions
Materials
- Large rectangular canvas (e.g., 24×36 or larger)
- Acrylic paints: Carbon Black, Phthalo Blue, Prussian Blue, Turquoise, Titanium White
- Large flat brush (2-3 inch)
- Medium filbert brush
- Soft blending brush (mop style)
- Water spray bottle
- Palette knife
- Mixing palette
- Floating frame (optional, for finishing)
Step 1: Setting the Composition
-
Prime the Surface:
Ensure your canvas is clean and ready. Apply a thin coat of gesso if the canvas texture is too rough, as smooth blending works best on a finer surface. -
Map the Light:
Identify your light source. For this piece, visualize a diagonal beam cutting from the top left center down toward the bottom right. Lightly sketch this ‘path of light’ with diluted white paint or chalk. -
Mix Your Base Palette:
Prepare large piles of your main colors: a deep black-blue mixture (Carbon Black + Prussian Blue), a mid-tone sea blue (Phthalo Blue + Turquoise), and a highlight color (Turquoise + White).
Step 2: Applying the Colors
-
Lay Down the Darkest Darks:
Using your large flat brush, apply the black-blue mixture heavily to the top right corner and the bottom left corner. These areas should be nearly opaque to create the vignette effect. -
Introduce the Mid-Tones:
While the dark paint is still wet, brush the Phthalo Blue mixture next to the black areas. Work diagonally, mirroring the direction of your light path. -
Establish the Light Beam:
Apply the Turquoise and White mixture through the central diagonal channel you mapped out earlier. Don’t worry about perfect edges yet; simply get the paint on the canvas. -
Initial Wet Blending:
Mist the canvas lightly with your spray bottle. Use a clean, large brush to stroke back and forth where the dark blues meet the mid-tones, blurring the harsh lines.
Muddy colors?
If your blues are turning grey or muddy during blending, stop and clean your brush. Blending wet-on-wet requires a clean tool to keep the transition from light to dark vibrant.
Step 3: Refining Texture and Depth
-
Strengthen the Gradient:
Once the first layer is tacky but not dry, go back over the transition zones. I often find adding a tiny bit of water to the brush helps pull the dark paint into the light areas more naturally. -
Create Directional Texture:
Switch to a dry filbert brush. Use long, sweeping strokes diagonally downward to mimic rays of light or rushing water currents. -
Enhance the Highlights:
Mix a purely Titanium White with just a hint of Turquoise. Apply this to the absolute center of your light beam using short, energetic strokes to create a glowing core. -
Scumbling Technique:
Take a dry brush with a very small amount of the mid-tone blue. Lightly drag it over the dark black corners. This ‘scumbling’ creates a misty, atmospheric look that softens the vignette. -
Adding Speckles:
Dampen the bristles of a small brush with white paint. Flick the bristles to create tiny, star-like specks or bubbles within the light beam area for added detail.
Add metallic shimmer
Mix a small amount of iridescent medium or silver paint into your white highlights. When the light hits the canvas, the ‘water’ will seem to sparkle.
Step 4: Finishing Touches
-
Deepen the Void:
Assess your dry painting. If the corners dried lighter than you wanted, apply a transparent glaze of Carbon Black to push them back into shadow. -
Final Smooth:
Use a soft, dry mop brush to feather out any distracting brush ridges in the highlight area, ensuring the ‘light’ looks ethereal rather than solid. -
Varnish:
Once completely dry (wait at least 24 hours), apply a satin or gloss varnish. A gloss finish works particularly well here to make the darks look wet and deep. -
Framing:
Install the canvas into a simple wooden floating frame, like the oak one shown, to act as a warm contrast against the cool blue tones.
Hang your new masterpiece in a well-lit area to let the gradients truly shine
Indigo Agate Slice Pattern
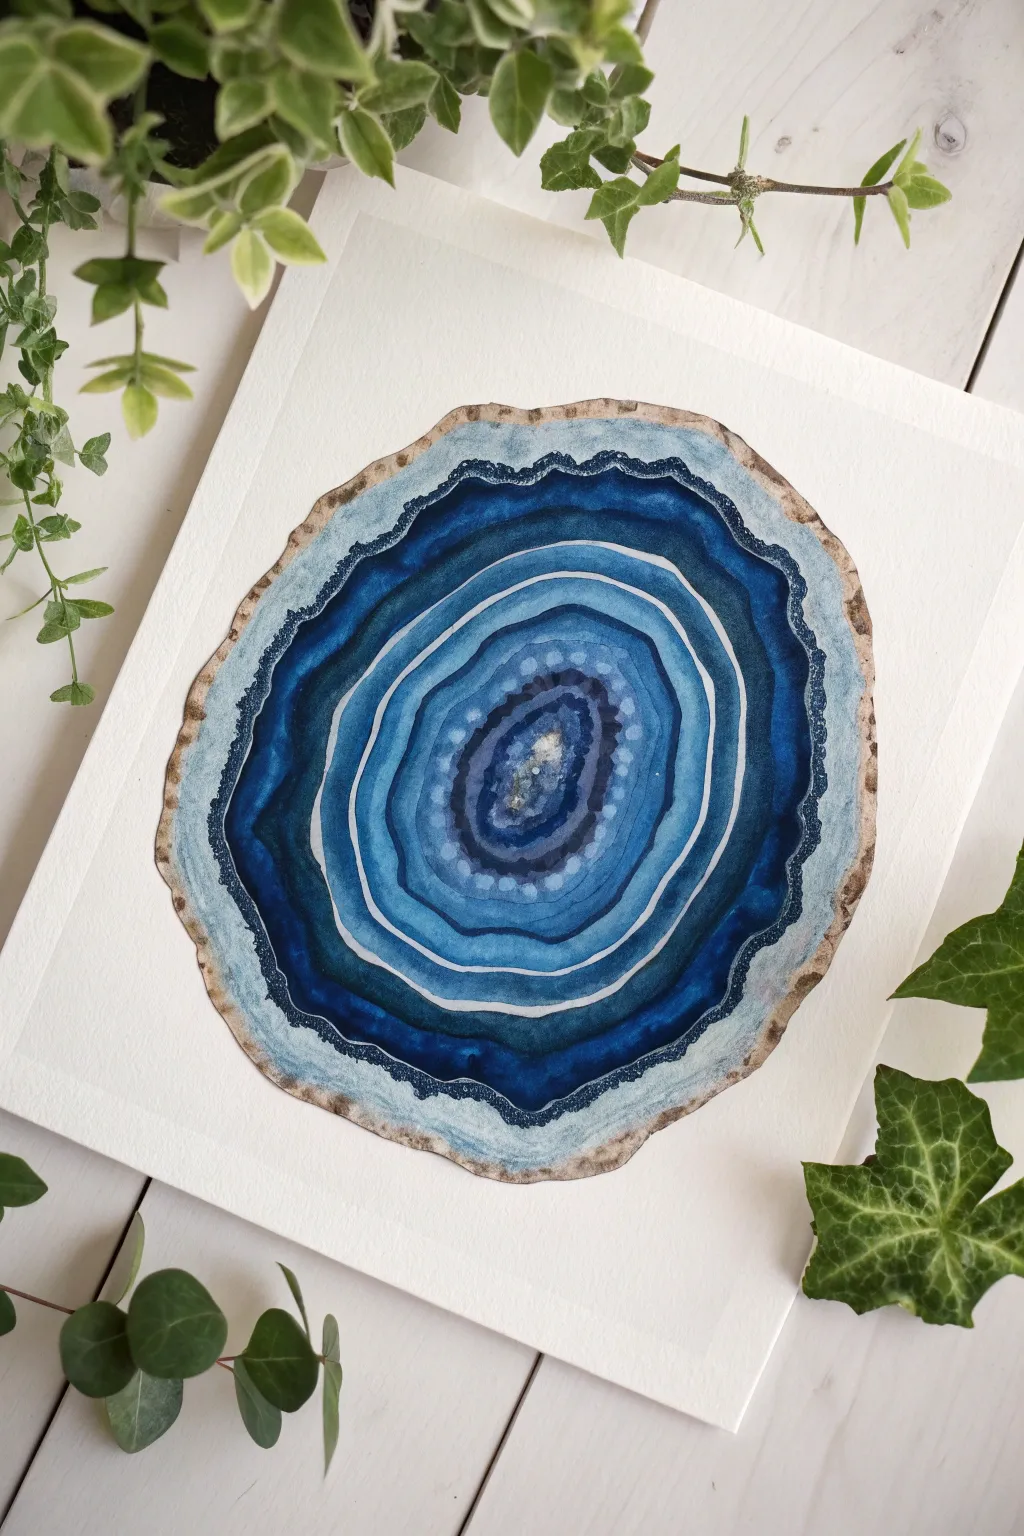
This captivating watercolor project captures the organic layers and crystalline depth of a sliced agate geode. Using a monochromatic palette of blues with strategic white space, you will build concentric rings that mimic nature’s beautiful geological formations.
How-To Guide
Materials
- Cold press watercolor paper (300 gsm or heavier)
- Watercolor paints (Indigo, Prussian Blue, Ultramarine, Burnt Umber)
- White gouache or white gel pen
- Round watercolor brushes (sizes 2, 6, and 10)
- Pencil and eraser
- Two jars of water
- Paper towels
- Palette for mixing
- Salt (optional for texture)
Step 1: Planning and Sketching
-
Outline the shape:
Begin by lightly sketching the outer perimeter of your agate slice on the watercolor paper. Agates are rarely perfect circles, so draw slightly wobbly, organic lines to create a natural, rough oval shape. -
Map the rings:
Lightly sketch the internal concentric rings. Vary the spacing between them—some bands should be wide and expansive, while others should be thin and tightly packed. Create a small, irregular oval in the very center for the crystalline core.
Salty Textures
Sprinkle table salt into wet paint on one of the wider bands. Let it dry completely before brushing it off. This creates amazing starburst textures that look just like mineral deposits.
Step 2: Painting the Core and Inner Rings
-
Paint the center crystal:
Mix a very dark, concentrated Indigo. Paint the small central core, leaving tiny jagged white spaces in the middle to represent sparkling crystals. While the paint is still damp, you can drop in a tiny touch of clear water to create a bloom effect. -
Add first light wash:
For the ring immediately surrounding the core, dilute your blue to a medium transparency. Paint this ring, carefully avoiding the wet edge of the core if you want a hard line, or letting them touch slightly for a soft bleed. -
Create the dotted band:
Around the light wash, paint a medium-dark blue ring. While wet, lift out small dots of pigment using a damp, clean brush or a paper towel corner to mimic the bubbly, cloudy inclusions often found in stones. -
Layering darker bands:
Move outward to the next set of rings. Use a saturated Prussian Blue here. Paint a wide band, but leave a thin strip of dry white paper between this new ring and the previous one. This white negative space acts as the quartz banding found in real agates. -
Softening edges:
On the outer edge of this wide dark band, use a clean, damp brush to soften the paint line, dragging the color outward slightly to create a fade rather than a hard stop.
Gold Leaf Glamour
Paint the outermost crust edge or specific inner rings with liquid gold leaf or metallic watercolor. The gold adds a luxurious shimmer that mimics polished high-end agate coasters.
Step 3: Building the Outer Layers
-
The main body:
Mix a large puddle of a slightly tealer blue, perhaps by adding a touch of green to your blue or using a specific pigment like Phthalo Blue. Paint the widest ring in your composition, varying the color intensity as you go around the circle. -
Defining separations:
As you continue adding rings outward, focus on leaving those crucial thin white channels between sections. If you accidentally paint over a white line, you can reclaim it later with opaque white gouache. -
Deep contrast ring:
Near the outer edge, paint a very thin, highly pigmented dark blue or indigo ring. I allow this line to be shaky and organic; the jittery quality adds to the realism of the stone layers. -
The crust layer:
For the outermost ring (the rock’s crust), mix Burnt Umber with a tiny bit of blue to create a neutral, rocky beige-grey. Paint this along the perimeter, letting it have a rough, jagged outer edge. -
Texturing the crust:
While the brown crust layer is wet, drop in hints of darker brown or concentrated blue in random spots to give it volume and shadow.
Step 4: Details and Finishing Touches
-
Adding texture:
Once the main blue layers are dry, look for areas that feel too flat. Glaze over them with a very watery wash of blue to deepen the color without losing the shapes underneath. -
Crystalline details:
Use a small detail brush with white gouache (or a white gel pen) to enhance the separation lines between rings. Make these lines uneven—thick in some spots and vanishing in others. -
Sparkle effect:
In the very center core or along the darkest indigo ring, add tiny white dots or hatch marks. This simulates the sparkly, crystalline texture of a geode’s interior. -
Final assessment:
Step back and check the contrast. If the darks have dried too light, go back in with your smallest brush and reinforce the deepest crevices with concentrated Indigo paint.
Allow your painting to dry completely, revealing the beautiful, sedimentary layers of your handcrafted stone
Deep-Sea Glow and Coral Shadows
Capture the serene beauty of the deep sea with this atmospheric watercolor piece. Using a monochrome palette of blues and stark black silhouettes, you will create a luminous gradient that mimics the ocean’s gentle glow.
Step-by-Step Tutorial
Materials
- Cold press watercolor paper (A5 or 5×7 inches)
- Watercolor paints (Phthalo Blue, Prussian Blue, Turquoise)
- Black ink or black gouache paint
- White gel pen or white gouache
- Masking tape
- Large flat brush or wash brush
- Small round detail brush (size 0 or 1)
- Two jars of water
- Pencil for sketching (optional)
Step 1: Creating the Gradient Background
-
Prepare your paper:
Begin by taping down all four edges of your watercolor paper to a board or table. This prevents buckling and creating a crisp, clean border for framing later. -
Wet the surface:
Using your large flat brush and clean water, apply an even layer of moisture across the entire paper surface. The paper should glisten but not have puddles sitting on top. -
Start with the lightest blue:
At the bottom-center of the paper, drop in a very watery, pale wash of Turquoise or watery Phthalo Blue. This will serve as your light source or ‘glow’ area. -
Deepen the color upwards:
Load your brush with a slightly stronger mix of Prussian Blue. Start painting from the top edge downwards, sweeping horizontally. -
Blend the transition:
While the paint is still wet, gently blend the darker top section down into the lighter middle area. Tilt your board slightly if needed to help the pigments flow naturally together. -
Add depth to the bottom:
Mix a medium-strength blue and apply it to the very bottom corners, leaving the center area light. We want a vignette effect where the light seems to emerge from the middle. -
Intensify the top edge:
For a dramatic night-sky or deep-ocean feel, add a final layer of concentrated Prussian Blue along the very top edge, blending it downwards before it dries. -
Let it dry completely:
This is crucial—wait until the paper is bone dry and flat. If you rush this steps, your black silhouettes will bleed into the blue background.
Wet-on-Wet Magic
Work quickly when blending the blue background. If the paper starts to dry, stop blending to avoiding creating ‘cauliflower’ back-run textures.
Step 2: Painting the Silhouettes
-
Outline the rocky base:
Using black ink or gouache and a medium round brush, paint an irregular, bumpy shape along the bottom edge of the paper to represent the seabed or coral reef base. -
Fill the base:
Fill in this bottom shape completely with solid black. I like to make the edges slightly soft or textured to mimic rock or dense plant matter. -
Start the main coral structure:
Switch to your fine detail brush. On the right side, draw a single vertical line that curves slightly as it rises, serving as the trunk of your main coral plant. -
Branching out:
From the main trunk, pull smaller lines outward and upward. Keep your hand loose and allow the lines to waver slightly for an organic look. -
Add secondary branches:
Add tiny V-shaped branches splitting off from your previous lines. The branches should get thinner and more delicate the higher they go. -
Create background coral:
On the left side of the paper, paint a smaller, simpler coral structure. This asymmetry creates a balanced composition without looking mirrored. -
Add smaller details:
Fill in any gaps near the bottom with small, shrubby shapes or tiny vertical strokes to suggest distant seaweed or smaller coral formations.
Step 3: Final Flourishes
-
Add the stars or bubbles:
Using a white gel pen or a tiny dot of white gouache, place small dots primarily in the upper blue area. Vary the sizes slightly for a natural effect. -
Create a constellation effect:
Cluster a few dots together and leave other areas empty, rather than spacing them all out evenly like a polka-dot pattern. -
Reveal the border:
Once the black ink is fully dry, carefully peel away the masking tape at a 45-degree angle to reveal your clean white edges.
Shaky Lines?
If your hand shakes while painting branches, embrace it! Coral and underwater plants naturally have wiggly, imperfect structures, so it adds realism.
Frame your deep-sea masterpiece in a simple white frame comfortably to let those colors pop
Black-and-Blue Animal Portrait
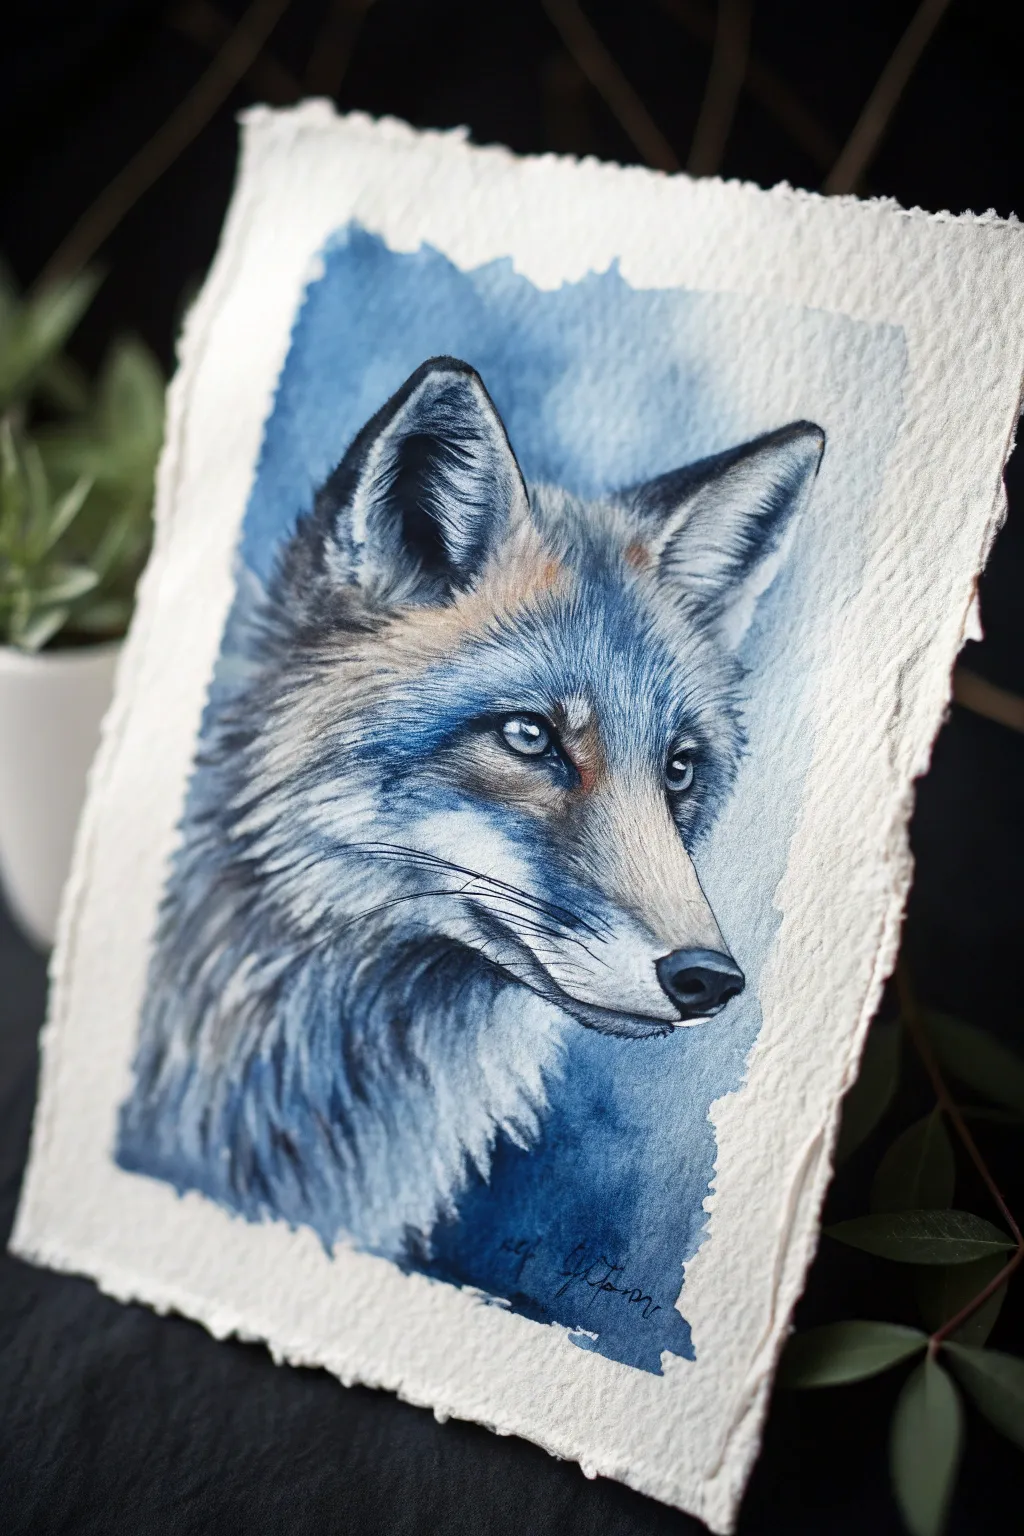
This striking monochromatic study captures the wild essence of a fox using a moody palette of indigo, Payne’s gray, and subtle earthy touches. The deckle-edged paper adds a rustic, timeless quality that frames the animal’s intense gaze perfectly.
Detailed Instructions
Materials
- Heavyweight watercolor paper with deckle edge (300gsm cold press recommended)
- Watercolor paints: Indigo, Payne’s Gray, Lamp Black, Burnt Sienna, Burnt Umber
- Synthetic sable brushes: Size 8 round (for washes) and Size 00 or 0 liner (for fur details)
- White gouache or white gel pen
- Masking fluid (optional)
- Pencil (HB) and kneaded eraser
- Two jars of water
- Paper towels
Step 1: Sketching the Form
-
Map the proportions:
Begin by lightly sketching the outline of the fox’s head on your deckle-edged paper. Keep the composition centered, leaving about an inch of negative space around the edges to let the paper’s texture shine. -
Refine the features:
Draw the almond shape of the eyes, the triangular ears, and the snout. Pay close attention to the direction of the fur growth, sketching faint guidelines to help you later with your brushstrokes. -
Protect the highlights:
If you want to preserve the purest whites of the paper for the whiskers or eye catchlights, apply a tiny amount of masking fluid now and let it dry completely. Otherwise, simply be mindful to paint around these areas.
Wet-on-Wet Control
To keep the background fuzzy but the fox sharp, dry the fox area completely with a hairdryer before re-wetting the background paper to add more blue clouds.
Step 2: The First Washes
-
Create the atmospheric background:
Mix a watery wash of Indigo and Payne’s Gray. Wet the area around the fox’s head with clean water first, then drop in your color, letting it bloom outward for that loose, unfinished cloud effect. Keep the edges ragged and natural. -
Establish the base tones:
While the background is settling, mix a very pale wash of Payne’s Gray and apply it to the shadowed side of the fox’s face. Leave the muzzle and the area around the eyes mostly white for now. -
Add warmth:
While the paper is still slightly damp (but not soaking), touch a diluted mix of Burnt Sienna into the forehead and the bridge of the nose. This subtle warmth will make the blues pop later.
Metallic Magic
Mix a tiny amount of iridescent silver medium into your final blue glaze on the neck fur. It gives a frosty, moonlit shimmer that only shows at certain angles.
Step 3: Building Depth and Texture
-
Define the ears:
Using a size 4 brush and a stronger mix of Indigo and Black, paint the interior shadows of the ears. Use quick, flicking strokes upward to mimic ear fluff. -
Paint the eyes:
For the eyes, use a mix of Burnt Umber and Indigo for the iris, keeping it transparent. Once dry, paint the pupil solid black, ensuring you leave that critical white reflection spot. -
Layering the neck fur:
Switch to your smaller round brush. Load it with a mid-tone blue-grey mix. Start at the bottom of the neck and work upward, laying down clusters of fur strokes that overlap slightly. -
Mid-tones on the face:
Deepen the shadows under the cheekbones and around the muzzle using Payne’s Gray. I find it helps to squint at your reference to see the main shapes of shadow rather than individual hairs here.
Step 4: Detailed Fur Work
-
Start the fine lines:
Switch to your refined liner brush (00 or 0). Mix a dark, concentrated Indigo-Black color with very little water. -
Directional strokes:
Paint individual hairs on the darker parts of the face—the forehead, between the ears, and the bridge of the nose. Always pull the brush in the direction the hair grows. -
Soften the transitions:
As you move toward the lighter muzzle, dilute your paint significantly. You want texture, but not harsh lines. The transition from the dark cheek to the white muzzle should be feathered. -
Darkest accents:
Paint the nose leather with solid black, leaving a tiny sliver of unpainted paper on top for a highlight to suggest wetness. Add the dark lip line.
Step 5: Final Touches
-
Whiskers and highlights:
If you used masking fluid, rub it off gently now. If not, use white gouache or a gel pen to draw long, confident sweeping curves for the whiskers. -
Enhance texturing:
Use the white gouache sparingly to add a few stray white hairs on top of the darkest blue areas of the neck and ears. This creates incredible depth. -
Review contrast:
Step back and check your values. If the background feels too light compared to the fox, add another glaze of Indigo to the corners to frame the subject. -
Signature:
Sign your work in the bottom corner using a fine aesthetic script, perhaps partially over the painted area as seen in the example, to integrate it into the piece.
Now you have a soulful animal portrait that balances precise detail with loose, expressive watercolor techniques
Moonlit Florals in Silhouette
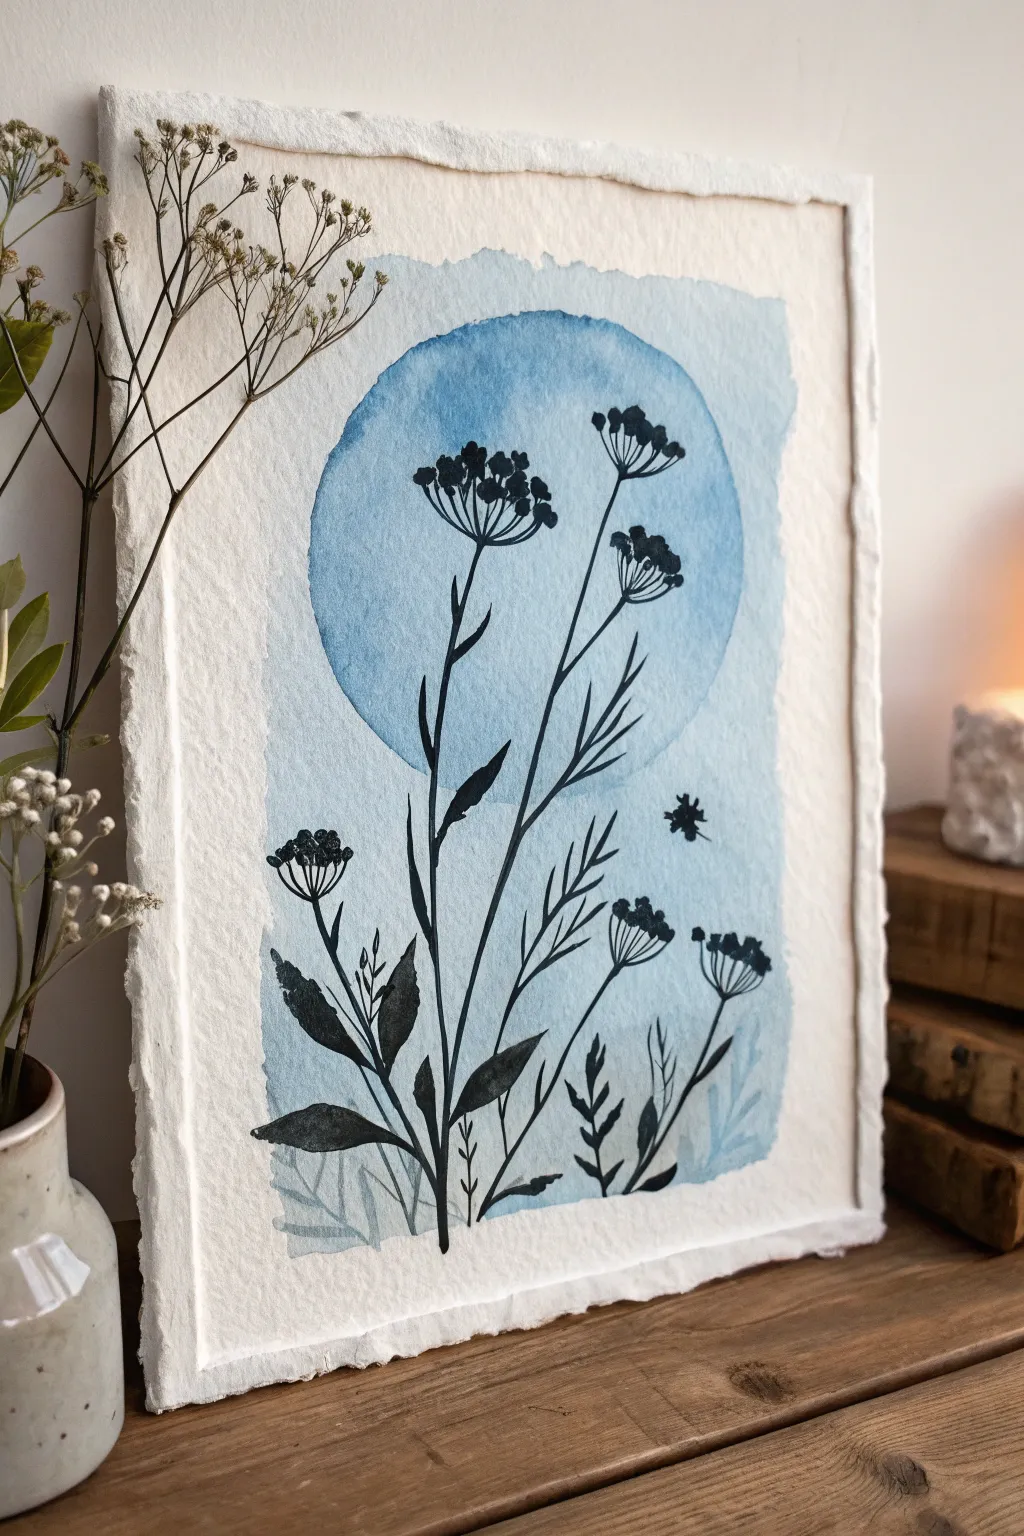
Capture the serenity of a moonlit meadow with this elegant watercolor project. By combining soft, wet-on-wet washes with crisp black silhouettes, you’ll create a striking botanical piece that feels both modern and timeless.
Step-by-Step
Materials
- Heavyweight watercolor paper (rough texture/deckled edge)
- Watercolor paints (Indigo, Prussian Blue)
- Black ink or black gouache
- Large round watercolor brush (size 10 or 12)
- Fine detail brush (size 0 or 1)
- Pencil
- Circular object for tracing (plate or bowl)
- Painter’s tape or masking tape
- Water jars
- Paper towels
Step 1: Setting the Moonlit Stage
-
Paper preparation:
Begin with a sheet of high-quality, rough-textured watercolor paper. If yours doesn’t have deckled edges, you can gently tear the edges against a ruler to create that rustic, handcrafted look shown in the example. -
Drafting the layout:
Lightly trace a large circle in the upper center of your paper using a bowl or plate. This will serve as your moon. Keep your pencil lines extremely faint so they disappear under the paint later. -
Establishing the wash area:
Decide on the rectangular area you want the background color to fill. It shouldn’t go all the way to the paper’s edge. You can mark corners lightly with a pencil or just eyeball it for a more organic feel. -
Painting the moon:
Load your large round brush with clean water and wet the inside of your traced circle. Drop in a saturated mix of Prussian Blue, letting the pigment bloom naturally. Keep the edges of the circle relatively crisp. -
Creating the background wash:
While the moon is damp but setting, wet the rectangular background area below and around the moon with clean water. The water should touch the bottom of the moon circle. -
Adding background color:
Apply a very diluted wash of the same blue to this wet rectangular area. You want this to be significantly lighter than the moon itself to create depth. Let the blue from the moon bleed slightly into this wash if it wants to. -
Subtle textures:
While the background wash is still wet, you can drop in tiny hints of darker blue or gray at the very bottom to suggest ground or shadows, but keep it minimal. Let the entire paper dry completely before moving on.
Uneven Moon Edges?
If your circle’s edge looks messy, wait for the paint to dry fully. Then, trace the original circle object again with a pen or fine brush and carefully fill the gap to sharpen the border.
Step 2: Inking the Silhouettes
-
Planning the stems:
Once the blue background is bone dry, lightly sketch the main stems of your wildflowers. Aim for an asymmetrical composition with the tallest flower reaching up into the moon. -
Painting main stems:
Switch to your black ink or gouache. Using a medium-sized brush or the tip of your large brush, paint the main vertical stems. Use a steady hand but allow natural variations in thickness; stems aren’t perfect pipes. -
Adding the leaves:
Paint the leaves attached to the lower stems. These should be almond-shaped and jagged. Press down on the brush to widen the leaf belly and lift up to create a sharp point. -
Creating the flower heads:
For the umbellifer flowers (the umbrella shapes), start by painting the central point where the tiny stems radiate from. Draw thin lines fanning upward and outward from this point. -
Detaliling the blooms:
At the end of each tiny radiating stem, dab small clusters of dots or tiny petal shapes. I like to make the ones inside the moon silhouette slightly darker or denser to contrast against the bold blue. -
Foreground elements:
Add lower, smaller plants near the bottom. Paint a few grassy blades or fern-like shapes in solid black to anchor the composition. -
Ghost leaves:
Mix a small amount of black into your blue wash water to create a transparent grey-blue. Paint a few faint leaf shapes at the very bottom, behind the black stems, to create a sense of distance. -
Final touches:
Check for balance. You might want to add a tiny ‘floating’ seed or insect silhouette in the open space on the right to fill the void. Ensure all black areas are opaque and solid.
Starry Night Effect
Before painting the black florals, flick a toothbrush loaded with white gouache or masking fluid over the dry moon to create a subtle field of stars for extra magic.
Frame your finished piece without glass or in a shadow box to show off the beautiful texture of the watercolor paper
Monochrome Ink Wash With Blue Bloom
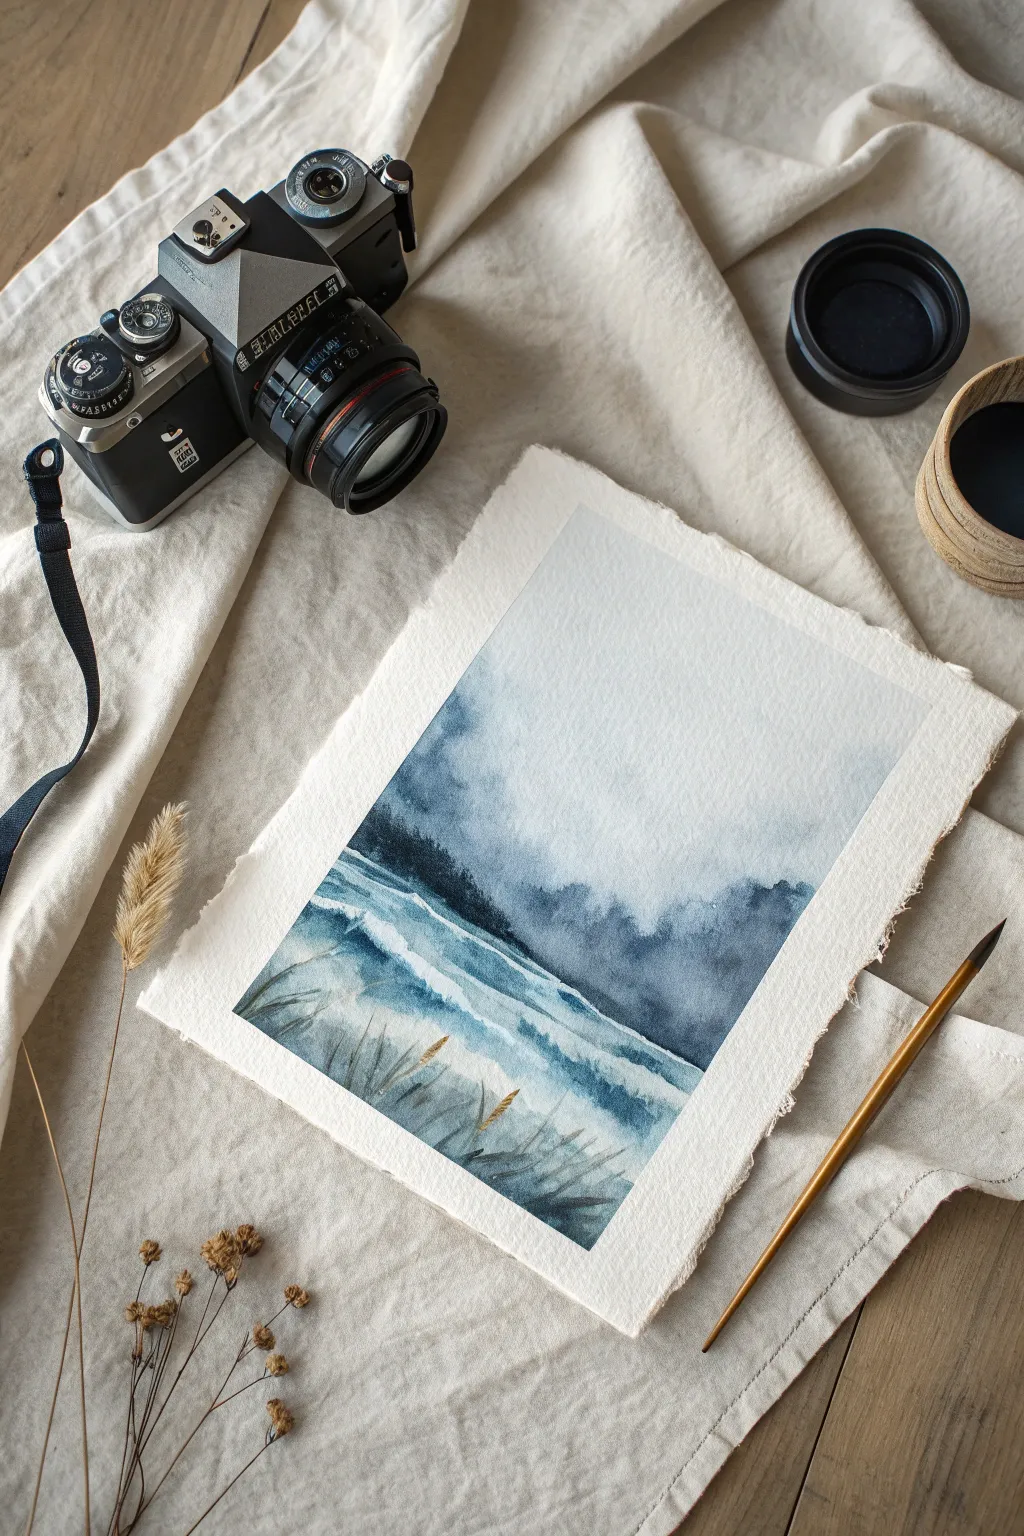
Capture the moody serenity of a foggy shoreline with this monochromatic watercolor study. Using deep indigos and Payne’s gray, you’ll explore the delicate balance between wet-on-wet diffusion and sharp, dry-brush details.
How-To Guide
Materials
- Cold press watercolor paper (300 gsm or heavier), preferably with deckled edges
- Watercolor paints: Indigo, Payne’s Gray, Prussian Blue
- Large wash brush (size 10-12, round or mop)
- Medium round brush (size 6)
- Fine detail brush (size 2 or rigger)
- Masking fluid (optional)
- Jar of clean water
- Paper towel or rag
- Mixing palette
- Painter’s tape or board for mounting
Step 1: Setting the Atmosphere
-
Prepare the surface:
Begin by securing your paper to a board if you aren’t using a block. Since we will be using a fair amount of water, this helps prevent buckling. If you want a clean border, tape the edges, but for the deckled look shown, leave the edges free and just tape the back. -
Wet the sky area:
Using your large clean brush, apply a generous layer of clear water to the top two-thirds of the paper. You want an even sheen, not puddles. -
Create the sky wash:
Mix a very dilute wash of Indigo and Payne’s Gray. While the paper is still glistening, drop this color into the upper sky area, letting it drift downwards naturally. Keep the horizon area almost white to suggest thick fog. -
Soft horizon line:
While the sky is damp but losing its shine (satin finish), load your medium brush with a slightly stronger mix of Indigo. Gently tap in irregular shapes along the horizon line to suggest distant trees or hills fading into the mist. -
Diffuse the edges:
If the tree shapes look too sharp, rinse your brush and soften the bottom edge of that horizon line with clean water, pulling the pigment down to start forming the background of the water.
Step 2: Defining the Middle Ground
-
Wait for dampness:
Allow the initial sky wash to dry just enough that it’s no longer shiny but feels cold to the touch. This is the perfect stage for soft-but-defined shapes. -
Darker forest layer:
Mix a saturated, creamy consistency of Indigo and Prussian Blue. Paint the main tree line across the middle, varying the height to create a natural, organic silhouette. -
The bloom effect:
Creating that characteristic ‘bloom’ texture seen in the reference involves dropping clean water or very wet pigment into the drying paint of the tree line. Touch the tip of a wet brush into the dark misty areas and watch the pigment push away. -
First wave movements:
Using the side of your medium brush, sweep horizontal strokes below the tree line to indicate water. Leave gaps of white paper showing through to represent the crests of waves or foam. -
Let it dry completely:
Stop here and let the painting bone-dry. If you rush the next steps, the crisp foreground details will bleed into the misty background.
Muddy Waters?
If your blues look dull or ‘muddy,’ you may be overworking the paper while it’s damp. Let layers dry completely before ignoring the urge to fix things.
Step 3: Foreground and Details
-
Texture the water:
Re-wet the water section slightly if you want soft waves, or work on dry paper for choppier water. Use a mix of Prussian Blue and Payne’s Gray to deepen the troughs between the waves. -
Dry brush highlights:
Load a brush with thick, almost dry pigment. Drag it quickly across the paper’s surface in the foreground area. The texture of the paper will catch the paint, leaving sparkling white gaps that look like sea foam. -
Adding the grasses:
Switch to your fine detail or rigger brush. Mix a dark, neutral grey-blue. Starting from the bottom edge, flick the brush upward in quick, confident strokes to create dune grasses. -
Varying grass direction:
Ensure the grasses aren’t all straight soldiers; cross them over each other and vary the lengths. Some should bend with the imaginary wind. -
Add depth to foliage:
Once the first layer of grass is dry, mix an even darker value (almost black-blue). Add a few sparse, sharp blades in the very front to create a sense of depth and perspective. -
Optional scraping:
If painting the white highlights is tricky, you can gently scratch out a few grass blades with a craft knife or fingernail while the paint is still damp to reveal the white paper underneath. -
Final assessment:
Step back and look at the values. If the tree line faded too much upon drying, add a final glaze of dark blue to the deepest shadows to anchor the composition.
Bloom Control
To get those beautiful cauliflower-like blooms in the mist, drop clean water into the paint when the surface sheen has just disappeared but the paper is still cool.
Frame your moody seascape behind glass to protect those delicate watercolor textures

Have a question or want to share your own experience? I'd love to hear from you in the comments below!