If you have a plain post or utility pole staring you down, painting it can turn that boring vertical chunk of wood or metal into real-deal outdoor art. Here are my favorite pole painting ideas that use the tall, narrow shape to your advantage—so it feels intentional, playful, and totally you.
Wraparound Floral Vines
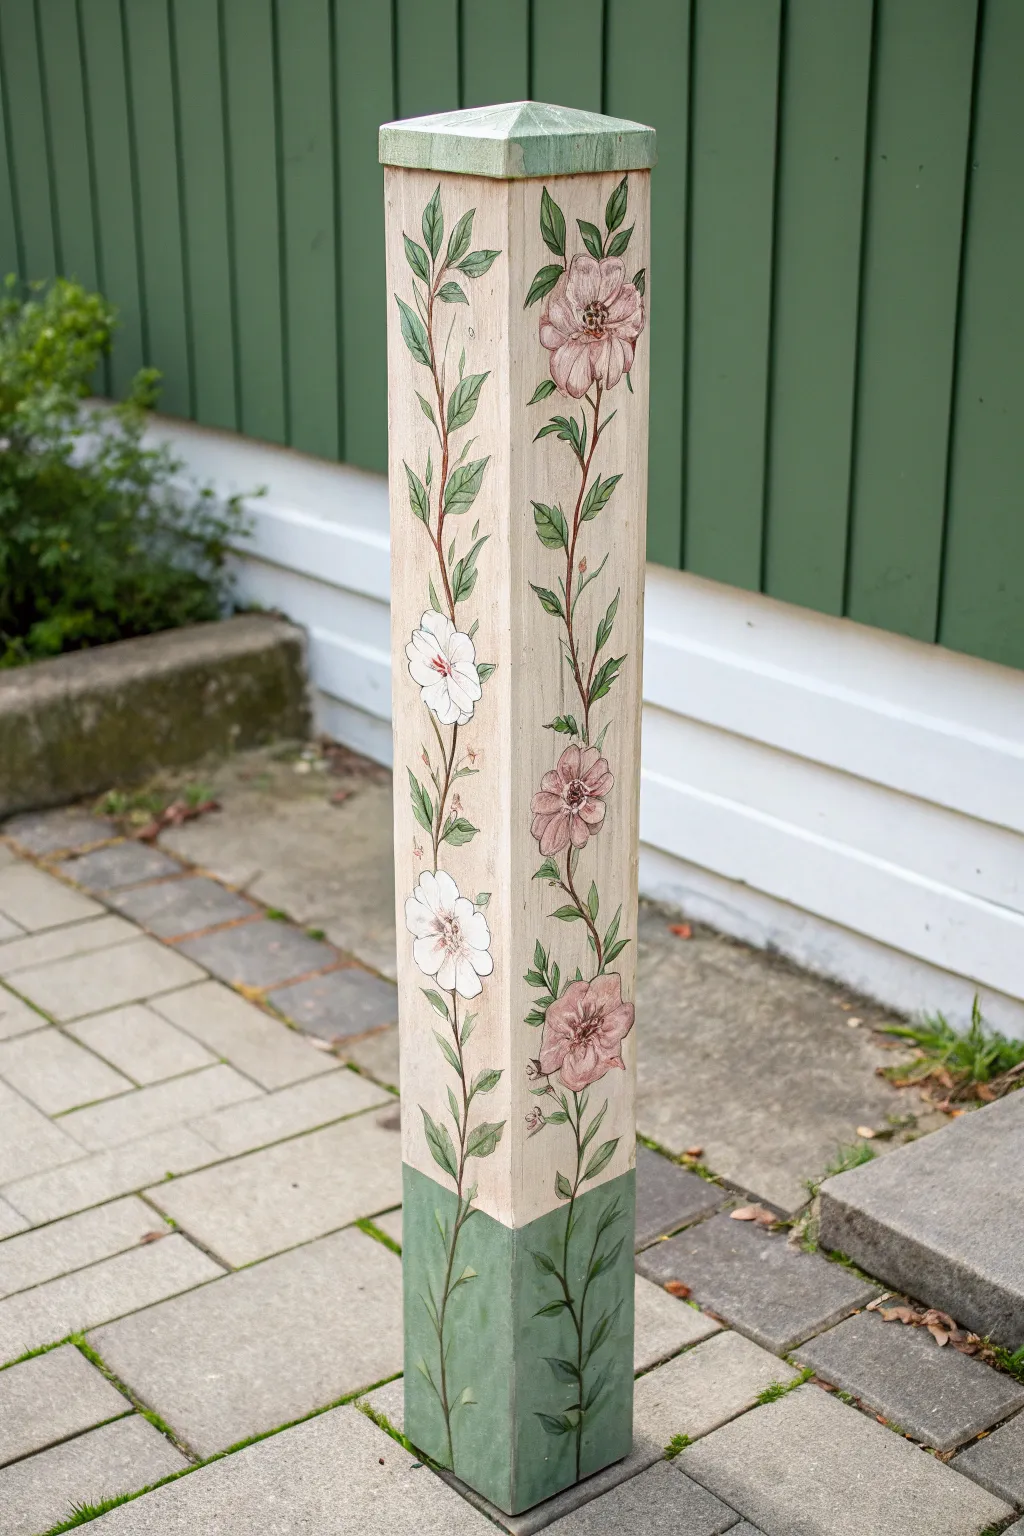
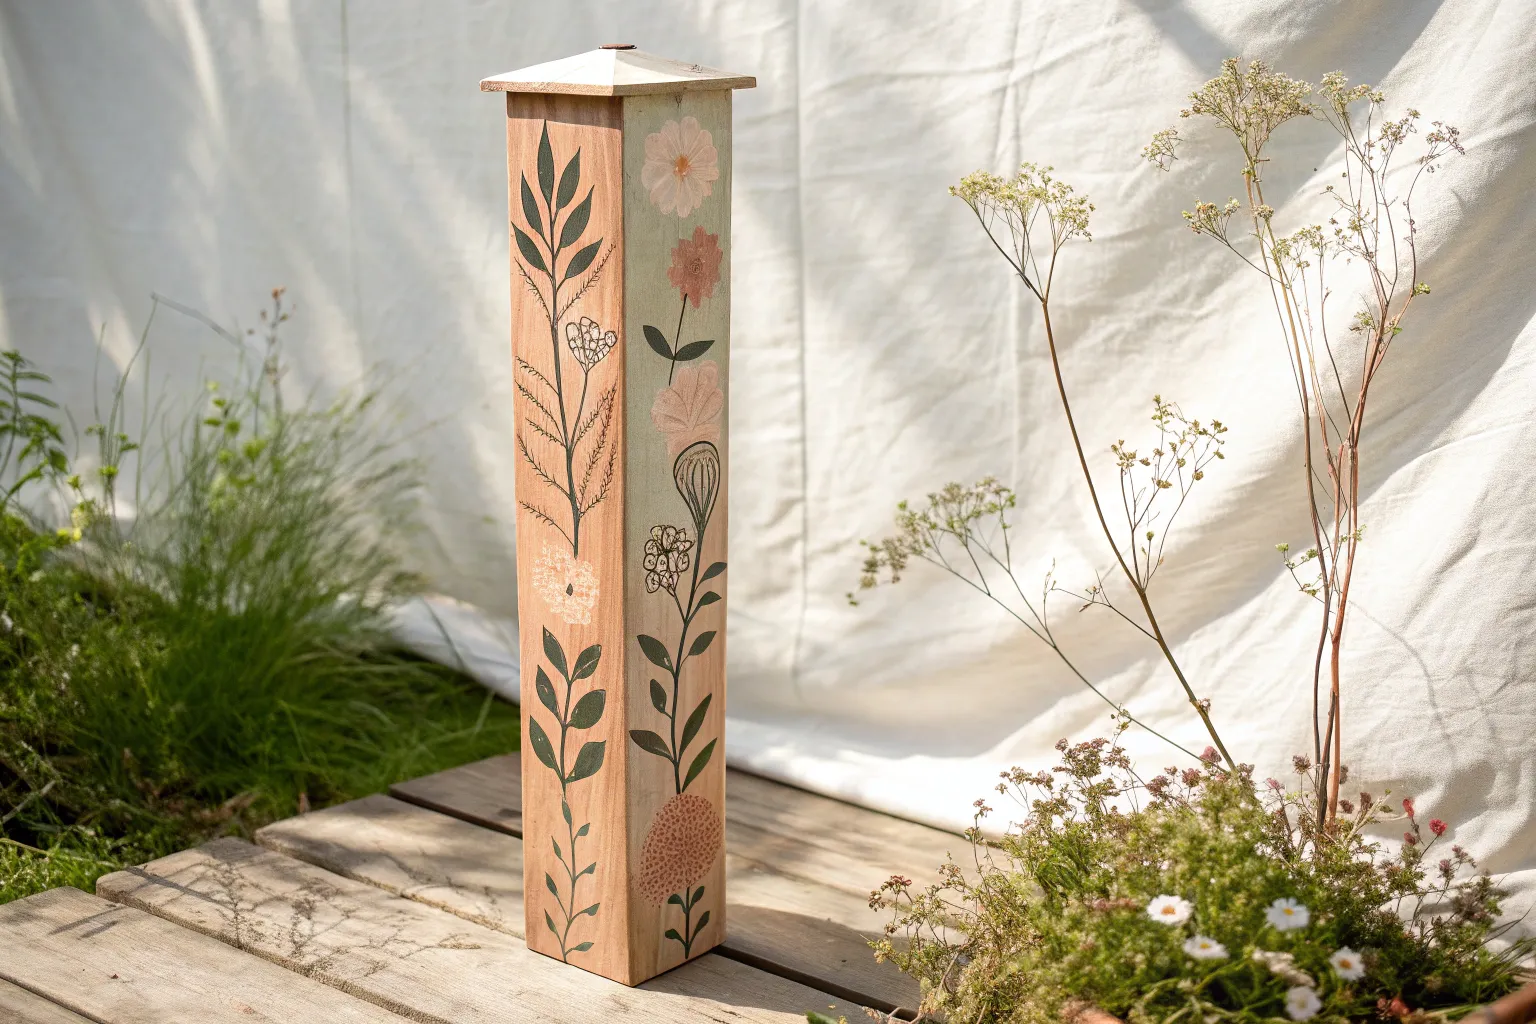
Transform a plain square timber post into a charming garden feature with this climbing floral vine design. The soft, weathered color palette and delicate botanical illustrations give the piece an elegant, aged farmhouse aesthetic.
Step-by-Step Tutorial
Materials
- Square wooden post (4×4 or 6×6) with pyramidal cap
- Sandpaper (medium and fine grit)
- Exterior primer
- Outdoor acrylic paints (Cream/Off-white, Sage Green, Rose Pink, White, Dark Brown)
- Painter’s tape
- Pencil
- Round brushes (sizes 2, 4, and 6)
- Flat brush (1-inch or larger for base coats)
- Fine liner brush (size 0 or 00)
- Clear matte exterior sealant
Step 1: Preparation & Base Painting
-
Surface Prep:
Begin by sanding the entire wooden post to remove any rough splinters or previous finishes. Start with medium grit and finish with fine grit for a smooth painting surface. Wipe away all dust with a damp cloth. -
Priming:
Apply a coat of exterior primer to the entire post, including the cap. Let this dry completely according to the manufacturer’s instructions to ensure your topcoats adhere properly. -
Bg – Cream Section:
Using your large flat brush, paint the main body of the post with the cream or off-white paint. You may need two coats for solid coverage. Leave the bottom 12 inches and the top cap unpainted for now, or paint over them if you plan to layer the green on top. -
Taping Off:
Once the cream paint is fully dry, use painter’s tape to mark a straight horizontal line about 10-12 inches from the bottom. This will create a crisp division for the green base. -
Bg – Green Accents:
Paint the bottom section below your tape line and the pyramidal cap at the very top with sage green paint. I find adding a tiny drop of brown to the green helps achieve that weathered, earthy tone seen in the photo. -
Distressing (Optional):
If you want a rustic look, lightly sand the edges of the post and the cap after the paint dries to reveal a bit of the wood or primer underneath. Peel off the painter’s tape carefully.
Wobbly Lines?
If your vine stems look shaky, don’t worry. Just thicken the line slightly in the wobbly areas to look like natural knots or bark texture on the vine.
Step 2: Sketching & Vine Structure
-
Penciling the Path:
Lightly sketch a winding vine path up the center of each face of the post with a pencil. Make the line undulate gently in S-curves rather than a straight line to look organic. -
Painting the Stems:
Mix a dark brown with a touch of green to create a woody stem color. Using a size 4 round brush, paint over your pencil line. Continue the stem straight down into the green base section so it looks like it’s growing from the ground. -
Adding Leaf Shapes:
Along the main stem, paint almond-shaped leaves using the sage green. Vary the angles and sizes. Place leaves in pairs or alternating patterns, extending them on small stems branching off the main vine. -
Highlighting Leaves:
While the green on the leaves is still slightly tacky, blend in a tiny bit of white or lighter green on one side of each leaf to create dimension and a sense of light hitting the foliage.
Step 3: Floral Details
-
Blocking in Flowers:
Choose two main flower types for variety. On one side, paint 3-4 large, five-petaled flowers using rose pink. On the adjacent side, paint similar shapes in white. Space them out vertically along the vine. -
Layering Petals:
For the pink flowers, mix a darker rose shade and paint thin lines radiating from the center of each petal outward to create texture. For white flowers, use a very light grey or cream to define the overlapping petals. -
Defining Centers:
Use your fine liner brush and dark brown paint to stipple small dots in the center of the pink flowers. For the white flowers, add a small reddish or yellow center to make them pop. -
Fine Details:
Switch to your smallest liner brush (size 0). Mix a very fluid dark brown paint (add a drop of water if needed) and outline the leaves and petals very loosely. The lines shouldn’t be perfect; broken lines add to the illustrative style. -
Leaf Veins:
With the same liner brush and dark mixture, paint a central vein and delicate side veins on each leaf. Keep your hand light to ensure the lines remain thin. -
Base Shadows:
On the bottom green section, paint faint shadows behind the stems using a darker green. This subtler detail adds depth to the base where the ‘plants’ originate.
Variant Visuals
Try alternating the background colors on different sides—like cream on two sides and a soft blue on the others—for a unique, multi-view garden surprise.
Step 4: Finishing Touches
-
Cleanup:
Check the entire piece for any pencil marks still visible and erase them gently. Touch up any background cream paint if you accidentally smudged it. -
Sealing:
Apply at least two coats of clear matte exterior sealant to the entire post. This is crucial to protect your artwork from rain, sun, and dirt.
Place your finished artwork along a garden path or driveway to welcome guests with enduring blooms

Crisp Classic Stripes
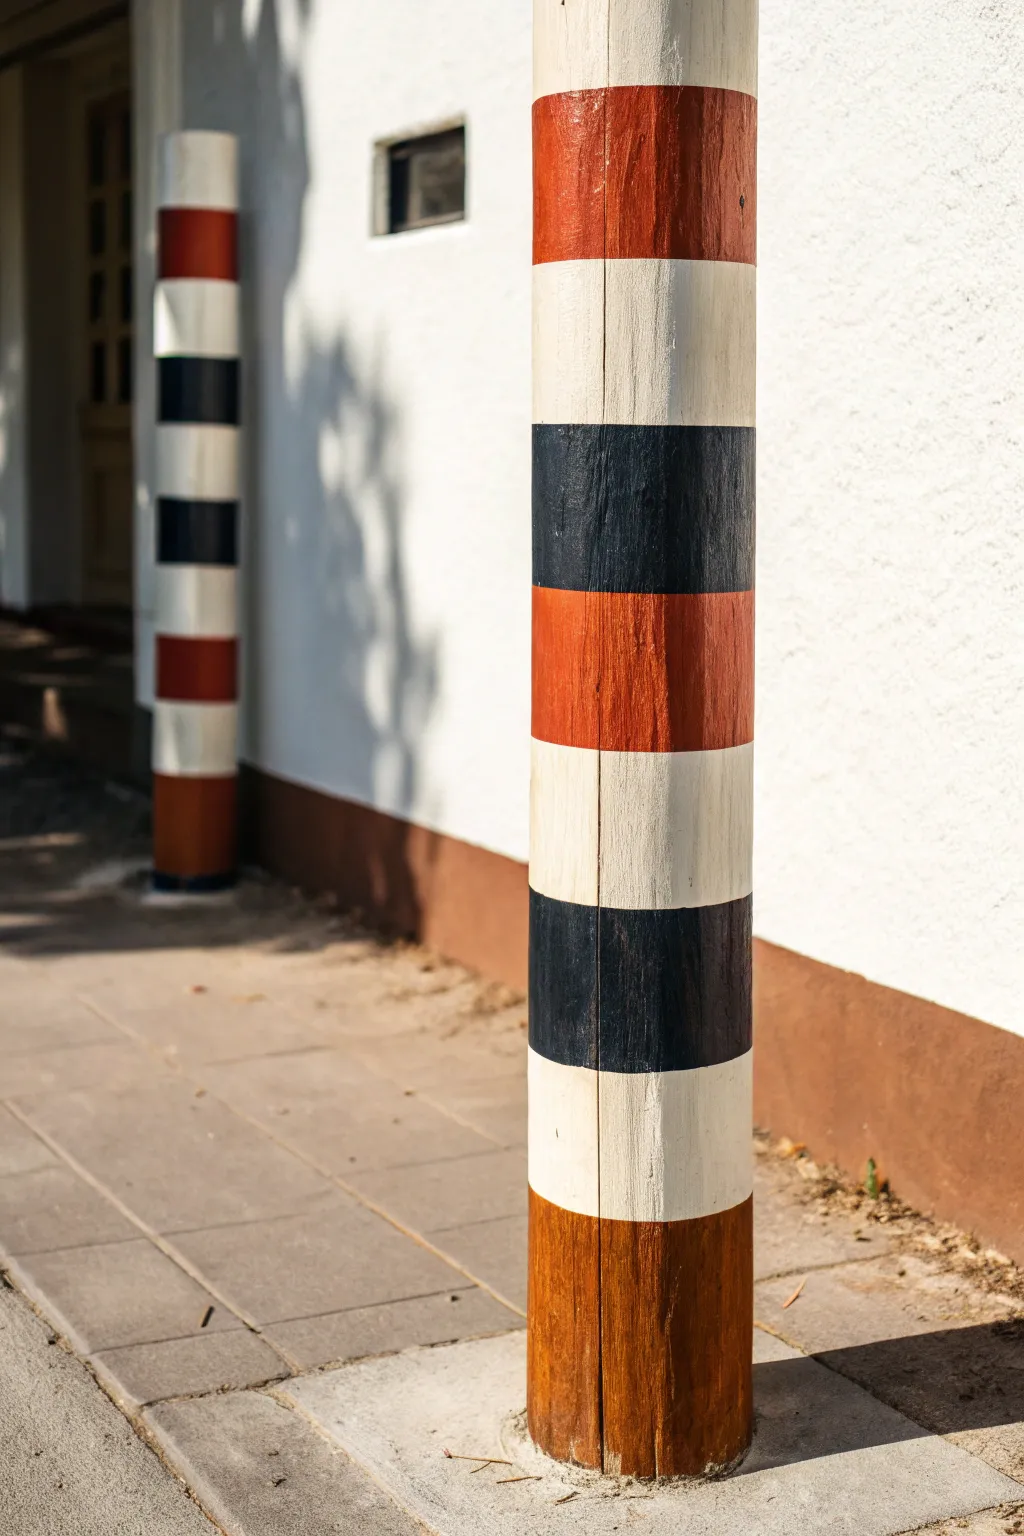
Transform a plain wooden post into a piece of structured architectural decor with this timeless striped pattern. The bold combination of burnt orange, navy blue, and cream creates a striking, nautical feel that adds instant curb appeal and character to any entryway.
How-To Guide
Materials
- Wooden post or pole (existing or new timber)
- Exterior wood primer
- Exterior acrylic latex paint (Cream/Off-white)
- Exterior acrylic latex paint (Burnt Orange/Terracotta)
- Exterior acrylic latex paint (Navy Blue/Black)
- Painter’s tape (high-quality, 1.5-inch or 2-inch width)
- Measuring tape
- Pencil
- Sandpaper (80 and 120 grit)
- Clean rags or tack cloth
- Small roller (4-inch) with smooth nap
- Angled sash brush (2-inch)
- Drop cloths
Step 1: Preparation and Priming
-
Assess the surface:
Begin by inspecting your wooden pole for any profound cracks or structural damage that needs repair before painting. -
Sand the wood structure:
Using 80-grit sandpaper, roughly sand the entire pole to remove old loose paint or splinters. Follow up with 120-grit sandpaper to create a smoother surface that will accept paint more evenly. -
Clean the surface:
Wipe down the entire pole with a damp rag or tack cloth to remove all sawdust. Any dust left behind will prevent the tape from sticking properly later. -
Apply the primer:
Coat the entire pole with a high-quality exterior wood primer. This step seals the wood and ensures your topcoats will be vibrant and long-lasting. -
Dry thoroughly:
Allow the primer to dry completely according to the manufacturer’s instructions. If the grain raised during priming, give it a very light scuff sand.
Seal the Deal
Before painting your color, brush a tiny amount of the *base* color (cream) over the tape edge. This seals the gap, so any bleed is invisible!
Step 2: Base Coat Application
-
Apply the lightest color:
Paint the entire pole with your cream or off-white paint. I find it much easier to paint the whole thing one color rather than trying to paint individual white stripes later. -
Add a second coat:
Once the first coat is dry to the touch, apply a second coat of the cream paint to ensure solid, opaque coverage without any wood grain showing through. -
Let it cure:
This is crucial: let the base coat cure for at least 24 hours. The paint needs to be hard enough to withstand having tape pulled off it without peeling.
Step 3: Measuring and Taping
-
Determine stripe width:
Decide on a uniform height for your stripes. Based on the photo, these sections look to be about 6 to 8 inches tall. -
Mark the intervals:
Using your measuring tape and pencil, make small tick marks vertically up the pole at your chosen interval (e.g., every 8 inches). -
Tape the boundaries:
Wrap painter’s tape around the pole at your marks. Remember to place the tape on the *outside* of the area you intend to paint, protecting the white stripes. -
Seal the edges:
Run your fingernail or a credit card firmly along the edge of the tape to ensure a tight seal. This prevents paint bleed-under. -
Plan your pattern:
Mark the sections to be painted with a tiny piece of tape or a light ‘O’ (orange) and ‘B’ (blue) in pencil so you don’t accidentally paint the wrong section.
Metallic Accent
Add a thin pinstripe of metallic gold or copper paint between the major color blocks for an elegant, high-end architectural finish.
Step 4: Applying Color
-
Paint the Orange stripes:
Using a clean brush or small roller, fill in the sections designated for the burnt orange color. Apply thin coats to avoid drips. -
Paint the Blue stripes:
Similarly, fill in the navy blue (or black) sections. Be careful not to overload your brush near the tape edge. -
Apply second coats:
Wait for the first color pass to dry, then apply a second coat to both the orange and blue sections for rich, deep color saturation. -
Inspect for coverage:
Check closely for any light spots or brush strokes and touch them up while the tape is still in place. -
Remove the tape:
While the final coat is still slightly tacky (not fully dry), carefully peel off the painter’s tape at a 45-degree angle to reveal your crisp lines. -
Final touch-ups:
If any paint bled under the tape, use a tiny artist’s brush and the cream paint to correct the line once the colors are fully dry.
Enjoy the clean, rhythmic look your new striped pole brings to the space.


Soft Ombre Gradient Fade
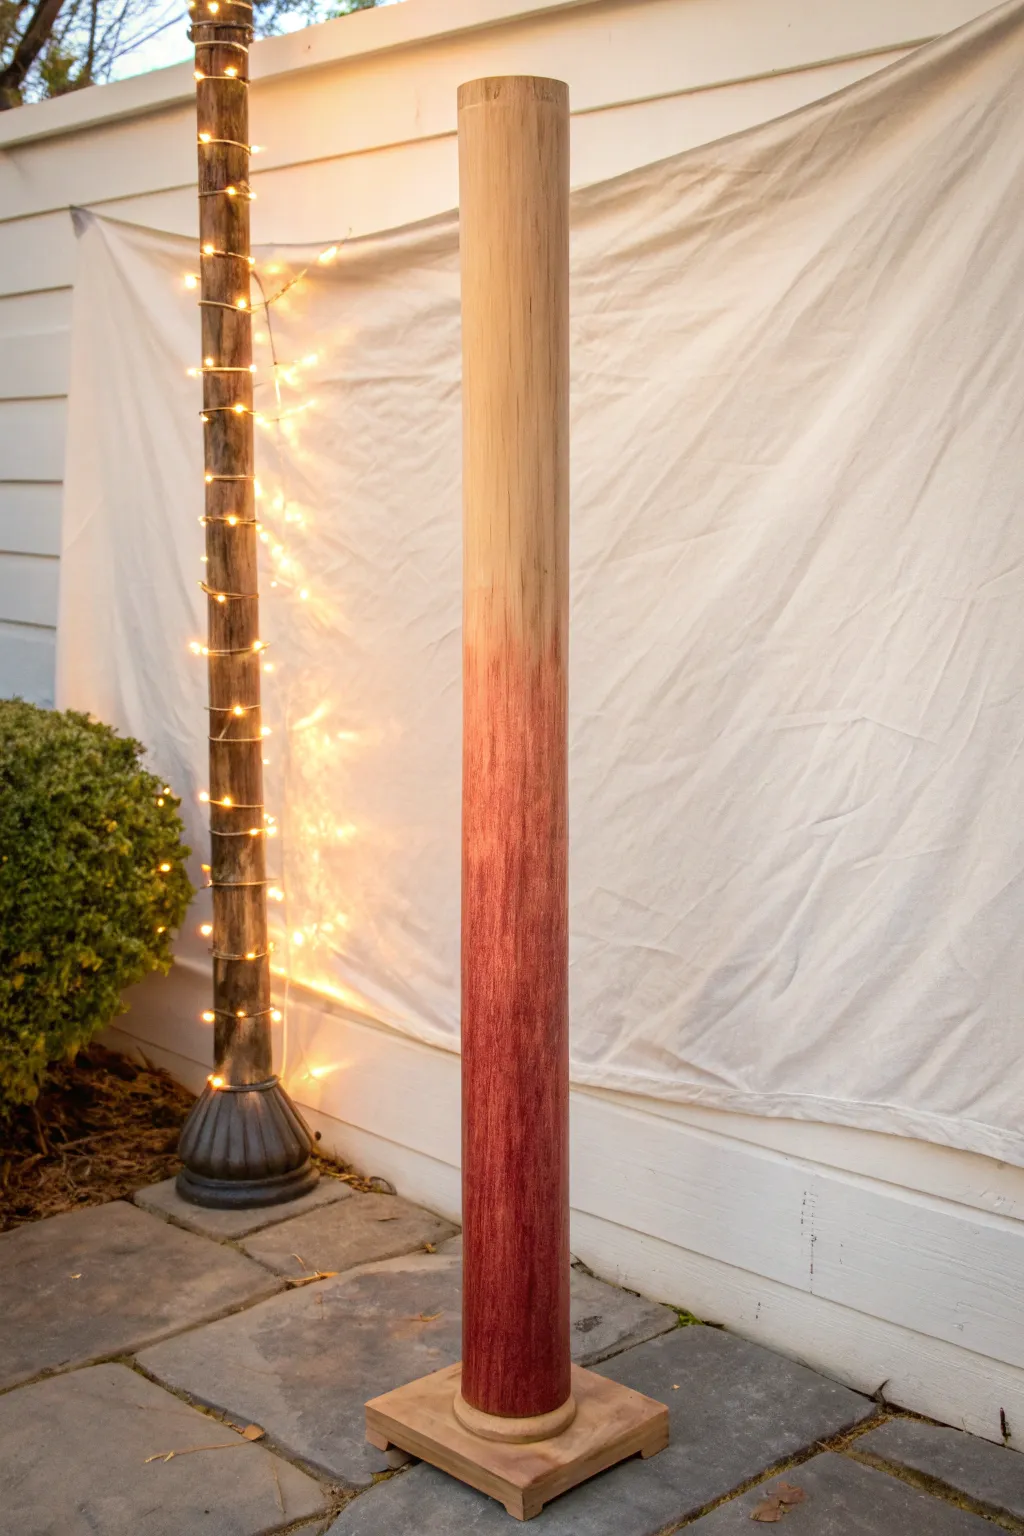
Transform a plain wooden post into a piece of modern decor with this subtle yet striking ombre technique. The design starts with a deep, earthy red at the base and gently fades into natural wood, creating a warm, pillar-like effect that mimics the glow of a sunset.
Detailed Instructions
Materials
- Wooden pole or post (cylindrical or square)
- Wooden base plinth
- Sandpaper (80, 120, and 220 grit)
- Tack cloth or clean rag
- Deep red or burgundy acrylic paint (or wood stain)
- White acrylic paint (for mixing)
- Clear matte polyurethane or varnish
- Two paintbrushes (one for application, one strictly for blending)
- Mixing palette or shallow tray
- Water spray bottle (mister)
- Painter’s tape
- Wood glue and screws (for base assembly)
Step 1: Preparing the Wood Surface
-
Initial Sanding:
Begin by sanding the entire wooden pole with 80-grit sandpaper to remove any existing finish, rough spots, or splinters. This rough pass ensures the wood is raw and ready to accept pigment. -
Smoothing the Grain:
Switch to 120-grit sandpaper and go over the pole again. Follow the direction of the wood grain to smooth out the scratches from the coarser paper. -
Final Polish:
Finish the sanding process with 220-grit sandpaper. Run your hand along the surface; it should feel silky smooth. This step is crucial because the ombre effect relies on a uniform surface for the paint to grab evenly. -
Dust Removal:
Thoroughly wipe down the pole with a tack cloth or a slightly damp rag. Any lingering sawdust will get trapped in your paint and ruin the smooth gradient. -
Base Attachment:
If your pole isn’t already attached to a base, secure it to the square wooden plinth now. Apply wood glue to the bottom of the pole, center it on the base, and secure it from underneath with screws.
Uneven Fade Fix
If your gradient looks blocky, dip a rag in water (for acrylics) or mineral spirits (for oil/stain) and vigorously rub the transition line. This lifts excess pigment and smooths the blend.
Step 2: Creating the Ombre Effect
-
Base Coat Application:
Dip your application brush into the deep red paint. Start applying it at the very bottom of the pole, covering the wood solidly up to about 12 inches from the bottom. -
Feathering Upward:
Without reloading your brush, continue dragging the paint upward. Let the brush run dry as you move higher, creating streaks rather than a solid block of color. -
Creating the Mid-Tone:
In your mixing tray, add a tiny drop of white or water to your red paint to slightly dilute the opacity. Apply this mixture starting just where your solid red block ends, overlapping slightly. -
Dry Brushing:
Take your clean, dry blending brush. While the paint is still wet, lightly whisk perpendicular to the grain where the solid color meets the bare wood. This softens the hard line. -
Adding Moisture:
Mist the transition area very lightly with your water spray bottle. You don’t want drips, just enough dampness to keep the acrylic workable for longer blending. -
Extending the Fade:
Using the almost-dry application brush, pull the faint pigment further up the pole. The goal is to have the red color slowly disappear into the natural wood grain around the halfway point. -
Refining the Transition:
Step back to look at the gradient from a distance. If the line looks too abrupt, use a damp rag to gently wipe away some pigment at the top edge, blurring it further into the raw wood. -
Texturing the Paint:
For a rustic look like the example, use a stiff-bristled brush to vertically scratch through the semi-wet paint in the middle section. This reveals tiny peeks of wood grain underneath the red fade.
Step 3: Sealing and Finishing
-
Drying Time:
Allow the paint to dry completely. Since we used water for blending, I recommend letting it sit for at least 2-3 hours to ensure all moisture has evaporated from the wood fibers. -
First Sealer Coat:
Stir your clear matte polyurethane gently. Apply a thin coat over the entire pole, starting from the unpainted top section and working your way down to the painted base. -
Light Sanding:
Once the first coat of sealer is dry, very lightly sand the surface with 220-grit paper to knock down any raised grain. Wipe away the dust. -
Final Protection:
Apply a second coat of sealant. This protects the raw wood at the top from yellowing and keeps the painted gradient vibrant and chip-resistant. -
Base Finishing:
Don’t forget to seal the wooden base plinth as well, ensuring the entire structure is protected against humidity and dust.
Level Up: Metallic Touch
Mix a tiny amount of gold or copper metallic powder into your clear sealer for the bottom 12 inches. It adds a subtle shimmer that catches the light without overpowering the rustic look.
Now you have a stylish, custom-painted pole that brings height and warmth to any corner of your room.


Modern Color Blocking Bands
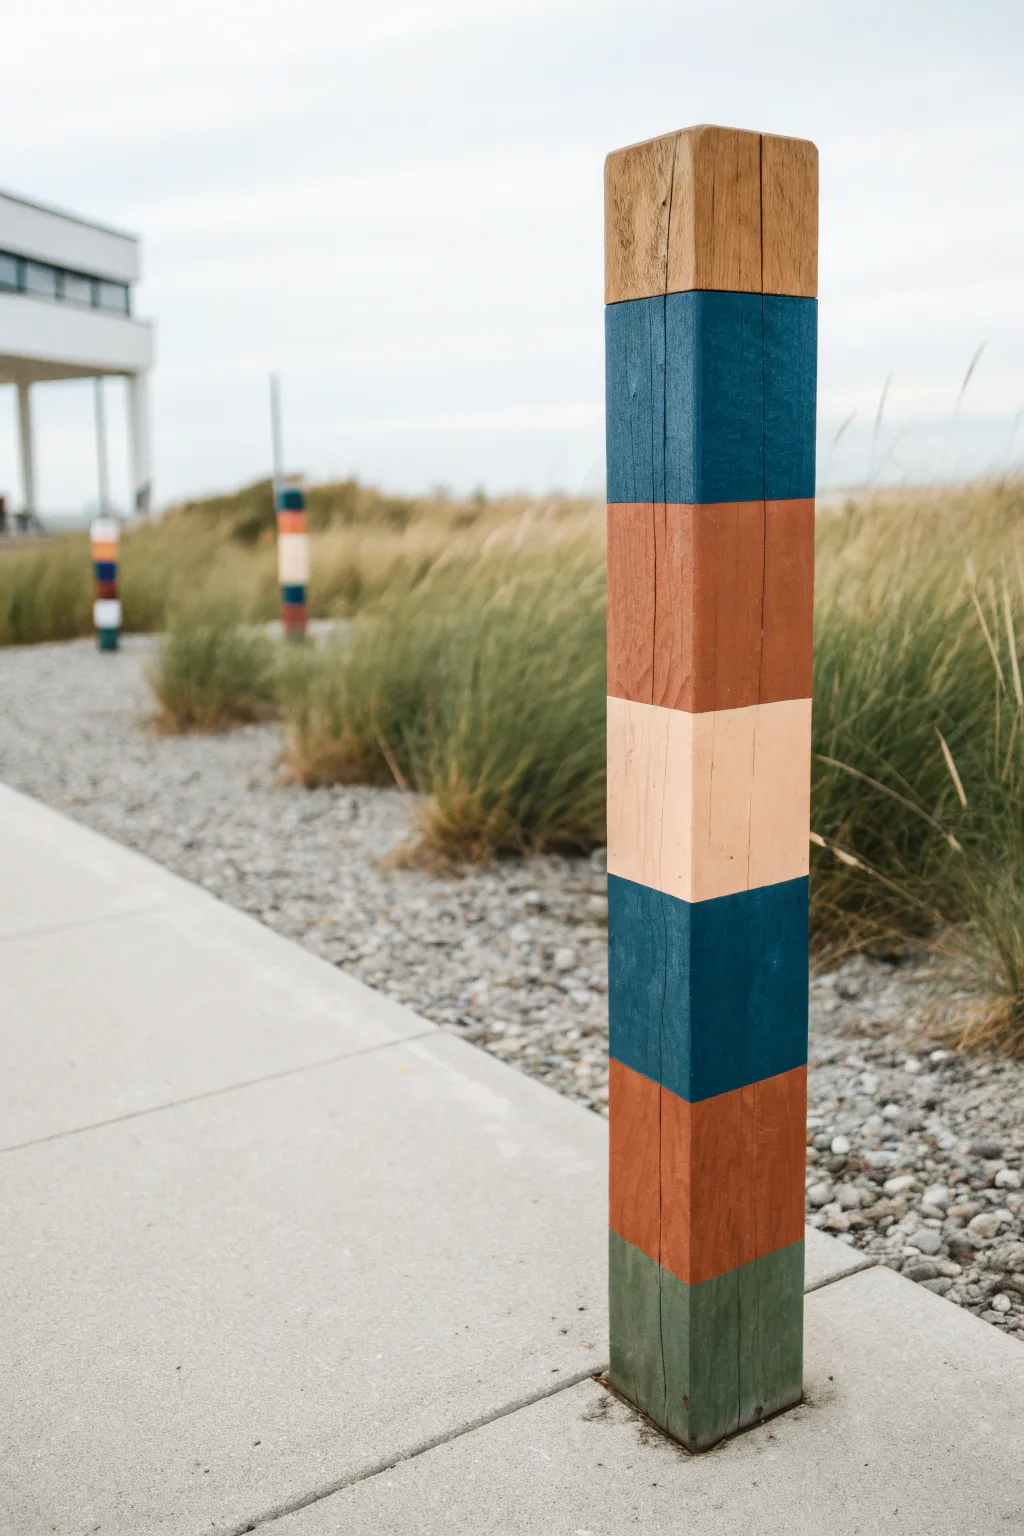
Transform ordinary square wooden posts into modern, nautical-inspired wayfinding markers or garden accents. This project builds distinct horizontal bands of earthy rust, teal, sand, and moss green for a crisp, organized aesthetic.
How-To Guide
Materials
- Square wooden post (4×4 or similar size)
- Exterior acrylic latex paint (Rust, Teal/Navy, Sand/Peachy-Beige, Moss Green)
- Painter’s tape (high-quality edging tape)
- Sandpaper (120 and 220 grit)
- Clean rag or tack cloth
- Measuring tape
- Pencil
- Small roller (foam or microfiber) for smooth application
- Angled sash brush (1.5 or 2 inch)
- Clear outdoor sealant (matte or satin finish)
Step 1: Preparation & Mapping
-
Surface Smoothing:
Begin by sanding the entire wooden post thoroughly with 120-grit sandpaper to remove rough splinters and existing finishes. -
Refining the Grain:
Follow up with a pass of 220-grit sandpaper to create a velvety smooth surface that will accept the paint evenly. -
Dust Removal:
Wipe the entire post down with a damp rag or tack cloth to ensure absolutely no sawdust remains on the surface. -
Measuring Bands:
Decide on the height of your bands; for the look in the image, aim for sections that are roughly equal squares, about 4-5 inches high. -
Marking the Lines:
Use a pencil and measuring tape to lightly mark the horizontal transition lines on all four sides of the post.
Step 2: Applying the Paint
-
Taping the First Set:
Apply painter’s tape along the OUTSIDE of the alternating sections you plan to paint first (e.g., the top natural wood section and the sand-colored middle band). -
Sealing the Tape Edge:
Run a credit card or your thumbnail firmly along the tape edge to prevent paint bleed. -
Base Color Application:
Paint the first set of alternating bands—start with the deep teal sections and the bottom rust section. -
Second Coat:
After the first coat is dry to the touch, apply a second coat to ensure rich, opaque color coverage. -
Removing First Tape:
While the paint is still slightly tacky but mostly dry, carefully peel off the tape at a 45-degree angle. -
Drying Time:
Allow these painted sections to cure fully, usually overnight, so the fresh paint isn’t damaged by the next round of taping. -
Taping the Second Set:
Apply fresh tape over the dry painted edges to protect them while you paint the remaining empty sections. -
Painting Remaining Colors:
Fill in the remaining bands with your rust, sand, and moss green paints. -
Preserving the Top:
For the top section, simply tape off the upper limit of the top blue band and leave the wood raw, or apply a clear stain if you want to keep the natural timber look shown.
Bleed-Proof Lines
Paint a thin layer of the *base* color (or clear matte medium) over the tape edge first. This seals the gap so your new color can’t sneak underneath.
Step 3: Finishing Touches
-
Final Tape Removal:
Once the second set of colors has achieved good coverage, slowly remove the tape to reveal your crisp, clean lines. -
Touch Ups:
Inspect the corners and edges; use a very small artist’s brush to fix any tiny bleeds or missed spots. -
Sealing the Project:
Apply two coats of clear, exterior-grade polyurethane or sealant over the entire post to protect the colors from UV fading and weather damage.
Vary the Widths
Instead of uniform squares, try mixing thin pinstripes with wide blocks of color for a dynamic, asymmetrical barcode effect.
Step back and admire how these simple blocks of color create a striking modern statement against the landscape
BRUSH GUIDE
The Right Brush for Every Stroke
From clean lines to bold texture — master brush choice, stroke control, and essential techniques.
Explore the Full Guide
Tape-Resist Geometric Patterns
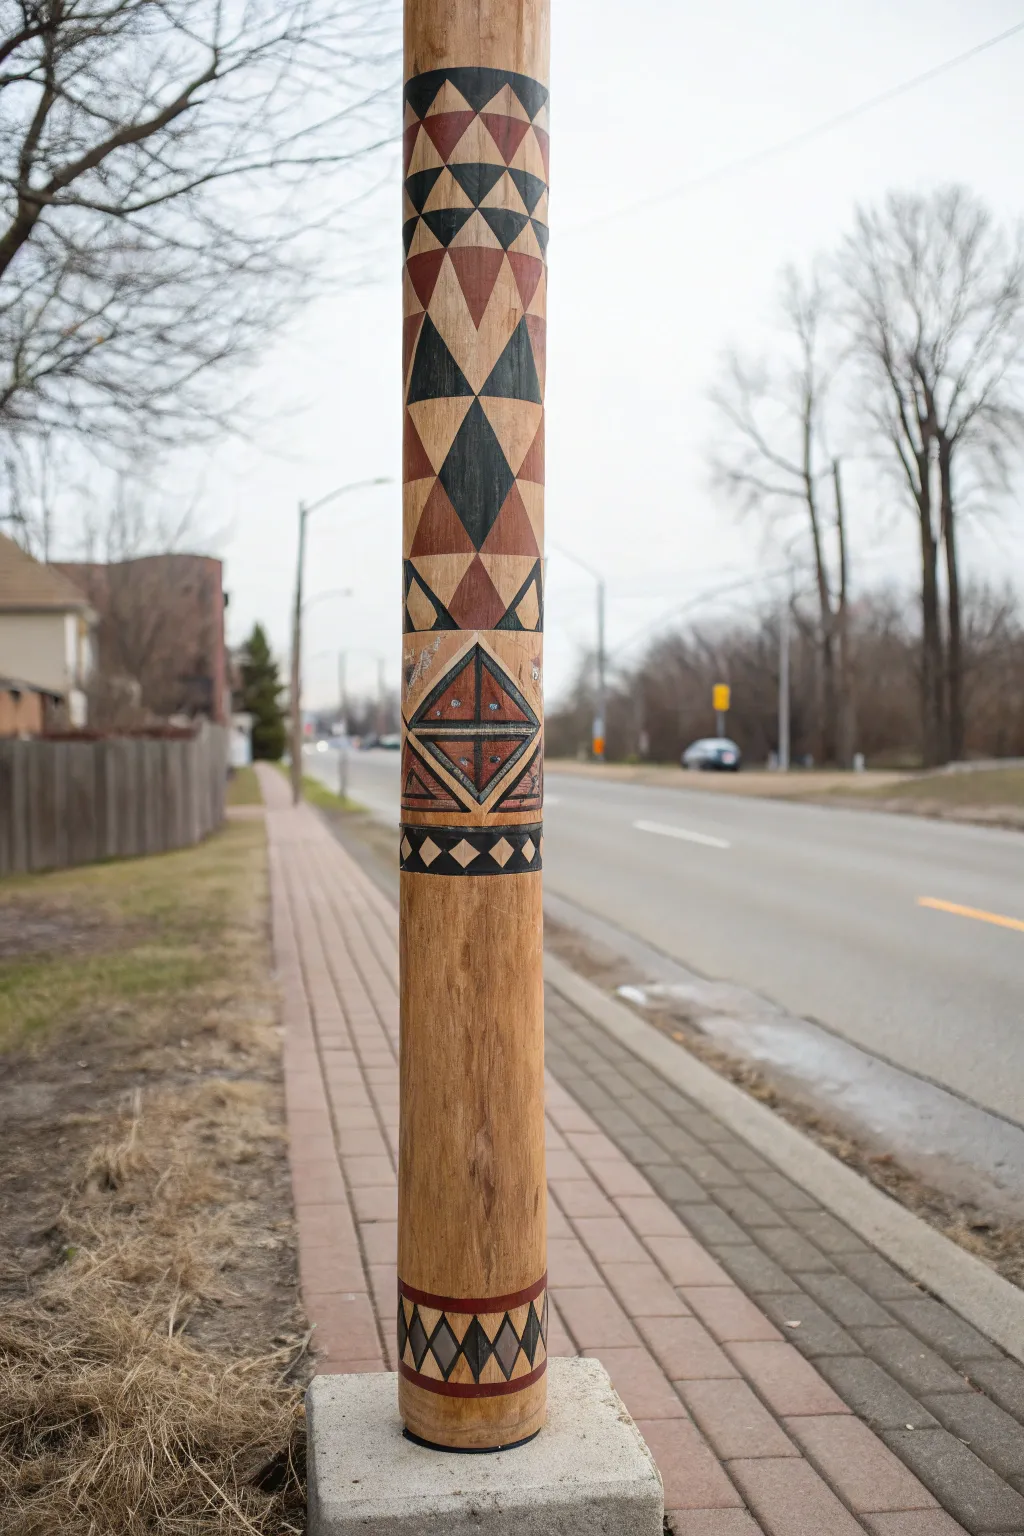
Transform a plain wooden post into a striking piece of public art using the power of triangles and a simple tape-resist method. This design features interlocking triangles in a limited palette of black, brick red, and natural wood tones, creating a bold, rhythmic totem effect.
Step-by-Step Guide
Materials
- Wooden landscaping pole or post (approx. 4-6 inches diameter)
- Sandpaper (80 and 120 grit)
- Painter’s tape (various widths: 1/4 inch, 1/2 inch, 1 inch)
- Outdoor acrylic paints (Black, Brick Red/Terracotta, Beige/Tan)
- Flat paintbrushes (1 inch and small detail brushes)
- Clear outdoor spar urethane or varnish
- Pencil
- Ruler or soft measuring tape
- Damp cloth
Step 1: Preparation and Planning
-
Clean and Sand:
Start by scrubbing your wooden pole to remove any dirt or moss. Once dry, sand the entire surface thoroughly, starting with 80 grit to remove rough patches and finishing with 120 grit for a smooth painting surface. -
Wipe Down:
Use a damp cloth to remove all sanding dust. The wood needs to be completely clean for the tape and paint to adhere properly. -
Mark Sections:
Using your soft measuring tape and a pencil, make light marks to divide the pole into horizontal bands. Referencing the photo, you’ll need a large central section for the main triangles, a distinct detailed band below it, and a bottom border near the base.
Clean Lines Secret
Before painting your color, brush a thin layer of clear matte medium over the tape edges. This seals the tape so any bleed is clear, keeping your colors razor sharp.
Step 2: Creating the Main Pattern
-
Base Triangle Layout:
For the upper section with the large triangles, use 1/4 inch painter’s tape to create a grid of diagonal lines. These lines should crisscross to form rows of diamond shapes or opposing triangles. -
Burnish the Tape:
Run your fingernail or a credit card firmly over all tape edges. This step is crucial to prevent paint from bleeding under the tape and ruining your crisp lines. -
Designating Colors:
Lightly mark inside each taped triangle with a pencil code (e.g., ‘B’ for black, ‘R’ for red) to plan your alternating pattern. Leave some triangles blank to show the natural wood tone. -
Painting the Dark Tones:
Fill in the designated black triangles first using a small flat brush. Apply thin, even coats to avoid ridges. -
Adding Warm Tones:
Once the black is dry to the touch, paint the alternating triangles with your brick red or terracotta color. I find two coats usually give the best opacity. -
Remove Tape Carefully:
While the last coat of paint is still slightly tacky, slowly peel back the tape at a 45-degree angle to reveal the sharp wooden lines underneath.
Add Texture
Mix a small amount of sand or texturing medium into the brick red paint. This gives the painted sections a rustic, unexpected tactile quality that mimics clay.
Step 3: Detailing the Central Band
-
Define the Middle Section:
Tape off two horizontal rings about 6-8 inches apart to create the central focal band. Paint bold black horizontal stripes at the top and bottom of this section. -
Create the Diamond Motif:
Inside this band, use thin tape to create a large central diamond shape, subdivided into four smaller triangles. -
Detailed Painting:
Paint the subdivisions with alternating red and black. For the tiny dots seen in the photo, use the handle end of a paintbrush dipped in black paint. -
The Zig-Zag Border:
Just below the main diamond motif, use tape to create a horizontal row of small diamonds. Paint these alternating black and natural wood for high contrast.
Step 4: Finishing and Sealing
-
Bottom Border:
Near the base of the pole, tape off a simple band. Inside this band, paint a row of elongated triangles or diamonds, alternating grey or tan with black outlines. -
Touch Ups:
Inspect your work for any paint bleeds. You can carefully scrape away small errors with a craft knife or touch them up with a tiny brush. -
Top Coat Application:
Stir your outdoor spar urethane gently to avoid bubbles. Apply a generous coat over the entire painted area and the exposed wood to protect against weather. -
Final Seal:
Allow the first coat of sealer to dry completely according to the can’s instructions, then apply a second coat for maximum durability.
Step back and admire how simple geometric shapes have created a sophisticated, lasting landmark for your garden or street
Stacked Sunflowers Up The Pole
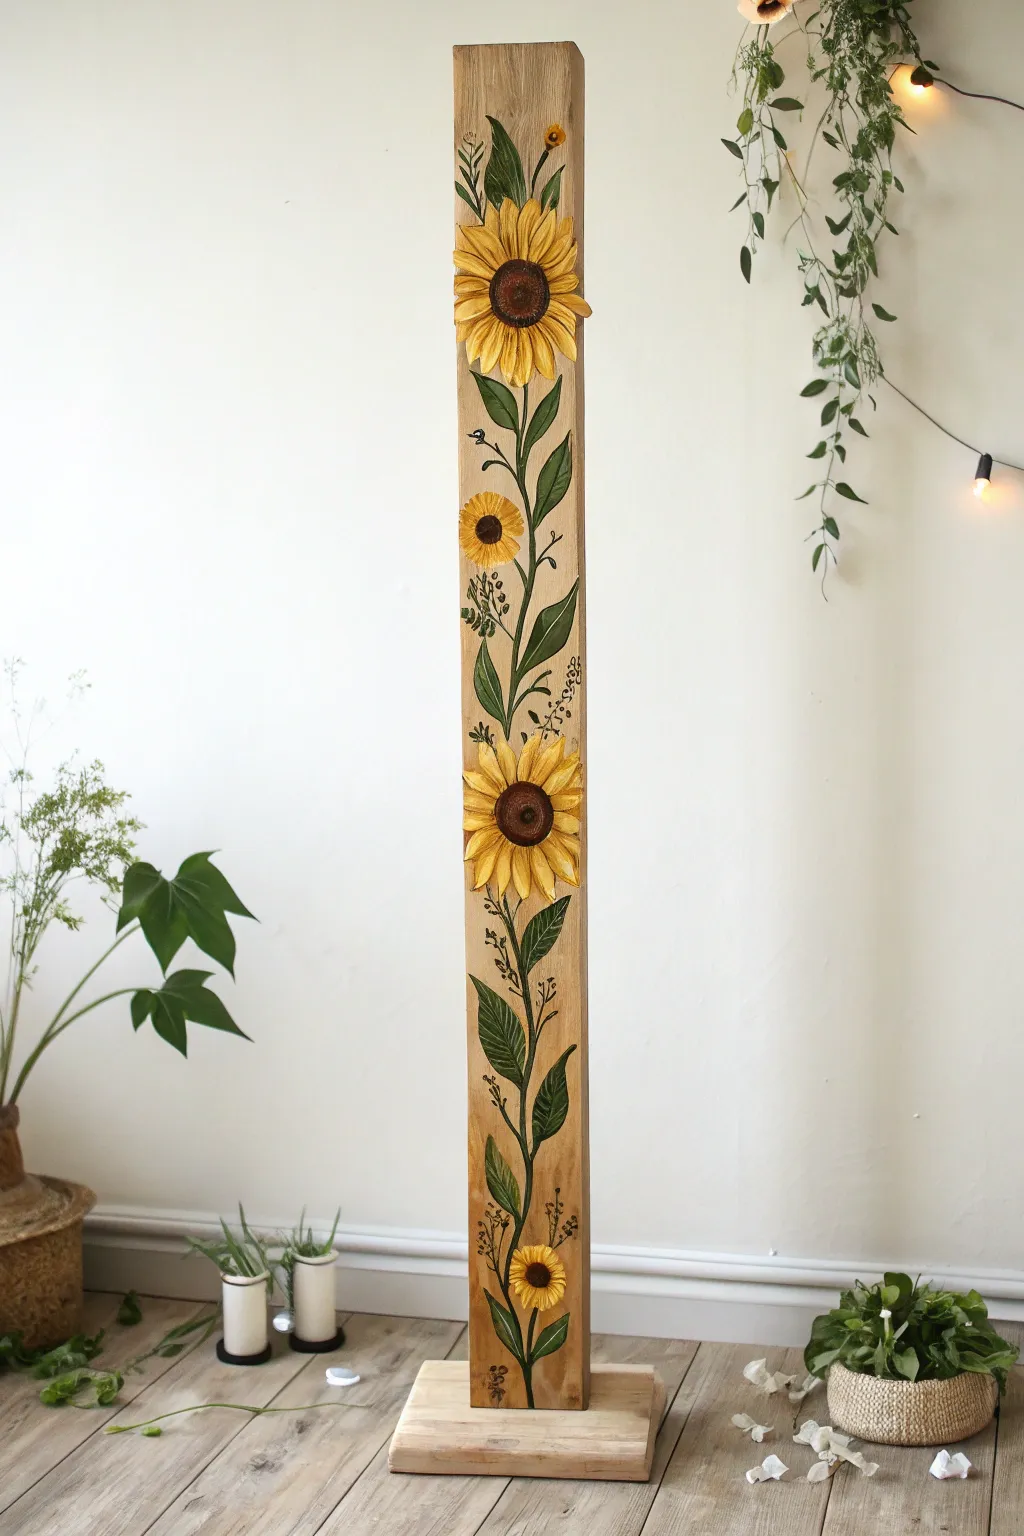
Bring a touch of perpetual summer to your porch or garden with this charming painted post featuring climbing sunflowers. This vertical design uses a simple wooden beam as a canvas, transforming it into a rustic totem of blooms and trailing vines.
Step-by-Step
Materials
- 4×4 or 6×6 wooden post (sanded)
- Wooden base plate (slightly wider than the post)
- Wood glue and long wood screws
- Acrylic craft paints (Yellow Ochre, Bright Yellow, Burnt Umber, Forest Green, Olive Green, White)
- Assorted paintbrushes (flat wash brush, round detail brush, liner brush)
- Pencil and eraser
- Clear outdoor sealer (matte or satin finish)
- Palette or paper plate
- Sandpaper (medium and fine grit)
Step 1: Preparation and Base
-
Prepare the timber:
Start by ensuring your wooden post is smooth. Sand down any rough splinters or saw marks with medium-grit sandpaper, then finish with fine-grit for a painting-ready surface. Wipe away all dust with a damp cloth. -
Attach the base:
Secure the post to the wooden base plate. Apply wood glue to the bottom of the post, center it on the base, and drive long screws up through the bottom of the base into the post for stability. -
Sketch the vine layout:
Using a pencil, lightly draw a wavy, vertical line traveling up the center of the post. This S-curve will serve as the main stem connecting your flowers. -
Placement of flowers:
Sketch four main flower circles along your vine. Place a large one near the top and another just below the center. Add two smaller blooms—one between the large ones and one near the bottom.
Natural Wood Tone
To keep the background wood looking warm but not yellow, apply a clear matte sealer before painting. This prevents the acrylics from bleeding into the grain.
Step 2: Blocking in Color
-
Base coat the stems:
Mix Forest Green with a touch of Burnt Umber to get a deep, natural stem color. Use a medium round brush to paint the main vine line you sketched earlier. -
Paint the leaves:
Add large, pointed oval leaf shapes extending from the vine. Paint these with a solid coat of Forest Green. Don’t worry about shading yet; just get the shapes blocked in. -
Flower centers:
Paint the circular centers of your sunflowers using plain Burnt Umber. Make them fairly large, as sunflower centers are prominent. -
Petal base layer:
Load a flat brush with Yellow Ochre. Paint the petals radiating outward from the brown centers. I find it easiest to paint the petals at the 12, 3, 6, and 9 o’clock positions first, then fill in the gaps.
3D Embellishments
Glue small wooden ladybugs or bee cutouts onto the petals or leaves after sealing for a playful, mixed-media element.
Step 3: Adding Depth and Detail
-
Highlight the petals:
Once the ochre layer is dry, mix Bright Yellow with a tiny bit of White. Paint shorter, focused strokes down the center of each petal to create a highlighted ridge, giving the flower dimension. -
Detail the centers:
Dip a stencil brush or an old, stiff brush into dark brown and stipple (dab repeatedly) around the outer edge of the flower center. Then, stipple a lighter golden-brown in the very middle to simulate texture. -
Leaf shading:
Mix Olive Green with a little White. Paint one half of each leaf with this lighter shade, blending slightly into the darker green to suggest light hitting the foliage. -
Veining work:
Using your thinnest liner brush and a very dark green (or black-green mixture), carefully paint fine veins onto the leaves. -
Adds filler stems:
With the liner brush and dark brown paint, add very fine, wispy twigs branching off the main vine. These will hold the smaller filler details. -
Tiny filler flowers:
Dip the handle end of a paintbrush into yellow or white paint and dot small clusters of ‘buds’ onto those wispy twigs for a delicate wildflower look.
Step 4: Finishing Touches
-
Clean up edges:
Use a small brush and a little bit of water to clean up any stray paint marks on the raw wood background. Alternatively, represent sand specific spots if needed. -
Seal the project:
Once the paint is completely cured (give it at least 24 hours), apply two to three coats of clear outdoor sealer. This protects the wood and paint from UV fading and moisture.
Place your warm and welcoming sunflower pole by the entryway to greet guests with a permanent splash of sunshine

PENCIL GUIDE
Understanding Pencil Grades from H to B
From first sketch to finished drawing — learn pencil grades, line control, and shading techniques.
Explore the Full Guide
Climbing Woodland Critters
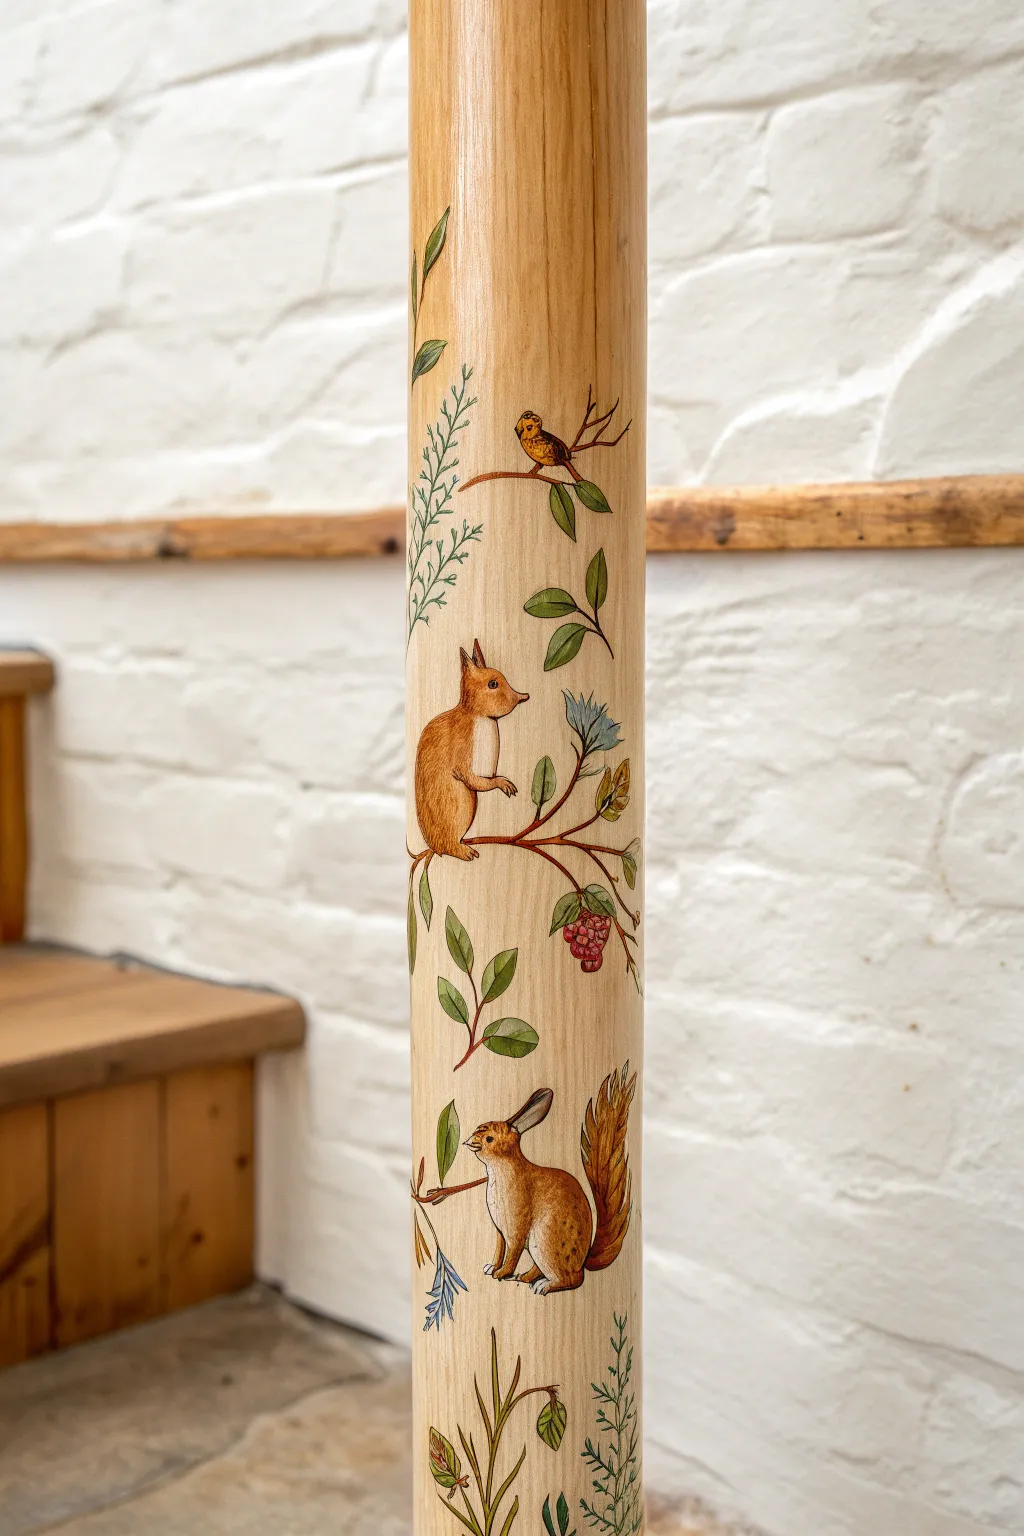
Transform a plain wooden structural pole or column into a delightful storybook scene featuring climbing squirrels and perching birds. This project celebrates the natural grain of the wood by using it as a warm, neutral backdrop for delicate botanical and animal illustrations.
How-To Guide
Materials
- Wooden pole (sanded smooth)
- Fine-grit sandpaper (220-grit)
- Pencil and eraser
- Tracing paper (optional)
- Acrylic paints (sienna, burnt umber, ochre, forest green, olive green, crimson red, white, grey)
- Fine detail brushes (sizes 0, 1, and 2)
- Matte or satin clear wood varnish
- Water container
- Palette or small plate
- Paper towels
Step 1: Preparation & Planning
-
Surface Preparation:
Begin by ensuring your wooden pole is clean and smooth. Lightly sand the area you intend to paint with 220-grit sandpaper to remove any existing glossy finish or rough spots, creating a better ‘tooth’ for the paint to grip. -
Initial Sketching:
Using a light pencil, sketch your ascending vine pattern. Draw a meandering line that wraps gently around the pole to guide the placement of branches, but keep the lines faint so they don’t show through later. -
Drafting the Animals:
Sketch the main critters along the imaginary vine. Place a squirrel near the top looking right, and perhaps another lower down looking left. Add a small bird perched on a high branch. Focus on capturing simple silhouettes first before adding details like ears or tails.
Brush Control Secret
Rest your pinky finger on the pole while painting details. This stabilizes your hand and allows for much finer control when drawing whiskers or stems.
Step 2: Painting the Flora
-
Branch Basics:
Mix a thin wash of burnt umber and water. Using a size 2 brush, paint the primary branches and twigs following your pencil lines. Keep the paint fluid so the strokes are tapered and elegant. -
Adding Ferns:
For the fern-like foliage, switch to a darker forest green. Use quick, short strokes stemming from a central vein to create airy, feather-like leaves that fill the vertical gaps. -
Painting Broad Leaves:
Mix olive green with a touch of white to create a soft, natural green. Paint the broader, oval-shaped leaves attached to the main branches. Vary the size to keep the composition dynamic. -
Stem Details:
Once the green leaves are dry, use your smallest brush (size 0) with dark brown paint to connect the leaves to the main branches with thin, delicate stems. -
Berry Accents:
Add a pop of color by painting small clusters of berries using crimson red. Create small circles grouped tightly together, perhaps hanging from a leafy branch near the middle of the composition.
Step 3: Bringing Animals to Life
-
Squirrel Base Coat:
Fill in the squirrel bodies with a warm sienna or ochre tone. I find it helpful to leave the belly and chest areas unpainted or very lightly washed, letting the natural wood show through for the lighter fur tone. -
Bird Base Coat:
Paint the small bird using a mix of ochre and brown. Keep the application fairly opaque on the wings but lighter on the breast. -
Fur Texture:
Mix a slightly darker brown than your base coat. Using a size 0 brush, add tiny, flicking dashes to the squirrels’ tails and backs to simulate fur texture. Follow the curve of the body with your strokes. -
Defining Features:
Use a very dark brown or black to carefully paint the eyes, noses, and tiny paws of the squirrels. Add a tiny white dot in the eyes for a life-like glint. -
Bird Details:
Add feather details to the bird’s wing using thin strokes of dark brown. Define the beak and eye with precision.
Seasonal Switch
Change the feel by swapping the greenery for autumn colors like burnt orange and deep maroon, or add tiny white snowflakes for a winter theme.
Step 4: Final Touches & Sealing
-
Highlighting Flora:
Mix a light lime green or yellow-green. Add tiny highlights to the tips of the leaves and ferns to simulate sunlight hitting the foliage. -
Cleaning Up:
Review the pole for any stray pencil marks. Gently erase them, being careful not to rub the fresh paint. -
Protective Coat:
Once the artwork is completely dry (wait at least 24 hours), apply a coat of clear matte or satin varnish over the painted areas to protect your work from dust and handling.
Enjoy your beautiful new vertical garden that brings a touch of nature indoors
Bold Tropical Leaf Wrap
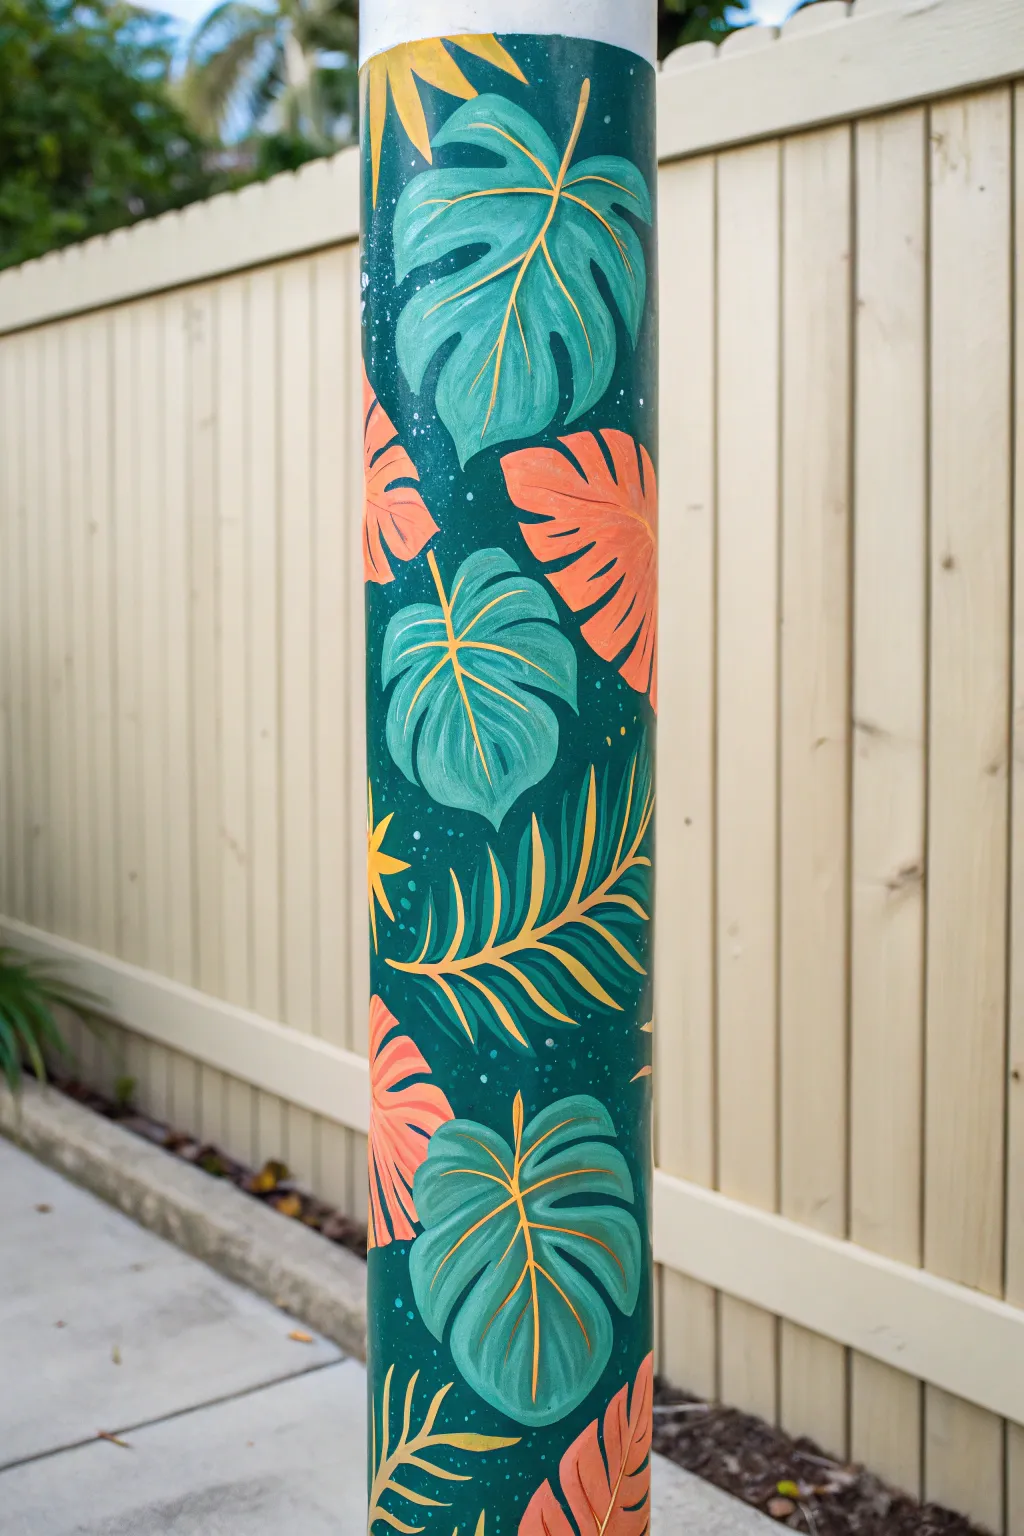
Transform a plain support beam or structural pole into a lush garden feature with this vibrant botanical design. By layering teal monsteras and coral palms over a deep green background, you’ll create a striking contrast that brings island vibes to any outdoor space.
Step-by-Step Guide
Materials
- Outdoor acrylic paint or exterior latex paint (Dark Forest Green, Teal/Blue-Green, Coral/Orange, Pale Yellow, White)
- Painter’s tape
- Sanding block (medium grit)
- Primer suitable for the pole surface (metal or PVC)
- Clean rags and mild cleaner
- Medium flat brush (1-inch)
- Small angled brush or filbert brush
- Fine liner brush (size 1 or 0)
- Chalk or a light-colored watercolor pencil
Step 1: Preparation & Base Coat
-
Clean surface:
Begin by thoroughly cleaning the pole with a mild cleaner and rag to remove dirt, grease, or grime. Allow it to dry completely. -
Sand for adhesion:
Scuff sand the entire surface of the pole using a medium-grit sanding block. This creates a slightly rough texture that helps the paint grip better, especially on smooth metal or PVC. -
Mask edges:
Apply painter’s tape to the very top and bottom edges of the pole (or wherever you want the painted section to stop) to ensure crisp, clean lines. -
Prime the pole:
Apply a coat of primer suited for the specific material of your pole. Let this cure according to the manufacturer’s timeframe; getting the base right prevents peeling later. -
Apply background color:
Paint the entire pole with your Dark Forest Green. This deep shade will act as the negative space between leaves. Apply two coats if necessary for full opacity, letting each coat dry.
Pro Tip: Chalk It Out
Use white chalk for sketching. It shows up well on dark green but wipes away easily with a damp cloth if you make a mistake layout-ing your leaves.
Step 2: Blocking in the Leaves
-
Sketch the layout:
Use chalk or a white watercolor pencil to lightly sketch the outlines of large monstera leaves and fan palms. I prefer to stagger them so they wrap around the curve naturally rather than lining them up vertically. -
Paint teal monstera foundations:
Fill in the large heart-shaped leaf outlines with your Teal paint. Don’t worry about the vein details yet; just focus on getting a solid, smooth shape against the dark background. -
Add coral palm accents:
Using the Coral paint, fill in the fan-shaped or split-leaf shapes placed between the teal monsteras. These add a warm pop of color to balance the cool tones. -
Create yellow palm tonal shapes:
Paint the long, thin frond shapes using a mix of Yellow and a tiny bit of Green to create a chartreuse tone, or use pure Yellow for higher contrast. -
Dry and assess:
Step back and let the base layers dry. Check for patchiness; the curves of a pole can make coverage tricky, so apply a second coat to the leaf shapes if the dark green is showing through.
Level Up: Hidden Critters
Hide small details among the foliage for people to find, like a tiny painted tree frog, a ladybug, or a tropical butterfly resting on a leaf tip.
Step 3: Detailing & Highlights
-
Add monstera shading:
Mix a slightly lighter version of your Teal (add a drop of White). Paint stroke-like highlights on the ‘ribs’ of the monstera leaves, radiating from the center vein outward. -
Define palm ribs:
Take a paler orange or peach tone and add definition to the Coral leaves, painting lines that follow the direction of the leaf splits. -
Paint the central veins:
Switch to your fine liner brush and the Pale Yellow paint. Carefully draw the central spine down the middle of each monstera leaf and the main stems of the fan palms. -
Add secondary veins:
Continue with the liner brush and Yellow paint to draw the veins branching off the main stems. Keep your hand loose to allow the lines to taper naturally at the ends. -
Add splatter texture:
Cover nearby areas if needed. Dip an old toothbrush or stiff brush into diluted White or Pale Teal paint and flick tiny specks across the pole to mimic pollen or mist, adding depth to the dark background. -
Seal the work:
Once fully dry (give it at least 24 hours), apply a clear outdoor UV-resistant sealer. This is crucial for protecting the vibrancy of your colors against sun and rain.
Enjoy the year-round greenery your new botanical art piece brings to the garden


Swirling Ocean Scene Spiral
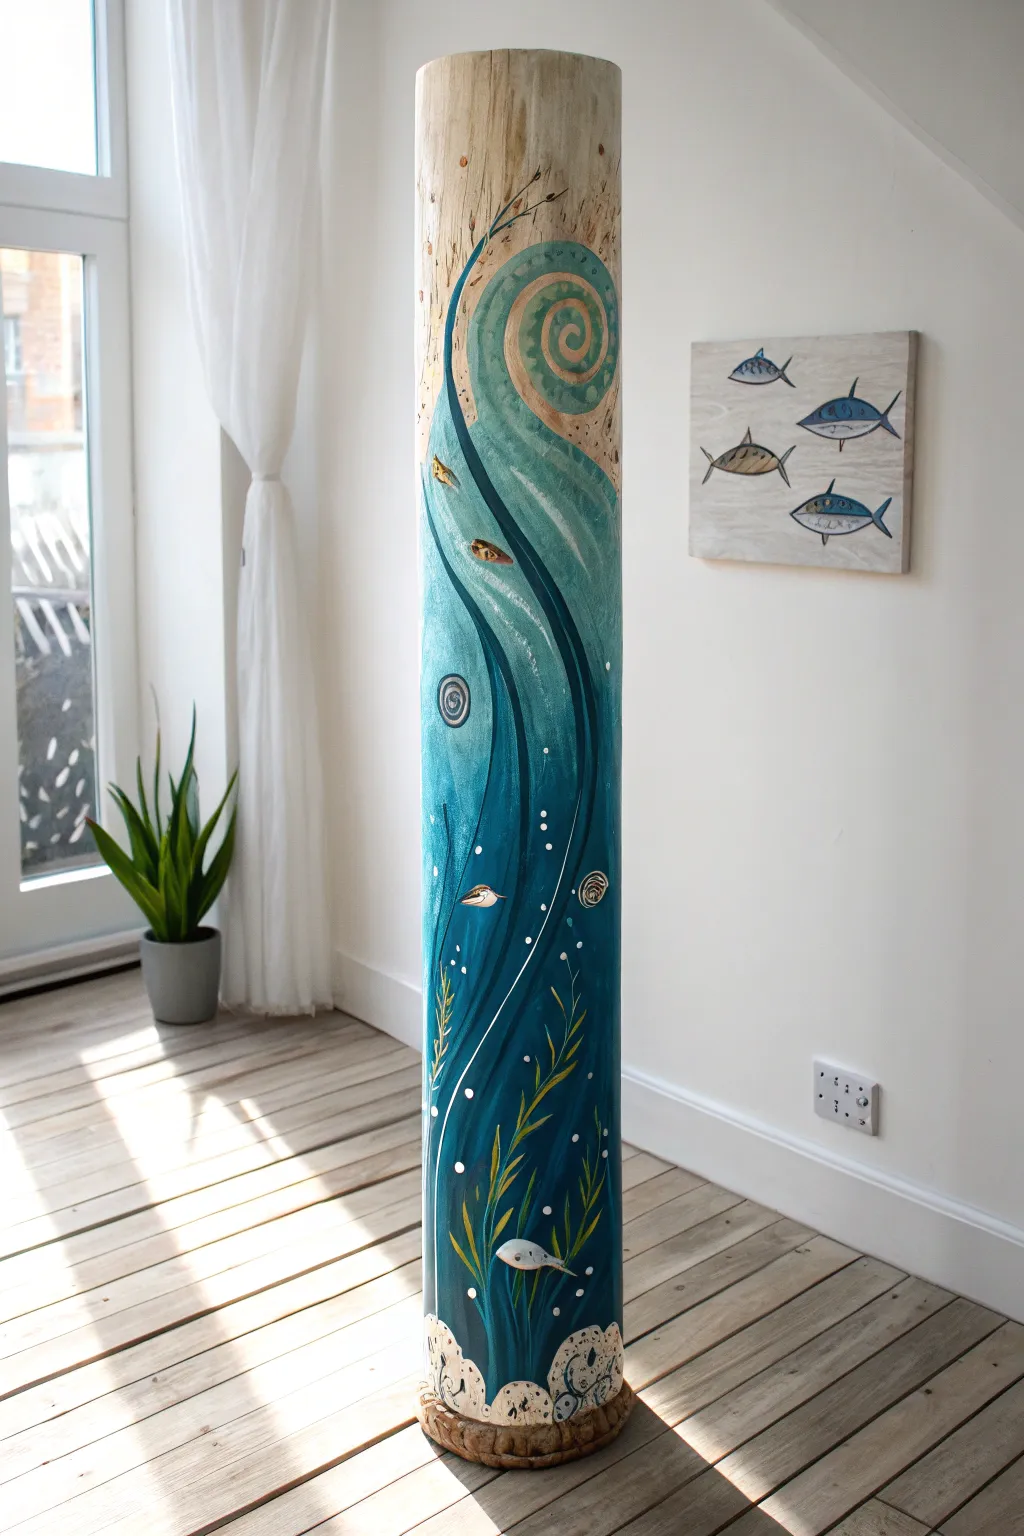
Transform a plain wooden column into a mesmerizing piece of nautical art with this layered acrylic painting project. The design captures the movement of the sea through swirling turquoise currents, playful fish, and ancient spirals.
Step-by-Step
Materials
- Wooden pole or column (sanded smooth)
- Acrylic paints (Titanium White, Phthalo Blue, Teal, Turquoise, Deep Navy, Sand/Beige, Metallic Gold)
- Wide flat brush (2-3 inch)
- Medium round brush (size 6 or 8)
- Small liner brush or detail brush (size 1)
- Pencil and eraser
- Sanding block (medium grit)
- Clear acrylic sealer (matte or satin)
- Painter’s tape or chalk (optional)
Step 1: Preparation & Mapping
-
Surface Prep:
Ensure your wooden pole is clean and dry. Give it a light sanding with a medium-grit block to remove any existing finish or roughness, creating a ‘tooth’ for the paint to grip. -
Wood Grain Preservation:
Decide which areas you want to keep as raw wood. In this design, the very top section and small patches near the spiral remain unpainted to show the natural grain. You can mask these off lightly with tape if you’re worried about accidental strokes. -
Sketch the Flow:
Using a pencil, lightly sketch the main S-curve of the wave. Start near the bottom right, flowing upwards across the pole to the top left. This defines the boundary between the deep ocean and the lighter surface. -
Draft the Spiral:
At the top of your wave curve, draw a large spiral shape. Don’t worry about perfection; a hand-drawn look adds character to this folk-art style.
Uneven Spiral Fix
If your spiral looks wobbly, don’t repaint the whole thing. Outline the ‘bad’ edge with a thicker dark line or add small painted bubbles along the erratic edge to disguise the wobble.
Step 2: Painting the Ocean Depths
-
Base Color Gradient:
Load your wide flat brush with Deep Navy and Phthalo Blue. Start painting from the bottom of the pole, working upwards within your wave boundaries. -
Transitioning Hues:
As you move up the pole, gradually mix in Turquoise and Teal. The color should be darkest at the bottom and become lighter and more vibrant as you approach the spiral. -
Highlighting the Current:
While the paint is still slightly tacky, use a dry brush with a lighter Teal mix to sweep long, vertical strokes following the curve of the pole. This creates the illusion of flowing water currents. -
Defining the Spiral:
Paint the background of the top spiral area with a mix of Turquoise and White for a lighter, surf-like color. Let the background layers dry completely before moving on.
Dynamic Flow Trick
Always pull your brush strokes in the direction the water would flow. Even for solid color blocking, directional strokes add subconscious energy to the final piece.
Step 3: Adding Details & Movement
-
Defining Lines:
Using a medium round brush and dark blue or black paint, carefully outline the major curves of your wave and the spiral. Vary the line thickness to create a dynamic, organic feel. -
Painting the Gold Spiral:
I like to use a metallic gold paint here to make the spiral pop. Fill in the spiral channel carefully, allowing the brushstrokes to follow the circular motion. -
White Water Accents:
Mix a watery white paint. Use your liner brush to add thin, sweeping lines alongside your dark contour lines. These highlight the flow of the water. -
Seaweed & Plants:
At the base of the pole, paint long, wavy strands of seaweed using a yellow-green mix. Let these strands overlap the deep blue background, reaching upwards towards the light. -
Adding Bubbles:
Dip the handle end of a brush into white paint and dot it onto the pole to create perfect circles for rising bubbles. Group them in small clusters of three or five.
Step 4: Character & Finishing
-
Tiny Fish:
Paint very small, simple fish shapes swimming with the current. Keep them stylized—just a simple almond shape for the body and a small triangle for the tail. -
Sandy Texture:
For the raw wood sections near the top, dry brush a very small amount of Sand/Beige paint to blend the painted edge softer into the raw wood, creating a shoreline effect. -
Bottom Weight:
Paint some abstract rock or coral shapes at the very bottom using cream and grey tones to visually ‘ground’ the ocean scene. -
Final Cleanup:
Check for any stray pencil marks and erase them gently. Touch up any lines that may have gotten covered during the detailing phase. -
Sealing the Work:
Once absolutely dry (give it at least 24 hours), apply two coats of clear acrylic sealer to protect your painting from scuffs and UV light.
Place your finished pole in a well-lit corner to let the metallic gold spiral catch the light
Four-Sided Bird And Branch Story
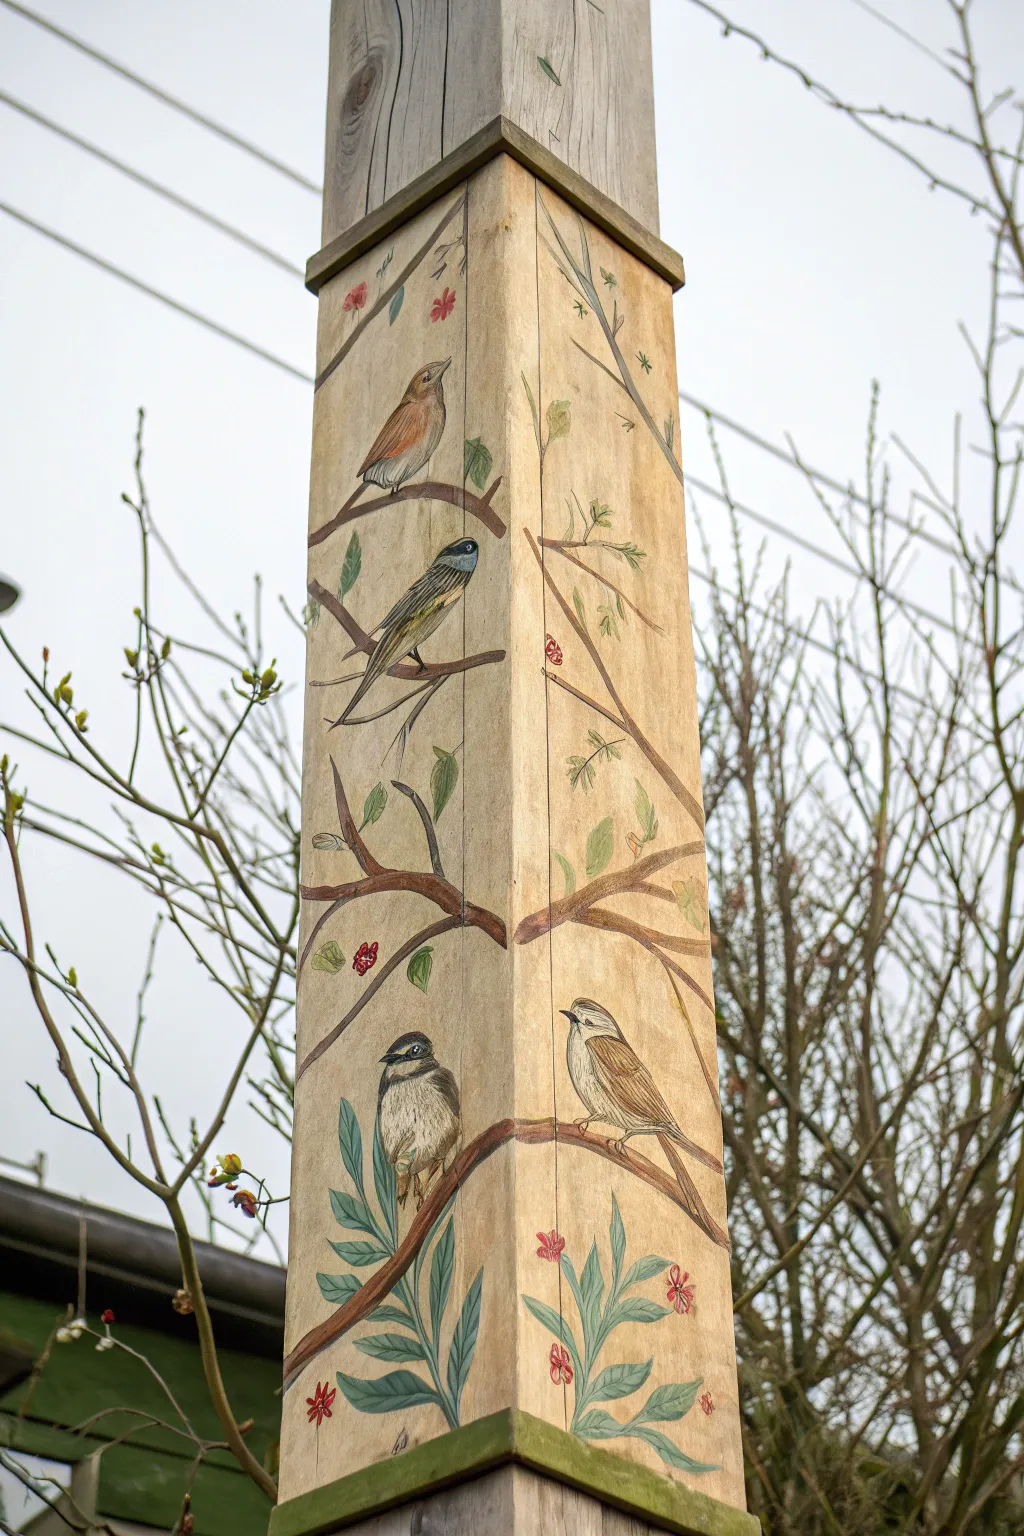
Transform a plain square wooden post into a whimsical garden feature with this nature-inspired painting project. Using soft, muted tones and delicate brushwork, you’ll create an inviting vertical scene where birds perch among leafy branches.
Step-by-Step Tutorial
Materials
- Square wooden post (4×4 or 6×6, treated for outdoor use)
- Sandpaper (120 and 220 grit)
- Outdoor wood primer
- Acrylic paints (beige/tan base, various browns, greens, blues, greys, and muted reds)
- Variety of brushes: 2-inch flat (for base), medium filbert, fine liner (0 or 00)
- Graphite transfer paper and pencil (optional for sketching)
- Clear outdoor sealant (matte or satin finish)
- Painter’s tape
- Palette for mixing
Step 1: Preparation and Base Coat
-
Prepare the surface:
Start by sanding the entire wooden post to remove any rough splinters or previous finishes. Start with 120-grit for heavy rough spots and finish with 220-grit for a smooth painting surface. Wipe away all dust with a damp cloth. -
Apply the primer:
Coat all four sides of the post with a high-quality outdoor wood primer. This step is crucial for longevity and preventing the wood tannins from bleeding through your artwork. Let it dry completely according to the manufacturer’s instructions. -
Create the faux-antique background:
Mix a warm beige or tan acrylic paint with a tiny drop of water to improve flow. Apply this as your base color on all sides. For that slightly aged look seen in the photo, you can wash a very dilute darker brown over the dried beige in some areas, wiping it back with a rag to create subtle texture.
Natural Texture Hack
To make wood grain on the birds’ perches look real, drag a dry, stiff-bristled brush with dark paint over the wet brown branch base before it dries.
Step 2: Drafting the Design
-
Plan the layout:
Lightly sketch your design directly onto the wood with a pencil. I find it easiest to draw the main branches first, ensuring they wrap around the corners or connect visually from one side to the next for a cohesive 360-degree look. -
Position the birds:
Sketch the outlines of your birds. Place them at different heights—some looking left, some right—to keep the composition dynamic. Don’t worry about feathers yet; just get the oval body shapes and head proportions correct. -
Add floral elements:
Draw small clusters of leaves and simple flower shapes at the ends of the twigs. Keep the pencil lines light so they don’t show through lighter paint colors later.
Add a 3D Element
Screw in a small wooden finial or cap to the top of the post before painting, or attach a small metal hook on one side to hang a real bird feeder.
Step 3: Painting the Branches and Foliage
-
Paint the main branches:
Using a medium round or filbert brush, paint the branches in a medium brown. Vary the pressure on your brush: press down for thick sections and lift up as you taper the branch toward the tip. -
Add branch shadows:
Once the brown is dry, mix a darker umber shade and paint along the bottom edge of each branch. This simple step adds immediate dimension and makes the branches look round rather than flat. -
Base coat the leaves:
Fill in the leaf shapes with a muted sage green. The goal is a soft, natural look, so avoid neon or overly bright greens. You can mix a little of your background beige into the green to harmonize the colors. -
Detail the foliage:
With a fine liner brush and a darker evergreen color, paint the center veins on the leaves. Add wispy, thin stems connecting the leaves to the main branches.
Step 4: Bringing the Birds to Life
-
Block within bird colors:
Fill in the birds’ bodies with their main local colors—white bellies, brownish wings, or grey heads. Use flat colors for this layer to establish the silhouette. -
Layering feathers:
Dip a small flat brush or angle brush into a slightly darker shade than your base color. Use short, choppy strokes to mimic the texture of feathers on the wings and back. Layer these strokes like roof shingles, starting from the tail and working up toward the head. -
Facial features:
Switch to your finest liner brush (size 00 is perfect here). Paint the tiny black beaks and the eyes. Add a tiny white dot in the eye as a highlight; this ‘catchlight’ is what gives the bird a spark of life. -
Add definition:
Use a dark grey or black wash to define the separation between the wing and the body, and to outline distinct markings like the mask on the titmouse or chickadee.
Step 5: Finishing Touches
-
Paint the flowers:
Add small pops of color with the flowers. A muted red or coral looks lovely against the beige background. Keep them simple—just four or five small petals per bloom detailed with a tiny yellow or black center dot. -
Final inspection:
Walk around the post and check for any spots you missed or lines that need tidying. Use your background beige color to ‘erase’ any messy edges. -
Seal the artwork:
Once the paint has cured for at least 24 hours, apply two to three thin coats of clear outdoor craft sealer. A matte or satin finish looks most natural for this style. Ensure you seal the top and bottom grain thoroughly to prevent water rotting.
Now you have a charming piece of vertical art ready to watch over your garden bed
Seasonal Garden Palette Pole
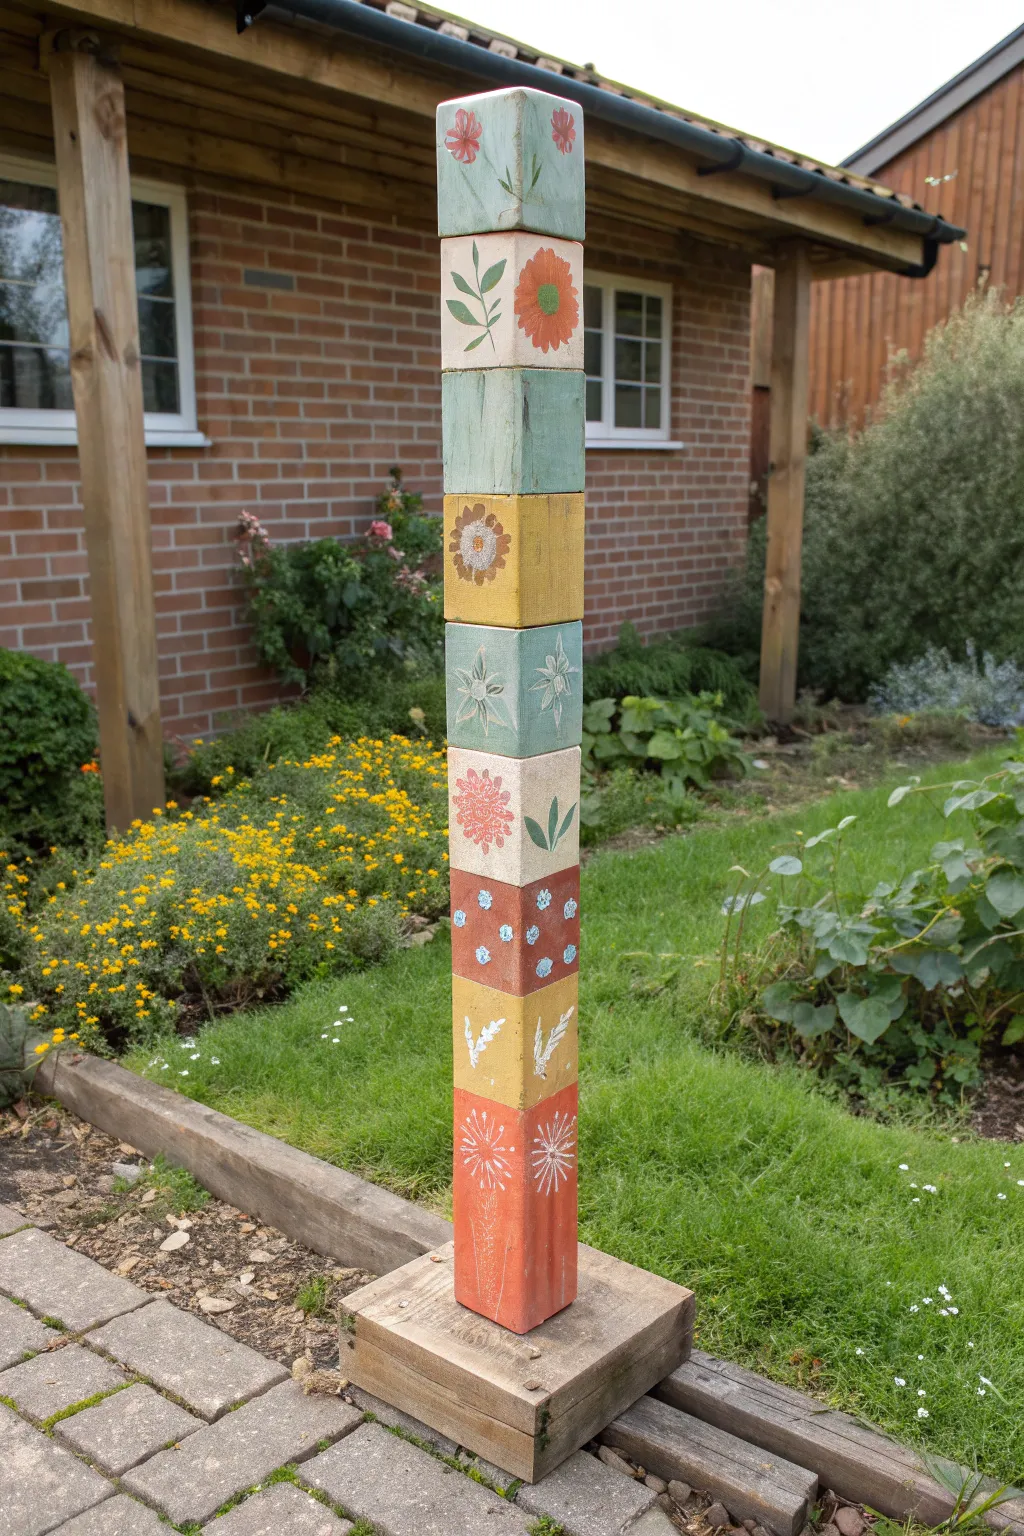
Transform a simple timber post into a stacked tower of blooming art, featuring a charming mix of painted flowers and leaves on muted, earthy backgrounds. This garden totem adds vertical interest and a touch of handmade folk art to any outdoor space.
Step-by-Step Guide
Materials
- 4×4 inch treated wooden post (approx. 4-5 feet tall)
- Wooden base plate (approx. 12×12 inches)
- Sandpaper 100-grit and 220-grit
- Exterior primer
- Masking tape or painter’s tape (1 inch wide)
- Acrylic outdoor craft paints (sage green, mustard yellow, terra cotta, cream/off-white)
- Small round paintbrushes (sizes 2 and 4)
- Flat paintbrush (1 inch width)
- Pencil
- Outdoor matte varnish or polyurethane sealer
- Reference images of simple flowers (cosmos, daisies, leaves)
Step 1: Preparing the Canvas
-
Sand the surface:
Begin by thoroughly sanding the 4×4 wooden post. Start with 100-grit sandpaper to remove rough splinters and finish with 220-grit for a smooth painting surface. -
Prime the wood:
Apply a coat of exterior wood primer to all four sides of the post. This ensures your colors will pop and the paint will adhere properly to the treated wood. -
Mark the sections:
Using a pencil and a ruler, measure equal square sections down the length of the post. Since it’s a 4×4 post (actually 3.5 inches wide), making each block about 3.5 to 4 inches tall works perfectly to create the look of stacked cubes. -
Tape the boundaries:
Apply painter’s tape horizontally at your pencil marks to create crisp separation lines between each color block. Press the edges firmly to prevent bleed-through.
Step 2: Blocking the Colors
-
Mix your palette:
Prepare your base colors. Aim for earthy, muted tones rather than bright primaries—think sage green, mustard yellow, terra cotta, and a soft cream stone color. -
Paint alternating blocks:
Paint the first, third, and fifth blocks (and so on) with your chosen colors. I find it helps to plan the pattern first so colors are evenly distributed. -
Remove and dry:
Carefully peel off the tape while the paint is still slightly tacky to avoid chipping. Let these blocks dry completely for at least an hour. -
Tape the remaining sections:
Once the painted sections are fully dry, apply fresh tape over their edges to protect them while you paint the remaining empty blocks. -
Fill the gaps:
Paint the remaining squares with your alternating colors. Create variety by ensuring no two adjacent blocks are the same color. -
Reveal the stack:
Remove the second round of tape. You should now have a post that looks like a tower of colorful children’s blocks.
Bleeding Lines?
If paint bleeds under the tape, wait for it to dry fully. Then, take a small flat brush with the background color and carefuly ‘cut in’ a straight line to cover the mistake.
Step 3: Painting the Botanicals
-
Sketch the motifs:
Lightly sketch a different simple botanical design in the center of each block using a pencil. Use the reference image—simple cosmos, single leaves, daisy shapes, and starbursts work best. -
Paint the main flowers:
Using a size 4 round brush, paint the primary flower shapes. Use contrasting colors; for example, an orange flower on a cream block, or a white daisy on a green block. -
Add leafy details:
Switch to green paint for stems and leaves. Vary the leaf shapes—some can be single oval strokes, while others can be fern-like fronds. -
Layering details:
Once the base flower shapes are dry, add centers to the flowers using small dots of yellow or brown. A toothpick can be a great tool for these tiny dots. -
Create white highlights:
Using a fine liner brush and white paint, add delicate outlines or internal lines to the leaves and petals to give them a folk-art feel. -
Distress the edges (optional):
For a weathered look, lightly sand the corners and edges of the post where the paint meets the raw wood, revealing a bit of the timber underneath.
Top Topper
Drill a hole in the very top block to insert a solar light or a ceramic finial. This adds extra height and makes your garden totem functional at night.
Step 4: Final Assembly
-
Seal the artwork:
Apply two coats of outdoor matte varnish or polyurethane to the entire painted area. This is crucial for protecting your art from sun and rain. -
Prepare the base:
While the sealer dries, take your wooden base plate and drill a pilot hole through the center. -
Attach the base:
Screw the base plate into the bottom of the painted post using a long galvanized deck screw to ensure stability.
Place your finished totem in a flowerbed to add color all year round
Painted Tile Mosaic Illusion
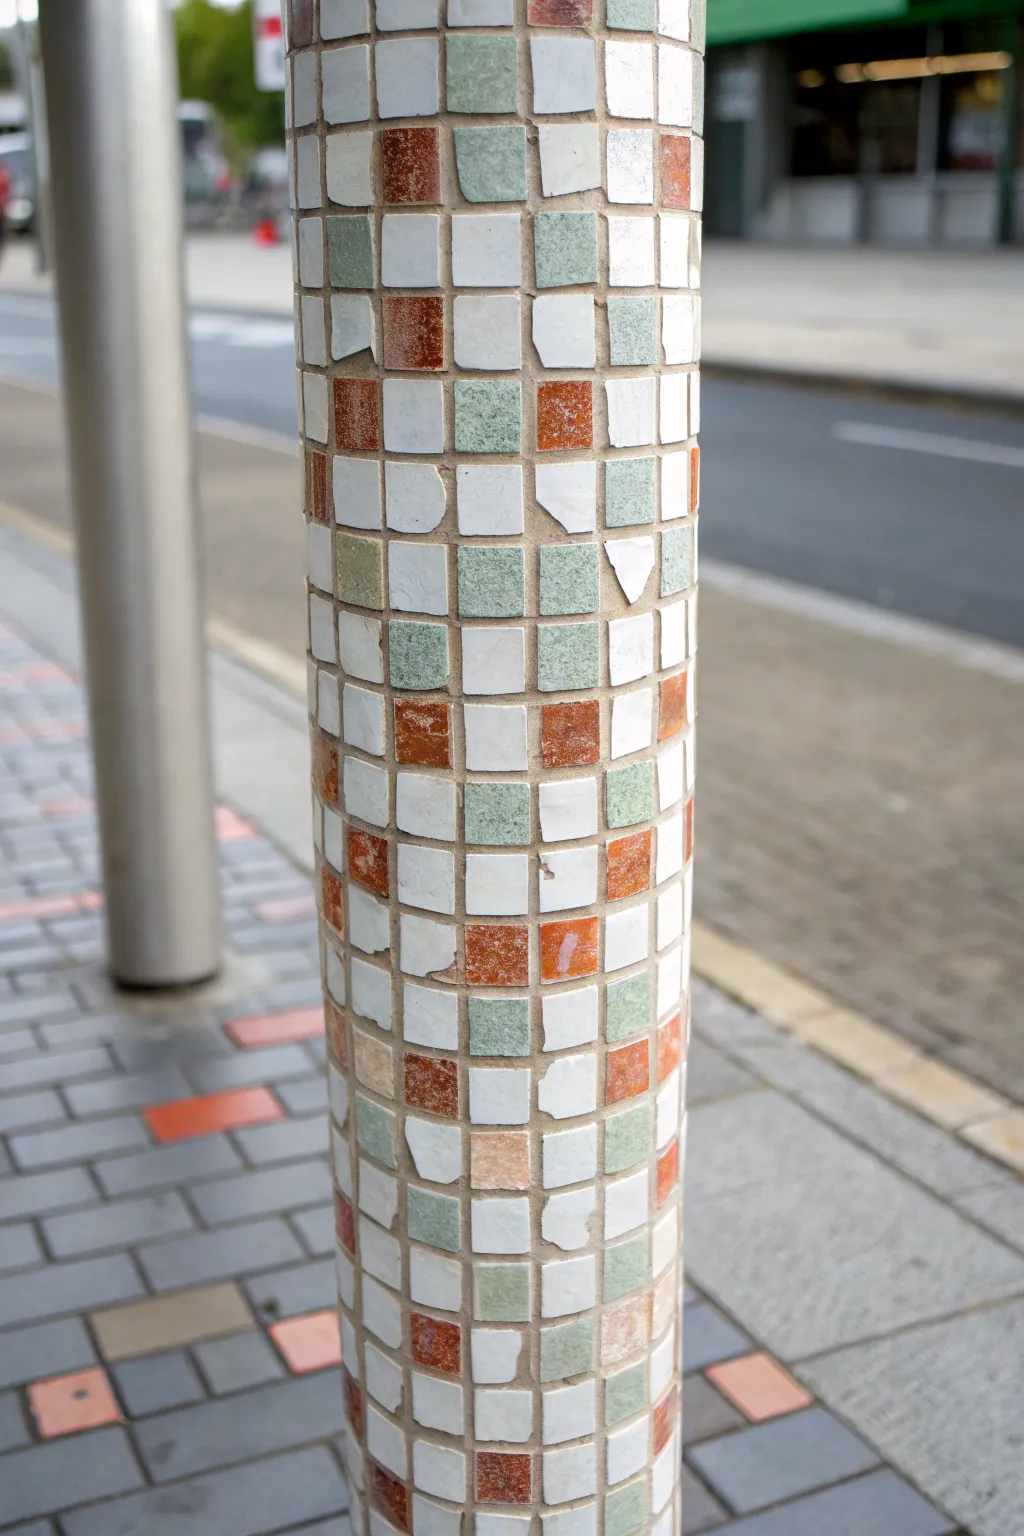
Transform a plain metal or concrete pole into a stunning architectural feature with this remarkably realistic painted mosaic technique. By carefully layering colors and adding subtle highlights, you can mimic the depth and texture of aged ceramic tiles without using a single piece of actual grout.
How-To Guide
Materials
- Outdoor acrylic paint (White, Sage Green, Terracotta/Rust, Light Grey, Dark Grey)
- Wide painter’s tape (1-inch width)
- 1/4-inch grid tape or very thin masking tape lines
- Measuring tape and pencil
- Flat shader brushes (medium and small sizes)
- Small round detail brush
- Sea sponge or scrunched plastic bag
- Outdoor varnish or sealant (Matte or Satin)
- Mixing palette
Step 1: Preparation and Base Coat
-
Clean the surface:
Before you begin, scrub the entire pole thoroughly to remove road dust, grime, or existing flaking paint. A clean surface is crucial for long-lasting adhesion. -
Prime the pole:
Apply a hearty coat of primer suitable for the pole’s material (metal or concrete). Let this cure completely according to the manufacturer’s instructions. -
Paint the grout color:
Cover the entire pole with your chosen grout color—a neutral light grey works best here. This layer will eventually peek through the gaps, so ensure solid, opaque coverage.
Step 2: Grid Layout
-
Measure vertical guides:
Use your measuring tape to mark vertical intervals around the circumference of the pole. These marks dictate how wide your tile columns will be. -
Apply vertical tape lines:
Run long strips of your narrow grid tape vertically down the pole, following your marks. These strips create the vertical grout lines. -
Mark horizontal rows:
Starting from the bottom or a distinct architectural line, mark off horizontal rows. Keep them roughly square-shaped relative to your vertical lines. -
Create the grid:
Apply the thin tape horizontally around the pole at your marked intervals. You should now have a complete grid of squares covering the surface. -
Seal the tape edges:
Lightly brush a thin layer of your grey base paint over the tape edges. I find this helps seal the tape and prevents the subsequent tile colors from bleeding under, keeping your grout lines crisp.
Tape Sealing Trick
Burnish the tape edges with a spoon or fingernail before painting. This ensures zero seepage and keeps those faux grout lines looking sharp and realistic.
Step 3: Painting the Tiles
-
Plan your pattern:
Decide on a randomization pattern. In the reference, white is the dominant color, punctuated by random squares of sage green and terracotta. -
Sponge on the white base:
Using a sponge or scrunched plastic bag, dab white paint onto the majority of the squares. Don’t aim for perfect opacity; a little texture looks more like ceramic. -
Add colored accents:
Switch to your flat brush and fill in random squares with the sage green and terracotta paints. Keep the distribution uneven for a more natural, organic look. -
Create distinct shades:
Mix a tiny amount of grey or brown into your white and green puddles to varying degrees. Paint a few squares with these slightly ‘off’ shades to simulate natural variation in tile production. -
Remove the tape:
Carefully peel away all the tape while the paint is tacky but not fully wet. Revealing those crisp grey grout lines is instantly satisfying.
Add Missing Tiles
Leave one or two grid squares painted just grey (the background color) to make it look like a tile has fallen off over the years.
Step 4: Detailing and Dimension
-
Highlight the edges:
Once the squares are dry, use fine detail brush with a very light, almost white shade. Paint a thin line along the top and left edge of each ’tile’ to simulate a light source hitting the ceramic. -
Add drop shadows:
Mix a dark grey glazing medium. Paint a thin, translucent line along the bottom and right edge of the tiles, right on the paint (not the grout), to create a sense of 3D lift. -
Weather the tiles:
Dry brush a little bit of brownish-grey dirt tone randomly over patches of the mosaic, focusing on the lower sections where street grime would naturally accumulate. -
Simulate imperfections:
For extra realism, take a tiny brush and paint small cracks or ‘chipped’ corners on a few tiles using dark grey paint, then highlight the edge of the crack. -
Final seal:
Coat the entire artwork with a durable outdoor varnish. A satin finish mimics the slight sheen of ceramic tiles perfectly without being too glossy.
Step back and admire how a flat surface now captures the charm and intricacy of classic street mosaic work
Trompe-l’Oeil Ribbon Wrap
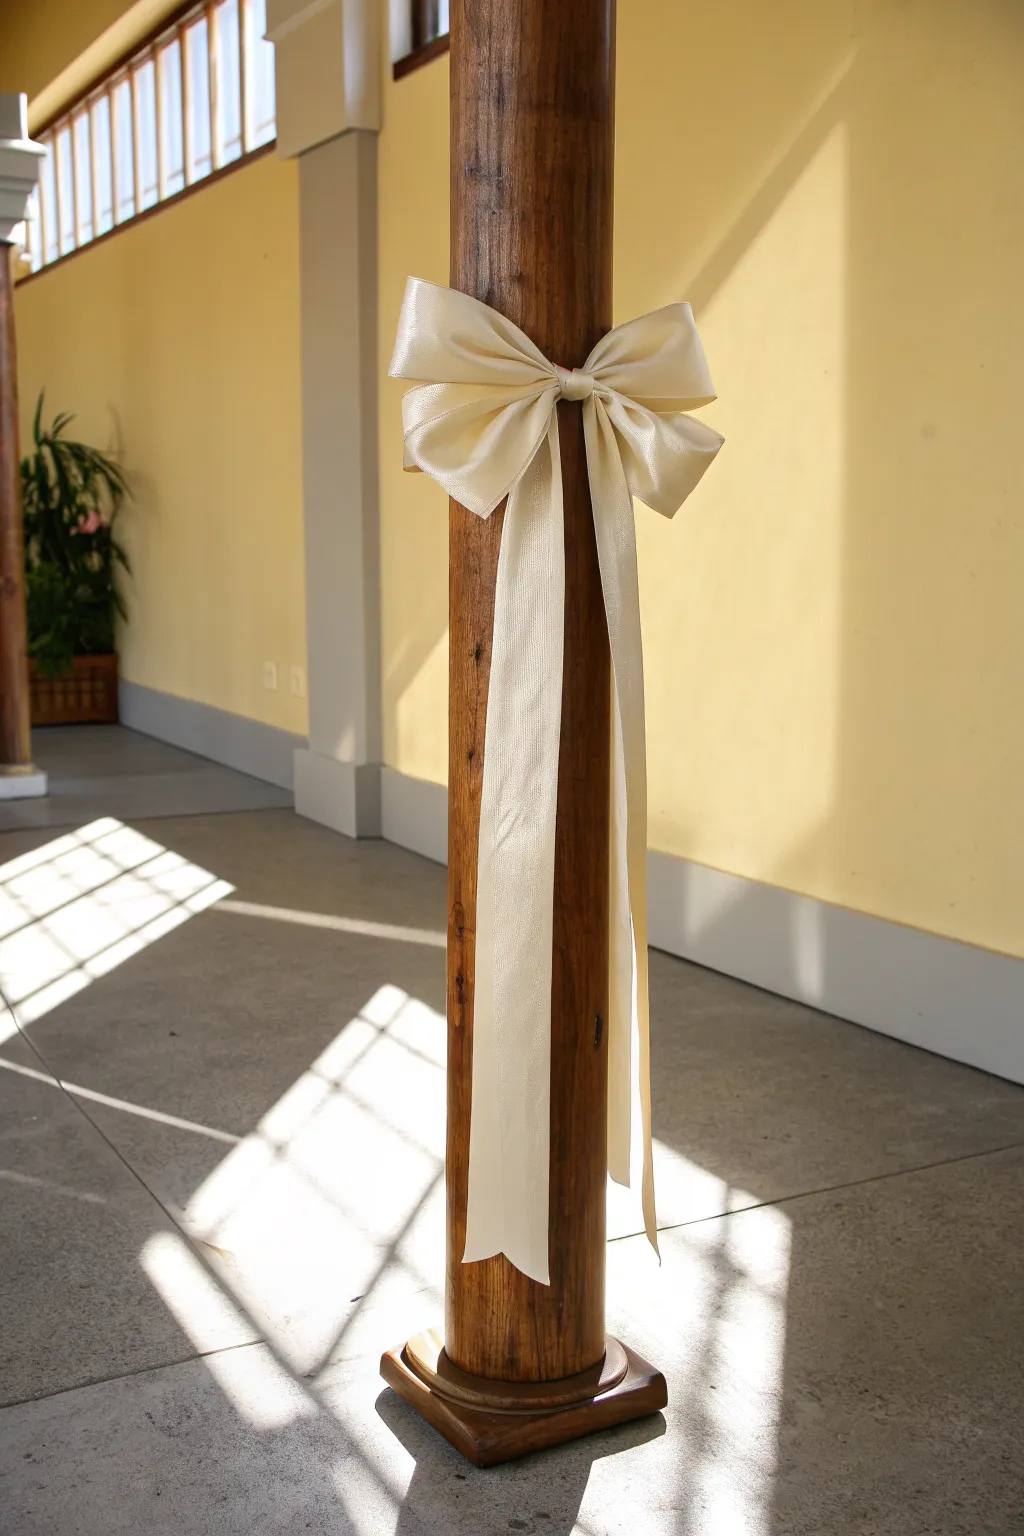
Transform a plain support pole into an elegant architectural feature with this trompe-l’oeil painting technique. This project teaches you how to create the realistic illusion of a luxurious satin ribbon and bow wrapped around a wooden column using nothing but acrylic paint and careful shading.
Step-by-Step Tutorial
Materials
- Support pole (wood or primed surface)
- Acrylic paints (Cream, White, burnt umber, raw sienna, black)
- Wide flat brush (2-3 inch) for base coat
- Medium filbert brush
- Small round detail brush
- Fine liner brush
- Chalk or pastel pencil (light color)
- Painter’s tape
- Acrylic glazing medium
- Reference photo of a tied ribbon
- Palette for mixing
- Water container and rags
Step 1: Preparation and Base
-
Prime the Surface:
Begin by ensuring your pole is clean and smooth. If it’s raw wood, apply a wood primer; if it’s already painted, give it a light sanding to help the new paint adhere. This is crucial for a smooth, satin-like finish. -
Establish the Wood Grain:
Paint the entire pole with a base coat of warm brown, mixing burnt umber and raw sienna. I like to use long, vertical strokes to mimic the natural direction of wood grain. -
Enhance Wood Texture:
While the base is still slightly tacky, streak in darker brown and black lines using a dry brush technique to create depth and realistic wood grain patterns. -
Seal the Background:
Allow the wood effect to dry completely for at least 24 hours. Apply a matte varnish to protect this layer so you can paint the ribbon over it without disturbing the grain.
Blending Woes?
If acrylics dry too fast while blending shadows, add a retarder medium to your paint. This keeps it wet longer, allowing for smoother gradients.
Step 2: Sketching the Ribbon
-
Outline the Composition:
Using a piece of chalk or a pastel pencil, lightly sketch the outline of the bow and the trailing ribbons. Position the knot at eye level for the best visual impact. -
Refine the folds:
Draw the internal lines of the bow loops, indicating where the fabric folds and tucks into the center knot. Pay attention to the drape of the long tails hanging down. -
Block in the Base Color:
Mix a creamy, off-white shade. Using your filbert brush, fill in the entire outline of the ribbon, painting solidly enough to cover the wood grain underneath. You may need two coats.
Step 3: Creating Dimensions
-
Mix Shadow Tones:
Prepare a glaze by mixing a small amount of burnt umber with your cream base and a generous amount of glazing medium. This creates a translucent shadow color. -
Define the Knot:
Apply the shadow glaze to the recesses around the center knot, blending outward to show where the fabric bunches together. -
Paint the Deep Folds:
Identify the deepest folds in the loops and tails. Paint these areas with the darker glaze mixture, keeping the edges soft to mimic the gentle curve of fabric. -
Establish mid-tones:
Mix a slightly lighter version of the cream color. Apply this to the flat areas of the ribbon that would catch indirect light, blending it smoothly into the shadowed areas.
Level Up: Pattern Play
Make the ribbon more complex by painting a decorative edge, like gold stitching or a thin pinstripe, along the length of the tails.
Step 4: Highlights and Details
-
Add Satin Highlights:
Satin is reflective, so accurate highlights are key. Mix pure white with a touch of glazing medium. Paint crisp, bright highlights on the highest points of the loops and the center of the tails. -
Enhance Contrast:
Deepen the darkest shadows right next to the knot and under the loops using a mix of dark brown and a tiny touch of black. This high contrast makes the bow pop. -
Soft Blending:
Use a clean, dry soft brush to lightly feather the edges between highlights and shadows while the paint is wet to create that smooth, silky transition typical of ribbon. -
Refine Edges:
Use your fine liner brush and the original wood color to tidy up the outer edges of the ribbon, sharpening the silhouette against the pole. -
Cast Shadows:
To make the ribbon look like it’s sitting *on* the pole rather than painted on it, paint a transparent dark glaze on the wood directly underneath the loops and tails, opposite the light source. -
Final Protection:
Wait for the artwork to cure fully. Apply a satin or semi-gloss varnish only over the painted ribbon area to enhance its sheen, leaving the wood areas matte.
Step back and enjoy the trompe-l’oeil effect as your flat painting takes on a convincing three-dimensional form
Midnight Galaxy With Stars
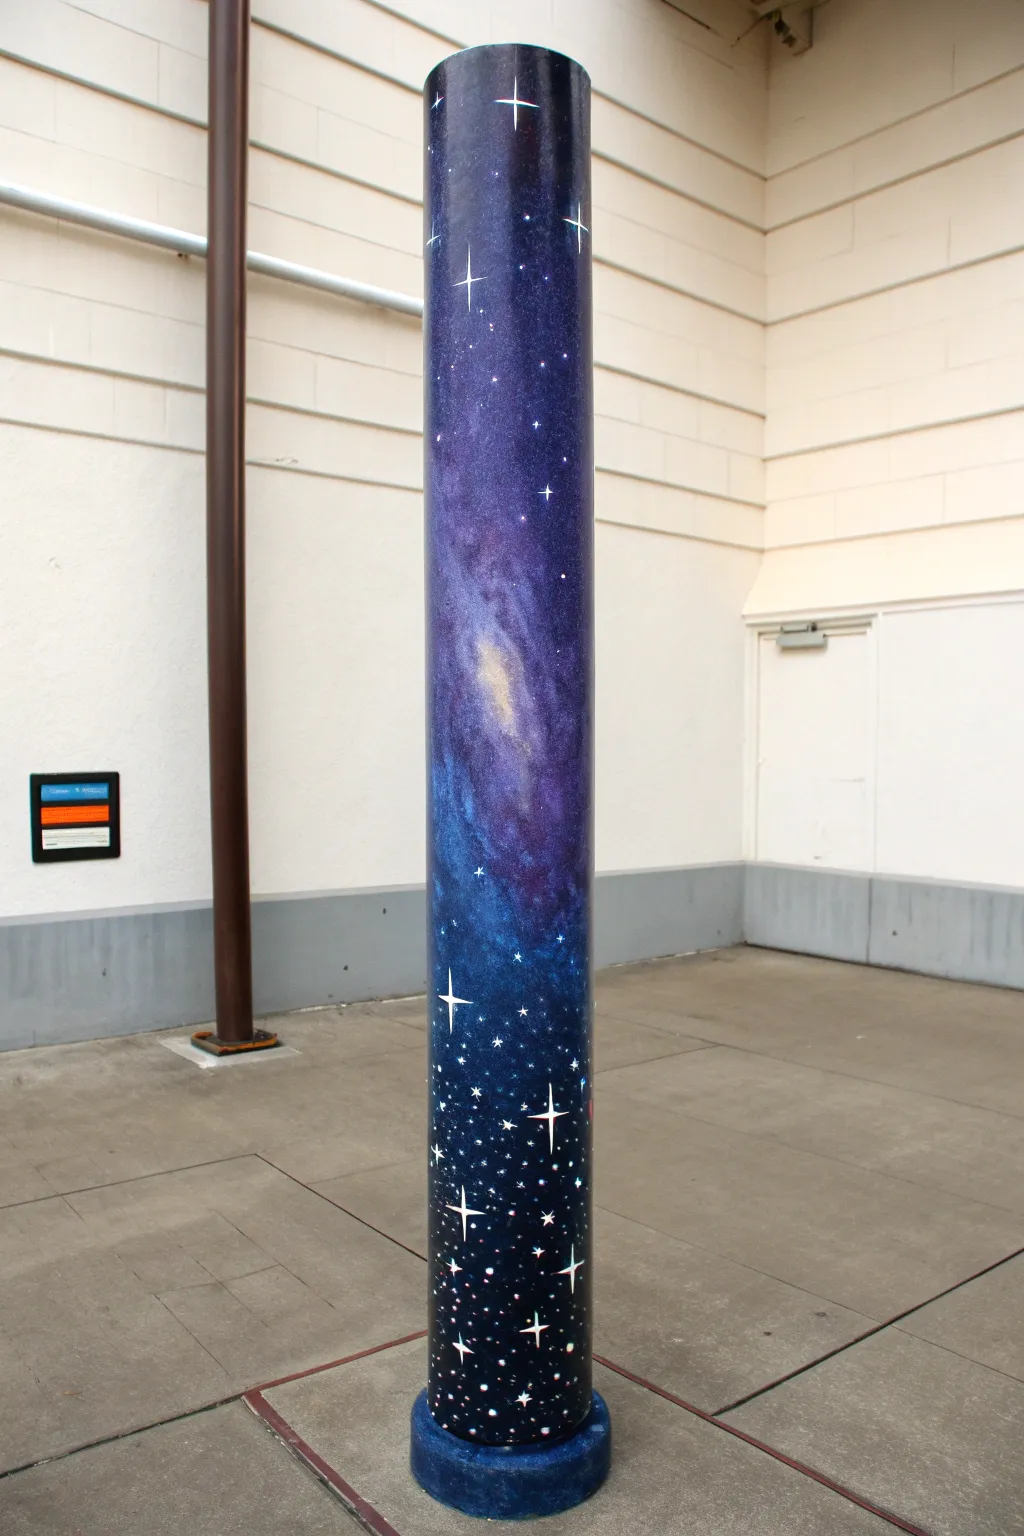
Transform a plain architectural column into a breathtaking window into deep space. This project uses layers of sponged acrylics to build a rich, nebulous galaxy effect, punctuated by sharp, brilliant stars that seem to twinkle against the midnight blue background.
How-To Guide
Materials
- Outdoor acrylic paints (Dark Blue, Black, Purple, Magenta, Teal, White)
- Acrylic primer (stain-blocking)
- Wide basecoat brush
- Natural sea sponges (assorted sizes)
- Synthetic sponges
- Fine liner brush (size 0 or 00)
- Small round brush
- Painter’s tape
- UV-resistant clear sealant (gloss or satin)
- Drop cloth
- Mixing palette or paper plates
- Water cups
- Ladder or step stool
Step 1: Preparation and Base
-
Clean surface:
Thoroughly wipe down the pole to remove any dust, grime, or oils. If the surface is glossy, give it a light sanding to help the paint adhere better. -
Protect surroundings:
Lay down your drop cloth around the base of the pole. Use painter’s tape to mask off the floor and ceiling where the pole connects to ensure crisp edges. -
Apply primer:
Coat the entire pole with a high-quality stain-blocking primer. This is crucial for outdoor or public art to ensure longevity. Let this dry completely according to the manufacturer’s instructions. -
Paint the base color:
Using your wide brush, apply a solid coat of black paint mixed with a tiny bit of dark blue. This creates a deep, rich void as your canvas. You may need two coats for full opacity.
Muddy Nebula Fix
If colors blend into gray mud, let the layer dry completely. Re-apply the base black/blue over the muddy spot, let it dry, and sponge fresh bright color on top.
Step 2: Creating the Nebula
-
Start the gradient:
Dampen a natural sea sponge and wring it out well. Load it with dark blue paint and blot off excess on your palette. Sponge this randomly over the black background, leaving some black areas showing through for depth. -
Add purple tones:
While the blue is still tacky, take a fresh piece of sponge and apply purple paint. Focus these in diagonal clusters or drifting cloud shapes to mimic the organic flow of a galaxy. -
Introduce brighter hues:
Mix a little magenta with the purple or use straight teal in smaller areas. Lightly sponge these colors near the center of your purple clouds to create ‘hot spots’ of nebular gas. -
Blend the transitions:
Use a clean, slightly damp sponge to softly dab the edges where colors meet. This blurs the lines and makes the gas clouds look ethereal rather than stamped on. -
Highlight the core:
Mix a small amount of white with yellow or pale orange. Sponge this very lightly into the center of the largest nebula cluster to represent the bright galactic core, feathering it out into the surrounding purple.
Glow In The Dark
Mix phosphorescent pigment into your white paint for the stars. By day it looks normal, but at night the stars will actually glow for passersby!
Step 3: The Starfield
-
Flick the distant stars:
Thin down some white paint with water until it’s the consistency of ink. Dip a stiff brush (or incorrect toothbrush) into it, and flick the bristles to spray tiny specks across the pole. Test on cardboard first to control the splatter size. -
Paint medium stars:
Using a small round brush, dot individual white stars purely by hand. Cluster them slightly denser around the nebula and lighter in the dark void areas. -
Create major stars:
Select several spots for large, bright stars. Paint a solid white dot, then use your fine liner brush to pull four long, thin lines outward from the center to create the cross-shaped flare effect. -
Refine the flare:
For the largest stars, add shorter diagonal rays between the main cross points. I find that thinning the paint just slightly helps these fine lines glide smoothly without breaking. -
Add colored starlight:
Mix a tiny drop of blue or red into white paint. Add a few very small colored stars into the background to suggest different star temperatures and add realism.
Step 4: Finishing Touches
-
Paint the footer:
If your pole has a concrete base or footer, paint it a solid dark blue or black to ground the artwork visually. -
Check for gaps:
Step back and view the pole from a distance. Look for any areas that feel too empty or unbalanced and add a few extra sponge dabs or stars if needed. -
Apply sealant:
Once the paint is cured (usually 24-48 hours), apply two coats of clear, UV-resistant sealant. This protects the colors from fading in the sunlight and makes the surface easy to clean. -
Remove tape:
Carefully peel away the painter’s tape while the sealant is still slightly tacky to avoid ripping the paint film.
Your cosmic column now stands as a stunning piece of public art that invites viewers to look up and dream.
Painted Growth Chart Pole
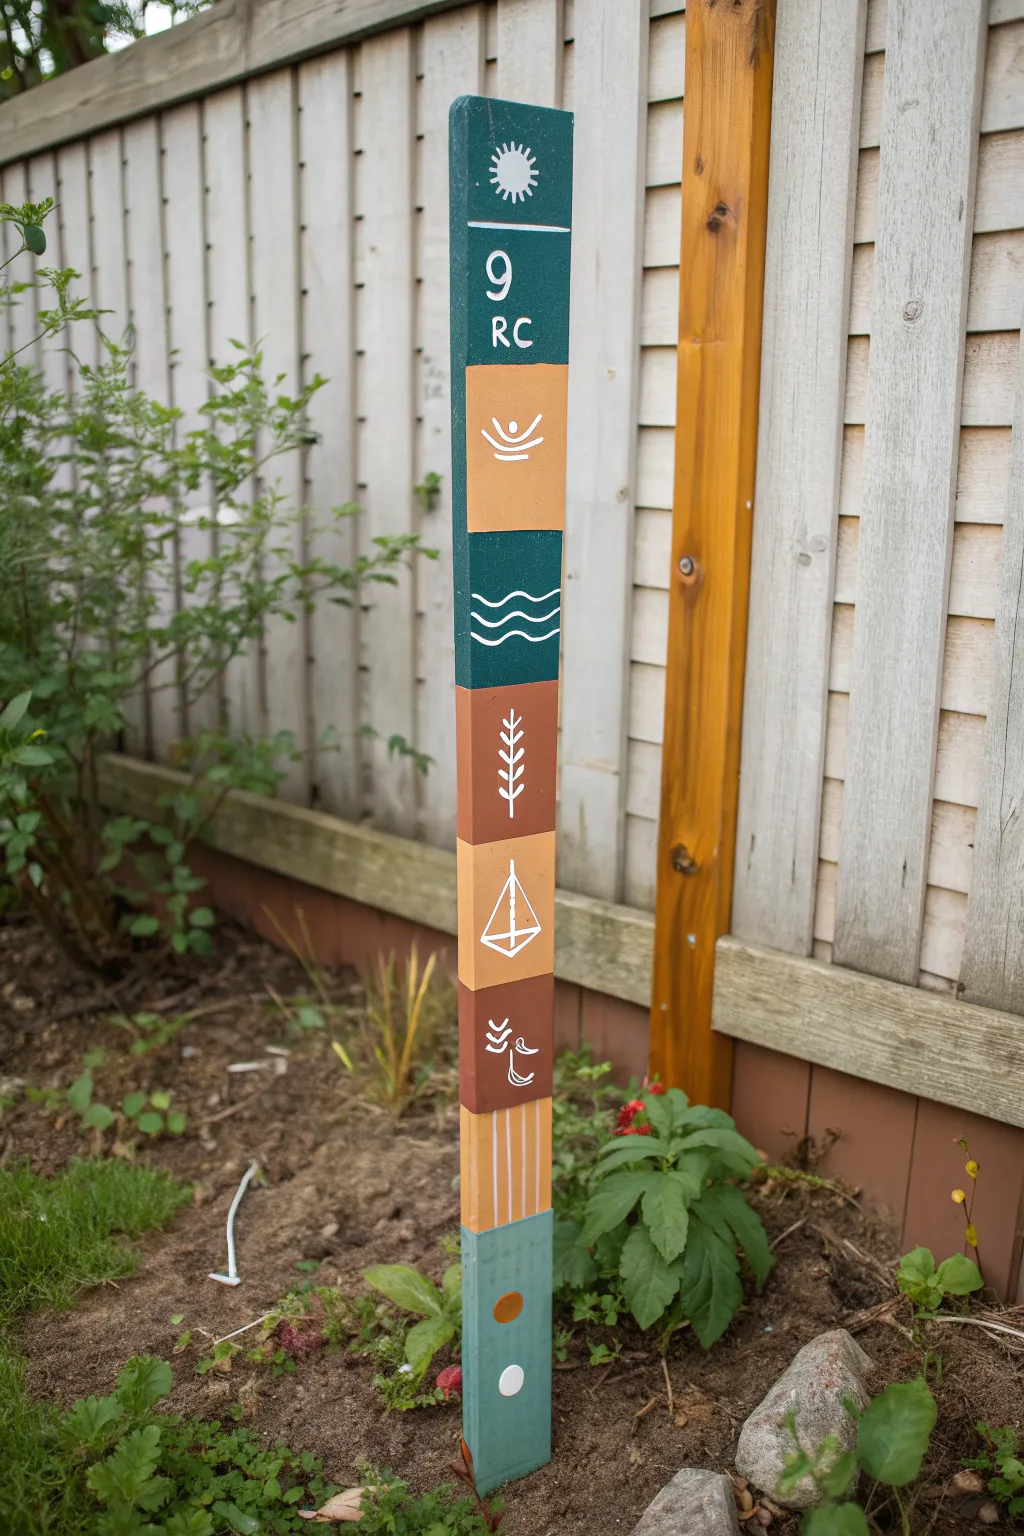
Transform a simple wooden post into a piece of meaningful garden art with earthy tones and symbolic iconography. This project uses blocked geometric sections to tell a vertical story, perfect for adding height and visual interest to a flower bed or vegetable patch.
Step-by-Step
Materials
- 4×4 wooden pressure-treated post (4-6 feet tall)
- Sandpaper (80 and 120 grit)
- Painter’s tape (1-inch width)
- Outdoor acrylic paints (Dark Teal, Burnt Orange, Terracotta, Tan/Beige, Mint Green)
- White outdoor paint or paint pen (medium tip)
- Flat paintbrushes (1-inch and 2-inch)
- Detail brush or stencil brush
- Measuring tape
- Pencil
- Clear outdoor sealer (polyurethane or spar urethane)
Step 1: Preparation & Base Work
-
Sand the surface:
Begin by sanding your 4×4 post thoroughly. Start with 80-grit sandpaper to remove any rough splinters or mill glaze, then follow up with 120-grit for a smoother finish that will accept paint readily. -
Clean the wood:
Wipe down the entire post with a tack cloth or damp rag to remove all sawdust. Let it dry completely if you used water. -
Measure the sections:
Using your measuring tape, mark horizontal lines up the post to define your color blocks. Aim for roughly 6-8 inch intervals, though you can vary them slightly for visual interest.
Crisp Line Pro-Tip
To prevent paint bleed, lightly brush the base color (or clear matte medium) over the tape edge first. This seals the gap before you apply the new color.
Step 2: Blocking the Colors
-
Tape the first set:
Apply painter’s tape along your pencil lines. To get crisp edges, I like to press the edge of the tape down firmly with a credit card or fingernail. -
Paint alternate blocks:
Paint every other section first to avoid wet paint bleeding under the tape. Start with the top block in Dark Teal, then skip a section and paint the third block in the same Dark Teal. -
Apply warm tones:
While the teal dries, move lower down. Paint the fifth block in a reddish-brown Terracotta. Paint the lowest visible block (near the ground) with Mint Green. -
Painting the gaps:
Once the first set of blocks is dry to the touch, carefully remove the tape. Re-tape over the dry painted edges to protect them, then fill in the remaining gaps. Use Burnt Orange for the second block and Tan/Beige for the fourth block. -
Second coats:
Assess the coverage. Outdoor wood soaks up paint, so apply a second coat to all colors to ensure they cover the wood grain solidly.
Make it Functional
Turn this art piece into a true growth chart by marking height measurements on the side or back of the post to track your kids’ or plants’ growth.
Step 3: Adding Symbols & Details
-
Sketch the icons:
Lightly sketch your nature symbols onto the center of each color block using a pencil. For the top teal block, draw a sunburst. For the orange block below it, sketch a curved bowl shape with a dot. -
Draft the water and plants:
On the middle teal block, draw three wavy lines for water. On the terracotta block, sketch a simple wheat stalk or vertical leaf pattern. -
Draft the geometric shapes:
On the lower beige block, sketch a triangle intersected by a vertical line. On the bottom brown block, draw small abstract curved arrow shapes. -
Paint the white lines:
Using a white paint pen or a very fine detail brush, trace over your pencil sketches. The paint pen gives excellent control for consistent line width. -
Add text (optional):
The example image includes numbers and letters (‘9 RC’) near the top. If this serves as a garden marker or address post, add your specific text now using the white paint. -
Create bottom stripes:
For the very bottom painted section, use a ruler to draw thin vertical lines. Paint these white to create a pinstripe effect. -
Add final geometric accents:
On the lowest Mint Green section, paint a small solid orange circle and a white circle for a pop of contrasting geometry.
Step 4: Sealing & Installation
-
Cure the paint:
Allow the entire post to dry for at least 24 hours. This ensures the moisture has evaporated before sealing. -
Apply sealer:
Brush on a clear outdoor sealer. Use long, smooth strokes to avoid bubbles. This step is crucial to prevent the colors from fading in the sun and rain. -
Install the post:
Dig a hole roughly 1/3 the length of your post for stability, create a gravel base for drainage, and set your new art piece into the earth.
Enjoy the colorful statement this custom totem adds to your outdoor sanctuary
Community Patchwork Panels
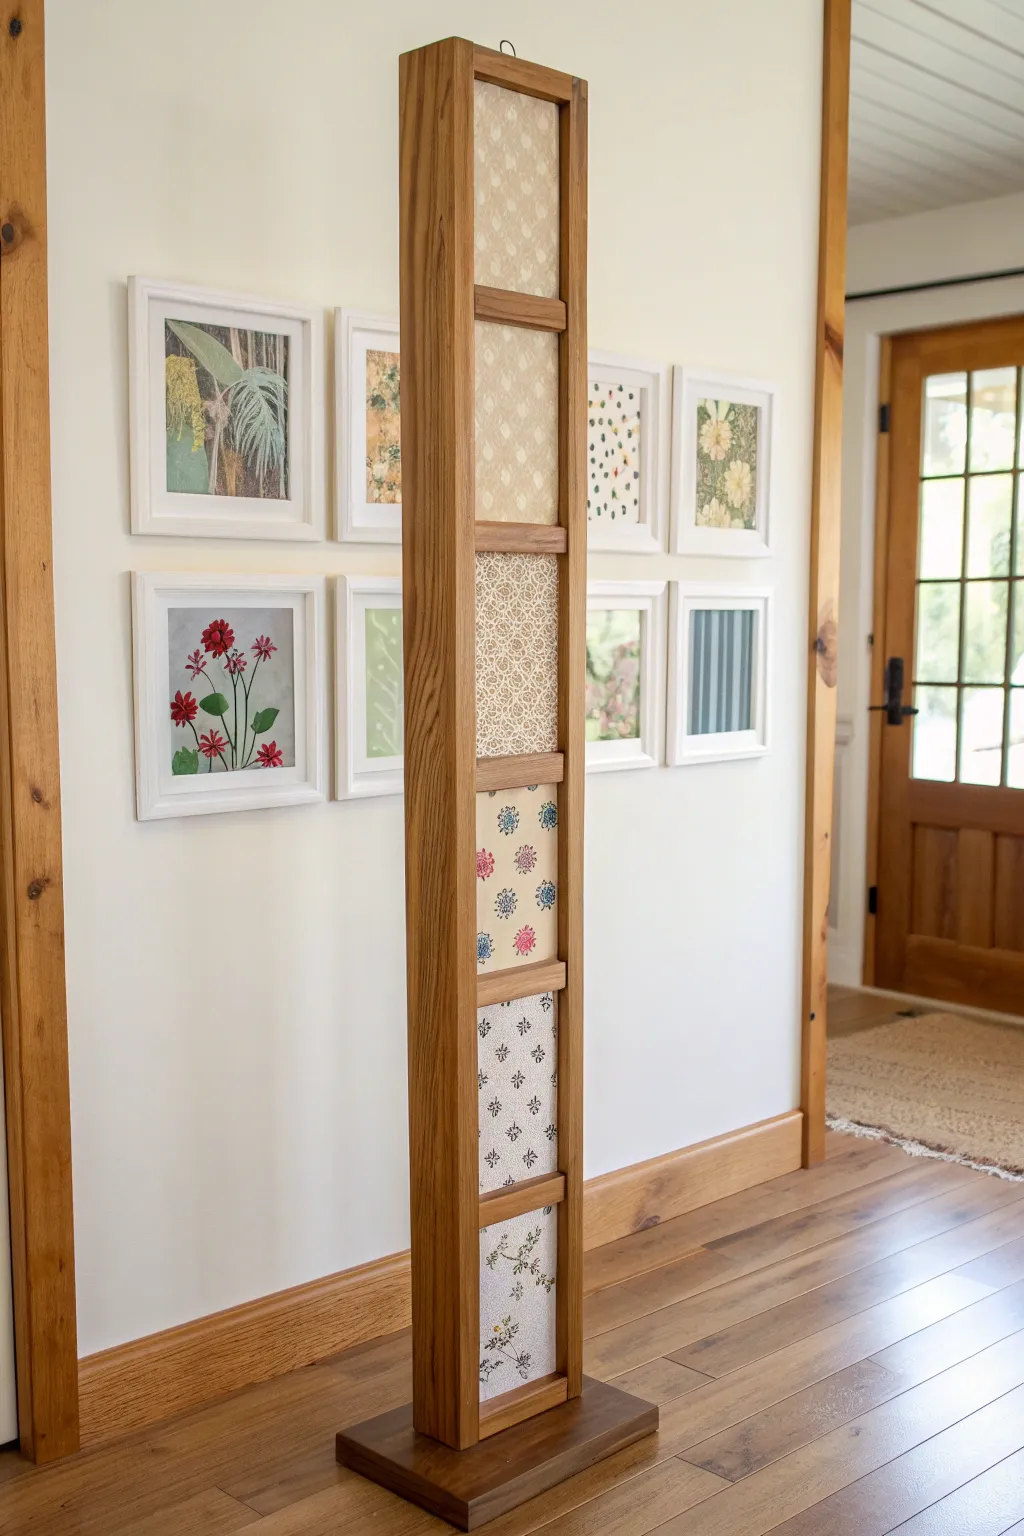
Transform a simple wooden column into a striking vertical gallery of textiles or paper patterns. This freestanding structure features a series of framed panels, each showcasing a unique botanical or geometric design for a cozy, quilted aesthetic.
How-To Guide
Materials
- 4×4 inch wooden post (approx. 6 feet tall)
- Wide wooden base plinth (approx. 12×12 inches)
- Small wooden trim or molding strips
- Patterned wrapping paper, wallpaper scraps, or fabric
- Mod Podge or decoupage glue
- Wood stain (warm oak or walnut)
- Wood glue
- Finishing nails or brad nailer
- Clear matte varnish
- Sandpaper (120 and 220 grit)
- Paintbrush or foam brush
- Carpenter’s square
- Measuring tape
- Saw (miter saw or hand saw)
Step 1: Constructing the Frame
-
Prepare the base:
Begin by sanding your wooden base plinth until smooth. Center the 4×4 post on top of the base plinth and trace its position with a pencil to ensure perfect alignment later. -
Attach the post:
Apply a generous amount of wood glue to the bottom of the 4×4 post. Secure it to the base plinth by screwing upwards through the bottom of the base into the post using long wood screws. Countersink these screws so the base sits flat on the floor. -
Create the panel recesses:
To create the framed look seen in the image, you need a recess. Measure the width of your post and cut thin wooden strips to create a ‘frame’ around the front face. Glue and nail these strips along the long vertical edges of the post, slightly overhanging the front face to create a shallow channel. -
Add horizontal dividers:
Measure the total vertical space inside your new channel. Divide this length by six to determine the height of your individual panels. Cut small horizontal pieces of trim to fit snugly between the vertical rails at these intervals. -
Secure the dividers:
Glue and pin nail the horizontal dividers in place. I always use a carpenter’s square here to ensure every ‘box’ is perfectly rectangular, as uneven spacing will be obvious once the patterns are added.
Wrinkle Rescue
If paper bubbles while gluing, use a brayer or old credit card to gently push air to the edges. If a bubble persists, prick it with a needle and press flat.
Step 2: Staining and Prep
-
Sand the structure:
Give the entire structure a thorough sanding. Start with 120 grit to remove rough spots and finish with 220 grit for a furniture-grade smoothness. -
Apply stain:
Using a rag or brush, apply your chosen wood stain. The example uses a warm tone similar to teak or medium oak. Work the stain into all corners of the framed recesses. -
Wipe excess:
After letting the stain penetrate for a few minutes, wipe away any excess with a clean lint-free cloth. Let the wood dry completely according to the manufacturer’s instructions.
Glow Up
Install a small LED strip light or battery-operated puck light hidden under the top overhang of the frame to cast a soft downlight on your patterned panels.
Step 3: Applying the Patterns
-
Cut backing boards:
Cut thin pieces of cardboard or heavy cardstock to fit exactly inside each of the six recessed rectangles. Test fit them to ensure they slide in easily without buckling. -
Select your patterns:
Curate your mix of papers or fabrics. Alternate between geometric micro-prints, florals, and bolder stripes to create a balanced ‘patchwork’ rhythm. Arrange them on the floor first to finalize the order. -
Adhere patterns to backing:
Brush a thin, even layer of Mod Podge onto a backing card. Carefully press your first paper or fabric piece onto it, smoothing from the center outwards to eliminate air bubbles. -
Trim edges:
Flip the card over and use a sharp craft knife or scissors to trim the excess material flush with the cardstock edge. -
Mount the panels:
Apply wood glue or strong double-sided tape to the back of your wrapped panels. Press them firmly into their designated recessed spots on the wooden column. -
Seal the surface:
To protect the paper or fabric from dust and light wear, brush a coat of matte Mod Podge or clear varnish over each panel. Be careful not to let it pool in the corners.
Step 4: Finishing Touches
-
Final clear coat:
Apply a final protective clear coat of varnish over the wooden frame parts (avoiding the fabric panels if you want them to keep a textile texture). -
Add felt pads:
Stick felt protective pads to the bottom corners of the base plinth to prevent scratching your floors.
Place your new decorative column in a hallway or corner to add a unique architectural element to your room


Have a question or want to share your own experience? I'd love to hear from you in the comments below!