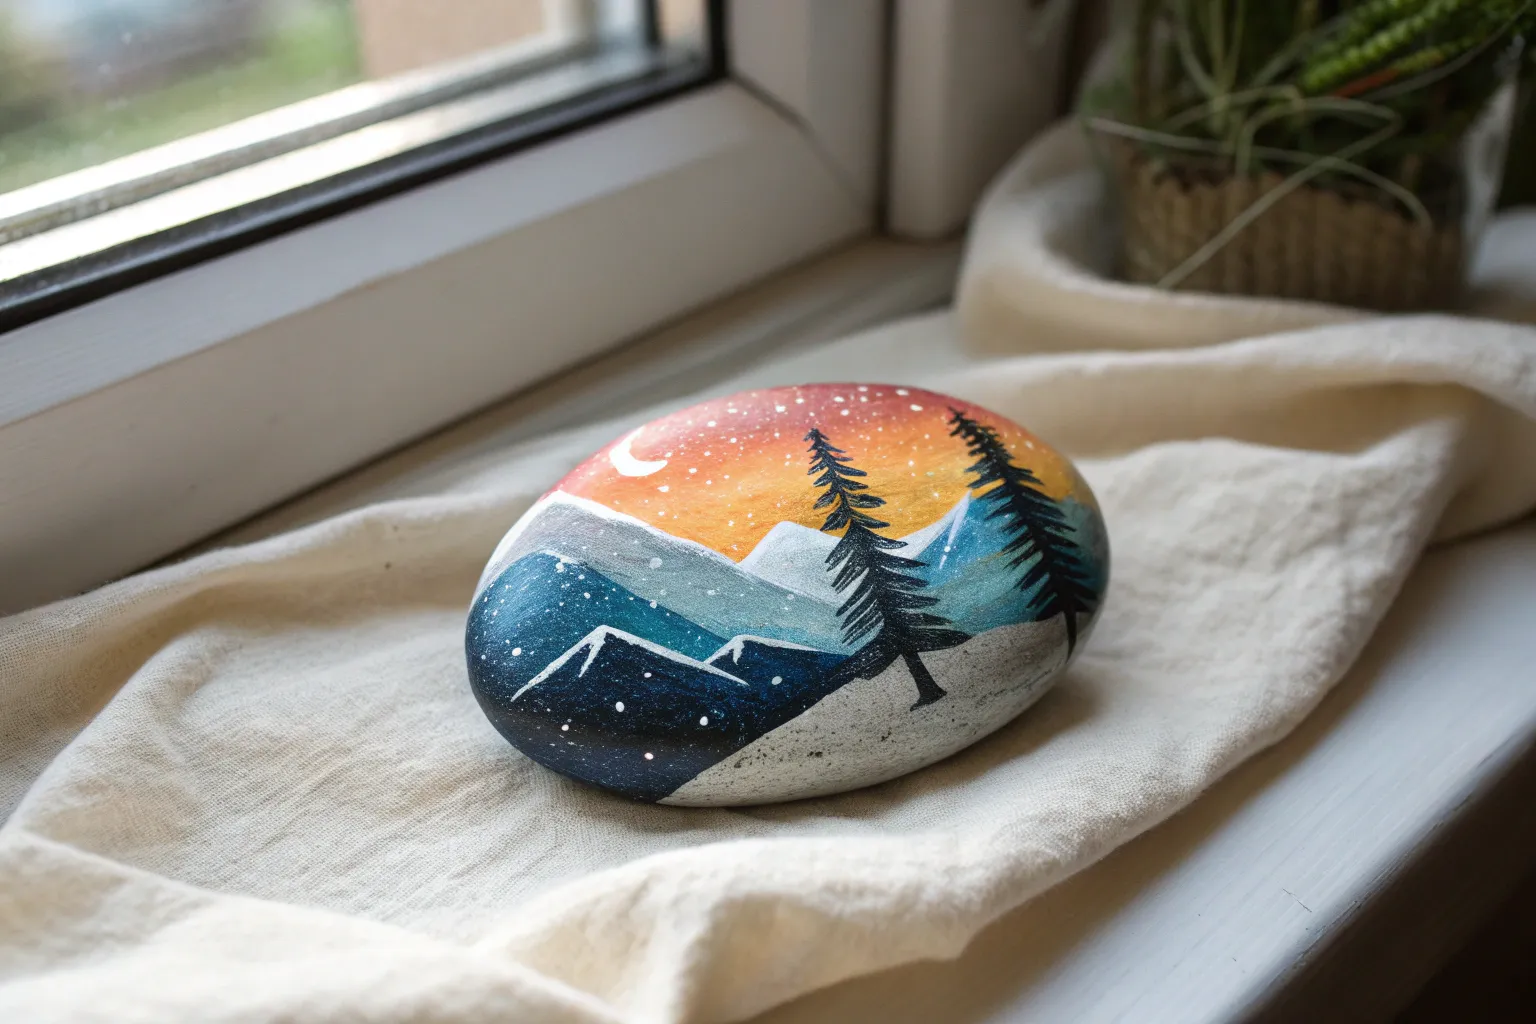
If you love painting tiny worlds, nature rock painting is the sweetest way to turn a simple stone into a pocket-sized escape. I’m sharing my favorite nature rock painting ideas—from classic mini landscapes to a few unexpected “wait, that’s on a rock?” scenes.
Sunset Mountain Layers
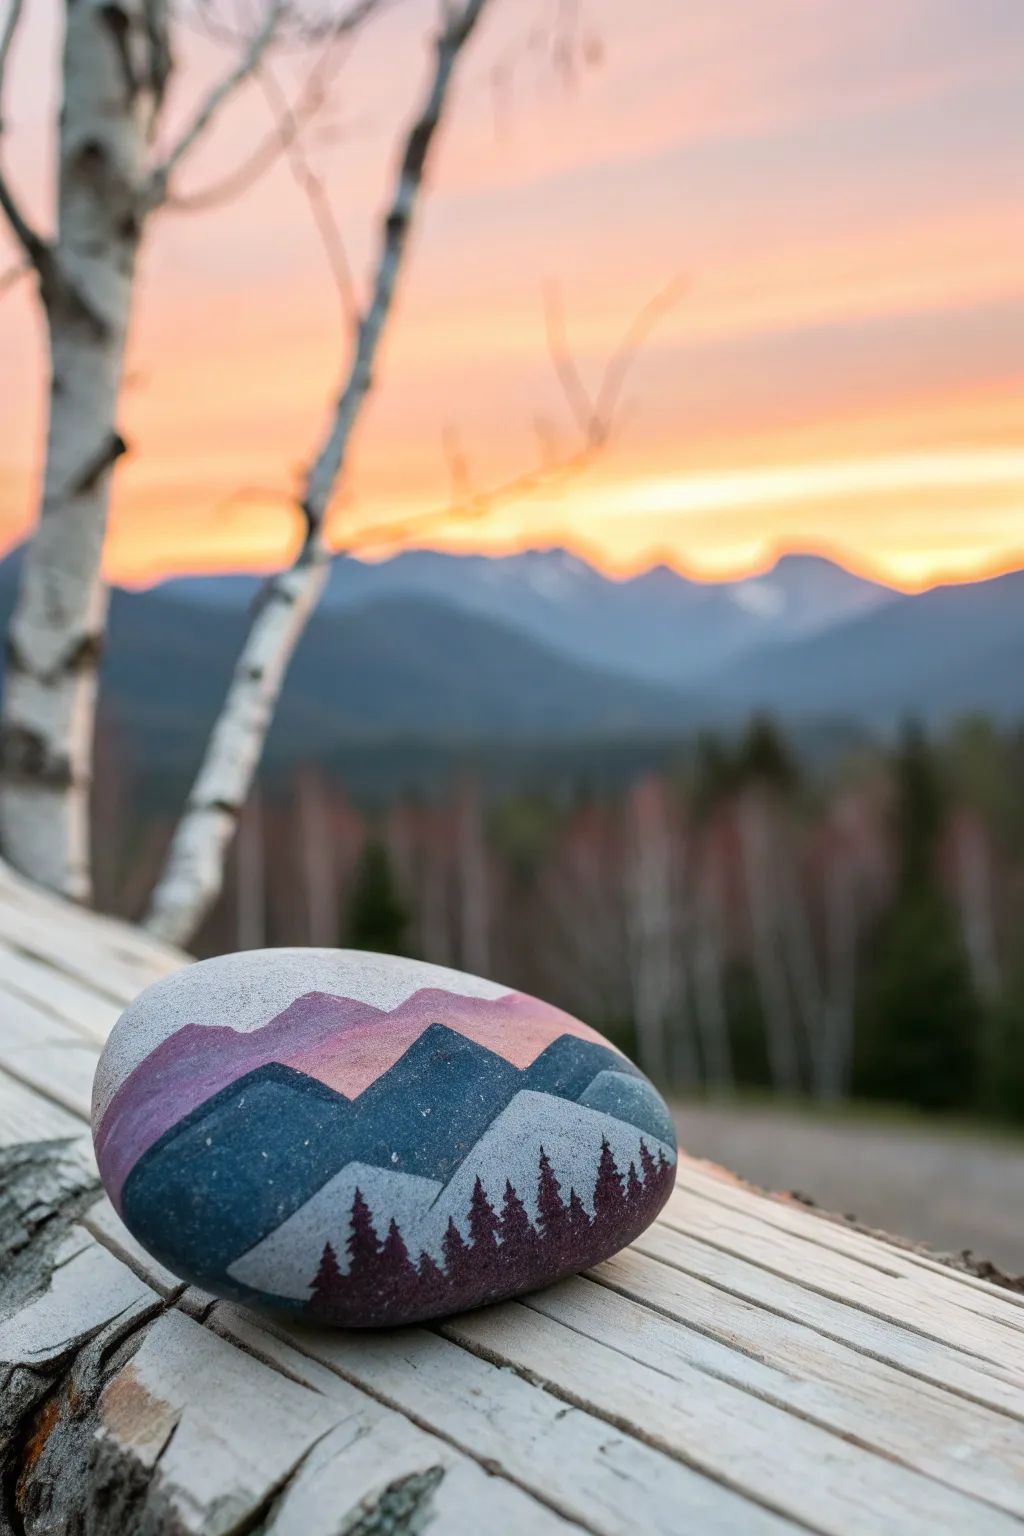
Capture the serene beauty of twilight on layers of distant peaks with this stunning rock painting project. The design uses gradients and silhouettes to create depth, mirroring the actual sunset in the background.
Step-by-Step
Materials
- Smooth, flat river rock (oval shape works best)
- Acrylic paints: White, Light Pink, Lavender, dark Teal/Blue, Deep Plum/Black
- Fine detail brush (size 00 or 0)
- Small flat brush (size 2 or 4)
- Pencil for sketching
- Matte spray sealer
- Palette for mixing
Step 1: Preparation and Base
-
Clean your canvas:
Begin by scrubbing your rock with warm soapy water to remove any dirt or oils. Let it dry completely in the sun or use a hair dryer to speed up the process. -
Prime the surface:
While the natural rock color is nice, painting a thin layer of white or light grey where the mountains will go helps the colors pop. If you prefer the natural stone texture for the top sky area, you can skip priming that specific section. -
Sketch the layers:
Lightly sketch three distinct wavy lines across the rock using a pencil. The top line is for the distant peaks, the middle for the main mountain range, and the bottom line defines the tree line.
Clean Lines?
bumpy rock surface making lines wobble? slightly dilute your paint with a drop of water. This helps the paint flow into the rock’s porous texture smoother.
Step 2: Painting the Mountains
-
Mix the sky colors:
On your palette, mix white with a tiny dot of light pink and lavender. You want a very pale, sunset-hued top layer. -
Paint the furthest range:
Using your small flat brush, fill in the top section (the furthest mountain range) with your pale pink-lavender mix. Ensure smoothly curved ‘peaks’ along the top edge. -
Create the middle range color:
Mix a dark teal or slate blue. It should be significantly darker than the top layer to create atmospheric perspective. -
Fill the middle mountains:
Paint the middle section with the teal blue. Carefully follow the pencil line guides, making the peaks overlap the pink layer slightly for a clean edge. -
Add dimension (Optional):
While the teal paint is still wet, I sometimes blend a slightly lighter shade of blue on the left side of the peaks to suggest a light source. -
Paint the foreground base:
For the bottom-most mountain layer (before the trees), mix a lighter, dusty blue-grey. Paint this section below the teal mountains, creating a soft transition zone.
Step 3: Adding Details
-
Dry thoroughly:
It is crucial that the base layers are completely dry before adding the fine trees. If it’s tacky, the sharp lines will blur. -
Mix the silhouette color:
Mix a deep plum color with a touch of black. You want a very dark, rich color for the forest silhouette—avoid using straight black as it can look flat. -
Start the tree line:
Switch to your fine detail brush. Paint a solid undulating line along the very bottom edge of the painted area to ground the trees. -
Paint tree trunks:
Draw thin vertical lines of varying heights extending up from that bottom line. These will be the centers of your pine trees. -
Stipple the branches:
Using the very tip of your brush, use a tiny stippling or tapping motion to create branches. Start wide at the bottom of the trunk and taper to a point at the top. -
Vary density:
Make some trees taller and others shorter to create a natural-looking forest line. Group some closely together. -
Clean up edges:
Check the boundaries between your mountain layers. If you need to sharpen a peak, use a clean brush with the appropriate color to tidy the line.
Level Up
Add tiny white dots in the unpainted top section of the stone to mimic stars appearing in the twilight sky just above the sunset peaks.
Step 4: Finishing
-
Let it cure:
Allow the rock to sit undisturbed for at least 24 hours to ensure the paint has fully cured. -
Seal the artwork:
Take the rock outside and spray it with a clear matte sealer. This protects the paint from chipping and weather if you choose to leave it outdoors.
Place your finished mountain landscape on a windowsill or back in nature for someone to find


Twilight Sky Pine Silhouette
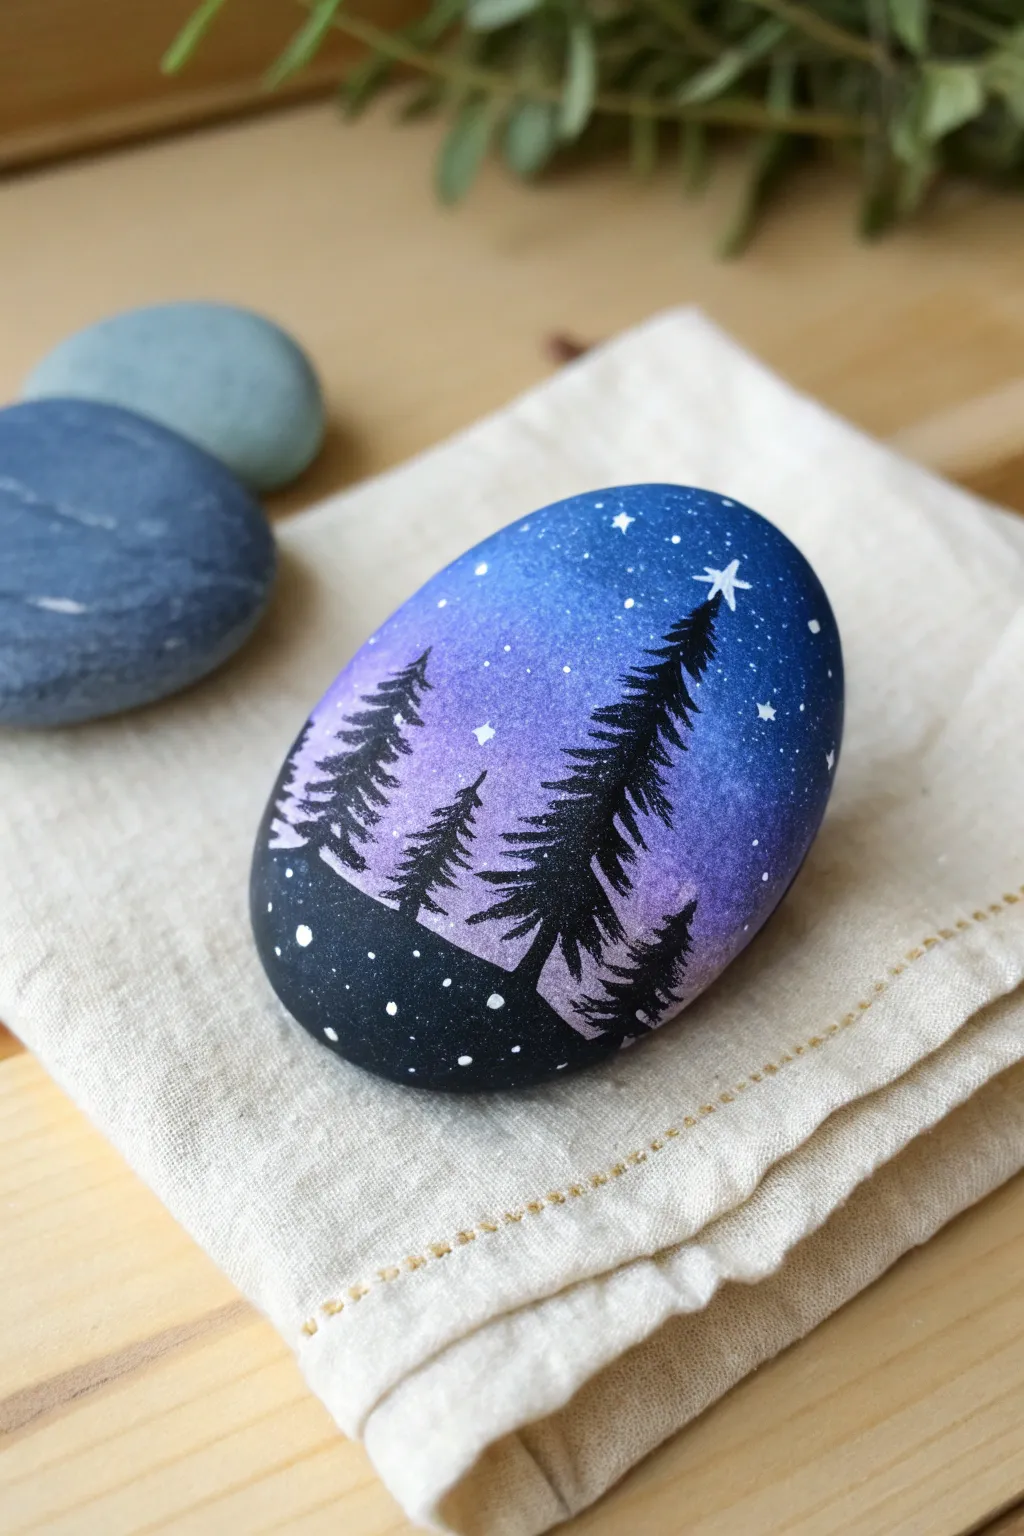
Transform a smooth river stone into a serene twilight landscape with this striking starry night design. The blend of deep blues and purples creates a stunning backdrop for sharp pine tree silhouettes.
Detailed Instructions
Materials
- Smooth, oval river rock (cleaned and dried)
- Acrylic paints: Black, White, Prussian Blue, Violet, Magenta
- Paintbrushes: Flat brush (for blending), fine liner brush (for details)
- Small piece of sponge (optional for blending)
- Water cup and paper towels
- Clear acrylic sealer (spray or brush-on)
Step 1: Creating the Twilight Gradient
-
Prime surface:
Start by applying a thin coat of white acrylic paint over the top surface of the rock. This acts as a primer and ensures your gradient colors will pop vibrantly rather than sinking into the stone’s natural gray tones. -
Apply deepest blue:
Using a flat brush, paint the top third of the rock with Prussian Blue. Curve your brushstrokes slightly to follow the rounded shape of the stone, ensuring full coverage at the very top. -
Transition to purple:
While the blue is still wet, introduce Violet paint in the middle section. Use back-and-forth strokes where the colors meet to blend them seamlessly, creating a soft transition from the dark night sky. -
Add the horizon glow:
Mix a tiny bit of White with Magenta or a lighter Violet to create a pale lavender hue. Apply this to the bottom third of the sky area, blending it upwards into the purple section. -
Smooth the blend:
If I notice harsh lines, I like to use a clean, slightly damp sponge or soft dry brush to lightly tap over the transition areas. This softens the gradient for a misty, atmospheric look. Let this layer dry completely.
Step 2: Painting the Silhouettes
-
Establish the ground:
Using black paint, create a curved horizon line near the bottom of the rock. Fill in the area below this line completely with black to form the solid ground. -
Mark the trees:
Switch to your finest liner brush. Paint thin vertical lines extending upward from the ground to mark the trunks of your pine trees. Vary their heights, making the one on the right the tallest for visual interest. -
Form the tree tops:
Starting at the very top of your tallest trunk, use the tip of the liner brush to dab tiny horizontal strokes. These should be very narrow at the peak. -
Build the branches:
Moving down the trunk, gradually widen your horizontal strokes. Use a zig-zag or tapping motion to mimic the irregular texture of pine needles, keeping the silhouette varied rather than perfectly triangular. -
Fill lower branches:
As you reach the bottom of the tree, make the branches denser and wider, blending them into the black ground. Repeat this process for the smaller trees on the left, ensuring they look slightly distant.
Muddy Gradient?
If blending turns gray or muddy, rinse your brush completely between colors. Let the muddy layer dry, then re-apply fresh paint over it.
Step 3: Stars and Details
-
Mix star paint:
Ideally, mix a small amount of white paint with a drop of water to create an inky consistency. This flows better off the brush for tiny distinct dots. -
Paint the North Star:
Place a prominent star near the top of the tallest tree. draw a small cross shape first, then add smaller diagonal lines in between the arms for a twinkling effect. -
Add constellations:
Using the very tip of your detail brush or a toothpick, dot tiny white specks across the blue and purple sections of the sky. Vary the pressure to create different star sizes. -
Create ground sparkle:
Add a few larger white dots on the black ground area to represent fallen snow or sparkling frost catching the moonlight. -
Protect the art:
Allow the entire painting to dry for at least 24 hours. Once cured, apply a coat of clear acrylic sealer to protect the paint from chipping and to give the rock a polished sheen.
Sharp Tree tips
For super crisp pine needles, check that your paint isn’t too thick. Add a literal drop of water to your black paint so it flows smoothly.
Place your finished piece on a desk or in a planter for a peaceful touch of nature


Moon and Stars Over a Forest
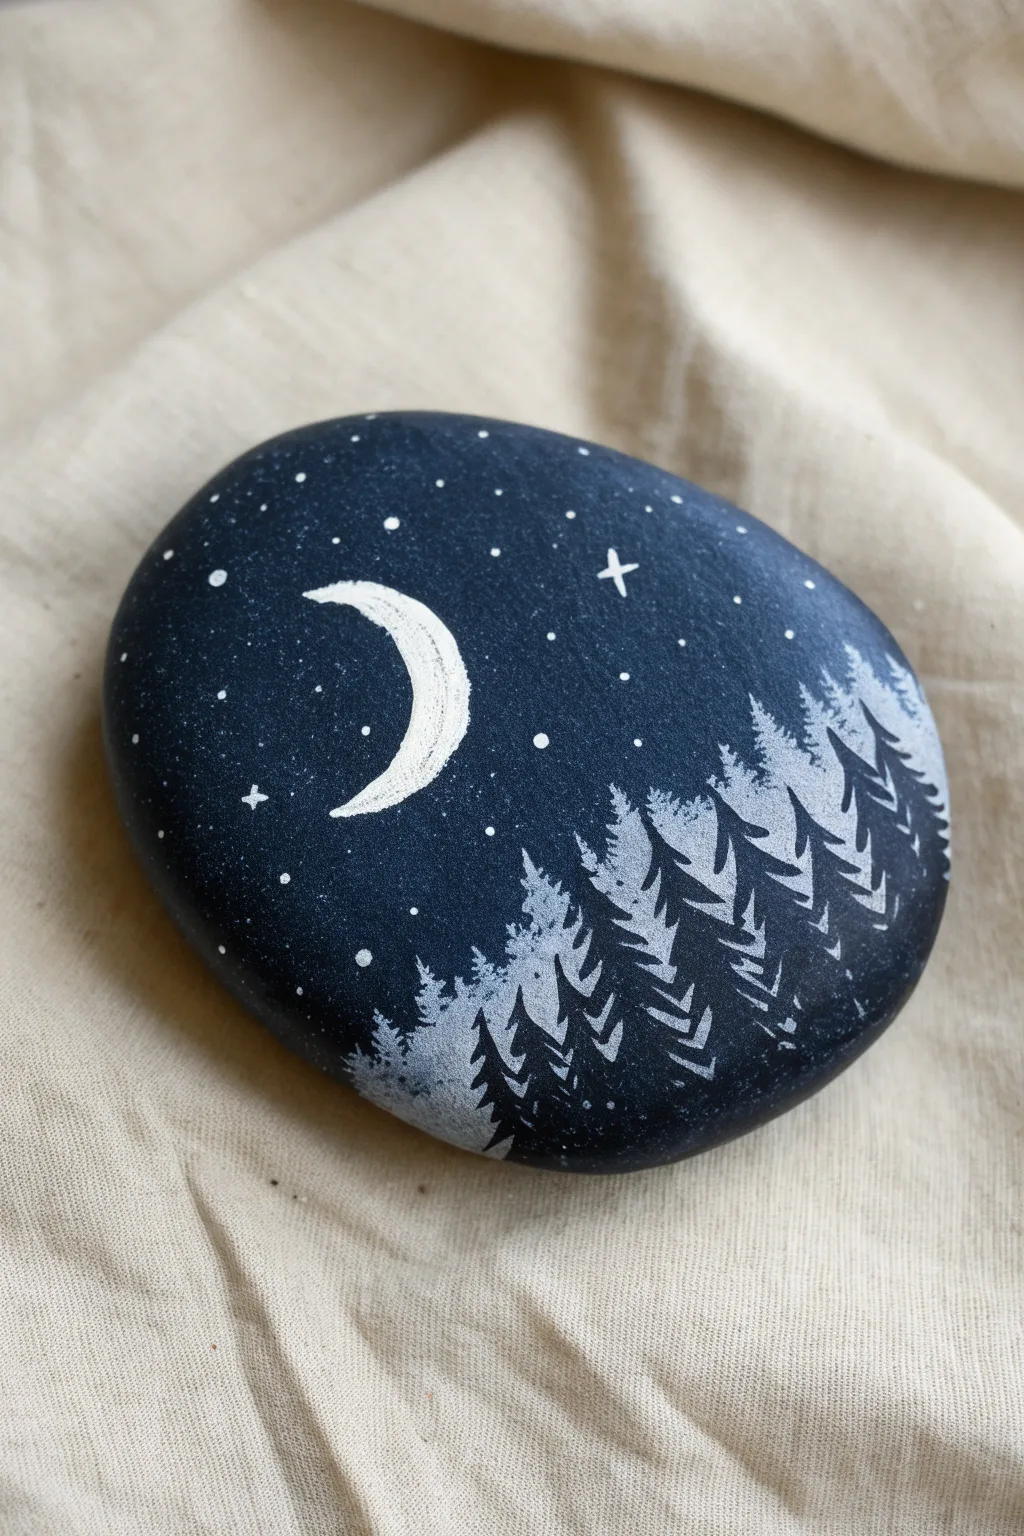
Transform a smooth river stone into a serene window onto a midnight forest using simple silhouette techniques. This high-contrast design captures the magic of a crescent moon glowing over textured pine trees.
Step-by-Step
Materials
- Smooth, oval river rock (palm-sized)
- Black acrylic paint (matte or satin)
- Titanium White acrylic paint
- Dark navy blue acrylic paint (optional)
- Wide flat brush
- Fine liner brush (size 0 or 00)
- Small round brush
- Dotting tool or toothpick
- Clear spray sealant (matte finish)
Step 1: Setting the Midnight Stage
-
Clean the canvas:
Begin by thoroughly washing your stone with soapy water and a scrub brush to remove any dirt or oils. Let it dry completely in the sun or with a hairdryer. -
Mix the base color:
While you could use pure black, I prefer mixing a tiny drop of dark navy blue into black acrylic paint. This gives the night sky a subtle, rich depth that looks more natural than flat black. -
Apply the base coat:
Using a wide flat brush, cover the entire top surface of the rock with your dark mixture. Smooth out your brushstrokes so they wrap gently around the edges for a borderless look. -
Second coat:
Allow the first layer to dry until it’s no longer cool to the touch. Apply a second coat to ensure complete opacity, covering any natural stone texture showing through.
Chalky Moon?
If your white paint looks translucent over the black, don’t keep layering wet paint. Let it dry completely, then apply a second thin coat for crisp brightness.
Step 2: Painting the Forest Silhouette
-
Thin the white paint:
Place a dollop of Titanium White on your palette and mix in a tiny drop of water. You want an ink-like consistency that flows smoothly off the brush but remains opaque. -
Establish tree trunks:
Using your fine liner brush, paint thin vertical lines starting from the bottom right edge of the rock, curving slightly inward. Vary their heights, making the ones on the far right taller and the ones toward the center shorter to create depth. -
Start the pine branches:
Starting at the top tip of a trunk line, use short, downward-angled strokes to create the needle texture. Keep these strokes very small near the top of the tree. -
Fill out the trees:
Continue working down the trunk, making your angled strokes gradually wider as you reach the bottom. Don’t worry about being perfect; stylized, messy zig-zags often look more like organic branches. -
Overlap the forest:
Paint the trees closest to the foreground first with solid white. Then, for trees that look further away (behind the main ones), you can mix a tiny bit of your base black color into the white to make a light grey, pushing them visually into the distance. -
Anchor the bottom:
Use a small round brush to dab darker dabs of grey and black at the very bottom of the trees where they meet the stone edge, blending them into the darkness so the trees don’t look like they are floating.
Needle Precision
Load your brush with paint, then roll the tip on a paper towel before painting branches. This sharpens the bristles to a fine point for crisp pine needles.
Step 3: Adding the Night Sky
-
Outline the crescent:
Switch back to your smallest detail brush and pure white paint. In the upper left quadrant of the open sky, carefully paint a thin outline of a crescent moon shape. -
Fill the moon:
Fill in the crescent shape. You might need two layers of white here to make it pop against the dark background. You can lightly tap the wet paint for a slight texture. -
Create main stars:
Using a dotting tool or the tip of a toothpick, place three or four larger dots randomly in the sky. To make the cross-shaped twinkle stars, drag a very dry liner brush outward from a center point in four directions. -
Sprinkle the stardust:
Fill the remaining empty space with tiny dots. Vary the pressure you put on the dotting tool to create different sizes, clustering some near the tree line for a magical effect. -
Final cure:
Let the rock sit undisturbed for at least 24 hours to ensure the thickest parts of the paint are fully cured. -
Seal the artwork:
Take the rock outside and apply a light coat of matte spray sealant. This protects the paint from chipping and keeps the matte, velvety look of the night sky.
Now you have a piece of the midnight wilderness to hold in the palm of your hand


Ocean Horizon With Rolling Waves
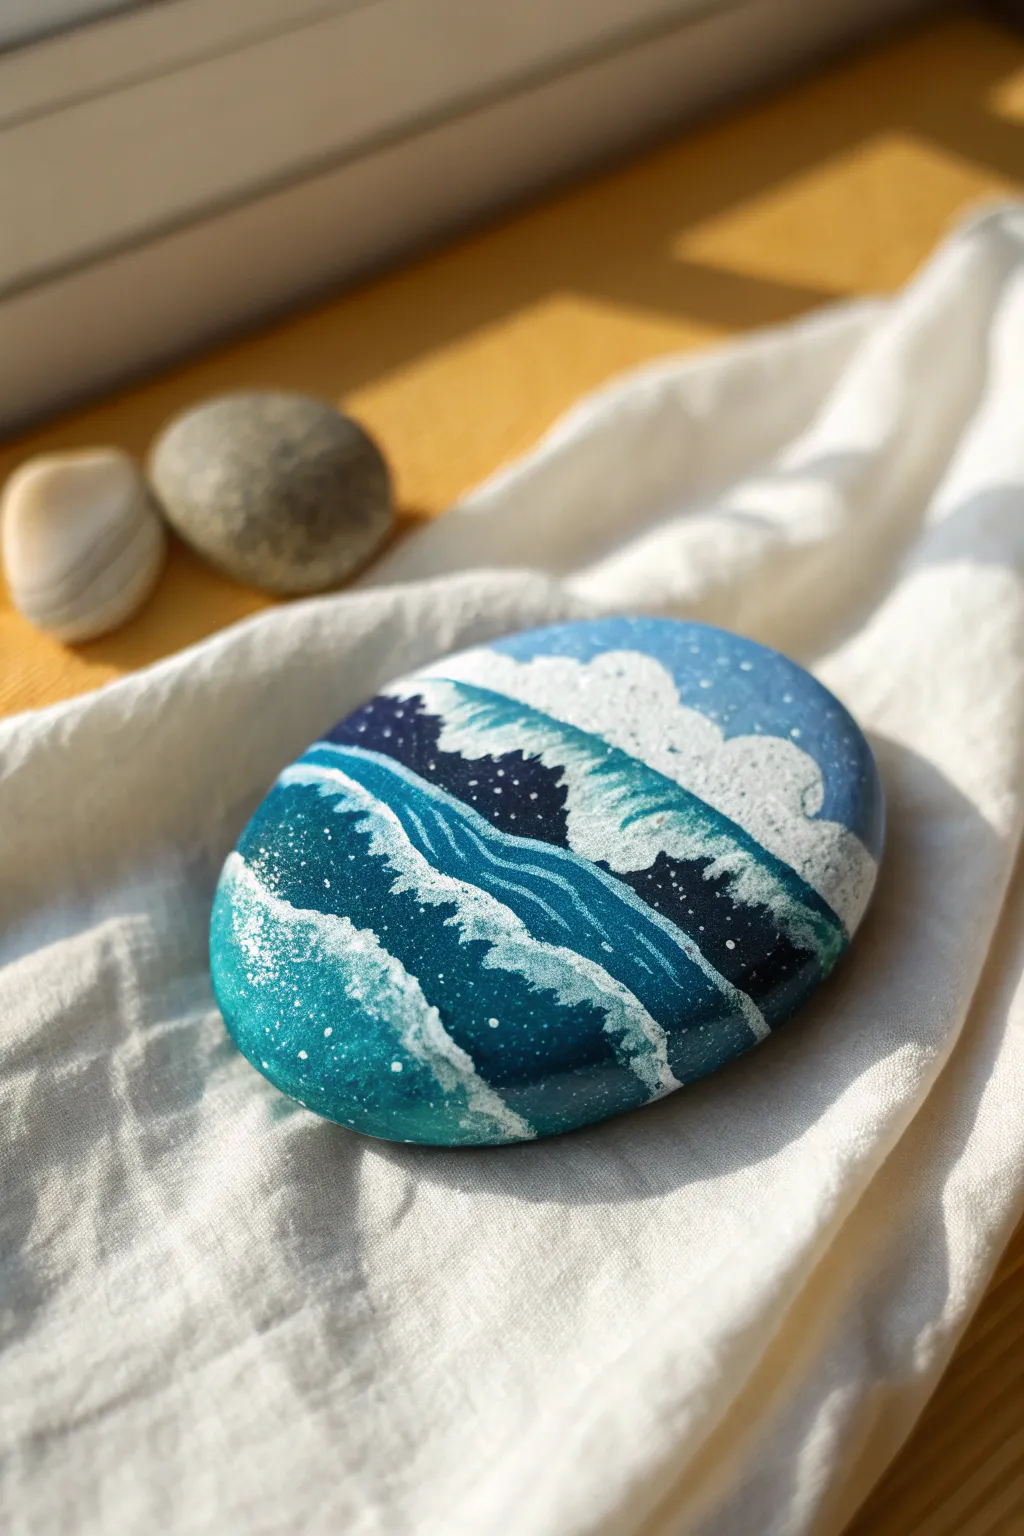
Capture the raw power of the ocean on a simple smooth stone with this rolling waves design. The layers of teal, deep navy, and crisp white come together to form dynamic, crashing surf against a starry backdrop.
Detailed Instructions
Materials
- Smooth oval river rock (flat surface is best)
- Acrylic paints: Navy blue, phthalocyanine blue, teal/turquoise, titanium white
- Flat shader brushes (medium and small)
- Fine liner brush (size 0 or similar)
- Old toothbrush or stiff bristle brush (for splatter)
- Water cup and paper towels
- Spray varnish or sealant
Step 1: Setting the Scene
-
Clean Your Canvas:
Begin by washing your rock thoroughly with soap and water to remove any dirt or oils. Let it dry completely before starting to ensure the paint adheres properly. -
Base Color Blocking:
Visualize the rock in three diagonal sections. Using your medium flat brush, paint the top third in your deepest navy blue to represent the distant, deep ocean or night sky. -
Middle Waters:
While the navy is still slightly wet, blend a strip of pure phthalocyanine blue (a rich, true blue) just below it. -
Foreground Swell:
Paint the bottom third in a bright teal or turquoise. Blend the meeting points of each color band softly with a damp brush so there are no harsh horizontal lines. -
Let it Dry:
Allow this base gradient to dry completely. Since rocks can be porous, you might need a second coat of these base colors to get really opaque, solid coverage.
Wet-on-Wet Blending
Work quickly on the base layer. If the paint starts to dry while blending the blue gradients, mist the rock lightly with water to keep the acrylics movable.
Step 2: Painting the Rolling Waves
-
Outline the Crests:
Mix a lighter teal by adding a touch of white to your turquoise paint. Using a small flat brush, paint sweeping, curved shapes starting from the left and curling over to the right to define the main wave forms. -
Deep Shadows:
Underneath the curve of your main wave, paint a stripe of dark navy blue. This shadow creates the illusion of height and depth, making the wave look like it’s curling over. -
Initial Foam Layer:
Load a small brush with titanium white. Paint the top edge of the furthest back wave (the navy section) with a jagged, irregular line to look like distant whitecaps. -
Main Wave Crash:
For the large central wave, use white paint to create the crashing lip. Instead of a smooth line, use a dabbing motion to simulate the texture of frothy, churning water. -
Water Highlights:
Mix a pale blue-green. Using your fine liner brush, paint thin, flowing lines inside the body of the wave, following the curve of the water. These striations show movement and current.
Metallic Magic
Mix a tiny amount of iridescent medium or silver paint into your white foam. It adds a magical shimmer that catches the light like real sun-kissed water.
Step 3: Details and Texture
-
Sea Spray Splatter:
Dilute a small amount of white paint with water until it’s inky. Dip an old toothbrush or stiff brush into it, and flick the bristles with your thumb to create a fine mist spray over the crashing part of the wave. -
More Spray Details:
If the splatter is too subtle, use your finest detail brush to manually add tiny white dots around the crests of the waves to represent larger droplets of foam. -
Foreground Foam:
In the teal foreground area, stipple (dot repeatedly) white paint in sweeping curves to create the look of sea foam rushing toward the shore. -
Add Depth to Foam:
Once the white foam is dry, mix a very watery, transparent wash of teal. Lightly glaze over the bottom edges of your white foam areas to make them look wet and heavy. -
Starry Sky (Optional):
If you want the top navy section to look like a night sky rather than deep water, add a few calculated dots of white in the dark blue area. -
Final Touches:
Check your contrast. If the darks have faded, carefully re-intensify the deep navy shadows under the white wave crests. -
Seal the Deal:
Once the rock is 100% dry (give it a few hours), apply a spray varnish. A glossy finish works beautifully here, making the painted water look permanently wet.
Place your finished rock in a sunny spot and enjoy the calming ocean vibes.
BRUSH GUIDE
The Right Brush for Every Stroke
From clean lines to bold texture — master brush choice, stroke control, and essential techniques.
Explore the Full Guide
Mini Wildflower Meadow
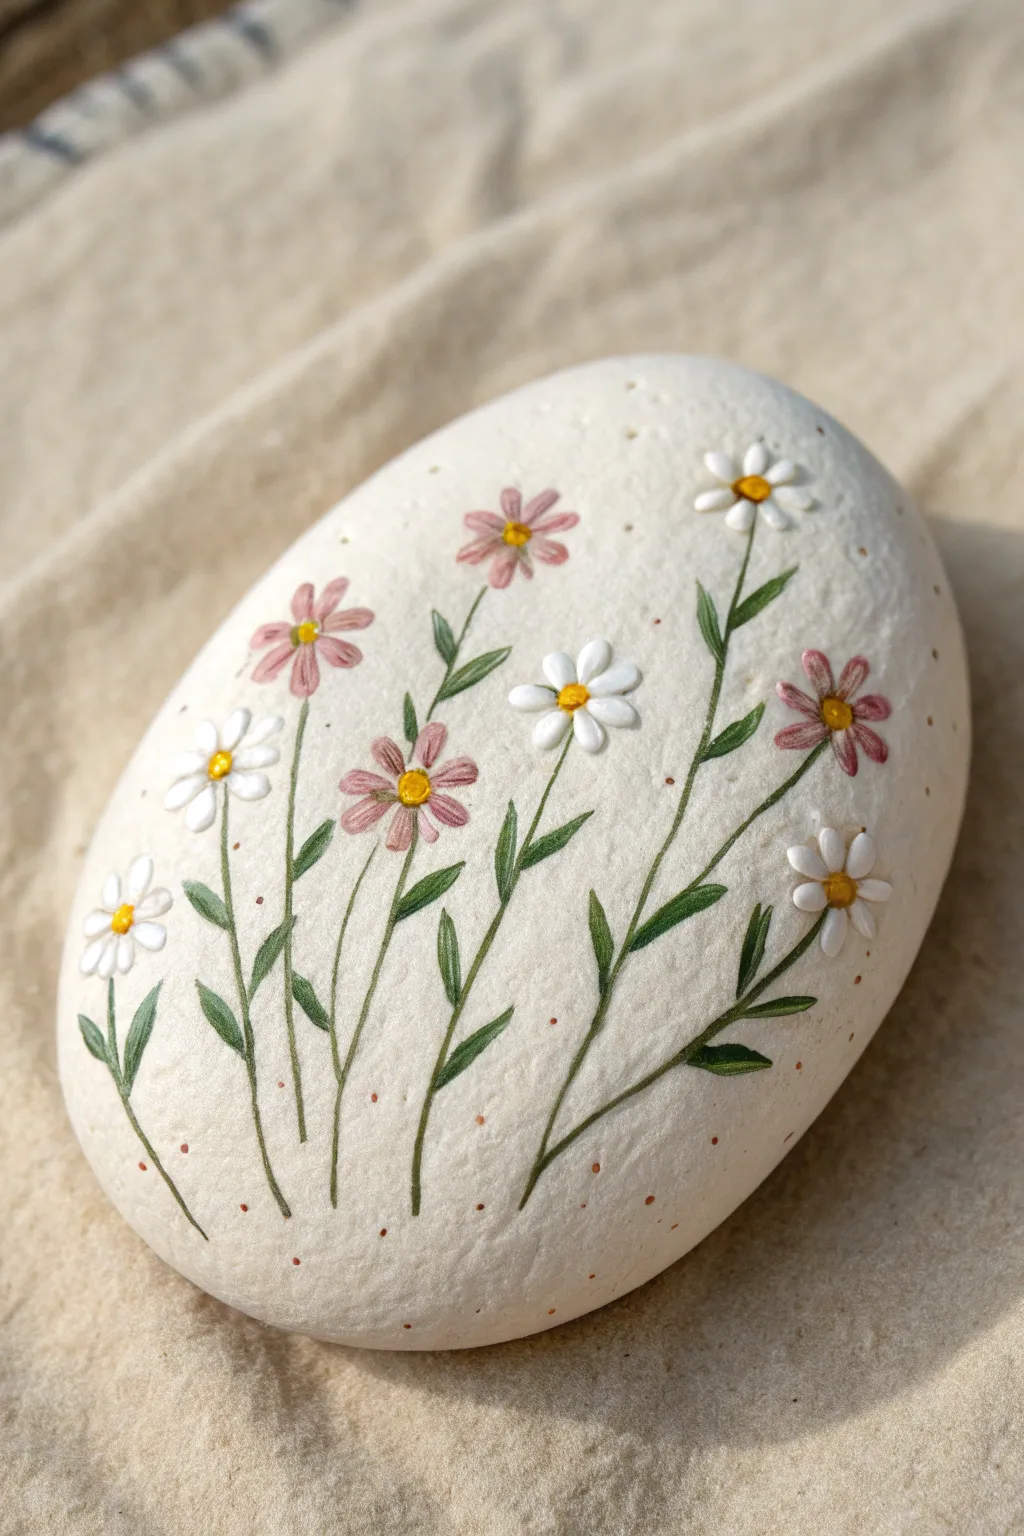
Transform a simple river rock into a slice of everlasting garden with this gentle wildflower design. The soft cream background makes the dainty pink and white blooms pop, creating a serene piece perfect for a desk or windowsill.
Step-by-Step Guide
Materials
- Smooth, rounded river rock with a flat surface
- Acrylic paint (Cream/Off-white for base)
- Acrylic paint (Titanium White, Dusty Pink/Mauve, Dark Green, Olive Green, Yellow Ochre)
- Fine detail brushes (sizes 0, 00, and 000)
- Larger flat brush for base coat
- Very fine needle tool or toothpick
- Matte finish sealant spray
- Palette for mixing
Step 1: Prepping the Canvas
-
Clean the stone:
Begin by scrubbing your rock with warm soapy water and a stiff brush to remove any dirt or grit. Let it dry completely in the sun or with a hairdryer before painting. -
Mix the base color:
Mix Titanium White with a tiny drop of Yellow Ochre or a speck of brown to create a warm, creamy off-white shade. This looks more natural than stark white. -
Apply the first coat:
Using the large flat brush, apply a smooth, even layer of the cream paint over the entire top surface of the rock. Don’t worry if it looks streaky yet. -
Refine the background:
Once the first layer is dry to the touch, apply a second and possibly third coat until the stone’s natural color is completely hidden and the texture looks like eggshell. Let this base cure fully for at least an hour.
Step 2: Growing the Stems
-
Plan the composition:
Visualize three to four main stems curving gently from the bottom. Imagine them swaying slightly in a breeze rather than standing stiffly straight. -
Mix your greens:
Create an organic green by mixing Dark Green with a touch of Olive. Avoid using straight-from-the-tube bright green, as it can look artificial. -
Paint the main stems:
Load your size 0 liner brush with thinned green paint (ink consistency). Using just the tip and very light pressure, pull three long, graceful lines upward, allowing them to curve naturally. -
Add shorter stems:
Paint a few shorter, secondary stems branching off the main ones or rising independently from the bottom, varying their heights to create depth. -
Add the leaves:
Switching to the 00 brush, add small, slender leaves along the stems. Press down slightly at the base of the leaf and lift as you pull away to create a sharp point. -
Layer leaf colors:
To add dimension, mix a slightly lighter olive shade and add a few highlights to the tops of the larger leaves while the dark green is still tacky.
Uneven Petals?
Don’t stress if petals overlap or vary in size! Real wildflowers are imperfect. Rotate the rock as you paint to get better angles for your hand.
Step 3: Blooming Flowers
-
Position the white flowers:
Identify spots for the white daisies, usually near the top of the stems. Using Titanium White and a size 000 brush, paint small teardrop shapes radiating from a center point. -
Refine white petals:
Go over the white petals a second time to ensure opacity. Keep the petals slightly spaced apart so the petals look distinct rather than like a solid blob. -
Create the pink blooms:
Mix a soft mauve or dusty pink. Paint similar teardrop-shaped petals for the pink flowers, grouping them on alternate stems. I like to vary the angles so some flowers look like they are facing sideways. -
Add petal details:
For the pink flowers, take a tiny amount of diluted white paint and add a very subtle highlight line down the center of a few petals to give them a cupped shape.
Vintage Look
For an aged botanical chart aesthetic, wash a very thin glaze of diluted raw umber (brown) over the dried white background before painting the stems.
Step 4: Finishing Touches
-
Paint the centers:
Dip the back end of your brush or a dotting tool into Yellow Ochre. Place a firm, raised dot in the center of every flower. -
Detail the centers:
While the yellow paint is wet, touch the very bottom of the yellow dot with a minuscule amount of brown or dark orange to create a shadow, giving the center a 3D effect. -
Add tiny buds:
Using your smallest brush, add tiny white and pink buds at the tips of the very thinnest upper stems. These can be simple single brushstrokes. -
Sprinkle magic dust:
Mix a watery brown-pink shade. Dip a toothbrush or stiff brush into it and lightly flick it (or tap the handle against another brush) to create microscopic speckles across the background for an organic, vintage look. -
Hand-painted accents:
If the splatter feels too risky, take a needle tool or toothpick and manually place tiny reddish-brown dots randomly in the empty spaces around the flowers. -
Seal the artwork:
Allow the rock to dry overnight. Finish with a matte spray varnish to protect the paint without making it look like plastic.
Place your finished stone in a sunny spot to enjoy a permanent wildflower bloom all year round.
Daisy Cluster on a Pebble
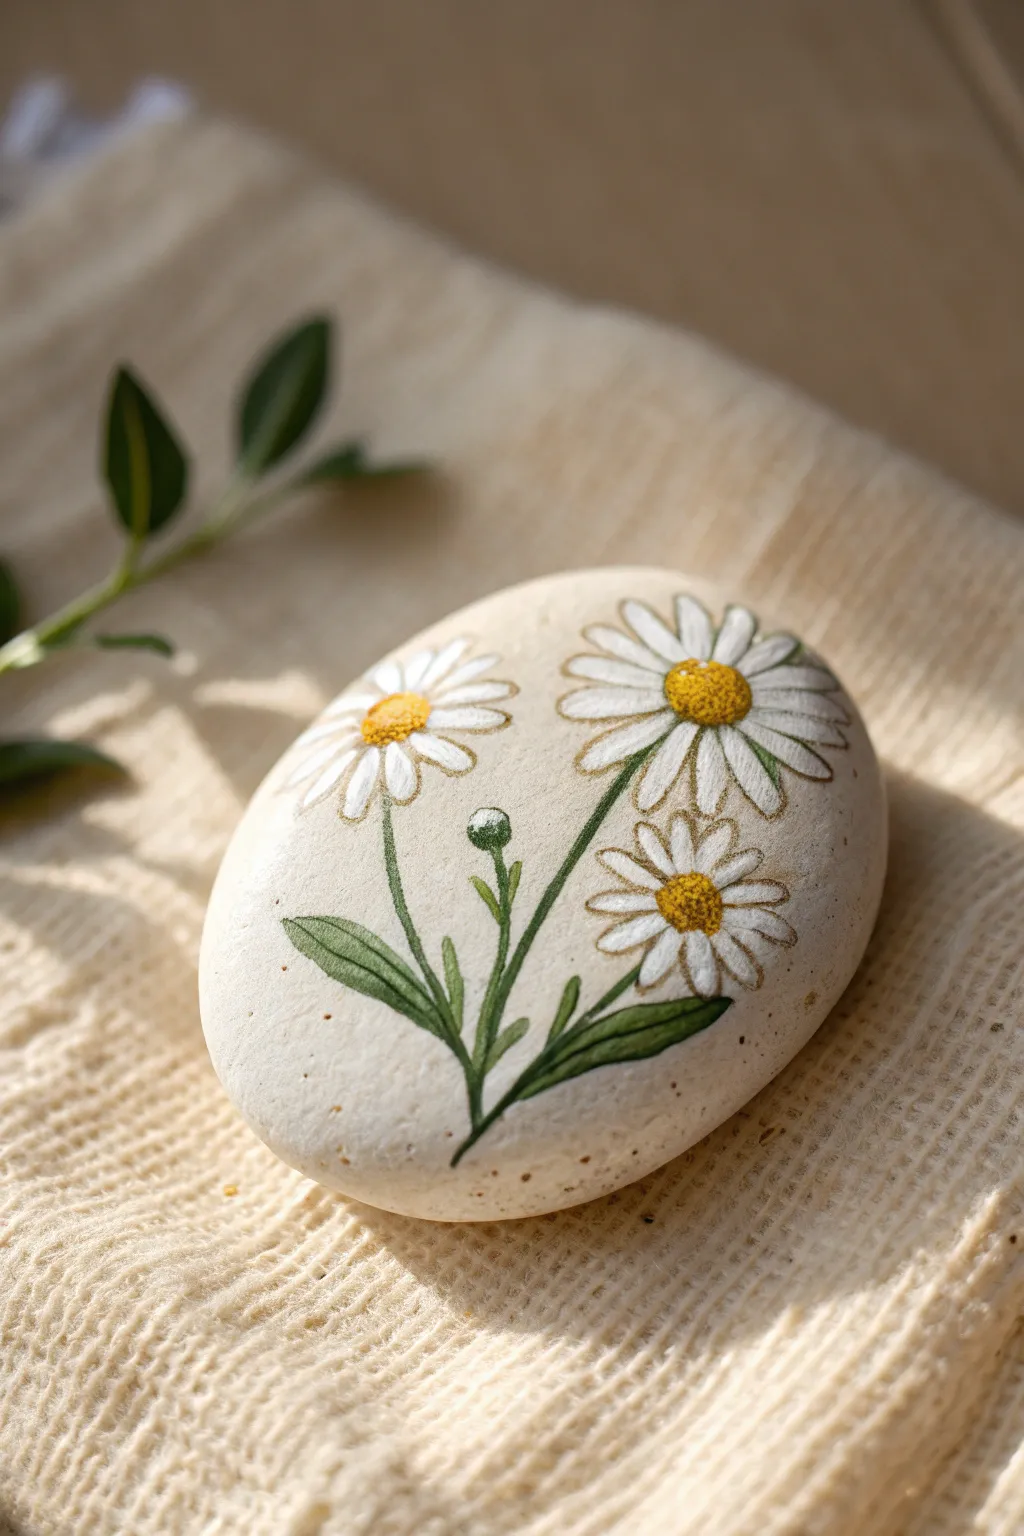
Transform a simple smooth pebble into a delightful piece of nature art with this detailed daisy cluster design. The soft white petals and warm yellow centers pop beautifully against the natural stone background, creating a charming decoration or kindness rock.
How-To Guide
Materials
- Smooth, light-colored river stone (oval shape preferred)
- Acrylic paints (Titanium White, Golden Yellow, Ochre, Sap Green, Deep Forest Green)
- Fine detail brushes (sizes 0 and 00)
- Small flat brush (size 2)
- Pencil for sketching
- Palette for mixing
- Water cup and paper towel
- Matte finish clear acrylic sealer
Step 1: Preparation and Sketching
-
Surface Prep:
Begin by washing your stone with warm soapy water to remove any dirt or grit. Let it dry completely in the sun or with a hair dryer, as paint won’t adhere well to a damp surface. -
Base Tone (Optional):
If your stone is too dark, mix a very diluted wash of beige acrylic paint and glaze the surface. I prefer to leave the stone natural if it’s already a light, sandy color like the one in the photo. -
Sketching the Composition:
Using a light pencil, gently sketch three circles to mark where the flower heads will go. Place the largest one on the upper right, a medium one on the left, and a smaller one tucked below the large blossom. -
Adding Stems:
Draw faint lines connecting these circles to a central point near the bottom of the rock. Don’t worry about being perfect; these are just guides for your brushwork. -
Mapping the Leaves:
Sketch two elongated, lance-shaped leaves near the base of the stem cluster. Add a small bud stem rising between the two upper flowers.
Textured Centers
For realistic 3D centers, mix a pinch of baking soda into your yellow paint. It creates actual grit that mimics pollen when dry.
Step 2: Painting the Florals
-
Blocking in Petals:
Load your size 2 flat brush or a round brush with Titanium White. Starting from the outer edge of your sketched circle, pull the brush inward toward the center to create teardrop-shaped petals. -
Layering White:
The first layer of white might look translucent against the stone. Let it dry completely, then apply a second coat to make the petals bright and opaque. -
Painting the Centers:
Once the white petals are dry, use a small round brush to dab Golden Yellow into the center of each flower. Make these centers slightly domed rather than perfectly flat. -
Adding Texture to Centers:
Mix a tiny bit of Ochre or light brown with your yellow. Stipple (dot lightly) key areas on the bottom and sides of the yellow centers to give them a fuzzy, pollen-heavy appearance and 3D volume. -
Painting the Stems:
Switch to your fine detail brush (size 0) and Deep Forest Green. Carefully trace over your stem lines, keeping them thin and elegant. Vary the pressure slightly to make them look organic. -
Filling the Leaves:
Mix Sap Green with a touch of Titanium White for a softer leaf color. Fill in the leaf shapes at the base, ensuring solid coverage. -
Painting the Bud:
For the small unbloomed bud, paint a tiny green oval at the tip of the central stem. Once dry, add a minuscule dot of white at the very top to show the petals just starting to peek through.
Help! Shaky Lines?
If your stem lines are wobbly, brace your painting hand’s pinky finger against the dry part of the rock for stability while you work.
Step 3: Refining Details
-
Petal Definition:
To separate the petals, mix a very watery grey or diluted brown. Use your finest 00 brush to paint incredibly thin lines between the petals, defining their individual shapes. -
Highlighting Leaves:
Using the lighter green mix again, add a subtle vein line down the center of each leaf. You can also add a highlight to one side of the stem for dimension. -
Shadowing:
Add a tiny touch of dark grey or brown wash right underneath the flower centers where they meet the petals. This small shadow grounds the center and makes the flower look cupped. -
Final White Touches:
Inspect your petals. If the outlines dulled the white, add tiny, crisp streaks of pure white on the tips of the petals to bring back the brightness. -
Sealing the Art:
Allow the rock to cure for at least 24 hours. Apply a thin layer of matte varnish to protect the paint without adding a distracting glossy shine, preserving the natural stone look.
This lovely little rock arrangement captures the innocent beauty of wild daisies and brings a permanent bloom to your home decor

PENCIL GUIDE
Understanding Pencil Grades from H to B
From first sketch to finished drawing — learn pencil grades, line control, and shading techniques.
Explore the Full Guide
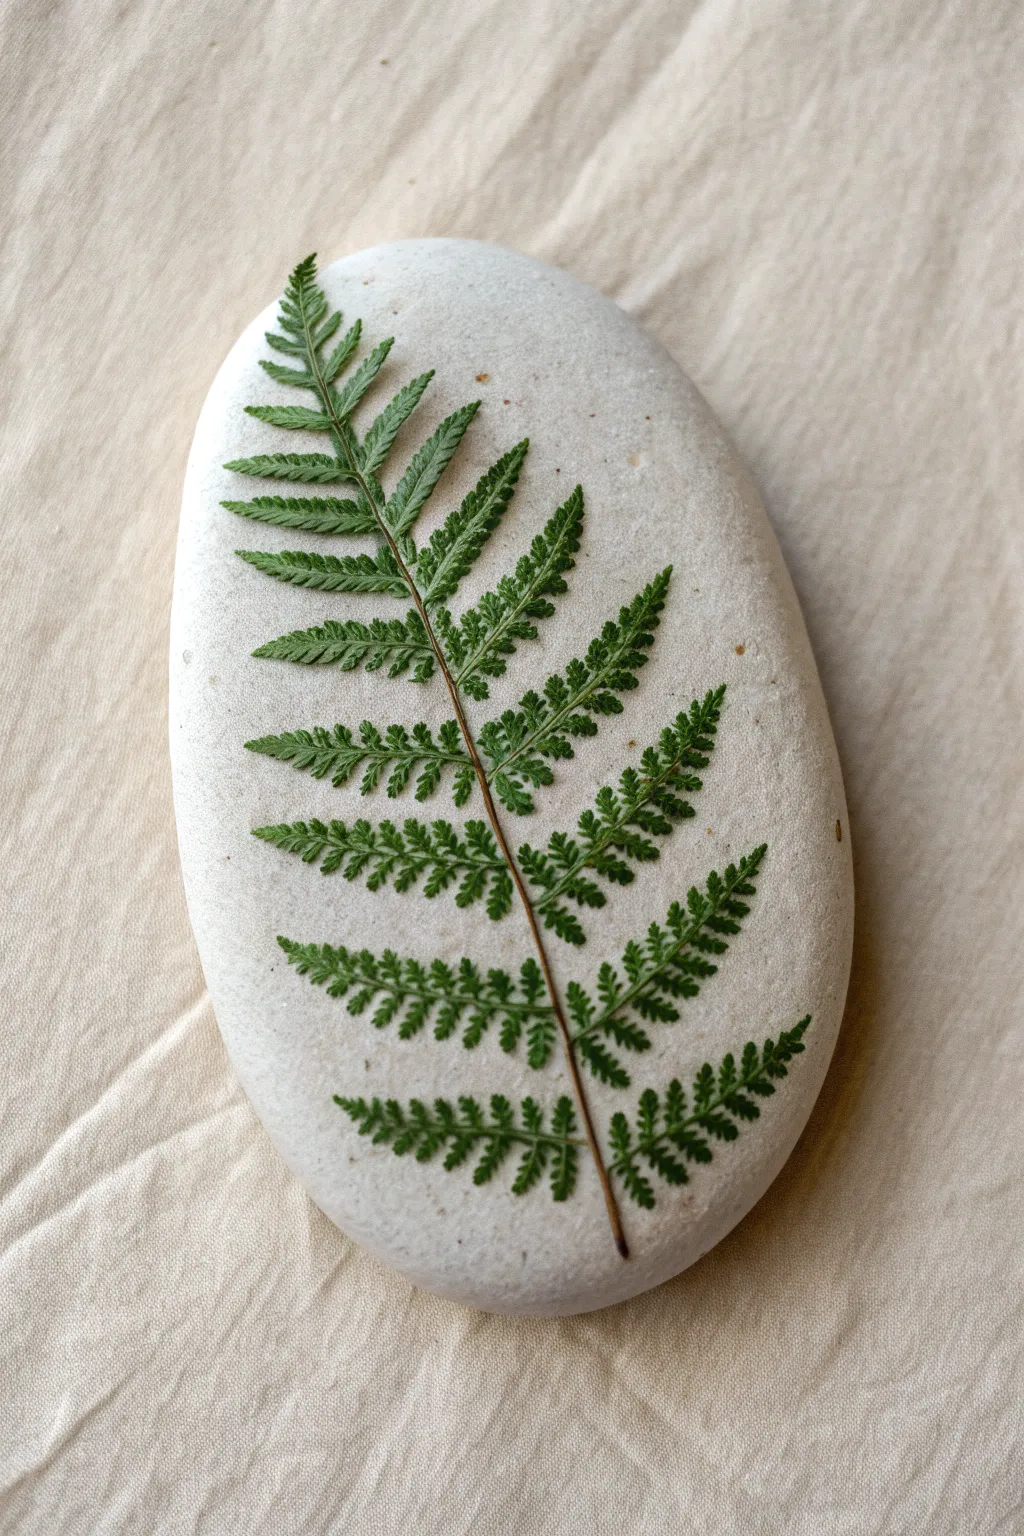
Single Leaf Botanical Study
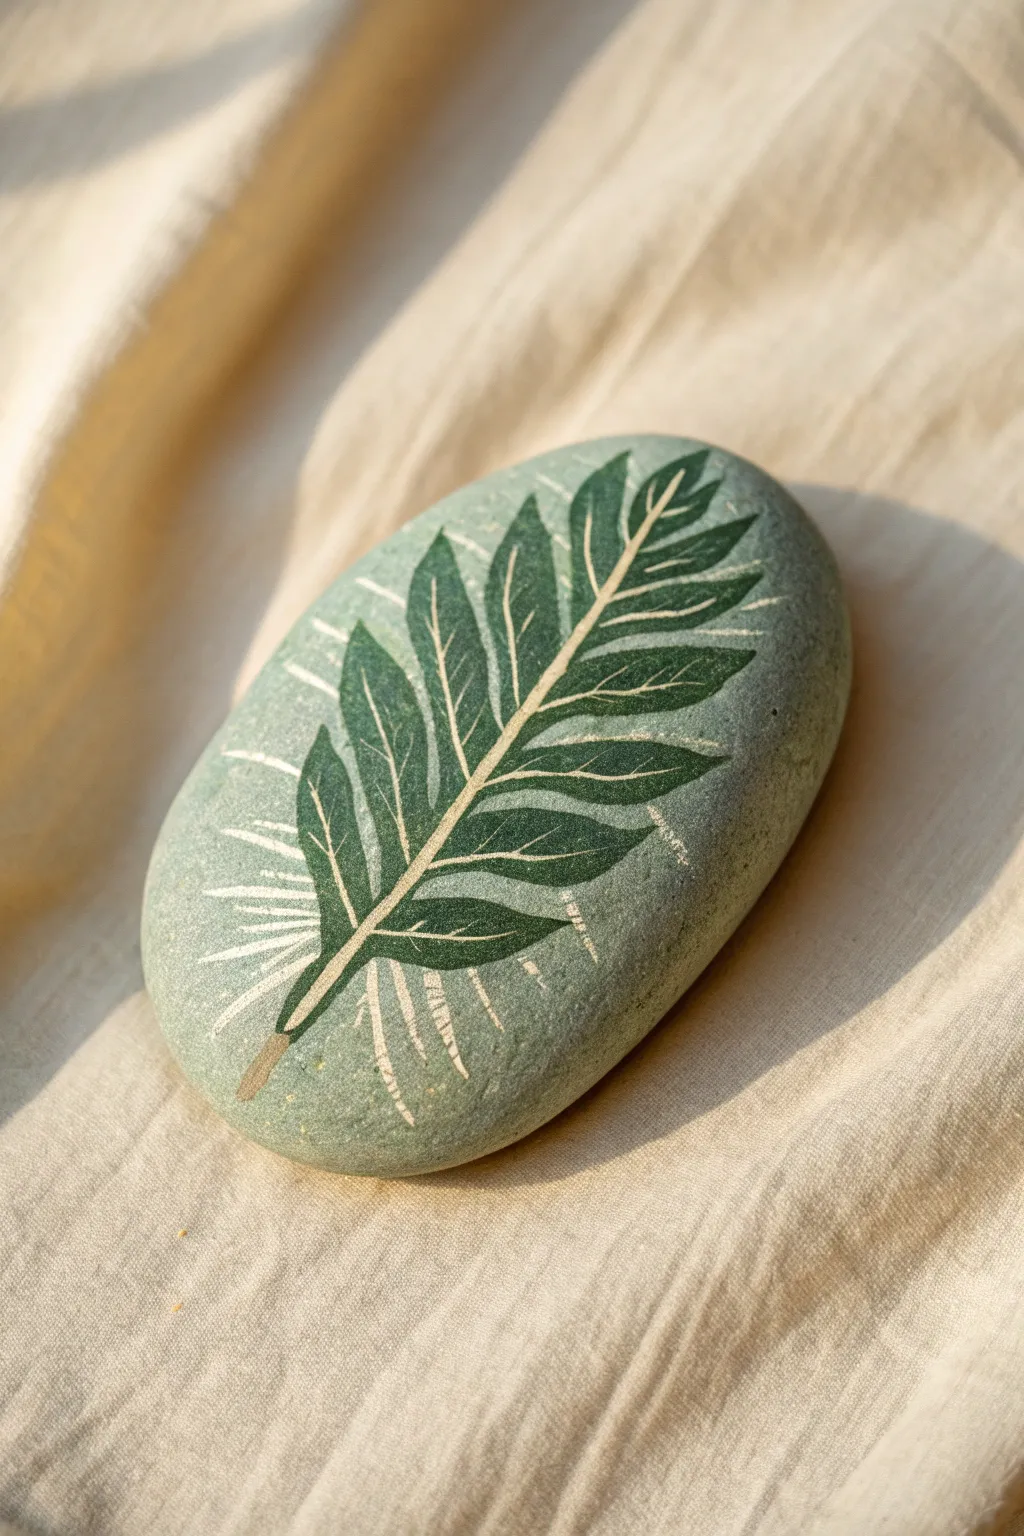
This project transforms a simple river rock into a botanical study featuring a stylized fern frond. The monochrome green palette, accented with crisp white veins, creates an elegant and organic piece of decor that looks lovely on a desk or shelf.
Detailed Instructions
Materials
- Smooth, oval river rock (approx. 3-4 inches)
- Acrylic paints: Sage Green (light), Forest Green (dark), Titanium White, Yellow Ochre
- Matte acrylic medium or gesso (optional)
- Flat shader brush (size 6 or 8)
- Fine liner brush (size 0 or 00)
- Pencil (HB or lighter)
- Palette or mixing plate
- Water cup and paper towels
- Matte varnish spray
Step 1: Base Preparation
-
Clean the surface:
Before painting, scrub your rock with warm soapy water and a brush to remove any dirt or oils, then let it dry completely. Paint adheres best to a clean, gritty surface. -
Prime the stone:
If your rock is very porous or dark, apply a thin layer of matte medium or gesso. This creates a barrier and helps the colored paint sit on top rather than soaking in. -
Mix the background color:
Create a soft sage green by mixing Titanium White with a small amount of Forest Green and a touch of Yellow Ochre to warm it up. Aim for a milky, natural stone color. -
Apply the base coat:
Using the flat shader brush, cover the entire top surface of the rock with your mixed sage green. Paint in long, smooth strokes to minimize texture. Let this layer dry fully. -
Second coat:
Apply a second coat of the sage green mix to ensure opaque, solid coverage where no original rock shows through. Allow this to dry for at least 20 minutes.
Step 2: Sketching the Design
-
Plan the stem:
Using a light touch with your pencil, draw a curved line diagonally across the rock to serve as the central vein (rachis) of the leaf. -
Outline the leaflets:
Sketch the leafy shapes extending from the central stem. Draw pairs of elongated, pointed leaflets that curve slightly towards the tip of the frond. Keep the shapes simple and symmetrical.
Clean Lines
Does your liner brush wobble? Rest your pinky finger on the dry part of the rock to stabilize your hand while painting the fine veins.
Step 3: Painting the Leaf
-
Prepare the dark green:
Squeeze out straight Forest Green paint. If it feels too stiff, add a tiny drop of water or flow medium to make it inky but still opaque. -
Fill in the leaf shapes:
Using a smaller round brush or the edge of your shader, carefully fill in the pencil outlines with the dark forest green. Work slowly near the edges to keep them crisp. -
Refine the edges:
Go back over the leaf shapes to smooth out any brushstrokes. Ensure the dark green contrasts boldly against the lighter sage background. -
Add the stem base:
Mix a little Yellow Ochre with white and a dot of green to make a beige/tan color. Paint the very bottom of the stem where it would attach to the plant.
Ghost Lines
For the faint sketch details outside the leaf, try using a white watercolor pencil or a very dry brush tip. It creates a subtle texture.
Step 4: Adding Veins and Details
-
Mix the vein color:
This is a key step—mix a very pale, creamy hue using mostly Titanium White with just a whisper of the background sage color. It needs to be bright to pop. -
Paint the central vein:
Switch to your finest liner brush (size 00). Starting from the base, paint a thin, continuous line up the center of the dark green leaf shape. -
Add lateral veins:
Paint thin, delicate lines branching out from the center vein into each leaflet. I find it helps to rotate the rock as I work to keep my hand angle comfortable. -
Create the scratch effect:
For the stylized look seen in the photo, add faint, scratchy white lines extending ‘outside’ the leaf boundaries into the background. These should look like pencil sketches or ghost lines. -
Initial seal:
Let the paint cure for several hours. Once bone dry, erase any visible pencil marks gently. -
Varnish:
Finish with a matte spray varnish to protect the paint from chipping while maintaining that natural, stony finish.
Enjoy the calming process of painting nature’s patterns on your stone canvas
Fern Frond on a Slim Stone
Capture the delicate beauty of the forest floor with this realistic fern study. Using a smooth, pale stone as your canvas allows the intricate green fronds to pop, creating a stunning piece of natural decor perfect for paperweights or garden accents.
How-To Guide
Materials
- Smooth, oval river rock (white or light grey)
- Acrylic paints (dark green, sap green, lime green, brown)
- Fine liner brush (size 00 or 000)
- Small round brush (size 1)
- Palette or mixing plate
- Water cup and paper towels
- Pencil (optional)
- Spray varnish (matte or satin finish)
Step 1: Preparation and Stem
-
Clean the canvas:
Begin by washing your stone thoroughly with soap and water to remove any dirt or oils. Let it dry completely before starting. -
Analyze the shape:
Hold your stone vertically. Visualize the central spine of the fern running from the bottom center almost to the top tip, curving slightly to follow the stone’s natural contour. -
Sketch the spine (optional):
If you are nervous about free-handing, lightly sketch the central stem line with a pencil. Make it a gentle, organic curve rather than a ruler-straight line. -
Mix the stem color:
On your palette, mix a small amount of brown paint with a drop of dark green. You want a deep, earthy tone for the main stem. -
Paint the central rachis:
Using your fine liner brush, paint the central stem (rachis). Start at the bottom with a slightly thicker line and let it taper off to a whisper-thin point near the top of the stone.
Wobbly Lines?
If your hand shakes while painting the thin stem, rest your pinky finger on a dry part of the stone or the table to stabilize your hand.
Step 2: Painting the Fronds
-
Plan the leaflet spacing:
Visualize where the main branches will go. Fern fronds are widest near the bottom one-third and taper significantly as they reach the tip. -
Mix your greens:
Prepare three shades of green: a deep forest green for the base, a mid-tone sap green, and a lighter lime green for highlights. -
Start the bottom leaflets:
Using the size 00 brush and your mid-tone green, paint the first set of leaflets near the bottom. These should curve slightly downward or outward. -
Create the leaflet shape:
For each leaflet, paint a thin central vein extending from the main stem, then dab tiny, jagged strokes on either side to mimic the fern’s feathery texture. -
Work your way up:
Continue painting pairs of leaflets moving up the stem. As you ascend, make each pair progressively shorter and angled slightly more upward. -
Add the tip:
At the very top of the steam, paint the smallest, most delicate leaflets, merging them almost directly into the stem tip. -
Let the base layer dry:
Allow the green paint to dry for about 10 minutes so the next layers sit on top rather than muddying the colors.
Step 3: Adding Detail and Depth
-
Deepen the shadows:
Load your liner brush with the dark forest green. Add tiny touches of this color where the leaflets meet the main stem to create depth and shadow. -
Refine the edges:
Use the dark green to gently sharpen the jagged edges of lower leaves if they look too rounded. Real ferns have distinct, serrated edges. -
Connect the veins:
I like to take a tiny bit of the brown stem mixture and carefully drag it partially into the center vein of the larger lower leaves, connecting them visually to the main stalk. -
Add highlights:
Clean your brush thoroughly. mix a little lime green with a speck of white if needed. Lightly touch the tips and upper edges of the leaflets to simulate sunlight hitting the frond. -
Final stem check:
If the main brown stem got covered by green paint, carefully re-trace it with the fine liner brush to bring it back to the foreground. -
Cleanup:
Check for any stray paint marks on the bare stone and wipe them away with a damp Q-tip before the paint cures. -
Seal the artwork:
Once the painting is completely bone-dry (give it at least an hour), take the stone outside and apply a coat of matte spray varnish to protect your work without making it unnaturally glossy.
Botanical Twist
Make it a scientific study by painting the Latin name of the fern in tiny, elegant cursive along the bottom curve of the rock.
Place your finished stone on a stack of books or a windowsill to bring a permanent touch of nature indoors


Mushrooms in Moss
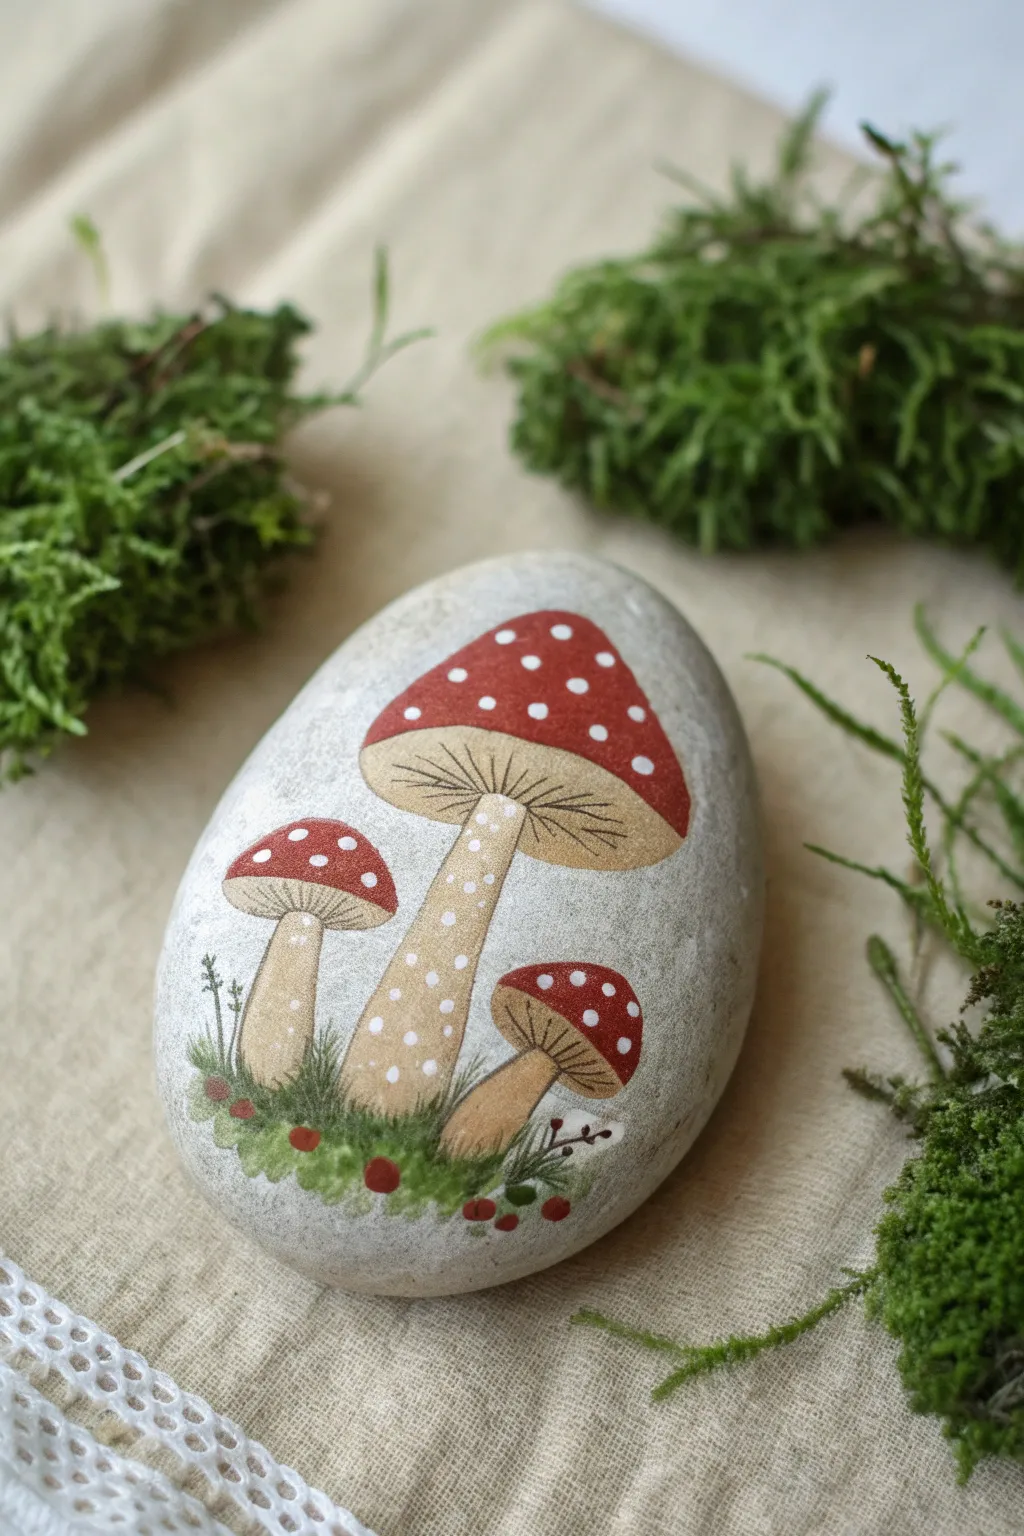
Capture the charm of the forest floor with this delightful rock painting featuring three fly agaric mushrooms nestled in moss. The smooth grey stone provides the perfect natural canvas for the vibrant reds and earthy greens of this woodland scene.
Step-by-Step Tutorial
Materials
- Smooth, oval river rock (light grey)
- Acrylic paints (Titanium White, Cadmium Red, Yellow Ochre, Burnt Sienna, Sap Green, Olive Green)
- Pencil for sketching
- Fine liner brush (0 or 00)
- Small flat brush
- Round brush (size 2-3)
- Matte finish varnish or sealer
- Palette and water cup
Step 1: Preparation & Sketching
-
Clean the canvas:
Begin by washing your stone with warm soapy water to remove any dirt or oils. Let it dry completely so the paint adheres properly. -
Outline the composition:
Using a light pencil, sketch the outline of the three mushrooms. Place the largest mushroom in the center, slightly offset to the right. Draw a medium-sized one to the left and a small one leaning in from the bottom right. -
Define the caps:
Refine the shapes of the mushroom caps. The main cap should be a wide, rounded triangle, while the smaller ones are more dome-like.
Red Coverage Fix
If your red paint looks transparent or streaky over the grey stone, paint the cap area white first. Let it dry, then apply the red on top for vibrancy.
Step 2: Painting the Stems
-
Mix the stem base color:
Create a creamy beige color by mixing a generous amount of White with a touch of Yellow Ochre and a tiny dot of Burnt Sienna. -
Fill in the stems:
Use a round brush to paint the stems of all three mushrooms. Ensure the paint is opaque; you might need two coats. -
Add subtle shading:
While the beige is still slightly tacky, mix a slightly darker version of your beige and gently shade the bottom and right edges of the stems to give them volume.
Make It Pop
Add a very thin, watery line of dark brown or black paint along one side of the stems and under the caps to create high-contrast definition.
Step 3: Painting the Caps
-
Base coat for caps:
Paint the top section of the mushroom caps with Cadmium Red. I like to leave a small gap between the red cap and the beige stem to keep the colors crisp. -
Deepen the red:
Add a second coat of red if the first one looks streaky. For the edges of the caps, you can mix a tiny bit of brown into the red to create a slight shadow effect. -
Paint the gills:
Underneath the red caps, paint the gill area with a darker beige or light brown tone. This section connects the cap to the stem.
Step 4: Detailing & Texture
-
Draw the gill lines:
Using your finest liner brush and thinned brown paint, carefully draw fine lines radiating from the stem outward to the edge of the cap to represent the gills. -
Add the signature spots:
Dip the handle of a small paintbrush or use a dotting tool into pure Titanium White. Create scattered dots on the red caps working in various sizes. -
Texture the stems:
Add tiny white specks up the stems using the very tip of your liner brush. This mimics the textured skin of a real fly agaric.
Step 5: The Mossy Base
-
Lay down the moss:
Mix Sap Green with a little Olive Green. Using a stippling motion (rapid gentle tapping) with an old or stiff brush, create a grassy patch at the base of the stems. -
Add grassy details:
Switch back to the fine liner brush. With darker green paint, flick upward rapidly to create individual blades of grass and moss strands overlapping the bottom of the mushroom stems. -
Include tiny berries:
For a pop of color, add tiny red dots in the moss to look like wild berries, adding a few dark green stems to connect them. -
Final touches:
Review your work. If any lines look messy, tidy them up with the background grey color or the appropriate paint tone. -
Seal the rock:
Once fully dry, apply a coat of matte varnish to protect your artwork without making it too shiny, preserving the natural stone look.
Place your finished mushroom stone in a potted plant or on a windowsill for a touch of woodland magic
Desert Cactus at Golden Hour
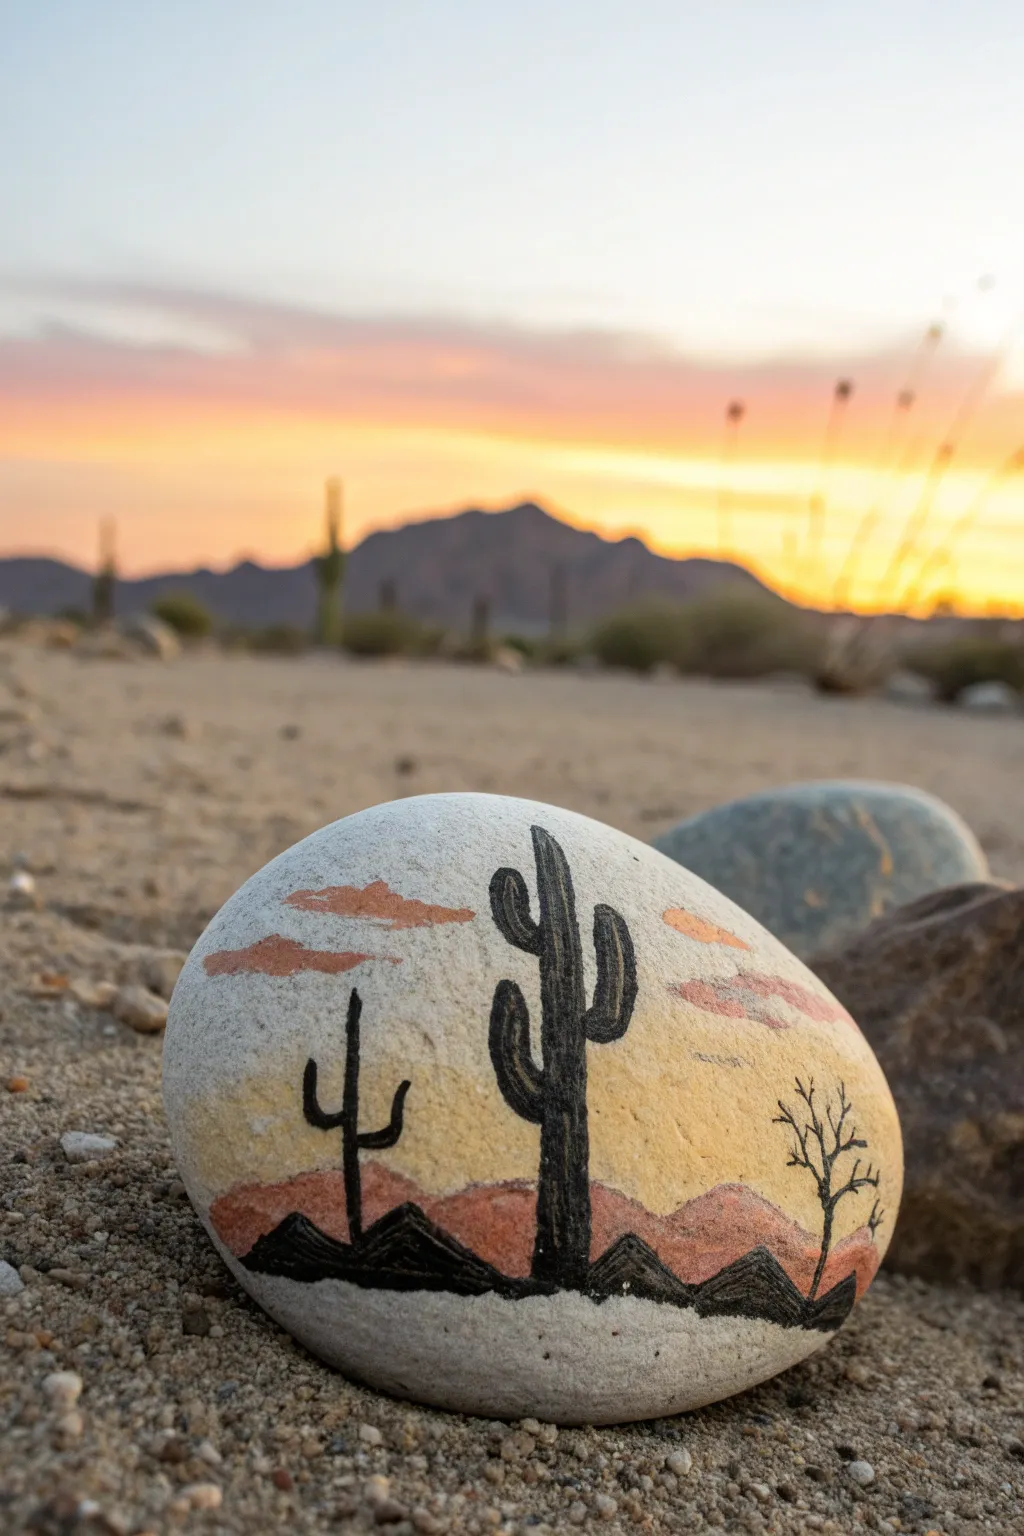
Capture the serene beauty of a desert sunset on a small, smooth canvas. This rock painting project combines warm, blended skies with striking silhouettes for a stunning piece of pocket-sized art.
Step-by-Step Guide
Materials
- Smooth, oval river rock (light gray or white)
- Acrylic paints (orange, yellow, white, black, light pink)
- Small flat brush (size 4 or 6)
- Fine detail liner brush (size 0 or 00)
- Paint palette or mixing plate
- Water cup and paper towels
- Pencil for light sketching (optional)
- Matte or satin sealant spray
Step 1: Creating the Sunset Sky
-
Clean the surface:
Begin by washing your rock with soap and water to remove any dirt or oils. Let it dry completely before applying any paint. -
Mix a pale sunset yellow:
On your palette, mix a generous amount of yellow with a touch of white to create a soft, glowing base color for the sky. -
Paint the horizon line:
Using your flat brush, paint a horizontal band of the pale yellow across the middle third of the rock. Don’t worry about perfect edges on the top or bottom yet. -
Blend in the orange:
While the yellow is still slightly wet, pick up a tiny bit of orange paint. Gently blend it into the top edge of the yellow band to start the transition upward. -
Add soft pink clouds:
Mix a very light pink using white and a dot of red or pre-mixed pink. Use just the corner of your brush to dab floating cloud shapes above the yellow horizon. Keep them wispy and horizontal. -
Add distant mountains:
Mix a muted peach or terracotta color. Paint a low, rolling mountain range shape right through the lower section of your yellow sky band. This establishes the far-off landscape. -
Let the background set:
Wait about 10-15 minutes for these background layers to dry. If the paint feels tacky, give it a bit more time so your black details won’t smear.
Uneven Rock Surface?
If your rock is pitted, mix a little white gesso or heavy body acrylic with your base colors. This fills small holes and creates a smoother surface for fine details.
Step 2: Adding Silhouettes and Detail
-
Outline the foreground mountains:
Switch to your fine liner brush and black acrylic paint. Draw a crisp, jagged line near the bottom of the rock to act as the closest mountain ridge. -
Fill the silhouette:
Fill in the space below that black line completely with black paint. This grounds your composition. -
Draft the main saguaro:
Identify the spot for your main cactus, slightly off-center to the right. Paint a vertical line upward from the black ground to form the main trunk. -
Add the cactus arms:
Paint the curved arms of the saguaro. I usually add one arm bending upward on the left and a slightly higher one on the right to keep it balanced but natural. -
Thicken the cactus shape:
Go back over your cactus lines to thicken them slightly. The trunk should be thicker than the arms. Round off the tips so they look organic, not sharp. -
Paint the smaller cactus:
To the left of the main cactus, paint a smaller, simpler saguaro silhouette. Keep it lower on the horizon to create a sense of depth. -
Add a dry shrub:
On the far right side, paint a delicate, skeletal tree or shrub. use the very tip of your liner brush to create thin, branching twigs reaching upward. -
Check for opacity:
Once the black paint dries, check if it looks solid. If you can see the background color through it, apply a second coat of black to the silhouettes. -
Seal the artwork:
Allow the rock to cure for at least 24 hours. Finish by spraying a light coat of matte or satin sealant to protect your desert scene from scratching.
Tiny Brush Control
Rest your pinky finger on the dry part of the rock while painting details. This stabilizes your hand and prevents the shaky lines common with fine brushes.
Enjoy displaying your miniature desert sunset on a desk or finding it a home in your garden
Cherry Blossom Branch Close-Up
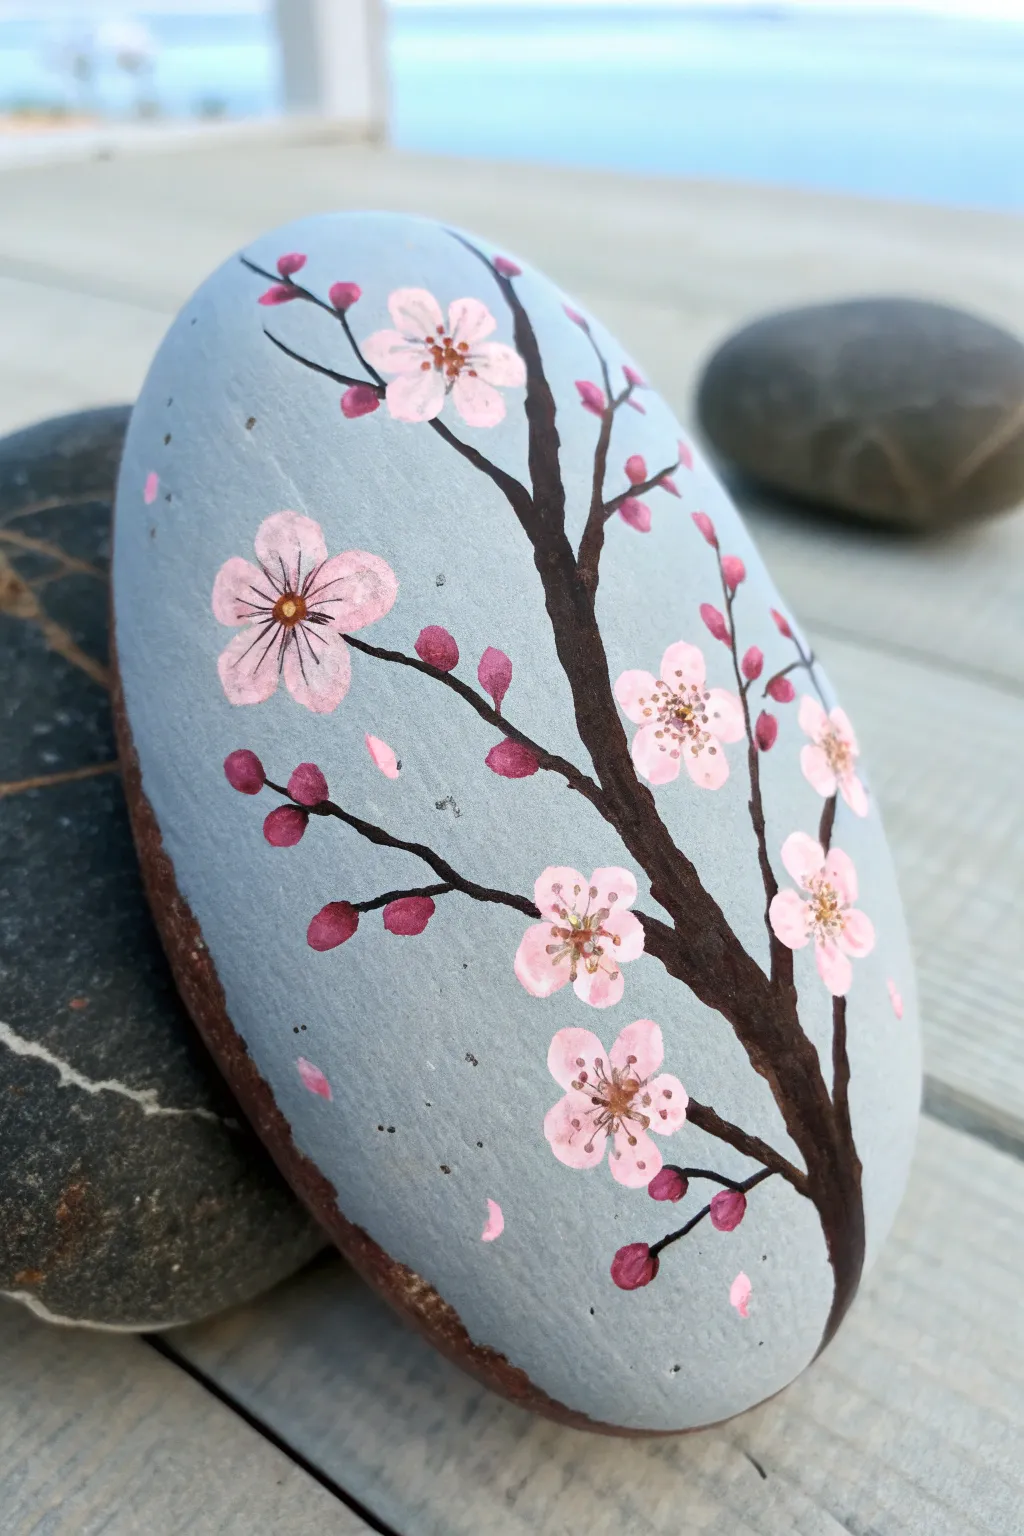
Capture the delicate beauty of spring with this elegant cherry blossom rock painting. The soft blue-grey background provides a calming canvas for the intricate branch and blooming pink petals.
Step-by-Step Tutorial
Materials
- Smooth river rock (oval shape preferred)
- Acrylic paints: Light blue-grey, dark brown, titanium white, light pink, dark pink/magenta, metallic gold (optional)
- Flat brush (medium size)
- Fine liner brush (size 0 or 00)
- Round brush (small)
- Dotting tool or toothpick
- Spray varnish or sealant
Step 1: Base Coat & Branch Structure
-
Prepare the Canvas:
Begin by cleaning your rock thoroughly to remove any dirt or oils. Once dry, paint the entire surface with a light blue-grey acrylic paint. You may need two coats to ensure opacity, allowing the first layer to dry completely before applying the second. -
Map the Main Branch:
Using a fine liner brush and dark brown paint, start painting the main branch. Start thicker at the bottom right side of the rock and curve it upwards toward the top left, tapering the line as you go. -
Add Secondary Twigs:
From the main branch, extend smaller, thinner twigs outwards. Keep your hand loose and allow the lines to be slightly uneven, mimicking the natural, gnarled growth of a real cherry tree. -
Thicken Connections:
Go back over the points where the smaller twigs meet the main branch. Slightly thicken these ‘V’ shapes with the brown paint to make the connections look sturdy and realistic rather than stick-like.
Fixing Shaky Lines
If your branches look wobble, just thicken them slightly to cover the error. Cherry branches are naturally knotty, so bumps actually look realistic.
Step 2: Blossoms & Buds
-
Paint Open Blossoms:
Mix a soft, light pink color. Using a small round brush, paint simple five-petal flower shapes scattered along the branches. Don’t worry about perfection; organic shapes look more natural. -
Add Falling Petals:
Paint a few single petals floating in the empty blue space, as if a gentle breeze has just blown them off the branch. This adds movement to your composition. -
Create Closed Buds:
Dip your round brush into a slightly darker pink or magenta. Paint small, oval teardrop shapes at the very tips of the thinnest twigs to represent unbloomed buds. -
Detail the Buds:
Add a tiny dab of the lighter pink to the top of each dark pink bud to give them volume and dimension. -
Connect the Buds:
Use your finest liner brush and the dark brown paint to draw tiny stems connecting the pink buds securely to the wooden branches.
Level Up: 3D Texture
Mix a small amount of cornstarch or modeling paste into your pink paint. This thickens it, allowing you to dab on raised petals for a sculptural 3D effect.
Step 3: Centres & Highlights
-
Darken Flower Centers:
Once the light pink petals are dry, use a diluted dark pink or magenta to add a small starburst or wash in the very center of each open flower. This creates depth. -
Stamen Base:
With the fine liner brush and dark brown (or dark red) paint, draw very delicate lines radiating from the center of the flowers outward onto the petals. -
Anther Dots:
Using a dotting tool or a toothpick, place tiny dots of gold or yellow paint at the ends of those center radiating lines. I find this tiny sparkle really brings the flowers to life. -
Add Highlights:
Mix a very pale pink or use pure white. Add tiny, transparent strokes to the edges of selected petals to simulate light hitting the soft texture. -
Final Specks:
For a textured, organic finish, you can dilute some black or dark grey paint and lightly splatter tiny specks in the background using an old toothbrush, or carefully dot them with your finest tool. -
Varnish:
Allow the rock to dry overnight to ensure all thick paint layers are cured. Finish with a coat of spray varnish to protect the artwork and give it a lovely sheen.
Place this stone on your desk for a permanent reminder of spring’s gentle beauty or gift it to a friend who needs a smile
Four Seasons Tree Set
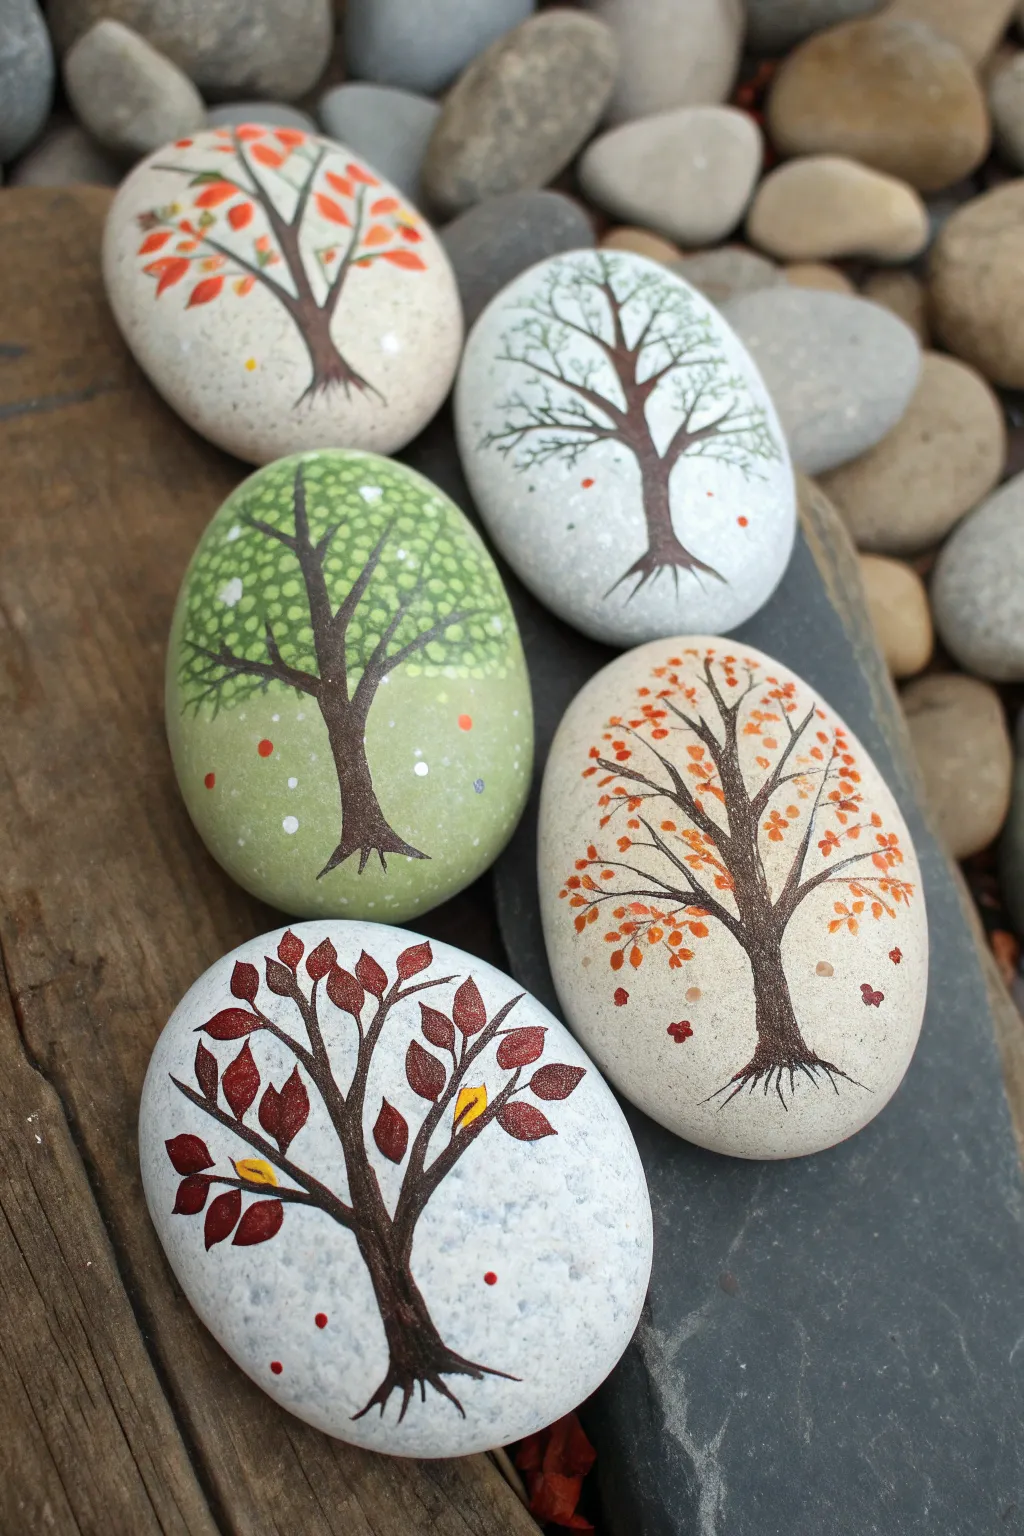
Capture the changing beauty of nature with this elegant set of five hand-painted river rocks, each showcasing a unique interpretation of a tree through the seasons. From the lush stippling of summer to the stark branches of winter, this project creates a harmonious display perfect for a garden accent or windowsill.
How-To Guide
Materials
- 5 smooth, oval river rocks (approx. 2-3 inches long)
- Acrylic paints: Black, White, Burnt Umber, Deep Green, Light Green, Orange, Yellow, Deep Red
- Fine liner brush (0 or 00 size) for branches
- Small flat brush for backgrounds
- Dotting tool or toothpick
- Pencil for sketching
- Matte or satin spray sealant
- Palette for mixing
Step 1: Preparation & Base Layers
-
Clean and dry:
Begin by scrubbing your rocks with warm, soapy water to remove any dirt or oils. Let them dry completely, preferably in the sun, to ensure the paint adheres properly. -
Base coat application:
For the winter (white background) and summer (green background) rocks, apply a base coat. Use white acrylic for the snow-themed rocks and a soft sage green mixed with a little white for the summer rock. You may need two thin coats for full opacity. -
Natural canvas:
For the autumn and spring rocks, leave the natural stone color exposed. This creates a beautiful, organic texture that mimics the earthiness of the seasons.
Branch technique
Add a drop of water to your brown paint until it has an ink-like consistency. Fluid paint flows much smoother off a liner brush, creating crisper, thinner branches without drag marks.
Step 2: Painting the Tree Skeletons
-
Sketch the trunks:
Lightly trace the central trunk and main branches onto each rock with a pencil. Vary the shapes slightly; some can curve left, others right, to give each tree personality. -
Paint the trunks:
Using your fine liner brush and Burnt Umber mixed with a tiny drop of black, carefully paint the main trunks. Start slightly wider at the base and taper as you go up. -
Extend the branches:
Flick your brush outwards from the main trunk to create increasingly thinner branches. I find it easiest to roll the brush slightly between my fingers to get those delicate, tapering ends. -
Root details:
Add tiny, root-like strokes at the very bottom of the trunk where it meets the ‘ground’ to ground the tree visually.
Step 3: Detailing the Seasons
-
The Winter Tree:
On the white-background rock, use a very dilute black or dark grey to paint fine, bare branches. Add tiny dots of light blue or grey near the tips to suggest frost. -
The Spring Tree (Top Left):
Mix a bright orange and red. Paint small, leaf-like dashes along the branches. Leave plenty of negative space so the tree looks airy and budding. -
The Summer Tree (Center):
On the green-base rock, use a darker green to stipple (tap repeatedly) foliage clusters around the branches. Once dry, layer lighter green and white dots over the top to create sunlight filtering through leaves. -
The Autumn Tree (Right):
Using a dotting tool or small brush tip, apply clusters of orange, yellow, and rust-colored dots. Concentrate them on the outer edges and let some ‘fall’ near the roots. -
The Late Fall/Winter Transition (Bottom):
Paint larger, distinct leaves using deep red and maroon. Make these leaves sparse, as if the tree is nearly bare. Paint a few fallen red leaves on the ground near the roots.
Shaky hands?
If you struggle with painting straight thin lines for branches, try steadying your painting hand by resting your pinky finger on a dry part of the rock as an anchor while you work.
Step 4: Finishing Touches
-
Tiny accents:
Go back to the Spring and Winter trees and add minute dots of red or orange scattered on the ground area to balance the composition. -
Highlighting trunks:
Mix a tiny bit of white into your brown paint and add extremely subtle vertical highlights on the sunny side of each tree trunk to give them dimension. -
Final drying:
Allow the rocks to sit undisturbed for at least 24 hours to ensure the thickest dots of paint are cured all the way through. -
Seal and protect:
Spray the rocks with a matte or satin sealant. This protects your artwork from the elements if you place them outside and unifies the sheen of the different paints.
Arranging these five stones together tells a beautiful story of nature’s cycle on your table or shelf
Northern Lights Over Evergreens
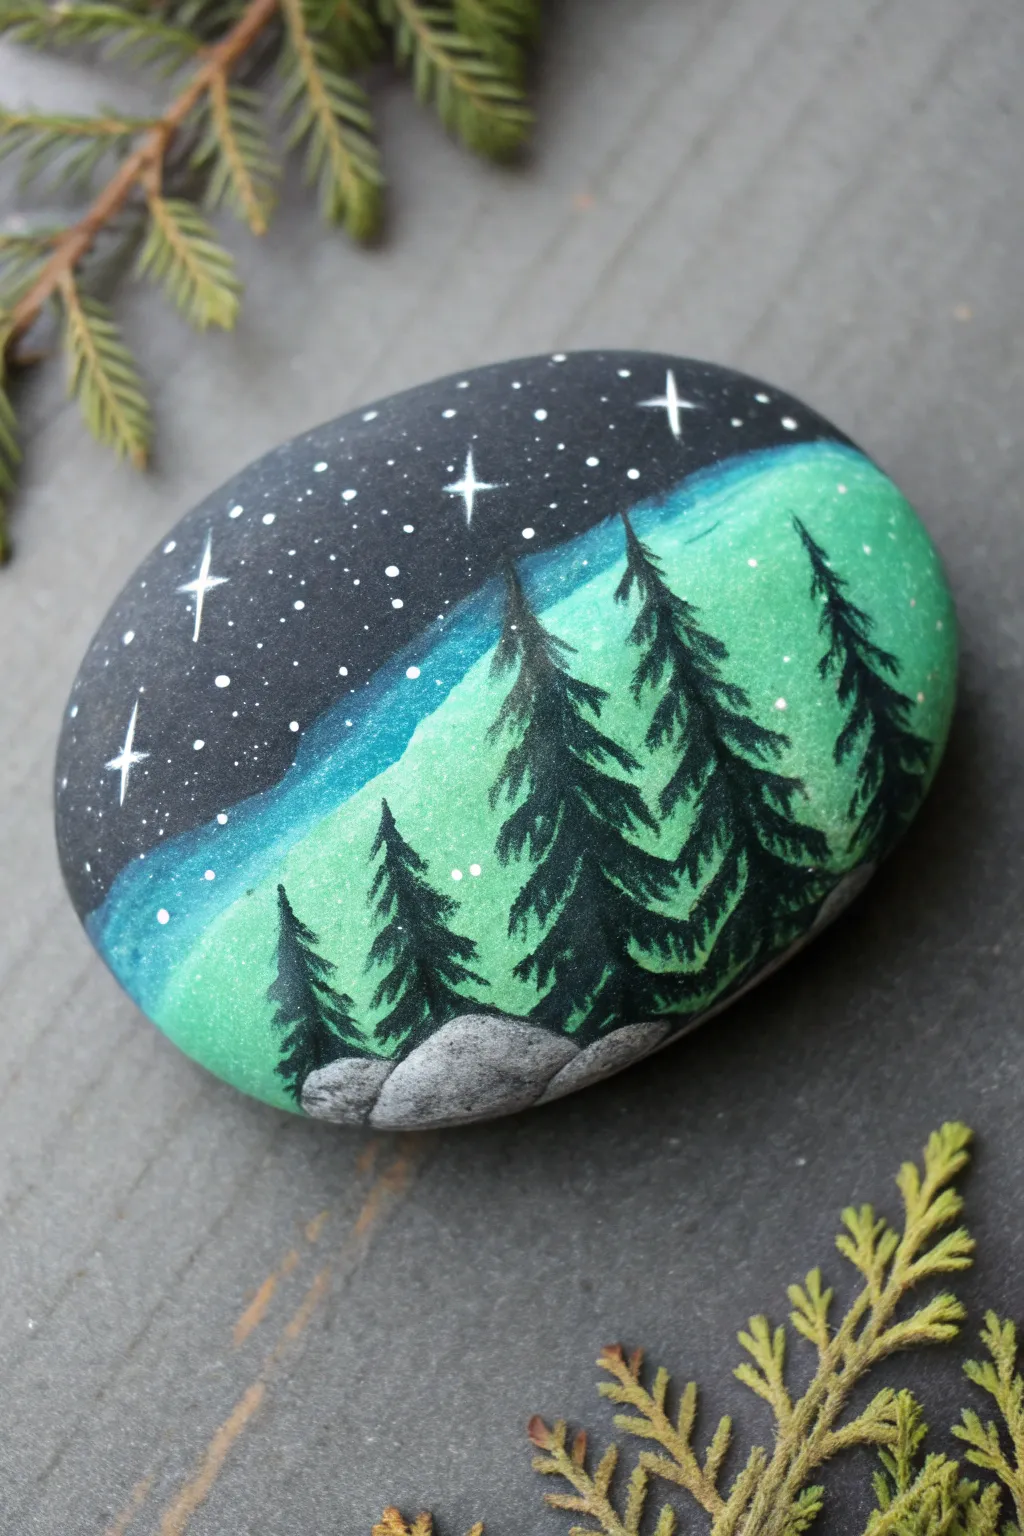
Capture the magic of an aurora borealis dancing over a silent forest on a simple river rock. This project combines smooth blending techniques with crisp silhouettes to create a miniature nighttime masterpiece that fits in the palm of your hand.
Step-by-Step Guide
Materials
- Smooth, oval river rock (cleaned and dried)
- Acrylic paints: Black, Titanium White, Teal, Phthalo Green, Light Blue, Light Grey, Dark Grey
- Paintbrushes: Flat brush (medium), round brush (small), fine liner brush (00 or 000)
- Sponge or blending foam (optional)
- Cup of water and paper towels
- Spray sealer or varnish (glossy or matte)
Step 1: Setting the Night Sky
-
Base coat:
Start by painting the entire front surface of your rock with a solid coat of black acrylic paint. Let this dry completely; if the rock’s natural color shows through, apply a second coat for a truly opaque background. -
Map the aurora:
Visualize a diagonal swooping motion across the rock. Using a clean flat brush or a small sponge, lightly dab a mix of teal and light blue across the middle-right section, leaving the top left corner pure black for deep space. -
Intensify the glow:
While the first layer is still tacky, blend in bright Phthalo Green and a touch of white into the center of your teal swoop. Use a dry brush technique to feather the edges out into the black, creating that ethereal, misty look characteristic of northern lights. -
Add the stars:
Dip the handle end of a paintbrush or a dotting tool into white paint. Gently dot the black section of the sky with tiny stars, varying the pressure to create different sizes. Avoid the green aurora section to keep the focus on the lights. -
Create twinkling stars:
Select 3 or 4 of your larger white dots. Using your finest liner brush, carefully pull tiny lines outward from the center of the dot—top, bottom, left, and right—to create cross-shaped glimmering stars.
Muddy Aurora?
If your green sky gets muddy blending into the black, let it dry fully. Then, re-apply the green/teal layer on top. Acrylics are opaque, so you can always layer over mistakes.
Step 2: Planting the Forest
-
Draft the tree lines:
Switch to black paint and a small round brush. Paint vertical distinct lines starting from the paint-free bottom edge up into the green aurora. These lines will be the trunks of your pine trees. Vary their heights, making the ones on the right slightly taller for visual interest. -
Paint the foliage:
Using the tip of your liner brush, start at the top of a trunk and paint downward-sloping branches. Use short, quick dabs that get slightly wider as you move down the tree. -
Thicken the canopy:
Go back over your trees, adding more fullness to the branches. Ensure the black silhouette is solid so the bright green sky behind it creates a sharp contrast. I find that leaving small gaps between branches helps the trees look more realistic. -
Create depth:
Add a few smaller, shorter trees in between the larger ones. Painting these slightly lower down creates the illusion of a forest receding into the distance.
Step 3: Grounding the Scene
-
Base for the rocks:
At the very bottom of the stone, where the tree trunks end, paint rounded shapes using light grey paint. These will represent boulders in the foreground. -
Shadowing:
Mix a little black into your grey or use a dark grey paint. Apply this to the bottom edges and crevices between the boulders to give them weight and dimension. -
Texture:
Take a tiny amount of black on a mostly dry brush and stipple (tap repeatedly) small dots onto the grey rocks to simulate a stone texture. -
Highlighting:
Clean your brush and pick up a tiny bit of white paint. Add a thin highlight line to the top curves of the boulders where the moonlight or aurora would hit them. -
Final touches:
Inspect your sky. If you want more magic, add incredibly tiny white dots (distant stars) near the horizon line or amidst the tree tops. -
Seal the artwork:
Once the paint is completely dry (give it at least an hour), take the rock outside and spray it with a clear acrylic sealer. This protects the paint from chipping and makes the colors pop.
Add Some Snow
Make it a winter scene! Mix water into white paint until it’s inky, load an old toothbrush, and flick it over the dried painting for a splatter of snow.
Place this luminous stone on your desk or windowsill to enjoy a calm winter night scene even during the day
Rain Clouds and a Tiny Rainbow
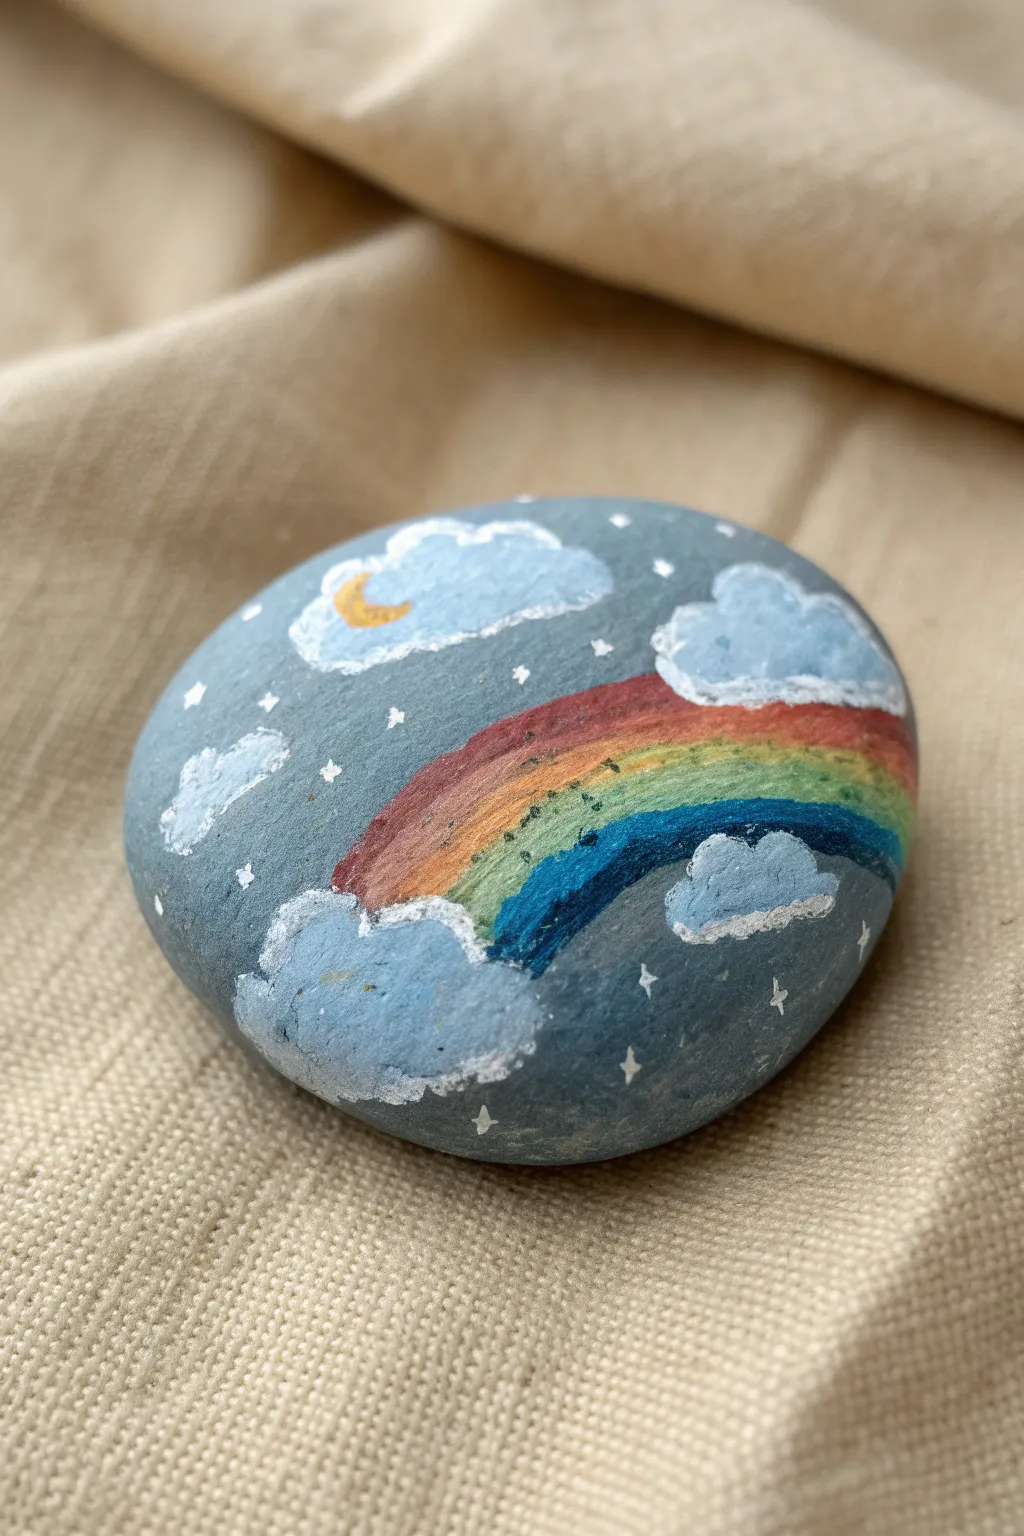
Capture the magic of a clearing storm with this whimsical painted rock, featuring fluffy clouds and a bright rainbow set against a moody evening sky. The dark blue-grey background makes the colors pop beautifully, creating a cozy little piece of pocket-sized art.
Detailed Instructions
Materials
- Smooth, rounded rock (medium size)
- Acrylic paints (dark blue-grey, white, red, orange, yellow, green, blue, indigo/violet, metallic gold)
- Flat paintbrush (medium)
- Fine liner brush
- Detail brush
- Water container
- Paper towels
- Sealant (spray or brush-on varnish)
Step 1: Prepping the Canvas
-
Clean the stone:
Before you begin, wash your rock with warm soapy water and a scrub brush to remove any dirt or oils, then let it dry drastically. -
Base coat application:
Using your medium flat brush, mix a moody slate blue color by combining dark blue with a touch of grey or black. Coat the entire top surface of the rock. -
Second layer:
Once the first coat is dry to the touch, apply a second layer of the slate blue to ensure full opacity so the natural rock color doesn’t peek through.
Uneven Stripes?
If rainbow stripes wobble, let them dry fully. Then, use the background blue color to carefully paint over mistakes and “cut” the line back to straight
Step 2: Painting the Elements
-
Drafting clouds:
Mix a very light blue shade using mostly white with a tiny drop of blue. Paint fluffy cloud shapes near the top and bottom edges of the rock, leaving the center open for the rainbow. -
Whiter highlights:
While the light blue cloud paint is still slightly damp or just after drying, dab pure white paint onto the tops of the cloud puffs to give them dimension. -
Rainbow arc base:
Visualize a slight curve connecting the bottom left cloud area to the top right cloud area. You might want to sketch this faintly with a pencil first. -
Red stripe:
Using a fine detail brush, paint the top arc of the rainbow in red. Keep the line somewhat organic; it doesn’t need to be perfectly straight. -
Warm colors:
Carefully paint the orange stripe directly beneath the red, followed by the yellow stripe. Wipe your brush well between colors to keep them crisp. -
Cool colors:
Continue the rainbow sequence with a green stripe, followed by blue, and finally a deep indigo or violet at the bottom of the arc. -
Blending edges:
I find that if the rainbow looks too ‘stiff,’ you can gently dry brush the ends of the rainbow slightly into the clouds so it looks like it’s emerging from them.
Glow Effect
Mix glazing medium with white acrylic to paint faint, translucent halos around the moon and stars for a soft, glowing atmospheric effect
Step 3: Celestial Details
-
Adding the moon:
Nestled inside or near a top cloud, paint a small crescent moon shape using metallic gold or bright yellow paint. -
Moon details:
You can add a tiny dot or dash of darker orange on the moon to give it a bit of texture. -
Simple stars:
Using your finest liner brush or even a toothpick, dip into white paint to create scattered white dots across the dark blue sky background. -
Sparkle stars:
Select a few of the white dots and turn them into four-pointed stars by dragging tiny lines outward from the center dot: up, down, left, and right. -
Cloud outline:
To make the clouds pop, take a very small amount of white paint on a detail brush and loosely outline the very top edges of the cloud mounds. -
Sealing the art:
Allow the entire rock to dry for at least 24 hours. Once fully cured, apply a clear sealant to protect your miniature skyscape from chipping or fading.
Place your finished rock in a garden pot or on a sunny windowsill to enjoy a permanent rainbow regardless of the weather
Peek-a-Boo Cave Nature Window

Transform a simple stone into a magical portal with this captivating cave painting. This project uses the rock’s natural darkness to create depth, framing a serene sunset scene inside a rough stone archway.
Step-by-Step Tutorial
Materials
- Smooth, egg-shaped rock (approx. 4-5 inches)
- Black acrylic paint or black gesso
- Acrylic paints: Titanium white, sunset orange, medium yellow, magenta, teal or light blue, dark brown
- Fine detail brushes (sizes 0/0 and 000)
- Small flat shader brush
- Dotting tool or toothpick
- Matte or satin varnish
Step 1: Preparation and Base
-
Clean and Prep:
Scrub your rock with soapy water and let it dry completely to ensure the paint adheres. -
Base Coat:
Paint the entire surface of the rock with a solid layer of black acrylic paint or black gesso. Depending on coverage, a second coat might be needed for a deep, opaque matte finish. -
Mapping the Cave:
Using a very light pencil sketch or a thin wash of white paint, outline an irregular arch shape in the center of the rock. This will be your window to the outside world.
Uneven Gradients?
If your sunset looks streaky, blend the acrylics while they are still wet on the rock. A slightly damp brush helps smooth the transition between colors.
Step 2: Painting the Sky and Sea
-
Sky Gradient:
Inside the arched outline, start painting the sky. Blend white and yellow near the horizon line, transitioning upward into orange and then a soft magenta at the top of the opening. -
Creating the Sun:
While the sky paint is still slightly tacky, place a small, bright white semi-circle nestled right in the yellow-orange horizon area to represent the setting sun. -
Adding Clouds:
With a tiny brush and slightly diluted coral or light pink paint, streak in horizontal cloud lines across the sun and upper sky to add texture. -
The Horizon Line:
Paint a straight horizontal line across the bottom of your sky gradient using a teal or light blue mixed with a touch of white. -
Water Reflections:
Below the horizon, paint horizontal strokes of teal and white. Add brighter white highlights directly under the sun to mimic the light reflecting on the water.
Add a hidden glow
Mix a tiny amount of glow-in-the-dark medium into your white paint for the sun and the birds. When the lights go out, the scene will reveal a secret magic.
Step 3: Building the Cave Texture
-
Rough Edges:
Mix a dark brown with a little black. Using a small brush, paint rugged, bumpy edges along the inside of your arch outline to make it look like broken rock. -
Highlighting Stones:
I find that adding a touch of tan or ochre to the brown mixture works best here—lightly stipple this lighter color onto the right-hand inner edge of the cave wall to simulate light hitting the rough stone. -
Deepening Shadows:
On the left side of the cave wall, keep the stones darker, using mostly black and dark brown to show that it is in shadow.
Step 4: Foreground Details
-
Grassy Banks:
Paint two dark, mounds at the bottom corners of the cave opening using black paint stippled with a stiff brush to look like mossy earth. -
Tall Grasses:
Using your finest liner brush and slightly watered-down green-grey paint, flick quick, upward strokes from the bottom mounds to create tall blades of grass. -
Silhouetted Plants:
Add a few thin, black stems with tiny oval leaves or seed pods silhouetted against the bright sunset background. -
Tiny Flowers:
Use a dotting tool or the tip of a toothpick to place clusters of 5 tiny white dots for flower petals on the dark foreground grass. -
Flower Centers:
Place a microscopic dot of orange or yellow in the center of each white flower cluster. -
Distant Birds:
With the very tip of your smallest brush and white paint, create tiny ‘v’ shapes in the black area above the cave mouth to represent birds flying in the distance. -
Seal and Protect:
Once fully dry, apply a coat of varnish to protect your miniature landscape from chipping or fading.
Enjoy displaying your tiny, portable window into a peaceful sunset seascape
Topographic Contour Landscape
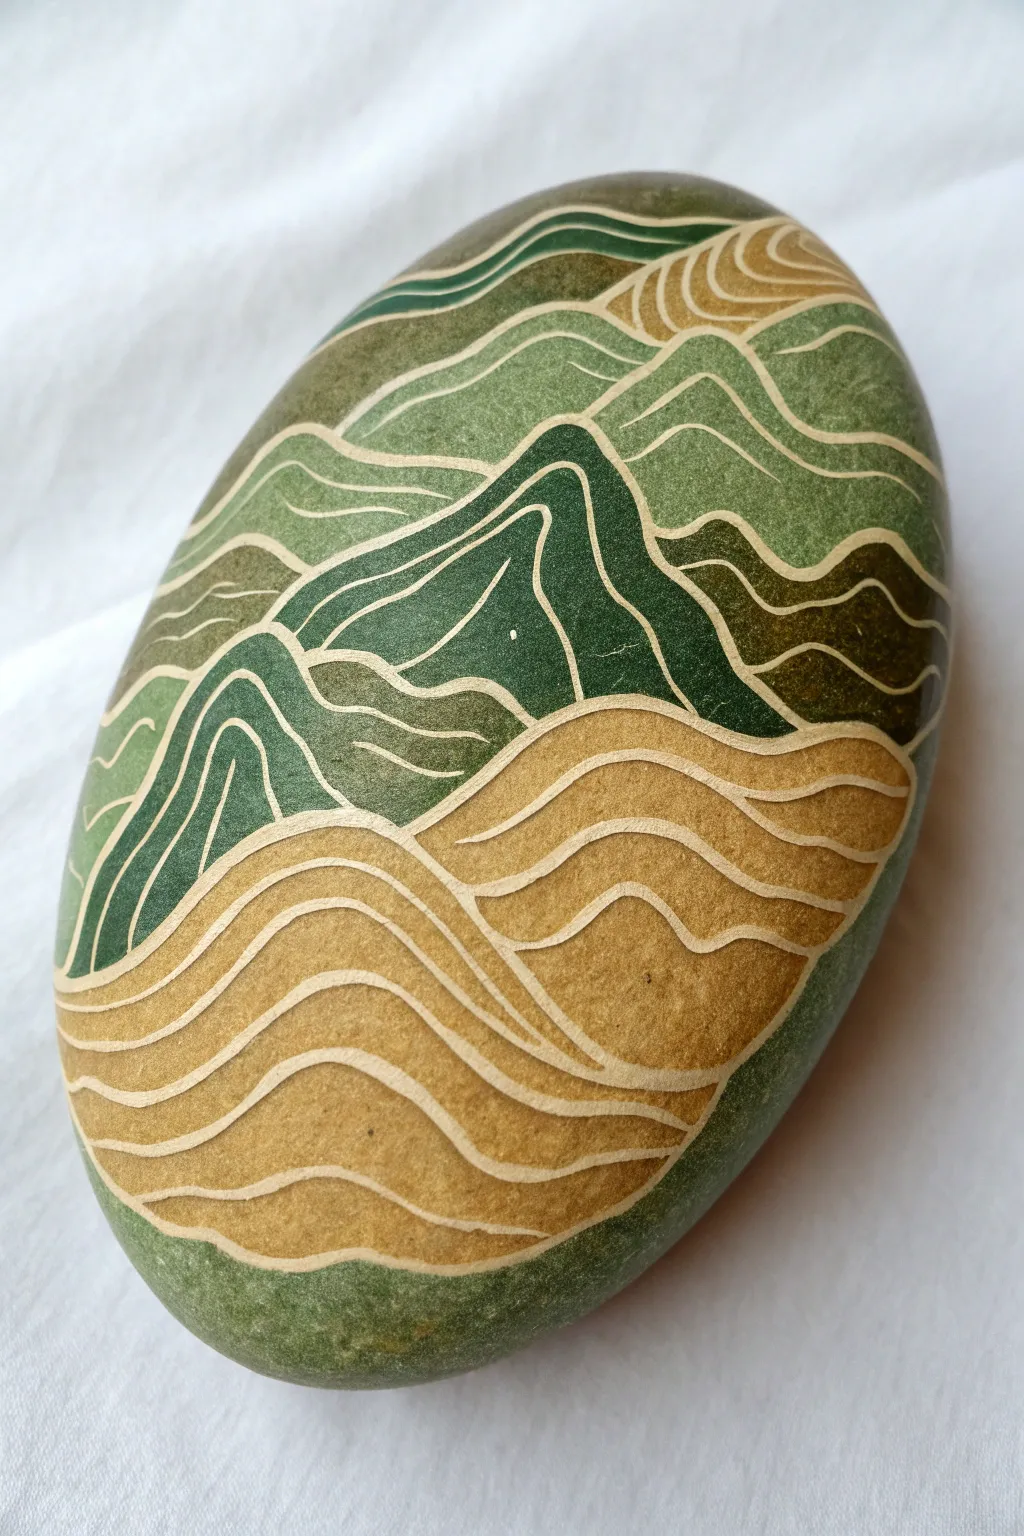
Transform a smooth river stone into a miniature landscape with this topographic-inspired design. By layering earthy greens and warm tans with precise, flowing lines, you’ll create a stylized mountain scene that feels both modern and organic.
Detailed Instructions
Materials
- Smooth oval river rock (approx. palm-sized)
- Acrylic paints (dark forest green, medium moss green, muted olive, tan/ochre, light beige)
- Fine liner brush (size 00 or 000)
- Small flat brush (size 2-4)
- White or light cream paint pen (extra fine tip, 0.5mm)
- Pencil for sketching
- Matte finish spray sealer
- Palette or mixing plate
- Water cup and paper towels
Step 1: Preparation and Base Sketch
-
Clean the canvas:
Start by thoroughly washing your rock with warm soapy water to remove any dirt or oils. Let it dry completely. A clean surface mimics the texture of paper and ensures your paint adheres smoothly. -
Observe the shape:
Hold the rock to find its natural orientation. For this project, a vertically oriented oval works best to give height to your mountain peaks. -
Sketch the major forms:
Use a pencil to lightly sketch the main dividing lines. You want to create three distinct zones: a foreground of rolling hills at the bottom, a mid-ground of jagged peaks, and distant rolling mountains at the top. -
Refine the topography:
Within those major zones, lightly draw wavy, parallel contour lines that follow the shape of your mountains. These will guide your painting later, so keep them flowing naturally like water.
Step 2: Blocking in Color
-
Paint the foreground:
Using your flat brush, fill in the bottom rolling hills with a warm tan or ochre color. Apply two thin coats rather than one thick one for overlapping opacity. -
Mid-ground mountains:
Mix a deep forest green. Paint the central, most prominent mountain shapes with this dark hue. This dark value creates visual weight and draws the eye to the center. -
Background layers:
For the top section, use lighter shades of green—like moss or muted olive. This atmospheric perspective helps the top of the rock feel like it’s receding into the distance. -
Let it cure:
Allow the base colors to dry completely. If the paint is even slightly tacky, the fine line work in the next phase might drag or smudge.
Steady Hands
Rest your pinky finger on the dry part of the rock or table to stabilize your hand while painting the fine contour lines.
Step 3: Detailing the Contours
-
Prepare your fine liner:
Thin a small amount of light beige or off-white acrylic paint with a drop of water to an ink-like consistency. I prefer using a fluid consistency here so the lines glide uninterrupted. -
Outline the major shapes:
Start by outlining the separation lines between your tan foreground, dark green peaks, and lighter background. Keep your hand steady and use the very tip of the brush. -
Fill the tan section:
Paint the internal contour lines on the tan foreground hills. These lines should curve gently downwards, mimicking the slope of sand dunes or rolling hills. -
Detail the dark peaks:
Switch to painting the lines on the dark green mountains. These lines should be more angular and vertical, emphasizing the steepness of the terrain. -
Finish the background:
Add the contour lines to the top green section. Make these lines wavier and strictly horizontal to suggest distant, flattened ridge lines. -
Clean up edges:
If any lines look shaky, use a clean damp brush to gently wipe them back before they dry, or touch up with the base color after drying.
Level Up: Metallic Touch
Swap the beige contour lines for gold metallic paint on the dark green sections for a luxurious, geode-like effect.
Step 4: Sealing
-
Double check work:
Look over the rock for any pencil marks still showing through and gently erase them if the paint is fully cured. -
Seal the surface:
In a well-ventilated area, spray the rock with a matte sealer. A glossy finish can create too much glare that hides the fine line work, so matte is usually the best choice for this earthy style.
Place your finished topographic stone on a desk or shelf to bring a small piece of the mountains indoors
Wraparound Waterfall and River
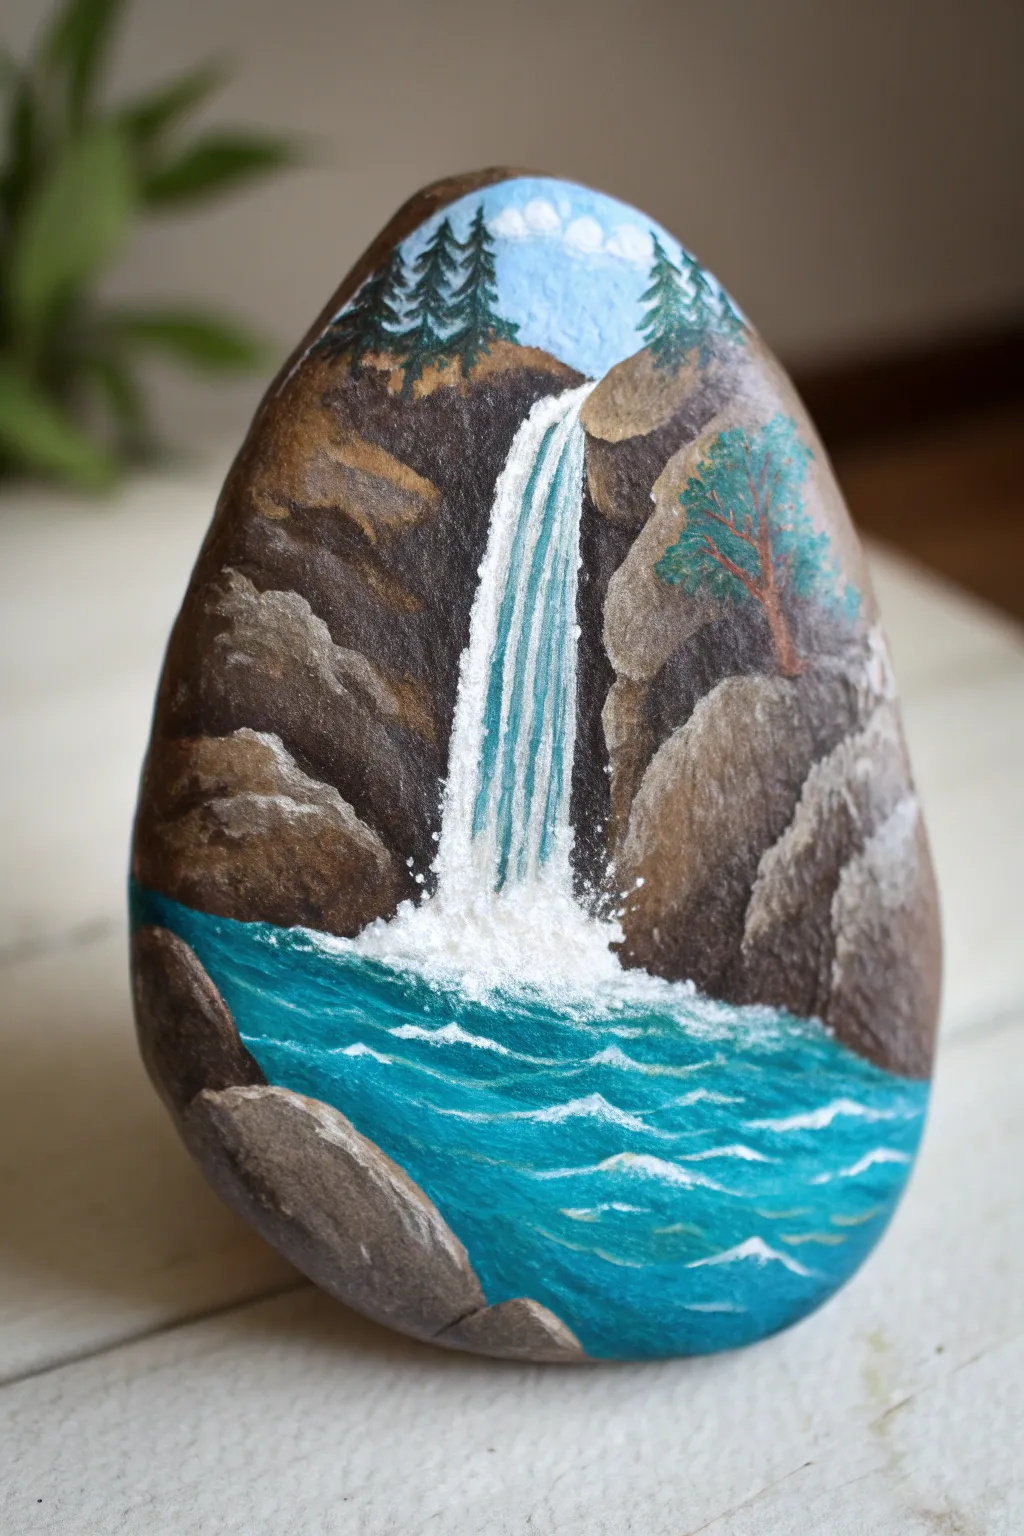
Transform a simple stone into a breathtaking landscape featuring a tumbling waterfall and rushing blue river. This project uses the natural shape of the rock to give the scene depth, making the water look like it flows right off the stone.
Step-by-Step Guide
Materials
- Smooth river rock (preferably tall and flat-faced)
- Acrylic paints (titanium white, phthalo blue, turquoise, burnt umber, raw sienna, dark green, black)
- Set of paintbrushes (flat shader, small filbert, fine liner)
- Palette or mixing plate
- Water cup and paper towels
- Spray varnish or clear sealer (glossy)
Step 1: Setting the Scene
-
Prepare the stone:
Begin with a clean, dry rock. Since we are creating a full landscape, you won’t need a base coat for the whole rock, but rubbing the surface with a little rubbing alcohol ensures the paint adheres perfectly. -
Block in the sky:
Mix a light sky blue using plenty of white and a touch of phthalo blue. Paint a small semi-circle at the very peak of the rock, letting the edges stay somewhat rough where the mountains will overlap it. -
Establish the cliff faces:
Using burnt umber mixed with a little black, paint the large rocky masses on either side of the center. Leave a vertical gap in the middle where the waterfall will eventually go. These dark shapes define the canyon structure. -
Paint the river basin:
Fill the bottom third of the rock with a deep turquoise blue. Paint right up to the edges of your brown cliffs, creating the pool where the waterfall lands.
Step 2: Developing the Rocks and Trees
-
Add rocky dimension:
Mix a lighter brown using raw sienna and a bit of white. Use a small filbert brush to dab highlights onto the dark brown cliffs. Focus on the tops of the rock formations to suggest ledges where light would hit. -
Deepen the shadows:
Go back in with your darkest brown/black mix and define the crevices and cracks between the lighter boulders. This contrast gives the mountain volume. -
Paint distant pines:
Using a small flat brush turned on its side or a fine liner, dab dark green triangles at the top of the cliffs against the sky. I like to tap the brush tip gently to create the jagged texture of evergreen branches. -
Add a foreground tree:
On the right side cliff, about mid-height, paint a delicate tree trunk using burnt umber. Add airy foliage with tiny dabs of green and a touch of turquoise for variety.
Uneven Texture?
If your rock has pits that ruin straight lines, try thickening your paint with a gel medium to fill gaps, or simply incorporate the bumps as natural turbulence in the water flow.
Step 3: Creating the Waterfall
-
Draft the water flow:
Mix a very pale blue (almost white). Starting from the top gap between the cliffs, pull your brush straight down to the river basin. Make the top slightly narrower and let it flare out slightly as it falls. -
Add pure white streaks:
Reload a fine liner brush with pure titanium white. Paint vertical stripes over the pale blue waterfall base. These lines represent the rushing speed of the water. -
Create the splash zone:
Where the waterfall hits the river, use an old, scruffy brush or a sponge to stipple pure white paint. Create a cloud of mist that rises slightly up the sides of the brown rocks.
Add Sparkle
Mix a tiny pinch of iridescent glitter or shimmer medium into your white paint for the waterfall and river highlights to make the water glisten in the sunlight.
Step 4: River Details and Finishing
-
Brighten the river:
Layer a brighter, lighter turquoise over parts of the deep blue river base, leaving the edges darker to show depth. -
Paint water movement:
Using your fine liner and white paint thinned slightly with water, paint horizontal, wavy lines across the turquoise river. Make these lines curve slightly upward in the center to mimic ripples. -
Enhance the foam:
Add more concentrated white squiggles and foam patterns near the base of the waterfall where the water is most turbulent, fading them out as you move toward the bottom of the rock. -
Final highlights:
Add tiny touches of white to the top of the sky for clouds and highlight the tips of the green trees to bring them forward. -
Seal the artwork:
Once fully dry, spray the rock with a glossy varnish. The gloss finish is essential here because it makes the painted water look permanently wet and shimmering.
Place your finished nature scene on a desk or in a planter for a peaceful daily view


Have a question or want to share your own experience? I'd love to hear from you in the comments below!