If you’ve got a tired piece of furniture and a little creative itch, spray paint can deliver that jaw-dropping makeover fast. I pulled together my favorite spray paint furniture ideas—starting with the classics and ending with the artsy, studio-style twists.
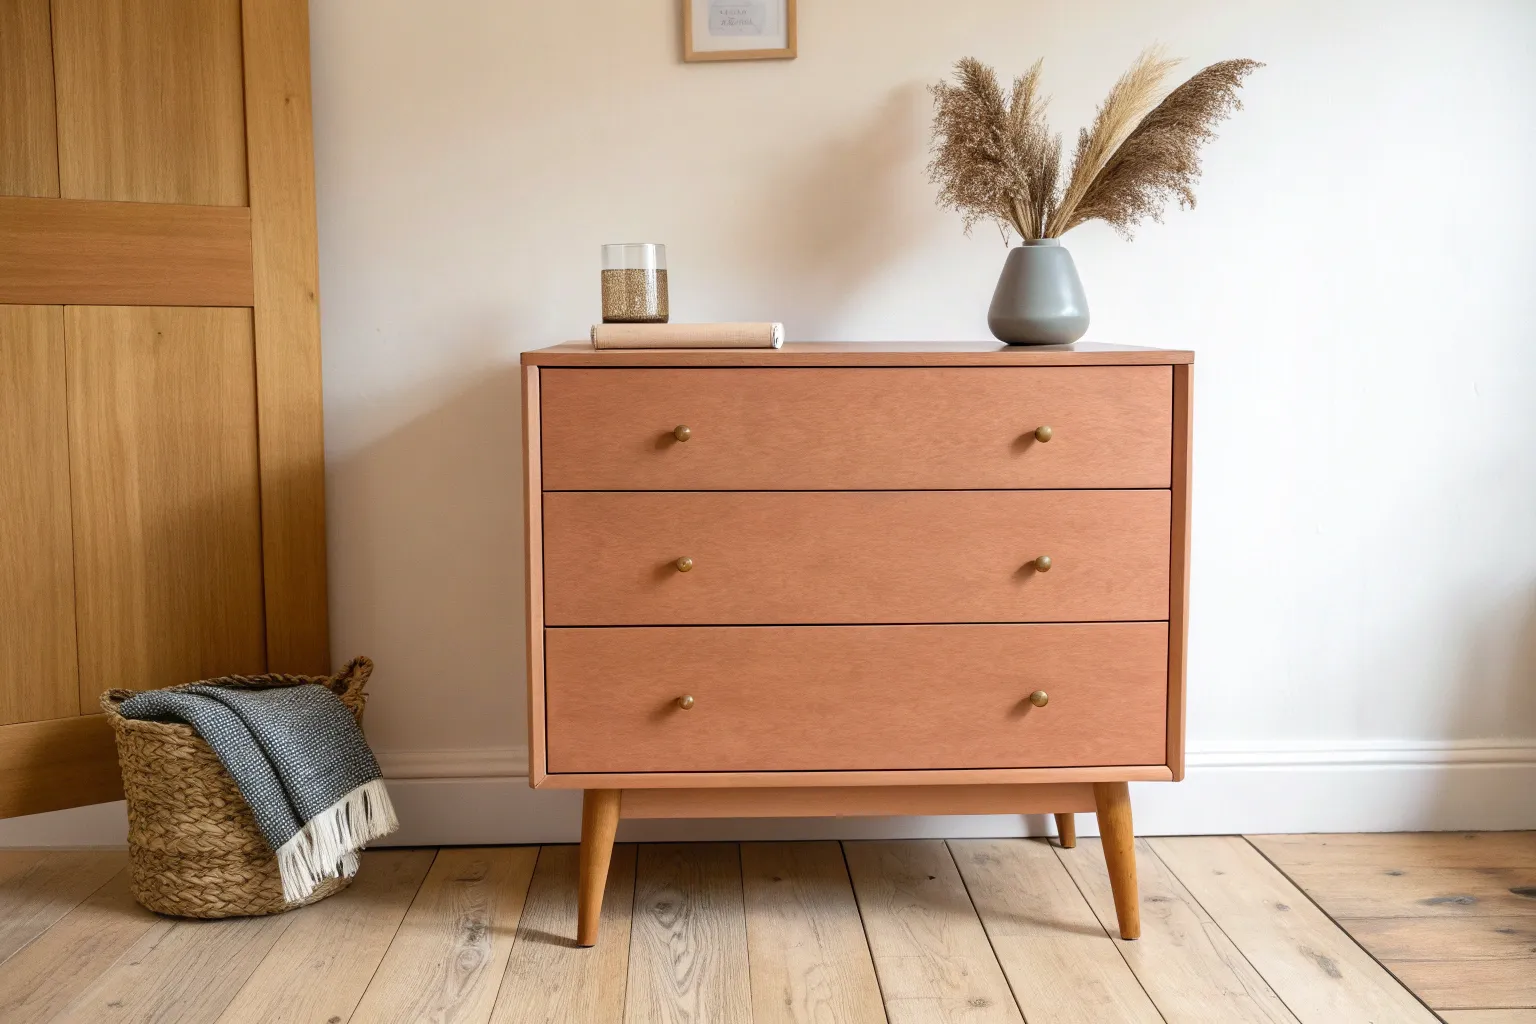
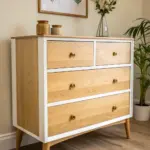
Classic Solid-Color Dresser Makeover
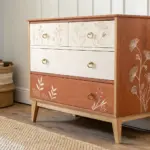
Transform a dated or plain dresser into a sleek statement piece by combining crisp white paint with warm, natural wood tones. This project perfectly balances modern minimalism with organic textures for a high-end look on a budget.
Step-by-Step Tutorial
Materials
- Solid wood dresser (preferably with good legs)
- Orbital sander
- Sandpaper (80, 120, and 220 grit)
- High-quality white spray paint (satin or matte finish)
- Spray primer (bonding)
- Painter’s tape
- Plastic drop cloths or masking paper
- Tack cloth
- Wood stain (light oak or walnut)
- Polycrylic top coat (spray or brush-on)
- Screwdriver
- Clean rags
- Modern wood bar pulls (optional replacement hardware)
Step 1: Preparation & Sanding
-
Remove Hardware:
Start by removing all drawers from the dresser body. Use a screwdriver to take off all existing handles or knobs from the drawer fronts and set them aside. -
Clean Surfaces:
Wipe down the entire piece with a degreaser or warm soapy water to remove years of dust and oils. Let it dry completely. -
Sand the Top surface:
Using an orbital sander with 80-grit sandpaper, strip the old finish off the top of the dresser to reveal the raw wood grain. -
Refine the Top:
Switch to 120-grit and then 220-grit sandpaper on the top surface. The goal is a buttery smooth finish that feels soft to the touch. -
Sand the Legs:
Since legs can be tricky, you might need to hand-sand these. Strip them down to raw wood just like the top to match that natural tone. -
Scuff Sand the Body:
For the sides and drawer fronts that will be painted white, you don’t need to strip to bare wood. Just give them a good scuff sanding with 120-grit paper to help the paint stick.
Step 2: Staining & Sealing Wood
-
Clean Dust:
Vacuum up all the sawdust and wipe everything down with a tack cloth. Any leftover dust will ruin your smooth finish. -
Masking Off:
Carefully tape off the edges where the natural wood top meets the body. Use masking paper and painter’s tape to completely cover the top and legs so no white paint touches them later. -
Stain Application:
Apply your chosen wood stain to the raw wood top and legs using a clean rag. Wipe with the grain, let it sit for a few minutes, and wipe away excess. -
Seal the Wood:
Once the stain is dry, apply two to three thin coats of Polycrylic sealer to the wood parts. Sand lightly with high-grit paper between coats for the best feel.
Drip Disaster?
If you get a paint drip, let it dry completely (don’t wipe it wet!). Once hard, sand it flat with 220-grit paper and respray that specific area lightly.
Step 3: Painting & Reassembly
-
Prime the Body:
Spray a light coat of bonding primer onto the dresser body and the drawer fronts. Keep the can moving to avoid drips. -
Light Sanding:
After the primer cures, run a fine sanding sponge over the surface to knock down any fuzz or texture. -
First Paint Coat:
Apply your white spray paint in thin, sweeping motions. Start spraying off the edge of the piece and move across. -
Build Coverage:
Apply 2-3 additional thin coats of white paint, allowing proper drying time between each. Multiple thin layers are always better than one thick, drippy one. -
Remove Tape:
Here I recommend peeling off the painter’s tape while the final coat is still slightly tacky—this helps prevent peeling the paint up with the tape. -
Install Hardware:
Once the paint is fully cured (give it at least 24 hours), install your new modern wooden bar pulls to complete the look. -
Reassemble:
Slide the drawers back into their tracks and check that everything glides smoothly.
Drawer Liner Luxe
Line the interior of the drawers with a geometric wallpaper or patterned contact paper for a hidden pop of design every time you open them.
Enjoy the fresh, modern vibe this two-toned beauty brings to your space


Matte Black Nightstands That Look Brand New
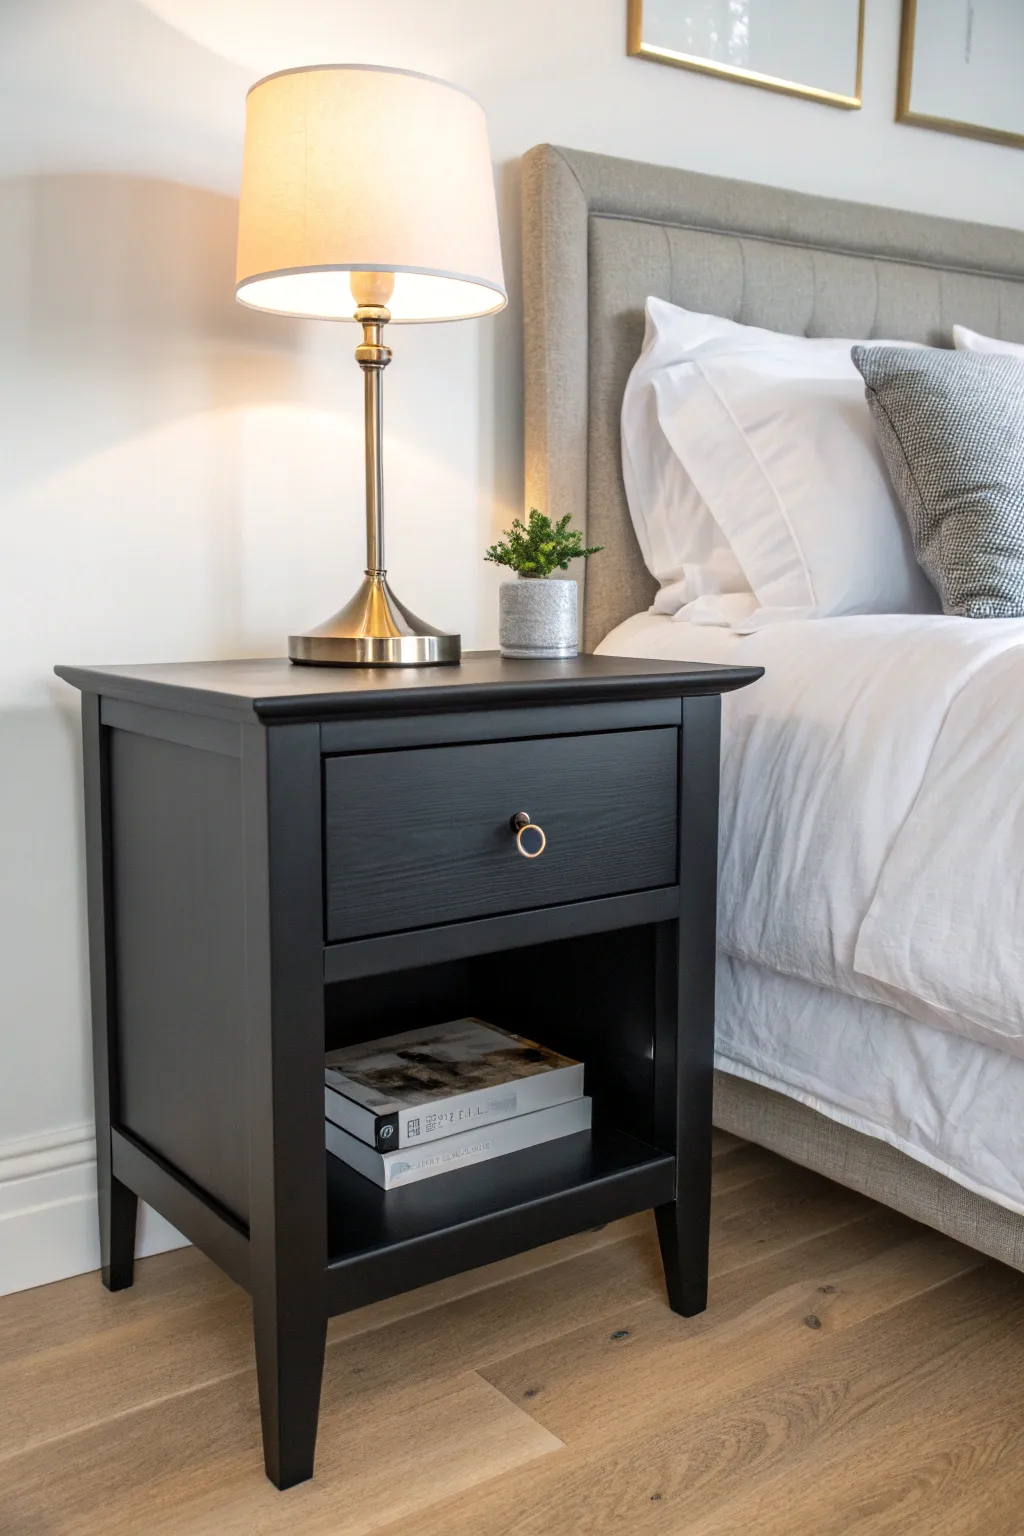
Transform a tired or dated wooden nightstand into a sleek, modern statement piece with a flawless matte black finish. This project proves that simple hardware updates and the right spray paint can make old furniture look brand new and high-end.
Detailed Instructions
Materials
- Wooden nightstand with drawer
- Matte black spray paint (2-3 cans)
- Spray primer (grey or white)
- Sandpaper (120, 220, and 320 grit)
- Tack cloth
- Painter’s tape
- Drop cloths
- Screwdriver
- Wood filler (if needed)
- Putty knife
- Respirator mask
- Degreasing cleaner (like TSP)
- Gold ring pull hardware
Step 1: Preparation & Sanding
-
Remove Hardware:
Empty the nightstand completely and remove the drawer. Use a screwdriver to take off the old knob or handle. Store the screws in a baggie if you plan to reuse them, though we’ll be replacing the pull for this look. -
Clean Thoroughly:
Wipe down the entire piece with a degreasing cleaner to remove oils, wax, and dust. This step is crucial because paint won’t stick to oily surfaces. -
Fill Imperfections:
Inspect the surfaces for deep scratches or dents. Apply a small amount of wood filler with a putty knife, smoothing it out. Let it dry completely according to the package instructions. -
Initial Sanding:
Sand the entire nightstand, including the drawer front, using 120-grit sandpaper. You don’t need to strip it to bare wood, but you must scuff up the shiny finish so the primer adheres. -
Smooth the Surface:
Follow up with 220-grit sandpaper to smooth out any rough patches from the first sanding and to level out the dried wood filler. -
Remove Dust:
Vacuum up the loose sawdust, then wipe the entire piece down with a tack cloth to catch every last particle. Dust is the enemy of a smooth spray finish. -
Protect the Drawer Interior:
If you don’t want paint inside the drawer, use painter’s tape and paper to mask off the sides and inside box, leaving only the drawer front exposed.
Step 2: Priming & Painting
-
Set Up Spray Zone:
Move the furniture to a well-ventilated area, preferably outdoors. Lay down drop cloths to protect the ground. -
Apply Primer:
Shake your primer can vigorously. Apply a thin, even coat of primer to the nightstand and drawer front. Keep the can moving to avoid drips. -
Sand the Primer:
Once the primer is fully dry, lightly sand it with 320-grit sandpaper. This knocks down any ‘fuzzy’ texture and ensures a glass-smooth base. Wipe away the dust with a tack cloth. -
First Black Coat:
Shake the matte black spray paint for at least a minute. Spray the first coat using long, sweeping motions, starting and stopping the spray off the edge of the piece. Keep the coat light; coverage doesn’t need to be perfect yet. -
Second Black Coat:
Wait for the first coat to dry to the touch (check the can for specific times). Apply a second thin coat, focusing on areas that look a bit transparent. I find that changing directions—spraying horizontally then vertically—helps cover inconsistent spots. -
Detail Inspection:
Check for any rough spots or dust nibs. If you find any, very gently sand them with the 320-grit paper and wipe clean before proceeding. -
Final Coat:
Apply a third and final coat of matte black spray paint to ensure deep, solid color saturation and a uniform finish. -
Curing Time:
Let the nightstand dry undisturbed for at least 24 hours. While it may feel dry sooner, the paint needs time to cure and harden, or the finish may chip easily.
Uneven Spray Pattern?
If the nozzle clogs and spits, wipe it with lacquer thinner or warm water. Always turn the can upside down and spray until clear after use to prevent future clogs.
Step 3: Finishing Touches
-
Unmasking:
Carefully peel away the painter’s tape from the drawer sides. -
Install Hardware:
Insert the new gold ring pull into the hole on the drawer front. Tighten the nut from the inside until it is secure but not over-tightened. -
Reassemble:
Slide the drawer back into the nightstand tracks. Your modern update is complete.
Elevate the Look
Line the bottom of the drawer with a fun geometric or floral peel-and-stick wallpaper. It adds a pop of surprise color every time you reach for your belongings.
Enjoy the sleek sophistication this refurbished piece brings to your bedroom space


Two-Tone Body and Drawer Fronts
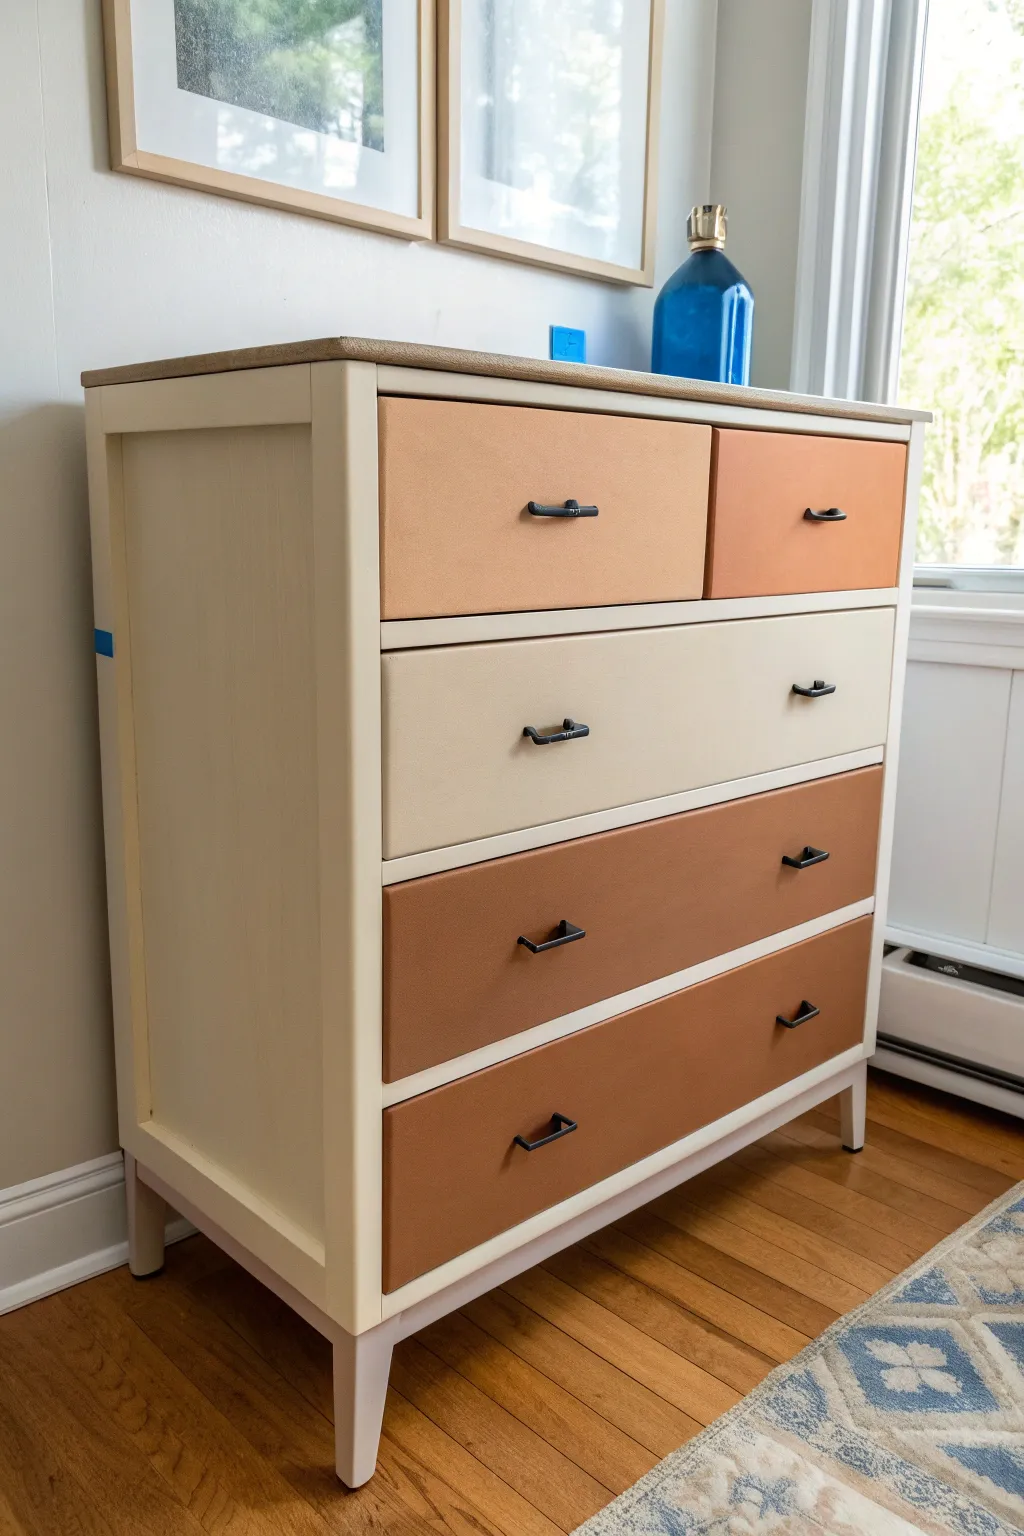
Transform a plain dresser into a modern statement piece by playing with a gradient of warm, earthy tones against a crisp cream frame. This project combines the durability of spray paint with a sophisticated color palette to create a custom look that feels both retro and fresh.
Step-by-Step Guide
Materials
- Wooden dresser (pre-owned or unfinished)
- Sandpaper (120 and 220 grit)
- Tack cloth
- Painter’s tape
- Primer spray paint
- Cream or off-white spray paint (satin finish)
- Spray paint in four complementary earth tones (e.g., terracotta, rust, tan, deep beige)
- Matte clear topcoat spray
- Screwdriver
- Drop cloths
- Respirator mask
Step 1: Preparation and Disassembly
-
Remove hardware:
Begin by removing all the drawers from the dresser body. Use a screwdriver to detach all pulls, knobs, or handles and set them aside in a labelled bag so you don’t lose the screws. -
Clean surfaces:
Wipe down the entire dresser body and all drawer fronts with a degreaser or mild soap and water to remove oils, dust, and grime. -
Initial light sand:
Scuff sand all surfaces using 120-grit sandpaper. You aren’t trying to strip it to bare wood, just creating a rough surface for the paint to grip. -
Smooth finishing sand:
Follow up with a quick pass of 220-grit sandpaper to smooth out any scratches from the coarser paper. -
Dust removal:
Vacuum up the loose dust, then wipe everything down thoroughly with a tack cloth to ensure a perfectly clean surface.
Clean Lines
If you don’t want to remove the drawer slides or if they are non-removable, wrap them completely in painter’s tape to ensure they glide smoothly after painting.
Step 2: Painting the Body
-
Protect the area:
Lay down drop cloths in a well-ventilated area, preferably outdoors or in a garage with open doors. -
Prime the frame:
Apply a coat of primer to the main body of the dresser. Use long, sweeping motions to avoid drips. -
Paint the body coat:
Once the primer is dry, apply your cream or off-white spray paint to the dresser frame. Keep the can moving and hold it about 8-10 inches away. -
Apply second coat:
Let the first coat dry according to the can’s instructions, then apply a second light coat for full, even coverage.
Textured Touch
For a tactile finish similar to the image, consider using a ‘stone effect’ or textured spray paint for the drawer fronts before sealing them with matte clear coat.
Step 3: Creating the Gradient Drawers
-
Organize by color:
Line up your drawers in the order they will appear in the dresser. Assign a specific spray paint color to each drawer to plan your gradient effect. -
Prime drawer fronts:
Spray a coat of primer on all drawer fronts. If the sides of the drawers fit tightly, use painter’s tape to mask them off so paint buildup doesn’t cause sticking later. -
First color application:
Working one color at a time, spray the drawer fronts. Start with the lightest tan shade for the top split drawer and middle drawer. -
Second color application:
Move to the medium terracotta tone for the other top split drawer. -
Darker tone application:
Apply your rust or deep brownish-orange shade to the bottom two drawers to anchor the gradient look. -
Check for consistency:
Inspect all drawers for uneven spots. I like to do a very light misting coat as a final pass to ensure the sheen is uniform across the flat surfaces. -
Paint the hardware:
While the drawers dry, spray your original hardware with matte black paint for a modern contrast, or clean them if keeping the original finish.
Step 4: Assembly and Finish
-
Seal the deal:
Once all paint is completely cured (usually 24 hours), apply a clear matte topcoat to the drawer fronts and body for added durability against scratches. -
Reattach hardware:
Screw the handles back onto the drawer fronts, being careful not to over-tighten and crack the fresh paint. -
Reinsert drawers:
Slide the drawers back into their corresponding slots in the dresser body to reveal the full two-tone effect.
Step back and admire how a simple gradient of colors has completely revitalized your furniture piece


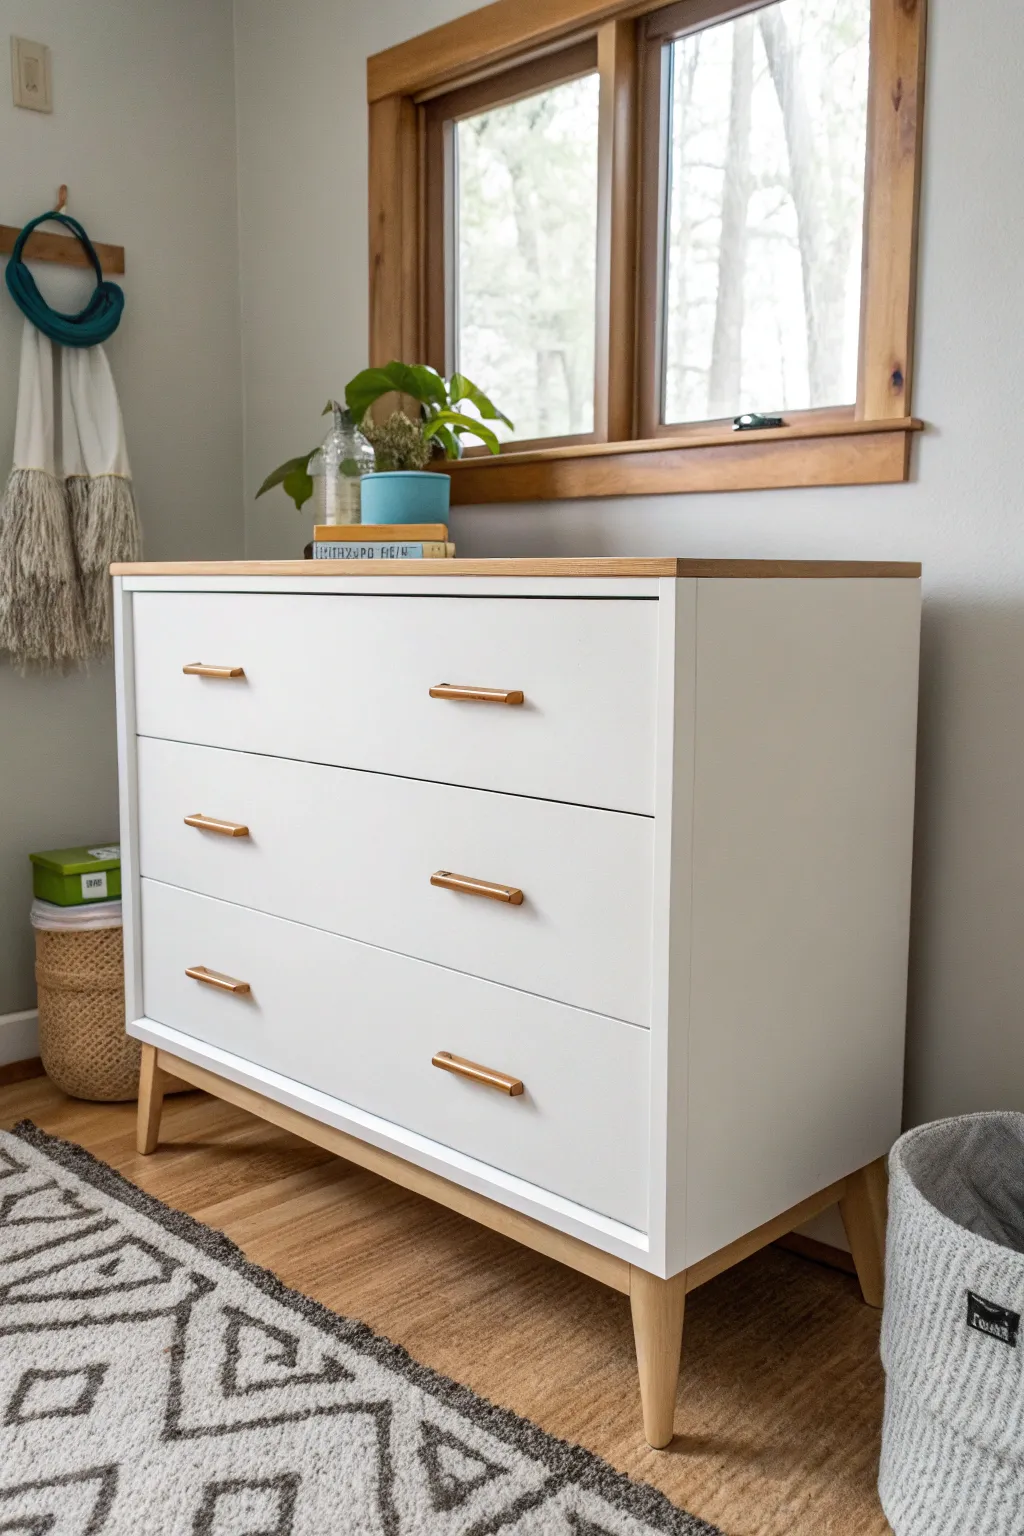
Glossy Cabinet Refresh With a Sleek Sheen
Transform a tired or dated cabinet into a bright, modern focal point with a crisp white finish that reflects light beautifully. This project focuses on achieving that perfectly smooth, factory-like sheen using high-quality spray enamel.
How-To Guide
Materials
- Wooden cabinet or sideboard
- High-gloss or semi-gloss white spray enamel (e.g., Rust-Oleum or Krylon)
- Spray primer (white or gray based on original color)
- Sandpaper assortment (120, 220, and 320 grit)
- Tack cloth
- Degreaser or TSP substitute
- Painter’s tape
- Drop cloths or plastic sheeting
- Screwdriver for hardware removal
- Respirator mask
- Fine finishing wax (optional)
Step 1: Preparation
-
Clear and clean:
Begin by removing all items from the cabinet and wiping down the entire surface with a degreaser or TSP substitute to remove oils, dust, and furniture polish residue. -
Disassemble hardware:
Use your screwdriver to remove the doors from their hinges and take off the round knobs. Store all screws and hardware in a labeled bag so nothing gets lost. -
Initial sanding:
Scuff sand the entire cabinet body and the doors with 120-grit sandpaper. You aren’t trying to strip it to bare wood, just removing the existing glossy finish to give the new paint ‘tooth’ to grab onto. -
Fill imperfections:
If there are deep scratches or dents, fill them with wood filler now. Let it dry completely, then sand those spots flush with the surface. -
Dust removal:
Vacuum up the sanding dust, then wipe every inch of the piece with a tack cloth. Even a single speck of dust can ruin a glossy spray finish, so take your time here. -
Masking off:
Tape off any areas you don’t want painted, such as drawer interiors or the back panel if it’s a different material. Cover your workspace floor and surrounding walls with drop cloths.
Trigger Finger Fatigue
Use a snap-on spray can trigger handle. It saves your finger from cramping and provides way better control for consistent, smooth passes.
Step 2: Priming and Sanding
-
Apply primer:
Spray a thin, even coat of primer over the cabinet and doors. hold the can about 8-10 inches away and keep your hand moving to prevent drips. -
Dry and inspect:
Allow the primer to dry according to the can’s instructions. Look for any bleed-through stains; if you see them, apply a second coat of stain-blocking primer. -
Intermediate sanding:
Once fully dry, lightly sand the primed surface with 220-grit sandpaper. This smooths out the texture of the primer, which is crucial for a high-gloss topcoat. -
Second tack cloth wipe:
Wipe away the fine primer dust with a fresh tack cloth. The surface must be perfectly clean before the enamel goes on.
Step 3: Painting and Finishing
-
First coat of gloss:
Shake your white spray enamel vigorously for at least a minute. Apply the first coat in light, sweeping passes, slightly overlapping each stroke. Don’t aim for full coverage yet; thin layers are key. -
Build the layers:
Wait for the paint to become tacky or dry (check the specific recoat window on your can). Apply a second and potentially third coat, moving systematically across panels to keep a wet edge. -
Sanding between coats:
For an ultra-smooth finish, I like to very lightly wet-sand with 320-grit paper between the final coats once they are fully dry, though you can skip this if your spray technique is spot-on. -
Final coat application:
Apply the final coat a bit heavier to allow the paint to self-level, but be incredibly careful not to cause runs. This is the ‘money coat’ that provides that sleek sheen. -
Extended curing time:
Leave the cabinet and doors to cure for at least 24-48 hours. Glossy enamels stay soft for a while, and rushing this step can lead to fingerprints or dents. -
Reassembly:
Once the paint is hard and cured, carefully reattach the hinges and screw the doors back onto the frame. -
Add hardware:
Reattach your knobs. If the old ones look worn, consider spray painting them with a metallic brass or gold paint before reinstalling to match the modern vibe.
Orange Peel Texture?
This bumpy texture happens if the paint dries too fast or you spray too far away. Sand it smooth with fine-grit paper and spray closer next time.
Now step back and admire how the light bounces off your freshly updated, sleek white cabinet
BRUSH GUIDE
The Right Brush for Every Stroke
From clean lines to bold texture — master brush choice, stroke control, and essential techniques.
Explore the Full Guide
Bookcase Back Panel Color Pop
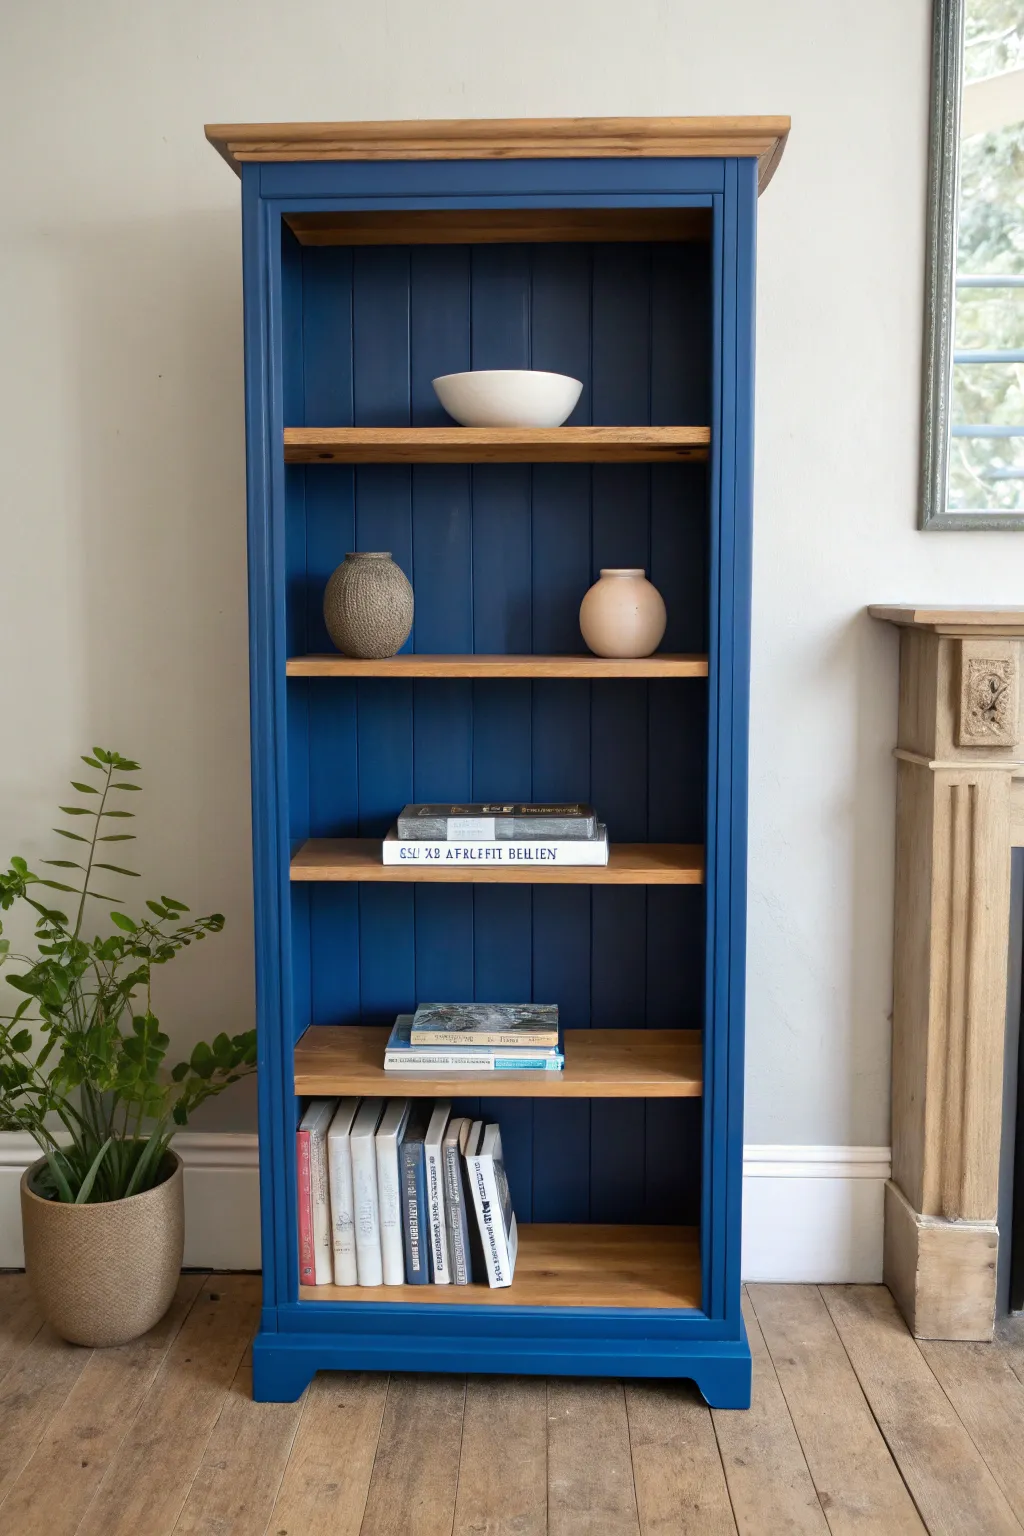
Transform a plain wooden bookcase into a contemporary statement piece by combining bold color with natural wood tones. This project proves that you don’t need to paint everything to make a dramatic impact; sometimes, preserving the warmth of natural grain adds the perfect contrast to a classic navy finish.
Step-by-Step Guide
Materials
- Tall wooden bookcase with removable shelves (solid wood preferred)
- Sandpaper (120 and 220 grit)
- Orbital sander (optional, for speed)
- Painter’s tape (high quality)
- Plastic drop cloths or old newspapers
- Primer spray (specifically for wood)
- Spray paint in a deep navy or royal blue (satin or matte finish)
- Wood stain (optional, if you want darker shelves)
- Clear matte or satin varnish spray
- Tack cloth
- Screwdriver (for disassembling back panel, if applicable)
Step 1: Preparation and Disassembly
-
Assess the piece:
Before starting, inspect your bookcase. If the back panel is tacked or screwed on, gently remove it. This makes painting the back much easier and prevents overspray on the frame later. -
Remove shelves:
Take out all adjustable shelves. If your shelves are fixed, you will need to rely heavily on taping, but removability is ideal for this two-tone look. -
Clean surfaces:
Wipe down the entire unit with a mild degreaser or soapy water to remove years of dust or furniture polish. Let it dry completely. -
Sand the finish:
Using 120-grit paper, lightly scuff all surfaces you intend to paint (the outer frame, the inner sides, and the back panel). The goal isn’t to remove the old finish entirely, just to give the paint something to grip. -
Refine the wood accents:
Sand the top surface and the removable shelves more aggressively using 120-grit, followed by 220-grit, until you expose clean, raw wood. We want these parts to shine as natural elements.
Step 2: Painting the Color Pop
-
Mask the top:
Using high-quality painter’s tape and plastic sheeting, completely cover the newly sanded top surface of the bookcase. Ensure the tape edge is perfectly straight along the molding or lip. -
Prime the frame:
In a well-ventilated area, apply a coat of primer to the main body of the bookcase and the detached back panel. Use long, sweeping motions to avoid drips. -
Apply the first coat of color:
Once the primer is dry, shake your navy blue spray paint vigorously. Spray a light, even coat over the frame and back panel. Don’t try for full coverage yet; light layers are key for a smooth factory finish. -
Sand slightly between coats:
I like to run a very fine sanding sponge quickly over the first coat once it’s dry to knock down any dust nibs before the final layer. -
Apply the final color coat:
Spray a second, slightly heavier coat of blue to achieve full opacity. Check all the nooks and crannies to ensure no original wood color is peeking through. -
Remove tape promptly:
Carefully peel off the masking tape from the top while the paint is still slightly tacky to prevent the dried paint from cracking or peeling.
Drip Disaster?
If you get a run or drip in the spray paint, don’t wipe it wet! Let it dry completely, sand it smooth with fine-grit paper, and then apply a final light coat over that area.
Step 3: Treating the Natural Wood
-
Clean the raw wood:
Use a tack cloth to remove every speck of sanding dust from the shelves and the top surface. -
Stain (optional):
If the raw wood is too light for your taste, wipe on a penetrating stain now. However, for the look in the image, a simple clear coat on oak or pine works beautifully. -
Seal the wood:
Spray a clear matte or satin varnish on the shelves and top. This protects the wood from water rings and scratches without changing its natural character. -
Second seal coat:
After the first clear coat dries, lightly sand with 220-grit paper and apply one final protective layer for durability.
Level Up: Pattern Play
Before painting the back panel blue, apply thin striping tape in a geometric pattern. Peel it off after painting to reveal raw wood lines for a subtle graphic effect behind your books.
Step 4: Reassembly
-
Reattach the back:
Once the blue paint has cured for at least 24 hours, carefully screw or tack the back panel onto the main frame. Ensure the painted side faces inward. -
Install hardware:
Insert your shelf pins or supports back into the pre-drilled holes. -
Place shelves:
Slide your natural wood shelves back into position, enjoying the crisp contrast between the warm timber and the cool blue frame.
Now step back and admire how a simple two-tone palette has completely refreshed your storage space
Ombre Gradient on a Buffet or Dresser
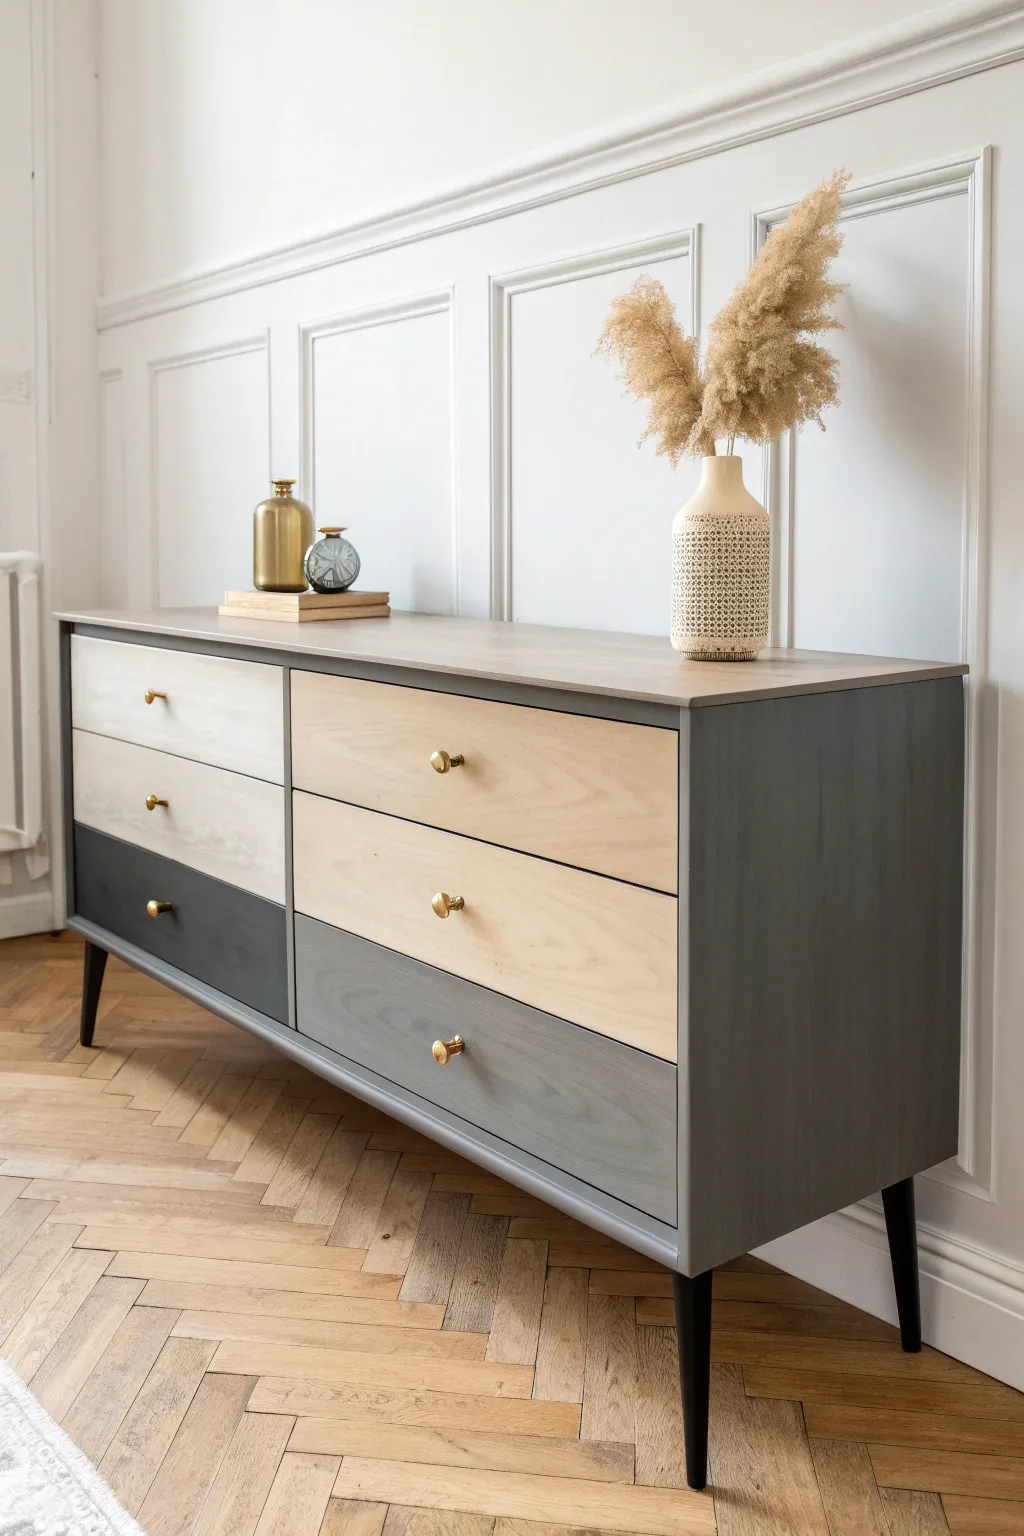
Transform a plain dresser into a modern statement piece with this sophisticated ombre color block technique. By blending varying shades of grey and natural wood tones, you’ll achieve a high-end designer look for a fraction of the cost.
Step-by-Step
Materials
- Wooden dresser or buffet (preferably with flat drawer fronts)
- Sandpaper (120 and 220 grit)
- Mouse sander or sanding block
- Primer spray paint (grey or white)
- Masking tape or painter’s tape
- Spray paint in dark charcoal grey (matte or satin)
- Spray paint in medium grey
- Spray paint in light grey or off-white
- Clear matte sealer spray
- Gold finish knobs or pulls
- Tack cloth
- Drop cloth
Step 1: Preparation & Sanding
-
Remove hardware:
Begin by unscrewing all existing knobs, handles, and pulls. Store these in a zippered bag if you plan to reuse them, though upgrading to gold hardware really elevates this specific look. -
Remove drawers:
Pull out all the drawers and set them aside on a drop cloth. You will be working on the frame and the drawer fronts separately to ensure clean lines. -
Clean surfaces:
Wipe down the entire piece with a damp cloth and mild degreaser to remove dust, oils, and old furniture polish. Let it dry completely. -
Sand the frame:
Using 120-grit sandpaper, scuff sand the main body of the dresser. You don’t need to strip it to bare wood, but you do need to remove the sheen so the paint adheres. -
Sand the drawers:
This step is crucial. Sand the drawer fronts down to bare wood if possible, especially for the sections you want to leave natural. Start with 120-grit and finish with 220-grit for a smooth finish. -
Dust removal:
Wipe every surface with a tack cloth. Any leftover dust will create bumps in your spray paint finish.
Smooth Operator
Between coats of spray paint, lightly sand with a brown paper bag. It acts like ultra-fine sandpaper to knock down nibs without scratching the finish.
Step 2: Painting the Frame
-
Prime the frame:
Apply a coat of primer to the main body of the dresser. Use long, sweeping motions to avoid drips. Let the primer dry according to the can’s instructions. -
Paint the dark base:
Spray the frame with your dark charcoal grey paint. I find that two thin coats provide much better coverage and durability than one thick coat. -
Check coverage:
Inspect the corners and legs. Ensure the dark grey is opaque and even. Allow the frame to cure fully while you work on the drawers.
Paint Splatter?
If spray paint sneaks under the tape onto the wood, gently scrape it away with a razor blade or sand just that spot lightly before sealing.
Step 3: Creating the Ombre Drawers
-
Plan the gradient:
Arrange your drawers in their correct order on the ground. Decide which drawers will remain natural wood and which will be painted. In this design, we alternate painted sections with exposed wood for a modern twist. -
Masking off:
Use high-quality painter’s tape to mask off the areas you want to keep as natural wood. Press the tape edges down firmly with a credit card to prevent paint bleed. -
Painting the bottom tier:
Spray the bottom-most drawer front with the dark charcoal grey to match the frame. This anchors the piece visually. -
Painting the middle tier:
For the middle section (or just the left side, as shown in the inspiration), spray with your medium grey tone. Keep the can 8-10 inches away for an even mist. -
Painting the top tier:
Apply the light grey or off-white spray paint to the top drawer section. This creates that ‘fading upward’ ombre effect. -
Remove tape:
Peel off the tape carefully while the paint is still slightly tacky—not wet, but not fully cured. This helps ensure a crisp, sharp line without chipping.
Step 4: Assembly & Finishing
-
Seal the wood:
Once all paint is dry, spray the entire drawer front (both painted and wood sections) with a clear matte sealer. This protects the raw wood and unifies the sheen of the paint. -
Reinstall drawers:
Slide the drawers back into the frame carefully to avoid scratching your new paint job. -
Add new hardware:
Install the new gold knobs. Center them perfectly on the drawer fronts for a professional finish.
Step back and admire how a simple gradient completely revitalized your furniture piece

PENCIL GUIDE
Understanding Pencil Grades from H to B
From first sketch to finished drawing — learn pencil grades, line control, and shading techniques.
Explore the Full Guide
Metallic Accents on Legs and Bases
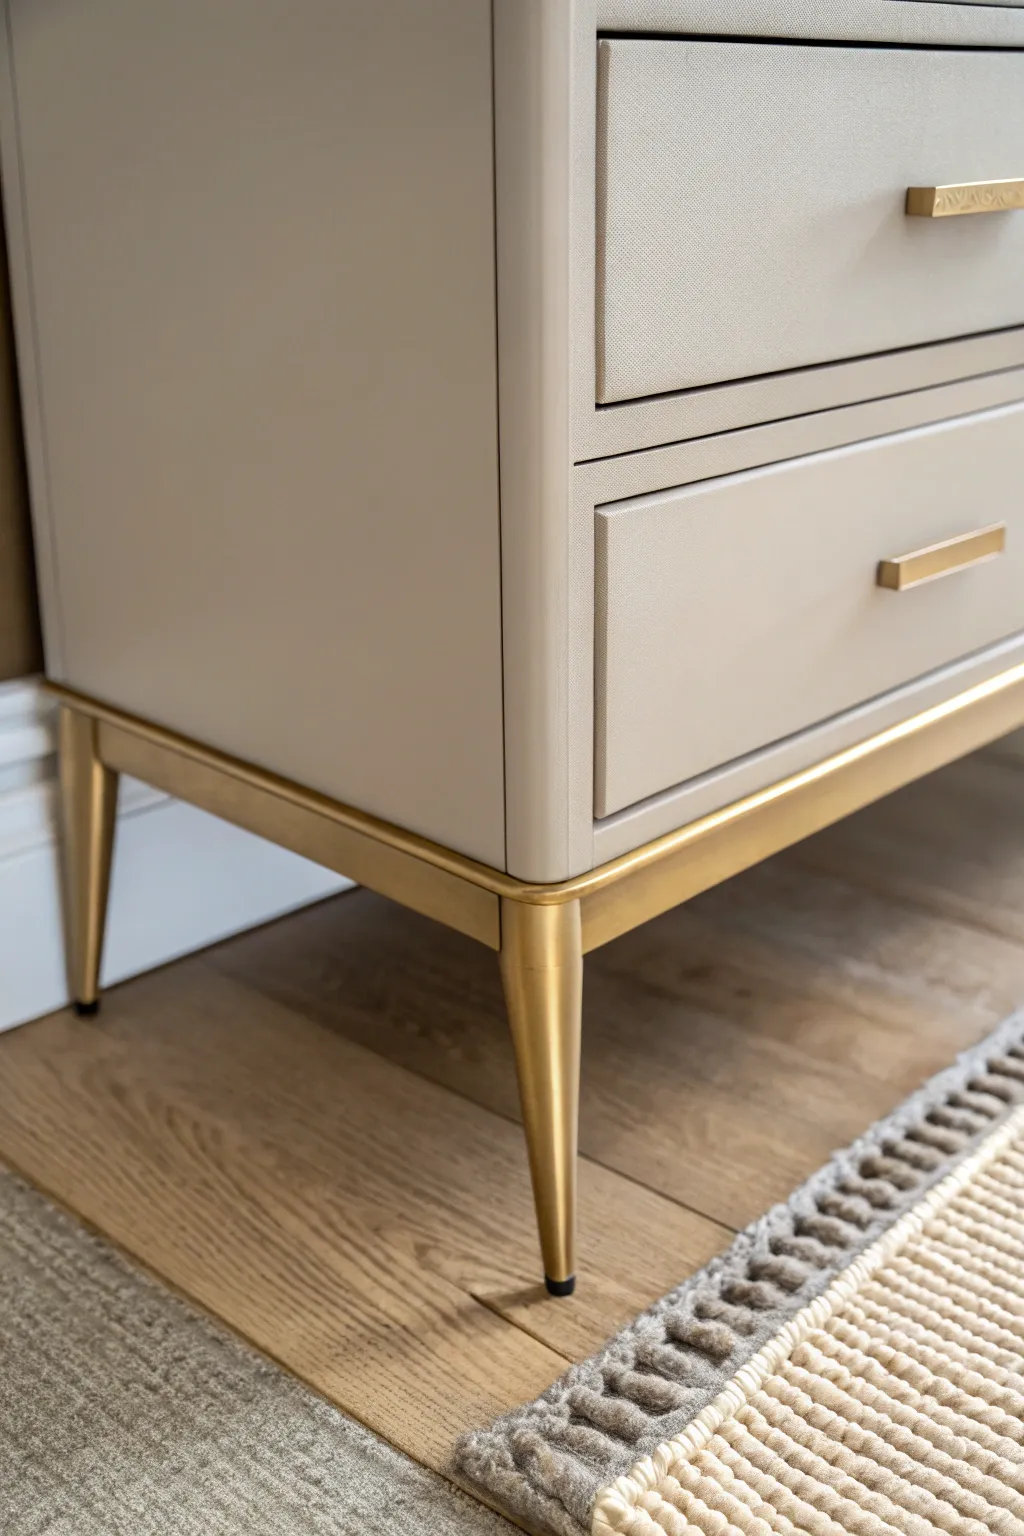
Elevate a simple piece of furniture into a high-end statement by adding a metallic touch to its foundation. This project focuses on transforming ordinary wooden or metal legs with a rich brushed gold finish that perfectly complements neutral tones.
Step-by-Step Tutorial
Materials
- Furniture piece with legs (nightstand or dresser)
- Metallic Gold Spray Paint (Brushed Brass or Champagne Gold)
- Spray Paint Primer (suitable for your leg material)
- High-grit sandpaper (220-grit and 400-grit)
- Painter’s tape (high quality)
- Plastic drop cloths or old newspapers
- Degreasing cleaner or TSP substitute
- Microfiber tack cloth
- Screwdriver or drill (for removing legs)
- Clear protective sealant spray (matte or satin)
- Cardboard box or dedicated spray area
Step 1: Preparation & Dismantling
-
Assess the Base:
Examine how the legs are attached to your furniture piece. Most modern pieces have screw-on legs or a base frame screwed into the bottom cabinet. -
Remove the Base:
Carefully unscrew the legs or the entire metal frame from the furniture body. It is vastly easier to get a professional finish by spraying these parts separately rather than masking off the entire cabinet. -
Clean Thoroughly:
Wipe down the legs with a degreasing cleaner to remove distinct oils, dust, or old wax. This step is crucial for paint adhesion. -
Initial Sanding:
Scuff the surface of the legs using 220-grit sandpaper. You aren’t trying to remove all previous finish, just creating a ‘tooth’ for the primer to grab onto. -
Wipe Down:
Use a microfiber tack cloth to remove every speck of sanding dust. Any leftover dust will create bumps in your metallic sheen.
Step 2: Priming for Adhesion
-
Setup Spray Zone:
Take the legs outside or to a well-ventilated area. I like to stand legs up inside a cardboard box or on a drop cloth to catch overspray. -
Protect the Glides:
If the legs have plastic floor glides or feet at the very bottom that shouldn’t be painted, wrap them tightly in painter’s tape now. -
Apply Primer:
Shake your primer can vigorously for at least one minute. Apply a thin, even coat of primer to the legs, keeping the can moving constantly to avoid drips. -
Let it Cure:
Allow the primer to dry completely according to the manufacturer’s time, usually about 30-60 minutes. -
Light Sanding:
Once dry, very gently run 400-grit sandpaper over the primed surface to smooth out any texture. Wipe away dust again with the tack cloth.
Drips & Runs?
If paint drips, let it dry completely (don’t wipe it wet!). Sand the drip flat with fine sandpaper, wipe clean, and re-spray that area lightly.
Step 3: The Gold Finish
-
First Coat of Gold:
Shake your metallic gold spray paint well. Apply the first coat in light, sweeping passes, holding the can about 8-10 inches away. Do not try to get full coverage on the first which often causes runs. -
Drying Time:
Let this light coat set for about 15-20 minutes. It should look patchy; that is normal and better than a drippy finish. -
Second Coat:
Apply a second, slightly heavier coat, ensuring you hit the angles and insides of the legs. Pay attention to the corners where shadows might hide missed spots. -
Inspect Coverage:
Check for evenness. Metallic paints can sometimes look uneven if sprayed too heavily in one spot. If you need a third light coat for depth, apply it now. -
Sealing the Deal:
Once the gold is fully dry (I prefer leaving it overnight), apply a light coat of clear protective sealer. This prevents the metallic finish from tarnishing or rubbing off over time.
Adding Texture
For a textured fabric look on the drawers like the photo, use a specialized ‘stone’ or ‘textured’ spray paint before applying your top color.
Step 4: Reassembly
-
Wait for Full Cure:
Allow the legs to cure for at least 24 hours before handling them heavily. This ensures the paint hardens and won’t fingerprint. -
Remove Tape:
Carefully peel off the painter’s tape from the floor glides. -
Reattach:
Screw the legs or base frame back onto your furniture piece, tightening securely. -
Hardware Match:
If your piece has drawer handles, repeat this same process on the hardware so your metals match perfectly.
Now step back and admire how a simple can of gold paint gave your furniture a sophisticated, designer-grade upgrade


Have a question or want to share your own experience? I'd love to hear from you in the comments below!