When I’m craving big impact with fast color, I reach for spray paint and think in mural-sized shapes. These spray paint mural ideas are meant to feel doable and playful, whether you’re working on a wall, a wood panel, or a few canvases taped into one big scene.
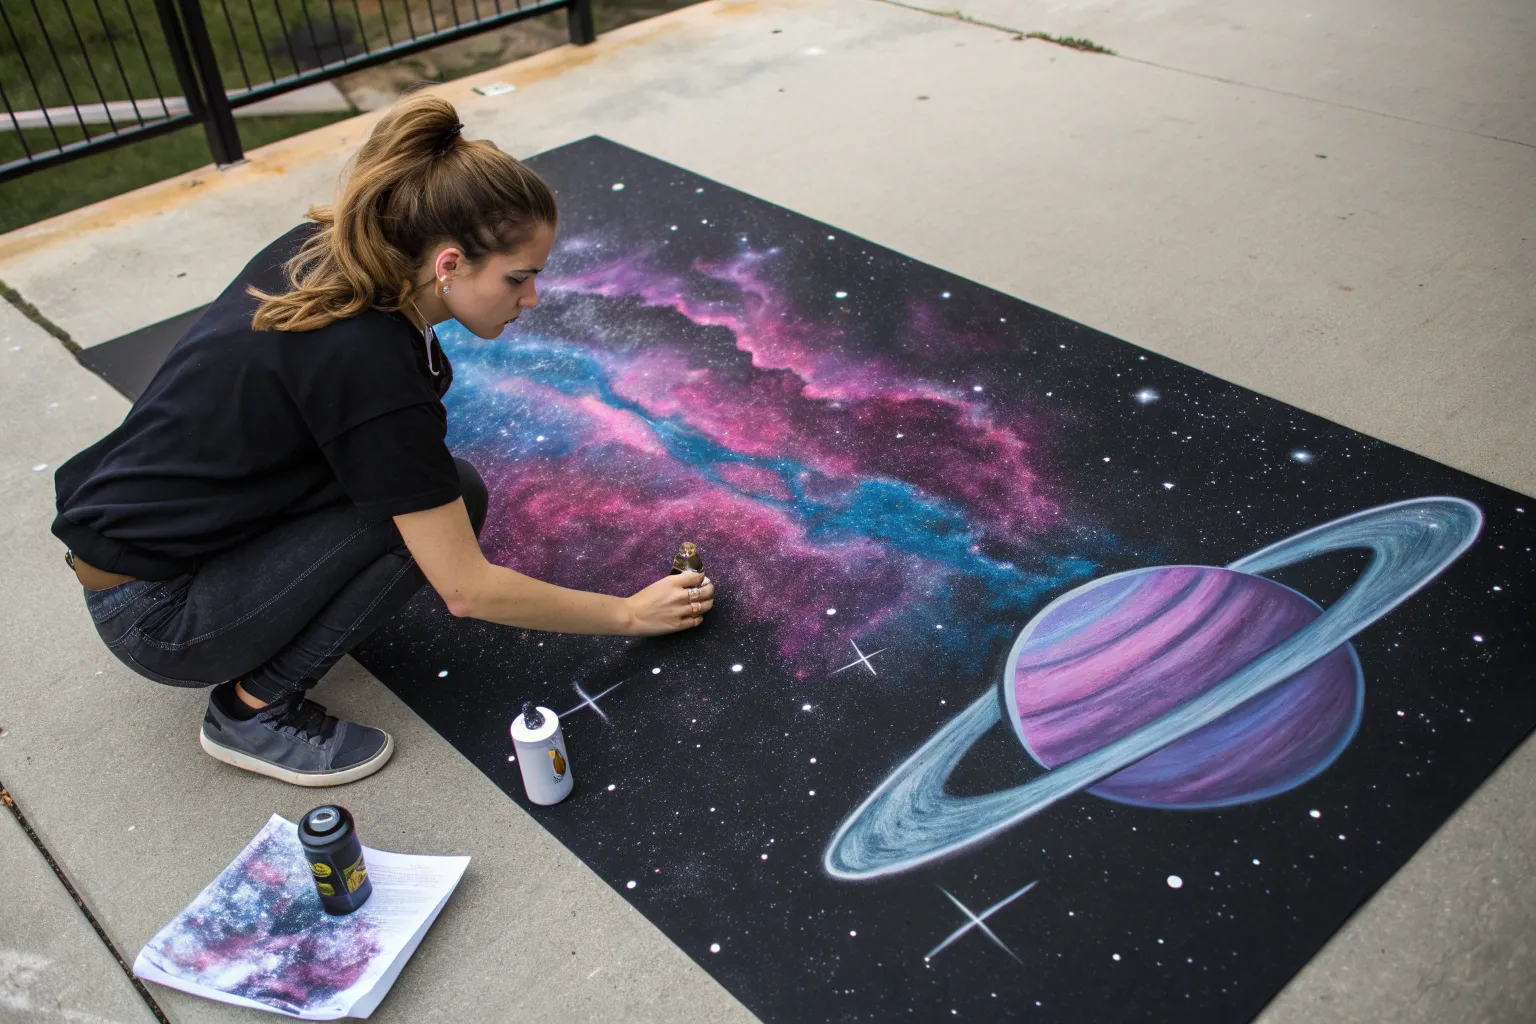
Classic Galaxy With Starfield
Transform a plain exterior corner into a window to deep space with this vibrant galaxy mural. By layering deep blues and purples with crisp white stars, you can create a stunning dimensional effect that wraps right around your building.
Step-by-Step Tutorial
Materials
- External masonry primer (grey or white)
- Spray paint: deeply saturated Navy Blue
- Spray paint: Royal Blue or Azure
- Spray paint: Magenta or Purple
- Spray paint: Black
- Spray paint: White
- Painter’s tape (wide)
- Drop cloths or plastic sheeting
- Thin cardboard or heavy paper (for stencils)
- Craft knife
- Face mask/respirator
- Gloves
Step 1: Preparation & Base Coat
-
Clean the surface:
Before painting, scrub the wall thoroughly to remove dirt, dust, and loose debris. Let the masonry dry completely, as trapped moisture will ruin the paint. -
Tape the borders:
Using wide painter’s tape, carefully mask off the top edge just under the windowsill and the bottom edge above the ground line. The image shows a thick grey border at the base, so tape off that area specifically if you want to keep it unpainted or paint it grey later. -
Protect the surroundings:
Lay down drop cloths on the ground and pavers. Tape plastic sheeting over any nearby windows, pipes, or adjacent walls you don’t want painted. -
Apply the primer:
Coat the entire working area with a solid layer of external masonry primer. This ensures your colors will be vibrant and the paint will adhere properly to the stucco texture.
Fixing Drips
If you spray too close and get a drip, don’t wipe it! Let it dry completely, adhere a small piece of tape over it, and pull it off to remove the bump, then lightly respray the area.
Step 2: Creating the Nebula
-
Lay the dark foundation:
Start by spraying patches of Black and the deepest Navy Blue. Focus on the corners and edges to create depth, avoiding the center areas where the bright nebula clouds will go. -
Draft the nebula shape:
Using your Royal Blue, spray a diagonal swath across the wall, moving from top-left to bottom-right. Keep the can about 8-10 inches away for soft, misty edges. -
Add the purple core:
Inside your blue swath, spray the Magenta or Purple paint. I like to pulse the nozzle gently here to create cloud-like irregularities rather than a solid line. -
Blend the transitions:
While the paint is still slightly tacky, lightly mist Navy Blue over the edges where the Purple meets the background. This softens the transition so it looks like gas clouds rather than stripes. -
Highlight the gas clouds:
Take your White spray paint and very, very lightly mist the center of the brightest blue and purple areas. Hold the can far back (12+ inches) to create a glowing, foggy effect without creating solid white spots. -
Add deep contrast:
Go back in with Black spray paint and darken the negative spaces between the clouds. This high contrast is what makes the colors pop.
Glow Up
Use glow-in-the-dark spray paint for the final layer of stars. During the day it looks normal, but at night your galaxy will faintly shimmer.
Step 3: The Starfield
-
Create the distant stars:
For the background stars, hold the White spray can about 2 feet away and press the nozzle only halfway down, or use a ‘splatter’ cap if you have one. You want a fine mist of speckles to land on the dark areas. -
Flicker technique:
Alternatively, spray a puddle of white paint onto a piece of cardboard, dip a stiff bristle brush into it, and flick the bristles at the wall for organic, random star clusters. -
Cut starburst stencils:
On a piece of thin cardboard, use a craft knife to cut out a few 4-point star shapes (a long cross). Make a large one and a couple of smaller ones. -
Spray the hero stars:
Hold the stencil tight against the wall in your chosen spots—usually over the darkest areas for contrast. Quick-blast white spray over the cutout. Lift the stencil straight back to avoid smudging. -
Add center glow:
To make the big stencil stars shine, hold the white spray can very close and do a tiny, quick dot right in the center of the cross you just painted.
Step 4: Finishing Touches
-
Paint the bottom border:
Once the galaxy is dry, remove the bottom tape. Mask off the bottom edge of your mural (where the galaxy ends) and paint the foundational trim a solid dark grey as seen in the photo to ground the artwork. -
Remove masking:
Carefully peel away all remaining tape and plastic sheeting. Pull the tape at a 45-degree angle away from the wet paint to ensure a crisp line. -
Seal the work:
Apply a clear, UV-resistant exterior sealer over the entire mural. This protects the pigments from fading in the sun and makes the wall easier to clean.
Enjoy the view of your personal slice of the universe every time you pass by


Geometric Color Blocks With Tape
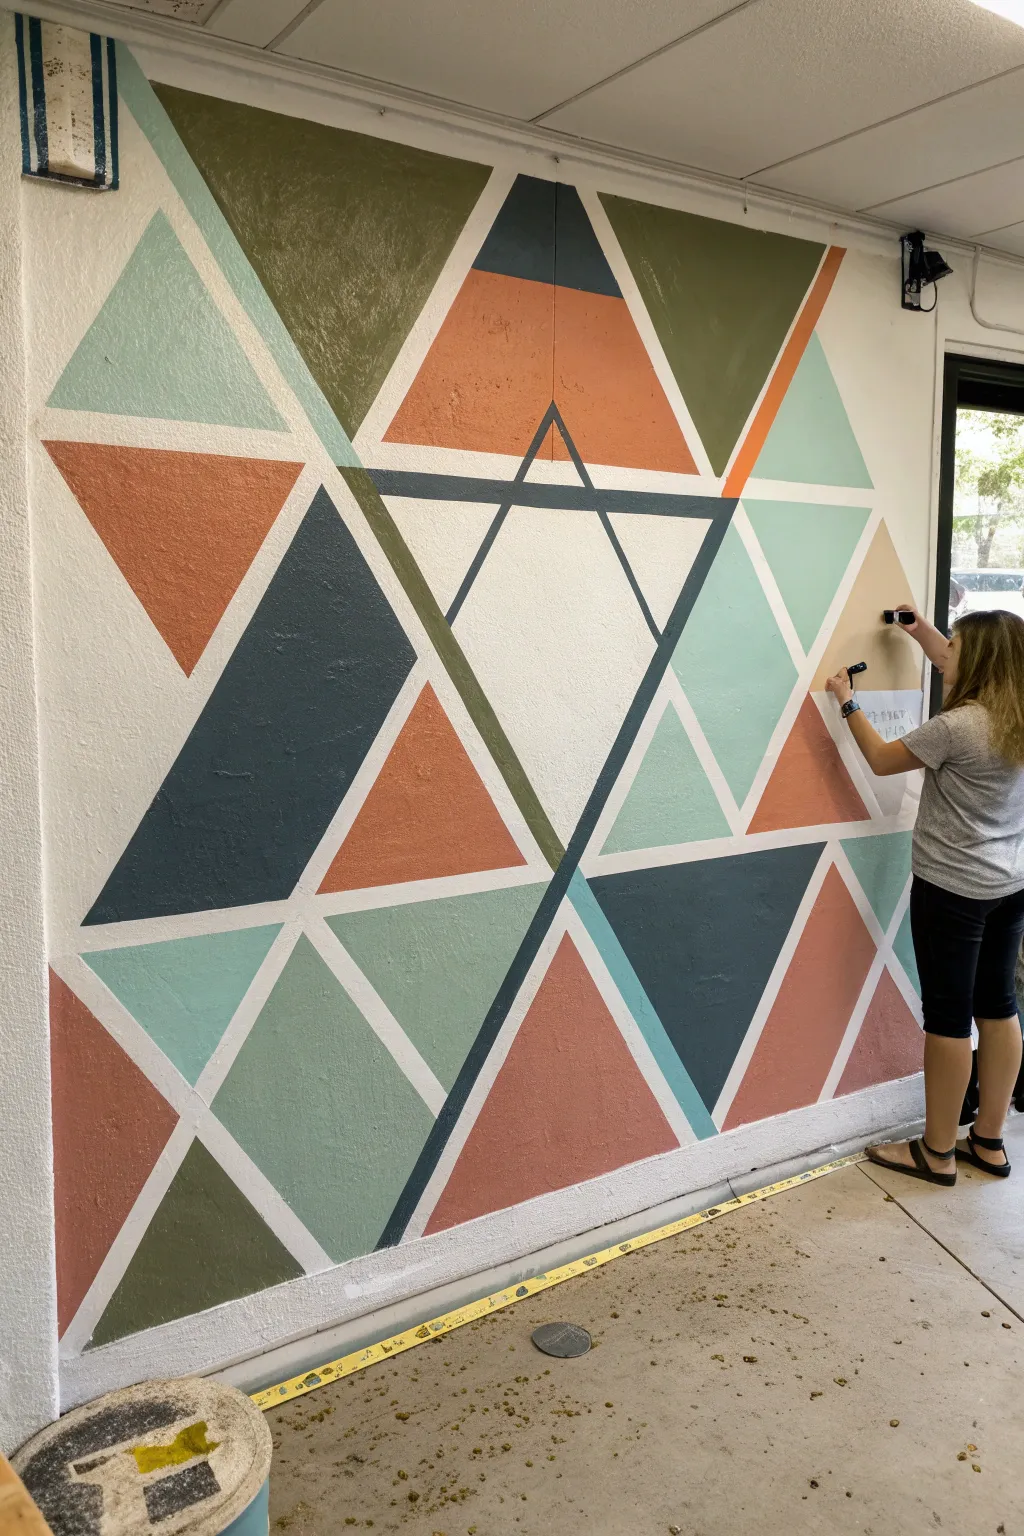
Transform a plain wall into a modern art piece with this striking geometric mural featuring interlocking triangles. The design uses crisp lines of negative space to separate bold blocks of terra cotta, sage, teal, and beige for a sophisticated, structured look.
Step-by-Step Guide
Materials
- Interior latex paint (Terra Cotta, Sage Green, Deep Teal, Mint, Beige)
- Painter’s tape (1-inch width for standard lines)
- Painter’s tape (2-inch width for bold accents)
- Drop cloths
- Paint rollers (4-inch mini rollers work best)
- Roller tray with liners
- Small angled sash brush
- Level and measuring tape
- Pencil
- Damp rag
Step 1: Preparation and Mapping
-
Clean and prime:
Begin by wiping down your wall to remove dust and oils. If the wall isn’t already white (or your desired ‘grout’ line color), apply a fresh coat of white base paint and let it cure for at least 24 hours. -
Locate the center:
Measure the width and height of your wall to find the exact center point. Mark this lightly with a pencil, as this will anchor your main central triangle design. -
Draft the primary shape:
Using your level and a straight edge, lightly draw a large inverted equilateral triangle in the center. This serves as the focal point around which the other shapes will radiate. -
Expand the pattern:
Continue drawing lines extending outwards from your central shape. Create a mix of large and medium triangles, ensuring the lines connect cleanly to create a cohesive geometric web.
Bleed-Through Blues?
If paint bleeds under the tape, wait for it to dry completely. Then, place a new piece of tape over the colored area and touch up the white line with a small brush.
Step 2: Taping the Design
-
Apply the main tape lines:
Run your 1-inch painter’s tape directly over your pencil lines. Press the tape down firmly, especially along the edges, to prevent paint bleed. -
Create the bold accent:
Notice the thick, dark triangle outline in the mural? Create this by placing two parallel strips of tape about 2 inches apart, or use a wider 2-inch tape to mask out where you want a thicker negative space or a specific dark border. -
Seal the edges:
I always take a moment here to run a credit card or a putty knife over every strip of tape. This burnishing step is crucial for getting those razor-sharp lines. -
Bleed-proof the tape:
Lightly brush a small amount of your base wall color (white) over the edges of the tape. This seals the tape so that if any paint bleeds under, it’s the invisible base color, not your bold hues.
Step 3: Painting the Blocks
-
Plan your palette:
Before opening a can, stick small pieces of colored paper or sticky notes in each section to plan your color distribution. Aim for balance—don’t put two terra cotta sections right next to each other. -
Cut in the edges:
Start with your first color (e.g., Deep Teal). Use the small angled brush to carefully paint along the tape edges inside your chosen shape. -
Roll the fill:
Use a 4-inch mini roller to fill in the rest of the shape. These small rollers offer better control than standard ones for these angular spaces. -
Switch colors:
Move on to your next color (Sage Green), repeating the cutting-in and rolling process. It helps to do all sections of one color at time so you aren’t constantly washing brushes. -
Apply the second coat:
Once the first coat is dry to the touch (usually 1-2 hours), apply a second coat to ensure rich, opaque coverage, especially for the darker terra cotta and teal shades. -
Paint the dark accent triangle:
If recreating the specific dark triangular frame shown in the image, carefully paint that specific linear section with a steady hand or use extra tape to isolate it.
Pro Tip: Number Your Zones
Write a small number or initial (like ‘G’ for green) lightly in pencil inside each taped-off triangle. This prevents accidental mix-ups once you start painting.
Step 4: The Reveal
-
Peel while slightly damp:
Don’t wait for the paint to fully cure. When the final coat is tacky but not wet, slowly peel the tape off. Pull it at a 45-degree angle away from the paint. -
Touch up imperfections:
Inevitably, a tiny bit of paint might creep through. Use a small artist’s brush and your base white paint to tidy up any fuzzy lines for a crisp finish.
Step back and admire clean lines and vibrant colors that you brought to life on your new accent wall


Rainbow Arc Gradient Bands
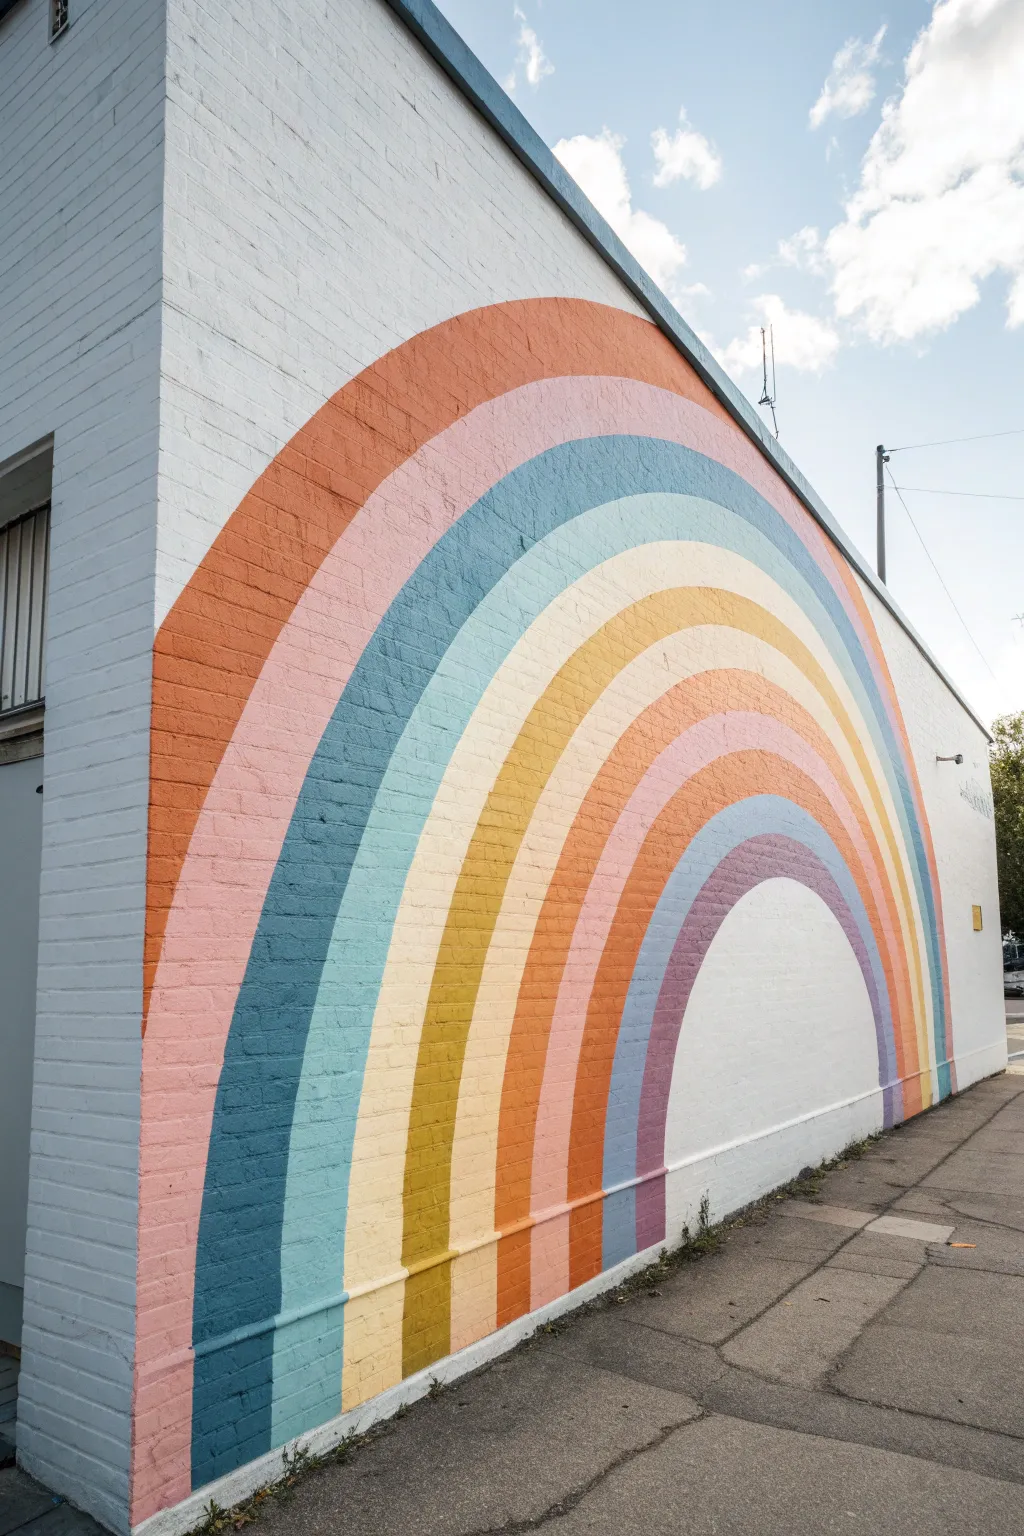
Transform a plain exterior brick wall into a massive statement piece with this towering, multi-colored blended rainbow mural. The muted, slightly retro color palette creates a warm and inviting atmosphere while the crisp lines keep the design modern and clean.
Step-by-Step
Materials
- Exterior masonry primer (white)
- Spray paint cans (rust orange, dusty pink, teal, sky blue, cream, mustard, warm orange, salmon, lavender, grape)
- Pencil usually tied to string
- String or twine (approx. 10-15 feet length)
- Concrete screw or heavy-duty tape
- Painter’s tape (2-inch width)
- Drop cloths
- Ladder
- Cardboard shields (for overspray)
- Wire brush (for prep)
Step 1: Wall Preparation
-
Clean the Surface:
Before painting, scrub the brick wall thoroughly with a wire brush to remove distinct dirt or loose debris. If available, use a pressure washer for the best clean, allowing the wall to dry completely for at least 24 hours. -
Prime the Base:
Coat the entire section of the wall where the mural will go with a high-quality white masonry primer. This ensures the pastel colors pop against the brick texture and adhere properly. -
Protect Surroundings:
Lay down drop cloths on the sidewalk or ground to catch drips. If the mural is near windows or other architectural features, tape them off securely.
Cardboard Shield Trick
Cut a large piece of cardboard with a curved edge matching your arc. Hold this against the wall while spraying to catch overspray and create crisp lines without taping every single inch.
Step 2: Drafting the Design
-
Establish the Anchor Point:
Locate the center bottom point of your rainbow. Secure a string at ground level using a concrete screw or by having a friend hold it firmly against the wall. -
Draw the Outermost Arc:
Tie a pencil or chalk to the other end of the string at your desired maximum height. Keep the string taut and trace a large semi-circle to define the top edge of the biggest rainbow band. -
Map Inner Arcs:
Shorten the string by about 8-10 inches (depending on your desired band width) and draw the next arc. Repeat this process, shortening the string by the same increment each time, until you have mapped out all ten distinct bands. -
Tape the Edges:
Carefully apply painter’s tape along the pencil lines. Deciding whether to tape inside or outside the line is crucial; I generally tape over the line itself to separate zones, but since these bands touch, you will need to paint every other band first or use a shield.
Make It Interactive
Scale the rainbow so the smallest inner arch is roughly 5-6 feet tall. This creates a perfect photo-op spot where people can stand ‘inside’ the rainbow center for pictures.
Step 3: Painting the Bands
-
Start with Alternating Bands:
To keep lines crisp, paint bands 1, 3, 5, 7, and 9 first. This prevents wet paint from bleeding into adjacent colors. Start with the outermost Rust Orange band. -
Apply First Coat:
Hold the spray can about 8-10 inches from the wall. Apply paint in smooth, sweeping motions, following the curve of the arch. Don’t aim for full opacity immediately; light layers are better to avoid drips. -
Fill the Texture:
Brick is porous and uneven. Angle your spray slightly from left and right to ensure the paint coverage gets into the mortar joints and crevices of the brickwork. -
Continue the Sequence:
Move to the Teal band, then the Cream band, the Warm Orange, and finally the Lavender band. Allow these sections to dry to the touch, usually about 30 minutes depending on humidity. -
Mask the Painted Areas:
Once the first set of bands is fully dry, cover the painted edges with fresh tape or hold a cardboard shield firmly against the dried line to define the boundary for the remaining empty bands. -
Paint Remaining Colors:
Fill in the remaining gaps: Dusty Pink (2nd band), Sky Blue (4th band), Mustard (6th band), Salmon (8th band), and Grape (center arch). -
Blend Edges (Optional):
For a softer transition between colors rather than hard lines, you can overlap the spray slightly without tape, but this specific project utilizes hard edges for a graphic look.
Step 4: Finishing Touches
-
Remove Tape:
Peel off any painter’s tape slowly at a 45-degree angle while the final coat is still slightly tacky. This helps prevent the paint from chipping along the line. -
Touch Up:
Inspect the mortar lines. If bleed-through occurred, spray a small amount of the white primer into a cup and use a small detail brush to tidy up the edges where the color meets the white background. -
Seal the Work:
Apply a clear, UV-resistant masonry sealer over the entire mural. This protects the pigments from sun fading and weather damage over time.
Step back and admire how this simple geometric shape brings vibrant energy to the entire building


Big Abstract Flowers With Spray Layers
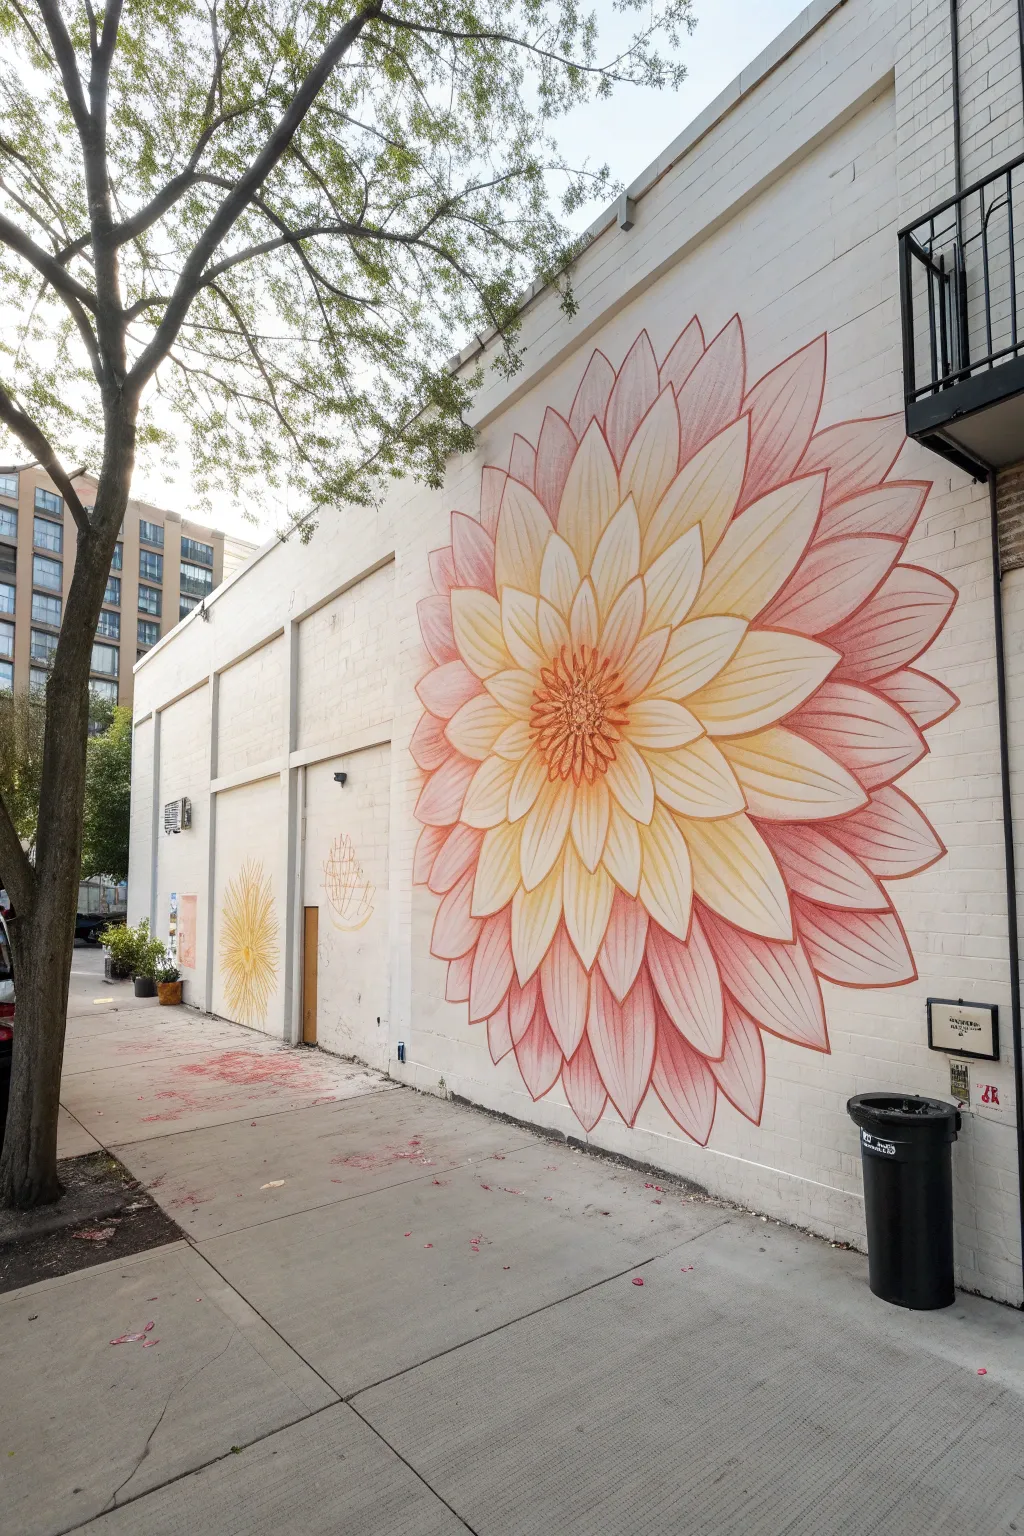
Transform a plain exterior wall into a blooming masterpiece with this large-scale floral mural featuring a mesmerizing gradient from soft yellow to deep rose. The layered petal technique creates stunning depth and movement, making it a perfect statement piece for any urban canvas.
How-To Guide
Materials
- Exterior primer (white)
- Spray paint (Yellow, Light Orange, Peach, Rose Pink, Deep Red)
- Montana Gold or similar low-pressure spray cans
- Assorted spray caps (Skinny pro cap, Soft cap, Fat cap)
- Chalk or doodle grid materials for sketching
- Cardboard or poster board for petal stencils (optional)
- Painter’s tape and drop cloth
- Ladder or scaffolding
- Respirator mask and gloves
Step 1: Preparation & Sketching
-
Prime the Surface:
Clean the brick wall thoroughly to remove dust and grime. Apply a solid coat of white exterior primer to create a bright, neutral base that will make your flower colors pop. -
Establish the Center:
Mark the center point of your flower at eye level or slightly higher. This will be the anchor for all your radiating petals. -
Sketch the Basic Shape:
Using chalk or a light gray spray paint with a skinny cap, lightly sketch a large circle to define the outer limit of the flower. Divide this circle into rough concentric rings to guide your petal layers. -
Draft the Petals:
Starting from the center and working outward, sketch the outline of the pointed, elliptical petals. Ensure the petals overlap slightly, like roofing shingles, to create a natural floral look.
Drips Ruining Lines?
If paint drips, wait for it to dry completely. Don’t wipe it wet! Once dry, sand the drip down and spray over it with your background white before redrawing the line.
Step 2: Color Application
-
Start with the Core:
Using a soft cap, spray the very center of the flower with a deep orange. Keep the application fairly tight to define the ‘eye’ of the bloom. -
Apply the Yellow Gradient:
Moving to the first ring of petals around the center, fill them with bright yellow spray paint. Fade the yellow slightly outward into the next section. -
Transition to Peach:
For the middle layers of petals, use your peach and light orange tones. I like to overlap the spray slightly with the yellow interior to create a smooth, sun-kissed gradient. -
Add the Rose Outer Layer:
Fill the largest, outermost petals with rose pink. Allow the spray to be denser at the tips and lighter towards the base where it meets the peach tones. -
Deepen the Tips:
Take the deep red spray paint and lightly hit just the very tips of the outer petals. This adds dimension and makes the flower look like it is curving away from the wall.
Step 3: Detailing & Line Work
-
Outline the Petals:
Switch to a skinny pro cap and a darker shade (like a burnt orange or brownish-red) to trace the final outline of every petal. Keep your hand steady and move quickly to ensure crisp lines. -
Add Central Texture:
In the orange center eye, add small dots and tight loops with a skinny cap to simulate the pollen and textured stamen of a dahlia. -
Refine the Veins:
Inside each large petal, use your outline color to lightly flick a central vein line from the base upward. This subtle detail gives the petals structural realism. -
Clean Up Edges:
If any spray dust drifted onto the white background, use your white primer paint to cut back in and clean up the negative space around the flower tips.
Add a Glow Effect
After outlining, use a transparent white or very pale yellow spray to add a faint ‘highlight’ curve on the upper edge of each petal for a 3D glistening look.
Step 4: Scattered Effects
-
Create Falling Petals:
To the left or bottom of the main flower, sketch and paint a few loose, detached petals or a smaller, fainter flower to suggest movement. -
Ground Scatter:
Using a loose spraying motion or a simple cardboard stencil, add splashes of pink and red on the pavement near the wall base to mimic fallen petals. -
Final Seal:
Once fully dry, apply a clear UV-resistant topcoat to protect your vibrant colors from fading in the sun.
Step back and admire how this vibrant bloom breathes new life and energy into the streetscape
BRUSH GUIDE
The Right Brush for Every Stroke
From clean lines to bold texture — master brush choice, stroke control, and essential techniques.
Explore the Full Guide
Radial Mandala Spray Mural
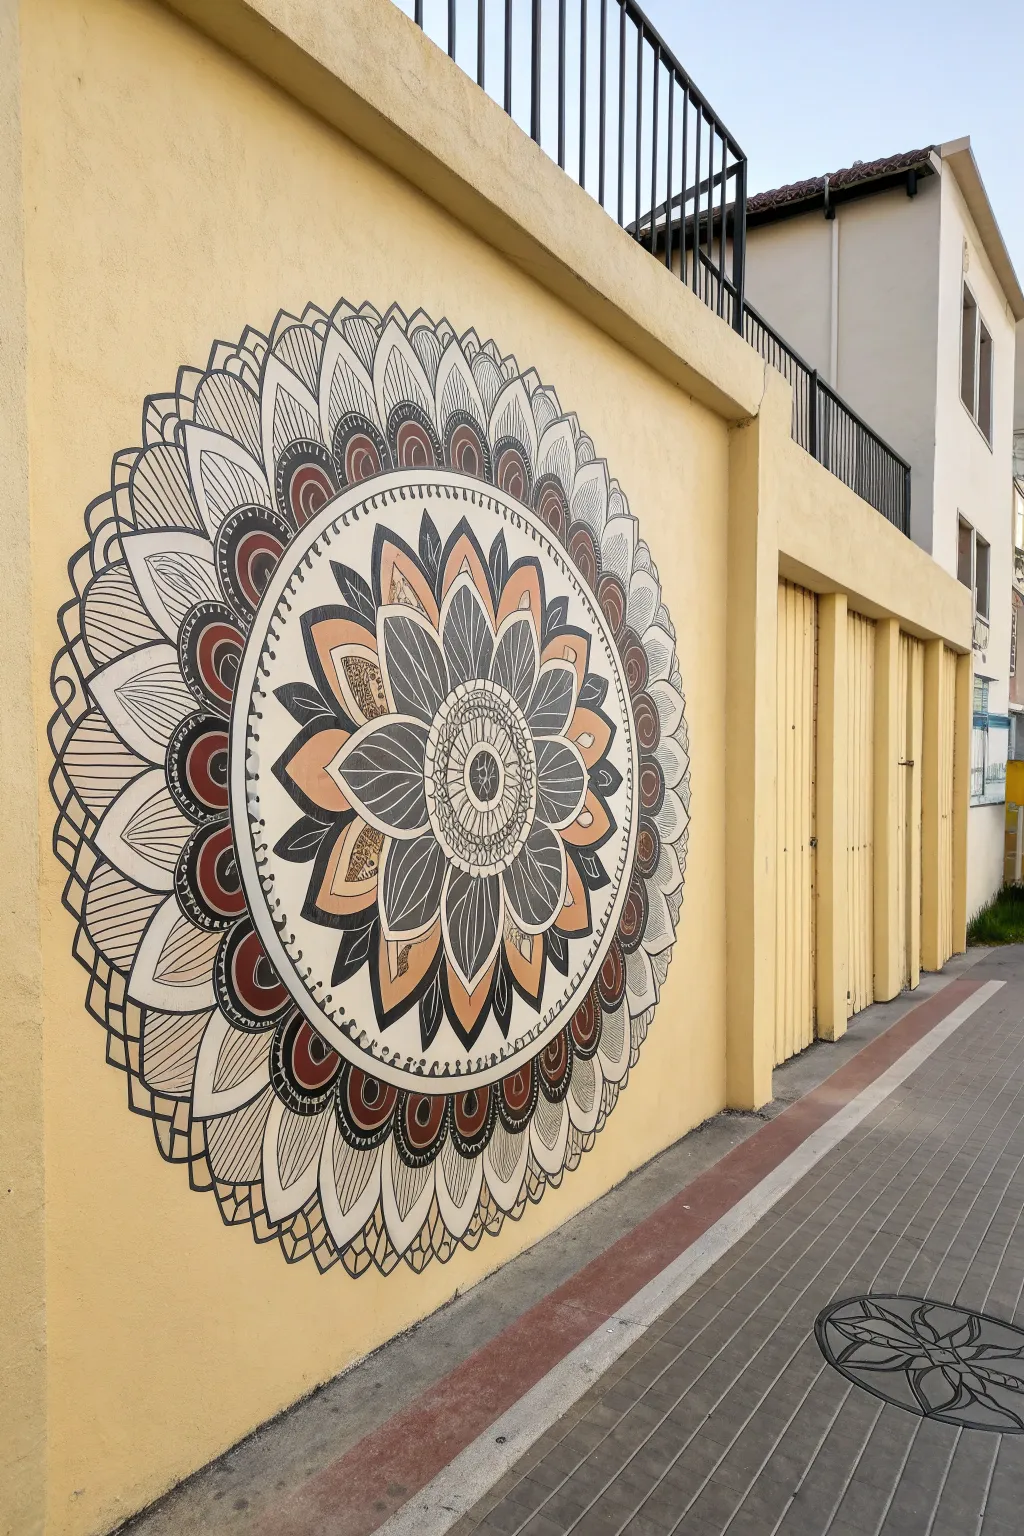
Transform a blank outdoor wall into a meditative focal point with this large-scale radial mandala mural. Using a blend of spray paint and brushwork, you’ll create intricate, symmetrical layers that pop against a warm yellow background.
Detailed Instructions
Materials
- Exterior wall primer (optional, depending on wall condition)
- Light yellow exterior latex paint (for base/touch-ups)
- Dark grey or black spray paint (low pressure)
- Terracotta/rust orange exterior acrylic paint
- Cream or off-white exterior acrylic paint
- Dark charcoal grey exterior acrylic paint
- Chalk line or long string
- Pencil or chalk
- Thumbtack or nail
- Measuring tape
- Assorted brushes (angled sash brush, liner brush, flat brush)
- Cardboard or stencil acetate (for creating curves)
- Painter’s tape
Step 1: Preparation and Grid
-
Prepare the surface:
Clean the wall thoroughly to remove dust and grime. If the existing yellow paint is faded or chipping, roll on a fresh coat of pale yellow exterior paint to serve as your background color and let it cure completely. -
Establish the center:
Measure the wall to find the exact center point where you want your mandala to sit. Mark this spot clearly with a pencil or fix a small nail there to anchor your string compass. -
Draw concentric circles:
Tie a string to your center nail and a piece of chalk on the other end. Draw a series of concentric circles radiating outward, spacing them according to the distinct rings of the design—roughly 6-8 rings expanding from the core to the outer edge. -
Mark radial guidelines:
Divide your circles into equal pie slices. Use a long straightedge or snap a chalk line through the center point to create 16 or 32 equal sections. These lines will ensure your petals stay symmetrical.
Step 2: Painting the Core
-
Draft the central flower:
Sketch the innermost flower petals within the first few rings using chalk. The design features a central circle surrounded by small intricate loops, then larger pointed petals. -
Fill the dark petals:
Using a flat brush and dark charcoal grey paint, fill in the large primary petals of the central flower. Leave a thin gap between them or outline later to define the edges. -
Add secondary colors:
Paint the petals immediately behind the grey ones with a terracotta or rust orange shade. I usually mix in a tiny bit of the background yellow to harmonize the tones. -
Define the center detail:
With a fine liner brush and black paint (or a paint marker suitable for outdoors), draw the intricate web-like mesh and small circles in the very center core.
Wobbly Circles?
If your hand-painted circles look shaky, create a template from cardboard for the repeating petal shapes. Trace this template around the grid for perfect uniformity.
Step 3: Expanding the Rings
-
Create the middle border:
Moving outward, paint the distinct ring that separates the inner flower from the outer layers. This is a wide band of creamy white with a scalloped inner edge and small dot details. -
Draft outer petal shapes:
Sketch the large, sweeping scallops of the outer rings. Use your radial guidelines to ensure each scallop peaks at the exact same height and width. -
Paint the decorative scallops:
Fill these outer scallops with alternating patterns. Some sections get filled with solid cream paint, while others feature rust-colored semi-circles or grey accents. Keep your paint consistency smooth to avoid drips on the vertical surface. -
Add linear details:
Using a thin liner brush and dark grey or black paint, carefully add the hatching lines (thin parallel strokes) inside the cream-colored petals to give them texture and depth.
Make it Glow
Add a thin line of metallic gold paint along the edge of the darkest grey petals. When the sun hits the wall, the mandala will shimmer.
Step 4: Outlining and Finishing
-
Execute the bold outlines:
This is the most critical step for sharpness. Use a flat brush or a very steady hand with low-pressure black spray paint to outline every major shape. The lines should be thick enough to be visible from a distance. -
Refine the edges:
Go back with the background yellow paint to clean up any spots where the mandala paint may have strayed outside the intended lines. This ‘cutting in’ makes the artwork look crisp. -
Add final dots and accents:
Dip the handle end of a paintbrush into black or dark grey paint and press it onto the wall to create the uniform dots seen in the white divider ring. -
Seal the work (optional):
If your wall is exposed to harsh weather, apply a clear, matte masonry sealer over the mural once the paint is fully cured to protect the colors from UV fading.
Step back and admire how your precise geometry brings a calming creative energy to the street.
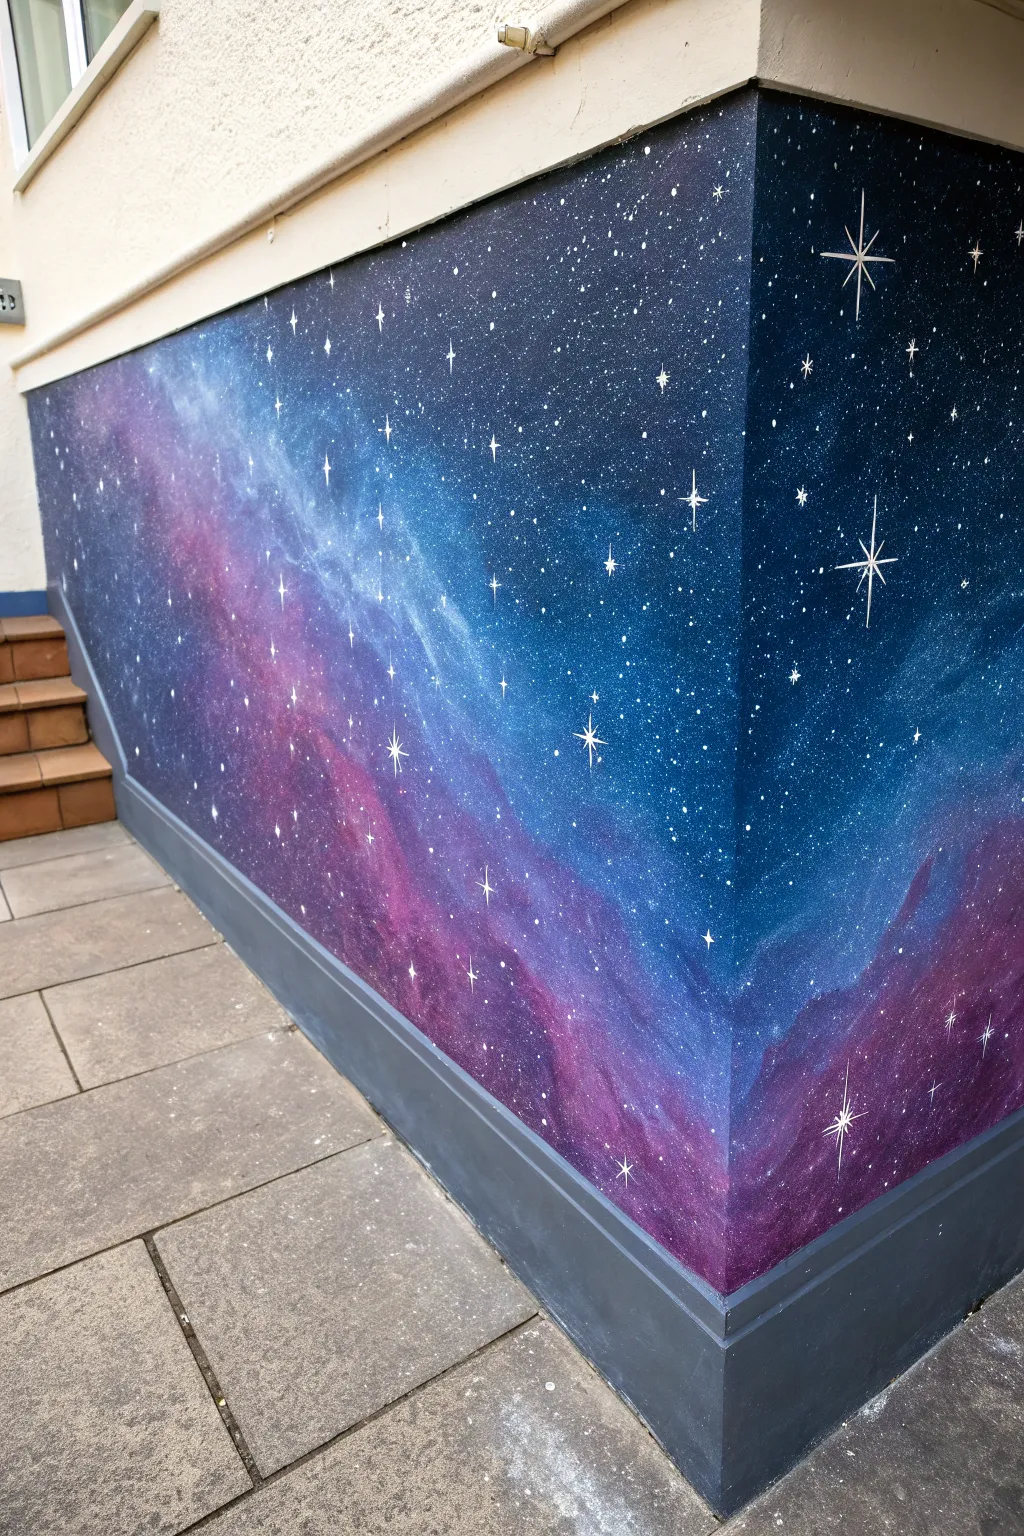
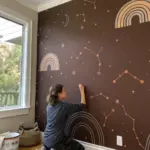
Constellation Map With Metallic Accents
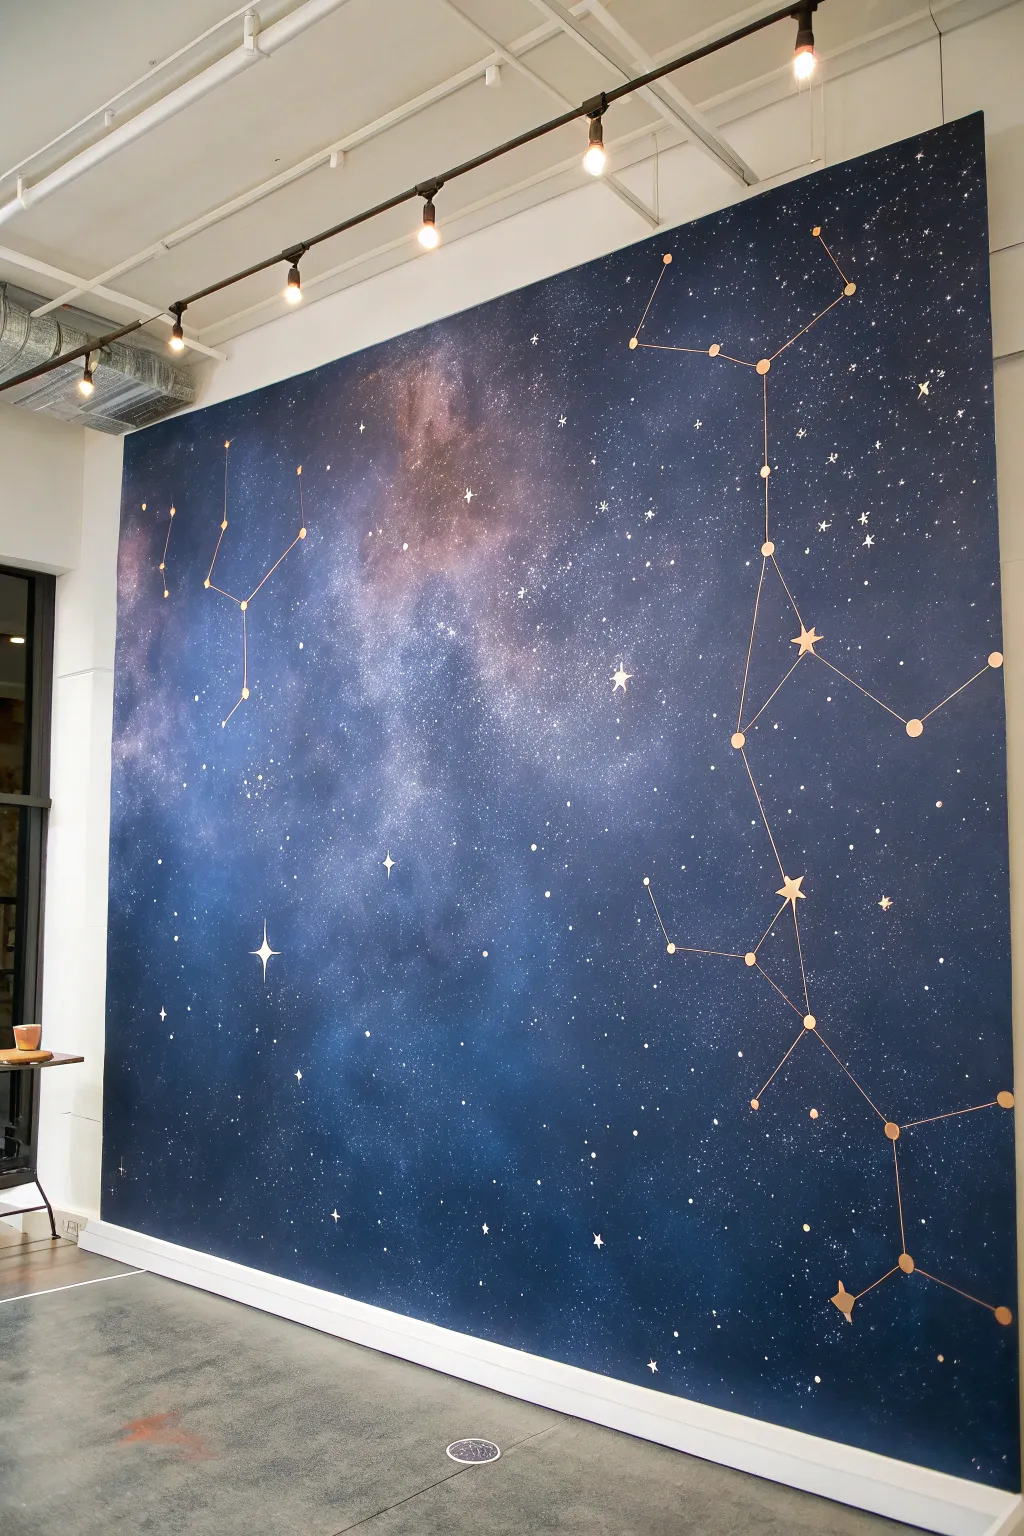
Transform a blank wall into a window to the cosmos with this stunning deep-space mural. By layering spray paint for a nebulous galaxy effect and adding crisp metallic constellations, you’ll create a sophisticated and dreamy feature wall.
How-To Guide
Materials
- High-quality interior matte paint (dark navy blue)
- Wide paint roller and extension pole
- Spray paint (lighter blue, purple, magenta, white)
- Metallic copper or gold paint pen (broad tip)
- Metallic copper or gold spray paint
- Painter’s tape and drop cloths
- Chalk or pastel pencil (light color)
- Long straight edge or level
- Star stencil (optional)
- Small round paint brush
- Cardboard or scrap paper
Step 1: Setting the Stage
-
Prep the Area:
Clear the room and cover the entire floor with drop cloths. Tape off the ceiling, baseboards, and adjoining walls meticulously, as spray paint particles can travel. -
Base Coat Application:
Roll on two coats of your dark navy blue matte paint to create the depths of space. Allow this base to dry completely, preferably overnight, so the spray paint adheres properly without tackiness.
Cosmic Softness Tip
If your spray paint clouds look too harsh, hold a piece of cardboard a few inches from the wall and spray against its edge to deflect a softer mist onto the surface.
Step 2: Creating the Galaxy
-
Test Your Nozzles:
Before hitting the wall, test your spray cans on cardboard. Practice holding the can 10-12 inches away to create a light mist rather than a heavy coat. -
Layering Nebulae:
Start with your lighter blue spray paint. Spray in gentle, circular bursts in a few concentrated areas to create clouds. Keep the can moving constantly to avoid drips. -
Adding Depth with Color:
While the blue is still slightly tacky, spray hints of purple and magenta into the center of your blue clouds. This blending creates that softly bruised, cosmic nebula look. -
Highlighting the Centers:
Use white spray paint very sparingly. aim for the absolute brightest points of your nebula clouds, misting lightly to create a glowing core effect. -
Splattering Stars:
Spray a puddle of white paint onto a paper plate or piece of cardboard. Dip a toothbrush or stiff bristle brush into it. -
Flicking the Universe:
Run your thumb over the bristles to flick tiny droplets of white paint across the entire wall. Vary your distance from the wall to create different star sizes. -
Adding Key Stars:
I like to go back in with a small paint brush and manually dot a few larger, brighter stars in areas that feel empty. You can also paint small four-point sparkles for extra shimmer.
Drip Disaster?
If the spray paint drips, don’t wipe it! Let it dry completely, adhere a light patch of the base navy blue over it, and re-mist the nebula colors on top.
Step 3: Drafting the Constellations
-
Map Your Design:
Look up real star charts (like Orion, Cassiopeia, or Ursa Major) or invent your own. Use a light-colored chalk pencil to mark the main ‘anchor’ stars where your lines will connect. -
Connecting the Dots:
Using a long straight edge or level, lightly draw chalk lines connecting your anchor stars to visualize the constellation geometry before making it permanent. -
Applying Metallic Lines:
Trace over your chalk lines using a broad-tip copper or gold paint pen. Use the straight edge again to ensure the lines remain crisp and architectural. -
Creating Large Metallic Stars:
At the intersections (the anchor stars), use a small stencil or freehand a solid circle shape. -
Painting the Star Details:
Fill these circles with metallic copper paint using a small brush. For variety, add larger five-pointed metallic stars at key focal points. -
Cleaning Up:
Once the metallic paint is fully dry, gently wipe away any visible chalk guidelines with a slightly damp microfiber cloth.
Step back and admire your personal slice of the night sky, ready for stargazing.


Have a question or want to share your own experience? I'd love to hear from you in the comments below!