If you’ve been staring at a blank wall and craving something bold, spray paint wall art is one of my favorite ways to get a huge payoff fast. I’m sharing ideas I use (and teach) all the time—easy to start, super customizable, and guaranteed to make your space feel like you.
Bold Abstract Color-Block Wall
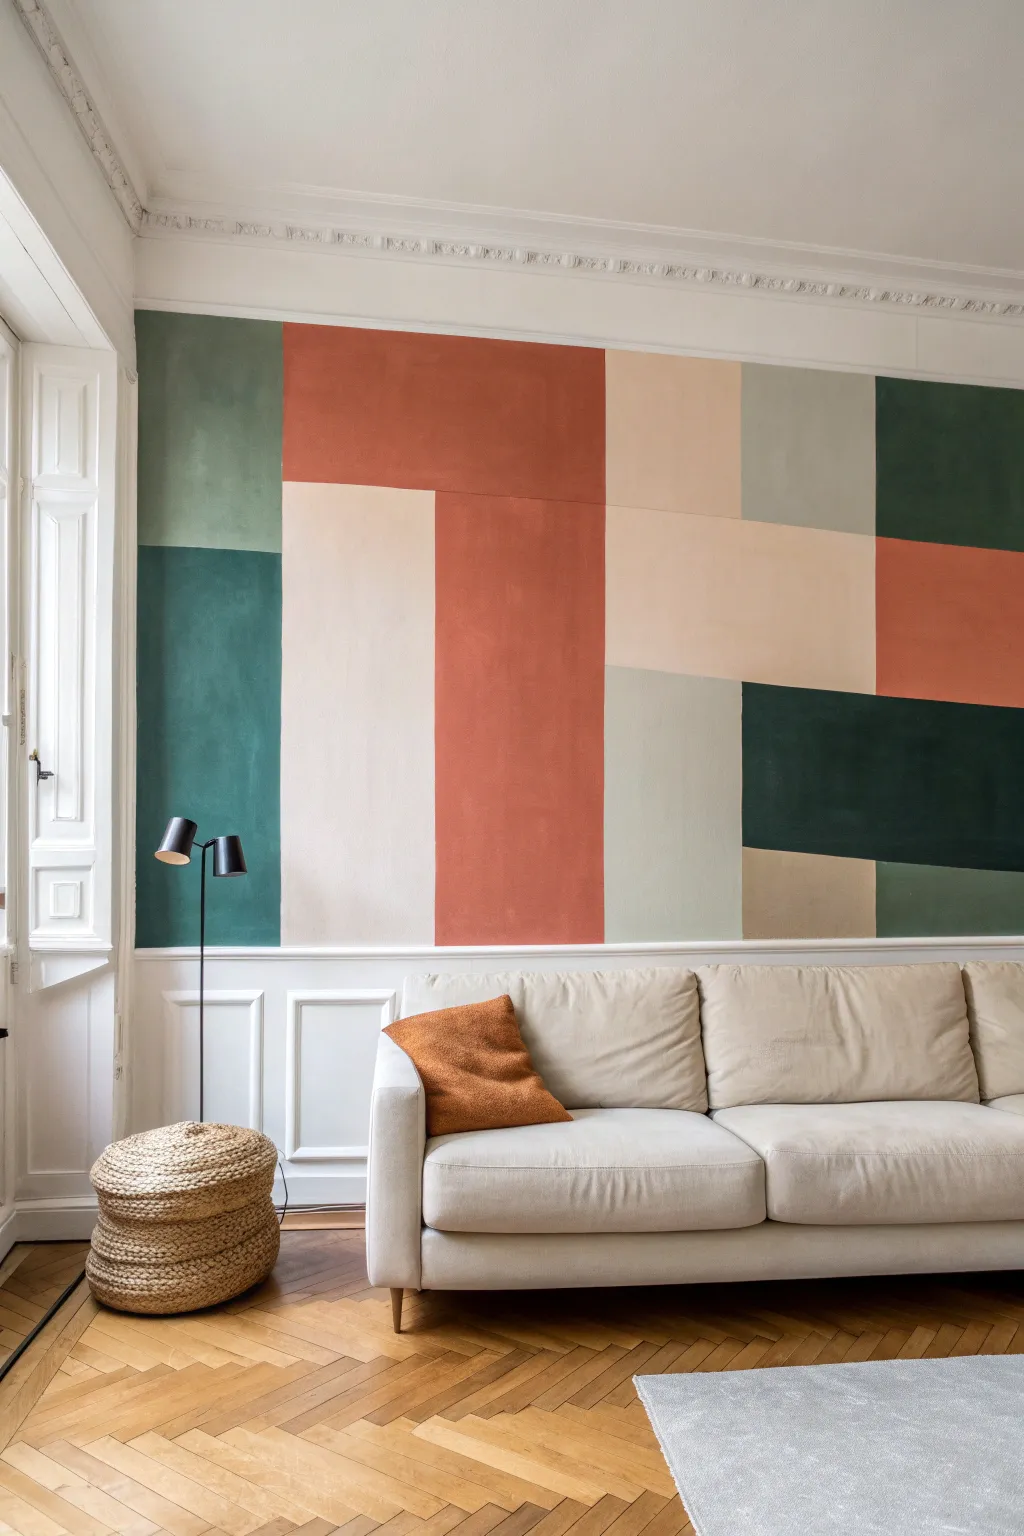
Transform a plain white wall into a striking architectural feature with this large-scale color-block mural. Using a palette of muted terracotta, sage, and deep forest greens, this project brings warmth and modern structure to your living space without needing perfect artistic skills.
Detailed Instructions
Materials
- Interior acrylic latex paint (matte or eggshell finish)
- Colors: Terracotta/Rust, Deep Forest Green, Sage Green, Blush Pink, Beige/Cream
- Painter’s tape (high quality delicate surface tape)
- Drop cloths
- Laser level (optional but helpful)
- Pencil
- Tape measure
- Small roller covers (microfiber, 4-inch)
- Roller handle
- Paint tray with liners
- Angled sash brush (2-inch)
- Damp rag for drips
Step 1: Preparation and Planning
-
Prepare the workspace:
Clear the furniture away from the wall to give yourself plenty of room to maneuver. Lay down drop cloths to protect your beautiful herringbone floors from any accidental splatters. -
Clean the surface:
Wipe down the wall with a damp cloth or a mild sugar soap solution to remove dust and oils. This ensures your tape sticks well and the paint adheres properly. -
Sketch the layout:
Take a photo of your wall and use your phone or computer to sketch out your color blocks roughly. This acts as your roadmap so you don’t get lost once you start taping. -
Measure and mark:
Using a pencil and tape measure, lightly mark the key intersection points of your rectangles on the wall. I find it helpful to mark the largest central vertical block first to anchor the design.
Bleed-Through Rescue
If paint bleeds under the tape, wait for it to fully dry. Then, re-tape precisely over the line and paint the correction color over the mistake. Do not wipe wet paint.
Step 2: Taping the Grid
-
Apply vertical tape lines:
Using your marked points, run long strips of painter’s tape vertically. A laser level is a lifesaver here to ensure perfectly plumb lines, but a long bubble level works too. -
Apply horizontal tape lines:
Connect your vertical lines with horizontal tape strips to create the rectangular boxes. Press the edges of the tape down firmly with your fingertip or a credit card to prevent bleed-through. -
Seal the tape edges:
This is a pro move: lightly brush a tiny amount of your existing wall color (usually white) over the tape edges. This seals the gap, meaning any paint that bleeds under will match the base coat, leaving your colored lines crisp. -
Identify color zones:
Place a tiny piece of tape with the color name written on it inside each taped box. It may seem overkill, but it saves you from accidentally painting the sage green where the rust should go.
Add Subtle Texture
For that soft, plaster-like look seen in the photo, mix a small amount of joint compound or baking soda into your paint for a thicker, more tactile finish.
Step 3: Painting the Color Blocks
-
Cut in the corners:
Start with your first color, perhaps the deep rust. Use the angled sash brush to carefully paint along the taped edges and corners of the assigned block. -
Roll the first coat:
Switch to a small 4-inch roller for the larger areas within the block. Roll in a ‘W’ pattern to distribute paint evenly, aiming for consistent coverage rather than thickness. -
Rotate through colors:
While the first color dries, rinse your brush (or use a fresh one) and move on to non-adjacent blocks, like the forest green or blush pink sections. Keeping wet edges away from each other prevents accidents. -
Apply the second coat:
Once the first layer is dry to the touch (usually 1 hour), apply a second coat to all blocks. This ensures the colors are rich, opaque, and true to the swatch. -
Check for holidays:
Inspect the wall from different angles to spot any ‘holidays’—missed spots or thin patches—and touch them up lightly while the roller is still wet.
Step 4: Finishing Touches
-
Remove tape while damp:
Don’t wait for the paint to cure completely. Peer the tape off slowly at a 45-degree angle while the final coat is still slightly tacky to avoid peeling up chunks of dried paint. -
Assess the lines:
If you do find a spot where paint bled under, use a tiny artist’s brush and your base wall color to clean up the line carefully. -
Blend textures (optional):
If you want the subtle, suede-like texture seen in the photo, you can lightly stipple the surface with a nearly dry brush once the paint is mostly dry, or use a chalk-based paint initially. -
Let it cure:
Allow the entire mural to cure for at least 24 hours before pushing furniture back against it to prevent scuffing the fresh surface.
Step back and admire how these simple color blocks have completely redefined the atmosphere of your room.


Ombre Fade Feature Wall
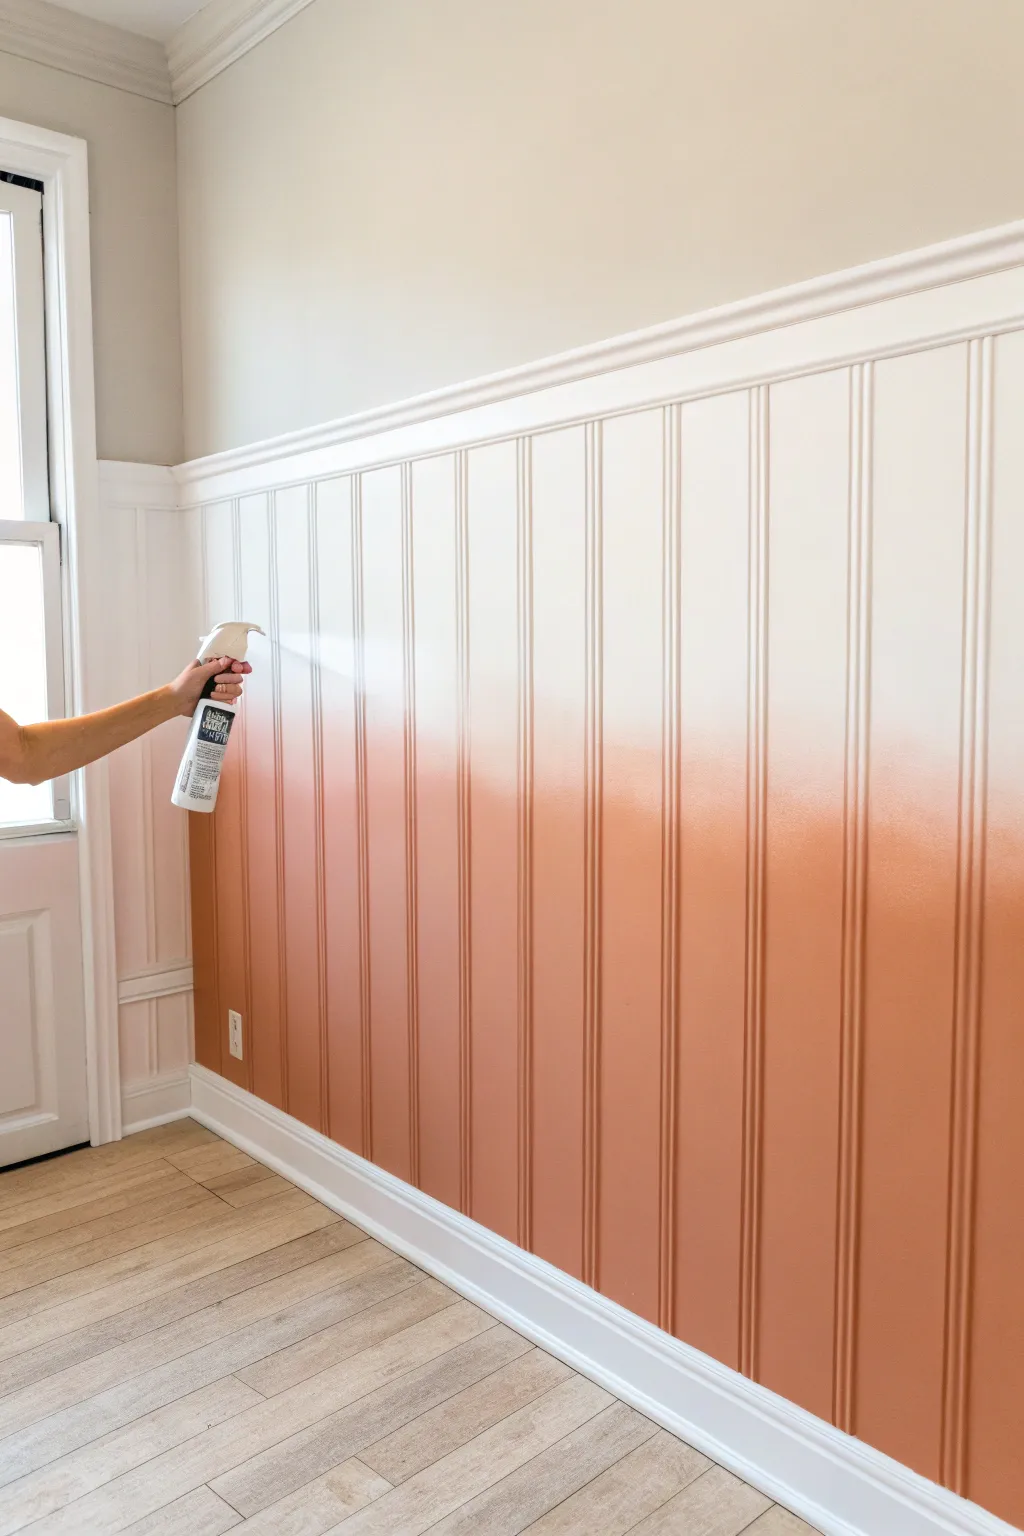
Transform ordinary beadboard into a stunning focal point with this soft, sunset-inspired gradient. By blending a warm terracotta hue upward into crisp white, you create a seamless, dreamy transition that adds depth and color without overwhelming the space.
How-To Guide
Materials
- White latex wall paint (eggshell or satin finish)
- Terracotta orange latex wall paint (eggshell or satin finish)
- Quality paint roller and tray
- 2-inch angled sash brush
- Continuous mist spray bottle filled with water
- Painter’s tape
- Drop cloths
- Clean, lint-free rags
- Large blending brush or dry paintbrush
Step 1: Preparation and Base Coat
-
Protect the area:
Begin by taping off the baseboards, the top rail of the wainscoting, and any adjacent walls to prevent accidental splatters. Lay down a drop cloth to catch drips, as the blending process can get a little messy. -
Apply the white base:
Paint the entire wainscoting area with your white base color. Use a roller for the flat sections and a brush to get into the grooves of the beadboard. -
Let it dry completely:
Allow the white base coat to cure fully according to the manufacturer’s instructions. A completely dry surface is crucial so the subsequent blending layer doesn’t lift the primer.
Step 2: Applying Color
-
Mark your transition line:
Decide where you want the solid terracotta color to stop and the fade to begin. Lightly mark this height on the wall with a pencil or a piece of tape as a guide. -
Paint the bottom section:
Using a brush and roller, apply the terracotta paint to the bottom portion of the wall, working in sections about 3-4 feet wide. Don’t worry about a perfect top edge yet. -
Feather the edge up:
While the terracotta paint is still wet, use your brush to lightly feather the paint upward past your marked line. Use less paint on the brush as you go higher to start the gradient naturally. -
Apply fresh white above:
Immediately brush a stripe of fresh white paint just above the feathered orange edge. You want the two wet paints to meet but not fully mix yet.
Wet Brush Trick
Keep two separate brushes handy for the blending phase: one designated for the darker color and one for the lighter color. This keeps the pure colors clean while a third brush handles the middle mix.
Step 3: The Blending Technique
-
Mist the transition zone:
Take your spray bottle filled with water and lightly mist the area where the white and orange paints meet. The goal is to keep the latex paint open and workable longer. -
Start the blend:
Using a clean, dry blending brush, work back and forth horizontally across the transition line. The water will help the colors bleed into each other softly. -
Work vertically in grooves:
For beadboard specifically, you need to address the vertical grooves. Run your brush up and down within the cracks to ensure the gradient looks smooth inside the recesses too. -
Misty adjustments:
If the paint starts to drag or feel sticky, give it another quick spritz of water. I find that keeping the surface slightly damp is the secret to getting that airbrushed look with latex paint. -
Soften harsh lines:
Step back to look for any hard lines. Use a damp rag or a soft brush to buff out any distinct stripes, pushing the orange pigment higher into the white area gently. -
Repeat across the wall:
Move to the next 3-4 foot section and repeat the process: paint the solid bottom, feather the edge, apply fresh white, mist, and blend. Overlap slightly with the previous section to avoid vertical seams.
Metallic Accent
Once the ombre is fully dry, run a thin gold leaf strip or use metallic gold paint along the very top rail of the wainscoting for a glamorous, unexpected finish.
Step 4: Refining the Gradient
-
Check for drips:
Because you are using water, watch carefully for drips running down the wall. Catch them immediately with your brush and smooth them back into the gradient. -
Evaluating the fade:
Once you have covered the whole wall, stand back and squint your eyes. This helps you identify areas where the transition might be too abrupt or uneven. -
Second pass (optional):
If the color isn’t saturated enough at the bottom, apply a second coat to the lower solid area once the first is dry, carefully blending the top edge into the existing fade again using the misting technique. -
Clean up:
Remove the painter’s tape carefully while the paint is still slightly tacky to ensure crisp edges around the trim. -
Final cure:
Let the wall dry undisturbed for at least 24 hours. The misting technique adds moisture, so it may take slightly longer than standard painting to fully harden.
Enjoy the warmth and modern artistry this unique feature wall brings to your room


Botanical Shadow Wall Mural
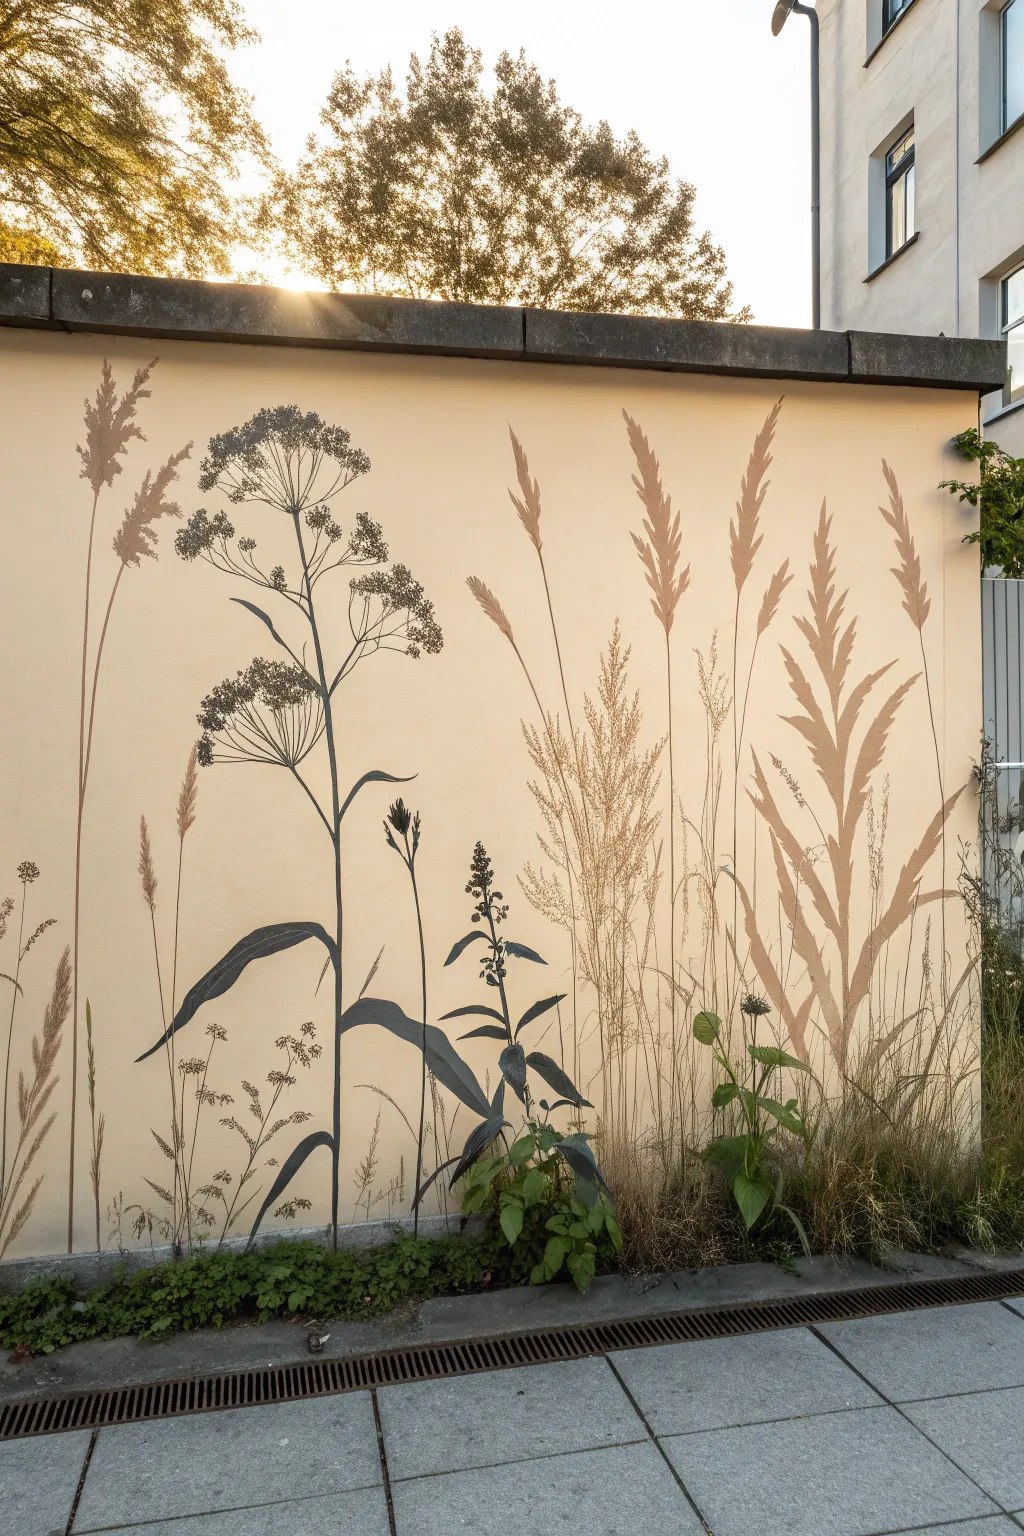
Transform a plain exterior or interior wall into a serene garden scene with this sophisticated shadow mural. By layering different plant silhouettes in soft earth tones, you create an illusion of depth and movement that perfectly complements real foliage.
Step-by-Step Guide
Materials
- Exterior masonry paint (cream/beige base)
- Spray paint in warm taupe/tan (for background grasses)
- Spray paint in charcoal grey or black (for foreground plants)
- Cardboard or sturdy cardstock sheets
- Craft knife and cutting mat
- Pencil and eraser
- Painter’s tape
- Drop cloths
- Natural sea sponge (optional for texture)
- Protective mask and gloves
Step 1: Preparation & Stencil Creation
-
Clean the surface:
Begin by thoroughly cleaning the wall surface to remove dust, dirt, or loose paint. If working outdoors, a pressure washer on a low setting works well; otherwise, use a stiff brush and soapy water. -
Establish the base coat:
Ensure your wall has a seamless, neutral background. If the existing paint is chipped or the wrong color, roll on two coats of a high-quality cream or light beige exterior masonry paint and let it cure completely. -
Draft your silhouettes:
On large sheets of cardboard, sketch out your botanical designs. Focus on three distinct types: tall thin grasses, feathery reed-like tops, and structural umbellifers (like fennel or cow parsley). -
Cut the stencils:
Using a sharp craft knife, carefully cut out the negative space of your designs to create stencils. For the most realistic look, I find it helpful to cut separate stencils for stems and flower heads so they can be positioned flexibly. -
Test spacing:
Tape your cardboard stencils to the wall dry (without paint) to evaluate the composition. Aim for varying heights and organic grouping rather than a straight, uniform line.
Step 2: Painting the Background Layer
-
Position the grass stencils:
Start with the tallest, wispiest grass shapes. Secure these stencils to the wall using painter’s tape, ensuring the cardboard sits flush against the surface to minimize overspray. -
Apply the first color:
Using the warm taupe spray paint, lightly mist over the stencil. Hold the can about 8-10 inches away and use short, controlled bursts. Don’t aim for solid opacity; a slight transparency mimics a shadow effect. -
Create movement:
Shift the stencil slightly to the right or left and spray again lightly. This slight blurring or doubling up of the image creates a sense of movement, as if the wind is blowing through the grass. -
Build the mid-ground:
Switch to your feathery reed stencils. Spray these in the same taupe tone but apply the paint slightly heavier than the background grasses to bring them forward visually. -
Let it dry:
Allow this first layer of tan and taupe botanicals to dry to the touch, which usually takes about 15 to 20 minutes depending on humidity.
Fixing Overspray
If spray drifts under the stencil, don’t wipe it wet! Let it dry completely, then lightly sponge your base wall color over the mistake to blend it out.
Step 3: Adding the Foreground Detail
-
Place the focal plants:
Position the stencils for the large, structural umbellifers and broader leaves. These should be placed predominantly in the foreground, overlapping the lighter grasses you just painted. -
Apply the dark contrast:
Using your charcoal or black spray paint, fill in these stencils. Apply the paint more solidly here to create a crisp, sharp silhouette that stands out against the softer background. -
Connect the stems:
If your stencil didn’t include the full length of the stem, use a piece of card held vertically as a straight-edge shield to spray a thin line connecting the flower head down to the ground. -
Soften the base:
At the very bottom of the wall where the stems meet the ground, lightly mist a small amount of the dark paint without a stencil to create a grounding shadow that hides the exact termination point of the stems. -
Touch up edges:
If any lines are too blurry where they should be sharp, you can use a small brush and a bit of spray paint sprayed into a cup to manually refine the edges of the dark foreground leaves. -
Preserve the work:
Once satisfied and fully dry (wait at least 24 hours), apply a clear matte exterior sealer over the mural area to protect the design from UV fading and weather damage.
Sunlight Effect
Spray a very sheer layer of gold or yellow mist over the top left corner of the mural to simulate a permanent ‘golden hour’ glow hitting the plants.
Step back and enjoy how your permanent garden creates a peaceful atmosphere regardless of the season


Soft Landscape Spray Blend
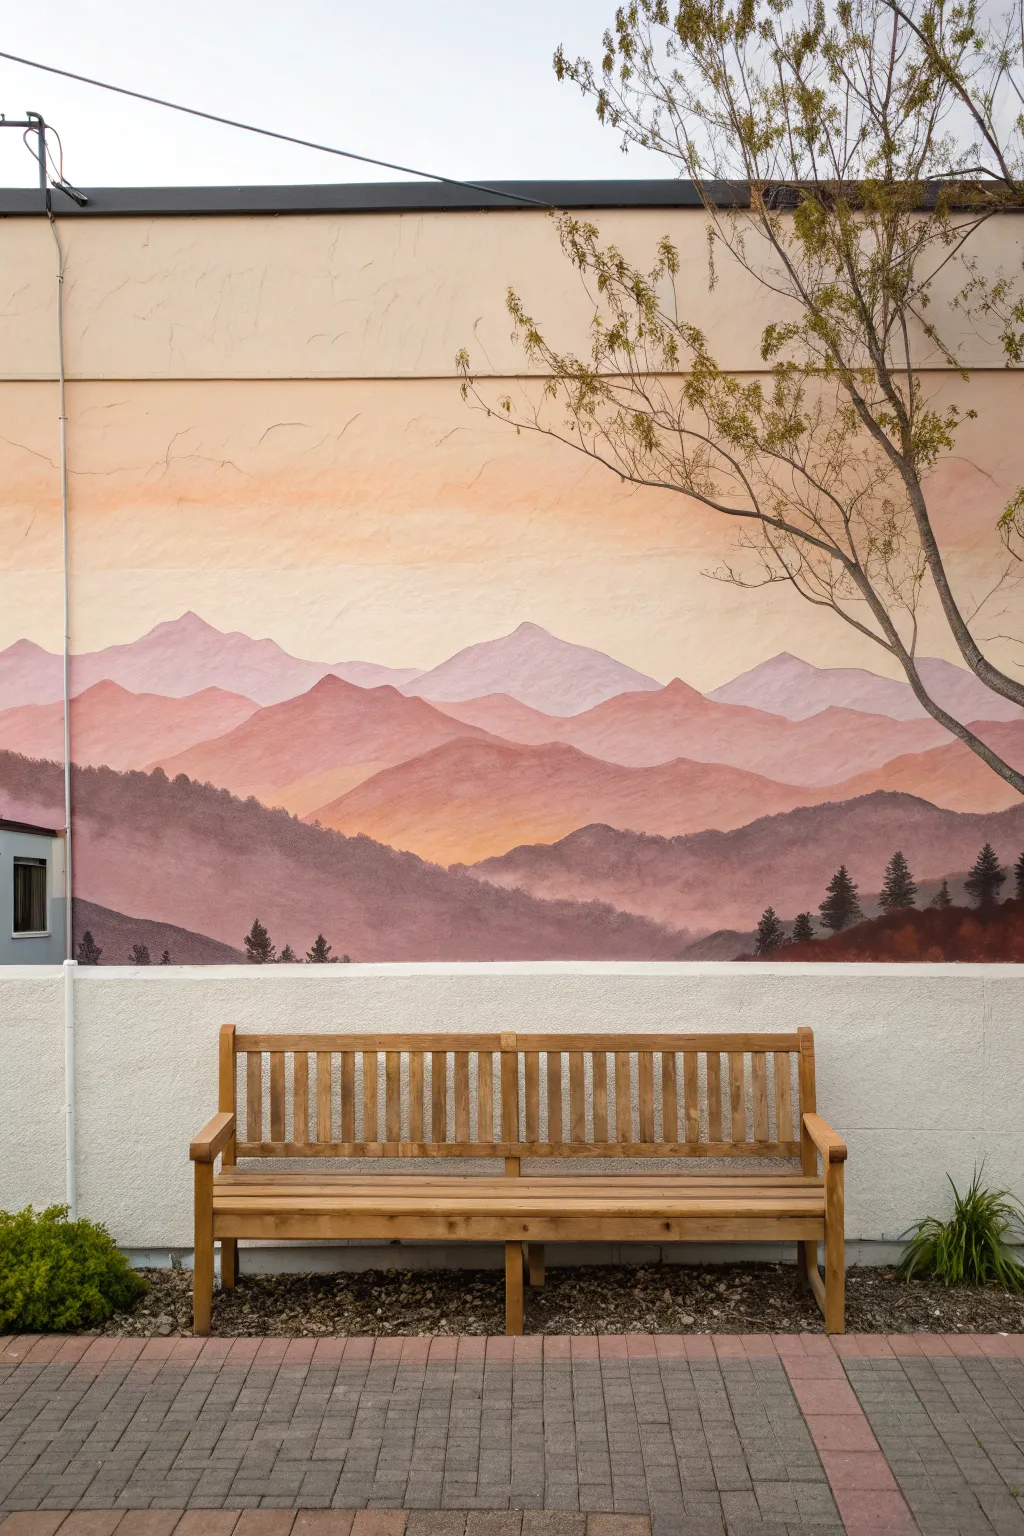
Transform a plain exterior wall into a serene mountain vista using soft gradients and atmospheric perspective. This large-scale mural captures the hazy beauty of a sunset by blending warm peach tones into deep purples and earthy browns.
How-To Guide
Materials
- Exterior masonry primer
- Various cans of high-quality spray paint (shades of pale yellow, peach, soft pink, mauve, violet, and deep brown)
- Cardboard or large stencils (hand-cut)
- Drop cloths
- Painter’s tape
- Respirator mask
- Ladder or step stool
- Clear UV-resistant topcoat (matte finish)
Step 1: Preparation & Sky
-
Prepare the surface:
Begin by cleaning the wall thoroughly to remove dirt and cobwebs. Apply a generous coat of masonry primer to ensure the spray paint adheres properly and colors remain vibrant. -
Mask the area:
Use painter’s tape and drop cloths to protect the ground, any fixtures, gutters, or adjacent walls from overspray. It’s crucial to cover a wide area since spray paint particles drift easily. -
Paint the background sky:
Start at the very top of your wall with your lightest pale yellow or off-white shade. Spray in long, horizontal sweeping motions to create a clean base. -
Create the first gradient:
While the top layer is still slightly tacky, introduce a soft peach color below it. Spray slightly upward into the yellow zone to blur the line where the colors meet, creating a seamless hazy effect. -
Deepen the sunset:
Work your way down the upper third of the wall, transitioning from peach to a soft pink. Keep your spray can about 10-12 inches away from the surface to avoid dripping and ensure a misty texture.
Drips ruining the view?
If you get a drip, don’t wipe it wet! Let it dry completely, then lightly sand it down and mist over the area with your background color to blend it back in.
Step 2: Mountain Layers
-
Create mountain stencils:
To get crisp ridge lines, tear or cut large pieces of cardboard into jagged mountain shapes. I prefer tearing the cardboard slightly to give the peaks a more organic, rocky silhouette. -
Paint the furthest range:
Hold your cardboard stencil against the wall, positioning it just below your pink sky. Spray over the top edge of the cardboard using a light mauve or lavender color. This creates the most distant, faded mountain range. -
Soften the bottom edge:
As you spray the body of this first mountain range, let the paint fade out toward the bottom rather than creating a hard line. This mistiness will help blend it behind the next layer. -
Add the middle range:
Move down the wall and position a new stencil shape to create the next range of peaks. Select a slightly darker, warmer pink or terracotta shade for this layer to establish depth. -
Define the ridges:
Spray heavily along the top edge of your stencil to define the ridge, then fill in the body of the mountains, again fading the paint out as you near the bottom of this section. -
Create the lower peaks:
Repeat the process with a third layer, using a deeper violet or reddish-brown hue. Vary the height and shape of your stencil placement so the composition feels natural and not too repetitive.
Pro Tip: Atmospheric Perspective
Remember: objects get lighter and bluer the further away they are. Keep your top mountain layers pale and low-contrast, becoming darker and sharper as you move down.
Step 3: Foreground & Details
-
Paint the foreground hills:
For the closest, largest hills at the bottom, switch to your darkest brown or charcoal spray paint. Use a large, sweeping stencil or freehand the curve if you feel confident to ground the composition. -
Add texture to the foreground:
Instead of a solid flat color, use short, quick bursts of spray on the dark foreground hills to suggest rough terrain or vegetation density. -
Stencil the treeline:
Using a smaller piece of cardboard with tiny tree-shaped cutouts—or a specialized tree stencil—add a row of silhouetted pine trees along the ridges of the darkest foreground layer. -
Detail the trees:
Ensure the trees are solid dark brown or black to contrast against the lighter mountains behind them. Vary their sizes slightly to maintain a realistic scale. -
Seal the mural:
Allow the entire mural to dry for at least 24 hours. Finish by applying a clear matte UV-resistant topcoat to protect the colors from fading in the sun and to seal the porous surface.
Step back and enjoy the calming view of your permanent sunset right in your own backyard
BRUSH GUIDE
The Right Brush for Every Stroke
From clean lines to bold texture — master brush choice, stroke control, and essential techniques.
Explore the Full Guide
Galaxy Nebula Wall Art
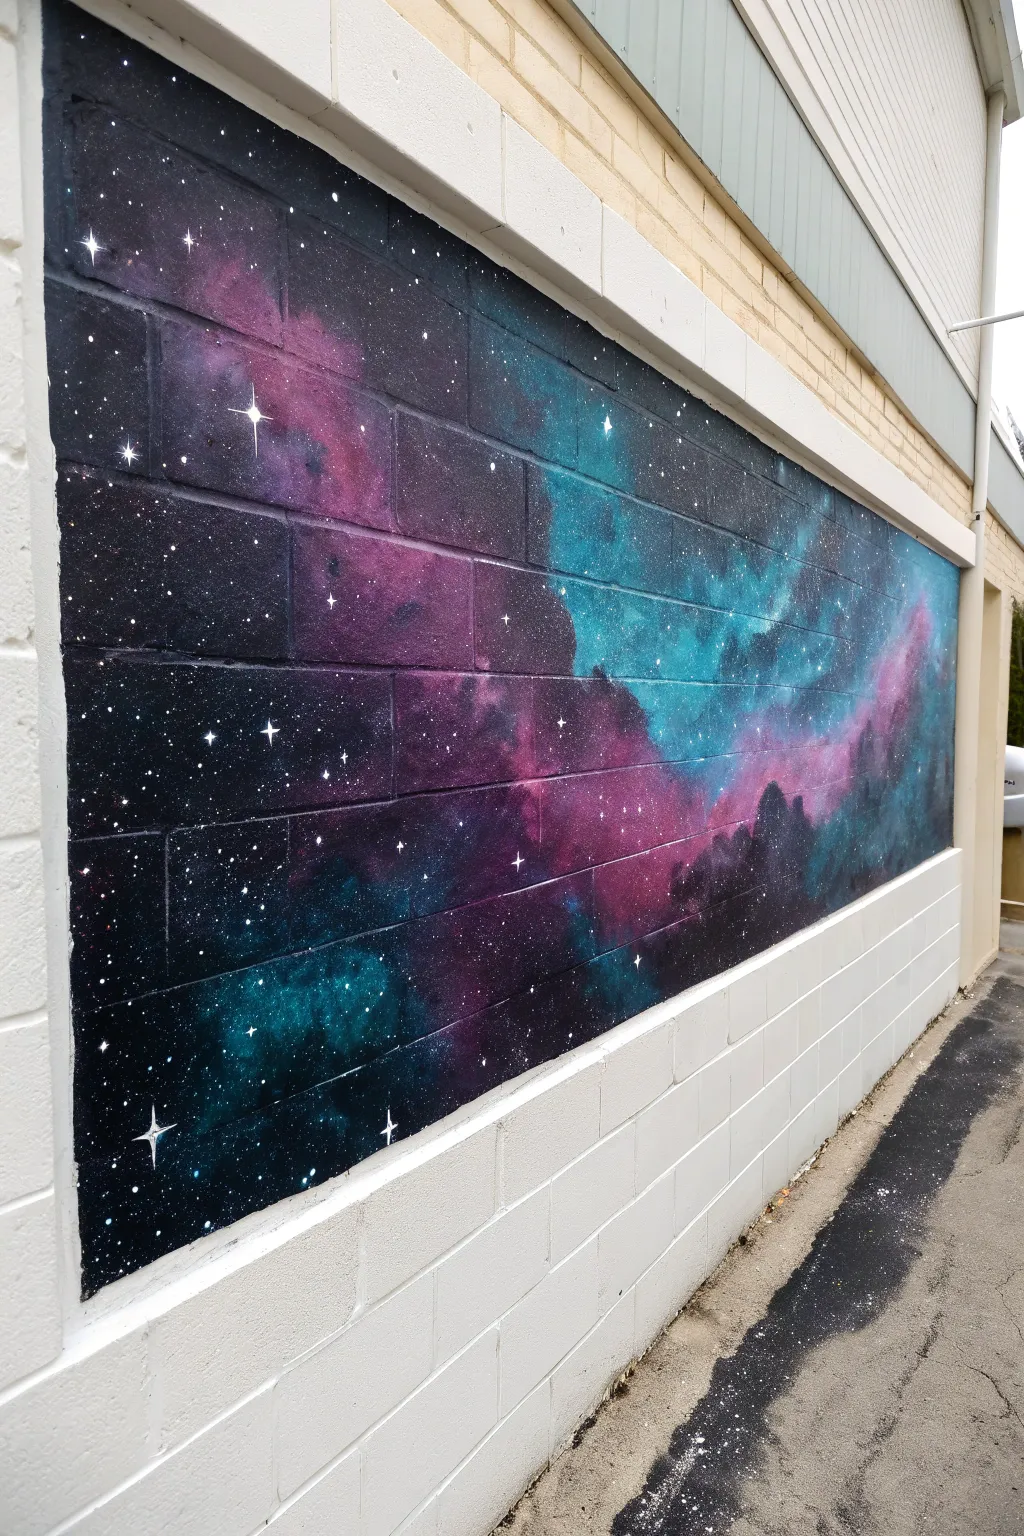
Transform a plain exterior cinder block wall into a breathtaking window to the cosmos with this vibrant galaxy mural. By layering spray paints in deep blacks, vibrant teals, and hot pinks, you’ll create a stunning nebula effect that brings depth and wonder to any outdoor space.
Step-by-Step Tutorial
Materials
- Exterior primer (white or grey)
- Spray paint: Matte Black
- Spray paint: Dark Blue or Navy
- Spray paint: Teal or Turquoise
- Spray paint: Magenta or Hot Pink
- Spray paint: Purple
- Spray paint: White (for stars)
- Painters tape
- Drop cloth or cardboard
- Respirator mask
- Gloves
- Cardboard scraps (for soft edges)
Step 1: Preparation & Base Layer
-
Protect the perimeter:
Begin by taping off the edges of your ‘canvas’ area on the brick wall. Use a high-quality painter’s tape to ensure crisp lines against the surrounding white bricks. Lay down drop cloths on the ground to catch overspray. -
Clean the surface:
Use a stiff brush to remove any loose dirt, cobwebs, or debris from the cinder blocks. Painting over dust will cause the paint to peel later. -
Apply the primer:
Spray a coat of exterior primer over the designated rectangle. This ensures your colors will pop and stick properly to the porous concrete. Let this dry completely according to the can’s instructions. -
Lay the darkness:
Start with your matte black spray paint. Cover the borders and the deep corners of your composition, leaving the center areas slightly lighter or empty where the nebula clouds will go. I like to keep this layer slightly uneven to look organic.
Misty Gas Effect
To get that ethereal, smoky look for the nebula clouds, press the spray nozzle down only halfway. This lowers the pressure and sputters larger droplets for texture.
Step 2: Building the Nebula
-
Introduce deep blues:
Spray dark blue or navy into the spaces between the black and the empty centers. Blend it slightly into the black by pulling the can away from the wall as you spray, creating a soft gradient. -
Add the purple core:
In the central areas, spray patches of purple. Don’t worry about perfect shapes; misty, irregular blobs work best for space clouds. -
Highlight with teal:
Apply the teal or turquoise paint in specific areas to create luminosity. Focus on one side of the galaxy stream to suggest a light source or a dense gas cloud. -
Inject vibrancy with pink:
Use the magenta or hot pink sparingly near the purple and teal sections. This creates the ‘hot’ conceptual center of the nebula and adds crucial contrast against the dark background.
Step 3: Blending & Detailing
-
Blend the edges:
Return to your black spray paint. Very lightly mist over the edges where the colors meet the black background to soften the transitions. The goal is to make the colors look like they are emerging from the darkness, not sitting on top of it. -
Create soft textures:
If a line looks too harsh, hold a piece of scrap cardboard a few inches off the wall and spray half on the board, half on the wall. This ‘shield’ technique acts as a soft baffle. -
Reinforce the shadows:
Look for areas within the color clouds that look flat. Add quick, small bursts of black or dark blue to create ‘voids’ or shadows within the nebula gas. -
Mix colors on the wall:
While the paint is still slightly tacky, you can lightly mist purple over teal to create interesting intermediate shades directly on the brick surface.
Glow in the Dark
For a hidden surprise at night, overspray the lightest parts of the nebula and the major stars with clear UV-reactive or glow-in-the-dark spray paint.
Step 4: The Starfield
-
Prep the stars:
Shake your white spray paint can vigorously. You want the pigment fully mixed for bright, crisp stars. -
Create distant stars:
Technique time: Put on a latex glove. Spray a puddle of white paint onto your gloved fingertips, then quickly flick your fingers at the wall. This splatters tiny, random dots that look like distant stars. -
Spray the large flares:
For the major ‘hero’ stars, hold the white can very close to the wall (about 2-3 inches) and do a quick, concentrated burst to make a solid white dot. -
Add the gleam:
To give the large stars their cross-flare, use a piece of cardstock to shield the spray, creating four sharp lines radiating from the center dot: one vertical and one horizontal. -
Final touches:
Step back and assess. Add a few more tiny flicks of white in the darkest black areas to balance the composition. -
Remove tape:
Wait until the paint is dry to the touch but not fully cured before peeling off the painter’s tape. Pull at a 45-degree angle to ensure a straight, clean border.
Step back and admire your personal window into deep space, ready to spark conversation at your next backyard gathering
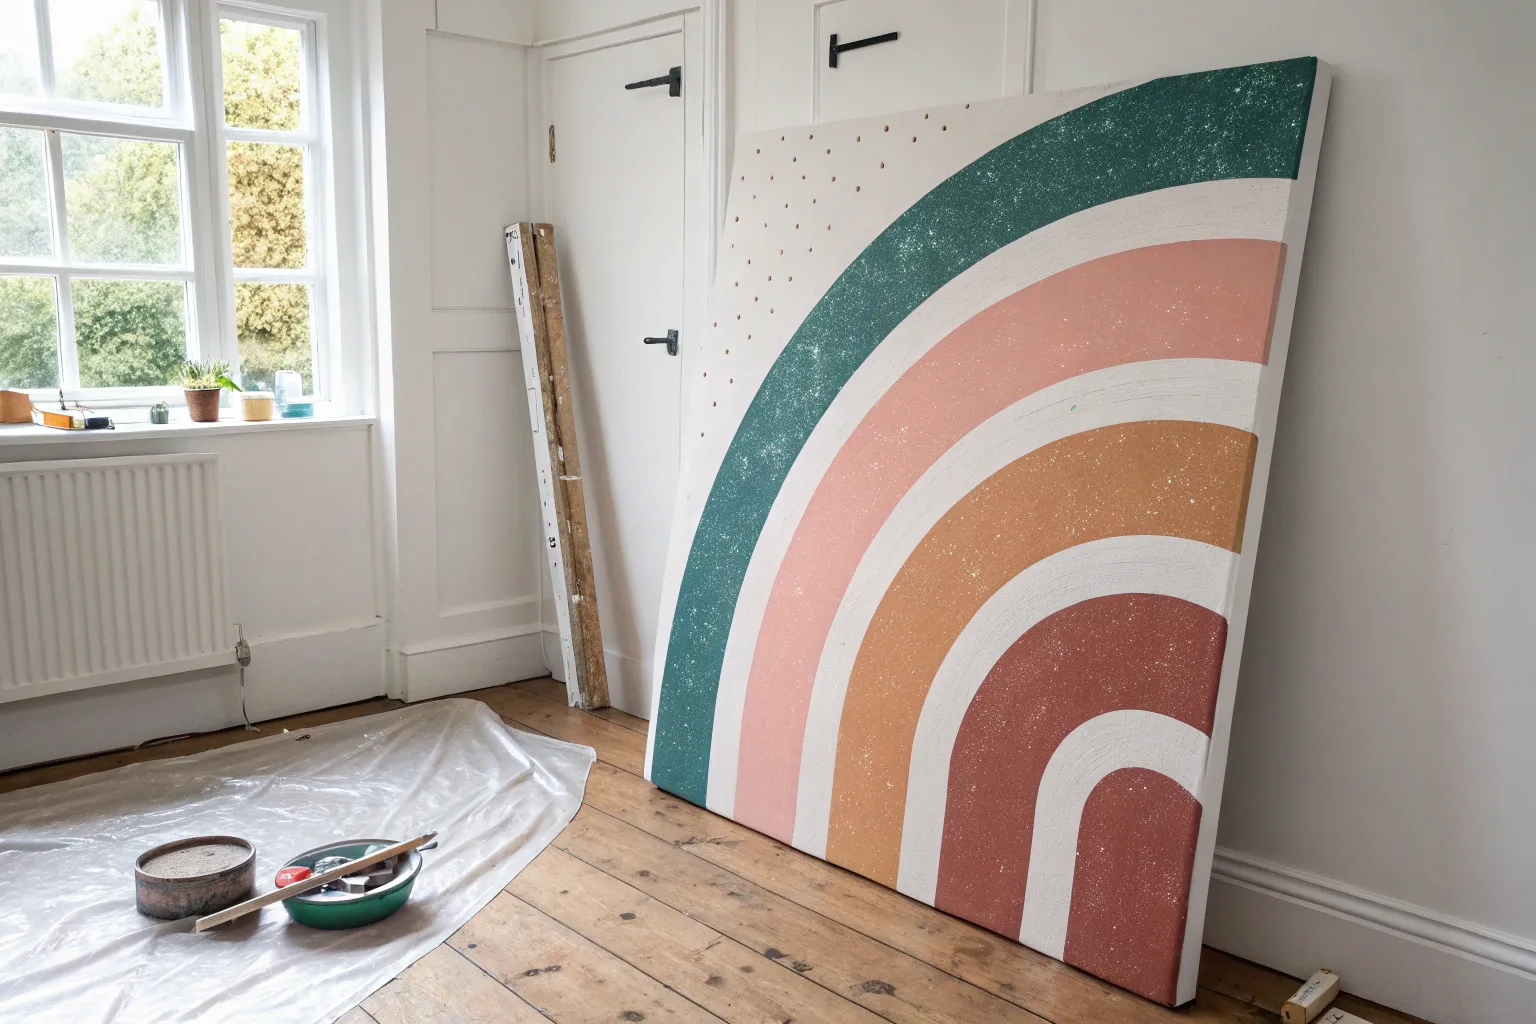
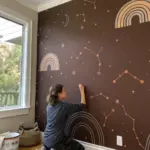
Rainbow Arch Accent Over Bed

Transform your bedroom into a warm, inviting sanctuary with this large-scale rainbow mural. Featuring muted terracotta, mustard, and sage tones, this statement piece adds architectural interest and vertical height to any space without needing a headboard.
Step-by-Step Guide
Materials
- Interior latex paint (terracotta, rust, mustard yellow, sage green)
- White interior paint (for spacing)
- Pencil
- String or twine
- Painter’s tape
- Push pin or small nail
- High-quality angled sash brush (1.5 to 2 inch)
- Small foam roller (optional for filling inside lines)
- Drop cloth
- Measuring tape
- Eraser
Step 1: Preparation and Mapping
-
Clear and Prep:
Begin by moving the bed away from the wall to give yourself ample working space. Lay down a drop cloth to protect your flooring from drips. -
Find the Center:
Measure the width of your bed or intended area to find the exact horizontal center point. Mark this spot on the wall lightly with a pencil just above the floor trim or baseboard; this will be your anchor point. -
Create a Compass:
Tie a piece of non-stretchy string to a pencil. Measure the string length from your anchor point to the desired height of the outermost arch. This determines your mural’s total height. -
Secure the Anchor:
Attach the free end of the string to your center mark using a push pin or a helper’s finger. Ensure the string is taut but not pulling the pin out. -
Draw the First Arc:
Keeping the string tight, guide the pencil in a smooth, continuous semi-circle from left to right to create the top boundary of your largest arch. -
Map Inner Arches:
Shorten the string by approximately 4-5 inches (depending on how thick you want your bands) and draw the next arc inside the first one. Repeat this process until you have outlined all five color bands and the white spaces between them. -
Extend to Floor:
Use a level or a straight edge to extend the ends of each arc straight down to the baseboards, creating vertical legs for your rainbow.
Step 2: Painting the Bands
-
Outline the Outer Band:
Starting with your darkest terracotta color, use an angled sash brush to carefully cut in the edges of the outermost band. I find it easiest to work from the top center down toward the sides. -
Fill the First Color:
Once the edges are defined, fill in the rest of the band. You can continue using the brush for a textured, hand-painted look or switch to a small foam roller for smoother coverage. -
Paint the Second Band:
Skip the ‘space’ band and move to the second color (the rust tone). Repeat the outlining process, being mindful of the guidelines you drew earlier. -
Work Inward:
Continue the process for the mustard yellow and sage green bands, working your way toward the center. Working outer-to-inner prevents you from accidentally leaning your hand or arm into wet paint. -
Let Dry:
Allow the first coat of paint to dry completely according to the manufacturer’s instructions. This usually takes about 2-4 hours depending on humidity. -
Apply Second Coat:
Apply a second coat to each colored band to ensure rich, opaque saturation. This is crucial for lighter colors like the mustard yellow.
Uneven Arches?
Don’t stress over wobbly lines! Use a small artist’s brush with your background wall color to ‘cut back’ into the colored bands. This corrects mistakes easier than adding more color.
Step 3: Refining Details
-
Paint the Spacers:
Once the colors are dry, use a small brush and your white wall paint to fill in the negative spaces between the arches. This cleans up any wobbly edges from the colored bands. -
Touch Ups:
inspect the edges where the rainbow legs meet the baseboard. Use a little painter’s tape on the trim if you need a super crisp line at the floor. -
Erase Marks:
Gently erase any visible pencil lines that weren’t covered by paint, or touch them up with a tiny bit of the appropriate color. -
Final Cure:
Allow the entire mural to cure for at least 24 hours before pushing furniture back against it to prevent scuffing or sticking.
Pro Tip: Custom Colors
Instead of buying quarts, grab sample pots of paint. They are cheaper and provide plenty of coverage for thin rainbow bands like these.
Step back and admire how this simple geometric addition completely redefines the focal point of your room

PENCIL GUIDE
Understanding Pencil Grades from H to B
From first sketch to finished drawing — learn pencil grades, line control, and shading techniques.
Explore the Full Guide
Minimal “Planets” Circle Mural
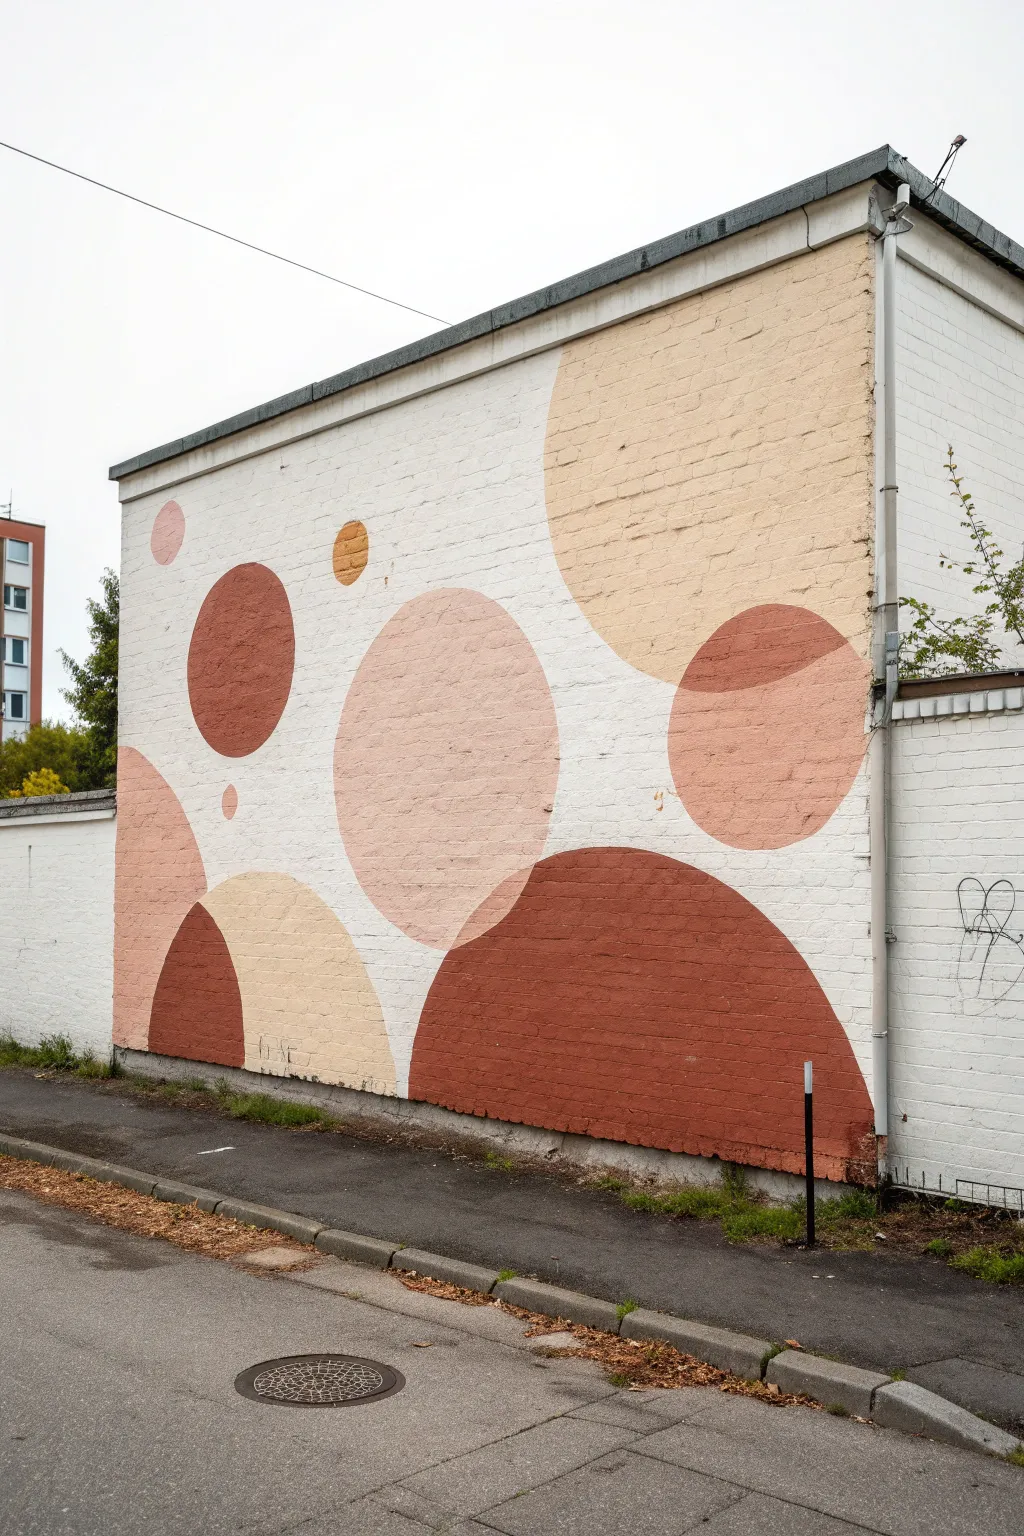
Transform a plain exterior wall into a stunning piece of modern art with this minimalist circle mural. Featuring a warm palette of rust, peach, and beige, these overlapping planetary shapes create a calming yet striking visual statement.
Step-by-Step Guide
Materials
- White exterior masonry paint (for base coat)
- Exterior masonry paint in: Rust Red, Terracotta, Peach, Beige/Sand, Light Blush
- Large roller and tray
- Various sized paint brushes (angled sash brushes are great for edges)
- Pencil or chalk
- String
- Push pin, nail, or tape
- Painter’s tape
- Extension pole (optional for height)
- Drop cloths
Step 1: Preparation & Base
-
Clean the surface:
Begin by thoroughly cleaning the brick wall. Use a stiff brush or a power washer on a low setting to remove dust, dirt, and loose debris. Let the wall dry completely before proceeding. -
protect the area:
Lay down drop cloths along the base of the wall to protect the sidewalk or ground from paint drips. -
Apply the white base:
Using a large roller, apply a fresh coat of white masonry paint to the entire wall section. The brick texture will soak up paint, so I usually plan for two coats to get that crisp, clean background essential for the minimal look.
Brick Trick
For ultra-crisp lines on textured brick, paint your outline with the *white* base color first. This seals the tape or stencil edge, preventing the colored paint from bleeding underneath.
Step 2: Drafting the Design
-
Plan your layout:
Look at the reference photo to gauge the scale. Note how the largest semi-circles anchor the bottom and top right corner, while smaller floating circles fill the middle space. -
Construct a compass:
To draw perfect circles on a large scale, create a simple makeshift compass. Tie a piece of string to a pencil or chalk. The length of the string determines the radius of your circle. -
Draw the large anchor shapes:
Start with the large rust-red semi-circle at the bottom right. Have a friend hold the string end at the center point (which will be on the ground or very low on the wall), pull the string taut, and swing the pencil to draw the arc. -
Draft the remaining large circles:
Move to the top right corner for the beige shape, then the middle-left for the peach tones. Secure the string center point with tape or a small nail in a mortar joint if you don’t have a helper. -
Add the smaller accents:
Shorten your string significantly to draw the small rust and yellow-orange circles scattered near the top left. Varying the sizes is key to the dynamic feel. -
Mark overlapping zones:
Lightly mark where circles overlap. In this design, the overlaps are actually painted as opacity shifts or distinct colors, so you need to identify these intersection shapes clearly.
Texture Play
Add dimension by using different paint finishes. Try a matte finish for the background circles and a satin or semi-gloss for the foreground ‘planets’ to make them pop.
Step 3: Painting the Circles
-
Start with the lightest colors:
Begin painting the lightest beige and peach circles first. Use an angled brush to carefully cut in the curved outline, ensuring a sharp edge against the white background. -
Fill in the base shapes:
Once outlined, use a smaller roller or large brush to fill in the body of the circle. Work the paint well into the mortar grooves of the brick so no white specks show through. -
Paint the mid-tones:
Move on to the terracotta and medium pink shapes. If a shape is meant to look like it’s behind another, paint it up to the line of the overlapping circle. -
Apply the darkest rust tones:
Paint the large semi-circle at the bottom and the dark accents. The deep rust color anchors the composition, so ensure this coat is solid and opaque. -
Create the transparency effect:
Where two circles overlap (like the peach and rust shapes on the right), mix your two paint colors together 50/50 to create a third, intermediate ‘blend’ shade. Paint the intersection area with this custom mix to simulate transparency. -
Handle complex overlaps:
For the bottom left where three shapes interact, carefully colour-block each section. The goal is to make it look like sheets of coloured glass laying on top of one another.
Step 4: Finishing Touches
-
Touch up edges:
Step back and inspect your curves. On rough brick, lines can look wobbly. Use a small artist’s brush and your background white paint to tidy up any ragged edges or drips. -
Check coverage:
Look at the wall from different angles. Brick is porous, so you might need a second coat on some of the darker circles to get full saturation. -
Remove draft lines:
If any pencil or chalk marks are still visible outside the paint, gently wipe them away with a damp cloth or touch them up with white paint.
Step back and admire how simple geometry can create such a warm and inviting atmosphere on your wall
Street-Style Lettering Name Wall
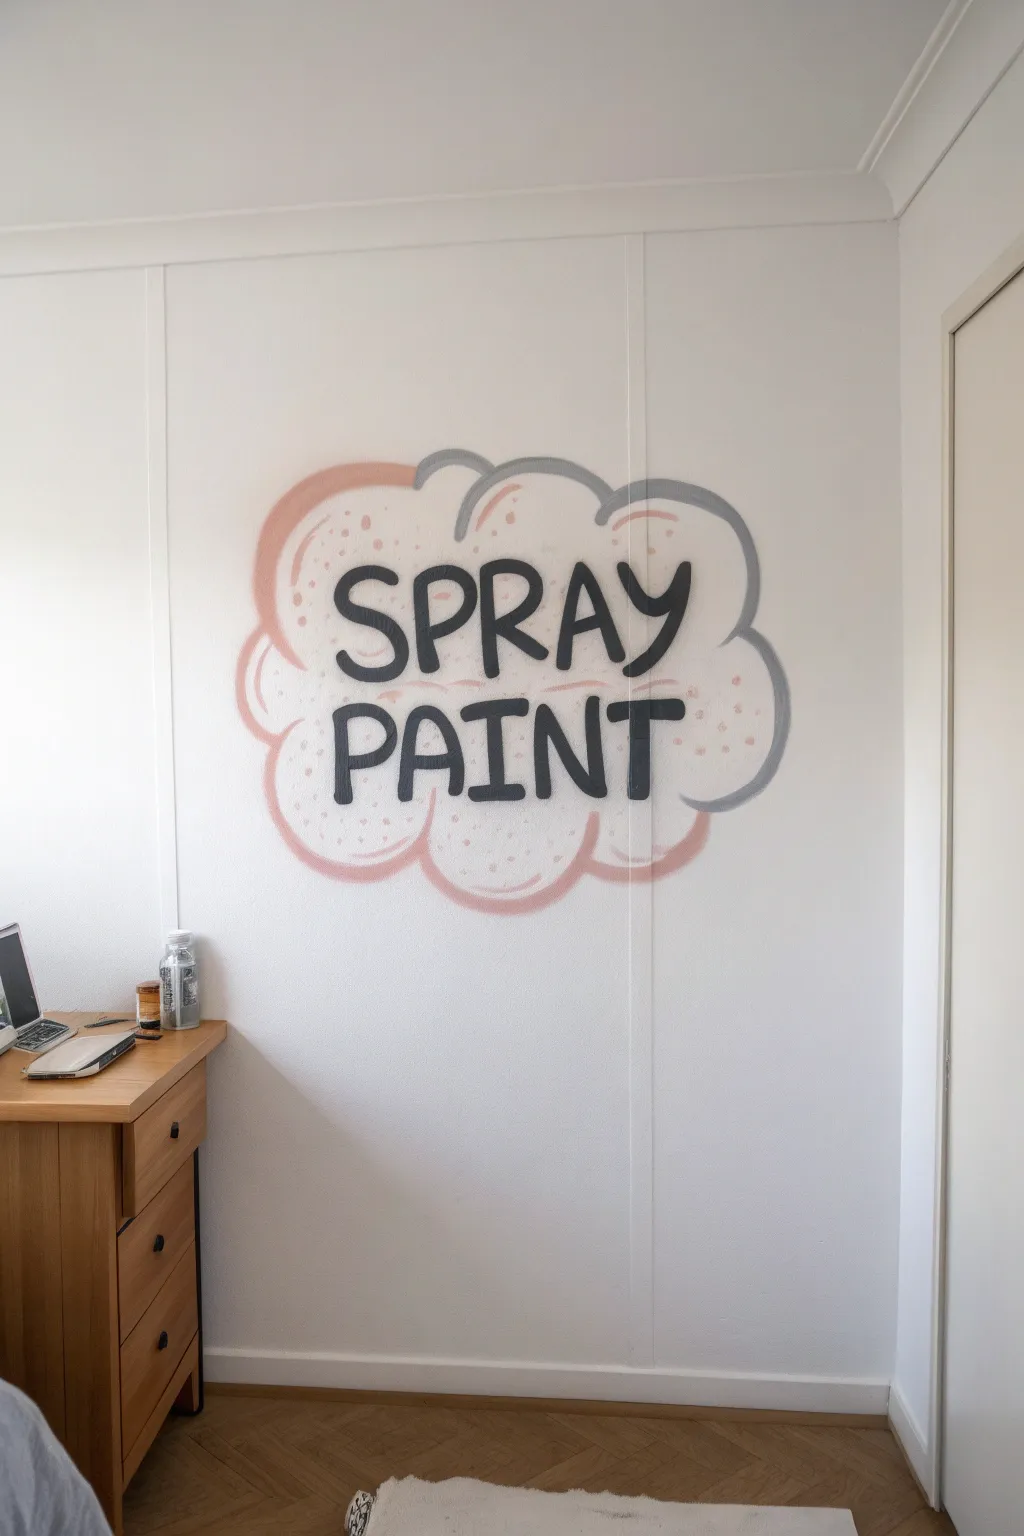
Bring a touch of urban flair indoors with this playful, cloud-framed typographic mural. The soft, billowy outlines contrast perfectly with the bold, dark lettering for a statement piece that feels both edgy and approachable.
Detailed Instructions
Materials
- Wall paint (white base)
- Pencil
- Eraser
- Bubble level or laser level
- Grey acrylic paint or flat wall paint
- Peach/dusty pink acrylic paint or flat wall paint
- Dark grey or black acrylic paint for text
- Medium round brush (size 8-10)
- Small flat brush (size 4-6)
- Artist sponge or stippling brush
- Painters tape (low tack)
- Drop cloth
Step 1: Preparation and Sketching
-
Prepare the area:
Clear furniture away from the wall you intend to paint. Lay down a drop cloth to protect your flooring from any accidental drips or spills. -
Clean the surface:
Wipe the wall down with a damp cloth to remove dust or oils. This ensures your paint adheres smoothly and lasts longer. -
Establish boundaries:
Using a pencil and a level, lightly mark the center point where you want your text to sit. This helps keep the composition balanced on the wall panel. -
Sketch the text:
Lightly sketch the words ‘SPRAY PAINT’ in a loose, block-letter style. Keep the letters slightly rounded and irregular to mimic hand-drawn street art. -
Outline the cloud:
Draw a free-form cloud shape around your text. Don’t worry about perfect symmetry; the lumpy, organic nature of the bubbles adds to the charm.
Smooth Moves
Add a texturizing additive or flow improver to your acrylics if painting on rough drywall. It helps the brush glide over bumps for cleaner lines.
Step 2: Painting the Background Shape
-
Mix your colors:
Prepare your grey and peach paints on a palette. I usually water down acrylics just slightly so they flow smoothly on textured dry wall. -
Paint the grey curves:
Using your medium round brush, paint the top right sections of the cloud outline in grey. Keep the stroke fairly thick and rounded. -
Paint the peach curves:
Switch to the peach paint and fill in the remaining left and bottom outline sections. Allow the ends of the peach and grey lines to overlap or meet naturally. -
Add inner details:
Paint a few additional curved lines inside the main cloud shape using both colors. These inner ‘C’ shapes give the cloud volume and fluffiness. -
Create texture:
Dip a sponge or stippling brush lightly into the peach paint. Dab soft, scattered spots inside the cloud area to mimic spray paint splatter or texture. -
Dry time:
Let the background outlines and texture dry completely to the touch before starting on the lettering to prevent smudging.
Shadow Play
Paint a faint grey drop shadow behind the letters and the cloud outline to make the mural pop off the wall with a 3D sticker effect.
Step 3: Lettering and Final Touches
-
Outline the letters:
Using the small flat brush and dark grey/black paint, carefully outline your penciled letters. A steady hand is key here. -
Fill the text:
Fill in the body of the letters with the dark paint. You may need two coats here to get a solid, opaque look without streaks. -
Detail the round edges:
Go back over the rounded tips of letters like ‘S’, ‘P’, and ‘R’ with a round brush to ensure the curves are smooth and not blocky. -
Refine edges:
Check the edges of your text. If any lines look shaky, use a tiny bit of white wall paint to cut back in and clean them up. -
Add highlights (optional):
If you want extra depth, add a tiny white line or dot to the upper left corner of each letter to simulate a light source. -
Erase guidelines:
Once the paint is fully cured—ideally after 24 hours—gently erase any visible pencil marks that weren’t covered by paint.
Step back and admire your custom street-art inspired wall piece


Mandala Burst Stencil Centerpiece
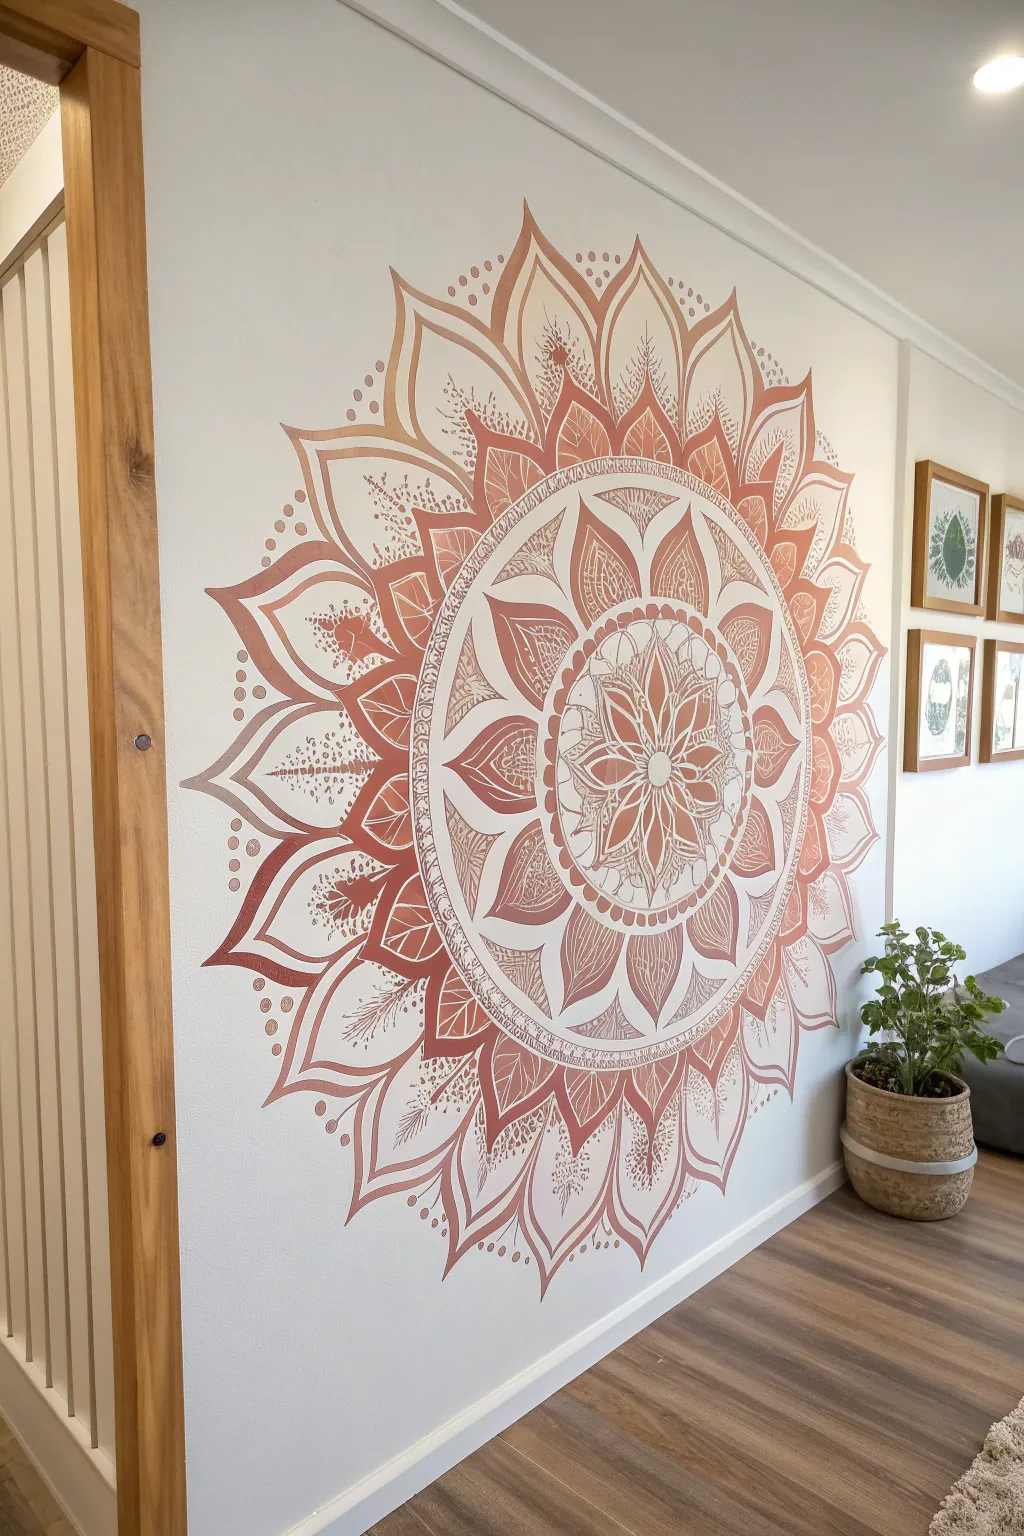
Transform a plain white wall into a stunning focal point with this large-scale mandala design. Using a metallic rose gold palette and a precise stenciling technique, you’ll create an intricate, radiating pattern that adds warmth and artistic flair to any room.
Step-by-Step Tutorial
Materials
- Large mandala wall stencil (approx. 36-48 inch diameter)
- Painter’s tape or stencil spray adhesive
- Rose gold metallic spray paint (or acrylic paint if hand-stenciling)
- Copper metallic spray paint (for shading)
- Small foam roller and tray (if not spraying directly)
- Stencil brushes (for touch-ups)
- Drop cloths
- Measuring tape
- Level
- Paper towels
Step 1: Preparation and Positioning
-
Clean the surface:
Begin by wiping down your target wall area with a damp cloth to remove any dust or oils. A clean surface ensures the stencil adheres properly and prevents paint bleed. -
Measure the center:
Decide exactly where you want the mandala to sit. Measure the width of your wall and mark the center point at eye level with a pencil. -
Secure the stencil:
Apply a light mist of stencil adhesive to the back of your stencil. Wait a moment for it to become tacky, then press it firmly onto the wall, aligning the stencil’s center with your pencil mark. -
Tape the edges:
Use painter’s tape to secure the outer edges of the stencil to the wall. This extra security helps keep heavier stencils from sliding down during painting. -
Protect the surroundings:
Tape up drop cloths or newspaper around the stencil, extending at least 2 feet in all directions to catch any overspray if you are using spray paint.
Adhesive Mastery
Don’t skip the spray adhesive. Tape alone leaves gaps in intricate designs like this, which leads to fuzzy edges. The tacky back seals the details tight.
Step 2: Painting the Mandala
-
Start with the base layer:
Shake your rose gold spray paint can vigorously. holding the can about 8-10 inches away, apply a very light, misting coat over the entire stencil. Keep the can moving to avoid drips. -
Apply the second coat:
Once the first mist is dry to the touch (usually 5-10 minutes), apply a second light coat of rose gold to build up opacity. Avoid creating thick puddles of paint. -
Create the ombre effect:
To achieve the depth seen in the photo, take the slightly darker copper spray paint and lightly mist just the outer petals and edges of the stencil, leaving the center bright rose gold. -
Blend the transition:
If the transition between rose gold and copper looks too harsh, do a very quick, light mist of rose gold over the blend area to soften the line. -
Check for coverage:
Inspect the design from different angles. Metallic paints can look different depending on the light, so ensure you have even coverage on all intricate cutouts.
Add Sparkle
While the paint is wet on the final coat, blow a tiny pinch of extra-fine glitter onto the center petals for a subtle shimmer that catches the sunlight.
Step 3: Finishing Touches
-
Remove the stencil:
This is the crucial moment. Carefully peel the tape off, then slowly pull the stencil away from the wall. Pull it straight back rather than dragging it to keep edges crisp. -
Inspect the edges:
Look closely at the design. If there is any minor bleed-under where paint got under the stencil, wait for it to dry completely before fixing. -
Touch up with a brush:
Spray a small amount of your wall’s base color paint into a cup. Use a tiny detail brush to paint over any unwanted bleed marks. -
Define the center:
If the center details aren’t popping enough, you can hand-paint a few highlights using a small brush and the copper paint to add dimension. -
Clean the stencil:
Immediately clean your stencil with warm soapy water or paint remover (depending on stencil material) so it can be reused for future projects.
Enjoy the relaxing atmosphere your new mandala wall brings to the space
Layered Cutout Mask Light-and-Shadow Mural
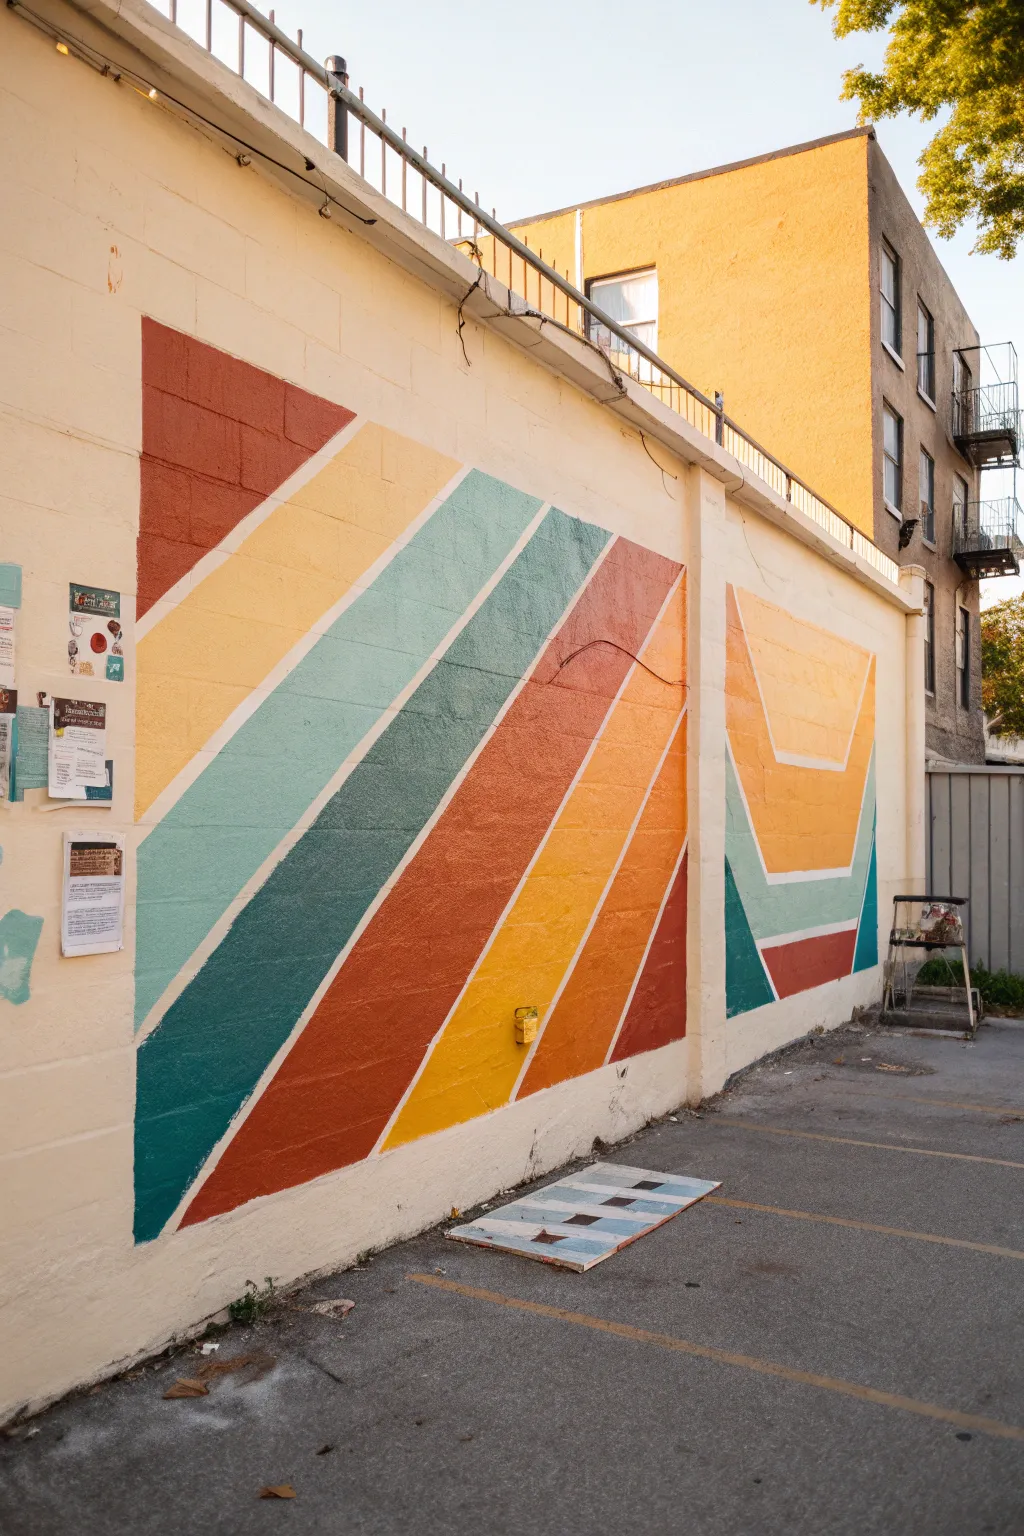
Transform a blank outdoor wall into a vibrant statement piece with this retro-inspired geometric mural. Featuring bold diagonal stripes in warm earthy tones and cool teals, this design uses hard-edge painting techniques to create a clean, modern aesthetic.
How-To Guide
Materials
- Exterior masonry primer
- Exterior latex paint (Cream/Off-white for base)
- Exterior latex paint (Burnt Orange/Terracotta)
- Exterior latex paint (Golden Yellow)
- Exterior latex paint (Teal/Aqua)
- Exterior latex paint (Dark Teal/Forest Green)
- Painter’s tape (1.5 inch or 2 inch width)
- Extension pole
- Paint rollers (9-inch for large areas, 4-inch for details)
- Roller tray and liners
- Chalk line or laser level
- Tape measure
- Ladder
- Drop cloths
- Stiff bristle brush (for cleaning wall)
Step 1: Preparation & Base Coat
-
Clean the Surface:
Begin by thoroughly cleaning the masonry wall. Use a stiff bristle brush to remove loose dirt, cobwebs, and chalky residue. If the wall is particularly dirty, a pressure washer on a low setting can help, but ensure the wall dries completely for at least 24-48 hours before painting. -
Protect the Area:
Lay down heavy-duty drop cloths along the base of the wall to protect the pavement or ground from drips and spills. Secure the edges with tape if it’s windy. -
Prime the Wall:
Apply a coat of high-quality exterior masonry primer. This is crucial for concrete block walls to ensure the paint adheres well and the colors pop. Roll it on evenly and let it dry according to the manufacturer’s instructions. -
Apply the Base Color:
Once primed, roll on your base color—a creamy off-white or beige works well here. You will likely need two coats to get full coverage over the mortar joints. Allow this base to cure fully, preferably overnight, so your tape won’t peel it up later.
Step 2: Mapping & Taping
-
Establish the Main Angles:
Decide on the angle of your diagonal stripes. A 45-degree angle is standard, but you can adjust based on the wall dimensions. Mark your starting point at the top left and bottom left. -
Snap Chalk Lines:
Have a friend help you hold a chalk line tight against the wall to mark the straight edges of your stripes. Snap the lines to create a guide for your tape. I find using blue chalk is easier to cover up later than red. -
Tape the Left Section:
Apply painter’s tape firmly along the outside edges of your chalk lines for the large diagonal stripes on the left section of the wall. Press the tape edges down firmly with a putty knife or rag to prevent bleed-under, especially into the textured mortar grooves. -
Seal the Tape Edges:
To get perfectly crisp lines on rough masonry, lightly brush a small amount of your base color (the cream paint) over the edge of the tape. This seals any gaps; if paint bleeds, it will match the base wall color.
Bleed-Through Blues
If paint bleeds under the tape into deep mortar joints, wait for it to dry completely. Then, re-tape the line slightly over the mistake and touch up with the correct color for a sharp edge.
Step 3: Painting the Colors
-
Plan Your Color Order:
Reference the design or your sketch. The pattern alternates between warm (terracotta, yellow, orange) and cool (light teal, dark teal) tones to create visual rhythm. -
Paint the Top Triangles:
Start with the top-left corner triangle, painting it in the terracotta/burnt orange shade. Use a smaller 4-inch roller for control near the edges. -
Fill the Yellow Stripe:
Move to the next section down, applying the golden yellow paint. Ensure you push the paint into the block texture without overloading the roller, which causes drips. -
Apply Cool Tones:
Paint the subsequent stripes in light teal and the darker teal/green. Be mindful of which side of the tape is the ‘paint’ side versus the ‘masked’ side. -
Complete the Left Gradient:
Finish the bottom stripes on the main left section, transitioning back to warm oranges and deep reds. Apply a second coat to all colors once the first is dry to the touch for solid opacity. -
Remove Tape While Slightly Damp:
Carefully peel off the tape while the final coat is still slightly tacky. Pulling slowly at a 45-degree angle helps ensure a clean edge without chipping the paint.
Tape Gap Trick
On very rough cinder blocks, use a dab of clear acrylic caulk along the tape edge before painting. It creates an impenetrable barrier for clean lines on uneven surfaces.
Step 4: Right Section Detail
-
Tape the Chevron Pattern:
Once the main section is dry, move to the distinct section on the right. Mark and tape off the nested ‘V’ or chevron shapes. -
Paint the Nested Layers:
Fill in the large upper area with yellow, followed by the teal stripe below it. Finally, paint the bottom triangle in the dark red/terracotta tone. -
Touch Ups:
After removing the final tape, inspect the wall for any bleeds or uneven spots. Use a small artist’s brush and your leftover base color to tidy up any lines where the texture of the cinder block might have caused minor wicking.
Step back and admire how your colorful geometric design brings new energy to the space


Have a question or want to share your own experience? I'd love to hear from you in the comments below!