If you’ve been craving a painting theme that feels bold, meaningful, and full of story, military art gives you so many powerful directions to explore. I’m sharing a mix of classic, respectful tributes and more creative approaches you can make totally your own—while still keeping that unmistakable service and honor vibe.
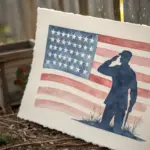
Kneeling Soldier in Prayer
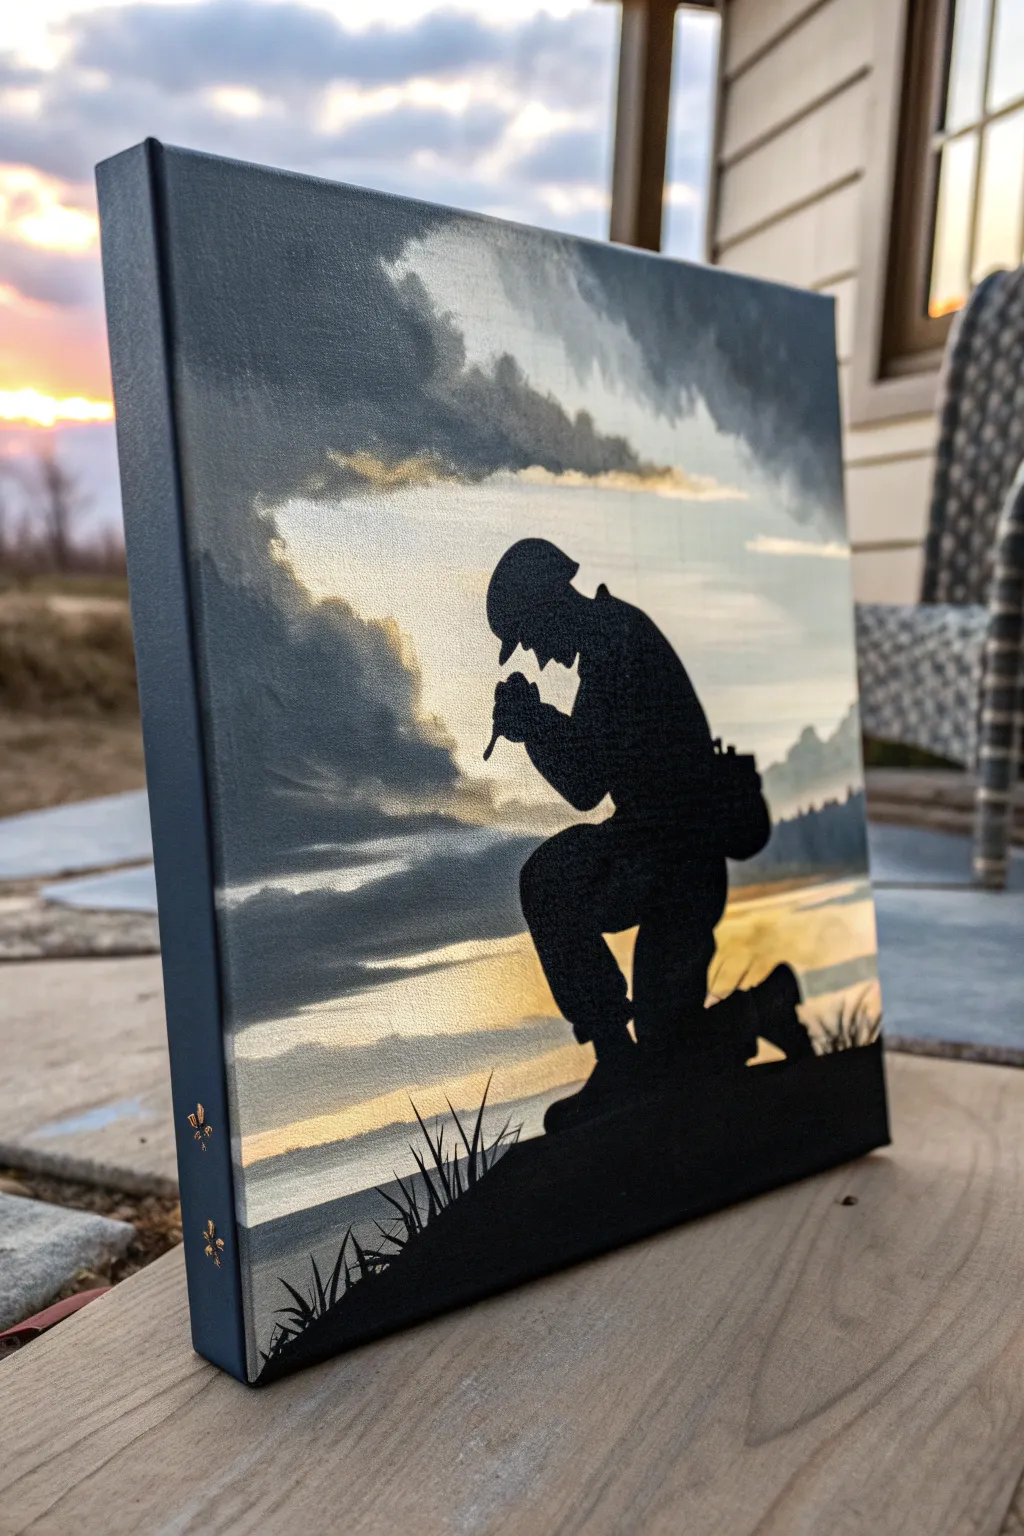
Capture a moment of quiet reverence with this striking canvas art, featuring a crisp black silhouette of a soldier set against a dramatic, cloudy sky. This project combines atmospheric background blending with precise stencil work to create a deeply moving tribute piece suitable for any home.
How-To Guide
Materials
- Stretched canvas (e.g., 10×10 or 12×12 inch)
- Acrylic paints: Titanium White, Payne’s Grey, Raw Umber, Yellow Ochre, Cadmium Orange, Mars Black
- Large flat brush (1 inch) for background blocking
- Medium filbert brush for clouds
- Small round detail brush (size 1 or 0)
- Painter’s tape or masking tape
- Pencil and eraser
- Soldier silhouette stencil or traceable printout
- Carbon transfer paper (optional)
- Palette knife (optional for texture)
- Matte or satin varnish
Step 1: Setting the Atmosphere
-
Prime the canvas:
Begin by ensuring your canvas surface is clean. If it’s not pre-primed, apply a coat of gesso. Once ready, I like to apply a very thin wash of watered-down Yellow Ochre across the lower half to establish a warm undertone for the sunset. -
Paint the upper gradient:
Mix Titanium White with a touch of Payne’s Grey. Using your large flat brush, start at the top third of the canvas, painting horizontal strokes. Gradually add more white as you move down to create a fading effect. -
Add warmth to the horizon:
While the upper sky is still slightly tacky, mix Titanium White with the tiniest amount of Cadmium Orange and Yellow Ochre. Blend this into the middle section of the canvas, creating a soft, glowing light where the sun would be. -
Create the cloud base:
Switch to your filbert brush. Mix Payne’s Grey with a little Raw Umber for a brownish-grey storm cloud color. Dab the paint onto the upper left and right corners, using a scumbling motion to create fluffy, irregular shapes. -
Highlight the clouds:
Without cleaning your brush thoroughly, pick up some of your pale orange-white mixture. Lightly brush the bottom edges of your dark clouds to catch the ‘sunlight,’ giving them volume and dimension. -
Refine the sky blend:
Use a clean, dry brush to gently sweep over the transitions between the clouds and the background sky. This softens any harsh lines and makes the atmosphere look misty and distant. -
Paint the distant water or ground:
Near the bottom third, paint faint horizontal streaks using a mix of Payne’s Grey and White. This suggests a distant shoreline or body of water reflecting the sky, providing a base for the foreground hill.
Pro Tip: Sharper Edges
For a razor-sharp silhouette, paint clear acrylic medium over your pencil lines first. Let it dry, then paint the black on top. This seals the canvas grain and prevents black paint from bleeding.
Step 2: The Soldier Silhouette
-
Dry completely:
Before moving to the high-contrast black sections, let the background dry completely. You can use a hair dryer on a cool setting to speed this up. -
Transfer the design:
Place your soldier stencil or printout over the dry canvas. If using a printout, slide carbon paper underneath and trace the outline carefully with a pencil, focusing on the distinct shape of the helmet and boots. -
Outline the hill:
Sketch a sloping hill shape at the bottom of the canvas that rises up to support the kneeling figure. Ensure the angle looks natural for a kneeling posture. -
Block in the black:
Load your medium brush with Mars Black. Fill in the large hill area first to get a feel for the opacity. You may need two coats to ensure no background light shows through. -
paint the soldier’s body:
Switch to a smaller flat brush for the main body of the soldier. Carefully fill in the torso, legs, and gear, keeping your edges as crisp as possible. -
Detail the profile:
Use your smallest round detail brush (size 0) for the most critical part: the face profile, the hands, and the helmet strap. Take your time here; resting your hand on a mahl stick or dry section of canvas stabilizes shaky fingers.
Level Up: 3D Texture
Mix modeling paste with your black acrylic paint for the ground and grass. This physically raises the foreground off the canvas, making the soldier silhouette pop against the smooth, flat sky.
Step 3: Finishing Touches
-
Paint the grass blades:
Using the same small liner brush and Mars Black, flick quick, upward strokes from the top of the hill contour. Vary the length and direction slightly to simulate wild grass. -
Paint the canvas edges:
Wrap the Mars Black paint around the sides of the canvas (the gallery wrap edges). This frames the image beautifully without needing an external frame. -
Clean up edges:
Inspect your silhouette. If you see any rough spots, you can touch them up with the background sky color, essentially ‘erasing’ mistakes with paint. -
Add faint gold details (decorative):
As seen on the side of the example canvas, you can paint tiny decorative motifs like bees or stars using metallic gold paint on the black side edges for a unique signature touch. -
Seal the artwork:
Once the black paint has cured (give it at least 24 hours), apply a layer of matte or satin varnish to protect the paint and unify the sheen.
Hang this poignant artwork in a quiet corner or gift it to a service member to honor their sacrifice


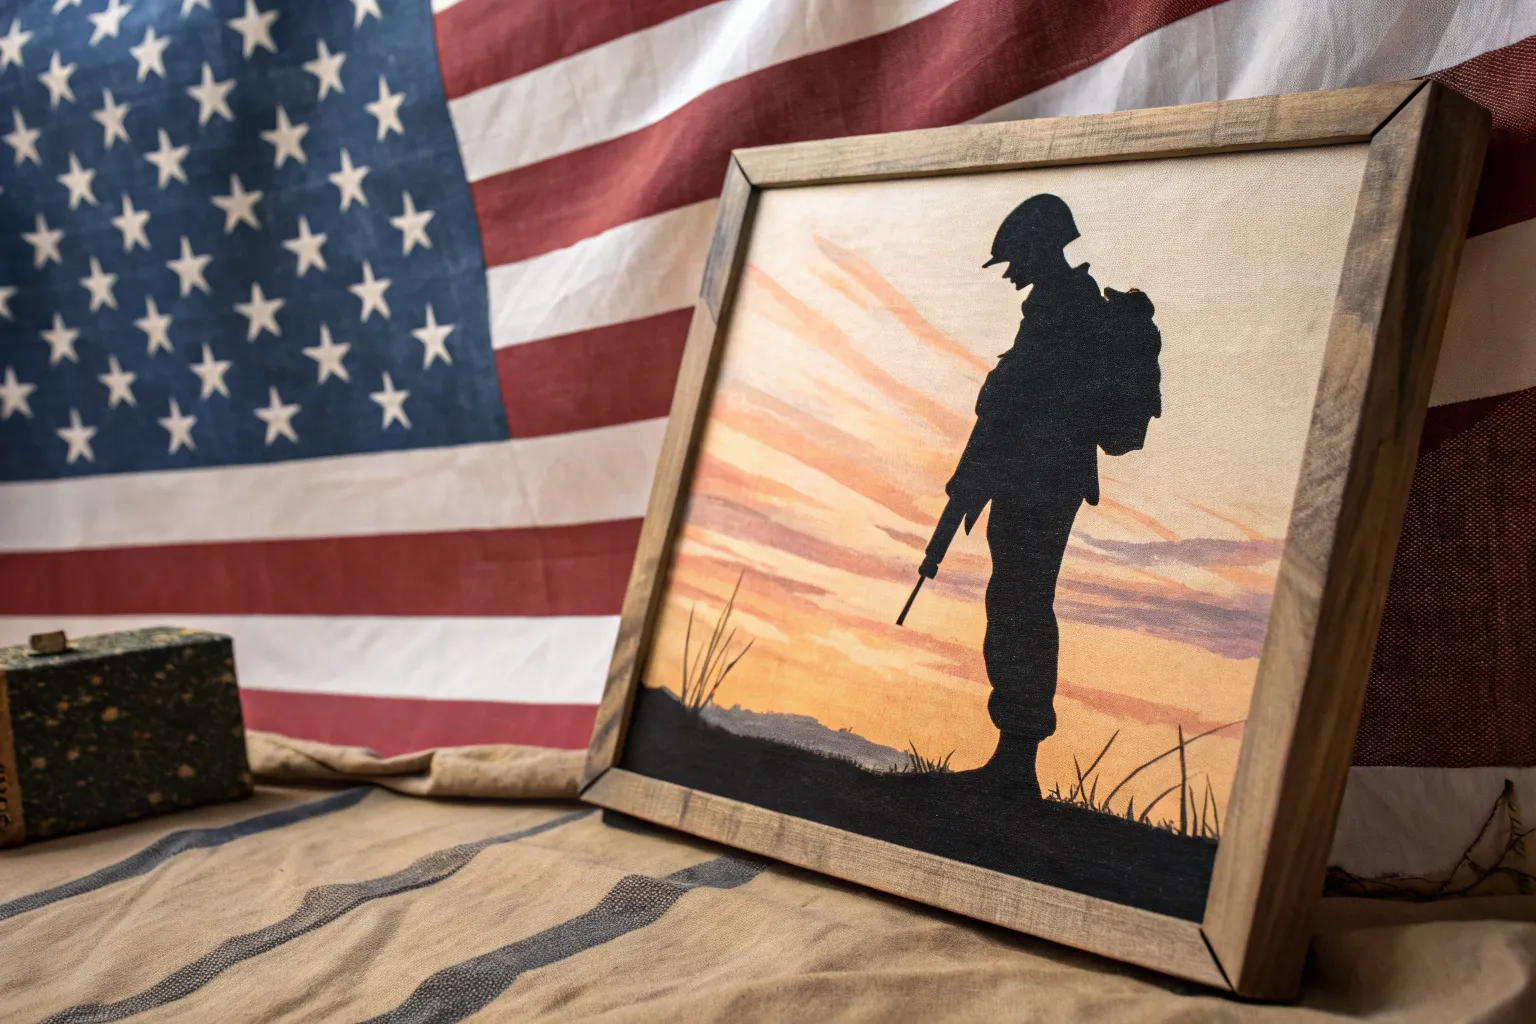
Salute Against Morning Light
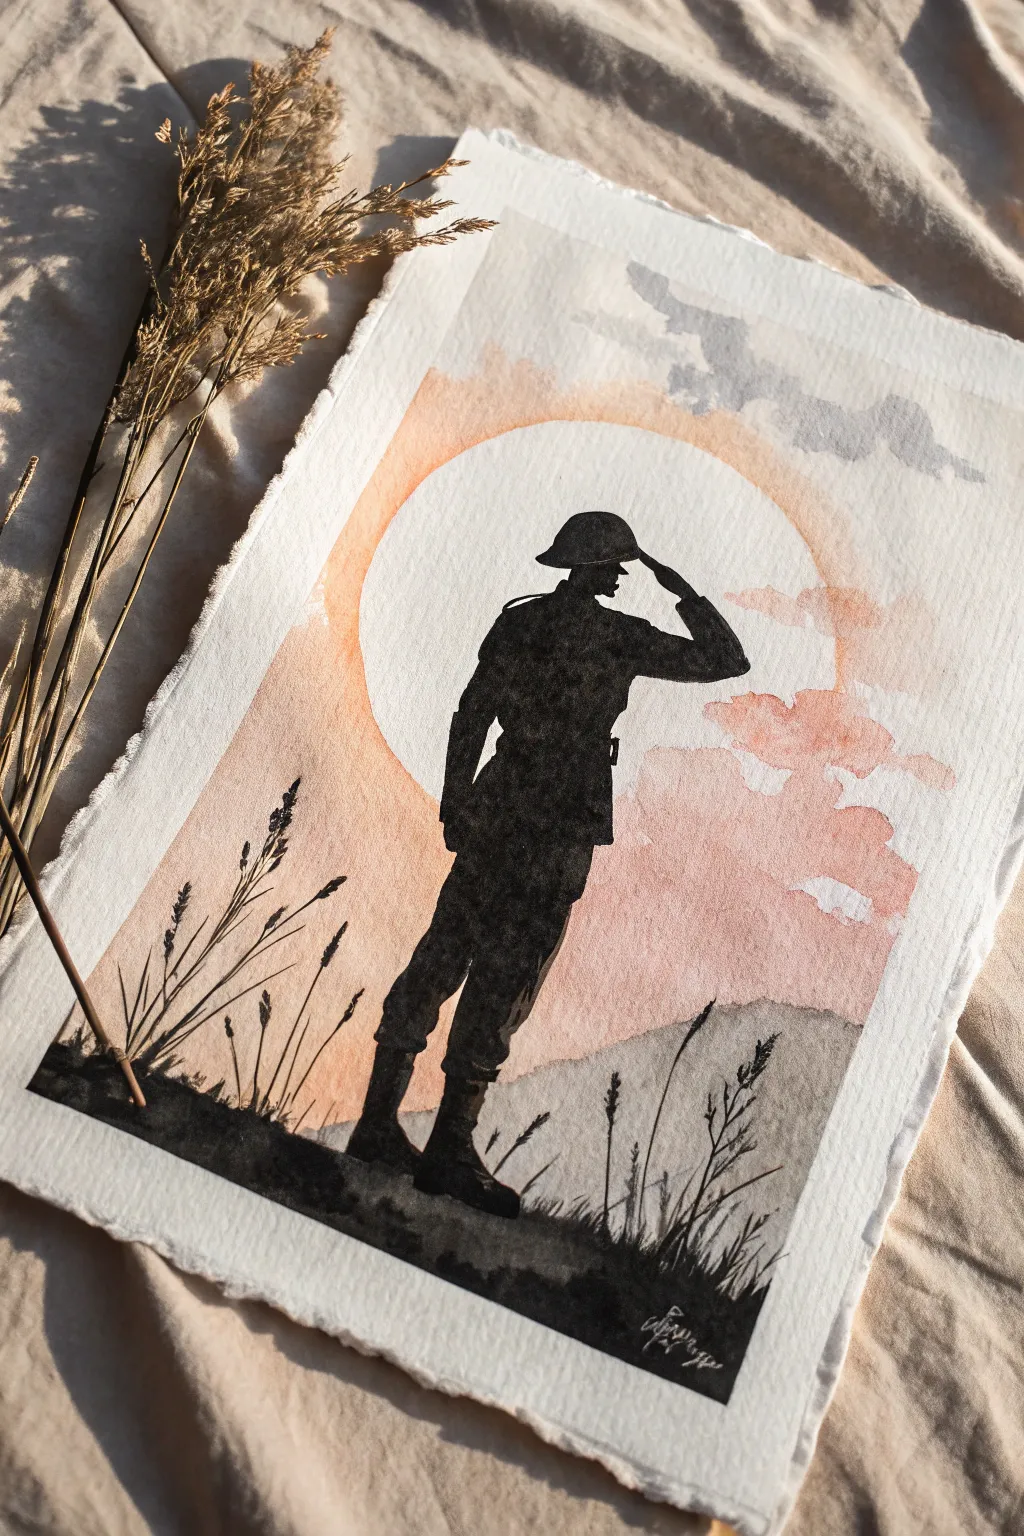
This poignant watercolor and ink piece captures a silhouette of a saluting soldier framed by a soft, glowing orb. The stark contrast between the black ink and the gentle peach and grey washes creates a solemn and respectful tribute.
Step-by-Step Guide
Materials
- Cold press watercolor paper (deckle edge preferred)
- Black waterproof ink or intensely pigmented black watercolor
- Watercolor paints: Peach/Salmon, Warm Grey, cool Grey
- Round watercolor brush (size 6 or 8)
- Fine liner brush or rigger brush for grass details
- Pencil for sketching
- Large circular object (like a bowl) or compass
- Masking fluid (optional)
Step 1: Planning and Sketching
-
Outline the sun:
Begin by placing your circular object in the center of the paper, slightly towards the top half. Lightly trace a large circle with a pencil to define the glowing orb behind the figure. -
Sketch the silhouette:
Lightly sketch the outline of the soldier in the foreground. Focus on the posture: the straight back, the helmet shape, and the distinct angle of the arm in a salute. Don’t worry about internal details, just the outer shape. -
Define the horizon:
Sketch a gentle, sloping horizon line near the bottom of the page, ensuring it grounds the soldier’s feet.
Bleeding Edges?
If your black ink bleeds into the background, the paper wasn’t fully dry. Blot immediately with a tissue, let it bone dry, and carefully re-paint the edge with thick flowing ink.
Step 2: The Watercolor Wash
-
Wet the background:
With clean water, gently wet the area roughly surrounding your circle prompt, letting the water extend outward towards the edges of the paper. Keep the inside of the circle dry for now. -
Apply the peach glow:
Load your round brush with a watered-down peach or salmon color. Dab it around the outer perimeter of your pencil circle, letting it bleed outwards into the wet paper to create a soft, hazy corona. -
Add cloud textures:
While the paper is still damp, drop in touches of warm grey near the top and right side to suggest soft, drifting clouds. Allow these to bleed naturally into the peach tones. -
Paint the hills:
Mix a light, cool grey wash for the distant hills. Paint the area behind the soldier’s legs, keeping the value very light so it recedes into the background. Let this entire layer dry completely.
Add Texture
Before the background wash dries, sprinkle a pinch of salt on the wet paint. Brush it off once dry to create a unique, speckled texture that looks like distant stars or dust.
Step 3: Inking the Silhouette
-
Fill the helmet and head:
Switch to your black ink or concentrated black watercolor. Carefully fill in the helmet shape first, ensuring the edges are crisp against the background. -
Paint the body:
Work your way down the uniform. Use solid black fill, but pay close attention to the small negative spaces, like the gap between the arm and the torso, and the space between the legs. -
Refine edges:
Check the profile of the face and hand. These small details define the emotion of the piece, so take your time to get the silhouette shape accurate. -
Ground the figure:
Paint the immediate foreground in solid black. Extend this black area horizontally to create the earth the soldier stands on, covering your pencil horizon line.
Step 4: Details and Atmosphere
-
Add distinct grass blades:
Using a fine liner or rigger brush loaded with ink, flick upwards from the black ground to create tall, thin blades of grass. Vary the height and angle for realism. -
Include seed heads:
On a few of the taller grass stalks, add small dots or textured clusters at the tips to resemble wild wheat or seed heads, similar to the dried props in the photo. -
Soften the ground:
Dilute your black ink slightly with water to create a dark grey. Add a few rough, horizontal strokes at the very bottom edge of the black ground to suggest uneven terrain rather than a flat line. -
Final dry:
Allow the ink to dry completely. If you have any visible pencil marks around the sun or silhouette that weren’t covered, gently erase them now.
Once dry, you can frame this evocative silhouette to honor a memory or historic moment.


Soldiers Walking in Formation
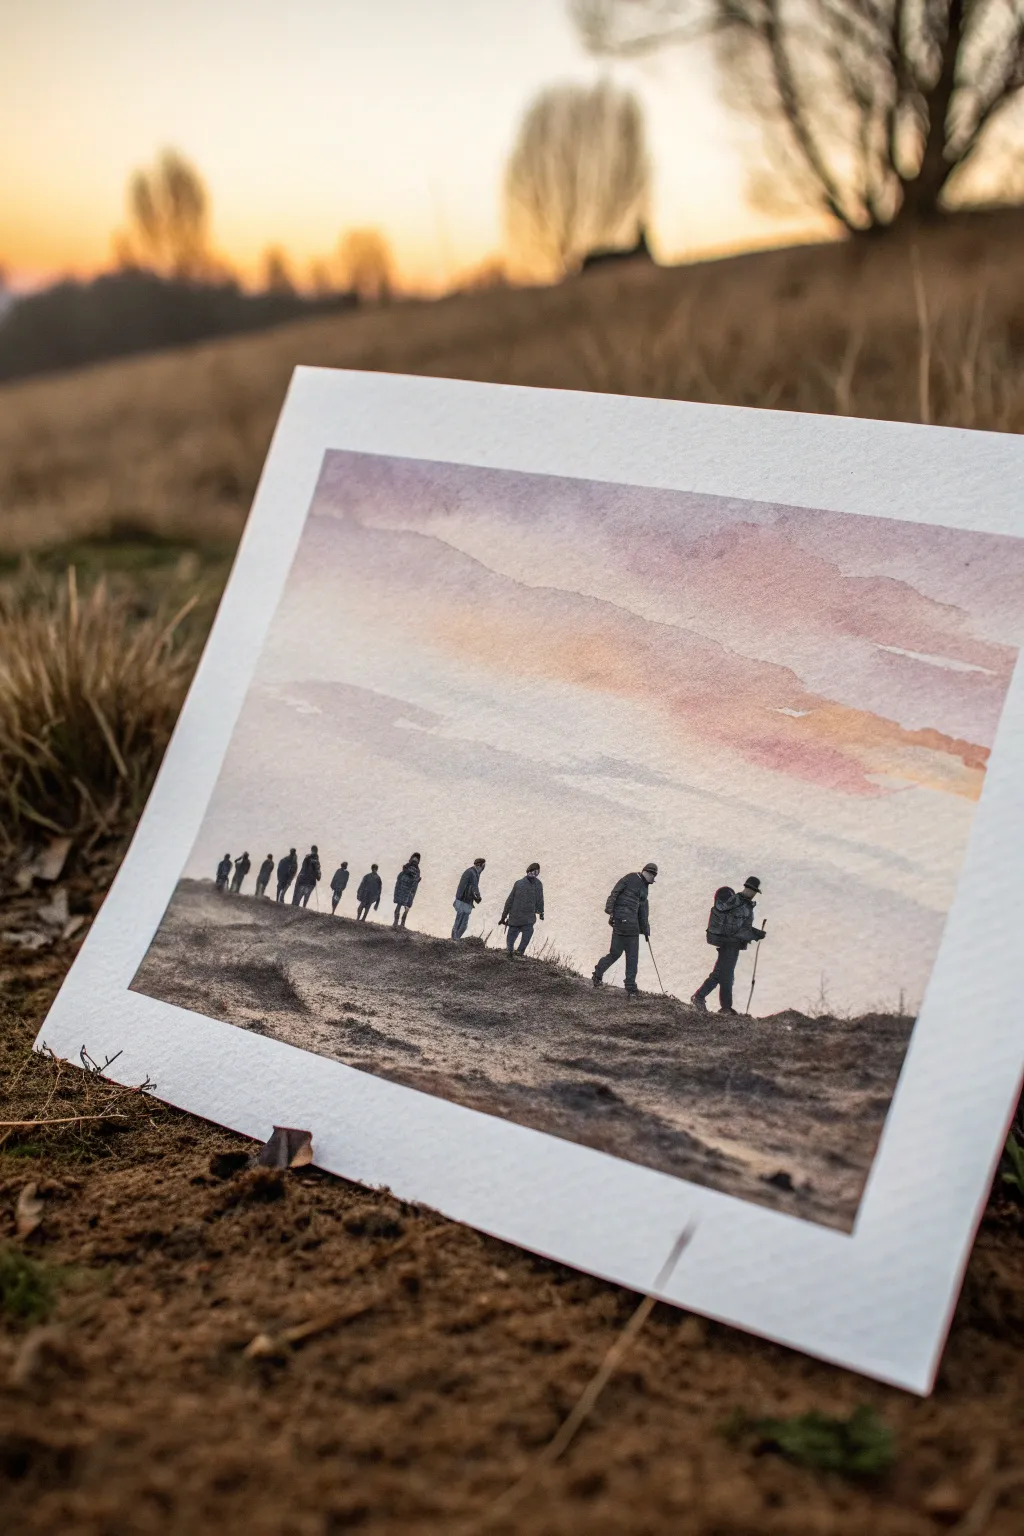
Capture the solemn beauty of a squad moving in formation against a soft, gradient sky with this evocative watercolor project. The contrast between the ethereal washed background and the crisp, dark figures creates a powerful sense of movement and quiet camaraderie.
Step-by-Step Tutorial
Materials
- Cold press watercolor paper (300 gsm)
- Watercolor paints (Payne’s Grey, Alizarin Crimson, Yellow Ochre, Burnt Sienna)
- Flat wash brush (3/4 inch)
- Round brushes (sizes 2 and 6)
- Masking tape
- Pencil (HB or 2H)
- Two jars of water
- Paper towels
Step 1: Setting the Scene
-
Prepare the workspace:
Begin by taping down all four edges of your watercolor paper to a board. This prevents buckling when we add the wet washes later. -
Sketch the horizon:
Using your pencil, lightly draw a sloping line for the ridge where the figures will walk. Keep it uneven and organic; nature rarely deals in straight lines. -
Draft the figures:
Sketch the small figures walking along the ridge. Don’t worry about perfect anatomy yet—focus on their heights and spacing. Make the figures near the front right slightly larger to suggest perspective.
Step 2: The Sky Wash
-
Wet the sky area:
With your flat brush and clean water, dampen the paper everywhere above the ridge line. The paper should glisten but not have standing puddles. -
Apply the first gradient:
Load your brush with a very diluted Yellow Ochre. Start just above the horizon line and sweep upward, letting it fade out as you reach the middle of the sky. -
Introduce warmth:
While the paper is still wet, mix a touch of Alizarin Crimson into the yellow area to create a soft peachy tone. Let these colors bleed naturally. -
Darken the upper sky:
Mix a watery purple-grey using Alizarin Crimson and a tiny bit of Payne’s Grey. Apply this to the very top of the paper, pulling it down to meet the warm tones. -
Create cloud textures:
While the paint is damp, drag a slightly drier brush horizontally across the purple section to suggest thin, stratus clouds. Let this entire sky layer dry completely.
Bleeding Control
If your sky colors are spreading too fast into the horizon, tilt your board slightly upward so gravity pulls the paint away from the ridge line.
Step 3: The Terrain
-
Underpaint the ground:
Mix a light wash of Burnt Sienna and Payne’s Grey. Paint the ground area below the figures, keeping it fairly light for now. -
Add texture to the earth:
While the ground wash is still wet, drop in concentrated spots of darker brown (more pigment, less water) to create uneven, rocky textures. -
Define the ridge edge:
Once the ground is semi-dry, use the size 6 round brush to paint a darker line just under the feet of where the figures will be, grounding them.
Pro Tip: Atmospheric Depth
Add a tiny bit more water to your dark mix for the farthest soldiers on the left. Making them slightly lighter than the lead soldiers creates instant distance.
Step 4: Painting the Formation
-
Mix the silhouette color:
Create a thick mixture of Payne’s Grey with a touch of Burnt Sienna. I find this creates a rich, warm charcoal color that looks more natural than straight black. -
Paint the first figure:
Using your smallest brush (size 2), carefully fill in the lead hiker on the right side. Pay attention to the backpack shape and the angle of the walking stick. -
Continue the line:
Work your way left, painting each figure. Vary their postures slightly—some leaning forward, some upright—to make the group look realistic. -
Add distinct details:
For the closer figures, add tiny details like the brim of a hat or the strap of a pack. As the figures get smaller to the left, simplify them into basic shapes. -
Ground the shadows:
Add small, horizontal dashes of your dark mix directly under each boot to connect the figures to the terrain so they don’t look like they are floating.
Step 5: Final Touches
-
Deepen the foreground:
If the bottom of the painting dried too light, glaze over the very bottom edge with a dark brown wash to lead the eye upward. -
Remove tape:
Wait until the paper is bone dry—cool to the touch usually means it’s still damp. Peel the tape away slowly at a 45-degree angle to reveal the clean border.
Now you have a serene, reflective piece that honors the journey of those who serve


Tank Tracks Through Dusty Light
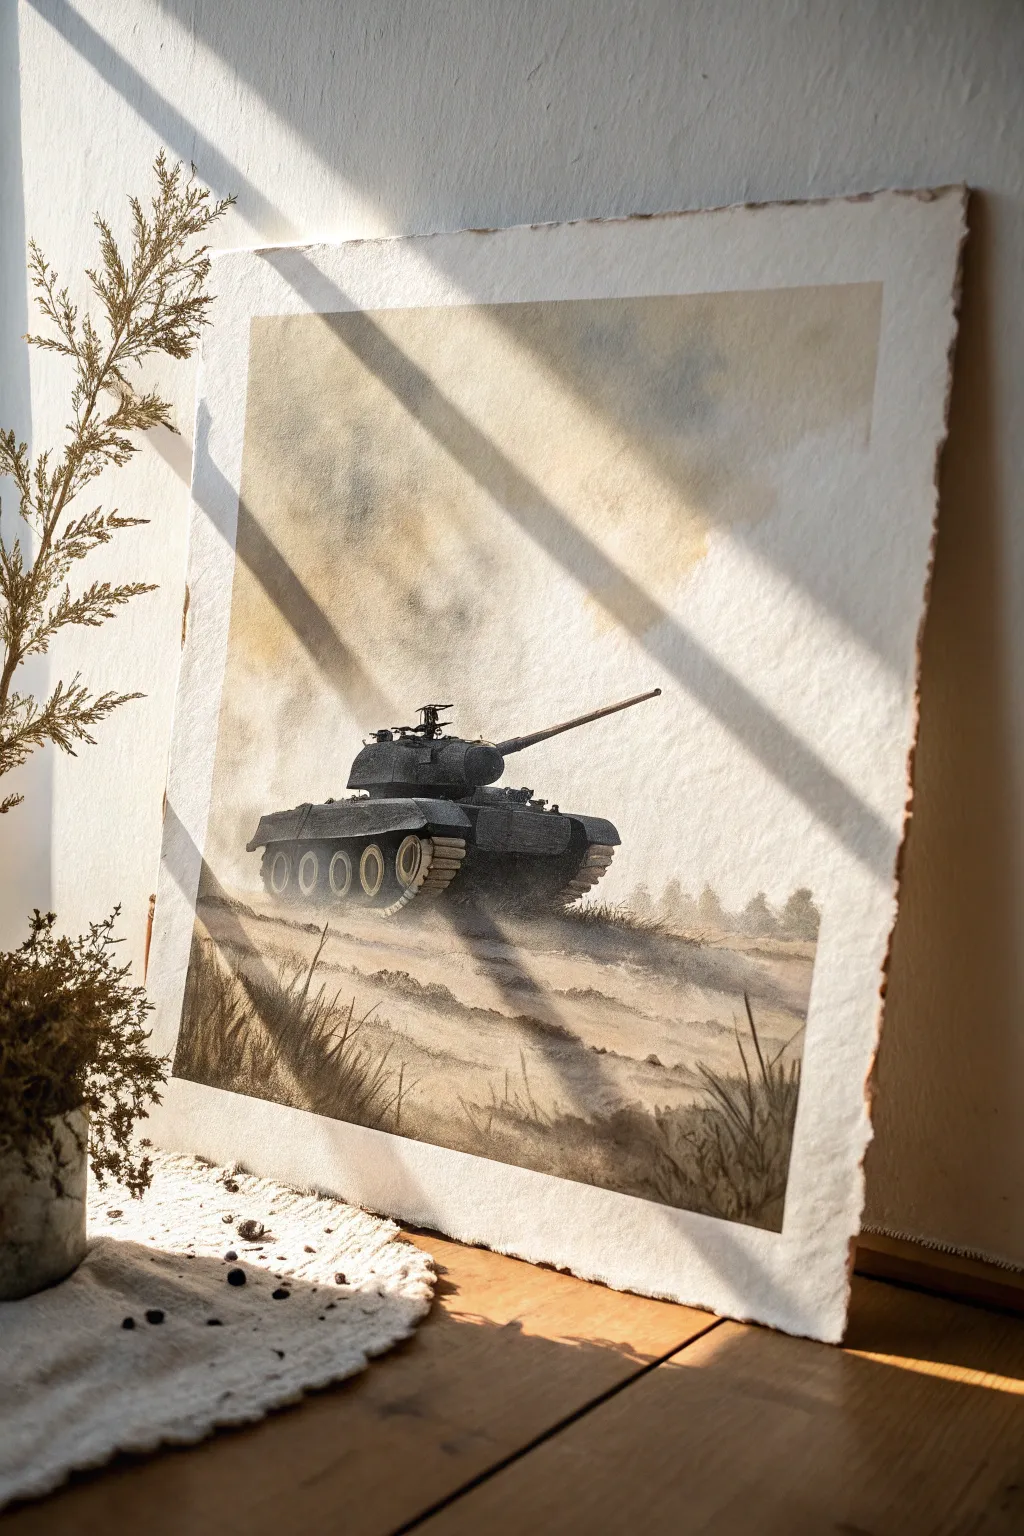
Master the art of atmospheric perspective with this watercolor painting of a tank charging through arid terrain. You will learn to balance the hard, mechanical lines of armor against soft, diffused washes of dust and sunlight.
Step-by-Step
Materials
- Cold Press watercolor paper (300 gsm, heavy texture)
- Watercolor paints: Paynes Gray, Burnt Umber, Yellow Ochre, Sepia, Burnt Sienna
- Flat brush (1 inch) for washes
- Round brushes (sizes 4, 8, and 0 for details)
- Masking fluid (optional)
- HB Pencil for sketching
- Two water jars
- Masking tape
Step 1: Setting the Scene
-
Tape and Prep:
Begin by taping your watercolor paper to a board with the masking tape. Leave a generous white border around the edge, roughly 1-2 inches, to frame the final piece. This mimics the deckled edge look in the photo. -
Light Sketching:
Using an HB pencil, lightly sketch the horizon line about a third of the way up the page. Gently outline the tank’s hull, turret, and tracks. Keep lines faint; graphite can smudge into watercolor. -
Sky Wash:
Wet the sky area with clean water using your flat brush. While damp, drop in a very diluted wash of Yellow Ochre and a touch of Burnt Sienna on the right side to suggest filtered sunlight. -
Atmospheric Smoke:
While the sky is still damp, add touches of diluted Paynes Gray and Sepia in random, cloudy shapes above the tank to create the look of distant smoke or dust kicking up. Let the colors bleed softly.
Muddy Waters?
If your dust clouds look like mud, stop! Let the paper dry completely. Use a clean, damp stiff brush to gently scrub and lift the excess color, then re-apply a lighter wash.
Step 2: The Terrain
-
Foreground Base:
Mix a wash of Yellow Ochre and Burnt Umber. Apply this across the foreground below the tank, using horizontal strokes. Allow the brush to skip over the paper’s tooth occasionally to create texture. -
Shadows on the Ground:
While the foreground is semi-dry, use a mix of Sepia and Paynes Gray to paint the long, stretching shadows cast by the tank and the uneven ground. Angle these shadows diagonally to match the light source. -
Dust Clouds:
Around the tracks, wet the paper again and drop in pigment-heavy Yellow Ochre. Lift some paint out with a dry brush or paper towel to create soft, billowing dust effects.
Add Real Grit
Sprinkle a tiny pinch of salt into the wet foreground wash while it paints. As it dries, the salt pushes pigment away, creating an incredible, naturalistic sandy texture.
Step 3: Painting the Armor
-
Base Silhouette:
Once the background is completely dry, mix a strong Paynes Gray with a hint of Burnt Sienna (to warm it up). Paint the main silhouette of the tank, avoiding the very lightest highlight areas on the turret. -
Deepening Shadows:
While the base layer is damp, drop concentrated Paynes Gray into the undercarriage, beneath the turret, and the shadowed side of the continuous tracks to build volume. -
Turret Details:
Switch to a size 4 round brush. Define the curved shape of the turret. I like to keep the top edges soft to suggest sunlight hitting the curved metal. -
The Gun Barrel:
Paint the long gun barrel with a single, steady stroke. Ensure the underside is darker than the top edge to give it a cylindrical form.
Step 4: Refining and Detailing
-
Defining Tracks:
Use a size 0 brush and pure Sepia to draw the individual links of the tracks. Don’t outline every single one perfectly; broken lines suggest motion and dust accumulation. -
Wheels and Suspension:
Paint the road wheels using dark circles, leaving the centers slightly lighter. Add the drive sprocket at the rear with careful, small strokes. -
Foreground Grass:
In the immediate foreground, use a rigger brush or the tip of your size 4 brush with dark Burnt Umber to flick upwards, creating dry, sparse grass blades. -
Final Contrast:
Evaluate your values. If the tank looks too flat, add a final glaze of pure Paynes Gray to the darkest crevices—under the fenders and between the wheels. -
The Reveal:
Let the painting dry completely. Carefully peel off the masking tape to reveal the crisp white border, which instantly makes the artwork look professional and finished.
Step back and admire how the interplay of light and shadow brings this steel giant to life on the page


Have a question or want to share your own experience? I'd love to hear from you in the comments below!