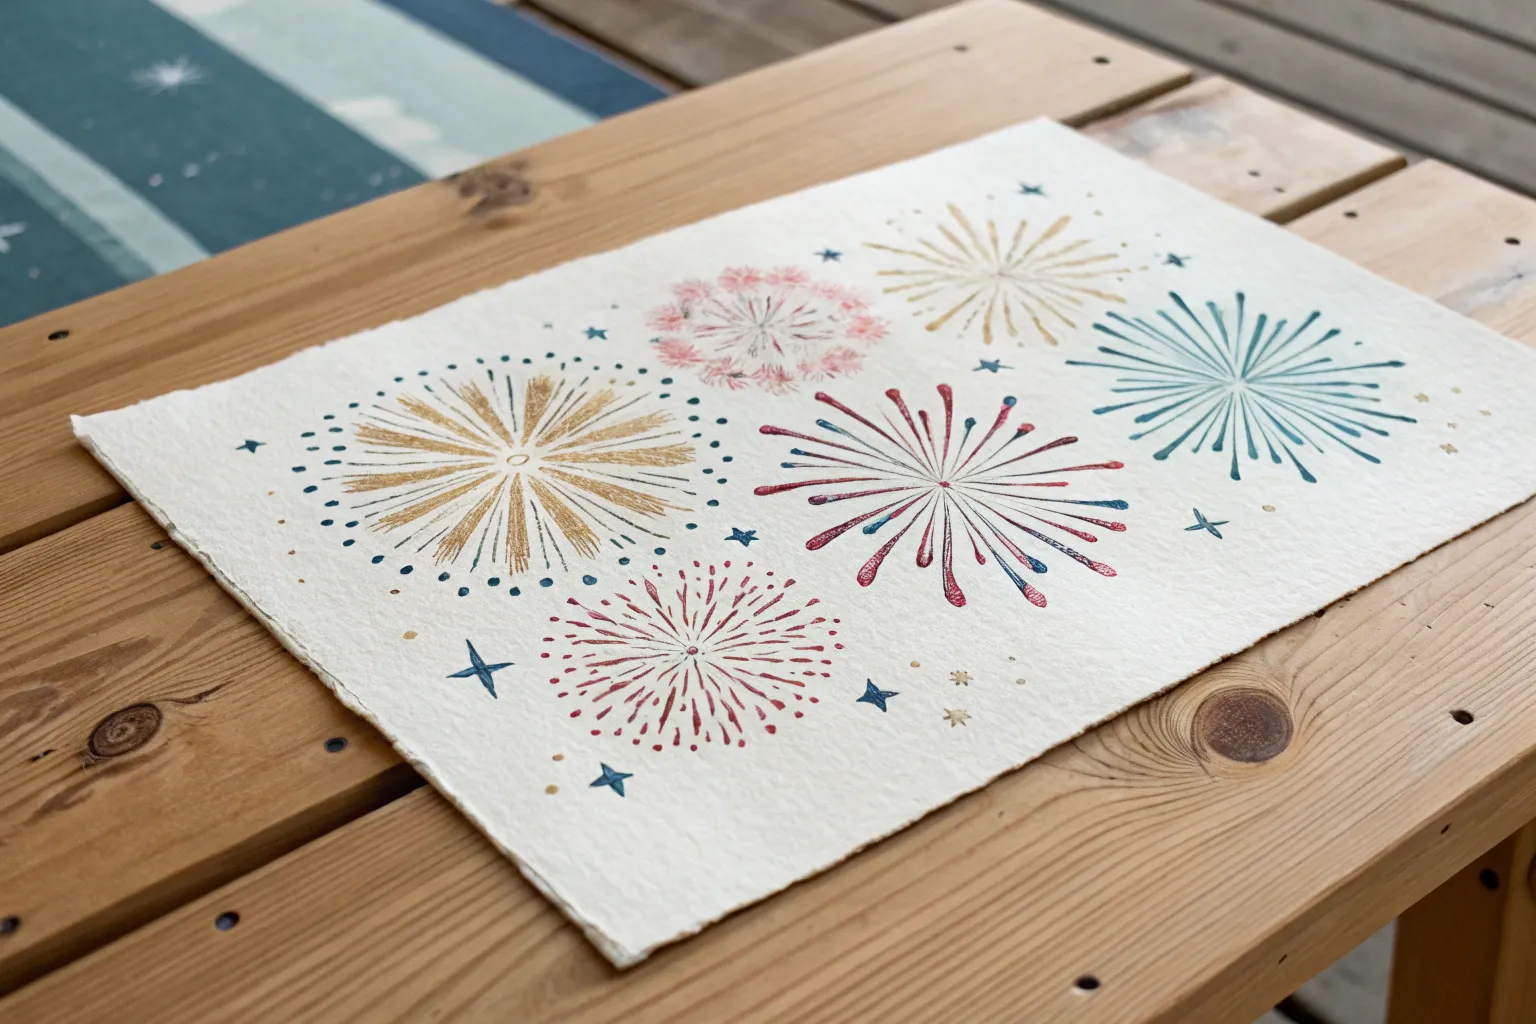
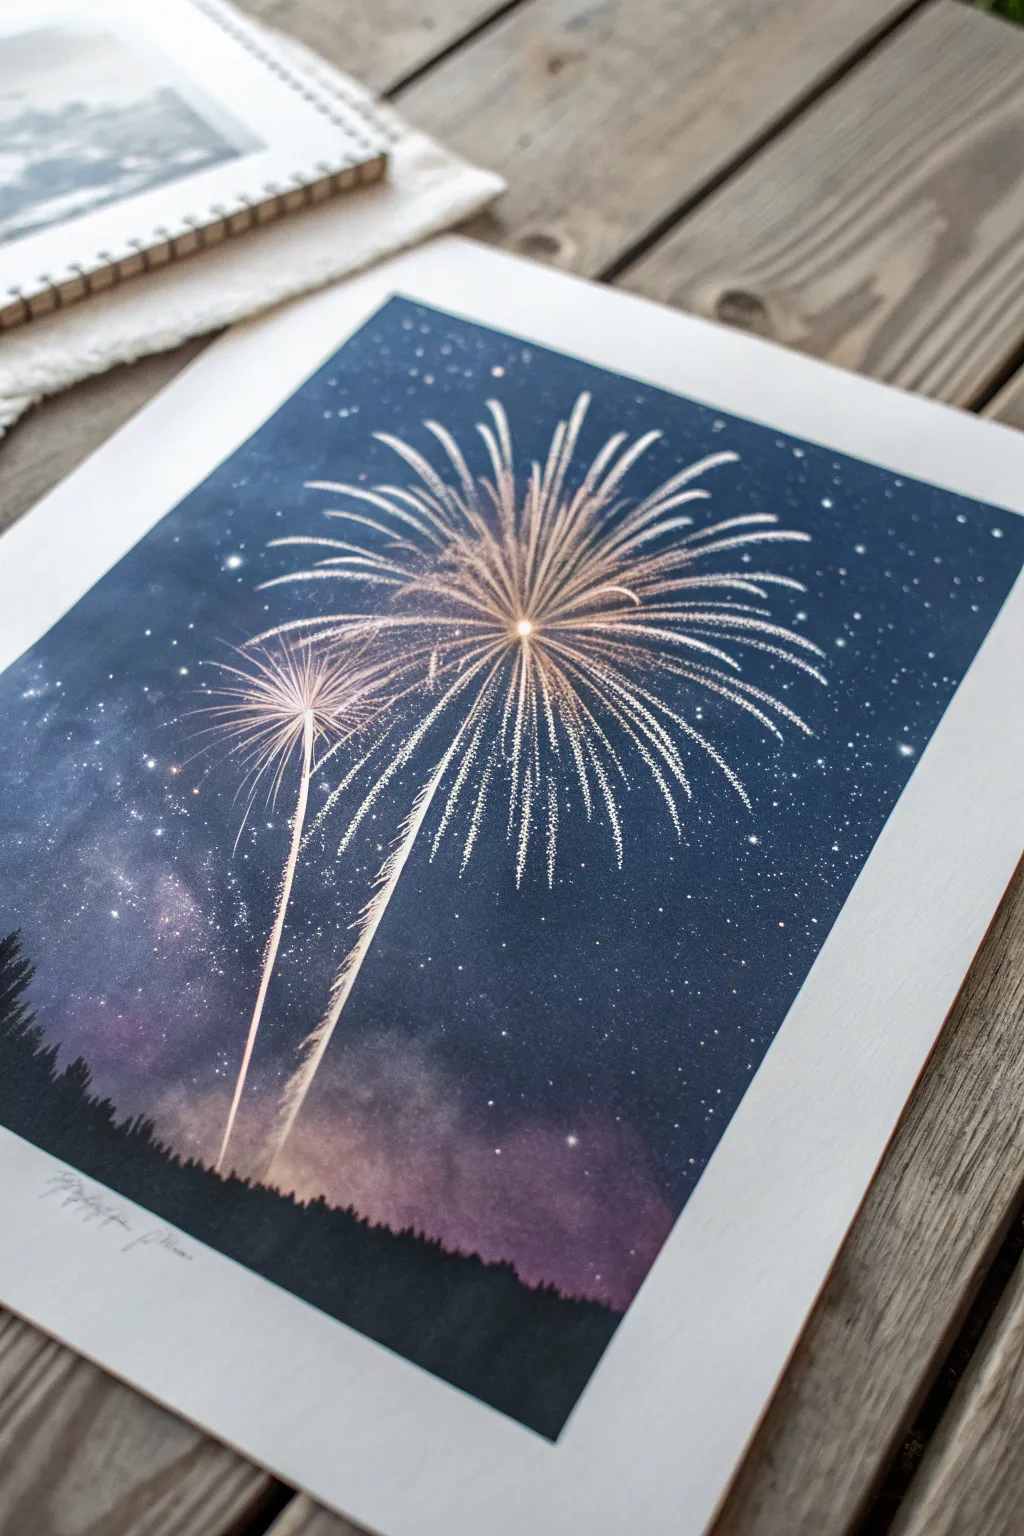
If you’ve ever stared at fireworks and thought, “How do I paint that glow?”, you’re in the right headspace. I’m sharing my favorite firework painting ideas—from classic starbursts on a night sky to playful, unexpected techniques that still scream “boom.”
Classic Starbursts on a Black Sky
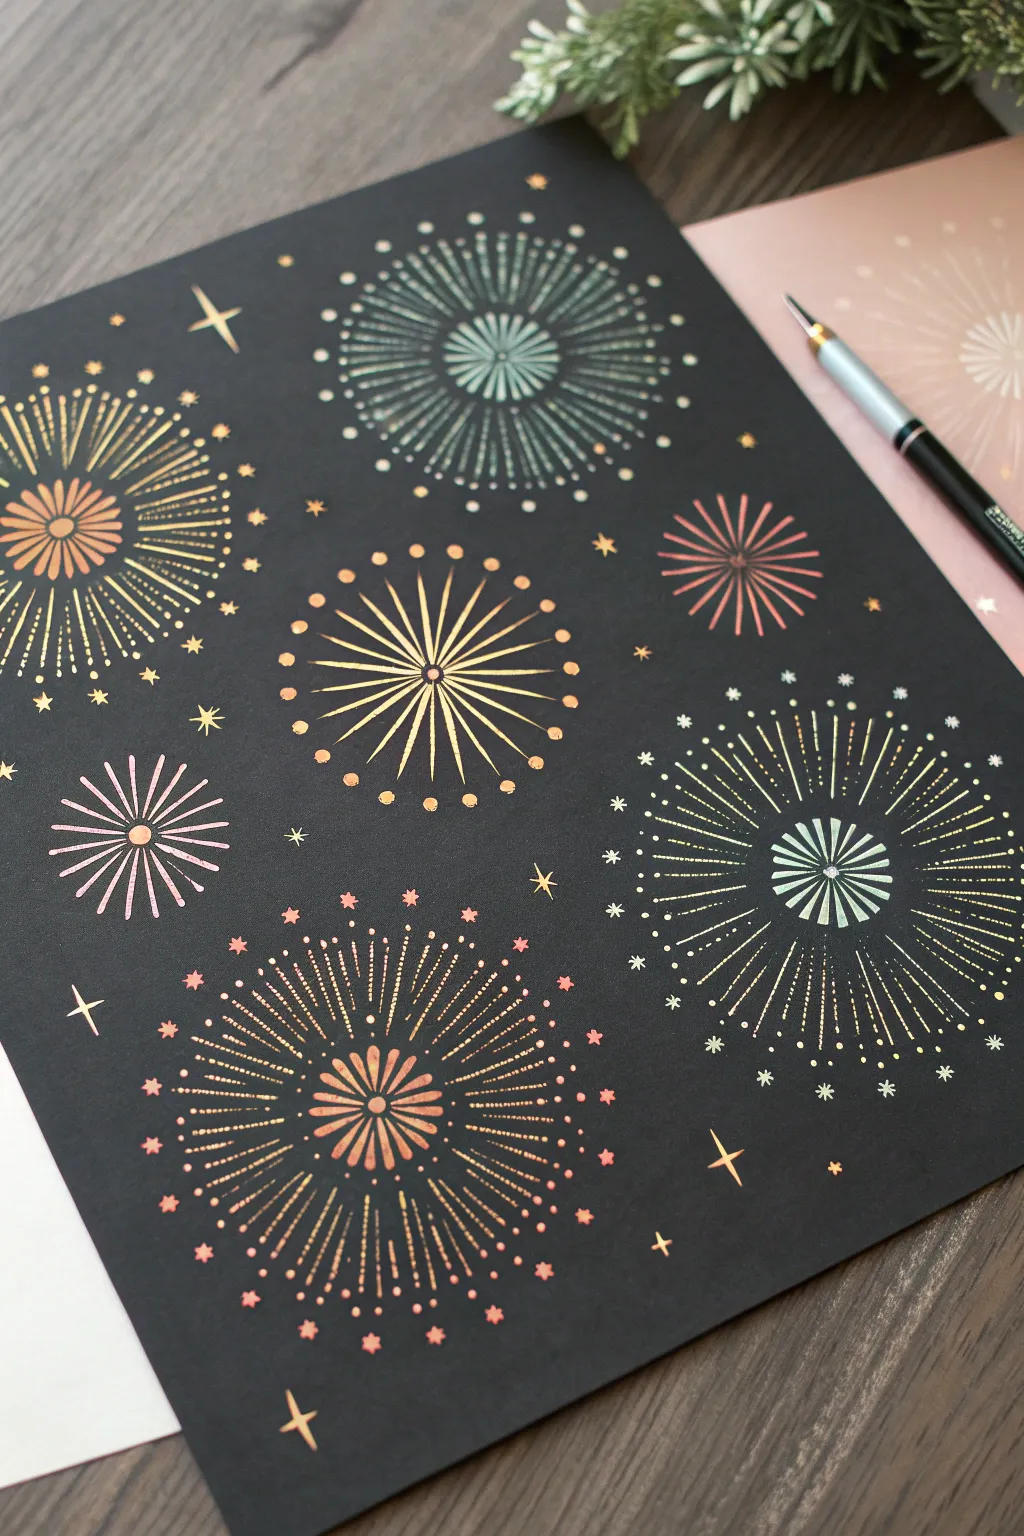
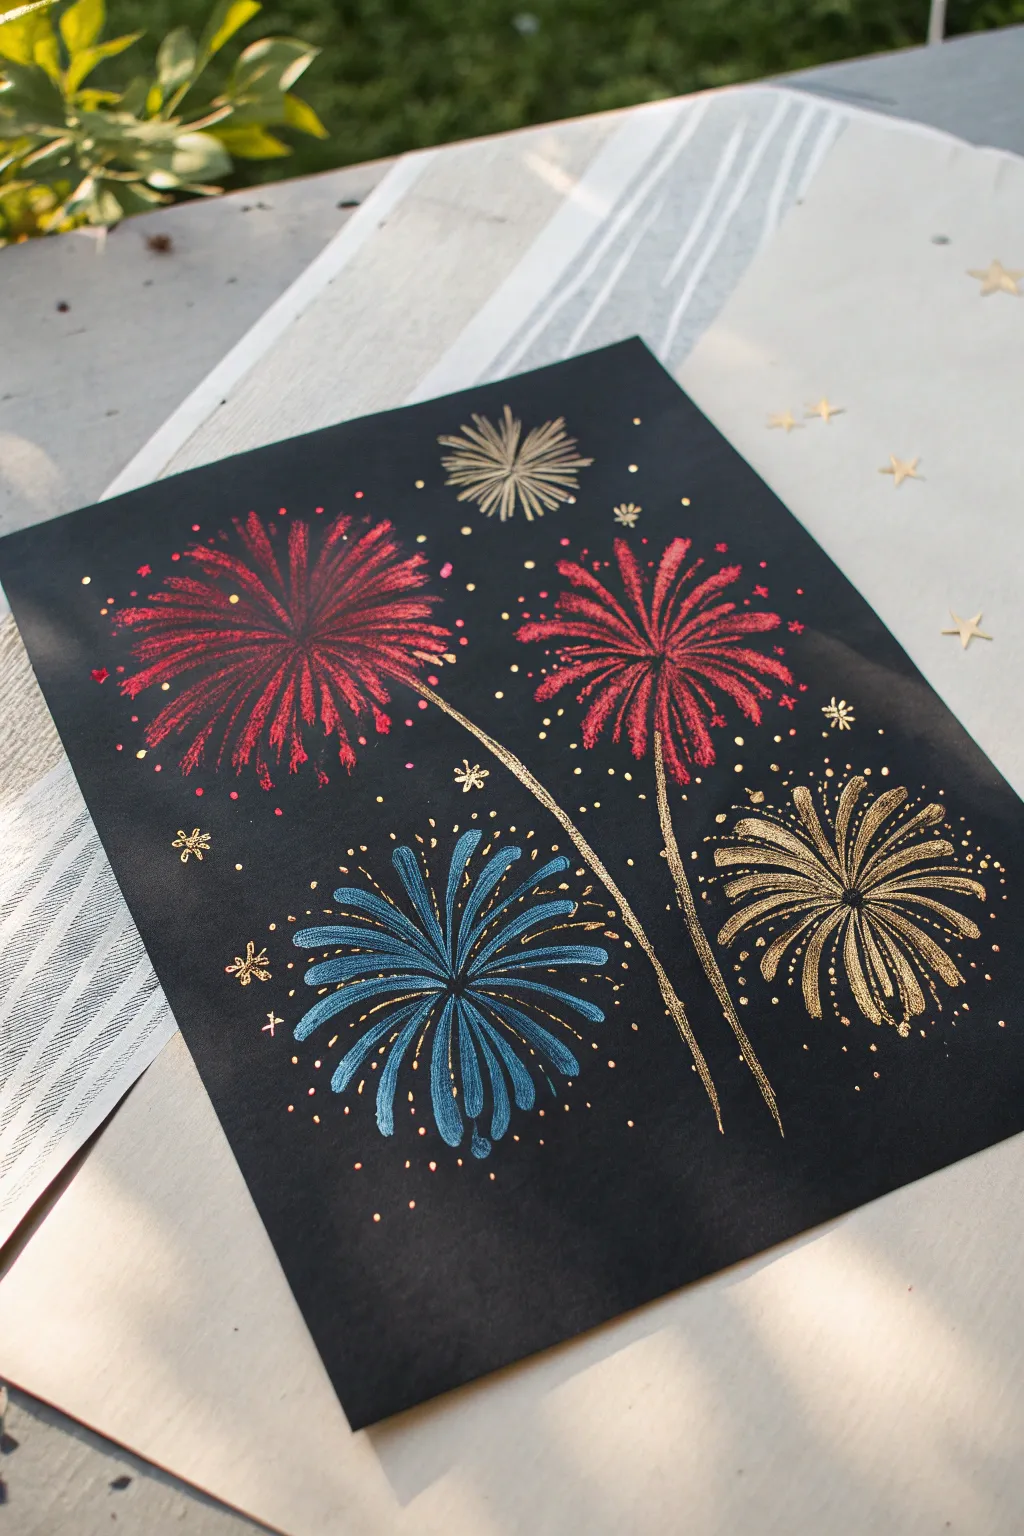
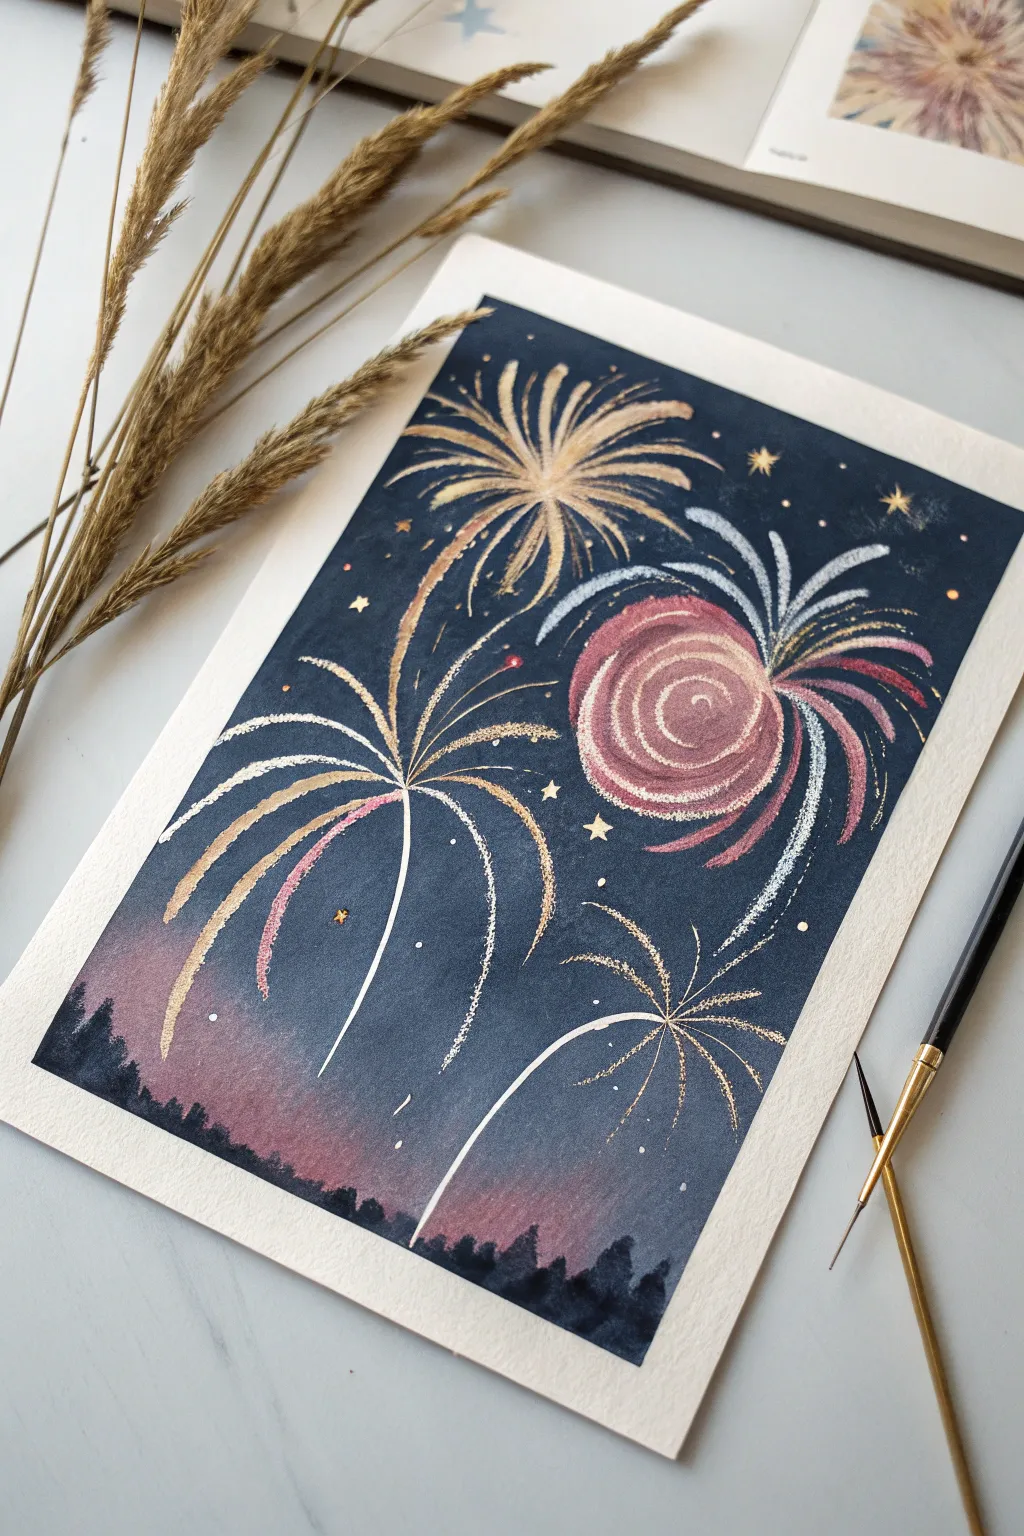
Capture the magic of a celebration night with these stunning metallic fireworks on black paper. The contrast of shimmering gold, copper, and teal inks against the dark background creates a sophisticated and vibrant effect that pops off the page.
How-To Guide
Materials
- Black cardstock or mixed media art paper
- Metallic gel pens (gold, copper, silver, rose gold, teal)
- Fine-point metallic paint markers (optional for thicker lines)
- Ruler
- pencil
- Eraser
- Compass (optional)
Step 1: Planning Your Sky
-
Map out the composition:
Begin by deciding where your firework bursts will go. You want a varied composition, so plan for 3-4 large bursts and several smaller ones to fill the gaps. -
Mark the centers:
Using a pencil very lightly, mark a small dot or ‘x’ where the center of each firework will be. Stagger them so they aren’t perfectly aligned in rows. -
Pencil guide circles:
If you want perfectly round fireworks, use a compass or trace circular objects to draw faint guide circles around your center points. This helps keep the rays even later.
Step 2: Drawing the Base Bursts
-
Start the center motifs:
Choose a metallic copper or gold pen. For your first large firework, draw a small, dense flower shape or a cluster of petals right at the center point. -
Extend the primary rays:
Draw long, straight lines radiating outward from that center motif like the spokes of a wheel. Leave a little space between each line for secondary details. -
Add secondary rays:
Switch to a slightly different metallic shade, perhaps a teal or silver. Draw shorter rays in between the long primary ones to build density. -
Create dotted trails:
To mimic fading sparks, extend some of your lines with a series of small dots. I find that gradually decreasing the dot size as you move outward creates a nice sense of motion.
Ink Flow Secret
Store your metallic gel pens tip-down for 30 minutes before starting. This ensures the metallic particles are near the nib for maximum opacity.
Step 3: Adding Variety and Detail
-
Draw a ‘dandelion’ style burst:
For the next large firework, try a teal color. Instead of a solid center, leave the middle open and draw thin, delicate lines radiating from an empty center point. -
Add circular caps:
At the very tip of each teal ray, draw a tiny solid circle. This mimics the ‘shell’ style of firework that explodes into perfect spheres. -
Create a ringed burst:
For a different look, draw a small starburst in gold. Then, leave a gap of negative space and draw a ring of disconnected dashes or dots floating around it. -
Outer ring details:
Add a third layer to this ringed burst by drawing long, thin spikes extending from the ring of dashes outward. -
Mix your metals:
Don’t be afraid to change pens within a single firework. A copper center with gold rays and silver tips adds incredible depth and shimmer.
Make It 3D
Add tiny adhesive rhinestones or dab glitter glue to the very center of your largest fireworks for actual texture and extra sparkle.
Step 4: Filling the Night Sky
-
Draw small filler stars:
Look for the large empty spaces of black paper between your main fireworks. Draw tiny four-pointed stars or simple cross shapes using a gold pen. -
Add distant sparkles:
Scatter single, tiny metallic dots randomly across the background. These represent distant stars or fading embers falling from the sky. -
Incorporate geometric elements:
Try drawing a small firework that is just simple lines with circle tips, arranged in a perfect circle, to contrast with the more chaotic bursts. -
Review the balance:
Step back and look at your composition. If one area looks too dark, add a small, simple starburst using a light silver or champagne color to lift the brightness. -
Clean up:
Once the ink is completely dry—give it a few minutes to be safe—gently erase any visible pencil guide marks from the first phase.
Now you have a dazzling display of permanent pyrotechnics to brighten up any room


Q-Tip Spark Dots and Trails
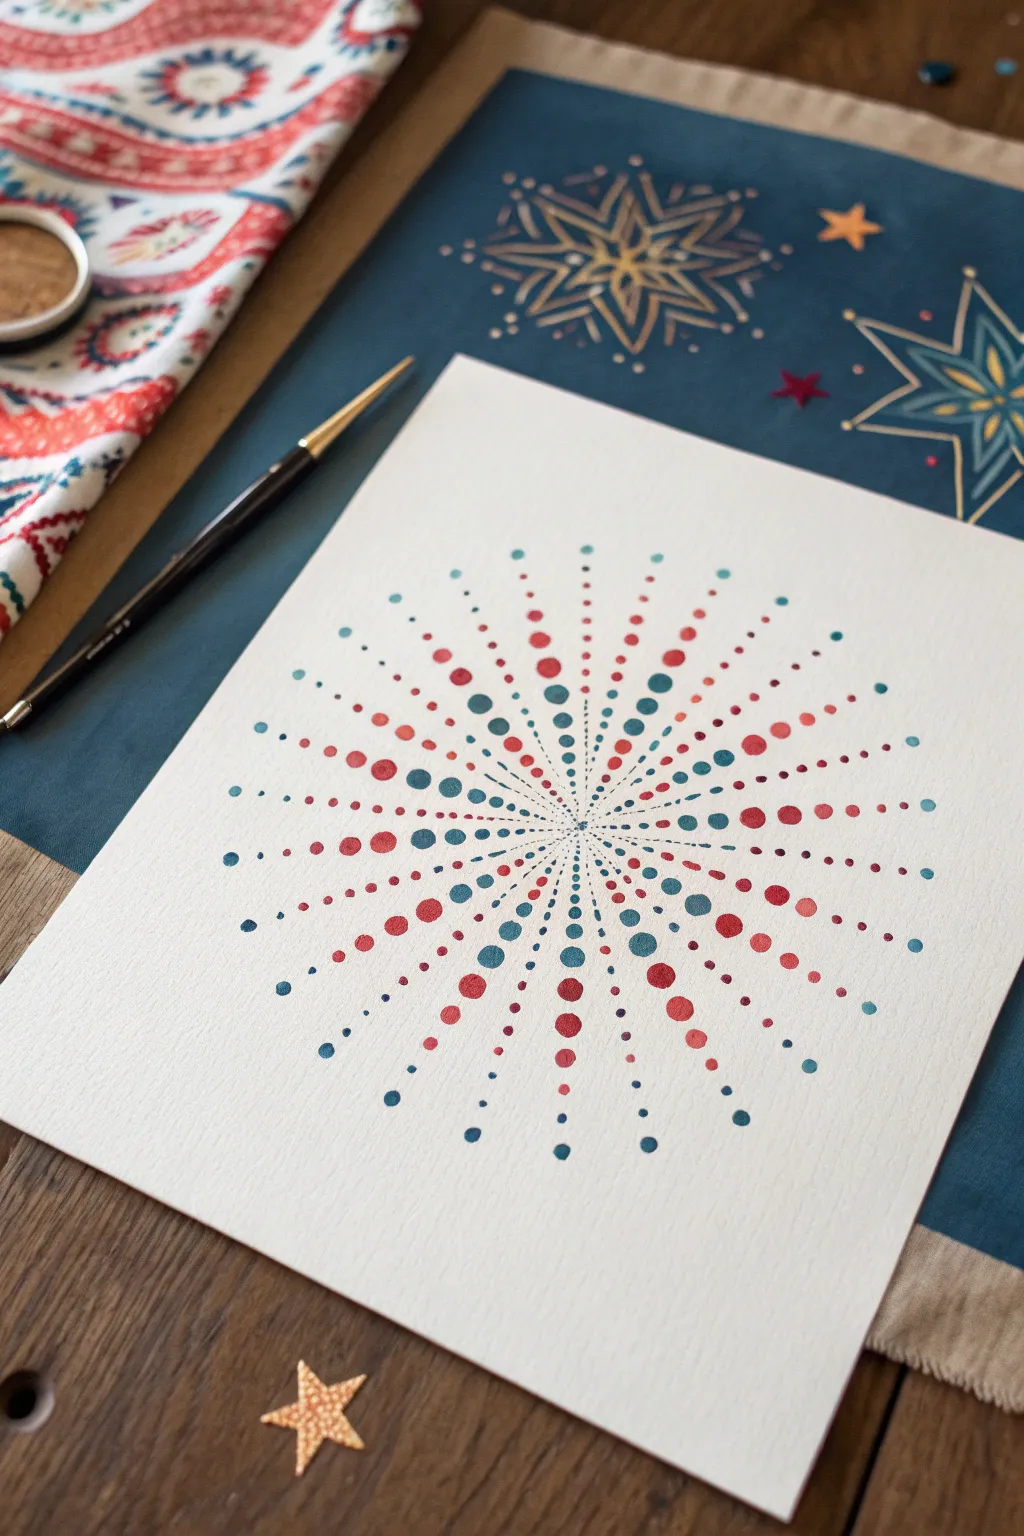
This elegant firework design swaps explosive chaos for geometric precision, using carefully placed dots to create a mesmerizing radial burst. The result is a clean, modern interpretation of a pyrotechnic display that feels both festive and sophisticated.
How-To Guide
Materials
- Heavyweight watercolor paper or cardstock (white)
- Acrylic paints or gouache (red, teal, dark blue)
- Cotton swabs (Q-tips)
- Fine detail paintbrush (size 0 or 00)
- Small round paintbrush (size 2)
- Palette for mixing
- Pencil and ruler (optional)
- Water cup and paper towels
Step 1: Preparation and Center
-
Prepare your palette:
Squeeze out small amounts of your chosen colors: a vibrant red, a deep teal or turquoise, and a dark navy blue. If your acrylics are very thick, add a tiny drop of water to improve flow, but keep them opaque. -
Mark the center:
Identify the center of your paper. If you struggle with spacing, lightly mark a tiny ‘x’ with a pencil, or draw very faint concentric circles with a compass to guide your ring placement later. -
Start the inner ring:
Using your smallest detail brush (size 0 or 00), dip into the teal paint. Create a very tight circle of tiny micro-dots right around your center point. -
Add the second layer:
Moving slightly outward, paint a second ring of small dots in the same teal color. Stagger them slightly so they sit in the gaps of the first ring, creating an expanding starburst effect.
Uneven Dots?
If Q-tip dots look fuzzy, the cotton is too loose. Roll the damp paint-covered tip between your fingers (wear gloves!) to tighten the fibers before stamping.
Step 2: Building the Burst
-
Introduce the red:
Switch to your red paint. Using the fine tip of the size 2 brush (or pressing slightly harder with the detail brush), add a ring of slightly larger dots outside the teal center. -
Create the spokes:
Instead of just painting circles, visualize lines radiating from the center like wheel spokes. Start placing dots along these imaginary lines, alternating between red and teal. -
Incorporate the Q-tip technique:
For the medium-sized dots in the middle of the burst, dip a Q-tip into the paint. Touch it gently to the paper to create perfectly round, uniform circles. Use this for the prominent red and teal rings. -
Vary the sizes:
To make the firework feel dynamic, ensure the dots in the middle section are the largest. This creates a sense of volume and depth. -
add the dark accents:
Intersperse the dark navy blue dots now. Place them intentionally between the brighter colors to add contrast and make the red pop.
Pro Tip: Gradient Effect
Mix a little white into your colors for the outer rings. Making the dots lighter as they move outward mimics the way real firework light fades as it travels.
Step 3: Fading Out
-
Taper the dots:
As you move toward the outer edge of the firework, switch back to your smallest brush. The dots should get progressively smaller to simulate the fading light of the sparks. -
Extend the rays:
Select several ‘rays’ of the firework to extend further than the others. Continue these lines outward with tiny micro-dots, alternating colors to keep the eye moving. -
Check spacing:
Look at the overall balance. If there are large white gaps between your radial lines, fill them with tiny singular dots in a contrasting color. -
Final tiny details:
For the outermost tips, use the very point of your detail brush with almost dry paint to make the tiniest speck-like dots, suggesting sparks vanishing into the night. -
Let it dry completely:
Allow the paint to fully set. The thicker dots made with Q-tips will take longer to dry than the brush strokes, so be patient before handling. -
Erase guidelines:
If you used any pencil marks for the center or concentric circles, gently erase them once you are absolutely certain the paint is bone dry.
Frame your creation or use it as a stunning front for a handmade celebration card


Fork-Pulled Comet Fireworks
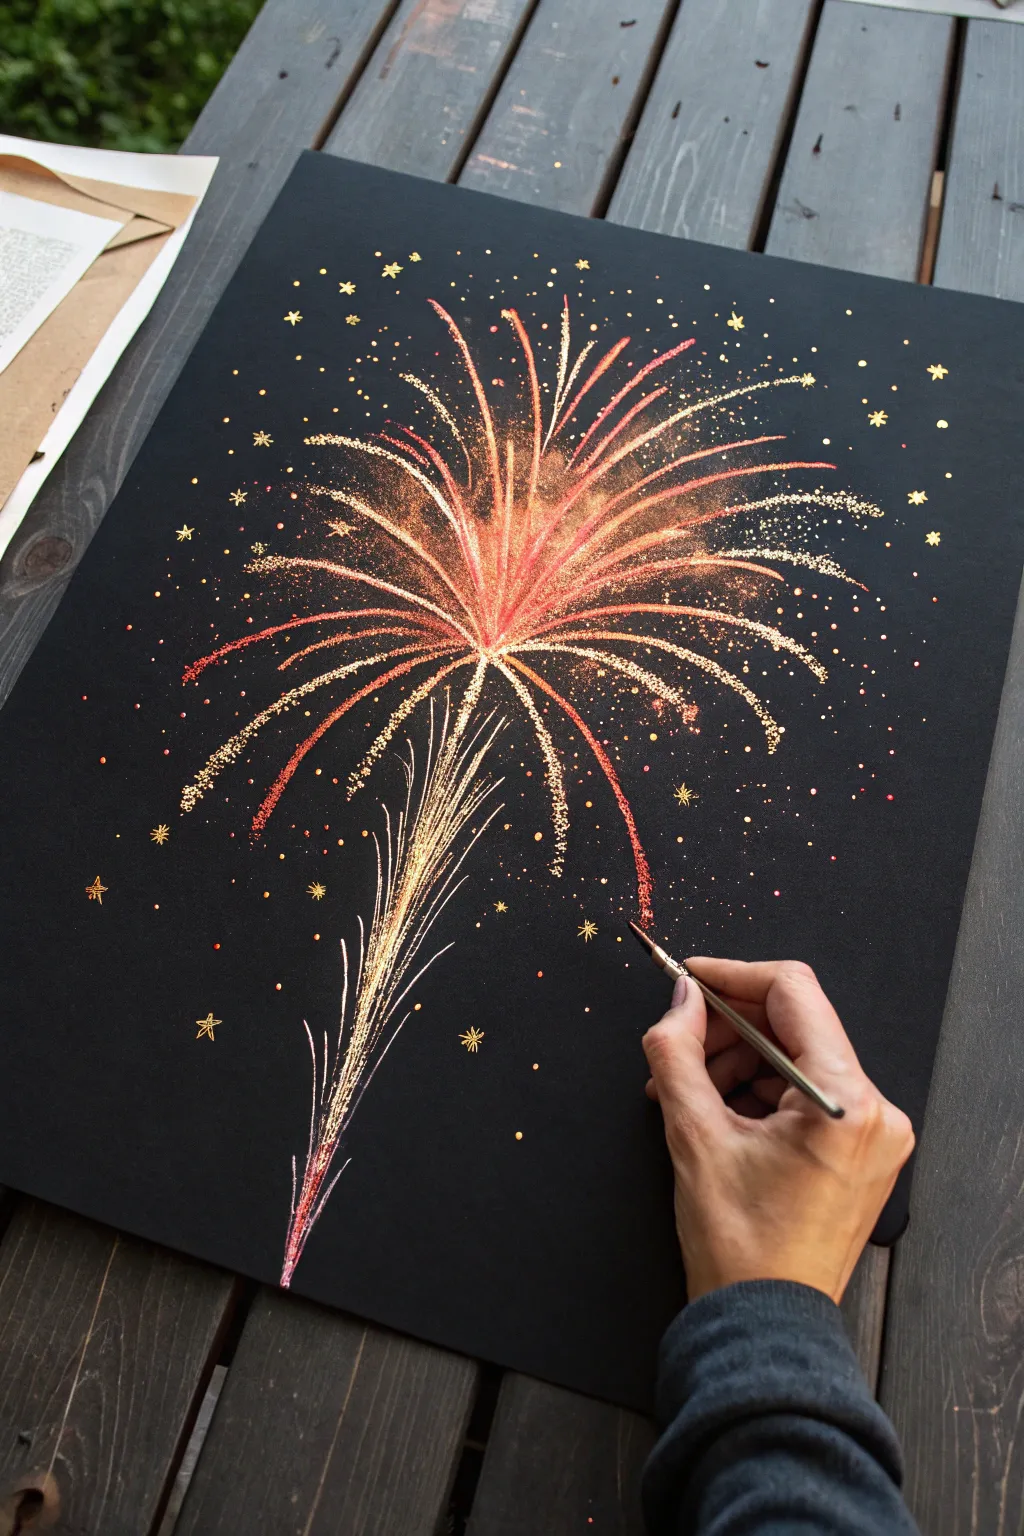
This striking firework study captures the explosive energy of a pyrotechnic burst using metallic paints on a stark black background. The technique combines dynamic, sweeping lines with delicate stippling to create a textured, shimmering effect that looks like real sparks freezing in mid-air.
Step-by-Step Tutorial
Materials
- High-quality black cardstock or mixed media paper (A3 or A4)
- Metallic acrylic paints (Gold, Copper, Red-Orange)
- Fine glitter paint or loose extra-fine glitter (optional)
- Round detail brushes (size 0 and 2)
- Small flat brush or rigger brush for long lines
- Palette
- Water cup and paper towels
- Pencil (white or metallic charcoal for sketching)
Step 1: Preparation and Base Structure
-
Prepare your canvas:
Begin by securing your black paper to a flat surface with masking tape if desired, though the heavy cardstock should lay flat on its own. Ensure the surface is completely clean of dust which shows up easily on black. -
Map the explosion center:
Using a white charcoal pencil or very light pressure with a standard pencil, mark a small dot slightly above the center of the page. This will be the origin point for your firework burst. -
Sketch directional guides:
Lightly sketch faint, curved lines radiating outward from your center dot. Imagine a fountain shape—lines shooting up and curving gravity-bound downward on the sides. Don’t crowd them; just place 5-7 main guidelines.
Step 2: Creating the Vertical Tail
-
Mix the comet tail color:
On your palette, mix a transition shade using metallic gold and a touch of copper. You want a color that looks like a burning fuse. -
Paint the upward thrust:
Using a rigger brush or a thin round brush, paint a series of vertical lines starting from the bottom center of the page, sweeping upward toward your explosion origin point. Let the lines be slightly jagged. -
Layer the tail texture:
While the first layer is tacky, add finer strokes of pure gold over the copper lines. Lift your brush at the end of each stroke to create a tapered, feather-like effect for the comet’s tail.
Stipple Technique
For uneven, organic sparks, try using an old toothbrush. Dip it in gold paint and flick the bristles with your thumb to spray tiny droplets.
Step 3: Exploding the Main Burst
-
Draft the red core:
Load a round brush with metallic red-orange paint. Paint the inner core of the explosion first, creating short, energetic strokes radiating directly from the center point. -
Extend the primary arms:
Switching to copper paint, extend long, sweeping curves outward following your pencil guides. I like to keep my wrist loose here to ensure the curves look organic rather than stiff. -
Add secondary branches:
Between your main copper arms, paint slightly shorter, thinner lines using the gold paint. This creates depth and makes the firework look spherical rather than flat.
Level Up: Glowing Core
Mix a tiny drop of neon orange or fluorescent pink into your center red paint. Under UV light or bright daylight, the core will seem to actually glow.
Step 4: Stippling and Sparkle Effects
-
Create the sparkle dust:
This is the crucial texture step. beautiful texture. Load a size 0 brush with gold paint. Instead of painting lines, tap the brush tip repeatedly along the outer edges of your copper curves. -
Vary the dot density:
Cluster the dots tightly near the lines, and space them out further as you move away. This mimics the look of sparks fizzling out as they travel. -
Dry brush the spray effect:
Take a nearly dry brush with vital gold paint and lightly drag it sideways from the main arms. This creates a fine, powdery ‘spray’ look that mimics smoke illuminated by the flash. -
Highlight the core:
Return to the center explosion point with your brightest gold or perhaps a mix of white and gold. Add intense, solid highlights where all the lines converge to suggest maximum heat.
Step 5: Final Stars and Details
-
Add floating embers:
Dip a toothpick or the very tip of your smallest brush into red-orange paint. Dot random embers floating below the main canopy of the firework. -
Paint distinct stars:
Using your fine detail brush, paint small 5-point stars scattered in the varying background distance. Start with yellow or gold paint. -
Vary star sizes:
Make some stars tiny dots and others clearly defined shapes. This variation pushes the background back and pulls the firework forward. -
Optional glitter application:
If you want extra shine, carefully apply a thin line of glitter glue or loose glitter over the thickest parts of the gold explosion arms. -
Clean up sketch lines:
Once the paint is 100% dry (give it at least an hour), use a soft eraser to gently remove any visible pencil guidelines from step 1. -
Final assessment:
Step back and look at the composition. If the outer edges feel empty, add a few more stray gold dots to balance the negative space.
Hang your shimmering pyrotechnic display somewhere distinct to enjoy the sparkle year-round


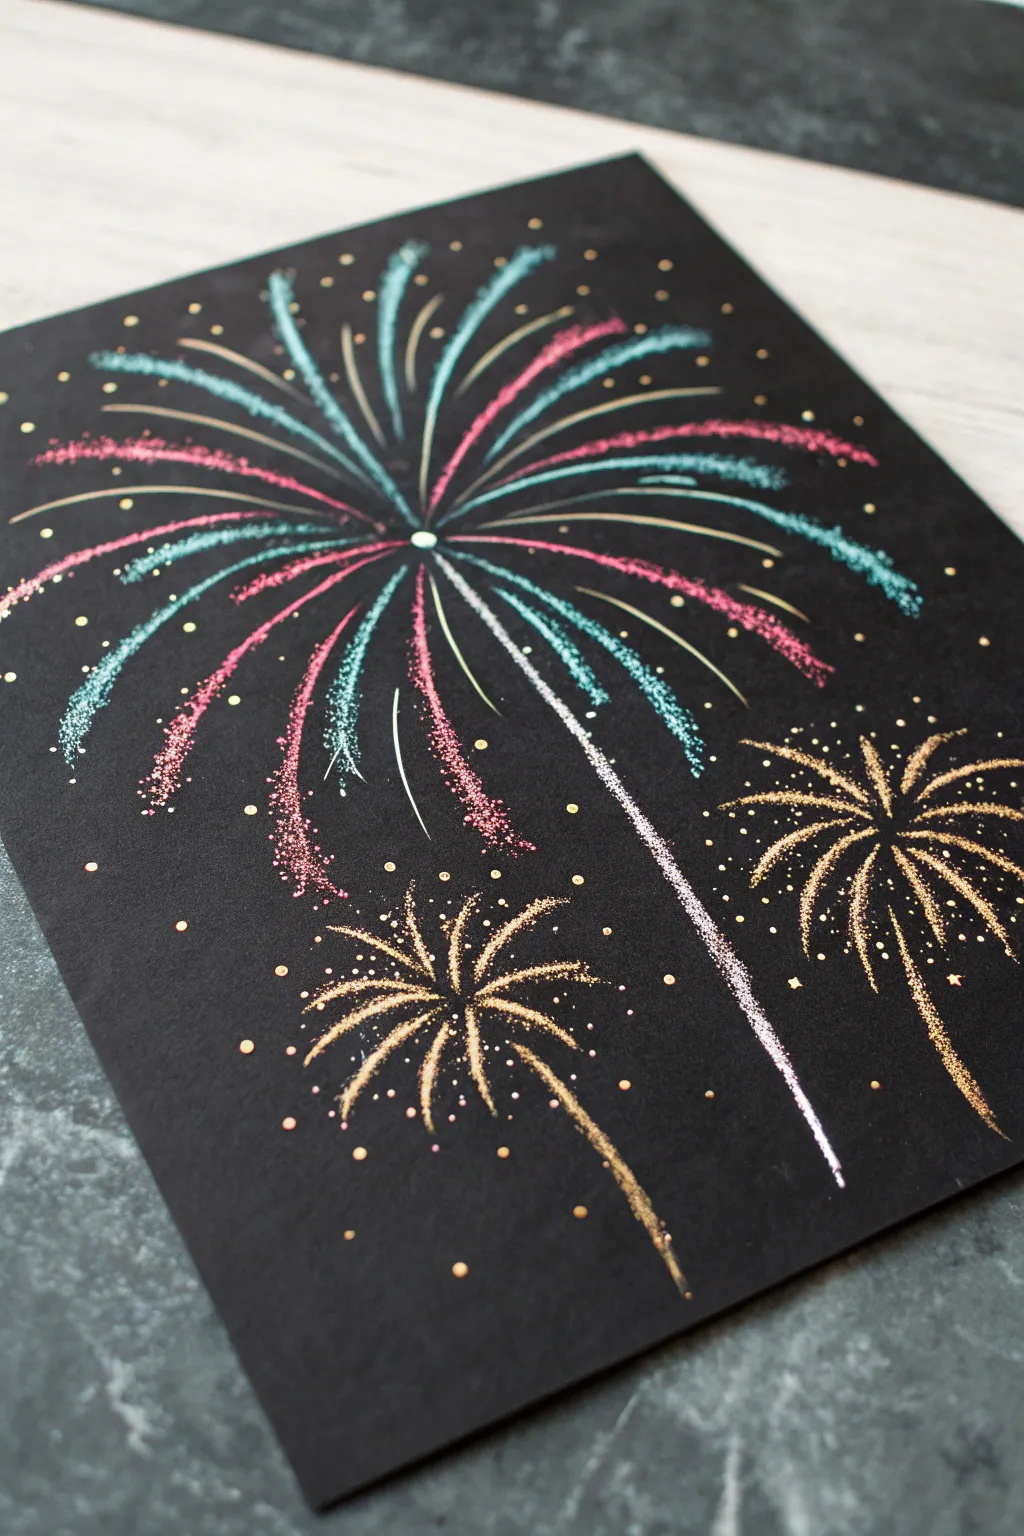
Splatter Painting Firework Explosions
Capture the magic of a night sky celebration with this striking black paper art project. Using metallic markers or pens creates a stunning contrast that makes each firework burst pop with vibrant color and shine.
Step-by-Step Guide
Materials
- Black cardstock or thick black art paper
- Metallic brush pens or metallic paint markers (Red, Blue, Gold/Bronze)
- Fine-point gold gel pen
- Silver or white gel pen (optional for highlights)
- Pencil (optional for sketching)
Step 1: Preparation & Composition
-
Choose your surface:
Begin with a clean sheet of high-quality black cardstock. The darkness of the paper is crucial for making the metallic colors vibrant. -
Plan the placement:
Visualize where your four main firework bursts will go. Place two near the top (red and a smaller gold one) and two near the bottom (blue and a large gold one) to balance the composition. -
Light sketching:
If you’re nervous about freehanding, make tiny, barely visible dots with a pencil to mark the center point of each explosion.
Flick of the Wrist
The key to realistic fireworks is lifting your pen quickly at the end of each stroke. This creates a tapered ‘tail’ that looks like fading light.
Step 2: Creating the Bursts
-
Start the red firework:
Using a red metallic brush pen, start at the center point of the top-left burst. Draw quick, outward strokes that flick at the ends to taper them naturally. -
Layering strokes:
Continue adding strokes in a relaxed circular pattern. Vary the lengths—some short, some long—to create a realistic, explosive look. -
Density control:
Draw more strokes near the center to make the ‘core’ of the firework look dense and bright, leaving more space between the tips. -
The blue starburst:
Move to the bottom left area. Using your blue metallic pen, replicate the same flicking motion. I like to curve these lines slightly to give the feeling of the firework falling or expanding. -
The golden explosions:
Create the large gold burst on the bottom right and the smaller one near the top center. The gold ink usually shimmers best when applied with confident, single strokes rather than re-coloring the same line. -
Add the trails:
For the bottom-right gold firework and top-left red firework, draw long, sweeping curved trails extending downward with a gold pen. These represent the rockets’ paths upwards.
Glitter Upgrade
While the ink is still wet on the thickest center parts, sprinkle a tiny pinch of extra-fine glitter in a matching color for actual texture and sparkle.
Step 3: Adding Detail & Sparkle
-
Draw mini-stars:
Switch to a fine-point gold gel pen. In the empty black spaces, draw tiny five-pointed stars or asterisks to fill the background. -
Create distant embers:
Dot the paper around the outer edges of your main fireworks with the gold pen. These tiny specks look like fading embers drifting away. -
Highlight the centers:
Go back to the centers of your main fireworks. Add a few tiny dots of contrasting colors (like gold dots in the red firework) to add depth. -
Small decorative bursts:
Draw a few tiny, simple starburst shapes (just cross-hatched lines) floating in the background to simulate distant fireworks. -
Final check:
Look for any large empty voids in your composition and fill them with a single gold dot or a tiny star. -
Dry completely:
Metallic inks can smudge easily if touched too soon. Let the artwork sit untouched for at least 15 minutes to fully cure.
Now you have a dazzling display of pyrotechnics that won’t fade away
BRUSH GUIDE
The Right Brush for Every Stroke
From clean lines to bold texture — master brush choice, stroke control, and essential techniques.
Explore the Full Guide
Sponge-Stamped Firework Clouds
Capture the magic of a summer night sky with this delicate watercolor resist project. By using masking fluid to preserve the white of the paper, you can create luminous, stylized fireworks that pop against a dreamy, blended galaxy background.
Step-by-Step Tutorial
Materials
- Cold-pressed watercolor paper (300gsm)
- Masking fluid (drawing gum)
- Ruling pen or fine brush for masking
- Watercolor paints: Indigo, Prussian Blue, Magenta, Purple
- Large round watercolor brush (size 10 or 12)
- Small round brush (size 2)
- Pencil and eraser
- Masking tape
- Board regarding paper
Step 1: Planning and Masking
-
Prepare your paper:
Begin by taping down all four edges of your watercolor paper to a hard board. This prevents the paper from buckling when we add the heavy water washes later and creates that crisp white collection border. -
Sketch the layout:
Lightly sketch seven or eight circles where you want your main firework bursts to be. Vary their sizes slightly, placing some higher and others lower to create a natural, asymmetrical look. -
Draw firework centers with mask:
Using a ruling pen or an old fine brush dipped in masking fluid, draw a small circle in the center of your first sketched firework light. Add a small dot right in the middle of that circle. -
Add the petals:
Carefully draw radiating lines outwards from the center circle. These should look like elongated teardrops or simple lines that thicken slightly at the end. Repeat this for all your firework bursts. -
Include extra details:
Dot tiny spots of masking fluid randomly in the upper left corner to represent distant stars. If you look closely at the reference, some lower foliage is also negative space, so you can mask out a few leaf shapes at the very bottom if you choose. -
Let it cure completely:
Wait until the masking fluid is 100% dry. It should feel hard and rubbery to the touch. Painting over wet mask will ruin your brush and tear the paper.
Protect Your Brushes
Masking fluid ruins bristles instantly! Coat your brush hairs in bar soap before dipping into the fluid. The soap acts as a barrier, making cleanup much easier.
Step 2: Creating the Galaxy Wash
-
Wet the paper:
Use your large brush to apply a generous layer of clean water over the entire paper surface, right over your dried masking fluid. The paper should glisten but not have puddles. -
Drop in the warm tones:
While the paper is wet, load your brush with Magenta or a reddish-purple. Touch it to the paper in the center and lower-middle areas, letting the pigment bloom and spread softly. -
Add the cool darks:
Switch to Indigo or Prussian Blue. Apply this to the top corners and the bottom edge. I like to encourage the dark blue to bleed slightly into the magenta areas to create deep violets. -
Intensify the contrast:
While the wash is still damp, drop more concentrated Indigo into the very top corners and right along the bottom edge where the foliage will be. This creates the depth needed for a night sky. -
Dry the background:
Let this layer dry completely. The paper must be bone-dry before the next step. You can use a hairdryer on a low, cool setting if you are impatient.
Torn Paper Trouble?
If removing the mask tears your paper, you likely removed it while the paper was still damp inside. The paper must be completely dry to the touch first.
Step 3: Revealing and Refining
-
Remove the mask:
Gently rub your finger or a rubber cement pickup eraser over the masking fluid to peel it away. This feels incredibly satisfying as the bright white paper is revealed underneath. -
Paint the foliage silhouettes:
Mix a strong, creamy consistency of Indigo or dark teal. Using your small round brush, paint stylized leafy plants rising from the bottom edge. -
Layer the leaves:
Ensure your painted leaves overlap the background wash. Paint some leaves shorter and some taller, reaching up toward the fireworks. The dark silhouette anchors the colorful sky. -
Retouch the fireworks:
If any of the white firework lines look too stark or disconnected, you can use a slightly damp brush to soften their edges just a tiny bit, blending them gently into the surrounding color. -
Final assessment:
Check for balance. If the sky needs more ‘stars,’ you can use white gouache or a white gel pen to add a few extra speckles in the darkest blue areas. -
Remove the tape:
Peel off the masking tape slowly at a 45-degree angle to reveal your clean, crisp frame.
Step back and admire how the white resist technique makes your painted fireworks glow brilliantly against the evening sky
Straw-Blown Spark Branches
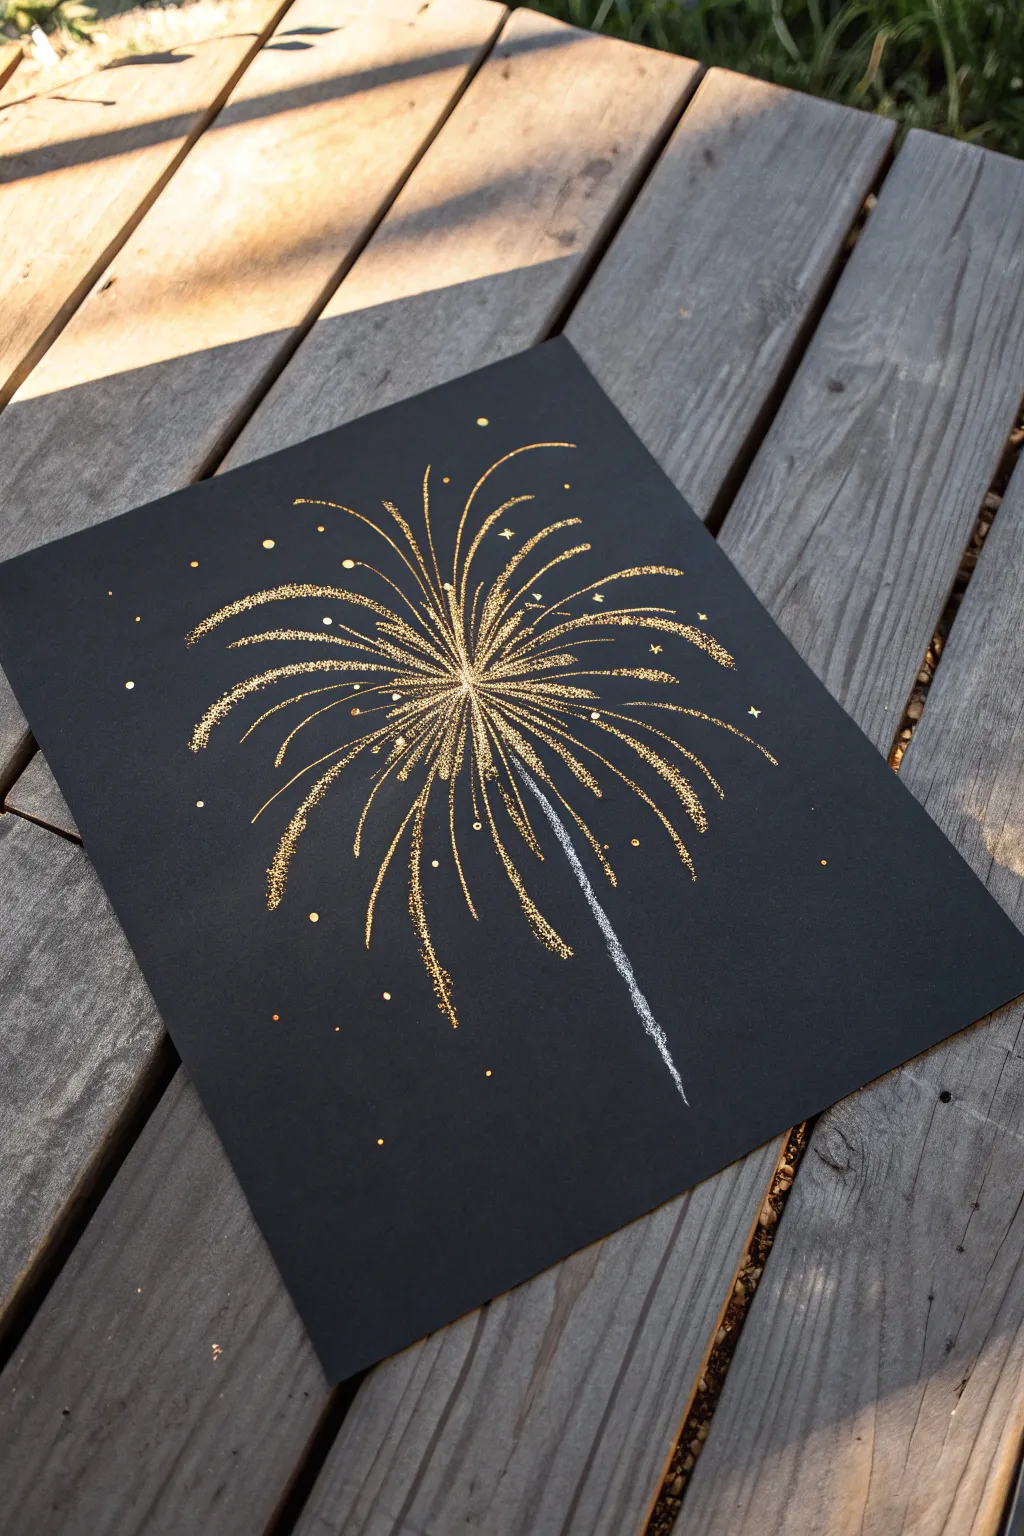
Capture the explosive beauty of a firework display using a simple straw-blowing technique that results in delicate, radiating lines. This method creates a dynamic, organic burst of gold against black paper, perfect for a festive celebration or New Year’s art project.
Step-by-Step
Materials
- Black cardstock or heavy watercolor paper
- Gold metallic acrylic paint or ink
- Silver metallic paint or white gel pen
- Water
- Plastic straw
- Small round paintbrush
- Palette or small dish
- Paper towels
Step 1: Preparation & Base
-
Prepare your workspace:
Since this technique involves blowing paint, cover your table with newspaper or a drop cloth to catch any stray droplets. -
Mix the paint:
Squeeze a generous amount of gold metallic paint onto your palette. Add water gradually, mixing until it reaches a fluid, ink-like consistency that runs easily but still holds its pigment. -
Create the center puddle:
Using your paintbrush, deposit a small, thick puddle of the thinned gold paint onto the center of your black cardstock. Don’t spread it out; you want a bead of liquid to work with.
Step 2: Blowing the Burst
-
Position the straw:
Hold your straw about an inch above the center of the paint puddle, aiming directly downwards to start. -
Blow the initial burst:
Give a strong, sharp puff of air through the straw to scatter the paint outward in multiple directions, creating the primary arms of the firework. -
Extend the rays:
Rotate the paper as needed. Bring the straw closer to the end of a paint streak and blow gently to extend the line further outward, creating longer, tapering tendrils. -
Create branching effects:
To make the firework look more realistic, blow at an angle against the existing wet lines to force them to split into smaller, delicate branches. -
Repeat for fullness:
If the center runs dry but you want a fuller shape, add another small drop of watered-down paint to the middle and blow again in the gaps.
Paint splatter control
If paint isn’t moving, add a drop of water. If it splatters too uncontrollably, thicken the mix slightly or blow softer.
Step 3: Embellishment & Details
-
Let the base dry:
Allow the blown paint to dry completely. Metallic acrylics usually dry quickly, but give it about 10-15 minutes to avoid smudging. -
Add the rocket trail:
Using a silver metallic paint or a white gel pen, draw a single, slightly shaky line from the bottom of the page up toward the center of the burst to represent the smoke trail. -
Highlight the center:
Dip a small brush into unthinned gold paint and dab the very center of the explosion to create a bright, solid core where the burst originated. -
Create shimmering sparks:
Load your brush with gold paint and gently tap the handle against your finger over the paper to splatter tiny dots around the main burst. -
Paint larger stars:
Use the tip of a fine brush or a toothpick to manually place slightly larger dots or tiny cross-shapes at the tips of some rays. -
Add silver accents:
Interperse a few tiny silver dots among the gold splatter to give the piece depth and extra sparkle. -
Refine the lines:
If any blown lines look too thick or abruptly ended, use a fine liner brush with gold paint to manually extend them into sharp points. -
Final dry:
Let the entire piece sit undisturbed until all the thick splashes and dots are fully hardened.
Glitter upgrade
While the paint is still wet, sprinkle ultra-fine loose gold glitter over the center burst for a textured, 3D sparkle effect.
Frame this sparkling creation to bring a permanent pop of celebration to your wall

PENCIL GUIDE
Understanding Pencil Grades from H to B
From first sketch to finished drawing — learn pencil grades, line control, and shading techniques.
Explore the Full Guide
Salt Resist Glittery Fireworks
Capture the magic of a night sky celebration with this mixed-media project that combines metallic sheen with gritty texture. Using black paper as a dramatic backdrop, you’ll create bursting fireworks that actually sparkle thanks to a clever salt-resist technique.
Step-by-Step Guide
Materials
- Heavyweight black cardstock or watercolor paper
- Liquid watercolor paints or food coloring (teal, magenta, purple)
- White or clear school glue (with a fine tip nozzle)
- Table salt
- Gold and silver metallic gel pens or paint markers
- Paintbrush
- A tray or baking sheet (to catch salt)
Step 1: Drafting the Bursts
-
Map out the centers:
Place your black cardstock on a flat surface. Visualize where your three main fireworks will go: one large burst near the top center and two smaller ones near the bottom corners to balance the composition. -
Draw the glue lines:
Starting with the large top firework, squeeze the glue bottle gently to draw curved lines radiating outward from a central point. Vary the lengths, making some lines long and sweeping, and others shorter. -
Add variance:
Ensure the glue lines taper off naturally at the ends. You don’t need perfect symmetry; organic, slightly uneven spacing looks more realistic. -
Create the smaller fireworks:
Repeat the process for the two lower fireworks. Use shorter strokes here to make them appear smaller or further away. Do not let these glue lines touch the upper firework.
Step 2: Applying the Texture
-
Salt the wet glue:
immediately place your paper into a tray or baking sheet. Generously pour table salt over every wet glue line until the white glue is completely covered and hidden. -
Let it set:
Wait about a minute for the glue to absorb the salt crystals, then gently lift the paper and tap the excess salt off into the tray. You should be left with raised, crusty white lines. -
Essential drying time:
Allow the salted glue to dry completely. This is crucial—if the glue is wet, the next step will turn into a mushy mess. I usually give it at least an hour or two.
Make it Sparkle
For extra shimmer, mix a pinch of superfine cosmetic glitter directly into your table salt before shaking it onto the glue. The paint will tint the salt, but the glitter will shine through.
Step 3: Adding Color
-
Prepare your paints:
Dilute your liquid watercolors or food coloring slightly if they are very thick. You want a watery consistency that will travel easily. -
Touch and flow:
Dip your brush into the teal paint. Gently touch the tip of the brush to the dried salt on one of the large firework rays. Watch as the salt wicks the color along the line. -
Alternate colors:
Switch to magenta for every other ray on the large firework. The colors might blend slightly where lines are close, creating a lovely gradient effect. -
Color the lower bursts:
Use a golden yellow or orange watercolor for the two bottom fireworks to mimic the look of gold sparks. Let the paint dry fully.
Paint Not Flowing?
If the paint isn’t traveling along the salt line, your paint is likely too thick or the brush is too dry. Add a drop of water to the paint and load the brush heavily so it drips upon contact.
Step 4: Metallic Embellishments
-
Draw fine connector lines:
Once the salt art is dry, take a silver or white metallic gel pen. Draw thin, wispy lines in between the salted rays of the large firework to add depth and fullness. -
Add the trails:
Using a silver marker or pen, draw a long, slightly wobbly line from the center of the large firework down toward the bottom of the page to represent the smoke trail. -
Enhance the gold bursts:
Use a gold metallic pen to add extra fine lines radiating from the centers of the two bottom fireworks, filling in the gaps between the salted texture. -
Create the gold trails:
Draw corresponding gold trails for the smaller lower fireworks, curving them slightly as if they are falling. -
Sprinkle the stars:
Using both silver and gold pens, dot the background with small speckles and tiny circles to represent distant sparks and stars. -
Final highlights:
Add a few larger dots of metallic ink at the very tips of the main firework rays for that extra pop of brightness.
Hang your artwork in a well-lit spot to see the salt crystals catch the light
Spray Mist Layered Firework Bursts
Capture the magic of a summer night with this mixed-media project that combines a dreamy, galaxy-inspired background with sharp, explosive firework bursts. This technique uses layers of spray mist and fine liner work to create depth and movement against a starry silhouette landscape.
Step-by-Step
Materials
- High-quality watercolor paper (cold press creates nice texture)
- Deep indigo and violet watercolor paints
- Black gouache or acrylic paint
- White acrylic ink or liquid watercolor
- Fine mist spray bottle with water
- Small spray bottle or toothbrush (for stars)
- Fine-point white gel pen or liner brush
- Gold or champagne metallic watercolor (optional)
- Masking tape
- A flat wash brush and a detail rigger brush
Step 1: Setting the Night Sky
-
Prepare your surface:
Begin by taping down all four edges of your watercolor paper to a sturdy board. This prevents warping and ensures a crisp, clean border like the one in the reference photo. -
Lay the base wash:
Using a wet-on-wet technique, saturate the paper with clean water. Drop in deep indigo concentrated at the top, blending smoothly into violet and lighter purple hues near the bottom third of the page to mimic atmospheric glow. -
Create the galaxy texture:
While the paint is still damp, lightly spritz water from a distance using your fine mist bottle. This pushes the pigment away in tiny spots, creating a nebulous, clouded texture perfect for a night sky. -
Deepen the contrast:
Once the first layer is tacky but not dry, drop more saturated indigo into the upper corners. This vignetting effect frames the eventual fireworks and makes the light pop. -
Add the stars:
Cover the bottom third of your painting with a scrap piece of paper to protect the horizon area. Load a toothbrush or stiff brush with white acrylic ink and flick a fine mist of ‘stars’ across the dark upper sky. -
Allow specifically for drying:
Let this background layer dry completely. This is crucial; if the paper is damp, your crisp firework lines will bleed and lose their definition.
Bleeding Lines?
If your white ink lines start spider-webbing into the blue background, your paper is still too damp. Stop immediately and use a hair dryer on a low, cool setting before continuing.
Step 2: Painting the Foreground
-
Draft the horizon:
Using black gouache or acrylic paint, sketch a jagged line across the bottom of the paper to represent a treeline. Keep the shapes irregular—pine trees vary in height and width. -
Fill the silhouette:
Fill in the tree shapes completely with the black paint. Ensure the coverage is opaque so no galaxy background shows through the trees.
Step 3: Exploding the Fireworks
-
Map the center points:
Visualize where your two main bursts will go. Place a tiny, faint dot of white ink where the center of the large upper burst and the smaller lower burst will be. -
Draw the main stems:
Using a rigger brush with thin white ink (or a mixture of white and a touch of gold), paint a long, slightly curved line rising from the trees toward each center dot. Taper the line so it gets thinner as it ascends. -
Draft the primary spokes:
Switch to your white gel pen or a very fine liner brush. Starting from the central dot, draw long, confident curves radiating outward in a spherical shape. I like to lift my pen quickly at the end of each stroke to create a tapered, feathery tip. -
Layer the secondary bursts:
Between your primary spokes, add shorter, finer lines. Vary the lengths to make the explosion look spherical and 3D, rather than like a flat wheel. -
Add the ‘sparkle’ texture:
Go back over your white lines and add tiny dots or dashed stippling along the outer edges of the spokes. This simulates the fizzing, crumbling sparks of a real firework. -
Highlight the core:
Place a slightly larger, brighter dot of white (or very pale yellow) at the center of the burst. Soften the edges of this dot slightly with a damp brush to make it glow. -
Create distant shimmer:
Dilute a tiny amount of white ink with water. Paint a few very faint, ghostly lines behind the main sharp white lines to suggest sparks that are fading into the smoke. -
Final reveal:
Once everything is bone dry, carefully peel away the masking tape at a 45-degree angle to reveal your clean white border.
Make It Shimmer
Mix a tiny pinch of mica powder or iridescent medium into your white ink for the firework bursts. It adds a subtle but magical glitter effect when the light hits the artwork.
Step back and admire your captured celebration, frozen in time against the cosmos.


Negative Space Masked Fireworks
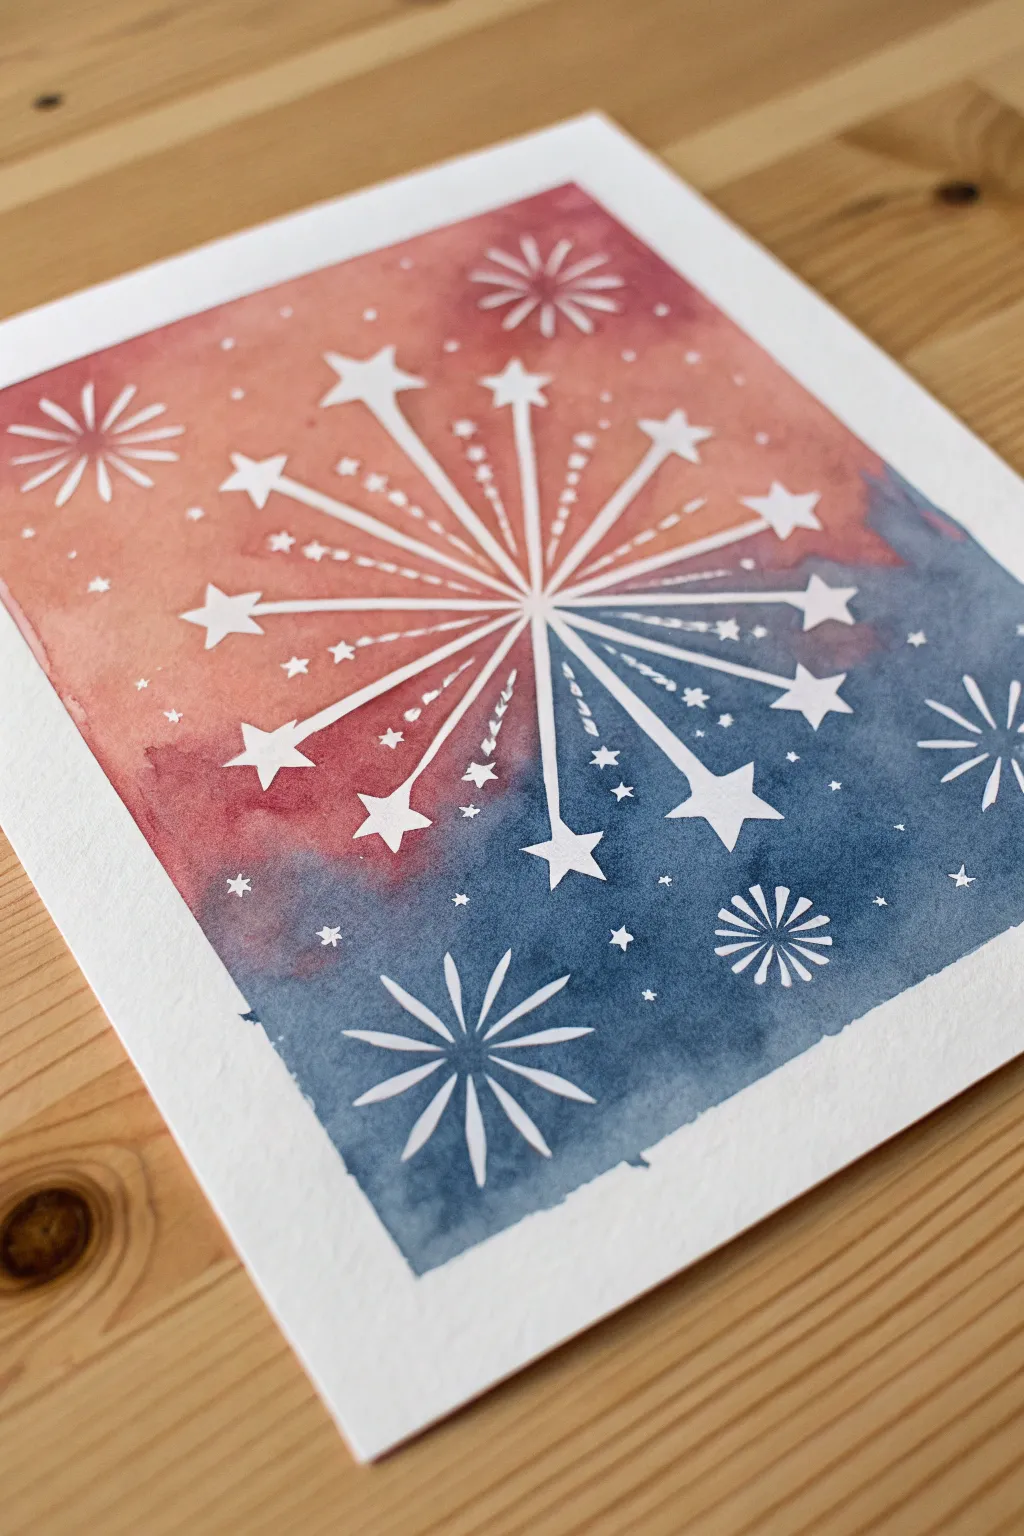
Capture the brilliant burst of a firework display using a clever negative space technique that keeps your brightest whites crisp against a colorful night sky. This project combines loose, wet-on-wet watercolor blending with precise masking fluid application for a stunning, high-contrast final reveal.
Detailed Instructions
Materials
- Cold press watercolor paper (cut to 5×7 or desired card size)
- Painter’s tape or washi tape
- Masking fluid (drawing gum)
- Fine point application tool (ruling pen, dip pen, or old brush)
- Watercolor paints (Indigo, Prussian Blue, Burnt Sienna, Alizarin Crimson)
- Large round watercolor brush (size 10 or 12)
- Small spray bottle with water
- Clean water and paper towels
- Rubber cement pickup tool or clean finger
Step 1: Preparation & Masking
-
Secure the paper:
Begin by taping down all four edges of your watercolor paper to a board or table surface. This creates that clean white border seen in the example and prevents the paper from buckling during the heavy wash. -
Plan the composition:
Visualize where your main explosion will be. In this piece, the primary starburst is centered, with smaller secondary burst motifs in the corners to balance the frame. -
Draw the center burst:
Dip your fine point tool into the masking fluid. Start from the center point and draw long lines radiating outward. Make sure to vary the lengths—some long, some short—to create a natural explosive look. -
Add the stars:
At the end of some of the radiating lines, draw simple five-pointed stars with the masking fluid. Leave other lines plain to add variety to the burst. -
Create secondary bursts:
In the corners (like the bottom left and top left), draw smaller floral-style firework shapes. Use simple tear-drop strokes radiating from a center point for these smaller elements. -
Sprinkle the details:
Fill the empty spaces between the main lines with tiny dots or small stars using the masking fluid. This mimics the sparkling debris of a firework trail. -
Let it cure fully:
This is crucial: allow the masking fluid to dry completely. It should turn yellowish or transparent and feel rubbery to the touch. If you paint too soon, you’ll smear the mask and ruin the crisp lines.
Sticky Situation
If masking fluid ruins your brush, coat the bristles with bar soap before dipping into the fluid next time. It creates a barrier that makes cleanup much easier.
Step 2: The Watercolor Wash
-
Pre-wet the paper:
Using your large round brush or a spray bottle, apply a generous layer of clean water over the entire paper surface, painting right over the dried masking fluid. -
Introduce warm tones:
While the paper is wet, load your brush with a mix of Alizarin Crimson and Burnt Sienna. Drop this warm reddish-orange color into the upper left area of the paper, letting it bloom naturally. -
Add the night sky:
Clean your brush, then load it with a deep Indigo or Prussian Blue. Apply this to the bottom right section and around the edges, letting it flow toward the middle. -
Blend the transition:
Allow the red and blue sections to meet in the middle. Since the paper is wet, they will mix to form a soft purple transition, creating a cohesive atmospheric gradient. -
Deepen the contrast:
I like to drop concentrated blue pigment into the wet paper near the bottom corner to make the sky look truly dark and dramatic. -
Wait for drying:
Leave the paper taped down and let it dry completely. The paper must be bone dry before the next step, or you risk tearing the surface.
Starry Night Shimmer
For extra magic, splatter a tiny bit of metallic silver or pearlescent watercolor over the dark blue sections after the main wash dries for a glittery effect.
Step 3: The Reveal
-
Remove the mask:
Once dry, gently rub the masking fluid with a rubber cement pickup tool or your clean finger. Start at the edges of the masked shapes and peel carefully. -
Peel the tape:
Slowly peel away the painter’s tape from the edges. Pull the tape away from the paper at a 45-degree angle to ensure a clean edge without ripping the paper fibers. -
Final touches:
Inspect the white areas. If any paint seeped under, you can carefully scrape it away with a craft knife or touch it up with white gouache if absolutely necessary, though the crisp paper white is usually best.
You now have a vibrant celebration captured on paper, ready to serve as a festive greeting card or wall art
Metallic Highlights for Extra Glow
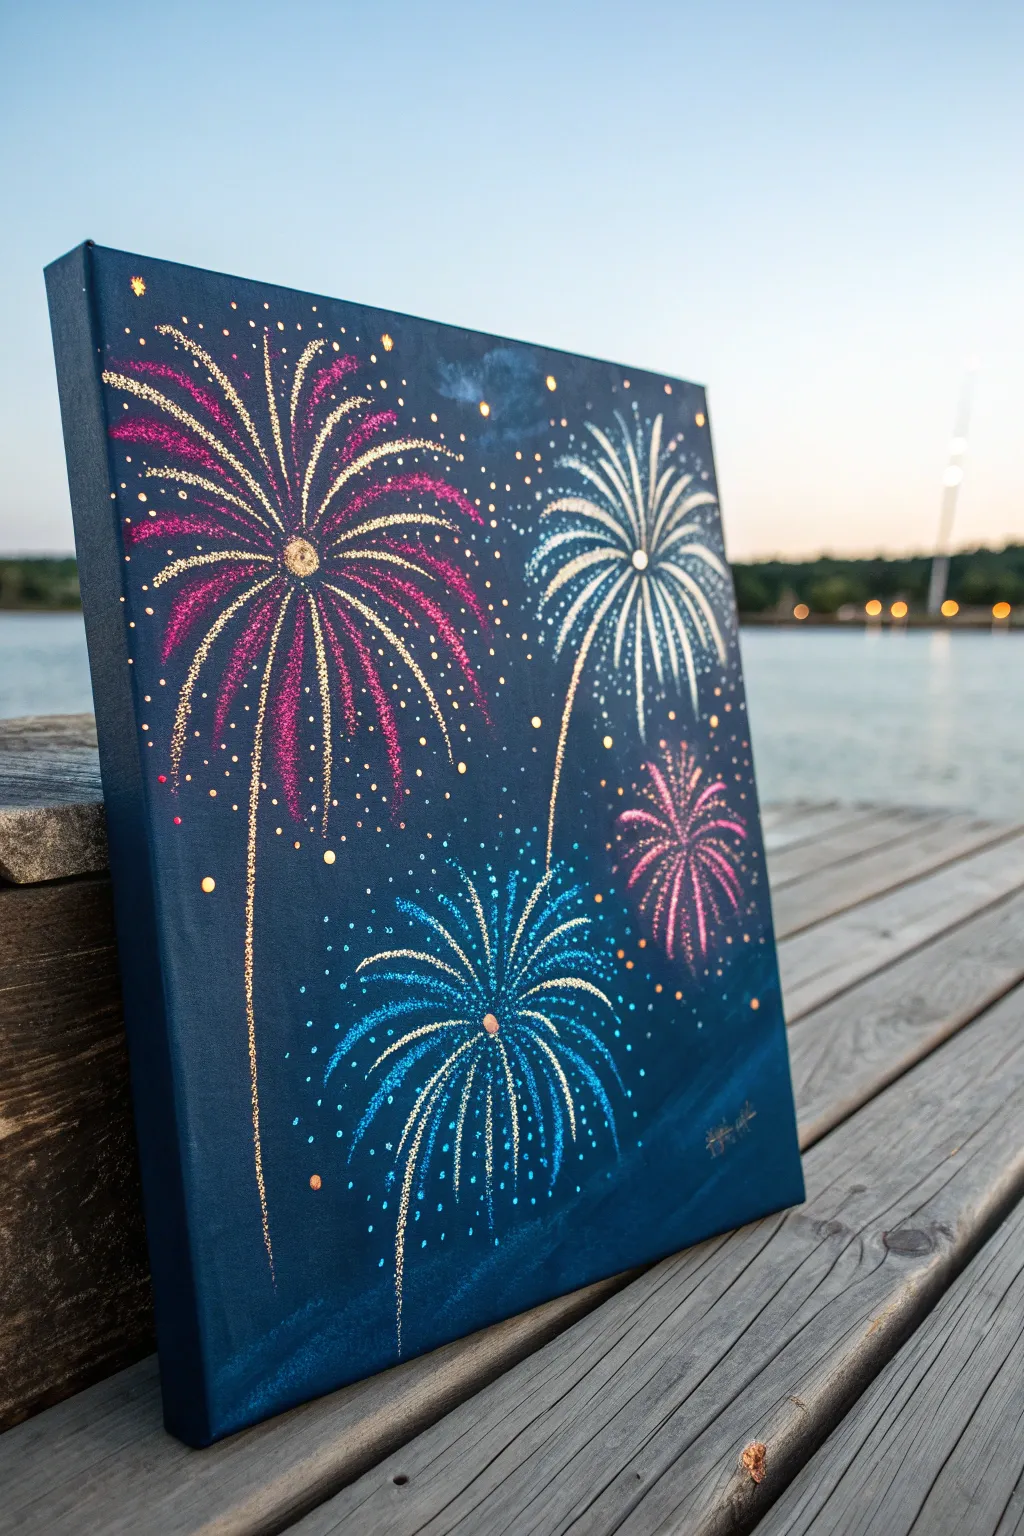
Capture the magic of a celebration with this dazzling acrylic painting that uses metallic touches to make fireworks pop against a deep blue sky. The combination of matte darks and glittering lights creates a stunning contrast that looks beautiful on any wall.
Step-by-Step Tutorial
Materials
- Stretched canvas (square format recommended)
- Deep blue acrylic paint (e.g., Prussian Blue or Navy)
- Black acrylic paint
- Metallic acrylic paints (Gold, Silver, Copper)
- Colored acrylic paints (Magenta, Cyan, Pink)
- Fine glitter or glitter paint (optional)
- Wide flat brush (for background)
- Fine liner brush (size 0 or 00)
- Small round brush
- Palette
- Water cup and paper towels
Step 1: Setting the Scene
-
Mix the background color:
Start by creating a very dark, rich midnight blue. Mix your deep blue acrylic with a touch of black. You want it to look almost like a night sky, but not pitch black, so the color still has some depth. -
Paint the base layer:
Using a wide flat brush, cover the entire canvas with your dark mixture. Ensure you paint the sides of the canvas too for a finished look. Apply long, smooth horizontal strokes to minimize texture. -
Create a subtle gradient:
While the paint is still slightly wet, I like to blend a tiny bit of lighter blue or white into the upper corners to suggest faint clouds or atmospheric depth. Keep this very subtle and blended. -
Let it dry completely:
Allow the background to dry fully. This is crucial because you don’t want the bright firework colors to muddy up with the dark background.
Keep it Fluid
Mix a drop of water or flow improver into your metallic paint. This helps the liner brush glide smoothly for long, uninterrupted firework trails.
Step 2: Designing the Bursts
-
Plan the composition:
Visualize where your four main fireworks will go. Place the largest burst (magenta) on the left, a tall one (white/silver) on the right, a lower blue one in the center-bottom, and a small pink one tucked on the side. -
Paint the centers:
Using a small round brush, dab a small dot of gold or copper metallic paint where the center of each firework will be. This acts as your anchor point. -
Draft the primary lines:
Switch to your fine liner brush. For the large magenta firework, mix magenta with a little white to make it opaque. Paint thin, curved lines radiating outward from the center dot, curving slightly downward at the ends like gravity is pulling them. -
Add the other colors:
Repeat the previous step for the other fireworks. Use white/silver for the top right burst, cyan blue for the bottom one, and soft pink for the small side burst. Keep the lines feathery and thin.
Step 3: Adding the Sparkle
-
Layer metallic gold:
Once the colored base lines are dry, take your gold metallic paint. Paint a second set of lines over and slightly offset from your colored lines. This creates a two-tone effect that mimics light hitting the smoke. -
Intensify the centers:
Go back to the center dots and build them up with thick gold or copper paint to give them texture and make them the brightest point. -
Create the trailing tails:
Drag a long, wavy line of gold paint extending downward from the center of the bursts to represent the rocket’s smoke trail rising up. -
Add stippled sparkles:
Dip just the tip of your liner brush into gold or silver paint. Gently dot (stipple) along the lengths of the firework rays. This breaks up the solid lines and makes them look sizzling.
3D Sparkle Effect
Use 3D fabric paint or puff paint for the gold dots and centers. Once dry, paint over them with metallic acrylics for raised texture that catches light.
Step 4: Final Details
-
Add floating embers:
Dot tiny specks of gold and the corresponding firework color loosely around the main bursts. These represent fading embers drifting in the wind. -
Paint distant stars:
Use a toothpick or the very tip of your smallest brush to place tiny faint gold dots in the empty background space to hint at distant stars. -
Highlight with glitter:
For the ultimate glow, carefully re-trace a few select rays with glitter paint. If using loose glitter, paint a thin line of clear medium and sprinkle a pinch of glitter over it while wet. -
Review and refine:
Step back and look at the overall balance. If a firework looks too dim, add a few strokes of pure white or silver to the brightest parts of the rays to simulate intense light.
Hang your masterpiece in a spot where evening light hits it to see those metallic sparks truly shine
Fireworks Over Water Reflections
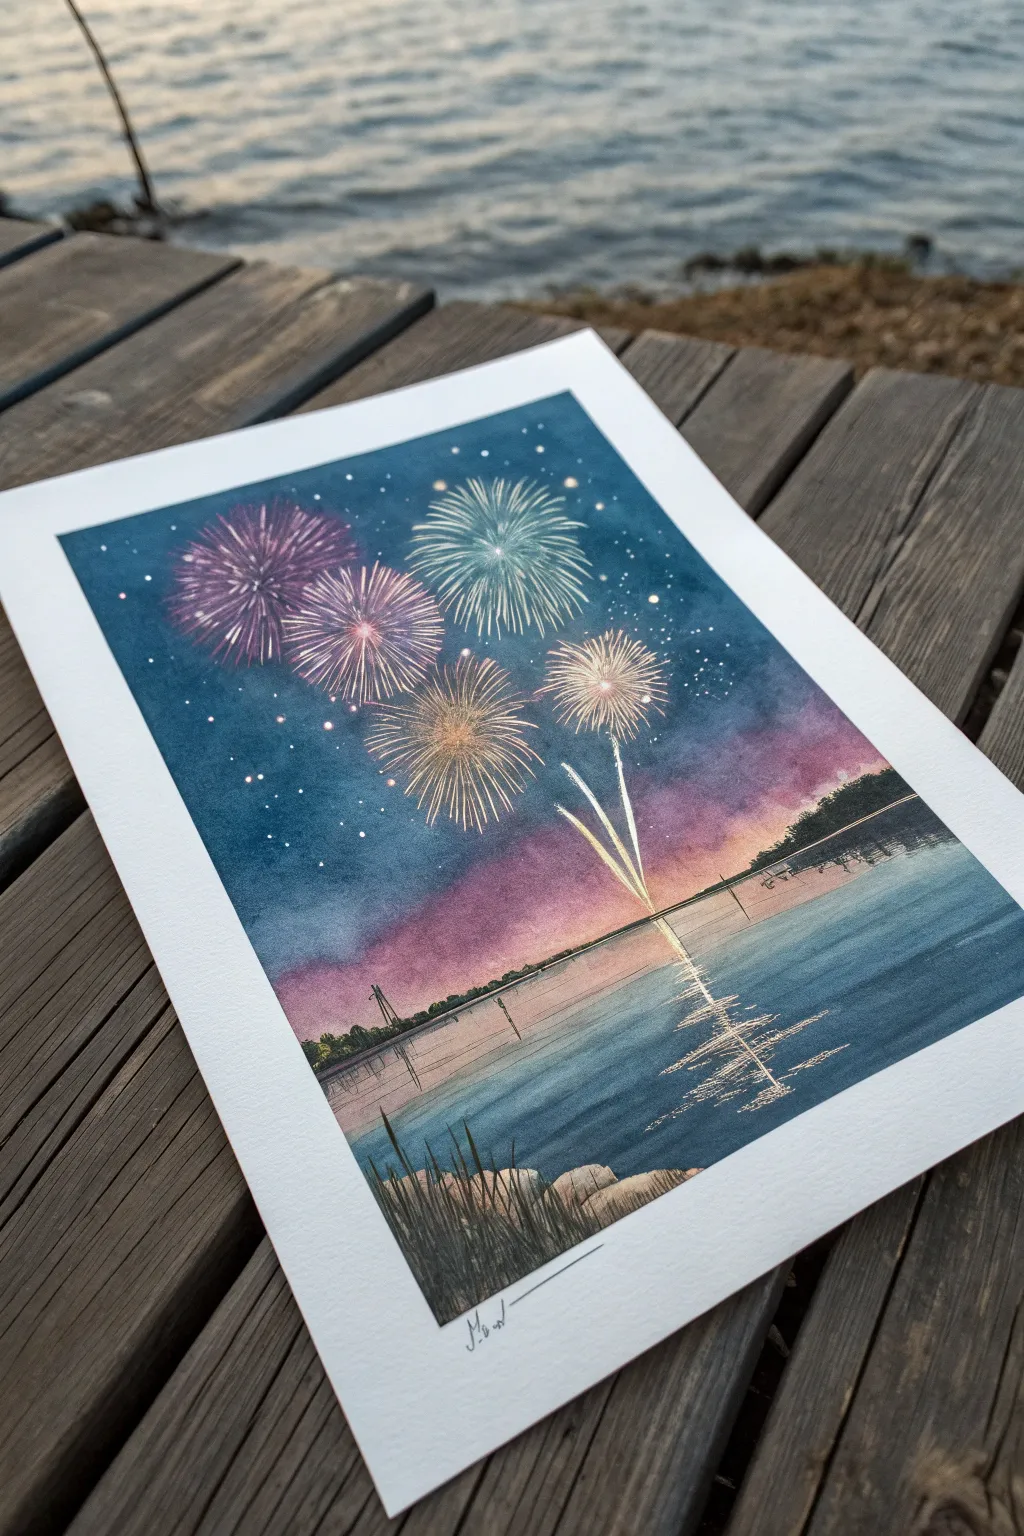
Capture the magic of a summer night with this vibrant watercolor project featuring exploding fireworks reflecting over a calm lake. This tutorial guides you through creating a deep, atmospheric sky and shimmering water reflections using simple masking and wet-on-wet techniques.
Step-by-Step Tutorial
Materials
- Cold press watercolor paper (300 gsm)
- Masking fluid (drawing gum) with a fine applicator or old brush
- Watercolor paints (Indigo, Prussian Blue, Purple/Violet, Magenta, Yellow Ochre, Burnt Sienna)
- White opacity paint (gouache or acrylic ink)
- Round brushes (sizes 4, 8, and 12)
- Fine liner brush (size 0 or 00)
- Two jars of water
- Painter’s tape
- Paper towels
- Salt (optional for texture)
Step 1: Planning and Masking
-
Secure the paper:
Tape your watercolor paper down to a flat board on all four sides. This creates that clean white border visible in the final piece and prevents the paper from buckling under heavy washes. -
Sketch the horizon:
Lightly draw a straight horizontal line about one-third of the way up from the bottom to separate the sky from the water. -
Mask the fireworks:
Using masking fluid and a fine applicator or an old brush, draw the fireworks. Create central points and flick outward in curved, spiky lines to simulate the explosions. Don’t forget the few trailing ‘stems’ shooting up from the horizon. -
Mask the stars and reflections:
Dot tiny specks of masking fluid in the sky area for stars. Add a few vertical, jagged lines in the water directly below where the main fireworks are to preserve white paper for the brightest reflections. -
Let it dry completely:
Wait until the masking fluid is distinctively rubbery and yellowed. If you paint over wet masking fluid, you will ruin your brushes and the paper.
Sticky Situation?
If your paper tears when removing the masking fluid, the paper was likely too soft or the fluid stayed on too long. Try high-quality cotton paper next time.
Step 2: Painting the Sky and Water
-
Wet the sky:
Use your largest brush to apply clean water to the entire sky area, stopping just at the horizon line. The paper should be glistening but not forming puddles. -
Create the sunset glow:
Drop a band of Magenta and soft Purple right along the horizon line while the paper is wet, allowing it to bleed upward slightly. -
Deepen the night sky:
Starting from the top of the paper, paint rich strokes of Indigo and Prussian Blue. As you move down towards the purple horizon, dilute the blue slightly so it blends seamlessly into the sunset colors without overpowering them. -
Paint the water base:
Once the sky is damp (not soaking), wet the water area. Mirror the colors from the sky: place the purple tones just below the horizon line and the deep blues at the very bottom, pulling the color horizontally. -
Add reflected ripples:
While the water area is still wet, use a slightly drier brush with dark Indigo to paint horizontal streaks. This suggests the movement of water and breaks up the reflection.
Step 3: Revealing and Refining
-
Remove the mask:
Ensure the artwork is 100% bone dry. Gently rub off the masking fluid with a clean finger or a rubber cement pickup tool to reveal the crisp white paper underneath. -
Tint the fireworks:
The white bursts look stark, so gently glaze over them. I usually paint the center of the bursts with varying translucent colors—pale yellow for one, soft pink or mint green for the others—leaving the tips white for sparkle. -
Paint the distant treeline:
Mix a dark, almost black green (Indigo + Green). Paint a silhouette of trees along the horizon line using a size 4 brush. Keep the shapes irregular and organic. -
Enhance the reflections:
Using thin white gouache or acrylic, carefully drag vertical zig-zag lines through the water reflection area to mimic the shimmering light on the waves.
Make it Sparkle
Mix a tiny bit of iridescent medium or silver watercolor into your white gouache for the final highlights. The fireworks will shimmer when the light hits them!
Step 4: Foreground Details
-
Add the foreground rocks:
At the very bottom edge, sketch in a few rock shapes. Paint them with a mix of Burnt Sienna and a touch of blue for shadow, keeping the tops light to show dimension. -
paint the reeds:
Using your liner brush and a dark green-black mix, flick quick, confident strokes upward from the rocks to create tall grasses or reeds in the immediate foreground. -
Final highlights:
Add a few extra dots of white gouache to the center of the fireworks for intensity, and perhaps a few more crisp stars in the darkest part of the sky. -
Remove the tape:
Slowly peel the painter’s tape away at a 45-degree angle to reveal your crisp, clean borders.
Frame your sparkling night scene and enjoy the permanent celebration on your wall.
Long-Exposure Style Light Trails
Capture the magic of a festive evening with this mixed-media painting that combines moody watercolor gradients with striking metallic accents. By layering opaque golds and whites over a deep indigo sky, you’ll create the illusion of long-exposure photography on paper.
How-To Guide
Materials
- Cold press watercolor paper (300 gsm)
- Watercolor paints (Indigo, Paynes Gray, Alizarin Crimson, Violet)
- Gold metallic paint (gouache or calligraphy ink)
- White opacity gouache or gel pen
- Soft round watercolor brush (size 8 or 10)
- Fine liner brush or rigger brush (size 0 or 1)
- Painter’s tape
- Jar of clean water
- Paper towel
Step 1: Setting the Atmosphere
-
Prepare your canvas:
Tape down all four edges of your watercolor paper to a sturdy board. This prevents buckling and creates that crisp white border seen in the final piece. -
Wet the paper:
Using your large round brush, apply a clean coat of water across the entire surface of the paper. You want it glistening or having a slight sheen, but not swimming with puddles. -
Paint the horizon glow:
While the paper is wet, drop in a mix of Alizarin Crimson and Violet near the bottom third of the page. Let the colors bleed softly upwards to create the ambient light pollution of the horizon. -
Add the night sky:
Load your brush with heavy pigment—Indigo mixed with a touch of Payne’s Gray. Start at the very top and paint downwards, letting the dark blue gradually meet and blend into the purple horizon. -
Deepen the contrast:
While the wash is still damp, dab more concentrated Indigo into the upper corners and top edge. This vignette effect drives focus to the center where the fireworks will be. -
Let it dry completely:
This is crucial; the paper must be bone dry before moving on. If the paper is cool to the touch, it’s still wet. I sometimes use a hairdryer on a low setting to speed this up.
Pro Tip: Flow is Key for Lines
For smooth, long trails, use a ‘rigger’ brush with long bristles. It holds more paint, allowing you to paint long, unbroken curves without stopping to reload.
Step 2: Painting the Foreground & Structure
-
Paint the tree silhouettes:
Mix a very dark, near-black shade using Indigo and Payne’s Gray. With a smaller brush, dab irregular shapes along the very bottom edge to suggest a distant pine forest. Vary the heights to keep it natural. -
Plan the firework placement:
Visualize where your three main bursts will go. You want one large burst slightly off-center right, one to the left, and a smaller one lower down. No pencil sketch is needed; just keep the positions in mind. -
Create the spiral burst:
For the unique, rose-colored firework on the right, mix a slightly opaque pink (gouache works best here). Paint a loose, spiraling coil shape that acts as the center ‘body’ of the explosion.
Step 3: Adding the Sparkle
-
Prepare the metallic paint:
Get your gold metallic paint or ink ready. It should be the consistency of thin cream so it flows smoothly off a fine liner brush. -
Paint main stems:
Starting from the imagined center of each firework, paint long, curved lines extending outward. These are the primary trails. Use a flicking motion: press down at the start and lift up as you drag to get a tapered end. -
Add secondary gold trails:
Between your main stems, add shorter gold strokes. Vary the curvature—some arcing left, some right—to mimic the chaotic beauty of an explosion. -
Layer in white accents:
Using white gouache and a fine brush, add white trails alongside the gold ones, especially on the right-hand spiral firework. The white adds brightness and depth, making the gold pop. -
Detail the spiral center:
Go back to that pink spiral shape. Outline parts of the coil with thin white and gold strokes to give it definition and make it look like spinning light. -
Create the ‘palm’ effect:
For the top-left firework, ensure the gold strokes droop significantly at the ends, resembling the leaves of a palm tree, which is a classic firework shape. -
Add distant stars:
Dip the tip of your smallest brush into the gold paint. Dot tiny stars randomly in the dark blue areas. Paint a few four-pointed sparkle shapes for larger, twinkling stars. -
Final falling embers:
Add a few disconnected dots or dashes at the ends of the light trails to represent fading embers dropping toward the ground. -
Reveal the border:
Once everything is absolutely dry, slowly peel off the painter’s tape at a 45-degree angle to reveal your crisp, clean edges.
Troubleshooting: Paint Won’t Pop
If your gold or white looks dull, the background wash might not have been dark enough. Layer the metallic paint a second time once the first coat dries for maximum opacity.
Step back and admire your dazzling pyrotechnic display captured on paper
Abstract Firework Color Fields
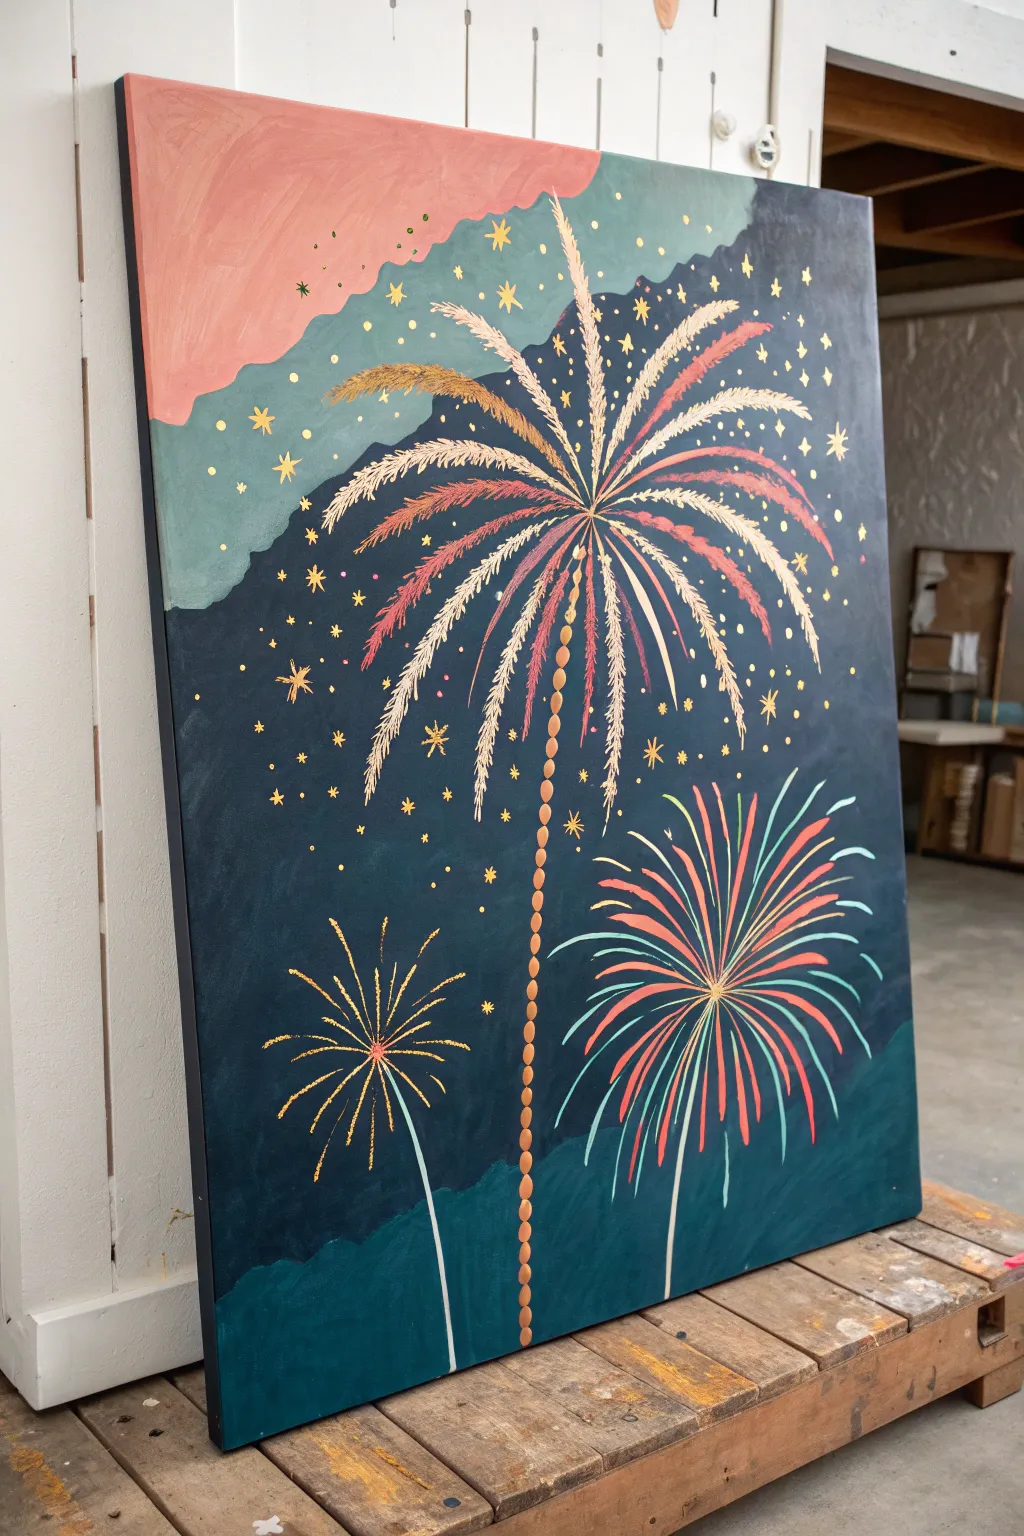
This striking large-scale artwork merges the festive energy of fireworks with organic, palm-like shapes set against retro-inspired color fields. The design uses bold blocking and delicate metallic accents to create a scene that feels both celebratory and serene.
Step-by-Step
Materials
- Large canvas (e.g., 24×36 or larger)
- Acrylic paints: Navy blue, sage green, salmon pink, teal, white, metallic gold, copper
- Wide flat brush (2-3 inch)
- Medium round brush
- Fine liner brush
- Palette or paper plates for mixing
- Pencil
- Ruler (optional)
- Cup of water and paper towels
Step 1: Planning the Background Layers
-
Map out the color zones:
Begin by lightly sketching the undulating horizon lines on your canvas. You’ll need three main zones: a top sky area for the pink, a middle mountain-like ridge for the sage, and a large bottom area (about 60% of the canvas) for the deep navy blue. -
Paint the pink sky:
Load your wide flat brush with salmon pink paint. Fill in the top left corner, ensuring the bottom edge follows a soft, wavy line rather than a perfect straight edge to keep that organic feel. -
Add the sage ridge:
Mix a muted green or straightforward sage color. Paint the middle band, letting the top edge meet the pink and the bottom edge dip down into a valley shape on the left side, curving upward towards the right. -
Block in the navy background:
Fill the rest of the canvas with a rich navy blue. This dark background is crucial as it will make your metallic fireworks pop later. I recommend two coats here for solid, opaque coverage. -
Define the bottom teal hills:
At the very bottom of the canvas, paint a low, rolling landscape using a deep teal color. This grounds the composition and adds one final layer of depth. -
Allow thorough drying:
Let the entire background dry completely. Because we will be painting detailed lines over these blocks, the surface must be non-tacky.
Flow Factor
Add water to your metallic paints until they have an ink-like consistency. This helps the liner brush glide smoothly for long, crisp lines.
Step 2: Creating the Central Firework Palm
-
Sketch the main spine:
Using a pencil very lightly, mark a vertical line slightly right of center for the main firework’s trunk. -
Dot the trunk:
Dip a medium round brush into copper or bronze paint. Instead of painting a solid line, dab a vertical row of oval shapes stacked on top of each other to create the trunk. -
Fan out the fronds:
Switch to a liner brush with gold paint. Starting from the top of your trunk, paint long, curved lines radiating outward in a spherical, fan-like shape. -
Add the feathered texture:
For the signature ‘palm’ look, add tiny, short dashes along both sides of each gold spine you just painted. This creates a feathery, fringed texture. -
Layer in pink accents:
Clean your brush and pick up some of the salmon pink used in the sky. Add a second layer of feathery fronds interspersed between the gold ones to tie the color palette together. -
Mix white highlights:
Add a few final fronds in white or very pale cream to bring brightness to the center of the explosion.
Step 3: Adding Secondary Bursts and Details
-
Paint the lower right burst:
In the bottom right quadrant, create a smaller firework using red and teal paints. Paint simple, smooth curved lines radiating from a center point, skipping the feathery texture for variety. -
Create the lower left sparkler:
On the left side, paint a smaller, starburst-style firework using thin gold lines. Give this one a long, thin stem that reaches down into the teal hills. -
Add floating stars:
Using your smallest brush and gold paint, scatter small four-point and five-point stars throughout the navy and sage sections. -
Stipple the dust:
Create the look of shimmering dust by dotting tiny specks of gold and white paint around the main firework and in the upper sky area. -
Detail the mountain edge:
Use a very fine brush to add tiny dots or small star shapes along the border where the sage green meets the pink sky. -
Final touches:
Step back and assess your composition. If the navy area feels too empty, add a few more gold specks or faint stars to balance the negative space.
Gilded Texture
Once the paint is dry, careful apply gold leaf adhesive and foil to just the center of the main firework for a true metallic shine.
Hang your new masterpiece and enjoy the permanent celebration on your wall

Have a question or want to share your own experience? I'd love to hear from you in the comments below!