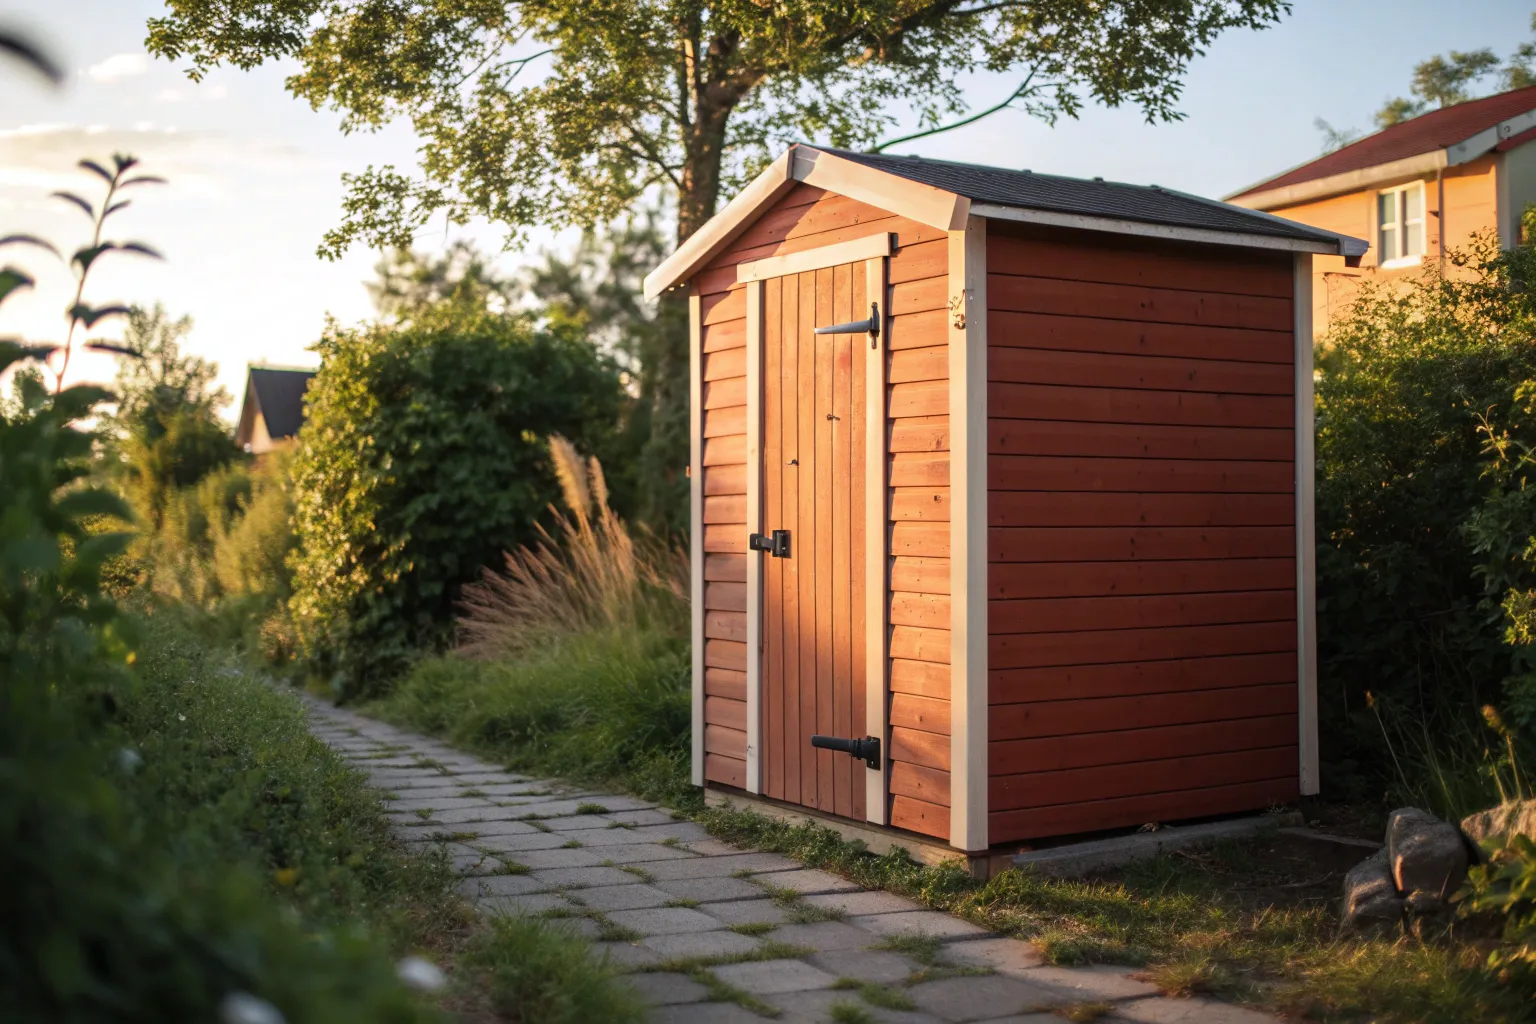
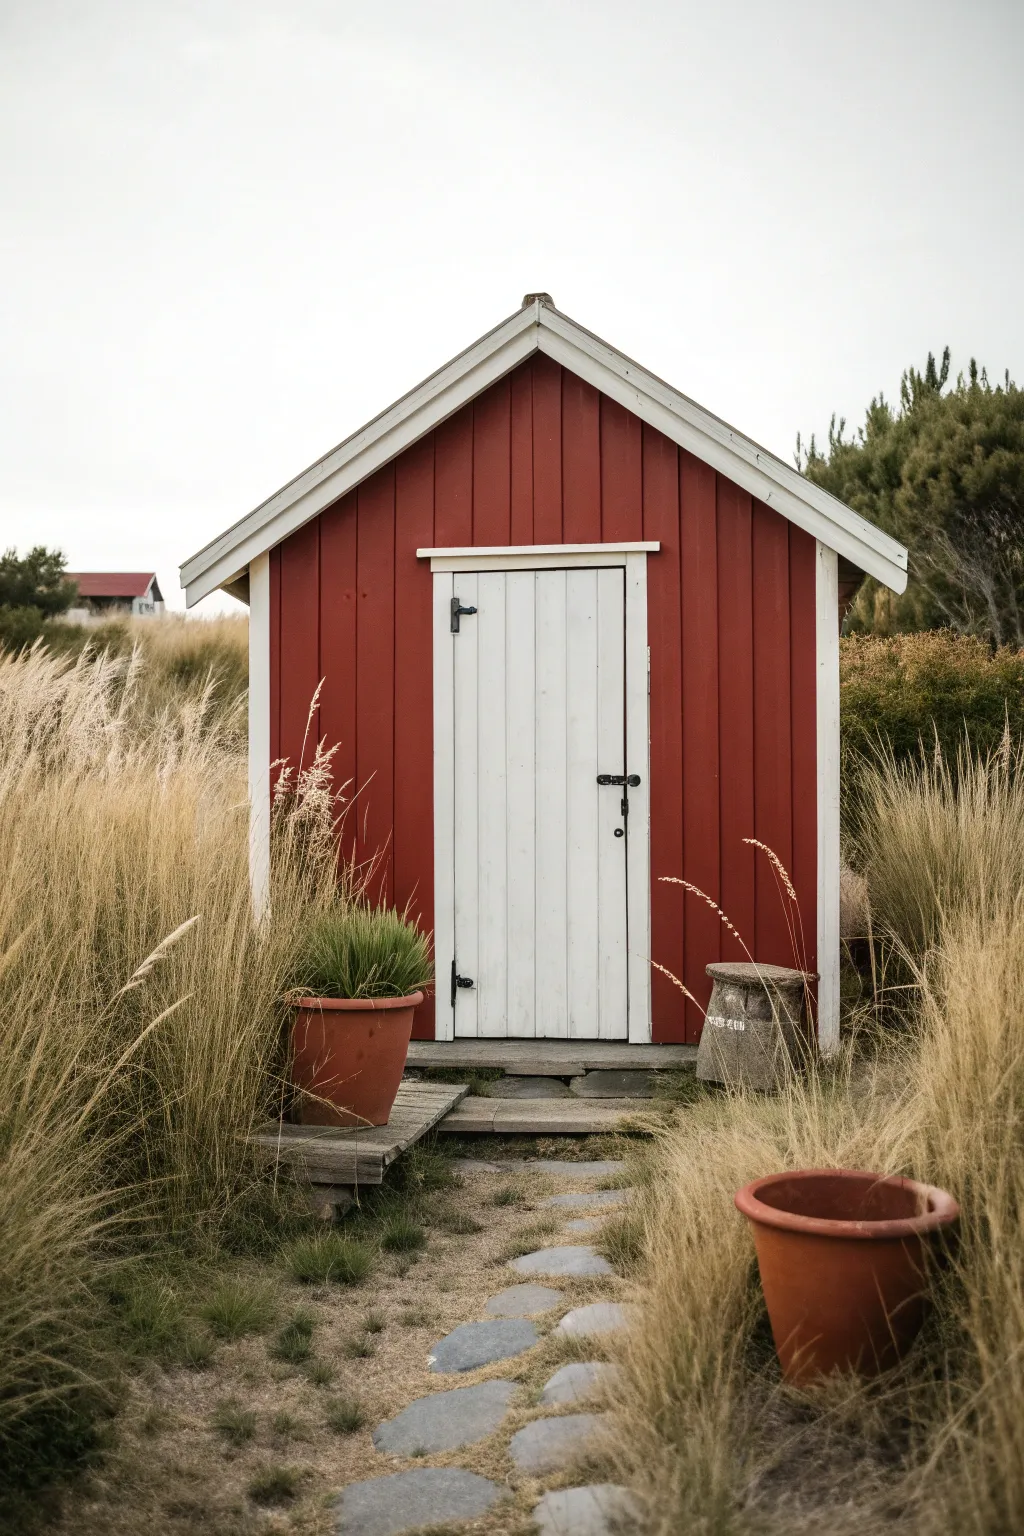
A plain shed can turn into the cutest little backyard feature with the right paint color and a few thoughtful details. Here are my favorite painted shed ideas—starting with the classic, crowd-pleasing looks and ending with some artsy, head-turning twists.
Classic Two-Tone Shed With Crisp Trim
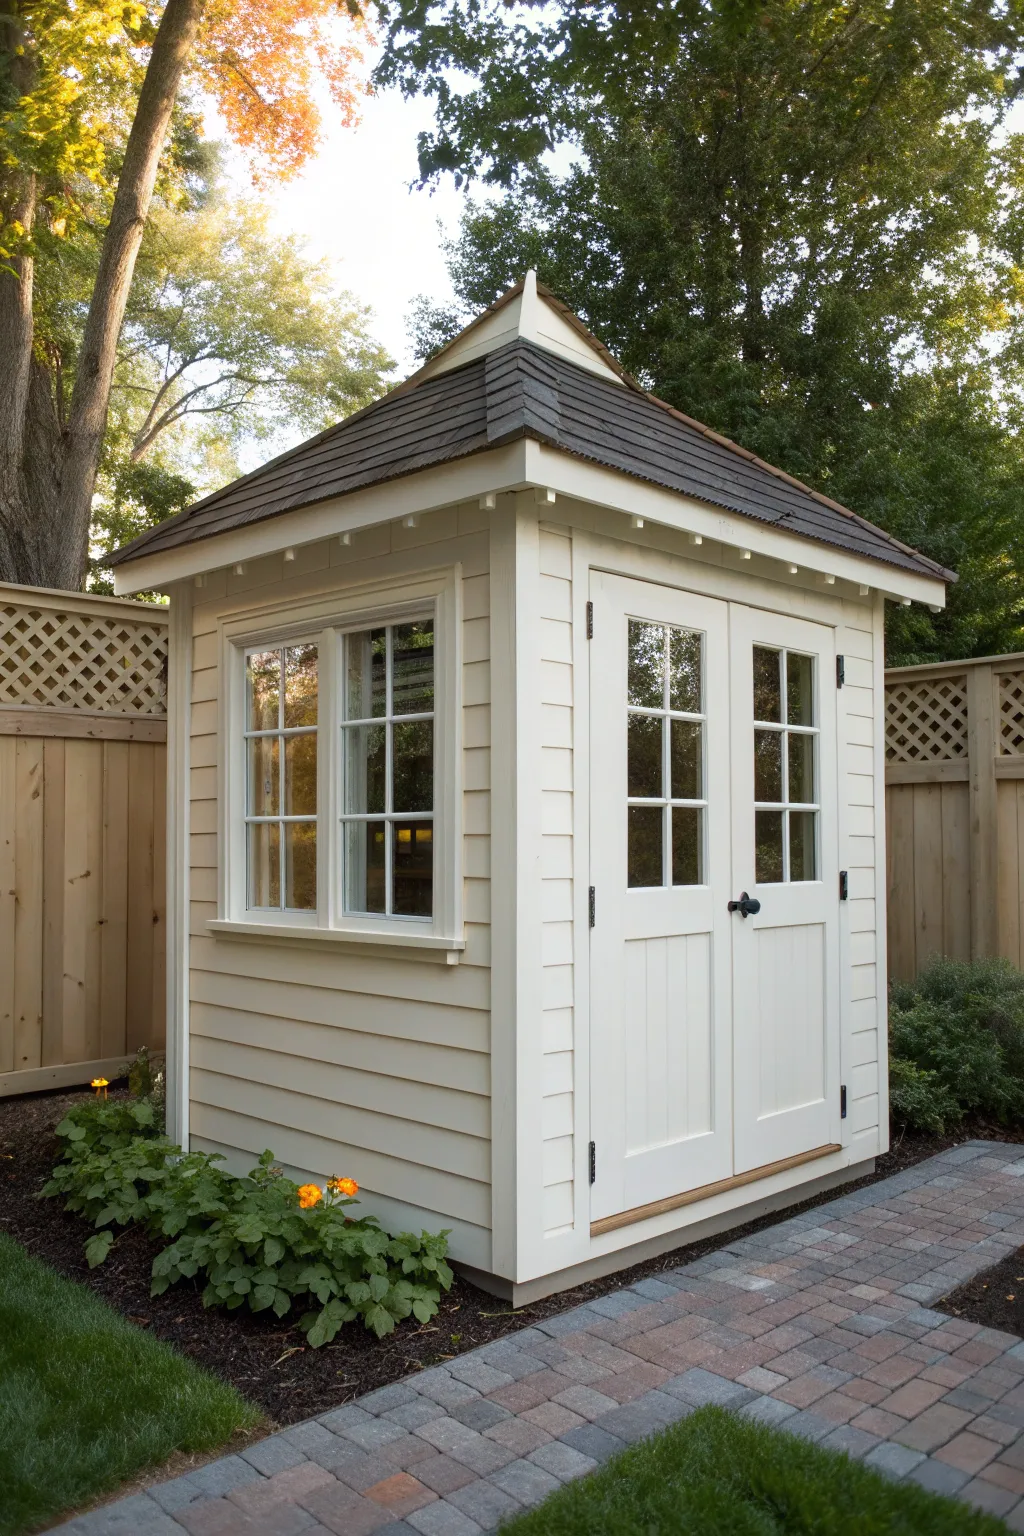
Transform a standard backyard structure into a charming garden retreat with this classic two-tone paint scheme. The soft beige siding paired with crisp white trim creates a timeless look that feels both inviting and sophisticated, perfectly complementing natural landscaping.
Step-by-Step Tutorial
Materials
- Exterior acrylic latex paint (satin finish, soft beige)
- Exterior acrylic latex paint (semi-gloss finish, bright white)
- Exterior primer (if shed is unpainted wood)
- Paint sprayer (optional but recommended for siding)
- Synthetic bristle sash brush (2.5 inch)
- Mini roller and tray
- Painter’s tape (exterior grade)
- Drop cloths or plastic sheeting
- Sanding block (medium grit)
- Caulk and caulking gun (exterior grade)
- Screwdriver or drill (for hardware removal)
- Ladder
Step 1: Preparation and Prime
-
Clear the area:
Begin by removing any existing planters, mats, or decorations from around the shed base. Pull weeds or trim grass back to ensure you have clear access to the bottom edge of the siding. -
Remove hardware:
Using your drill or screwdriver, take down the exterior light fixture, door handles, hinges (if possible), and any latch hardware. Place all screws and pieces in a labeled bag so nothing gets lost. -
Clean and prep surfaces:
Wash the shed exterior to remove dirt, mildew, or cobwebs. A pressure washer on a low setting works well, or use a scrub brush with soapy water. Let the wood dry completely for at least 24 hours. -
Patch and caulk:
Inspect the siding for any gaps, particularly around the window frames and door casings. Apply exterior grade caulk to seal these seams for a watertight finish. Fill any nail holes with wood filler. -
Protect the surroundings:
Lay down drop cloths over the gravel and paver path to catch any drips. Mask off the window glass carefully with painter’s tape to ensure your crisp lines later. -
Apply primer:
If painting bare wood or making a drastic color change, apply a full coat of quality exterior primer. I prefer using a roller for the broad sections and a brush to cut in the corners.
Step 2: Painting the Siding
-
Cut in the edges:
Once the primer is dry, start with your beige siding color. Use an angled sash brush to paint along the edges where the siding meets the trim, roofline, and foundation. -
Roll or spray the main body:
Fill in the large vertical siding panels with the beige paint. A paint sprayer makes quick work of this and gets into the grooves easily, but a thick-nap roller works too. Apply two coats for even coverage. -
Allow specifically adequate drying time:
Check the manufacturer’s instructions for drying times between coats. Do not rush this step; the base color must be fully cured before you start taping over it for the trim work.
Hardware Refresh
If your existing hinges and handles are rusty or the wrong color, spray paint them with matte black metal spray paint before reinstalling for that high-contrast look.
Step 3: Detailing the Trim
-
Mask the siding:
For the sharpest lines, apply painter’s tape to the beige siding right where it meets the trim boards. This protects your fresh beige coat while you focus on the white. -
Paint the fascia and corners:
Using the semi-gloss white paint, coat the fascia boards under the roofline and the vertical corner trim pieces. The semi-gloss finish adds a nice durability and subtle shine. -
Tackle the door frames:
Paint the door casings and the decorative cross-buck details on the doors themselves. A smaller 1.5-inch angle brush helps navigate the window panes on the doors without making a mess. -
Paint the window trim:
Carefully paint the frames around the side windows. Since you taped off the glass earlier, you can paint confidently here. Ensure you get the underside of the sills. -
Second coat for brightness:
White paint over wood often needs a second coat to look truly opaque and bright. Apply a second layer to all trim pieces once the first is dry to the touch.
Clean Lines Hack
To prevent paint bleeding under tape, seal the tape edge with a tiny amount of the *base* color (beige) first. Let it dry, then apply your white trim paint.
Step 4: Finishing Touches
-
Remove tape:
Ideally, peel off the painter’s tape while the final coat is still slightly tacky. Pull the tape at a 45-degree angle away from the painted edge to prevent peeling. -
Reinstall hardware:
Once the paint has cured (usually 24-48 hours), screw the black hinges, handles, and light fixture back into place. The black hardware provides a stunning contrast against the new paint job. -
Clean glass:
Remove any tape residue from the windows and give the glass a final shine with glass cleaner. -
Style the entrance:
Reintegrate the landscaping elements. Place the woven planters with yellow marigolds on either side of the door and lay down a fresh coir doormat to complete the welcoming look.
Step back and admire how a simple two-tone palette completely revitalized your garden focal point


Sage Green Shed That Melts Into the Garden
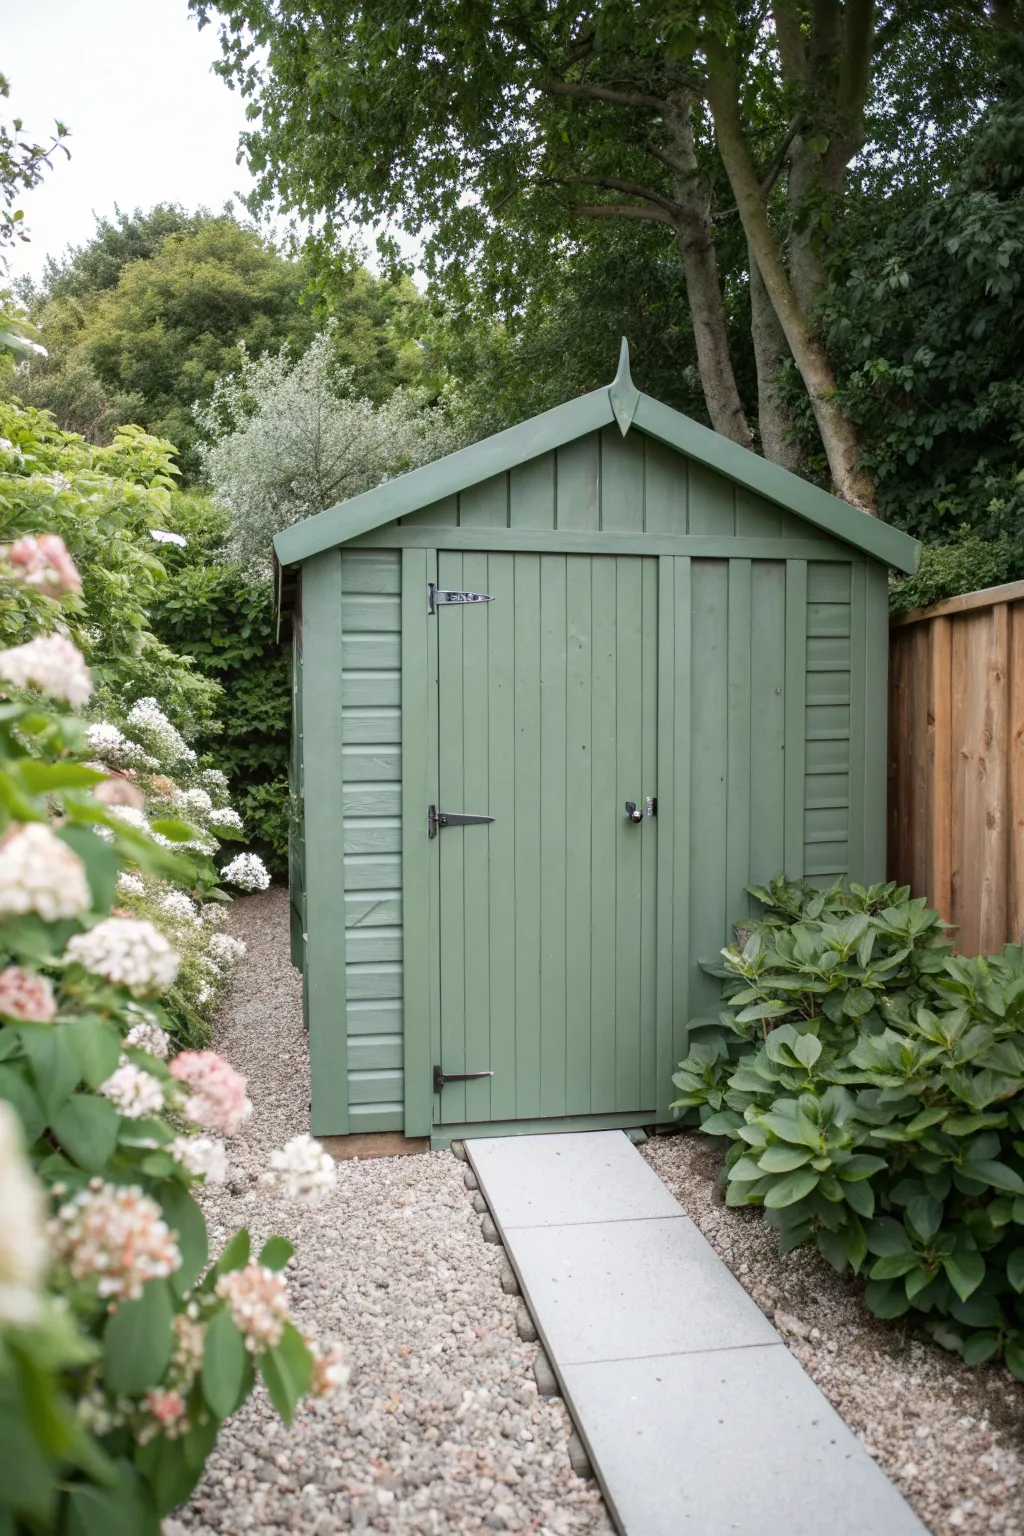
Transform a standard garden structure into an organic extension of your landscape with this serene sage green finish. This project helps your shed recede visually into the foliage, creating a tranquil and cohesive garden atmosphere.
Detailed Instructions
Materials
- Exterior wood paint (Sage Green or similar earth tone)
- Exterior primer/undercoat (if painting bare wood)
- Wide synthetic paintbrush (4 inch)
- Smaller detail brush (1-2 inch) for trim and hinges
- Sanding block or sandpaper (120 grit)
- Wire brush
- Pressure washer or stiff bristle brush and bucket
- Mild detergent or fungicidal wash
- Masking tape
- Drop cloths or old sheets
- Screwdriver (for removing hardware)
- Clean rags
Step 1: Preparation
-
Clear the area:
Begin by tying back any overgrown shrubs or hydrangeas that are touching the shed walls. You need clear access to all sides, and you don’t want wet paint transferring onto your prize blooms. -
Clean the surface:
Wash the entire shed vigorously. If the wood is old and algae-covered, use a pressure washer on a low setting or scrub with a stiff brush and fungicidal wash to kill any spores. -
Remove hardware:
Take a screwdriver and remove the door handle, lock, and bolt. While you can tape around the black hinges, removing the smaller functional hardware ensures a much cleaner finish. -
Scrape and sand:
Once dry, use a wire brush to flake off any old, peeling paint. Follow up by sanding the entire surface with 120-grit paper to create a key for the new paint to adhere to. -
Protect the surroundings:
Lay down drop cloths over the gravel and paving stones. Tuck the edges of the cloth right up against the base of the shed to catch any drips. -
Masking up:
Apply masking tape carefully around the edges of window panes (if applicable) and over the black T-hinges if you decided not to unscrew them.
Sticky Situation
If the door sticks after painting, wait for a dry day and sand the edges lightly. Paint adds thickness, so you might need to shave a millimeter off the door frame to restore smooth movement.
Step 2: Priming and Painting
-
Apply primer:
If you are working with bare wood or a drastic color change, apply a coat of exterior wood primer. Focus on working it into the grain and any knots in the timber. -
Paint the grooves first:
Dip your smaller brush into the sage green paint and tackle the vertical tongue-and-groove joints first. It’s tedious, but ensuring these recesses are covered prevents white stripes from showing later. -
Broad strokes:
Using the wide 4-inch brush, paint the main panels. Follow the direction of the wood grain—usually vertical on the walls and diagonal on the roof line fascias—for the smoothest application. -
Tackle the trim:
Paint the corner trims, door frame, and the fascia boards along the roofline. I find it helpful to feather the edges where the trim meets the wall panels to avoid heavy ridge lines. -
Dry and assess:
Allow the first coat to dry completely according to the manufacturer’s instructions. Exterior wood often drinks up the first layer, looking patchy initially. -
Second coat application:
Apply a second full coat of sage green. This layer will provide the true depth of color and the weatherproofing durability needed for outdoor structures. -
Check the hidden spots:
Open the door and paint the inside edge of the door frame and the side of the door itself. These areas engage when the door opens and are often forgotten.
Step 3: Finishing Touches
-
Clean the hardware:
While the paint dries, clean the black ironmongery you removed earlier. A quick wipe with a slightly oily rag can restore their luster and prevent rust. -
Remove tape:
Peel off the masking tape while the paint is still slightly tacky to ensure a crisp line, especially around the hinges. -
Reinstall hardware:
Screw the handles, locks, and bolts back into place. ensure everything is aligned correctly and the latch functions smoothly. -
Tidy the perimeter:
Remove the drop cloths and untie the plants, allowing the foliage to settle back against your newly painted, nature-inspired structure.
Natural Harmony
Plant a climbing jasmine or honeysuckle at the side. The white flowers will pop against the sage green, and the vines will further integrate the shed into the landscape over time.
Step back and admire how your shed now sits quietly and elegantly within your garden greenery


Coastal Blue Shed With White Details
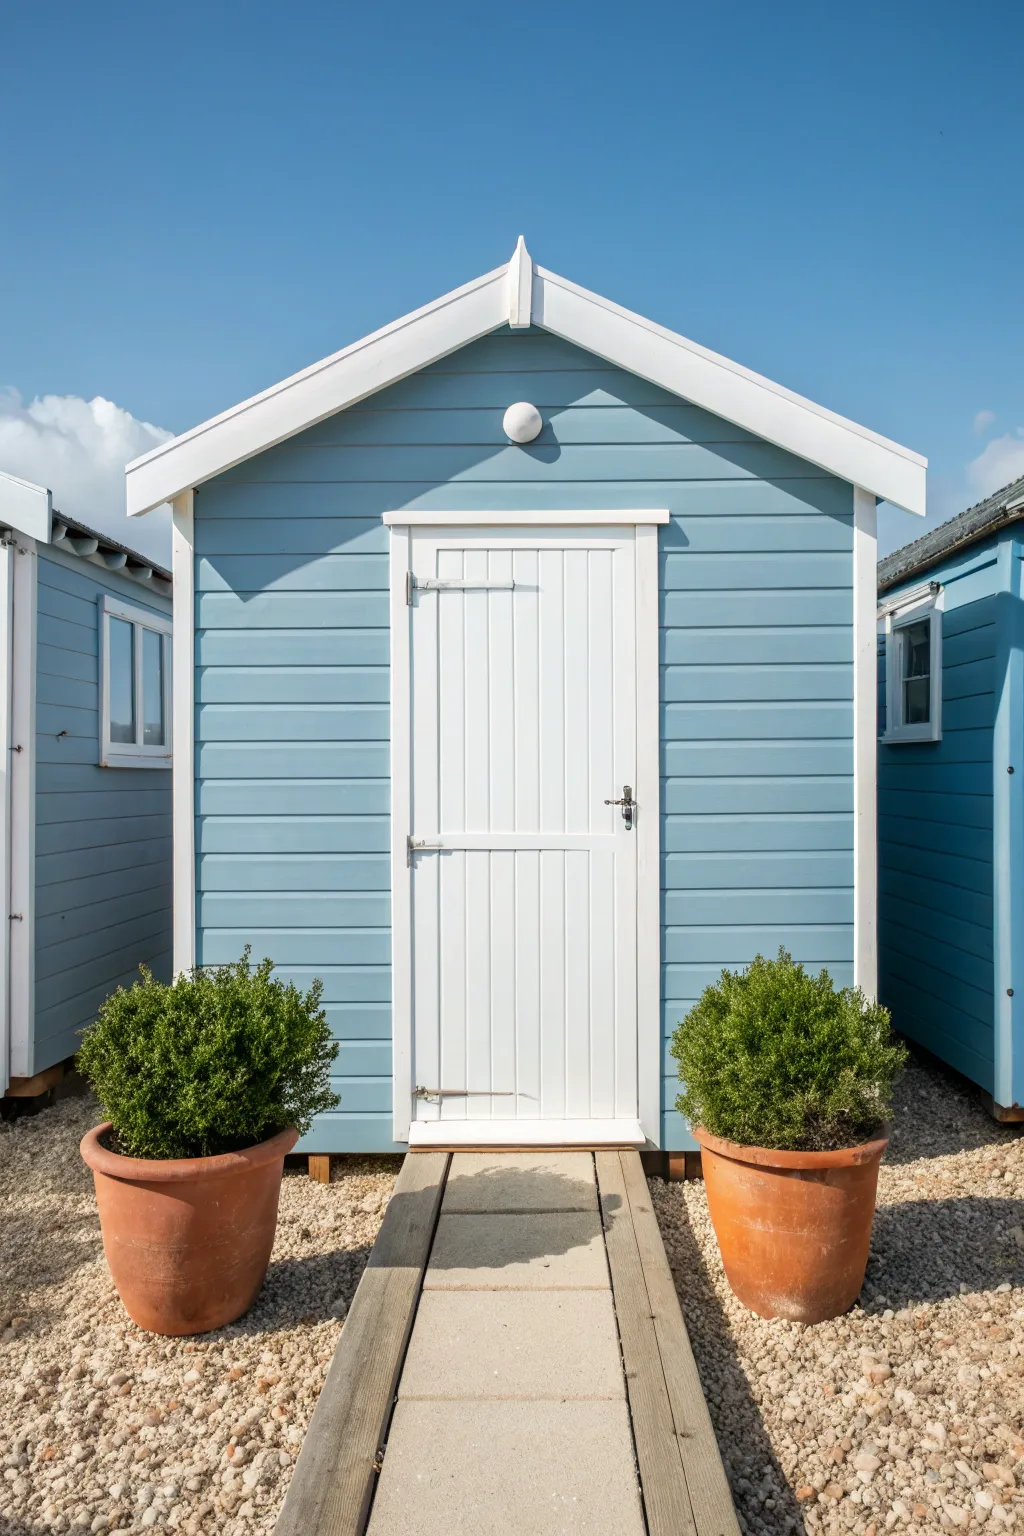
Transform a tired backyard structure into a charming beach hut retreat with this classic coastal palette. The soft, airy blue siding contrasted against crisp white trim instantly evokes sunny days by the sea, creating a peaceful focal point for any garden.
Step-by-Step
Materials
- Exterior wood primer
- Exterior eggshell or satin paint (Soft Sky Blue)
- Exterior gloss or semi-gloss paint (Pure White)
- Sandpaper (120 and 220 grit)
- Painter’s tape
- Pressure washer or scrubbing brush
- Wood filler
- 2-inch synthetic angled sash brush
- 4-inch foam or microfiber mini roller
- Drop cloths
Step 1: Preparation & Repairs
-
Clean the surface:
Begin by thoroughly cleaning the entire exterior of the shed. Use a pressure washer on a low setting or a stiff brush with soapy water to remove dirt, mildew, and loose paint flakes. -
Dry and inspect:
Allow the wood to dry completely, which may take 24 to 48 hours depending on the weather. Once dry, inspect for any rotten wood or deep cracks. -
Fill imperfections:
Apply exterior-grade wood filler to any nail holes, cracks, or gouges. Smooth it over with a putty knife and let it cure according to the package instructions. -
Sand the surface:
Sand the entire shed using 120-grit paper to smooth out the filler and rough up existing paint for better adhesion. Follow up with 220-grit for the door and trim areas to ensure a silky finish. -
Protect the surroundings:
Lay down drop cloths around the base of the shed to protect your gravel or grass. Use painter’s tape to mask off any hardware, like hinges or handles, if you aren’t removing them.
Pro Tip: Weather Watch
Check the forecast before starting. Avoid painting in direct, hot sunlight which dries paint too fast, or when rain is expected within 24 hours.
Step 2: Priming & Body Color
-
Apply primer:
Coat any bare wood or filled areas with a high-quality exterior primer. If you are making a drastic color change, I find priming the whole structure saves time on topcoats later. -
Cut in the edges:
Open your Soft Sky Blue paint. Using the 2-inch angled brush, carefully paint along the edges where the siding meets the roof, the corners, and around the door frame. -
Roll the siding:
Use the 4-inch mini roller to apply the blue paint to the main shiplap or siding boards. Roll with the direction of the wood grain for a uniform texture. -
Check the gaps:
Use your brush to catch any drips or missed spots between the siding boards that the roller might have skipped. -
Apply the second coat:
Let the first coat dry thoroughly. Apply a second coat of blue to ensure rich, opaque coverage that stands up to the elements.
Step 3: Trim & Finishing Touches
-
Prep the trim:
Once the blue body paint is fully dry, tape off the blue siding where it meets the white trim areas to ensure a razor-sharp line. -
Paint the facia and corners:
Apply the Pure White gloss paint to the roof facia boards (the bargeboards) and vertical corner trims. The gloss finish helps shed water and adds a nice pop. -
Detail the door:
Your door is the welcoming point. Paint the door frame and the door itself in the same Pure White. Use long, smooth brush strokes to minimize texture. -
Highlight the hardware:
If you painted over the hinges, carefully clean them up or reinstall your removed hardware. Black or galvanized steel hardware contrasts beautifully with the white door. -
Clean up:
Remove all painter’s tape while the paint is still slightly tacky to prevent peeling. Clean your brushes immediately with warm, soapy water. -
Style the entrance:
Finish the look by placing matching terracotta pots with boxwood or shrubs on either side of the door to ground the structure.
Level Up: Porthole Magic
Install a small circular mirror or a faux porthole window in the center gable triangle to amplify the nautical, beach-hut aesthetic.
Now you have a refreshing backyard escape that brings the coast to you


Bright White Shed With a Bold Door Color
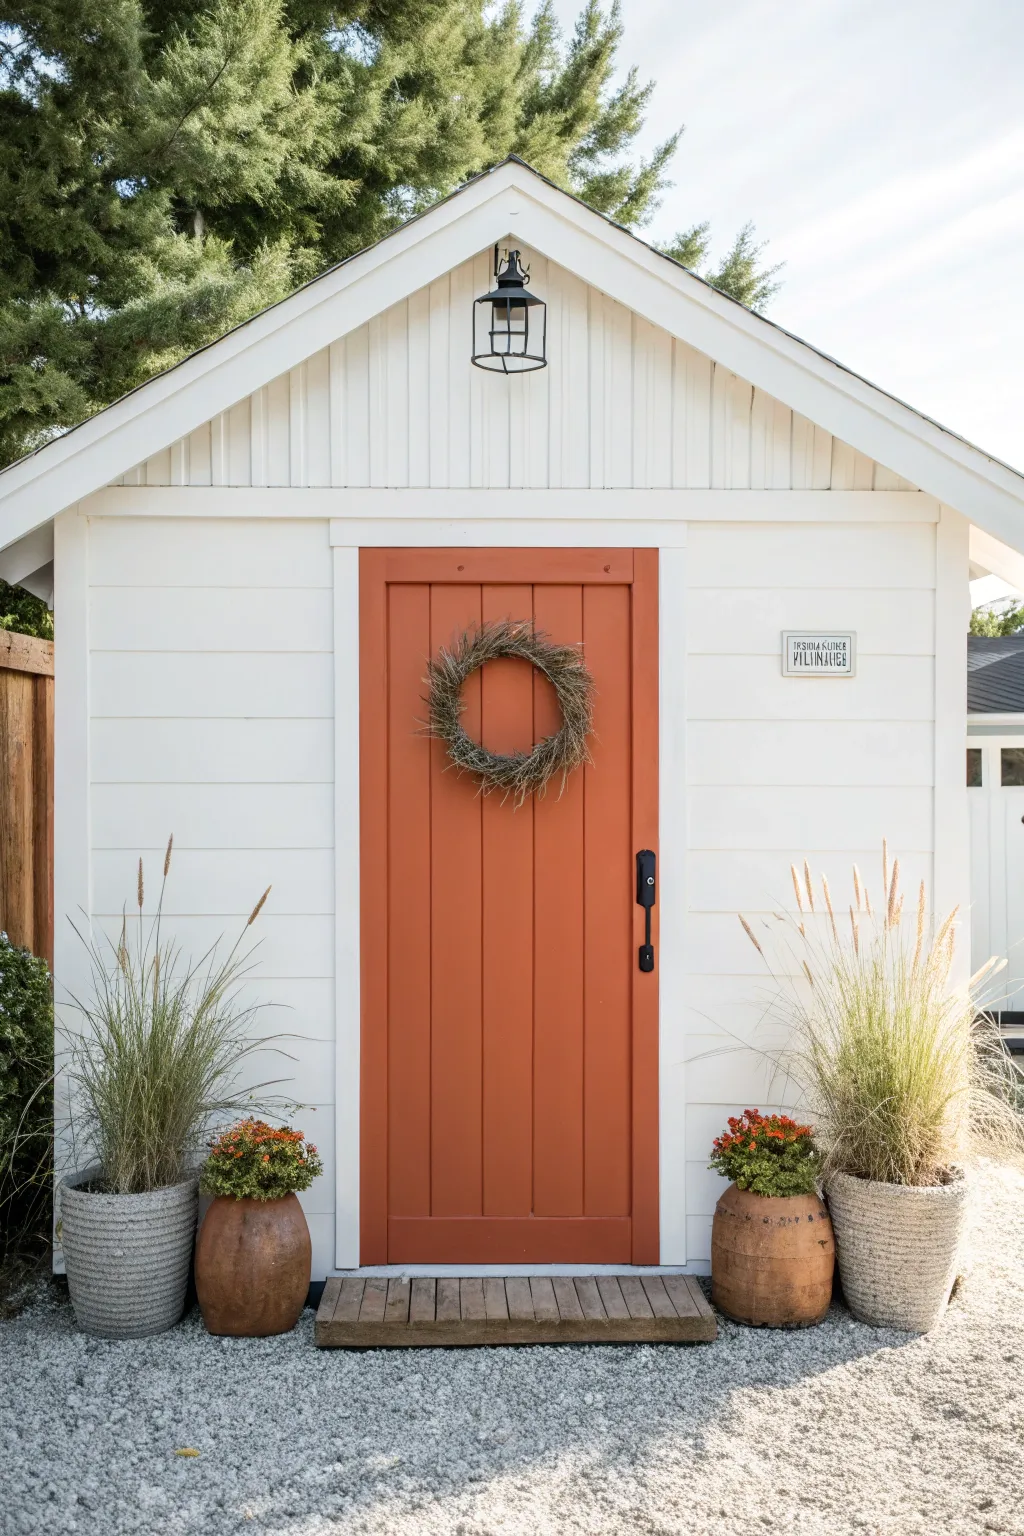
Transform a basic garden shed into a stunning backyard focal point using a crisp white exterior and a warm, inviting terracotta door. This high-contrast look is surprisingly easy to achieve and instantly elevates your outdoor space with modern farmhouse vibes.
How-To Guide
Materials
- Exterior acrylic latex paint (clean white)
- Exterior acrylic latex paint (burnt orange/terracotta)
- Painter’s tape (exterior grade)
- Drop cloths
- Pressure washer or stiff bristle brush
- Exterior wood primer
- Sanding block (120-grit)
- Angled sash brush (2.5 inch)
- Medium nap paint roller and frame
- Screwdriver or drill (for hardware removal)
- Matte black spray paint (optional for hardware)
- Small dried twig wreath
Step 1: Preparation
-
Clear and clean:
Begin by removing any existing decor, planters, or furniture from around the shed. Use a pressure washer or a stiff bristle brush with soapy water to thoroughly clean the siding and door, removing dirt, mildew, and loose paint. -
Remove hardware:
Using your screwdriver or drill, take off the door handle, lock mechanism, and any exterior light fixtures. Store the screws in a labeled bag so they don’t get lost. -
Masking time:
Apply exterior-grade painter’s tape carefully around window trims, the roofline, and the door frame where it meets the siding. Press the edges down firmly to prevent bleed-through. -
Sand and prime:
Lightly sand any rough spots on the wood siding and door with a 120-grit block to ensure better adhesion. Wipe away the dust, then apply a coat of exterior wood primer to any bare wood or areas where the old paint has peeled.
Pro Tip: Weather Watch
Check the forecast before starting! You need at least 24-48 hours of rain-free weather with temperatures between 50°F and 85°F for exterior paint to cure properly.
Step 2: Painting the Exterior
-
Cut in the white:
Open your can of clean white exterior paint. Use the angled sash brush to ‘cut in’ along the edges, corners, under the eaves, and around the door frame. -
Roll the siding:
Once the edges are cut in, switch to the roller. Apply the white paint to the main siding boards using long, even strokes. Work in sections to keep a wet edge. -
Second coat:
Allow the first coat to dry completely according to the manufacturer’s instructions. Apply a second coat of white for full, opaque coverage, ensuring no old color shows through. -
Paint the trim:
If your shed has distinct trim boards like the fascia or corner boards, give them a fresh coat of white using the sash brush for precise control.
Troubleshooting: Sticky Door
If the door sticks after painting, dust the edges with a little talcum powder or rub a clear candle on the jambs. This creates a barrier while the paint fully hardens over the next week.
Step 3: The Statement Door
-
Prep the door surface:
Ensure the door is clean and dry. If the previous finish was glossy, give it an extra scuff sand to help the new bold color stick. -
Detail work first:
Dip your angled brush into the terracotta paint. Start by painting the recessed panels, grooves, or any detailed woodwork on the door first. -
Flat surfaces next:
Use a mini-roller or a flat brush to paint the rails and stiles (the vertical and horizontal flat sections) of the door. I find following the direction of the wood grain gives the smoothest finish. -
Layering color:
This bold orange needs depth. Let the first coat dry fully, then apply a second coat. A third thin coat might be necessary for bright colors to look truly rich and uniform. -
Remove tape:
While the final coat of paint is still slightly tacky (but not wet), carefully peel off the painter’s tape at a 45-degree angle to get a crisp line.
Step 4: Finishing Touches
-
Update hardware:
If your existing black hardware is looking tired, give it a quick refresh with matte black spray paint. Let it cure fully before handling. -
Reinstall fixtures:
Once the door is perfectly dry (wait at least 24 hours to prevent sticking), reinstall the handle, lock, and the overhead light fixture. -
Add the step:
Place a simple wooden pallet or slatted wood step in front of the door. If needed, stain it a natural wood tone to complement the orange door. -
Style with greenery:
Position tall planters with ornamental grasses on either side of the entrance to frame the view. Add smaller terracotta pots with bright flowers for layered texture. -
Hang the wreath:
Finish the look by hanging a simple dried twig wreath in the center of the upper door panel. A small metal sign near the door adds a final personalized touch.
Step back and admire how this simple splash of color completely reinvents your garden landscape
BRUSH GUIDE
The Right Brush for Every Stroke
From clean lines to bold texture — master brush choice, stroke control, and essential techniques.
Explore the Full Guide
Soft Gray Shed for a Modern Neutral Look
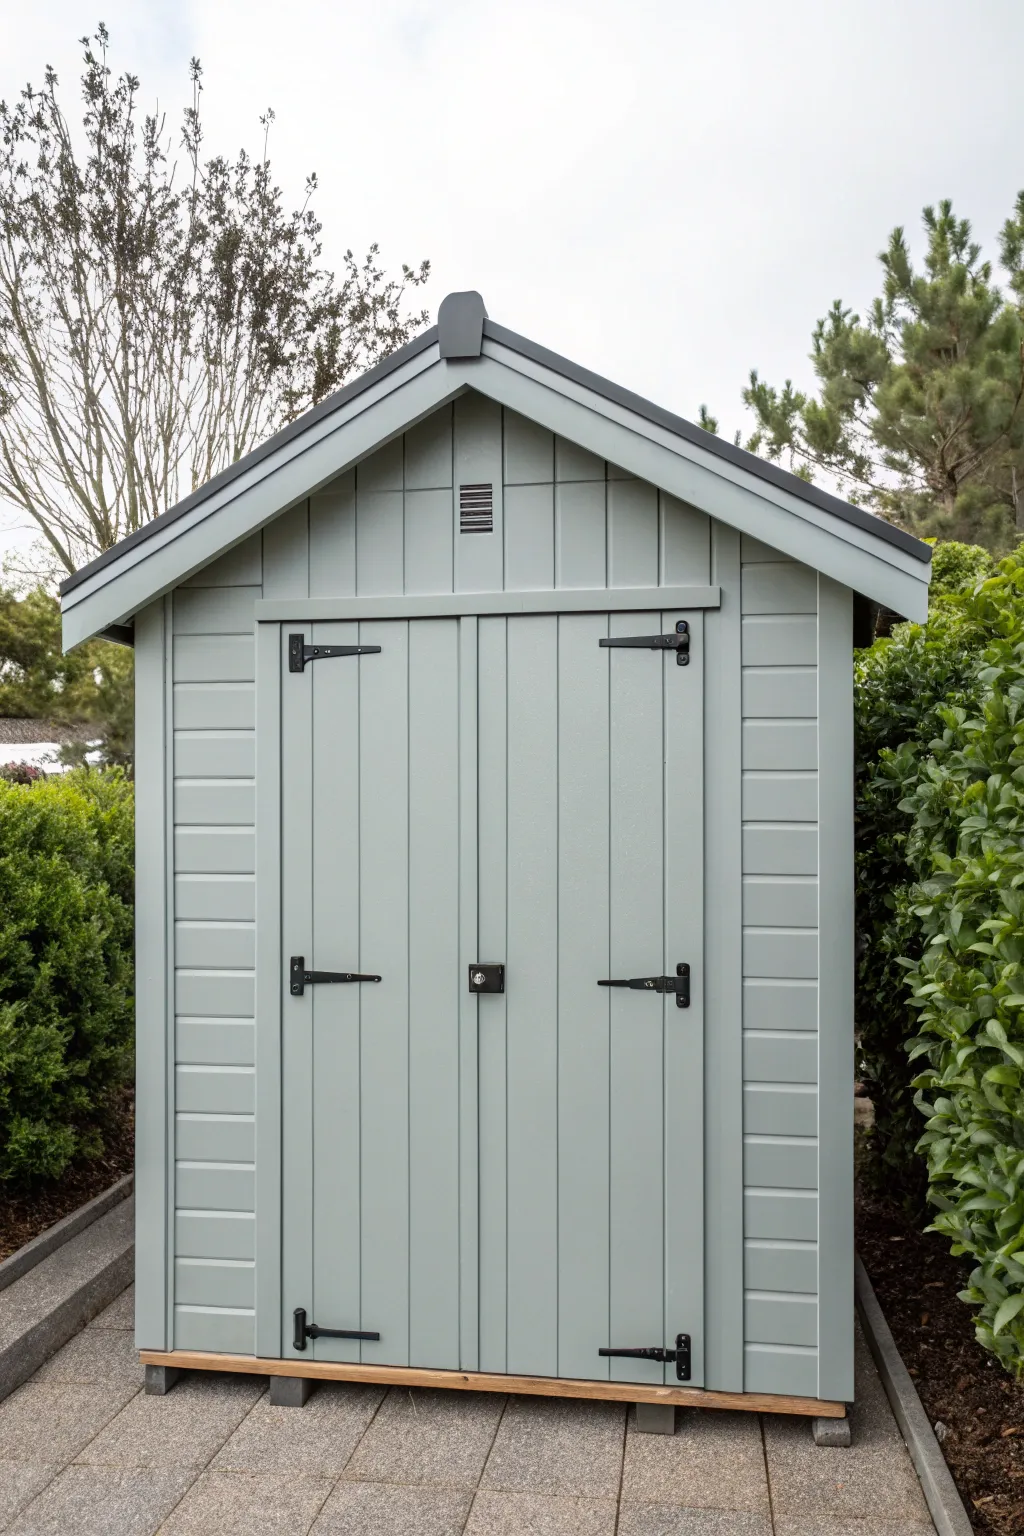
Transform a standard wooden garden shed into a sleek, modern statement piece using a calming palette of soft blue-gray. This project focuses on achieving a professional, uniform finish that highlights vertical paneling while contrasting beautifully with bold black hardware.
Step-by-Step Tutorial
Materials
- Exterior wood primer (oil-based or high-quality acrylic)
- Exterior satin or eggshell paint in Soft Blue-Gray (e.g., Farrow & Ball ‘Manor House Gray’ or similar)
- Matte black metal spray paint or exterior metal paint
- Medium-grit sandpaper (120-150 grit)
- Painter’s masking tape (exterior grade)
- Drop cloths or tarps
- Screwdriver or drill (for hardware removal)
- 4-inch paint roller with medium nap covers
- 2-inch angled synthetic sash brush
- Small detail brush
- Wood filler (exterior grade)
- Putty knife
- Mild detergent and scrub brush
Step 1: Preparation & Hardware Removal
-
Clear the area:
Begin by clearing any vegetation, pots, or debris from around the base of the shed. Lay down drop cloths to protect your paving or soil from paint splatters. -
Remove hardware:
Using your screwdriver or drill, carefully remove all hinges, handles, locks, and bolts. Place them in a labeled bag or container so you don’t lose any screws. Do not attempt to paint around them; removing them ensures a much cleaner finish. -
Clean the surface:
Wash the entire shed exterior with mild detergent and a scrub brush to remove dirt, mildew, or spiderwebs. Rinse thoroughly with a hose and allow the wood to dry completely for at least 24 hours. -
Inspect and fill:
Check for any loose knots, cracks, or nail holes. Apply exterior wood filler with a putty knife to smooth out these imperfections, ensuring the surface is level.
Step 2: Sanding & Priming
-
Sand the wood:
Once the filler is dry, lightly sand the entire shed with medium-grit sandpaper. This scuffs the surface to help the primer adhere better and smooths out any rough wood fibers. -
Dust off:
Wipe down the shed ideally with a tack cloth or a slightly damp rag to remove all sanding dust. Dust residue is the enemy of a smooth paint job. -
Mask trim and glass:
If your shed has windows or adjacent roof elements you don’t want painted, apply exterior painter’s tape carefully along those edges. Ensure the tape is pressed down firmly. -
Prime the edges:
Start priming by cutting in. Use your angled brush to apply premier into the grooves of the vertical paneling, corners, and around the door frames. -
Prime the panels:
Switch to the 4-inch roller to prime the flat surfaces of the panels. A roller speeds up the process significantly and provides an even coat. Let the primer cure according to the manufacturer’s instructions.
Sticky Situation
If the doors stick after painting, sand the contact edges down to bare wood and apply a thin layer of wax or clear sealer instead of thick layers of paint.
Step 3: Painting the Exterior
-
First coat application:
Stir your soft gray paint thoroughly. Just like with the primer, use the brush first to get into the vertical grooves and tight corners where the roller can’t reach. -
Roll the flats:
Immediately follow the brushing with your roller to cover the flat faces of the boards. Maintain a ‘wet edge’ to avoid lap marks, working in sections from top to bottom. -
Drying time:
Allow the first coat to dry fully. I usually wait a bit longer than the can suggests—especially in humid weather—to ensure the second coat doesn’t drag the first one. -
Apply second coat:
Repeat the brush-and-roll method for the second coat. This layer creates the true depth of color and provides the necessary weather protection. Pay extra attention to the bottom boards where rain splash occurs. -
Check for drips:
While the paint is wet, inspect the vertical grooves for runs or drips and brush them out immediately for a flawless look.
Pro Tip: Weather Watch
Pick a day that is overcast but dry. Direct, hot sunlight can cause the paint to dry too quickly on the surface, leading to blister bubbles and confusing brush marks.
Step 4: Hardware & Finishing Touches
-
Refinish hardware:
While the shed dries, take your metal hardware to a well-ventilated area. Clean the metal, lightly sand if there’s rust, and apply two thin coats of matte black metal spray paint. -
Paint the vent:
Don’t forget the small ventilation grate near the peak. Use a small detail brush to paint the slats black to match your hardware, creating a sharp bit of contrast. -
Remove tape:
Carefully peel off the painter’s tape. Pull it away from the painted edge at a 45-degree angle while the paint is still slightly tacky to prevent peeling. -
Reinstall hardware:
Once the shed paint has cured (ideally 24-48 hours) and the hardware is dry, screw the hinges, handles, and locks back into their original positions. -
Touch up:
Do a final walk-around with your small brush to catch any spots you might have missed during reassembly or tape removal.
Step back and admire how this cool, neutral tone instantly modernizes your garden storage space
Charcoal Shed With a Surprise Accent Door
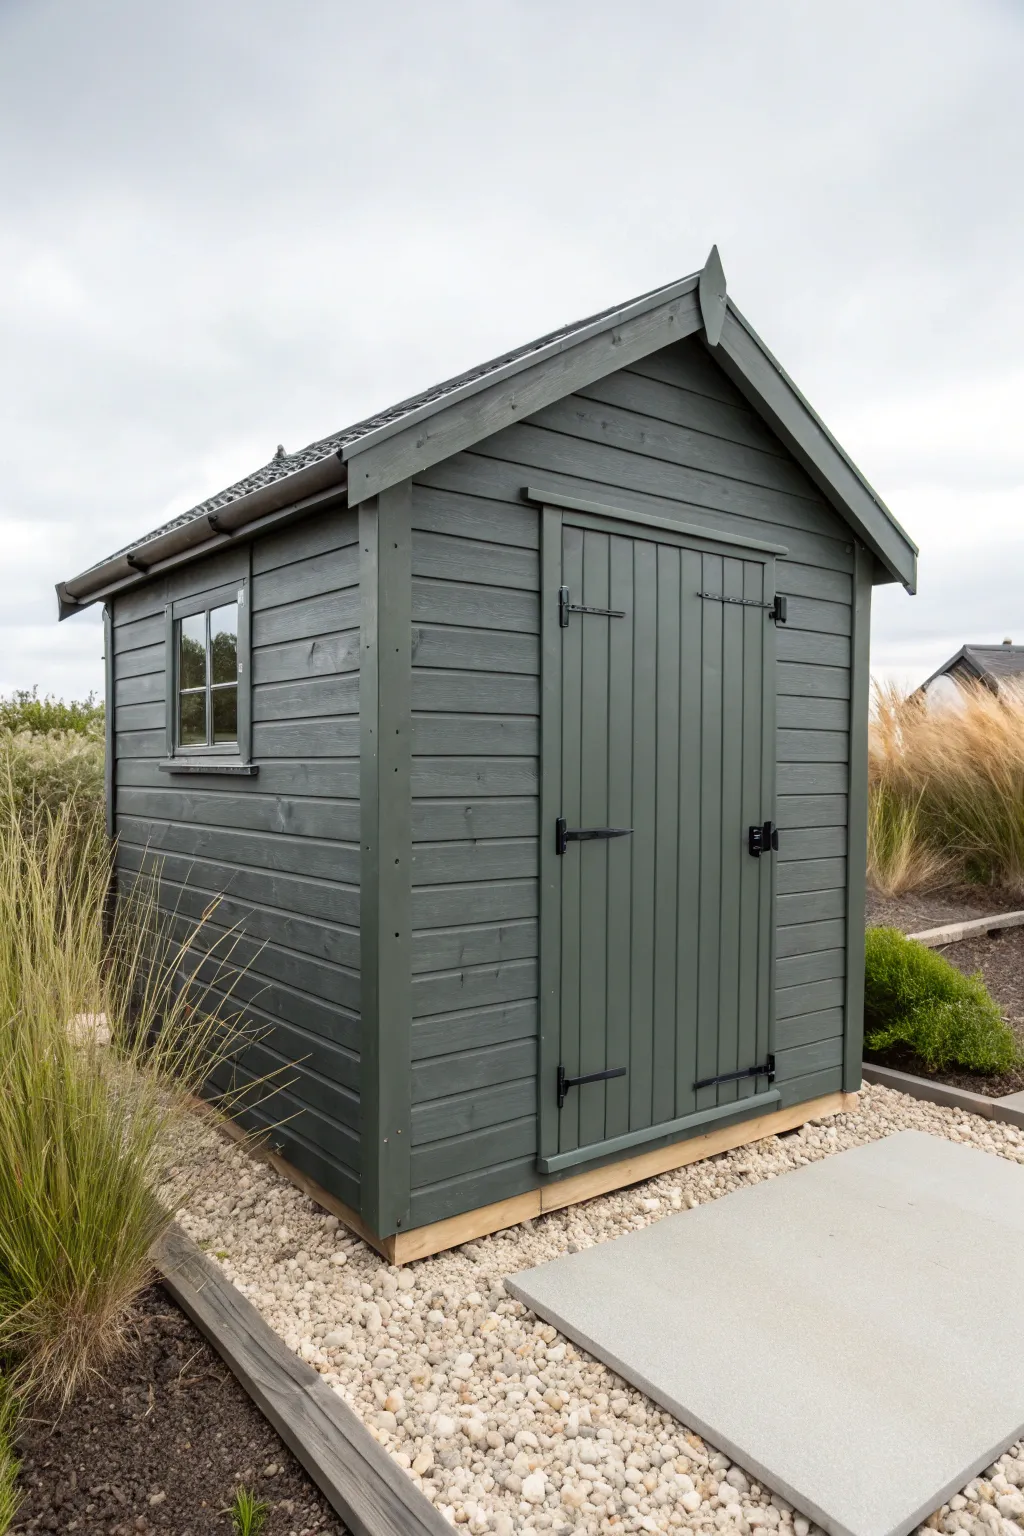
Transform a basic garden shed into a sleek, modern statement piece with an all-over charcoal finish. This project relies on the power of a single, moody hue to unify the structure, window, and door for a minimalist Scandinavian-inspired look.
Step-by-Step
Materials
- Exterior wood paint or opaque stain (Charcoal/Dark Slate)
- Small roller with extension pole
- 2-inch synthetic bristle brush
- 1-inch angled sash brush
- Sandpaper (80 and 120 grit)
- Wood filler (exterior grade)
- Painter’s tape
- Drop cloths or plastic sheeting
- Screwdriver or chill (to remove hardware)
- Sugar soap or deck cleaner
- Scrubbing brush
Step 1: Preparation
-
Clear the area:
Begin by removing any plants, pots, or obstacles from around the base of the shed to ensure you have clear access to the lowest siding boards. -
Protect the ground:
Lay down drop cloths or heavy plastic sheeting over the gravel and paving stones. Since you are working with dark paint over light stones, thorough coverage here is critical. -
Remove hardware:
Unscrew and remove the black hinges, handles, and latches from the door. It is tempting to paint around them, but removing them ensures a cleaner finish and prevents paint buildup on the metal. -
Clean surface:
Wash the entire exterior with sugar soap or a dedicated wood cleaner and a stiff scrubbing brush to remove dirt, mildew, and cobwebs. Rinse thoroughly with a hose and let the wood dry completely for at least 24 hours. -
Smooth the wood:
Inspect the cladding for splinters or rough patches. Sand these areas down with 80-grit paper, then finish with 120-grit for a smooth surface. Fill any significant holes or cracks with exterior wood filler and sand flush once dry.
Paint Choice Pro Tip
Choose a ‘self-priming’ exterior wood paint or opaque stain. These products flex with the wood as it expands and contracts in the weather, preventing the cracking common with standard paints.
Step 2: Painting the Exterior
-
Stir the paint:
Open your charcoal paint and stir it thoroughly with a wooden paddle, ensuring the pigment at the bottom is fully incorporated for a consistent color. -
Cut in edges:
Using the 2-inch brush, start by painting the corners, the underside of the roof overhang, and the vertical trim pieces where a roller won’t reach effectively. -
Paint the cladding:
Switch to your small roller for the main cladding boards. Roll horizontally along the length of the boards. I find this speeds up the process significantly while ensuring an even coat. -
Back-brushing:
Immediately after rolling a section, lightly run your brush over the wet paint in the direction of the wood grain. This pushes the paint into the texture of the wood and removes roller marks. -
Detail around the window:
Use the 1-inch angled sash brush to carefully paint the window mullions and frame. Use painter’s tape on the glass if you aren’t confident with a steady hand, pressing the edges down firmly to prevent bleed. -
Paint the door:
Treat the door as its own section. Paint the vertical tongue-and-groove boards first, getting deep into the grooves, then move to the horizontal bracing if your door style has it. -
Apply second coat:
Allow the first coat to dry according to the manufacturer’s instructions (usually 4-6 hours). Apply a second coat using the same method to achieve that deep, opaque charcoal color.
Uneven Coverage?
If the old wood color is showing through after two coats, the timber might be very dry and absorbent. Spot-prime these thirsty areas lightly, let dry, and then apply a final third coat.
Step 3: Finishing Touches
-
Refinish hardware:
While the shed dries, inspect your metal hardware. If the black finish is chipped or faded, give them a quick spray with black metal paint to make them pop against the dark wood. -
Reinstall hardware:
Once the paint is fully cured (give it an extra day if possible to prevent tackiness), screw the hinges, handles, and latches back into place. -
Clean the glass:
Remove any painter’s tape from the window. Use a razor blade scraper to gently remove any stray paint specks from the glass, then polish with glass cleaner. -
Tidy the perimeter:
Carefully fold up your drop cloths, ensuring no paint chips or drips fall onto the white gravel. Replace any decorative elements or plants to frame your freshly painted structure.
Step back and appreciate how this sophisticated, single-color update completely redefines your garden space.

PENCIL GUIDE
Understanding Pencil Grades from H to B
From first sketch to finished drawing — learn pencil grades, line control, and shading techniques.
Explore the Full Guide
Barn-Red Shed That Feels Timeless
Bring a touch of Scandinavian charm to your backyard with this classic project that transforms a basic structure into a nostalgic focal point. The iconic combination of deep barn red and crisp white trim creates a look that feels both historic and welcoming.
Detailed Instructions
Materials
- Exterior-grade wood primer
- Adhesive painter’s tape (1.5 – 2 inch width)
- Barn red exterior paint (matte or satin finish)
- Bright white exterior trim paint (semi-gloss)
- Black wrought-iron hardware (hinges and latches)
- Paint rollers and extension pole
- Angled sash brush (2.5 inch)
- Drop cloths
- Sandpaper (120 and 220 grit)
- Wood filler (exterior grade)
- Two large terracotta pots
- Stepping stones (slate or flagstone)
Step 1: Preparation & Repairs
-
Assess the surface:
Begin by inspecting your shed’s existing siding for any rot or loose boards. Replace any compromised wood to ensure a solid foundation for your new finish. -
Clean thoroughly:
Wash the entire exterior with a stiff brush and mild detergent or a power washer on a low setting to remove dirt, mildew, and cobwebs. Let it dry completely for 24 hours. -
Fill and smooth:
Use exterior wood filler to patch nail holes or small cracks in the siding. Once dry, sand these spots flush with 120-grit sandpaper. -
Scuff sand the rest:
I like to give the entire shed a quick pass with 120-grit sandpaper to rough up the previous finish, which helps the new primer adhere much better. -
Protect the surroundings:
Lay down heavy canvas drop cloths around the base of the shed to catch drips, covering any existing grass or pathways you want to keep clean.
Pro Tip: Weathering
For an instantly aged look, lightly sand the edges of the white door after painting to reveal a hint of wood underneath.
Step 2: Priming & Painting the Siding
-
Prime the surface:
Apply a coat of high-quality exterior wood primer over the entire shed, paying special attention to raw wood or filled areas. Allow this to dry according to the can’s instructions. -
Detailed masking:
Once the primer is cured, carefully tape off the door frame, corner trim, and fascia boards using painter’s tape to protect them from the upcoming red paint. -
Cut in the edges:
Using your angled sash brush, paint the edges and corners of the vertical siding boards with your barn red paint where the roller can’t reach. -
Roll the siding:
Use a medium-nap roller to apply the barn red paint to the flat surfaces of the siding. Work in small vertical sections to maintain a wet edge. -
Evaluate and recoat:
Allow the first coat to dry fully. If the old color is showing through or the coverage looks uneven, apply a second coat for that deep, rich saturation.
Step 3: Trim, Door & Details
-
Remove the tape:
Carefully peel away the masking tape while the red paint is still slightly tacky to prevent tearing the dried film. -
Prep the trim:
Now tape off the newly painted red siding around the door frame and corner boards to ensure crisp lines for your white trim. -
Paint the brightwork:
Apply two coats of bright white semi-gloss exterior paint to the door frame, the door itself, the corner boards, and the roof fascia. Use the sash brush for control. -
Enhance the door:
For the door specifically, paint vertically along the planks. The semi-gloss finish here adds durability against frequent handling. -
Install hardware:
Once the door is fully cured, attach the black wrought-iron hinges and latch hardware. The high contrast against the white door is key to the look.
Troubleshooting: Blisters
If paint bubbles appear, it’s likely due to moisture trapped in the wood or painting in direct, hot sun. Scrape, sand, and repaint in shade.
Step 4: Landscaping the Scene
-
Position the pots:
Place one large terracotta pot near the door’s threshold and another further out in the tall grass to frame the entrance naturally. -
Create the path:
Arrange irregular slate stepping stones leading up to the shed door, embedding them slightly into the dirt so they feel established and aged. -
Final touches:
Fill the pots with ornamental grasses or simple greenery to mirror the surrounding landscape and soften the connection between the structure and the ground.
Step back and enjoy the simple elegance of your newly refreshed, timeless backyard retreat.
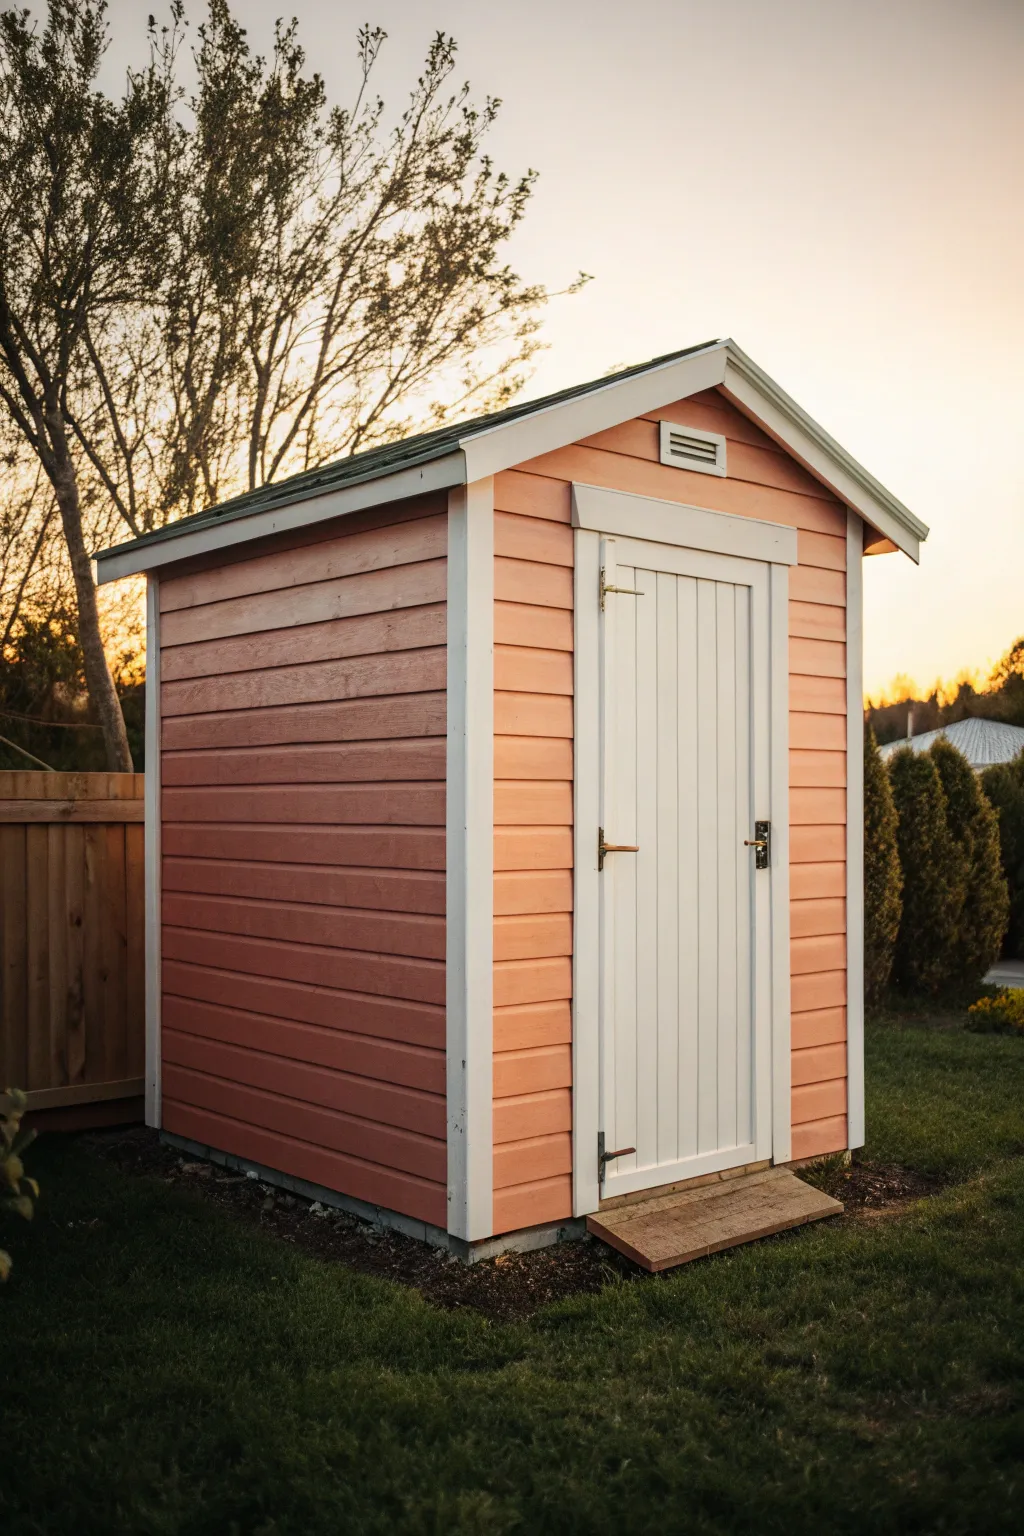
Wood-Tone Painted Shed for Warmth Without Stain
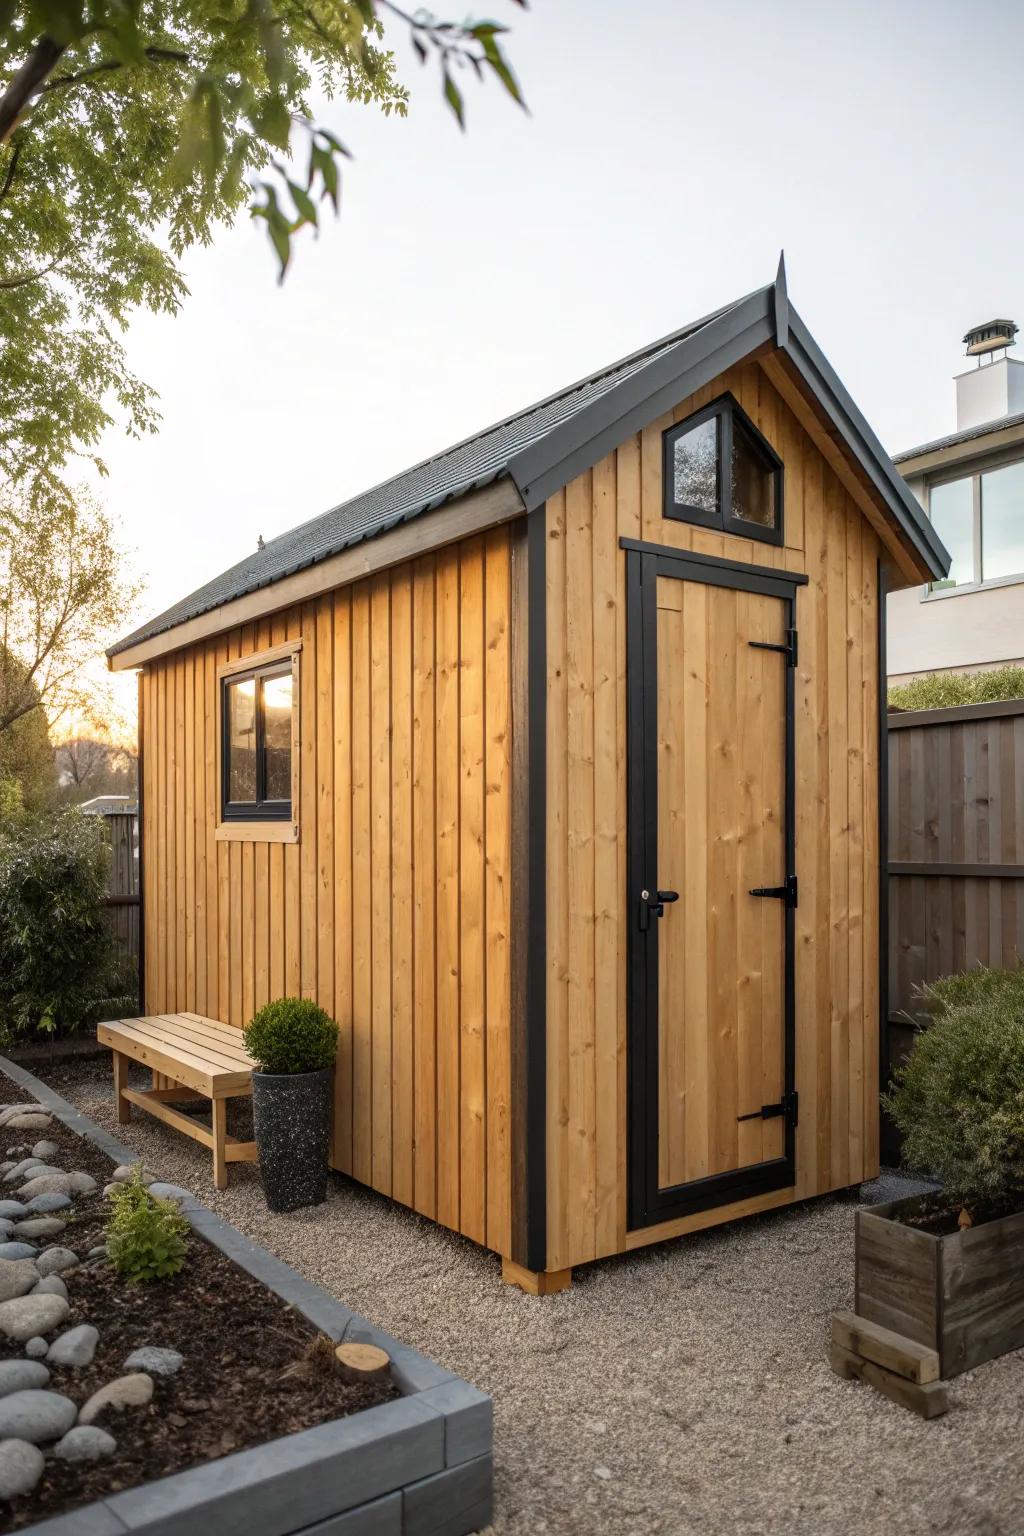
This project transforms a standard garden shed into a modern architectural feature using a warm, honey-toned finish paired with striking black accents. The result balances rustic charm with contemporary definition, making your storage space a natural focal point in the garden.
Step-by-Step
Materials
- High-quality timber shed kit (or custom build materials)
- Exterior wood preservative (clear)
- Water-based exterior wood stain (Honey or Amber tone)
- Exterior semi-gloss paint (Black)
- Exterior semi-gloss paint (Dark Graphite/Charcoal for roof)
- 2-inch synthetic bristle brush
- 4-inch shed & fence brush or mini-roller
- Detail brush (1-inch angled sash)
- Painter’s tape (exterior grade)
- Drop cloths
- Sandpaper (120-grit and 180-grit)
- Tack cloth
- Wood filler (exterior grade)
- Screwdriver or drill (for removing hardware)
Step 1: Preparation and Base Treatment
-
Clear the area:
Before you begin, ensure there is ample workspace around the shed structure. Lay down heavy-duty drop cloths over the gravel or ground to catch any drips, as exterior wood stains can be very difficult to remove from stone. -
Remove hardware:
Using your drill or screwdriver, carefully remove all door handles, hinges, and latches. Removing these items rather than taping around them ensures a much cleaner, professional finish and prevents the black paint from accidentally getting on the metal later. -
Inspect and fill:
Check the timber cladding for any significant knots, cracks, or nail holes that look unsightly. Fill these with exterior-grade wood filler. Once dry, sand the filled areas flush with 120-grit sandpaper so they disappear under the stain. -
Sand the surface:
Give the entire exterior a light scuff-sand with 120-grit sandpaper. This opens up the wood grain slightly to help it absorb the stain more evenly. Wipe everything down with a tack cloth to remove all sawdust. -
Apply preservative:
If your shed timber is untreated, apply a coat of clear wood preservative first. This protects against rot and fungus without altering the color. Allow this to fully dry according to the manufacturer’s instructions, usually 24 hours.
Pro Tip: UV Protection
Choose a stain with built-in UV filters. The honey tone relies on the wood remaining bright; UV filters stop the timber from turning silver-grey underneath the clear finish.
Step 2: Creating the Warm Wood Tone
-
Test your stain colour:
I always recommend testing the honey-toned stain on a scrap piece of wood or an inconspicuous area first. The final color depends heavily on the underlying wood species, and you want to ensure it matches that golden amber look before committing. -
Stain the cladding:
Using the 4-inch brush, apply the honey-toned stain to the main vertical timber boards. Work in the direction of the grain, covering 2-3 boards at a time from top to bottom to maintain a ‘wet edge’ and avoid lap marks. -
Work into the grooves:
Pay special attention to the tongue-and-groove gaps. Use the corner of your brush to push stain into these recesses so no raw wood peeks through. This depth of color is crucial for the finished look. -
Apply a second coat:
Once the first coat is touch-dry (usually 4-6 hours), lightly sand with 180-grit paper if the grain has raised. Apply a second coat of stain to deepen the color to that rich, warm honey hue shown in the image.
Troubleshooting: Blotchy Stain
If the stain appears blotchy, the wood may have absorbed it unevenly. Apply a pre-stain wood conditioner before your next coat to help regulate absorption for a smoother finish.
Step 3: The Bold Frame and Finish
-
Tape the glass and edges:
Apply exterior painter’s tape carefully to the window glass and along the edges where the honey-stained wood meets the areas destined for black paint. Press the tape edges down firmly to prevent bleed-through. -
Paint the door and window frames:
Using the dark graphite or black exterior paint and a 2-inch brush, carefully paint the window frames. For the small triangular window at the top, switch to the 1-inch angled sash brush to get into the tight corners. -
Define the door trim:
Paint the main door frame and the surrounding trim in the same matte black. Start from the inner edges closest to the door panel and work outward. This bold outline is what gives the shed its modern graphical quality. -
Paint the vertical corner posts:
Coat the corner vertical trim pieces in black. These long vertical lines frame the honey wood beautifully. Ensure you have a steady hand or use a straight edge guide if you haven’t taped this transition. -
Paint the heavy hardware:
While the trim dries, clean your removed hinges and latches. If they aren’t already black, spray paint them with a metal-grade matte black paint. Reattach them once the wood paint has fully cured.
Step 4: Roof and Final details
-
Paint the fascia boards:
Finish the woodwork by painting the fascia boards (the extensive trim just under the roof) in black or dark contrasting grey to cap off the structure. -
Address the roof:
If your shed has a metal or timber roof that needs matching, apply the dark charcoal exterior paint. If it is felt or shingles, ensure they are clean and in good repair; the dark grey tone complements the black trim perfectly. -
Final clean up:
Remove all painter’s tape gently while the final coat of paint is still slightly tacky to ensure crisp lines. Inspect for any touch-ups needed where the black and honey tones meet.
Enjoy the satisfaction of seeing how a simple two-tone palette can elevate a basic garden structure into a stylish backyard feature.


Color-Matched Shutters and Window Boxes
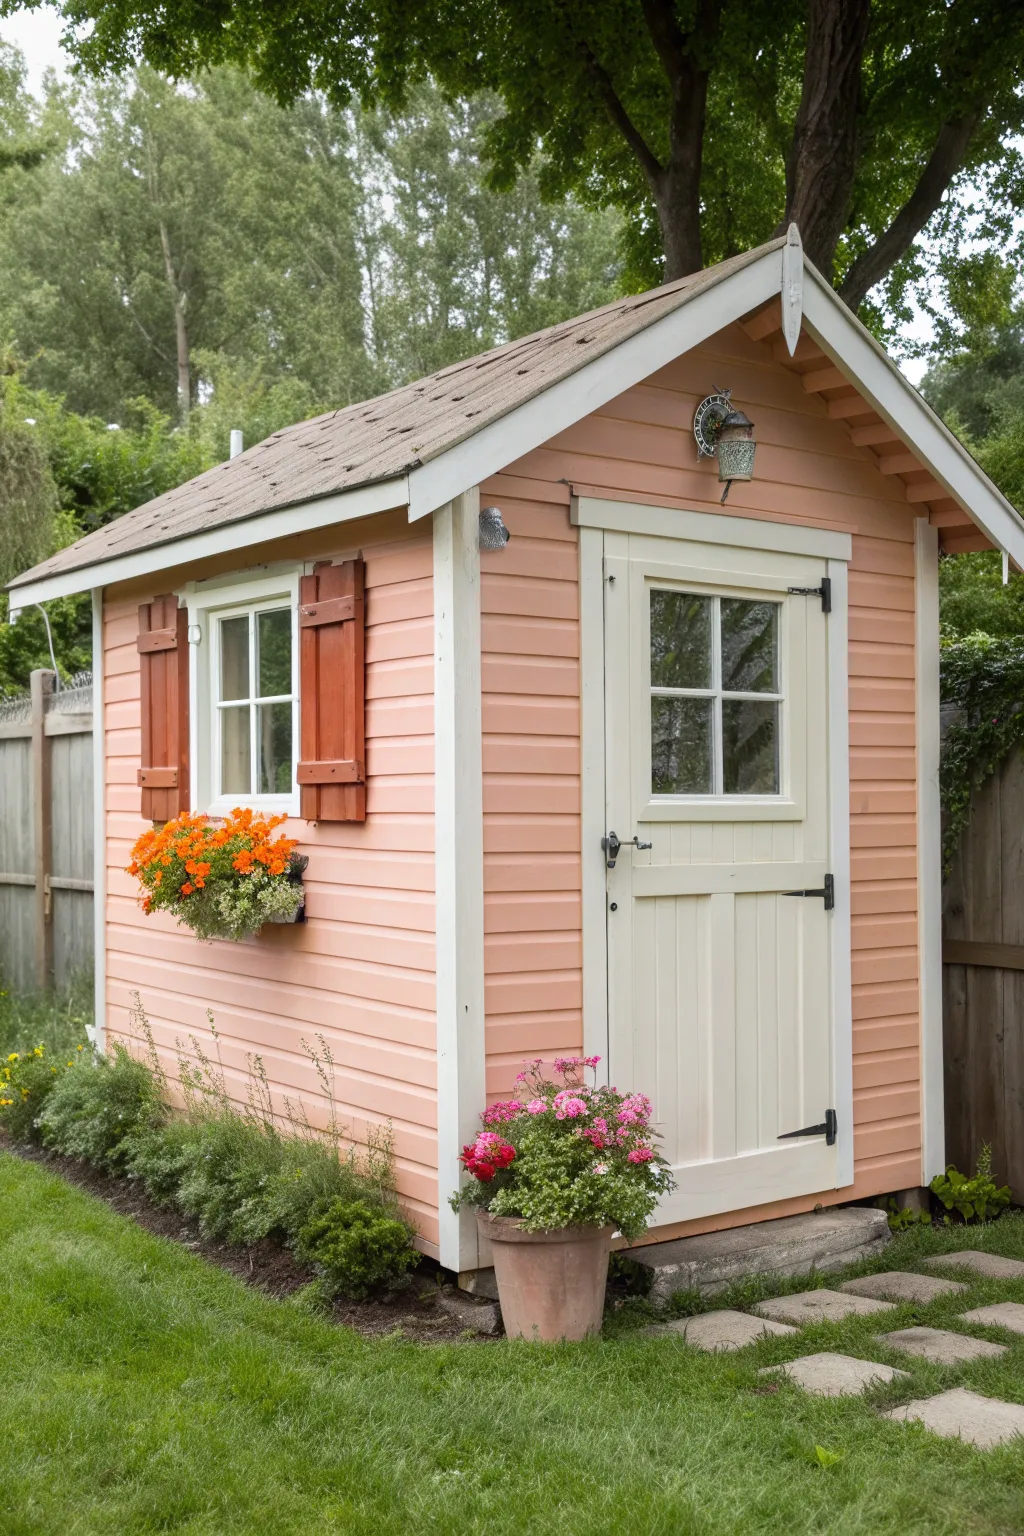
Transform a basic garden structure into a charming focal point by embracing a warm, cohesive color palette. This project focuses on integrating wooden textures with soft peach tones and creamy accents to create an inviting, storybook shed aesthetic.
Step-by-Step
Materials
- Exterior wood primer
- Soft peach exterior latex paint (satin finish)
- Creamy off-white exterior latex paint (semi-gloss)
- Red-brown wood stain or paint for shutters
- Paint rollers (medium nap)
- Angled sash brushes (2 inch and 1 inch)
- Painter’s tape
- Drop cloths
- Sandpaper (120 and 220 grit)
- Wood filler
- Outdoor planter boxes (optional wood for construction)
- Black exterior hardware (hinges and latches)
Step 1: Preparation and Base Coat
-
Assess and clean:
Begin by thoroughly cleaning the exterior siding of the shed. Remove any dirt, mildew, or cobwebs using a stiff brush and a mild detergent solution. Rinse well and let it dry completely. -
Surface repair:
Inspect the wood for any cracks, nail holes, or rot. Apply wood filler to minor imperfections, allowing it to cure before sanding smooth with 120-grit sandpaper. -
Prime the canvas:
Apply a high-quality exterior wood primer to the entire shed, including the door and trim. This ensures your peach tone stays true and adheres properly to the siding.
Step 2: Applying the Main Colors
-
Paint the siding:
Roll on the soft peach exterior paint onto the horizontal siding. Work from the top down to catch any drips. Use a brush to cut in under the eaves and along the corner trim. -
Second coat coverage:
Once the first coat is dry to the touch, apply a second coat of the peach paint. This deepens the color and provides better weather protection. -
Detailing the trim:
Switch to the creamy off-white paint. Carefully paint the corner boards, door frame, window frame, and fascia boards. I like to use an angled sash brush here for crisp lines without needing tape everywhere. -
Painting the door:
Remove the door hardware if possible. Paint the door, including the cross-bracing and panels, in the same creamy off-white to create a smooth visual break from the peach siding.
Brush Maintenance
Wrap your wet brushes in plastic wrap or a plastic bag between coats. This keeps the paint from drying out so you don’t have to wash them fully during a lunch break.
Step 3: Shutters and Accents
-
Prepare the shutters:
If your shutters are raw wood, sand them lightly. If painting over old ones, clean and scuff them up. Lay them flat on a drop cloth for easier painting. -
Apply the reddish-brown tone:
Paint or stain the shutters a deep reddish-brown. This darker color anchors the light peach and connects visually with natural brick or soil tones in the garden. -
Install the shutters:
Once dry, reattach the shutters on either side of the side window. Ensure they are level and spaced evenly from the window frame. -
Hardware contrast:
Install or reinstall the black iron strap hinges and door latch. The black metal pops beautifully against the cream door and adds a rustic touch.
Custom Gables
Add a decorative wooden finial or ‘gingerbread’ trim to the apex of the roof gable. Painting it white draws the eye upward and adds vintage character.
Step 4: Floral Finishes
-
Window box installation:
Mount a window box beneath the side window. Paint it a dark color (like black or dark brown) so it disappears, letting the flowers take center stage. -
Planting vibrant contrast:
Fill the window box with bright orange marigolds or calibrachoa. The bright orange flowers echo the peach siding but with more intensity. -
Potted accents:
Place a large terracotta pot near the door. The clay material naturally complements the shed’s color palette. -
Final floral touch:
Plant pink geraniums or similar blooms in the terracotta pot to soften the base of the structure and bridge the gap between building and lawn.
Step back and enjoy how your fresh color choices have turned a utility space into a garden highlight
Light-Painted Shed Interior for a Tiny Studio Feel
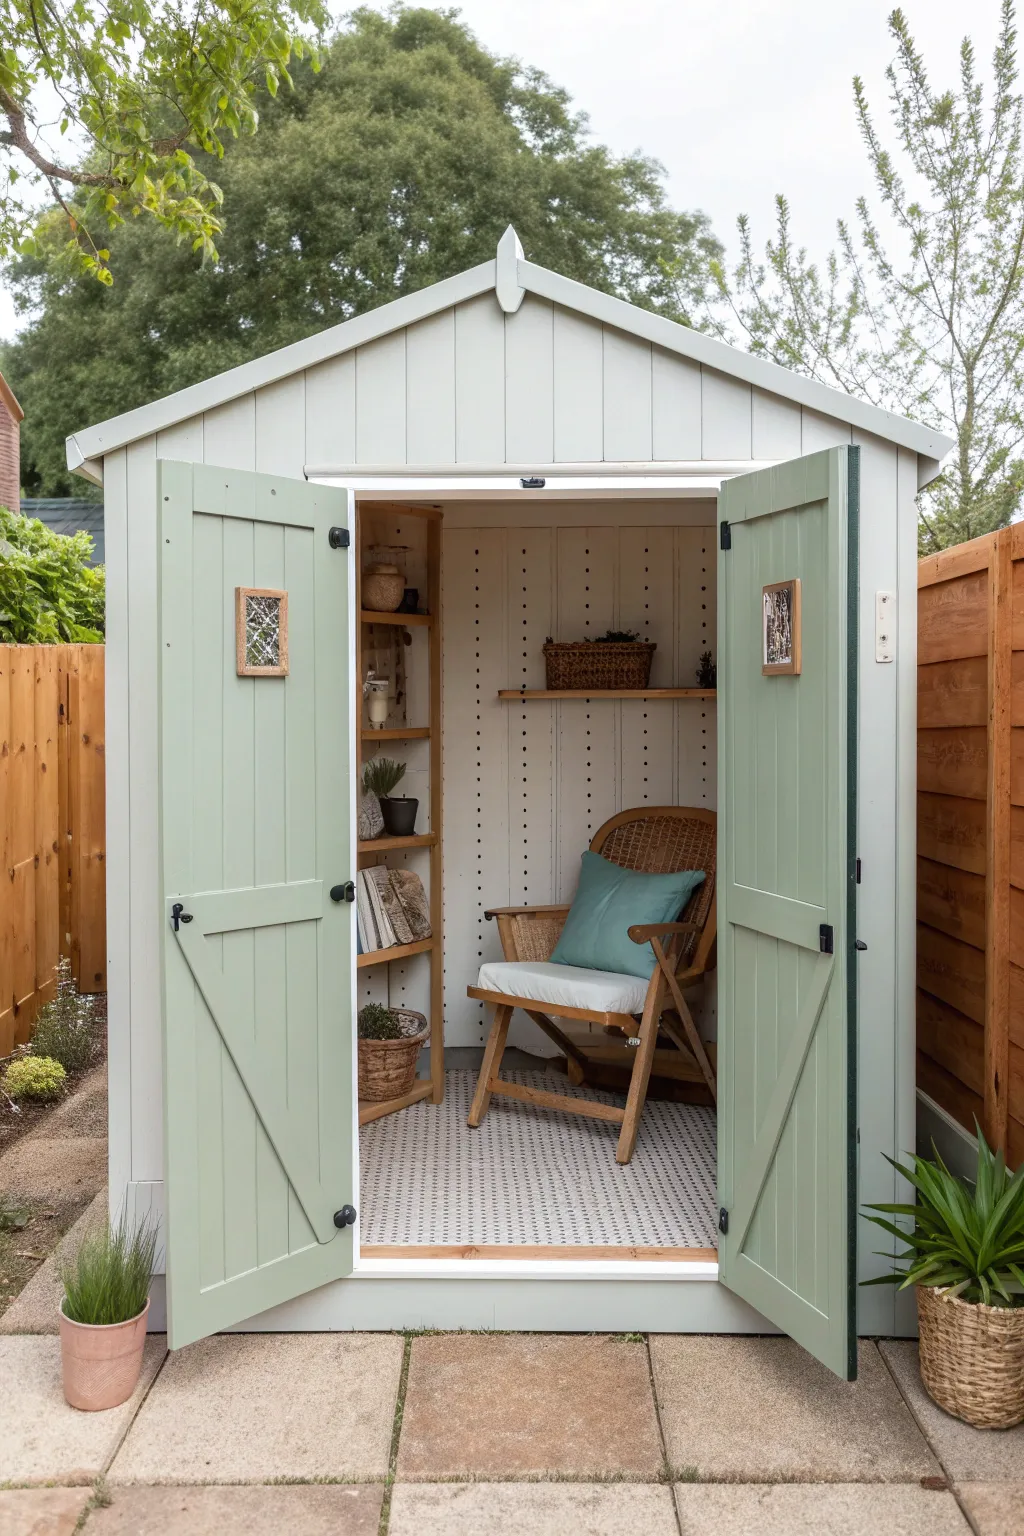
Transform a standard wooden shed into a serene garden retreat by combining soothing sage greens with crisp, pale grey interiors. This project creates a surprisingly spacious feel, turning a small footprint into a cozy reading nook or compact studio workspace.
How-To Guide
Materials
- Exterior wood primer
- Pale satin grey wood paint (exterior/interior suited)
- Sage green exterior wood paint
- Sandpaper (80 and 120 grit)
- Wide masking tape
- Drop cloths
- 2-inch synthetic paintbrush (for cutting in)
- 4-inch foam roller and tray
- Clear matte varnish (optional)
- Screwdriver or drill
Step 1: Preparation and Priming
-
Clear and clean:
Begin by removing all contents from the shed. Use a stiff brush to sweep away cobwebs, dust, and debris from the walls, floor, and ceiling beams. -
Sand the surfaces:
Lightly sand all wooden surfaces you intend to paint using 80-grit sandpaper to remove rough splinters, followed by 120-grit for a smoother finish. Wipe down with a damp cloth to remove dust. -
Mask hardware:
Use wide masking tape to cover hinges, latches, and window panes. Alternatively, unscrew and remove hardware completely for the cleanest possible finish. -
Apply primer:
Apply a coat of high-quality wood primer to all raw wood surfaces. This prevents tannins from bleeding through your light paint colors later. -
Let it cure:
Allow the primer to dry completely according to the manufacturer’s instructions, usually about 4-6 hours.
Sticky Situation?
Is paint peeling off knots in the wood? Coat knots with a specialized knotting solution before priming to seal in the resin and prevent future staining or peeling.
Step 2: Painting the Interior
-
Cut in the edges:
Start with the pale grey paint. Use your 2-inch brush to paint the corners, around the window frames, and along the floor and ceiling lines where a roller can’t reach. -
Roll the main walls:
Using the 4-inch foam roller, apply the pale grey paint to the large wall panels. Work in vertical sections to follow the wood grain. -
Paint the ceiling:
Don’t forget the ceiling; painting it the same pale grey as the walls lifts the space visually, making the shed feel taller and brighter. -
Apply second coat:
Once the first coat is dry, apply a second coat of grey for opaque, solid coverage. I find this second layer crucial for getting that professional studio look. -
Paint interior beams:
For a cohesive look, paint the structural beams the same color as the walls to help them blend in, rather than standing out.
Level Up
Create a pegboard wall on one side by drilling a grid of holes before painting. This adds flexible storage for tools or craft supplies without needing bulky furniture.
Step 3: Exterior and Accents
-
Paint the doors:
Switch to your sage green paint. Carefully paint the interior and exterior faces of the double doors. Use the brush to get deep into the grooves of the tongue-and-groove paneling. -
Detail the door frames:
Paint the Z-bracing on the back of the doors in the same sage green to highlight the craftsmanship and add structural interest. -
Allow thorough drying:
Leave the doors open while drying to prevent them from sticking to the frame. This might take up to 24 hours depending on humidity.
Step 4: Styling and Finishing
-
Drill shelf supports:
Install wooden shelving brackets or supports on one side of the shed. Ensure they are level before securing them with screws. -
Add shelving:
Place natural wood planks across the supports. Leaving these unpainted adds warmth and connects the interior to the garden outside. -
Lay flooring:
Roll out a durable, patterned outdoor rug or matting to define the floor space and add softness underfoot. -
Style the nook:
Place a comfortable armchair in the corner opposite the door. Add a soft cushion that complements the sage green door color. -
Final touches:
Reattach any hardware you removed. Add small potted plants and baskets to the shelves to complete the studio atmosphere.
Enjoy your customized garden escape, perfect for reading, crafting, or simply enjoying a cup of tea
Cottage Stripes for a Playful Painted Shed
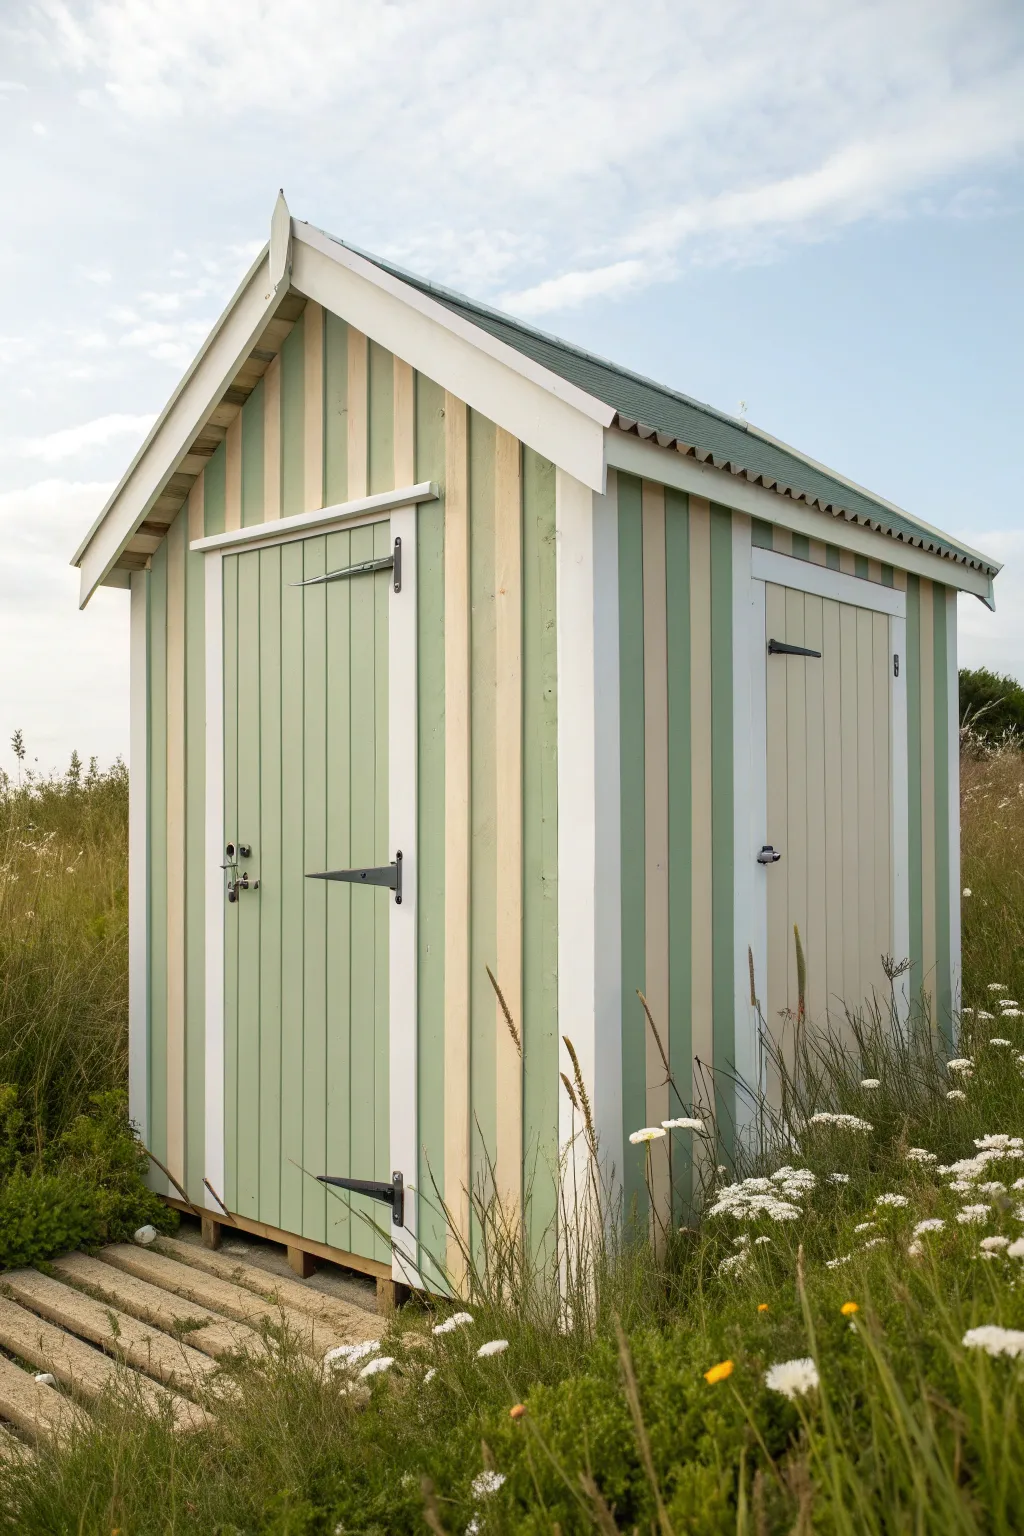
Transform a plain wooden structure into a charming beach-hut inspired feature with soft sage and sand stripes. This painting project uses vertical lines to add height and character, blending beautifully with natural garden surroundings.
Step-by-Step Guide
Materials
- Exterior wood primer/undercoat (white)
- Exterior eggshell or satin paint (Soft Sage Green)
- Exterior eggshell or satin paint (Sand/Beige)
- Exterior eggshell or satin paint (Bright White)
- 2-inch synthetic angle sash brush
- 4-inch mini roller and tray
- High-quality painter’s tape (1.5 inch width)
- Sandpaper (120 grit)
- Clean rags and tack cloth
- Drop cloths
- Tape measure and pencil
- Screwdriver (to remove hardware)
Step 1: Preparation & Priming
-
Clear hardware and obstacles:
Begin by unscrewing and removing all door latches, hinges, and handles. Label these and set them aside in a bag to prevent losing screws. Lay down heavy-duty drop cloths around the shed’s perimeter to protect the ground or decking. -
Surface prep:
Give the entire exterior wood surface a thorough sanding with 120-grit paper. You want to smooth out any rough patches and create a ‘key’ for the paint to adhere to. Wipe away all dust using a damp rag followed by a tack cloth. -
Prime the wood:
Apply a generous coat of white exterior wood primer to the entire shed, including the doors and trim. A roller works fast for the panels, but use a brush to work the primer into the grooves between planks. Let this dry completely, usually for 4-6 hours.
Bleeding Stripes?
If paint bleeds under the tape, wait for it to dry completely. Re-tape the damaged line slightly wider and paint over the mistake with the correct color for a crisp fix.
Step 2: Base Coat & Trim
-
Apply the lighter base color:
Since the stripes alternate, painting the lighter color first makes coverage easier. Apply two coats of the Sand/Beige paint to all the vertical wall panels and doors. Allow full drying time between coats. -
Paint the trim:
While the beige drying, paint the door frames, corner posts, fascia boards, and roof overhangs with the Bright White paint. Use the angle sash brush for crisp edges. Two coats will ensure a bright, clean border. -
Define the door details:
The image features white outlines on the door itself. Carefully paint the Z-bracing or the perimeter frame of the door in Bright White to emphasize the architectural structure.
Step 3: Creating the Stripes
-
Measure the planks:
Examine your shed’s cladding. If the shed uses tongue-and-groove boards, let the natural grooves dictate your stripe width. If it’s a flat sheet, measure and mark vertical lines every 4-6 inches with a pencil. -
Tape the pattern:
Apply painter’s tape firmly along the vertical lines to mask off the areas that should remain beige. Press the tape edges down firmly with a putty knife or your fingernail to prevent paint bleed. -
Seal the tape edges:
I like to lightly brush a tiny amount of the *base* beige color over the tape edge first. This seals the tape so any paint that bleeds underneath matches the background, keeping your green lines perfect. -
Apply the green stripes:
Using a 2-inch brush, fill in the unmasked vertical sections with the Soft Sage Green paint. Apply smooth, long strokes from top to bottom. -
Multiple coats for depth:
The green may need a second coat for full opacity, especially over the light beige base. Apply the second coat once the first is dry to the touch but not fully cured. -
Reveal the stripes:
Remove the painter’s tape slowly at a 45-degree angle while the final coat of green paint is still slightly tacky. This prevents the dried paint ‘skin’ from peeling off with the tape.
Pro Tip: Weather Watch
Check the forecast before starting! You need at least 2-3 rain-free days. Avoid painting in direct, scorching midday sun, which dries paint too fast and leaves brush marks.
Step 4: Finishing Touches
-
Touch up details:
Inspect your stripes and trim. Use a small artist’s brush to fix any minor bleeds or spots where the white trim paint might have accidentally touched the wall panels. -
Refinish hardware:
While the shed cures, spray paint the removed hinges and latches with a matte black metal paint if they look worn. This creates the high-contrast iron look seen in the photo. -
Reinstall hardware:
Once the shed paint has cured for at least 24 hours, screw the hinges and latches back into place. Ensure the doors swing freely without scraping the fresh paint.
Now you have a custom garden focal point that feels like a permanent vacation spot right in your backyard
Geometric Color-Block Painted Shed Panels
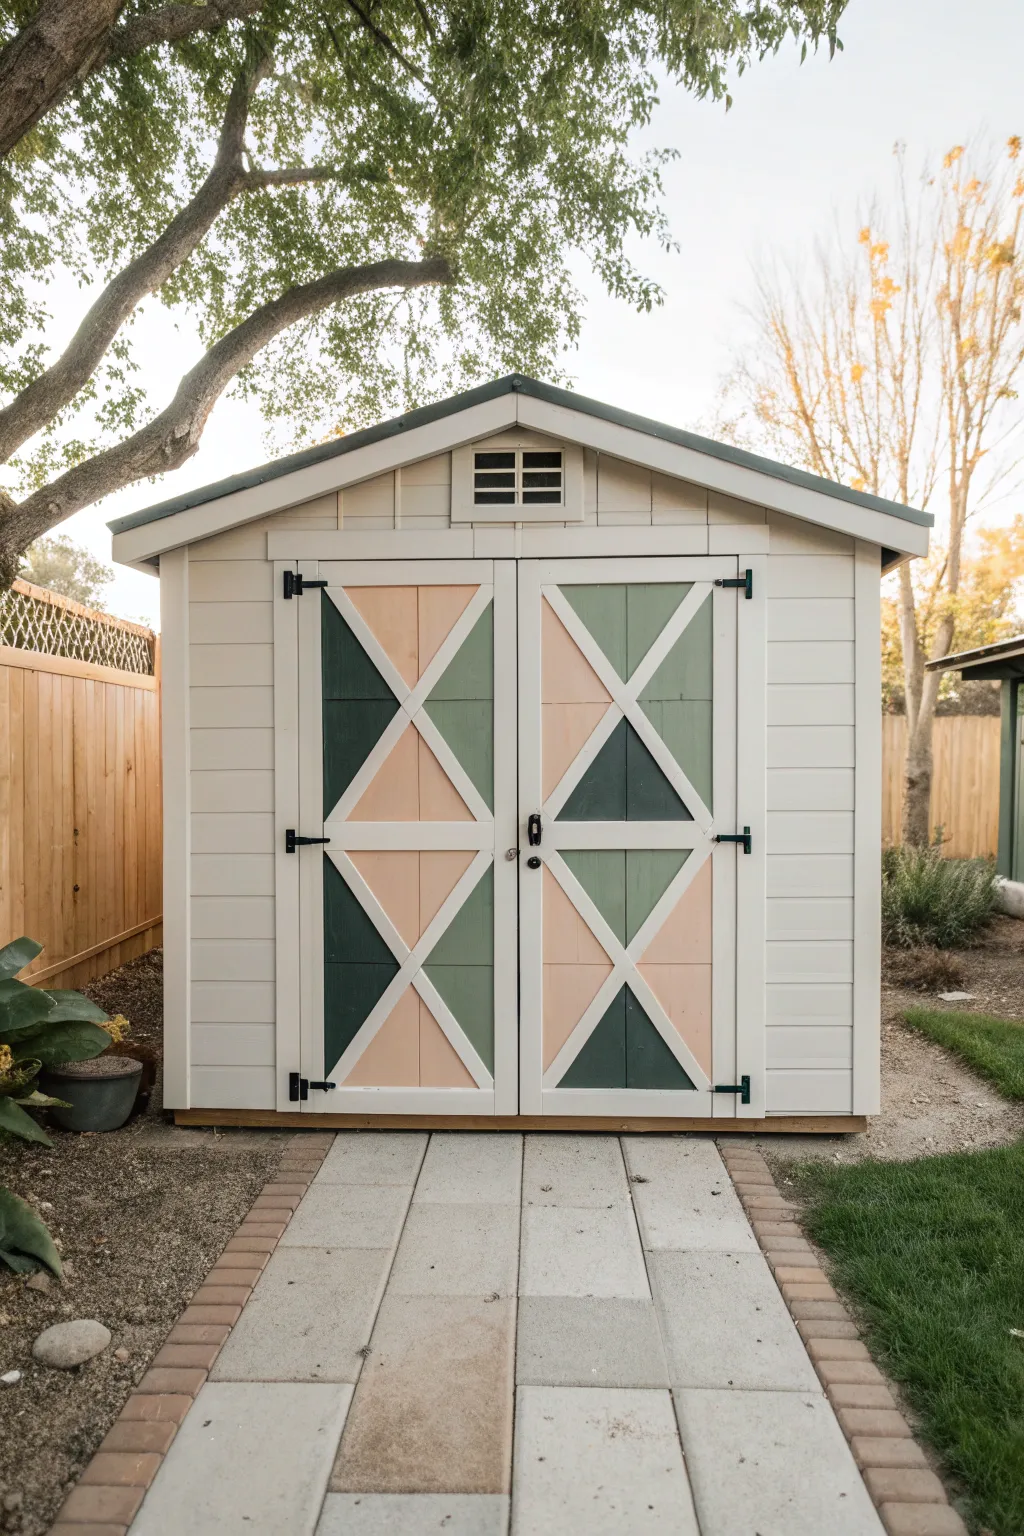
Transform a standard garden shed into a backyard focal point with this modern geometric makeover. By using the door’s existing support beams as a guide, you can create a striking pattern of alternating greens and soft peach tones that feels fresh and custom.
How-To Guide
Materials
- Exterior grade primer
- Exterior paint in White (trim/base)
- Exterior paint in Dark Forest Green
- Exterior paint in Sage Green
- Exterior paint in Peach/Blush Pink
- Painter’s tape (multi-surface)
- Sandpaper (120 and 220 grit)
- Tack cloth
- 2-inch angled sash brush
- 4-inch foam roller or mini roller
- Drop cloth
- Screwdriver (for hardware removal)
- Utility knife
Step 1: Preparation
-
Remove hardware:
Before dipping any brushes, take a screwdriver and carefully remove the door handles, latches, and hinges if possible. If the hinges are difficult to remove, cover them completely with painter’s tape. -
Clean surface:
Wash the shed doors thoroughly with a mixture of water and mild detergent or TSP substitute. Scrub away any dirt, mildew, or spiderwebs and let the wood dry completely. -
Sand the wood:
Using 120-grit sandpaper, lightly scuff the entire surface of the doors. This removes any loose paint and gives the new coat something to grip. Follow up with a quick pass of 220-grit for smoothness. -
Wipe down:
Remove all sanding dust using a tack cloth. This step is crucial because even small dust particles can ruin the crispness of your paint lines later. -
Prime the surface:
Apply a coat of high-quality exterior primer to the entire door surface. This ensures your colors pop and the paint adheres well to the wood grain.
Bleed-Through Fix
Paint bled under the tape? Don’t panic. Wait for it to dry completely, then re-tape over the color and lightly brush your white trim paint over the messy edge to sharpen it up.
Step 2: Painting the Framework
-
Paint the trim:
Start by painting the ‘X’ bracing, the door frames, and the center stile with your white exterior paint. I find that an angled sash brush gives the best control for these narrow strips. -
Apply second coat:
Allow the first coat of white to dry according to the can’s instructions, then apply a second coat for full opacity. Let this dry fully for at least 24 hours before taping. -
Tape the design:
Apply painter’s tape along the inner edges of the white ‘X’ braces and frame. Press the tape edges down firmly with a putty knife or credit card to prevent bleed-under.
Step 3: Adding Color
-
Plan your pattern:
Look at the triangles formed by the bracing. Decide where your colors go. In this design, notice how the colors mirror each other: the top left triangle on the left door matches the top right triangle on the right door. -
Paint the dark green sections:
Using a clean brush or mini roller, fill in the specific triangles designated for the Dark Forest Green. Apply two thin coats rather than one thick one to avoid drips. -
Paint the sage green sections:
Switch brushes and fill in the sections for the lighter Sage Green. Keep a damp rag nearby to quickly wipe up any accidental splatters on the white trim. -
Paint the peach sections:
Finally, fill in the remaining triangles with the Peach/Blush Pink paint. This warm tone provides a beautiful contrast to the cool greens. -
Remove tape:
While the final coat of paint is still slightly tacky (not fully dry), carefully peel back the painter’s tape at a 45-degree angle. This keeps the paint from chipping.
Go Monochromatic
For a subtler look, skip the high contrast colors and use three shades of the same color family (like navy, medium blue, and sky blue) for an ombré geometric effect.
Step 4: Finishing Touches
-
Touch up:
Inspect your lines. If any color bled onto the white trim, use a tiny artist’s brush and white paint to clean up the edges once the color is dry. -
Reinstall hardware:
Once the doors have cured for at least 48 hours to a hard finish, screw the handles and hinges back into place. -
Clean hardware:
Before ignoring the hardware, wipe down the black metal parts with a little oil to refresh their shine and protect them from rust.
Step back and admire how a simple paint job has turned your practical storage space into a charming garden feature
Ombre Painted Shed That Fades Like a Sunset
Capture the warmth of dusk with this stunning ombre shed transformation that blends soft peach tones into rich terracotta. This gradient effect adds depth and a calming, artistic touch to any backyard garden structure.
Step-by-Step Guide
Materials
- Exterior wood primer
- High-quality exterior latex paint (White) for trim
- Exterior latex paint (Light Peach)
- Exterior latex paint (Medium Coral)
- Exterior latex paint (Deep Terracotta)
- Wide paint roller and tray
- 2-inch angled trim brush
- 4-inch blending brush or dry synthetic brush
- Painter’s tape
- Sandpaper (120-grit)
- Drop cloths
- Paint spray gun (optional, for base coats)
- Clean bucket for mixing
Step 1: Cleaning and Prep
-
Prepare the surface:
Before dipping a brush, thoroughly clean the entire shed exterior. Use a power washer or a stiff scrub brush with soapy water to remove dirt, mold, and mildew. Let the wood dry completely for at least 24 hours. -
Smooth the wood:
Walk around the shed and sand down any rough patches or peeling old paint using 120-grit sandpaper. This ensures your gradient glides on smoothly without catching on splinters. -
Protect the trim:
Unless you plan to paint the trim last (which is riskier for the ombre finish), tape off all door frames, window sills, and corner boards with high-quality exterior painter’s tape to keep lines crisp. -
Prime the surface:
Apply a solid coat of exterior wood primer to the siding. This is crucial for sealing the wood and ensuring true color payoff for your lighter peach tones. Allow the primer to cure according to the can instructions.
Step 2: Creating the Ombre Effect
-
Map your sections:
Mentally divide the shed siding vertically into three horizontal sections. The top third will be light peach, the middle coral, and the bottom terracotta. You don’t need pencil lines; rough mental zones are better for blending. -
Apply the lightest tone:
Start at the very top under the eaves. Using a roller or sprayer, apply the Light Peach paint down to the top of your middle section. Keep the bottom edge wet and irregular—do not paint a straight horizontal line. -
Apply the darkest tone:
Move immediately to the bottom third of the shed. Apply the Deep Terracotta paint from the foundation line up to where the middle section begins. I prefer doing this before the middle color to establish my contrast points. -
Fill the middle:
Apply the Medium Coral paint in the center strip, leaving a few inches of gap between it and the top/bottom colors for now. Work quickly so the paint adjacent to the gaps remains workable. -
The upper blend:
Dip a fresh 4-inch brush lightly into the Medium Coral. Feather it upwards into the wet edge of the Light Peach section. Use long, sweeping X-motions to blur the transition line until the colors merge softly. -
The lower blend:
Clean your blending brush or grab a new one. Dip it lightly into the Deep Terracotta and feather it upwards into the wet Medium Coral section. The goal is to eliminate hard stripes, creating a hazy transition. -
Refining the gradient:
Step back about ten feet to view the whole wall. If lines look too harsh, use a barely damp brush (no paint) to lightly drags vertically across the transition zones to soften the look further. -
Repeat for all sides:
Continue this process on the remaining walls, working one wall at a time to ensure the paint stays wet enough for blending. Consistency in your color zones is key here.
Fixing Blotchy Blends
If the blending dries patchy, don’t panic. Mix a 50/50 blend of the two adjacent colors in a cup and dry-brush this intermediate shade over the messy transition area.
Step 3: Trim and Details
-
Remove tape and touch up:
Once the ombre siding is fully dry (give it a day), carefully peel away the painter’s tape. If any coral or peach seeped onto the trim, sand it off gently. -
Paint the trim:
Using your 2-inch angled brush, paint the corner boards, roof fascia, and door frame with crisp White exterior paint. Apply two coats for a stark, clean contrast against the warm siding. -
Paint the door:
Paint the main door panel and its cross-bracing in the same White trim color. This bright center point anchors the gradient design. -
Install hardware:
Reattach or install new door handles and hinges. Brass or matte black hardware looks particularly elegant against these sunset hues. -
Add a ramp (optional):
If you have a wooden entry ramp like the one shown, stain it a neutral wood tone or paint it the Deep Terracotta color to ground the structure visually.
Add Solar Accents
Install small solar-powered sleek sconces on either side of the white door frame. They will illuminate the ombre fade beautifully as the real sunset happens.
Now you have a backyard retreat that glows with color even on cloudy days
Hand-Painted Floral Mural on the Shed Wall
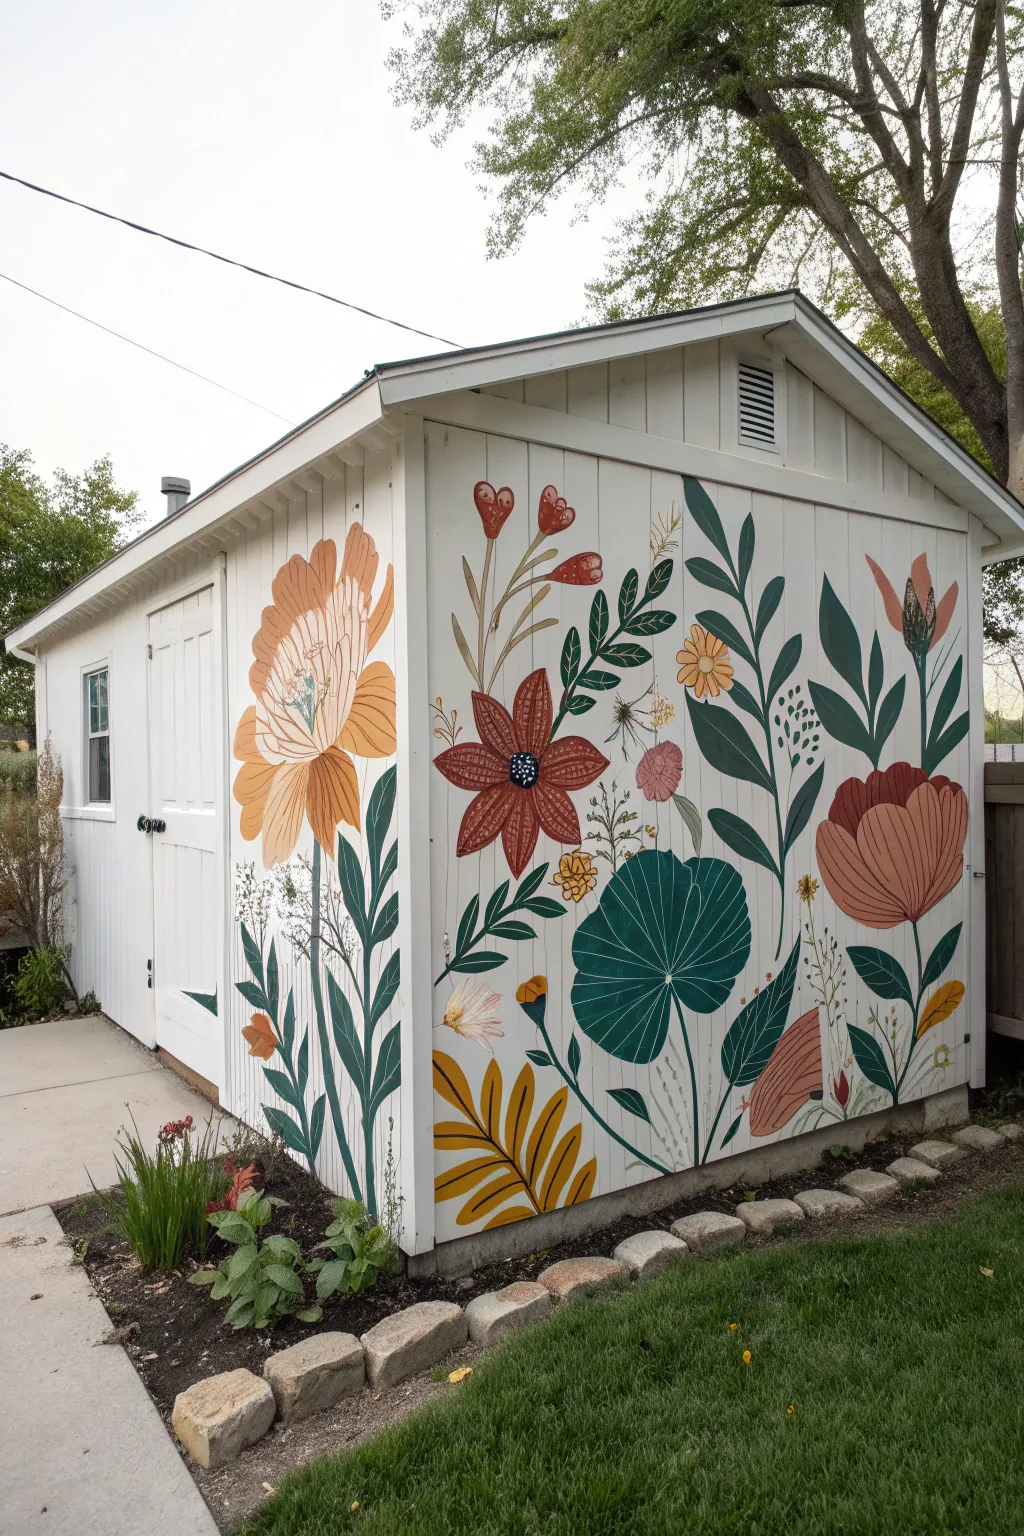
Transform a plain backyard shed into a stunning garden focal point with this oversized floral mural. Featuring warm earth tones, stylized botanicals, and bold organic shapes, this project brings blooming beauty to your outdoor space year-round.
Step-by-Step Tutorial
Materials
- Exterior latex primer (white)
- Exterior acrylic latex house paints (White, Cream, Mustard Yellow, Burnt Orange, Terracotta, Deep Teal, Sage Green, Olive Green)
- Assorted paintbrushes (2-inch sash brush, 1-inch flat brush, various round detail brushes sizes #4-#10)
- Chalk or watercolor pencils (light gray or pale yellow)
- Small plastic cups or containers for mixing
- Painter’s tape
- Drop cloth
- Step stool or ladder
- Clear exterior UV-protective sealant (matte or satin finish)
- Rags and water bucket for cleanup
Step 1: Preparation & Base Coat
-
Clean surface:
Begin by thoroughly cleaning the shed siding with a mild detergent and water to remove dirt, mildew, or cobwebs. Let the wood dry completely before moving on. -
Tape and protect:
Apply painter’s tape to any trim, door handles, or vents you want to keep paint-free. Lay down a drop cloth along the foundation to catch drips. -
Prime the wall:
Apply a solid coat of white exterior primer to the entire painting surface. This ensures your colors pop and the paint adheres properly to the siding. -
Apply background color:
Once the primer is dry, paint two coats of a warm white or soft cream exterior paint as your background. Allow full drying time between coats according to the can’s instructions.
Muralist’s Secret
Step back frequently! Painting up close can distort your perspective. Viewing from 10 feet away helps ensure your composition feels balanced.
Step 2: Sketching the Design
-
Plan the layout:
Step back and mentally divide the wall. Notice how the large orange peony anchors the door side, while the oversized red daisy and teal lily pad dominate the main wall. -
Chalk the outlines:
Using chalk or a watercolor pencil, lightly sketch the main floral shapes directly onto the siding. Start with the largest blooms first to establish scale, then fill in the gaps with stems and leaves. -
Refine organic shapes:
Don’t worry about perfection; keep lines loose and organic. Draw the sweeping curves of the stems reaching upward and the fun, rounded shapes of the leaves.
Make It Yours
Incorporate local wildflowers or pollinators like bees and butterflies into the design for a mural that celebrates your specific regional ecosystem.
Step 3: Painting the Large Form
-
Block in foliage:
Start with your greens. Use the deep teal for the large, round lily-pad shape and the dark, pointy leaves. Switch to sage and olive greens for the fern-like fronds and smaller stems. -
Paint the main blooms:
Fill in the large flower heads. Use a flat brush to block in the mustard yellow and creamy orange petals of the large peony near the door. -
Add vibrant reds:
Paint the large central daisy shape with terracotta or rustic red. Use smooth, confident strokes that follow the direction of the petals. -
Layering colors:
For the bottom corner fan-leaf, mix mustard yellow with a touch of brown for an autumnal gold tone. I find applying a second coat on these darker colors really helps achieve full opacity.
Step 4: Detailing & Line Work
-
Add petal definition:
Once the base flower colors are dry, use a smaller round brush to add details. Paint thin, dark lines inside the peony petals to suggest texture and depth. -
Create flower centers:
For the red daisy, paint a dark navy or black center. Once dry, use a fine tip brush to add tiny white dots for pollen seeds. -
Enhance the leaves:
Use a light green or cream color to paint the veins onto the large teal lily pad shape, radiating from the center outward. -
Paint delicate fillers:
Using your smallest round brush, paint the wispy stems and tiny white flower clusters that fill the negative space between the big blooms. -
Clean up edges:
Step back to check your work. If any background color shows through unevenly, or if edges look messy, use a small angled brush to tidy them up.
Step 5: Finishing Touches
-
Erase guidelines:
Wipe away any remaining visible chalk lines with a damp cloth once the paint is fully cured. -
Seal the mural:
Apply two thin coats of clear UV-protective exterior sealant. This is crucial to prevent fading from the sun and damage from rain.
Enjoy the view of your beautiful, everlasting garden display every time you step into the backyard
Trompe L’Oeil Faux Windows and Painted Architectural Details
Create a charming, realistic painting of a small backyard garden shed, complete with intricate architectural details and lush surrounding greenery. This project captures the play of light on siding and the inviting warmth of a private garden retreat.
How-To Guide
Materials
- Canvas or primed panel (16×20 inches or similar)
- Acrylic paints (Titanium White, Burnt Umber, Yellow Ochre, Ultramarine Blue, Hooker’s Green, Cadmium Red, Raw Siena)
- Set of synthetic brushes (1-inch flat, #6 filbert, #2 round, #0 liner)
- Palette and palette knife
- Water container and paper towels
- Pencil and eraser
- Ruler or T-square
Step 1: Sketching the Structure
-
Establish the horizon:
Begin by lightly drawing a horizon line about a third of the way up the canvas. This ground the shed in the scene. -
Outline the main volume:
Using your ruler and pencil, draft the main rectangular box of the shed in two-point perspective. The corner facing the viewer should be slightly off-center to the right. -
Add the roof geometry:
Sketch the hip roof shape on top. Pay attention to the angles; the front slopes should meet at a peak that aligns with the center of the structure’s footprint. -
Detail doors and windows:
Draw the double doors on the right-facing wall and the double-hung window on the left-facing wall. Sketch the muntins (grid lines) inside the glass panes carefully. -
Indicate surroundings:
Lightly sketch the shapes of the trees in the background, the fence line behind the shed, and the stone pavers leading up to the door.
Step 2: Blocking In Colors
-
Paint the sky:
Mix a very pale blue with Titanium White and a dot of Ultramarine. Paint the sky areas peeking through the trees first, keeping it light and airy. -
Underpaint the foliage:
Use a mix of Hooker’s Green and Burnt Umber to block in the dark masses of the trees and bushes. Don’t worry about individual leaves yet; just establish the dark values. -
Base coat the siding:
Mix a warm, creamy off-white using Titanium White and a tiny touch of Yellow Ochre. Apply this to the siding walls, keeping brushstrokes horizontal to mimic the wood planks. -
Roof base layer:
Mix Burnt Umber into a dark grey-brown for the roof shingles. Apply a solid coat to the roof area. -
Groundwork:
Block in the walkway with a mix of grey and slate blue. For the garden bed soil, use a rich dark brown (Burnt Umber plus a touch of Blue for depth).
Straight Lines Matter
If your painted lines for the siding or trim look shaky, use the edge of a piece of masking tape or a ruler as a guide for your brush to steady your hand.
Step 3: Architectural Definition
-
Define the siding shadows:
Using a slightly darker version of your cream wall color (add a tiny bit of Raw Siena), paint thin horizontal lines under each lap of siding to create the shadow cast by the plank above. -
Paint the trim:
Use a pure Titanium White to paint the corner boards, door frames, and window casings. This slight brightness difference will make the trim pop against the creamy siding. -
Detail the roof shingles:
With a small flat brush, dab rows of lighter grey-brown onto the roof to suggest individual shingles. I find keeping these strokes loose prevents the roof from looking too rigid. -
Glass reflections:
Paint the window and door panes dark grey or almost black first. Then, while dry, scumble reflections of trees and sky using thinned greens and blues.
Evening Glow
Glaze the entire finished painting with a very thin, transparent layer of golden yellow acrylic medium to give the scene a warm, late-afternoon sunlit quality.
Step 4: Bringing It to Life
-
Hardware details:
Switch to your #0 liner brush and black paint to carefully add the hinges and door handle. These tiny high-contrast details add significant realism. -
Leaf texture:
Stipple lighter greens (Hooker’s Green + Yellow Ochre) over your dark foliage base to create volume in the trees and the small plants at the base of the shed. -
Flower accents:
Dab small spots of bright orange (Cadmium Red + Yellow Ochre) in the lower left garden bed to represent the marigolds or nasturtiums. -
Paver texture:
Use a thinned grey wash to outline individual bricks in the walkway. Vary the color of a few bricks slightly with touches of red or brown earth tones. -
Final highlights:
Add sharp white highlights to the top edges of the window muntins and the door handle to simulate sunlight catching the surfaces.
Step back and admire how your brushwork has built a peaceful garden sanctuary right on the canvas


Have a question or want to share your own experience? I'd love to hear from you in the comments below!