
If you’re dreaming up baby girl canvas painting ideas, I’ve got you—these are the kinds of soft, sweet pieces that instantly make a nursery feel personal. Think gentle color palettes, a little whimsy, and just enough detail to feel special without being stressful to paint.
Baby Girl Name Script Canvas
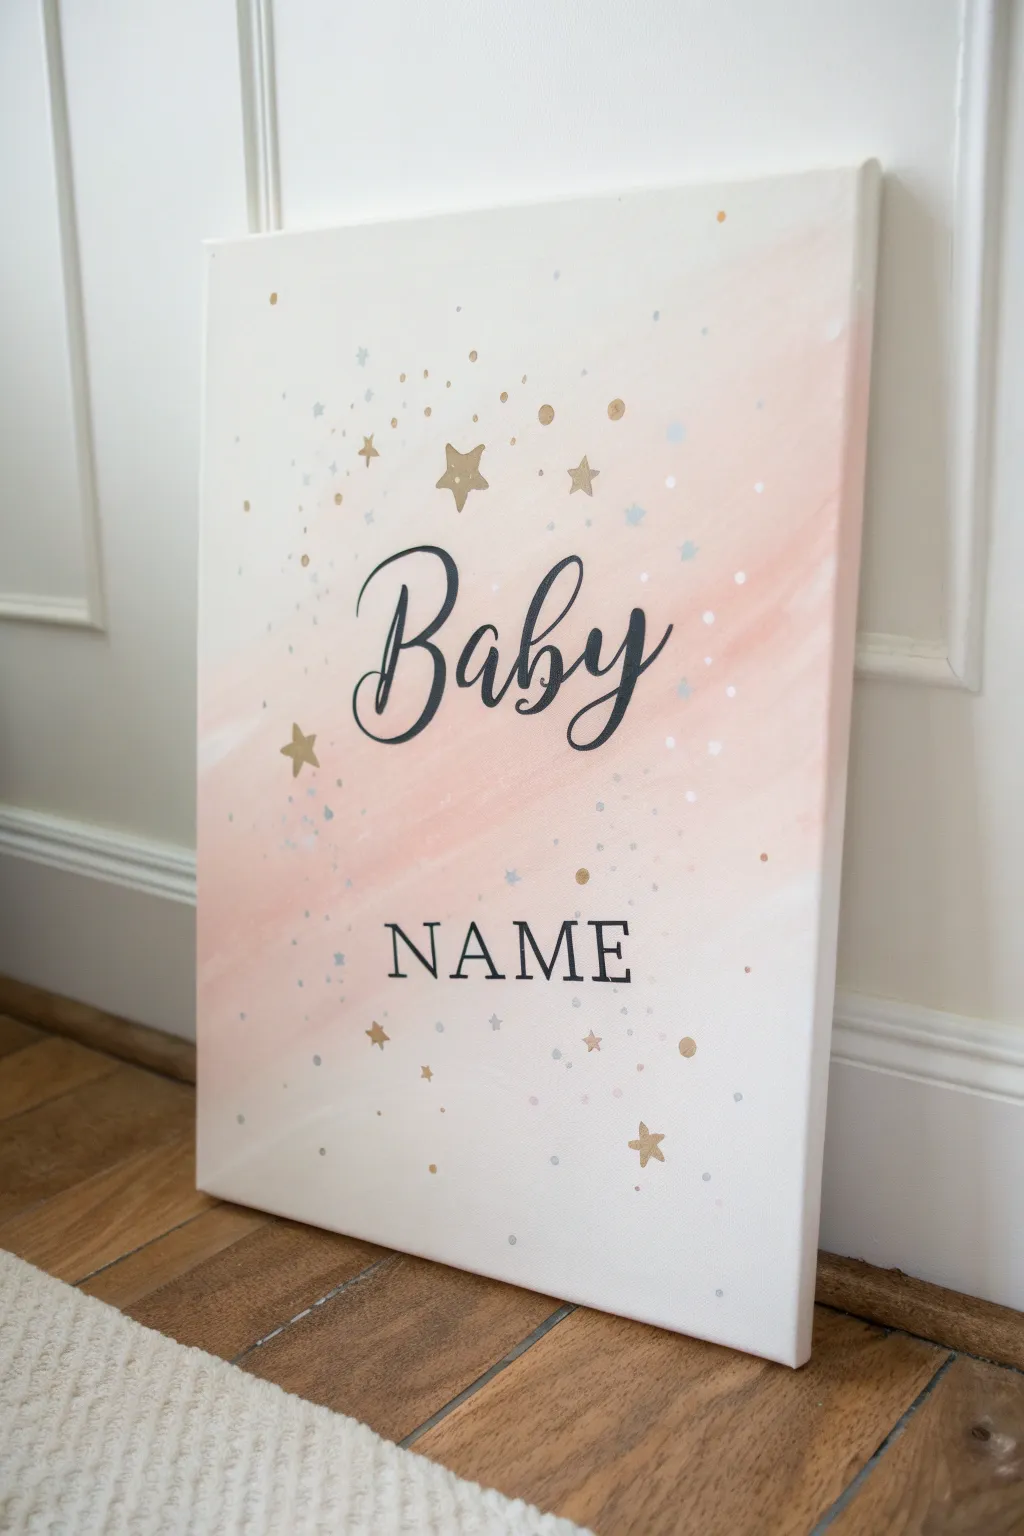
Create a whimsical and personalized piece of nursery art with this soft, celestial canvas project. Featuring a gentle blush watercolor wash and scattered gold stars, this design frames a baby’s name in a way that feels both modern and timeless.
Step-by-Step Tutorial
Materials
- Rectangular stretched canvas (16×20 or similar size)
- Acrylic paints: White, Blush Pink, Metallic Gold, Soft Grey
- Textile medium or glazing liquid (optional, for transparency)
- Wide flat wash brush (2 inch)
- Small round detail brush (size 0 or 1)
- Medium round brush (size 4)
- Pencil and eraser
- Carbon transfer paper (optional)
- Printed template of the name (optional)
- Palette or paper plate
- Cup of water and paper towels
Step 1: Creating the Ethereal Background
-
Prepare your workspace:
Lay down a drop cloth or newspaper to protect your surface. Set up your canvas vertically. Squeeze a generous amount of white paint and a smaller amount of blush pink onto your palette. -
Mix the base wash:
Mix a large portion of white with a tiny dot of pink to create a very pale, milky blush color. Thin this slightly with water or glazing liquid to make it semi-transparent. -
Apply the diagonal sweep:
Using the wide flat brush, start applying the paint in a diagonal motion from the bottom left toward the top right. We want a sweeping, uneven band of color across the middle of the canvas. -
Add depth and variation:
While the first layer is wet, pick up a slightly darker shade of the pink mixture. Gently streak it into the diagonal band to create a soft, cloud-like texture. -
Fade the edges:
Clean your wide brush and leave it barely damp. Gently feather the edges of your pink band outward into the white canvas space so there are no hard lines. -
Let it cure:
Allow the background to dry completely. This is crucial—if the background is wet, your lettering will bleed. I usually give this at least an hour.
Step 2: Lettering the Name
-
Plan your layout:
Lightly sketch the word ‘Baby’ in a large, loose script font in the upper center. Below it, sketch the baby’s name in a classic serif font. If you aren’t confident freehanding, use a printed template and carbon paper to transfer the design. -
Mix the lettering color:
Mix a dark charcoal grey or soft black acrylic paint. Avoid pure black if possible, as it can look too harsh against the soft pink. -
Paint the script text:
Using the medium round brush, carefully paint over your pencil lines for the word ‘Baby’. Vary the pressure on your brush: press down on downstrokes for thickness, and lift up on upstrokes for thin lines. -
Paint the name:
Switch to your small detail brush for the serif font (‘NAME’). Keep your edges crisp and straight, focusing on the small ‘feet’ of the letters. -
Clean up edges:
Once the letters are touch-dry, use a clean eraser to gently remove any visible pencil marks, being careful not to smudge the paint.
Unsteady Hand?
If painting letters feels scary, use paint pens instead of brushes! A broad tip marker works great for the script, and a fine tip is perfect for the smaller serif name.
Step 3: Adding Celestial Details
-
Paint the main stars:
Load your small brush with metallic gold paint. Randomly place 5-7 medium-sized five-pointed stars around the text, concentrating them slightly around the ‘Baby’ script. -
Add smaller stars:
Paint tinier, simple stars (just crossing lines or small dots) further out from the center using the gold paint. -
Create soft grey accents:
Clean your brush and switch to a very pale grey. Add tiny dots or small star shapes in between the gold ones to add depth to the ‘galaxy’ effect. -
Add confetti dots:
Dip the tip of a brush handle or a toothpick into the gold paint. Dot it onto the canvas to create perfectly round, tiny specks of stardust. -
Final speckle:
For a magical finish, dilute a tiny bit of grey paint on a stiff brush. Flicker the bristles with your thumb to create a microscopic mist of speckles near the edges of the pink wash.
Pro Tip: Floating Stars
Let the stars overlap the pink wash and the white background equally. This helps integrate the background color with the foreground elements seamlessly.
Hang this sweet masterpiece in the nursery and enjoy the dreamy atmosphere it creates


Monogram With Floral Wreath
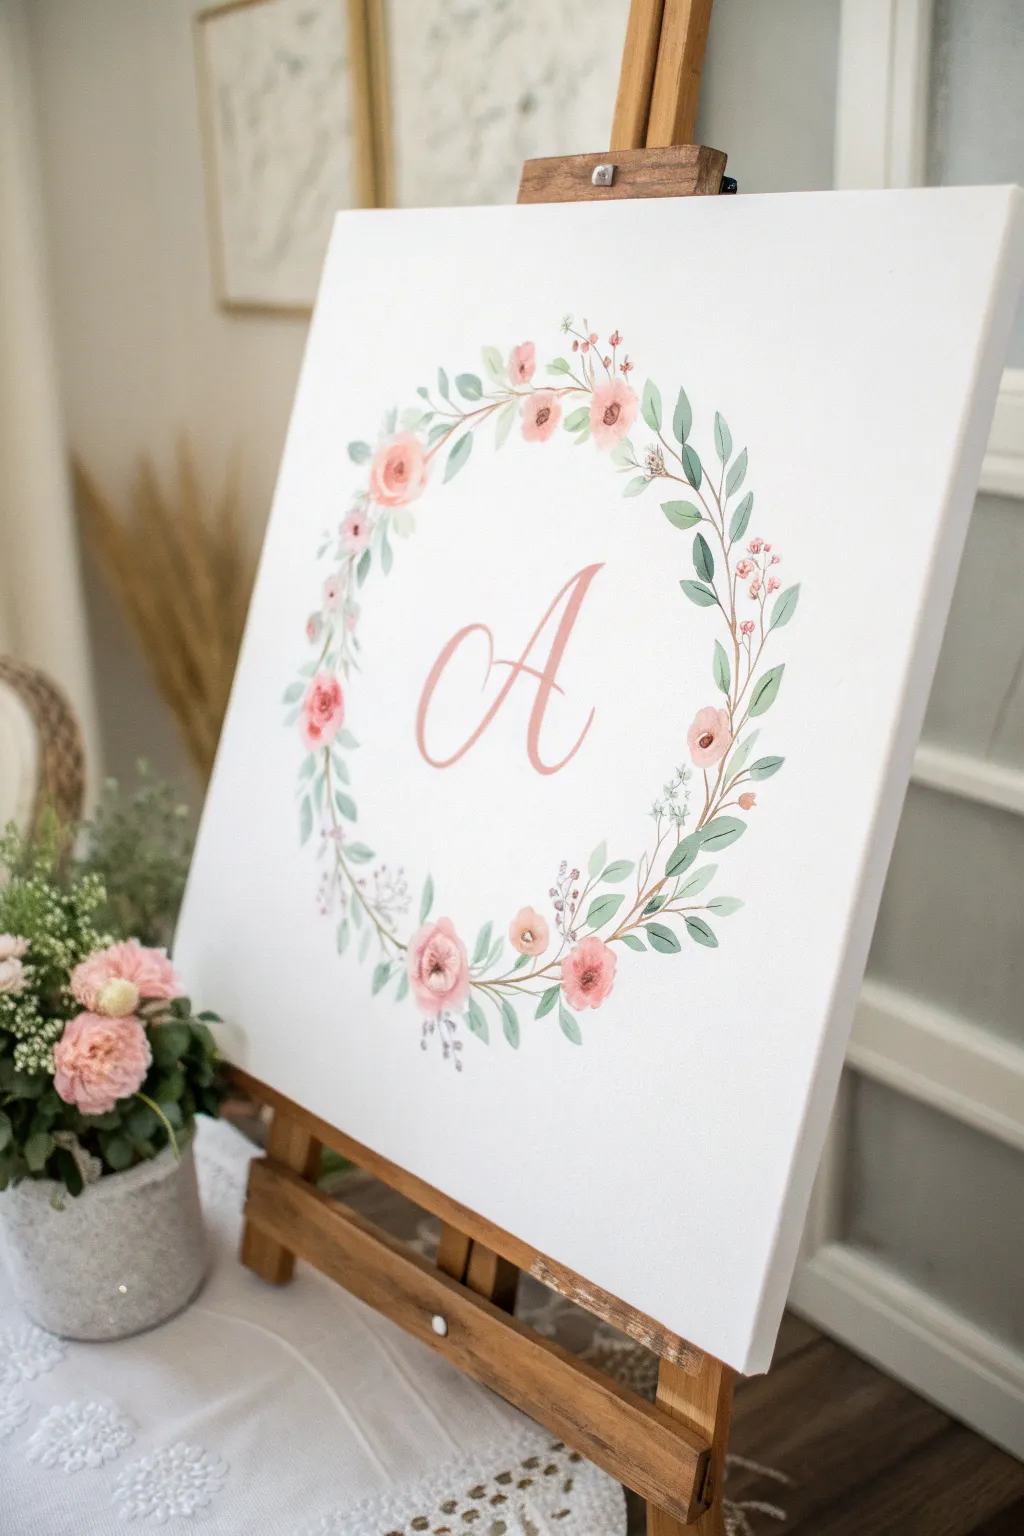
Create a sweet, personalized focal point for a nursery with this delicate floral wreath canvas. Combining soft acrylics or watercolors with a prominent central monogram, this piece captures a timeless botanical charm perfect for a little girl’s room.
Step-by-Step Guide
Materials
- Square stretched canvas (16×16 or similar size)
- H pencil and good quality eraser
- Acrylic paints (Titanium White, Sage Green, Sap Green, Light Pink, Peach, Burgundy)
- Acrylic matte medium or flow improver (optional, for watercolor effect)
- Round synthetic brushes (Size 2, 4, and 6)
- Fine liner brush (Size 00)
- Palette or mixing plate
- Compass or a large circular object (like a dinner plate) for tracing
- Printed letter template (optional)
- Paper towels and water cup
Step 1: Planning the Layout
-
Establish the center:
Find the exact center of your canvas by lightly measuring with a ruler. Make a tiny pencil mark that will easily be covered later. -
Create the wreath guide:
Use a compass or trace around a large circular object to draw a light circle. This will serve as the spine for your floral wreath, ensuring the shape stays consistent. -
Draft the monogram:
In the center of the circle, freely sketch a large cursive initial using an H pencil. If you aren’t confident in your lettering, print out a large letter font you like, rub graphite on the back of the paper, and trace it onto the canvas.
Acrylics as Watercolor
To get that translucent, airy look, heavily dilute acrylics with water or glazing liquid. Build color in thin, sheer layers rather than one thick coat.
Step 2: Painting the Monogram
-
Mix the lettering color:
Combine a small amount of Burgundy with Light Pink and a touch of Titanium White to create a soft, dusty rose color. It should be distinct but not overpowering. -
Fill the letter:
Using a size 4 round brush, carefully paint the letter. Keep your hand steady and apply slightly more pressure on the downstrokes to thicken them, while lifting to the tip of the brush for hairline upstrokes to mimic calligraphy. -
Let it cure:
Allow the letter to dry completely before starting the flowers, as you don’t want to accidentally smudge the focal point while working on the surrounding wreath.
Step 3: Creating the Botanical Wreath
-
Mix leaf greens:
Prepare two shades of green on your palette. For the main leaves, mix Sage Green with White for a dusty look. For contrast, have plain Sap Green ready. -
Dilute for transparency:
Since we want a watercolor look with acrylics, mix a little flow improver or water into your paints. They should be fluid but not dripping. -
Paint the main vines:
Using the size 2 brush and your lighter green mix, follow the pencil circle guide. Don’t paint a solid line; instead, paint thin, broken stems that curve and overlap slightly. -
Add primary leaves:
Along the stems, paint small, oval-shaped leaves. Group them in pairs or alternate them. Vary the pressure—press down for the belly of the leaf and lift for the tip. -
Position the main blooms:
Switch to your pink and peach mixtures. Identify 5 spots around the circle for your main roses. Paint loose, circular swirls, starting from the center and working outward with C-shaped strokes. -
Layer the rose petals:
While the paint is still wet, blend in a tiny bit of darker pink near the centers and white on the outer edges to create depth and volume. -
Add filler flowers:
Using the Peach color and a size 2 brush, dab small clusters of buds or tiny flowers in the gaps between the larger roses and leaves. -
Incorporate darker foliage:
Take your darker Sap Green and add smaller, thinner leaves tucked behind the flowers and the lighter leaves. This creates a sense of fullness and shadow.
Shaky Hands?
If your lines feel wobbly, try holding the brush further back on the handle. Also, rest your pinky finger on a dry part of the canvas for specialized stability.
Step 4: Final Details
-
Add fine stems:
Switch to your liner brush (00) and very watered-down brown or dark green paint. Draw extremely fine lines connecting floating flowers to the main vine. -
Detail the flower centers:
add tiny dots of dark burgundy or brown in the center of the smaller peach flowers to make them pop. -
Erase guidelines:
Once the painting is 100% dry (give it a few hours to be safe), gently erase any visible pencil marks from your initial circle guide.
Hang this lovely personalized wreath above a crib or dresser to add a gentle artistic touch to the room


Blush Heart Pattern Canvas
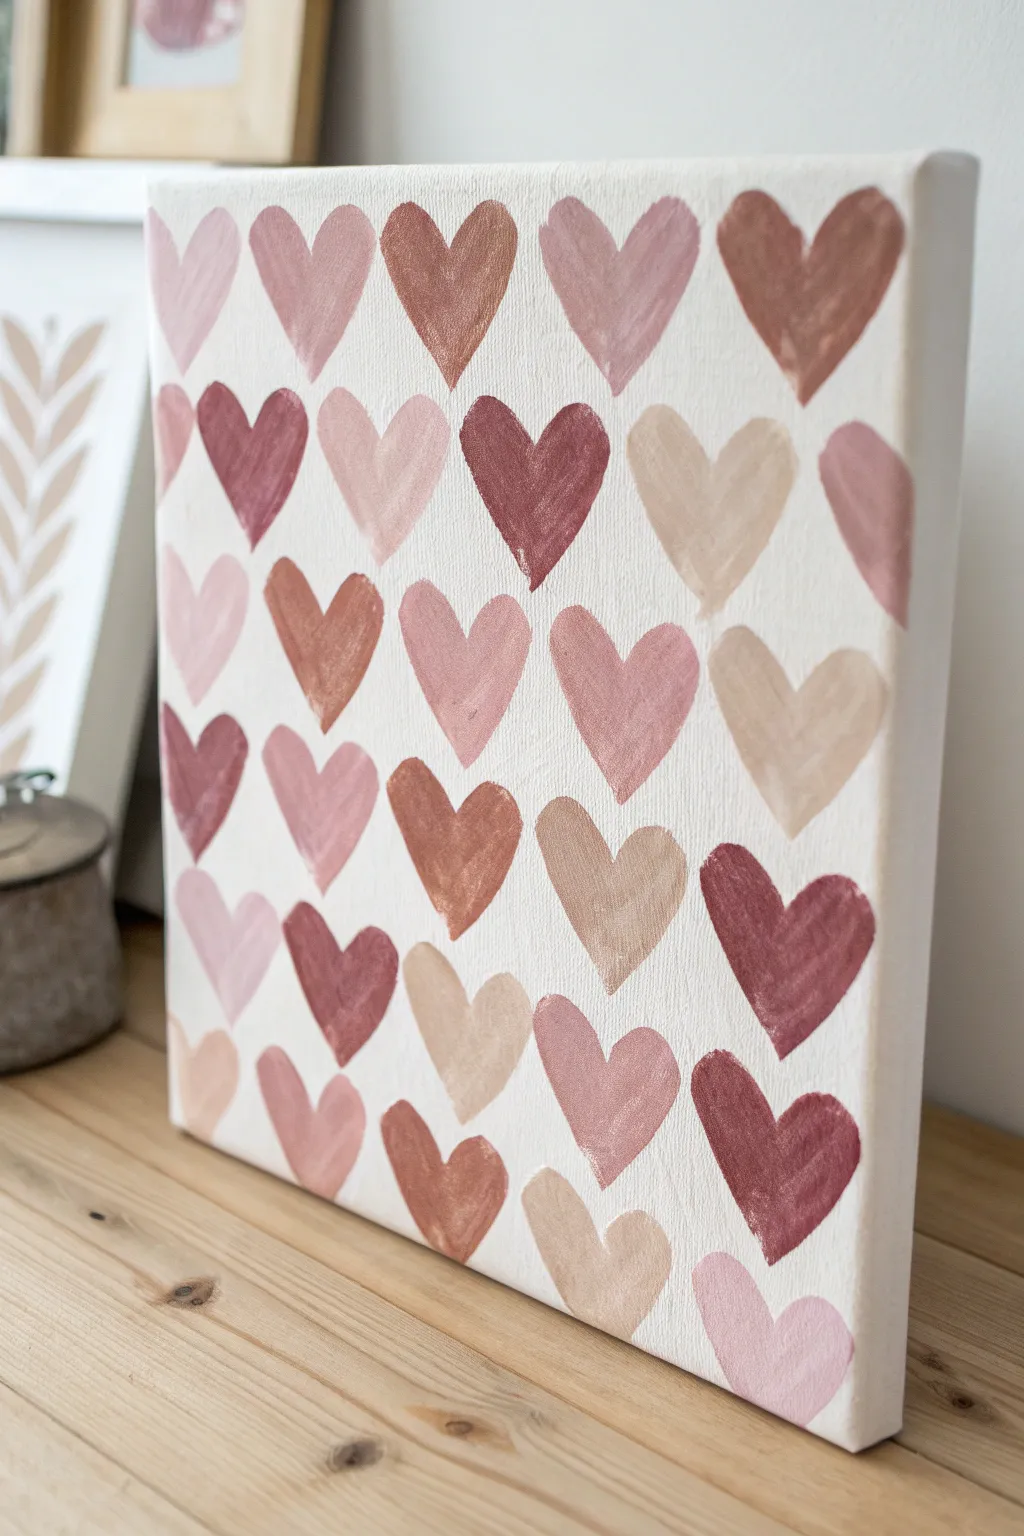
Create a calming, minimalist nursery focal point with this palette of soft earthy pinks and muted browns. This recurring heart pattern brings gentle rhythm and warmth to any wall without overwhelming the space.
How-To Guide
Materials
- Square stretched canvas (deep profile recommended for a modern look)
- Acrylic paints (Titanium White, Burnt Sienna, Raw Umber, Alizarin Crimson, Red Oxide)
- Flat synthetic paintbrush (approx. 1/2 inch width)
- Pencil
- Ruler or straight edge
- Paper plate or painting palette
- Jar of water
- Paper towels
Step 1: Planning the Grid
-
Prepare the canvas:
Start with a clean, dry canvas. If you want a warmer base tone instead of bright white, give the entire canvas a wash of heavily diluted cream paint and let it dry completely. -
Measure the columns:
Using your ruler and pencil, lightly mark out vertical columns. For the look in the photo, you’ll need about six columns across. Measure the width of your canvas and divide by six to find the spacing. -
Measure the rows:
Mark out horizontal rows with similar spacing to the columns. You don’t need to draw full grid lines across the canvas; small tick marks along the edges or very faint dots where the hearts will sit are sufficient to keep things aligned.
Step 2: Mixing the Palette
-
Create the base colors:
Squeeze out your Burnt Sienna, Raw Umber, and Alizarin Crimson onto the palette. These deep earth tones will be the foundation for all your lighter shades. -
Mix the darkest blush:
Take a small amount of Alizarin Crimson and mix it with a tiny dot of Burnt Sienna to knock back the brightness. This will be your deepest dusty rose color. -
Mix the terracotta tones:
Combine Red Oxide with a little Titanium White to create the warm, clay-colored shade seen in several hearts throughout the pattern. -
Create the lightest pinks:
Scoop a large amount of Titanium White into a clean spot on your palette. Gradually add tiny specks of the Alizarin Crimson mixture until you have a barely-there baby pink. -
Make the beige tones:
Mix Titanium White with a very small amount of Raw Umber or Burnt Sienna to create the neutral beige and sand-colored shades that balance the pinks.
Keep it Imperfect
Don’t stress about making every heart identical. The charm of this piece comes from the slight variations in brushstrokes and shape, giving it a hand-stamped look.
Step 3: Painting the Hearts
-
Start the first row:
Beginning at the top left, load your brush with one of your medium pink shades. Paint a simple ‘V’ shape first to establish the bottom of the heart. -
Complete the shape:
From the top of the ‘V’, curve the brush upward and inward to create the two lobes of the heart. Keep the shape somewhat loose and painterly rather than perfectly geometric. -
Vary the colors:
As you move to the next heart in the row, switch to a different color from your mixed palette. Aim for a random distribution where no two identical colors sit directly next to each other. -
Clean brush between changes:
Rinse your brush thoroughly and blot it on a paper towel before dipping into a new color to keep the shades distinct and muddy-free. -
Continue strictly grid-wise:
I find it helpful to work row by row, top to bottom, to avoid smudging wet paint with my hand. Fill the next spot in the grid, ensuring the hearts are roughly the same size. -
Handle the edges:
For the hearts on the far right edge (and potentially the left), wrap the painting slightly around the side of the canvas if you are using a deep-edge frame, or simply let the pattern end naturally at the corner. -
Add half-hearts:
If your spacing results in gaps at the very top or bottom edges, paint partial hearts appearing to go ‘off-screen’ to emphasize the repeating pattern effect.
Add Metallic Flair
Mix a little gold metallic paint into one of your beige shades, or paint 2-3 random hearts in pure gold leaf for a subtle, shimmering detail that catches the light.
Step 4: Finishing Touches
-
Review the balance:
Step back from the canvas to look at the overall color distribution. If one area looks too dark or too beige, you can carefully paint over a dry heart with a different shade to balance the composition. -
Erase guide marks:
Once the paint is 100% dry to the touch, gently erase any visible pencil tick marks that represent your grid lines. -
Seal the artwork:
If this is going in a nursery or high-traffic area, apply a coat of matte varnish to protect the surface from dust and fading.
Hang your new masterpiece and enjoy the gentle warmth it brings to the room


Soft Pink Ombre Background
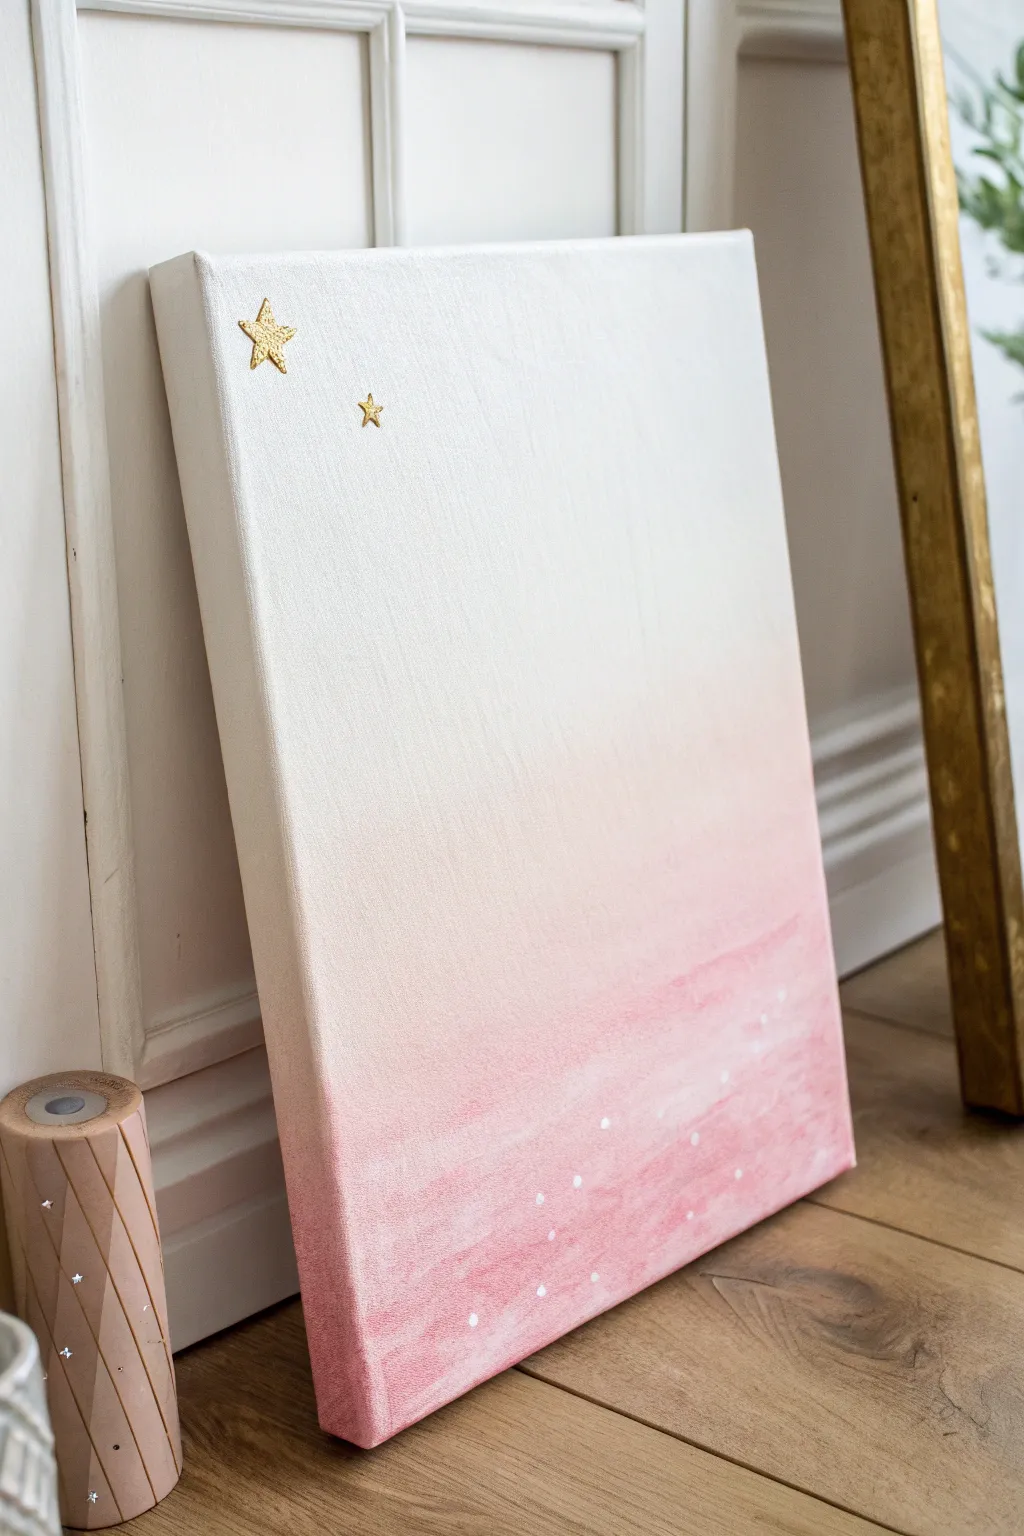
This dreamy canvas features a seamless transition from pure white to a gentle rose pink, evoking a peaceful dawn sky perfect for a nursery. Subtle golden stars and delicate white speckles add a touch of celestial magic to the soft background.
Step-by-Step
Materials
- Rectangular stretched canvas (e.g., 16×20 inches)
- White acrylic paint (heavy body preferred)
- Soft pink acrylic paint (or magenta to mix with white)
- Gold leaf adhesive size
- Gold leaf sheets
- Soft synthetic flat brush (large)
- Small round detail brush
- Foam brush (optional)
- Water cup and paper towels
- Palette or mixing plate
Step 1: Creating the Ombre Base
-
Prime the top:
Begin by squeezing a generous amount of white acrylic paint onto the top third of your canvas. Using a large, slightly damp flat brush, spread the white paint horizontally, ensuring full coverage of the weave, including the top edge. -
Apply the base pink:
At the very bottom of the canvas, apply a strip of your pure pink paint. Paint horizontally across the bottom third, wrapping the color around the bottom edge for a finished look. -
Prepare the middle mix:
On your palette, mix a 50/50 blend of the white and pink paint to create a mid-tone. Apply this mixture directly to the center of the canvas, between the pure white and pure pink sections. -
Blend the transitions:
With a clean, dry brush, work the area where the white meets the mid-tone. Use long, horizontal strokes to feather the colors together. Wipe your brush, then do the same where the mid-tone meets the bottom pink layer. -
Smooth the gradient:
Continue brushing horizontally across the entire surface while the paint is still wet. I find that using a very light hand here helps eliminate harsh lines. Ideally, the color should drift imperceptibly from white to pink. -
Paint the sides:
Don’t forget the sides of the canvas canvas. Extend the ombre effect around the left and right edges so the art looks professional from every angle. -
Let it dry:
Allow the background to dry completely. This is crucial before adding distinct details; otherwise, your stars will get muddy.
Step 2: Adding Celestial Details
-
Plan star placement:
Decide where you want your two gold stars. In the reference, they are placed in the upper left white section, but you can position them wherever feels balanced. -
Apply adhesive size:
Using a small detail brush, paint the sharp silhouette of two stars using gold leaf adhesive size. Focus on getting clean, crisp points. -
Wait for tackiness:
Allow the adhesive size to sit until it becomes clear and tacky—this usually takes about 10-15 minutes depending on the brand. -
Apply gold leaf:
Gently press a sheet of gold leaf over the tacky star shapes. Rub the back of the sheet softly to ensure the leaf adheres to the glue. -
Remove excess leaf:
Use a dry, soft brush to dust away the loose gold leaf that isn’t stuck to the adhesive, revealing your shiny stars. -
Mix watery white:
Dilute a small amount of white acrylic paint with water until it reaches an inky consistency. -
Paint white specks:
Dip the tip of a small round brush into the watery white paint. Gently dot small ‘stars’ or speckles near the bottom pink section, concentrating them in the darker pink area for contrast. -
Vary dot sizes:
Make some dots tiny and others slightly larger to create depth. Keep the distribution random and organic. -
Final dry:
Allow the gold leaf and white dots to dry completely before displaying.
Seamless Blending
Keep a spray bottle of water nearby. A very light mist over the canvas while blending keeps acrylics wet longer, making the gradient much smoother.
Add a Moon
Complement the stars by adding a thin gold leaf crescent moon alongside them, or paint a subtle moon in the white section using pearl white paint.
Hang this serene piece in a nursery to create a calming focal point above a crib or changing table
BRUSH GUIDE
The Right Brush for Every Stroke
From clean lines to bold texture — master brush choice, stroke control, and essential techniques.
Explore the Full Guide
Simple Wildflower Bouquet
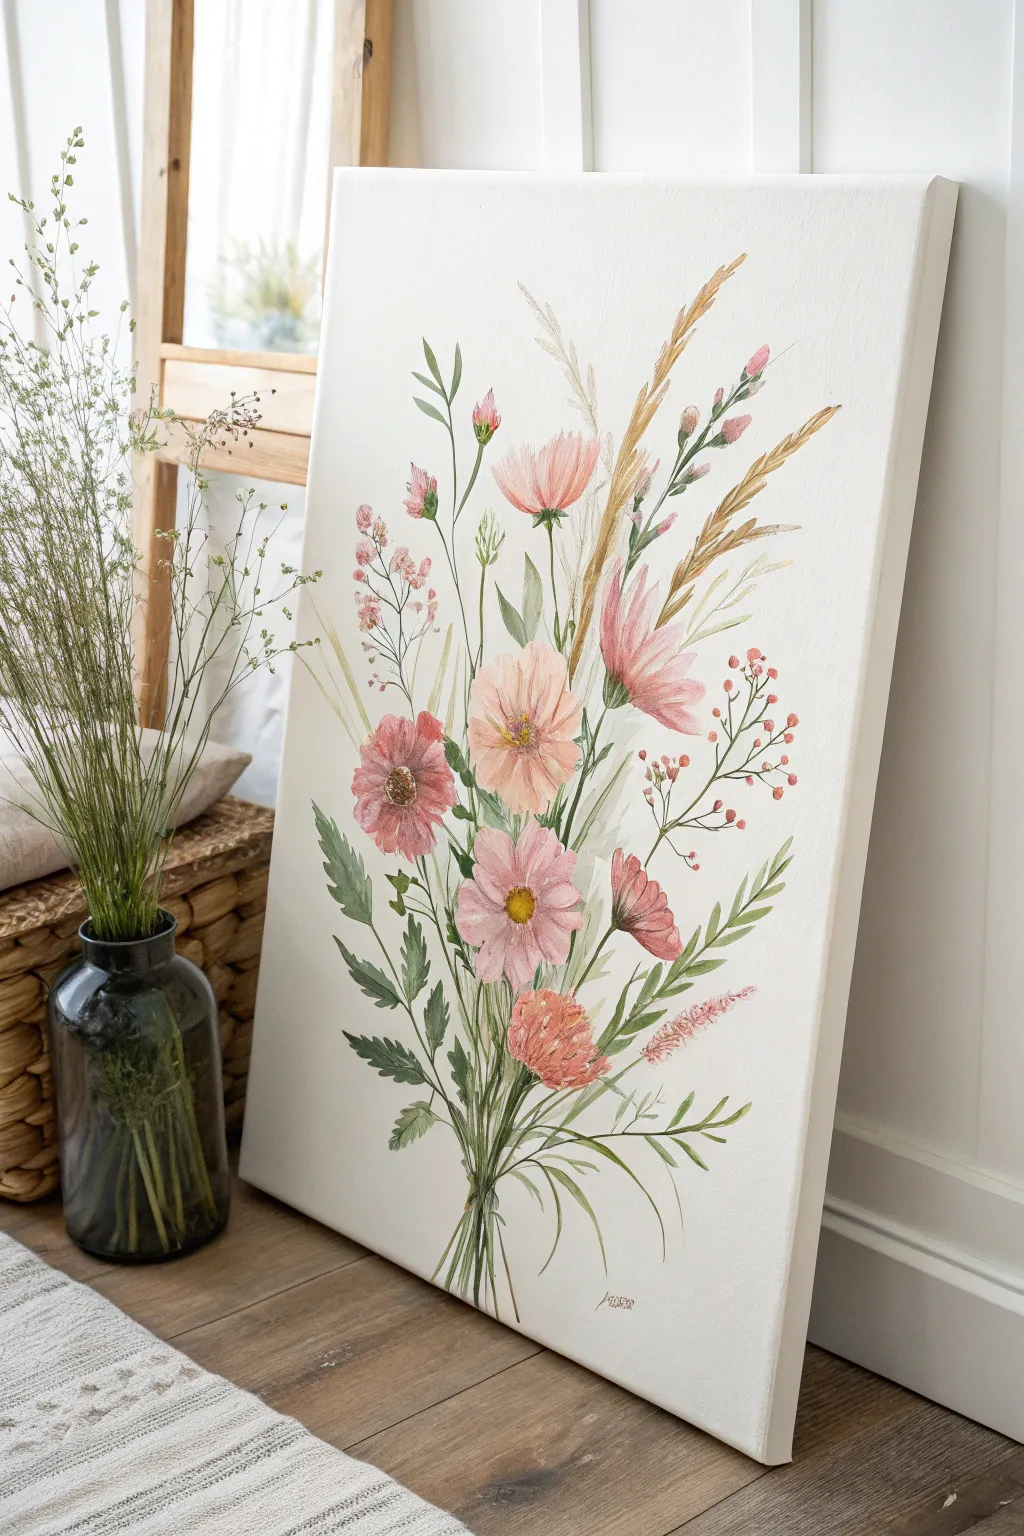
Capture the delicate beauty of a sunlit meadow with this airy wildflower bouquet painting. Using soft washes of pink, coral, and sage green, you’ll create a gentle composition perfect for a sweet nursery accent.
Step-by-Step Guide
Materials
- Rectangular stretched canvas (primed)
- Acrylic paints (Titanium White, Sap Green, Olive Green, Blush Pink, Coral, Burnt Sienna, Yellow Ochre)
- Acrylic glazing medium or flow improver
- Round brushes (sizes 2, 6, and 10)
- Fine liner brush (size 0 or 00)
- Palette
- Water cups
- Pencil (light H grade)
- Paper towels
Step 1: Planning and Base Stems
-
Prepare the canvas:
Since we are aiming for a watercolor look on canvas, start by applying a very thin layer of Titanium White mixed with a little water over the entire surface. This ensures a smooth, non-absorbent base that helps the translucent layers glide better. -
Sketch the bouquet shape:
Lightly sketch the general composition using a hard pencil. Focus on the central vertical axis—draw a faint line where the stems gather at the bottom and fan out toward the top. Don’t draw every flower yet, just mark the positions of the main blooms. -
Mix your greens:
Create two shades of green on your palette. Mix Sap Green with a touch of White for a fresh, light green, and Olive Green with a tiny bit of Burnt Sienna for a deeper, earthier stem color. Thin these mixtures with glazing medium so they are semi-transparent. -
Paint the main stems:
Using a size 6 round brush, paint long, slender strokes starting from the bottom grouping and sweeping upward. Vary the pressure—start light, press down slightly, and lift off to create tapered ends. Keep the lines fluid and slightly curving. -
Add delicate grasses:
Switch to your fine liner brush. Using the lighter green mix, add whisper-thin, arching grass blades amongst the main stems. These should look erratic and natural rather than perfectly straight.
Step 2: Blooming Flowers
-
Paint the Cosmos base:
Mix Blush Pink with plenty of glazing medium. For the large cosmos flowers, paint loose, petal-shaped washes. Don’t worry about solid coverage; let the white canvas show through in spots to mimic light hitting the petals. -
Add the coral accents:
While the pink is still slightly tacky, mix a soft Coral shade. Add this to the centers of your pink flowers and create smaller, bud-like shapes near the top of the bouquet. Soften the edges with a clean, damp brush. -
Create the dried wheat stalks:
Mix Yellow Ochre with White and a dash of Burnt Sienna. Using the size 2 brush, paint the tall, feathery wheat stalks on the right side. Use a stippling motion (tapping the brush tip) to create the textured grain heads. -
Layering petals:
Once the first layer of pink constitutes a dry base, mix a slightly more opaque version of the Blush Pink. Paint a second layer of clearer defined petals over the wash, leaving gaps so the translucent underlayer creates depth. -
Paint the flower centers:
Mix Yellow Ochre and Burnt Sienna. Dot this mixture into the center of the main open flowers. Use the very tip of your brush to make tiny stippled dots, suggesting pollen and seeds.
Watercolor Effect
To get that watercolor look with acrylics, use way more water or glazing medium than you think you need. Build up 3-4 translucent layers rather than one thick one.
Step 3: Details and Definition
-
Add the berry sprigs:
Mix a muted red-pink tone. With your liner brush, draw thin, branching stems extending to the right. Add tiny circular dots at the ends of these delicate branches to create the berry clusters. -
Deepen the leaves:
Go back to your darker olive green mix. Paint detailed, fern-like leaves near the base of the bouquet. These should be more opaque than the background grasses to anchor the composition visually. -
Highlight the wheat:
Take a mix of almost pure Titanium White with a touch of Ochre. Add tiny highlights to the tips of the wheat stalks and the edges of the finest grass blades to make them shimmer. -
Refine the petals:
I like to use a very diluted darker pink to add faint veins to the larger petals. Use the liner brush and a very steady hand to pull hairline strokes from the flower center outward. -
Gather the stems:
At the very bottom where the stems converge, apply a darker wash of the olive green and brown mix. This shadow suggests the stems are tightly bundled together without needing to paint a string or vase. -
Final touches:
Step back and look at the balance. Add a few floating petals or tiny buds if there are empty spaces that feel too open. Sign your masterpiece near the bottom right stem.
Metallic Magic
Mix a tiny drop of gold metallic paint into your Yellow Ochre for the center of the flowers or the wheat stalks. It adds a lovely subtle shimmer in the nursery light.
Hang your lovely bouquet and enjoy the peaceful garden vibes it brings to the room.
Watercolor-Style Peony Cluster
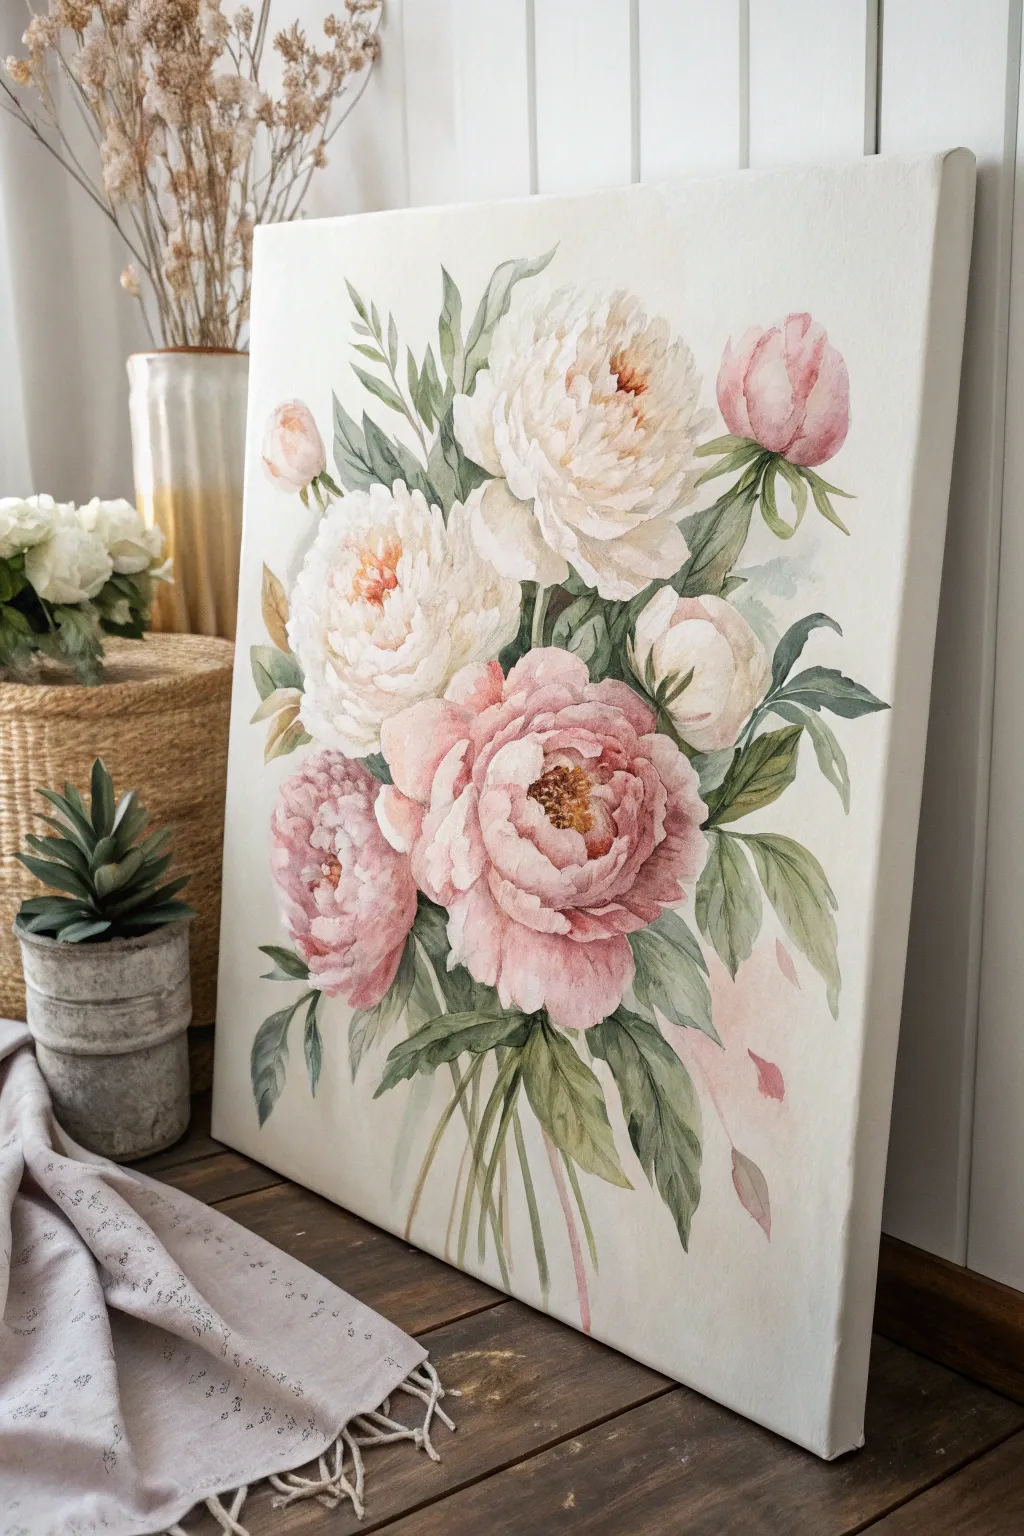
Soft blooms in blush and cream come together in this gentle, romantic painting that perfectly captures the sweetness of a new baby girl. By using acrylics with plenty of water, you can achieve that translucent watercolor effect while enjoying the durability of canvas.
Step-by-Step
Materials
- Rectangular stretched canvas (e.g., 16×20 inches)
- Acrylic paints: Titanium White, Alizarin Crimson, Burnt Sienna, Sap Green, Hookers Green, Yellow Ochre
- Floetrol or acrylic glazing medium
- Spray bottle with water
- Brushes: Large round brush (size 10-12), small liner brush (size 1 or 0), filbert brush
- Palette or mixing plate
- Paper towels
- Pencil for sketching
Step 1: Planning and Sketching
-
Prime the Surface:
Even though your canvas is likely primed, apply a fresh coat of Titanium White mixed with a drop of water to create a sleek, non-absorbent ground. Let it dry completely. -
Map the Composition:
Lightly sketch the flower placements using a pencil. Draw a large oval for the central white peony, a slightly smaller circle below it for the pink one, and scatter smaller ovals for buds around the top and right sides. Keep lines faint so they don’t show through the sheer paint.
Step 2: Creating the Blooms
-
Mix Your Base Washes:
Prepare your ‘watercolor’ acrylics. Mix Alizarin Crimson with white and lots of glazing medium (or water) to make a pale blush wash. Do the same with Titanium White and a tiny dot of Yellow Ochre for the cream flowers. The consistency should be like skim milk. -
Paint First Layers:
Using your large round brush, lay down wet, loose shapes for the petals. For the white peony, use dirty water or very pale grey to define the shadow areas, leaving the canvas white for the highlights. For the pink peony, wash in the basic round shape with your blush mix. -
Build Petal Depth:
While the first layer is still slightly damp, add a second, slightly more pigmented layer to the center of the flowers. This wet-on-wet technique creates soft, blooming edges typical of watercolor. -
Define the Petals:
Once the base is dry, mix a slightly darker version of your pink and cream. Use the tip of your round brush to paint distinct petal shapes, focusing on the ruffled edges. Leave gaps between petals to let the light base layer shine through. -
Add the Centers:
Mix Yellow Ochre with a touch of Burnt Sienna. I like to stipple this into the center of the open peonies using a relatively dry brush to create the texture of pollen and stamens.
Muddy colors?
If your transparent layers are turning brown or gray, you are likely reworking wet paint too much. Let each layer dry completely before glazing the next color on top.
Step 3: Leaves and Stems
-
Mix Green Shades:
Create three green puddles: a pale yellow-green (Sap Green + White), a mid-tone (Sap Green), and a deep cool green (Hookers Green + tiny touch of Crimson to mute it). -
Paint Main Stems:
Load your liner brush with watered-down mid-tone green. Draw thin lines trailing down from the flower heads, crossing them naturally near the bottom as if gathered in a bouquet. -
Block in Leaves:
Use the filbert brush to press and lift shapes for the leaves. Start near the flower heads, tucking leaves underneath the petals. -
Layer Leaf Colors:
While the leaves are wet, drop in bits of the darker green near the veins and lighter green at the tips. Let the colors bleed together on the canvas. -
Add Floating Petals:
With a very watery pink mix, paint a few loose, detached petal shapes near the bottom right to imply movement and softness.
Softness Level Up
Before painting, apply a coat of Watercolor Ground to your canvas. This specialty primer mimics the texture of paper, allowing pigment to bloom and spread much more naturally.
Step 4: Final Details
-
Deepen Shadows:
Mix a dark maroon (Crimson + Green). Use your smallest brush to add tiny, sharp details in the deepest crevices of the flower centers to make them pop. -
Highlight Edges:
Take pure Titanium White with just a little medium. Carefully outline the topmost edges of the central peony petals to bring them forward visually. -
Final Wash (Optional):
If a flower looks too flat, apply a very watery glaze of pink or cream over the shadow side to unify the layers.
Step back and admire the gentle bouquet that will bring a timeless beauty to the nursery room

PENCIL GUIDE
Understanding Pencil Grades from H to B
From first sketch to finished drawing — learn pencil grades, line control, and shading techniques.
Explore the Full Guide
Moon and Stars in Pink Tones
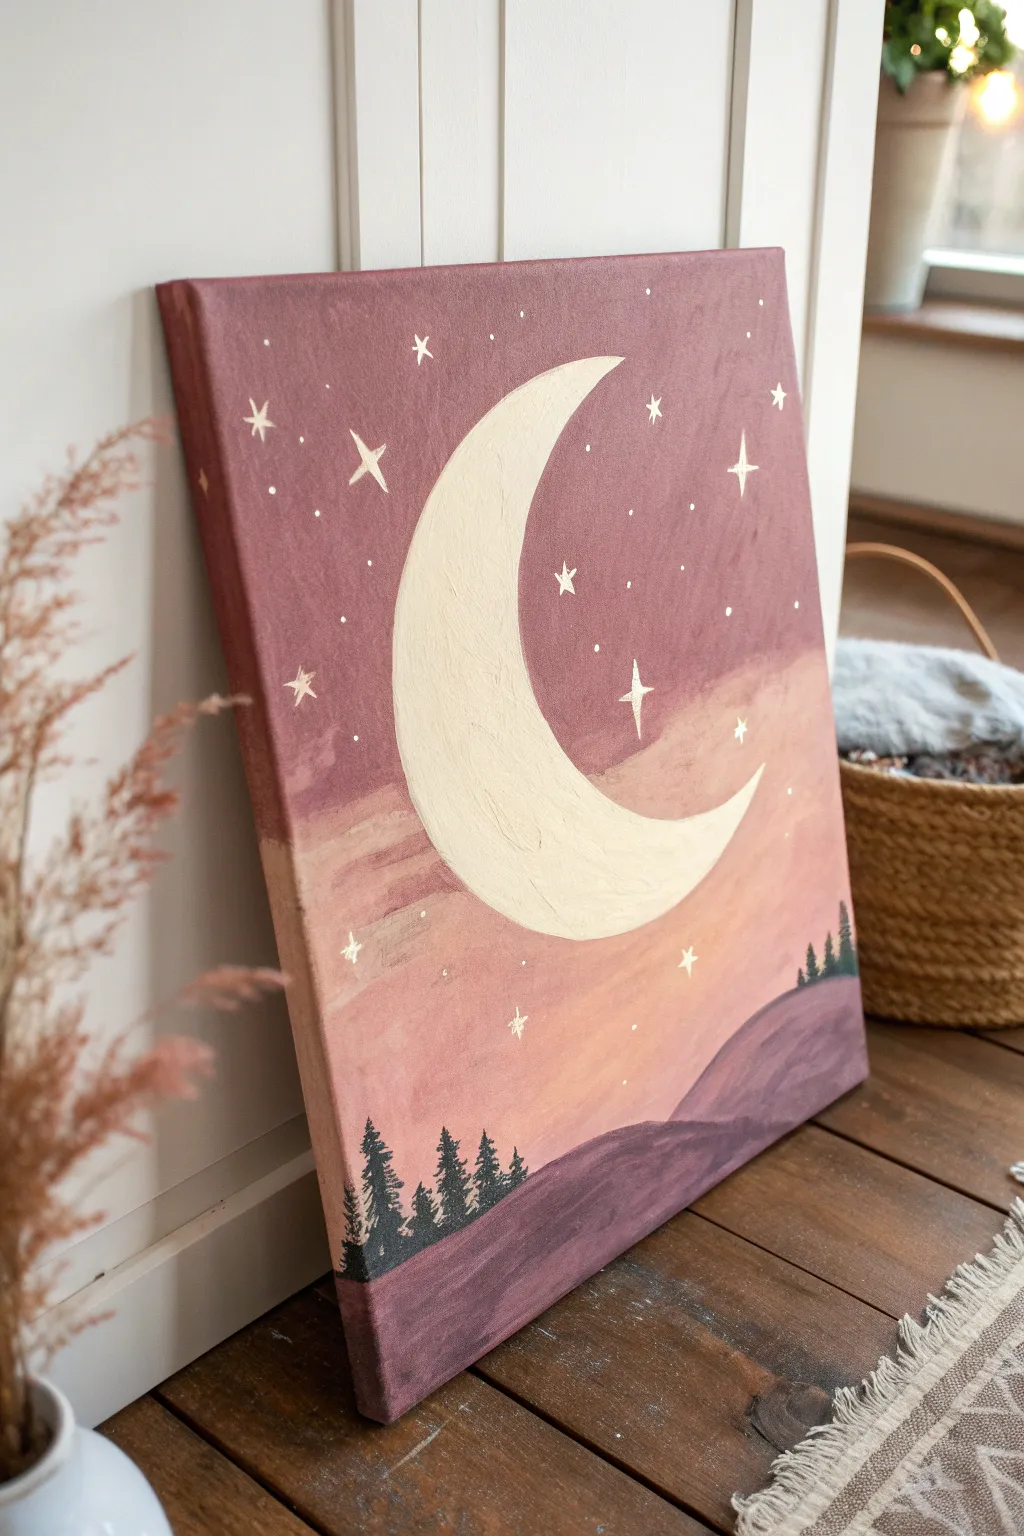
This serene canvas brings a touch of magic to any nursery with its soft ombré sky and bold crescent moon. The gentle transition from dusty plum to peach creates a calming atmosphere perfect for drifting off to sleep.
How-To Guide
Materials
- Stretched canvas (16×20 or similar)
- Acrylic paints: Titanium White, Mauve or Dusty Plum, Peach or Soft Pink, Deep Purple, Black
- Large flat brush (1-2 inch)
- Medium filbert brush
- Small round detail brush (size 0 or 1)
- Pencil
- Palette for mixing
- Cup of water and paper towels
Step 1: Planning the Composition
-
Sketch the moon:
Begin by lightly sketching a large crescent moon shape in the center of your canvas using a pencil. Make it prominent, taking up about a third of the vertical space. -
Mark the horizon:
Draw a gently sloping line near the bottom third of the canvas to establish where the hills will be. This separates your sky from the foreground.
Step 2: Creating the Ombré Sky
-
Mix the top color:
On your palette, mix a dusty mauve shade. If you only have purple, add a touch of brown and white to desaturate and lighten it. -
Paint the upper sky:
Using your large flat brush, apply the mauve paint to the top third of the canvas. Use confident horizontal strokes, working your way down. -
Introduce the peach tone:
While the mauve is still slightly wet, load your brush with the peach or soft pink color. Start painting below the mauve section, slightly overlapping the colors. -
Blend the transition:
Gently brush back and forth where the mauve and peach meet to create a soft, seamless fade. I like to keep my brush slightly damp here to help the acrylics blend smoothly. -
Avoid the moon:
Paint carefully around your pencil sketch of the moon. It doesn’t need to be perfect, but keeping the canvas white inside the shape will help the moon color pop later. -
Finish the sky:
Continue the peach color down to your horizon line. Let this background layer dry completely before moving on.
Smooth Blending Trick
To get that buttery gradient in the sky, add a drop of ‘slow-dry medium’ or ‘retarder’ to your acrylics. It keeps paint wet longer for stress-free blending.
Step 3: Painting the Features
-
Fill in the moon base:
Mix a large amount of Titanium White with just a tiny speck of yellow or cream to warm it up. Use your filbert brush to fill in the crescent shape. -
Add texture to the moon:
Apply a second, thicker layer of the cream-white paint. Use a dappling motion with your brush to create a slight texture, mimicking the cratered surface of the moon. -
Paint the hills:
Mix a darker purple shade for the hills. Use your medium brush to fill in the area below the horizon line, ensuring the top edge is smooth and rolling. -
Add depth to the hills:
While the hill paint is wet, mix a slightly lighter purple and sweep it across the top ridges of the hills to create dimension and form.
Uneven Moon Edges?
If painting the curve freehand is tricky, cut a crescent shape out of masking tape or contact paper to act as a stencil while you paint the background sky.
Step 4: Adding the Magic
-
Paint the large stars:
Switch to your small detail brush and white paint. Paint a few four-pointed stars by drawing a thin cross shape. Make the vertical line slightly longer than the horizontal one. -
Add medium stars:
Paint traditional five-pointed stars scattered loosely around the moon. Keep them smaller than your four-pointed stars for variety. -
Create distant stardust:
Dip the tip of your detail brush or a toothpick into white paint and dot tiny specks across the sky, focusing more density near the top mauve section. -
Paint the silhouettes:
Mix a very dark grey or black-green. using the smallest brush, paint tiny pine trees along the left and right edges of the hills. -
Detail the trees:
Start with a vertical line for the trunk, then use tiny dabbing motions to create branches that get wider towards the bottom of the tree. -
Final touches:
Check your moon’s edges and clean them up with white paint if any sky color accidentally overlapped too much. Let the entire piece dry fully.
Hang this lovely piece near the crib to inspire sweet dreams for your little one
Pastel Rainbow With Her Name
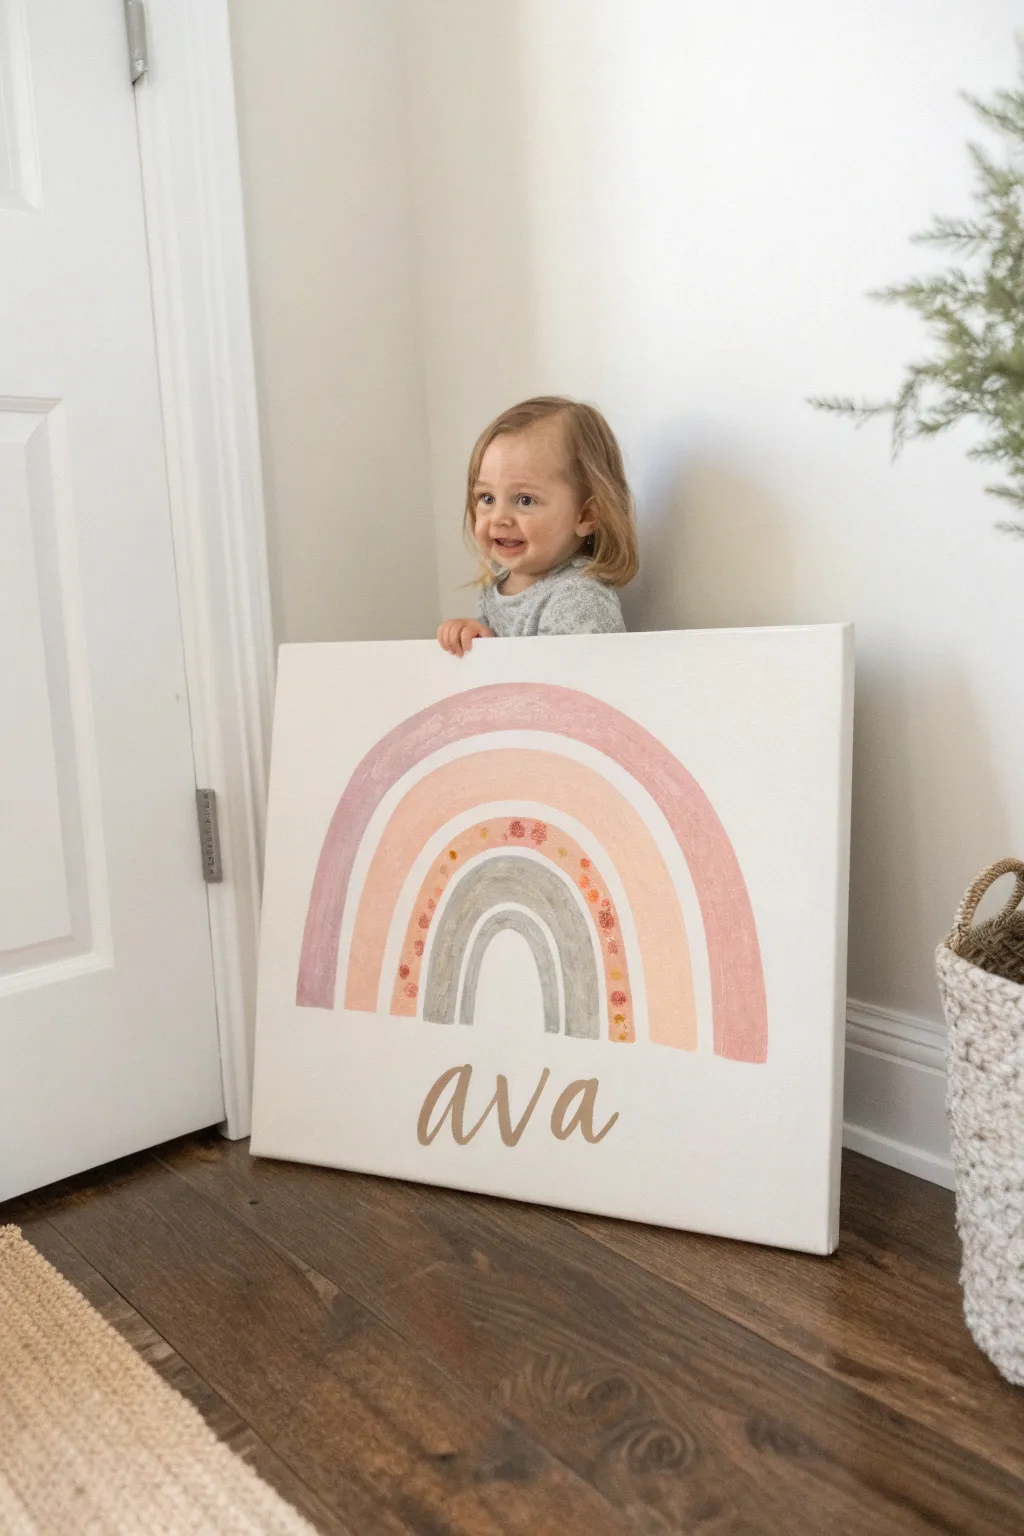
This sweet, understated canvas adds a personal touch to any nursery with its soft palette of muted pinks, greys, and apricots. The gentle arches and custom name script create a timeless piece that grows with your little one.
Step-by-Step
Materials
- Large rectangular stretched canvas (approx. 18×24 or 24×30 inches)
- Acrylic paints (muted pink, peach/apricot, warm grey, white, burnt sienna)
- Large flat brush (1-inch width)
- Medium round brush
- Small detail brush
- Pencil and eraser
- Ruler or large straightedge
- String and push pin (for compass method)
- Palette or paper plate for mixing
Step 1: Planning and Sketching
-
Canvas preparation:
Begin by wiping down your canvas with a clean, dry cloth to remove any dust. Lay it flat on a protected work surface. -
Establish the center:
Use your ruler to find the horizontal center of the canvas. Mark a small dot near the bottom edge; this will be the anchor point for your rainbow arches. -
Create a string compass:
Tie a piece of string to a pencil. Hold or pin the loose end of the string at your center mark near the bottom canvas edge. This simple tool helps draw consistent curves. -
Sketch the arches:
Adjust the string length to draw five distinct arches. Start with the smallest, innermost arch and work your way out, leaving equal spacing between each band. -
Refine the sketch:
Lightly sketch the horizontal bottom lines for each arch so they look like flat-bottomed horseshoes rather than full semi-circles. Keep your pencil pressure light so lines are easy to cover later. -
Draft the name:
Below the rainbow, freehand the name in a loose, lower-case cursive script. If you aren’t confident in your handwriting, you can print the name in a font you like, rub graphite on the back of the paper, and trace it onto the canvas.
Wobbly Lines?
If your arch edges look uneven, wait for the paint to dry fully. Then, use a white paint pen or a small brush with white acrylic to carefully ‘cut in’ and tidy up the boundaries.
Step 2: Painting the Rainbow
-
Mix the outer pink:
Mix white with a touch of red and a tiny speck of brown or burnt sienna to get a dusty, muted pink. Add water to thin the paint slightly for a smoother flow. -
Paint the largest arch:
Using the large flat brush, fill in the outermost arch. Apply the paint in long, sweeping strokes that follow the curve of the rainbow to maintain a clean look. -
Mix the apricot tone:
Create a soft peach or apricot shade by mixing orange (or yellow and red) with plenty of white. It should be pastel but distinct from the pink. -
Fill the second arch:
Paint the second largest band with your new apricot mixture. Be careful where the colors meet; a tiny gap of white canvas between arches adds a nice stylistic touch. -
Create the grey shades:
Mix a warm grey using black, white, and a micro-drop of brown. You’ll need a lighter version for the fourth band and a slightly darker version for the smallest, central arch. -
Paint the grey bands:
Skip the third band for now. Paint the fourth band with the lighter grey mixture and the smallest, center arch with the darker grey tone. -
Paint the decorative band:
For the third (middle) band, use a very pale, creamy white or barely-there beige. Let this base coat dry completely before adding details.
Step 3: Details and Lettering
-
Add floral speckles:
On the dried third band, use your small detail brush to dab tiny clusters of dots using the pink and apricot paints you mixed earlier. These represent abstract flowers or confetti. -
Mix the lettering color:
Create a taupe or soft brown shade for the text. It should be dark enough to stand out against the white background but softer than stark black. -
Paint the name:
Using a liner brush or small round brush, carefully paint over your penciled letters. I find that pulling the brush toward me helps keep the lines steady. -
Thicken the downstrokes:
To mimic modern calligraphy, go back over the ‘downstrokes’ (the parts of the letters where your pen would move downward) and make them slightly thicker. -
Clean up edges:
Once everything is touch-dry, use a clean eraser to gently remove any visible pencil marks. Use a small brush with white paint to touch up any smudges on the background.
Add Texture
Mix a pinch of baking soda into your acrylic paint for the rainbow arches. This creates a trendy, slightly gritty plaster-like texture that adds depth to the nursery art.
Hang this lovely pastel creation low enough for your little one to admire their very own name


Hot Air Balloon Nursery Dream
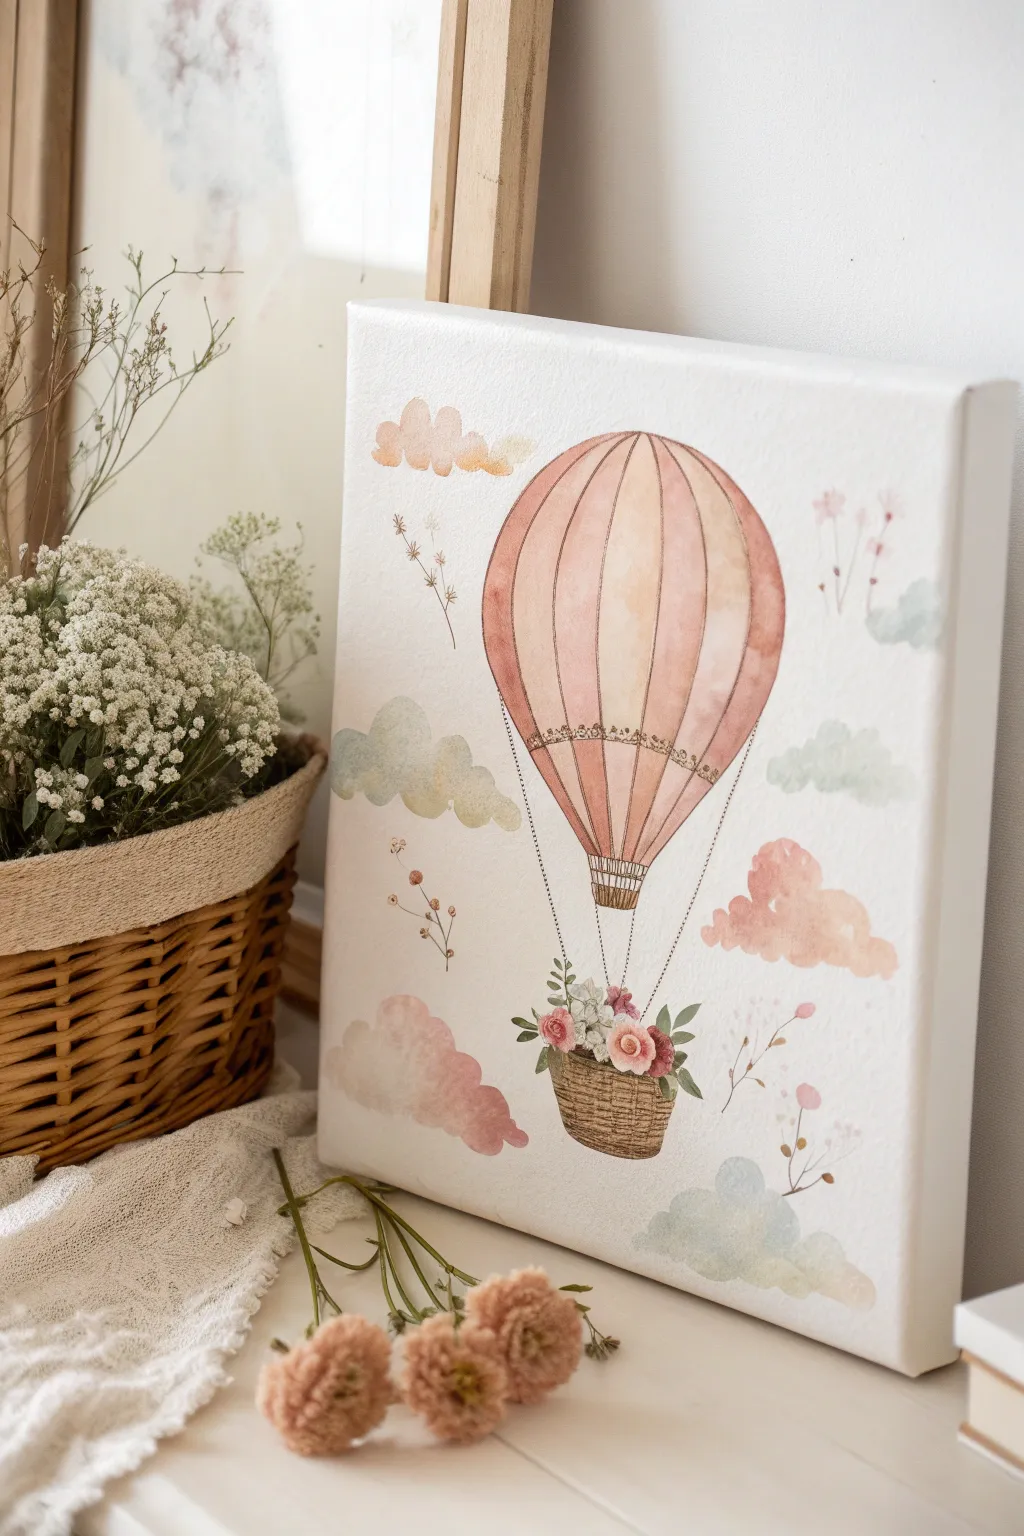
Capture the magic of flight with this soft, dreamy hot air balloon painting that mimics the delicate look of watercolor on canvas. With its pastel palette of blush pinks and misty blues, this piece makes a gentle, charming addition to any baby girl’s nursery.
Step-by-Step Tutorial
Materials
- Primed stretched canvas (8×10 or 11×14 inches)
- Acrylic paints (Titanium White, Burnt Sienna, Raw Umber, Alizarin Crimson, Ultramarine Blue, Yellow Ochre, Sap Green)
- Acrylic glazing medium or flow improver
- Soft synthetic brushes (large flat wash, medium round, fine liner)
- Pencil and eraser
- Palette and water cup
- Paper towels
Step 1: Sketching the Elements
-
Map out the composition:
Begin by lightly sketching the large oval shape of the balloon slightly off-center near the top. Add the suspended basket below it, leaving a gap for the ropes. -
Define the balloon segments:
Draw curved vertical lines within the balloon to create the segments, making sure they curve with the shape of the oval to create dimension. -
Add floating elements:
Roughly sketch cloud shapes around the balloon—some near the bottom, some higher up. Keep the lines very faint so they don’t show through the paint later. -
Detail the basket:
Sketch a mound of flowers sitting inside the basket and draw four straight lines connecting the basket corners to the base of the balloon.
Too Opaque?
If your acrylics look too solid and plastic-like, you haven’t added enough medium. The paint should feel slippery and thin, allowing the canvas texture to show through slightly.
Step 2: Painting the Balloon
-
Mix a translucent pink:
Mix Titanium White with a tiny touch of Alizarin Crimson and Yellow Ochre to get a warm peach-pink. Important: Add a generous amount of glazing medium to make the paint semi-transparent like watercolor. -
Wash the balloon segments:
Using a medium round brush, fill in the balloon segments. Alternate between lighter and slightly darker peach tones to show roundness, keeping the center of the balloon lightest. -
Create the decorative band:
Mix a slightly darker, earthier pink using a dot of Burnt Sienna. Paint a horizontal band across the lower third of the balloon, adding small scalloped edges for detail. -
Paint the basket texture:
Mix Raw Umber with White and glazing medium for a soft brown. paint the basket shape horizontally. Once dry, use a fine liner brush with detailed Raw Umber to add woven horizontal and vertical lines.
Step 3: Clouds and Atmosphere
-
Mix pastel cloud colors:
Prepare three very pale, watery mixes: a soft blue (White + tiny Ultramarine), a minty green (White + Sap Green + tiny Blue), and a blush pink. -
Apply the cloud washes:
Wet the canvas slightly where a cloud will go, then dab in your pastel color. The water will help the edges bloom and soften, mimicking real watercolor. -
Layering cloud tones:
For the larger bottom clouds, I like to drop a second color (like pink into blue) while the paint is still wet to create a dreamy gradient.
Pro Tip: Edges
To get that specific watercolor look where pigment pools at the edges, go back over the still-wet edge of a shape with a damp, clean brush to soften the center while leaving the outline crisp.
Step 4: Floral Details and Fine Lines
-
Start the basket bouquet:
Using a small round brush, dab opaque blobs of pink and white into the basket area to form the base of the roses. -
Define the rose petals:
Once the base blobs are tacky, use a darker pink on a fine brush to swirl distinct petal shapes into the centers. -
Add greenery:
Paint small, muted green leaves extending from the basket. Keep the green desaturated by mixing in a little red or pink to soften it. -
Draw the ropes:
Using your finest liner brush and thinned dark brown paint (ink consistency), draw the four thin ropes connecting the basket to the balloon. Steady your hand by resting your pinky on the dry canvas. -
Floating botanicals:
Add whimsical sprigs floating in the background using very thin brown lines. Dot the ends with tiny pale pink or blue buds. -
Final decorative touches:
Add tiny dots or cross-hatching to the decorative band on the balloon using a dark brown or gold-ochre mix to mimic embroidery.
Hang your masterpiece once dry and enjoy the serene, uplifting atmosphere it brings to the room
Baby Elephant With Pink Balloons
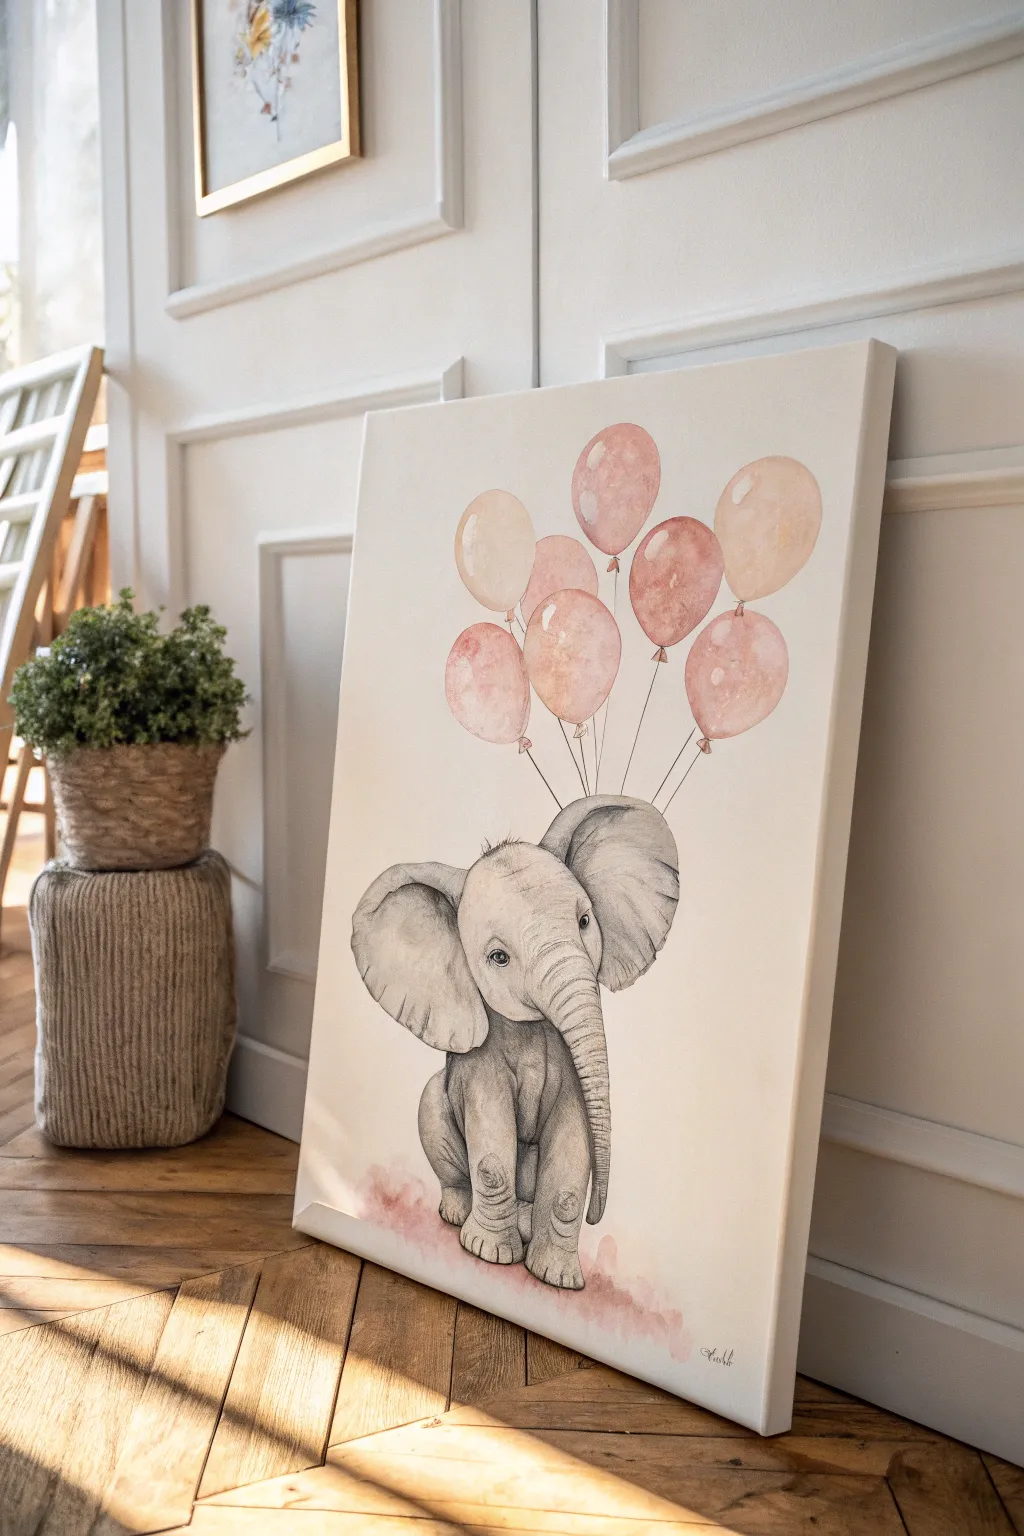
This adorable nursery project features a gentle baby elephant rendered in soft greys under a cluster of blush pink balloons. While it mimics the delicate transparency of watercolor, we’ll achieve this lasting look on canvas using diluted acrylics or fabric paints.
Detailed Instructions
Materials
- Stretched white canvas (ex. 16×20 inches)
- Pencil and large eraser
- Acrylic paints: Black, White, Burnt Umber, Crimson Red, Yellow Ochre
- Soft synthetic brushes: Large round (size 8-10), small detail round (size 0-2), flat wash brush
- Water cups and mixing palette
- Fine-grit sandpaper
- Spray sealant (matte finish)
Step 1: Preparation & Sketching
-
Prep the Surface:
Since canvas texture can be rough for detailed work, lightly sand the gessoed surface with fine-grit sandpaper. Wipe away the dust with a damp cloth to ensure a smooth painting ground. -
Draft the Elephant:
Using a light pencil, sketch the elephant’s body in the bottom center. Start with a large oval for the head and a rounded pear shape for the body. -
Refine the Features:
Draw the large, ruffled ears extending from the head. Add the trunk curling downward and inward. Sketch the legs, ensuring the front ones look shorter and stumpy for that baby animal appeal. -
Add the Balloons:
Lightly sketch 7-8 floating ovals and circles above the elephant. Vary their sizes and overlap a few to create depth. Draw thin lines connecting the balloons to the elephant’s trunk.
Fixing “Muddy” Greys
If your grey shadows look dirty, you likely added too much black. Remix using white and touch of blue or brown to create cleaner, richer shadows.
Step 2: Painting the Elephant
-
Mix the Base Grey:
On your palette, mix a light grey using plenty of White and a tiny dot of Black. I like to add a barely-there touch of Burnt Umber to warm up the grey so it doesn’t look like cold steel. -
Apply the First Wash:
Dilute your acrylic grey with water until it has a milky, watercolor-consistency. Wash this over the entire elephant body, keeping the paint very thin and transparent. -
Build Shadows:
While the first layer is still slightly damp, mix a darker grey. Apply this to the creative shadow areas: under the ears, beneath the chin, along the belly, and inside the leg folds. -
Texture the Skin:
Switch to your small detail brush. Using a medium-grey tone, paint faint, curved horizontal lines across the trunk to mimic wrinkles. Add subtle hatching marks on the knees and ears. -
Paint the Eye:
Use solid Black to fill in the eye pupil, leaving a tiny dot of white canvas (or adding a dot of Titanium White later) for the highlight. Outline the eye with a thin dark grey line.
Add 3D Texture
Glue actual miniature satin ribbons onto the canvas where the painted strings meet the trunk for a mixed-media pop.
Step 3: Creating the Balloons
-
Mix Blush Tones:
Create three shades of pink: a pale blush (White + tiny speck of Red), a warmer peach (White + Red + Yellow Ochre), and a dusty rose (White + Red + tiny Black). -
Fill the Balloons:
Paint each balloon with your watered-down acrylics. Use different shades for adjacent balloons so they stand out from one another. -
Add Watercolor Blooms:
To mimic the watercolor look, drop a tiny bit of water or darker pigment onto the wet balloon paint and let it spread naturally. This creates those charming, uneven edges. -
Create Highlights:
Once the balloons are dry, take semi-transparent white paint and add a curved highlight on the upper right side of each balloon to make them look spherical. -
Connect the Strings:
Use your finest liner brush or a fine-tip black ink pen to trace over your pencil lines for the balloon strings. Keep your hand loose so the lines aren’t perfectly straight.
Step 4: Finishing Touches
-
Ground the Subject:
Mix a very watery pinkish-grey wash. Apply it loosely under the elephant’s feet to create a soft shadow, grounding the figure so it isn’t floating in space. -
Clean Up:
Once the paint is fully dry, gently erase any visible pencil sketch marks that weren’t covered by paint. -
Seal the Work:
Spray the entire canvas with a matte sealant. This protects the delicate washes and ensures the colors won’t fade over time.
Hang this sweet masterpiece in the nursery to inspire big dreams for your little one
Sleepy Bunny With a Bow
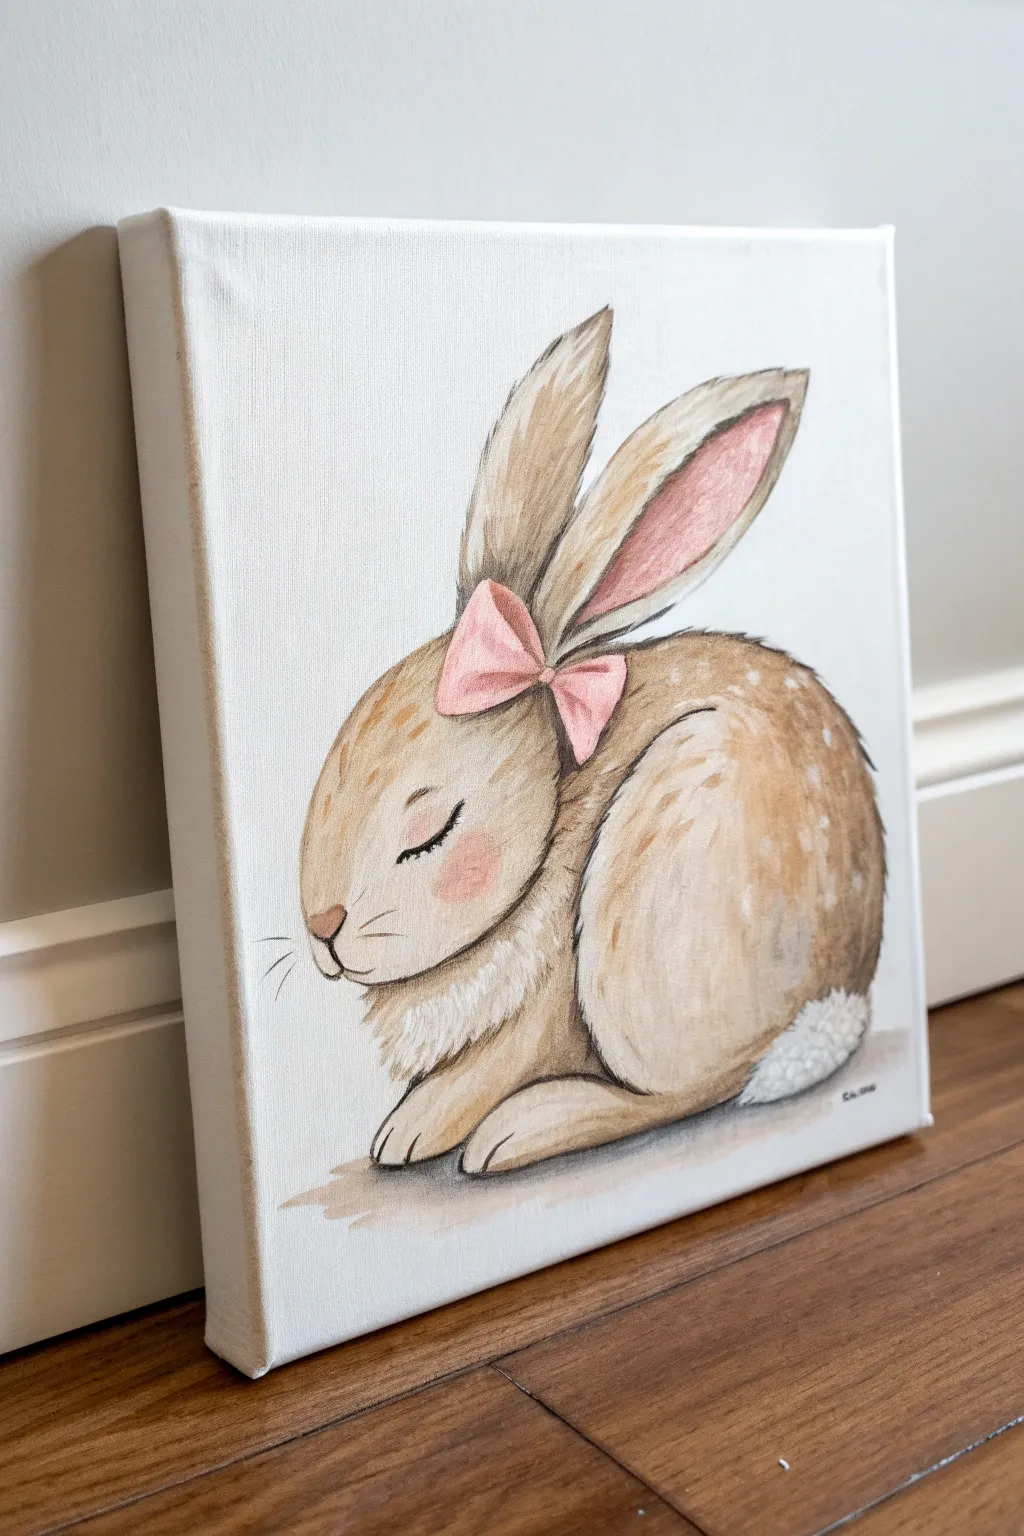
Capture the sweetness of a sleeping bunny with this gentle, illustrative painting project perfect for a nursery or child’s room. Using soft acrylic washes or watercolors, you’ll build up layers to create fluffy fur textures and a delicate pink bow.
Step-by-Step Tutorial
Materials
- Stretched canvas or canvas board (square format)
- Acrylic paints (Titanium White, Burnt Umber, Yellow Ochre, Rose Pink, Black, Grey)
- Set of brushes (1 inch flat, medium filbert, script liner/detail brush)
- Palette for mixing
- Water cup and paper towels
- Pencil and eraser
- Acrylic matte medium or water for thinning
Step 1: Sketching the Outline
-
Map out the basic shapes:
Start by lightly sketching a large oval for the bunny’s body, angling it slightly so the back is higher than the chest. Add a smaller circle overlapping the front for the head. -
Add the ears:
Draw two long, petal-shaped ears extending upwards from the head. Make the front ear slightly shorter and wider, while the back ear stretches taller. -
Define the features:
Refine the head shape to give it a rounded snout and cheek. Sketch a small triangle nose, a curved line for the closed eye, and the paws tucked neatly under the chest. -
Place the bow:
Draw a cute bow at the base of the ears, where they meet the head. Sketch two loops and a small center knot.
Pro Tip: Fur Effect
Use a ‘scumbling’ technique with a dry brush for the chest fur. Rubbing a brush with very little paint in circles creates a soft, cloud-like texture.
Step 2: Base Layers & Fur
-
Mix your base color:
Create a warm beige by mixing Titanium White with a small amount of Yellow Ochre and a tiny dot of Burnt Umber. It should be very pale. -
Apply the first wash:
Using a wet filbert brush, wash this beige color over the entire bunny body and ears, avoiding the bow and the fluffy tail area. Keep it translucent so the canvas texture shows through. -
Darken the back and ears:
Mix a slightly darker brown using more Burnt Umber. While the base is tacky, gently blend this tone along the spine and the outer edges of the ears to create volume. -
Paint the inner ear:
Mix a soft pink using Rose Pink and plenty of White. Paint the inside of the taller ear with this shade, blending the edges into the brown fur. -
Fill the bow:
Use a slightly stronger pink mixture to paint the bow. Add a touch more pigment to the center knot and the folds for depth. -
Create the white accents:
Paint the fluffy tail and the chest fur with pure Titanium White. Using a dry brush technique here helps suggest a fuzzy texture immediately.
Step 3: Details & Texture
-
Stipple the fur texture:
Switch to a smaller round brush. Mix a medium brown and start painting short, curved strokes to simulate fur, following the curve of the bunny’s body. -
Add the spots:
I like to add character by dabbing tiny spots of white and lighter beige on the bunny’s back and rear flank, mimicking a fawn-like pattern. -
Shadow the limbs:
Use a thinned brown wash to outline the curve of the hind leg and separate the front paws, giving the body clear definition. -
Blush the cheek:
Take a very watery wash of pink and glaze it gently onto the round part of the cheek for a sweet, rosy glow. -
Outline the features:
Using a script liner brush and watered-down black or dark grey paint, carefully trace the closed eye with eyelashes, the nose, and the mouth. -
Enhance the outlines:
Go over the main contours of the bunny—ears, back, and paws—with a fine, broken line of dark brown to sharpen the illustration style. -
Add whiskers:
With the finest point of your liner brush, flick out a few delicate whiskers from the snout area. -
Shadow underneath:
Mix a cool grey-brown wash and paint a small pool of shadow directly under the bunny to ground it, so it doesn’t look like it’s floating.
Level Up: Floral Crown
Instead of a simple bow, paint a tiny ring of daisies or wildflowers around one ear to give the piece a springtime nature vibe.
Hang this peaceful artwork near a crib or reading nook to inspire quiet dreams
Ballerina Silhouette With Tutu Texture
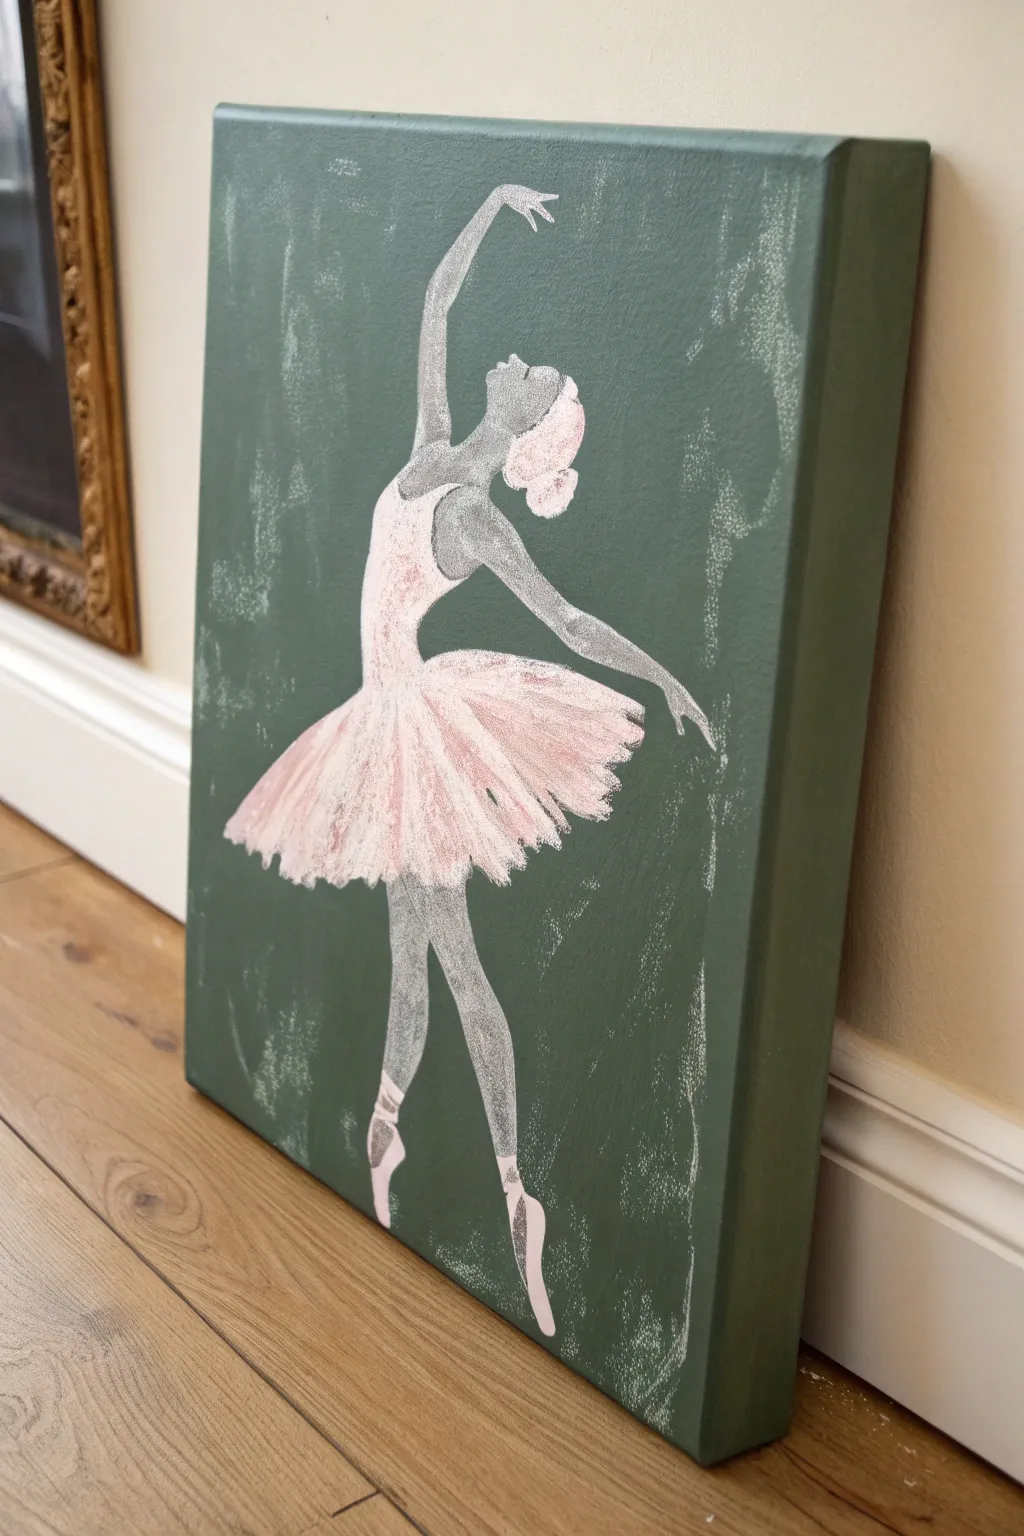
This elegant canvas project combines the softness of stenciled art with textured brushwork to create a dreamy ballerina figure. The muted olive green background contrasts beautifully with the delicate pink tutu and silver-grey silhouette, perfect for a sophisticated nursery.
Step-by-Step
Materials
- Stretched canvas (rectangular)
- Acrylic paint: Olive/Sage green, Titanium White, Silver or Grey, Soft Pink
- Ballerina dancer stencil (or printout and craft knife)
- Stencil adhesive spray or painter’s tape
- Small sponges or dabbers
- Flat paintbrush (medium size)
- Fine detail brush
- Paper plate or palette
- Old toothbrush (optional for texture)
Step 1: Setting the Stage
-
Prepare the background:
Begin by painting your entire canvas with the olive green acrylic paint. Ensure you paint the sides of the canvas for a professional, gallery-wrapped finish. -
Apply a second coat:
Depending on the opacity of your paint, a second coat of green might be necessary to get a completely solid, matte finish. Let this dry completely before moving on. -
Create distressing (optional):
To mimic the worn look in the photo, you can lightly dry-brush some white or very pale green vertically along the edges or corners. Keep the brush almost devoid of paint for a subtle, scratchy effect.
Step 2: Creating the Silhouette
-
Position the stencil:
Place your ballerina stencil in the center of the canvas. Use a light mist of stencil adhesive on the back to keep it perfectly flat against the textured canvas surface. -
Load the sponge:
Pour a small amount of silver or grey paint onto your palette. Dip your sponge in, then dab most of it off onto a paper towel until the sponge is almost dry. -
Stipple the body:
Gently dab the paint over the stencil openings for the dancer’s body, arms, and legs. Use an up-and-down motion rather than brushing side-to-side to prevent paint from bleeding under the stencil edges. -
Build opacity slowly:
The charm of this piece is the textured, slightly porous look of the silhouette. Don’t aim for solid coverage immediately; let some of the canvas texture show through the first layer. -
Add highlights:
While the grey is still tacky, pick up a tiny bit of white on your sponge and dab it lightly on the upper parts of the arms and head to create dimension.
Bleeding Lines?
If paint seeps under the stencil, wait for it to dry fully. Then, use the green background paint and a tiny liner brush to ‘erase’ the mistake.
Step 3: The Tutu and Details
-
Base the tutu:
Switch to a clean sponge and the soft pink paint. Stipple the skirt area of the stencil. I like to let this overlap slightly with the grey body area for a cohesive look. -
Add texture to the skirt:
Once the initial pink layer is down, use a small, dry bristle brush with a bit of white paint. Flick the brush outward from the waist to mimic the texture of tulle fabric. -
Remove the stencil:
Carefully peel the stencil away from the canvas while the paint is still slightly damp. This helps prevent the paint from peeling up with the plastic. -
Refine the edges:
If any paint bled under the stencil, use a small brush dipped in the background green color to touch up the edges and sharpen the silhouette. -
Paint the shoes:
Using a fine detail brush and pink paint, carefully fill in the ballet slippers. Add tiny ribbons crisscrossing up the ankle with very thin strokes. -
Add the bun:
Dab a small circle of pink at the back of the head for the hair bun. You can add a speck of white to suggest a floral accessory. -
Enhance the tutu volume:
With the stencil removed, you can freehand a few extra strokes of white and pink extending past the original stencil line to make the tutu look fluffier and more organic. -
Final dry brushing:
Take a nearly dry brush with a hint of white paint and whisk it vertically over the background around the dancer to enhance the distressed, vintage vibe.
Add Some Sparkle
Mix a clear glitter medium into the pink paint for the tutu, or sprinkle fine iridescent glitter over the skirt while the paint is still wet.
Hang this charming piece near a window where natural light can catch the subtle textures of the tutu
Coquette Bow Trio Mini Canvases
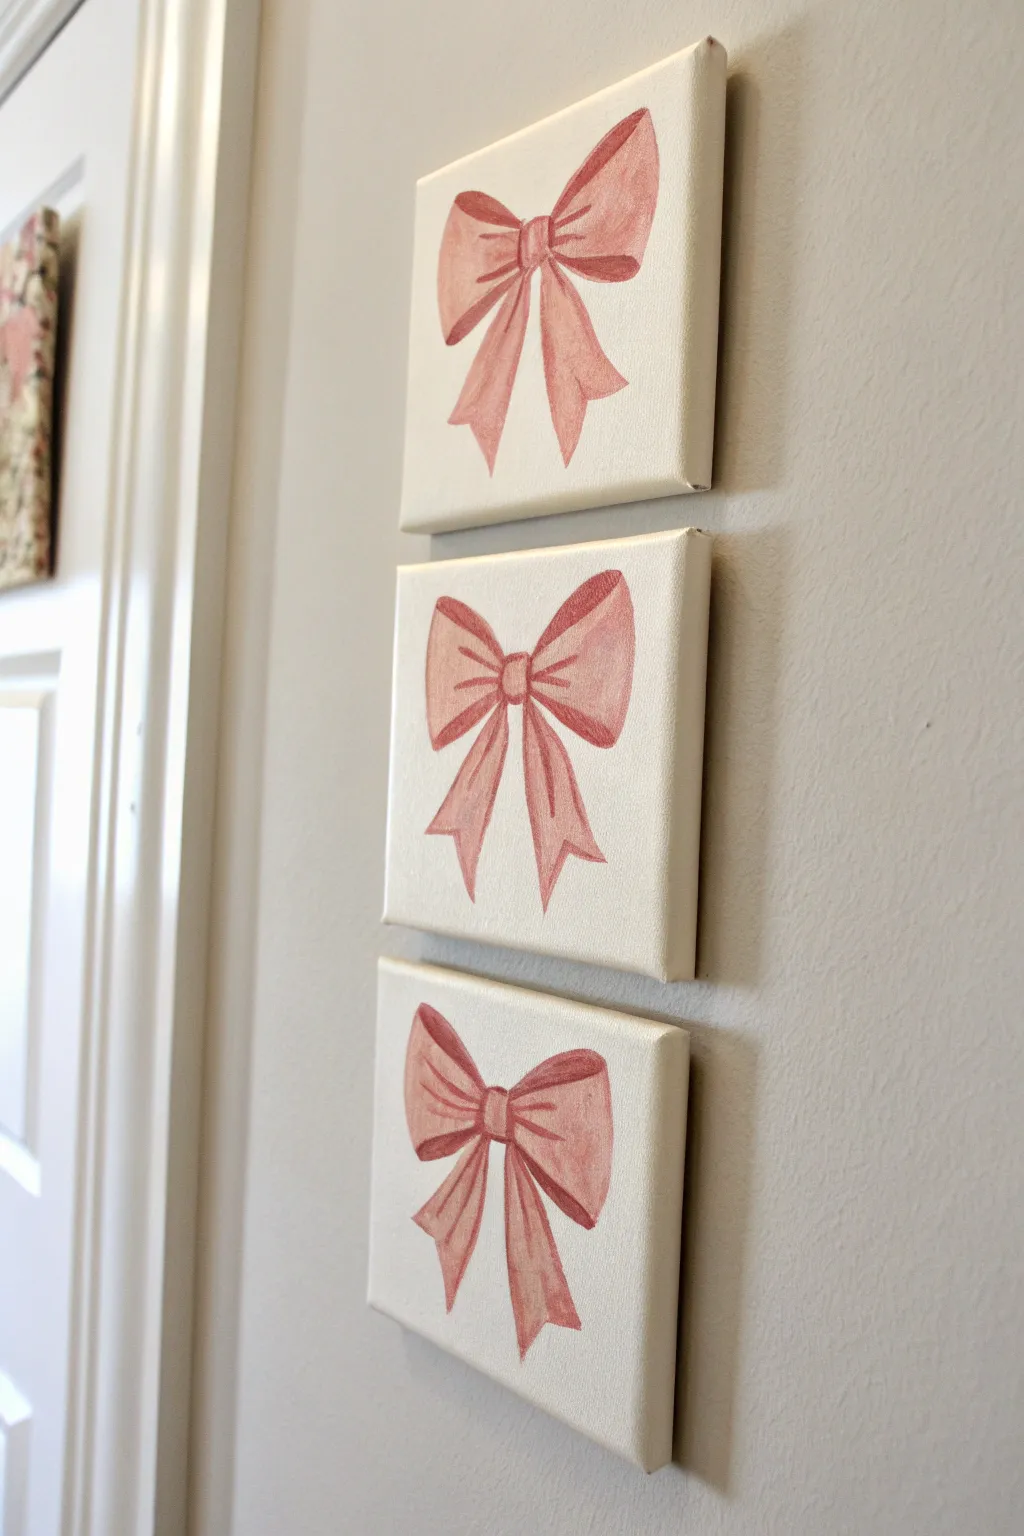
Embrace the sweet and dainty ‘coquette’ aesthetic with this charming trio of mini paintings. These soft pink bows add a lovely, feminine touch to a nursery wall, using simple shading techniques to create depth and dimension.
Step-by-Step Tutorial
Materials
- 3 mini square stretched canvases (e.g., 4×4 or 5×5 inches)
- Acrylic paint (Titanium White, Portrait Pink or similar soft pink, Crimson or darker pink for shading)
- Small flat brush (size 4 or 6)
- Small detail round brush (size 0 or 1)
- Palette for mixing paint
- Jar of water
- Paper towels
- Pencil and eraser
Step 1: Preparation and Sketching
-
Set up your workspace:
Arrange your three mini canvases in a row on your work surface. This helps you visualize the flow of the bows if you want slight variations in their shape, though they should look cohesive. -
Sketch the center knot:
Using a pencil very lightly, draw a small, rounded square or oval shape in the center of the first canvas. This will be the knot of your bow. -
Outline the loops:
Draw two large, fluffy loops extending from the center knot to the left and right. Make the top edges curve gently upwards before dipping back to the knot, giving them a perky, full appearance. -
Add the tails:
Sketch two ribbon tails flowing downward from behind the knot. The ends should have a ‘V’ cut (dovetail) or a simple slant to look like cut ribbon. -
Repeat for all canvases:
Repeat the sketching process on the remaining two canvases. You can make each bow identical, or slightly angle the loops differently for variety.
Step 2: Base Painting
-
Mix your base pink:
On your palette, mix a small amount of Portrait Pink with a touch of Titanium White to create a soft, pastel base color. -
Fill in the shapes:
Using the small flat brush, paint the entire shape of the bow (loops, knot, and tails) with your base pink color. Don’t worry about shading yet; just get a solid, opaque coat. -
Let it dry:
Allow the base coat to dry completely. Acrylics dry fast, but wait until the surface is matte and not tacky to the touch before proceeding.
Fixing Opacity
If your pink paint looks streaky or translucent after the first coat, don’t keep brushing wet paint. Let it dry fully, then apply a second thin coat for solid coverage.
Step 3: Adding Shading and Dimension
-
Mix a mid-tone shadow:
Add a tiny drop of Crimson or darker pink to your original base mix. You want a color that is about two shades darker than your base. -
Define the knot:
Using the round brush, paint small vertical strokes on the sides of the center knot to make it look rounded and gathered. -
Shadow the loops:
Apply this darker pink inside the loops near the knot, where the fabric would bunch up. Also paint along the bottom edge of the loops to suggest dimension. -
Detail the tails:
Paint a shadow right underneath the loops where the tails emerge. Add vertical streaks down the tails to simulate the folds of the ribbon fabric. -
Blend the transitions:
While the paint is still slightly wet, use a clean, damp brush to gently soften the edges between your base color and the shadows so the transition isn’t too harsh.
Fabric Texture
Use a dry brush technique (very little paint on brush) for the final highlights to mimic the slight sheen and texture of satin or grosgrain ribbon.
Step 4: Highlights and Final Touches
-
Create a highlight color:
Mix a fresh batch of paint that is almost pure Titanium White with just a whisper of pink. -
Highlight the curves:
Imagine a light source hitting the bow from above. Paint thin, curved highlight lines on the top edges of the loops and the center of the knot. -
Accentuate folds:
Add highlight strokes on the high points of the ribbon tails, right next to your darker shadow lines, to increase the contrast and make the ribbon look shiny. -
Refine the edges:
I like using the smallest brush to tidy up the outer perimeter of the bow with white paint (matching the canvas) if any pink strayed over the sketch lines. -
Final assessment:
Step back and look at all three canvases together. Ensure the shading intensity is consistent across the trio for a balanced collection.
Once dry, hang these darling bows vertically to create a sweet focal point in the room
Modern Pink and Gray Geometric Set
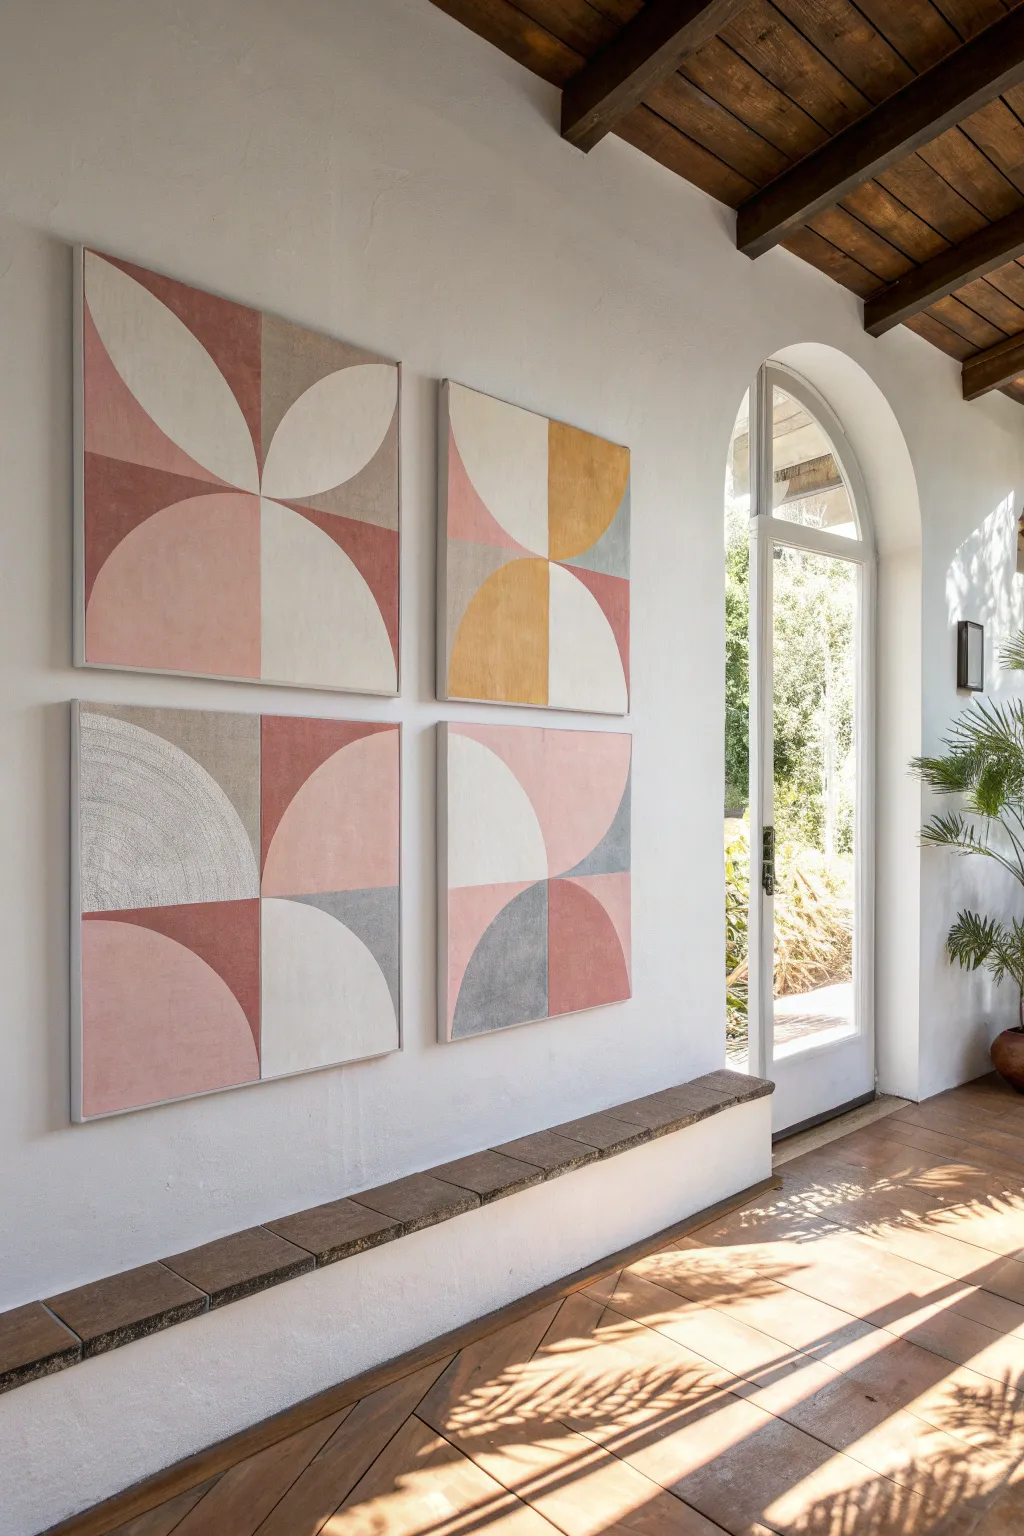
Bring soft warmth to a nursery with this modern four-piece art set featuring abstract quarter-circles and arches. The earthy pinks, greys, and ochres create a sophisticated yet playful geometric patchwork that elevates any blank wall.
Detailed Instructions
Materials
- 4 square canvases (e.g., 20×20 inches)
- Acrylic paints (dusty pink, blush, light grey, warm ochre, warm white)
- Modeling paste or texture medium
- Painter’s tape (1-inch width)
- Compass tool, large string, or round object for tracing
- Palette knife
- Wide flat brush (2-inch)
- Medium flat brush
- Pencil and eraser
- Ruler
Step 1: Planning the Composition
-
Lay out the canvases:
Arrange your four canvases on the floor in a large 2×2 square grid. This helps you visualize how the lines will flow from one canvas to another. -
Mark the midpoints:
Using a ruler and pencil, lightly mark the vertical and horizontal center points on each canvas edge. These marks will guide your geometric shapes. -
Sketch the major curves:
Use a large compass (or a string pinned to a corner) to draw the large quarter-circles. Ensure the curves on adjacent canvases meet perfectly at the seams to create the illusion of continuous flow. -
Create secondary shapes:
Within some of the larger shapes, sketch smaller quarter-circles or intersecting lines to create the color-block sections, referencing the image for the specific pattern.
Clean Curves Pro-Tip
For sharp curved lines without tape, use a stiff, flat-headed shader brush. Load it with paint and drag it slowly along the pencil line; the bristles act as a natural guide.
Step 2: Adding Texture
-
Mix the texture medium:
Mix a generous amount of modeling paste with a small bit of white acrylic paint. You want a thick, frosting-like consistency. -
Apply paste to specific zones:
Using a palette knife, scrape the paste onto selected sections—specifically the white and lighter grey areas seen in the reference—to create visual interest. Leave other areas smooth. -
Create directional texture:
While the paste is wet, use a clean wide brush or a comb to create subtle grooves. I like to drag the tool in a curve that mimics the shape of the painted arch for harmony. -
Let it cure:
Allow the textured sections to dry completely, preferably overnight. The surface must be hard before you apply tape.
Level Up: Earthy Finish
Mix a tiny amount of fine sand or baking soda into your paint colors before applying. This gives the entire piece a gritty, sandstone finish typical of high-end decor.
Step 3: Color Blocking
-
Tape the first boundaries:
Apply painter’s tape along the straight edges of your first color set. For curved edges, you can carefully cut the tape or freehand the curve if you have a steady hand. -
Paint the background whites:
Start by painting the lightest sections (the creams and warm whites) using a wide flat brush. Apply two coats for solid opacity. -
Apply the ochre tones:
Next, fill in the yellow/ochre sections. Use a crisscross brush stroke to give it a matte, plaster-like look rather than a shiny finish. -
Layer the pinks:
Mix a dusty rose and a lighter blush pink. Paint the large quarter circles and intersecting zones, letting the brush strokes remain slightly visible for an organic feel. -
Add grey accents:
Fill in the remaining geometric shapes with a soft, warm grey. If painting over the textured areas, perform a ‘dry brush’ technique to highlight the ridges of the modeling paste. -
Refine the edges:
Once dry, peel off any tape carefully. Use a small angled brush to sharpen any wobbly lines where two colors meet.
Step 4: Finishing Touches
-
Paint the sides:
Don’t forget the deep edges of the canvas. Paint them a neutral creamy white or continue the design over the edge for a gallery-wrapped look. -
Seal the artwork:
Apply a clear matte varnish over the entire set. This unifies the sheen between the textured paste areas and the flat painted areas. -
Install the hardware:
Attach hanging wire or D-rings to the back. Ensure they are measured exactly the same on all four pieces so the grid hangs perfectly straight.
Hang these four pieces with about 2 inches of spacing between them to complete your sophisticated nursery wall
Polka Dot Gradient in Blush
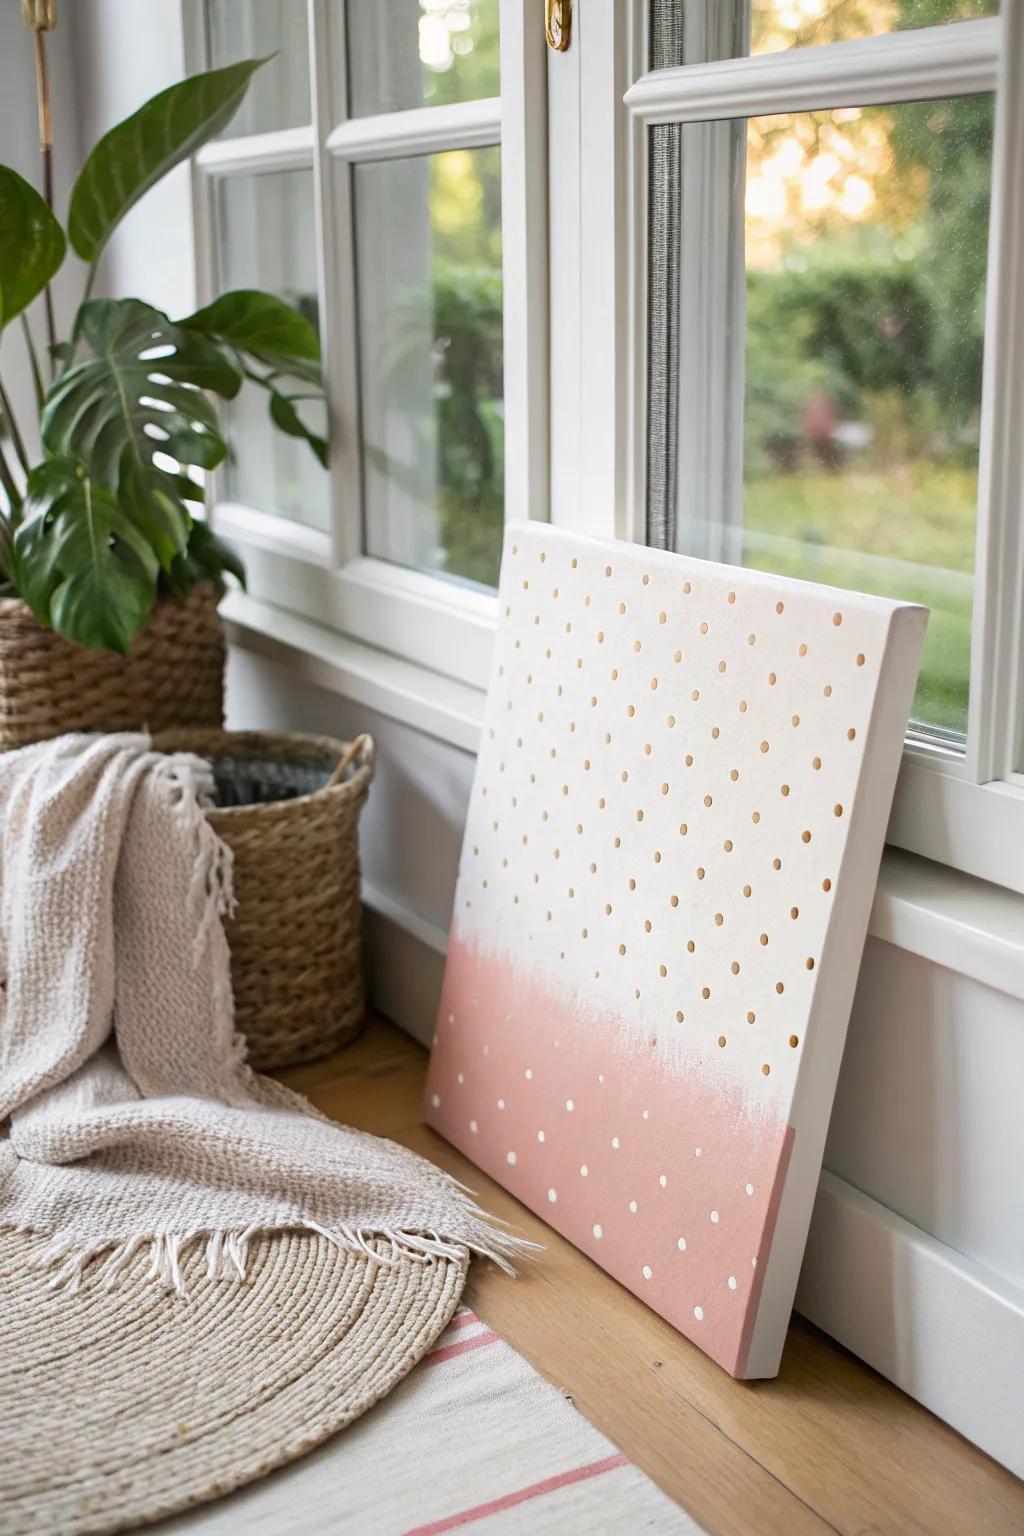
Soft, modern, and perfectly sweet, this polka dot project combines a gentle blush gradient with textured gold accents. It’s a beginner-friendly piece that adds a touch of playful sophistication to any nursery decor.
Step-by-Step
Materials
- Rectangular stretched canvas (e.g., 16×20 inches)
- Titanium white acrylic paint
- Blush pink acrylic paint
- Metallic gold paint or gold leaf pen
- Wide flat paintbrush (2-inch)
- Round foam pouncer (small) or pencil eraser
- Ruler
- Pencil
- Mixing palette or paper plate
- Jar of water
- Paper towels
Step 1: Setting the Base
-
Prepare the canvas:
Start by wiping down your canvas lightly with a dry cloth to remove any dust. If your canvas isn’t pre-gessoed, apply a thin coat of white gesso first to ensure the paint adheres smoothly. -
Paint the top section:
Squeeze a generous amount of titanium white acrylic paint onto your palette. Using your wide flat brush, cover the top two-thirds of the canvas with smooth, horizontal strokes. -
Apply the blush color:
Clean your brush thoroughly. Apply the blush pink paint to the bottom third of the canvas, painting solid horizontal strokes all the way to the bottom edge. -
Create the transition zone:
While both paints are still slightly wet, mix a tiny amount of the blush pink into a dollop of white on your palette to create a very pale transitional pink. -
Blend the gradient:
Apply this transitional shade right where the white and blush sections meet. Use a dry, clean brush to feather the edges where the colors touch, sweeping back and forth lightly to create a soft, imperfect ombre effect rather than a hard line. Don’t worry if it looks a bit brushy; that adds texture. -
Let it cure:
Allow the background to dry completely. This is crucial—if the base is wet, your measuring and dotting steps will smudge the paint. I usually give it at least an hour.
Step 2: Creating the Grid
-
Plan the spacing:
Decide on your dot spacing. For a clean look like the photo, a diagonal grid pattern works best. Measure approximately 1.5 to 2 inches between each prospective dot location. -
Mark the rows:
Using a ruler and a pencil, make very faint marks along the left vertical edge of the canvas to denote where each row of dots will begin. -
Mark the columns:
Do the same along the top horizontal edge. Use lighter pressure with the pencil here so the marks are barely visible to the naked eye. -
Plot the grid points:
Lightly mark the intersection points across the entire canvas. To achieve the offset look, indent every other row by half the width of your spacing measurement.
Sticky Situation?
If using a pencil eraser to stamp dots, clean it off every few stamps. Dried build-up can make your circles wonky or uneven.
Step 3: Adding the Gold Dots
-
Prepare the gold paint:
Pour a small amount of metallic gold paint onto your palette. It should be creamy but not too runny to hold a nice round shape. -
Select your tool:
Choose a tool that matches your desired dot size. The eraser end of a standard pencil creates perfect small circles, or you can use a small round foam pouncer for larger dots. -
Test your technique:
Practice stamping a few dots on a piece of scrap paper first. Dip the tool, press straight down, and lift straight up to avoid smearing. -
Start stamping:
Begin at the top left corner. Dip your tool into the gold paint and press it firmly onto your first pencil mark. -
Work in rows:
Continue stamping row by row, moving downward. Reload your tool with paint every 2-3 dots to ensure consistent opacity. -
Stamp over the gradient:
Continue the pattern seamlessly over the transition area where the white meets the pink. The gold pops beautifully against both background colors. -
Switch colors at the bottom:
As you reach the solid blush pink section at the bottom, stop using gold. Clean your tool and switch to white paint for the dots in this lower section to create contrast. -
Detail the edges:
Check the sides of the canvas. If you wrap the paint colors around the edges, consider adding half-dots on the sides where the pattern runs off for a professional finish. -
Erase guidelines:
Once the dots are absolute dry (give them plenty of time, as thick dots take longer), gently erase any visible pencil marks with a clean white eraser.
Texture Twist
Instead of flat gold paint, use gold puff paint or apply gold leaf adhesive on the dots for a raised, 3D texture.
Hang your new masterpiece near a window to let the natural light catch those shimmering gold details
Butterfly Garden With Soft Florals
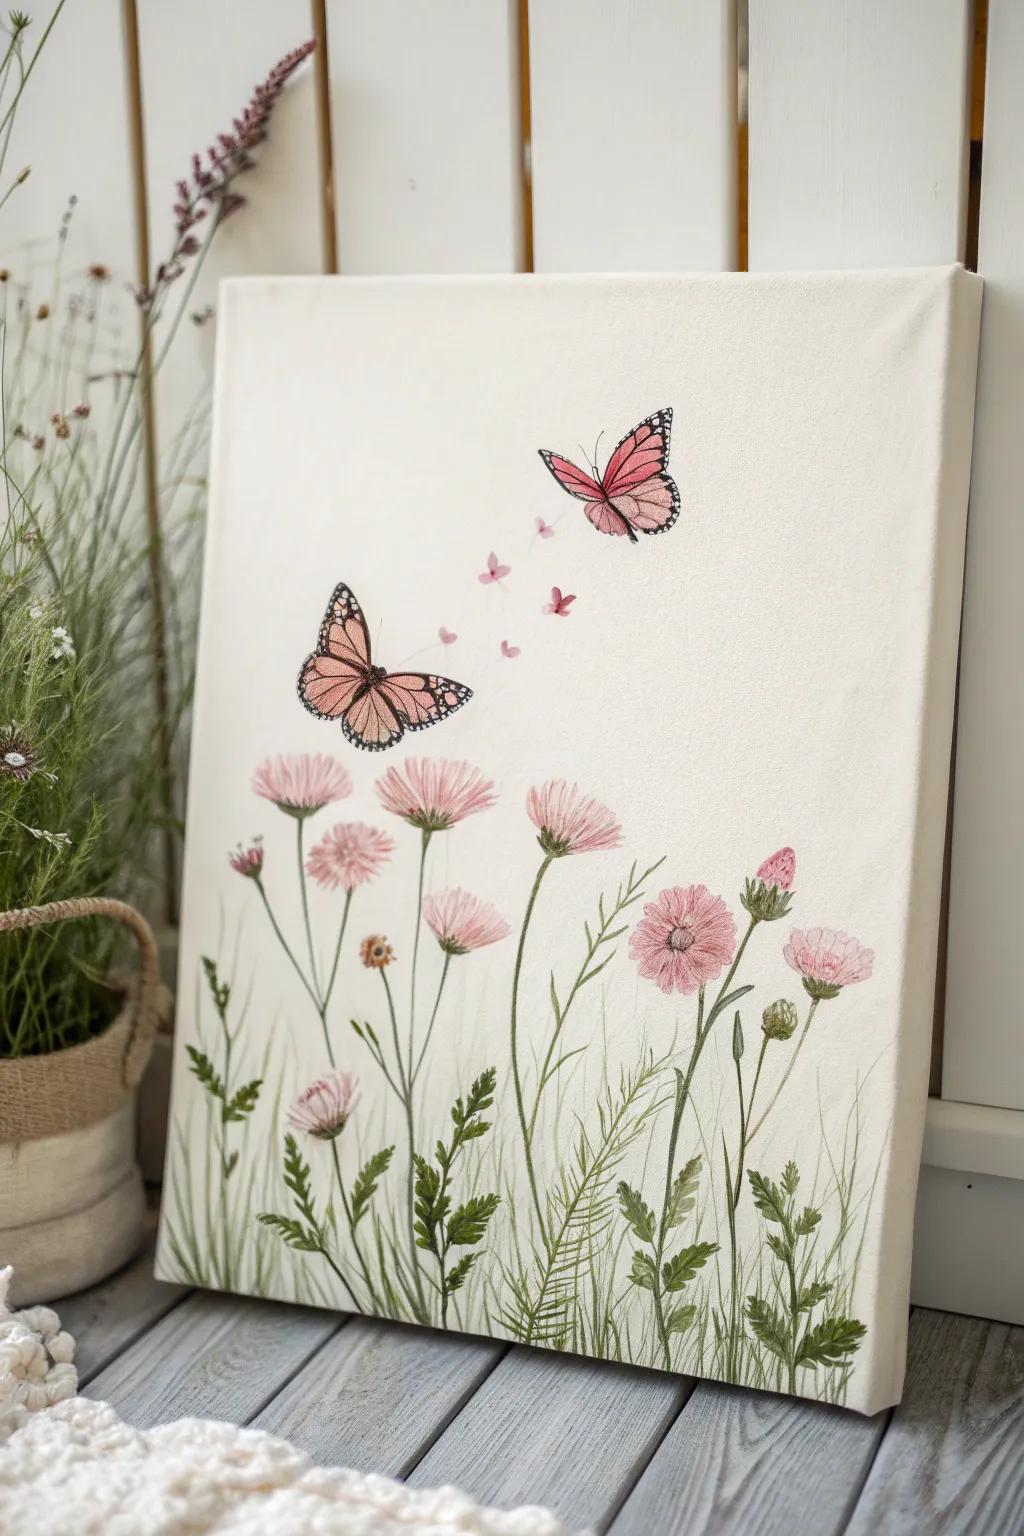
Perfect for a nursery, this sweet canvas features two monarch-style butterflies fluttering above a meadow of gentle pink cosmos flowers. The design uses delicate textures and soft lines to create a dreamy, ethereal garden scene that feels both modern and timeless.
Step-by-Step Guide
Materials
- Stretched canvas (11×14 or 16×20 inches recommended)
- Acrylic paints (Titanium White, Soft pink/Blush, Magenta, Black, Sap Green, Olive Green)
- Fine liner brushes (size 00 and 1)
- Small flat brush (size 4) and small round brush (size 2)
- Pencil for sketching
- Fabric medium (optional, if blending for a softer look)
- Palette
- Water cup and paper towels
Step 1: Planning and Background
-
Prepare the canvas:
Start with a clean, stretched canvas. While the background in the reference is a natural cream, you can apply a coat of Titanium White mixed with a tiny drop of yellow ochre or unbleached titanium if your canvas is too starkly white. Let this base coat dry completely. -
Sketch the composition:
Using a light pencil (HB), gently map out your layout. Place the two butterflies in the upper center—one angled slightly down, one angled up. Then, draw varying stalk heights for your flowers along the bottom third of the canvas, ensuring they look organic and not too uniform.
Step 2: Painting the Flowers
-
Base layer for petals:
Mix a soft blush pink using White and a touch of Magenta. Using a small round brush, paint the cosmos petals. Use short, sweeping strokes starting from the flower center outward to create that gentle, ray-like texture. -
Add petal definition:
While the pink is still tacky, mix a slightly darker rose shade. Add thin lines inside the petals to suggest veins and separation. I like to keep the edges slightly feathery rather than perfectly smooth to mimic real cosmos. -
Paint the centers:
For the flower centers, use an earthy tone. Mix a little Black with Magenta or use a pre-mixed burnt sienna. Dab small dots in the center of the open flowers to create a textured, pollen-filled look. -
Developing the stems:
Switch to your liner brush and confident, fluid motions. Using Sap Green mixed with a little White for opacity, pull long, slender lines upward to connect to your flower heads. -
Adding foliage:
Mix Olive Green with a touch of Black for contrast. Paint the feathery, fern-like leaves typical of cosmos flowers along the bottom and branching off stems. Use very light pressure with the liner brush to keep these delicate. -
Layering the grass:
Fill in the bottom edge with vertical grass strokes in varying shades of green. Alternate between the light Sap Green mix and the darker Olive tone to create depth behind the main flower stems.
Clean Lines
If your black outlines look shaky, try thinning your paint with a flow improver or water to an ink-like consistency. It helps the brush glide smoothly without dragging.
Step 3: Creating the Butterflies
-
Butterfly wing base:
For the upper butterfly, paint the wings with a gradient. Start with a deep pink near the body and blend out to a lighter blush at the tips using a small flat brush. -
Lower butterfly coloring:
Repeat the process for the lower butterfly, perhaps using a slightly more peachy tone (mix pink with a tiny dot of yellow) to distinguish it from the top one. -
Outlining the wings:
Once the wing color is fully dry, use your finest liner brush and black paint (thinned slightly with water for flow) to outline the wings. Keep the lines varying in thickness—thicker on the outer curve, thinner near the body. -
Wing veins and details:
With the 00 liner brush, paint the intricate vein patterns inside the wings. Use a very light hand here. Add the small white dots along the black edges of the wings once the black is dry. -
Bodies and antennae:
Paint the slender black bodies between the wings. Use a quick, flicking motion to add the delicate antennae protruding from the heads.
3D Effect
For a mixed-media twist, stitch the butterfly flight path with pink embroidery floss directly through the canvas after the paint dries.
Step 4: Finishing Touches
-
Adding the trail:
Mix a translucent pink wash. Between the two butterflies, paint tiny floating hearts or petals to suggest a magical flight path connecting them. -
Refining the greenery:
Look for empty spots in the lower garden. Add a few darker green sprigs or tiny flower buds (small pink ovals on green stems) to make the garden feel lush. -
Highlighting:
Use Titanium White on your finest brush to add tiny highlights to the upper edges of the flower stems and the brightest parts of the petals to give them dimension. -
Protection:
Allow the painting to cure for at least 24 hours. Because this is for a nursery, consider adding a coat of matte or satin varnish to protect it from dust and fading over time.
Hang this lovely piece in a well-lit spot to bring a sense of gentle nature into the room
Mother and Baby Girl Silhouette
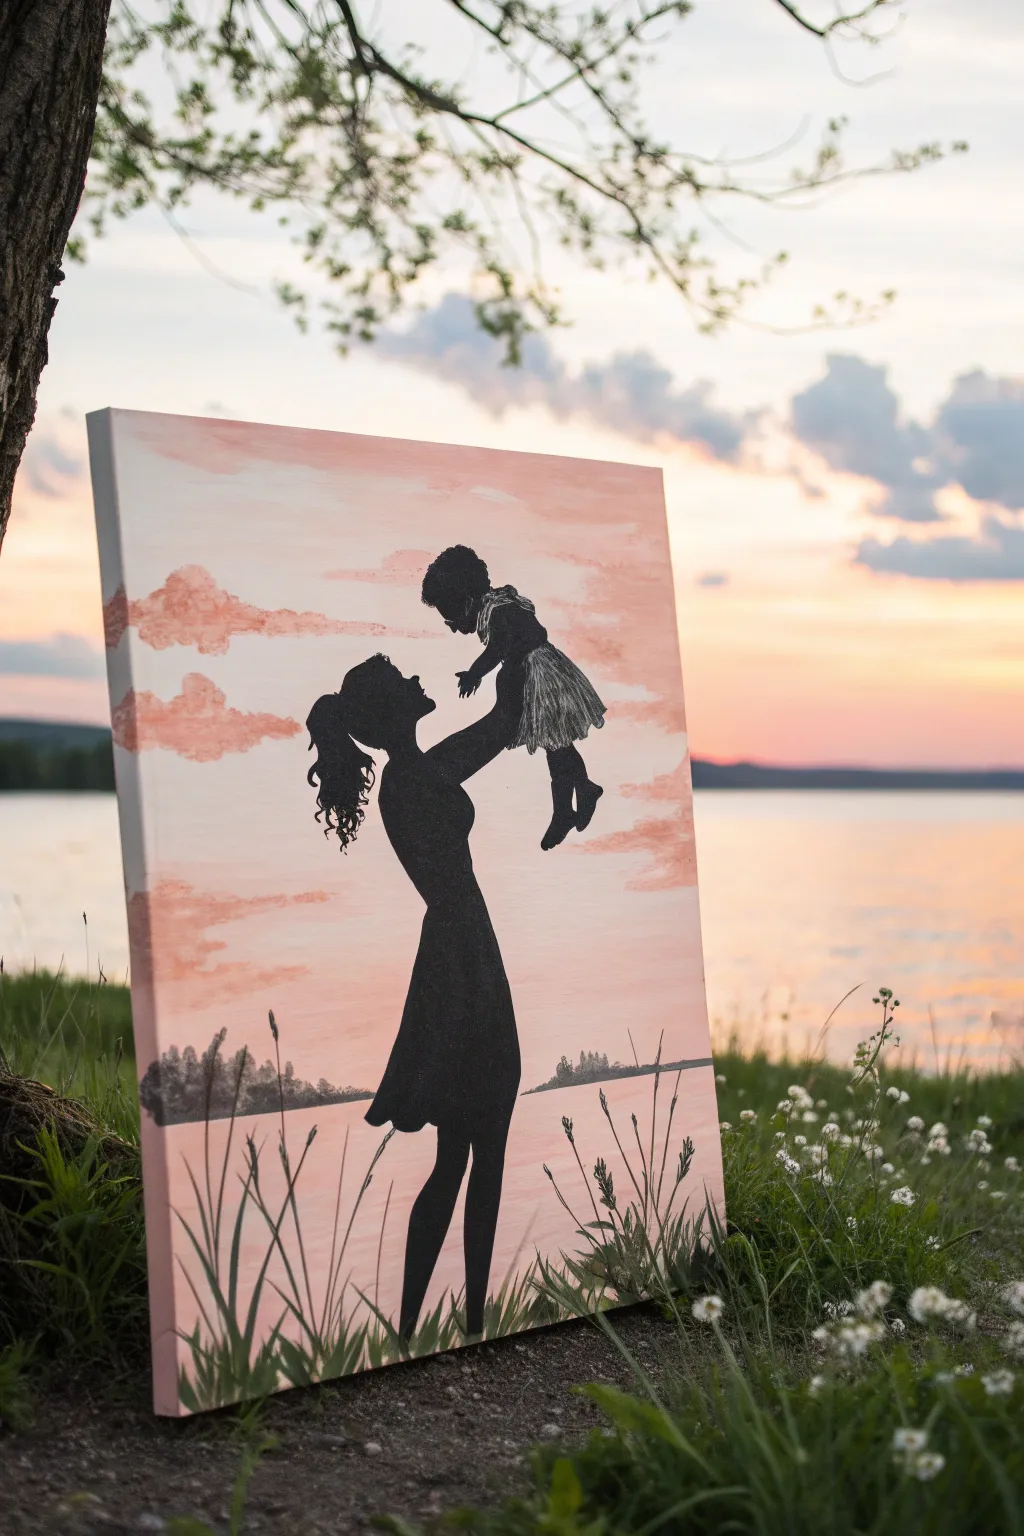
Capture the tender bond between mother and daughter with this striking silhouette painting. Set against a soft, pastel sunset sky, the high-contrast black figures create a timeless and emotional piece of art perfect for a nursery.
How-To Guide
Materials
- Rectangular canvas (e.g., 16×20 inches)
- Acrylic paints: Titanium White, Baby Pink, Warm Sunset Orange, Lamp Black
- Large flat wash brush (2-inch)
- Medium flat brush (1/2-inch)
- Small round detail brush (size 0 or 1)
- Pencil and eraser
- Palette or mixing plate
- Cup of water and paper towels
- Optional: Silhouette stencil or carbon paper
Step 1: Painting the Sky Background
-
Prepare the gradient colors:
Begin by squeezing out generous amounts of white, pink, and a small touch of orange onto your palette. You’ll need more white than you expect to create that soft, hazy atmosphere. -
Apply the warm horizon:
Using your large wash brush, mix a soft peach color using pink, a tiny dot of orange, and white. Paint horizontal strokes across the bottom third of the canvas, ensuring full coverage. -
Blend upward into pink:
Without cleaning the brush entirely, pick up more pink and white. Paint the middle section of the canvas, blending the wet paint into the peach section below using long, sweeping back-and-forth strokes. -
Create the pale upper sky:
Gradually transition to a very pale pink—almost white—as you reach the top of the canvas. Keep your strokes horizontal to mimic the calm atmosphere of a sunset. -
Add soft clouds:
While the background is still slightly tacky, mix a slightly darker, rosier pink. Use the corner of a medium flat brush to dab in gentle, irregular cloud shapes on the left side and upper corners. -
Soften the edges:
Wipe your brush dry and gently feather out the edges of your clouds so they look wispy rather than stamped on. Let the entire background dry completely before moving forward.
Smoother Backgrounds
Add a drop of acrylic retarder or water to your sky paints. This keeps the paint wet longer, allowing for effortless, seamless gradients without brush drag.
Step 2: Drafting the Silhouette
-
Sketch the figures:
Use a pencil to lightly sketch the outline of the mother lifting the child. Focus on the pose: the mother’s head tilted back, ponytail flowing, and the child held high with a flared dress. -
Refine the proportions:
Double-check the connection points, specifically where the mother’s hands grasp the child’s torso. Validating the anatomy now prevents awkward shapes later. -
Sketch the horizon line:
Draw a faint horizontal line across the lower third of the canvas to represent the distant water’s edge, interrupting it where the mother’s legs will be. -
Outline foreground grasses:
Lightly mark vertical lines at the very bottom edge where tall grass blades will eventually sit in the foreground.
Step 3: Filling the Silhouette
-
Outline in black:
Switch to your medium brush loaded with Lamp Black paint. Carefully trace over your pencil lines for the main figures to establish distinct boundaries. -
Fill the mother’s form:
Fill in the mother’s body with solid black. Use smooth strokes to ensure the paint is opaque; you may need a second coat after the first dries to eliminate streakiness. -
Detail the child:
Use the small round brush to fill in the child. Pay special attention to the texture of the dress and the tiny feet, keeping the edges sharp. -
Paint the hair details:
Using the very tip of your small brush, paint loose, curly tendrils for the mother’s ponytail and the child’s hair. I like to flick the brush quickly here to keep the lines tapered and natural. -
Create the distant land:
Paint the distant tree line along your horizon sketch. Use a dabbing motion to create the bumpy texture of treetops, keeping this layer flat and shadow-like. -
Add foreground grasses:
Starting from the absolute bottom of the canvas, paint quick, upward strokes in black to create tall blades of grass. Vary their height and angle so they don’t look like a picket fence. -
Final touches:
Check for any pinholes of light showing through your black paint and touch them up. Ensure the silhouette edges are crisp against the sunset sky.
Correction Trick
If black paint accidentally smudges onto the pink sky, don’t wipe it! Let it dry completely, then paint over the mistake with your opaque sky colors.
Now you have a heartwarming keepsake that freezes a moment of joy in time
Lace Stencil With a Sweet Initial
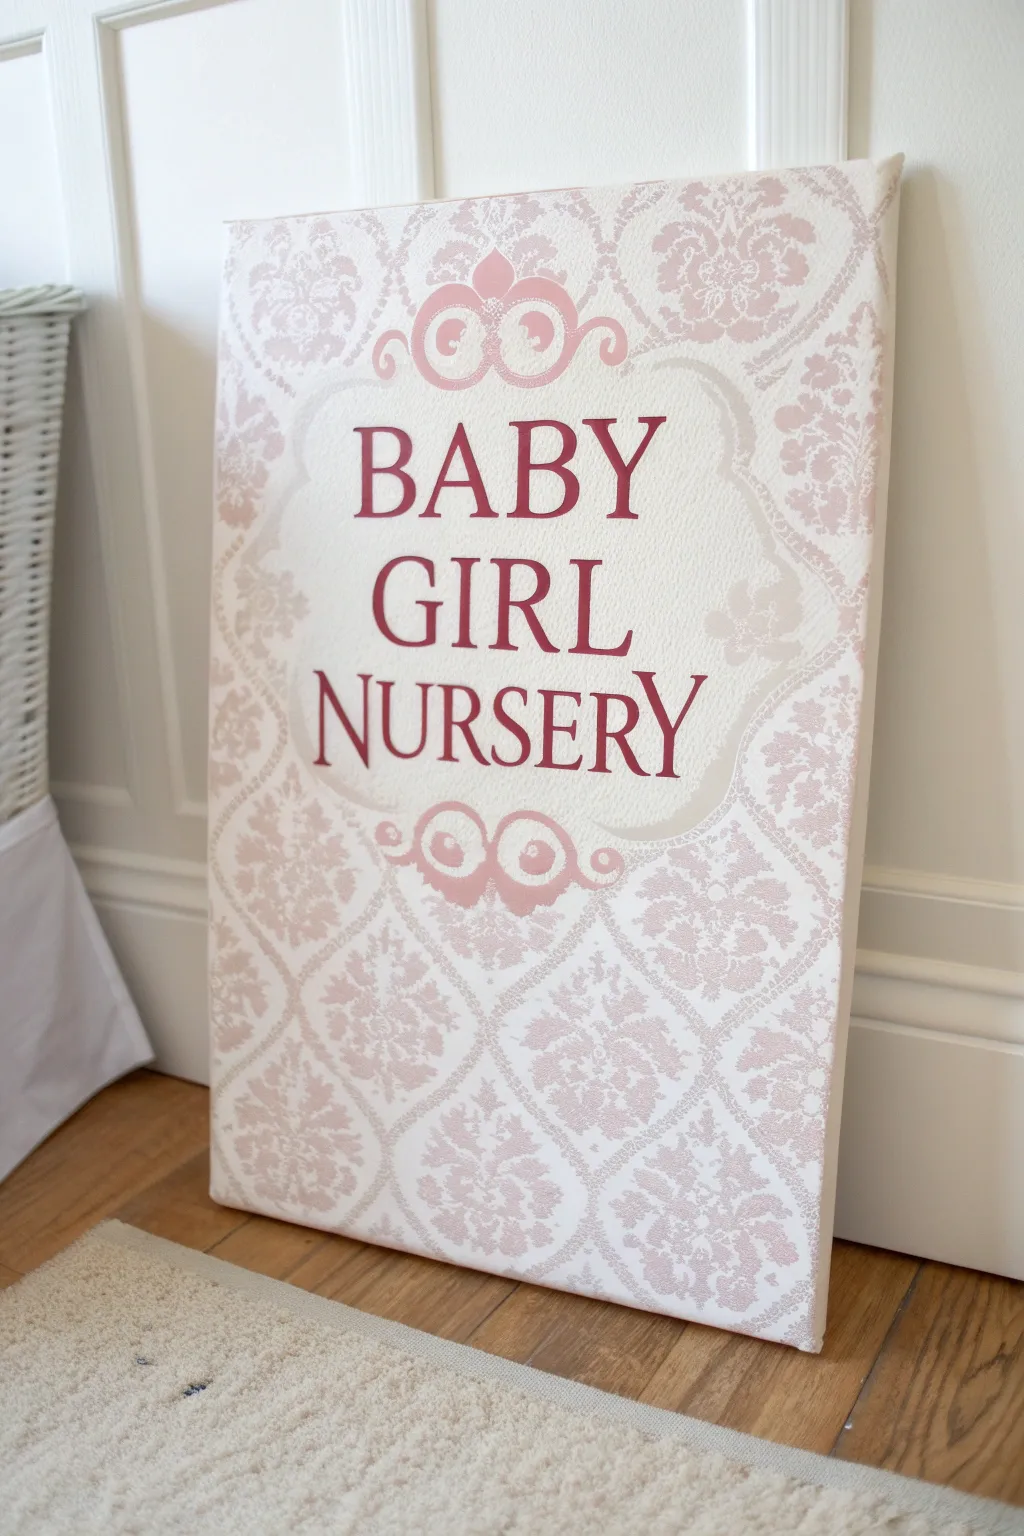
Create a sophisticated nursery centerpiece featuring a soft pink damask pattern and elegant lettering. This project combines stenciling techniques with crisp vinyl or hand-painted typography for a high-end, custom look.
Detailed Instructions
Materials
- Large stretched canvas (e.g., 16×20 or 18×24 inches)
- White acrylic craft paint
- Soft baby pink acrylic craft paint
- Dark rose or burgundy acrylic paint (for lettering)
- Large damask or lace wall stencil
- Repositionable spray adhesive
- Stencil brush or high-density foam roller
- Computer and printer
- Vinyl cutter (like Cricut or Silhouette) OR graphite transfer paper
- Adhesive vinyl (dark rose) OR fine detail paintbrush
- Painter’s tape
- Matte finish sealer spray
- Decorative flourish stencil (optional, for center accents)
Step 1: Preparing the Background
-
Base coat application:
Begin by painting the entire canvas with a coat of crisp white acrylic paint to ensure a bright, clean foundation. Let this dry completely before moving forward. -
Positioning the stencil:
Lay your damask or lace stencil flat. Lightly mist the back with repositionable spray adhesive and wait about 30 seconds for it to become tacky but not wet. -
Securing the pattern:
Place the stencil onto the canvas, starting from one edge. Press it down firmly, smoothing out any air bubbles to ensure tight contact with the canvas surface. -
Stenciling the pattern:
Load a foam roller or stencil brush with the soft baby pink paint. Offload most of the paint onto a paper towel until the brush feels almost dry—this prevents paint from bleeding under the stencil edges. -
Applying the pink layer:
Roll or dab the paint gently over the stencil. Use a light touch and build up the color slowly rather than trying to get full coverage in one heavy coat. -
Completing the background:
carefully lift the stencil to reveal the pattern. If your stencil is smaller than the canvas, realign it with the painted design to continue the pattern across the entire surface. Allow the pink layer to dry fully.
Bleed Prevention Trick
Before applying your pink stencil paint, do a quick pass of white paint over the stencil first. This seals the edges so any bleed is invisible white-on-white.
Step 2: Creating the Central Cartouche
-
Designing the frame:
To create the white space for the text, you will need a central shape. You can paint a custom shape in the center using white paint to block out the damask pattern, or simply plan ahead and leave the center unstenciled. -
Refining the center shape:
If you painted over the pattern, apply two to three coats of white paint in a decorative bracket or shield shape in the center of the canvas until the underlying pink pattern is no longer visible. -
Adding decorative flourishes:
Using a smaller stencil or freehand painting, add the stylized pink scroll details at the top and bottom of your white central cartouche to frame the text area beautifully.
Add Dimension
Mix a tiny amount of glaze medium into your pink damask paint. This creates a subtle, sheer fabric-like effect rather than a solid, heavy opaque block of color.
Step 3: Lettering and Details
-
Preparing the text:
Design your text layout on a computer. Choose a classic serif font for a timeless look. Scale it to fit perfectly within your white central space. -
Option A: Vinyl application:
If using a vinyl cutter, cut the text from dark rose or burgundy vinyl. Weed out the excess material and use transfer tape to center and apply the decal directly onto the white painted area. -
Option B: Transfer method:
If painting by hand, print your design on paper. Place a sheet of graphite paper between the printout and the canvas, then trace the letters with a pencil to transfer the outline. -
Painting the letters:
Using a fine detail brush and your dark rose paint, carefully fill in the letter outlines. I find resting my hand on a bridge or book helps keep the lines steady. -
Cleaning up shapes:
Once the lettering is dry, use a tiny brush with white paint to touch up any edges where the rose paint might have strayed outside the intended lines. -
Sealing the work:
After the canvas has dried for at least 24 hours, take it to a well-ventilated area and apply a light coat of matte clear sealer spray to protect the finish and unify the sheen.
Hang your beautiful new artwork above the crib or changing table to add a classic, feminine touch to the room

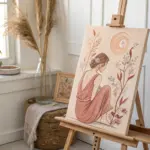

Have a question or want to share your own experience? I'd love to hear from you in the comments below!