Baseboards might be small, but changing their color can totally reshape how a room feels—like adding a clean outline to a drawing. Here are my favorite baseboard color ideas that help you coordinate with walls, doors, and molding without overthinking it.
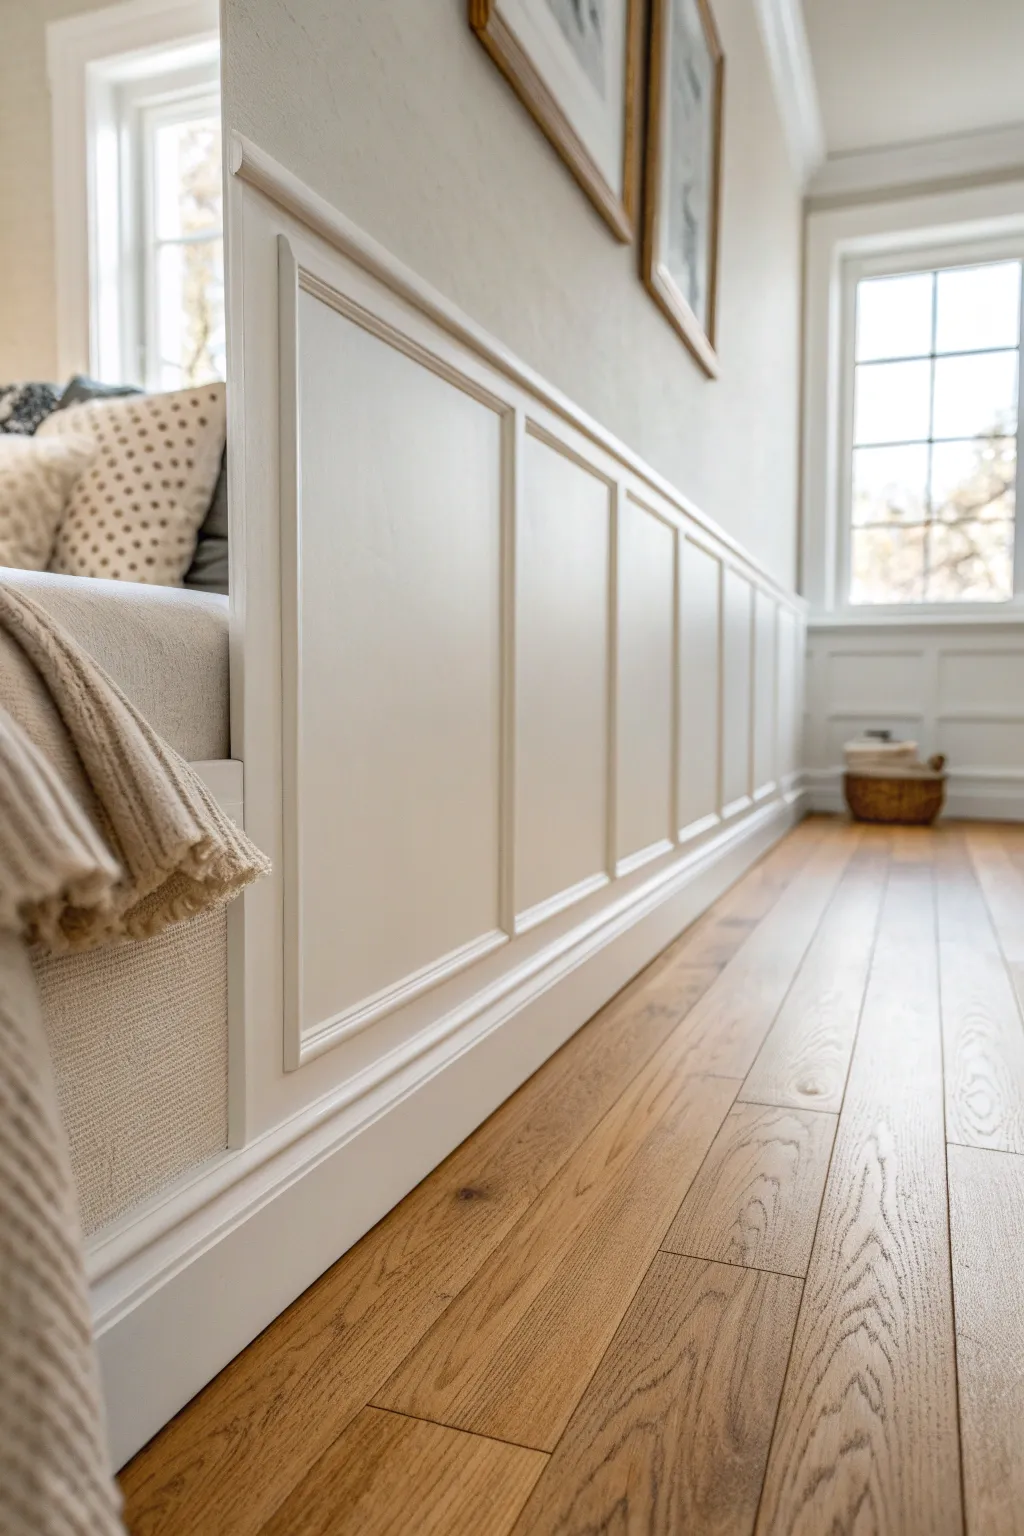
Crisp White Baseboards
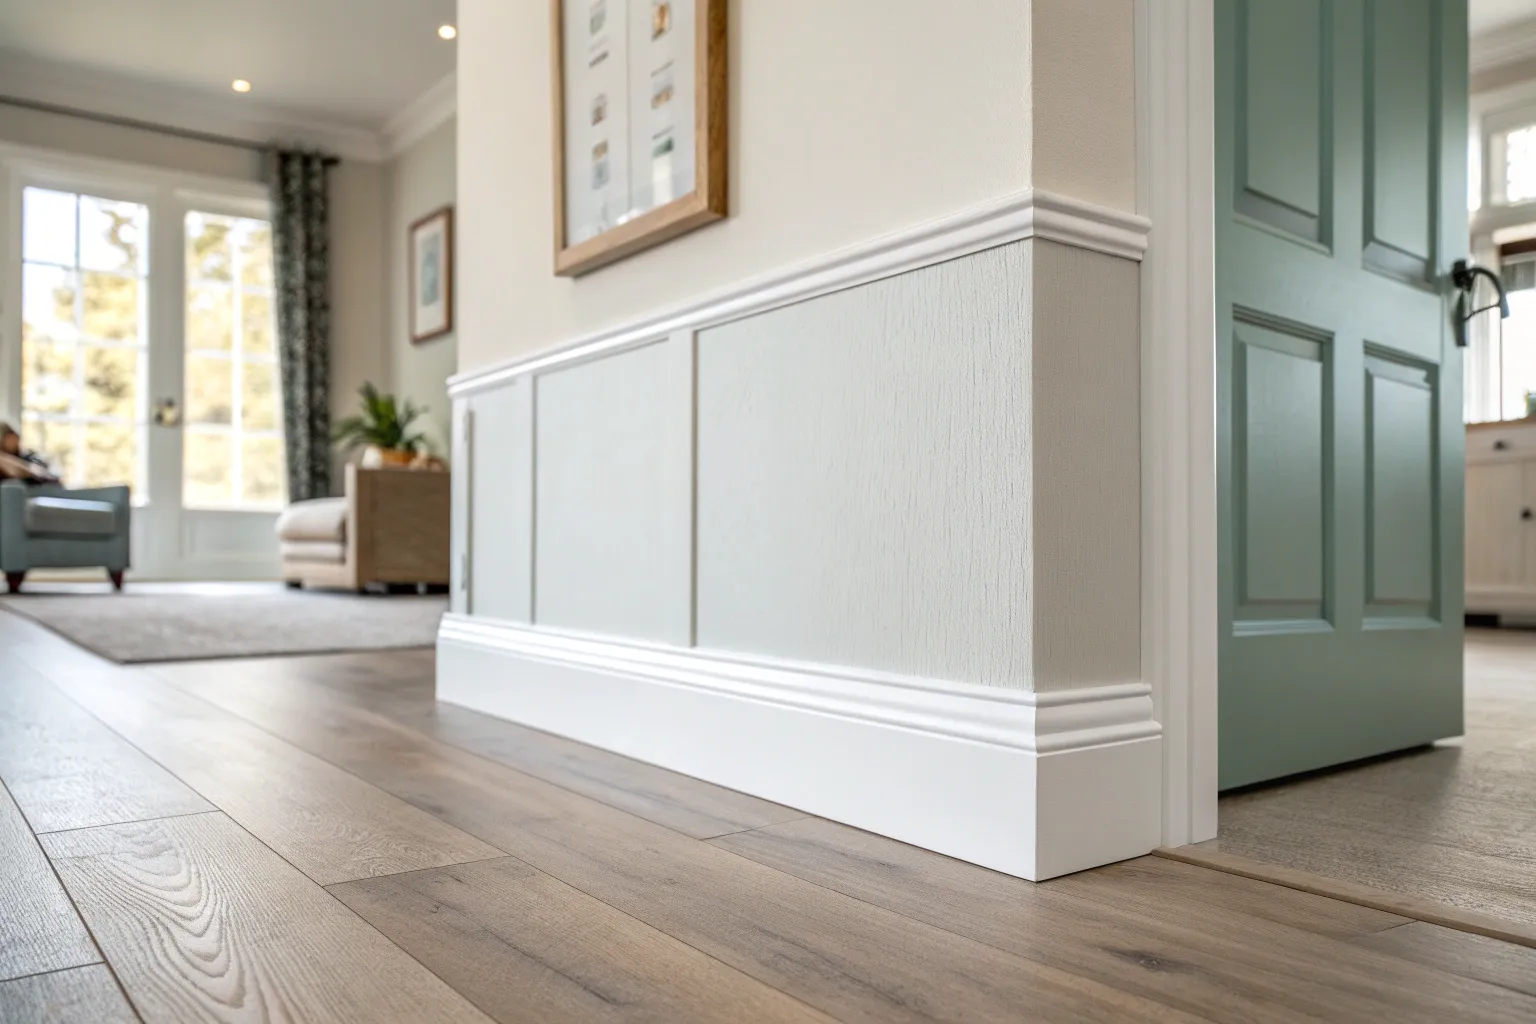
Achieve a high-end, architectural look by combining substantial baseboards with elegant wainscoting panels. This project transforms a plain wall into a sophisticated feature using layers of molding and a flawless white finish.
Step-by-Step Guide
Materials
- 1×6 MDF or Primed Pine (for rails and stiles)
- 1×8 MDF or Primed Pine (for baseboard)
- Base cap molding
- Chair rail molding
- Panel molding (small profile)
- Construction adhesive (e.g., Liquid Nails)
- Wood filler and spackle
- Paintable caulk
- High-quality trim paint (Semi-gloss white)
- Compound miter saw
- Brad nailer with 2-inch and 1.25-inch nails
- Level and stud finder
- Fine-grit sandpaper (220 grit)
- Tack cloth
Step 1: Planning and Layout
-
Assess the wall:
Begin by removing any existing baseboards and repairing large holes in the drywall. Use a stud finder to mark all vertical studs along the wall, as this is critical for nailing your main support pieces. -
Determine spacing:
Calculate your panel sizes. Divide the total wall length by the desired number of panels to ensure even spacing, aiming for panels roughly 24 to 36 inches wide. Mark these vertical stile locations directly on the wall with a pencil. -
Set the height:
Decide on the total height of your wainscoting. A common height is roughly 1/3 of the wall height, or about 32-36 inches from the floor. Use a long level to draw a horizontal line across the entire wall at this height.
Seamless Joints
Cut your miters a tiny bit long (1/32 inch) and snap the pieces into place. The pressure creates a friction fit that keeps joints airtight.
Step 2: Installing the Framework
-
Install the top rail:
Cut your 1×6 horizontal top rail to the length of the wall. Apply construction adhesive to the back, position it so the top edge aligns with your level line, and nail it into the studs using 2-inch brad nails. -
Install the baseboard:
Install the 1×8 board along the floor as your baseboard foundation. Use adhesive and nail into the bottom plate of the wall framing. This wider board grounds the entire design visually. -
Attach vertical stiles:
Measure the distance between the top rail and the baseboard foundation. Cut your 1×6 vertical stiles to this exact measurement. Apply adhesive and nail them into place at your pre-marked customized intervals. -
Add the chair rail:
To cap the design, cut your chair rail molding to length. Place it directly on top of the 1×6 top rail, creating a finished ledge. Miter the ends at 45 degrees if turning a corner, or return it to the wall if ending abruptly.
Step 3: Adding Detail Molding
-
Apply base cap:
This is where the look really comes together. Install a piece of base cap molding along the top edge of your 1×8 baseboard. This softens the transition between the flat baseboard and the recessed wall panel. -
Frame the inner panels:
Using the small panel molding, measure the inside perimeter of the squares created by your rails and stiles. Cut these pieces with 45-degree miters to create ‘picture frames’ inside each recessed panel area. -
Install inner molding:
Nail these small molding pieces into place inside each box. I find using a scrap block of wood as a spacer helps keep the distance from the edge consistent all the way around without constant measuring. -
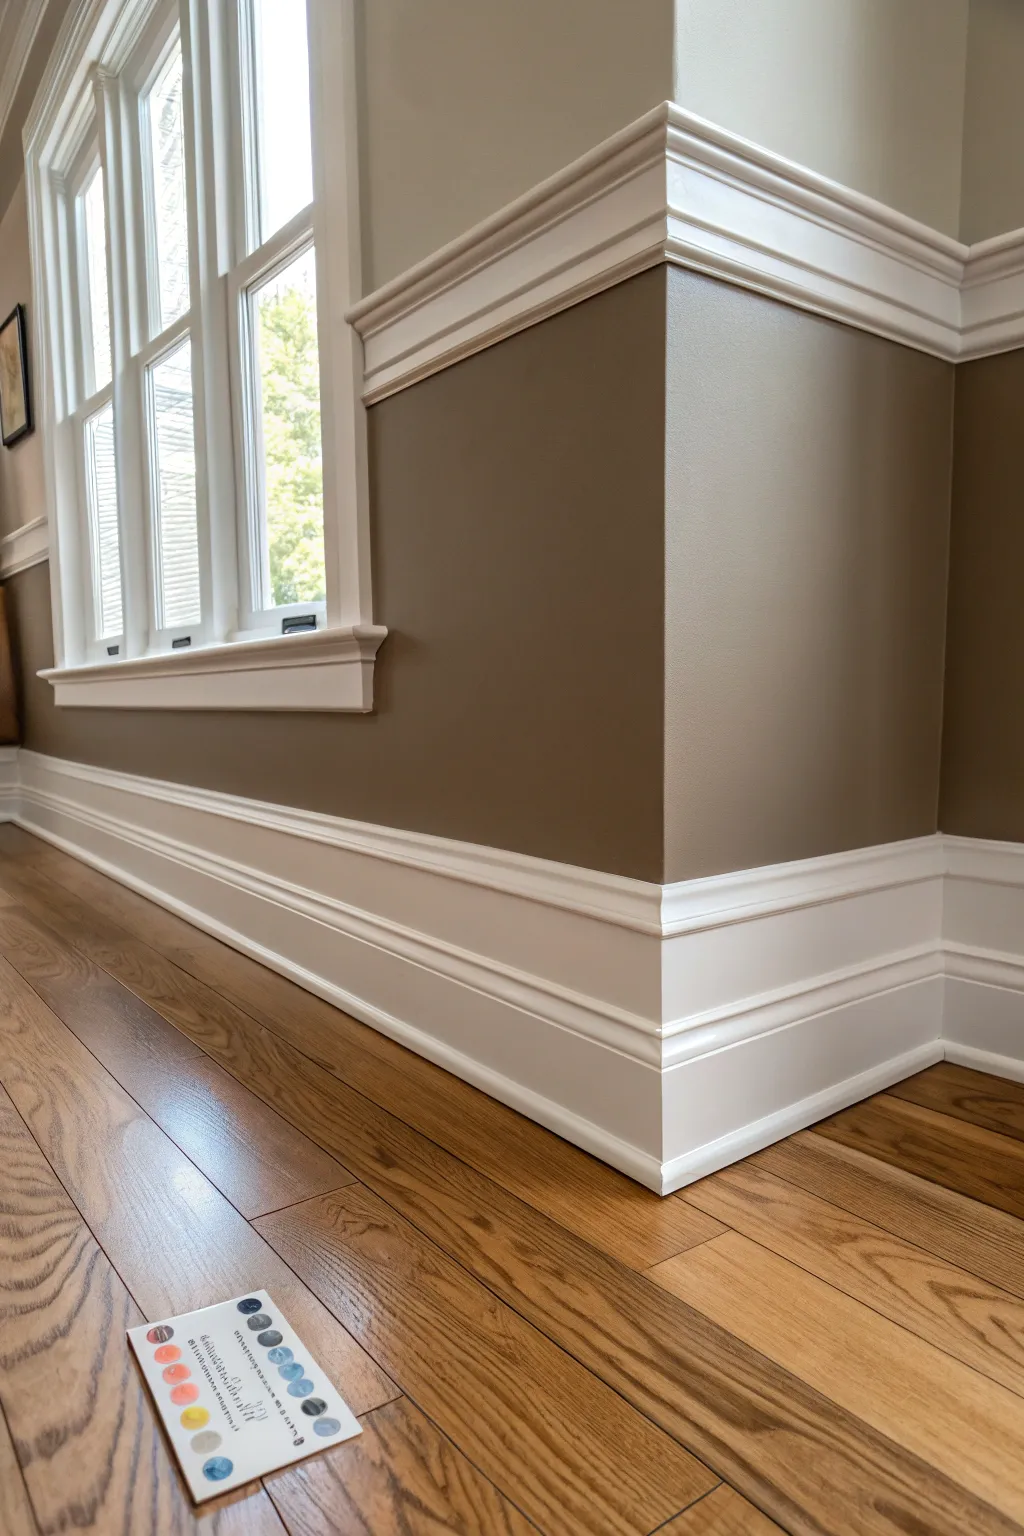
Wrap exterior corners:
If your project wraps around an outside corner (as shown in the image), pay special attention to the miters on the baseboard and chair rail. Glue the mitered joints before nailing to keep them tight as the wood expands and contracts.
Shoe Molding Accent
For uneven floors, add a quarter-round or shoe molding at the very bottom of the baseboard to hide gaps without scribing the main board.
Step 4: Finishing and Painting
-
Fill nail holes:
Go over every inch of the project and fill all nail holes with wood filler. Overfill slightly, as the filler will shrink when drying. -
Sand smooth:
Once the filler is dry, sand all surfaces with 220-grit sandpaper. Focus particularly on the transitions where boards meet to ensure they feel like one continuous piece. -
Caulk the seams:
Apply a thin bead of paintable caulk to every seam where wood meets wood or wood meets wall. Smooth it with a wet finger or a damp rag. This step is crucial for that seamless, built-in look. -
Prime the wood:
If using bare wood, apply a high-quality primer. If using pre-primed material, you can skip this, though a quick spot-prime over sanded filler spots helps avoid flashing. -
First coat of paint:
Apply your first coat of semi-gloss white trim paint. Use a brush for the detailed molding profiles first, then follow up with a small foam roller for the flat rails and stiles to minimize brush strokes. -
Final coat:
Lightly sand with very fine sandpaper if any dust nibs appeared. Wipe with a tack cloth, then apply the final coat of paint for a durable, crisp white finish.
Step back and admire how this architectural detail completely elevates the character of your room


Soft Warm White for Cozy Rooms
Transform a plain wall into an architectural feature with this sophisticated take on board-and-batten wainscoting. The soft warm white finish creates an inviting atmosphere perfect for reading nooks or hallways.
How-To Guide
Materials
- 1×4 MDF or Poplar boards (for stiles and rails)
- Small decorative panel molding/trim
- Baseboard molding (to match existing room style)
- Top cap molding (like a chair rail or window stool)
- Construction adhesive (e.g., Liquid Nails)
- Brad nailer and brad nails (1.5 inch and 2 inch)
- Wood filler and caulk
- Sandpaper (120 and 220 grit)
- Primer (high-quality bonding primer)
- High-quality trim paint (Warm White, semi-gloss or satin)
- Paint rollers (foam or short nap) and angled sash brushes
- Level, tape measure, and stud finder
Step 1: Planning and Layout
-
Determine panel spacing:
Measure your total wall length and decide on the number of panels you want. Divide the length by the number of panels to find the center-to-center measurement, ensuring equal spacing between vertical stiles. -
Mark lines on the wall:
Use a level and pencil to mark the locations of all vertical stiles and the horizontal top rail directly on the drywall. This visualization helps prevent errors before any cutting begins. -
Locate and mark studs:
Run a stud finder along the planned horizontal rail lines and mark the stud locations. While adhesive helps, nailing into studs provides the critical structural strength needed for wainscoting.
Uneven Walls?
If gaps appear between the board and wall due to bowing, don’t force the wood. Nail it securely, then fill the gap with paintable caulk for a seamless transition.
Step 2: Board Installation
-
Install the bottom rail:
Remove existing baseboards first, then install a flat 1×4 board along the floor level as your bottom rail. Secure it with adhesive and nails into the studs. -
Mount the top rail:
Install the horizontal top rail at your desired wainscoting height. Use a long level to ensure it is perfectly straight, as floors often dip or rise. -
Cut and place vertical stiles:
Measure the distance between the top and bottom rails for each specific section, as walls can vary slightly. Cut your 1×4 vertical stiles to fit snugly between the rails. -
Secure the vertical stiles:
Apply construction adhesive to the back of each stile and nail them into place according to your layout marks. If a stile doesn’t land on a stud, nail downwards at an angle to grip the drywall or rely heavily on the adhesive. -
Add the top cap:
Finish the upper edge by installing a projecting top cap molding on top of the upper rail. This creates a finished ledge and adds a professional touch to the profile.
Perfect Corners
Assemble your inner panel molding ‘picture frames’ with glue on a flat table first, let them dry, and then install the whole frame into the box at once.
Step 3: Adding Detail and Prep
-
Install interior panel molding:
Measure the interior rectangle of each panel box formed by your stiles and rails. Miter cut your small decorative molding at 45-degree angles to create picture frames inside each box. -
Attach the molding:
Secure the inner molding with a thin bead of wood glue and short brad nails. I find it easiest to tack the top piece first, then fit the sides and bottom tightly against it. -
Fill all holes:
Fill every nail hole with wood filler. Overfill slightly as the filler tends to shrink when drying, then sand it flush once distinctively hard. -
Caulk the seams:
Apply a thin bead of paintable caulk to every seam where wood meets wood or wood meets wall. Smoothing this with a damp finger is crucial for that seamless, custom-built look. -
Final sanding:
Give the entire installation a light sanding with 220-grit sandpaper to remove any rough patches or raised grain, then wipe away all dust with a tack cloth.
Step 4: Painting
-
Prime the woodwork:
Apply a coat of high-quality primer to all wood and the drywall inside the boxes. If using raw wood, a second coat of primer on knots prevents bleed-through. -
Cut in the edges:
Use an angled sash brush to paint your Warm White color into the corners of the molding and along the edges where the roller can’t reach. -
Roll the flat surfaces:
Use a foam roller or short-nap microfiber roller to paint the flat panels and rails. Keep a ‘wet edge’ to avoid lap marks and achieve a smooth, sprayed-like finish. -
Apply finishing coats:
After the first coat is fully dry, lightly sand any bumps, wipe clean, and apply a second coat for full, rich coverage and durability.
Step back and admire how this elegant architectural detail warms up your entire space with timeless charm


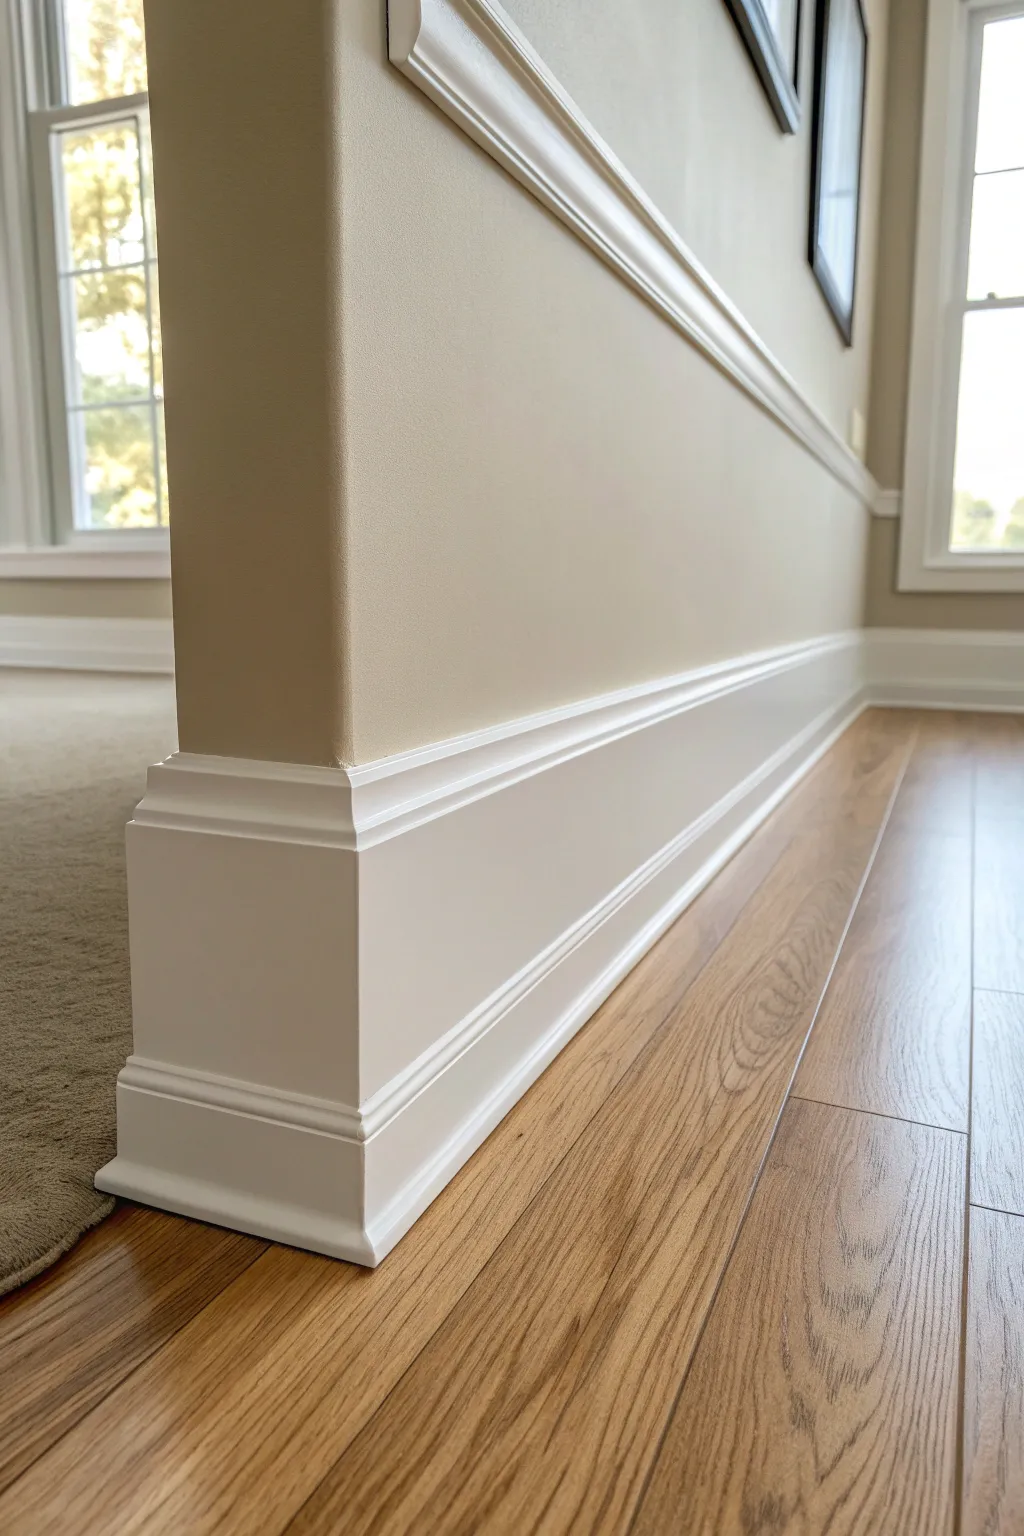
Cool Clean White With Blue-Gray Walls
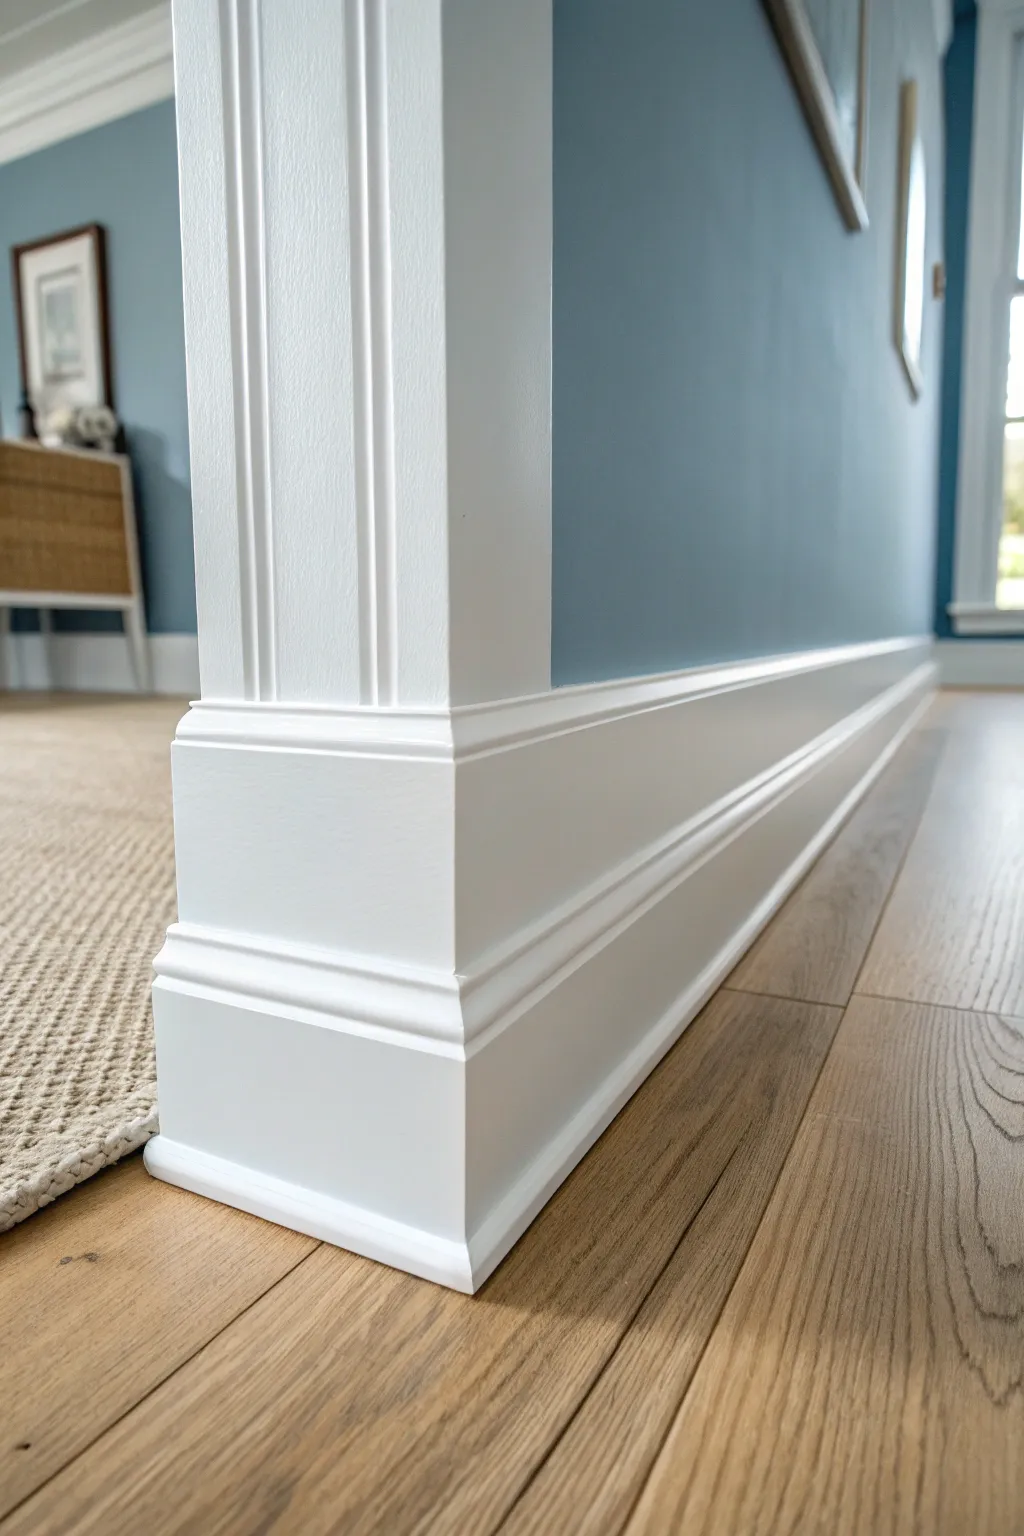
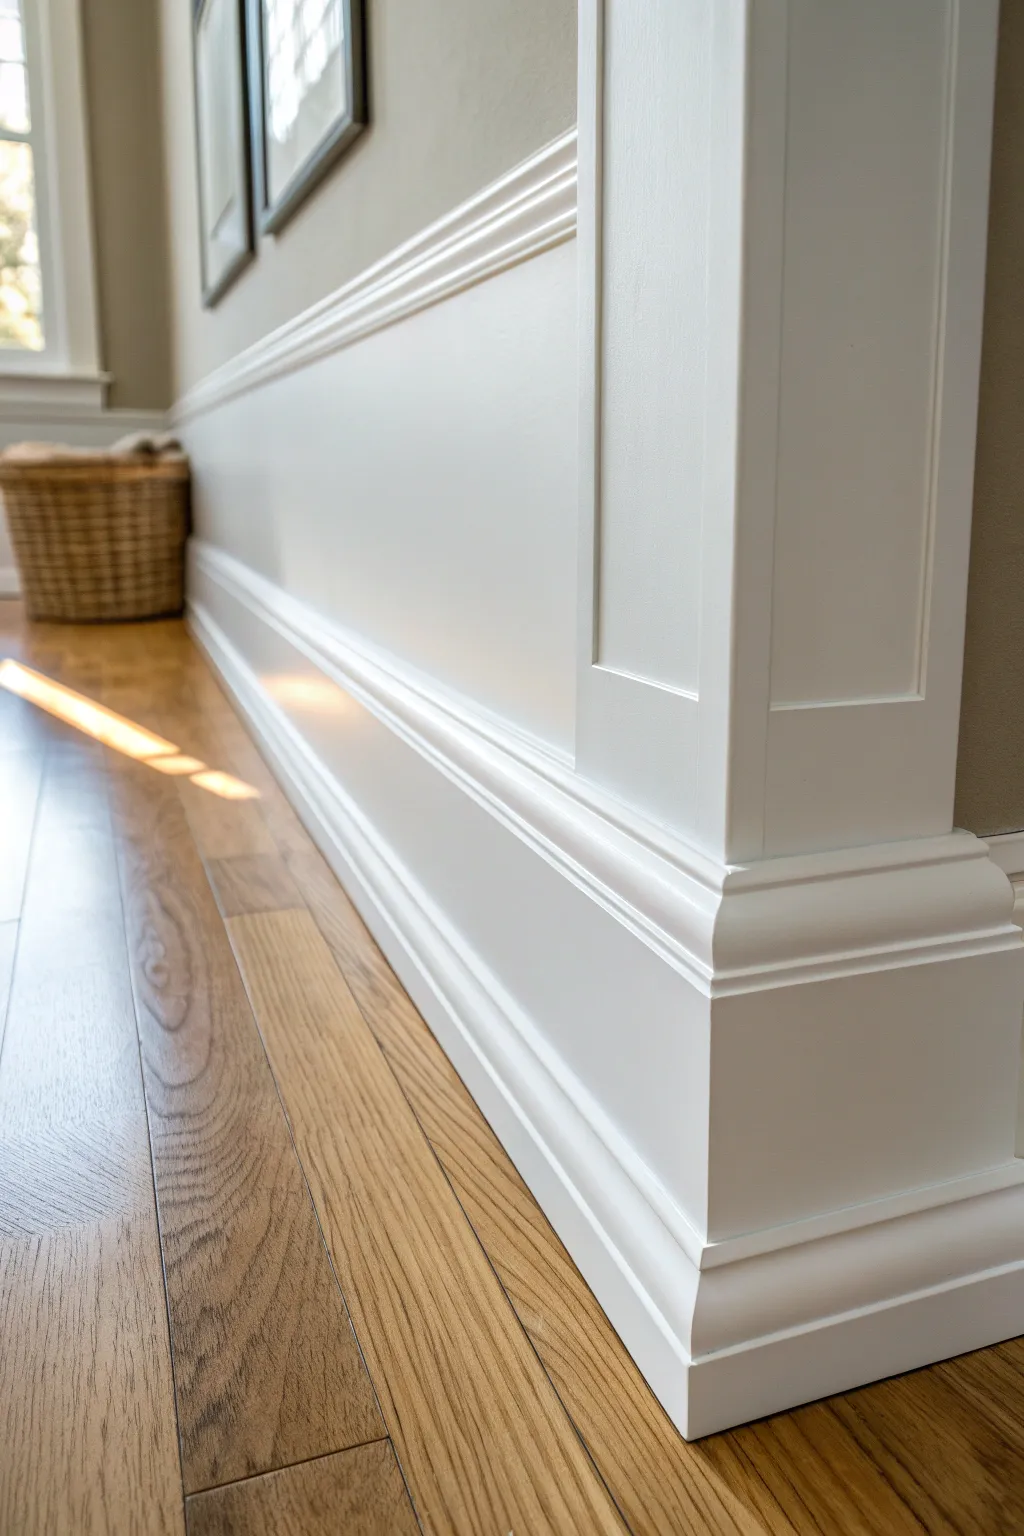
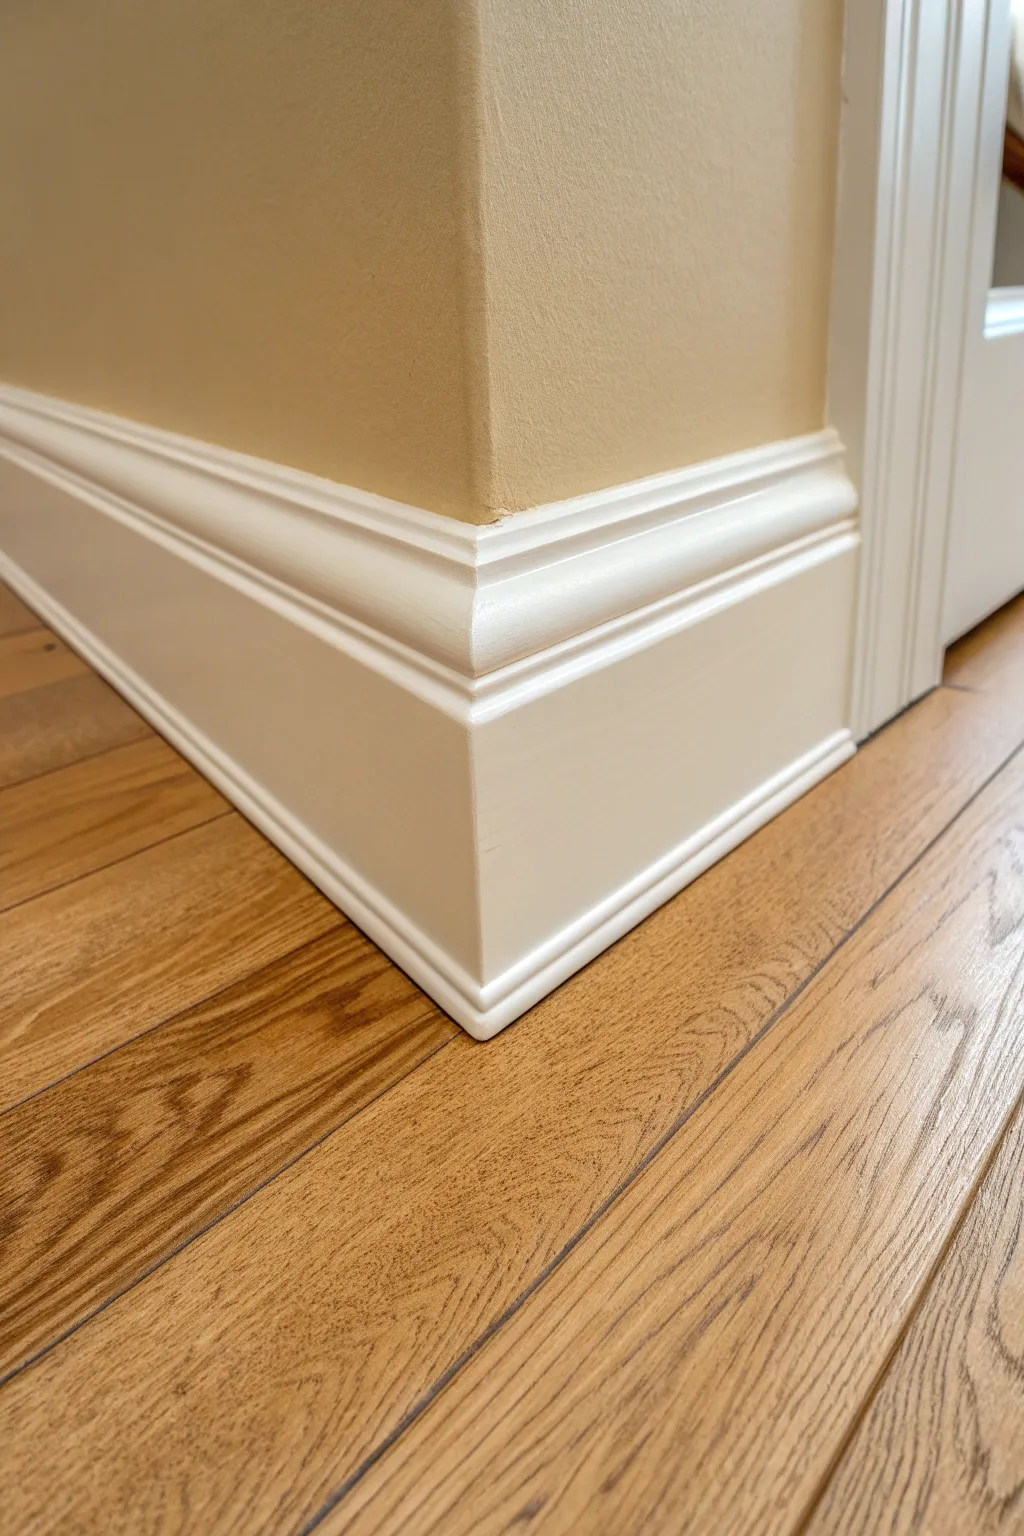
Achieve a sophisticated, seamless transition between your flooring and blue-gray walls with this chunky, multi-layered baseboard treatment. The clean white finish pops beautifully against the cool wall tone, creating a timeless architectural statement.
Step-by-Step Guide
Materials
- Pre-primed 1×6 MDF or poplar board (for the flat base)
- Base cap molding profile
- Shoe molding (optional, for uneven floors)
- Miter saw
- Coping saw
- 18-gauge brad nailer
- 2-inch brad nails
- Wood glue
- Wood filler
- Fine-grit sanding sponge (220 grit)
- High-quality acrylic latex primer
- Semi-gloss or satin enamel paint (Pure White)
- 2.5-inch angled sash brush
- Painter’s tape
- Caulk gun
- Paintable acrylic latex caulk
Step 1: Preparation & Base Installation
-
Measure twice:
Start by meticulously measuring the perimeter of the room and the dimensions of any columns or bump-outs. Add 10% to your total length for waste and miter cuts. -
Prep the surface:
Ensure the bottom of the wall is clean and free of old caulk ridges. If you have existing baseboards, remove them carefully and scrape the wall smooth. -
Install the flat stock:
Cut your 1×6 flat board to length. For straight runs, butt joints work fine, but for corners, you’ll need precise miters. I like to dry-fit everything before nailing to ensure a tight fit. -
Nail it home:
Secure the flat 1×6 to the wall studs using your brad nailer. Aim for two nails at every stud location to prevent warping over time. -
Wrap the corners:
For outside corners like the column base shown, cut 45-degree miters on both pieces. Apply a thin bead of wood glue to the mitered edges before pinning them together for a gap-free joint.
Glue Trick
For outside corners, put a dab of super glue on one side and wood glue on the other. The super glue acts as a clamp while the wood glue creates the long-term bond.
Step 2: Adding Detail & Finishing
-
Cap it off:
Measure and cut your decorative base cap molding to sit securely on top of the 1×6 flat stock. This piece gives the baseboard its multi-dimensional, high-end look. -
Perfecting the miters:
Getting the miters tight on the small base cap can be tricky. Cut these slightly long and shave them down slowly at the saw until the points meet perfectly. -
Coping inside corners:
For inside corners, don’t just miter. Cut one piece square to the wall, then cope the profile of the second piece to fit snugly over it. This prevents gaps if the corners aren’t perfectly 90 degrees. -
Secure the cap:
Nail the cap molding into the studs (through the drywall) and down into the top edge of the 1×6 board. Use shorter nails if needed to avoid blowing through the front face. -
Fill the holes:
Go around with wood filler and fill every nail hole. Overfill slightly, as the filler will shrink when it dries. -
Sanding smooth:
Once dry, sand the filler flush with your 220-grit sponge. Also lightly sand the joints to ensure the transition between pieces feels like one continuous element. -
Caulking the seams:
Run a bead of paintable caulk along the top edge where the molding meets the wall and any inside corners. Smooth it with a wet finger for a seamless finish. -
Final wipe down:
Remove all sanding dust with a tack cloth or damp rag. Dust is the enemy of a smooth paint finish. -
Prime bare spots:
Spot prime any areas where you sanded through the pre-prime or where there is bare wood filler. -
The first coat:
Apply your first coat of Pure White semi-gloss enamel. Start with the intricate profiles of the cap molding using the tip of your brush, then fill in the flat areas. -
Finish strong:
After the first coat dries completely, lightly sand any raised grain or imperfections, wipe clean, and apply your final coat for that rock-hard, durable finish.
Level Up: Shoe Molding
Add a quarter-round or shoe molding at the very bottom to hide gaps between the flooring and the baseboard, adding yet another layer of depth.
Step back and admire how this substantial, crisp white molding transforms the entire character of your room


Greige Baseboards for a Soft Outline
Elevate your room’s architecture with this substantial, multi-piece baseboard installation that adds weight and elegance to any corner. This project combines flat stock with decorative molding to create a high-end, custom craftsman look that beautifully frames your walls.
Step-by-Step Tutorial
Materials
- 1×6 Primed Pine or MDF (for the flat face)
- Base Cap Molding (for the top profile)
- Shoe Molding or Quarter Round (for the floor connection)
- Miter Saw (10-inch or larger)
- Braid Nailer with 2-inch and 1-inch brads
- Wood Glue
- Caulk Gun and Paintable Latex Caulk
- Spackle or Wood Filler
- Fine-grit Sanding Sponge (220-grit)
- Greige Paint (Satin or Semigloss finish)
- White Paint (if matching existing trim)
- Painter’s Tape
- Angle Finder or Protractor
Step 1: Preparation and Base Layer
-
Check the Corner Geometry:
Before cutting any wood, use an angle finder to measure the outside corner of your wall. Walls are rarely a perfect 90 degrees, and knowing the exact angle (often 89 or 91 degrees) ensures a tighter fit. -
Measure Run Lengths:
Measure the length of the wall on both sides of the corner where the baseboard will sit. Mark these measurements on your 1×6 stock material, leaving a few inches of extra length for safe cutting. -
Set the Miter Saw:
Adjust your miter saw to half of your measured wall angle. For a standard 90-degree corner, set the saw to 45 degrees. I like to make a test cut on scrap wood first to verify the joint closes perfectly. -
Cut the Main Board Miters:
Cut the outside miter on your first piece of 1×6. Position the board upright against the fence exactly as it will sit on the wall to ensure the bevel is correct. -
Cut the Second Miter:
Repeat the cut for the adjoining piece of 1×6. Dry fit them against the wall corner. If there’s a slight gap, adjust your saw angle by a fraction of a degree and re-trim one side until they meet seamlessly. -
Install the Flat Stock:
Apply a zigzag of construction adhesive to the back of the boards if your drywall is uneven. Nail the boards into the studs using 2-inch brad nails, keeping the nails slightly below the surface. Add a dab of wood glue to the miter joint itself before nailing the corner together.
Step 2: Adding Detail and Finishing
-
Cut the Top Cap Molding:
Now for the decorative top profile. Measure the length needed for the cap molding, measuring from the long point of the miter on your installed 1×6. -
Miter the Cap:
Set your saw to the same angle used for the base. Cut the decorative cap molding, positioning it on the saw fence exactly how it sits on top of the baseboard. This can be tricky, so take your time holding it steady. -
Install the Cap:
Apply a thin bead of wood glue along the top edge of the 1×6. Place the cap molding on top and secure it with 1-inch brad nails, nailing downward into the 1×6 rather than into the wall for a tighter seam. -
Add the Shoe Molding:
Measure and cut your shoe molding or quarter round for the bottom edge using the same miter settings. This piece hides gaps between the flooring and the trim. Nail this into the baseboard, not the floor, to allow for wood movement. -
Fill Nail Holes:
Use a high-quality spackle or wood filler to fill all nail indentations. Overfill them slightly to account for shrinkage as it dries. -
Sand Smooth:
Once the filler is dry, sand the filled areas and the miter joints with a fine-grit sanding sponge until perfectly flush with the surrounding wood. -
Caulk the Seams:
Run a thin bead of paintable latex caulk along the top edge where the molding meets the wall and inside the inside corners. Smooth it immediately with a wet finger for a seamless transition. -
Prime and Paint:
If using raw wood, apply a primer first. Follow up with two coats of your chosen paint—finish with a high-quality brush strokes along the length of the board.
Glue Trick
Rub the shaft of a screwdriver over the glued miter joint while it’s still wet. This ‘burnishes’ the wood fibers together, often closing small gaps completely.
Wall Contrast
For a designer look, paint the baseboard a slightly darker ‘greige’ than the walls, rather than the traditional white, to ground the room.
Step back and admire how this robust architectural detail completely transforms the character of your space
BRUSH GUIDE
The Right Brush for Every Stroke
From clean lines to bold texture — master brush choice, stroke control, and essential techniques.
Explore the Full Guide
Light Gray Baseboards With White Walls
This project creates a serene, upscale transition between your floors and walls by painting the baseboards a soft, barely-there gray while keeping the trim crisp white. The result is a nuanced, custom look that highlights architectural details without overwhelming the space.
How-To Guide
Materials
- High-quality interior trim paint (Satin or Semi-Gloss finish)
- Color: Very light gray (e.g., Benjamin Moore ‘Classic Gray’ or Sherwin Williams ‘Repose Gray’ lightened by 50%)
- Color: Pure White (for door casing/trim)
- 2-inch angled sash brush
- 4-inch foam roller (optional for flat sections)
- Painter’s tape (specifically for delicate surfaces)
- Fine-grit sandpaper (220 grit)
- Tack cloth or damp rag
- Drop cloth or rosin paper
- Spackle (if filling nail holes)
- Putty knife
- Caulk and caulk gun (paintable acrylic latex)
Step 1: Preparation
-
Protect the Floors:
Begin by laying down a drop cloth or rolling out rosin paper to protect your beautiful wood flooring. Secure the edges with painter’s tape to ensure no accidental drips reach the planks. -
Clean Surfaces:
Wipe down the existing baseboards and door casing with a damp rag to remove dust, pet hair, or grime. Paint adheres best to a clean surface. -
Inspect and Fill:
Look closely for any nail holes or dents in the woodwork. I like to use a small dab of lightweight spackle to fill these imperfections, smoothing it over with a putty knife. -
Sand for Adhesion:
Once the spackle is dry, lightly sand the baseboards and door casing with 220-grit sandpaper. You aren’t trying to remove old paint, just scuffing the surface to give the new coat some ‘tooth’ to grab onto. -
Caulk Gaps:
Check the seam where the baseboard meets the wall and where the casing meets the jamb. If the old caulk is cracking, run a thin bead of fresh, paintable acrylic latex caulk along these lines and smooth it with a wet finger. -
Final wipe down:
Use a tack cloth to remove all the sanding dust completely. Any leftover dust will create a gritty texture in your final finish. -
Tape Off Areas:
Carefully apply painter’s tape to the floor right up against the baseboard edge. If you aren’t painting the walls, tape the wall edge just above the baseboard as well for a crisp line.
Clean Edges Instantly
Before painting, press your tape down firmly with a putty knife. Then, paint a thin layer of the *base* color (white) over the tape edge first to seal it.
Step 2: Painting the Trim
-
Start with Door Casing:
Paint the vertical door casing first using your pure white paint. Use the 2-inch angled sash brush, painting with long, smooth strokes following the vertical grain of the wood. -
Detail the Plinths:
Where the door casing meets the floor (or plinth block if you have one), ensure the white paint covers fully. Let this white layer dry completely according to the can’s instructions before moving near it with gray. -
Tape the Casing:
Once the white door casing is fully cured (give it at least 24 hours if possible), apply a strip of delicate-surface painter’s tape vertically along the edge where the baseboard will meet the door casing to ensure a sharp color separation.
Step 3: Applying the Gray
-
Cut in the Edges:
Dip your angled brush into the light gray paint. Carefully ‘cut in’ the top edge of the baseboard against the wall and the bottom edge against the taped floor. -
Paint the Profile:
Use the brush to work the gray paint into the curved profile at the top of the baseboard. Don’t overload the brush here, as paint tends to pool in these crevices. -
Fill the Flat Face:
Paint the flat, vertical face of the baseboard. You can use the brush for this, maintaining long horizontal strokes, or switch to a small 4-inch foam roller for a smoother, spray-like finish on flat sections. -
Check for Drips:
immediately scan the length of the board for any drips or runs, especially near the corners or where the profile dips. Smooth them out gently with the tip of your brush. -
Second Coat:
Allow the first coat of gray to dry for the time recommended by the manufacturer. Apply a second coat to ensure full coverage and a rich, solid color depth. -
Remove Tape:
While the final coat is still slightly tacky (not fully dried), carefully peel away the painter’s tape at a 45-degree angle. This prevents the dried paint from peeling off with the tape. -
Touch Up:
inspect the junction where the gray baseboard meets the white door casing. If any gray bled onto the white, use a small artist’s brush and a touch of white paint to clean up the line for a perfect finish.
Shoe Molding Accent
Install a quarter-round or shoe molding painted in the same light gray at the bottom of the baseboard to add extra visual weight and hide floor gaps.
Enjoy the quiet elegance this subtle color shift brings to your room’s architecture
Moody Charcoal Baseboards
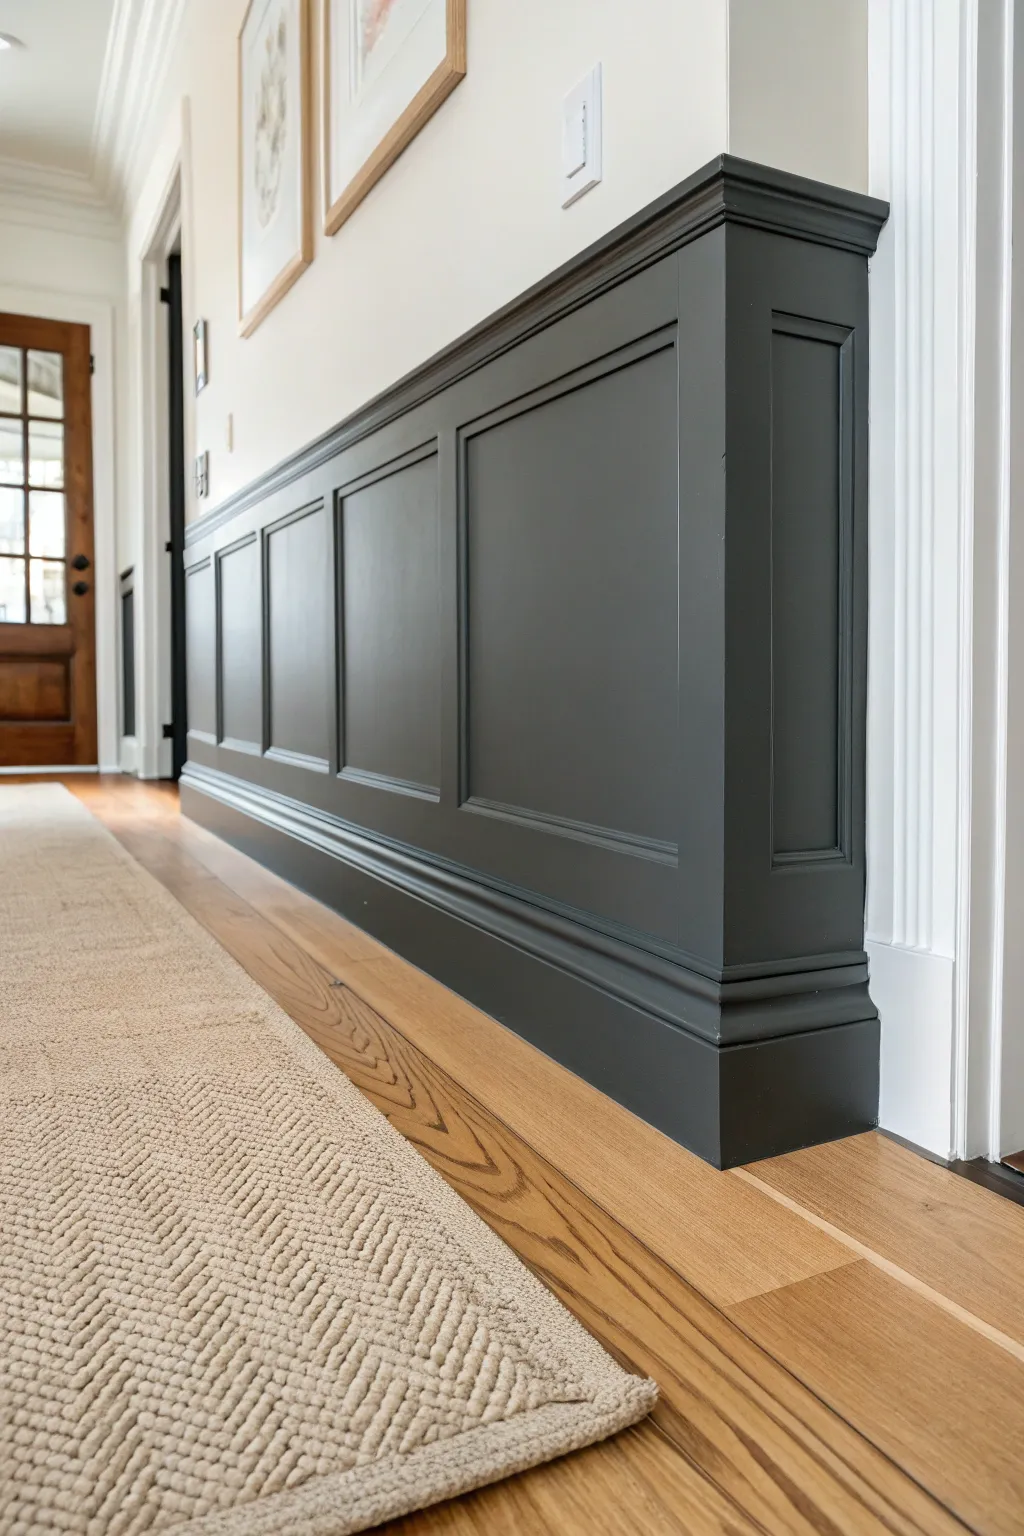
Elevate a plain hallway wall with this sophisticated, moody wainscoting installation featuring deep charcoal tones and crisp recessed paneling. The dark finish adds architectural weight and modern elegance to an otherwise transitional space.
Step-by-Step
Materials
- 1×4 MDF or Poplar boards (for stiles and rails)
- 1×6 MDF or Poplar boards (for baseboard)
- Small panel molding or base cap molding
- Top cap molding (chair rail)
- Construction adhesive
- 2-inch brad nails
- Wood filler
- Paintable caulk
- Fine-grit sandpaper (220 grit)
- Primer
- Charcoal paint (satin or semi-gloss finish)
- Level
- Miter saw
- Brad nailer
- Tape measure
Step 1: Planning & Base Layer
-
Measure the wall:
Begin by measuring the total length of your wall to determine spacing. Sketch out a plan where your panels are equal in width; aim for panel widths between 20 and 30 inches for a balanced look. -
Prep the surface:
Remove any existing baseboards carefully with a pry bar. Sand down any high spots on the drywall to ensure your new boards will sit relatively flat against the surface. -
Install the bottom rail:
Install the 1×6 board along the floor as your new baseboard foundation. Apply construction adhesive to the back, level it perfectly, and secure it into the studs using 2-inch brad nails. -
Install the top rail:
Determine your wainscoting height—usually about 1/3 of the wall height. Mark this level line across the wall. Install a horizontal 1×4 board with its top edge aligned to this line, securing it with adhesive and nails.
Step 2: Stiles & Details
-
Cut vertical stiles:
Measure the distance between your top rail and bottom baseboard. Cut your 1×4 vertical stiles to this exact length. -
Place the stiles:
Using your layout plan, mark the positions for the vertical stiles. Apply adhesive to the back of each piece and nail them into place, ensuring they are perfectly plumb with a level. -
Add the top cap:
Install the decorative chair rail or top cap molding along the very top edge of the upper horizontal rail. This creates a finished ledge and hides the raw edge of the MDF. -
Measure interior molding:
Measure the inside perimeter of each recessed rectangle created by your grid. -
Cut panel molding:
Set your miter saw to 45 degrees. Cut the small panel molding to fit inside each rectangle, framing the inner edges of the stiles and rails. -
Install panel molding:
Fit the picture frame molding inside each box. Use a little wood glue and smaller brad nails to secure them. I find this step instantly transforms the look from flat boards to high-end cabinetry.
Spacer Block Trick
Cut a scrap block of wood to the exact width needed between your vertical stiles. Use this spacer to quickly position each stile without measuring every single time.
Step 3: Finishing Touches
-
Fill nail holes:
Go over every nail hole with wood filler. Overfill slightly to account for shrinkage, then let it dry completely. -
Sand smooth:
Sand the wood filler flush and lightly scuff the entire surface of the wood with 220-grit sandpaper to prepare it for paint adhesion. -
Caulk the seams:
Run a thin bead of paintable caulk along every seam where wood meets wood or wood meets wall. Smooth it with a wet finger for a seamless, built-in appearance. -
Prime the woodwork:
Apply a coat of quality primer to all the wood elements and the drywall inside the boxes. This ensures your dark charcoal paint will have an even sheen. -
First coat of color:
Brush the corners and intricate molding areas with your charcoal paint first, then roll the flat surfaces with a foam roller for a smooth finish. -
Final inspection and coat:
Once dry, lightly sand any bumps. Apply a second (and potentially third) coat of charcoal paint to achieve that rich, deep opacity seen in the photo.
Two-Tone Contrast
For a bolder look, paint the drywall inside the boxes a lighter gray or white before installing the interior molding, keeping only the grid work dark charcoal.
Step back and admire how the dark, dramatic color turns a simple hallway into a stunning architectural feature.

PENCIL GUIDE
Understanding Pencil Grades from H to B
From first sketch to finished drawing — learn pencil grades, line control, and shading techniques.
Explore the Full Guide
Black Baseboards for High-Contrast Framing
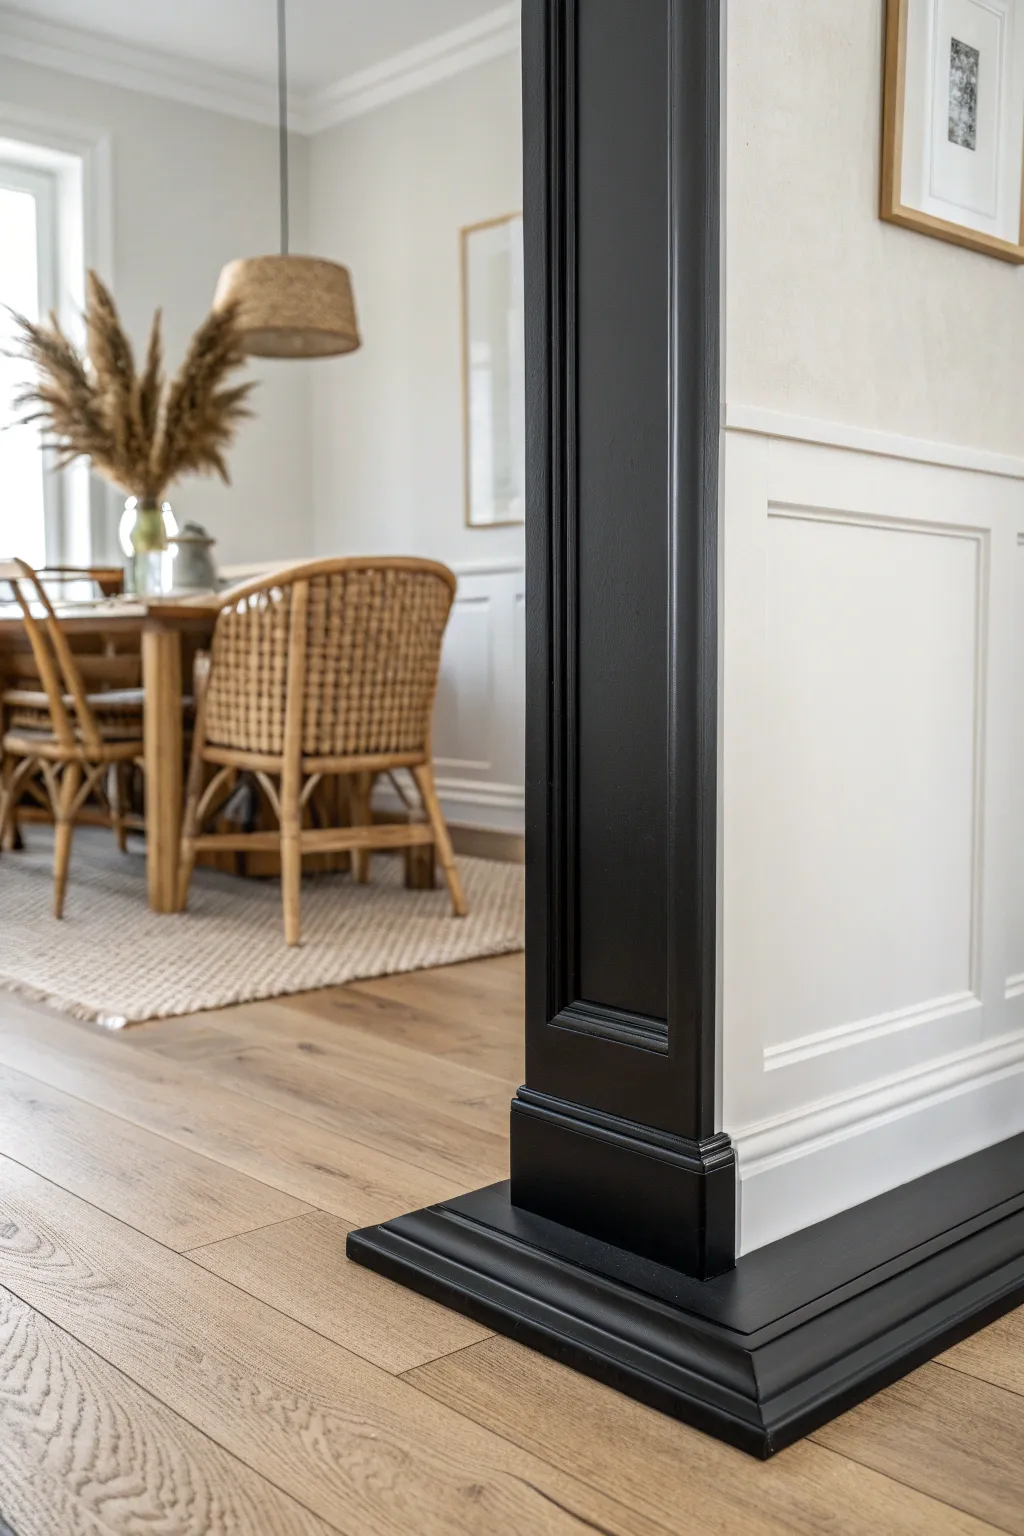
This project transforms standard wainscoting and column casing into a striking architectural statement by using matte black paint for high-contrast framing. It creates a modern, sophisticated border that immediately draws the eye and defines the space.
Step-by-Step Guide
Materials
- High-quality painter’s tape (frog tape recommended)
- Medium-grit sanding sponge (120-150 grit)
- Fine-grit sanding sponge (220 grit)
- Tack cloth
- High-bonding primer (tinted gray recommended)
- Matte or satin black interior trim paint
- 2-inch angled sash brush
- 4-inch foam roller
- Small roller tray
- Drop cloths
- Wood filler (if repairs are needed)
- Caulk and caulk gun
Step 1: Preparation & Repairs
-
Clear and Protect:
Begin by moving furniture away from the work area, like the dining chairs seen in the background. Lay down drop cloths to protect your hardwood floors from splatters and dust. -
Inspect the Trim:
Check the existing baseboards, plinth blocks, and column casing for any nail holes, dents, or gaps. If you find any, fill them with wood filler. -
Sand the Filler:
Once the filler is completely dry, sand it flush with the surface using a medium-grit sanding sponge. -
Scuff Sand Everything:
Even if the trim is in good shape, scuff sand all surfaces you intend to paint black. This removes the existing sheen and helps the new paint adhere better. -
Check Caulking:
Inspect the seams where the trim meets the wall or floor. If the old caulk is cracking, scrape it out and apply a fresh bead of paintable caulk for a seamless look. -
Clean Surfaces:
Wipe down all the trim with a tack cloth to remove every speck of dust. Dust is the enemy of a smooth dark finish.
Step 2: Masking & Priming
-
Tape the Floor:
Apply painter’s tape carefully along the floor edge. Press the edge of the tape down firmly with a putty knife to prevent bleed-through. -
Tape the Wainscoting:
Tape off the white wainscoting panels where they meet the black vertical column casing and the top of the baseboard. Accuracy is crucial here for that crisp line. -
Apply Primer:
Using your angled brush, apply a coat of high-bonding primer. I like to use a gray-tinted primer when planning for black topcoats; it makes coverage much easier. -
Let Primer Cure:
Allow the primer to dry completely according to the manufacturer’s instructions. -
Light Sanding:
Give the primed surface a very quick, light pass with the fine-grit sponge to knock down any brush ridges, then wipe with the tack cloth again.
Clean Lines
To stop black paint from bleeding onto the white panels, seal the tape’s edge with a tiny amount of the *white* paint first before applying the black.
Step 3: Painting the Black Finish
-
Cut In Edges:
Dip your angled sash brush into the black paint and carefully cut in along the tape lines and into the detailed grooves of the column casing. -
Roll Flat Areas:
For the flat, wider sections of the column and baseboard, use the 4-inch foam roller. This minimizes brush strokes and achieves a sprayed-like finish. -
Let Dry:
Allow the first coat to dry fully. Dark colors often require longer drying times to avoid tackiness. -
Apply Second Coat:
Repeat the cutting and rolling process for a second coat. This ensures a deep, true black without transparency. -
Inspect for Holidays:
Check for ‘holidays’ (missed spots) under a bright light. Touch up any areas where the primer might still be peeking through. -
Remove Tape:
While the final coat is still slightly wet (or very recently dried), slowly peel the tape away at a 45-degree angle to ensure a razor-sharp line.
Level Up
Add a quarter-round shoe molding painted in the same black at the bottom of the baseboard to hide gaps and add extra visual weight.
Step back and admire how the bold black framing instantly modernizes the room’s character
Deep Navy Baseboards That Feel Classic
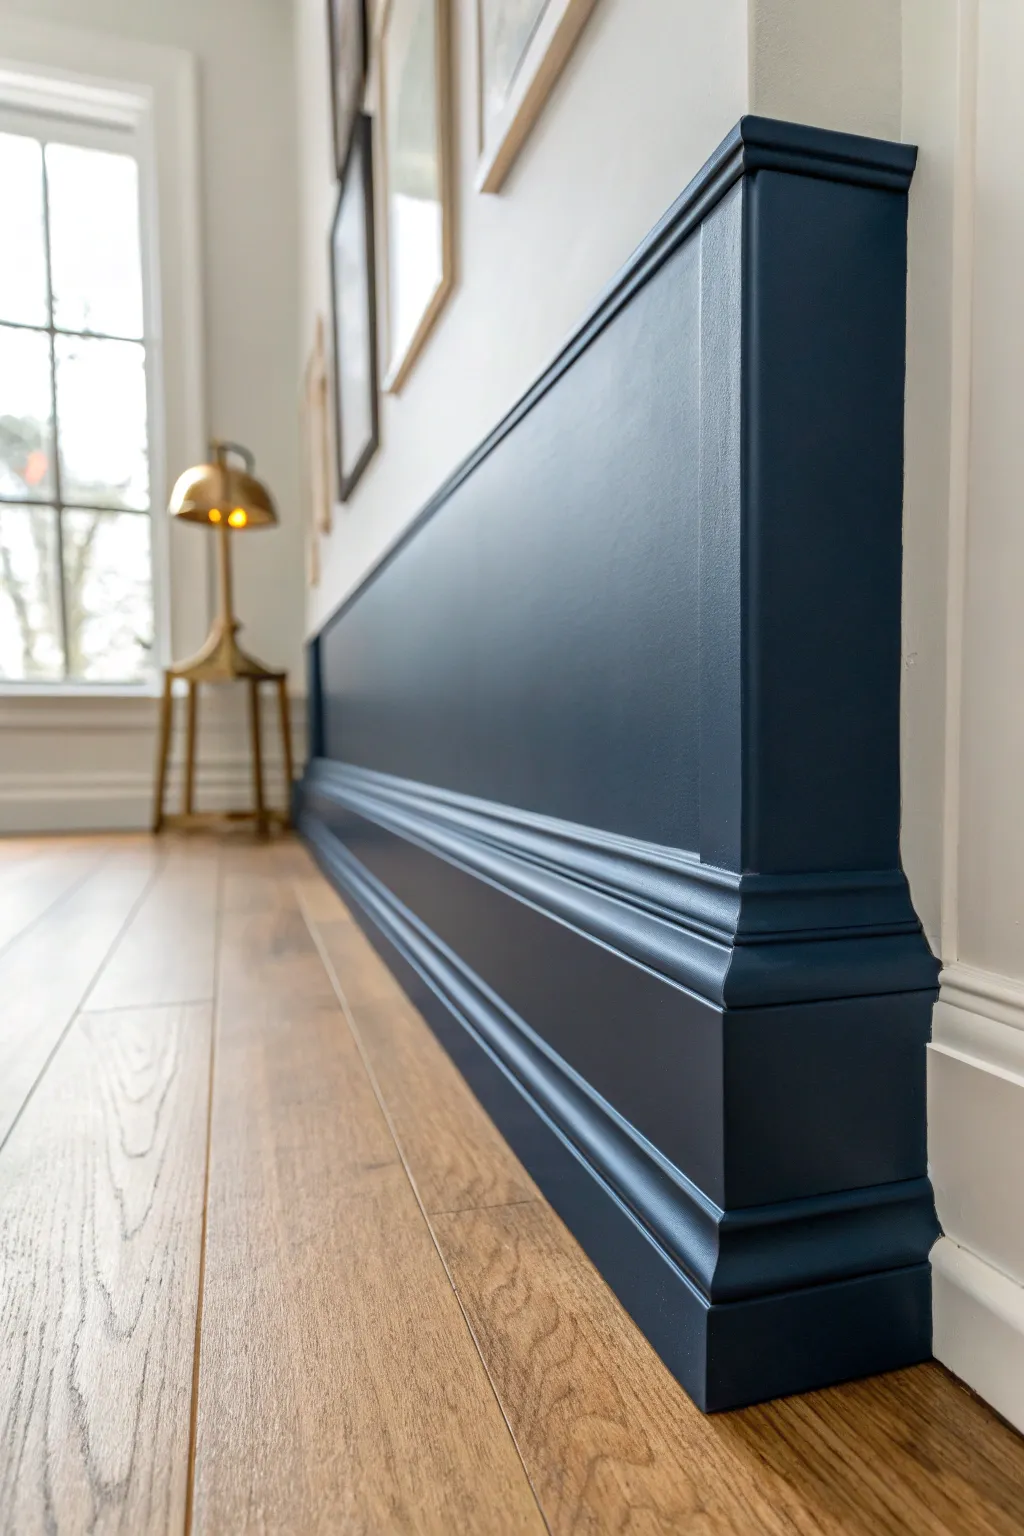
Transform a plain hallway into a distinguished gallery space by installing this sophisticated navy wainscoting featuring substantial baseboards and clean box trim. The deep blue hue adds instant drama and architectural interest, creating a grounded, classic aesthetic that feels custom-built.
How-To Guide
Materials
- 1×4 or 1×6 MDF boards (for vertical stiles and top/bottom rails)
- Small chair rail moulding
- Base cap moulding (optional)
- Deep navy interior paint (Satin or Semi-Gloss)
- Wood filler
- Paintable caulk
- Construction adhesive
- Primer (tinted gray recommended)
- Painter’s tape
- Brad nailer & 2-inch nails
- Miter saw
- Level
- Tape measure
- Sandpaper (120 and 220 grit)
- Paint roller (foam or velour for smooth finish)
- Angled sash brush
Step 1: Planning and Layout
-
Determine height:
Decide on the total height of your wainscoting. A general rule of thumb is about one-third of the wall height, but for this dramatic look, you might go slightly higher, around 36 to 42 inches from the floor. -
Mark the wall:
Use a pencil and a long level to draw a horizontal line across the entire length of the wall representing the top of your chair rail. This ensures everything stays straight even if your floors aren’t perfectly level. -
Locate studs:
Run a stud finder along the wall and mark every stud location just above or below your guide lines. Nailing into studs is crucial for structural integrity, though construction adhesive will help with the rest.
Uneven Walls?
Walls are rarely perfectly flat. If boards won’t sit flush, don’t force them. Use shims behind the wood to bridge gaps, then trim the shims and cover the gap heavily with caulk before painting.
Step 2: Installation
-
Install the top rail:
Cut your 1×4 or 1×6 top rail board to length. Apply construction adhesive to the back, align the top edge with your level line, and nail it securely into the studs. -
Install the baseboard:
For the bottom, you can use existing baseboard if it’s flat, or install a new 1×6 board. Place this flush against the floor. If you have gaps due to uneven floors, scribe the bottom edge or plan to add a shoe moulding later. -
Measure for stiles:
To create the panel look, measure the distance between your top rail and bottom baseboard. Decide on your spacing—typically 24 to 36 inches apart looks balanced—and cut your vertical MDF strips (stiles) to fit snugly between the rails. -
Attach vertical stiles:
Apply adhesive to the back of each stile. Position them according to your spacing layout, use a level to ensure they are perfectly plumb, and nail them into place. If a stile doesn’t hit a stud, angle your nails in opposite directions (cross-nailing) to lock it into the drywall. -
Add the chair rail cap:
To finish the top ledge, cut your chair rail moulding to match the wall length. Set it on top of the upper horizontal rail so it creates a small shelf or decorative cap, then nail it down. -
Enhance the profile:
To recreate the specific depth seen in the photo, add a small piece of moulding (like a base cap) inside the boxes or along the top edge of the baseboard to soften the transition and add elegance.
Step 3: Preparation for Paint
-
Fill nail holes:
Go over every single nail hole with wood filler. Leave it slightly overfilled to account for shrinkage, and let it dry completely. -
Sand smooth:
Once dry, sand the wood filler flush with the board surface using 120-grit paper. I find running my hand over the spots is the best way to check for smoothness. -
Caulk the seams:
Apply a thin bead of paintable caulk to every seam where wood meets wood or wood meets wall. This includes the inside corners of your boxes and along the top of the chair rail. Smooth it with a wet finger for a seamless look. -
Final sanding:
Give all the MDF surfaces a quick scuff sand with 220-grit paper to knock down any raised fibers and help the primer adhere.
Level Up: Shoe Moulding
For a truly historic look, add a small ‘shoe moulding’ or quarter-round painted the same navy at the very bottom where the baseboard meets the floor to hide gaps.
Step 4: Painting
-
Protect surroundings:
Mask off the floor meticulously with painter’s tape and paper. Tape off the wall above the chair rail as well to ensure a crisp line. -
Apply primer:
Since you are painting with a dark navy, use a gray-tinted primer. This helps achieve better coverage with fewer topcoats. Brush into the corners first, then roll the flat surfaces. -
Cut in the edges:
Using an angled sash brush and your deep navy paint, carefully cut in around all edges, corners, and detail crevices where a roller won’t reach. -
Roll the first coat:
Use a high-quality foam or short-nap velour roller to apply the navy paint to the flat panels and rails. These rollers minimize texture, giving you that smooth, sprayed-on look. -
Sand between coats:
After the first coat dries, very lightly sand any bumps or dust nibs with fine sandpaper and wipe with a tack cloth. -
Apply final coat:
Apply the second coat of navy paint, maintaining a ‘wet edge’ to avoid lap marks. Remove the painter’s tape slowly while the final coat is still slightly tacky to prevent peeling.
Step back and admire the classic depth your new architectural details bring to the room


Sage Green Baseboards for an Earthy Calm
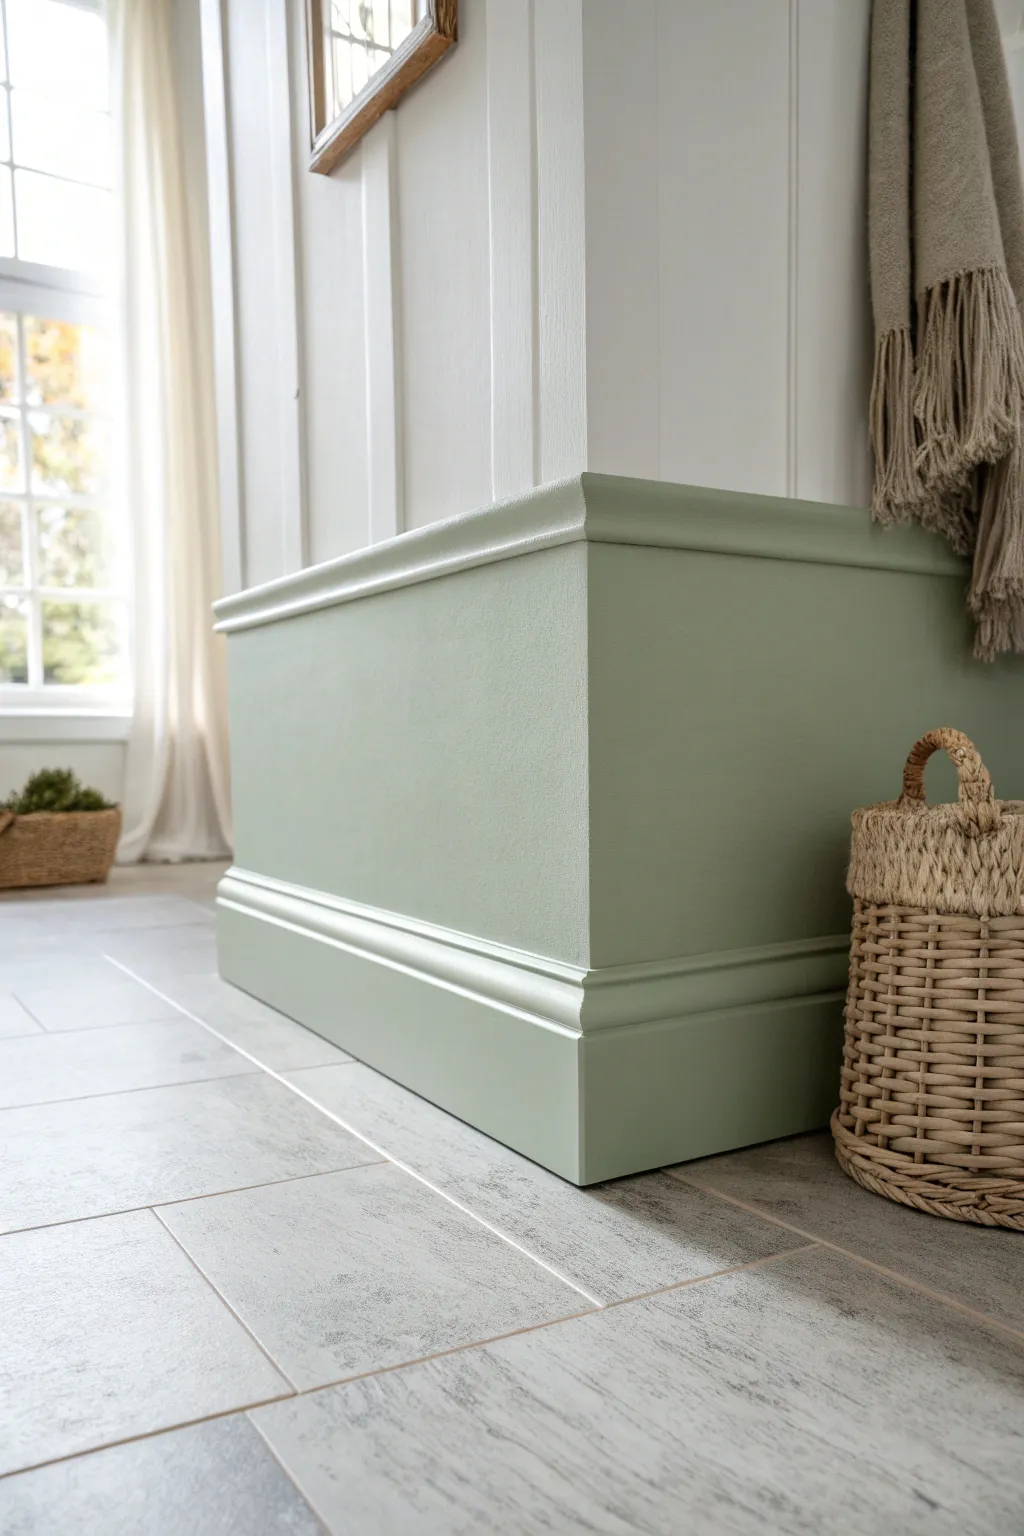
Transform a plain wall corner into a grounding focal point with this sage green baseboard and trim project. By wrapping the corner with substantial molding and painting it a soft, earthy hue, you create a cohesive and calming architectural feature.
Step-by-Step Guide
Materials
- High-quality interior trim paint (Matte or Eggshell, Sage Green)
- White semi-gloss paint (for upper wall)
- Wide baseboard molding (approx. 5-6 inches)
- Chair rail molding or cap trim
- MDF or wood paneling (optional, depending on existing wall)
- Miter saw
- Brad nailer and 1.5-inch brad nails
- Wood glue
- Construction adhesive
- Caulk and caulk gun
- Wood filler
- Fine-grit sanding block (220 grit)
- Angled sash brush (2 inch)
- Small foam roller
- Painter’s tape
- Clean tack cloths
Step 1: Prep and Structural Build
-
Assess and Measure:
Begin by thoroughly cleaning the wall area where you plan to install the trim. Measure the width of your corner or column precisely to determine the lengths needed for your top and bottom molding. -
Pre-Sand Materials:
Before making any cuts, lightly sand your baseboard and chair rail molding. This ensures a smoother finish later and saves you from awkward sanding angles once installed. -
Cut the Baseboard Miters:
Set your miter saw to a 45-degree angle. Cut the baseboard pieces to wrap around the outside corner. Remember, for an outside corner, the back of the molding is the short point of your measurement. -
Dry Fit the Baseboard:
Place your cut baseboard pieces against the wall to check the corner fit. If the joint isn’t tight due to unsquare walls (which is common!), slightly adjust your miter angle until they meet flush. -
Install Baseboards:
Apply a bead of construction adhesive to the back of the baseboards. Position them on the wall and secure them using a brad nailer, nailing into studs where possible. Add a dab of wood glue to the mitered corner joint for extra strength. -
Cut and Install Cap Molding:
Repeat the measuring and cutting process for the top chair rail or cap molding. This piece defines the upper limit of your color block. Install it at your desired height, ensuring it is perfectly level using a spirit level.
Step 2: Finishing and Painting
-
Fill Nail Holes:
Using a putty knife, press wood filler into all nail holes. I like slightly overfilling them, as the filler shrinks a bit when drying. -
Perfect the Corner Joints:
Apply wood filler to the outside corner seams of both the top and bottom molding. Shape it as best as you can with your finger to follow the molding profile. -
Seal the Gaps:
Run a thin bead of paintable caulk along the top edge of the baseboard and the bottom edge of the chair rail where they meet the wall. Smooth it with a wet finger for a seamless transition. -
Sanding Down:
Once the filler is completely dry, sand the filled areas flush with a fine-grit sanding block. Pay special attention to the corner joints to make them feel like one continuous piece of wood. -
Clean Up Dust:
Wipe down the entire area with a tack cloth to remove every speck of dust. Any debris left behind will show up in your paint finish. -
Tape Off Surroundings:
Apply painter’s tape to the floor and the wall area directly above your top trim to protect them from the green paint. -
Cut In Edges:
Dip your angled sash brush into the sage green paint. Carefully ‘cut in’ the paint along the detailed profiles of the molding and corners where a roller can’t reach. -
Roll the Flat Surfaces:
Use a small foam roller for the flat vertical wall space between the moldings and the flat faces of the trim itself. This helps avoid brush strokes and achieves a smooth, sprayed-on look. -
Apply Second Coat:
Allow the first coat to dry according to the manufacturer’s instructions. Apply a second coat to ensure rich, opaque color coverage. -
Remove Tape:
While the second coat is still slightly tacky, carefully peel away the painter’s tape at a 45-degree angle to ensure a crisp, clean line.
Seamless Corners
Rub the shank of a screwdriver over the mitered corner joint after gluing but before nailing. This burnishing trick crushes wood fibers together for an invisible seam.
Gaps at the Wall?
If your wall is wavy and creates gaps behind the trim, don’t force the wood. Fill the gaps with paintable caulk, smoothing it with a damp sponge for a hidden fix.
Step back and appreciate the grounded, peaceful atmosphere your new architectural detail brings to the room
Dusty Blue Baseboards for a Breezy Look
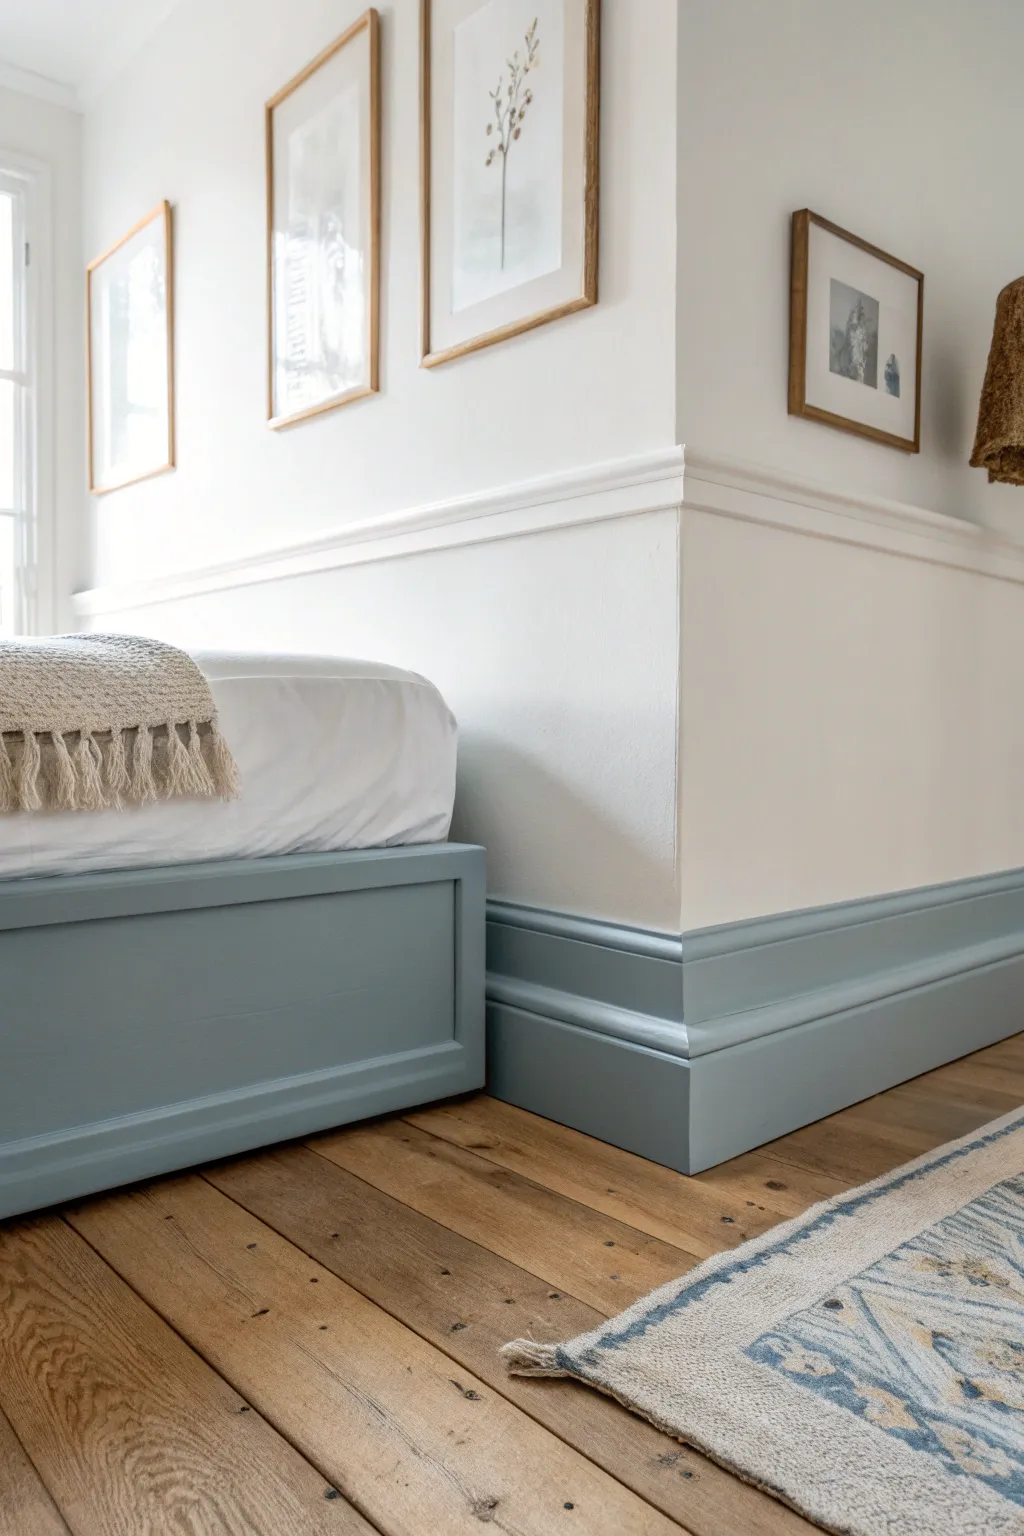
Transform your standard white trim into a serene focal point with this dusty blue baseboard project. By extending the color to custom furniture pieces like a bed frame, you create a cohesive, built-in look that feels both modern and tranquil.
Step-by-Step
Materials
- High-quality interior trim paint (Dusty Blue/Slate Blue, satin or semi-gloss finish)
- Angled sash brush (2-2.5 inch)
- Small foam roller and tray
- Painter’s tape (delicate surface optional)
- Fine-grit sandpaper (120 and 220 grit)
- Tack cloth
- Wood filler or spackling paste
- Caulk and caulking gun
- Drop cloth or plastic sheeting
- Mild degreaser or TSP substitute
- Primer (stain-blocking if painting over dark colors or raw wood)
Step 1: Preparation & Cleaning
-
Protect the area:
Begin by laying down drop cloths to protect your beautiful hardwood floors. Ensure the cloth is pushed right up to the edge of the baseboards but not covering them. -
Clean the surface:
Baseboards collect dust and grime. Wipe them down thoroughly with a mild degreaser or TSP substitute to ensure the paint adheres properly. Let them dry completely. -
Fill imperfections:
Inspect the woodwork for nail holes or dings. Apply a small amount of wood filler to these spots, slightly overfilling them to account for shrinkage. -
Sand for smoothness:
Once the filler is dry, sand the patched areas flush with 120-grit paper. Then, lightly scuff sand the entire baseboard surface with 220-grit paper to remove any glossy sheen, which helps the new paint grip. -
Remove dust:
Vacuum up the sanding dust, then wipe the trim with a tack cloth. This step is crucial for a professional, smooth finish that isn’t gritty. -
Caulk the gaps:
Run a thin bead of caulk along the top edge where the baseboard meets the wall if the old caulk is cracked or missing. Smooth it immediately with a wet finger for a seamless transition.
Paint Peeling on Tape Remove?
If paint lifts when pulling tape, stop immediately. Score the edge where the tape meets the baseboard with a sharp utility knife to break the seal, then peel gently.
Step 2: Taping & Priming
-
Tape the floors:
Carefully apply painter’s tape to the floor right against the baseboard. Press the edge of the tape down firmly with a putty knife or fingernail to prevent paint bleed. -
Tape the wall:
Apply tape to the wall just above the baseboard. Since we are creating a high-contrast look against white walls, precision here is key. -
Prime the surface:
If your baseboards are raw wood or a very dark color, apply a coat of high-quality primer. If they are already painted white and in good condition, you might be able to skip this, but I prefer priming to ensure true color fidelity.
Level Up: Color Drenching
For a bolder, more immersive look, carry the dusty blue color up from the baseboards to paint the door casings and even the doors themselves.
Step 3: Painting the Blue
-
Cut in the edges:
Dip your angled sash brush into the dusty blue paint. carefully paint the top edge along the wall and the bottom edge along the floor tape. Don’t worry about the middle yet. -
Paint the profiles:
Use the brush to dab paint into any intricate curves or grooves of the molding profile. Smooth out any pooling paint immediately so you don’t lose the detail. -
Roll the flat sections:
For the flat, vertical face of the baseboard, use a small foam roller. This speeds up the process and eliminates brush marks for a factory-like finish. -
Check for drips:
Do a quick visual sweep for drips, especially on the corners, and smooth them out with your brush before the paint sets. -
Apply second coat:
Allow the first coat to dry according to the can’s instructions (usually 2-4 hours). Lightly sand with very fine grit if needed, wipe clean, and apply a second coat for full, rich coverage.
Step 4: Finishing Touches
-
Remove tape while damp:
The secret to a crisp line is peeling the tape before the final coat is 100% dry. Pull the tape slowly at a 45-degree angle away from the painted edge. -
Touch up lines:
If a little blue bled onto the white wall, wait for it to fully dry. Then, use a tiny artist’s brush and your wall color to carefully conceal the mistake. -
Match the furniture:
To recreate the look in the photo, apply the same blue paint to a wooden bed frame or side table using the same sanding and priming steps, tying the room together instantly.
Enjoy the calming atmosphere your new custom-colored trim brings to the space
Color-Drenched Baseboards (Match the Walls)
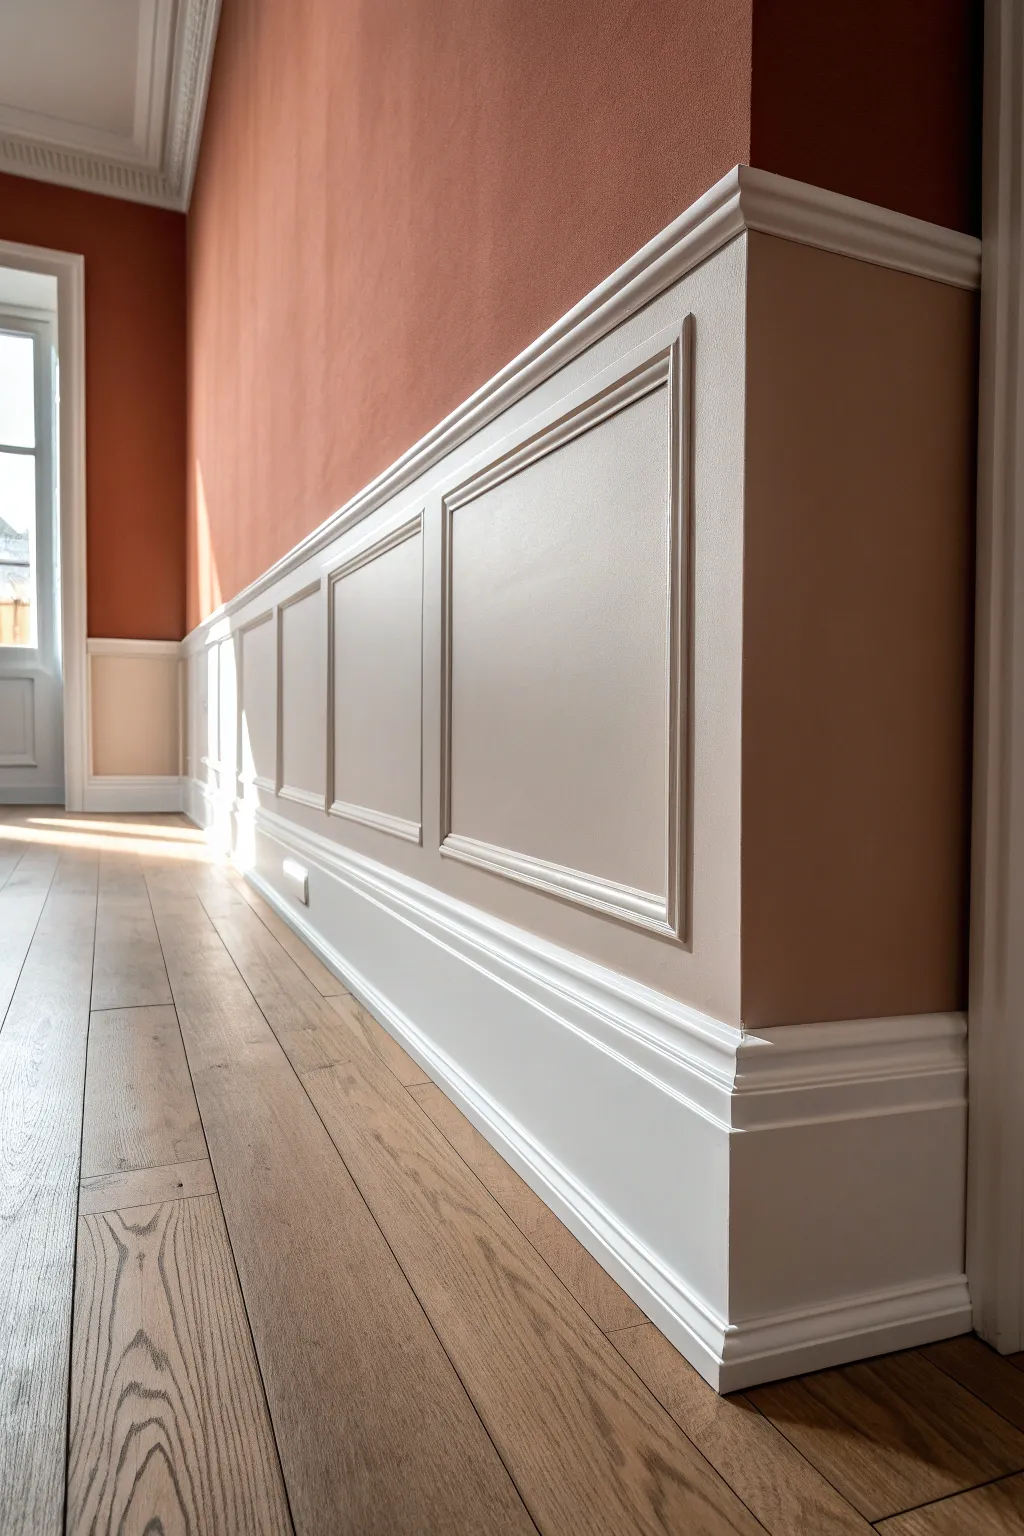
Transform a plain wall into an architectural masterpiece by installing classic raised-panel wainscoting with a substantial baseboard. This project brings depth and elegance to a room, creating a seamless transition between your flooring and the rich wall color above.
Detailed Instructions
Materials
- MDF or wood panel molding (rails and stiles)
- Cap railing molding
- Base cap molding
- 1×6 or 1×8 flat stock lumber (for baseboards and rails)
- Inner panel molding trim (cove or decorative)
- Construction adhesive (Liquid Nails)
- Brad nailer and 1.5-inch brad nails
- Miter saw
- Wood filler
- Caulk and caulk gun
- Sandpaper (120 and 220 grit)
- Primer
- Semi-gloss interior trim paint (White)
- Wall paint (Terracotta/Burnt Orange)
- Painter’s tape
- Level and measuring tape
- Stud finder
Step 1: Preparation and Layout
-
Clear and Clean:
Remove existing baseboards carefully with a pry bar. Ensure the wall surface is clean, smooth, and dry before beginning any installation. -
Mark Studs:
Use a stud finder to locate all vertical studs along the wall. Mark these locations lightly with a pencil at the height where your top rail will sit, as this is crucial for solid nailing. -
Determine Height:
Decide on the total height of your wainscoting. A classic rule of thumb is approximately one-third the height of the ceiling, but for this look, measure up about 32-36 inches from the floor. -
Draw Layout Lines:
Use a long level or a laser level to draw a continuous horizontal line across the wall representing the top edge of your wainscoting. This ensures everything stays level even if the floor isn’t perfect.
Spacer Block Trick
Cut a small scrap block of wood to the exact width you want your spacing to be. Use this block to position your inner panel molding instantly without measuring every single time.
Step 2: Base and Rail Installation
-
Install Bottom Baseboard:
Cut your wide flat stock (1×6 or 1×8) to length for the bottom rail. Apply construction adhesive to the back, press it against the wall, and nail it into the studs along the bottom edge. -
Install Top Rail:
Cut another strip of flat stock for the top horizontal rail. Align its top edge with your level line, apply adhesive, and nail it securely into the studs. -
Measure Vertical Stiles:
Determine the spacing for your vertical ‘stiles’ (the upright pieces). Measure the distance between the top rail and the bottom baseboard. I prefer to lay these out on the floor first to visualize the box sizes. -
Install Stiles:
Cut the vertical stiles to fit snugly between the top and bottom rails. Adhere and nail them to the wall at your determined intervals to create the recessed ‘boxes’.
Troubleshooting Gaps
If your miter joints have small gaps due to uneven walls, don’t panic. Rub the round shaft of a screwdriver over the joint to mash fibers together, then fill with wood filler.
Step 3: Trim and Detail
-
Add Decorative Base Cap:
To give the baseboard that chunky, historic look seen in the photo, install a decorative base cap molding directly on top of the bottom flat stock rail. -
Install Cap Molding:
Finish the very top of the wainscoting by installing a chair rail or cap molding that sits on the upper edge of your top rail. Miter the corners at 45 degrees for outside edges. -
Cut Panel Moulding:
Now for the inner boxes. Measure the inside dimensions of the rectangular spaces created by your rails and stiles. Cut decorative picture-frame molding with 45-degree miters to create inner frames. -
Install Inner Frames:
Glue and pin-nail these molding frames inside each box, maintaining an equal reveal (spacing) from the rails and stiles on all four sides. Using a spacer block accelerates this step significantly.
Step 4: Finishing
-
Fill Nail Holes:
Go over every single nail hole with wood filler. Leave it slightly proud of the surface so it can be sanded flush later. -
Caulk Seams:
Apply a thin bead of paintable caulk to every seam—where wood meets wall, and where wood meets wood. Smooth it immediately with a damp finger for a seamless, built-in appearance. -
Sand Everything:
Once dry, sand the wood filler flat and give all the wood surfaces a light scuff with 220-grit sandpaper to prepare them for paint. -
Prime the Woodwork:
Apply a high-quality primer to all the wood and the wall sections inside the boxes. This unifies the texture between the wood trim and the drywall. -
Paint the Upper Wall:
Paint the wall above the wainscoting with your chosen terracotta or burnt orange color. Cut in carefully along the top cap molding. -
Paint the Wainscoting:
Finally, apply two coats of semi-gloss white paint to the wainscoting and baseboards. The sheen difference helps the woodwork pop against the matte wall color above.
Enjoy the sophisticated, architectural depth this beautiful wainscoting brings to your space
Tonal Trim: Baseboards One Shade Darker
Elevate your room’s architecture with this guide to installing tall, structured baseboards that contrast beautifully against warm tonal walls. This project adds significant weight and elegance to any corner, creating a timeless junction between your flooring and wall color.
Step-by-Step
Materials
- Primed MDF or wood baseboard molding (6-inch height)
- Base cap molding (for top detail)
- Shoe molding (optional, for floor gaps)
- Miter saw
- Coping saw
- Stud finder
- Pneumatic finish nailer with 2-inch nails
- Wood glue
- Construction adhesive
- Fine-grit sandpaper (220 grit)
- Painter’s caulk and caulk gun
- Wood filler
- Semi-gloss white trim paint
- Angled sash brush (2.5 inch)
Step 1: Preparation and Cutting
-
Measure the Perimeter:
Start by measuring the total linear footage of the room, adding 10% extra for waste and miter cuts. Measure each wall segment twice to ensure accuracy before purchasing your molding. -
Locate Wall Studs:
Use a stud finder to mark the stud locations along the bottom of the wall. Mark these spots slightly above where the top of the baseboard will sit so you can see them during installation. -
Acclimate Materials:
Bring your molding into the room at least 24 hours before installation. This allows the wood or composite material to adjust to the room’s humidity, preventing gaps later on. -
Cut the First Inside Corner:
For the first piece of baseboard on an inside corner, cut it square at a 90-degree angle so it butts tightly into the corner wall. -
Cope the Adjoining Piece:
For the piece connecting to that first corner, cut a 45-degree bevel on the face. Then, use a coping saw to carefully cut along the profile line of the bevel, removing the back material. -
Test the Fit:
Dry fit the coped joint against the installed square-cut piece. The coped profile should slide over the first board’s face for a seamless, tight corner that resists opening up if the walls shift.
Closing Gaps
If your outside corner miters have a tiny gap at the tip, rub the shank of a screwdriver over the heavy wood fibers to crush them slightly together, closing the visible seam.
Step 2: Installation
-
Apply Adhesive:
Run a wavy bead of construction adhesive along the back of your first baseboard piece. This helps bond the board to the drywall and keeps it flat against the surface. -
Nail into Studs:
Position the baseboard and use your finish nailer to drive nails into the marks you made earlier. Aim for two nails per stud—one high and one low—to secure it firmly. -
Handle Outside Corners:
For the sharp 90-degree outside corner shown in the referenced image, cut both meeting pieces at 45-degree angles. I find applying a thin layer of wood glue to the mitered faces is essential here for a lasting bond. -
Add Base Cap Detail:
If your baseboard design includes a separate cap molding for extra height or detail, install it now, resting it on top of the main board and nailing it into the wall studs. -
Scribe for Uneven Floors:
If the baseboard doesn’t sit flush with the hardwood floor, hold it level and use a compass to trace the floor’s contour onto the board, then trim the bottom with a jigsaw for a perfect fit. -
Set Nail Heads:
Go around the perimeter and ensure all nail heads are sunk just below the surface of the wood. Use a nail set tool and hammer if the gun didn’t sink them deep enough.
Step 3: Finishing Touches
-
Fill Nail Holes:
Dab a small amount of wood filler into every nail hole. Overfill slightly, as the filler will shrink when drying, then let it cure completely. -
Sand Smooth:
Once the filler is dry, sand the filled holes and any rough joints with 220-grit sandpaper until the surface feels completely flush to the touch. -
Caulk the Top Edge:
Run a thin bead of painter’s caulk along the top gap where the baseboard meets the wall. Smooth it immediately with a damp finger for a professional, seamless transition. -
Prime Bare Spots:
If you sanded through the pre-primed surface or have raw wood exposures, spot prime these areas to ensure the final paint coat looks consistent. -
Apply Final Paint:
Using an angled sash brush, apply a coat of semi-gloss white trim paint. Keep a wet edge and use long strokes to minimize brush marks, giving that crisp, polished look seen in the photo.
Cleaner Caulking
Use blue painter’s tape on the wall just above the baseboard before caulking. Remove the tape while the caulk is still wet to get a razor-sharp paint line.
Step back and admire how this architectural detail completely transforms the character of your space
Match Baseboards to Wainscoting or Paneling
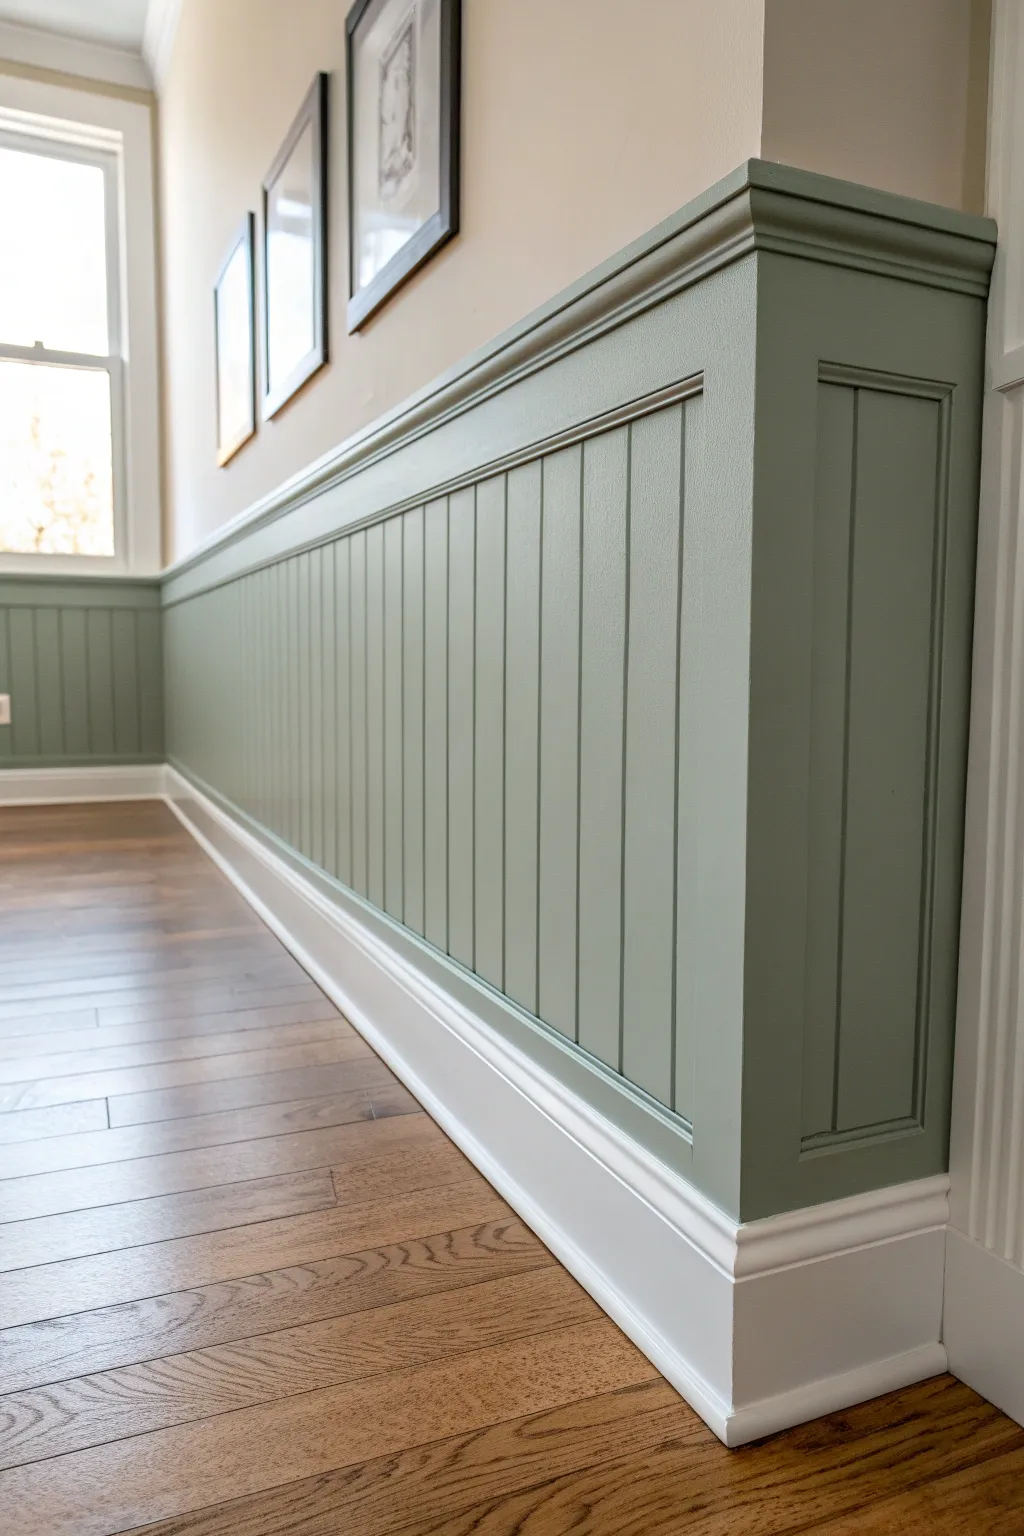
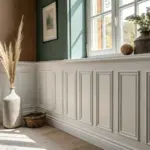
Transform a plain hallway into a sophisticated corridor with this classic beadboard wainscoting project painted in a calming sage green. The contrast between the soft green panels and the crisp white baseboards creates a timeless, architectural look that feels both historic and fresh.
How-To Guide
Materials
- 4×8 sheets of beadboard paneling (MDF or wood)
- Baseboard molding (5-inch height or similar)
- Chair rail molding with cap
- Construction adhesive (e.g., Liquid Nails)
- Finishing nails (1.5 inch and 2 inch)
- Wood filler or spackle
- Paintable caulk
- Sage green interior paint (satin or semi-gloss finish)
- Bright white trim paint
- Primer
- Circular saw or table saw
- Miter saw
- Level
- Stud finder
- Caulk gun
- Sandpaper (220 grit)
Step 1: Preparation and Layout
-
Clear the space:
Remove any existing baseboards carefully using a pry bar. Score the top edge with a utility knife first to prevent peeling the drywall paper. -
Determine height:
Decide on the height of your wainscoting. A common rule of thumb is one-third of the wall height, but for this specific look, aim for about 36 inches from the floor. -
Mark a level line:
Using a long level or a laser level, mark a continuous horizontal line around the room at your chosen height. This will represent the top edge of your beadboard. -
Locate studs:
Use a stud finder to locate and mark the wall studs above your level line so you know where to nail later.
Step 2: Installing the Beadboard
-
Cut the panels:
Measure and cut your beadboard sheets to size. If your floor is uneven, you may need to scribble the bottom edge, but since we are adding a baseboard over it, a general straight cut usually suffices. -
Apply adhesive:
Apply zigzag patterns of construction adhesive to the back of your first panel. I find this helps keep the panel flat against the wall and reduces the number of nails needed. -
Install first panel:
Press the panel against the wall, aligning the top edge with your level line. Secure it with finishing nails into the studs. -
Continue installation:
Butt the next panel tightly against the first. Ensure the bead grooves align perfectly to hide the seam. Continue around the room. -
Handle corners:
For corners, measure carefully and cut the panel so it fits flush. In inside corners, you can butt them together; outside corners will be covered by corner trim later.
Clean Lines Pro Tip
For the crispest line between the green panel and white baseboard, use high-quality painter’s tape on the baseboard edge, then seal the tape edge with a tiny bit of white paint before applying the green.
Step 3: Adding the Trim
-
Install the chair rail:
Measure and cut the chair rail molding for the top edge. Use miter cuts for corners. The chair rail typically has a groove or lip that sits over the top of the beadboard panel. -
Secure top rail:
Nail the chair rail into the studs, ensuring it covers the rough top edge of the beadboard completely. -
Install the baseboard:
Measure and cut your new baseboards. Install these directly over the bottom portion of the beadboard. This creates the layered look seen in the photo. -
Finish outside corners:
If you have outside corners (like the one shown in the project image), install vertical corner trim pieces to cover the exposed beadboard edges.
Take It Up a Level
Install electrical outlet extenders before putting up panels. This ensures your outlet covers sit flush on top of the beadboard rather than being recessed inside the deep paneling.
Step 4: Finishing and Painting
-
Fill holes:
Fill all nail holes with wood filler. Once dry, sand them smooth with 220-grit sandpaper. -
Caulk gaps:
Apply a thin bead of paintable caulk along all seams: on top of the chair rail, between the baseboard and beadboard, and in the corners. Smooth it with a wet finger. -
Prime surfaces:
Apply a coat of primer to the beadboard and new molding. This is crucial if you’re using MDF, as it soaks up paint quickly. -
Paint the baseboards:
Paint the baseboard molding with your bright white trim paint first. Don’t worry if you get a little on the beadboard, as you’ll cut in later. -
Paint the wainscoting:
Using a brush for the grooves and the edges, carefully cut in your sage green paint against the white baseboard. Then, use a small foam roller to paint the flat surfaces of the beadboard for a smooth finish. -
Apply second coat:
Allow the first coat to dry completely, then apply a second coat of green for full, rich coverage.
Step back and admire how the dual-tone color scheme adds architectural weight and elegance to your hallway.
Carry the Color Onto Door Casings
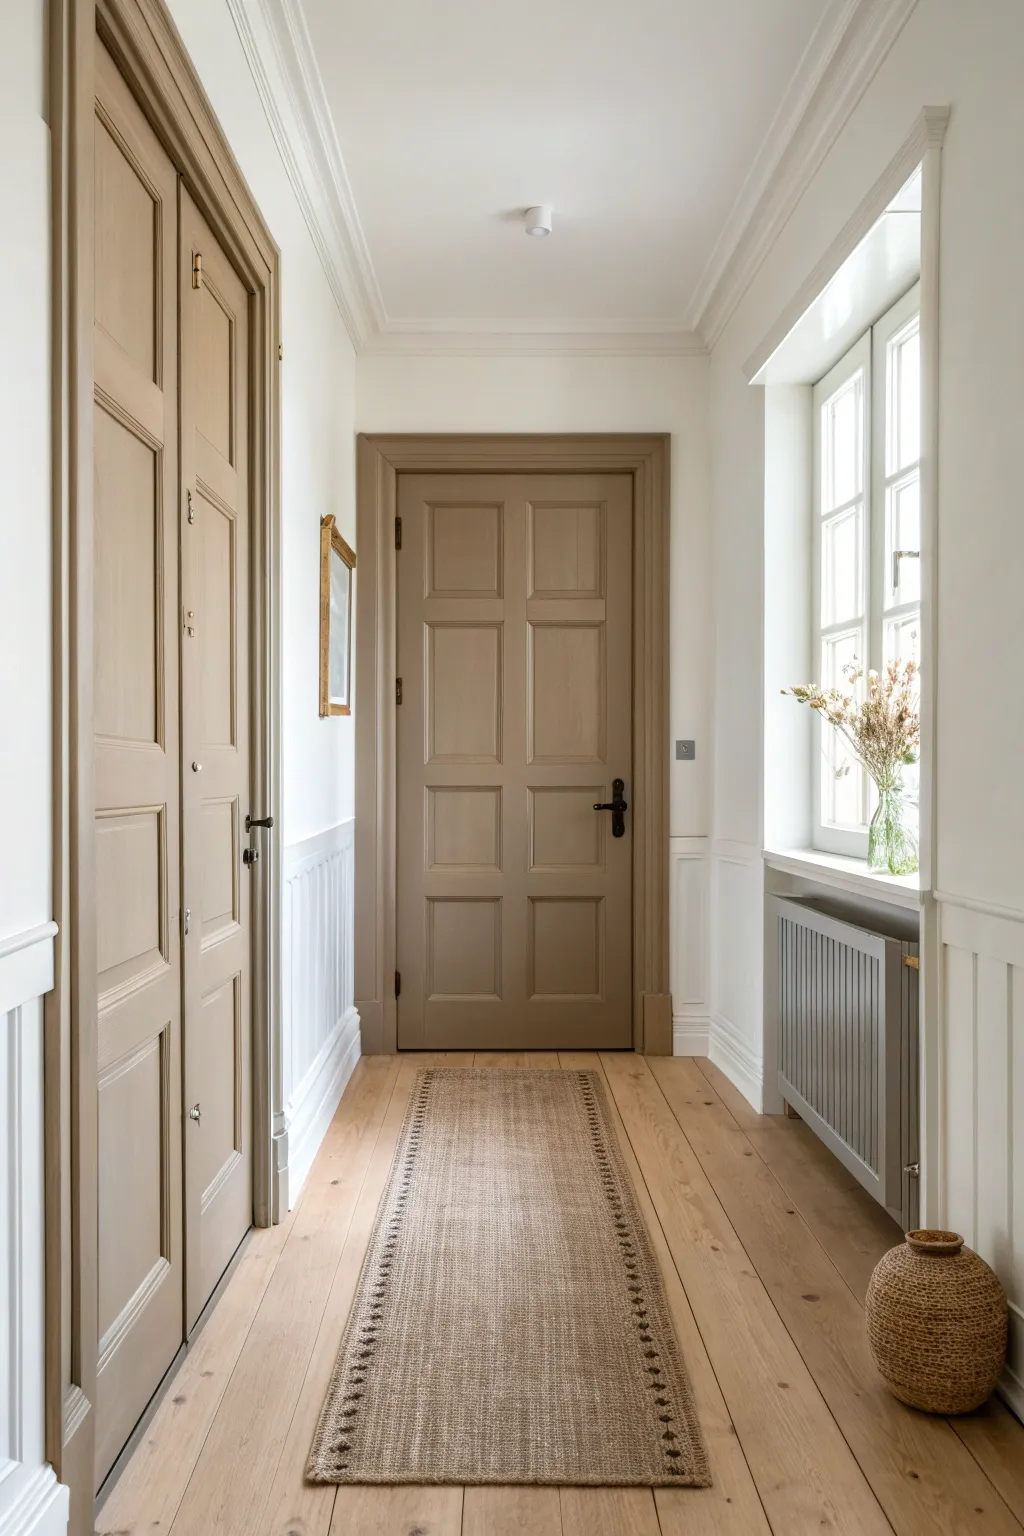
Create a seamless, high-end look in your hallway by painting your baseboards, door casings, and doors in the same sophisticated beige hue. This monochromatic approach elongates the perception of height and adds a calm, architectural elegance to the space.
Step-by-Step Tutorial
Materials
- High-quality interior trim paint (satin or semi-gloss finish, beige/taupe color)
- White semi-gloss paint (for wainscoting/contrasting trim)
- Painter’s tape (multi-surface)
- Sanding sponge (medium and fine grit)
- Tack cloth
- Angled sash brush (2-inch)
- Small foam roller and tray
- Drop cloths
- Wood filler
- Caulk and caulk gun
- Screwdriver (to remove hardware)
Step 1: Preparation & Repairs
-
Clear and Clean:
Begin by removing the rug and furniture from the hallway. Wipe down all baseboards, door casings, and doors with a damp cloth and a mild degreaser to remove dust and oils. -
Hardware Removal:
Using your screwdriver, carefully remove all door handles, lock plates, and hinges if possible. Labeling them in small bags saves frustration later. -
Detailed Sanding:
Scuff sand all surfaces you intend to paint—doors, frames, and skirting boards—using a medium-grit sanding sponge. This helps the new paint adhere properly. -
Fill Imperfections:
Inspect the wood for dings or nail holes. Apply a small amount of wood filler, let it dry completely, and sand it flush with the surface. -
Caulking Gaps:
Check the seams where the casing meets the wall or the baseboard meets the casing. If there are gaps, run a thin bead of caulk and smooth it with a wet finger for a seamless transition.
Brush Maintenance Pro-Tip
Wrap your wet brush and roller tightly in a plastic bag or plastic wrap between coats. This keeps the paint from drying out so you don’t have to clean them completely during short breaks.
Step 2: Painting the Trim & Doors
-
Tape for Protection:
Apply painter’s tape to the floor right up against the baseboards and along the wall edges where you want a crisp line. Press the tape edges down firmly to prevent bleed-through. -
Cutting In:
Stir your beige trim paint thoroughly. Dip your angled sash brush and begin ‘cutting in’ the edges of the door casing and the detailed grooves of the door panels. -
Rolling the Flat Areas:
For the larger flat panels of the door and the wide sections of the casing, switch to a small foam roller. This speeds up the process and leaves a smoother finish than brushing alone. -
Baseboard Application:
Paint the baseboards using long, smooth brush strokes. Since I prefer to avoid brush marks, I always finish with a single, long stroke in one direction while the paint is still wet. -
Review and Dry:
Allow this first coat to dry according to the manufacturer’s instructions, usually about 4 hours. Keep the room ventilated. -
Light Sanding Between Coats:
Once dry, very lightly rub a fine-grit sanding sponge over the painted surfaces to knock down any raised grain or dust nibs, then wipe with a tack cloth. -
Second Coat:
Apply a second coat to the doors, casings, and baseboards just as you did the first. This coat provides the true depth of color and durability.
Sticky Door Fix
If the door feels sticky after rehanging, rub a little clear candle wax or paraffin along the edges where it meets the frame. This acts as a lubricant and prevents paint transfer.
Step 3: Contrasting Elements & Finishing
-
Wainscoting Check:
If you have white wainscoting or lower wall paneling like in the reference, now is the time to touch up that white paint. Ensure a clean separation where the beige door casing meets the white paneling. -
Window Trim Contrast:
Paint the window frame and its sill in a crisp white semi-gloss to match the ceiling and upper walls, creating that bright, airy juxtaposition against the beige doors. -
Radiator Cover:
If painting a radiator cover, use a heat-resistant paint in a soft grey or match the wall color. Use a spray can or roller for the slats to avoid drips. -
Remove Tape:
Carefully peel away the painter’s tape while the final coat is still slightly tacky. Pulling at a 45-degree angle helps ensure a razor-sharp line. -
Reinstall Hardware:
Once everything has cured for at least 24 hours to prevent sticking, screw your door handles and hinges back into place. -
Styling:
Roll out your textured runner rug and place a decorative vase or basket to complete the welcoming hallway vignette.
Enjoy the cohesive and polished atmosphere your newly unified trim brings to your home.
Paint the Doors and Baseboards the Same Color
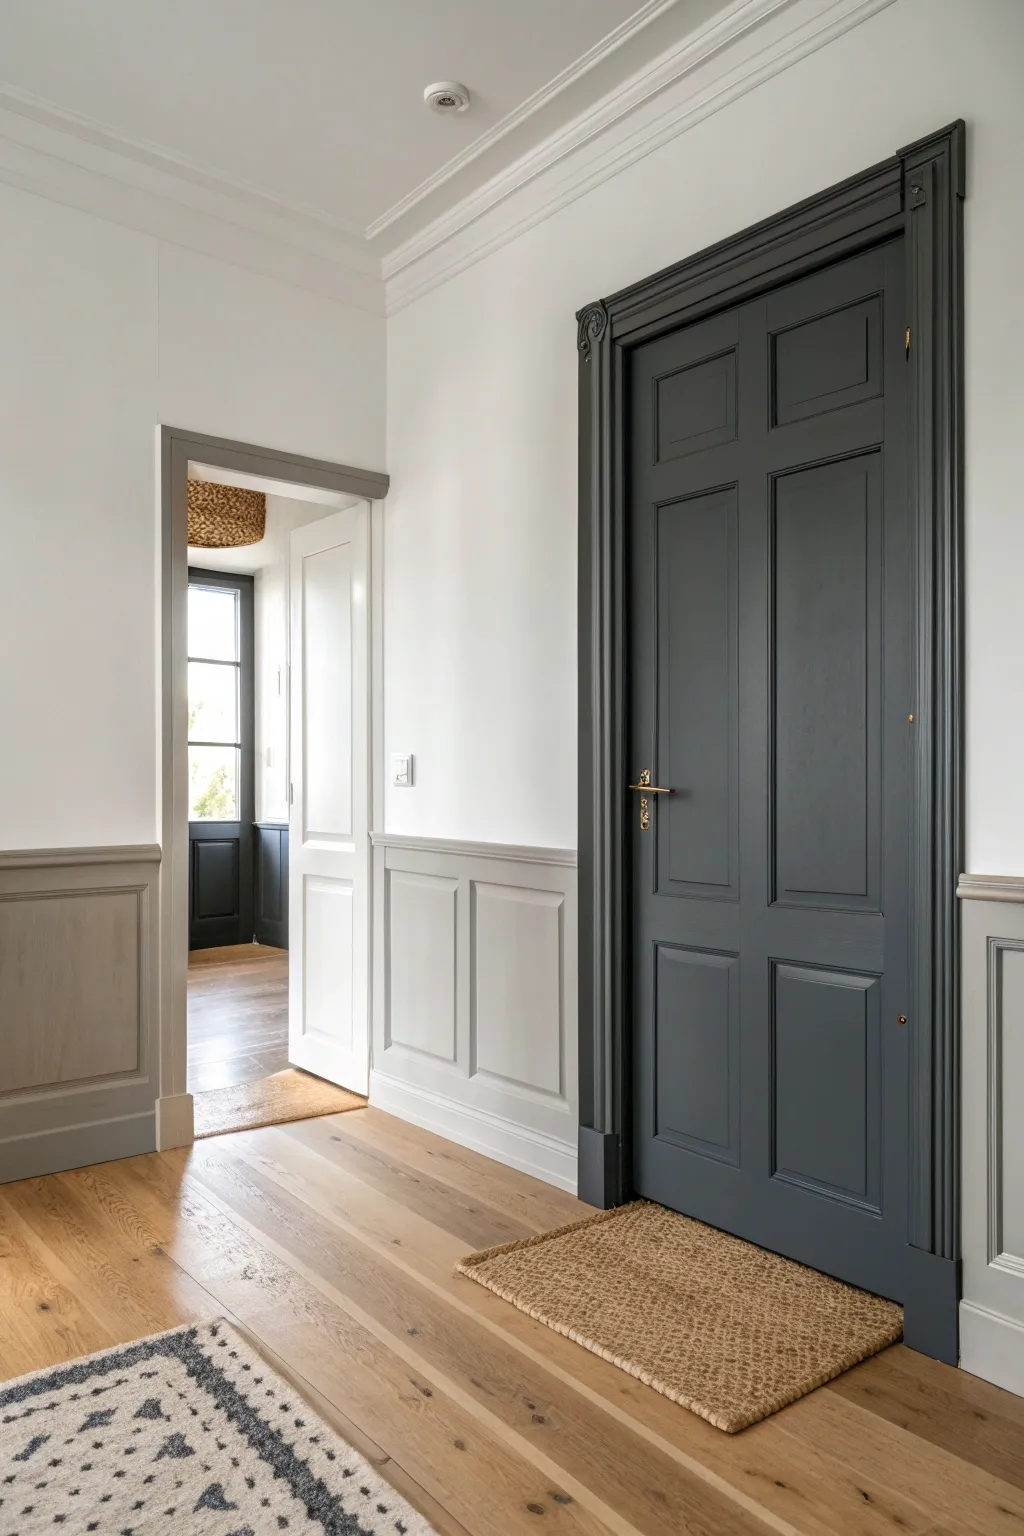
Achieve a sophisticated, cohesive look by painting your interior doors and their surrounding trim in a rich, dark charcoal hue to create a stunning focal point. This project transforms standard hallway features into architectural statements, contrasting beautifully with lighter walls and warm wood floors.
Step-by-Step
Materials
- High-quality interior paint (satin or semi-gloss finish)
- Deep charcoal or slate grey paint color
- Painter’s tape (multi-surface)
- Sanding sponge (fine grit 120-220)
- Tack cloth
- Angled sash brush (2-2.5 inch)
- Small foam roller (4-inch) with tray
- Drop cloth or masking paper
- Screwdriver (for hardware removal)
- Wood filler (optional)
- Primer (tinted grey)
Step 1: Preparation
-
Clear the area:
Remove any rugs, furniture, or decor from the immediate vicinity of the door to give yourself ample working space. Lay down a drop cloth or masking paper to protect your beautiful wooden floors from detailed paint drips. -
Remove hardware:
Using your screwdriver, carefully take off the door handle, lock mechanism, and strike plates. It is much easier to get a professional finish by removing these rather than taping around them. Place all screws and parts in a labeled baggie so nothing gets lost. -
Clean surfaces:
Wipe down the door, the door frame, and the baseboard trim with a mild degreasing cleaner to remove hand oils and dust. A clean surface ensures the best paint adhesion. -
Sand lightly:
Scuff sand the entire door and trim using a fine-grit sanding sponge. You aren’t trying to remove old paint, just creating a slightly rough texture or ‘tooth’ for the new paint to grab onto. Pay special attention to the crevices in the panel molding. -
Dust off:
Vacuum up the sanding dust, then wipe everything down thoroughly with a tack cloth to capture remaining fine particles. Painting over dust leads to a gritty finish. -
Tape edges:
Apply painter’s tape along the wall where it meets the door trim and baseboards. Press the tape edge down firmly with your thumb or a putty knife to prevent paint bleed.
Sticky Door?
If the door sticks after painting, rub a clear candle or paraffin wax along the edges where it touches the frame. This lubricates the surface without damaging the new paint job.
Step 2: Prime and Paint
-
Apply primer:
Since we are switching to a dark color, apply a coat of grey-tinted primer. This helps achieve the true depth of the charcoal color with fewer topcoats. Use your brush for the detailed molding and the roller for the flat panels. -
Paint the panels:
Once the primer is dry, start painting the door with your finish color. Begin with the recessed panels using the angled brush, working the paint into the corners. -
Roll the flat surfaces:
Immediately after brushing the varying panel depths, use the small foam roller to smooth out the flat interior surfaces of the panels. This combination technique minimizes brush strokes. -
Paint the stiles and rails:
Move on to the vertical stiles (sides) and horizontal rails (top, bottom, and middle) of the door. Brush with the grain of the wood. Keeping a ‘wet edge’ helps blend sections seamlessly. -
Paint the door frame:
While the door dries, paint the surrounding casing and door jambs. Use the angled sash brush here for precision against the taped wall edge. -
Dry and recoat:
Allow the first coat to dry according to the manufacturer’s instructions (usually 2-4 hours). Lightly sand any imperfections if necessary, then apply a second coat following the same order: panels first, then the frame.
Upgrade the Hardware
Since you removed the old handle, consider swapping it for a brushed brass or unlacquered brass lever. The gold tones pop incredibly well against dark charcoal paint.
Step 3: Finishing Touches
-
Remove tape:
Score the edge of the painter’s tape with a utility knife before the final coat is fully cured, then peel it away slowly at a 45-degree angle. This prevents the tape from pulling up your fresh paint. -
Reinstall hardware:
Once the paint has cured for at least 24 hours—so it’s hard enough not to dent—screw the handles and lock plates back into place. -
Style the entry:
Place a natural fiber rug or mat at the base of the door to complement the new rich color and add warmth back into the space.
You have successfully created a dramatic entryway that feels custom and high-end
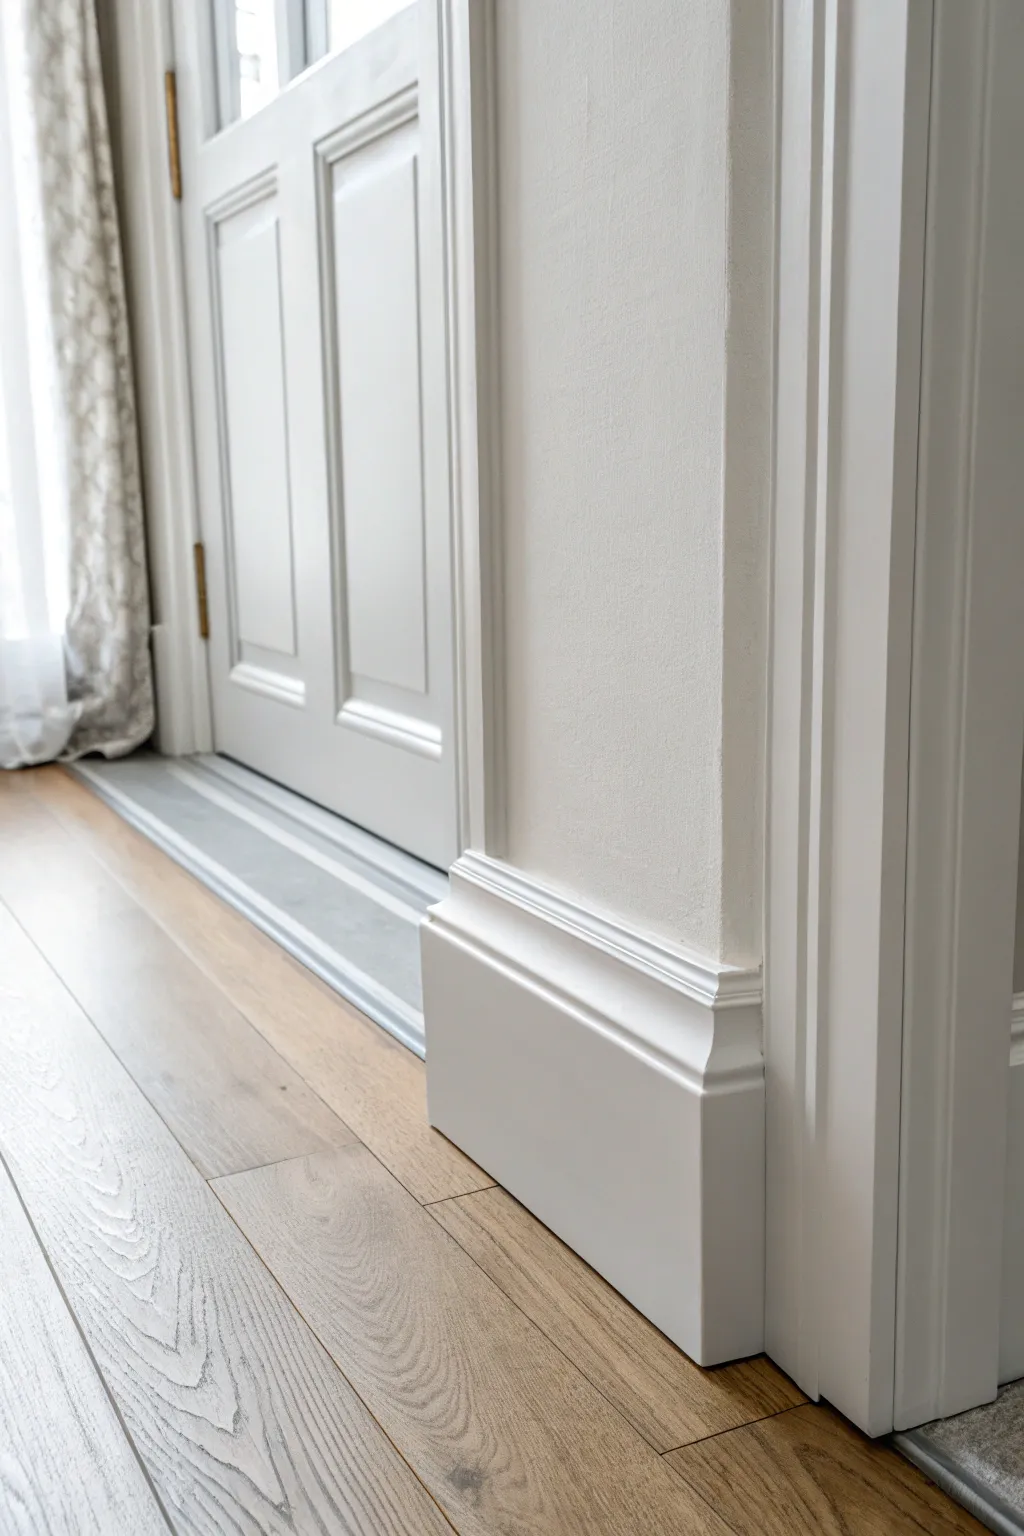
Warm Tan Baseboards With Natural Wood Floors
achieve a professional, seamless transition between warm tan walls and natural wood floors with this guide to installing and finishing classic white baseboards. The focus here is on creating that perfect ‘outside corner’ miter joint that defines high-quality craftsmanship.
Step-by-Step Tutorial
Materials
- Pre-primed MDF or wood baseboard molding
- Measuring tape
- Miter saw (power or manual box)
- Coplanar carpenter’s glue
- Brad nailer with 2-inch brad nails
- Wood filler or spackle
- Fine-grit sanding sponge (220-grit)
- Painter’s tape (delicate surface)
- Premium white semi-gloss trim paint
- 2-inch angled sash brush
- Caulk gun and paintable acrylic latex caulk
- Clean rags
Step 1: Measuring and Cutting
-
Measure the first run:
Start by measuring the length of the wall from the inside corner to the edge of the outside corner. Mark this measurement on the back of your baseboard piece. -
Set the miter angle:
Adjust your miter saw to a 45-degree angle. Since this is an outside corner, the face of the molding should be the long point of your cut. -
Cut the first piece:
Position the baseboard upright against the saw fence just as it will sit on the wall. Make your cut carefully, ensuring the blade cuts on the waste side of your mark. -
Measure the return piece:
Measure the adjacent wall for the connecting piece. It’s often helpful to cut this piece slightly long at first so you can trim it for a perfect fit. -
Cut the matching miter:
Swing your miter saw blade to the opposite 45-degree setting. Cut the second piece of molding, again making sure the finished face is the longest point. -
Test the fit:
Dry fit both pieces against the wall corner. Walls are rarely perfect 90-degree angles, so check if the gap is tight. If there’s a gap at the front, cut slightly more sharp than 45 degrees; if at the back, go slightly less.
Glue Trick
Rub the shank of a screwdriver firmly over the outside corner of the miter joint while the glue is wet. This ‘burnishes’ the fibers, closing invisible gaps.
Step 2: Installation
-
Apply carpenter’s glue:
Dab a small amount of wood glue onto the mitered face of one board. This step is crucial for keeping that joint closed tight over years of seasonal expansion. -
Nail the first piece:
Place the first board against the wall. Using your brad nailer, drive nails into the studs, keeping them about 16 inches apart. Avoid nailing too close to the very edge of the corner initially. -
Secure the joint:
Bring the second piece into position. Align the corner perfectly with your fingers. I find it helps to shoot a nail through the joint itself (cross-nailing) from one piece into the other to lock them together if the material allows. -
Finish nailing:
Once the corner is perfect, nail the rest of the second board into the wall studs.
Step 3: Finishing Touches
-
Fill nail holes:
Press a small amount of wood filler or spackle into each nail head depression. Overfill slightly as it will shrink when drying. -
Sand smooth:
Once the filler is dry, gently sand the spots flat with a 220-grit sponge. Also give the corner joint a light pass to ensure the two pieces feel like one continuous surface. -
Caulk the top gap:
Run a thin bead of paintable acrylic latex caulk along the top edge where the baseboard meets the tan wall. Smooth it immediately with a wet finger for a seamless line. -
Protect the floor and wall:
Apply painter’s tape to the floor right up against the baseboard edge, and use delicate tape on the tan wall just above the caulk line if you don’t have a steady hand. -
First coat of paint:
Using your angled sash brush, apply a coat of white semi-gloss paint. Use long, smooth strokes to minimize brush marks. -
Final coat:
Allow the first coat to dry completely according to the can’s instructions. Lightly sand off any dust nibs, then apply a final coat for that bright, durable finish. -
Remove tape:
Pull the tape while the final coat is still slightly tacky to prevent peeling the fresh paint, revealing a crisp, professional edge.
Gap Prevention
If the corner gap keeps opening up during the dry fit, the drywall corner might be built up with too much mud. Getting behind the board to scrape the wall flat can help.
Now you have a flawless, elegant corner that perfectly frames your room
Two-Tone Baseboards With a Thin Accent Line
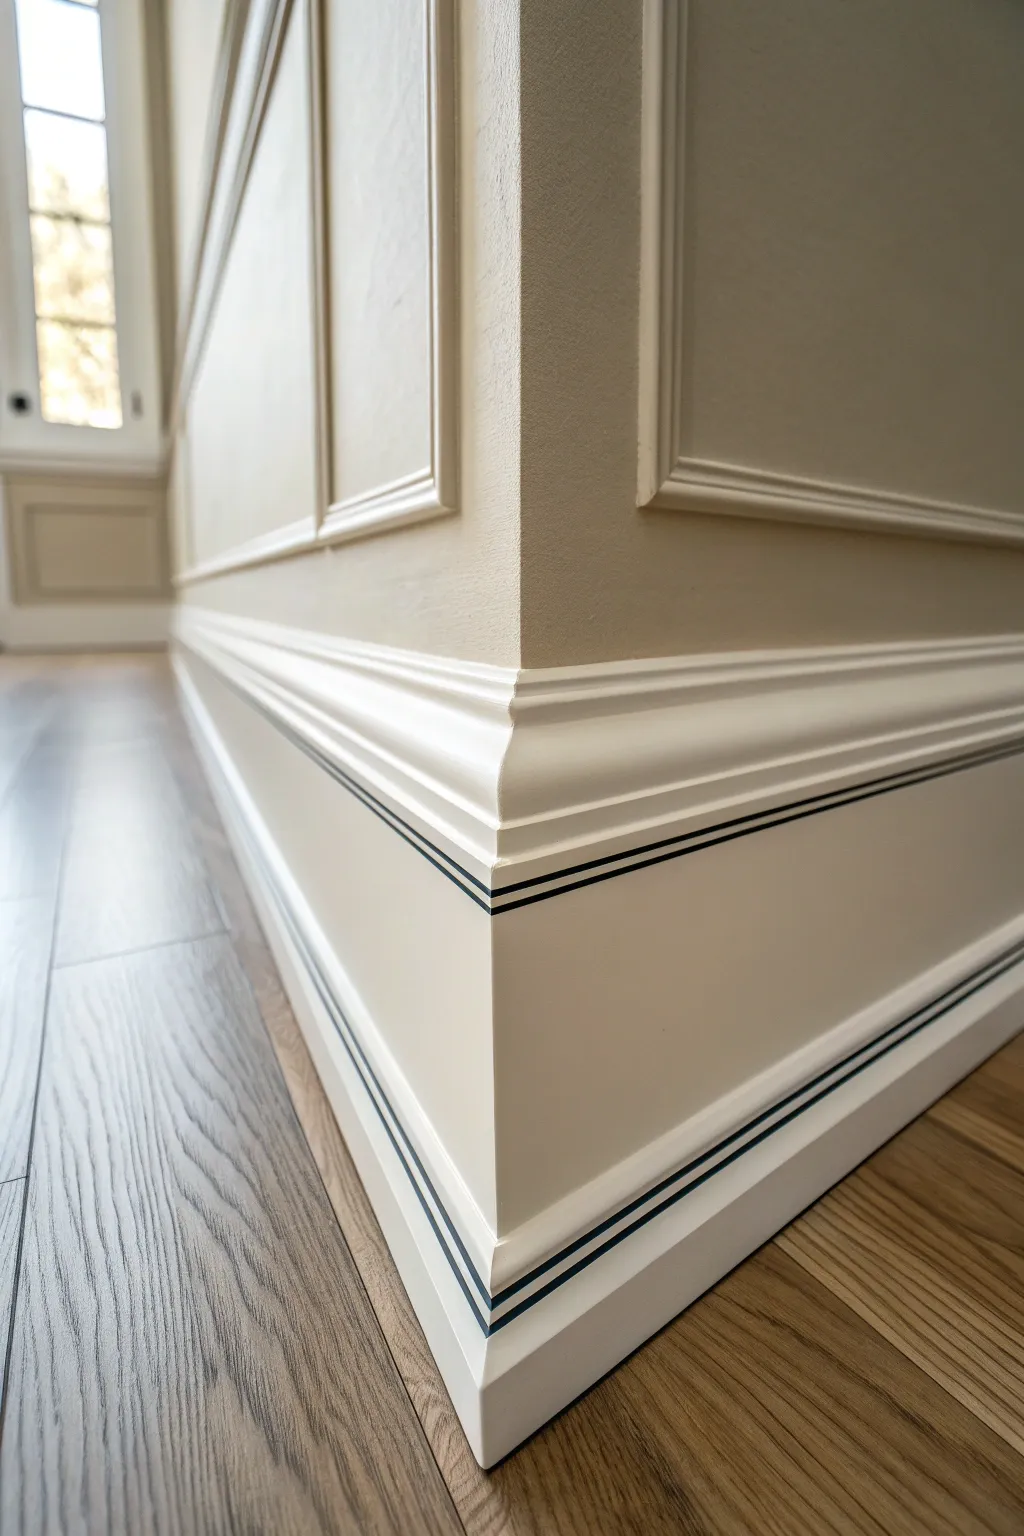
Elevate your room’s architecture with this sophisticated take on traditional baseboards, featuring a crisp white finish and a striking double pinstripe accent. This detail adds a custom, high-end feel that frames your flooring beautifully and highlights the craftsmanship of your trim work.
Step-by-Step
Materials
- High-quality semi-gloss white trim paint
- Black acrylic paint or high-gloss enamel
- Painter’s tape (various widths, including fine line tape)
- Small angled sash brush (1.5 to 2 inch)
- Fine detail brush (size 0 or 1 round)
- Sanding sponge (220 grit)
- Tack cloth
- Drop cloth
- Laser level or straight edge ruler
- Pencil
Step 1: Preparation & Base Coat
-
Clean the surface:
Start by thoroughly cleaning your existing baseboards to remove dust, grime, or grease. A mixture of warm water and a little dish soap works well, followed by a clear water rinse. -
Sand for adhesion:
Lightly scuff the entire surface of the baseboard with a 220-grit sanding sponge. This creates a ‘tooth’ for the new paint to grab onto, ensuring a durable finish. -
Remove dust:
Wipe down the sanded trim with a tack cloth to pick up every speck of fine dust. Any debris left behind will show up in your final glossy finish. -
Protect the area:
Lay down your drop cloth and apply painter’s tape to the floor and the wall directly above the baseboard to protect surrounding surfaces from stray brush strokes. -
Apply the white base:
Using your angled sash brush, apply a smooth coat of semi-gloss white trim paint. Work in long, even strokes to minimize brush marks. -
Allow to dry:
Let the first coat dry completely according to the manufacturer’s instructions. Keep in mind that humidity can extend drying times significantly. -
Second coat:
Apply a second coat of white paint for full opacity and a rich, professional look. Allow this coat to cure fully—wait at least 24 hours before applying any tape over it.
Use Fine Line Tape
Standard blue tape is often too thick for delicate pinstripes. Use automotive ‘fine line’ tape for the sharpest, crispest edges possible on detail work like this.
Step 2: Creating the Pinstripes
-
Measure the stripe placement:
Decide on the height of your stripe detail. Using a ruler or a laser level, lightly mark the path for your stripes with a pencil about 2-3 inches from the bottom of the baseboard. -
Apply the main tape lines:
Place a strip of painter’s tape along the top edge of where your top stripe will be. Then, place a second strip defining the bottom edge of the bottom stripe. -
Create the middle gap:
To create two distinct lines, apply a thin strip of tape (or fine line tape) right in the middle somewhat parallel to your outer tape lines. This middle tape preserves the white space between the two black stripes. -
Seal the tape edges:
I like to brush a very thin layer of the *white* base paint over the tape edges first. This seals the tape and ensures that if any paint bleeds under, it matches the base color, keeping your eventual black lines razor-sharp. -
Let the seal dry:
Allow this sealing layer to dry to the touch, which usually takes about 30 to 60 minutes. -
Paint the stripes:
Using a small detail brush or a very specifically sized flat brush, carefully fill in the exposed channels with your black paint. Use a steady hand and don’t overload the brush. -
Check for coverage:
If the black looks streaky or translucent, wait for it to dry briefly and apply a second thin coat. Two thin coats are always better than one thick, gloopy one. -
Remove tape immediately:
While the black paint is still slightly wet, carefully peel back the tape at a 45-degree angle. Pulling it while wet helps prevent the paint from peeling up with the tape. -
Touch up edges:
Inspect your lines closely. If any black paint bled through, wait for it to dry fully, then use a tiny brush and your white paint to carefully correct the mistake.
Paint Bleeding Under Tape?
You likely skipped the sealing step. Always paint the base color over the tape edge first before applying the accent color blocks any gaps.
Enjoy the refined and architectural impact this simple painted detail adds to your room
Artful Patterned Baseboards in Small Doses

Transform a plain white baseboard into a statement feature with this intricate geometric fan pattern. The warm coral tones bring a subtle, artful energy to the room’s perimeter, balancing perfectly against the crisp white molding.
Detailed Instructions
Materials
- Primed MDF or wood baseboard (flat profile center)
- Painter’s tape (low tack)
- Semi-gloss white trim paint
- Terra cotta or coral acrylic craft paint
- Fine liner detail brush (size 0 or 00)
- Small flat brush (1/4 inch)
- Ruler or straight edge
- Pencil
- Cardstock or clear acetate for stencils
- X-Acto knife or cutting machine
- Clear polycrylic sealer
Step 1: Preparation & Base Coat
-
Surface Prep:
Clean your baseboards thoroughly with a mild degreaser and a damp cloth to remove any dust or grime. If the surface is glossy, give it a quick scuff sanding with fine-grit sandpaper so the paint adheres better. -
Protect the Surroundings:
Apply painter’s tape to the floor right up against the bottom of the baseboard, and along the wall just above the top edge. Press the edges down firmly to prevent bleed-through. -
Base Painting:
Paint the entire baseboard with your semi-gloss white trim paint. Use smooth, long strokes to minimize brush marks. Allow this coat to dry completely, following the manufacturer’s recommended drying time.
Step 2: Creating the Layout
-
Template Creation:
Cut a triangle template from cardstock or acetate that fits the height of the flat recessed area of your baseboard. An equilateral triangle works best for this repeating pattern. -
Marking the Grid:
Using your template and a pencil, lightly trace the triangles along the baseboard. Alternate them pointing up and down so they nest perfectly together. -
Checking Consistency:
Step back occasionally to ensure your pattern isn’t drifting up or down. I like to use a ruler to lightly mark a centerline if I’m working on a particularly long stretch of wall.
Clean Lines Hack
Use a clear acrylic ruler or a steady hand with a posca paint pen instead of a brush for the fan lines. It offers way more control and consistent ink flow.
Step 3: Painting the Triangles
-
Outline the Shapes:
Load your fine liner brush with the terra cotta paint. Carefully outline every other triangle (the ones pointing down) on your guide marks. -
Fill in Color:
Switch to your small flat brush to fill in the triangles you just outlined. Apply the paint thinly; two thin coats are always smoother and more durable than one thick, gloppy coat. -
Tidying Edges:
Once the filled triangles are dry, use the fine liner brush and a bit of white paint to touch up any wobbles on the edges where the geometric shapes meet the white background.
Level Up: Texture
Mix a tiny amount of baking soda into your terra cotta paint before applying. It creates a matte, plaster-like texture that mimics encaustic tile.
Step 4: Adding the Fan Detail
-
Practice the Motif:
Before painting the baseboard, practice painting the internal fan lines on a piece of scrap paper. It’s usually three to five radiating lines starting from the triangle’s point. -
Painting the Lines:
Using your finest detail brush and white paint, carefully draw the fan motif inside each terra cotta triangle. Start from the bottom tip and flick the brush upward for a tapered look. -
Consistency Check:
Try to keep the spacing of the internal lines consistent, but don’t obsess over perfection; slight variations add to the hand-painted charm. -
Drying Time:
Let the detail work dry completely, ideally overnight, to ensure the acrylic paint hardens sufficiently.
Step 5: Sealing and Finish
-
Seal the Work:
Brush on a coat of clear polycrylic sealer over the patterned area. This protects your handiwork from scuffs and makes cleaning the baseboards much easier later on. -
Tape Removal:
While the sealer is still slightly tacky (but not wet), carefully peel away the painter’s tape at a 45-degree angle to get a crisp, clean line.
Now you have a custom architectural detail that adds unexpected warmth and character to your floor level

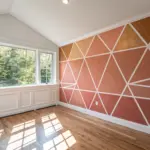
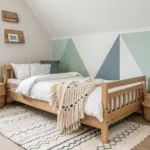
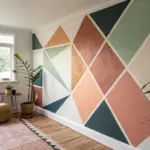
Have a question or want to share your own experience? I'd love to hear from you in the comments below!