
Mermaids are basically the perfect excuse to paint glowing color, flowing movement, and a little bit of magic all in one canvas. Here are some of my favorite acrylic mermaid painting ideas—from classic beginner-friendly silhouettes to playful, unexpected twists that still feel totally “mermaid.”
Moonlit Mermaid Silhouette on a Rock
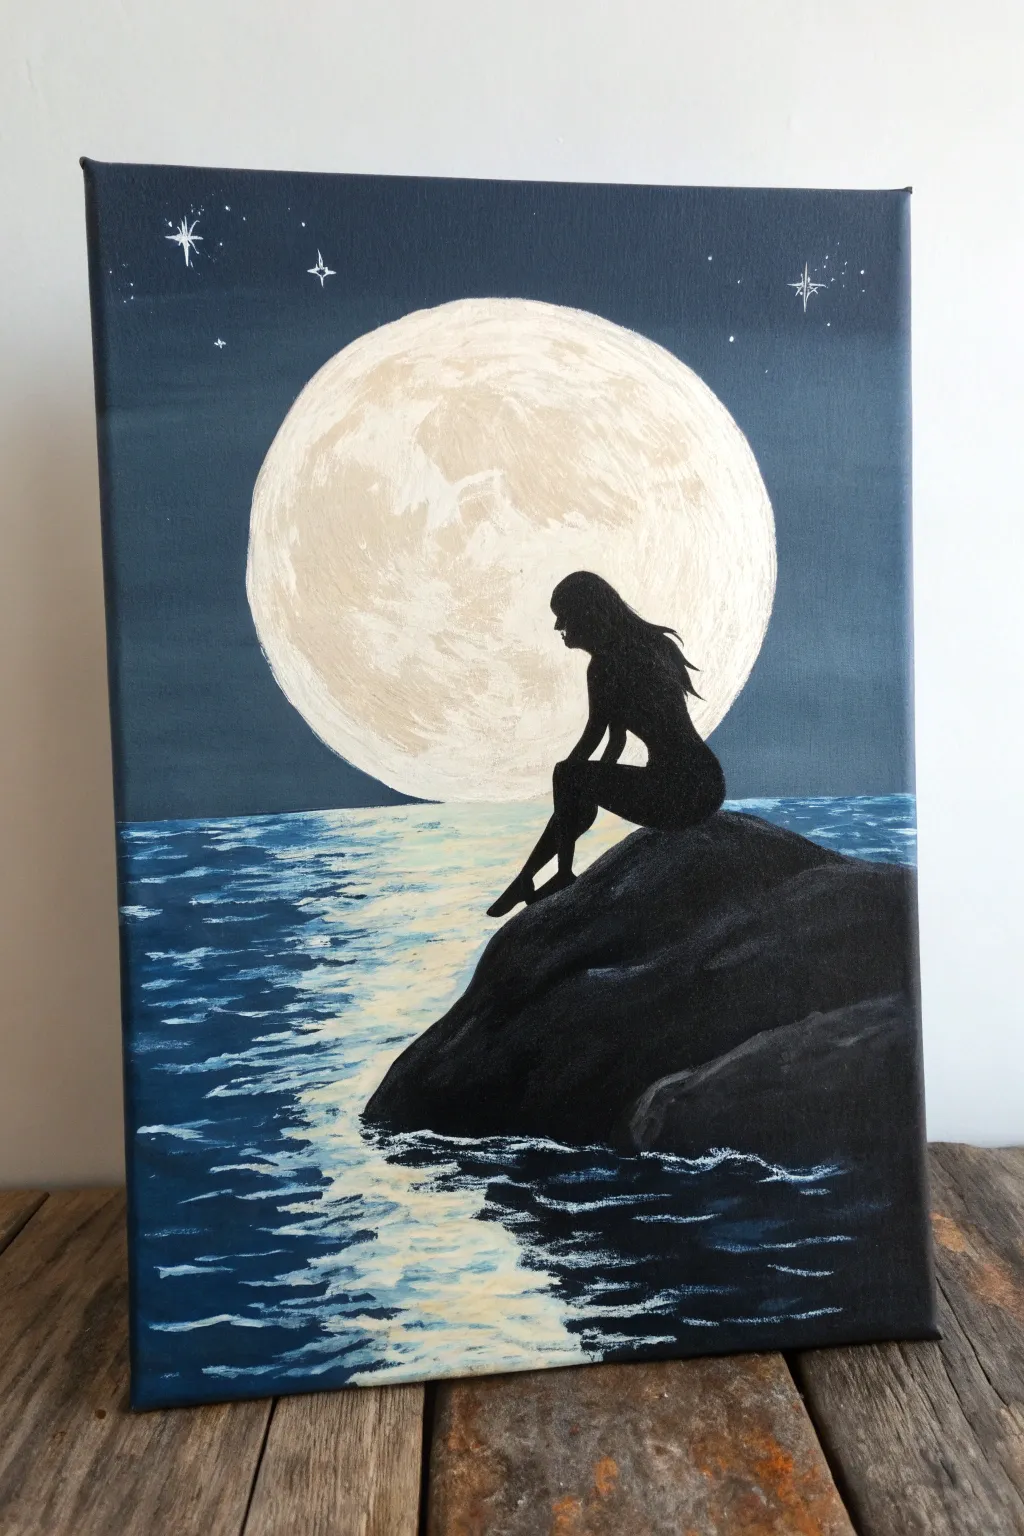
This serene acrylic painting captures the quiet beauty of a mermaid silhouetted against a luminous full moon. Using simple blending techniques and stark contrasts, you’ll create a magical night scene that feels both peaceful and mysterious.
Detailed Instructions
Materials
- Canvas (rectangle, approx. 11×14 or similar)
- Acrylic paints: Phthalo Blue (or Navy), Black, Titanium White, and a touch of Cream/Unbleached Titanium
- Large flat brush (1 inch)
- Medium round brush
- Fine liner brush
- Paper plate or round object for tracing
- Pencil
- Water cup and paper towels
Step 1: Setting the Scene
-
Outline the moon:
Position your round object (like a paper plate or bowl) slightly above the center of the canvas. Lightly trace around it with a pencil to define your moon’s shape. -
Define the horizon:
Draw a horizontal line across the canvas about one-third of the way up from the bottom. This separates the sky from the ocean. -
Sketch the rock:
On the right side, starting from the bottom edge, sketch a large, rounded rock shape that rises above the horizon line and overlaps the bottom right edge of your moon circle. -
Outline the mermaid:
In the center of the rock, sketch the silhouette of the seated mermaid. Keep it simple—focus on the curve of the back, the bent knees, and the long hair flowing down her back. Don’t worry about facial features; this will be a solid shadow.
Clean Lines
For a perfect moon circle, paint the white moon first and let it dry. Then, paint the blue sky around it, carefully cutting in the edge. This is easier than trying to fill a circle perfectly.
Step 2: Painting the Sky and Moon
-
Block in the night sky:
Mix a dark blue using Phthalo Blue and a tiny bit of Black. Paint the entire sky area around the moon, getting darker as you move toward the top corners. -
Create a glow:
While the blue is still slightly wet, carefully blend a lighter blue (mix blue with a little white) right around the outer edge of the pencil circle to create a soft atmospheric glow. -
Base coat the moon:
Fill in the moon circle with a mix of Titanium White and a tiny drop of Cream. This doesn’t need to be perfectly smooth; texture adds character. -
Add lunar texture:
Using a dry brush technique, dab very small amounts of light grey or unmixed Cream onto the white moon to create craters and surface details. Keep the center slightly brighter than the edges.
Step 3: The Water and Reflection
-
Paint the dark water:
Paint the water area on the left and right (avoiding the center strip under the moon) with your darkest blue mix. Use horizontal strokes to mimic the surface of the ocean. -
Establish the reflection base:
Directly under the moon, paint a vertical column of lighter blue mixed with white. Blend the edges of this column horizontally into the dark water so there are no hard vertical lines. -
Add shimmering highlights:
Load a small brush with pure Titanium White and Cream. Using short, choppy horizontal dashes, paint the brightest reflection right down the center of the water column. -
Refine the ripples:
As you move away from the center reflection, make your white dashes smaller and thinner, fading them out into the dark blue water.
Make it Sparkle
Mix a tiny amount of iridescent mixing medium or glitter glaze into the white paint used for the moonlight reflection on the water to make the whole piece shimmer.
Step 4: Silhouettes and Details
-
Fill the rock:
Using pure Black paint, fill in the rock shape. Ensure the top edge is crisp against the moon and sky. -
Add rock dimension:
Mix a dark grey color. While the black rock is still tacky, lightly highlight the top ridges of the rock where the moonlight would hit it, giving it form and volume. -
Paint the mermaid:
Switch to your fine liner brush and carefully fill in the mermaid silhouette with solid Black. Pay close attention to the delicate points like the fingers, nose, and the tip of the tail or feet. -
Define hair strands:
Flick the liner brush slightly at the ends of the hair silhouette to create loose, flowing strands caught in a breeze. -
Add stars:
Dip the tip of your smallest brush or use a toothpick to dot tiny white stars in the dark blue sky. Add a few larger, cross-shaped stars for variety. -
Final water touches:
I like to add a few very thin white lines right at the base of the rock where the water meets the stone, creating a slight foamy edge.
Allow the thickest parts of the texture to dry completely before displaying your magical night seascape


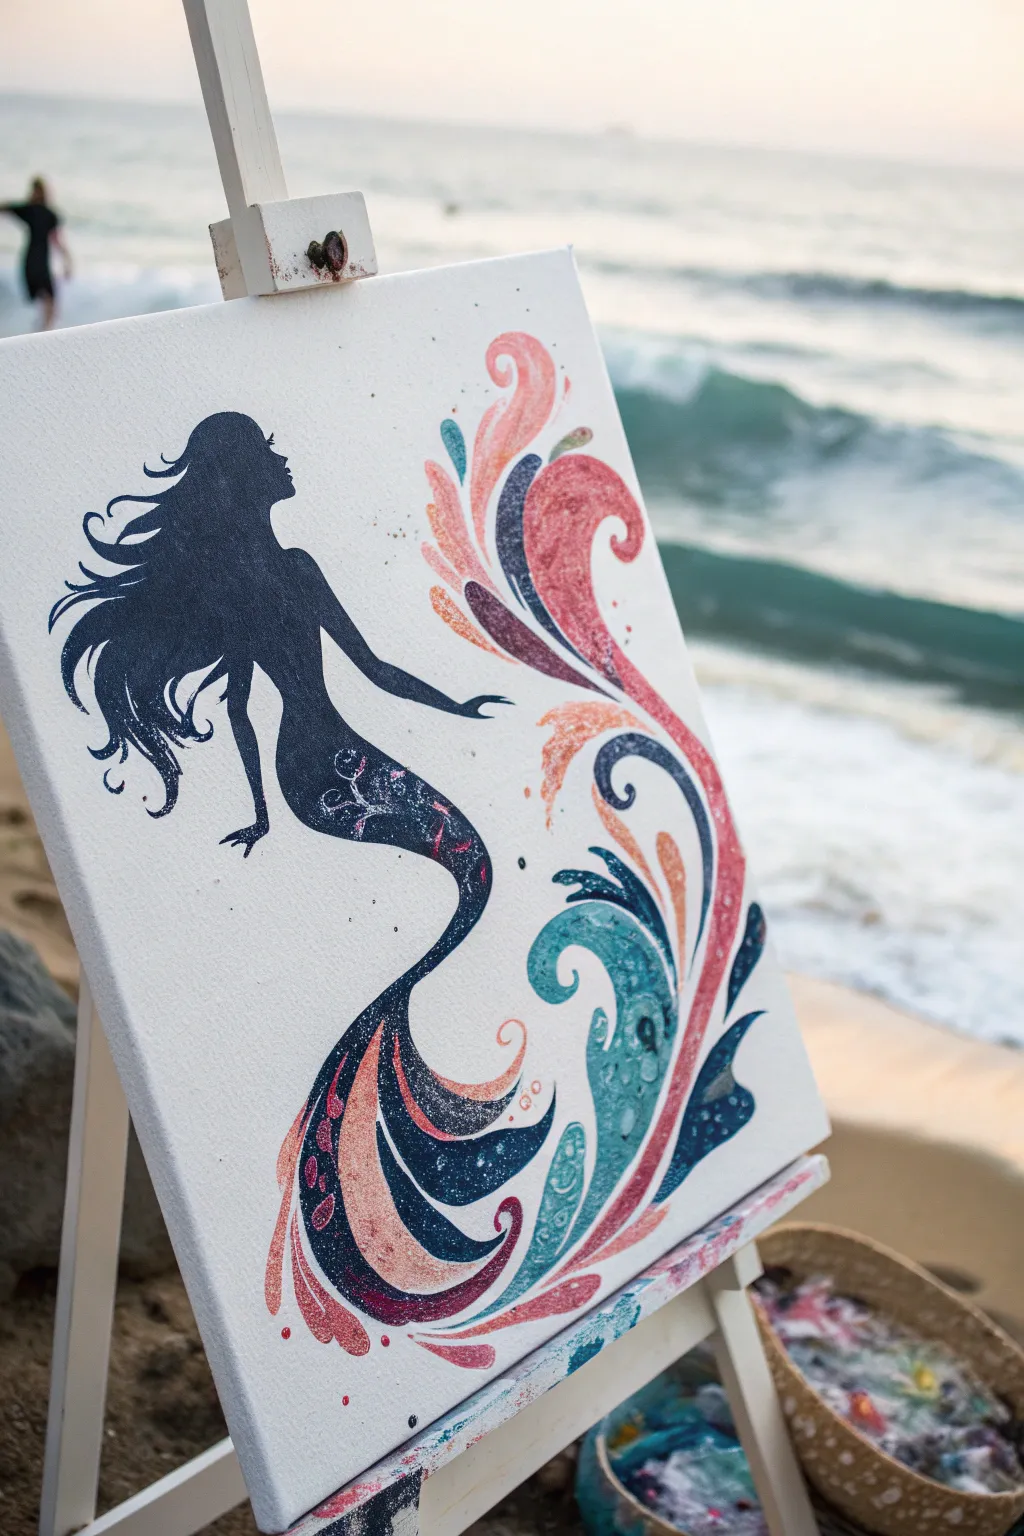
Sunset Gradient Mermaid Profile
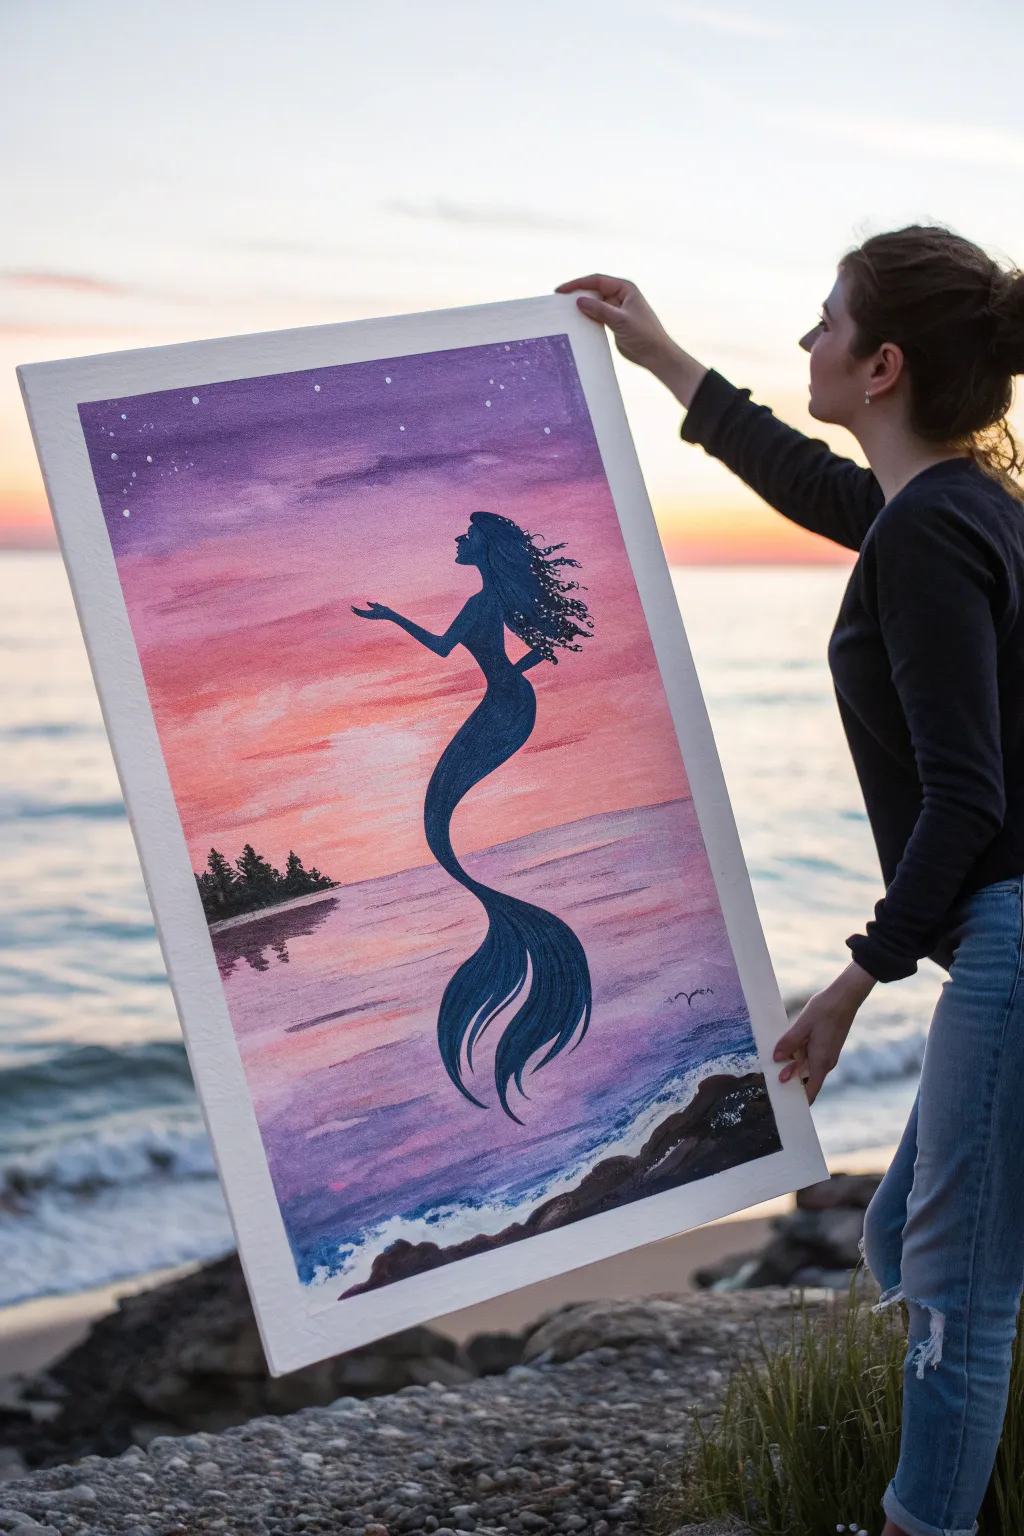
Capture the magic of twilight with this stunning acrylic painting, featuring a graceful mermaid silhouette against a vibrant gradient sky. The seamless blend of purples, pinks, and oranges creates a dreamy atmosphere, while the bold silhouette adds a touch of mystery.
How-To Guide
Materials
- Large stretched canvas (at least 18×24 inches)
- Acrylic paints: Deep Violet, Magenta, Salmon Pink, Titanium White, Ultramarine Blue, Lamp Black
- Large flat brush or foam brush (2-3 inch width)
- Medium flat brush (1 inch)
- Small round brush (size 2 or 4)
- Detail liner brush (size 0 or 00)
- Palette or paper plate
- Cup of water and paper towels
- Pencil and eraser
- Masking tape (for clean edges, optional)
Step 1: Painting the Gradient Sky
-
Establish the horizon line:
Use a pencil to lightly mark your horizon line about one-third of the way up from the bottom of the canvas. This separates your sky from the sea. -
Mix the sky colors:
Prepare three main pools of color on your palette: a deep violet mixed with a touch of blue for the top, a vibrant magenta for the mid-section, and a soft salmon pink (mix pink with a little orange and white) for near the horizon. -
Apply the top layer:
Using your large flat brush, apply the deep violet mixture across the top third of the canvas using long, horizontal strokes. Ensure the paint is somewhat fluid to help with blending. -
paint the middle section:
While the violet is still wet, wash your brush and apply the magenta directly below it. Quickly work the brush back and forth where the two colors meet to create a soft, seamless transition. -
Finish the sunset glow:
Clean your brush again and apply the salmon pink near the horizon line, blending it upward into the magenta. The goal is a smooth gradient from dark night to sunset glow. -
Add the stars:
Once the sky is tacky or dry, dip a toothbrush or stiff brush into watered-down white paint. Use your thumb to flick tiny specks across the purple section to create a starry effect. Add a few larger dots with a small brush for distinct stars.
Step 2: Creating the Sea and Foreground
-
Paint the water base:
Mix a lighter version of your violet and magenta. Paint the water section below the horizon using horizontal strokes, letting the colors mirror the sky but slightly muted and darker. -
Add water reflections:
With a smaller flat brush, add horizontal streaks of the salmon pink and white just below the horizon to mimic the sunset reflecting on the waves. -
Paint the distant island:
Using black paint and a small flat brush, tap in a small island shape on the left horizon line. Use vertical dabbing motions to suggest tiny pine trees silhouetted against the light. -
Create the rocky shore:
In the bottom right corner, paint varied rocky shapes using black. Add subtle highlights with grey or dark brown to give the rocks dimension and texture. -
Add sea foam:
Use a dry brush technique with a tiny amount of white paint to dab along the edge of the rocks and the bottom of the canvas, creating the look of crashing waves and sea foam.
Blending Woes?
If acrylics dry too fast to blend, mist the canvas lightly with water or add a slow-drying retarder medium to your paint to keep it workable longer.
Step 3: The Mermaid Silhouette
-
Sketch the outline:
Wait until the background is fully dry. Lightly sketch the mermaid’s profile in the center. Start with the head looking up, an arched back, and a curving tail that flicks upward. -
Fill the silhouette:
Using your medium round brush and pure black paint (or a very dark blue-black), carefully fill in the mermaid’s body. Paint smoothly to ensure opaque coverage. -
Detail the hair:
Switch to your liner brush. Paint the hair flowing backward, using quick, wispy strokes to make it look like it’s floating in the breeze. -
Refine the hands and arms:
Use the liner brush to define the delicate shape of her arm reaching out and her hand cupping the air. This gesture is the focal point, so take your time here. -
Detail the tail fin:
Paint the tail fin with flowing, curved strokes that taper into sharp points. I like to leave tiny gaps or create split ends in the fin to give it an ethereal, aquatic feel. -
Add subtle highlights:
Mix a dark navy blue. Carefully paint a thin line along the top of her shoulder, arm, and tail curve to suggest moonlight hitting her silhouette, giving the figure volume.
Make it Sparkle
Once the painting is sealed and dry, add tiny adhesive rhinestones to the stars or mix iridescent glitter medium into the tail fin for extra magic.
Step back and admire your serene twilight masterpiece


Underwater Mermaid With Floating Hair
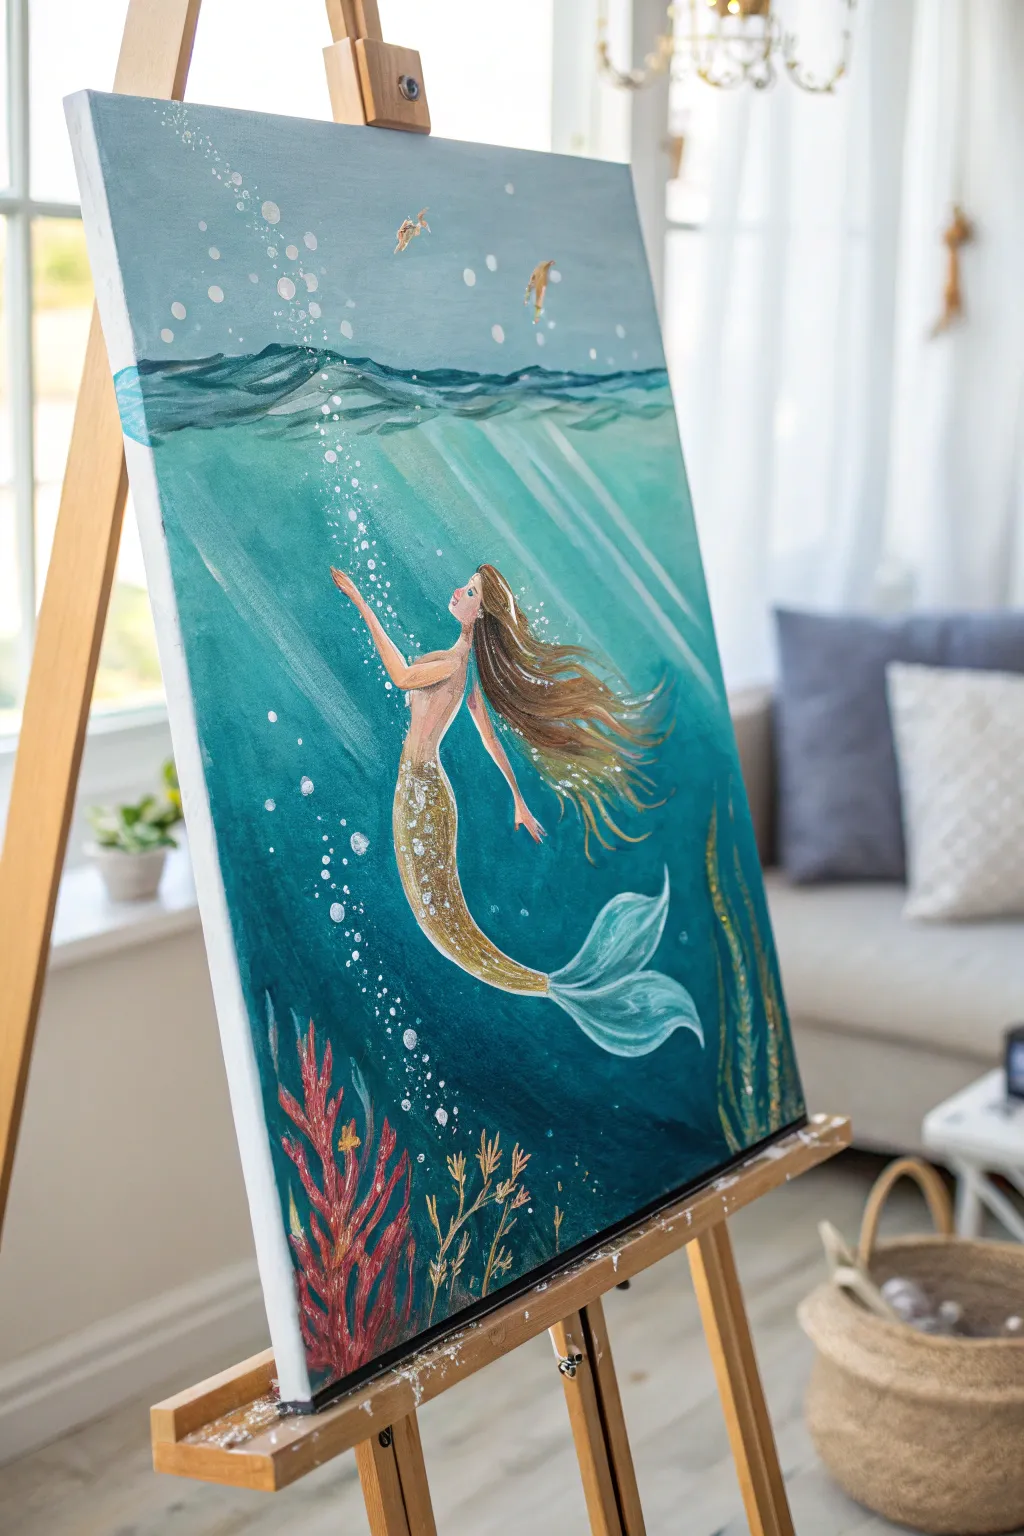
Capture the serenity of the deep blue with this vertical acrylic painting featuring a mermaid swimming toward the surface light. The piece utilizes soft blending techniques to create convincing underwater light rays and shimmering bubble effects.
How-To Guide
Materials
- Stretched vertical canvas (e.g., 16×20 inches)
- Acrylic paints: Phthalo Blue, Turquoise, Titanium White, Burnt Umber, Yellow Ochre, Gold Metallic, Red Oxide, Sap Green
- Large flat wash brush (1-2 inch)
- Medium filbert brush
- Small round detail brush (size 0 or 1)
- Fan brush
- Water cup and paper towels
- Palette or mixing plate
- Pencil for sketching
Step 1: Creating the Ocean Depth
-
gradient base:
Begin by covering the entire canvas. Mix Phthalo Blue with a touch of black or dark green for the very bottom third. As you move upward, gradually mix in Turquoise and then increasing amounts of Titanium White to create a smooth gradient from deep ocean depth to surface light. -
surface texture:
While the top section is still slightly damp, use a clean, dry brush to add horizontal, choppy strokes in pure White and very light Blue across the top edge to simulate the water’s surface line. -
light rays:
Once the background is dry, mix a glazing medium or lots of water with Titanium White. Using a large flat brush or a fan brush, drag diagonal streaks from the top surface down towards the bottom right to create sunbeams filtering through the water.
Step 2: Painting the Mermaid
-
basic sketch:
Lightly sketch the mermaid’s silhouette with a pencil. Position her diagonally, swimming upwards, with arms reaching toward the light bubbles. -
skin tones:
Mix a basic skin tone using White, a speck of Red Oxide, and Yellow Ochre. Block in the face, arms, and torso. Don’t worry about perfect shading yet; just get the shapes solid. -
golden tail base:
Paint the tail shape using Yellow Ochre mixed with a little White. Ensure the tail curves gracefully upward, ending in a wide, flowy fin. -
shimmering scales:
Once the tail base is dry, use your Gold Metallic paint. Dab small, scale-like spots over the ochre base. I find using the tip of a filbert brush works best for this texture. -
tail fin details:
Paint the tail fluke (fin) using a mix of White and light Turquoise to make it look semi-transparent. Blend the gold of the tail body into this fin for a seamless transition. -
flowing hair:
Using Burnt Umber and a medium round brush, paint long, flowing strands of hair. Make sure they float upwards and outwards to mimic the effect of water buoyancy. -
hair highlights:
Mix a lighter brown using the Umber and Ochre. Add thin streaks to the top of the hair clumps where the surface light would hit them.
Glazing for glowing water
Mix gloss medium with your white paint for the sun rays. This makes the paint translucent, allowing the blue water to show through for a realistic glow.
Step 3: Ocean Floor & Details
-
red coral structure:
In the bottom left corner, paint branch-like structures using Red Oxide. Keep the edges slightly soft to maintain the underwater feel. -
coral highlights:
Add dimension to the coral by mixing Red Oxide with White and highlighting the tips and right-side edges of the branches. -
sea grass:
On the bottom right and scattered along the bottom edge, paint waving blades of grass using Sap Green mixed with a little Blue. Use long, fluid strokes. -
grass definition:
Add thin lines of lighter Green/Yellow mix to the sea grass blades to separate them from the dark background. -
bubble stream:
Dip the back of a paintbrush handle or a dotting tool into Titanium White. Create a trail of dots rising from the mermaid’s hands toward the surface, varying the sizes from tiny specks to larger circles. -
final sparkles:
Add tiny white highlights to the mermaid’s shoulder, the curve of the tail, and the center of the largest bubbles to make them shine.
Trouble with smooth blending?
If your acrylics dry too fast while blending the water gradient, spray a fine mist of water on the canvas or mix in a slow-drying retarder medium.
Step back and admire the tranquil movement you’ve captured in your underwater scene


Simple Scale Texture With Dabbing
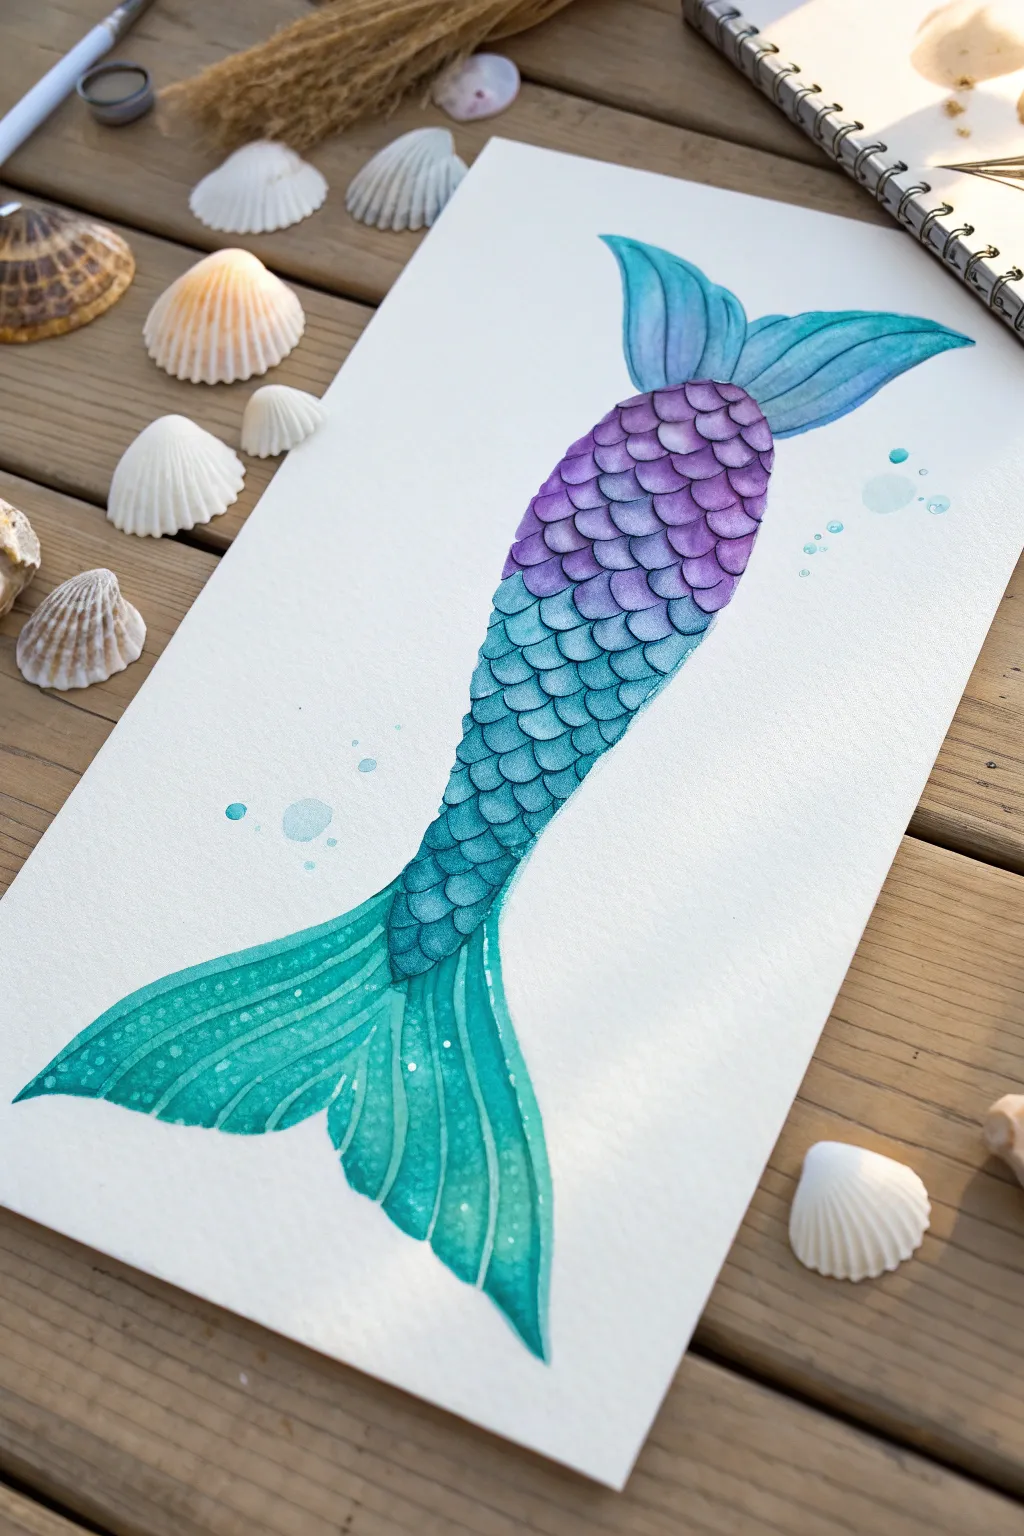
Capture the magic of the ocean with this elegant mermaid tail study, featuring a seamless gradient from deep violet to aquamarine. Using diluted acrylics or watercolors creates a translucent, aquatic feel perfect for beginners wanting to practice precision and blending.
Step-by-Step Guide
Materials
- High-quality watercolor paper or mixed media paper (heavyweight)
- Acrylic paints (purple, ultramarine blue, teal/turquoise, white)
- Small round brush (size 2 or 4)
- Fine liner brush (size 0 or 00)
- Pencil and eraser
- Palette for mixing
- Water cups
Step 1: Sketching the Silhouette
-
Outline the Shape:
Begin by lightly sketching the S-curve of the mermaid tail in the center of your paper. Make the top section wider where the waist would be, tapering down to a narrow point before flaring out into the tail fin. -
Add the Fins:
Sketch the large, flowing caudal fin at the bottom, giving it soft, rippled edges like fabric underwater. Add a smaller, whimsical fin structure at the very top waistline for extra flair. -
Grid the Scales:
Lightly draw intersecting diagonal lines across the body of the tail to create a diamond grid. This guideline ensures your scales remain uniform in size and follow the curvature of the tail properly.
Uneven Scales?
If your scales look messy, don’t rush. Use the ‘dot’ method: place a small dot of paint where the bottom center of the scale should be, then paint the curve up to the corners.
Step 2: Painting the Scales
-
Mix the Purple:
On your palette, mix a vibrant violet using purple and a touch of white to make it opaque but bright. Add water to thin it slightly for smooth flow. -
Start at the Top:
Using your small round brush, paint the first few rows of U-shaped scales at the top waistline. Fill them in solidly, keeping the rounded bottom edge crisp. -
Transition to Blue:
As you move down a few rows, begin mixing a little ultramarine blue into your purple. Paint the next section of scales, allowing the color to shift gradually toward a cool indigo. -
Shift to Teal:
Midway down the tail, start introducing teal into your mix. Paint the middle rows with this blue-green hybrid color, ensuring each scale overlaps the gap of the two scales above it. -
Finish with Turquoise:
For the narrowest part of the tail near the bottom fin, switch to a pure teal or turquoise mix. I find using a slightly smaller brush here helps maintain the tiny scale details as the tail tapers. -
Add Depth:
Once the base layer of scales is dry, take a slightly darker version of each section’s color and paint a thin shadow line along the bottom curve of each scale to make them pop.
Pro Tip: Volume
To make the tail look rounded and 3D, slightly darken the paint color on the extreme left and right sides of the tail, keeping the center scales lighter and brighter.
Step 3: Fins and Details
-
Base Coat the Fins:
Wet the fin areas with clean water first, then drop in diluted teal paint. Let the color flow naturally, concentrating darker pigment near the base where it connects to the tail. -
Create Texture:
While the fins are still damp, use a clean, dry brush to lift out faint lines, simulating the ridges found in fish fins. Alternatively, paint darker teal lines once dry to define the structure. -
Top Fin Detail:
Repeat the process for the small waist fin, using a blend of the blue and purple tones to connect it visually to the top scales. -
Highlighting:
Using your fine liner brush and watered-down white acrylic, add tiny specks or thin lines to the center of the fins to simulate light hitting wet skin. -
Bubble Accents:
Mix a very watery pale blue. Paint a few scattered circles around the tail to represent bubbles. Let the centers remain dry or pale to make them look transparent. -
Final Cleanup:
Once absolutely everything is dry, gently erase any visible pencil guidelines from your initial grid, leaving a clean, crisp illustration.
Frame this aquatic beauty or use it as a stunning handmade card for an ocean lover
BRUSH GUIDE
The Right Brush for Every Stroke
From clean lines to bold texture — master brush choice, stroke control, and essential techniques.
Explore the Full Guide
Mermaid Tail Emerging From the Sea
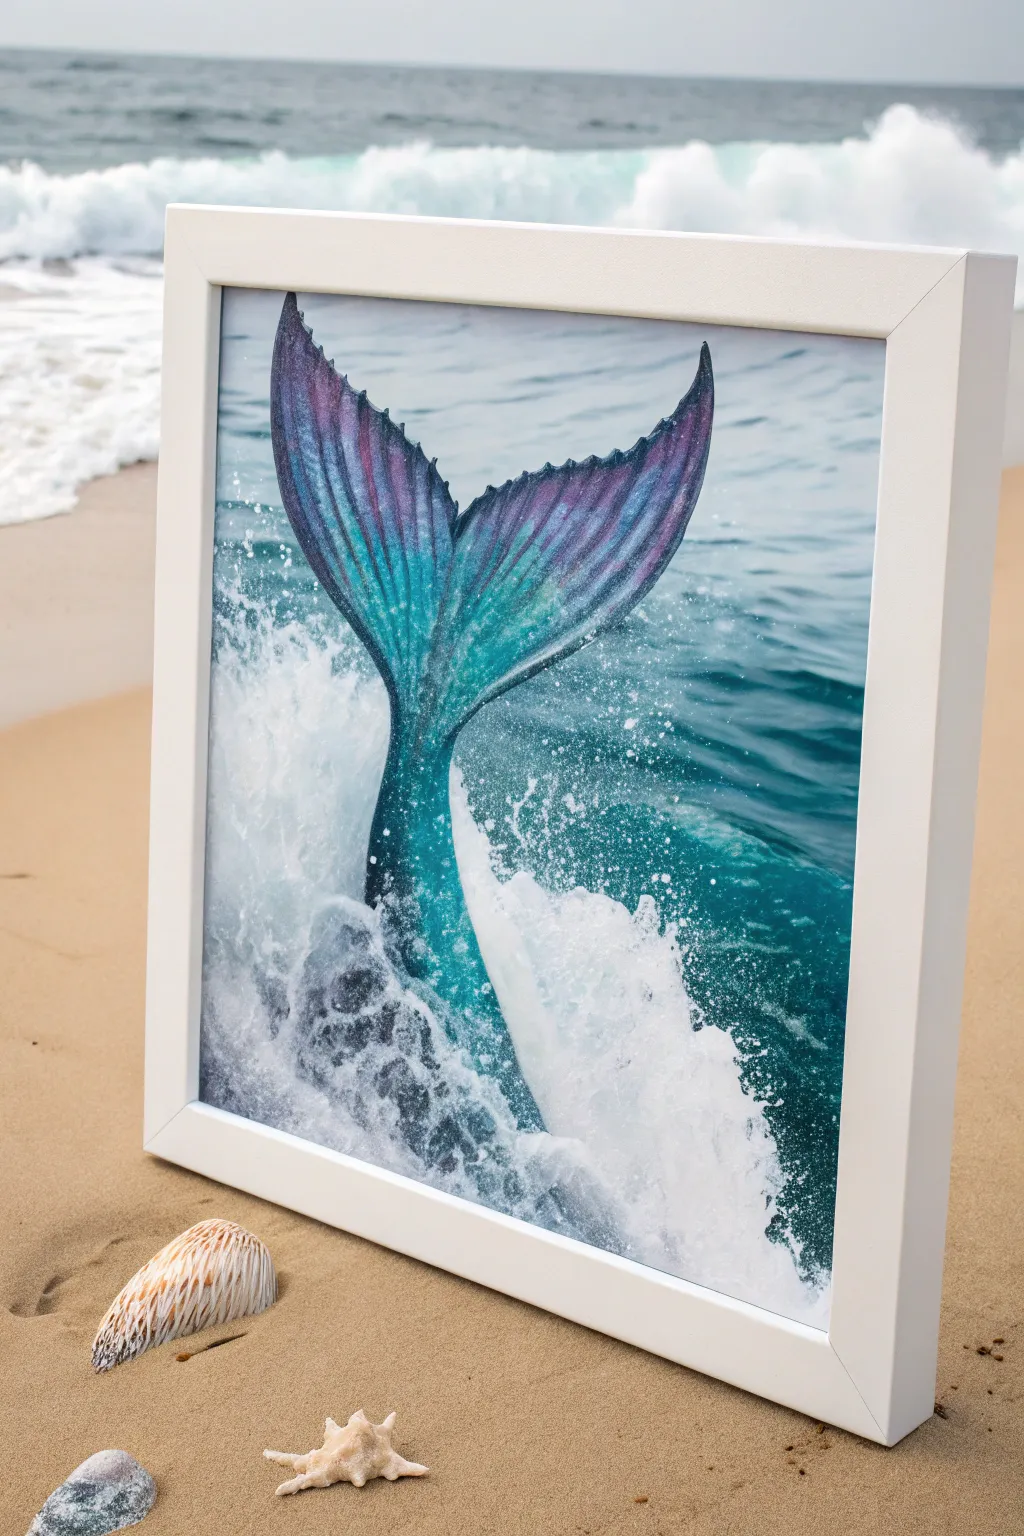
Capture the magic of the ocean with this vibrant acrylic painting featuring an iridescent mermaid tail emerging from crashing waves. The blend of deep teals, purples, and frothy white splashes creates a dynamic and enchanting scene perfect for coastal decor.
Step-by-Step
Materials
- Square canvas (12×12 or similar)
- Acrylic paints: Phthalo Blue, Turquoise, Dioxazine Purple, Titanium White, Ultramarine Blue, Black
- Iridescent or metallic medium (optional)
- Flat brushes (large and medium)
- Round brushes (small and fine liner)
- Fan brush or old scruffy brush
- Palette and container for water
- Pencil for sketching
- Paper towels
Step 1: Setting the Scene
-
Sketch the Composition:
Begin by lightly sketching the outline of the mermaid tail in the center of the canvas. Draw a curved line for the spine to suggest motion, then flesh out the flukes on either side. Keep the bottom concealed where the water will splash. -
Block in the Water Background:
Mix Phthalo Blue with a touch of Ultramarine and White to create a mid-tone ocean blue. Using a large flat brush, paint horizontal strokes across the background, avoiding the tail area. Vary the pressure to create natural ripples. -
Deepen the Depths:
While the background is still slightly damp, add darker streaks of Phthalo Blue and a tiny bit of Black to the lower corners and beneath where the tail rises. This adds depth to the water. -
Add Distant Waves:
Mix a lighter turquoise shade with white. Near the top horizon line, add softer, blurry horizontal strokes to suggest distant waves or calmer water.
Step 2: Painting the Tail
-
Base Coat the Tail:
Fill in the tail silhouette with a solid coat of turquoise. This doesn’t need to be perfectly smooth, as texture will help with the scales later. -
Add Purple Gradients:
Before the base coat fully dries, blend Dioxazine Purple onto the tips of the flukes and along the outer edges of the tail. Use a damp brush to soften the transition between purple and turquoise. -
Create Muscle Definition:
Using a smaller round brush and a dark mix of purple and blue, paint thin lines radiating from the center spine of the tail out towards the edges of the fin. These lines define the structure of the tail. -
Enhance Highlights:
Mix a pale mint green or add a touch of iridescent medium to Titanium White. Paint the center vertical area of the tail to make it look rounded and catching the light. -
Detail the Fluke Tips:
Use a liner brush with dark purple to sharpen the jagged edges of the tail fin. Add tiny, darker veins near the tips for realistic texture.
Scale Texture Tip
For easy scales, stretch a piece of old fishnet stocking over the tail area and sponge over it with a lighter color before painting the final details.
Step 3: Creating the Splash
-
Block in the Splash Base:
Mix a very light grey-blue using White and a speck of Phthalo Blue. With a medium brush, dab in the general shape of the water splashing up around the base of the tail. -
Build the Foam Volume:
Switch to pure Titanium White on a fan brush or an old, splayed bristle brush. Loading it heavily, protect the tail area, and stipple (dab repeatedly) over the grey-blue base to create thick, frothy foam. -
Add Spray Droplets:
Load a toothbrush or stiff brush with watery white paint. Use your thumb to flick fine mist and droplets around the main splash area for an energetic, wet effect. -
Define Water Movement:
With a small round brush and slightly thinned white paint, draw erratic, curvy lines pulling up from the foam. These represent thin streams of water caught in the air. -
Blend the Tail Entry:
Take a bit of the white foam color and dab it slightly over the bottom part of the tail. This makes it look like the tail is truly submerged and breaking through the surface, rather than floating on top. -
Final Highlights:
Add touches of pure white to the very top edges of the water splashes and the brightest point of the tail curve to maximize contrast.
Make it Sparkle
Once the painting is fully dry, glaze over the purple and teal sections of the tail with a clear glitter medium or iridescent varnish for a magical shimmer.
Frame your mermaid masterpiece in a simple white frame to let those ocean colors truly pop
Mermaid Portrait With Soft Facial Features
Capture the mystic beauty of the sea with this gentle mermaid portrait, focusing on soft blending and dreamy color palettes. The artwork features a serene expression framed by cascading teal hair, perfect for practicing delicate facial features and atmospheric layering.
Step-by-Step Tutorial
Materials
- Canvas (16×20 or similar)
- Acrylic paints (Titanium White, Burnt Sienna, Yellow Ochre, Alizarin Crimson, Phthalo Blue, Phthalo Green, Raw Umber)
- Wide flat brush (for background)
- Filbert brushes (sizes 4, 6, 8)
- Round detail brushes (sizes 0, 2)
- Palette and water cup
- Paper towels
- Pencil (HB or H) for sketching
- Slow-drying blending medium or retarder (optional but recommended)
Step 1: Preparation and Sketching
-
Prime the background:
Mix a very pale wash of Phthalo Green, Phthalo Blue, and a lot of Titanium White. Cover the entire canvas with this soft, misty teal background. Use horizontal strokes to suggest a distant ocean atmosphere and let it dry completely. -
Outline the composition:
Using an HB pencil, lightly sketch the profile of the mermaid. Focus on the tilt of the head, the upturned nose, and the sweeping motion of the hair. Keep your lines faint so they don’t show through the pale skin tones later. -
Block in base skin tones:
Create a base flesh tone using Titanium White, a touch of Yellow Ochre, and a tiny dot of Alizarin Crimson. Apply this flatly to the face and neck area to establish coverage.
Smooth Operator
Use a slow-drying medium with your acrylics. This mimics oil paint blending capability, essential for achieving that porcelain-smooth skin without harsh drying lines.
Step 2: Face and Features
-
Establish shadows:
Mix a slightly darker version of your skin tone by adding a bit of Burnt Sienna. Apply this to the shadow areas: under the chin, the hollow of the cheek, the eye socket, and the side of the nose. -
Blend the skin:
While the paint is still slightly tacky (or using a blending medium), smooth the transition between the base tone and shadows using a clean, damp filbert brush. The key to this soft look is eliminating harsh lines. -
Add the blush:
Glaze a very watered-down mix of Alizarin Crimson and Burnt Sienna onto the cheeks, the tip of the nose, and the lips. This ‘strawberry’ tone gives her that youthful, sun-kissed look. -
Detail the eyes:
Paint the iris using a bright mix of Phthalo Blue and White. Add a dark Raw Umber pupil and outline the upper lid. Use your smallest round brush to flick delicate eyelashes. -
Refine facial highlights:
Mix a nearly pure white with a hint of flesh tone. Dab this onto the tip of the nose, the highest point of the cheekbone, and the bottom lip to bring the face forward. -
Add freckles:
Mix a watery brown wash. Load a toothbrush or stiff brush and gently flick it with your thumb to create realistic, irregular freckles across the nose and cheeks.
Step 3: Hair and Atmosphere
-
Base layer for hair:
Mix Phthalo Green, a touch of Phthalo Blue, and White to create a medium teal. Block in the main shapes of the hair, following the flow established in your sketch. -
Add depth to locks:
Create a deeper shadow teal by adding more blue and a touch of Raw Umber. Paint in the negative spaces between hair strands and near the neck to create volume. -
Create soft strands:
I like to mix a very pale mint color (White + tiny bit of Green). Using a long liner brush or a distinct edge of a filbert, pull long, flowing strands from the roots to the tips to simulate movement. -
Integrate pastel highlights:
Introduce subtle strokes of pale pink or peach into the lower sections of the hair. This reflects the skin tone and adds a mystical, iridescent quality to the locks. -
Embellish the hair:
Using the tip of a small round brush, dot small pink and white clusters near the temple to represent tiny flowers or coral pieces stuck in her hair. -
Paint the decorative leaves:
At the bottom left, sketch and paint translucent, leaf-like shapes rising near her shoulder. Use very watered-down teals and pinks so they look ghostly and ethereal, overlapping the hair slightly.
Ocean Sparkle
Once fully dry, apply iridescent medium or pearlescent glaze over the hair strands and eyelids to make the mermaid shimmer as if she’s catching the surface light.
Step 4: Final Touches
-
Intensify the eyes:
Add a stark white reflection dot to the pupil of the eye. This breathes life into the portrait instantly. -
Soft focus check:
Step back and check edges. If hair outlines look too sharp against the background, dry-brush a little of the background color over the edges to soften them, effectively pushing the subject into the atmosphere.
Step back and admire the serene, oceanic mystery you have captured on your canvas

PENCIL GUIDE
Understanding Pencil Grades from H to B
From first sketch to finished drawing — learn pencil grades, line control, and shading techniques.
Explore the Full Guide
Starfish and Shell Hair Accessories
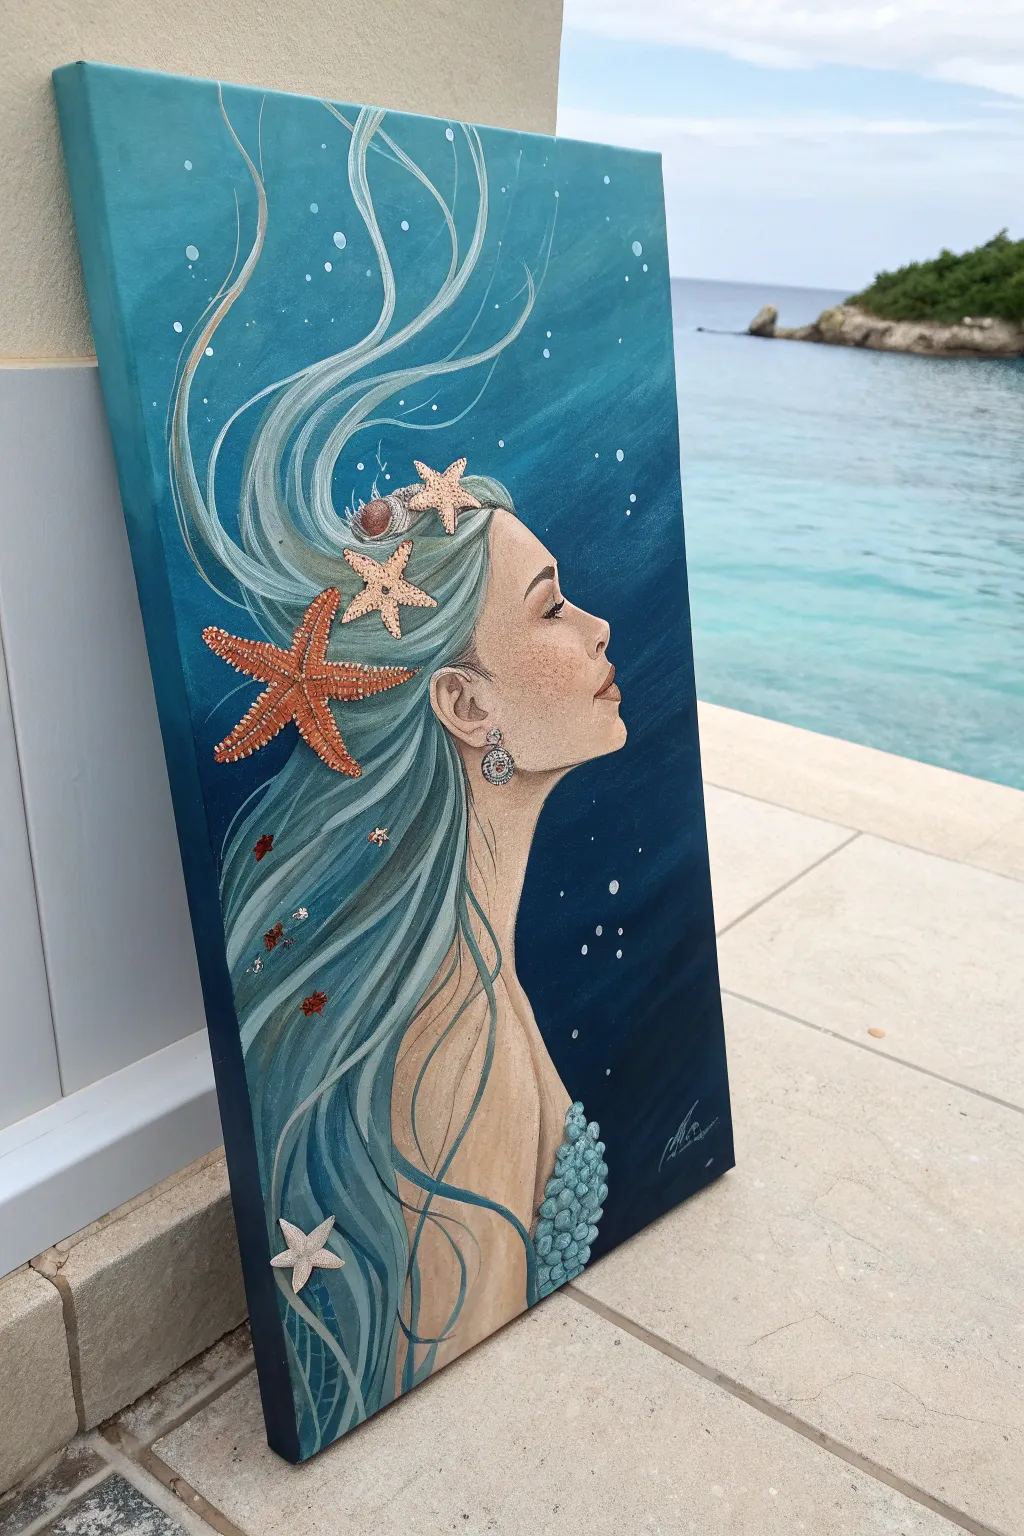
Capture the serenity of the ocean with this striking profile portrait, blending smooth acrylic gradients with the tactile beauty of real starfish and textured scales. This mixed-media piece combines traditional portrait painting with 3D elements to bring the mermaid’s flowing hair and jeweled accessories to life.
Step-by-Step Guide
Materials
- Rectangular canvas (16×24 or similar vertical aspect ratio)
- Acrylic paints: Phthalo Blue, Ultramarine, Titanium White, Teal, Burnt Sienna, Yellow Ochre, Skin tone mix (Naples Yellow/Portrait Pink)
- Flat brushes (1 inch, 1/2 inch)
- Round detail brushes (size 0, 2, and 4)
- Assorted dried starfish (varying sizes)
- Strong craft adhesive or heavy gel medium
- Puffy paint or dimensional fabric paint (teal or pearlescent blue)
- Pencil and eraser
- Palette and water cup
Step 1: The Ocean Depths & Sketch
-
Create the gradient background:
Start by mixing Phthalo Blue with a touch of black or Payne’s Gray for the bottom right corner, creating a deep abyss. Gradually blend upwards toward the top left, introducing Teal and then substantial amounts of Titanium White to create a light-filled surface effect. Use a large flat brush and long, diagonal strokes for a seamless transition. -
Add surface bubbles:
While the background is still slightly tacky or after drying, use a small round brush to paint scattered bubbles rising toward the light. Use diluted white paint for a translucent look, adding tiny solid white highlights on the upper curve of each bubble. -
Sketch the silhouette:
Once the background is completely dry, lightly sketch the profile of the mermaid. Focus on the upward tilt of the chin, the elegant slope of the neck, and the general flow of the hair which should mimic underwater currents.
Step 2: Face & Skin Tones
-
Base coat the skin:
Mix a base skin tone using White, Yellow Ochre, and a tiny drop of Red or Burnt Sienna. Apply a smooth, even layer to the face, neck, and shoulder area, avoiding the hair space. -
contouring the features:
Mix a slightly darker shade of your skin tone. gently shade under the jawline, the hollow of the neck, the nostril, and the eye socket to create dimension. -
Painting the eye and lips:
Use a detail brush to paint the closed eyelid with a dark brown line for lush lashes. Paint the lips with a soft dusty rose color, keeping the edges soft. -
Adding freckles:
Dilute Burnt Sienna with water until it’s very thin. Dip a toothbrush or stiff bristle brush into it and gently flick it with your thumb to splatter tiny, realistic freckles across the nose and cheek.
Sticky Situation?
If real starfish won’t stick, sandpaper the canvas spot lightly to roughen the surface before gluing. Heavy gel medium works best for this weight.
Step 3: Flowing Locks
-
Block in hair color:
Paint the main mass of hair using a mix of Teal and White. Don’t worry about individual strands yet; just fill the shape you sketched earlier. -
Define the strands:
Using a liner brush and darker Blue-Green paint, create long, sweeping lines that follow the curves of the hair to suggest movement and depth. -
Add highlights:
Switch to a lighter mix of White and Teal. Paint thinner, brighter strands on the ‘ridges’ of the hair waves where the light from the surface would hit. I find that varying the pressure on the brush here creates lovely, organic-looking tapered lines. -
Loose floating strands:
Extend a few wispy, individual hairs upward into the water background to emphasize the weightlessness of being submerged.
Pro Tip: Glowing Skin
Glaze a tiny amount of diluted pink over the cheekbone and shoulder tip after the skin is dry to give the mermaid a flushed, living warmth.
Step 4: Textures & Embellishments
-
Paint the earring:
Use metallic silver or white paint to carefully draw a dangling earring. Add a bright white highlight to make it look like a captured pearl or gem. -
Create the scale bodice:
At the bottom curve of the shoulder, paint rows of small ‘U’ shapes for scales. Use a mix of blues and teals. -
Add dimensional texture:
Go over the painted scales with teal puffy paint or dimensional fabric paint. Squeeze small dots or curves directly onto the canvas to give the scales a raised, tactile 3D effect. -
Prepare the accessories:
Arrange your dried starfish on the canvas to find the best placement within the hair. A large one acts as a focal point, with smaller ones trailing behind. -
Adhere the starfish:
Apply a generous amount of heavy gel medium or strong craft glue to the back of the starfish. Press them firmly onto the canvas and let them dry flat for several hours. -
Integrate the objects:
Once the glue is dry, use a tiny bit of watered-down white acrylic to lightly brush over the starfish edges or paint tiny strands of hair overlapping them slightly, so they look entangled rather than just stuck on top.
Hang your masterpiece in a bright room to let the natural shadows of the starfish add depth to your underwater scene
Kelp Forest Mermaid Scene
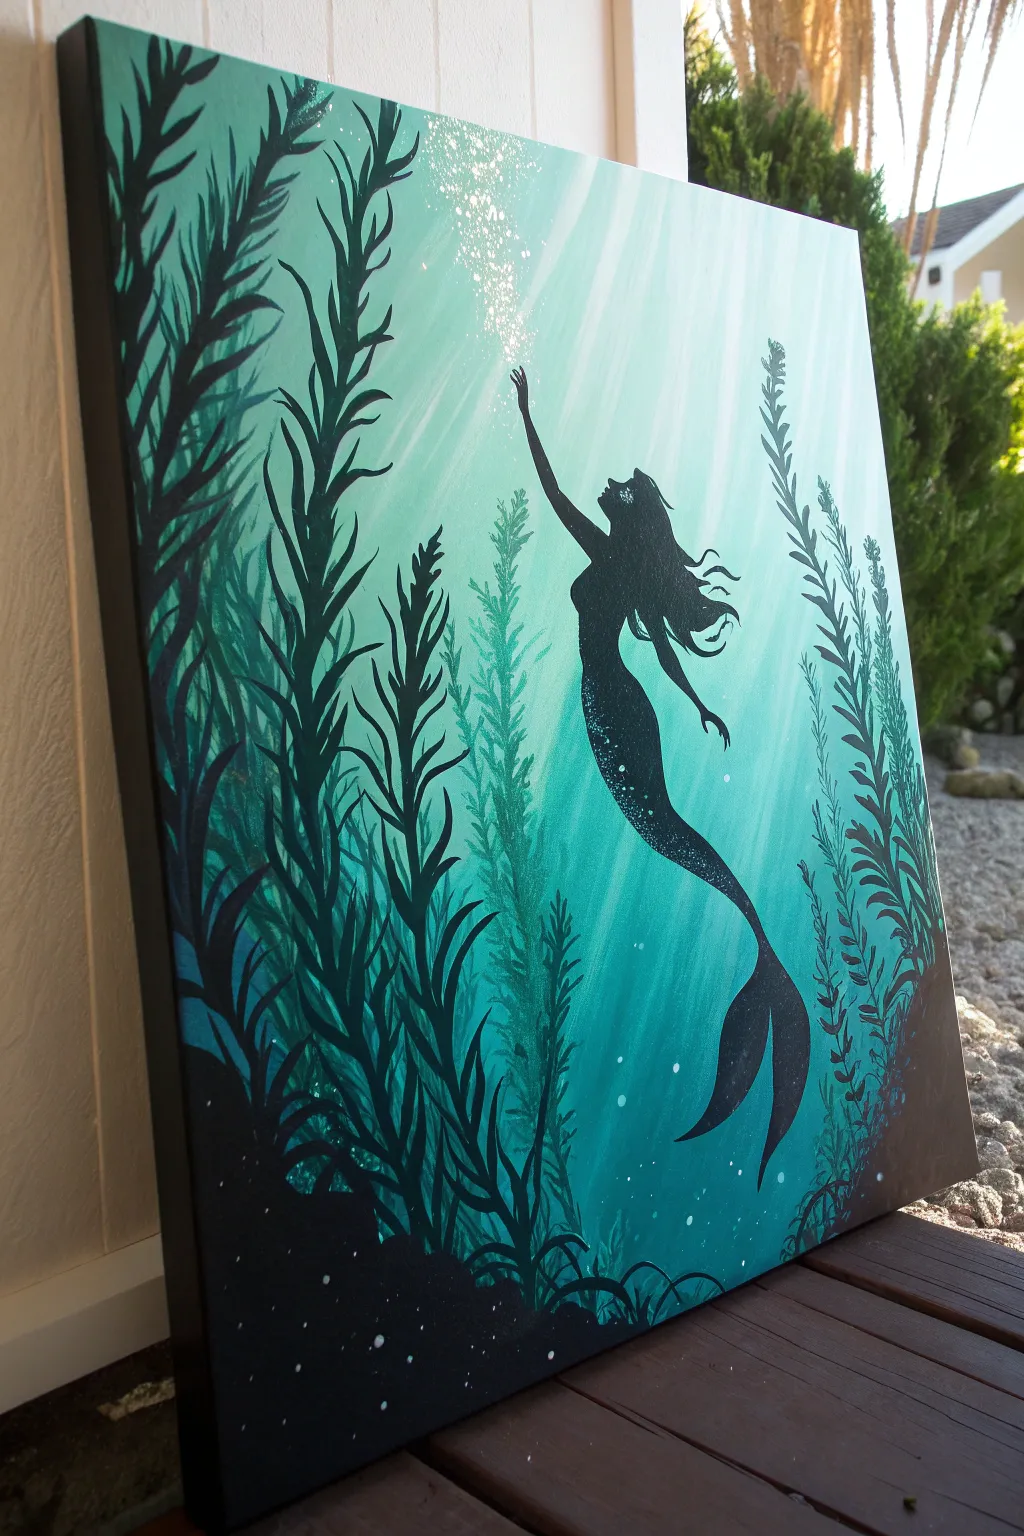
Capture the magic of an underwater world with this striking acrylic painting that balances deep ocean teals with illuminating rays of light. Using simple silhouettes against a glowing gradient, you’ll create a scene where a mermaid reaches toward the shimmering surface.
Detailed Instructions
Materials
- Rectangular canvas (e.g., 16×20 or 18×24 inches)
- Acrylic paints: Phthalo Green, Phthalo Blue, touches of Black, and Titanium White
- Large flat brush (2-inch)
- Medium flat brush
- Small round detail brush (size 1 or 2)
- Old toothbrush (for splatter effect)
- Cup of water and paper towels
- Blow dryer (optional, for speed)
Step 1: Setting the Ocean Backdrop
-
Prepare the gradient palette:
Mix three main puddles of paint: a very light aqua (mostly white with a tiny dot of Phthalo Green), a medium teal (Phthalo Green and Blue mixed), and a deep teal-green. -
Establish the light source:
Using your large flat brush, paint the top center of the canvas with your lightest aqua mixture. This will be the focal point where the light hits the water surface. -
Blend downward:
While the paint is still wet, introduce the medium teal color around the light center, blending outward and downward in sweeping, curved strokes that mimic water movement. -
Deepen the edges:
Apply the darkest teal-green mixture to the bottom third and the far sides of the canvas. Use horizontal, crisscross strokes to seamlessly blend this into the medium teal, creating a vignette effect. -
Create light rays:
Dip a clean, damp flat brush into watered-down Titanium White. Starting from the top light source, pull straight, confident streaks diagonally downward toward the bottom corners. The water makes the paint semi-transparent, looking like refracted light.
Step 2: The Mermaid Silhouette
-
Draft the outline:
Once the background is fully dry, lightly sketch the mermaid’s form with a pencil or chalk. Position her reaching upward toward the light source you painted earlier. -
Block in the shape:
Mix a very dark teal-black (mostly black with a touch of green to harmonize with the water). Using the medium flat brush, fill in the main torso and tail, ensuring the edges are opaque. -
Refine the details:
Switch to your small round brush. carefully paint the delicate arms, fingers reaching up, and the flowing hair. The hair should look weightless, floating upward and backward. -
Add subtle dimension:
While the silhouette is still slightly wet, I like to dab a tiny bit of plain teal onto the side of the mermaid facing the light. Blend it gently into the black to suggest a faint highlight on her body.
Hair Flow Trick
When painting floating hair, rotate your brush as you lift it off the canvas. This twisting motion creates tapered, natural-looking tendrils rather than stiff spikes.
Step 3: The Kelp Forest
-
Paint the foreground rocks:
Using pure black, paint an undulating, rocky ocean floor along the very bottom edge of the canvas. Keep the contour uneven to look natural. -
Start the tall kelp:
Mix a dark green-black. Using a liner or small round brush, paint long, wavy vertical lines extending from the bottom rocks all the way to the top of the canvas on the left side, and about halfway up on the right. -
Add kelp leaves:
Along these wavy stems, paint elongated, leaf-like shapes. Group them densely near the bottom and let them thin out as they reach the light. -
Layering the foliage:
Mix a slightly lighter, more transparent teal. Paint a second layer of seaweeds behind the black ones to create depth. These should look like they are further away in the murky water.
Make it Sparkle
Mix a small amount of holographic glitter medium into your white paint for the final bubbles and light rays. It adds a literal shimmer when viewed from different angles.
Step 4: Magical Final Touches
-
Create the sparkle:
Load an old toothbrush with slightly watered-down white paint. Aim it at the top light source area and flick the bristles with your thumb to create a spray of fine mist and shimmer. -
Paint rising bubbles:
With the detail brush and pure white, dot tiny circles of varying sizes rising from the seaweed and around the mermaid. Keep them concentrated near the light rays. -
Glitter accents:
Dip the very tip of your smallest brush into thick white paint and add a few sharp, distinct dots right at the mermaid’s fingertips, emphasizing the magic of her reach.
Step back and admire how the dark silhouette contrasts with your glowing ocean depths, creating a truly mesmerizing underwater story.


Mermaid and Dolphins in Silhouette

Capture the serene beauty of a pink and purple sunset reflecting over calm waters in this acrylic landscape painting. The scene features delicate cloud formations and striking silhouette trees that frame the glowing horizon perfectly.
Step-by-Step Tutorial
Materials
- Square canvas (approx. 12×12 inches)
- Acrylic paints: Titanium White, Magenta, Cadmium Yellow, Ultramarine Blue, Burnt Umber, Mars Black
- Large flat brush (1 inch)
- Medium filbert brush
- Small round brush for details
- Palette knife (optional for texture)
- Cup of water and paper towels
- Palette or paper plate
Step 1: Painting the Sky and Background
-
Prime the gradients:
Start with a clean, dry canvas. Mix a pale pink using Titanium White and a tiny touch of Magenta. Apply this horizontally across the middle third of the canvas where the horizon will be. -
Adding warmth:
While the pink is still wet, mix a soft peach color using White, Yellow, and a dot of Magenta. Blend this into the lower part of the sky area, just above your horizon line, to create the glowing light of the setting sun. -
Upper sky transition:
For the top third of the canvas, mix a muted lavender shade using White, a touch of Ultramarine Blue, and Magenta. Paint the top edge and blend it downwards into the pale pink area using long, horizontal strokes to create a seamless gradient. -
Creating clouds:
Using a smaller filbert brush, mix a slightly darker purple-grey. Gently dab in horizontal cloud streaks across the upper sky. I like to keep these edges soft by lightly sweeping over them with a dry brush to mimic distant, wispy clouds. -
Reflective expanse:
Mirror the sky colors onto the bottom half of the canvas for the water. Start with the peach/pink mix just below the horizon line and transition into the lavender/pink mix as you move toward the bottom edge. -
Distant land:
Mix a dark purple-grey using Ultramarine Blue and Burnt Umber. With a small round brush, paint a thin, uneven strip across the horizon line to represent the distant shoreline. Make it slightly thicker on the right side to suggest perspective.
Pro Tip: Sky Holes
Don’t paint the tree foliage as a solid block. Leave small gaps where the background sky color shows through to make the tree look realistic and airy.
Step 2: Water and Light Effects
-
Sunlight path:
Mix a bright, pale yellow-white. Using the edge of a flat brush or a small round brush, paint horizontal dashes down the center of the water. Start with small, tight dashes near the horizon and make them slightly wider and more spaced out as they come closer to the viewer. -
Water movement:
Add very subtle horizontal streaks of darker pink or light purple into the water area to suggest gentle ripples disrupting the reflection. Keep these strokes confident but sparse.
Step 3: Foreground Silhouettes
-
Mixing the darks:
Create a rich, dark color for the silhouettes by mixing Mars Black with a little Burnt Umber and Ultramarine Blue. Pure black can look flat, so this mixture adds depth. -
Main trees:
On the right side of the canvas, use your medium round brush to paint the trunks of the large trees. Let the trunks bend slightly and branch out as they go up; nature rarely makes straight lines. -
Foliage texture:
Switch to an old, splayed brush or use a stippling motion with a round brush to create the leaves. Tap the dark mixture onto the branches, leaving plenty of ‘sky holes’ so the sunset peeks through the leaves. -
Distant left bank:
On the far left horizon, paint tiny, simple shapes to suggest distant trees using the same dark mixture, but keep them much smaller and less detailed than the right foreground. -
Grassy banks:
Paint the immediate foreground at the bottom of the canvas with the dark mixture. Use upward flicking strokes to create the texture of tall grass and reeds along the water’s edge. -
Foreground highlights:
Mix a warm, earthy orange-brown. Lightly stipple this over the tops of the foreground bushes and grass to suggest the last rays of the sun catching the vegetation. -
Pathway detail:
If you want to suggest a small path or clearing in the center foreground, blend a bit of the dark earth tone with some grey-brown and gently scrub it into the bottom center area, leading the eye into the painting. -
Final touches:
Step back and assess your values. If the sun reflection needs more pop, add a final touch of pure white to the very center of the water ripples.
Troubleshooting: Muddy Clouds
If your clouds turn grey or muddy blending into the sky, let the sky layer dry completely first. Then glaze the clouds on top with a watered-down mix.
Allow your painting to dry fully before framing it to enjoy your peaceful sunset view
Stormy Sea Mermaid With Dramatic Contrast
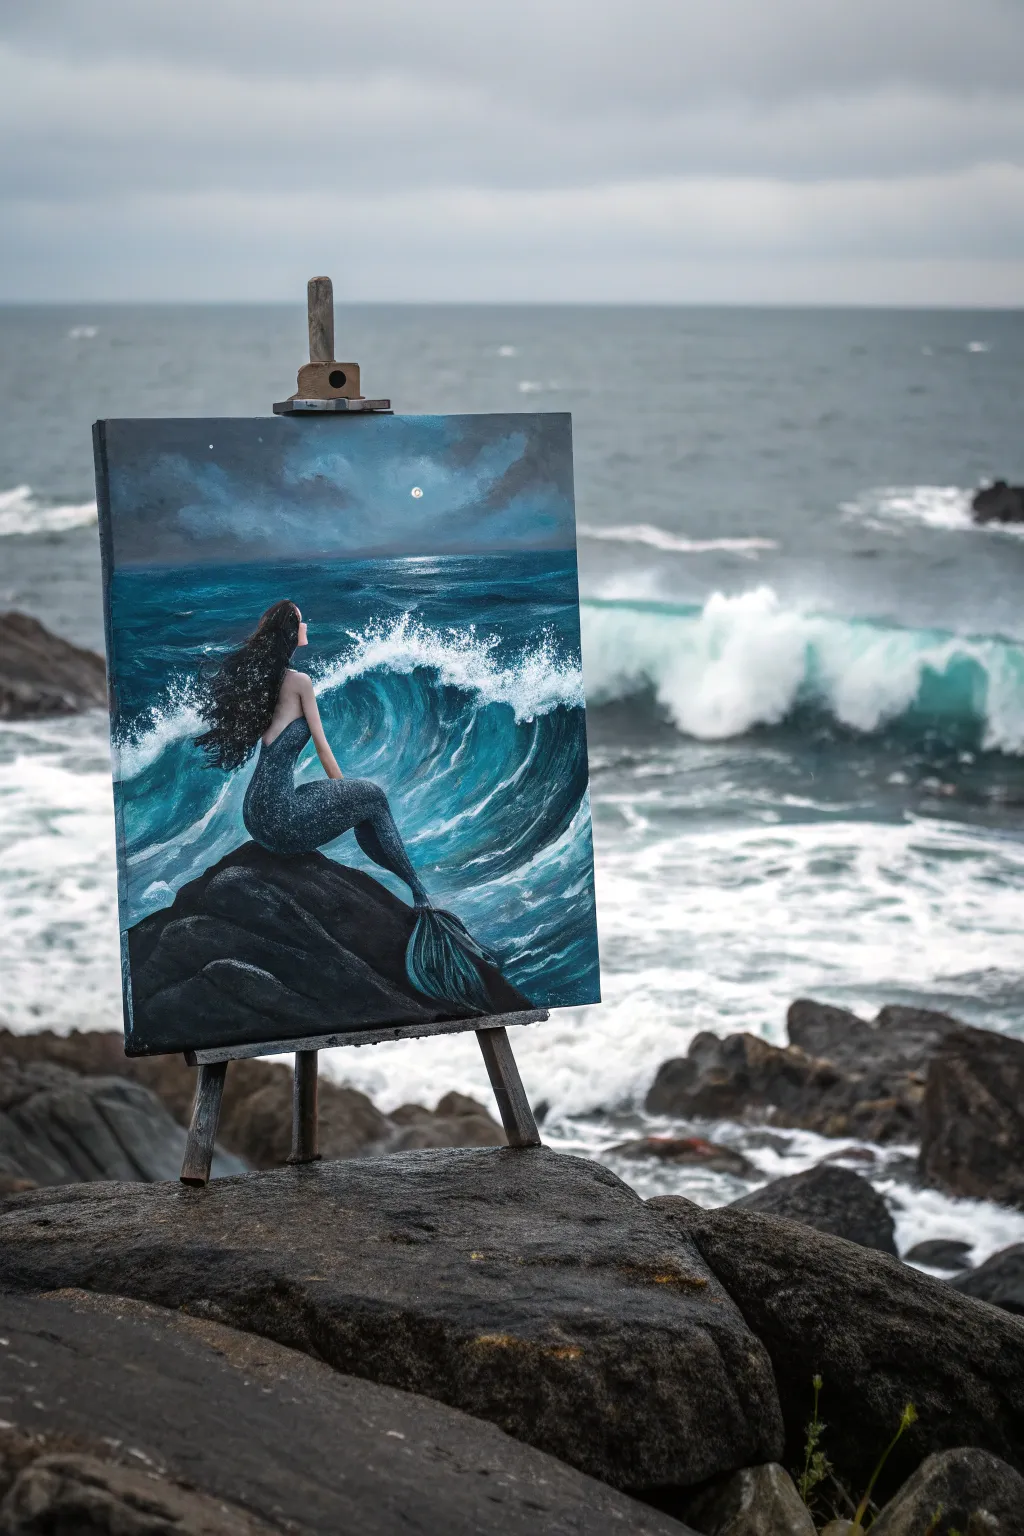
Capture the raw power of the ocean and the serene solitude of a mermaid in this dramatic acrylic painting. You’ll learn to balance deep, stormy shadows with the ethereal glow of moonlight on crashing waves.
Step-by-Step Guide
Materials
- Stretched canvas (e.g., 16×20 inch)
- Acrylic paints: Phthalo Blue, Prussian Blue, Turquoise, Payne’s Grey, Mars Black, Titanium White, and darker Umber
- Large flat brush (for washing in background)
- Medium filbert brush (for waves and body)
- Small round brush (for details and hair)
- Fine liner brush
- Palette knife (optional for rock texture)
- Water cup and paper towels
- Easel
Step 1: The Mood & Atmosphere
-
Establish the horizon:
Begin by lightly sketching a horizon line about one-third of the way from the top of the canvas. Sketch the large, sloping rock formation in the bottom left corner to anchor your composition. -
Base layer for the sky:
Mix Prussian Blue with a touch of Payne’s Grey and White to create a stormy night sky color. Apply this to the upper third of the canvas using long, horizontal strokes. Leave a small, lighter circle area open where the moon will sit. -
Deepening the ocean:
For the distant ocean (below the horizon but above the wave), use a dark mix of Phthalo Blue and Mars Black. Paint this area completely dark to create depth before adding highlights later. -
Blocking the wave shape:
In the middle ground, use a wash of Turquoise and Phthalo Blue to block in the large, curving shape of the crashing wave. Keep the paint somewhat thin here so you can adjust the flow. -
Painting the rock foundation:
Mix Mars Black with Burnt Umber for a very dark, earthy tone. Paint the entire rock formation in the foreground solid dark, creating a silhouette against the water.
Keep it Translucent
Use glazing liquid instead of water for the inner wave. This keeps the turquoise paint transparent, making the wave look like real water with light passing through it.
Step 2: Shaping the Wave & Light
-
Adding the moon:
With a clean small brush, dab Titanium White into the reserved moon spot. Soften the edges slightly into the surrounding clouds to create a glow, rather than a hard sticker-like circle. -
Cloud highlights:
Mix a blue-grey (White + Payne’s Grey) and scumble it loosely around the moon and across the upper sky to suggest moody storm clouds illuminated by moonlight. -
Wave translucency:
I like to focus on the inner curve of the wave now. Mix Turquoise with a little White and glaze it into the center or ‘eye’ of the wave. This mimics sunlight or moonlight shining through the thinner water. -
Sea foam crests:
Using a dry brush or a sponge with thick Titanium White, dab along the top edge of the crashing wave. Let the paint drag downward slightly to simulate falling spray and foam. -
Foreground water texture:
Beneath the main wave, use choppy strokes of blue-green and white to create the turbulent, churning water washing up against the rocks.
Step 3: The Mermaid & Details
-
Silhouette the figure:
Using a small round brush and your dark grey/black mix, carefully paint the silhouette of the mermaid sitting on the rock. Focus on the posture—an arched back and head turned toward the horizon. -
Skin tones:
Paint the mermaid’s skin with a pale flesh tone (White + tiny amount of Umber/Ochre). Because it is night, glaze over the skin with a very watered-down blue wash to push her into the shadow. -
Scales and tail:
For the tail, use Phthalo Blue and Black. Once dry, dry-brush metallic or light blue highlights on the curve of the hip and tail fluke to suggest shimmering scales. -
Flowing hair:
Use a liner brush with watered-down Mars Black ink or fluid acrylic to paint the hair. Pull the strokes outward from the head as if the wind is blowing towards the left, matching the storm’s intensity. -
Rock texture and highlights:
Add dimension to the dark rock by dry-brushing grey highlights on the top edges. This shows where the moonlight hits the wet stone. -
Splash details:
Load a toothbrush or stiff brush with watered-down White paint. Flick it gently near the wave crash and the base of the rock to create realistic tiny droplets of sea spray. -
Final moonlight reflection:
Add a thin, vertical line of broken white strokes directly under the moon on the distant water to connect the light source to the sea.
Glittering Scales
Mix a small amount of iridescent medium or silver glitter paint into the highlights on the mermaid’s tail for a magical, shimmering effect that catches the light.
Step back and admire the powerful contrast between the dark storm and the luminous moonlight in your finished piece
Mermaid Tail Color Palette Challenge
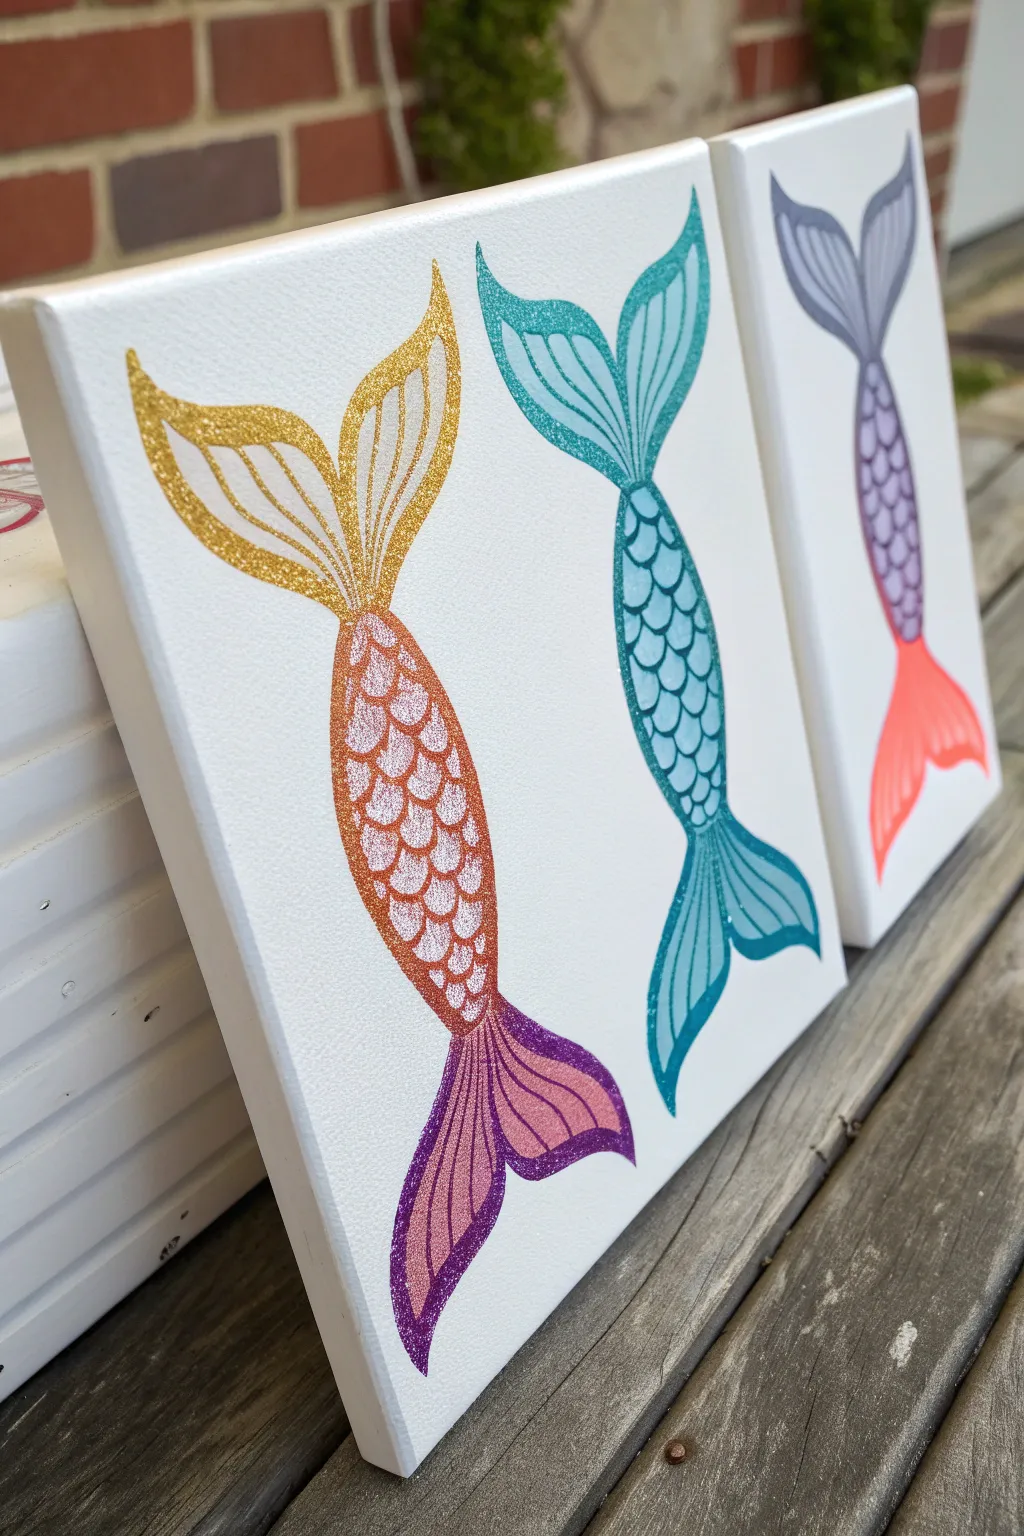
Recreate the magic of the ocean with this sparkling canvas project featuring stylized mermaid tails in harmonious color palettes. The design focuses on clean lines, ombre scale effects, and distinct glitter accents to create a finished piece that feels both modern and whimsical.
Step-by-Step Tutorial
Materials
- White stretched canvas (8×10 inches or similar)
- Acrylic paints (Gold, Orange/Coral, Purple, Teal, light & dark Blue, Grey)
- Fine glitter paint or loose glitter with Mod Podge
- Pencil for sketching
- Fine liner paintbrush (size 0 or 00)
- Small flat shader brush (size 4)
- Palette for mixing
- Water cup and paper towels
Step 1: Preparation & Sketching
-
Prime the Surface:
Ensure your canvas is clean and ready. Even though these are pre-primed, giving them a quick coat of fresh white acrylic paint provides a smoother surface for detailed line work. -
Outline the Shape:
Using a light pencil, sketch the outline of the mermaid tail. Start with a curved, elongated tear-drop shape for the body. -
Add the Fins:
Draw the fluke (the bottom fin) spreading out from the tail tip. For the top, you can add a decorative fin that fans out wide like a crown, mirroring the bottom shape. -
Define the Scales:
Inside the main body section, lightly sketch a grid of overlapping ‘U’ shapes to create the scales. Keep them relatively large and uniform for this graphic style.
Sticky Situation
Use drafting tape or painter’s tape to mask off the sharp angles of the tail tips before painting. This ensures super sharp points without requiring a steady hand.
Step 2: Painting the Base Colors
-
Select Color Trios:
Choose three distinct colors for each tail to create a ‘challenge’ palette. For the first tail, prepare a gold/yellow, a coral orange, and a deep purple. -
Base Coat the Fins:
Using your flat brush, paint the top fin with your gold tone and the bottom fluke with the purple. Apply thin, even layers to avoid ridges. -
Fill the Scales:
Paint the scale section with the coral orange. Start with a solid block of color; you don’t need to paint individual scales yet, just the background shape. -
Repeat for Other Tails:
If painting the second tail on the same canvas, switch to your next palette (e.g., teal/light blue/dark blue). Paint the top and bottom fins in opposing teal shades and the center body in a lighter blue. -
Dry Completely:
Let the base coats dry fully. Acrylics dry darker, so check if a second coat is needed for opacity before moving on to details.
Make It 3D
Instead of painting the scales, use large sequins glued in an overlapping pattern for the body section. This adds real texture and catches the light beautifully.
Step 3: Detailing & Liner Work
-
Outline the Fins:
Load your fine liner brush with the same color used for the fin base, but mix in a tiny drop of black or use a slightly darker shade. Outline the outer edges of the fins crisply. -
Draw Fin Texture:
Paint thin, curved lines radiating from the base of the tail outward to the edges of the fins to simulate the ribbing texture. -
Define the Scales:
Switch to a darker version of your body color (e.g., dark rust for the orange tail). Paint the ‘U’ shapes over your dry base coat to define the individual scales. -
Add Scale Highlights:
Mix a little white into your body color. Gently dab the center of each scale with this lighter hue to give them a slight 3D curve.
Step 4: The Glitter Finish
-
Prepare the Glitter:
I like to mix loose fine glitter directly into a clear gloss medium or Mod Podge rather than shaking it onto wet paint, as it gives more control. -
Apply to Fins:
carefully paint your glitter mixture over the top and bottom fins. Match the glitter color to the paint underneath (gold glitter on gold paint, purple on purple). -
Scale Sparkle:
For the scales, apply the glitter selectively. Just trace the ‘U’ outlines with a glitter pen or a very fine brush dipped in glitter medium for a subtle shimmer. -
Clean Up Edges:
Once everything is dry, use white paint to touch up the background canvas around the tails if any paint went outside the lines, ensuring a crisp silhouette.
Hang your shimmering seascape trio together for a splash of color on any wall
Galaxy Ocean Mermaid Silhouette
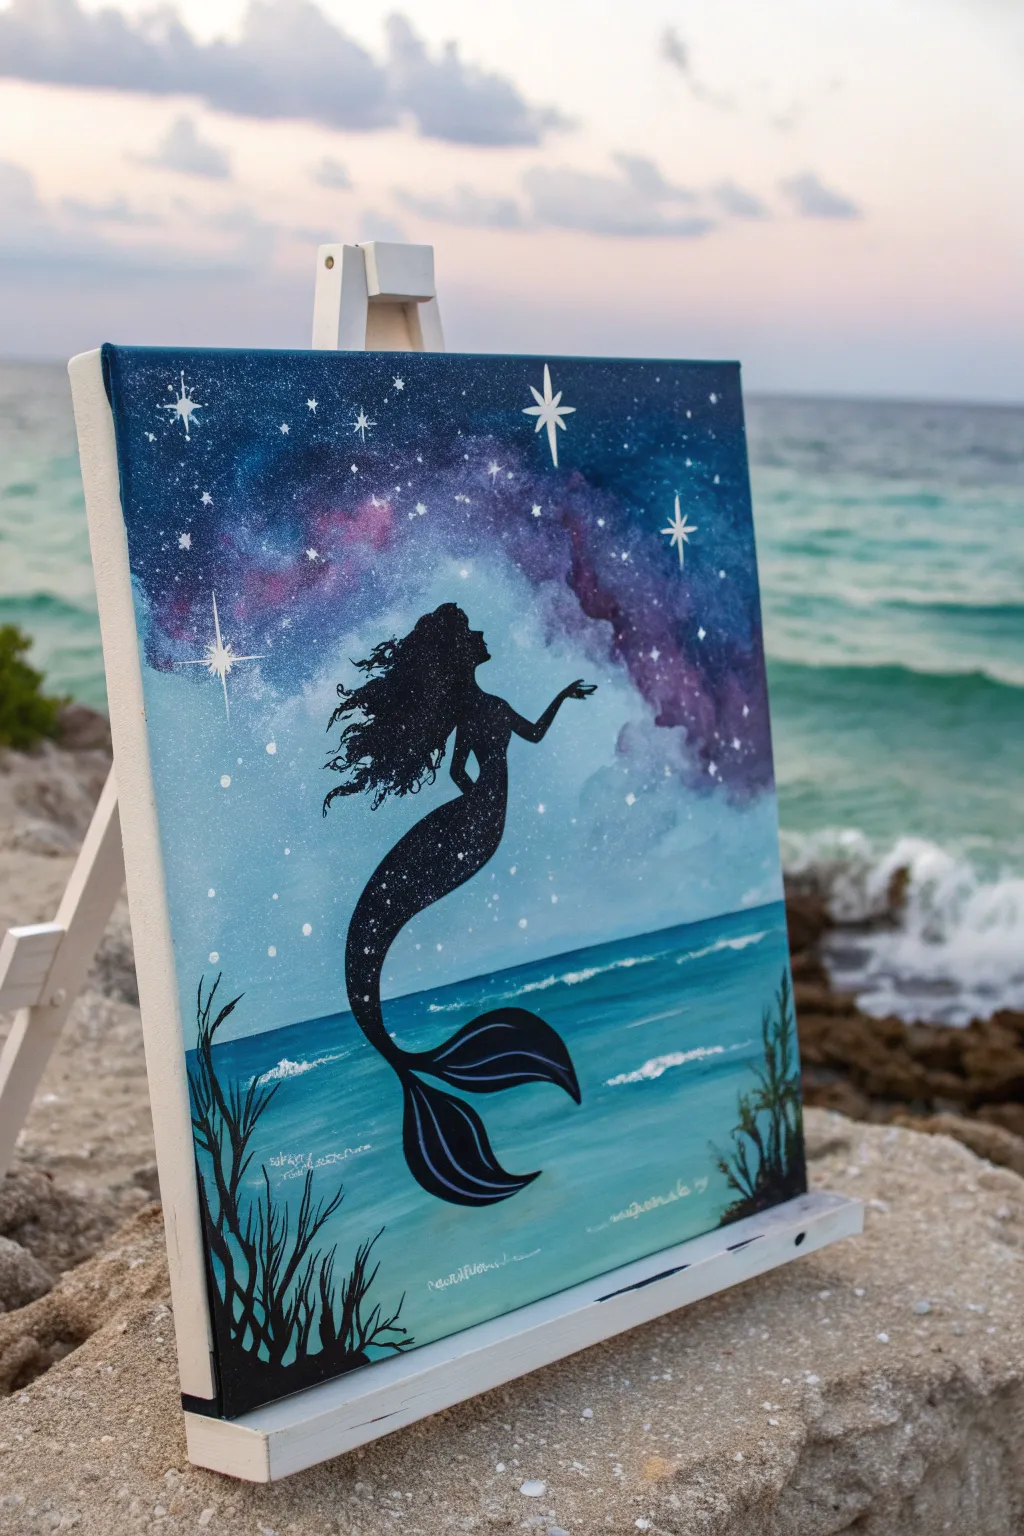
Merge the mysteries of the deep ocean with the wonders of the cosmos in this enchanting acrylic painting. This project features a striking black mermaid silhouette surrounded by a dreamy galaxy sky that seamlessly transitions into turquoise waters.
Step-by-Step
Materials
- Stretched canvas (e.g., 11×14 or 16×20)
- Acrylic paints: phthalo blue, turquoise, prussian blue, purple/violet, magenta, titanium white, black
- Large flat wash brush (1 inch)
- Medium round brush
- Small liner or detail brush
- Old toothbrush (for splattering)
- Palette or paper plate
- Water cup and paper towels
- Chalk or pencil (optional)
Step 1: Creating the Background Gradient
-
Prime the top section:
Begin by applying a dark mixture of Prussian blue and minimal black to the top corners of your canvas. This establishes the deepest part of your night sky. -
Blend the galaxy colors:
While the dark corners are still wet, blend in purple and magenta tones towards the center. Use crisscross strokes to create a cloudy, nebula-like texture rather than straight lines. -
Transition to sky blue:
Below the purple galaxy area, start blending in lighter blues and white. This middle section acts as the horizon line where the cosmic sky meets the water. -
Paint the ocean base:
For the bottom third of the canvas, switch to turquoise mixed with a little white. Paint horizontal strokes here to simulate calmness in the water, distinct from the cloudy sky above. -
Deepen the water:
Add a touch of Phthalo blue to the very bottom edge of the canvas to give the water depth and weight. -
Create the horizon:
Use a clean, damp brush to softly blend the meeting point between the light blue sky and the turquoise water. Keep this transition soft; we want a dreamlike atmosphere, not a sharp line.
Muddy Galaxy?
If your galaxy colors turn brown or grey while blending, stop! Let the layer dry completely, then add fresh color on top. Overworking wet paint causes muddiness.
Step 2: Adding Galaxy Details
-
Create stars:
Dilute a small amount of white paint with water until it’s fluid. Dip an old toothbrush into it, and flick the bristles with your thumb to spray tiny stars across the dark blue and purple sky sections. -
Paint larger stars:
Using your small liner brush and pure white paint, create a few larger, four-pointed stars. Start with a vertical line, then a horizontal one, curving the lines slightly inward for a ‘twinkle’ effect. -
Dry completely:
Let the background dry entirely before moving on. This is crucial so your black silhouette remains crisp and doesn’t muddy up the background colors.
Step 3: Painting the Silhouette
-
Sketch the outline:
Lightly sketch the mermaid’s form using chalk or a pencil. Position her centrally, with her tail curving near the bottom and her hand reaching up toward the galaxy. -
Fill the body:
Load a medium round brush with black acrylic. Carefully fill in the torso, arms, and head profile. Ensure the paint is opaque; you may need a second coat after the first dries. -
Paint the tail:
Sweep the brush downward to create the graceful curve of the tail. Paint the flukes (fin tips) wide and flowing. -
Detail the hair:
Switch to your smallest liner brush. Paint flowing, wavy strands of hair trailing behind the mermaid’s head to suggest movement underwater. -
Add seaweed:
At the bottom left and right corners, paint black, wavy lines moving upward to represent sea grass or coral. This helps ground the composition.
Add Dimension
Mix a tiny amount of iridescent or glitter medium into the white paint for the stars and water highlights to make the painting shimmer in real light.
Step 4: Final Touches
-
Define the tail:
Once the black tail is dry, mix a little purple or dark blue with white to create a dull highlight color. Use a fine brush to outline the inner curves of the tail fins for definition. -
Add tail sparkles:
Using the toothbrush splatter technique, gently flick a tiny amount of white spray specifically over the mermaid’s black tail. This connects her to the galaxy theme above. -
Highlight the water:
Paint thin, broken horizontal white lines across the turquoise water section to suggest gentle waves reflecting the starlight.
Allow your painting to dry fully before displaying your cosmic seascape
Whimsical Cartoon Mermaid With Big Color Blocks
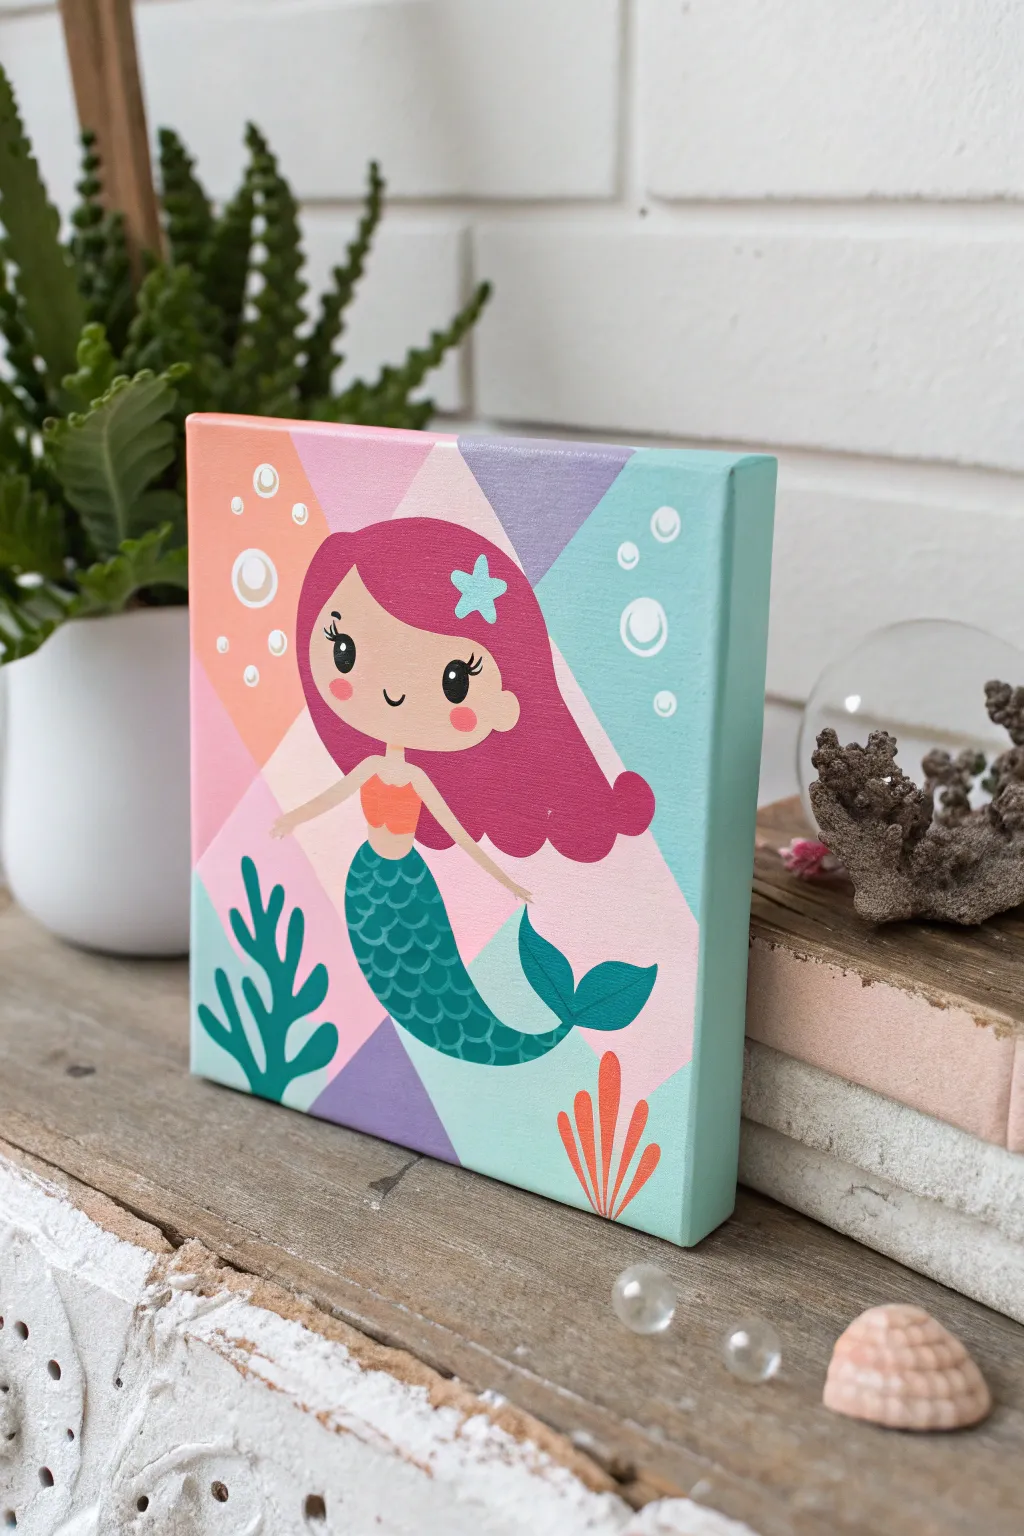
This charming project combines crisp geometric color blocking with a sweet, cartoon-style character for a modern nursery look. Combining flat, clean shapes with simple details makes this an approachable piece for beginning painters who want a professional finish.
Detailed Instructions
Materials
- Square stretched canvas (e.g., 6×6 or 8×8 inch)
- Painter’s tape (low tack)
- Acrylic paints: white, peach, lavender, mint green, baby pink, magenta, teal, bright orange, black
- Flat shader brushes (medium size for background)
- Round detail brushes (sizes 0 and 2)
- Pencil and eraser
- Ruler
- Palette for mixing
Step 1: Planning and Background
-
Draft the layout:
Begin by lightly sketching your design onto the canvas with a pencil. Use a ruler to draw large diagonal lines creating geometric triangular sections for the background. Sketch the mermaid shape centrally over these lines—don’t worry about the background lines crossing through her yet. -
Mask the first triangles:
Apply painter’s tape along the pencil lines of the background triangles that aren’t touching each other. Press the edges of the tape down firmly to prevent paint bleed. -
Paint the first color blocks:
Fill in the masked sections using your pastel colors: peach, lavender, baby pink, and mint green. Use a flat brush for smooth coverage. Apply two coats if necessary to hide the canvas texture, letting the first coat dry completely before adding the second. -
Paint remaining blocks:
Once the first sections are completely dry, carefully peel off the tape. Re-apply tape over the dried painted areas to protect them, exposing the remaining unpainted triangles. Paint these with alternating pastel colors to create that patchwork effect. -
Edge clean-up:
Remove the final tape. If any paint bled under the tape, use a small flat brush with the correct color to neaten the straight lines. Don’t forget to paint the sides of the canvas to match the adjacent geometric shapes for a polished, gallery-wrap look.
Bleeding Lines?
If paint bleeds under your tape, let it dry completely. Then, lay a straight edge (like a ruler) over the line and use the background color to paint a crisp edge right over the mistake.
Step 2: Painting the Mermaid
-
Base coat the skin:
Mix a pale skin tone using white and a tiny dot of peach or orange. Paint the mermaid’s face, neck, torso, and arms. You will likely paint over some of the background intersections, so ensure the underlayer is fully dry first. -
Fill the hair:
Using magenta paint, fill in the large shape of the hair. Use a round brush to carefully navigate around the curve of the face and the sharper points at the ends of the hair. -
Create the tail base:
Paint the main tail shape and the fin using a solid teal color. Keep the edges curved and smooth against the geometric background. -
Top tip:
Paint the small shell bikini top with a bright orange or coral color. I find using a small round brush helps keep these tiny shapes crisp. -
Second coats:
Check your coverage. The dark background colors might show through the lighter skin tone or hair. Apply a second coat to the mermaid’s body, hair, and tail to ensure solid, opaque color.
Pro Tip: Transparency
For the bubbles, mix a tiny amount of water into white paint to make a glaze. Paint sheer circles, then add a solid white highlight dot for a glassy look.
Step 3: Details and Finishing
-
Add facial features:
Using your smallest detail brush (size 0) and black paint, carefully add the eyes. They are simple ovals with a small lash curved upwards at the outer corner. Paint a tiny ‘u’ shape for the smile. -
Cheeks and highlights:
Dip the back end of your brush handle into pink paint and dot it onto the cheeks for perfect circles. Add tiny white reflection dots to the black eyes to bring them to life. -
Scales pattern:
Mix a slightly lighter teal (add a little white or mint to your base teal) or use a darker teal for contrast. Using a fine liner brush, paint small ‘u’ shapes in overlapping rows down the tail to create scales. -
Hair accessories:
Paint a small star shape in the hair using mint green or light blue. Paint a tiny dot in the center for detail. -
Seaweed accents:
Add stylized organic shapes for coral or seaweed in the bottom corners using teal and coral orange. These should be curvy and fluid to contrast with the sharp geometric background lines. -
Bubbles:
Dip the handle of a larger brush or a dedicated dotting tool into white paint. Stamp circles of varying sizes in the background. Once dry, you can paint over the center with the background color to turn them into rings, or leave them solid.
Hang this sweet underwater scene on the wall or prop it on a shelf for an instant splash of color
Abstract Mermaid Made From Color Swirls
Create a stunning contrast between a bold, dark silhouette and whimsical, abstract swirls of color in this acrylic painting. This project combines precise linework with fluid, glittering shapes to capture the magic of a mermaid’s tail dissolving into the ocean.
Step-by-Step
Materials
- Rectangular stretched canvas (around 16×20 inches)
- Acrylic paints: Black (or Payne’s Grey), Teal, Turquoise, Coral Pink, Salmon, and White
- Fine glitter or glitter acrylic medium (silver and iridescent)
- Small round paintbrushes (sizes 0, 2, and 4)
- Flat brush (size 6 or 8 for larger swirls)
- Pencil and eraser
- Palette for mixing
- Water cup and paper towels
Step 1: Planning and Sketching
-
Prepare the canvas:
Start with a clean, white canvas. If your canvas isn’t pre-primed, apply a coat of gesso and let it dry completely to ensure a smooth surface for your detailed silhouette work. -
Lightly sketch the silhouette:
Using a pencil, lightly draw the outline of the mermaid’s head, flowing hair, torso, and arms. Focus on the negative space created by hair strands to evoke movement. -
Draft the abstract tail:
Instead of drawing a traditional fishtail, sketch long, curving teardrop shapes and swirls starting from the waist and flowing downward and outward to the right. -
Refine the composition:
Ensure the swirls fan out nicely, creating a sense of volume and flow that balances the solid upper body.
Step 2: Painting the Silhouette
-
Outline the upper body:
Load a size 0 or 2 liner brush with black or very dark blue acrylic paint. Carefully trace the pencil lines of the face, arms, and hair. -
Fill the solid areas:
Switch to a slightly larger round brush to fill in the head and torso. Apply the paint opaquely; you may need a second coat to ensure no canvas shows through. -
Detail the hair strands:
Using your finest brush, flick the paint outward at the tips of the hair to create delicate, tapered points that look windswept. -
Transition the waist:
As you paint down to the waist, stop where the solid form breaks apart. Paint a few small, detached shapes near the hip to suggest the form is dissolving into magic.
Clean Lines Hack
To get super sharp tips on the hair strands and swirl ends, dilute your paint slightly with water to an ink-like consistency so it flows smoothly off the brush.
Step 3: Creating the Color Swirls
-
Mix your palette:
Prepare your colors: a deep teal, a lighter turquoise, a coral pink, and a soft salmon. I find that keeping these distinct on the palette helps prevent muddy blending later. -
Paint the anchor swirls:
Start with the darkest color (deep teal or navy) for the main swirl connected to the waist. Paint this curve boldly, following your sketched lines. -
Add the warm tones:
Using a clean brush, paint the upward-sweeping swirls in coral pink and salmon. Let these shapes nestle against the blue ones but try to keep a tiny gap of white canvas between them for definition. -
Layer in light blues:
Fill the lower swirls with turquoise. Vary the pressure on your brush to make the lines thick in the middle and tapered at the ends. -
Introduce texture:
While the colored paint is still slightly tacky, or after it dries, stipple contrasting colors inside the swirls. For example, add small teal dots inside the pink swirls.
Level Up: Gemstones
Glue small flat-backed rhinestones or crystals along the curve of the tail swirls to make the artwork sparkle physically, mimicking real mermaid scales.
Step 4: Finishing Touches
-
Add decorative elements:
Paint small, detached paisley-like shapes and dots floating around the main tail structure to fill empty space and add whimsy. -
Apply glitter accents:
Once the base colors are dry, mix fine glitter with a clear gloss medium or use glitter paint. Apply this selectively over the colored swirls, focusing on the curves to highlight the movement. -
Enhance the silhouette:
Paint delicate floral or vine patterns inside the mermaid’s hip area using white or pale pink paint. This connects the solid silhouette to the abstract tail. -
Final inspection:
Check your edges. If any white background got smudge, use white acrylic to clean it up. Reinforce the darkest blacks if they dried looking faded.
Step back and admire how the colors dance together to create this modern take on a classic myth


Have a question or want to share your own experience? I'd love to hear from you in the comments below!