If a room feels a little plain, paint is the fastest way I know to turn it into something that feels like you. These room decor painting ideas are all about creating a focal point with color, shapes, and murals—without making it feel intimidating.
Classic Accent Wall Focal Point
Bring the warmth of the Mediterranean into your living space with this textured accent wall project. By using a limewash-style technique, you will transform a standard flat wall into a surface rich with movement, depth, and earthy charm.
Step-by-Step Guide
Materials
- High-quality latex paint (base color: warm beige or off-white)
- Limewash paint or mineral-based specialty paint (color: deep rust/terracotta)
- Block brush or wide masonry brush (4-6 inches)
- Painter’s tape
- Drop cloths
- Paint tray and liner
- Roller and frame (for base coat)
- Clean bucket for mixing
- Water (for diluting)
- Stir stick
Step 1: Preparation & Base Coat
-
Clear the area:
Move furniture away from the wall you intend to paint. Remove any wall hangings, nails, or outlet covers to ensure a completely unobstructed surface. -
Protect surroundings:
Lay down heavy-duty drop cloths to protect your flooring. Apply painter’s tape generously along the ceiling line, baseboards, and adjacent walls to create crisp, clean edges. -
Clean the wall:
Wipe down the existing wall with a damp cloth or mild degreaser to remove dust and oils, ensuring the new paint adheres properly. -
Apply the primer:
If you are using a true mineral limewash, apply the specific mineral primer required by the manufacturer. If using a faux-finish latex method, roll on a coat of matte off-white or light beige paint as your neutral grounding layer. -
Allow to dry:
Let this base layer dry completely according to the can instructions, usually for at least 4-6 hours, before beginning the specialty finish.
Step 2: Creating the Texture
-
Prepare the wash:
Pour your terracotta limewash paint into a clean bucket. I find that diluting it slightly with 10-15% water helps create that cloudy, ethereal movement, but check your specific brand’s recommendation first. -
Load the block brush:
Dip just the tips of your wide block brush into the paint mixture. You want the brush loaded but not dripping wet to maintain control over the texture. -
Start loosely:
Begin in a top corner, applying the paint in classic ‘X’ strokes or Criss-cross patterns. Do not paint in straight lines or uniform rows; random movement is key here. -
Work in clouds:
Paint in organic, cloud-like sections of about 3×3 feet at a time. Keep the edges of these sections wet and feathery so they blend seamlessly into the next area. -
Vary pressure:
Apply different amounts of pressure as you brush. Pressing harder deposits more pigment, while a lighter touch creates transparency that reveals the base coat.
Fixing “Heavy” Spots
If a spot looks too dark or solid, lightly mist it with water and use a clean, dry brush to disperse the pigment before it sets completely.
Step 3: Building Depth
-
Complete the first coat:
Continue working across the wall until the entire surface is covered. Don’t worry about patchiness at this stage; limewash is designed to look uneven initially. -
Dry time:
Allow the first coat to dry until it is dry to the touch. It will appear much lighter as it dries, which is completely normal for mineral paints. -
Begin the second coat:
Load your brush again and start a second layer. This time, focus on filling in areas that look too sparse or deepening the color in spots where you want more intensity. -
Refine the movement:
Use the brush to soften any harsh lines created in the first layer. The goal is to build up overlapping veils of color rather than a solid, flat block of paint. -
Inspect from afar:
Step back frequently to view the wall from a distance. Look for unintentional patterns or heavy spots and blend them out while the paint is still workable. -
Final cure:
Let the wall dry undisturbed for at least 24 hours. The colors will continue to shift and bloom as the minerals cure and react with the air. -
Clean up:
Carefully remove the painter’s tape at a 45-degree angle while the paint is still slightly tacky to avoid peeling, then reset your room.
Pro Tip: The Brush Matters
Don’t use a standard roller. A natural bristle block brush is essential for holding enough liquid and creating those signature textured brushstrokes.
Now you have a stunning, old-world backdrop that adds immediate sophistication to your room


Cozy Color-Drenched Room

Transform a standard bedroom into a cozy, color-drenched retreat by creating a textured, deep navy accent wall that contrasts beautifully with crisp whites and natural woods. This project focuses on achieving that velvety, imperfect plaster-like finish using standard paint techniques.
Step-by-Step Tutorial
Materials
- Deep navy blue interior matte latex paint (e.g., Hague Blue or similar)
- White or off-white ceiling paint
- Texture additive for paint (sand or silica based) or pre-mixed textured paint
- Painter’s tape (multi-surface)
- Wide paint roller (9-inch) and roller cage
- Medium nap roller cover (3/8 or 1/2 inch) for texture
- Angled sash brush (2.5 inch) for cutting in
- Drop cloths
- Sanding sponge (medium grit)
- Wide putty knife or drywall taping knife (optional for knockdown texture)
- Extension pole for painting high areas
Step 1: Preparation and Base
-
Clear and Clean:
Begin by removing all furniture, outlet covers, and wall hangings from the room. Wipe down the walls with a damp cloth and mild detergent to remove dust and oils, ensuring a clean surface for the best adhesion. -
Protect Surfaces:
Lay down drop cloths to protect your flooring. Apply painter’s tape meticulously along the baseboards, window frames, and the edges of the ceiling if you aren’t repainting it. Press the tape edges down firmly to prevent bleed-through. -
Patch Imperfections:
Inspect the wall for any large holes or cracks. Since we are adding texture, minor dings are fine, but structural cracks should be filled with spackle and sanded smooth once dry. -
Prime the Surface:
Roll a coat of primer over the entire wall, cutting in the corners first. If your topcoat is very dark, I suggest using a tinted grey primer; it helps the Navy blue achieve its true depth with fewer coats.
Step 2: Creating the Textured Effect
-
Mix Texture Additive:
If you aren’t using pre-mixed textured paint, pour your deep navy paint into a bucket and gradually stir in your texture additive. Follow the package ratio instructions carefully to avoid clumps. -
Test the Texture:
Before hitting the wall, test your mixture on a piece of cardboard. The goal is a subtle, limestone-wash feel, not heavy popcorn. Adjust by adding more paint if the texture is too aggressive. -
Cut In Borders:
Using your angled sash brush, paint a 3-inch border of the navy texture mix around all edges—ceiling line, corners, and baseboards. Keep a wet edge so this blends into the rolled areas seamlessly. -
First Roll Application:
Load your roller with the textured paint. apply it to the wall in a ‘W’ or ‘V’ pattern, working in roughly 3×3 foot sections. Roll with random, multi-directional strokes rather than perfectly vertical lines to enhance the organic look. -
Optional: Knockdown Technique:
For a plaster-like finish, wait about 10-15 minutes for the paint to set slightly, then lightly drag a wide drywall knife over the high points of the texture. This creates flat spots that catch light differently. -
Allow to Dry:
Let this first heavy coat dry completely. Dark colors with texture can take longer than standard paint, often requiring 4-6 hours depending on humidity.
Patchy Color?
Dark matte paints scuff easily and show roller marks. If you see lap lines, apply a final coat using unbroken floor-to-ceiling strokes with a slightly drier roller.
Step 3: Deepening the Color
-
Assess Coverage:
Check the wall for thin spots. The first coat often looks patchy with dark colors. Don’t worry, the second coat provides the richness. -
Apply Second Coat:
Apply the second coat of navy paint. You can use less texture additive here or just straight paint if you are happy with the roughness of the first layer. This coat seals the color. -
Paint the Radiator (Optional):
For a ‘color-drenched’ look like the photo, paint trim or radiators the same color. Use a metal-appropriate primer on the radiator first, then apply heat-resistant metal paint color-matched to your wall. -
Remove Tape:
While the final coat is still slightly tacky (not fully dried), carefully peel off the painter’s tape at a 45-degree angle. This prevents the dried paint skin from peeling off with the tape. -
Final Touch-Ups:
Inspect edges for any bleed-through. Use a small artist’s brush to correct any lines where the navy might have crept onto the white ceiling or woodwork.
Limewash Effect
For more depth, mix a small amount of glazing liquid into a slightly lighter shade of blue and rag-roll it randomly over the dried wall for a clouded effect.
Enjoy the soothing embrace of your new, deeply colored sanctuary

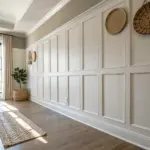

Crisp Tape-Lined Color Blocking
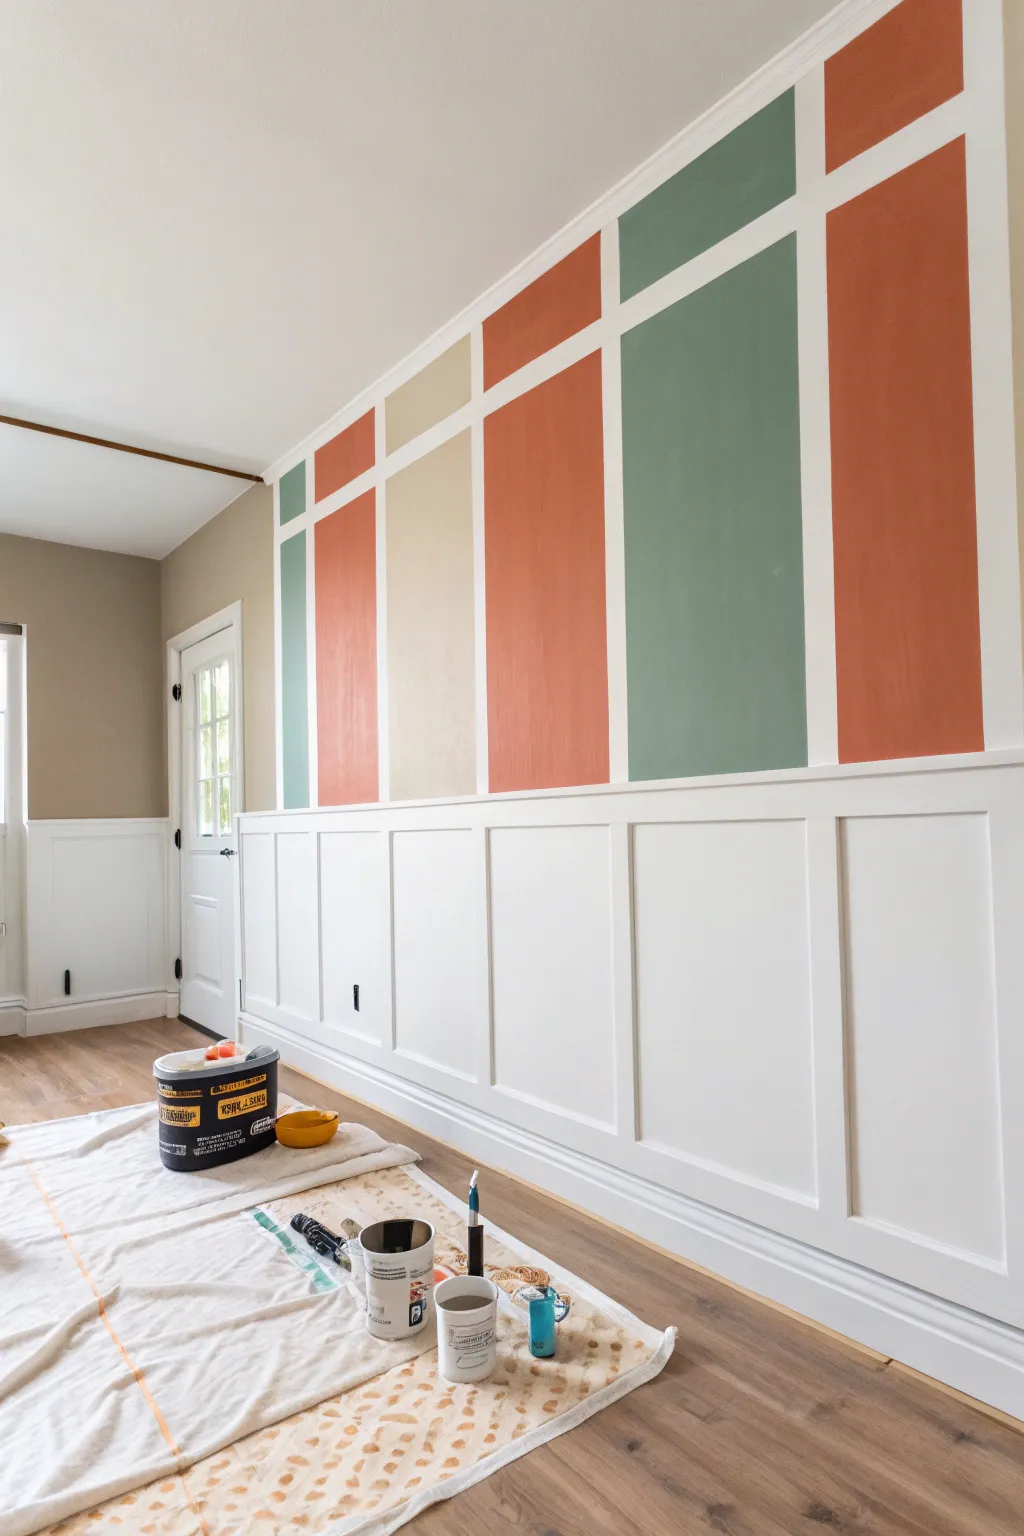
Transform a plain wall into a structured masterpiece with this tape-lined color blocking technique. By combining classic wainscoting with a modern, Mondrian-inspired upper geometric pattern, you create a sophisticated yet playful focal point perfect for entryways or living spaces.
Step-by-Step Guide
Materials
- Interior latex paint (White for base/trim, plus Terracotta Orange, Sage Green, and Cream Beige)
- Painter’s tape (high quality, 1.5-inch or 2-inch width)
- Laser level or 4-foot bubble level
- Measuring tape
- Pencil
- Paint rollers (9-inch for large areas, 4-inch for colors)
- Angled sash brush (2-inch)
- Pre-installed wainscoting panels (or MDF strips/board and batten materials if starting from scratch)
- Drop cloths
- Spackle and sandpaper (for wall prep)
- Paint tray and liners
Step 1: Preparation and Base Coat
-
Clear and protect:
Begin by moving all furniture away from the wall and laying down heavy-duty drop cloths to protect your flooring from drips. -
Prep the surface:
Inspect the wall for any nail holes or imperfections. Fill them with spackle, let dry, and sand smooth so your geometric lines will be crisp. -
Prime the canvas:
Paint the entire upper wall section white first. This specific look relies on the white lines between the colors, and it’s much easier to paint the whole wall white now than to try painting lines later. -
Address the wainscoting:
If your wainscoting is already installed, give it a fresh coat of semi-gloss white paint to match the grid lines you’ll be creating above. Allow everything to cure for at least 24 hours before applying any tape.
Step 2: Mapping the Grid
-
Calculate spacing:
Measure the total width of your wall. To replicate the photo, divide the space so the vertical color blocks align perfectly with the vertical battens of the wainscoting below. -
Mark vertical guides:
Using a pencil, make small tic marks at the ceiling and just above the wainscoting rail to indicate where your vertical white stripes will go. -
Establish horizontal division:
Decide on the height of the horizontal stripe. In the reference, it sits about roughly 12-18 inches below the ceiling, creating smaller manageable blocks at the top.
Seal like a pro
The secret to crisp lines is ‘locking’ the tape. After taping, brush a light coat of the BASE wall color over the tape edges. This fills gaps so the colored paint can’t seep through.
Step 3: Taping the Design
-
Apply vertical tape:
Run long strips of painter’s tape vertically, connecting your ceiling and wainscoting marks. Use a laser level here to ensure the lines are perfectly plumb. -
Apply horizontal tape:
Run your single horizontal strip of tape across the entire wall width at your chosen height. Ensure this line is strictly level. -
Seal the edges:
Press the tape edges down firmly with a putty knife or credit card. I like to then paint a thin layer of the *base white color* over the tape edges; this locks the tape and prevents the colored paint from bleeding underneath.
Peeling paint fix
If pulling the tape lifts the paint, your paint may be too dry or the layers too thick. Use a utility knife to very gently score the edge where the tape meets the clear wall before pulling.
Step 4: Applying Color
-
Visual planning:
Before dipping your brush, stick small pieces of tape with ‘G’ (Green), ‘O’ (Orange), or ‘B’ (Beige) written on them into each rectangle to map out your color distribution pattern. -
Cut in edges:
Starting with your Terracotta Orange, use the angled brush to cut in around the tape perimeters and near the ceiling in the designated orange blocks. -
Roll the color:
Use a 4-inch mini roller to fill in the centers of the orange blocks. Two thin coats are better than one thick one to avoid texture buildup. -
Repeat for Sage Green:
Switch to a fresh roller cover and brush, then apply the Sage Green to its assigned large and small rectangles, ensuring consistent coverage. -
Apply Cream Beige:
Finish with the neutral Cream Beige sections. These lighter blocks might require a distinct third coat to achieve full opacity compared to the darker tones. -
Final inspection:
Check all colored blocks for uneven spots or transparency while the tape is still up and touch up as needed.
Step 5: Reveal and details
-
Remove tape:
Pull the tape off carefully while the final coat of paint is still slightly tacky—pulling at a 45-degree angle away from the painted edge usually yields the sharpest line. -
Touch up:
Inevitably, a tiny bit of paint might bleed or a line might wobble. Use a small artist’s brush and your base white paint to correct any minor imperfections.
Enjoy the structured elegance of your new graphic feature wall
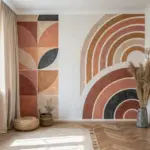
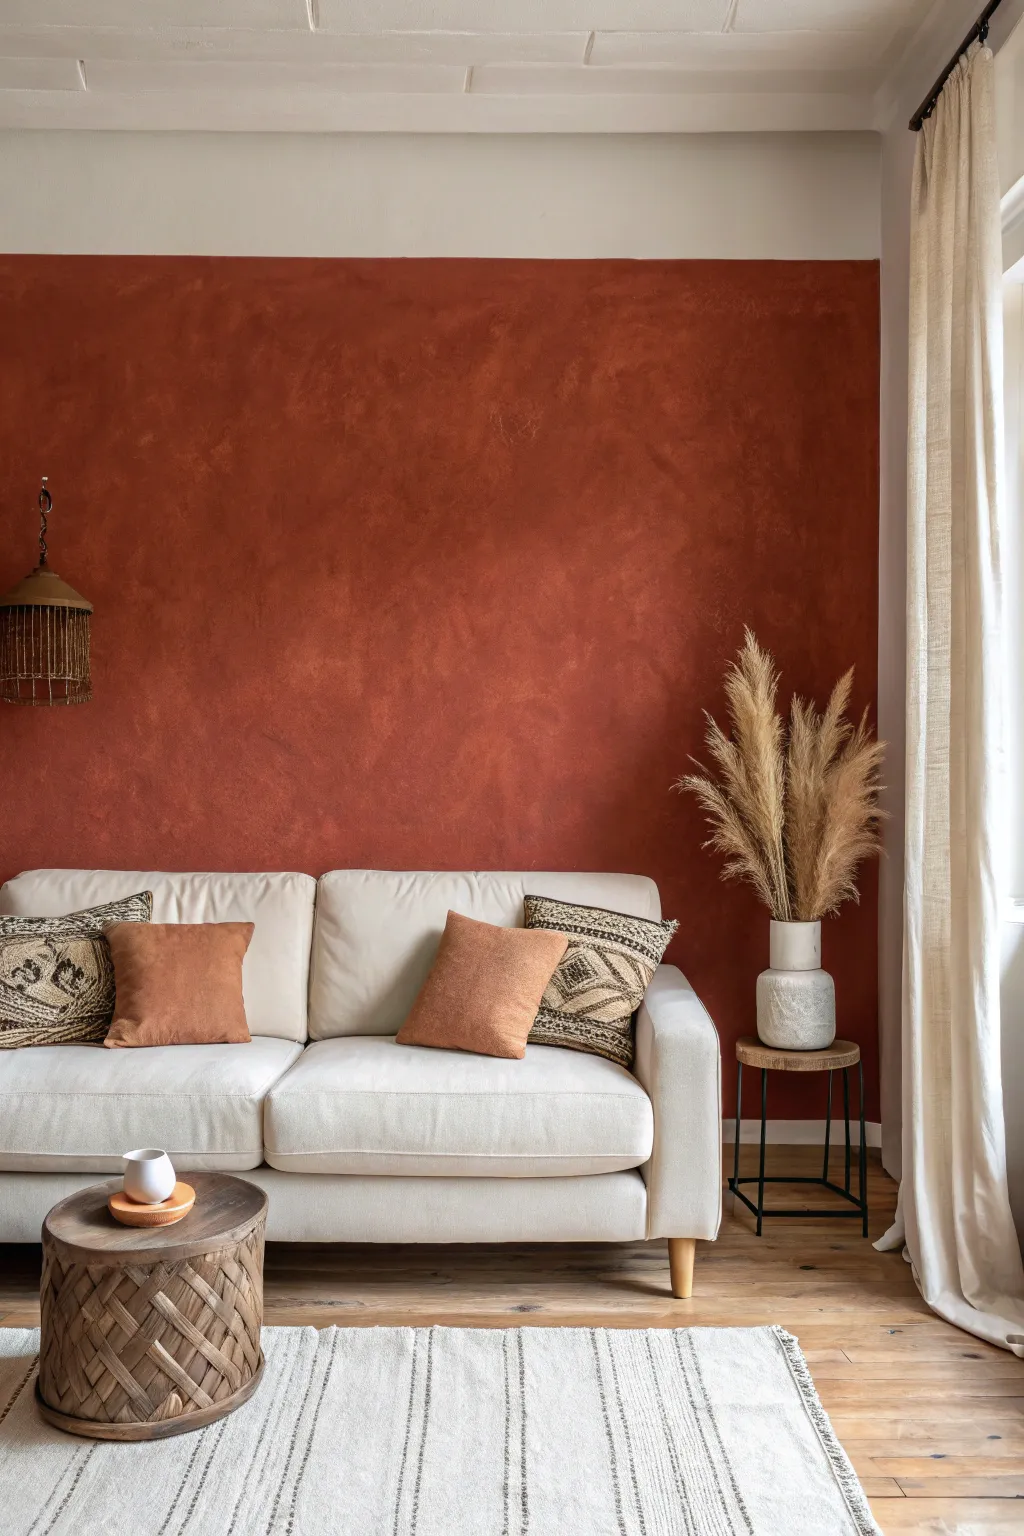
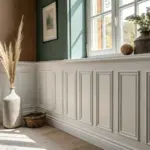
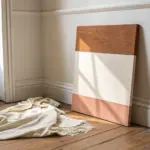
Easy Two-Tone Half Wall
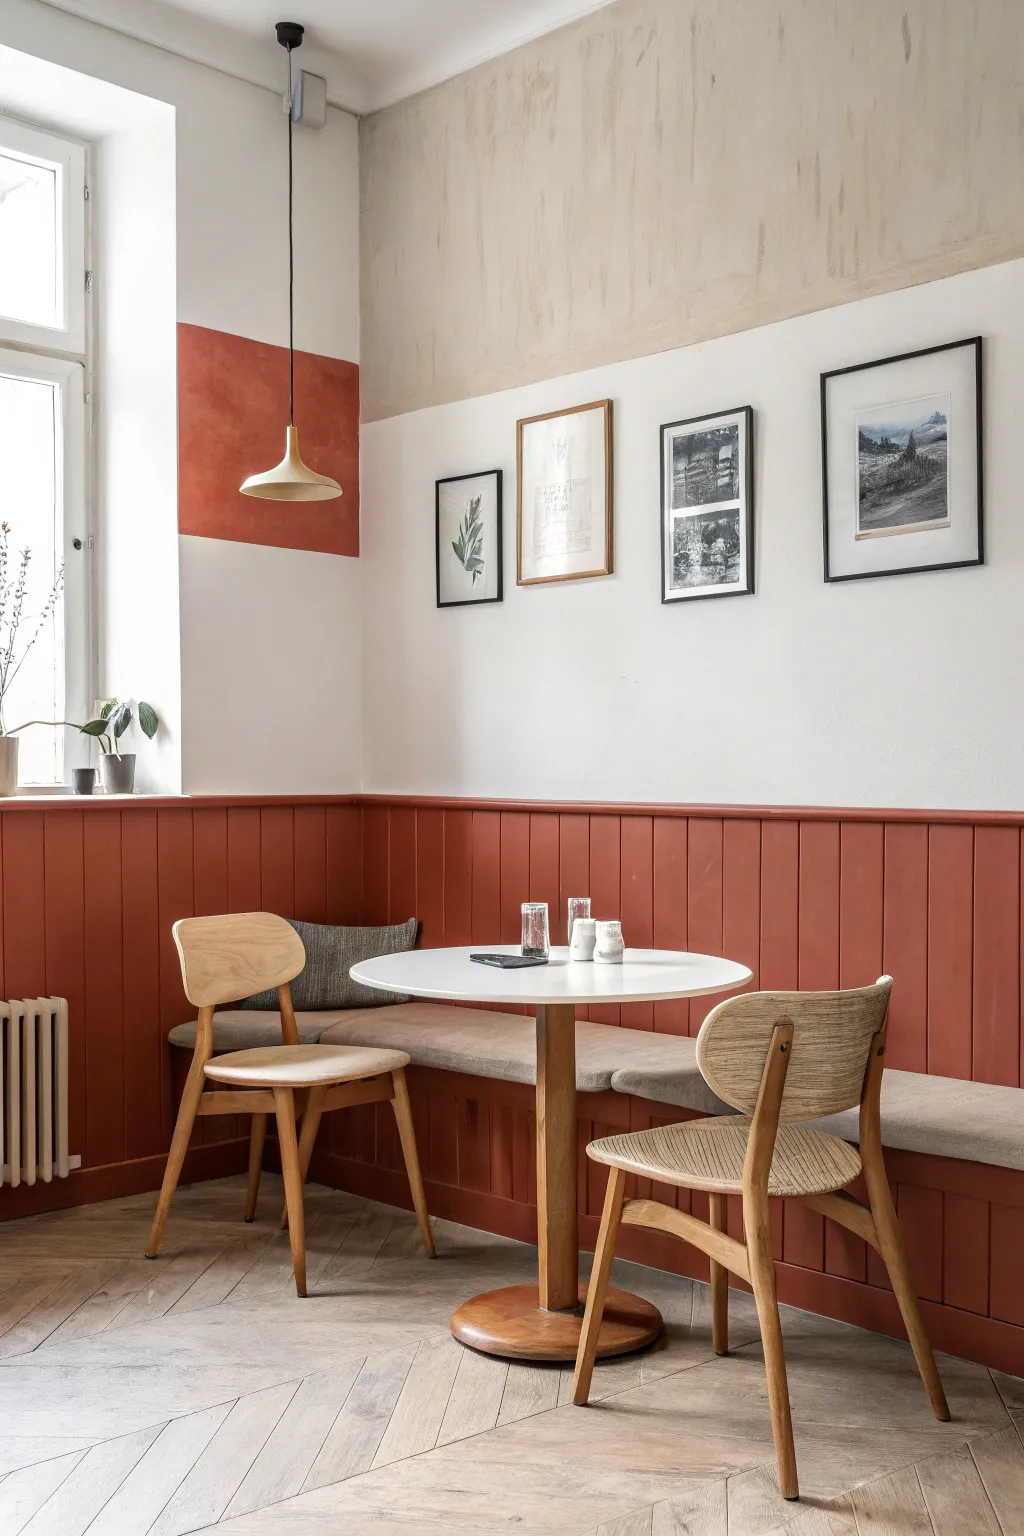
Transform a plain corner into a cozy nook with this warm, two-tone wall treatment that combines classic texture with modern color blocking. The rich terracotta lower half grounds the space, while the crisp white upper wall keeps the room feeling airy and bright.
Detailed Instructions
Materials
- Vertical wood paneling sheets or tongue-and-groove boards
- Top rail moulding (dado rail)
- Construction adhesive
- Finishing nails or brad nailer
- Wood filler
- Sandpaper (120 and 220 grit)
- Painter’s tape
- Primer (suitable for wood and drywall)
- Terracotta or rust-colored interior paint (satin or eggshell finish)
- Creamy white interior paint (matte or flat finish)
- Paint rollers (medium nap for wood, low nap for drywall)
- Angled sash brush
- Caulk gun and paintable caulk
- Spirit level
- Measuring tape
Step 1: Preparation & Paneling
-
Measure the walls:
Determine the desired height for your wainscoting. In this look, the paneling sits at about chair-rail height, roughly 32-36 inches from the floor. -
Prep the surfaces:
Clear the room and remove any existing baseboards or trim from the area you plan to panel. Patch any holes in the drywall to ensure a flat installation surface. -
Cut the panels:
Cut your vertical wood paneling sheets or boards to your determined height. Using a circular saw with a fine-finish blade helps prevent splintering. -
Install the first panel:
Apply construction adhesive to the back of your first panel. Place it in the corner, using a spirit level to ensure it is perfectly plumb before nailing it into the studs. -
Continue installation:
Work your way out from the corner, butting the panels tightly against each other. If using tongue-and-groove, tap them gently together to lock the joints. -
Add the top rail:
Install the horizontal top rail moulding directly on top of the cut panel edge. This caps the wainscoting and creates a finished transition point. -
Fill and sand:
Fill all nail holes and any gaps between boards with wood filler. Once dry, sand the filler smooth and give the entire wood surface a light sanding to help the paint adhere. -
Caulk the seams:
Run a bead of paintable caulk along the top of the rail where it meets the wall, inside the corners, and along the bottom edge. Smooth it with a damp finger for a seamless look.
Gaps happen
If your walls aren’t perfectly straight, you might see gaps behind the top rail. Fill small gaps with caulk; for larger ones, scribe the wood to match the wall curve.
Step 2: Painting & Finishing
-
Prime the wood:
Apply a high-quality primer to the entire wood section, including the rail. This prevents wood knots or tannins from bleeding through your final color. -
Paint the upper wall:
Roll your creamy white paint onto the upper drywall section first. Don’t worry about being perfect near the rail yet; it’s easier to cut in the darker color later. -
Paint the color block (optional):
To recreate the specific look in the photo, measure a rectangle of the same terracotta color on the upper wall adjacent to the window. Tape this area off precisely with painter’s tape. -
Cut in the paneling:
Using an angled sash brush, carefully paint the terracotta color along the top edge of the rail and into the vertical grooves of the paneling. -
Roll the main color:
Use a medium-nap roller to apply the terracotta paint to the flat surfaces of the paneling. I like to work in small sections to maintain a wet edge. -
Let it dry and repeat:
Allow the first coat to dry completely according to the can’s instructions. Apply a second coat to ensure rich, opaque coverage, especially in the grooves. -
Remove tape:
If you painted the color-block square, peel off the painter’s tape while the paint is still slightly tacky to achieve a crisp, clean line. -
Style the corner:
Once fully cured, reinstall outlet covers, add your furniture, and hang artwork. Use black frames with white mats to contrast beautifully against the white upper wall.
Texture play
For a rustic, aged look on the upper wall similar to the photo, use a limewash paint or apply a subtle plaster finish before painting the creamy white.
Now step back and enjoy the warmth and character your new paneled corner brings to the room
BRUSH GUIDE
The Right Brush for Every Stroke
From clean lines to bold texture — master brush choice, stroke control, and essential techniques.
Explore the Full Guide
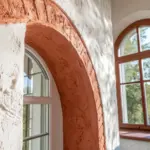
Painted Arch Faux Headboard
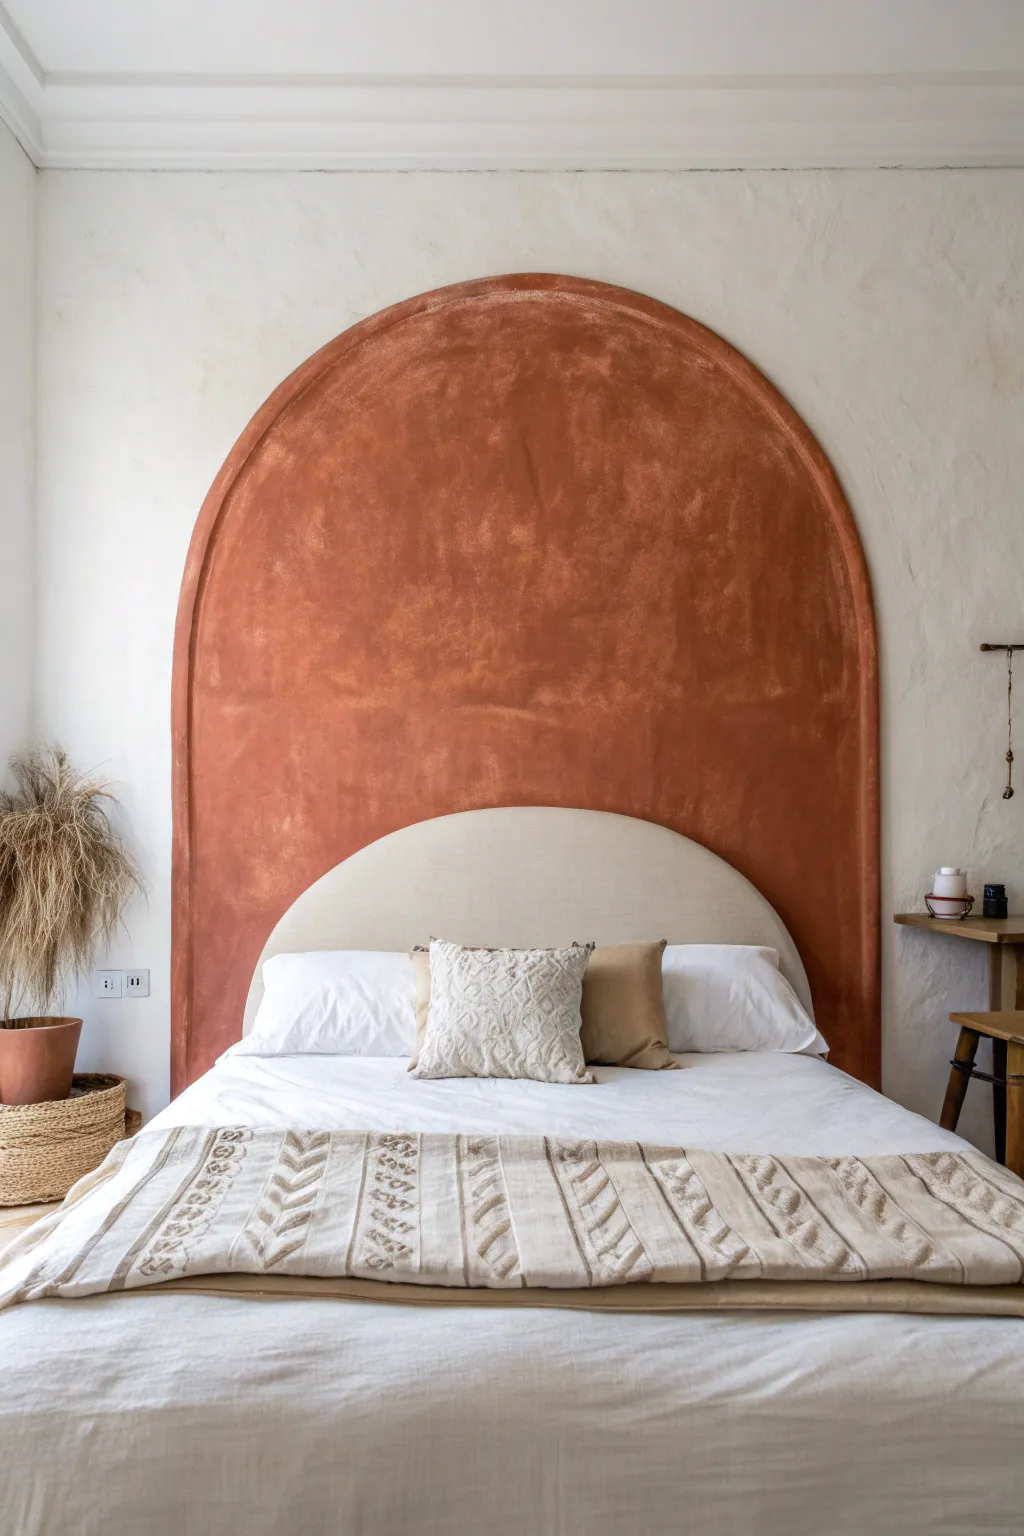
Transform your bedroom with this stunning, oversized faux headboard painted directly onto the wall. This project uses a warm terracotta hue and a unique rag-rolling technique to mimic the look of aged plaster or limestone.
How-To Guide
Materials
- Matte latex paint (terracotta/rust color)
- Glaze medium or water for thinning
- Pencil
- String and thumb tack (or painter’s tape)
- Small angled sash brush (1.5 – 2 inch)
- Lint-free cotton rags or a dedicated rag-rolling tool
- Measuring tape
- Level
- Drop cloth
- Painters tape
Step 1: Planning and Outlining
-
Find the center:
Measure the width of your bed or intended headboard area. Mark the exact center point on the wall at the height where you want the arch to begin curving. -
Determine the width:
Decide how wide you want your arch to be. It should be slightly wider than your bed frame for the best visual balance. Mark the outer edges at the base. -
Create a compass:
Cut a piece of non-stretchy string to half the total width of your desired arch. Tie one end to a pencil and the other end to a thumbtack. -
Draw the curve:
Push the thumbtack into your center mark. Pulling the string taut, swing the pencil upward in a smooth semi-circle motion to draw the top of the arch. -
Mark vertical lines:
Use a long level and a pencil to draw straight vertical lines down from the ends of your semi-circle to the floor (or baseboard). -
Tape the edges:
Apply painter’s tape along the outside of the straight vertical lines. For the curved top, hand-painting is often smoother, but you can use flexible painter’s tape if you prefer.
Uneven Texture?
If your rag marks look too distinct or ‘stamped,’ lightly brush over the wet area with a dry, soft paintbrush to blur and soften the texture.
Step 2: Painting the Base
-
Cut in the outline:
Using your small angled brush, carefully paint along the inside of your pencil line for the arch and along the taped vertical edges. -
Fill the center:
Roll or brush the interior of the arch with your terracotta paint to create a solid base coat. Don’t worry about texture yet; just get good coverage. -
Let it dry:
Allow this base coat to dry completely, usually for about 2-4 hours, before starting the texturing process.
Add Depth
For a richer look, mix a second batch of glaze with a slightly darker or lighter shade of terracotta and sponge it randomly over the dry first layer.
Step 3: Creating Texture
-
Prepare the glaze:
Mix your terracotta paint with a small amount of glaze medium or water (about a 4:1 ratio) to make it slightly translucent and slower drying. -
Work in sections:
Apply the thinned paint mixture to a small 2×2 foot section of the arch using a brush. You want the paint wet for the next step. -
Rag roll technique:
Bunch up a lint-free cotton rag into a loose ball. Press and roll it gently into the wet paint, lifting off some pigment to reveal the base coat underneath. -
Vary the pressure:
Change the way you hold the rag and vary your pressure to create organic, cloud-like patterns rather than a repetitive stamp. -
Blend the edges:
As you move to the next section, overlap slightly with the previous wet edge to ensure there are no harsh lines between work areas. -
Detail the perimeter:
I like to use a slightly drier rag near the very edge of the arch to soften the transition and give it that worn, plaster-like appearance. -
Review and refine:
Step back to look at the whole shape. If any areas look too uniform, dab a little more fresh paint on and blot it with a clean rag to break up the pattern. -
Remove tape:
Carefully peel off the painter’s tape while the top coat is still slightly tacky to prevent peeling the dry paint. -
Final dry:
Let the entire project cure for at least 24 hours before pushing your bed back against the wall.
Now you have a warm, focal point that anchors your room without taking up any floor space
Arched Nook for a Desk Spot
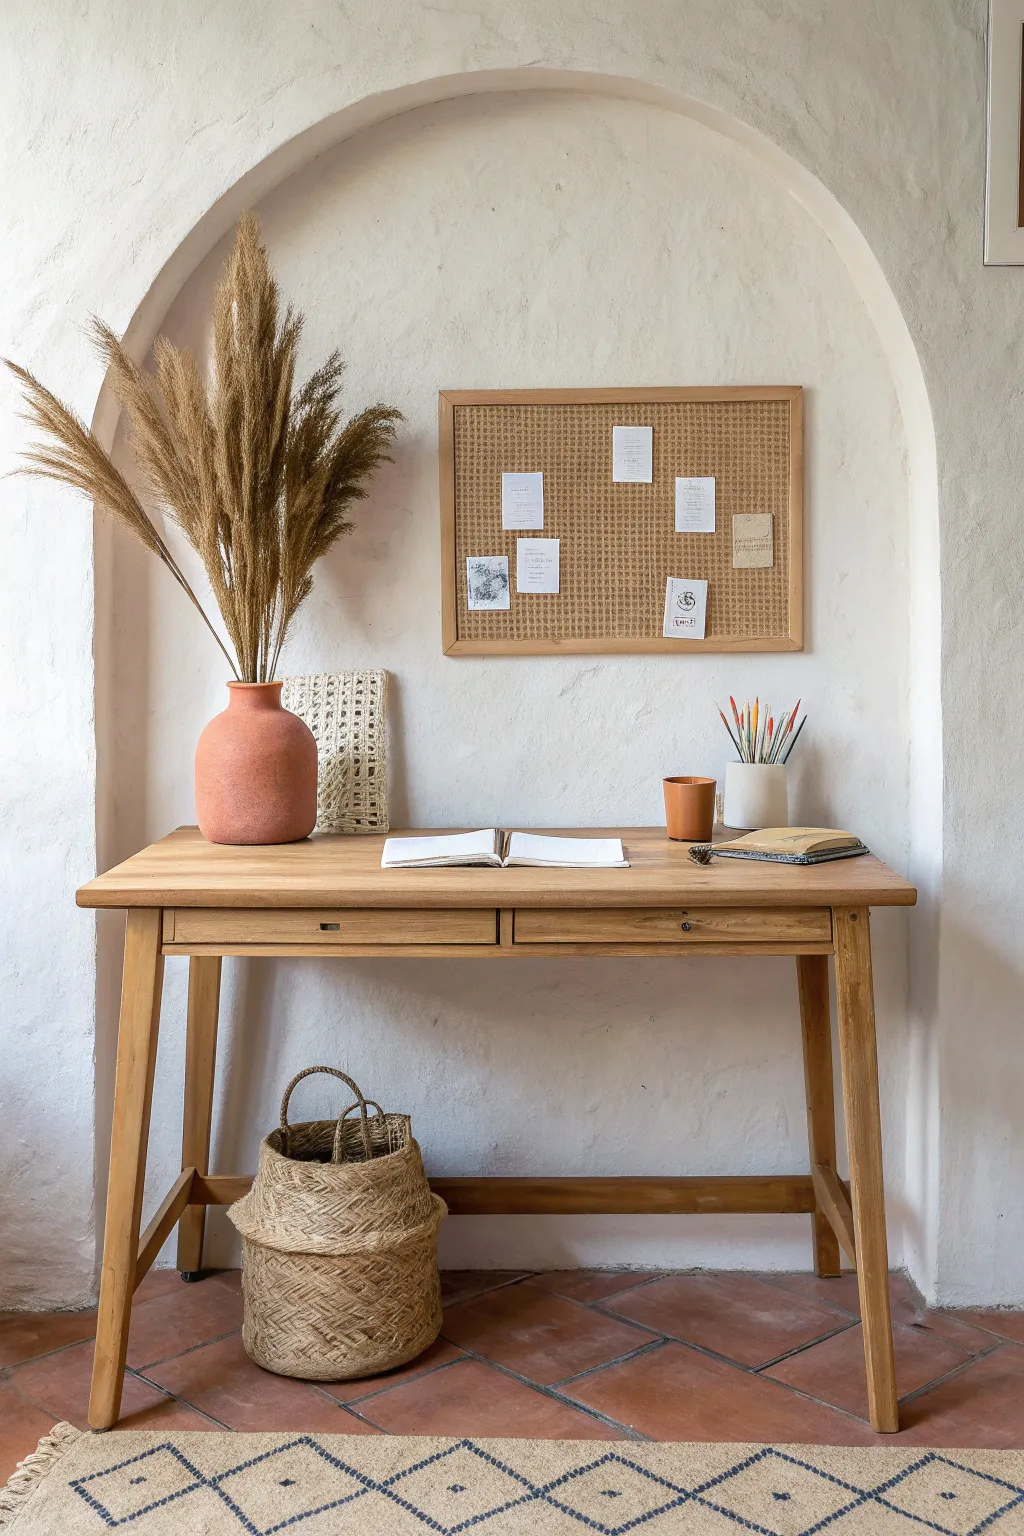
Capture the serene, warm aesthetic of a Mediterranean-style study nook with this charming watercolor and gouache illustration. You will learn to build up textures for wood, woven seagrass, and plaster walls to create a cozy, inviting scene.
Step-by-Step
Materials
- Cold press watercolor paper (300 gsm)
- HB pencil
- Kneaded eraser
- Watercolor paints (Yellow Ochre, Burnt Sienna, Burnt Umber, Paynes Grey, Terracotta)
- White gouache paint
- Round brushes (sizes 2, 4, 8)
- Fine liner brush or 00 round brush
- Masking fluid (optional)
- Ruler
Step 1: Sketching the Composition
-
Outline the Arch:
Start by lightly drawing the large arch shape that frames the composition. Use a ruler to ensure the vertical sides are straight before curving gently at the top to create the alcove effect. -
Draft the Furniture:
Within the lower third of the arch, sketch the basic rectangular form of the wooden desk. Add the four splayed legs, ensuring the perspective looks grounded. -
Place the Objects:
Sketch the accessories: a large rounded vase on the left, a rectangular cork board on the wall, a cylindrical cup with pencils, and the woven basket underneath the desk. -
Refine Details:
Add smaller details like the tall pampas grass stems extending from the vase, the drawers on the desk, and the open notebook. Keep pencil lines light so they don’t show through the paint.
Dry Brush For Grass
To get the fluffiest pampas grass, remove almost all moisture from your brush before picking up pigment. The rough bristles create natural texture.
Step 2: Painting the Base Layers
-
Wall Wash:
Mix a very dilute wash of Yellow Ochre with a touch of Paynes Grey to create a warm off-white. Apply this over the wall area, keeping it uneven to suggest a plaster texture. -
Terracotta Vase:
While the wall dries, paint the vase using a solid Terracotta color. Drop in a slightly darker mix on the right side while wet to create volume and shadow. -
Wooden Desk Base:
Mix Yellow Ochre and Burnt Sienna for a light oak wood tone. Wash this over the entire desk surface and legs. Let the brush strokes follow the grain of the wood. -
Floor Tiles:
Use a mix of Terracotta and Burnt Umber to paint the floor tiles. Leave thin gaps between them to represent grout lines.
Muddy Shadows?
If your shadows look dirty, you may be layering wet paint too quickly. Ensure the base layer is bone dry before glazing a shadow tone over it.
Step 3: Building Texture and Depth
-
Wood Grain Detail:
Once the desk layer is dry, use a size 2 brush and a slightly darker mix of Burnt Umber to paint fine, broken lines horizontally across the drawers and vertically down the legs to mimic wood grain. -
Cork Board Texture:
Paint the frame of the board with the wood mix. For the cork center, stipple a mix of Yellow Ochre and Burnt Sienna to create a speckled, textured appearance. -
Woven Basket Texture:
Paint the basket base with a light straw color. Using the fine liner brush and a darker brown, paint small, interlocking ‘v’ shapes or hatched lines to replicate the woven seagrass pattern. -
Pampas Grass Fluff:
Use a dry brush technique with a mix of Ochre and Brown. Fan out the bristles and drag them lightly upward from the stems to create the feathery, soft look of the pampas grass.
Step 4: Final Highlights and Accents
-
Shadows and Depth:
Mix a cool grey using Paynes Grey and a lot of water. Glaze this under the desk, behind the basket, and inside the upper curve of the arch to deepen the sense of three-dimensional space. -
Stationery Details:
Paint the pencil cup a crisp white or light grey. Add tiny pops of color for the pencils. Carefully paint the small white squares on the cork board to represent notes. -
Gouache Highlights:
I like to switch to opaque white gouache here. Use it to add crisp highlights to the rim of the vase, the edge of the desk, and the brightest parts of the pampas grass. -
Rug Pattern:
For the rug at the bottom, paint a light beige wash. Once dry, use a blue-grey mix to paint the geometric diamond pattern over the top. -
Final Contrast:
Assess the whole image. If any area looks flat, add a tiny bit of concentrated dark brown or grey to the deepest crevices, like the handle of the basket or the gap between drawers.
Step back and admire your tranquil painted corner, perfect for a greeting card or framed wall art

PENCIL GUIDE
Understanding Pencil Grades from H to B
From first sketch to finished drawing — learn pencil grades, line control, and shading techniques.
Explore the Full Guide
Wide Stripes to Stretch the Room
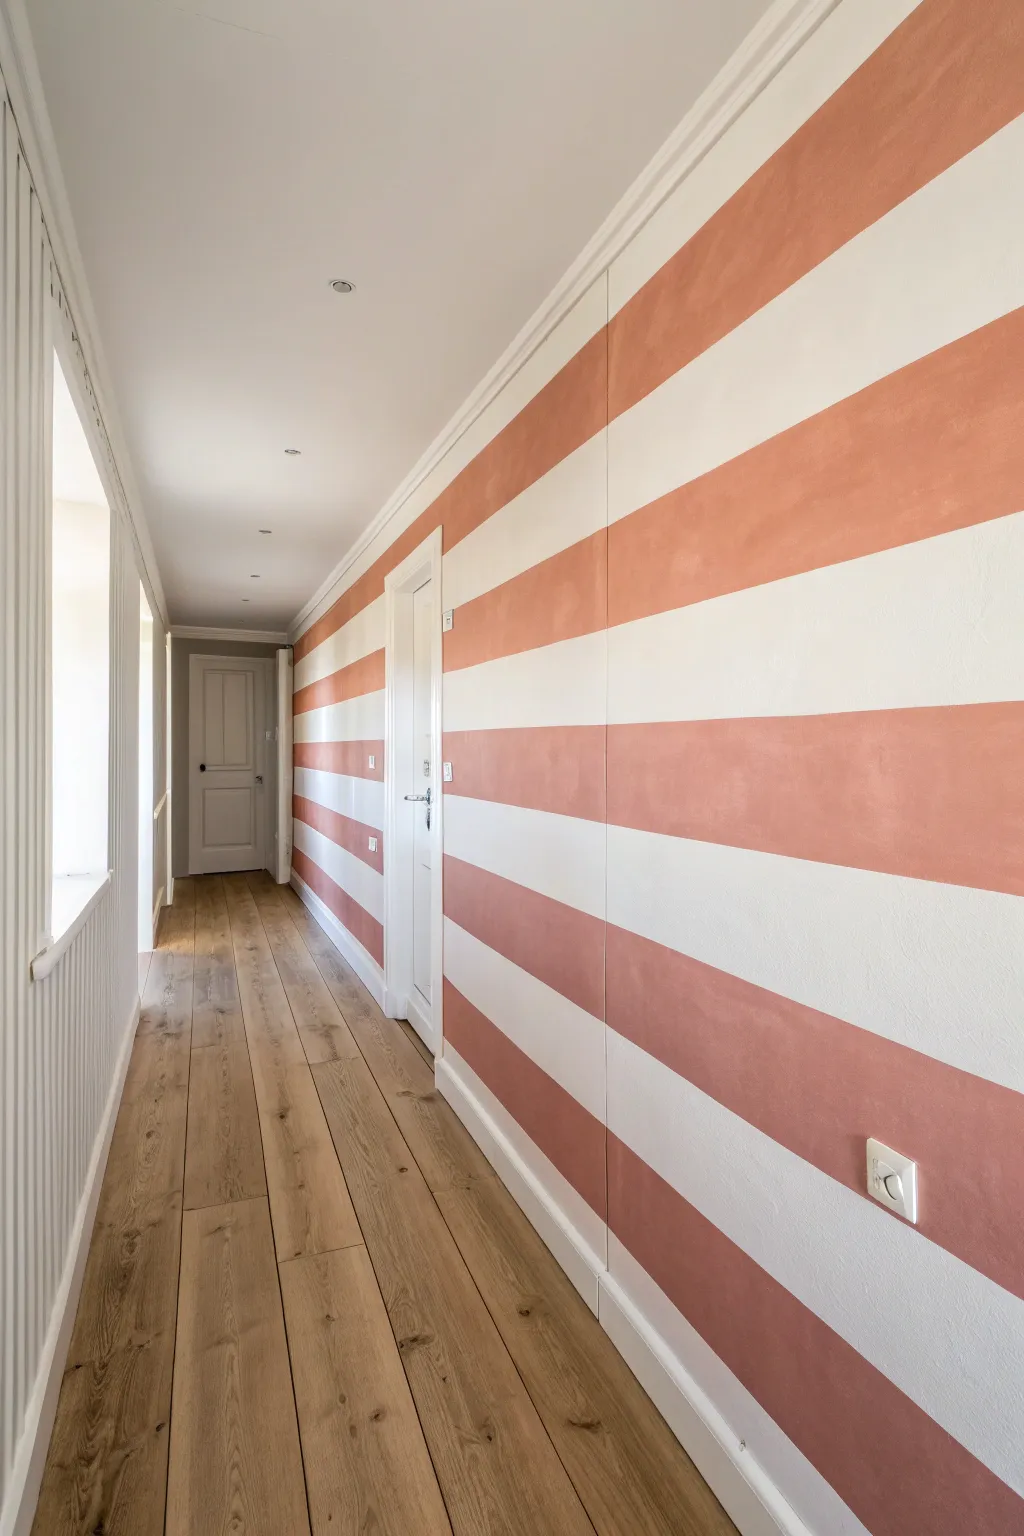
Transform a narrow hallway into a spacious corridor with the optical illusion of wide, horizontal stripes. This project combines crisp white bands with a warm, dusty terracotta hue to add character and visually stretch the length of the room.
How-To Guide
Materials
- High-quality painter’s tape (frog tape recommended)
- White latex wall paint (semi-gloss or eggshell)
- Terracotta/rose pink latex wall paint (matte or eggshell)
- Laser level (optional but highly recommended)
- 4-foot box level
- Measuring tape
- Pencil
- Paint roller frame and extension pole
- Microfiber roller covers (3/8 inch nap)
- Angled sash brush (2.5 inch)
- Paint tray and liners
- Drop cloths
- Putty knife or credit card
Step 1: Preparation and Base Coat
-
Clear and Clean:
Remove all furniture, switch plates, and outlet covers from the wall. Wipe the surface down with a damp cloth and mild soap to remove dust and oils, ensuring the tape will stick perfectly later. -
Protect Surfaces:
Lay down your drop cloths to protect that beautiful wood flooring. Tape off the baseboards, ceiling molding, and any adjacent walls where you don’t want paint to stray. -
Paint the Base Color:
Roll the entire wall with your lighter color first—in this case, the white. It is much easier to paint stripes over a light base than trying to cut in white stripes later. -
Second Coat and Dry:
Apply a second coat of white if necessary for full opacity. Allow this base layer to cure for at least 24 to 48 hours. This is crucial; if the paint is soft, the tape will peel it right off.
Bleed Fixer
If paint bled under the tape, don’t panic. Wait for it to dry fully, then use a stiff straight edge (like a ruler) and a tiny artist brush to paint a crisp line of the base color over the mistake.
Step 2: Measuring and Taping
-
Calculate Stripe Width:
Measure the total height of the wall between the baseboard and crown molding. Divide this number by an odd number (like 7 or 9) to ensure you start and end with the same color, or use an even number for alternating finishes. For this look, aim for stripes about 12-14 inches wide. -
Mark the Wall:
Using a pencil and a measuring tape, make small tick marks vertically up the wall at your calculated intervals. Do this at the start, middle, and end of the hallway to keep things consistent. -
Level Lines:
Connect your tick marks using a long box level and a pencil. Draw a faint horizontal line all the way across the wall. I find a laser level saves immense time here—just align the beam with your mark and tape directly along the light. -
Apply the Tape:
Apply painter’s tape along your pencil lines. Important: Place the tape on the *outside* of the area you intend to paint terracotta. The stripes you want to remain white should be covered by the tape. -
Mark Your Colors:
To avoid confusion, place a small piece of tape or a lightly penciled ‘X’ inside the bands that will receive the terracotta paint. It’s surprisingly easy to lose track once you start rolling. -
Seal the Tape Edges:
Run a putty knife or the edge of a credit card firmly over all the tape edges to adhere them tightly to the wall. This prevents paint from creeping underneath.
Step 3: Painting the Stripes
-
The Bleed-Through Trick:
Brush a very light coat of your *base color* (white) over the edge of the tape that faces the stripe area. This seals the tape edge with white paint, so any bleed-through matches the base underneath. -
Cut In Borders:
Once the seal coat is dry, use your angled brush to cut in the terracotta paint along the ceiling, baseboards, and vertical corners within the marked stripes. -
Roll the Stripes:
Use a mini roller or a standard roller to fill in the terracotta stripes. Apply a thin, even coat, being careful not to overload the roller, which can cause drips. -
Second Coat:
Allow the first coat of pink to dry to the touch (usually 2-4 hours), then apply a second coat for a rich, deeper hue that matches the inspiration image. -
Peel While Damp:
Remove the tape roughly an hour after the final coat, while the paint is still slightly gummy but not wet. Pull the tape slowly at a 45-degree angle away from the fresh paint. -
Touch Ups:
Inspect your lines closely. If any tiny bleeds occurred, use a small artist’s brush and your original white paint to carefully correct the edge. -
Reinstall Hardware:
Once fully cured (give it another 24 hours), screw your outlet covers and light switches back into place.
Tape Removal Pro Tip
If the paint has fully dried and the tape feels stuck, lightly score the edge where the tape meets the paint with a sharp utility knife before pulling to prevent ripping the new paint layer.
Enjoy the dramatic, lengthening effect these warm stripes bring to your hallway
Thin Pinstripes for Subtle Texture
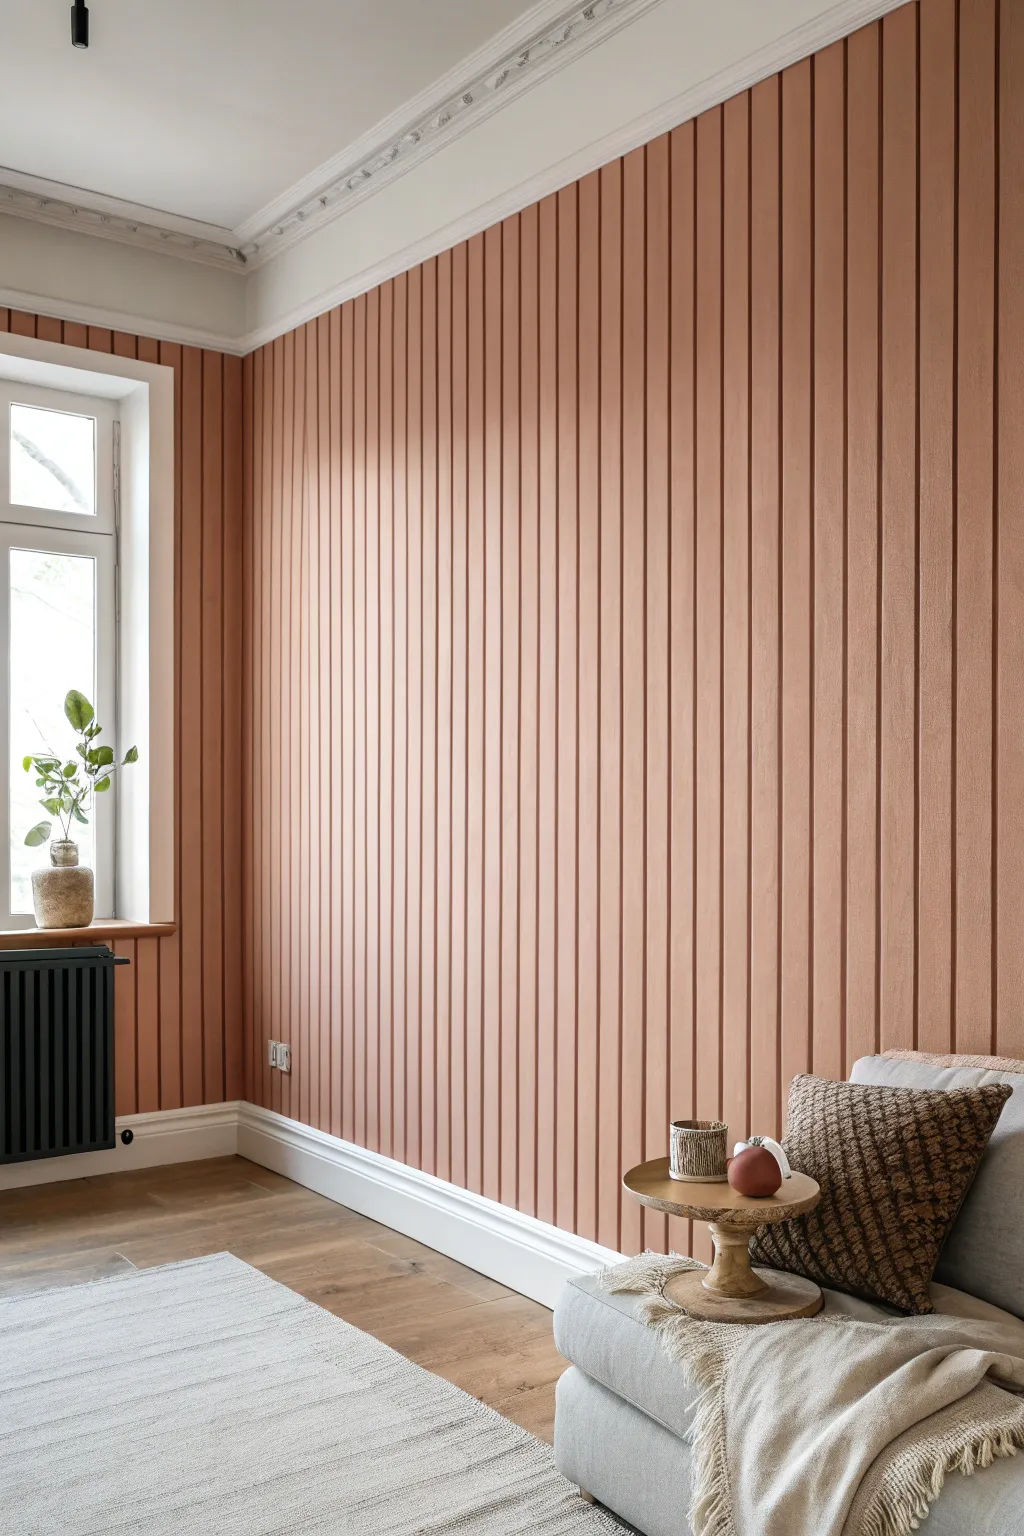
Transform a plain surface into a textural masterpiece by installing sleek, narrow vertical slats painted in a warm, earthy hue. This project merges architectural interest with color, creating a sophisticated backdrop that mimics the rhythmic beauty of classic pinstripes.
Step-by-Step
Materials
- Trim boards (1×2 pine or primed MDF strips)
- Terra-cotta or salmon-pink interior paint (matte or eggshell finish)
- Construction adhesive (e.g., Liquid Nails)
- Brad nailer and 1.5-inch brad nails
- Laser level or traditional spirit level
- Paint rollers (microfiber) and angled sash brushes
- Wood filler or spackle
- Caulk and caulking gun
- Fine-grit sanding block (220-grit)
- Tape measure
- Spacer block (custom cut to your desired gap width)
Step 1: Preparation and Layout
-
Assess the wall:
Begin by cleaning your wall thoroughly to ensure adhesives will stick. Remove any existing baseboards if you plan to install new ones, or decide if your slats will cease just above the current skirting. -
Paint the background:
Before attaching any wood, roll a coat of your chosen terra-cotta paint onto the flat wall. This ensures that the gaps between the slats will match the slats themselves perfectly without tedious brushwork later. -
Pre-paint the slats:
Lay your trim boards out on a drop cloth or saw horses. I prefer to paint the edges and faces of the boards now—it’s much faster than trying to paint the sides of the slats once they are on the wall. -
Plan the spacing:
Measure the total width of your wall. Calculate how many boards you need based on the board width plus your desired gap (usually 1/2 to 1 inch). Adjust the gap slightly if needed to avoid a tiny sliver of wood at the end. -
Establish a plumb line:
Using a laser level is a lifesaver here. Set a perfectly vertical beam near the center or starting edge of the wall to guide your first board placement.
Step 2: Installation
-
Apply adhesive:
On the back of your first board, apply a zigzag bead of construction adhesive. This helps keep the board flat against the wall, especially if the wall has imperfections. -
Place the first board:
Align the board strictly with your laser level or plumb line. Press it firmly against the wall and secure it with your brad nailer, shooting nails into studs where possible or angling them to grip the drywall. -
Use a spacer:
Take your scrap wood spacer block and place it snugly against the installed board. This guarantees consistent spacing without measuring every single time. -
Continue the pattern:
Apply adhesive to the next board, butt it against the spacer, and nail it in place. Repeat this process across the wall, checking for plumb every 3-4 boards to ensure you aren’t drifting. -
Navigate obstacles:
When you reach outlets or windows, measure carefully and cut the boards to fit around them. You may need a jigsaw for notches around trim or sills.
Spacer Block Trick
Make a handle for your spacer block by screwing a long screw halfway into it. This makes it easier to pull out from tight fits between slats.
Step 3: Finishing Touches
-
Fill the holes:
Once all boards are up, go back with wood filler and fill every tiny nail hole. Overfill slightly as the filler will shrink when drying. -
Caulk the seams:
Run a thin bead of finish caulk where the slats meet the ceiling molding and the baseboards. This creates a seamless, built-in look rather than a tacked-on appearance. -
Sand smooth:
After the wood filler is completely dry, lightly sand the spots flush with the board surface using your fine-grit sanding block. -
Final coat:
Roll a final, thin coat of paint over the face of the slats to cover the filler and ensuring an even sheen across the entire wall. Use a brush to hit any caulk lines or touched-up areas carefully. -
Inspect angles:
View the wall from different angles in the room to catch any missed spots on the sides of the slats and touch up as needed.
Add a Picture Rail
Install a horizontal ledge or picture rail about 3/4 up the wall to break the vertical lines and create a dedicated display space for art.
Now, step back and admire how the vertical lines elongate your room and add incredible depth to your space


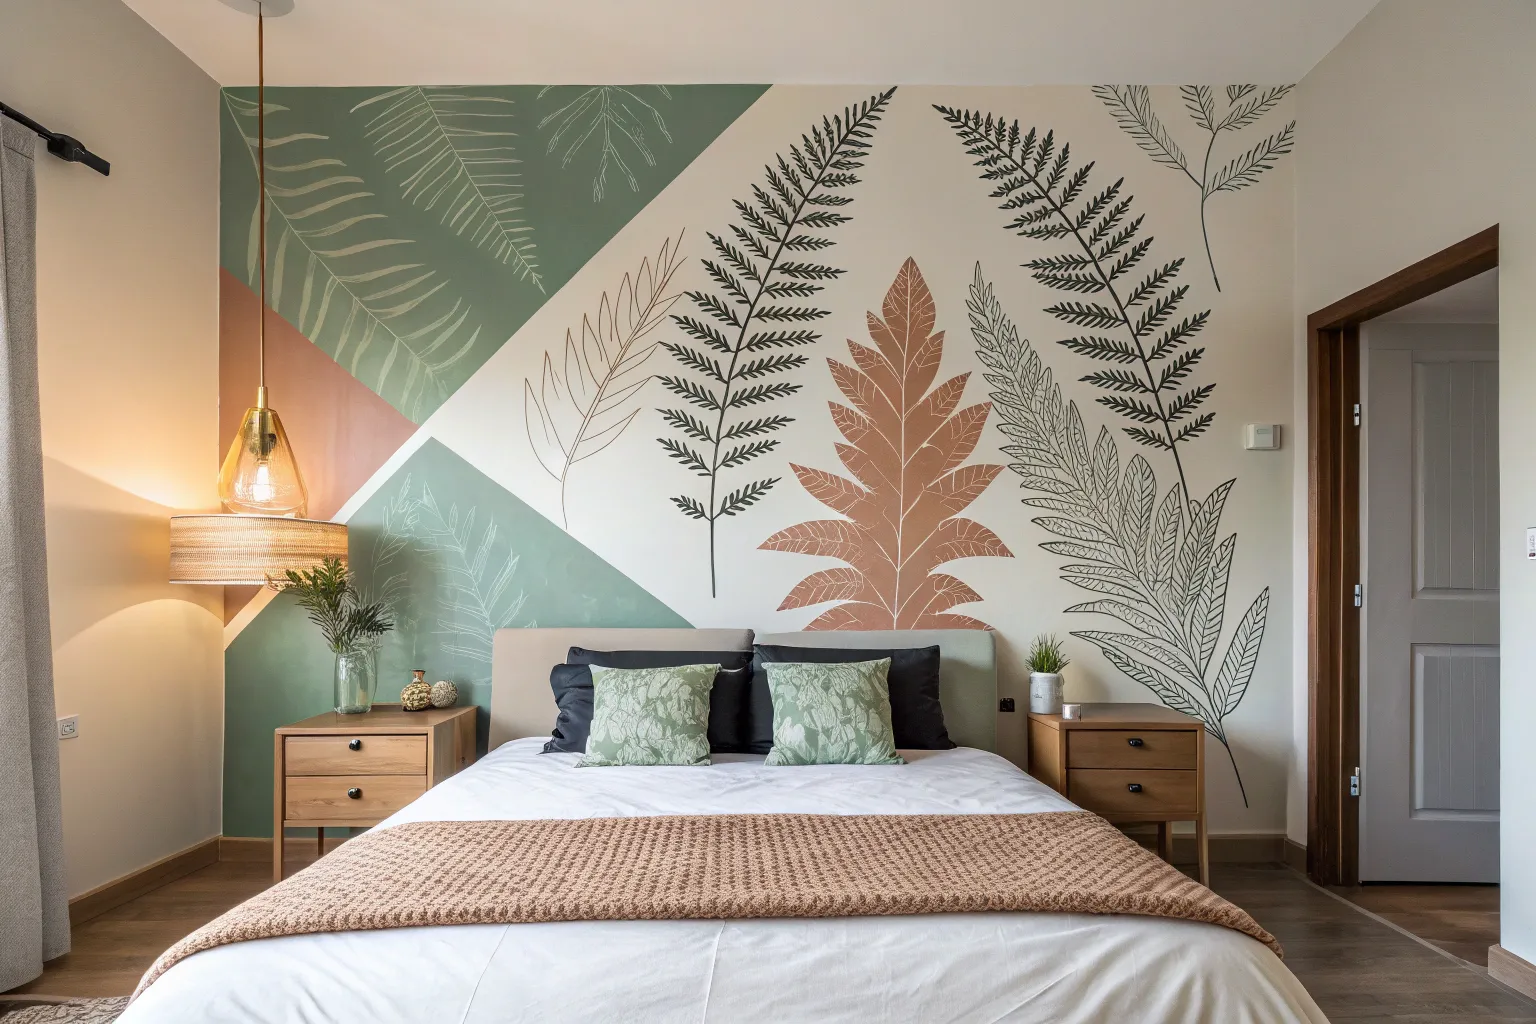
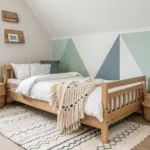
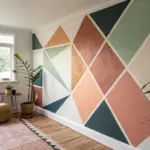
Simple Geometric Triangle Mural
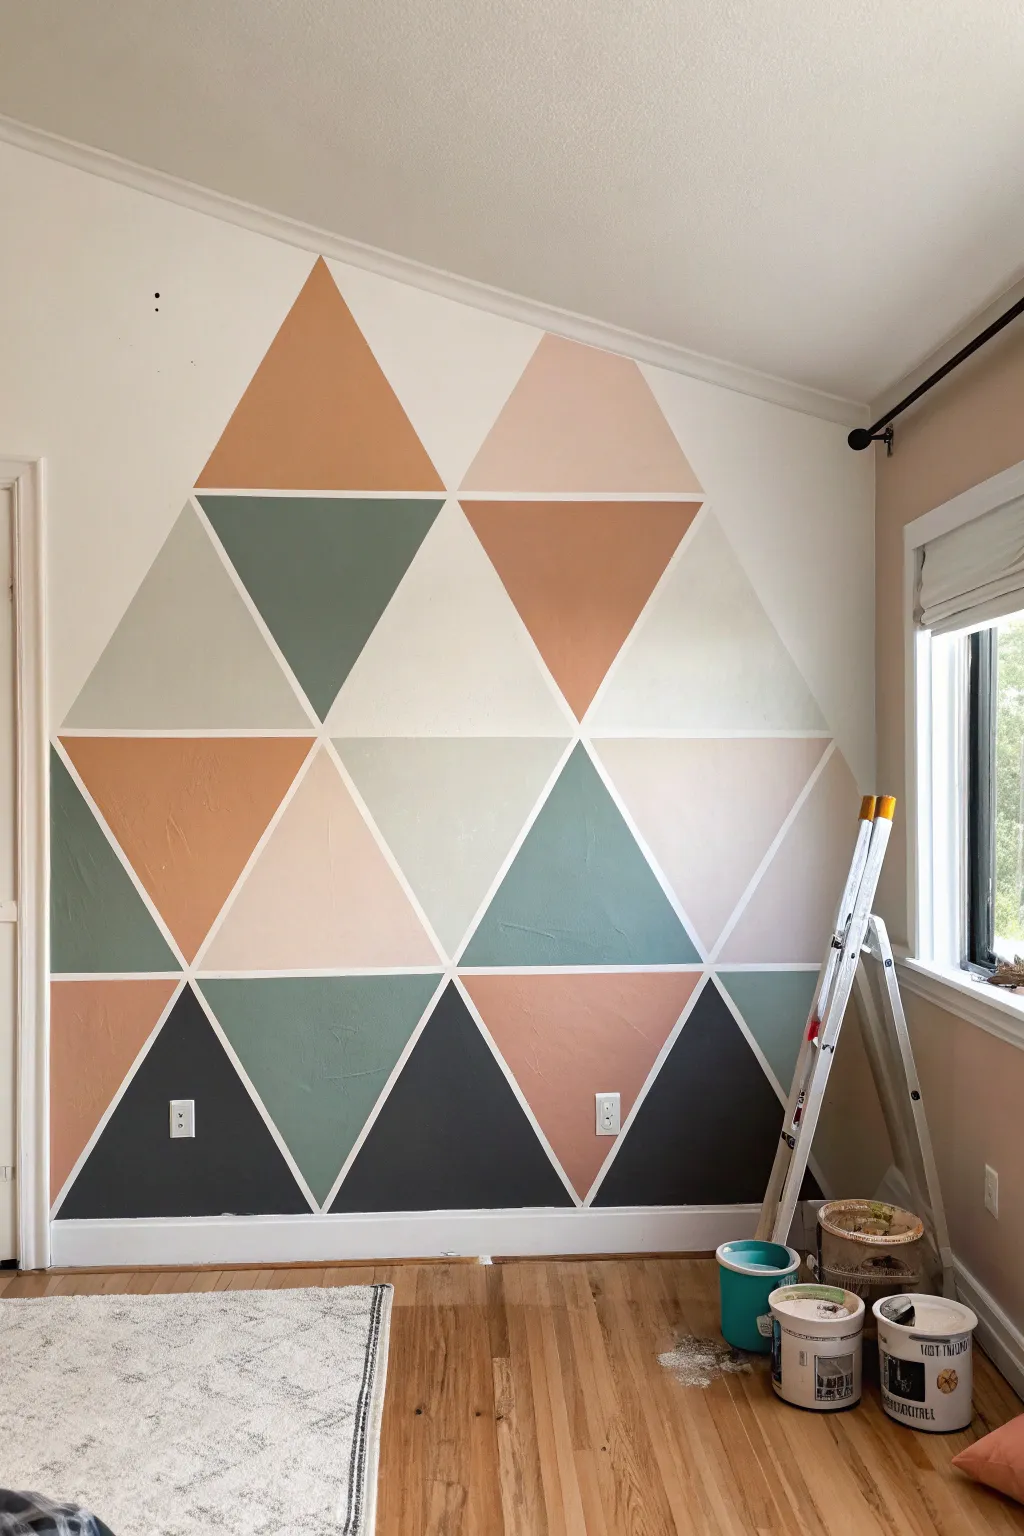
Transform a plain wall into a striking focal point with this large-scale geometric triangle mural. Using a palette of soft sage, terracotta, blush, and charcoal separated by crisp white lines, this project adds architectural interest and modern warmth to any room.
Detailed Instructions
Materials
- Latex interior wall paint (Sample sizes work well for the colors)
- Colors: Terracotta/Rust, Sage Green, Blush Pink, Charcoal/Dark Grey, Cream/Off-White
- Painter’s tape (1-inch width works best, specific for delicate surfaces if needed)
- Tape measure
- Bubble level or laser level
- Pencil
- Plastic drop cloth
- Step ladder
- Paint rollers (4-inch mini rollers work best for triangles)
- Small angled sash brush (for edging)
- Paint trays
- Damp rag
Step 1: Planning and Taping
-
Base Coat Preparation:
Before creating your shapes, ensure the wall is painted in the color you want your dividing lines to be. In this design, the lines are white, so I recommend painting the entire wall white first and letting it cure for at least 24 hours to prevent tape damage. -
Establish the Grid:
Decide on the size of your triangles. Measure the total width of the wall and divide it to find a comfortable base width for your triangles (e.g., 24 inches). Mark these intervals along the baseboard with a pencil. -
Mark the Peaks:
To create the second row of points, you need to find the center spots. Measure exactly halfway between your base marks, but move up the wall vertically. The height of the triangle is up to you, but keeping it proportional to the base creates an equilateral look. -
Connect the Dots:
Using long strips of painter’s tape, connect your base marks to your peak marks. This creates the first row of zig-zag lines across the wall. -
Complete the Pattern:
Continue adding tape lines to form the inverted triangles. You are essentially creating a grid of diamonds and triangles. Use a level occasionally to ensure your peaks and valleys aren’t drifting sideways. -
Secure the Edges:
Once the entire pattern is taped, run your finger firmly over every edge of the tape to seal it tightly against the wall.
Bleeding Lines?
If paint bleeds under the tape, let it dry fully. Then, place a new piece of tape precisely over the crisp line of the colored shape, and repaint the white dividing line with a small brush.
Step 2: Sealing and Color Selection
-
The Sealing Trick:
To get perfectly crisp lines, paint over the edge of the tape with your *base wall color* (white) first. This fills any tiny gaps under the tape with white paint so the colored paint won’t bleed through later. -
Wait for Sealant to Dry:
Let this sealing coat dry completely to the touch before moving on to the colors. -
Map Your Colors:
Take a photo of your taped wall and use a phone markup tool to plan which triangle gets which color. This prevents two of the same color from touching and helps balance the composition before you open a paint can. -
Designate Triangles:
Place a tiny dot of painter’s tape or a small pencil mark inside each triangle with a letter code (e.g., ‘G’ for Green, ‘P’ for Pink) corresponding to your plan.
Add Metallic Flair
For a luxe twist, use metallic gold or copper masking tape (washi tape) instead of removing the tape, or paint the dividing lines in gold leaf paint after the shapes dry.
Step 3: Painting the Colors
-
Start with Color One:
Open your first color (e.g., the charcoal gray). Using a 4-inch mini roller or a small brush, fill in all the triangles marked for this shade. -
Work the Edges:
When painting near the tape, brush or roll away from the tape edge rather than into it to minimize the risk of forcing paint underneath. -
Rotate Through Colors:
Wash your roller or switch to a fresh one, then proceed to the next color (terracotta), filling in its designated sections. Repeat this process for the sage green, blush pink, and cream sections. -
Apply Second Coats:
Lighter colors like the blush pink or cream usually require a second coat for full opacity. Allow the first coat to dry for the time recommended on the can, then re-apply. -
The Reveal:
This is the crucial moment: peel the tape while the final coat of paint is still slightly tacky (not fully cured). Pull the tape slowly at a 45-degree angle away from the painted area for the sharpest lines. -
Touch Ups:
Inspect the lines closely. If any paint bled through, use a tiny artist’s brush and a bit of the base white paint to carefully correct the line.
Step back and admire how this simple taping technique has completely redefined the energy of your space
Abstract Organic Shape Feature Wall
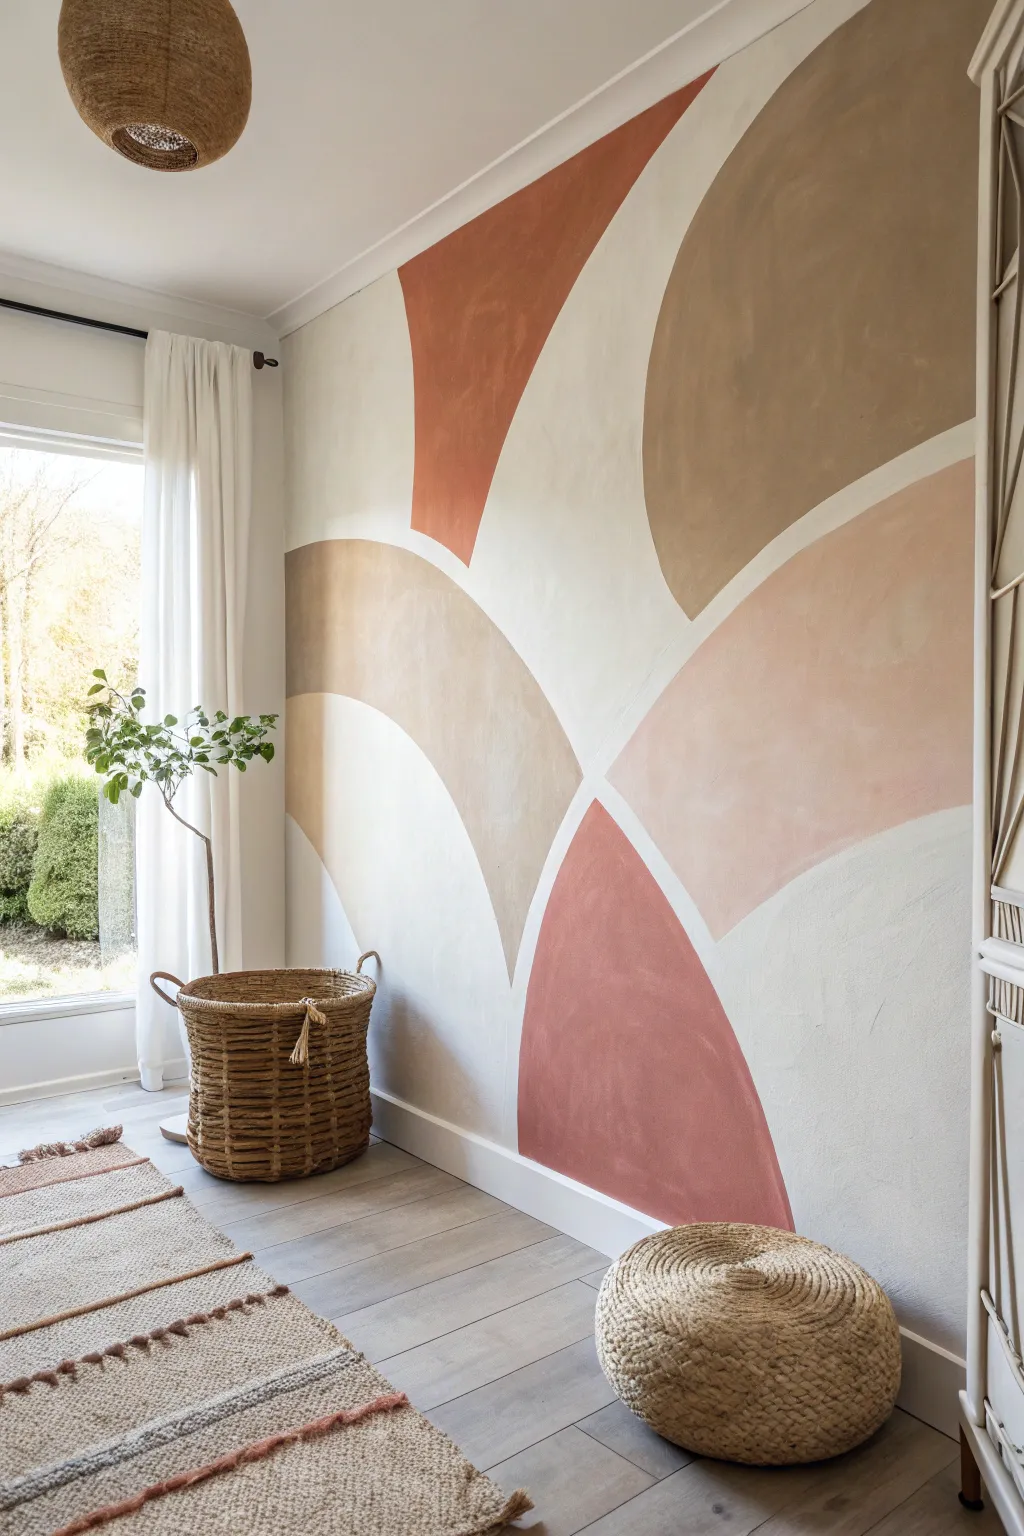
Transform a plain wall into a stunning focal point with this large-scale abstract mural featuring warm, earthy tones and fluid, organic shapes. The design uses negative space to create crisp white lines between the color blocks, giving the finish a modern yet hand-painted artisan feel.
Step-by-Step Guide
Materials
- Interior latex wall paint (white for base)
- Interior latex wall paint (colors: Terracotta, Beige, Tan, Soft Pink)
- Small foam roller and tray
- 2-inch angled sash brush
- Small artist brushes (for touch-ups)
- Chalk or pencil
- Painter’s tape
- Drop cloths
- Ladder or step stool
- Damp rag
Step 1: Preparation & Planning
-
Clear and clean:
Remove all furniture, artwork, and outlet covers from the wall area. Wipe down the entire surface with a damp cloth to remove dust and oils, ensuring the paint adheres properly. -
Prime the base:
If your wall isn’t already white or if the existing paint is dark, apply a fresh coat of white base paint. This white will serve as the dividing lines between your shapes, so ensure it looks crisp and clean. -
Protect the edges:
Apply painter’s tape along the ceiling line, baseboards, and adjoining walls to protect them from stray brushstrokes. -
Plan your design:
Looking at the reference image, study how the shapes radiate from a central point or interact. Sketch a rough layout on paper first to determine where your largest blocks of color will sit.
Step 2: Drafting the Design
-
Sketch the curves:
Using a piece of chalk or a light pencil, draw the organic shapes directly onto the wall. Focus on smooth, flowing arches and rounded triangles. -
Define the gaps:
Draw double lines for every curve to create the ‘negative space’ gap. The space between the shapes should remain consistent, roughly 1 to 1.5 inches wide. -
Review perspective:
Step back frequently to view the wall from a distance. If a curve looks lopsided or a gap looks too narrow, simply wipe away the chalk and redraw it until the composition feels balanced. -
Mark your colors:
Lightly write the initial of each paint color (e.g., ‘T’ for Terracotta, ‘B’ for Beige) inside the corresponding shape outline to avoid confusion once you start painting.
Smooth Curves Hack
Make a giant compass! Tie a string to a pencil and tape the other end to the wall. Keep the string taut to draw perfectly smooth arches.
Step 3: Painting the Shapes
-
Cut in the edges:
Start with your darkest color first (the terracotta). Use the 2-inch angled brush to carefully paint along the inside of your chalk outline. Keep your hand steady to maintain a crisp edge against the white gap. -
Feather the edges:
Feather the paint slightly inward from the outline so you don’t build up a thick ridge of paint that might show through later layers. -
Fill the center:
Once the perimeter is cut in, use a small foam roller to fill in the center of the shape. I find rolling in diverse directions adds a nice subtle texture rather than uniform vertical stripes. -
Repeat for all colors:
Move on to the next color shapes (beige, tan, pink), rinsing your brush thoroughly or using separate brushes for each hue. Be careful not to smudge wet paint from adjacent shapes while you work. -
Apply second coats:
Allow the first coat to dry for at least 2-4 hours. Apply a second coat to ensure rich, opaque coverage, especially for the lighter beige and pink tones.
Wobbly Lines?
Don’t stress over imperfection. If a curve is shaky, widen the colored shape slightly with an artist brush to smooth it out rather than repainting the white line.
Step 4: Refining & Finishing
-
Clean the lines:
Once all colored sections are fully dry, inspect the white negative spaces. If you painted over a line accidentally, use a small artist brush and your white base paint to touch up the gap and reclaim that crisp edge. -
Erase guidelines:
Use a barely damp cloth to gently wipe away any visible chalk or pencil marks that weren’t covered by paint. -
Remove tape:
Slowly peel off the painter’s tape from the ceiling and trim. Pull the tape at a 45-degree angle while the final touch-ups are still slightly tacky to prevent peeling.
Step back and admire how these warm, flowing shapes bring a calm and artistic energy to your space
Minimal Line Art Wall Painting
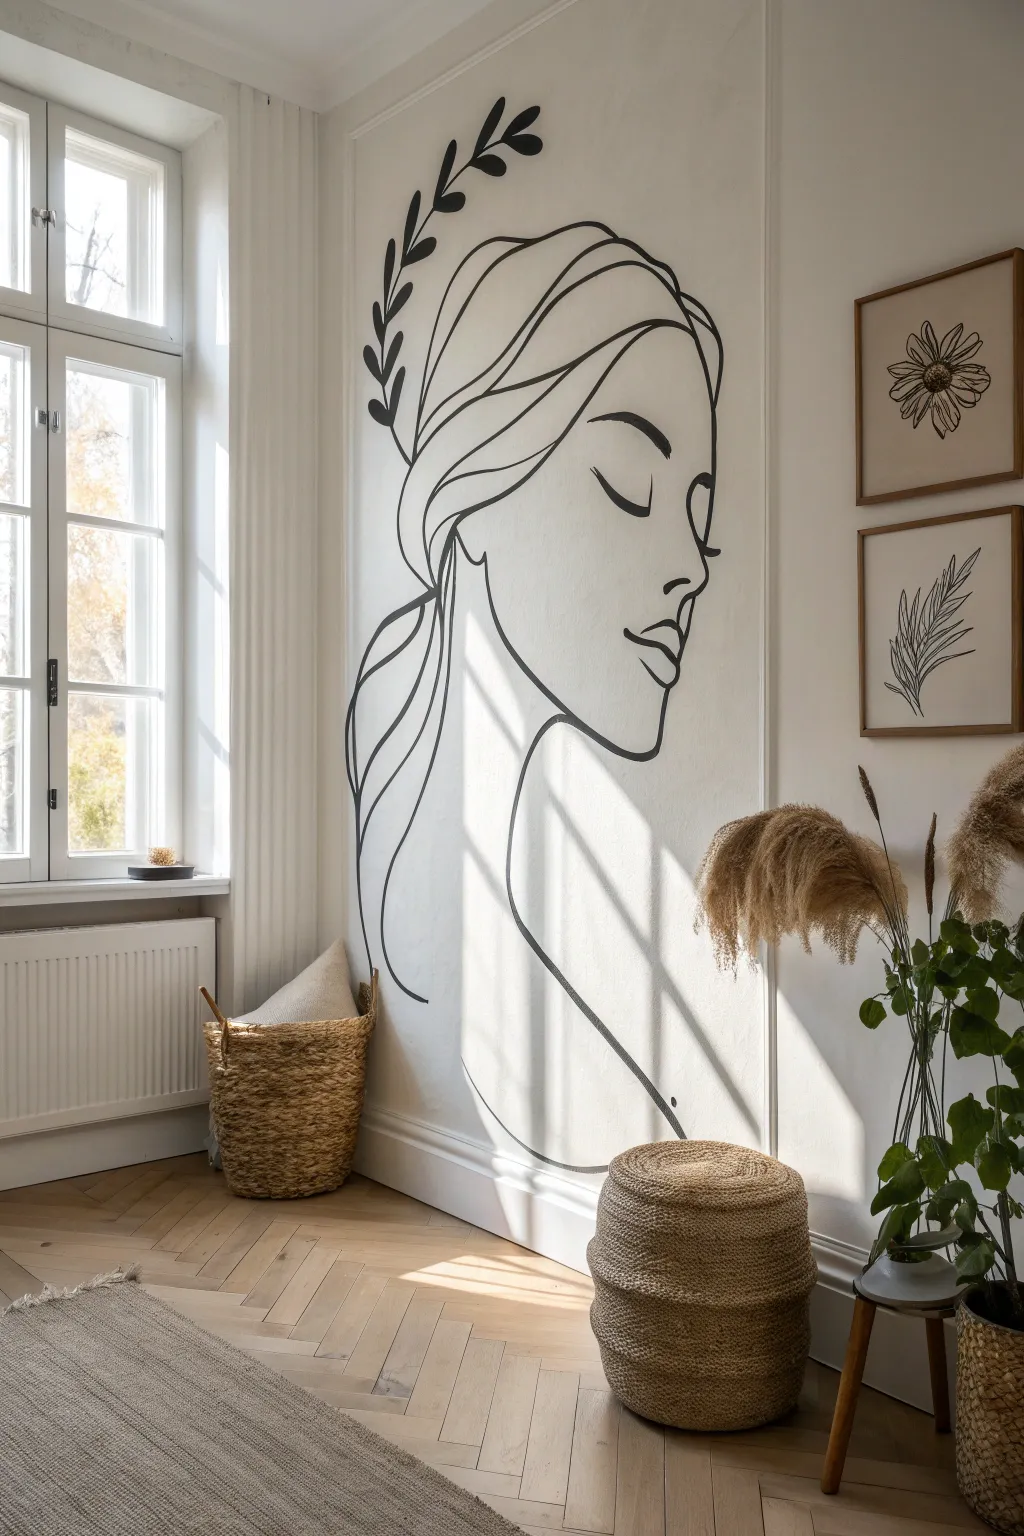
Transform a blank wall into a sophisticated focal point with this large-scale minimal line art mural. The elegant, flowing lines of the woman’s profile create a calming atmosphere that pairs beautifully with natural light and organic textures.
How-To Guide
Materials
- Projector or transparency sheets (optional but recommended)
- Pencil (HB or lighter)
- High-quality black acrylic interior paint (eggshell or satin finish)
- Round artist brushes (sizes 4, 8, and 12)
- Painter’s tape
- Drop cloth
- Eraser
- Small roller and white touch-up paint
- Ladder or sturdy step stool
- Damp rag
Step 1: Preparation and Planning
-
Prepare the surface:
Start by ensuring your wall is clean, dry, and free of dust. If you have any holes or significant bumps, patch and sand them now so your lines will flow smoothly over the surface. -
Define the boundaries:
Visualize exactly where you want the face to sit. Lay down a drop cloth at the base of the wall to protect your floors and baseboards from stray drips. -
Set up your guide:
The easiest way to get proportions right on this scale is using a digital projector connected to a laptop or phone. Project the reference image onto the wall, adjusting the distance until the size feels impactful but breathing room remains at the edges.
Steady Hand Trick
Mix a tiny amount of water or flow improver into your black acrylic paint. This creates an ink-like consistency that aids long, smooth brushstrokes without dragging.
Step 2: The Sketching Phase
-
Outline the main features:
Using a light hand and an HB pencil, trace the projected lines onto the wall. Focus on the sweeping curve of the jawline, the nose profile, and the closed eyelid. -
Add hair details:
Sketch the wavy lines representing the hair and ponytail. Don’t worry about being perfectly precise; the flow is more important than exact replication. -
Draft the botanical element:
Lightly trace the leafy laurel branch that curves above the head. Ensure the leaves are spaced evenly, as this adds balance to the composition. -
Review without projection:
Turn off the projector and step back. Look at your pencil sketch from across the room to ensure the composition feels centred and balanced on the wall. -
Refine the lines:
Use your eraser to lighten any heavy pencil marks or correct any shaky areas. You want the guide to be visible to you up close, but faint enough not to show through the paint.
Add Dimension
For a subtle 3D effect, paint the design in a very dark charcoal grey instead of pure black, or add a thin shadow line in light grey behind the main strokes.
Step 3: Painting the Artwork
-
Start with the main contours:
Dip your size 8 or 12 round brush into the black acrylic paint. Begin with the long, continuous lines of the neck and shoulder. Try to paint with your shoulder rather than just your wrist for smoother curves. -
Tackle the facial features:
Switch to a smaller brush (size 4) for delicate areas like the eyelashes, lips, and nose. I like to stabilize my painting hand by resting my pinky finger lightly against the wall. -
Create line variation:
To mimic the artistic feel, vary the pressure on your brush. Press down slightly harder on curves like the hair waves to thicken the line, and lift slightly for the tapered ends. -
Paint the leaves:
Fill in the leaf shapes on the branch. These aren’t just outlines; paint them solid black for visual weight, using a single confident stroke for the stem connection. -
Connect the hair lines:
Go back to the hair section. Ensure the lines flowing from the forehead into the ponytail feel connected and fluid, using long, deliberate strokes to avoid start-stop marks. -
Check consistency:
Step back frequently to check line thickness. If some areas look too thin compared to others, gently thicken them with the medium brush to maintain visual harmony.
Step 4: Finishing Touches
-
Clean up edges:
Once the black paint is dry to the touch, use a clean edger brush and your white wall paint to sharpen any black lines that look fuzzy or uneven. -
Erase guidelines:
After the paint has fully cured (give it at least a few hours), gently erase any remaining visible pencil marks that weren’t covered by paint. -
Final inspection:
Remove the drop cloth and wipe down the baseboards if any dust settled. Stand back and admire how the simple lines transform the room’s energy.
Enjoy the peaceful, artistic vibe your new hand-painted mural brings to the space
Leafy Border for a Fresh Edge
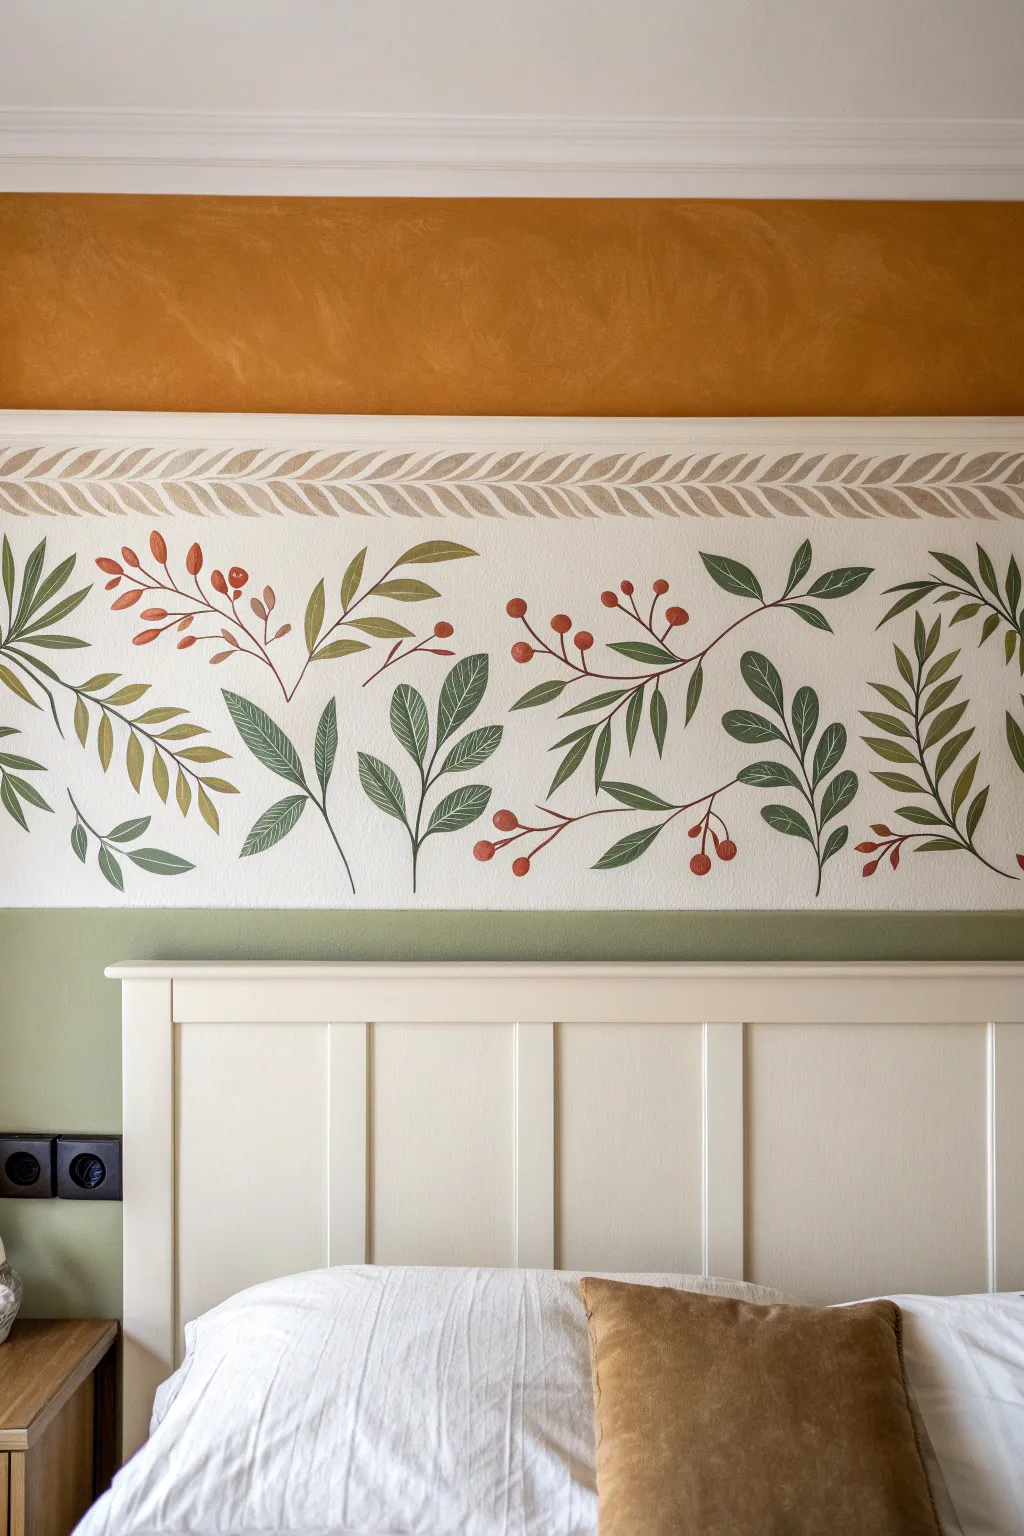
Transform a plain bedroom wall into a serene garden retreat with this sophisticated hand-painted border. This project mimics the elegance of wallpaper or a custom mural by layering a braided geometric top border with a free-flowing vine and berry motif below.
Detailed Instructions
Materials
- Wall paints (base white/cream, terracotta orange, sage green)
- Acrylic craft paints (various shades of green, burnt orange/red, brown)
- Artist brushes (filbert sizes 6-10 for leaves, round size 2-4 for stems/details)
- Painter’s tape (multi-surface)
- Pencil and large eraser
- Measuring tape and spirit level/laser level
- Stencil material (optional for top border)
- Palette or disposable plates
- Water cups and paper towels
Step 1: Planning and Base Coats
-
Prepare the wall:
Ensure your wall surface is clean, dry, and smooth. If you are starting from a dark color, apply a coat of primer to the area where the border will be painted to ensure your colors pop. -
Mark your zones:
Using a measuring tape and a laser level (or spirit level), mark horizontal lines to divide the wall. You need three zones: the terracotta header at the top, the main white band for the artwork (approx. 18-24 inches high), and the sage green lower section. -
Tape and paint the color blocks:
Apply painter’s tape along your pencil lines. Paint the upper section with the terracotta orange and the lower section behind the bedhead with the sage green. Let these dry completely before removing tape. -
Paint the central band:
paint the middle section—the canvas for your artwork—with a creamy off-white or light beige flat interior paint.
Step 2: The Geometric Braided Border
-
Mark the border boundaries:
Just below the terracotta section, lightly mark a narrow band (about 3-4 inches high) for the braided leaf pattern. -
Sketch the braid:
Lightly sketch a repeating chevron or ‘V’ pattern within this band. It doesn’t need to be mechanically perfect; a little hand-drawn charm works well here. -
Paint the beige leaves:
Using a small filbert brush and diluted beige-brown paint, fill in each ‘V’ with a simple leaf shape. Press the brush down and lift as you pull back to create the tapered leaf look naturally. -
Add the stroke details:
Once the main leaf shapes are dry, use a fine liner brush to add very faint, thin outlines or central veins to define the braid structure.
Uneven Coverage?
If acrylics look streaky, don’t overload the brush. Instead, apply two thin layers. Let the first dry completely (hairdryers help speed this up) before adding the second for opacity.
Step 3: Painting the Main Vine Motif
-
Sketch the flow:
With a pencil, lightly draw the main undulating stems across the white band. Aim for a gentle wave motion that rises and falls naturally. -
Block in the main stems:
Mix a dark brown paint with a touch of green. Using a round brush size 4, paint over your pencil lines to create the primary vines. -
Paint the foundation leaves:
Start with the largest leaves using a deep forest green. Use a larger filbert brush (size 8 or 10) to create these shapes, varying the direction they point. -
Layer in lighter foliage:
Switch to a sage or olive green and paint smaller clusters of leaves. I like to overlap these slightly with the darker stems to create depth. -
Add textural variety:
For visual interest, paint some leaves that are skeletal or veined rather than solid. Use a fine liner brush and your sage green to draw delicate fern-like fronds. -
Introduce the berries:
Using a reddish-orange clay color, paint small clusters of circles near the ends of the finer stems to clear berries. -
Highlight the berries:
Once the red circles are dry, add a tiny dot of white or very light pink to each berry to simulate a shine or reflection.
Add Metallic Depth
For a subtle luxury touch, mix a tiny drop of gold metallic paint into your beige top border or use it for the highlights on the red berries to catch the light.
Step 4: Refining and Sealing
-
Add leaf veining:
Go back to your solid green leaves. Using a lighter shade of green or white mixed with the base color, paint thin central veins on the larger leaves. -
Connect the elements:
Look for empty spots. Draw very thin, wispy stems using a liner brush to connect floating berries or leaves back to the main vine. -
Clean up edges:
If any paint bled under the tape during the color blocking phase, use a small angled brush and the original wall color to touch up the lines. -
Erase pencil marks:
Wait at least 24 hours to ensure the paint is fully cured, then gently erase any visible pencil guidelines.
Step back and admire how this continuous botanical border ties your room together with organic charm
Misty Mountain Nursery Mural

Transform a nursery wall into a calming vista with this soft, watercolor-style mountain landscape. Using atmospheric perspective and muted earth tones, you’ll create depth that makes the room feel spacious and tranquil.
Step-by-Step
Materials
- Latex interior paint (white for base)
- Small sample pots of paint (dark sage green, light sage, beige, warm taupe, light grey)
- Glaze medium (acrylic or latex compatible)
- Large fluffy synthetic brushes (3-4 inch)
- Medium angle sash brush (2 inch)
- Small round detail brush
- Painter’s tape
- Drop cloth
- Pencil and eraser
- Water bucket and rags
- Paper plates or palette tray
- Step ladder
Step 1: Preparation & Sketching
-
Prep the canvas:
Begin by cleaning your wall thoroughly to remove dust and oils. If the wall isn’t already white or a very light off-white, apply a fresh coat of base paint to ensure your translucent misty layers show up correctly. Let this dry completely. -
Map the horizon lines:
Stand back and visualize three to four distinct layers of mountains. Using a pencil, lightly sketch the ridgeline of the furthest, highest mountains near the ceiling. Keep the lines irregular and jagged for realism. -
Sketch the middle ground:
Draw the next layer of mountains slightly lower, overlapping the first. These should be larger curves and slopes. Continue this downward, creating a foreground layer that sits just above the crib height. -
Protect the edges:
Apply painter’s tape to the ceiling, baseboards, and adjoining walls to protect them from stray brushstrokes.
Step 2: Painting the Mountains
-
Mix the furthest layer:
For the highest peaks, mix your warm taupe or beige paint with a generous amount of glaze medium and a bit of white. You want a very pale, translucent color to mimic distance. -
Paint the top peaks:
Using a large brush, fill in the top mountain shapes. Don’t worry about perfect coverage; a slightly uneven, watery application enhances the watercolor effect. Feather the bottom edge of this layer out with a damp rag so it fades into nothingness. -
Create the grey-mist layer:
Mix a light grey with a touch of blue and your glaze. Paint the second layer of mountains, situated just below the beige ones. Concentrate the pigment at the top ridge and drag the brush downward, letting the paint run out of pigment as you go down. -
Mix the middle green:
Combine your light sage green with white and glaze. This layer should be slightly darker and more opaque than the top two layers, representing the middle ground. Paint the large rolling hills in the center of the wall. -
Create atmospheric mist:
While the middle green layer is still tacky, use a clean, dry brush to lightly blend the bottom edge into the white background below, softening any harsh lines to create a ‘fog’ effect. -
Paint the foreground hills:
Using your darker sage green (still mixed with glaze but less of it), paint the lowest, closest rolling hills. This layer anchors the mural and should have the most saturated color.
Watercolor Effect
Work in sections and keep a spray bottle of water handy. Spritzing the wall lightly before applying glazed paint helps colors bleed and blend naturally.
Step 3: Adding the Forest Details
-
Plan the trees:
Once the background hills are dry to the touch, use your pencil to mark vertical lines where you want your evergreen trees to stand in the foreground. Vary their heights to keep the composition dynamic. -
Mix the tree color:
Use your darkest sage green straight from the sample pot, perhaps mixing in a tiny drop of black or dark grey for depth. I find adding a touch of water helps the paint flow better for branches. -
Paint the tree trunks:
With the detail brush, paint thin vertical lines following your pencil marks. These will serve as the trunks of your pines. -
Stipple the branches:
Switch to an angle sash brush or a flat brush turned on its side. Starting at the top of the trunk, dab paint in a downward, triangular motion to create the boughs of the pine tree. -
Layer the foliage:
As you move down the tree trunk, make the branches wider and denser. Leave some gaps between branches to let the background mountain color peek through, which prevents the trees from looking like solid triangles. -
Add distant trees:
Mix a lighter, greyer green. In the layer behind the main trees, paint smaller, fainter silhouettes of trees to suggest a forest stretching back into the distance. -
Final softening:
Inspect your edges. if any mountain ridge looks too sharp, lightly dry-brush a tiny bit of white paint over the line to push it back into the mist. -
Clean up:
Remove the painter’s tape carefully while the paint is still slightly damp to avoid peeling. Erase any visible pencil marks once the wall is fully dry.
Level Up: Texture
Use a natural sea sponge to dab the very tops of the trees or the rocky mountain faces. This adds organic texture that brushes can’t quite replicate.
Step back and enjoy the peaceful, misty atmosphere you’ve brought into the space.
Painted “Halo” Behind Floating Shelves
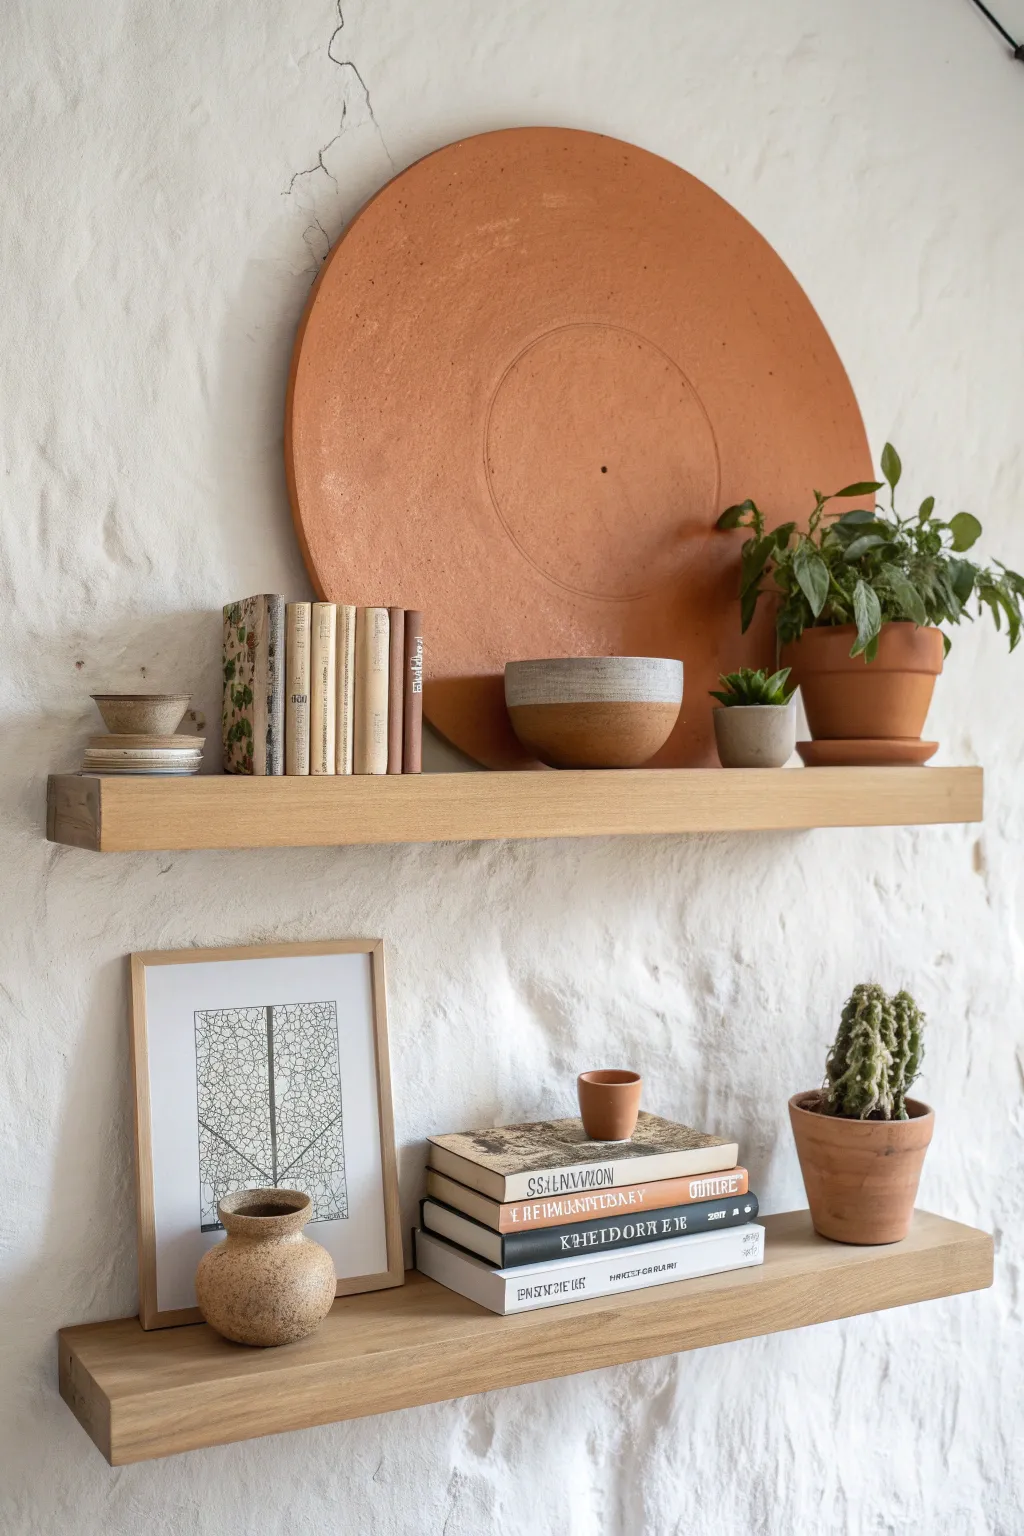
Transform a plain white wall into an architectural statement with this warm, circular accent painted behind your open shelving. This geometric “halo” adds depth and an earthy, ceramic-like texture that beautifully frames your favorite decor objects.
Step-by-Step Tutorial
Materials
- Matte latex paint (terracotta or burnt orange)
- Small paintbrush (for edges)
- Mini foam roller and tray
- String or twine
- Push pin or tack
- Pencil
- Measuring tape
- Painter’s tape (optional)
- Clean, damp cloth
Step 1: Preparation & Mapping
-
Clear and Clean:
Remove existing shelves if possible, or clear them completely. Wipe down the wall area with a damp cloth to remove dust, ensuring the paint adheres properly to the plaster texture. -
Determine Placement:
Visualize where you want the circle’s center. For this look, the circle should sit behind the top shelf, with the shelf cutting across the lower third of the circle. -
Measure the Radius:
Decide on your circle size. A diameter of about 24-30 inches works well for standard shelving. Cut a piece of string to half that length (the radius), adding a few inches for knots. -
Create the Compass:
Tie one end of the string securely around a pencil. Tie a loop in the other end so the distance between the loop and pencil tip equals your desired radius. -
Anchor the Center:
Press a push pin through the string loop and firmly into the wall at your determined center point. Make sure it’s secure enough to hold tension. -
Draw the Perimeter:
Pull the string taut with the pencil. Keep the pencil perpendicular to the wall and lightly trace your full circle. If you have textured walls, go slowly to keep the line steady.
Uneven Circle Edges?
If textured walls make your circle jagged, don’t fret. Use a small flat artist’s brush to tap paint into the low spots of the texture along the perimeter for a sharper line.
Step 2: Painting the Halo
-
Outline the Edge:
Using a small paintbrush, carefully paint along the inside of your pencil line. I like to focus on creating a crisp, smooth curve here, as this defines the whole shape. -
Protect the Shelf:
If you couldn’t remove your shelf, apply painter’s tape to the back edge where it meets the wall to prevent accidental smudges. -
Fill the Center:
Once the outline is established, switch to a mini foam roller. Load it with terracotta paint and fill in the large interior section of the circle. -
Manage Texture:
Since the wall has a plaster texture coverage might be uneven. Use the roller to push paint into the crevices, or use a stippling motion with a brush for deep pockets. -
Apply Second Coat:
Let the first coat dry completely (usually 1-2 hours). Apply a second coat to ensure a rich, opaque color that mimics solid clay. -
Detail Work:
Add the inner eccentric circles. Create a smaller string compass (shorten your string by 4-6 inches) and lightly draw a smaller circle inside the main one. -
Paint the Inner Ring:
Using a very fine brush and slightly diluted paint (or a slightly darker shade if you want contrast), carefully paint this thin inner ring line.
Pro Tip: Custom Glaze
Mix a tiny bit of plaster or baking soda into your paint for the final coat. This adds a subtle gritty texture, making the circle look like real fired ceramic.
Step 3: Finishing Touches
-
Remove Guide Point:
Pull the push pin from the center. Fill the tiny hole with a dab of spackle or a thick drop of paint. -
Add the Dot:
To mimic the look of a vinyl record or a wheel, paint a small solid dot right over where the pinhole was. -
Clean Up:
Remove any painter’s tape from the shelf. Use a small brush to touch up any white areas on the wall if you slipped outside the line. -
Style the Shelves:
Once fully dry (give it 24 hours to cure), restyle your shelves. Place darker objects or greenery in front of the terracotta circle to make the color pop.
Step back and enjoy the warm, modern focal point you’ve added to your display area
Painted Frame for a Gallery Zone
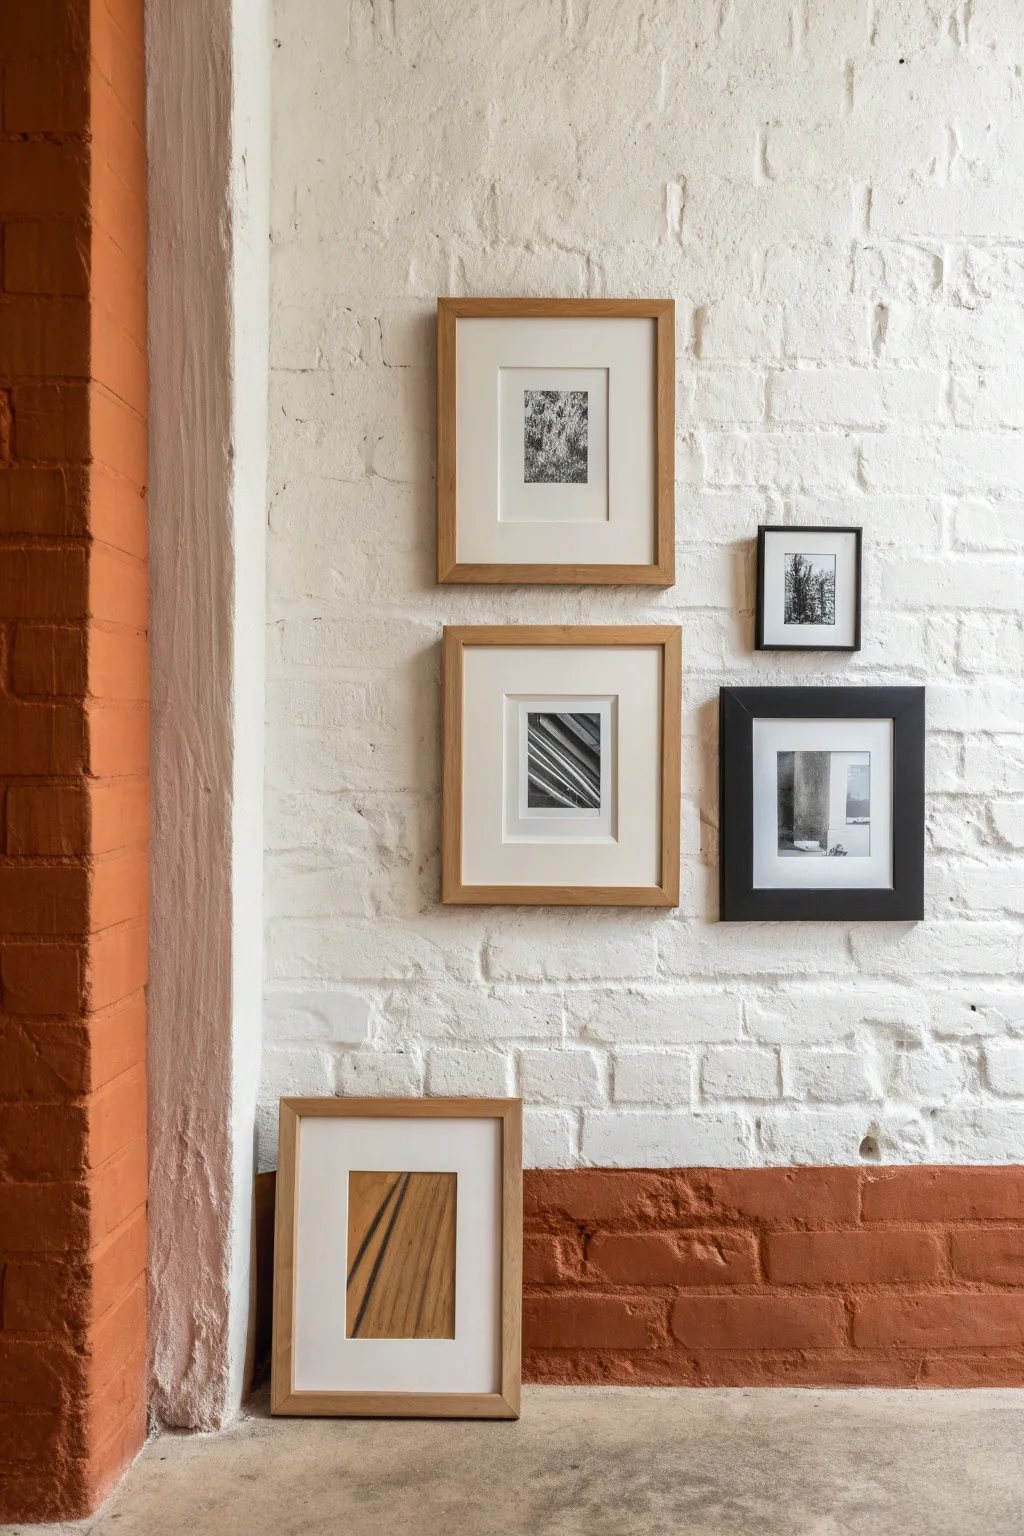
Transform a plain brick wall into an architectural statement by painting a bold, grounding border that frames your favorite art prints. This high-contrast color block technique adds instant structure and gallery-like sophistication to any corner of the room.
Detailed Instructions
Materials
- High-quality painter’s tape (multi-surface)
- Terracotta or burnt orange interior acrylic latex paint
- White masonry paint (for the base wall)
- Wide paint roller and tray
- Small angled sash brush (1.5 – 2 inch)
- Medium-stiff bristle brush (for brick crevices)
- Drop cloth
- Level and measuring tape
- Pencil
- Damp rag
Step 1: Preparation & Base Coat
-
Clean surface:
Begin by removing any dust or cobwebs from the brick surface using a stiff brush or vacuum attachment. -
Wipe down:
Follow up with a damp rag to ensure the brick is clean, which is crucial for tape adhesion and paint durability. -
Protect floor:
Lay down your drop cloth strictly along the wall edge, taping it down if necessary to prevent slippage. -
Apply base color:
If your wall isn’t already white, paint the entire brick surface with white masonry paint. Use a thick nap roller to get into the texture. -
Fill crevices:
Use a brush to jab paint into deep mortar lines where the roller missed, ensuring a solid, opaque white background. -
Dry thoroughly:
Allow the white base coat to cure completely, ideally for at least 24 hours. Tape will peel fresh paint if applied too soon.
Bleeding Tape?
Brick surfaces are uneven. To stop leaks, run a bead of clear acrylic caulk along the tape edge and wipe it flush before painting. This creates a perfect barrier.
Step 2: Measuring & Taping
-
Mark height:
Decide on the height of your lower border (dado rail height is standard, around 36 inches). Make a small pencil mark. -
Level the line:
Using a laser level or a long spirit level, lightly mark a horizontal line across the wall and a vertical line for the corner column. -
Apply tape:
Press the painter’s tape firmly along your marked lines. On brick, this is tricky; press the tape deep into the mortar grooves with your thumb. -
Seal the tape edge:
I like to brush a tiny amount of the *white* base paint along the tape edge first. This seals the gap so any bleed-through matches the wall.
Step 3: Painting the Accent
-
Cut in edges:
Once the seal is dry, use your angled sash brush and terracotta paint to cut in along the floor and the taped lines. -
Brush mortar lines:
Before rolling, use a brush to work the terracotta paint into the deep mortar indentations within the taped zone. -
Roll first coat:
Roll the main sections of the border and the vertical column with the terracotta paint. -
Dry and repeat:
Let the first coat dry to the touch, then apply a second coat for rich, opaque color saturation. -
Remove tape:
While the second coat is still slightly tacky (not fully dry), slowly peel the tape at a 45-degree angle to get a crisp line. -
Touch ups:
If any paint bled into deep brick pits, use a tiny artist’s brush and white paint to clean up the edge line.
Pro Tip: Visual Weight
Keep the heaviest visual elements low. By painting the bottom third a darker color, you ground the space, making the white upper walls feel taller and airier.
Step 4: Styling the Gallery
-
Select frames:
Choose a mix of wood tone and black frames to bridge the gap between the white wall and the warm terracotta paint. -
Arrange layout:
Lay your frames on the floor first to test the balance. Aim for an asymmetrical, organic arrangement. -
Hang artwork:
Install the frames primarily on the white section, perhaps leaning one large framed piece against the wall within the painted zone for depth.
Step back and admire how a simple band of color has created a custom architectural feature in your home
Ceiling Paint as the Fifth Wall
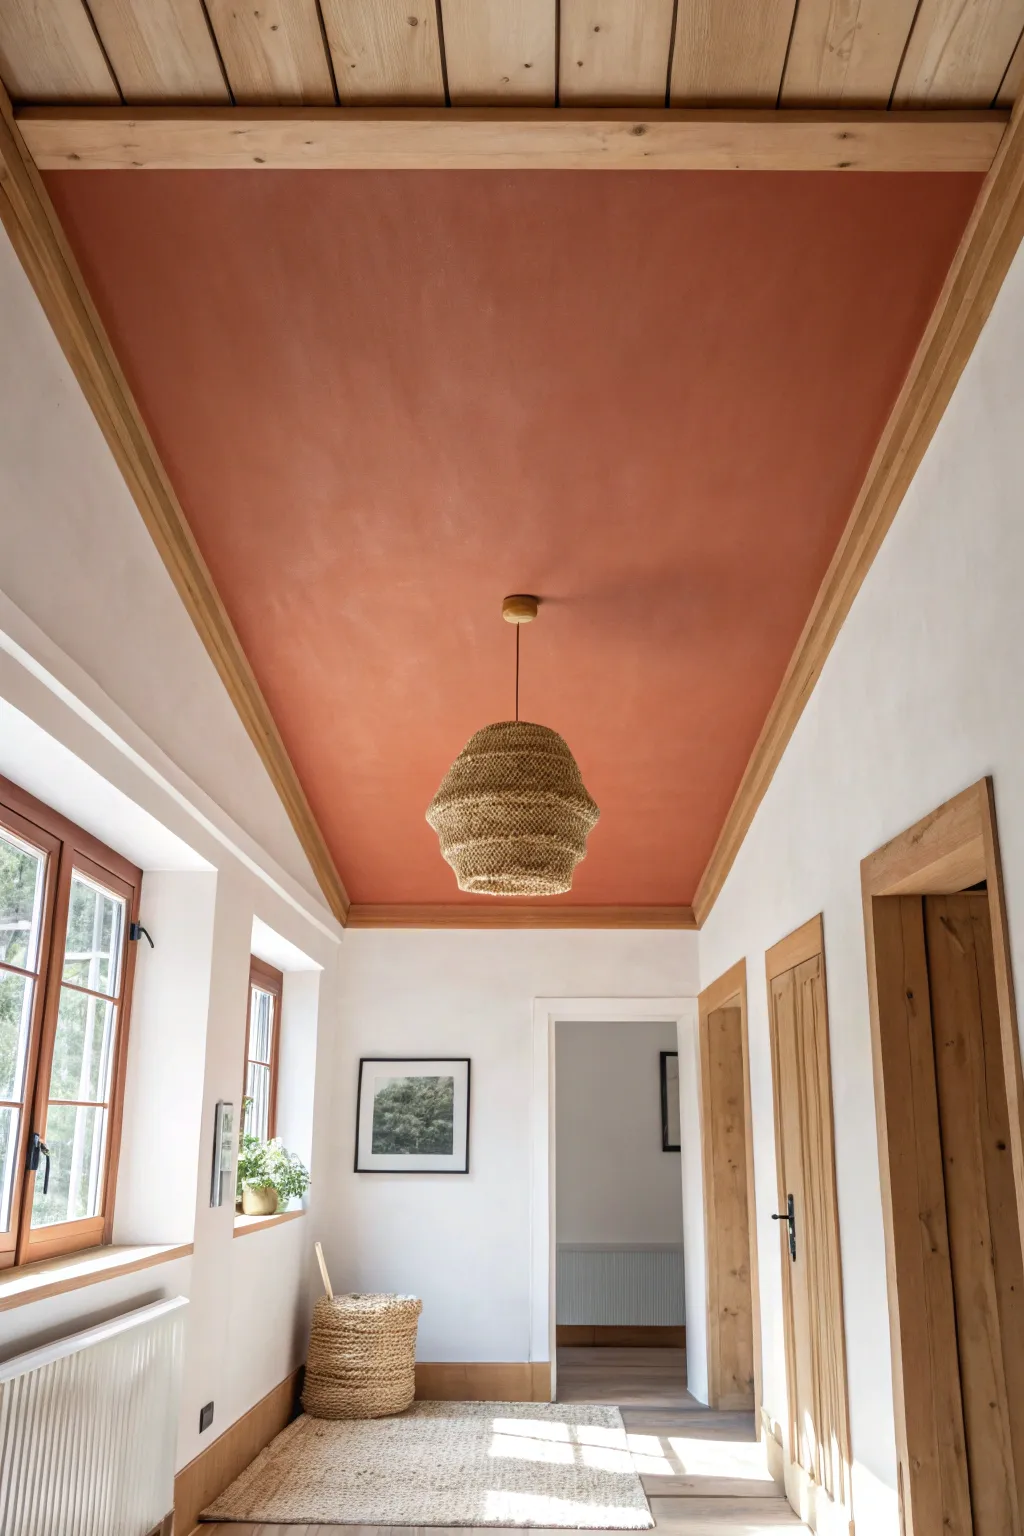
Transform a plain hallway into a warm, structural statement by treating the ceiling as a fifth wall. This project uses a rich, earthy terracotta hue framed by natural timber trim to draw the eye upward and add instant coziness.
Step-by-Step Tutorial
Materials
- Terracotta or rust-colored latex paint (matte or eggshell finish)
- Painter’s tape (high-quality, multi-surface)
- 2-inch angled sash brush
- 9-inch roller frame and microfiber roller cover (3/8-inch nap)
- Extension pole for roller
- Drop cloths
- Sanding sponge (fine grit)
- Ladder
- Screwdriver (for light fixture removal)
- Clean rags
- Primer (tinted gray or white, optional)
Step 1: Preparation
-
Clear the space:
Remove any furniture or rugs from the hallway to give yourself ample room to endure the ladder work without tripping hazards. -
Protect the floor:
Lay down drop cloths immediately. Since you are painting overhead, gravity is not your friend, and drips are inevitable even for pros. -
Remove the fixture:
Turn off the power to the light fixture at the breaker box. Use your screwdriver to carefully remove the woven pendant light canopy and disconnect the fixture, storing it safely aside. -
Clean the surface:
Wipe down the ceiling area with a clean, slightly damp rag to remove dust or cobwebs. Paint adheres best to a clean surface. -
Protect the trim:
Apply painter’s tape to the top edge of the wooden crown molding or trim where it meets the ceiling. Press the tape edge firmly with your fingernail or a putty knife to prevent bleed-through.
Step 2: Cutting In
-
Open and stir:
Open your terracotta paint can and stir it thoroughly. The pigments in earthy reds can settle, so ensure the color is consistent from the bottom up. -
Load the brush:
Dip your 2-inch angled sash brush about an inch into the paint. Tap off the excess against the side of the can; don’t wipe it, as you want a full load. -
Paint the perimeter:
Start cutting in along the taped edge of the wooden trim. Paint a band about 3 to 4 inches wide along the entire perimeter of the ceiling. I find cutting in the entire room first works best so I can just roll continuously later. -
Detail around the electrical box:
Use the brush to carefully paint around the central electrical box where the light fixture hangs. Feather out the edges so you don’t leave a thick ridge of paint.
Patchy Paint?
Reds have low hiding power. If the color looks uneven after two coats, don’t panic. A third thin coat usually solves the opacity issue, or use a gray-tinted primer next time.
Step 3: Rolling the Ceiling
-
Prepare the roller:
Attach your roller frame to the extension pole. Load the roller cover with paint in the tray until it is saturated but not dripping. -
First pass:
Start in one corner and roll in a ‘W’ pattern, working in roughly 4×4 foot sections. Keep a wet edge by overlapping your passes slightly. -
Directional consistency:
Try to roll across the width of the narrow hallway rather than the length if possible, or maintain one consistent direction to minimize roller marks in the final sheen. -
Let it dry:
Allow the first coat to dry completely according to the manufacturer’s instructions, usually about 2-4 hours. -
Assess coverage:
Check for patchiness. Reds and terracottas often require a second coat for true depth. If it looks uneven, prepared for round two. -
Second coat:
Repeat the cutting in (if necessary) and rolling process for the second coat. Rolling perpendicular to your first coat can sometimes help ensure perfectly smooth coverage.
Texture Play
For an old-world plaster look without the cost, mix a texture additive like fine sand or silica into your paint can before rolling. It adds tactile depth.
Step 4: Refining and Finishing
-
Remove tape:
While the paint is still slightly tacky (not fully cured), carefully peel off the painter’s tape at a 45-degree angle. This prevents the dried paint film from ripping. -
Touch ups:
Inspect the edges where the paint meets the wood trim. Use a tiny artist’s brush to fix any spots where paint might have bled or missed the mark. -
Reinstall fixture:
Once the paint is fully cured (give it at least 24 hours to be safe so the canopy doesn’t stick), reattach the pendant light wiring and secure the canopy. -
Clean up:
Fold up your drop cloths carefully to trap any dried paint flecks inside, and wash your brushes immediately with warm soapy water.
Step back and admire how a single weekend project has completely altered the warmth and character of your hallway
Contrasting Painted Trim and Doors
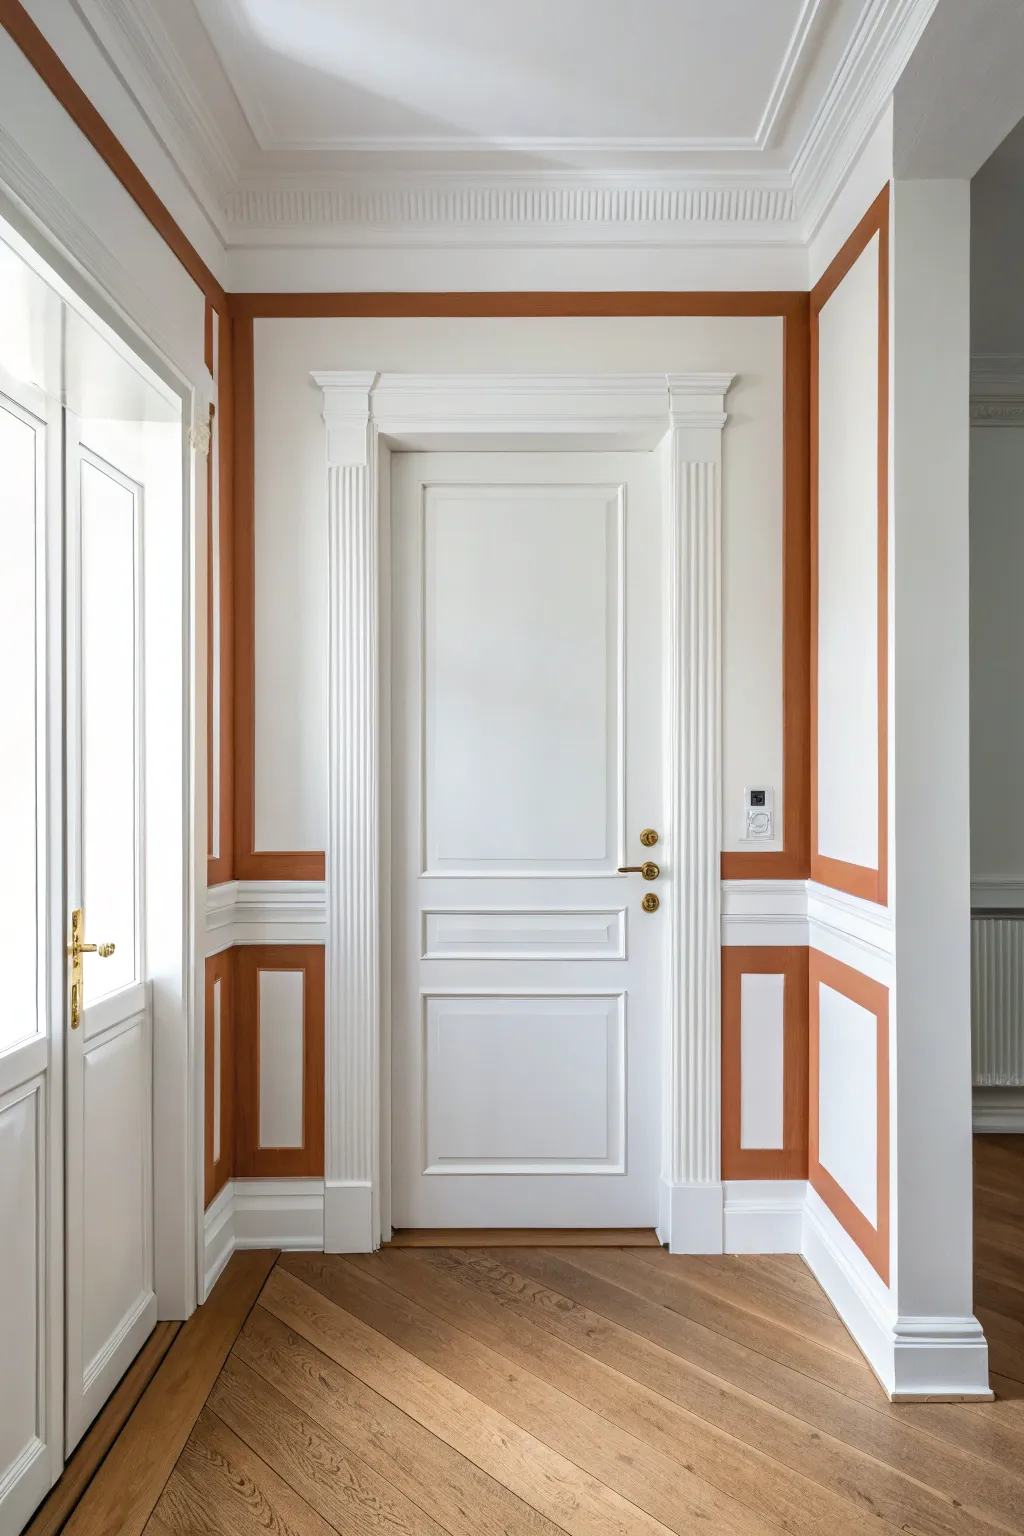
Elevate your hallway by turning standard molding into architectural art with this precise painting technique. By highlighting the inset panels with a warm terracotta tone while keeping the trim crisp white, you create a sophisticated, high-contrast look that mimics custom joinery.
Detailed Instructions
Materials
- High-quality painter’s tape (multiple widths: 1-inch and 2-inch)
- Interior semi-gloss or satin paint (White for base, Terracotta for accent)
- A crisp, angled sash brush (1.5 to 2 inch)
- Small foam roller and tray
- Sanding sponge (220 grit)
- Tack cloth
- Drop cloths
- Putty knife or 5-in-1 tool
- Damp rag for immediate cleanup
Step 1: Preparation & Base Coat
-
Clear and Clean:
Remove any switch plates or hardware from the walls and door frames. Wipe down all molding and flat surfaces with a damp cloth to remove dust and oils that prevent paint adhesion. -
Inspect the Surface:
Check the paneling for any old drips or bumps. Use your sanding sponge to lightly smooth out imperfections, focusing on the inside edges of the rectangular molding. -
Prime Repairs:
If you filled any nail holes or cracks, spot prime those areas now. Let it dry completely before moving on. -
Paint the White Base:
Even if your trim is already white, a fresh coat ensures a seamless finish. Paint the entire wall, including the door casing, chair rail, and baseboards, with your chosen white semi-gloss paint. -
Allow Deep Drying:
This is crucial: allow the white base coat to cure for at least 24 to 48 hours. If the paint is even slightly tacky, the tape we apply next will pull it off.
Step 2: Taping the Design
-
Plan the Accent Areas:
Identify exactly which parts will receive the color. In this design, it is the flat wall surface *inside* the molding frames and the flat wall surface surrounding the door frame, but leaving the actual molding relief white. -
Apply Tape Precision:
Apply painter’s tape along the inner edge of the molding strips. You need to protect the white molding while exposing the flat wall space you intend to paint. -
Seal the Edges:
Take a putty knife or a credit card and firmly press down the edge of the tape. This prevents the accent color from bleeding under the tape and ruining the crisp line. -
The White Paint Trick:
Brush a very light layer of your *white base paint* over the edge of the painter’s tape. This seals the tape edge with white paint, so if any bleeds through, it matches the molding underneath.
Seal the Tape Edge
Always paint a thin layer of the *base* color over the tape edge before applying the accent color. This fills any tiny gaps with the base color, ensuring the final reveal is razor-sharp.
Step 3: Applying the Accent Color
-
Cut In Corners:
Using your angled sash brush, carefully paint the corners and edges of the taped-off sections with your terracotta color. -
Roll the Flat Areas:
Use a small foam roller to fill in the larger flat sections between the taped molding. This ensures a smooth texture without brush strokes. -
Apply Second Coat:
Allow the first coat to dry to the touch (usually 1-2 hours). Apply a second coat to ensure rich, opaque color coverage. -
Vertical Panel Details:
For the vertical stripe surrounding the door frame, use a steady hand or additional tape to ensure the line separating the accent color from the main white wall is perfectly plumb.
Peeling Paint?
If lifting the tape pulls up the base paint, your base wasn’t cured enough or the tape is too tacky. Score the edge with a razor blade before pulling, or use a hair dryer to soften the adhesive.
Step 4: Finishing Touches
-
Remove Tape Early:
I recommend peeling the tape off while the second coat is still slightly damp. Pull the tape away from the painted edge at a 45-degree angle to slice through the paint film cleanly. -
Inspect Lines:
Once the tape is gone, inspect your lines. If there are minor bleeds, wait for everything to dry fully, then use a tiny artist’s brush and white paint to touch up. -
Reinstall Hardware:
Once the paint has cured hard (wait overnight), screw your switch plates and door hardware back into place. -
Final Cleanup:
Wipe away any dust from the floor and step back to admire the architectural depth you’ve added to the hallway.
With clean lines and bold contrast, your hallway now boasts a custom, high-end architectural feel that transforms the entire space
Ombre Gradient Wall Fade

Bring the warmth of a desert evening into your bedroom with this textured, two-tone ombre wall effect. By blending a deep terracotta hue into a soft cream using a lime wash or chalk-style finish, you create an organic, plaster-like aesthetic that feels both modern and grounding.
Step-by-Step Guide
Materials
- Drop cloths and painter’s tape
- Lime wash paint or chalk-finish paint (Cream/Beige color)
- Lime wash paint or chalk-finish paint (Terracotta/Rust color)
- Wide block brush (4-6 inch natural bristle)
- Medium mixing bucket
- Water spray bottle or misting bottle
- Stir sticks
- Clean rags
- Small brush for edges
Step 1: Preparation & Base Coat
-
Clear and Protect:
Start by moving furniture away from the wall—especially the bed frame—to give yourself plenty of working room. Lay down drop cloths to protect your flooring, as the drippy nature of lime wash can be messy. -
Tape the Edges:
Apply painter’s tape to the ceiling line, baseboards, and adjacent walls. Press the edges down firmly to prevent bleed-through, crucial for that crisp border contrast against the organic wall texture. -
Prepare the Surface:
Ensure the wall is clean and dry. If you are painting over a glossy surface, give it scuff sand. If using true lime wash, apply a specifically formulated mineral primer first to help the paint bond properly. -
Apply the Cream Base:
Using your large block brush, apply the lighter cream color to the entire wall. Use crisscross ‘X’ strokes rather than straight lines to begin building that cloudy, textured movement. Let this base layer dry completely according to the manufacturer’s instructions.
Keep it cloudy
Work in varied, arched strokes rather than straight lines. The beauty of this technique is the ‘cloudy’ movement, so avoid distinct horizontal stripes during the blending phase.
Step 2: Creating the Ombre Effect
-
Map Your Horizon Line:
Decide where you want the color transition to happen—in this look, it’s slightly above the midpoint. You can lightly mark this with a pencil or just eyeball it for a more natural feel. -
Apply the Top Section:
Start applying a second coat of the cream color from the ceiling down, stopping about 12 inches above your imagined horizon line. Keep the edges wet; don’t let this section dry yet. -
Apply the Bottom Section:
Immediately dip a clean block brush into the terracotta paint. Start from the baseboards and work your way up, using those same chaotic cross-hatch strokes to create texture. -
Meet in the Middle:
Bring the terracotta color up to meet the wet edge of the cream section. Leave a gap of about 6-8 inches of unpainted wall between the solid cream and solid terracotta for the blending zone. -
The Initial Blend:
Mix a small amount of the terracotta paint with the cream paint in a separate bucket to create a mid-tone. Apply this 50/50 mix into the gap, overlapping slightly with both the top and bottom sections.
Level Up: Mineral depth
For extra texture, mix a small amount of fine sand or crushed minerals into the terracotta paint bucket. This adds a tactile, earthy grit that catches the light beautifully.
Step 3: Refining the Transition
-
Mist the Wall:
Lightly spray the transition area with water. This keeps the paint workable longer and encourages the pigments to bleed into each other naturally, mimicking a watercolor effect. -
Feathering Up:
Take a slightly damp brush with a tiny amount of the terracotta paint. Use upward, sweeping strokes to pull the darker color into the lighter area. I find that using a very light hand here prevents hard lines from forming. -
Feathering Down:
Switch to a clean brush (or clean your current one well). Pull the cream color down into the terracotta zone using downward strokes. The goal is an irregular, organic edge, not a straight line. -
Add Texture Details:
While the wall is still tacky, use a dry brush to stipple or cross-hatch over the blending zone. This disrupts any brush marks that look too directional and enhances the cloudy look. -
Step Back and Assess:
Walk to the far side of the room. Look for areas that seem too heavy or too abrupt. If a spot is too dark, dab a little cream paint over it and blend with a damp rag. -
Final Dry:
Allow the wall to dry undisturbed. Lime wash often dries much lighter than it appears when wet, so don’t panic if the contrast looks intense right now. -
Remove Tape:
Once the wall is fully dry to the touch, carefully peel away the painter’s tape at a 45-degree angle to reveal your clean edges.
Step back and admire the soft, soothing gradient that now serves as a stunning focal point for your room
Painted Checkerboard Statement Pattern
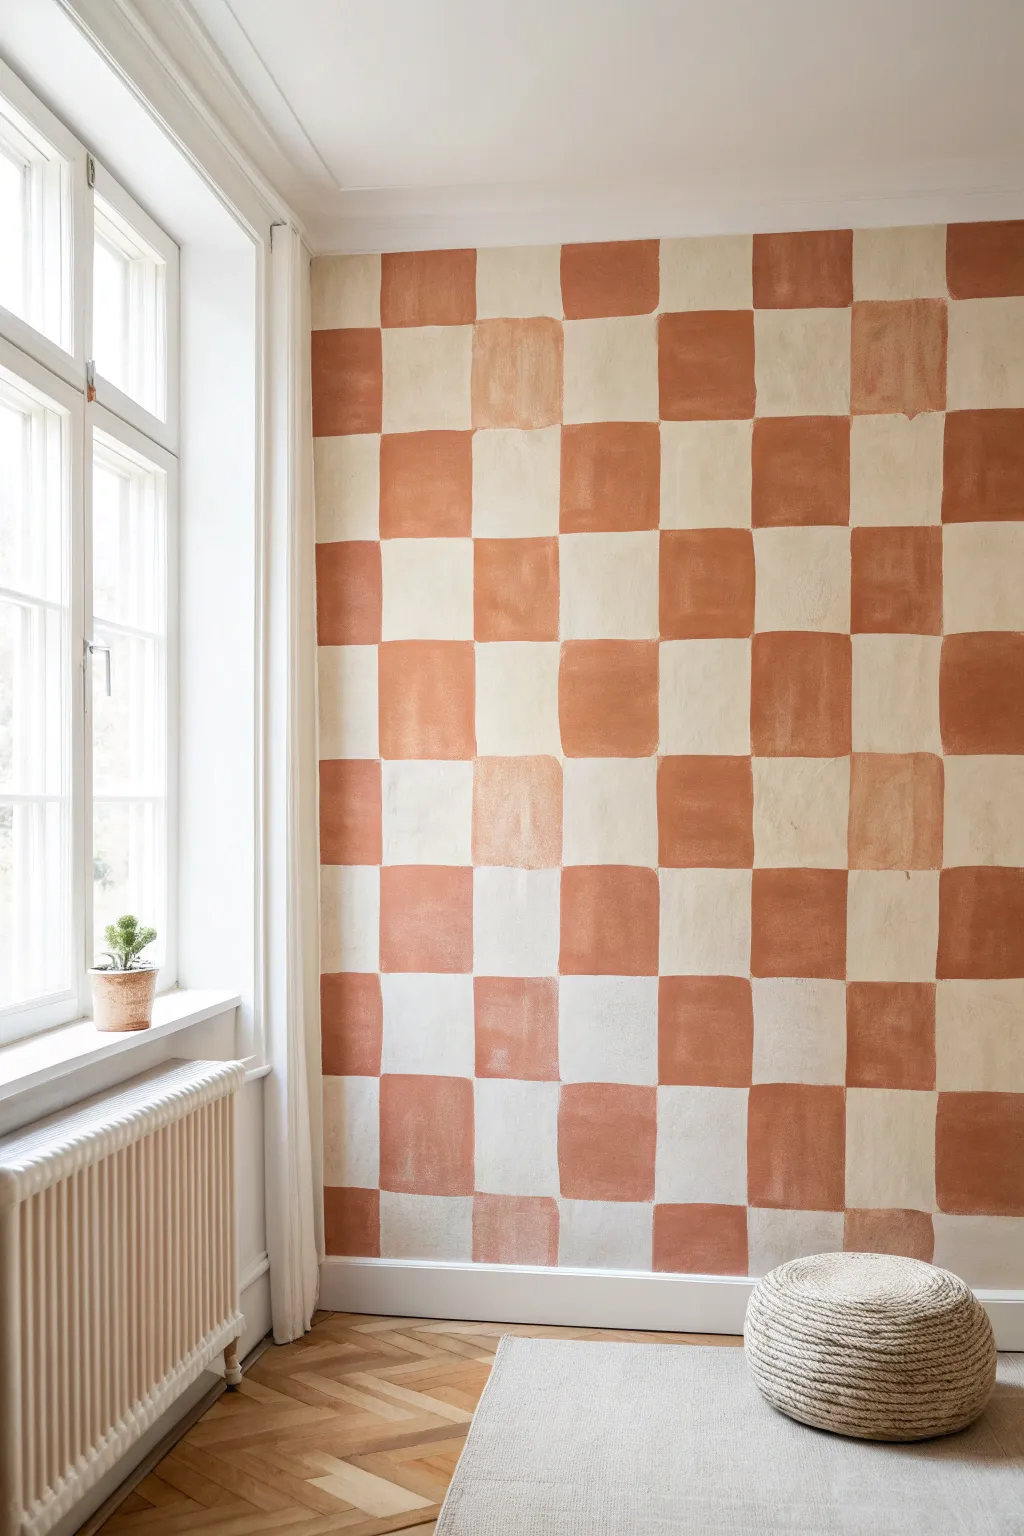
Embrace the charm of imperfection with this hand-painted checkerboard wall that skips the painter’s tape for a softer, organic feel. The warm terracotta and cream tones create a cozy, artisanal backdrop that transforms a plain room into a statement space.
Detailed Instructions
Materials
- Matte latex interior paint (Warm Terracotta/Burnt Orange)
- Matte latex interior paint (Cream/Off-White)
- 2-inch to 3-inch flat angled sash brush
- Pencil
- Level (2-foot or 4-foot length)
- Measuring tape
- Chalk line (optional)
- Small artist brush (for touch-ups)
- Drop cloth
- Paint tray and liners
- Damp rag
Step 1: Preparation & Mapping
-
Prepare the workspace:
Clear furniture away from the wall and lay down a drop cloth to protect your floors. Wipe the wall down with a damp rag to remove dust, ensuring a clean surface for the paint to adhere to. -
Measure the wall:
Measure the total width and height of your wall. Decide on the size of your squares; generally, 10 to 12 inches works well for a standard room to avoid the pattern looking too busy. -
Calculate the grid:
Divide your wall dimensions by your desired square size to determine how many rows and columns fits. If the math doesn’t end in a whole number, plan to have the partial squares at the bottom or sides where they are less noticeable. -
Mark the vertical lines:
Starting from the top center or a prominent corner, measure and mark your column widths with a pencil along the top of the wall. -
Draw vertical guides:
Using your level and a pencil (or a chalk line for speed), lightly draw vertical lines floor-to-ceiling at each mark. Keep these lines faint since you will be painting over them. -
Mark the horizontal lines:
Measure down from the ceiling to mark your row heights. Use the level to draw horizontal lines across the entire wall, creating a complete grid of squares. -
Designate the colors:
To avoid confusion later, lightly mark an ‘X’ or a small dot in every other square that will be painted terracotta. This simple step saves you from the headache of accidentally painting two adjacent squares the same color.
Step 2: Painting the Pattern
-
Cut in the first color:
Start with your cream or off-white base color if the wall isn’t already that shade. If the wall is already the correct base color, you can skip straight to the terracotta squares. -
Paint the terracotta outline:
Pour your terracotta paint into the tray. Load your 2-inch angled brush and carefully hand-paint the perimeter of your first marked square. Don’t worry about laser-straight lines; the charm of this look is the hand-drawn edge. -
Fill the center:
Once the outline is established, fill in the center of the square. Use vertical strokes to keep the texture consistent, or vary your brush direction slightly if you want a more plastered, limewash effect. -
Continue the pattern:
Move across the wall, painting every marked square. I find it easiest to work in horizontal rows from the top down to prevent my hand from smudging wet paint below. -
Feather the edges:
As you paint, resist the urge to hard-stop exactly on the pencil line. Letting the brush naturally lift or wobble slightly creates that specific soft, organic look shown in the inspiration image. -
Let the first coat dry:
Allow the terracotta squares to dry for at least 2-4 hours. The matte paint needs to set so you can see the true opacity. -
Assess opacity:
Step back and look at the wall. If the terracotta looks too streaky, apply a second coat to the colored squares. However, some translucency adds to the vintage vibe. -
Paint the alternate squares:
If painting the contrasting cream squares (rather than leaving the existing wall color), repeat the outlining and filling process for the empty grid spaces. Be careful where the corners touch. -
Handle the corners:
Where four squares meet, use a smaller artist brush if necessary to keep the intersection somewhat tidy, though a tiny gap or overlap is perfectly acceptable for this style. -
Erase visible guides:
Once the paint is fully cured (give it 24 hours), check for any visible pencil lines. Gently erase them, or use a tiny bit of touch-up paint to cover them.
Wobbly Lines?
Don’t panic! If a square looks too wonky, wait for it to dry completely, then cut back into it with the neighboring color to reshape the edge.
Pro Tip: Texture
For a limewash look, mix a little glaze medium into your latex paint. It extends drying time and creates beautiful subtle variations in color density.
Enjoy the relaxed, artistic atmosphere your new feature wall brings to the room.
Trompe L’Oeil Painted Architectural Panels
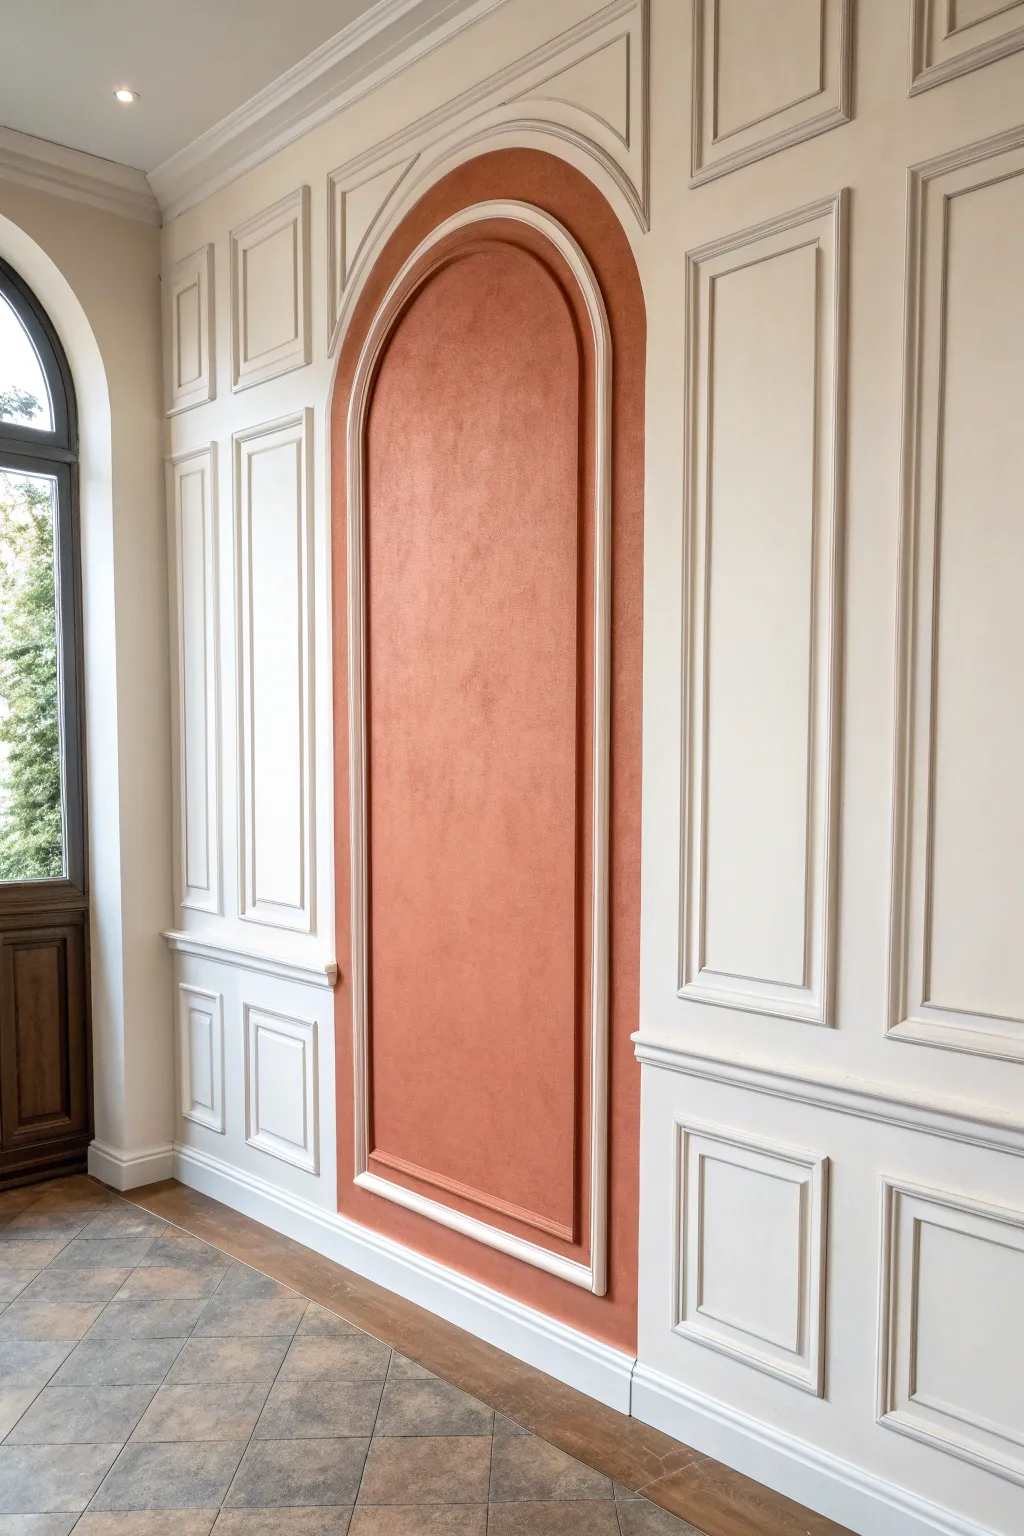
Transform a plain flat wall into a grand, classical feature using the art of trompe l’oeil and textured faux finishing. This project creates the convincing illusion of deep, recessed paneling and a highlighted archway without the need for expensive construction.
Step-by-Step
Materials
- High-quality masking tape (painter’s tape)
- Laser level or long spirit level
- Measuring tape and pencil
- White or off-white wall paint (satin finish)
- Terra cotta or rust-colored textured paint (or suede finish paint)
- Dark grey glazing medium (for shadows)
- White paint (for highlights)
- Assorted angled sash brushes (1-inch and 2-inch)
- Small artist brushes (round and flat shader)
- Sea sponge or rag (optional for texture)
- Straight edge or ruler
Step 1: Preparation & Layout
-
Base Coat:
Begin by painting your entire wall with your chosen white or off-white base color in a satin finish. This sheen mimics the look of real lacquered woodwork better than flat paint. Allow it to cure fully for at least 24 hours. -
Mark the Grid:
Using a laser level for precision, lightly pencil the layout of your panels. Start with the lower dado panels, moving up to the large vertical rectangles. Leave a wide central space for the feature arch. -
Draw the Arch:
To create the perfect arch shape in the center, tie a string to a pencil. Pin the string at the center point of the arch’s width and draw the semi-circle top, extending the lines straight down to the baseboard.
Wobbly Lines?
If your hand shakes during detailing, steady your pinky finger against the wall as a pivot point. Also, using a mahl stick or long ruler as a bridge can offer support while painting highlights
Step 2: Painting the Texture
-
Mask the Center:
Carefully apply masking tape along the *outside* edge of your central arch pencil line. You want to protect the surrounding ‘white’ wall while you paint the inside. -
Apply Textured Paint:
Fill in the archway area with your terra cotta or rust-colored textured paint. Use a roller for the main area and cut in the edges with a brush. This brings warmth and depth to the focal point. -
Stipple for Depth:
While the textured paint is still tacky, stipple the surface gently with a dry brush or sea sponge if you want to enhance the stone-like effect. -
Create the Inner Frame:
Remove the masking tape once the paint is dry. Now, tape off a thin border inside the terra cotta shape to paint a white inner molding line, or paint this freehand if you have a steady hand.
Add Real Trim
Combine techniques! Use real wooden chair rail in the middle for tactile texture, then paint the upper and lower faux panels. It adds physical depth that sells the illusion even harder
Step 3: Creating the 3D Illusion
-
Tape the Molding Shapes:
Return to your pencil grid for the rectangular panels. Apply tape to define the outer edges of where your ‘moldings’ would sit. -
Determine Light Source:
Decide where your imaginary light is coming from (usually top-left or top-right). This is crucial for the trompe l’oeil effect to look realistic. -
Paint Drop Shadows:
Mix a small amount of dark grey glaze. Using a small angled brush, paint a thin shadow line on the side of the molding opposite the light source (e.g., bottom and right edges of the inside panels). -
Feather the Shadows:
Before the glaze dries, use a clean, dry brush to gently soften the outer edge of the shadow line, fading it into the wall color. -
Paint Highlights:
Using pure white paint, apply thin lines to the edges facing the light source (e.g., top and left edges). I find a detail work brush gives the sharpest line here. -
Detail the Arch Molding:
Apply the same highlight and shadow technique to the white border surrounding the terra cotta arch. The shadow should fall underneath the curve of the arch molding to make it pop. -
Sharpen Corners:
Go back with an artist’s brush to ensure the corners where highlights meet shadows are crisp and mitered properly at a 45-degree angle. -
Clean Up:
Erase any visible pencil lines carefully. Step back periodically to ensure the illusion holds up from a distance.
With these shading techniques, your flat wall now boasts the elegance of a historic estate


Have a question or want to share your own experience? I'd love to hear from you in the comments below!