
A little paint can turn a plain porch into the kind of entryway that makes you smile before you even find your keys. Here are my favorite painted porch ideas—starting with the classics and drifting into the artsy, pattern-loving stuff I can’t resist.
Timeless Solid-Color Porch Floor
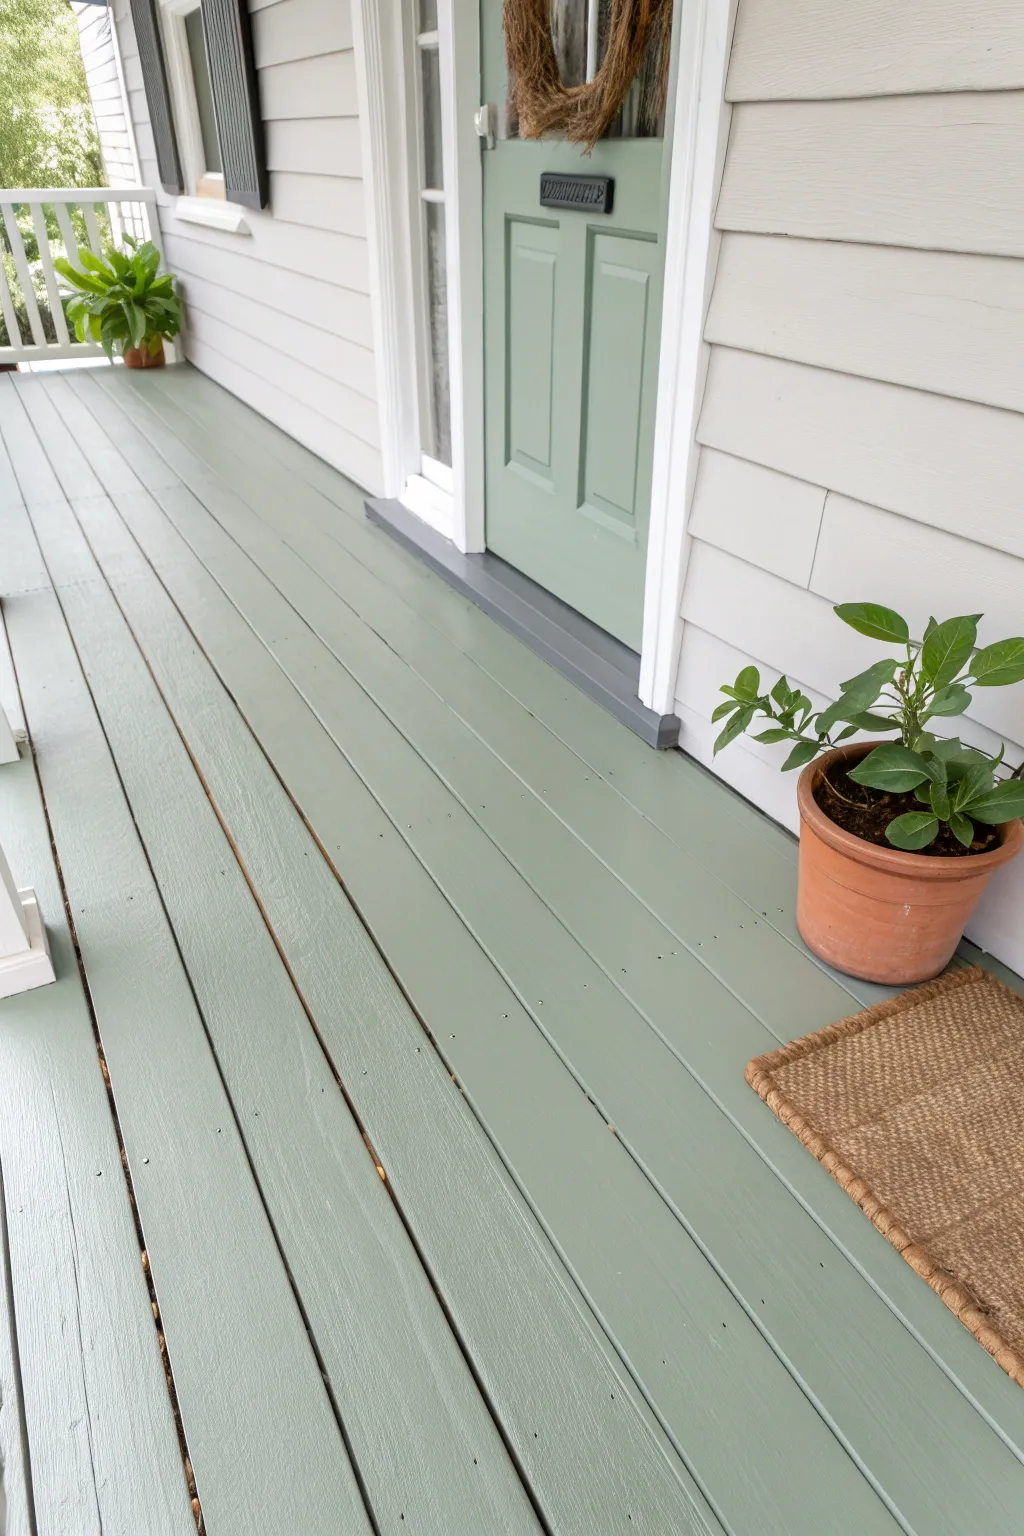
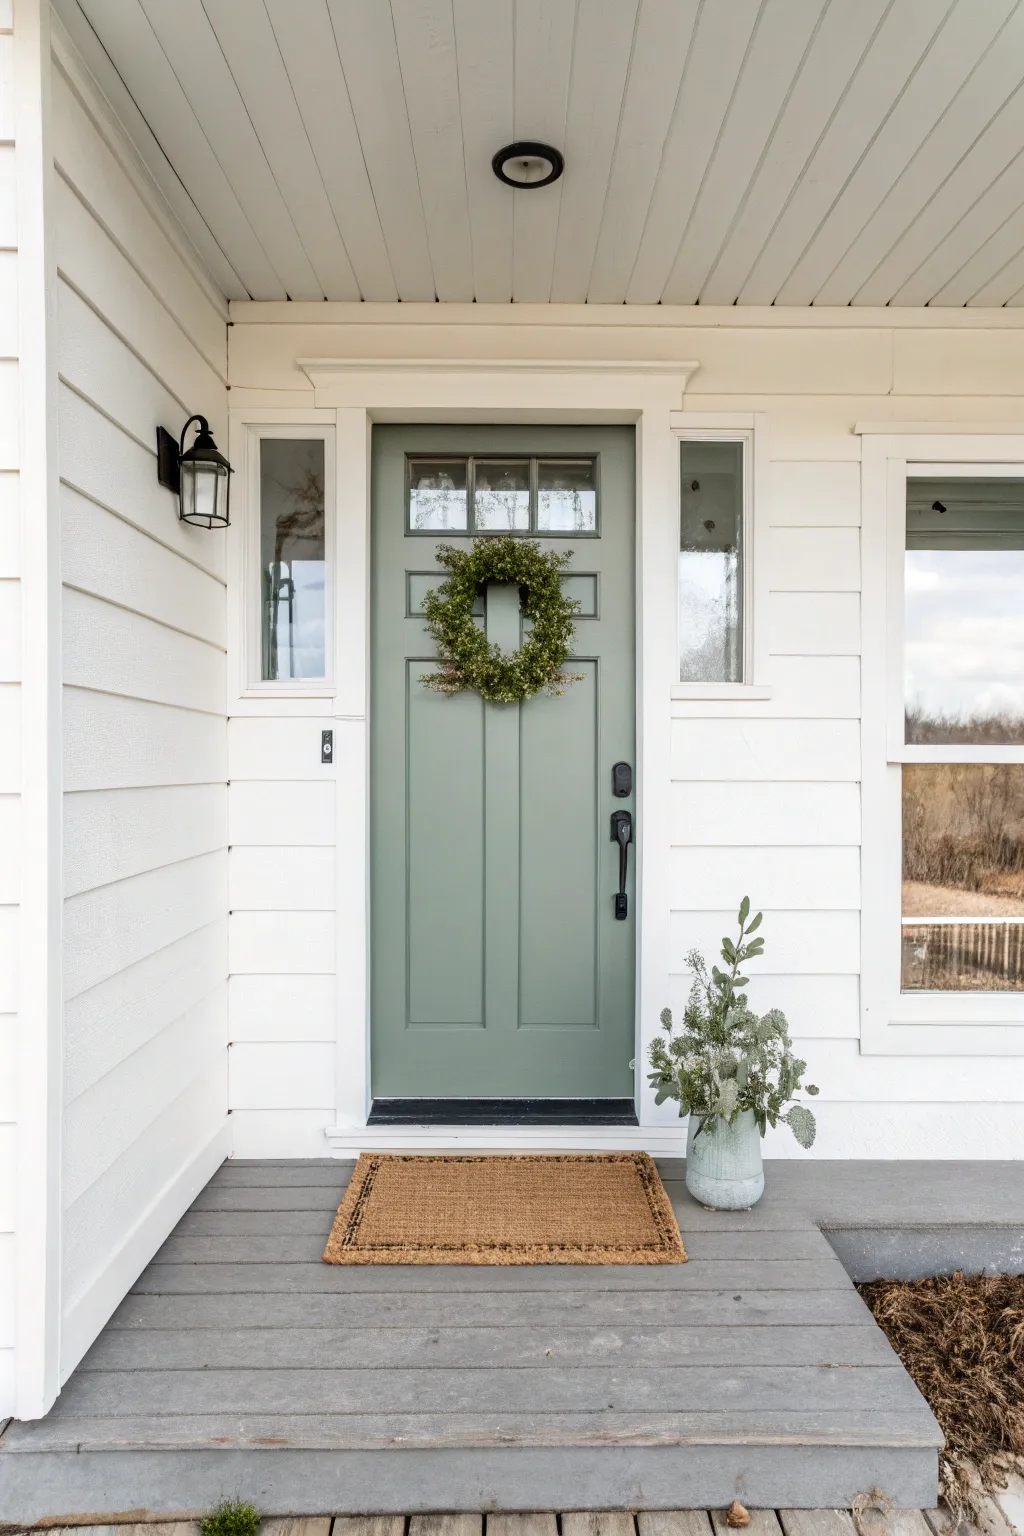
Transform a tired, weathered porch into a tranquil entryway with a solid coat of timeless sage green. This project revitalizes your curb appeal by pairing a soft, nature-inspired floor color with matching door accents for a cohesive, classic cottage look.
Step-by-Step
Materials
- Exterior porch and floor paint (Sage Green)
- Exterior porch and floor paint (Dark Grey/Slate)
- Exterior semi-gloss trim paint (White)
- Pressure washer or stiff bristle broom
- Deck cleaner or TSP substitute
- Medium-grit sandpaper (80-100 grit) and sanding pole
- Wood filler or epoxy wood patch (for exterior use)
- High-quality angled sash brush (2.5 inch)
- Paint roller frame with extension pole
- 3/8 inch nap roller cover (specifically for rough surfaces)
- Painter’s tape (exterior grade)
- Drop cloths
- Caulk gun and exterior paintable caulk
Step 1: Preparation & Repairs
-
Clear and Clean:
Remove all furniture, plants, and mats from the porch area. Sweep away loose debris, dirt, and spiderwebs from the floor, railings, and siding. -
Deep Washing:
Scrub the porch floor thoroughly using a deck cleaner and a stiff-bristle brush. If you use a pressure washer, keep the pressure low to avoid gouging the wood fibers, and let the wood dry completely for at least 24-48 hours. -
Inspect and Repair:
Check for any rotting boards or deep cracks. Fill holes and cracks with an exterior-grade wood filler, smoothing it out with a putty knife. -
Sanding the Surface:
Once the filler is dry, sand the entire floor using a sanding pole and medium-grit sandpaper. This scuffs the old finish to help the new paint adhere and smooths down any raised wood grain. -
Caulking Gaps:
Run a bead of exterior caulk along the seams where the house siding meets the porch floor or where trim pieces join, ensuring a watertight seal. -
Final Dust Removal:
Vacuum or sweep up all sanding dust, then wipe the surface with a tack cloth or a slightly damp rag to ensure no dust remains before painting.
Weather Watch
Check the forecast carefully. You need a window of 2-3 dry days with temperatures between 50°F and 90°F. Painting in direct, scorching sunlight can cause blisters.
Step 2: Painting & Detailing
-
Taping Off:
Apply exterior painter’s tape along the bottom edge of the white siding and around any columns or railings you don’t intend to paint green. -
Cutting In the Edges:
Dip your angled sash brush into the sage green floor paint. Carefully brush paint along the perimeter of the porch, getting into the corners and edges where the roller won’t reach. -
Painting the Grooves:
While cutting in, use the brush to force paint into the gaps between the floorboards. Doing this first ensures no raw wood shows when the boards contract in cooler weather. -
Rolling the First Coat:
Pour your paint into a tray. I like to start at the farthest corner and work my way toward the exit, rolling with the grain of the wood using the extension pole. -
Applying the Second Coat:
Allow the first coat to dry according to the manufacturer’s instructions (usually 4-6 hours). Apply a second coat to ensure full coverage and durability. -
Painting the Threshold:
Clean and tape off the door threshold strip. Apply the dark grey slate paint using a small brush, creating a sharp contrast between the light green floor and the interior transition. -
Matching the Door:
For the look in the photo, paint the front door in the exact same sage shade as the floor. Remove hardware first, then brush the recessed panels before rolling the flat stiles and rails. -
Curing Time:
Remove the painter’s tape while the paint is still slightly tacky to prevent peeling. Let the floor cure for at least 24-72 hours before walking on it or replacing furniture.
Texture Addition
If your climate gets much rain or snow, mix a non-skid additive into the final coat of floor paint. It adds grit without changing the color, making the surface safer.
Enjoy the fresh, calming atmosphere this simple color change brings to your home’s entrance


Dark Floor, Bright Trim Contrast
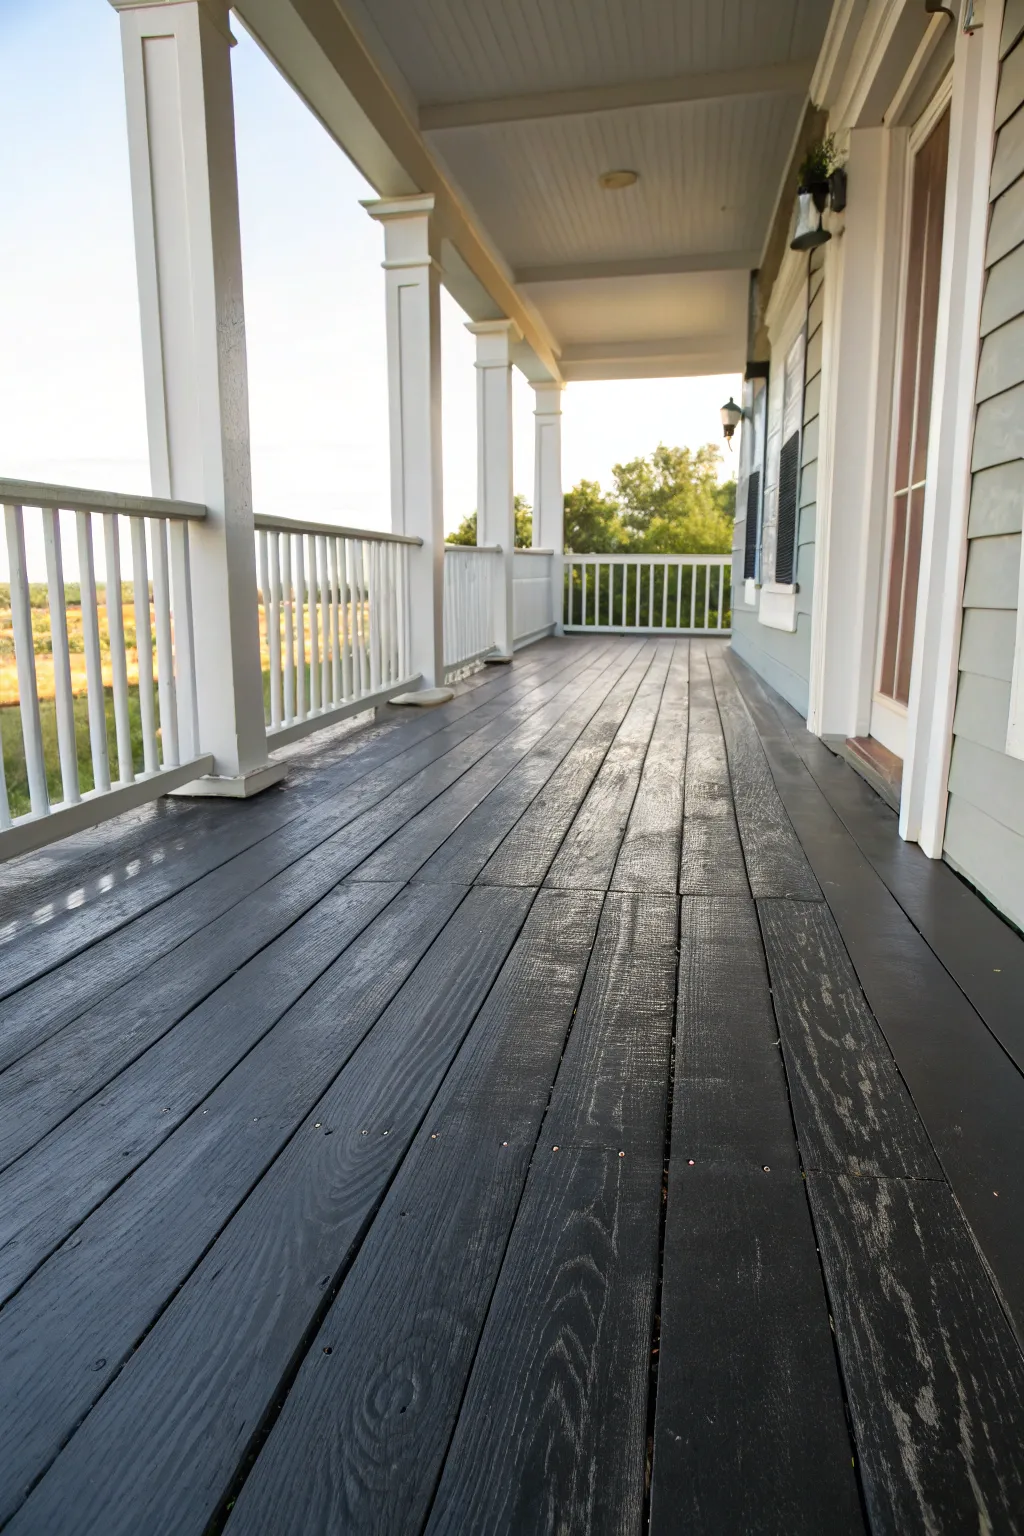
Achieve a striking, sophisticated look for your outdoor space by pairing deep charcoal floorboards with crisp white trim. This project revitalizes worn wood decking with a solid color stain that allows the natural grain texture to shine through while providing a durable, weather-resistant finish.
How-To Guide
Materials
- Deck cleaner/stripper
- Pressure washer (optional but recommended)
- Stiff-bristle scrub brush
- 80-grit sandpaper or sanding pole
- Exterior solid color deck stain (Charcoal/Black)
- Exterior semi-gloss paint (White) for trim
- Paint roller with extension pole (3/8″ nap)
- 4-inch paint brush for cutting in
- Painter’s tape
- Drop cloths
- Wood filler (exterior grade)
- Putty knife
Step 1: Preparation & Cleaning
-
Clear the deck:
Remove all furniture, rugs, and décor from the porch. Sweep away loose dirt, leaves, and debris to start with a blank canvas. -
Inspect and repair:
Walk the entire surface looking for raised nail heads or loose boards. Hammer nails flush and tighten any screws. If you find deep gouges, fill them with exterior wood filler and let it cure according to the package instructions. -
Apply deck cleaner:
Saturate the wood with a quality deck cleaner or stripper. Let it sit for about 10–15 minutes to break down old finish and mildew, but don’t let it dry out. -
Scrub and rinse:
Scrub the wet deck vigorously with a stiff-bristle brush to lift grime. Rinse thoroughly with a garden hose or pressure washer on a low setting (under 1200 PSI) to avoid damaging the wood fibers. -
Allow to dry:
This is crucial—let the wood dry completely for at least 48 hours. Painting damp wood will cause peeling later on.
Sticky Situation
If the stain feels tacky after drying, you likely applied it too thickly or it’s too humid. Improve airflow with box fans, but avoid direct heat. Wait another 24 hours before walking on it.
Step 2: Sanding & Detailing
-
Light sanding:
Go over the floorboards with an 80-grit sanding pole. This opens the wood pores for better stain absorption and smooths down any fibers raised during washing. -
Clean dust:
Vacuum or blower-sweep the entire area to remove all sanding dust. -
Masking trim:
Apply painter’s tape to the bottom of the white columns and along the house siding where it meets the floor to ensure crisp lines.
Step 3: Painting the Floor
-
Cut in edges:
Using your 4-inch brush, apply the harsh charcoal stain along the perimeter of the porch, between railing spindles, and in the gaps between boards where a roller won’t reach. -
Roll the first coat:
Pour your stain into a tray. I like to work in small sections of 3-4 boards at a time, rolling with the grain using the extension pole. Maintain a ‘wet edge’ to avoid lap marks. -
Let it cure:
Allow the first coat to dry for the time recommended by the manufacturer, usually 4–6 hours. -
Apply second coat:
Roll on a second coat of stain for rich, opaque coverage. This ensures the dark color is uniform and provides maximum weather protection.
Pro Tip: The Gap Trick
To get stain deep into the cracks between boards without drips, use a small foam brush or a specialized gap-staining tool before rolling the top surface. It seals the wood better against moisture.
Step 4: Finishing Touches
-
Refining the trim:
Once the floor is bone dry (give it 24 hours), remove the painter’s tape carefully. -
Touch up columns:
If any dark stain bled onto the white columns, use a small artist’s brush and your exterior white paint to touch up the bottoms for that perfect, high-contrast look. -
Final cure:
Keep foot traffic off the porch for at least 24 hours and hold off on replacing heavy furniture for 72 hours to prevent scuffing the fresh finish.
Now you have a dramatic, modern porch floor that beautifully frames your view


Soft Graywash on Porch Boards
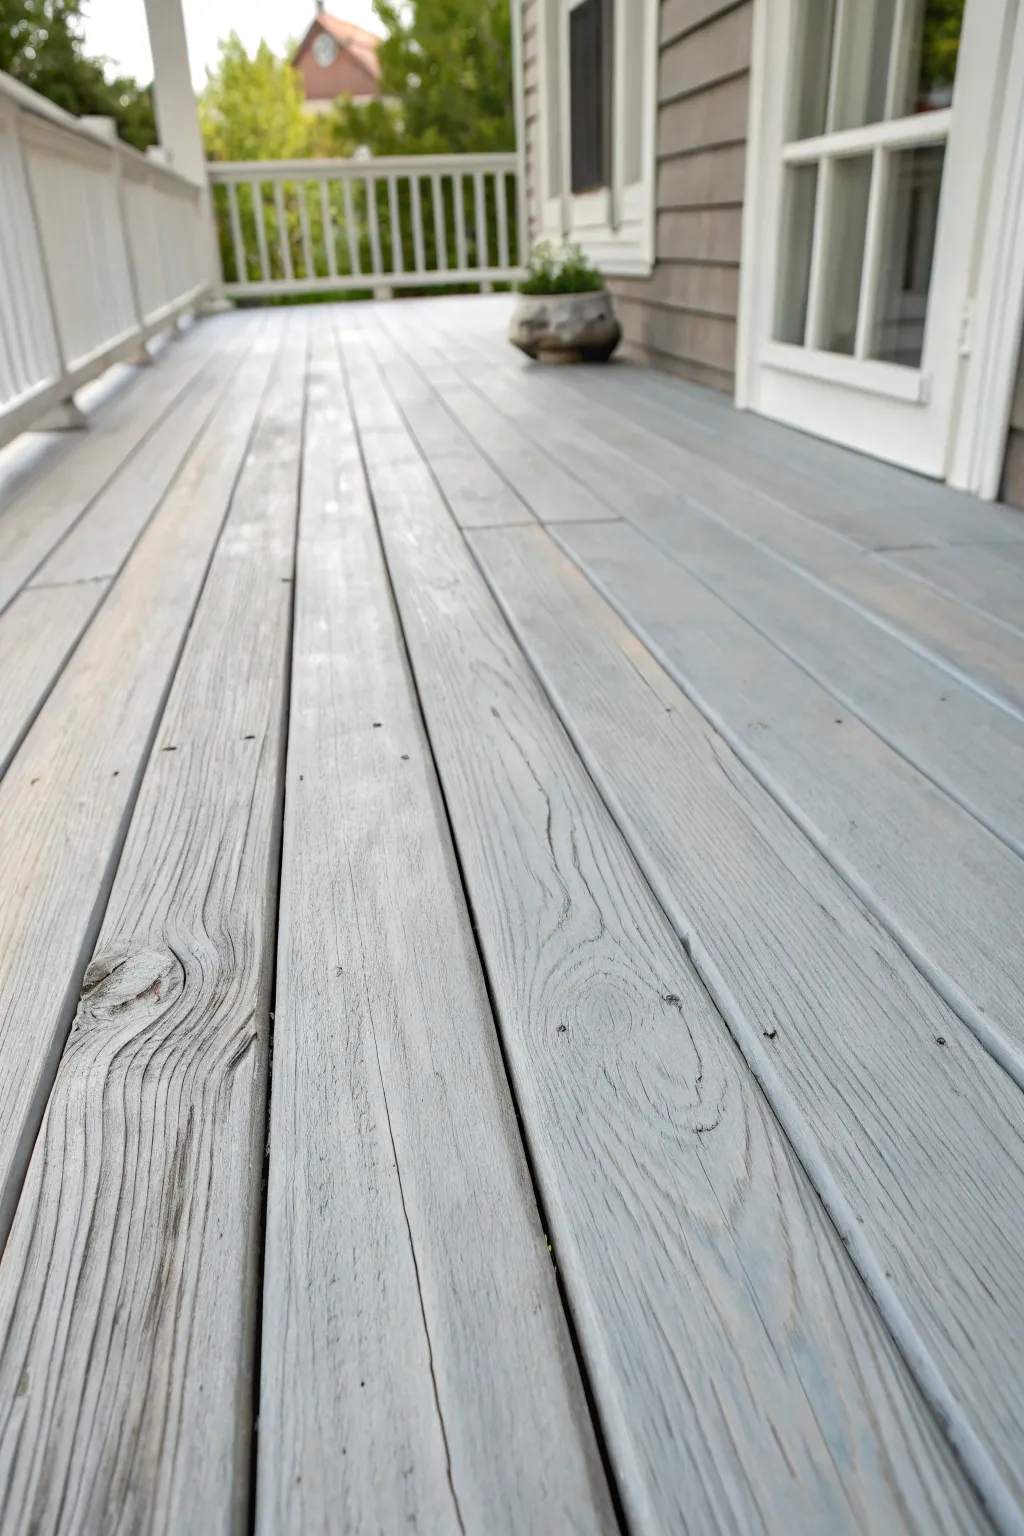
Transform tired deck boards into a serene, weathered retreat with this subtle graywash technique. By layering semi-transparent stains, you achieve a finish that resembles driftwood while protecting the wood from the elements.
Step-by-Step
Materials
- Deck cleaner/stripper
- Pressure washer (optional but recommended)
- Stiff-bristle scr-ub brush
- 80-grit sandpaper or sanding pole
- Leaf blower or broom
- Masking tape (exterior grade)
- Semi-transparent gray deck stain (base color)
- Water-based white or light gray exterior stain (for wash)
- Wide staining brush (4-6 inches)
- Paint tray and liner
- Rags or lint-free cloths
- Matte exterior sealer (optional)
Step 1: Preparation
-
Clear the area:
Remove all furniture, planters, and rugs from the porch. You need a completely empty canvas to ensure even application and no lap marks. -
Clean the surface:
Apply a deck cleaner generously according to the manufacturer’s instructions. Let it sit for the recommended time to break down old grime and mildew. -
Scrub the grain:
Using a stiff-bristle brush, scrub the wet boards vigorously. Focus on getting into the grooves and removing any loose, peeling finish from previous years. -
Rinse thoroughly:
Wash away the cleaning solution and debris. A pressure washer on a low setting is excellent here, but a hose with a strong nozzle works too. Let the wood dry completely—usually 24 to 48 hours. -
Sand for smoothness:
Once bone dry, run 80-grit sandpaper over the boards. You aren’t trying to make it furniture-smooth, but rather opening the wood pores to accept the stain and removing splintery areas. -
Remove dust:
Sweep or use a leaf blower to clear every speck of sanding dust. Dust trapped under the stain will ruin the smooth finish. -
Protect edges:
Apply exterior masking tape to the bottom of the house siding, door frames, and any posts you don’t intend to stain.
Step 2: Application
-
Plan your path:
Identify your exit strategy. Start at the corner furthest from the stairs or door so you don’t paint yourself into a corner. -
Apply the base coat:
Stir your semi-transparent gray stain thoroughly. Dip your wide brush and apply along the length of the first 2-3 boards. -
Work in sections:
Maintain a wet edge by completing entire lengths of boards before moving to the next set. This prevents visible overlap lines. -
Back-brushing:
After applying the stain, run your brush over the wet area one last time in long, continuous strokes to even out puddles and push color into the grain. -
Let it cure:
Allow this primary coat to dry according to the can’s instructions. It usually takes about 4-6 hours, depending on humidity. -
Mix the wash:
For that weathered look, dilute a small amount of white or very light gray stain with water (about a 3:1 ratio of stain to water) creates a thinner consistency. -
Apply the wash:
Brush this lighter wash selectively over the gray boards. I find focusing on the center of the boards rather than the edges creates a natural wear pattern. -
Wipe back:
Immediately wipe the wash with a rag. You want the white pigment to settle into the wood grain texture while leaving the gray base visible. -
Check for consistency:
Step back occasionally to ensure the ‘weathering’ looks random and natural, not striped or uniform. -
Final dry time:
Stay off the deck for at least 24-48 hours. If you want extra durability, apply a clear matte exterior sealer once the stain is fully cured.
Pro Tip: The Water Test
Not sure if your wood needs sanding? Sprinkle water on it. If it beads up, the old finish is still active. If it soaks in quickly, the wood is ready to accept new stain.
Level Up: Faux Knots
Use a darker charcoal stain and a small artist brush to accentuate existing knots or cracks in the wood, adding depth and character to the weathered look.
Enjoy your beautifully refreshed outdoor living space perfectly styled for relaxing afternoons


Warm Earthy Porch Floor Tones
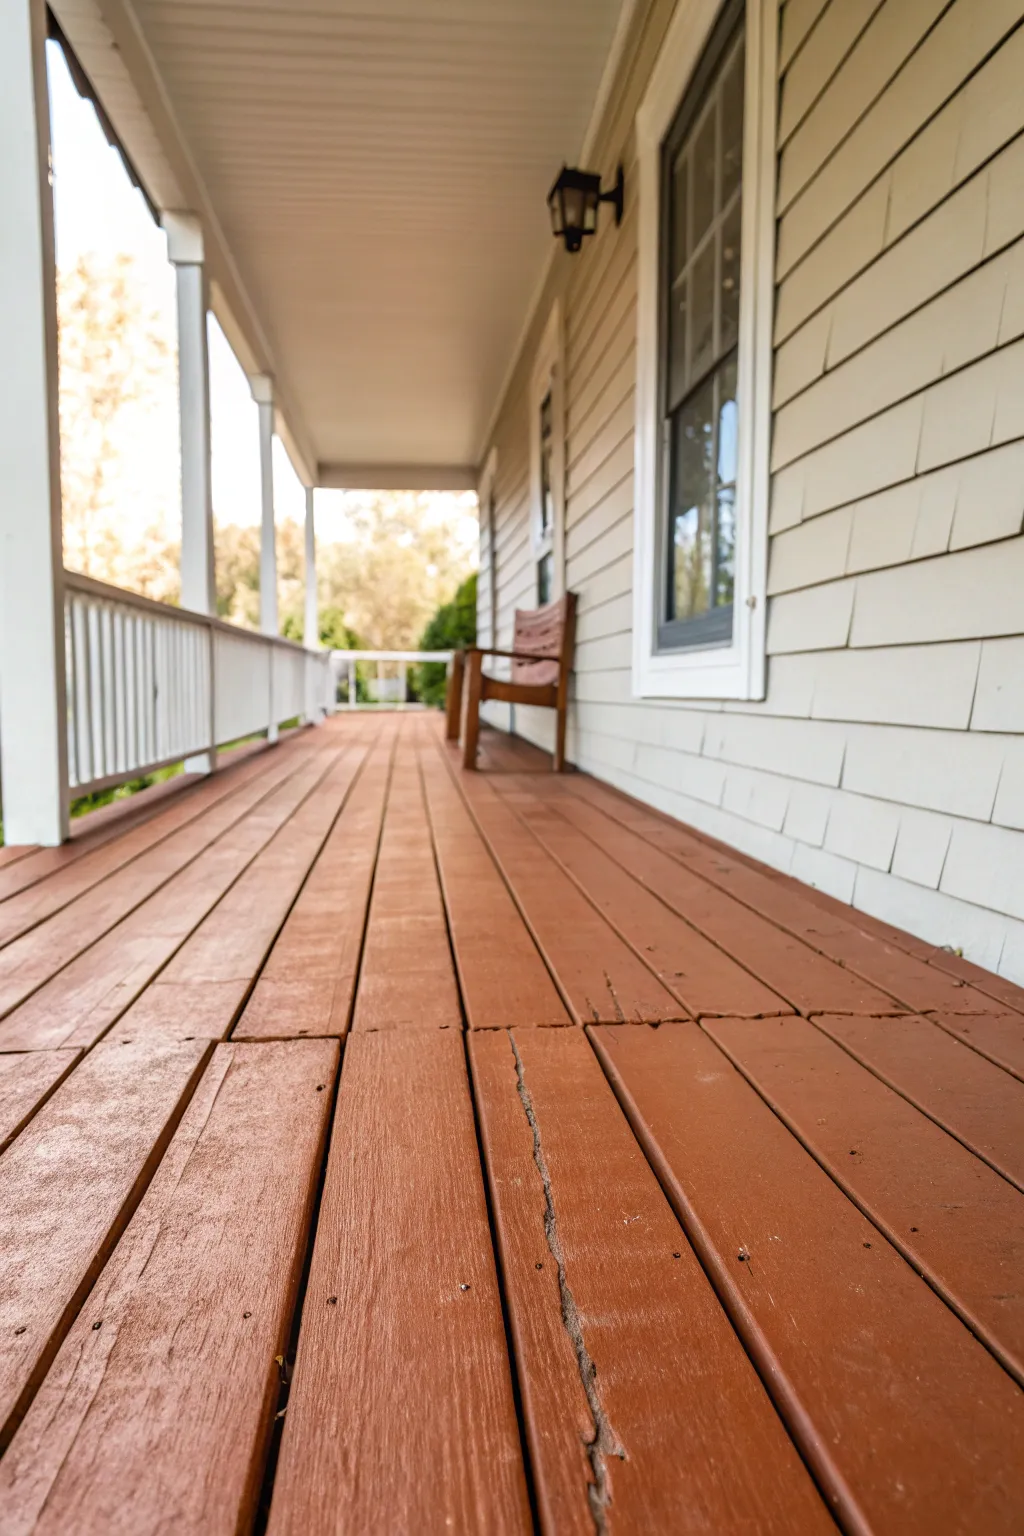
Transform a weathered wooden porch into a welcoming entryway with this rich, earthy solid stain application. The finish mimics the deep warmth of redwood while providing consistent coverage that hides older imperfections while highlighting the natural wood texture.
Step-by-Step Tutorial
Materials
- Solid color exterior deck stain (Redwood or deeply warm Cedar tone)
- Deck cleaner solution
- Stiff-bristle scrub brush on a pole
- Garden hose or pressure washer
- Medium-grit sandpaper (80-grit)
- Exterior wood filler (paintable)
- Putty knife
- painters tape
- 4-inch exterior paint brush (synthetic)
- Paint roller with extension pole
- 3/8-inch nap roller covers
- Paint tray
- Drop cloths
Step 1: Preparation & Cleaning
-
Assess the surface:
Walk the entire porch to identify loose boards, protruding nail heads, or rotten wood. Secure loose boards with deck screws and hammer down any popped nails. -
Clear the area:
Remove all furniture, plants, rugs, and decorative items. Sweep the deck thoroughly to remove loose dirt, leaves, and debris from between the boards. -
Apply deck cleaner:
Mix your deck cleaner according to the manufacturer’s instructions. Apply it liberally to the wood surface, working in manageable sections so it doesn’t dry out before you scrub. -
Scrub the wood:
Using a stiff-bristle brush on a pole, scrub the wet deck vigorously. Pay special attention to high-traffic areas and spots with visible mildew or grime. -
Rinse thoroughly:
Rinse the entire deck with a garden hose or a pressure washer on a low setting (under 1200 PSI) to avoid damaging the wood fibers. Allow the wood to dry completely, ideally for at least 48 hours.
Pro Tip: Gap Management
Use a small, cheap foam brush to specifically target the deep gaps between boards before rolling the top surface. This hides the old wood color from peeking through.
Step 2: Filing & Sanding
-
Address major cracks:
Locate deep gouges or significant cracks that might trap water. Fill these with exterior wood filler using a putty knife, smoothing it flush with the surface. -
Sand the surface:
Once the filler is dry, go over the entire deck with 80-grit sandpaper. This isn’t about making it furniture-smooth, but rather opening the wood pores to accept the stain and smoothing out any raising grain. -
Remove sanding dust:
Sweep or use a leaf blower to remove all sanding dust. Wiping down the surface with a tack cloth or damp rag ensures the stain adheres properly. -
Protect adjacent areas:
Apply painter’s tape along the bottom of the house siding, door trim, and around railing posts where they meet the floor to ensure crisp lines.
Step 3: Stain Application
-
Cut in edges:
Start by using your 4-inch brush to ‘cut in’ the perimeter of the deck and around any posts. Brush stain into the gaps between boards where a roller won’t reach. -
Roll the first coat:
Pour your solid stain into a tray. Using the roller on an extension pole, apply a generous coat of stain, rolling with the grain of the wood. Work in sections of 3-4 boards at a time to maintain a wet edge. -
Back-brush the finish:
Immediately after rolling a section, I like to lightly run a brush over the wet stain. This pushes the pigment into the wood pores and texture, ensuring better adhesion and a more hand-finished look. -
Allow to dry:
Let the first coat dry completely according to the can’s instructions, usually 4 to 24 hours depending on humidity and temperature. -
Apply second coat:
Roll on a second coat moving in the same direction as the first. This layer builds the depth of color and ensures uniform opacity, hiding any color variations in the old wood. -
Detail check:
While the second coat is still wet, inspect for drips, puddles in screw holes, or missed spots between plank gaps, correcting them immediately with your brush. -
Final cure:
Remove the painter’s tape slowly while the stain is still slightly tacky to avoid peeling. Allow the floor to cure for at least 24-48 hours before replacing furniture.
Level Up: Two-Tone Railings
Contrast your warm earthy floor by painting the vertical railing spindles a crisp bright white, while staining the top handrail to match the floor color.
Now you have a durable, beautifully reimagined outdoor space ready for relaxing afternoons.
BRUSH GUIDE
The Right Brush for Every Stroke
From clean lines to bold texture — master brush choice, stroke control, and essential techniques.
Explore the Full Guide
Painted Porch Steps With Edge Highlights
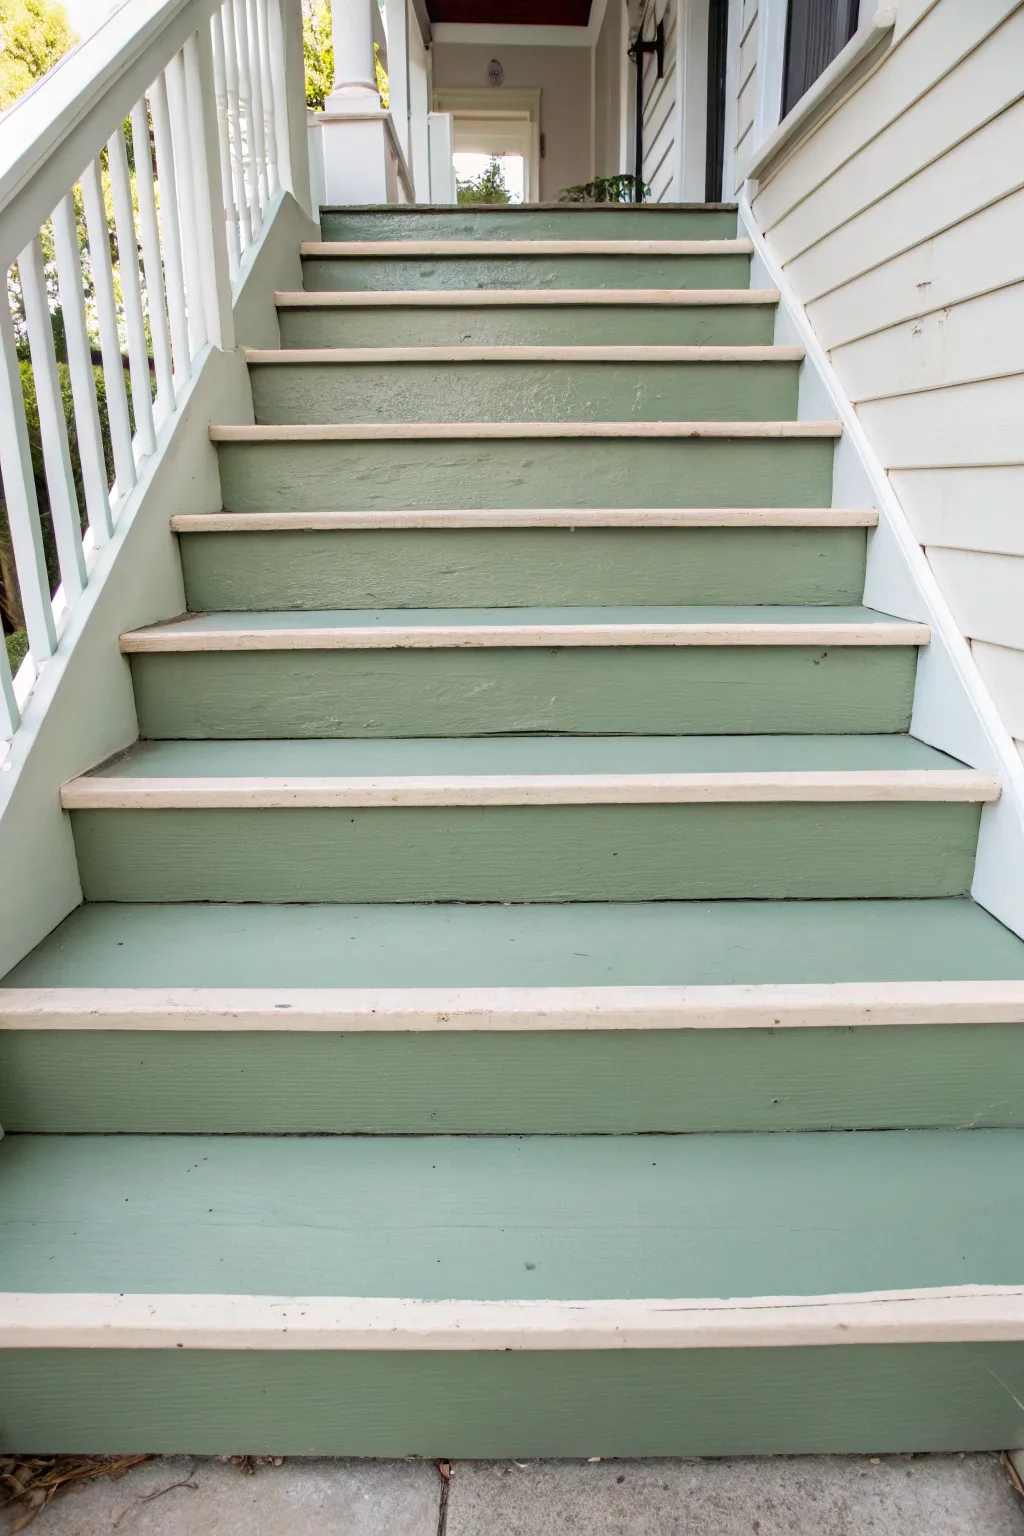
Transform your porch entryway with this classic two-toned look that highlights architectural details while adding a soft splash of color. The combination of muted sage green risers and treads with crisp cream nosing creates a welcoming, vintage-staircase vibe that is both practical and stylish.
Step-by-Step Guide
Materials
- Exterior porch & floor paint (sage green)
- Exterior porch & floor paint (cream or off-white)
- Course sandpaper (60-80 grit)
- Fine sandpaper (120-150 grit)
- Wood filler or epoxy intended for exterior use
- Pressure washer or stiff scrub brush
- High-quality angled sash brush (2-2.5 inch)
- Mini roller with foam or low-nap cover
- Painter’s tape (exterior grade)
- Primer (bonding primer suitable for exterior wood)
- Clean rags
- Paint tray and liners
Step 1: Preparation & Repairs
-
Clean surface thoroughly:
Begin by removing all dirt, moss, and loose debris. A pressure washer works best here, but a bucket of soapy water and a stiff scrub brush will do the trick if you’re careful to rinse well. Let the wood dry completely for at least 24-48 hours. -
Scrape loose paint:
If there is any peeling or flaking old paint, use a scraper to remove it until you reach a solid edge. This prevents your new paint job from failing prematurely. -
Sand the wood:
Using the coarse sandpaper, sand the entire surface of the treads and risers. This roughs up the existing finish so the new primer adheres properly. Follow up with fine sandpaper to smooth out any rough patches. -
Fill imperfections:
Inspect the stairs for deep gouges or rot. Use an exterior-grade wood filler to patch these areas, overfilling slightly to account for shrinkage. -
Sand repairs flush:
Once the filler has cured fully, sand those spots flush with the surrounding wood using the fine-grit paper. Wipe away all sanding dust with a damp rag or tack cloth.
Uneven Edges?
If your hand shakes while painting the cream nosing, use a ‘paint edger’ tool or a sturdy piece of cardboard as a mobile shield to protect the riser below while you work.
Step 2: Painting the Base Coat
-
Mask surrounding areas:
Protect the porch landing, siding, and any adjacent trim with painter’s tape to ensure you don’t get sage green where it doesn’t belong. -
Prime the stairs:
Apply a coat of high-quality exterior bonding primer to all surfaces—treads, risers, and nosing. Start from the top stair and work your way down so you don’t paint yourself into a corner. -
Cut in the corners:
Once the primer is dry, open your sage green paint. Use the angled sash brush to ‘cut in’ the corners where the tread meets the riser and the sides. -
Roll the main surfaces:
Use the mini roller to apply the sage green paint to the flat surfaces of the treads and the vertical risers. Painting the entire stair green first is usually faster than trying to avoid the edges. -
Apply second coat:
Allow the first coat to dry according to the manufacturer’s instructions, then apply a second coat of sage green for full, durable coverage. Let this cure for at least 24 hours before moving to the detail work.
Anti-Slip Additive
Porch paint can be slippery when wet. Mix a specialized non-skid additive (usually a fine sand texture) into your green paint for the tread surfaces to improve traction.
Step 3: Detailing the Cream Edges
-
Define the edge:
Decide how wide you want your highlight strip to be. The nosing (the rounded front edge) is naturally defined, but you can tape off a line about 1 inch back on the tread if you want a sharper, straighter look. -
Load the brush lightly:
Dip your sash brush into the cream paint, but only about halfway up the bristles. Wipe off the excess; you want control, not drips. -
Paint the nosing front:
Carefully drag the brush horizontally across the rounded front of the stair nose. I find holding the brush handle perpendicular to the stair helps maintain a steady hand. -
Paint the top edge:
Smooth out the paint on the very top lip of the stair nose. If you used tape, paint slightly over the tape edge to ensure a crisp line. -
Check for drips:
immediately look underneath the nosing. If any cream paint has dripped onto the riser below, wipe it immediately with a damp rag or touch it up with a small brush and green paint. -
Apply second detail coat:
The cream color might need a second pass to fully cover the green underneath. Wait for the first coat to dry to the touch, then apply a light second layer. -
Remove tape:
If you used tape for the straight line on the tread, peel it back slowly while the paint is still slightly tacky to prevent it from pulling up dry paint chips.
Enjoy the fresh, structured look giving your home a charming dose of curb appeal every time you walk up the steps
Bright White Porch Ceiling Lift
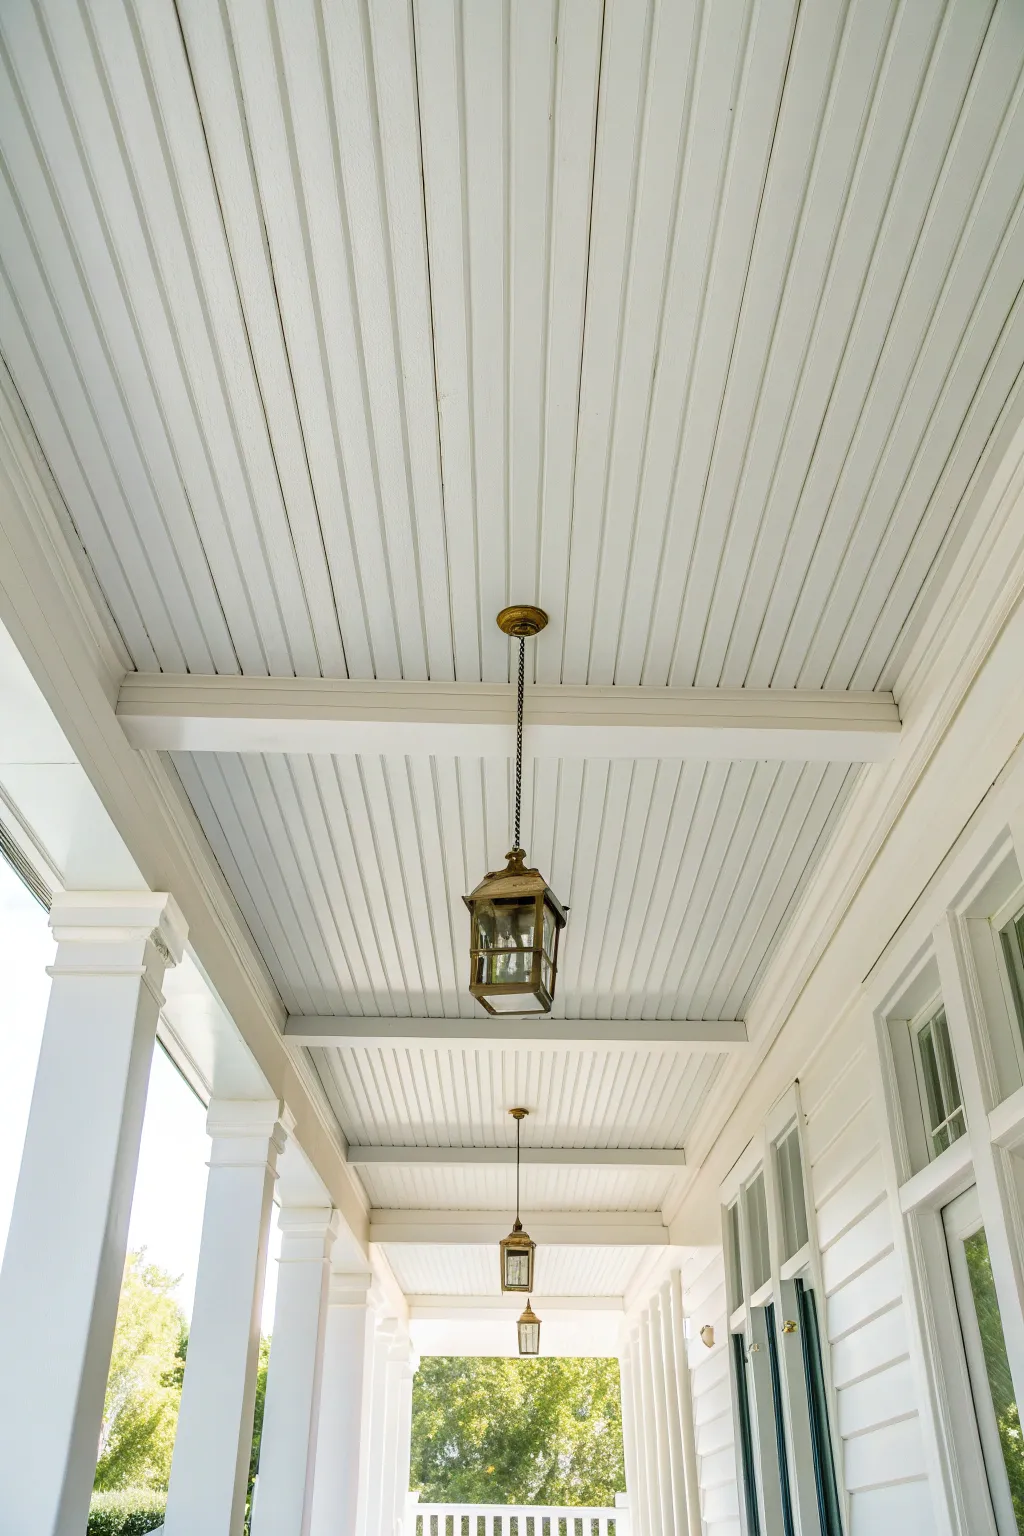
Transform a dark or unfinished porch into an airy, light-filled haven with this classic beadboard ceiling update. The crisp white finish reflects natural light while the linear planks add subtle texture and architectural charm overhead.
Step-by-Step
Materials
- Beadboard planks (tongue and groove preferred)
- Wooden beams (faux or structural wraps)
- Adhesive/liquid nails
- Finishing nails and nail gun
- High-quality exterior primer
- Exterior semi-gloss white paint
- Caulk and caulking gun
- Wood filler
- Sandpaper (medium and fine grit)
- Paint rollers and angled brushes
- Drop cloths
- Ladder
Step 1: Preparation and Planning
-
Measure and calculate:
Begin by measuring the total square footage of your porch ceiling to determine how much beadboard you will need. Don’t forget to account for the beams if you plan to wrap existing structures or add faux ones. -
Inspect the existing surface:
Check the current ceiling for any water damage, mold, or structural issues. Repairs must be made before covering anything up to ensure your new ceiling lasts. -
Acclimate the wood:
If you are using real wood beadboard, let it sit in the general environment (covered from rain) for a few days to acclimate to the humidity levels, reducing future warping. -
Protect the area:
Lay down drop cloths over your porch decking and cover any light fixtures or furniture you can’t move. Securing these with painter’s tape is a smart move to prevent shifting.
Seamless Beam Joints
When wrapping beams, use mitered corners for the box construction. It makes the beams look like solid timber rather than boards nailed together.
Step 2: Installation
-
Install the first plank:
Start at the house wall or the edge furthest from the prominent view. Apply construction adhesive to the back of the beadboard plank and secure it with your nail gun into the ceiling joists. -
Continue the pattern:
Slot the tongue of the next board into the groove of the first. Tap it gently with a rubber mallet if needed to ensure a tight fit before nailing it into place. -
Mind the seams:
Stagger any butt joints (where the ends of two boards meet) so they don’t all align in one noticeable row across the ceiling. This creates a stronger and more visually pleasing surface. -
Install the beams:
Once the beadboard field is complete, install your cross beams. Measure and cut your lumber to span the width of the porch, securing them perpendicular to the beadboard direction to create that coffered look. -
Box out columns:
If your columns need refreshing to match, box them out with smooth trim lumber now, ensuring the tops meet the new beams cleanly.
Add a Pop of Blue
For a Southern traditional twist, paint the flat beadboard sections a pale ‘haint blue’ while keeping the beams and trim bright white.
Step 3: Detailed Finishing
-
Fill the holes:
Go over every nail hole with high-quality wood filler. I like to slightly overfill these, as the filler tends to shrink a tiny bit when it dries. -
Sand until smooth:
Once the filler is dry, sand the filled spots flush with the wood surface. Also, give the beams a light sanding to ensure they are ready to accept paint. -
Caulk the gaps:
Run a bead of exterior-grade caulk along the edges where the beams meet the beadboard and where the ceiling meets the walls. Smooth it out with a damp finger for a seamless transition.
Step 4: Painting
-
Prime the wood:
Apply a coat of high-quality exterior primer to the entire ceiling, beams, and columns. This step is crucial for blocking tannins in the wood from bleeding through your white finish. -
Check for imperfections:
After the primer dries, inspect the surface. The white primer will highlight any missed holes or rough patches that need a quick touch-up before the final coat. -
Cut in the edges:
Use an angled sash brush to paint the grooves of the beadboard and the corners around the beams first. It’s tedious work, but it ensures no raw wood peeks through later. -
Roll the flat surfaces:
Use a foam or low-nap roller to apply the exterior semi-gloss paint to the flat faces of the boards and the bottom of the beams for a smooth, brush-mark-free finish. -
Apply the second coat:
Allow the first coat to dry completely according to the manufacturer’s instructions, then apply a second coat for full, durable coverage and a rich, bright white sheen. -
Reinstall fixtures:
Once the paint is fully cured, reinstall your hanging lanterns or ceiling fans to complete the sophisticated look.
Enjoy the fresh, clean atmosphere your new bright white ceiling brings to your outdoor living space

PENCIL GUIDE
Understanding Pencil Grades from H to B
From first sketch to finished drawing — learn pencil grades, line control, and shading techniques.
Explore the Full Guide
Sky-Blue Painted Porch Ceiling
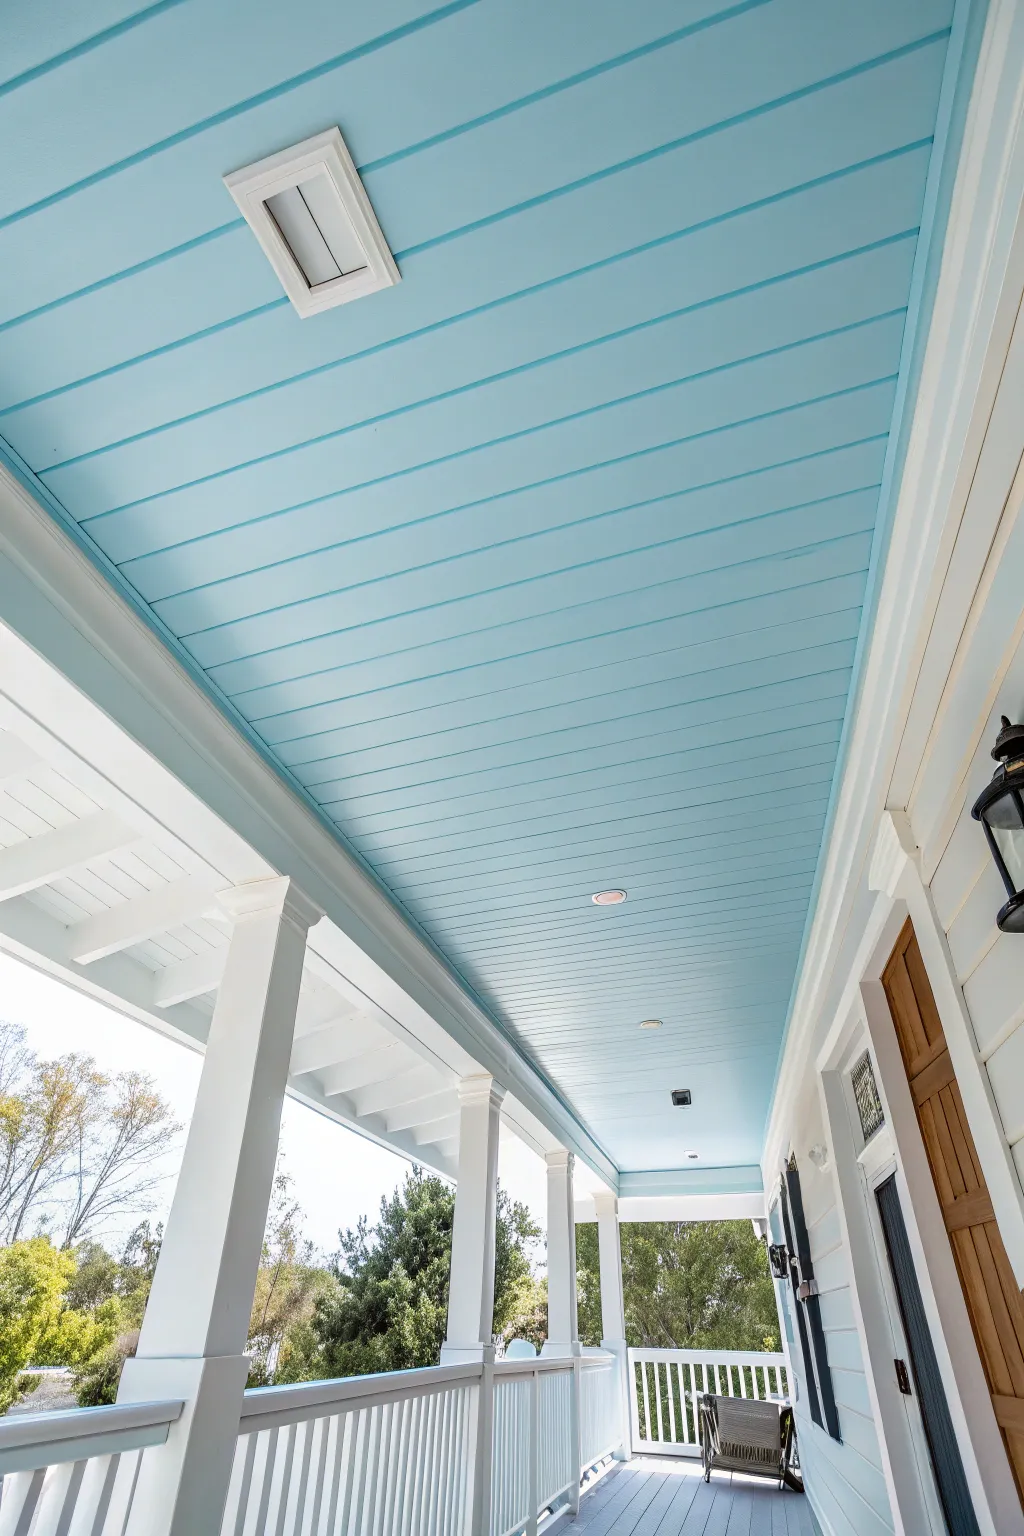
Bring a touch of Southern charm to your outdoor space with this classic sky-blue porch ceiling project. This soft, airy color not only brightens up shaded areas but, according to folklore, keeps spirits—and insects—at away.
How-To Guide
Materials
- Exterior acrylic latex paint (sky blue, satin or eggshell finish)
- Exterior primer (bonding)
- High-quality angled sash brush (2.5 inch)
- Roller frame and 3/8-inch nap roller covers
- Extension pole
- Painter’s tape
- Drop cloths
- Sanding sponge (medium grit)
- Tack cloth
- TSP substitute cleaner
- Ladder
Step 1: Preparation
-
Clear and cover:
Remove all furniture, hanging plants, and light fixtures from the porch. Lay down heavy-duty drop cloths to protect the decking floor, ensuring they are taped down at the edges so they don’t slide while you work. -
Clean surfaces:
Mix a TSP substitute cleaner with water according to package directions. Scrub the ceiling thoroughly to remove dirt, mildew, spiderwebs, and pollen, rinsing well with a hose or clean sponge afterwards. -
Address imperfections:
Once dry, inspect the beadboard or planks for peeling paint. Scrape away any loose chips and lightly sand glossy areas with a medium-grit sanding sponge to help the new paint adhere better. -
Remove dust:
Wipe the entire surface down with a tack cloth to grab every bit of sanding dust. I always double-check the grooves of the beadboard here, as dust loves to hide in those channels. -
Protect edges:
Apply painter’s tape along the top edge of any molding, columns, or siding where they meet the ceiling. Press the tape edge firmly with a putty knife to prevent paint bleed.
Sticky Situation
If humidity is high, acrylic latex can get tacky. If your roller starts lifting the first coat, STOP. Let it cure overnight before applying the second coat.
Step 2: Priming and Cutting In
-
Spot prime:
If there are bare wood spots or stubborn stains, apply a coat of high-quality bonding primer to those specific areas first. If you are making a drastic color change, prime the entire ceiling. -
Cut in perimeter:
Using your angled sash brush, paint a 2 to 3-inch border of your blue paint around the entire perimeter where the ceiling meets the walls and beams. -
Brush the grooves:
If your ceiling is beadboard, run your brush vertically inside the deep grooves first. A roller often misses these crevices, so doing this ‘pre-fill’ step ensures solid coverage. -
Work around fixtures:
Carefully brush paint around any recessed lighting trim or fixture boxes that couldn’t be removed, feathering the edges outwards so they blend easily with the roller later.
Add Dimension
For a vaulted look, paint the ceiling beams or rafters in a crisp semi-gloss white. This contrast makes the blue ceiling look even higher, like the real sky.
Step 3: Painting the Ceiling
-
Load the roller:
Attach the roller to your extension pole and load it with paint, rolling off the excess on the tray ramp. You want it saturated but not dripping. -
Roll first section:
Starting in one corner, roll the paint onto the flat surfaces of the planks. Work in small 4×4 foot sections to maintain a wet edge. -
Roll with the grain:
Always finish your roller strokes in the direction of the wood planks (parallel to them). This minimizes texture lines and creates a smoother finish. -
Check coverage:
Step back and look at the section you just finished from a different angle. The light reflection often reveals missed spots or thin areas that need a quick touch-up while wet. -
Dry and recoat:
Allow the first coat to dry completely, usually about 4 hours depending on humidity. Apply a second coat using the same technique: cutting in edges, brushing grooves, then rolling the flats. -
Remove tape:
Score the edge of the painter’s tape lightly with a utility knife before the final coat is 100% hard. Peel the tape away slowly at a 45-degree angle to get a crisp line.
Now you have a serene, breezy retreat right outside your door to enjoy all season long
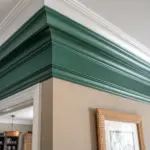
Two-Tone Porch Columns and Railings
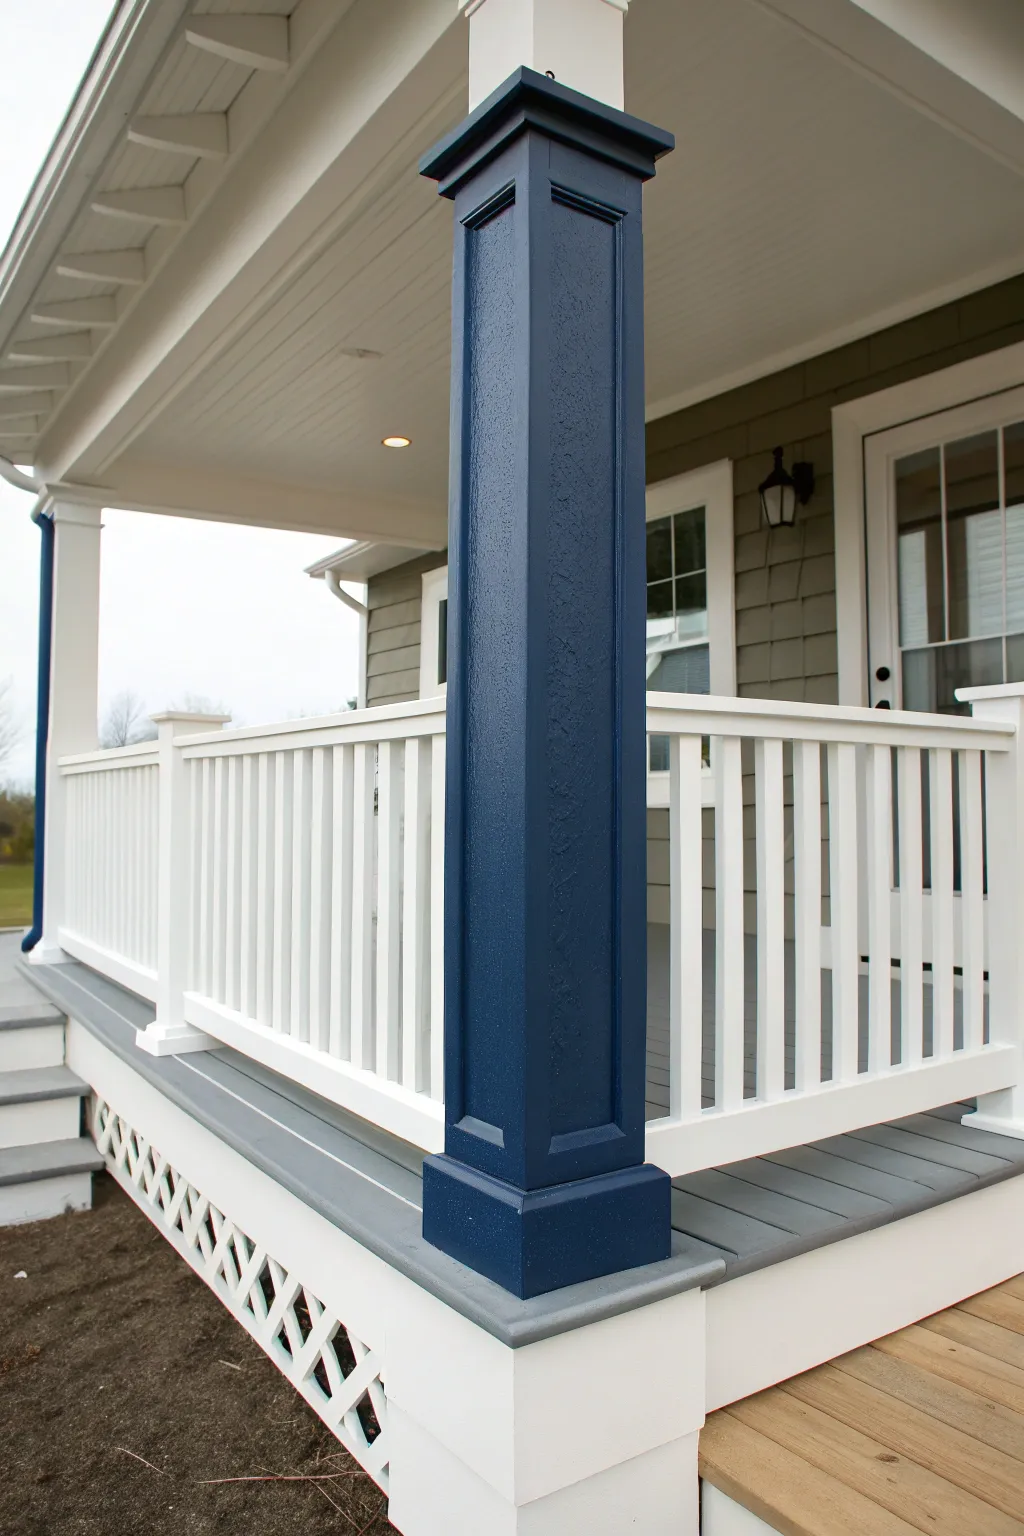
Transform a standard porch into a stately entrance by pairing deep navy columns with crisp white railings. This high-contrast look emphasizes architectural details like trim and molding, giving your home’s exterior an instant touch of modern elegance.
Step-by-Step Guide
Materials
- Exterior semi-gloss paint (Deep Navy Blue)
- Exterior semi-gloss paint (Bright White)
- Exterior primer (High-adhesion)
- Sandpaper (120 and 220 grit)
- Painter’s tape (Exterior grade)
- Wood filler or caulk
- 2-inch angled sash brush
- 4-inch foam roller and tray
- Drop cloths
- Tack cloth
- Scraper tool
Step 1: Preparation & Repairs
-
Protect the area:
Begin by laying down drop cloths around the base of the column and sliding them under the railing to catch any drips or sanding dust. -
Scrape loose paint:
Inspect the column and railings for any flaking or peeling paint. Use a scraper tool to remove these loose bits until you reach a solid surface. -
Sand the surfaces:
Using 120-grit sandpaper, conduct a thorough sanding of the entire column and the adjacent railing sections. The goal is to scuff the existing finish so the new paint adheres properly. -
Fill imperfections:
If you find any deep gouges, nail holes, or cracks in the wood, fill them with exterior-grade wood filler. Allow it to dry completely according to package instructions. -
Smooth the filler:
Once dry, sand the filled areas flush with 220-grit sandpaper for a smooth finish. Wipe everything down with a tack cloth to remove all dust. -
Caulk the seams:
Run a bead of exterior caulk along the joints where the trim meets the main column shaft to ensure a seamless, watertight look.
Step 2: Painting the Railings & Trim
-
Prime bare wood:
Spot-prime any areas where you exposed bare wood or filler. If you are making a drastic color change on the railing, a full coat of primer is recommended. -
Paint the railings:
Starting with the railings first prevents white splatter on your finished navy column later. Apply two coats of Bright White exterior paint to the spindles and handrails using your angled sash brush. -
Paint column trim (optional):
If your design includes white trim at the very top or bottom cap of the column (as seen in some variations), paint those sections white now and let them cure. -
Tape off the edges:
Once the white paint is fully dry (wait at least 24 hours), apply painter’s tape to the railing ends where they meet the column to ensure a razor-sharp line.
Uneven Coverage?
Deep colors like navy can look streaky on the first pass. Don’t overwork wet paint; let it dry fully. A third thin coat is better than one thick, drippy one.
Step 3: Applying the Navy Finish
-
Cut in the corners:
Open your Deep Navy Blue paint. Using the angled sash brush, carefully ‘cut in’ the recessed corners of the column detail and around the edges of the trim. -
Roll the flat surfaces:
For the flat, broad sides of the column, I prefer using a 4-inch foam roller. This applies the paint smoothly without leaving brush marks. -
Brush out the texture:
Immediately after rolling, you can lightly drag a dry brush over the wet paint if you want to mimic a wood-grain texture, or leave it smooth for a modern finish. -
Apply the second coat:
Navy is a dark pigment and often requires patience. Allow the first coat to dry completely, then apply a second coat to ensure rich, opaque coverage. -
Remove the tape:
While the second coat is still slightly tacky (not fully dry), carefully peel away the painter’s tape at a 45-degree angle to reveal crisp lines. -
Touch up edges:
Inspect the transition where the navy column meets the gray floor or white ceiling. Use a small artist’s brush for any tiny touch-ups needed to perfect the edges.
Add Dimension
For a subtle high-end look, use a satin finish for the siding but a high-gloss finish for the navy column. The sheen contrast makes the color pop even more.
Step back and admire how that bold pop of color completely redefines your porch’s character


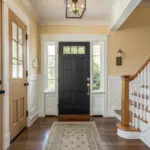
Front Door Color That Ties to the Porch
Enhance your home’s curb appeal with a welcoming sage green front door that beautifully complements a gray painted porch floor. This project revitalizes your entryway, creating a seamless and sophisticated transition from the outdoors in.
Detailed Instructions
Materials
- Exterior satin or semi-gloss paint (Sage Green)
- Exterior porch & floor paint (Cool Gray)
- Painter’s tape
- Sanding block (medium grit)
- Clean rags or tack cloth
- Angle sash brush (2 inch)
- Mini foam roller or small nap roller
- Drop cloths
- Screwdriver or chill (for hardware removal)
- TSP substitute or mild detergent
- Primer (bonding primer recommended)
Step 1: Preparation
-
Check the weather:
Before starting, ensure you have a stretch of clear weather with mild temperatures, ideally between 50°F and 80°F, to allow proper drying. -
Remove hardware:
Using a screwdriver, carefully remove the door handle, deadbolt, and any other hardware. Store screws in a labeled bag so they don’t get lost. -
Clean surfaces thoroughly:
Wash the door and the porch floor area you plan to paint with a TSP substitute or mild detergent to remove dirt, grease, and grime. Let everything dry completely. -
Scrape and sand:
Use a sanding block to scuff the existing finish on the door and any rough spots on the porch floor. This mechanical bond helps the new paint adhere better. -
Protect surrounding areas:
Lay down drop cloths to protect walkways. Use painter’s tape to mask off the door hinges (if not removed), the glass window panes, and the edges of the siding where it meets the porch floor.
Sticky Door Syndrome?
If the weather stripping sticks to your fresh paint, rub a little paraffin wax or talcum powder on the rubber seal to prevent it from bonding to the door.
Step 2: Painting the Front Door
-
Prime the door:
Apply a coat of bonding primer to the door, especially if making a drastic color change or painting over a slick surface. Allow it to dry according to the can’s instructions. -
Paint the panels first:
Start painting the recessed panels of the door using your angled brush. Work the sage green paint into the corners and edges. -
Paint the vertical center stile:
Using a mini roller or brush, paint the vertical strip of wood that runs down the center of the door between the panels. -
Paint horizontal rails:
Move on to the horizontal rails (top, middle, and bottom). Keep a wet edge to blend brush strokes smoothly. -
Paint the outer stiles:
Finish the door by painting the long vertical stiles on the far left and right. Check for drips in the corners as you go. -
Apply a second coat:
Once the first coat is dry to the touch, lightly sand if needed, wipe away dust, and apply a second coat for a rich, true sage color.
Step 3: Refreshing the Porch Floor
-
Cut in the edges:
With the gray porch and floor paint, use a brush to cut in around the perimeter of the porch floor, near the house siding and any posts. -
Roll the floor:
Pour your gray paint into a tray and use a roller on an extension pole to paint the main floorboards. I prefer rolling in the direction of the wood grain for the smoothest finish. -
Wait and recoil:
Allow the first floor coat to dry completely—usually 4 to 6 hours depending on humidity—before applying a second coat for durability.
Upgrade Your Hardware
While the hardware is off, spray paint it matte black for a modern farmhouse look that pops against the sage green.
Step 4: Finishing Touches
-
Remove tape carefully:
Score the edge of the painter’s tape with a utility knife before pulling it off to ensure you don’t peel up any fresh paint. -
Reinstall hardware:
Once the door is fully cured (give it at least 24 hours if possible so it doesn’t stick), screw the handle and lockset back into place. -
Clean the glass:
Use a razor blade to scrape off any stray paint specks from the window panes, then clean the glass with window cleaner. -
Style the entrance:
Complete the look by placing a natural fiber doormat, hanging a greenery wreath, and adding a potted plant like the one shown to echo the sage tones.
Enjoy the fresh, cohesive look of your newly painted entryway every time you come home
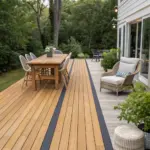
Classic Striped Porch Floor
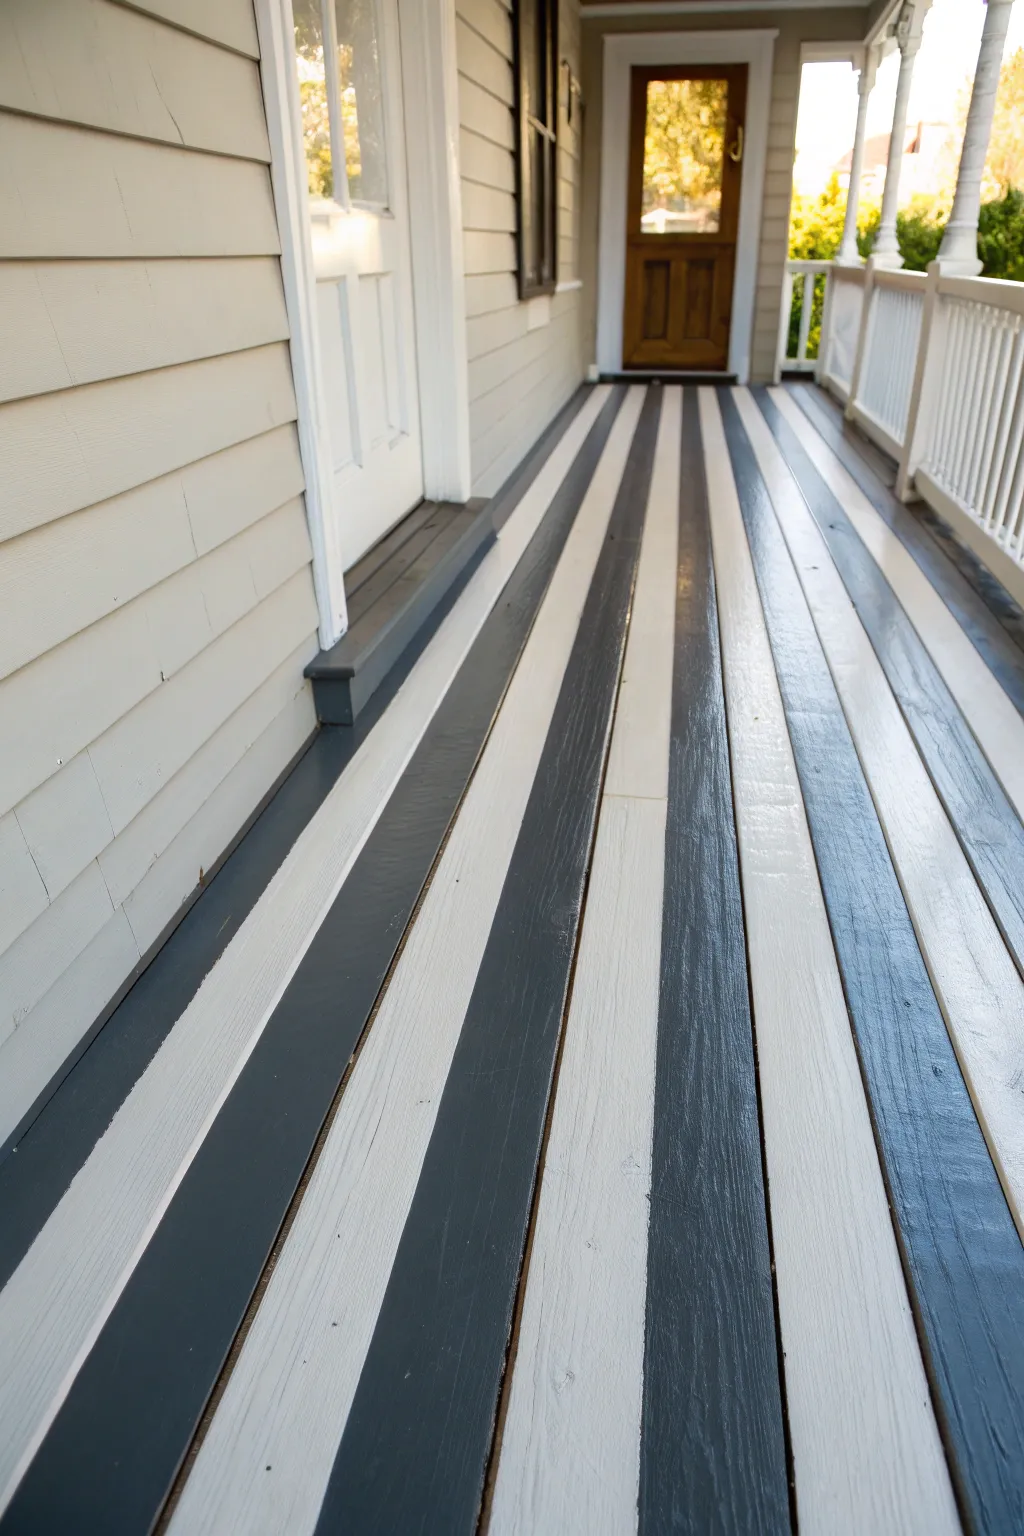
Elevate your outdoor entryway with this classic design that instantly adds architectural interest and expands the visual depth of your porch. Using simple painter’s tape and contrasting durable porch paints, you can create crisp, clean lines that mimic the charm of historic farmhouse flooring.
Step-by-Step Tutorial
Materials
- High-quality exterior porch and floor paint (white base)
- High-quality exterior porch and floor paint (dark grey or charcoal accent)
- Course-grit sandpaper (60-80 grit) or orbital sander
- Pressure washer or stiff scrub brush
- TSP (Trisodium Phosphate) cleaner
- Vacuum or shop vac
- Exterior primer (if bare wood)
- Extension pole
- Paint roller frame and 3/8-inch nap covers
- 2-inch angled trim brush
- High-quality painter’s tape (multi-surface)
- Measuring tape
- Chalk line or pencil
- Putty knife (optional for scraping)
Step 1: Preparation
-
Clear and clean:
Remove all furniture, rugs, and planters from the porch area. Sweep thoroughly to remove loose debris, cobwebs, and dirt. -
Deep cleaning:
Scrub the floorboards vigorously with a stiff brush and a TSP solution to degrease and remove mildew. If you have a pressure washer, use it carefully on a low setting so you don’t gouge the wood, then let the wood dry completely for at least 48 hours. -
Scrape and sand:
Inspect the boards for any peeling old paint. Use a putty knife to scrape these areas down to solid material. Sand the entire floor, focusing on rough spots, to create a surface ( -
Dust removal:
Vacuum up every bit of sanding dust. I prefer to follow this with a tack cloth or a damp rag to ensure no fine powder remains, as dust is the enemy of paint adhesion. -
Prime bare wood:
If your sanding revealed raw wood, spot-prime those areas with a high-quality exterior primer. If the floor was previously unpainted, prime the entire surface and allow it to cure according to the can’s instructions.
Step 2: Base Coloring
-
Cut in the edges:
Open your lighter color (the white base) and use your 2-inch angled brush to paint along the edges where the floor meets the house siding and the porch railing. -
Roll the first coat:
Attach your roller to an extension pole to save your back. Roll the white base coat over the entire porch floor, working from the house outward toward the stairs so you don’t paint yourself into a corner. -
Apply second coat:
Let the first coat dry completely—usually 4 to 6 hours depending on humidity. Apply a second coat of the white paint to ensure solid, opaque coverage without any streaks. Let this base cure for at least 24 hours before taping; if the paint is soft, the tape will peel it right off.
Tape Trouble?
If paint bleeds under the tape despite sealing it, wait for it to fully cure, then use a tiny artist’s brush and your base color to touch up the uneven spots by hand.
Step 3: Creating Stripes
-
Determine stripe width:
Measure the total width of your porch. Decide how wide you want your stripes; matching the width of the individual floorboards is the easiest and most classic method, but you can also measure larger custom widths. -
Mark the lines:
Using a pencil or a chalk line, lightly mark where your dark stripes will go. If you are following the floorboards, you can skip the chalk line and just use the gaps between boards as your guide. -
Apply the tape:
Run your painter’s tape along the outside edges of the areas that will remain white. Press the tape down firmly. -
Seal the tape edges:
This is the secret to crisp lines: taking a small amount of your *base* color (white), lightly brush over the edge of the tape that faces the stripe area. This seals the tape edge so any bleed-under is white-on-white and invisible. -
Start the dark paint:
Once the tape seal is dry to the touch, use your trim brush to carefully cut in the dark grey paint along the tape lines and near the house wall within the taped-off sections. -
Fill the stripes:
Use a mini roller or your standard roller to fill in the dark stripes. Apply a thin, even coat rather than a thick, goopy one. -
Finish dark coverage:
Allow the dark paint to dry for the time recommended on the can, then apply a second coat to ensure the color is rich and solid. -
The reveal:
Remove the painter’s tape while the final coat is still slightly tacky—pulling slowly at a 45-degree angle away from the fresh paint ensures the cleanest edge. -
Cure time:
Resist the urge to walk on it immediately. Let the floor cure for at least 3-4 days before replacing heavy furniture or high-traffic rugs.
Add a Border
Instead of running stripes all the way to the edge, tape off a 12-inch border around the perimeter of the porch in a solid dark color to
Now you have a stunning, durable entryway that welcomes guests with classic style
Vintage Checkerboard Porch Pattern
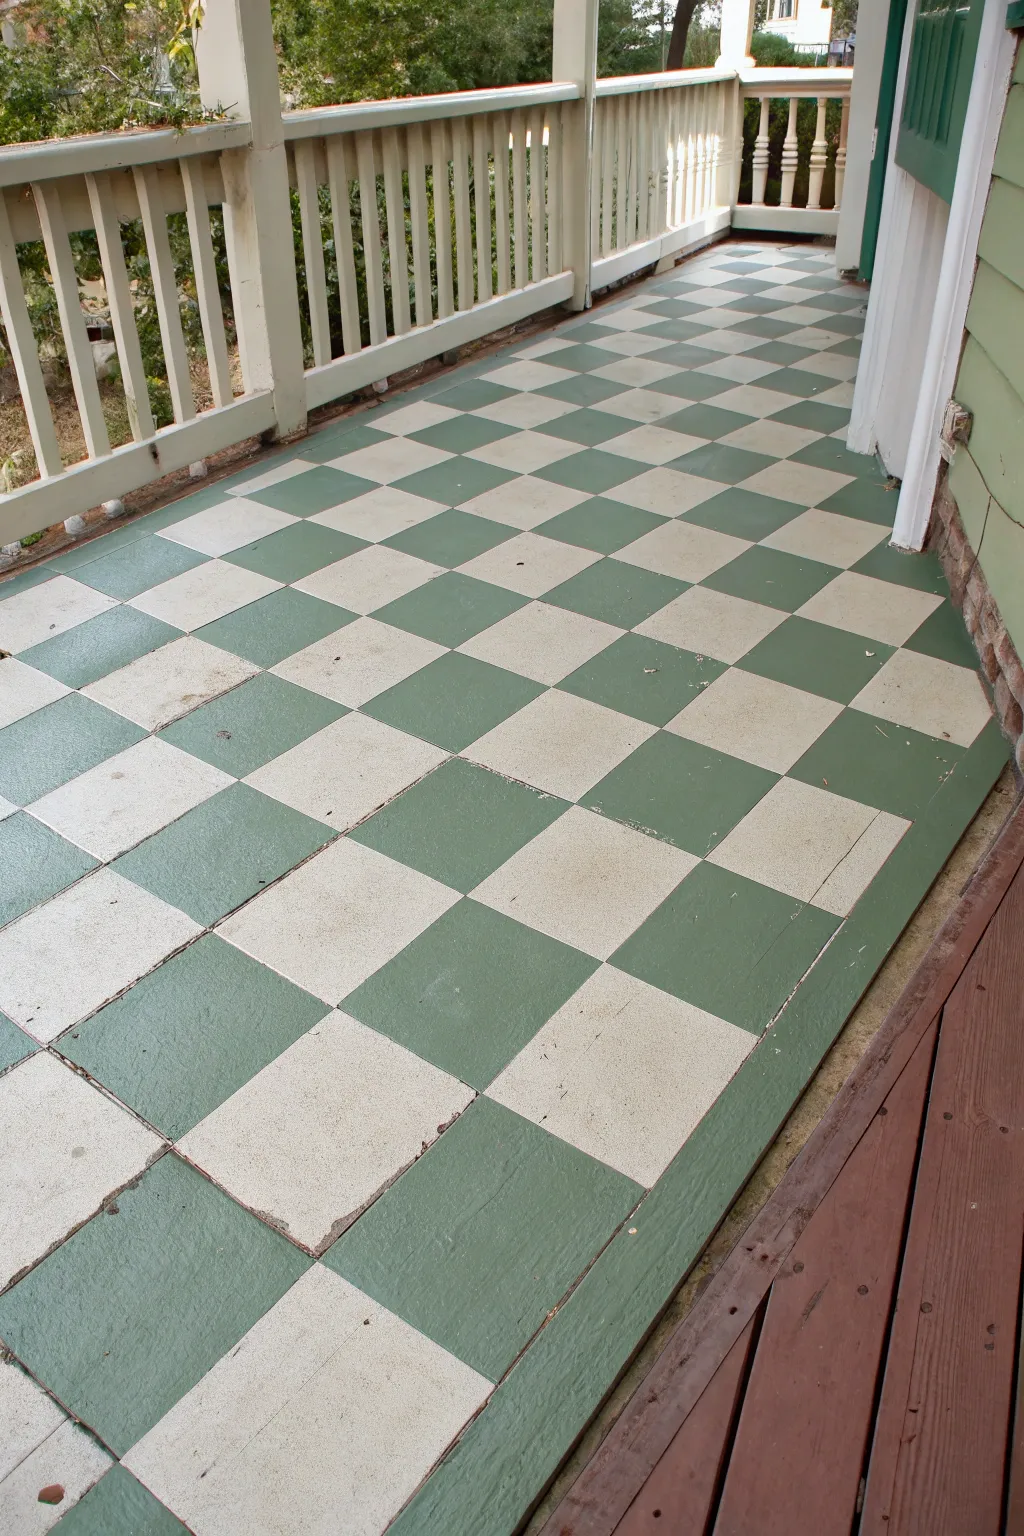
Transform a plain porch into a nostalgic retreat with this timeless checkerboard floor pattern. The classic combination of sage green and creamy white creates an inviting, vintage aesthetic that instantly elevates your home’s curb appeal.
How-To Guide
Materials
- Exterior porch & floor paint (Cream/Off-White)
- Exterior porch & floor paint (Sage Green)
- Pressure washer or stiff bristle broom
- Wood filler (for exterior)
- Sandpaper (80 and 120 grit)
- Painter’s tape (high-quality, specifically for clean lines)
- Measuring tape
- Chalk line or long straight edge
- Pencil
- Paint rollers (flock or smooth surface nap)
- Extension pole for roller
- Angled sash brush (2.5 inch)
- Square ruler or carpenter’s square
- Clear exterior polyurethane (optional sealer)
Step 1: Preparation & Base Coat
-
Clean the Surface:
Begin by thoroughly cleaning the porch floor. Use a pressure washer on a low setting or scrub vigorously with a stiff broom and deck cleaner to remove dirt, mildew, and loose paint. Let the wood dry completely for at least 24-48 hours. -
Repair Imperfections:
Inspect the floorboards for any deep cracks, rot, or protruding nail heads. Hammer down loose nails and fill significant gouges with exterior wood filler, allowing it to cure according to the package instructions. -
Sand the Floor:
Sand the entire surface, focusing on smooth transitions where filler was applied. Start with 80-grit if the old finish is rough, and finish with 120-grit to create a smooth surface that helps the new paint adhere properly. -
Remove Dust:
Sweep away the sanding dust, then wipe the floor down with a damp tack cloth or a rag lightly soaked in mineral spirits. It is crucial that no dust remains, or the tape won’t stick cleanly later. -
Cut in the Base Color:
Using your angled sash brush, paint the perimeter of the porch and in between any railing posts with your lighter color (the Cream/Off-White). This ensures the edges are neat before you switch to the roller. -
Apply Base Coats:
Roll on the first coat of the lighter cream paint over the entire floor. I usually find that two coats provide the best durability for foot traffic. Allow ample drying time between coats as specified by your paint manufacturer.
Bleeding Lines?
If paint bleeds under the tape, wait for it to dry fully. Then, tape over the correct line and touch up with the original color using a small artist brush.
Step 2: Measuring & Taping
-
Find the Center:
Measure the width of your porch at both ends to find the center point. Snap a chalk line down the entire length of the porch connecting these center points. This central line ensures your pattern looks symmetrical. -
Establish Square Size:
Decide on the size of your checks (12×12 inches or 16×16 inches are standard). Mark these intervals along your center chalk line using a pencil. -
Mark Perpendicular Lines:
Using a carpenter’s square, draw lines perpendicular to your center line at each interval mark. Extend these lines all the way to the edges of the porch. -
Complete the Grid:
Continue marking parallel lines lengthwise and widthwise until the entire floor is covered in a pencil grid. Double-check your measurements periodically to ensure the squares aren’t drifting. -
Tape the Pattern:
Apply painter’s tape along the *outside* edges of the squares that will remain cream. This is the mentally tricky part; you want to expose the squares that will be painted green. I like to mark the ‘green’ squares with a small piece of tape inside them first so I don’t get confused. -
Seal the Tape Edges:
Firmly press down all tape edges. To prevent any green paint from bleeding under, lightly brush a tiny amount of the *base cream color* over the tape edges. This seals the gap with the base color, ensuring crisp lines later.
Tape Removal Tip
Don’t leave the tape on overnight! If the paint fully cures over the tape, it might peel up the paint layer when you remove it. Pull while slightly tacky.
Step 3: Painting the Pattern
-
Paint the Green Squares:
Using a small roller or brush, paint the exposed squares with your Sage Green exterior paint. Be careful not to overload the roller, as too much paint can puddle or splatter onto the protected squares. -
Apply Second Coat:
Once the first green coat is dry to the touch, apply a second coat for rich, opaque coverage. This depth of color makes the checkerboard really pop against the lighter background. -
Remove Tape Promptly:
Carefully peel off the painter’s tape while the second coat of green paint is still slightly tacky. Pull the tape at a 45-degree angle away from the fresh paint to keep the edges sharp. -
Touch Up:
inspect the floor for any minor bleeds or mistakes. Use a small artist’s brush to tidy up any lines where paint might have crept under the tape. -
Cure and Protect:
Allow the floor to curve for several days before placing heavy furniture back on the porch. If you live in a harsh climate, consider rolling on a clear exterior sealer for extra protection.
Step back and admire how this classic pattern brings a fresh, welcoming energy to your outdoor living space
Tape-Style Herringbone Porch Floor Illusion
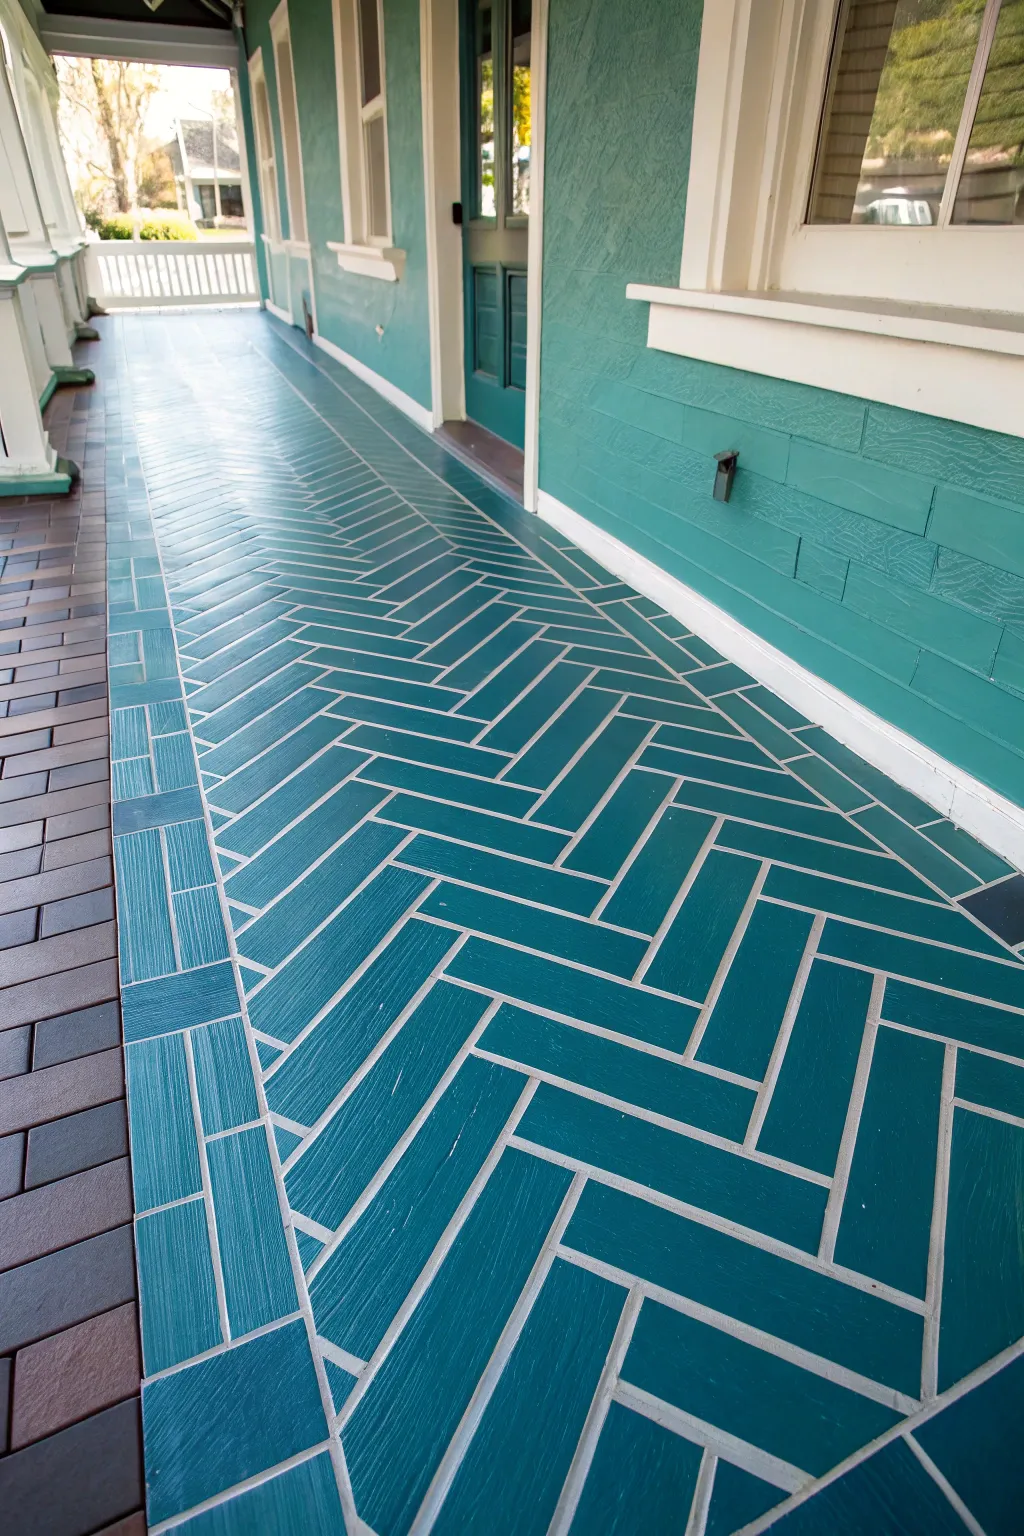
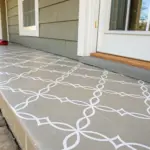
Transform a plain concrete or wood porch into a stunning architectural feature with this clever paint-and-tape technique. By using narrow tape as a resist, you’ll create crisp, bright grout lines that make vibrant teal paint pop against the floor for a polished, high-end look.
Step-by-Step Guide
Materials
- Exterior porch & floor paint (white base coat)
- Exterior porch & floor paint (teal top coat)
- 1/4-inch or 1/2-inch artist’s tape or automotive striping tape
- Pressure washer or stiff scrub brush
- Concrete cleaner/degreaser
- Paint rollers (medium nap) and extension pole
- Paint tray and liners
- Square ruler or speed square
- Long straightedge or chalk line
- Measuring tape
- Utility knife
- Paint stirrer
- Clear concrete sealer (optional)
Step 1: Preparation and Base Coat
-
Clean surface thoroughly:
Begin by removing all furniture and sweeping the porch. Use a pressure washer or a stiff brush with concrete degreaser to remove dirt, mildew, and stuck-on grime. A clean surface is critical for tape adhesion. -
Allow extensive drying:
Let the porch dry completely, preferably for 24 to 48 hours. If moisture remains trapped in the concrete or wood, the paint may peel later. -
Apply the ‘grout’ color:
Roll on two coats of high-quality white exterior porch paint. This layer will eventually become your grout lines. Allow the first coat to dry according to the can’s instructions before applying the second. -
Wait for full cure:
This is the hardest part—waiting. Let the white base coat cure for at least 3 full days. The paint must be hard enough to withstand tape being applied and pulled off without lifting.
Clean Lines Only
If paint bleeds under the tape, it’s usually because the tape wasn’t pressed down firmly enough. Run a credit card firmly over all tape lines before painting.
Step 2: Mapping the Herringbone Pattern
-
Establish a centerline:
Find the center of your porch width and snap a chalk line down the entire length of the walkway. This central axis ensures your V-shape pattern stays symmetrical. -
Mark the border:
Decide on the width of your border. Run a continuous strip of your thin tape parallel to the walls along the entire length of the porch to create the separation between the main field and the border tiles. -
Start the V-shape:
Use a speed square to lay your first pieces of tape at a 45-degree angle from your centerline. I find starting near the door or the most visible end helps ensure the pattern looks best where you stand most. -
Use a spacer block:
Cut a piece of wood or cardboard to the exact length and width you want your ‘bricks’ to be (e.g., 4×10 inches). Use this as a guide to spacing your tape lines consistently rather than measuring every single one. -
Tape the long diagonal lines:
Lay down long continuous strips of tape diagonally in one direction, using your spacer to keep them equidistant. -
Tape the opposing diagonals:
Lay down the tape in the opposite direction to create a grid of diamonds if you were doing a checkerboard, but stop here for herringbone we need to segment them. -
Create individual bricks:
This step transforms the grid. Use your utility knife to carefully cut and remove sections of the tape to form the interlocking rectangular brick shapes characteristic of herringbone. -
Tape the border pattern:
Inside the border channels you created earlier, add short perpendicular tape strips to create a ‘soldier course’ or simple running bond pattern that frames the complex center. -
Seal the tape edges:
Lightly brush a very thin layer of your base white paint over the tape edges. This bleeds white paint under the tape (instead of the teal), ensuring your final lines are razor sharp.
Step 3: Painting and Reveal
-
Cut in the edges:
Use a sash brush to carefully paint the teal color along the wall edges and corners where a roller might miss or be too messy. -
Roll the main color:
Using a roller on an extension pole, apply the teal exterior floor paint over the entire taped surface. Work in sections to maintain a wet edge. -
Apply second coat:
Once the first coat is dry to the touch (usually 4-6 hours), apply a second coat for rich, opaque coverage that hides any brush strokes. -
Remove tape promptly:
Do not let the topcoat fully cure before removing tape. Peel the tape up slowly at a 45-degree angle while the paint is still slightly tacky to prevent chipping. -
Touch up imperfections:
If any paint bled under the tape, use a small artist’s brush and your white paint to touch up the grout lines. If the teal chipped, dab a little color back in. -
Apply clear sealer (optional):
For high-traffic areas, roll on a clear, non-yellowing concrete sealer to protect your design from scuffs and weather wear.
Add Texture
For a faux-stone look, lightly sponge a slightly darker shade of teal onto the wet topcoat before removing the tape to give the ‘bricks’ visual depth.
Step back and admire how this simple paint trick completely redefines the character of your entryway
Night-Sky Painted Porch Ceiling
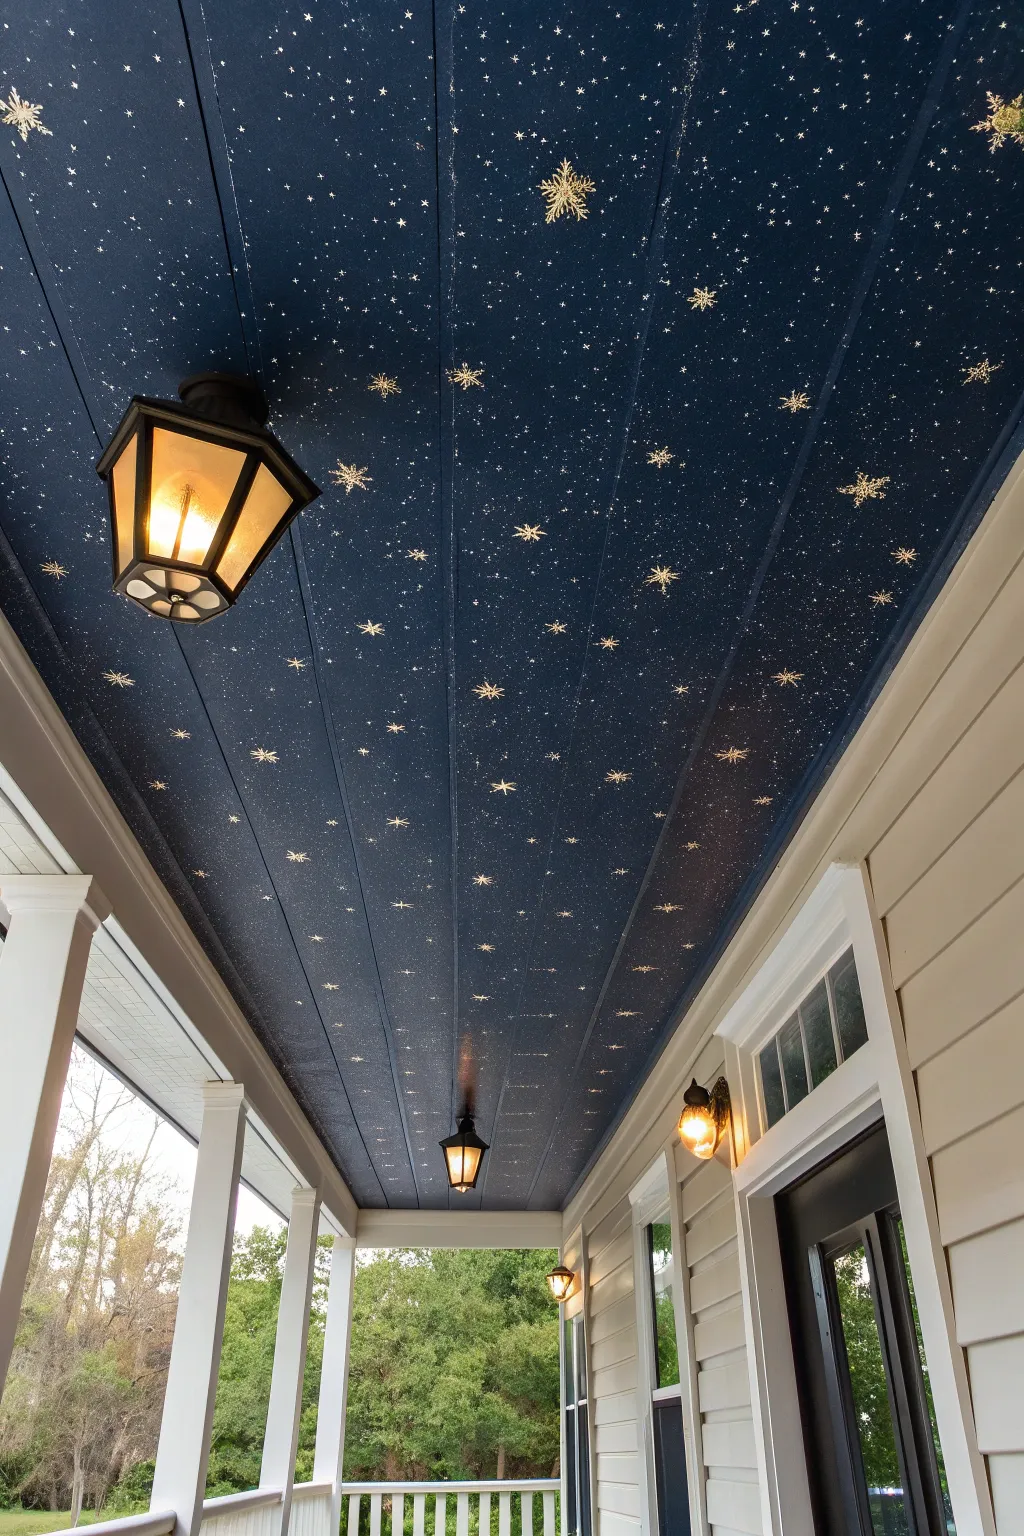
Transform your outdoor living space into a magical stargazing spot with this deep blue ceiling adorned with shimmering gold constellations. This project uses a rich, dark base coat and clever stenciling techniques to bring the cosmos right to your front door.
Detailed Instructions
Materials
- Deep navy blue exterior latex paint (e.g., Midnight Blue or Deep Space)
- Metallic gold acrylic craft paint (outdoor rated)
- Metallic white or silver acrylic paint (for smaller stars)
- Paint roller with extension pole
- 2-inch angled sash brush
- Painter’s tape
- Drop cloths
- Star and snowflake stencils (various sizes)
- Small stencil brushes or sponge daubers
- Fine-tip artist brush
- Old toothbrush (for the spatter effect)
- Step ladder
- Clean rags
Step 1: Preparation and Base Coat
-
Safety First:
Begin by turning off the power to any porch light fixtures at the breaker box. Carefully remove the fixtures or cover them completely with plastic bags and painter’s tape to protect them from drips. -
Cleaning the Surface:
Use a broom or a shop vac to remove any cobwebs, dust, or insect nests from the ceiling boards. If the wood is particularly dirty, give it a quick wipe with a damp rag and let it dry completely. -
Protecting the Area:
Ideally, you don’t want navy blue speckles on your porch floor. Lay down drop cloths across the entire floor area and use painter’s tape to mask off the top of the walls or siding where it meets the ceiling. -
Cutting In:
Pour your deep navy paint into a small container. Using the angled sash brush, carefully ‘cut in’ the edges of the ceiling, painting the perimeter and groove lines between the wooden planks first. Getting paint deep into those grooves now ensures no bare wood shows through later. -
Rolling the Ceiling:
Pour the navy paint into a tray. Use a roller on an extension pole to paint the flat surfaces of the planks. Apply a consistent pressure to avoid drips. -
Second Coat Application:
Allow the first coat to dry according to the manufacturer’s instructions (usually 2-4 hours). Apply a second coat to ensure a rich, opaque background that resembles the depth of space. Let this cure for at least 24 hours before starting the detail work.
Bleed Prevention
If using stencils on grooved beadboard, paint bleeds are common. Seal the stencil edges with a clear matte medium first, let it dry, then apply your gold paint.
Step 2: Creating the Cosmos
-
Planning the Layout:
Before painting, hold up your various stencils to get a feel for spacing. You want a random, organic look, not a grid. I like to mark a few key spots with small pieces of painter’s tape to ensure the large design elements are balanced. -
Stenciling Large Stars:
Start with your largest snowflake or starburst stencils. Secure a stencil with painter’s tape. Load a stencil brush with metallic gold paint, then offload most of it onto a paper towel until the brush is almost dry. -
Applying Gold Paint:
Use a dabbing or swirling motion to apply the gold paint through the stencil. Build up the color in light layers rather than one heavy coat to prevent paint from bleeding under the stencil edges. -
Adding Medium Stars:
Move on to medium-sized star stencils. Scatter these around the larger feature stars. Vary the rotation of the stencils so the stars don’t all look identical. -
Freehand Details:
For a truly custom look, use a fine-tip artist brush dipped in gold paint to touch up any stencil bridges (the small gaps in stencils) so the stars look like solid connected lines. -
Creating the Milky Way:
Dip an old toothbrush into a mix of metallic white and gold paint thinned slightly with water. Run your thumb over the bristles to flick a fine mist of paint onto the ceiling. Practice on cardboard first to control the spray. -
Adding Depth:
Focus the spattering in specific ‘clouds’ or pathways between the larger stars to simulate the Milky Way or distant celestial dust. This adds incredible depth to the flat blue background. -
Painting Tiny Stars:
Use the back end of your paintbrush or a small dotting tool dipped in white or silver paint to create individual pin-prick stars. Place these randomly to fill any large empty voids in the dark blue expanse. -
Removing Protection:
Once all the decorative paint is fully dry, carefully peel away the painter’s tape from the wall edges. Re-install or uncover your light fixtures. -
Final Touch-ups:
Turn the lights on to see how the metallics catch the glow. Use a small brush with the navy base color to correct any accidental gold smudges or drips.
Glow in the Dark
Mix clear glow-in-the-dark additive into your white paint for the tinier stars. They will charge during the day and create a subtle, invisible-by-day magic at night
Enjoy your evenings under a canopy that stays clear and starry regardless of the weather forecast


Have a question or want to share your own experience? I'd love to hear from you in the comments below!