When I want a painting to feel alive, I reach for acrylics and let the energy of music steer my brush. These ideas are all about turning rhythm, melody, and instruments into bold, colorful compositions you can make your own.
Treble Clef as the Star
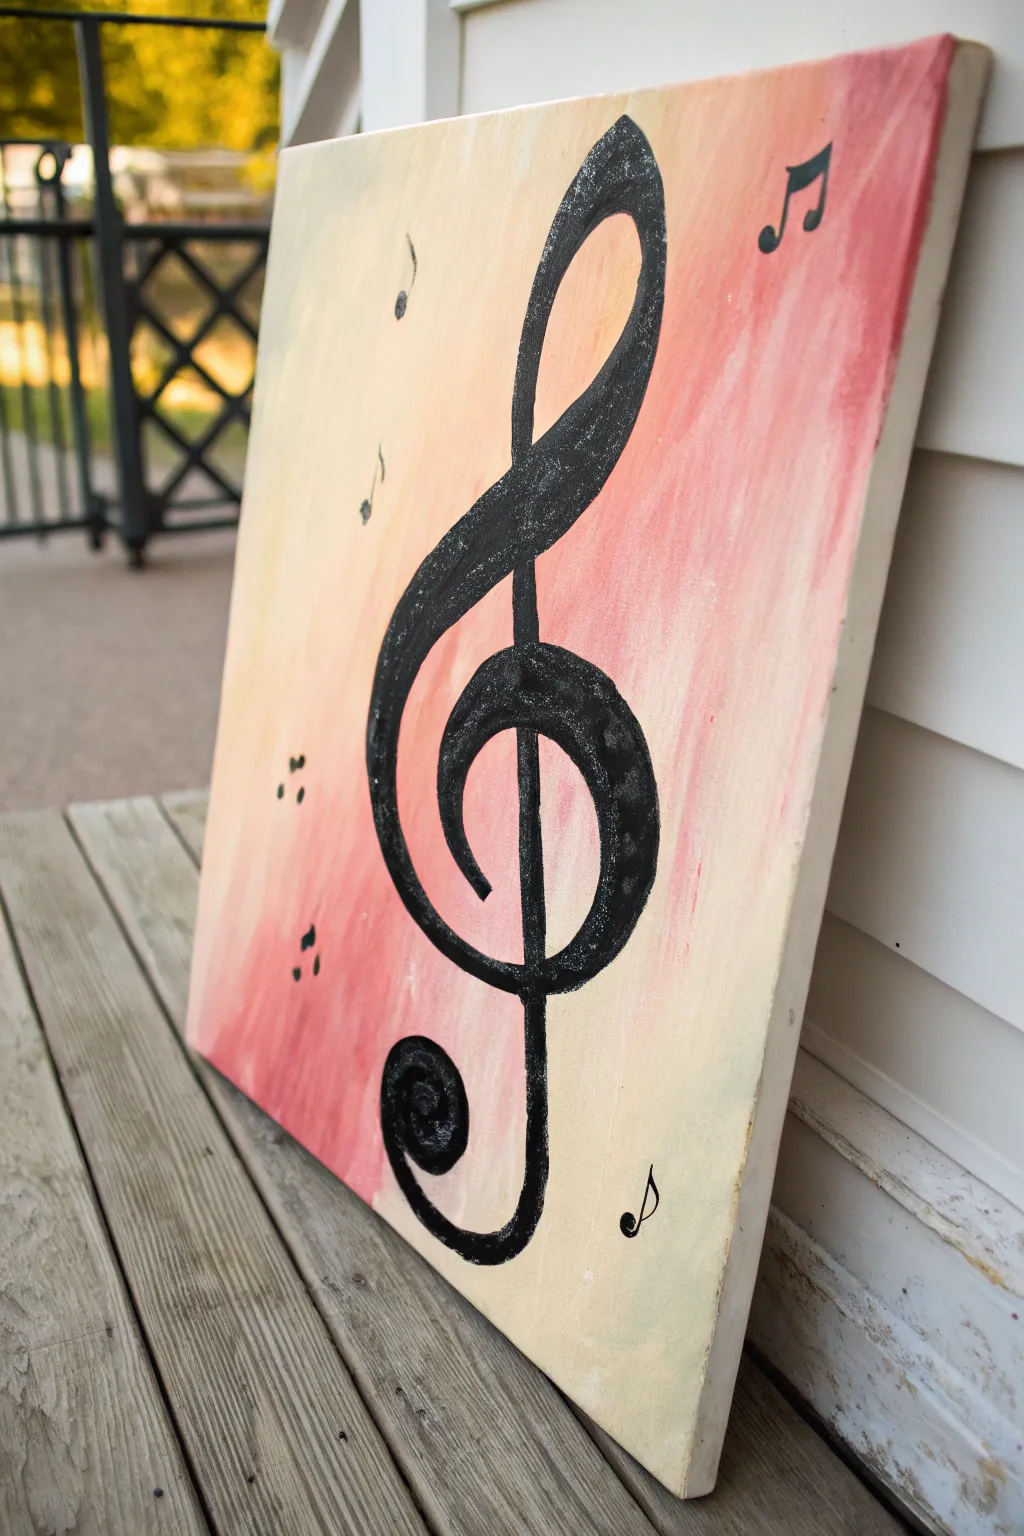
Let music take center stage with this elegant canvas featuring a bold treble clef against a dreamy, sunset-hued background. The gradient of cream to rose creates a soft atmosphere, while the textured black symbol adds sophisticated dimension.
Step-by-Step Guide
Materials
- Rectangular stretched canvas (e.g., 16×20 inch)
- Acrylic paints: Titanium White, Cream (or Unbleached Titanium), Peach or Salmon, Rose Pink
- Black acrylic paint
- Fine black glitter or texture medium (sand)
- Wide flat brush (2-inch) for blending
- Medium round brush (Size 6 or 8)
- Fine liner brush (Size 0 or 1)
- Pencil and eraser
- Palette
- Water cup and paper towels
Step 1: Creating the Ombré Background
-
Prepare the palette:
Squeeze out generous amounts of Titanium White, Cream, Peach, and Rose Pink onto your palette. Keep the black paint separate for later. -
Start with the lightest tone:
Using a slightly damp wide flat brush, load up with Titanium White mixed with a touch of Cream. Apply this to the top left corner and swoop down diagonally across the upper third of the canvas using long, broad strokes. -
Introduce the mid-tone:
Without cleaning your brush, pick up the Peach or Salmon color. Begin painting below the cream section, brushing diagonally from top-right towards the bottom-left. -
Blend the transition:
Where the cream and peach colors meet, use quick back-and-forth strokes to blend them wet-on-wet. I find that working quickly here prevents harsh lines from forming. -
Add the deepest hue:
Load the brush with Rose Pink. Apply this to the remaining bottom corners and central band, creating a rich base for the main subject. -
Final blends:
Smooth out the entire gradient with long, sweeping diagonal strokes across the whole canvas to ensure a seamless transition from pale cream to deep rose. Let the background dry completely before proceeding.
Step 2: Drafting the Design
-
Mapping placement:
Using a pencil, lightly mark the top and bottom boundaries for your treble clef to ensure it stays centered and roughly fills the vertical space. -
Sketch the spiral:
Start the treble clef by drawing the spiral ‘belly’ around the second line position (imagining a staff) in the lower middle section. -
Draw the vertical line:
Extend a vertical line straight up through the spiral, looping it at the top and crossing back down. -
Complete the tail:
Finish the shape by drawing the bottom hook or tail curling to the left. Take a moment to thicken your sketch lines to represent the final width of the paint. -
Add scattered notes:
Lightly sketch a few smaller music notes—like eighth notes or sixteenth notes—floating in the background curves. Keep them random for a whimsical feel.
Keep it clean
Rest your hand on a clean, dry paper towel while painting the black details to prevent smudging your beautiful pink background gradient.
Step 3: Painting the Treble Clef
-
Mix the textured black:
In a small cup or on your palette, mix black acrylic paint with a sprinkle of fine black glitter or a texture medium. This gives the focal point that sparkle seen in the original. -
Outline the main shape:
Switch to your medium round brush. Carefully outline the edges of your large treble clef sketch with the black mixture. -
Fill the form:
Fill in the body of the treble clef. Apply the paint somewhat thickly to enhance the texture, following the curve of the symbol with your brushstrokes. -
Refine the edges:
Check for any wobbly edges and smooth them out. The vertical line should be fairly straight, while the curves should taper elegantly. -
Painting the small notes:
Use the fine liner brush dipped in plain black paint (no texture needed for these tiny details) to fill in the small floating notes you sketched earlier. -
Reference the staff lines:
If desired, paint very faint, broken segments of dots or tiny dashes near the floating notes to suggest movement, using the very tip of your liner brush. -
Final inspection:
Step back and look at the overall balance. If the treble clef needs more definition, apply a second coat of the textured black once the first is dry.
Metallic magic
Instead of glitter, use metallic gold paint for the small floating notes to make them pop against the pink background.
Hang your musical masterpiece in a practice room or studio to inspire your next melody


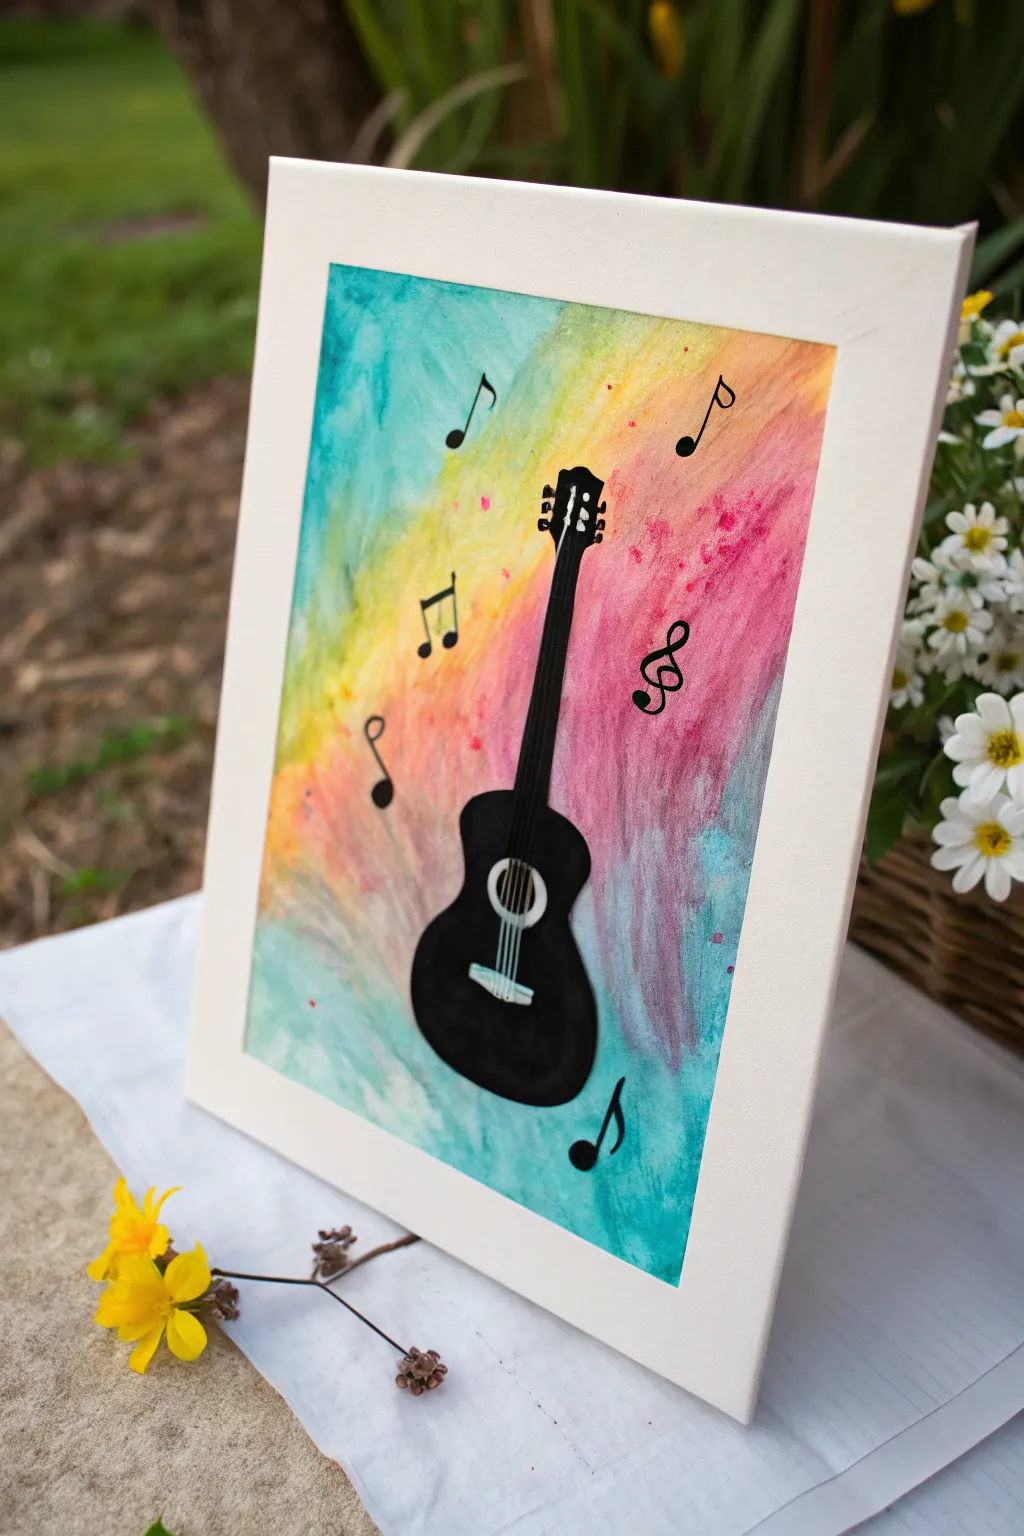
Guitar Silhouette Over Sunset Blend
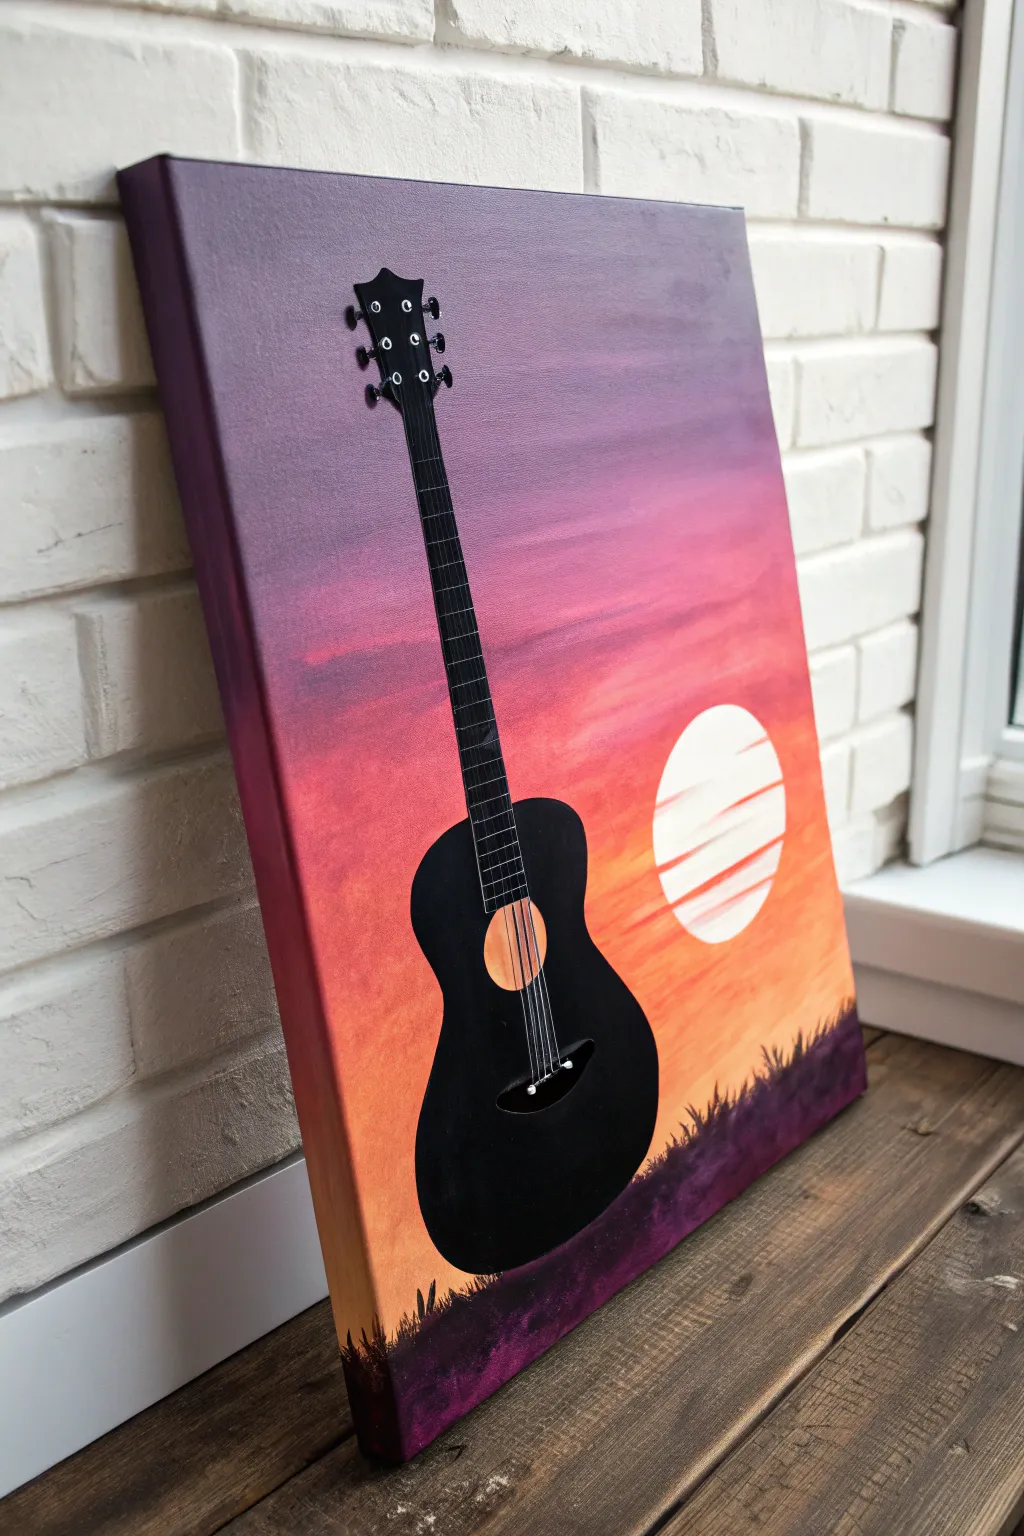
Capture the rhythm of a perfect evening with this vibrant acrylic painting, featuring a bold guitar silhouette against a serene, gradient sky. The striking contrast between the black subject and the warm, blended background makes this a standout piece for any music lover’s room.
Step-by-Step
Materials
- Rectangular stretched canvas (e.g., 16×20 inches)
- Acrylic paints: Titanium White, Cadmium Yellow, Orange, Magenta, Purple (Violet), Mars Black
- Wide flat brush (1-2 inch) for blending
- Medium flat brush
- Small round detail brush (size 0 or linear)
- Pencil and eraser
- Ruler or straight edge
- Mixing palette
- Cup of water and paper towels
Step 1: Creating the Sunset Gradient
-
Prepare your palette:
Squeeze out generous amounts of purple, magenta, orange, yellow, and white onto your palette. You will need plenty of paint to achieve a smooth blend without the canvas drying too quickly. -
Start with the top horizon:
Using your wide flat brush, apply a horizontal strip of purple mixed with a tiny touch of white across the very top of the canvas. Don’t forget to paint the top and side edges of the canvas as you go for a finished look. -
Blend downwards:
Without cleaning the brush perfectly, pick up magenta and paint the next strip below the purple. Use long, horizontal back-and-forth strokes to overlap the colors where they meet, creating a soft transition. -
Add warmth:
Wipe your brush on a paper towel, then pick up the orange paint. Continue moving down the canvas, blending the orange up into the magenta layer. The colors should look like a smooth fade rather than stripes. -
Brighten the horizon:
Mix yellow with a little orange and white for the lowest sky section. Blend this into the orange layer above, bringing it all the way down to the bottom quarter of the canvas where the dark grass will eventually go. -
Paint the sun:
Once the background is dry to the touch, use a medium flat brush or a round object to trace a circle on the right side. Paint it solid white. You can leave faint streaks of the background color showing through horizontally to simulate thin clouds passing over the sun.
Sticky Situation?
If your sunset paint is drying too fast to blend smooth gradients, mist the canvas lightly with a spray bottle of water or mix a slowing medium into your acrylics.
Step 2: Drafting the Guitar
-
Sketch the outline:
Once the background is fully dry, lightly sketch the guitar silhouette with a pencil. Use a ruler to ensure the neck is perfectly straight and centered. I prefer to draw a vertical centerline first to keep the body symmetrical. -
Detail the headstock and bridge:
Sketch the distinct shape of the headstock at the top and the bridge on the body. Don’t worry about the strings yet; just focus on the main solid shapes. -
Refine the sound hole:
Draw the sound hole circle. This area won’t be painted black, so mark it lightly to remind yourself to leave the background visible there.
Make It Yours
Customize the sound hole label! Instead of plain wood grain, paint a tiny recognizable album cover or a miniature galaxy inside the guitar’s opening.
Step 3: Painting the Silhouette
-
Block in the body:
Using Mars Black and a medium flat brush, carefully fill in the body of the guitar. Use smooth, confident strokes to keep the curved edges clean and sharp against the sunset background. -
Paint the neck and headstock:
Switch to a smaller brush to fill in the long, thin neck and the headstock shape. Ensure the edges are crisp, as any wobbles here will be noticeable. -
Add the tuning pegs:
With your smallest detail brush, paint the small tuning pegs sticking out from the sides of the headstock. These require a steady hand, so rest your pinky on the dry canvas for stability. -
Create the sound hole illusion:
Inside the sound hole circle you left empty, paint vertical lines using a thinned-down orange or light brown to simulate the wood grain inside the acoustic guitar.
Step 4: Final Details
-
Paint the bridge:
Paint the bridge shape in black below the sound hole. Add small white or silver dots for the bridge pins where the strings will anchor. -
Add the frets:
Using a very fine liner brush and slightly watered-down white or light grey paint, draw horizontal lines across the neck for the frets. Keep them evenly spaced, getting slightly closer together as you move down toward the body. -
String the guitar:
This is the most delicate step. Use a ruler and a white gel pen or a liner brush with thinned white paint to draw six straight lines from the bridge up to the tuning pegs. Start from the middle strings and work outward. -
Detail the tuning posts:
Add small white circles on the face of the headstock to represent the tuning posts. -
Paint the foreground grass:
Load a medium brush with black paint. Using a dabbing motion, create an uneven, grassy texture along the very bottom edge of the canvas. Flick the brush upward quickly to create individual blades of grass that overlap the bottom of the guitar slightly.
Hang your finished masterpiece where it can catch the evening light and inspire your next musical session


Music Notes Confetti Background
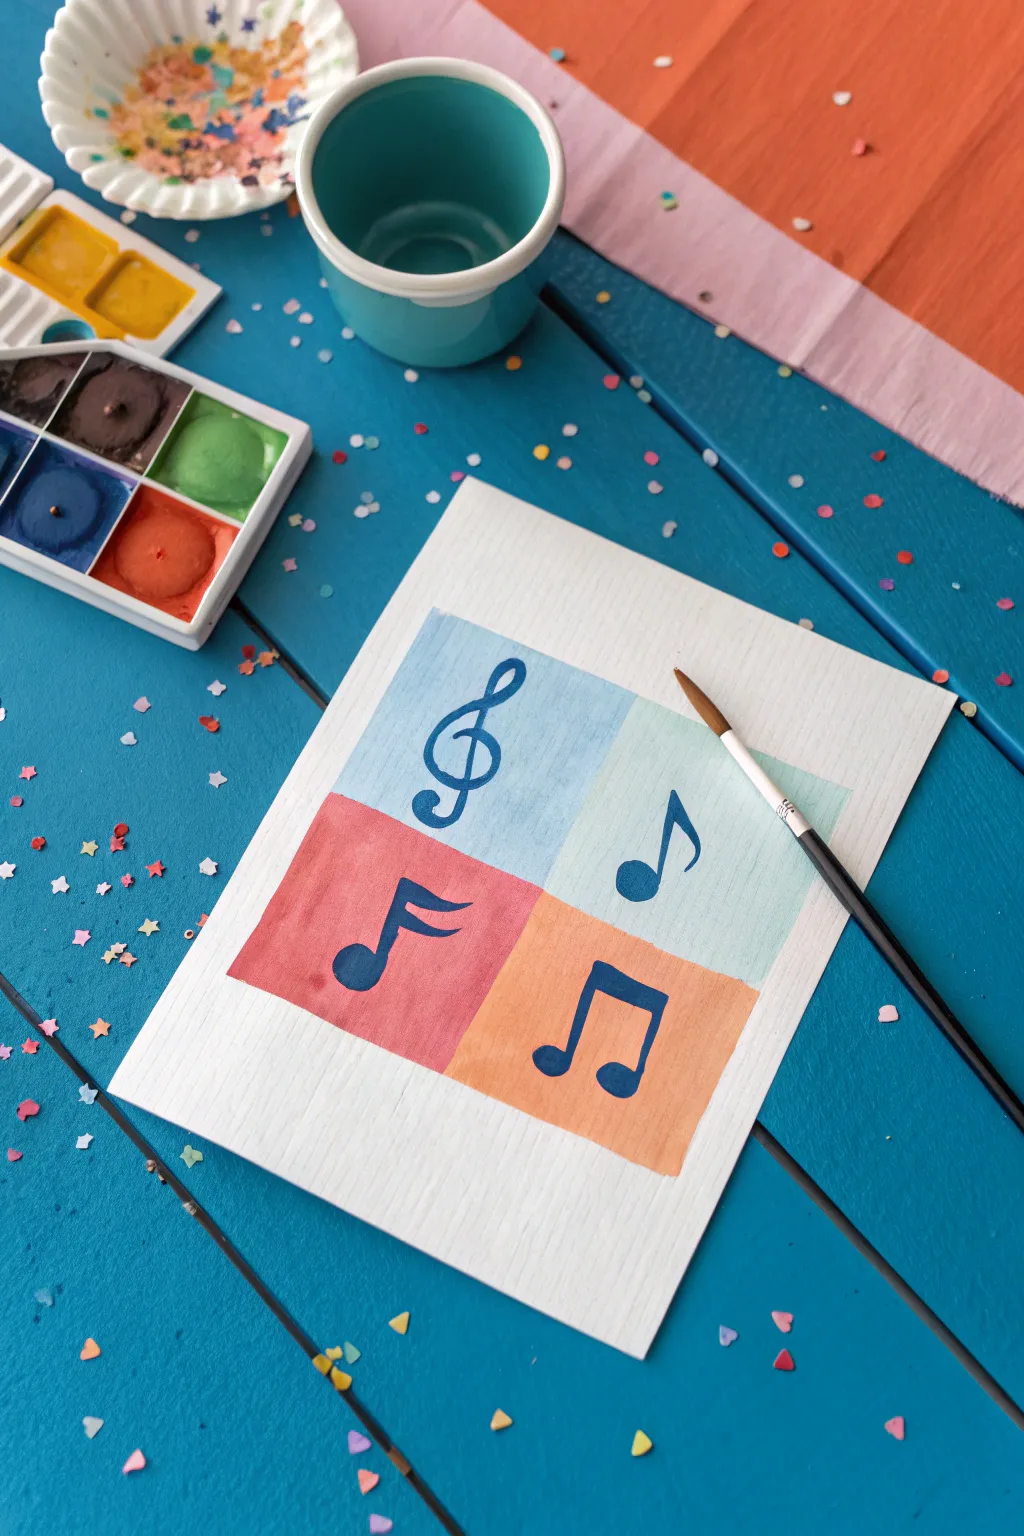
Celebrate your love of music with this clean, graphic painting featuring classic musical symbols against varied pastel blocks. It’s a beginner-friendly project that combines geometric precision with the free-flowing charm of watercolor or diluted acrylics.
Step-by-Step Tutorial
Materials
- Watercolor paper or thick mixed-media paper (cut to roughly 5×7 inches)
- Watercolor paint set (pan set shown in image)
- Small round paintbrush (size 2 or 4)
- Fine liner brush (size 0 or 00) for details
- Pencil and ruler
- Jar of clean water
- Paper towels
- Washi tape or masking tape (optional)
Step 1: Planning and Grid Layout
-
Prepare your paper:
Start with a clean sheet of watercolor or mixed-media paper. If you want a crisp white border around your final piece, you can tape the edges down to your workspace with washi tape, though the example image shows an unbordered edge. -
Measure the center:
Find the center point of your paper using a ruler. Lightly mark it with a pencil. -
Draft the grid:
Draw a large square centered on your paper. Divide this large square into four equal quadrants by drawing one vertical line down the center and one horizontal line across the middle. Keep your pencil pressure very light so the graphite doesn’t show through the paint later. -
Sketch the symbols:
Lightly sketch a musical symbol in the center of each quadrant. Place a treble clef in the top left, a single eighth note in the top right, a beamed sixteenth note in the bottom left, and beamed eighth notes in the bottom right.
Bleeding Lines?
If colors bleed into each other, your paint was too wet. Let the first square dry completely before painting the neighbor, or leave a tiny hair-thin gap of white paper between blocks.
Step 2: Painting the Color Blocks
-
Mix the sky blue:
Activate your blue watercolor pan with a wet brush. Dilute the pigment on a palette lid or saucer to create a soft, transparent blue wash. -
Paint the first quadrant:
Carefully fill in the top-left square (around the treble clef sketch) with your blue wash. Try to keep the edges straight. You can paint right over your pencil sketch since the musical note will be darker later. -
Create the mint green:
Clean your brush thoroughly. Mix a light green with a touch of blue and plenty of water to get a pale mint shade. -
Paint the second quadrant:
Fill the top-right square with the mint mixture. Be very careful where the green paint meets the wet blue paint; try to leave a microscopic hairline of dry paper between them, or wait for the blue to dry completely to avoid bleeding. -
Mix the coral red:
Clean your brush. Mix a red with a tiny bit of orange and water to create a soft coral or salmon tone. -
Paint the third quadrant:
Fill the bottom-left square with the coral wash. -
Mix the orange:
Finally, mix a clear orange hue, keeping it transparent enough to match the intensity of the other squares. -
Paint the fourth quadrant:
Fill the bottom-right square with the orange wash. Let the entire background dry completely before moving on. The paper must be bone-dry.
Step 3: Adding the Musical Notes
-
Mix a deep indigo:
To make the notes pop, you need a high-contrast dark color. Create a thick mixture of dark blue paint. You want less water here so the paint is opaque and rich. -
Use the right brush:
Switch to your smaller detail brush or a fine liner brush for better control. -
Outline the treble clef:
Start with the top-left quadrant. carefully trace the spiral of the treble clef. I prefer to paint the thin lines first, then thicken the curves gradually. -
Paint the eighth note:
Move to the mint quadrant. Paint the solid oval head of the note first, then pull the stem upward and add the flag. -
Paint the sixteenth note:
In the red quadrant, paint the note head, the stem, and the double flags. Take your time to get sharp points on the flags. -
Paint the beamed notes:
Finally, in the orange quadrant, paint the two oval heads, draw the vertical stems, and connect them with the thick horizontal beam. -
Final dry:
Allow the dark blue paint to dry fully. If any pencil lines are still visible around the grid edges, you can gently erase them now.
Level Up
Instead of painting the notes, use a metallic gold paint marker or a black fine-liner pen for ultra-crisp symbolism on top of the watercolor wash.
Display your harmonious creation on a mini easel or frame it to add a rhythmical touch to your decor

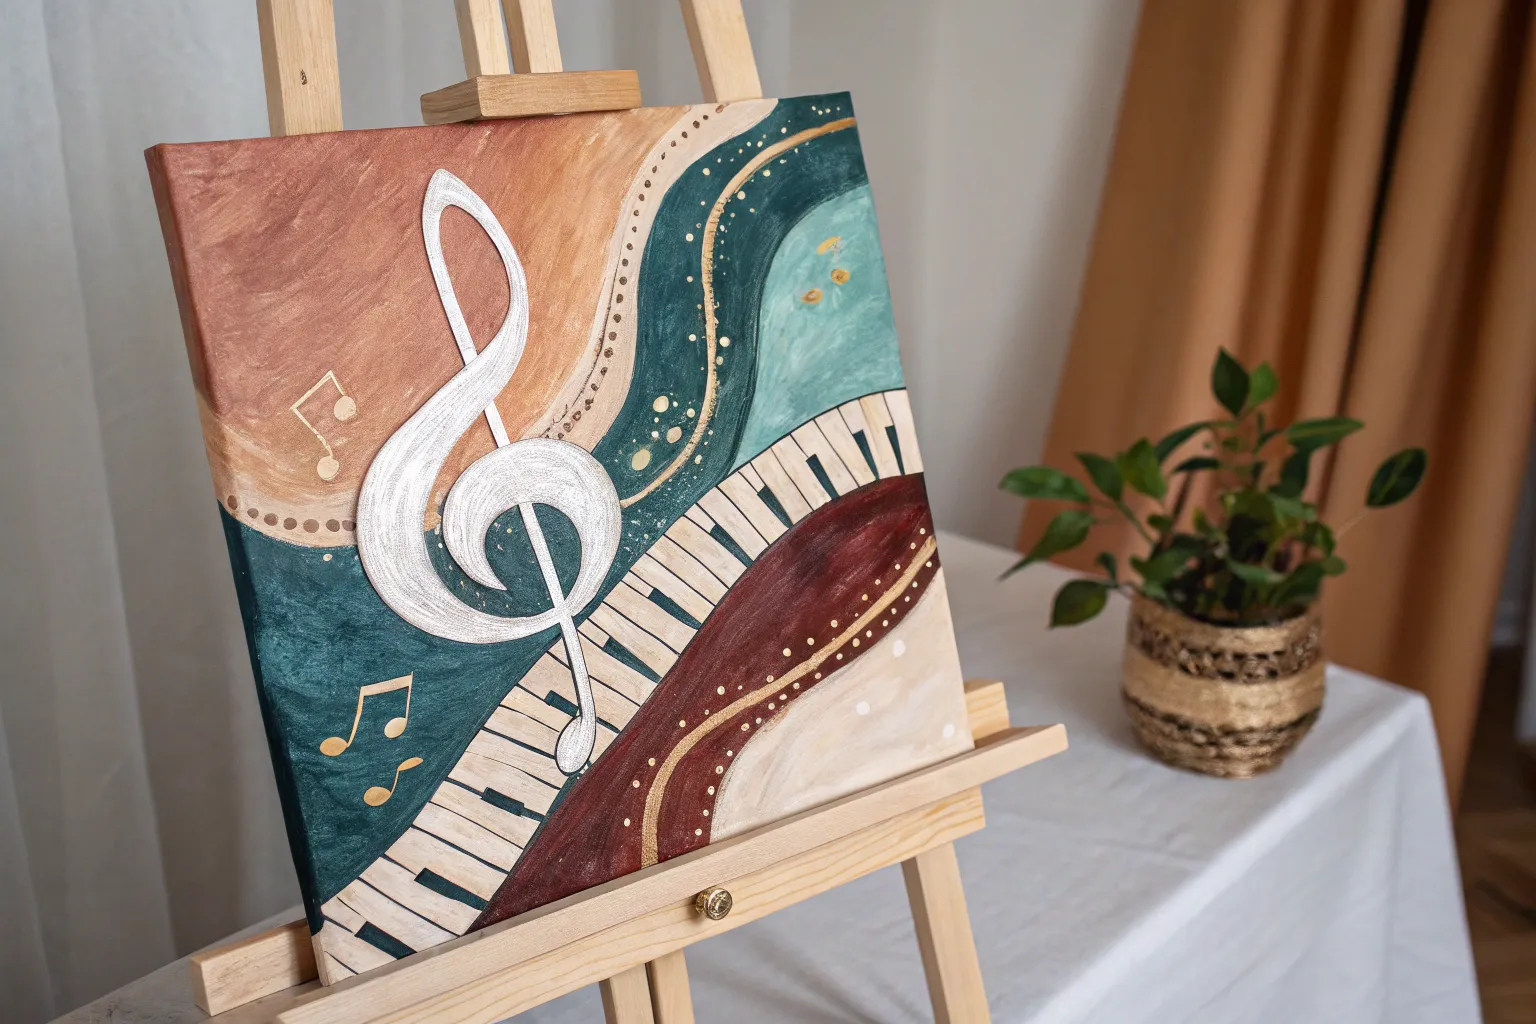
Flowing Abstract Sound Waves
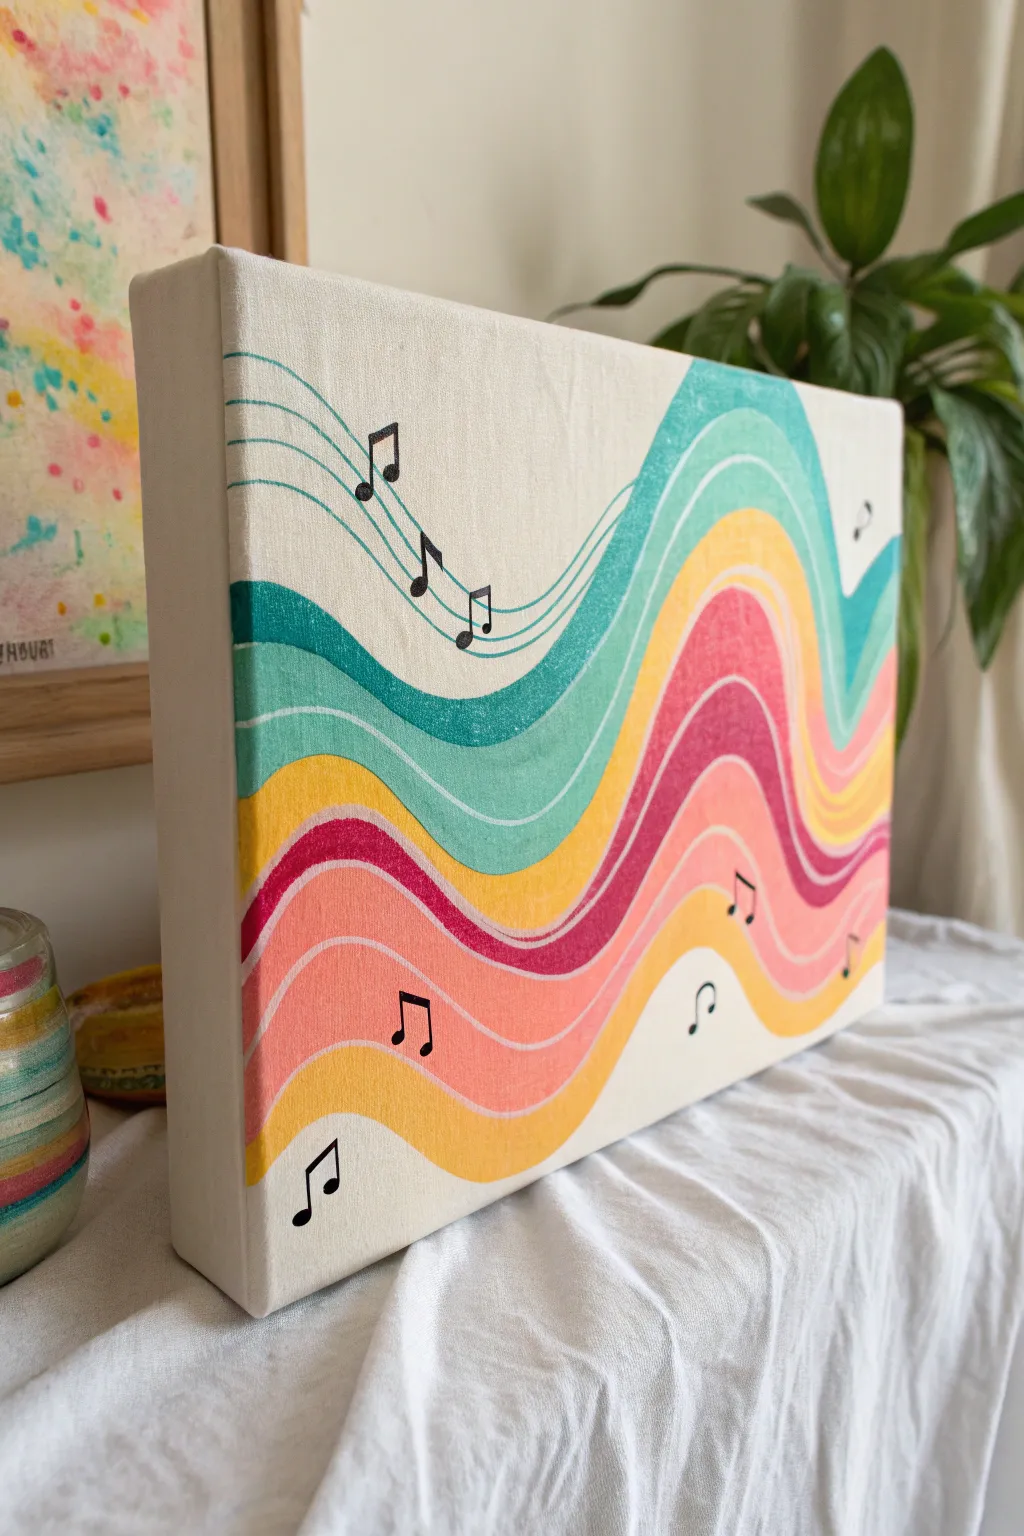
Capture the rhythm of music visually with this vibrant abstract painting featuring flowing ribbons of color and dancing musical notes. The combination of warm sunset hues and cool teals creates a groovy, retro aesthetic that brings movement to any wall.
Step-by-Step Guide
Materials
- Rectangular stretched canvas (e.g., 11×14 or 16×20 inches)
- Acrylic paints: Teal/Turquoise, Mint, Mustard Yellow, Coral/Salmon, Magenta, White, Black
- Pencil and eraser
- Wide flat brush (approx. 1 inch)
- Medium round brush
- Fine liner brush (size 0 or 00) or acrylic paint marker (black)
- Palette for mixing
- Water cup and paper towels
Step 1: Planning and Sketching
-
Prime the background:
Start by painting your entire canvas with a layer of Titanium White acrylic paint. Even if the canvas is pre-primed, this fresh coat ensures a smooth, non-absorbent surface for your wave blending. Let this dry completely. -
Map the flow:
Using a light pencil touch, sketch the main undulating wave shape. Start from the bottom left edge and curve upwards, dipping down in the middle, and rising again toward the top right edge. This forms the spine of your composition. -
Divide the bands:
Within your main wave shape, sketch parallel curved lines to divide the flow into distinct bands of color. Aim for about 5-6 bands of varying widths to create visual interest. -
Extend to the sides:
Don’t stop at the front face! Continue your pencil lines around the thick edges of the canvas. This gallery-wrap effect makes the painting look professional from every angle.
Step 2: Painting the Color Bands
-
Start with the coolest tone:
Mix a vibrant teal or turquoise. Using your flat brush, paint the topmost band of the wave. Keep your stroke fluid, following the curve of your sketch. It’s okay if you go slightly over the lines since we will clean them up later. -
Apply the transition color:
Below the teal, paint the next band in a lighter mint green. I find that mixing a little white into the teal creates a perfect harmonic transition between these two sections. -
Add the warmth:
Switch to your mustard yellow for the central band. This color acts as a bridge between the cool tones above and the warm tones coming next. -
Deepen the hues:
Paint the next band in a rich salmon or coral color. Ensure the paint is opaque; you might need a second coat after the first one dries to avoid streaks. -
Anchor with magenta:
Fill the lowest band with a deep magenta or berry pink. This dark, saturated color adds weight to the bottom of the wave. -
Paint the bottom section:
Fill the remaining bottom right corner (beneath the waves) with a lighter yellow-orange or cream color to balance the white space at the top left. -
Finish the edges:
Rotate the canvas and meticulously paint the corresponding colors on the sides of the canvas, matching up with your front-facing lines.
Clean Lines Hack
To get super crisp white lines between colors, paint the whole wave area white first. Use thin masking tape to mark your divisions, paint the colors, then peel the tape away.
Step 3: Refining and detailing
-
Create separation:
Once the color bands are fully dry, load a round brush or a steady liner brush with titanium white. Carefully paint thin, consistent lines between each color band. This ‘grout line’ makes the colors pop. -
Add the staff lines:
In the upper left white section, use a heavily diluted teal (almost like watercolor) or a very light touch with a colored pencil to draw three faint, curved parallel lines that follow the wave’s motion. -
Draft the notes:
Lightly sketch the placement of your musical notes with a pencil. Place some ‘riding’ the waves and others floating in the white space to create a dynamic sense of rhythm. -
Paint the note heads:
Using black paint and a small round brush, fill in the oval heads of the musical notes at a slight angle. -
Add stems and flags:
Switch to your finest liner brush or a black acrylic paint pen. Draw the vertical stems and the wavy flags of the quavers and semi-quavers. -
Connect the groupings:
For pairs of eighth notes, draw the thick beam connecting the stems. Ensure the angle of the beam matches the flow of the wave underneath it. -
Final touches:
Check your white separator lines and touch them up if any color bled through. Erase any visible pencil marks in the white background areas once the paint is 100% cured.
Add Sparkling Rhythm
Mix a tiny amount of iridescent medium or glitter glaze into the black paint for the musical notes. They will catch the light subtly as you move past the canvas.
Hang your new masterpiece in a creative space and enjoy the visual melody you have created
BRUSH GUIDE
The Right Brush for Every Stroke
From clean lines to bold texture — master brush choice, stroke control, and essential techniques.
Explore the Full Guide
Microphone Spotlight Mood

Capture the golden age of broadcasting with this stylish acrylic painting that pairs a bold, block-print aesthetic with gentle metallic accents. The finished piece features a classic ribbed microphone surrounded by free-flowing musical notes, all set against a textured, off-white background.
Step-by-Step
Materials
- Small square canvas (e.g., 8×8 or 10×10 inches)
- Acrylic paints: Carbon Black, Titanium White, Gold Metallic, Silver Metallic, and a touch of Burnt Umber
- Flat shader brushes (sizes 4 and 6)
- Small round detail brush (size 1 or 2)
- Graphite transfer paper (optional)
- Pencil and eraser
- Reference photo of a vintage microphone
Step 1: Setting the Stage
-
Prepare the background:
Start by mixing a large amount of Titanium White with a tiny dot of Burnt Umber to create a warm, creamy off-white. Cover the entire canvas with this mixture using a large flat brush. -
Add texture:
While the base coat is still wet, use a clean, dry brush to dab vertically across the surface. This creates a subtle stippled texture that mimics heavy paper or fabric, giving the painting a vintage feel. -
Let it cure:
Allow the background to dry completely. If the canvas texture shows through too much, apply a second coat of your cream mix for a smoother, more opaque surface. -
Draft the outline:
Using a pencil, lightly sketch the microphone’s shape. Start with the main pill-shaped grill, angling it slightly to the right for a dynamic composition. Add the rectangular connector base and the vertical stand stem below it. -
Sketch musical elements:
Draw a large treble clef to the left of the mic and a few beaming eighth notes to the right. Keep these lines loose and playful.
Wobbly Lines?
If your straight lines for the microphone stand look shaky, use a ruler or the edge of a piece of cardstock as a guide for your brush to ride against.
Step 2: Blocking in the Mic
-
Paint the mic silhouette:
Using your Carbon Black paint and a size 4 flat brush, carefully fill in the outer shape of the microphone grill. Don’t worry about the internal details yet; just focus on getting a solid, dark silhouette. -
Define the stand:
Switch to the smaller round brush to paint the base connection and the vertical stand stand. Use straight, confident strokes to mimic the industrial look of metal hardware. -
Create the grill cutouts:
I prefer to paint the ‘light’ areas rather than outline the dark ones here. Mix Titanium White with a tiny bit of Silver. Using your smallest brush, paint horizontal curved stripes across the black silhouette to represent the metal ribs of the microphone. -
Detail the ribs:
Ensure the silver-white stripes curve downward slightly to give the object volume. Leave gaps of black between them to act as the deep shadows between the metal fins. -
Add vertical definition:
On the left side of the grill, paint a vertical interruption in the ribs to show the microphone’s side casing. On the right, allow the ribs to wrap around close to the edge.
Step 3: Adding Rhythm and Shine
-
Paint the music notes:
Using the Carbon Black again, carefully trace over your pencil sketches for the treble clef and the quarter note on the far right. Use a round brush to get smooth curves on the clef. -
Introduce gold accents:
Dip your clean round brush into the Gold Metallic paint. Use this to paint the double eighth note group on the right side. The gold adds a lovely warmth against the black and cream. -
Create sound wave echoes:
With the gold paint, add curved ‘wifi signal’ lines emanating from the top of the microphone. Keep the paint thin here so it looks airy and vibrant. -
Add motion lines:
Paint sweeping, gestural curves of gold on the lower left and right sides of the microphone. These abstract swooshes suggest sound vibration and energy moving outward. -
Splatter effect:
Dilute a small amount of Carbon Black with water until it’s inky. Tap your brush over the canvas to create very subtle, tiny specks near the bottom right, adding a jazzy, improvised feel. -
Final highlights:
Once the black ribs are dry, add tiny dots of pure White to the highest point of the curved silver stripes. This simulates a stage spotlight hitting the chrome.
Gold Pop
Metallic acrylics can be translucent. Paint a layer of yellow ochre or light brown first as a base coat under the gold notes to make the metallic shine much brighter.
Now you have a piece of visual music ready to hang in your studio or listening room
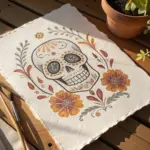
Hearts Hidden in Musical Symbols
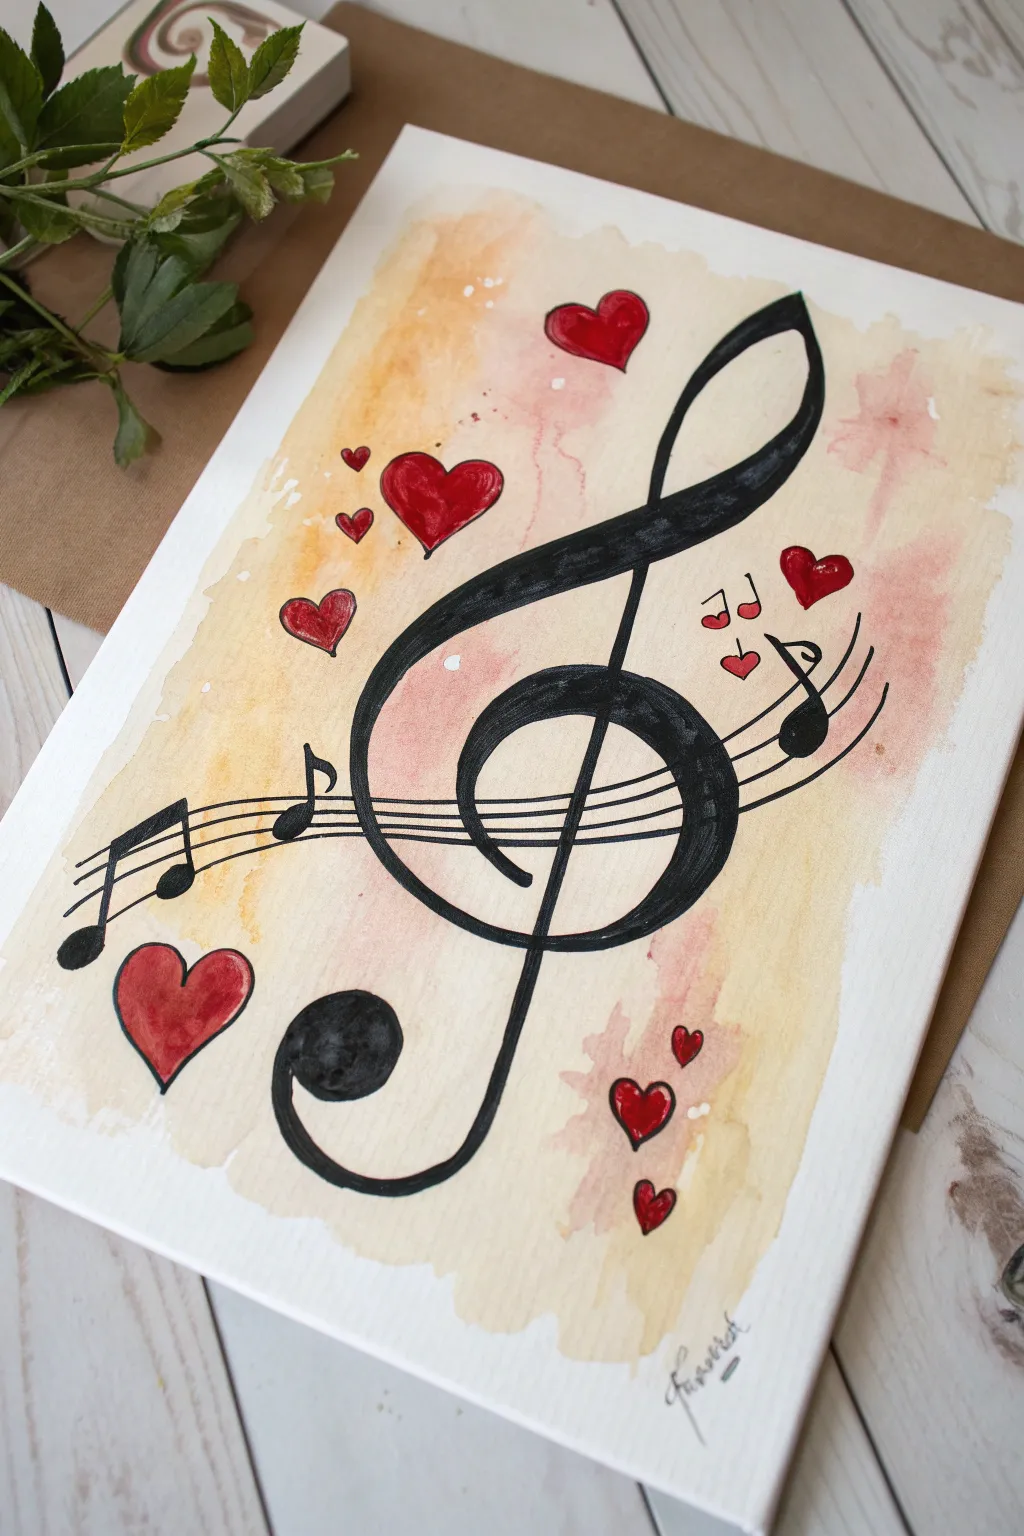
This charming artwork combines the elegance of musical notation with scattered hearts to create a visual symphony of romance. Using acrylics with a watercolor technique creates a soft, vintage-inspired background that makes the bold black symbols pop.
Detailed Instructions
Materials
- Rectangular stretched canvas (e.g., 9×12 or 11×14 inches)
- Acrylic paints: Black, Red, Titanium White, Yellow Ochre, Burnt Sienna
- Water container for rinsing and thinning
- Flat wash brush (about 1 inch width)
- Round synthetic brush (size 4 or 6)
- Fine liner brush (size 0 or 1)
- Pencil for sketching
- Paper towels
- Palette or paper plate
Step 1: Creating the Vintage Wash Background
-
Prepare the dreamy base color:
Mix a large amount of water with a tiny dot of Yellow Ochre and a speck of Burnt Sienna to create a very transparent ‘tea-stained’ watery wash. Test it on a scrap paper first; you want a tint, not an opaque layer. -
Apply the first wash:
Using your large flat brush, apply this beige wash loosely across the center of the canvas. Don’t paint all the way to the edges; leave a jagged, uneven white border to give it an artistic, torn-paper look. -
Add subtle pink blushes:
While the beige layer is still slightly damp, mix a very watery pale pink using Red and White. Dab this randomly into the beige areas, letting the colors bleed slightly into each other for a soft, clouded effect. -
Create water texture:
Dip your fingers or a stiff brush into clean water and flick a few droplets onto the wet paint. Let this sit for a minute to lift some pigment, creating those characteristic watercolor-style blooms and spots. -
Let it dry completely:
This step is crucial. The background must be bone dry before you add the precise black lines, or the ink will bleed. You can use a hairdryer on low heat to speed this up.
Keep it flowing
Add a drop of flow improver or water to your black paint for long lines. Inky consistency prevents the brush from skipping on the canvas weave.
Step 2: Sketching the Composition
-
Outline the treble clef:
Lightly sketch the large treble clef in pencil first. Start with the spiral in the lower middle, loop up and cross over, curve down through the center, and finish with the hook at the bottom. -
Add the staff lines:
Draw five curved, sweeping lines that run horizontally through the treble clef. These don’t need to be perfectly straight; a slight wave adds movement to the piece. -
Placement of hearts and notes:
Sketch outline shapes for hearts of various sizes—two large ones, a medium one near the top, and several tiny ones. Add a few quarter or eighth notes dancing on the staff lines.
Background too dark?
If your vintage wash looks too muddy or dark while wet, dab it immediately with a clean, crumpled paper towel to lift the pigment back to a pale tint.
Step 3: Painting the Symbols
-
Paint the treble clef:
Using black acrylic and a round brush (size 4 or 6), carefully fill in your treble clef sketch. I find it helps to slightly thin the black paint with a drop of water so it flows smoothly without drag marks. -
Refine the edges:
Go back over the edges of the clef with your smaller brush to ensure the curves are crisp and sharp against the soft background. -
Add the staff lines:
Switch to your liner brush. Load it with thinned black paint and paint the five staff lines. Try to do each line in one confident stroke if possible, but don’t worry if they break slightly—it adds character. -
Fill in musical notes:
Paint the note heads (the oval parts) solid black. Add the stems and flags carefully. For the grouped notes on the right, connect the stems with a slightly curved beam.
Step 4: Adding the Hearts and Details
-
Paint the large hearts:
Mix a classic bright red. Fill in the larger heart outlines. You might need two coats here to cover the background wash completely and get a solid, vibrant color. -
Paint the tiny hearts:
Use the tip of your round brush to dab in the smaller hearts. Think of them as musical accents scattered around the main melody. -
Add highlights:
Once the red paint is dry, take a clean liner brush with Titanium White. Add a tiny curved highlight to the top right curve of the largest hearts to make them look shiny and dimensional. -
Outline the hearts (optional):
For a more illustrative look, use your finest liner brush and thinned black paint to gently outline the red hearts, mimicking the style of the musical notes. -
Final touches:
Inspect your work. If any background color accidentally painted over a black line, touch it up. Sign your name at the bottom right with a flourish.
Now you have a lyrical piece of art that perfectly captures the rhythm of romance

PENCIL GUIDE
Understanding Pencil Grades from H to B
From first sketch to finished drawing — learn pencil grades, line control, and shading techniques.
Explore the Full Guide
Black Silhouettes on Neon Wash
This vibrant project combines an electric wash of watercolor-style blending with a crisp, stark black silhouette for high contrast. It is perfect for music lovers wanting to capture the energy of sound through color.
How-To Guide
Materials
- White stretched canvas or canvas board (9×12 or similar)
- Painter’s tape or masking tape
- Acrylic paints: Teal/Turquoise, Lemon Yellow, Magenta/Pink, Black, White
- Large flat brush or sponge brush
- Medium round brush
- Fine liner brush
- Cup of water and paper towels
- Guitar stencil (optional but helpful)
- Pencil
Step 1: Setting the Stage
-
Border Prep:
Begin by taping off a clean border around the edge of your canvas using painter’s tape. Press the edges down firmly to prevent any paint from seeping underneath, which ensures a crisp white frame later. -
Diluting the Colors:
On your palette, prepare your background colors. Mix the teal, yellow, and magenta acrylics with a generous amount of water. You want a consistency that is closer to heavy cream or watercolors than thick tube acrylics.
Bleeding Edges?
If paint seeped under your tape, wait for it to fully dry, then use white acrylic paint or gesso to carefully touch up the border lines.
Step 2: The Neon Wash
-
Applying the Yellow:
Start near the center-left area with your diluted lemon yellow. Use a large brush to apply it in a diagonal, sweeping motion. Don’t worry about perfect coverage; a patchy, clouded look adds texture. -
Adding the Magenta:
While the yellow is still slightly damp, introduce the magenta to the right side of the canvas. Let the edges where the pink meets the yellow blend naturally to create soft orange transitions. -
The Teal Corners:
Fill the remaining corners (top left and bottom right) with the watery teal paint. Allow it to touch the yellow and pink areas, watching how they mix to form greens and purples. I like to work quickly here so the edges stay soft. -
Create Texture:
For that mottled, dreamy effect, dab a crumpled paper towel lightly over the wet paint to lift some color. This technique exposes bits of the white canvas underneath. -
Drying Time:
This step requires patience. Let the background layer dry completely before moving on to the black paint, or the silhouette will bleed. You can use a hair dryer on a low setting to speed this up.
Step 3: Painting the Silhouette
-
Sketch the Outline:
Once dry, lightly sketch the guitar outline in the center using a pencil. If drawing freehand feels daunting, you can print a simple guitar shape, cut it out, and trace it onto the canvas. -
Blocking the Body:
Load a medium round brush with undiluted black acrylic paint. Begin filling in the main body of the guitar, using smooth strokes to ensure solid coverage without streaks. -
The Neck:
Switch to a smaller brush to paint the long, thin neck of the guitar. Keep your hand steady and pull the brush upward in straight lines. -
Headstock Details:
Use the edge of your brush to carefully shape the headstock at the top of the neck. Add the small tuning pegs protruding from the sides. -
Sound Hole and Bridge:
While the black body is still wet, you can leave a small circle unpainted for the sound hole, or paint it solid black and add details later. Paint the rectangular bridge area below the sound hole.
Make it Sparkle
Mix a tiny amount of iridescent medium or fine glitter into your neon wash colors before painting for a subtle, shimmering background effect.
Step 4: Fine Details
-
Adding Strings:
Once the black body is fully dry, take your fine liner brush with white paint. Paint thin vertical lines running from the bridge up the neck to represent the strings. -
Highlighting:
Add a thin white circle to delineate the sound hole against the black body. A small white rectangle on the bridge adds realism and depth. -
Musical Notes:
Using a small round brush and black paint, draw musical notes and a treble clef floating around the guitar. Vary the sizes and angles to suggest movement and rhythm. -
Refining Edges:
Check the edges of your guitar silhouette. If any background color shows through or the lines look shaky, go over the perimeter one last time with black paint for a sharp finish. -
The Reveal:
Gently peel away the painter’s tape at a 45-degree angle to reveal your clean white border, framing your artwork instantly.
Step back and admire the visual melody you have created on canvas
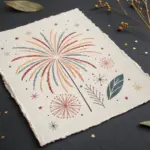
Drips and Splatter Rhythm
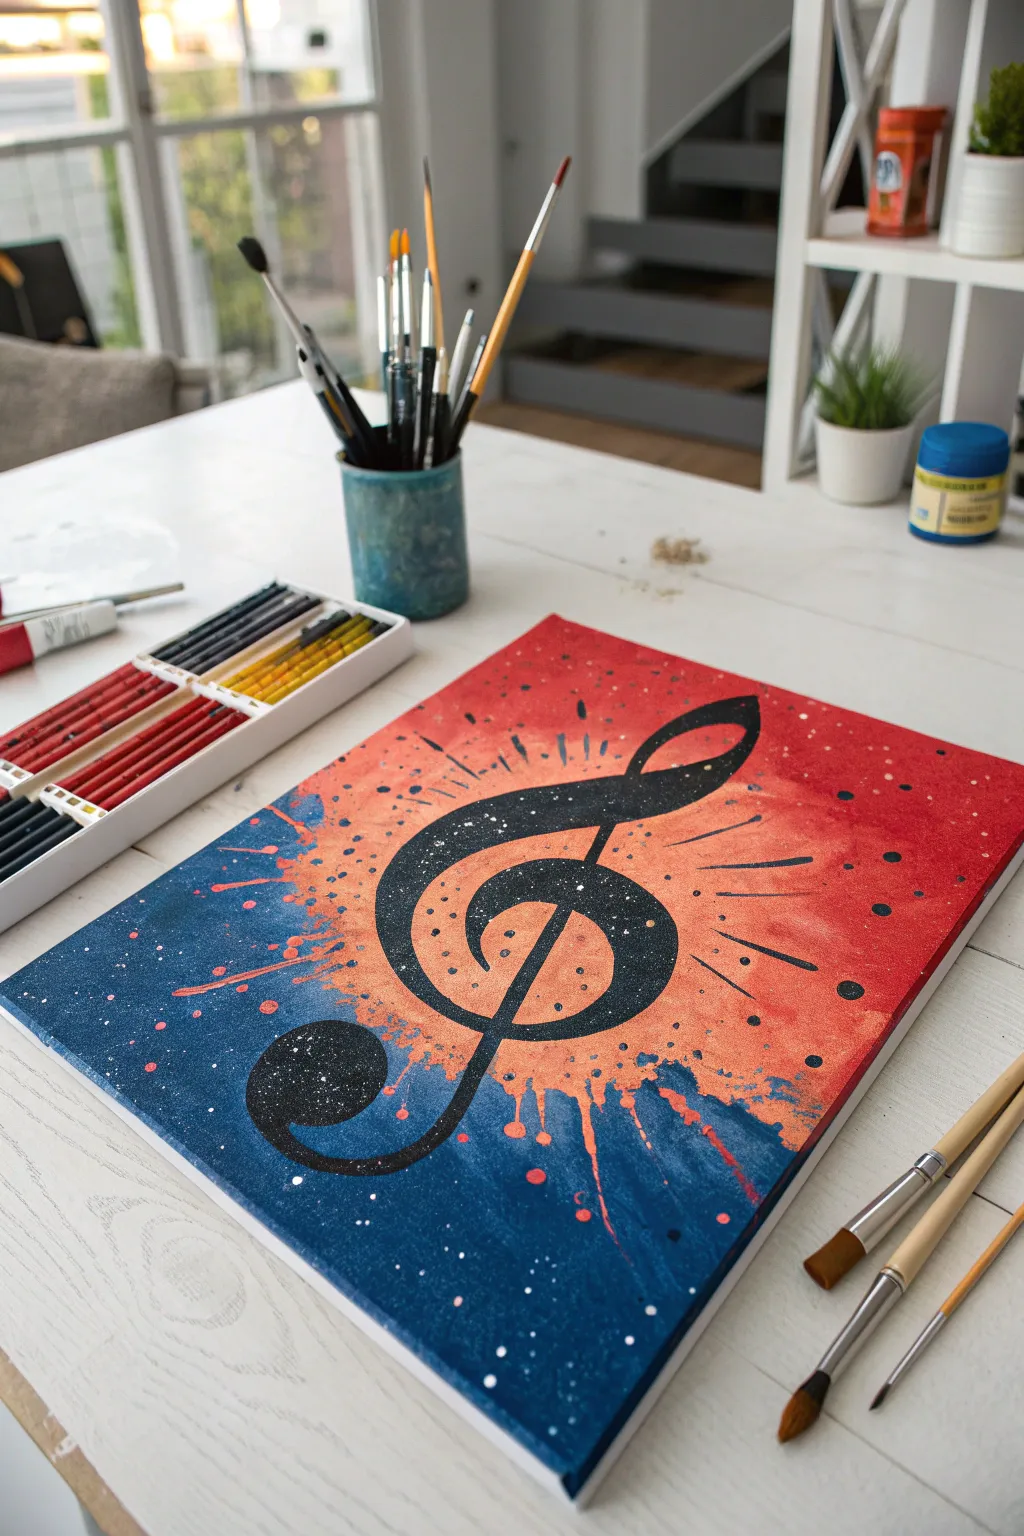
This vibrant project captures the energy of music by blending a fiery red and cool blue galaxy-style background with a bold, striking treble clef. The dynamic splatter effects create a visual rhythm that makes the symbol feel like it is bursting with sound.
Step-by-Step
Materials
- Square stretched canvas (approx. 12×12 or 14×14 inches)
- Acrylic paints: Navy Blue, Bright Red, Orange, White, and Black
- Large flat brush or sponge
- Medium round brush
- Fine detail liner brush
- Old toothbrush (for splattering)
- Cup of water
- Paper towels
- Palette or mixing plate
- Pencil (optional)
Step 1: Creating the Dynamic Background
-
Prime the corners:
Start by loading a large flat brush with Navy Blue paint. Apply this color heavily to the bottom-left corner of the canvas, brushing diagonally upward toward the center. -
Add the opposing warmth:
Clean your brush thoroughly, then pick up Bright Red. Paint the opposite top-right corner, bringing the color down diagonally to meet the blue in the middle. -
Create a central burst:
While the red paint is still wet, mix in a little Orange or Golden Yellow near the center of the red zone. This creates a glowing ‘hot spot’ where the two main colors will eventually converge. -
Blend the meeting point:
Where the blue and red meet in the middle diagonal, use a damp brush to soften the edges. Don’t over-mix them, or you’ll get purple mud; instead, create a rugged, textured transition where the colors scuff against each other. -
Add the splatter:
Dilute a small amount of Orange paint with water until it’s inky. Dip an old toothbrush into it and flick the bristles with your thumb to spray fine mist and larger droplets over the center area. Repeat this with diluted Navy Blue over the red sections for contrast. -
Paint radial burst lines:
Using a smaller round brush and the diluted Orange or Red, flick quick, short lines radiating outward from the center point. These represent sound waves exploding from the middle. -
Dry completely:
This step is crucial. Let the background dry fully—wait about 20-30 minutes or use a hairdryer—before starting the main subject to avoid smearing the underlayer.
Step 2: Painting the Treble Clef
-
Sketch the outline:
Lightly sketch a large treble clef in the center of the canvas with a pencil. Start with the vertical line, loop the top, cross down to the left, and spiral inward at the bottom. -
Fill the silhouette:
Using a medium round brush and Black acrylic paint, carefully fill in the shape of the treble clef. Apply the paint thickly to ensure it is opaque against the colorful background. -
Refine the edges:
Switch to a liner brush to tidy up the curves and sharp points of the music note. I find turning the canvas upside down helps me get the smoothest curves on the spiral. -
Add black accents:
Paint a few large black dots scattered randomly in the red zone to balance the heavy black note in the center.
Muddy colors?
If the blue and red mix into a brown mess in the middle, stop blending. Let it dry, then paint a fresh layer of orange or white over the transition area before trying again.
Step 3: Final Cosmic Details
-
Create the stars:
Dilute White paint with water. Using the toothbrush technique again, gently mist white speckles over the entire painting, focusing heavily on the black treble clef to make it look like a void in space. -
Detail the nebulas:
Dip the toothbrush in diluted White again, but this time flick larger, specific drops onto the blue corner to simulate distant stars. -
Clean up:
If any white splatter landed where you don’t want it (like outside the canvas edges or too heavily in one spot), quickly dab it up with a wet paper towel before it dries. -
Seal the work:
Once fully dry (give it at least an hour), apply a coat of gloss varnish to make the colors pop and protect the splatter texture.
Add some sparkle
Mix a small amount of iridescent medium or silver glitter glue into your white splatter paint. The ‘stars’ will shimmer beautifully when the light hits the canvas.
Hang your masterpiece in a music room or studio to inspire your next creative session


Rainbow Gradient Melody Trail
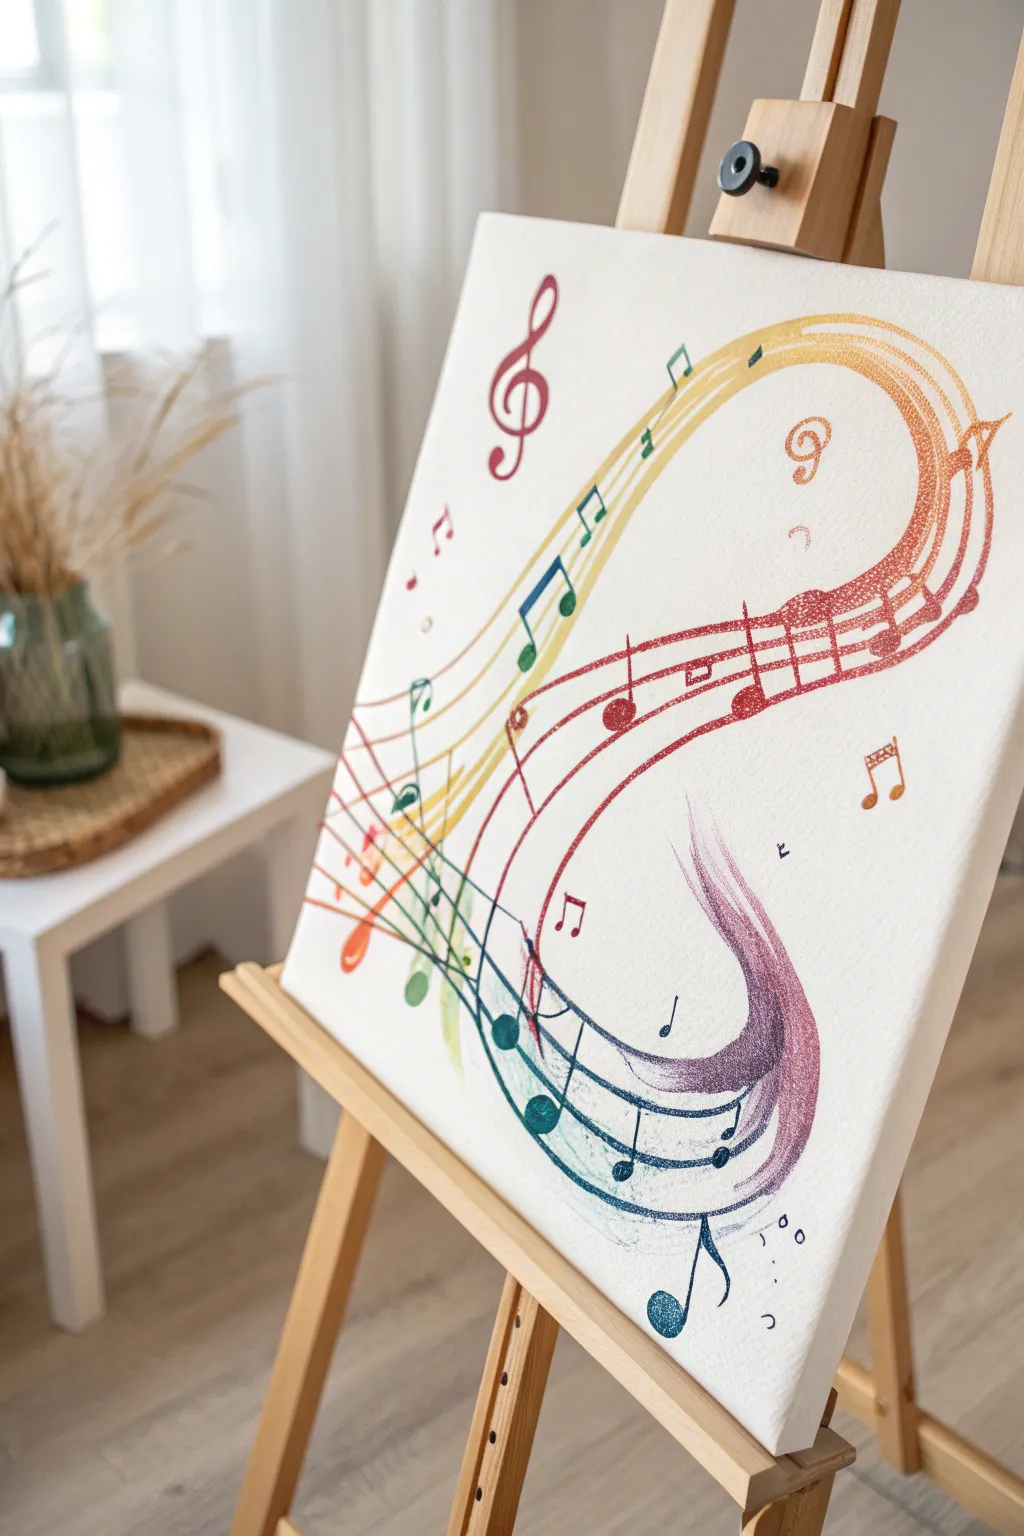
Bring the joy of music to life with this vibrant acrylic painting that features a sweeping, colorful stave filled with dancing notes. The design uses a beautiful gradient effect that transitions from warm oranges to cool purples, creating a dynamic sense of movement on the canvas.
Step-by-Step Guide
Materials
- Stretched canvas (e.g., 16×20 inch)
- Acrylic paints (Red, Orange, Yellow, Green, Teal, Blue, Purple, Black)
- Round brushes (sizes 2, 4, and 6)
- Small detail brush (size 0 or 00)
- Pencil and eraser
- Palette or paper plate
- Water cup and paper towels
- Ruler (optional, but helpful for stave lines)
Step 1: Planning the Flow
-
Sketch the primary curve:
Start with a light pencil sketch to define the main shape of your musical staff. Draw a large, swooping ‘S’ shape that starts narrow at the top right, widens in the middle, and curls up at the bottom left. -
Define the stave lines:
Carefully draw the five lines of the musical staff within your main ‘S’ curve. Keep them parallel to each other as they twist and turn. Don’t worry if they aren’t mechanically perfect; a hand-drawn look adds character. -
Place prominent symbols:
Sketch a large treble clef floating near the top left. Add a few key musical notes (quarter notes, eighth notes) along the stave lines to plan your composition.
Fixing Wobbly Lines
If your staff lines look shaky, don’t stress. Use a flat edge of a credit card dipped in paint to ‘stamp’ straight segments, or use painter’s tape for the longer straight sections.
Step 2: Painting the Gradient Stave
-
Prepare your palette:
Squeeze out your rainbow colors in order: red, orange, yellow, green, teal, blue, and purple. You’ll want them ready for blending. -
Start with the warm tones:
Using a size 4 round brush, begin painting the top right section of the stave lines with red, quickly blending into orange as you move left along the curve. -
Transition to yellow and green:
Continue painting the lines, mixing the orange into yellow as the stave curves downward. As the ribbon twists toward the middle, blend the yellow into a fresh green. -
Cool down the colors:
As your stave sweeps to the bottom left, transition the green into teal, then blue. Keep your brush damp to help the acrylics flow smoothly on the canvas texture. -
Finish with purple:
Complete the tail of the swooping staff in a deep purple. I like to let the very end of the lines fade out slightly for a feathery effect. -
Add the sweeping texture:
While the paint is still tacky, use a dry brush to lightly drag the color outward from the curves, creating the motion-blur or ‘swoosh’ effect seen in the purple and orange sections.
Making It Flow
To get that airy, sweeping look at the end of the purple curve, don’t clean your brush fully. Let the paint run out naturally as you stroke, creating a dry-brush fade.
Step 3: Adding Notes and Details
-
Paint the treble clef:
Using a reddish-pink hue, paint the floating treble clef you sketched earlier. Use a size 2 brush for clean curves. -
Fill in the main notes:
Paint the musical notes on the stave. Match the color of the note to the section of the gradient it sits on (e.g., green notes on the green section) or barely offset the color for contrast. -
Create the stems and beams:
Use your smallest detail brush to paint the thin stems and beams connecting the notes. Keep your hand steady and use the edge of the brush. -
Add scattered symbols:
Paint smaller, free-floating notes, sharps, flats, or rests around the main composition to fill empty white space and add whimsy. -
Detail the texture:
Once the base layers are dry, go back in with a very dry brush and stipple (dot) some darker shades over the main colored areas to add depth and a textured, almost glittery look. -
Refine edges:
Check the edges of your stave lines. If any paint smudged onto the white background, you can touch it up with white acrylic for a crisp finish. -
Final touches:
Add tiny decorative dots or sparkles near the curves of the music using a contrasting color or metallic paint if you have it.
Step back and admire the rhythm and color of your musical masterpiece
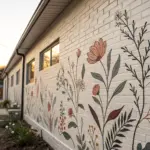
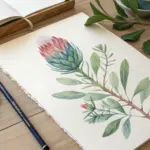
Instrument Mashup Fusion
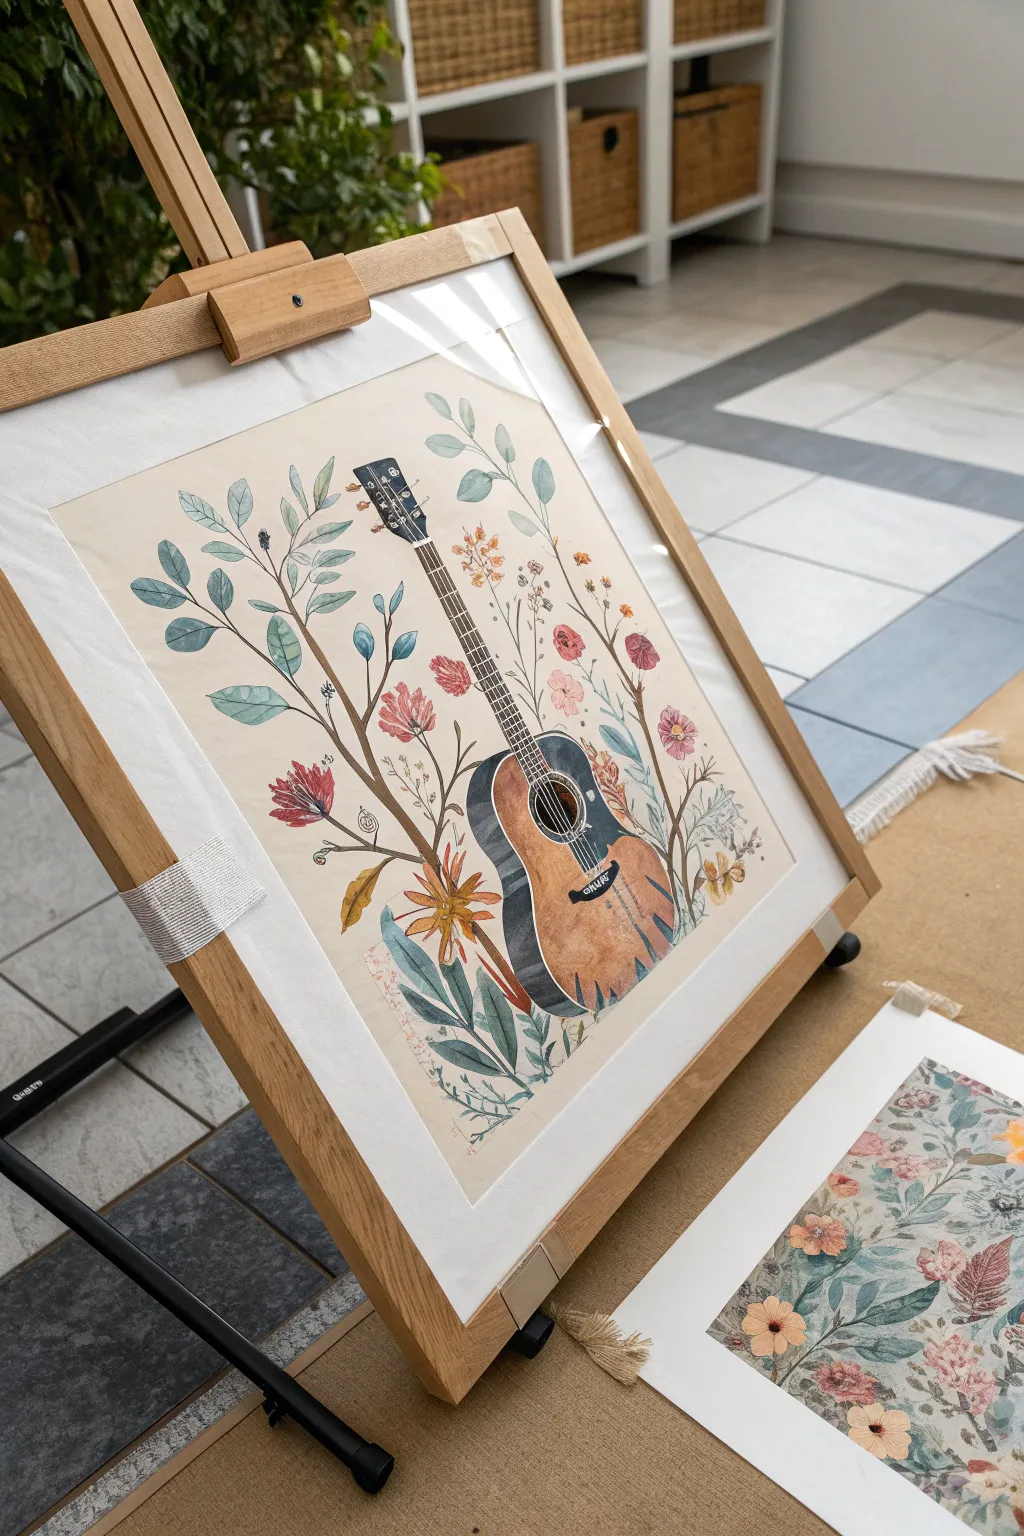
This project blends the rigid structure of an acoustic guitar with the organic flow of wild botanicals, creating a harmonious composition perfect for music lovers. Using diluted acrylics or gouache, you will achieve a soft, illustrative look that feels vintage and fresh all at once.
Step-by-Step Tutorial
Materials
- Heavyweight watercolor paper or mixed media tonal paper (cream or off-white)
- Acrylic paints (burnt sienna, raw umber, sap green, olive green, crimson red, yellow ochre, white, black, teal)
- Acrylic glazing medium or water for dilution
- Pencil (HB) and eraser
- Fine liner brushes (sizes 0 and 1)
- Flat shader brush (size 4)
- Ruler
- Reference photo of an acoustic guitar
Step 1: Sketching the Composition
-
Establish the Guitar Angle:
Begin by lightly sketching the central subject: the acoustic guitar. Using a ruler, draw the neck at a slight diagonal tilt. Don’t worry about perfect perspective, but ensure the body shape looks balanced. -
Draft the Botanicals:
Sketch long, flowing stems rising from the bottom and sides, curving around the guitar body. Draw leaf clusters and general flower shapes, letting some vines overlap behind the instrument to create depth. -
Refine the Details:
Go back over your sketch to add the tuning pegs on the headstock and the six strings running down the neck. Clarify the shapes of the leaves, particularly the fern-like foliage at the base.
Step 2: Painting the Guitar
-
Base Coat for the Body:
Mix burnt sienna with a touch of yellow ochre and plenty of water or glazing medium. Apply a transparent wash over the guitar body to create that warm, wooden glow. -
Darkening the Sides:
For the sides of the guitar, use a mix of raw umber and a tiny bit of black. Paint these areas solidly to separate the front face of the instrument from its depth. -
Fretboard and Soundhole:
Paint the fretboard and the bridge area with a dark charcoal gray or black. Carefully fill in the soundhole circle with solid black to give it that hollow appearance. -
Adding Wood Grain:
Once the base coat is dry, mix a slightly darker version of your body color. Use a fine liner brush to paint very subtle vertical streaks on the guitar body to simulate wood grain. -
Highlighting:
Mix a small amount of white with water. Add a soft highlight along the curve of the guitar body and on the tuning pegs to suggest a glossy finish.
Keep it Transparent
To mimic the watercolor look with acrylics, use more water than usual. Build up color in thin glazes rather than thick, opaque strokes.
Step 3: Bringing the Flora to Life
-
Painting Stems:
Using a thin brush and a mix of raw umber and olive green, trace over your pencil lines for the main stems. Keep your hand loose to mimic natural growth. -
Leaf Variation:
Paint the leaves using varied shades of green. Use a teal-green mix for the larger, rounded leaves and a warmer olive green for the smaller foliage. I find varying the opacity here adds nice visual interest. -
Blossom Base Layers:
Fill in the flower shapes with diluted crimson red and touches of yellow ochre for the centers. Keep the paint fluid so it settles naturally on the paper. -
Adding Floral Details:
Once the flowers are dry, use a fine brush with darker red or brown paint to add stamen lines and petal separation. -
Ferns and Ground Cover:
At the very bottom of the guitar, paint the fern-like leaves using a blue-green shade. These should appear to ‘cradle’ the instrument.
Add Texture
Splatter tiny droplets of watered-down brown or gold paint across the background for a vintage, organic sketchbook vibe.
Step 4: Final Touches
-
Stringing the Instrument:
This requires a steady hand. Use your finest brush (size 0) with white or very light gray paint to draw the six strings from the bridge up to the tuning pegs. -
Fret Lines:
Paint horizontal silver or light gray lines across the fretboard to mark the frets. -
clean Up:
Erase any visible pencil marks that weren’t covered by paint. If you need more definition, use a fine-tip black pen to loosely outline some of the leaves or guitar edges for an illustrative pop.
Step back and admire how the natural elements harmonize with the instrument for a truly peaceful piece of art
Abstract Equalizer Bars in Motion
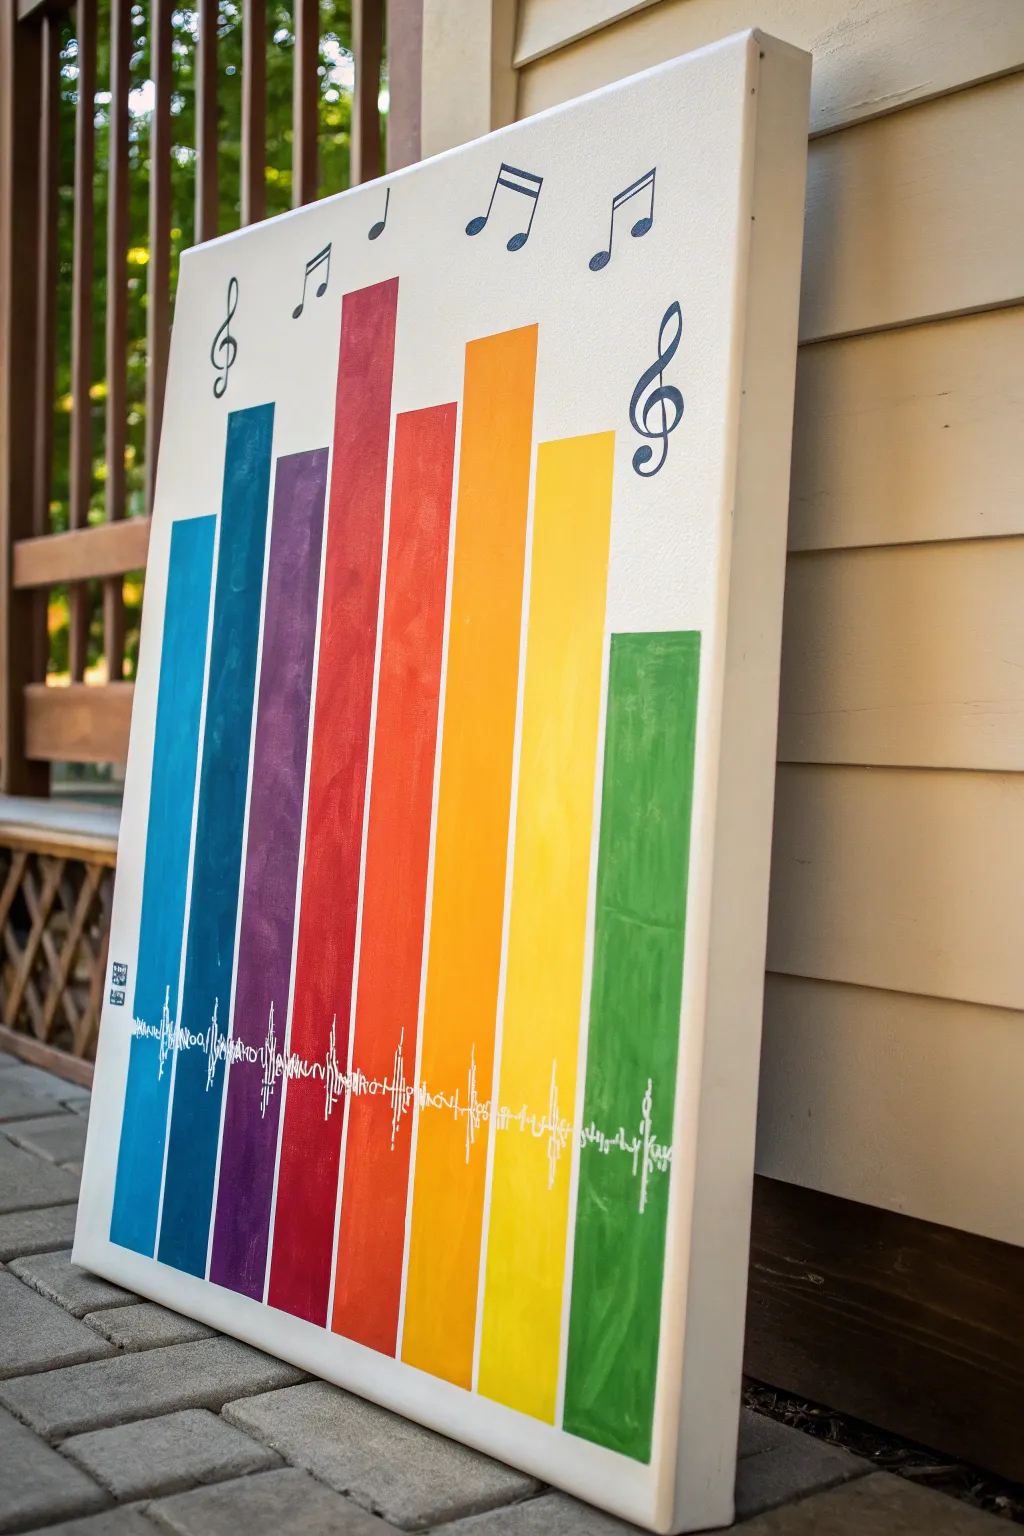
Bring the rhythm of your favorite song to life with this vibrant, abstract representation of sound waves. Featuring crisp, colorful bars and delicate white waveforms, this piece combines geometric precision with musical flair.
Step-by-Step Guide
Materials
- Rectangular stretched canvas (e.g., 18×24 inches)
- Acrylic paints (Cyan, Phthalo Blue, Purple, Crimson, Orange, Yellow-Orange, Yellow, Green, Black, White)
- Painter’s tape or masking tape (1 inch width)
- Ruler or T-square
- Pencil
- Flat shader brushes (3/4 inch and 1/2 inch)
- Fine liner brush (size 0 or 00)
- White paint pen (fine tip) – optional but recommended
- Palette or paper plate
- Water cup and paper towels
Step 1: Planning and Taping
-
Prime the Surface:
Ensure your canvas is clean and white. If necessary, apply a coat of white gesso to create a smooth, bright base for your colors. Let this dry completely before moving on. -
Measure the Layout:
Using your ruler and pencil, lightly mark horizontal guides for the top and bottom of your equalizer bars. Don’t make them all the same height—vary the top levels to create that dynamic ‘bouncing’ look associated with sound levels. -
Space the Bars:
Determine the width of your bars. For a standard look, aim for about 1.5 to 2 inches per bar. Mark vertical lines where each bar will sit, leaving a consistent gap (about 1/4 inch) between them. -
Tape the Vertical Lines:
Apply painter’s tape along the pencil lines to mask off the spaces *between* the bars. Press the edges of the tape down firmly with your fingernail or a credit card to prevent paint bleeding underneath. -
Seal the Tape Edges:
For super crisp lines, I like to lightly brush a tiny amount of white paint over the tape edges first. This seals any gaps; if paint bleeds, it’s just white on white.
Step 2: Painting the Spectrum
-
Begin with Blues:
Start on the left side. Paint the first bar a bright cyan blue. Ensure opaque coverage, which might require two coats. Move to the second bar using a deeper Phthalo blue. -
Transition to Warm Tones:
Paint the third bar a rich purple, followed by a transition into crimson red for the fourth bar. Use your flat shader brush and stroke vertically to align with the bar’s shape. -
Brighten the Upper Register:
Continue the gradient. Paint the fifth bar a vibrant reddish-orange, the sixth a golden yellow-orange, and the seventh a pure, sunny yellow. -
Finish with Green:
There is a significant drop in height for the final bar on the right. Paint this shorter block a classic grass green to complete the spectrum. -
Remove the Tape:
While the paint is tacky but not fully wet, carefully peel off the painter’s tape. Pull at a 45-degree angle away from the freshly painted areas to reveal clean white gaps.
Bleeding Lines?
If paint seeped under the tape, wait for it to dry completely. Then, use a small flat brush and white paint (or gesso) to carefully ‘cut in’ and paint over the mistake to straighten the edge.
Step 3: Adding Musical Details
-
Draft the Notes:
Once the color bars are bone-dry, use a pencil to lightly sketch musical symbols in the white space above the bars. Include a treble clef on the left and right, and floating eighth notes in the center. -
Paint the Symbols:
Using a small round brush or liner brush loaded with black acrylic, carefully fill in your pencil sketches. If you aren’t confident with a brush, a black permanent marker or paint pen works wonders here. -
Mark the Waveform Line:
Lightly pencil a horizontal line straight across the lower third of the colorful bars. This will serve as the anchor for your white sound wave. -
Create the Sound Wave:
Using a fine liner brush with white paint or a white paint pen, draw a scratchy, oscillating line across the guide you just made. Let the line spike up and down randomly to mimic audio frequency waves. -
Add Scribble Texture:
Over your white waveform line, add loose, scribbly loops and text-like abstract shapes. This adds energy and makes it look like digital noise or handwriting intermingled with the sound. -
Final Clean Up:
Check the white spaces between bars for any stray smudges. Touch these up with a bit of white paint to keep the separation distinct and professional.
Customize Your song
Instead of abstract scribbles in the white waveform line, write the actual lyrics or the sheet music notation of a favorite song across the color bars.
Hang your artwork vertically to display your visual symphony with pride


Have a question or want to share your own experience? I'd love to hear from you in the comments below!