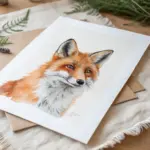
If you’re craving panda painting ideas that feel adorable, doable, and still totally your own, you’re in the right mindset. I love how a panda can be built from simple shapes and bold black and white contrast, then dressed up with color, texture, and fun little storytelling details.
Big-Eyed Chibi Panda Portrait
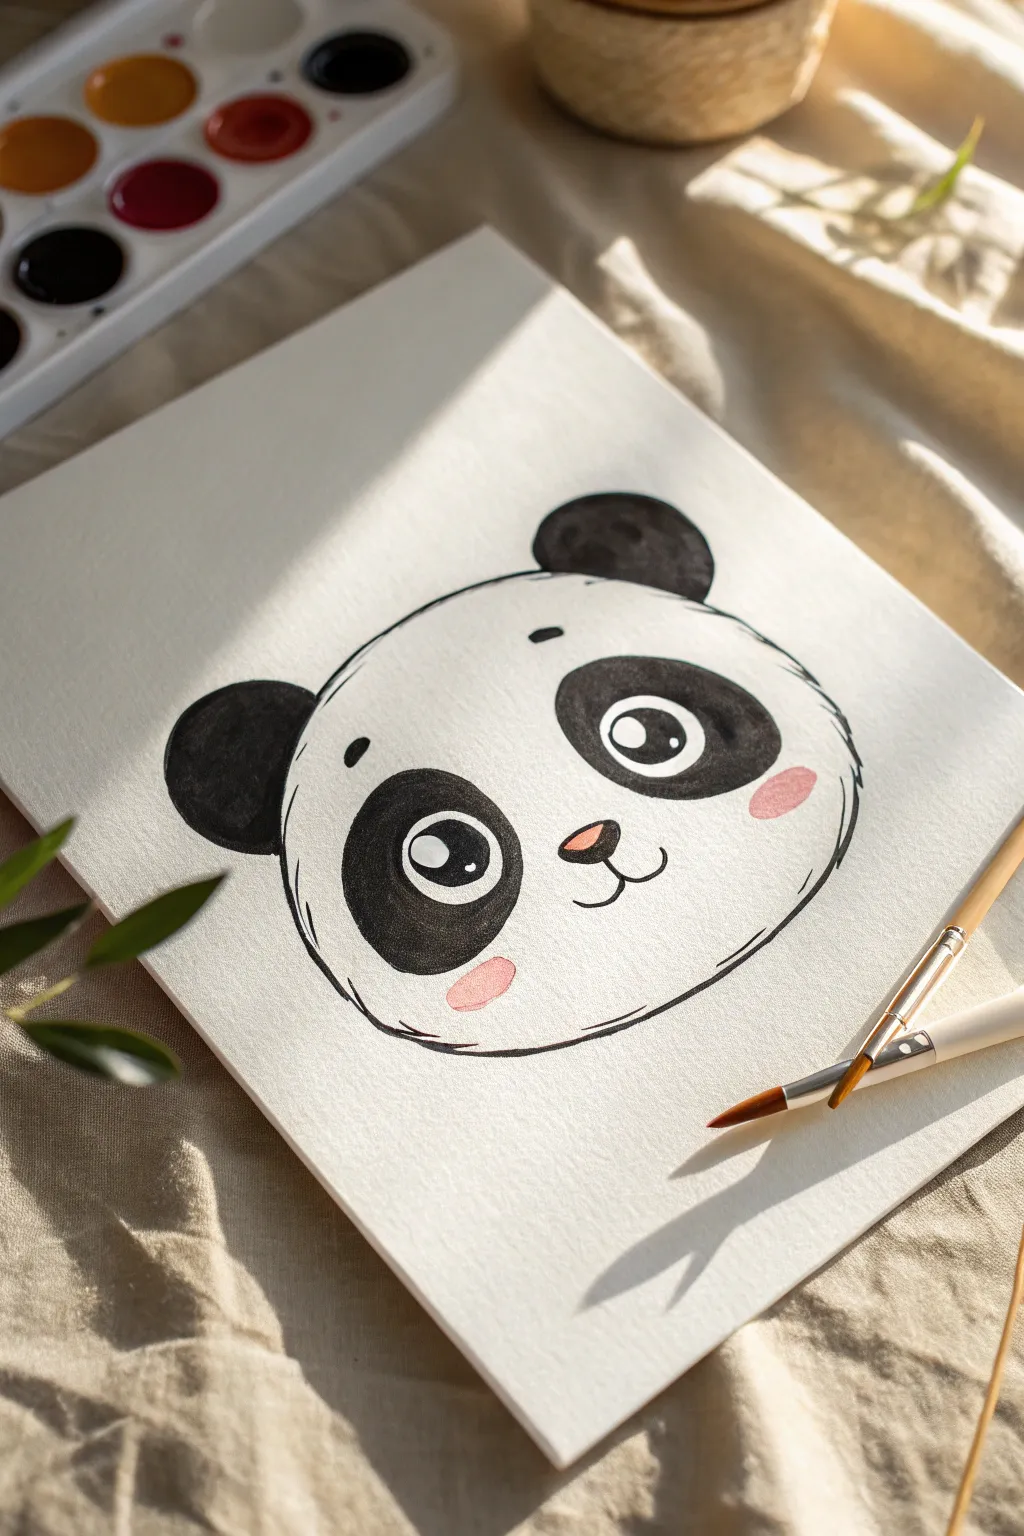
Capture the adorable essence of a panda with this simple yet expressive portrait, featuring oversized sparkling eyes and soft pink cheeks. The minimal style uses bold black shapes against white space, making it perfect for practicing clean lines and facial proportions.
Step-by-Step
Materials
- Thick watercolor paper (cold press)
- Black watercolor paint or black gouache
- Soft pink watercolor paint
- Round synthetic brush (size 6 or 8)
- Fine liner brush (size 0 or 1)
- HB Pencil
- Eraser
- Water cups and paper towel
Step 1: Sketching the Shape
-
Outline the head:
Start by lightly sketching a wide, slightly flattened oval shape for the panda’s head using your HB pencil. Keep the bottom curve slightly flatter than the top to give it that cute ‘squishy’ look. -
Position the ears:
Draw two semi-circles on the top corners of the head. Place them symmetrically, but don’t worry if they aren’t perfect; slight variation adds character. -
Map the features:
Lightly mark a horizontal line slightly below the center of the face. This will guide where the eyes and nose sit, which is crucial for the ‘chibi’ proportion.
Step 2: Drawing Features
-
Sketch eye patches:
Draw two large, slanted kidney-bean shapes for the varying black eye patches. They should tilt slightly inwards toward the nose area. -
Define the eyes:
Inside each patch, draw a large circle for the eye itself. Within that circle, sketch a smaller circle near the top right for the ‘sparkle’ reflection. -
Add nose and mouth:
Draw a small, soft triangular nose right in the center. Extend two small curved lines downwards from the nose to create the classic ‘w’ mouth shape. -
Refine the outline:
Go over your head outline, intentionally breaking the line in a few spots to suggest fur texture rather than a solid, hard wire.
Fixing Smudges
Accidentally got black paint where it shouldn’t be? Don’t rub it! Wet a clean brush with water, gently lift the pigment, and dab with a paper towel immediately.
Step 3: Painting the Darks
-
Fill the ears:
Load your round brush with black watercolor. Fill in the ears, keeping the edges fairly crisp but allowing the paint to pool slightly for texture. -
Paint the eye patches:
Carefully paint around the inner eye circles to fill the large black patches. I find it helpful to outline the patch first with the tip of the brush, then fill the center. -
Fill the pupils:
Switch to your fine liner brush for better control. Paint the pupils black, being extremely careful to leave the white reflection circle completely unpainted. -
Add floating eyebrows:
Using the very tip of your liner brush, paint two small, floating eyebrows above the eye patches to give the panda an innocent expression.
Add a Prop
Give your panda a snack by painting a simple green bamboo stalk in its mouth or off to the side to add a pop of contrasting color.
Step 4: Details & Color
-
Outline the face:
Using a slightly diluted black paint and a fine brush, trace the outer head shape. Use short, disjointed strokes to mimic fur texture rather than one continuous heavy line. -
Paint the nose:
Clean your brush thoroughly. Mix a very watery, soft pink or peach tone and fill in the small nose shape. -
Add the blush:
While the nose dries, mix a slightly stronger pastel pink. Paint two soft ovals on the cheeks, just below the eye patches. -
Define the mouth:
Once the area is dry, use your finest brush with black paint to carefully trace the ‘w’ mouth line. -
Enhance texturing:
Add a few tiny, thin scratchy lines around the ears and cheeks to suggest extra fluffiness. -
Final check:
Erase any visible pencil marks that weren’t covered by paint, ensuring the paper is completely dry before doing so to avoid smudging.
Once dry, frame your cheerful panda portrait to add a touch of whimsy to any room


Panda in a Simple Bamboo Forest
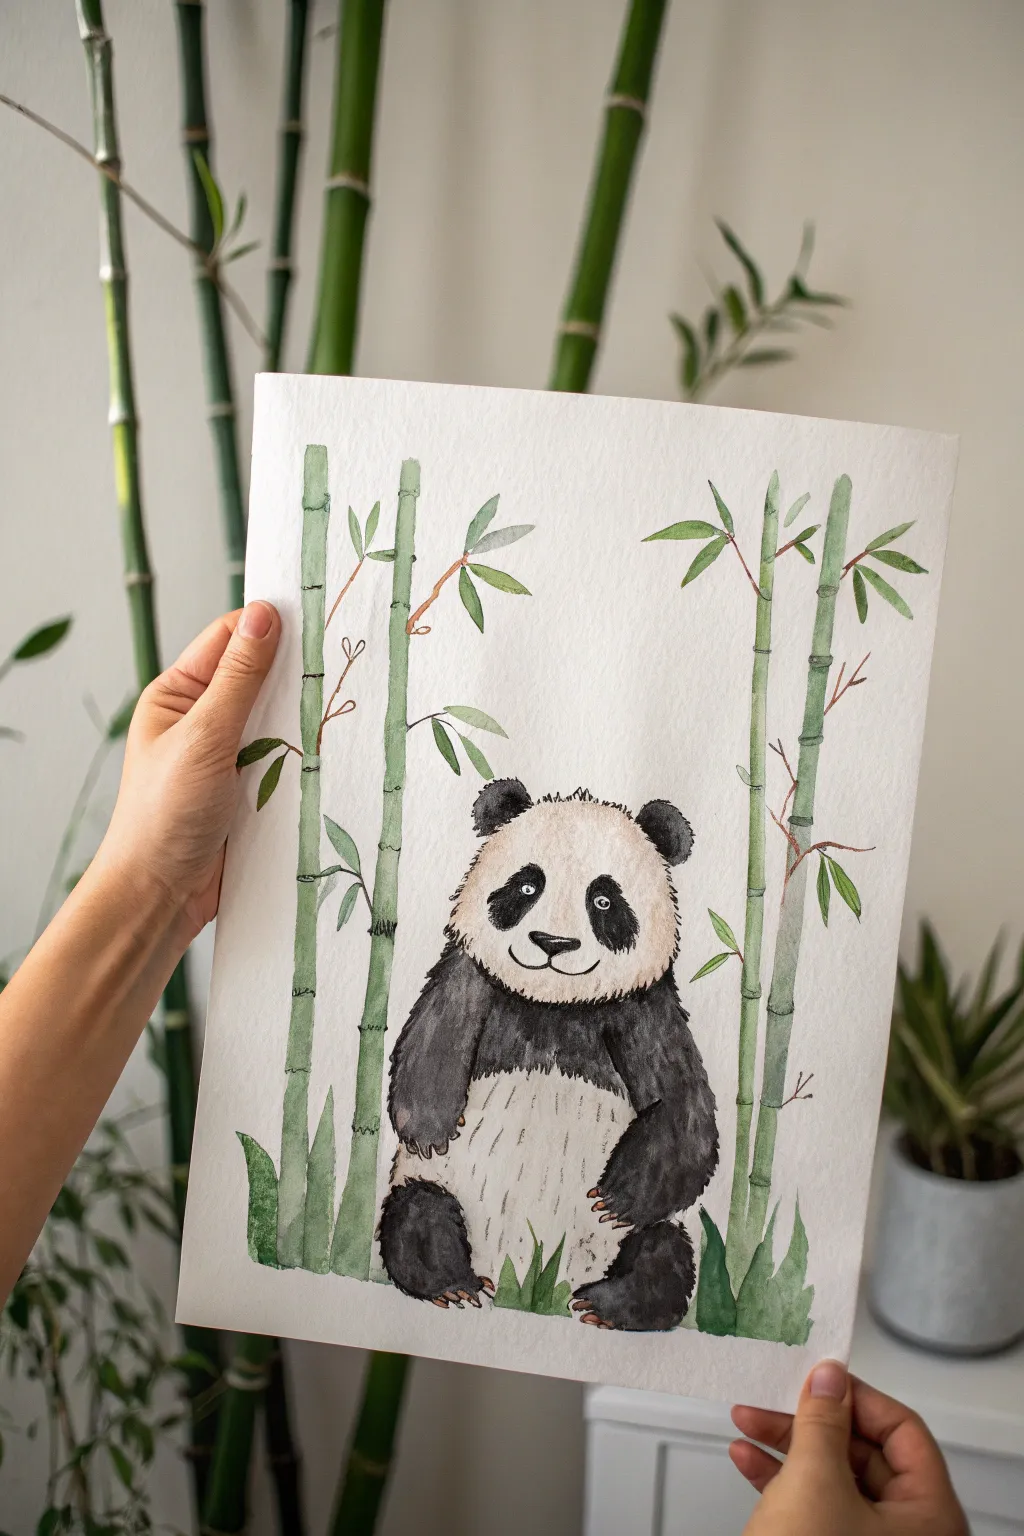
Capture the gentle charm of this giant panda sitting peacefully among tall bamboo stalks with this beginner-friendly watercolor tutorial. The soft washes and crisp lines create a lovely balance between illustrative whimsy and natural detail.
Detailed Instructions
Materials
- Cold press watercolor paper (A4 or similar size)
- Watercolor paints (greens, browns, Paynes gray or black)
- Round watercolor brushes (size 6 for washes, size 2 for details)
- Pencil (HB or H for light sketching)
- Kneaded eraser
- Clean water and paper towels
- Fine liner pen (optional, for crisp outlines)
Step 1: Sketching the Composition
-
Outline the Panda:
Start by lightly sketching a large oval shape for the panda’s body in the lower center of your paper. Add a slightly flattened circle on top for the head. -
Add Facial Features:
Sketch two rounded ears on top of the head. Draw large oval shapes for the eye patches, a small triangular nose, and a simple curved mouth. -
Define the Limbs:
Draw the front legs resting against the belly and the back legs extended forward in a sitting position, keeping the shapes rounded and soft. -
Sketch the Bamboo Stalks:
Draw four vertical stalks—two on the left, two on the right. Make sure they are segmented with small horizontal lines to indicate the bamboo nodes. -
Leaf Placement:
Add slender, pointed leaves sprouting from the nodes. Vary the direction and size of the leaves to make them look organic and natural. -
Refine and Erase:
Go over your sketch to darken the lines slightly if you want them visible, or lighten them with a kneaded eraser so they barely show under the paint.
Step 2: Painting the Bamboo Forest
-
First Bamboo Layer:
Mix a light sap green with plenty of water. Paint the bamboo stalks, leaving tiny gaps between segments or lifting color out after painting to create separation. -
Painting the Leaves:
Using the tip of your size 6 brush, paint the leaves with the same light green. Press down to widen the stroke and lift up for a pointed tip. -
Adding Plant Details:
While the green is still slightly damp, drop a darker green or brown into the nodes and the base of the leaves to add depth and shadow. -
Ground Cover:
Paint simple, jagged grass shapes at the very bottom of the paper around the panda’s feet using a mix of greens to ground the composition. -
Branch Accents:
Use a thin brush and a reddish-brown mix to paint thin, twig-like lines connecting some leaves to the main bamboo stalks.
Furry Edges
To make the panda look soft, don’t paint straight lines. Use short, flicking brushstrokes at the edges of the black patches to mimic fur texture.
Step 3: Bringing the Panda to Life
-
Underpainting the White Fur:
Mix a very watery, pale gray or beige wash. Lightly paint the ‘white’ areas of the panda—the face and belly—to give the fur warmth and suggestion of texture. -
Base Black Layer:
Mix a dark gray (Paynes gray is softer than pure black). Fill in the ears, eye patches, legs, and band across the shoulders. Keep the edges slightly uneven to suggest fluffiness. -
Deepening the Darks:
once the first layer is dry, go back with a more concentrated black paint. Add another layer to the center of the limbs and ears, leaving the edges slightly lighter for dimension. -
Adding Fur Texture:
I like to use a nearly dry brush with dark paint to flick tiny lines along the edges of the black areas, making the fur look bristly rather than smooth. -
Facial Details:
Paint the nose black, leaving a tiny spot unpainted for a highlight. Fill in the pupils within the eye patches, ensuring there is a tiny white glint in the eyes for life. -
Claws and Paws:
Using your smallest brush, carefully paint small, sharp claws on the paws using a dark brown or black shade. -
Final Fur Accents:
Using a very fine brush or a fine liner pen, add small, scribbly texture lines onto the belly and face to mimic the direction of fur growth.
Muddy Greens?
If your bamboo green looks too dull, try mixing a tiny bit of yellow into your sap green. This brightens it instantly for that fresh plant look.
Once fully dry, you may want to gently erase any remaining pencil marks to leave your panda looking crisp and clean


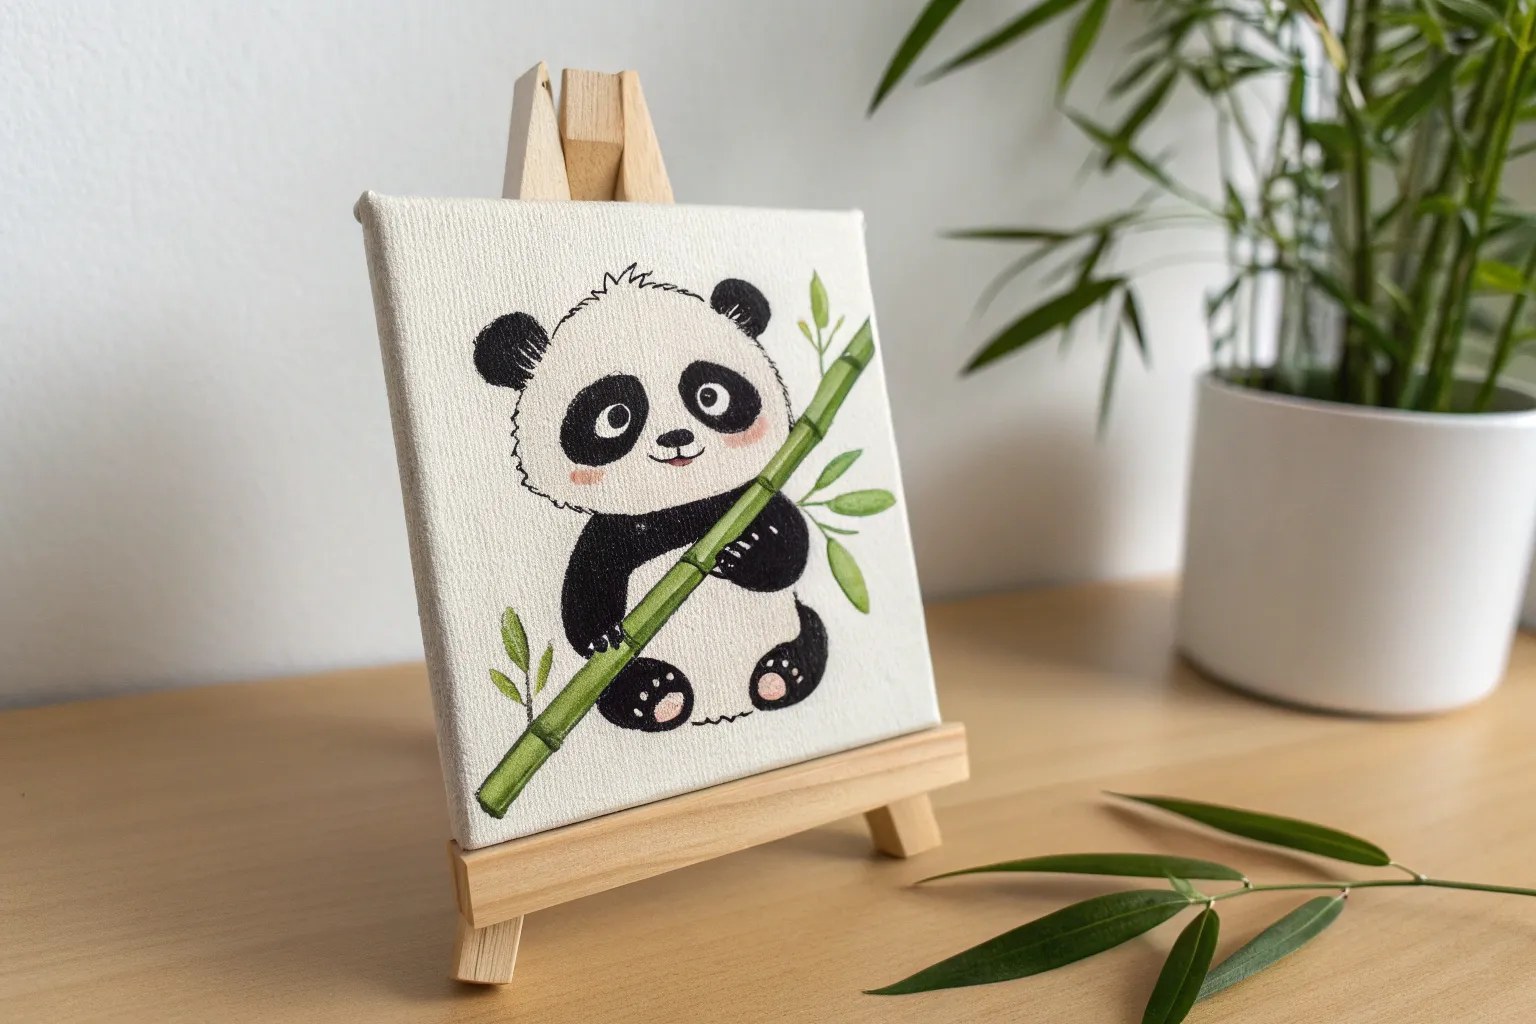
Panda Holding a Bamboo Snack
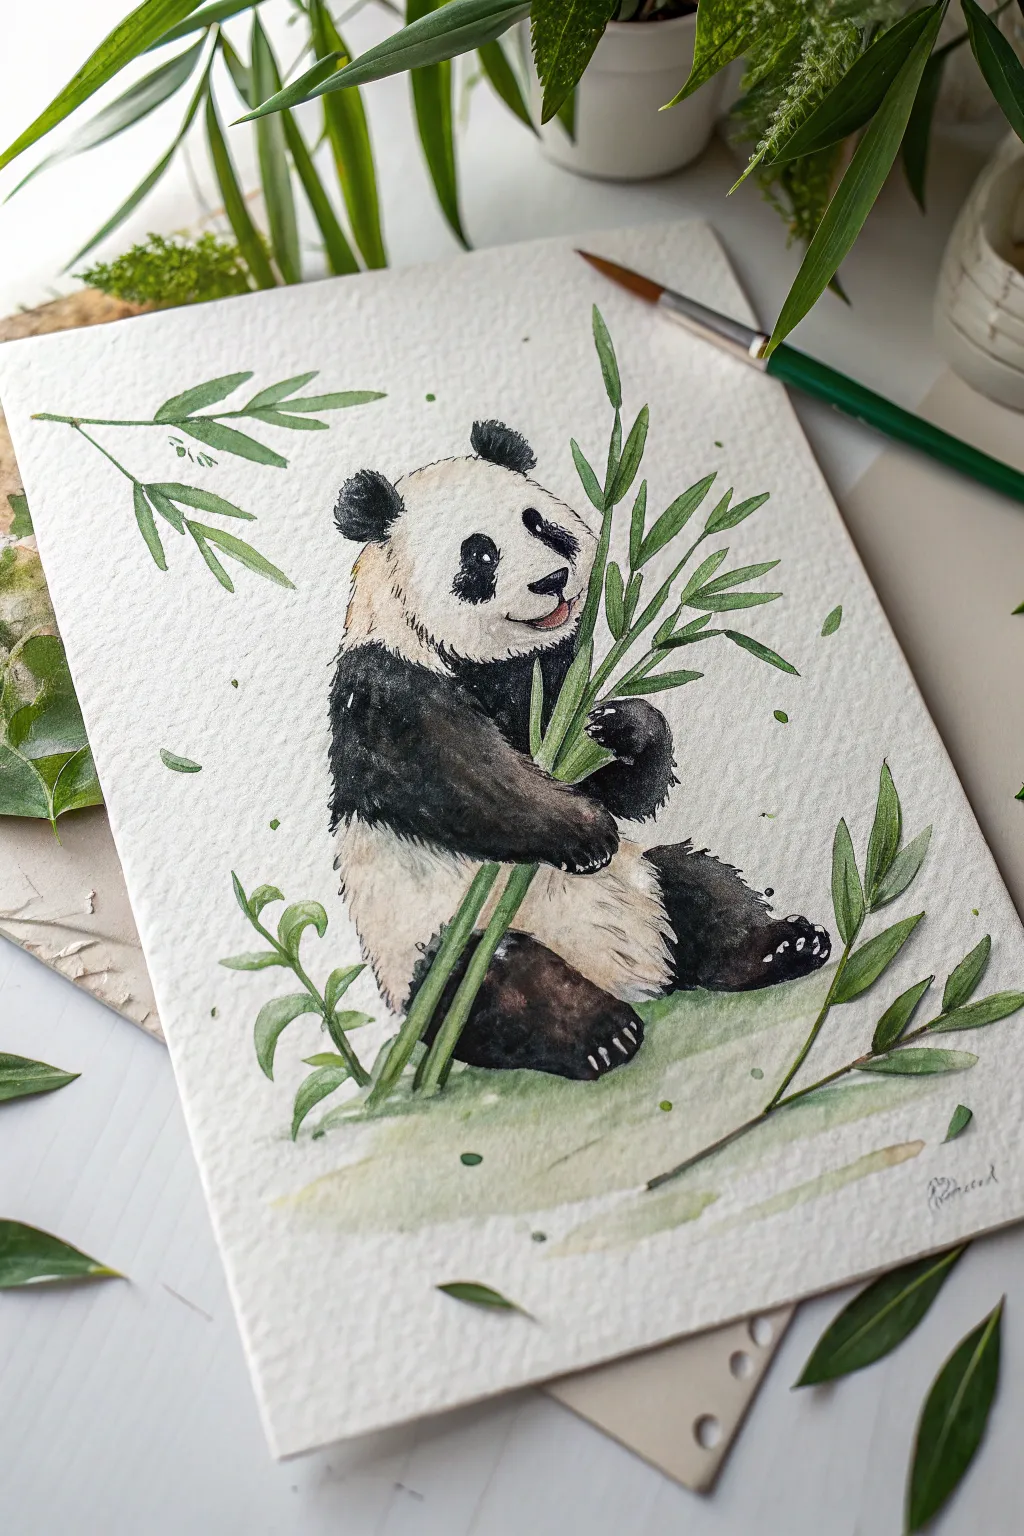
Capture the charm of a hungry panda with this delightful watercolor tutorial. You’ll learn how to build up soft fur textures and create contrast between the fluffy white body and deep black limbs.
Step-by-Step Tutorial
Materials
- Cold press watercolor paper (300 gsm)
- Watercolor paints (lamp black, burnt sienna, sap green, yellow ochre)
- Round watercolor brushes (size 4, size 8, and a detail brush)
- HB pencil
- Kneadable eraser
- Jar of clean water
- Paper towels
- White gouache or white gel pen (optional for highlights)
Step 1: Sketching and Initial Washes
-
Map out the basic shapes:
Start with a light pencil sketch. Draw a large oval for the body and a slightly smaller, rounded shape on top for the head. Add position markers for the legs and arms to ensure the panda looks seated comfortably. -
Refine the features:
Sketch in the ears, the characteristic eye patches, and the nose. Draw the bamboo stalks crossing the body diagonally, held by the panda’s paws. Keep your pencil lines faint so they don’t show through the paint later. -
Soften the sketch:
Roll a kneadable eraser gently over your drawing to lift excess graphite, leaving just a ghost of the image to guide your painting. -
Paint the first ‘white’ layer:
Mix a very dilute wash of burnt sienna and a tiny dot of black to create a warm, creamy off-white. Apply this loosely to the ‘white’ areas of the fur (the head and belly), leaving the paper white in the brightest center spots for natural highlights. -
Add fur texture while wet:
While that initial creamy wash is still slightly damp, use a detail brush to flick tiny strokes of slightly darker cream along the edges of the belly and cheeks to suggest fluffiness.
Muddy Fur?
If your black bleeds too much into the white fur, let the paper dry completely. Then, use a clean, damp stiff brush to gently ‘scrub’ and lift the unwanted dark pigment.
Step 2: Adding the Dark Fur
-
Base layer for black areas:
Mix a medium-strength wash of lamp black. Paint the ears, eye patches, legs, and arms. Don’t go for solid black immediately; let the watercolor granulate on the textured paper to look like hair. -
Deepen the shadows:
Once the base black layer is dry, mix a concentrated, thick black. Apply this to the darkest parts of the limbs and ears to create volume, leaving the previous lighter black visible on the upper edges where light hits. -
Feather the edges:
Using a small, damp brush, gently pull pigment outward from the black shapes into the white fur areas. This ‘feathering’ technique makes the transition look like overlapping fur rather than a hard cutout line. -
Define the face:
Paint the nose with solid black, leaving a tiny sliver of white paper for a shine. Carefully paint the pupils inside the black eye patches, ensuring they are positioned to make the panda look toward the bamboo.
Step 3: Bamboo and Finishing Details
-
Paint the bamboo stalks:
Mix sap green with a touch of yellow ochre for a natural plant tone. Paint the bamboo stalks in segments, leaving tiny gaps between the joints (nodes) to add realism. -
Add the leaves:
Using the tip of your round brush, press down and lift up quickly to create the tapered shape of bamboo leaves. cluster them around the top of the stalks and near the paws. -
Create depth in the greenery:
While the green paint is still wet, drop in a slightly darker green mixture (sap green + tiny bit of black) at the base of the leaves and joints of the bamboo stems for instant shading. -
Ground the panda:
Mix a watery green wash and paint a soft patch of grass underneath the panda. Fade the edges out with clean water so it doesn’t look like a solid block. -
Add scattered foliage:
Paint a few loose leaves floating or resting on the ground near the panda to balance the composition. -
Final highlights:
Once everything is bone dry, use white gouache or a gel pen to add tiny sparkle dots to the eyes and distinct claw marks on the paws.
Make It Pop
Sprinkle a tiny pinch of table salt onto the wet bamboo leaves while painting. As it dries, the salt pushes the pigment away, creating an organic, speckled texture.
Now you have a charming, bamboo-munching friend to add to your collection


Peekaboo Panda Over a Ledge
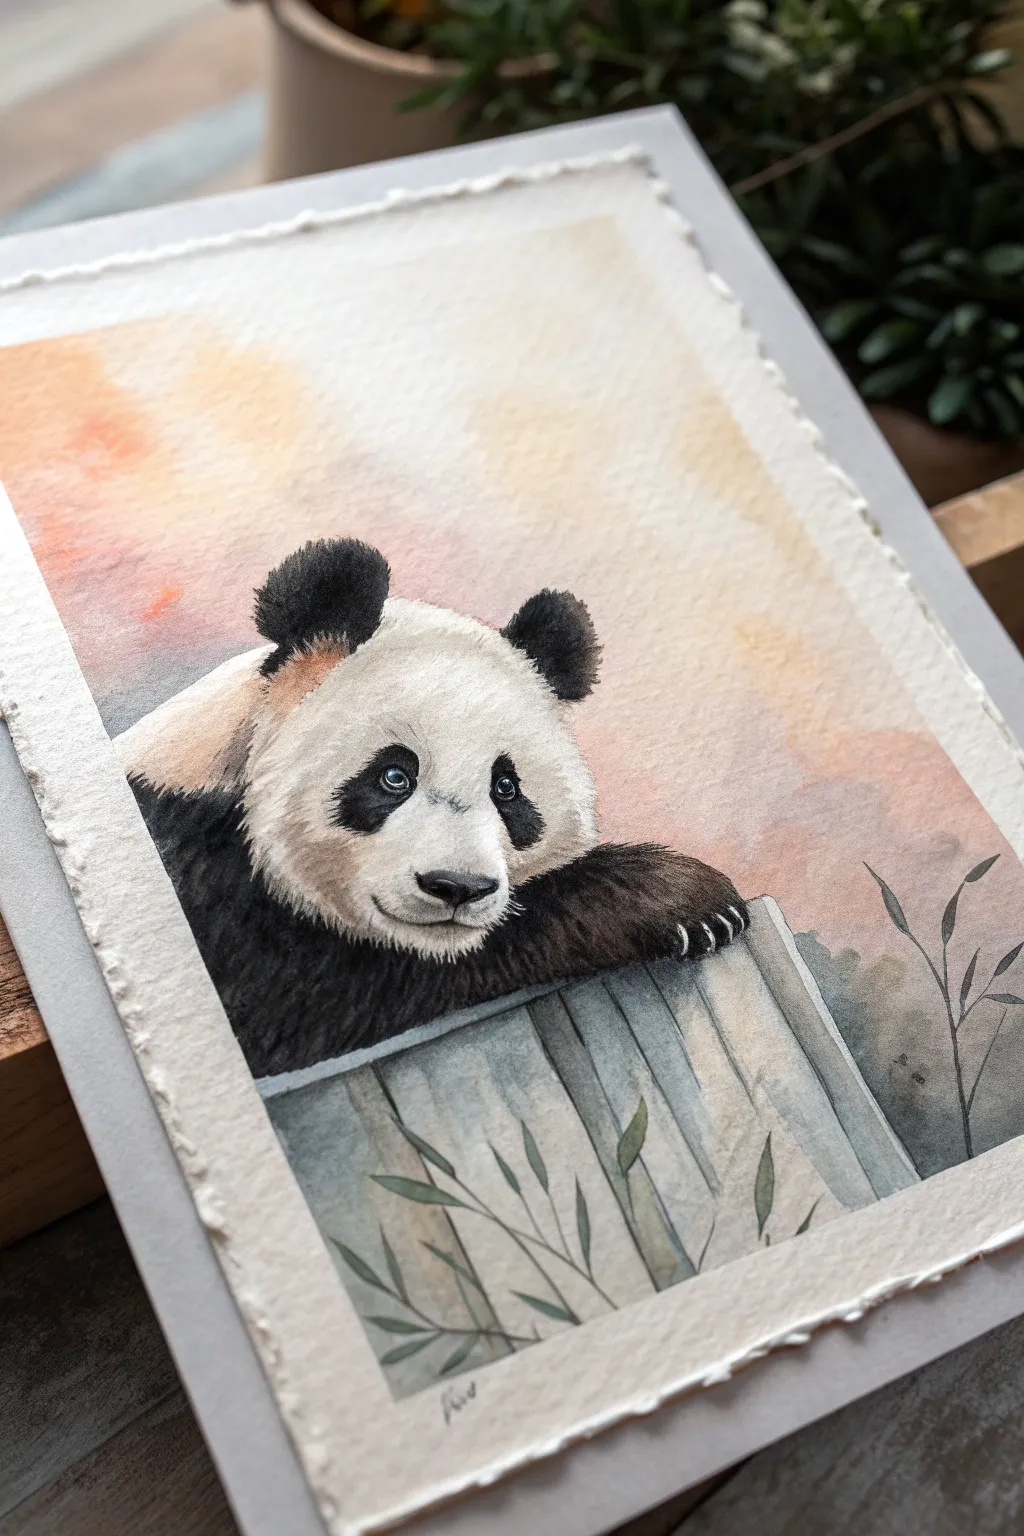
Capture the soft curiosity of a panda in watercolor with this warm and inviting painting. The combination of wet-on-wet background washes and dry-brush fur textures creates a lovely contrast between the dreamy sky and the detailed animal.
Step-by-Step
Materials
- Cold press watercolor paper (300 gsm or heavier, preferably cotton)
- Watercolor paints (Payne’s Gray, Lamp Black, Burnt Sienna, Yellow Ochre, Alizarin Crimson, Indigo)
- Round brushes (sizes 2, 6, and 10)
- Small fine-liner brush or rigger brush for fur details
- Masking fluid
- Pencil (HB) and kneaded eraser
- Clean water and paper towels
- Rigid board and masking tape
Step 1: Planning and Preparation
-
Sketch the composition:
Begin by lightly sketching the panda’s head and paws resting over a simple wooden fence. Keep the shapes rounded and soft, marking out the eye patches, nose, and ears lightly. Don’t press too hard; you want these lines to disappear under the paint. -
Mask the highlights:
Apply a tiny dot of masking fluid to the pupil of each eye to preserve the white reflection. You can also add a few very thin lines of masking fluid along the top of the fence or on a few stray whiskers if you wish to keep them pure white. -
Prepare the paper:
If you aren’t using a block, tape your paper down securely to a board. For that lovely deckled edge look in the photo, you can tear the edges of your paper beforehand using a ruler as a guide.
Muddy Fur?
If your black fur looks like a flat blobs, wait until it’s 100% dry. Then, use white gouache or a gel pen to add tiny, sparse hairs on top to separate the limbs from the body.
Step 2: The Soft Sunset Background
-
Wet the sky area:
Using your largest brush, apply clean water to the entire background area around the panda. Be careful to paint around the panda’s outline, but it’s okay if the water touches the edge of the fur slightly. -
Paint the warm glow:
While the paper is wet, drop in a watery mix of Yellow Ochre and a touch of Burnt Sienna near the top left corner and let it fade diagonally across the paper. This creates that warm, late-afternoon light. -
Add cool shadows:
On the opposite side (bottom right and near the fence), drop in a very diluted mix of Alizarin Crimson and a tiny bit of Payne’s Gray to create a soft, dusty purple haze. Let the colors bleed naturally. -
Create background foliage:
While the background is still damp (not soaking), tap in some indistinct shapes using a mix of Indigo and green on the lower right to suggest distant bushes. Soft edges are key here.
Soft Edges Pro-Tip
To make the panda look fluffier, soften the outer edges of the black ears with a clean, slightly damp brush immediately after painting them so the hard line blurs slightly.
Step 3: Bringing the Panda to Life
-
Base layer for the fur:
For the panda’s white areas, don’t leave the paper perfectly white. Mix a very watery, pale gray using Payne’s Gray and wash it over the shadow areas of the face—typically under the chin, around the eyes, and the side of the head away from the light source. -
Paint the black patches:
Switch to a size 6 brush. Load it with a strong mix of Lamp Black and a touch of Burnt Sienna (to warm it up). Paint the ears and the eye patches. Keep the edges slightly uneven to suggest fluffiness. -
Detailing the eyes:
Once the black eye patches are dry, paint the actual eyes. Use amber or brown for the iris and pure black for the pupil. I like to lift a tiny bit of color from the bottom of the iris with a damp brush to create depth. -
Building fur texture:
Using your smallest brush or a dry brush technique, start adding short texturing strokes to the black areas (ears, arms). Direction is crucial—ensure your strokes follow the curve of the body. -
Add facial definition:
Paint the nose with a strong black, leaving a tiny lighter area on top for a highlight. Use very faint, diluted gray strokes to suggest fur direction on the white face without overcrowding it.
Step 4: The Ledge and Final Details
-
Base wash for the fence:
Paint the wooden ledge with a watery wash of Payne’s Gray and a hint of Indigo. Keep it vertical, pulling lines downward to mimic wood grain. -
Define the planks:
Once the first layer is dry, use a liner brush with a darker gray/blue mix to draw the gaps between the fence planks. Vary the thickness of these lines so the wood looks weathered and natural. -
Add foreground plants:
Using a mix of Sap Green and Indigo, paint slender, delicate leaves rising from the bottom edge in front of the fence. Swift, upward strokes work best for grass-like leaves. -
Remove masking and finishing touches:
Rub away the masking fluid from the eyes. Add the claws on the paws using opaque dark gray or gouache if you need them to stand out against the fence. Sign your work at the bottom.
Now you have a charming panda portrait ready to frame or gift to a friend
BRUSH GUIDE
The Right Brush for Every Stroke
From clean lines to bold texture — master brush choice, stroke control, and essential techniques.
Explore the Full Guide
Panda Face Study in Black and White
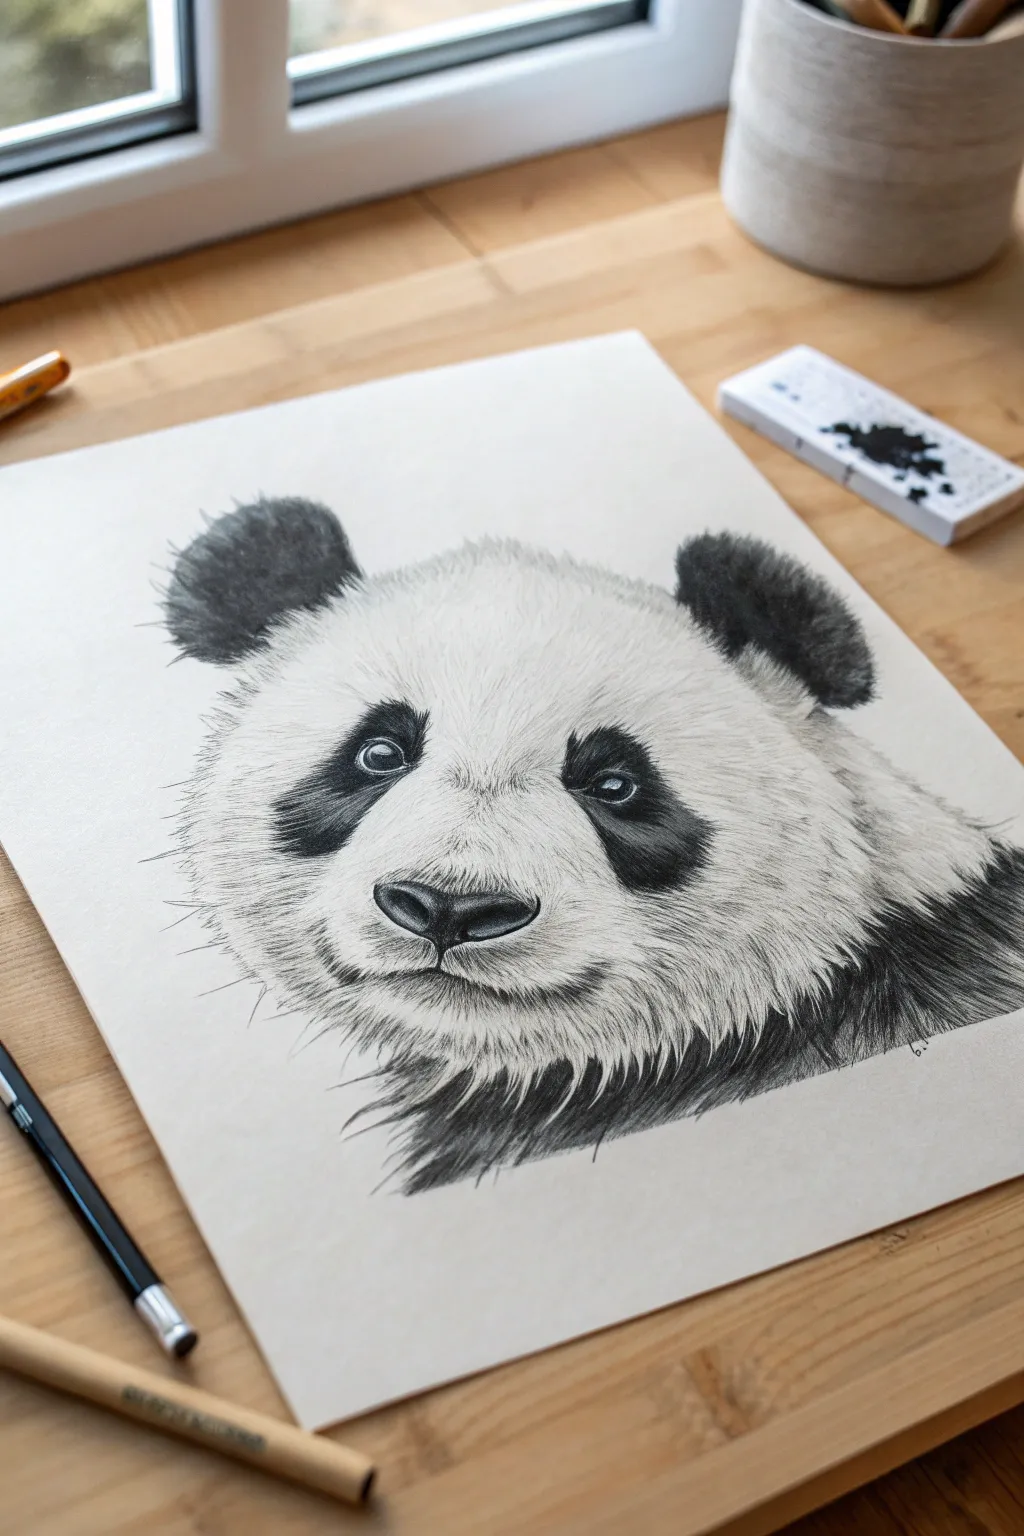
Capture the gentle spirit of a giant panda with this detailed black and white face study. Using graphite or charcoal pencils, you’ll build up layers of fur texture to create a soft, photorealistic portrait that pops off the page.
How-To Guide
Materials
- High-quality drawing paper (smooth or vellum finish)
- Graphite pencils (HB, 2B, 4B, 6B)
- Black charcoal pencil (for deepest blacks)
- Kneaded eraser
- Precision eraser or eraser pen
- Blending stump or tortillon
- Mechanical pencil (0.5mm) for fine hairs
Step 1: Initial Sketching
-
Map the proportions:
Begin with a very light HB pencil to sketch the basic oval shape for the head. Mark intersecting lines for the center of the face and the eye level to ensure symmetry. -
Place the features:
Lightly draw the bean-shaped patches for the eyes, the small triangular nose, and the faint line for the mouth. Keep these lines faint so they disappear later under the fur. -
Outline the ears:
Add the rounded ears at the top corners of the head. Don’t make the lines perfect arcs; give them a slight fluffiness to suggest fur right from the start.
Step 2: Mapping the Values
-
Establish the darks:
Using a 4B pencil or charcoal, gently fill in the darkest areas: the ears, the nose, and the eye patches. Don’t press too hard yet; just establish where the deep shadows live. -
Detail the eyes:
Refine the eyes inside the dark patches. Leave a tiny, crisp white circle in each pupil for the catchlight—this spark of life is crucial. -
Define the nose:
Darken the nostrils and add a subtle gradient to the top of the nose leather to make it look slightly wet and three-dimensional.
Fixing “Flat” Fur
If the fur looks too flat, you likely over-blended. Use a sharp mechanical pencil to draw fresh, crisp hairs over the smooth gray areas to restore depth.
Step 3: Creating Fur Texture
-
Start the fur direction:
Observe how fur grows outward from the center of the face. Using sharp HB and 2B pencils, begin making short, flicking strokes that radiate from the nose bridge outward. -
Layering the lighter fur:
Working on the white areas of the face, use a hard pencil (H or HB) to create very faint texture. You don’t want these areas to look gray, just textured, so keep strokes sparse and light. -
Transitioning zones:
Where the white fur meets the black patches, overlay your pencil strokes. Let the black hairs flick into the white zone and vice-versa to create a soft, natural boundary rather than a hard line. -
Deepen the black fur:
Return to the ears and eye patches with a 6B or charcoal pencil. Use directional strokes to simulate dense, dark fur rather than a flat block of color. -
neck and chest shadows:
The fur beneath the chin is darker and shaggier. Use longer, heavier strokes here to show the shadow cast by the head and the texture of the thicker body fur.
Pro Tip: preserve whites
Place a scrap sheet of paper under your drawing hand. This prevents your palm from smudging the graphite into the pristine white areas of the panda’s face.
Step 4: Refining and Polishing
-
Blend for softness:
Use a blending stump to gently smudge the mid-tone areas around the nose and cheeks. This simulates the soft undercoat beneath the guard hairs. -
Re-establish texture:
Blending can flatten the drawing, so go back over the smudged areas with a sharp mechanical pencil to bring back crisp, individual hairs. -
Lift out highlights:
Take your kneaded eraser, pinch it into a fine edge, and ‘draw’ with it by lifting graphite out of the fur. This is perfect for the white hairs overlapping the dark neck area. -
Whisker details:
Add the final whiskers on the muzzle. Use quick, confident strokes that taper off at the ends so they don’t look like stiff wires. -
Final contrast check:
Step back and look at your drawing. Deepen the darkest shadows in the ears and neck one last time to ensure maximum contrast against the white paper.
Now you have a striking portrait that balances deep shadows with delicate textures
Sleeping Panda Curled Up
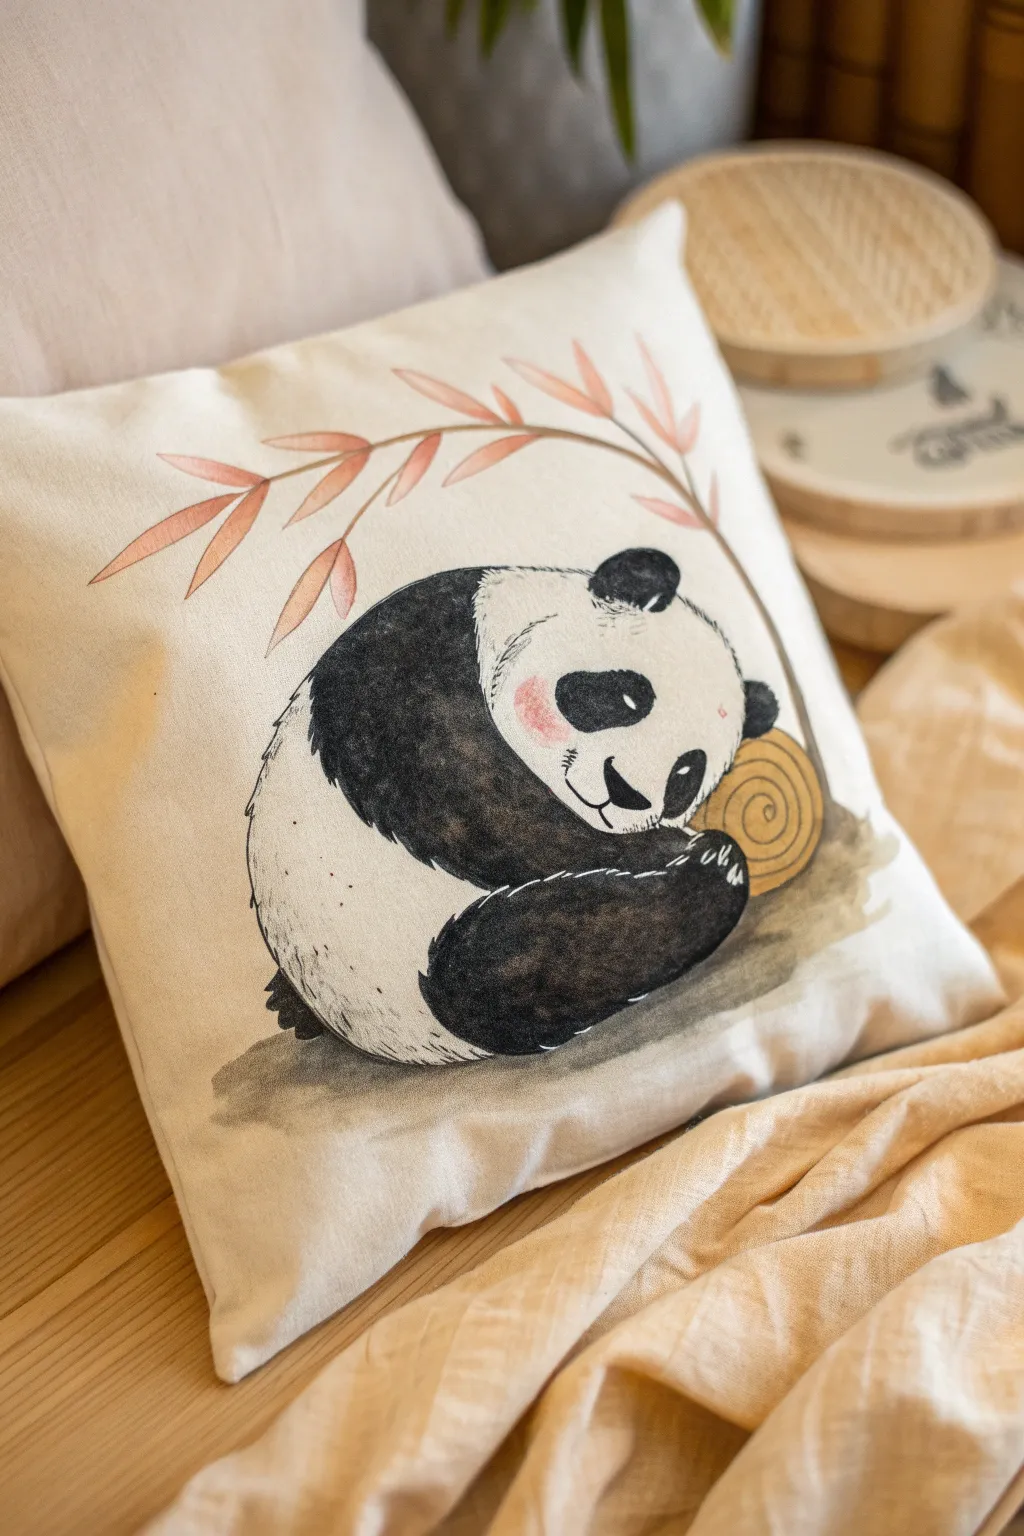
This charming project captures the peaceful serenity of a deep slumber with a curled-up panda resting beneath gentle branches. Using fabric-friendly paints with a watercolor technique allows you to create soft, dreamy textures that are perfect for a decorative throw pillow.
Step-by-Step
Materials
- White or cream cotton/canvas pillow cover
- Fabric medium (mixed with paints or pre-mixed specific fabric paints)
- Acrylic paints (Carbon Black, Titanium White, Raw Umber, Burnt Sienna, Soft Pink)
- Round brushes (sizes 4, 8, and 12)
- Fine liner brush (size 0 or 00)
- Piece of cardboard (to insert inside pillow)
- Water container and palette
- Pencil and eraser
- Iron (for heat setting)
Step 1: Sketching Boundaries
-
Prepare the fabric:
Before starting, wash and dry your pillow cover to remove sizing. Insert a piece of cardboard inside the cover to prevent paint from bleeding through to the back side. -
Map the basic shape:
Lightly sketch a large oval shape in the lower center of the pillow using a pencil. This will be the main body of the curled-up panda. -
Define the limbs:
Sketch the legs and arms tucked inward. Ensure the back leg curves up towards the chin, creating that classic ‘ball’ shape pandas are famous for. -
Add facial guides:
Draw the head shape resting on the front paws. Mark positions for the eye patches, nose, and the small ears. -
Sketch the branch:
create a sweeping line arching over the panda from the left side. Add teardrop-shaped leaves hanging down gently.
Pro Tip: Watercolor Effect
To get that soft watercolor look on fabric, wet the fabric slightly with clean water before applying the paint. This encourages the pigment to bleed softly at the edges.
Step 2: Applying Base Layers
-
Mix the black tone:
Mix Carbon Black with fabric medium. I like to add a tiny touch of water to get an inky consistency that absorbs into the fabric like watercolor. -
Paint the dark fur:
Fill in the ears, eye patches, legs, and the band across the shoulders. Use the size 8 brush, letting the edges stay slightly rough to suggest fur texture. -
Create the white fur shading:
Mix a very dilute grey wash using a speck of black and lots of water/medium. Lightly paint the shadow areas on the white fur—specifically along the bottom of the belly and where the limbs overlap. -
Paint the log:
Mix Raw Umber and Burnt Sienna with medium. Paint the circular log end the panda is resting against, using concentric brush strokes to mimic wood rings.
Step 3: Adding Details and Texture
-
Refine the fur:
Switch to a smaller round brush (size 4). Using pure black, add short, flicking strokes at the edges of the black patches to make the fur look fluffy rather than solid. -
Paint the face details:
Carefully fill in the nose and the tiny mouth line. Paint the dark pupils within the eye patches, leaving a tiny dot of white fabric showing for a highlight if possible (or add white paint later). -
Add the blush:
Dilute the Soft Pink with plenty of medium to make a transparent glaze. Gently dab this onto the cheek area for a rosy, sleepy glow. -
Paint the branch:
Using a thin mix of Burnt Sienna, paint the arching stem of the branch above the panda. -
Color the leaves:
Mix Soft Pink with a tiny bit of Burnt Sienna for a dried-rose color. Fill in the leaves, pressing the brush down at the base and lifting at the tip to create points.
Troubleshooting: Paint bleeding
If paint bleeds outside your lines, use a clean, stiff brush dipped in water to scrub the edge gently, then dab with a paper towel. Do this immediately while wet.
Step 4: Final Touches
-
Add ground shadows:
Create a watery wash of grey-brown. Paint a loose, horizontal shadow underneath the panda creates a sense of weight and grounding. -
Detail with ink lines:
Once the paint is dry, take your fine liner brush with slightly watered-down black paint. Add very subtle outline definitions to the paws and the separate fur sections. -
Enhance texturing:
Add tiny dot stippling on the white fur areas to suggest density without darkening the whole shape. -
Heat set the design:
Let the pillow dry completely (at least 24 hours). Iron on the reverse side (or use a pressing cloth) according to your fabric medium’s instructions to make the artwork permanent.
Once heat-set, fluff up your pillow and enjoy the peaceful vibe this cute panda brings to your room.

PENCIL GUIDE
Understanding Pencil Grades from H to B
From first sketch to finished drawing — learn pencil grades, line control, and shading techniques.
Explore the Full Guide
Mother and Cub Panda Duo
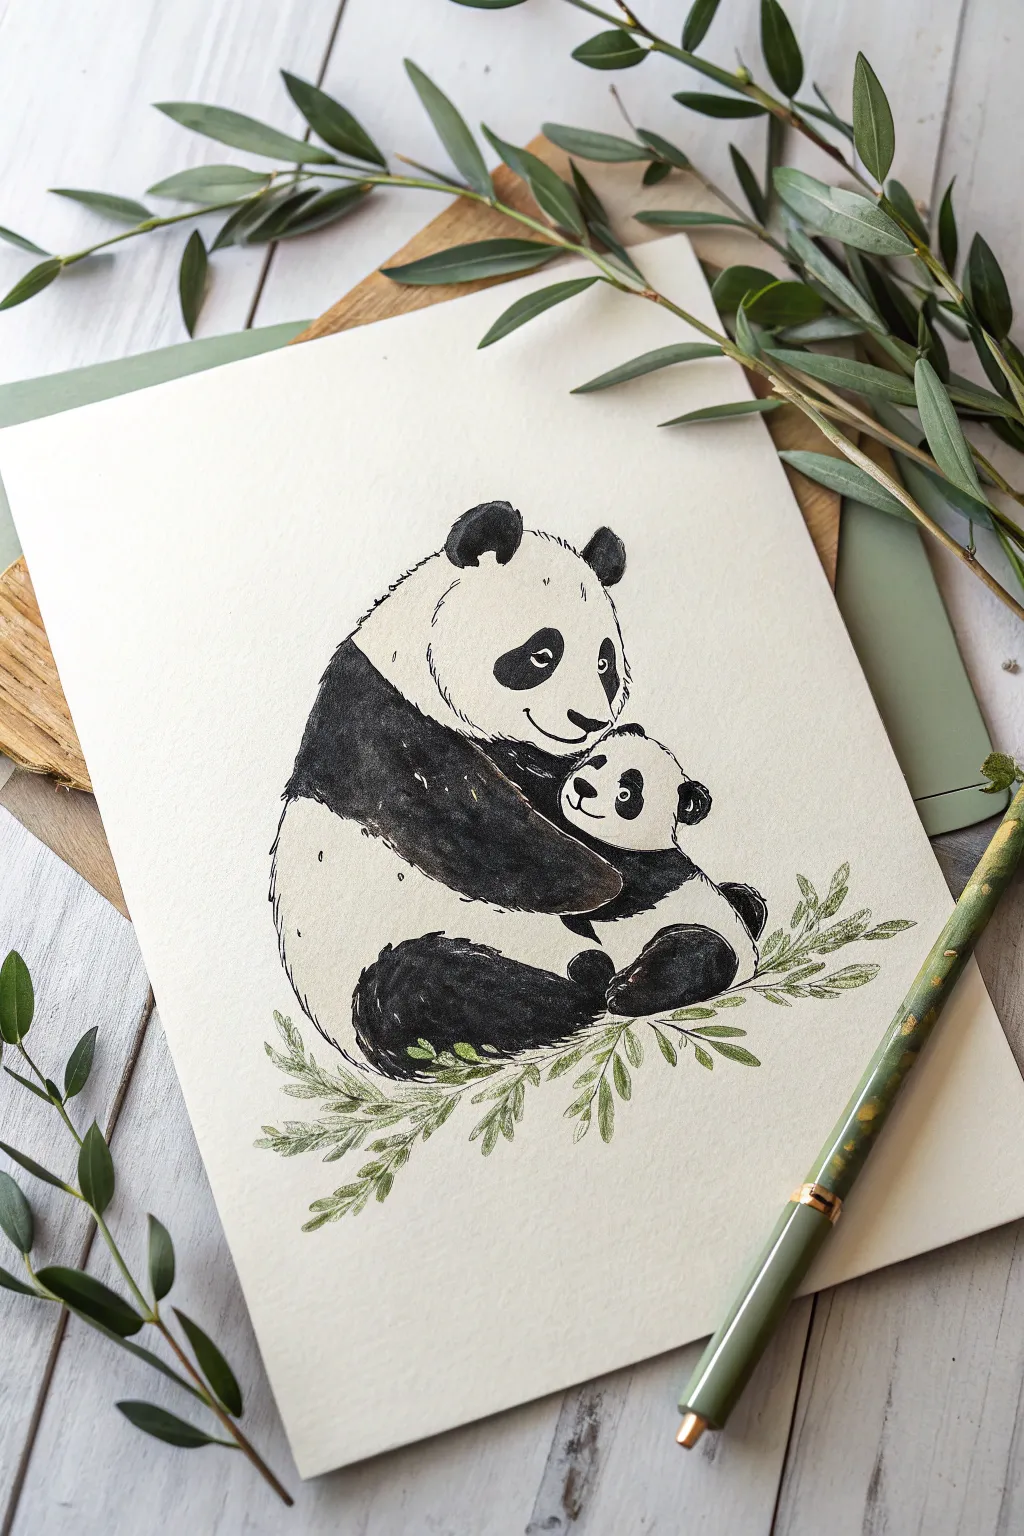
Capture the tender bond between parent and child with this heartwarming panda duo illustration. Using a combination of watercolor washes and fine ink details, you’ll create a soft, textured piece that feels both organic and charming.
How-To Guide
Materials
- Cold press watercolor paper (A4 or slightly smaller)
- Black watercolor paint or black india ink
- Sap green and olive green watercolor paints
- Round watercolor brushes (size 6 for washes, size 2 for details)
- Fine liner pen (0.3mm or 0.5mm, waterproof black)
- HB pencil for sketching
- Kneaded eraser
- Clean water and paper towels
Step 1: Sketching the Composition
-
Outline the main shapes:
Start by lightly sketching a large, rounded oval for the mother panda’s body in the center of your paper. Add a slightly smaller circle on top for her head. -
Add the cub:
Draw a smaller oval shape nestled against the mother’s chest to represent the baby panda. Position the cub’s head so it looks like it’s resting on the mother’s arm. -
Refine the features:
Sketch the characteristic panda eye patches, small ears, and noses. Draw the mother’s arm wrapping protectively around the cub’s back. -
Foliage placement:
Lightly mark out where the leafy branches will go beneath the pandas. Keep these lines very faint as they will guide your painting later. -
Clean up the sketch:
Use your kneaded eraser to roll over the graphite, lifting up excess lead until only a ghost of the image remains. This prevents pencil marks from showing through the paint.
Step 2: Painting the Pandas
-
First black wash:
Load your size 6 brush with diluted black watercolor or ink. Paint the main black areas: the mother’s ears, eye patches, and the broad band across her shoulders. -
Deepening the blacks:
While the first layer is still slightly damp, drop in concentrated black pigment into the center of the dark patches to create depth and texture. -
Painting the cub:
Switch to a smaller brush to paint the cub’s ears, eye patches, and little legs. Be careful to leave small white highlights in the eyes to give them life. -
Adding texture:
Use a nearly dry brush with a small amount of grey-black paint to scumble texture along the edges of the black fur. This dry-brush technique mimics the look of fuzzy fur rather than a smooth edge. -
Defining the white fur:
Mix a very watery, pale grey wash. Add subtle shadows under the mother’s chin and where her arm overlaps the body to define the white fur shapes without coloring them in.
Dry Brush for Fur
Don’t wet the paper before painting the black fur. Using drier paint on dry paper creates rough, jagged edges that look much more like real animal fur than smooth lines.
Step 3: Inking and Foliage
-
Ink outlines:
Once the paint is completely dry, use your waterproof fine liner to loosely outline the pandas. Keep your line broken and scratchy to suggest fur texture. -
Fur details:
Add small, quick hatching marks inside the black painted areas and along the edges of the white fur. I find this creates a nice transition between the stark black and white areas. -
Painting the leaves:
Mix olive green and sap green watercolors. Using the tip of your round brush, paint simple, almond-shaped leaves clustering around the base of the pandas. -
Layering greenery:
While the green is wet, touch a slightly darker green into the base of the leaves where they meet the stem for a natural gradient. -
Stem work:
Use your finest brush or the green paint on the very tip of your brush to connect the leaves with thin, delicate stems. -
Final ink touches:
Add a few tiny ink strokes to the leaves for veins, and darken the pupils of the pandas’ eyes one final time to make them pop.
Muddy Whites?
If your white fur areas look grey or muddy, you likely overworked the shadow wash. Let it dry completely, then use white gouache to reclaim the brightest highlights.
Allow your artwork to dry fully before erasing any remaining pencil marks to reveal your adorable panda family portrait
Minimalist Panda With Ink-Wash Feel
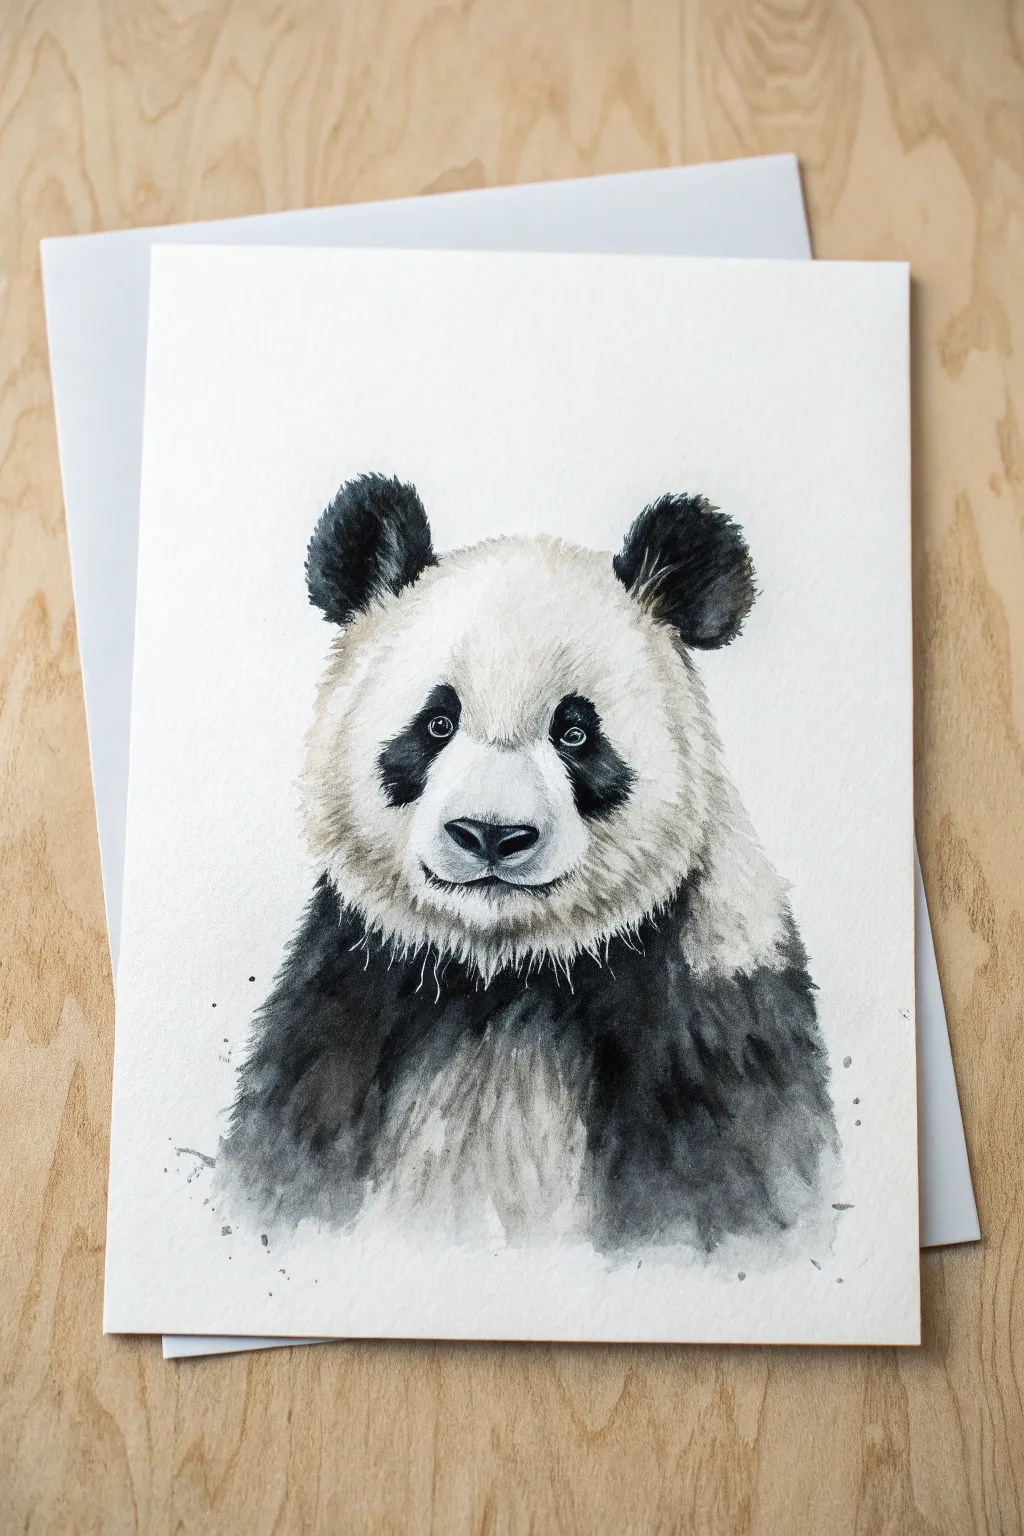
Capture the gentle spirit of a giant panda with this expressive ink-wash style painting. By balancing precise facial details with loose, watery fur textures, you can create a piece that feels both realistic and delightfully artistic.
Step-by-Step Tutorial
Materials
- Cold-pressed watercolor paper (300 gsm)
- Black watercolor paint or India ink
- Payne’s Grey watercolor paint (optional for cooler tones)
- Small round brush (size 2 or 3) for details
- Medium round brush (size 6 or 8) for washes
- Mixing palette
- Two jars of water (clean and dirty)
- Paper towels
- Pencil (HB or H) for sketching
Step 1: Sketching the Foundations
-
Outline the head shape:
Begin with a very light pencil sketch on your watercolor paper. Draw a large, slightly flattened oval for the head. Keep your lines faint so they won’t show through the translucent paint later. -
Mark facial features:
Lightly sketch the distinct kidney-bean shapes for the black eye patches. Place a small, rounded triangle for the nose in the lower third of the face, and indicate the mouth line just below it. -
Indicate the ears and body:
Add two rounded ears on the top corners of the head. Roughly sketch the shoulder line sloping down from the neck to define the upper body mass.
Step 2: Painting the Face
-
First layer of the eyes:
Mix a diluted black wash (light grey). Using your small brush, paint the eye patches, leaving the actual eyeball white for now. Let the edges be slightly soft, not hard lines. -
Darkening the patches:
While the first layer is still slightly damp, drop in concentrated black paint into the center of the eye patches. Let it bleed naturally outward to create that fuzzy fur texture. -
Painting the eyes:
Once dry, paint the actual eyes jet black, leaving a tiny, crisp white circle in each for the highlight. This spark of life is crucial for the panda’s expression. -
Nose and mouth details:
Paint the nose with a solid black mix, leaving a small sliver of unpainted paper on the top ridge for a highlight. Use the tip of your small brush to paint the thin, smiling mouth line.
Bleeding too much?
If the black paint spreads uncontrollably into the white face, your paper is too wet. Lift excess water with a corner of a paper towel and let it dry slightly before adding more pigment.
Step 3: Creating Fur Texture
-
Wet the ear area:
Move to the ears. Paint the shape with clean water first, then touch your loaded brush of black paint to the wet area. Watch the pigment bloom and fill the shape organically. -
Feather the edges:
While the ears are wet, use a clean, damp brush to gently pull tiny flicks of paint outward from the edges to simulate fluffy fur tufts. -
Establish the neck shadow:
Mix a very watery grey wash. Paint loosely under the chin to create a shadow that separates the head from the body. Keep this uneven to suggest layers of fur. -
Start the body wash:
Load your medium brush with a dark grey-black mix. Apply it boldly to the shoulder and chest area. I find that holding the brush further back on the handle helps keep these strokes loose and energetic. -
Dry brush technique:
As your brush runs out of paint, drag it across the lower body edges. The texture of the paper will catch the remaining pigment, creating a rough, fur-like effect. -
Deepen the blacks:
While the body wash is damp, drop pure black ink or paint into the darkest shadow areas—specifically right under the neck ruff and the sides of the shoulders. -
Add spatter details:
Tap your paint-loaded brush against your finger to flick tiny droplets of grey paint around the bottom of the body. This adds to the artistic, ink-wash aesthetic.
Pro Tip: Depth of Color
Mix a tiny touch of blue or brown into your black paint. Pure black can look flat, but a cool or warm undertone makes the dark fur look much richer and more realistic.
Step 4: Final Touches
-
Refine the white fur:
Though most of the face remains white paper, mix a barely-there grey wash to add faint shadows around the muzzle to give it 3D fullness. -
Connect the textures:
Use a very fine brush with semi-dry black paint to draw tiny little hair lines where the black patches meet the white fur, softening any transitions that look too harsh. -
Final assessment:
Step back and check the contrast. If the black areas have dried too light (watercolor often fades as it dries), glaze over them with another layer of dark paint to get that deep, velvety look.
Allow your painting to dry completely before framing it to showcase your charming new artwork


Pastel Background Panda Pop

Capture the magic of a starry night with this charming mixed-media project featuring a panda gazing out from a pastel galaxy. This tutorial combines wet-on-wet watercolor techniques for the background with precise ink detailing for a lovable, fluffy subject.
Step-by-Step Guide
Materials
- Cold press watercolor paper (300 gsm)
- Watercolor paints (Pink, Purple, Indigo/Dark Blue, Teal)
- Black waterproof fine liner pen or India ink
- White opacity gouache or white gel pen
- Synthetic watercolor brushes (medium round and fine detail)
- Masking tape
- Pencil and eraser
- Water cups and paper towels
Step 1: Setting the Scene
-
Prepare your canvas:
Tape down all four edges of your watercolor paper to a board using masking tape. This creates that crisp white border seen in the final piece and prevents the paper from buckling under heavy washes. -
Draft the sketch:
Lightly sketch the outline of the sitting panda in the lower center of the page. Keep your lines faint, focusing on the round head, the pear-shaped body, and the position of the legs. Add a simple horizon line near the bottom for the snowy ground. -
Map the patterns:
Outline the panda’s black patches—around the eyes, the ears, the band across the shoulders, and the legs. Don’t worry about fur texture yet; just get the shapes right. -
Mask the subject:
If you are worried about paint bleeding into the panda, you can apply a thin layer of masking fluid over the panda shape. Alternatively, just paint carefully around the pencil lines in the next steps.
Step 2: The Pastel Sky
-
Wet the background:
Using a clean brush and clear water, wet the entire sky area above the horizon line, avoiding the panda shape. The paper should be glistening but not forming puddles. -
Apply the first wash:
Drop in soft pinks and lavenders while the paper is still wet. Let the colors bleed and bloom naturally to create cloud-like formations. -
Deepen the galaxy:
While the paper is damp, introduce darker purple and hints of indigo near the top edges and corners. This creates depths and makes the galaxy feel vast. -
Paint the ground:
Once the sky is slightly settled but maybe not fully dry, paint the ground area with a very diluted teal or ice blue. Keep it pale to represent shadowed snow.
Fixing “Cauliflowers”
If water blooms ruin your flat wash, don’t panic. Wait for it to dry, then gently scrub the edge with a damp stiff brush to soften it, or simply splatter more white stars over the uneven area.
Step 3: Creating the Stars
-
Create speckles:
While the sky is drying, you can flick tiny droplets of clean water onto the damp paint. This pushes the pigment away, creating soft, star-like blooms. -
Add bright stars:
Wait for the background to dry completely. Load a stiff brush with white gouache or acrylic ink and tap the handle to splatter white dots across the purple and pink sky. -
Include dark contrast:
Add a few splatters of watered-down black watercolor or ink to the sky area for artistic contrast and depth.
Pro Tip: Fur Texture
Don’t outline the entire panda in a solid line. Use broken, feathery strokes with your pen or brush tip. This implies softness and fluffiness far better than a continuous hard contour.
Step 4: Bringing the Panda to Life
-
Fill the black shapes:
Using black watercolor or ink, fill in the ears, eye patches, arms, and legs. Use a brush with a fine tip to flick outward at the edges, simulating fluffy fur texture. -
Define the face:
Within the black eye patches, leave small white circles for the eyes, or paint them back in later with white gouache. Add the small nose and mouth with a fine liner pen. -
Texture the white fur:
The white parts of the panda shouldn’t be stark white. Use a very diluted mix of black and blue to paint subtle shadows on the belly and under the chin. Add tiny dashed lines to suggest fur direction. -
Refine the edges:
Go back over the transition areas between black and white fur. Use your fine liner or a dry-brush technique with black paint to pull tiny hairs from the dark areas into the light areas.
Step 5: Final Touches
-
Add greenery:
Paint simple sprigs of leaves on either side of the panda using a muted green watercolor. I find that keeping these stylized and simple directs the focus back to the animal. -
Outline the plants:
Once the green paint is dry, loosely outline the leaves and stems with your fine black pen to match the illustrative style of the panda. -
Highlight the eyes:
Use a white gel pen or a dot of thick white gouache to add a tiny ‘catchlight’ reflection in each eye. This single step creates the panda’s soulful expression. -
Reveal the border:
Wait until the painting is bone dry—touch it with the back of your hand to check. Peel the masking tape away slowly at a 45-degree angle.
Frame your gentle giant to add a peaceful, dreamy vibe to any room
Geometric Panda in Flat Shapes
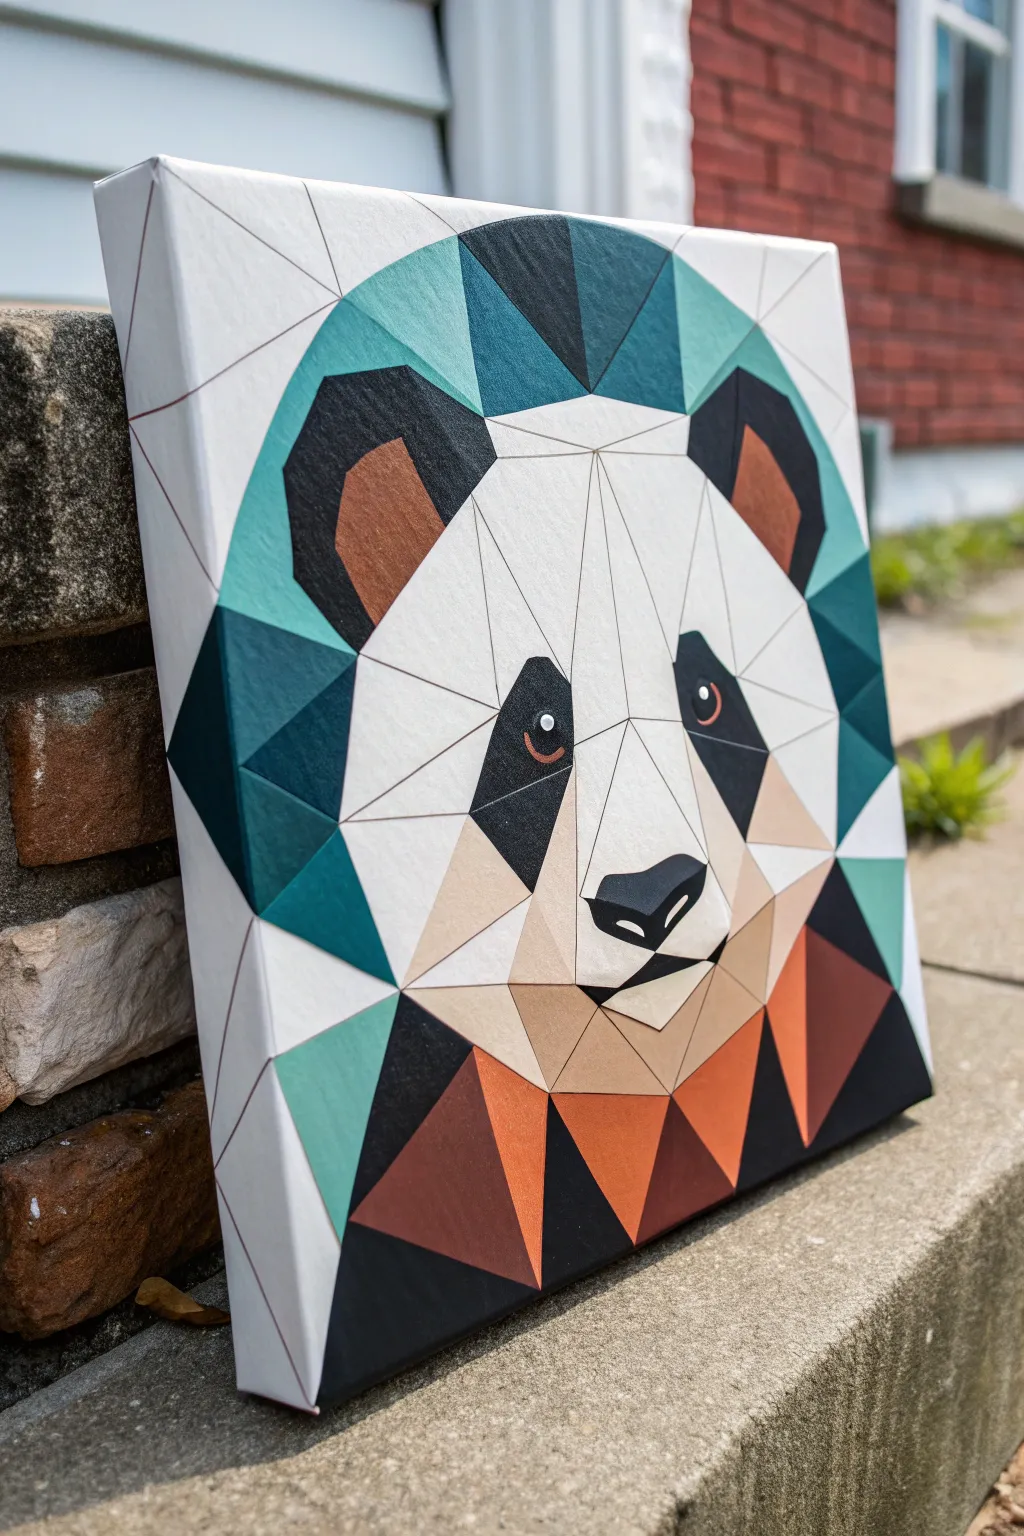
Bring modern, angular style to your walls with this striking geometric panda portrait. By breaking the animal’s gentle features into sharp, colorful facets, you create a dimensional look that feels both playful and sophisticated.
Step-by-Step Tutorial
Materials
- Square stretched canvas (12×12 or larger)
- Acrylic paints (Titanium White, Mars Black, Burnt Sienna, Teal/Turquoise, Beige/Skin Tone)
- Painter’s tape or masking tape (narrow width is best)
- Pencil and ruler
- Synthetic flat brushes (angled and straight)
- Small round detail brush
- Palette or mixing plate
- Graphite transfer paper (optional)
Step 1: Planning and Sketching
-
Prime the Surface:
Ensure your canvas is clean and ready. Apply a coat of gesso if the canvas isn’t pre-primed, or paint the entire surface a solid white base coat to ensure your later colors pop. -
Map the Midpoint:
Use your ruler to lightly mark the exact center of the canvas. This central vertical line will serve as the symmetry guide for the panda’s face. -
Draft the Framework:
Start drawing the panda using only straight lines. Begin with a large hexagon-like shape for the head, then add angular triangles for the ears. Keep your pencil pressure very light so lines can be erased or painted over later. -
Subdivide into Facets:
Break the large shapes down into smaller triangles and polygons. Draw lines radiating from the nose bridge outward to the cheeks. Think of it like connecting dots; these lines will become the borders between your different colors. -
Refine the Eyes and Nose:
Draw the black eye patches as angular polygons rather than rounded blobs. Sketch the nose as an inverted geometric shape, adding a small triangular highlight area.
Clean Lines Hack
Apply a thin layer of clear matte medium over your tape edges before painting your color. This seals the tape and ensures absolutely zero paint bleeds underneath.
Step 2: Painting the Design
-
Tape the Darkest Shapes:
To get those razor-sharp edges, apply painter’s tape along the outlines of the black sections—the ears, eye patches, and lower neck area. Press the tape edges down firmly to prevent bleed. -
Fill the Black Areas:
Load a flat brush with Mars Black and fill in the taped sections. Paint inward from the tape edge to minimize seepage. Let this dry completely before peeling the tape away. -
Mix Your Palette:
Prepare your teal shades. Mix a pure teal, and then a slightly darker version (add a touch of black) and a lighter version (add white). Do the same for your browns and earthy reds. -
Apply the Cool Tones:
Identify the background facets and the ‘shadow’ side of the panda’s head. Paint these geometric shards with your various teal mixtures. I like to alternate light and dark shades next to each other to create the illusion of depth. -
Paint the Warm Facets:
Move to the rust and brown sections on the inner ears and neck. Use the Burnt Sienna mixes here. Use a clean, angled flat brush to cut in sharp lines against the already dried black areas. -
Fill the Face:
Paint the main facial area with white. For the sections below the eyes and near the nose, mix a very pale grey or beige to suggest shadows and dimension in the snout. -
Detail the Eyes:
Switch to your smallest round brush. Carefully paint a small brown iris inside the black patch, then add a tiny dot of pure white for the catchlight. This brings the character to life immediately.
Go Metallic
Swap the teal or brown paint for metallic copper or gold leaf on just a few specific triangles. It adds a stunning, light-catching shift to the modern design.
Step 3: Refining and Finishing
-
Touch Up Lines:
Once the main blocks of color are dry, inspect your edges. If any paint bled or lines are wobbling, use a small brush with the appropriate color to straighten them out. The key to this style is crisp intersections. -
Add Subtle Outlines:
Take a very diluted grey paint or a fine-tip grey marker. Very lightly trace the geometric divisions on the white sections of the face. This faint ‘net’ reinforces the polygon aesthetic without being overpowering. -
Paint the Canvas Sides:
Extend the design around the edges of the canvas. Continue the lines of the background shapes (the teal and white polygons) over the side so the artwork looks finished from every angle. -
Final Varnish:
Allow the painting to cure for at least 24 hours. Apply a layer of matte or satin varnish to unify the sheen and protect those crisp geometric edges from dust.
Hang your masterpiece in a well-lit spot where the sharp angles can be admired
Panda With Floral Crown
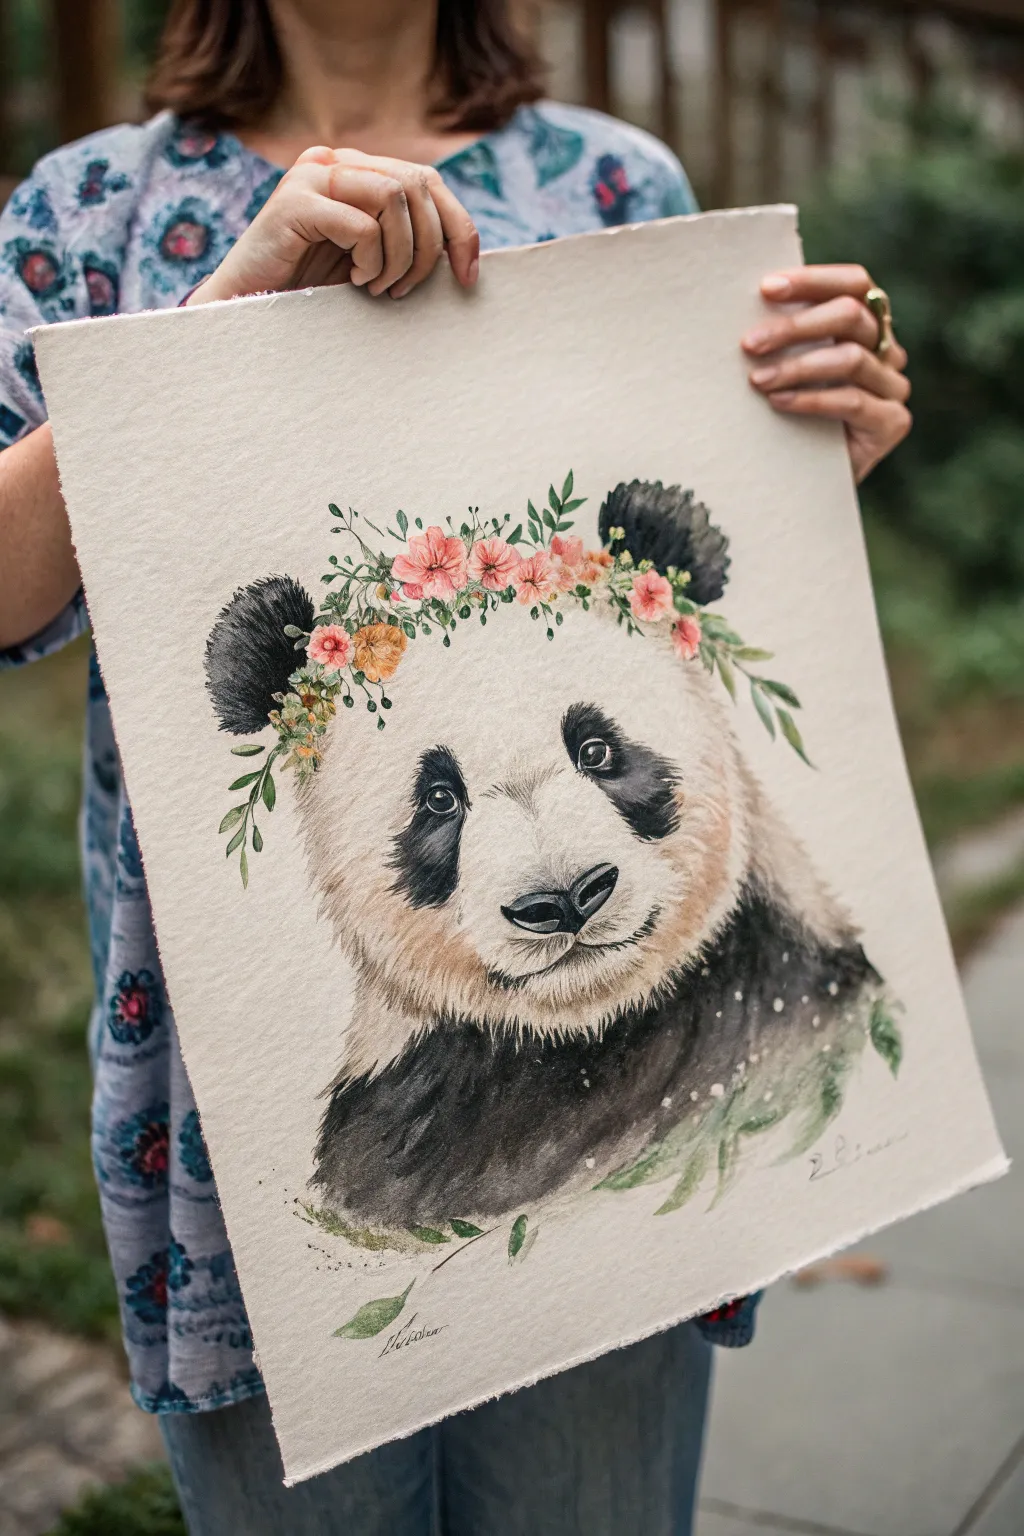
Capture the gentle spirit of a giant panda adorned with a delicate crown of pink blossoms and greenery. This watercolor project focuses on soft fur textures and intricate floral details to create a portrait full of personality and charm.
Step-by-Step
Materials
- Cold press watercolor paper (deckled edge optional but recommended)
- Watercolor paints (Payne’s Grey, Lamp Black, Burnt Sienna, Sap Green, Opera Pink, Raw Umber)
- Round brushes (sizes 2, 6, and 10)
- Fine liner brush or rigger brush
- HB Graphite pencil and kneadable eraser
- White gouache or white gel pen
- Two jars of water
- Paper towels
Step 1: Sketching the Foundations
-
Outline the head shape:
Begin with a light graphite sketch to establish the panda’s large, round head. Don’t press too hard; you want the lines to be barely visible. Mark the center of the face to help with symmetry. -
Place facial features:
Sketch the classic panda eye patches—they are slightly kidney-bean shaped and angle downwards. Position the triangular nose and the simple mouth line below it. -
Map the floral crown:
Lightly draw the general shape of the flower crown across the forehead. Sketch small circles for the main blossoms and flowing lines for the leaves and vines that will drape down the sides.
Muddy Fur Fix
If your black fur looks like a solid blob, wait for it to fully dry. Then, use white gouache on a fine dry brush to flick ‘hairs’ back over the dark areas to restore texture.
Step 2: Painting the Fur
-
First wash of fur:
Mix a very dilute wash of Burnt Sienna and a tiny touch of black to create a warm, creamy off-white shade. Using a size 10 brush, apply this to the white areas of the face, keeping the edges soft and leaving the paper white around the muzzle for highlights. -
Base layer for dark patches:
While the face dries, mix Payne’s Grey with a little Lamp Black. Apply a wet wash to the ears and the neck area below the chin. Let the pigment bleed slightly into the textured paper to suggest soft fur. -
Defining the eye patches:
Use a size 6 brush to fill in the black eye patches. Keep the edges ragged and uneven to mimic fur texture rather than a smooth, solid shape. Leave the actual eyes unpainted for now. -
Layering fur texture:
Switch to a smaller brush with a drier mix of black and grey. Use short, flicking strokes to build up the fur density on the ears, neck, and around the eye patches. Pay attention to the direction the hair would naturally grow. -
Adding warmth:
I like to glaze a tiny amount of Raw Umber on the cheeks and under the chin once the initial layers are dry. This adds dimension and makes the panda look less flat.
Step 3: Bringing the Face to Life
-
Painting the eyes:
Fill the small round eye shapes with concentrated black paint. Leave a tiny speck of white paper for the catchlight, or add it later with white gouache. -
Detailing the nose:
Paint the nose using a dark grey mix, leaving a small sliver of lighter value on the top edge to show wetness and form. Use pure black for the nostrils. -
Refining the mouth:
Using your finest brush, paint the mouth line and add small, stippled dots on the muzzle to suggest whisker follicles.
Make It 3D
For a mixed-media twist, use real pressed flowers glue-dotted onto the paper instead of painting them, creating a beautiful tactile crown.
Step 4: Creating the Floral Crown
-
Base flowers:
Mix a watery Opera Pink and dab in the main flower shapes individually. Let the color vary in intensity—some petals should be pale, others more saturated. -
Adding greenery:
With Sap Green and a size 2 brush, paint small leaves tucked between the flowers. Add trailing vines that extend slightly down the sides of the face, following your initial sketch. -
Flower centers and details:
Once the pink petals are dry, add tiny yellow or orange dots to the centers. Use a fine liner to add delicate stems connecting the greenery. -
Connecting to the head:
Soften the bottom edge of the floral crown where it meets the fur using a clean, damp brush so the flowers look like they are resting in the hair, not floating above it.
Step 5: Final Touches
-
Deepening shadows:
Revisit the black fur areas. Add one final layer of the darkest black to the deepest shadows under the chin and at the base of the ears to create high contrast. -
Atmospheric splatter:
Load a brush with white gouache and gently tap it against another brush handle to sprinkle snowy specks over the dark fur on the neck and lower section. -
Bottom foliage:
Paint a few loose, ghostly green leaves at the very bottom right of the panda’s chest to fade the portrait out organically.
Step back and admire the gentle expression of your floral-crowned creation
Triptych Split Panda Face
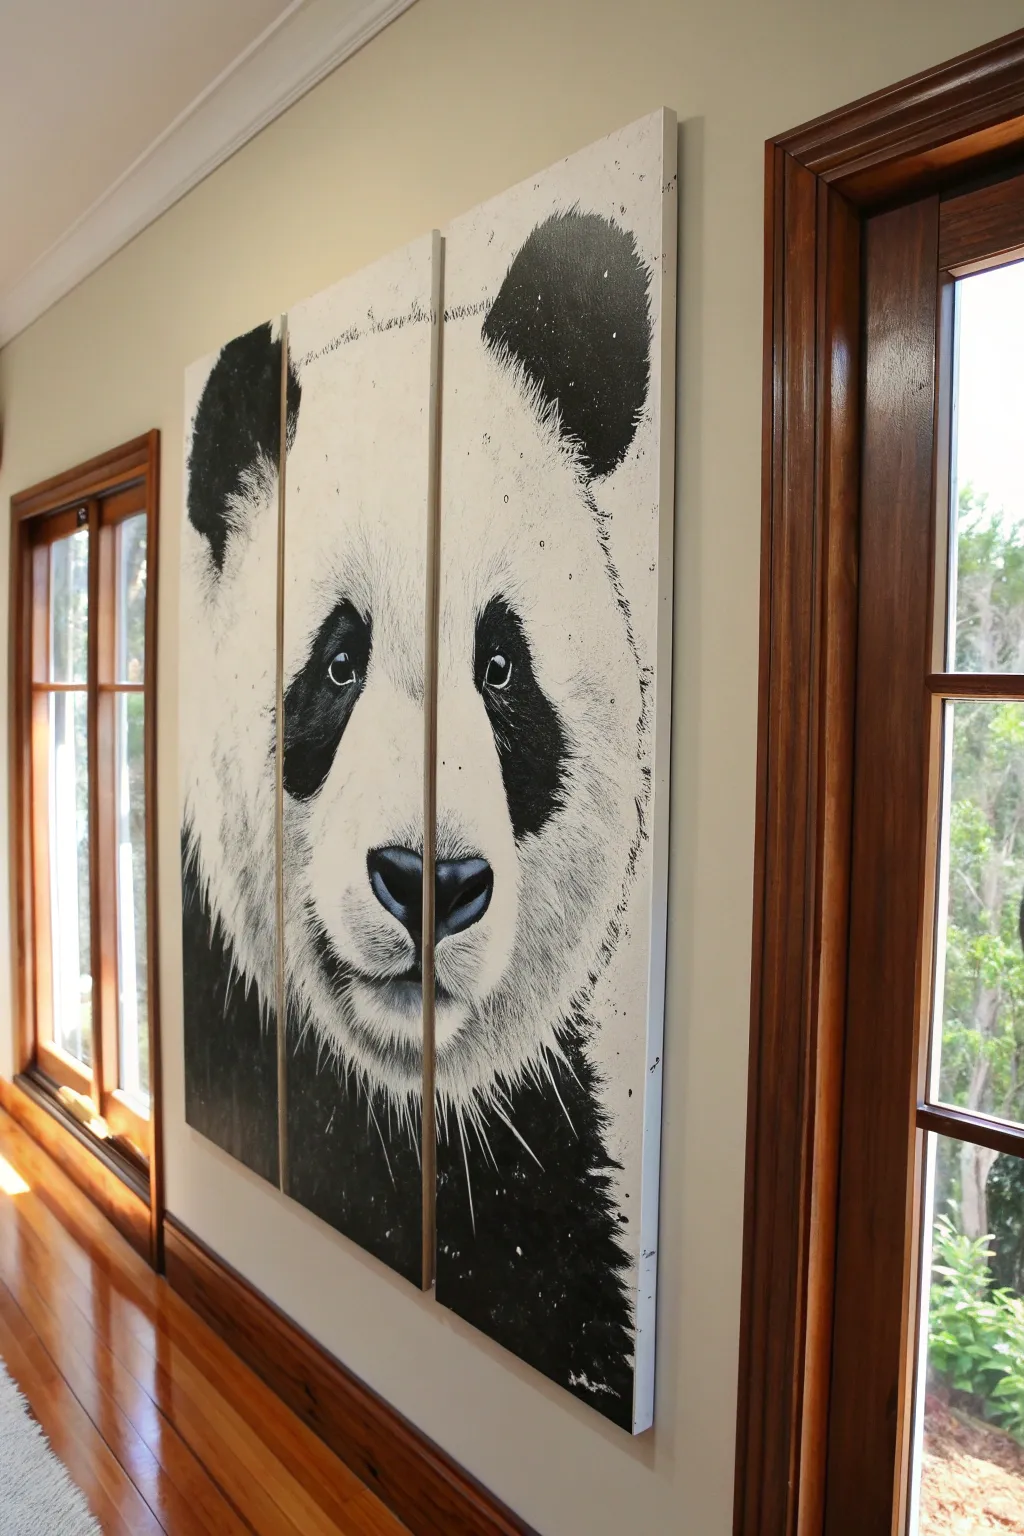
Transform a blank wall into a bold statement piece with this three-panel panda portrait. By splitting the image across three canvases, you create a modern, gallery-worthy installation that emphasizes the striking contrast of black and white.
Step-by-Step Tutorial
Materials
- 3 large vertical canvases (same size, e.g., 24×48 inches)
- Acrylic paint (Mars Black, Titanium White)
- Small amount of glazing medium or water
- Large flat brushes (2-3 inch)
- Medium filbert brushes
- Fine liner brush
- Charcoal stick or soft pencil
- Easel or large drop cloth for floor work
- Reference photo of a panda face
- Masking tape
- Old toothbrush (for splatter)
Step 1: Preparation and Sketching
-
Arrange the Canvases:
Lay your three canvases side-by-side on the floor or mount them closely on a wall. Leave a very small gap (about half an inch) between them to simulate how they will hang, ensuring your sketch flows naturally across the breaks. -
Prime the Surface:
Apply a coat of Titanium White across all three panels if they aren’t pre-primed. Even if they are, a fresh coat helps the sketching medium adhere better and gives you a smooth starting point. -
Draft the Outline:
Using a charcoal stick or soft pencil, lightly sketch the panda’s face. Focus on big shapes first: the massive round head, the placement of the ears, and the iconic eye patches. Don’t worry about fur texture yet; just get the proportions right. -
Mark the Splitting Points:
Pay special attention to where the image crosses from one canvas to the next. The nose usually bridges the center gap, while ears often sit on the outer panels. Step back frequently to ensure the face looks cohesive despite the gaps.
Pro Tip: The Flow
When painting across the gap, physically push the canvases together to paint the bridging strokes (like the nose or chin), then separate them immediately so they don’t stick.
Step 2: Blocking in Values
-
Mix Your Blacks:
Squeeze out a generous amount of Mars Black. For the deepest shadows (like the pupils and the darkest parts of the ears), use the paint straight from the tube for maximum opacity. -
Paint the Deepest Darks:
Using a large flat brush, fill in the solid black areas: the ears, the main shapes of the eye patches, and the shadowed neck area. Keep your edges somewhat loose and organic rather than perfectly sharp. -
Create Grey Washes:
Mix a small amount of black with water or glazing medium to create a transparent grey wash. Use this to softly denote the shadows under the chin and around the muzzle, building up the panda’s form without making it solid black. -
Refine the Eyes:
Switch to a medium filbert brush. Inside the black eye patches, paint the actual eyes. You’ll need dark browns or blacks for the iris, but leave a small spot of bare white canvas (or paint it white later) for that crucial catchlight that brings the panda to life.
Step 3: Detailing and Texture
-
Feather the Edges:
Now, address the transition between the black patches and the white face. Using a ‘dry brush’ technique with very little black paint, flick the brush outward from the black areas to create the look of coarse fur. -
Shoulder and Neck Fur:
For the heavy black fur at the bottom (the shoulders), use long, sweeping strokes. Let the brush run out of paint at the end of the stroke to create jagged, fur-like tips. -
Add White Highlights:
Clean your brush thoroughly. taking pure Titanium White, paint fur strands *into* the black areas. This reverse painting technique adds depth and makes the fur look layered, especially around the ears and chin. -
Detail the Nose:
Paint the nose black, but while it’s wet, mix in a tiny touch of white to create a soft grey highlight on the top ridge. This gives the nose a wet, leathery 3D appearance. -
Refine the Whiskers and Hairs:
Using your fine liner brush and thinned black paint (ink consistency), add delicate individual hairs around the muzzle and eyes. Quick, confident flicks work best here so lines don’t look shaky.
Trouble with Fur?
If your fur looks too stiff or like wire, your paint is likely too thick. Thin it slightly with water to get longer, tapered strokes that look softer.
Step 4: Expressive Finishes
-
Loose Splatter Effect:
To mimic the artistic, slightly messy style of the original, load an old toothbrush with watery black paint. Run your thumb over the bristles to flick tiny speckles around the ears and outer edges. I prefer to practice on scrap paper first to control the spray. -
Adding Textural Noise:
You can also add a few deliberate drips or larger spots of black in the white negative space to enhance the painterly, contemporary feel. It keeps the piece from looking too photographic or stiff. -
Paint the Canvas Sides:
Don’t forget the edges! Paint the sides of the canvases either solid white or wrap the image around. For a triptych, painting the inner facing edges (where the canvases meet) a dark grey or black helps the image flow seamlessly. -
Final Varnish:
Once fully dry (give it at least 24 hours), apply a satin or matte varnish to protect the paint and unify the sheen across all three panels.
Hang your trio of canvases with precise spacing and enjoy the dramatic presence of your giant panda masterpiece.
Abstract Texture Panda With Palette-Knife Fur
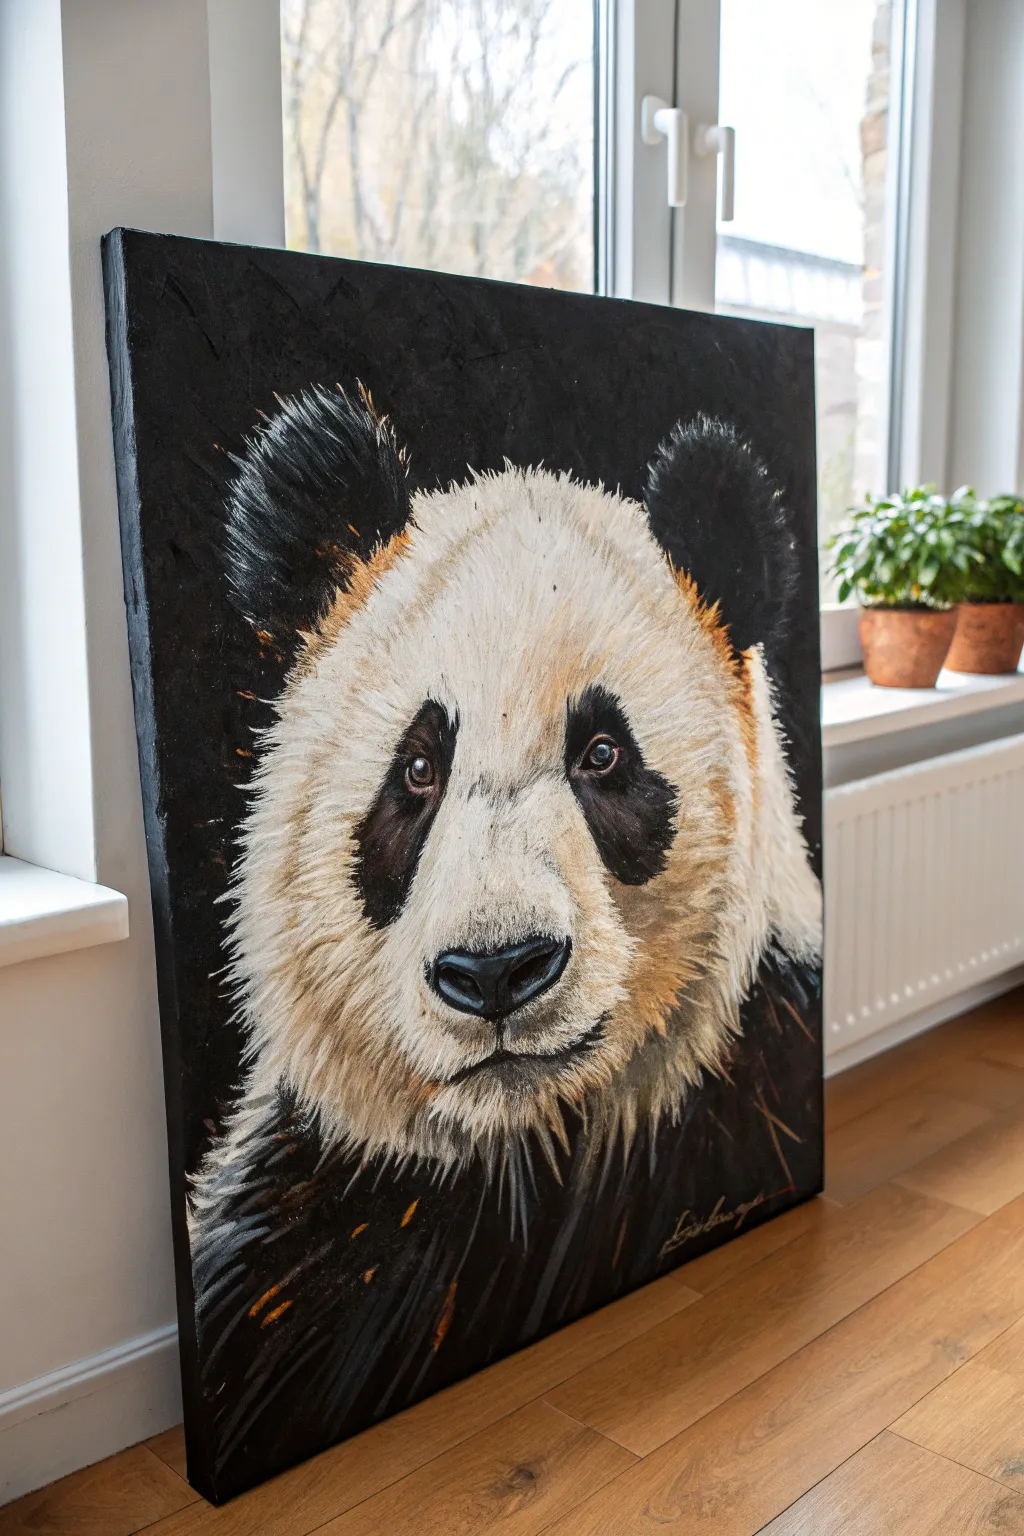
Capture the soulful expression of a giant panda with this impactful acrylic painting technique. By layering heavy body paint and utilizing both brushes and palette knives, you’ll create fur that looks touchably soft and dimensionally rich against a dramatic black background.
Detailed Instructions
Materials
- Large square canvas (approx. 24×24 inches or larger)
- Heavy body acrylic paints (Titanium White, Mars Black, Burnt Umber, Raw Sienna)
- Black gesso
- Large flat brush (2-inch)
- Medium filbert brush
- Small round detail brush (size 1 or 2)
- Palette knife (diamond shape)
- Fan brush (optional)
- Chalk or pastel pencil (white or gray)
- Water container and paper towels
Step 1: Preparation and Background
-
Prime the Surface:
Begin by covering your entire canvas with a solid coat of black gesso. This creates the deep, dramatic background and saves you from painting black around the panda later. -
Add Texture Layers:
While the gesso is still wet, use your palette knife to create random, rough textures, especially around the edges where the fur will fade out. Let this base layer dry completely. -
Sketch the Outline:
using a white chalk or light gray pastel pencil, lightly sketch the large oval shape of the panda’s head centered on the canvas. Mark the position of the ears, the eye patches, and the nose.
Muddy Fur Fix
If your white and black paint start mixing into gray mud, stop immediately. Let the current layer dry completely before adding fresh, clean strokes on top.
Step 2: Building the Head Structure
-
Block in Base Values:
Mix Titanium White with a tiny touch of Burnt Umber to create a warm, creamy off-white. Use a large flat brush to block in the main shape of the head, avoiding the eye patches and nose area. -
Define the Dark Areas:
Switch to Mars Black and fill in the ears and the general shape of the eye patches. Don’t worry about fur texture yet; just establish the solid dark shapes. -
Create Mid-Tones:
Mix Raw Sienna with White and a little Umber to get a warm, toasty tan color. Apply this roughly around the edges of the face and under the chin where shadows would naturally fall.
Step 3: Creating Fur Texture
-
Start the Palette Knife Work:
Load the edge of your palette knife with thick Titanium White. Drag the knife from the center of the face outward to simulate coarse, thick fur layers. -
Blend the Transitions:
Where the white fur meets the black ears and eye patches, use a dry filbert brush to pull the white paint slightly over the black edges, softening the transition. -
Add Warmth to the Fur:
Take a small amount of your Raw Sienna mix on the knife. Scrape it lightly over the cheek and forehead areas to create those subtle brownish highlights often seen in panda fur. -
Detail the Dark Fur:
Using a smaller brush or the tip of the knife, add streaks of black and dark brown into the white areas at the bottom of the neck to suggest the chest fur merging with the shadows.
Level Up: Gloss Varnish
Once fully dry (give it 72 hours for thick paint), apply a high-gloss varnish only to the eyes and nose to make them look permanently wet and alive.
Step 4: Refining the Features
-
Paint the Nose:
Use Mars Black to paint the nose shape. While wet, add a tiny dab of light gray or blue-gray to the top edge of the nose to make it look wet and three-dimensional. -
Develop the Eyes:
Inside the black eye patches, paint small, dark brown circles for the irises. Add a solid black pupil in the center of each. -
Add the Eye Sparkle:
This is crucial for life. Place a tiny, crisp dot of pure Titanium White in the upper quadrant of each pupil to create the reflection. -
Refine Eye Patches:
Use a small round brush to flick tiny black hairs outward from the eye patches into the white face fur, making the patches look organic rather than like perfectly painted circles.
Step 5: Final Touches
-
Highlight the Ears:
Dry brush a very small amount of dark gray or blue-black onto the tips of the ears to give them volume so they don’t look like flat silhouettes. -
Extending the Fur:
I like to take a clean palette knife and scratch through some of the wet paint at the outer edges of the face, revealing the black background underneath for a spiky, textured look. -
Add Whisker Indications:
Using thin, watery black paint and your smallest liner brush, add a few very subtle whisker dots or faint lines near the muzzle. -
Final Contrast Check:
Step back and assess. If the face looks too flat, add more pure white highlights to the center of the forehead and muzzle using thick impasto strokes.
Hang your finished masterpiece in a spot with good lighting to let those textures really pop


Have a question or want to share your own experience? I'd love to hear from you in the comments below!