
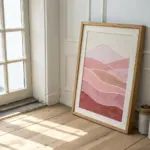
Purple acrylics are basically mood in paint form—soft and dreamy one minute, bold and dramatic the next. Here are my favorite purple acrylic painting ideas that make the most of those luscious violet gradients, silhouettes, and magical light.
Purple Twilight Gradient Sky

Capture the peaceful essence of dusk with this minimalist acrylic landscape featuring a soft, gradient sky. This large-scale canvas uses broad blending techniques to create a seamless transition from deep violet to a glowing horizon line.
Step-by-Step
Materials
- Large square stretched canvas (24×24 or 30×30 inch)
- Heavy body acrylic paints: Titanium White, Dioxazine Purple, Quinacridone Magenta, Ultramarine Blue, Mars Black
- Large flat wash brush (2-3 inch)
- Medium flat brush (1 inch)
- Palette knife for mixing
- Slow-drying medium or retarder
- Jar of water
- Paper towels
- Easel or flat working surface
Step 1: Preparing the Gradient Sky
-
Prepare the canvas:
Start by ensuring your canvas is clean and taut. While you can prime it with gesso if needed, most store-bought canvases are ready to go. Place the canvas on your easel or lay it flat on a table to prevent drips. -
Mix the sky colors:
On your palette, prepare four distinct puddles of paint for the sky gradient. Create a deep violet (Purple + touch of Blue), a mid-tone lavender (Purple + White), a soft pink-lilac (Purple + Magenta + White), and a pale sunset peach (White + tiny speck of Magenta). -
Add retarder:
Mix a small amount of slow-drying medium into each of your sky colors. This is crucial for achieving that smooth, blended look without the paint drying too quickly on the canvas. -
Apply the top band:
Using your large flat wash brush, apply the deep violet mixture across the top quarter of the canvas. Use long, horizontal strokes that go all the way from the left edge to the right edge. -
Apply the mid-tone:
Without cleaning the brush perfectly (wipe it slightly on a towel), pick up the mid-tone lavender. Apply this directly below the violet band, overlapping the wet edges slightly. -
Blend the upper transition:
Working quickly while both bands are wet, use long, sweeping horizontal strokes to blend the violet into the lavender. Go back and forth until the line between them disappears and becomes a soft transition. -
Introduce the pink tones:
Wipe your brush clean. Pick up the soft pink-lilac mixture and apply it below the lavender section. Again, overlap the wet paint above it. -
Blend the middle section:
Blend the pink-lilac into the lavender using the same long horizontal motion. If the paint feels too sticky or dry, mist the canvas very lightly with water. -
Create the horizon glow:
Finally, clean your large brush thoroughly. Apply the pale sunset peach color near the horizon line (about one-quarter up from the bottom). Blend this upward into the pink section to create a glowing effect. -
Final smooth:
Take a clean, dry soft brush and very gently sweep it across the entire sky horizontally. This feathering technique removes harsh brushstrokes and perfects the gradient. Let the sky dry completely.
Master the Blend
Keep a misting spray bottle handy. A very light mist of water over the canvas keeps acrylics workable longer, allowing for smoother, cloud-like gradients.
Step 2: Painting the Dark Foreground
-
Mix the shadow color:
Create a very dark, rich color for the ground. Don’t use straight black; instead, mix Mars Black with a significant amount of Dioxazine Purple and a touch of Ultramarine Blue. This keeps the shadows harmonious with the sky. -
Establish the horizon line:
Using the medium flat brush, carefully paint the horizon line. Keep it mostly straight but allow for a very gentle, subtle unevenness to suggest distant land rather than a sharp geometric line. -
Paint the distant hills:
Mix a slightly lighter version of your dark ground color by adding a little more purple and white. Paint a thin, low strip of distant hills right at the horizon line, softening the top edge into the sky. -
Block in the foreground:
Switch back to the darkest purple-black mixture. I find it helpful to load the brush heavily here. Fill in the entire bottom section of the canvas, ensuring solid, opaque coverage. -
Add subtle texture:
While the dark foreground is still slightly wet, use a dry brush to stipple or lightly drag horizontal streaks across the black. This adds a hint of texture, suggesting grassy plains or dark earth. -
Check the edges:
Don’t forget to paint the sides of your canvas! Wrap the image around the edges—continue the purple sky gradient on the top sides and the dark ground on the bottom sides for a finished, gallery-ready look. -
Final assessment:
Step back five feet. Check if the horizon line feels balanced. If the transition from sky to ground looks too sharp, you can glaze a very thin, watery layer of purple over the meeting point once it’s dry.
Add a Focal Point
Once dry, paint a tiny silhouette of a lone tree or a distant house on the horizon line in solid black to give the landscape scale and a sense of solitude.
Hang your finished piece in a well-lit room where the subtle color shifts can truly shine


Silhouetted Pine Forest in Violet Mist
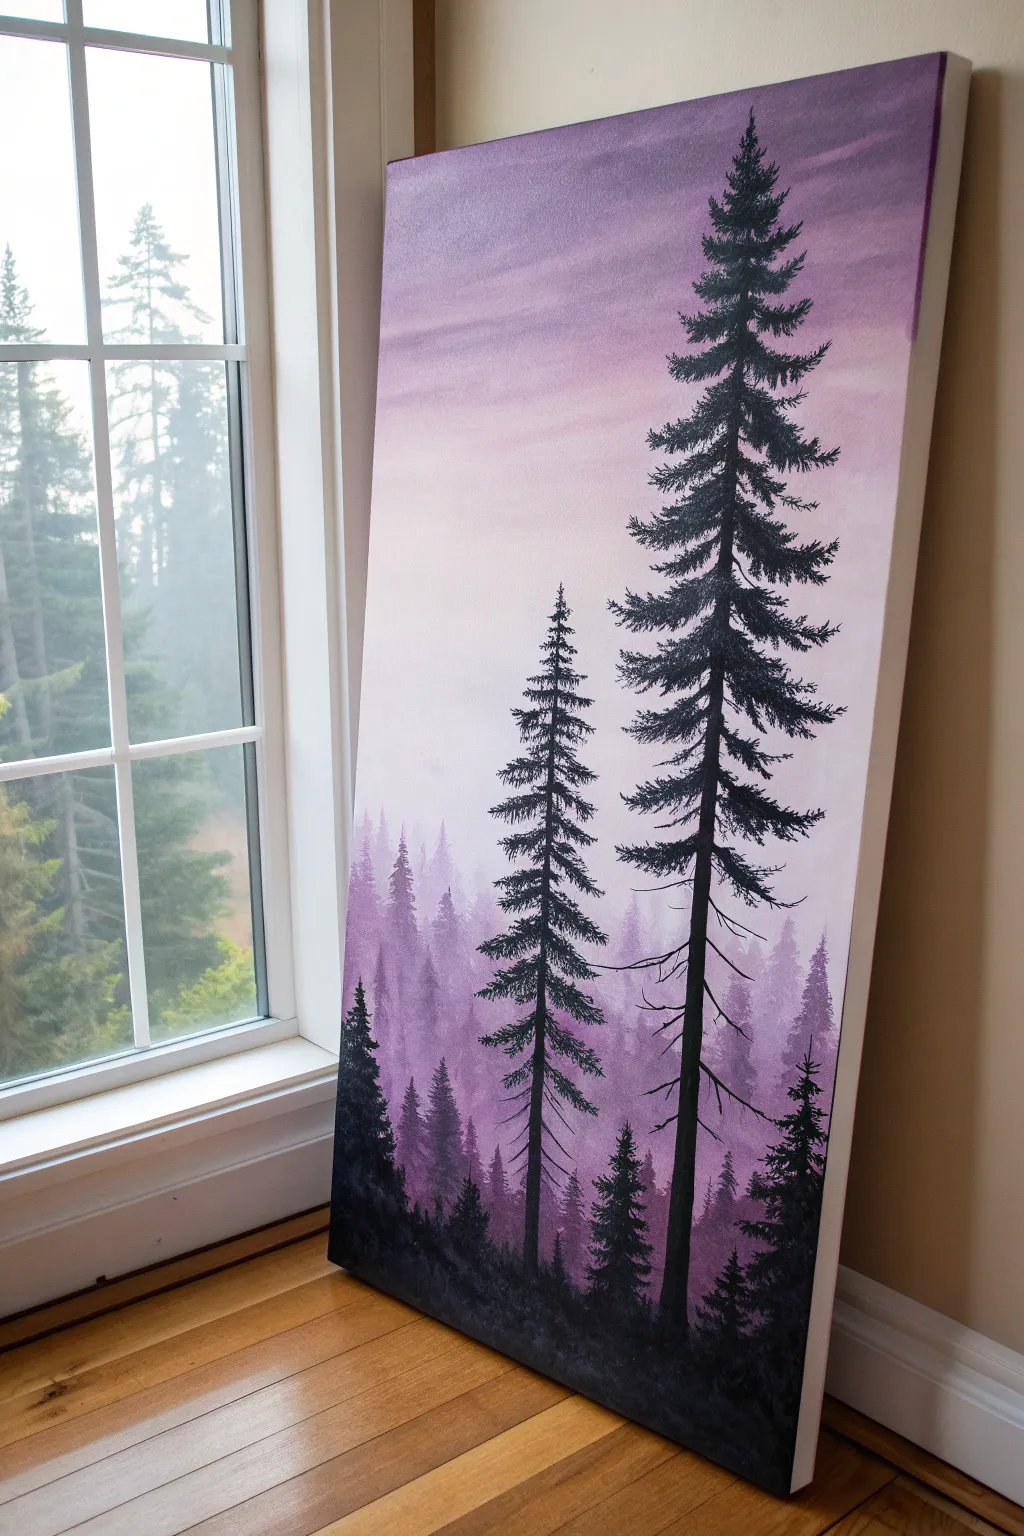
Capture the serene beauty of a foggy forest morning with this atmospheric acrylic painting. By layering translucent washes of purple and stark black silhouettes, you’ll create a striking sense of depth and distance.
Step-by-Step Tutorial
Materials
- Large stretched canvas (e.g., 24×36 inches)
- Acrylic paints: Titanium White, Dioxazine Purple, Mars Black
- Large flat brush (2-3 inch) for blending
- Medium flat brush (1 inch)
- Fan brush (optional, for foliage)
- Small round detail brush or liner brush
- Palette
- Water cup and paper towels
- Easel (optional but recommended for large canvas)
Step 1: Creating the Atmospheric Background
-
Prepare the gradient palette:
Begin by squeezing out a generous amount of Titanium White and a smaller amount of Dioxazine Purple. Create three distinct mixtures: a very pale, almost white lavender; a medium softness lavender; and a slightly deeper, richer purple. -
Paint the upper sky:
Using your large flat brush, apply the medium lavender mixture to the very top section of the canvas working in horizontal strokes. It doesn’t need to be perfect yet, just get the color on the canvas. -
Blend the middle mist:
While the top is still wet, load your brush with the palest lavender mixture. Apply this to the middle section of the canvas, brushing upwards into the darker top section to create a seamless, soft transition. -
Establish the horizon glow:
Clean your brush thoroughly. Mix more white into your palest lavender until it is nearly pure white. Apply this to the lower-middle section where the horizon line will be, blending it smoothly upward into the previous layer to simulate morning mist. -
Add the lower ground hue:
For the bottom third of the canvas, introduce the deepest purple mix. Blend this upward into the bright horizon line, keeping the transition soft and misty rather than sharp. -
Refine the gradient:
Take a clean, dry large brush and gently sweep it horizontally across the entire canvas to smooth out any brush strokes and perfect the misty fade. Let this background layer dry completely.
Misty Margin
To push trees further back into the mist, mix a tiny bit of your background color into the tree color. This ‘atmospheric perspective’ trick instantly adds incredible depth.
Step 2: Layering the Distant Forest
-
Mix a ghostly purple:
Create a wash by mixing a small amount of purple with plenty of white and a tiny touch of black to desaturate it. This color should be only slightly darker than your background mist. -
Block in distant shapes:
Using the medium flat brush, paint uneven, jagged shapes along the lower third of the canvas to represent the furthest tree line. These should be faint and lack detail. -
Add a mid-ground layer:
Mix a slightly darker, more saturated purple. Paint another row of treeline shapes slightly lower on the canvas, overlapping the previous layer. Tap the brush vertically to simulate pine tops. -
Create depth with contrast:
Continue moving down the canvas, mixing progressively darker purples for each new layer of trees. With each layer closer to the bottom, the paint should be less watery and more opaque.
Starry Night Twist
Before painting the black trees, flick a toothbrush loaded with watered-down white paint across the upper purple sky to add a subtle field of stars.
Step 3: Painting the Foreground Silhouettes
-
Prepare the silhouette black:
For the main focal trees, use pure Mars Black. You might want to thin it slightly with water or flow medium so it glides smoothly off the liner brush for sharp lines. -
Position the main trunks:
Decide on the placement of your two large foreground trees. Using a medium brush, paint a straight vertical line for the trunk, tapering it to a fine point as you reach the top. -
Start the pine branches:
Switch to a small round brush. Starting from the top of the tree, make small, downward-sloping dashes. Keep these very short and sparse at the apex. -
Widen the foliage:
As you move down the trunk, make your branches wider and heavier. Use a jagged, zig-zag motion or tap the brush to create the texture of pine needles. -
Add branch variation:
Don’t make the tree perfectly symmetrical. Leave some gaps between branches to let the background sky peek through, which adds realism to the silhouette. -
Detail the lower branches:
Near the bottom, allow some branches to droop heavily and curve slightly upward at the tips. I find this gives the trees an older, more majestic character. -
Paint the foreground scrub:
Use the black paint to fill in the very bottom edge of the canvas, tapping the brush to create texture for bushes, grass, or small saplings that anchor the scene. -
Final touches:
Step back and check for balance. If needed, add a few tiny black treetops poking up from the very bottom to connect the foreground with the mid-ground layers.
Allow your forest scene to dry completely before signing your name in the corner


Purple Mountain Range and Lake Reflection
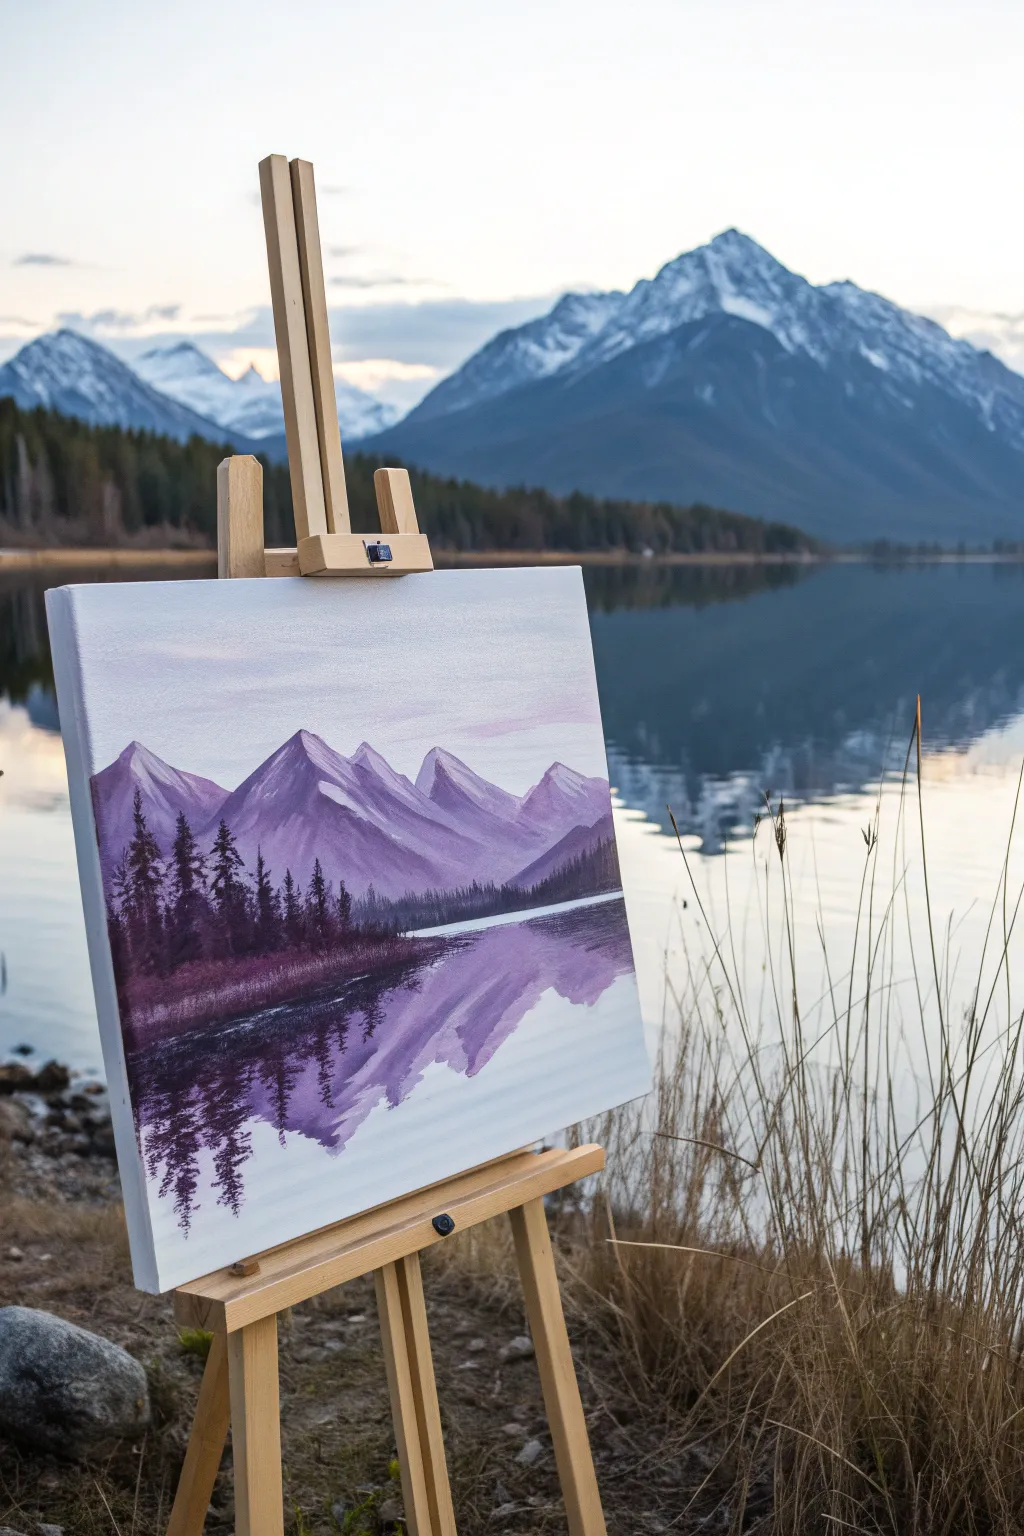
Capture the serene beauty of a monochrome landscape with this purple mountain range study. By limiting your palette to various shades of purple, white, and black, you’ll create a cohesive, moody scene featuring striking peaks and their misty reflections.
Step-by-Step Guide
Materials
- Square stretched canvas (e.g., 12×12 or 16×16 inches)
- Acrylic paints: Dioxazine Purple, Titanium White, Mars Black
- Large flat brush (1 inch)
- Medium angle brush
- Small round brush or liner brush
- Palette knife (optional for texture)
- Water cup and paper towels
- Palette or mixing plate
Step 1: Sky and Base Layers
-
Mix the sky color:
Start by mixing a very large amount of white with a tiny dot of purple. You want an extremely pale, almost white lavender shade for the sky. -
Paint the sky gradient:
Using your large flat brush, cover the top two-thirds of the canvas with horizontal strokes. Add a touch more purple as you move upward to create a very subtle gradient, keeping the horizon line area the lightest. -
Establish the horizon:
Decide where your water line will be—in this reference, it’s fairly low, about one-third up from the bottom. Lightly mark this horizontal line with a pencil or a faint wash of purple paint.
Muddy Reflections?
If your water reflections look messy, let the paint dry completely. Then, apply a thin horizontal glaze of watered-down white over the area to push it back before re-adding ripple details.
Step 2: Mountain Structure
-
Mix the mountain shade:
Create a mid-tone purple by mixing Dioxazine Purple with White. It should be significantly darker than the sky but not fully saturated. -
Block in mountain shapes:
Using the angle brush, paint triangular peaks rising from the horizon line. Vary the heights and widths, making the central peaks the tallest to create a balanced composition. -
Add highlights:
Mix a lighter tint of the mountain color. Imagine a light source coming from the right throughout this piece. Paint the right sloped face of each mountain peak with this lighter lavender. -
Add shadows:
Mix a darker version of the base color by adding a tiny touch of black or just using pure purple. Apply this to the left-hand slopes of the peaks. I find that keeping edges sharp here helps define the ruggedness.
Level Up: Texture
Use a palette knife to apply the white highlights on the mountain peaks. The thick, broken paint will mimic the look of snow resting on rocky crags.
Step 3: Forest Line
-
Mix the tree color:
Create a very dark, deep eggplant color. Mix roughly equal parts Dioxazine Purple and Mars Black. This needs to be the darkest value on your canvas. -
Paint the distant tree line:
Use the edge of your flat brush or the angle brush to dab a horizontal band of dark trees right at the base of the mountains. Keep these relatively short and uniform to suggest distance. -
Create foreground trees on the left:
On the left side of the canvas, paint larger, more distinct evergreen silhouettes. Use the classic fan brush method or detailed dabbing with a round brush to create the jagged pine branches. -
Extend the shoreline:
Continue the dark tree line across the painting, but let it taper off and become smaller as it moves to the right side, creating depth. -
Add shoreline detail:
Use a small brush to paint a thin, dark line at the very bottom of the trees to firmly ground them against the water.
Step 4: Reflections and Water
-
Mirror the mountains:
Using the same mid-tone, highlight, and shadow purples from step two, loosely paint the inverted shape of the mountains below the horizon line into the ‘water’ area. -
Soften the reflection:
While the paint is still slightly wet, pull your brush vertically downward to blur the shapes, then very gently swipe horizontally across the reflection to simulate ripples. -
Reflect the trees:
Take your dark tree mix and paint inverted versions of the trees directly below the shoreline. Focus heavily on the large trees on the left. -
Distort the dark reflection:
Use a clean, dry brush to gently zig-zag through the dark tree reflections horizontally. This breaks up the solid shape and makes it look like moving water. -
Add water highlights:
Mix a pale lavender-white. With a liner brush or the thin edge of a flat brush, add horizontal dashes along the waterline and intermittently through the reflection area to suggest light catching the ripples. -
Final assessment:
Step back and check your values. Ensure the sky is the lightest point and the trees are the darkest; deepen the shadows in the water if the contrast feels too low.
Enjoy the calm atmosphere of your monochromatic mountain escape


Full Moon in a Purple Night Sky
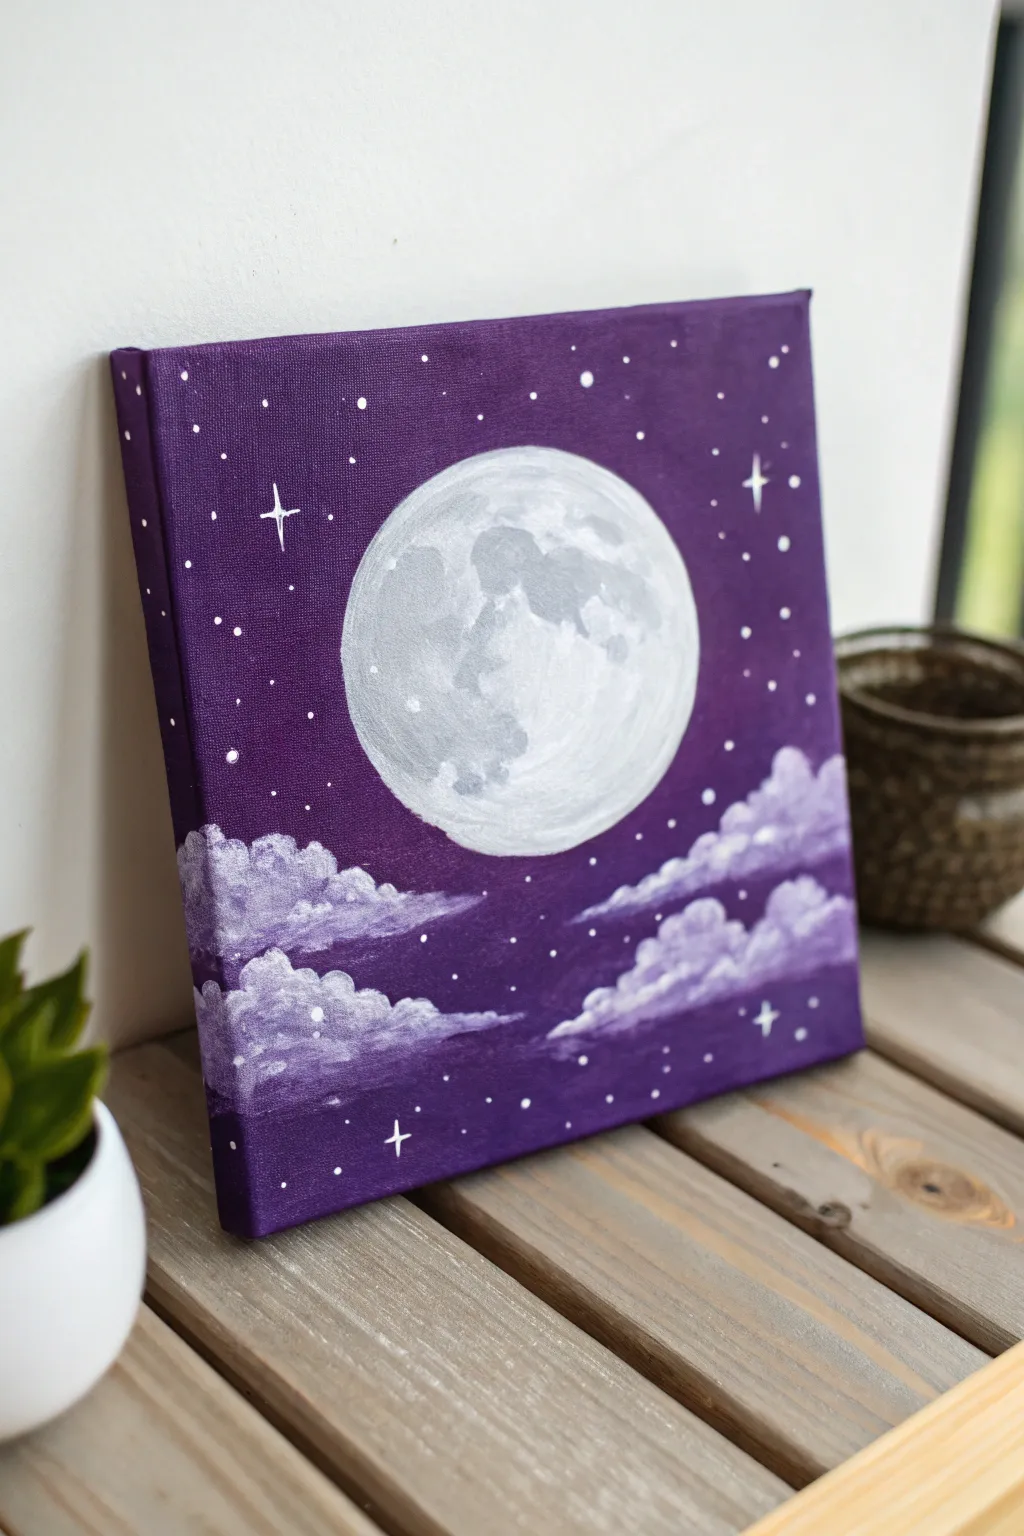
Gaze up at a mystical night sky with this beginner-friendly acrylic painting of a bright moon set against a deep violet backdrop. The soft, fluffy clouds and sparkling starlight create a dreamy atmosphere perfect for any space enthusiast.
Step-by-Step Tutorial
Materials
- Square stretched canvas (roughly 8×8 or 10×10 inches)
- Acrylic paints: Deep Purple, Titanium White, Black, Phthalo Blue (optional)
- Flat brush (1-inch width)
- Small round brush (size 2 or 4)
- Fine liner brush (size 0 or 00)
- Water cup and paper towels
- Palette or paper plate
- Pencil for sketching
- Circle template (like a bowl or cup)
Step 1: Setting the Night Sky
-
Outline the Composition:
Place your canvas on a flat surface. Using a pencil and your circular object (like a masking tape roll or small bowl), lightly trace a circle in the center of the canvas where your moon will live. Sketch faint, wavy lines near the bottom to mark where the clouds will drift. -
Mix the Base Purple:
Squeeze a generous amount of deep purple onto your palette. If the purple feels too bright, mix in a tiny pinhead of black or phthalo blue to deepen it into a midnight violet hue. -
Block in the Background:
Using your larger flat brush, paint the entire sky area with your deep purple mix. Be careful to paint around your moon circle, but don’t worry about being perfectly neat near the cloud line at the bottom, as you will paint over that later. -
Paint the Edges:
Don’t forget to wrap the color around the sides of the canvas. This gallery-wrap style gives the piece a professional, finished look without needing a frame. -
Smooth the Sky:
While the paint is still wet, use long horizontal strokes to smooth out any brush marks. If the first coat is patchy, let it dry completely and apply a second coat for solid, opaque coverage.
Uneven Moon Edge?
If creating a perfect circle with a brush is hard, paint the background purple *over* the edge of your dry white moon to execute a ‘cut-in’ technique for a sharper line.
Step 2: Painting the Full Moon
-
Fill the Moon Shape:
Once the purple background is dry to the touch, use a medium round brush to fill the moon circle with pure Titanium White. It’s okay if it picks up a tiny bit of texture; nature isn’t perfect. -
Create Grey Tones:
On your palette, mix a small amount of black into your white to create a light grey. Then, create a second, slightly darker grey shade. -
Add Crater Shadows:
While the white moon is still slightly damp, dob the light grey paint onto the surface using a dabbing or stippling motion. Focus on the left side and the center to suggest craters and lunar maria. -
Deepen the Textures:
Use the darker grey sparingly to add depth to the largest craters. Keep your brush touches random and blotchy to mimic the moon’s organic surface texture rather than painting specific shapes. -
Clean the Edge:
If your grey paint went outside the lines, use your fine brush with a bit of the background purple to carefully crisp up the outer edge of the moon.
Step 3: Clouds and Starlight
-
Mix a Lavender Tint:
Create a light lavender shade by mixing a large amount of white with a tiny dot of your background purple. This will integrate the clouds with the sky color. -
Form the Cloud Shapes:
Using an old or scruffy round brush, tap the lavender paint onto the bottom section of the canvas. Use a ‘scumbling’ or circular scrubbing motion to create fluffy, billowy tops to the clouds. -
Add Cloud Volume:
Layer pure white paint onto the very tops of the clouds and the areas where the moonlight would hit them. I like to keep the bottoms of the clouds darker and more purple to creating a shadowing effect. -
Blend the Bases:
Allow the bottoms of the cloud formations to fade gently into the purple background paint. You can do this by using a clean, slightly damp brush to soften the bottom edges. -
Dot the Stars:
Using your finest liner brush or even a toothpick, dip into thinned white paint. Dot tiny stars randomly across the purple sky. Vary the pressure to create different sized dots. -
Create Twinkling Stars:
Select 3 or 4 spots for larger ‘hero’ stars. Paint a small cross shape (+) and then layer an ‘x’ over it to create a four-pointed glimmer. Keep lines thin and delicate. -
Final Highlights:
Add a few tiny white dots within the darker purple sections of the clouds to suggest stars shining through the mist, tying the foreground and background together.
Add a Glow
Before painting stars, dry-brush a very faint, translucent ring of white around the moon. This creates a hazy atmospheric glow that makes the moon pop.
Step back and admire your serene lunar landscape, ready to bring a touch of cosmic wonder to your wall
BRUSH GUIDE
The Right Brush for Every Stroke
From clean lines to bold texture — master brush choice, stroke control, and essential techniques.
Explore the Full Guide
Lavender Field at Sunset
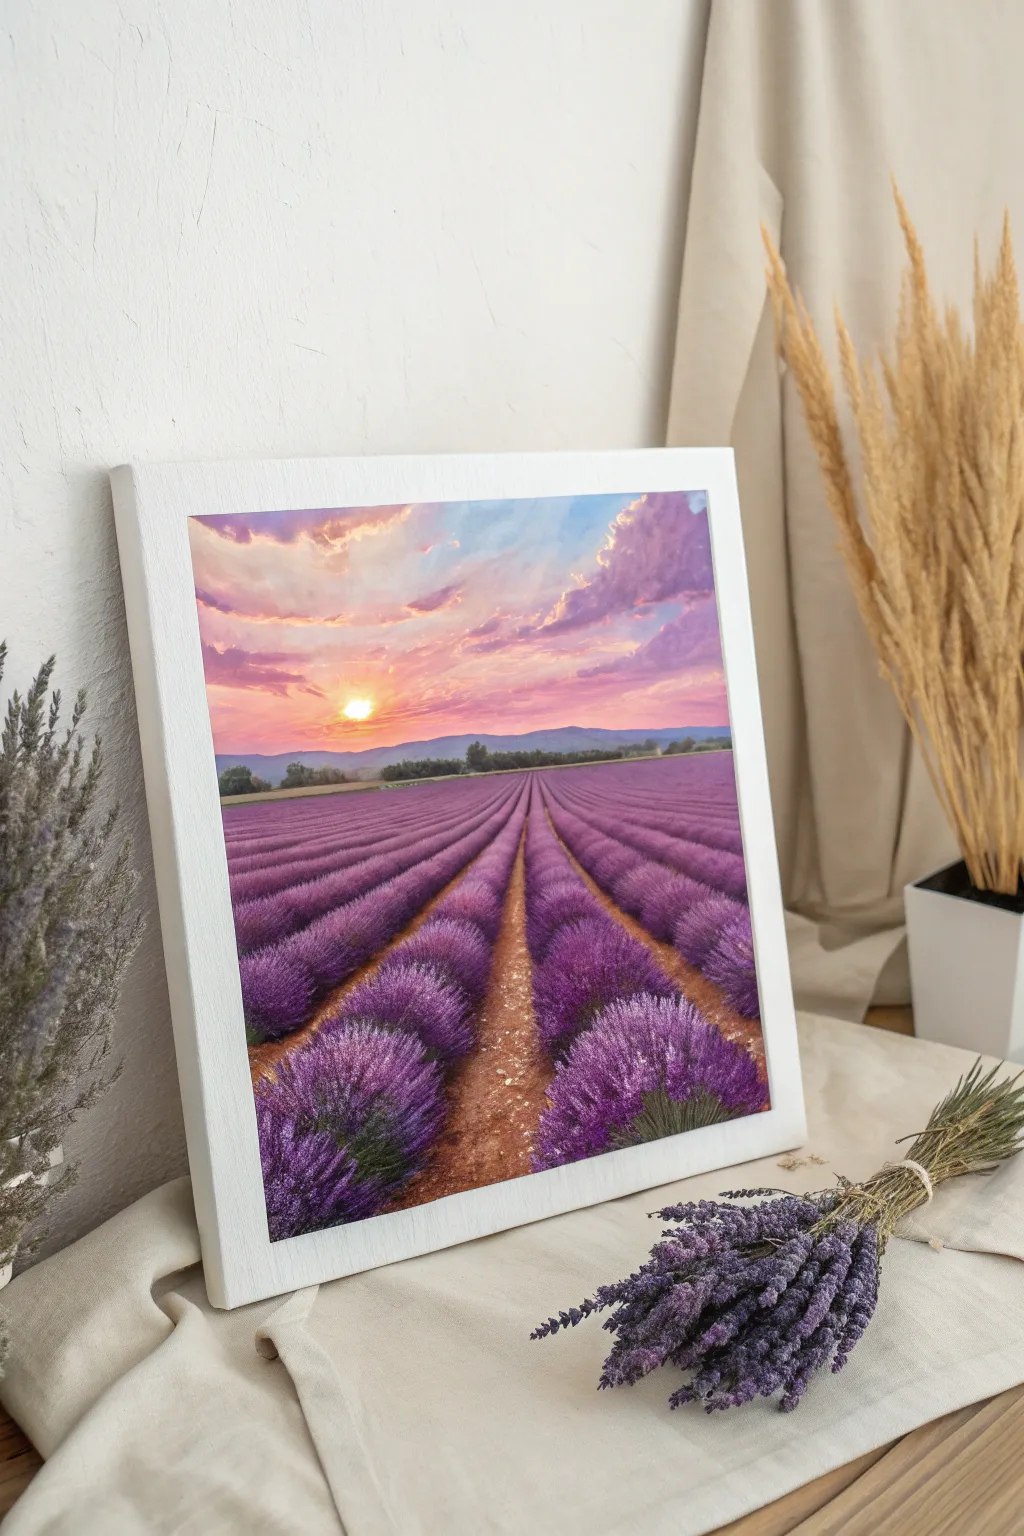
Transport yourself to the rolling hills of France with this vibrant acrylic landscape featuring endless rows of blooming lavender. The scene captures the magic of golden hour, blending warm sunset hues with deep, cool purples for a striking and peaceful composition.
Detailed Instructions
Materials
- Square canvas or canvas board (12×12 inches suggested)
- Acrylic paints: Titanium White, Ultramarine Blue, Dioxazine Purple, Cadmium Yellow, Cadmium Red (or Alizarin Crimson), Burnt Sienna, Burnt Umber
- Flat shader brushes (large and medium)
- Filbert brush (medium)
- Small round detail brush
- Palette knife (optional for texture)
- Palette for mixing
- Cup of water and paper towels
- Pencil for sketching
- Ruler
Step 1: Planning and Sky
-
Establish the Horizon:
Use a pencil and ruler to draw a straight horizon line about one-third of the way down from the top of your canvas. This will separate your sky from the landscape. -
Sketch the Perspective:
Mark a vanishing point near the center of your horizon line. Lightly draw diagonal lines radiating from this point down to the bottom edge of the canvas; these lines will guide the rows of lavender, making them appear to stretch into the distance. -
Base the Sky:
Mix a soft, pale blue using Titanium White and a touch of Ultramarine Blue. Paint the upper corners of the sky, blending downward towards the horizon. -
Add Warmth:
While the blue is still slightly wet, mix a pale pink using White and a tiny dot of Red. Blend this into the lower middle section of the sky. -
Create the Sunset Glow:
Mix Cadmium Yellow with a lot of White for a bright, sunny glow. Apply this right above the horizon where your sun will be, blending it softly into the pinks and blues. -
Paint the Clouds:
Using a smaller brush, mix purple with pink and white to create fluffy cloud shapes. Dab these onto the sky, keeping the bottoms of the clouds slightly darker and highlighting the tops with your pale yellow mixture where the sun hits them.
Depth Perception
Make distant lavender rows paler and bluer. As rows get closer, use warmer, more saturated purples and larger brushstrokes.
Step 2: The Landscape Foundation
-
Paint the Distant Mountains:
Mix a muted purple-grey using Dioxazine Purple, White, and a tiny bit of Burnt Umber. Paint the silhouette of distant mountains along the horizon line, keeping the edges soft to suggest atmospheric depth. -
Lay the Groundwork:
Identify the triangular spaces between your lavender rows. Paint these dirt paths using a mix of Burnt Sienna, Burnt Umber, and White to create a warm, reddish-brown earth tone. Make the paths narrower as they get closer to the horizon. -
Block in the Lavender Rows:
Mix a dark, rich purple using Dioxazine Purple and Ultramarine Blue. Fill in the specific wedge shapes you drew for the lavender rows, following the perspective lines carefully.
Step 3: Detailing the Flowers
-
Add Mid-Tones:
Once the dark base is dry, mix Dioxazine Purple with a little White. Using a filbert brush or an old scruffy brush, tap texture onto the top-rounded parts of the lavender rows. -
Build Texture:
I like to use a dabbing motion here to mimic the spiky nature of the flowers. Continue adding lighter purple layers, concentrating them on the sides of the rows that would be catching the sunset light. -
Highlight the Blooms:
Create a very light lavender color (mostly White with a touch of purple). Gently dab this onto the very tops of the nearest lavender bushes to make them pop against the darker undersides. -
Refine the Sun:
Use pure Titanium White mixed with the tiniest bit of Yellow to paint the sun disc just peering over the mountains. Add a few horizontal strokes of this color into the clouds nearby for reflection. -
Final Contrast:
Check your dirt paths. If they look too flat, dry brush some lighter tan color (Burnt Sienna + White) down the center of the paths to suggest sunlight hitting the ground. -
Add Foliage Hints:
Mix a dark green using Blue and Yellow with a touch of Umber. With a small brush, add tiny flicks of green at the very bottom base of the lavender closest to the viewer to show stems and leaves.
Texture Boost
Try using a natural sea sponge or a fan brush for the lavender rows. It creates instant, organic floral texture without painting every petal.
Step back and admire how the warm sun illuminates your peaceful purple field
Purple Ocean at Dusk
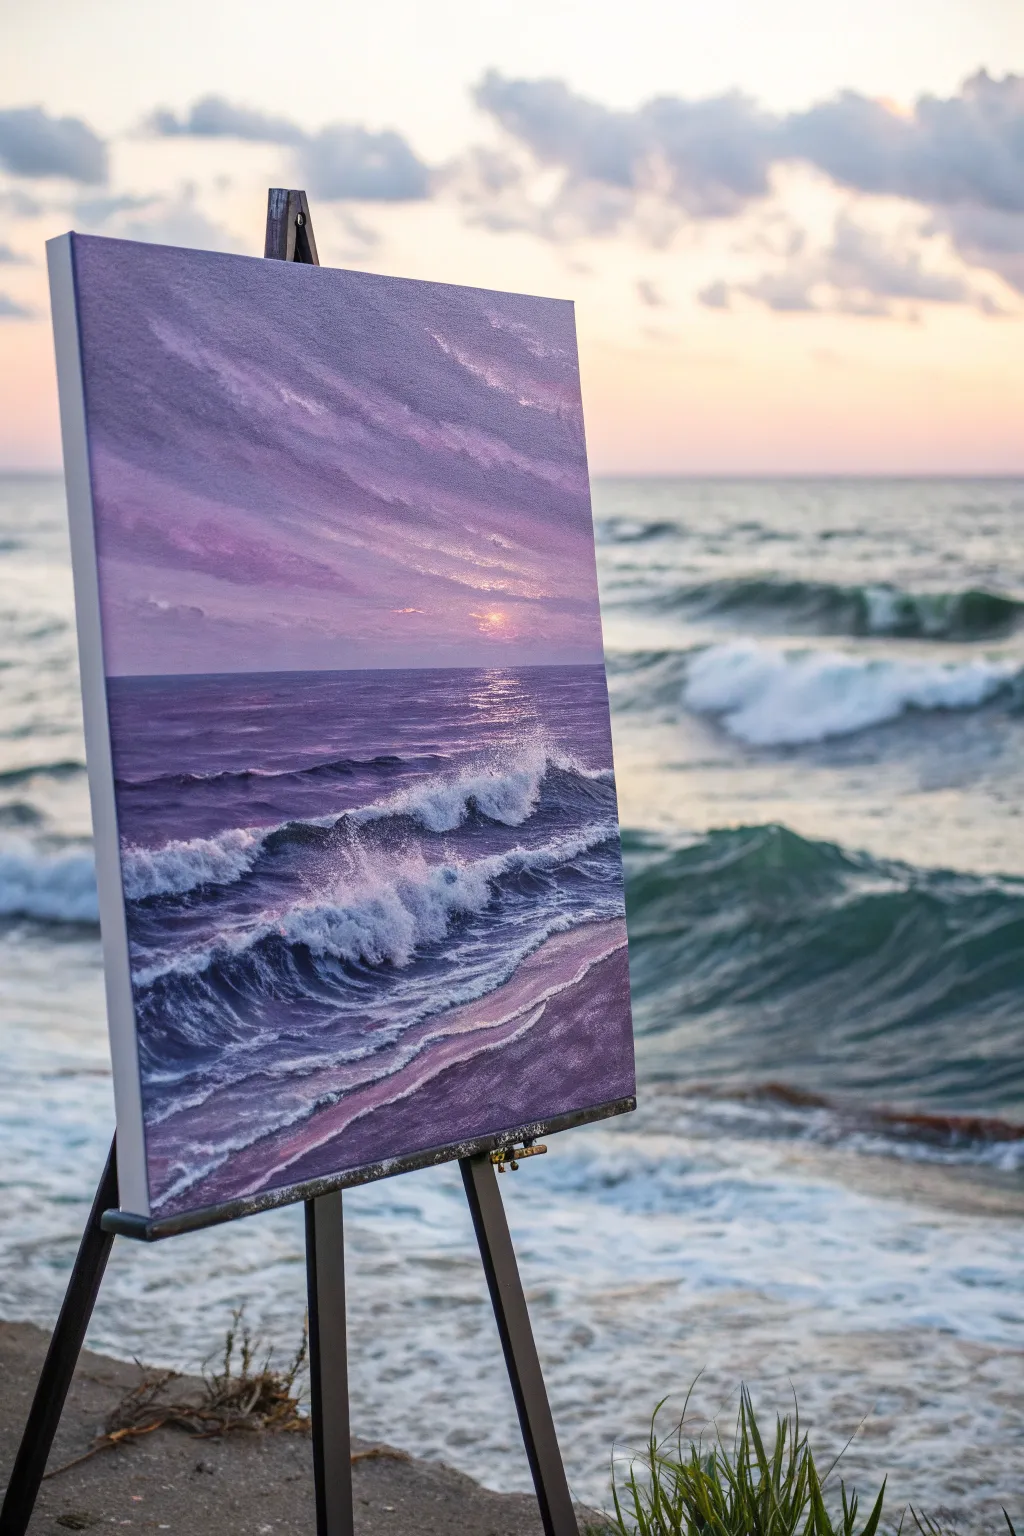
Capture the moody romance of twilight with this monochromatic purple seascape. By limiting your palette to various shades of violet, lavender, and deep indigo, you create a cohesive and atmospheric scene where the waves seem to glow against the setting sun.
Step-by-Step Guide
Materials
- Stretched canvas (vertical orientation)
- Acrylic paints: Dioxazine Purple, Ultramarine Blue, Titanium White, Magenta, Phthalo Blue
- Large flat wash brush
- Medium filbert brush
- Small round detail brush
- Fan brush (optional)
- Palette knife
- Water cup and paper towels
- Easel
Step 1: Sky and Horizon Base
-
Establish the horizon:
Using a ruler or a steady hand with a flat brush, paint a straight horizon line about one-third of the way up from the bottom of the canvas. This line divides your calm sky from the active sea. -
Paint the upper sky gradient:
Mix a medium violet using Dioxazine Purple and a touch of Titanium White. Apply this to the very top of the canvas, brushing horizontally. As you move down, mix in a little more white and Magenta to warm the color slightly. -
Create the sunset glow:
Near the horizon line, blend in a soft, pale lavender-pink mix. You want the lightest point to be just slightly right of center, where the sun will eventually sit. -
Add diagonal cloud structures:
While the sky is still tacky, use a filbert brush with a slightly darker purple mix to sweep in diagonal cloud bands stretching from the top left toward the horizon. Keep the edges soft and feathered. -
Define the sea base:
Paint the entire ocean area below the horizon with a deep, dark purple-blue mix (Dioxazine Purple plus Phthalo Blue). This dark underlayer provides depth for your waves later. -
Let it dry completely:
Allow the entire canvas to dry. Acrylics dry darker, so don’t worry if the ocean looks very dark right now; that contrast is essential.
Muddy Purple?
If your purples look brown or dull, you may be mixing complementary colors (like yellow) by accident. Stick to mixing cool blues and warm reds to keep the violet hues vibrant and clean.
Step 2: Painting the Rolling Waves
-
Highlight the horizon water:
Mix a shimmering light purple using Titanium White and a tiny dot of purple. Dry brush horizontal streaks right under the horizon line to simulate distant water reflecting the sky. -
Form the main wave shapes:
Using your medium brush and a mid-tone purple, paint the general shapes of two or three large waves rolling toward the viewer. These should look like curved, horizontal mounds rising from the dark background. -
Add the wave shadows:
Deepen the color under the crest of each wave with pure Dioxazine Purple or a touch of black. This shadow creates the steepness of the wave right before it breaks. -
Create the sun reflection:
Paint a vertical column of light reflections under the sun’s position. Use short, horizontal dashes of pale pink-white, making them wider as they get closer to the foreground waves. -
Paint the sun:
Add a small, distinct circle of pale pinkish-white just above the horizon line where your sky glow is brightest. Soften the edges slightly so it glows rather than looks like a sticker.
Add Texture
Use a palette knife to apply the pure white highlights on the crashing wave crests. This thick impasto texture will physically catch the light in the room, making the splash look real.
Step 3: Foam and Details
-
Start the breaking foam:
Mix a thick, heavy body white paint with a hint of lavender. Using a fan brush or the side of a filbert, tap paint onto the crest of the nearest wave where it is crashing over. -
Shape the sea spray:
Use a dry brush technique to drag some of that white foam paint downwards and backwards from the wave crests, simulating the wind blowing the spray off the top. -
Detail the turbulence:
In the trough between waves, use a small round brush to paint intricate, webbing patterns of foam. I like to keep these lines thin and broken so the dark water shows through. -
Add foreground shore wash:
At the very bottom right, paint a diagonal swoop of wet sand using a muted purple-grey. Overlap this with a thin, translucent line of white wash to show the water receding. -
Refine highlights:
Go back with pure Titanium White on your smallest brush and add the brightest highlights to the top of the crashing foam and the center of the sun reflection. -
Final glaze (optional):
If the colors feel too separated, mix a very watery, transparent glaze of Magenta and brush it lightly over the transition area between sky and sea to unify the lighting.
Step back and admire how the simple purple palette creates such a complex and serene atmosphere

PENCIL GUIDE
Understanding Pencil Grades from H to B
From first sketch to finished drawing — learn pencil grades, line control, and shading techniques.
Explore the Full Guide
City Skyline Against a Purple Sky
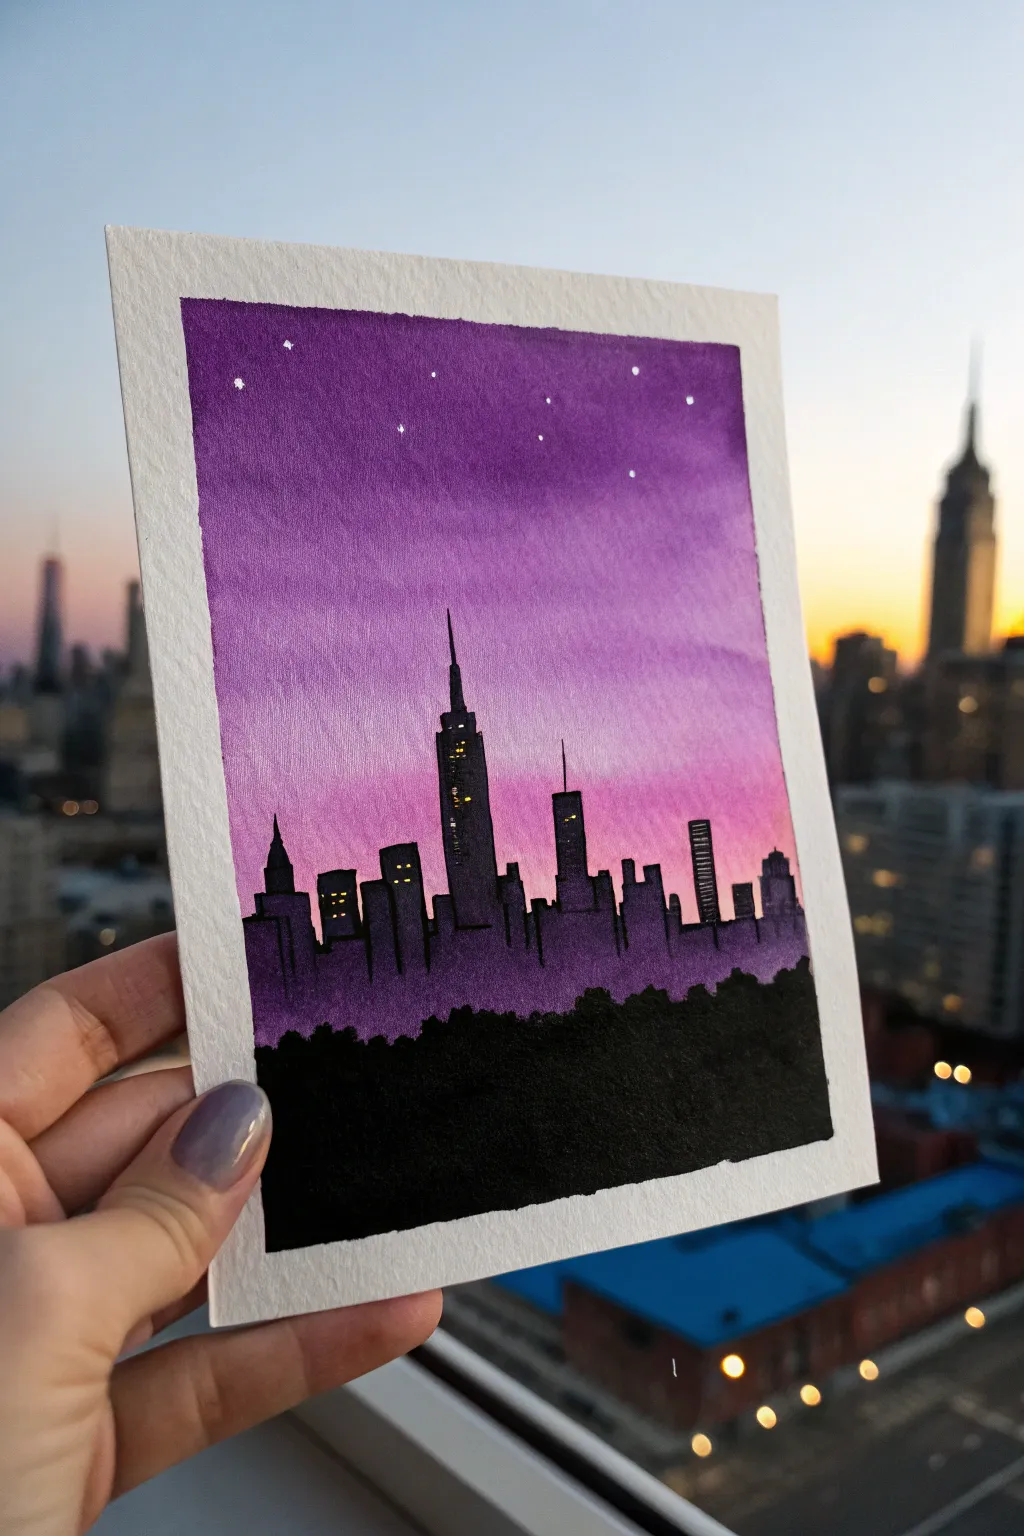
Capture the magic of twilight in New York City with this atmospheric cityscape painting. Using watered-down acrylics, you’ll create a seamless purple gradient sky that serves as the perfect backdrop for a striking silhouette skyline.
Detailed Instructions
Materials
- Heavyweight watercolor paper or mixed media paper (300gsm)
- Masking tape or painter’s tape
- Acrylic paints: Deep Violet, Magenta, White, Black, Yellow
- Flat shader brush (3/4 inch or similar)
- Small round detail brush (size 0 or 1)
- Stylus, toothpick, or white gel pen (for stars)
- Palette or mixing plate
- Cup of water
- Paper towels
Step 1: Preparation & Sky Gradient
-
Secure the paper:
Tape down all four edges of your watercolor paper to a hard surface or drawing board. This creates a clean white border and prevents the paper from buckling when we add water. -
Mix your colors:
Prepare three shades of purple on your palette. Mix a deep violet, a mid-tone purple (violet mixed with a touch of magenta), and a lighter pink-purple (magenta mixed with plenty of white). -
Apply the darkest tone:
Using a wet flat brush, load up the deep violet acrylic paint. Apply it to the top third of the paper using horizontal strokes. Because we want a watercolor effect, ensure your paint is thinned slightly with water so it flows smoothly. -
Blend the mid-tone:
While the top layer is still wet, pick up your mid-tone purple. Start painting directly below the violet, slightly overlapping the colors so they bleed together. Brush back and forth to create a soft transition. -
Add the horizon glow:
Clean your brush and pick up the lightest pink-purple mixture. Paint the bottom third of the sky area, blending it upward into the mid-tone purple. This creates that fading sunset glow near the horizon. -
Refine the gradient:
If the transitions look harsh, use a damp, clean brush to gently sweep horizontal strokes across the meeting points of the colors until the gradient looks smooth and dreamy. -
Let it dry completely:
Allow the background to dry fully. Acrylics dry fast, but since we used extra water, give it about 15-20 minutes. The paper must be bone-dry before we add the skyline.
Clean Lines
If paint bleeds under your tape, use a slightly damp, stiff brush or a white gel pen to touch up the edges after removing the tape.
Step 2: The City Skyline
-
Outline the silhouette:
Switch to your small round detail brush and black acrylic paint. About one-third up from the bottom, carefully outline the varied heights of the buildings. Include the iconic Empire State Building spire as the focal point. -
Fill in the buildings:
Dilute your black paint just a tiny bit so it’s somewhat translucent, like purple ink. Fill in the building shapes. This transparency allows the purple background to subtly influence the building color, making them look distant. -
Paint the foreground trees:
For the bottom section, use pure, undiluted black paint. Paint a dense, uneven line of trees or bushes below the buildings. Use a stippling or tapping motion to mimic leaf textures. -
Fill the bottom area:
Fill the rest of the bottom area completely solid black. This anchors the painting and provides contrast against the lighter city buildings and the bright sky.
Smooth Blends
Work quickly while blending the sky! Acrylics dry fast. If the paint gets tacky, stop blending or you’ll lift the previous layer.
Step 3: Details & Finishing Touches
-
Add city lights:
Mix a tiny amount of yellow paint with white. Using the very tip of your smallest brush (or a toothpick), dab tiny squares of light onto a few of the skyscrapers. -
Refine the windows:
Don’t overdo the lights; just a few clusters here and there suggest an active city. Place most of them on the taller central building. -
Paint the stars:
Using a white gel pen or a toothpick dipped in white paint, dot a few stars into the upper, darkest part of the purple sky. Keep them random and sparse for realism. -
Remove the tape:
Once everything is completely dry, slowly peel away the masking tape at a 45-degree angle. This reveals the crisp white border that frames your artwork professionally.
Display your mini cityscape on a desk or small easel to enjoy that serene sunset vibe every day
Cherry Blossom Silhouette in Violet Light
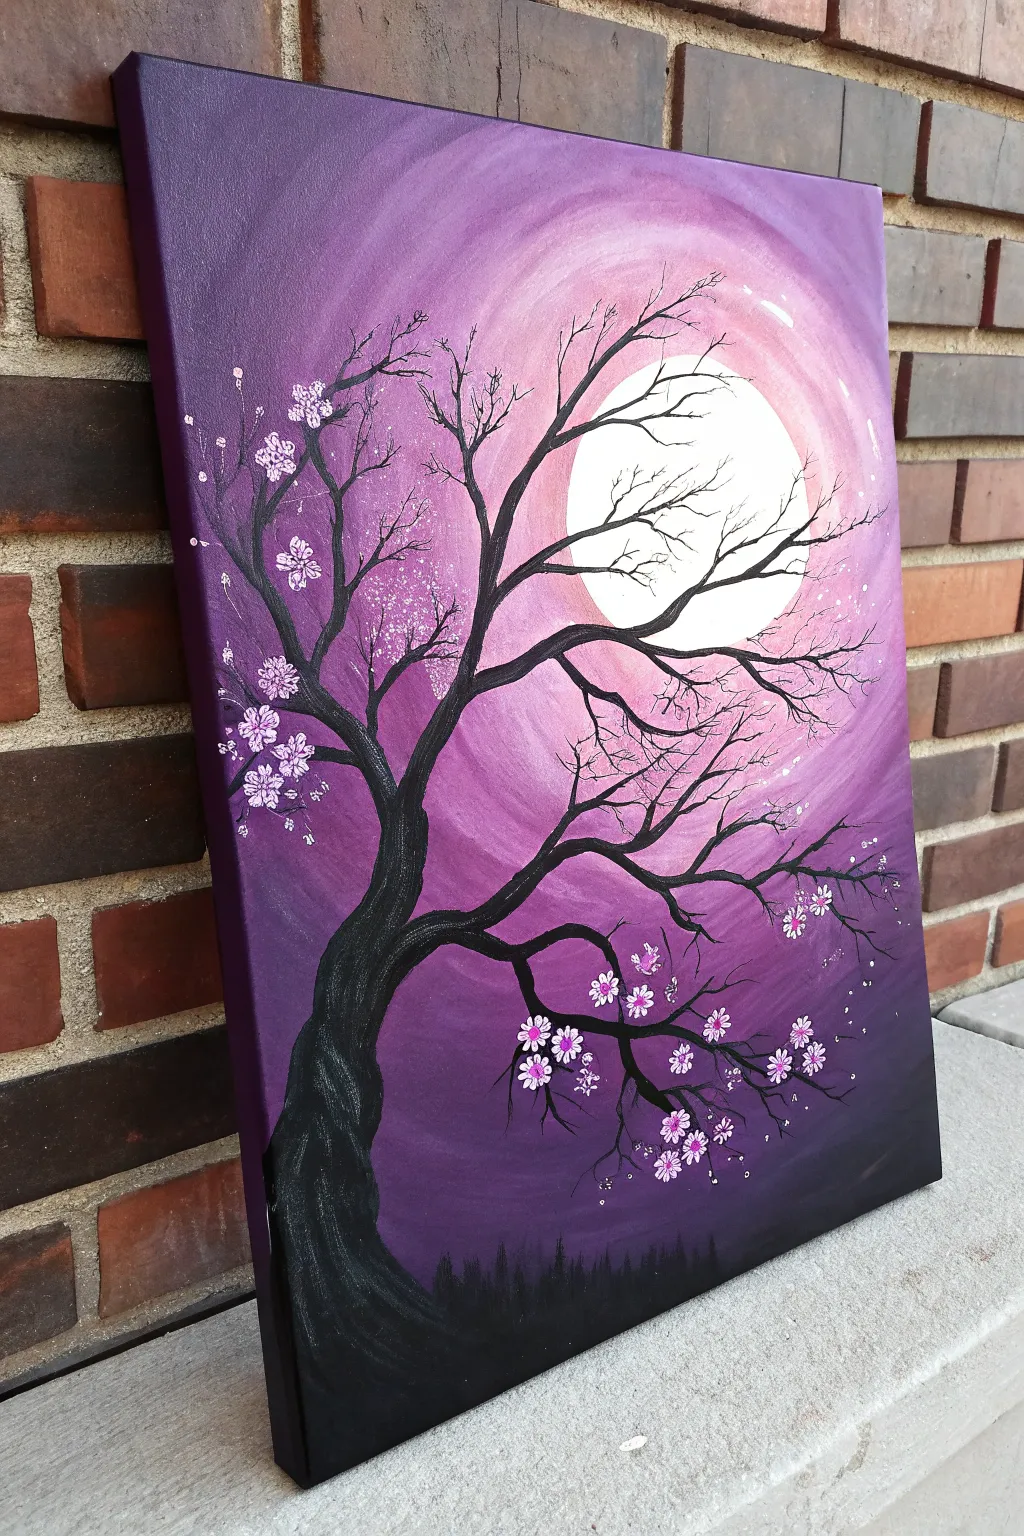
This striking acrylic painting captures the serene beauty of a cherry blossom tree silhouetted against a glowing, violet-hued moon. The circular gradient background creates a luminous depth, making the stark black branches and delicate pink flowers pop with dramatic flair.
How-To Guide
Materials
- Stretched canvas (e.g., 11×14 or 16×20 inches)
- Acrylic paints: Black, White, Violet (or Deep Purple), Magenta/Pink
- Large flat brush or sponge brush
- Medium round brush
- Small fine liner brush
- Palette or paper plate
- Water cup and paper towels
- A round object for tracing (large bowl or plate)
Step 1: Creating the Luminous Background
-
Trace the moon:
Place your large round object slightly off-center on the canvas, towards the upper right quadrant. Lightly trace a circle with a pencil to mark where your bright moon will be. -
Paint the moon:
Fill the circle completely with titanium white current paint. It doesn’t need to be perfectly opaque yet, but ensure the shape is defined. -
Start the gradient:
Mix white with a very small dot of violet. Using a large brush, paint a ring around the white moon, blending the edges while the paint is still wet to create a soft, glowing transition. -
Deepen the purple:
Gradually add more violet and a touch of magenta to your mix. Paint concentric rings radiating outward from the moon, blending each new darker shade into the previous lighter one. -
Finish the edges:
For the outermost corners and edges of the canvas, use your darkest purple straight from the tube (or mix in a tiny bit of black for depth). Blend this inwards so the canvas is darkest at the edges and brightest at the moon. -
Let it dry completely:
Allow the background to dry fully before moving on. This prevents the black silhouette paint from muddying your beautiful purple gradient.
Smooth Blending Trick
If your acrylics are drying too fast while blending the purple background, mist the canvas lightly with water or use a ‘slow-dry’ blending medium.
Step 2: Painting the Tree Silhouette
-
Paint the trunk base:
Using black paint and a medium brush, outline the thick trunk starting from the bottom left corner. Curve it upwards and diagonally towards the center of the canvas. -
Texture the bark:
Fill in the trunk. While wet, you can streak in a tiny bit of dark grey or lighter black to give the illusion of twisted bark texture, following the curve of the tree. -
Add main branches:
Extend 3-4 distinct, thick branches from the main trunk. Let some reach across the moon and others stretch into the dark purple corners. -
Create fine twigs:
Switch to your fine liner brush inky-consistency black paint (add a drop of water if needed). Paint intricate, jagged twigs growing off the main branches, keeping your hand loose for a natural look. -
Add the ground line:
At the very bottom of the canvas, paint a rough, uneven black horizon line. Add tiny vertical strokes to suggest a distant forest silhouette in the background.
Make It Sparkle
Once the painting is fully dry, add tiny dots of silver glitter glue or metallic silver paint to the flower centers or the moon’s edge for a magical effect.
Step 3: The Blossoms
-
Mix pink shades:
Prepare two shades of pink on your palette: a light pastel pink (white + magenta) and a slightly darker magenta. -
Dab the petals:
Dip a small round brush into the pink paint. Press gently to create 5-petal flower shapes scattered along the branches. I prefer to cluster them in groups of three or four for a natural composition. -
Layer the colors:
Once the first layer of petals is tacky, add smaller dots of the lighter pink or pure white to the center of some flowers to create highlights and dimension. -
Falling petals:
Paint a few single petals floating in the air below the branches as if the wind is gently blowing them down. -
Final centers:
Using your smallest brush, add a tiny dot of deep magenta or white in the absolute center of the most prominent flowers to finish them off.
Step back and admire how the dark silhouette contrasts beautifully against your glowing violet sky


Purple Galaxy With Splatter Stars
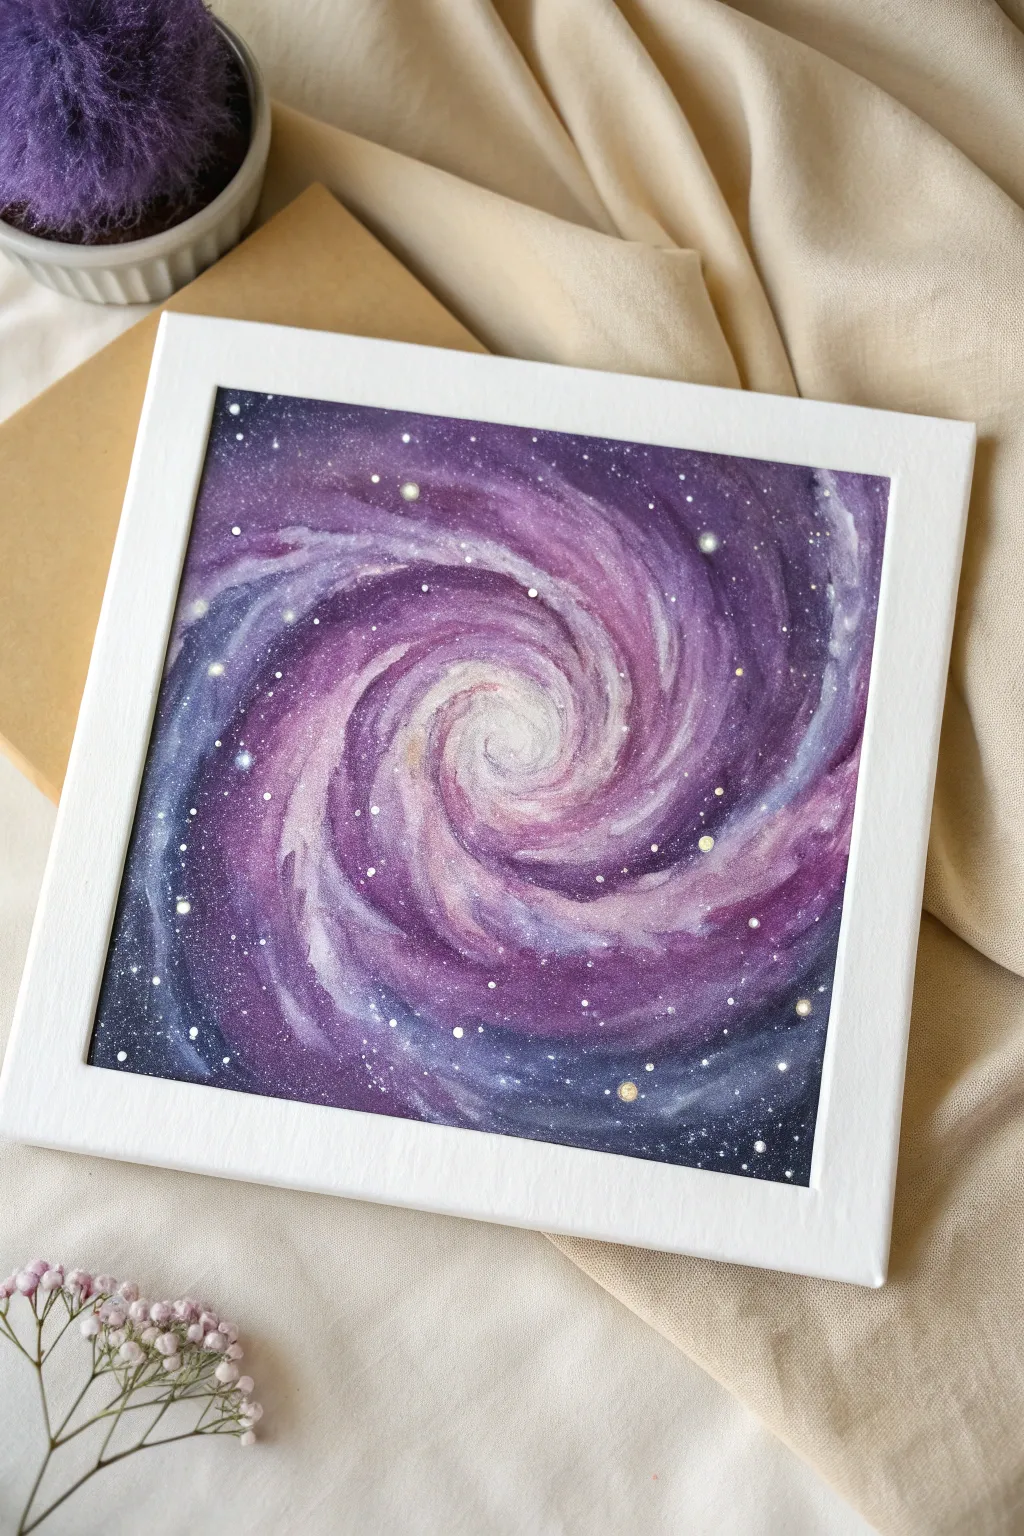
Capture the mesmerizing depth of outer space with this vibrant purple spiral galaxy painting. Using simple blending techniques and splatter effects, you’ll create a swirling celestial masterpiece that looks stunning in a clean white frame.
Detailed Instructions
Materials
- Square canvas or canvas panel (6×6 or 8×8 recommended)
- Acrylic paints: Titanium White, Ultramarine Blue, Dioxazine Purple, Magenta (or Quinacridone Magenta), Black
- Flat shader brush (medium size)
- Round brush (small size) for details
- Old toothbrush (for splattering stars)
- Cup of water
- Palette or paper plate
- Paper towels
- White or light wood frame (optional)
Step 1: Setting the Background
-
Prepare the canvas:
Start by laying down a solid base coat of deep purple mixed with a tiny bit of black. This doesn’t need to be perfect, but covering the white canvas helps give the galaxy depth later on. Let this base layer dry completely. -
Map the spiral:
Using a very faint wash of white paint or a piece of white chalk, lightly sketch the spiral shape. Start from the center and draw two or three loose arms curving outward to the edges.
Muddy colors?
If your purples and yellows start turning brown while blending, stop and let the layer dry completely. Paint the next color on top as a glaze rather than mixing wet-on-wet.
Step 2: Building the Galaxy
-
Mix your deep space colors:
On your palette, create a gradient of colors. You’ll need a deep violet (Purple + Blue + a touch of Black), a mid-tone purple, and a bright magenta. -
Paint the outer edges:
Using the flat brush, apply the darkest blue-violet mixture to the four corners of the canvas and the outer edges of the spiral arms. Keep the paint slightly wet to help with blending. -
Fill the mid-tones:
While the dark edges are still tacky, apply pure purple next to them, moving inward along the spiral arms. Use sweeping, curved brushstrokes that follow the direction of the galaxy’s spin. -
Add the inner glow:
Switch to your magenta and mix it with a little white to create a bright orchid pink. Apply this closer to the center of the spiral and along the inner curves of the arms. -
Blend the transitions:
Clean your brush slightly but leave it damp. Gently brush over the areas where the dark blue, purple, and pink meet. I like to use a soft, feathering motion here to create a smoky, gaseous look rather than hard lines.
Step 3: The Luminous Center
-
Create the core:
Mix a large amount of Titanium White with a tiny dot of magenta. Paint the very center of the spiral, using a circular motion. -
Expand the light:
Drag this pale white-pink mixture outward into the spiral arms, letting it fade as it reaches the darker purple areas. This creates the intense energy radiating from the galaxy’s core.
Pro Tip: Nebulous Texture
Instead of a brush, try using a small piece of natural sea sponge to dab on the galaxy clouds. It creates an organic, fluffy texture that looks incredibly realistic for space gas.
Step 4: Stars and Details
-
Prepare for splattering:
Wait for the galaxy layers to be mostly touch-dry. Dilute some white paint with water until it reaches an ink-like consistency. It needs to be fluid but opaque. -
Splatter the starfield:
Dip an old toothbrush into the thinned white paint. Point the bristles toward the canvas and run your thumb across them to flick a fine mist of stars. Focus slightly more density near the center and spiral arms. -
Paint major stars:
Using your smallest round brush and pure, undiluted white paint, dot a few larger stars randomly around the composition. -
Add colored stars:
For variety, mix a pale yellow or light blue and add a few medium-sized dots among the white stars. This subtle color variation adds realism. -
Create star halos:
To make the larger stars glow, dry brush a tiny, faint circle of white around 3-5 of the biggest stars. Keep this extremely subtle.
Step 5: Final Touches
-
Intensify contrast:
Step back and look at your painting. If the darks have faded, gently glaze a thin layer of transparent black or dark blue over the corners to push the background further back. -
Highlight the arms:
Add final, sharp streaks of white along the very brightest ridges of the spiral arms to define their shape one last time. -
Varnish and frame:
Once fully dry (give it at least 24 hours), apply a gloss varnish to make the colors pop. Place it in a white frame to mimic the clean look of the reference image.
Hang your finished galaxy on the wall and enjoy the window into deep space you’ve created
Purple Desert Sunset With Cactus Silhouettes

Capture the serene beauty of the desert at twilight with this striking acrylic painting that blends vibrant purples and soft pinks. The stark black silhouettes of cacti against a smooth gradient sky create an eye-catching contrast that looks professional but is surprisingly beginner-friendly.
Step-by-Step Tutorial
Materials
- Stretched canvas or canvas board (square format recommended)
- Acrylic paints: Violet, Deep Purple, Magenta, Titanium White, Black
- Large flat brush (for background blending)
- Medium flat brush
- Small round detail brush (size 0 or 1)
- Palette or paper plate
- Water cup and paper towels
- Easel (optional)
Step 1: Painting the Gradient Sky
-
Prepare your palette:
Squeeze out your violet, deep purple, magenta, and white paints. Leave the black for later so you don’t accidentally mix it into your beautiful sunset colors. -
Start at the top:
Using your large flat brush, load up deep purple mixed with a touch of violet. Paint a horizontal band across the very top quarter of the canvas. Use confident, long strokes from left to right. -
Blend downward:
Without cleaning your brush, pick up some magenta. Paint specifically below the purple section, slightly overlapping the wet edge. Stroke back and forth until the colors merge seamlessly. -
Lighten the mixture:
Clean your brush thoroughly. Mix white with a small amount of magenta and violet to create a soft lavender-pink. Apply this band below the magenta section. -
Create the horizon glow:
Clean the brush again. Mix a generous amount of white with just the tiniest dot of pink. Paint the lowest section of the sky, blending it upward into the previous lavender layer to create a glowing horizon effect. -
Smooth the transitions:
I like to take a clean, slightly damp large brush and run it lightly horizontally across the entire canvas while the paint is still wet to soften any harsh lines. -
Let it dry completely:
Allow the background to dry fully. If you try to paint the mountains too soon, the colors might lift or muddy.
Uneven Blending?
If your sky gradient looks streaky, the paint was likely too dry. Mist the canvas lightly with water or use a slow-drying medium to keep the acrylics workable longer.
Step 2: Adding the Mid-Ground Mountains
-
Mix the distant mountain color:
Mix purple with white and a tiny touch of black to create a muted, misty lavender shade that is slightly darker than your sky but lighter than pure purple. -
Shape the first range:
Using a medium flat brush, paint a jagged mountain range gently across the lower third of the canvas. Keep the tops uneven to simulate distant peaks. -
Fill in the shape:
Fill in the area below this mountain line with the same lavender mix. Let this layer dry. -
Create the closer range:
Mix a slightly darker shade of purple (less white this time). Paint a second mountain range slightly lower than the first one to create depth and perspective. -
Dry check:
Wait for these mountain layers to dry completely before touching the black paint.
Pro Tip: Perspective
Make objects at the bottom of the canvas darker and sharper. As elements move toward the horizon line, make them lighter and slightly blurrier to add realistic depth.
Step 3: Silhouettes and Details
-
Establish the foreground:
Load your medium brush with pure black paint. Paint a solid, uneven ground line across the very bottom of the canvas. Use a dabbing motion along the top edge to simulate rough terrain and scrub brush. -
Outline the main cactus:
Switch to your small round detail brush. On the right side of the canvas, paint a tall vertical line for the main trunk of the Saguaro cactus. Make the base slightly wider than the top. -
Add cactus arms:
Paint the characteristic arms of the Saguaro. Typically, these curve upward. Add one main arm on the left and a slightly higher one on the right to balance the shape. -
Paint smaller cacti:
Add a smaller cactus on the left side of the composition to balance the visual weight. Paint this one shorter and closer to the horizon line to make it look further away. -
Detail the scrub:
Using the very tip of your small brush, flick tiny vertical lines upward from the black ground area. This creates the illusion of desert grass and small spiky plants. -
Refine edges:
Go back over your black silhouettes. If the paint looks transparent, apply a second coat of black to ensure they are solid and opaque. -
Sign your work:
Use a white paint pen or a very fine brush with white paint to sign your initials in the bottom corner of the black foreground.
Once dry, frame your artwork in a white or light wood frame to make those purple tones really pop on your wall
Purple Snow Scene With Indigo Shadows
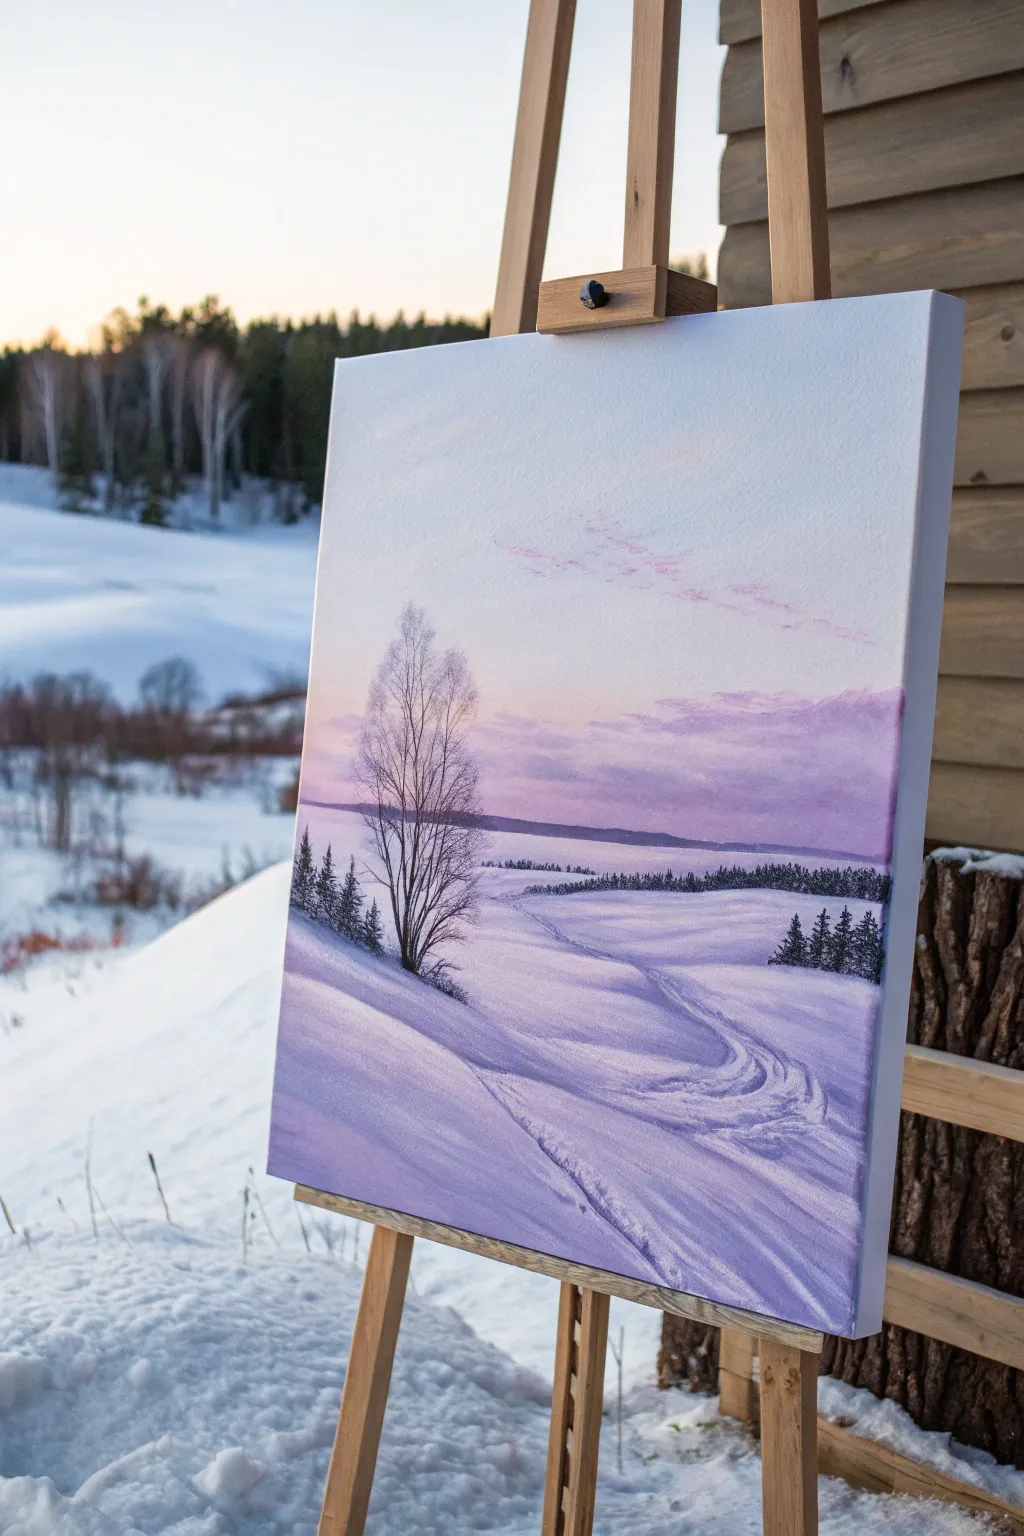
Capture the serene hush of a winter twilight with this acrylic landscape, where the snow reflects the soft lavender of the sky. This project focuses on building depth through subtle gradients and using cool indigo tones to create realistic, sculpted snow shadows.
Step-by-Step
Materials
- Stretched canvas (rectangular portrait orientation)
- Acrylic paints (Titanium White, Ultramarine Blue, Dioxazine Purple, Alizarin Crimson, Burnt Umber, Payne’s Gray)
- Large flat brush (for sky blending)
- Medium filbert brush (for snow hills)
- Small rounds and liner brushes (for trees and details)
- Palette knife
- Water container and paper towels
- Slow-drying medium (optional)
Step 1: Setting the Atmosphere
-
Prepare the Gradient Sky:
Begin by dampening the upper portion of your canvas slightly with clean water. Mix a pale wash of Titanium White with a tiny touch of Ultramarine Blue for the very top edge, transitioning quickly into a soft, pale lavender mix (White + Dioxazine Purple + hint of Crimson). -
Blend the Horizon:
As you move down the canvas toward the horizon line (about one-third up from the bottom), warm up your mixture by adding more Alizarin Crimson and White to create a soft pink glow. Use a large flat brush and horizontal strokes to blend these colors seamlessly while they are still wet. -
Add Subtle Clouds:
While the sky is tacky but not fully dry, mix a slightly darker purple-grey. Use the corner of a filbert brush to scumble in faint, wispy cloud shapes just above the horizon on the right side, keeping edges soft and diffused. -
Establish the Horizon Line:
Mix a dark, muted purple using Dioxazine Purple and a touch of Payne’s Gray. Paint a thin, distant strip of land across the horizon, allowing it to fade slightly into the atmosphere to suggest distance.
Fixing Muddy Snow
If your snow shadows look grey or muddy, you likely added too much black or brown. Let it dry, then glaze over the area with a thin wash of Ultramarine Blue to restore that crisp, chilly winter look.
Step 2: Sculpting the Snow
-
Block in Base Snow Values:
For the snowy foreground, cover the bottom two-thirds of the canvas with a base coat of Titanium White mixed with a very small amount of purple-blue. This ensures the snow isn’t stark white but reflects the ambient sky light. -
Map Out the Hills:
Using a diluted mix of Ultramarine Blue and Purple, lightly sketch the flowing curves of the snowbanks. Focus on the large hill sloping down from the left and the winding path that cuts through the center. -
Deepen the Shadows:
Now, mix a stronger shadow color using Ultramarine Blue, Dioxazine Purple, and White. Paint the recessed areas of the snow, particularly the right side of the tracks and the steep drop-off of the foreground hill on the left. -
Highlight the Crests:
Clean your brush thoroughly. taking pure Titanium White (maybe with a pinprick of warm yellow or pink), paint the tops of the snowbanks where the light hits directly. Blend the edge between the highlight and the shadow to create a soft, rolling roundness to the snow. -
Create Texture in the Foreground:
In the immediate foreground at the bottom, use a drier brush to drag slightly thicker white paint over the dried underlayer. This creates the texture of undisturbed, powdery snow.
Level Up: Sparkle Effect
For a magical finish, load an old toothbrush with watered-down white paint. Roughly flick the bristles to spatter tiny white dots specifically over the darker tree areas to simulate fresh falling snow.
Step 3: Trees and Details
-
Paint Distant Pines:
Mix a dark green-black using Payne’s Gray and a touch of Burnt Umber. With a small round brush, stipple in a line of distant pine trees along the mid-ground ridge. Keep these shapes small and slightly indistinct. -
Add Middle-Ground Grouping:
On the right side of the painting, halfway up the snow field, paint a cluster of slightly larger, sharper pine trees using the same dark mixture, ensuring the tops are pointed and the bases settle into the snow. -
Draft the Focal Tree:
For the large, bare tree on the left, thin down Burnt Umber and Payne’s Gray with water until it flows like ink. Using a liner brush, paint the main trunk, starting wider at the base and tapering upward. -
Build the Branch Structure:
Extend branches outward from the main trunk. Remember that birch-style trees often have branches that reach upward. Use a light hand to keep the lines delicate. -
Add Fine Twigs:
Switch to your finest liner brush. Add hundreds of tiny, intersecting twigs to the halo of the tree. I find that holding the brush loosely by the end of the handle helps create natural, random twitchy lines. -
Define the Tracks:
Return to the winding path in the snow. Strengthen the cast shadows inside the tracks using your deepest indigo mix to make them look carved into the surface. -
Final Highlights:
Add a few sharp touches of pure white on the edges of the tracks and the very tips of the snow mounds to make the scene pop.
Step back and admire how the cool shadows balance the warm glows in your winter landscape
Single Purple Flower Study
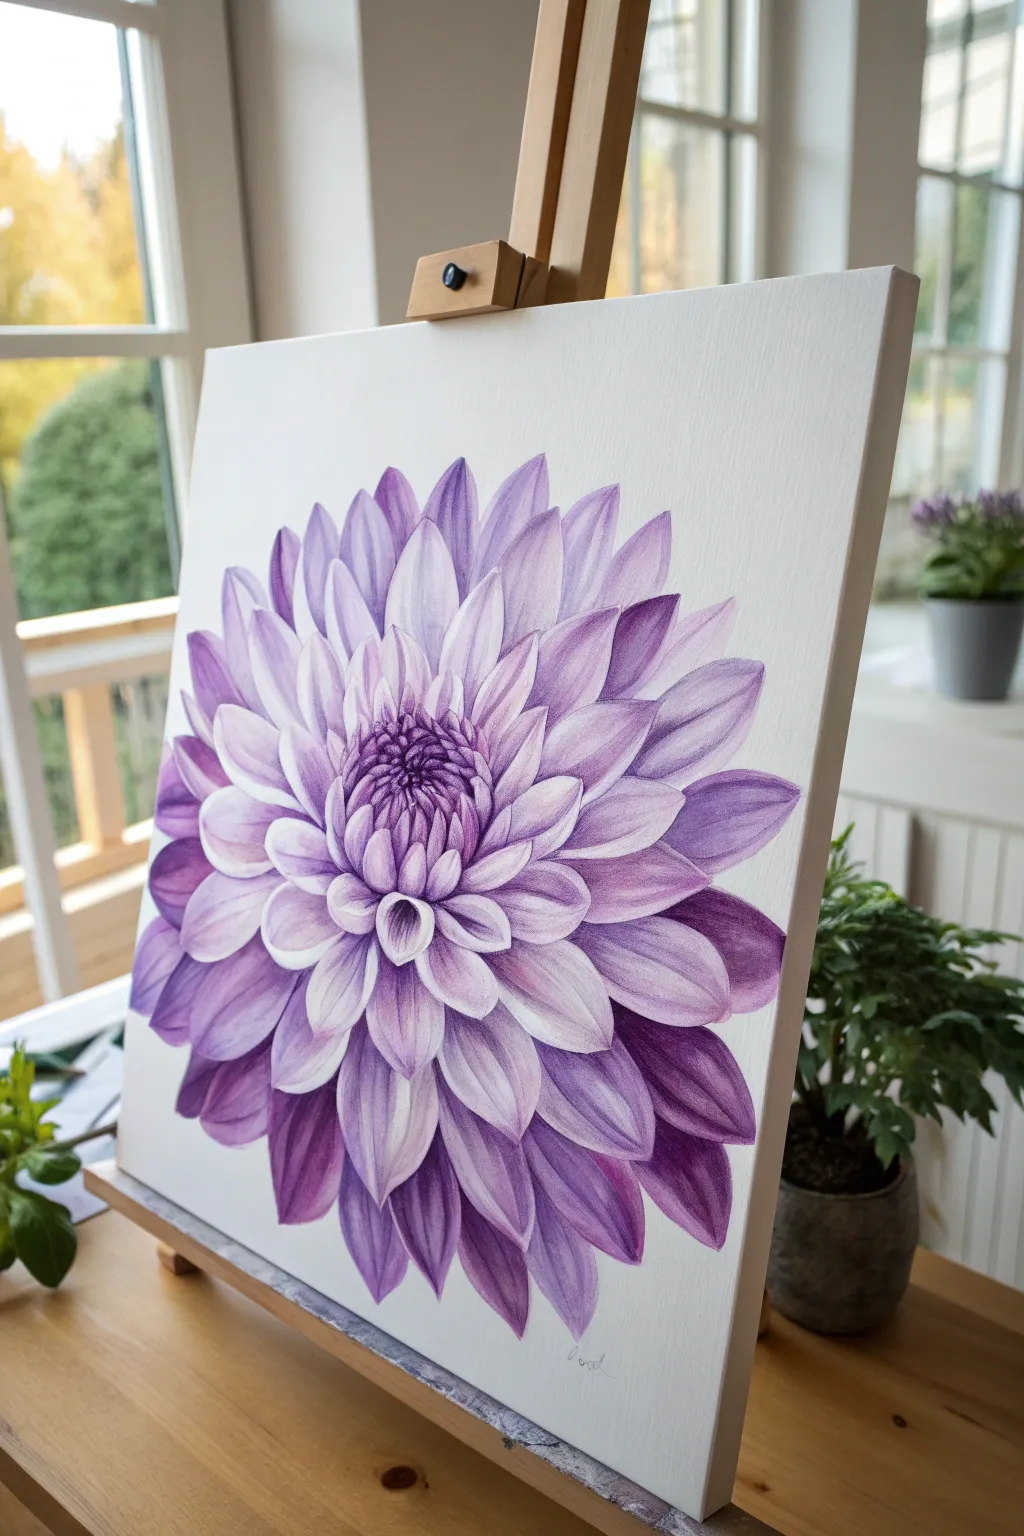
Capture the intricate beauty of a single dahlia blossom with this focused acrylic study. You will build layers of violet and lavender to create a realistic sense of depth, with petals that seem to curve right off the canvas.
Detailed Instructions
Materials
- Square stretched canvas (approx. 12×12 or 16×16 inches)
- Acrylic paints: Dioxazine Purple, Quinacridone Magenta, Ultramarine Blue, Titanium White, Raw Umber
- Flat shader brushes (sizes 6 and 10)
- Round detail brushes (sizes 0, 2, and 4)
- Filbert brush (size 6)
- Pencil (HB or 2H)
- Reference photo of a purple dahlia
- Palette and water container
- Slow-drying medium or retarder (optional)
Step 1: Planning and Underpainting
-
Center placement:
Begin by finding the exact center of your canvas. Lightly sketch a small circle about the size of a coin; this will be the tight button center of your dahlia. -
Sketching the petal rings:
Working outward from that center circle, sketch concentric rings of petals. The petals near the center should be small, tightly packed ovals. As you move outward, draw the petals larger, longer, and slightly more pointed. -
Refining the outer shape:
Continue sketching until the flower fills most of the canvas, leaving varying negative space at the corners. Ensure the outermost petals curve gently and overlap naturally, rather than looking like stiff spikes. -
Base layer for shadows:
Mix a dark purple using Dioxazine Purple with a tiny touch of Raw Umber. Using a size 4 round brush, paint the deepest recesses between the petals, particularly focusing on the gaps near the center.
Step 2: Building the Petal Structure
-
Mixing mid-tones:
Create a rich mid-tone purple by mixing Dioxazine Purple with a small amount of Titanium White and a dot of Magenta. This will be your primary petal color. -
Blocking in petals:
Using a size 6 flat or filbert brush, fill in the majority of each petal shape with your mid-tone mix. Leave the very tips and the bases (where you painted the dark shadows) empty for now. -
Blending the gradient:
While the paint is still wet (or using a retarder), blend the mid-tone into the dark shadow areas at the base of the petals. Use a clean, damp brush to soften the transition so it looks like a smooth curve rather than a hard line. -
Adding lavender highlights:
Mix a significantly lighter lavender shade by adding more Titanium White to your purple mix. Paint the tips of the petals, blending back into the mid-tone body of the petal. -
Intensifying the center:
For the tight center cluster, use a small size 2 brush to dab concentrated dark purple spots, outlining the tiny, un-opened petals to create density.
Smooth Gradients
To get silky transitions on petals, use a ‘retarder’ medium. It keeps acrylics wet longer, allowing you to blend colors on the canvas just like oils.
Step 3: Refining Details and Texture
-
Strengthening contrast:
Once the first layer is dry, mix a deep, cool shadow tone using Dioxazine Purple and Ultramarine Blue. Glaze this over the areas where petals overlap to push the bottom petals further into the background. -
Striated texture:
I particularly enjoy this stage where the flower comes alive. Using a liner brush or size 0 round brush with thinned white-lavender paint, carefully paint fine, curved lines running from the petal tip toward the center. This mimics the vein texture. -
Defining petal edges:
Sharpen the edges of the foreground petals with your lightest white mixture. This crisp edge separates the front petals from the ones behind them. -
Central highlights:
Add tiny dots and curved dashes of pale lavender to the very tips of the tight center petals. This makes the center look like a textured jewel rather than a dark hole. -
Correcting the shape:
Step back and look at the overall circular form. If any petals look flat, add a slightly darker glaze to one side of that petal to suggest it is curling or twisting. -
Final brights:
Mix almost pure Titanium White with just a whisper of purple. Apply this only to the highest points of the petals that would catch the most light—usually the curved ridge down the center of each petal.
Dew Drop Drama
Add realism by painting a small transparent water droplet on one petal. Use dark shadow on top and a bright white spec on the bottom reflect light.
Step 4: Finishing Touches
-
Cleaning up the background:
Using a clean flat brush and pure Titanium White, carefully paint around the outer edge of the flower to clean up any messy sketching lines or accidental smudges, ensuring a crisp silhouette. -
Final assessment:
Check for depth. The center should feel deepest and darkest, while the outer petal tips should feel light and airy. -
Varnishing:
Allow the painting to cure fully (at least 24 hours). Apply a satin or gloss varnish to deepen the dark purples and unify the surface sheen.
Hang your masterpiece where it can catch natural light to let those purple hues truly shine
Neon Violet Glow Landscape

Capture the ethereal beauty of a glowing twilight sky silhouetting a jagged mountain peak. This acrylic painting balances deep, moody shadows with a neon violet gradient that seems to illuminate the canvas from within.
Step-by-Step Guide
Materials
- Stretched canvas (square format recommended)
- Acrylic paints: Titanium White, Mars Black, Dioxazine Purple, Quinacridone Magenta, Ultramarine Blue, Burnt Umber
- Large flat brush (2 inch)
- Medium filbert brush (size 8)
- Small round brush for details
- Fan brush (optional)
- Palette knife
- Water container and rags
- Old toothbrush (for the stars)
Step 1: Setting the Atmospheric Sky
-
Prime the background:
Begin by covering the top two-thirds of the canvas with a wash of Dioxazine Purple. Keep this layer somewhat fluid but not dripping; it serves as the base for our gradient. -
Establish the horizon glow:
Mix Titanium White with a generous amount of Quinacridone Magenta. Apply this bright neon pink horizontally across the middle of the canvas where the mountain base will eventually sit. -
Blend the transition:
Using a clean, damp large flat brush, blend the bright pink upwards into the deep purple. Work in long, horizontal sweeping motions to create a smooth, cloud-like transition without hard lines. -
Add wispy clouds:
Load a filbert brush with a lighter lavender mix (Purple + White). Gently scumble in diagonal streaks in the upper corners to suggest atmospheric movement, softening the edges with a dry brush. -
Splatter the stars:
Once the sky is tacky but not fully dry, dilute a small amount of white paint with water. Dip an old toothbrush into it and flick the bristles to create a field of stars across the darkest purple areas at the top.
Muddied Sky fix
If blending pink into purple turns grey, your purple might have yellow undertones. Let it dry completely, then glaze pure magenta over the transition area.
Step 2: Constructing the Mountain
-
Outline the peak:
Mix Mars Black with a touch of Ultramarine Blue for a cold, dark tone. Use a medium brush to outline the jagged silhouette of the central mountain peak, placing the tip just above the center of the canvas. -
Fill the silhouette:
Block in the entire mountain shape with your dark mixture. Don’t worry about texture yet; just establish the solid, imposing form against the bright sky. -
Create background ranges:
Mix a lighter, hazy purple-grey (Black + White + Purple). Paint smaller, softer mountain ridges flanking the main peak on the left and right to push depth into the distance. -
Highlight the ridges:
Mix a cool grey (White + Black + tiny dot of Blue). Using a palette knife or the side of a dry brush, drag this color down the right-hand slopes of the mountain to catch the imaginary light and create rocky texture. -
Deepen the shadows:
Reinforce the shadowed side (the left slopes) of the mountain with pure Mars Black, ensuring the contrast against the highlighted ridges is sharp and dramatic.
Neon Boost
Use fluorescent pink acrylic paint for the horizon line instead of standard magenta. This creates an intense, artificial glow that really pops.
Step 3: Foreground and Details
-
Base the foreground:
Paint the bottom third of the canvas with a mix of Burnt Umber and Black. This sloping hill should angle upwards from left to right, covering the bottom of the mountain base. -
Add mid-ground texture:
Use a dry brush with a dark grey-brown to stipple texture onto the shadowed valley between the foreground hill and the mountain, simulating dense, distant forests. -
Suggest grassy slopes:
Mix Burnt Umber with a little Yellow Ochre or White to create a dull gold. Using a fan brush or a rough bristle brush, flick upward strokes on the bottom hill to create illuminated dry grass. -
Highlight rocky outcrops:
Scumble a light grey mixture onto parts of the dark foreground hill to suggest protruding rocks or patches of snow catching the ambient light. -
Refine the grass:
Go back in with a small liner brush and bright tan paint (Umber + White) to add individual sharp blades of grass in the immediate foreground for crisp definition. -
Final lighting check:
Assess the ‘glow’ at the horizon. If the mountain overlaid too much pink, carefully glaze a thin layer of neon magenta right along the mountain’s edge to make it pop against the dark rock.
Step back and admire the stark contrast of your majestic peak against that vibrant, otherworldly sky.
Purple Rain Clouds and Reflections

Capture the moody elegance of a passing storm with this monochromatic masterpiece heavily reliant on shades of purple and grey. This project explores wet-on-dry layering for billowing clouds and delicate line work to depict distant heavy rain.
How-To Guide
Materials
- Square canvas (approx. 8×8 or 10×10 inches)
- Acrylic paints: Deep Violet, Titanium White, Paynes Grey, Black
- Flat brushes (1-inch and 1/2-inch)
- Round brush (size 4 or 6)
- Fine liner brush or rigger brush
- Ruler (optional)
- Palette for mixing tones
- Cup of water and paper towels
Step 1: Planning and Sky Structure
-
Prime the canvas:
Begin with a clean canvas. If you want a smoother surface for the delicate rain lines later, apply a coat of white gesso and sand it lightly once dry, though standard store-bought canvases usually work fine as-is. -
Block in the sections:
Use a pencil or very faint grey paint to lightly mark your horizon line. Position it low, about one-third of the way up from the bottom, to give dominance to the dramatic sky. -
Mix cloud colors:
Prepare three shades of purple on your palette: a deep, dark violet mixed with a touch of grey for shadows, a mid-tone purple, and a very pale lavender (lots of white) for the highlights. -
Form the cloud shapes:
Using a round brush and your mid-tone purple, paint rounded, billowing shapes starting from just below the top edge of the canvas down to about the halfway point. Keep the edges ragged and uneven to mimic cumulus clouds.
Rain Control
For the rain lines, try using a ruler as a guide but not touching the brush to it directly. Hover just next to it to keep your vertical direction true without making the lines look strangely mechanical.
Step 2: Creating Volume and Atmosphere
-
Add shadows:
While the base cloud layer is still slightly tacky, brush your darkest purple mixture into the bottom curves of each cloud puff. This creates weight and volume. -
Highlight the peaks:
Take the pale lavender mix and dab it onto the top edges of the cloud formations. Blend the transition slightly where it meets the mid-tone, but leave the top edge somewhat crisp against the white background. -
Deepen the storm base:
Paint a solid, darker horizontal band of purple-grey straight across the bottom of the cloud mass. This flat bottom edge suggests the heavy ‘shelf’ of the storm cloud before the rain begins. -
Paint the background sky:
Fill the very top strip of sky (above the clouds) and the gap between the clouds and the horizon with a very watered-down, translucent grey-white wash. This shouldn’t be stark white; it needs to look like overcast air.
Streaky Sky?
If your large rain wash looks uneven or patchy, wait for it to fully dry and apply a second very thin, watered-down glaze of grey over the entire section to unify the tone without hiding the details.
Step 3: The Rain and Horizon
-
Paint the tree line:
Using a small flat brush and a mix of black and deep purple, paint a distinct horizon line. Add small, vertical bumps along the top edge to simulate distant trees or an island shore found in lakeland scenes. -
Add tree reflections:
Immediately below the tree line, paint a mirror image in a slightly lighter, watered-down version of the dark tree color to suggest the reflection on the water. -
Dry completely:
It is crucial that the cloud layer and the sky ‘gap’ are 100% dry before proceeding to the next step to prevent smudging. -
Draw the rain:
Using a very fine liner brush and thinned-down grey paint (almost like ink consistency), pull long, vertical lines from the flat bottom of the clouds down toward the horizon. Keep your hand loose; the lines don’t need to be perfectly straight. -
Distress the rain:
If the lines look too uniform, I sometimes lightly drag a mostly dry flat brush vertically over them while the paint is wet to soften the effect and create a ‘sheet’ of rain.
Step 4: Foreground Water
-
Base the water:
Below the tree reflection, fill the rest of the canvas with a very pale, grey-purple wash similar to your sky color. -
Block in foreground ripples:
Mix a vibrant purple similar to your mid-tone cloud color. Using a flat brush, paint horizontal strokes starting from the bottom edge of the canvas, becoming thinner as you move upward. -
Add movement:
Intersperse these purple strokes with thinner lines of white and deep violet. Ensure the lines are imperfect and slightly wavy to mimic the movement of gentle waves. -
Blend the transition:
As you move closer to the reflected tree line, let the ripples fade out so the water becomes calmer and more reflective near the horizon. -
Final touches:
Step back and check your contrast. If the clouds look too flat, add a tiny bit more dark violet to the deepest shadows to make them pop.
Now you have a moody, atmospheric window into a summer storm that looks great on any wall
Monochrome Violet Portrait Lighting
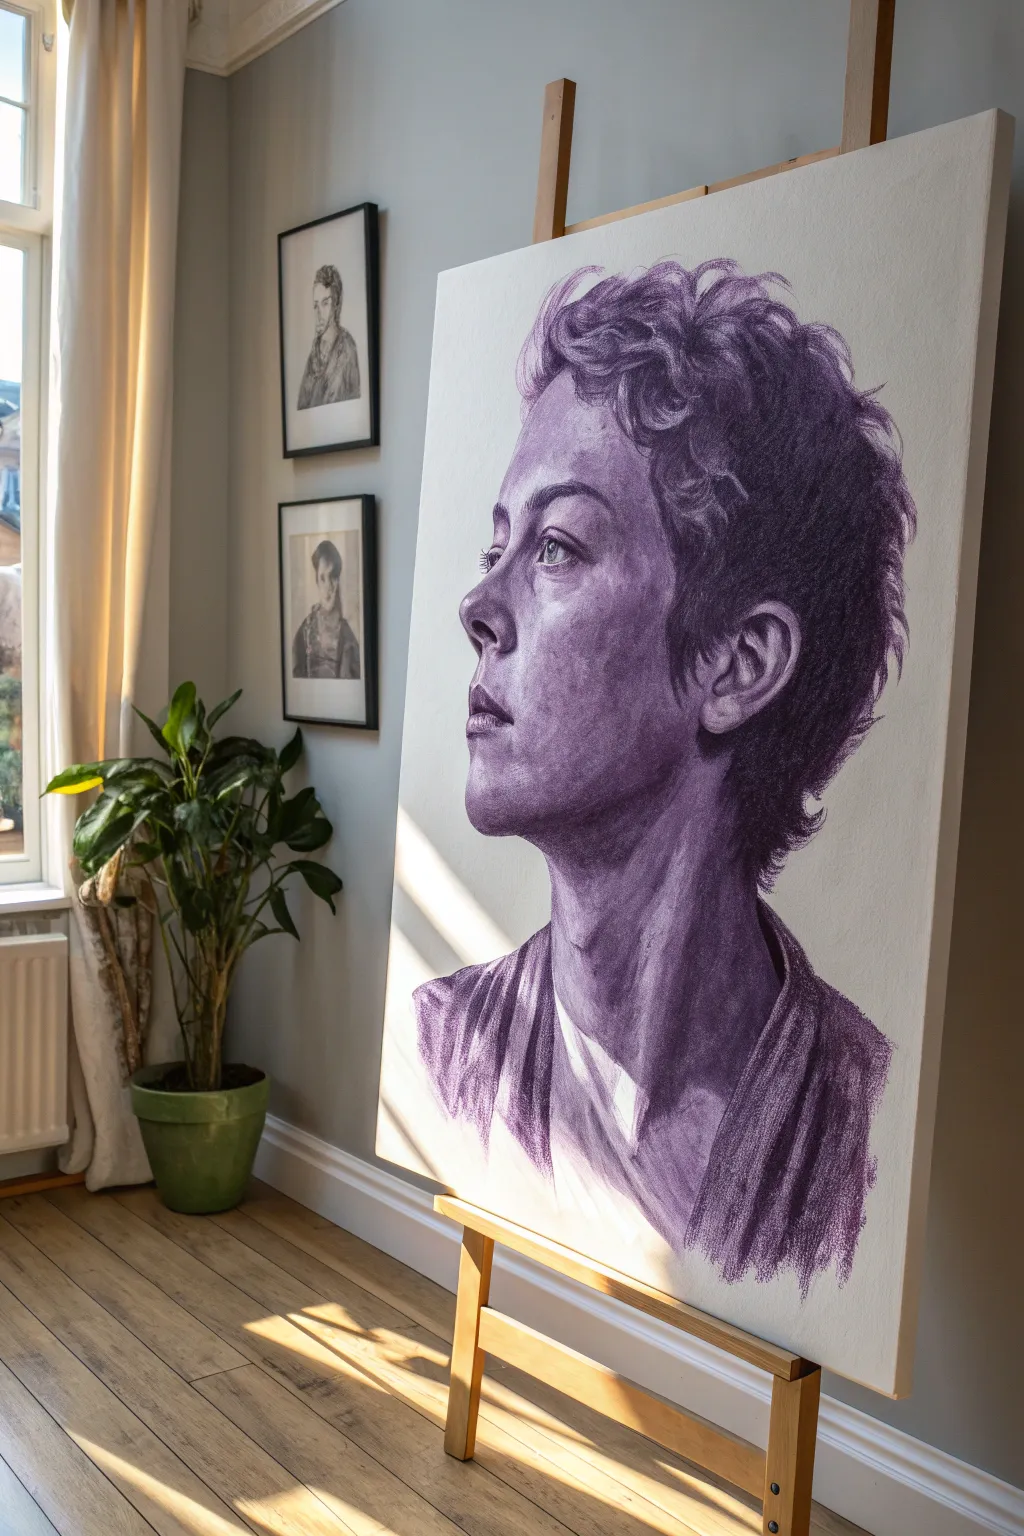
This project explores the emotive power of a single hue by creating a highly realistic profile portrait using only varied tones of violet. By limiting your palette, you can focus entirely on value and lighting to sculpt the features of the subject.
Step-by-Step Tutorial
Materials
- Large stretched canvas (e.g., 24×36 inches)
- Heavy body acrylic paints: Dioxazine Purple, Titanium White, Mars Black (optional)
- Matte medium or glazing liquid
- Soft charcoal pencil (for initial sketch)
- Various flat and filbert brushes (sizes 2, 6, 12, and a large 1-inch brush)
- Palette knife for mixing
- Water container and rags
- Reference photo of a profile portrait with strong lighting
Step 1: Preparation and Sketching
-
Prime the surface:
Ensure your canvas is clean. If you want a smoother texture for the face, apply an extra coat of gesso and sand it lightly once dry to remove the heaviest canvas weave. -
Establish the grid (optional):
If you struggle with freehand proportions, lightly pencil a large grid on your reference photo and a corresponding one on your canvas to help place key features like the eye and ear. -
Draft the outline:
Using a soft charcoal pencil or a brush with very watered-down purple paint, sketch the profile. Focus on the major angles: the slope of the nose, the jawline, and the placement of the ear. -
Refine the features:
Tighten up the drawing around the eye, nostril, and mouth. These are your focal points, so take your time ensuring the anatomy looks correct before applying heavy paint.
Muddy Purple Problem?
If your purple shadows look dull or brown, stop adding black. Instead, darken Dioxazine purple with a tiny touch of Burnt Umber or Phthalo Green. This keeps the hue rich and vibrant.
Step 2: Blocking in Values
-
Mix your value scale:
On your palette, create a gradation of purple. Squeeze out a large amount of Dioxazine Purple. Create a dark pile (pure purple + tiny touch of black), a mid-tone (pure purple), and three progressively lighter tints by mixing in increasing amounts of Titanium White. -
Apply the darkest darks:
Identify the deepest shadows in your reference—usually the hair, the nostril, the pupil, and the shadow under the jaw. Paint these areas with your darkest purple mixture. -
Block in mid-tones:
Using your pure purple and the slightly lighter mix, fill in the skin areas that aren’t in direct light. This includes the cheek hollows, the side of the neck, and the hair mass. -
Establish the lights:
Switch to your lighter violet tints. Block in the forehead, the bridge of the nose, and the upper cheekbone where the light hits. Don’t worry about blending perfectly yet; just get the values in the right places.
Try Dry Brushing
To mimic the textured look of the reference image, use an old, stiff brush with very little paint. Drag it lightly over the dried underlayers to create a grainy, charcoal-like effect.
Step 3: Refining and Texturing
-
Soft blending for skin:
Use a dry brush technique or a tiny bit of glazing liquid to blend the edges between your painted values on the face. I find a soft filbert brush works best here to create that smooth skin transition. -
Build the hair texture:
Unlike the skin, the hair needs distinct strokes. Use a smaller round brush with dark and mid-tone purples to create wavy, C-shaped strokes that mimic the flow of curls. -
Detail the eye:
This is the most crucial part. Carefully paint the iris, leaving a small spot of white canvas or adding a dot of pure white later for the catchlight. Use a fine liner brush for the eyelashes. -
Sculpt the lips and nose:
Add subtle highlights to the bottom lip and the tip of the nose. These small touches of light help push the forms forward in space. -
Create skin texture:
To make the skin look realistic rather than plastic, scumble a very thin later of mid-tone purple over the cheek area. This adds a bit of ‘noise’ that mimics pores and skin variation.
Step 4: Final Highlights and Touches
-
Brightest highlights:
Mix a value that is almost pure white with just a whisper of purple. Apply this selectively to the wettest looking areas: the tear duct, the lip highlight, and the brightest shine on the forehead. -
Define the clothing:
Keep the clothing loose and painterly to contrast with the detailed face. Use broad, confident strokes with the large flat brush to suggest folds in the fabric. -
Refine edges:
Check the silhouette of the face against the background. If you need to sharpen the profile, paint the background (using white or a very pale grey/purple) carefully up to the line of the face. -
Final assessment:
Step back from the easel. Look for contrast balance. If the portrait looks flat, deepen your darks in the hair and neck shadow to make the face pop.
Step back and admire how a single color can capture such depth and emotion in your finished portrait


Have a question or want to share your own experience? I'd love to hear from you in the comments below!