
Ramadan is packed with beautiful symbols—crescent moons, glowing lanterns, and quiet night skies that practically beg to be painted. Here are my favorite Ramadan painting ideas, starting with the classic, beginner-friendly scenes and moving into more playful, creative twists.
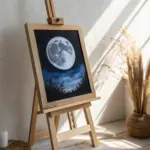
Crescent Moon and Starry Night Sky
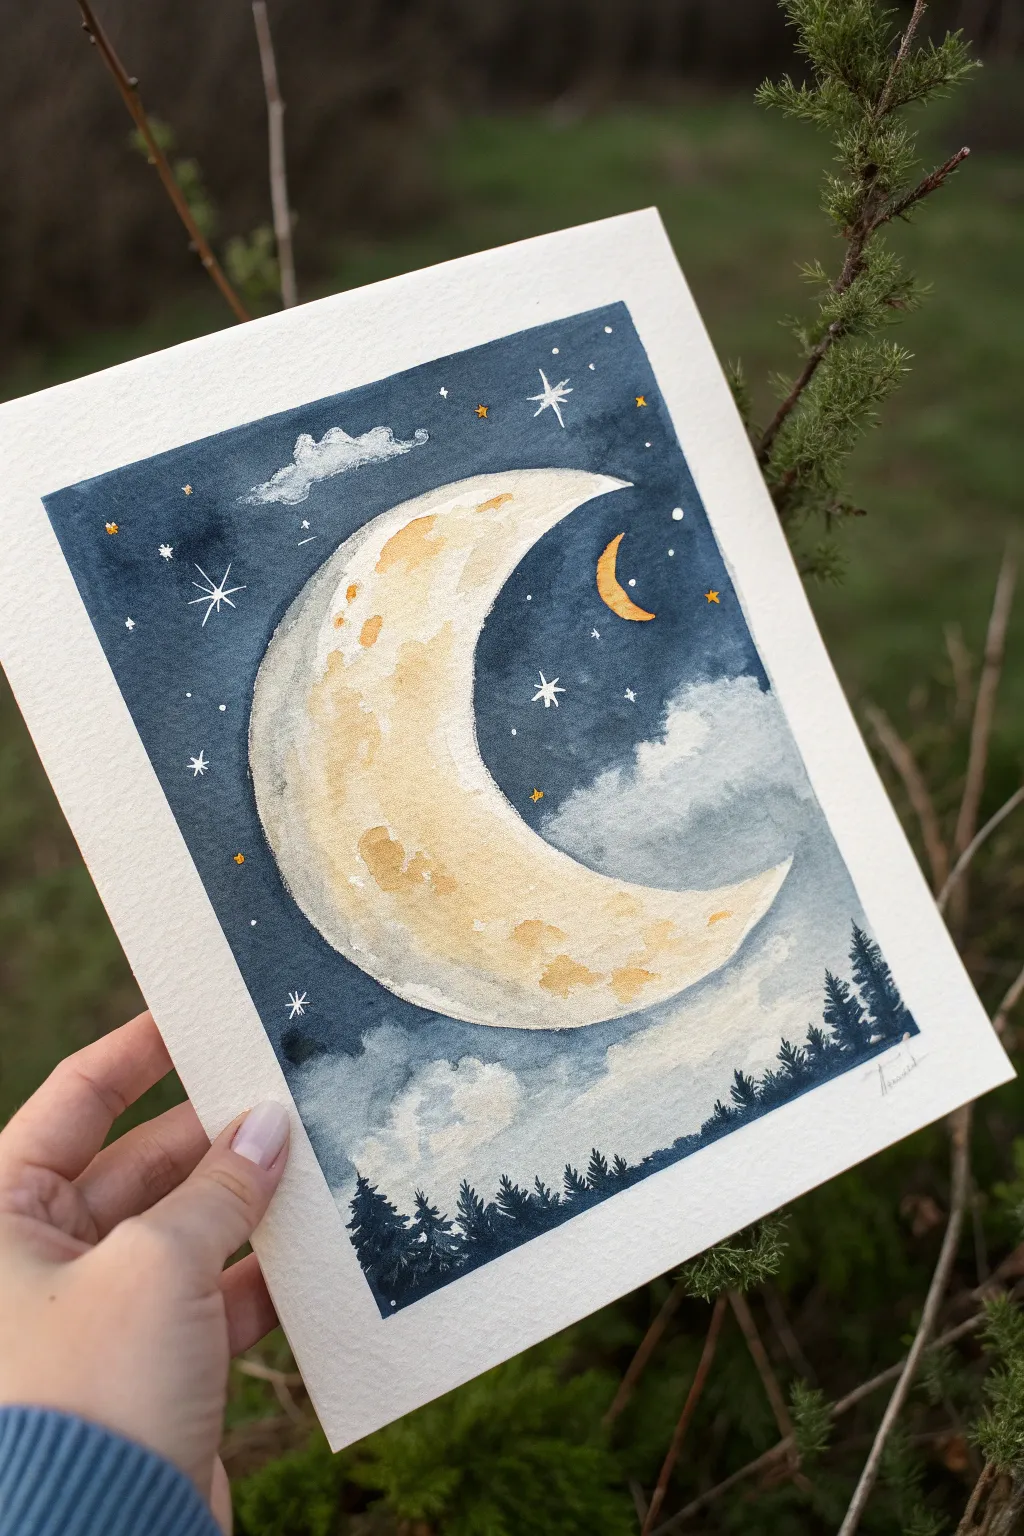
Capture the magic of a Ramadan evening with this dreamy watercolor painting featuring a glowing, oversized crescent moon set against a deep indigo sky. The contrast between the cratered moon texture and the soft, cloudy background makes for a serene and spiritual piece.
Step-by-Step Tutorial
Materials
- Cold press watercolor paper (300 gsm)
- Masking tape
- Pencil and kneaded eraser
- Watercolor paints (Indigo, Payne’s Gray, Yellow Ochre, Burnt Sienna, Orange, White Gouache)
- Round brushes (size 8 for washes, size 2 for details)
- Jar of clean water
- Paper towels or rag
- White gel pen (optional)
Step 1: Sketching and Preparation
-
Secure your paper:
Tape down all four edges of your watercolor paper to a board or table. This creates that crisp white border seen in the example and prevents the paper from buckling when wet. -
Draft the moon:
Lightly sketch a very large crescent moon shape dominating the center-left of the page. Make the curve deep and dramatic. Keep your pencil lines faint so they don’t show through the final paint. -
Add floating elements:
Sketch a much smaller, thinner crescent shape to the right of the main moon. Mark out a few positions for clouds near the horizon and the top left corner.
Bleeding Edges?
If paint bleeds into the moon, lift it quickly with a clean, damp brush or paper towel. Wait for the darker color to dry completely before fixing the shape with opaque gouache.
Step 2: Painting the Sky
-
Prepare the wash:
Mix a large puddle of Indigo with a touch of Payne’s Gray. You want a deep, saturated night sky color. Dilute a separate puddle of the same mix for the lighter cloud areas. -
Wet-on-dry technique:
Using your size 8 brush, carefully paint around the large crescent moon shape. Fill the sky with the dark Indigo mix, but leave irregular patches blank or very light near the bottom and top left for the clouds. -
Softening cloud edges:
While the sky paint is still damp, rinse your brush and use clean water to soften the edges where the dark sky meets the white paper areas reserved for clouds. This creates a fluffy, misty effect. -
Adding depth to clouds:
Drop very diluted gray shadows into the bottom sections of the white cloud areas to give them volume, ensuring they don’t look flat. -
Let it dry:
Wait for the sky layer to be completely bone dry before moving on. If the paper feels cool to the touch, it’s still wet.
Step 3: Painting the Moons
-
Base layer for the large moon:
Dilute Yellow Ochre with plenty of water. Paint a very pale, uneven wash over the entire large crescent moon, leaving tiny speckles of white paper showing for texture. -
Adding craters and texture:
While the moon is damp, drop in stronger concentrations of Yellow Ochre and small touches of Burnt Sienna to create ‘craters’ and shadowy patches. I like to focus these darker spots along the inner curve. -
The small crescent:
Paint the smaller floating crescent with a vibrant Orange. Keep this shape solid and bold to make it pop against the dark background.
Pro Tip: Glowing Stars
To make the stars glow, gently lift a tiny circle of blue paint with a damp brush before painting the white star in the center. This creates a subtle halo effect.
Step 4: Details and Foreground
-
Silhouetted tree line:
Mix a very thick, creamy consistency of Indigo and Payne’s Gray—almost black. Using the tip of your small brush, paint a jagged tree line along the very bottom edge. -
Creating pine details:
Use vertical strokes for the tree trunks, then dab the brush horizontally in a zigzag motion to create pine branches. Vary the heights, making the trees on the right side taller. -
Adding stars:
Load a small brush or white gel pen with White Gouache. Paint several four-pointed stars and small dots scattered throughout the dark blue sky. -
Highlights and sparkles:
Add a few tiny yellow or orange dots among the white stars to echo the color of the moon. This brings warmth to the cool sky. -
The reveal:
Once absolutely everything is dry, slowly peel away the masking tape at a 45-degree angle to reveal your clean edges.
Hang your finished celestial scene where it can remind you of the peace of the night sky.


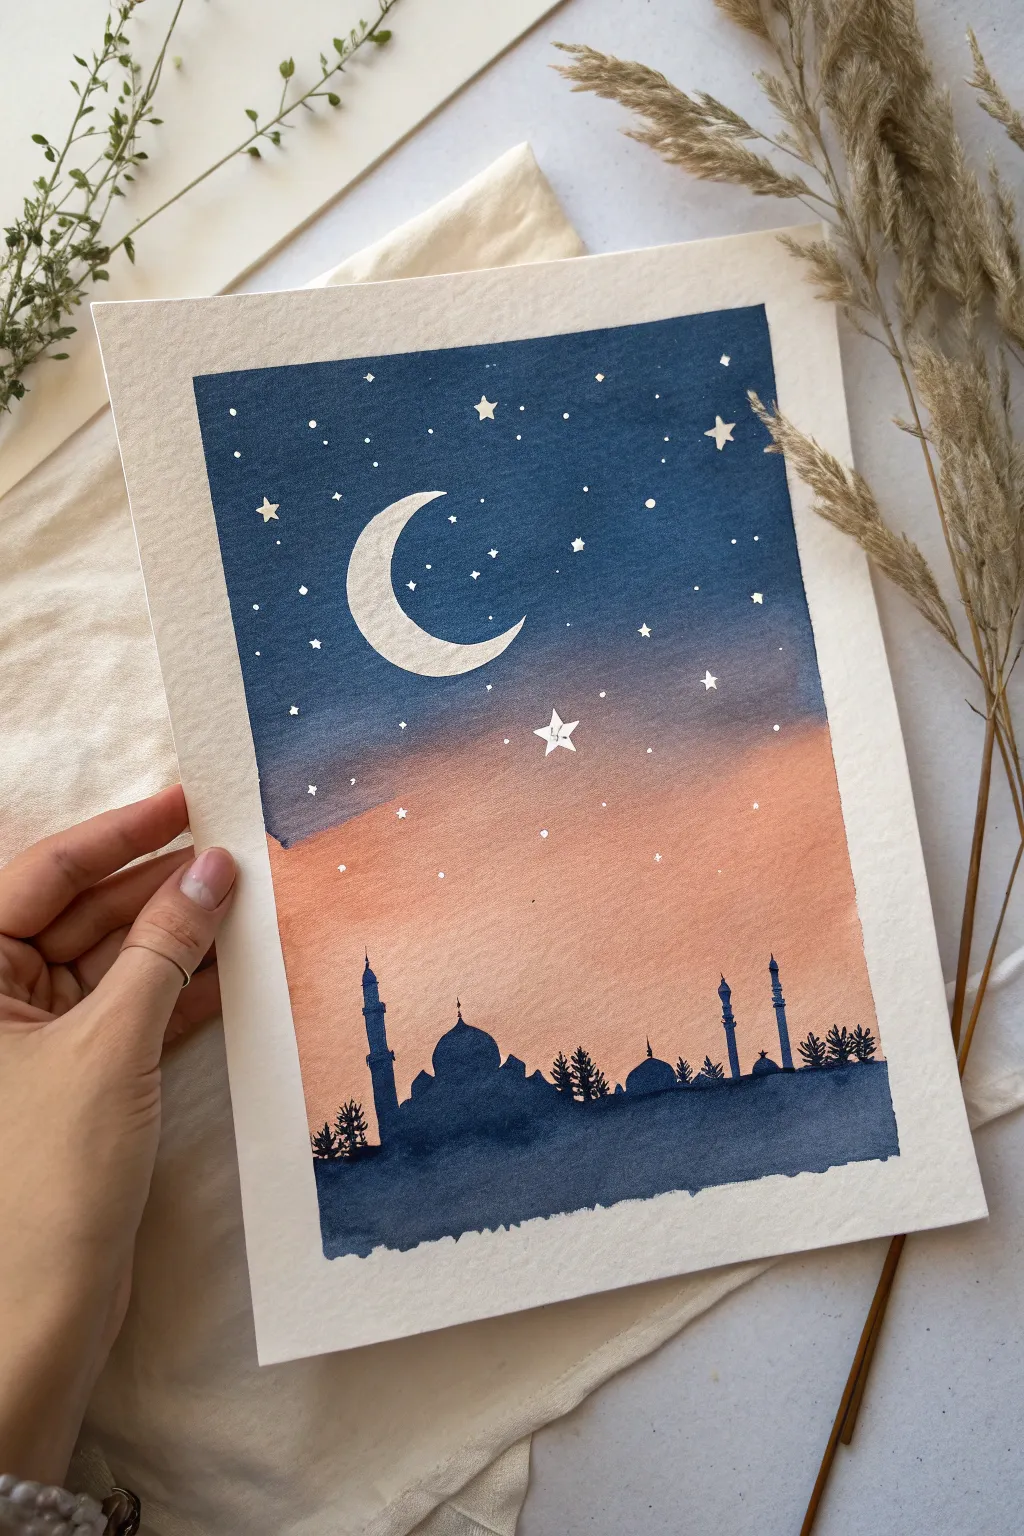
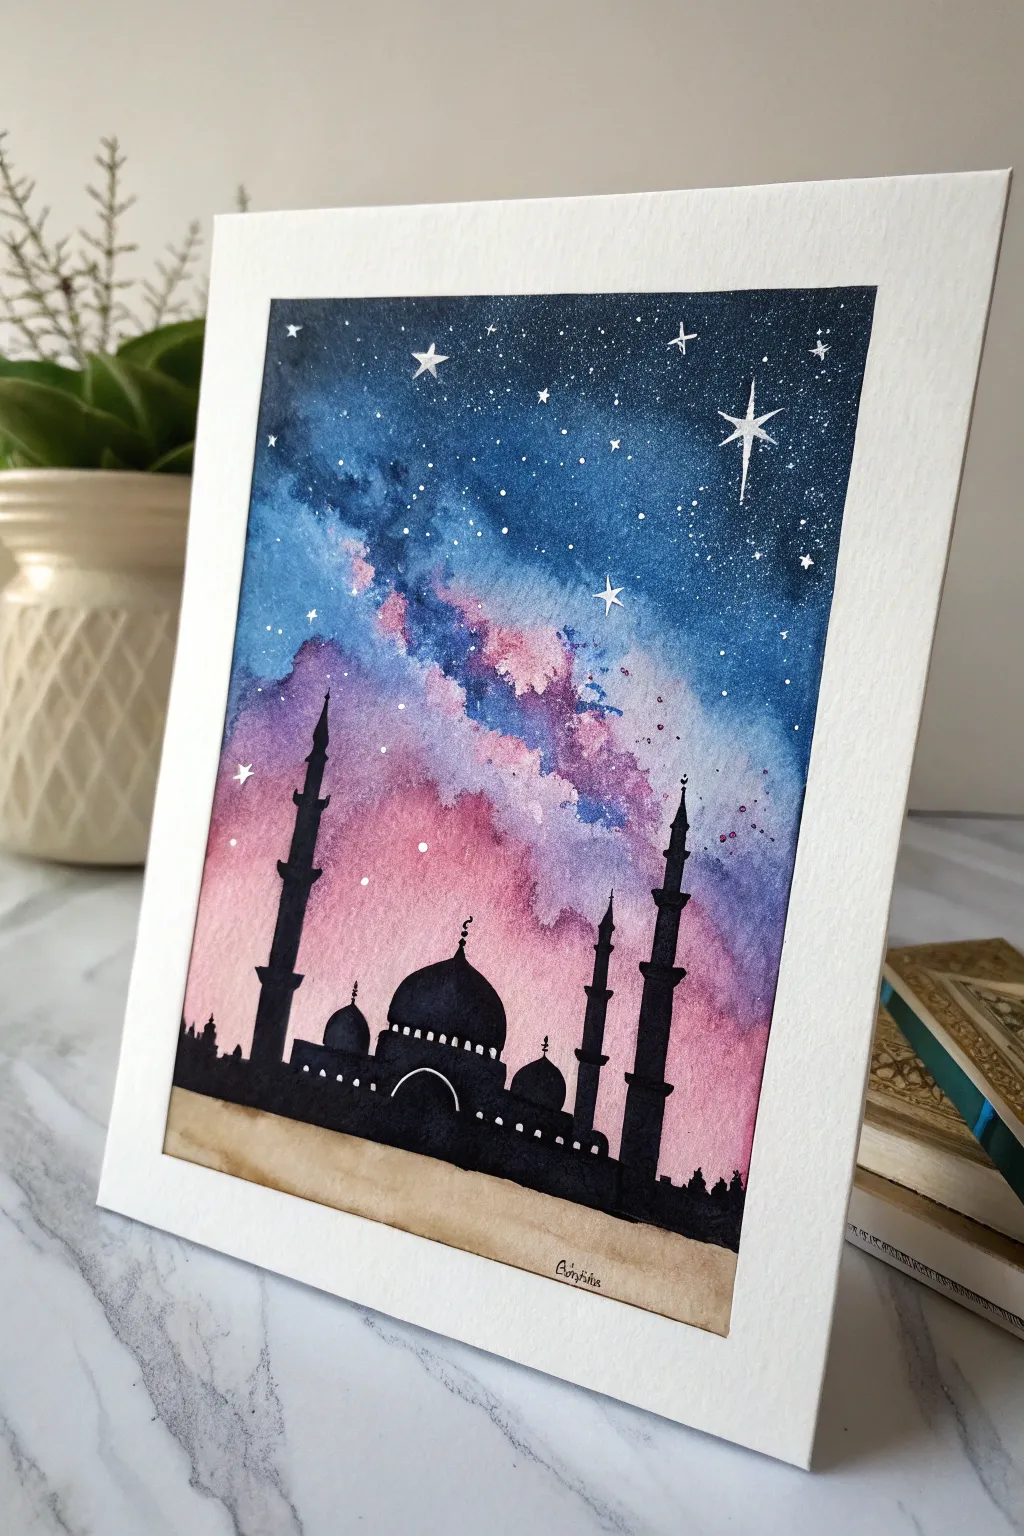
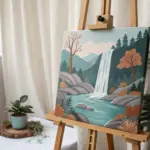
Mosque Silhouette at Sunset

Capture the serene beauty of a mosque at dusk with this vibrant watercolor project that balances a glowing, colorful sky against a stark, detailed silhouette. The soft wet-on-wet background creates the perfect atmospheric canvas for the crisp architectural lines of the foreground.
How-To Guide
Materials
- Cold press watercolor paper (with deckled edges if possible)
- Watercolor paints (purple, pink, orange, yellow-ochre)
- Black waterproof ink or gouache
- Flat wash brush (3/4 inch)
- Fine detail brush (size 0 or 00)
- Clean water jar
- Masking tape
- Paper towels
- Pencil
Step 1: Painting the Sunset Sky
-
Prepare the paper:
Begin by taping down your watercolor paper to a hard board, or simply lay it flat if it’s a heavy weight block. If you want that rustic deckled edge look shown in the photo, you can carefully tear the edges against a ruler before starting. -
Wet the surface:
Using your large flat brush, apply a clean coat of water across the entire upper section of the paper where the sky will be. Leave the bottom strip dry where the ground will eventually go. -
Apply the top color:
Load your brush with a diluted purple or soft violet. Gently establish a horizontal wash across the very top of the wet area, letting the pigment flow naturally downward into the damp paper. -
Blend the middle tones:
While the purple is still wet, rinse your brush and pick up a warm pink or coral shade. Paint this directly below the purple, allowing the two colors to touch and bleed together softly to create a gradient. -
Add the warmth:
Move downwards with a yellow-orange or peach tone. Blend this into the bottom of the pink section, painting all the way down to where your horizon line will sit. The colors should look like a soft, dreamy sunset. -
Create texture:
I like to tilt the board slightly at this stage to encourage subtle directional blending. If the sky looks too flat, you can dab just a hint of stronger pigment into the wet areas to create cloud-like variations. -
Let it dry completely:
This is crucial. The paper must be bone dry before you touch it with black paint, or the silhouette will bleed into the sky. Use a hairdryer on a low setting if you are impatient.
Step 2: Creating the Silhouette
-
Sketch the outline:
Once the sky fits firmly dry, lightly sketch the outline of the main dome, the smaller domes, and the two tall minarets using a pencil. Keep the lines faint so they don’t show through later. -
Outline the main dome:
Switch to your black ink or gouache and a medium round brush. Carefully trace the curve of the large central dome, ensuring the edge is sharp and smooth against the colorful sky. -
Fill the central mass:
Fill in the body of the mosque below the dome with solid black. Ensure the coverage is opaque; you may need a second coat if your paint looks streaky. -
Paint the minarets:
Using your fine detail brush, paint the two tall towers on either side. Start from the base and work upwards, tapering the width as you go higher. Add the small balconies (sheret) as tiny horizontal protrusions. -
Add the crescent moons:
Switch to your smallest brush (size 00) for the finials. Carefully paint the tiny crescent moons atop the main dome and the minaret spires. Precision is key here. -
Paint the side domes:
Add the smaller domes flanking the main structure. These help balance the composition and add architectural weight to the bottom of the painting. -
Ground the scene:
Extend the black paint horizontally across the bottom to create the ground level. This connects all the architectural elements and provides a solid base for the composition.
Bleeding Silhouette?
If your black paint starts spider-webbing into the sky, stop immediately! Your background holds moisture deep inside. Let it dry for another 1-2 hours or use a hairdryer before continuing.
Step 3: Final Details
-
Add the large moon:
In the upper right corner of the sky, carefully paint a crescent moon using black ink. Make sure the curve is smooth and faces the correct direction relative to your light source. -
Paint the birds:
Using the very tip of your fine brush, add a few tiny ‘v’ or ‘m’ shapes high in the sky to represent birds flying in the distance. Vary their sizes slightly to suggest depth. -
Add vegetation:
On the far right of the ground silhouette, use a semi-dry brush to dab in the texture of a small tree or bush. Use upward flicking motions to mimic leaves and grass blades along the baseline. -
Final check:
Step back and look for any tiny white gaps in your silhouette. Fill them in with black to ensure the contrast is absolute and the shapes read clearly.
Sharper Details
For the ultra-fine spires and crescents, switch to a black fineliner pen (like a Micron) instead of a brush. It gives you way more control over those tiny architectural elements.
Frame this serene piece in a simple floating frame to show off the beautiful paper texture and vibrant gradient.

Crescent Moon Over a Quiet City Skyline
Capture the peace of a quiet evening with this watercolor silhouette painting featuring a mosque skyline against a dramatic gradient sky. The contrast between the warm sunset hues and the cool indigo night creates a striking backdrop for the crisp crescent moon.
Step-by-Step
Materials
- Cold press watercolor paper (300 gsm)
- Masking tape
- Watercolor paints (Indigo, Prussian Blue, Burnt Orange, Cadmium Yellow)
- White gouache or white gel pen
- Round brushes (large size 10 or 12, medium size 6, fine detail size 0 or 1)
- Masking fluid (drawing gum) and old brush
- Two jars of water
- Paper towels
- Pencil and eraser
Step 1: Preparation & Masking
-
Tape the edges:
Begin by taping down all four edges of your watercolor paper to a board. Press the edges of the tape down firmly to ensure crisp, clean borders later. -
Sketch the moon:
Lightly sketch the shape of the crescent moon in the upper left quadrant. Keep your pencil pressure very light so the graphite doesn’t show through later. -
Mask the moon:
Using an old brush or a silicone applicator, carefully fill in the moon shape with masking fluid. This preserves the bright white paper -
Add some stars:
Dot tiny specks of masking fluid around the sky area to create random distant stars. I like to vary the size, making a few slightly larger to represent brighter stars. -
Let it dry completely:
Wait until the masking fluid is distinctively rubbery and dry to the touch before moving on to any paint.
Step 2: Painting the Sky Gradient
-
Wet the paper:
Using your largest clean brush, apply a consistent sheen of clean water across the entire sky area, stopping just above where your skyline will be. The paper should be glisten, not puddle. -
Apply the warm horizon:
Load your medium brush with a mix of Burnt Orange and a touch of Cadmium Yellow. Paint a horizontal band across the lower third of the paper. -
Blend upwards:
While the orange is still wet, quickly rinse your brush and pick up your dark blue (Indigo mixed with Prussian Blue). Start painting from the very top of the paper, moving downward. -
Create the gradient:
Where the blue meets the orange, use gentle back-and-forth strokes. Don’t overwork it; let the water on the page help the colors merge naturally into a dusky violet transition. -
Deepen the night:
While the top section is wet, drop in more concentrated Indigo paint near the top edge to make the night sky look rich and deep. -
Dry strictly:
Allow the background wash to dry completely. If the paper is cold to the touch, it’s still damp. Using a hairdryer on a low setting can speed this up.
Clean Edges Trick
To prevent paint bleeding under the tape, seal the inner edge of the tape with a tiny bit of clear water or white paint first and let it dry before starting the sky.
Step 3: Silhouettes & Details
-
Remove the masking:
Once the paper is bone dry, gently rub off the masking fluid with your clean finger or a rubber cement pickup to reveal the crisp white moon and stars. -
Sketch the skyline:
Lightly sketch the outline of the mosque domes, minarets, and trees along the bottom edge. Vary the heights to create visual interest. -
Paint the base layer:
Mix a very concentrated, creamy consistency of Indigo blue. Using a medium brush, fill in the bottom block of the land, covering the bottom of your sketch. -
Refine the architecture:
Switch to your fine detail brush. carefully paint the domes and tall, thin minarets. Ensure the edges are sharp against the sunset background. -
Add texture:
Use the tip of the brush to stipple small, irregular shapes between the buildings to suggest trees and foliage. -
Brighten the stars:
If the masked stars look dull, touch them up with a tiny dot of white gouache or a white gel pen. You can paint a few larger, glimmering 5-point stars now too. -
Final reveal:
Wait for the silhouette layer to dry, then slowly peel away the masking tape at a 45-degree angle to reveal your clean white border.
Gold Leaf Accent
For a luxurious touch, apply gold leaf to the crescent moon instead of leaving it white. Use size adhesive carefully over the moon shape once the sky is dry.
Now you have a serene piece of art perfect for displaying during the holy month

Kaaba-Inspired Night Scene
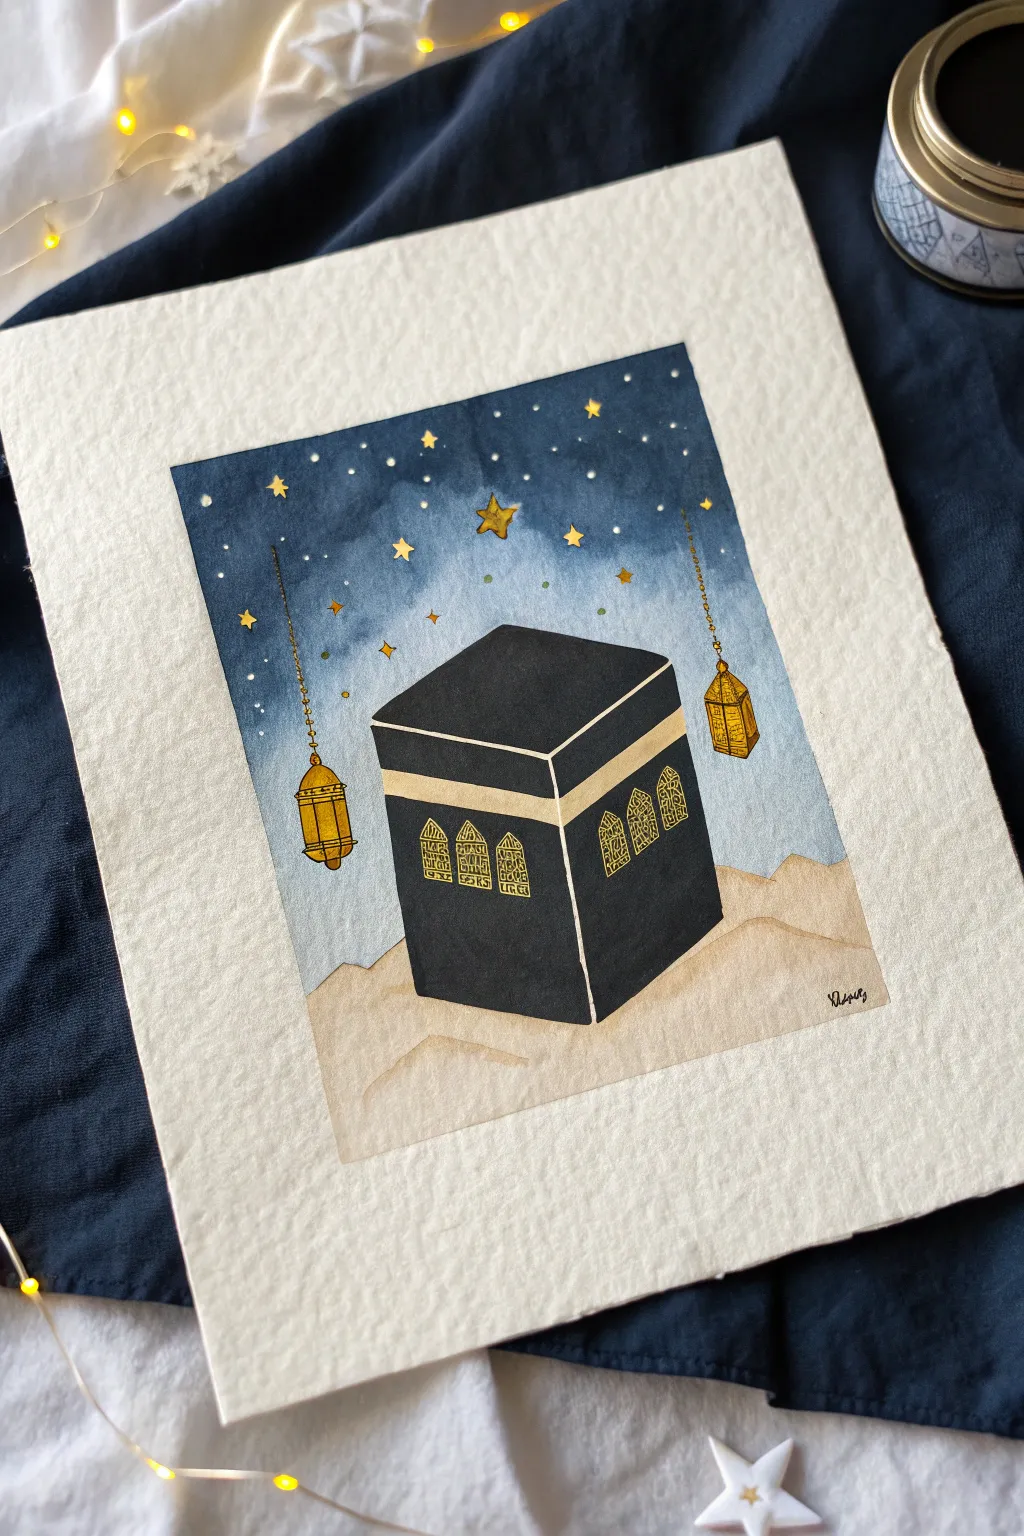
Capture the serenity of a holy night with this beautiful watercolor illustration featuring the Kaaba beneath a glittering sky. The contrast between the deep indigo heavens and the minimalist dunes creates a striking, peaceful composition perfect for Ramadan décor.
Step-by-Step
Materials
- Cold press watercolor paper (300 gsm)
- Watercolor paints (Indigo, Payne’s Grey, Yellow Ochre, Burnt Sienna)
- Black ink fine liner pen or black acrylic paint
- Gold metallic paint or gold paint pen
- White gouache or white gel pen
- Masking tape
- Pencil and eraser
- Round brushes (sizes 2, 6, and 10)
- Ruler
Step 1: Preparation and Sketching
-
Tape the edges:
Secure your watercolor paper to a board or table with masking tape. This creates that crisp, professional white border you see in the reference image and keeps the paper flat while wet. -
Draft the horizon:
Lightly sketch a low, undulating line about one-third of the way up the paper to represent the sand dunes. Keep the lines soft and organic. -
Outline the Kaaba:
Using a ruler, draw a cube shape resting on the dunes. The perspective doesn’t need to be perfect, but ensure the vertical lines remain straight up and down to anchor the structure. -
Detail placement:
Mark the positions for the two hanging lanterns on either side of the Kaaba and lightly indicate where the gold band will wrap around the top of the cube.
Starry Sky Tip
For a natural starry effect, load a toothbrush with white gouache and flick the bristles to splatter tiny stars, rather than painting each dot individually.
Step 2: Painting the Background
-
Base wash for the sky:
Wet the sky area with clean water first. Load your largest brush with a mix of Indigo and Payne’s Grey. Start painting from the top down, letting the pigment be darkest at the very top edge. -
Create the gradient:
As you move closer to the horizon line, dilute your paint slightly with water. You want a seamless fade from deep midnight blue to a lighter, hazy blue near the sand. -
Paint the dunes:
Once the sky is dry, mix a very watery wash of Yellow Ochre with a tiny touch of Burnt Sienna. Paint the sand area, layering a slightly darker mix on the shadowed sides of the dunes for dimension. -
Dry completely:
Let the background layers dry thoroughly before proceeding, or use a hairdryer on a low setting to speed things up.
Level Up: Texture
Use a heavy-texture or rough grain watercolor paper. The paint will settle into the grooves, giving the sand dunes a realistic, gritty appearance.
Step 3: Painting the Kaaba
-
Block in the black:
Using a smaller round brush and highly pigmented black watercolor (or black ink/acrylic for opacity), fill in the main body of the Kaaba. -
Leave the gold band:
Carefully paint around the strip near the top where the gold band will go. If you accidentally cover it, don’t worry—opaque gold paint can usually cover black later. -
Add subtle dimension:
I like to leave the top face of the cube just a shade lighter than the sides (mix a tiny bit of white or water into the black) to show that moonlight is hitting it.
Step 4: Adding the Gold Details
-
Paint the band:
Using your gold paint or a gold marker, fill in the horizontal band near the top of the Kaaba. Ensure the edges are sharp. -
Add the door and script:
Draw the detailed arches and calligraphy panels on the front face of the Kaaba using the gold pen. You can simplify the calligraphy into abstract squiggles suggesting text. -
Illustrate the lanterns:
Paint the two lanterns hanging from the sky in gold. Start with outline shapes, then fill them in, adding small horizontal lines for the glass panes. -
Chains and stars:
Use a fine point gold pen or a very thin brush to draw vertical chains connecting the lanterns to the sky. Scatter different-sized gold stars across the blue gradient.
Step 5: Final Touches
-
Add white stars:
For depth, add tiny dots of white gouache or white gel pen among the gold stars. This variation makes the night sky look more magical. -
Clean up:
Once absolutely everything is dry, slowly peel away the masking tape at a 45-degree angle to reveal your clean white borders.
Display your completed night scene in a frame or gift it to a loved one for a thoughtful handmade present
BRUSH GUIDE
The Right Brush for Every Stroke
From clean lines to bold texture — master brush choice, stroke control, and essential techniques.
Explore the Full Guide
Desert Dunes Under a Ramadan Moon
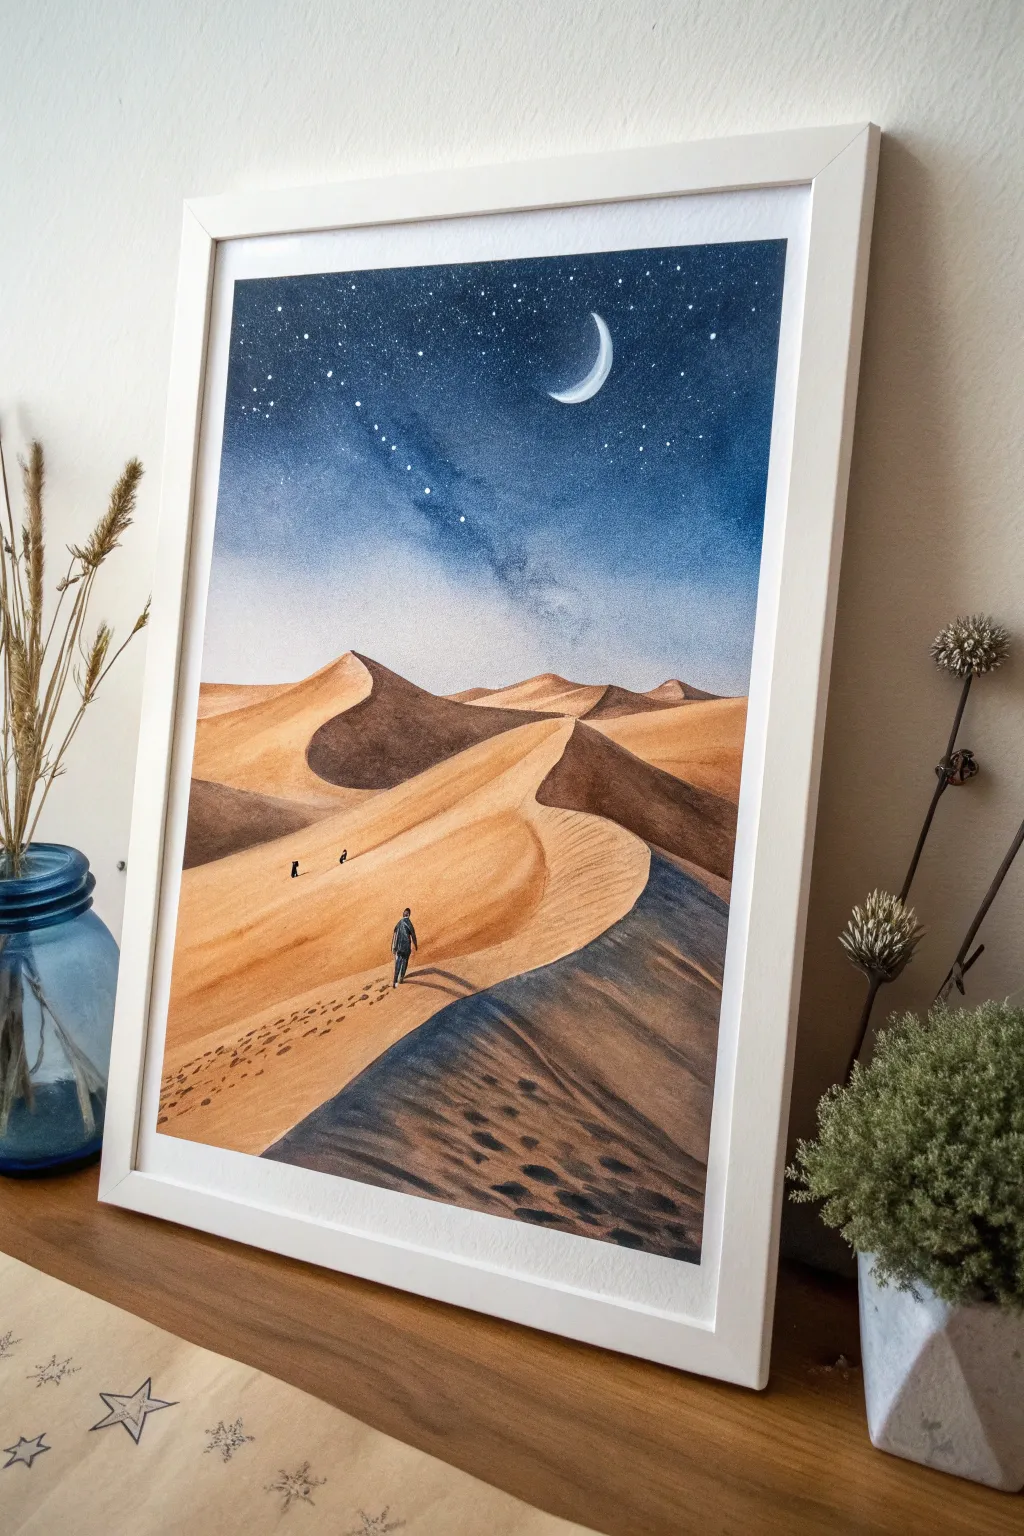
Capture the serenity of a moonlit desert walk with this atmospheric watercolor painting. This project combines smooth gradients for the starry sky with textured layering for the warm, shifting sands below.
How-To Guide
Materials
- Cold press watercolor paper (300 gsm)
- Watercolor paints (Indigo, Prussian Blue, Payne’s Grey, Yellow Ochre, Burnt Sienna, Burnt Umber)
- White gouache or white gel pen
- Masking tape
- Soft round brushes (size 8 and 12 for washes)
- Fine detail brush (size 0 or 00)
- Two jars of water
- Paper towels
- Pencil and eraser
- Mixing palette
Step 1: Preparation and Sketching
-
Secure the paper:
Tape down all four edges of your watercolor paper to a board or table. This creates a clean white border and prevents the paper from buckling when wet. -
Outline the landscape:
Lightly sketch the horizon line about two-thirds of the way down the page. Draw the main S-curve of the central dune ridge, guiding the viewer’s eye from the bottom let toward the middle right. -
Add figures and details:
Sketch a tiny silhouette of a walking figure on the central ridge. Add very faint marks where the distant camels will go, just ensuring the perspective looks correct.
Step 2: The Night Sky
-
Wet the sky area:
Using a large, clean brush, apply clear water to the entire sky area above your horizon line. You want an even sheen, not puddles. -
Drop in the darkest blues:
While the paper is wet, load your brush with a strong mix of Indigo and Prussian Blue. Apply this to the top corners and edges, letting the color bleed downward. -
Create the gradient:
As you move down toward the horizon, dilute your paint slightly to create a lighter blue. Leave the area just above the dunes very pale, almost white, to simulate the glow of the horizon. -
Paint the Milky Way:
While the sky is damp but not soaking, lift out a diagonal band of pigment using a thirsty (damp, clean) brush to suggest the Milky Way, or dab gently with a clean tissue. -
Splatter stars:
Once the sky is bone dry, mix white gouache with a tiny bit of water. Tap a brush loaded with this mixture against another brush handle to splatter fine stars across the dark blue areas. -
Paint the Moon:
Use opaque white gouache and a fine brush to carefully paint the crescent moon shape. Keep the edges crisp against the dark sky.
Moon Glow Trick
Before painting the sky, apply a tiny circle of masking fluid where the moon will go. This keeps the paper perfectly white and makes painting the dark sky much faster.
Step 3: Painting the Dunes
-
Base layer for sand:
Mix a watery wash of Yellow Ochre with a touch of Burnt Sienna. Apply this quickly over the sand dune areas to establish the base light color. -
Define the shadows:
Once the base is dry, mix Burnt Umber with a tiny bit of Indigo to create a cool shadow tone. Paint the dark sides of the dunes, following the S-curve you sketched earlier. -
Soften edges:
Immediately after painting a shadow shape, use a clean, damp brush to soften the edge where the shadow meets the light. This creates the rounded, soft look of wind-blown sand. -
Deepen the contrast:
I like to go back into the deepest crevices of the dunes with a stronger mix of Burnt Umber and Payne’s Grey to add dramatic depth and separate the foreground from the background. -
Foreground texture:
Use a nearly dry brush with dark brown paint to add scumbled texture to the bottom right foreground, simulating coarser sand or ripples.
Make It Sparkle
Mix a tiny amount of iridescent or gold watercolor medium into the sand dune wash. It will give the sand a magical, subtle shimmer when the light hits the painting.
Step 4: Final Details
-
Paint the traveler:
Switch to your smallest detail brush. Use opaque black or very dark blue paint to fill in the silhouette of the walking figure. Keep the posture upright and legs clearly separated. -
Add the shadow:
Paint a long, thin shadow extending from the figures feet to the right, consistent with the moon’s light source. -
Distant camels:
Paint two tiny, distinct dark specks in the distance for the camels. Simple shapes work best at this scale—just a suggestions of a hump and legs. -
Add footsteps:
Using a dilute brown mix, paint a trail of tiny, irregular dots following the main figure’s path back down the dune. Make them smaller as they get further away. -
Reveal the border:
Ensure the artwork is completely dry before slowly peeling off the masking tape at a 45-degree angle to reveal your clean, crisp edges.
Frame your finished desert scene in white to accentuate the dramatic contrast of the night sky
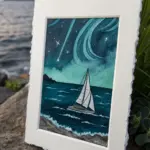
Galaxy Sky Behind a Mosque Silhouette
Capture the serene beauty of a mosque set against a vibrant, star-filled galaxy. This watercolor project uses wet-on-wet blending to create a dreamy sky that transitions seamlessly into a crisp, black silhouette.
Step-by-Step
Materials
- Watercolor paper (cold press, heavy weight)
- Watercolor paints (Indigo/Dark Blue, Purple, Magenta/Pink, Black)
- Masking tape or painter’s tape
- Flat wash brush
- Round detail brushes (size 2 and size 00)
- White gel pen or white gouache
- Pencil and eraser
- Clean water and paper towels
- Old toothbrush (optional for spattering)
Step 1: Preparation and Sketching
-
Prepare the borders:
Tape down your watercolor paper to a board or table to prevent buckling. Place the tape carefully to create a clean, even white border around your painting area. -
Sketch the horizon:
Lightly draw a low horizon line about an inch or two from the bottom masking tape. The area below this line will be the sandy ground. -
Lightly outline the mosque:
Very faintly sketch the outline of the domes and minarets just above your horizon line. You don’t need details, just the basic shapes to know where to stop your sky wash.
Muddy colors?
If your pinks and blues turn gray where they meet, let the first color dry slightly before adding the next, or wash your brush thoroughly between color switches.
Step 2: Painting the Galaxy Sky
-
Pre-wet the sky:
Using your flat wash brush and clean water, wet the entire sky area above the mosque sketch. The paper should be glistering but not swimming in puddles. -
Start with pinks:
Load a round brush with a watery magenta or bright pink. Drop this color diagonally across the wet paper to create the ‘milky way’ band. Let it bloom naturally into the wet surface. -
Add purples:
While the paper is still wet, add touches of purple along the edges of the pink areas, allowing them to blend slightly without completely overtaking the bright pink center. -
Deepen the blue:
Using a concentrated indigo or dark blue, paint the upper corners and the areas furthest from the pink band. I like to work quickly here so the blue merges softly with the purple edges. -
Create contrast:
Drop simpler, more saturated dark blue into the very top corners to simulate the depths of space. Leave the area immediately around the mosque lighter to make the silhouette pop later. -
Let it dry completely:
Allow the sky layer to dry thoroughly. The paper must be bone-dry before moving to the next step to prevent bleeding.
Add some sparkle
Mix a tiny amount of metallic silver or iridescent medium into your blue paint for the top of the sky. It adds a subtle shimmer when the light hits the card.
Step 3: Adding Starts and Ground
-
Spatter the stars:
Cover the bottom sketch area with a piece of scrap paper. Dip a stiff brush or toothbrush into white gouache or white ink, and flick the bristles to spray tiny white stars across the dark blue sky. -
Paint larger stars:
Use a white gel pen or a fine detail brush with white gouache to add a few larger, specific stars. For the prominent ‘North Star’, paint a small cross with elongated vertical lines. -
Paint the ground:
Mix a very watery, light brown or beige wash. Paint the strip of ground below the horizon line. Keep it pale and uneven to look like sand.
Step 4: The Silhouette
-
Outline the structures:
Using black watercolor (with very little water) or black gouache, carefully outline the domes and minarets you sketched earlier. You want opaque coverage here. -
Fill in the shapes:
Fill in the main body of the mosque with solid black. Ensure the bottom edge meets the sandy ground line cleanly. -
Add architectural details:
Switch to your smallest detail brush (size 00). Paint the crescents on top of the domes and the thin spires of the minarets. -
Create windows:
Paint the suggestion of arched windows or arcades at the base of the mosque using tiny dots or small arches. You can leave tiny gaps of the background color showing through if you are precise, or add them later with a white pen. -
Final touches:
Add tiny silhouettes of distant buildings or palm trees on the far left and right horizon to give the scene depth. -
Reveal:
Wait until the black paint is 100% dry. Slowly peel off the masking tape at a 45-degree angle to reveal your crisp white border.
Now you have a stunning, peaceful night scene perfect for gifting or display

PENCIL GUIDE
Understanding Pencil Grades from H to B
From first sketch to finished drawing — learn pencil grades, line control, and shading techniques.
Explore the Full Guide
Geometric Pattern Background With Crescent Focal Point
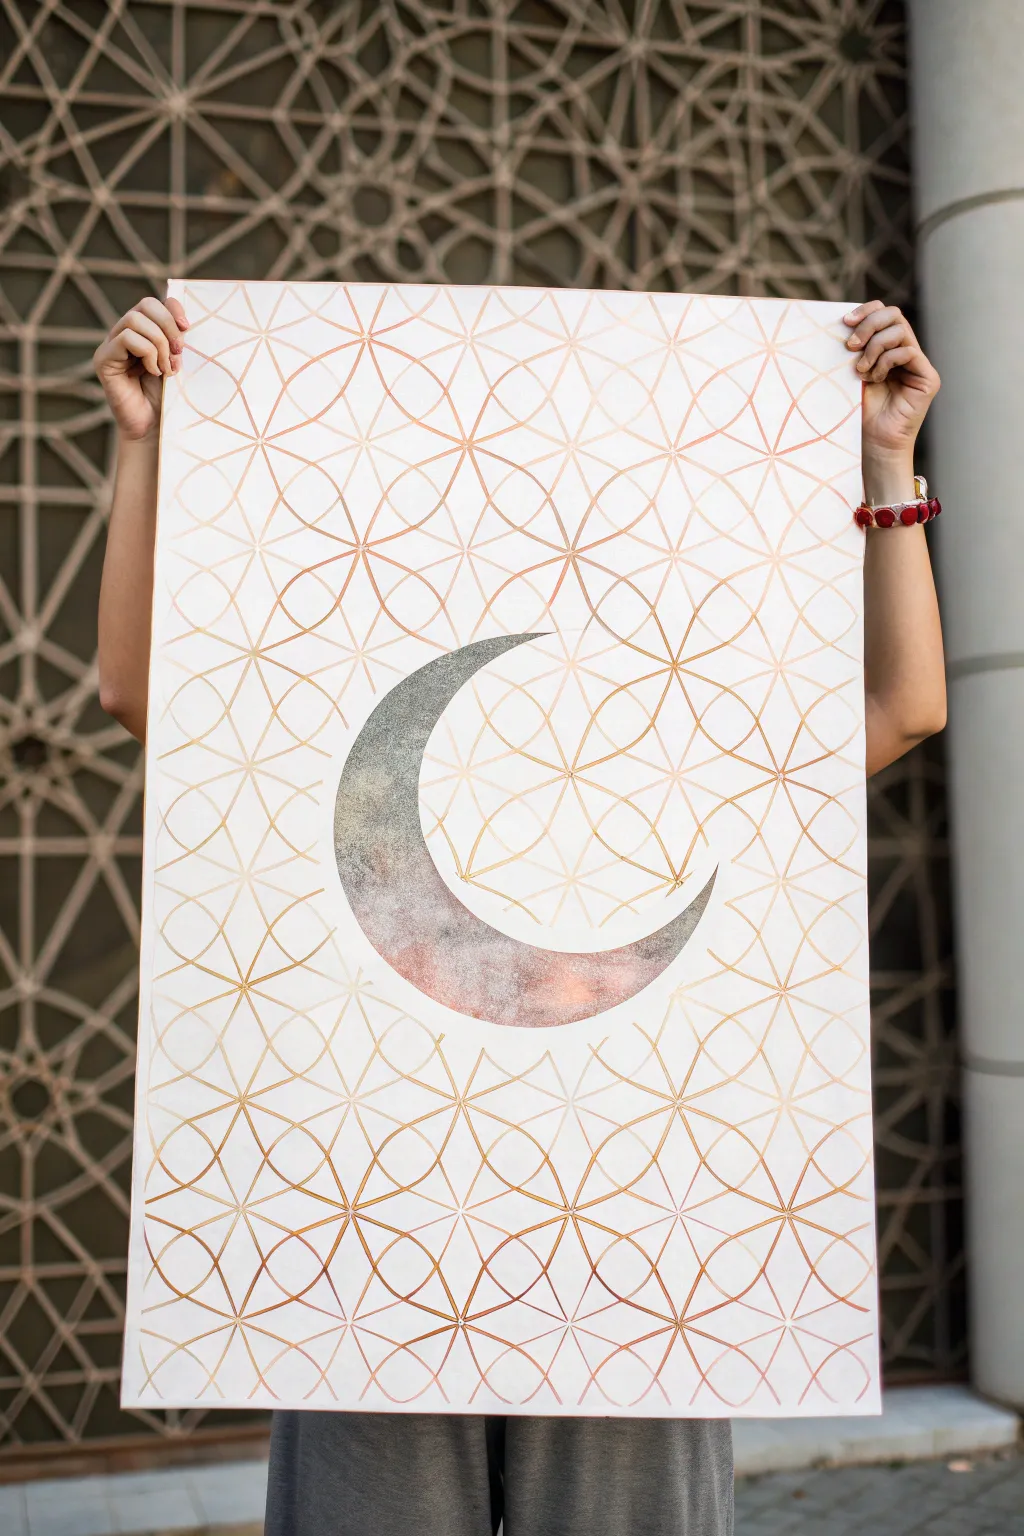
Embrace the serenity of sacred geometry with this elegant artwork featuring a shimmering crescent moon resting on a lattice of copper-lined circles. This piece combines the meditative process of geometric drafting with the texture of metallic paints for a modern, spiritual aesthetic.
How-To Guide
Materials
- Large watercolor paper or primed canvas board (A2 or A1 size)
- Drawing compass with an extension arm (or a large bowl/plate for the moon)
- Ruler or straight edge
- Metallic copper paint pen or fine-tip metallic marker
- Metallic acrylic paints (Silver, Gunmetal Grey, Pewter)
- Small sea sponge or stippling brush
- Pencil (HB or lighter)
- Eraser
- Masking tape or painter’s tape
- Palette for mixing
Step 1: Drafting the Geometric Grid
-
Find the center:
Begin by measuring your paper or canvas to find the exact center point. Make a tiny, faint mark with your pencil here, as this will anchor your entire pattern. -
Set your compass radius:
Decide on the size of your geometric ‘flower’ petals. A radius of about 2-3 inches works well for a large piece. Lock your compass width so it doesn’t shift while you work. -
Draw the central circle:
Place the compass needle on your center mark and draw the first circle very lightly in pencil. This is just for guidance. -
Create the first intersections:
Place your compass point anywhere on the line of that first circle. Draw a second circle. This will create two intersection points with your original circle. -
Complete the flower:
Move your compass point to one of the new intersections and draw another circle. Continue this process around the center circle until you have a six-petaled flower shape in the middle. -
Expand the grid:
Continue placing your compass point at the intersections of the outer circles to expand the pattern outward. Keep going until you have covered the entire surface of the paper.
Step 2: Establishing the Crescent
-
Draft the outer curve:
Locate the center specifically for your moon shape. Using a compass with an extension or a large circular object, draw a large circle lightly in pencil over the geometric grid. -
Draft the inner curve:
Shift your compass point slightly to the right and up (or use a slightly smaller circular object), and draw an inner curve to intersect with the larger circle, forming a crescent shape. -
Refine the shape:
I usually step back at this point to check proportions. If the crescent looks too thick or thin, erase and adjust the inner curve until it feels balanced. -
Mask the moon:
Use masking tape to carefully mask off the area *outside* the crescent moon shape if you are worried about painting over the lines, though free-handing carefully is also fine. -
Erase guidelines:
Gently erase the geometric grid lines that are *inside* the moon shape so they don’t show through the paint later.
Clean Lines Tip
To prevent compass holes in your final paper during the pencil phase, put a small piece of masking tape under the needle point each time you pivot.
Step 3: Painting and Refining
-
Apply the base texture:
Ssqueeze out your silver and pewter metallic paints. Dampen a sea sponge, dip it into the silver, and dab it repeatedly onto the moon area to create a mottled texture. -
Add depth and gradient:
While the base is tacky, sponge darker gunmetal grey near the bottom curve of the moon and lighter silver near the top tip. Blend them by dabbing the sponge where the colors meet. -
Let it dry completely:
Allow the moon to dry fully. Metallic paints can sometimes take a bit longer to set, so give it at least an hour. -
Trace the pattern:
Once dry, take your copper metallic paint pen. Carefully trace over all your pencil grid lines outside the moon. Use a ruler for straight edges if your pattern includes them, or steady your hand for the curves. -
Connect to the moon:
When a copper line meets the painted moon, stop cleanly at the edge of the paint. The moon should appear to be floating *in front* of the pattern. -
Final clean up:
Wait for the copper ink to dry completely to avoid smudging. Then, use a soft eraser to gently remove any visible pencil marks remaining under the copper lines.
Add Dimension
Add real silver leaf flakes on top of the dried moon paint for an extra reflective, high-end texture that catches the light beautifully.
Hang your finished masterpiece where it can catch natural light to show off the metallic shimmer
Ramadan Night Sky With Silhouetted Palms
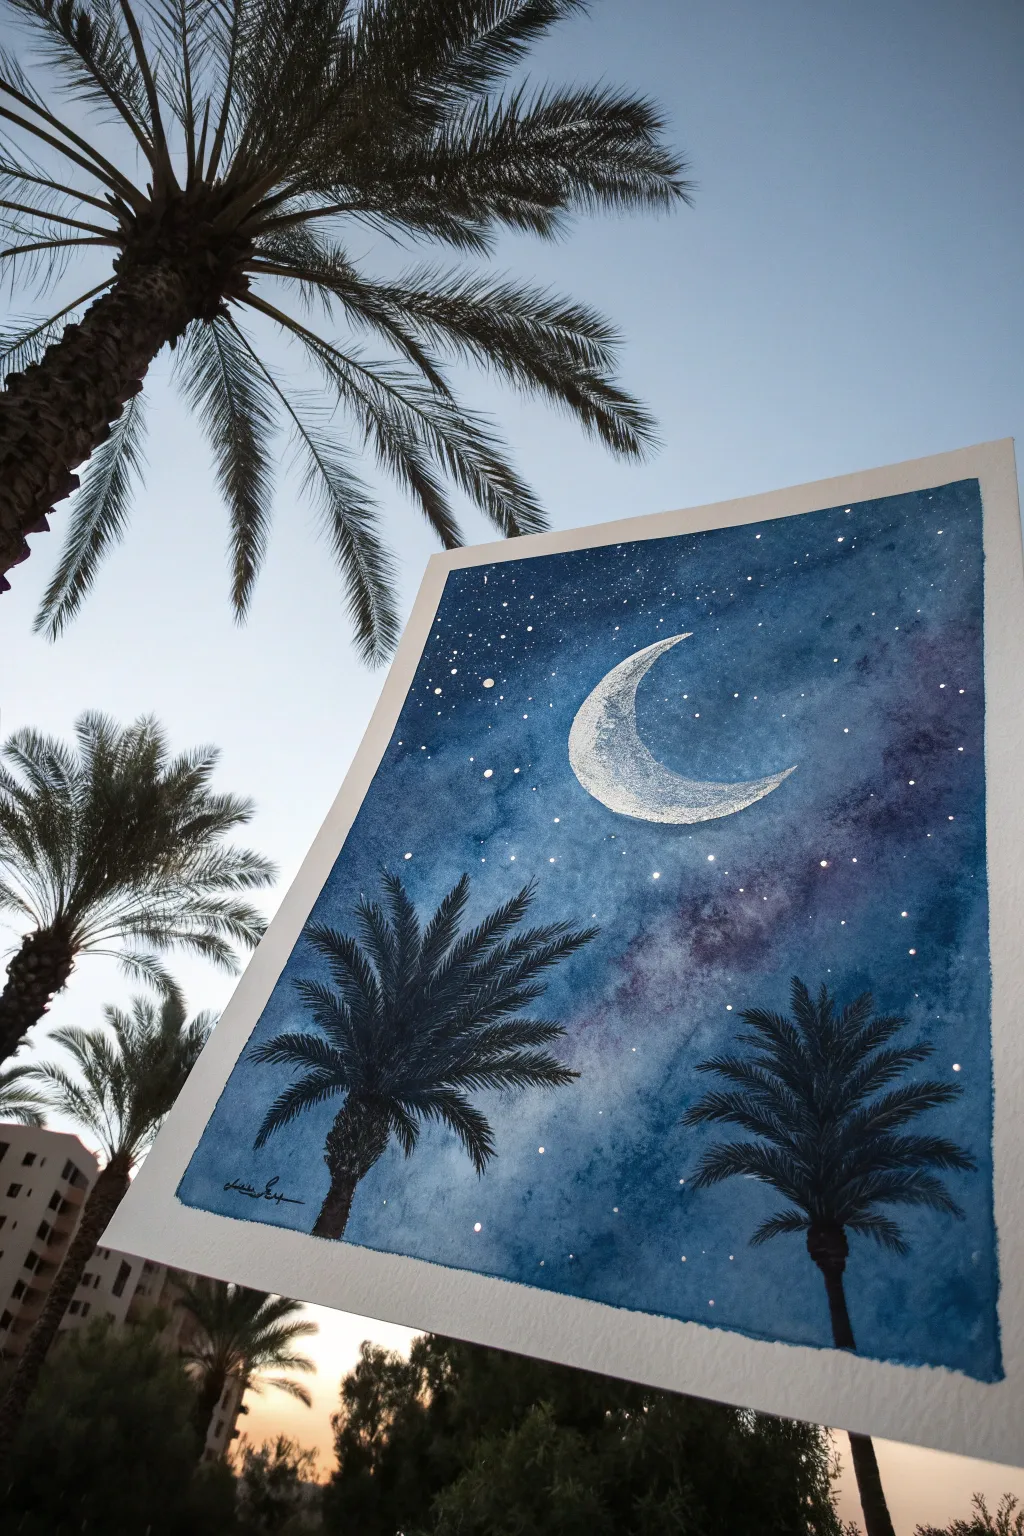
Capture the serenity of a moonlit Ramadan night with this dreamy watercolor project. You’ll create a deep, starry indigo sky punctuated by a glimmering crescent moon and framed by delicate palm tree silhouettes.
Detailed Instructions
Materials
- Cold-press watercolor paper (approx. 5×7 or A5 size)
- Painter’s tape or masking tape
- Watercolor paints: Indigo, Prussian Blue, Violet, Black
- White opacity: White gouache, white gel pen, or acrylic ink
- Round brushes (sizes 6 or 8 for wash, 0 or 1 for details)
- Pencil and eraser
- Cup of water and paper towels
- Drawing board or hard surface
Step 1: Preparation and Sketching
-
Tape it down:
Secure your watercolor paper to a board using painter’s tape on all four sides. This creates that crisp, professional white border seen in the photo and prevents the paper from buckling when wet. -
Sketch the moon:
Lightly sketch a large crescent moon shape in the upper center-right area. Keep your pencil lines very faint so they don’t show through later. -
Mask the moon:
To keep the moon bright white, you need to protect it. Carefully fill in your moon sketch with masking fluid if you have it. Alternatively, simply paint very carefully around this shape in the next steps.
Step 2: Painting the Galaxy Sky
-
Wet the paper:
Use a clean, large brush to wet the entire sky area with clear water, avoiding the moon area. The paper should glisten but not have puddles. -
Lay the base blue:
Load your brush with a watery Prussian Blue or a bright mid-tone blue. Drop this color onto the wet paper, letting it spread naturally. -
Deepen the night:
While the paper is still damp, introduce Indigo and darker blues near the edges and corners to create a vignette effect. This draws the eye toward the center. -
Add galaxy clouds:
Mix a small amount of Violet or deep purple. Dab this irregularly into the wet blue areas to create the feeling of a nebula or galaxy dust. -
Create texture:
Sprinkle a tiny pinch of salt onto the wet paint in a diagonal streak across the sky. As it dries, the salt will push the pigment away, creating beautiful star-like textures. -
Let it dry completely:
This is crucial—wait for the paper to be bone dry. If you used salt, gently brush the crystals off once the paint is fully set.
Bleeding Lines?
If your black palm trees bleed into the blue sky, the background wasn’t dry enough. Wait longer, or use a hairdryer on the ‘cool’ setting to speed up the process.
Step 3: Stars and Moon Details
-
Splatter the stars:
Dilute white gouache or white acrylic paint with a little water. Load a brush or toothbrush and tap it over the painting to splatter tiny white stars across the sky. -
Add specific stars:
Use a white gel pen or a fine detail brush with white paint to add a few larger, brighter stars manually ensuring a nice distribution. -
Reveal the moon:
If you used masking fluid, rub it off now. If you painted around it, ensure the white space is clean. -
Texture the moon:
Mix a very watery, pale gray. Dab it lightly onto the white moon to create craters and texture. Add a rim of bright white gouache (or gel pen) along the outer curve to make it glow.
Make It Sparkle
For a magical touch, use metallic silver or gold watercolor for the moon’s crescent edge or mix some iridescent medium into your star splatter.
Step 4: The Silhouettes
-
Outline the palms:
Using black watercolor (thick consistency, less water) or black ink, paint the trunk of the first palm tree on the left. It should lean slightly inward. -
Paint the fronds:
Switch to your smallest detail brush. From the top of the trunk, paint the palm fronds arching outward. Use quick, flicking motions to mimic the feathery leaves. -
Add the second palm:
Repeat the process for the second tree on the right side. Vary the height slightly to make the composition feel natural and balanced. -
Final touches:
Add your signature in the bottom corner with a fine liner pen. I find a small, delicate signature works best so it doesn’t distract from the scene. -
The reveal:
Once everything is 100% dry, peel off the painter’s tape slowly, pulling away from the center of the paper to prevent tearing, revealing your crisp white border.
Display your beautiful nightscape during Ramadan or gift it as a handmade card.


Abstract Ramadan Color Wash With Hidden Symbols

Capture the serene beauty of a moonlit Ramadan night with this atmospheric watercolor painting. Using a stunning gradient of indigo to teal, you’ll create a mystical sky that perfectly frames a silhouette mosque and shimmering stars.
Step-by-Step Guide
Materials
- Cold press watercolor paper (A4 or slightly smaller)
- Painter’s tape or masking tape
- Watercolor paints (Indigo, Prussian Blue, Teal, Turquoise, Payne’s Gray)
- White gouache or white ink for stars
- Flat wash brush (1 inch)
- Round brushes (size 4 and 8)
- Fine liner brush (size 0 or 1)
- Masking fluid (optional, but recommended for the moon)
- Pencil and eraser
- Jars of water
- Paper towels
Step 1: Preparation & Sky Wash
-
Tape the edges:
Begin by taping down all four sides of your watercolor paper to a board or table. This creates that crisp, clean white border seen in the finish and prevents the paper from buckling when wet. -
Sketch the silhouette:
Lightly sketch the outline of the mosque, minarets, and the tree line at the bottom third of the paper. Keep these lines very faint as they will be filled with dark paint later. Also, mark the position of the crescent moon. -
Mask the moon:
To keep the crescent moon perfectly white, carefully apply masking fluid to the shape. If you don’t have masking fluid, you can paint around it very carefully or use white gouache at the end, though masking preserves the paper’s glow best. -
Wet the sky area:
Using your large flat brush, apply a generous amount of clean water to the sky area only, stopping just above your pencil sketch of the mosque and trees. -
Drop in dark blues:
While the paper is wet, load your brush with Indigo and Prussian Blue. Start at the very top of the paper, tapping in concentrated pigment to create a deep, night-sky darkness. -
Transition to teal:
As you move down the page, rinse your brush slightly and pick up a vibrant Teal or Turquoise. Blend this into the dark blue while everything is still wet, letting the colors bleed naturally. -
Fade to light:
Continue washing down towards the horizon line. As you approach the mosque silhouette, add more water to your brush to dilute the pigment, creating a misty, light blue haze right above the buildings. -
Create texture:
Before the wash dries completely, splatter a few drops of clean water or sprinkle a pinch of salt onto the dark upper section. This pushes the pigment away and creates subtle ‘starry’ textures. -
Let it dry:
Allow the sky layer to dry completely. The paper must be bone-dry before moving to the next step to prevent the silhouette from bleeding into the sky.
Tape Like a Pro
To prevent the tape from ripping your watercolor paper upon removal, stick the tape to your clothes or pants first. This removes some tackiness for a gentler hold.
Step 2: Silhouettes & Stars
-
Paint the mosque base:
Mix a dense, dark color using Indigo and Payne’s Gray. It shouldn’t be fully black, but very dark blue. Use a round brush to fill in the domes and main structure of the mosque. -
Add the minarets:
Switch to a smaller round brush or your fine liner. carefully paint the slender minarets. Keep your hand steady and pull the brush upward for sharp, tapered points. -
Detail the trees:
Use the tip of your brush to stipple in the trees on either side of the mosque. Use a tapping motion to mimic the irregular texture of leaves and branches against the night sky. -
Layering the darks:
While the silhouette layer is still slightly damp, drop darker pigment (pure Payne’s Gray) into the bottom-most areas to give the foreground visual weight. -
Starry details:
Once the sky is dry, rub off the masking fluid to reveal the crisp white moon. If you didn’t use fluid, paint the moon now with opaque white gouache. -
Paint large stars:
Using a fine liner brush and white gouache, paint the larger, twinkle-shaped stars. Draw a small cross shapes with elongated vertical lines. -
Splatter the galaxy:
Load a toothbrush or stiff brush with watered-down white gouache or ink. Use your thumb to flick fine misty specks across the darker upper section of the sky for a distant galaxy effect. -
Final touches:
Review your painting for any gaps. Add any final tiny white dots for constellations near the moon. -
Reveal the border:
Wait until the entire painting is perfectly dry. Peel the tape away slowly at a 45-degree angle to reveal your clean edges.
Bleeding Lines?
If your silhouette paint bleeds into the sky, the sky wasn’t dry enough. Let it dry, then use a damp stiff brush to ‘lift’ the error, or broaden the tree line to cover it.
Sign your masterpiece in the bottom corner and enjoy the peaceful atmosphere you’ve created.

Have a question or want to share your own experience? I'd love to hear from you in the comments below!