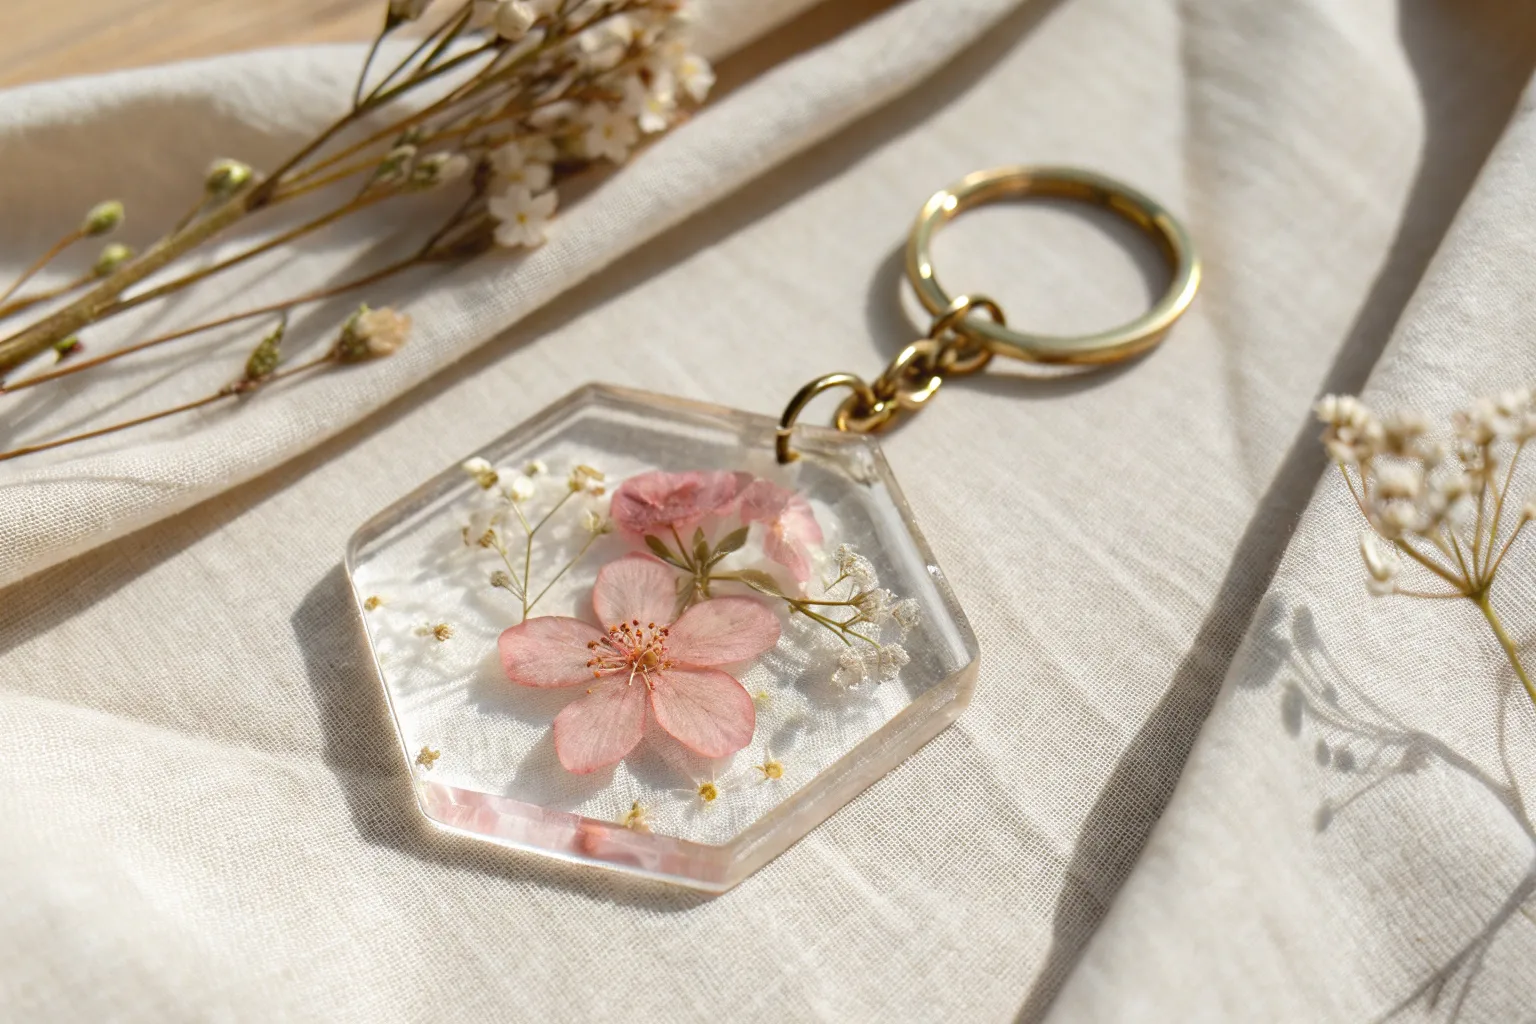
Resin charms are my favorite tiny canvases—each pour is a little painting you can actually wear or clip onto your bag. Here are 21 resin charm ideas that feel totally doable, whether you love botanical embeds, dreamy color blends, or bold mixed-media details.
Pressed Flower Petal Charms
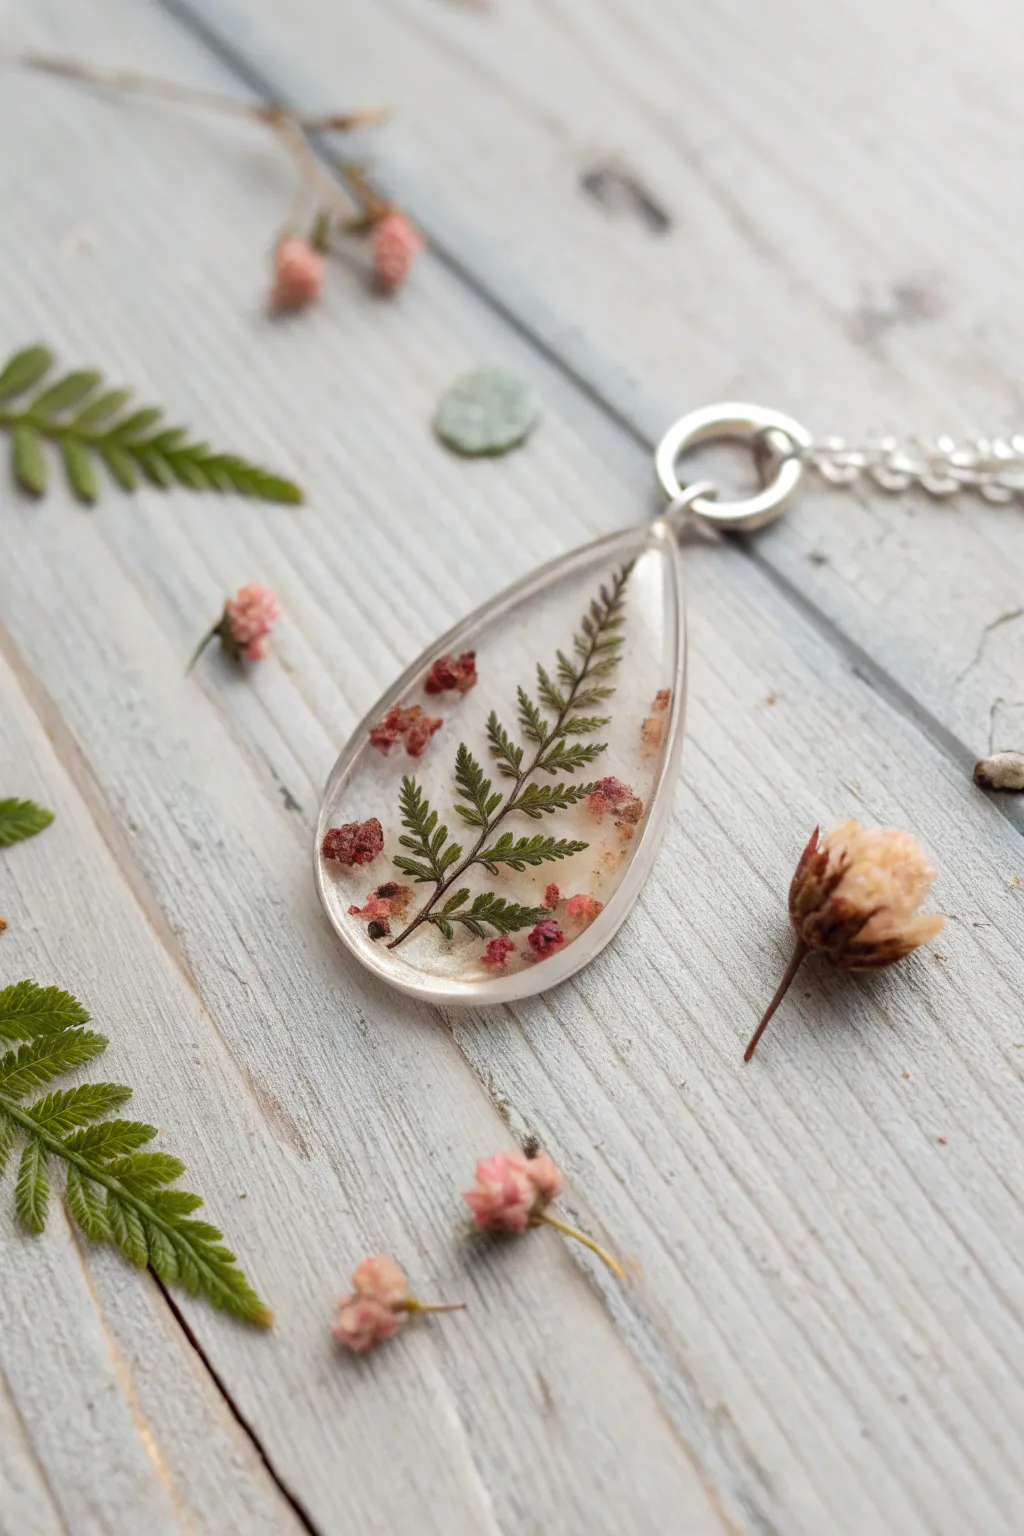
Capture the delicate beauty of the forest floor with this elegant teardrop pendant featuring a preserved fern frond and tiny crimson accents. The milky white background makes the botanical elements pop, creating a wearable piece of nature that feels both modern and timeless.
Detailed Instructions
Materials
- Teardrop-shaped open back bezel (silver tone)
- UV resin (hard type)
- UV lamp
- Small dried fern frond (pressed flat)
- Dried tiny pink/red flower buds or crushed petals
- White resin pigment or opaque white alcohol ink
- Resin tape or packing tape
- Silicone work mat
- Fine-point tweezers
- Toothpick or needle tool
- Small mixing cup
- Jump ring and necklace chain
Step 1: Preparation & Base Layer
-
Prepare the bezel:
Cut a strip of resin tape and place it sticky-side up on your work surface. Firmly press the open-back teardrop bezel onto the tape, ensuring a tight seal around all edges to prevent leakage. -
Mix the background color:
In a small mixing cup, combine a dollop of UV resin with a very small amount of white pigment. You want a milky, semi-opaque look, not a solid block of white, so add the pigment sparingly. -
Pour the first layer:
Carefully pour the white-tinted resin into the bezel, filling it about halfway. Use a toothpick to guide the resin to the edges and pop any bubbles that rise to the surface. -
Initial cure:
Place the bezel under your UV lamp and cure for 60 seconds. The surface should be tacky but solid enough to support the botanicals without them sinking.
Step 2: Botanical Arrangement
-
Prepare the fern:
Select a fern frond that fits neatly inside your teardrop shape. Trim the stem if necessary so it doesn’t crowd the bezel’s point. -
Position the greenery:
Coat the back of the fern very lightly with clear UV resin using a toothpick. Using tweezers, gently place it onto the cured white layer. -
Secure the fern:
Flash cure under the lamp for about 10-15 seconds just to lock the fern in place so it doesn’t float during the next steps. -
Add floral accents:
Dip your toothpick into clear resin to pick up tiny crushed pink petals or micro-buds. Scatter them organically around the fern, focusing on the wider bottom area of the teardrop. -
Seal the arrangement:
Apply a very thin focal layer of clear resin over just the plants to seal them. Cure for 60 seconds.
Tape Seal Trick
Run your fingernail or a burnishing tool firmly along the inside edge of the bezel where it meets the tape. This extra pressure prevents the dreaded resin leak-out.
Step 3: Encapsulation & Finish
-
Domed top coat:
Pour clear UV resin over the entire piece, filling the bezel to the brim until it forms a slight convex dome due to surface tension. -
Check for bubbles:
Wait a moment for bubbles to rise. I like to pass a lighter quickly over the surface (don’t burn the resin!) or use a needle tool to drag stubborn micro-bubbles to the edge. -
Final front cure:
Cure under the UV lamp for 2-3 minutes to ensure a hard, scratch-resistant finish. -
Remove tape:
Peel the resin tape off the back of the pendant. If there is any sticky residue, wipe it away with a little rubbing alcohol. -
Seal the back:
Flip the pendant over. If the back feels tacky or uneven, apply a thin layer of clear resin to the back surface and cure for another 2 minutes. -
Assembly:
Open a silver jump ring with two pairs of pliers. Thread it through the loop at the top of the bezel and attach your necklace chain.
Add Subtle Sparkle
Mix a tiny pinch of white mica powder or iridescent micro-glitter into your white base layer for a shimmering snow-like effect behind the greenery.
Now you have a serene piece of botanical jewelry ready to wear or gift.


Glitter Gradient Charms
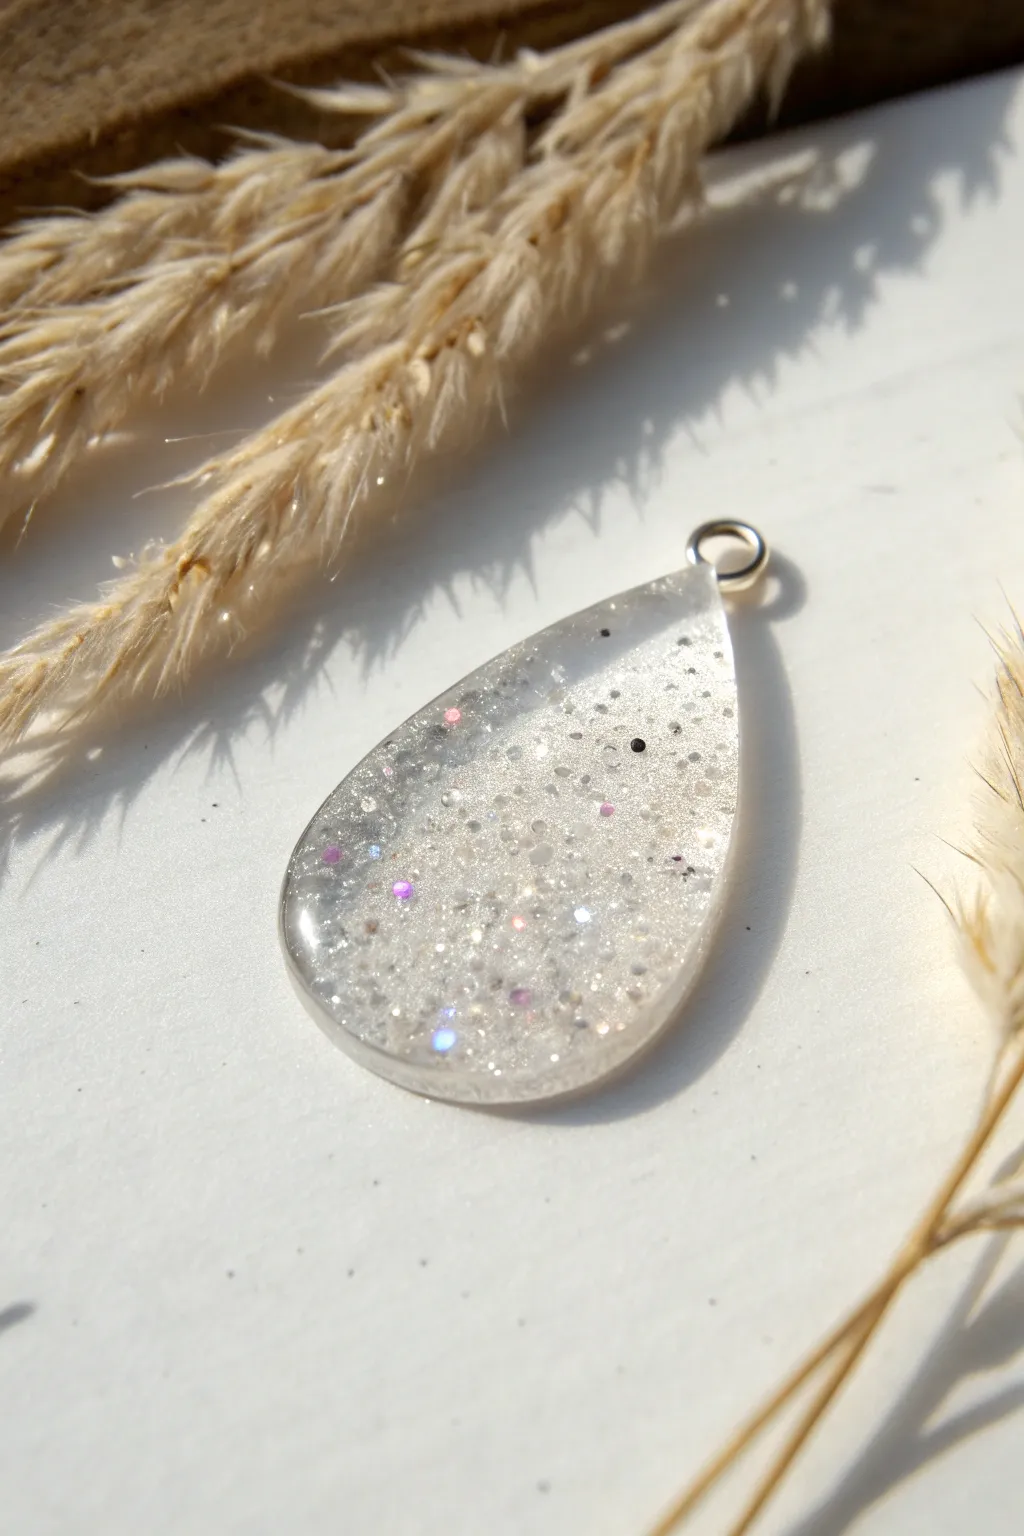
Capture the magic of a snowy morning with this luminous resin charm featuring a delicate glitter gradient. The finished piece looks like frozen ice sparkling in sunlight, perfect for a subtle yet eye-catching necklace pendant.
How-To Guide
Materials
- Two-part clear epoxy resin (and hardener)
- Teardrop-shaped silicone mold
- Fine white holographic glitter
- Chunky iridescent glitter mix (white/clear)
- Tiny black or dark grey micro-beads or glitter flakes
- Mixing cups and stir sticks
- Toothpick or dotting tool
- Silver screw eye pin or jump ring (if mold has a hole)
- Bic lighter or heat gun
- UV resin (optional, for doming)
Step 1: Preparing the Mixture
-
Mix the resin:
Measure equal parts of resin and hardener into a small cup. Stir slowly and thoroughly for at least 3 minutes, scraping the sides and bottom to ensure a complete chemical reaction. -
Separate into batches:
Pour a small amount of clear resin into a second cup. We will use this to create the gradient effect later. -
Create the heavy glitter mix:
In your main cup, add a generous amount of fine white holographic glitter. You want this mixture to be fairly dense. -
Add texture:
Sprinkle in some of the chunky iridescent glitter and just a tiny pinch of the dark grey micro-beads. Stir well until the glitter is evenly distributed.
Cloudy Resin?
If your clear section looks milky, it’s usually due to high humidity or tiny micro-bubbles. Warm your resin bottles in water before mixing to help bubbles release.
Step 2: Pouring the Gradient
-
Pour the bottom layer:
Carefully pour the heavy glitter mixture into just the wide, bottom section of the teardrop mold. Fill it about halfway up the shape. -
Add the clear resin:
Take your reserved clear resin and pour it into the top, narrow point of the mold. It should naturally flow down to meet the glitter layer. -
Blend the transition:
Using a toothpick, gently drag some of the glitter resin up into the clear section. I find swirl motions work best here to avoid a harsh line between the two zones. -
Refine the glitter placement:
Use the toothpick to push a few larger chunky glitter pieces further up into the clear area, creating a scattered, falling snow effect. -
Check for trapped bubbles:
Look closely at the bottom edges of the mold where glitter can trap air. gently nudge any bubbles loose with your tool. -
Remove surface bubbles:
Pass a lighter or heat gun quickly over the surface of the resin to pop any rising air bubbles.
Glitter Sinking Pro Tip
Let your mixed resin sit for 10-15 minutes before pouring. As it thickens, the viscosity increases, preventing heavy glitter from sinking entirely to the bottom.
Step 3: Curing and Finishing
-
Let it cure:
Cover the mold with a dust cover and let it sit undisturbed for 24 hours (or the time specified by your resin brand). -
Demold the charm:
Once fully hard, gently flex the silicone mold to release the charm. It should pop out with a glossy finish. -
Sand edges (if needed):
If the back edge feels sharp or uneven, run it lightly over fine-grit wet sandpaper to smooth it out. -
Drill the hole:
If your mold didn’t have a built-in post for a hole, use a small hand drill to make a hole at the very top point of the teardrop. -
Add hardware:
Open a sturdy silver jump ring using two pliers. Thread it through the hole and close it securely. -
Dome the back (optional):
For a truly professional finish, apply a thin layer of UV resin to the back of the piece and cure it under a UV lamp to create a smooth, rounded surface on both sides.
This icy charm looks beautiful on a silver chain or as a winter-themed zipper pull


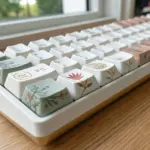
Initial Letter Resin Charms
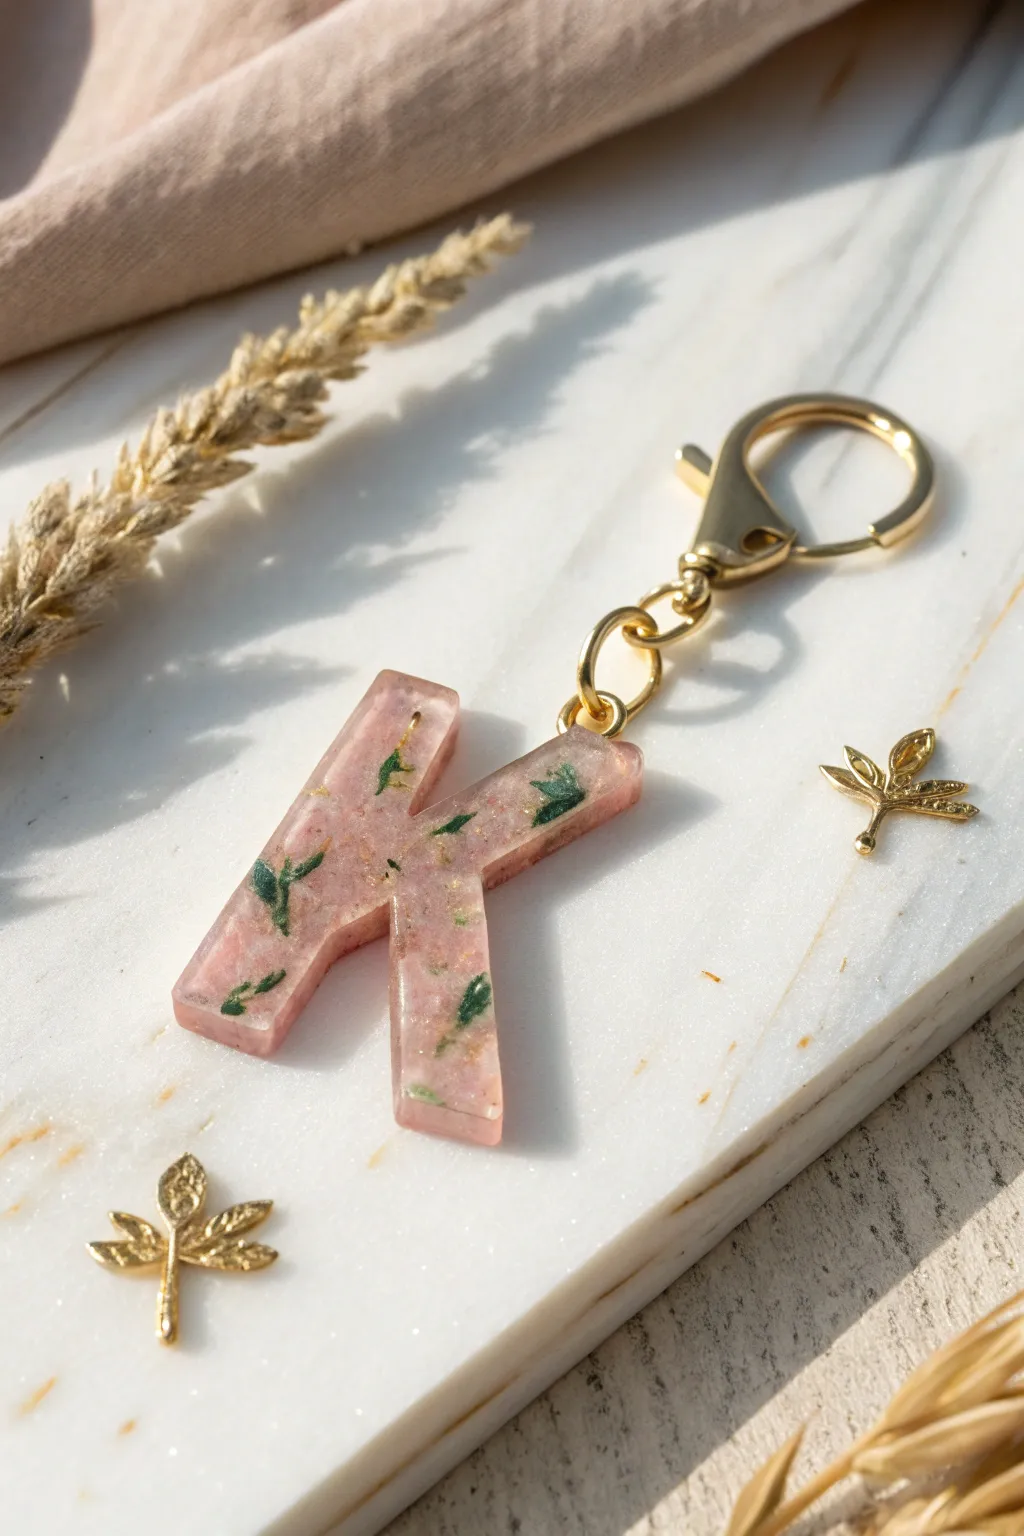
Capture the delicate beauty of spring with this soft pink resin letter charm, featuring suspended greenery and subtle gold accents. This sophisticated initial makes a perfect personalized gift or a stylish addition to your own keyring.
Step-by-Step Tutorial
Materials
- Epoxy resin (Part A and Part B)
- Silicone alphabet mold
- Pale pink opaque resin pigment or mica powder
- Dried pressed green leaves (miniature ferns or thyme)
- Gold foil flakes
- Mixing cups and stir sticks
- Toothpick or tweezer
- Gold keychain hardware with jump ring
- Small hand drill or pin vise
- Jewelry pliers
Step 1: Preparation & First Layer
-
Prepare your workspace:
Set up in a well-ventilated area and cover your surface with a silicone mat or wax paper. Ensure your silicone alphabet mold is clean and free of dust or lint, using tape to lift off any debris if necessary. -
Mix the resin:
Measure equal parts of Resin A and Hardener B into a mixing cup. Stir slowly and thoroughly for 3-5 minutes, scraping the sides and bottom to ensure a complete chemical blend. -
Tint the resin base:
Pour about two-thirds of your mixed resin into a separate cup. Add a very small drop of pale pink opaque pigment. You want a soft, milky blush tone, not a solid hot pink, so start with less than you think you need. -
Pour the base layer:
Carefully pour the pink resin into your letter mold, filling it about halfway. Let the resin spread naturally to the corners. -
Pop bubbles:
Wait about 2-3 minutes for air bubbles to rise to the surface, then gently pass a heat gun or lighter quickly over the surface to pop them.
Floating Foliage Tip
Dip your dried leaves in a tiny bit of mixed resin before placing them in the mold. This ‘seals’ them and significantly reduces trapped air bubbles around the delicate stems.
Step 2: Embedding Botanicals
-
Prepare the greenery:
While the base layer is still liquid but slightly tacky (after sitting for maybe 15-20 minutes depending on your resin’s pot life), break your dried green leaves into small, manageable sprigs. -
Add gold foil:
Using tweezers, pick up small flakes of gold foil and gently place them onto the pink resin. Push them down slightly so they are submerged but still visible. -
Place the leaves:
With tweezers, carefully position the green sprigs into the mold. I like to arrange them so they look like they are floating diagonally across the letter. -
Secure the elements:
Use a toothpick to gently press the leaves down if they try to float to the very top. You want them embedded within the resin, not poking out of the surface. -
Let it cure partially:
Allow this layer to cure for 4-6 hours until it is gelatinous and firm enough to support the final layer without blending.
Step 3: Finishing Touches
-
Mix final clear layer:
Mix a fresh, smaller batch of clear resin following the manufacturer’s instructions. -
Top off the mold:
Pour the clear resin over your cured pink layer until a slight dome forms on top of the letter. This encapsulates the leaves and creates a smooth finish. -
Final cure:
Cover the mold with a box to prevent dust from settling and let it cure fully for 24-48 hours. -
Demold:
Once fully hardened, gently flex the silicone mold and pop your letter out. -
Drill the hardware hole:
Use a hand drill or pin vise to carefully drill a small hole at the top corner of the letter. -
Attach the hardware:
Open the jump ring using two pairs of jewelry pliers. Thread it through the drilled hole and attach the gold keychain clasp. -
Close the ring:
Use the pliers to twist the jump ring closed securely, ensuring there is no gap for the charm to slip through.
Cloudy Resin?
If your clear top layer looks cloudy or has streaks, it likely wasn’t mixed enough. Always scrape the sides of your cup thoroughly while mixing to blend unmixed hardener.
Now you have a beautifully personalized charm ready to accessorize your keys or bag


Simple Tinted Clear Charms

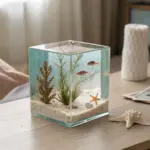
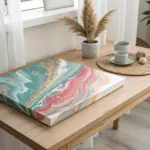
Capture the serene hues of a beach at dusk with this elegant resin charm. Featuring a soft transition from sandy peach to misty blue, this piece uses a simple tinting technique to create a translucent, glass-like finish.
Detailed Instructions
Materials
- UV resin (clear hard type)
- Rectangular silicone mold (with hanging hole post)
- Peach or coral mica powder
- Pale blue or teal mica powder
- Fine iridescent glitter (optional)
- UV lamp
- Silicone mixing cups or small disposable cups
- Toothpicks or silicone stirring tools
- Silver jump ring (6-8mm)
- Jewelry pliers
- Wet wipes (for cleanup)
Step 1: Preparation and Tinting
-
Prepare your workspace:
Set up in a well-ventilated area, away from direct sunlight which can prematurely cure UV resin. Clean your silicone mold with a piece of tape to remove any dust. -
Mix the peach layer:
Pour a small amount of clear UV resin into a mixing cup. Add a tiny pinch of peach mica powder. You want a translucent look, so start with very little pigment—just a speck on the end of a toothpick—and mix thoroughly to avoid clumps. -
Add shimmer:
If you want that subtle sparkle seen in the example, mix a tiny pinch of fine iridescent glitter into the peach resin now. -
Mix the blue layer:
In a second cup, repeat the process with clear resin and the pale blue mica powder. The goal is a misty, airy blue, so keep the pigment load very light.
Pro Tip: The Toothpick Trick
To get that ‘floating’ pigment look, dip a toothpick in clear resin before swirling your colors. It keeps the distinct colors from getting muddy while blending the transition.
Step 2: Pouring the Gradient
-
Pour the bottom layer:
Carefully pour the peach resin mixture into the bottom third of the rectangular mold cavity. I find tilting the mold slightly helps guide the resin into the corners without trapping air. -
Pour the top layer:
Pour the blue resin mixture into the top third of the mold, near where the hanging hole post is located. -
Bridge the gap:
Fill the empty middle section with clear resin. This clear buffer helps create a smoother, softer transition rather than a hard line between colors. -
Create the gradient:
Using a clean toothpick, gently drag the peach resin up into the clear section and the blue resin down into it. Swirl very lightly where they meet to blend them. -
Check for bubbles:
Let the resin sit for a minute so bubbles rise to the surface. Pop any visible surface bubbles with a lighter or a heat gun on low setting. -
Initial cure:
Place the mold under your UV lamp and cure for about 60-90 seconds to set the base layer. It doesn’t need to be fully hard yet, just solid enough to add the final doming layer.
Troubleshooting: Sticky Cure?
If your piece feels tacky after curing, your color layer was likely too thick or pigmented. Cure it submerged in a shallow bowl of water to force a hard, tack-free finish.
Step 3: Finishing Touches
-
Fill the mold:
The gradient layer likely didn’t fill the mold to the brim. Top off the entire mold with clear resin until it is level with the top edge, creating a sense of depth over the colored sand-like texture below. -
Full cure:
Cure under the UV lamp for 2-3 minutes. Flip the mold over and cure the back side for another 2 minutes to ensure the light reaches all the pigment. -
Demold safely:
Allow the mold to cool completely before popping the charm out. Removing it while hot can cause warping. -
Inspect edges:
If there are any sharp edges from overfill, gently sand them down with fine-grit sandpaper or a nail file. -
Add hardware:
Using two pairs of jewelry pliers, twist a silver jump ring open (forward and back, not pulling apart). Thread it through the hole in the charm. -
Close the ring:
Twist the jump ring back into a closed position, ensuring the ends meet flush so the charm doesn’t slip off.
Now you have a tranquil, wearable piece of art that looks like a slice of the horizon
BRUSH GUIDE
The Right Brush for Every Stroke
From clean lines to bold texture — master brush choice, stroke control, and essential techniques.
Explore the Full Guide
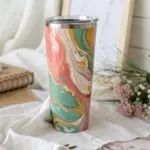
Sunset Ombre Resin Charms
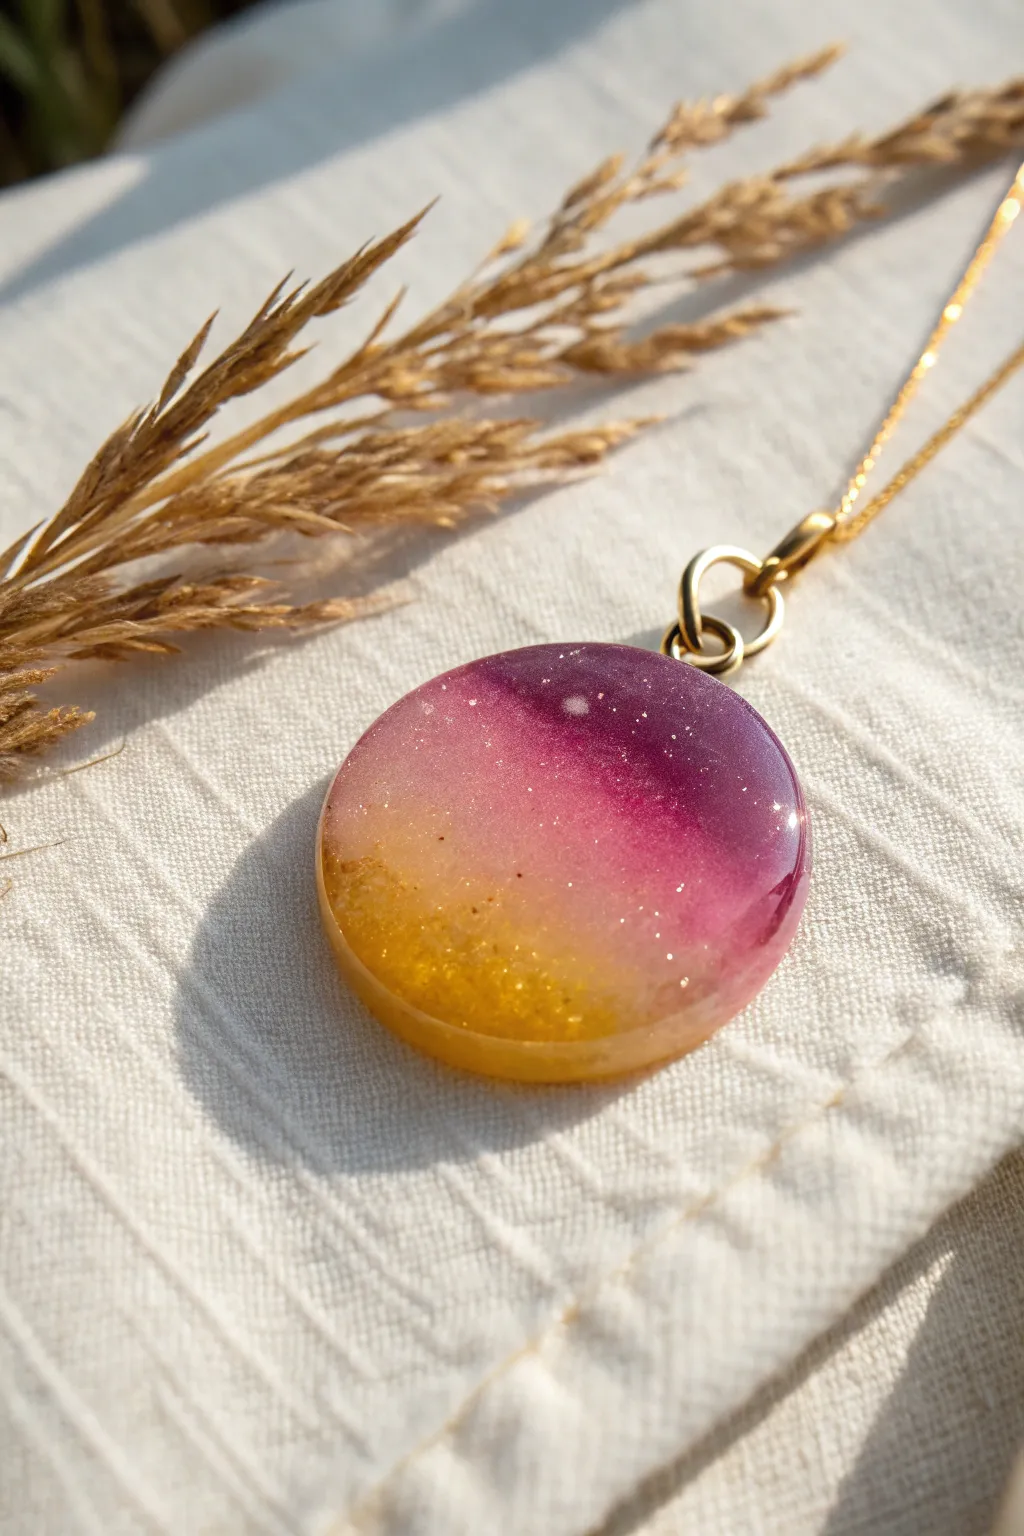
Capture the magic of twilight with this stunning ombre resin pendant that blends deep magenta into warm honey gold. The subtle shimmer of fine glitter mimics the first stars appearing in a sunset sky, creating a wearable piece of art that glows in the light.
How-To Guide
Materials
- Two-part epoxy resin (clear)
- Round silicone pendant mold (approx. 3-4cm diameter)
- Magenta or deep purple specialized resin ink/pigment
- Golden yellow or amber specialized resin ink/pigment
- Fine holographic silver glitter
- Mixing cups and stirring sticks
- Heat gun or torch for bubbles
- Gold tone jump rings (one large, one small oval)
- Gold tone necklace chain
- Jewelry pliers
Step 1: Preparation & Mixing
-
Prepare your workspace:
Set up a clean, level surface covered with a silicone mat or parchment paper. Ensure your room is well-ventilated and within the temperature range recommended by your resin manufacturer. -
Mix the base resin:
Measure equal parts of resin and hardener (or as per bottle instructions) into a mixing cup. Stir slowly but thoroughly for at least 3 minutes, scraping the sides and bottom. -
Divide the batch:
Pour the mixed clear resin into two separate small cups. You will need slightly more resin for the purple section than the yellow section based on the visual balance.
Step 2: Coloring & Glitter
-
Create the sunset hues:
In the first cup, add a drop of magenta pigment. Mix well. If it involves transparency, check the opacity against a light; it should be rich but slightly translucent. -
Mix the golden tone:
In the second cup, add your golden yellow or amber pigment. This section mimics the sun just dipping below the horizon. -
Add the starry shimmer:
Sprinkle a very small pinch of fine holographic silver glitter into the magenta cup. Mix it in so it’s suspended throughout the color. -
Add golden shimmer:
Add a tiny amount of glitter to the yellow cup as well, though you can keep this slightly subtler than the top section.
Clean Edges Only
If the back of your piece has a sharp raised lip (the meniscus), sand it flat with wet sandpaper (400 to 2000 grit) and apply a thin doming layer of clear resin.
Step 3: The Pour
-
Pour the magenta layer:
Carefully pour the magenta resin into the top 2/3 of your round silicone mold. Let it settle for a minute. -
Pour the yellow layer:
Gently pour the yellow resin into the remaining bottom 1/3 of the mold. -
Create the ombre transition:
Where the two colors meet, use a clean toothpick or stirring stick to very gently swirl the boundary line back and forth. Don’t overmix, or you’ll lose the gradient effect; just soften the hard line. -
Remove bubbles:
Let the resin sit for 5-10 minutes to allow bubbles to rise. Quickly pass a heat gun or torch over the surface to pop them. -
Cure completely:
Cover the mold with a box to prevent dust from settling on it and let it cure for 24-48 hours, depending on your resin’s specifications.
Cloud Effect
Between the purple and yellow layers, drop a tiny bit of white alcohol ink. Do not stir it. It will bloom and create wispy ‘cloud’ formations in your sunset.
Step 4: Assembly
-
Demold the charm:
Once fully hard, gently peel the silicone mold away from the resin piece. The edges might be sharp, so handle with care. -
Drill the hole:
If your mold didn’t have a built-in post for a hole, use a small hand drill or rotary tool to drill a hole near the top edge of the magenta section. -
Attach the hardware:
Using two pairs of jewelry pliers, twist open the smaller jump ring (don’t pull apart) and thread it through the hole in the pendant. -
Add the bail:
Loop a larger, decorative jump ring or bail through the smaller ring you just attached, then twist the small ring closed securely. -
Thread the chain:
Slide your delicate gold chain through the large top ring to complete the necklace.
Enjoy wearing your personal slice of sunset wherever you go
Marbled Mica Swirl Charms
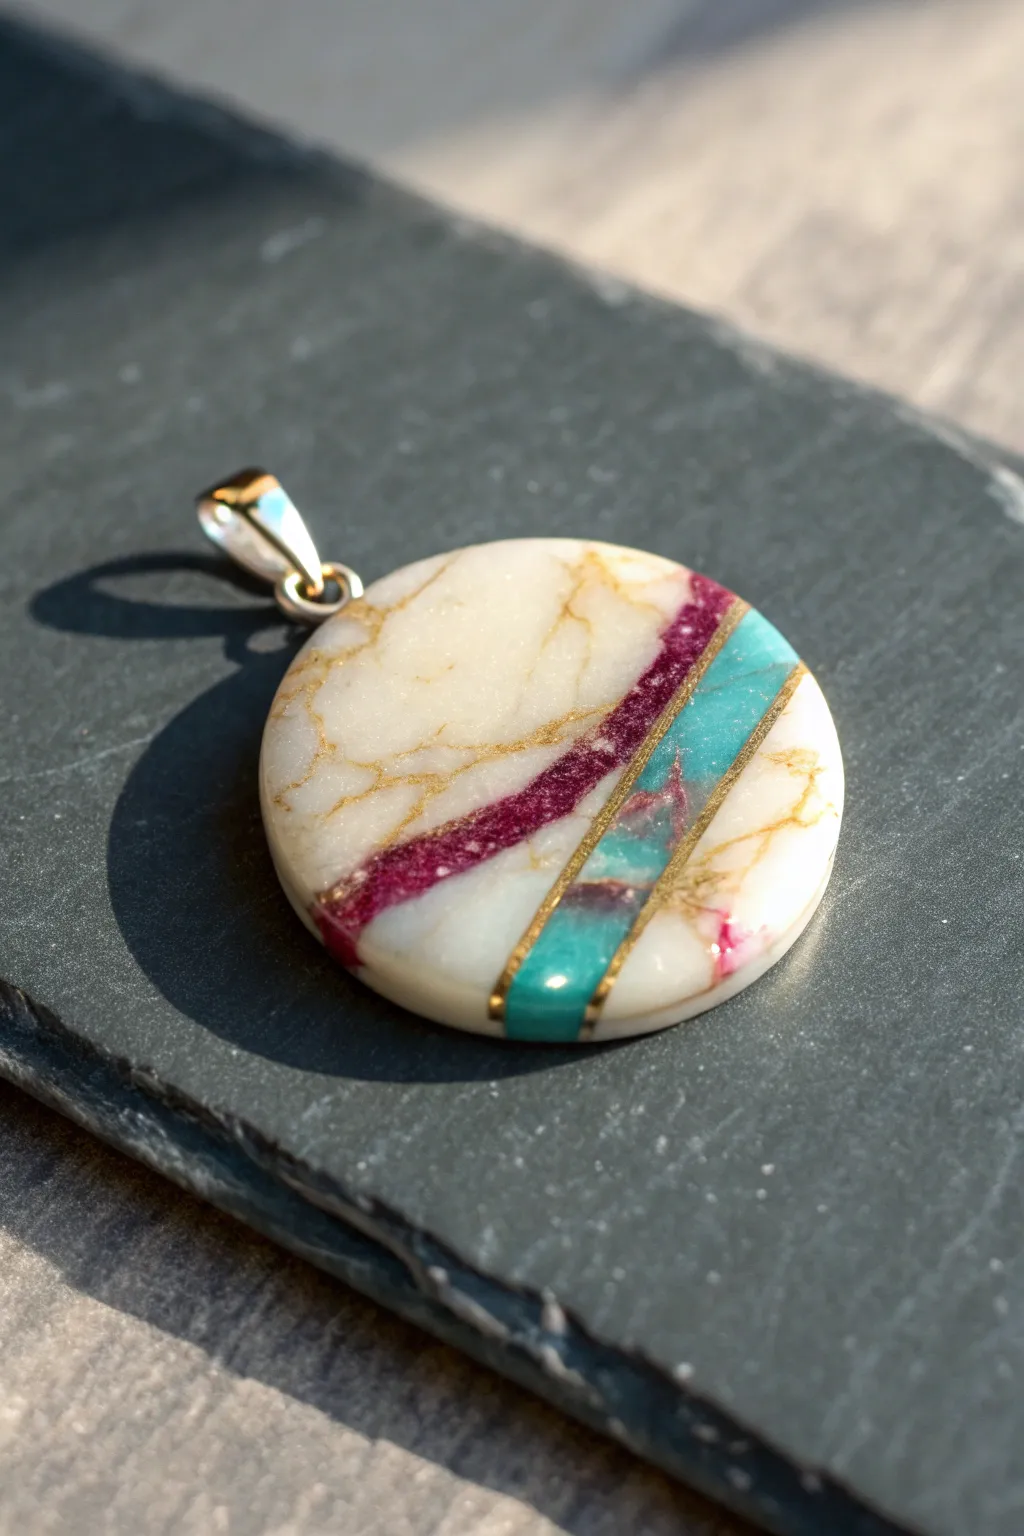
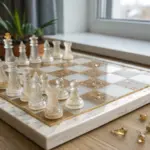
This elegant pendant mimics the look of high-end stone inlay with veins of brilliance reminiscent of kintsugi pottery. The design features a smooth, creamy marble base intersected by striking bands of magenta and turquoise, all tied together with delicate gold fractures.
Step-by-Step Tutorial
Materials
- Epoxy resin (casting resin)
- Round silicone pendant mold
- White opacity pigment (resin dye)
- Magenta mica powder or deep pink alcohol ink
- Turquoise mica powder
- Gold leaf flakes or metallic gold pigment powder
- Gold acrylic paint or a metallic gold paint pen (fine tip)
- Mixing cups and stirring sticks
- Toothpicks or fine needle tool
- UV resin (optional, for quick top coat)
- Pendant bail (silver or gold)
- Jewelry adhesive (E6000) or drill and jump ring
- Sandpaper (fine grit)
Step 1: Preparing the Resin Base
-
Mix the initial batch:
Begin by mixing a small amount of epoxy resin according to the manufacturer’s instructions. You will need enough to fill your mold about halfway initially. -
Create the marble base:
Pour the majority of your mixed resin into a cup and add white pigment. You want a solid, opaque creamy white color, so add the pigment gradually until fully saturated. -
Prepare accent colors:
Divide the remaining clear resin into two very small cups. Mix magenta mica into one and turquoise mica into the other. These should be vibrant and semi-opaque. -
Add gold detailing:
Mix a generous amount of gold metallic pigment or fine gold leaf flakes into a tiny bit of clear resin. This will form the precious veins running through the stone.
Wait for the Honey Stage
Don’t pour stripes immediately! Let the white resin sit for 15-20 mins until it feels like honey. This prevents the colors from bleeding into a blurry mess.
Step 2: Pouring the Pattern
-
Pour the white foundation:
Pour the white resin into the mold, filling it most of the way but leaving just a little room at the top. Pop any surface bubbles with a lighter or heat gun. -
Create the color channels:
Wait for the resin to thicken slightly to a syrup-like consistency. Carefully pour a thin line of the magenta resin across the mold. Leave a small gap and pour a parallel line of the turquoise resin. -
Manipulate the edges:
Using a toothpick, gently feather the edges of the colored bands slightly into the white to create a natural stone transition, but keep the main stripes distinct. -
Inject the gold veins:
Dip a toothpick into your gold resin mixture. Drag it through the white sections to create random, lightning-bolt style fractures. I like to trace along the edges of the colored bands for extra definition. -
Initial cure:
Cover the mold to protect it from dust and let the resin cure completely, usually for 24 hours depending on your brand.
Add Real Texture
Crush a small piece of dried tinted resin or real turquoise stone and embed the fragments into the colored stripes for genuine mineral texture.
Step 3: Refining and Finishing
-
Demold the charm:
Once fully hard, pop the pendant out of the silicone mold. Check the edges for any sharp bits of cured resin. -
Sand the edges:
Use fine-grit wet sandpaper to smooth the back and sides of the disc, ensuring a professional, polished feel. -
Enhance the veins:
If your gold veins settled too deep, take a fine-tip gold paint pen and re-trace the ‘cracks’ on the surface of the cured resin to make them pop. -
Domed top coat:
To seal the paint and add depth, apply a final layer of clear resin (UV resin is fastest here) over the top. Spread it to the edges with a clean toothpick until it forms a perfect dome. -
Final cure:
Cure the top coat under a UV lamp or let it air dry if using epoxy. Ensure the surface is glass-smooth. -
Attach hardware:
Apply a dab of strong jewelry adhesive to the flat pad of a pendant bail and press it firmly onto the back or top edge of the charm.
Now you have a sophisticated, stone-effect charm ready to hang on a chain or cord

PENCIL GUIDE
Understanding Pencil Grades from H to B
From first sketch to finished drawing — learn pencil grades, line control, and shading techniques.
Explore the Full Guide
Ocean Wave Resin Charms
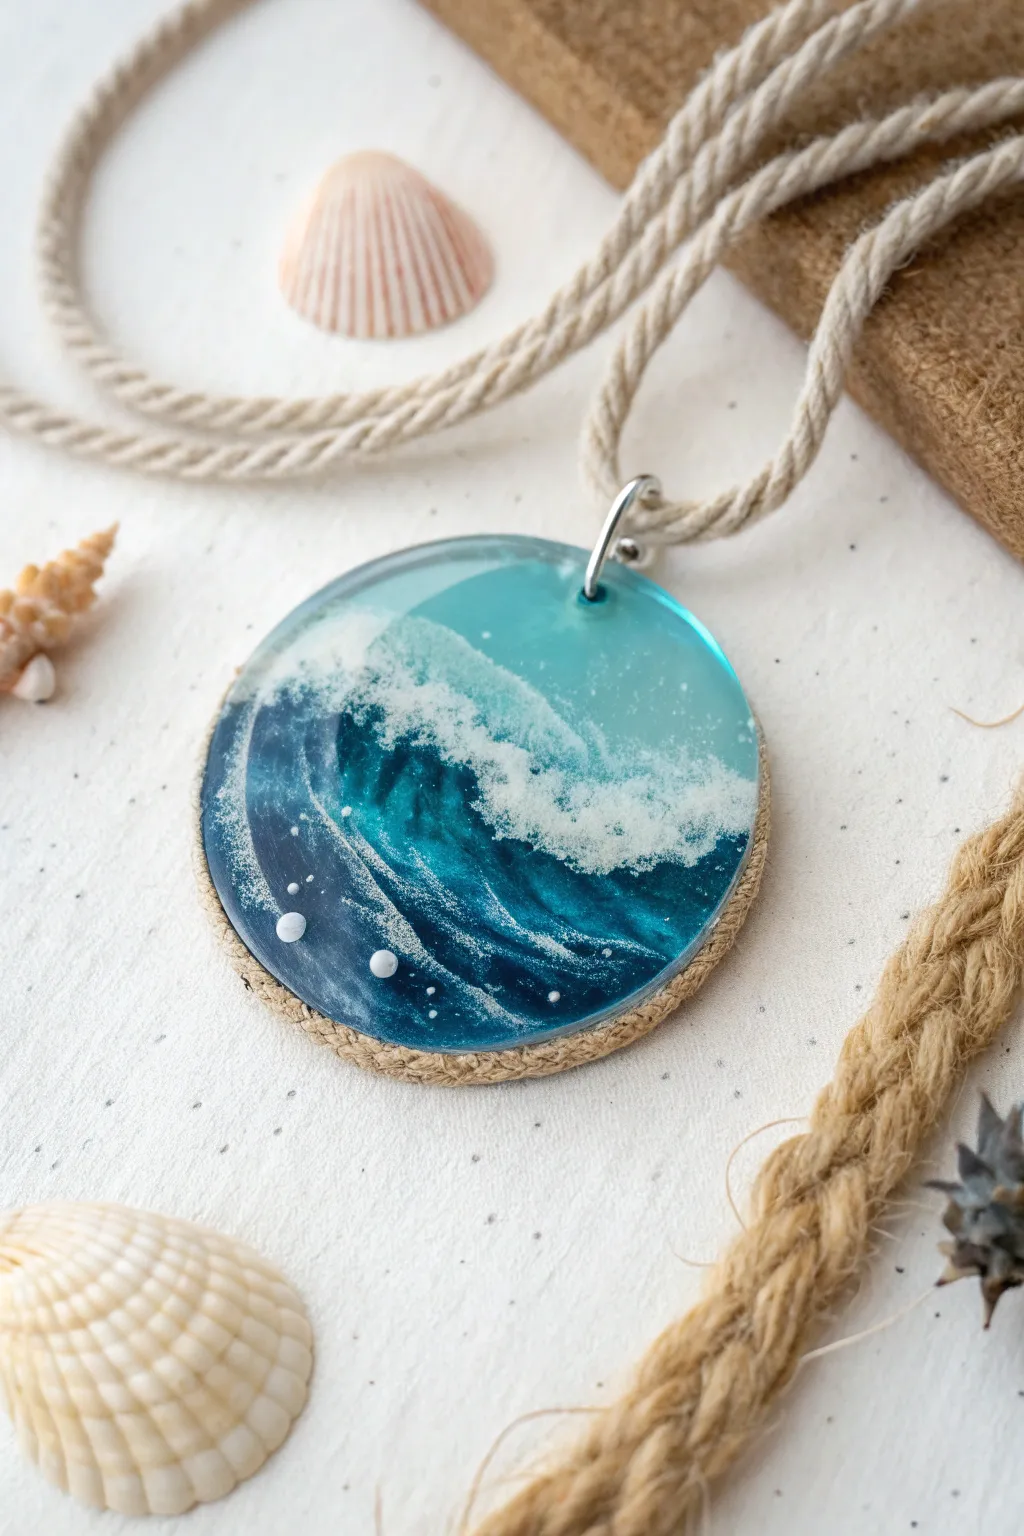
Capture the raw power and beauty of the ocean in this stunning circular pendant, featuring a crashing wave frozen in time. The layers of deep translucent blues and frothy white foam create a mesmerizing depth that looks like a miniature seascape you can wear.
Step-by-Step
Materials
- High-quality 2-part Epoxy Resin (or UV resin for faster layering)
- Round silicone mold (pendant size, approx. 4-5cm diameter)
- Resin dyes: Transparent Teal, Deep Ocean Blue, Navy Blue
- White alcohol ink or opaque white resin pigment paste
- Fine white glitter or mica powder (optional for sparkle)
- Small mixing cups and stirring sticks
- Heat gun or torch lighter
- Straw or airbrush tool (for blowing waves)
- Thin jute twine or hemp cord
- Strong craft glue (E6000 or similar)
- Jump ring and jewelry pliers
- Toothpick or needle tool
- Tiny white beads or micro-marbles (for bubbles)
Step 1: Setting the Scene
-
Prepare the workspace:
Ensure your mold is clean and dust-free. Mix a small batch of clear resin according to manufacturer instructions. If you’re using epoxy, make sure to let it sit for a few minutes to degas. -
Pour the base layer:
Pour a thin, clear layer of resin into the mold to create a smooth front surface. Let this cure completely (or semi-cure to a tacky state if rushing, but fully cured ensures clarity).
Step 2: Creating the Deep Ocean
-
Mix your blues:
Prepare three small cups of resin. Tint one teal (lagoon color), one medium ocean blue, and the last a deep navy blue. Keep the colors translucent rather than opaque. -
Pour the gradient:
Start by pouring the navy blue at the bottom left section of the circle. Create a diagonal line. -
Add the mid-tones:
Pour the medium ocean blue next to the navy, blending the edges slightly with a toothpick. -
Finish with teal:
Pour the teal resin into the remaining top right section. The goal is a diagonal gradient from dark depths to shallow waters. Pop bubbles with a heat gun.
Cellular Magic
Add 1-2 drops of silicone oil to your white resin mix before pouring. When heated, this encourages ‘cells’ to form, creating realistic sea foam bubbles.
Step 3: Making Waves
-
Prepare the foam:
Mix a very small amount of resin with white pigment paste. It needs to be opaque. Add a drop of white alcohol ink to help it spread. -
Apply the white line:
Draw a thin line of the white resin mixture across the boundary where the dark blue meets the lighter teal. This will become the crashing wave. -
Blow the wave:
Gently use a straw or a heat gun on a low setting to push the white resin back towards the teal section. I find short, controlled puffs work best to create that lacy, cellular effect. -
Add depth details:
Use a toothpick to drag fine lines of white back into the dark blue section, mimicking the whitewash trails left by a receding wave. -
Add sparkle:
If desired, sprinkle a tiny pinch of white glitter into the white foam area while wet to simulate sunlight hitting the spray. -
Insert bubbles:
Carefully place two or three tiny white beads or micro-marbles into the dark blue section near the bottom to represent underwater air bubbles. Let this entire layer cure fully.
Sandy Shores
Mix real sand with a bit of resin and place it at the very bottom edge before pouring your blues to create a realistic beach transition.
Step 4: Finishing Touches
-
The sealing layer:
Mix a final batch of clear resin. Pour a generous dome over the top of the cured artwork. This adds magnification and depth to the wave effect. -
Final cure:
Allow the piece to cure completely, covered to prevent dust, for at least 24 hours. -
Demold and drill:
Remove the charm from the silicone mold. Drill a small hole near the top center for your jump ring if the mold didn’t have a built-in post. -
The nautical border:
Apply a thin bead of strong craft glue around the circumference of the resin disc. -
Wrap the cord:
Carefully press the thin jute twine into the glue, wrapping it around the edge to frame the ocean scene naturally. Trim the ends neatly. -
Attach hardware:
Using your pliers, open a large jump ring, loop it through the hole, and twist it closed securely.
String this nautical masterpiece on a simple twisted rope necklace and enjoy carrying a piece of the ocean with you wherever you go
Galaxy Night-Sky Charms
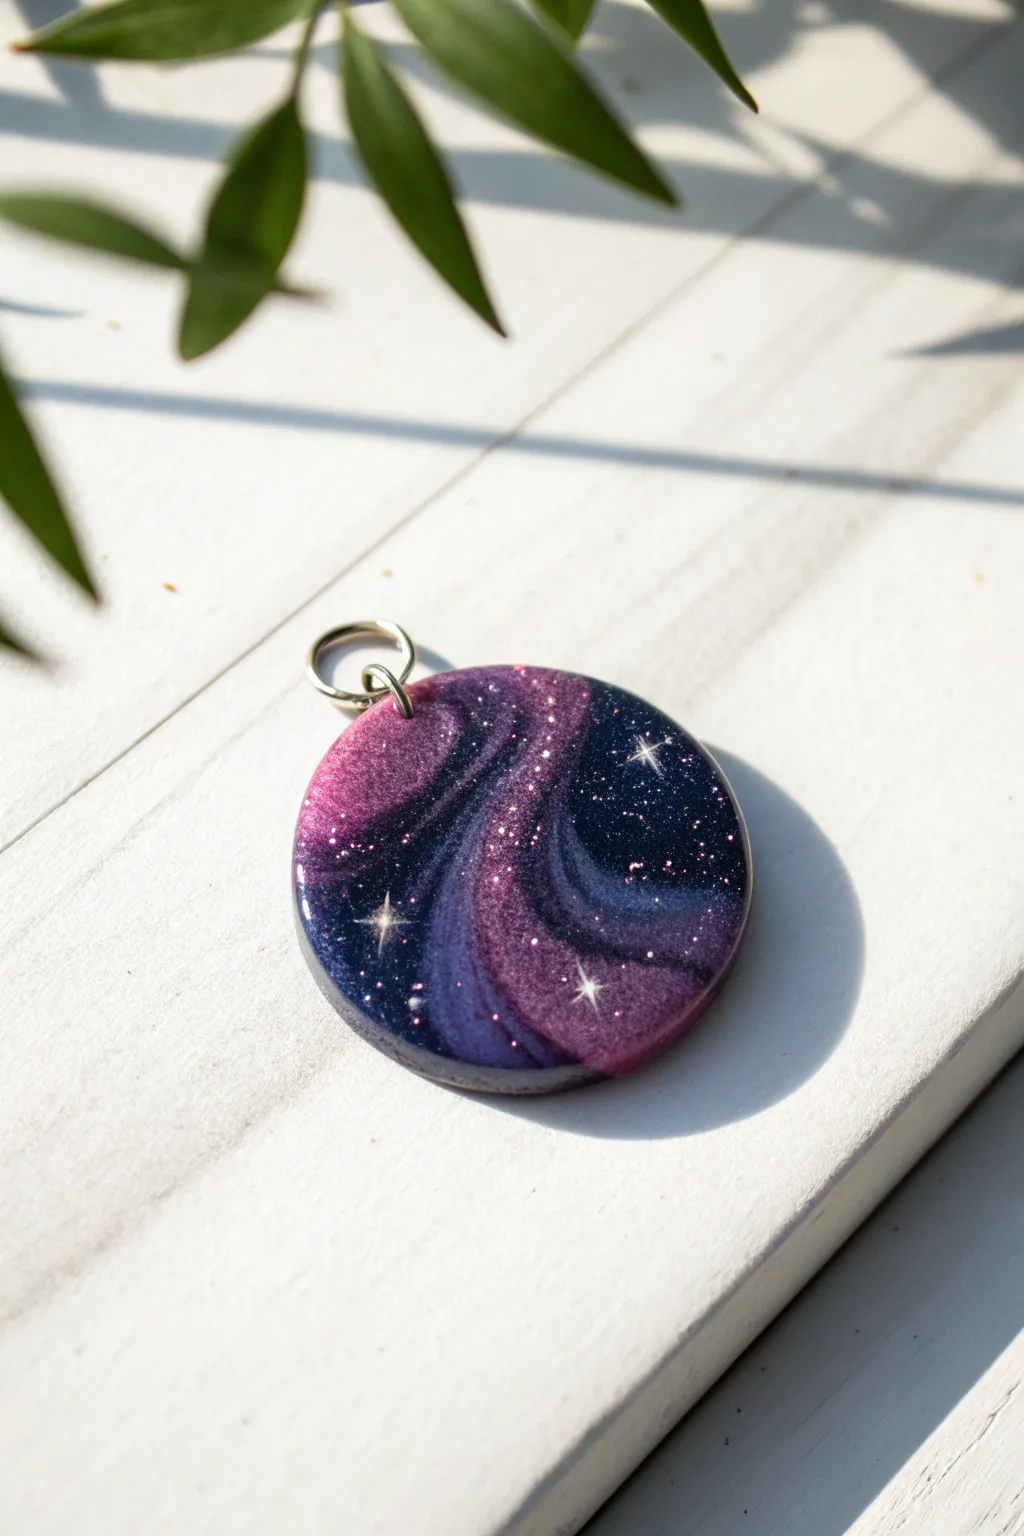
Capture the magic of deep space with this mesmerizing galaxy resin charm, featuring swirling nebulas of violet and indigo. The finished piece shines with a glassy surface and delicate star details, perfect for a unique necklace or keychain.
Step-by-Step
Materials
- Two-part epoxy resin (jewelry grade)
- Round silicone mold (pendant size)
- Black resin pigment or alcohol ink
- Purple pearl mica powder (violet/fuchsia shift)
- Blue pearl mica powder (deep navy/indigo)
- Fine silver holographic glitter
- White acrylic paint
- Fine detail brush (00 or 000 size) or dotting tool
- Mixing cups and stir sticks
- Heat gun or long-neck lighter
- Silver screw eye pin or bail
- Small hand drill (if not embedding hardware)
Step 1: Preparing the Nebula
-
Mix base resin:
Measure and mix your two-part epoxy resin according to the manufacturer’s instructions. Stir slowly for at least three minutes to ensure a proper chemical bond while minimizing bubbles. -
Separate colors:
Divide your mixed resin into three small cups. Pour about 40% into the first cup, 40% into the second, and keep 20% clear or lightly glittered in the third. -
Tint the darkness:
In the first cup, add a tiny drop of black pigment and a scoop of deep blue mica powder. You want a dark, midnight blue color that is almost opaque. -
Create the nebula:
In the second cup, mix in your violet or purple mica powder. Adjust the intensity until it creates a rich, shimmering satin look.
Muddy Colors?
If your purple and blue merge into a gray blob, you overmixed the swirl. Stop swirling as soon as you see distinct lines. Use thicker resin for better separation.
Step 2: Pouring the Galaxy
-
Pour the dark base:
Pour the dark blue/black resin into opposite sides of your round mold, leaving an empty channel curving through the middle. -
Add the nebula stream:
Carefully pour the purple resin into the empty center channel. Don’t worry if it touches the dark resin; we want them to meet. -
Swirl the cosmos:
Take a clean toothpick or silicone tool and gently drag the dark resin into the purple and vice versa. Use a curvy ‘S’ motion to mimic the organic flow of a galaxy, but don’t overmix or it will turn muddy. -
Add stardust:
Sprinkle a pinch of fine holographic glitter over the wet resin, focusing on the boundary lines between colors to simulate distant star clusters. -
pop bubbles:
Pass a heat gun or lighter quickly over the surface to pop any rising air bubbles. Let this layer cure completely, usually for 12-24 hours.
Depth Trick
Paint stars on multiple layers of resin. Pour half full, cure, paint stars, pour the rest. This creates a 3D ‘deep space’ effect where some stars look further away.
Step 3: Stars and Finish
-
Paint the stars:
Once hardened, demold the piece if you wish to paint comfortably, or leave it in the mold. Dip a fine detail brush or a toothpick into white acrylic paint. -
Create starbursts:
Paint a few larger ‘north stars’ by drawing a small cross with elongated vertical lines. Keep the lines very thin for a delicate effect. -
Add distant stars:
Use a dotting tool or the tip of a toothpick to add tiny specks of white paint randomly across the dark and purple areas, varying the spacing. -
Dry the paint:
Allow the white acrylic paint to dry completely. If the paint is wet when you add the top coat, it will smear. -
Dome the top:
Mix a small batch of clear resin. Pour a small amount onto the center of the charm and gently push it to the edges with a stir stick to create a magnifying, domed finish that seals the paint. -
Install hardware:
If your mold didn’t have a built-in hole, use a small hand drill to make a hole at the top edge once the final layer is fully cured. -
Attach the bail:
Screw in a small eye pin with a dab of superglue on the threads for security, or attach a jump ring through the drilled hole.
Now you have a piece of the universe to wear or gift to a stargazer


Constellation Dot Resin Charms
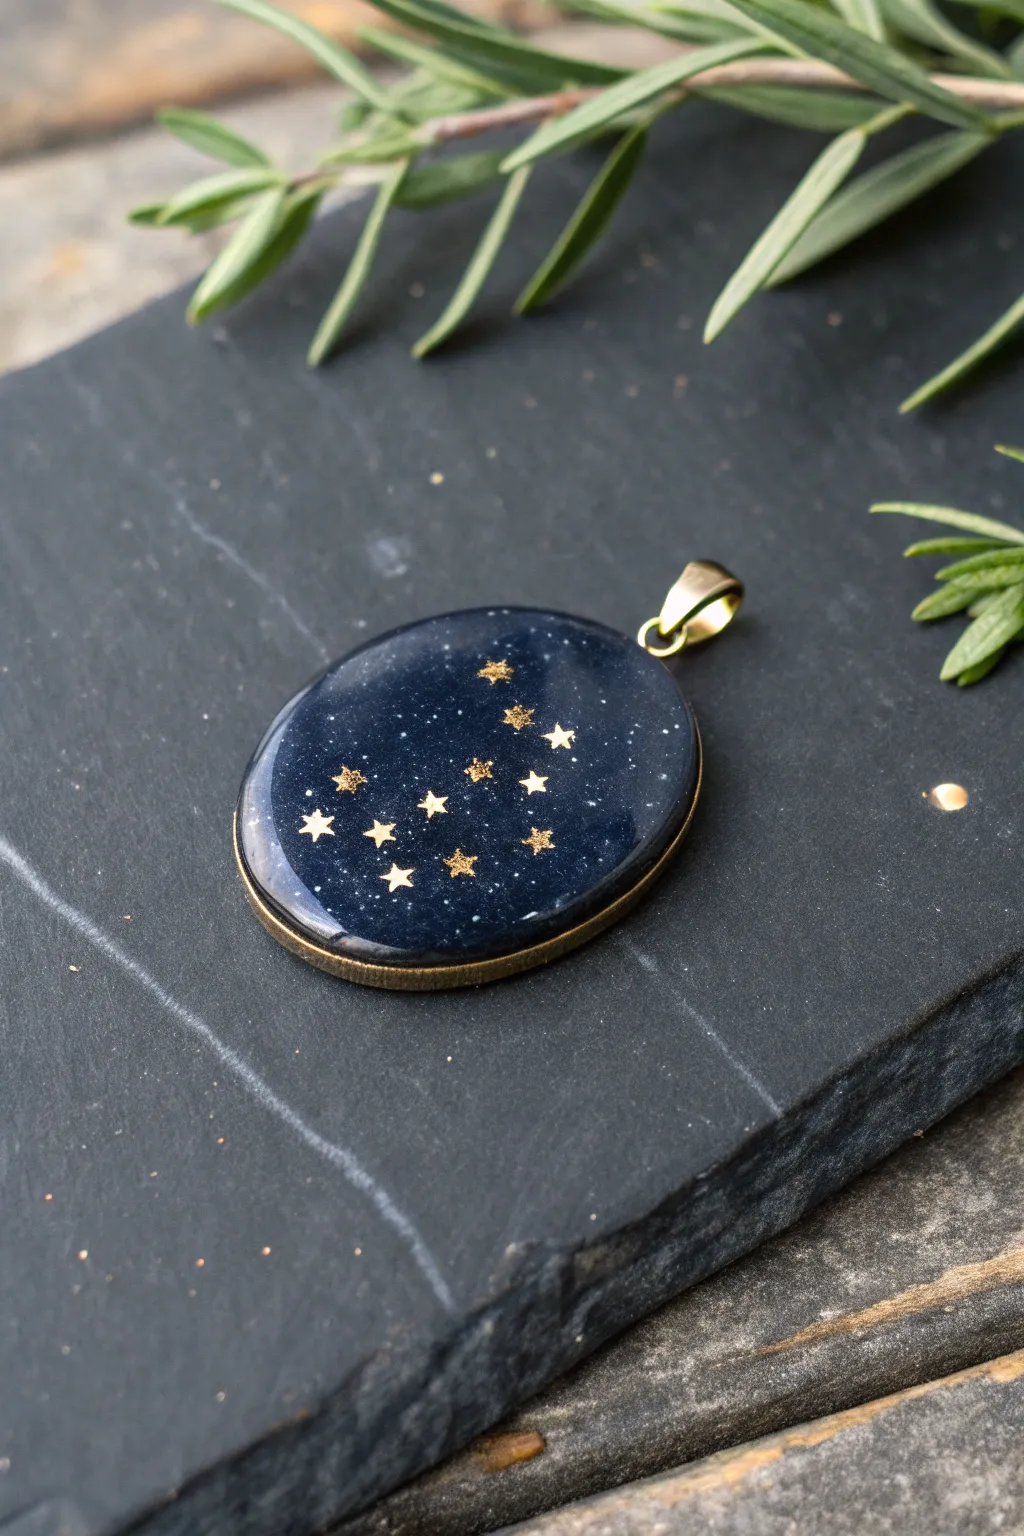
Capture the magic of the cosmos with this stunning deep blue constellation pendant. Using a simple layering technique and gold star accents, you will create a piece of jewelry that looks like a miniature window into a starry night.
Detailed Instructions
Materials
- Oval metal bezel pendant (bronze or gold tone)
- UV resin (hard type) or 2-part epoxy resin
- UV lamp (if using UV resin)
- Deep blue pigment liquid or mica powder
- Black pigment liquid (optional, for depth)
- Fine silver or iridescent glitter dust
- Tiny gold star confetti or metallic nail art stickers
- Tweezers
- Toothpick or silicone mixing tool
- Silicone mat
- Jump ring (gold tone)
Step 1: Creating the Cosmic Base
-
Prepare the workspace:
Lay down your silicone mat to protect your work surface. Ensure your metal bezel is clean, dry, and sitting perfectly flat so the resin cures evenly. -
Mix the base color:
In a small mixing cup, combine clear resin with a drop of deep blue pigment. I like to add a tiny pinprick of black pigment here to make the blue feel more like midnight than royal blue. -
Add the stardust:
Sprinkle a very small amount of fine silver or iridescent glitter into the blue mixture. You want a subtle shimmer, not a solid glitter block, so less is more. -
Pour the first layer:
Carefully pour the colored resin into the bezel, filling it about halfway. Use a toothpick to guide the resin to the edges, ensuring it touches the metal rim all the way around. -
Pop bubbles:
Pass a lighter or heat gun quickly over the surface to pop any air bubbles that have risen to the top. -
First cure:
Place the bezel under a UV lamp for 60-90 seconds (or let it sit for the required cure time if using epoxy) until the surface is tacky but firm enough to hold decorations.
Cloudy Finish?
If your resin cures with a cloudy or sticky finish, your UV light might be too weak or the layers were too thick. Wipe with rubbing alcohol and add a final thin coat of fresh resin.
Step 2: Forming the Constellation
-
Plan your stars:
Select your tiny gold stars. You will need a mix of slightly larger and smaller stars if possible to create visual interest. -
Apply a thin adhesive layer:
Apply a very thin layer of clear resin over the cured blue base. This acts as the glue for your stars without adding too much bulk yet. -
Place the main stars:
Using fine-point tweezers, gently place the stars into the wet resin to form your chosen zodiac constellation. Refer to a star chart image if you need help with the pattern. -
Adjust positions:
Nudge the stars into perfect alignment using a toothpick. Ensure they are fully flat against the blue background so they don’t poke out of the final layer. -
Add distant stars:
If you have extremely fine holographic glitter or micro-beads, sprinkle just a pinch in the empty spaces to look like distant galaxies. -
Lock the design:
Cure the piece again under the UV lamp for 60 seconds to freeze the stars in place.
Depth Trick
For a 3D effect, mix your glitter into the bottom layer, but place your gold stars on a second, clear layer above the blue. This creates a shadow and makes the stars float.
Step 3: Doming and Finishing
-
Prepare the dome layer:
Pour fresh, clear resin onto the center of the pendant. Pour slowly to avoid overflowing. -
Create surface tension:
Using a clean toothpick, drag the clear resin from the center out to the very edge of the metal bezel. The resin should stop right at the rim, creating a beautiful curved dome effect. -
Final bubble check:
Inspect the piece closely for any trapped micro-bubbles, especially around the gold stars. Pop them gently. -
Final cure:
Cure the piece under the UV lamp for a longer duration—usually 2 to 3 minutes—to ensure a hard, scratch-resistant finish. Use the flip side if the bezel is open-backed. -
Cool down:
Let the pendant sit for a few minutes to cool down completely before touching it, as resin can get hot during curing. -
Attach hardware:
Using pliers, open a gold jump ring and thread it through the loop of the bezel. Close it securely to finish your charm.
Wear your personalized zodiac charm on a simple gold chain to keep the stars close to your heart
Geode-Inspired Crystal Chip Charms

Capture the organic beauty of natural stone with this striking resin geode charm, featuring a jagged crystalline center nestled within layers of teal and white. This project uses clever layering techniques to mimic the raw texture of a sliced agate stone.
Step-by-Step Guide
Materials
- UV resin (hard type)
- Epoxy resin (optional, for final coating)
- UV lamp
- Oval silicone mold (flat pendant style)
- Teal or turquoise opaque resin pigment
- White alcohol ink or opaque pigment
- Raw rose quartz chips or pink glass glitter shards
- Clear quartz points or crushed clear glass
- Gold leaf paint or liquid gilding
- Fine liner brush
- Gold jump ring and lobster clasp
- Silicone mixing cups
- Toothpicks or silicone tools
- Masking tape (for cleaning debris)
Step 1: Creating the Crystal Core
-
Prepare the center:
Begin by placing a small amount of clear UV resin directly into the center of your oval silicone mold. You don’t need to fill the whole mold, just a central puddle. -
Add pink stones:
Carefully arrange your raw rose quartz chips or pink glass shards into the wet resin. Cluster them tightly in the very middle to form the ‘heart’ of the geode. -
Initial cure:
Cure this central cluster under your UV lamp for about 60 seconds to lock the stones in place so they don’t drift during the next steps. -
Surround with white:
Mix a small drop of white pigment into some UV resin. You want a semi-translucent milky look rather than solid white paint. -
Create the crystalline border:
Pour a ring of this milky white resin around the pink center. While it’s wet, drop in your crushed clear quartz or glass pieces into this white ring. -
Texturize:
Use a toothpick to poke at the white ring, ensuring the clear crystals jut out naturally. Cure this layer thoroughly for 2 minutes.
Depth Perception
For realistic depth, pour a thin layer of clear resin over the entire top (doming) afterwards. It magnifies the ‘crystals’ inside.
Step 2: Pouring the Outer Agate Layer
-
Mix the teal color:
In a mixing cup, combine clear resin with a tiny drop of teal or turquoise opaque pigment. Aim for a rich, consistent color. -
Fill the perimeter:
Carefully pour the teal resin into the remaining space of the mold, surrounding the white crystal ring. Fill it right up to the edge of the mold walls. -
Blend the transition:
Before curing, I like to take a clean toothpick and very gently drag a tiny bit of the wet teal resin just slightly into the cured white debris to soften the line, though keeping a distinct border is also classic for geodes. -
Final structural cure:
Cure the entire piece under the UV lamp for 3-4 minutes, flipping the mold over halfway through to ensure the bottom sets completely.
Sticky Resin?
If the resin feels tacky after curing, wipe it with rubbing alcohol or place it in direct sunlight for 30 minutes to finish the cure.
Step 3: Finishing Touches
-
Demold:
Once cool to the touch, pop the charm out of the silicone mold. Check for any sharp resin edges and sand them lightly if necessary. -
Gilding the edges:
Shake your liquid gold gilding or leaf paint well. Using a fine liner brush, paint the entire outer rim of the resin charm. -
Create the organic gold lip:
Don’t just paint the side; bring the gold paint slightly over onto the front face of the charm. Make this line uneven and jagged to mimic a natural metallic rock crust. -
Drilling the hole:
If your mold didn’t have a built-in hole, use a small hand drill to create an opening at the top of the oval. -
Hardware assembly:
Open a gold jump ring using two pairs of jewelry pliers. Thread it through the hole and attach your gold lobster clasp before closing the ring securely.
Now you have a stunning, geology-inspired accessory ready to clip onto your keys or bag
Candy Confetti Resin Charms
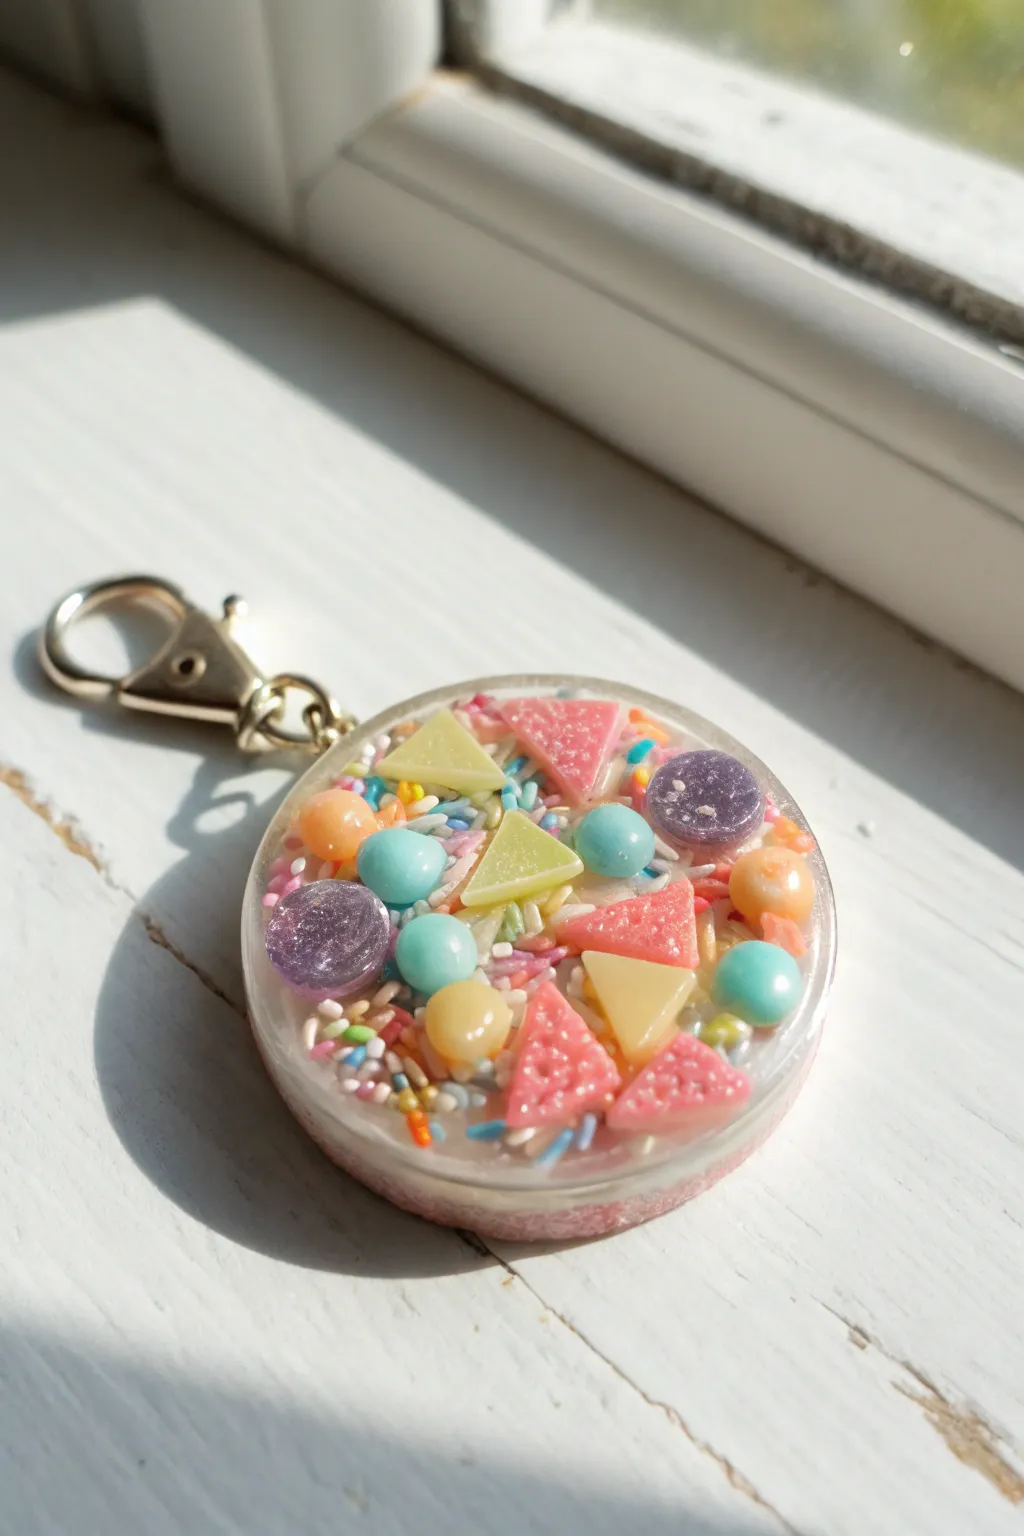
Capture the joy of a candy shop with this adorable resin charm packed with faux sweets and pastel sprinkles. The finished piece looks good enough to eat, showcasing a bright mix of geometric candy shapes suspended in crystal-clear resin.
Step-by-Step
Materials
- Two-part epoxy resin (mixing cups and stirrers)
- Circular silicone mold (approximately 1.5 – 2 inches)
- Fake candy inclusions (polymer clay triangles, resin cabochons)
- Pastel sprinkle mix (non-edible clay sprinkles recommended)
- Faux sugar/glitter spheres (blue, orange, purple)
- Gold lobster clasp keychain hardware
- Jump rings and small screw eye pin
- Hand drill or pin vise
- UV resin (optional, for doming)
- Tweezers
- Lighter or heat gun
Step 1: Base Preparation
-
Clean Your Mold:
Begin by ensuring your circular silicone mold is completely free of dust or lint. Use a piece of masking tape to lift away any tiny particles that might ruin the clear finish. -
Mix the Resin:
Measure equal parts of resin and hardener (or according to your brand’s instructions) into a mixing cup. Stir slowly but thoroughly for at least 3-5 minutes, scraping the sides and bottom. -
Degas the Resin:
Let the mixed resin sit for a few minutes to allow larger air bubbles to rise to the surface naturally. You can pop surface bubbles with a lighter or heat gun. -
Pour the First Layer:
Pour a thin layer of clear resin into the mold, filling it about halfway. This base layer will suspend your candy pieces so they don’t sink all the way to the bottom face.
Sticky Situation?
If your resin is still sticky after 48 hours, the ratio was likely off or it wasn’t mixed enough. Unfortunately, you can’t save it; you must re-pour with precise measurements.
Step 2: Adding the ‘Candy’
-
Place Large Elements:
Using tweezers, carefully place your largest faux candy pieces first. Arrange the pink and yellow triangles ensuring they are evenly distributed. -
Add Spherical Candies:
Drop in the colourful spheres—blue, orange, and the glittery purple ones. Try to balance the colours so no two identical shades are right next to each other. -
Check Positioning:
Look at the mold from the side (if translucent) or carefully from the top to ensure none of the candy pieces are poking out above the resin level. -
Sprinkle It On:
Take a pinch of your pastel sprinkle mix and scatter it into the gaps between the larger candies. I find it helpful to use a toothpick to push stray sprinkles into empty pockets of resin. -
Let it Cure:
Allow this layer to cure until it reaches a soft gel state (usually 4-6 hours depending on your resin) or fully hardness if you prefer working slowly. This prevents the heavy pieces from sinking.
Step 3: Finishing Touches
-
Top Up the Resin:
Mix a fresh, smaller batch of clear resin. Pour it over the arrangement until the mold is filled to the brim, creating a slight dome effect due to surface tension. -
Pop Surface Bubbles:
Quickly pass a lighter or heat gun over the surface one last time to remove any bubbles introduced during the second pour. -
Full Cure:
Cover the mold with a box to protect it from dust and let it cure fully for 24-48 hours until rock hard. -
Demold:
Gently flex the silicone mold and pop your resin charm out. The edges should be smooth, but you can sand any sharp spots if necessary. -
Drill the Hole:
Use a small hand drill or pin vise to drill a hole into the top edge of the resin disc for your hardware. -
Attach Hardware:
Screw in a small eye pin into the drilled hole. Add a drop of superglue or UV resin to the threads for extra security. -
Final Assembly:
Open a jump ring with pliers, loop it through the eye pin, and attach your gold lobster clasp. Close the jump ring securely.
Add Some Sparkle
Mix a tiny amount of iridescent mica powder or fine glitter into your resin before pouring for a magical, shimmering background behind the candy.
Now you have a sweet, permanent treat to hang on your keys or bag
Mini Fruit Slice Resin Charms
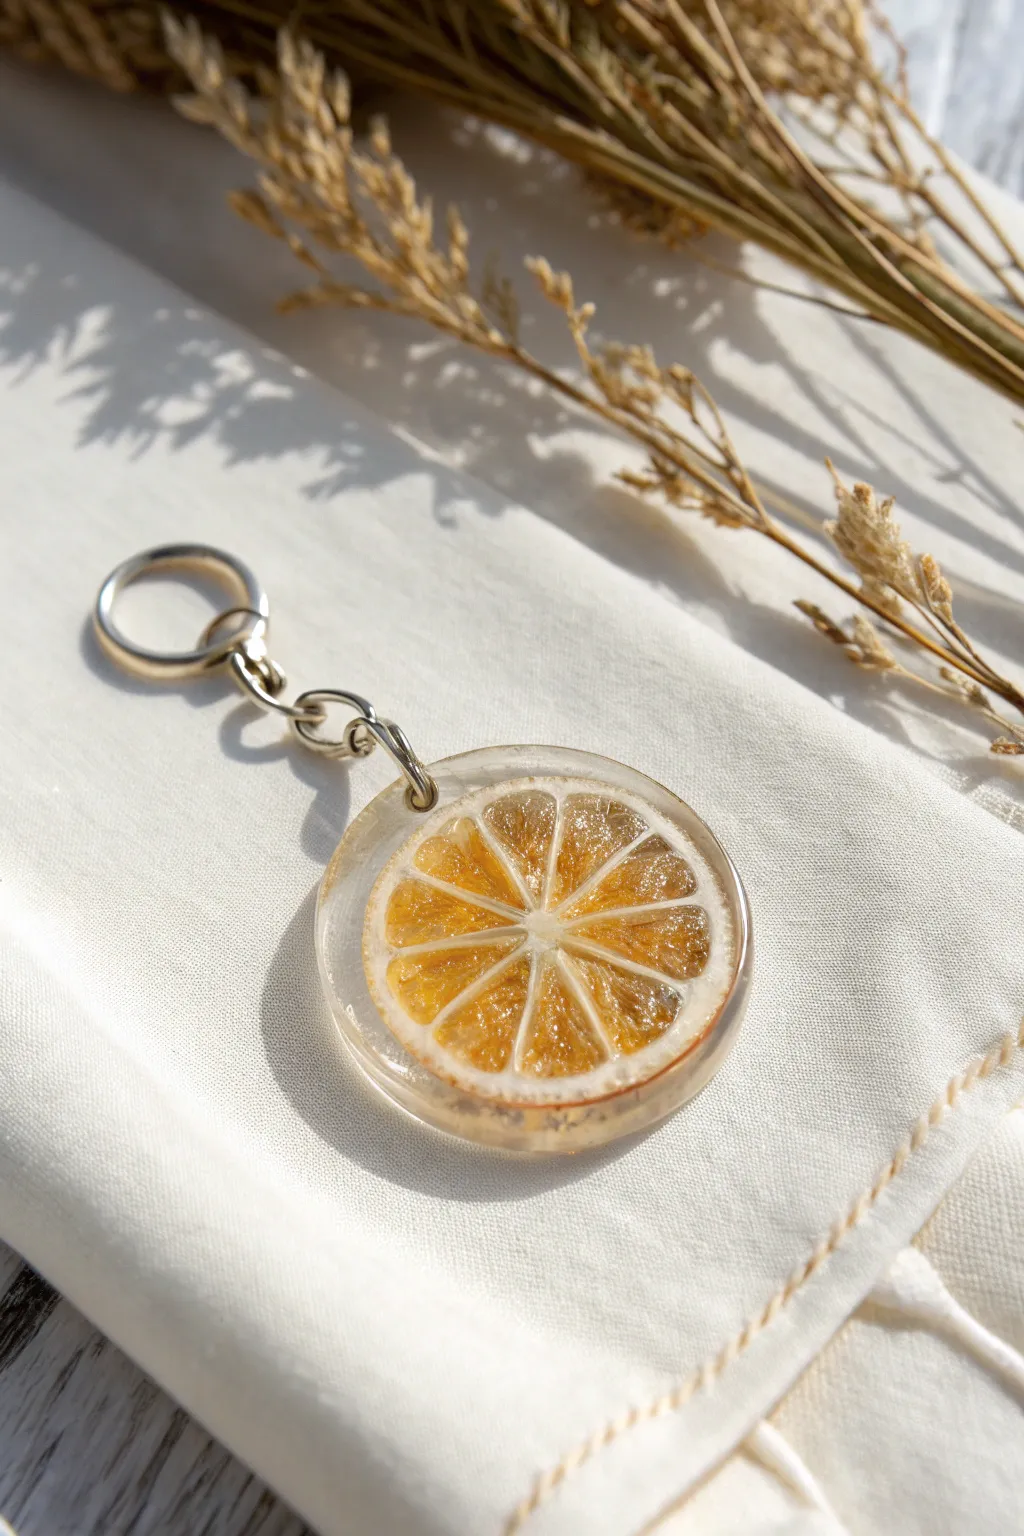
Capture the eternal freshness of summer with this stunning dried lemon slice keychain. Encased in crystal-clear resin, the translucent citrus segments catch the light beautifully, making for a durable and organic accessory.
Step-by-Step Guide
Materials
- UV resin or 2-part epoxy resin (clear)
- Dried pressed lemon slice
- Round silicone mold (slightly larger than the lemon slice)
- UV lamp (if using UV resin)
- Wooden stir sticks
- Mixing cup
- Lighter or heat gun
- Hand drill or pin vibe
- Silver screw eye pin
- Silver keychain hardware (split ring and chain)
- Jewelry pliers
Step 1: Preparation and Base Layer
-
Select your fruit:
Choose a dried lemon slice that fits comfortably within your silicone mold. Ensure it is completely dehydrated; any moisture trapped inside will cause the fruit to rot or the resin to cure improperly. -
Clean the mold:
Wipe your round silicone mold with a piece of tape or a lint-free cloth to remove any dust or glitter particles, ensuring a glass-like finish. -
Pour the initial layer:
Pour a thin layer of clear resin into the bottom of the mold. This layer acts as a barrier so the fruit doesn’t touch the very bottom surface. -
Removing bubbles:
Use a lighter or heat gun to quickly pass over the surface of the wet resin to pop any rising air bubbles. -
Initial cure:
If using UV resin, cure under the lamp for about 60 seconds until tacky but stable. For epoxy, let it sit until gel-like.
Cloudy Resin?
If your clear resin turned cloudy, it might be due to moisture in the fruit reacting with the resin, or high humidity. Ensure fruit is 100% bone-dry before casting.
Step 2: Embedding the Citrus
-
Placement:
Gently place the dried lemon slice into the center of the mold on top of the cured base layer. -
Preveting bubbles:
Press the slice down gently with a stir stick. I like to coat the underside of the slice with a tiny bit of wet resin before placing it to avoid trapping air pockets underneath. -
Fill the voids:
Pour more resin slowly over the fruit, focusing on filling the tiny gaps between the fruit pulp segments first. -
Top up the mold:
Continue pouring resin until the lemon slice is completely submerged and the resin slightly domes over the top edge of the mold. -
Bubble check:
Let the piece sit for a minute to allow trapped air from the fibrous fruit to rise, then pop bubbles with your heat source or a toothpick. -
Full cure:
Cure completely under a UV lamp for 3-5 minutes (flip the mold over halfway through), or let epoxy cure for 24-48 hours.
Step 3: Finishing Touches
-
Demold:
Once fully hardened and cool to the touch, gently peel back the silicone mold to release the resin charm. -
Sand edges:
Check the edges for any sharp resin flashing. If found, smooth them down gently with fine-grit sandpaper or a nail buffer. -
Drill the hole:
Mark a spot near the rind at the top of the charm. Using a hand drill or pin vise, carefully drill a small hole for the hardware. -
Insert hardware:
Place a dab of superglue or wet resin on the tip of a silver screw eye pin and screw it firmly into the pre-drilled hole. -
Attach the chain:
Using two pairs of jewelry pliers, twist open the jump ring on the keychain hardware. -
Final assembly:
Loop the open jump ring through the eye pin on your lemon charm, then twist the ring closed so the ends meet perfectly flush.
Add Subtle Sparkle
Mix a tiny pinch of ultra-fine iridescent glitter or gold flake into the final resin pour. It mimics the glistening juice of a fresh lemon slice.
Now you have a vibrant slice of nature to brighten up your keys or bag
Sticker Collage Layered Charms
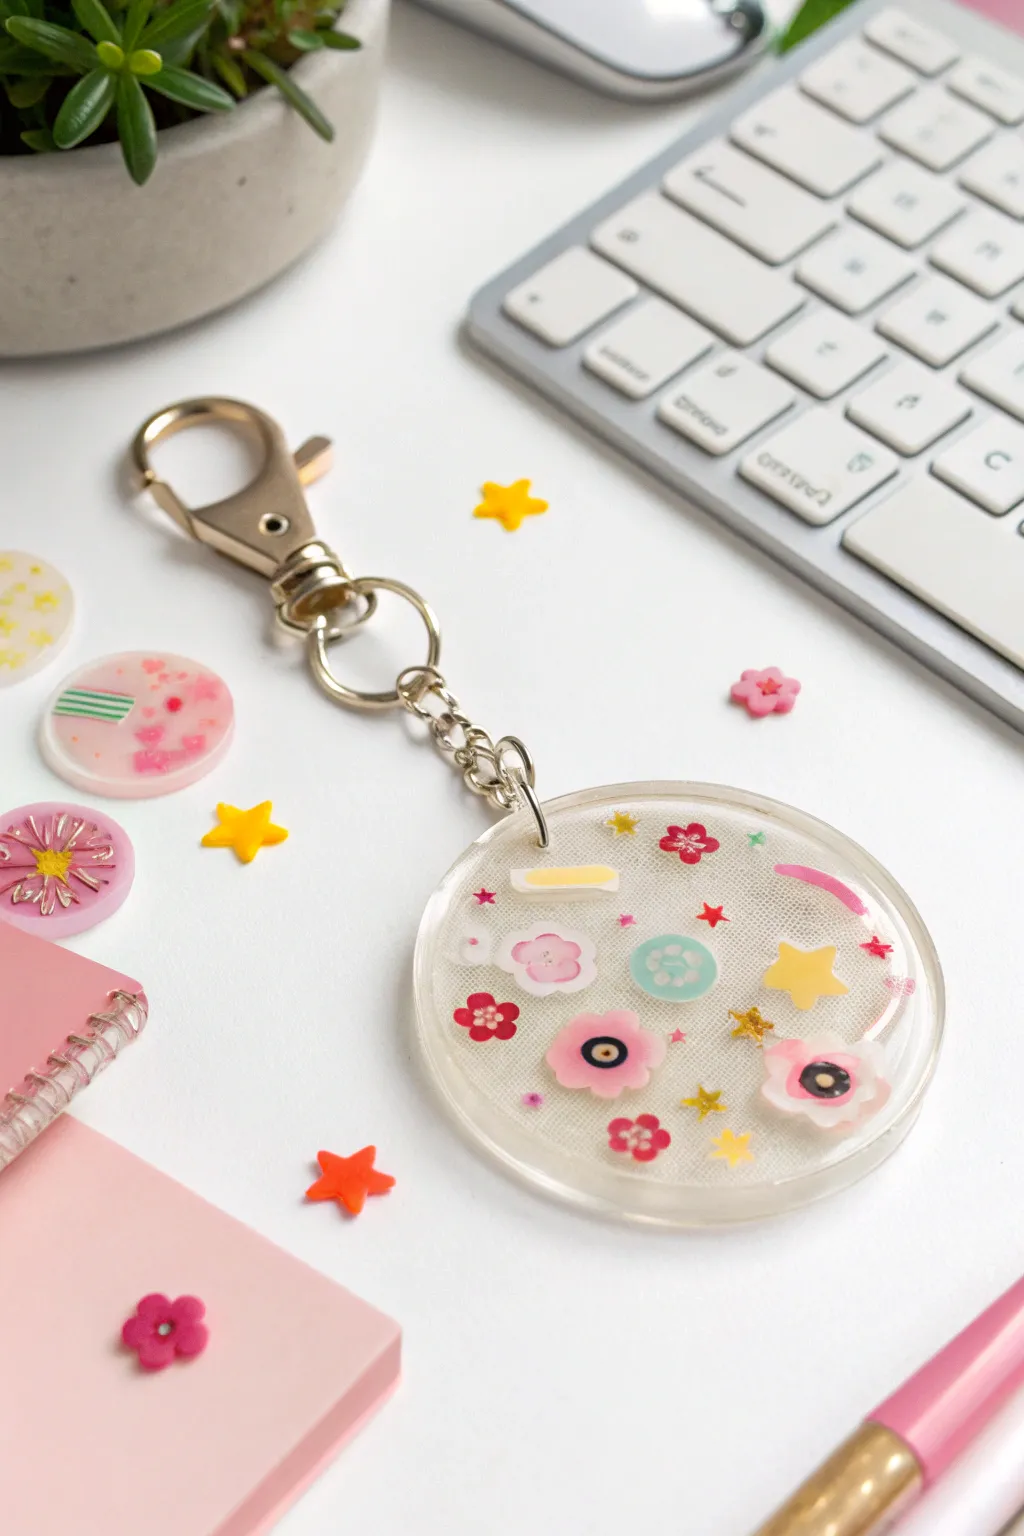
Capture your favorite tiny aesthetic stickers forever in a glass-like bubble with this simple yet stunning resin project. By layering stickers between coats of clear resin, you create a beautiful floating effect that adds depth and whimsy to your keys or bag.
How-To Guide
Materials
- Two-part epoxy resin (mixing cups and stirrers)
- Circular silicone mold (approx. 5-7cm diameter)
- Assorted small stickers (flowers, stars, dots, washi styles)
- Sealer (Mod Podge or clear drying glue)
- Small paintbrush
- Tweezers
- Fine glitter (optional)
- Gold keychain hardware with jump rings
- Hand drill or UV resin for attaching hardware
- Lighter or heat gun
- Gloves and respirator mask
Step 1: Preparation & First Layer
-
Seal your stickers:
Before working with resin, stick your chosen stickers onto a piece of plastic or silicone mat and brush a thin layer of Mod Podge or clear glue over them. This prevents the resin from soaking into paper stickers and appearing translucent. -
Mix the resin:
While the sealer dries, measure and mix your two-part epoxy resin according to the manufacturer’s ratio. Stir slowly for several minutes to minimize bubbles. -
Pour the base layer:
Pour a very thin layer of clear resin into the bottom of your circular mold. This acts as the ‘face’ of the charm and ensures the stickers aren’t exposed on the surface. -
Pop bubbles:
Wait about 5 minutes for bubbles to rise, then swiftly pass a lighter or heat gun over the surface to pop them. Let this layer cure until it reaches a soft gel stage (usually 2-4 hours).
Seal the Deal
Paper stickers often turn dark or transparent in resin. Always seal them with 2-3 coats of white glue or clear spray sealant first.
Step 2: Creating the Collage
-
Plan your layout:
While the base is tacky, lay out your stickers on a table to finalize your design. The image uses a mix of pink flowers, yellow stars, and pastel shapes. -
Place the first stickers:
Using tweezers, gently place your largest floral stickers onto the tacky resin layer. Press them down lightly to ensure full contact without trapping air underneath. -
Add floating elements:
Mix a tiny fresh batch of resin. Pour just enough to cover the first stickers. Now, add your secondary elements like the star stickers and smaller dots into this wet layer to create depth. -
Add sparkle:
I like to dip a toothpick into clear resin and pick up individual flakes of glitter or star sequins, placing them strategically in empty spaces for a subtle shimmer. -
Second cure:
Check for air bubbles trapped under the stickers and pop them. Allow this layer to cure fully (follow your resin’s instruction, usually 12-24 hours).
Step 3: Finishing Touches
-
Final pour:
Mix a final batch of clear resin. Pour it into the mold until it is level with the top edge, creating a smooth backing for your charm. -
Final cure:
Cover the mold to prevent dust from settling and let it cure completely for at least 24 hours until rock hard. -
Demold:
Gently peel the silicone mold away from the cured resin. The edges might be sharp, so careful handling is key. -
Sand edges:
If there is a raised edge or ‘lip’ from the mold, use fine-grit wet sandpaper to smooth the perimeter of the circle. -
Drill the hole:
Using a small hand drill or rotary tool, carefully drill a hole near the top edge of the charm for the hardware. -
Attach hardware:
Open a jump ring with two pairs of pliers. Thread it through the drilled hole and attach your gold keychain clasp. -
Secure the ring:
Close the jump ring tightly so there is no gap. Your playful sticker collage charm is now ready to use.
Level Up: 3D Depth
Do 3 or 4 thin layers instead of 2. Place stickers in every single layer to create a shadow-box effect where items truly look suspended in space.
Now you have a durable, personalized keepsake that showcases your favorite stationery aesthetic in a brand new way
Ink Bloom Petri-Style Charms
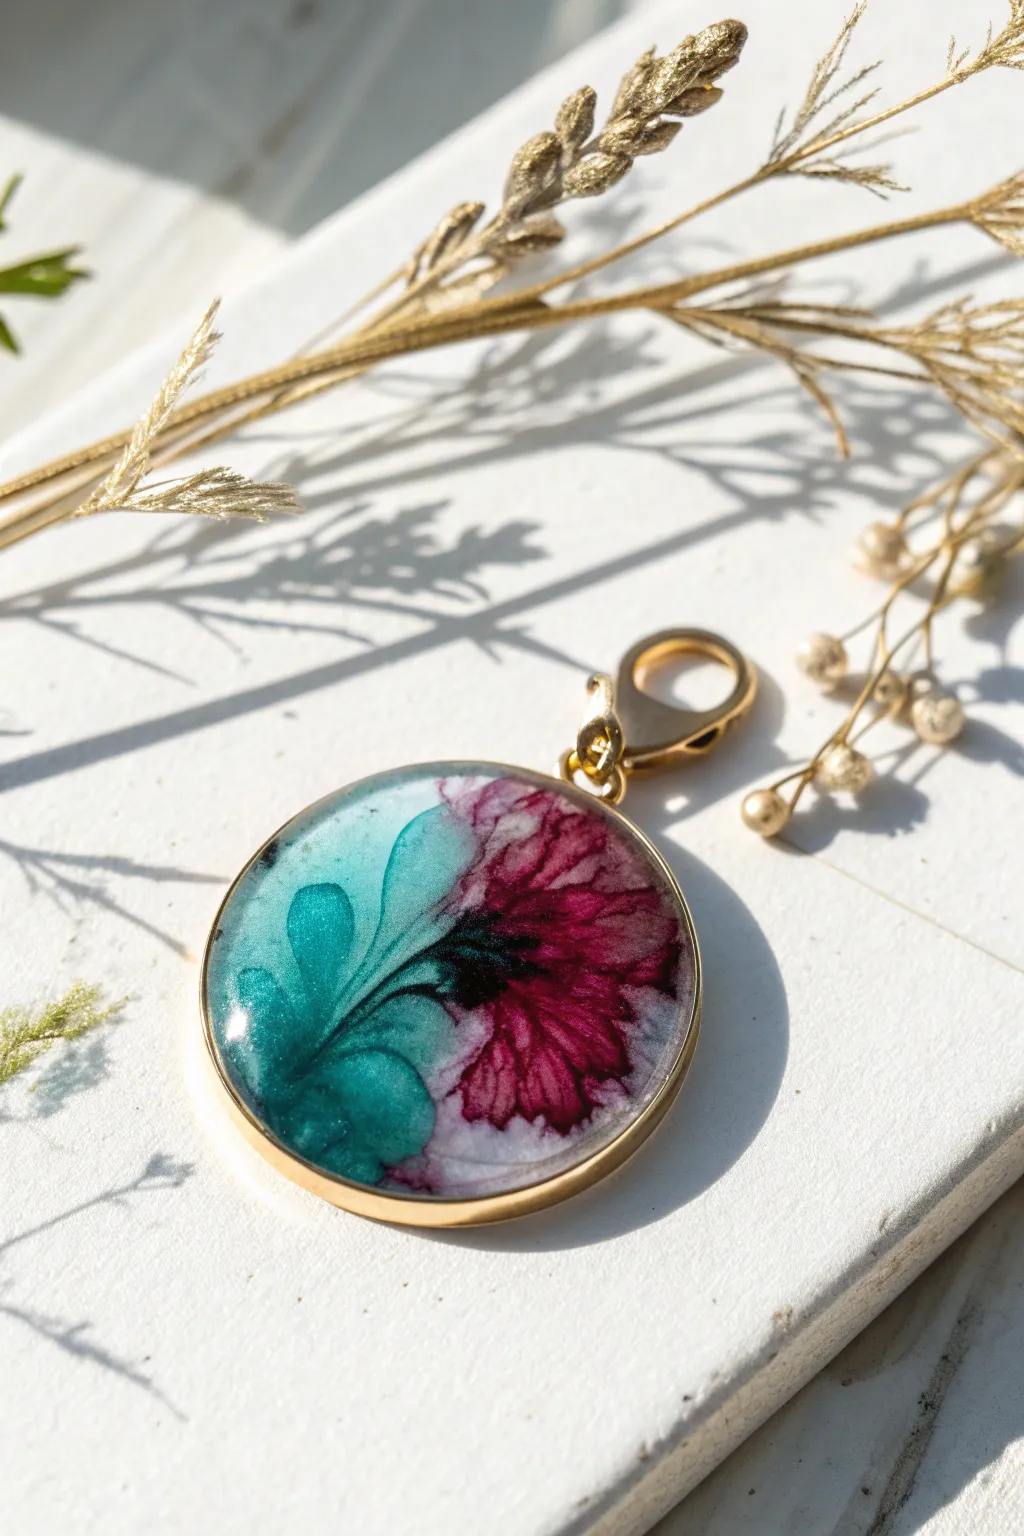
Capture the delicate, microscopic beauty of ink blooms in this elegant gold-framed pendant. Using the petri dish technique, you’ll create a stunning organic design where vibrant teal and rich magenta inks dance together in resin.
How-To Guide
Materials
- Two-part epoxy resin (doming or jewelry grade)
- Round gold open-backed bezel pendant blank
- Jewelry resin tape (blue or clear)
- Alcohol inks: Teal/Turquoise, Magenta/Deep Red
- White alcohol ink (specifically sinker white)
- Mixing cups and stir sticks
- Gloves and protective mat
- Lighter or heat gun
- Toothpick or pin
- Jump ring and clasp (if not included with bezel)
Step 1: Preparation & Base Layer
-
Seal the bezel:
Cut a piece of jewelry resin tape slightly larger than your pendant. Press the open-backed bezel firmly onto the sticky side of the tape, ensuring a tight seal around the entire rim to prevent leaks. -
Burnish the edges:
Use a burnishing tool or your fingernail to rub the tape against the metal rim specifically. Verify there are no air gaps where resin could sneak out. -
Mix the resin:
Measure and mix a small amount of two-part epoxy resin according to the manufacturer’s ratios. Stir slowly to minimize bubbles, creating just enough to fill a few bezels. -
Let it rest:
Allow the mixed resin to sit for about 5–10 minutes. This degassing period lets bubbles rise to the surface so you can pop them before pouring. -
Pour the first layer:
Carefully pour clear resin into the bezel until it is about halfway full. Don’t fill it to the brim yet; we need room for the inks to displace the resin. -
Check for bubbles:
Pass a lighter quickly over the surface or use a toothpick to pop any stubborn bubbles clinging to the inner edges of the gold frame.
Ink Viscosity Tip
Refrigerating your alcohol inks for 10 minutes before use thickens them slightly. This prevents them from spreading too fast in the resin, keeping your flower patterns tight.
Step 2: Creating the Ink Bloom
-
Wait for the texture window:
Let the resin thicken slightly for another 10–15 minutes. If the resin is too thin, the colors will mud together immediately; a slightly thicker base holds the bloom shape better. -
Apply the teal ink:
Drop one single drop of teal alcohol ink onto the left side of the resin pool. Watch how it naturally spreads outward. -
Apply the magenta ink:
Immediately drop one drop of magenta ink on the right side, close enough so it gently touches or pushes against the teal drop. -
Add the sinker white:
Crucial step: Drop one drop of white ‘sinker’ ink directly into the center of the teal spot, and another drop directly into the center of the magenta spot. This heavier pigment pushes the color down to create depth. -
Repeat for intensity:
If you want deeper saturation, add a second tiny drop of color on top of the white, followed by one last drop of white. Be careful not to overfill the bezel. -
Manipulate the flow:
I like to use a clean toothpick to very gently swirl the boundary where the two colors meet. Don’t over-mix, or you lose the distinct ‘petri’ separation; just a tiny drag helps them mimic organic petals. -
Let it cure:
Cover the piece with a dust dome and let it cure fully for 24 hours. The inks will continue to move and settle as the resin hardens.
Add Some sparkle
Mix a tiny pinch of white mica powder or holographic micro-glitter into your clear resin base before pouring. It adds a subtle shimmer behind the ink blooms.
Step 3: Finishing Touches
-
Remove the tape:
Once fully hard, peel off the back tape. You might find sticky residue; clean it off with a little rubbing alcohol or Goo Gone. -
Doming the back (Optional):
If the back looks slightly concave from the tape, mix a tiny bit more clear resin and apply a thin doming layer to the back for a crystal-clear finish. -
Doming the front:
For that high-end glossy look seen in the photo, pour a final, clear layer of resin over the cured ink art. Bring it right to the edge of the gold bezel carefully. -
Final cure:
Allow this top coat to cure for another 24 hours on a perfectly level surface. -
Attach hardware:
Open a gold jump ring using two pairs of pliers. Thread it through the bezel’s loop and attach your clasp before closing the ring securely.
Wear your unique floral abstraction with pride, knowing no two blooms will ever look exactly the same

Have a question or want to share your own experience? I'd love to hear from you in the comments below!