
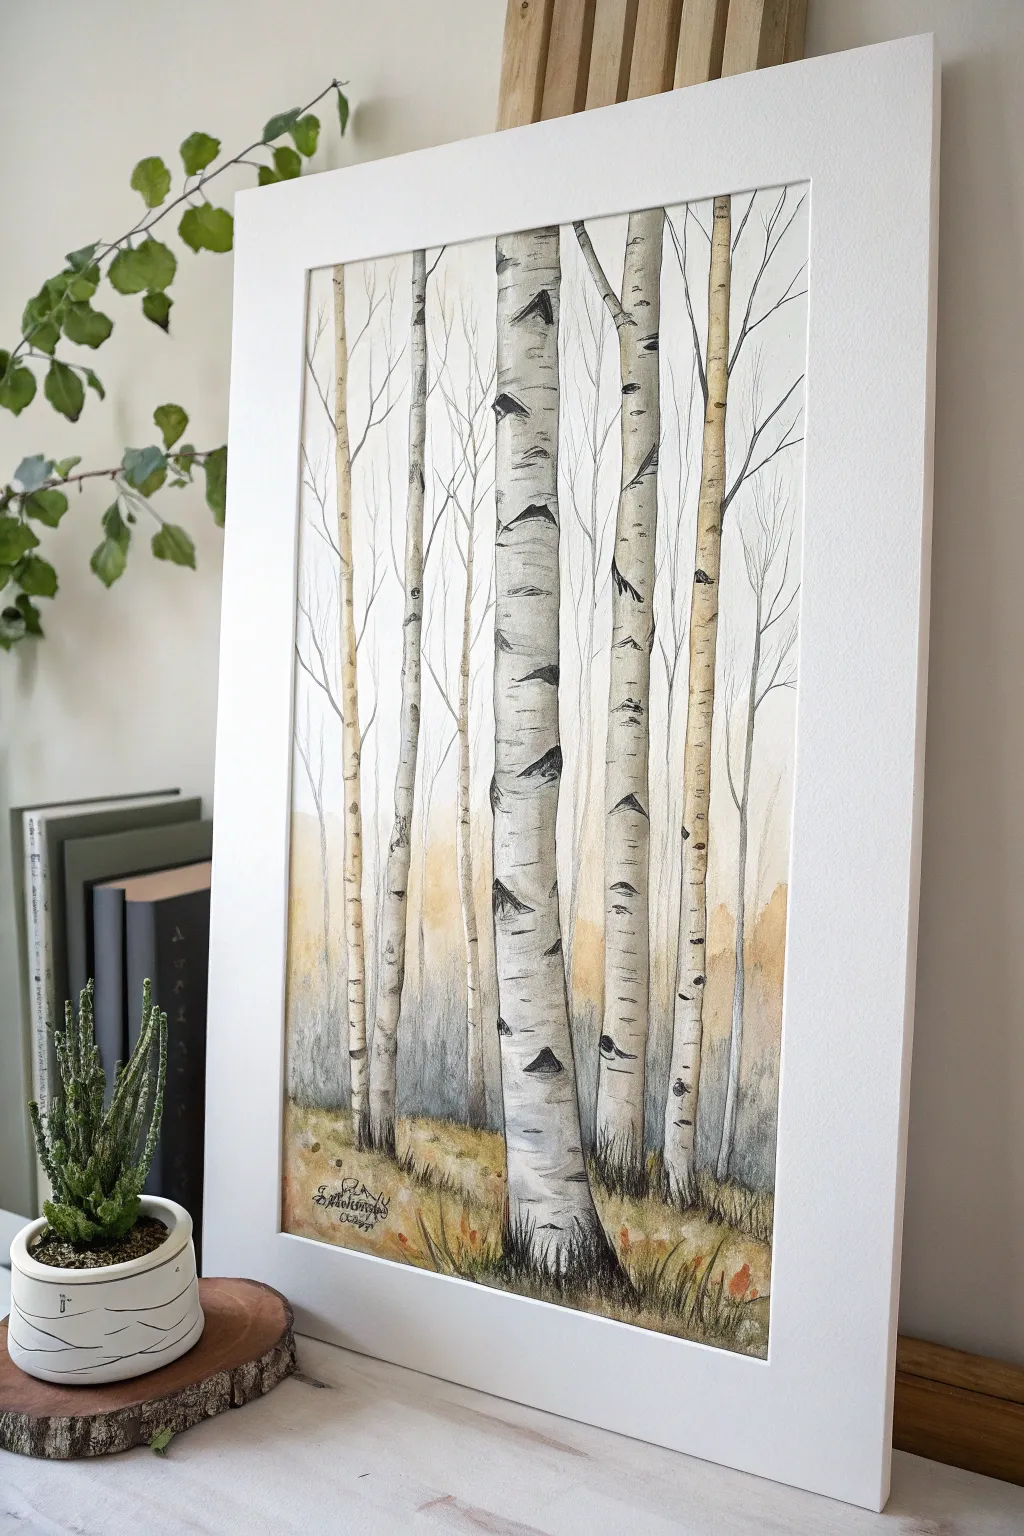
I love painting birch trees because that bright white bark and those quirky black markings make a piece feel bold without needing a million details. If you’re craving fresh birch tree painting ideas, here are my favorite classics first—then we’ll wander into the more playful, unexpected directions.
Tape-Resist Birch Trunks for Clean Edges
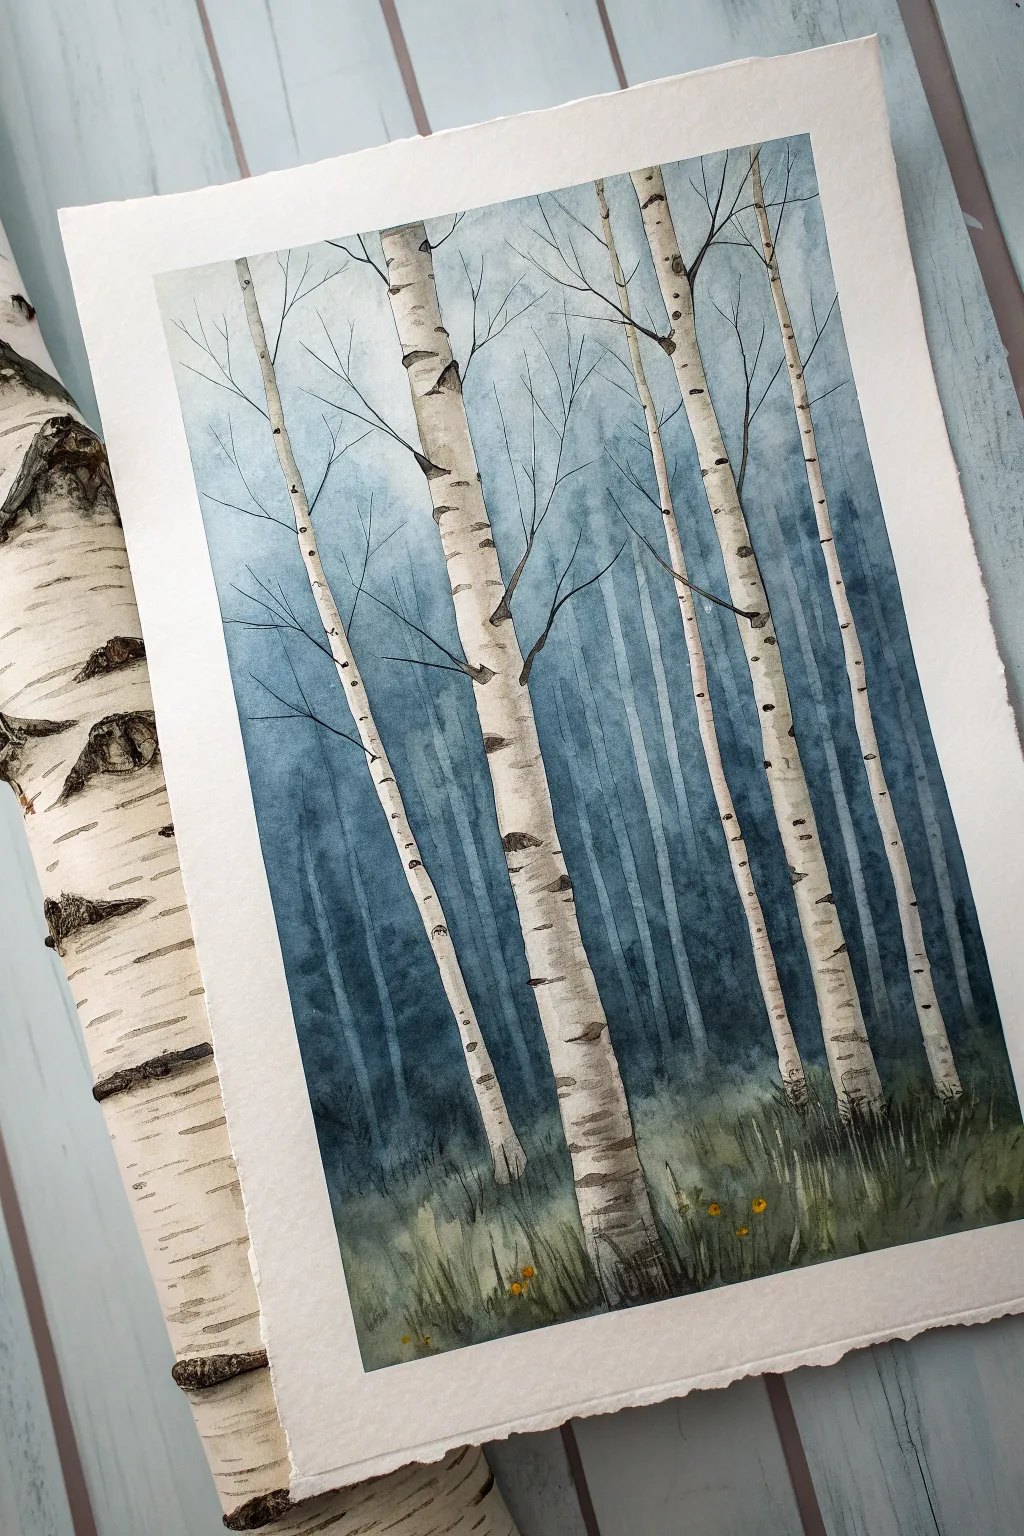
Capture the serene beauty of a birch grove with this atmospheric watercolor tutorial. By using masking tape to preserve the crisp white paper, you can easily create striking contrast against a moody, misty blue background.
How-To Guide
Materials
- Cold press watercolor paper (deckled edge preferred)
- Watercolor paints: Indigo, Payne’s Grey, Sap Green, Burnt Umber, Yellow Ochre
- Masking tape or painter’s tape (various widths)
- Watercolor brushes: Large flat wash brush, medium round brush, fine detail liner brush
- Masking fluid (optional)
- Clean water and paper towels
- Pencil and eraser
- Palette for mixing
Step 1: Preparation and Masking
-
Prepare your paper:
Start with a sheet of high-quality watercolor paper. If you want that rustic look shown in the photo, you can carefully tear the edges of a larger sheet against a ruler to create a deckled effect. -
Plan the composition:
Lightly sketch the position of 4-5 main birch trunks. Vary their angles slightly so they aren’t perfectly vertical, suggesting a natural growth pattern. -
Apply the tape resist:
Tear strips of masking tape lengthwise to create slightly uneven, organic edges rather than perfectly straight machine-cut lines. Apply these strips firmly over your sketched tree trunks to protect the white paper. -
Mask the branches:
For the thinner branches extending from the main trunks, use very thin strips of torn tape or apply liquid masking fluid with an old brush. Let the fluid dry completely before painting.
Bleeding Troubles?
If paint seeped under your tape, don’t panic. Use a small, stiff brush dampened with clean water to gently scrub and lift the unwanted paint, then blot with a tissue.
Step 2: Painting the Atmospheric Background
-
Mix your background wash:
Create a watery mix of Indigo and Payne’s Grey. You want a cool, moody blue tone that is heavily diluted for transparency. -
Wet the paper:
Using your large flat brush, apply clean water to the entire paper surface around the taped areas. Getting the paper wet first will help the colors bloom and blend softly. -
Apply the distant wash:
Start painting the background from the top down. Keep the wash very light at the top and gradually increase the pigment concentration as you move downward to create a gradient. -
Create ghost trees:
While the background wash is still damp but not soaking wet, lift out vertical strips of pigment using a clean, damp brush. This negative painting technique creates the illusion of distant, faint trees receding into the mist. -
Deepen the shadows:
While still damp, drop slightly concentrated dark blue or grey vertical streaks between your main trees to suggest the density of a deep forest. -
Paint the forest floor base:
Blend a mix of Sap Green and Indigo at the bottom of the paper, allowing it to bleed upward into the blue wash a bit. This establishes the grassy undergrowth. -
Let it dry completely:
This is crucial. Wait until the paper is bone dry and flat before removing any tape to prevent tearing or paint bleeding.
Torn Tape Trick
Tearing the tape lengthwise instead of cutting it with scissors creates a ragged edge that mimics the natural roughness of bark much better than a straight line.
Step 3: Revealing and Detailing the Trees
-
Remove the masking:
Gently peel away the masking tape and rub off any masking fluid. You should now have stark white silhouettes of your trees against the blue background. -
Add trunk texture:
Mix a very dilute grey wash. Using a round brush, paint subtle vertical shadows along one side of each trunk to give them cylindrical volume. -
Paint the birch markings:
Using a fine detail brush and a concentrated mix of Payne’s Grey and Burnt Umber, paint the characteristic horizontal lenticels (markings). Make these marks jagged, varying in thickness, and wrapping slightly around the curve of the trunk. -
Add knot details:
Paint distinctive eye-shaped knots where branches diverge. Use a darker pigment here to create contrast against the white bark. -
Connect the branches:
Use your liner brush to extend fine, bare branches from the trunks into the sky area, ensuring they taper off to nothing at the tips.
Step 4: Foreground and Finishing Touches
-
Detail the grass:
Using a dry-brush technique with Sap Green and a little Burnt Umber, flick upward strokes at the base of the trees to simulate blades of grass overlapping the trunks. -
Add wildflowers:
With a small brush, dab tiny spots of Yellow Ochre or bright yellow into the grass to represent small wildflowers peeking through the undergrowth. -
Ground the trees:
Add a slightly darker shadow right at the base of each tree where it meets the ground to firmly plant them in the scene. -
Final assessment:
Step back and see if any branches need thickening or if the foreground needs more density. Add final dark accents if necessary.
Now you have a tranquil forest scene that brings a breath of fresh air to any room


Winter Birches With Snowy Ground
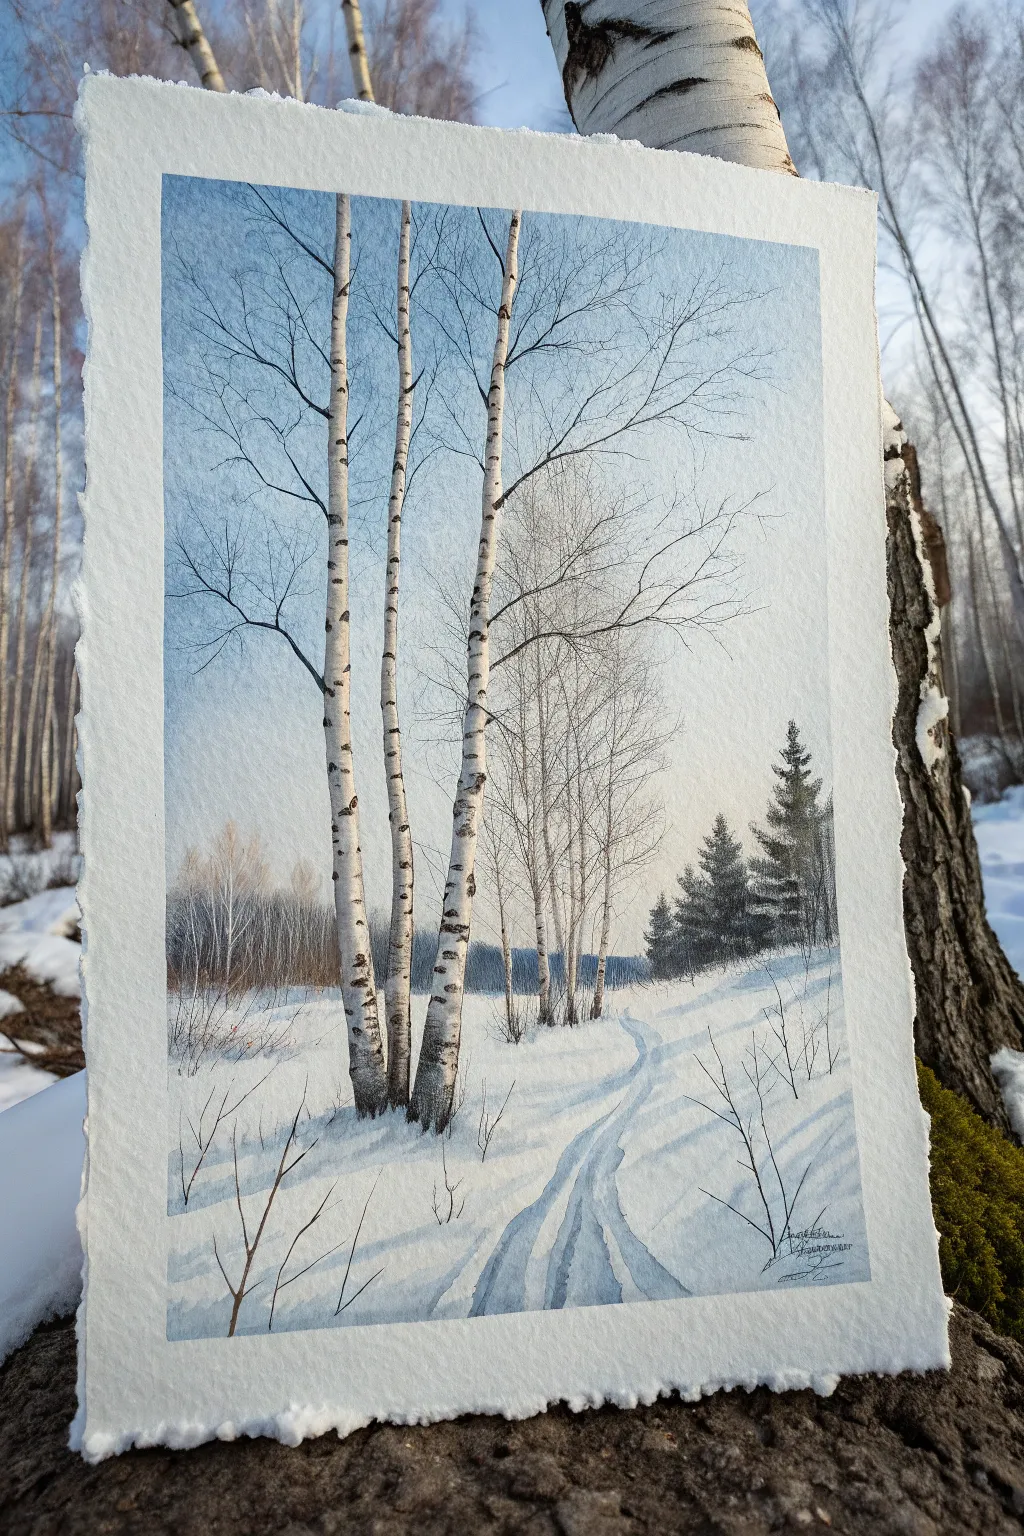
Capture the crisp silence of a winter morning with this delicate watercolor landscape. You will learn to balance the stark white of birch bark against soft blue shadows and create depth with distant, hazy tree lines.
Step-by-Step Tutorial
Materials
- Cold pressed watercolor paper (300gsm/140lb, rough grain preferred)
- Watercolor paints: Cobalt Blue, Ultramarine Blue, Burnt Umber, Payne’s Grey, Raw Sienna, Alizarin Crimson
- Masking fluid
- Old brush or ruling pen for masking
- Round brushes (sizes 4, 8, and a rigger brush)
- Flat wash brush (1 inch)
- Board and masking tape
- Salt (optional for texture)
- Paper towels
- Pencil and eraser
Step 1: Preparation and Masking
-
Sketch the layout:
Lightly sketch the three main birch trunks in the foreground, slightly off-center to the left. Mark the horizon line about a third of the way up and lightly outline the winding path leading into the distance. -
Protect the whites:
Using an old brush or a ruling pen, apply masking fluid carefully to the three main birch trunks. Don’t simply paint straight lines; wiggle the tool slightly to mimic the natural, uneven texture of bark edges. -
Mask foreground details:
Flick tiny dots of masking fluid or use a fine point to mask out a few thin, wiry stems and snow-covered weeds protruding from the snow at the base of the trees. Let the masking fluid dry completely before painting.
Natural Edges
To get the beautiful rough edge shown in the photo, tear your watercolor paper against a ruler instead of cutting it with scissors, or buy ‘deckled edge’ paper blocks.
Step 2: Painting the Sky and Background
-
Wet-on-wet sky wash:
Wet the entire sky area above the horizon line with clean water. While shiny, drop in a mix of Cobalt Blue and a touch of Cerulean, keeping the color stronger at the top and fading to near-white as you reach the horizon. -
Add distant atmosphere:
While the sky is still damp near the horizon, mix a very pale, watery purple-grey using Cobalt Blue and a tiny bit of Alizarin Crimson. Paint faint, vertical suggestions of distant trees, letting them blur softly into the wet paper. -
Define the tree line:
Once the sky layer is dry, mix a stronger, cooler grey-blue. Using the tip of a size 8 brush, paint the middle-ground forest line across the horizon. Vary the heights to suggest different tree tops. -
Paint the evergreens:
Mix a dark, cool green using Ultramarine Blue and Burnt Umber or a deep Green. Paint the definitive shapes of the fir trees on the right side. Use horizontal dabs with the brush tip for branches, leaving gaps for ‘snow’ on the boughs.
Step 3: Snow and Shadows
-
The first snow wash:
Wet the snowy foreground area with clean water. I like to drop in very diluted Cobalt Blue into the wet surface to create soft, undulating shadows across the snow, leaving pure white paper for the brightest highlights. -
Carve the path:
While the snow wash is settling (or after it dries for sharper edges), mix a slightly darker blue-violet. Paint the long, curved shadows that define the ski tracks or footpath, following the perspective lines toward the horizon. -
Remove the mask:
Ensure the paper is bone dry. Gently rub off the masking fluid with your clean finger or a rubber cement pickup tool to reveal the pristine white paper of the birch trunks.
Fixing Hard Edges
If your snow shadows have harsh lines that look unnatural, soften them immediately with a clean, damp brush before the paint sets to create a smooth gradient.
Step 4: Detailing the Birch Trees
-
Shadow the trunks:
The trunks shouldn’t remain stark white. Paint a pale blue-grey shadow down the right side (shaded side) of each trunk to give them cylindrical form, softening the edge into the white. -
Add bark markings:
Mix a thick, dark grey-black using Burnt Umber and Ultramarine. Using a rigger brush or fine point, paint the horizontal lenticels (markings) on the birch bark. Vary the pressure to create thick-and-thin lines. -
Create textural knots:
Add characteristic dark patches and knots where branches might emerge. Keep these marks loose and organic rather than geometric patterns. -
Paint fine branches:
Switch to your rigger brush and a watery grey-brown mix. Paint the delicate network of fine branches reaching up into the sky. Remember to taper them as they extend outward, making the lines shaky and natural. -
Foreground grasses:
Using the same rigger brush, flick quick, upward strokes of burnt sienna and grey around the base of the trees to represent dry winter grasses poking through the snow.
Step 5: Final Touches
-
Cast shadows:
Paint the cast shadows of the birch trees onto the snow. These should fall to the right, matching the light source, and follow the undulations of the ground. -
Enhance contrast:
Evaluate your values. If the evergreens or bark markings dried too light, add a second layer of dark pigment to punch up the contrast.
Sign your work in the corner and enjoy the peaceful winter stillness you’ve created.


Golden Autumn Birch Trees
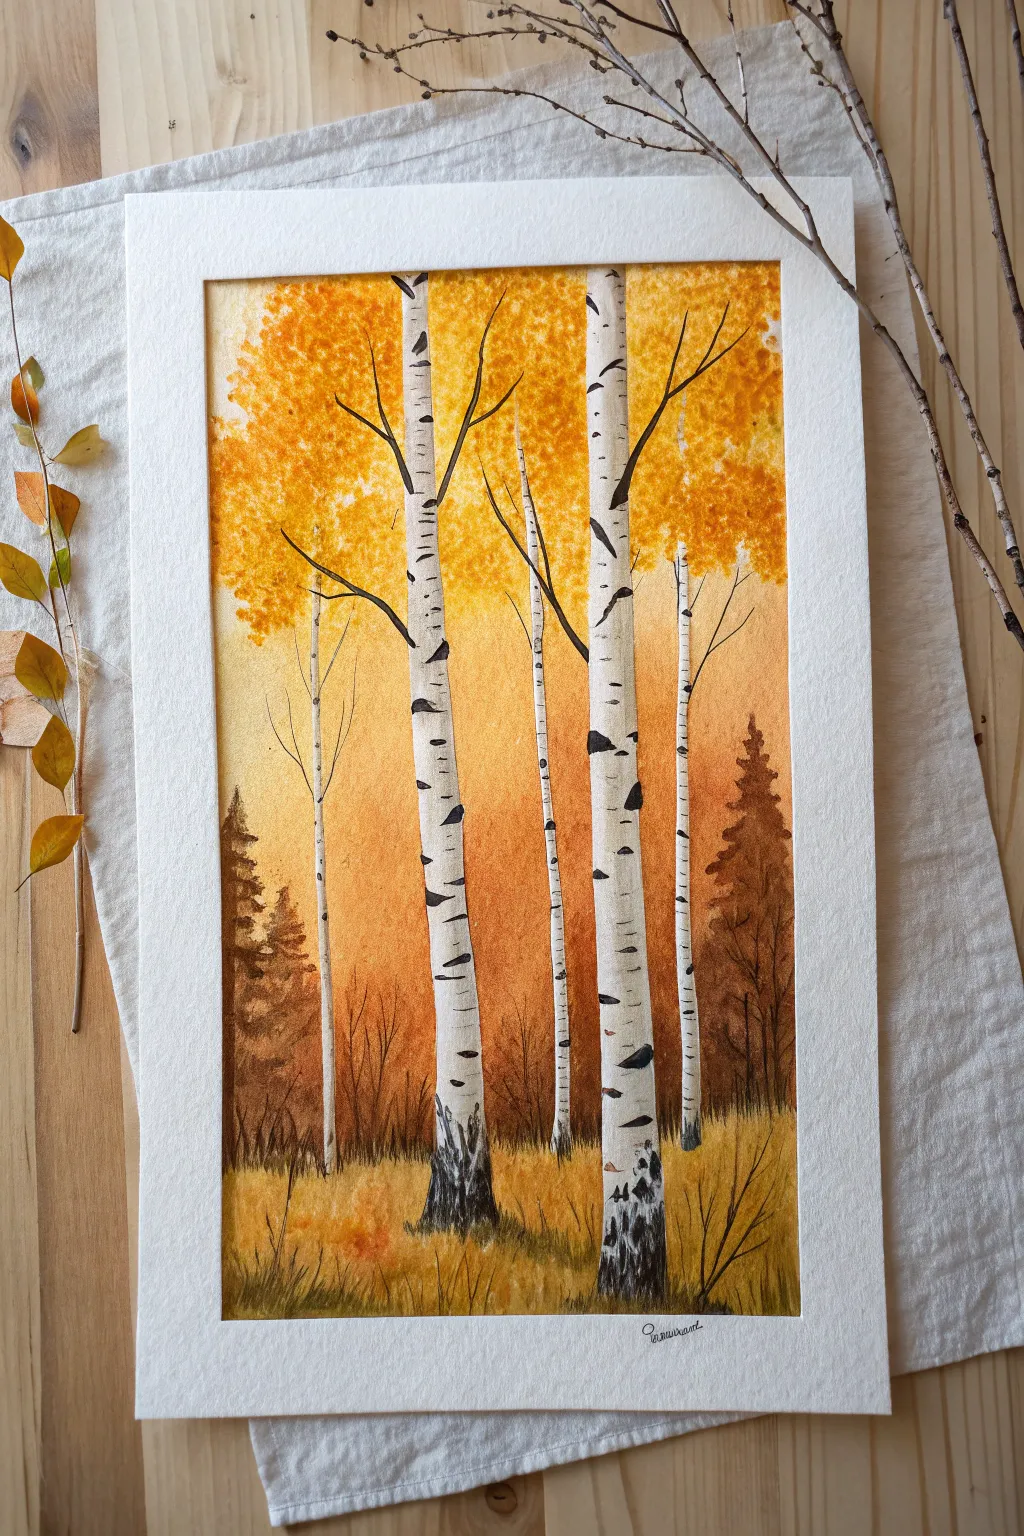
Capture the warmth of a crisp fall day with this watercolor tutorial featuring striking white birch trees against a glowing amber backdrop. You will learn to use masking techniques to preserve the pristine white trunks while creating a hazy, atmospheric autumn forest.
Detailed Instructions
Materials
- Cold press watercolor paper (140 lb/300 gsm)
- Masking fluid (drawing gum) and old brush or ruling pen
- Watercolor paints: Lemon Yellow, Cadmium Orange, Burnt Sienna, Burnt Umber, Paynes Grey or Ivory Black
- Large round brush (size 10 or 12)
- Small detail brush (size 0 or 2)
- Palette
- Two jars of water
- Paper towels
- Masking tape
- Pencil and kneadable eraser
Step 1: Preparation and Masking
-
Secure the paper:
Tape down all four edges of your watercolor paper to a board with masking tape. This creates the crisp white border seen in the final piece and prevents the paper from buckling during the wet wash stages. -
Sketch the composition:
Lightly sketch the outlines of several birch trees. Vary their widths and angles slightly for a natural look. Place two main thick trees in the foreground and a few thinner, distant trees behind them. -
Apply masking fluid:
Using an old brush (one you don’t care about) or a specialized applicator, fill in the sketched tree trunks completely with masking fluid. Don’t forget the thin branches extending upward. -
Let it dry completely:
Allow the masking fluid to dry fully. It should feel tacky but hard, and not transfer to your finger. This is crucial to keep the paper white during the background wash.
Sticky Situation?
If masking fluid rips your paper when removed, the paper was likely still damp or the fluid was left on too long. Ensure bone-dry paper and remove gum within 24 hours.
Step 2: Painting the Glowing Background
-
Wet the paper:
With your large brush, gently wet the entire sky and background area with clean water, painting right over the masked trees. -
Apply the first wash:
Drop in a vibrant yellow paint near the top of the paper, letting it bloom into the wet surface. This creates the sunlit canopy effect. -
Deepen the gradient:
While the paper is still wet, introduce orange and burnt sienna as you move down the page. The bottom third should be the darkest, mixing burnt sienna with a touch of brown to suggest the forest floor depth. -
Create canopy texture:
While the top yellow area is still damp, dab in concentrated spots of orange and darker yellow to simulate clusters of leaves. Soft edges are desirable here. -
Dry the background:
Let this entire background layer dry completely. If the paper feels cool to the touch, it is still wet.
Step 3: Adding Depth and Removing Mask
-
Paint background pines:
Mix a watery grey-brown. On the dried background, paint the silhouette of pine trees behind the birches. Keep these loose and slightly transparent to push them into the distance. -
Add distant shrubbery:
Use Burnt Sienna to paint faint, vertical ‘grassy’ strokes and small shrub shapes at the horizon line between the trees. -
Remove the masking fluid:
Once the paint is bone dry, gently rub off the masking fluid with your finger or a rubber cement pickup tool. You should now have stark white silhouettes of your birch trees.
Pro Tip: Texture Trick
For realistic birch bark texture, try ‘dry brushing’ the black marks. Wipe most paint off your brush so it skips across the paper grain, creating natural, rough patterns.
Step 4: Detailing the Birch Trees
-
Shadow the trunks:
Mix a very pale grey wash. Paint a thin vertical strip down the right side of each white trunk to give them cylindrical form. Soften the edge of this shadow with a clean, damp brush. -
Create the signature bark:
Using Paynes Grey or black on your detail brush, paint the horizontal striations (lenticels) on the bark. Make these marks curved slightly downward to wrap around the tree form. -
Add the ‘eyes’:
Paint distinctive triangle or diamond shapes where branches meet the trunk and scattered randomly up the tree. These dark marks define the classic birch look. -
Ground the trees:
At the base of the trees, use stippling motions with black and dark brown to create rough, textured dark patches where the roots meet the earth. -
Paint the branches:
Use a very fine liner brush or the tip of your small brush to paint delicate black branches extending from the upper trunks, connecting them to the yellow canopy blobs you painted earlier. -
Refine the foreground:
Add sharp, dark grass strokes at the very bottom of the painting to cover the base of the trunks and integrate them into the ground.
Peel off the border tape slowly to reveal your crisp, finished autumn masterpiece


Birch Trees Against a Soft Sunset Gradient
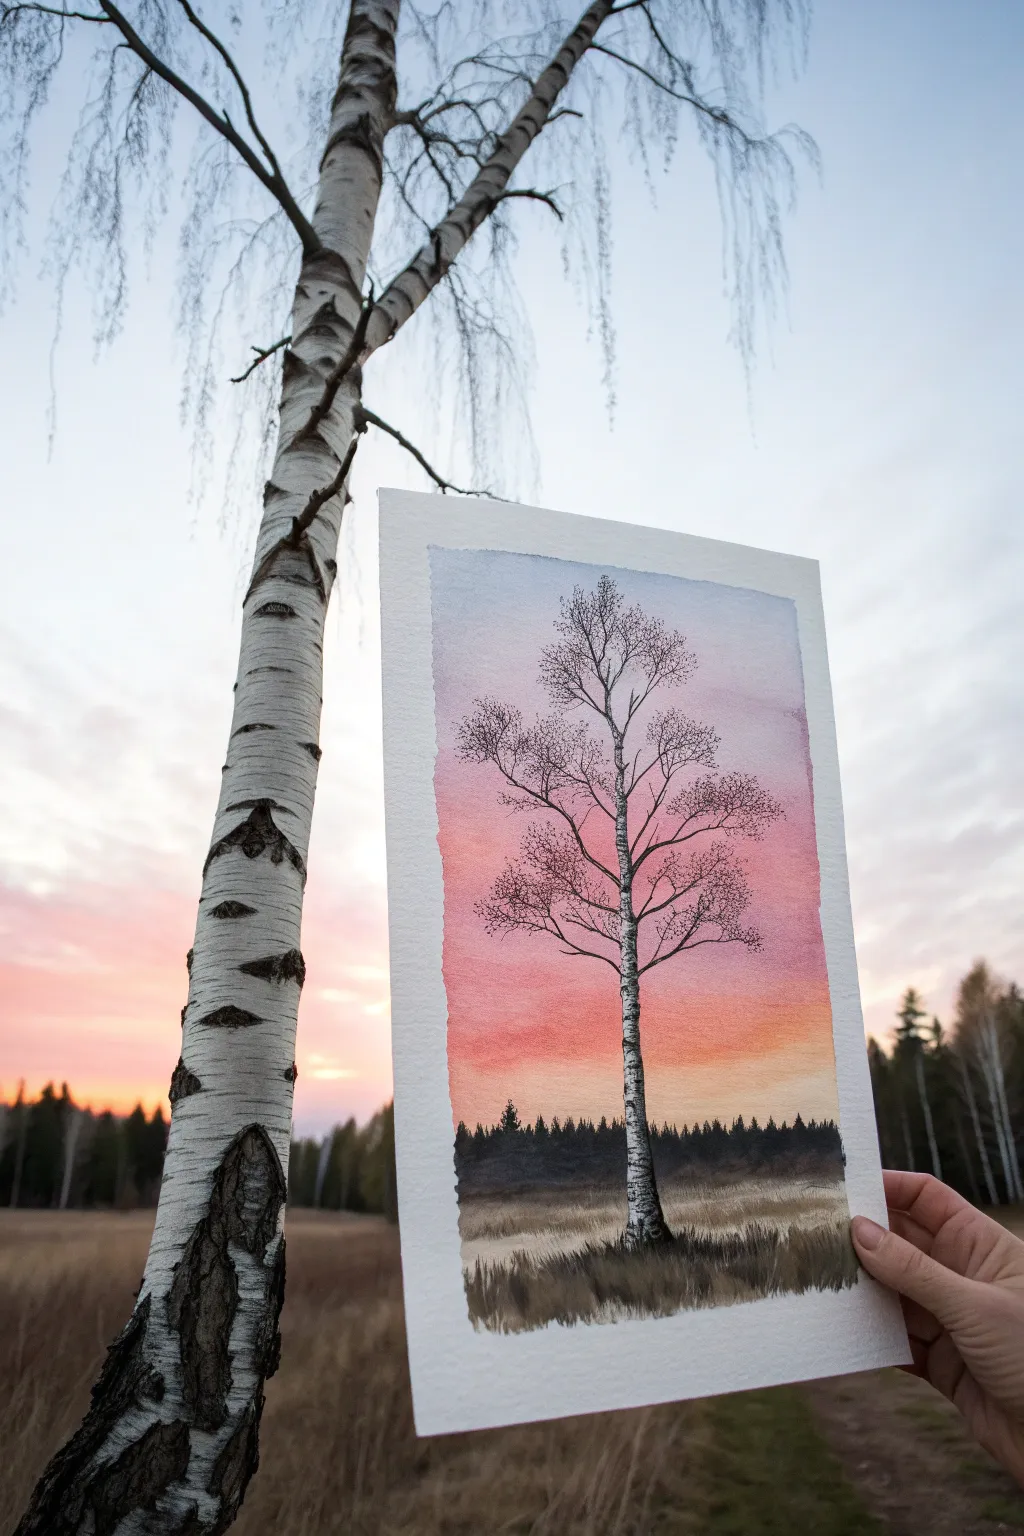
Capture the serene beauty of twilight with this delicate watercolor study, featuring a solitary birch tree standing tall against a fading sky. The soft gradient from cool blue to warm peach creates a stunning backdrop for the crisp, detailed bark texture.
Detailed Instructions
Materials
- Cold press watercolor paper (300 gsm)
- Masking tape
- Pencil (HB or H)
- Watercolor paints (Indigo, Cobalt Blue, Alizarin Crimson, Cadmium Orange, Burnt Umber)
- White opacity paint (gouache or white watercolor)
- Round brushes (sizes 8, 4, and 0 for details)
- Jar of clean water
- Paper towels
Step 1: Planning and Sky Gradient
-
Secure the paper:
Tape down all four edges of your watercolor paper to a board. This creates a clean white border and prevents the paper from buckling when we apply the wet wash. -
Sketch the tree:
Using a light pencil, gently sketch the central trunk of the birch tree. Keep the lines faint, as we want the paint to do most of the work later. Mark the horizon line near the bottom third of the paper. -
Wet the sky area:
With a large clean brush, wet the entire sky area above the horizon line with clear water. Ensure the sheen is even, but not puddling. -
Paint the upper sky:
Load your brush with a watery mix of Cobalt Blue and a touch of Indigo. Apply this to the top third of the paper, letting it flow naturally downwards. -
Transition to warmth:
Rinse your brush and pick up a diluted Alizarin Crimson (pink). Blend this gently into the bottom edge of the blue while the paper is still wet to create a violet transition zone. -
Add the sunset glow:
Near the horizon line, introduce a soft Cadmium Orange or peach tone. Allow this to bleed slighty upward into the pink, creating a seamless gradient from cool to warm. Let this layer dry completely.
Bleeding Colors?
If your gradient colors are creating ‘cauliflowers’ or blooms, you likely added water to a section that was already half-dry. Try to work quickly while the sheen is consistent across the paper.
Step 2: Horizon and Foreground
-
Establish the distant forest:
Mix a dark, cool grey using Indigo and Burnt Umber. With a size 4 brush, paint a jagged, uneven line of distant trees right along the horizon. Keep these shapes loose and indistinct to suggest depth. -
Paint the ground layer:
For the field, use a wash of Burnt Umber and Yellow Ochre. Apply it horizontally, leaving some lighter streaks to mimic dry grass texture. -
Deepen the foreground shadows:
While the ground is damp, drop in darker brown tones at the very bottom edge and around the base of the birch tree to anchor it.
Step 3: The Birch Tree
-
Define the trunk:
Using white gouache or a very opaque white watercolor, paint the main trunk of the birch tree over your gradient. The opacity is crucial here to cover the sunset colors. -
Add the main branches:
Switch to a smaller brush just for the main branches extending from the trunk, keeping the paint white or very pale grey. Taper them as they extend outward. -
Texture the bark:
Once the white trunk is dry, mix a concentrated black or dark grey. Using the very tip of your brush, paint the characteristic horizontal lenticels (strips) and knot marks. Focus the heaviest darks on the shadowed side of the tree. -
Detail the crown:
Use your smallest brush (size 0) with a dark grey-brown mix to paint the fine, spindly twigs at the top of the tree and ends of branches. Use shaky, organic strokes for realism. -
Add grassy details:
At the base of the tree, use upward flicking motions with a dry brush and dark brown paint to create long blades of dry grass overlapping the bottom of the trunk. -
Final touches:
Review your painting. If the white trunk looks too flat, add a very subtle diluted grey shadow along the right side to give it roundness. -
Reveal the artwork:
Wait until the painting is 100% dry to the touch, then slowly peel away the masking tape at a 45-degree angle to reveal your crisp white borders.
Pro Tip: Masking Fluid
For a pure white trunk without using gouache, apply masking fluid to the tree shape *before* painting the sky. Rub it off at the end to reveal the untouched white paper underneath.
Frame your delicate birch landscape or gift it to a nature lover to bring a bit of the outdoors inside
BRUSH GUIDE
The Right Brush for Every Stroke
From clean lines to bold texture — master brush choice, stroke control, and essential techniques.
Explore the Full Guide
Misty Birch Forest With Layered Depth
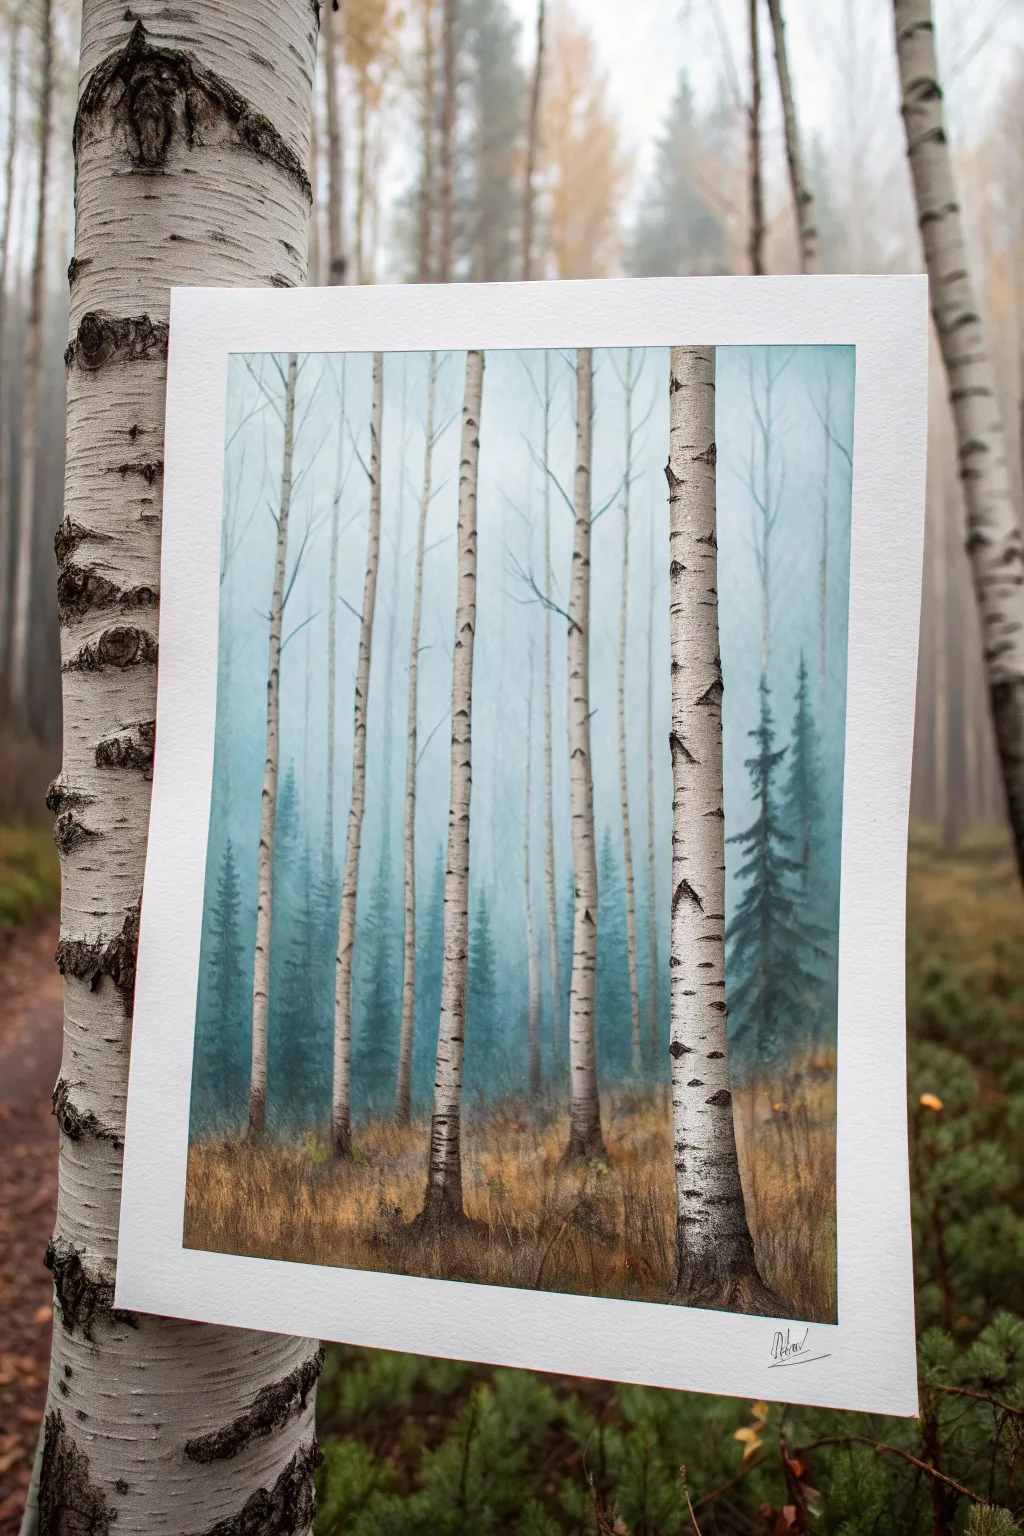
Capture the serene silence of a foggy woodland with this atmospheric watercolor painting. By mastering wet-on-wet techniques and careful masking, you’ll build depth layer by layer, creating a scene where distinct white trunks stand bold against a soft, receding forest.
Step-by-Step Tutorial
Materials
- Cold press watercolor paper (140lb/300gsm)
- Masking fluid (drawing gum) and old brush or ruling pen
- Watercolor paints: Indigo, Paynes Gray, Burnt Sienna, Yellow Ochre, Sap Green, and Titanium White gouache (optional)
- Round brushes (sizes 4, 8) and a large flat wash brush
- Painter’s tape or masking tape
- Board for mounting paper
- Paper towels and two jars of water
Step 1: Preparation & First Layer
-
Secure the paper:
Tape your watercolor paper securely to a board on all four sides. This creates that crisp white border seen in the photo and keeps the paper flat during heavy washes. -
Sketch the composition:
Lightly sketch the vertical lines for your birch trees. Vary the spacing and thickness—some should be prominent in the foreground (right side), others thinner and receding (left side). -
Protect the white trunks:
Apply masking fluid carefully to the tree trunks you sketched. Don’t worry about the tiny black markings yet; just block out the main white shapes. Let this dry completely before touching it with water. -
Wet-on-wet background:
Using your large flat brush, wet the entire paper surface with clean water. The paper should glisten but not have puddles. -
Create the atmospheric sky:
Drop in a very diluted wash of Indigo or Paynes Gray at the top, letting it bleed downwards. Keep the color extremely pale to suggest heavy fog.
Pro Tip: Texture Trick
Use the edge of an old credit card to scrape into the wet paint of the birch bark markings. This moves pigment unpredictably, creating natural, rugged textures.
Step 2: Building the Forest Depth
-
Paint distant ghost trees:
While the background is still slightly damp (but losing its shine), use a small round brush with a slightly darker blue-grey mix to paint faint vertical lines between your masked trunks. These are the trees furthest back in the mist. -
Add soft evergreens:
Mix Indigo with a touch of Sap Green for a cool, muted teal. While the paper is still moist, dab in hazy shapes of pine trees in the mid-ground. The wet paper will fuzz the edges, making them look distant. -
Dry completely:
Allow the paper to bone dry. Use a hairdryer on a low setting if you’re impatient, but be careful not to melt the masking fluid. -
Define the mid-ground trees:
On the dry surface, paint sharper, more defined pine trees using a stronger mix of Indigo and Green. Place these behind the masked birch trunks but in front of the blurry background trees.
Step 3: The Foreground & Details
-
Paint the grassy floor:
Wet the bottom quarter of the paper. Drop in Burnt Sienna and Yellow Ochre, allowing them to bleed up slightly into the mist to create soft, tall grasses. Add touches of the dark green mix near the bottom edge for shadowing. -
Remove the mask:
Once the painting is 100% dry, gently rub off the masking fluid with your finger or a rubber cement pickup tool to reveal the stark white paper underneath. -
Shadow the trunks:
The white trunks will look too flat initially. Mix a very watery grey and paint a thin vertical shadow along the left or right side of each trunk to give them cylinder volume. -
Add birch markings:
Using a small round brush (size 4) with concentrated Paynes Gray or Black, paint the characteristic horizontal lenticels and scars. Use a shaky hand motion; nervous lines look more organic here than straight ones. -
Anchor the trees:
Darken the base of the trees where they meet the grass with a mix of Burnt Sienna and Black. Feather this color upward slightly so the tree doesn’t look like it’s floating. -
Detail the grass:
With a rigger brush or fine round brush, flick upward strokes using Burnt Sienna and Ochre to create individual blades of dry, autumnal grass overlaying the base of the trees. -
Final branches:
Using a thin brush and watery grey-brown, draw fine, spindly branches extending from the upper parts of the birch trunks. Keep these delicate and sparse.
Troubleshooting: Ripped Paper
If the paper tears when removing masking fluid, your paper was likely too soft or the fluid stayed on too long. Only remove gum when the paper is bone dry.
Peel off the tape carefully to reveal those crisp edges and enjoy your misty forest walk from the comfort of your home
Cropped “Cathedral” View of Birch Trunks
Capture the solemn beauty of a forest interior with this watercolor painting that emphasizes verticality and texture. You’ll create a sense of height by cropping the canopy and focusing entirely on the rhythmic patterns of birch bark against a soft, misty background.
How-To Guide
Materials
- Cold press watercolor paper (140lb/300gsm)
- Watercolor paints (Payne’s Gray, Yellow Ochre, Burnt Sienna, Raw Umber)
- Black waterproof fine liner pen (0.3mm or 0.5mm)
- Masking fluid (optional but helpful)
- Round brushes (sizes 4, 8, and 12)
- Pencil (HB) and kneaded eraser
- Paper towels and two water jars
- Drawing board and masking tape
Step 1: Sketching and Masking
-
Compose the grove:
Lightly sketch five to seven vertical birch trunks using your HB pencil. Vary their thickness and spacing to create a natural rhythm—avoid placing them perfectly evenly apart. Let some trunks slant slightly. -
Add secondary growth:
Draw thinner, spindly saplings in the background spaces between the main trunks. These should be much fainter and thinner lines to suggest depth and distance. -
Protect the whites:
If you are less confident painting around shapes, apply masking fluid carefully to the main tree trunks. This preserves the bright white of the paper which is crucial for birch bark. Allow this to dry completely before touching it with a wet brush.
Stubborn Masking Fluid?
If masking fluid rips your paper upon removal, the paper likely wasn’t fully dry. Wait longer, or try softening the adhesive by warming it slightly with a hair dryer before rubbing it off.
Step 2: The Atmospheric Background
-
Wet the paper:
Using your largest brush, gently wet the negative space (the sky and background areas) with clean water. Be careful not to flood the paper, just get an even sheen. -
Drop in the haze:
While the paper is damp, drop in a very dilute wash of Payne’s Gray mixed with a touch of Burnt Sienna near the horizon line (the bottom third of the paper). This creates that misty, distant forest floor look. -
Create a warm glow:
Add a soft wash of Yellow Ochre higher up in the background spaces to suggest sunlight filtering through unseen leaves. Keep this extremely pale and watery so it doesn’t compete with the foreground. -
Add distant foliage:
While the background is still slightly damp but no longer shiny, dab in faint, blurry patches of Raw Umber and gray near the bottom to suggest bushes or distant trees. Soft edges are key here. -
Let it dry:
Let the paper dry completely. If you used masking fluid, gently rub it away with your finger or a rubber cement pickup tool once the paper is bone dry.
Step 3: Defining the Trunks
-
Shadowing the cylinders:
Mix a watery light gray using Payne’s Gray and plenty of water. Paint a thin strip of shadow down the right side of each trunk to give them a cylindrical volume. Keep the left side bright white. -
Grounding the trees:
At the base of the trees, darken the gray slightly and blend it downward into the ground area, rooting the trees so they don’t look like they are floating. -
Warm highlights:
I sometimes like to glaze a tiny amount of diluted Yellow Ochre on the sun-facing side (left side) of a few trunks to clear cut the stark white and add warmth.
Add Autumn Magic
To change the season, splatter tiny dots of orange and gold watercolor over the finished painting to simulate falling leaves drifting down through the quiet grove.
Step 4: Bark Details and Texture
-
Start the markings:
Using your smallest round brush or a waterproof pen, begin adding the iconic black horizontal notches (lenticels) on the bark. These should wrap slightly around the curve of the trunk. -
Create the ‘eyes’:
Paint larger, triangular black markings where branches have fallen off. These often look like eyes or chevrons pointing upward. Vary the pressure to get organic, jagged edges. -
Peeling bark texture:
Use a dry brush technique with a mix of Payne’s Gray and Raw Umber to create subtle smears and peeling textures on the main trunks. Don’t overdo it; leave plenty of white space. -
Draw fine branches:
Switch to your fine liner pen or a rigger brush. Draw delicate, wispy branches extending from the upper parts of the trunks. Keep lines shaky and organic, not straight.
Step 5: Foreground and Finishing
-
Paint the forest floor:
Mix Yellow Ochre and Raw Umber to paint grassy tufts and fallen leaves at the very bottom. paint upward flicking strokes to simulate tall, dry grass around the tree bases. -
Deepen the base shadows:
Add a concentrated mix of Payne’s Gray and black at the very bottom of the trunks and into the grass clumps to create high contrast anchors for the eye. -
Final ink details:
Use the pen to add final sharp details to the grass and reinforce the darkest crevices in the bark markings. Sign your work in the bottom corner.
Step back and enjoy the stillness of your woodland scene as the paint settles.

PENCIL GUIDE
Understanding Pencil Grades from H to B
From first sketch to finished drawing — learn pencil grades, line control, and shading techniques.
Explore the Full Guide
Birch Trees Along a Quiet Lakeshore Reflection
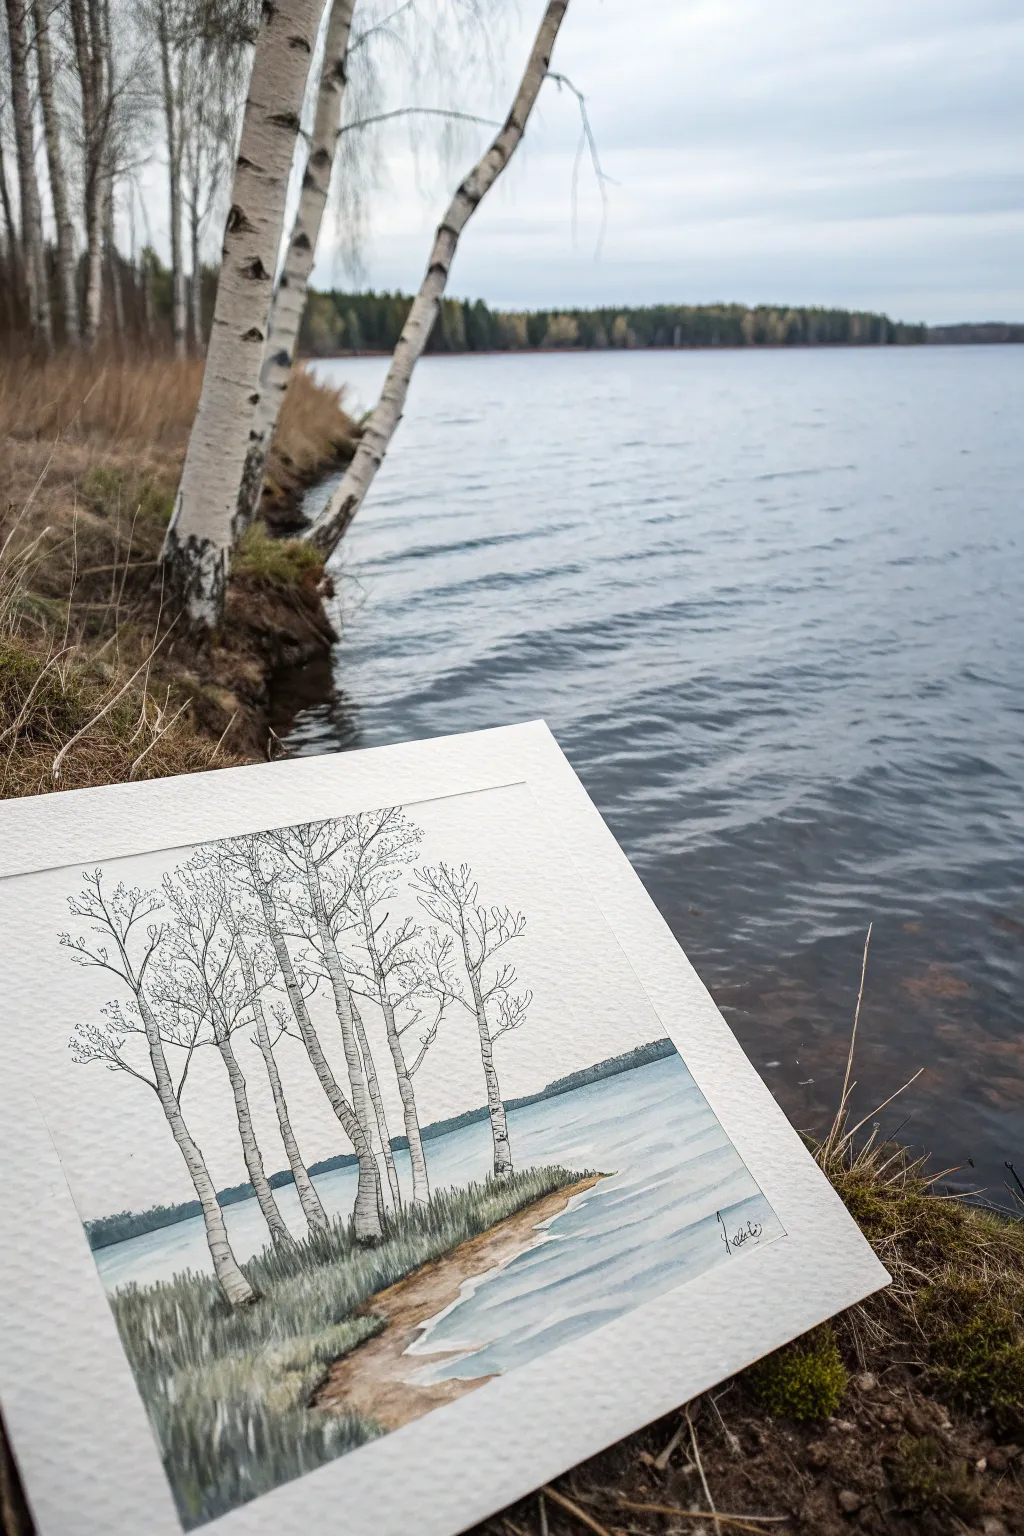
Capture the serene beauty of a lakeside view with this delicate mixed-media project. By combining the fluidity of watercolor for the water and grass with the crisp precision of black ink for the birch bark, you’ll create a piece with lovely depth and texture.
Step-by-Step Tutorial
Materials
- Cold press watercolor paper (approx. 140lb/300gsm)
- Pencil (HB or 2B) and eraser
- Waterproof fine liner pen (black, 0.1mm – 0.5mm)
- Watercolor paints (Cerulean Blue, Ultramarine, Burnt Umber, Sap Green, Yellow Ochre)
- Round watercolor brushes (size 4 and 8)
- Clean water and paper towels
- Masking tape (optional, to secure paper)
Step 1: Sketching the Composition
-
Plan your horizon line:
Begin by lightly sketching a horizon line about a third of the way up your paper. This separates your sky (which remains mostly unpainted white space) from the lake water below. -
Outline the shoreline:
Sketch a gentle, curved shoreline shape in the foreground on the left side, sweeping down towards the right corner. This area will be your grassy bank. -
Position the birch trees:
Lightly draw the main trunks of about five to seven birch trees growing from the grassy bank. I like to vary their angles slightly—some leaning left, some right—to mimic their natural growth habit. -
Add branch details:
Extend thinner branches upward from the main trunks. Keep these lines faint for now, focusing on the overall Y-shapes and forks that characterize birch canopies.
Ink Smearing?
Even waterproof pens can smear if the paper surface is damp or the ink isn’t 100% set. Test your pen on a scrap piece of watercolor paper first, let it dry for 5 minutes, then wet it to confirm it holds.
Step 2: Inking the Trees
-
Outline the trunks:
Using your waterproof fine liner, carefully go over your pencil lines for the tree trunks. Don’t make the lines perfectly straight; give them a slight wobble to suggest the organic texture of bark. -
Create bark texture:
Add the distinctive birch markings. Draw small horizontal dashes, curved lines, and occasional ‘eye’ shapes up and down the trunks. Concentrate more ink markings near the base and at branch joints. -
Detail the canopy:
Trace the delicate upper branches with your finest pen tip. For the very ends of the twigs, use broken lines or tiny dots to define the delicate tips without adding leaves. -
Erase pencil lines:
Wait a few moments to ensure the ink is totally dry, then gently erase all visible pencil marks from the tree area so you have a crisp black-and-white framework.
Add Seasonal Flair
Transform the season by splattering tiny dots of yellow and orange paint near the branches for autumn leaves, or use light blue shading on the ground for winter snow drfits.
Step 3: Painting the Landscape
-
Paint the distant water:
Mix a very dilute wash of Cerulean Blue. Paint horizontal strokes to represent the lake water, leaving some white gaps to suggest ripples and light reflection. Keep the color lighter near the horizon. -
Add the far shore:
While the water is drying, mix a dark, muted green-blue color. Paint a thin, uneven strip along the horizon line to represent the distant forest on the opposite shore. -
Paint the sandy edge:
Mix Burnt Umber with plenty of water to create a soft tan. Paint the very edge of your shoreline where it meets the water, letting the color fade as it moves inward toward the grass. -
Create the grassy bank:
Wet the grassy area with clean water first. Drop in specific patches of Sap Green and Yellow Ochre, allowing them to bleed together softly to create a varied, mossy ground cover. -
Add grass texture:
Once the base green wash is damp but not soaking, take a slightly drier brush with darker green paint. Use quick upward flicking motions to paint individual blades of tall grass around the base of the trees.
Step 4: Final Touches
-
Shadowing the trunks:
Mix a very pale grey wash (watered down black or blue mixed with brown). carefully paint a thin shadow line down one side (the right side) of each white birch trunk to give them cylindrical volume. -
Deepen the water:
Glaze a slightly darker blue (Ultramarine) near the bottom right corner of the water to suggest depth and shadow closer to the viewer. -
Sign your work:
Use your fine liner to add your signature in the bottom corner, perhaps mimicking the fluid line of a grass blade or a ripple.
Step back and admire how the crisp ink lines contrast beautifully with the soft watercolor wash.
A Pop of Red Bird in a Birch Grove
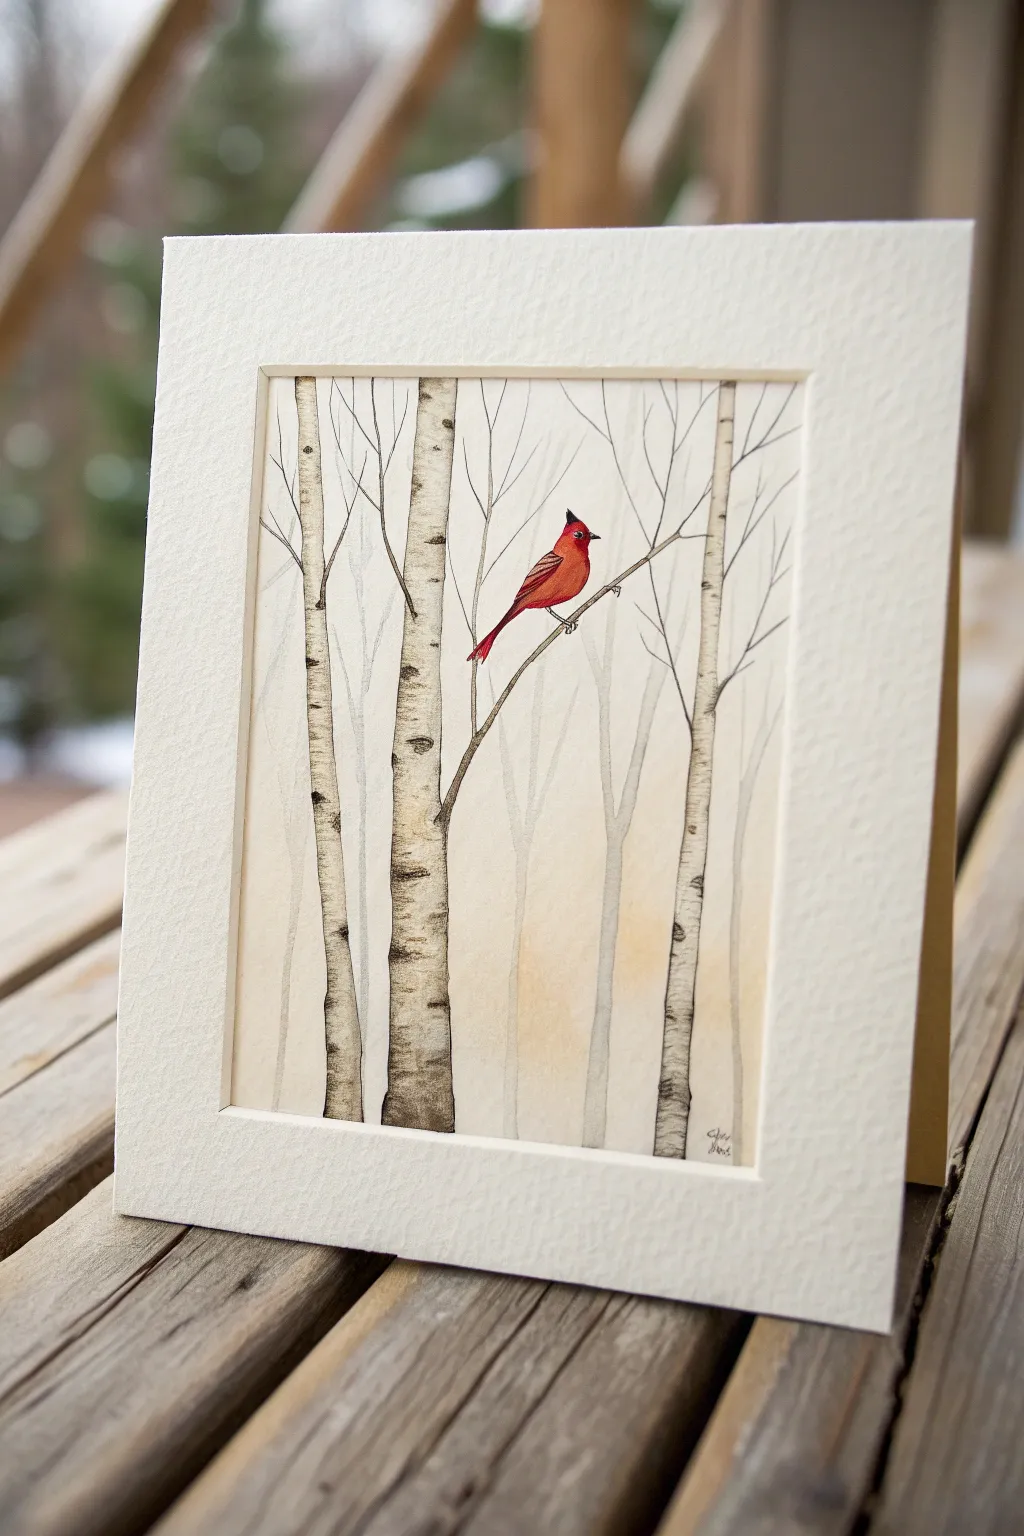
This serene project captures the stillness of winter with a striking contrast between pale birch bark and a vibrant red cardinal. Using a combination of watercolor washes and fine ink details, you’ll create a layered, illustrative piece perfect for framing or gifting as a greeting card.
Step-by-Step
Materials
- Cold press watercolor paper (cut to 5×7 or desired size)
- Watercolor paints (burnt umber, payne’s gray, cadmium red, yellow ochre)
- Fine liner pen (waterproof, black, size 01 and 03)
- Round watercolor brushes (size 2 and 6)
- Pencil (HB or 2H)
- Kneaded eraser
- Ruler
- Clean water and paper towels
- Masking tape
Step 1: Sketching the Grove
-
Prepare the paper:
Begin by taping down your watercolor paper to a hard board using masking tape. This creates a clean border and prevents buckling when you add water. -
Draft the tree trunks:
Using a light hand and your pencil, draw three or four main vertical birch trunks. Keep the lines slightly wavering rather than perfectly straight to look organic. -
Add the focal branch:
Sketch a diagonal branch coming off the central birch tree where your bird will perch. Ensure it’s thick enough to support the bird visually. -
Outline the cardinal:
Draw the simple shape of the cardinal on the branch. Start with an oval for the body, a small triangle for the crest, and a long tail extending downward. -
Fill in background trees:
Lightly sketch fainter, thinner trees in the spaces between your main trunks to create depth. These should look like they are further away.
Smudge Prevention
Wait until the paper is bone dry before ink outlining. If the paper is cool to the touch, it’s still damp inside and will bleed ink.
Step 2: Watercolor Washes
-
Background wash:
Mix a very dilute wash of yellow ochre and a touch of payne’s gray. Wet the background area (avoiding the trees) and drop in this pale color to create a soft, wintry atmosphere. -
Painting the distant trees:
While the background is still slightly damp but not soaking, paint the distant ‘ghost’ trees with a very watery gray. This soft-edge technique pushes them into the distance. -
Painting the main trunks:
Once the background is totally dry, mix a creamy beige using burnt umber and plenty of water. Paint the main birch trunks, keeping the wash uneven to mimic natural bark variations. -
Base layer for the bird:
Load your size 2 brush with cadmium red. Paint the body of the cardinal, leaving the face area empty for the black mask later. Let this layer dry completely. -
Deepening the red:
Add a second layer of red to the belly and wing area of the bird to build saturation and vibrancy.
Step 3: Ink Details
-
Outline the trunks:
Switch to your 03 pen. Carefully outline the main birch trunks. Don’t use a continuous line; break it up occasionally to suggest texture. -
Create bark markings:
Draw the characteristic horizontal lenticels (markings) on the birch bark. Use short, curved horizontal strokes that wrap around the form of the tree. -
Add dark knots:
Identify a few spots on the trunks to add ‘eyes’ or knots. Draw an oval shape and darken the inside, adding a few radiating lines for emphasis. -
Draw fine branches:
Using the finer 01 pen, draw delicate, spindly twigs extending from the main trees into the sky. Let these lines be shaky and organic. -
Detail the bird:
Use the pen to color in the black mask on the cardinal’s face and draw the eye. Add tiny lines on the wings to suggest feathers.
Branch Placement
Vary the height of your branches. Don’t have them all exit the trunk at the same level; asymmetry looks more natural.
Step 4: Finishing Touches
-
Shadowing the trees:
Take a very dilute gray watercolor mix. Paint a thin strip of shadow down the left side of each main tree trunk to give them cylindrical volume. -
Clean up:
Allow the ink and paint to dry 100%. Gently execute a final pass with your kneaded eraser to remove any visible pencil lines. -
Reveal the border:
Slowly peel away the masking tape at a 45-degree angle to reveal your crisp, white edge.
Now you have a tranquil winter scene ready to be framed or sent to a friend


Night Sky Birches With Tiny Star Splatter
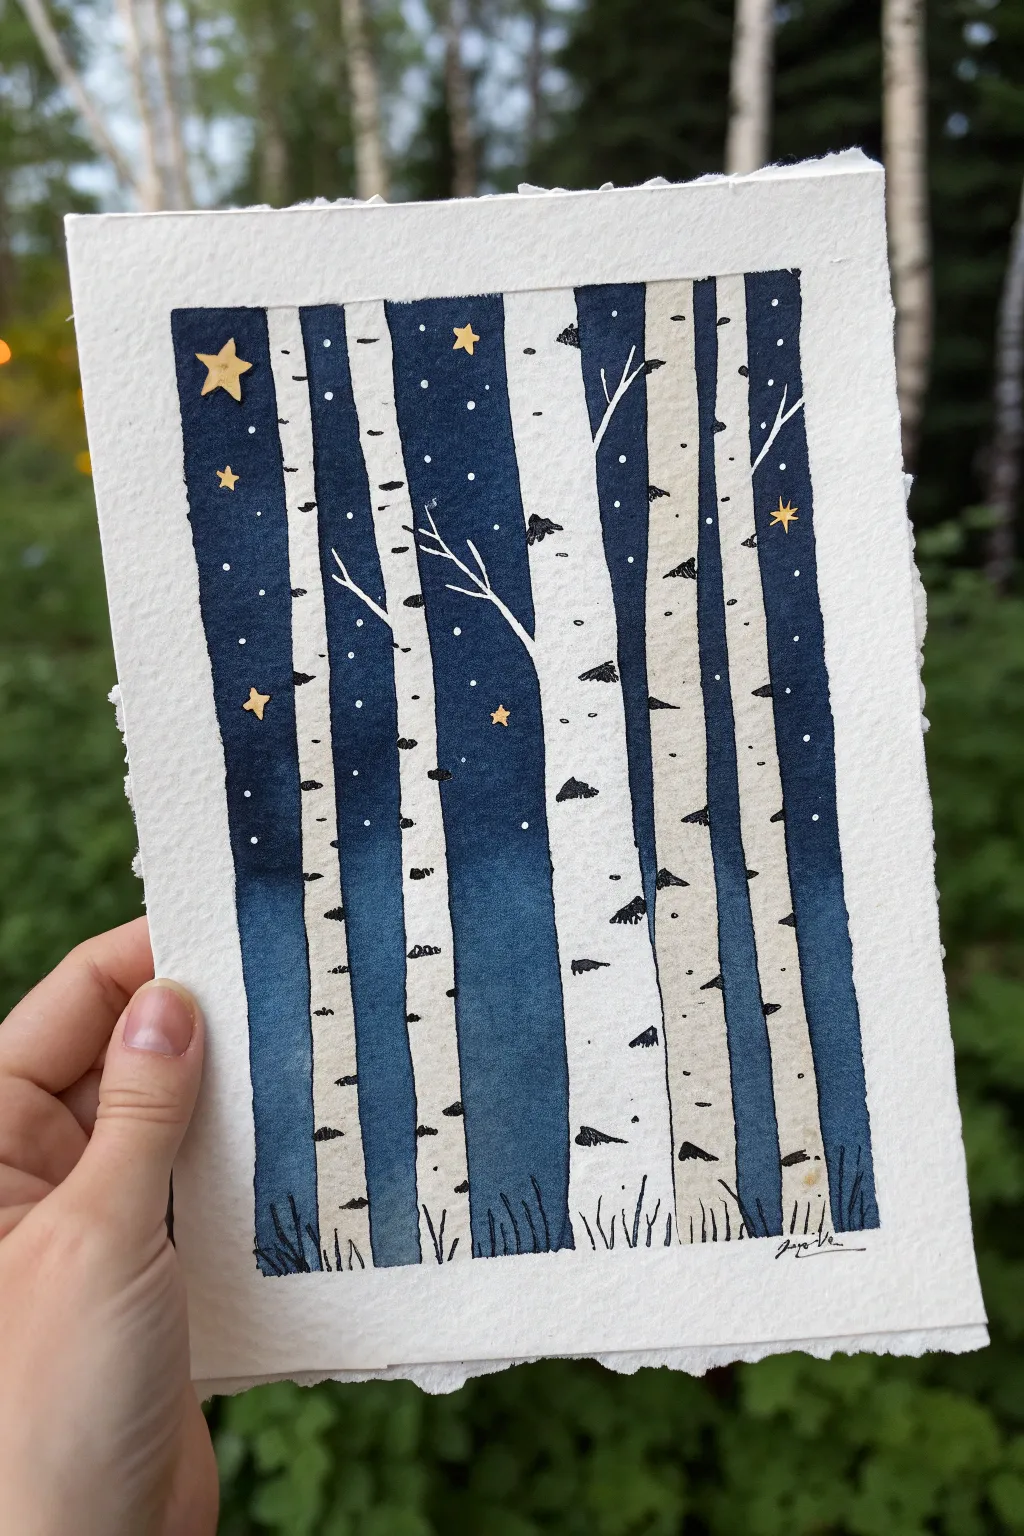
Capture the serene magic of a midnight forest with this striking watercolor composition. By utilizing negative space and deep indigo washes, you’ll create glowing white birch trunks that stand out beautifully against a starry backdrop.
How-To Guide
Materials
- Cold press watercolor paper (deckled edge optional)
- Masking tape or painter’s tape
- Watercolor paints (Indigo, Payne’s Grey, Prussian Blue)
- White gouache or white ink for stars
- Gold paint, gold ink, or gold star stickers
- Fine liner pen (black, waterproof)
- Round watercolor brushes (size 4 and 8)
- Small detail brush or toothbrush for splattering
- Palette
- Water cups and paper towels
Step 1: Preparation & Masking
-
Tape the borders:
Begin by taping down all four edges of your watercolor paper to a board. This creates the crisp, clean white border seen in the example and prevents buckling. -
Map out the trees:
Instead of sketching pencils lines that might show later, use strips of masking tape to block out the trunks. Tear or cut strips of tape vertically to represent the width of your birch trees. Place them somewhat randomly, varying the spacing. -
Add variance:
Ensure your tape strips aren’t perfectly straight; slightly angling them makes the trees look more organic. You can also overlap small bits of tape to create slight bends in the trunks. -
Seal the edges:
Press down firmly along the edges of the tape strips. This is crucial to prevent the blue paint from seeping underneath and ruining your clean white bark lines.
Step 2: Painting the Night Sky
-
Mix the night sky color:
Create a deep, rich midnight blue by mixing Indigo with a touch of Payne’s Grey. You want a very saturated mixture, more pigment than water, to get that dark contrast. -
Apply the first wash:
Paint the entire background area between your taped trees. Start at the top with your darkest color and work downward. -
Create a gradient:
As you move toward the bottom of the paper, I like to dilute the paint slightly with water. This creates a subtle gradient where the sky is lighter near the horizon line. -
Add texture:
While the paint is still wet, you can drop in hints of different blues or even a touch of purple to give the sky depth, avoiding a flat, uniform look. -
Let it dry completely:
Wait until the paint is bone dry. If the paper feels cool to the touch, it’s still wet. Patience here prevents the tape from tearing the paper later.
Bleeding Edges?
If paint leaked under your tape, wait for it to dry completely. Then, use white gouache or a white gel pen to paint over the mistake and restore the crisp tree line.
Step 3: Revealing the Forest
-
Remove the tape:
Very gently peel off the masking tape strips. Pull the tape away at a 45-degree angle to minimize the risk of ripping the paper surface. You should now have stark white columns. -
Paint the background trees (optional):
If you want depth, you can paint very faint, light grey vertical stripes in the bare spaces between the white trunks to suggest trees further in the distance.
Add Metallic Sheen
Mix iridescent medium into your white gouache for the splatter stars. They will catch the light and glimmer just like real stars when viewed from different angles.
Step 4: Texture & Details
-
Add bark markings:
Using your waterproof black fine liner, draw small horizontal lenticels (the dark markings on birch bark). Focus these marks on the edges of the trunks, curving them slightly to show the roundness of the tree. -
Vary the marks:
Don’t make every mark identical. Some should be small triangles, others thin lines, and some jagged patches. Leave plenty of white space in the center of each trunk. -
Draw branches:
With the pen or a very fine brush, add thin, spindly branches extending from the trunks into the blue sky. Use white gouache/gel pen where the branches cross the dark sky, and black ink where they cross the white trunks. -
Ground the trees:
At the very bottom of the painting, use the pen to sketch loose, jagged grass blades or shrubs overlapping the base of the trees to settle them into the landscape.
Step 5: Final Celestial Touches
-
Splatter some stars:
Dilute white gouache or acrylic ink slightly. Load a toothbrush or stiff brush and flick the bristles to spray fine white dots across the blue sections for distant stars. -
Add the main stars:
Using gold paint or carefully placed gold star stickers, add a few larger, focal stars in the open spaces of the sky. -
Remove the border tape:
Once everything is dry, peel off the border tape to reveal the clean, gallery-style frame around your painting.
Frame this piece in a simple black frame to let the high contrast do all the talking
Textured Leaves Using Thick, Dabby Strokes
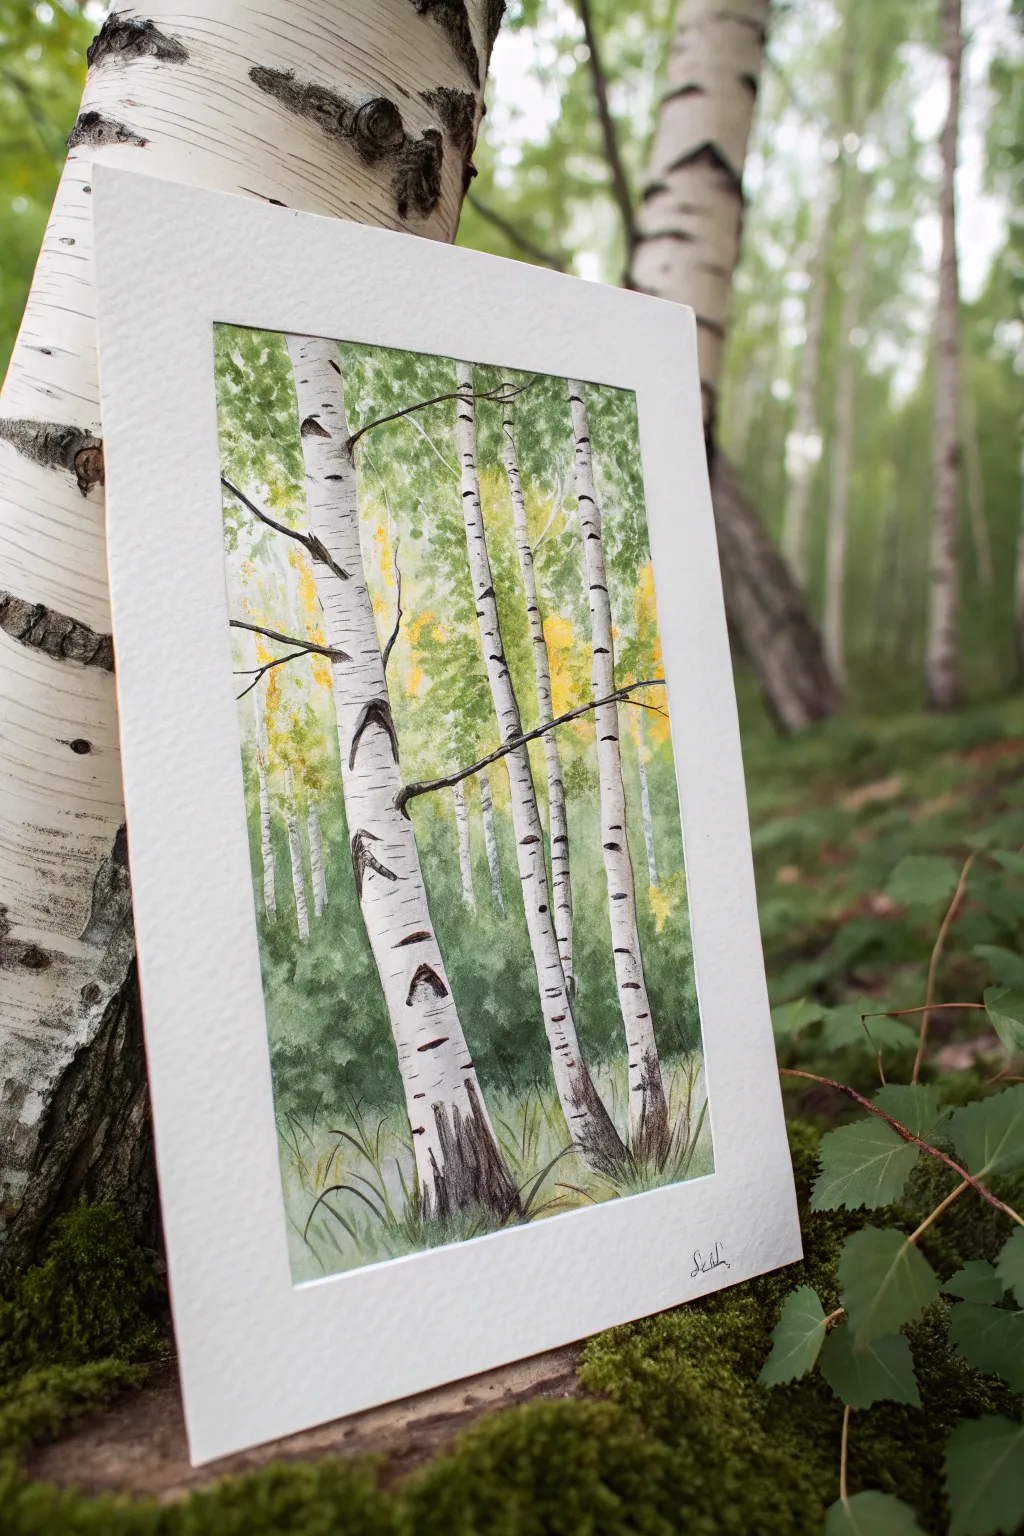
Capture the serene beauty of a birch grove with this textured watercolor project. By balancing crisp white trunks against soft, dabbed foliage, you’ll create a scene full of depth and natural light.
Step-by-Step Guide
Materials
- Cold press watercolor paper (140 lb/300 gsm)
- Watercolor paints (Sap Green, darker Hooker’s Green, Yellow Ochre, Burnt Umber, Payne’s Grey or Black)
- Masking fluid (drawing gum) and old brush or silicone applicator
- Round watercolor brushes (size 4, 8, and a small rigger/liner brush)
- Clean water and paper towels
- Pencil and eraser
- White mat board (optional for display)
Step 1: Planning and Masking
-
Sketch the composition:
Begin by lightly sketching the outline of your main birch trees. Place a prominent, thicker tree in the foreground slightly off-center, and arrange 2-3 thinner trees further back to retreat into the distance. -
Add branch guides:
Draw delicate lines indicating where the main branches will extend outwards. Keep these lines faint, as birch branches are often thin and erratic. -
Protect the white trunks:
Using an old brush or silicone tool, carefully apply masking fluid to the sketched tree trunks. This essential step preserves the crisp white paper, which is crucial for birch bark. -
Wait for drying:
Allow the masking fluid to dry completely until it is yellowish and rubbery to the touch. Do not proceed until you are certain it is solid.
Bleeding Mask?
If paint bleeds under your masking fluid, the paper might be too textured or the mask wasn’t pressed down fully. Gently lift bleed marks with a damp stiff brush and a paper towel.
Step 2: Painting the Foliage
-
Start with light yellows:
Mix a watery wash of Yellow Ochre and a touch of Sap Green. Using a Size 8 round brush, lightly dab uneven patches of color in the background areas to represent sunlight hitting early autumn leaves. -
Layer mid-tone greens:
While the first layer is still slightly damp, introduce Sap Green. Use a dabbing, stippling motion with the tip of your brush to create the texture of leaf clusters rather than painting solid blocks of color. -
Deepen the forest shadows:
Mix a darker Hooker’s Green with a tiny bit of blue or Payne’s Grey. Apply this to the lower sections of the background and between the trees to suggest the dense, shadowed forest floor. -
Texture the background:
Continue adding layers of green dabs, varying the saturation. Leave some white paper speckling through in the upper canopy to simulate light filtering through the leaves. -
Suggest distant trees:
With a very diluted grey-green mix, paint faint vertical suggestions of trees in the far background. These should be soft and blurry, achieved by painting onto damp paper (wet-on-wet). -
Ground the scene:
At the very bottom, paint upward flicking strokes using green and burnt umber to create grassy textures around the base of the masked trees.
Pro Tip: Card Trick
Use the edge of an old credit card dipped in dark paint to scrape horizontal lines across the wet trunks. It creates perfectly random, organic birch bark textures instantly.
Step 3: Detailing the Trunks
-
Remove the mask:
Once the background paint is 100% bone dry, gently rub off the masking fluid with your finger or a rubber cement pickup tool to reveal the stark white trunks. -
Shadow the trunks:
Mix a very watery grey using Payne’s Grey and plenty of water. Paint a thin strip of shadow down one side (the right side in our reference) of each trunk to give them cylindrical form. -
Paint the lenticels:
Load a small liner or rigger brush with concentrated Payne’s Grey or Black. Paint the distinctive horizontal dashes and eye-shaped markings up the trunks. -
Vary the markings:
Keep the marks random—some should be thin lines, others triangular wedges, particularly where branches connect to the trunk. -
Connect the branches:
Using the same dark mixture, paint fine, jagged lines connecting the trunk markings to the green canopy, extending the branches you sketched earlier. -
Ground the trees:
Darken the very base of the birch trunks with strokes of Burnt Umber and Black where they meet the earth, blending slightly into the grass. -
Add final grass details:
With your smallest brush and dark green paint, add a few sharp, distinct blades of grass in the foreground overlapping the bottom of the white trunks to settle them into the landscape.
Once dry, frame your piece in a white mat to echo the bright bark of your new forest creation.
Abstract Birch Pattern in Bold Color Blocks
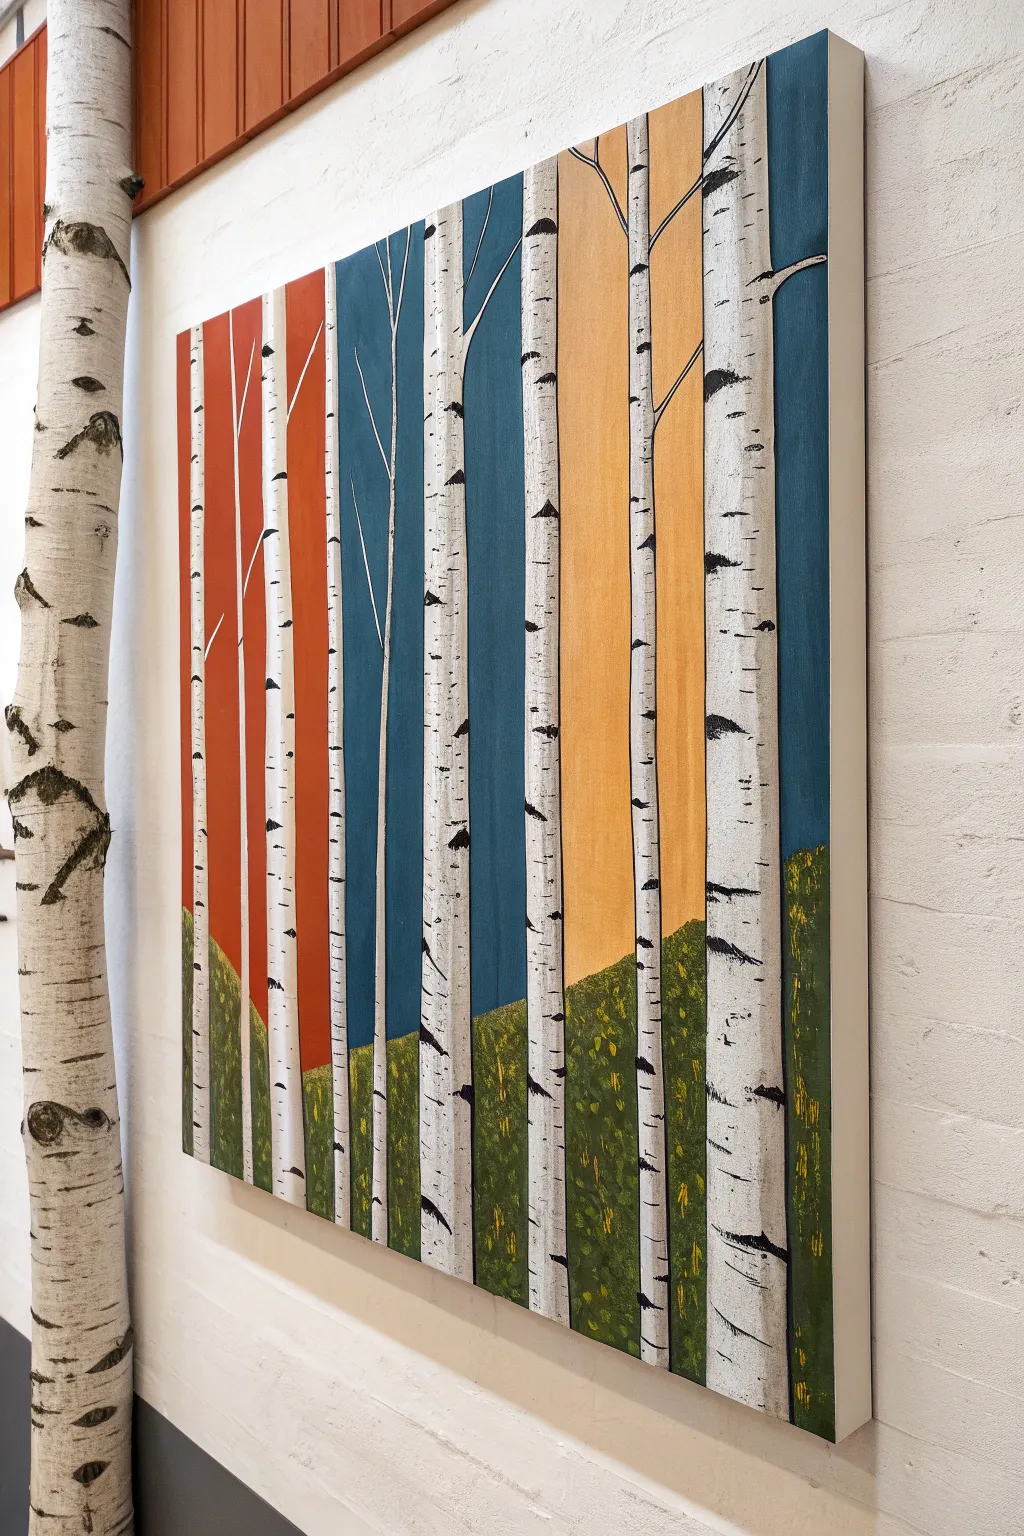
This striking painting combines the organic textures of birch bark with the clean lines of modern geometric design. By dividing your background into bold vertical stripes of color, you can create a vibrant, abstract forest that feels both structured and natural.
Step-by-Step Tutorial
Materials
- Large square canvas (e.g., 24×24 or 30×30 inches)
- Acrylic paints (Titanium White, Mars Black, Burnt Umber, Cadmium Red, Phthalo Blue, Yellow Ochre, Sap Green, Bright Yellow)
- Painter’s tape (1-inch width)
- Large flat brush (2-inch)
- Medium flat brush (1/2-inch or 3/4-inch)
- Small round brush (size 2 or 4)
- Liner brush (size 0 or 00)
- Ruler or straight edge
- Pencil
- Palette knife (optional)
Step 1: Planning and Background
-
Measure and mark margins:
Begin by deciding on the width of your columns; count how many distinct color zones you want. Lightly use a ruler and pencil to mark the vertical boundaries for your red, blue, and yellow sections evenly across the canvas. -
Mask the edges:
Apply painter’s tape vertically along your pencil lines to ensure crisp, straight edges between colors. You will have to paint in stages: tape off the middle section to paint the outer ones first, or work carefully with a steady hand if you prefer skipping tape. -
Paint the red section:
Mix a warm, rusty red using Cadmium Red with a touch of Burnt Umber. Apply this to the far-left section of the canvas using your large flat brush, ensuring solid, opaque coverage. -
Paint the blue section:
For the middle stripe, mix Phthalo Blue with a tiny bit of black or umber to deepen it into a rich teal-blue. Paint this vertical block smoothly, keeping the brushstrokes vertical to match the column’s energy. -
Paint the yellow section:
Mix Yellow Ochre with a little Titanium White to create a soft, warm gold. Fill in the remaining vertical section on the right side. Let the entire background dry completely before removing any tape. -
Add the ground layer:
Using a medium flat brush, paint a rolling hill shape across the bottom quarter of the canvas. Use a dark Sap Green mixed with a little black to create a deep, shadowy base for the grass.
Bleeding Lines?
If paint bleeds under your tape, let it dry completely. Then, gently scrape the excess with a craft knife or paint over the error with the original background color for a crisp fix.
Step 2: Constructing the Trees
-
Draft the tree trunks:
I like to use a ruler for this step to keep the graphic style consistent: lightly pencil in vertical parallel lines for your tree trunks. Space them irregularly to avoid looking too robotic—some can be close together, others far apart. -
Fill the trunks white:
Using a medium flat brush and pure Titanium White, fill in the tree trunk shapes. You may need two coats to fully cover the bold background colors beneath. -
Create distinct outlines:
Mix a thin, inky black paint. Using a small round brush or a liner brush, carefully outline the left and right sides of each white trunk. This separates the trees clearly from the colorful background. -
Add the branches:
Switch to your liner brush. Paint thin, delicate branches extending upward and outward from the main trunks. Keep these lines fine and slightly shaky to mimic natural growth, letting them cross over the color boundaries.
Metallic Pop
Use metallic gold or copper paint instead of yellow ochre for one of the background columns. It catches the light beautifully and makes the white birch trees stand out even more.
Step 3: Detailing and Texture
-
Paint the bark markings:
Using Mars Black and a small round brush or the edge of a small flat brush, add the signature horizontal striations of birch bark. vary the pressure: make some marks thick triangles and others thin dashes. -
Add subtle shading:
Mix a very light grey (white with a dot of black). Paint a thin vertical strip down the shaded side (usually the right side) of each trunk to give them a slight cylindrical volume so they don’t look like flat paper strips. -
Detail the grass:
Mix a lighter green using Sap Green and Bright Yellow. Dabbing with an old, scruffy brush or a sponge, add texture to the green hill section to simulate foliage and grass blades catching the light. -
Highlight the base:
Add small touches of yellow or light green near the base of the trees where the trunks meet the grass, integrating the vertical trees into the horizontal landscape. -
Final touches:
Inspect your edges. Use a small brush to touch up any white paint that strayed into the color blocks, or sharpen any black outlines that got fuzzy. Ensure the black bark markings are fully opaque.
Step back and admire how the simple vertical rhythm creates a calm yet colorful modern landscape for your wall
Negative-Space Birches Using One Dark Wash

This moody, atmospheric tutorial captures the stark beauty of birch trees against a deep night sky using a clever negative space technique. By preserving the white of the paper for the trunks, you create a striking contrast with the single dark wash of indigo blue.
Detailed Instructions
Materials
- Cold press watercolor paper (300gsm)
- Masking tape
- Watercolor paints: Indigo, Payne’s Gray, Burnt Umber
- Large flat brush or wash brush
- Round brush (size 4 or 6)
- Rigger or liner brush for fine branches
- Masking fluid
- Old synthetic brush or applicator for masking fluid
- Rubber cement pickup or clean fingers
- White gouache or white gel pen
Step 1: Preparation and Masking
-
Tape the edges:
Begin by taping down all four edges of your watercolor paper to a board. This creates the crisp white border seen in the final piece and prevents the paper from buckling under a heavy wash. -
Sketch the composition:
Lightly sketch the outlines of two prominent birch trunks slightly off-center. They should lean gently, rather than standing perfectly straight, to look organic. Add a thinner, third trunk branching off to the right. -
Apply masking fluid:
Using an old brush or a dedicated applicator, fill in the entire shape of the tree trunks and the main branches with masking fluid. This is crucial as it protects the white paper, allowing you to paint the dark sky freely. -
Add fine branches:
Don’t forget the tiny twigs reaching out. Use a fine-tip applicator or the very tip of your brush to mask delicate lines extending from the main branches. -
Let it cure:
Wait until the masking fluid is completely yellow and rubbery to the touch. Painting over wet masking fluid will ruin your brushes and the paper.
Don’t ruin your brush
Coat your brush bristles in bar soap before dipping into masking fluid. The soap acts as a barrier, preventing the rubbery fluid from drying deep in the ferrule and ruining the bristles.
Step 2: Painting the Night Sky
-
Mix your dark wash:
Create a large pool of dark blue paint. I recommend a mix of Indigo with a touch of Payne’s Gray to get that deep, midnight hue. You want enough liquid to cover the whole background without stopping. -
Apply the wash:
Using your large flat brush, apply the paint boldly across the entire paper, painting right over the masked trees. Work quickly to ensure an even, non-streaky background. -
Create variation:
While the sky is still wet, drop in slightly more concentrated pigment in the upper corners to create a vignette effect, and add a little extra water near the horizon line to suggest a soft glow or mist. -
Add distant pines:
Before the background is bone dry—when it has lost its sheen but is still damp—mix a very thick, dark blue-black. Paint small, jagged tree shapes along the bottom edge. Because the paper is damp, the edges will soften, making them look like a distant forest. -
Allow to dry completely:
This is the hardest part: waiting. The paper must be 100% dry before the next step. If it feels cool to the touch, it’s still wet.
Step 3: Revealing and Detailing
-
Remove the mask:
Gently rub away the masking fluid using a rubber cement pickup or your clean finger. Peel slowly to avoid tearing the paper, revealing the stark white trunks beneath. -
Define the edges:
The masked edges might look a bit too sharp or jagged. Use a damp brush to gently soften any unnatural ridges along the tree trunks. -
Paint the bark markings:
Mix a diluted gray-brown using Burnt Umber and Payne’s Gray. With a round brush, paint the characteristic horizontal lenticels (the dark dashes) on the birch bark. Vary their size and thickness. -
Add shadows:
To give the flat white shapes cylinder-like volume, paint a thin, watery gray shadow down one side of each trunk. This instantly makes them look round. -
Connect the branches:
Use a liner brush and a dark gray mix to reconnect any fine branches that might have been disconnected when removing the mask, and add finer tweaks reaching into the sky. -
Sprinkle the stars:
Dip a toothbrush or stiff brush into white gouache (consistency of heavy cream). Tap the brush over the painting to splatter tiny stars across the dark sky. -
Final highlights:
Place a few specific bright white dots among the splatters with a white gel pen or the tip of a brush for larger, glowing stars near the horizon.
Blooms in the sky?
If you see ‘cauliflower’ blooms in your dark wash, don’t panic. In a night sky, these dried water marks actually add fantastic texture that looks like drifting clouds or northern lights.
Now peel off your painter’s tape to reveal that satisfying crisp border framing your silent winter night


Have a question or want to share your own experience? I'd love to hear from you in the comments below!