A heart-shaped canvas is basically a composition cheat code—those curves do half the design work for you. Here are my favorite easy heart canvas painting ideas that look thoughtful and impressive without needing fancy drawing skills.
Classic Ombre Sunset Heart
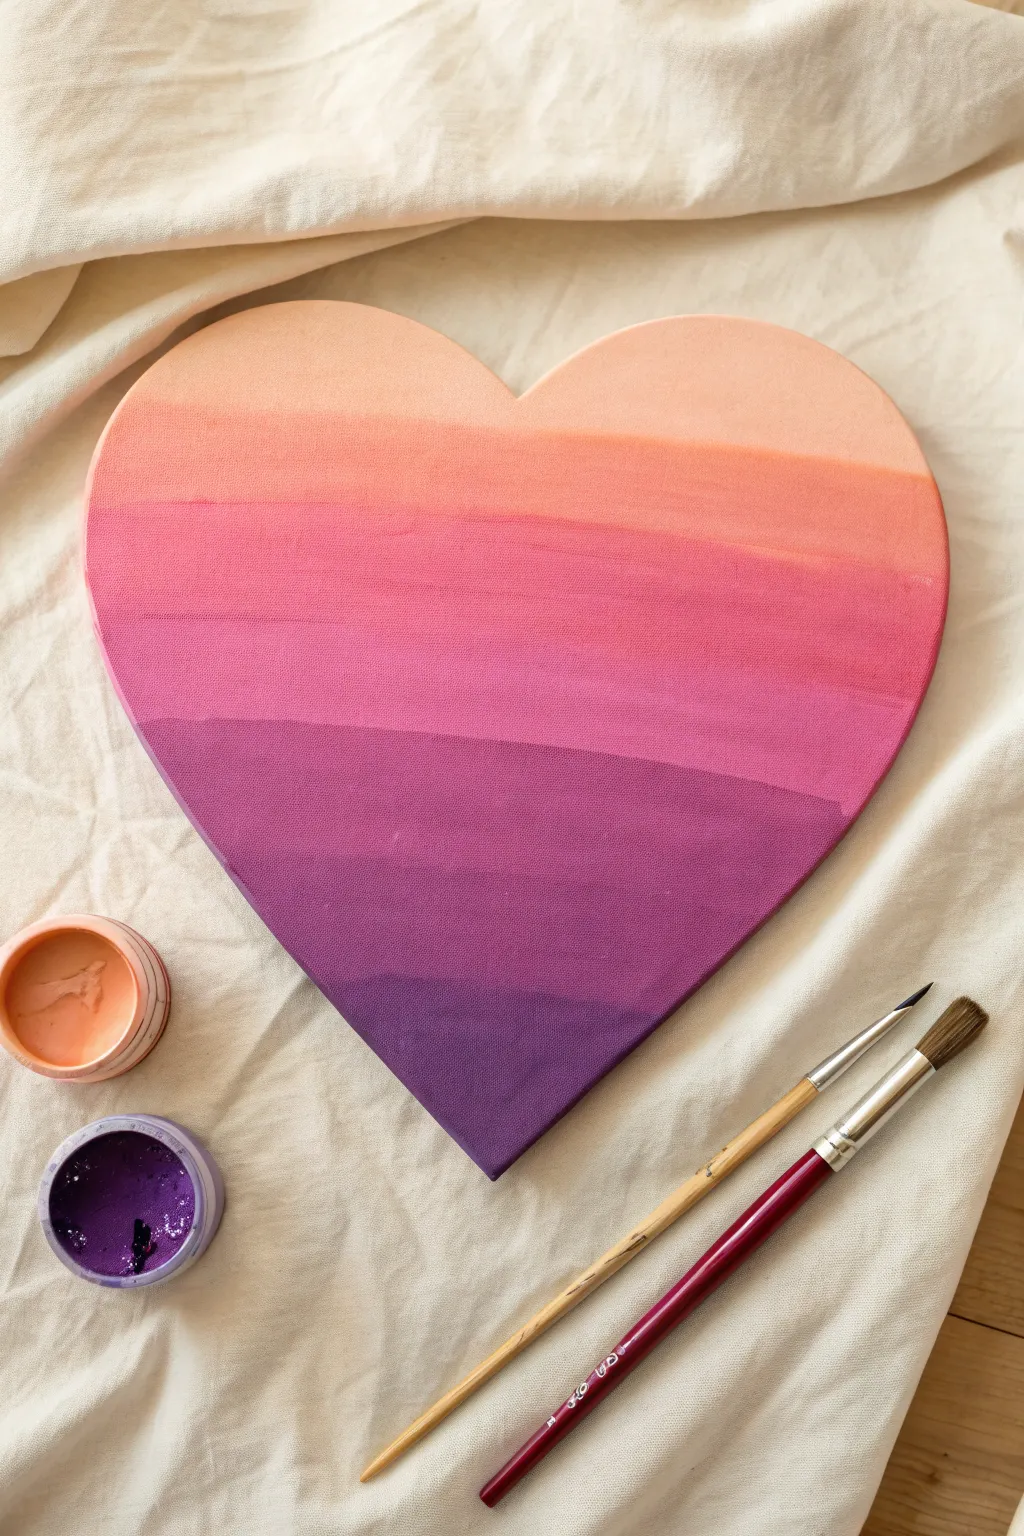
Capture the warmth of a setting sun with this stunning ombre design on a heart-shaped canvas. The smooth transition from soft peach to deep plum creates a modern, graphic look that brightens any corner of your space.
Step-by-Step Guide
Materials
- Heart-shaped stretched canvas
- Acrylic paints (peach, coral, hot pink, magenta, deep purple)
- Flat paint brushes (medium and large)
- Palette or paper plate
- Cup of water
- Paper towels
Step 1: Setting the Foundation
-
Prepare your palette:
Squeeze out your five key colors: a light peach, a vibrant coral orange, a hot pink, a magenta or orchid purple, and a deep violet. Having them ready helps you work quickly while the paint is wet. -
Start at the top:
Load a clean, medium-sized flat brush with your lightest peach shade. Paint the very top curves of the heart, ensuring you cover the rounded edges smoothly. -
Paint the first band:
Extend this peach color down about two inches. Use horizontal strokes to keep the texture consistent with the final look. -
Add the coral stripe:
Pick up the coral orange paint without completely rinsing your brush. Paint a horizontal band directly below the peach section. -
Blend the transition:
While both paints are still wet, gently brush back and forth over the line where the peach and coral meet. This creates a soft, hazy transition rather than a hard stripe.
Smooth Blending Trick
Keep a spray bottle of water nearby. A very light mist over the canvas keeps acrylics wet longer, giving you more time to perfect your gradient blends.
Step 2: Building the Spectrum
-
Introduce the pink:
Wash your brush thoroughly. Move to the hot pink color and paint a generous band below the coral section, slightly wider than the previous stripes. -
Soften the middle line:
Dip just the tip of your brush into a tiny bit of coral and work it into the top edge of the pink band to marry the two warm tones together. -
Move to magenta:
Switch to your magenta or orchid shade. Paint the next section down, which usually sits right around the widest part of the heart’s bottom curve. -
Work quickly:
Acrylics dry fast, so I try to keep my pace steady during these middle sections. Blend the pink into the magenta using long, confident horizontal strokes across the canvas. -
Check the edges:
Pause briefly to paint the sides of the canvas (the depth) with the corresponding colors so the artwork looks finished from every angle.
Glazed Finish
Once fully dry, coat the heart with high-gloss varnish. It makes the colors pop and gives the piece a professional, ceramic-like shine.
Step 3: Deepening the Tones
-
Apply the darkest hue:
Load a fresh brush with your deepest purple paint. Fill in the pointed tip of the heart completely. -
Create the final blend:
Where the deep purple meets the magenta, use a slightly damp brush to blur the harsh line, pulling the darker color slightly up into the lighter one. -
Assess the gradient:
Take a step back and look at your bands. If any transition looks too stark, mix an intermediate color (like pink mixed with magenta) and glaze it thinly over the trouble spot. -
Refine the texture:
For a cohesive finish, take a clean, dry brush and lightly sweep it horizontally across the entire painting one last time to unify the brushstroke texture. -
Allow to cure:
Let the painting dry completely flat to ensure no drips form on the slanted edges.
Hang your colorful heart on a gallery wall or prop it on a shelf for a daily dose of sunset warmth


Moonlit Silhouette Scene in a Heart
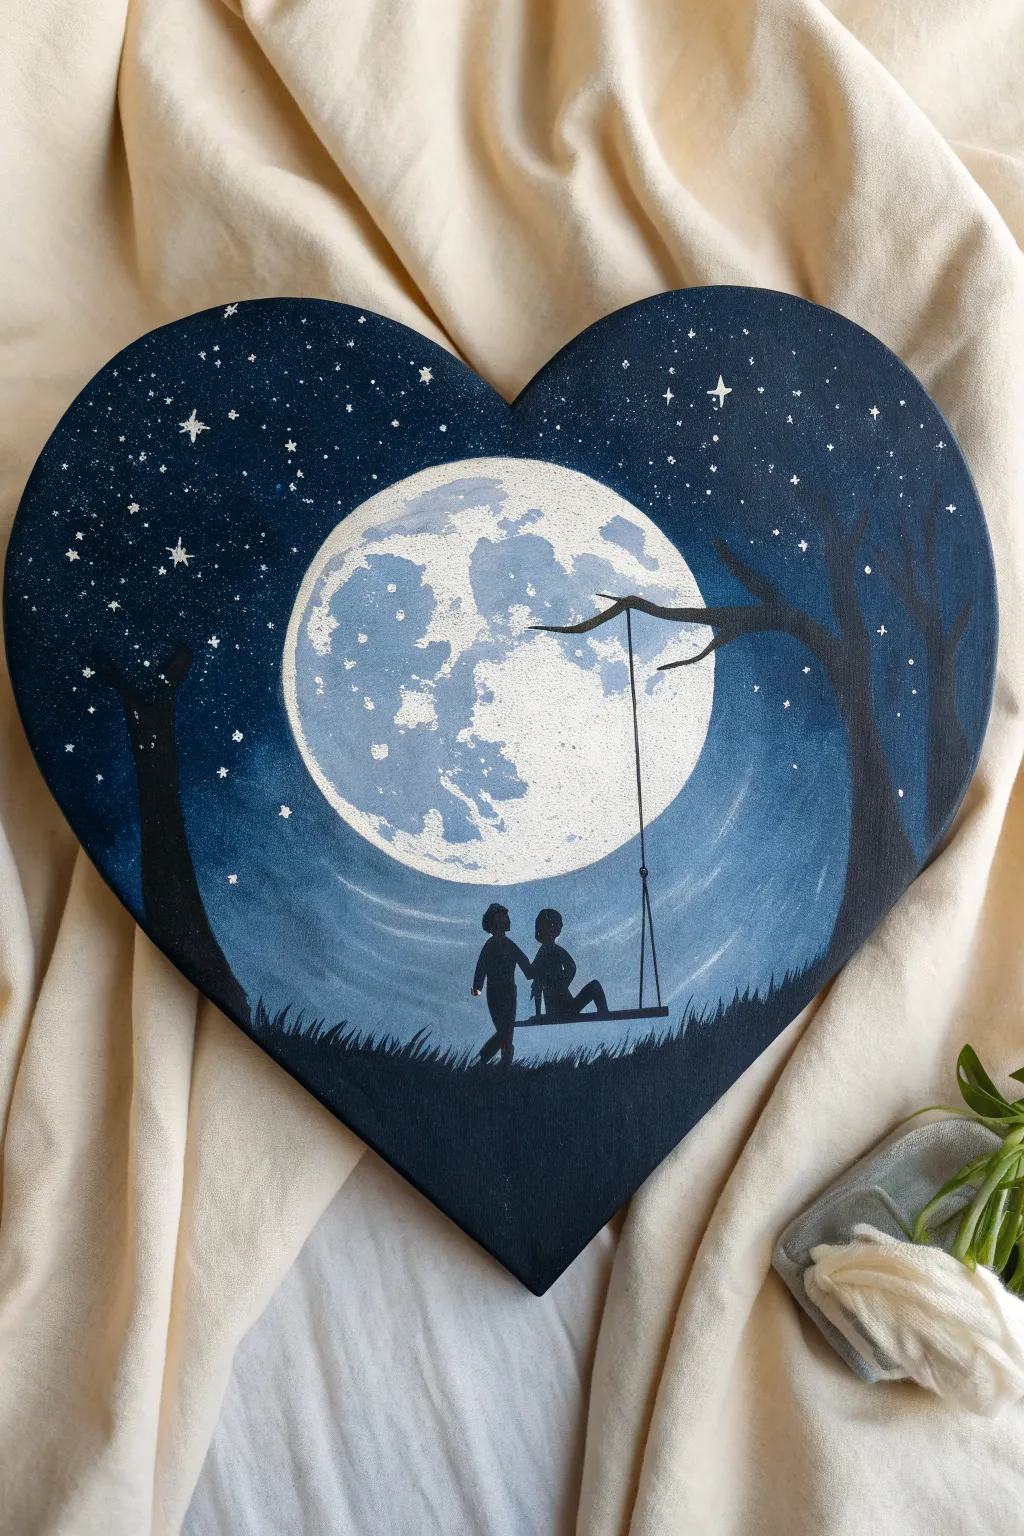
Capture the magic of a quiet evening with this romantic silhouette painting on a unique heart-shaped canvas. Using simple blending techniques and stark contrasts, you’ll create a glowing moon that perfectly illuminates a couple gazing at the stars.
Step-by-Step Tutorial
Materials
- Heart-shaped stretched canvas (medium size)
- Acrylic paints: Dark Navy Blue (or Prussian Blue), Black, Titanium White, and a tiny touch of Light Blue
- Flat shader brushes (large and medium)
- Small round detail brush (size 0 or 1)
- Sponge dabber or small sea sponge
- A circular object for tracing (like a roll of tape or a small plate)
- Pencil
- Palette
- Cup of water and paper towels
Step 1: Setting the Scene
-
Outline the Canvas:
Begin by placing your circular object in the upper center of the heart canvas. Use a pencil to lightly trace a perfect circle; this will separate your bright moon from the dark sky. -
Paint the Deep Sky:
Load a large flat brush with your darkest navy blue mixed with a tiny drop of black. Start painting the outer edges of the heart, working inward. The paint should be darkest at the perimeter. -
Create the Gradient:
As you move closer to the moon circle, gradually mix more pure navy blue and then a little white into your brush without cleaning it fully. This creates a natural gradient, getting lighter as it approaches the moon’s halo. -
Establish the Halo:
Paint right up to the pencil line with a lighter, hazy blue mix. Don’t worry about being perfectly neat on the line, as the moon paint will cover slight overlaps later. -
Dry the Background:
Let this background layer dry completely. If the canvas texture is still showing through too much, apply a second coat to get that deep, rich night sky effect.
Step 2: Painting the Moon
-
Fill the Base:
Using a clean brush, paint the entire circle with solid Titanium White. You may need two coats to ensure it’s fully opaque against the canvas. -
Texture the Craters:
Mix a very pale grey-blue color. Dip your sponge dabber (or a crumpled piece of paper towel) into the paint, dab off the excess, and gently press texture onto the moon. Focus on the left side and bottom to give it dimension. -
Add Highlights:
Once the texture is tacky but not fully dry, dab a little pure white over the brightest areas of the moon to make the craters recede visually.
Fixing Wobbly Lines
If your swing ropes look shaky, use a ruler and a fine-tip black permanent marker instead of paint. It gives a crisp, straight line instantly.
Step 3: Adding the Stars
-
Flick the Stars:
Thin down some white paint with water until it’s inky. Load an old brush or toothbrush and gently flick the bristles to spray tiny stars across the dark blue areas, avoiding the moon and the bottom section where the ground will be. -
Paint Major Stars:
Use your smallest detail brush to manually paint a few larger, glimmering 4-point stars. I like to place these sporadically near the top curves of the heart.
Adding Sparkle
Mix a tiny amount of silver glitter into your white paint when doing the larger stars for a subtle shimmer that catches the light.
Step 4: Silhouettes and Details
-
Lay the Groundwork:
Mix black paint with a tiny bit of navy blue (to keep it cool-toned). Paint a curving hill shape at the very bottom V of the heart. -
Add Grass Texture:
Turn your brush vertically or use a fan brush to flick short, quick strokes upward from the hill to simulate grass blades. -
Paint the Trees:
On the left side, paint a thick tree trunk rising up about halfway. On the right, paint a larger, more gnarled tree that extends its branches over the moon. Keep the edges relatively sharp. -
Hang the Swing:
Using your finest detail brush and thinned black paint (for better flow), draw two straight vertical lines dropping from the large branch on the right. Connect them at the bottom with a flat rectangle for the seat. -
Sketch the Figures:
Lightly sketch the outlines of the two figures with a pencil first if you are nervous. One figure is standing and holding the rope; the other is seated. -
Fill the Figures:
Carefully fill in the silhouettes with solid black. Use the tip of the brush to refine small details like the heads and the arm reaching out. -
Final Touches:
Check your edges. If the moon paint looks messy around the tree branches, use a tiny bit of black to sharpen the silhouette. Let everything dry for at least 24 hours before varnishing.
Hang your heartfelt masterpiece on a wall where the evening light can catch those delicate stars.


Simple Tree of Love That Follows the Curves

This charming project captures the essence of love with a gracefully curving tree painted on a unique heart-shaped canvas. Its delicate copper-toned leaves and tender heart details make it a perfect gift or a lovely piece of wall art for your own home.
Step-by-Step Guide
Materials
- Heart-shaped stretched canvas (approximately 10×10 or 12×12 inches)
- Acrylic paints: Black, White, Burnt Sienna (warm brown), Copper or Rose Gold metallic paint, Red
- Paintbrushes: Medium flat brush, small round brush, fine liner brush
- Pencil and eraser
- Palette or paper plate
- Water cup and paper towels
Step 1: Preparing the Foundation
-
Prime the Surface:
Start with a clean slate by applying a coat of white acrylic paint over the entire heart canvas if the primed surface isn’t bright enough for your liking. Let it dry completely. -
Sketch the Trunk:
Using a pencil very lightly, draw the main trunk of the tree. Position the base slightly off-center at the bottom, curving the trunk upward so it follows the natural left curve of the heart shape. -
Sketch the Branches:
Extend branches outward from the trunk, ensuring they fan out to fill the upper curves of the heart. The goal is to make the tree look like it ‘fits’ inside the shape comfortably. -
Outline the Roots and Heart:
Sketch small, spindly roots extending from the base. In the space below the roots on the right side, lightly draw a medium-sized heart that looks like it’s buried in the earth.
Brush Control Tip
For the thinnest twigs, water down your black paint slightly so it has an ink-like consistency. This helps the paint flow smoothly off the liner brush without skipping.
Step 2: Painting the Structure
-
block in the Trunk:
Load a small round brush with black acrylic paint. Carefully paint along your pencil lines for the trunk, making the base wider and tapering as you move up. -
Extend the Main Branches:
Switch to a fine liner brush for better control. Pull the paint from the trunk outward to create the main branches, keeping your hand relaxed for natural, organic lines. -
Add Fine Twigs:
From your main branches, flick the brush gently to create thinner, smaller twigs. I find that holding the brush further back on the handle helps create these looser strokes. -
Paint the Roots:
Use the liner brush to paint the spindly roots at the bottom, letting them curve downwards and around the sketched underground heart. -
Create the Sprouting Hearts:
On the lower right side of the tree, just above the roots, paint three thin stems rising up. Top each stem with a small red heart to look like flowers blooming.
Make It Personal
Hide tiny initials of you and your loved one inside the texture of the tree trunk or within the ‘buried’ heart for a hidden romantic message.
Step 3: Adding Life and Details
-
Mix the Leaf Color:
On your palette, mix a little Burnt Sienna with Copper metallic paint. This gives you a warm, shimmering autumnal hue. -
Paint the Leaves:
Using a small round brush, press and lift gently at the ends of the twigs to create small leaf shapes. Vary the direction of the leaves to keep the movement dynamic. -
Add Texture to Leaves:
While the leaves are wet, you can add a tiny dot of lighter brown or white to a few of them for a subtle highlight. -
Create Falling Leaves:
Paint a few stray leaves floating in the open white space around the trunk to suggest a gentle breeze. -
Paint the Buried Heart:
Fill in the large heart shape beneath the roots using your mixed copper-brown color. It should look like a warm seed or stone. -
Detail the Buried Heart:
Once the brown heart is dry, use your finest brush or a stylus to add tiny white dots inside it for texture. Outline the heart thinly in black to define it against the canvas. -
Add Trunk Accents:
Dip the back end of a paintbrush into the copper paint or red paint and dot tiny specks up one side of the black trunk for a magical, whimsical touch. -
Final Touches:
Erase any visible pencil lines once the paint is fully dry. Add a few tiny red speckles in the air for extra color balance.
Hang your beautiful heart canvas where it can remind you daily that love, like a tree, grows stronger with time


Pastel Galaxy Night Sky Heart
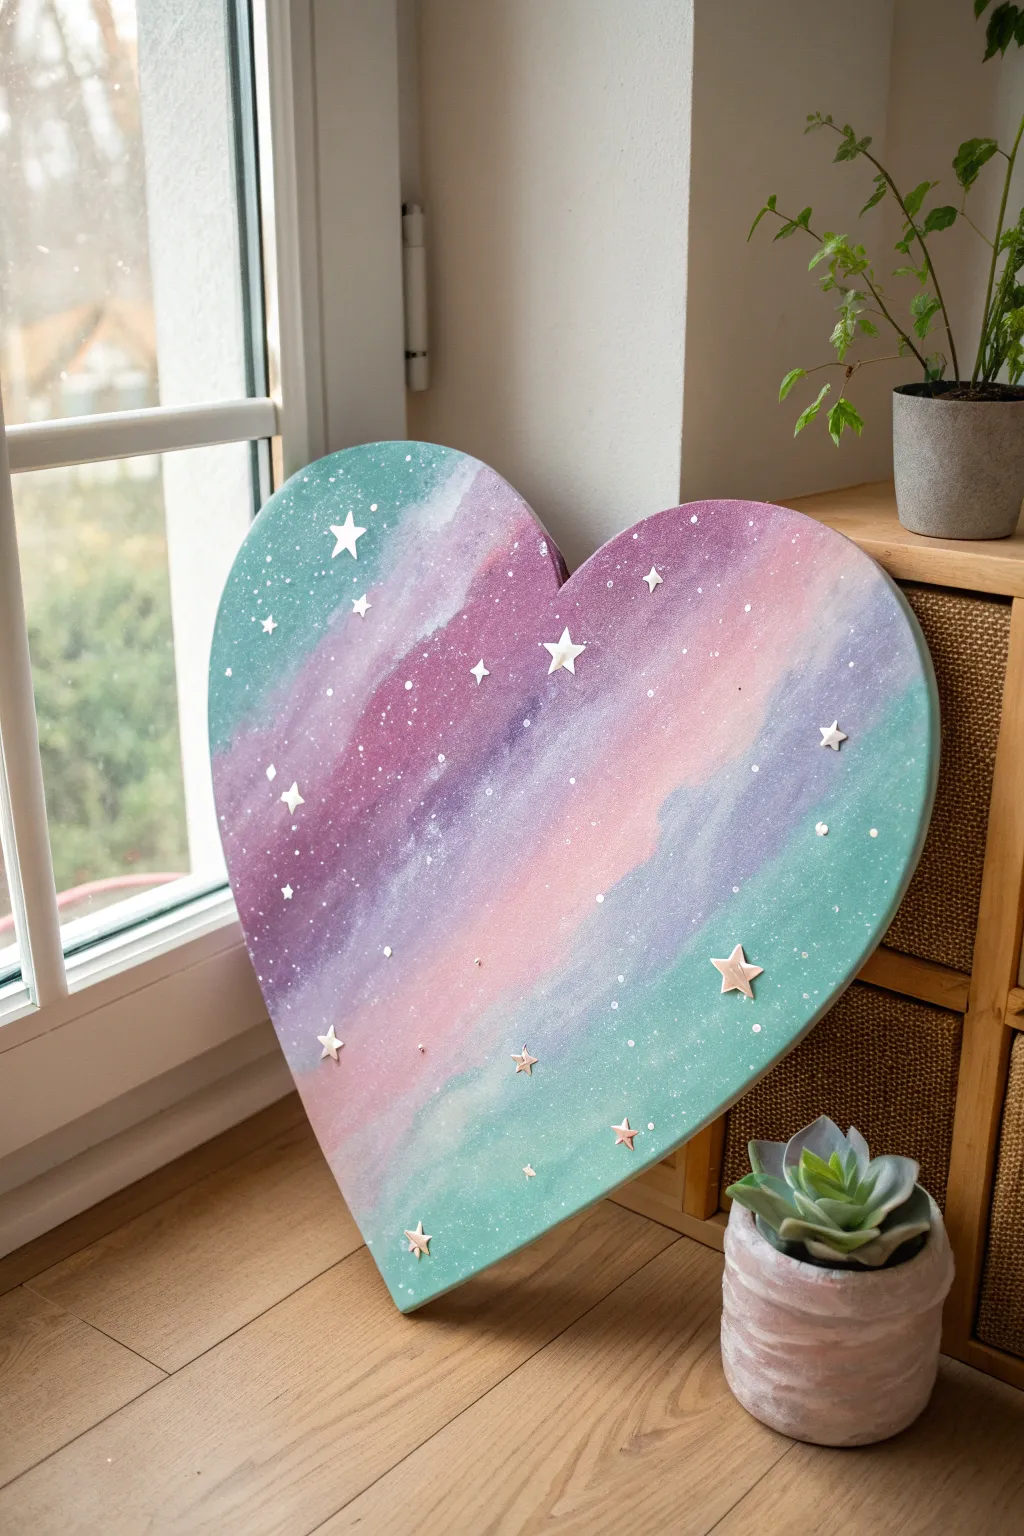
Bring the cosmos down to earth with this dreamy, soft-toned galaxy painting on a unique heart shaped canvas. This project blends sweeping clouds of teal, pink, and purple acrylics with sparkling stars to create a romantic celestial effect.
Detailed Instructions
Materials
- Heart-shaped stretched canvas (approx. 16-20 inches)
- Acrylic paints: Teal/Mint, Lavender/Purple, Soft Pink, Titanium White
- Large flat brush or foam sponge for blending
- Medium round brush
- Small liner brush or toothbrush (for splatter)
- Small 3D star embellishments (wood, plastic, or foam)
- Strong craft glue or hot glue gun
- Cup of water and paper towels
- Palette or paper plate
Step 1: Creating the Nebula Background
-
Prepare your palette:
Squeeze generous amounts of teal, purple, pink, and white paint onto your palette. Keeping them separate initially makes it easier to pull clean colors before blending. -
Start with the teal corners:
Using your large flat brush or a damp sponge, apply the teal paint to the outer edges of the heart, specifically focusing on the bottom point and the upper curves. Don’t worry about neatness; rough edges are good for galaxy blending. -
Add the purple mid-tones:
While the teal is still wet, introduce the purple paint. Apply it in diagonal streaks adjacent to the teal areas. Let the colors overlap slightly so they mix on the canvas to create a darker transition shade. -
Blend in the pink:
Fill the central diagonal area with soft pink paint. Use long, sweeping strokes that follow the same direction as your purple streaks. This creates the main ‘cloud’ of your galaxy. -
Create the milky way effect:
Dip a clean corner of your sponge or brush into titanium white. Lightly dab and sweep it through the center of the pink and purple areas to create a hazy, milky effect. This adds depth and makes the galaxy look luminous. -
Enhance the transitions:
If distinct lines are visible between colors, use a clean, slightly damp dry brush to feather the edges where the pink meets the purple and purple meets teal. The goal is a seamless, misty gradient. -
Let it cure:
Allow the base layer to dry completely. This is crucial because adding white stars over wet paint will result in muddy gray stars instead of bright white ones.
Sponge vs. Brush
For the smoothest galaxy blend, use a damp kitchen sponge instead of a brush. The texture mimics gas clouds perfectly and prevents harsh brushstrokes.
Step 2: Adding Stars and Details
-
Create distant star splatter:
Thicken a small amount of white paint with a tiny drop of water until it has an inky consistency. Dip a toothbrush or stiff brush into it. -
Flick the stars:
Hold the brush over the canvas and run your thumb across the bristles to flick tiny speckles onto the surface. Focus more splatter in the lighter ‘milky way’ sections for realistic density. -
Paint larger stars:
Using your finest liner brush, paint a few specific stars by hand. Making small cross shapes or little diamonds adds variety compared to the random splatter. -
Plan embellishment placement:
Take your 3D star embellishments and scatter them loosely over the dry canvas to test the arrangement. Aim for a balanced look without overcrowding any single area. -
Attach the 3D stars:
I usually lift one star at a time, apply a small dot of strong craft glue or hot glue to the back, and press it firmly into place. Hold for a few seconds to ensure adhesion. -
Paint the embellishments (optional):
If your 3D stars aren’t the right color, gently paint them white or silver now that they are glued down. Some artists prefer metallic silver for an extra pop. -
Final touches:
Inspect the canvas for any bare spots on the edges. Painting the sides of the canvas (the depth) gives the piece a professional, gallery-wrapped finish.
Glow in the Dark
Mix phosphorescent medium into your white paint for the stars. During the day it looks normal, but at night your heart galaxy will actually glow.
Once dry, prop your new masterpiece against a wall or hang it up to add a soft, cosmic touch to any room
BRUSH GUIDE
The Right Brush for Every Stroke
From clean lines to bold texture — master brush choice, stroke control, and essential techniques.
Explore the Full Guide
Day-and-Night Split Heart Scene
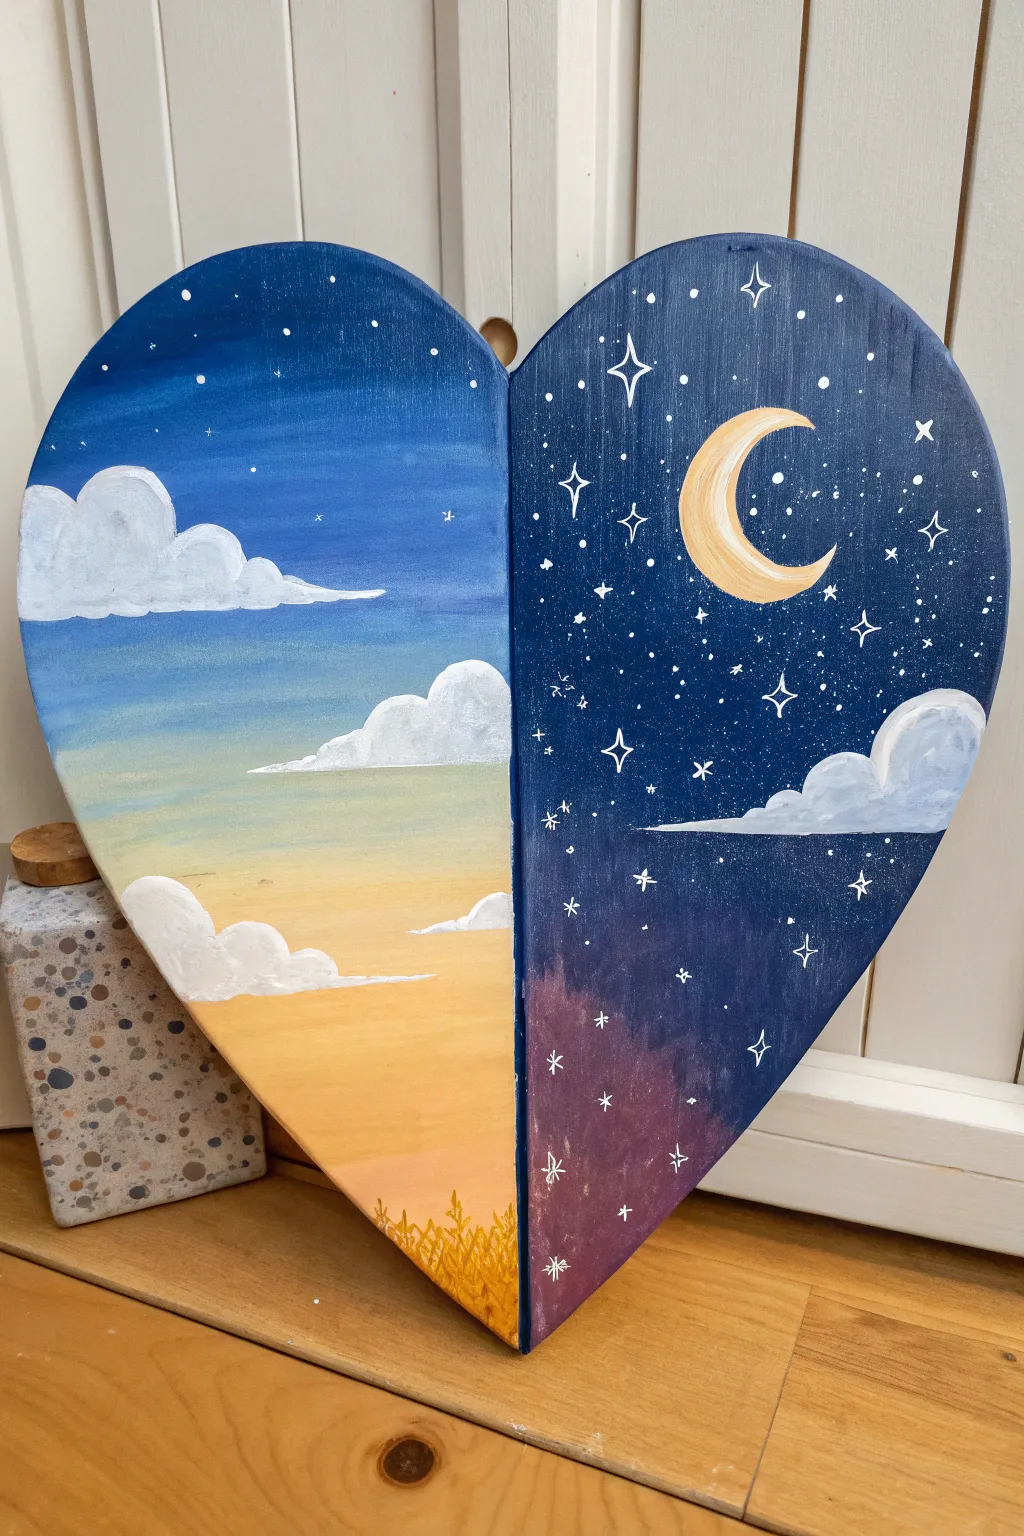
Capture the beauty of the full daily cycle on a single heart-shaped canvas with this split-scene design. The left side glows with a soft, cloud-filled daytime gradient, while the right side plunges into a sparkling, starry night.
How-To Guide
Materials
- Heart-shaped stretched canvas
- Acrylic paints (Titanium White, Phthalo Blue, Ultramarine Blue, Cadmium Yellow, Orange, Purple/Violet, Gold)
- Set of paintbrush (1-inch flat brush, medium filbert, fine liner brush)
- Painter’s tape or masking tape
- Palette for mixing
- Cup of water and paper towels
Step 1: Setting the Divide
-
Tape the center:
Begin by placing a strip of painter’s tape vertically down the exact center of the heart canvas. This will ensure a crisp, straight line between your two worlds. -
Prime the surface:
If your canvas isn’t pre-primed, apply a thin coat of white gesso or white acrylic paint to the entire surface and let it dry completely.
Clean Lines
To prevent paint bleeding under the tape, seal the tape’s edge with a thin layer of white paint or matte medium before adding color.
Step 2: Painting the Daytime Sky (Left)
-
Start with the darkest blue:
Using your flat brush, paint the top third of the left section with a rich Phthalo Blue. Don’t wash the brush yet. -
Create the mid-sky transition:
Pick up some Titanium White on your dirty blue brush. Blend this lighter blue directly onto the canvas below the dark section, working your way down to creates a smooth gradient. -
Add the sunset horizon:
Clean your brush thoroughly. Mix white with a touch of yellow and start painting from the bottom up, blending into the light blue sky. Add a tiny bit of orange at the very bottom tip for a warm sunset glow. -
Paint fluffy clouds:
Switch to a filbert brush loaded with pure white. Dab on cloud shapes near the top and middle. Keep the tops of the clouds rounded and crisp, but smudge the bottoms slightly to make them look airy. -
Add grassy details:
Once the orange bottom is dry, use a small brush and gold or yellow-ochre paint to flick tiny vertical lines at the bottom point, creating a field of wheat or grass.
Step 3: Painting the Night Sky (Right)
-
Move the tape:
Ensure the day side is 100% dry to the touch. Gently peel off the tape and re-apply it over the painted day side, right along the edge, to protect your work. -
Lay the dark base:
Mix Ultramarine Blue with a tiny dot of black or purple to get a deep midnight blue. Paint the majority of the right side with this color. -
add purple haze:
While the blue is still slightly wet near the bottom, blend in some deep purple or violet. This creates a mystical atmosphere near the bottom point of the heart. -
Paint the crescent moon:
Using a small round brush, paint a C-shaped crescent moon in the upper center using pale yellow or cream paint. You may need two coats to make it opaque against the dark background. -
Add the night cloud:
Just like on the day side, dab a small cloud near the bottom right edge using white paint. Since it’s night, mix a tiny bit of blue into the white for the shadowed parts of the cloud. -
Sparkle with stars:
Use your finest liner brush and thinned white paint to dot stars all over the sky. Create variety by painting some tiny dots and drawing small crosses for twinkling larger stars.
Starry Splatter
For a dense star field, dilute white paint with water, load a toothbrush, and flick the bristles to spray tiny specks over the night side.
Step 4: Finishing Touches
-
The final reveal:
Carefully peel away the painter’s tape to reveal the sharp division line between day and night. -
Touch up the center:
If any paint bled under the tape, use a small flat brush and the appropriate background color to carefully tidy up the center line. -
Paint the edges:
I usually like to paint the thick sides of the canvas to match the front—blue on the left, dark blue on the right—so it looks finished from every angle.
Hang your duality masterpiece on the wall and enjoy the best of both worlds
Tape-Resist Geometric Blocks Inside a Heart
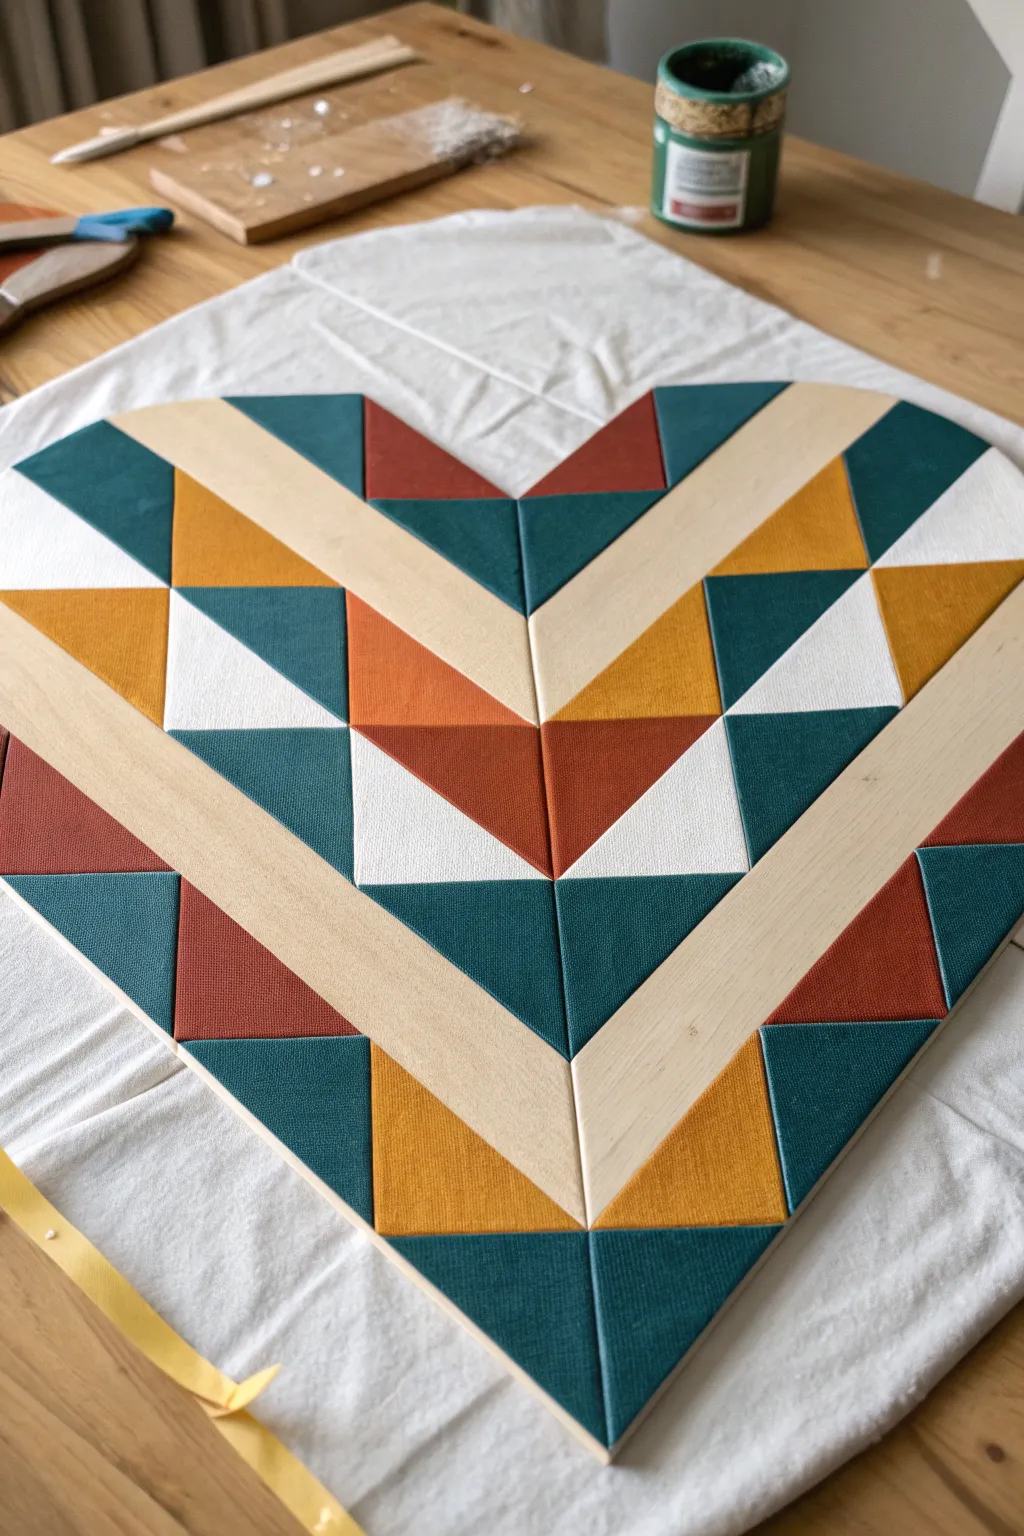
This striking wall art combines the warmth of a classic quilt block pattern with modern geometric design. By carefully painting sections to mimic pieced wood or fabric, you’ll create a textured, multi-dimensional heart that serves as a stunning focal point.
How-To Guide
Materials
- Large heart-shaped wooden panel or canvas
- Painter’s tape (high quality, various widths)
- Acrylic paints (teal, mustard yellow, burnt orange, rust red, white)
- Light beige or cream paint (for the ‘wood’ stripping)
- Flat shader brushes (medium and small)
- Ruler or straight edge
- Pencil
- Clear matte varnish or sealer
- Palette or paper plate
Step 1: Preparation & Mapping
-
Surface prep:
Begin with a clean heart-shaped base. If you are using raw wood, give it a quick sanding and a coat of primer. If using a canvas, ensure it’s taut and dust-free. -
Center line:
Find the exact vertical center of the heart. Use your ruler to draw a very light pencil line from the dip at the top straight down to the point at the bottom. -
Drafting the chevron:
This design relies on symmetry. Lightly sketch a large ‘V’ shape (chevron) that divides the heart into roughly equal upper and lower halves. This will be the main ‘wood’ strip. -
Adding the grid:
Using your ruler, divide the remaining space above and below the main chevron into triangular sections. Follow the lines in the reference photo: alternating triangles that mirror each other across the center line.
Crisp Line Secret
To prevent bleeding, brush a tiny bit of the *base* color (or clear matte medium) over the tape edge first to seal it before applying your colored paint.
Step 2: Taping Strategy
-
Tape the ‘wood’ strip:
Apply painter’s tape along the outside edges of your main chevron shape first. We want to preserve this area to be painted differently than the colorful blocks. -
Paint the dividers:
Paint the main chevron strip with a light beige or cream color to mimic light wood. Let this dry completely before moving on. -
Protect the strip:
Once the beige strip is fully dry, cover it entirely with tape to protect it while you paint the surrounding colorful triangles. -
Sectioning triangles:
Tape off the borders of your first set of non-adjacent triangles. You cannot paint touching shapes simultaneously, or the colors will bleed into each other.
Uneven Coverage?
Yellows and whites often streak. Don’t cake it on heavily; instead, do three very thin coats, letting each one dry completely in between.
Step 3: Painting the Colors
-
Deep teal application:
Mix a deep, rich teal. Fill in the corresponding outer triangles and the central lower diamonds. Use smooth, even strokes to minimize brush marks. -
Mustard accents:
Apply the mustard yellow paint to the designated triangles. You may need two thin coats for the yellow to be fully opaque and vibrant. -
Rust and orange tones:
Paint the remaining warm-toned sections with burnt orange and rust red. These earthy tones balance the cool teal beautifully. -
Adding white contrast:
Fill in the specific triangles intended to be white. This brightness pops against the deeper colors and mimics the look of a quilt pattern. -
Dry and peel:
Wait for the paint to be dry to the touch but not fully cured before carefully peeling back the tape. Pull it away at a 45-degree angle. -
Second wave taping:
Once the first set of shapes is dry, apply tape over their dry edges to define the borders for the remaining empty triangles. -
Finish interior shapes:
Paint the remaining triangles, ensuring you match the color pattern symmetrically on both sides of the heart.
Step 4: Detailed Finishing
-
Clean up lines:
Remove all remaining tape. Use a very small detail brush and the appropriate paint color to touch up any spots where paint might have bled or lines aren’t crisp. -
Simulate wood grain (optional):
If you want the beige chevron to look more like real wood, mix a slightly darker beige glaze and lightly drag a dry brush through it to create faint grain lines. -
Sealing:
Allow the entire piece to cure for 24 hours. Apply a coat of clear matte varnish to unify the sheen of the different paint colors and protect the surface.
Hang your geometric heart proudly on the wall and enjoy the warm, modern vibe it brings to your space

PENCIL GUIDE
Understanding Pencil Grades from H to B
From first sketch to finished drawing — learn pencil grades, line control, and shading techniques.
Explore the Full Guide
Finger-Painted Blended Heart With Playful Strokes
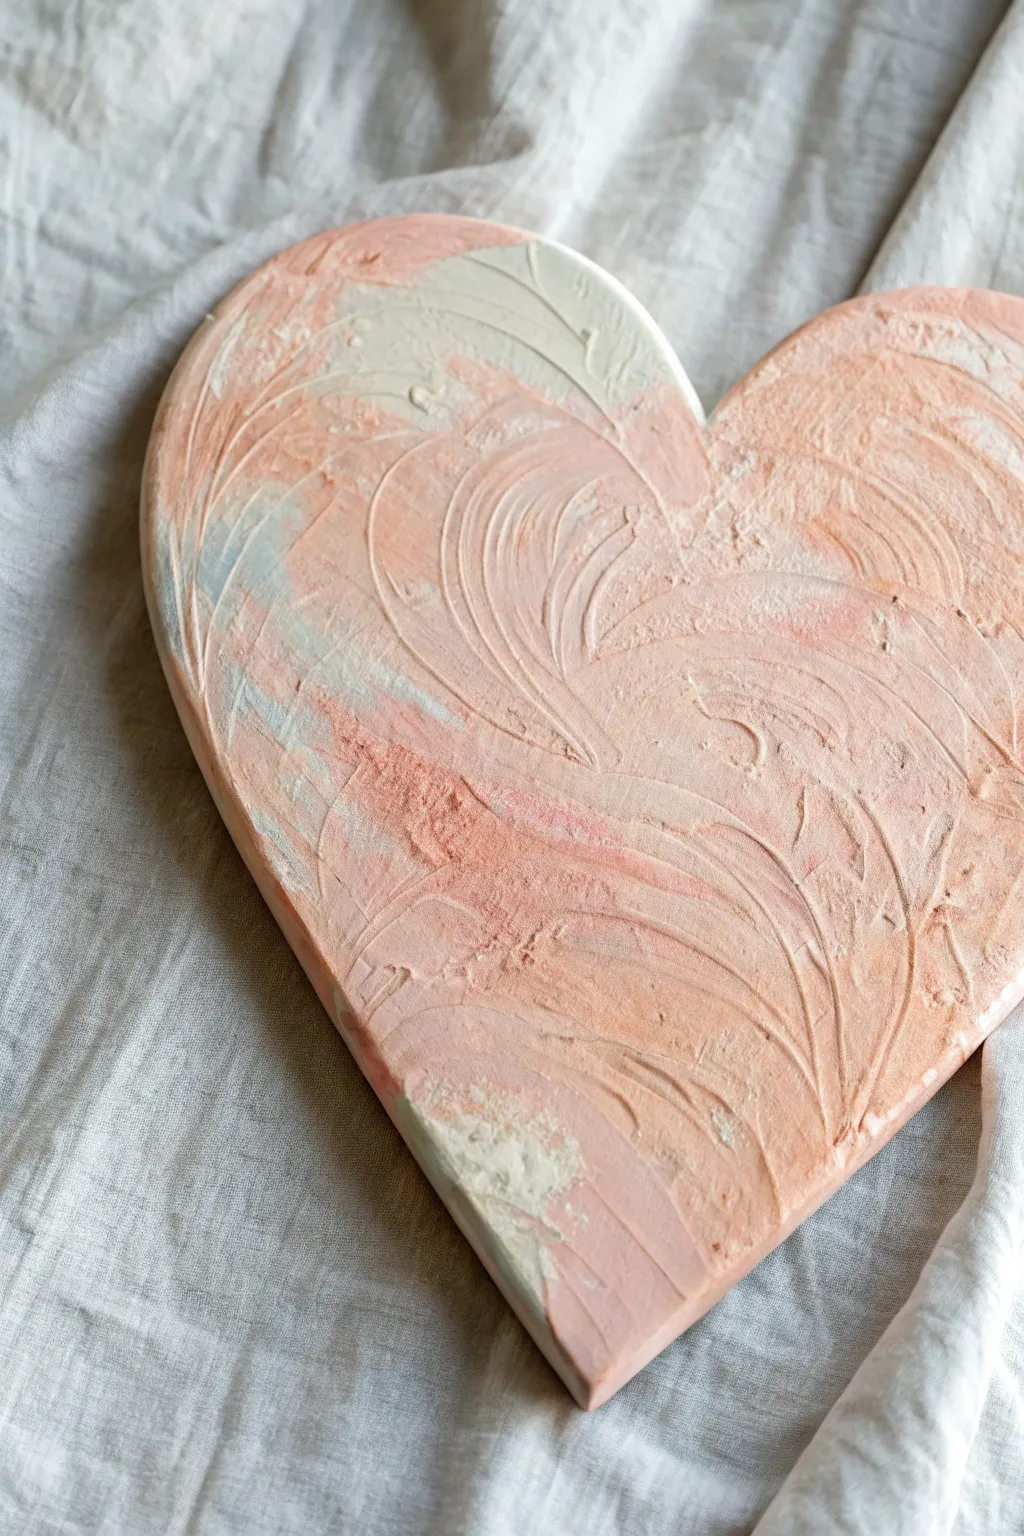
Embrace messy creativity with this tactile project that focuses on texture over perfection. Using thick body acrylics or modeling paste, you’ll create a sculptural, swirling surface in soft shades of blush, peach, and cream.
Detailed Instructions
Materials
- Heart-shaped canvas or wood panel
- Heavy body acrylic paints (blush pink, peach, white, titanium white)
- Small amount of sage green or light grey paint
- Modeling paste or heavy gel medium (optional but recommended for texture)
- Palette knife or stiff piece of cardboard
- Paper plate or palette
- Protective workspace covering
Step 1: Base Preparation
-
Prepare your palette:
Squeeze out generous amounts of your pink, peach, and white paints onto your palette. If you are using modeling paste to add extra dimension, mix a dollop of it into each color pile now. You want the consistency to be like frosting. -
Prime the surface:
Apply a thin, flat base coat of white acrylic paint over the entire heart canvas to seal it. Let this layer dry completely before moving on to the thick application.
Oops, too muddy?
If your colors over-blend and turn brown or dull, stop immediately. Let the current layer dry for 30 minutes, then apply fresh, clean strokes of color on top.
Step 2: Color Application
-
Apply the main color:
Using a palette knife or your fingers, scoop up a large amount of the peach-pink mixture. Slather it onto the canvas, starting from the center and working outward. Don’t worry about smoothing it out yet; just get the pigment on the surface. -
Add white highlights:
Drop globs of pure white paint or white modeling paste onto the wet pink layer. Focus these lighter areas near the top curves of the heart to simulate light hitting the surface. -
Introduce contrast:
Dip just the corner of your tool into the sage green or grey paint. Swipe this color sparingly into a few areas, particularly near the edges or bottom point, to create subtle depth and color variation.
Make it Sparkle
While the thick paint is still wet, lightly sprinkle fine gold glitter or gold leaf flakes into the ridges for a glamorous, mixed-media finish.
Step 3: Creating Texture
-
Blend on the canvas:
Use your fingers or the palette knife to gently push the colors into each other directly on the heart. You want a marbled effect, not a fully blended solid color, so stop while distinct streaks remain. -
Create primary swirls:
Here I prefer to use my fingers for the best organic feel. Press into the thick paint and make large, C-shaped sweeping motions following the curve of the heart shape. -
Add directional ridges:
Drag your fingers or a notched spreader through the paint to create defined ridges. Vary the pressure: push harder to reveal layers underneath, and lighter to just skim the surface. -
Build up the edges:
Ensure the paint extends over the sides of the canvas or panel. Use your thumb to smooth the excess paint around the rim, giving it a finished, professional look. -
Check for balance:
Step back and look at your composition. If an area looks too flat, dab on a bit more thick white paint and swirl it in to revive the texture.
Step 4: Finishing Touches
-
Refine the texture:
If painting with fingers, look for areas that need sharper definition. Use the edge of a credit card or palette knife to re-carve a few distinct lines if the paint has settled too much. -
Let it set:
Because the paint application is very thick, this project requires significant drying time. Lay it flat in a dust-free area for at least 24 hours. -
Check for cracks:
Sometimes thick acrylics crack while drying. If this happens and you don’t like the look, mix a tiny bit of paint with water and wash it over the cracks to fill them in. -
Optional varnish:
Once fully cured (which may take a few days for the deepest layers), you can apply a gloss varnish to make the texture look wet and shiny, or a matte varnish to keep the plaster-like appearance.
Hang your textured heart on a gallery wall or prop it on a shelf for a lovely pop of pastel color
Card-Swipe Texture Heart for Rustic Stripes
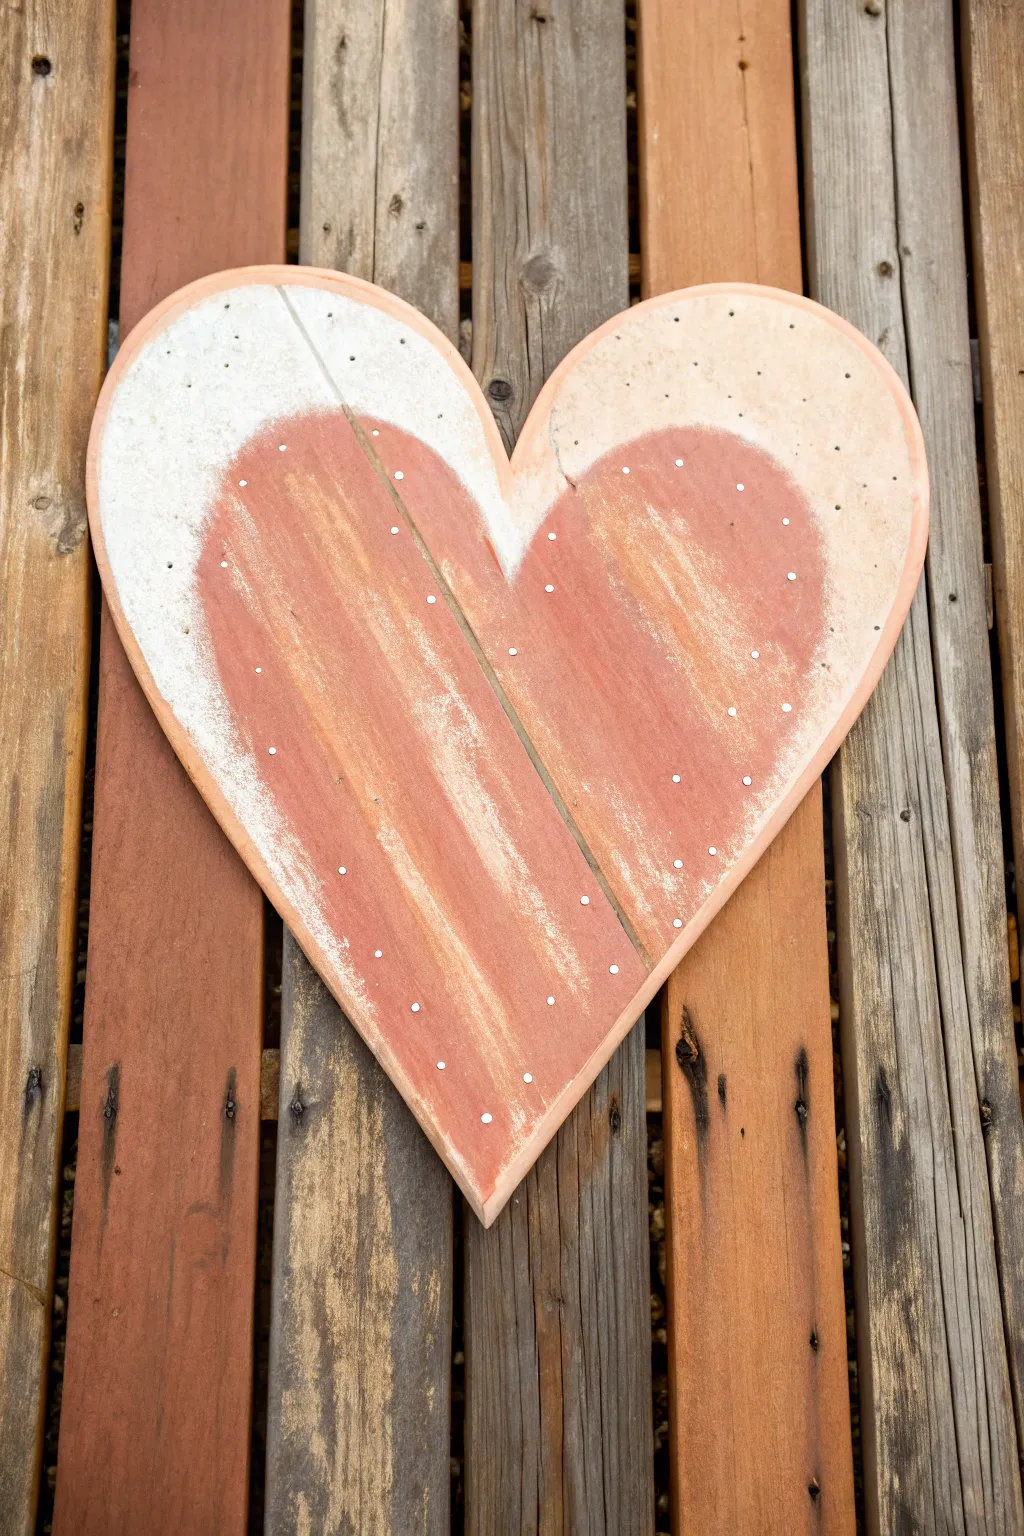
Capture the charm of weathered barn wood with this rustic heart project that uses a simple credit card to create authentic texture. The muted terracotta tones and distressed finish make it a perfect accent piece for farmhouse or cottage-style decor.
Step-by-Step Guide
Materials
- Large wooden heart cutout (approximately 12-16 inches)
- Acrylic craft paint (Cream/Off-White)
- Acrylic craft paint (Terracotta or Muted Brick Red)
- Medium flat paintbrush
- Old credit card, gift card, or scrap piece of stiff cardboard
- Small round paintbrush or dotting tool
- Sandpaper (fine grit, 220)
- Paper plate or palette
- Paper towels
Step 1: Base Preparation
-
Surface Prep:
Begin by lightly sanding your wooden heart cutout to remove any rough splinters or factory coatings. Wipe away the dust with a dry paper towel or cloth. -
Base Coat Application:
Using your medium flat brush, paint the entire front surface of the heart with the Cream or Off-White acrylic paint. You don’t need perfect coverage here; a little transparency adds to the rustic vibe. -
Drying Time:
Let this base coat dry completely. Since acrylics dry fast, 15-20 minutes usually does the trick.
Step 2: Creating the Swipe Texture
-
Load the Paint:
Squeeze a generous mesmerizing amount of the Terracotta paint onto your palette. You want enough paint to be able to dip the edge of your card into it. -
First Swipe:
Dip the short edge of your old credit card into the Terracotta paint. Place the card near the top-center of the heart and drag it firmly straight downward. -
Varying Pressure:
As you drag the card, experiment with pressure. Lighter pressure will leave more paint, while harder pressure creates those desirable scratchy, weathered streaks. -
Building the Shape:
Repeat the swiping process, moving outwards from the center. Focus on creating a smaller, inner heart shape with the red paint, leaving a clear border of the cream base visible around the edges. -
Directional Swiping:
Keep your swipes vertical to mimic the grain of wood planks. If you need to reload the card, do so sparingly to maintain that distressed look. -
Refining Edges:
Use the corner of your card to gently feather the edges of the red section if they look too blocky. The transition should feel organic and worn. -
Center Line:
To mimic joined wood planks, take the clean edge of your card and firmly scrape a single vertical line straight down the center of the heart while the paint is still wet, revealing the base coat underneath. -
Check Balance:
Step back and look at your heart. If one side looks too heavy with paint, do a ‘dry swipe’ with a clean card to remove some excess. -
Let it Set:
Allow the red swiped layer to dry completely. This might take a bit longer due to the texture, so give it about 30-45 minutes.
Too Much Paint?
If a swipe looks too solid or gloppy, wait a few seconds for it to tack up, then scrape over it firmly with a clean credit card to lift the excess.
Step 3: Detailing and Finishing
-
Preparing Details:
Pour a tiny drop of fresh Cream/Off-White paint onto your palette for the dot detailing. -
Dot Placement Strategy:
Plan to place small dots along the border where the red paint meets the cream background. -
Adding Texture Dots:
Dip the handle end of a small brush or a dotting tool into the cream paint. Gently press a dot every inch or so along the outer edge of the red heart shape. -
Center Line Dots:
Add a few vertical dots down the center scrape line you created earlier to simulate nails in wood planks. -
Final Sanding:
Once all paint is 100% dry, lightly sand over the red area with fine-grit sandpaper. This knocks back any raised ridges and enhances the worn, vintage appearance. -
Clean Up:
Wipe away the sanding dust with a dry cloth to reveal your finished, rustic masterpiece.
Custom Colors
Try a dark turquoise base with a white swipe for a beachy look, or swap the red for slate grey to create a modern farmhouse style.
Hang your textured heart on a gallery wall or prop it on a mantel to add instant warmth to your home


Cling-Wrap Marble Heart in Bold Colors
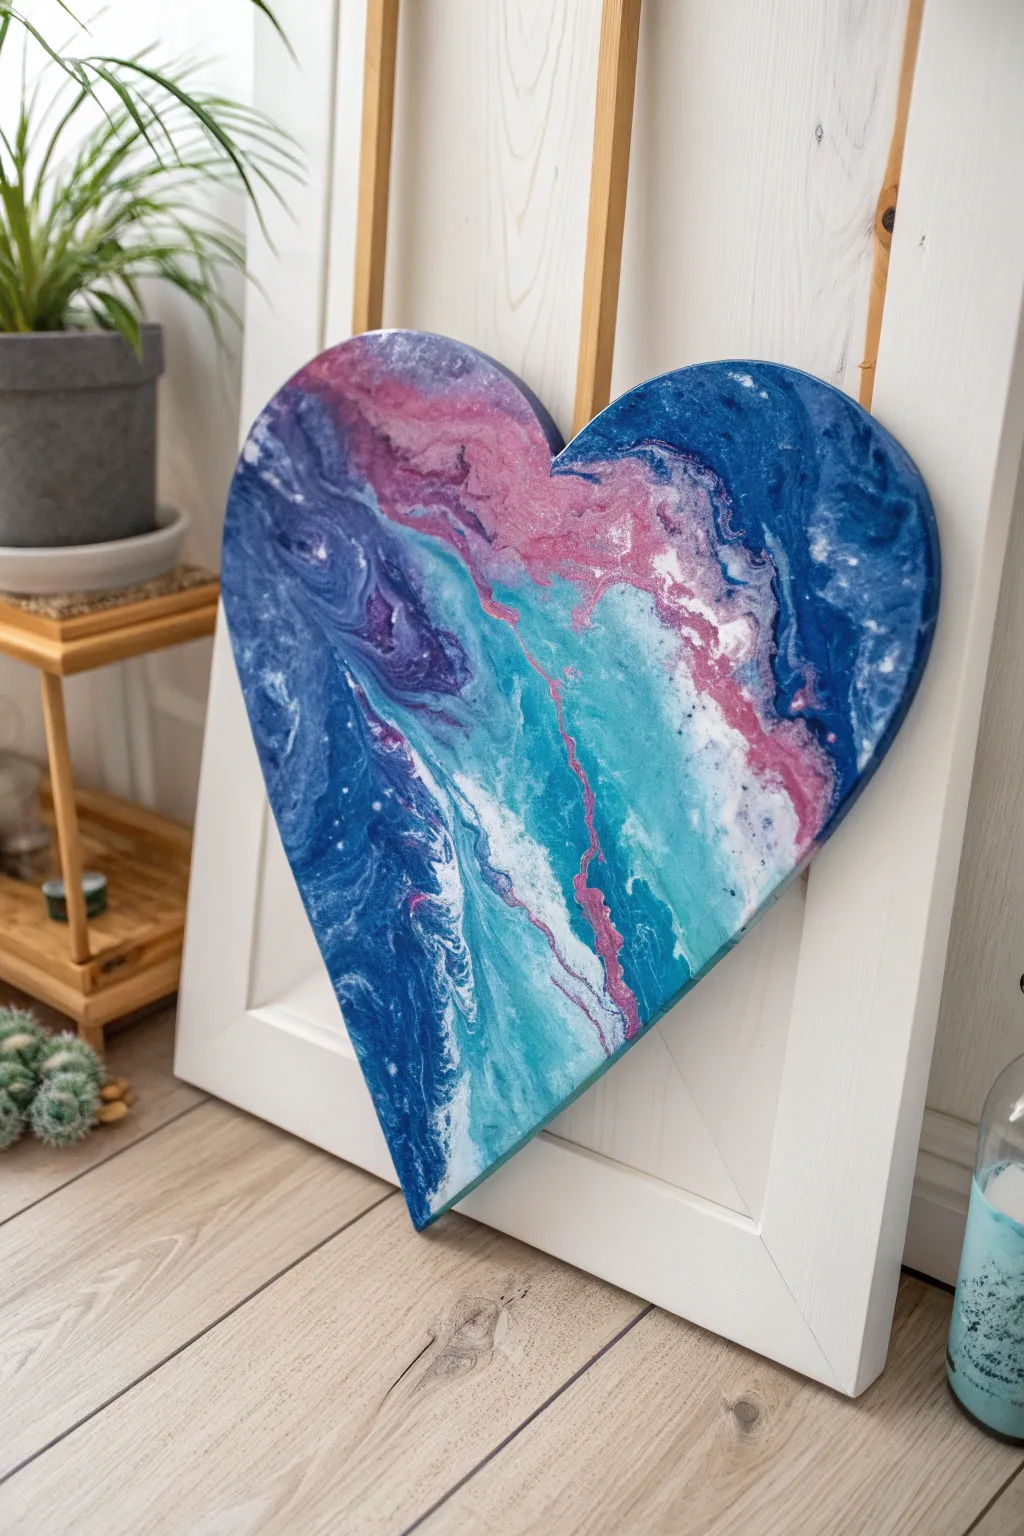
Capture the swirling beauty of a nebula with this vibrant heart-shaped fluid art project. Using simple pouring techniques and cling wrap, you’ll create a mesmerizing blend of deep blues, teals, and shimmering pinks that looks like a slice of the universe.
Step-by-Step Tutorial
Materials
- Heart-shaped stretched canvas or wooden panel
- Gesso (if using wood)
- Acrylic paints (Navy Blue, Phthalo Blue, Teal/Turquoise, Magenta, White)
- Pouring medium (Liquitex or Floetrol)
- Plastic cups and stir sticks
- Cling wrap (plastic food wrap)
- Gloves
- Drop cloth or large trash bags
- Heat gun or torch (optional, for bubbles)
- High-gloss varnish or resin (for finish)
Step 1: Preparation & Mixing
-
Prepare the Workspace:
Cover your entire work surface with a drop cloth or trash bags. This process gets messy, so ensure you have plenty of room. -
Prime the Surface:
If you are using a wooden heart cutout, apply a coat of white gesso to seal the wood and help the colors pop. Let it dry completely. -
Elevate the Canvas:
Place your heart canvas on top of four overturned cups (or similar props) so the paint can flow freely off the edges without sticking the heart to the table. -
Mix the Paints:
In separate cups, mix your acrylic paints with the pouring medium. A standard ratio is 1 part paint to 2 parts medium, but check your bottle’s instructions. Aim for the consistency of warm honey. -
Adjust the White:
Make the white mixture slightly thinner than the other colors. This helps it break through the darker layers to create those lightning-like veins later.
Wrap It Right
Don’t press the cling wrap down too hard or you’ll expose the canvas. Just let it rest on the paint surface to pull the pigments gently.
Step 2: The Pouring Process
-
Apply the Base Layer:
Pour a generous amount of Navy Blue and Phthalo Blue onto the canvas, spreading it roughly to cover the surface. It doesn’t need to be perfect yet. -
Add Accent Colors:
Drizzle the Teal and Magenta across the heart in diagonal, organic lines. Think of them as rivers of color cutting through the dark blue ocean. -
Introduce White:
Pour thin streams of white alongside the teal and magenta lines. Don’t overdo it; a little white goes a long way in fluid art. -
Tilt to Blend:
Gently pick up the heart and tilt it in various directions. Let the paint slide around, stretching the lines and merging the colors naturally. -
Cover the Edges:
Ensure the paint flows over the sides of the heart. Use a gloved finger to touch up any bare spots on the corners or hard-to-reach edges.
Muddy Colors?
If your colors turn brown or grey, you likely over-tilted or over-mixed them on the canvas. Next time, move the canvas less and let the paint sit.
Step 3: Creating the Texture
-
Apply Cling Wrap:
While the paint is still very wet, tear off a piece of cling wrap larger than the heart. Gently lay it directly onto the wet paint surface. -
Scrunch and Wrinkle:
Use your fingers to pinch and wrinkle the plastic while it’s sitting on the paint. I like to twist specific areas where I want intricate veins, especially along those diagonal color bands. -
Wait and Lift:
Let the cling wrap sit for just a minute or two to create the texture impressions, then carefully peel it off. Lift slowly from one corner to reveal the marbled, lightning-strike effect underneath. -
Pop Bubbles:
If you see tiny air bubbles trapped in the paint, quickly pass a heat gun or torch over the surface to pop them. -
Initial Drying:
Leave the heart on its elevated cups to dry in a dust-free area. This usually takes at least 24 to 48 hours depending on humidity.
Step 4: Finishing Touches
-
Check for Dryness:
Touch a side edge gently to ensure the paint is fully cured before moving to the next step. -
Clean the Back:
If paint drips have dried on the underside of the heart, you can trim them away with a craft knife or use sandpaper to smooth them out. -
Apply Gloss Varnish:
To get that wet, glassy look seen in the photo, apply two to three thin coats of high-gloss varnish or a layer of art resin.
Hang your cosmic heart where it catches the light to fully appreciate the depth of those swirls
Drip Paint From the Top Dip for a Cute Cascade
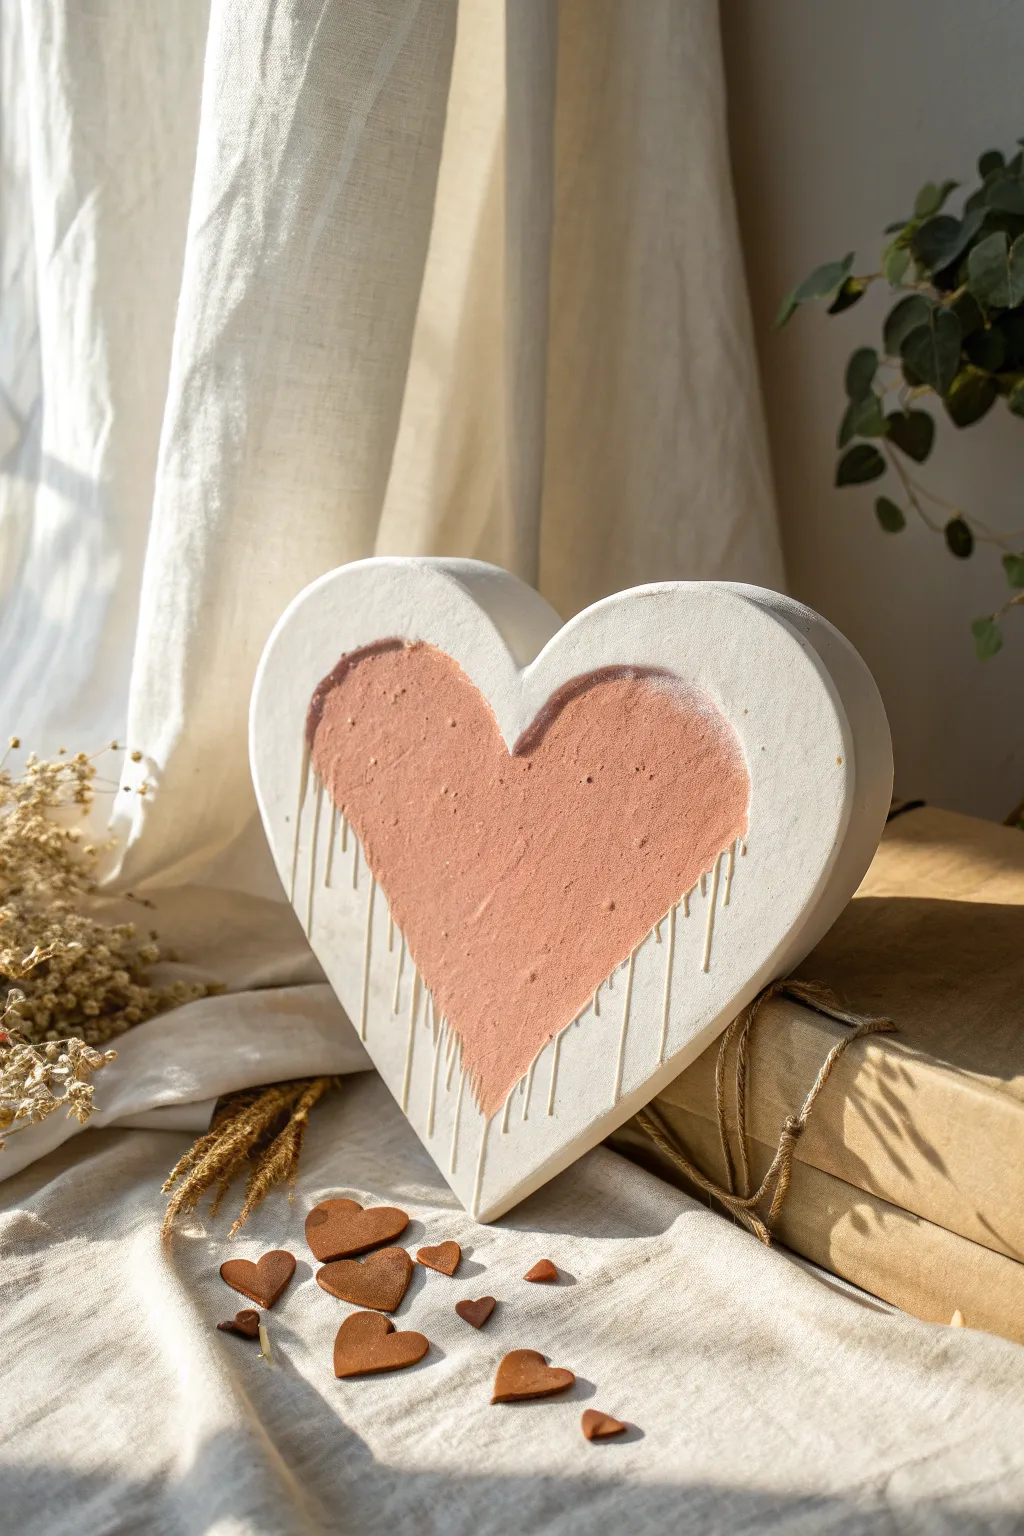
This rustic, sculptural project combines the texture of concrete with a playful drip effect for a stunning 3D art piece. The warm terracotta tones contrasting against fresh white drips create a cozy, handcrafted look perfect for a mantel or bookshelf display.
Detailed Instructions
Materials
- Heart-shaped hollow mold (silicone or plastic)
- White concrete mix or plaster of Paris
- Terracotta acrylic paint
- White acrylic paint (heavy body or mixed with medium)
- Mixing bowl and spoon
- Fine-grit sandpaper (220 grit)
- Small flat paintbrush
- Squeeze bottle or palette knife
- Water
- Clear matte sealant spray
Step 1: Casting the Base
-
Prepare the workspace:
Cover your table with plastic sheeting or newspaper. Ensure your heart mold is clean and dry inside to prevent any surface imperfections on your casting. -
Mix the casting medium:
Follow the package instructions to mix your white concrete or plaster of Paris with water. Aim for a consistency similar to pancake batter—pourable but not watery. -
Pour the mold:
Slowly pour the mixture into your heart-shaped mold. Fill it all the way to the rim to ensure a nice, thick block which will stand upright easily. -
Release air bubbles:
Gently tap the sides of the mold and lift it slightly to tap it on the table. This brings trapped air bubbles to the surface, creating that characteristic smooth stone look. -
Let it cure:
Allow the heart to dry completely. This usually takes 24 to 48 hours depending on humidity and the depth of the mold. It should feel cool and hard to the touch. -
Demold the heart:
Carefully peel back the silicone or pop the heart out of the plastic mold. Handle it gently, as fresh plaster can chip easily. -
Sand imperfections:
Use fine-grit sandpaper to smooth out any rough edges on the back or sides where the mold might have overflowed. Wipe away the dust with a slightly damp cloth.
Step 2: Painting the Design
-
Outline the inner heart:
Using a pencil, very lightly sketch a smaller heart shape in the center of your stone block allowing for a wide border around the edge. -
Paint the center:
Fill in the sketched heart area with terracotta acrylic paint. Use a flat brush to get crisp edges, applying two coats if needed for a rich, earthy color. -
Add texture (optional):
If you want the center to look more like clay, stipple the wet paint slightly with a dry brush or sponge to create a rougher texture before it dries. -
Prepare the drip paint:
For the white drips, you need a thicker consistency. Use heavy body white acrylic paint, or mix standard acrylic with a thickening gel medium so it holds its shape.
Paint Runny-ness
If your white paint is running too fast and not leaving raised textural lines, let it sit on your palette for 10 minutes to thicken slightly before applying.
Step 3: Creating the Cascade
-
Start the drips:
Load a generous amount of white paint onto a palette knife or into a squeeze bottle. Apply it to the very top edge of the inner terracotta heart. -
Guide the flow:
Gently encourage the paint to run down vertically using the tip of your tool. Vary the length of the lines—some short, some reaching near the bottom. -
Thicken the drops:
Add a tiny extra dot of paint at the end of each drip line to simulate gravity pulling a heavy droplet downward. -
Refine the border:
I like to go back along the upper rim where the white meets the terracotta and smooth that transition line so it looks like the paint is spilling out naturally. -
Seal the piece:
Once the paint is fully dry (overnight is best for thick drips), spray the entire sculpture with a clear matte sealant to protect the finish.
Clean Lines
For a super crisp edge on the inner heart, you can create a stencil from contact paper or painter’s tape to mask off the outer border.
Place your finished sculpture near natural light to highlight the beautiful texture and shadows created by the drips
Minimal Line Art Bouquet Centered in a Heart
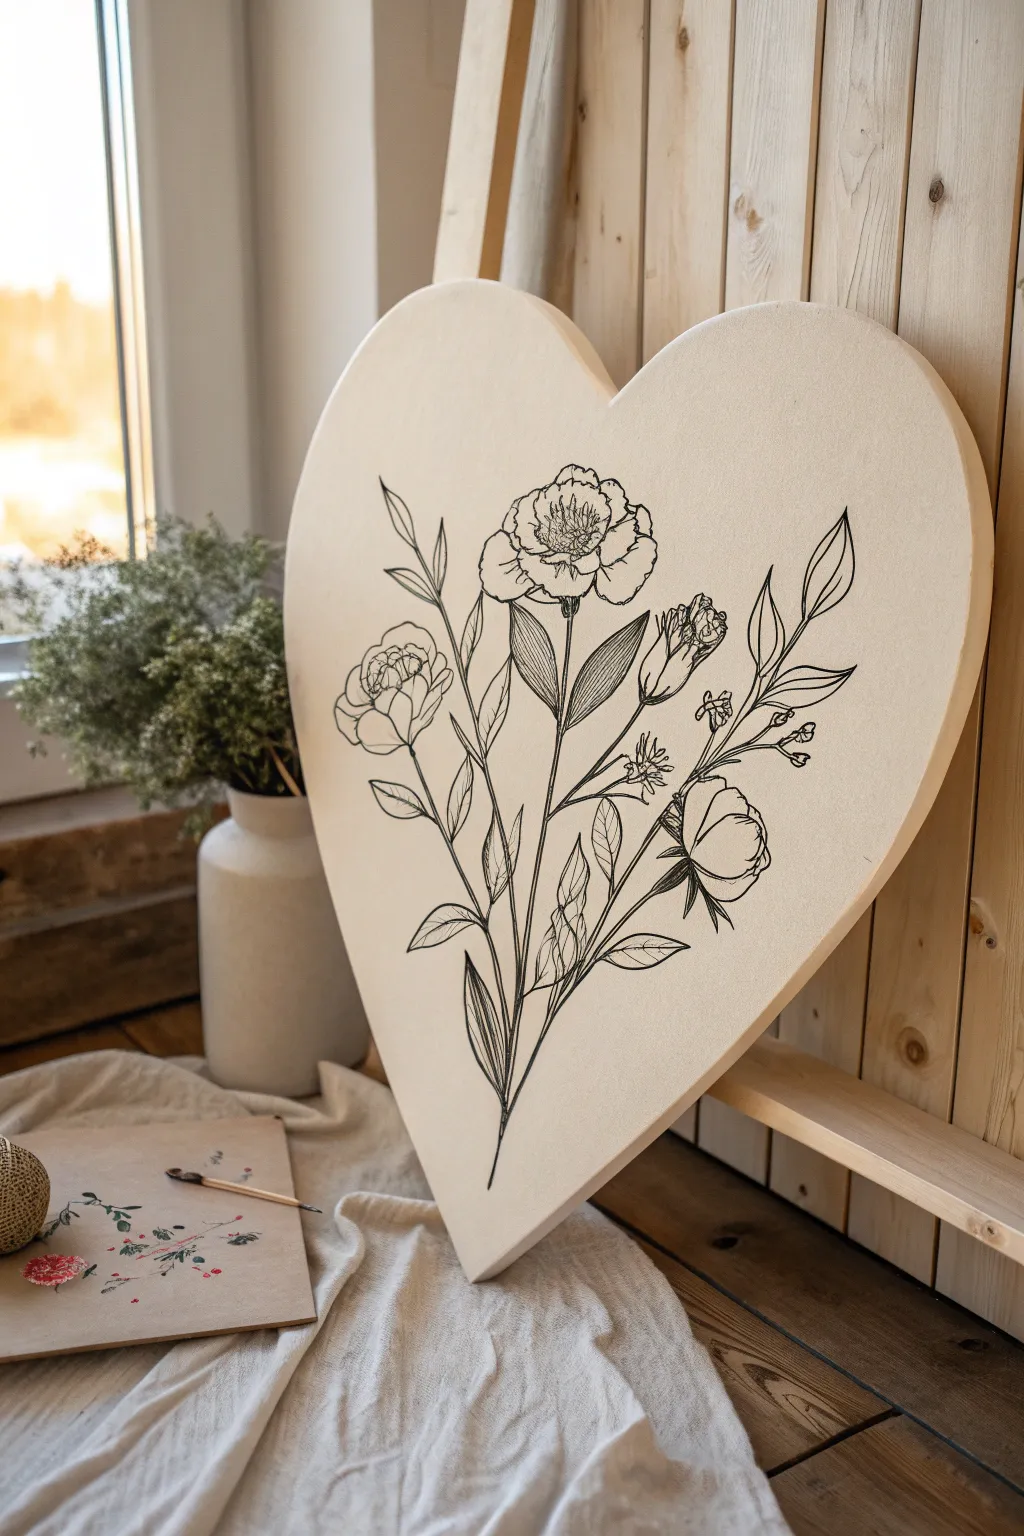
This project combines the romantic shape of a heart canvas with the elegant simplicity of botanical line art. The result is a clean, modern piece that looks sophisticated but relies on basic drawing techniques perfect for beginners.
Step-by-Step
Materials
- Heart-shaped stretched canvas (approx. 12-16 inches)
- Black acrylic paint or black acrylic paint pens (fine and medium tips)
- Graphite transfer paper
- Pencil and eraser
- Printed botanical line art template (or original sketch paper)
- Painter’s tape
- Fine liner brush (size 0 or 00) if using paint
- Matte varnish (spray or brush-on)
Step 1: Preparation and Design
-
Prepare the canvas:
Ensure your heart-shaped canvas is clean and free of dust. If the canvas surface feels too rough, you can apply a thin coat of gesso and sand it lightly once dry to create a smoother surface for your lines. -
Create your composition:
Sketch your floral design on a separate piece of plain paper first. Aim for a central bouquet arrangement with a main focal flower (like a peony) near the top center, flanked by smaller buds and reaching leaves. -
Refine the sketch:
Darken the lines of your paper sketch so they are clearly visible. Make sure the stems converge at a single point near the bottom point of the heart to create a balanced V-shape composition. -
Check the scale:
Hold your paper sketch over the canvas to ensure the drawing isn’t too small or too large; you want the side leaves to gently follow the curve of the heart’s lobes without touching the very edge.
Bleeding Lines?
If paint markers bleed into the canvas weave, apply a thin layer of clear matte medium over your pencil sketch first. Let it dry, then draw on top for crisp lines.
Step 2: Transferring the Image
-
Position the transfer paper:
Place a sheet of graphite transfer paper (dark side down) onto the canvas. Secure it lightly with a small piece of painter’s tape if needed to keep it from sliding. -
Align the design:
Place your sketch on top of the transfer paper. I like to measure from the center top dip of the heart to the center of my main flower to ensure perfect vertical alignment. -
Trace the design:
Using a ballpoint pen or a hard pencil, firmly trace over every line of your sketch. Apply consistent pressure to ensure the graphite transfers clearly to the canvas texture. -
Reveal the guide:
Lift one corner of the paper to check the transfer. If the lines are faint, press harder. Once satisfied, remove the papers to reveal your faint graphite guide on the canvas.
Step 3: Inking the Lines
-
Outline the main stems:
Start from the bottom ‘convergence point’ and work your way up. Use a medium-tip acrylic paint pen or a liner brush with black acrylic paint to trace the main structural stems. -
Draw the focal flower:
Move to the large central bloom. Outline the outer petals first, using slightly varying line weights—thicker on the shadow side, thinner on the light side—to add depth. -
Detail the center:
Switch to a fine-tip marker or a size 00 brush. Add the delicate stamens and inner petal folds of the main flower with light, short strokes. -
Add secondary buds:
Outline the smaller flower buds on the left and right. Keep these lines fairly simple, focusing on the oval shapes of the petals and the sepals at the base. -
Trace the leaves:
Inking the leaves requires a steady hand. Draw the central vein of each leaf first, then draw the outer edges, connecting them back to the stem. -
Add leaf details:
Using your finest tool, add light shading lines or hatching inside the leaves and on the underside of petals to suggest texture and shadow.
Add a Pop of Color
Though the monochrome look is chic, try adding a very sheer wash of watercolor or thinned acrylic inside just the flower petals for a soft, vintage botanical vibe.
Step 4: Final Touches
-
Clean up borders:
Check the edges where your ink meets the canvas weave. If the canvas texture caused any jagged lines, carefully smooth them out with a second pass of the pen or brush. -
Erase guidelines:
Allow the ink or paint to dry completely—give it at least an hour to be safe. Gently erase any visible graphite lines with a kneaded eraser. -
Protect the work:
Once fully cured (wait 24 hours for markers), apply a coat of matte varnish spray. This seals the graphite and ink, preventing smudging and UV fading.
Hang this lovely piece in a gallery wall or prop it on a shelf for instant cottage-core charm
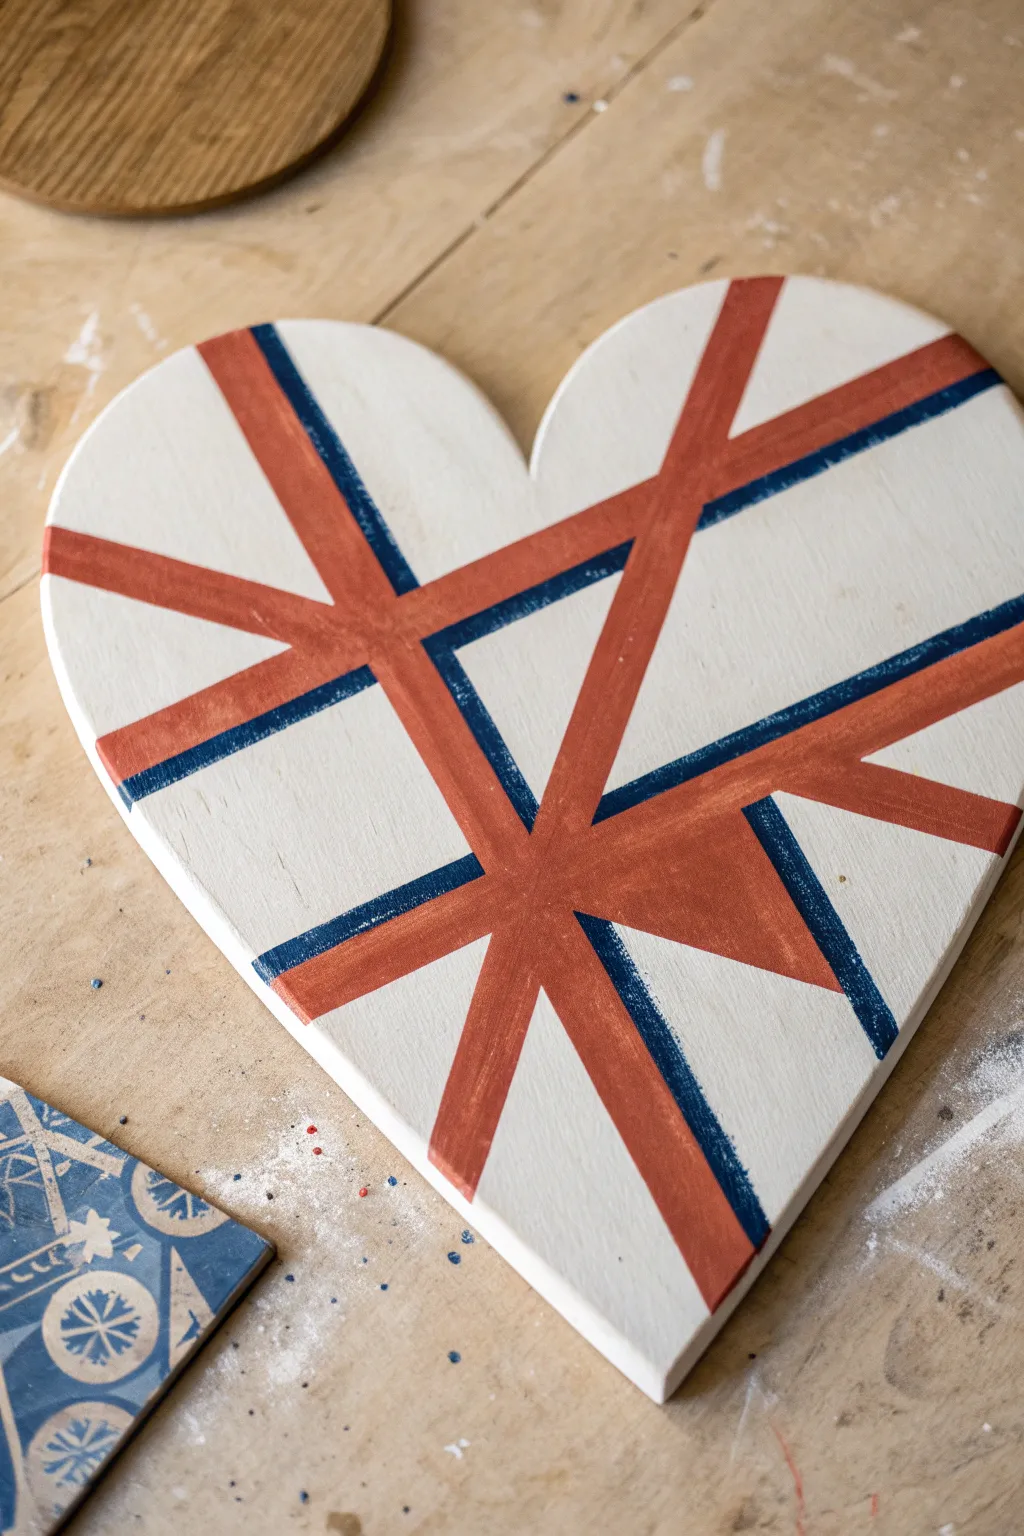
Negative Space Heart With a Painted Background

Celebrate British style with this rustic Union Jack design painted onto a wooden heart shape. The bold geometric lines and distressed finish give it a charming, hand-crafted feel perfect for wall decor.
Detailed Instructions
Materials
- Heart-shaped wooden plaque or canvas
- Acrylic paint (Creamy white, Navy blue, Brick red/rust)
- Painter’s tape or masking tape (various widths)
- Flat paintbrushes (medium and small)
- Sandpaper (fine grit)
- Ruler or straight edge
- Pencil
Step 1: Base Preparation
-
Prepare the surface:
Before painting, ensure your heart-shaped wood piece is clean and smooth. If there are any rough splinters on the edges, give them a quick rub with fine-grit sandpaper and wipe away the dust. -
Apply the base coat:
Paint the entire front surface of the heart with a creamy off-white acrylic paint. This will serve as the background for your flags pattern. -
Let it dry completely:
Allow the white base coat to dry fully. If the wood grain is still showing through too much, apply a second coat for better opacity.
Bleeding Lines?
If paint bleeds under the tape, wait for it to dry fully. Then, use a small flat brush with the base white color to paint over the mistake and create a crisp edge again.
Step 2: Mapping the Design
-
Find the center:
Using a ruler, lightly mark the center point of the heart. This doesn’t need to be mathematically perfect, but visual balance is key for the flag design. -
Draft the main cross:
Lightly sketch a vertical line down the center and a horizontal line across the middle using your pencil and ruler. These will guide the main red cross. -
Draft the diagonal:
Sketch diagonal lines forming an ‘X’ that intersects at your center point. These lines will guide the secondary stripes.
Seal edges first
After applying tape, paint a thin layer of your BASE color (white) over the tape edges first. This seals the tape, ensuring the next color layer has perfectly sharp lines.
Step 3: Tape and Paint: Blue Layer
-
Tape for the blue sections:
To create the blue triangles, you actually need to mask off where the white and red stripes will go. Apply tape along the pencil lines you drew, covering the areas that should remain white. -
Positioning the tape:
Ensure you place tape over the vertical center, horizontal center, and diagonal paths. The exposed wood (the negative space between the tape) will become the blue sections. -
Paint the blue triangles:
Fill in the triangular spaces left exposed between your tape strips with navy blue paint. Use a flat brush and paint away from the tape edge to minimize bleeding. -
Remove tape and dry:
Carefully peel up the tape while the paint is still slightly tacky to get cleaner lines, then let the blue sections dry completely.
Step 4: Tape and Paint: Red Layer
-
Mask the blue areas:
Once dry, place new tape over the blue triangles you just painted to protect them. You also need to tape off thin strips of white border that separate the red cross from the blue background. -
Create the main cross:
Position tape to create a wide vertical stripe and a wide horizontal stripe that intersect in the middle. This forms the main St. George’s cross. -
Create the diagonal cross:
Position tape for the thinner diagonal red stripes. Traditionally, these are offset, but for this simplified craft version, centered diagonal stripes work well. -
Paint the red stripes:
Fill in the exposed cross shapes with your brick red or rust-colored paint. A slightly muted red gives it a more vintage, farmhouse look than a bright primary red. -
Reveal the design:
Gently remove all painter’s tape. Don’t rush this step—pulling slowly prevents peeling up the base paint.
Step 5: Finishing Touches
-
Touch up lines:
If there’s any significant bleeding, use a small detail brush and the appropriate paint color to tidy up the edges. A little wiggle in the line adds character, so don’t stress over perfection. -
Distress (optional):
For the rustic look shown in the inspiration photo, lightly sand over the painted design once it is bone dry. Focus on the edges and high points to reveal a bit of the wood underneath. -
Seal the artwork:
Protect your work with a coat of clear matte sealer or wax, which will also deepen the colors slightly.
Hang your new patriotic heart on a door or prop it on a shelf for a lovely accent


Have a question or want to share your own experience? I'd love to hear from you in the comments below!