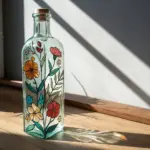
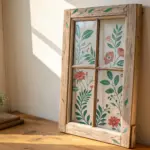
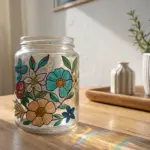
There’s something downright magical about stained glass painting—the moment light hits your colors, the whole piece comes alive. If you’re craving ideas that feel doable (and still look wow-worthy), these designs will give you plenty to play with on glass.
Bold Sunflower Suncatcher

Capture the warmth of a late summer afternoon with this radiant sunflower suncatcher, designed to glow beautifully in natural window light. This project focuses on rich amber and yellow tones framed by bold, dark leading to mimic the classic stained glass look.
Step-by-Step Guide
Materials
- Circular plexiglass or glass blank (8-10 inches)
- Black liquid lead leading (outliner paint)
- Gallery Glass or similar glass paints (Sunflower Yellow, Amber, Cocoa Brown, Clear texture medium)
- Black metal hanging ring or circular frame
- Paper template of sunflower pattern
- Toothpicks or fine-point stylus
- Tape
- Small round paintbrush
- Drying rack or level surface
Step 1: Preparation and Leading
-
Prepare the surface and pattern:
Clean your circular glass or plexiglass blank thoroughly with alcohol to remove any oils. Place your printed sunflower pattern—featuring radiating petals and a central disk—underneath the glass and secure it with tape so it doesn’t shift. -
Trace the outer perimeter:
Using the bottle tip of your black liquid leading, carefully squeeze a steady line around the very edge of the clear panel if you aren’t using a pre-made metal frame. If you have a metal frame, apply a thin bead of lead just inside the rim to seal the gap. -
Outline the center:
Move to the center of the design. Draw the circle for the sunflower’s disk. Add a second, slightly smaller scalloped circle inside the first one to create a defined variation in the seed head. -
Draft the petals:
Begin outlining the petals. Start at the top (12 o’clock) and bottom (6 o’clock) to ensure symmetry, then fill in the remaining petals. Make sure each petal connects firmly to the center circle and touches the outer rim but doesn’t overlap messily. -
Refine the lines:
Before the lead dries, check your lines. If you see any air bubbles or breaks in the line, use a toothpick to gently pop the bubbles or drag the lead to close the gap. Let the outline cure for at least 8 to 12 hours until firm.
Step 2: Painting the Petals
-
Load the yellow petals:
Select the ‘Sunflower Yellow’ paint. Fill in every other petal with this brighter shade. Squeeze a generous amount into the center of the petal, then push the paint toward the lead lines using the nozzle or a toothpick. -
Fill the amber petals:
For the remaining alternating petals, use the ‘Amber’ or a slightly darker golden yellow. This alternation adds depth and mimics the shifting light seen in the reference photo. -
Create texture:
While the petal paint is wet, lightly tap the surface with a stiff brush or toothpick. This creates a subtle ripple effect that catches the light once dried, rather than a perfectly flat finish. -
Blend the edges:
I like to add a tiny drop of amber near the base of the bright yellow petals and swirl it slightly outward. This creates a natural gradient where the petal meets the center ensuring a more organic look.
Lead Line Precision
Keep your elbow resting on the table while leading. It stabilizes your hand for smoother, less shaky lines.
Step 3: Detailing the Center and Background
-
Texture the center disk:
Fill the central disk with ‘Cocoa Brown’ paint. Immediate after applying, take a toothpick and vigorously swirl the paint in small tight circles to create a rough, seeded texture. -
Add dimension to the center:
Drop a small bead of gold or lighter brown right in the very middle of the textured area. Do not blend it fully; let it sit on top slightly to act as a highlight. -
Apply the background:
For the negative space between the petals, use ‘Clear’ paint or ‘Crystal Clear’ texture medium. Apply it thickly. -
Swirl the background:
Using the tip of a toothpick, swirl the clear medium in random, frantic directions. This creates the ‘crackle’ or ‘ice’ look that obscures the view slightly and diffuses light. -
Final drying phase:
Move the project to a safe, dust-free area. Allow it to dry flat for at least 24 to 48 hours. The colors will darken and become more transparent as they cure. -
Attach hardware:
If using a blank without a hook, attach a small adhesive hanger or drill a tiny hole at the top. Thread a rustic twine or gold chain through the loop for hanging.
Sunset Gradient
Add a tiny drop of orange to the very tips of the petals for a ‘sunset’ variety that looks stunning in evening light.
Hang your new creation in a sunny window and enjoy the warm glow all year round


Butterfly With Chunky Leading
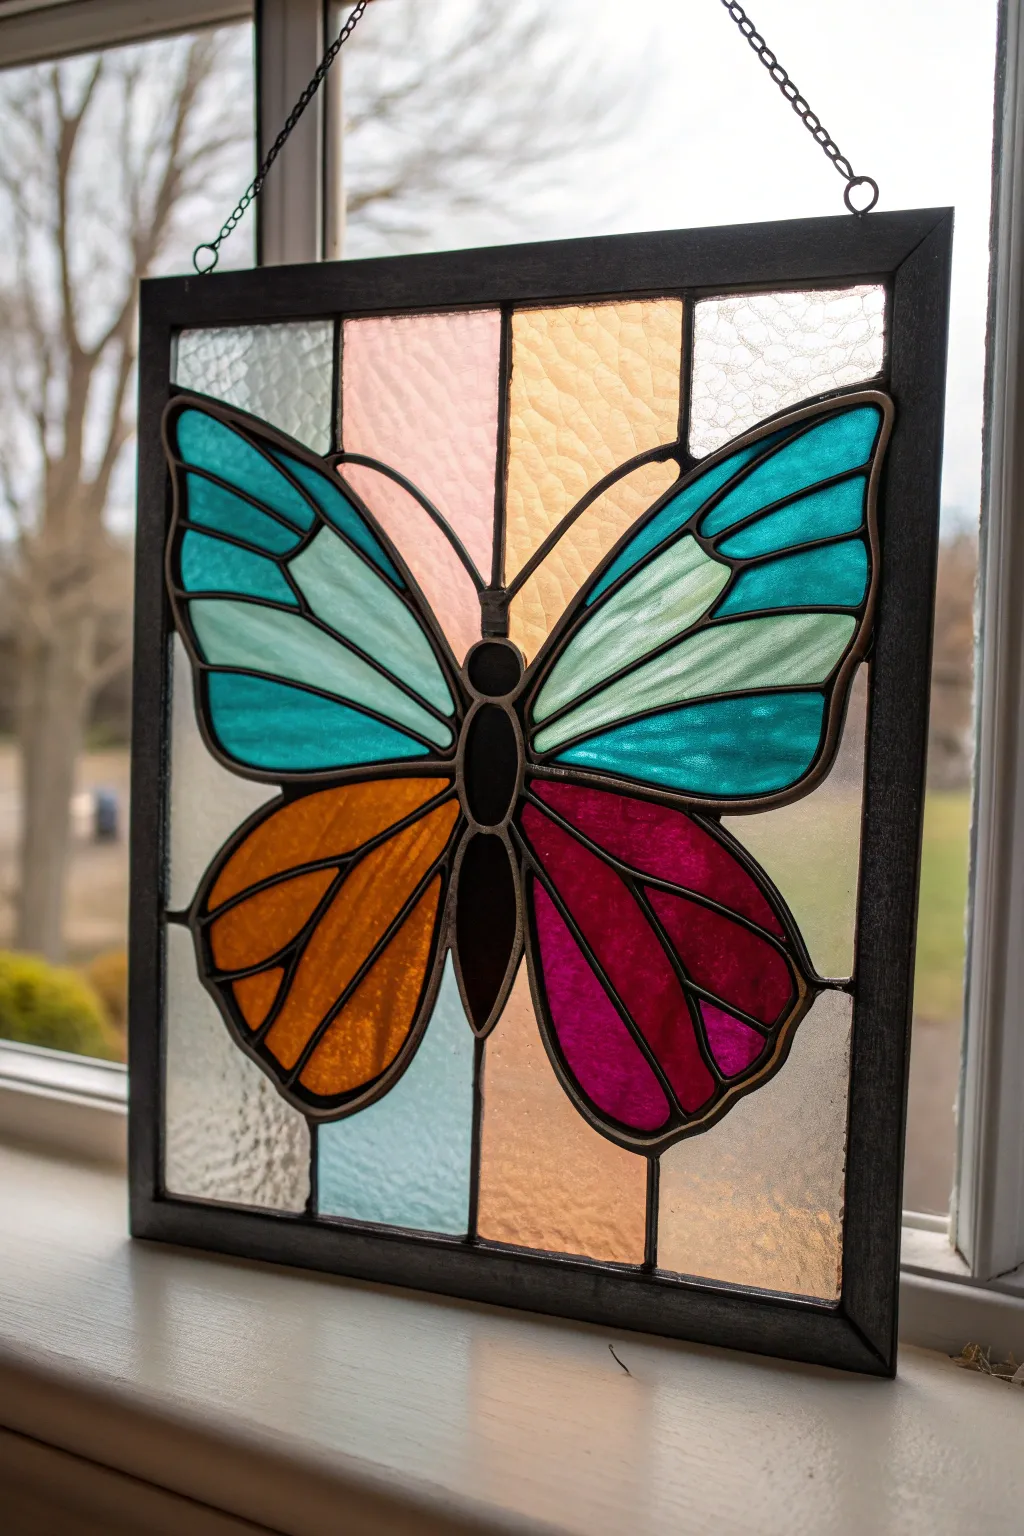
Capture the whimsy of nature with this geometric butterfly panel that combines bold leading lines with soft textured glass. The finished piece features a striking central butterfly set against a grid of pastel colors, perfect for catching the afternoon sun in any window.
Detailed Instructions
Materials
- Stained glass sheets (teal, light blue, orange, magenta, clear textured, pale pink, amber, pale blue, peach)
- Glass cutter (oil-filled)
- Running pliers and grozing pliers
- Copper foil (7/32 inch black back recommended)
- Soldering iron (100-watt)
- 60/40 Solder
- Liquid flux and flux brush
- Pattern paper and scissors
- Zinc U-channel came for framing
- Black patina
- Jump rings and chain for hanging
- Safety glasses and glass grinder
Step 1: Preparation & Cutting
-
Create the pattern:
Begin by drawing or printing a full-scale pattern of the butterfly panel. Ensure your grid lines are straight and the butterfly is centered. Number each piece on the paper pattern to keep track of the specific colors. -
Cut pattern pieces:
Use special foil pattern shears to cut out your paper pieces; these shears remove a thin strip of paper between pieces to account for the thickness of the copper foil later. -
Select your glass:
Choose textured clear glass for the corner accents and mix smoother pastel varieties for the background grid. For the butterfly, select vibrant teal, orange, and magenta to make it pop against the softer background. -
Score the glass:
Place a pattern piece under your glass (or trace it with a permanent marker). Hold your glass cutter like a pen and apply consistent pressure to score the glass along the pattern lines. -
Break the glass:
Use running pliers to snap the glass along the score lines. For smaller curves on the butterfly wings, you may need to use grozing pliers to nibble away excess glass carefully. -
Grind the edges:
Once all pieces are cut, run the edges of each piece against a glass grinder. This removes sharp shards and creates a rough surface that helps the copper foil adhere better.
Step 2: Foiling & Assembly
-
Clean the glass:
Wash all your ground glass pieces thoroughly to remove glass dust and grinder fluid. Dry them completely before moving to the next step. -
Apply copper foil:
Wrap the edge of each glass piece with 7/32 inch copper foil. Center the glass in the foil tape, then fold the edges over onto the front and back surfaces. -
Burnish the foil:
Use a fid or a smooth plastic tool to rub the foil down tightly against the glass. I like to pay extra attention to the corners to ensure the foil creates a crisp line. -
Assemble the panel:
Place your original paper pattern on a work board. Lay out all the foiled pieces on top of the pattern, fitting them together like a puzzle to form the complete rectangle. -
Tack solder:
Brush liquid flux onto the copper foil seams. Apply small dots of solder at key intersections (joints) to hold all the pieces in place temporarily.
Solder Won’t Stick?
If solder balls up or refuses to stick, your foil is likely dirty or oxidized. Use steel wool to gently clean the foil before fluxing again to fix it.
Step 3: Soldering & Finishing
-
Solder the front:
Run a continuous bead of solder along all the seams on the front side. Aim for a smooth, rounded profile (often called a concave bead) on the lead lines. -
Add the frame:
Cut your zinc U-channel came to fit the perimeter of the panel. Slide it over the edges and solder the corners of the frame securely. Solder the lead lines that touch the frame directly to the zinc channel. -
Solder the back:
Carefully flip the panel over. Flux and solder all the seams on the back side just as you did the front. -
Attach hardware:
Solder two jump rings to the top corners of the zinc frame, ensuring they are secure enough to hold the panel’s weight. -
Clean and patina:
Wash the entire panel thoroughly with flux remover or soapy water to remove acidic residue. Once dry, apply black patina with a rag to turn the solder lines dark, giving it that chunky, graphic look. -
Final polish:
After rinsing off the patina and drying again, apply a finishing compound or carnauba wax. Buff it to a high shine to protect the patina and make the glass sparkle.
Add Delicate Details
Make the antennae from tinned copper wire. Bend them into shape and solder the base directly into the seams near the butterfly’s head for a 3D effect.
Hang your finished masterpiece in a sunny spot and watch how the vibrant colors transform the light in your room


Simple Heart Motif for Beginners
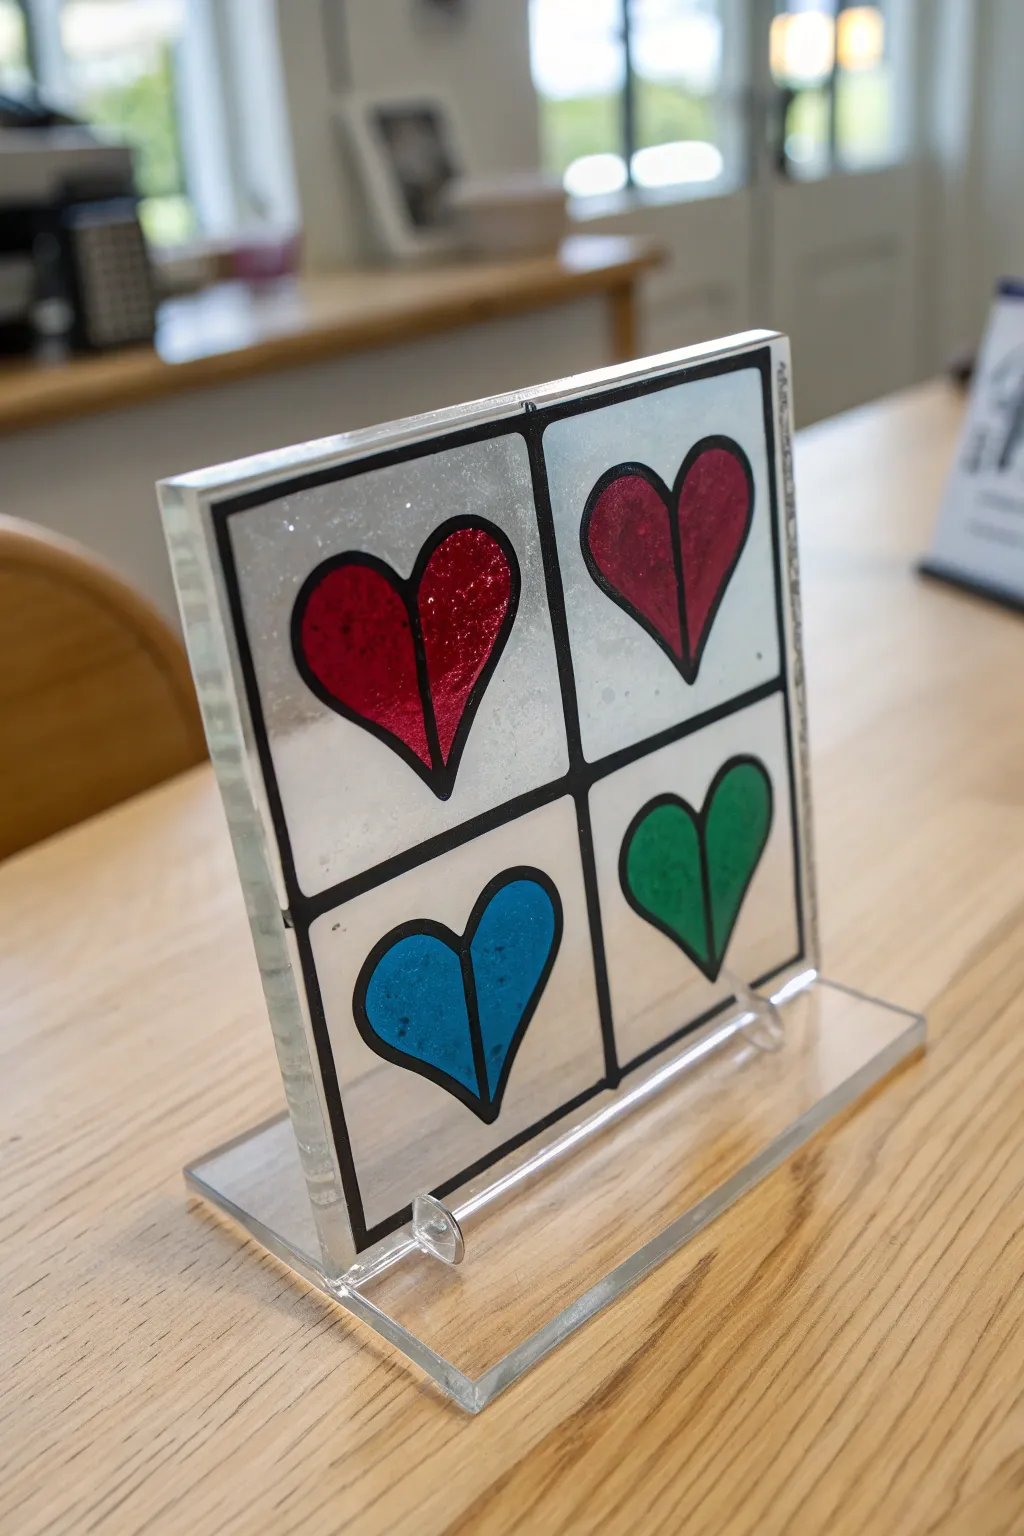
This charming, framed-style glass painting project creates a modern pop-art look with four distinct heart motifs separated by bold black leading. It mimics the texture and translucency of real stained glass without needing a kiln or soldering iron.
Step-by-Step
Materials
- Square glass pane (approx. 6×6 inches)
- Black liquid leading or glass outline paint (in a squeeze bottle)
- Glass paints: Red, Blue, Green, and Clear/Frost texture (optional)
- Rubbing alcohol and paper towels
- Paper template with a 2×2 grid and heart designs
- Tape
- Bubble popper tool or toothpick
- Clear acrylic display stand
Step 1: Preparation & Outlining
-
Prepare your surface:
Begin by thoroughly cleaning your glass pane with rubbing alcohol and a paper towel to remove any oils or fingerprints that could prevent the paint from adhering properly. -
Set up the template:
Design or print a square template divided into four equal quadrants, with a simple, slightly asymmetrical heart centered in each box. Tape this template securely to the underside of your glass pane. -
Establish the outer border:
Using your black liquid leading, squeeze a steady, continuous line along the outermost edges of the glass pane to create the frame. Keep the nozzle slightly above the glass to allow the line to fall smoothly. -
Create the inner grid:
Draw the vertical and horizontal intersecting lines that divide the pane into four quadrants. Make sure these lines connect fully to the outer border so your paint colors won’t bleed later. -
Outline the hearts:
Carefully trace the heart shapes within each quadrant using the liquid leading. Pay attention to the center vertical line of each heart, which gives them a segmented, stained-glass appearance. -
Let the outlines cure:
Allow the black leading to dry completely—usually at least 2 to 4 hours, though I prefer leaving it overnight to ensure it is rock-hard before filling.
Lead Line Hack
Does your leading line look shaky? Wait for it to dry completely, then use a craft knife or razor blade to slice off the mistake neatly before reapplying.
Step 2: Adding Color & Texture
-
Fill the red hearts:
Starting with the top two quadrants, squeeze red glass paint into the heart segments. Apply the paint generously enough to flood the area, gently pushing it against the black leading boundaries. -
Pop adjacent bubbles:
Immediately inspect the wet red paint for tiny air bubbles. Use a toothpick or a dedicated bubble tool to pop them or drag them to the edge so the finish dries smooth. -
Paint the blue heart:
Move to the bottom-left quadrant and fill the heart shape with brilliant blue glass paint. Ensure the color is evenly distributed and touches the black outlines on all sides. -
Paint the green heart:
Fill the final heart in the bottom-right quadrant with emerald green paint. Work quickly but carefully to maintain an even thickness, which helps color consistency. -
Apply background texture:
For the negative space surrounding the hearts, use a clear medium or a frosted glass paint. Fill the remaining white areas of the grid, ensuring you coat the glass completely up to the black lines. -
Add surface interest:
While the clear background paint is still wet, you can lightly tap it with a stiff brush to create a stippled, textured look similar to seeded glass, or leave it smooth for a simpler finish. -
Final drying phase:
Place the piece in a dust-free area and let it dry flat for at least 24 hours. The colors will often clear up and become more transparent as the milky binder evaporates. -
Display your work:
Once fully cured, gently slide the glass pane onto your acrylic stand, ensuring the heavier bottom edge is secure.
Preventing Leaks
If paint bleeds underneath your black lines, your outlines likely weren’t fully dry or had tiny gaps. Always hold the finished outline up to the light to check for holes first.
This colorful quartet creates a wonderful light-catching accent for any desk or windowsill


Geometric Diamond Grid
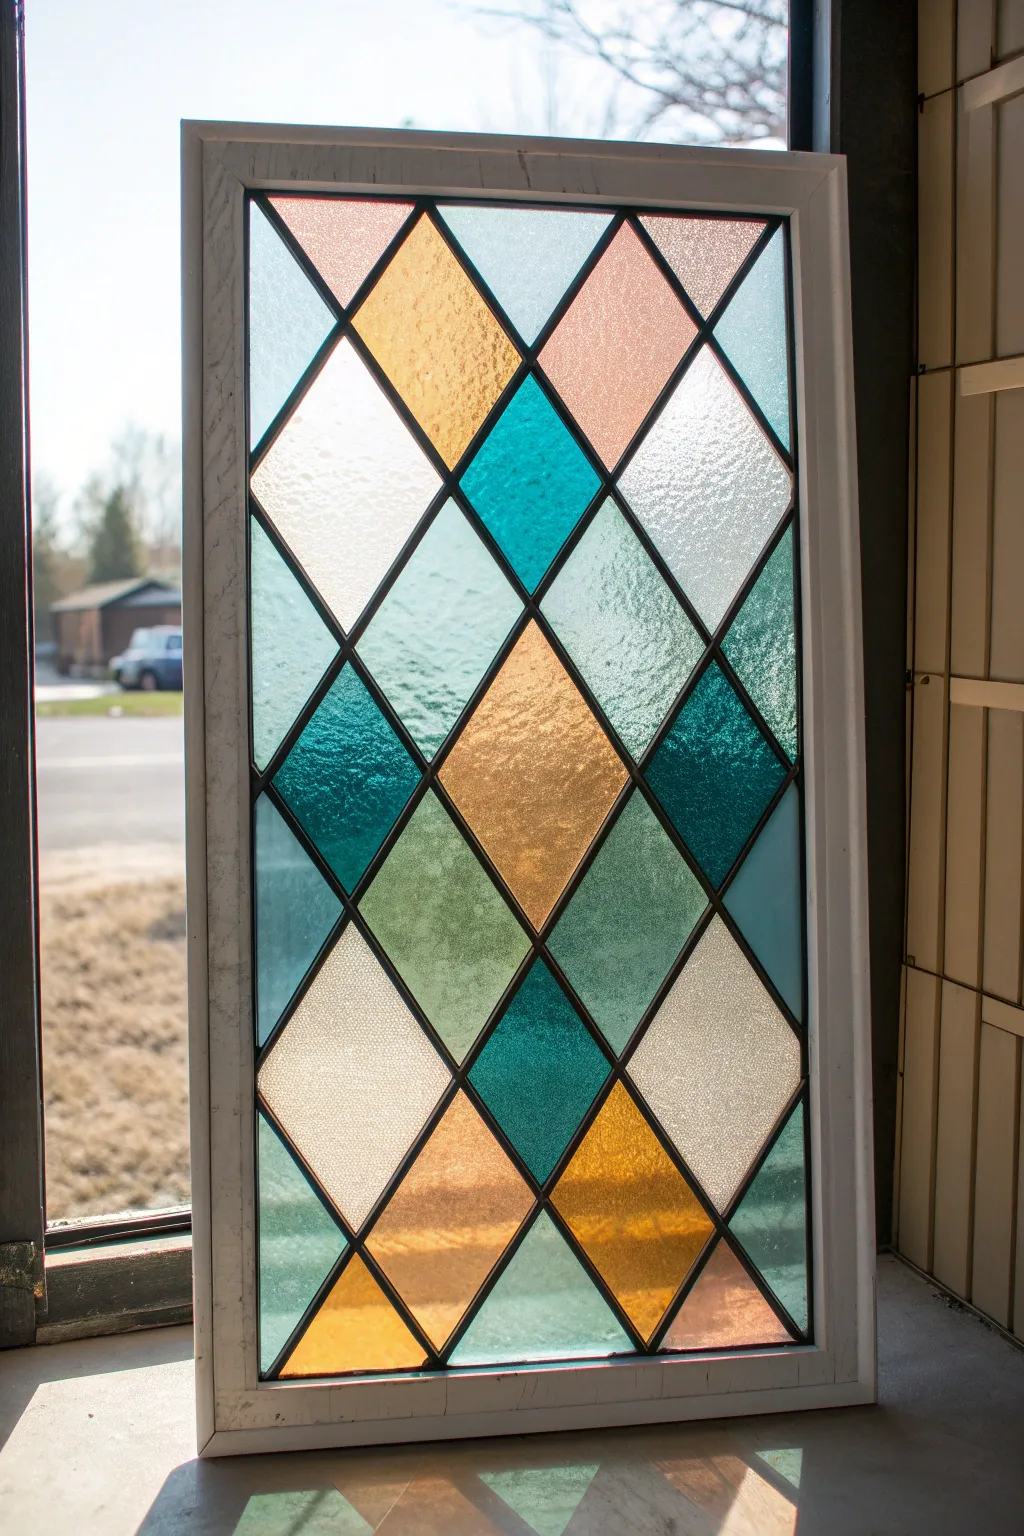
Transform a plain window pane into a stunning geometric feature piece using liquid leading and glass paints. This project mimics the classic argyle look of traditional leaded glass with warm ambers, cool teals, and textured clear sections.
Step-by-Step Tutorial
Materials
- Large picture frame with glass or a salvaged window pane
- Gallery Glass Liquid Leading (black)
- Gallery Glass Window Color paints (Amber, Turquoise, Emerald Green, Clear/Crystal)
- Ruler or straight edge
- Grease pencil or dry-erase marker
- Rubbing alcohol
- Paper towels
- Toothpicks or a scribe tool
- Craft knife
Step 1: Preparation & Mapping
-
Clean surface:
Remove the glass from your frame or clean your salvaged window thoroughly. Wipe both sides down with rubbing alcohol to remove any oils or fingerprints, ensuring a pristine surface for the paint to adhere to. -
Plan the grid:
Calculate the spacing for your diamonds. Measure the width of your glass and divide it to find the center points for each diamond column. A standard diamond shape is usually twice as tall as it is wide. -
Mark the guide:
Using a ruler and a grease pencil on the *back* side of the glass (or on a paper template placed underneath), draw your diagonal grid lines. Creating the guide on the reverse side means you won’t have to clean lines off your finished work later. -
Check symmetry:
Step back and look at your grid. Ensure the half-diamonds at the edges are relatively symmetrical on the left and right sides for a balanced, professional appearance.
Clean Lines Pro-Tip
Keep a paper towel handy to wipe the leading bottle nozzle often. If you make a mistake, don’t wipe wet lead! Let it dry, then peel it off like a rubber band tailored to fix the error.
Step 2: Creating the Lead Lines
-
Start leading:
Take your bottle of black liquid leading and tap it upside down on the table to remove air bubbles. Begin tracing your grid lines on the *front* of the glass, moving from the top left corner downwards to avoid smudging your work. -
Maintain pressure:
Squeeze the bottle with consistent pressure while holding the tip slightly above the glass—don’t drag it. Let the line of liquid ‘fall’ onto the glass for the smoothest result. -
Connect intersections:
When lines cross, pause briefly to let the liquid pool slightly, creating a solid joint that looks like soldered lead. I find that messy intersections are the first giveaway of a faux project, so take your time here. -
Clean edges:
Run a thick line of leading around the entire perimeter of the glass where it meets the frame to seal the design and provide a border for your colors. -
Dry time:
Allow the leading lines to dry completely, typically for 8 to 12 hours. The lines should feel firm and rubbery before you move on to painting.
Level Up: Vintage Age
To make the ‘lead’ lines look like antique metal, wait until they are dry and lightly rub a metallic wax (like Rub ‘n Buff) in silver or pewter over the black raised lines.
Step 3: Adding Color & Texture
-
Base texture technique:
For the clear and textured diamonds, apply the Crystal Clear paint first. Instead of smoothing it out, tap the tip of the bottle repeatedly into the wet paint to create a pebbled, ‘hammered glass’ texture. -
Apply amber tones:
Fill selected diamonds with Amber paint. Start by outlining the inner edge of the lead lines, then flood the center. Use a toothpick to swirl the paint gently to break up any bubbles. -
Add teal accents:
Apply the Turquoise paint to specific diamonds, following your reference pattern. Keep the layer thick; the paint will shrink as it dries, and a thin layer might look streaky. -
Mix custom greens:
For the darker green sections, try mixing a drop of Emerald Green into the Turquoise directly on the glass. swirl them slightly with a toothpick for a variegated, vintage glass effect. -
Pop bubbles:
Inspect your wet paint closely. Use a toothpick or a lighter held briefly near the surface (carefully!) to pop any stubborn air bubbles that could mar the finish. -
Dry flat:
Leave the glass to dry on a perfectly flat surface for at least 24-48 hours. If it’s tilted, the paint will pool at one end and ruin the effect. -
Final assembly:
Once fully cured (the colors will be transparent rather than milky), gently clean the back of the glass to remove your guide lines and reinstall the pane into its frame.
Place your finished piece in a sunny window and enjoy the beautiful colored light casting into your room.
BRUSH GUIDE
The Right Brush for Every Stroke
From clean lines to bold texture — master brush choice, stroke control, and essential techniques.
Explore the Full Guide
Mandalas in a Round Frame
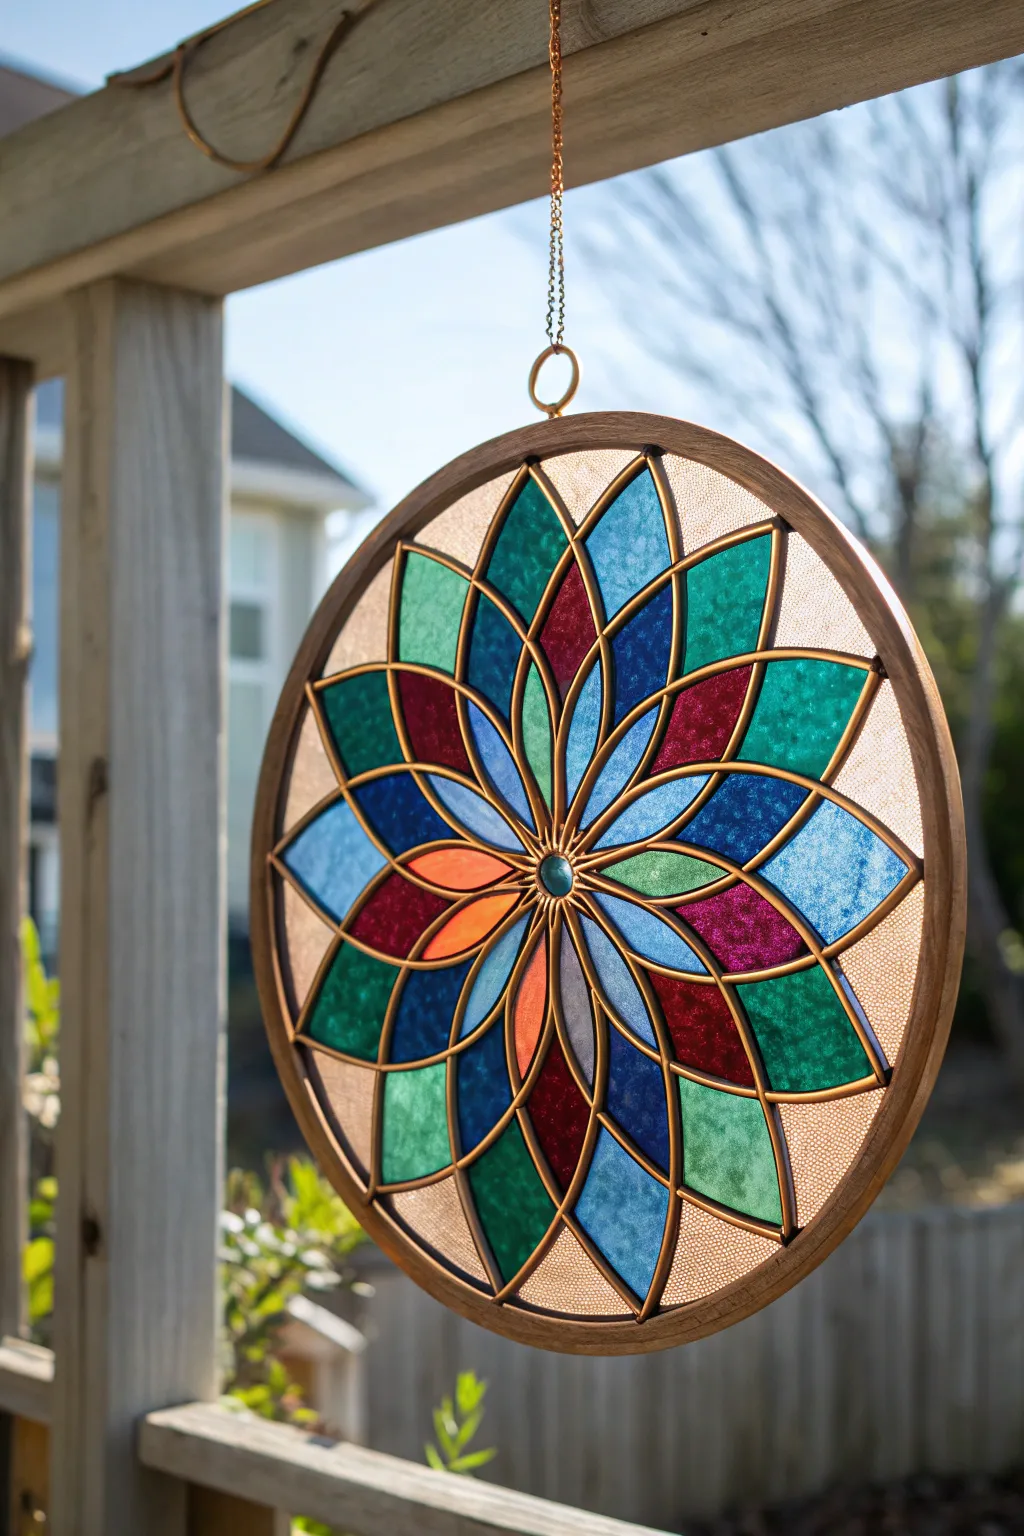
Capture the morning light with this stunning faux stained glass mandala that brings the intricate beauty of cathedral windows to your porch. Using a round wooden canvas and glass paints, you will build colorful, geometric petals radiating from a central jewel.
Step-by-Step Guide
Materials
- Round wooden frame with glass insert (approx. 10-12 inches)
- Gallery Glass or similar glass paint (Teal, Deep Blue, Magenta, Amber, Emerald Green, Clear)
- Instant Lead (liquid leading) in Gold or Brass color
- Compass and ruler
- Paper for template drafting
- Painter’s tape
- Small round rhinestone or glass gem (centerpiece)
- Superglue or E6000
- Toothpicks or pin tool
- Hanging chain and eye hooks
Step 1: Designing the Grid
-
Draft the template:
Trace the inner diameter of your frame onto a sheet of paper. Find the exact center point and use your compass to draw three concentric circles: one small (center), one medium (mid-petals), and one large (outer edge). -
Mark dividing lines:
Use a protractor to divide your circle into 12 or 16 equal sections, drawing straight lines from the center to the edge to act as guides for your petal symmetry. -
Sketch the petals:
Connect your guide lines with curved strokes to create the pointed leaf or petal shapes seen in the reference image. You want overlapping layers that create a starburst effect. -
Secure the template:
Cut your paper template to size and tape it securely to the *back* of your glass insert so the pattern is visible from the front.
Clean Lines Secret
Keep a steady hand by resting your wrist on a raised book or block next to the project, so you aren’t hovering unsupported while applying the leading.
Step 2: Leading the Lines
-
Clean surface:
Wipe the front of the glass thoroughly with rubbing alcohol to remove oils and fingerprints, ensuring the leading sticks perfectly. -
Center gem:
Before leading, adhere your small glass gem or rhinestone precisely in the center using a tiny dab of clear strong adhesive. -
Apply main curves:
Using your gold liquid leading bottle, carefully trace the major petal outlines. Keep the nozzle tip slightly above the glass and let the line fall into place for smoother curves. -
Connect the web:
Fill in the smaller connecting lines between petals. Ensure every line connects fully to its neighbor—gaps will allow the liquid paint to leak through later. -
Clean connections:
I like to use a toothpick to nudge any messy intersections while the leading is wet, sharpening the points of the petals. -
Dry completely:
Allow the leading lines to dry for at least 8 hours, or until they are firm to the touch.
Fixing Leaking Paint
If paint bleeds underneath a lead line, wait for it to dry completely. Then use a craft knife to slice along the lead line and peel off the mistake.
Step 3: Painting the Glass
-
Fill outer ring:
Start with the outermost ring. Squeeze Crystal Clear or a textured privacy medium onto the glass, pushing it all the way to the leading edges to create that textured, semi-opaque background. -
Add cool tones:
Select alternating petals for your cool colors—Teal and Deep Blue. Fill these sections liberally; the paint shrinks as it dries, so a thick application is best. -
Pop bubbles:
Immediately look for tiny air bubbles in the wet paint and pop them with a clean pin tool or toothpick to ensure visual clarity. -
Introduce warmth:
Fill the inner petal layer with your warm accents—Magenta and Amber. Blend slightly near the center if you want a gradient look, or keep colors solid for a graphic style. -
Fill remaining leaves:
Finish the design by painting the remaining mid-sections with Emerald Green, ensuring the color touches the gold leading everywhere for a secure seal. -
Dry vertically:
Let the piece dry flat for 24-48 hours. If you hang it too early, the paint will sag and gather at the bottom of the outlines.
Step 4: Finishing Touches
-
Check transparency:
Hold the piece up to a light source to check for any thin spots. If needed, add a second coat of paint to areas that look too streaky. -
Assemble frame:
If your glass was removable, place it back into the wooden frame and secure the backing clips. -
Add hardware:
Screw small eye hooks into the top of the wooden frame and attach your chain for hanging.
Hang your new mandala in a sunny window and enjoy the play of color and light throughout the day
Mountain Sunrise Color Blocks
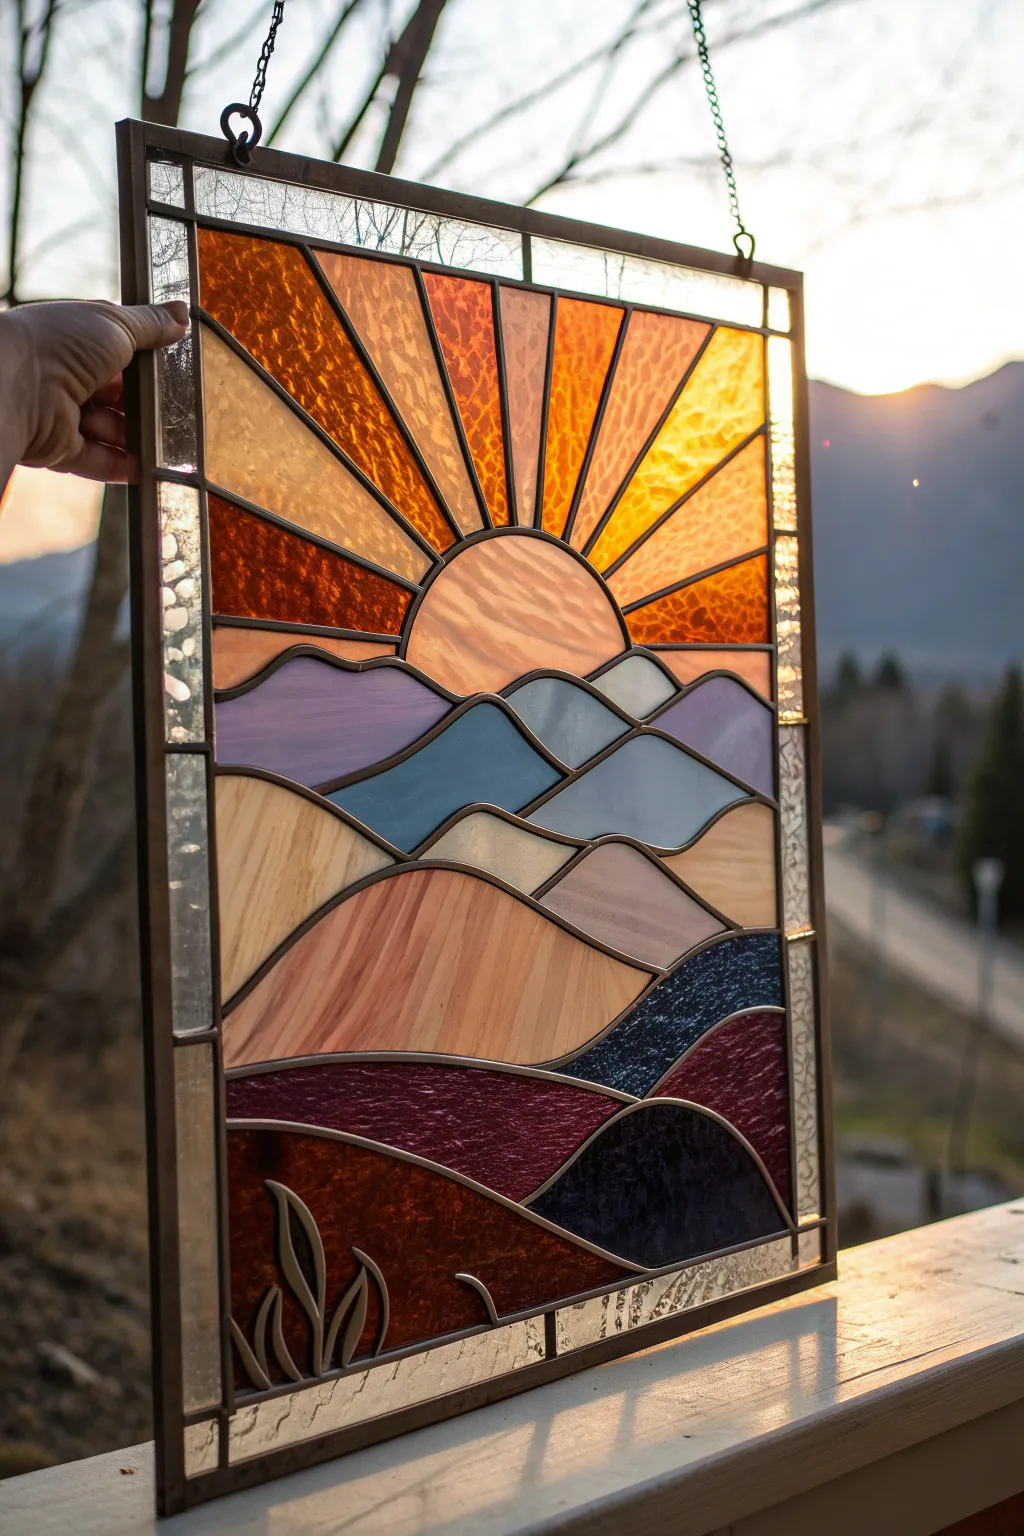
Capture the serene beauty of a mountain sunrise with this vibrant stained glass project, featuring layered hills and a glowing sunburst. The copper foil method allows for these intricate, flowing lines that create a sense of depth and movement against the light.
Detailed Instructions
Materials
- Stained glass sheets (amber, orange, yellow, clear textured, purple, blue, beige, dark red, dark blue)
- Glass cutter (oil-filled preferred)
- Breaking pliers and running pliers
- Glass grinder with various bits
- Copper foil tape (7/32 inch black backed)
- Soldering iron and temperature controller
- 60/40 solder
- Flux and flux brush
- Pattern shears or scissors
- Cardstock for templates
- Zinc or lead came for framing (U-channel)
- Patina (black)
- finishing compound/wax
Step 1: Pattern and Preparation
-
Draft the design:
Sketch a rectangular landscape design on paper. Draw a central semi-circle for the sun, radiating rays upward, and rolling hills layered below. Include a narrow border around the perimeter. -
Create templates:
Make two copies of your pattern. Number every piece on both copies. Cut one copy apart using pattern shears, which remove a small strip of paper to account for the copper foil thickness. -
Glass selection:
Choose your glass carefully to mimic the photo. Use highly textured amber and orange glass for the sun rays to catch the light. Select smooth or wispy purples, blues, and earth tones for the mountains to suggest distance and shadow.
Step 2: Cutting and Grinding
-
Trace and score:
Place your cardstock templates on the corresponding glass sheets. Trace around them with a permanent marker. Score the glass firmly along the lines using your glass cutter, ensuring a continuous scratch. -
Break the glass:
Use running pliers to snap the glass along the score lines. For smaller curves, use grozing pliers to nibble away excess glass carefully. -
Grind edges:
Run the edges of each piece against a glass grinder to smooth them out and ensure they fit perfectly inside the pattern lines. I find it helpful to fit pieces together on the second pattern copy as I go to check the fit. -
Cut the clear border:
Cut strips of clear, heavily textured glass (like glue chip or crackle) for the outer border segments. Grind these to precise rectangular shapes.
Sun Ray Texture
Align the grain of textured glass so it radiates outward from the sun center. This directional flow mimics real light beams.
Step 3: Foiling and Assembly
-
Clean the glass:
Wash every piece of glass thoroughly to remove grinder dust, marker lines, and oil. Dry them completely. -
Apply copper foil:
Wrap the edges of each glass piece with 7/32 inch copper foil tape. Center the glass in the tape, then fold the edges over. Burnish (rub) the foil down smooth using a fid or flexible plastic tool. -
Arrange pieces:
Reassemble the foiled pieces on your work board, holding them in place with layout blocks or push pins. Ensure the gaps are tight and uniform. -
Tack soldering:
Brush flux onto the copper seams. Apply small dots of solder at the intersections of the pieces to ‘tack’ the panel together, locking the design in place.
Wire Overlay Detail
Solder curled copper wire on top of the bottom panel to create the 3D grass silhouette effect shown in the corner.
Step 4: Soldering and Finishing
-
Full solder beads:
Run a continuous, rounded bead of solder along all seams on the front side. Move the iron at a steady pace to avoid overheating the glass. -
Flip and repeat:
Carefully turn the panel over. Flux and solder all the seams on the back side, ensuring the solder penetrates through to meet the front bead. -
Add detail overlays:
For the small plant details at the bottom left, cut thin copper wire or foil strips into leaf shapes. Tin them with solder and carefully attach them directly onto the surface of the dark bottom glass pieces. -
Attach the frame:
Measure and cut U-channel zinc came for the border. Slide it over the edges of the glass panel and solder the corners securely. Solder the came to the foil lines where they meet the edge. -
Add hanging loops:
Solder two strong jump rings to the top corners of the zinc frame, reinforcing the joint well to support the weight. -
Patina application:
Clean the panel thoroughly to neutralize the flux. Apply black patina to the solder lines with a rag or brush, turning the silver solder to a dark, contrasting finish. -
Polish and protect:
Apply a finishing compound or wax to the entire piece. Buff it to a high shine to protect the patina and make the glass colors pop.
Hang your finished panel in a bright window and watch the sunrise illuminate your room with warm, glowing color

PENCIL GUIDE
Understanding Pencil Grades from H to B
From first sketch to finished drawing — learn pencil grades, line control, and shading techniques.
Explore the Full Guide
Ocean Waves With Curved Segments
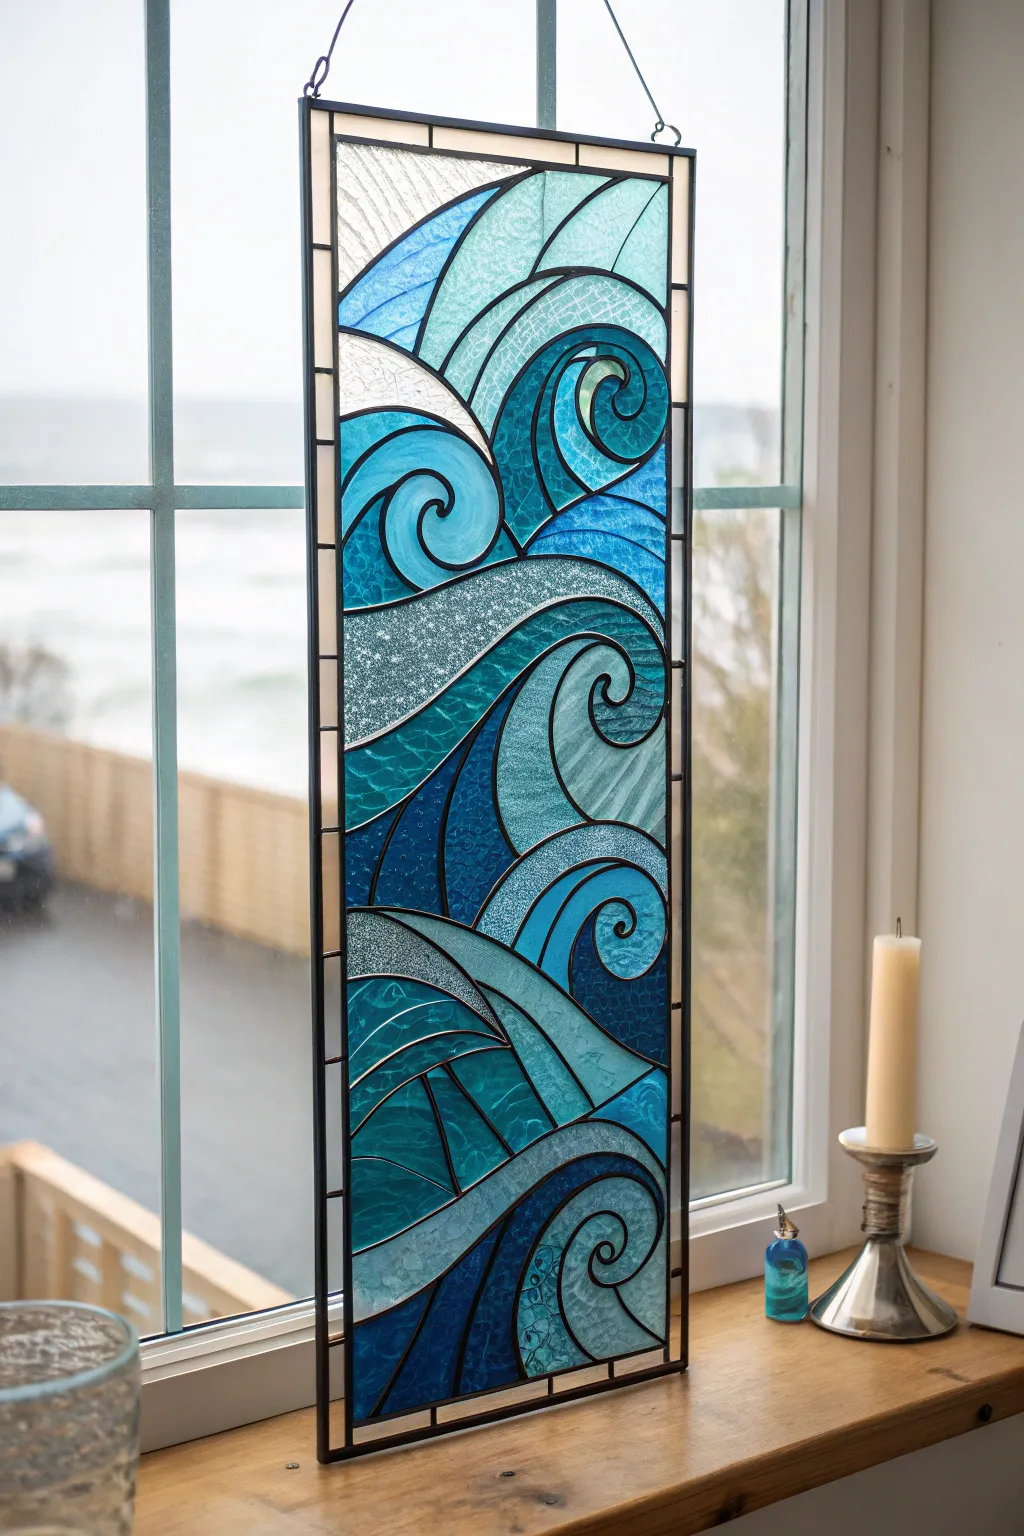
Capture the relentless motion of the sea with this stunning monochromatic vertical panel. Featuring sweeping curves and a rich variety of textured blue and teal glass, this intermediate-level project brings the soothing energy of the ocean right into your window.
How-To Guide
Materials
- Stained glass sheets (cobalt blue, teal, aqua, sky blue, clear textured)
- Glass cutter (pistol grip or pencil style)
- Running pliers
- Grozing pliers
- Grinder with 1/4″ and standard bits
- Copper foil (7/32″ black backed recommended)
- Soldering iron (100-watt)
- 60/40 Solder
- Flux and flux brush
- Pattern paper and scissors
- Zinc or lead came for framing (H-channel)
- Jump rings for hanging
- Black patina
- Glass cleaner and soft rags
Step 1: Pattern and Preparation
-
Draft the Wave Design:
Sketch a long, vertical rectangle on your pattern paper, roughly 10 inches by 24 inches. Draw a series of large, interlocking ‘S’ curves and spirals to mimic rolling waves, ensuring the lines flow from bottom to top. -
Number the Segments:
Assign a unique number to every single segment of your drawing to keep track of the complex puzzle. I like to also mark color codes (e.g., ‘TB’ for Textured Blue) directly on the pattern. -
Cut the Pattern Template:
Use special foil pattern shears to cut out each paper shape. These shears automatically remove a small strip of paper to account for the thickness of the copper foil later. -
Trace onto Glass:
Lay your cut paper pieces onto the glass sheets. Orient the glass so the grain or texture flows in the direction of the wave for maximum realism. Trace around them with a permanent marker.
Cracked Curves?
Deep inner curves often break. Don’t force them! Score deeper relief lines inside the waste glass area and break it away in small sections rather than one big snap.
Step 2: Cutting and Grinding
-
Score the Deep Curves:
Using your glass cutter, score the difficult inside curves first. Press firmly but consistently. For tight spirals, make multiple relief scores to prevent the glass from breaking incorrectly. -
Break the Glass:
Use running pliers to gently snap the glass along your score lines. Go slow; if a curve is too steep, nibble away the excess glass bit by bit with grozing pliers. -
Grind for Precision:
Take each piece to the grinder. Shape the edges until they match your original paper pattern perfectly. The edges need to be slightly rough for the foil to stick, but smooth to the touch. -
Fit Check:
As you grind, lay the pieces onto a second copy of your pattern to ensure they fit snugly against their neighbors without large gaps. -
Clean the Glass:
Wash every piece thoroughly to remove grinder dust, marker lines, and oil. Dry completely, as moisture will prevent the foil from adhering.
Step 3: Foiling and Soldering
-
Apply Copper Foil:
Center the 7/32″ copper foil along the edge of each glass piece. Wrap it around evenly, then use a fid or the back of a sharpie to burnish (rub) the foil down tight against the glass. -
Tack Solder the Panel:
Arrange all your foiled pieces back into the final design. Brush flux onto the joints and apply small dots of solder at key intersections to hold the panel together. -
Full Bead Soldering:
Run a continuous, rounded bead of solder along all the seams. Move the iron at a steady pace to avoid cracking the glass from heat shock. -
Flip and Repeat:
Carefully turn the panel over and solder the seams on the backside. Don’t forget to tin the outer edges where the frame will attach.
Make it Sparkle
Incorporate clear iridescent textured glass for the ‘foam’ sections at the tops of the waves. It catches sunlight differently than standard color, mimicking water spray.
Step 4: Framing and Finishing
-
Measure the Frame:
Cut your zinc or lead came strips to match the dimensions of the panel’s perimeter. Miter the corners at a 45-degree angle for a professional look. -
Attach the Frame:
Slide the came onto the edges of the glass. Solder the frame joints at the corners and solder the frame to the lead lines of the artwork where they intersect. -
Add Hardware:
Solder two sturdy jump rings to the top of the zinc frame, aligning them with vertical solder lines for better weight distribution. -
Apply Patina:
Clean the panel thoroughly to remove flux residue. Apply black patina with a rag to turn the silver solder lines into a deep, unifying black. -
Final Polish:
After washing the patina off, wax the panel with stained glass finishing compound to protect the solder and make the glass textures sparkle.
Hang your finished panel in a sunny spot and watch the tides change as the daylight shifts.
Water Lilies on a Pond Scene
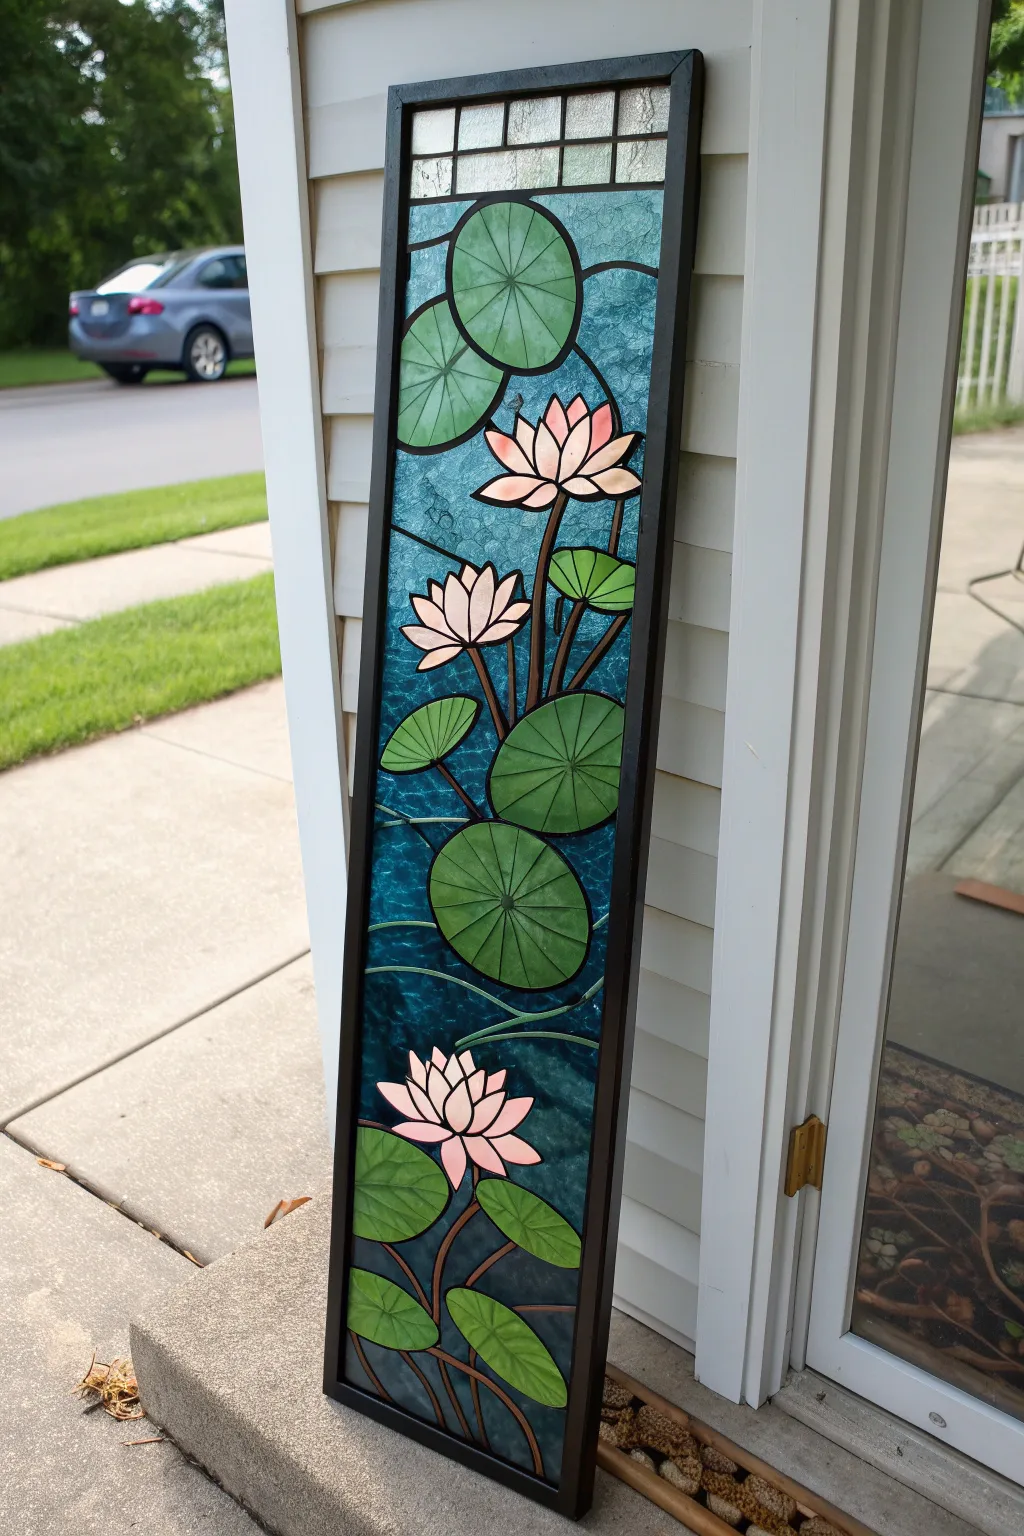
This tall, slender panel captures the peaceful elegance of water lilies drifting on a deep blue pond. Using the copper foil technique, you can recreate this stunning vertical design that features delicate pink blooms and textured green lily pads set against rippled water glass.
Step-by-Step Tutorial
Materials
- Tall rectangular pattern (approx. 10″ x 40″)
- Water glass (rippled blue texture)
- Lily pad glass (mottled or streaky greens)
- Flower glass (soft pink and white opalescent)
- Grid glass (clear texture or pale hammered)
- Glass cutter and breaking pliers
- Glass grinder
- Copper foil (7/32 inch black back recommended)
- 60/40 Solder
- Soldering iron and stand
- Flux and brush
- Zinc channel frame (black or patina-ready)
- Black patina
- Finishing compound/wax
Step 1: Planning and Cutting
-
Prepare the pattern:
Begin by enlarging your pattern to the desired dimensions, likely around 10 inches wide by 40 inches tall to match the elongated look in the photo. Make two copies: one to use as your layout guide and one to cut into individual template pieces. Number every piece on both copies to avoid confusion later. -
Cut the templates:
Using pattern shears (which remove a small strip of paper to account for the copper foil), carefully cut out each numbered shape from your working pattern. Group your paper pieces by color—greens for the pads, pinks for the lilies, and blues for the water background. -
Select the glass grain:
Before scoring, lay your templates on the glass sheets. For the blue water glass, ensure the grain or ripples run horizontally to mimic the natural movement of water. For the lily pads, try to position the templates so any streaks in the green glass radiate outward or suggest light hitting the leaf. -
Score and break:
Score your glass pieces using a carbide cutter, following the template lines. Use your running pliers to gently break the glass along the score lines. Start with the larger background pieces and lily pads before tackling the more intricate, pointed petals of the pink flowers. -
Grind the edges:
Once all pieces are cut, run the edges of each piece against a glass grinder. This removes sharp shards and ensures the pieces fit together snugly like a puzzle. Pay special attention to the deep curves between the lily petals; you may need a smaller grinder bit for these tight spots.
Glass Selection Tip
For the circular lily pads, choose a ‘ring mottle’ glass. The naturally occurring ring patterns in the glass mimic the vein structure of real lily pads without extra soldering.
Step 2: Foiling and Assembly
-
Clean and foil:
Wash all the ground glass pieces to remove dust and dry them thoroughly. Apply 7/32″ copper foil to the edges of every piece. Center the glass in the foil tape, then fold the edges over. I find that burnishing (rubbing) the foil down tightly with a fid or old credit card is crucial for a strong solder bond. -
Layout the design:
Place your layout pattern on a work board and secure it with a frame or jig blocks. Assemble your foiled pieces on top of the pattern, starting from the top grid section and working your way down through the water and lilies. Ensure the fit is tight; minimal gaps make for cleaner solder lines. -
Tack solder:
Apply flux to all the copper seams. Using your soldering iron and 60/40 solder, apply small ‘tack’ welds at the intersections of the pieces. This temporary hold keeps the design stable while you perform the full soldering pass. -
Solder the front:
Once stable, fully solder all the seams on the front side. aim for a smooth, rounded bead of solder. Move the iron at a consistent pace to avoid overheating the glass, especially on the narrower flower petal pieces.
Level Up: 3D Elements
Add copper wire ‘stems’ overlaid on the blue water sections before soldering. This creates visual depth, making the flowers look like they are truly floating above the stems.
Step 3: Finishing Touches
-
Complete the back:
Carefully flip the panel over. It’s helpful to have a second pair of hands for a tall piece like this. Clean, flux, and solder all the seams on the back side just as you did the front. -
Install the frame:
Measure and cut zinc channel framing to fit the perimeter of your panel. Miter the corners for a professional look. Slide the frame onto the edges and solder the corners together, as well as soldering the frame to the lead lines at every intersection for structural integrity. -
Clean deeply:
Wash the entire panel thoroughly with warm water and a specialized flux remover or mild detergent. You need to remove every trace of flux, or it will cause oxidation later. Dry the panel completely. -
Apply patina:
Using a rag or brush, apply black patina to the solder lines and zinc frame. The chemical reaction will turn the silver solder a deep, matte black, which makes the colors of the glass pop and unifies the design. Wipe off excess patina immediately. -
Polish and protect:
Finally, apply a stained glass finishing compound or carnauba wax. Buff it to a high shine. This not only makes the glass sparkle but creates a protective barrier against oxidation.
Hang your new masterpiece in a bright window and enjoy the tranquil beauty of a water garden all year round


Bird on a Branch Silhouette
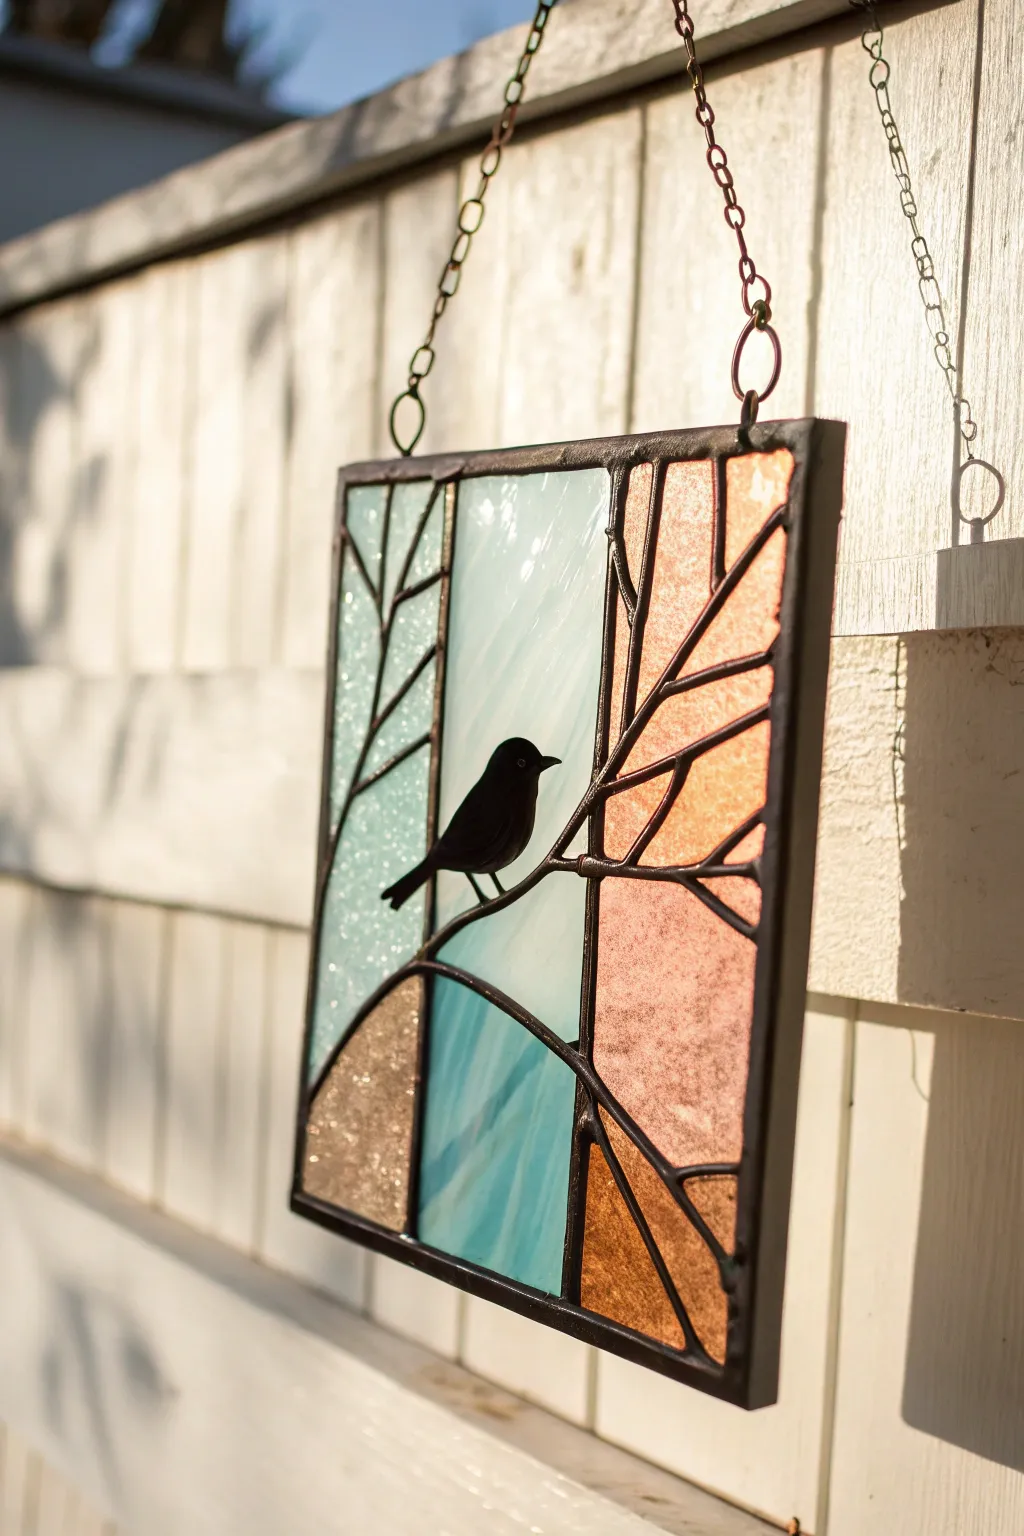
Capture the serene moment of a bird greeting the morning with this geometric stained glass panel. The design cleverly uses the varying textures and hues of the glass to suggest dawn breaking through bare branches, framing a delicate silhouette against the light.
Step-by-Step
Materials
- Stained glass sheets (light blue textured, opaque pale blue, amber textured, dark brown textured)
- Pattern paper or cardstock
- Glass cutter and running pliers
- Grinder with diamond bit
- Copper foil tape (7/32 inch width, black backed)
- Soldering iron (60-watt or higher) and stand
- 60/40 Solder
- Flux and flux brush
- Zinc channel frame (U-shaped)
- Black patina
- Glass paint (black) or adhesive vinyl for the bird silhouette
- Hanging chain and jump rings
- Safety glasses and gloves
Step 1: Pattern and Cutting
-
Design your template:
Begin by drawing a square approximately 8×8 inches on your pattern paper. Sketch a vertical triptych design, dividing the square into three distinct vertical sections with slightly curved, organic lines. -
Add branch details:
Within these vertical sections, draw connecting lines that resemble tree branches reaching inward. These lines will eventually become your solder lines, so ensure they connect structurally from one side of a glass piece to another. -
Create the working copies:
Number each segment of your drawing and make two copies: one to serve as your layout guide and one to cut apart into individual templates. -
Select your glass:
Choose a textured pale green or teal for the left panel to suggest foliage or morning mist. For the center, pick a solid, creamy pale blue to represent the open sky. Use warm amber and textured brown glass for the right side to mimic the rising sun hitting the trees. -
Score the glass:
Place your paper templates on the glass and trace them with a permanent marker. Firmly score the glass along your lines using the glass cutter, maintaining consistent pressure. -
Break out the pieces:
Use running pliers to snap the glass along the score lines. For tricky curves, like the branch intersections, careful nibbling with grozing pliers might be necessary.
Uneven Solder Lines?
If solder looks lumpy, your iron may be too cool. Let it reheat fully, clean the tip, and re-flux the area before smoothing it out again in a single pass.
Step 2: Grinding and Foiling
-
Grind edges smooth:
Run each cut piece through the grinder to remove sharp splinters and ensure the edges are perfectly vertical and rough enough to hold the foil tape. -
Check the fit:
Lay your ground pieces onto the layout guide. They should fit together snugly like a puzzle with minimal gaps between the ‘branches’. -
Apply copper foil:
Wrap the edges of every glass piece with 7/32 inch copper foil tape. Center the glass in the tape so even amounts fold over the front and back. -
Burnish the foil:
Use a fid or the back of a marker to rub the foil firmly against the glass. This prevents the flux from sneaking underneath and lifting the foil later.
Pro Tip: Painted Detail
Bake the painted bird element in a home oven according to the paint manufacturer’s instructions to make the silhouette scratch-resistant and permanent.
Step 3: Assembly and Soldering
-
Tack solder carefully:
Reassemble the foiled pieces on your heat-resistant board. Brush flux onto the seams and apply small dots of solder at the intersections to hold everything in place. -
Run the bead:
Once tacking is secure, completely solder all the seams. A slightly raised, rounded bead looks best for the branch effect. I usually work slowly here to ensure the lines look organic. -
Add the frame:
Measure and cut zinc channel framing for the four sides. Slide the glass panel into the frame and solder the corners and the connection points where the lead lines meet the frame. -
Attach hardware:
Solder two jump rings securely to the top edge of the zinc frame, spaced evenly to support the weight.
Step 4: Finishing Touches
-
Clean and patina:
Wash the entire piece thoroughly to neutralize the flux. Apply black patina to the solder lines and zinc frame to turn them a deep, matte charcoal, enhancing the silhouette look. -
Create the bird:
Since cutting a tiny glass bird is difficult, paint the bird silhouette onto the center panel using specialist opaque black glass paint. Alternatively, cut the shape from high-quality black adhesive vinyl. -
Attach chains:
Connect your decorative chain to the jump rings using pliers, ensuring the lengths are equal so the piece hangs straight. -
Final polish:
Give the glass a final clean with a finishing compound or carnauba wax to make the textures sparkle in the varied light.
Now hang your panel in a sunny spot and watch the colors shift as the daylight changes
Night Sky With Constellation Lines
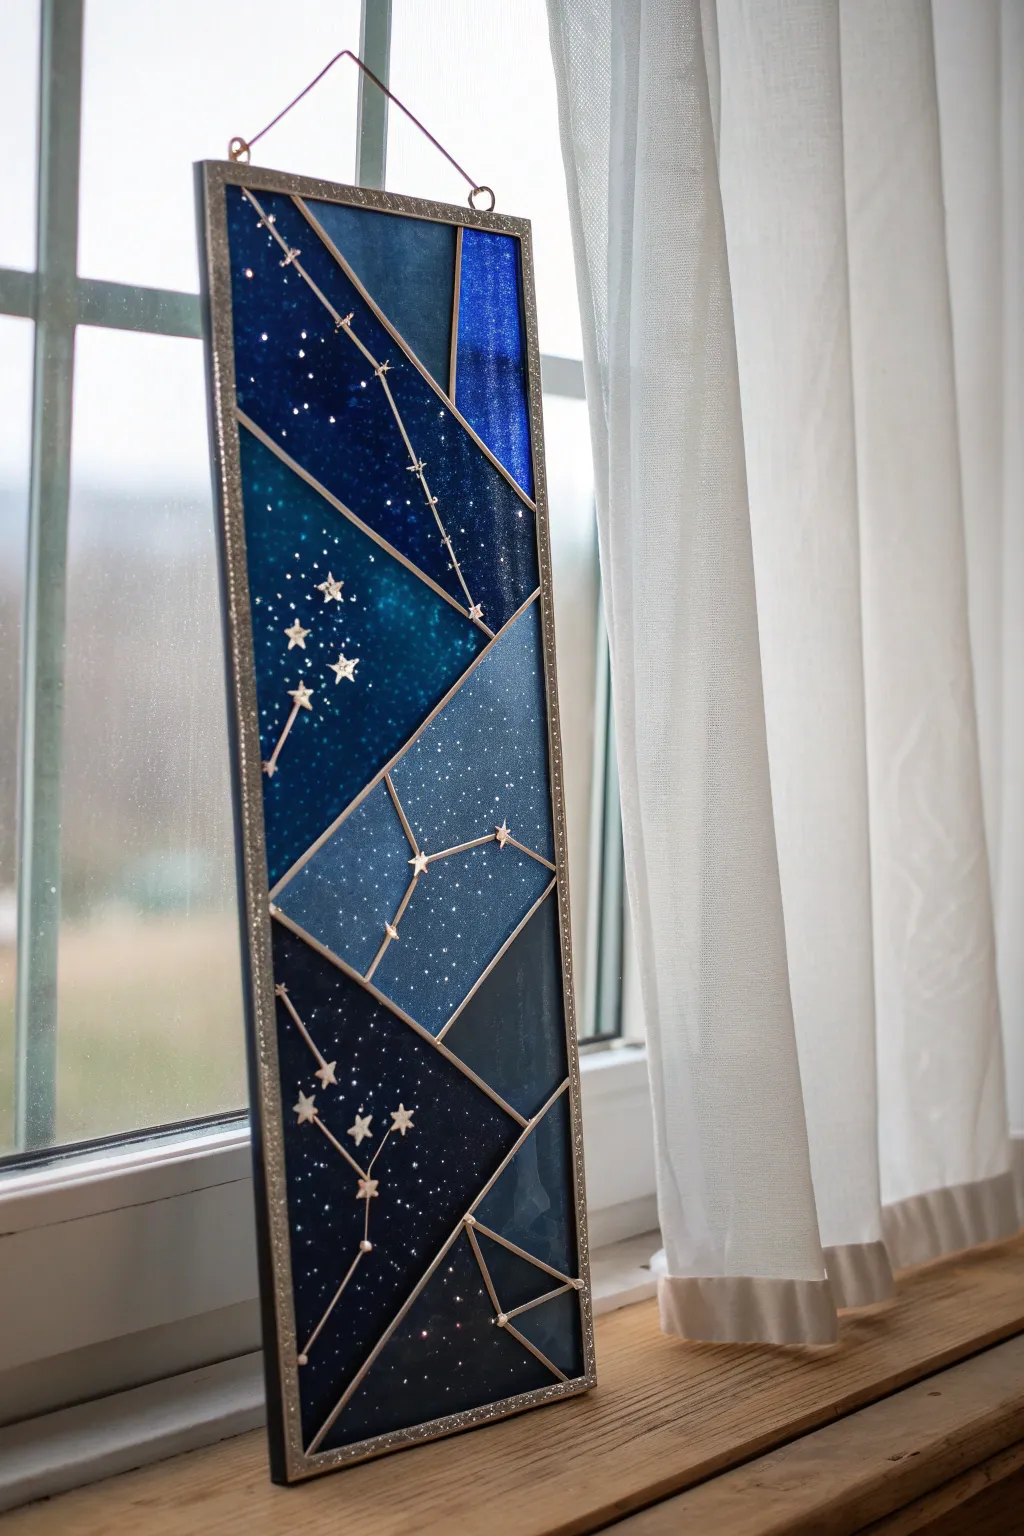
Capture the magic of the cosmos with this stunning faux stained glass panel featuring geometric sections of deep blues and sparkling stars. The metallic linework creates elegant constellations against a backdrop of glittery galaxy hues, perfect for catching the light in a sunny window.
Step-by-Step Tutorial
Materials
- Rectangular glass or clear acrylic panel (approx. 8×20 inches)
- Faux lead lines (adhesive lead strip) or gold outliner relief paste
- Gallery Glass or Pebeo Vitrail glass paints (in Indigo, Turquoise, Royal Blue, Clear)
- Fine loose glitter (silver, holographic, and iridescent)
- Small star sequins or confetti stars
- Small metal wire or gold connectors (optional for stars)
- Small round paintbrush
- Toothpicks
- Ruler and grease pencil or dry erase marker
- Printed pattern of geometric layout (optional)
- Chain for hanging
Step 1: Planning and Linework
-
Clean the surface:
Begin by thoroughly cleaning your glass or acrylic panel with rubbing alcohol and a lint-free cloth to remove any oils or fingerprints that might resist the paint. -
Map the design:
Slide your geometric pattern underneath the glass. If you are working freehand, use a ruler and a dry erase marker to lightly sketch intersecting diagonal lines that break the panel into large, sharp triangular shards. -
Apply the main lines:
Using self-adhesive lead strips (warm/gold tone) or a tube of gold outliner paste, carefully trace over your geometric lines. If using relief paste, keep steady pressure to ensure a raised barrier that will hold the liquid paint. -
Let the lines cure:
Allow the relief paste or adhesive strips to set completely. This ensures color sections won’t bleed into one another during the painting phase. -
Plan the constellations:
Decide which constellations will live in which geometric shards. You can mark dot placements for the major stars using a small marker dot directly on the glass surface within the sections.
Don’t Shake the Paint!
Never shake glass paint bottles, as this introduces bubbles that are hard to remove. Instead, roll the bottle gently between your palms to mix pigments.
Step 2: Painting the Galaxy
-
Mix your first blue:
Start with the darkest section. Pour a small amount of Indigo glass paint into a palette well and mix in a tiny pinch of silver glitter to create depth. -
Flood the section:
Load your brush and drop the paint into the center of a geometric section. Push the paint gently toward the edges until it touches the metallic borders, ensuring an even, thick coat. -
Create variation:
For the next adjacent section, switch to a lighter hue like Turquoise or Royal Blue. I prefer to leave at least one section partially transparent by mixing clear medium with a tiny drop of blue for a lighter, atmospheric look. -
Add texture:
While the paint is still wet, sprinkle a little extra fine glitter into the wet paint to mimic distant star clusters. Use a toothpick to swirl it slightly for a nebula effect. -
Embed the stars:
Carefully place star sequins or large confetti stars into the wet paint at the constellation points you planned earlier. The wet paint acts as the glue. -
Connect the stars:
If you are using small wire pieces for constellation lines, gently lay them into the wet paint connecting your star sequins. Alternatively, wait for the paint to dry and draw these lines with a metallic paint pen later. -
Fill remaining sections:
Continue working section by section, alternating between dark, medium, and light blue mixtures. Ensure no two sections of the exact same shade touch each other for maximum contrast.
Step 3: Finishing Details
-
Dry completely:
Let the panel dry flat in a dust-free area for at least 24 to 48 hours. Faux stained glass paint shrinks as it dries, so be patient. -
Add surface stars:
Once the base layer is cured, you can adhere additional tiny rhinestone stars or painted metallic dots on the surface for a 3D effect that catches the light differently than the embedded ones. -
Frame the piece:
If your glass came with a frame, reassemble it now. Alternatively, run a line of copper foil tape or lead adhesive around the entire outer perimeter to seal the edges and give it a finished look. -
Attach the hanger:
Secure the hanging loops to the top corners of the frame. Attach your chain, ensuring it’s sturdy enough to support the weight of the glass.
Glow in the Dark
Mix a small amount of phosphorescent pigment powder into the lighter blue sections so your constellations glow softly after the sun goes down.
Hang your finished masterpiece in a sunny window and enjoy the shifting blue shadows it casts throughout the day
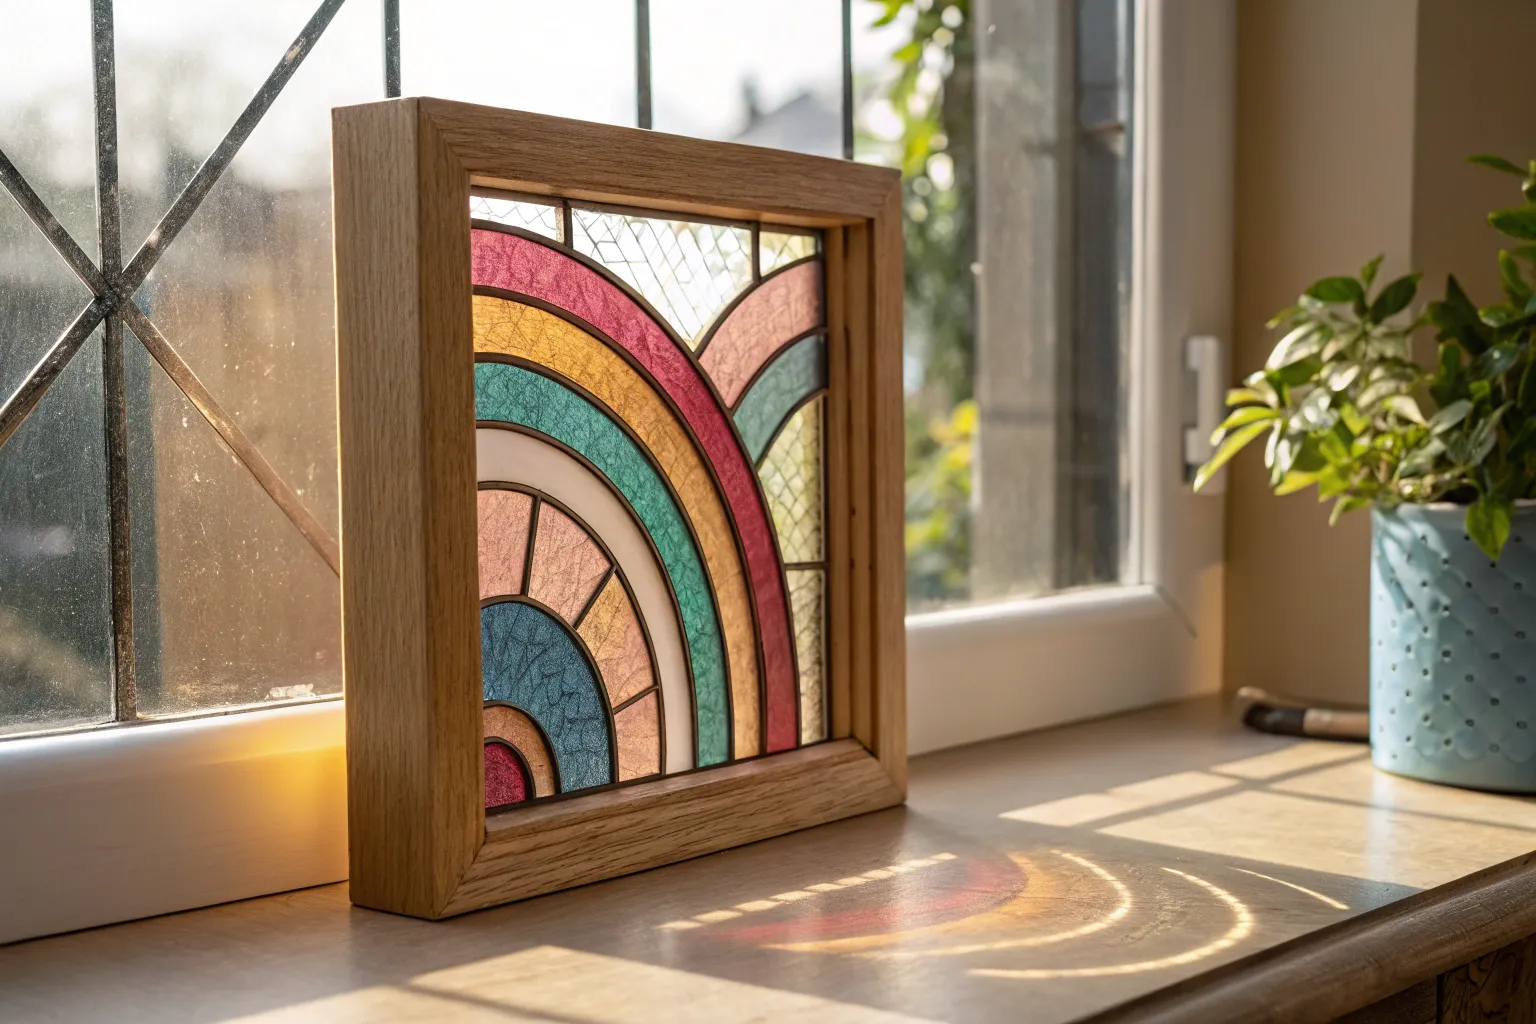
Rainbow Prism Stripes
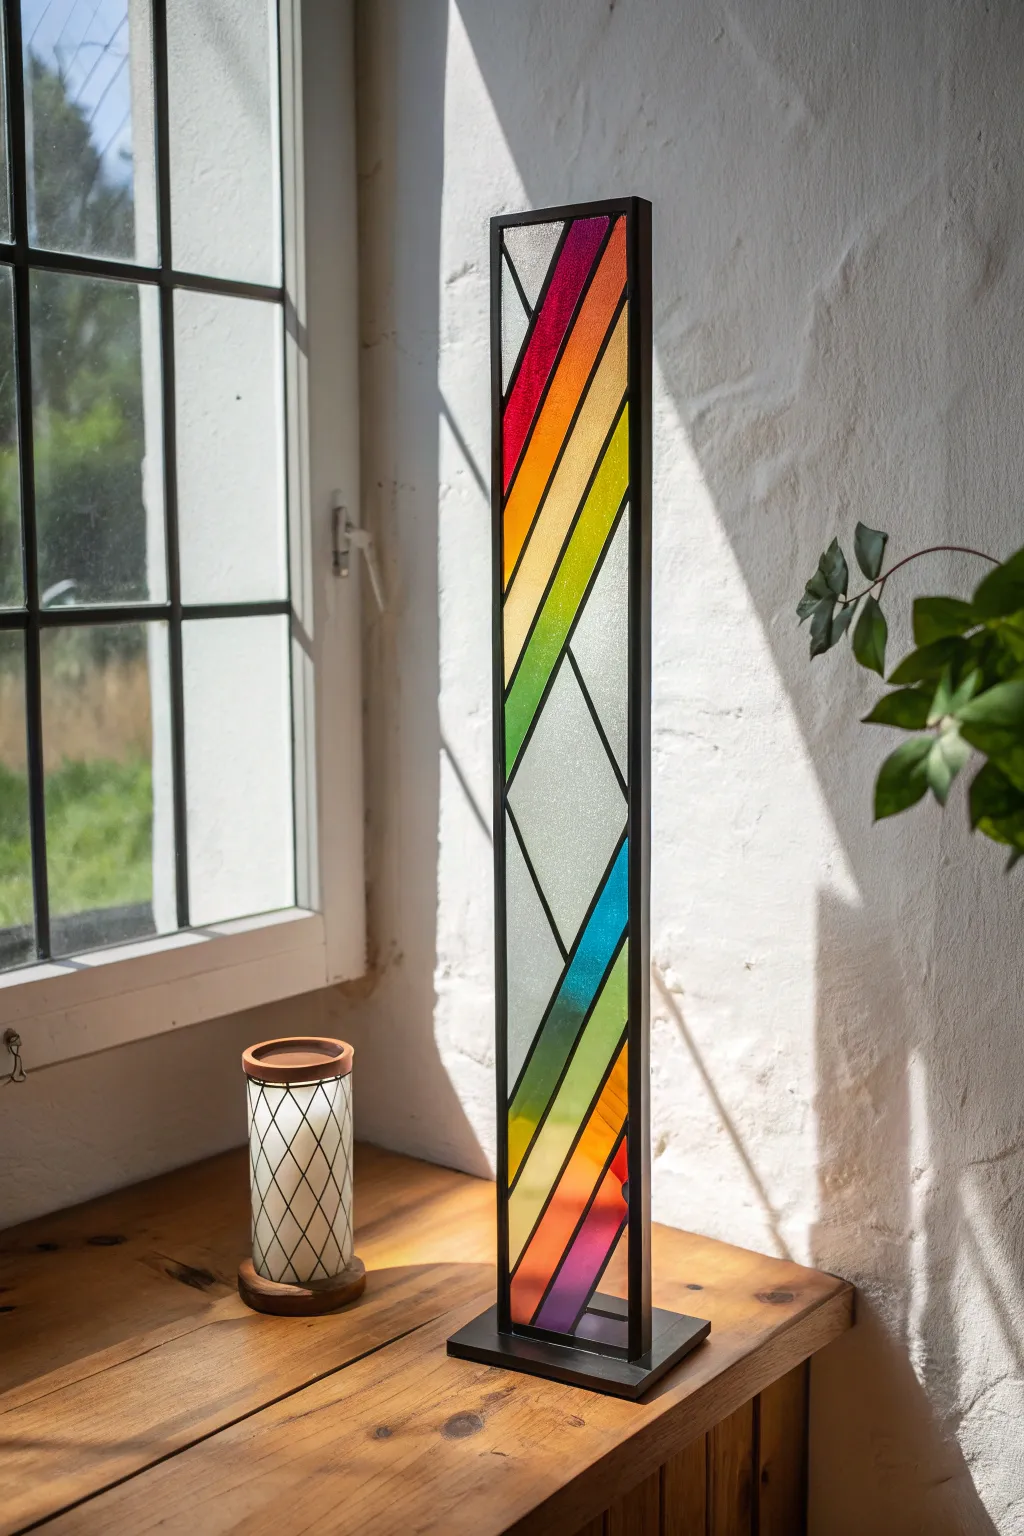
Brighten any corner with this striking vertical accent piece that marries modern geometric lines with the classic beauty of a rainbow gradient. This freestanding stained glass sculpture captures sunlight beautifully through its diagonal prisms, casting colorful shadows throughout the room.
Detailed Instructions
Materials
- Stained glass sheets: Red, orange, yellow, bright green, teal blue, purple
- Clear textured glass (e.g., glue chip or hammered texture)
- Glass cutter (pistol grip recommended)
- Running pliers and grozing pliers
- Copper foil tape (7/32 inch, black backed)
- 60/40 Solder
- Soldering iron with temperature control
- Flux and flux brush
- Soldering safety gear (fume extractor, safety glasses)
- Zinc U-channel came (for the perimeter)
- Rectangular metal base (pre-made or custom fabricated)
- Patina (black)
- Glass grinder
- Pattern paper and marker
- Strong adhesive (E6000 or similar for mounting)
Step 1: Design and Preparation
-
Draft the Dimensions:
Begin by sketching a tall, narrow rectangle on your pattern paper. A good starting size is approximately 4-5 inches wide by 18-20 inches tall to match the slender elegance of the reference piece. -
Create the Diagonal Stripes:
Draw diagonal lines across your rectangle. Create two main groups of colored stripes—one starting from the top left corner and another near the bottom right. Leave large diamond or trapezoid shapes in the middle for the clear glass. -
Number and Cut Pattern:
Number every segment on your drawing to avoid confusion later. Use special pattern shears (which remove a small strip of paper to account for the copper foil) to cut out each individual shape from your master pattern. -
Trace onto Glass:
Lay your cut pattern pieces onto the corresponding glass colors. Use the rainbow sheets for the diagonal stripes and the textured clear glass for the larger central blocks to create contrast.
Straight Line Secret
For the long vertical cuts, clamp a straight edge ruler directly to the glass. Run your cutter against it to ensure the panel sides are perfectly straight for the zinc frame.
Step 2: Cutting and Grinding
-
Score the Glass:
Using your glass cutter, score along the traced lines. Maintain steady, even pressure. For the long straight edges of the rectangle, you might want to use a straight edge ruler as a guide. -
Break the Pieces:
Use your running pliers to snap the glass along the score lines. If you have any small jagged edges, gently nibble them away with grozing pliers. -
Grind Edges Smooth:
Run the edges of every glass piece through your grinder. This removes sharp edges and creates a rough surface that the copper foil can adhere to securely. Make sure the pieces fit together perfectly on your layout diagram. -
Clean Thoroughly:
Wash all glass pieces with mild soapy water to remove grinding dust and marker lines. Dry them completely, as moisture will prevent the foil from sticking.
Step 3: Foiling and soldering
-
Apply Copper Foil:
Wrap the edges of each piece with 7/32 inch copper foil. Center the glass in the foil so an even amount folds over onto the front and back. Burnish the foil down smooth using a fid or the handle of a plastic tool. -
Assemble the Layout:
Reassemble your puzzle of foiled glass pieces on a heat-resistant work board. Use push pins or a jig to hold the outer rectangular shape perfectly square. -
Tack Solder:
Brush flux onto the copper seams. Apply small dots of solder at the intersections where pieces meet. I find this helps stabilize the entire panel before committing to the full bead lines. -
Soldering the Seams:
Run a smooth, continuous bead of solder along all the interior seams. do this on the front side first, then carefully flip the panel over and repeat on the back. -
Install Zinc Border:
Cut your zinc U-channel came to fit the two long vertical sides and the top horizontal edge. Slide the glass panel into the channel and solder the corners where the zinc meets. This adds the necessary structural rigidity for a tall piece.
Dual-Function Display
Install a small LED strip or puck light behind the glass column on the base. This turns the sculpture into a functional, moody accent lamp at night.
Step 4: Finishing and Mounting
-
Clean and Patina:
Scrub the entire piece with flux remover or soapy water to clean the solder lines. Apply black patina with a rag or brush to turn the silver solder and zinc frame a deep, matte black. -
Polish:
Once the patina has set and been rinsed, apply a stained glass finishing compound or wax. Buff it to a high shine to protect the patina and make the glass sparkle. -
Prepare the Base:
Clean the surface of your metal base. If you are fabricating one, ensure there is a slot or a bracket wide enough to hold the bottom of your glass panel securely. -
Final Assembly:
Insert the bottom edge of the glass panel into the base. Use a strong epoxy like E6000 inside the joint to bond the glass frame to the heavy base. Allow this to cure fully for 24 hours before moving the sculpture.
Place your finished prism near a window to watch the changing light play through the colors all day long
Negative Space Monogram Panel
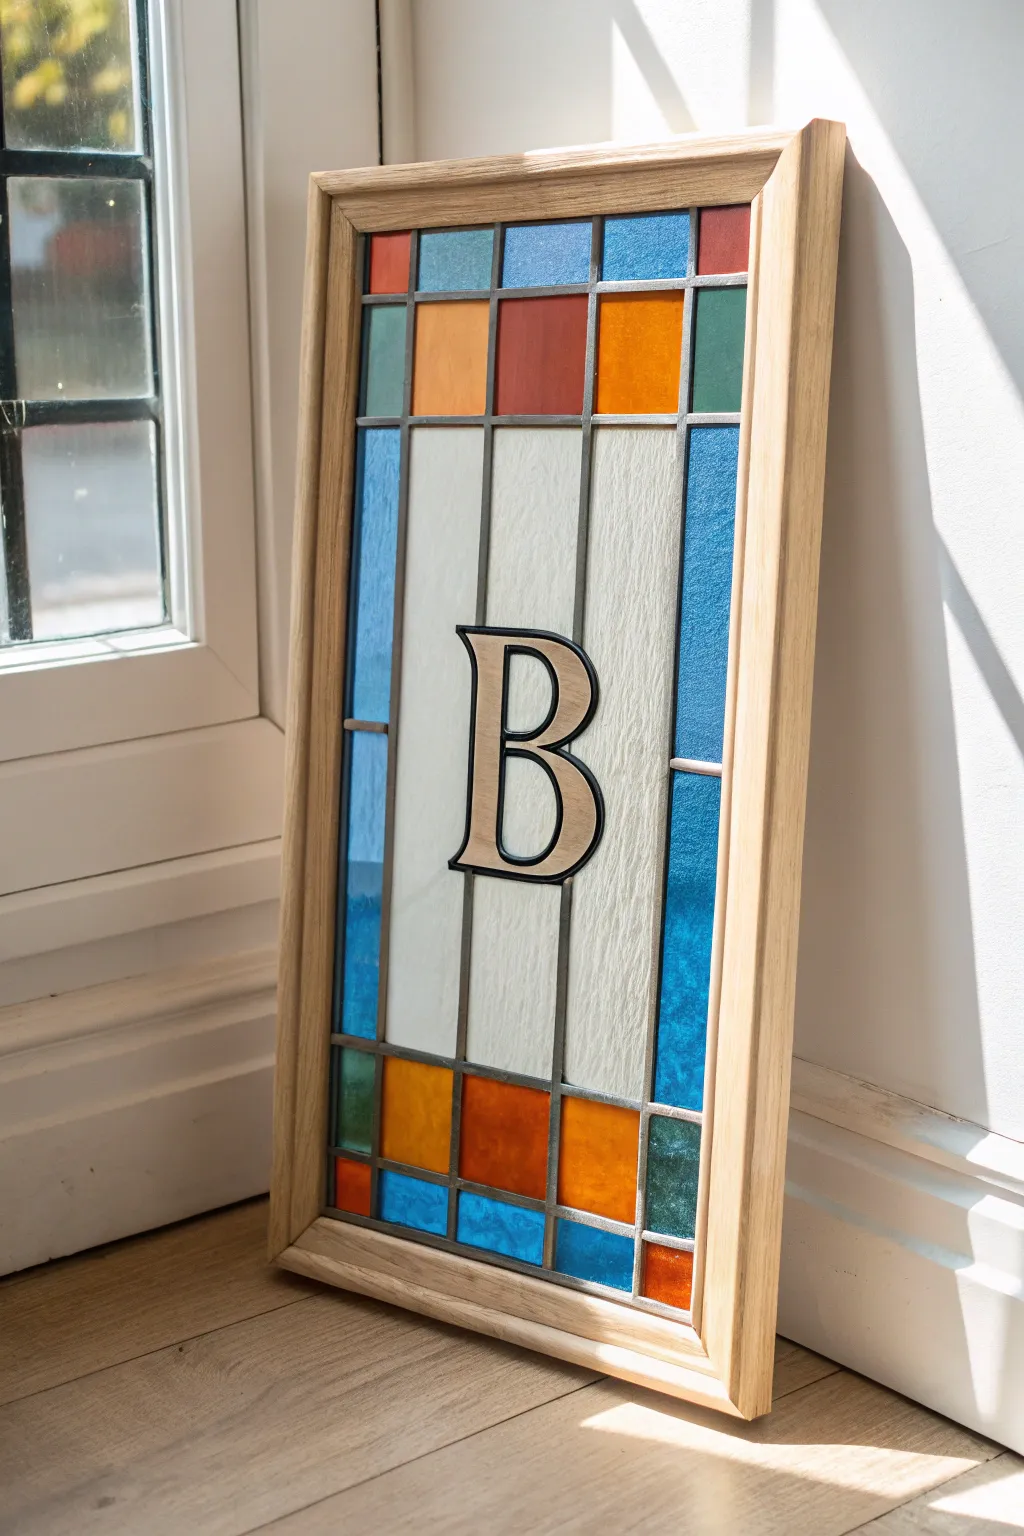
This striking project combines the timeless appeal of traditional stained glass with clean, modern typography. By using floating negative space for the central initial, you create a personalized piece that catches the light beautifully without feeling cluttered.
Step-by-Step
Materials
- Stained glass sheet (textured white/clear)
- Stained glass sheets (assorted colors: orange, red, medium blue, teal, green)
- Custom pattern or template
- Glass cutter (oil-fed preferred)
- Running pliers
- Grozing pliers
- H-channel lead came (7/32 inch)
- U-channel zinc border came
- Flux and flux brush
- Soldering iron (100-watt)
- 60/40 Solder
- Lead knife or dykes
- Horseshoe nails
- Leading board (plywood or homasote)
- Glass grinder
- Patina (black)
- Framing materials (custom wood frame)
- Safety glasses and gloves
Step 1: Pattern and Glass Preparation
-
Design your template:
Create a rectangular pattern featuring a large central panel for the letter and a geometric border of squares and rectangles. Ensure the letter ‘B’ is drawn with thick, consistent linework to represent the lead lines later. -
Cut the pattern pieces:
Make two copies of your pattern. Keep one whole for layout reference and cut the other apart with pattern shears (which remove a small strip of paper to account for the lead heart) to use as stencils. -
Trace the clear center:
Place the large central rectangular pieces on your textured white or clear glass. Score firmly along the lines, then use running pliers to snap the glass cleanly. -
Cut the complex monogram:
For the letter ‘B’, you will actually be cutting the *background* shapes that surround the letter, not the letter itself. Carefully cut the white glass shapes that will form the negative space inside and around the ‘B’. -
Cut the colored borders:
Score and snap your colored borders. You’ll need small squares for the corners and top/bottom rows, plus long rectangular strips of medium blue for the vertical sides. -
Grind the edges:
Run every piece of glass through your grinder to smooth sharp edges and ensure a perfect fit against the pattern lines. Pay special attention to the curves where the glass meets the letter.
Step 2: Assembly and Leading
-
Set the corner:
Secure your pattern to the leading board. Nail two wooden strips into a right angle at the bottom left corner to create a jig. Treat this as your rigid starting point. -
Cut the perimeter came:
Measure and cut strips of zinc came for the exterior border, but only place the bottom and left side first to hold the glass as you build. -
Build the bottom row:
Insert the bottom row of colored glass squares into the bottom zinc channel. Cut small pieces of H-channel lead to fit vertically between each square. -
Place the horizontal separator:
Cut a long strip of H-channel lead to span the entire width of the panel. Fit this over the top edge of your bottom row of squares. -
Install the central panel:
Slide the large vertical blue side strips and the central white glass pieces into place. You will need to carefully bend and shape flexible lead came to trace the outline of the ‘B’ sandwiched between the white glass pieces. -
Construct the top section:
Add another horizontal H-channel strip above the central panel, then fit the top row of colored squares and their vertical dividers, mirroring the bottom layout. -
Close the borders:
Slide the final top and right-side zinc channels onto the glass. Use horseshoe nails to hold everything tightly together against the wooden jig, ensuring the panel is perfectly square.
Gap Troubleshooting
If you have gaps between glass and lead, don’t fill them with solder. Instead, pack the lead channels with glazing cement after soldering to firm up the panel and stop rattles.
Step 3: Finishing Touches
-
Flux the joints:
Brush generous amounts of flux onto every intersection where lead lines meet. -
Solder the front:
Using a hot soldering iron and 60/40 solder, create small, neat beads at every joint. Don’t forget to solder the lead lines to the zinc border frame. -
Flip and repeat:
Carefully turn the panel over. Flux and solder all the joints on the backside to ensure structural stability. -
Clean and patina:
Scrub the panel thoroughly to remove all flux residue. Apply black patina to the lead lines and zinc border with a rag, turning them a dark, rich charcoal color to contrast with the glass. -
Polish and frame:
After cleaning off the patina, apply a finishing compound or wax to polish the glass. Finally, mount the finished piece into your custom oak frame to protect the edges and hang it in a sunny spot.
Level Up: Texture
Swap standard smooth glass for ‘glue chip’ or ‘corduroy’ textured glass in the white sections. The texture catches sunlight differently, making the ‘B’ pop more.
Once hung in a window, the light will pour through the colored squares and illuminate your custom monogram beautifully
Painted Glass Block Night Glow
Transform a simple glass structure into a glowing work of art that mimics the elegance of traditional leaded glass. This project uses faux leading and specialized glass paints to create a warm, decorative night light featuring floral and geometric motifs.
Step-by-Step Tutorial
Materials
- Rectangular glass vase or 4 rectangular glass panes glued together
- Self-adhesive lead strip tape (3mm or 6mm width)
- Glass outline paint (black or liquid lead)
- Solvent-based glass paints (Emerald Green, Crimson Red, Golden Yellow, White/Frosted)
- Fine-point round paintbrush (size 0 or 1)
- Isopropyl alcohol or glass cleaner
- Paper towels
- Ruler
- Permanent marker or grease pencil
- Bone folder or craft stick (for burnishing)
- LED puck light or light string
- Pattern templates (printed floral and geometric designs)
Step 1: Preparation and Layout
-
Clean the Surface:
Before you begin, wipe down all glass surfaces thoroughly with rubbing alcohol and a paper towel to remove fingerprints and oils. This ensures the adhesive lead and paints stick properly. -
Prepare Your Patterns:
Draft two designs on paper to fit the dimensions of your glass panels. For the first panel, sketch a winding vine with a central five-petal flower. For the second, create a geometric grid featuring a central six-pointed star flower. -
Secure the Templates:
Tape your paper patterns to the *inside* of the glass vase or panels. This allows you to see the design clearly through the glass while you work on the outside surface.
Step 2: Creating the Framework
-
Apply Vertical Lead Lines:
Start by applying vertical strips of self-adhesive lead tape to create the outer borders and the inner column sections. Measure carefully, cut the tape to length, and press it down gently. -
Add Horizontal Dividers:
Cut smaller pieces of lead tape for the horizontal sections at the top and bottom of the geometric panel. Ensure the ends butt up tightly against the vertical lines to prevent gaps. -
Form Geometric Shapes:
For the diamond and triangle shapes on the right panel, cut strips of lead tape at angles. Place them over your pattern lines, trimming the intersections with a craft knife for a clean, flush joint. -
Burnish the Tape:
Once all straight lines are placed, firmly rub over the lead tape with a bone folder or craft stick. This “burnishing” step seals the adhesive and prevents paint from seeping underneath later. -
Outline Organic Shapes:
For the curved vines and flower petals, lead tape can be tricky. Instead, use the liquid glass outline paint (liquid lead) to trace the floral designs directly onto the glass. Squeeze the bottle with consistent pressure. -
Dry the Outlines:
Allow the liquid outline paint to dry completely. This usually takes about an hour, but check the manufacturer’s instructions. While waiting, I like to double-check my straight lead lines for any lifted edges.
Paint Leaking?
If paint seeps under the lead tape, wait for it to dry slightly, then use a craft knife to gently scrape the excess away. Press the lead down again firmly.
Step 3: Painting the Design
-
Paint the Red Accents:
Dip your fine brush into the Crimson Red glass paint. Fill in the petals of the left flower and the small circular accents on the geometric panel. Drop the paint into the center and nudge it toward the lead lines. -
Fill the Leaves:
Using a clean brush, apply Emerald Green paint to the leaf shapes on both panels. Apply the paint generously enough to self-level, but be careful not to overfill the sections or it might spill over the leading. -
Add the Yellow Center:
Place a drop of Golden Yellow paint into the center of the red flower on the left panel. If you want a textured look like the example, dab it slightly as it begins to set. -
Create the Frosted Background:
For the main background areas, use a White or Frosted glass paint. Apply it with a stippling motion (dabbing up and down) to create the clouded, textured look seen in the reference image. -
Paint the Geometric Flower:
On the right panel, fill the petals of the central star flower with White/Frosted paint, keeping it slightly smoother than the textured background to differentiate the shapes. -
Check for Pinholes:
Hold the glass up against a light source to check for tiny gaps or bubbles in the paint. touch up any missed spots with the tip of your brush. -
Final Cure:
Let the project sit undisturbed for at least 24 hours to cure fully. Some solvent paints may require oven baking for durability, so verify your specific paint label.
Pro Tip: Texture Trick
To get that authentic swirled glass look in the white background, swirl a toothpick through the wet paint just minutes after applying it.
Step 4: Final Assembly
-
Remove Templates:
Carefully remove the paper patterns from the inside of the glass structure. -
Insert Lighting:
Place your LED puck light or string lights inside the structure. The textured white paint will diffuse the light beautifully, creating a soft, warm glow through the colored sections.
Place your stained glass block on a shelf or side table and enjoy the customized ambiance it brings to your room


Have a question or want to share your own experience? I'd love to hear from you in the comments below!