When I’m decorating pottery, I like to think of the surface like a tiny canvas you get to use every day. These pottery designs ideas are all about approachable, painterly looks you can pull off on bisque pieces—no perfection required.
Polka Dot Party
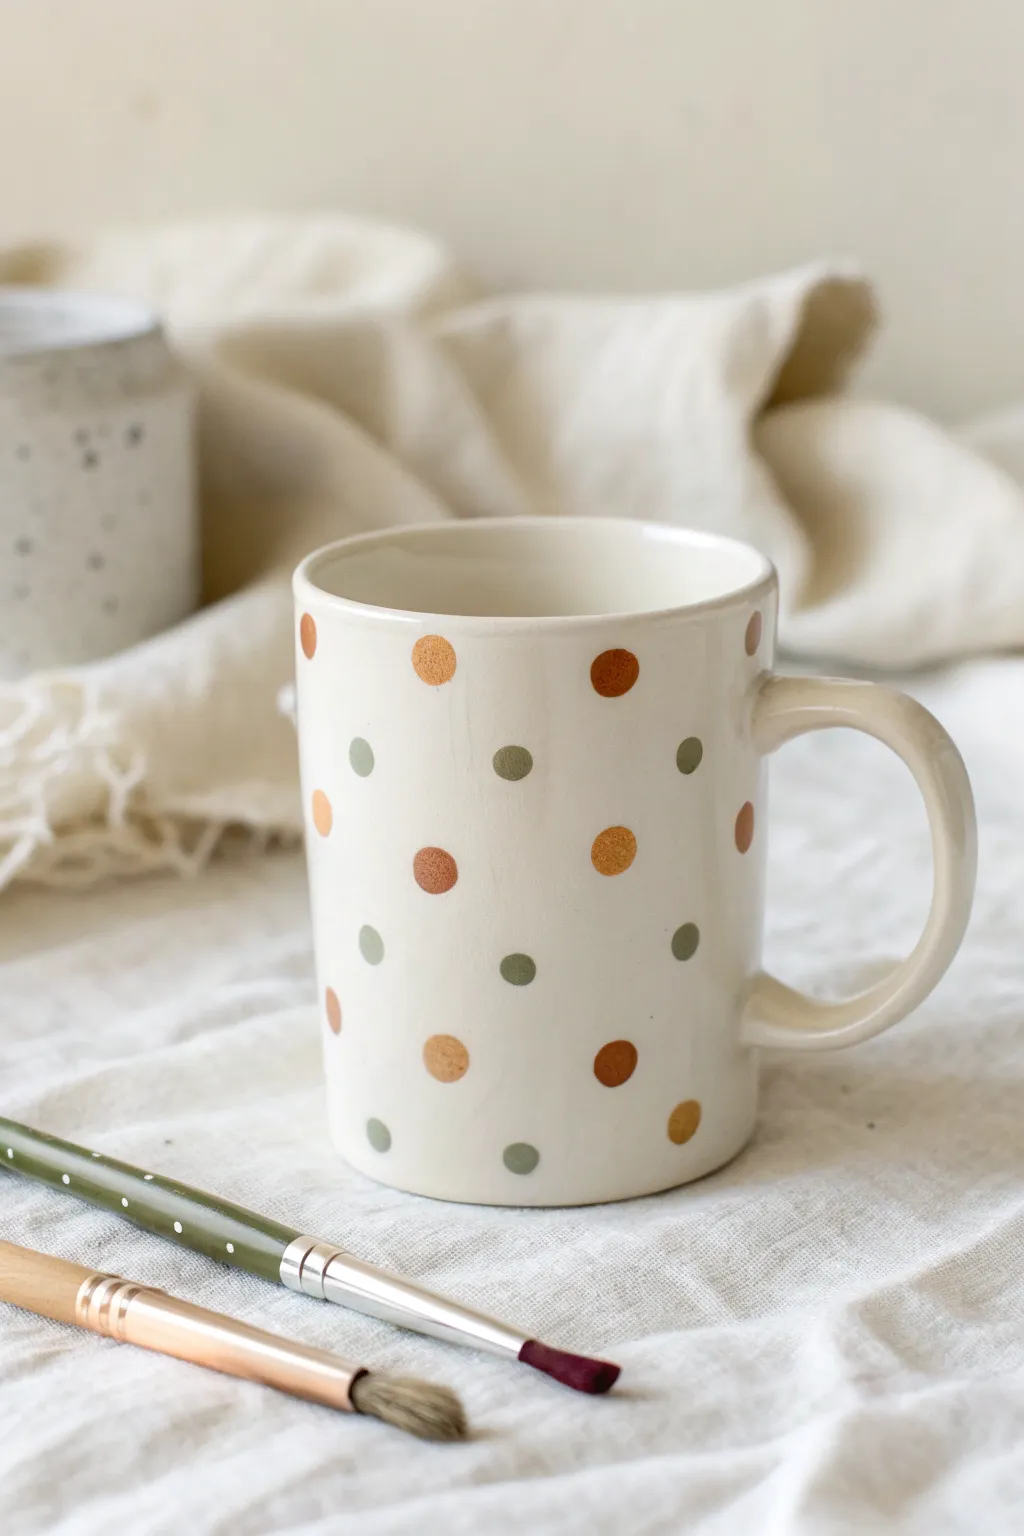
Transform a plain white mug into a cozy, modern statement piece with this simple pattern. Using a palette of metallic copper and sage green, you’ll create a rhythmic polka dot design that feels both playful and sophisticated.
Step-by-Step Guide
Materials
- Plain white ceramic mug (glazed)
- Pebeo Porcelaine 150 paint (or similar bake-on ceramic paint) in Copper/Gold
- Pebeo Porcelaine 150 paint in Sage Green
- Round foam pouncer brushes (small size)
- Fine detail paintbrush (size 0 or 1)
- Rubbing alcohol
- Cotton pads or paper towel
- Paper plate or palette
- Cotton swabs (for clean up)
- Oven (for curing)
Step 1: Preparation & Planning
-
Clean the surface:
Before applying any paint, it is crucial to remove invisible oils from your fingerprints. Wipe the entire exterior of the mug thoroughly with rubbing alcohol and a cotton pad. -
Dry completely:
Allow the alcohol to evaporate completely. Avoid touching the main body of the mug with your bare hands after this step; try to hold it by the handle or the rim. -
Prepare the palette:
Shake your paint bottles vigorously. Squeeze a small amount of the copper metallic paint and the sage green paint onto your paper plate, keeping them well separated.
Smudged a dot?
If a dot smears while wet, wipe it off immediately with a damp Q-tip. If it’s already tacky, use a little rubbing alcohol on the swab to lift the mistake cleanly.
Step 2: Painting the Gold Dots
-
Load the pouncer:
Dip a small round foam pouncer into the copper paint. Dab it a few times on a clean part of the palette to ensure the paint is evenly distributed and not dripping. -
Start the first row:
Press the pouncer gently against the mug near the top rim to create your first dot. Lift straight back to keep the circle crisp. -
Complete the metallic grid:
Continue adding copper dots in a loose grid pattern across the mug. Space them out generously to leave room for the green dots later. -
Refine edges:
If the foam pouncer leaves a bubbly texture or uneven edges, use your fine detail brush to smooth out the paint while it’s still wet, especially around the circumference of the dot. -
Partial dry:
Let the copper dots dry for about 15-20 minutes. This prevents smudging while you work on the second color.
Step 3: Adding the Sage Accents
-
Switch tools:
Use a fresh foam pouncer or thoroughly clean and dry the first one. Dip it into the sage green paint. -
Offset the pattern:
Place a green dot in the empty spaces between your copper dots. Imagine a diamond shape formed by four copper dots; the green dot goes right in the center. -
Check consistency:
I like to ensure the green paint isn’t too thick, as it can be prone to cracking during baking if applied too heavily. A thin, even coat is best. -
Touch up:
Use a cotton swab dampened with a little water or alcohol to wipe away any stray marks or reshape any wonky circles immediately. -
Handle coverage:
Don’t forget the area near the handle. Tuck a dot or two in that space so the pattern feels continuous all the way around.
Mix it up
Instead of a standard grid, try clustering the dots at the bottom of the mug and having them get sparser as they move up for a ‘falling snow’ gradient effect.
Step 4: Curing the Design
-
Long drying period:
Following the specific instructions of your ceramic paint brand, let the mug air dry. For Porcelaine 150, this usually requires 24 hours to fully set before baking. -
Cold oven start:
Place the mug into a cool oven. Do not preheat the oven, as the sudden temperature change can crack the ceramic. -
Bake carefully:
Set the oven to 300°F (150°C). Once the oven hits that temperature, set a timer for 35 minutes. -
Cool down:
Turn off the oven after the time is up, but leave the mug inside. Let it cool down gradually with the oven door closed to ensure the finish is durable.
Now brew your favorite tea and enjoy sipping from your custom-patterned creation


Simple Stripes and Bands
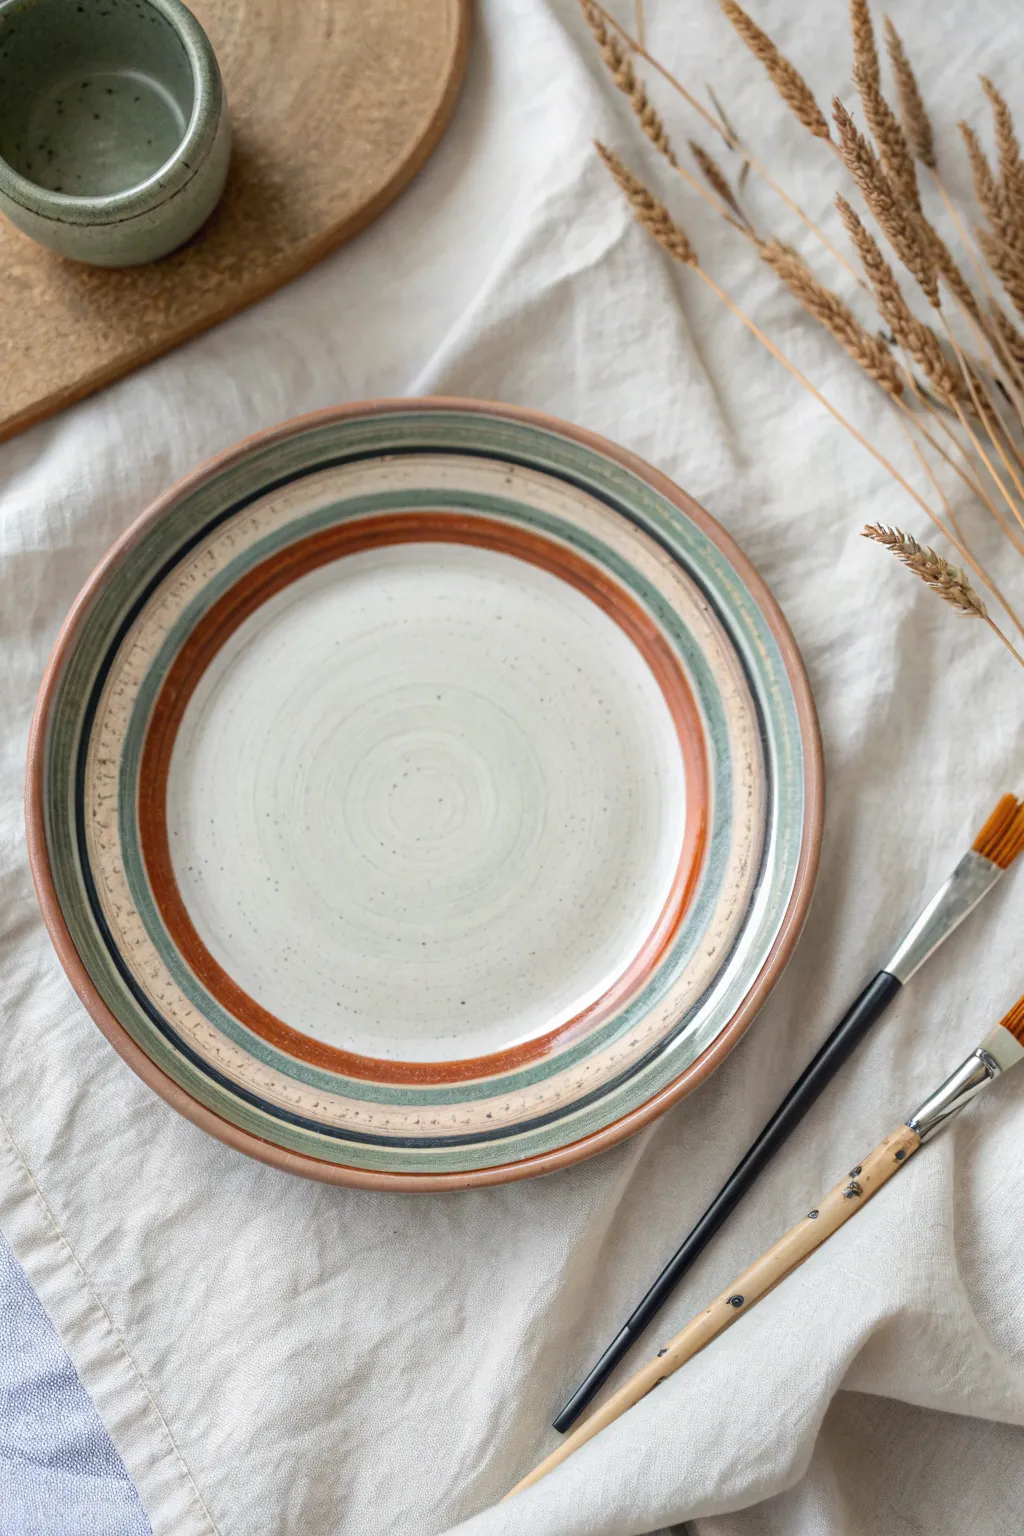
Bring a touch of organic elegance to your table with this simple yet striking pottery project. Featuring concentric rings of rust, sage, and charcoal, this design creates a warm, rustic aesthetic perfect for everyday dining.
Step-by-Step
Materials
- Bisque-fired ceramic plate (approx 8-10 inches diameter)
- Pottery wheel or banding wheel
- Underglazes: Rust/Terracotta, Sage Green, Charcoal/Black, Cream/Off-white
- Clear dipping or brushing glaze
- Flat shader brushes (medium and small)
- Fine liner brush
- Sponge
- Clean water
- Kiln access
Step 1: Preparation & Base Coat
-
Clean surface:
Begin by wiping down your bisque-fired plate with a slightly damp sponge. This removes any kiln dust or oils from your hands that might resist the glaze. -
Center the piece:
Place your plate carefully on the center of your banding wheel or pottery wheel. Give it a gentle spin to ensure it isn’t wobbling; precise centering is crucial for even bands. -
Apply base color:
Using a wide flat brush, apply two to three even coats of a Cream or Off-white underglaze to the entire top surface of the plate. Allow each coat to dry to the touch before adding the next. -
Dry completely:
Let the base coat dry completely until it’s chalky and matte. This ensures your colored stripes won’t muddy the background.
Step 2: Creating the Outer Bands
-
Load the brush:
Load a medium flat shader brush with the Sage Green underglaze. You want the brush fully saturated but not dripping. -
Paint the rim:
Spin the wheel at a slow, steady pace. Hold your brush hand steady against a support or your other hand, and gently touch the brush to the outer rim to create the widest green band. -
Add detail line:
Switch to a smaller brush or the edge of your flat brush. Dip it in Charcoal underglaze to paint a thin, defining line just inside the green rim. -
Create texture (Optional):
If you want that slightly weathered look seen in the photo, you can blot the Charcoal line gently with a nearly dry sponge while the wheel spins, softening the hard edge.
Steady Hands Secret
Rest your painting arm on a stack of bricks or a tall container while the wheel spins. This mechanical stability creates much smoother lines than a free-floating hand.
Step 3: The Central Feature
-
Position the rust band:
Identify the midpoint between the rim and the center well of the plate. This is where the bold Rust band will sit. -
Apply the rust color:
Using a medium brush loaded with Rust/Terracotta underglaze, apply the band while spinning the wheel. Apply steady pressure to keep the width consistent, about half an inch thick. -
Layering density:
I like to go over this rust band a second time to make the color rich and opaque, ensuring it stands out against the cream background. -
Inner green accent:
Load a small brush with Sage Green again. Paint a thinner band immediately inside the Rust band, leaving a tiny hairline of the cream base showing between them for contrast.
Wax Resist Method
Paint wax resist over your finished bands before glazing. This reveals the raw clay texture for the stripes while keeping the rest of the plate glossy.
Step 4: Finishing Touches & Glazing
-
Review and refine:
Stop the wheel and inspect your lines. If any edges look ragged, use a damp stiff brush to gently clean them up or scrape away excess underglaze. -
Add speckles (Optional):
For the speckled look on the white center, dilute a small amount of Charcoal underglaze with water. Dip a stiff toothbrush in it and flick the bristles to spray tiny dots across the plate’s center. -
Bisque fire (Optional):
Depending on your specific underglaze brand instructions, you may need to do a soft bisque fire now to set the design. Check your bottle labels. -
Apply clear glaze:
Once the underglaze is fully set, dip the entire plate into a clear dipping glaze. Alternatively, brush on 2-3 coats of clear brushing glaze. -
Clean the foot:
Wipe the bottom foot ring of the plate completely clean with a wet sponge to prevent it from sticking to the kiln shelf. -
Final firing:
Fire the plate in the kiln to the temperature specified by your clay and glaze manufacturer (usually Cone 5 or 6 for stoneware).
Enjoy using your beautifully banded plate for your next meal or display it as a piece of art.


Modern Color Blocking
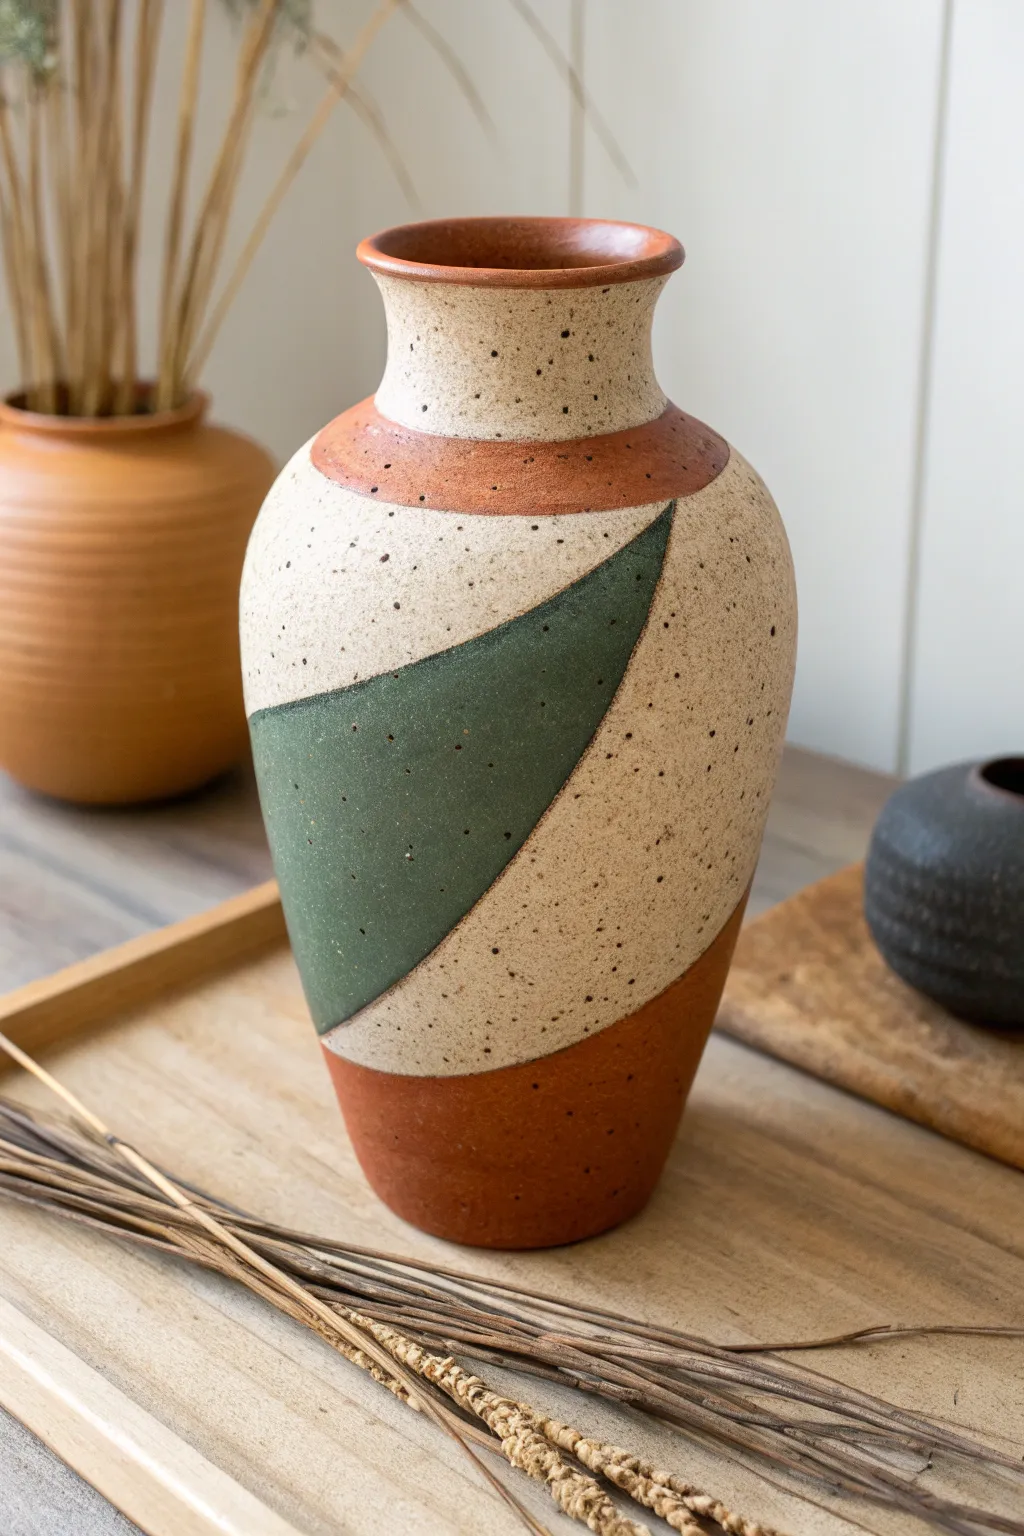
Embrace the warmth of modern color blocking with this striking vase, featuring distinct bands of rust-orange and a bold triangular wedge of forest green against a speckled cream background. The design balances organic clay textures with sharp, geometric lines for a truly contemporary feel.
Detailed Instructions
Materials
- Speckled stoneware clay (buff or light brown)
- Pottery wheel
- Throwing tools (sponge, rib, wire cutter)
- Trimming tools
- Wax resist or masking tape
- Underglazes: Rust Orange, Forest Green
- Clear matte glaze (food safe)
- Small soft bristle brushes
- Fettling knife
- Kiln
Step 1: Throwing the Form
-
Center and open:
Start with about 3-4 lbs of speckled stoneware clay. Center it firmly on the wheel and open the mound, creating a flat floor about 3-4 inches wide. -
Pull the cylinder:
Pull the walls up into a tall, even cylinder. Keep the walls consistent in thickness, aiming for a height of around 10-12 inches. -
Shape the belly:
From the inside, gently push the clay outward to create a gentle swell. The widest point should be just above the middle section, creating a high-shouldered profile. -
Collar the neck:
Use both hands to collar the top third of the pot inward significantly. This creates the narrow neck. Be gentle to avoid buckling the clay. -
Flare the rim:
Once the neck is narrowed, gently flare the very top lip outward to create a defined, rolled rim that mirrors the width of the base. -
Refine and smooth:
Use a flexible metal or rubber rib to smooth the exterior curve, removing throwing lines to create a clean canvas for your geometric design.
Step 2: Trimming and Prep
-
Dry to leather hard:
Allow the vase to dry slowly until it is leather hard. It should be firm enough to handle without warping but still hold moisture. -
Trim the foot:
Place the pot upside down on the wheel, center it, and trim the bottom. Create a slight inward taper at the very base to give the vase a visual lift. -
Smooth the surface:
Wipe the entire surface with a barely damp sponge. This exposes the natural grog or grit in the speckled clay, which is crucial for the final texture.
Bleeding Lines?
If underglaze bleeds under your tape, gently scrape the excess away with a sharp X-Acto knife or needle tool once the underglaze is bone dry for crisp edges.
Step 3: Applying the Design
-
Plan the geometry:
Lightly sketch your design onto the vase with a pencil. Mark a horizontal band directly under the neck, a dynamic sweeping triangle in the middle, and a solid base color section. -
Tape or wax off areas:
Apply thin automotive masking tape or wax resist along your pencil lines. This ensures the crisp, hard edges that define the color blocking style. -
Paint the rust sections:
Using the Rust Orange underglaze, paint the band just below the neck and the entire bottom third of the vase. Apply 2-3 coats for opaque coverage. -
Paint the green wedge:
Fill in the triangular mid-section with Forest Green underglaze. I find that brushing in one direction helps minimize streaks in this large shape. -
Leave negative space:
Leave the remaining sections bare clay. The natural speckled clay body acts as the third color in this palette. -
Peel and reveal:
If you used tape, peel it off carefully while the underglaze is slightly tacky but not bone dry to prevent flaking.
Make it Pop
For more texture, leave the speckled cream sections unglazed on the exterior. Only glaze the inside for waterproof functionality and the colored areas for contrast.
Step 4: Finishing
-
Bisque fire:
Load the dry vase into the kiln and bisque fire to Cone 04. This sets the underglaze and prepares the pot for the final glaze. -
Clear glaze application:
Dip or spray the entire interior and exterior with a clear matte glaze. A matte finish is essential here to preserve the earthy, stone-like aesthetic. -
Final wipe down:
Wipe the foot ring clean of any glaze with a sponge to prevent it from sticking to the kiln shelf. -
Glaze fire:
Fire the piece to maturity (likely Cone 5 or 6, depending on your clay body). Allow the kiln to cool completely before unloading.
Place your finished vase near a window where natural light can highlight the beautiful contrast between the smooth glaze and the gritty clay texture


Doodle Border Details
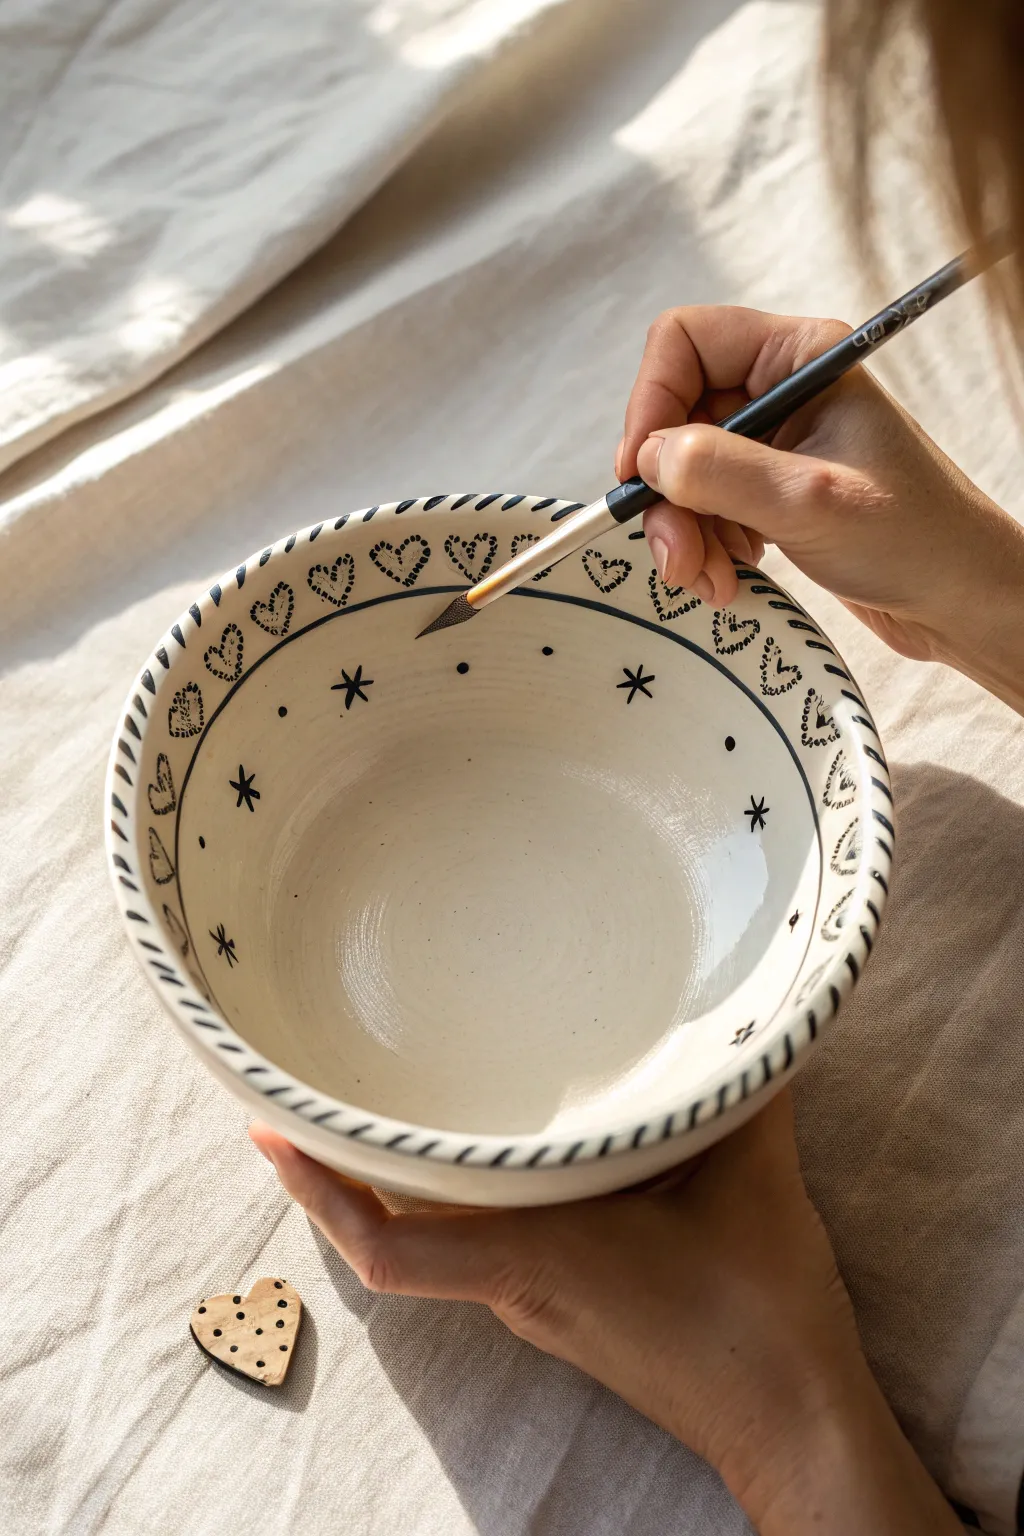
Transform a simple ceramic bowl into a charming piece of art with this hand-painted doodle design. Featuring playful hearts, twinkling stars, and classic dashed borders, this black-and-white motif adds a touch of sweetness to any table setting.
How-To Guide
Materials
- Bisque-fired ceramic bowl (white or cream clay body)
- Black underglaze
- Fine liner brush (size 0 or 00)
- Round brush (size 2)
- Small sponge
- Clean water
- Clear dipping glaze
- Kiln access
Step 1: Preparation & Rim Design
-
Clean surface:
Begin by wiping down your bisque-fired bowl with a damp sponge. This removes any kiln dust or oils from your hands that might resist the underglaze application. -
Load the liner brush:
Shake your black underglaze well. Dip your fine liner brush in, ensuring the bristles are coated but not dripping. If the underglaze feels too thick, thin it slightly with a drop of water for better flow. -
Start the rim markings:
Focus on the very top edge of the bowl’s rim. Using the tip of your liner brush, paint short, diagonal dashes evenly spaced around the entire circumference. -
Angle the dashes:
Try to keep the angle consistent—imagine them slanted like forward slashes (/). They should wrap slightly from the inside edge to the outside edge of the rim. -
Create the inner border line:
Moving just below the dashed rim on the inside of the bowl, paint a continuous thin black line. This acts as a frame for your heart designs. -
Refine the circle:
If painting a perfect circle is tricky, rest your pinky finger on the bowl for stability or place the bowl on a banding wheel and spin it slowly while holding your brush steady.
Smudged lines?
If you smear the underglaze while painting, wait for it to dry completely. Then, gently scratch the mistake off with a toothpick or a clean, stiff brush before reapplying the design.
Step 2: Painting the Heart Pattern
-
Outline hearts:
Directly below the rim dashes but above your continuous line, paint a row of small hearts. Space them out so they have room to breathe. -
Add dotted texture:
Inside each heart outline, stipple tiny dots to fill the shape. I find that varying the pressure slightly creates a more organic, hand-drawn look rather than a perfect machine print. -
Paint secondary hearts:
Below the continuous black line, create a second, larger ring of hearts. These should be slightly bigger than the rim hearts. -
Fill the larger hearts:
Using the same stippling technique, fill these larger hearts with dots. Make sure the dots are dense enough to read as a filled shape but distinct enough to see the clay body underneath.
Add some color
For a pop of interest, paint a single solid red heart hidden among the black-and-white pattern, or use a pastel color for the interior bottom of the bowl.
Step 3: Stars & Finishing Touches
-
Paint the stars:
Move further down into the bowl’s interior wall. Paint simple six-pointed asterisks using intersecting lines to create stars. -
Position the stars:
Space these stars evenly in a ring around the mid-section of the bowl. Aim for a loose, whimsical placement rather than rigid geometry. -
Add floating dots:
Between each star, place a single, solid black dot. This ties the design together and fills the negative space effectively. -
Complete the bottom ring:
Paint final decorative elements lower in the bowl if desired, such as another simple star or small cross near the bottom curve. -
Dry thoroughly:
Let the underglaze dry completely. It should look chalky and matte when fully dry. -
Glaze application:
Dip the entire bowl into a clear transparent glaze. Ensure an even coat and shake off excess drips carefully. -
Final firing:
Fire the piece in the kiln according to the clay and glaze manufacturer’s instructions to seal the design and make it food-safe.
Now you have a charming, custom-painted bowl ready for your morning cereal or to give as a heartfelt gift
BRUSH GUIDE
The Right Brush for Every Stroke
From clean lines to bold texture — master brush choice, stroke control, and essential techniques.
Explore the Full Guide
Minimal Line Art Faces
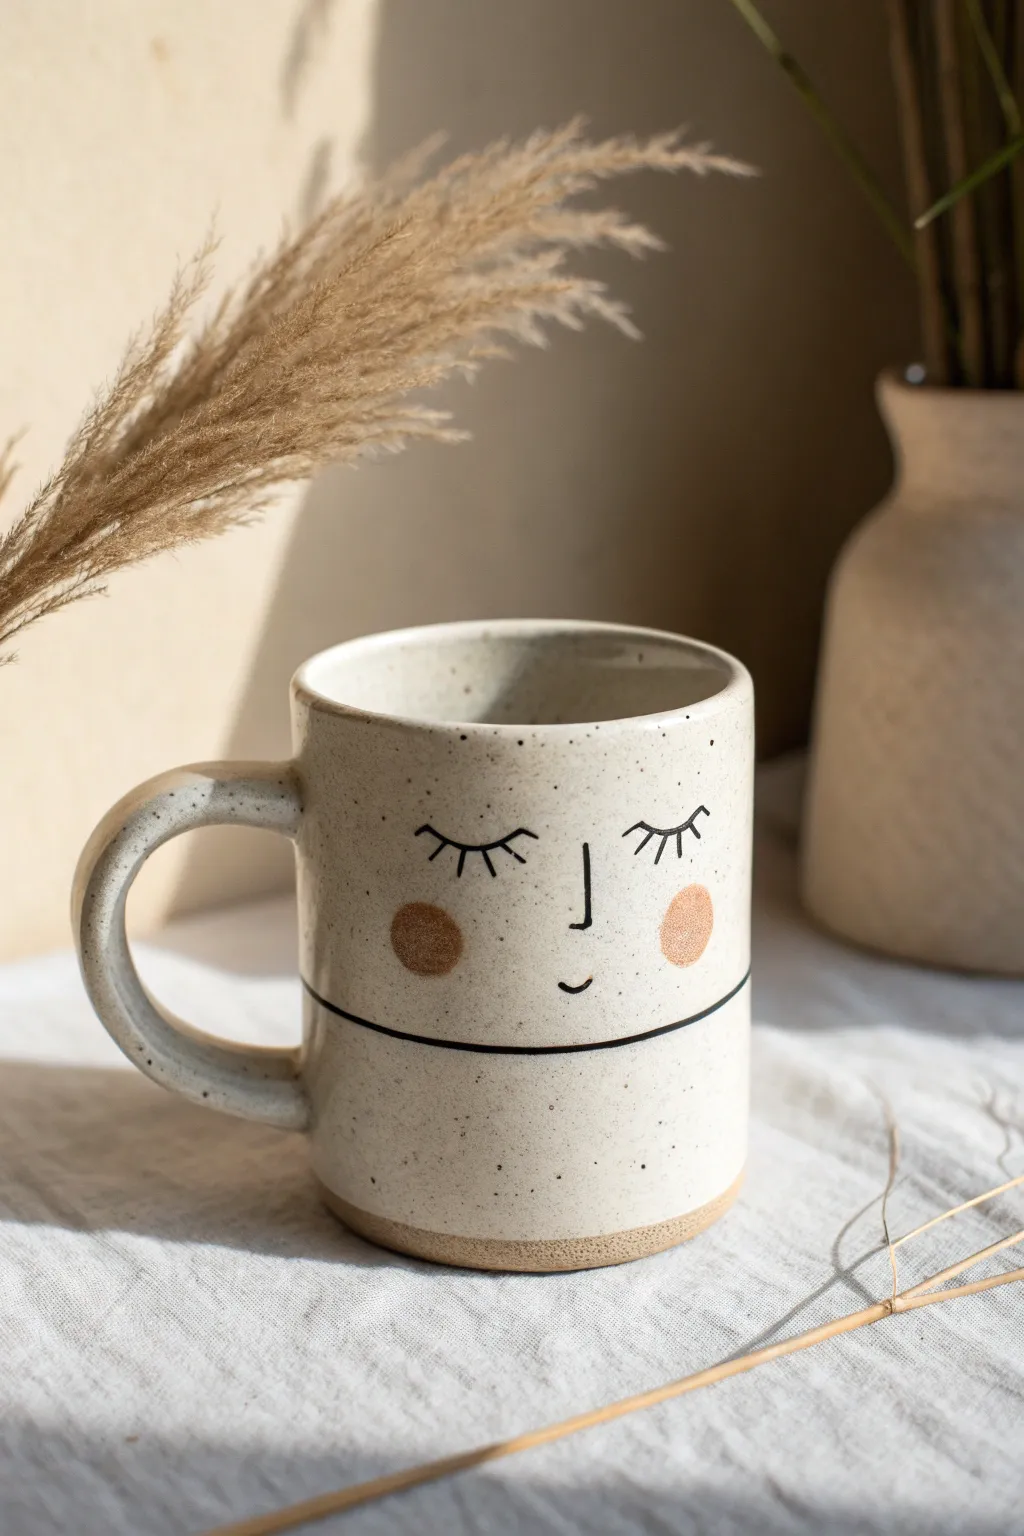
This charming ceramic mug combines rustic, speckled stoneware with the delicate simplicity of line art. The design features a peaceful, sleeping face with rosy cheeks, creating a cozy companion for your morning coffee routine.
Step-by-Step Tutorial
Materials
- Speckled buff stoneware clay
- Pottery wheel
- Rib tool (wooden or silicone)
- Needle tool
- Wire cutter tool
- Trimming tools
- Black underglaze pencil or fine liner brush
- Black underglaze
- Terracotta or peach underglaze
- Small round brush
- Clear matte or satin food-safe glaze
- Sponge and bucket of water
- Serrating tool (or old toothbrush)
Step 1: Throwing the Cylinder
-
Center the Clay:
Begin with about 1 pound of speckled buff stoneware clay. Slam it onto the center of your wheel head and work it up and down into a cone shape before pressing it down into a smooth puck to ensure it is perfectly centered. -
Open the Form:
Drill your thumbs into the center of the puck, leaving about a quarter-inch of clay at the bottom for the base. Pull the clay outward to establish the floor of your mug. -
Pull the Walls:
Using firm, even pressure with wet hands, pull the walls upward. I like to keep the cylinder straight-sided for this design, as it provides a flat ‘canvas’ for the face illustration. -
Refine the Rim:
Compress the rim with a chamois or your sponge to round it off, ensuring it will be comfortable to drink from. -
Smooth the Surface:
Run a wooden or silicone rib up the exterior while the wheel spins slowly. This removes throwing lines and creates that ultra-smooth surface necessary for clean line art later. -
Cut and Dry:
Wire the mug off the wheel head and set it aside on a ware board until it reaches a leather-hard state.
Smudged Lines?
If you smudge the underglaze pencil, wait for it to dry completely, then gently scrape the mistake off with an X-Acto knife or needle tool.
Step 2: Trimming and Handling
-
Trim the Base:
Once leather hard, center the mug upside down on the wheel. Trim away excess clay from the bottom, creating a neat foot ring. Leave the bottom unglazed later to show off the raw clay texture. -
Pull a Handle:
Take a separate small ball of clay and pull a classic C-shaped handle. Let it stiffen up slightly on a board until it holds its curve without sagging. -
Attach the Handle:
Score the attachment points on both the mug and the handle. Apply slip, press the handle firmly onto the mug body, and smooth the seams with a moist finger or sponge.
Add Dimension
Instead of painting the cheeks, press a small, textured stamp or circle of clay onto the surface before bisque firing for tactile 3D rouged cheeks.
Step 3: Illustrating and Glazing
-
Map the Design:
If you’re nervous about freehanding, lightly sketch the face features onto the leather-hard clay using a dull pencil. The graphite will burn off in the kiln. -
Draw the Line Art:
Using a black underglaze pencil or a very fine liner brush dipped in black underglaze, draw the closed eyelids with eyelashes, the simple L-shaped nose, and the small U-shaped smile. -
Add the Horizontal Line:
Create the signature horizontal band that wraps around the mug. You can do this by placing the mug on a banding wheel, holding your brush steady, and spinning the wheel. -
Paint the Cheeks:
Dip a small round brush into your terracotta or peach underglaze. Dab two solid circles onto the midway point of the face to create the rosy cheeks. -
Bisque Fire:
Once the underglaze is dry, load the mug into the kiln for a bisque firing (usually Cone 04). This sets the shape and makes the pot porous for glazing. -
Apply Clear Glaze:
After the bisque fire, wipe the mug with a damp sponge to remove dust. A dip into a clear matte or satin glaze works best to seal the piece while letting the speckles and drawing shine through. -
Wax the Foot:
Apply wax resist to the bottom foot ring to prevent glaze from adhering to the kiln shelf. -
Final Fire:
Fire the mug to maturity (Cone 5 or 6, depending on your clay body). Let the kiln cool completely before unloading.
Now fill your adorable new mug with a hot drink and enjoy the cozy vibes.
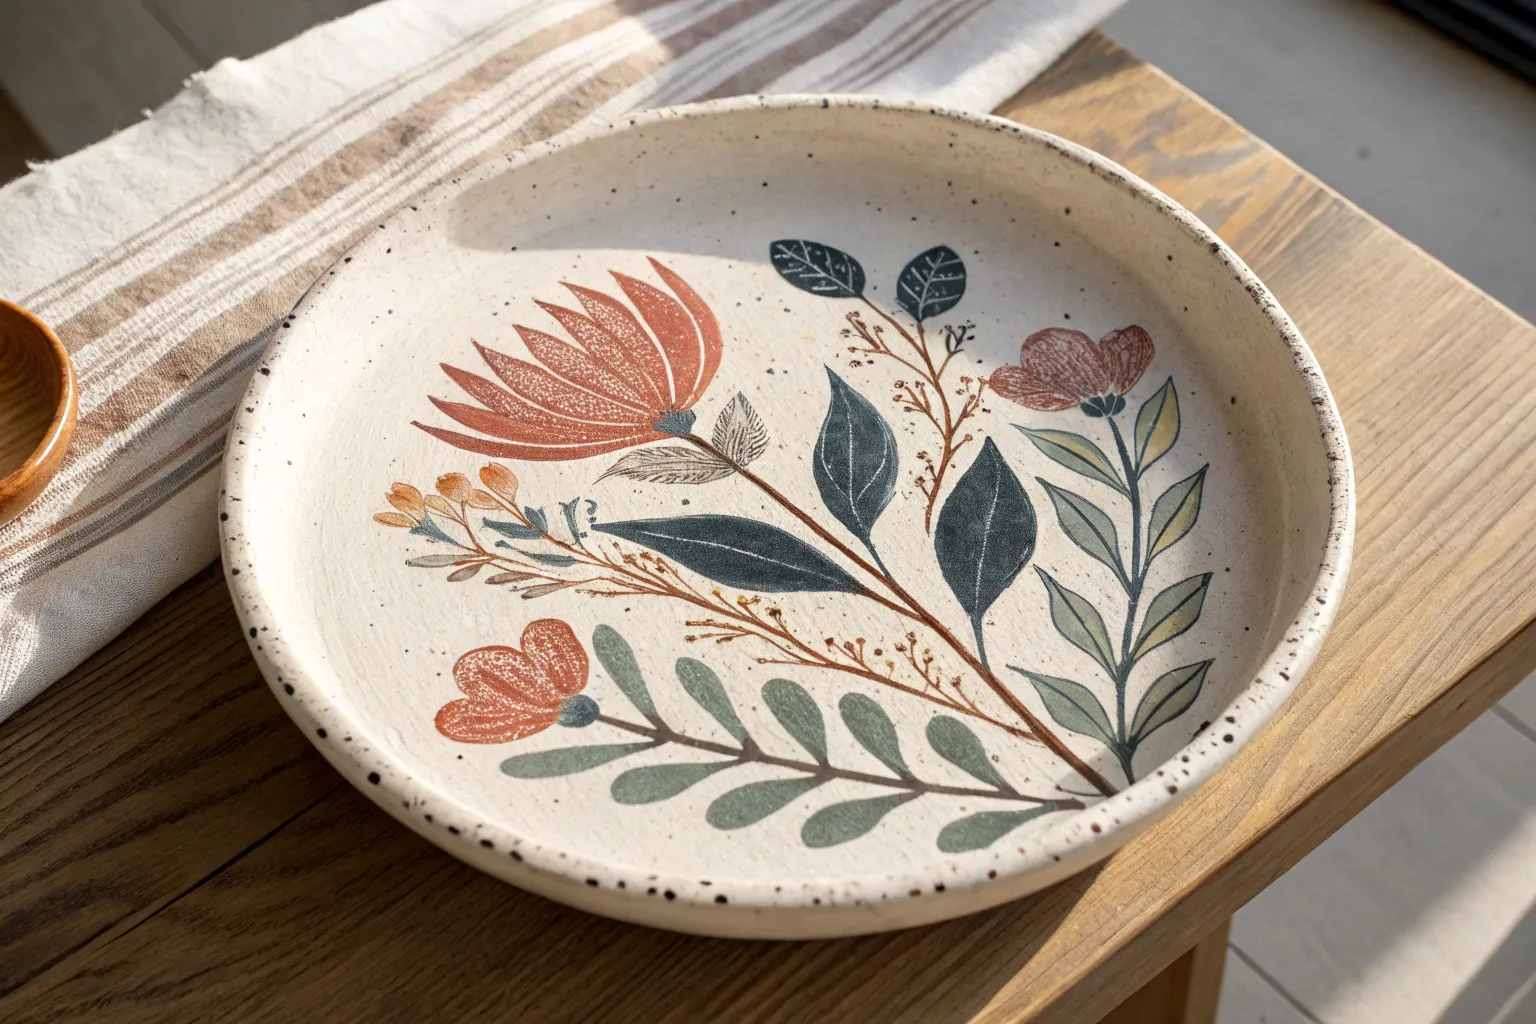
Classic Floral Sprigs
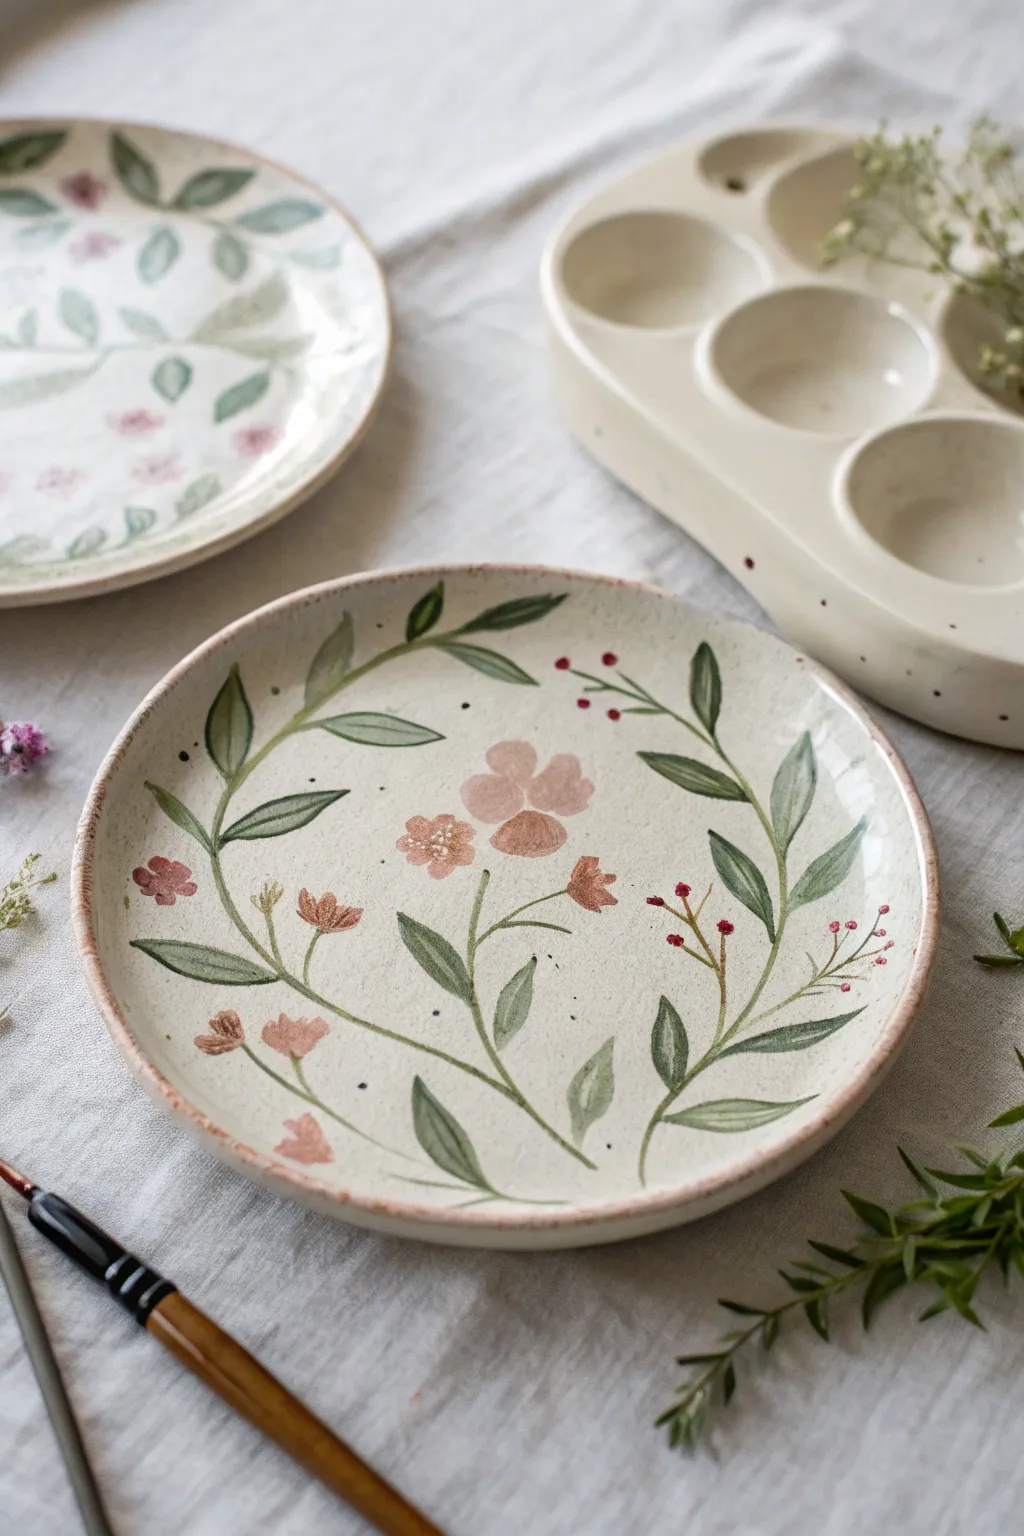
Capture the delicate beauty of a spring meadow with this classic floral sprig design, featuring trailing vines and gentle pink blossoms. The natural speckle of the clay body shines through, giving the finished piece an organic, rustic elegance perfect for everyday dining.
How-To Guide
Materials
- Bisque-fired ceramic plate (speckled clay body recommended)
- Underglazes: Sage Green, Olive Green, Blush Pink, Dusty Rose, Brick Red, Dark Brown
- Round watercolor brushes (sizes 2, 4, and 6)
- Fine liner brush (size 0 or 00)
- Glazed palette or tile
- Water cup and sponge
- Clear dipping glaze or brush-on clear glaze
- Pencil (optional for sketching)
Step 1: Planning and Layout
-
Prepare your surface:
Wipe your bisque plate with a damp sponge to remove any kiln dust. This ensures the underglaze adheres properly to the surface. -
Reference marks:
Visualize the wreath shape. You want a loose, open circle that follows the curvature of the plate rim but doesn’t feel rigid. If you’re nervous, lightly sketch the main vine path with a pencil; the graphite will burn off in the kiln.
Step 2: Painting the Greenery
-
Mix your greens:
On your palette, put out the Sage Green and Olive Green. I like to slightly mix them on the brush for a natural, variegated look rather than a flat color. -
Paint the main stems:
Using a size 4 round brush, paint two long, curving stems that start from the bottom center and reach upwards along the sides. Keep your wrist loose to create organic, wavering lines rather than perfect arcs. -
Add primary leaves:
Switch to a size 6 brush for the larger leaves. Press the belly of the brush down to create the wide part of the leaf, then lift as you pull away to create a sharp tip. Place these sporadically along the main vines. -
Layer secondary foliage:
Using the Olive Green and a size 2 brush, add smaller, thinner leaves tucked behind or between the larger ones. This creates depth and makes the wreath look fuller. -
Add sprig details:
Paint a few tiny, thin stems branching off the main vine into empty white spaces. These will hold your berries and smaller buds later.
Uneven Brushstrokes?
Don’t fix every wobble! If a leaf looks transparent or streaky, leave it. The charm of this style comes from the ‘watercolor effect’ where the brush thickness varies naturally.
Step 3: Adding the Blooms
-
Paint the main flower:
Dip your size 6 brush into Dusty Rose. Paint the central flower using simple, rounded strokes for petals. Don’t worry about perfect symmetry; a ‘blobby’ organic shape looks more hand-painted. -
Add smaller buds:
Using Blush Pink and a size 4 brush, dab small, single-stroke flowers and buds near the leaf clusters. Vary the pressure to make some petals transparent and watercolor-like. -
Create center contrast:
Once the main pink flower is touch-dry (it happens quickly on bisque), dab a darker Dusty Rose or a mix of Pink and Brown in the center to suggest depth. -
Paint the berries:
Switch to your smallest liner brush and Brick Red. Add clusters of tiny dots at the ends of the thin stems you painted earlier. Keep these delicate and precise.
Level Up: Sgraffito
Once the leaf shapes are semi-dry, use a needle tool to gently scratch vine details through the green paint, revealing the raw clay color beneath instead of painting veins on top.
Step 4: Refining and Glazing
-
Define the veins:
With the liner brush and a watered-down Dark Brown or concentrated Olive Green, paint a simplified central vein on the largest leaves. Keep the line incredibly thin. -
Add movement specks:
To enhance the rustic feel, you can flick a few tiny specks of watered-down brown or green paint onto the plate, or carefully paint small floating dots to fill visual gaps. -
Rim the edge:
Use a damp sponge or a wide brush with a very light amount of watered-down pink or brown to gently distress the very edge of the rim, framing the design. -
Let it dry completely:
Allow the underglaze to dry for at least 24 hours to ensure all moisture has evaporated from the bisque. -
Apply clear glaze:
Dip the plate into a clear glaze, or apply three even coats of brush-on clear glaze. This will seal the design and make the plate food-safe and glossy. -
Final wipe:
Clean the foot of the plate (the bottom ring) with a sponge to ensure no glaze is left there, preventing it from sticking to the kiln shelf.
This gentle floral wreath will bring a touch of timeless nature to your table setting, ready for your next homemade meal

PENCIL GUIDE
Understanding Pencil Grades from H to B
From first sketch to finished drawing — learn pencil grades, line control, and shading techniques.
Explore the Full Guide
Leafy Botanical Layers
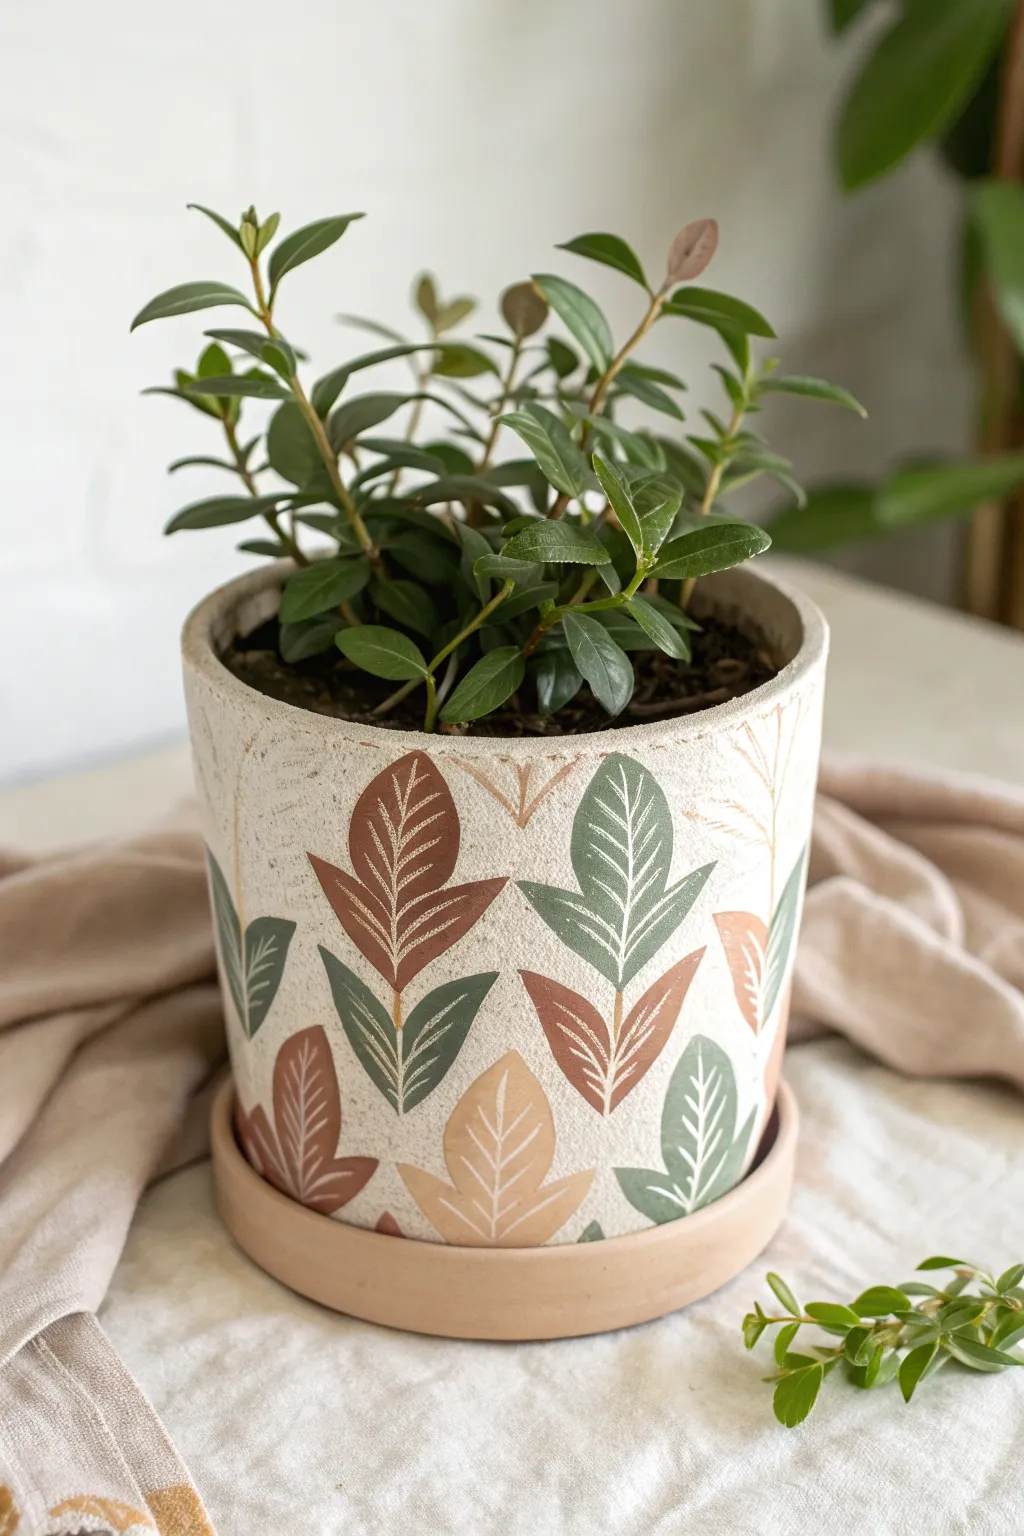
Bring the serene beauty of the forest floor into your home with this textured botanical planter. Using a combination of underglaze painting and sgraffito-inspired carving, you’ll create layered, leafy motifs in warm earth tones on a speckled clay body.
Step-by-Step
Materials
- Leather-hard stoneware clay pot (cylinder shape)
- Underglazes (Sage Green, Forest Green, Terracotta, Rust Brown, Ochre)
- Small flat synthetic brush (size 6 or 8)
- Sgraffito tool or needle tool
- Loop trimming tool
- Clean sponge and water
- Matte clear glaze
- Pencil (optional)
Step 1: Planning and Layout
-
Surface Preparation:
Ensure your clay pot is at a perfect leather-hard stage—stiff enough to hold its shape but soft enough to carve into without chipping. Wipe the surface gently with a damp sponge to remove any dust or loose clay crumbs. -
Establish the Grid:
Visualize or lightly sketch a staggered grid around the circumference of the pot using a soft pencil. The pencil lines will burn off in the kiln, so don’t worry about erasing them later. -
Sketch the Base Shapes:
Draw simple, broad teardrop shapes for the leaves. Arrange them in clusters of three, fanning out from a central stem point. Alternate the orientation slightly to create a natural, organic flow around the vessel.
Clean Lines Hack
Wait until the underglaze is ‘leather hard’ on the pot before carving. If it’s too wet, the lines will be mushy; too dry, and the glaze will chip.
Step 2: Applying Color
-
Mixing Earth Tones:
Prepare your palette by pouring out small pools of your underglazes. I like to keep a bit of water nearby to thin the underglaze slightly if it feels too thick or tacky. -
Base Leaf Painting:
Using the flat brush, fill in the leaf shapes. Start with the Forest Green for the largest leaves in the pattern to anchor the design. -
Alternating Colors:
Switch to your Terracotta and Rust Brown shades for adjacent leaf clusters. Apply 2-3 coats of underglaze to each shape to ensure solid, opaque coverage, letting each coat dry briefly in between. -
Adding Highlights:
Fill in the remaining smaller leaves or gaps with the Sage Green and Ochre tones. This variety creates the layered, autumnal look visible in the finished pot. -
Drying Time:
Allow the underglaze application to dry until it is no longer shiny and feels cool and matte to the touch. This usually takes about 15-20 minutes depending on humidity.
Texture Play
Use a speckled clay body like buff stoneware. The iron specks will show through the clear glaze, adding depth to the white space around the leaves.
Step 3: Carving the Details
-
Carving Central Veins:
With your sgraffito tool or needle tool, carve a straight vertical line down the center of each painted leaf. Use steady, medium pressure to cut through the colored underglaze and reveal the raw clay body underneath. -
Adding Side Veins:
Carve angled lines branching off the central stem, mimicking the veins of a real leaf. Keep your strokes swift and confident to get clean lines. -
Refining the Edges:
If any paint went outside your original sketch, use the loop tool to gently scrape away the excess, sharpening the outline of each leaf against the background. -
Cleaning Burrs:
Once all carving is complete and the pot is bone dry, use a stiff brush or your finger to gently flick away the little clay crumbs (burrs) created by the carving tools.
Step 4: Finishing and Firing
-
Bisque Fire:
Load your piece into the kiln for a bisque fire. This hardens the clay and sets the underglaze permanently onto the surface. -
Waxing the Bottom:
Apply wax resist to the bottom of the pot and a few millimeters up the side to prevent the glaze from adhering where it touches the kiln shelf. -
Glazing:
Dip the entire pot into a matte clear glaze. A matte finish is crucial here to maintain the earthy, textured aesthetic rather than making it look like glossy plastic. -
Final Wipe:
Wipe any glaze droplets off the bottom or waxed areas with a sponge. -
Glaze Fire:
Fire the piece to the final temperature appropriate for your clay body (likely Cone 5 or 6). Once cool, sand the bottom if necessary to ensure it sits flat.
Now you have a stunning, handcrafted home for your favorite green friend
Fruit Pattern Repeat
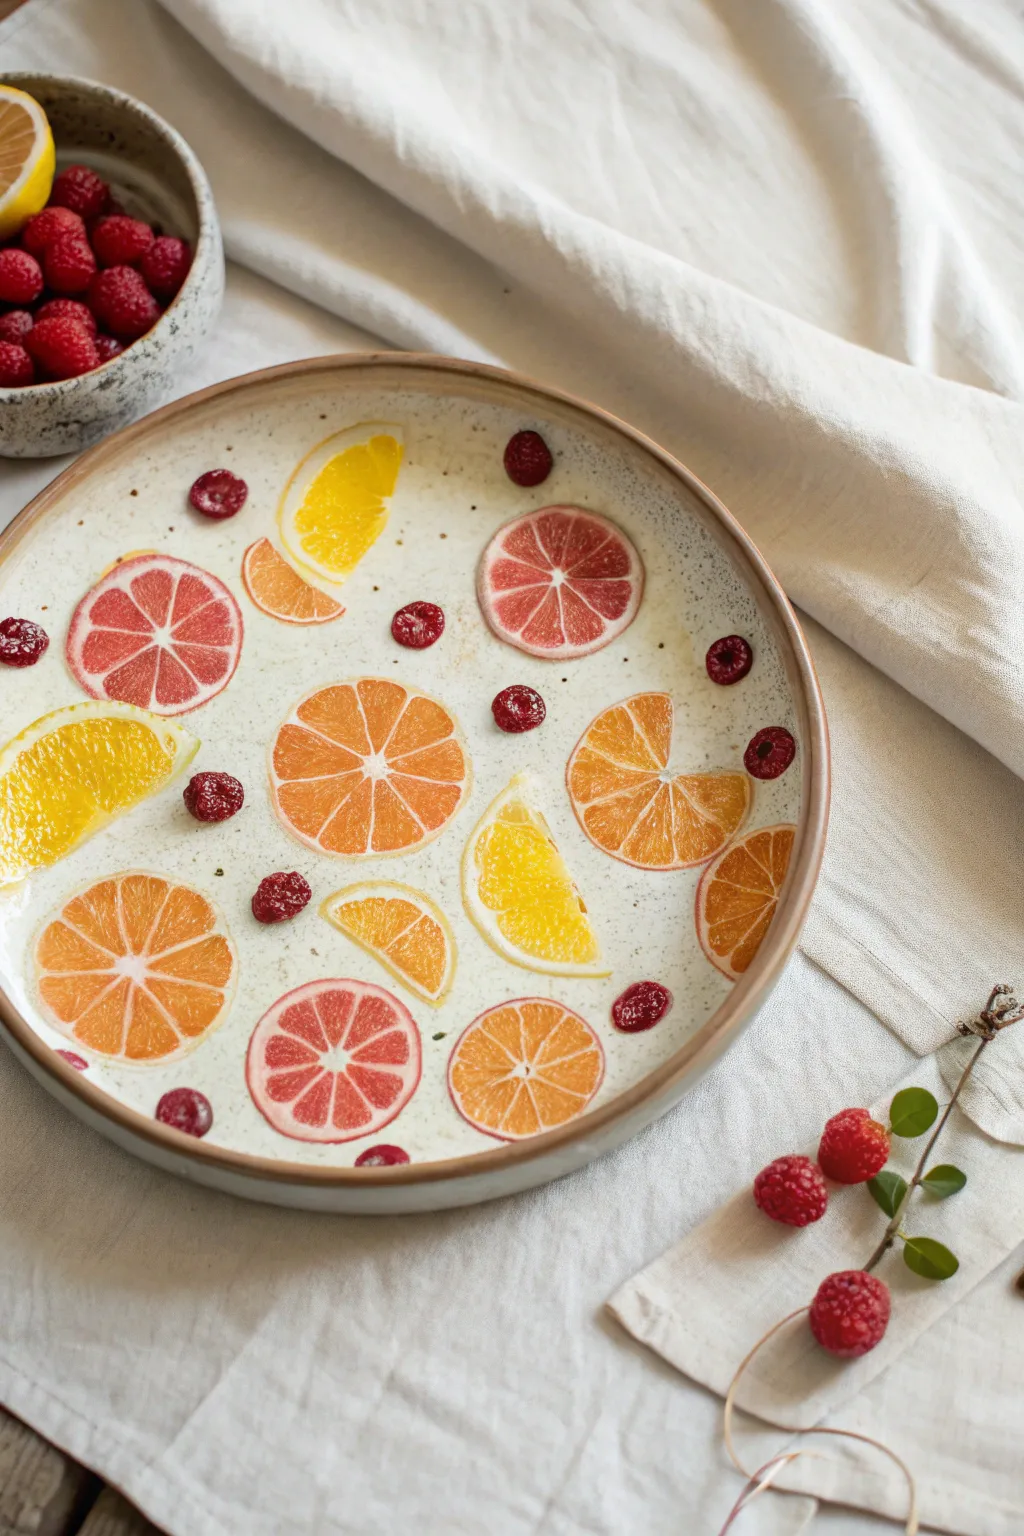
Bring the refreshing zest of summer to your table with this delightful ceramic plate design featuring translucent citrus slices and vibrant raspberries. Whether you use underglaze transfers or hand-painting techniques, the result is a bright, speckled finish that looks good enough to eat.
Step-by-Step Guide
Materials
- Bisque-fired ceramic plate (wide rim, speckled clay body preferred)
- Underglazes (Lemon Yellow, Bright Orange, Grapefruit Pink, Deep Red)
- Fine liner brush (size 0 or 00)
- Small round brush (size 2 or 4)
- Clear transparent glaze (food safe)
- Paper template or real citrus slices for reference
- Sponge
- Pencil (Hb)
- Palette for mixing
Step 1: Planning and Layout
-
Clean surface:
Begin by wiping down your bisque plate with a damp sponge to remove any dust or oils that might resist the glaze. -
Citrus sizing:
Lightly sketch circles of varying sizes across the plate surface using a standard pencil. The graphite will burn off in the kiln. -
Arrangement strategy:
Scatter the circles randomly, ensuring you include both full rounds and half-moon shapes for variety. Leave enough negative space between them so the speckled clay body can shine through. -
Sketching segments:
Inside each circle, lightly draw the triangular segments of the citrus flesh. Don’t worry about being perfectly geometric; organic unevenness looks more natural.
Use Wax Resist
Apply wax resist over the white pith lines before painting segments. This keeps lines crisp and speeds up the painting process.
Step 2: Painting the Citrus
-
Base colors:
Using your round brush, fill in the segments with your base colors. Use lemon yellow for lemons, bright orange for oranges, and grapefruit pink for the ruby red grapefruits. -
Layering for opacity:
Apply 2-3 coats of underglaze depending on the brand’s translucency. Let each coat dry until it’s chalky before adding the next. -
Creating the rinds:
With a steady hand, paint a thin ring around the outer edge of each fruit slice, matching the interior color. Leave a tiny gap of raw clay between the rind and the flesh to simulate the white pith. -
Adding gradients:
I like to create depth by adding a slightly darker shade near the center of the orange segments or the outer edge of grapefruit slices while the paint is still slightly damp.
Add Dimension
Mix a tiny bit of clear glaze into your underglaze for the specific fruit segments to give them a juicy, slightly raised texture after firing.
Step 3: Detailing the Berries
-
Berry placement:
Identify the empty spaces between your citrus slices where small raspberries would fit naturally. -
Base shape:
Paint small, irregular circular blobs using a deep red underglaze. These don’t need to be perfect circles. -
Texture details:
Once the red base is dry, use your finest liner brush to dab tiny dots of a slightly lighter red or pink on top to mimic the individual drupelets of a raspberry. -
Shadow accents:
Add a tiny dot of dark purple or black mixed with red in the center of a few berries to create the hollow look typical of raspberries.
Step 4: Defining Features
-
Citrus membranes:
Use the liner brush with a very pale yellow or diluted white to crisply define the lines separating the fruit segments if your ‘pith’ gaps got messy. -
Segment texture:
Paint very faint, thin radiating lines inside the segments using a slightly darker version of the fruit color to suggest the juice sacs. -
Final cleanup:
Check for any stray underglaze smudges on the background and gently scratch them off with a needle tool or wipe with a stiff, damp brush.
Step 5: Glazing and Firing
-
Clear coat application:
Once the underglaze is bonedry, dip or brush on a clear, food-safe transparent glaze. A dipping tong works best to ensure an even coat. -
Foot check:
Wipe the foot of the plate completely clean to prevent it from fusing to the kiln shelf. -
Final fire:
Load the kiln and fire to the temperature appropriate for your specific clay and glaze (usually cone 5 or 6 for stoneware).
Now you have a permanently fresh fruit display ready for your next breakfast spread


Seasonal Mini Motifs
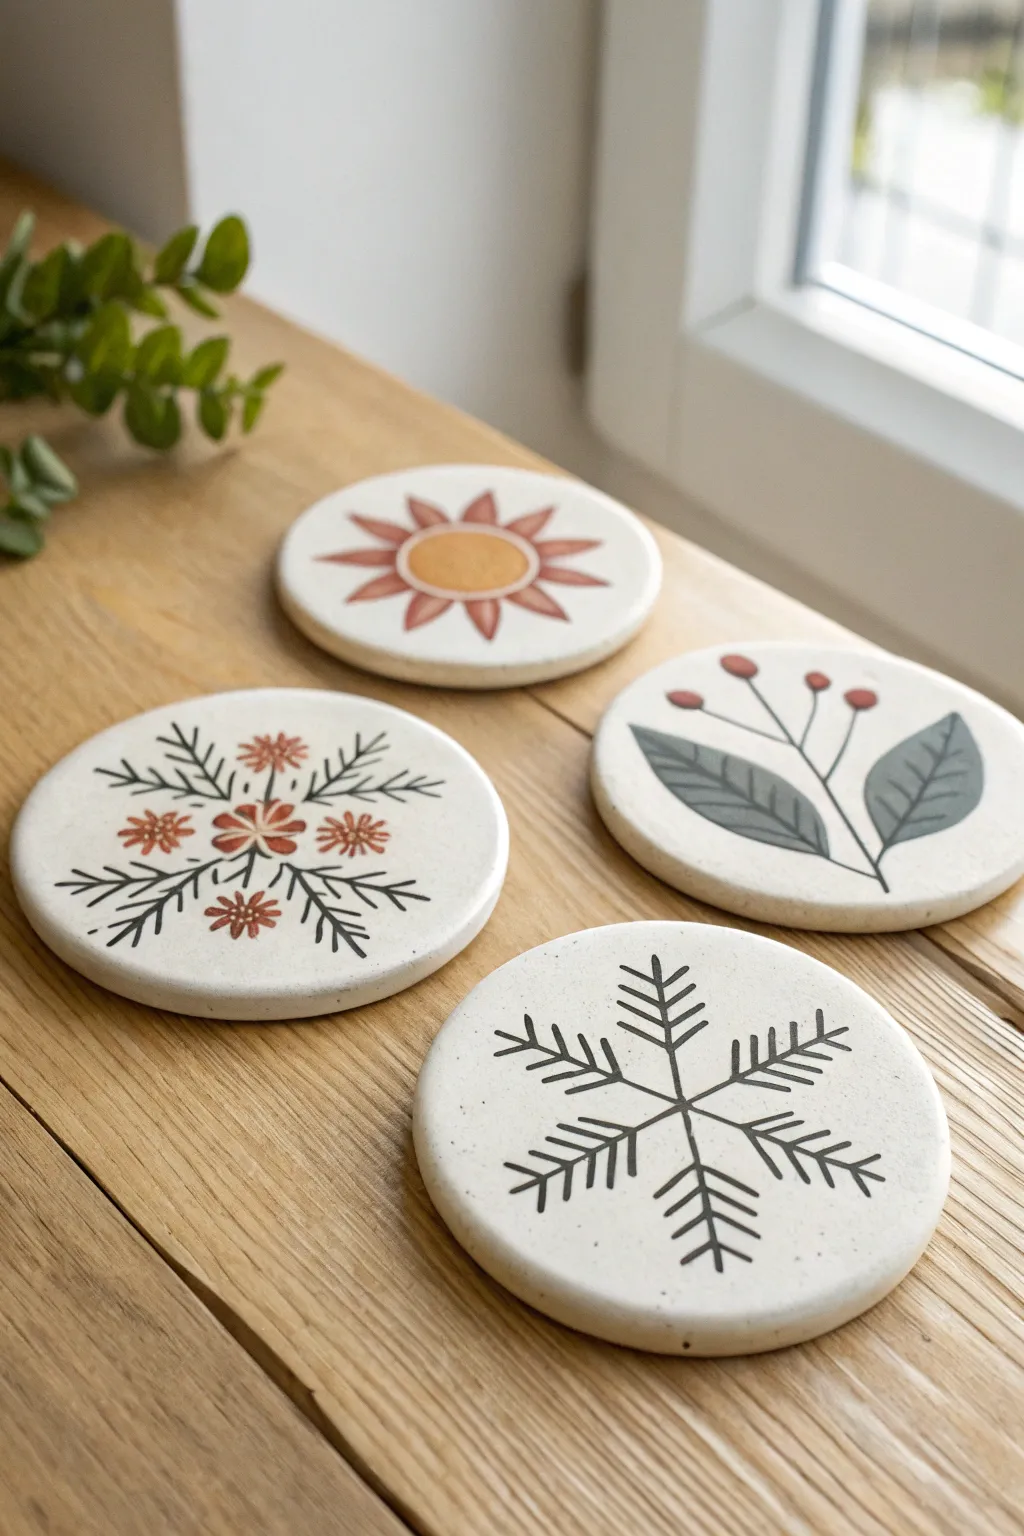
Capture the essence of the changing seasons with this charming set of four hand-painted clay coasters. Using simple lines and earth-toned glazes, you will create a minimalist collection featuring a sun, a snowflake, a botanical sprig, and a floral hybrid motif.
How-To Guide
Materials
- White polymer clay or air-dry clay (approx. 500g)
- Circular clay cutter (approx. 4 inches) or a bowl guide
- Rolling pin
- Fine-grit sandpaper (220-400 grit)
- Acrylic paints (Terracotta, Mustard Yellow, Sage Green, Black/Dark Grey)
- Fine detail paintbrushes (size 0 and 00)
- Matte spray varnish or sealant
- Parchment paper or clay mat
- Pencil for sketching (optional)
Step 1: Shaping the Base
-
Condition the Clay:
Begin by kneading your white clay until it is soft, pliable, and free of air bubbles. If using polymer clay, warm it in your hands to make it easier to work with. -
Roll Out the Slab:
Place the clay on parchment paper and roll it out to an even thickness of about 1/4 inch (6mm). Try to keep the surface as smooth as possible. -
Cut the Circles:
Use your circular cutter or trace around a small bowl to cut out four identical circles. Peel away the excess clay carefully. -
Smooth the Edges:
Dip your finger in a little water (for air-dry clay) or baby oil (for polymer) and gently run it along the cut edges to round them off slightly, removing any sharp angles. -
Dry or Bake:
Follow the instructions for your specific clay type. For air-dry clay, let them sit for 24-48 hours, flipping occasionally for even drying. If using polymer clay, bake according to the package directions on a baking sheet. -
Sand for Smoothness:
Once fully cured and cooled, lightly sand the surface and edges with fine-grit sandpaper to create a pristine canvas for your painting.
Pro Tip: Steady Hands
Rest your pinky finger on the table or a dry part of the coaster while painting fine lines. This anchors your hand and gives you much better control.
Step 2: Painting the Motifs
-
Sketch the Designs:
Lightly sketch your four designs with a pencil directly onto the clay: a central sun, a six-point snowflake, a sprig with berries, and a floral snowflake pattern. -
Paint the Summer Sun:
On the first coaster, paint a solid circle in the center with mustard yellow. Once dry, add triangular rays around it using terracotta paint, keeping the lines rustic and hand-drawn. -
Create the Winter Snowflake:
For the second coaster, used thin black or dark grey paint. Draw three intersecting lines to form a star, then add small ‘V’ shapes along each arm to create the classic snowflake pine branches. -
Detail the Autumn Sprig:
On the third coaster, paint a thin black stem that branches out. Add sage green leaves to the lower branches and small terracotta dots at the tips of the upper branches for berries. -
Paint the Spring Floral:
For the final design, combine elements. Paint a black snowflake structure first, then add small terracotta flower bursts at the center intersection and midway along the branches. -
Add Fine Details:
Go back over your designs with your smallest brush to sharpen lines or add tiny dots for texture, like I sometimes do on the flower petals for extra depth. -
Clean Up Edges:
If any paint smudged onto the white background, carefully scrape it away with a craft knife or paint over it with a bit of white acrylic once the other colors are dry.
Step 3: Finishing Touches
-
Seal the Surface:
Since these will be used as coasters, apply 2-3 coats of a matte spray varnish or a waterproof sealant to protect the paint from moisture and heat. -
Add Felt Backing:
Optional but recommended: glue a circle of felt or cork to the bottom of each coaster to prevent them from scratching your table surfaces.
Level Up: Texture Play
Before baking the clay, press actual dried flowers or pine needles gently into the surface for a debossed effect, then paint inside the impressions.
Now you have a beautiful, functional set of coasters that celebrates the cycle of the year
Bold Geometric Shapes
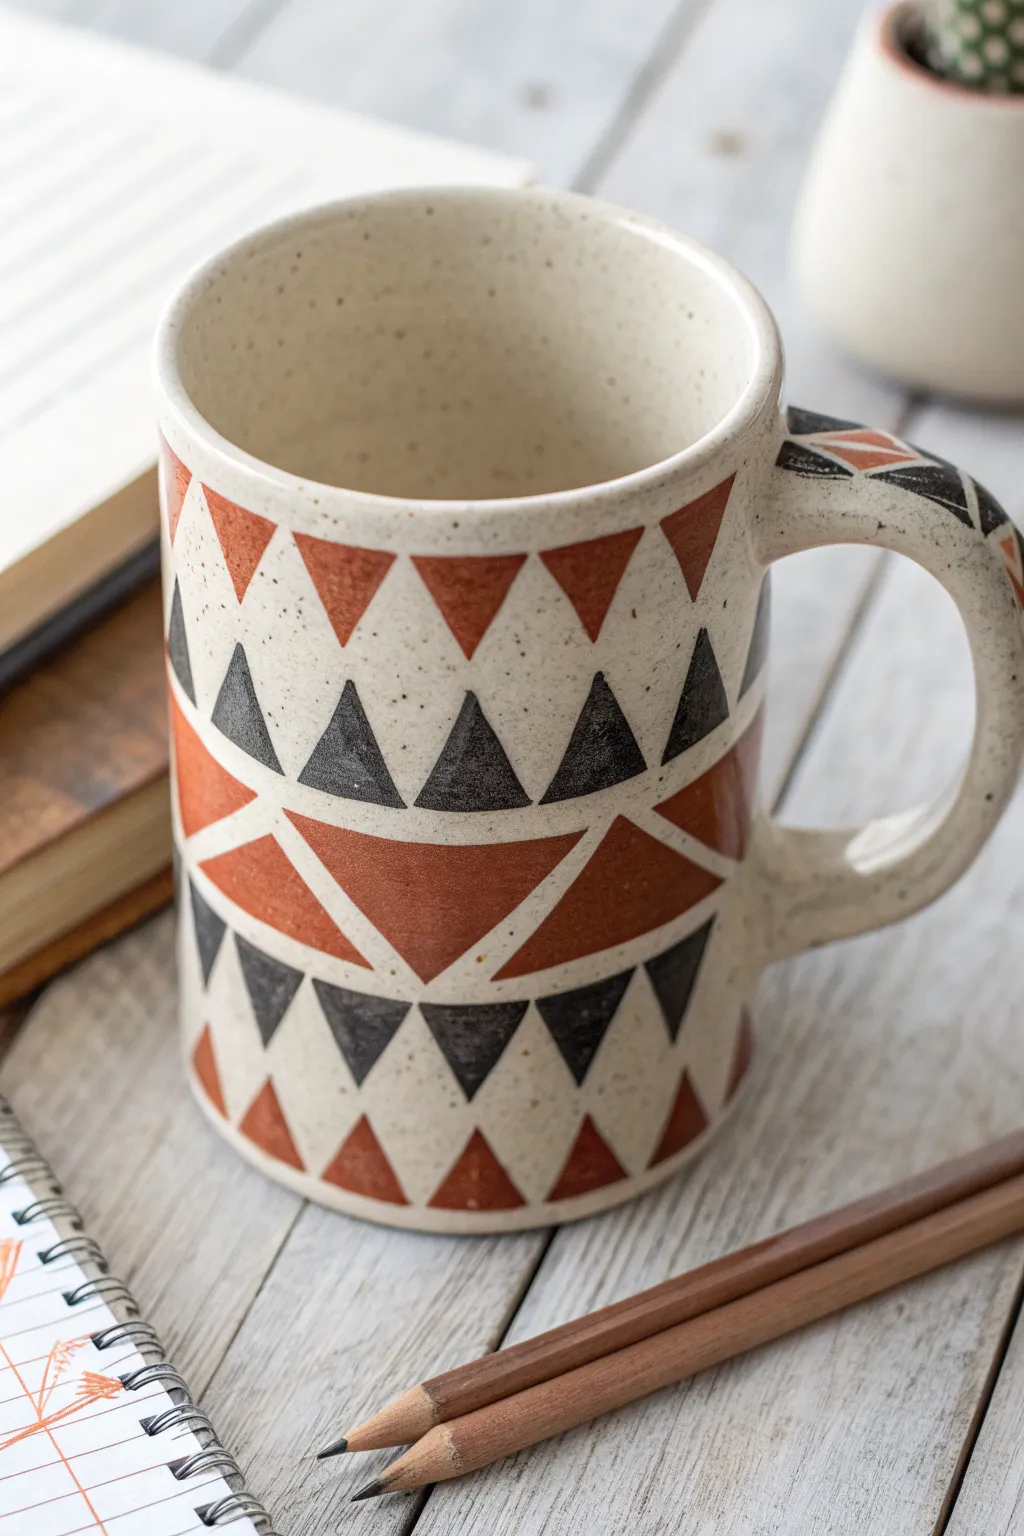
This project combines the rustic charm of speckled stoneware with the sharp, modern appeal of bold geometric patterns. The rust and black triangles create a striking contrast against the creamy clay body, making for a truly eye-catching piece of functional art.
Step-by-Step Tutorial
Materials
- Speckled stoneware clay (approx. 1 lb)
- Pottery wheel (or slab roller for hand-building)
- Ribs (wooden and metal)
- Needle tool
- Trimming tools
- Sponge
- Underglazes: Rust/Terracotta and Black
- Detail brushes (flat shader and fine liner)
- Clear matte or satin glaze
- Wax resist (optional)
- Pencil (graphite burns off in kiln)
Step 1: Forming the Body
-
Throw the Cylinder:
Center your speckled clay on the wheel and open it up. Pull the walls to create a straight-sided cylinder, aiming for a height of about 4-5 inches. Keep the walls even, as this will help when painting the geometric design later. -
Refine the Rim:
Compress the rim with a chamois or your finger to ensure it’s smooth and pleasant to drink from. I like to give it a slight inward bevel for a finished look. -
Smoothing the Canvas:
Use a metal rib on the exterior while the wheel is spinning slowly to remove throwing lines. You want a smooth, flat surface for your geometric painting. -
Dry to Leather Hard:
Wire the mug off the bat and let it dry slowly until it reaches a leather-hard state. It should be firm enough to handle without deforming but still hold moisture.
Sticky Situation
Use automotive pinstriping tape or masking tape cut into thin strips to block out the triangle shapes before painting. This guarantees razor-sharp straight lines.
Step 2: Trimming and Handle
-
Trim the Foot:
Center the mug upside down on the wheel. Trim away excess clay from the bottom to create a clean foot ring. This defines the bottom edge of your pattern area. -
Pull a Handle:
Pull a strap of clay for the handle. Shape it into a curve that allows for a comfortable two or three-finger grip. -
Attach the Handle:
Score and slip the attachment points on both the mug and the handle. Press the handle firmly onto the mug, smoothing the joints with a damp sponge or modeling tool to make them seamless.
Step 3: Geometric Design
-
Grid the Surface:
Using a soft pencil, lightly mark horizontal bands around the mug. You’ll need four distinct bands to house the different rows of triangles. The graphite will burn off in the firing, so don’t worry about the marks. -
Draft the Triangles:
Lightly sketch the zig-zag patterns within your bands. Draw inverted triangles for the top row, upright triangles for the second, large inverted triangles for the middle band, and then smaller rows near the bottom. -
Paint Rust Triangles:
Using a flat shader brush, fill in the top row of inverted triangles and the large central band triangles with your rust/terracotta underglaze. Apply 2-3 coats for solid opacity. -
Paint Black Triangles:
Switch to clean brushes and fill in the second row (upright triangles) and the bottom accent rows with black underglaze. Be careful to keep the edges crisp and sharp. -
Handle Details:
Don’t forget the handle! Continue the geometric theme by painting a small diamond or triangle pattern on the top curve of the handle where the thumb rests. -
Clean Up Lines:
If any underglaze smudged or went outside your pencil lines, gently scrape the error away with a sharp needle tool or exacto knife once the paint is dry.
Go Darker
Try reversing the color scheme by using a dark stoneware or chocolate clay body and painting the triangles with white and bright turquoise underglazes.
Step 4: Finishing
-
Bisque Fire:
Once the mug is bone dry, load it into the kiln for a bisque firing (usually cone 04 or 06). This sets the shape and makes the underglaze handleable. -
Clear Glaze Application:
Dip the entire mug into a clear matte or satin glaze. A glossy glaze can work, but a matte finish emphasizes the texture of the speckled clay and the graphic quality of the design. -
Wipe the Foot:
Thoroughly wipe the glaze off the foot ring with a damp sponge to prevent it from sticking to the kiln shelf. -
Final Fire:
Fire the mug to maturity (typically Cone 5 or 6 for stoneware). Let the kiln cool completely before opening to reveal your sharp geometric design.
Enjoy your morning coffee in a mug that balances ancient craft with modern geometry
Black-and-White Checkerboard
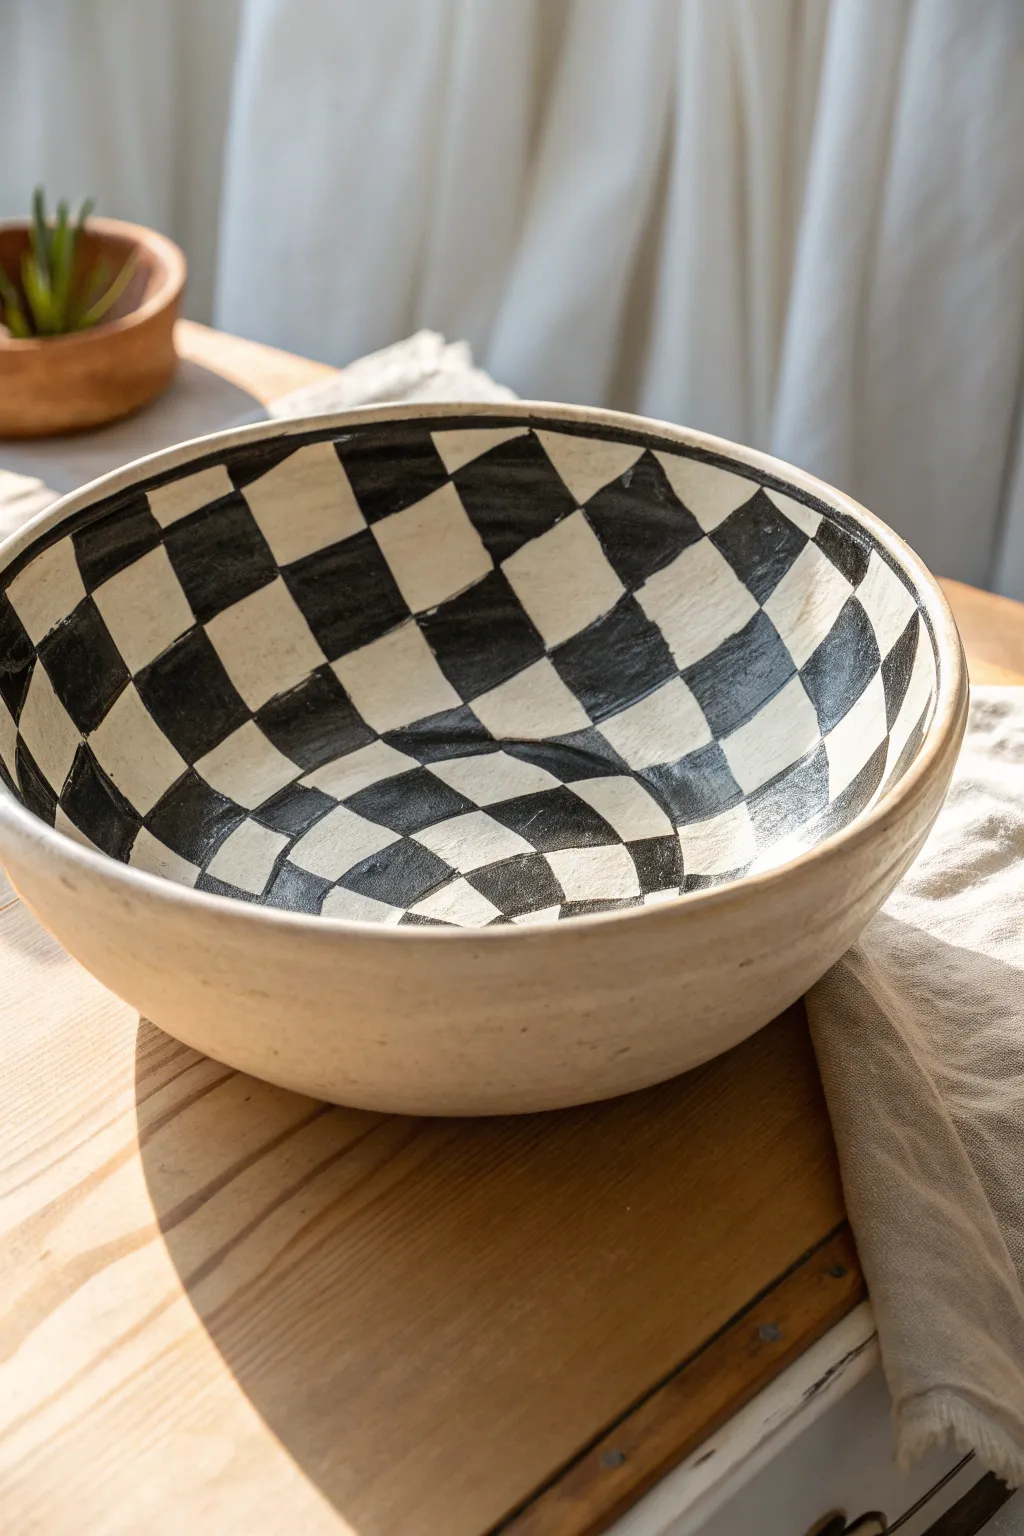
Bring a bold, graphic touch to your table with this handmade ceramic bowl featuring a mesmerizing black-and-white checkerboard interior. The organic, imperfect lines of the hand-painted pattern contrast beautifully with the warm, natural clay exterior, creating a piece that feels both modern and rustic.
Detailed Instructions
Materials
- Stoneware clay (buff or white)
- Pottery wheel or rolling pin and slump mold
- Rib tool
- Sponge
- Underglaze pencil (black or grey)
- Black underglaze
- Small square-headed brush
- Medium round brush
- Clear transparent glaze (food safe)
- Wax resist (optional)
- Kiln access
Step 1: Forming the Bowl
-
Prepare your clay:
Begin by wedging about 3-4 pounds of stoneware clay to remove air bubbles. This ensures your bowl will have a consistent structure without weak points. -
Shape the vessel:
Form the clay into a wide, open bowl shape. You can do this by throwing on the wheel for symmetry, or using a slump mold with a rolled slab for a more organic feel. Aim for a diameter between 10-12 inches. -
Refine the rim:
While the clay is still workable, compress the rim with a piece of chamois or your sponge. The rim in this project has a gentle, slightly uneven character, so don’t worry about surgical precision. -
Smooth the interior:
Use a flexible rib tool to smooth the interior surface perfectly. Any bumps or grog dragging here will interfere with your checkerboard painting later, so take your time to get a clean canvas. -
Dry to leather hard:
Allow the bowl to dry slowly until it reaches a leather-hard state. It should be firm enough to handle without warping but still cool to the touch. -
Trim the foot:
Flip the bowl over and trim a clean foot ring. This adds visual lift and makes the piece feel lighter.
Clean Lines
For crisper squares, use narrow masking tape (automotive detailing tape works well on curves) to mask off the ‘white’ squares before painting.
Step 2: Drafting the Grid
-
Find the center:
Place the bowl right-side up. Using a light touch with an underglaze pencil, mark the direct center at the bottom of the bowl. -
Sketch radial lines:
Draw radial lines extending from the center point up to the rim, like slicing a pie. These lines will determine the width of your checkers. Don’t use a ruler; the hand-drawn wobble is part of the charm. -
Add concentric circles:
Starting from the bottom center, sketch concentric circles outward towards the rim. These intersect with your radial lines to form the grid. Space them out slightly wider as you move up the bowl to account for the curve.
Warped Checkers
Intentionally distort the grid near the rim or bottom for an optical illusion effect that emphasizes the bowl’s depth and curvature.
Step 3: Painting the Pattern
-
Prepare the underglaze:
Pour a small amount of black underglaze onto a palette. If it’s too thick, thin it slightly with water until it has a heavy cream consistency for smooth application. -
Mark your squares:
Before committing with a full brush, place a tiny dot of black underglaze in every alternating square. It’s incredibly easy to lose track of the pattern on a curved surface, and this prevents mistakes. -
Outline the black squares:
Using a fine detail brush, outline the edges of a ‘black’ square. I find it helps to do a few outlines at a time before filling them in. -
Fill in the checks:
Switch to your square-headed brush to fill in the outlined squares. Apply 2-3 coats of underglaze, letting each coat dry briefly in between, to ensure a solid, opaque black. -
Clean up the edges:
If you smudge any black into a white square, gently scrape it away with a sharp needle tool or clean it up with a stiff, damp brush once the paint is dry. -
Bisque fire:
Once the underglaze is completely dry, fire the bowl to bisque temperature (usually cone 04 or 06). This sets the pattern permanently.
Step 4: Glazing and Finishing
-
Wipe down:
After the kiln cools, wipe the bisque-fired bowl with a damp sponge to remove any dust that might cause pinholes in your glaze. -
Apply clear glaze:
Pour a clear, food-safe glaze into the interior of the bowl, swirl it to coat the entire checkerboard surface, and pour out the excess. Ensure the coating is even to avoid milkiness. -
Leave exterior bare:
To recreate the look in the photo, leave the exterior unglazed to show off the natural clay body. You can apply a wax resist to the outside if you’re dipping the whole piece, or simply carefully pour the glaze inside only. -
Final wipe:
Clean any stray glaze drips off the rim or the exterior with a sponge. -
Glaze fire:
Fire the piece again to your clay body’s maturity temperature (e.g., cone 5, 6, or 10). Let the kiln cool completely before opening.
Now you have a stunning, graphic centerpiece ready for fruit or serving favorite dishes.
Dot Mandala Centerpiece
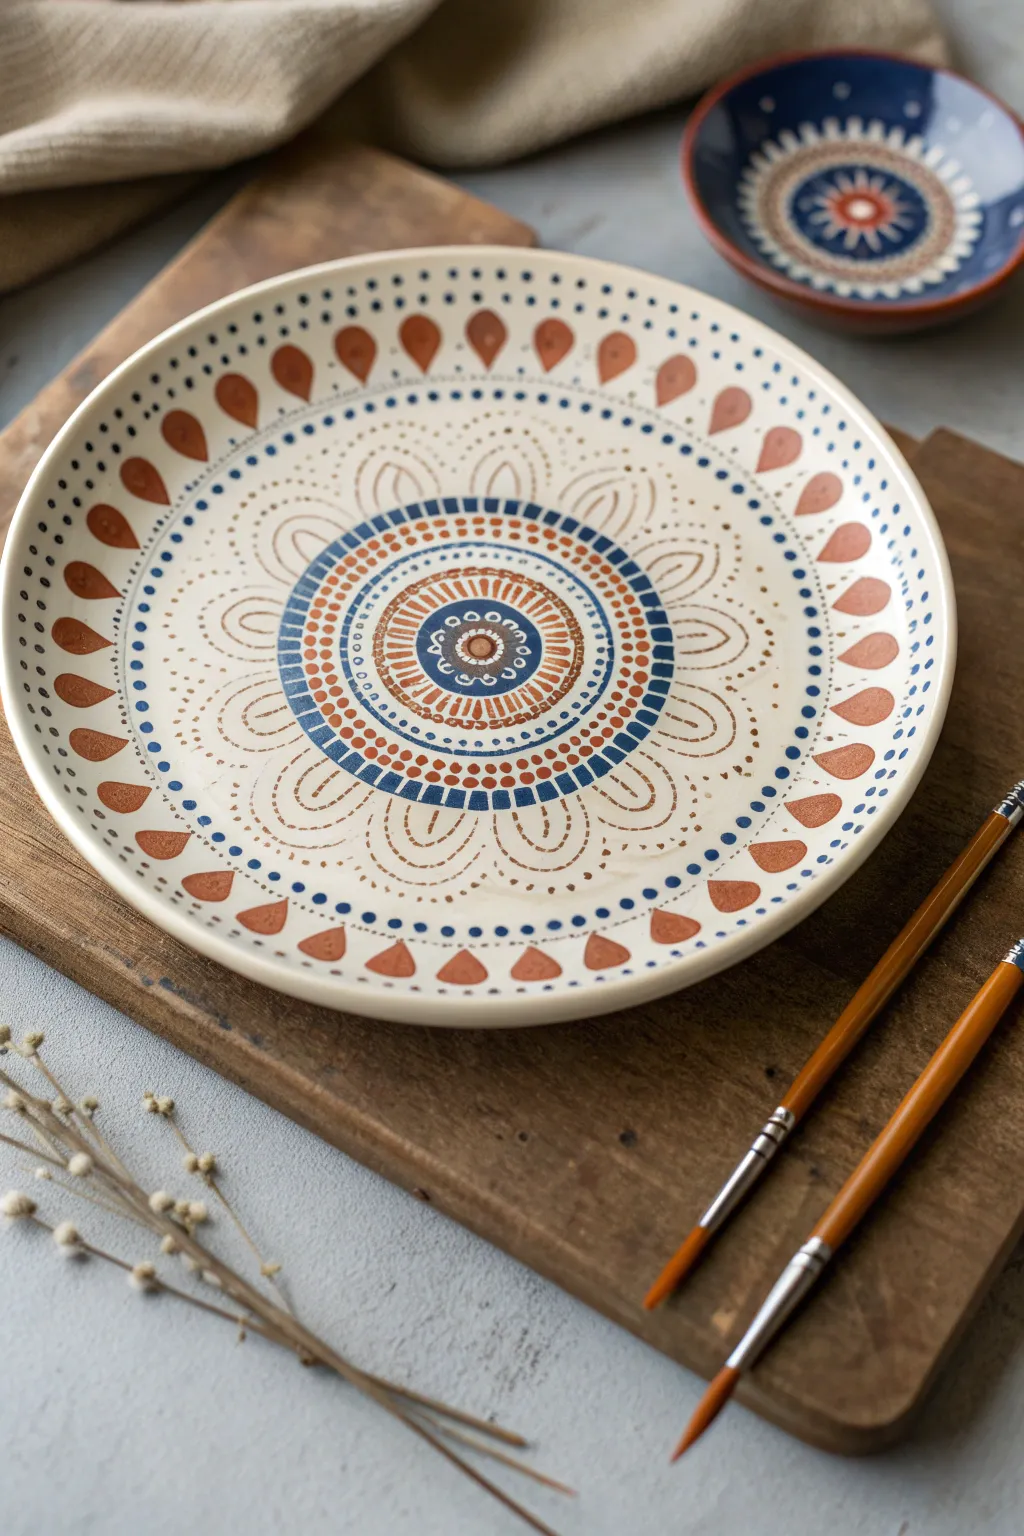
This project combines earthy warmth with intricate geometric beauty, transforming a simple cream-colored bisque plate into a stunning centerpiece. By layering radial patterns of dots, lines, and teardrop shapes in shades of deep indigo and rust, you’ll achieve a soothing, harmonious design.
Step-by-Step
Materials
- Bisque-fired ceramic plate (approx. 10-inch diameter, cream or off-white clay body)
- Underglazes: Deep indigo blue, rust orange/burnt sienna, and off-white
- Assorted paintbrushes (specifically a fine liner brush and a small round brush)
- Dotting tools (various sizes) or the ends of brush handles
- Pottery wheel or banding wheel (optional but helpful)
- Pencil (HB or lighter)
- Clear transparent food-safe glaze
Step 1: Setting the Center
-
Find the center:
Begin by lightly marking the exact center of your bisque plate with a pencil. Place the plate on a banding wheel if you have one, or a lazy susan, to help with rotation. -
Paint a central anchor:
Using a small round brush loaded with rust orange underglaze, paint a small, solid circle right in the center, about the size of a dime. -
Add the first ring:
Switch to your indigo blue underglaze. Using a fine liner brush, paint a tight ring around the orange center, leaving a tiny gap of the cream clay visible between them. -
Create the delicate inner scallops:
With the off-white underglaze and a very fine brush, paint tiny loops or scalloped lines inside the blue ring, creating a lace-like effect against the dark background.
Use a Steady Stick
Rest your painting hand on a maulstick or a bridge (a wooden slat resting on blocks) placed over the plate. It prevents smudging wet underglaze and steadies your line work.
Step 2: Building the Radial Core
-
Border the core:
Moving outward about an inch from the center, paint a thicker band of rust orange. I find that holding the hand steady and spinning the banding wheel creates the smoothest line. -
Fill with texture:
In the space between the center motif and this new orange band, use a fine tip brush to paint concentric circles of tiny, hatched lines in alternating rust and blue tones. -
Add the definitive blue ring:
Paint a solid, bold band of indigo blue around the rust section. This will serve as the heavy contrast point for the mandala. -
Decorate the blue band:
Once the blue band is dry to the touch, use a small dotting tool dipped in off-white underglaze to verify spacing, then apply dots evenly around the center of the blue ring. -
Create the outer rust border:
Paint another thin ring of rust orange just outside the heavy blue band. Then, create a ring of larger indigo dots immediately outside of that using a medium-sized dotting tool.
Step 3: Crafting the Floral Petals
-
Outline the petals:
Using a fine liner brush and rust orange underglaze diluted slightly with water for flow, paint large, sweeping petal outlines radiating from your central core. -
Double the lines:
Echo these petal shapes by painting a second, slightly smaller petal outline inside each one. Keep your hand loose to maintain organic curves. -
Dot the petal interiors:
Take a very small dotting tool and the indigo blue underglaze. Place a single line of tiny dots following the inner curve of each petal arch.
Create a Set
Reverse the color palette for a matching bowl! Make the background indigo blue and paint the mandala details in cream and rust for a striking complementary piece.
Step 4: Rim and Final Details
-
Establish the outer boundary:
Move to the rim of the plate. Paint a circle of medium-sized indigo dots about an inch inward from the edge. -
Add the teardrop rim:
Using the rust orange underglaze and a round brush, paint teardrop shapes pointing inward from the edge of the plate. Space them evenly so they align between the petal peaks below. -
Detail the rim dots:
Between the large rust teardrops and the inner blue dot ring, add two concentric rows of tiny indigo dots. These should be very fine, almost like stippling. -
Clean up stray marks:
Check the design for any smudges or uneven dots. You can gently scrape away mistakes on bisque ware using a craft knife or a stiff brush. -
Glaze and fire:
Once the underglaze is completely dry, dip or brush on a clear transparent glaze. Fire the piece in the kiln according to your clay and glaze specifications (usually Cone 5 or 6 for stoneware).
Once fired, you will have a durable, food-safe piece of art perfect for displaying fruit or serving meals.
Soft Ombre Gradient
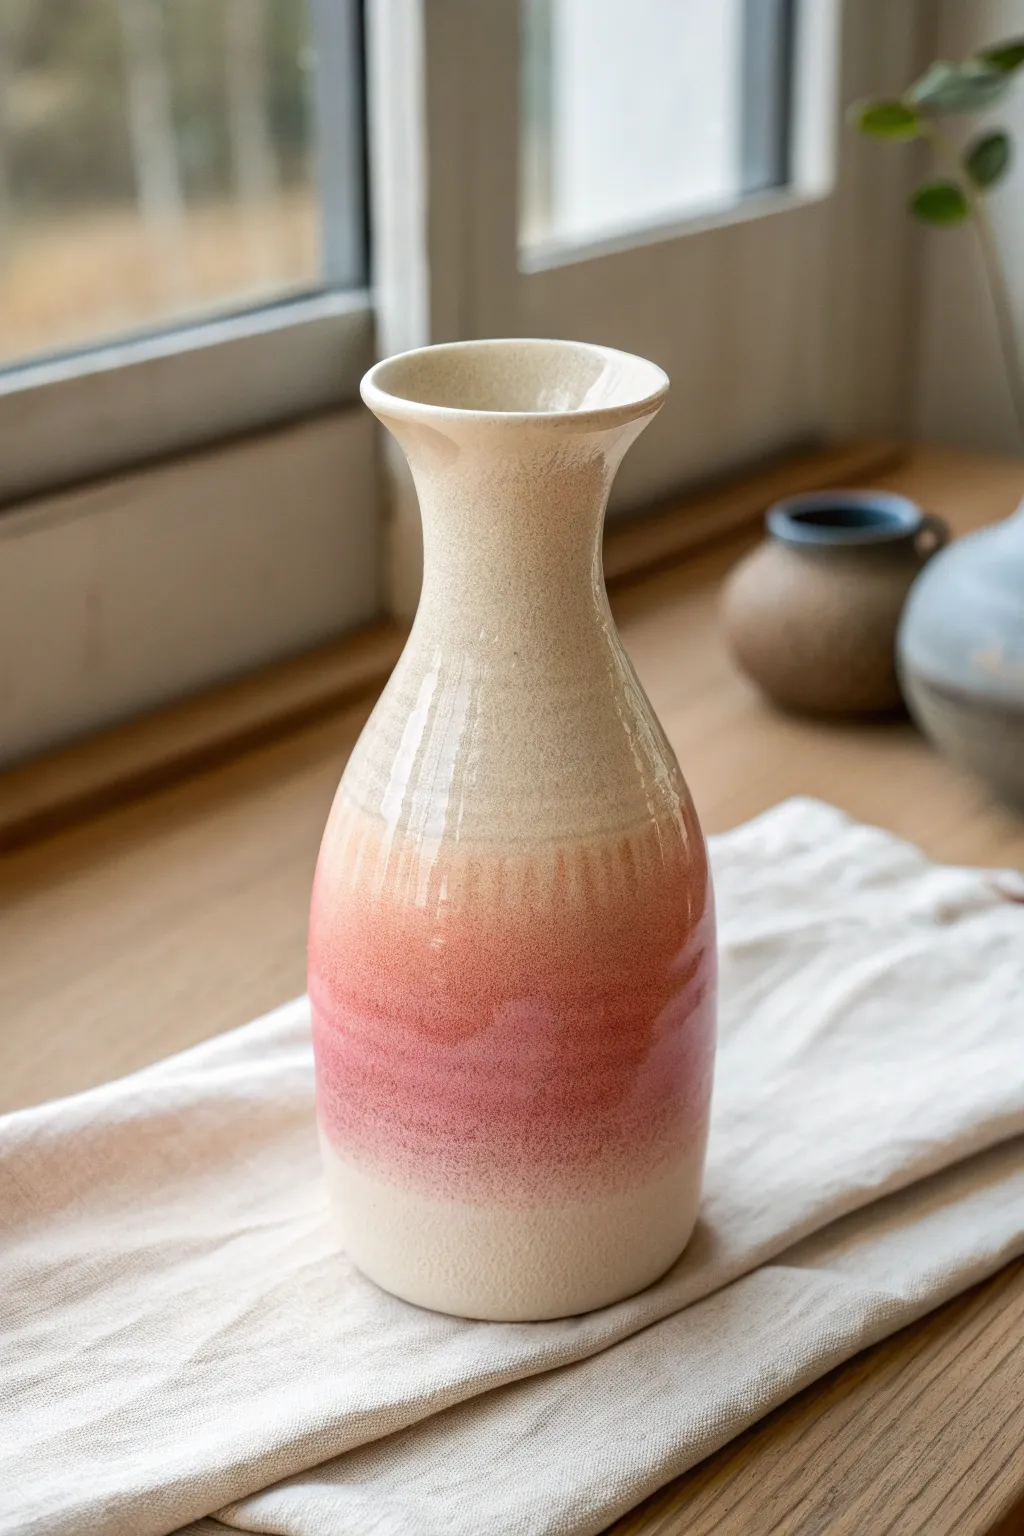
Capture the gentle warmth of a summer evening with this elegant bottle vase featuring a soft coral ombre effect. The smooth transition from creamy speckled stoneware to a blushing pink center creates a sophisticated, modern piece perfect for showcasing simple stems.
Step-by-Step Tutorial
Materials
- Stoneware clay body (specs of grog recommended for texture)
- Pottery wheel and throwing tools
- Sponge and bucket of water
- Wire cutter
- Trimming tools
- Bisque kiln
- Creamy matte white glaze (with speckles)
- Coral or peach underglaze or glaze
- Airbrush or spray gun (optional but recommended for ombre)
- Glaze kiln
Step 1: Throwing the Form
-
Center the Clay:
Begin with about 2-3 pounds of stoneware clay. Center it firmly on the wheel, ensuring a solid base before opening. -
Open and Pull:
Open the clay and pull up a tall cylinder. Keep your walls even, measuring about 1/4 inch thick throughout. -
Shape the Belly:
Gently push the clay outward from the inside to create a slight curve for the body of the vase. The widest point should be in the lower third. -
Collar the Neck:
Slowly collar in the upper section to narrow the neck. Use plenty of water or slip to prevent friction from twisting the clay. -
Refine the Neck:
Continue collaring and pulling upward until you have a long, slender neck. Use a rib tool to smooth the transition from the body to the neck. -
Flare the Rim:
At the very top, gently press outward with your thumb to create a distinct, flared rim. This adds a classic touch to the silhouette. -
Smooth and Cut:
Use a metal rib to remove throwing lines for a sleek surface. Cut the vase from the bat with a wire tool.
Control Your Spray
If you don’t use an airbrush, try a mouth atomizer for a similar misty effect. Practice on a piece of paper first to get the distance right.
Step 2: Trimming and Bisque
-
Leather Hard Stage:
Allow the piece to dry to a leather-hard state. It should be firm enough to handle without deforming. -
Trim the Foot:
Center the vase upside down on the wheel. Trim excess weight from the bottom and carve a clean foot ring. -
Final Smoothing:
Wipe down the entire surface with a damp sponge to smooth any rough spots or tool marks. -
Bisque Fire:
Let the vase dry completely (bone dry) before loading it into the kiln for a bisque firing to cone 04 or 06.
Layering Colors
For a deeper sunset look, spray a thin band of purple or darker pink right in the center of the coral section before the final firing.
Step 3: Glazing the Ombre
-
Base Glaze Application:
Dip the entire bisque-fired vase into a bucket of creamy, speckled matte white glaze. Ensure the inside is fully coated by pouring glaze in and out first. -
Clean the Foot:
Wipe the foot ring clean with a damp sponge to prevent the glaze from sticking to the kiln shelf. -
Prepare the Gradient Color:
Load an airbrush or spray gun with your coral or peach glaze. Thin it slightly if necessary for a fine mist. -
Spray the Middle Section:
While turning the vase on a banding wheel, gently spray the coral color around the middle belly of the vase. I like to keep the spray light at first to build color slowly. -
Create the Fade:
Focus the densest color in the center of the band. Gradually mist upward and downward, pulling the sprayer further away to feather the edges into the white base. -
Check Density:
Ensure the gradient is seamless and soft, avoiding hard lines. The color should practically disappear into the cream base at the top and bottom. -
Final Glaze Fire:
Load the glazed vase into the kiln and fire to the maturity temperature of your clay and glaze (typically cone 5/6 or cone 10).
Once cooled, the subtle speckling will peek through the blush tone, leaving you with a serene vessel ready for wildflowers
Animal Print Accents
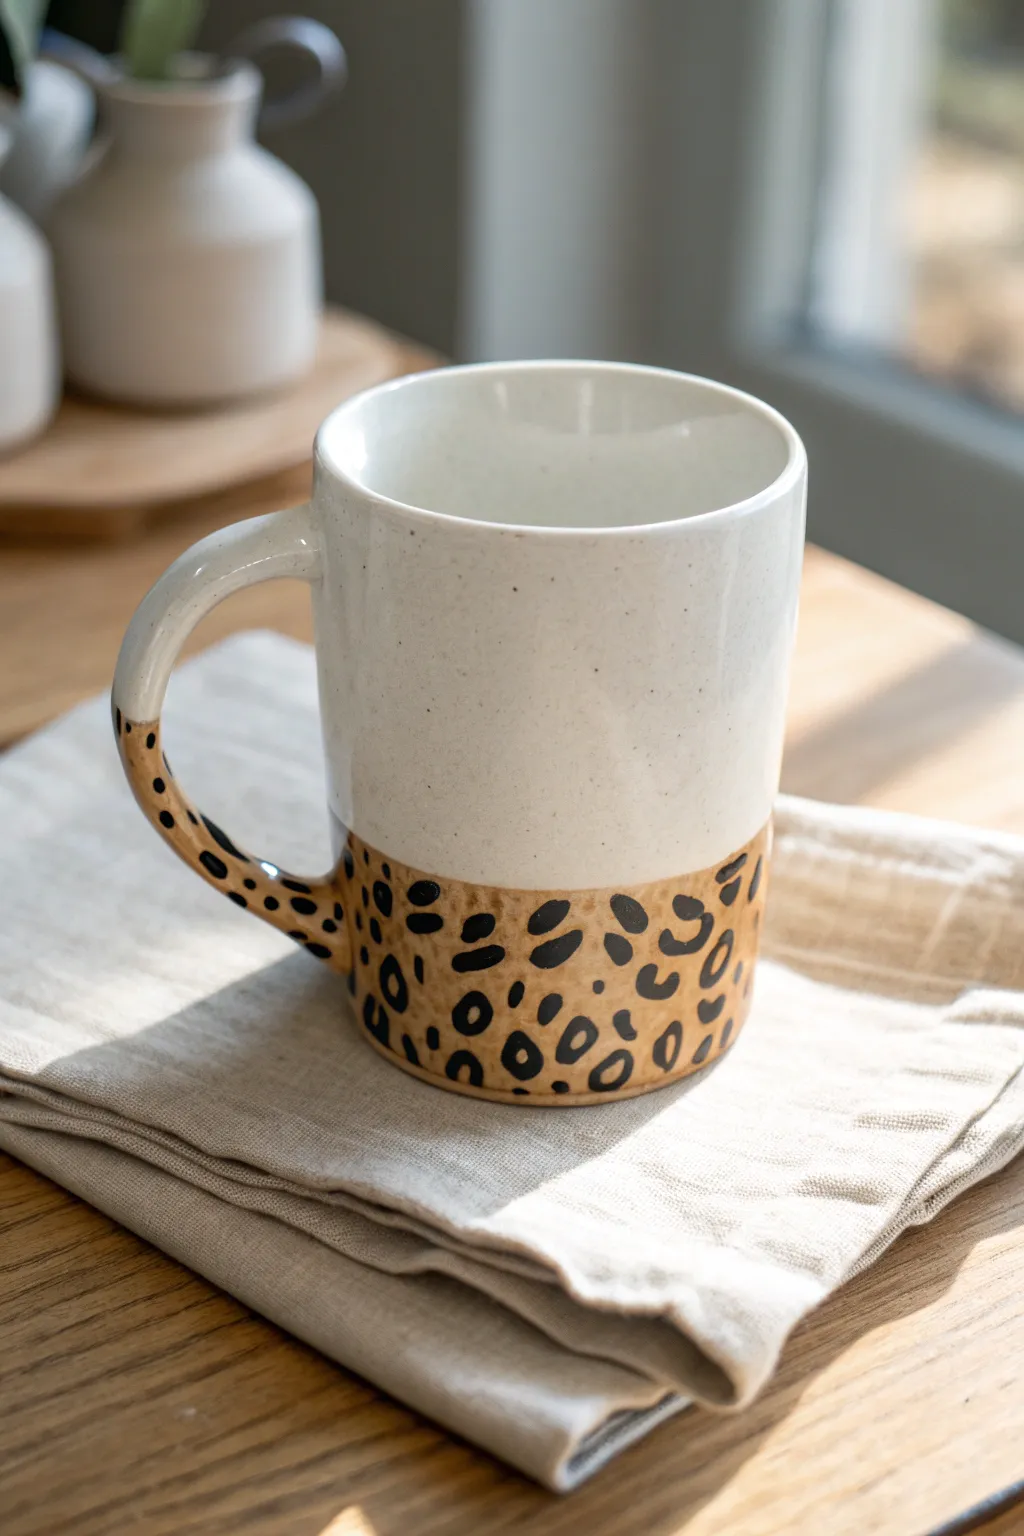
This charming ceramic mug combines rustic simplicity with a bold animal print accent. Featuring a speckled creamy white glaze on top and a raw, patterned base, it’s a delightful way to add some wild flair to your morning coffee routine.
How-To Guide
Materials
- Stoneware clay body (buff or speckled)
- Pottery wheel
- Throwing tools (sponge, rib, wire cutter)
- Trimming tools
- Underglaze (Black)
- Small round detail brush
- Wax resist
- Creamy white dipping glaze (speckled matte)
- Kiln
Step 1: Throwing and Trimming
-
Wedge the clay:
Start by wedging about 1 to 1.5 lbs of stoneware clay to remove air bubbles and ensure consistency. Proper wedging is crucial for throwing a balanced cylinder. -
Center and open:
Center the clay on the wheel head. Open up the center and establish the floor of your mug, compressing it well to prevent S-cracks later. -
Pull the walls:
Pull the walls up into a straight cylinder shape. Aim for an even thickness throughout, slightly tapering the rim if desired for a comfortable drinking edge. -
Shape the body:
Use a rib tool to refine the profile. For this design, keep the sides relatively straight or just slightly convex. Smooth the surface to prepare it for painting later. -
Attach the handle:
Once the cylinder is leather hard, pull a handle from a matching piece of clay. Attach it securely, ensuring the curve is comfortable for gripping. Smooth the attachment points seamlessly. -
Trim the foot:
Turn the mug over and trim the base to give it a clean, defined foot ring. This helps the mug sit flat and adds a professional finish.
Uneven Spots?
To fix smudged spots before firing, gently scrape the dry underglaze off with a needle tool or an X-Acto knife, then re-paint the spot cleanly.
Step 2: Painting the Pattern
-
Mark the glaze line:
Lightly visualize or score a faint line around the mug where you want the pattern to stop. I usually aim for the bottom third of the cup and include the handle in the patterned section. -
Apply base color (optional):
If your clay body isn’t naturally tan or caramel-colored, you can brush a coat of tan underglaze on the bottom third and handle. If using a buff clay, leave it bare. -
Paint the spots:
Using black underglaze and a small detail brush, paint irregular oval shapes. Vary the sizes slightly to keep it looking organic. -
Add the C-shapes:
Around the solid spots, paint ‘C’ shapes or broken circles. The key to a good leopard print is irregularity—don’t make them perfect circles. Mix open shapes with solid dots. -
Extend to the handle:
Continue painting the pattern up the entire length of the handle. Wrap the spots around the curves so the design looks continuous from every angle. -
Bisque fire:
Once the underglaze is fully dry, load the mug into the kiln for a bisque firing according to your clay’s specifications (usually Cone 04 or 06).
Step 3: Glazing and Finishing
-
Clean the bisque:
Wipe the bisque-fired mug with a damp sponge to remove any dust or oils that might repel the glaze. -
Apply wax resist:
Carefully brush wax resist over the entire leopard print area—the bottom third and the handle. Be precise with your line where the pattern meets the bare clay area above. -
Let wax set:
Allow the wax to dry completely. It needs to be firm so it effectively resists the glaze during the dipping process. -
Dip the mug:
Hold the mug by the foot (or use dipping tongs gripping the inside) and dip it straight down into the creamy white glaze. Submerge it until the glaze reaches slightly past the wax line to ensure full coverage on the top section. -
Clean up drips:
As you pull the mug out, the wax should shed the glaze. Use a damp sponge to wipe away any stubborn droplets that bead up on the waxed leopard section. -
Glaze fire:
Load the mug into the kiln for the final glaze firing (e.g., Cone 5 or 6). Ensure the foot is wiped clean so it doesn’t fuse to the kiln shelf.
Pro Tip: Natural Look
Use a clay body with heavy grog or speckles. When glazed with a semi-opaque white, the natural speckles show through, adding lovely depth.
Enjoy your morning brew in a vessel that is uniquely wild and wonderfully handmade
Ocean Wave Swirls
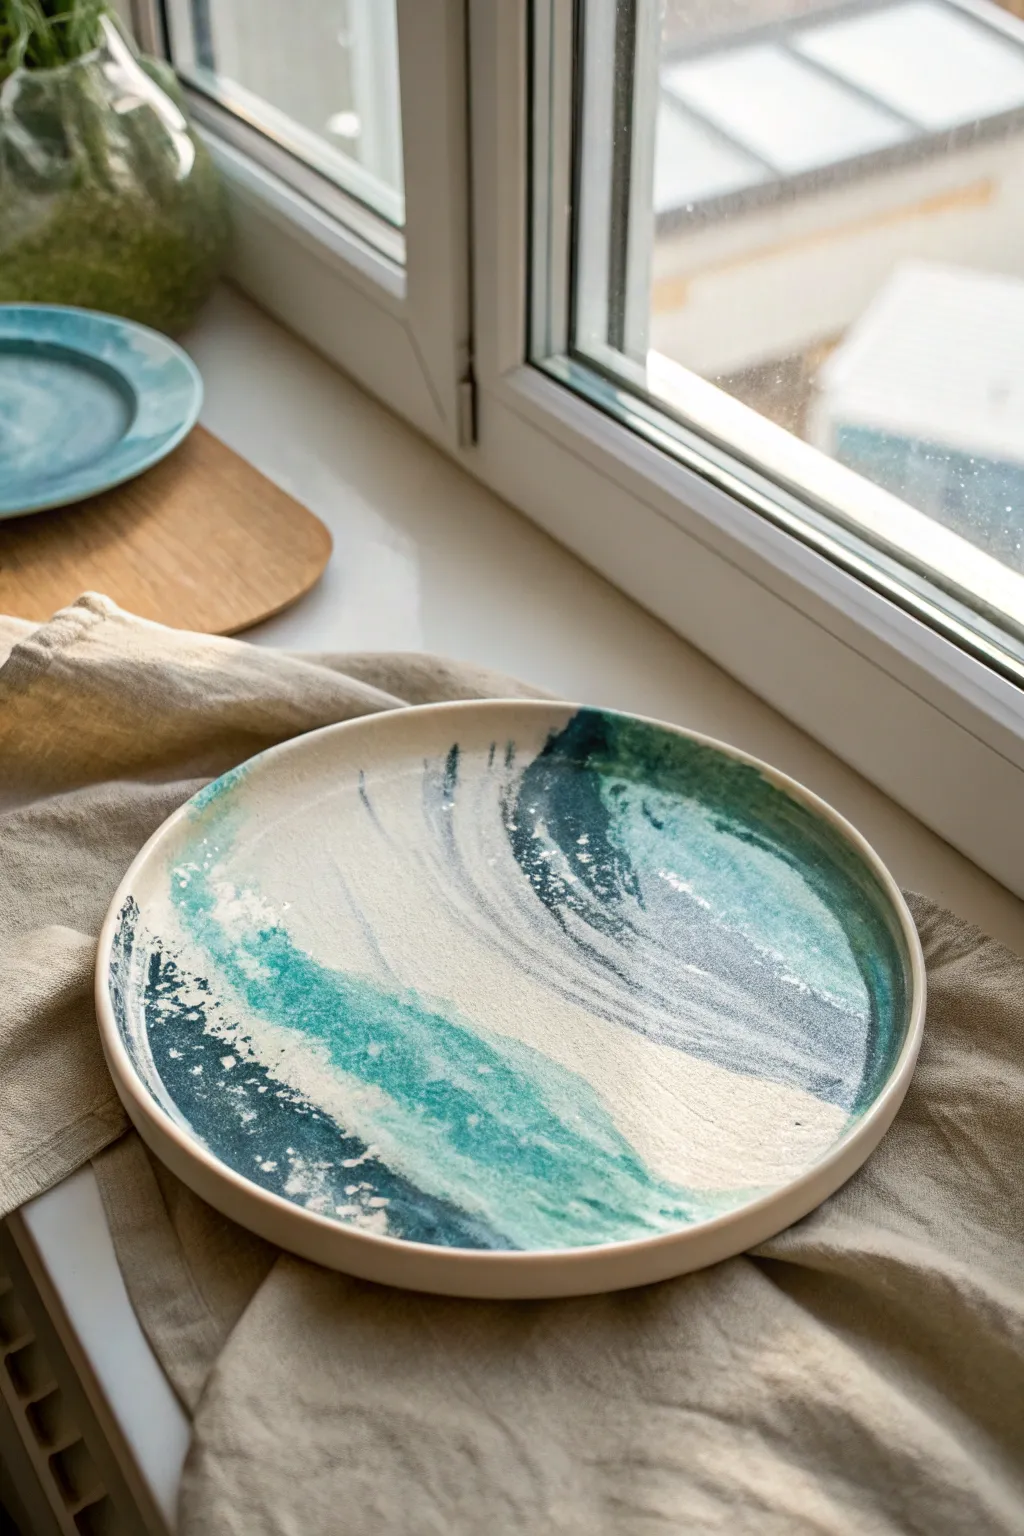
Capture the movement of the ocean on your dinnerware with this fluid plate design. Using a combination of brushing and pouring techniques, you’ll create a dynamic surface that mimics crashing waves and sandy shores.
Step-by-Step
Materials
- Stoneware clay body (white or speckled)
- Wide rim plate mold or pottery wheel
- Rib tool
- Sponge
- Underglazes: Deep Navy, Teal/Turquoise, White
- Wide hake brush
- Slip trailer or small bulb syringe
- Clear glaze (dipping or brushing)
- Wax resist
- Kiln
Step 1: Forming the Canvas
-
Prepare the slab:
Roll out a slab of stoneware clay to a uniform thickness, roughly 1/4 inch. Smooth both sides with a rib tool to compress the clay particles. -
Shape the plate:
Drape your slab over a wide plate mold or, if you prefer throwing, pull a flat plate on the wheel with a very shallow, upturned rim. The surface needs to be relatively flat to allow the glaze design to be the focal point. -
Refine the rim:
While the clay is leather hard, trim the rim to a clean, rounded edge. I like to use a damp sponge here to soften any sharp angles that might chip later. -
Bisque fire:
Allow the plate to dry slowly and completely before loading it into the kiln for a bisque firing to Cone 04 (or your clay body’s specifications).
Muddy Waters?
If your blue and teal blend too much into a single muddy color, let the first layer (navy) dry until it’s chalky before applying the teal next to it.
Step 2: Painting the Ocean
-
Base layer planning:
Wipe the bisque-fired plate with a damp sponge to remove dust. Visualize a diagonal sweep across the plate; this will be the direction of your wave. -
Apply the sand texture:
Leave the central diagonal section unglazed if you want the raw clay look, or apply a matte, sand-colored glaze. For the look in the photo, the creamy ‘sand’ serves as negative space. -
Start with deep blue:
Load a wide brush with Deep Navy underglaze. Start at the bottom left edge and sweep upwards in a curve, tapering off as you reach the middle. -
Add the teal mid-tones:
While the navy is still slightly damp, brush Turquoise or Teal underglaze right next to it, blending the edges slightly where they meet to create a gradient. -
Creating the crest:
Apply the teal color to the upper right section of the plate as well, sweeping downward to create an opposing wave motion that frames the central sandy area.
Step 3: Adding Movement and Detail
-
Loose brushwork:
Using a drier brush, drag some of the blue and teal pigment swiftly across the white space. This ‘dry brush’ technique mimics the spray of water and adds energy to the composition. -
Add sea foam:
Load a slip trailer or a small brush with White underglaze. Dot and stipple white pigment over the darkest blue sections to look like sea foam and bubbles. -
Swirling effects:
Add thin, sweeping lines of white that follow the curve of your blue brushstrokes. This highlights the motion of the water. -
Splatter texture:
Flick a stiff-bristled toothbrush loaded with watered-down white underglaze over the transition areas to create a fine mist effect. -
Clean the foot:
Apply wax resist to the foot ring of the plate to ensure no glaze sticks to the kiln shelf. -
Clear glaze application:
Once the underglaze design is completely dry, dip the entire plate into a clear glaze. Alternatively, brush on two to three even coats of clear brushing glaze. -
Final wipe:
Check the rim and foot for any glaze drips and wipe them away with a sponge. -
Glaze fire:
Fire the plate to the maturation temperature of your glaze and clay (typically Cone 5 or 6). Let the kiln cool completely before opening to avoid thermal shock.
Add Sparkle
For a magical touch, sprinkle a tiny pinch of crushed glass or heavy flux into the deepest blue section before firing to create pools of intense gloss.
Now you have a stunning piece of ocean art ready for your table
Night Sky and Constellations

Capture the magic of a starry night with this wheel-thrown mug, featuring a dreamy two-tone background and elegant gold constellations. The deep midnight blue glaze transitions softly into a misty grey base, providing the perfect canvas for twinkling golden details.
Detailed Instructions
Materials
- Stoneware clay body (white or light grey)
- Pottery wheel
- Trimming tools
- Sponge and bucket
- Midnight Blue reactive glaze
- Dove Grey interaction glaze or matte grey glaze
- Wax resist (optional)
- Small paintbrush
- Gold luster or overglaze (low fire)
- Fine liner brush (size 0 or 00)
- Kiln for bisque, glaze, and luster firings
Step 1: Forming the Mug
-
Throw the cylinder:
Center roughly 1 pound of clay on the pottery wheel. Open the clay and pull up the walls to create a cylinder about 4.5 inches tall, keeping the rim slightly thicker for comfort. -
Shape the body:
Using a rib tool on the exterior, gently belly out the form so it is wider at the bottom and tapers slightly inward toward the rim, creating a cozy, huggable shape. -
Finish the rim:
Compress the rim with a chamois or your finger to ensure it is smooth and durable for drinking. -
Trim the foot:
Once leather hard, trim away excess weight from the bottom and carve a neat foot ring. This lifts the mug visually and protects your table surfaces. -
Pull the handle:
Pull a strap of clay for the handle. I like to let this stiffen just slightly before attaching it so it holds its curve better. -
Attach handle:
Score and slip the contact points on the mug body and handle. Press firmly to attach, creating a curve big enough for three fingers, and smooth the join seams completely. -
Bisque fire:
Allow the mug to bone dry slowly to prevent cracking, then bisque fire it to cone 04 (or your clay body’s recommendation).
Glaze Crawling?
If the gold luster beads up or crawls during application, your fired glaze surface might be too greasy from handling. Wipe the spot with rubbing alcohol before applying gold.
Step 2: Glazing the Night Sky
-
Clean surface:
Wipe the bisque-fired mug with a damp sponge to remove any dust that might resist the glaze. -
Dip the bottom:
Hold the mug by the rim and dip the bottom third into the Dove Grey glaze. Hold it there for about 3 seconds to get an even coat, then lift and let it dry. -
Dip the top:
Once the grey is dry to the touch, hold the mug by the foot and dip the top two-thirds into the Midnight Blue glaze. Overlap the grey section by about half an inch to create a soft transition line. -
Glaze the interior:
Pour Midnight Blue glaze inside the mug, roll it around to coat the entire interior, and pour out the excess. Clean any drips off the rim. -
Spray the splatter (optional):
To create tiny distant stars, dip a stiff toothbrush into white or light grey glaze and flick the bristles to spray a fine mist over the dark blue section. -
Clean the foot:
Wipe the foot ring completely clean of glaze using a wet sponge to prevent it from fusing to the kiln shelf. -
Glaze fire:
Fire the mug to cone 5 or 6 (mid-range oxidation) to mature the clay and melt the glazes together.
Use Real Maps
Make it personal by painting the specific zodiac constellation of the recipient, or recreate the actual night sky arrangement from a special date using a star map app.
Step 3: Applying Gold Accents
-
Plan the constellations:
Use a pencil to lightly sketch your star patterns onto the fired, glossy surface. The graphite will burn off, so don’t worry about mistakes. -
Apply luster stars:
Using a dedicated brush and only a tiny amount of gold luster, paint small five-point stars and dots where your constellation points are. Work in a well-ventilated area as luster fumes are strong. -
Connect the lines:
With an ultra-fine liner brush, barely touch the surface to drag thin lines of gold between your star points. The lines should be delicate, not thick or gloopy. -
Add random sparkle:
Scatter a few extra tiny gold dots or small stars in the negative space of the dark blue area to balance the composition. -
Luster fire:
Place the mug back in the kiln for a third firing, usually around cone 018 (check your specific luster’s instructions). This fuses the gold permanently to the glaze.
Now you have a stunning, galaxy-inspired mug that makes every sip of tea feel like stargazing
Panoramic Landscape Wrap
Bring the serenity of the outdoors into your morning routine with this rustic, hand-illustrated ceramic mug. The simple black line work against the speckled clay body creates a modern yet timeless aesthetic perfect for any nature lover.
How-To Guide
Materials
- Bisque-fired ceramic mug (speckled clay body)
- Black underglaze (or underglaze pencil)
- Fine liner brush (size 0 or 00)
- Clear dipping glaze (gloss or satin)
- Damp sponge
- Pencil (graphite)
- Paper and scissors (for template)
- Wax resist (optional)
Step 1: Planning and Sketching
-
Prepare the surface:
Begin with your bisque-fired mug making sure it is free of dust or oils. Wipe it down gently with a damp sponge to clean the surface, which ensures the underglaze adheres properly. -
Draft the mountain profile:
Cut a strip of paper that matches the height and circumference of your mug. On this strip, sketch out a rolling mountain range, varying the peak heights to create natural interest. -
Transfer the design:
Lightly sketch your design onto the bisque ware using a standard graphite pencil. Don’t worry about mistakes here, as the graphite will burn off completely in the kiln. -
Establish the horizon line:
Draw a faint, slightly uneven ground line near the bottom quarter of the mug where your trees will eventually stand.
Step 2: Painting the Landscape
-
Outline the peaks:
Dip your fine liner brush into the black underglaze. Ensure the consistency is like ink—add a drop of water if it helps with flow. Carefully trace over your pencil lines for the mountain ridges. -
Add detail to the slopes:
On the shaded side of the mountain peaks (choose a light source direction, usually left or right), use short, angled strokes or stippling to suggest rocky texture and depth. -
Draw the tree trunks:
Start plotting out your forest by painting vertical lines of varying heights along the foreground. Place taller trees in front and shorter ones slightly higher up to imply distance. -
Flesh out the pine trees:
Starting from the top of each trunk, use quick, downward strokes to create the evergreen branches. Widen your strokes as you move down the trunk to create that classic triangular pine shape. -
Vary the density:
Make some trees dense with ink and others sparse and scrappy. I find that leaving small gaps in the foliage keeps the design from looking too heavy. -
Ground the scene:
Add a few horizontal, sketchy lines at the base of the trees to ground them, implying earth and grass rather than having them float in space. -
Add atmosphere:
Using the very tip of your brush, add tiny dots or ‘stars’ randomly in the sky area above the peaks to fill the negative space without overcrowding it.
Brush Control Secret
Rest your pinky finger on the mug surface while painting to stabilize your hand. This acts as an anchor, allowing for much steadier fine lines on the curved surface.
Step 3: Glazing and Firing
-
Applying wax resist:
If you want the foot of the mug to remain unglazed, carefully apply wax resist to the bottom ring and let it dry completely. -
Prepare the clear glaze:
Stir your clear dipping glaze thoroughly. For this design, a transparent glaze is crucial so it doesn’t obscure the fine black lines or the natural speckles of the clay. -
Dip the mug:
Holding the mug by the foot (or using dipping tongs), submerge it swiftly into the clear glaze and pull it out in one smooth motion. Allow the excess to drip off. -
Clean the foot:
Once the glaze is dry to the touch, use a sponge to wipe any stray glaze off the waxed foot ring to prevent the mug from fusing to the kiln shelf. -
Final Fire:
Load the mug into the kiln and fire it to the temperature appropriate for your specific clay body and clear glaze (typically Cone 5 or 6 for stoneware).
Go Geometric
Instead of realistic trees, try using strict geometric triangles for the pines and sharp zig-zags for the mountains for a more Scandinavian, minimalist pattern.
Enjoy your morning coffee with a view of the mountains, no matter where you are
Sgraffito Scratch-Back Drawing
This project transforms a simple clay vessel into a striking piece of functional art using the sgraffito technique. By carving through a layer of sharp black slip to reveal the pale clay body underneath, you will create a graphic, nature-inspired design with beautiful contrast.
Detailed Instructions
Materials
- Leather-hard clay bowl (white stoneware or porcelain)
- Black underglaze or slip
- Soft fan brush or hake brush
- Pencil or needle tool (for light sketching)
- Loop tool (small)
- Sharp carving tool (sgraffito tool or ribbon tool)
- Soft bristle dusting brush (makeup brush works well)
- Clear glaze
- Kiln access
Step 1: Preparation & Application
-
Check clay consistency:
Ensure your thrown or hand-built bowl is at the perfect leather-hard stage. It should be firm enough to hold its shape without distorting, but soft enough to carve into easily. -
Clean the surface:
Wipe the interior surface of the bowl gently with a barely damp sponge. This removes any dust or grog that might interfere with the slip application. -
Apply the first coat:
Stir your black underglaze or slip thoroughly. Using a soft fan brush, apply a smooth, even layer to the entire interior of the bowl. -
Apply subsequent coats:
Allow the first layer to dry until it loses its wet sheen. Apply 2-3 additional coats, crossing your brush strokes in different directions to ensure solid, opaque coverage without streaks. -
Let it firm up:
Wait for the underglaze to dry to the touch. The surface should not be tacky, but the clay underneath should still retain some moisture for smooth carving.
Step 2: Designing & Carving
-
Plan the composition:
Visualize the placement of your leaves. The design features one large, curved leaf near the rim and a sprig of smaller leaves branching out from the bottom center. -
Lightly sketch the outline:
With a very light touch, use a pencil or a needle tool to scratch the faintest outline of your leaves onto the black surface. Don’t dig deep yet; just mark your path. -
Carve the large leaf vein:
Using your sharp sgraffito tool, carve the central vein of the large upper leaf first. Apply steady pressure to cut through the black layer and reveal the white clay. -
Detail the large leaf ribs:
Carve curved parallel lines extending from the central vein to the leaf edges. Keep the spacing consistent to mimic the natural texture of a leaf. -
Outline the large leaf:
Carve the outer perimeter of the large leaf. Connect the ends of your rib lines to create a smooth, organic shape. -
Begin the smaller branch:
Move to the bottom section. Carve the main stem for the sprig of smaller leaves, curving it slightly to follow the bowl’s form. -
Outline small leaves:
Carve the teardrop shapes of the smaller individual leaves attached to the stem. -
Add texture to small leaves:
Instead of full ribs, use short, quick hatching marks inside the smaller leaves to create a different textural quality that suggests shading. -
Clear the crumbs:
As you work, clay burrs will accumulate. Don’t blow them off, as clay dust is hazardous. Instead, use a soft, dry brush to gently sweep the debris out of the bowl. -
Refine the lines:
Go back over any lines that look ragged or too thin. I like to slightly vary the line weight here to make the drawing feel more dynamic.
Chipping Edges?
If the black slip chips off in chunks rather than carving cleanly, the clay is too dry. Mist it lightly with water, wrap it in plastic, and let it sit for two hours to rehydrate.
Step 3: Finishing
-
Slow drying:
This is crucial. Cover the bowl loosely with plastic to let it dry very slowly. Rapid drying can cause the slip to flake off the clay body. -
Bisque fire:
Once bone dry, bisque fire the bowl according to your clay body’s specifications (usually Cone 04 or 06). -
Glazing:
After the bisque, apply a clear, transparent glaze over the entire piece to seal the design and make it food safe. -
Final firing:
Glaze fire the piece to the final temperature required for your clay and glaze combination.
Line Clarity
Keep a small damp sponge nearby to wipe the tip of your carving tool frequently. A clean tool tip ensures crips, sharp lines without dragging excess clay across your design.
The high contrast of the sgraffito leaves against the dark background will make this bowl a standout piece in your collection
Tape-Resist Negative Space
This elegant project relies on the contrast between raw clay texture and smooth slip to create a striking geometric starburst pattern. The clean, intersecting lines are achieved using thin masking tape, resulting in a modern design that feels both organic and architectural.
How-To Guide
Materials
- Tall stoneware vase (leather hard)
- White decorating slip or underglaze
- 1/8 inch or 1/16 inch masking tape (or automotive detailing tape)
- Wide, soft synthetic brush
- Flexible rib tool
- Sponge
- Tweezers or needle tool
- Clear matte glaze (optional)
Step 1: Preparing the Canvas
-
Surface Prep:
Begin with your wheel-thrown or hand-built vase at the leather-hard stage. The clay needs to be firm enough to handle without warping but soft enough for slip application. -
Smoothing:
Use a flexible metal or rubber rib to ensure the surface is perfectly smooth. Any grog or bumps will make the tape harder to adhere properly. -
Wipe Down:
Gently wipe the surface with a damp (not wet) sponge to remove any dust. Let this air dry for about 10 minutes until the sheen disappears.
Bleeding Lines?
If slip seeps under the tape, wait until the pot is bone dry. Then, gently scrape the excess white slip off the dark line with a sharp exacto knife or needle tool.
Step 2: The Tape Resist Design
-
Vertical Anchors:
Start by applying vertical strips of your thin masking tape from the neck down to the foot. Imagine dividing the vase into quadrants to establish symmetry. -
Creating Diagonals:
From the center point of the vase’s belly, run diagonal tape lines connecting to your vertical lines. This creates the primary diamond shapes. -
Adding the Starburst:
Bisect your diamond shapes with additional diagonal lines creating X-patterns. Ensure all tape intersections cross cleanly at a central point. -
Secondary Geometry:
Fill in the larger open spaces with smaller triangles or parallel lines near the top and bottom curves to mimic the complex geometry shown in the photo. -
Sealing the Edges:
Once your pattern is complete, run a soft rib tool firmly over all tape strips. This step is crucial to prevent slip from bleeding underneath the edges.
Add Texture
Before removing the tape, gently sponge the white slip layer to create a mottled, stone-like texture instead of a perfectly smooth finish.
Step 3: Applying Slip and Revealing
-
First Coat:
Using a wide, soft brush, apply a layer of white decorating slip over the entire vase, covering the tape completely. Brushing in multiple directions helps get good coverage. -
Drying Check:
Wait until the first coat loses its wet shine—usually about 15-20 minutes depending on humidity. -
Second Coat:
Apply a second, slightly thicker coat of white slip. I find that two coats usually provide that solid, opaque finish without getting too heavy. -
Timing the Removal:
Do not let the slip dry completely bone dry. Wait until the slip is stiff but still slightly cool to the touch (leather hard). -
Lifting the Tape:
Use a needle tool or tweezers to carefully lift the end of a tape strip. Pull the tape slowly at a 45-degree angle away from the surface. -
Cleaning Intersections:
Continue removing all tape strips. If small chips of slip lift off at the intersections, gently press them back down with your finger or a tool. -
Softening Edges:
Once all tape is removed, lightly run a clean finger over the raw clay lines to soften any sharp ridges left by the slip thickness.
Step 4: Finishing
-
Bisque Fire:
Slowly dry the piece to avoid cracking, then bisque fire it according to your clay body’s specifications. -
Glazing:
For the look in the photo, leave the exterior unglazed (if the clay is vitrified) or apply a very thin clear matte glaze to seal the surface without adding shine. -
Interior Glaze:
Pour a functional liner glaze inside the vase to ensure it is watertight. -
Final Fire:
Fire the vase to its final maturity temperature.
Place your finished vase near a window where the light can highlight the tactile difference between the smooth slip and the raw clay lines
Raised Slip-Trail Squiggles

This charming speckled ceramic cup features a repeating, folk-art inspired pattern of stylized trees and dots. The design relies on slip-trailing and hand-painting techniques to create a delightful texture against the raw, earthy clay.
Step-by-Step Tutorial
Materials
- White or speckled stoneware clay
- Pottery wheel and throwing tools
- Underglaze pencil or soft brush for sketching
- Blue slip or underglaze (in a fine-tipped trail bottle)
- Red-orange underglaze
- Fine detail paintbrush (size 0 or 00)
- Wax resist
- Clear matte glaze or satin glaze
- Kiln
Step 1: Forming the Vessel
-
Throw the basic form:
Begin by centering your clay on the wheel and throwing a simple, handle-less cylinder. Aim for a slightly tapered shape that is wider at the top rim and gently narrows toward the foot. -
Refine the walls:
Pull the walls to an even thickness. Smooth the exterior surface with a rib tool to remove throwing rings, creating a blank canvas for your decoration. -
Define the rim:
Compress the rim well with a chamois or your finger to ensure it is rounded and pleasant to drink from. -
Leather-hard drying:
Allow the cup to dry to a leather-hard state. This is crucial—if it’s too wet, the slip trailing won’t hold its shape; too dry, and it won’t adhere. -
Trim the foot:
Turn the pot over and trim a neat foot ring. Remove any excess weight from the bottom, mirroring the internal curve on the outside.
Step 2: Designing the Pattern
-
Divide the surface:
Using a faint pencil line or decorating disk, lightly mark vertical guidelines around the cup to ensure your pattern repeats evenly. Space these lines about an inch apart. -
Sketch the triangles:
Near the rim, lightly sketch a row of small, inverted triangles. These will become the distinct blue geometric accents at the top. -
Outline the tree trunks:
Plan where your vertical lines will go. Alternate between a straight vertical line and a stylized ‘tree’ line with branches.
Slip Consistency
For crisp raised lines, ensure your slip is the consistency of heavy cream. Test flow on a scrap slab first.
Step 3: Slip Trailing and Painting
-
Trail the vertical lines:
Fill a slip trailer bottle with dark blue underglaze or slip. Carefully squeeze long, straight vertical lines down the cup body, following your guidelines. -
Create the tree branches:
On every other vertical line, add small, downward-pointing ‘V’ shapes or chevrons. I find that starting from the top and working down helps keep the spacing consistent. -
Paint the rim triangles:
Switch to a brush for the larger triangular shapes near the rim. Use the same dark blue underglaze to fill in the inverted triangles you sketched earlier. -
Add texture to triangles:
If you want the speckled look shown in the image, lightly dab the wet blue triangles with a slightly dry sponge or leave the application slightly uneven to let the clay texture show through. -
Apply the orange dots:
Using a fine detail brush and red-orange underglaze, add small dots to the pattern. Place a dot between the branches of the ‘trees’ and larger dots alongside the straight vertical lines. -
Clean up:
Use a small, damp brush or a needle tool to gently scratch away any stray marks or clean up the edges of your lines.
Mix It Up
Try varying the vertical lines by replacing the straight lines with dotted trails or wavy lines for a whimsical touch.
Step 4: Glazing and Firing
-
Bisque fire:
fire the piece to cone 04 (or your clay’s specific bisque temperature) to harden the ware and set the underglaze decoration. -
Wax the foot:
Apply wax resist to the bottom foot ring and slightly up the outer edge to keep the bottom clean during glazing. -
Clear glaze application:
Dip the entire cup into a clear matte or satin glaze. A matte finish complements the folk-art style better than a high gloss. -
Wipe the rim:
Check for any drips, especially near the foot. If the glaze is too thick over the blue slip, gently sponge it back slightly so the texture remains visible. -
Final firing:
Load the kiln and fire to the maturity temperature of your clay and glaze combination (typically cone 5 or 6 for stoneware).
Once cooled, your cup is ready for a warm beverage and quiet reflection


Have a question or want to share your own experience? I'd love to hear from you in the comments below!