When I want something calming that still looks impressive, I go straight for an easy mandala—just simple shapes repeated around a center point. Try any of these beginner-friendly mandala patterns and build them ring by ring, one relaxed loop at a time.
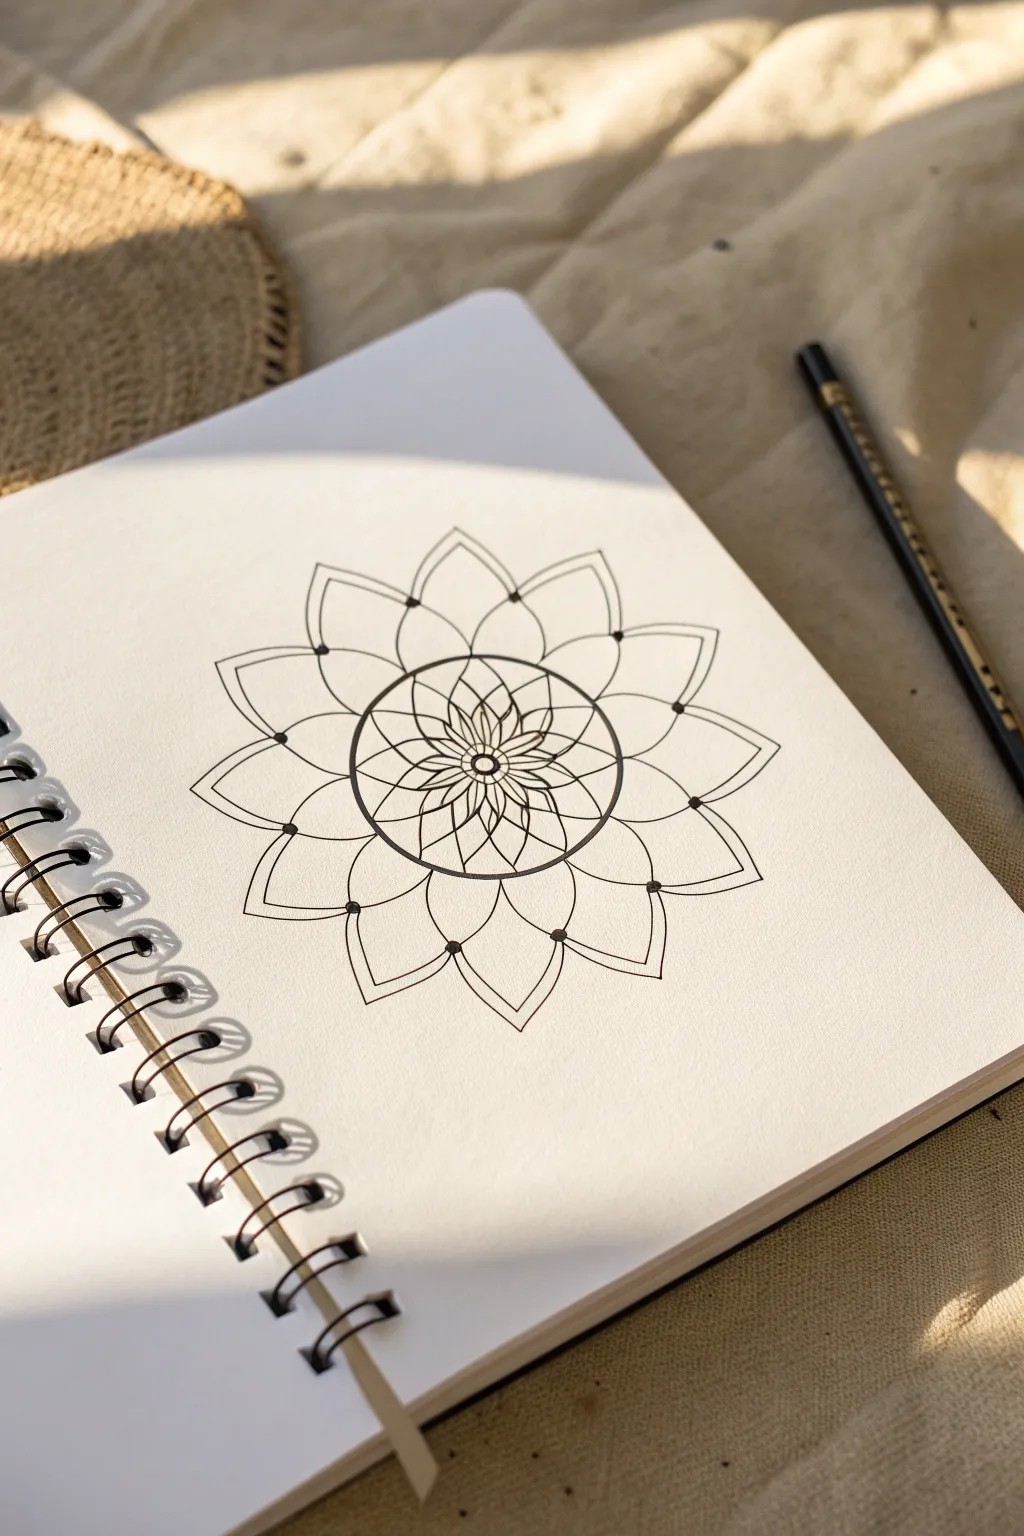
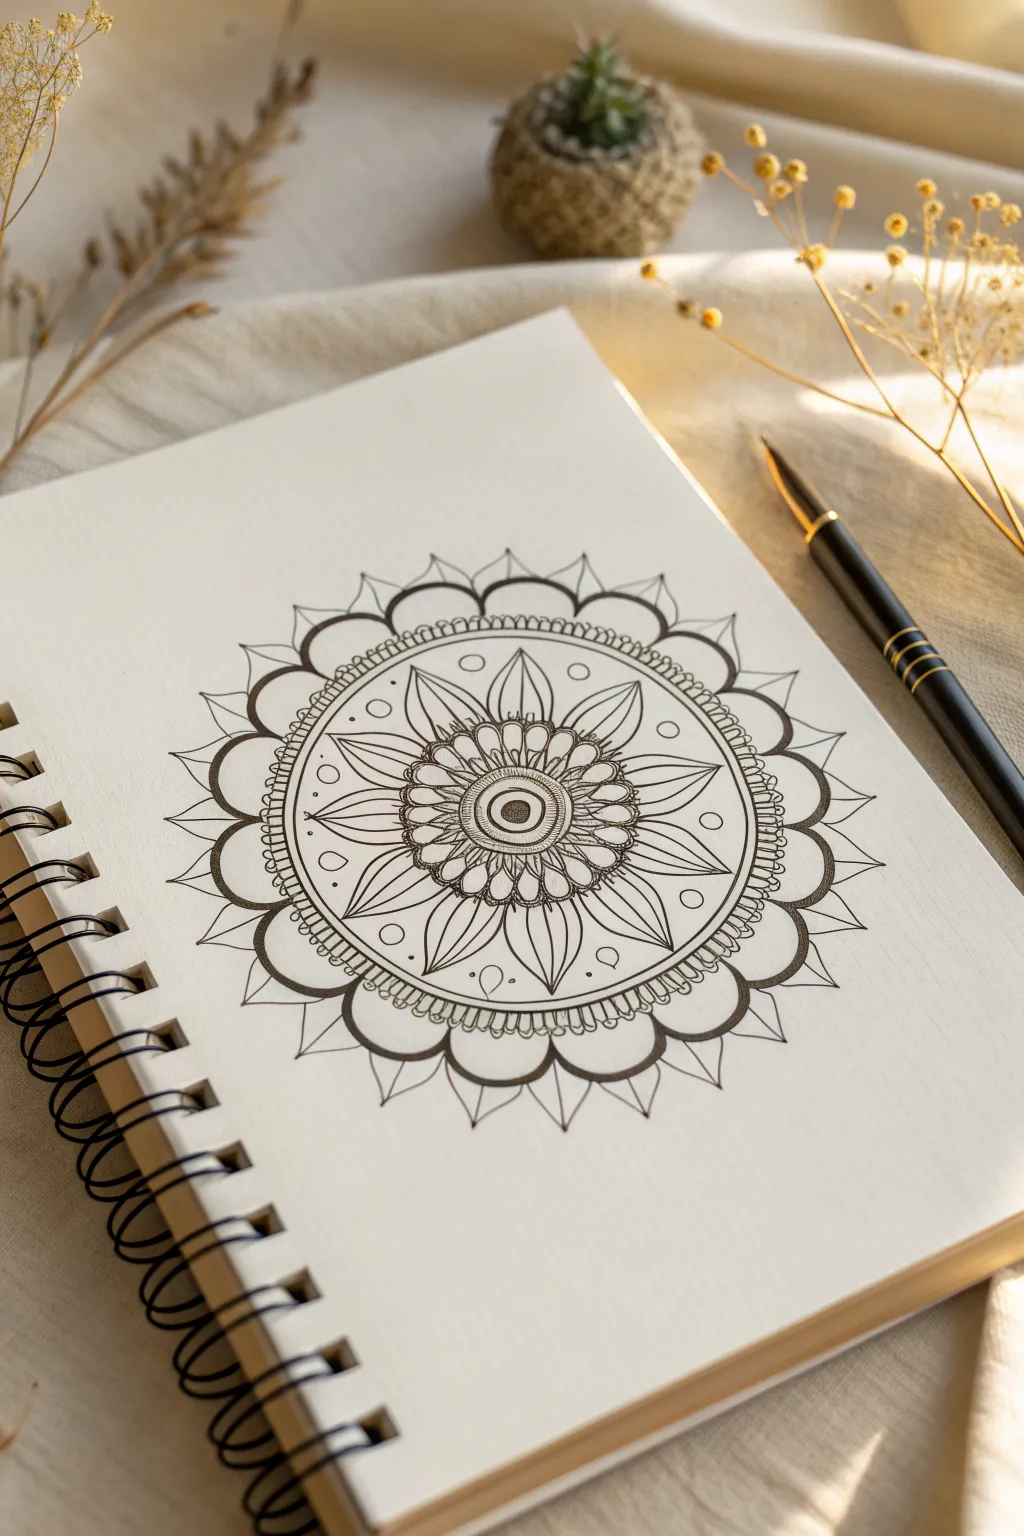
Concentric Circle Starter Mandala
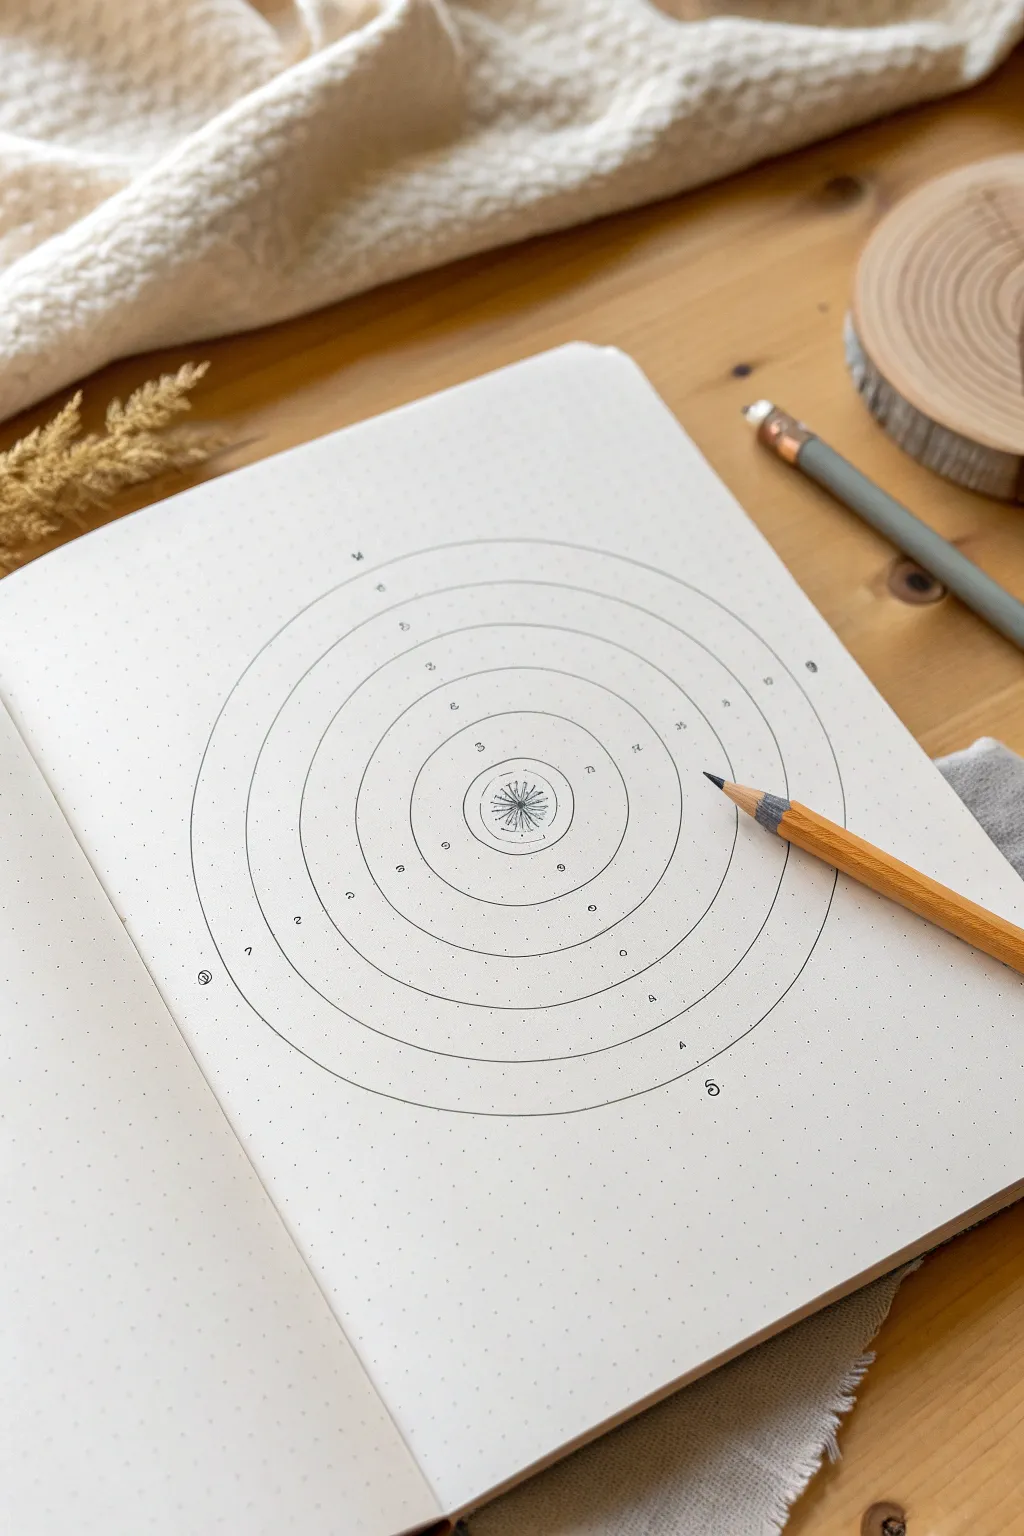
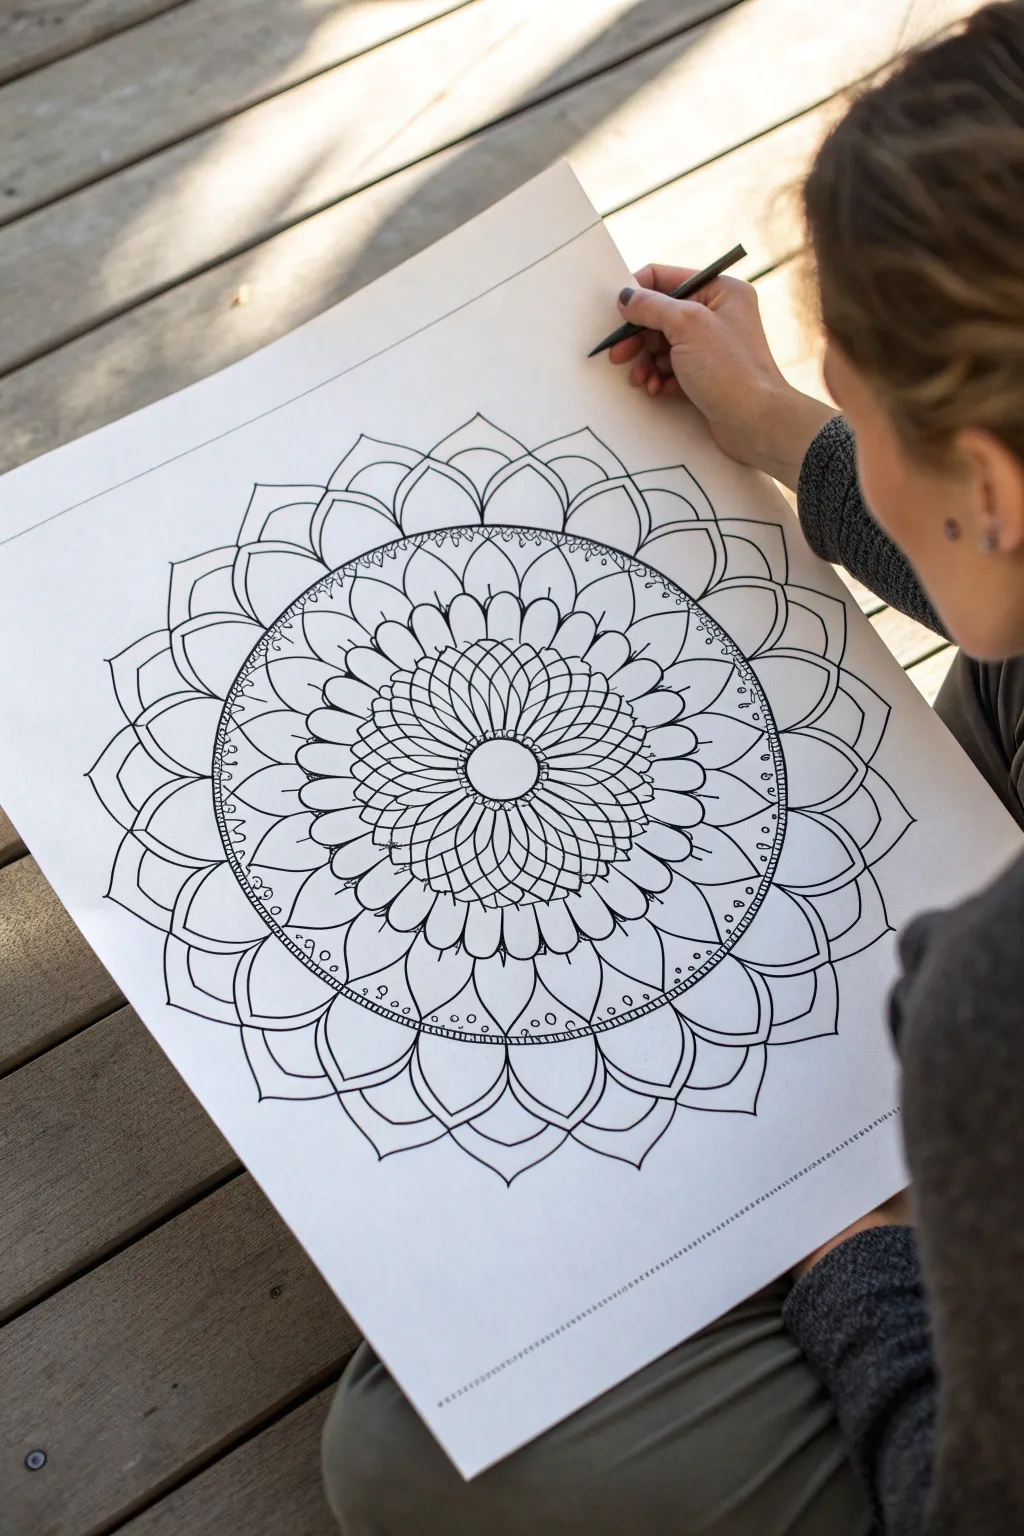
This project creates a perfect, serene foundation for a circular tracker or a complex mandala using nothing but basic geometry. The design features precise concentric circles radiating from a delicate central sunburst, ready to be filled with patterns or data.
Detailed Instructions
Materials
- A5 Dot grid notebook or high-quality drawing paper
- Compass with a sharp lead point
- Fine-point mechanical pencil (0.5mm or smaller)
- Fine-liner pen (0.05mm or 0.1mm, black)
- Ruler or straight edge
- Eraser (kneadable preferred)
Step 1: Setting the Center Stage
-
Find your center:
Count the dots on your page horizontally and vertically to locate exact center point. Mark this spot lightly with your pencil; accurate centering is crucial for the symmetry of the entire piece. -
Draw the core circle:
Set your compass to a very small radius, approximately 1.5 cm (or about 3 grid squares wide). Place the needle on your center mark and draw the first, smallest circle. -
Establish the second ring:
Widen your compass slightly. I usually like to leave about 1 cm of negative space between rings. Draw the second circle around the first core one. -
Create the sunburst center:
Inside that very first small circle, draw a tiny, rough circle by hand. From this center point, sketch short, radiating lines outward like wheel spokes. -
Detail the sunburst:
Add a second tier of shorter strokes between the main spokes to create a dense, textured starburst effect right in the middle.
Compass Control
To prevent the needle from slipping and enlarging the center hole, place a small piece of clear tape over the center point before you start swinging arcs.
Step 2: Expanding the Galaxy
-
Expand the compass:
Adjust your compass radius again, keeping the spacing consistent with your previous gap (roughly 1 cm or 2 grid units). Draw the third concentric circle. -
Continue the progression:
Repeat this process, widening the compass leg by the same increment each time. Draw your fourth and fifth circles, maintaining a steady hand for smooth arcs. -
Complete the rings:
Finish the structure with sixth and seventh circles. The final circle should fill a good portion of the page but leave plenty of white space at the margins for breathing room. -
Check line weight:
Examine your pencil lines. If any are too heavy, gently roll your kneadable eraser over them to lighten them without removing them completely.
Step 3: Plotting the Data Points
-
Mark the cardinal directions:
Using your ruler and the grid as a guide, lightly mark the 12:00, 3:00, 6:00, and 9:00 positions on the outermost ring. -
Subdivide sections:
Visually divide each 90-degree quadrant into smaller sections. If using this for a calendar or tracker, you might need 12 total sections or 30/31 distinct ticks. -
Add tiny markers:
Place very small, delicate numbers or symbols along the chart at random or specific intervals, as shown in the reference. Keep these incredibly small to maintain the minimalist aesthetic. -
Ink the detailed center:
Switch to your fine-liner pen. Carefully trace over the central sunburst design, making the lines crisp and dark. -
Ink the circles (optional):
If you want a permanent structure, trace the circles slowly with the fine-liner. Alternatively, you can leave them in pencil for a softer, sketch-like quality as seen in the image. -
Final clean up:
Once the ink is totally dry, erase any stray graphite marks or construction guidelines, leaving only your clean concentric rings and detailed center.
Wobbly Circles?
Don’t just move the compass; rotate the paper itself underneath while holding the compass steady. This often results in much smoother, continuous curves.
You now have a beautifully balanced geometric framework ready for your creative tracking or coloring


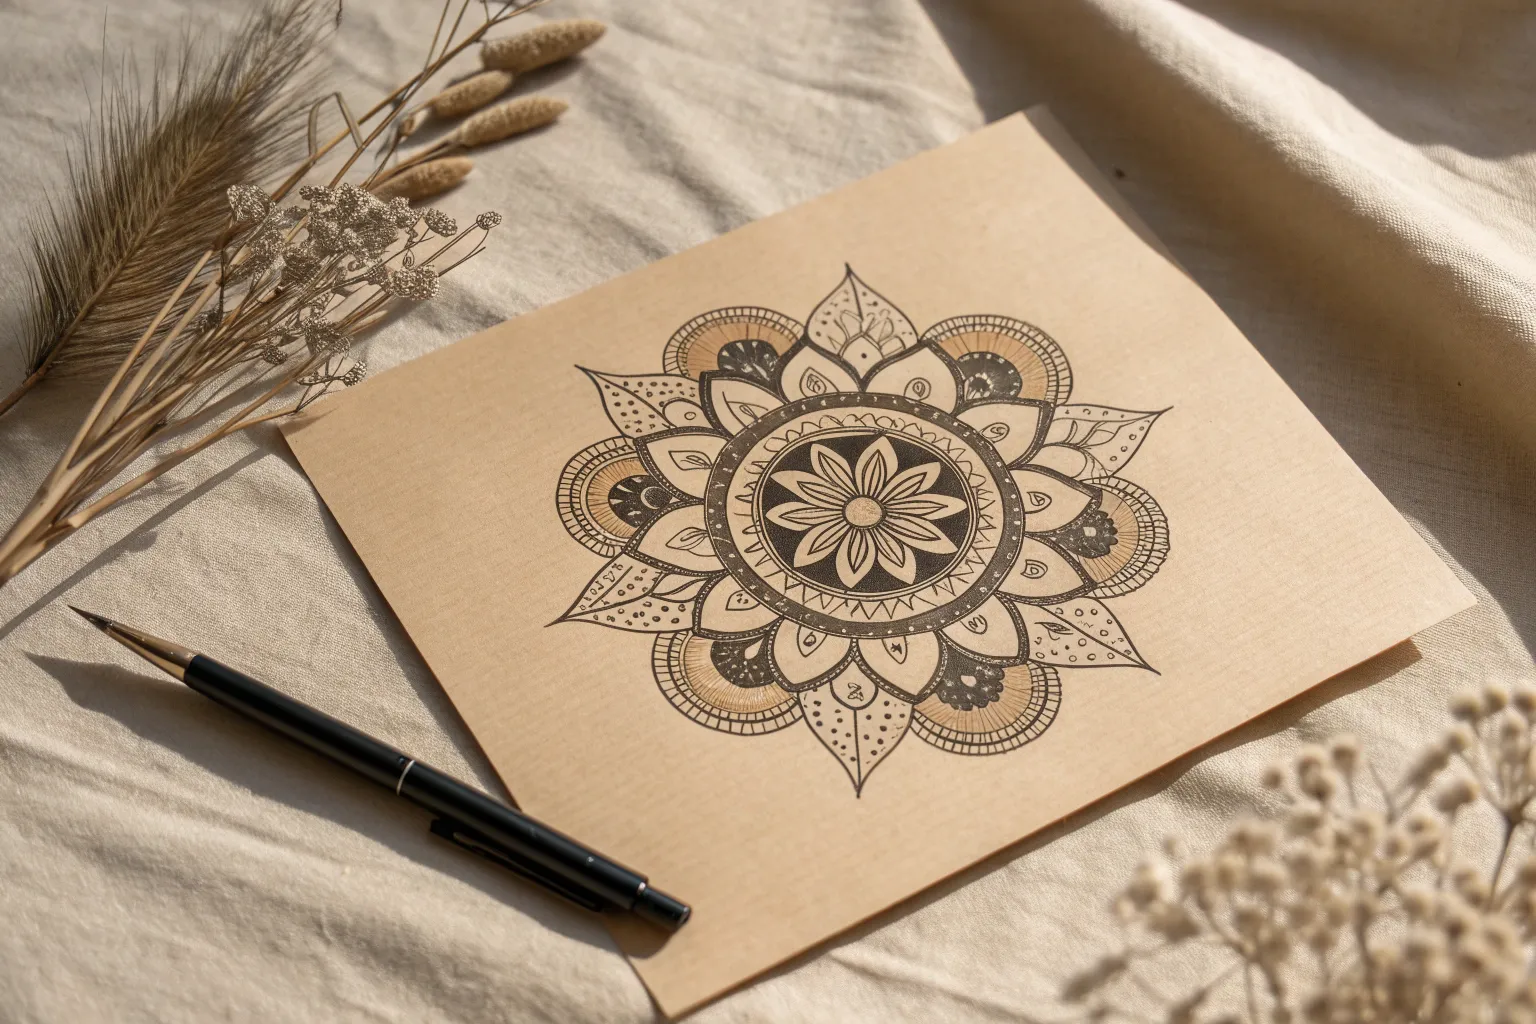
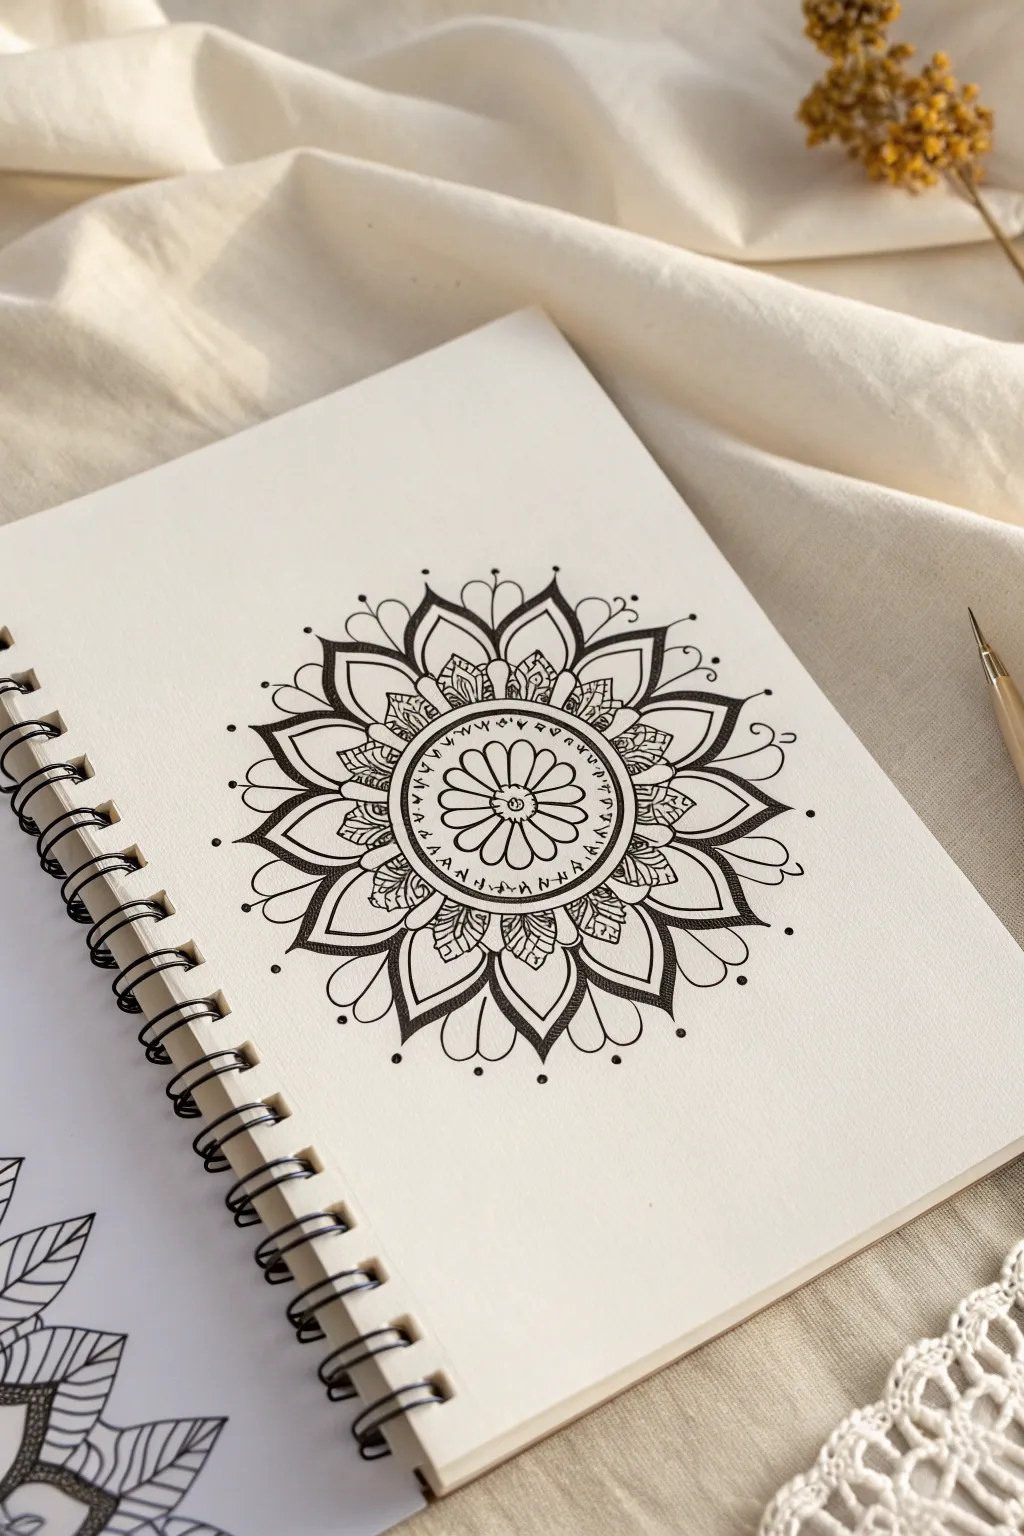
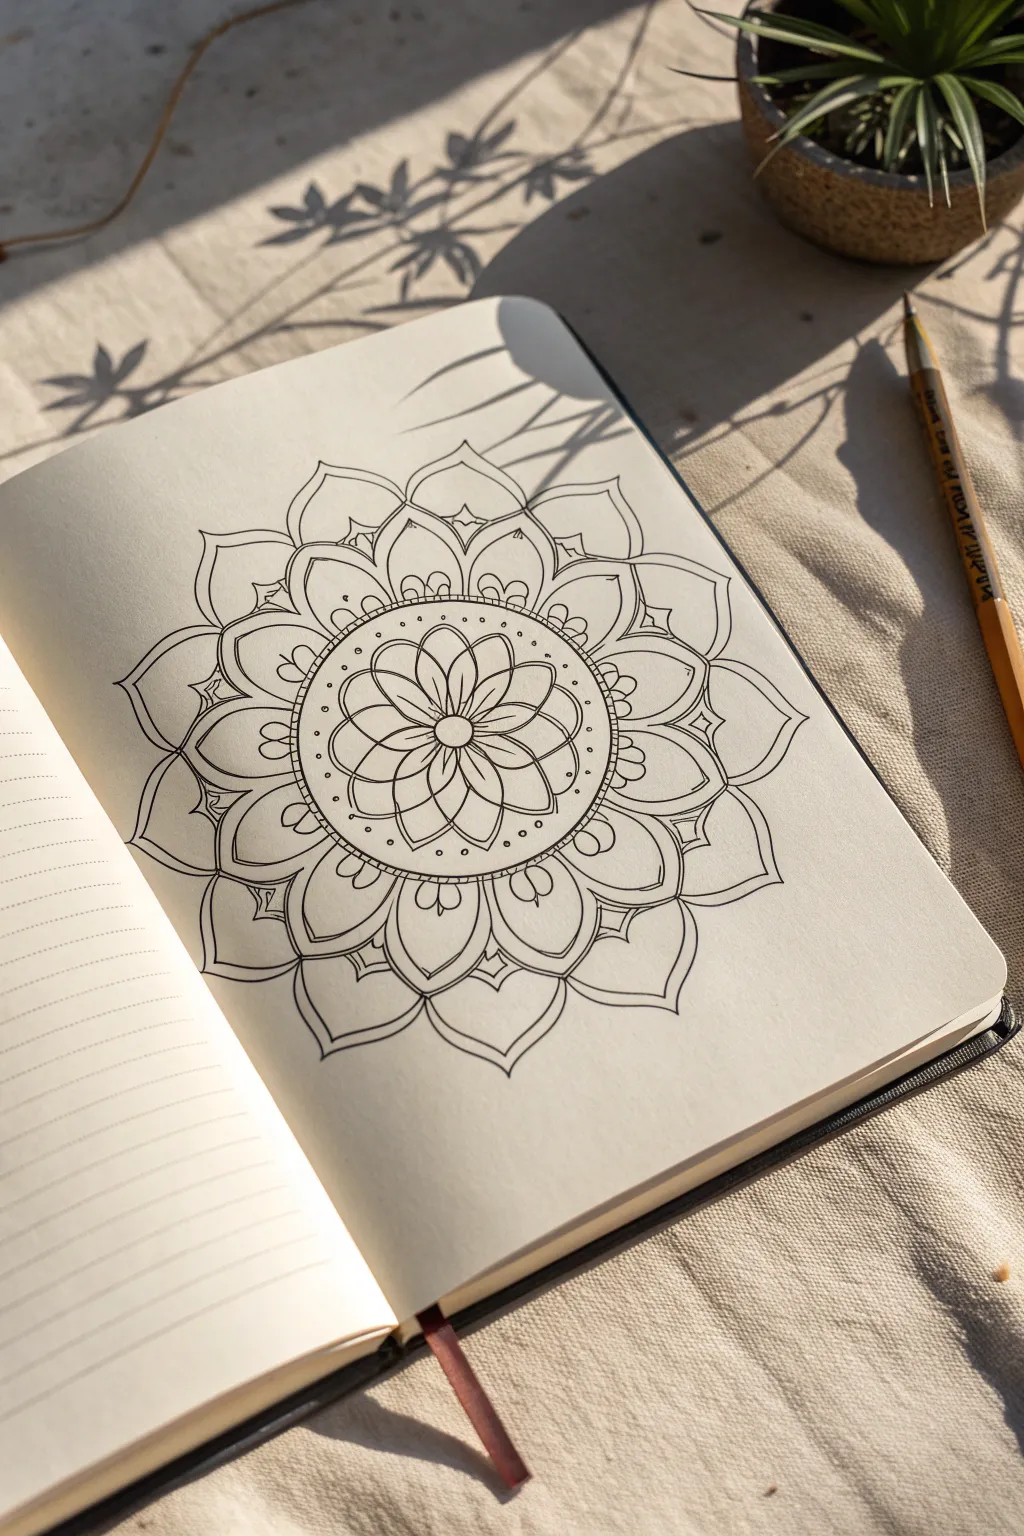
Simple Petal Ring Mandala
This elegant mandala design focuses on clean lines and a blossoming effect, starting from a dense floral center and expanding into airy, geometric petals. The result is a striking black-and-work piece that looks complex but is built from simple, repetitive shapes.
Step-by-Step Tutorial
Materials
- White sketchbook paper (smooth texture preferred)
- Ruler
- Compass
- Pencil (HB or H for light sketching)
- Fine liner pen (0.3mm or 0.5mm, black)
- Eraser
Step 1: Setting the Foundation
-
Find the center:
Begin by marking the center point on your page. This anchor is crucial for symmetry, so take a moment to measure it out accurately. -
Draw the guidelines:
Using your ruler and pencil, lightly draw a vertical line and a horizontal line crossing through your center point to create a cross. -
Add diagonal guides:
Bisect the four quadrants by drawing two diagonal lines through the center, giving you eight equal triangular sections like a pizza. -
Create the concentric circles:
With your compass set at the center point, draw three circles. The first should be very small (about 1cm diameter), the second medium-sized (about 4-5cm), and the third larger (about 8cm). Keep these pencil lines faint as they are just guides.
Step 2: Drawing the Floral Core
-
Sketch the center flower:
Inside the smallest circle, draw eight small, pointed petals. Each petal tip should align with one of your eight guideline spokes. -
Add the second layer of petals:
Draw a second set of slightly larger, rounded petals behind the first set. Place the peak of these petals in the gaps between the guideline spokes. -
Construct the geometric web:
Moving outward to the medium circle, draw arched lines connecting your guideline spokes. Use the intersection of the spokes and the circle as anchor points to create a curved ‘spiderweb’ effect. -
Detail the inner ring:
Inside the medium circle area, draw a second set of smaller arches beneath the ones you just created, mirroring their curve to create a segmented look. -
Ink the center circle:
Switch to your fine liner pen. Carefully trace the perimeter of the medium circle to define the core of your mandala. I find rotating the sketchbook helps keep my hand steady here.
Steady Hand Trick
Don’t lock your wrist when drawing curves. Move your entire arm from the elbow or shoulder to create smoother, more consistent petal arcs.
Step 3: Expanding the Outer Petals
-
Sketch the primary large petals:
Using pencil again, draw eight large, pointed petals extending from the inked circle out to the largest guide circle. Align the points with the main eight guide lines. -
Create the secondary petal layer:
Draw eight more large petals of the same size, but position their points in the spaces between the first set. These should appear to sit ‘behind’ the first set. -
Add the connecting dots:
At the widest part of each primary petal (where the curves change direction), draw a small dot. Do the same on the tips of the secondary petals. -
Draw the connecting curves:
Connect these dots with smooth, concave lines. This step unites the two layers of petals and creates that distinctive ‘floating layer’ effect seen in the reference.
Uneven Petals?
If your petals look lopsided, double-check your initial guideline grid. Using a protractor to measure exactly 45 degrees between spokes fixes most symmetry issues.
Step 4: Final Inking and Cleanup
-
Ink the central details:
Go back to the center and ink over your pencil sketch for the small flower and the geometric web pattern. -
Ink the large petals:
Trace the outer petals with confident strokes. For the overlapping areas, make sure lines don’t cross through petals that are supposed to be in the foreground. -
Refine line weight:
You can go over the main structural lines (like the central circle and main petal outlines) a second time to thicken them slightly, making the design pop. -
Erase guidelines:
Wait at least 10-15 minutes for the ink to dry completely. Once dry, gently erase all pencil guidelines and circles to reveal the crisp black and white design.
Enjoy the calming rhythm of the repeated shapes as your mandala comes to life


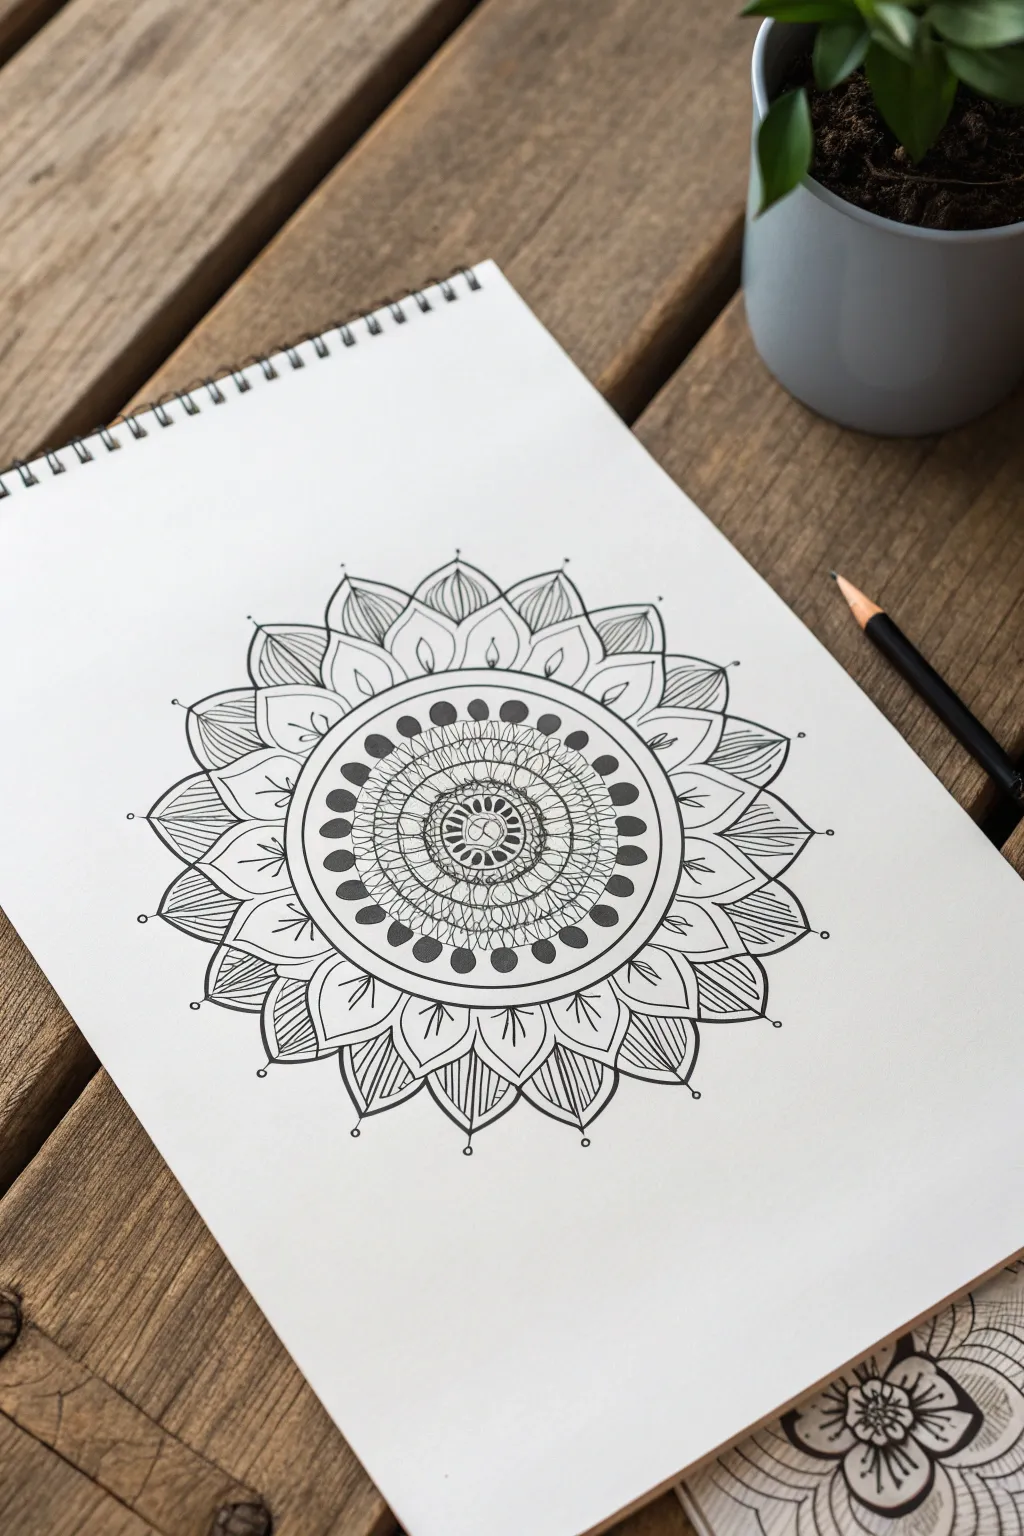
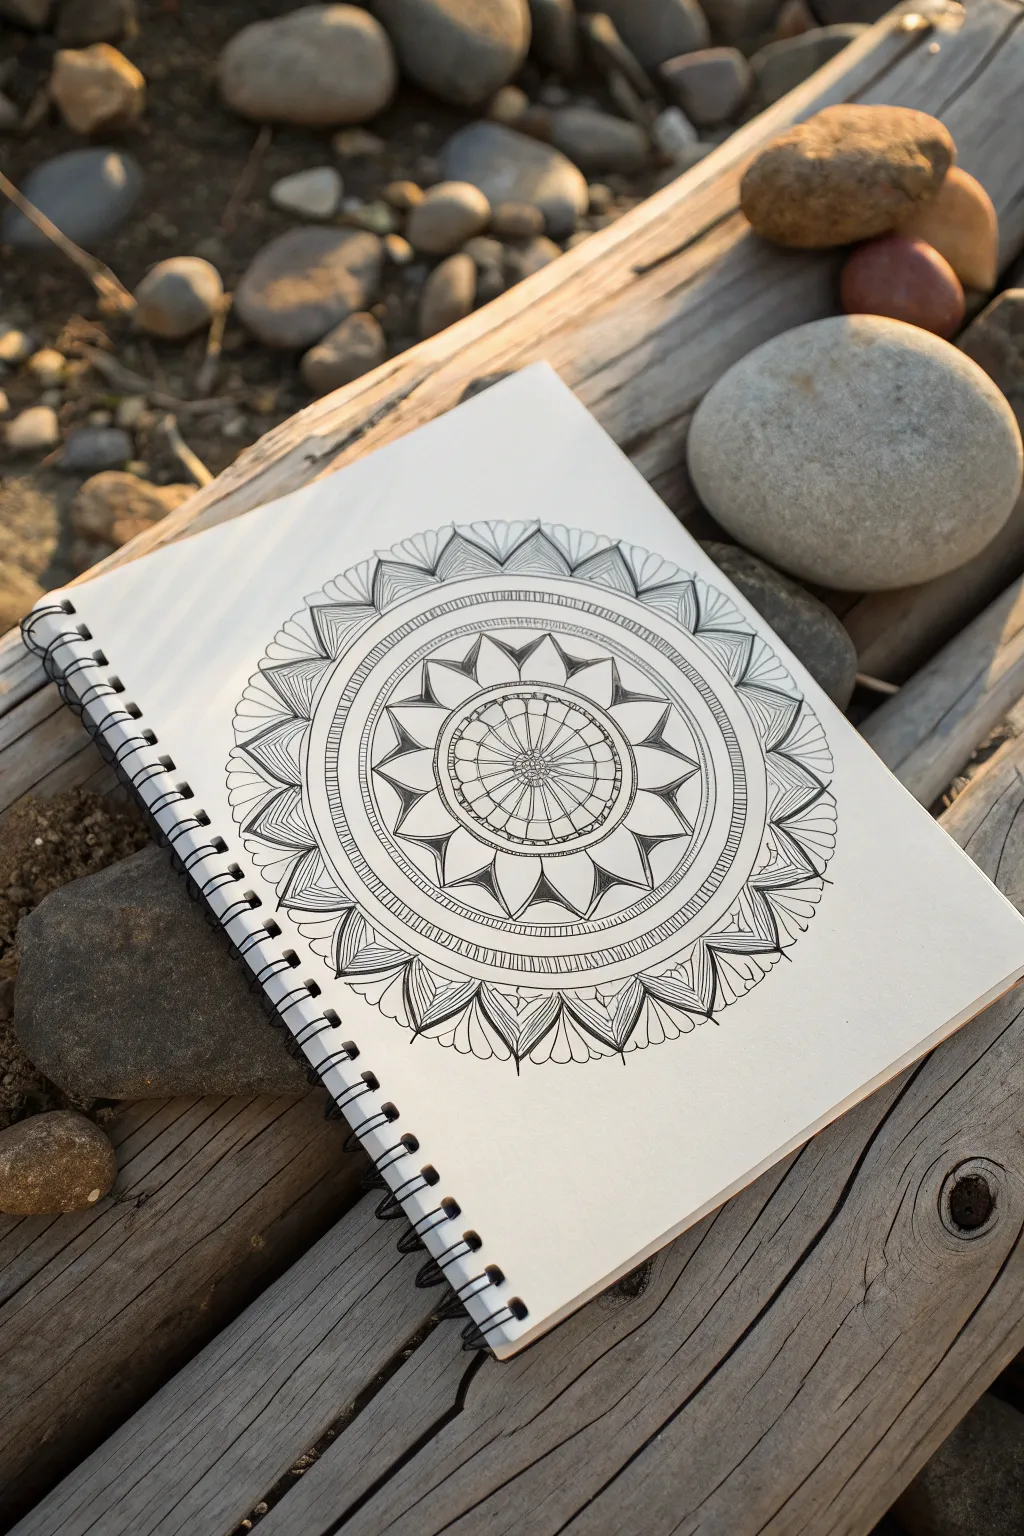
Teardrop and Leaf Motif Mandala
This elegant design combines soft organic petals with structured geometric repetition, creating a balanced and calming piece of art. Perfect for a relaxing afternoon, this mandala uses simple teardrop and leaf motifs to build complexity from the center outward.
Detailed Instructions
Materials
- Sketchbook or drawing paper (heavyweight, smooth surface)
- Fine liner pens (sizes 0.1, 0.3, and 0.5)
- Pencil (HB or 2H for light drafting)
- Compass
- Protractor (optional, but helpful for spacing)
- Eraser
Step 1: Drafting the Foundation
-
Find the center:
Begin by marking a small dot in the center of your page with your pencil. This will anchor the entire design, so ensure you have enough space on all sides. -
Draw the concentric circles:
Using your compass, draw four concentric circles. Start with a very small center circle about 1 cm in diameter, then a second one slightly larger for the petals, a third distinct band for the decorative ring, and a final large outer circle for the main leaves. -
Divide the space:
Lightly sketch pencil guidelines to divide your circle into sections. I like to divide it into 8 or 12 equal pie slices to ensure the petals remain symmetrical as I work around.
Fixing Wobbly Lines
Did a line go crooked? Don’t panic. Simply go over the line again to thicken it intentionally. A variation in line weight often looks like a stylistic choice rather than a mistake.
Step 2: Drawing the Floral Core
-
Ink the center detail:
Switch to your 0.3 pen. Draw a tiny, imperfect circle over your center dot, then add a small spiral or ‘c’ shape inside it to create a flower bud look. -
Create the first petals:
Inside the first guideline circle, draw roughly 12 long, slender oval petals radiating from the center bud. They should touch the edge of your first circle guideline. -
Define the outer ring:
Move to the next guideline circle. Ink two solid black rings: one marking the inner edge and one marking the outer edge of this band, leaving a channel of white space between them. -
Fill the decorative band:
Inside that white channel you just created, draw a series of small, simple ‘u’ shapes or scallops all the way around. Add a tiny dot inside each scallop for extra detail.
Rotation is Key
Physically rotate your sketchbook as you draw each petal or leaf. Drawing toward your body is much easier and keeps your hand from smudging wet ink on the sections you just finished.
Step 3: Adding the Leaf Layer
-
Outline the main leaves:
Using the 0.5 pen for a bolder line, draw large, pointed leaf shapes. Base each leaf on the outer decorative ring, extending the tip out to your final pencil guideline. Aim for about 12 to 16 leaves total. -
Inner leaf detailing:
Switch back to the finer 0.1 pen. Inside each large leaf, draw a smaller, matching shape that hugs the bottom curve but stops halfway up. Fill this smaller shape with thin hatching lines. -
Add floating arches:
Between the tips of the main leaves, draw a curved, floating line that connects one leaf tip to the next, creating a scalloped edge around the entire mandala. -
Second layer of arches:
Draw a second, slightly smaller arch directly underneath each floating arch you just drew, creating a double-line effect for visual weight.
Step 4: Final Flourishes
-
Draw the heart details:
At the peak of those floating arches, draw small, upside-down heart shapes or curled ‘v’ shapes that tuck into the valleys between the main leaves. -
Embellish with dots:
Using a 0.5 pen, place a solid black dot at the tip of every sharp leaf point. Then, place tiny dots floating just above the curved arches for a delicate finish. -
Thicken key lines:
Review your drawing and identify the primary leaf outlines. Trace over these specific lines again to thicken them slightly, making the main motif pop against the finer details. -
Erase guidelines:
Allow the ink to dry completely (wait at least 10 minutes to be safe). Gently erase all remaining pencil circles and slice lines to reveal the crisp black ink.
Enjoy the rhythmic process of adding these details and seeing your floral geometry come to life


Scallop Lace Border Mandala
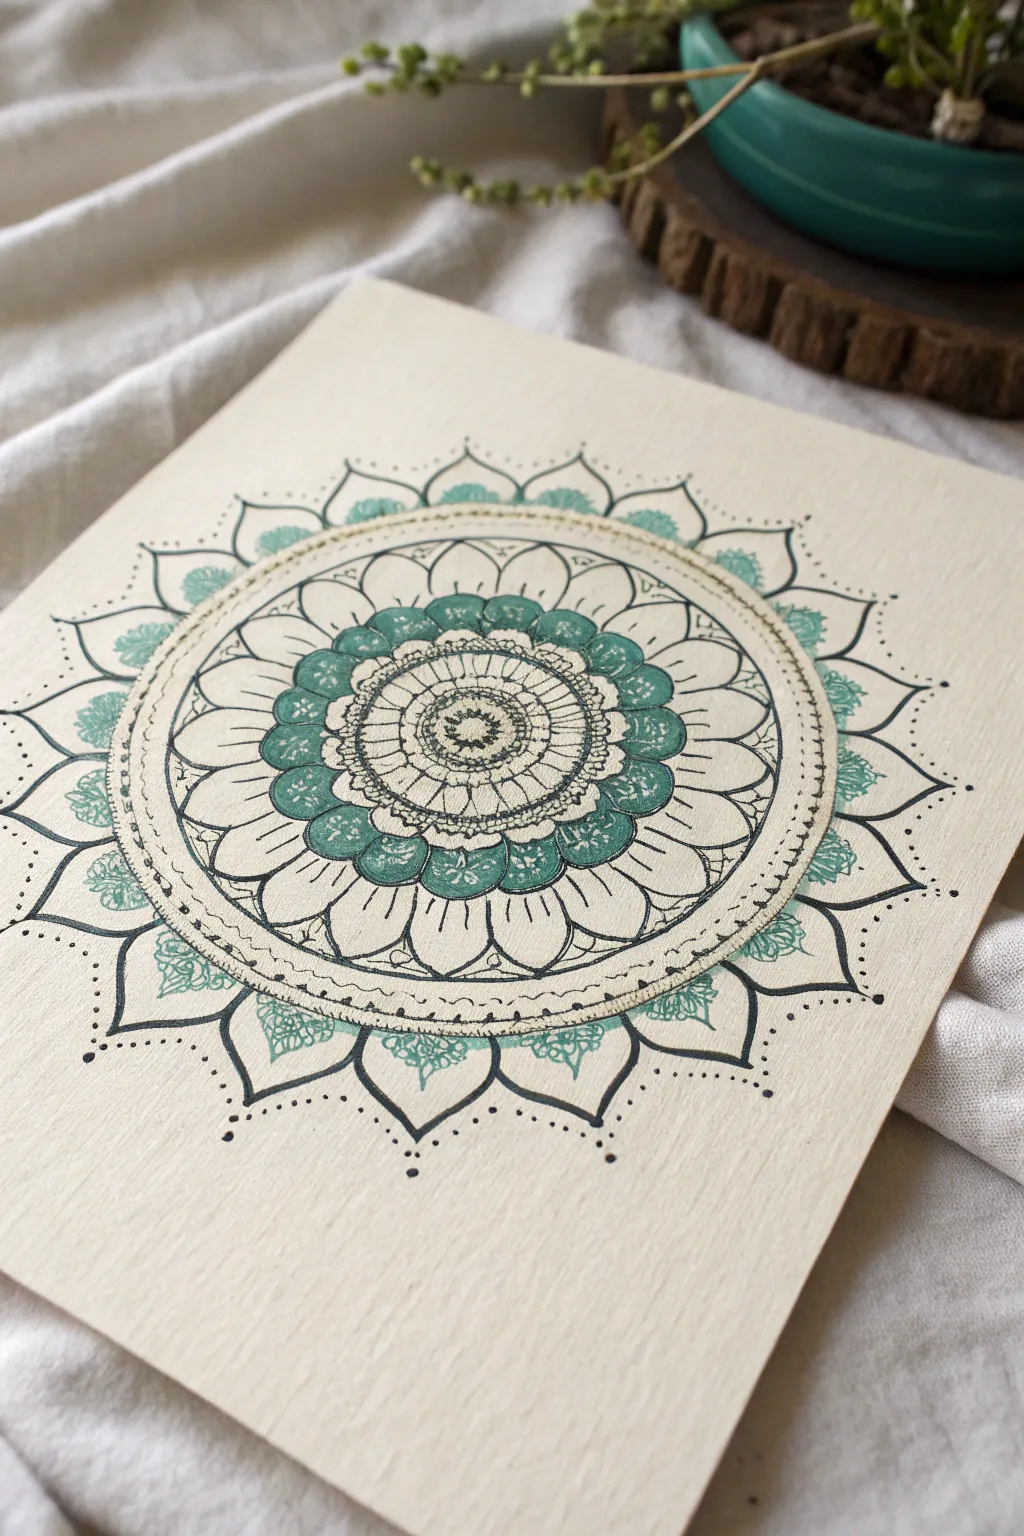
This elegant design combines the precision of fine-line ink work with the softness of teal watercolor accents. The layered petal shapes create a meditative, flower-like structure that feels both organic and structured, perfect for a relaxing afternoon sketch.
How-To Guide
Materials
- High-quality mixed media or watercolor paper (heavyweight, slight texture)
- Fine liner pens (sizes 005, 01, and 05 – black waterproof ink)
- Teal watercolor paint or water-based marker
- Small round synthetic watercolor brush (size 2 or 4)
- Compass
- Protractor
- HB Pencil
- Eraser
- Ruler
Step 1: Setting the Foundation
-
Establish the center:
Find the exact center of your paper using a ruler. Make a small, faint dot with your pencil. This will anchor every circle you draw. -
Draw the guide circles:
Using your compass, draw a series of concentric circles radiating from the center. Start small for the inner core (about 1 inch diameter) and work outward, spacing them apart to create ‘zones’ for your petals. The largest circle should leave about 2 inches of white space at the paper’s edge. -
Divide the circle:
Place your protractor on the center point. Mark every 22.5 degrees (or 30 degrees for fewer petals) lightly around the edge. Use your ruler to connect opposite marks through the center, creating ‘slices’ like a pizza. These grid lines will ensure your petals are symmetrical.
Step 2: Drafting the Design
-
Sketch the central rosette:
In the smallest central circle, pencil in a tiny flower shape with overlapping petals. Keep these loose and organic. -
Add first petal tier:
Moving to the next ring out, draw small, rounded petals. Each petal should sit centered within one of your ‘slice’ grid sections. -
Draft the teal band:
Identify the middle ring where the bold color will go. I sketch slightly wider, flatter scallops here to accommodate the paint later. -
Create the large petals:
Draw the largest, most prominent petal layer directly outside the teal band. These should be elongated ovals that touch the outer boundary line you drew earlier. -
Sketch the lace border:
On the very outer rim, draw points or ‘thorns’ between the tips of the large petals. Add tiny circles or dots along their edges to simulate a lace effect.
Ink Smudge Savior
Use a piece of scrap paper under your drawing hand while inking. It acts as a shield, preventing oils from your skin from touching the paper and stopping your palm from smearing wet ink.
Step 3: Inking the Lines
-
Outline the main shapes:
Switch to your 05 fine liner. Trace over your main pencil lines—the petals and major circles. Keep your hand steady but don’t worry about perfection; slight wobble adds character. -
Refine the center:
Use a finer 01 pen for the intricate center details. Add stippling (tiny dots) in the very center to create depth and texture. -
Draw the lace details:
With the 005 or 01 pen, ink the delicate outer border. Add the tiny dots floating off the tips of the outer spikes. -
Add internal petal details:
Inside the large white petals, draw a smaller, inner petal shape using a broken or thin line. This gives the illusion of layers. -
Add texture to the bands:
Between the petal layers, fill the narrow concentric rings with tiny repeated marks, like hash lines or small semi-circles, to create a textured border effect. -
Erase pencil guides:
Wait at least 10 minutes to ensure the ink is bone-dry. Gently erase all your pencil grid lines so only the clean black ink remains.
Tea-Stained Vintage Look
Before drawing, lightly wash your paper with diluted tea involved coffee and let it dry flat. This gives the background a warm, antique parchment tone that complements the teal ink beautifully.
Step 4: Adding Color & Finish
-
Paint the middle band:
Load your brush with teal watercolor. Carefully fill in the middle ring of scallops. Keep the paint fairly transparent to let the paper texture show through. -
Paint the outer accents:
Add touches of the same teal color to the tiny flourishes inside the outer ‘lace’ points. I like to use a very dry brush here for a lighter touch. -
Add white highlights (optional):
If your teal paint is dark enough, use a white gel pen to add tiny dots or lines on top of the painted areas once dry involved to mimic fabric stitching. -
Final stippling:
Use your 005 pen to add final shading to the base of the petals where they meet the center. This slight darkness pushes the center down and makes the petals look 3D. -
Review and unnecessary marks:
Do a final pass with your eraser to catch any stray graphite, and sign your work near the edge.
Now you have a serene, balanced mandala that captures both geometric precision and organic flow

PENCIL GUIDE
Understanding Pencil Grades from H to B
From first sketch to finished drawing — learn pencil grades, line control, and shading techniques.
Explore the Full Guide
Dotwork Sprinkle Mandala
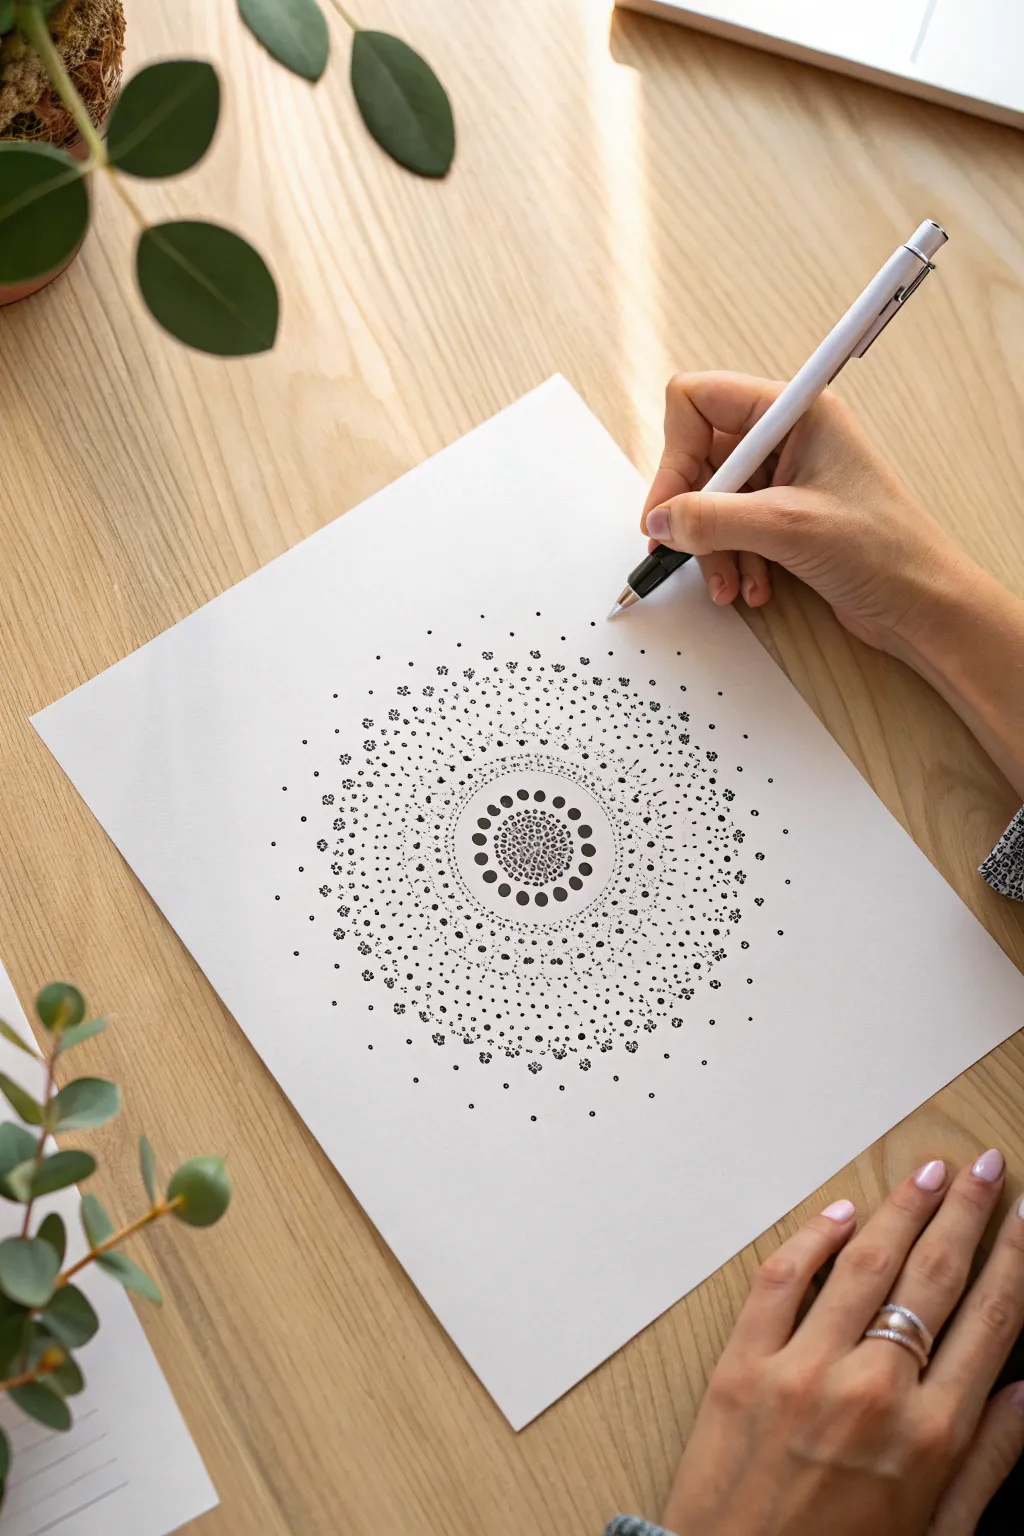
This meditative artwork uses simple stippling and dot placement to create a mesmerizing, radiating effect that looks complex but is surprisingly approachable. By varying the size and density of your dots, you’ll build a galaxy-like pattern that fades gently into the white of the page.
Step-by-Step Tutorial
Materials
- High-quality white drawing paper or cardstock
- Fine-point black fineliner pen (0.1mm – 0.3mm)
- Medium-point black fineliner pen (0.5mm – 0.8mm)
- Pencil (HB or lighter)
- Compass
- Eraser
Step 1: Setting the Foundation
-
Find your center:
Start by finding the exact center of your paper. Make a tiny pencil mark here to guide your compass placement. -
Draw guide circles:
Using your compass and a light pencil touch, draw a small circle (about 1 inch diameter) around the center. Draw two more concentric circles spaced about 0.5 inches apart moving outward. -
Expand the grid:
Continue adding 3-4 more faint concentric circles, increasing the spacing slightly as you move toward the edge of the paper. These lines will serve as boundaries for your dot layers but will be erased later.
Wrist Relief
Stippling can be tiring! Keep your grip loose and tap from the wrist, not the whole arm. Take breaks every 10 minutes to stretch your fingers.
Step 2: Core Structure
-
Create the central seeds:
With your finest pen, fill the very innermost circle with a dense cluster of tiny dots. Keep them tightest at the absolute center and slightly looser as they approach the first pencil line. -
Draw the bold ring:
Switch to your medium-point pen. On the first pencil guide line outside the center cluster, draw a ring of distinct, solid dots. Space them evenly so they look like a pearl necklace. -
Add the first variation:
Using the fine pen again, create a ring of slightly smaller dots just outside the bold ring. I find that offsetting these slightly—placing them in the triangular gaps between the larger dots—creates a nicer flow.
Step 3: Radiating Layers
-
Begin the stippling zone:
In the next band (between your second and third pencil circles), start stippling with the fine pen. create a loose cloud of dots. -
Define the density:
Concentrate more dots near the inner edge of this band to create a shadow effect, letting them sparse out as they reach the outer edge of the band. -
Introduce motifs:
In the next available ring space, instead of random dots, draw small groups of 3-4 dots clustered together to resemble tiny clover shapes or paw prints. Distribute these evenly around the circle. -
Fill the gaps:
Surround your ‘clover’ shapes with a light dusting of very fine, single dots to connect the layer visually without overpowering the motifs.
Fading Effect
To get a smooth gradient, hold the pen vertical for sharp dots, and slightly angled for fainter, smaller dots on the outer edges.
Step 4: Outer Expansion
-
Create the heavy outer ring:
Move to a wider band further out. Here, create a more structured pattern by drawing larger, circular clusters of dots. Imagine drawing a circle, but outlining it with dots instead of a solid line. -
Connect with stippling:
Between these large circular clusters, fill the negative space with a medium-density field of random stippling. -
Fade the edges:
As you move to the outermost guide circles, decrease the size of your dots and increase the space between them. -
Break the boundary:
Allow your final layer of dots to drift slightly past your last pencil line. This ‘sprinkle’ effect prevents the mandala from looking like it’s trapped in a hard box.
Step 5: Finishing Touches
-
Review contrast:
Step back and look at the overall piece. If the center doesn’t look dark enough compared to the edges, go back in and add another layer of tiny dots to deepen the core value. -
Dry thoroughly:
Let the ink sit for at least 15-20 minutes. Dotwork can pool slightly on the paper surface and smudge easily if touched too soon. -
Erase guides:
Gently erase all your pencil compass lines. Be careful not to rub too hard over the inked areas.
Now you have a delicate, celestial design that captures attention with its intricate simplicity
Alternating Thick-and-Thin Line Mandala
Learn to draw this striking mandala that plays with line weight to create depth and visual interest. By alternating between delicate, intricate patterns and bold, heavy outlines, you’ll produce a design that feels both organic and structured.
Detailed Instructions
Materials
- White sketchbook paper or cardstock
- Pencil (HB or 2B)
- Eraser
- Compass (optional but recommended for circles)
- Ruler
- Fine liner pen (0.1mm or 0.3mm)
- Thick marker or brush pen (black)
Step 1: Setting the Foundation
-
Establish the center:
Begin by marking the absolute center of your page. Using your compass (or tracing circular objects), draw a small circle about the size of a coin in the middle. -
Map out the rings:
Continuing with your pencil, lightly draw three to four concentric circles expanding outward from the center. Space them relatively evenly, leaving a larger gap for the final outer petal layer. -
Create guidelines:
Use a ruler to draw light lines intersecting through the center point, dividing your circle into 8 or 16 equal pie slices. These grid lines are crucial for keeping your petals symmetrical later on.
Step 2: Drafting the Design
-
Draw the central flower:
In the very center circle, sketch a small, simple flower shape with 8 rounded petals radiating from a tiny central dot. -
Add the first intricate band:
In the next ring outward, draft a series of tight, repetitive loops or scallops. This area will be detail-heavy, so keep your pencil marks light. -
Sketch the dot ring:
Draw a distinct ring around the previous section. Inside this band, sketch evenly spaced circles that will eventually become the bold black dots shown in the artwork. -
Outline the main petals:
For the largest outer section, sketch broad, leaf-shaped petals. Each petal should peak at one of your guideline intersections. Inside each large petal, draw a smaller, inner petal shape that mimics the outer contour. -
Add petal details:
Between the main petals, sketch smaller, pointed tips peeking out from behind. This layering effect adds dimension to the final piece.
Wobbly circles?
Don’t stress if your freehand circles aren’t perfect. Simply thicken the line slightly in the wobbly areas to smooth out the curve visually.
Step 3: Inking and Definition
-
Ink the center details:
Switch to your fine liner pen. Carefully trace over the central flower and the intricate scallop pattern. Use hatching or tiny lines to shade the very center for texture. -
Create the mesh texture:
In the band surrounding the center, use your fine liner to draw a delicate mesh or ‘netting’ pattern. I find that keeping these lines very thin contrasts beautifully with the heavier elements coming next. -
Fill the bold dots:
Using your thicker marker, fill in the ring of circles you sketched earlier. Make these solid black to create a strong visual anchor for the eye. -
Outline the main rings:
Go back and strengthen the circular boundary lines separating your pattern sections. Use a slightly thicker stroke here to clearly define the zones.
Make it Pop
Use a white gel pen to add tiny highlights on top of the solid black dots. This small reflection makes the design look almost three-dimensional.
Step 4: Final Petals and Cleanup
-
Ink the large petals:
Trace the large outer petals with a steady hand. For the inner petals, leave a small gap at the base so they look like they are floating inside the larger shape. -
Add linear shading:
Inside the large petals (but outside the inner shape), draw straight, parallel lines close together. This linear shading fills the negative space and creates a grey tone. -
Ink the background tips:
Ink the pointed tips that peek out from behind the main petals. Fill these shapes with similar straight, parallel lines to match the shading of the main petals. -
Add decorative accents:
Draw small circles on the very tips of the background points and the main petals. These tiny ‘jewelry’ accents give the mandala a finished, professional look. -
Erase and refine:
Once the ink is completely dry—give it a full minute just to be safe—gently erase all your pencil grid lines and circles. If any black lines look patchy, go over them one last time to ensure they are crisp.
Enjoy the meditative process of seeing your intricate patterns come together into a unified whole
BRUSH GUIDE
The Right Brush for Every Stroke
From clean lines to bold texture — master brush choice, stroke control, and essential techniques.
Explore the Full Guide
Checkerboard Ring Mandala
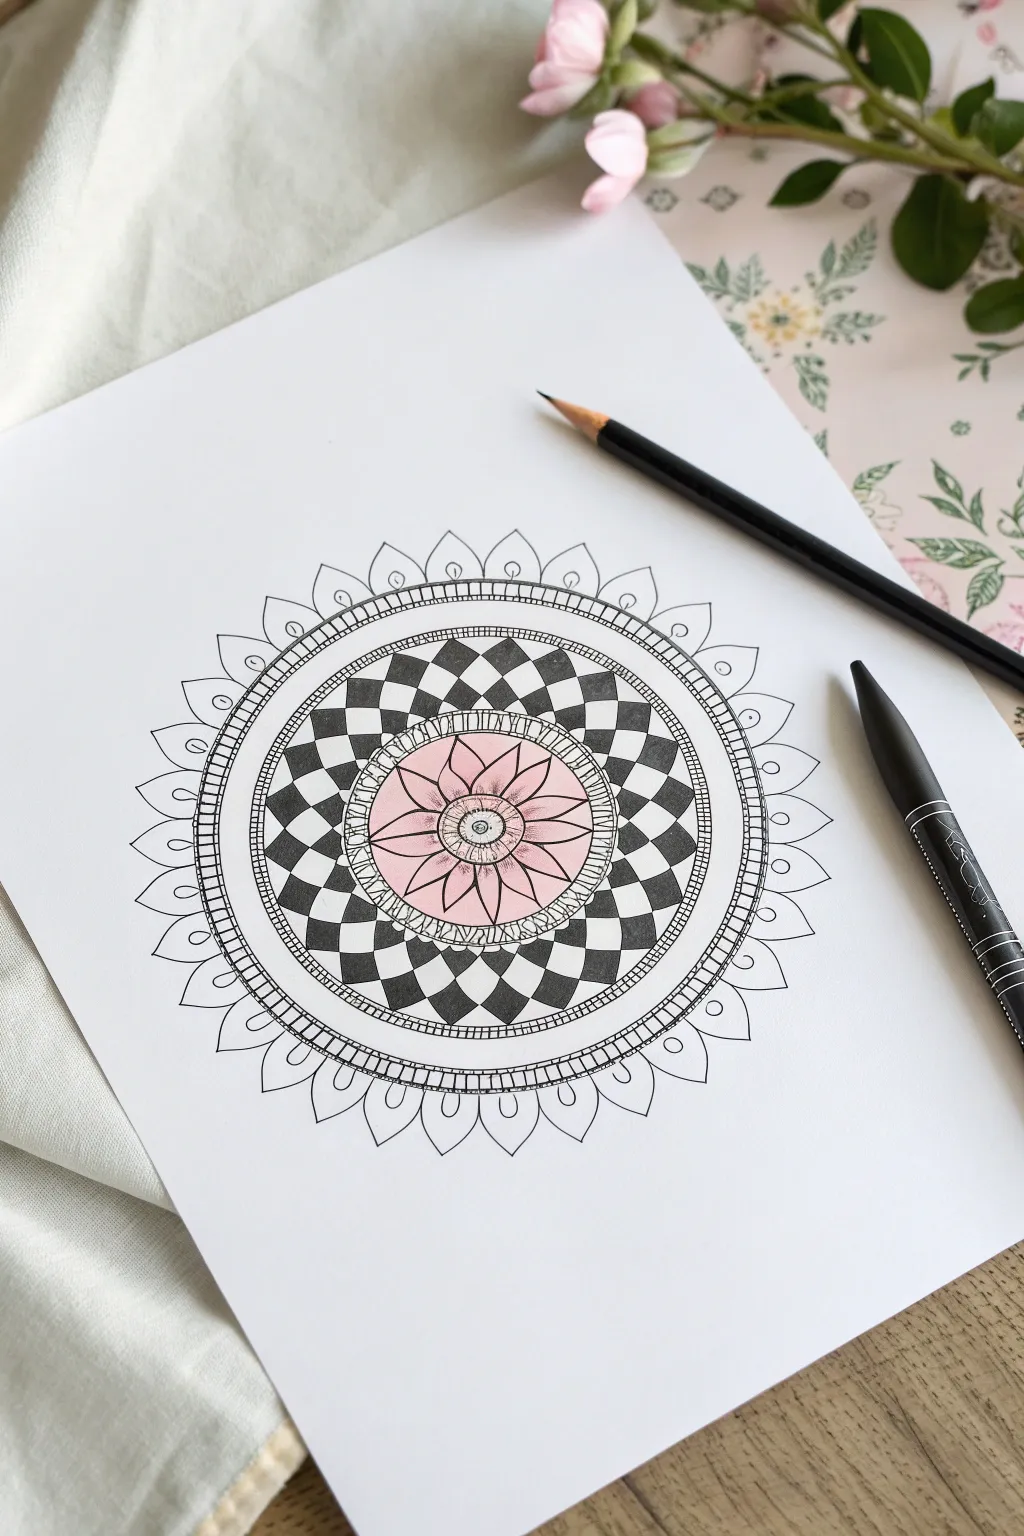
This striking mandala design combines the charm of a soft pink flower with the bold, graphic contrast of a black-and-white checkerboard pattern. It is an excellent project for practicing precision and exploring how opposite elements—organic petals and rigid geometry—can harmonize beautifully.
Step-by-Step Guide
Materials
- White drawing paper or cardstock (smooth texture)
- Compass for drawing circles
- Protractor (optional, for spacing)
- Pencil (HB or 2B)
- Eraser
- Fine liner pen (black, approx. 0.3mm or 0.5mm)
- Pink colored pencil or marker
- Ruler
Step 1: Setting the Foundation
-
Establish the center:
Begin by marking a precise dot in the center of your paper. This will be the anchor for every circle you draw. -
Draw the guideline circles:
Using your compass, draw a series of concentric circles radiating from the center. Start with a very small circle for the flower’s eye, then a slightly larger one for the petals. Create a distinct gap, then draw two circles close together to form a ring band. -
Define the checkerboard band:
Open your compass wider and draw a large band that will house the checkerboard pattern. This should be the widest section of your mandala. Close this section with another double-ring border. -
Add the outer petal guide:
Finally, draw one last large circle to serve as the height guide for the outermost ring of pointed petals. -
Divide the circle:
Use a protractor or simply visually divide your circle into equal wedge sections using light pencil lines. This grid is crucial for keeping your checkerboard pattern even.
Uneven Checkerboard?
If your grid sections look uneven, don’t freehand the spacing. Use a protractor to mark every 10 or 15 degrees before drawing your radial lines to keep the pattern consistent.
Step 2: Drawing the Floral Center
-
Create the central eye:
In the very center, draw a small circle and fill it with tiny dots or a spiral to create texture. Draw a simple ring around this texture. -
Sketch the inner petals:
Draw pointed, leaf-shaped petals radiating from the center eye, reaching out to your first major circle guide. Try to keep them symmetrical. -
Add detail to the petals:
Draw a straight line down the center of each petal to give them dimension and a vein-like appearance. -
Color the center:
With your pink colored pencil, gently shade the petals. I like to press slightly harder near the center and tips for a gradient effect, leaving the middle of the petals softer. -
Ink the floral section:
Trace over your pencil lines for the flower with your black fine liner. Don’t worry about erasing the pencil yet; let the ink set first.
Step 3: Constructing the Checkerboard
-
Create the grid:
Focus on the wide band you created earlier. Using your ruler and the center point, ensure your radial dividing lines are clear. Then, draw 2-3 concentric circles within this band to create a grid of curved rectangles. -
Draw the diamond pattern:
Instead of filling alternate squares, we are creating diamonds. Draw diagonal lines connecting the corners of your grid sections. This creates a zig-zag or argyle effect. -
Fill the black sections:
Carefully embrace the high-contrast look by filling alternating diamond shapes with solid black ink. This creates the optical illusion of depth. -
Detail the border rings:
Between the flower and the checkerboard, and on the outside of the checkerboard, you drew double rings. Fill these narrow channels with tiny tick marks or small vertical lines to create a ‘ladder’ texture.
Add Metallic Flair
Make the design pop by using a gold or silver gel pen for the tiny details inside the outer petals or for the ‘ladder’ lines, adding a luxurious shimmer to the matte black.
Step 4: Final Touches
-
Add outer petals:
On the outermost ring, draw a repeating pattern of simple, pointed petals or scallops. Use the guide circle to ensure they are all the same height. -
Decorate the outer petals:
Inside each outer petal, draw a small teardrop or circle to add a bit of delicate detail without overcrowding the design. -
Final Inking:
Go over all your remaining pencil lines with the fine liner. Ensure the outer petals and borders are crisp and dark. -
Clean up:
Once you are absolutely certain the ink is dry, gently erase all the underlying pencil guidelines to reveal the clean contrast of your work.
Take a moment to admire the satisfying balance between the soft pink center and the crisp geometric ring you have created
Loop-and-Arc Doodle Mandala
This elegant mandala design combines crisp inked lines with organic petal shapes to create a soothing, sun-like radial pattern. It balances bold, thick outlines with delicate interior details for striking contrast.
Step-by-Step Tutorial
Materials
- White sketchbook or drawing paper
- Pencil (HB or 2H for light guidelines)
- Eraser (kneaded eraser preferred)
- Compass
- Ruler
- Black fineliner pens (sizes 01, 03, and 05 or 08 for varied line weights)
Step 1: Setting the Foundation
-
Find the Center:
Begin by marking the center point of your page. This anchor is crucial for maintaining symmetry throughout the drawing. -
Draw Concentric Guideline Circles:
Using your compass and pencil, lightly draw a series of concentric circles radiating from the center. You’ll need a very small inner circle, a medium circle about an inch out, another half an inch from that, and two larger outer circles to guide the petal lengths. -
Divide the Space:
Use your ruler and pencil to draw light lines intersecting through the center, dividing the circle into equal pie slices. Aim for 12 or 16 sections to keep the spacing even for the petals.
Keep Rotation Fluid
Turn your sketchbook constantly as you draw. Pulling the pen toward your body usually results in smoother, more confident curves than pushing it away.
Step 2: Creating the Core
-
Ink the Center Eye:
With a thicker pen (05 or 08), draw the central pupil. Surround it with a filled circle, leaving a tiny white highlight if you wish, then add a ring around it. -
Add the First Petal Ring:
Switch to a finer pen (03). Upon the first guideline circle, draw small, rounded U-shapes or scallops that touch each other, creating a flower-like border around the center eye. -
Detail the Core:
Inside each of these small scallops, draw a tiny line radiating outward and add small dots between the peaks for texture.
Uneven Petals?
If your petals start looking uneven in size, don’t erase. Just vary the thickness of the outline on the smaller ones to balance the visual weight.
Step 3: Drawing the Main Petals
-
Outline the Large Petals:
Using the radial guidelines, draw long, pointed petal shapes extending from the core to the next major circle guideline. Try to make them symmetrical, like elongated teardrops. -
Add Inner Petal Detail:
Inside each large petal, draw a slightly smaller version of the same shape. This double-line effect adds depth without adding clutter. -
Create the Veins:
Draw a straight central line down the middle of each petal. Start from the base and stop just before the tip. -
Fill the Gaps:
In the V-shaped spaces between the petal tips, add small floating circles or ‘bubbles’ to fill the negative space.
Step 4: Expanding the Design
-
Draw the Frame Circle:
Use your compass or carefully freehand a solid ink circle that encloses all the pointed petals you just drew. -
Create the Looped Border:
On the outside of this new circle, draw a continuous series of small, tight U-shapes. Think of this as a scalloped lace edge. -
Double the Border:
Draw a second large circle just outside the scalloped edge to encase the entire design so far. -
Thicken the Lines:
Go back over your two large framing circles with your thickest pen (08) to make them bold and prominent.
Step 5: The Final Flourish
-
Draft the Outer Arcs:
Draw large, wide semi-circles (arcs) attached to the outer border. Space them so that each arc spans roughly the width of two inner petals. -
Connect with Peaks:
In the valleys where these large arcs meet, draw sharp, triangular spikes pointing outward. This creates a visually interesting rhythm of round and sharp shapes. -
Thicken Outer Arcs:
Use a thicker pen line for the tops of these outer arcs to give the mandala a defined, heavy edge. -
Erase Guidelines:
Once the ink is completely dry—I usually wait at least 15 minutes to be safe—gently erase all your pencil guidelines to reveal the clean contrast.
Step back and admire the rhythmic flow of your finished ink mandala


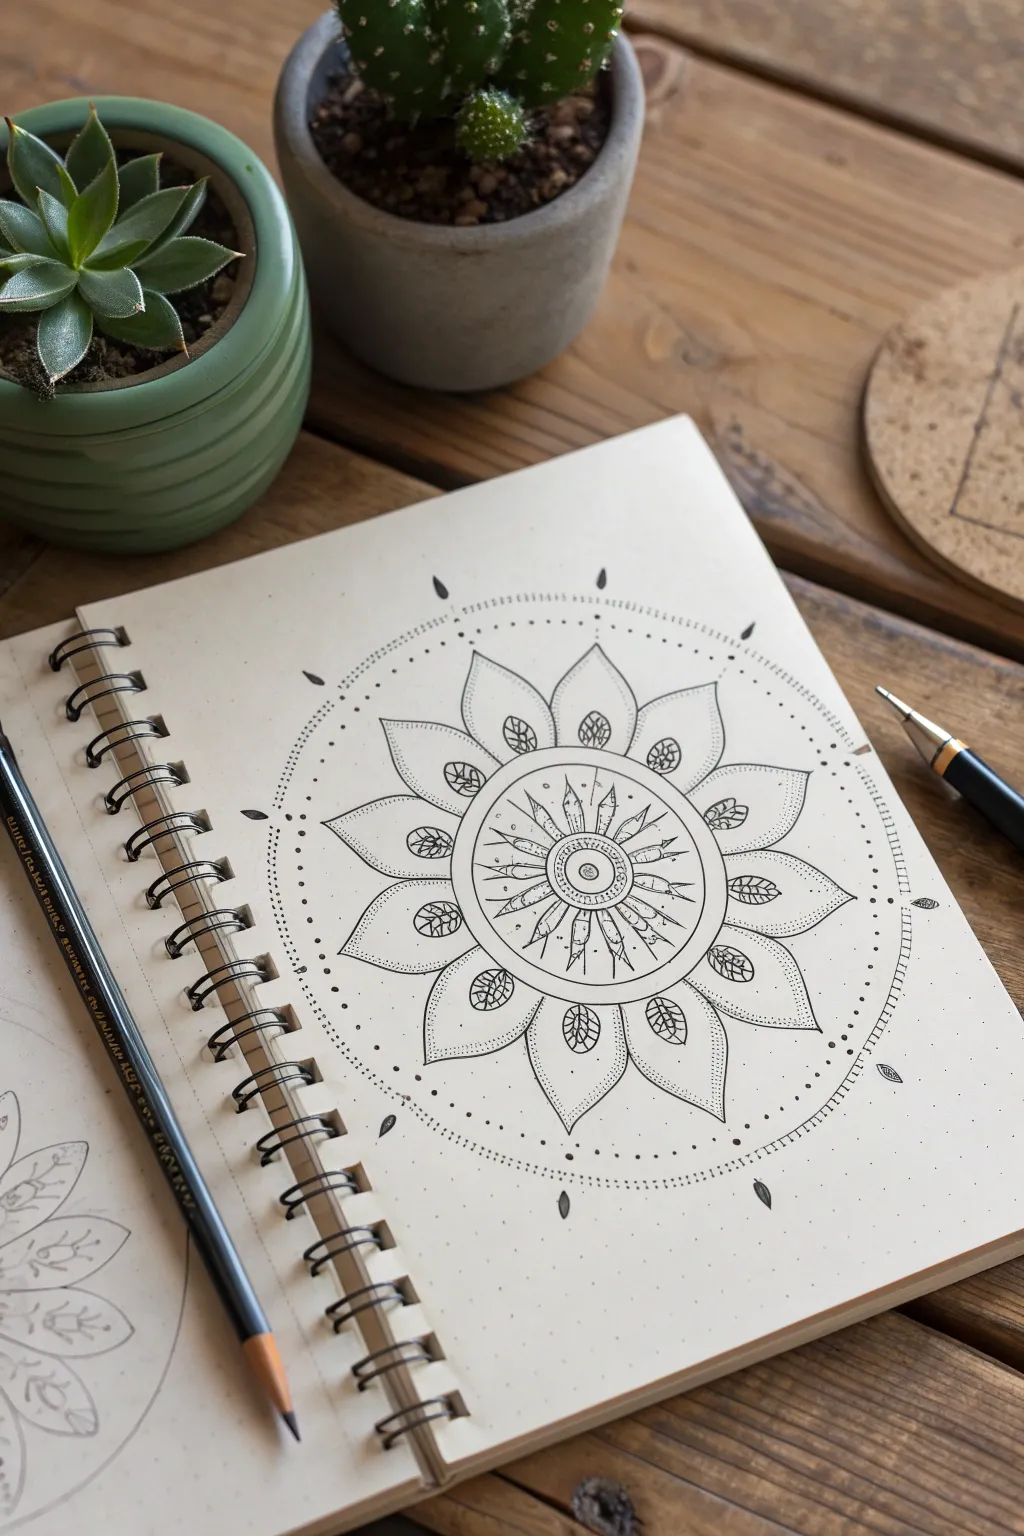
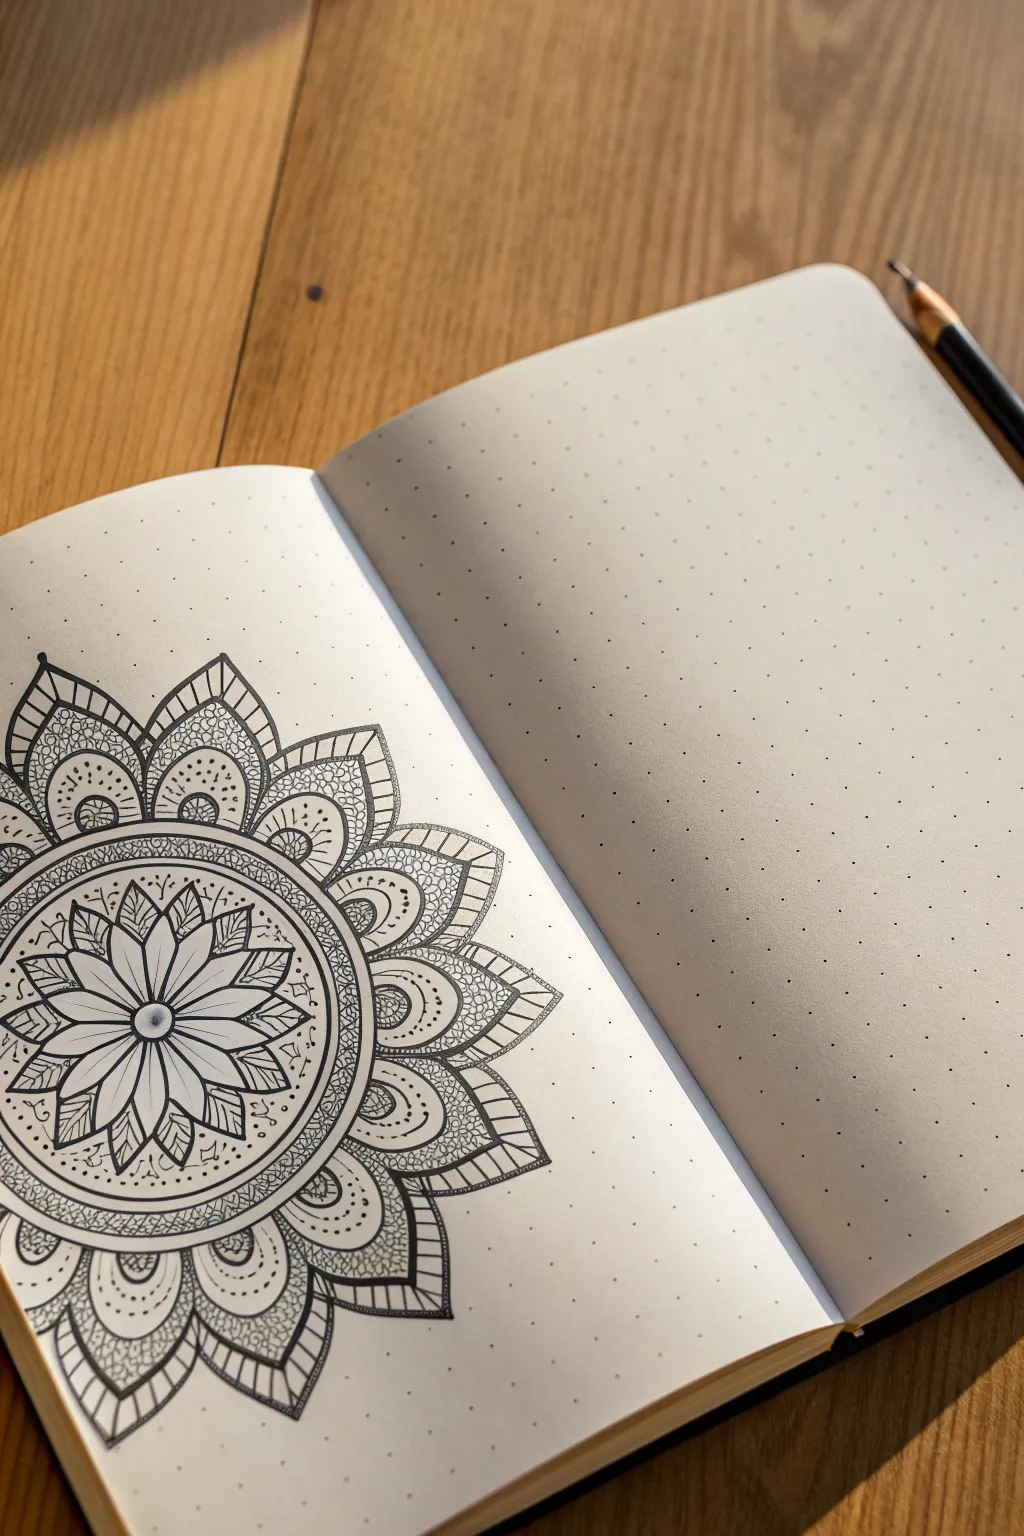
Tiny Heart Petal Mandala
This elegant mandala combines sweeping floral curves with delicate heart-shaped detailing in the center ring, creating a design that feels both organic and structured. The open layout allows for a meditative drawing process, perfect for filling a sunny afternoon with nothing but ink and paper.
How-To Guide
Materials
- Fine liner pen (0.3mm or 0.5mm)
- Pencil (HB or 2H)
- Compass
- Protractor
- Ruler
- Eraser
- Sketchbook or high-quality drawing paper
Step 1: Setting the Foundation
-
Find Center:
Begin by marking the center of your page lightly with a pencil. This will determine the symmetry of the entire piece. -
Draw Guidelines:
Using your compass, draw four concentric circles. Make the smallest one about an inch in diameter for the central flower, followed by a medium ring for the heart details, a larger ring for the main petals, and an outer ring for the final petal tips. -
Section the Circle:
With a ruler and protractor, lightly divide your circle into 8 or 12 equal sections. These radiating lines will act as the spine for your petals to ensure they remain evenly spaced.
Step 2: The Central Bloom
-
Core Circle:
Switch to your fine liner pen. Draw a small, clean circle in the very center of your guide. -
First Petal Layer:
Draw eight long, teardrop-shaped petals radiating from the core circle, extending out to the edge of your first pencil ring. They should look like a simple daisy. -
Inner Detailing:
Inside each teardrop petal, draw a slightly smaller version of the same shape. This double-line effect adds immediate depth to the center. -
Connecting Arcs:
Connect the tips of these petals with gentle, concave arcs that dip inward, creating a scalloped edge around the first flower layer.
Uneven Petals?
If your petals look lopsided, don’t erase! Simply thicken the outline on the thinner side to balance the visual weight. This hides the asymmetry instantly.
Step 3: The Heart Ring
-
Outline the Ring:
Draw a solid ink circle around the flower you just completed, leaving a few millimeters of breathing room. -
Draw the Outer Rim:
Create another ink circle about a centimeter outside the previous one to form a band. -
Add Texture:
Fill the space between these two rings with small, evenly spaced dots. I find that stippling here creates a nice textural contrast against the smooth lines of the petals. -
Tiny Hearts:
On the outer edge of this band, draw small, upside-down heart shapes or joined semi-circles. These should sit right on the line, acting as the base for the next layer of petals.
Make it Shine
Use a gold gel pen to fill in the tiny stippled dots in the central ring or the small teardrops in the outer petals for a subtle metallic glow.
Step 4: The Grand Petals
-
Primary Arcs:
From the valley between each heart shape, draw large, curved lines extending outward to your third pencil guide ring to form the base of the wide petals. -
Pointed Tips:
Bring these curves together at a sharp peak. These petals should be wide and expansive, resembling a lotus bloom. -
Double Outlining:
Carefully trace the inside of each large petal to create a border. This echoes the style of the center flower. -
Separation Drop:
Draw a small teardrop shape floating inside each large petal, near the pointed tip, to fill the negative space.
Step 5: Final Flourishes
-
Outer Leaves:
In the gaps between the large pointed petals, draw a second layer of petal tips peeking out from behind. These should be broader and slightly shorter. -
Leaf Veins:
Add a single, curved line inside each of these outer leaves to suggest a central vein or fold. -
Corner Accents:
Add tiny triangular details or small diamonds in the crevices where the outer petals meet, giving the mandala a finished, jewelry-like appearance. -
Erase and Clean:
Wait at least 10 minutes to ensure the ink is completely dry, then gently erase all your pencil guidelines to reveal the crisp black lines.
Now you have a serene floral design ready to be colored or admired in its stark black-and-white beauty
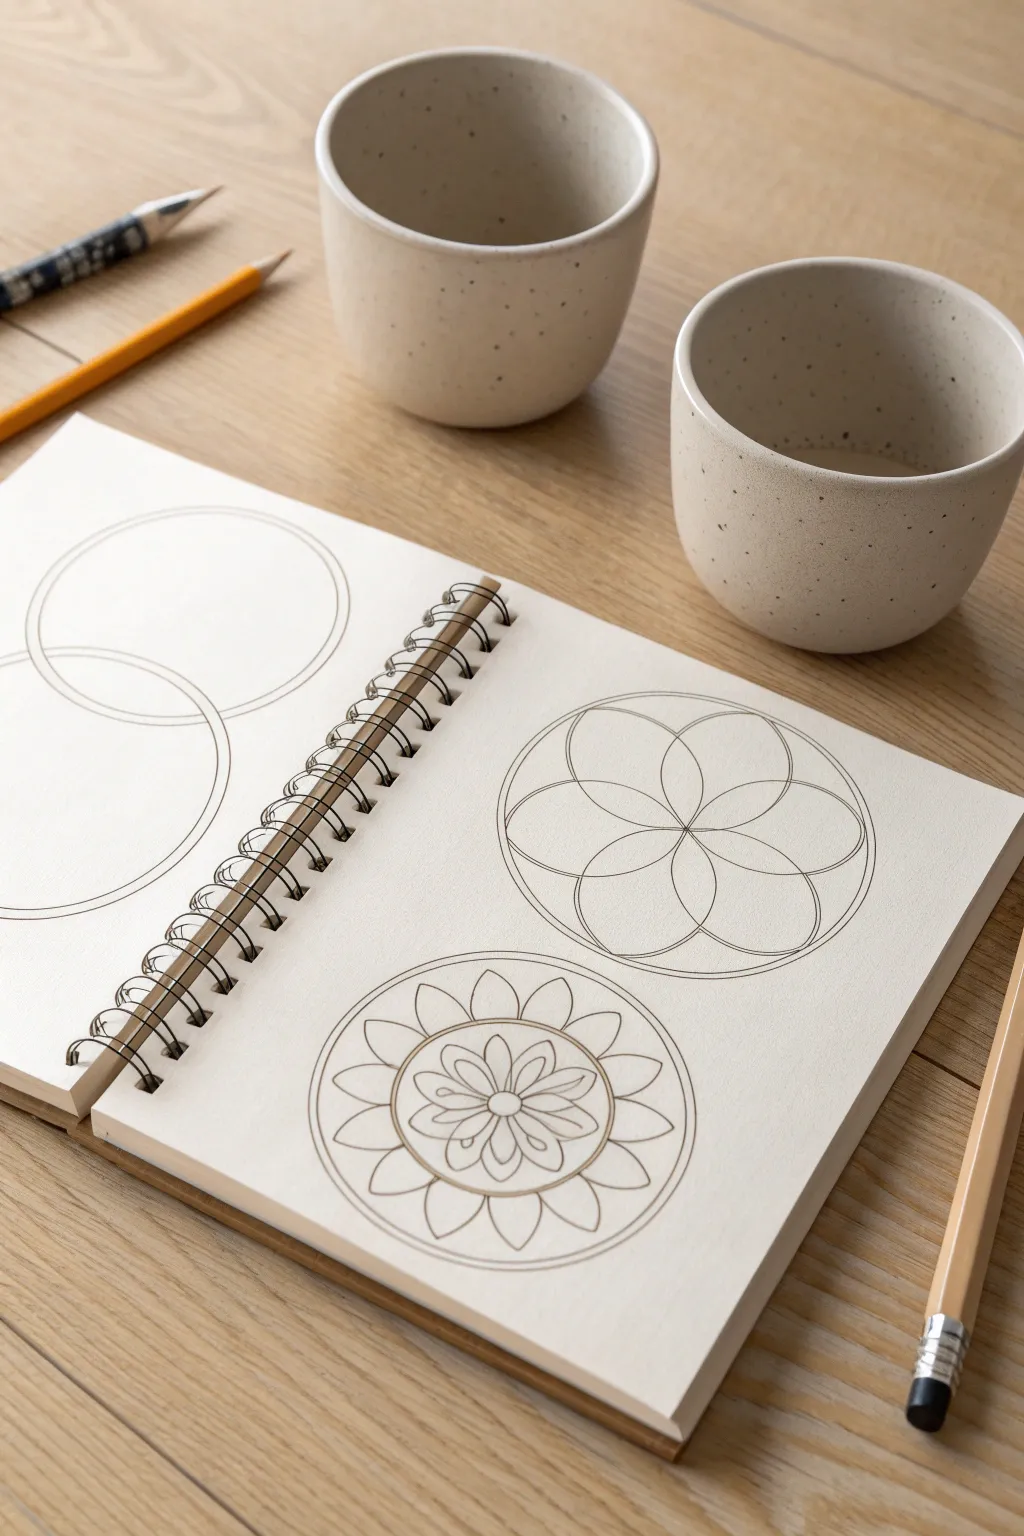
Four-Quadrant Mandala With Cross Guidelines
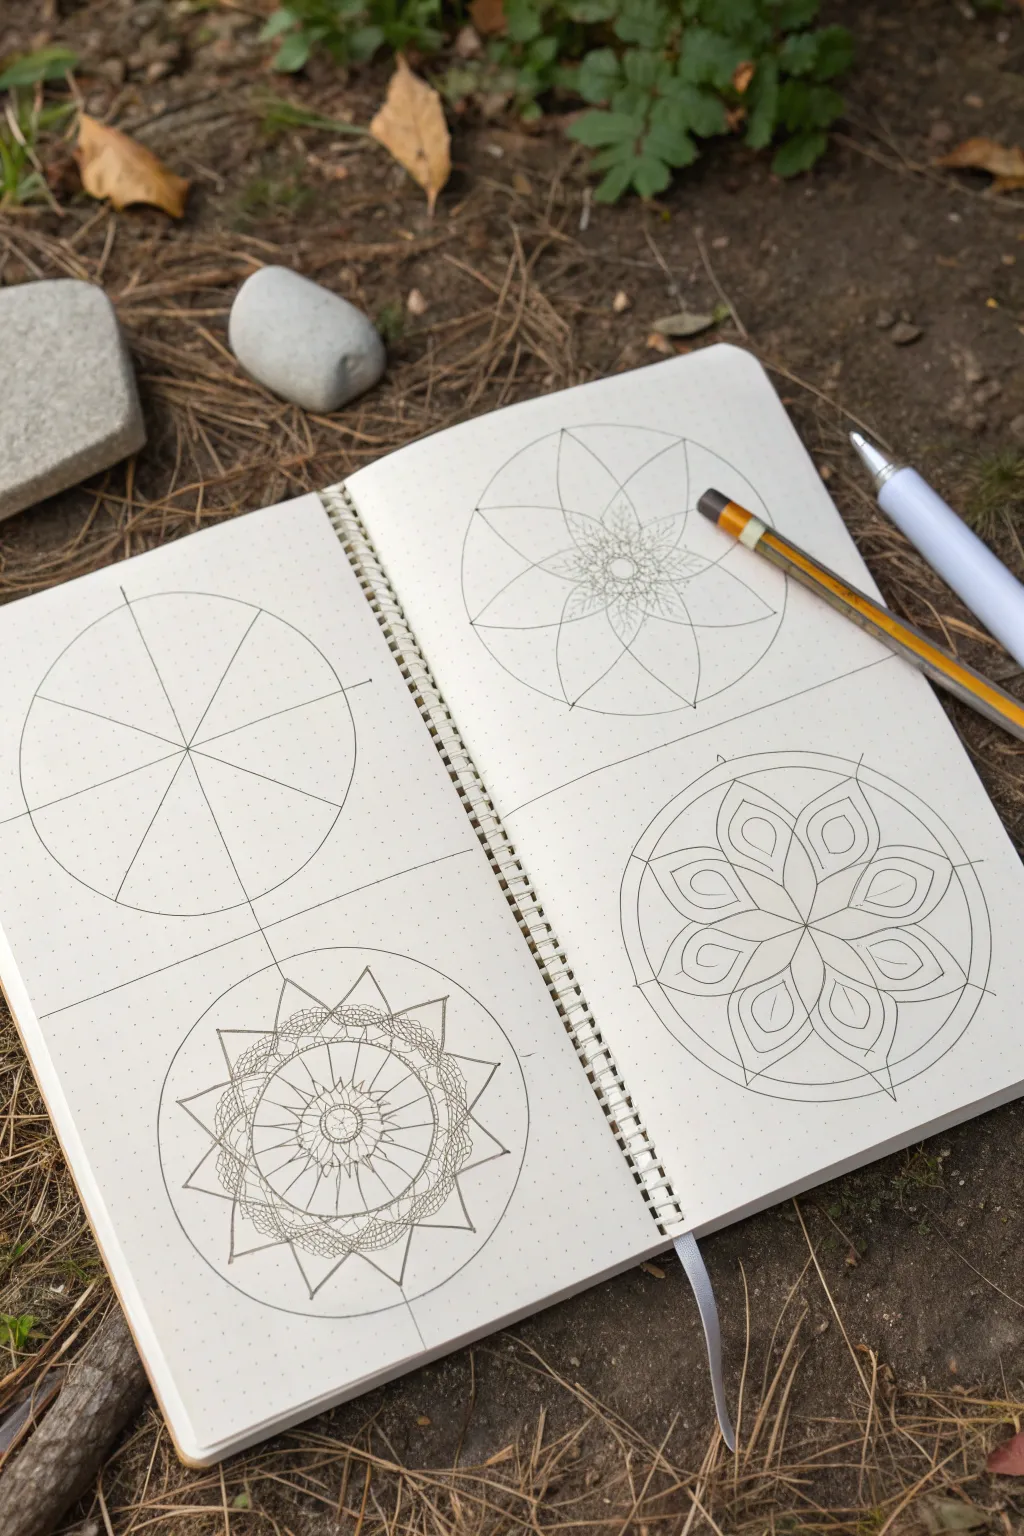
This practice spread is perfect for beginners, breaking down mandala construction into four approachable examples on a single page. It demonstrates the progression from basic guidelines to intricate floral and geometric patterns using a simple four-quadrant layout.
Step-by-Step Tutorial
Materials
- A5 Dot Grid Journal or Sketchbook
- Compass
- Ruler or Straight Edge
- Fine Liner Pen (Black, 0.3mm or 0.5mm)
- Pencil (HB or 2B)
- Eraser
Step 1: Setting Up the Framework
-
Divide the Page:
Start by finding the center of your open sketchbook page. Using a ruler and pencil, draw a large horizontal line across the middle and a vertical line down the center to create four equal quadrants. -
Draw the Base Circles:
Set your compass to a radius that fits comfortably within one quadrant (leaving about 1cm of breathing room on the edges). Place the compass point in the center of the top-left quadrant and draw a circle. -
Repeat the Circles:
Without changing the compass width, draw identical circles in the center of the remaining three quadrants. This ensures all your mandala studies will be the same size.
Step 2: Top Left: The Foundation
-
Add Radial Lines:
In the top-left circle, use your ruler to draw straight lines passing through the center point, effectively slicing the circle like a pizza. Aim for eight equal slices (vertical, horizontal, and two diagonals). -
Leave as Reference:
Keep this quadrant as a pure geometric reference. It serves as a reminder of the underlying ‘skeleton’ used for the more complex designs.
Wobbly Circles?
If your compass slips, place a small piece of masking tape over the center point before starting. This gives the needle better grip and prevents paper damage.
Step 3: Top Right: The Geometric Flower
-
Draw Petal Tips:
In the top-right quadrant, mark points on the outer circle where your radial guidelines would hit. Connect these points back toward the center with curved strokes to create large, pointed petals. -
Create the Inner Star:
Inside the center of these large petals, draw a smaller, intricate starburst pattern. Use tiny, repetitive leaf shapes radiating outward from the bullseye. -
Fill with Detail:
Fill the negative space between the central star and the outer petals with very fine stippling (tiny dots) or delicate hatching lines to add depth.
Pro Tip: Dot Grid Guide
Use the dot grid of your journal to ensure horizontal and vertical lines are perfectly straight without always needing to measure with a ruler first.
Step 4: Bottom Right: Layered Petals
-
Create Inner Circle:
Move to the bottom-right quadrant. Draw a smaller concentric circle inside the main one, about halfway to the center. -
Draw Teardrop Petals:
Sketch eight teardrop shapes radiating from the center, reaching out to touch the inner circle you just drew. -
Add Outer Petals:
Draw a second layer of larger, wider petals behind the first set. These should reach all the way to the outer perimeter circle. -
Double the Lines:
Go over your pencil sketches with a fine liner pen. Add an internal ‘echo’ line inside each large outer petal to give the design a striped or bordered look.
Step 5: Bottom Left: The Sunburst
-
Draw Star Points:
In the final quadrant (bottom-left), draw eight sharp, triangular points extending from an inner circle out to the perimeter, resembling a compass rose. -
Add the Web:
Connect the peaks of these triangles with draped, curved lines, creating a web-like connection between the points. -
Detail the Interior:
Inside the central circle, draw a small flower or gear shape. I find spiraling out from there with small geometric shapes keeps the symmetry tight. -
Apply Cross-Hatching:
Use your pen to add cross-hatching texture to the ‘web’ areas, making them look like mesh/netting. -
Final Cleanup:
Once the ink is completely dry on all quadrants, gently erase all remaining pencil guidelines to reveal your crisp, finished study sheet.
This four-part study creates a beautiful reference page you can look back on for future inspiration
Eight-Spoke Mandala Using Simple Slices
This elegant mandala design features a central wheel radiating outward into layers of pointed petals, surrounded by delicate stippling. The combination of strong outlines and fine dotted details creates a balanced, calming piece that looks beautiful in any sketchbook.
Step-by-Step
Materials
- Sketchbook or drawing paper (preferably dotted or plain)
- Pencil (HB or 2B)
- Compass
- Protractor (optional but helpful)
- Ruler
- Fine liner pen (01 or 03 nib)
- Thicker graphic pen (05 or 08 nib) for emphasis
- Eraser
Step 1: Setting the Foundation
-
Find the center:
Begin by marking the absolute center of your page. If you are using a dotted notebook, simply pick a central dot. For plain paper, measure carefully to ensure you have room to expand outwards. -
Draw the central circles:
Using your compass, draw a small circle about 1 inch in diameter. Draw a second, slightly larger circle around it to create a thin band. Draw a third circle significantly larger (about 3 inches diameter) to define the boundary of the inner wheel. -
Define the outer petal ring:
Expand your compass again to create the outermost boundary for your large petals. Draw this final guide circle lightly so it can be erased later. -
Divide the circle:
Lightly draw lines through the center to divide your circle into distinct sections. For this eight-spoke design, you need to divide the circle into eight equal slices. I find it easiest to draw a vertical cross, then an ‘X’ shape through the middle. -
Add detail guidelines:
Between each of your eight main spokes, mark the midpoint on the outer circle. These marks will help you center the tips of the large petals perfectly.
Step 2: Drafting the Shapes
-
Sketch the inner spokes:
Inside the middle ring, draft a series of thin, elongated triangular shapes radiating from the center. These should look like the spokes of a wagon wheel, tapering slightly as they reach the outer edge of this section. -
Create the inner circle detail:
In the very center circle, sketch a smaller ring and add a tiny dot in the middle. Around this dot, add small tic marks or lines radiating outward to fill the smallest core. -
Draw the main petals:
Using your outer guide circle, sketch eight large, pointed petals. The base of each petal should touch the inner wheel, and the tip should hit your outer guide circle at the marks you made earlier. Give them a slight curve for an organic feel. -
Add inner petal details:
Inside each large petal, near the base, sketch a small, teardrop or leaf shape. These will become the textured interior details later. -
Outline the decorative border:
Lightly sketch two concentric circles encasing the entire flower shape. This band will eventually hold the dotted border pattern.
Stippling Success
Don’t rush the dots! Hold your pen vertically and tap lightly. Pressing too hard can damage the nib and make the dots look like uneven dashes.
Step 3: Inking and Detailing
-
Ink the central hub:
Switch to your fine liner pen. Trace the very center circles and the radiating spoke lines. Be deliberate with your strokes to keep the lines clean. -
Define the petal outlines:
Carefully ink the outline of the eight large petals. I like to rotate my sketchbook as I work so my hand is always in a comfortable position for the curve. -
Texture the inner leaves:
Ink the small teardrop shapes inside each petal. Fill them with a cross-hatching or vein pattern to make them stand out against the white space. -
Stipple the petals:
Using your finest pen, add stippling (tiny dots) to the edges of the large petals. Concentrate the dots near the tips and the base to create a gradient shading effect. -
Add floating accents:
Draw small, detached leaf shapes floating between the tips of the main petals. Ink these and fill them with simple lines or solid black for contrast. -
Create the dotted halo:
Go to the outer circular border you sketched. Instead of a solid line, create the circle using only dots. Keep the spacing consistent for a polished look. -
Add radiating markers:
On the very outer edge, align small teardrop shapes or dashes with the tips of the petals and the spaces between them. This extends the energy of the mandala outward. -
Erase pencil lines:
Wait until the ink is completely dry—give it a few minutes to be safe. Gently run your eraser over the entire design to remove all graphite guidelines.
Wobbly Circles?
If your compass slips or creates a hole in the paper, put a piece of masking tape over the center point before you start. This reinforces the paper anchor.
Step back and admire the rhythmic symmetry of your new floral creation.
Dot-Grid Notebook Mandala Cheat Sheet

This elegant, symmetrical design transforms a simple dot-grid page into a stunning piece of floral line art. By leveraging the built-in grid for perfect spacing, you’ll create concentric layers of petals and geometric details that look surprisingly intricate but come together quite easily.
How-To Guide
Materials
- Dot-grid notebook or paper
- Fine liner pen (0.3mm or 0.5mm)
- Pencil (HB or 2B)
- Compass (optional but helpful for the circles)
- Ruler or straight edge
- Eraser
Step 1: Setting the Foundation
-
Find your center:
Locate the center point of your page or the area where you want your mandala to sit. Mark this central dot lightly with your pencil; everything will radiate from here. -
Draft the central circle:
Using a compass or by carefully freehanding, draw a small circle around your center point. It should span roughly 4 grid squares in diameter (2 squares out from the center on each side). -
Add the outer circle:
Draw a second, larger circle concentric to the first one. This ring should be about one grid unit wider than the first circle, creating a narrow band. -
Draft the petal guidelines:
Lightly sketch a much larger circle that will define the outer limit of your main petals. This helps ensure all your petals end at the same distance from the center.
Grid Guide
Use the dots on the paper as coordinate points. Count ‘two dots up, two dots over’ to make sure symmetrical petals on opposite sides mirror each other perfectly.
Step 2: Drawing the Inner Flower
-
Inking the center:
Draw a tiny circle around your original center dot with your fine liner. This is the heart of the flower. -
Create the eight central petals:
Draw eight distinct petals radiating from that tiny center. They should extend out to just inside your first pencil circle. Imagine a compass rose: draw the top, bottom, left, and right petals first, then fill in the diagonals to keep them even. -
Add detail lines:
Inside each of these eight petals, draw a single straight line from the center outwards, stopping just before the petal tip. I find this simple touch adds immediate depth. -
Ink the ring borders:
Trace over your penciled circles with ink. You should now have a ring enclosing your central flower. -
Decorate the ring:
Inside the band between the two circles, add small, evenly spaced dots all the way around. Use the grid lines to help space them symmetrically if they align.
Step 3: Building the Outer Layers
-
Draw the main petal outline:
Draw eight large, wide petals connecting the outer ring to your largest pencil guideline. Align the tips of these petals with the tips of the small inner flower petals. -
Add the secondary petals:
In the V-shaped gaps between those large petals, draw arched lines connecting them. This creates a second layer of petal shapes peaking out from behind the first set. -
Inner petal detailing:
Inside the eight main large petals, draw a smaller, inner petal shape that follows the same curve. It should float inside the larger shape without touching the edges. -
Dotted accents:
Place a single dot inside the tip of each of those floating inner petal shapes.
Go Botanical
Instead of geometric lines inside the petals, try drawing tiny leaf veins or stippling (shading with dots) to give the mandala a more organic, flower-like appearance.
Step 4: Final Touches
-
Detailing the secondary layer:
Go back to those arched ‘peaking’ petals in the background. Draw a long, straight line from the center outward through the middle of each arch. -
Tiny circles:
Draw a very small open circle near the base of these straight lines to fill the negative space. -
Outer orbit dots:
Look at the tips of your secondary (peaking) petals. Draw a solid black dot floating just above the point of each one. -
Large connecting dots:
Finally, place a slightly larger solid dot floating above the tip of each main petal. -
Erase and clean up:
Wait at least five to ten minutes to ensure the ink is bone dry. Gently erase all your pencil guidelines, being careful near the solid inked areas to avoid smudging.
Now you have a beautifully balanced mandala that highlights the harmony of grid-based drawing
No-Compass Cup-Trace Mandala
Discover the soothing rhythm of geometric sketching with these simple, elegant designs that require nothing more than a few circular objects and a steady hand. The result is a page of clean, minimalist patterns that look impressively precise, combining the classic Seed of Life motif with a floral-inspired mandala.
Step-by-Step Guide
Materials
- Two speckled ceramic cups (or any cups with different rim sizes)
- Spiral-bound sketchbook (heavyweight paper preferred)
- Fine-point mechanical pencil or standard HB pencil
- Eraser
- Ruler (optional, for spacing)
Step 1: Setting the Foundations
-
Prepare your workspace:
Clear a flat surface on a wooden table or desk. Open your sketchbook so both pages are flat. Having the spiral binding in the center allows you to work comfortably on either side. -
Trace the primary circles:
Take one of your ceramic cups—make sure the rim is clean and dry. Place it upside down on the right-hand page near the top. Hold it firmly and trace around the rim lightly with your pencil to create a perfect circle. -
Create the second foundation:
Using the same cup or a slight variation in size, trace a second circle on the lower half of the page, ensuring there is enough white space between the two designs so they don’t feel crowded. -
Practice overlap (optional):
If you’d like to practice the overlapping technique shown on the left page, trace a circle, then move the cup slightly to the right so it overlaps the first circle by about 30-40%, and trace again. This helps you get a feel for intersection points.
Don’t smudge your work!
Place a scrap piece of paper under your drawing hand while you work. This prevents the graphite from greasing and smearing across the page as you move around.
Step 2: Drawing the Seed of Life (Top Design)
-
Find the center:
Visually locate the center of your top circle. I like to make a very faint dot here to guide the next steps. -
Sketch the first petal:
Draw a football-shaped petal (vesica piscis) vertically through the center point. It should stretch from near the top of the circle to near the bottom, but leave a consistent border around the edge. -
Add the cross petals:
Draw two more petals forming an ‘X’ shape through the center point. You should now have a six-petaled flower shape in the middle. Try to keep the curves symmetrical. -
Connect the outer curves:
Now, draw arcs connecting the tips of the petals. These arcs mimic the curve of the outer circle, creating a scalloped effect inside the main boundary. -
Refine the circle borders:
Go back over your initial cup tracing. Emphasize the outer ring by drawing a second circle just millimetres inside the first one to create a ‘double line’ effect for definition.
Ink it up
Once happy with the pencil sketch, trace over the final lines with a fine-liner pen (0.5mm works great). Erase the pencil afterward for a crisp illustration.
Step 3: Creating the Floral Mandala (Bottom Design)
-
Draw the central flower:
In the center of your bottom circle, sketch a small eight-petaled flower. These petals should be narrow and radiate from a tiny central hub. -
Add the second layer:
Draw a ring around your central flower. Then, add a second tier of larger, wider petals radiating outward from this ring. -
Create the boundary rings:
Draw a circle that encloses the tips of this second petal layer. Add another circle about a centimeter outside of that one, creating a wide band. -
Fill the outer band:
Inside this wide band, draw a series of simple, curved petals. They should touch the inner circle and point outward, but stop just short of the outermost rim. -
Detail the center:
Return to the very center of the design and add small stamens or lines inside the inner petals to give the flower more organic detail.
Step 4: Finishing Touches
-
Clean up sketch lines:
Take your eraser and gently remove any stray marks, the central placement dot, or hesitant lines that blur the design. -
Reinforce the linework:
Go over your favorite lines with slightly more pressure to darken the graphite. This contrast makes the geometric shapes pop against the cream paper.
Enjoy the calm satisfaction of seeing complex patterns emerge from simple circles
Half Mandala Along the Page Edge
This elegant half-mandala design hugs the left edge of your notebook page, creating a beautiful border that leaves plenty of room for writing. It features a central floral motif radiating outward into intricate geometric petals, perfect for adding a touch of Zen to your bullet journal.
Step-by-Step Tutorial
Materials
- Dotted notebook (A5 size recommended)
- Fine liner pen (0.3mm or 0.5mm, black)
- Compass
- Pencil (HB or lighter)
- Eraser
- Ruler
Step 1: Setting the Foundation
-
Find your center:
Begin by locating the midpoint of the left page edge. Since this is a half-mandala, your center point will be right on the edge of the paper. -
Draw the guidelines:
Place your compass point on that edge mark. Draw four concentric semi-circles lightly in pencil. The first should be small (about 1cm radius), and each subsequent circle should be about 1.5cm to 2cm larger than the last. -
Mark the segments:
Use your protractor or just your eye to lightly divide the semi-circles into equal pie slices. Aim for about 12 sections total to guide your petal placement.
Step 2: Drawing the Core Flower
-
Ink the center:
Switch to your fine liner. Draw a small semi-circle at the very center point on the page edge to anchor the design. -
First layer of petals:
Draw long, slender petals extending from the center to the edge of your second pencil circle. These should look like the petals of a daisy or sunflower. -
Detail the first petals:
Inside each of these long petals, draw a smaller, similar shape floating in the center. Add tiny lines at the base of the inner shape for shading. -
Add separation leaves:
Between the tips of these main petals, draw small, pointed triangular leaves that peek out just slightly.
Uneven Petals?
If your petals look uneven sizes, rely heavily on your pencil grid. Don’t just eyeball it; mark the width of every petal on the guideline circle before inking.
Step 3: Building the Middle Layers
-
Create the border ring:
Draw a double line following the curve of your next pencil guideline to create a band enclosing the flower core. -
Fill the band:
Fill this narrow band with a tight pattern. Small circles or a simple honeycomb pattern work well to add texture without being overwhelming. -
Draw rounded scalloped petals:
On the outside of this textured band, draw a row of wide, shorter, rounded petals. These act as a base for the elaborate outer layer. -
Decorate the scallops:
Inside each rounded petal, draw two curved lines mirroring the top edge. In the space created, add three or four tiny dots for detail.
Add Gold Accents
Use a metallic gold gel pen to fill in the small decorative dots or the center of the flower for an elegant, illuminated manuscript look.
Step 4: The Elaborate Outer Rim
-
Draft the large points:
For the final and largest layer, draw tall, pointed arches extending to your outermost pencil guideline. These should align with the rounded petals below. -
Double the arches:
Outline each of these large point arches with a second line to give them a defined border. -
Add inner texture:
Fill the bottom half of these large arches with dense stippling (tiny dots). The dots should be clustered heavily at the bottom and fade out as they move up. -
Create the outer peaks:
Surround the top of each arch with a slightly larger, pointed frame. Leave a small gap between the arch and this new frame. -
Connect the peaks:
In the V-shape spaces between the large outer peaks, draw small inverted triangles or diamond shapes to bridge the gaps. -
Final shading touches:
Go back through the design and thicken any lines where shapes overlap to add depth. I find that darkening the ‘valleys’ between petals makes the design pop.
Step 5: Cleanup
-
Wait for ink to dry:
Let the ink sit for at least 5-10 minutes. If you erase too soon, the black lines will smear across the white paper. -
Erase guidelines:
Gently erase all your pencil circles and segment lines, revealing the crisp black-and-white mandala.
This half-mandala makes your page look sophisticated and complete, even before you write a single word
Corner Mandala Doodle
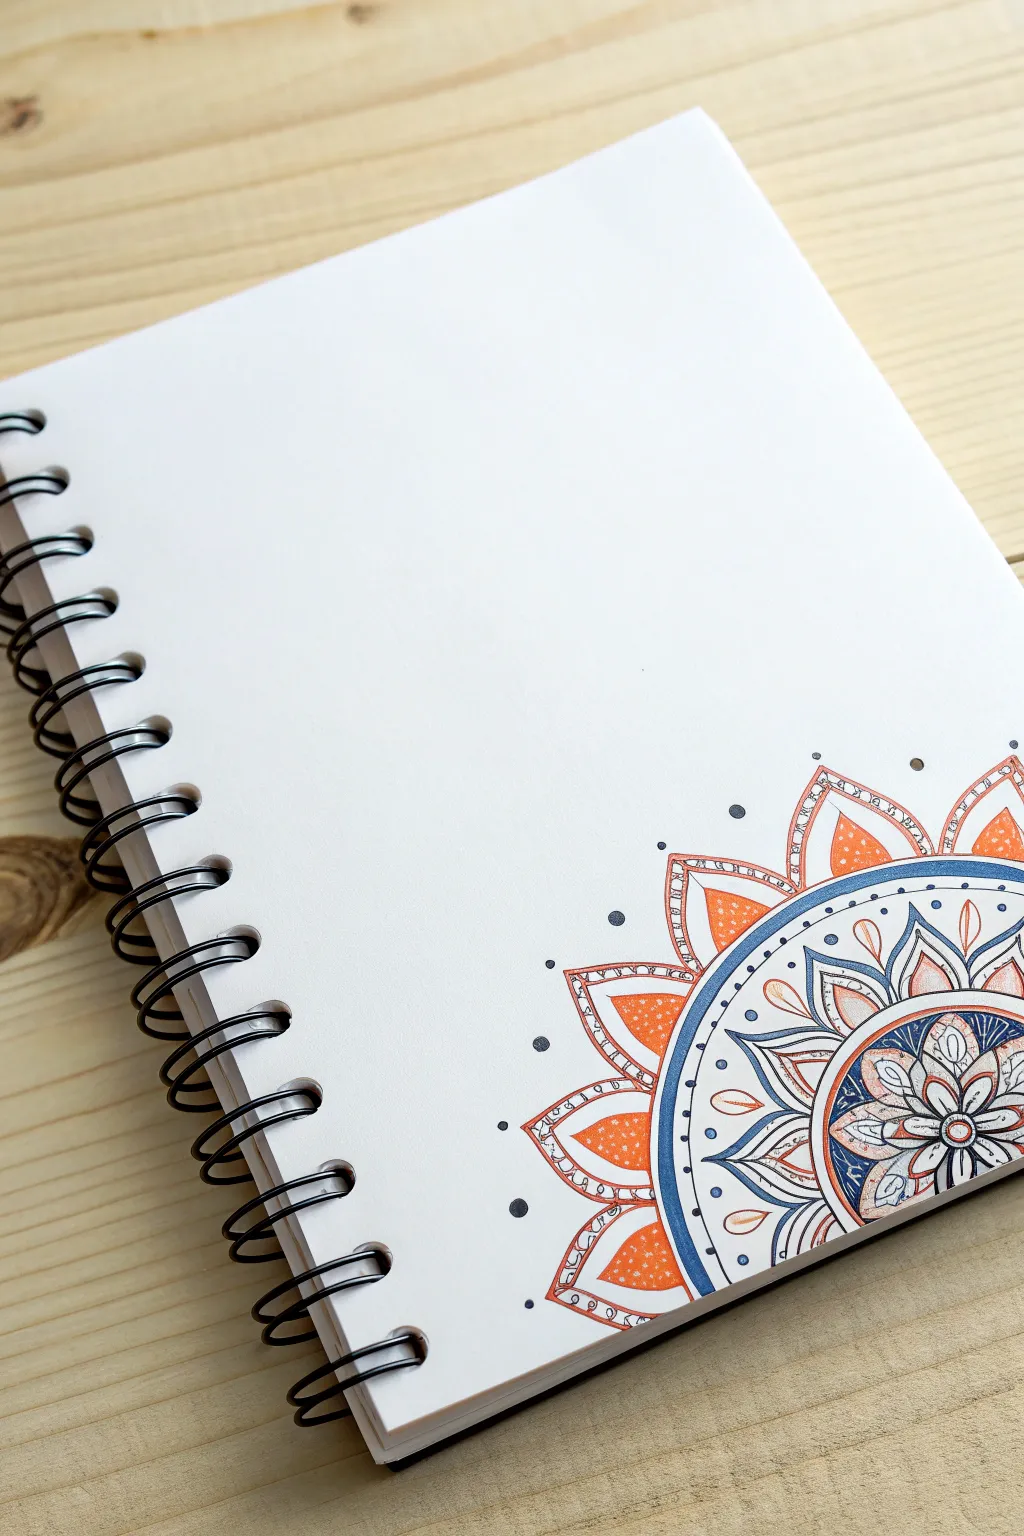
Transform a plain notebook page into a work of art with this elegant corner mandala design. Featuring a harmonious blend of navy blue and terracotta orange, this quarter-circle pattern adds a touch of bohemian flair to your journaling space.
How-To Guide
Materials
- Spiral-bound sketchbook or notebook
- Compass (optional but recommended for guidelines)
- Pencil and eraser
- Black fine liner pen (0.3mm or 0.5mm)
- Navy blue felt-tip marker or colored pencil
- Terracotta/Orange felt-tip marker or colored pencil
Step 1: Setting the Structure
-
Establish the center point:
Visualize the very bottom-right corner of your page as the center of a circle. If using a compass, place the point right at the corner edge. -
Draw the base arcs:
Lightly sketch three concentric quarter-circles radiating from that corner point. The first should be small (about 1 inch out), the second medium (about 2 inches), and the third larger (about 3 inches) to define the boundaries of your mandala layers.
Pro Tip: Rotation
Since this is a corner design, rotate your notebook 45 degrees so the corner points directly at your stomach. This makes drawing symmetrical arches significantly easier for your wrist.
Step 2: Drawing the Core
-
Create the central flower:
Inside the smallest quarter-circle, draw a half-flower shape. Start with a small semi-circle at the corner, then add distinct petal shapes radiating outward till they touch the first pencil guide. -
Detail the petals:
Ink the outlines of these central petals with your black fine liner. Inside each petal, draw a smaller, teardrop shape to add depth. -
Add separation lines:
Draw thick, bold lines between the petals to separate them, filling these gaps with navy blue ink later for high contrast.
Troubleshooting: Smudges
If you are left-handed working on a bottom-right corner, place a clean scrap of paper under your hand to prevent smudging pencil lead or wet ink across the finished sections.
Step 3: Building the Middle Layers
-
Draw the geometric band:
Move to the second band (between the first and second pencil arcs). Draw a series of U-shaped scallops that connect to form a chain around the central flower. -
Add internal details:
Within each scallop, draw a smaller inverted V-shape or a simple line that mimics the outer curve. This creates a layered look without adding too much complexity. -
Create the heavy border:
Draw a thick double line at the outer edge of this middle section. This serves as a strong visual divider between the floral center and the outer petals.
Step 4: Designing the Outer Petals
-
Sketch large outer petals:
utilizing the space up to your final pencil guideline, draw large, pointed petal shapes. These should direct outward like sun rays. -
Create the inner frames:
Inside each large petal, draw a slightly smaller version of the same shape. This creates a ‘frame’ effect where we will later add color. -
ink the outlines:
Go over all your pencil lines with the black fine liner. Use a steady hand, and I like to rotate the notebook as I draw curves to keep the angle comfortable. -
Erase guidelines:
Once the ink is fully dry—give it a minute or two—gently erase all the initial pencil arcs to reveal the clean design.
Step 5: Coloring and Embellishing
-
Color the outer petals:
Take your terracotta or orange marker and fill in the inner shape of the large outer petals. Leave the borders white for a crisp look. -
Fill the middle band:
Use the navy blue marker to color the thick band you created earlier. This dark ring anchors the design and makes the orange pop. -
Add subtle blue accents:
Add small touches of navy blue to the inner details of the central flower petals, keeping the coloring light and deliberate. -
Apply finishing dots:
Using the black fine liner, add small stippling dots inside the orange sections for texture. Finally, place several solid black dots floating outside the main design to help it fade naturally into the white page.
Now you have a stunning, colorful corner accent that brightens up your page every time you open it
Bold Outline Mandala With Big Color Blocks
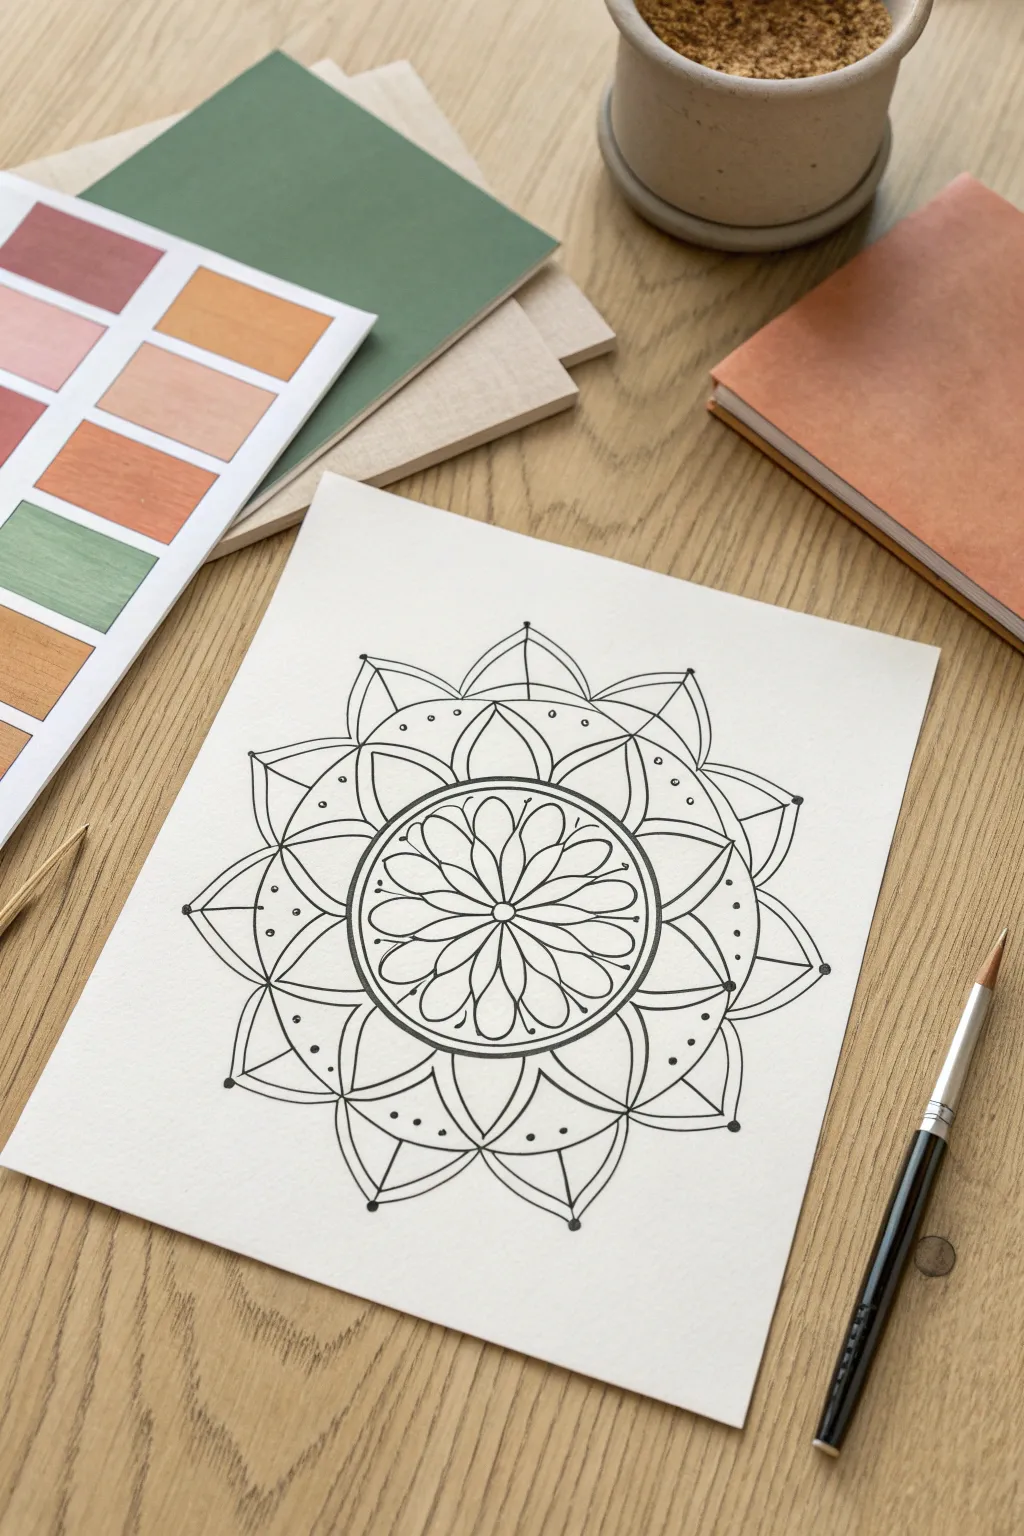
This project features a clean, petal-inspired mandala design with thick, confident lines perfect for filling with bold washes of color later. Its open structure makes it an ideal relaxing exercise for beginners who want to practice symmetry without getting lost in tiny details.
Step-by-Step
Materials
- Heavyweight mixed media or watercolor paper (approx. 300gsm)
- Compass
- Protractor (optional but helpful)
- Pencil (HB or 2H for light lines)
- Eraser (kneaded eraser is best)
- Fine liner pen (0.5mm or 0.8mm)
- Thicker marker or brush pen for bold outer lines
- Ruler
Step 1: Setting the Foundation
-
Find the center:
Begin by finding the exact center of your paper. Make a small, faint mark with your pencil to serve as your anchor point for the entire design. -
Draw the guide circles:
Using your compass, draw four concentric circles radiating from the center point. Space them out generously; the innermost circle should be small (about 1 inch diameter), and each subsequent circle should grow by about 1-1.5 inches to create the distinct ‘rings’ of petals seen in the reference. -
Divide the circle:
Lightly draw a vertical and horizontal line through the center to divide your circle into four quadrants. If you want precise symmetry, use a protractor to further divide these sections until you have 12 or 16 equal ‘slices’ like a pizza.
Pro Tip: Line Weight
Use a 0.8mm pen for main petal outlines and a 0.3mm pen for interior details. This contrast makes the design pop instantly.
Step 2: Sketching the Core Elements
-
Draft the center flower:
In the innermost circle, sketch a series of long, thin loops radiating from the center point. These should look like daisy petals, touching just at the base and widening slightly before rounding off at the top. -
Create the second ring:
Move to the next guide circle. Draw wider petal shapes that sit between the tips of the inner petals. I find it helps to think of these as arches bridging the gaps of the layer below. -
Add detail lines:
Inside each of these second-ring petals, lightly sketch a smaller, inner petal shape that floats in the middle, mirroring the outline. This creates the ‘double line’ effect shown in the artwork. -
Draft the outer petals:
For the outermost layer, draw large, sweeping pointed arches. Let the tips of these petals extend slightly beyond your largest pencil guide circle to give the mandala a dynamic, blooming feel. -
Connect the layers:
Draw curved connecting lines between the base of the outer petals and the ring below to unify the structure.
Troubleshooting: Shaky Hands?
If your long curves look wobbly, try locking your wrist and moving your entire arm from the shoulder. It creates smoother arcs.
Step 3: Inking and refining
-
Ink the central flower:
Switch to your fine liner pen. Carefully trace the innermost flower petals. Focus on making the lines smooth and continuous rather than sketchy. -
Outline the middle ring:
Ink the second layer of petals. For the circular border immediately surrounding the center flower, use a slightly thicker line weight or go over it twice to create a bold separation ring. -
Define the double lines:
Ink the decorative inner petal shapes within the second ring. Keep these lines slightly thinner than the main structural lines to create visual hierarchy. -
Ink the outer points:
Trace the large, pointed outer petals. At the very tip of each point, pause briefly to create a sharp, defined corner. -
Add the dots:
Carefully place small ink dots in the negative spaces of the middle ring and at the outer tips of the design. These small details add a lot of texture without clutter.
Step 4: Finishing Touches
-
Thicken key lines:
Go back over the major structural circles—specifically the ring enclosing the center flower—to thicken them up. This ‘bold outline’ style relies on variable line weights. -
Add accent tips:
Place a solid black dot at the very tip of each large outer petal and at the junctions between petals where the lines intersect. -
Let the ink cure:
Wait at least 10–15 minutes for the ink to dry completely. This is crucial because erasing too too soon creates grayish smudges. -
Erase pencil guides:
Gently erase all your pencil circles and dividing lines. Use a kneaded eraser and a dabbing motion first to lift graphite, then gently rub away the rest.
Your clean, bold mandala is now ready for scanning or a splash of watercolor paint
Negative-Space Ring Mandala
This striking mandala design balances intricate floral centers with bold, expansive outer petals, all anchored by a distinctive decorative ring. The high-contrast black ink on white paper creates a crisp, professional look that is perfect for relaxation and focus.
How-To Guide
Materials
- Large sheet of smooth drawing paper or bristol board (approx. 18×24 inches)
- Graphite pencil (HB or 2H)
- Large compass or string and tack for circles
- Ruler
- Eraser (kneaded eraser preferred)
- Fine liner drawing pens (0.3mm, 0.5mm, and 0.8mm sizes)
Step 1: Planning and Structure
-
Establish the Center:
Begin by finding the exact center of your paper. Make a small mark. Use your compass to draw a small circle about 1 inch in diameter; this will be the open ‘eye’ of the mandala. -
Draft the Grid Rings:
From that same center point, lightly draw a series of concentric circles moving outward. You’ll need roughly five distinct zones: the inner flower zone, a middle transition zone, the decorative ‘bead’ ring, and two larger zones for the outer petals. Keep these pencil lines very faint as they will be erased later. -
Divide the Circle:
Use your ruler and protractor to divide the circle into equal pie slices. Drawing 16 or 32 radial lines through the center point works best for this level of detail. These guidelines help ensure your petals stay symmetrical as you work around the design.
Wobbly Lines?
If your hand shakes, try drawing ‘ghost’ lines in the air above the paper before committing ink. Pulling the pen toward you rather than pushing it away also helps stability.
Step 2: Drawing the Inner Flower
-
Sketch the Inner Petals:
Starting from the central 1-inch circle, sketch a row of long, thin petals that extend out to your first grid line. They should look like daisy petals, slightly overlapping. -
Add Secondary Layers:
Draw two additional rows of petals behind the first set, making each row slightly larger and peeking out from between the previous petals. This creates a dense, chrysanthemum-like core. -
Ink the Central Core:
Switch to a 0.5mm fine liner. Carefully trace your pencil sketches for the central flower. I like to rotate the paper as I go to keep my hand in a comfortable position, ensuring smooth, confident curves.
Add Depth
Use stippling (tiny dots) at the base of each petal where it meets the center. This gradient shading adds a 3D effect without needing colored pencils.
Step 3: Creating the Decorative Ring
-
Define the Ring Borders:
Locate the grid lines reserved for the heavy decorative ring. Using a 0.8mm pen, trace the inner and outer circles of this band to create a solid boundary. This ring separates the dense center from the airy outer petals. -
Fill with Detail:
Inside this designated ring, draw small, evenly spaced circles or ‘beads’ all the way around. Alternatively, you can fill it with small stippling dots or tiny triangles. -
Add Texture:
Use a 0.3mm pen to add tiny decorative elements between the beads or along the borders of the ring, such as small hash marks or varying line weights, to make the ring look textured and intricate.
Step 4: The Outer Petals
-
Sketch Large Curves:
Moving outside the decorative ring, use your pencil to sketch large, sweeping petal shapes. These should be much wider than the inner petals, resembling lotus leaves. -
Layer the Final Tier:
Draw the final, largest layer of petals behind the previous ones. These should extend nearly to the edge of your drawing area. Give them pointed tips for a sharp, elegant finish. -
Refine the Shapes:
Before inking, check the symmetry. Since these outer petals are large, any unevenness is more visible. Adjust the curves so they flow naturally from the center. -
Ink With Confidence:
Use the 0.8mm pen for these outer lines. The thicker line weight will help ground the drawing and balance the visual weight of the dense center.
Step 5: Final Touches
-
Erase Guidelines:
Wait at least 15 minutes to ensure the ink is completely dry. Then, gently erase all pencil grid lines and radial dividers with a kneaded eraser to prevent smudging. -
Check Contrast:
Inspect your lines. If some areas look thin or weak, go over them again to darken the blacks. Thicken the connection points where petals overlap to add depth. -
Sign and Date:
Add your signature or a tiny date in a discreet spot near the edge of the paper, marking the completion of your meditative artwork.
Step back and admire the intricate balance of your handmade design
Texture-Inspired Mandala Rings
This soothing mandala design features a striking starburst center surrounded by concentric rings filled with delicate, repetitive textures. The precision of fine black ink on crisp white paper creates a beautiful contrast that is relaxing to draw and mesmerizing to look at.
Step-by-Step Guide
Materials
- White spiral-bound sketchbook (heavyweight paper is best)
- Pencil (HB or 2H for light guidelines)
- Compass (for perfect circles)
- Protractor (optional, for evenly spacing elements)
- Eraser
- Fine liner pens (sizes 0.1, 0.3, and 0.5)
- Ruler
Step 1: Setting the Foundation
-
Find the Center:
Start by locating the approximate center of your page. Mark a small dot with your pencil to serve as the anchor for all your circles. -
Draw Concentric Circles:
Using your compass, draw a series of light pencil circles radiating from the center point. You will need about 6-7 distinct rings, varying the gap widths between them to create interest. -
Mark Sections:
Lightly draw lines dividing your circle into even sections, like slicing a pizza. Establishing 12 or 16 sections now will help keep your petals and spikes symmetrical later on.
Wobbly Lines?
Don’t panic if your circles aren’t perfect. Simply thicken the line weight in that area to disguise the wobble, or add small dots along the line to turn it into a textured border.
Step 2: The Floral Core
-
Central Hub:
Switch to a 0.3 pen. In the very center circle, draw a tiny flower shape or simply a small circle with radiating spokes to act as the seed of the mandala. -
Inner Petals:
In the first main ring around the center, draw rounded petal shapes. Keep them contained within the pencil guideline you created earlier. -
Adding Dimension:
Inside those first petals, create a grid-like texture by drawing curved lines crossing each other. This mimics the center of a sunflower. -
Second Petal Layer:
Draw a larger ring of pointed petals around the first. I find it helps to aim the point of each petal at the guidelines you drew in the first phase.
Step 3: Building the Textured Rings
-
Create the Starburst:
In the next available wide ring, draw large, sharp triangular spikes. These should look like a sun or starburst. Use a thicker 0.5 pen for the outline to make it pop. -
Fill the Spikes:
Inside each large spike, draw a smaller, inner triangle. This creates a ‘double outline’ effect that adds depth without needing shading. -
Hatching Detail:
Using your finest 0.1 pen, draw very thin, straight lines within the gaps between the inner and outer triangles of the starburst layer. -
Narrow Rings:
Move outward to the narrow bands surrounding the starburst. Fill one distinct ring with simple, vertical tick marks or tiny fence-posts using a 0.3 pen. -
Scalloped Edges:
For the next layer, draw a series of small, connected U-shapes (scallops) all the way around the perimeter.
Add Some Shade
Use a heavy B pencil or light grey marker to add shadows where the layers overlap. This creates a 3D effect, making the spikes look like they are floating above the paper.
Step 4: The Outer Flourish
-
Large Outer Petals:
Draw the final, largest ring of petals. These should be wide and leafy, curving slightly right or left to give a sense of movement. -
Internal Veins:
Inside these large outer petals, draw multiple curved lines that follow the shape of the petal, similar to the veins on a leaf or ripples in water. -
Darkening Backgrounds:
Look for small triangular gaps between the base of these large petals. Fill these tiny voids with solid black ink to make the white petals stand out sharply. -
Final Ink Outline:
Go over your main structural circles one last time with a 0.5 pen to ensure the boundaries between sections are crisp and definitive. -
Erase and Refine:
Wait at least 10 minutes for the ink to dry completely. Gently erase all visible pencil guidelines to reveal the clean, high-contrast design.
Take a moment to admire the rhythm and balance of your finished ink creation
One-Shape-Only Mandala Challenge
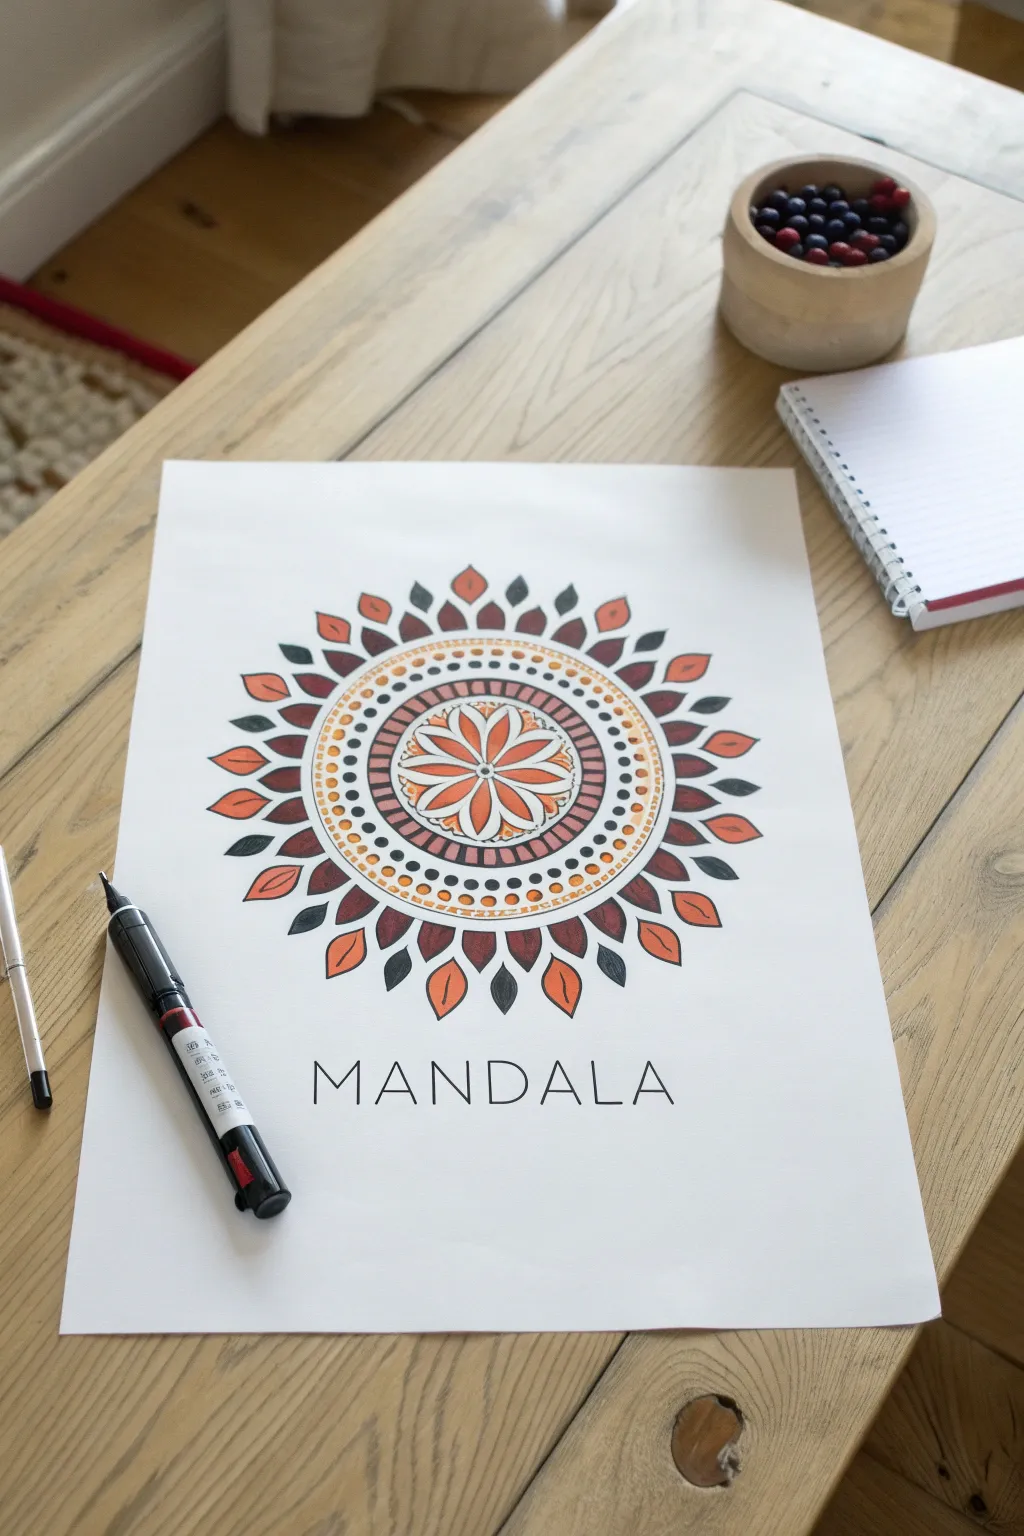
This striking mandala combines a delicate central flower with bold, rhythmic leaf patterns for a design that feels both organic and structured. The warm palette of oranges and deep reds against crisp black ink creates a cozy, autumnal vibe perfect for relaxing art sessions.
Step-by-Step Tutorial
Materials
- White drawing paper (A4 or similar size)
- Pencil (HB or H for light guidelines)
- Compass
- Protractor (optional, for spacing)
- Ruler
- Fine liner pen (Black, 0.4mm or 0.5mm)
- Thicker marker pen (Black, brush tip or bullet tip)
- Colored markers or pens (Orange)
- Colored markers or pens (Burgundy/Dark Red)
- Eraser
Step 1: Setting the Structure
-
Find the center:
Place your paper on a flat surface. Using a ruler, lightly mark the exact center of your page with a pencil. -
Draw the central circle:
Set your compass to a small radius (about 2-3 cm) and draw the first circle in the center. This will house the main flower motif. -
Add concentric rings:
Expand your compass slightly (about 1 cm larger) and draw a second circle. Continue this process, increasing the radius for each ring until you have about 5 distinct concentric circles radiating from the center. Keep your pencil pressure light so these lines can be erased later. -
Sketch the petal guides:
Around the outermost circle, lightly sketch radial lines to guide the placement of the large outer leaves. I find that spacing them evenly like clock numbers first helps maintain symmetry.
Fixing Wobbly Circles
If your concentric circles aren’t perfectly round, thicken the black outline on the narrower side to visually balance the shape.
Step 2: Drawing the Core Patterns
-
Detail the center flower:
In the very center circle, draw an eight-petaled flower with your black fine liner. Start with four petals at the compass points (North, South, East, West), then fill in the gaps with diagonal petals. -
Create the scalloped border:
Around the flower, draw a scalloped or wavy line inside the next ring. This creates a soft separation between the floral center and the geometric bands. -
Add the first pattern band:
In the next available ring, draw small, evenly spaced circles. These dots act as a simple filler pattern that contrasts with the lines of the flower. -
Layering detailed bands:
Move to the next ring outward. Draw a series of small, tight dashes or ‘ticks’ all the way around. This adds texture and density to the mandala’s core. -
The dottwork ring:
In the penultimate ring, create a pattern of alternating larger and smaller dots. This variation in size adds visual interest before the final leaf layer.
Step 3: The Outer Leaf Ring
-
Outline the leaves:
Using the radial guides you sketched earlier, draw pointed leaf shapes around the entire outer circumference. Ensure the tips point directly outward away from the center. -
Add the second leaf layer:
In the gaps between the main leaves, draw slightly smaller, darker leaf shapes peeking out from behind. This creates a beautifully layered, wreath-like effect. -
Inking the outlines:
Go over all your pencil lines with the black fine liner. Be confident with your strokes. If a line isn’t perfectly straight, don’t worry—organic imperfections add character. -
Erase guidelines:
Once the ink is completely dry (wait at least a few minutes to avoid smudging), gently erase all underlying pencil marks to reveal the crisp black design.
Golden Touch
Use a metallic gold gel pen instead of orange for the central flower petals to give your mandala a luxurious, illuminated manuscript feel.
Step 4: Color & Finish
-
Color the central flower:
Use your orange marker to fill in the petals of the central flower. Leave a tiny sliver of white space near the edges if you want a highlighted look. -
Tint the pattern bands:
Fill the background of the dotted ring with orange, being careful not to color over the black dots themselves. Use the burgundy marker for the dashed ring to create contrast. -
Fill the outer leaves:
Alternate colors for the outer leaf ring. Color the main leaves orange and the smaller, recessed leaves with the deep burgundy or black to make them recede visually. -
Add darkest accents:
Take your thicker black marker and fill in any remaining negative spaces or the smaller recessed leaves if you decided against burgundy. This high contrast makes the orange pop. -
Lettering:
Below the mandala, use the ruler to draw a straight pencil guideline. Carefully print the word ‘MANDALA’ in thin, minimalist capital letters with your fine liner, then erase the guide.
Step back and admire the rhythmic beauty of your finished piece

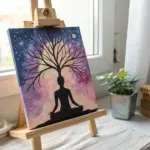

Have a question or want to share your own experience? I'd love to hear from you in the comments below!