
Whenever I’m stuck, painting the planet Earth snaps me right back into that playful, curious art headspace. Here are some earth painting ideas you can try today—starting with the classics and drifting into the fun, unexpected stuff.
Classic Blue Marble in Space
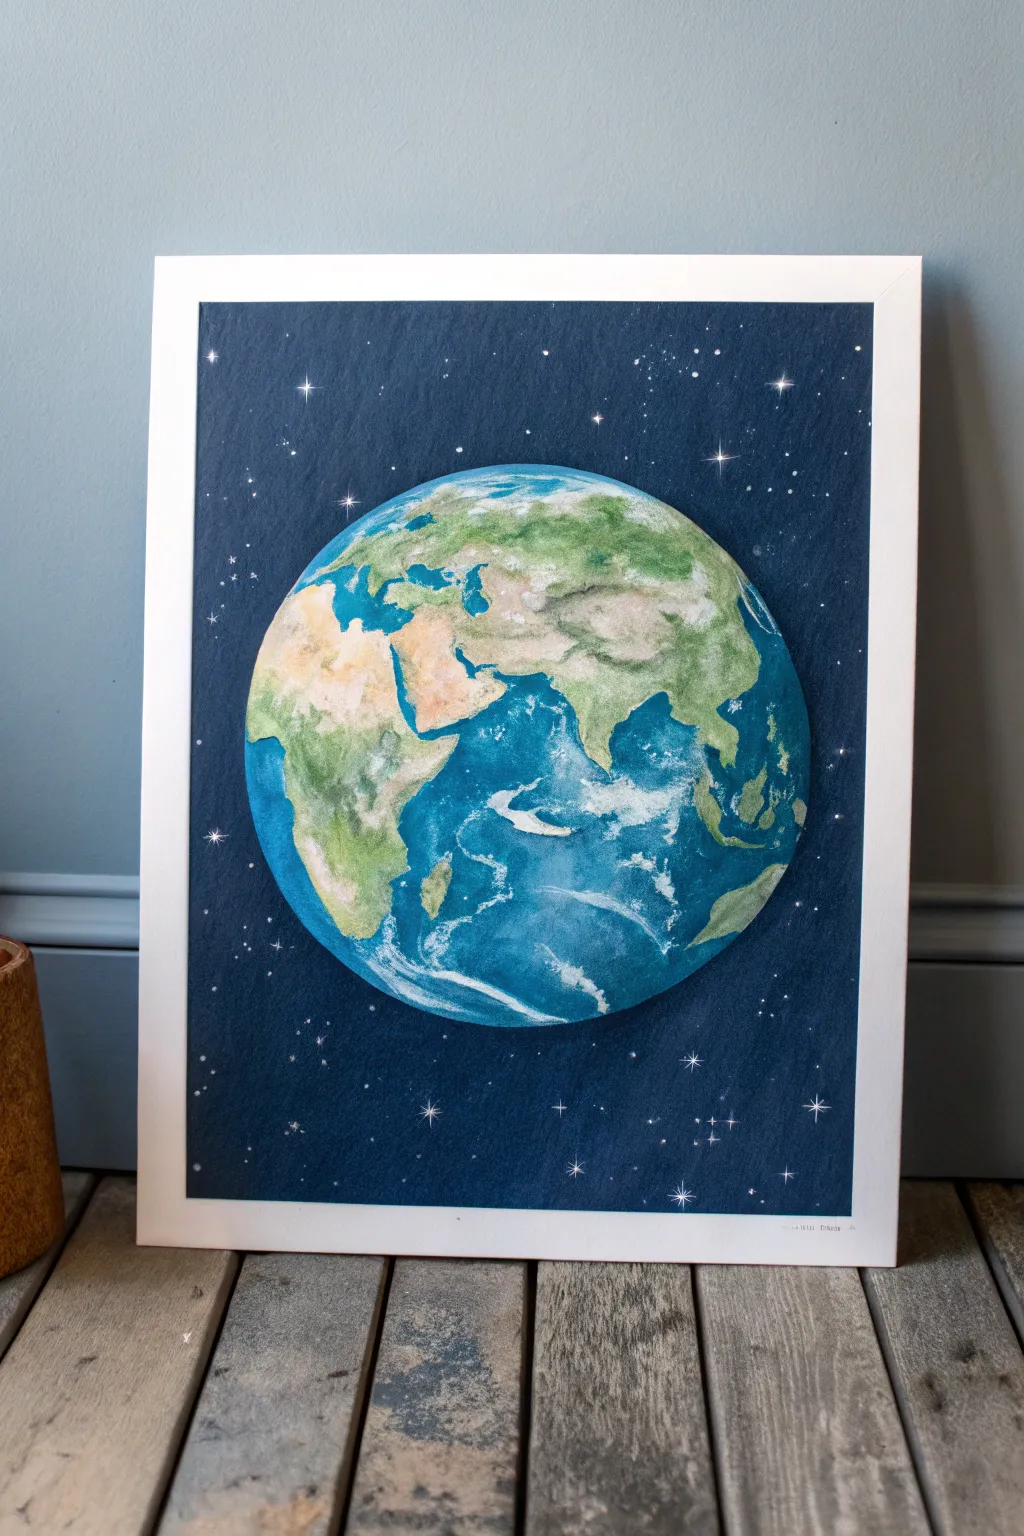
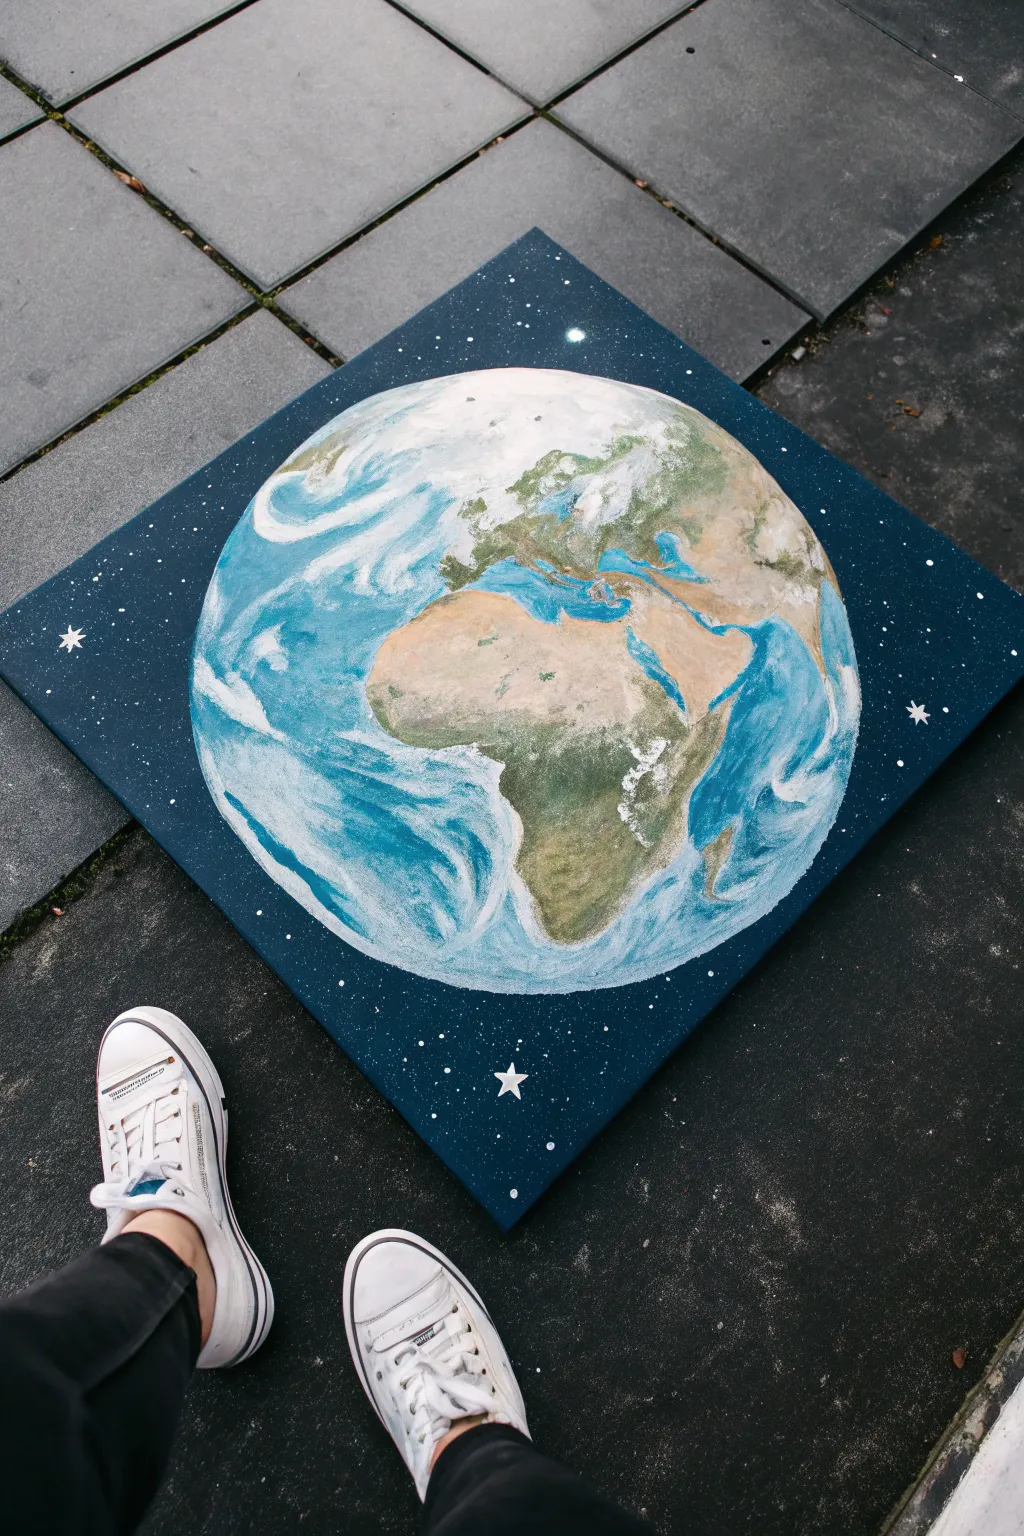
Capture the breathtaking fragility of our planet with this detailed watercolor study set against a deep indigo cosmos. This project blends wet-on-wet techniques for the oceans with precise detailing for the continents, resulting in a striking piece of wall art.
Step-by-Step
Materials
- High-quality watercolor paper (cold press, ideally 300gsm)
- Watercolor paints (Phthalo Blue, Ultramarine, Sap Green, Burnt Sienna, Yellow Ochre)
- White gouache or white acrylic ink
- Round watercolor brushes (sizes 6, 2, and 00 for details)
- Compass or round object for tracing
- HB Pencil and kneadable eraser
- Masking fluid (optional)
- Masking tape
- Work board
Step 1: Preparation and Sketching
-
Secure the paper:
Tape your watercolor paper down firmly to a board. This prevents bustling and warping when we add heavy washes for the dark background. -
Draft the globe:
Use a compass or trace a large round plate to draw a perfect circle in the center of your paper. Keep your pencil pressure very light so graphite doesn’t smudge into the yellow pigments later. -
Map the continents:
Lightly sketch the outlines of Africa, Europe, and Asia. Don’t worry about perfect cartographic accuracy; aim for recognizable shapes. Looking at a reference photo of the ‘Blue Marble’ helps significantly here.
Starry Splatter Tip
Cover the Earth circle with a paper cutout or masking fluid before splattering stars. This keeps your oceans pristine and prevents you from having to clean white specs off the green land.
Step 2: The Cosmic Background
-
Mix the space color:
Create a rich, dark mixture for space. I find mixing Ultramarine Blue with a touch of Burnt Umber or a tiny bit of black creates a deep, infinite-looking navy rather than a flat black. -
Paint the void:
Carefully paint around the outside of your circle. Use your medium brush to cut in close to the line, then fill the rest. Ensure the coverage is solid and dark; you may need two layers to eliminate streakiness. -
Add distant stars:
Once the sky is completely dry, load a brush with watered-down white gouache. Tap the handle against another brush to splatter tiny specks of stars across the dark background.
Step 3: Oceans and Landmasses
-
Base layer for land:
Start with the landmasses. Wet the area inside an outlined continent and drop in pale washes of Yellow Ochre and very light Sap Green. Let the colors bleed slightly for a natural terrain look. -
Deepen the terrain:
While the land is still slightly damp, drop in stronger greens and browns (Burnt Sienna) to suggest forests and mountains. Leave lighter areas for deserts, like the bubbly texture seen in Northern Africa. -
Ocean foundation:
Once the land forms are dry, wet the ocean areas with clean water. Drop in Phthalo Blue or Turquoise near the coastlines for shallower waters. -
Deep ocean depths:
Move to Ultramarine or Indigo for the deeper parts of the ocean. Blend these into the lighter coastal blues using a wet brush to create smooth gradients. -
Define the coastlines:
Carefully paint up to the edges of your dried landmasses. A crisp edge here is crucial for defining the continents against the water.
Level Up: Gold Leaf
For a luxurious twist, paint the landmasses with liquid gold leaf or metallic watercolor instead of natural tones. It creates a stunning contrast against the matte navy background.
Step 4: Atmosphere and Details
-
Cloud formations:
Using white gouache diluted slightly, paint swirling cloud patterns over the oceans and parts of the land. Use a dry-brush technique (little water, mostly paint) to scumble the clouds, giving them a wispy, transparent feel. -
Highlight the sphere:
To make the Earth look round, lightly glaze a shadow curve on the right (or ‘night’) side of the planet using a very watery violet or grey wash. -
Bright stellar accents:
Use a size 00 brush and pure white gouache to paint a few specific, larger ‘cross’ stars in the background for that classic twinkling effect. -
Final touches:
Check your edges. If the circle looks a bit wobbly against the dark background, carefully refine the edge with your dark space mixture to perfect the sphere.
Now you have a unique celestial portrait ready for framing and display


Simple Watercolor Earth Wash
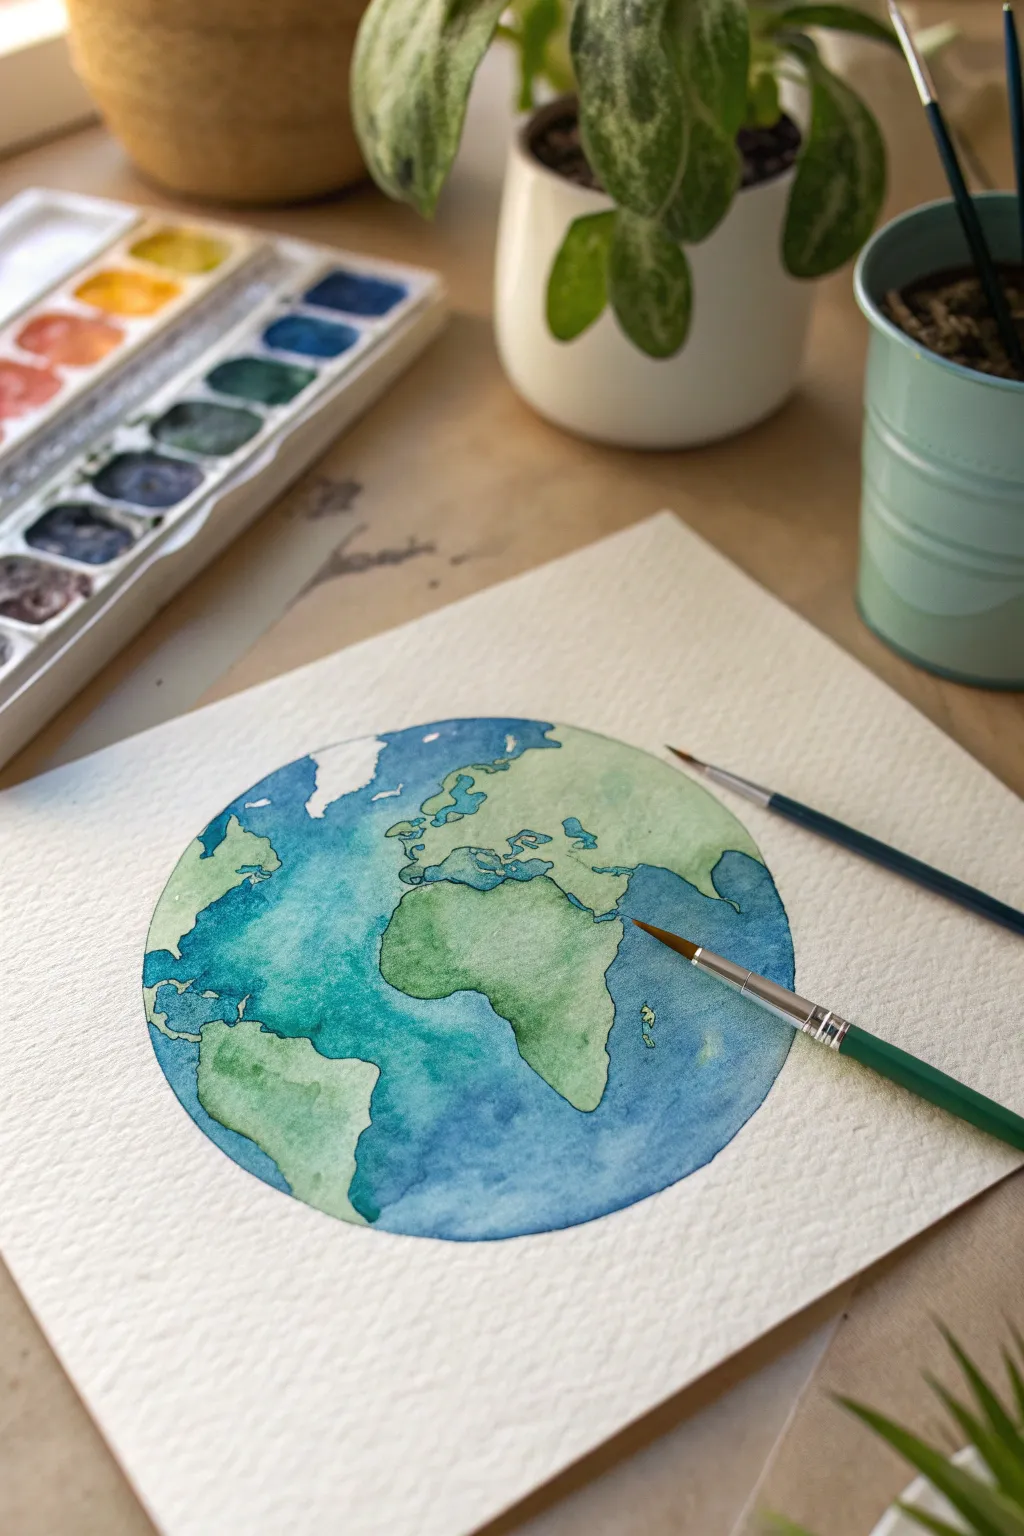
Capture the delicate beauty of our planet with this soft, textured watercolor wash project. Using a wet-on-wet technique allows the blues and greens to bloom naturally, mimicking the organic shapes of landmasses and oceans.
Step-by-Step Guide
Materials
- Cold-pressed watercolor paper (300 gsm)
- Watercolor paints (Cerulean Blue, Ultramarine, Sap Green, Viridian)
- Round watercolor brushes (sizes 4 and 6)
- Pencil
- Circular object for tracing (like a bowl or compass)
- Jar of clean water
- Paper towel
- Masking tape (optional)
Step 1: Preparation and Sketching
-
Secure the Paper:
Tape your watercolor paper down to a flat surface or board if you want to prevent buckling, although for a single circle, simply working on a flat table works well too. -
Trace the Circle:
Place your circular object in the center of the paper. Use a pencil to lightly trace a perfect circle. Keep the line faint so it won’t show through the paint later. -
Sketch the Continents:
Lightly sketch the outlines of the continents inside the circle. You don’t need perfect geographical accuracy; focus on the recognizable shapes of North America, South America, Africa, and Europe. -
Refine the Shapes:
Go back over your sketch to ensure you have drawn distinct islands like the UK or parts of the Caribbean, as these small details add realism.
Bleeding edges?
If green bleeds into blue, the ocean wasn’t dry enough. Wait for it to dry, then gently lift the mistake with a damp brush and patch it.
Step 2: Painting the Oceans
-
Prepare the Palette:
Mix a generous amount of Cerulean Blue and Ultramarine on your palette. Add plenty of water to create a fluid, transparent consistency. -
Wet the Ocean Area:
Dip your clean size 6 brush in water and carefully paint clear water inside the circle, avoiding the landmass shapes. This ‘wet-on-wet’ base helps the color spread smoothly. -
Apply the First Wash:
Load your brush with the lighter Cerulean mix and drop it into the wet ocean areas. I usually start near the poles and work inward, letting the pigment flow. -
Deepen the Blue:
While the paper is still damp, dab Ultramarine into the deeper parts of the ocean, particularly the Atlantic gap between Africa and South America, to create depth. -
Add Teal Accents:
For a tropical feel near the equator and coastlines, touch in a tiny bit of teal or Viridian mixed with blue. Let these colors bleed slightly for a natural look. -
Dry the Ocean Layer:
Allow the blue section to dry completely. If you paint the green land while the blue is wet, the colors will mud together.
Add Atmosphere
Once fully dry, use slightly watered-down white gouache or acrylic to softly dab clouds over the oceans and land for dimension.
Step 3: Painting the Landmasses
-
Mix Land Colors:
Create a puddle of Sap Green on your palette. For variation, create a second puddle of green mixed with a touch of brown or yellow ochre for drier regions. -
Paint South America:
Using the size 4 brush, carefully fill in South America. Keep the edges crisp against the dried blue ocean. -
Vary the Green Tones:
While the green paint is wet on the paper, drop in slightly darker green or brownish tones near mountain ranges or jungle areas to avoid flat color. -
Paint Africa and Europe:
Proceed to paint Africa and Europe. I like to keep the northern parts of Europe lighter or slightly cooler in tone to suggest a cooler climate. -
Define the Edges:
Use the tip of your small brush to sharpen the coastlines. The contrast between the dried blue edge and the wet green paint will make the continents pop. -
Add Texture:
Once the green is semi-dry (damp, not shiny), you can dab it gently with a clean, dry brush to lift pigment, creating texture that hints at clouds or terrain.
Step 4: Finishing Touches
-
Check for Gaps:
Look closely at the borders between land and sea. If there are accidental white gaps, carefully fill them with the appropriate color using the very tip of your smallest brush. -
Clean Up:
Erase any visible pencil marks around the outer edge of the circle once the painting is 100% bone dry to leave a crisp perimeter.
Now you have a serene little world that perfectly balances vibrant land and deep blue sea


Acrylic Earth With Crisp Continents
Capture the breathtaking beauty of our blue marble with this detailed acrylic painting project. You’ll create a striking contrast between the deep, starry cosmos and the vibrant, cloud-swirled surface of the continents and oceans.
Detailed Instructions
Materials
- Square canvas (stretched)
- Acrylic paints (Phthalo Blue, Ultramarine Blue, Titanium White, Burnt Umber, Hooker’s Green, Yellow Ochre, Lamp Black)
- Gesso (optional, for priming)
- Large flat brush
- Medium round brush
- Small liner brush or detail brush
- Plate or circular stencil (large enough to fill the canvas)
- Pencil
- Mixing palette
- Old toothbrush (for stars)
Step 1: Setting the Stage
-
Prime the Surface:
Start by ensuring your canvas is ready. If it isn’t pre-primed, apply a coat of gesso to create a smooth surface and let it dry completely. -
Draw the Outline:
Place your large circular object centered on the canvas to trace the Earth’s outline lightly with a pencil. A dinner plate or a pre-cut cardboard circle works perfectly for this. -
Sketch the Continents:
Lightly sketch the shapes of the continents inside the circle. Don’t worry about perfect geographical accuracy; focus on the recognizable shapes of Africa, Europe, and the Middle East as seen in the reference. -
Paint the Void:
Mix a deep, dark blue using Ultramarine Blue and a touch of Lamp Black. Paint the entire area outside the circle to create the space background. Keep the edge of the circle crisp and clean.
Step 2: Painting the Planet
-
Base Blue Oceans:
On your palette, mix Phthalo Blue with a generous amount of Titanium White to get a bright, azure blue. Paint the ocean areas, working carefully around your landmass sketches. -
Deepen the Waters:
While the base blue is still slightly tacky, blend in darker blue shades near the edges of the planet and in the deeper parts of the ocean to create spherical dimension. -
Land Mass Base:
Mix Yellow Ochre with a bit of Titanium White. Apply this sandy beige color to the desert regions, particularly the large expanse of the Sahara in Northern Africa and the Arabian Peninsula. -
Adding Vegetation:
Mix Hooker’s Green with a touch of Burnt Umber to dull it down. Stipple this color onto the central and southern parts of Africa and visible parts of Europe to represent forests and vegetation. -
Blending Terrains:
I like to use a slightly damp brush to gently blend the transition between the green vegetation and the sandy desert areas so there are no harsh lines, creating a natural gradient. -
Mountain Texture:
Using a small round brush, dab bits of Burnt Umber and grey (mix black and white) to suggest mountain ranges and varied terrain texture within the landmasses.
Use a Reference Map
Keep a photo of Earth on your phone while sketching. It helps you get the proportions of Africa relative to Europe much more accurate than relying on memory.
Step 3: Atmosphere and Details
-
Ocean Swirls:
Mix a very light blue, almost white. Add swirls into the oceans, blending wet-on-wet to simulate currents and lighter shallow waters near coastlines. -
Creating Clouds:
Load a round brush with pure Titanium White. Using a dry-brush technique (wipe most paint off on a paper towel first), scrub in swirling cloud formations over both land and sea. -
Atmospheric Glow:
Paint a thin, translucent line of white along the very edge of the Earth’s curve to represent the thin layer of atmosphere protecting the planet. -
Refining the Coastlines:
Use your smallest detail brush to sharpen up the coastlines where the blue ocean meets the land. A crisp edge here makes the painting look much more professional.
Add Glow-in-the-Dark
Mix glow-in-the-dark medium with your white paint for the stars and city lights on land. When the lights go out, your galaxy will truly come alive.
Step 4: Starry Finish
-
Splatter Stars:
Dilute some white acrylic paint with water until it’s inky. Dip an old toothbrush into it, and flick the bristles with your thumb to spray tiny stars over the dark background area. -
Hand-Painted Stars:
Use your finest liner brush to dot in a few larger, brighter stars. You can add small cross-shapes for twinkling stars to add variety. -
Final Inspection:
Step back and look at the painting as a whole. Touch up any areas where the space background might have accidentally gotten onto the planet, or vice versa.
Now you have a stunning orbital view to hang on your wall or display on the floor for a fun perspective photo

Earth With Puffy Clouds

This striking artwork captures the vibrancy of our planet with rich blue oceans, textured continents, and dramatic weather patterns. By building up layers of acrylic and using a unique dry-brushing technique, you’ll create a realistic globe effect that pops right off the canvas.
Step-by-Step Guide
Materials
- Large square canvas (approx. 24×24 inches or larger)
- Acrylic paints (Phthalo Blue, Ultramarine Blue, Titanium White, Sap Green, Burnt Sienna, Yellow Ochre)
- Gesso (optional for priming)
- Large compass or string and pencil
- Assorted brushes: wide flat brush, medium filbert, lush round brush
- Sea sponge or crumpled paper towel
- Mixing palette
- Water cup and rags
- White or natural wood frame (optional)
Step 1: Setting the Sphere
-
Prime the Surface:
If your canvas isn’t pre-primed, apply a coat of gesso to ensure a smooth, bright surface. Let this dry completely before starting your sketch. -
Draw the Circle:
Find the exact center of your square canvas. Use a large compass or a string tied to a pencil to draw a large, perfect circle that fills most of the space, leaving a few inches of white breathing room at the edges. -
Sketch the Continents:
Lightly sketch the outlines of North and South America. Don’t worry about perfect cartographic accuracy; focus on the general recognizable shapes, placing South America slightly lower and right of center.
Sphere Volume
To enhance the spherical 3D look, darken the blue ocean paint significantly right at the circle’s edge, mimicking the shadow as the earth curves away from the sun.
Step 2: Creating the Oceans
-
Mix the Deep Blue:
Create a deep ocean base color by mixing Phthalo Blue with a touch of drawing black or purple. Apply this to the darkest areas of the ocean, particularly around the edges of the globe to create a spherical 3D effect. -
Establish Mid-Tones:
Transition to pure Ultramarine Blue as you move inward from the edges. Blend this wet-in-wet with your darker edge color to create a smooth gradient. -
Add Shallow Waters:
Mix a light turquoise using Phthalo Blue, a little Yellow, and plenty of White. Paint this lighter shade around the coastlines, especially near the Caribbean and the tips of the continents, to represent shallower shelves. -
Blend the Sea:
Use a clean, damp filbert brush to soften the transitions between the deep oceans and the shallow coastal waters. The goal is a watery, organic look rather than hard lines.
Step 3: Painting the Landmasses
-
Base Green Layer:
Mix Sap Green with a tiny bit of Burnt Sienna to dull it down. Paint the Amazon basin and the eastern US with this lush green tone, using a stippling motion to suggest dense vegetation. -
Arid Zones and Mountains:
Mix Yellow Ochre with Burnt Sienna and White for sandy tones. Apply this to the western US, Mexico, and the Andes mountain range line along the west coast of South America. -
Texture the Land:
While the paint is tacky, dab a little dark brown into the mountain ranges to create shadows and depth. I find tapping with a stiff brush helps mimic rough terrain here.
Textured Terrains
Mix a small amount of modeling paste or sand into your green and brown paints. This physical texture will make the mountain ranges literally stand out from the canvas.
Step 4: The Atmosphere
-
Map Out Major Clouds:
Identify the major weather systems: the swirl over the southern ocean, the bands across the equator, and scattered puffs over land. Lightly mark these with faint white paint. -
Dry Brush Technique:
Load a dry round brush with Titanium White. Remove most of the paint on a paper towel, then lightly scrub circular motions over the blue ocean to create wispy, transparent cloud layers. -
Build Cloud Density:
Go back over the centers of the cloud formations with thicker, opaque white paint. Use a sea sponge or a crumpled paper towel to dab the paint on for a fluffy texture. -
Swirl the Cyclones:
For the dramatic hurricane shapes or southern swirls, pull the white paint in long, curved strokes that follow the curvature of the earth. -
Cast Shadows:
To make the clouds float, mix a very thin glaze of dark blue-grey. Paint a tiny, faint shadow on the ocean side of the thickest clouds, slightly offset from the white mass. -
Final Highlights:
Add pure white highlights to the highest mountain peaks (like the Andes) and the brightest tops of the clouds to catch the imaginary sunlight. -
Mount and Display:
Once fully dry, place your canvas into a simple white floater frame to enhance the modern, scientific aesthetic of the piece.
Step back and admire your personal view of the planet from space
BRUSH GUIDE
The Right Brush for Every Stroke
From clean lines to bold texture — master brush choice, stroke control, and essential techniques.
Explore the Full Guide
Earth From the Moon View
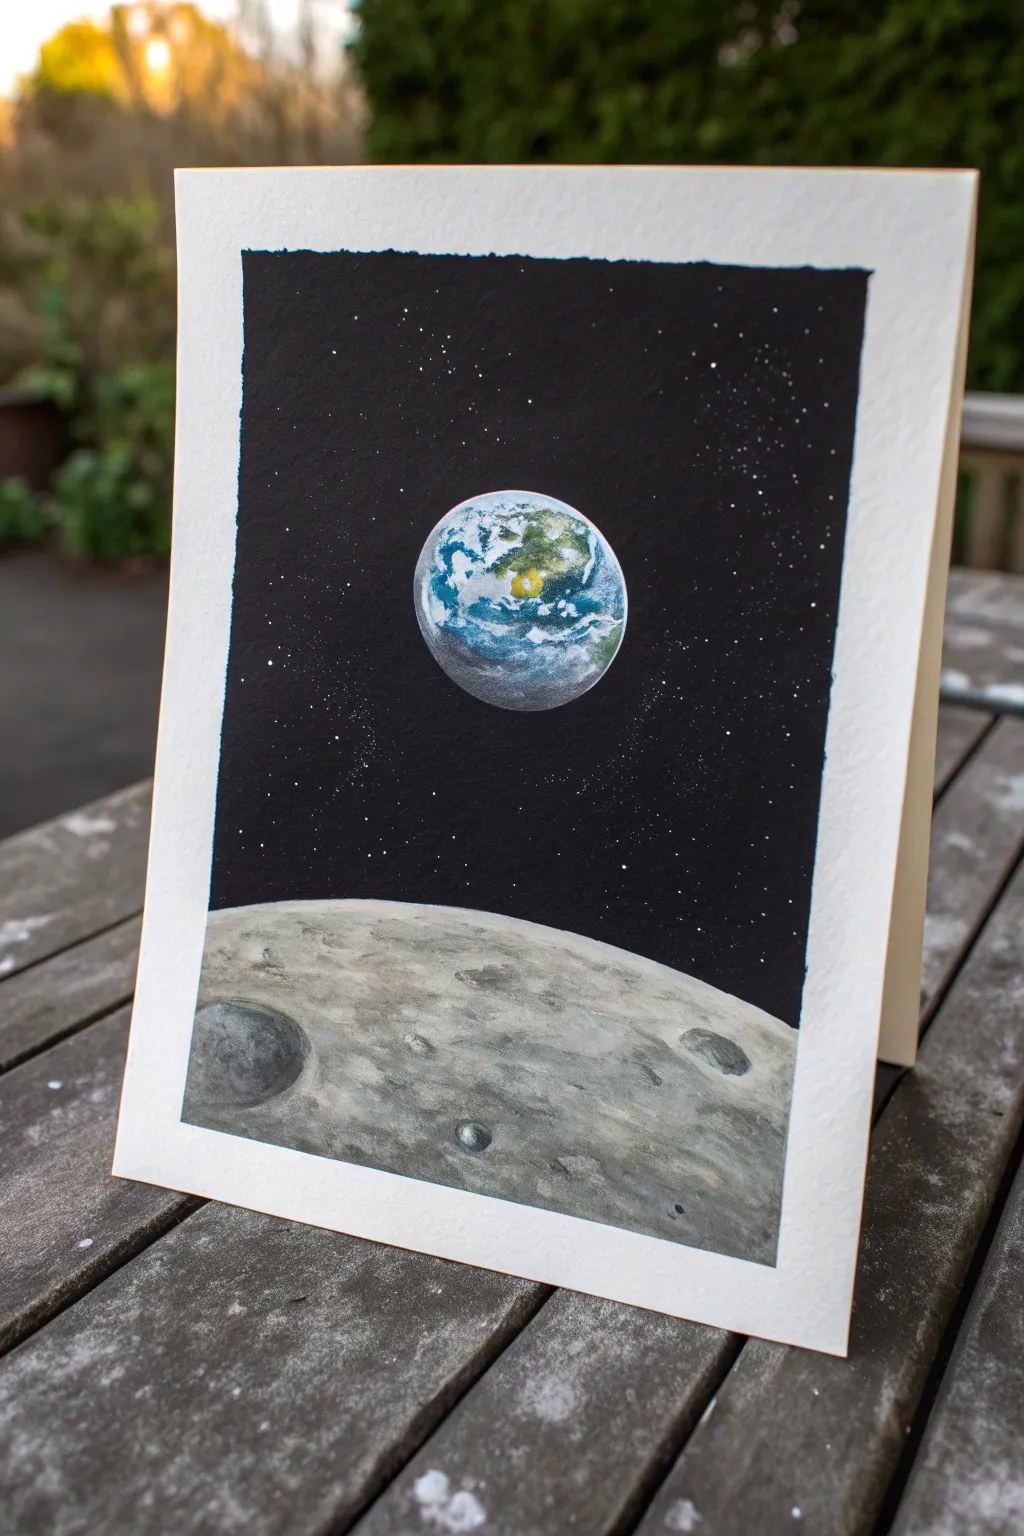
Capture the iconic perspective of our home planet rising above the barren lunar landscape with this striking greeting card design. Using opaque gouache or acrylics on a dark background allows for vivid contrasts and delicate planetary details.
Step-by-Step Guide
Materials
- High-quality watercolor paper or heavy cardstock (folded)
- Masking tape or painter’s tape
- Compass or circle stencil
- Gouache or acrylic paints (Black, Titanium White, Ultramarine Blue, Phthalo Blue, Sap Green, Burnt Umber)
- White gel pen or fine liner
- Stiff bristle brush (e.g., old toothbrush)
- Round synthetic brushes (sizes 2 and 0)
- Flat brush (size 6 or 8)
- Pencil and eraser
Step 1: Setting the Stage
-
Tape the boundaries:
Begin by taping off a clean rectangular border on the front of your folded cardstock. This ensures a crisp, professional white edge around your painting when you peel it off later. -
Sketch the celestial bodies:
Using a pencil, lightly draw a horizontal curve across the bottom third of the paper to represent the moon’s horizon. Above it, use a compass or a small round object (like a coin) to trace a perfect circle for Earth. -
Block in the background:
Paint the entire sky area with solid black paint. Carefully work around the circle you drew for the Earth, but you can paint right up to the moon’s horizon line. Apply two coats if necessary to get a deep, opaque void.
Uneven Edges?
If paint bleeds under your tape, wait for it to dry completely, then use a white gel pen or opaque white paint to neatly cover the mistake and restore the straight edge.
Step 2: Painting the Blue Marble
-
Base coat the Earth:
Mix a light blue using Titanium White and a touch of Phthalo Blue. Paint the entire Earth circle with this pale blue tone to establish a bright underlayer. -
Add continents:
While the base is drying, mix Sap Green with a tiny bit of Burnt Umber. Look at a reference photo of Earth and dab in organic shapes to represent landmasses. Keep the edges irregular for realism. -
Deepen the oceans:
Use pure Ultramarine Blue or a darker blue mix to glide around the green landmasses, creating the deep ocean water. Blend slightly into the lighter blue areas near the edges to suggest atmosphere. -
Cloud cover:
With a very small brush and pure white paint, stipple delicate swirls of clouds over the top. I like to keep the paint slightly dry here to create a wispy, broken texture. -
Shadow side:
Mix a thin glaze of black or dark grey and carefully paint a crescent shape on the bottom-left side of the Earth. This creates the ‘phase’ of the Earth and gives the sphere three-dimensional volume.
Dry Brush Magic
For the best moon texture, wipe most of the paint off your brush on a paper towel before hitting the paper. Less paint creates that dusty, rocky look.
Step 3: The Lunar Landscape
-
Base grey layer:
Mix a medium grey using Black and White and paint the entire moon surface area. It doesn’t need to be perfectly smooth; some brush texture helps mimic the rocky terrain. -
Create craters:
While the grey is still slightly wet, use a darker charcoal grey to paint oval and circular shapes. Make the ones closer to the bottom larger and the ones near the horizon smaller to force perspective. -
Highlighting rims:
Imagine the light source coming from the Earth or sun above. Paint a crisp white or light grey line on the top edge of each crater and a corresponding dark shadow inside the bottom edge of the crater holes. -
Texture the surface:
Use a dry brush technique with a very light grey to scumble over the general surface of the moon. This catches the ‘tooth’ of the paper and looks like dusty lunar soil. -
Deep shadows:
Add extra definition to the largest craters in the foreground by deepening the shadows inside them with almost-black paint, emphasizing their depth.
Step 4: Stars and Details
-
Prepare the stars:
Dilute a small amount of white gouache or acrylic with water until it has the consistency of heavy cream. -
Splatter technique:
Cover the Earth and Moon sections with scrap paper to protect them. Load a stiff brush (or toothbrush) with the thinned white paint and flick the bristles with your thumb to spray tiny stars across the black background. -
Manual stars:
Use a white gel pen or a size 0 brush to manually add a few larger, brighter stars in the empty black spaces to balance the composition. -
Refine the sphere:
If the edges of your Earth look messy against the black background, carefully touch them up with black paint to ensure the planet looks perfectly round. -
The reveal:
Wait until the painting is completely bone-dry. Slowly peel away the masking tape at a 45-degree angle to reveal the clean white borders framing your space scene.
This serene perspective of our blue planet makes for a thoughtful card or a lovely framed miniature
Easy Paper Plate Earth Painting
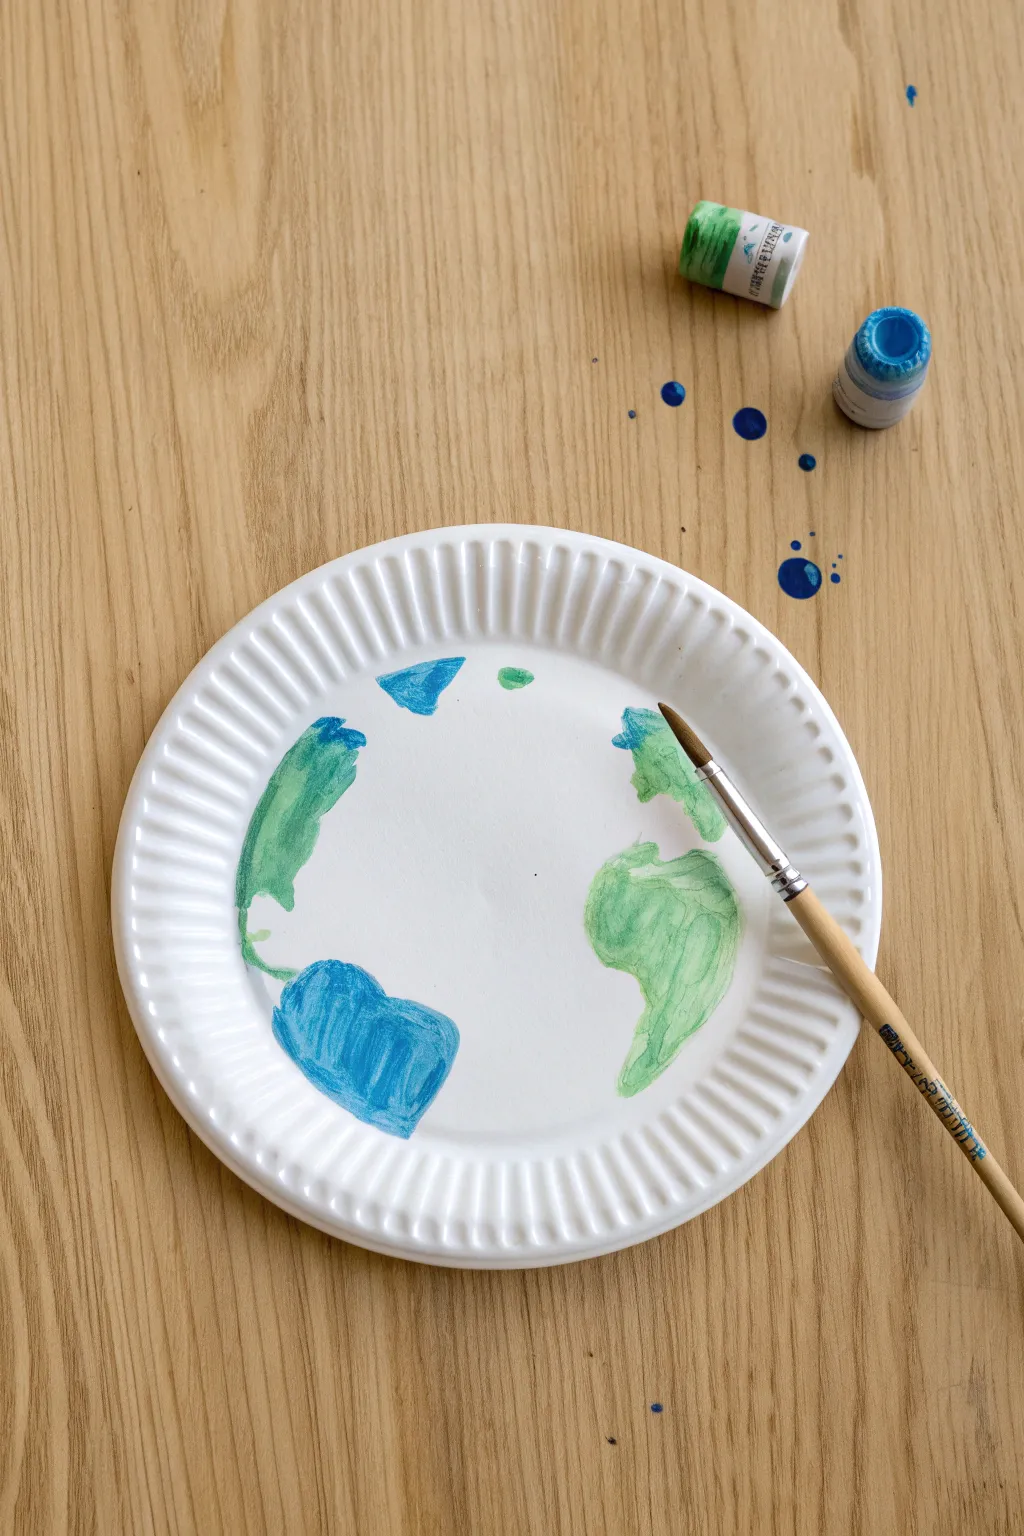
Transform a simple household item into a global masterpiece with this straightforward watercolor-style painting project. The absorbent texture of the paper plate creates a lovely, blended effect for land and sea, perfect for Earth Day celebrations or geography lessons.
Detailed Instructions
Materials
- White paper plate (uncoated or lightly coated)
- Small tube of green acrylic or gouache paint
- Small tube of blue acrylic or gouache paint
- Medium round paintbrush
- Cup of water
- Paper towels
- Pencil (optional)
Step 1: Preparation and Outline
-
Set up your workspace:
Lay down newspaper or a messy mat to protect your table, as we will be working with somewhat watery paint. -
Prepare your palette:
Squeeze a pea-sized amount of green and blue paint onto a palette or a spare piece of cardboard. Keep them separate for now. -
Visualize the continents:
Look at the circular center of the plate as your globe. You can lightly sketch the rough shapes of the continents with a pencil if you want a guide, or simply freehand them like I did.
Rim Control
Keep the paint strictly inside the smooth inner circle. Leaving the textured, ribbed rim crisp white creates a natural frame that makes the artwork look much more polished.
Step 2: Painting the Land
-
Start with South America:
Dip your brush in water and then pick up some green paint. The mixture should be fluid but not dripping. -
Form the shape:
paint a triangular shape on the lower right side of the inner circle to represent South America. -
Add North America:
Move to the upper right section. Paint a larger, somewhat jagged landmass above the first one. -
Create variation:
While the green paint is still wet, dip just the tip of your brush into the blue paint and dab it into parts of the green landmasses to create depth and interesting color variation. -
Paint the left side:
On the far left, paint another curved green shape to represent a portion of another continent peeking around the globe.
Space Effect
Once fully dry, take an old toothbrush dipped in white paint and flick tiny specks over the blue sections to create a starry galaxy effect or cloud cover look.
Step 3: Adding the Oceans
-
Clean your brush:
Rinse your brush thoroughly in the water cup until the water runs clear, then dab it on a paper towel. -
Load blue paint:
Saturate your brush with the blue paint, keeping it fairly watery to achieve that watercolor look. -
Paint the Southern Ocean:
Create a distinct blue patch near the bottom left, leaving plenty of white space between it and the green land. -
Add Northern details:
Paint a small, triangular patch of blue near the top center, and another small touch near the right edge. -
Embrace the white space:
It is crucial not to fill the entire plate. Leaving large areas of the white plate creates the feeling of clouds and atmosphere.
Step 4: Finishing Touches
-
Check density:
If any blue areas look too pale, go back over them with slightly thicker paint to deepen the ocean color. -
Dry partially:
Let the paint sit for about 5 minutes so it is no longer distinctively wet on the surface. -
Clean up splatters:
If you accidentally got paint on the ribbed rim of the plate, you can leave it for an artistic touch or carefully wipe it with a damp paper towel. -
Final dry:
Allow the plate to dry completely for at least an hour before hanging it up or using it for decoration.
Hang your new planetary art on a wall or window to enjoy your view of the world

PENCIL GUIDE
Understanding Pencil Grades from H to B
From first sketch to finished drawing — learn pencil grades, line control, and shading techniques.
Explore the Full Guide
No-Mess Bag-Smoosh Earth
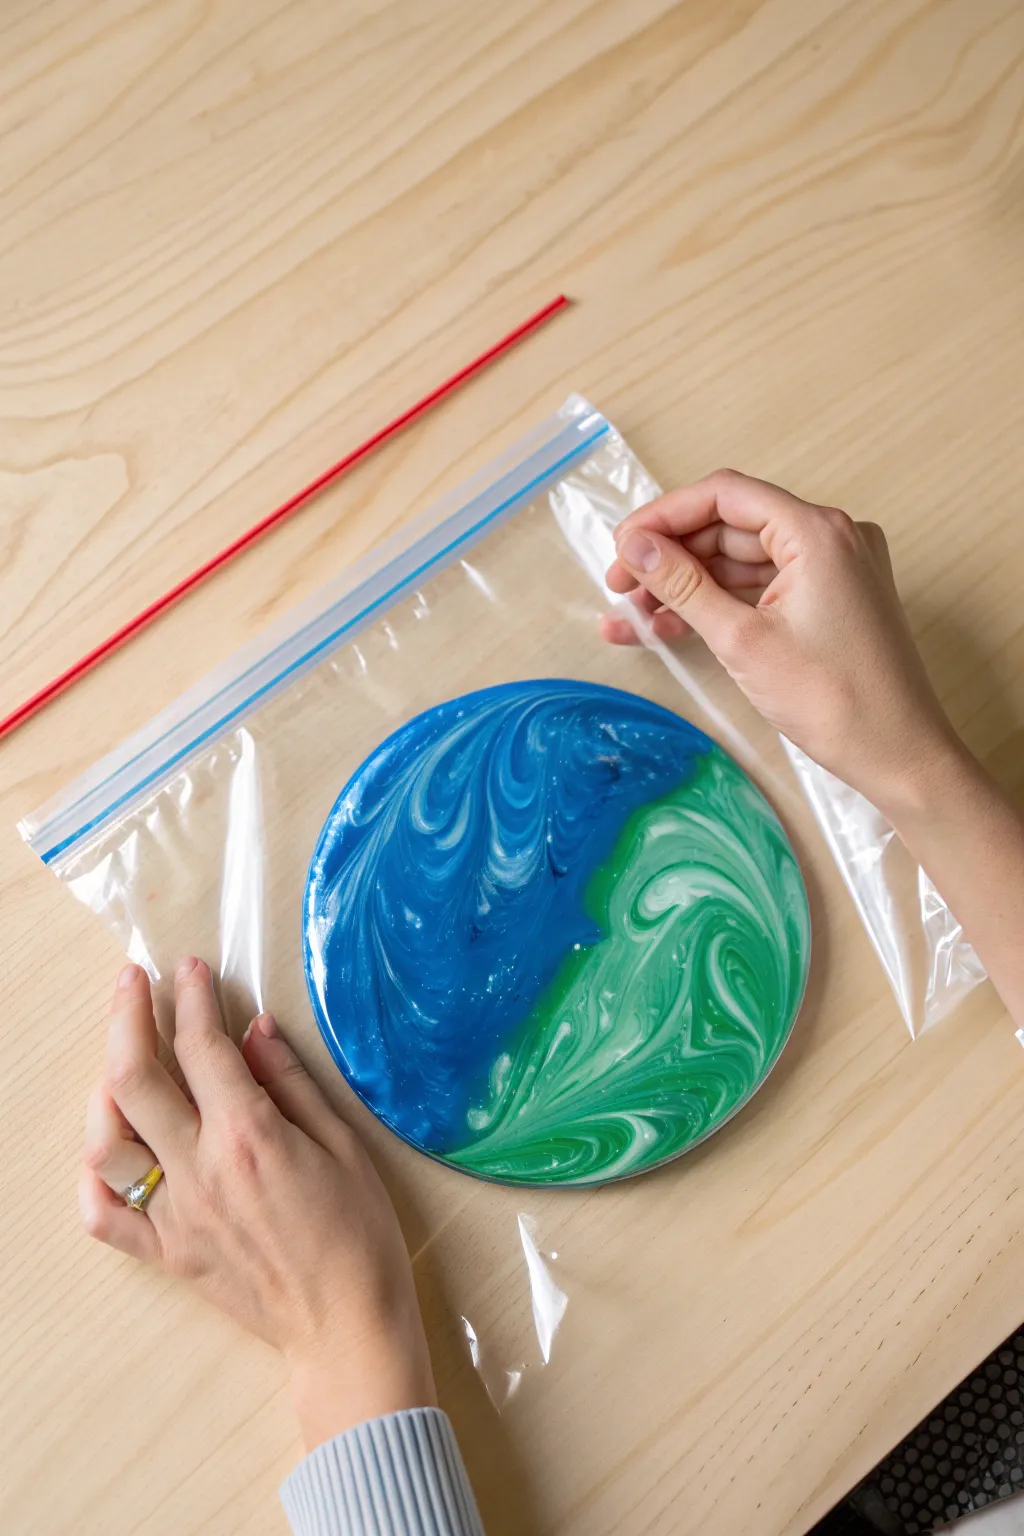
Capture the beauty of our planet with this fantastically tactile and low-stress art project. Using a simple zip-top bag, you can blend vibrant blues and greens into a mesmerizing, marble-like Earth that keeps little hands clean.
Step-by-Step Tutorial
Materials
- Plastic zipper storage bag (gallon or quart size)
- Blue tempera or acrylic paint
- Green tempera or acrylic paint
- White tempera or acrylic paint
- Thick white cardstock or paper plate
- Scissors
- Masking tape or painter’s tape (optional)
Step 1: Setting the Stage
-
Prepare the Planet:
Begin by cutting a large circle out of your thick white cardstock. You can trace a dinner plate or bowl to get a perfectly round shape. -
Bag Selection:
Choose a zipper storage bag that is large enough to fit your paper circle comfortably flat inside. -
Secure the Paper:
Slide your paper circle into the bag. If you want to prevent it from sliding around too much, I sometimes use a tiny loop of masking tape on the back of the paper to stick it lightly to the inside of the bag’s bottom layer.
Step 2: Adding the Color
-
Apply Blue Paint:
Squeeze a generous dollop of blue paint directly onto the left side of the paper circle inside the bag. Aim for an ocean-like coverage. -
Add Green Landmasses:
Add a similar amount of green paint to the right side of the circle to represent the continents. Don’t worry about perfect geography; abstract shapes work best. -
Create Clouds:
Add smaller drops of white paint scattered on top of both the blue and green sections. This will create the swirling cloud effects later. -
Seal the Bag:
Carefully press as much air out of the bag as possible without squishing the paint yet. Seal the zipper tightly. Removing the air is crucial for easy spreading.
Tape for Security
Tape the bag flat to the table using painter’s tape on all four corners. This keeps the bag from sliding while vigorous little artists do their squishing work.
Step 3: The Smoosh Technique
-
Initial Squish:
Using your fingers, gently press down on the paint globs to start flattening them out. -
Blending Borders:
Push the blue paint toward the green paint. Allow them to meet in the middle, but try not to mix them into a muddy color—you want distinct zones. -
Swirling the Clouds:
Use your fingertips to drag the white dots through the colored sections. Create spiral motions to mimic hurricanes or atmospheric flows. -
Covering the Edges:
Ensure the paint is pushed all the way to the circular edge of the cardstock so no white paper shows through. -
Review the Texture:
Look at your design. If you need more definition, run a finger lightly over the plastic to create ridges and valleys in the paint.
Muddy Colors?
If the earth turns brown, you’ve over-mixed! Stop squishing sooner next time, or place the blue and green globs further apart initially.
Step 4: Finishing Up
-
Careful Extraction:
This is the tricky part. You can either leave the art in the bag to dry as a sensory toy, or carefully cut the sides of the bag open with scissors to peel the top plastic sheet away. -
Peeling Back:
If removing it, peel the plastic away slowly to keep the texture peaks intact. -
Drying:
Let the paper circle dry completely on a flat surface. The thick paint may take several hours.
Hang your swirling planet in a window or on the fridge to enjoy a view of Earth from space
Cute Smiling Earth Character
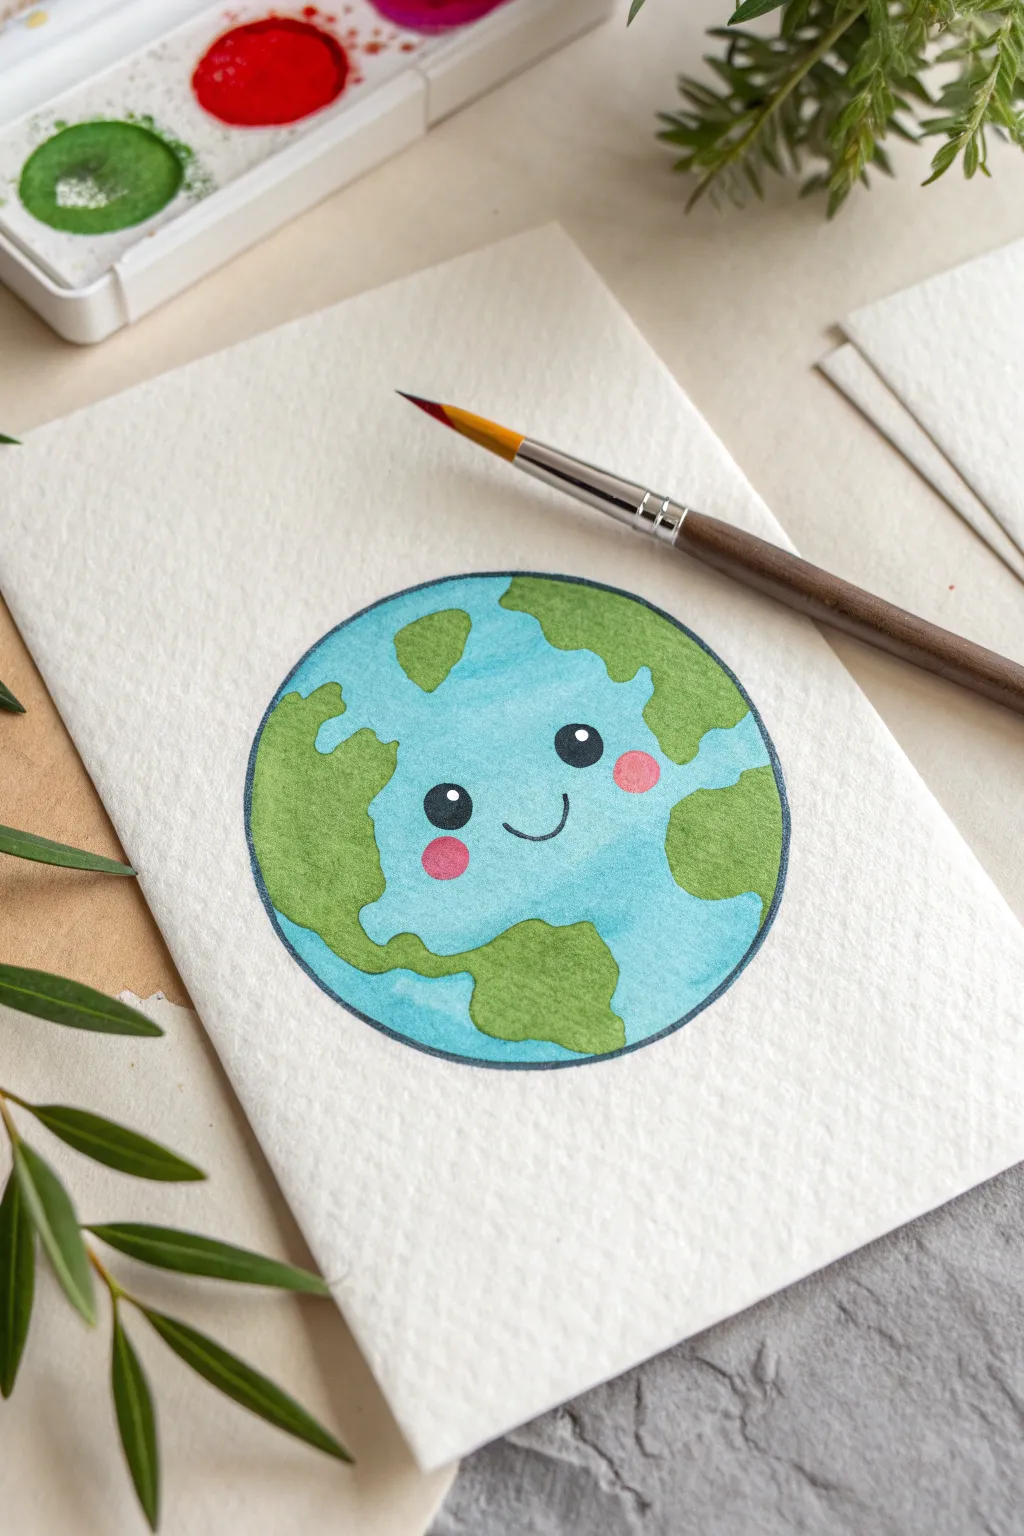
This adorable watercolor project transforms our planet into a cheerful character with rosy cheeks and a friendly smile. Using simple shapes and basic washes creates a bright, clean illustration perfect for greeting cards or Earth Day celebrations.
Step-by-Step Guide
Materials
- Cold press watercolor paper (approx. 5×7 inches)
- Watercolor paints (Cerulean or light blue, Sap Green, Rose/Pink)
- Round watercolor brush (size 4 or 6)
- Round detail brush (size 0 or 2)
- Black fine liner pen (waterproof) or black gouache
- Pencil and eraser
- Compass or a round object to trace
- Clean water and paper towel
Step 1: Sketching the Base
-
Draw the main circle:
Start by drawing a perfect circle in the center of your watercolor paper using a compass or by tracing a round object like a jar lid. Keep your pencil lines extremely light so they don’t show through the paint later. -
Outline the continents:
Lightly sketch irregular, bubbly shapes inside the circle to represent landmasses. They don’t need to be geographically accurate; focus on creating a balanced look with space for the face in the middle. -
Map out the face features:
In the large open ocean area near the center, lightly mark the position of two wide-set eyes and a simple U-shaped smile. Add two small circles below the eyes for the rosy cheeks.
Step 2: Painting the Oceans
-
Prepare the blue wash:
Mix a watery puddle of light blue paint, such as Cerulean or Turquoise. You want a consistent, semi-transparent color rather than thick pigment. -
Fill the water areas:
Using your medium round brush, carefully paint the ocean sections around your landmass sketches. I like to work wet-on-dry here for sharper edges, being careful not to paint over the land areas. -
Refine the edges:
While the paint is still wet, gently push the color right up to your pencil lines so there are no white gaps between the water and the future land. -
Let it dry mostly:
Allow the blue layer to dry until it loses its sheen. It doesn’t need to be bone dry, but it shouldn’t be shiny wet before you switch colors.
Keep it Clean
Work from the top of the globe downward when painting. This prevents your hand from resting in wet paint and smudging the work you’ve already finished.
Step 3: Adding Land and Cheeks
-
Mix the green tone:
Prepare a fresh puddle of Sap Green or a similar bright, leafy hue. If it feels too dark, water it down slightly to match the lightness of the blue. -
Paint the continents:
Fill in the land shapes with your green paint. If the blue touches the green while wet, the colors might bleed slightly, which is okay for watercolor, but for a cleaner look, ensure the blue is dry first. -
Paint the rosy cheeks:
Clean your brush thoroughly and pick up a soft pink or rose color. Paint the two small circular cheek spots you sketched earlier. These should be distinct circles. -
Full drying time:
Let the entire painting dry completely. This is crucial because using a pen or dense black paint on damp paper will ruin the paper surface.
Uneven Drying?
If you get ‘cauliflowers’ or hard edges in your blue wash, try to maintain a ‘wet edge’ by working quickly and not letting one section dry before joining it to the next.
Step 4: Details and Outline
-
Outline the globe:
Once the paper is bone dry, use a waterproof fine liner pen or a very thin brush with black gouache to trace the main outer circle of the Earth. -
Draw the eyes:
Fill in the two eye circles with solid black. Leave a tiny white dot in the upper corner of each eye to act as a catchlight, which brings the character to life. -
Add the smile:
Draw the small U-shaped mouth between the cheeks with a smooth, confident stroke. -
Erase guidelines:
If any pencil marks are still visible outside your paint or ink lines, gently erase them once you are absolutely sure the ink is dry.
Let your little planet dry completely before framing or turning it into a sweet card for a friend


Earth With Heart Hands
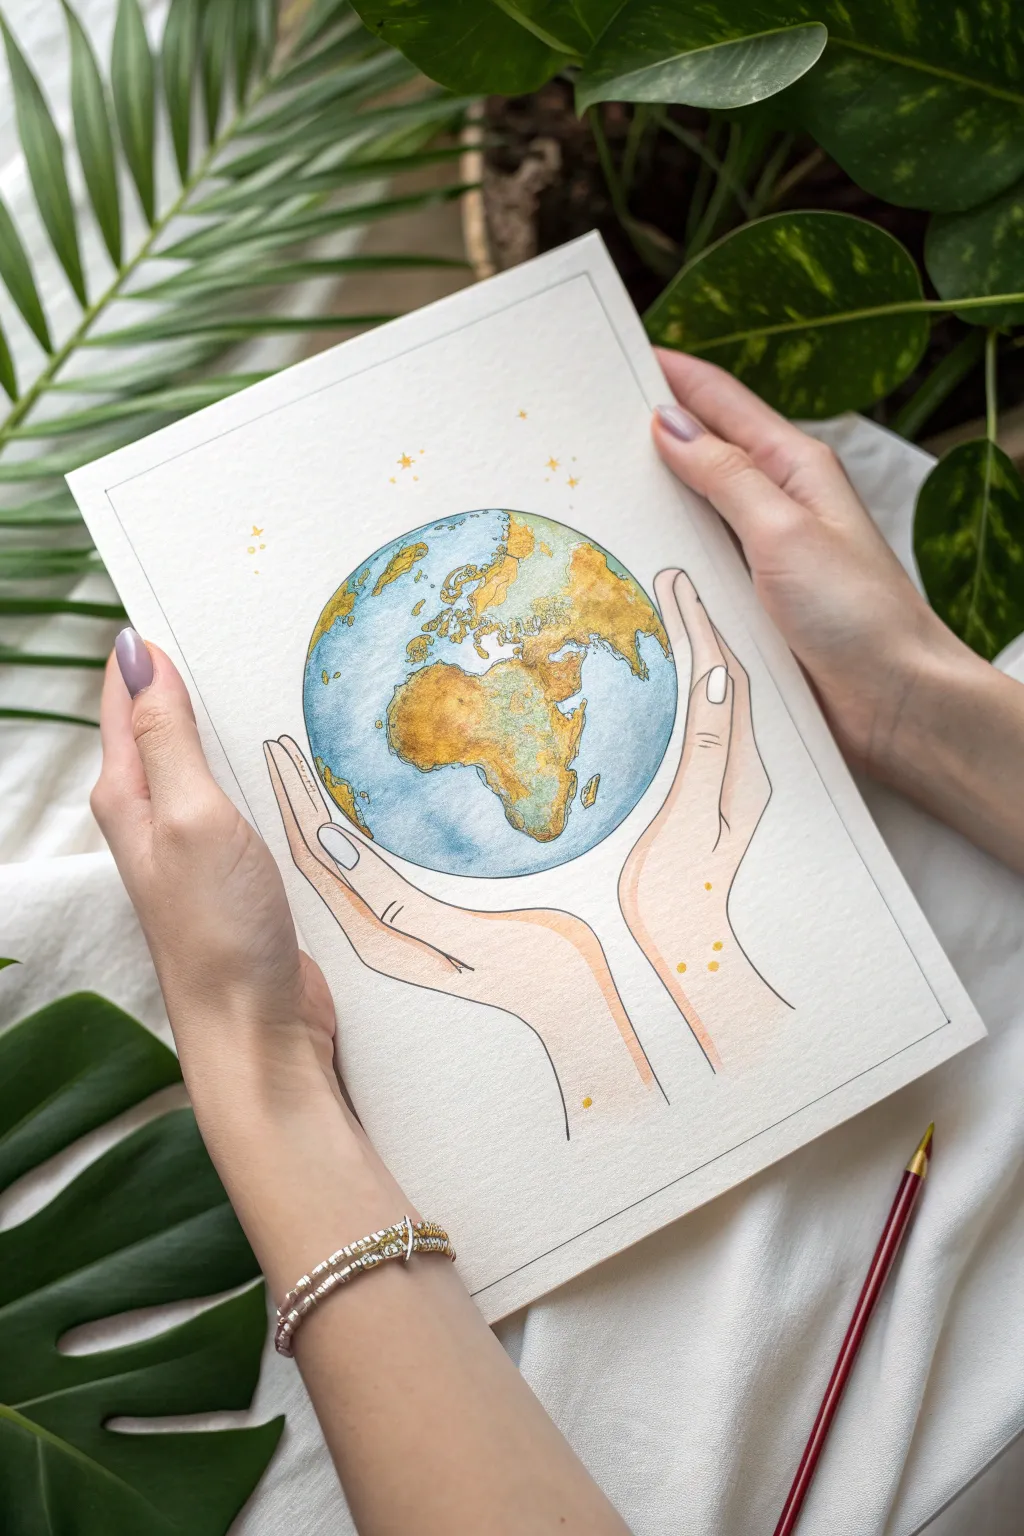
Capture the delicate beauty of our planet with this stylized illustration featuring open hands gently supporting the globe. Using a mix of watercolor washes and fine ink lines on textured paper, you’ll create a piece that feels both earthy and magical.
Step-by-Step
Materials
- Cold press watercolor paper (A4 or similar size)
- Watercolor paints (Cerulean Blue, Prussian Blue, Yellow Ochre, Burnt Sienna, Raw Umber, Sap Green)
- Waterproof fine liner pens (0.1mm and 0.3mm, black)
- Gold metallic paint or gold ink pen
- Round watercolor brushes (size 4 and 8)
- HB pencil
- Eraser
- Compass or circular object for tracing
- Ruler
Step 1: Sketching the Layout
-
Create the border:
Begin by lightly drawing a rectangular border about 1 inch inward from the edge of your paper using a ruler and pencil to frame your composition. -
Draw the circle:
Position your compass in the upper-middle center of the page. Draw a perfect circle for the Earth, ensuring there is enough space below it for the hands. -
Outline the continents:
Lightly sketch the shapes of the continents inside the circle. For this view, focus on Africa and Europe centrally, with parts of South America and Asia on the sides. Don’t worry about perfect geographical accuracy; illustrative shapes work beautifully here. -
Sketch the hands:
Draw the contour of two hands rising from the bottom border. The palms should curve slightly upward to ‘hold’ the circle without touching it excessively. Keep the fingers long and elegant, sketching the thumbs resting against the sides of the palms. -
Refine the details:
Add small details like fingernails and the creases where the fingers bend. Keep your pencil pressure very light so the graphite doesn’t show through the paint later.
Muddy Water Warning
Change your rinse water between painting the blue oceans and the orange/brown land. Mixing blue and orange residue creates a muddy gray that dulls the colors.
Step 2: Painting the Earth
-
Base wash for oceans:
Mix a watery wash of Cerulean Blue. Carefully paint the ocean areas, keeping the edges around the continents damp so blending is easier. Leave some tiny white gaps near the poles for ice caps if desired. -
Deepening the waters:
While the blue is still slightly damp, drop in touches of Prussian Blue along the edges of the circle to create a sense of spherical dimension and shadow. -
Base layer for land:
Once the oceans are dry, mix a diluted Yellow Ochre. Paint the landmasses with this warm, sandy tone as a base layer. -
Adding terrain texture:
While the ochre is wet, dab in spots of Burnt Sienna and Sap Green to represent deserts and forests. Allow these colors to bleed naturally into the ochre for an organic texture. -
Defining the edges:
Use a slightly stronger mix of Raw Umber to darken the eastern edges of the continents, giving them a slight relief effect against the blue water.
Level Up: Galaxy Effect
Instead of leaving the background white, paint a very pale, wet-on-wet wash of violet outside the hands before adding the gold stars for a cosmic feel.
Step 3: Painting the Hands
-
Mixing skin tone:
Create a very pale, watery skin tone using a mix of Yellow Ochre and a tiny dot of Red or Burnt Sienna. Test the color on scrap paper first to ensure it’s subtle. -
Washing the hands:
Apply this pale wash to the sketched hands. I like to keep the center of the palms slightly lighter to suggest volume. -
Shading the fingers:
Add a second, slightly darker layer of the same mix along the sides of the fingers and beneath the palms where shadows would naturally fall.
Step 4: Inking and Finishing
-
Outline the globe:
Once the paint is completely dry, use your 0.3mm fine liner to trace the perfect circle of the Earth. -
Detail the continents:
Switch to the finer 0.1mm pen to outline the continents. Use a broken, shaky line technique rather than a solid line to mimic rugged coastlines. -
Define the hands:
Ink the outline of the hands with the 0.3mm pen. Add delicate lines for the fingernails and palm creases using the 0.1mm pen to keep them subtle. -
Erase pencil marks:
Gently erase any remaining pencil sketches, being careful not to rub too hard over the painted areas. -
Add celestial magic:
Using gold metallic paint or a gold pen, draw small four-pointed stars and dots scattered in the white space above the Earth and on the wrists for a magical touch.
Now you have a serene, handcrafted reminder of the world in your hands ready to display
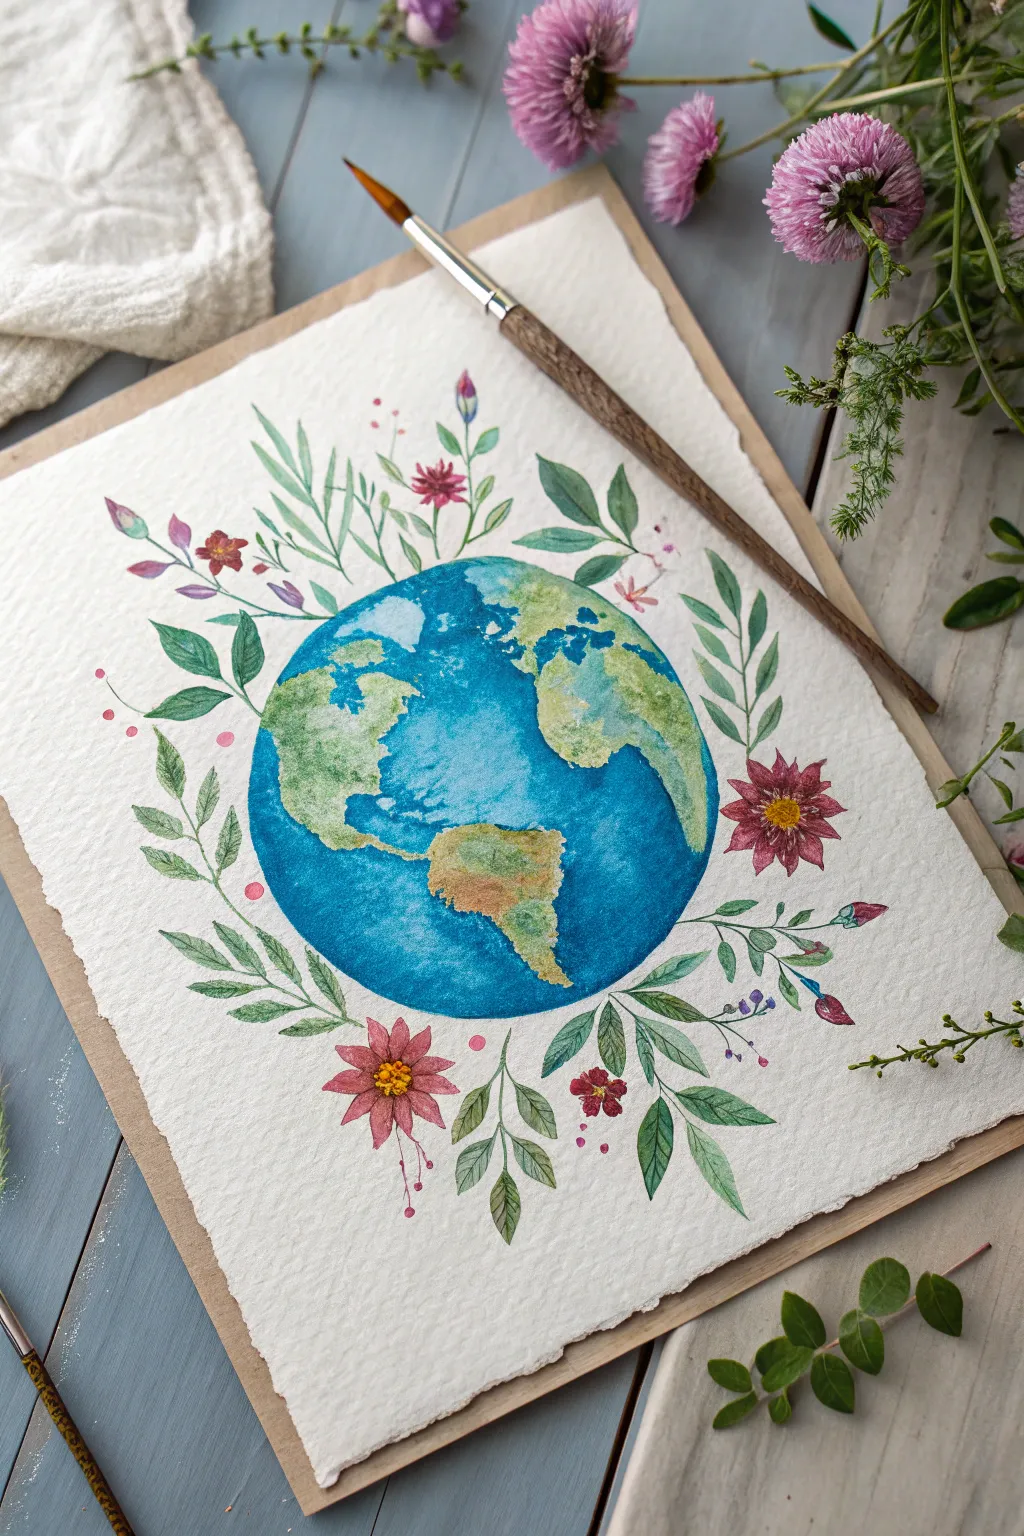
Earth With a Botanical Wreath
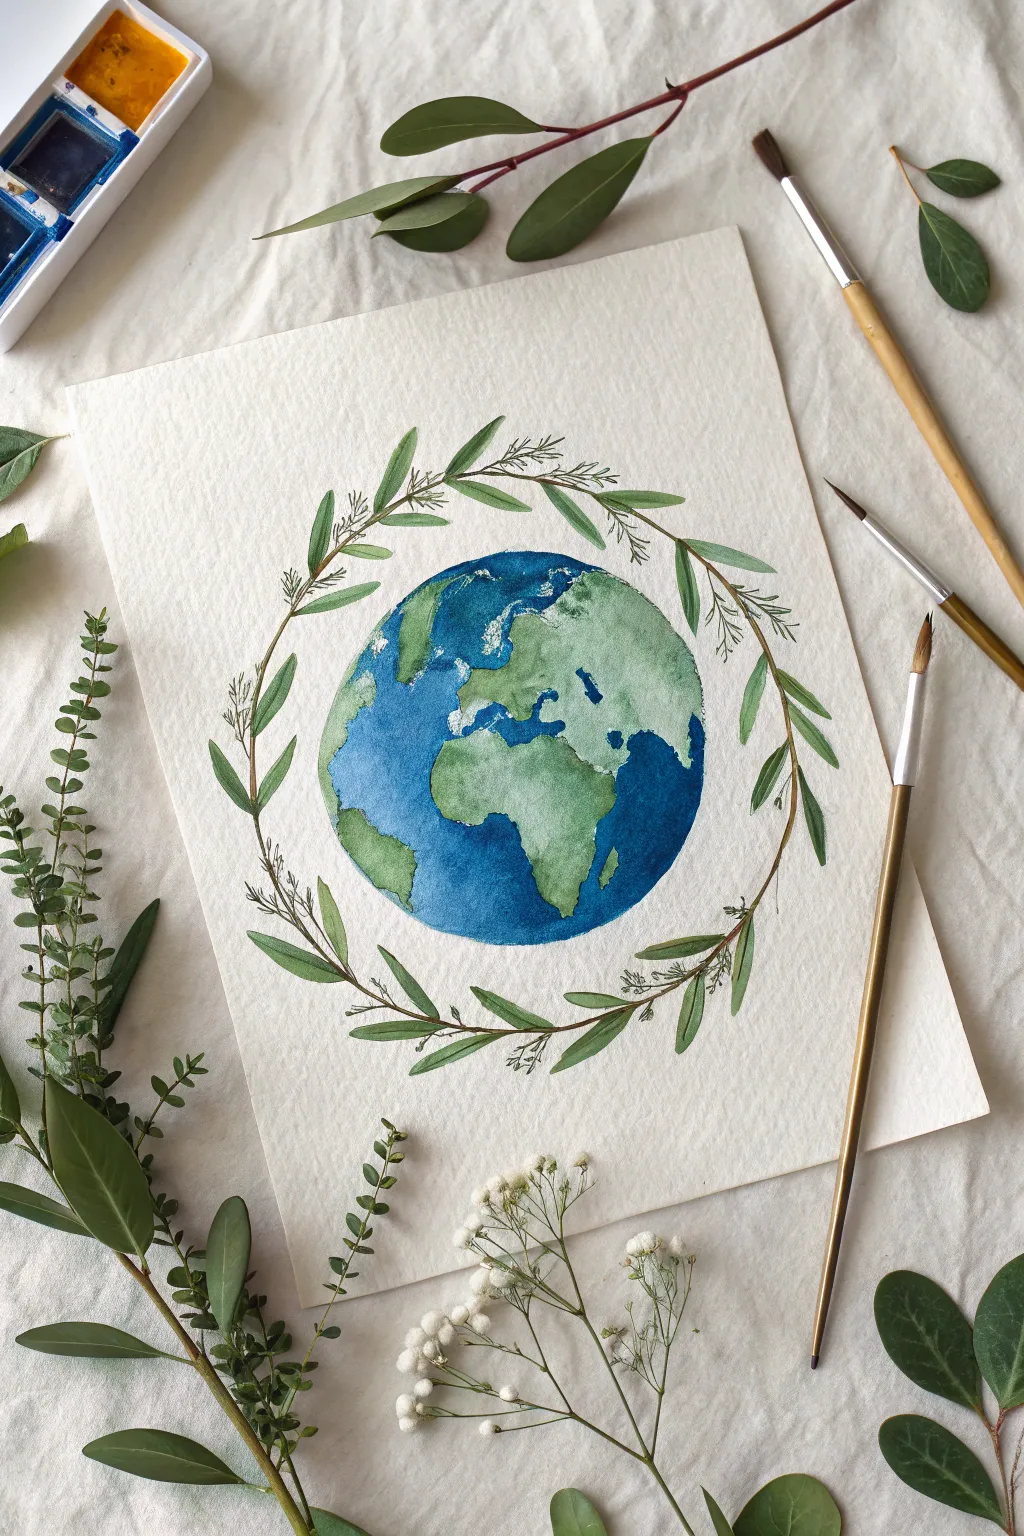
Celebrate nature’s beauty with this delicate watercolor painting featuring our planet encircled by a graceful botanical wreath. The soft, textured paper and natural color palette create a peaceful, organic feel perfect for Earth Day or everyday decor.
How-To Guide
Materials
- Cold press watercolor paper (300 gsm)
- Watercolor paints (Cobalt Blue, Phthalo Blue, Sap Green, Burnt Umber, Payne’s Gray)
- Round watercolor brushes (sizes 6 and 2)
- Pencil (HB or 2H)
- Circular items for tracing (bowls, lids)
- Clean water jar
- Paper towels
- Eraser
Step 1: Sketching the Composition
-
Center the Globe:
Begin by finding the center of your watercolor paper. Place a round object—like a small bowl or jar lid—in the center and trace a light circle with your pencil to represent the Earth. -
Outline the Wreath:
Find a slightly larger circular object and center it over your first circle. Lightly trace this second circle around the Earth to act as a guide for your botanical wreath. -
Draft the Continents:
Sketch the outlines of the continents inside the inner circle. Focus on the major shapes of Africa, Europe, and the Americas without worrying about perfect geographical accuracy; loose, recognizable shapes work best for this artistic style. -
Sketch the Foliage:
along the outer circle guide, lightly draw stems curving around the globe. Add small almond-shaped leaves and tiny sprigs attaching to the main stem, leaving some gaps for an airy, natural look.
Wet-on-Wet Magic
To make the oceans look deep and realistic, drop clear water onto the blue areas while wet. The pigment will push away, creating cloud-like blooms.
Step 2: Painting the Earth
-
Base Green Layer:
Mix a watery wash of Sap Green with a touch of Burnt Umber to tone it down. Using your larger round brush (size 6), fill in the landmasses. I like to keep this initial layer quite wet and uneven to create texture later. -
Adding Depth to Land:
While the green is still slightly damp, drop in a more concentrated green mixture near the bottom edges of the continents to suggest shadow and curvature. -
Initial Ocean Wash:
Once the land is dry to the touch, mix a vibrant blue using Cobalt Blue. Carefully paint the ocean areas, working around your green continents. -
Deepening the Blue:
While the blue paint is still wet, drop in hints of Phthalo Blue or Payne’s Gray along the edges of the circle and near the poles. This ‘wet-on-wet’ technique creates a spherical, 3D effect. -
Softening Edges:
If you end up with hard lines between land and sea, use a clean, slightly damp brush to gently soften the transition while the paint is still workable. -
Drying Time:
Allow the Earth section to dry completely before moving on to the wreath to prevent the green leaves from bleeding into the blue ocean.
Add Metallic Details
Once dry, use metallic gold watercolor paint to outline the continents or add tiny gold berries to the wreath for an elegant, shimmering finish.
Step 3: Painting the Wreath
-
Painting the Stems:
Switch to your smaller size 2 brush. Mix a brown-green value using Sap Green and Burnt Umber. With a steady hand, paint the thin, curving main stems of the wreath following your pencil guide. -
Filling the Leaves:
Using a clean Sap Green mix, paint the larger leaves. Try pressing the belly of the brush down and lifting up quickly to create a tapered leaf shape naturally. -
Varying the Green:
To make the wreath look organic, mix a slightly darker, cooler green and paint some of the overlapping or background leaves. -
Simulating Sprigs:
Using the very tip of your small brush and a diluted brown-grey mix, add fine, wispy lines branching off the main stem. These mimic dried floral filler or delicate twigs. -
Finishing Details:
Add tiny darker green veins to a few of the larger leaves once the base color is dry, which adds crispness to the illustration. -
Erase Guidelines:
Once the entire painting is bone dry—touch it with the back of your hand to check—gently erase any visible pencil lines from your initial tracing.
Now you have a serene piece of planetary art that reminds us of the delicate beauty of our world
Earth as a Flower Bloom
Celebrate nature by painting our blue planet nestled within a delicate wreath of watercolor leaves and wildflowers. This project combines wet-on-wet techniques for the globe with fine detailing for the floral elements, resulting in a soft, organic tribute to Mother Earth.
Step-by-Step
Materials
- Cold press watercolor paper (approx. 140lb/300gsm)
- Watercolor paints (Cerulean Blue, Prussian Blue, Sap Green, Burnt Sienna, Crimson, Violet)
- Round brushes (sizes 6 or 8 for washes, sizes 0 or 2 for details)
- Pencil (HB or H)
- Circular object for tracing (bowl or compass)
- Clean water and jar
- Paper towels
- Palette for mixing
- Wooden board and masking tape (optional, to stretch paper)
Step 1: Planning the Composition
-
Trace the globe:
Begin by placing your circular object in the center of the paper. Lightly trace a perfect circle using your pencil. Keep the line very faint so it doesn’t show through the final paint. -
Sketch the continents:
Lightly sketch the outlines of the Americas, Europe, and Africa inside the circle. Simplicity is key here; focus on the general recognizable shapes rather than exact geographical precision. -
Draft the floral frame:
Sketch the surrounding wreath. Draw sweeping, curved stems radiating outward from the globe’s edge. Add simple leaf shapes and a few indicator circles where the main flowers will go (like the large red ones at the bottom left and right).
Step 2: Painting the Earth
-
Wet the ocean areas:
Using your larger round brush and clean water, carefully wet the ‘ocean’ areas inside the circle. Avoid getting water on the landmass shapes for now. -
Drop in the blue:
Load your brush with Cerulean Blue and touch it to the wet paper. Watch the color bloom. Add touches of Prussian Blue near the edges and poles to create depth and roundness. -
Paint the landmasses:
While the blue is drying (or after, for crisper edges), wet the land shapes. Drop in varying shades of Sap Green. -
Add earthy textures:
While the green is still damp, dab in bits of Burnt Sienna or yellow ochre to suggest deserts and mountains. Let the colors bleed slightly into the green for a natural terrain look. -
Defined coastlines:
Once the base layers are completely dry, use a smaller brush with a more saturated blue to darken the coastlines slightly, making the continents pop against the water.
Water Control Pro-Tip
To get the soft, cloud-like texture in the oceans, try dabbing the still-wet blue paint with a twisted corner of a clean tissue. This lifts pigment to create white clouds.
Step 3: Creating the Floral Wreath
-
Base layer for leaves:
Mix a light, watery Sap Green. Paint the larger leaf shapes surrounding the globe, using the tip of your brush to create tapered ends. Vary the pressure to widen the belly of the leaf. -
Painting the main blooms:
Load a medium brush with a diluted Crimson or deep pink. Paint the petals of the prominent star-shaped flowers, pulling the pigment from the outside toward the center. -
Add darker foliage:
Mix a darker green (Sap Green + a touch of Blue or Brown). Paint the smaller, sharper leaves and add veins to the dried lighter leaves to create visual interest and layering. -
Detailing the buds:
Using a size 0 or 2 brush, paint the tiny buds and berries on the branch tips. Use violet and pink dots, connecting them to the main stems with hair-thin green lines. -
Flower centers:
Once the flower petals are dry, dot their centers with a thick mixture of yellow or orange paint to create the pollen area. You can add tiny brown specks for texture. -
Whispy accents:
Add very fine, floating elements like tiny pink pollen dots or loose petals drifting away from the wreath to give the piece a sense of movement. -
Final assessment:
Step back and look at the balance. If one side feels empty, add a small sprig of leaves or a few extra berries. Ensure the pencil lines are erased or covered.
Level Up: Metallic Touch
Once the painting is fully dry, trace the very edge of the globe or the veins of the leaves with metallic gold watercolor or a gold gel pen for a magical finish.
Allow your beautiful tribute to nature to dry completely before framing it or gifting it to an earth-loving friend
Swirly Ocean Currents Earth
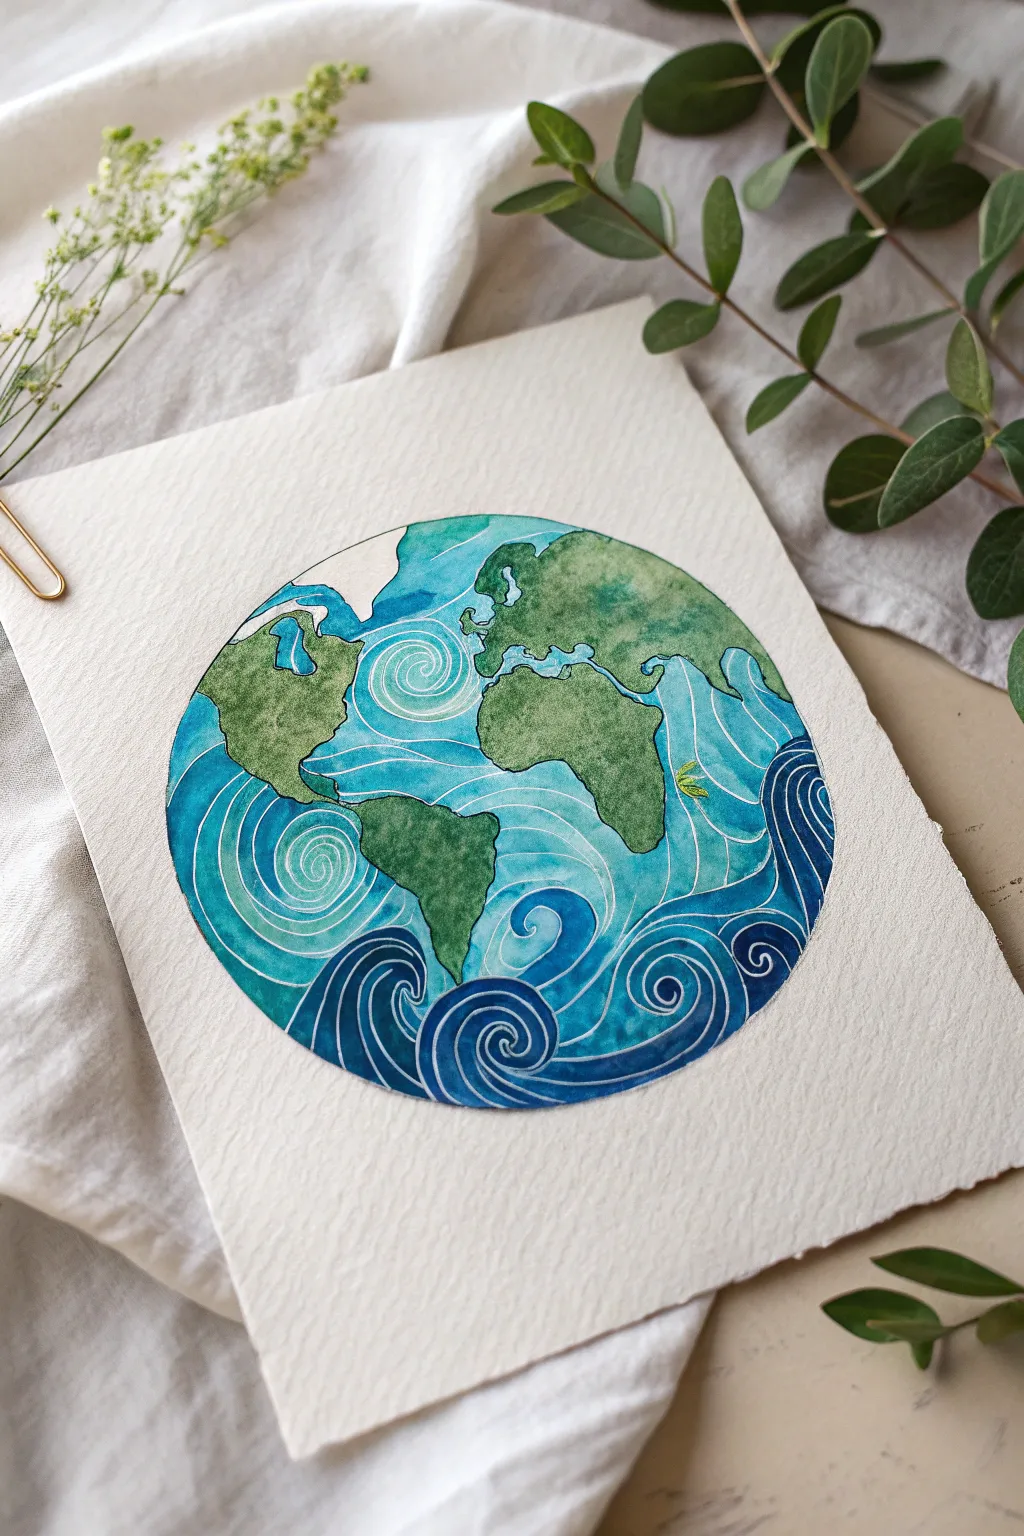
This stylized watercolor painting reimagines our planet with mesmerizing, rhythmic ocean currents swirling around lush green continents. The design balances geographical recognition with artistic flow, using white line work to create movement and depth within the deep blue waters.
Step-by-Step Tutorial
Materials
- Cold press watercolor paper (300 gsm)
- Watercolor paints (Phthalo Blue, Ultramarine, Indigo, Sap Green, Hooker’s Green)
- Round watercolor brushes (size 4 and 8)
- Pencil and eraser
- Compass or circular object (approx. 6 inches)
- White gel pen or fine white gouache with a detail brush
- Paper towel
- Jar of water
Step 1: Sketching the Globe
-
Draw the boundary:
Begin by lightly tracing a perfect circle in the center of your watercolor paper using a compass or a round household object like a bowl. -
Draft the continents:
Lightly sketch the outlines of North and South America on the left, and Africa and Europe on the right. Don’t worry about perfect cartographic accuracy; aim for recognizable shapes that fit comfortably within the circle. -
Map the currents:
Sketch flowing, swirly lines through the ocean areas. Create spiral patterns for major currents and wavy lines connecting them, treating the water as a dynamic, moving force rather than empty space.
Clean Lines Tip
To keep your white lines crisp, wipe the tip of your gel pen on a scrap paper frequently to remove any dried ink buildup or watercolor residue picked up from the paper.
Step 2: Painting the Land
-
Base layer for land:
Mix a watery wash of Sap Green. Apply this to the continent shapes, letting natural blooms occur to create texture like forests and terrain. -
Add depth to continents:
While the green is still slightly damp, drop in concentrated Hooker’s Green or a touch of blue into the shadowed areas (usually the eastern edges) to suggest volume. -
Dry completely:
Allow the landmasses to dry fully before moving to the water to prevent the green from bleeding into your blue sections.
Step 3: Creating the Ocean Swirls
-
Plan your blues:
Prepare three puddles of blue paint: a light turquoise (diluted Phthalo Blue), a medium true blue (Ultramarine), and a dark, deep navy (Indigo). -
Paint the first section:
Choose a section of ocean defined by your swirly pencil lines. Fill it with one of your blue shades, carefully painting up to the pencil line but leaving a tiny hairline gap between different swirl sections. -
Alternate colors:
Move to an adjacent swirl section and fill it with a different shade of blue. I find that placing dark indigo swirls next to lighter turquoise ones creates the best contrast and sense of depth. -
Create gradients:
For larger ocean areas, you can paint a gradient within a single swirl shape, starting with dark blue at the bottom and fading to a lighter blue at the top. -
Fill the gaps:
Continue working around the globe until all water areas are filled. Ensure the ocean paint touches the edges of the green continents cleanly.
Metallic Upgrade
Instead of plain white for the current lines, try using a metallic silver or gold pen. This adds a magical, celestial shimmer to the oceans when the light hits the artwork.
Step 4: Defining the Currents
-
Wait for total dryness:
This step is crucial: touch the paper with the back of your hand to ensure it is completely room temperature and bone dry. -
Trace the flow lines:
Using a white gel pen or a very fine brush with white gouache, trace over the gaps you left between the paint sections. This sharpens the separation between the currents. -
Add inner spirals:
Draw additional thin white spirals inside the larger painted shapes to emphasize the spinning motion of the water. -
Highlight the coastlines:
Run a thin white line along the coastlines where the water meets the land to make the continents pop against the dark ocean. -
Final touches:
Review the painting for any areas that look flat and add a few extra white contour lines to suggest ripples or waves.
Now you have a dynamic portrait of the earth that captures the constant motion of our blue planet
Salt-Texture Watercolor Seas

Capture the beauty of our blue planet with this texturally rich watercolor project. Using simple table salt creates organic, starry speckles in the deep blue oceans, adding depth and whimsy without needing complex brushwork.
Step-by-Step Guide
Materials
- Cold press watercolor paper (300 gsm)
- Watercolor paints (phthalo blue, ultramarine, sap green, burnt sienna)
- Round watercolor brushes (size 6 and size 2)
- Pencil and eraser
- Compass or circular object for tracing
- Table salt or sea salt
- White gel pen or gouache
- Clean water and paper towels
- Masking tape (optional)
Step 1: Planning and Sketching
-
Outline the globe:
Begin by lightly tracing a perfect circle in the center of your paper using a compass or by tracing around a bowl. Keep your pencil pressure very light so the graphite won’t show through the transparent paint later. -
Sketch the continents:
Lightly sketch the outlines of North and South America. Don’t worry about perfect geographical accuracy; aim for recognizable shapes. Include the curve of Western Africa on the right edge and the tip of Antarctica at the bottom to frame the composition. -
Mark the arctic:
Draw loose, jagged lines at the very top of the circle to demarcate the icy arctic regions. These areas will remain largely unpainted or very pale.
Salt Timing
Timing is everything. If the paint is too wet, the salt dissolves and does nothing. If too dry, it won’t move the pigment. Aim for a ‘sheen’ surface.
Step 2: Painting the Lands
-
Base green layer:
Mix a watery sap green. Using your size 6 brush, fill in the continent shapes. Keep the wash uneven—letting some pigment pool and other areas remain lighter creates a natural topographical look. -
Add earthy depth:
While the green is still damp, touch in small amounts of burnt sienna or a darker green along the western edges of the Americas to simulate mountain ranges like the Rockies and Andes. Let the colors bleed slightly. -
Dry completely:
Allow the landmasses to dry fully before moving on to the ocean. You can use a hairdryer on a low setting if you’re impatient, but air drying is safest.
Step 3: Creating the Oceans
-
Prepare the blue mix:
Mix a generous puddle of phthalo blue with a touch of ultramarine for a deep, vibrant ocean color. Ensure you have enough paint mixed to cover all the water areas without stopping. -
Wet-on-dry application:
Carefully paint around your dried continents with the blue mix. Work in sections if needed, but try to keep a wet edge to avoid harsh lines within the water. -
Deepen the edges:
Drop simpler, more concentrated blue pigment along the outer rim of the circle while the wash is wet. This creates a spherical 3D effect, making the globe look rounder. -
Apply the salt:
This is the crucial moment: while the blue paint is still shiny and wet (but not a dripping puddle), sprinkle a pinch of salt over the ocean areas. I find dropping it from a few inches up gives a better distribution. -
Wait for the magic:
Let the painting sit completely undisturbed. As it dries, the salt will push the pigment away, creating beautiful star-like blooming textures. Do not touch it until the paper is bone dry.
Atmospheric Clouds
Use a dry paper towel to gently lift small patches of wet blue paint before salting. This creates soft, hazy cloud formations swirling over the oceans.
Step 4: Finishing Touches
-
Remove the salt:
Once you are absolutely certain the paper is dry, gently rub off the salt crystals with your clean fingertips or a soft dry brush. -
Refine the poles:
Use a very dilute, watery blue to add faint shadows to the white arctic area at the top, giving the ice some form without overpowering the white space. -
Add crisp stars:
The salt creates a starry texture, but for extra pop, use a white gel pen or a tiny brush with white gouache to add distinct star drawings or constellations over the darkest blue parts. -
Define the perimeter:
If the edge of your circle got a bit wobbly during painting, use a fine liner brush with dark blue to carefully neaten the outer circumference.
Now you have a stunning, textured portrait of the world to display or gift to a fellow traveler
Textured Relief Continents
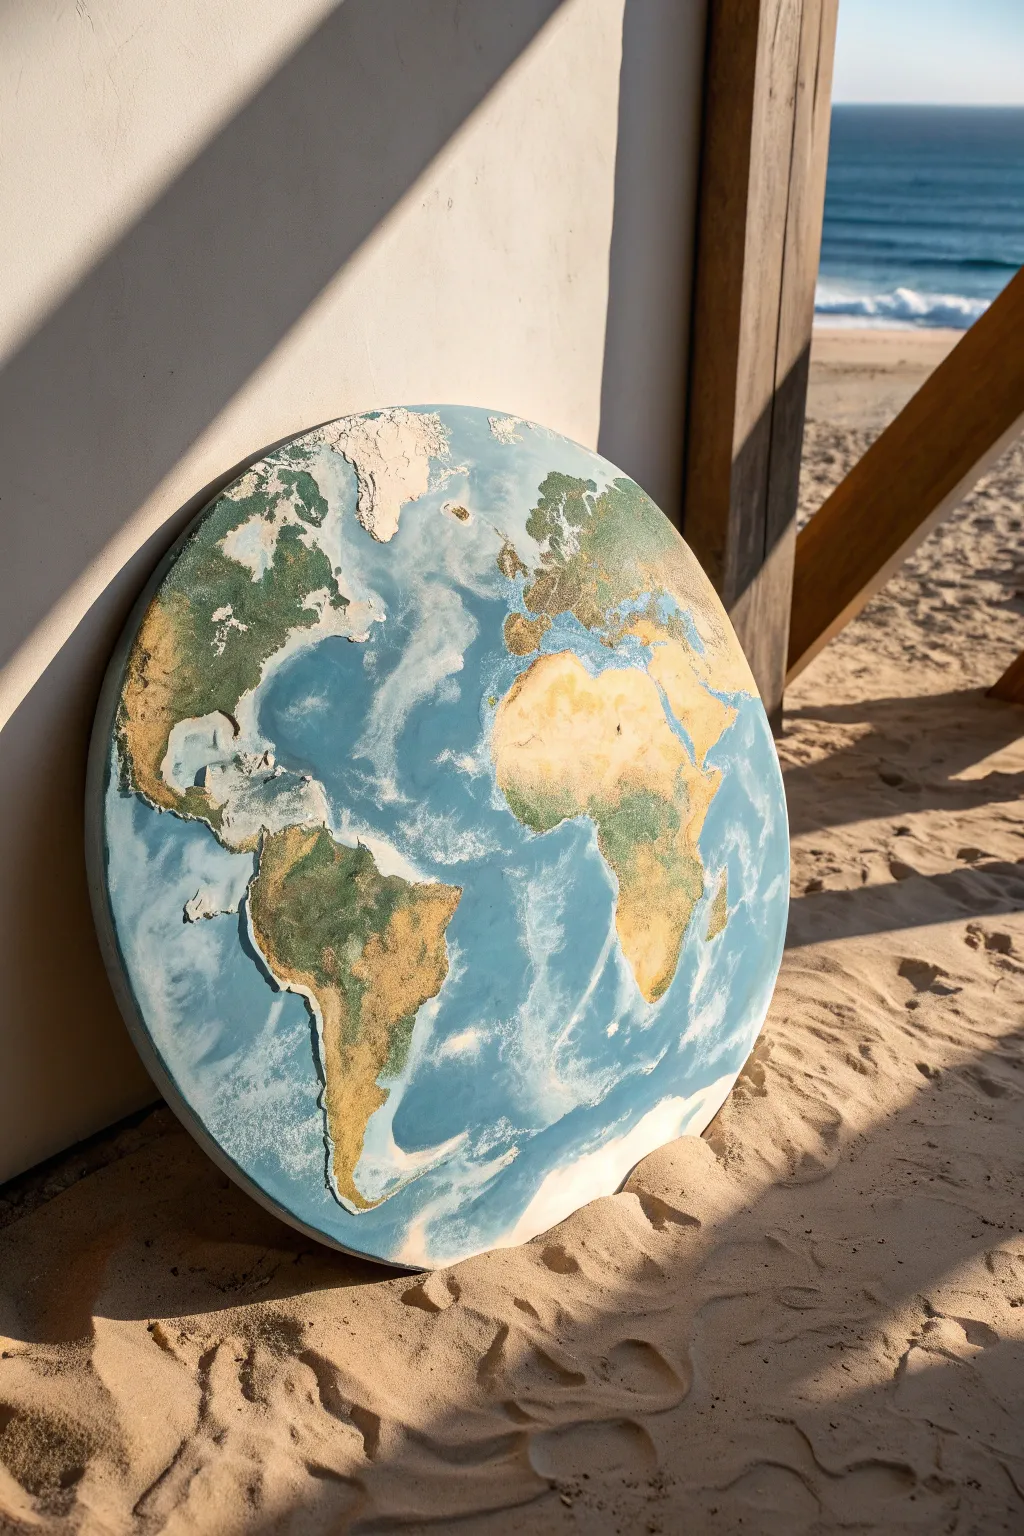
Bring the world to your wall with this stunning dimensional earth art that combines sculptural texture with fluid painting techniques. Using modeling paste to build actual topography, this project captures the rugged beauty of continents against a swirling, oceanic backdrop.
How-To Guide
Materials
- Round wood panel or heavy-duty canvas (24-36 inch diameter)
- Heavy body acrylic paints (Phthalo Blue, Turquoise, White, Raw Umber, Yellow Ochre, Sap Green)
- Modeling paste or heavy texture gel
- Palette knives (assorted sizes)
- Epoxy resin (optional for glossy finish) or gloss varnish
- Pencil and large world map stencil or projector
- Sandpaper (fine grit)
- Sea sponge
- Heat gun or torch (if using resin)
- Mixing cups and stir sticks
Step 1: Mapping the World
-
Prepare the surface:
Begin by sanding your round wood panel lightly to ensure good adhesion. Wipe away any dust with a damp cloth and let it dry completely. -
Prime the ocean:
Apply a base coat of deep blue acrylic paint across the entire surface. This ensures that no raw wood shows through your ocean layers later. -
Outline continents:
Once the base coat is dry, lightly trace the continents onto the panel. You can use a projector to cast a map image or trace around large paper cutouts for accuracy.
Cracking Paste?
If your texture paste cracks while drying, don’t panic. Mix a little more paste with white paint and fill the cracks, or leave them for a rugged, tectonic plate aesthetic.
Step 2: Building Topography
-
Apply base texture:
Scoop out a generous amount of modeling paste. Using a palette knife, fill in the continent outlines. Keep the layer relatively thin near the coastlines but build it up thicker in the centers. -
Sculpt mountain ranges:
While the paste is still wet, use the edge of your knife to pull and peak the material in areas known for mountains, like the Andes in South America or the Atlas Mountains in Africa. Creating these rough ridges now adds crucial realism. -
Create coastal texture:
Tap a sea sponge gently along the edges of your landmasses. This softens the transition from land to sea and mimics the look of shallow waters and shelves. -
Let it cure:
Allow the modeling paste to dry completely. This usually takes 24 hours depending on thickness. It must be rock hard before painting.
Add Metallic Shimmer
Mix gold mica powder into your sand-colored paint or dust it over the wet ocean resin to give the artwork a luxurious, map-like glow.
Step 3: Painting land and Sea
-
Paint the deep ocean:
Mix Phthalo Blue with a touch of black or purple for the deepest waters. Apply this freely in the open ocean areas, keeping it away from the immediate coastlines. -
Blend the shallows:
Mix Turquoise and White to create a lighter Caribbean blue. Paint this around the land borders, blending it wet-into-wet with the deeper blue water to create a gradient. -
Add cloud swirls:
I like to take a bit of watered-down white paint or white fluid acrylic and softly swirl it over the wet ocean paint, mimicking atmospheric clouds and currents. -
Base coat the land:
Paint the dried texture paste with a mix of Yellow Ochre and Raw Umber. This earthy tone serves as the foundation for both deserts and forests. -
Highlight vegetation:
Dry-brush Sap Green over the textured areas corresponding to rainforests and woodlands, such as the Amazon basin and central Africa. The texture paste will grab the paint nicely. -
Detail arid regions:
Use a light sandy beige to dry-brush the Sahara and other desert regions. Keep this application light so the darker base coat shows in the deep crevices. -
Cap the mountains:
With a very small brush and pure Titanium White, carefully tap the very peaks of your highest sculpted mountain ranges to suggest snow caps.
Step 4: Finishing Touches
-
Seal the work:
Once all paint is bone dry, choose your finish. For the glass-like look in the example, mix a batch of clear epoxy resin. -
Pour the finish:
Pour the resin over the center of the piece and spread it to the edges. If you prefer a matte look for the land, carefully apply the resin only to the ocean areas. -
Pop bubbles:
Use a heat gun or torch to quickly sweep over the resin surface to pop any air bubbles. -
Final cure:
Protect the piece from dust with a large box cover and let it cure for at least 72 hours before hanging.
Hang your textured world map in a spot with good lighting to really show off the dimensional relief shadows you created
Torn-Paper Collage Earth
This stunning earth project combines the rustic charm of torn paper with the organic flow of watercolor textures. By layering custom-painted papers, you’ll create a tactile, dimensional globe that feels both modern and handmade.
Detailed Instructions
Materials
- Heavyweight watercolor paper (300gsm)
- Deep teal or ultramarine cardstock (for the ocean base)
- Watercolor paints (phthalo blue, sap green, burnt sienna, yellow ochre)
- Medium round watercolor brush
- Pair of small, sharp scissors (and/or craft knife)
- PVA glue or matte gel medium
- Round wooden disc or cardboard circle (approx. 6-8 inches)
- Pencil
- Tracing paper (optional)
- Reference map of the world
Step 1: Creating the Textures
-
Paint the continent sheets:
Start by taking a sheet of your watercolor paper. Wet the entire surface lightly with clean water. -
Drop in color:
While the paper is damp, drop in patches of sap green, yellow ochre, and phthalo blue. Let the colors bleed into each other naturally to mimic terrain. -
Add earthy details:
Dab small amounts of burnt sienna into the wet areas to create warmer, brownish tones for deserts or mountains. Don’t worry about shapes yet; just create a varied field of color. -
Create texture:
While the paint is still drying, you can blot areas with a crumpled paper towel or sprinkle a pinch of salt to create organic, geological textures. -
Let it dry completely:
Set your painted paper aside until it is bone dry. The paper must be stiff and dry for the tearing and cutting phase later.
Step 2: Preparing the Ocean Base
-
Trace the globe shape:
Take your dark teal cardstock—this will be the ocean. Place your round wooden disc or cardboard circle onto the cardstock and trace around it. -
Texturize the ocean (optional):
If you want the ocean to have texture like the continents, lightly crumple the cardstock before cutting, then smooth it back out, or dry-brush a darker blue over it. -
Cut out the ocean:
Carefully cut out the teal circle. If you want a rough, torn edge look for the perimeter, you can carefully tear along the line instead of cutting, but scissors give a cleaner finish. -
Mount the ocean:
Glue the teal circle securely onto your wooden or cardboard backing. Press it flat and smooth out any air bubbles.
Sticky Situation?
If your paper ripples from the glue, place the finished artwork under a heavy book for 2-3 hours while it dries. Use wax paper to protect the book.
Step 3: Forming the Continents
-
Sketch the map:
Lightly sketch the outlines of the continents onto the back of your dried watercolor paper. You can freehand this or use tracing paper and a reference map for accuracy. -
Tear the major shapes:
For the larger landmasses like Africa and South America, gently tear along your pencil lines. Pull the paper toward you to create a soft, white fibrous edge, or away from you for a sharper edge. -
Refine with scissors:
For tricky coastlines like the Mediterranean or the islands of Southeast Asia, use small scissors. Tearing is too imprecise for these tiny details. -
Arrange the pieces:
Place your torn landmasses onto the blue ocean circle without gluing yet. Adjust their positions to ensure the spacing between continents looks correct. -
Check the edges:
Ensure the outer edges of the peripheral continents aligned perfectly with the curve of your circle backing. Trim any overhang.
Go Metallic
Mix metallic gold watercolor or gouache into your landmass painting phase. The continents will shimmer beautifully when the light hits the texture.
Step 4: Assembly and Finishing
-
Glue the continents:
Apply glue to the back of each continent piece. I prefer using a brush to spread the glue thinly to the very edges so they don’t curl up. -
Construct the globe:
Press the landmasses onto the teal base. Use a clean cloth to press firmly, ensuring good adhesion and smoothing out the paper. -
Add islands:
Don’t forget the tiny scraps! Glue down small torn bits for islands like Madagascar, the UK, or Japan. -
Distress the edges:
Once the glue is dry, run a fingernail or a bone folder along the edges of the landmasses to slightly lift or rough them up, enhancing the 3D collage effect. -
Final touches:
If the white torn edges of the paper are too bright, touch them up very lightly with a damp brush and a tiny bit of diluted paint to blend them in.
Display your textured world on a small easel or mount it in a shadow box to show off the dimension
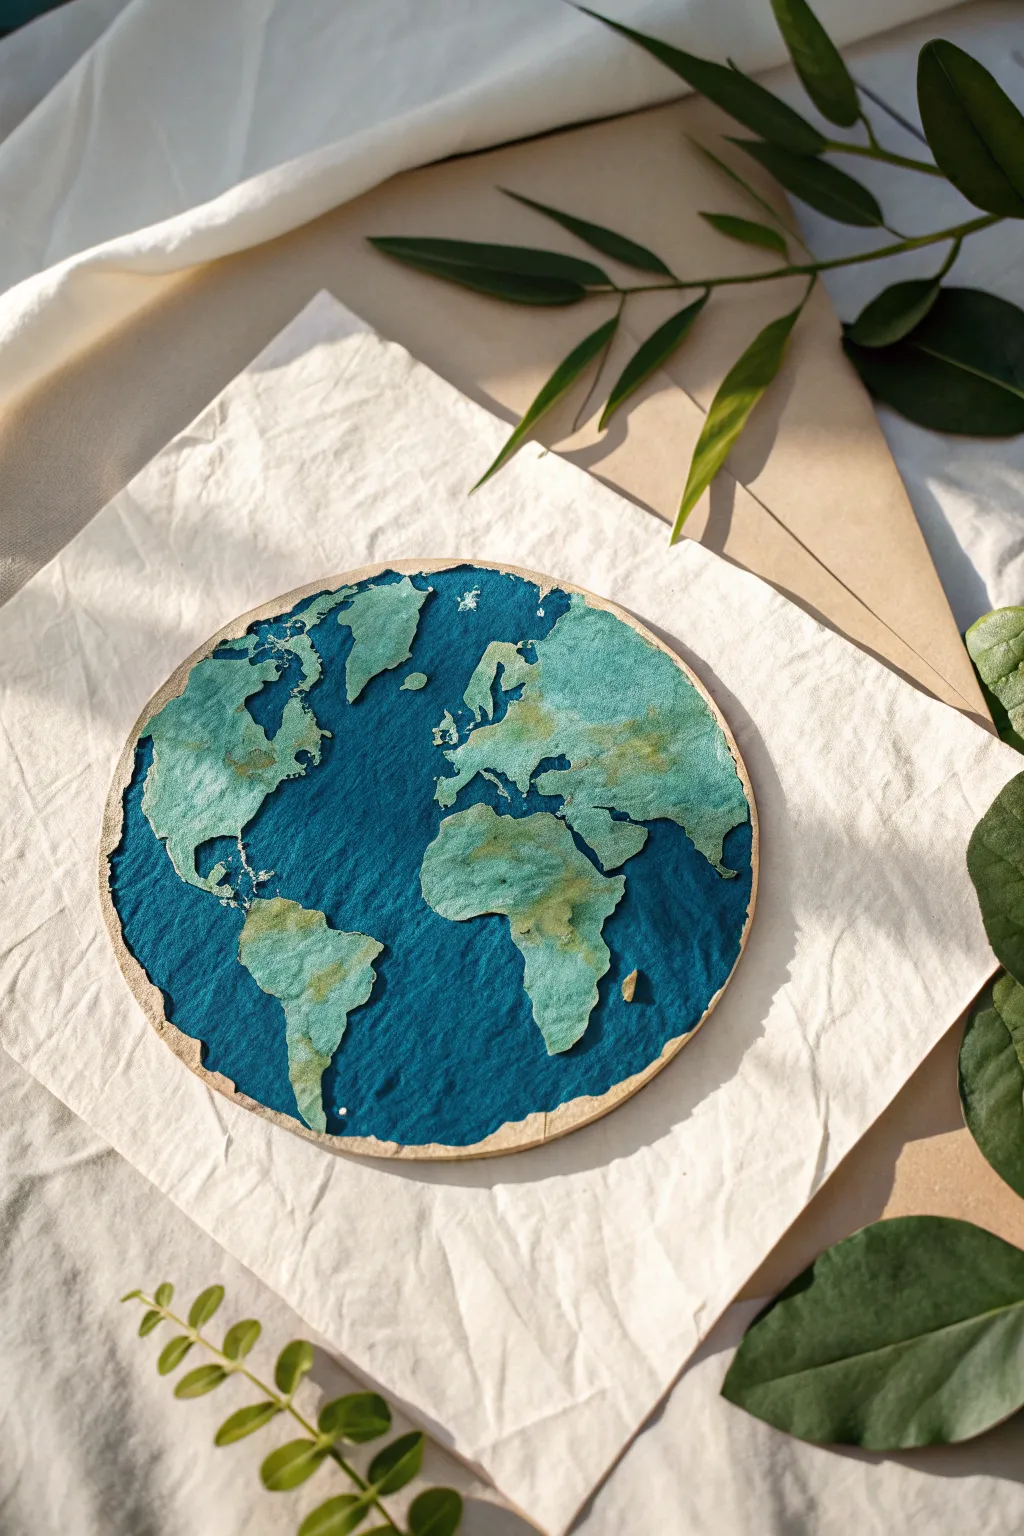
Recycled Text Earth Globe
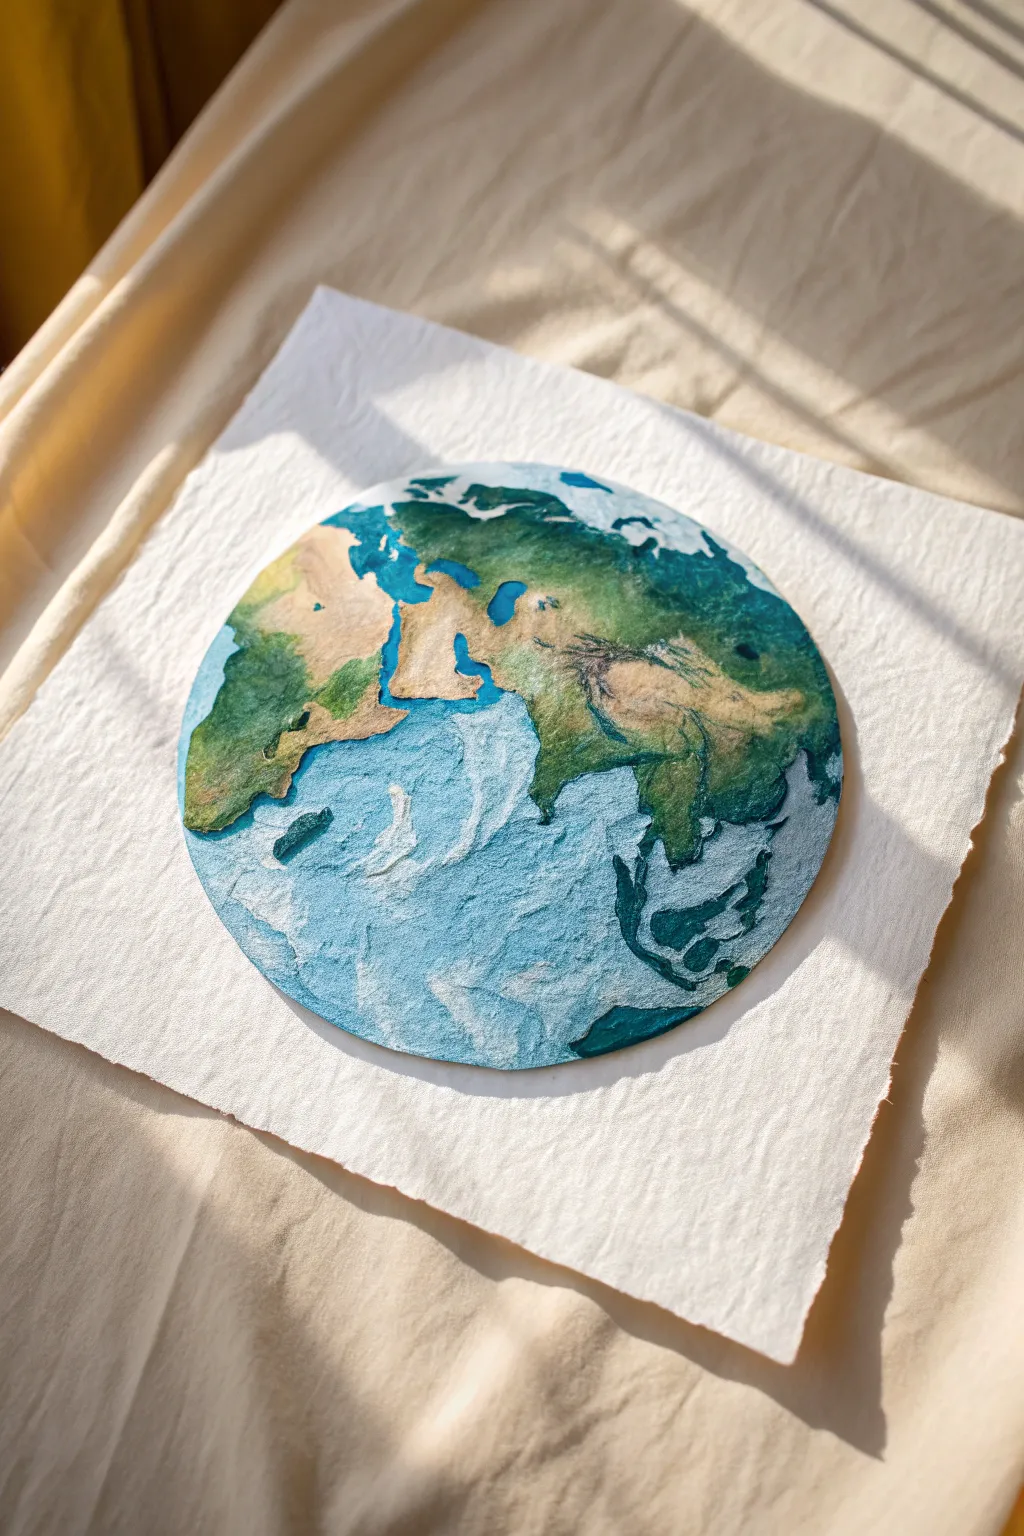
This project transforms simple paper pulp into a stunningly tactile relief map of the Eastern Hemisphere. The result is a dimensional, painterly globe that looks like it was carved from stone and hand-tinted with watercolors.
Step-by-Step Tutorial
Materials
- Recycled white paper (office paper or egg cartons)
- Blender or hand mixer
- Warm water
- PVA glue or Mod Podge
- Fine mesh strainer
- Heavyweight watercolor paper or handmade cotton rag paper (square sheer)
- Pencil and round object (for tracing)
- Watercolor paints (Phthalo Blue, Sap Green, Burnt Sienna, Yellow Ochre, Paynes Grey)
- Soft synthetic brushes (medium round and fine liner)
- Palette knife or small spoon
- Old towel
Step 1: Preparing the Pulp
-
Soak the paper:
Tear your recycled paper into small 1-inch strips or squares. Place them in a bowl and cover with warm water, letting them soak for at least an hour until they are completely soft and mushy. -
Blend the fibers:
Transfer the wet paper to a blender. Add plenty of water (about 3 parts water to 1 part paper) and pulse until you have a smooth slurry with no large chunks remaining. -
Strain and squeeze:
Pour the mixture through a fine mesh strainer. Squeeze out most of the water with your hands, but leave it slightly damp—not bone dry—so it’s malleable like clay. -
Add the binder:
Put the pulp into a clean bowl and mix in a generous tablespoon of PVA glue. Knead it with your fingers until it feels sticky and holds its shape when compressed.
Pulp Consistency Tip
If your pulp is too lumpy, the texture will look messy. Blend longer! The fibers should be almost unrecognizable, creating a smooth, clay-like paste rather than wet confetti.
Step 2: Sculpting the Globe
-
Outline the circle:
On your square sheet of heavyweight paper, trace a perfect circle lightly using a bowl or compass in the center of the page. -
Apply the base layer:
Fill the circle area with a thin layer of glue. Take small pinches of your paper pulp and press them firmly inside the circle, flattening them to create a uniform, textured disc. -
Sketch the continents:
Using a reference image of the Eastern Hemisphere (Africa, Europe, Asia), use the tip of a paintbrush handle or a pencil to gently indent the general shapes of the continents into the wet pulp. -
Build dimensional landmasses:
Add slightly more pulp to the continent areas to raise them up. I find it helpful to build up mountain ranges like the Himalayas with extra tiny ridges of pulp for added realism. -
Create ocean texture:
For the ocean areas, press the pulp flatter and swirl it slightly with your fingers or a palette knife to mimic the movement of currents and waves. -
Dry completely:
This is crucial: allow the relief to dry completely. This can take 24-48 hours depending on thickness. It must be rock hard and dry to the touch before painting.
Step 3: Painting the World
-
Base wash for oceans:
Mix a watery wash of Phthalo Blue and lightly brush it over the ocean areas. The texture of the pulp will naturally catch more pigment in the crevices, creating instant depth. -
Define the deep waters:
While the first layer is damp, drop concentrated blue mixed with a touch of Payne’s Grey into the deeper parts of the ocean and along the coastlines to create separation. -
Base layer for land:
Apply a light wash of Yellow Ochre over the landmasses, focusing on the desert regions of Northern Africa and the Middle East. -
Adding vegetation:
Switch to Sap Green. Dab this onto Central Africa, Europe, and Southeast Asia. Allow the green to bleed slightly into the ochre for a natural transition between climates. -
Highlighting mountains:
Use Burnt Sienna on the raised mountain areas you sculpted earlier. Use a ‘dry brush’ technique here—wiping most paint off the brush—so the brown only catches the very tops of the pulp ridges. -
Enhancing the poles:
Leave the northernmost areas and Antarctica (if visible) mostly unpainted or lightly dry-brushed with white gouache if your pulp isn’t white enough, simulating ice caps. -
Final ocean swirls:
Once the main colors are dry, use opaque white paint or white gouache to dry-brush swirling cloud patterns or highlighted wave crests over the blue oceans. -
Clean up edges:
If any paint bled onto the background paper, you can carefully dab it with a clean, wet brush or define the edge of the globe with a very thin line of dark blue to sharpen the circle.
Add Metallic Touches
For a magical finish, lightly brush metallic gold watercolor over the highest mountain peaks or desert dunes. It catches the light beautiful when the relief is hung on a wall.
Now you have a beautiful, geological art piece that celebrates the textures of our planet.
Minimal Line Art Earth Circle
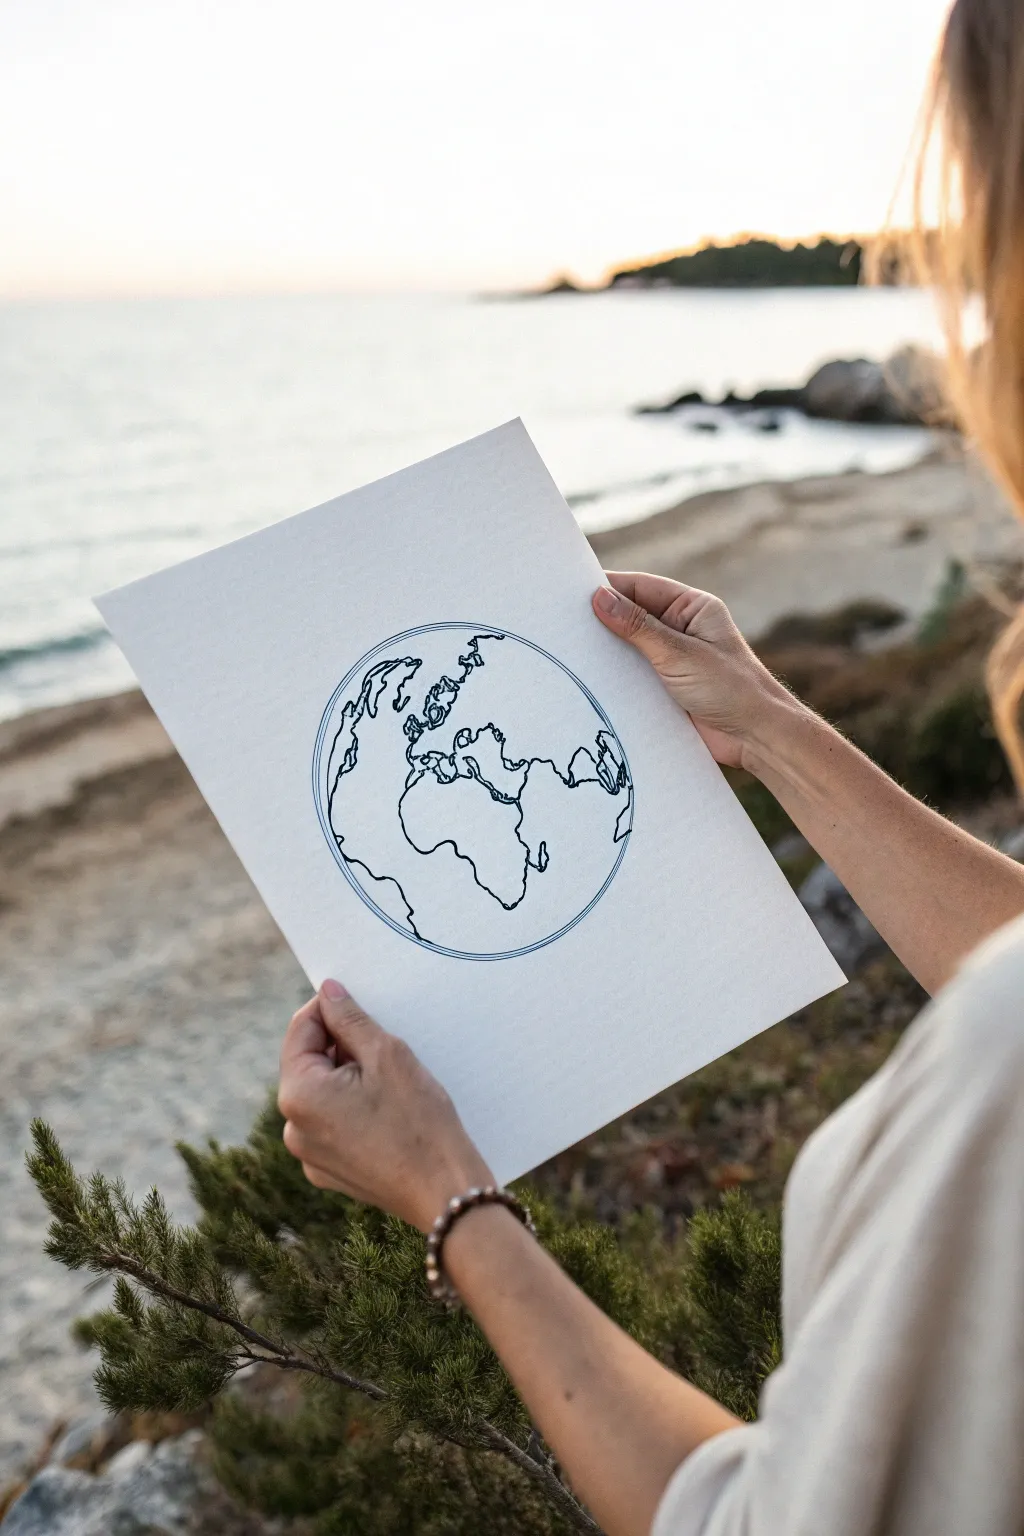
Capture the elegance of our planet with this simple yet striking line art project. Using a single continuous-style drawing technique, you will create a modern representation of Earth that looks beautiful framed or as standalone decor.
Step-by-Step
Materials
- High-quality white cardstock or watercolor paper (A4 or Letter size)
- Fine liner pen (black or dark blue, 0.5mm or 0.8mm)
- Pencil (HB or H)
- Eraser
- Compass or large circular object for tracing
- Ruler (optional)
- Reference image of Earth or a globe
Step 1: Preparation and Sketching
-
Set up your workspace:
Clear a flat, well-lit surface and secure your paper with tape if using lightweight stock to prevent it from shifting while you work. -
Draw the outer circle:
Using a compass or by carefully tracing around a large bowl or plate, draw a perfect circle in the center of your page with a light pencil touch. -
Create the inner border:
Adjust your compass slightly smaller or find a slightly smaller round object, and draw a second circle inside the first one to create a thin double-line border effect. -
Map out the continents:
Looking at your reference image, lightly sketch the general shapes of the continents. Focus on Africa, Europe, and the Middle East as seen in the example, keeping the shapes loose and organic. -
Refine the coastlines:
Go back over your pencil sketch to add the jagged, natural details of the coastlines. Don’t worry about perfect geographical accuracy; the goal is recognition through silhouette. -
Assess the composition:
Take a step back to ensure the landmasses look balanced within the circle. Erase and adjust any areas that feel too crowded or too empty.
Step 2: Inking the Design
-
Test your pen:
On a scrap piece of the same paper, test your fine liner to ensure the ink flows smoothly and doesn’t bleed. I prefer a slightly thicker 0.8mm nib for the bold outer rings. -
Ink the outer circles:
Carefully trace over your pencil lines for the two outer circles. Rotate the paper as you draw to maintain a steady hand curve without straining your wrist. -
Begin the continent outlines:
Switch to a 0.5mm pen if desired for finer detail, or stick with the same pen for a uniform look. Start inking the northernmost landmasses first to avoid smudging your work with your hand. -
Adding texture to the line:
As you trace the continents, allow your hand to wobble slightly. This ‘nervous line’ technique adds organic character and mimics the fractal nature of coastlines better than a straight line. -
Connect the islands:
Ink the smaller islands like the UK and Madagascar, ensuring they are positioned correctly relative to the main landmasses but not touching details you’ve already inked. -
Let the ink dry:
Wait at least 10–15 minutes specifically to ensure the ink is bone dry. Smearing a line at this stage is heartbreaking, so patience is key.
Wobbly Circles?
If you struggle to ink a perfect circle freehand, use an architect’s circle template or carefully run your pen along a physical object like a roll of tape.
Step 3: Finishing Touches
-
Erase pencil marks:
Gently glide a kneaded or high-quality vinyl eraser over the entire drawing to lift the graphite sketches. Hold the paper taut with your other hand to prevent crinkling. -
Inspect line weight:
Check for any thinner areas in your inked lines. You may want to go over the outer circular border a second time to make it stand out as a bold frame. -
Clean up edges:
If there are any tiny pencil smudges left on the white space, use a precision eraser to spot-clean them for a crisp, high-contrast finish. -
Flatten the paper:
If the ink caused any slight buckling, place your drawing under a heavy book overnight to ensure it is perfectly flat before displaying.
Add Watercolor
After the waterproof ink dries, lightly wash blue watercolor over the ocean areas or green/brown over the land for a soft pop of color.
Now you have a serene piece of globe art ready to frame or gift
Geometric Polygon Earth
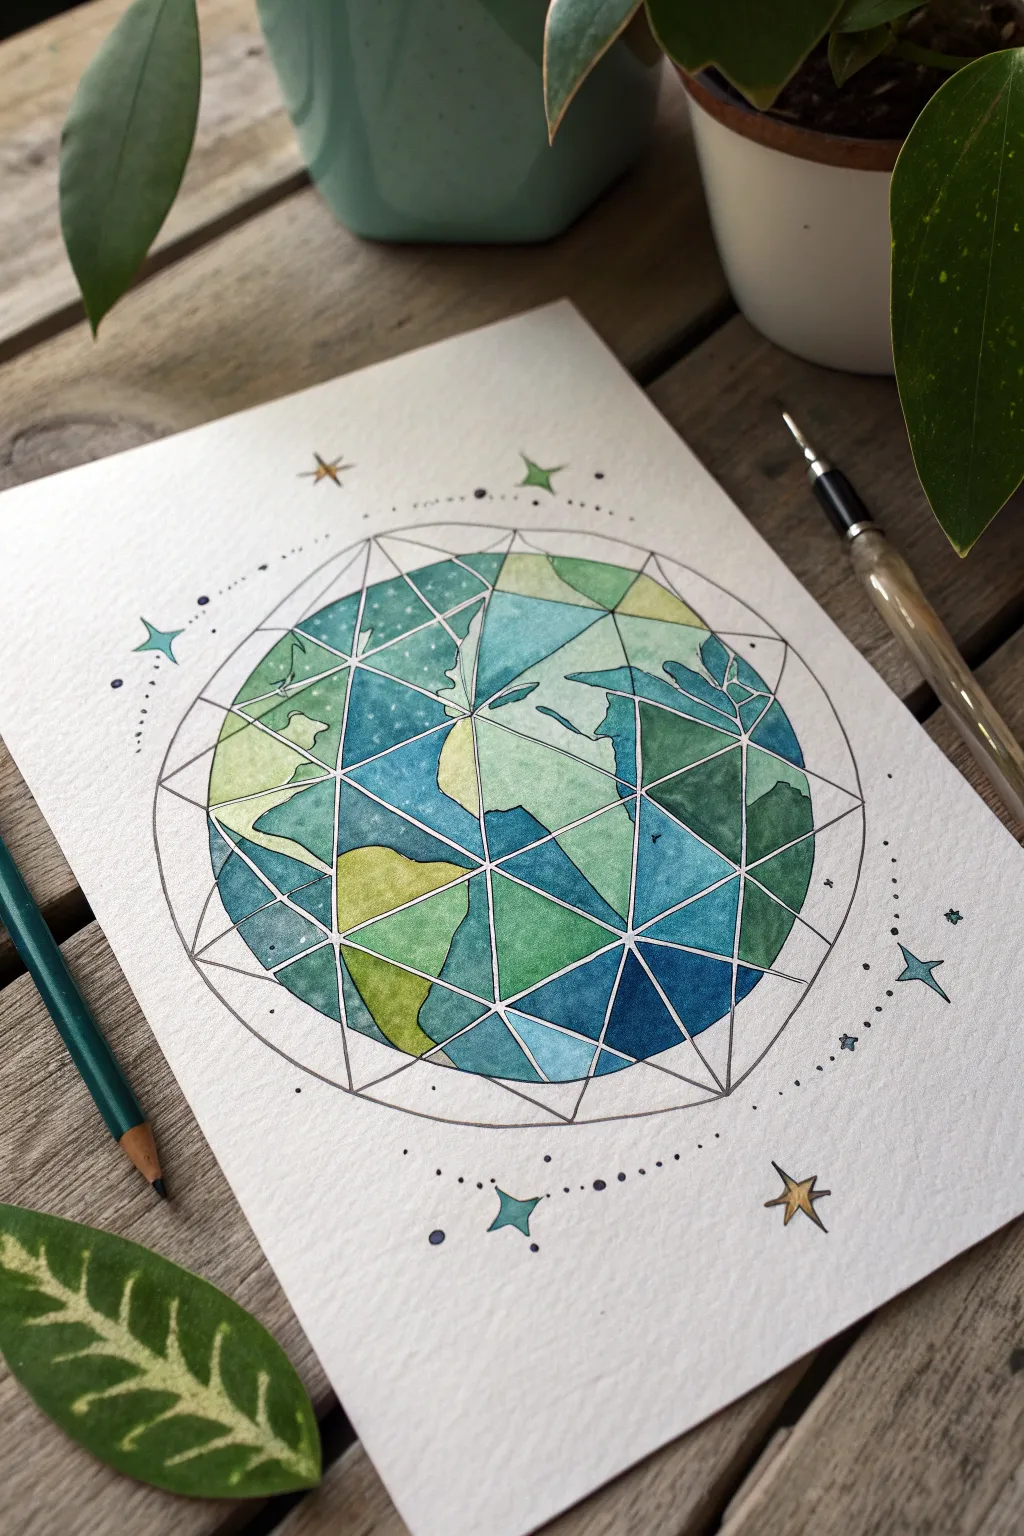
This striking watercolor project blends the organic shapes of our continents with rigid, geometric lines for a modern, stained-glass aesthetic. By breaking the globe down into colorful triangular facets, you’ll create a stylized map that feels both structured and vibrant.
Step-by-Step Tutorial
Materials
- Cold press watercolor paper (A4 or 9×12 inch)
- Watercolor paints (shades of phthalo blue, turquoise, sap green, and yellow ochre)
- Fine liner pen (01 or 03 micron, black, waterproof)
- Ruler
- Compass
- Pencil and eraser
- Small round brushes (sizes 2 and 4)
- White gel pen (optional)
- Mixing palette
Step 1: Drafting the Structure
-
Draw the main circle:
Find the center of your watercolor paper. Using your compass, draw a large circle that will serve as the boundary of your Earth. Keep the pencil pressure light so it can be erased later if needed. -
Sketch the continents:
This step requires a loose hand. Lightly sketch the major landmasses of North and South America, Europe, and Africa within the circle. Don’t worry about perfect cartographic accuracy; you primarily need the general shapes to guide your color placement later. -
Create the geometric web:
Using your ruler and pencil, start drawing chords across the circle to create a web of triangles. Start by connecting points on the circle’s edge to points in the center. Ensure the lines intersect frequently to break the map into medium-sized triangular or polygonal facets. -
Refine the grid:
Look at the composition. If there are large open spaces, bisect them with another straight line. The goal is to have a network of triangles covering the entire globe, varying slightly in size for visual interest. -
Ink the lines:
Take your waterproof fine liner and carefully trace over the circle’s perimeter and all your straight geometric grid lines. Do not ink the organic outlines of the continents; those are just guides for your paint. -
Clean up the sketch:
Once the ink is completely dry—give it a few minutes to be safe—gently erase all the pencil marks, including the continent sketches. You should now have a clean geometric sphere.
Step 2: Painting the Facets
-
Mix your ocean palette:
Prepare three different blue tones on your palette: a deep navy, a bright turquoise, and a watery sky blue. Having these pre-mixed ensures a cohesive look across the water sections. -
Paint the water sections:
Referencing a map or your memory of where the continents were, begin painting the ‘ocean’ triangles. Alternate between your three blue shades so that no two adjacent triangles are the exact same color. This creates depth and dimension. -
Mix your land palette:
Clean your brush and prepare your earth tones: a sap green, a jagged forest green, and a yellow ochre or pale lime. I like to keep these fairly transparent to let the paper texture show through. -
Fill in the landmasses:
Identify the triangles that fall within your original continent zones. Paint these with your green and ochre mix. If a triangle straddles the coast, make a choice to paint it either fully land or fully water to maintain the sharp geometric style. -
Add wet-on-wet texture:
While some of the larger triangles are still damp to the touch, drop in a tiny dot of a darker shade (like dark green into light green). This creates a subtle bloom effect that mimics texture. -
Let it dry thoroughly:
Allow the entire globe to dry completely. The watercolor needs to be set before adding any external details to prevent smudging.
Stay Within the Lines
To keep edges crisp, paint non-adjacent triangles first. Let them dry before painting their neighbors. This prevents colors from bleeding into each other across the black ink lines.
Step 3: Celestial Details
-
Draw the orbital path:
Using a pencil, lightly sketch two elliptical arcs curving around the globe—one crossing the top left, one the bottom right—to simulate an orbital ring or celestial path. -
Dot the details:
Go over your pencil arcs with the fine liner, but instead of a solid line, use a series of dots. vary the size of the dots, making some larger and some tiny specks. -
Add stars:
Draw four-pointed stars around the globe, focusing on the corners of the composition. Use your fine liner for the outline. -
Color the stars:
Fill the stars with diluted turquoise or yellow ochre to tie them back to the globe’s color palette. -
Final touches:
Inspect the grid lines on the globe. If the paint has obscured any black lines, carefully re-trace them with the pen to make the geometry pop again.
Metallic Accent
Use metallic gold watercolor or a gold gel pen to fill in the stars or trace the grid lines. This small change instantly makes the piece feel more luxurious and celestial.
Display your geometric world map in a simple frame to highlight the clean lines and modern design
Split-Ecosystem Earth Medallion
Capture the serene beauty of a winter night with this hand-painted wooden ornament, featuring majestic snowy peaks and a celestial Earth floating in the sky. The deep blues and crisp whites create a stunning contrast against the natural wood grain, making it a perfect keepsake for nature lovers.
How-To Guide
Materials
- Round wood slice ornament (approx. 3-4 inches diameter)
- Acrylic paints (dark navy blue, titanium white, forest green, teal, warm brown, gold)
- Small flat brush
- Fine detail liner brush (size 00 or 000)
- Pencil for sketching
- Gold string or ribbon for hanging
- Matte or satin varnish (optional)
- Palette and water cup
Step 1: Planning and Background
-
Prepare the surface:
Ensure your wood slice is clean and smooth. If the surface feels rough, give it a quick sanding with fine-grit sandpaper and wipe away the dust. -
Sketch the composition:
Lightly sketch your design directly onto the wood using a pencil. Draw a curved line for the hill in the foreground, jagged triangles for the mountains in the middle ground, and a circle in the upper right quadrant for the Earth. -
Paint the night sky:
Using a small flat brush, carefully fill in the sky area with deep navy blue acrylic paint. Paint around your sketched Earth circle and mountain peaks. You may need two coats to get a solid, opaque dark blue. -
Paint the landscape base:
For the snowy foreground and the base of the mountains, apply a coat of titanium white. Don’t worry about shading yet; just block in the basic white shapes.
Uneven Wood Texture?
If paint bleeds into the wood grain, seal the raw wood with a layer of clear matte medium or white gesso before you start your actual painting layers.
Step 2: Mountains and Earth
-
Define the mountains:
Mix a small amount of black or dark grey into your white paint to create a slate grey. Paint the body of the mountains, leaving the very tips white or painting crisp white highlights on the sun-facing slopes later. -
Add mountain textures:
Using your liner brush and pure white paint, add jagged lines down the slopes of the grey mountains to simulate snow-capped ridges and crevasses. Let the dark background peek through for contrast. -
Block in the Earth:
Paint the Earth circle with a base of bright teal or light blue. I like to let this dry briefly before adding the next layer to prevent muddiness. -
Add continents:
Dab dark green paint onto the teal circle to create abstract continent shapes. These don’t need to be geographically perfect; just suggest landmasses. -
Paint the foreground hill:
At the very bottom of the ornament, paint a rolling hill shape using a warm brown. Add a few streaks of darker brown to suggest texture and soil.
Step 3: Trees and Details
-
Paint the evergreen trees:
Using forest green and a detail brush, paint vertical lines for tree trunks. Starting at the top of each line, paint small, downward-slanting dashes that get wider as you move down to create the pine branches. -
Highlight the trees:
Mix a little white or light green into your forest green. Add tiny touches of this lighter color to the tips of the branches to show where the moonlight hits them. -
Create the crescent moon:
With a steady hand and your finest brush, paint a small, sharp crescent moon in the dark sky using gold paint. -
Add stars:
Dip the tip of a toothpick or the very end of your liner brush into white or gold paint. Gently dot the sky to create distant stars. Group a few together for a natural look. -
Add metallic accents:
For a magical touch, add tiny dots of gold paint along the mountain ridges or amidst the trees, mimicking fireflies or glimmering snow. -
Seal and hang:
Once fully dry, apply a coat of varnish to protect your artwork. Thread a gold string through the eyelet to finish your ornament.
Pro Tip: Crisp Edges
When painting the circular Earth, use the end of a lip gloss cap or a stencil to lightly trace a perfect circle first. This makes painting the edge much easier.
Hang your finished piece near a light source to let the metallic accents shimmer and bring the scene to life
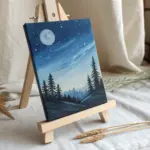

Have a question or want to share your own experience? I'd love to hear from you in the comments below!