Attics are basically the ultimate painting puzzle: sloped ceilings, quirky angles, and those little knee walls that can either feel charming or chaotic. I’m sharing my favorite attic painting ideas that help you brighten the dark corners, calm the geometry, and make the whole space feel intentional.
All-White Brightening Trick
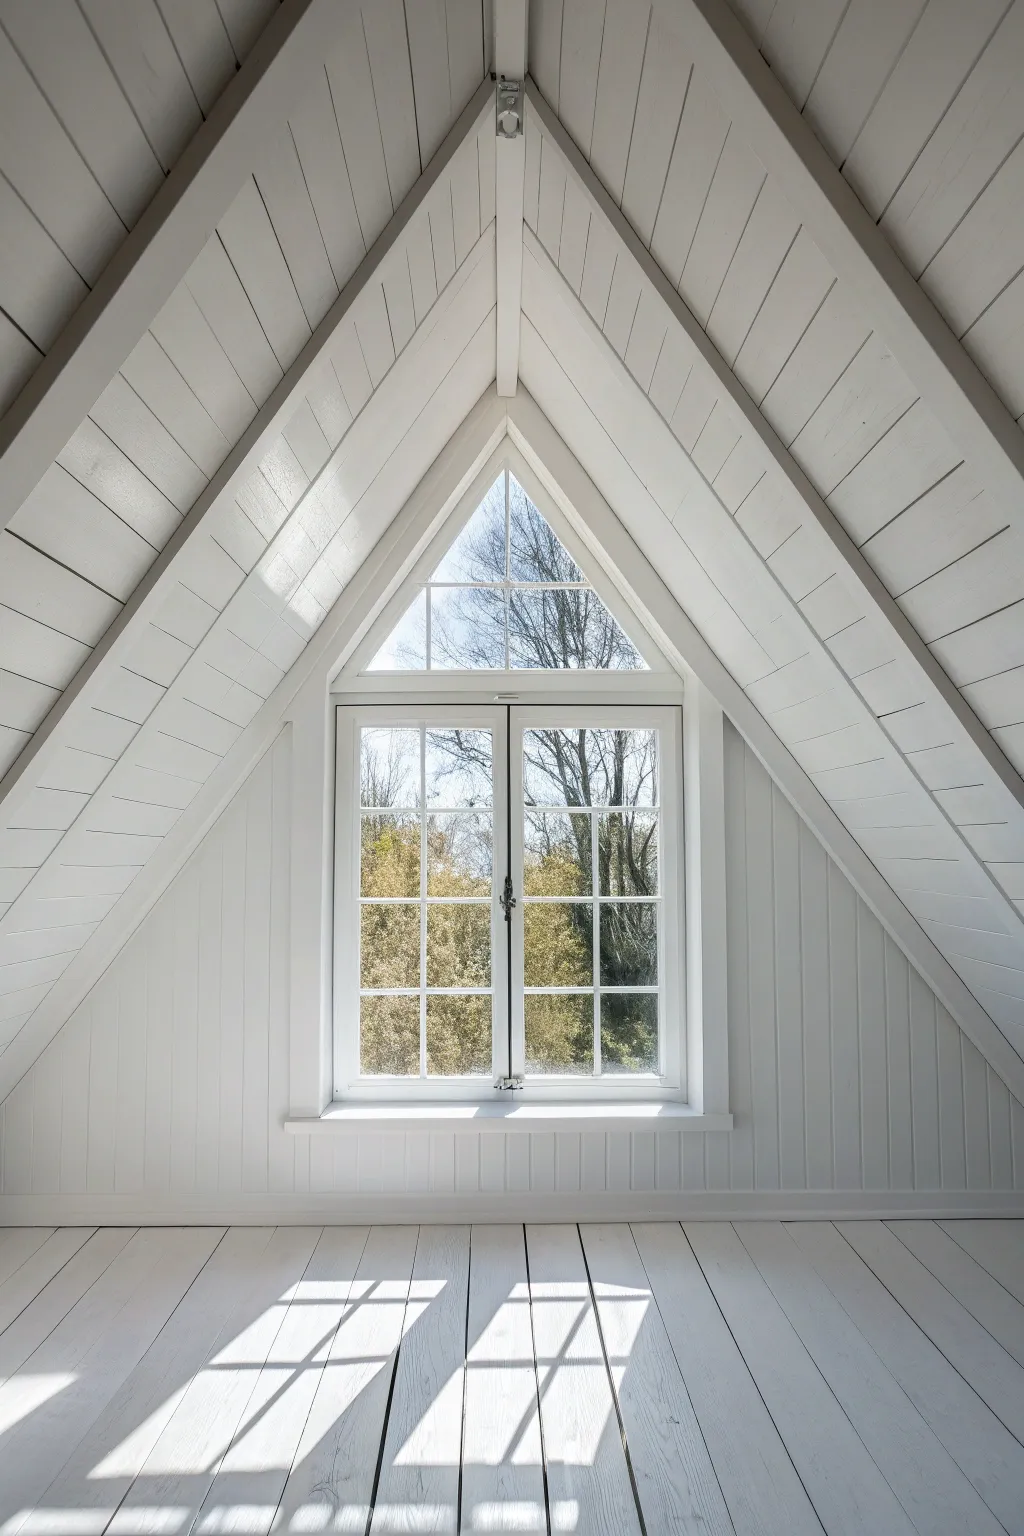
Transform a dark, cramped attic into an airy sanctuary using the power of pure white paint. By enveloping every surface—walls, ceiling beams, and floorboards—in a unified bright tone, you create an optical illusion of expansive height and serene minimalism.
Step-by-Step Tutorial
Materials
- High-quality white primer (stain-blocking)
- Pure white interior paint (semi-gloss or satin for trim)
- Pure white floor paint (durable epoxy or polyurethane blend)
- Angled sash brush (2.5 inch)
- Medium nap roller and extension pole
- Floor sander (rented)
- Sandpaper (80, 120, and 220 grit)
- Caulk and caulking gun
- Wood filler
- Painter’s tape
- Drop cloths
- Mild detergent and sponge
Step 1: Preparation & Repairs
-
Clear and Clean:
Remove all furniture and loose items from the attic space. Thoroughly vacuum dust from the corners, beams, and especially in the gaps between floorboards. -
Wash Surfaces:
Scrub the walls, ceiling planks, and beams with a mild detergent solution to remove any grease or grime. Let everything dry completely. -
Fill Imperfections:
Inspect the wood paneling and beams for cracks or holes. Apply wood filler to nail holes and significant gaps, smoothing it over with a putty knife. -
Seal Gaps:
Run a bead of paintable caulk along the seams where walls meet the ceiling or where beams intersect. This ensures a seamless, monolithic look later. -
Sand Walls and Trim:
Lightly sand painted surfaces with 120-grit sandpaper to create a ‘tooth’ for the new paint. Wipe away the dust with a tack cloth.
Step 2: Painting Ceiling & Walls
-
Tape Off Windows:
Carefully apply painter’s tape to the glass panes of your triangular or standard windows to protect them from splatters. -
Prime the Wood:
Apply a stain-blocking primer to the ceiling planks and beams. Wood knots can bleed through white paint, so don’t skip this step. -
Cut In Edges:
Using your angled sash brush, paint along the edges of the ceiling beams, corners, and around the window frames first. -
Paint the Ceiling Planks:
Use a roller or a wide brush to paint the flat sections of the ceiling paneling. Follow the direction of the wood grain for a smooth finish. -
Coat the Beams:
I like to switch back to a brush for the structural beams to ensure the paint gets into every groove and texture of the wood. -
Apply Second Coat:
Once the first coat is dry (check your can for times), apply a second coat to walls and ceiling for true, opaque coverage.
Bleed-Through Blues?
If yellow spots appear through the primer (tannin bleed), spot-treat them with a shellac-based primer before applying your topcoat.
Step 3: Flooring Transformation
-
Sand the Floors:
Use a floor sander with 80-grit paper to remove old varnish, then progress to 120-grit for a smooth finish. Vacuum up all dust meticulously. -
Prime the Floorboards:
Roll on a dedicated floor primer. Start from the corner furthest from the exit and work your way out. -
First Floor Coat:
Apply your specialized white floor paint using a roller on an extension pole. Keep a wet edge to avoid lap marks. -
Detail the Gaps:
If your roller misses the deep grooves between older floorboards, use a brush to quickly fill them in before the surface paint dries. -
Final Coat and Cure:
Apply a second or third coat as needed for durability. Allow the floor to cure for at least 48 hours before walking on it with shoes.
Add Subtle Depth
Use a satin finish on the walls but a high-gloss on the floor. The slight difference in sheen adds dimension to an all-white room.
Enjoy the incredible light and openness of your newly refreshed attic retreat


Monochromatic Slopes for a Bigger Feel
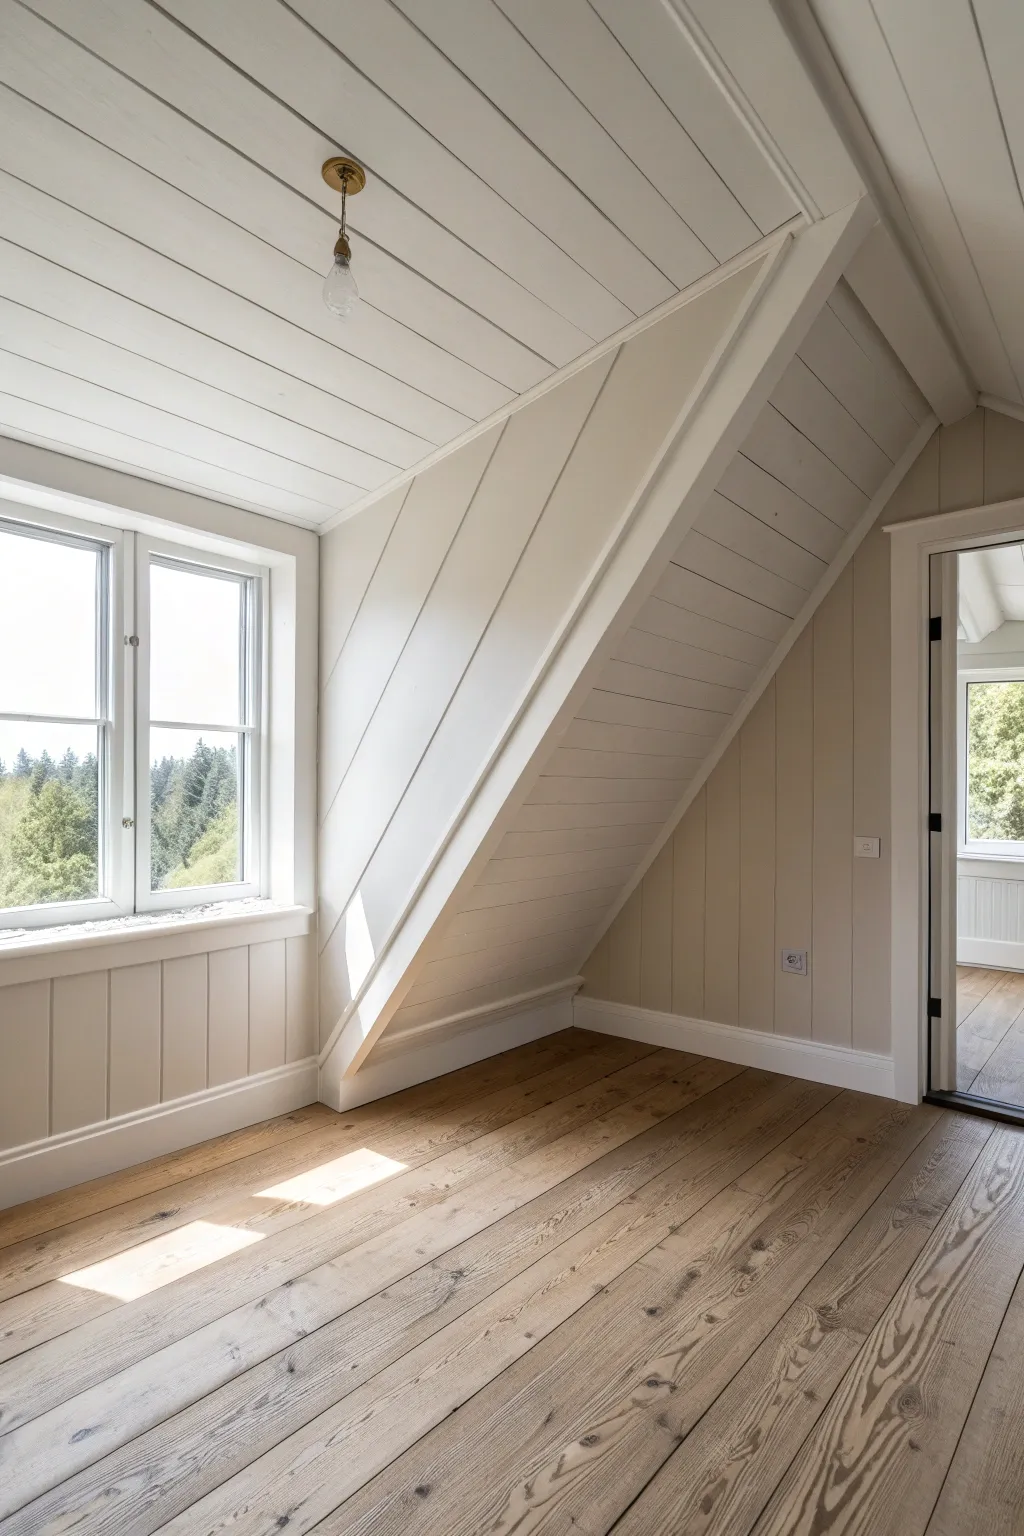
Transform a cramped attic space into an expansive, light-filled retreat using a monochromatic palette that blurs the lines between walls and ceiling. This project focuses on painting shiplap paneling a uniform, soft white to maximize height and reflect natural light.
Detailed Instructions
Materials
- High-quality interior acrylic latex paint (soft white/off-white, eggshell or satin finish)
- Angled sash brush (2.5 inch)
- Microfiber roller covers (3/8 inch nap)
- Roller frame and extension pole
- Painter’s tape (multi-surface)
- Canvas drop cloths
- Sanding sponge (medium grit)
- Tack cloth
- Caulk gun and paintable acrylic latex caulk
- Screwdriver (for removing hardware)
- Ladder or step stool
Step 1: Preparation & Repair
-
Clear and Protect:
Remove all furniture from the room to give yourself ample workspace. Lay down canvas drop cloths over the wooden flooring, ensuring they are taped down at the edges to prevent slipping. -
Remove Hardware:
Using a screwdriver, take off all switch plates, outlet covers, and any window hardware that might get in the way. If there is a light fixture, loosen the canopy or tape it off carefully. -
Inspect the Shiplap:
Walk around the room and inspect the tongue-and-groove paneling. Look for any nail holes, gouges, or gaps that need attention before painting. -
Fill Imperfections:
Fill any nail holes with wood filler. For gaps between the trim and the paneling, run a bead of paintable caulk to ensure a seamless transition later on. -
Sand the Surfaces:
Lightly sand the walls, ceiling, and trim with a medium-grit sanding sponge. This scuffs up the surface to help the new paint adhere better, especially if the previous finish was glossy. -
Clean Dust:
Wipe down all surfaces thoroughly with a tack cloth or a damp rag to remove any sanding dust. Paint won’t stick to a dusty surface, so this step is crucial. -
Tape edges:
Apply painter’s tape along the floorboards, window panes, and door jambs to protect areas you don’t want painted. Press the tape edge down firmly to prevent bleed-through.
Step 2: Painting the Slopes & Walls
-
Cut In the Ceiling:
Start at the highest point of the ceiling. Use your angled sash brush to ‘cut in’ a 2-3 inch band of paint along the corners and edges where the roller won’t reach. -
Address the Grooves:
Before rolling, use the brush to run paint horizontally into the shiplap grooves. Rollers often miss these deep recesses, so I prefer to pre-fill them by hand. -
Roll the Ceiling:
Attach the roller to an extension pole. Apply paint to the large flat surfaces of the ceiling shiplap, rolling in the direction of the boards to maintain a uniform texture. -
Cut In the Walls:
Once the ceiling is done, move to the slanted walls and vertical knee walls. Repeat the cutting-in process around the window frames, corners, and baseboards. -
Roll the Walls:
Roll the walls using smooth, even strokes. Work in small sections, overlapping your wet edge to avoid stripe marks as the paint dries. -
Paint the Trim:
Paint the window casings, baseboards, and door frames last. Since this is a monochromatic look, you can use the same paint color, but you might consider a slightly higher gloss for durability. -
Check for Drips:
Scan the shiplap grooves and corners for any paint drips or runs while the paint is still wet, smoothing them out immediately with your brush.
Sticky Situation
If old wood knots bleed through your fresh white paint, stop painting immediately. Spot-prime the knots with a shellac-based primer, let it dry, and then resume your topcoat.
Step 3: Finishing Touches
-
Apply Second Coat:
Allow the first coat to dry according to the manufacturer’s instructions (usually 4 hours). Apply a second coat to all surfaces to ensure rich, opaque coverage. -
Remove Tape:
Slowly peel off the painter’s tape while the second coat is still slightly tacky. pulling at a 45-degree angle away from the painted edge helps create crisp lines. -
Reinstall Hardware:
Once walls are fully cured (wait at least 24 hours just to be safe), screw the outlet covers and switch plates back into place. -
Final Cleanup:
Fold up your drop cloths carefully to keep paint chips contained, sweep the beautiful wood floors, and bring your furniture back in.
Sheen Strategy
To add subtle depth without changing colors, paint the walls in a matte finish and the trim/shiplap in satin. The light hits the textures differently, creating visual interest.
Enjoy the peaceful, expansive feeling of your newly brightened attic retreat


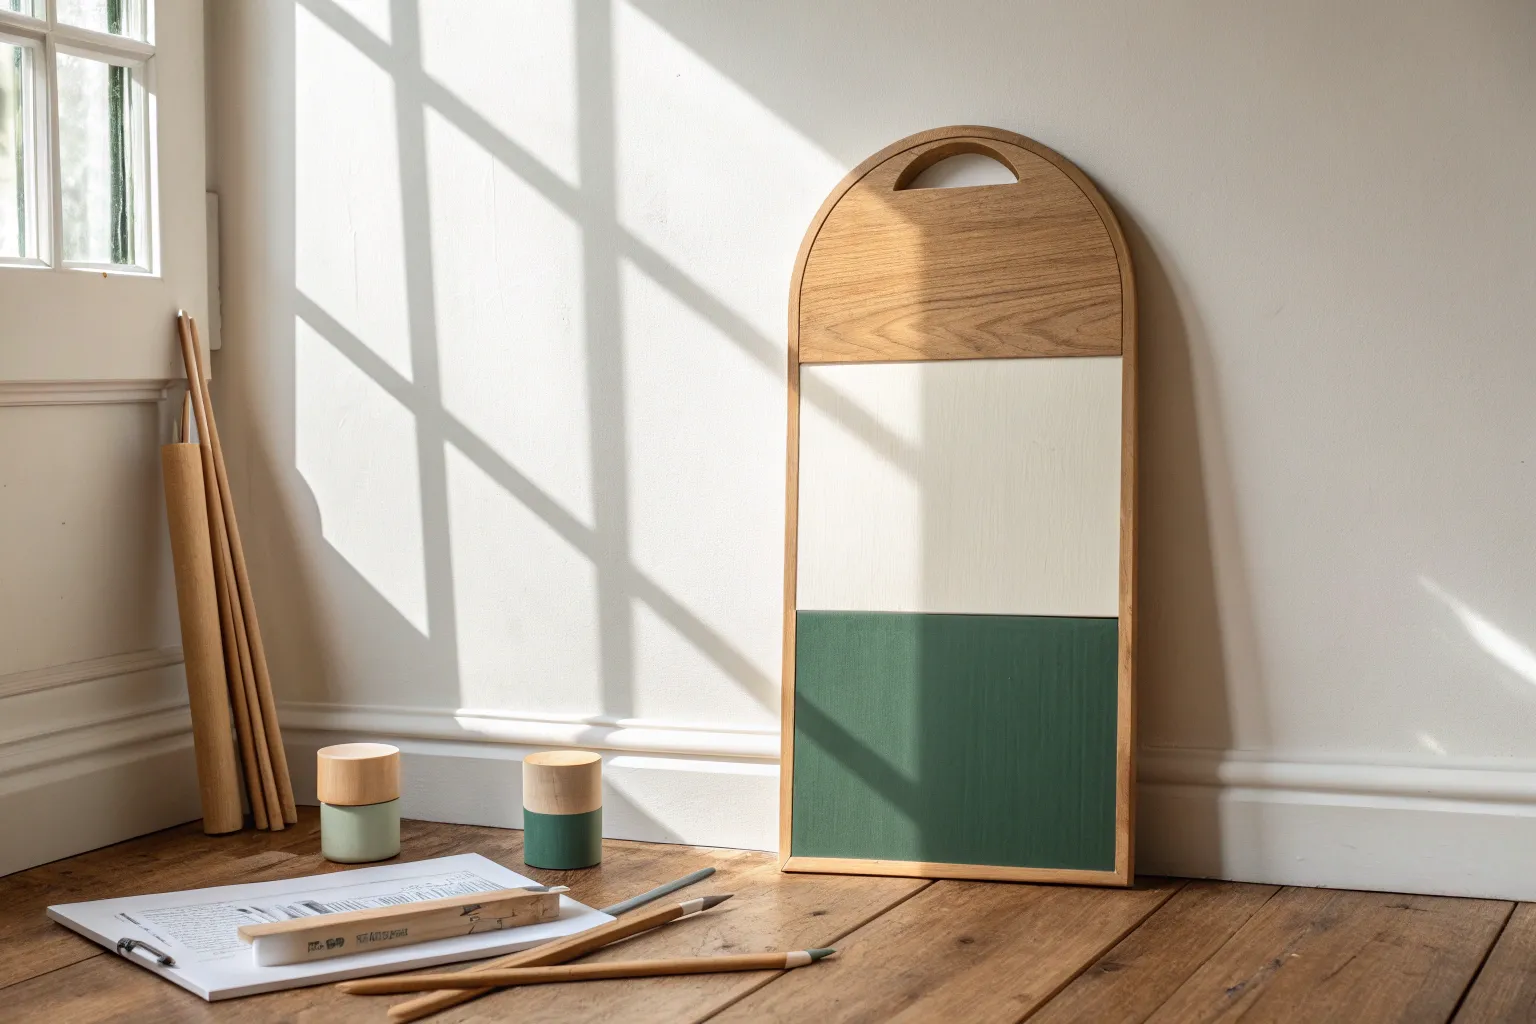
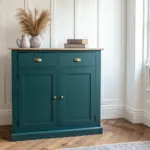
Gable Feature Wall, White Slopes
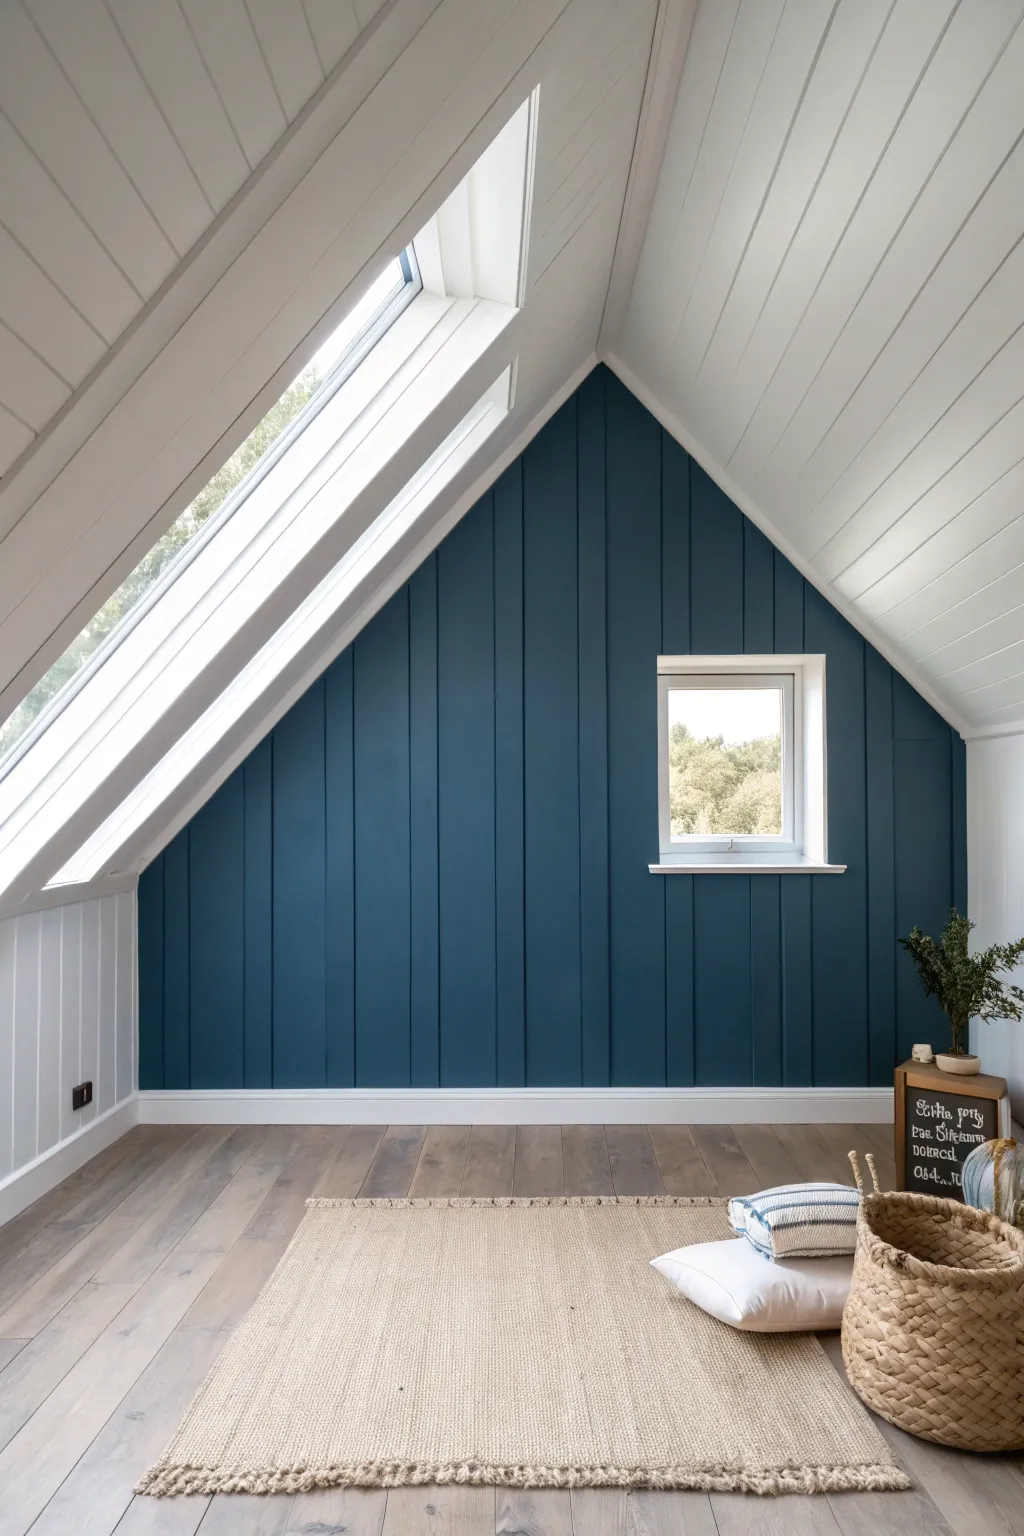
Transform a plain attic space into a cozy retreat by creating a dramatic focal point with a deep teal feature wall. This project highlights the architectural shape of the gable end while contrasting beautifully with crisp white sloping ceilings.
Step-by-Step
Materials
- Deep teal interior paint (matte or eggshell finish)
- High-quality white ceiling paint (satin or semi-gloss)
- Painter’s tape (multi-surface)
- Drop cloths or plastic sheeting
- Spackle or wood filler
- Sandpaper (120 and 220 grit)
- Angled sash brush (2.5 inch)
- Standard paint roller frame and handle
- microfiber roller covers (3/8 inch nap)
- Extension pole
- Paint tray and liners
- Ladder
- Clean rags
- Mild detergent
Step 1: Preparation
-
Clear the room:
Begin by removing all furniture, rugs, and decor from the room to give yourself ample space to maneuver the ladder and extension pole. -
Clean the surfaces:
Wipe down the wood paneling on both the gable wall and the sloping ceilings with a mild detergent solution to remove dust and oils. -
Inspect and repair:
Check the vertical paneling grooves and flat surfaces for any nail holes or dents. Fill these with spackle or wood filler and let dry completely. -
Sand for smoothness:
Lightly sand the filled areas with 120-grit sandpaper, then give the entire wall and ceiling a quick scuff sand with 220-grit paper to help the paint adhere. -
Protect the floors:
Lay down drop cloths, ensuring they cover the flooring entirely. Tape edges down if necessary so they don’t slide under your ladder.
Groove Strategy
Don’t let paint pool in the paneled grooves. After brushing paint into them, do a quick pass with a “dry” brush (no new paint) to smooth out drips before rolling.
Step 2: Painting the Slopes
-
Tape off the gable wall:
Apply painter’s tape along the edge where the sloping ceiling meets the gable wall to protect the area you will paint teal later. -
Cut in the edges:
Using an angled sash brush and your white ceiling paint, carefully cut in along the skylight frame and the bottom edges where the slope meets the knee wall. -
Paint the grooves:
Before rolling, use your brush to get paint deep into the vertical grooves of the ceiling paneling. This ensures no dark gaps show through later. -
Roll the slopes:
Use a roller on an extension pole to paint the flat surfaces of the sloping ceiling. Work in sections to maintain a wet edge. -
Apply a second coat:
Allow the first coat to dry according to the manufacturer’s instructions, then apply a second coat for a solid, opaque white finish.
Step 3: The Feature Wall
-
Switch tape location:
Once the white ceiling paint is fully cured (give it at least 24 hours), tape off the white ceiling edge to protect it from the teal paint. -
Tape the window and baseboard:
Apply tape around the small window frame and along the top edge of the floor skirting board. -
Cut in with teal:
Open your deep teal paint. Use a clean angled sash brush to cut in along the ceiling line, corners, and around the window frame. -
Brush the grooves:
Just as with the ceiling, use the brush to paint inside the vertical grooves of the gable wall first. I find doing 3-4 grooves at a time works best before rolling. -
Roll the panels:
Immediately after brushing the grooves, roll the flat panel sections with the teal paint to smooth out brush marks and create an even texture. -
Wait and recoat:
Let the first coat of teal dry completely. Dark colors often require a second or even third coat to achieve full depth and richness. -
Remove tape:
While the final coat is still slightly tacky, carefully peel away the painter’s tape at a 45-degree angle to ensure a crisp, clean line. -
Final touch-ups:
Inspect your edges. If any teal bled onto the white or vice versa, use a small artist’s brush to carefully touch up the imperfections once everything is dry.
Bleeding Tape Lines?
If paint bleeds under the tape, wait for it to dry fully. Then, lightly scrape the excess carefully with a putty knife or cover it with a tiny bit of the base color.
Enjoy the dramatic contrast of your new attic retreat.

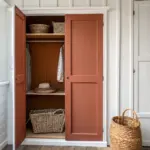
Two-Tone Knee Wall Definition
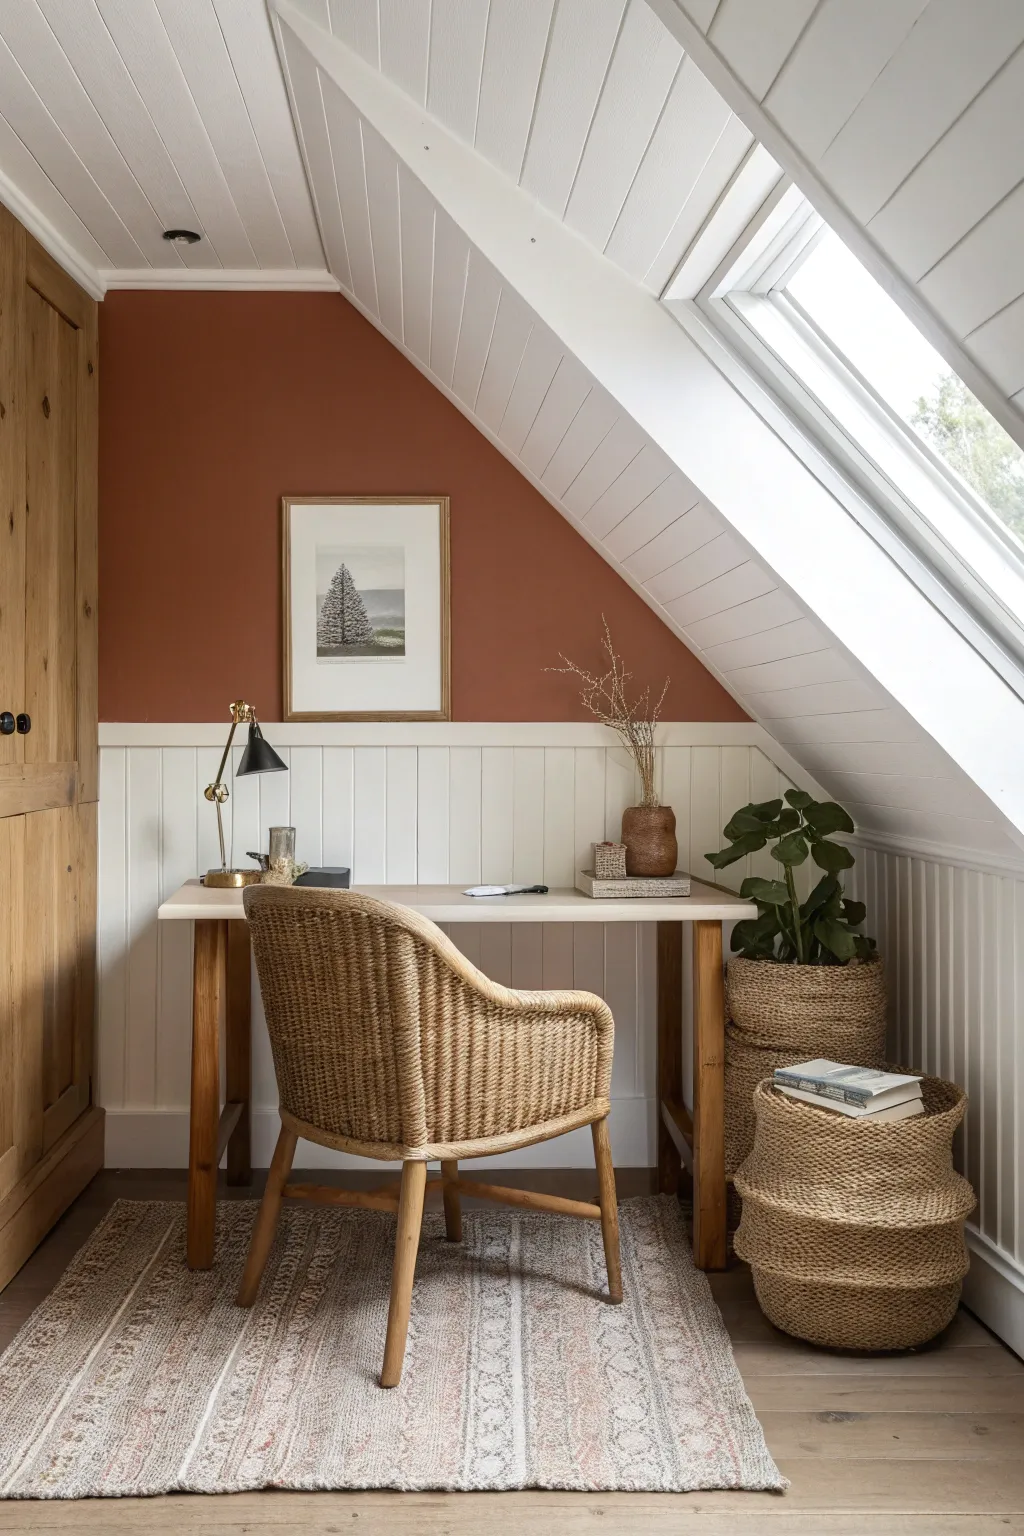
Transform a slanted attic nook into a defined, cozy workspace using a high-contrast two-tone effect. This project combines classic white beadboard paneling on the knee wall with a warm, earthy terra-cotta hue above to accentuate the unique architecture.
Detailed Instructions
Materials
- Interior latex paint (terra-cotta/rust color, eggshell or matte finish)
- Interior trim paint (bright white, satin or semi-gloss finish)
- Beadboard paneling sheets or tongue-and-groove planks
- Top cap moulding (dado rail)
- Baseboard moulding
- Construction adhesive (e.g., Liquid Nails)
- Finishing nails & nail gun (or hammer)
- Wood filler
- Sandpaper (120 and 220 grit)
- Painter’s tape (high quality)
- Drop cloths
- Paint rollers (flocked for trim, standard nap for walls)
- Angled sash brush (2.5 inch)
- Caulk gun & paintable latex caulk
- Spirit level
- Circular saw or jigsaw (for cutting panels)
Step 1: Preparation & Wall Color
-
Clear and clean:
Remove all furniture and cover the floor with drop cloths. Wash the walls with a mild TSP solution to ensure a clean surface for painting, especially if the attic has been dusty. -
Patch imperfections:
Inspect the upper drywall area for any dents or nail holes. Fill these with spackle, let dry, and sand smooth so the feature color will look flawless. -
Tape the ceiling line:
Apply painter’s tape along the ceiling line where the slope meets the flat ceiling or skylight trim. Press the edges down firmly with a putty knife to prevent bleed-through. -
Cut in the color:
Using an angled sash brush, carefully paint the terra-cotta color along the ceiling edges, corners, and around the skylight window frame. -
Roll the upper wall:
Load a standard roller with your earthy rust color. Paint the upper section of the wall, extending slightly down past where the wainscoting will sit to ensure full coverage. I find two coats usually give that rich, deep saturation seen in the photo.
Step 2: Installing the Wainscoting
-
Measure and cut panels:
Determine the desired height for your knee wall wainscoting (typically 30-36 inches). Measure and cut your beadboard sheets or planks to size, accounting for electrical outlets. -
Establish a level line:
Use a spirit level to draw a horizontal line across the wall at your determined height. This ensures your paneling stays straight even if the floor is slightly uneven. -
Apply adhesive:
Apply construction adhesive to the back of the first panel in a zig-zag pattern. Press it firmly against the wall, aligning the top edge with your level line. -
Secure with nails:
Secure the panel with finishing nails, placing them into the studs where possible, or along the top and bottom edges where moulding will eventually cover them. -
Continue installation:
Repeat the process across the wall, butting the panels tightly together. If using sheets, ensure the seams land on studs or are glued securely to avoid movement.
Uneven Gaps?
If floors are uneven, don’t force the panel down. Install it level and cover the bottom gap with the baseboard moulding later.
Step 3: Adding Trim & Finishing
-
Install baseboards:
Measure and cut baseboard moulding for the floor edge. Nail it into place through the bottom of the beadboard and into the wall studs. -
Add the top rail:
Ideally, choose a flat ledge or simple cap moulding to finish the top edge of the wainscoting. Cut it to length and nail it down into the top edge of the paneling for a crisp dividing line. -
Fill and caulk:
Fill all nail holes with wood filler. Run a bead of paintable caulk along the top of the rail where it meets the wall, inside corners, and along the baseboard seams to create a seamless look. -
Sand smooth:
Once dry, sand the wood filler flush and lightly scuff the pre-primed beadboard if needed to help the paint adhere better. -
Paint the woodwork:
Using a bright white satin or semi-gloss trim paint, coat the wainscoting, baseboards, and top rail. Use a brush for grooves and a small flocked roller for flat areas to minimize brush marks. -
Final touch-ups:
Remove the tape from the ceiling carefully. Inspect your crisp line between the rust wall and white rail; use a small artist’s brush to touch up any tiny spots for a perfect finish.
Cohesive Decor
Paint the skylight window trim in the same white as the wainscoting to tie the upper and lower halves of the room together visually.
Step back and admire how the warm paint color instantly makes the slanted ceiling feel like a deliberate design feature rather than an awkward angle
BRUSH GUIDE
The Right Brush for Every Stroke
From clean lines to bold texture — master brush choice, stroke control, and essential techniques.
Explore the Full Guide
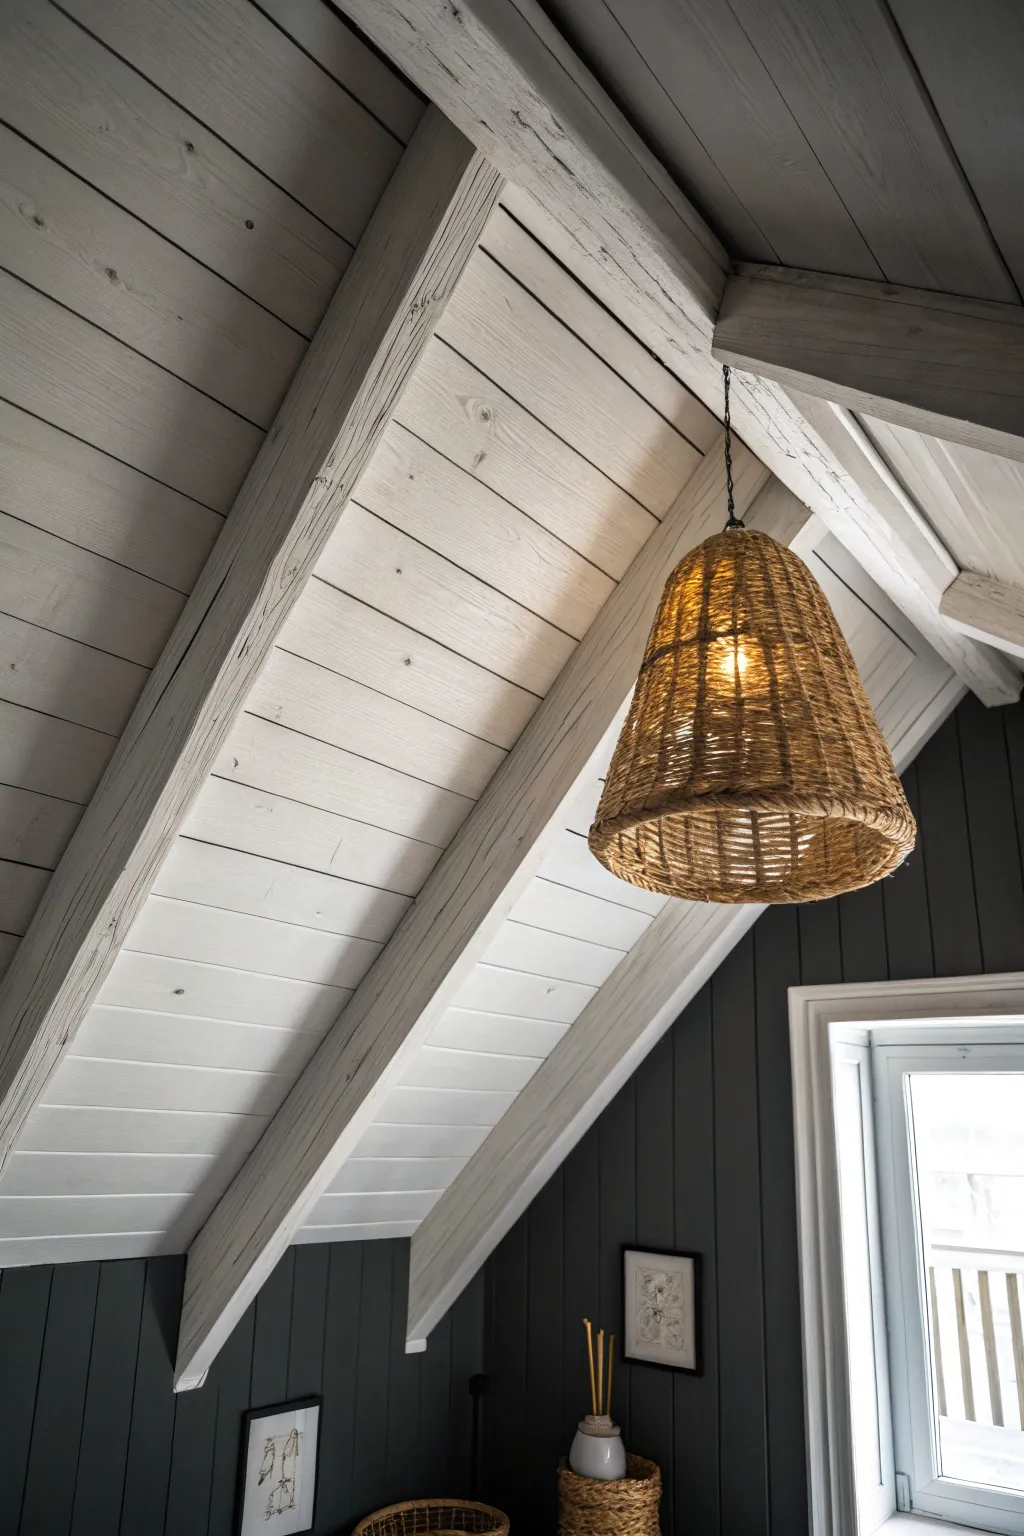
Painted Beams That Blend In
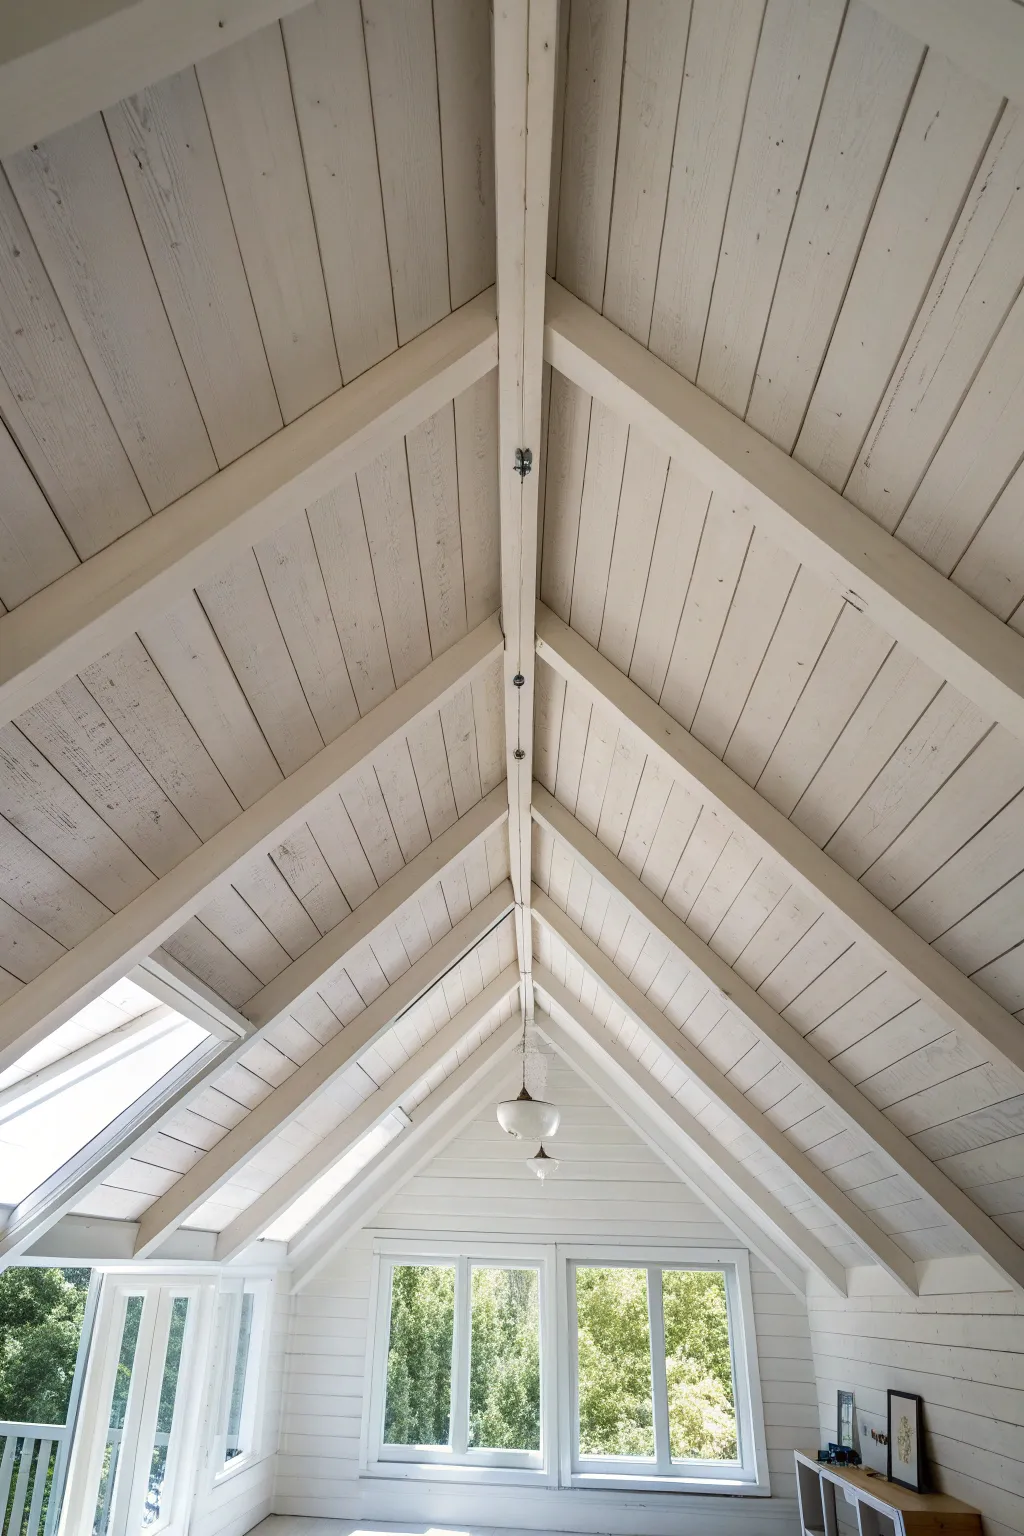
Achieve a soaring, airy feeling in your attic space by embracing a monochromatic palette that blends exposed structural beams seamlessly with the ceiling paneling. This project focuses on applying a uniform white finish to create a cohesive, light-filled sanctuary.
How-To Guide
Materials
- High-quality acrylic latex primer (stain-blocking)
- Interior acrylic latex paint (eggshell or satin finish, pure white)
- Angled sash brush (2.5 inch)
- Small trim brush (1-1.5 inch)
- Paint roller frame and extension pole
- Microfiber roller covers (3/8 inch nap)
- Painter’s tape
- Drop cloths
- Sanding sponges (medium and fine grit)
- Caulk gun and paintable latex caulk
- Dust mask and safety glasses
- Tack cloth
- Ladder or scaffolding
Step 1: Preparation & Cleaning
-
Clear and protect:
Remove all furniture from the room or move it to the center and cover completely. Lay down drop cloths to protect the flooring, securing them with tape if necessary to prevent slipping. -
Inspect the woodwork:
Examine the beams and tongue-and-groove ceiling boards for any rough spots, splinters, or old peeling paint. Address these areas first to ensure a smooth final finish. -
Clean thoroughly:
Vacuum the beams and ceiling boards to remove cobwebs and heavy dust. Follow up by wiping everything down with a damp cloth or a mixture of water and mild detergent to remove grime. -
Sand rough areas:
Use a medium-grit sanding sponge to smooth out any distinct rough patches on the wood. I find it helpful to lightly scuff glossy surfaces to help the primer adhere better. -
Remove dust:
After sanding, use a tack cloth to pick up every bit of fine sawdust. Painting over dust will create a gritty texture that detracts from the clean look. -
Fill gaps with caulk:
Apply a thin bead of paintable latex caulk into significant cracks, nail holes, or gaps where the beams meet the ceiling panels. Smooth it instantly with a damp finger for a seamless look.
Knot Bleed Prevention
If the wood has many dark knots, use a shellac-based primer specifically on the knots before the general water-based primer. Shellac is superior at locking in tannins.
Step 2: Priming the Wood
-
Tape off edges:
Apply painter’s tape around windows, trim, or walls that you do not intend to paint. Press the tape edges down firmly to prevent bleed-through. -
Cut in the primer:
Using an angled sash brush, apply a stain-blocking primer to the corners, edges, and crevices of the tongue-and-groove boards where a roller won’t reach. -
Prime the beams:
Brush primer onto the sides and bottom faces of the exposed beams. Pay special attention to knots in the wood, as these can bleed tannins through the final paint layer if not sealed properly. -
Roll the flat surfaces:
Use a roller on an extension pole to apply primer to the larger flat sections of the ceiling panels between the beams. Work in small sections to maintain a wet edge. -
Allow to dry:
Let the primer dry completely according to the manufacturer’s instructions. If you see dark wood knots still showing through, spot-prime those specific areas a second time.
Sheen Selection
For this look, an eggshell or satin finish is ideal. It reflects enough light to make the space feel airy but isn’t so glossy that it highlights every imperfection in the old wood.
Step 3: Painting
-
Cut in the first coat:
Just like with priming, start by using your brush to paint the edges, corners, and grooves of the ceiling boards with your chosen white paint. -
Paint the beam details:
Brush paint onto the intricate angles where the beams join or meet the central ridge beam. Ensure the paint gets into the wood grain without pooling or dripping. -
Roll the ceiling sections:
Roll the paint onto the flat ceiling panels. I prefer to roll parallel to the direction of the boards to minimize texture differences. -
Paint the beam faces:
Use the brush or a small roller to coat the main faces of the beams. Long, smooth strokes will help mimic the grain of the wood and reduce brush marks. -
Check for drips:
Immediately scan the area you just painted for drips, especially on the underside of the beams, and smooth them out before the paint sets. -
Apply second coat:
Once the first coat is fully dry, repeat the entire painting process. Two coats are essential to get that solid, opaque finish that makes the beams blend seamlessly with the ceiling. -
Final touches:
Remove the painter’s tape carefully while the paint is still slightly tacky to avoid peeling any dry paint. Let the room cure for at least 24 hours before moving furniture back in.
Enjoy the fresh, expansive atmosphere your newly unified ceiling brings to the room
Painted Beams That Stand Out
Transform a dark or unfinished attic ceiling into an airy retreat by contrasting whitewashed beams against deep charcoal walls. This technique highlights the natural wood grain while brightening the overall space.
Step-by-Step Tutorial
Materials
- White or off-white ceiling paint (matte or satin finish)
- Deep charcoal or slate grey wall paint (eggshell or satin finish)
- Primer (stain-blocking)
- Water for thinning paint (if whitewashing)
- Angled sash brush (2.5 inch)
- Medium nap paint roller and tray
- Extension pole for roller
- Painter’s tape
- Drop cloths
- Sandpaper (120 and 220 grit)
- Tack cloth
- Ladder
Step 1: Preparation
-
Clear and Protect:
Begin by removing all furniture or covering it completely with plastic sheeting. Lay down heavy-duty drop cloths to protect the flooring from splatters. -
Surface Cleaning:
Dust the ceiling planks and beams thoroughly using a broom or vacuum with a brush attachment. Wipe down any dirty areas with a damp cloth to ensure the paint adheres properly. -
Sanding the Wood:
Lightly sand the beams and ceiling planks with 120-grit sandpaper to remove any gloss or rough splinters. I find this creates a better ‘tooth’ for the new finish. -
Clean Dust:
After sanding, use a tack cloth to remove every speck of sawdust. Dust is the enemy of a smooth whitewash finish. -
Tape Borders:
Apply painter’s tape along the edges where the ceiling meets the walls. Be precise here, as the contrast between the white ceiling and dark walls will be sharp.
Step 2: Painting the Ceiling and Beams
-
Mix the Whitewash:
If you want the wood grain to show through like in the photo, dilute your white latex paint with water. A 1:1 ratio is a good starting point, but test it on a scrap piece of wood first. -
Cut In the Edges:
Using your angled sash brush, paint along the perimeter of the ceiling and into the corners where the beams meet the planks. -
Brush the Grooves:
Use the brush to get the whitewash mixture into the tongue-and-groove gaps between the ceiling planks. A roller often misses these deep crevices. -
Roll the Planks:
Roll the flat surfaces of the ceiling planks with the whitewash. Work in small sections (about 3-4 feet) to keep a wet edge. -
Wipe Back (Optional):
For a more rustic, transparent look, wipe the wet paint gently with a lint-free rag immediately after applying. This reveals more grain. -
Paint the Beams:
Paint the structural beams last. Use long, continuous brush strokes along the length of the beam to mimic the wood grain direction. -
Assess and Recoat:
Let the first coat dry completely. If the coverage is too sheer for your taste, apply a second coat of the whitewash mixture.
Bleed-Through Blues?
If knots in the wood bleed through the white paint, spot-prime them with a shellac-based primer before applying your final coat.
Step 3: Painting the Walls
-
Tape the Ceiling:
Once the ceiling is fully dry (wait at least 24 hours), apply painter’s tape to the bottom edge of the sloped ceiling beams to protect your fresh whitewash. -
Cut In Walls:
Use the angled brush to cut in the dark charcoal paint along the ceiling line, corners, and around window trim. -
Roll the Walls:
Use a roller to fill in the main wall areas with the charcoal paint. Dark saturated colors often need two coats for full opacity. -
Remove Tape:
Pull the painter’s tape off while the wall paint is still slightly tacky to ensure a crisp, clean line without peeling.
Add Warmth
Use a warm white or cream paint instead of bright white for the beams to create a cozier, aged cottage aesthetic.
Now step back and admire how the light bounce from the ceiling opens up your entire attic space

PENCIL GUIDE
Understanding Pencil Grades from H to B
From first sketch to finished drawing — learn pencil grades, line control, and shading techniques.
Explore the Full Guide
Creamy Neutrals for Windowless Attics
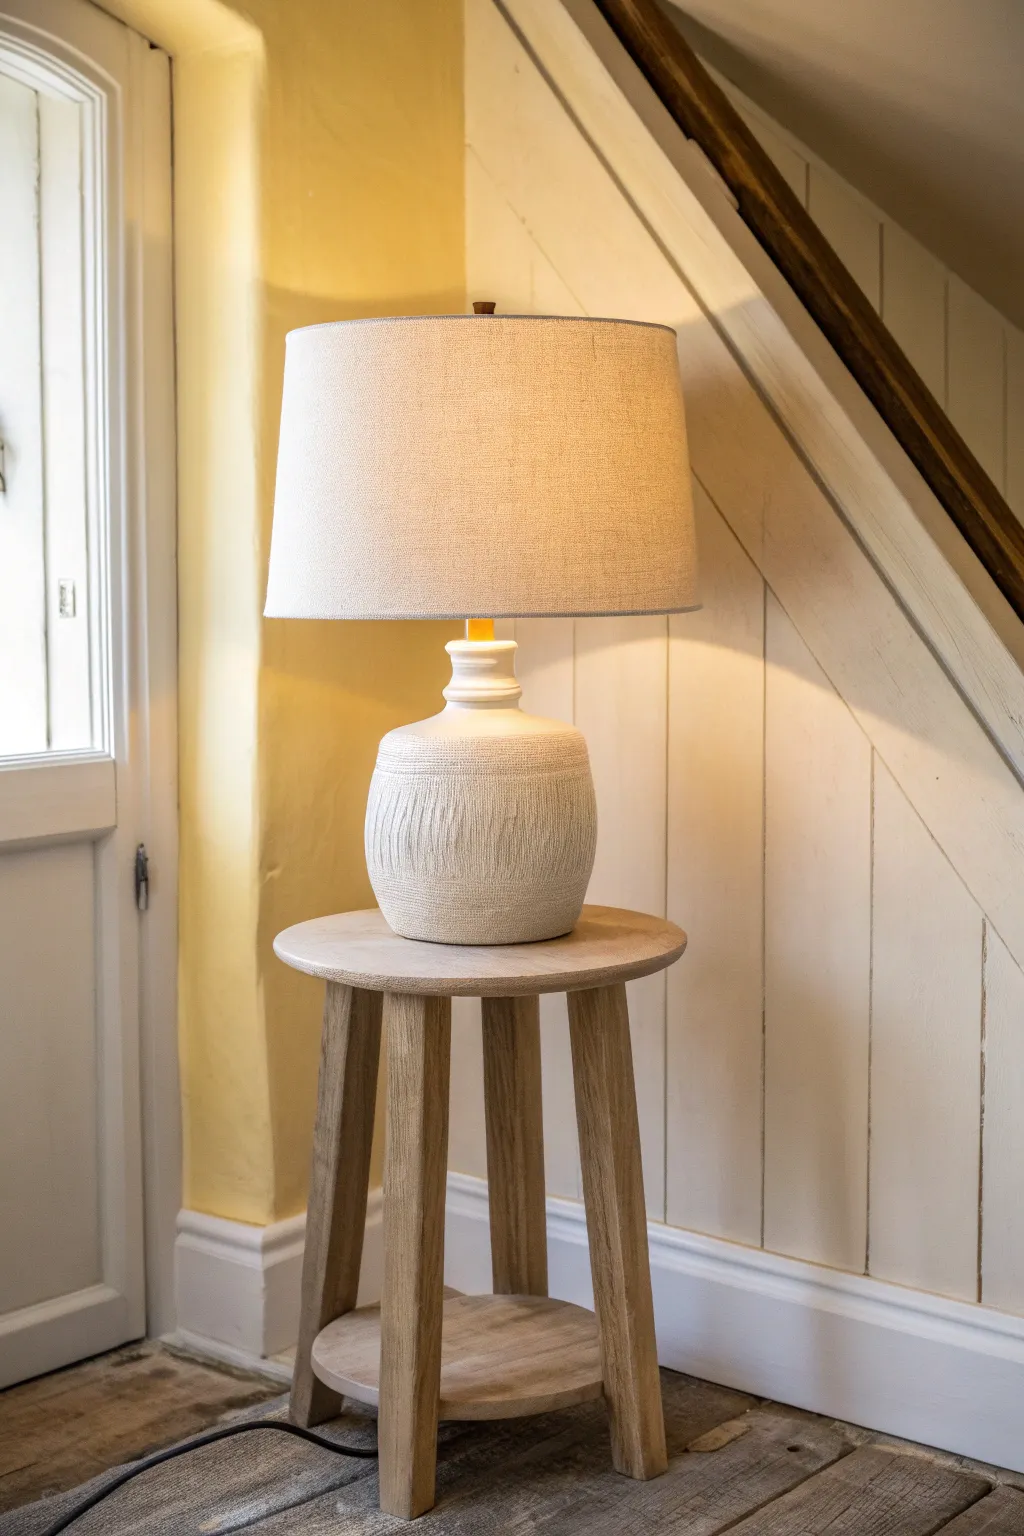
Bring warmth and organic texture to a dark corner with this beautifully tactile, hand-refinished lamp. Using a simple texturing technique and creamy neutral paints, you can transform a plain ceramic base into a stunning, artisanal-style piece that perfectly mimics high-end stoneware.
Detailed Instructions
Materials
- Old ceramic lamp base
- Medium-grit sandpaper (120-150 grit)
- White spray primer
- Baking soda or plaster of Paris
- Water-based paint (creamy white or bone color)
- Wide, stiff-bristled paintbrush
- Dry brush or old chip brush
- Sponge or lint-free rag
- Painter’s tape
- Clear matte sealant spray
Step 1: Prep and Prime
-
Clean the surface:
Before you begin, wipe down the lamp base thoroughly with a damp cloth and mild soap to remove any dust, grease, or grime that could prevent adhesion. -
Protect the hardware:
Carefully wrap the socket, cord, and any metal hardware you want to keep original with painter’s tape to shield them from paint and texture. -
Sand for grip:
Lightly scuff the entire ceramic surface with medium-grit sandpaper. This breaks the glossy glaze and gives the primer something deeper to hold onto. -
Apply primer:
In a well-ventilated area, spray a coat of white primer over the lamp base. Use short, even strokes to avoid drips and let it dry completely according to the can’s instructions.
Natural Grooves
For deeper, more deliberate ridges, run a cheap plastic fork or a wide-tooth comb horizontally through the wet texture paint.
Step 2: Create the Textured Mixture
-
Mix the paint:
Pour roughly a cup of your creamy neutral paint into a disposable container. I like to start small so the mix doesn’t dry out too quickly. -
Add texture agent:
Gradually stir in baking soda or plaster of Paris until the paint reaches a thick, fluffy consistency similar to whipped yogurt or mousse. -
Test the consistency:
Dab a small amount on cardboard. It should hold peaks slightly but still be spreadable without clumping excessively.
Cracking Paint?
If the texture cracks while drying, don’t panic. Simply dab a little fresh paint into the crack or embrace it for an aged, antique look.
Step 3: Application and Detailing
-
Apply the first coat:
Using a wide brush, apply the textured paint mixture to the lamp base. Don’t smooth it out; apply it haphazardly to build up an organic, uneven surface. -
Add horizontal striations:
While the paint is still wet, drag the stiff bristles of your brush horizontally around the base. This creates the subtle, pottery-wheel-style grooves seen in the reference image. -
Refine the texture:
Go back over certain areas with lighter horizontal strokes if the paint starts to settle too flat. You want distinct ridges. -
Let it cure:
Allow this textured layer to dry completely. Since the mixture is thick, it might take a few hours or overnight.
Step 4: Layering and Finishing
-
Check for gaps:
Inspect the dried surface. If you see too much original surface showing through the texture, dab a little more of the mixture into the sparse spots. -
Dry brush for depth:
Dip a dry chip brush into a slightly lighter shade of off-white paint (without baking soda). Offload almost all the paint onto a paper towel, then lightly whisk it horizontally over the dried ridges to highlight the texture. -
Gently sand:
Once everything is bone dry, run a piece of sandpaper very lightly over the roughest peaks to knock down any sharp bits, creating a worn, aged ceramic feel. -
Seal the finish:
Spray the entire base with a clear matte sealant. This is crucial as textured paint can be porous and prone to dust accumulation. -
Remove tape:
Carefully peel away the painter’s tape from the socket and cord. -
Final assembly:
Screw in your lightbulb and attach a complementary shade, preferably a linen drum shade to echo the natural textures of the base.
Now you have a custom, pottery-inspired lamp that brings character to your attic space
Cool Pale Color to Calm Busy Angles
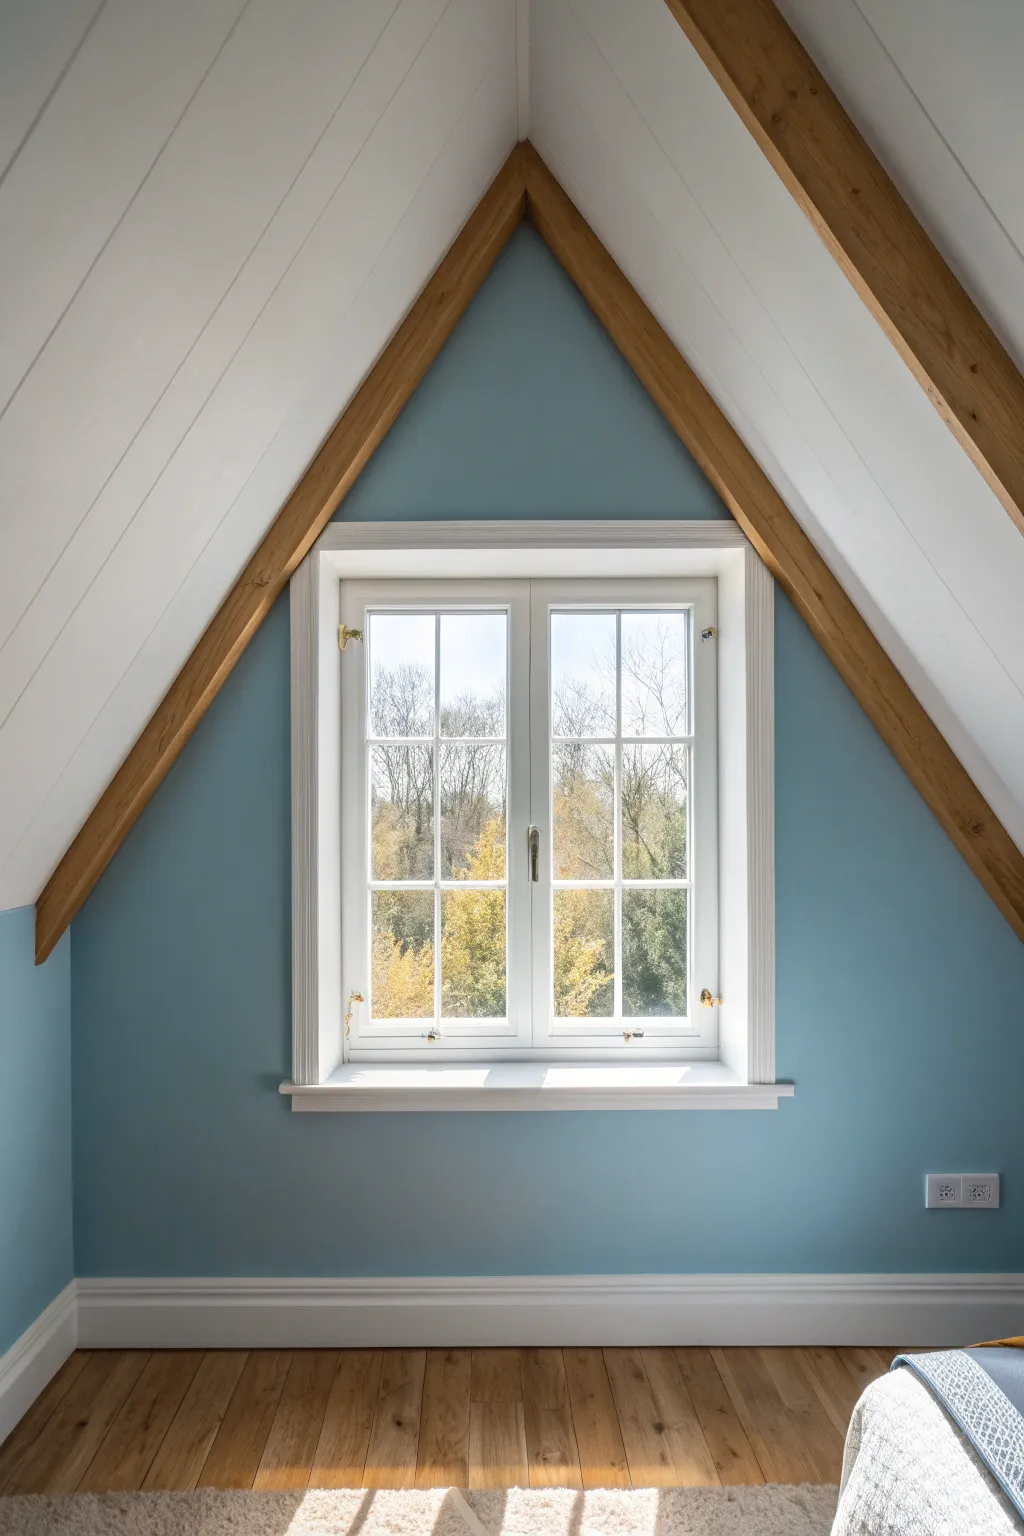
Capture the serenity of a quiet attic nook by painting this peaceful blue interior scene, featuring strong architectural angles softened by natural light. This acrylic project focuses on clean lines, smooth gradients for the walls, and detailed texture work for the view outside the window.
Step-by-Step Tutorial
Materials
- Acrylic paints (Phthalo Blue, Titanium White, Burnt Umber, Yellow Ochre, Sap Green, Payne’s Gray)
- Canvas board or stretched canvas (11×14 or similar aspect ratio)
- Flat shader brushes (1 inch, 1/2 inch)
- Round detail brushes (size 0, 2, 4)
- Ruler or straight edge
- Pencil and eraser
- Painter’s tape (optional)
- Palette and water cup
Step 1: Sketching the Architecture
-
Establish the Triangle:
Begin by drawing the dominant triangular shape of the roofline. Use a ruler to ensure the lines meet perfectly at the top center of your canvas, creating an inverted ‘V’ shape. -
Draft the Window:
Center a rectangular window frame within the blue wall space. Draw the inner mullions (the grid lines) carefully, dividing the window into two main vertical panes, each split into smaller squares. -
Outline the Beams:
Sketch the thick wooden beams running parallel to the roofline triangle. They should frame the blue wall section, tapering slightly as they recede upward. -
Mark the Floor and Trim:
Draw the horizontal line for the skirting board near the bottom. Below that, lightly sketch vertical lines to indicate the wooden floorboards.
Straight Line Struggles?
If your beam edges are wobbly, let the paint dry completely, then apply painters tape. Paint over the edge for a crisp line, then peek slowly.
Step 2: Blocking in Color
-
Mix the Wall Color:
Create a cool, pale blue by mixing Titanium White with a tiny touch of Phthalo Blue and a pinhead of Payne’s Gray to desaturate it. You want a matte, slate-like finish. -
Paint the Blue Wall:
Apply the blue mix to the central triangular wall section. Use a flat brush for smooth coverage, painting around the window frame sketch carefully. -
Base Coat the Ceiling:
paint the slanted ceiling panels on the left and right sides with pure Titanium White. I like to add a barely-there drop of brown to the white for the shadowed areas later, but keep it pure for now. -
Underpaint the Floor:
Wash the floor area with a diluted Burnt Umber and Yellow Ochre mix to establish a base wood tone.
Step 3: Refining the Details
-
Paint the Beams:
Mix Burnt Umber with a little Yellow Ochre. Paint the structural beams. While wet, streak in darker brown lines to simulate wood grain. -
Detail the Ceiling Planks:
Using a very light gray wash and a ruler, paint thin diagonal lines on the white ceiling sections to mimic the shiplap paneling texture. -
Define the Window Frame:
Use a small flat brush and pure Titanium White to paint the window casing, sill, and the grid lines (mullions). You may need two coats to ensure it looks crisp against the blue. -
Add Shadows:
Mix a glaze of Payne’s Gray and apply it subtly under the window sill and in the corners of the room to create depth.
Add a Cozy Element
Customize the corner of the room by painting the edge of a bed or a patterned rug in the foreground to make the space feel lived-in.
Step 4: The View & Finishing Touches
-
Background Trees:
For the view through the window, start by dabbing a pale sky blue at the top of the panes. Then, stipple in soft yellows and greens for distant autumn foliage. -
Tree Branches:
Use a size 0 liner brush with thinned brown paint to draw delicate, bare tree branches reaching up through the foliage. Keep these strokes light and organic. -
Window Sill Light:
Paint a bright white highlight on the top face of the window sill where the sunlight hits it. -
Floor Texture:
Return to the floor with a size 2 round brush. Paint stronger brown lines between the floorboards and add wood knots or grain patterns. -
Sunlight on Floor:
Mix a transparent glaze of White and Yellow Ochre. Paint geometric patches of light on the floorboards directly under the window to show the sun streaming in. -
Final Clean Up:
Review your straight lines. Use a small brush with the appropriate background color to sharpen any edges on the beams or window frame that look messy.
Step back and admire the calm atmosphere you’ve created with just a few simple hues.


Trim Matched to Walls to Reduce Visual Noise
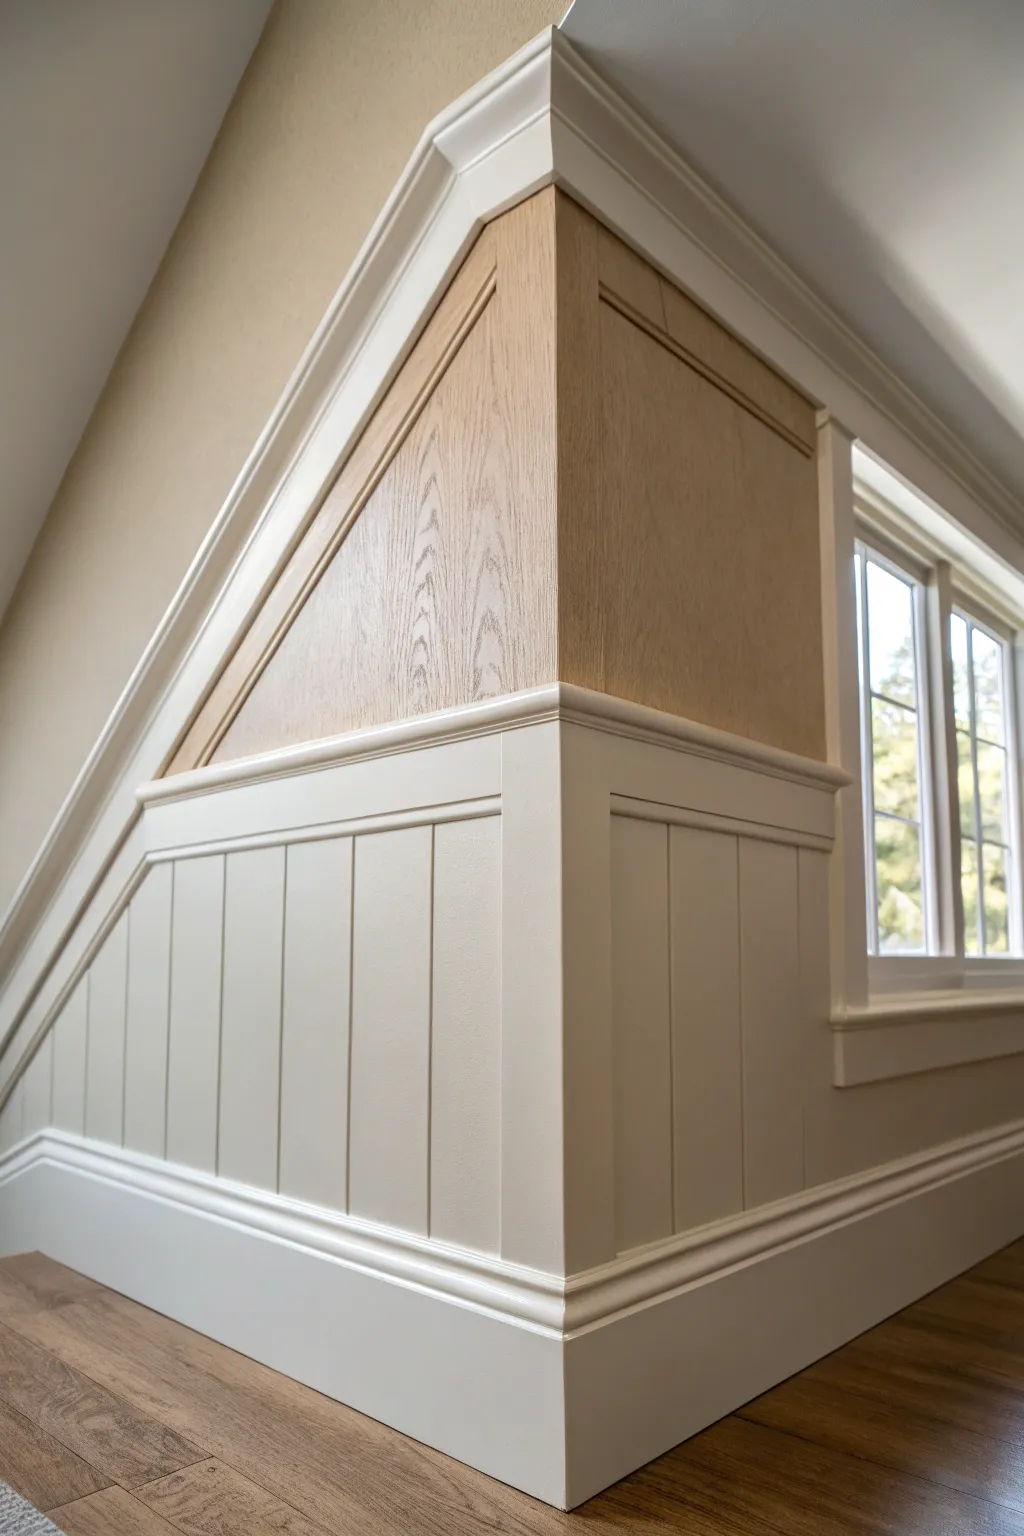
Transform awkward attic angles into a sophisticated architectural feature with this two-tone paneling project. By blending custom wainscoting with crisp upper molding, you create a cohesive look that turns irregular corners into intentional design statements.
Step-by-Step
Materials
- V-groove beadboard paneling sheets
- Oak veneer plywood (1/4 inch)
- Baseboard molding (5-inch craftsman style)
- Chair rail molding with cap
- Crown molding (angled profile for slope)
- Construction adhesive
- Finish nails and brad nailer
- Wood filler
- Caulk
- Primer
- Satin finish paint (color matched to walls)
- Clear matte polyurethane
- Miter saw
- Table saw
- Jigsaw
- Laser level
Step 1: Planning and Base Installation
-
Measure the angles:
Start by using an angle finder to determine the precise slope of your attic ceiling line. These angles act as your master guide for all subsequent diagonal cuts, so accuracy here is critical. -
Mark layout lines:
Use a laser level to mark the height of your chair rail around the corner. I find it helpful to mark studs at this stage to ensure solid nailing points later. -
Install baseboards:
Cut and install the wide baseboard molding first, coping the inside corners for a tight fit if your room allows, or simple miters if the angles are standard 90 degrees. -
Cut lower panels:
Rip your v-groove paneling sheets to height on a table saw. The height should sit exactly between your baseboard top and the bottom line of where the chair rail will go. -
Attach lower paneling:
Apply construction adhesive to the back of the panels and press them into place. Secure them with a brad nailer, shooting into the studs where possible and into the grooves to hide the holes.
Pro Tip: Dealing with Corners
For outside corners on the v-groove paneling, miter the edges of the sheets at 45 degrees before installing. This creates a sharp, continuous corner without needing a corner guard molding.
Step 2: Upper Carpentry
-
Cut oak upper panels:
Measure the triangular and rectangular spaces above the chair rail line. Transfer the ceiling slope angle to your oak veneer plywood and cut these shapes carefully with a table saw or circular saw with a fine-finish blade. -
Install the veneer:
Adhere and nail the oak panels to the upper wall section. Ensure the grain runs vertically to visually heighten the short attic walls. -
Add the chair rail:
Install the chair rail molding over the seam where the lower painted panel meets the upper oak panel. This piece acts as a transitional cap, hiding the raw edges of both materials. -
Frame the upper panels:
For the “paneled” look on the upper oak section, rip strips of 1×2 or use specific flat molding to frame the edges and the ceiling line. This adds depth and creates that recessed panel effect seen in the photo. -
Install sloped crown:
Cut and install the molding that runs along the sloped ceiling line. This is the trickiest cut; take your time finding the compound angle where the horizontal crown meets the sloped crown at the corner.
Level Up: Hidden Storage
Make the triangular ‘dead space’ behind the knee wall functional by building the paneling as a push-to-open door, revealing long-term festive decor storage inside.
Step 3: Finishing Touches
-
Fill nail holes:
Fill all nail holes on the lower painted section with standard wood filler. For the upper oak section, use a wood filler that matches your oak stain color perfectly. -
Caulk the seams:
Run a thin bead of finish caulk along all edges where the trim meets the painted panels, the baseboards, and the corner joints. Do not caulk the oak panels where they meet the trim; use clear silicone or careful scribing instead. -
Sand smooth:
Once dry, lightly sand the filler on the lower section until flush. Wipe away all dust with a tack cloth. -
Prime the lower section:
Apply a high-quality primer to the baseboard, v-groove paneling, and chair rail. This ensures an even sheen for the final coat. -
Paint monochromatic:
Paint the entire lower assembly—baseboards, paneling, and chair rail—in a satin finish paint. Crucially, match this color to your upper walls (outside the wood zone) to achieve the ‘visual noise reduction’ effect. -
Seal the oak:
Apply a clear matte polyurethane to the upper oak section. This protects the wood without darkening it too much, keeping that airy, natural Scandinavian vibe.
Now step back and enjoy how the seamless color integration makes your attic space feel larger and more intentional
Bright White Trim to Frame the Geometry
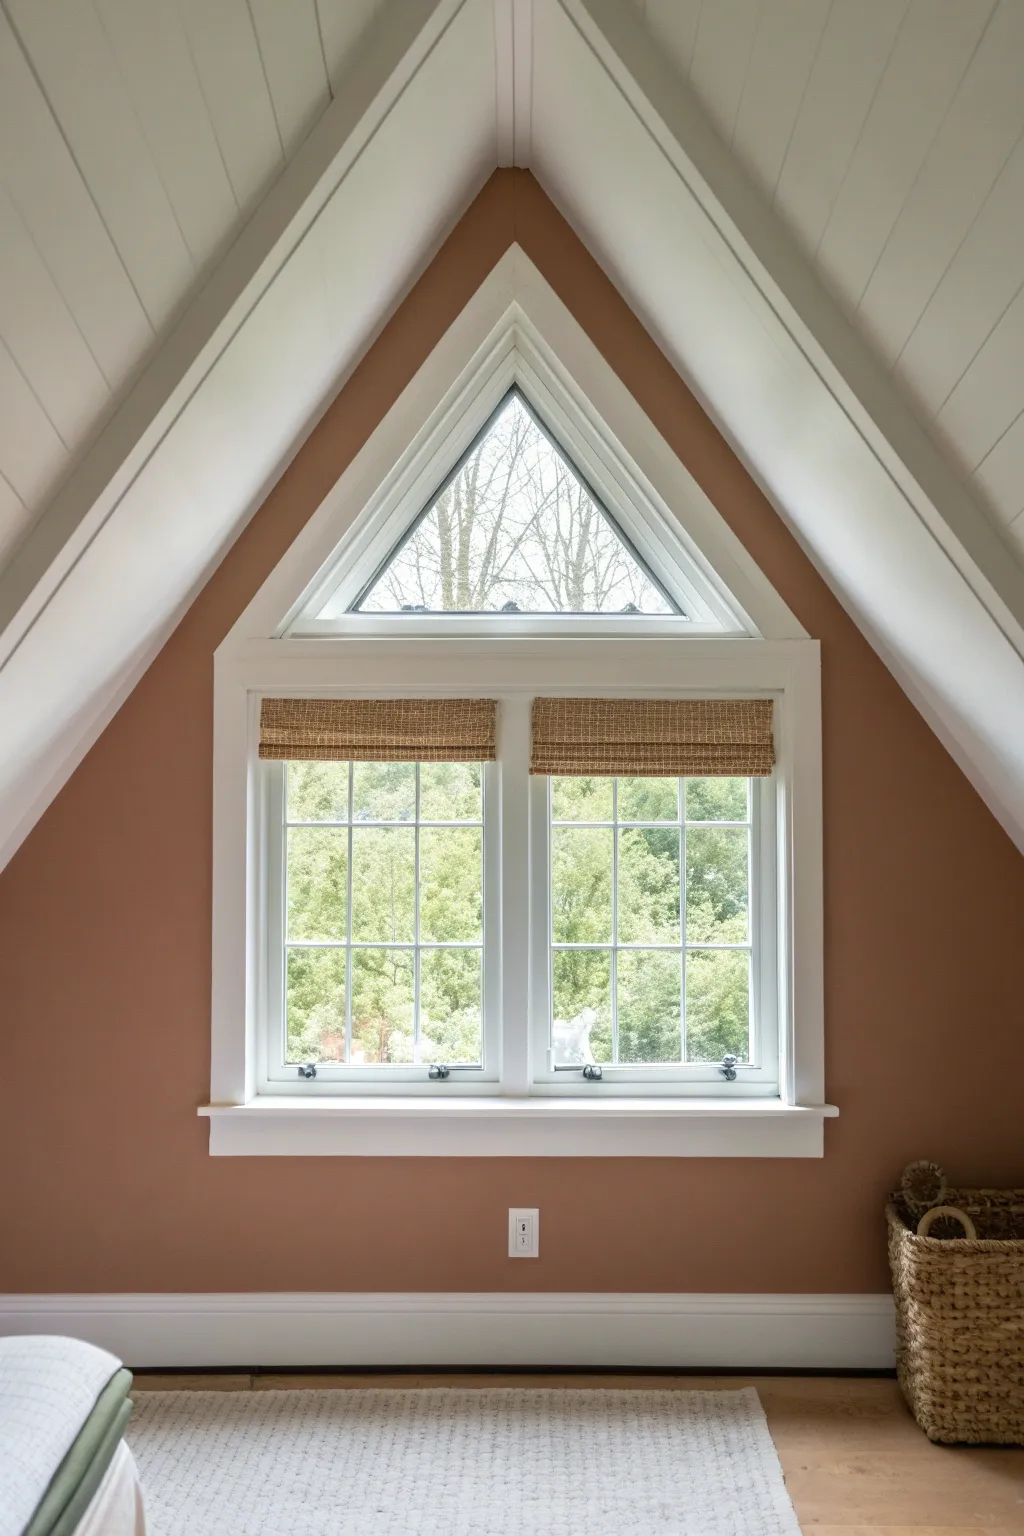
Transform an attic’s unique angles into a cozy retreat by contrasting warm earth tones with crisp, architectural white woodwork. This project emphasizes the dramatic geometry of gabled ceilings while creating a sophisticated, grounded atmosphere.
Step-by-Step Tutorial
Materials
- High-quality interior latex paint (Eggshell finish, Terracotta/warm clay color)
- High-quality interior latex paint (Semi-gloss finish, Bright White)
- Small angled sash brush (1.5 to 2 inch)
- Standard paint roller frame and roller covers (3/8 inch nap)
- Mini paint roller (4 inch) for narrow spaces
- Painter’s tape (high adhesion for trim, delicate for fresh paint)
- Spackle or wood filler
- Sandpaper (medium and fine grit)
- Drop cloths
- Extension pole for painting high peaks
- Caulk gun and paintable acrylic latex caulk
Step 1: Preparation and Surface Repair
-
Clear and protect:
Begin by removing all furniture, window treatments (like the woven shades seen here), and outlet covers from the area. Lay down drop cloths to completely cover the flooring, taping the edges to the baseboards if necessary to prevent shifting. -
Inspect the woodwork:
Examine the window casings, sills, and baseboards for any nail holes, dents, or gaps. Fill these imperfections with wood filler or spackle, slightly overfilling to allow for shrinkage. -
Sand for smoothness:
Once dry, sand the filled areas flush with the surrounding wood. Give the rest of the trim a light scuff-sand to help the new paint adhere properly. -
Caulk the seams:
Run a thin bead of paintable acrylic latex caulk along the seams where the trim meets the wall, and importantly, where the window components join together. Smooth this with a wet finger for a seamless look.
Step 2: Painting the Ceiling and Trim
-
Cut in the ceiling lines:
Start at the highest point of the gabled ceiling. Using your angled sash brush and the Bright White paint, carefully cut in along the peak and where the ceiling meets the wall. -
Roll the ceiling:
Using an extension pole and the standard roller, paint the sloped ceiling panels. Work in sections to maintain a wet edge, ensuring smooth coverage on the shiplap or drywall. -
Paint the window interiors:
Move to the detailed work on the window sashes and muntins (the grid bars). Use the small sash brush here. I find it easiest to paint the muntins first, then move to the frame. -
Coat the casing and baseboards:
Apply the Semi-gloss Bright White to the large window casing surround (including the triangular top section) and the baseboards. Apply two coats if necessary for a solid, bright finish. -
Allow specifically for drying:
Let this white paint cure fully—ideally overnight—before attempting to tape over it. This patience prevents the tape from pulling up your fresh trim work.
Clean Lines Secret
Before painting the wall color, brush a tiny amount of the *trim color* over the tape edge. This seals the tape so any bleed-through matches the trim, leaving a razor-sharp line.
Step 3: Applying the Wall Color
-
Tape the edges:
Apply painter’s tape to the outer edge of the now-dry white window trim and the top of the baseboards. Press the tape edge down firmly with a putty knife or fingernail to prevent bleed-through. -
Cut in the wall color:
Open your Terracotta/clay paint. Using a clean angled brush, cut in carefully along the ceiling line (where the slope meets the vertical wall) and alongside the taped trim. -
Paint the tight corners:
Pay special attention to the acute angles at the top of the triangle window and the attic peak. You may need a smaller artist’s brush if your sash brush can’t reach clearly into the point. -
Roll the main wall:
Use the roller to fill in the large field of the wall. Because of the window placement, you’ll have narrow strips of wall on either side; a 4-inch mini roller is perfect for navigating these spots without hitting the trim. -
Second coat application:
Allow the first coat to dry to the touch, then assess the coverage. Terracotta colors can sometimes be patchy, so a second coat is usually vital for that rich, velvety depth shown in the photo. -
Remove tape:
While the second coat is still slightly damp (not soaking wet, but tacky), carefully peel back the painter’s tape at a 45-degree angle. This ensures a crisp line without chipping the dried paint skin.
Add Texture
If your ceiling is plain drywall, consider installing shiplap or tongue-and-groove planks before painting. Run them vertically to visually heighten the room’s peak.
Step 4: Finishing Touches
-
Reinstall fixtures:
Once the walls are fully cured, screw the outlet covers back on. Align the screws horizontally or vertically for a professional detail. -
Mount window treatments:
Install the mounting hardware for your woven wood shades inside the lower window casing. Ensure they are level and fitted snugly within the frame. -
Final inspection:
Check your cut lines one last time. If any wall color bled onto the white trim, use a tiny brush and a bit of white paint to touch it up for a perfect finish.
Enjoy the warmth and architectural drama your new paint job brings to the space
Paint the Ceiling Slope Lower for Coziness
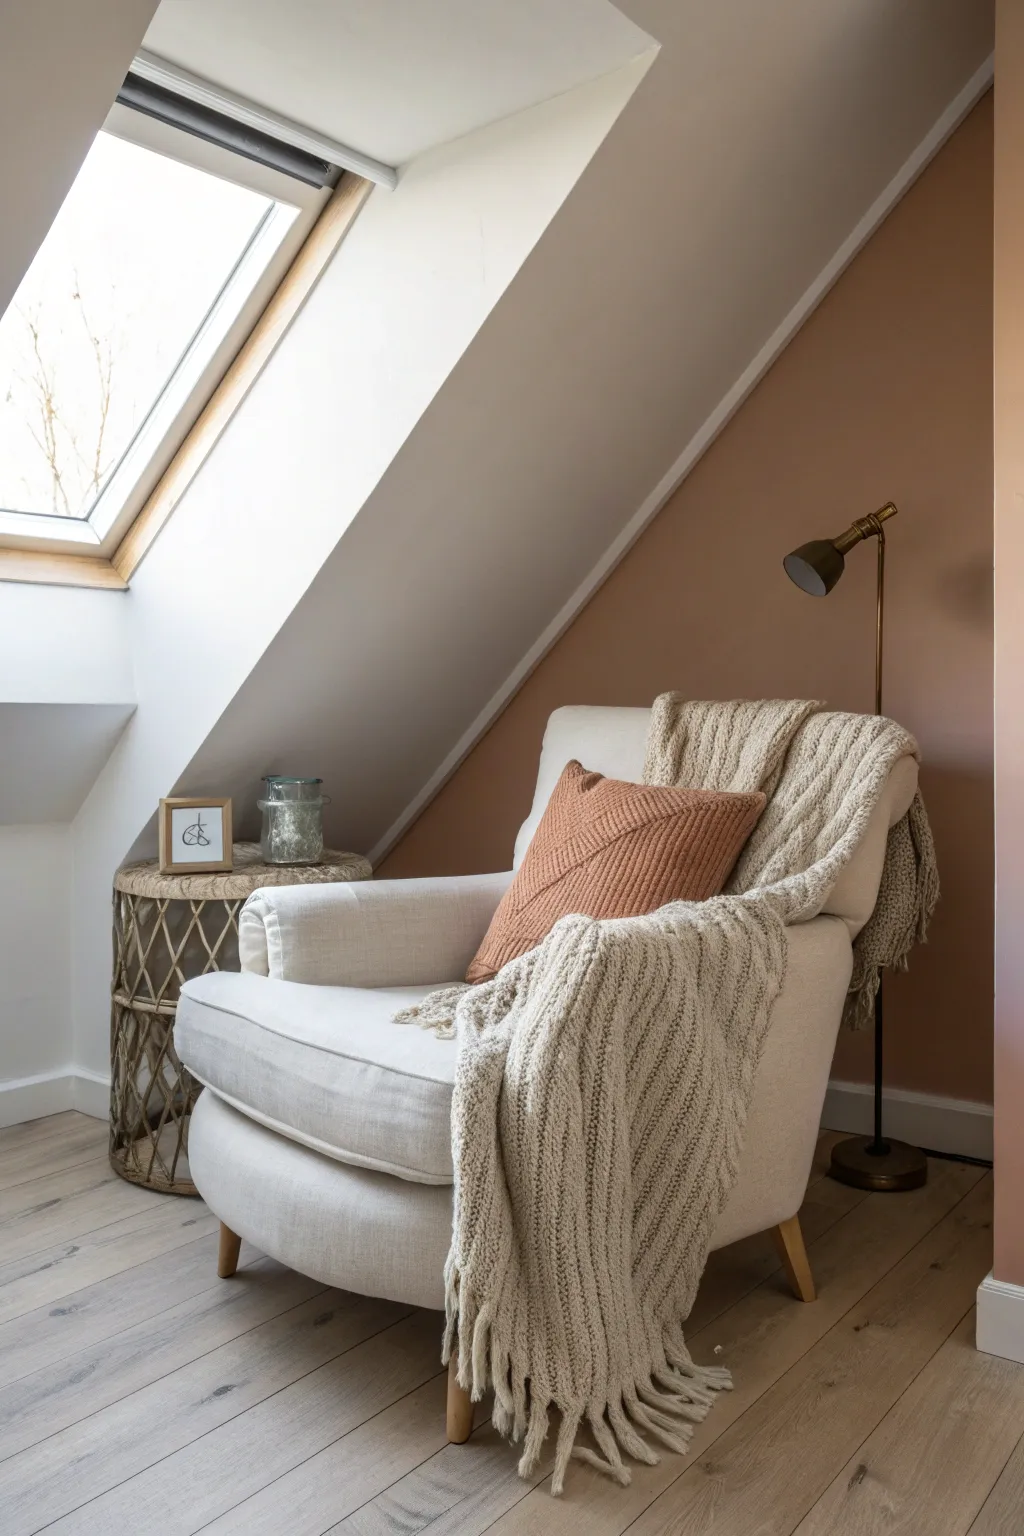
Transform an awkward attic corner into a cozy reading nook by cleverly using paint to define the space. This project uses a warm terracotta hue on the vertical wall while keeping the slope crisp white to maintain an airy feel.
Step-by-Step
Materials
- Warm terracotta/clay interior wall paint (matte finish)
- Crisp white interior ceiling paint
- Painter’s tape (high quality for sharp lines)
- Drop cloths
- Spackling paste and putty knife
- Fine-grit sandpaper (220-grit)
- Angled sash brush (2.5 inch)
- Roller frame and microfiber roller covers (3/8 inch nap)
- Extension pole for roller
- Paint tray and liners
- Ladder or step stool
- Damp rag for cleanup
Step 1: Preparation & Repairs
-
Clear the area:
Remove all furniture, including the armchair and side table, from the corner to give yourself ample working room. Lay down drop cloths to protect your flooring. -
inspect the walls:
Check the drywall, especially around the skylight and the seam where the slope meets the vertical wall. Look for any nail holes or cracks. -
Patch imperfections:
Using a putty knife, fill any holes or dings with spackling paste. Allow it to dry completely according to package instructions. -
Sand smooth:
Once the spackle is dry, lightly sand the patched areas with fine-grit sandpaper until they are flush with the wall. Wipe away the dust with a damp rag.
Step 2: Painting the Slope & Ceiling
-
Tape the window trim:
Carefully apply painter’s tape around the wooden trim of the skylight window to protect it from paint splatters. -
Cut in the white paint:
Using an angled sash brush and your white ceiling paint, cut in around the skylight trim and along the top edge where the slope meets the ceiling. -
Roll the slope:
Attach your roller to an extension pole. Load it with white paint and roll the sloped ceiling area. Work in ‘W’ patterns to ensure even coverage. -
Establish the transition line:
Paint slightly past the corner where the slope meets the vertical wall. You don’t need a perfect line yet; just ensure the white paint covers the very top of the vertical wall slightly. -
Allow to dry:
Let the white paint dry completely, preferably overnight, before moving to the next phase. This is crucial for the tape to stick properly without peeling the fresh paint.
Tape Trumps Texture
If your walls are heavily textured, run a bead of clear paintable caulk along the tape edge instead of paint. This fills the texture gaps for a perfect line.
Step 3: The Terracotta Wall
-
Tape the transition:
Apply a strip of high-quality painter’s tape along the sloped ceiling, right where it meets the vertical wall. Press the edge down firmly to prevent bleed-through. -
Seal the tape edge:
I like to brush a very thin layer of the *white* paint over the edge of the tape first. This seals any tiny gaps so that if paint bleeds, it’s white-on-white, keeping your final line razor-sharp. -
Cut in the color:
Once the seal is dry, use a clean angled brush to cut in the terracotta paint along the tape line, baseboards, and corners. -
Roll the first coat:
Roll the vertical wall with the terracotta paint. Ensure you get close to the edges to blend with your brushwork. -
Apply second coat:
Wait for the first coat to dry to the touch, then apply a second coat for rich, opaque color depth. -
Remove tape:
While the second coat is still slightly tacky (not fully dry), slowly peel off the painter’s tape at a 45-degree angle to reveal your crisp line.
Level Up: Color Drenching
Instead of white trim, paint the baseboards the same terracotta color as the wall. This ‘color drenching’ technique makes small spaces feel larger and more modern.
Step 4: Styling the Nook
-
Replace furniture:
Once the walls are fully cured, move your white armchair back into position. -
Add lighting:
Position a floor lamp nearby for reading light. The bronze finish in the example looks great against the terracotta. -
Layer textures:
Drape a chunky beige knit blanket over the chair and add a textured pillow in a complementary rust or orange tone. -
Final touches:
Place a small side table next to the chair with a simple framed art piece or candle to complete the look.
Enjoy your perfectly defined reading corner where the color warms the space without closing it in
Paint the Ceiling Slope Lighter for Height
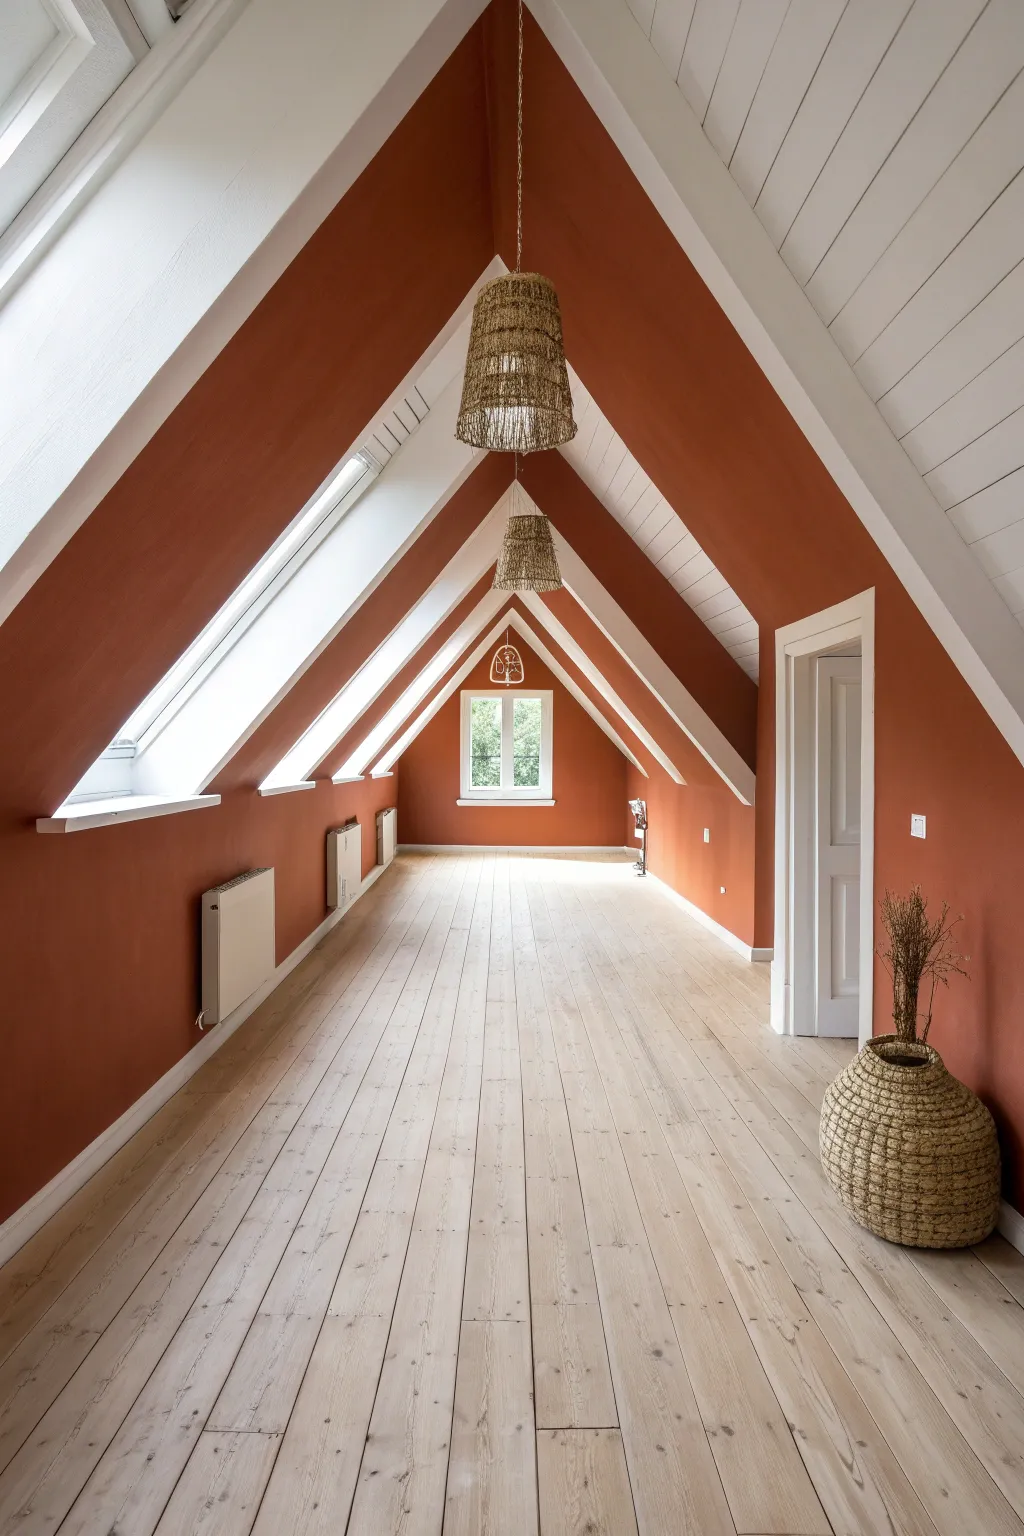
This project transforms a conventional A-frame attic space into a warm, structural statement by contrasting deep terracotta walls with crisp white ceiling slopes. The strategic use of color accentuates the architectural lines while keeping the space feeling airy and tall.
Step-by-Step Tutorial
Materials
- High-quality interior latex paint (Terracotta/Rust Orange, matte finish)
- High-quality interior latex paint (Bright White, eggshell or satin finish)
- Angled sash brush (2.5 inch)
- Roller frame and extension pole
- Microfiber roller covers (3/8 inch nap)
- Painter’s tape (delicate surface)
- Drop cloths
- Sanding sponge (medium grit)
- Spackling paste
- Putty knife
- Ladder
- Mild detergent and sponge
Step 1: Preparation & Repairs
-
Clear and Clean:
Remove all furniture, light fixtures (or mask them heavily), and switch plates from the room. Wipe down all walls and ceiling surfaces with a mild detergent solution to remove dust and oils, which is crucial for adhesion. -
Patch Imperfections:
Inspect the walls and slanted ceiling areas for nail holes or dents. Apply spackling paste with a putty knife, let it dry completely, and sand smooth until flush with the surface. -
Protect the Floor:
Lay down heavy-duty drop cloths to cover the entire wooden floor. Secure the edges with tape to prevent them from shifting while you move the ladder.
Step 2: Painting the Ceiling & Slopes
-
Tape Off Wall Junctions:
Apply painter’s tape along the top edge of the vertical knee walls where they meet the slanted ceiling, just to give yourself a guide, though we will cut in later. -
Cut In the White Paint:
Using the angled sash brush, paint a 3-inch strip of white paint along the corners, peaks, and around the skylight wells. I like to feather out the edges to avoid hard ridge lines. -
Roll the Slanted Ceilings:
Load your roller with the White paint. Using the extension pole, roll the paint onto the slanted ceiling sections and the central flat peak. Work in roughly 3-foot square sections, maintaining a wet edge. -
Roll the Window Trim:
Don’t forget the deep wells of the skylights and the end window. These should also be painted white to maximize light reflection. -
Second Coat:
Allow the first coat to dry for at least 4 hours. Apply a second coat of white to ensure a solid, opaque finish without streaks.
Bleeding Lines?
Paint bleeding under tape? For crisp lines, paint over the tape edge with the *base* color (white) first to seal it, then apply the accent color.
Step 3: Applying the Terracotta Walls
-
Tape the Ceiling Line:
Once the white ceiling paint is fully cured (give it 24 hours if possible), apply delicate surface painter’s tape along the edge of the white ceiling slope where it meets the vertical wall. Press the edge down firmly. -
Cut In the Terracotta:
Dip your angled brush into the Terracotta paint. Carefully paint along the tape line, the baseboards, and around door frames. This step defines the sharp contrast that makes this look work. -
Paint Around Radiators:
If you have radiators like the ones shown, use a smaller brush or a radiator roller to paint the wall behind them, or carefully cut in around their edges if they cannot be removed. -
Roll the Walls:
Switch to a fresh roller cover. Roll the Terracotta paint onto the vertical knee walls and the triangular end walls. Use a ‘W’ pattern to distribute paint evenly and then roll vertically to smooth it out. -
Detail the Beam Faces:
Note the structural beams running down the slope. Paint the face and sides of these deep Terracotta to create bold stripes against the white ceiling, or keep them white if you prefer less contrast. The image shows them painted to match the walls. -
Second Coat of Color:
Let the first coat dry. Apply a second coat of Terracotta to achieve the rich, deep saturation seen in the photo.
Add Warm Texture
To echo the rustic vibe of the baskets, try a Limewash paint for the terracotta walls instead of standard latex for a subtle, cloudy texture.
Step 4: Finishing Touches
-
Remove Tape:
While the second coat is still slightly tacky, carefully peel back the painter’s tape at a 45-degree angle. This prevents the dried paint film from ripping. -
Touch Up:
Inspect your lines. If any Terracotta bled onto the white, wait for it to dry, place a small piece of tape over the color, and lightly touch up with white using a small artist’s brush. -
Clean Up:
Reinstall switch plates and move your furniture back in. If you removed radiators or fixtures, reinstall them now.
Now you have a striking, architectural space that feels both cozy and expansive
Stripes That Stretch a Narrow Attic
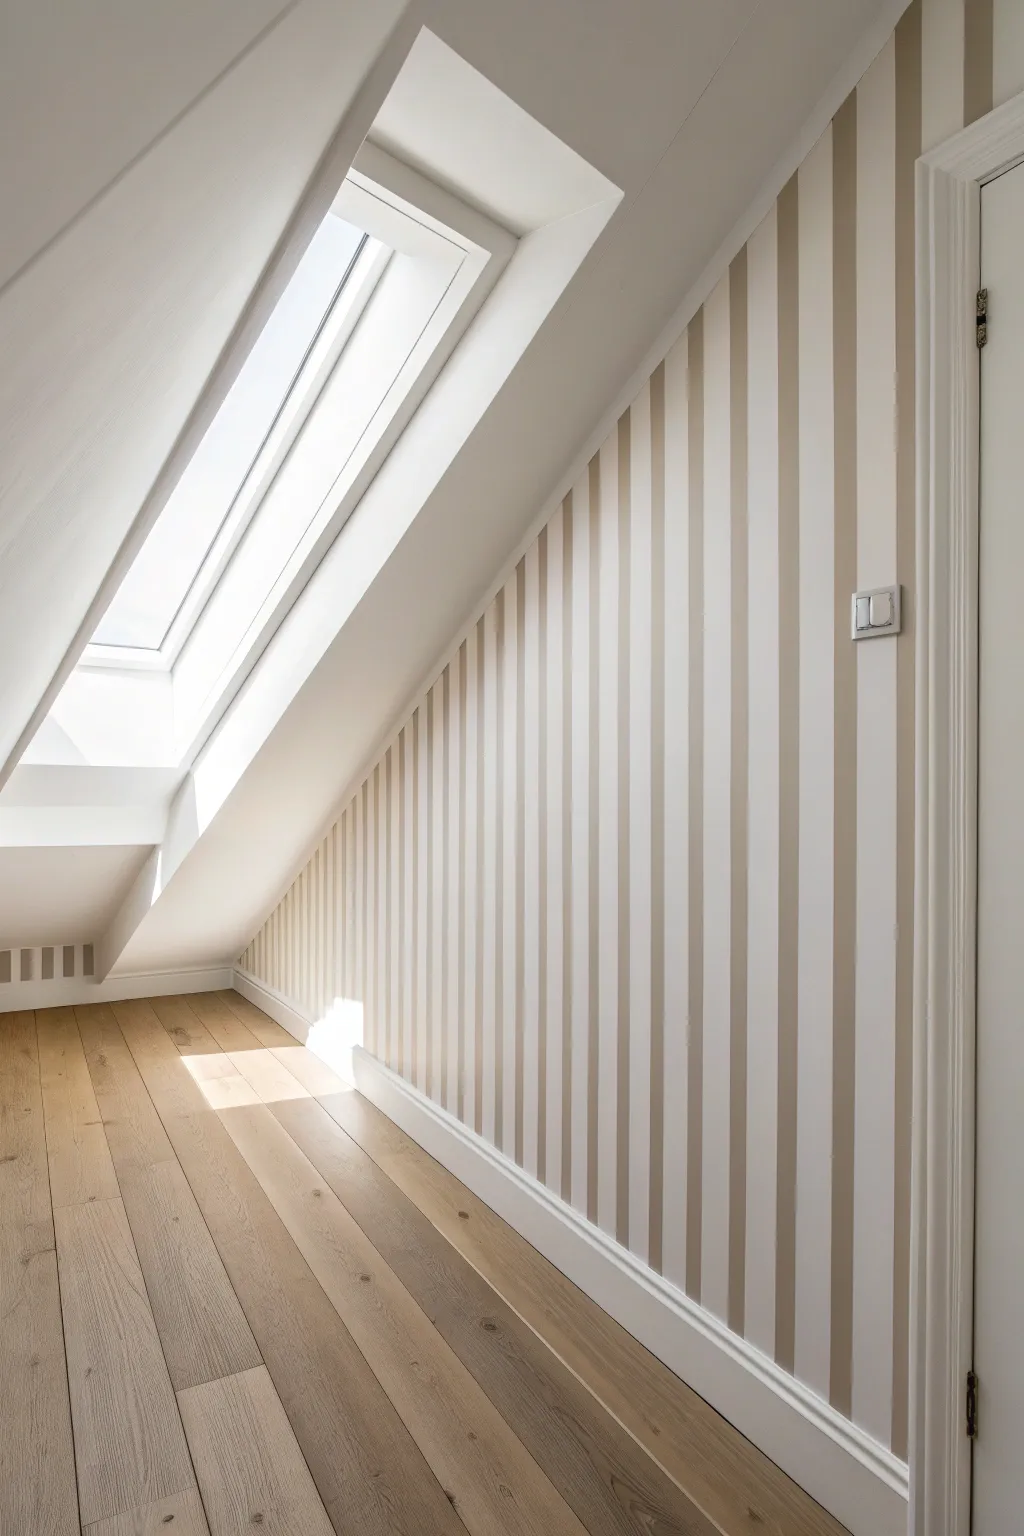
Transform a cozy but possibly cramped attic space into a room that feels miles high with this classic striping technique. By painting alternating vertical stripes of soft beige and crisp white, you draw the eye upward along the wall’s slope, creating an elegant visual trick that maximizes height.
How-To Guide
Materials
- High-quality painter’s tape (multi-surface)
- Laser level (highly recommended)
- Tape measure
- Pencil
- Small roller (4-inch)
- Standard roller (9-inch) and tray
- Paint brush (2-inch angled sash)
- Base color paint (Off-white/Eggshell finish)
- Stripe color paint (Warm Beige/Eggshell finish)
- Plastic drop cloths
- Step ladder
- Putty knife or credit card
Step 1: Preparation & Base Coat
-
Clear and protect:
Remove any outlet covers or switch plates from the wall. Lay down your drop cloths to protect that beautiful wood flooring from splatters. -
Clean the surface:
Wipe down the wall with a damp cloth to remove dust, especially near the baseboards and the angled ceiling line, ensuring the tape will stick perfectly later. -
Apply the base color:
Treat the lighter color (the off-white) as your base. Paint the entire wall with this shade, cutting in around the edges first and then rolling the main area. -
Second coat:
Once the first coat is dry to the touch, apply a second coat for solid, opaque coverage. This will eventually become your lighter stripes. -
Full cure time:
Allow the base coat to dry completely for at least 24-48 hours. This is crucial; if you tape too soon, you risk peeling off your fresh base coat.
Tape Removal Timing
Pull the tape while the paint is tacky, not dry. If paint dries over the tape, it forms a bridge that can rip your finish when removed.
Step 2: Measuring & Taping
-
Calculate stripe width:
Measure the total width of the wall at its widest point. Divide this number by an odd number to ensure you start and end with the same color stripe, usually aiming for stripes between 4 to 6 inches wide. -
Mark vertical lines:
Using your tape measure and pencil, make small tick marks along the top (sloped) and bottom of the wall at your calculated intervals. -
Set the laser level:
Set up your laser level to project a vertical plumb line aligning with your first set of tick marks. This is far easier than trying to use a long bubble level on a triangular wall. -
Apply the tape:
Run your painter’s tape along the laser line. Be careful to place the tape on the *outside* of the area you intend to paint as a beige stripe, preserving the correct width. -
Mark the ‘No Paint’ zones:
Place a small piece of tape or an ‘X’ made of tape inside the stripes that should remain white. It’s surprisingly easy to get confused once you start rolling. -
Seal the tape edges:
I like to run a putty knife or an old credit card firmly along the edge of the tape to press it down tight. This prevents paint from bleeding under. -
The bleed-prevention trick:
Lightly brush a tiny amount of your *base* color (off-white) over the edge of the tape that faces the stripe area. This seals the tape edge with the white paint, so any bleed-through matches the base coat perfectly.
Level Up: Gloss Contrast
Use the exact same color for both stripes but change the sheen. Alternate between matte and semi-gloss paint for a subtle, sophisticated texture.
Step 3: Painting the Stripes
-
Cut in the angles:
Using the angled sash brush and your beige paint, carefully paint the top sloped edge and the bottom baseboard edge within the stripe zones. -
Roll the stripes:
Use the small 4-inch roller to fill in the vertical beige stripes. A small roller offers better control than a large one in these narrow columns. -
Second coat coverage:
Wait for the first beige coat to dry, then apply a second coat to ensure the color is rich and even. -
Remove tape immediately:
Don’t wait for the paint to dry completely. While the second coat is still slightly wet, slowly peel the tape away at a 45-degree angle. This creates the sharpest lines. -
Touch ups:
Once everything is fully dry, use a small artist’s brush to fix any tiny imperfections where the paint might have bled or the line isn’t crisp. -
Define the slope:
If your ceiling line is messy, consider adding a thin strip of molding or simply ensuring your white ceiling paint is cut in sharply to meet the top of your new stripes.
Enjoy the sophisticated optical illusion your new stripes bring to the room
Painted Shiplap or Paneling for Quiet Texture
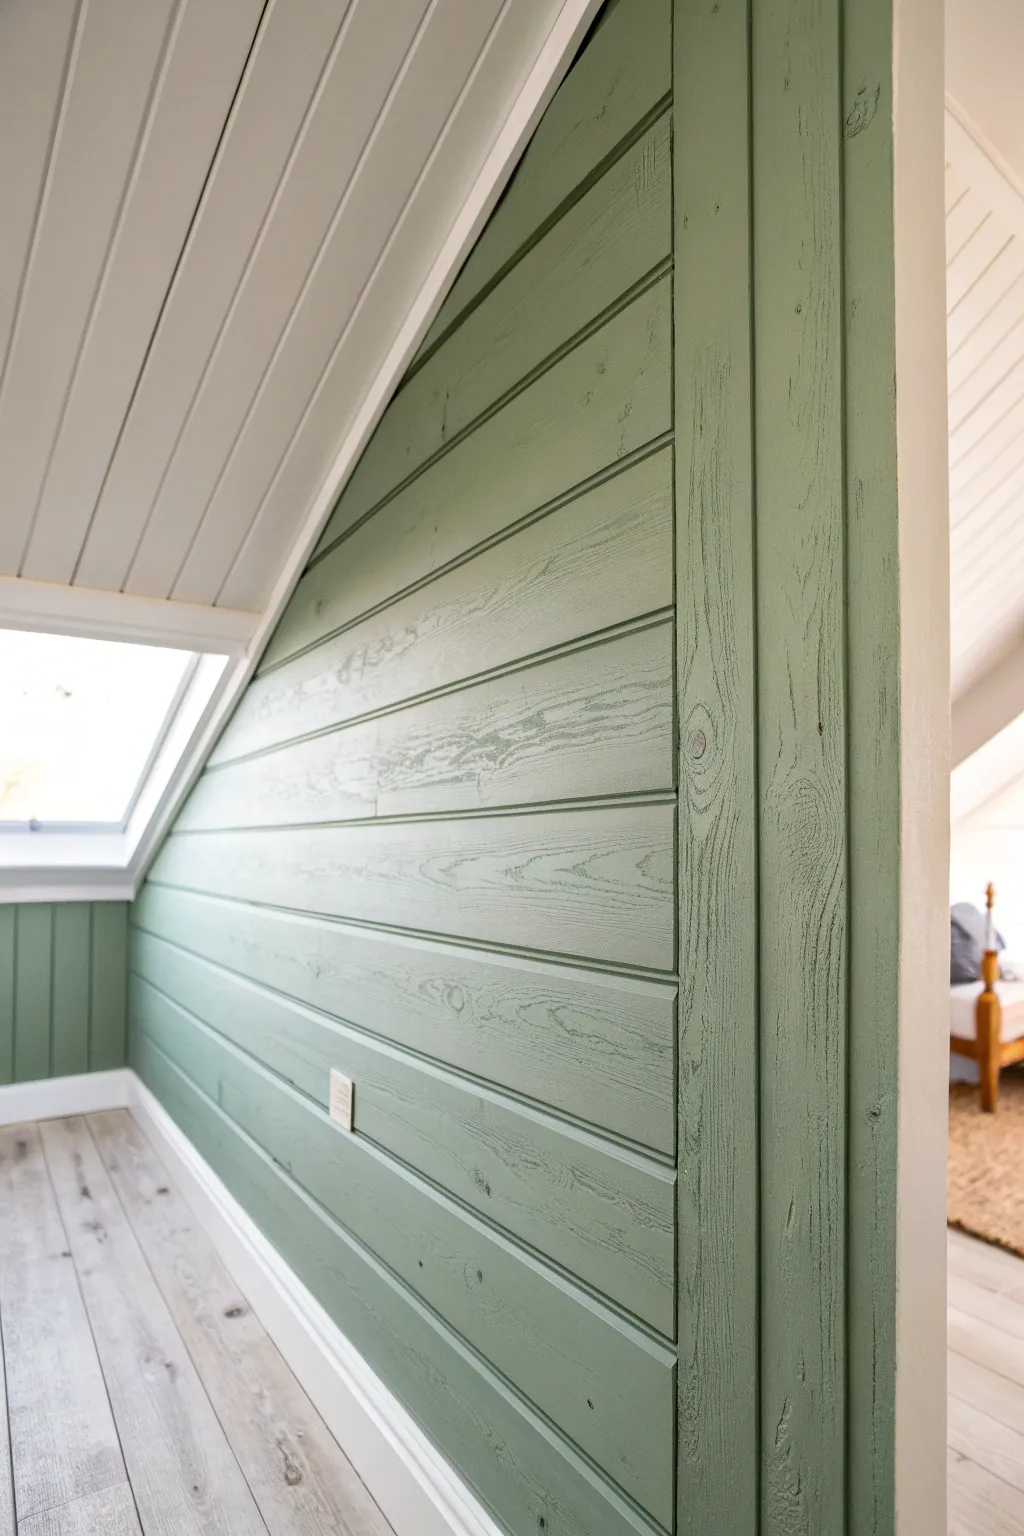
Transform an attic knee wall into a calming feature with this painted shiplap project. The soft sage green hue highlights the natural wood grain texture while maintaining a bright, airy feel under the slanted ceiling.
Step-by-Step Guide
Materials
- Interior paint (Sage Green, satin or eggshell finish)
- White trim paint (semi-gloss)
- Painter’s tape (1.5 or 2 inch)
- Sanding block (medium grit)
- Tack cloth
- High-quality angled sash brush (2.5 inch)
- Small foam roller and tray
- Drop cloths
- Screwdriver (for outlet covers)
- Primer (stain-blocking, if raw wood)
Step 1: Preparation
-
Clear the area:
Remove any furniture near the wall and lay down drop cloths to protect that lovely light wood flooring from splatters. -
Remove hardware:
Use a screwdriver to carefully take off any electrical outlet covers or switch plates on the wall. Store the screws with the plates so they don’t get lost. -
Clean the surface:
Wipe down the shiplap boards with a damp cloth or mild degreaser to remove dust and oils. If the wood is old or previously finished, give it a quick scuff sand to help the new paint adhere. -
Protect edges:
Apply painter’s tape along the floor trim, the vertical corner edge where the shiplap meets the next wall, and strictly along the slanted ceiling line. Press the tape edge down firmly to prevent bleed-through.
Pro Tip: Gap Gaps
Don’t caulk the horizontal lines between boards! Shiplap needs those gaps to expand and contract with humidity. Caulking will eventually crack.
Step 2: Priming (If Necessary)
-
Assess the wood:
If your shiplap is raw wood with knots, spot-prime the knots with a shellac-based primer to prevent sap from bleeding through later. -
Apply full primer:
Roll on a coat of stain-blocking primer over the entire surface. This ensures your green topcoat looks true to color and uniform. -
Sand the primer:
Once dry, lightly run a sanding block over the surface to knock down any raised grain, then wipe away the dust with a tack cloth.
Level Up: Vertical Accent
Install a vertical corner trim piece and paint it the same sage green to seamlessly finish the edge where the shiplap ends, just like in the photo.
Step 3: Painting the Shiplap
-
Cut in the edges:
Dip your angled brush into the sage green paint and carefully paint the perimeter of the wall, cutting in against the taped ceiling line, corners, and floor trim. -
Paint the grooves:
Use the brush to paint inside the horizontal gaps (the ‘rabbets’) between the boards first. I prefer to do this row by row so the paint doesn’t dry before I roll the face. -
Roll the planks:
Immediately after brushing the grooves of a section, use the foam roller to apply paint to the flat face of the boards. Move horizontally with the grain. -
Back-brushing:
If the roller leaves too much texture, lightly drag your brush horizontally over the wet paint to smooth it out and mimic the wood grain direction. -
Repeat for full coverage:
Continue this process—grooves first, then flat faces—working from the top of the slanted wall down to the floor. -
Allow to dry:
Let the first coat dry completely according to the manufacturer’s instructions, usually 2-4 hours. -
Apply second coat:
Repeat the painting steps for a second coat. This deepens the sage color and ensures total opacity.
Step 4: Finishing Touches
-
Remove tape:
While the final coat is still slightly tacky (not fully cured), carefully peel away the painter’s tape at a 45-degree angle to get a crisp line. -
Touch up trim:
If any green paint seeped onto the white ceiling or floor trim, use a small artist’s brush and white trim paint to cover the mistakes once the wall is dry. -
Replace hardware:
Screw the outlet covers back into place. If the old covers look yellow or dingy against the fresh green, consider swapping them for crisp white ones.
Step back and enjoy the serene, textured atmosphere your new attic feature wall creates
Dormer Nook Painted as One Seamless Block
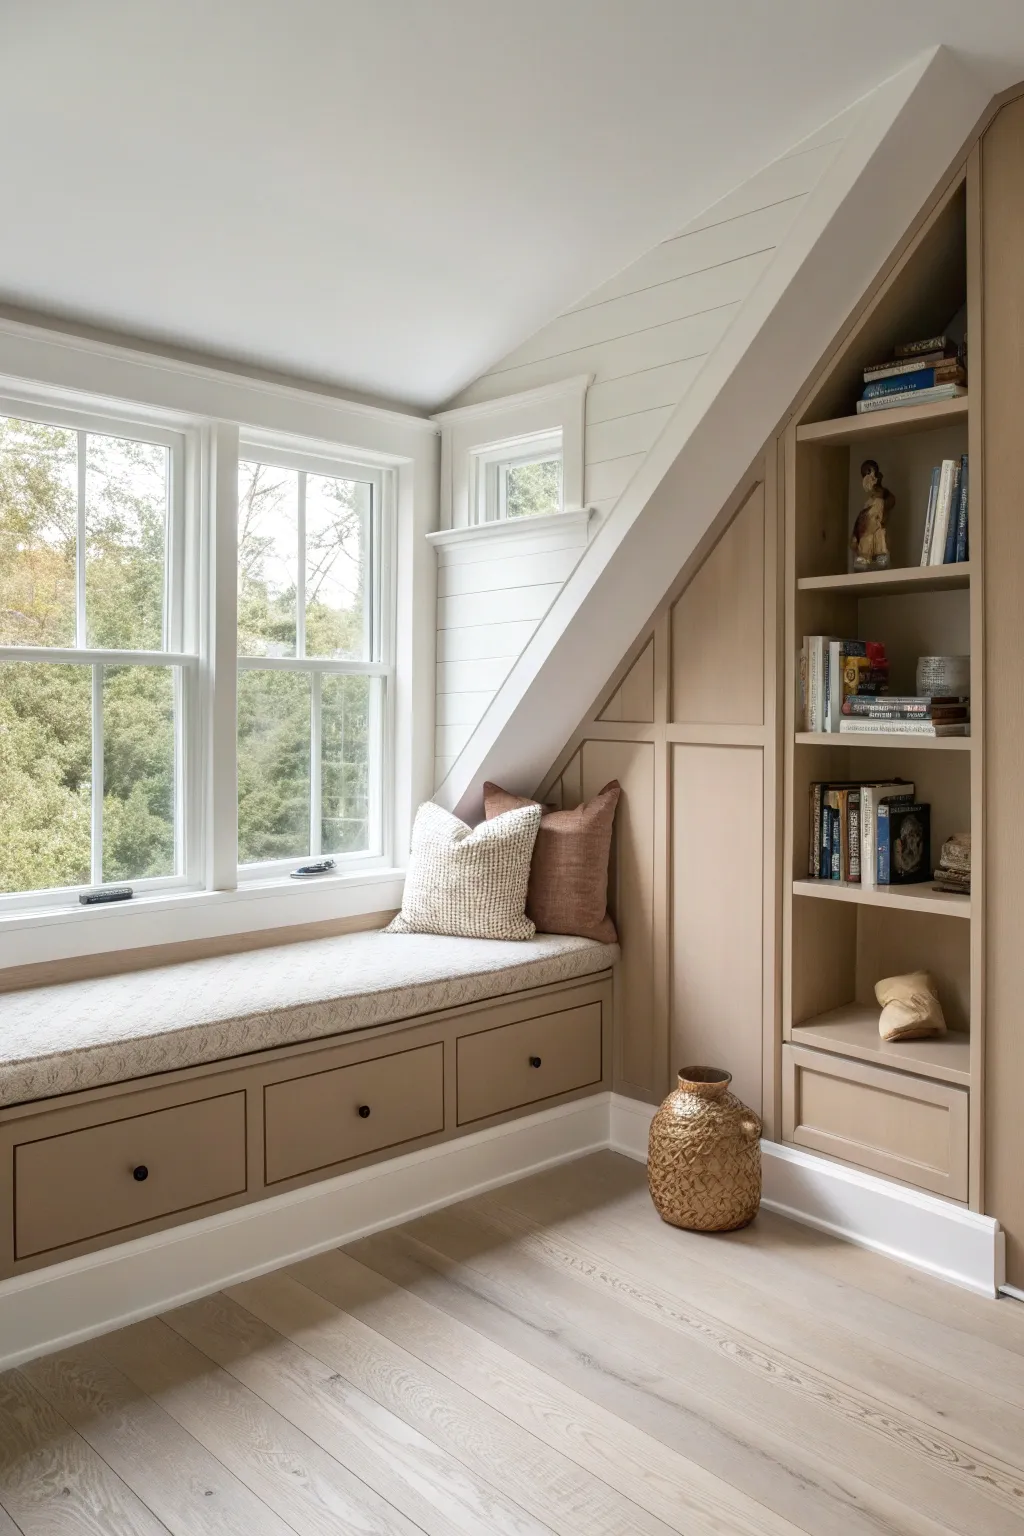
Transform an awkward attic corner into a sophisticated architectural feature by painting the built-ins and surrounding woodwork in a single, seamless block of color. This cohesive ‘color-drenching’ technique unifies the drawers, shelves, and paneling, creating a custom, high-end look that feels cozy and intentional.
How-To Guide
Materials
- High-quality interior paint (satin or semi-gloss finish) in a warm taupe or beige
- Primer (especially if painting over bare wood or previously varnished surfaces)
- Painter’s tape (high adhesion for sharp lines)
- Drop cloths
- Sanding block (medium and fine grit)
- Angle sash brush (2-2.5 inch)
- Mini foam roller and tray
- Screwdriver (for hardware removal)
- Wood filler (optional)
- Tack cloth
- Clean rags
Step 1: Preparation
-
Clear space:
Remove all cushions, books, and decorative items from the shelves and window seat to create a completely blank canvas. -
Remove hardware:
Using your screwdriver, carefully take off all drawer pulls or knobs from the under-seat storage; keeping screws and hardware together in a labeled bag makes reassembly much easier later. -
Protect surfaces:
Lay down drop cloths to cover the flooring completely. Apply painter’s tape meticulously along the edges where the woodwork meets the white walls, ceiling, and window frames to ensure crisp lines. -
Surface prep:
Lightly sand all surfaces you intend to paint—including the shelves, drawers, and wall paneling—using a medium-grit sanding block to scuff the existing finish for better adhesion. -
Clean dust:
Wipe down every nook and cranny with a tack cloth to remove all sanding dust, as even small particles can ruin the smooth finish we’re aiming for.
Seamless Transitions
Use a flexible painter’s caulk in the seams between molding and walls before painting. This fills gaps and creates a professional, built-in appearance.
Step 2: Painting Base Layers
-
Prime woodwork:
Apply a coat of high-quality primer to all the wood surfaces, paying special attention to any knots or repairs; use the brush for corners and groove details first. -
Roll flat areas:
While the corners are wet, use the mini foam roller to prime the larger flat sections of the bench front, drawer faces, and side paneling for a smooth, consistent base. -
Sand primer:
Once the primer is fully dry, give it a very light hand-sand with fine-grit paper to knock down any raised grain or brush marks, then wipe clean again.
Texture Play
For a subtle modern twist, use a matte finish for the wall paneling paint and a satin finish in the exact same color for the shelves and drawers.
Step 3: Applying Color
-
Cut in corners:
Start applying your taupe paint with the angle sash brush, cutting in along the taped edges, inside the bookshelf corners, and around any paneling trim or molding details. -
Paint interior shelves:
I like to tackle the difficult spots first, so paint the back wall and underside of the shelves before doing the flat shelf surfaces; this prevents reaching over wet paint later. -
Roll large surfaces:
Switch to your mini foam roller to apply paint to the drawer fronts, the bench seat (if wood), and the vertical paneling, smoothing out any brush marks from the cutting-in phase. -
First coat drying:
Allow the first coat to dry according to the manufacturer’s instructions; don’t rush this step, as tackiness can cause dragging on the second coat. -
Apply second coat:
Repeat the cutting-in and rolling process for a second coat to achieve that rich, opaque saturation that makes the unit look like a seamless block. -
Check for drips:
While the paint is still wet, do a final visual sweep for any drips in the corners of the paneling or shelves and smooth them out gently with your brush.
Step 4: Finishing Touches
-
Remove tape:
Carefully peel away the painter’s tape while the final coat is still slightly damp to prevent peeling the paint film and ensuring a razor-sharp edge. -
Cure time:
Let the paint cure for at least 24-48 hours before placing heavy objects like books back on the shelves to prevent sticking or marring the fresh finish. -
Reinstall hardware:
Screw the knobs or handles back onto the drawers; consider upgrading to new hardware like matte black or brass for a fresh contrast against the new color. -
Style and enjoy:
Place your custom cushion back on the seat and arrange books and decor on the shelves to complete your newly transformed reading nook.
Step back and admire how a single color can turn separate elements into one stunning architectural statement
Color-Block the Slopes to Organize Zones
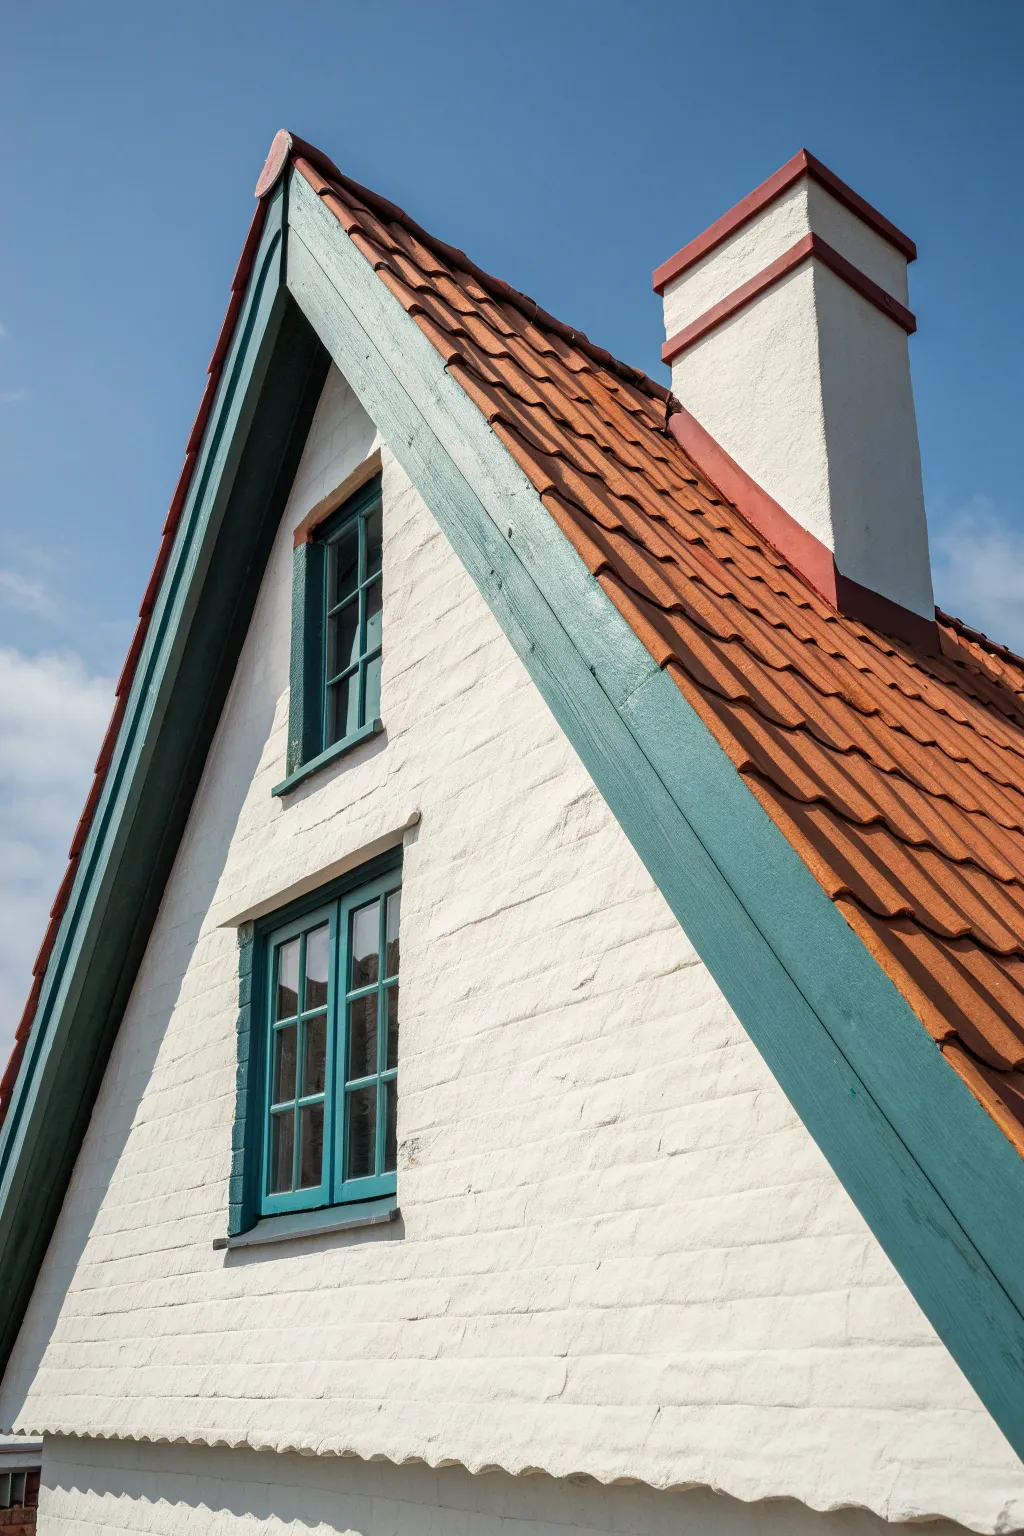
Capture the stark geometry and charming details of a gable roof in this watercolor and gouache mixed-media study. The sharp contrast between the bright white masonry, teal trim, and terracotta tiles creates a striking composition perfect for practice with clean lines.
Step-by-Step
Materials
- Cold press watercolor paper (300 gsm)
- Pencil (HB or 2B)
- Ruler
- Kneaded eraser
- Artist’s masking tape
- Watercolor paints (Ultramarine Blue, Burnt Sienna, Burnt Umber, Alizarin Crimson)
- Gouache paints (Titanium White, Teal/Viridian, Oxide Green)
- Round brushes (Sizes 4 and 8)
- Flat shader brush (Size 6)
- Fine liner brush (Size 0 or 1)
- Palette for mixing
- Two jars of water
Step 1: Drafting the Structure
-
Establish the Triangle:
Begin by lightly taping the edges of your paper to a board. Using your pencil and ruler, draw a large, steep isosceles triangle that dominates the center of the page to represent the main gable wall. -
Add the Roof Overhangs:
Sketch parallel lines outside the main triangle to define the thick eaves. Ensure the left side extends lower than the right to match the perspective of the reference photo. -
Position the Chimney:
On the right slope of the roof, draw the vertical rectangular shape of the chimney. Add a small cap detail at the top and a band of color reference near the rim. -
Sketch Windows and Tiles:
Place two rectangular window spaces on the white wall—one small upper window and a larger lower one. Lightly grid the roof area with diagonal lines to guide your tile painting later.
Pro Tip: Masking Fluid
Apply masking fluid to the thin window muntins (the grid bars) before painting the dark glass panes. It keeps lines crisp without needing a steady hand.
Step 2: Base Layers & Sky
-
Wash the Sky:
Mix a diluted Ultramarine Blue with plenty of water. Wet the sky area of the paper first, then drop in the pigment, leaving random soft edges for cloud suggestions. Let this dry completely. -
First Pass on Tiles:
Create a warm terracotta hue using Burnt Sienna and a touch of Alizarin Crimson. Using a round brush, paint the roof area in a flat, even wash, carefully painting around the chimney. -
The Masonry Tone:
While the wall is technically white, it needs texture. Mix a very watery, pale grey using diluted Ultramarine and Burnt Umber. Scumble this lightly across the white triangular wall to create a brick texture, leaving plenty of raw white paper showing.
Step 3: Defining the Trim
-
Mix the Green Trim:
Combine your Teal gouache with a little Oxide Green to get that specific weathered teal-green. Gouache is opaque, which is perfect for covering any pencil marks on the trim. -
Paint the Eaves:
Using the flat shader brush, fill in the thick wooden beams running along the roofline. Apply the paint thickly for a solid, matte finish that contrasts with the translucent watercolor sky. -
Window Frames:
Switch to your smaller round brush. Carefully paint the window frames with the same teal mix. Don’t worry about the glass panes yet; just focus on the woodwork structure.
Troubleshooting: Bleeding
If the red roof bleeds into the white wall, stop immediately. Blot with a clean tissue and let it dry fully before touching up with opaque white gouache.
Step 4: Texture and Details
-
Roof Tile Shadows:
Mix a darker version of your roof color by adding Burnt Umber. Using the fine liner brush, paint small scallops or ‘U’ shapes in rows to simulate individual roof tiles and their cast shadows. -
Chimney Accents:
Paint the top rim of the chimney with the terracotta mix. Use the pale grey wash to add a shadow on the left side of the chimney to give it three-dimensional form. -
Window Pane Depth:
Mix a dark, neutralized blue-grey for the window glass. Fill in the panes, but leave tiny hairline gaps of white paper near the corners to suggest reflected light on the glass. -
The Wood Grain:
Once the teal trim is dry, take a slightly darker green mix and a dry liner brush. Lightly drag it along the length of the eaves to suggest wood grain texture. -
Final Shadows:
Mix a cool violet-grey. Run a thin line of shadow under the eaves where they meet the white wall, and under the window sills to pop them forward.
Step 5: Finishing Touches
-
Brickwork Suggestions:
Using Titanium White gouache on a fairly dry brush, tap horizontal broken lines across the white wall sections to emphasize the painted brick texture. -
Highlight the Trim:
Add a few very thin lines of lighter teal (mixed with white) on the top edges of the green beams to show where the sun hits them. -
Clean Up:
Once the painting is bone dry, gently remove the masking tape to reveal crisp white borders.
Step back and admire how the simple geometry transforms into a detailed architectural portrait
Half-Moon or Arch Motif on a Gable Wall
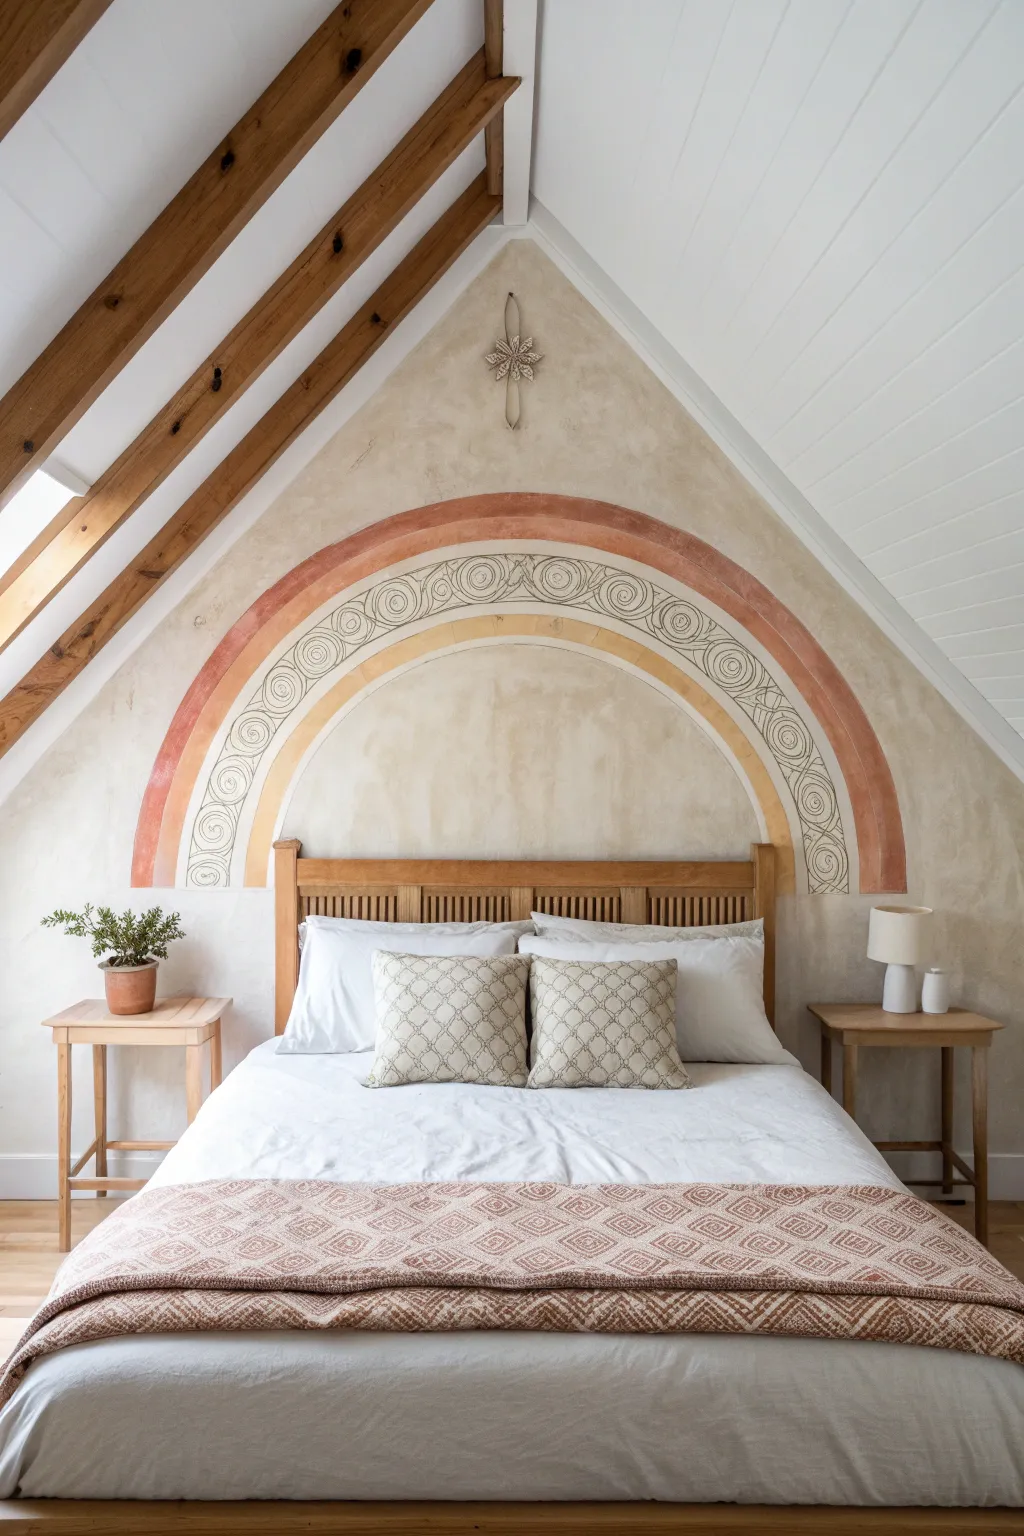
Transform a triangular gable wall into a stunning focal point with this arched mural that mimics the look of aged fresco. Using a combination of muted earth tones and delicate linework, this project adds warmth and architectural interest to an attic bedroom.
Detailed Instructions
Materials
- Limewash paint or flat matte latex paint (Base wall color: Cream/Beige)
- Acrylic or latex paint (Terracotta/Rust)
- Acrylic or latex paint (Mustard/Ochre)
- Black acrylic paint or paint pen (fine tip)
- Pencil
- String
- Push pin or tape
- Spirit level
- Measuring tape
- Angled sash brush (2 inch)
- Small round artist brushes (sizes 4 and 8)
- Painter’s tape set (optional)
- Eraser
- Clear matte varnish (optional)
Step 1: Preparing the Base and Geometry
-
Prep the surface:
Ensure your gable wall is clean and dry. For the most authentic look, paint the entire wall with a limewash or a very flat matte beige paint to create a textured, plaster-like background before starting the mural. -
Find your center:
Measure the width of your bed or headboard to determine where the center of the arch should sit. Mark a small ‘X’ on the wall just below where the headboard will cover, as this will act as the anchor point for your compass. -
Create a string compass:
Tie a piece of non-stretch string to a pencil. Pin or tape the other end of the string to your center mark ‘X’. -
Draw the outer boundary:
Extend the string to the desired height of your largest arch. Keep the string taut and lightly trace a large semi-circle on the wall. This marks the top edge of the terracotta band. -
Mark the inner bands:
Shorten the string by roughly 4-5 inches and draw a second arc (bottom edge of the terracotta band). Shorten again by another 6 inches for the wide decorative middle band. Finally, shorten once more by 3-4 inches to mark the inner mustard band. -
Check your proportions:
Step back and look at the pencil guidelines. The bands should look balanced within the triangular roofline not too crowded at the top.
Fixing Wobbly Arches
If your hand-painted arch curve looks wonky, don’t repaint the whole thing. Just widen the band slightly at the thin points to correct the visual weight.
Step 2: Painting the Color Arches
-
Paint the outer terracotta arch:
Using an angled sash brush, fill in the outermost band with your terracotta or rust-colored paint. Don’t worry about perfect opacity; a slightly streaky application enhances the old-world fresco vibe. -
Refine the edges:
Use a small brush to tidy up the outer curve. If you want a crisp line, you can use painter’s tape along the pencil marks, but hand-painting gives a softer, organic feel. -
Paint the inner yellow band:
Move to the innermost arch found closer to the bed frame. Fill this section with the mustard or ochre paint. I like to dry-brush this layer slightly to let some of the wall texture show through. -
Initial drying time:
Allow these two colored bands to dry completely to the touch before starting any work on the middle section. This usually takes about an hour.
Step 3: Creating the Decorative Scrolled Band
-
Define the middle section borders:
Using a very fine brush and diluted black paint (or a dark grey), outline the top and bottom curves of the wide middle band. -
Sketch the internal circles:
Lightly use a pencil to draw a series of circles inside the middle band. They should fit snugly between the upper and lower borders. -
Add the spiral details:
Inside each pencil circle, freehand a spiral pattern. Think of them like snail shells or architectural volutes. -
Draw the connecting lines:
Sketch curved lines that connect the bottom of one spiral to the top of the next, creating a flowing, wave-like continuity. -
Ink the design:
Go over your pencil sketches with a fine round brush and black paint. Keep the paint fluid but not watery. Alternatively, a high-quality black paint pen works wonders here for control. -
Add hatching texture:
Paint small, short hatch marks inside the negative spaces between the spirals and the borders to add depth and an engraved look.
Level Up: Texture
Mix a small amount of baking soda or plaster of Paris into your colored paints to create actual physical texture that mimics real plaster relief.
Step 4: Finishing Touches
-
Erase guidelines:
Once the black paint is bone dry, gently erase any visible pencil marks from your initial string compass work. -
Distress (Optional):
If the black lines feel too sharp, lightly sand them with a fine-grit sanding sponge to weather them back into the wall texture. -
Seal the work:
Apply a coat of clear matte varnish over the painted areas if you are concerned about scuffs, though leaving it unsealed maintains the chalky fresco appearance.
Step back and admire how this simple geometric addition completely redefines the character of your room
Soft Ombre Fade Up the Slanted Ceiling

Transform a slanted attic wall into a dreamy, textural feature with this soft ombre technique. By blending a warm, muted pink upward into your existing white ceiling color, you create an organic transition that makes the space feel taller and more ethereal.
How-To Guide
Materials
- White latex wall paint (matching existing ceiling/upper wall)
- Muted rose or terra-cotta pink latex paint (matte finish)
- Glaze medium
- Two large paint trays
- Standard paint roller and frame
- Two 4-inch high-density foam rollers
- Large, soft blending brush (dry)
- Sea sponge or clean cotton rags
- Painter’s tape
- Drop cloths
- Spray bottle with water
Step 1: Preparation and Base Coat
-
Protect the space:
Begin by laying down drop cloths to protect the hardwood flooring. This technique involves blending wet paint, so drips are more likely than with standard rolling. -
Tape the trim:
Apply painter’s tape carefully along the top edge of the baseboards and around the window casing to ensure crisp lines at the bottom. -
Clean the surface:
Wipe down the wall surface with a damp cloth to remove dust, ensuring the paint adheres smoothly to the texture. -
Refresh the upper white:
If the upper wall or sloped ceiling isn’t freshly painted, roll a coat of your white base color over the entire surface first. This ensures the white background is uniform and ready for blending.
Step 2: Applying the Colors
-
Mix the glaze:
In your paint tray, mix the pink paint with the glaze medium according to the manufacturer’s ratio (usually 4:1 paint to glaze). This extends drying time, giving you precious minutes to work the fade. -
Apply the solid bottom section:
Using a standard roller, apply the pink glaze mixture to the bottom third of the wall. Achieve full, solid coverage here, rolling tight to the baseboards. -
Create the middle transition:
Load a 4-inch roller with the pink mixture. Roll upwards from the solid section to about the halfway point of the wall, using crisscross strokes to create an uneven, organic edge. -
Apply the white transition:
Pour fresh white paint (mixed with a little glaze) into a second tray. Using a clean 4-inch roller, apply white paint starting from the top down, meeting the pink section but not overlapping yet.
Paint Getting Sticky?
If the paint starts dragging or peeling while blending, stop immediately. It has begun to dry. Lightly mist with water to reactivate, or wait for it to dry fully and dry-brush a second layer on top.
Step 3: Blending the Fade
-
Initial wet blending:
While both sections are still wet, use the dry blending brush to gently sweep across the meeting point. Use swift, ‘X’ shaped motions to pull small amounts of pink up into the white. -
Soften with a sponge:
Dampen a sea sponge and wring it out completely. Lightly dab along the transition line to break up any obvious brush marks and create a cloud-like texture. -
Fade upward:
I find it helpful to mist the wall very lightly with water if the paint starts to drag. Continue blending upward, ensuring the pink becomes increasingly sparse and transparent as it climbs. -
Feather the edges:
Use a clean, dry rag to softly buff the uppermost edges of the pink where it disappears into the white. The goal is to make it impossible to see exactly where the color ends. -
Step back and assess:
Frequently step back to the other side of the room to check the gradient. Look for harsh lines or heavy blotches. -
Adjusting the blend:
If a spot looks too heavy, dab a small amount of white glaze over it. If it looks too thin, dab a tiny bit of pink and blend outward immediately. -
Final softening:
Once you are happy with the placement, give the entire transition area one last very gentle pass with a large, dry soft-bristled brush to blur the texture slightly.
Pro Tip: The Scumble Technique
Don’t just paint up and down. Use a ‘scumble’ motion—scrubbing the brush in random circular motions. This prevents vertical streaks and mimics the organic randomness of clouds.
Step 4: Finishing Touches
-
Remove tape:
carefully peel away the painter’s tape from the baseboards while the paint is still slightly tacky to prevent peeling the film. -
Clean up details:
Check the outlet covers. If you painted over them (as seen in the photo), ensure they are fully dry before reattaching plates, or use a small artist brush to touch up around them. -
Final cure:
Allow the wall to cure undisturbed for at least 24 hours. The glaze extends the drying time, so the surface will remain soft longer than standard latex paint.
Now you have a serene, custom backdrop that adds depth and whimsy to your attic retreat
Starry Night Ceiling on the Highest Peak

Transform a slanted attic ceiling into a breathtaking midnight sky with this immersive painting project. By combining a deep, moody base coat with hand-painted or stenciled constellations, you can turn awkward angles into a dreamy stargazing observatory right above your bed.
Step-by-Step Guide
Materials
- Deep navy blue interior paint (matte or eggshell finish)
- White interior paint (for star mixing)
- Metallic gold paint
- Painter’s tape (multi-surface)
- Drop cloths
- Paint roller with extension pole
- Angled sash brush (2.5 inch)
- Small fine-point liner brushes
- Round detail brushes (sizes 2 and 4)
- Star stencils (optional)
- Chalk or pencil
- Stepladder
- Mixing palette or paper plate
Step 1: Preparation & Base Coat
-
Clear the area:
Remove all furniture, including the bed, from the room or push it to the center and cover completely with drop cloths. Since you will be painting overhead, drips are inevitable, so protect your floors well. -
Mask the beams:
Apply painter’s tape meticulously along the edges of the wooden beams and the window trim. Press the edges of the tape down firmly with a putty knife or your fingernail to prevent the navy paint from bleeding onto the natural wood. -
Cut in the edges:
Use an angled sash brush to paint a border of the deep navy blue along the taped beam lines, corners, and the floor line. Feather the edges outward so you don’t leave a thick ridge creating a harsh line later. -
Roll the first coat:
Using a roller on an extension pole, apply the first coat of navy paint to the large slanted sections. Work in ‘W’ shapes to distribute the paint evenly, moving from top to bottom. -
Let it cure:
Allow the first coat to dry according to the manufacturer’s instructions, usually about 4 hours. Attic spaces can get warm, which speeds up drying, but don’t rush this step or the second coat might drag. -
Apply the second coat:
Roll on a second coat of navy blue to achieve a rich, opaque finish that swallows the light. This depth is crucial for making the stars pop later.
Uneven Star Spacing?
If one area looks too crowded, use the navy base paint to ‘delete’ a few stars. If it looks too sparse, flick a toothbrush with white paint for a fine mist of galaxy dust.
Step 2: Mapping the Cosmos
-
Plan your constellations:
Once the blue base is fully dry, visualize where you want your largest stars. You can create random patterns or look up actual constellations. I find it helpful to lightly mark a few anchor points with white chalk that can be wiped off later. -
Mix your star colors:
On a palette, squeeze out some white paint and metallic gold. Create a third color by mixing a tiny dot of gold into the white for a soft, shimmering cream color. -
Paint the major stars:
Using a size 4 round brush and your white-gold mix, paint the largest stars first. Create these by painting an elongated cross shape (a vertical line crossed by a shorter horizontal line) to mimic a twinkling effect. -
Create the flares:
Switch to a fine liner brush. Carefully pull thin, whispy lines outward from the center of your large cross stars. Taper the pressure as you pull away to make the points sharp and delicate. -
Add medium stars:
Using the pure gold paint and a size 2 brush, add medium-sized 5-point stars scattered randomly. Don’t worry about making them perfect; a little irregularity adds to the hand-painted charm.
Step 3: Creating Depth & Detail
-
Sprinkle the stardust:
Dip the tip of a small round brush into the white paint. Dot the ceiling liberally to create the smallest, most distant stars. Vary the pressure to create different dot sizes. -
Cluster the dots:
Group some of your small white dots closer together in bands to simulate the Milky Way or dense star clusters, leaving other areas with fewer stars for negative space balance. -
Add variance:
Go back to a few specific stars and highlight their centers with a tiny dot of pure white. This creates a glowing core effect that adds dimension. -
Clean up the lines:
If any star points look too thick, use a small brush dipped in the navy base color to ‘erase’ or thin out the edges of the stars for a sharper look. -
Remove the tape:
While the star paint is drying, carefully peel off the painter’s tape from the beams. Pull the tape at a 45-degree angle away from the paint edge to ensure a crisp line. -
Final inspection:
Step back and look at the ceiling as a whole. Fill in any large empty gaps with a few extra tiny dots to balance the composition.
Glow Up
Mix glow-in-the-dark additive into your white paint for the smallest dots. They will be invisible during the day but create a magical hidden galaxy when you turn off the lights.
Enjoy drifting off to sleep under your own private galaxy every night
Painted “Fake Skylight” Glow Effect
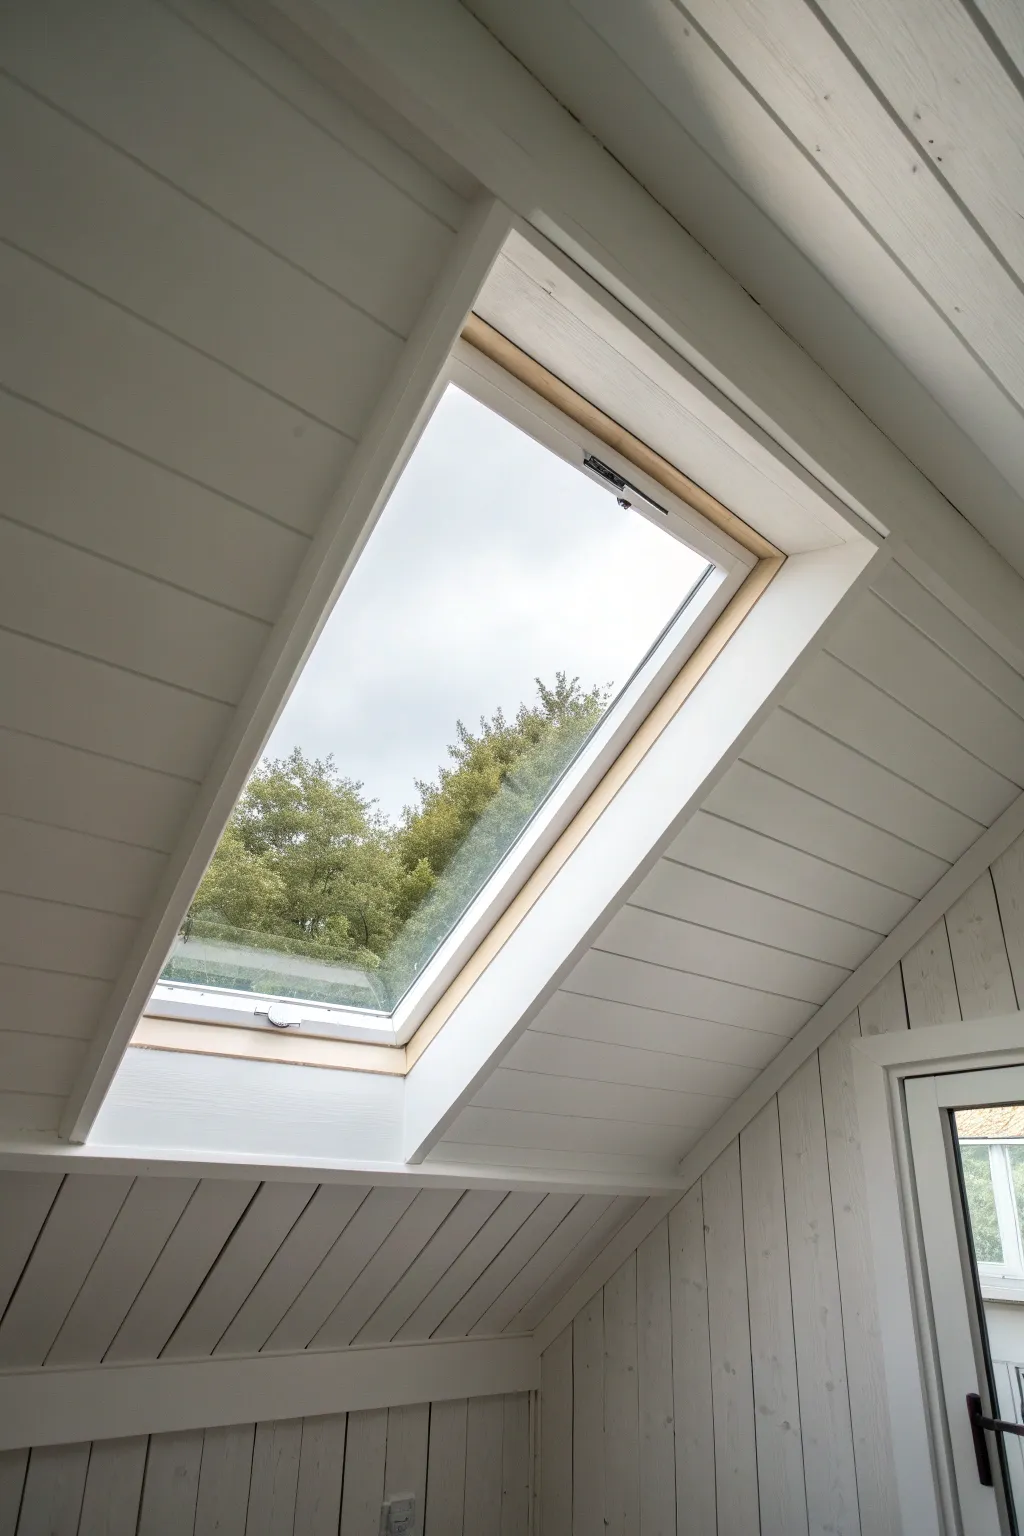
Transform a dark, slanted ceiling into a breath of fresh air with this trompe l’oeil skylight mural. By painting a realistic frame and a soft view of treetops, you can open up a cramped attic space without cutting a single hole in the roof.
Step-by-Step Tutorial
Materials
- Painter’s tape (high quality)
- Pencil and long straightedge or level
- Measuring tape
- Wall primer (white)
- Acrylic interior latex paints: White, Light Grey, Light Blue, Deep Green, Olive Green
- Assorted brushes: 2-inch angled sash brush, 1-inch flat brush, fan brush, small detail round brush
- Small roller and tray
- Mixing palette or paper plates
- Sea sponge (optional)
Step 1: Planning and Framing
-
Measure and Mark:
Decide on the placement of your faux skylight. Use a tape measure to determine the dimensions, aiming for a rectangular shape that naturally fits between any existing beams or on a flat expanse of the slanted ceiling. Mark the four corners lightly with a pencil. -
Draft the Lines:
Connect your corner marks using a long straightedge or level to draw the outline of the skylight ‘frame.’ Ensure your lines are parallel to the room’s actual walls or paneling lines to maintain a convincing perspective. -
Create Depth Perspective:
To give the illusion of a recessed window, draw a second, smaller rectangle inside the first one. Offset it slightly towards the ‘bottom’ edge (the edge closest to the floor) to mimic the thickness of the frame and the reveal of the drywall. -
Tape the Boundaries:
Apply painter’s tape firmly along the *outer* edges of your largest rectangle. This isolates your workspace from the rest of the ceiling. Press the tape edges down firmly to prevent bleed-through on the paneling.
Pro Tip: Shadow Play
Paint the ‘inner’ side walls of the frame slightly darker at the top and lighter at the bottom. This inverse shading mimics how natural light would hit a recessed box.
Step 2: Painting the Sky Background
-
Prime the Surface:
Apply a coat of white primer inside the taped rectangle. This is crucial if painting over wood paneling (like shiplap) to ensure the texture doesn’t distract too much from the illusion and to give a bright base for the sky colors. -
Base Coat:
Once dry, paint the entire inner rectangle with your lightest sky blue mixed with plenty of white. You want a very pale, atmospheric base rather than a deep midday blue. -
Add Cloud Textures:
While the blue is still slightly tacky, mix a touch of light grey with white. Use a sea sponge or a dry brush to dab irregular cloud shapes near the center and top. Soften the edges by gently brushing over them with a clean, dry brush to create that hazy, overcast look. -
Blend the Horizon:
Lighten the blue tone significantly as you move toward the bottom of the window (where the trees will go). This gradient mimics atmospheric perspective, making the sky look distant.
Step 3: Painting the Treetops
-
Block in Foliage Shapes:
Using a dark olive green, roughly block in the silhouettes of tree tops along the bottom third of the ‘window.’ Don’t worry about individual leaves yet; focus on the overall organic massing of the clusters. -
Layer Mid-Tones:
Mix a lighter leafy green. Using a fan brush or an old, splayed bristle brush, stipple this lighter color over the dark base, concentrating on the upper edges where sunlight would hit the leaves. -
Add Highlights:
For the finest details, use a small round brush with a mix of yellow and green to dot the very top tips of the branches. I prefer to keep these distinct and crisp to suggest leaves against the bright sky. -
Refine Edges:
Go back with your sky color and cut into the tree shapes slightly to create ‘sky holes’—gaps between branches where the light shines through. This adds immense realism to the foliage.
Level Up: Seasonal Views
Instead of summer green, paint orange/red leaves for autumn warmth, or bare branches with a darker, moodier grey sky for a cozy winter aesthetic.
Step 4: Creating the Frame Illusion
-
Define the Reveal:
Remove the interior tape masks if you used them, or simply carefully paint the strip between your inner and outer rectangle lines. Paint the top and side strips of this ‘frame’ in a pure white or the same color as your ceiling trim. -
Shadow the Interior:
Paint the bottom strip of the frame (nearest the floor) with a slightly darker shade than the white—a very pale grey or beige works well here. This shading represents the shadow cast inside the window well, reinforcing the 3D depth. -
Paint the ‘Glass’ Glint (Optional):
For an extra touch, paint a very thin, sharp diagonal line of pure white across the sky and trees in one corner to suggest a reflection on the glass pane. -
Add Hardware Details:
Using a fine detail brush and dark charcoal or black paint, carefully paint a small handle or latch mechanism at the bottom center of the frame. Add a tiny highlight to it to make it look metallic. -
Final Cleanup:
Peel off the external painter’s tape slowly at a 45-degree angle. Use a small brush to touch up any spots where the ceiling paint might have peeled or the skylight paint bled out.
Step back and enjoy the instant architectural upgrade that brings the outdoors inside your attic space
Mural That Turns Angles Into a Story
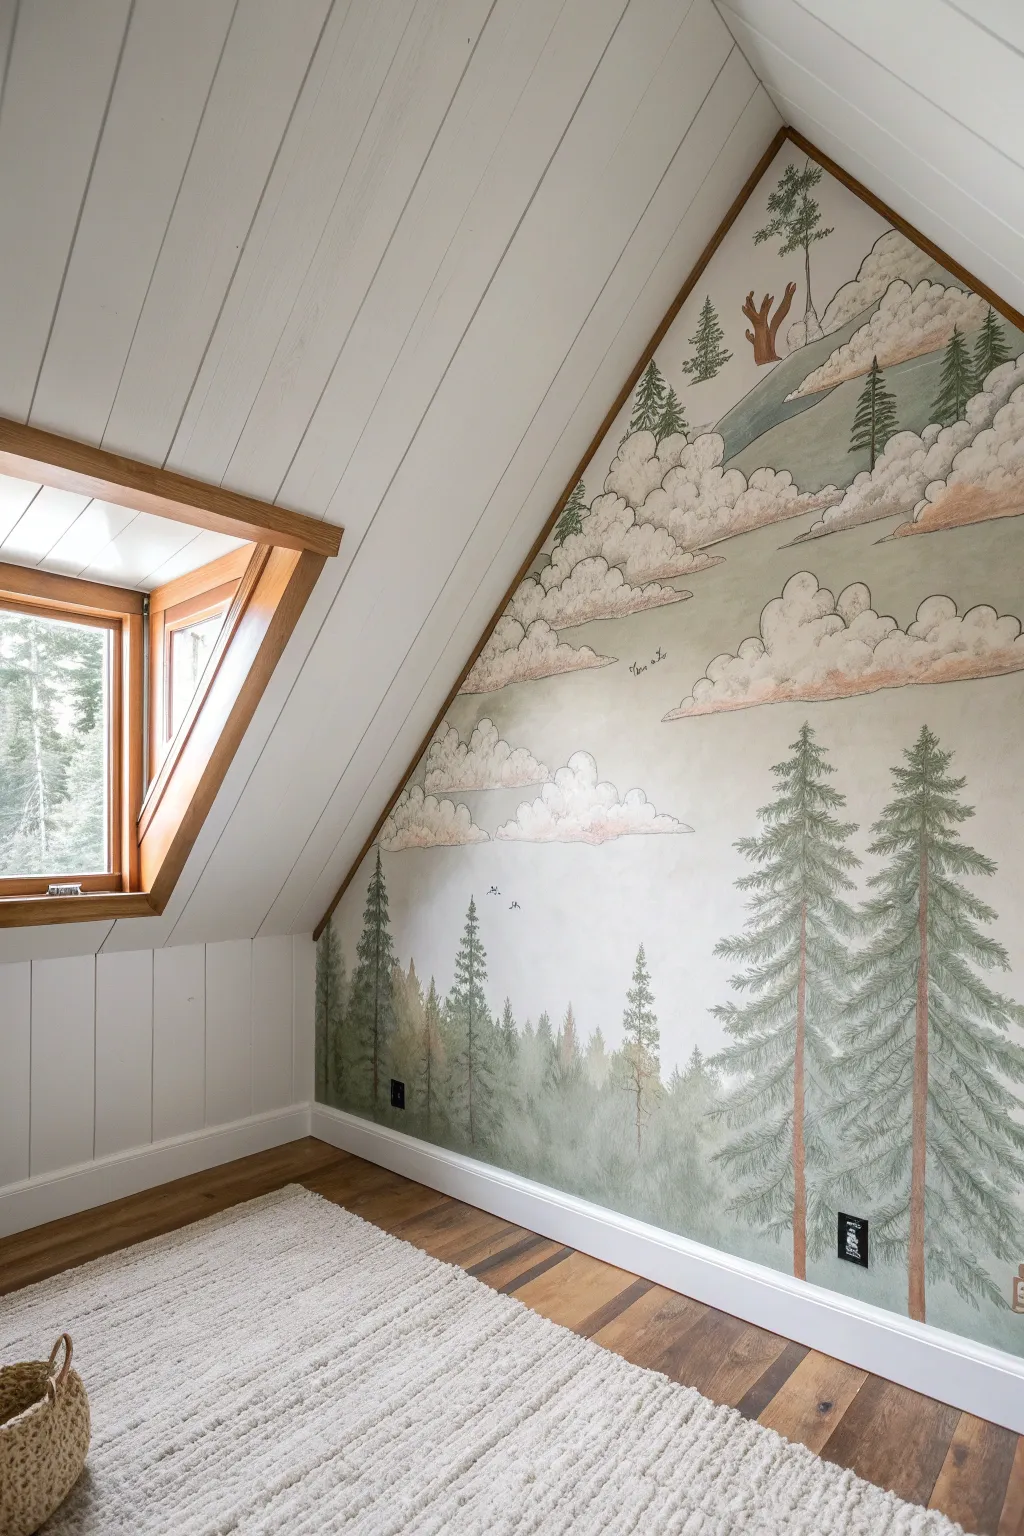
Transform awkward attic angles into a dreamy vista with this misty forest mural. Using soft washes and illustrative line work, this project turns a challenging triangular wall into a storybook window overlooking pine trees and billowing clouds.
Step-by-Step
Materials
- Interior acrylic latex paint (white base)
- Acrylic craft paints (sage green, forest green, burnt sienna, gray, pale blue, soft pink)
- Glaze medium or extender
- Assorted paintbrushes (2-inch angled sash brush, 1-inch flat brush, fine liner brushes)
- Painter’s tape
- Drop cloths
- Pencil and eraser
- Ladder
- Mixing cups or palette
Step 1: Preparation and Sky Layer
-
Prep the workspace:
Begin by clearing the wall area and laying down drop cloths to protect your flooring. Use painter’s tape to carefully mask off the trim, baseboards, and the adjacent ceiling panels to ensure clean, crisp edges. -
Mix the sky base:
Create a very pale, atmospheric base color by mixing white interior paint with a tiny drop of gray and a hint of sage green. You want an off-white that feels like overcast sky, not stark white. -
Apply the background wash:
Roll or brush this pale base coat over the entire wall surface. I like to apply two thin coats rather than one thick one to ensure even coverage without heavy texture. -
Draft the composition:
Once the base is fully dry, lightly sketch your composition using a pencil. Mark the placement of the large foreground trees on the right and left, the rolling hill lines, and the clusters of clouds near the peak.
Use Glazing Medium
Don’t use just water to thin your acrylics. Glazing medium increases transparency without breaking the paint binder, allowing for those smooth, misty watercolor-style transitions.
Step 2: Painting the Clouds and Hills
-
Block in cloud shapes:
Mix a soft, warm pink-beige tone using white, a touch of pink, and burnt sienna. Using a round brush, paint the fluffy, scalloped tops of the clouds found in the upper section of the mural. -
Create depth in clouds:
While the cloud paint is still slightly tacky, blend a darker gray-beige into the bottom edges of the clouds to give them volume and weight. -
Outline the clouds:
Using a fine liner brush and watered-down dark grey or charcoal paint, carefully outline the scalloped edges of the clouds. Use a slightly shaky, organic hand to give it that illustrative, storybook look. -
Paint distant hills:
Mix a pale, milky green using your sage paint and a lot of glazing medium. Paint the distant hills in broad, horizontal sweeps, overlapping the bottom of the cloud layer slightly for a misty effect.
Scale It Up
To get the scale right on a slanted wall, tape a grid on the wall and use a matching grid over your reference photo. This helps you manage tricky proportions on an angled surface.
Step 3: Creating the Forest Layer
-
Paint background trees:
Mix a muted olive green with glaze medium to make it translucent. Paint a row of smaller, less detailed trees along the horizon line. Keep these shapes simple and slightly blurry to push them into the distance. -
Establish foreground trunks:
For the main trees, mix burnt sienna with a touch of grey for the trunks. Using a flat brush, paint vertical lines extending from the floor up toward the ceiling slope. vary the thickness slightly but keep them relatively straight. -
Add trunk texture:
Take a finer brush with a darker brown mix and add vertical striations and knots to the trunks to simulate bark texture. -
Paint lower pine branches:
Switch to a fan brush or an angled sash brush loaded with deep forest green. Start near the bottom of the trunks and use downward, sweeping strokes to create the heavy, drooping lower branches. -
Build the canopy:
Continue working up the tree trunks, making your strokes shorter and more horizontal as you reach the top. Leave gaps between branches so the sky shows through. -
Add highlights:
Mix a lighter sage green and lightly dry-brush the tops of the pine branches. This mimics sunlight catching the needles and separates the branches from each other. -
Detail the needles:
For a refined look, use a fine liner brush to add individual needle details on the outermost edges of the branches, giving the trees a feathery, realistic silhouette.
Step 4: Finishing Touches
-
Add flying birds:
Using your smallest brush and dark grey or black paint, add tiny ‘V’ shapes in the negative space of the sky to represent birds flying in the distance. -
Soften the base:
Use a dry brush to feather out the bottom of the mural where the trees meet the grass area, blending the greens into a soft haze rather than a hard line. -
Remove tape:
Wait until the paint is dry to the touch, then slowly peel away the painter’s tape at a 45-degree angle to reveal your crisp borders.
Step back and admire how this peaceful woodland scene completely changes the atmosphere of your room


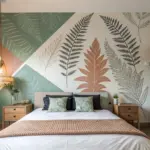

Have a question or want to share your own experience? I'd love to hear from you in the comments below!