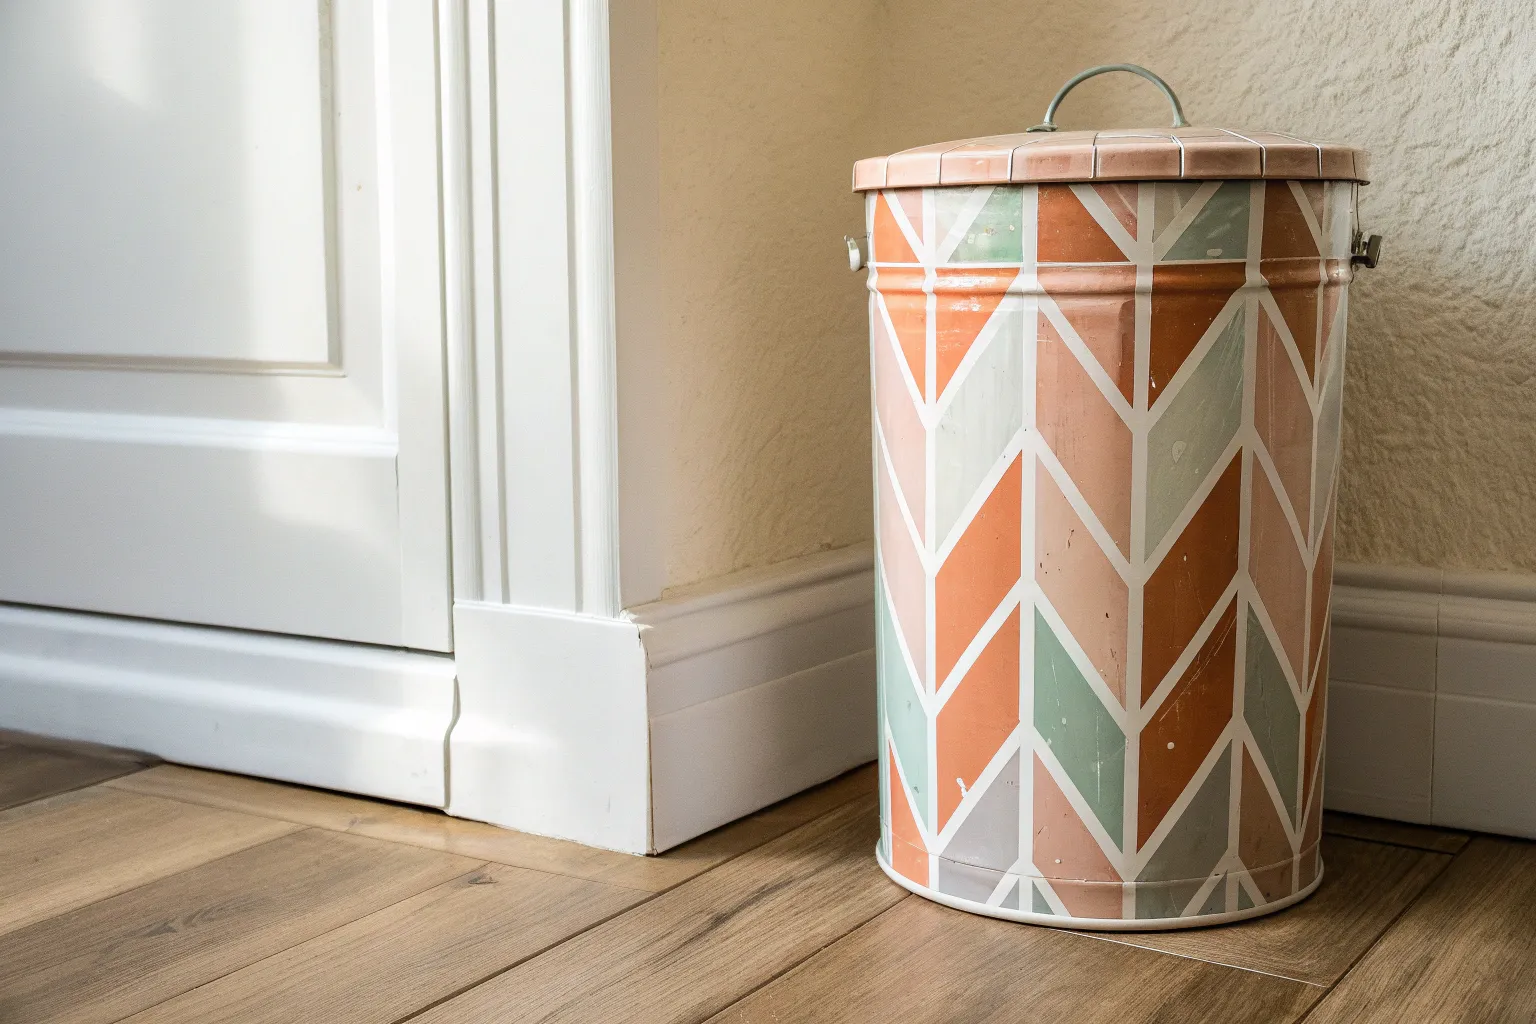
A painted trash can is one of my favorite “why not?” projects—because the most ordinary object can become a tiny piece of art you actually enjoy seeing every day. Here are my go-to painted trash can ideas, starting with the classics and ending with a few studio-style surprises.
Bold Vertical Stripes
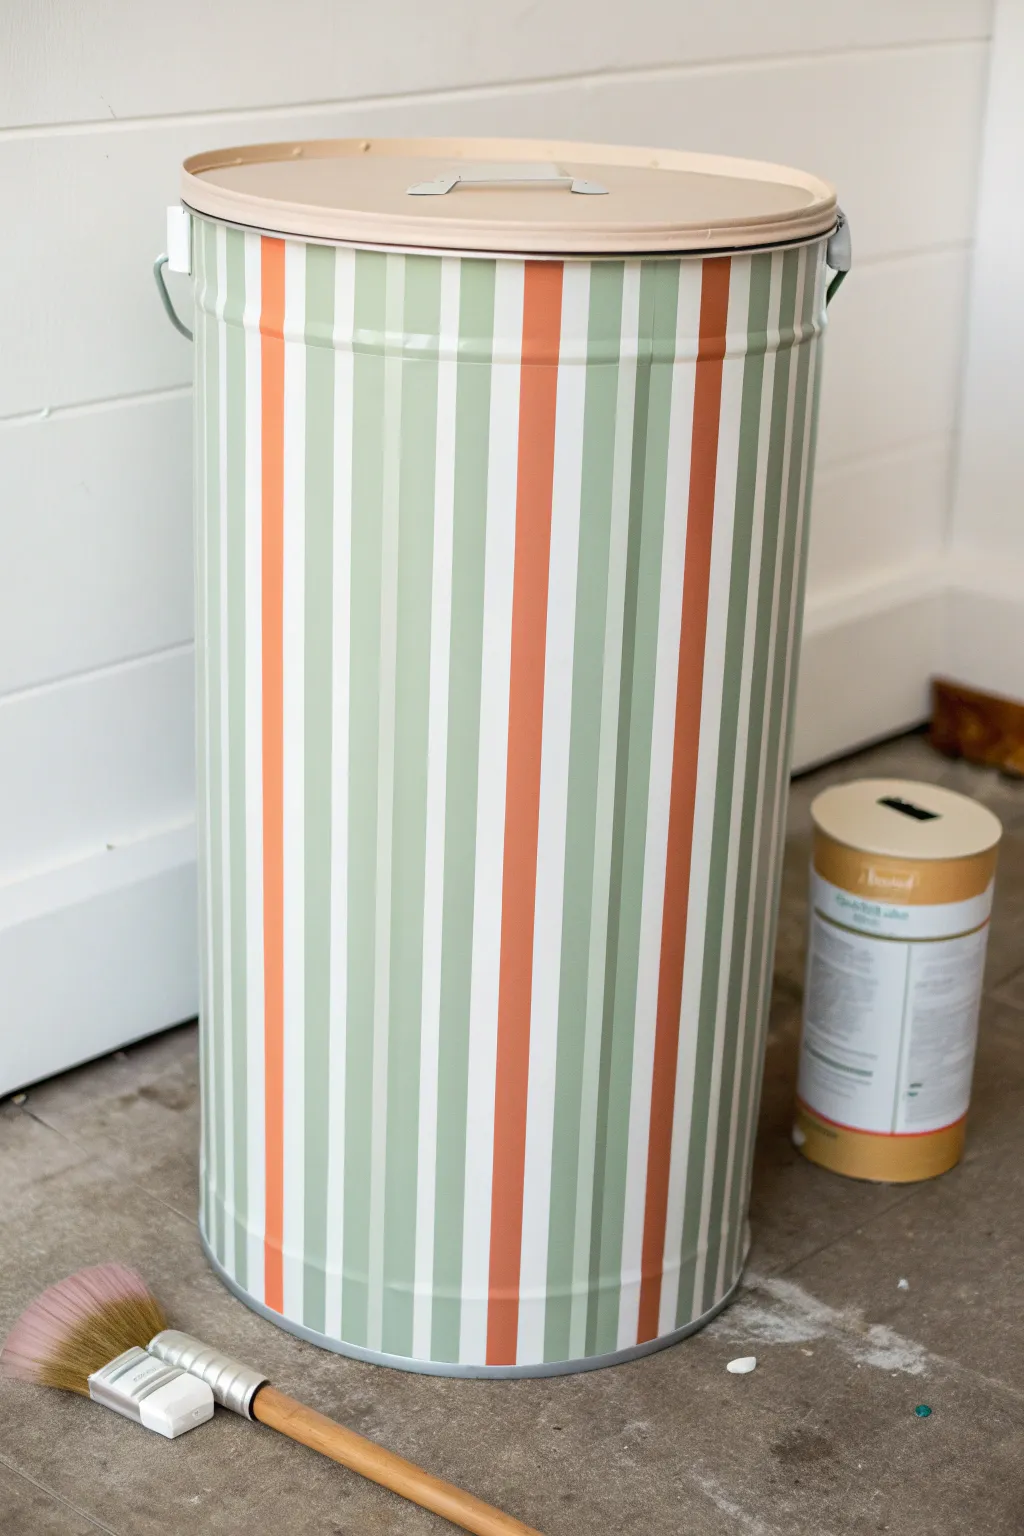
Transform a plain metal trash bin into a statement piece with this bold, retro-inspired stripe design. The combination of sage green, creamy white, and warm terracotta creates a sophisticated palette that elevates an everyday object into decor.
Step-by-Step Tutorial
Materials
- Metal trash can with lid
- Spray primer (metal-bonding)
- Chalk paint or multi-surface acrylic (Cream/Off-White)
- Chalk paint or multi-surface acrylic (Sage Green)
- Chalk paint or multi-surface acrylic (Terracotta Orange)
- Painter’s tape (various widths recommended)
- Flat paintbrush (1.5 to 2 inch)
- Ruler or measuring tape
- Pencil
- Clear matte polyurethane sealer
Step 1: Prep & Base Coat
-
Clean the surface:
Wipe down the entire trash can with soapy water or a degreaser to remove any manufacturing oils or dust. Let it dry completely. -
Prime the metal:
Apply a coat of metal-bonding spray primer to the entire can and lid. This ensures your paint sticks without chipping later. -
Apply the base color:
Paint the entire body of the can with your Cream/Off-White paint. This will serve as one of your stripe colors and the background. -
Add a second coat:
Once the first coat is dry to the touch, apply a second layer of cream paint for solid, opaque coverage. -
Paint the lid:
While the body dries, paint the lid a solid pale terracotta or beige color to complement the stripes you’ll be adding.
Bleeding Lines?
To stop bleeding, paint a thin layer of your BASE color (cream) over the tape edges first. This seals the gap so the colored paint can’t sneak under.
Step 2: Mapping the Stripes
-
Measure the circumference:
Measure around the top rim of the can. Divide this number by how many total stripes you want to ensure they fit evenly. -
Mark your intervals:
Using a pencil, make small tick marks along the top and bottom rims of the can where each stripe should begin and end. -
Tape the first set:
Apply painter’s tape vertically, connecting your top and bottom marks. Press the edges down firmly with your thumbnail or a credit card to seal them tight against the metal ridges. -
Protect the white stripes:
Remember, the areas under the tape will remain white. Tape off the sections that should stay cream, leaving the areas for green and orange exposed.
Step 3: Painting the Colors
-
Paint the sage stripes:
Select the specific open sections for your green stripes. Apply the Sage Green paint using long, smooth vertical strokes. -
Paint the terracotta stripes:
Identify the narrower accent stripes (if copying exactly) or alternating bands for the Terracotta Orange. Paint these carefully. -
Touch up edges:
Check for any light spots and do a quick second coat on the colored stripes if the white base is showing through. -
Remove tape immediately:
I prefer to peel the tape off while the paint is still slightly wet. Pull it away from the painted edge at a 45-degree angle to get the crispest lines. -
Let it cure:
Allow the paint to dry fully, ideally overnight, so the layers harden completely before sealing.
Make it Luxe
Swap the terracotta paint for a metallic copper or gold. The metallic sheen against the matte sage green creates a high-end, modern look.
Step 4: Finishing Touches
-
Fix imperfections:
If any paint bled under the tape, use a small detail brush and the cream paint to tidy up the lines. -
Seal the project:
Apply a clear matte polyurethane sealer over the entire can and lid. This protects the finish from scratches and makes it easy to wipe clean.
Enjoy your stylish new bin that perfectly matches your room’s aesthetic


Modern Gingham Grid
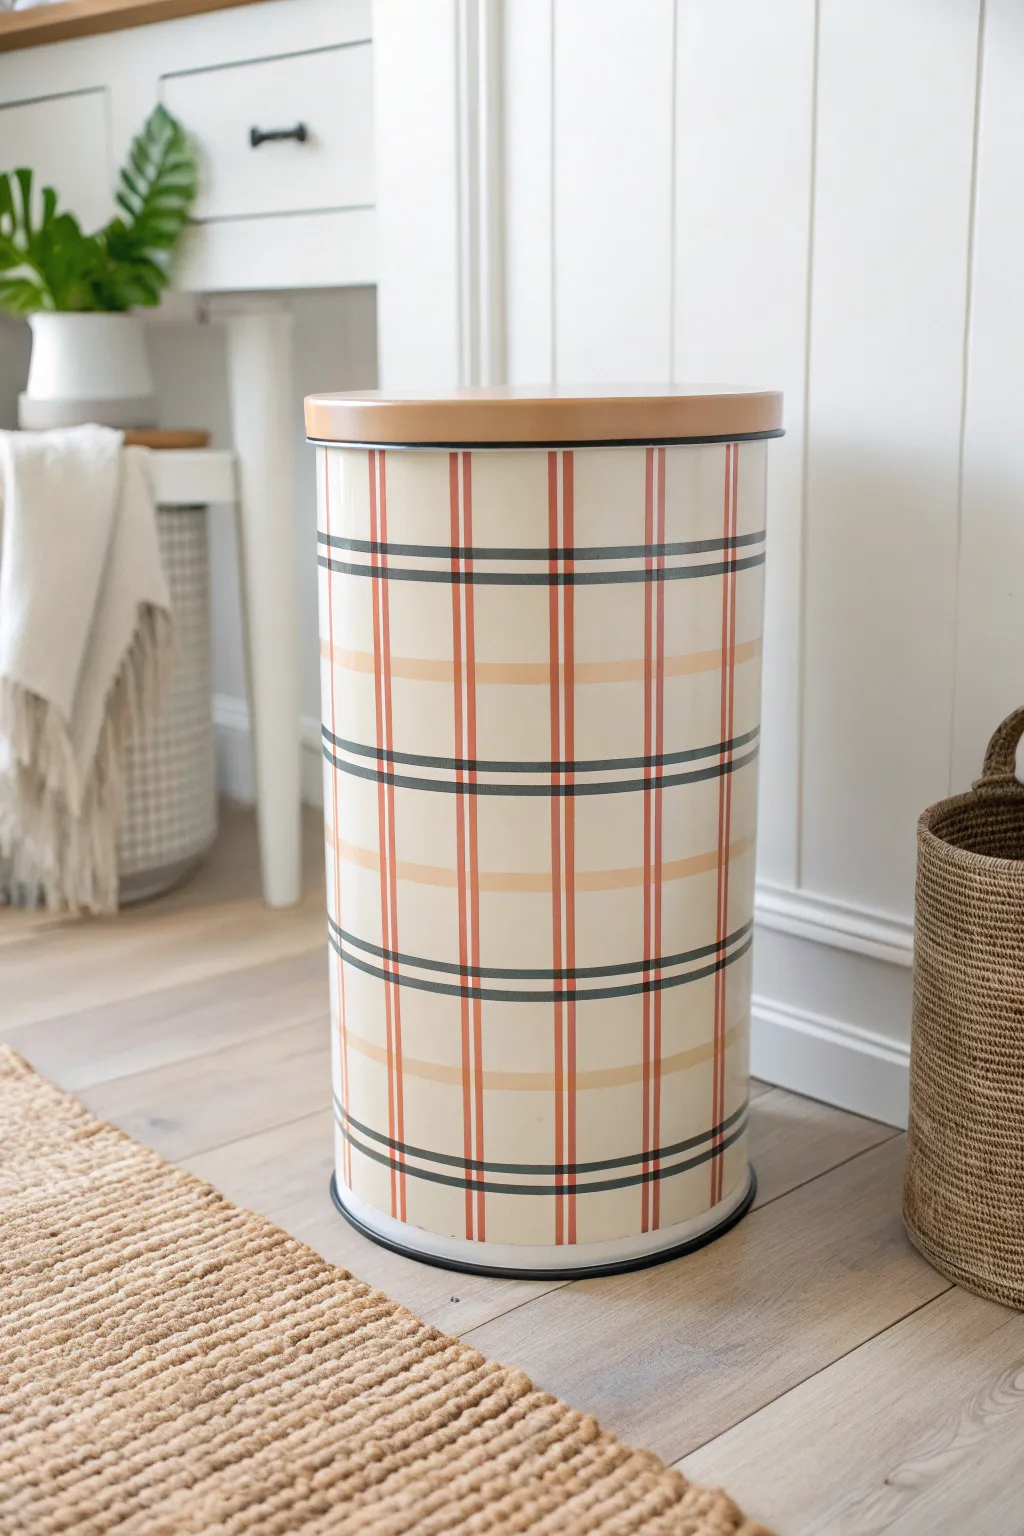
Transform a plain metal cylinder trash can into a cozy statement piece with this modern plaid makeover. Using a creamy base and precise taping techniques, you’ll create a crisp, structured pattern that feels both classic and contemporary.
Detailed Instructions
Materials
- Cylindrical metal trash can (with lid)
- Spray primer (white or bonding primer)
- Cream or oatmeal spray paint (satin finish)
- Acrylic craft paints: dark charcoal grey, burnt orange/terracotta, light peach
- Painter’s tape (various widths: 1-inch, 1/4-inch, 1/8-inch detailed tape)
- Flat artist brushes (small and medium)
- Ruler or flexible measuring tape
- Pencil
- Clear matte sealer spray
- Wood stain or light brown spray paint (for the lid)
Step 1: Base Preparation
-
Clean the surface:
Wipe down the entire trash can with soapy water or a degreaser to remove any oils or sticker residue. Dry it completely with a lint-free cloth. -
Prime the metal:
Apply a coat of bonding primer to the can body. This is crucial for ensuring your paint sticks to the smooth metal surface without chipping later. -
Apply the base color:
Spray the entire body of the can with your cream or oatmeal color. Apply two to three thin, even coats, letting it dry for about 15 minutes between each pass to prevent drips. -
Finish the lid:
While the body dries, spray the lid with a wood-tone paint or, if it’s already wood, give it a fresh clear coat. Let everything cure for at least 24 hours so the tape won’t peel up the base paint.
Crisp Line Secret
Before painting your colored stripes, brush a tiny bit of the *base* cream color over the tape edge. This seals the tape so no color bleeds underneath.
Step 2: Creating the Grid
-
Mark vertical guides:
Using your flexible measuring tape, lightly mark vertical intervals around the top rim of the can. Space them evenly, perhaps every 3-4 inches depending on the can’s circumference. -
Tape vertical stripes:
Run long strips of 1/4-inch painter’s tape vertically down the can at your marked intervals. Use the pencil marks as a guide and press the edges down firmly to prevent bleed-under. -
Paint the orange stripes:
Using a flat brush and the burnt orange paint, fill in the vertical stripes you just taped off. You may need two coats for full opacity. -
Remove vertical tape:
Peel off the tape while the paint is still slightly tacky to get the cleanest lines. Allow the orange stripes to dry completely before moving to the next step. -
Mark horizontal guides:
Measure down from the rim to spacing for your horizontal lines. To match the photo, create wider gaps between the grid lines, roughly equal to the vertical spacing. -
Tape for peach bands:
Apply two pieces of 1-inch tape horizontally around the can, leaving a roughly half-inch gap between them to create the wide, faint band. -
Paint the peach bands:
Fill this horizontal gap with the light peach paint. Keep this layer somewhat sheer or use a dry-brush technique if you want it to look woven into the background. -
Add horizontal orange stripes:
Once the peach paint is dry, mask off horizontal lines that intersect your vertical orange stripes, creating squares. Paint these with the burnt orange color.
Faux Fabric Texture
Mix a clear glazing medium into your acrylics. This makes the paint slightly translucent, mimicking the overlapping threads of real woven fabric.
Step 3: Adding Definition
-
Prepare for thin lines:
For the crisp dark grid, use the 1/8-inch painter’s tape or pinstriping tape. Place these thin strips right next to or slightly overlapping your orange lines. -
Paint the charcoal accents:
Carefully paint these thin lines with the dark charcoal grey acrylic. Using a smaller brush helps keep control here. -
Create the double-line effect:
Notice how the image has pairs of dark lines? Add a second horizontal charcoal line about a half-inch below the first one to replicate that structured plaid look. -
Touch up freehand:
After removing all tape, inspect your grid. I find it helpful to use a tiny detail brush with the base cream color to clean up any spots where paint might have bled. -
Seal the project:
Once the entire design is bone dry, spray the can with two coats of clear matte sealer. This protects your hard work from scratches and everyday use. -
Add slight rim detail:
For a final professional touch, use a steady hand or tape to paint the very top and bottom rims of the metal can in charcoal grey or black to frame the pattern.
Place the lid on your new custom bin and enjoy how it instantly warms up the corner of your room

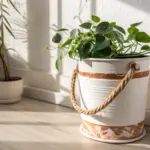
Oversized Polka Dots
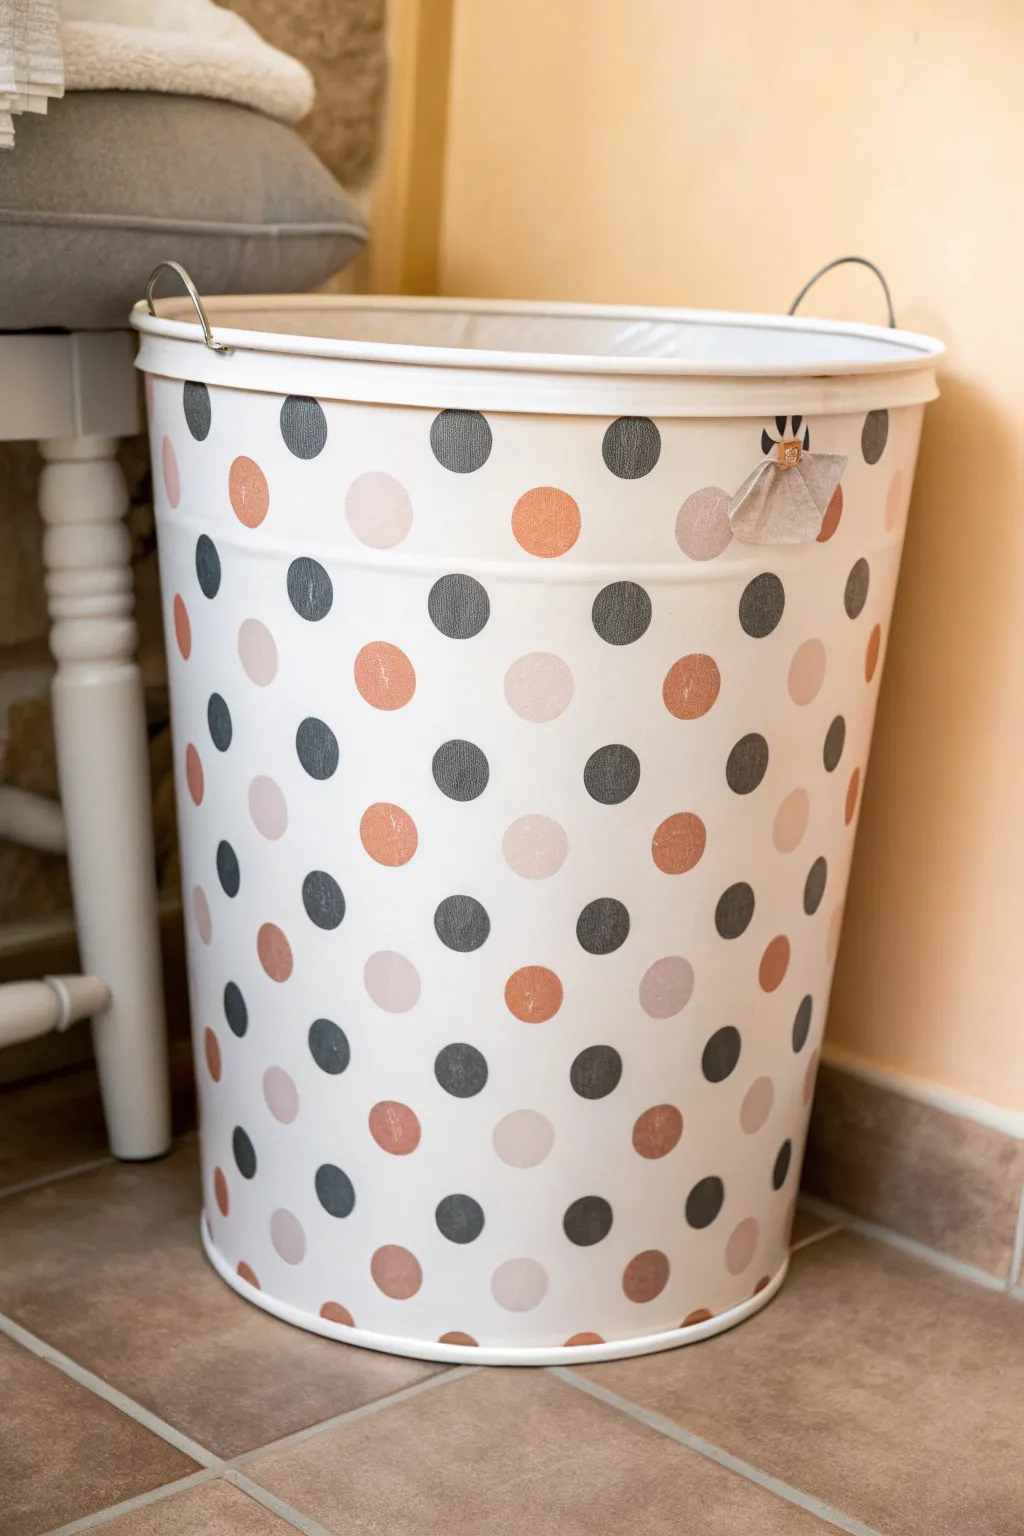
Transform a plain metal bin into a stylish, oversized polka dot statement piece that blends modern organization with bohemian flair. This project uses a soft, earthy color palette of charcoal, terracotta, and blush to create a playful yet sophisticated pattern perfect for a laundry room or nursery.
Step-by-Step Guide
Materials
- Large metal trash can or hamper (white)
- Acrylic craft paints (charcoal grey, terracotta, blush pink)
- Round foam pouncers (large size, approx. 1.5-2 inches)
- Small artist detail brush
- Paper plate or paint palette
- Painter’s tape or pencil (optional for grid)
- Clear matte acrylic sealer spray
- Small piece of fabric or ribbon (optional)
- Hot glue gun (optional)
Step 1: Preparation & Planning
-
Clean the Surface:
Begin by thoroughly wiping down the exterior of your metal bin with rubbing alcohol or a mild soapy water solution to remove any oils or dust. Let it dry completely to ensure the best paint adhesion. -
Plan Your Color Scheme:
Squeeze a generous amount of your three paint colors—charcoal, terracotta, and blush—onto separate areas of a paper plate. You want colors that contrast nicely against the white background. -
Practice Your Pattern:
Before committing to the bin, practice using the foam pouncers on a piece of scrap paper. Get a feel for how much paint is needed to create a solid circle without globs forming at the edges.
Step 2: Applying the Dots
-
Load the Foam Pouncer:
Dip your round foam pouncer into the first color (I usually start with the darkest shade, charcoal). Dab it off slightly on a clean part of the plate to distribute the paint evenly across the foam surface. -
Stamp the First Row:
Starting near the top rim, press the pouncer firmly against the bin and twist it slightly back and forth. Lift straight off to create a clean circle. Space these dots approximately 2-3 inches apart horizontally. -
Establish the Pattern:
Move to the next row down. Offset the dots so they sit in the empty spaces between the dots of the row above, creating a brick-lay or staggered pattern. -
Rotate Colors:
Switch to a clean pouncer and apply your second color, the terracotta, following the staggered pattern. The goal is to maximize variety, so try not to place two identical colors right next to each other. -
Add the Lightest Tone:
Introduce the blush pink dots into the mix. Continue working your way down the bin, rotating between charcoal, terracotta, and blush to keep the distribution random but balanced. -
Handle the Seam:
When you wrap around to the back of the can, the spacing might not align perfectly. Adjust the spacing slightly on the last few vertical columns to cheat the eye and make the seam less noticeable.
Circle Smudges?
If your foam pouncer slips, let the paint dry completely. Then, paint over the error with white paint (or your bin’s base color) before re-stamping the dot correctly.
Step 3: Refining Details
-
Touch Up Edges:
Once the stamped dots are dry to the touch, inspect the edges. If any bubbles popped or the paint looks thin, use a small detail brush to fill in the circles carefully for a solid, opaque look. -
Clean Up Mistakes:
If any paint smudged outside the circle, quickly wipe it with a damp cotton swab. For dried mistakes on a metal bin, you can often gently scrape them away with a fingernail. -
Seal the Design:
Take the bin to a well-ventilated area. Apply a light, even coat of clear matte acrylic sealer spray over the entire exterior. This protects the paint from scratching and makes the bin easier to wipe clean later. -
Fabric Accent:
For a cute finishing touch similar to the image, cut a small square of neutral fabric. Pinch the center to form a simple bow shape. -
Attach the Charm:
Using a small dot of hot glue, attach the fabric bow near the top rim or handle area. You can also hang a small tag or charm from the handle if preferred.
Make It Yours
Swap the blush and terracotta for navy and mustard yellow for a bolder nautical look, or use metallic gold and silver paints for a glam, modern aesthetic.
Enjoy using your customized hamper to brighten up your daily chores

Two-Tone Color Blocking
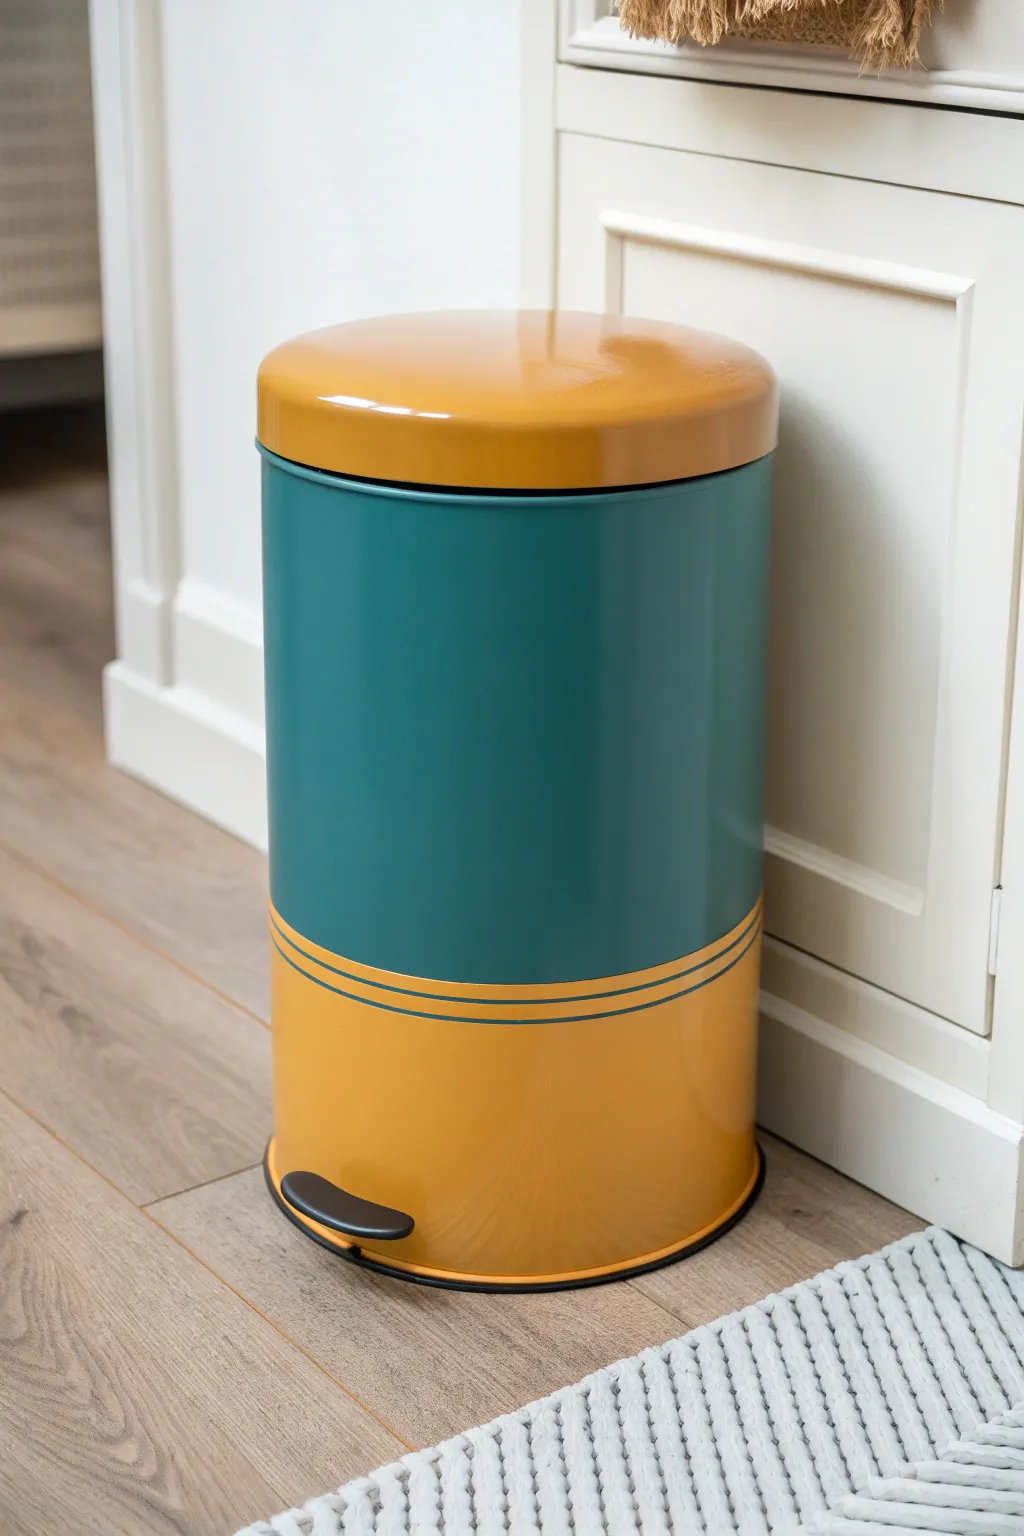
Transform a basic metal trash can into a mid-century modern statement piece with this bold color-blocked design. The combination of glossy mustard yellow and deep teal creates a vibrant, polished look that elevates even the humblest household item.
How-To Guide
Materials
- Metal pedal trash can (cylindrical)
- Sandpaper (220-grit and 400-grit)
- Painter’s tape (high quality)
- Spray primer (metal-appropriate)
- Mustard yellow spray paint (gloss finish)
- Teal or turquoise spray paint (satin or gloss finish)
- Drop cloth or cardboard
- Clean rags
- Degreaser or rubbing alcohol
- Plastic bag (for masking)
Step 1: Cleaning and Prepping
-
Disassemble the can:
Start by removing the inner plastic bucket and setting it aside. If possible, remove the lid mechanism or detach the lid to make painting easier; otherwise, you’ll need to mask carefully later. -
Clean thoroughly:
Wipe down the entire exterior of the trash can with a degreaser or rubbing alcohol. Removing factory oils or fingerprints is crucial for paint adhesion. -
Light sanding:
Use 220-grit sandpaper to lightly scuff the metal surface. You aren’t trying to strip the finish, just creating ‘tooth’ for the primer to grab onto. -
Wipe away dust:
Use a clean, damp cloth to remove all sanding dust, then dry completely with a lint-free rag. -
Tape off hardware:
Cover the pedal mechanism, any hinges, and the rubber rim at the bottom with painter’s tape to keep them clean.
Bleeding Lines?
If paint bleeds under the tape, wait until completely dry. Then, spray a small amount of the yellow paint into a cup and use a tiny artist’s brush to touch up the edges carefully.
Step 2: Priming and Base Color
-
Apply primer:
In a well-ventilated area, spray a thin, even coat of primer over the entire can and lid. Let it dry according to the can’s instructions. -
First coat of yellow:
Since the bottom and top are yellow, and the stripes will be too, spray the entire can with your mustard yellow gloss paint. This acts as your base layer. -
Build opaque coverage:
Apply two to three light coats of yellow rather than one heavy one to avoid drips. Allow complete drying time between coats. -
Extended drying time:
Let the yellow base coat cure for at least 24 to 48 hours. This is critical because you will be applying tape directly onto this fresh paint, and you don’t want it to peel off.
Step 3: Creating the Design
-
Mask the bottom section:
Measure about 6-8 inches up from the bottom rim. Apply a straight line of painter’s tape around the distinct circumference to define the top edge of the yellow base. -
Create the stripes:
To make the thin double stripe detail, place another band of tape slightly above your first one, leaving a roughly 1/8-inch gap. Then place a third band of tape, leaving another identical gap. Press the edges down firmly. -
Mask the top edge:
Run a line of tape around the top rim of the can body where the lid sits, ensuring the upper colored section stops neatly. -
Protect the lid and bottom:
Use plastic bags or paper taped securely over the bottom yellow section and the entire lid (if attached) to protect them from the teal overspray.
Seal the Edge
For ultra-crisp lines, spray a quick clear coat or a light layer of the base color (yellow) over the tape edges first. This seals the tape so the second color can’t seep underneath.
Step 4: Applying the Teal and Finishing
-
Spray the teal section:
Apply your teal spray paint to the exposed middle section of the can. Use smooth, horizontal sweeping motions to ensure even coverage. -
Second teal coat:
Apply a second coat of teal if needed for full opacity. I like to inspect it from different angles to ensure no yellow shows through. -
Remove tape promptly:
While the final coat of teal is still slightly tacky (not wet, but not fully cured), gently peel back the tape at a 45-degree angle. This keeps the paint from chipping at the line. -
Final cure:
Allow the entire project to dry undisturbed for another 24 hours before reassembling or using the pedal. -
Reassemble:
Remove any tape covering the pedal or hardware, place the inner bucket back inside, and your custom bin is ready for the bathroom or office.
Enjoy the pop of color this simple upgrade adds to your space
BRUSH GUIDE
The Right Brush for Every Stroke
From clean lines to bold texture — master brush choice, stroke control, and essential techniques.
Explore the Full Guide
Soft Ombre Fade
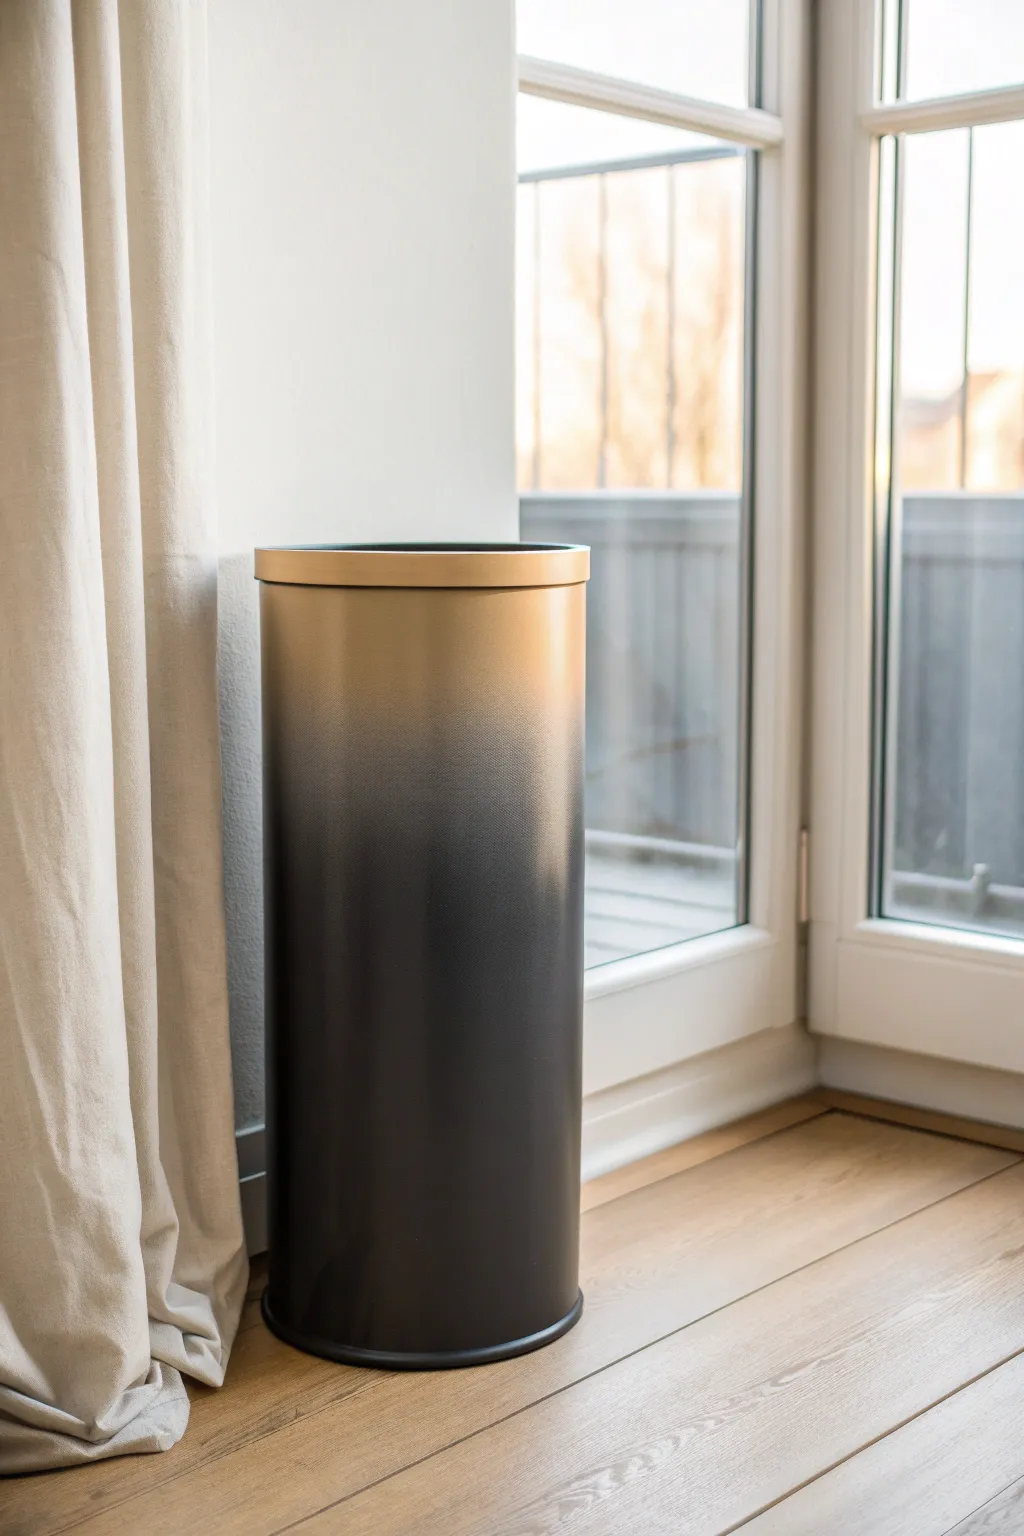
Transform a plain metal cylinder into a high-end statement piece with this sophisticated soft ombre technique. Creating that seamless blend from rich metallic gold down to deep matte black is easier than it looks and instantly elevates any corner of your room.
Step-by-Step
Materials
- Cylindrical metal trash can (clean and dry)
- Fine-grit sandpaper (220-300 grit)
- Clean tack cloth or lint-free rag
- Painter’s tape
- Drop cloth or cardboard workspace
- Primer spray paint (suitable for metal)
- Matte black spray paint
- Metallic gold spray paint (champagne or bright gold)
- Clear matte sealer spray
Step 1: Preparation & Priming
-
Scuff the Surface:
Begin by lightly sanding the entire exterior of your trash can with fine-grit sandpaper. You aren’t trying to strip the old finish, just creating ‘tooth’ so the new paint adheres perfectly. -
Clean Thoroughly:
Wipe away all sanding dust using a tacky cloth or a damp rag. Let it dry completely; any lingering dust or grease will show through later. -
Tape Off Interiors:
If you want to keep the inside original, carefully apply painter’s tape around the inner rim. I also like to stuff the inside with old newspaper to catch stray mist. -
Set Up Your Spray Zone:
Place your can upside down on a bucket or stand in a well-ventilated area protected by drop cloths. Getting the can off the ground helps you spray the bottom edge cleanly. -
Apply Primer:
Spray a thin, even coat of metal primer over the entire exterior. Hold the can about 8-10 inches away and keep your hand moving. Let this base layer dry according to the can’s instructions.
Distance is Key
For the smoothest ombre transition, hold the spray can 12-15 inches away during the blending phase. The increased distance creates a finer mist that lands softly without hard lines.
Step 2: Creating the Base & Ombre
-
Apply the Base Black:
Spray the entire can with your matte black paint. Apply 2-3 light coats rather than one heavy one to avoid drips. Let each coat dry to the touch before adding the next. -
Let the Black Cure:
Allow the black base coat to dry completely for at least an hour. A dry base is crucial for the ombre blending step. -
Start the Gold:
Shake your gold metallic spray paint vigorously. Test the spray pattern on a piece of cardboard first to ensure the nozzle is clean. -
Spray the Top Rim:
Begin spraying the gold at the very top rim (which is currently at the bottom if your can is upside down, or top if right-side up). Create a solid band of gold for the first 3-4 inches. -
Begin the Fade:
Move your spray can slightly further away from the surface as you work downwards. Use quick, light horizontal bursts to dust the gold paint over the black. -
Feathering Technique:
The key to the soft fade is overspray. Aim your gold spray slightly above the transition line so only the fine mist falls onto the black area, creating a speckled, gradual transition. -
Assess the Gradient:
Stand back and look at the can from a distance. If the line looks too harsh, mist a very light layer of gold from further away to soften the edge. -
Correct with Black (Optional):
If you accidentally brought the gold down too low, you can mist a tiny bit of black upwards from the bottom to push the gradient back up.
Sputtering Nozzle?
If the spray paint sputters and ruins the smooth gradient, wipe the nozzle immediately with mineral spirits or warm water. Shake the can for a full minute before trying again on scrap cardboard.
Step 3: Finishing Touches
-
Dry Time:
Let the paint cure undisturbed for at least 24 hours. Metallic paints often take longer to harden than standard colors. -
Apply Sealer:
To protect that beautiful fade from scratches, apply a clear matte sealer over the entire can. Use light sweeping motions. -
Remove Tape:
Once the sealer is dry to the touch, carefully peel away the painter’s tape from the inner rim. -
Final Cure:
Wait 48 hours for full hardness before using the bin, to prevent footprints or dents in the fresh paint.
Enjoy the sleek, gallery-worthy look of your new custom wastebasket
Clean Monochrome Minimalism

Transform a standard utility item into a sleek, sculptural element for your home with this monochrome makeover. By applying a high-gloss cream finish to a metal bin, you achieve a modern minimalist look that feels intentional and upscale.
Step-by-Step Guide
Materials
- Metal trash can (cylindrical)
- Sandpaper (medium and fine grit)
- Painter’s tape
- Spray primer (metal-appropriate, white or grey)
- High-gloss spray paint (cream, off-white, or almond)
- Drop cloth or cardboard
- Clean tack cloth
- Respirator mask
- Protective gloves
Step 1: Preparation & Cleaning
-
Disassemble the bin:
Start by taking the trash can apart completely. Remove the lid from the body, and if there is a removable inner bucket or any plastic rim inserts, take those out and set them aside. -
Clean thoroughly:
Wash the entire exterior surface with warm soapy water or a degreaser. It’s crucial to remove any oils, fingerprints, or sticky residue to ensure the paint adheres properly. -
Sanding the surface:
Once dry, lightly scuff the entire metal surface with medium-grit sandpaper. This creates a ‘tooth’ for the primer to grab onto. Don’t worry about removing the old finish entirely; just dull the shine. -
Dust removal:
Wipe away all the sanding dust using a clean tack cloth. I like to do a second pass just to be sure, as any trapped dust will show up in a high-gloss finish. -
Tape off details:
If your bin has a chrome rim or interior components you want to keep unpainted, carefully mask them off with painter’s tape. Press the edges of the tape down firmly to prevent bleed-through.
Smooth Operator
To get that factory-finish look, warm your spray paint can in a bowl of warm water for 5 minutes before spraying. It helps the paint flow smoother and harder.
Step 2: Priming
-
Set up your workspace:
Move your project to a well-ventilated area, preferably outdoors, and lay down your drop cloth. Place the bin body and lid on elevated surfaces (like scrap wood blocks) so you can reach the bottom edges easily. -
Apply primer coat 1:
Shake your primer can vigorously for at least a minute. Apply a thin, even coat of primer to the bin and lid, keeping the can moving constantly to avoid drips. -
Let it dry:
Allow the first coat of primer to dry according to the manufacturer’s instructions, usually about 15-30 minutes. -
Sand the primer:
For an ultra-smooth finish, lightly sand the primed surface with fine-grit sandpaper once it is fully dry. Wipe away the dust again with a tack cloth.
Step 3: Painting & Finishing
-
First color coat:
Using your high-gloss cream spray paint, apply the first coat. Spray in long, sweeping motions, starting the spray before you hit the object and ending after you pass it. -
Observe drying time:
Let this first coat dry until it is tacky but not fully cured—usually about 15 minutes depending on humidity. -
Second color coat:
Apply a second coat to build up opacity. Focus on achieving even coverage rather than thickness; multiple thin coats are always better than one thick, drippy one. -
Inspect for coverage:
Check for any spots where the primer might still be showing through. If needed, apply a third light coat to ensure a solid, rich color depth. -
Clear coat (optional):
If you want extra durability or shine, you can apply a clear gloss sealant spray once the color coats are dry to the touch, though many high-gloss enamels are tough enough on their own. -
Remove tape:
Carefully peel away any painter’s tape while the paint is still slightly soft (not wet, but not rock hard) to avoid chipping the edges. -
Curing:
Let the painted parts sit undisturbed for at least 24 hours. This curing time is essential for the paint to harden sufficiently against scratches. -
Reassembly:
Once fully cured, put the inner bucket back in and reattach the lid.
Level Up: Metallic Rim
Before painting the cream color, spray the top rim gold or silver. Tape over the rim once dry, then proceed with the cream body for a chic two-tone detail.
Now you have a custom piece that blends perfectly into your tranquil, minimalist space

PENCIL GUIDE
Understanding Pencil Grades from H to B
From first sketch to finished drawing — learn pencil grades, line control, and shading techniques.
Explore the Full Guide
All-Over Floral Bouquet
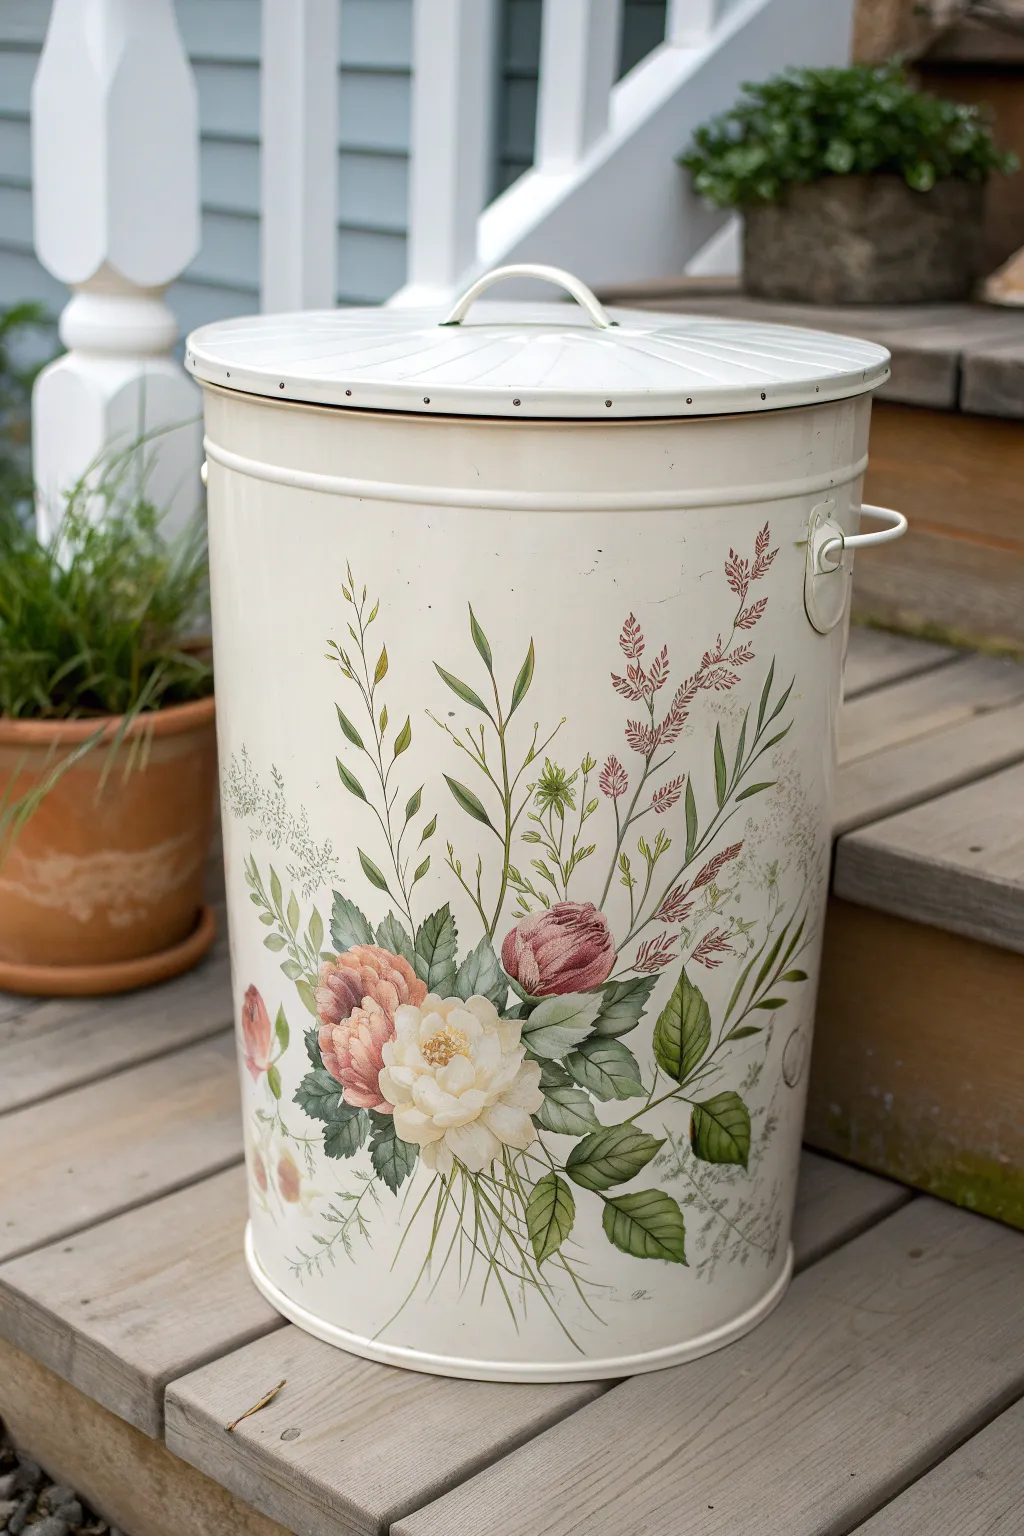
Transform a plain metal utility bin into a piece of cottage-core decor with this delicate floral transformation. The soft cream background and sprawling botanical illustration create a timeless look perfect for porches or garden sheds.
Step-by-Step
Materials
- Metal trash can with lid (galvanized or smooth steel)
- Sandpaper (220-grit)
- Metal primer spray (white)
- Cream or off-white exterior spray paint (satin finish)
- Acrylic craft paints (sage green, forest green, peach, mauve, cream, white, brown)
- Paintbrushes: large flat brush, medium shader, fine liner/detail brush
- Carbon transfer paper (optional)
- Pencil
- Clear matte exterior sealer spray
Step 1: Base Preparation
-
Clean surface:
Thoroughly wash the metal bin with warm soapy water to remove any factory grease or dirt. Dry it completely with a lint-free towel. -
Scuff sand:
Lightly sand the entire exterior surface with 220-grit sandpaper. This creates ‘tooth’ for the primer to adhere to so your artwork doesn’t peel later. -
Prime the metal:
In a well-ventilated area, apply a thin, even coat of metal primer. Don’t forget to prime the lid as well. -
Apply base color:
Once the primer is dry, spray the can with your cream-colored satin paint. I prefer doing two light coats rather than one heavy one to avoid drips. Let this cure for at least 24 hours.
Step 2: Establishing the Sketch
-
Plan composition:
Visualize a bouquet growing upward from the bottom third of the can. The design should fan out as it rises, leaving negative space near the rim. -
Transfer or sketch:
Lightly sketch your main flower stems and large blooms directly onto the cream paint using a pencil. If you aren’t confident freehanding, trace a printed floral design using carbon paper. -
Block in greenery:
Using a thin brush and diluted sage green paint, map out the longest stems that reach toward the top. Keep these lines wispy and organic, intersecting them slightly.
Float Your Colors
To get that soft, vintage petal look, use a floating medium or water to thin your acrylics. This makes the layers translucent rather than opaque.
Step 3: Painting the Blooms
-
Basecoat main flowers:
Mix a soft peach and a muted mauve tone. Block in the basic rounded shapes of your three main peonies or roses near the center cluster. -
Add petal depth:
While the base color is still slightly tacky, mix a darker version of your peach/mauve and paint curved shadows between the petals to define the flower’s center. -
Highlight petals:
Load your brush with cream or white paint. Add highlights to the outer edges of the petals to make them look voluminous and cupped. -
Paint secondary flowers:
Add the smaller, reddish-pink buds and stems rising above the main bouquet. These should look tighter and less open than the main blooms.
Fixing Mistakes
Did a stem get too thick? Don’t panic. Let it dry completely, then paint over the mistake with your cream base color before trying again.
Step 4: Detailing and Foliage
-
Layer the leaves:
Use forest green to paint the main leaves attached to the roses. Create serrated edges by pressing and lifting your brush tip rhythmically. -
Add dimension to leaves:
Blend a little white into your green to add soft veins and highlights on the leaves where the light would hit them. -
Create filler botanicals:
Switch to your finest liner brush. Mix a very watery brown-grey and flick upward to create delicate grasses and stems behind the main flowers. -
Stamp texture:
For the seed heads or small flower clusters at the top, gently dab your brush tip using a reddish-brown tone to create a stippled texture. -
Final airy touches:
Add extremely faint, ghost-like stems in a pale grey-green around the perimeter to give the bouquet depth and softness.
Step 5: Sealing
-
Cure time:
Allow the acrylic artwork to dry completely, ideally overnight, to ensure no moisture is trapped. -
Apply topcoat:
Spray the entire bin and lid with a clear matte exterior sealer. Apply 2-3 thin coats to protect your beautiful work from the elements.
Now you have a stunning, functional piece of art that brightens up even the most utilitarian corner of your home
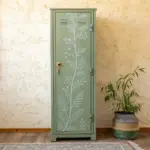
Climbing Vines and Leaves
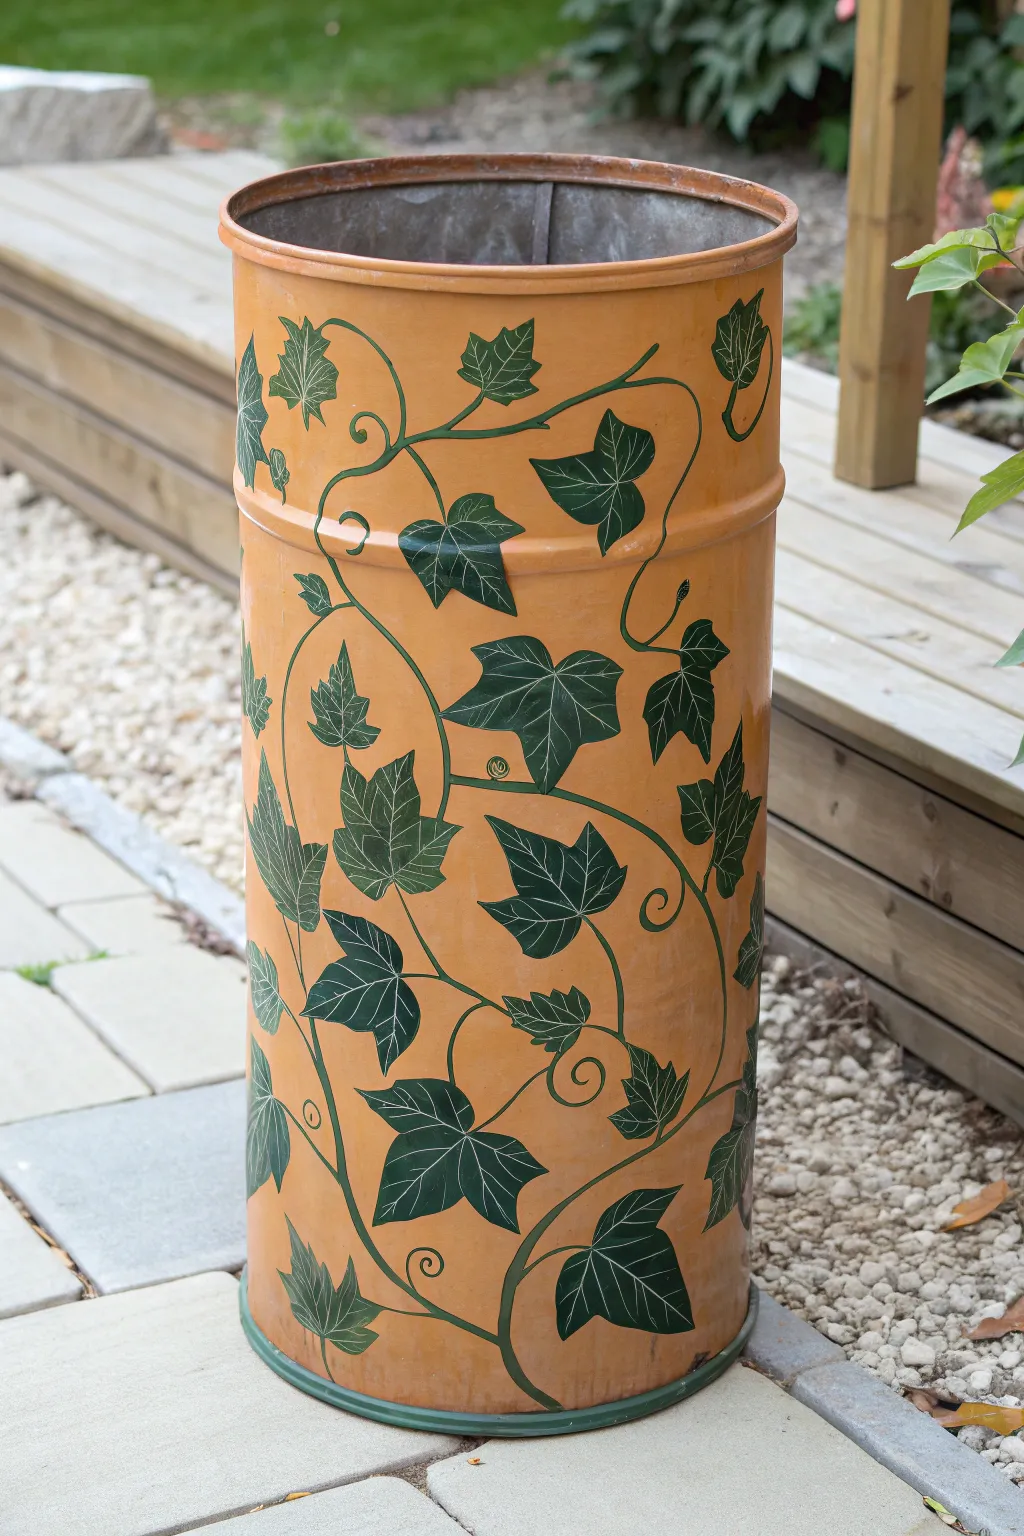
Transform a plain metal drum or trash bin into an elegant garden accent that mimics the look of high-end painted ceramic. By layering warm terracotta tones with trailing ivy vines, you can turn utilitarian storage into a sophisticated piece of patio decor.
How-To Guide
Materials
- Metal trash can or drum (cleaned and sanded)
- Metal primer spray
- Outdoor acrylic paints: Dusty Terracotta/Ochre, Dark Hunter Green, Sage Green, White
- Flat paintbrush (2-inch)
- Round paintbrush (medium size)
- Fine liner brush
- Chalk or pastel pencil
- Outdoor clear sealant (matte or satin finish)
Step 1: Preparation and Base Coat
-
Clean the surface:
Begin by thoroughly cleaning your metal can with soapy water to remove any grease or garden grime. If the metal is shiny or galvanized, give it a quick scuff-sanding with medium-grit sandpaper to give the paint some tooth. -
Apply primer:
Spray the entire exterior with a metal-bonding primer. This step is crucial for longevity, especially if this piece will live outdoors. -
Paint the base color:
Using your large 2-inch flat brush, apply the dusty terracotta or ochre paint. You want solid coverage, but slight visible brushstrokes can actually enhance the handmade ceramic look. -
Apply a second coat:
Once the first layer is dry to the touch, apply a second coat of your base color. Ensure you paint the very top rim and the bottom edge where the metal curls under. -
Paint the accent rims:
Mix a small amount of forest green with a touch of the base color to create a muted green-brown. Use this to paint the rolled rim at the very bottom of the can for a grounded look.
Sticky Situation
If your curved lines look shaky, try rotating the trash can while holding your brush hand steady, rather than moving your hand around the can.
Step 2: Drafting the Design
-
Sketch the main vines:
Using white chalk or a pastel pencil, lightly draw your vine stem lines. Start from the bottom and create sweeping S-curves that wander up and around the cylinder. -
Add curly tendrils:
Off the main vines, sketch small, spiraling loops. These purely decorative curls fill the negative space and add whimsy to the design. -
Placement of leaves:
Mark the positions for your leaves along the vines. Vary the sizes, placing larger leaves near the bottom and middle, and smaller leaflets near the vine tips.
Pro Tip
Add a drop of water to your green paint when doing the long vines. Inky consistency paint creates smoother lines than thick paint.
Step 3: Painting the Foliage
-
Paint the vine stems:
Load a liner brush with thinned Dark Hunter Green paint. Carefully trace over your chalk lines to create fluid, continuous stems. I find that thinning the paint slightly helps the brush glide over the curved surface without skipping. -
Block in the leaves:
Using the round brush and the Dark Hunter Green, fill in the leaf shapes. Use a ‘press and lift’ motion: press the brush down to create the wide base of the ivy leaf, then lift as you pull outward to create the sharp points. -
Refine the leaf shapes:
Ivy leaves have distinct lobes. Go back over your blocked-in shapes to ensure each leaf has three to five sharp points, characteristic of English ivy. -
Add dimension:
While the green is still slightly wet on the brush, dip the very tip into a tiny bit of Sage Green. Paint a few leaves with this blend to create natural variation so the foliage doesn’t look flat.
Step 4: Detailing and Sealing
-
Highlight the veins:
Mix a very pale green using your White and Sage paints. With your finest liner brush, paint thin central veins and branching capillaries on each leaf. -
Clean up chalk lines:
Allow the paint to fully cure for at least a few hours. Once dry, use a damp cloth to gently wipe away any visible chalk guidelines. -
Paint the top rim:
If the interior rim looks messy, paint the top rolled edge with the terracotta base color or a dark metallic tone to frame the opening. -
Apply sealant:
Finish the project by applying two coats of outdoor clear sealant. A matte or satin finish works best to maintain that rustic, earthen aesthetic.
Now you have a stunning, durable container that brings a touch of lush greenery to your space, even in the middle of winter


Fruit Slice Illusion
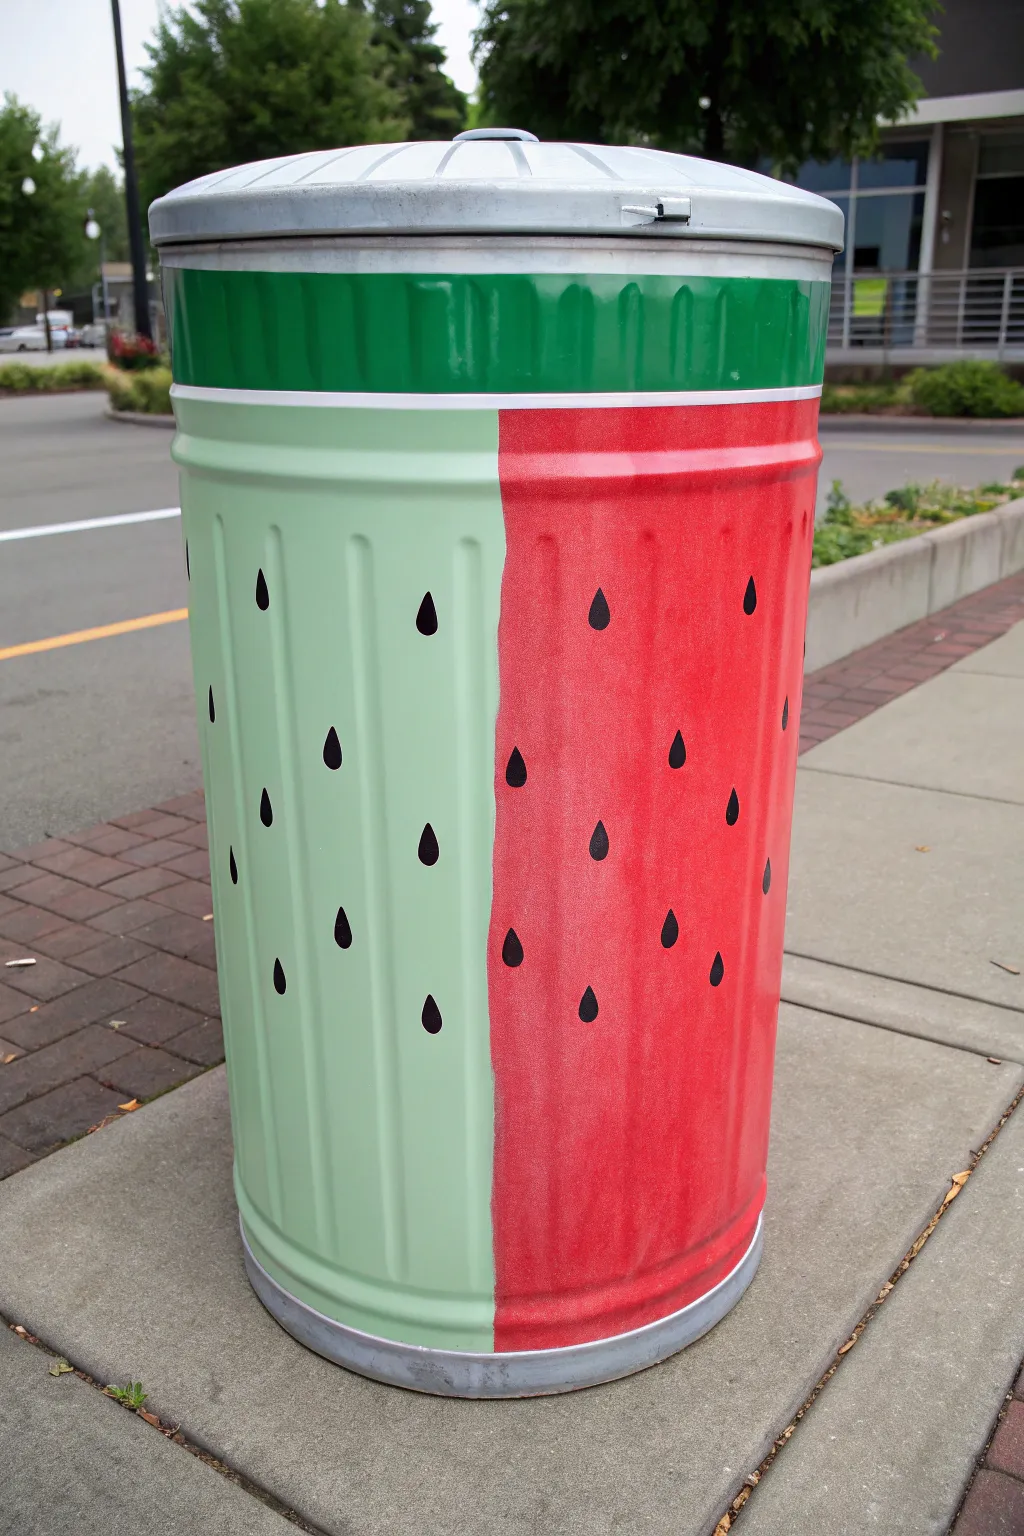
Turn a basic galvanized trash can into a refreshing piece of functional art with this clever two-tone watermelon design. By splitting the can’s ribs between a soft rind green and a vibrant fruit red, you’ll create a playful illusion that brightens up any outdoor space.
How-To Guide
Materials
- Galvanized metal trash can (cleaned and dried)
- Metal primer spray
- Painter’s tape (1-inch width)
- Dark green exterior paint (gloss or semi-gloss)
- Light pastel green exterior paint
- Bright watermelon red exterior paint
- Black acrylic craft paint
- Paintbrushes (2-inch sash brush and small detail brush)
- Pencil
- Clear outdoor sealant spray
Step 1: Preparation and Base Colors
-
Clean surface:
Begin by scrubbing the trash can thoroughly with soapy water to remove any grease or outdoor grime, then dry it completely with a towel. -
Prime the metal:
Apply a coat of metal primer spray to the entire exterior of the can, excluding the lid. This essential step ensures your paint adheres properly and prevents future peeling. -
Mark the dividing line:
Locate the vertical center of the can. Use a long strip of painter’s tape to mark a straight vertical line from the bottom rim all the way to the top ridge. -
Mask the top rim:
Run a horizontal line of painter’s tape just below the top rim’s ridge. This creates a boundary for the dark green outer rind section. -
Paint the dark rim:
Using a smaller brush, carefully paint the top rim section with your dark green paint. You might need two coats here to fully cover the metal texture.
Step 2: Color Blocking
-
Paint the red section:
Select the right side (or left, your choice) of the vertical tape line. Paint this entire half with the bright watermelon red, bringing the color right up to the tape edge. -
Apply second red coat:
Allow the first coat of red to dry until it’s tacky but firm, then apply a second coat for a rich, saturated fruit color. -
Remove vertical tape:
While the red paint is still slightly wet, carefully peel back the vertical painter’s tape. This prevents the dried paint from pulling up with the tape. -
Paint the light green section:
Now, carefully paint the remaining unpainted vertical half with the light pastel green. Use a steady hand or a fresh piece of tape over the dried red edge to get a crisp meeting point. -
Blend the transition:
If I want a sharper look, I re-tape, but freehanding the center seam carefully works well too. Ensure the light green fully covers its half, requiring two coats for opacity. -
Refine the rim separation:
Remove the horizontal tape below the dark green rim. Use a small detail brush and white paint (or the light green) to paint a very thin divider stripe between the dark rim and the main body colors if you want extra separation.
Straight Lines on Ribs
Painting a straight vertical line over a ribbed can is tricky. Press the tape firmly into every single groove with your fingernail before painting to prevent bleed-under.
Step 3: Seeds and Finishing
-
Outline seed placement:
Once the base colors are fully dry, use a pencil to lightly sketch teardrop shapes randomly across both the red and light green sections. -
Stagger the pattern:
Try to stagger the seeds vertically and horizontally within the indented ribs of the can, rather than placing them in perfect rows, to keep the look organic. -
Paint the seeds:
Fill in your pencil outlines with black acrylic paint and a fine-tip paintbrush. The teardrop shape should have the rounded bottom facing down and the point facing up. -
Touch up edges:
Check the edges of your seeds; if the metal ribs made the paint smudge, use a tiny bit of the background color (red or light green) to clean up the outline. -
Clean the bottom rim:
If any paint dripped onto the very bottom metal lip, wipe it clean or paint it silver to frame the artwork. -
Seal the project:
Protect your hard work from the elements by spraying the entire painted surface with two coats of clear, UV-resistant outdoor sealant.
Make It Glossy
Use a high-gloss sealant as your final step. It makes the red section look like fresh, juicy watermelon and helps repel dirt in an outdoor setting.
Now your waste bin is a delightful splash of summer color ready for the patio
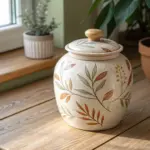
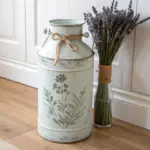
Faux Terra-Cotta Planter Look
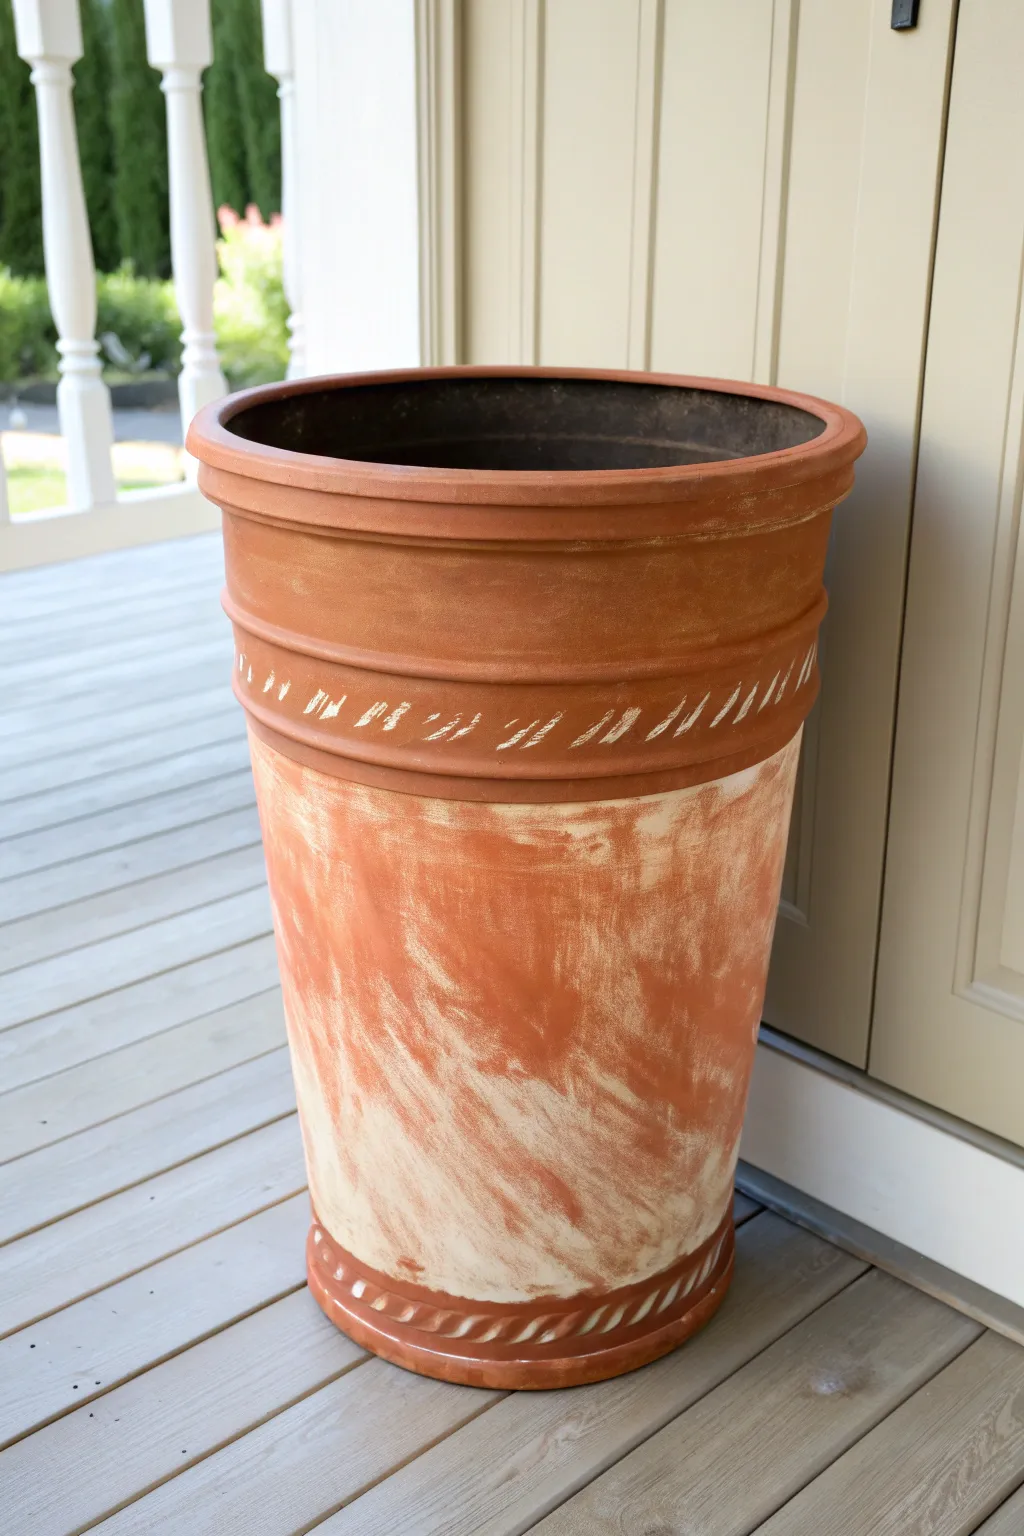
Transform an inexpensive plastic trash can into a high-end, classic garden vessel with just a few layers of paint. This project mimics the weathered, earthy texture of aged clay, giving you the stately look of heavy pottery without the back-breaking weight.
Detailed Instructions
Materials
- Tall plastic trash can (round)
- Sandpaper (120-grit)
- Spray primer (for plastics)
- Terra-cotta colored spray paint
- Terra-cotta colored acrylic paint (tube or bottle)
- Cream or off-white acrylic paint
- Baking soda
- Large chip brush or bristle brush
- Small round detail brush
- Paper towels
- Matte clear sealer spray
Step 1: Preparation & Base Coat
-
Prepare the surface:
Begin by scuffing the entire exterior of your plastic trash can with 120-grit sandpaper. This roughs up the smooth plastic finish, giving the primer something substantial to grip onto. -
Clean thoroughly:
Wipe down the can with a damp cloth or tack cloth to remove every speck of plastic dust from sanding. Any leftover dust will create unwanted bumps in your paint job. -
Prime the plastic:
Apply a coat of spray primer specifically designed for plastics. Hold the can about 8-10 inches away and use sweeping motions to avoid drips. Let this base cure completely according to the can’s instructions. -
Apply base color:
Spray the entire container with your terra-cotta colored spray paint. You may need two thin coats for full, opaque coverage, allowing proper drying time between each layer.
Step 2: Creating Texture
-
Mix the textured paint:
In a disposable cup, mix your terra-cotta acrylic paint with baking soda. Aim for a ratio of roughly 1 part baking soda to 2 parts paint. You want a gritty, paste-like consistency. -
Stipple the surface:
Dip your chip brush into the textured mixture and dab or stipple it onto the can. Don’t brush it on smooth; the goal is to create random bumps and imperfections that mimic real clay. -
Focus on key areas:
Concentrate slightly heavier texture near the rim and the very bottom, as these are areas where real pots would show more wear and accumulation. -
Let it set:
Allow this textured layer to dry completely. It will feel rough to the touch once it is ready for the next step.
Uneven Texture Tip
Don’t mix the baking soda seamlessly. Leave small clumps in the paint; later, when you dry brush over them, they look exactly like chipped clay.
Step 3: Weathering Effects
-
Prepare a whitewash:
Dilute a small amount of cream or off-white acrylic paint with water until it is very runny, almost like milk. -
Apply the wash:
Using a large brush, apply the wash liberally over the central body of the can. Work in manageable sections so the paint doesn’t dry before you can manipulate it. -
Wipe back:
Immediately use a crumpled paper towel or rag to wipe away the excess wash. Use vertical, diagonal wiping motions to create streaks that look like calcium deposits or salt staining. -
Build the patina:
Continue this process until you achieve the desired level of weathering. I find that leaving more white residue in the crevices of your baking soda texture really sells the illusion.
Add Greenery
Dab bits of moss-green paint near the bottom rim or in crevices to mimic algae growth for an ancient, garden-salvage aesthetic.
Step 4: Decorative Detailing
-
Paint the rim details:
Using a small round brush and undiluted cream paint, create the decorative ‘hash marks’ around the upper rim. Paint short, diagonal strokes evenly spaced around the circumference. -
Simulate a rope base:
Repeat the diagonal stroke pattern around the very bottom edge of the can. Ensure the angle of the strokes mimics the twist of a rope. -
Add a dry brush layer:
Dip a dry chip brush lightly into cream paint, offload most of it onto a paper towel, and lightly graze the raised ridges of the rim to highlight the shape. -
Seal the finish:
Once all paint is bone dry, spray the entire planter with a clear matte sealer. This protects your faux finish from rain and sun damage.
Place your new planter on the porch and enjoy the elegance of terra cotta without ever worrying about it cracking in the frost
Chalkboard Label Panel
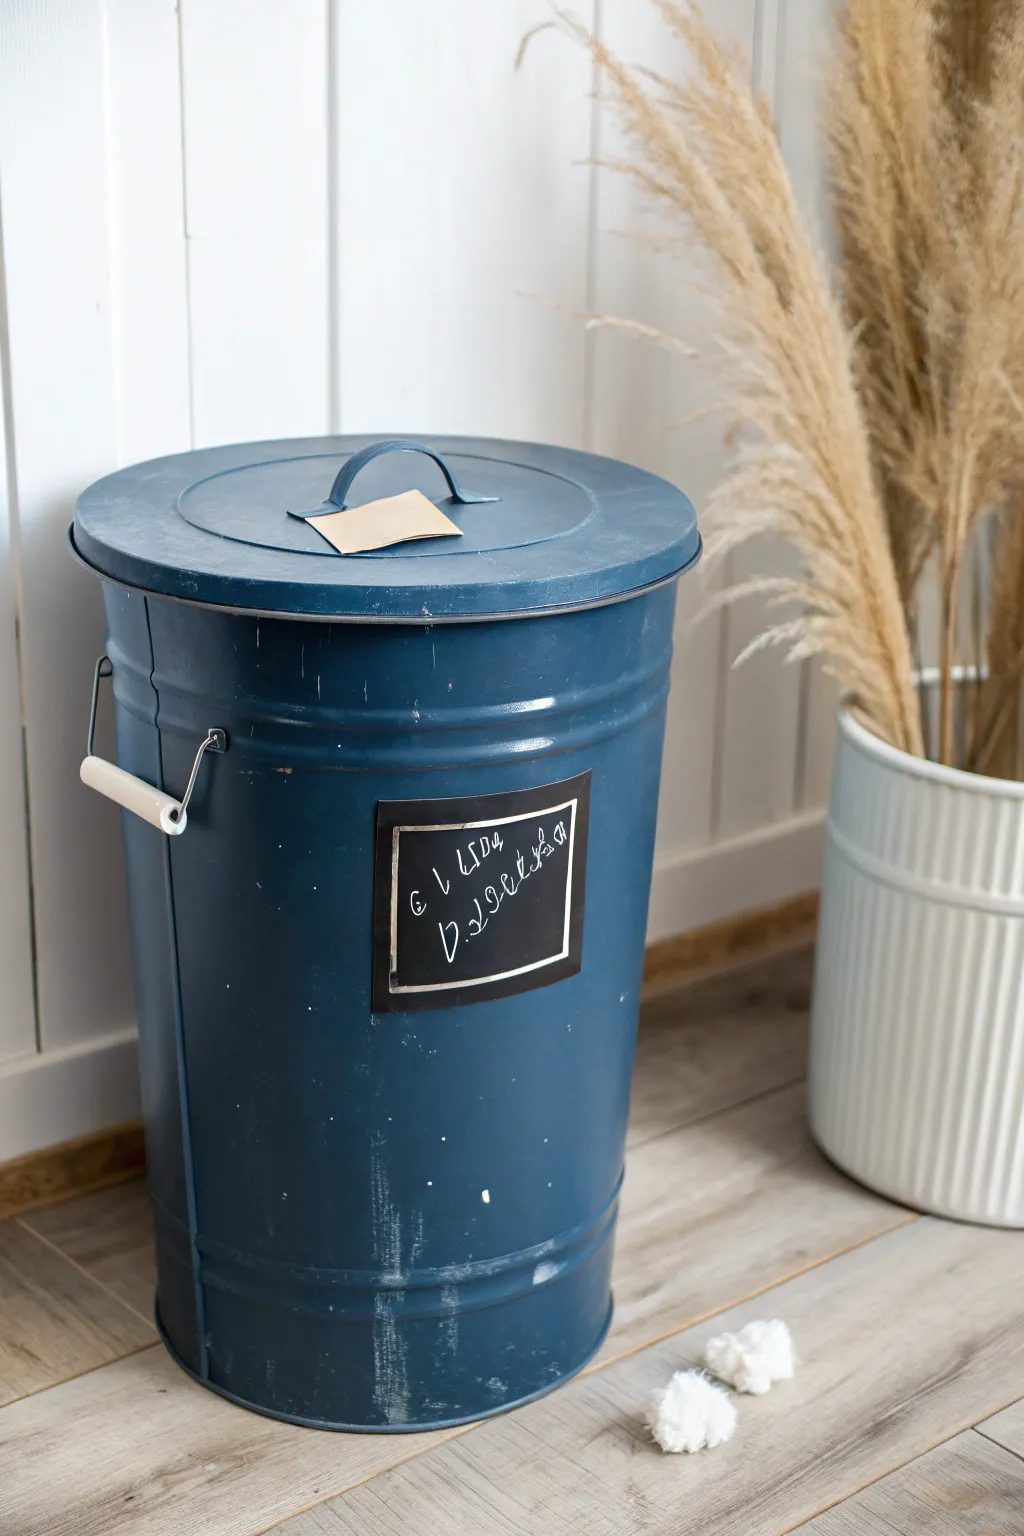
Transform a plain metal utility bin into a charming, vintage-inspired storage piece with a custom chalkboard label. The deep slate blue finish paired with a functional writing surface makes this project as practical as it is stylish.
Step-by-Step Tutorial
Materials
- Galvanized metal trash can (with lid and side handles)
- Sandpaper (medium and fine grit)
- Painter’s tape
- Self-etching primer spray (grey)
- Deep slate blue spray paint (satin finish)
- Matte black chalkboard paint (brush-on or spray)
- Small foam brush or detail brush
- White liquid chalk marker or traditional chalk
- Silver paint pen (optional, for frame detail)
- Clear matte sealer spray
- Damp cloth
- Cardboard or drop cloth
Step 1: Preparation & Base Coat
-
Clean surface:
Begin by thoroughly cleaning the metal bin with warm soapy water to remove any grease or oils. Dry it completely with a lint-free cloth. -
Sand for adhesion:
Scuff the entire exterior surface of the can and lid with medium-grit sandpaper. This rough texture helps the primer bite into the metal. -
Protect hardware:
Wrap painter’s tape carefully around the metal handle attachments and the wooden grip if your can has one. Cover the interior rim if you want to keep the inside unpainted. -
Prime the metal:
In a well-ventilated area, place the can on a drop cloth. Apply a thin, even coat of self-etching primer to the entire exterior. -
Dry and inspect:
Let the primer cure according to the can instructions. Check for any drips and sand them down gently if needed.
Step 2: Color Application
-
Apply base color:
Spray the deep slate blue paint over the primed surface. Hold the can about 8-10 inches away and use sweeping motions. -
Layering the paint:
Apply two to three light coats rather than one heavy one to prevent runs. Allow proper drying time between each coat. -
Paint the lid:
Don’t forget to spray the lid separately, ensuring the handle area is fully covered. I usually prop the lid up on a small box to spray the edges easily. -
Create distressed look:
Once the blue paint is fully dry, take fine-grit sandpaper and gently rub along the horizontal ridges and bottom rim to reveal glimpses of the metal or primer underneath.
Tape Trick
Paint a thin layer of the blue base color over the tape edges *before* the black paint. This seals the gap so your chalkboard lines stay razor-sharp.
Step 3: The Chalkboard Panel
-
Mark the area:
Decide on the placement for your label. Use painter’s tape to create a rectangular border on the front of the can, ensuring it is level. -
Press tape edges:
Run your fingernail or a credit card firmly along the inside edges of the tape to prevent paint bleed-under. -
Apply chalkboard paint:
Using a small foam brush, fill in the taped rectangle with matte black chalkboard paint. Apply in thin layers. -
Second coat:
After the first coat is dry to the touch, apply a second coat moving the brush in the opposite direction for full coverage. -
Remove tape:
Carefully peel away the painter’s tape while the final coat is still slightly tacky to ensure a crisp, clean line.
Rustic Texture
For a truly aged industrial feel, dab a tiny bit of metallic rust or burnt sienna acrylic paint onto the sanded, distressed ridges.
Step 4: Finishing Touches
-
Add a border detail:
To mimic an enamel label holder, use a silver paint pen to draw a freehand double line around the black rectangle. -
Season the chalkboard:
Once the black paint has cured for 24 hours, rub the side of a piece of chalk over the entire surface, then wipe it off. This primes it for writing. -
Seal the can:
Spray the blue areas of the can with a clear matte sealer to protect the finish, being careful to shield the chalkboard area with a piece of paper. -
Write your label:
Use a white chalk marker to write your desired label, such as ‘Trash’ or ‘Recycle’, in a loose, casual script.
Now you have a stylish, customized bin that perfectly combines rustic charm with everyday utility
Color-Coded Classroom Set

Transform standard plastic waste bins into a sleek, coordinated recycling station with a muted modern palette and crisp white iconography. This project uses precise vinyl decals and a smooth matte finish to turn utilitarian objects into a classroom design statement.
Detailed Instructions
Materials
- 4 plastic dome-lid trash cans (clean and dry)
- Spray paint for plastic (Sage Green, Terracotta, Pale Pink, Dusty Rose)
- Adhesive white vinyl sheets
- Cricut or silhouette machine (optional, but recommended)
- Transfer tape
- Painter’s tape
- Drop cloth
- Fine-grit sandpaper (220-grit)
- Isopropyl alcohol and lint-free cloth
Step 1: Preparation & Base Coat
-
Clean and scuff:
Start by thoroughly washing your trash cans to remove any manufacturing oils or grime. Once dry, lightly sand the entire exterior surface with 220-grit sandpaper; you aren’t trying to remove material, just giving the slick plastic some ‘tooth’ for the paint to grip. -
Degrease surface:
Wipe down the sanded bins with isopropyl alcohol and a lint-free cloth. This removes the sanding dust and ensures a perfectly clean canvas for your paint. -
Masking components:
If your bins contain inner flaps or metal components you don’t want painted, carefully cover them with painter’s tape and paper. -
Set up spray station:
Ideally, do this outdoors or in a well-ventilated garage. Lay down a large drop cloth and elevate the bins slightly on boxes if possible to easily reach the bottom edges. -
First light coat:
Apply the first coat of spray paint (one color per bin). Use sweeping motions, starting the spray off the object and ending off the object. Keep this coat very light; it might look splotchy, but that’s better than drips. -
Build coverage:
Wait 15-20 minutes for the first coat to tack up, then apply a second coat. I find that three thin coats usually provide the most durable finish for plastic. -
Full cure time:
Let the bins dry completely. While they might feel dry to the touch in an hour, let them cure for at least 24 hours before applying any adhesive decals to prevent bubbling.
Pro Tip: Bubble Free
If you get a stubborn air bubble under a larger vinyl section, poke a tiny hole in the center with a sewing needle and press the air out through the hole.
Step 2: Designing the Graphics
-
Select geometric icons:
Choose bold, linear symbols for your bins. The example uses abstract shapes like hexagons, triangles with center lines, and simple sun motifs. You can sketch these or find vector files online. -
Create rectangular outlines:
Design large rectangles with rounded corners to serve as frames for your icons. Measure the front panel of your bin to ensure the rectangle fits comfortably within the indented area if your bin has one. -
Cut the vinyl:
Use a digital cutting machine to cut your designs out of matte white vinyl. If you don’t have a machine, you can print stencils on cardstock and cut the vinyl manually with a sharp craft knife. -
Weeding:
Remove the excess vinyl from your backing sheet, leaving only the white lines of your geometric shapes and frames. Use a weeding tool or pin for the tiny internal pieces.
Step 3: Application
-
Apply transfer tape:
Place transfer tape over your weeded vinyl designs and burnish it down firmly with a scraper tool or credit card to ensure the vinyl lifts off the backing paper. -
Clean application area:
Even though the paint is fresh, give the area where the sticker will go a very gentle wipe with a dry cloth to remove any settled dust. -
Positioning the decal:
Hold the transfer tape up to the bin without pressing down. Center the main rectangular frame on the front face of the bin. Use a ruler to ensure it is vertically straight. -
Affix the design:
Press the design onto the bin, starting from the center and smoothing outward to push out air bubbles. Rub firmly over every line of the vinyl. -
Peel transfer tape:
Slowly peel back the transfer tape at a sharp 45-degree angle. If the vinyl lifts with the tape, lay it back down and burnish again before trying to peel. -
Side embellishments:
Repeat the process for the symbols on the side of the bin, like the large triangles and sun icons seen on the sage green bin. Staggering them vertically creates a nice visual rhythm. -
Final seal (optional):
For high-traffic classrooms, you can spray a clear matte sealer over the entire bin, including the vinyl, to prevent peeling edges over time.
Level Up: Texture
Use ‘stone effect’ spray paint for the base layer before adding the vinyl. The speckled texture hides distinct scuffs and fingerprints better than flat paint.
Now your recycling station is ready to keep the classroom clean with serious style
Abstract Geometric Pattern
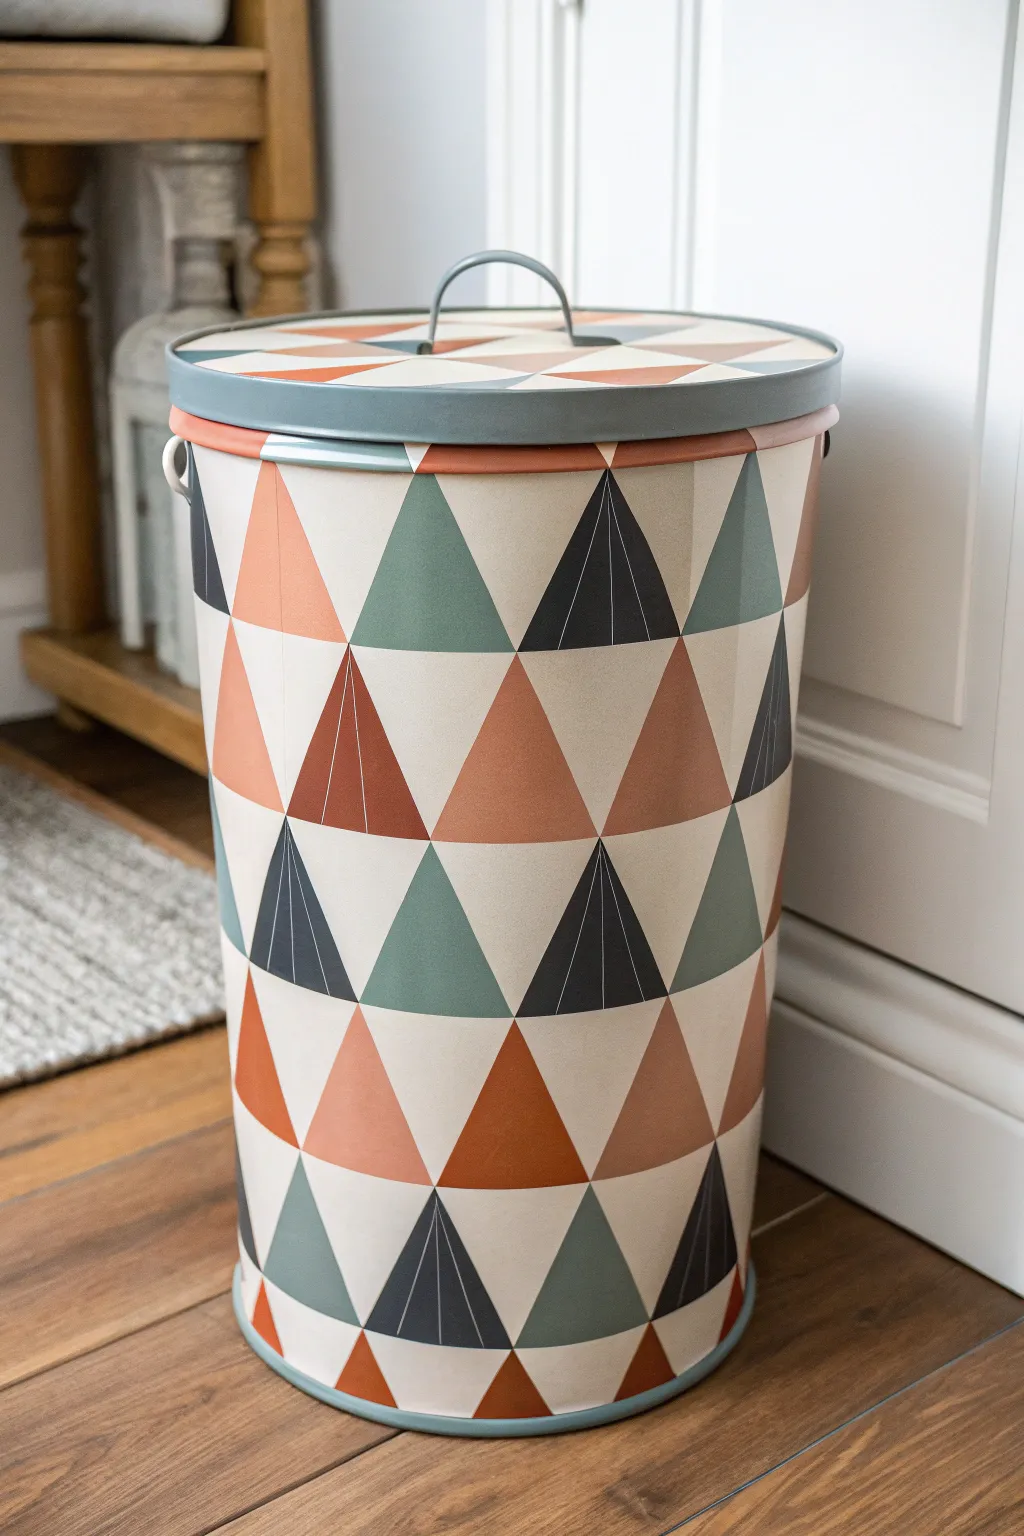
Transform a plain metal utility bin into a statement piece with this sophisticated, Scandinavian-inspired design. By combining muted earth tones like terracotta, sage, and charcoal in a repeating triangle motif, you will create functional art that hides trash in plain sight.
Step-by-Step
Materials
- Cylindrical metal trash can with lid
- Sandpaper (medium grit, around 120-150)
- Spray primer (white or light grey suitable for metal)
- Acrylic paints: Cream/Off-white, Muted Teal/Sage, Burnt Orange/Terracotta, Charcoal Grey
- Painter’s tape (various widths, preferably narrow 0.5 inch and standard 1 inch)
- Pencil and flexible ruler or measuring tape
- Small flat synthetic paintbrushes (approx. 1/2 inch)
- Fine liner brush (size 0 or 1)
- Clear matte or satin sealant spray
Step 1: Preparation and Base Coat
-
Clean and prep:
Start by thoroughly cleaning your metal can to remove any grease or oils. Once dry, lightly sand the entire exterior surface and the top of the lid to create a ‘tooth’ for the paint to grip. -
Prime the surface:
Apply a coat of metal spray primer to the can and lid. Use even, sweeping motions to avoid drips. Let this layer cure completely according to the manufacturer’s instructions. -
Apply the background color:
Paint the entire can and lid with your cream or off-white acrylic base. This will serve as the lightest triangles in your pattern and the color between shapes if you choose to leave gaps. You’ll likely need two to three coats for full opacity.
Bleeding Lines?
If paint seeps under the tape, wait for it to fully dry. Then, gently scrape the excess away with a craft knife or touch it up with the base color using a tiny brush.
Step 2: Drafting the Grid
-
Measure the circumference:
Measure the circumference of your can. Plan your pattern by dividing this number by an even integer to determine the width of each triangle base. You want them to wrap perfectly without a partial shape at the seam. -
Mark horizontal guides:
Use a pencil to lightly mark parallel horizontal rings around the can. The distance between these rings will determine the height of your triangle rows. I find 3-4 inches works well for a standard tall bin. -
Mark vertical points:
Along your horizontal rings, mark dots for the tips and bases of your triangles. Stagger the dots on alternating rings to create the tessellating diamond/triangle effect. -
Connect the dots:
Using your flexible ruler, lightly draw connecting lines between your dots to form the full triangle grid. Don’t press too hard; you want these lines to be easily covered by paint.
Step 3: Painting the Colors
-
Tape the first set:
Tape off a random selection of triangles that will be painted your first color (e.g., Terracotta). To get crisp lines, ensure you aren’t taping adjacent triangles that touch wet paint. It helps to work in scattered clusters. -
Seal the tape edges:
Quickly brush a tiny amount of your base cream color over the tape edges. This prevents color bleed and ensures your lines stay razor-sharp. -
Apply the first color:
Fill in the taped triangles with the Terracotta paint. Apply thin, even layers, allowing them to dry in between, until the color is solid. -
Remove tape and repeat:
Peel the tape while the paint is slightly tacky but not wet. Let these sections dry fully before taping off new sections for the second color (Muted Teal). -
Apply the dark accents:
Tape and paint the final set of triangles using the Charcoal Grey. These dark shapes add necessary contrast and visual weight to the pattern. -
Detail the lid:
Repeat the taping and painting process on the lid. Since the lid is circular, your triangles might need to taper slightly differently toward the center handle, radiating outward like a pie chart.
Pro Tip: Tape Strategy
Don’t try to tape the whole pattern at once. It’s physically impossible to tape adjacent triangles simultaneously. Work in color batches: all red, dry, all blue, dry.
Step 4: Fine Details and Finish
-
Add pinstripes:
Once the charcoal triangles are bone dry, take your fine liner brush with slightly watered-down cream paint. Carefully paint three vertical lines inside specific charcoal triangles as seen in the reference, adding a geometric ‘shading’ effect. -
Touch ups:
Inspect your lines. If any paint bled, use a small flat brush with the appropriate color to tidy up the edges. -
Paint the rim and handle:
Paint the bottom rim, top rim, and the lid handle in the Muted Teal color to frame the design cohesively. -
Protective seal:
Finish by spraying the entire project with a clear matte or satin sealant. This is crucial for a trash can, as it needs to withstand handling and occasional cleaning.
Place your new geometric bin in your home office or bathroom and enjoy the instant style upgrade it brings to the space
Terrazzo Speckle Finish
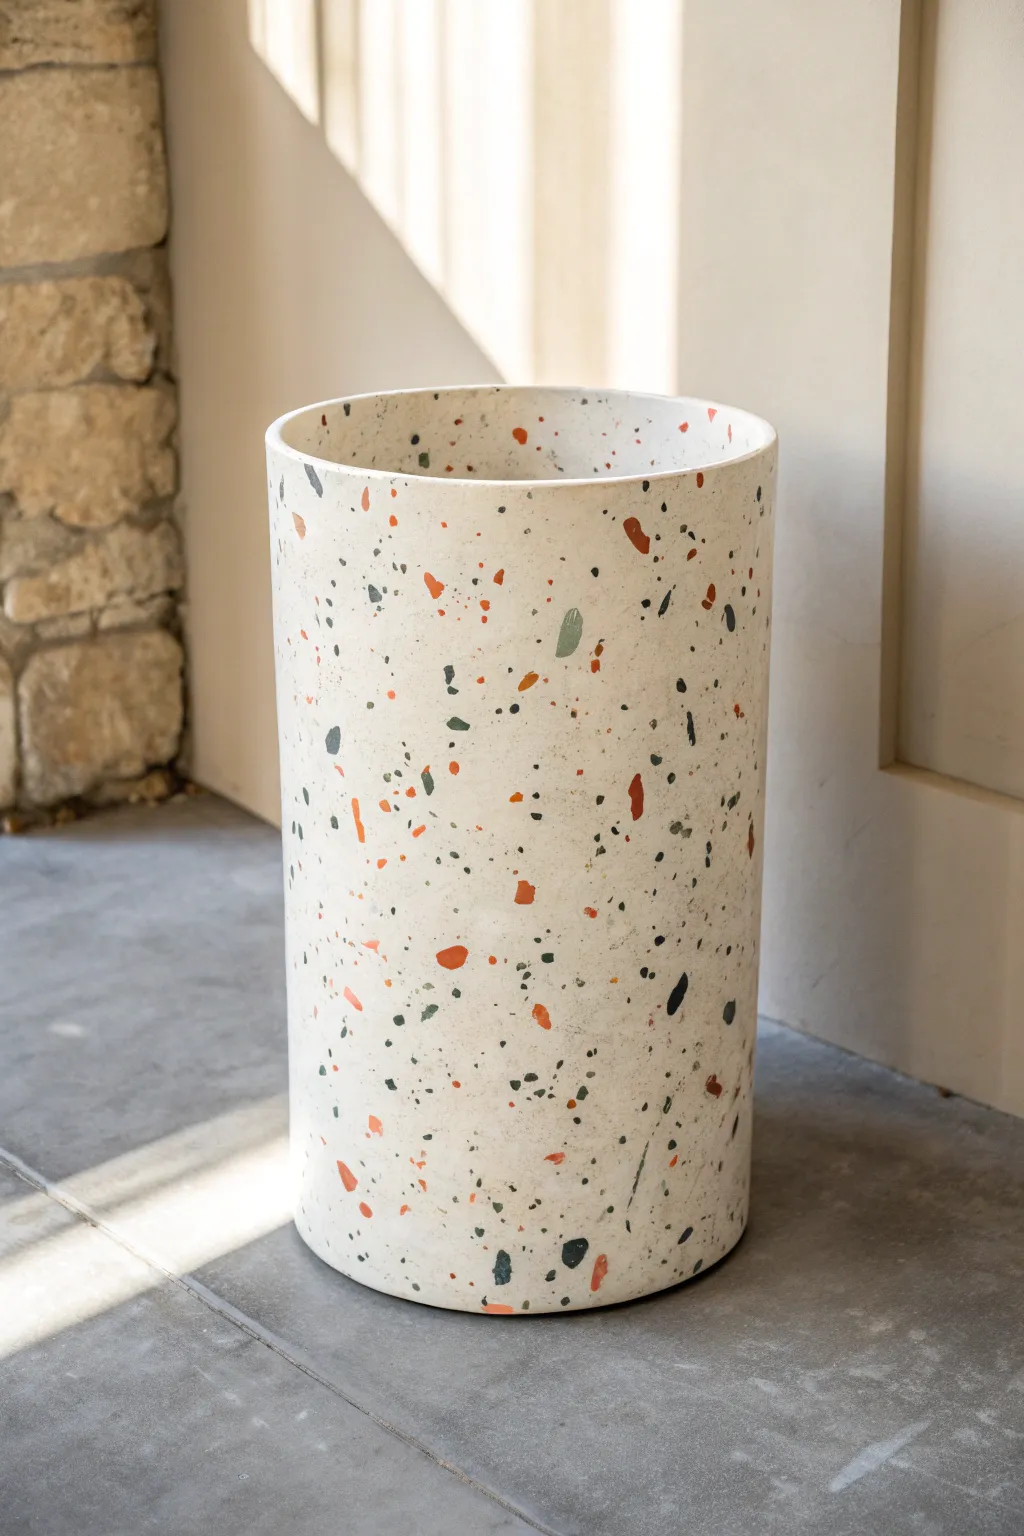
Transform a plain trash can into a trendy decor piece with this surprisingly simple paint technique. The result mimics the high-end look of real terrazzo stone using layers of scattered, organic shapes.
Step-by-Step Guide
Materials
- Cylindrical trash can (plastic or metal)
- Sandpaper (fine grit)
- Primer (spray or brush-on)
- Creamy off-white base paint (acrylic or chalk)
- Acrylic craft paints (burnt orange, sage green, slate grey, black)
- Assorted small paintbrushes (flat and detail)
- Clear matte or satin sealant spray
Step 1: Preparation & Base Coat
-
Clean surface:
Begin by thoroughly cleaning your trash can with soapy water to remove any grease or oils. Dry it completely with a lint-free cloth. -
Light sanding:
If your bin is glossy plastic or metal, lightly scuff the surface with fine-grit sandpaper. This creates ‘tooth’ for the primer to grip. -
Prime the can:
Apply a coat of primer over the entire exterior. I prefer a spray primer for the smoothest finish, but a brush-on version works too if you apply it thinly. -
Apply base color:
Once primed, paint the entire can with your creamy off-white base color. You will likely need two coats for opaque coverage. -
Dry completely:
Let the base coat dry fully—usually a few hours—before starting the fun part. A wet base will muddy your speckles.
Shape Variety Tip
Avoid round dots. Real terrazzo relies on angular, broken-stone shapes. Keep your brush strokes jagged and irregular for the most authentic look.
Step 2: Painting the Terrazzo Pattern
-
Mix palette:
Squeeze out small amounts of your accent colors: burnt orange, sage green, slate grey, and black onto a palette or paper plate. -
Start with large shapes:
Dip a small flat brush into the slate grey. Paint random, irregular shapes scattered around the surface. Think ‘shards’ rather than perfect circles—triangles and uneven trapezoids work best. -
Add secondary color:
Switch to the burnt orange color. Paint similar jagged shapes in the empty spaces, varying the size slightly so some are chunky and others are smaller fragments. -
Incorporate sage green:
Add your sage green shapes. Try to place these where the white space feels too large, but avoid touching the wet grey or orange shapes just yet. -
Check balance:
Step back and look at the can from a distance to ensure the distribution of colors feels random but balanced. -
Add detail speckles:
Using your smallest detail brush and black paint, dot in tiny specks and smaller chips between the larger colored shapes. -
Layering shapes:
Once the first layer of shapes is dry to the touch, you can carefully paint a few tiny specks overlapping the larger ones to create depth. -
Refine edges:
Go back over any shapes that look too translucent with a second dab of paint to ensure the colors pop against the cream background.
Step 3: Sealing & Protection
-
Full cure:
Allow the painted pattern to dry overnight. Acrylics need to be fully cured before sealing. -
Apply sealant:
Spray the entire can with a clear matte or satin sealer. This protects your artwork from scratches and allows you to wipe the bin clean later. -
Second coat:
Apply a second light coat of sealer for extra durability, paying attention to the rim where the bin gets handled most.
Help! Smudged paint?
If you accidentally smear a wet shape, don’t wipe it! Let it dry completely, then paint over the mistake with your cream base color before trying again.
Enjoy the sophisticated stone look of your new custom wastebasket
Faux Woodgrain Tree Trunk
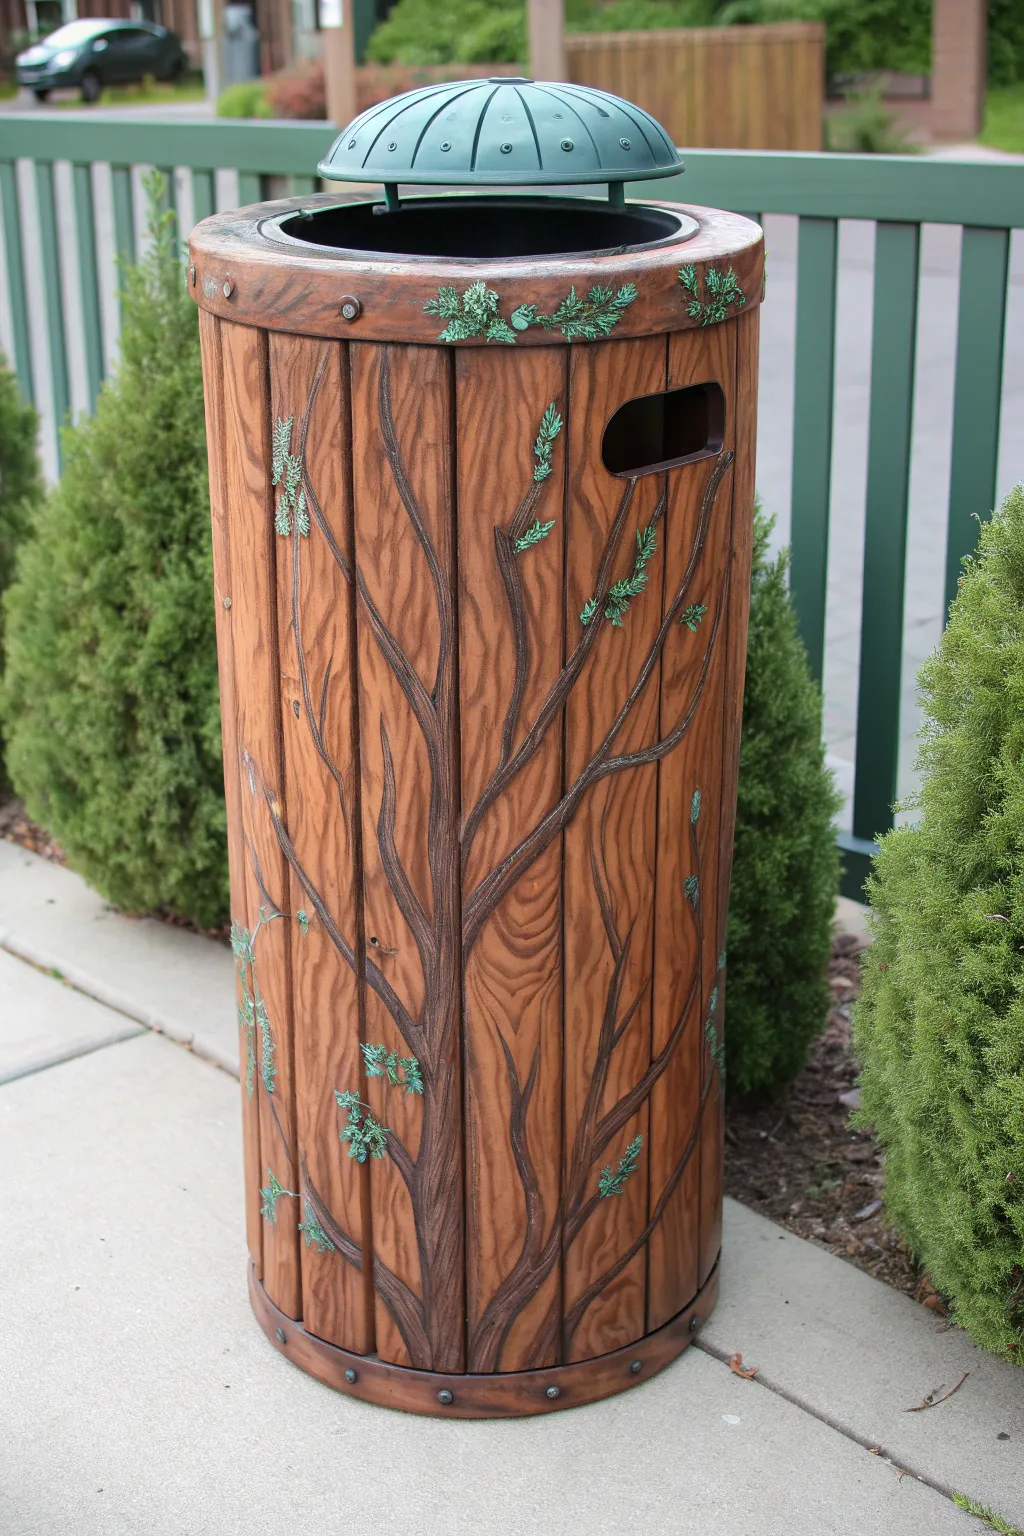
Transform a standard industrial trash receptacle into an enchanting piece of functional art that blends seamlessly with nature. Using clever shading techniques and dimensional painting, you’ll create the illusion of deep wood grooves and organic climbing vines.
Detailed Instructions
Materials
- Large cylindrical trash can (plastic or metal)
- Sandpaper (120 and 220 grit)
- Plastic-bonding primer spray
- Base coat exterior paint (warm tan/sand)
- Acrylic paints (dark brown, medium brown, burnt sienna, forest green, light teal)
- Wide bristle brush
- Medium filbert brush
- Fine liner brush
- Pencil or chalk
- Matte clear sealer spray
- Small sea sponge (optional)
Step 1: Preparation and Base Layer
-
Surface Prep:
Begin by thoroughly cleaning the trash can to remove any oils or dirt. Scuff the entire surface with 120-grit sandpaper to help the paint adhere, especially if the original surface is glossy plastic. -
Priming:
Apply a coat of plastic-bonding primer. Use long, even sweeping motions to avoid drips. Let this cure completely according to the can’s instructions, as a solid foundation prevents peeling later. -
Base Color:
Paint the entire exterior with your warm tan or sand-colored base coat. This lighter color will serve as the ‘high points’ of the wood grain. You may need two coats for full opacity.
Grain Lines Look Fake?
If your wood grain looks too striped, soften it by lightly dry-brushing the original base tan color over the darker streaks to blend them back together.
Step 2: Creating the Faux Woodgrain
-
Sketching the Slats:
Using a pencil or chalk, lightly draw vertical lines around the cylinder to mimic individual wooden plank sections. Don’t make them perfectly straight; a little wobble adds organic realism. -
Defining the Grooves:
Load a medium brush with dark brown paint mixed with a little water. Paint over your pencil lines to create the deep shadows between the ‘planks.’ Feather the edges slightly so the line isn’t too stark. -
Adding Wood Grain Texture:
Mix a medium brown glaze (paint plus water). Dip a wide bristle brush in, wipe off the excess, and drag it vertically down each ‘plank.’ Wiggle your hand occasionally to create knot patterns and natural grain variation. -
Deepening Shadows:
Go back with your darkest brown and a smaller brush to deepen the shadow lines between the planks and add darker streaks within the grain for contrast.
Step 3: Painting the Tree Structure
-
Mapping the Trunk:
Sketch the outline of a twisting tree trunk and branches climbing up the side of the can. Ensure the branches cross over multiple ‘planks’ to integrate the design. -
Blocking in the Tree:
Fill in your tree sketch with a solid medium brown. This separates the overlaying tree visual from the background planks. -
Highlighting Bark:
Mix a lighter tan color. I like to use the side of a filbert brush to gently streak this color down the center of the trunk and branches, leaving the edges dark to simulate roundness. -
Adding Bark Detail:
Use a fine liner brush and dark brown paint to create squiggly, vertical texture lines on the tree trunk. These simulated fissures give the bark visual roughness.
Pro Tip: Shadow Drop
Paint a thin line of black on just the *right* side of every vertical branch. This simple ‘drop shadow’ instantly makes the painted tree look 3D.
Step 4: Foliage and Finishing Touches
-
Placing the Greenery:
Identify spots on the branches where you want evergreen tufts. Use forest green paint and a small stiff brush to stipple or dab small clusters of needles. -
Adding Texture with Teal:
While the forest green is tacky, lightly dab a bit of light teal or mint green on the tips of the foliage. This highlights the texture and mimics the oxidized copper look seen in the inspiration image. -
Rim Detail:
Paint the top and bottom rims to look like metal bands or darker wood end-grain. Use dark brown with small metallic or grey accents for faux rivets. -
Sealing:
Once fully dry (give it 24 hours), spray the entire can with two coats of UV-resistant matte clear sealer to protect your artwork from the elements.
Place your new creation in the garden and enjoy how functionality disappears into the natural surroundings
Twilight Forest Landscape
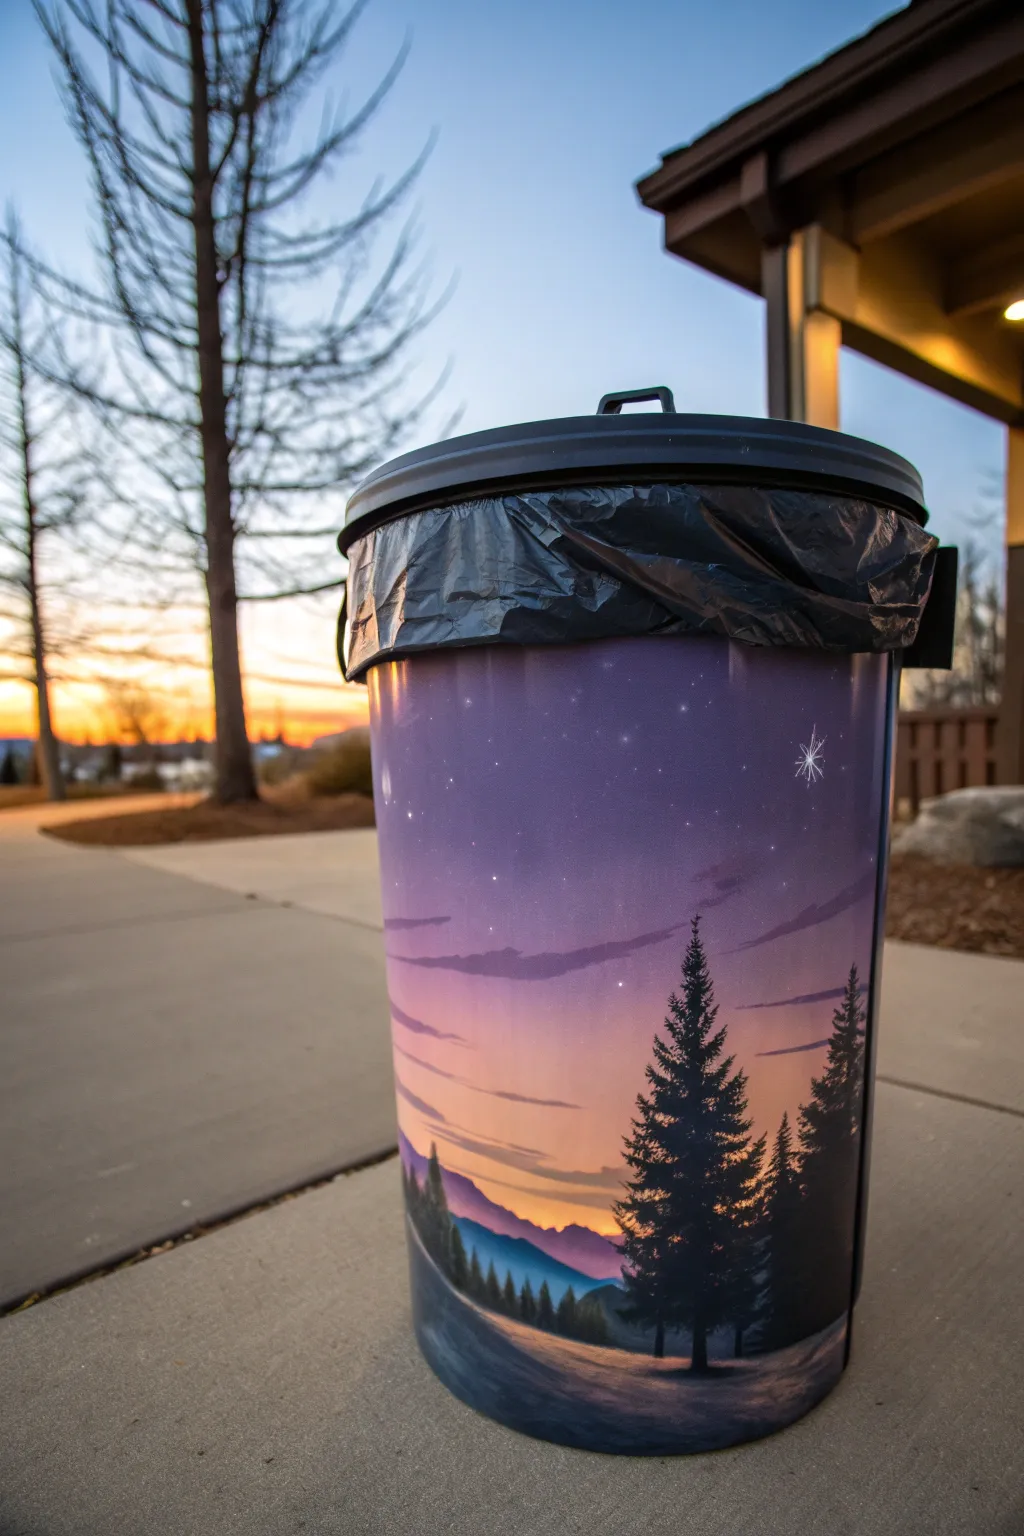
Transform a mundane household object into a stunning piece of functional art with this gradient landscape design. This project captures the serene beauty of a winter twilight, featuring an ombre sky, distant mountains, and crisp evergreen silhouettes.
How-To Guide
Materials
- Clean metal or plastic trash can
- Sandpaper (medium grit and fine grit)
- White spray primer (for metal or plastic)
- Acrylic paints: Dark violet, lavender, peach, light orange, white, dark blue, teal, black, burnt umber
- Large flat brush or sponge applicator
- Medium flat brush
- Small round detail brush
- Old toothbrush (for stars)
- Clear matte or satin sealant spray
- Painter’s tape
- Palette or paper plate for mixing
Step 1: Preparation & Base Coat
-
Prepare the surface:
Begin by thoroughly cleaning the trash can to remove any grease or dirt. If your can is plastic or glossy metal, scuff the surface lightly with medium-grit sandpaper to give the paint something to grip. -
Prime the can:
In a well-ventilated area, apply a coat of white spray primer over the entire exterior. This white base will make your sunset colors pop much more vividly than applying them directly onto a dark can. -
Protect the rim:
Once the primer is fully dry, use painter’s tape to mask off the rim or any handles you want to keep unpainted.
Blending Secret
Keep a misting spray bottle of water handy. If acrylics dry too fast while you’re blending the sky gradient, a light mist keeps them workable.
Step 2: Painting the Gradient Sky
-
Mix the sky colors:
Squeeze out your violet, lavender, peach, and light orange paints. You’ll need distinct puddles but also space to blend them on your palette. -
Apply the top layer:
Start at the very top of the can with the darkest violet. Use a large flat brush to paint a horizontal band about 4-5 inches wide. -
Transition to lavender:
While the violet is still wet, introduce the lavender paint below it. Blend the two colors where they meet by brushing back and forth horizontally to create a smooth, seamless transition. -
Add the sunset glow:
Below the lavender, paint a band of peach, blending it upward. Finally, near the horizon line (about the bottom third of the can), mix in the light orange to create the brightest point of the sunset. -
Create smooth clouds:
Using a slightly dry flat brush with a mix of lavender and a touch of violet, gently streak in thin, horizontal cloud shapes across the mid-section of the sky. Keep these faint and soft.
Step 3: Adding the Landscape
-
Block in distant mountains:
Mix teal with a little white and purple to get a hazy, distant mountain color. Paint jagged, uneven humps along the horizon line, overlapping the orange sky slightly. -
Paint the mid-ground snow:
For the snowy ground, use white mixed with a tiny drop of blue and lavender. Paint the bottom section of the can, sweeping the brush to mimic the curve of snowdrifts leading into the distance. -
Shadow the snow:
While the white is wet, streak in darker blue-grey shadows at the base of where your trees will go, creating depth in the snow. -
Draft the tree composition:
Visualize where your main trees will stand. You want a large focal tree on the right side and smaller ones fading into the distance on the left. -
Paint the main tree trunk:
Switch to your small round brush and black paint. Draw a thin vertical line for the trunk of the largest foreground tree on the right. -
Add pine branches:
Using a stippling or tapping motion, add foliage to the trunk. Start narrow at the top and flare out wider towards the bottom, leaving small gaps to let the sky peek through. -
Populate the forest:
Repeat this process to add a cluster of trees behind the main one, using slightly lighter dark grey paint for trees that are meant to look further away. -
Refine the foreground:
Add dark blue and slate grey tones to the very bottom edge of the can to ground the scene, suggesting a shadowed road or deep snowbank in the immediate foreground.
Glow Up
Mix a tiny bit of glow-in-the-dark medium into your white star paint. The trash can will faintly twinkle at night!
Step 4: Final Details
-
Add stars:
Dip an old toothbrush into watered-down white paint. Test it on paper first, then use your thumb to flick a fine mist of stars over the purple upper sky section. -
Highlight the North Star:
Use your finest detail brush to hand-paint one larger, crossed star sparkle in the upper right quadrant for a magical touch. -
Seal the artwork:
Allow the paint to cure for at least 24 hours. Once completely dry, spray the entire surface with a clear matte or satin sealant to protect the paint from scratches and wear.
Now you have a functional piece of decor that brings a calming nature vibe to any room
Underwater Waves and Creatures
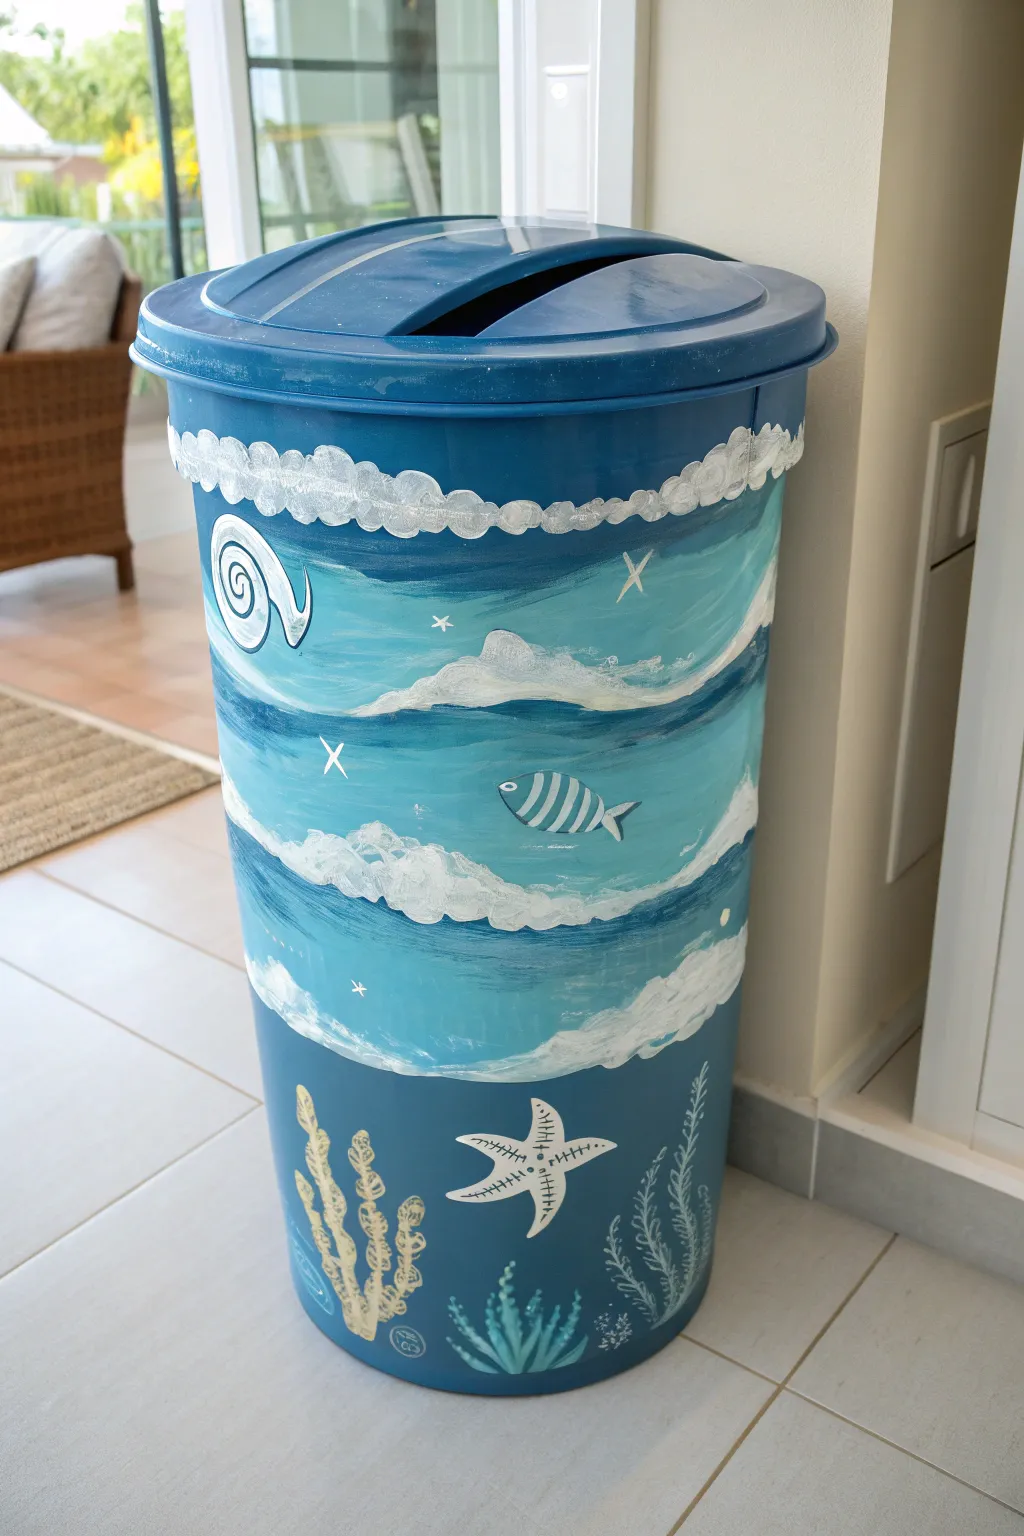
Transform a plain plastic bin into a whimsical underwater scene complete with rolling waves and charming sea life. This project uses layers of acrylic paint to create depth, turning a utilitarian object into a delightful piece of decor for a bathroom or kids’ room.
Step-by-Step Guide
Materials
- Plastic trash can with swing lid (dark blue base is ideal)
- Sandpaper (medium grit, around 150-220)
- Primer spray paint suitable for plastic
- Acrylic paints: Navy blue, turquoise, light blue, white, yellow ochre, pale yellow
- Wide flat brush (1-2 inch)
- Medium round brush
- Small detail brush
- Painter’s tape (optional)
- Clear acrylic sealer spray (gloss or satin)
Step 1: Preparation & Base Coat
-
Clean surface:
Thoroughly wash the trash can with warm soapy water to remove any grease or oils. Let it dry completely. -
Sand the plastic:
Lightly scuff the entire exterior surface with medium-grit sandpaper. This creates ‘tooth’ for the paint to grip onto, preventing peeling later. -
Apply primer:
Spray the can with a primer specifically designed for plastic. If your bin wasn’t originally blue, apply a navy blue base coat after priming. Let dry fully according to the can’s instructions.
Paint Peeling?
If paint lifts off the plastic, you likely skipped sanding or didn’t use a primer made for plastic. Sand that spot down to the bare surface and re-prime before painting over.
Step 2: Painting the Ocean Layers
-
Block in color bands:
Using the wide flat brush, paint three or four broad, horizontal wavy bands around the middle of the can using different shades of blue. Alternate between turquoise and light blue, leaving the original dark blue background visible at the very top and bottom sections. -
Blend the edges:
While the paint is still slightly tacky, soften the transitions between the blue bands using a damp brush to create a watery, gradient effect. -
Add white wave caps:
Mix a small amount of white with light blue. Use a round brush to paint scalloped, cloud-like shapes along the top edge of each color band to represent crashing wave foam. -
Highlight the foam:
Go back over the tops of the scalloped waves with pure white paint, dabbing the brush to create texture and brightness. -
Paint the lid trim:
Paint a decorative scalloped border of white foam just under the rim of the lid, connecting the lid design to the body of the can.
Make it Sparkle
Mix a pinch of fine silver glitter into your clear topcoat or the white paint used for the wave crests to give the water a magical, shimmering quality.
Step 3: Adding Sea Creatures & Details
-
Paint the fish:
In the center blue band, use light blue paint to create a simple oval fish shape with a tail. Once dry, add vertical stripes in white or navy blue. -
Detail the fish:
Use your smallest brush to add a tiny white eye with a black dot pupil and outline the fins. -
Create the starfish:
Near the bottom dark section, paint a five-pointed starfish shape using white paint. Let it dry, then add small black or navy dotted lines along the arms for texture. -
Add yellow coral:
Using yellow ochre, paint a tall, branching coral structure on the bottom left. Use small dabs to give it a bumpy, organic texture. -
Highlight the coral:
Add touches of pale yellow to the tips of the coral branches to make them pop against the dark background. -
Paint seaweed fronds:
On the bottom right, use a thin brush with light blue or white paint to create delicate, feathery seaweed strands curving upward. -
Add the spiral shell:
Near the top wave, paint a large white spiral shape resembling a nautilus shell or a curling wave crest. -
Scatter small details:
Fill in empty blue spaces with small white ‘x’ shapes or four-pointed stars to represent distant sparkles or smaller sea life.
Step 4: Sealing & Protection
-
Final dry time:
Allow the entire artwork to cure for at least 24 hours. I usually place it in a dry, dust-free area for this step. -
Apply sealant:
Spray the entire can and lid with two to three coats of clear acrylic sealer. This is crucial for a trash can that will be handled and cleaned frequently.
Once sealed, your ocean-themed bin is ready to handle everyday use while bringing a splash of coastal charm to your room
Whimsical Character Face
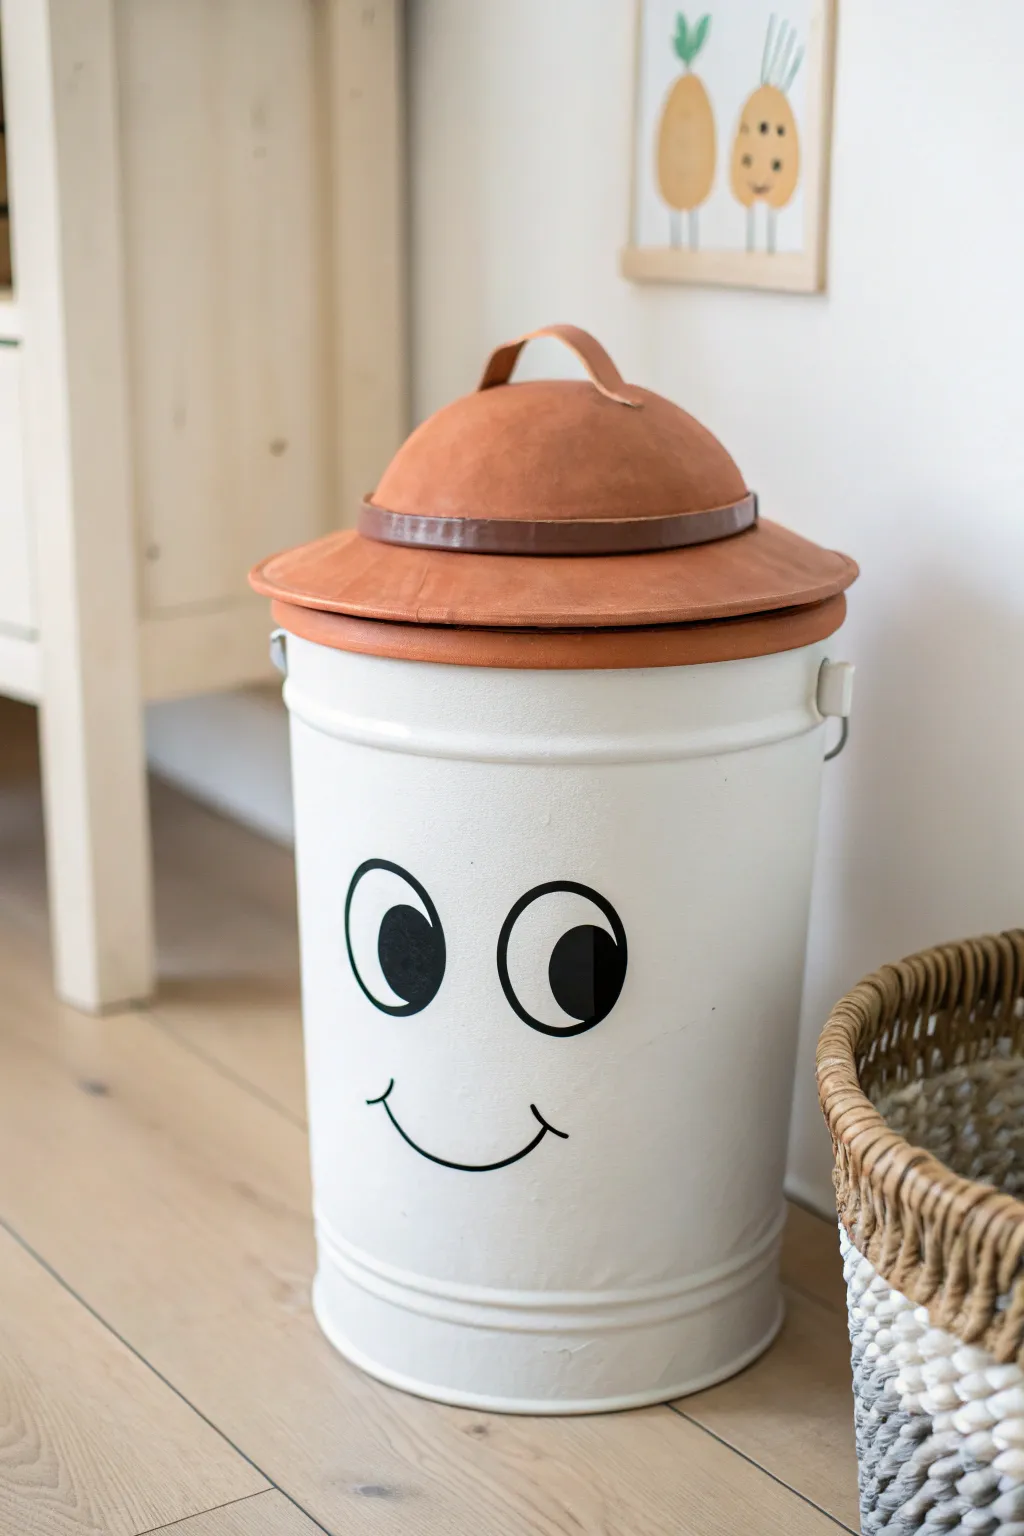
Transform a standard metal utility bin into a charming corner companion with just a bit of paint and some creative lid modification. This project turns functional storage into a delightful character featuring oversized expressive eyes and a unique hat-style lid.
Step-by-Step Tutorial
Materials
- Metal utility trash can with side handles (white)
- Black adhesive vinyl sheet or black acrylic paint
- Glossy black paint marker (medium tip)
- Compass or two circular objects (one large, one medium)
- Pencil
- Adhesive spray or contact cement
- Faux leather fabric (cognac or tan color)
- Leather strip or belt (darker brown)
- Scissors and craft knife
- Hot glue gun and glue sticks
Step 1: Preparing the Base
-
Clean the surface:
Begin by thoroughly wiping down the exterior of the white metal bin with rubbing alcohol or a mild degreaser to remove any fingerprints or oils. This ensures your vinyl or paint adheres perfectly. -
Plan the face placement:
Visualize where the eyes and mouth will sit. You want them centered vertically on the bin’s main body, leaving enough room at the top for the lid to sit without obscuring the eyebrows or upper eyes.
Step 2: Creating the Face
-
Draft the eyes:
On the back of your black adhesive vinyl, use a compass or trace a large circular object to draw two oval shapes for the pupils. Alternatively, draw the outline directly on the bin lightly in pencil if you plan to paint them. -
Cut the pupils:
Carefully cut out your two large black ovals from the vinyl using sharp scissors to get a clean, smooth edge. -
Apply the eyes:
Peel the backing off the vinyl ovals and stick them onto the bin. Place them slightly close together for a cute, eager expression. -
Add the eye outlines:
Using a black paint marker or a steady hand with a fine brush, draw a larger circle around each vinyl pupil. Leave significant white space between the pupil and the outline to create that wide-eyed ‘googly’ look. -
Draw the shine:
If your vinyl is matte, you might want to add a small white dot of paint in the upper corner of each pupil to represent a light reflection, bringing the character to life. -
Sketch the smile:
Lightly sketch a simple wide U-shape for the mouth. Add small tick marks at the ends of the smile line to create dimples or cheeks. -
Finalize the mouth:
Trace over your pencil line with the black paint marker. I like to do this in short, connecting strokes to keep the curve smooth and consistent.
Wrinkle Rescue
If the faux leather is bunching up on the curved lid, use a hair dryer on low heat to slightly soften the material, making it stretchier and easier to mold smoothly.
Step 3: Fashioning the Hat Lid
-
Clean the lid:
Wipe down the existing metal lid to ensure it is free of dust. -
Measure the leather:
Drape your faux leather fabric over the lid to estimate the size needed. You will need enough material to cover the dome and tuck under the rim. -
Apply adhesive:
Spray the top surface of the metal lid with a strong spray adhesive. Let it become tacky according to the can instructions. -
Mold the fabric:
Press the faux leather onto the center of the lid handle (if applicable) or dome first, then smooth it outwards towards the rim. Pull gently to eliminate wrinkles as you work your way down. -
Trim the excess:
Cut the fabric around the rim, leaving about an inch of overhang. -
Secure the edges:
Fold the overhanging fabric underneath the lid’s rim and secure it with hot glue, working in small sections to keep the tension tight. -
Add the hat band:
Take your darker leather strip or an old belt cut to size. Wrap it around the base of the ‘dome’ part of the lid where it meets the brim. -
Glue the band:
Secure the leather strip in place with hot glue. This hides any awkward fabric transitions and adds a distinct hat-like quality. -
Handle detail:
If your bin lid has a top handle, you can either wrap it in a small scrap of matching leather or paint it brown to blend in.
Accessorize It
Glue a faux flower or a small feather into the leather hat band for extra personality, or use a patterned fabric for the hat to match a specific room theme.
Pop the lid on your newly decorated bin and enjoy the friendly face that now brightens up the corner of your room
Glow-Style Constellation Night Can
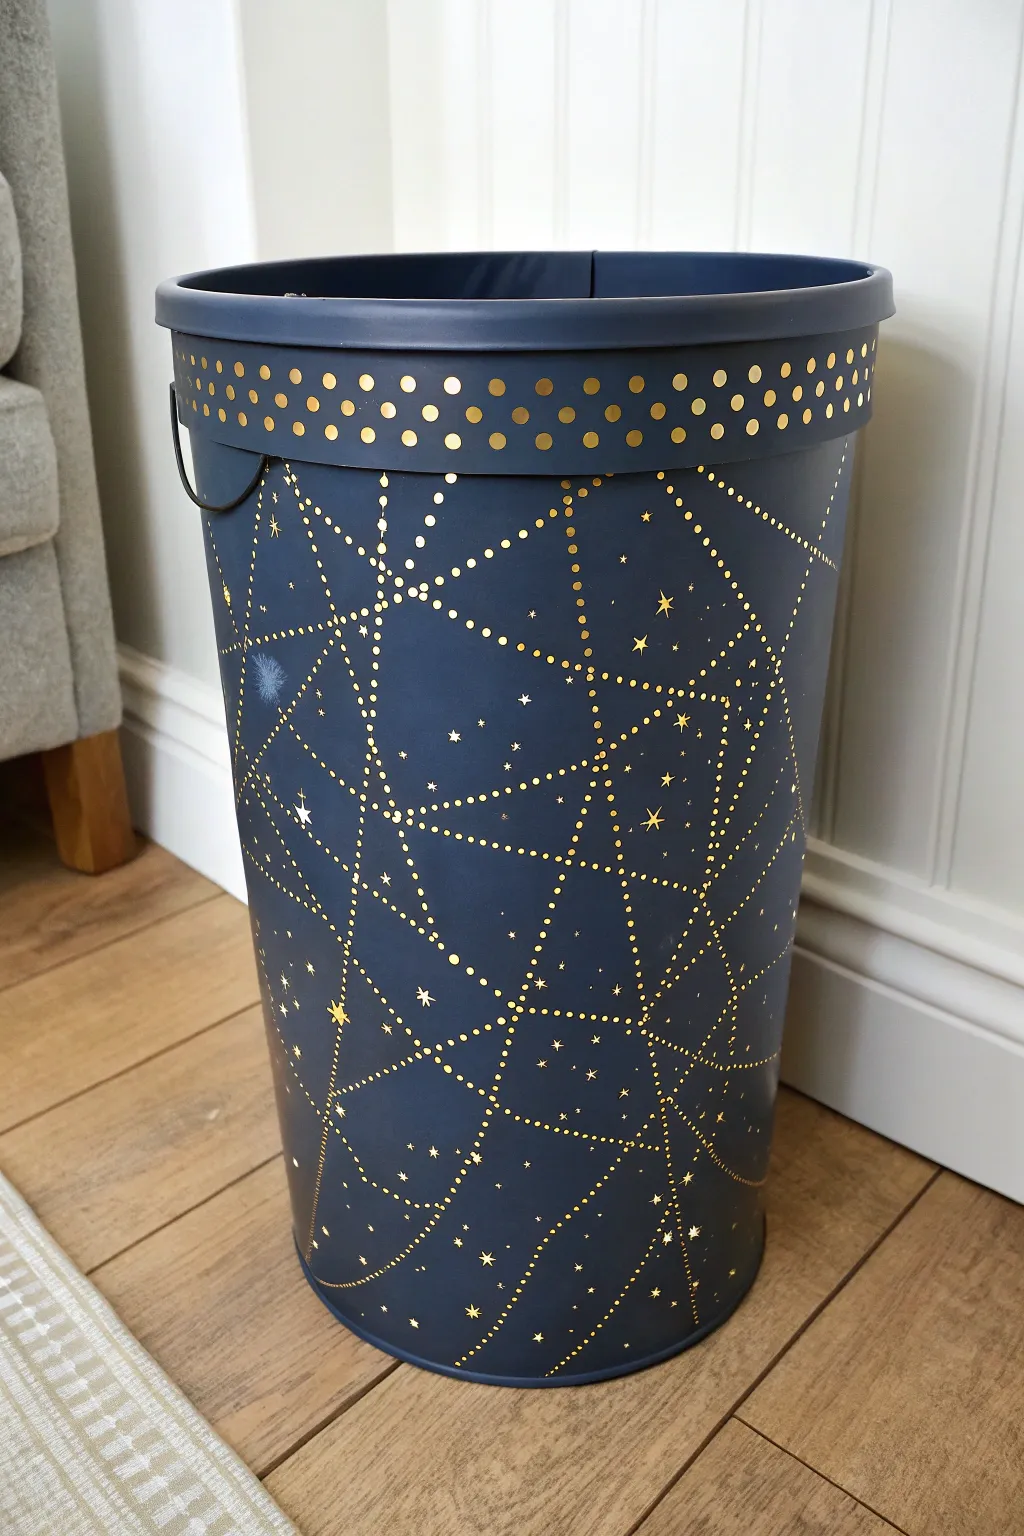
Transform a basic metal waste bin into a stunning piece of galactic decor that brings a starry night sky indoors. The deep matte navy finish creates the perfect backdrop for delicate golden constellations and geometric stardust patterns.
Step-by-Step
Materials
- Metal waste bin (cylindrical)
- Sandpaper (fine-grit, 220)
- Primer spray paint (suitable for metal)
- Matte navy blue spray paint
- Gold paint marker (fine tip)
- Gold paint marker (medium tip)
- Gold acrylic paint
- Small round detail brush
- Ruler or flexible measuring tape
- Pencil (white or light grey)
- Clear matte sealer spray
Step 1: Base Preparation
-
Clean the surface:
Start by thoroughly washing your metal bin with warm soapy water to remove any grease, stickers, or dust. Dry it completely. -
Sand for adhesion:
Lightly scuff the entire exterior surface with fine-grit sandpaper. This roughs up the metal slightly so the paint sticks better. -
Wipe away dust:
Use a damp cloth or tack cloth to remove all sanding dust. Ensure the bin is perfectly dry before moving on. -
Apply primer:
In a well-ventilated area, spray a thin, even coat of metal primer over the entire exterior. Let this cure according to the can’s instructions. -
Spray the base color:
Apply the matte navy blue spray paint. Use long, sweeping motions to avoid drips. You will likely need two coats for full, opaque coverage. -
Dry completely:
Allow the navy base coat to dry for at least 24 hours. The surface needs to be hard so the paint pens don’t dig into the finish.
Uneven Marker Flow?
If your gold pen skips, press the tip on a scrap piece of cardboard to re-saturate it. Never shake the pen directly over your project to avoid puddles.
Step 2: Creating the Galaxy
-
Plan the rim:
Using a flexible tape measure, lightly mark a consistent border around the top rim area where the solid dots will go. -
Paint the rim dots:
Using the medium-tip gold paint marker or a brush with gold acrylic, create two rows of solid gold dots around the upper rim. Stagger them slightly for a classic look. -
Sketch the constellations:
With a white pencil, very faintly sketch your geometric lines. I find it helpful to draw random anchor points first, then connect them to form triangles and irregular shapes. -
Draw the connecting lines:
Using the fine-tip gold marker, follow your sketched lines but don’t draw solid strokes. Instead, create lines made entirely of tiny, closely spaced dots. -
Add emphasis points:
Where your lines intersect, draw slightly larger dots to represent major stars in the constellation web. -
Create starbursts:
Throughout the web, add five-pointed or four-pointed stars using a fine brush and gold acrylic paint for variety. -
Fill the negative space:
Look for large empty navy areas within your geometric web. Add tiny, random dots inside these spaces to simulate distant clusters of stars. -
Vary dot sizes:
Go back over the design and thicken some of the ‘connector’ dots to create depth. A mix of tiny pinpricks and bolder dots makes the galaxy look more organic. -
Check density:
Step back and view the bin from a distance. Fill in any sparse areas with extra stardust speckles to balance the composition. -
Seal the artwork:
Once all gold paint is fully dry, spray the entire bin with a clear matte sealer to protect your handiwork from scratches and wear.
Glow Up Idea
Mix glow-in-the-dark powder into clear medium and trace over select stars. During the day it looks normal, but at night your bin will faintly glow.
Now you have a functional piece of art that makes even tidying up feel a little more magical


Have a question or want to share your own experience? I'd love to hear from you in the comments below!