If you love the look of a mandala but don’t want anything fussy, easy mandala rock painting is your sweet spot. I’m going to share beginner-friendly dot art ideas that look detailed (without requiring perfect drawing skills).
Classic Concentric Dot Mandala
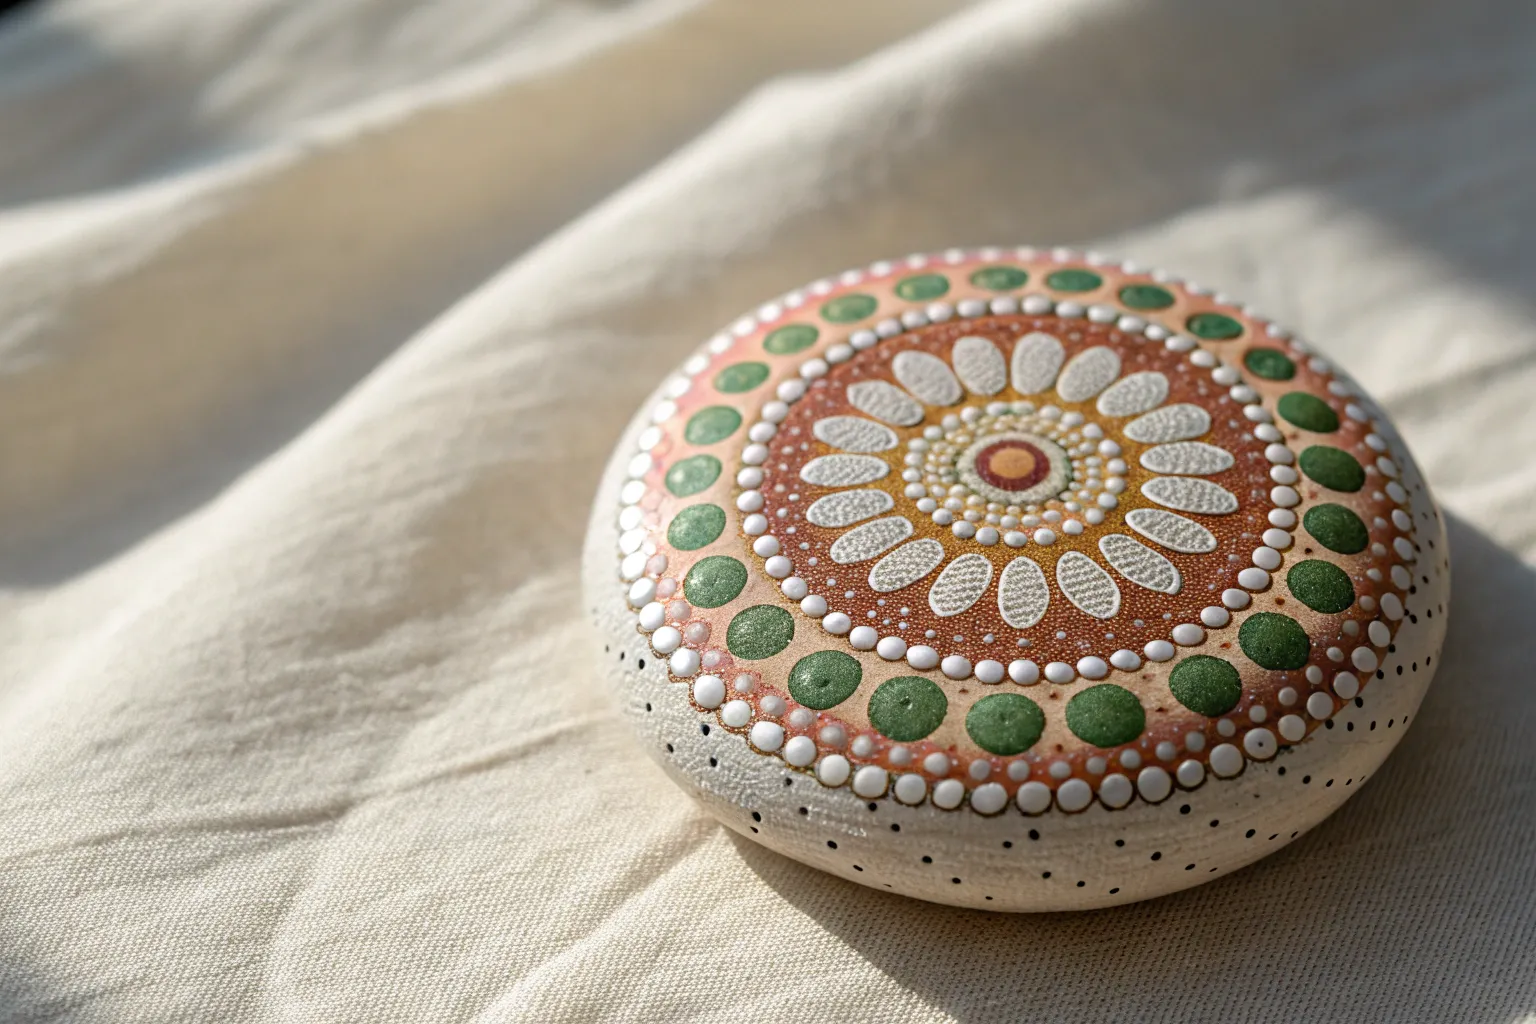
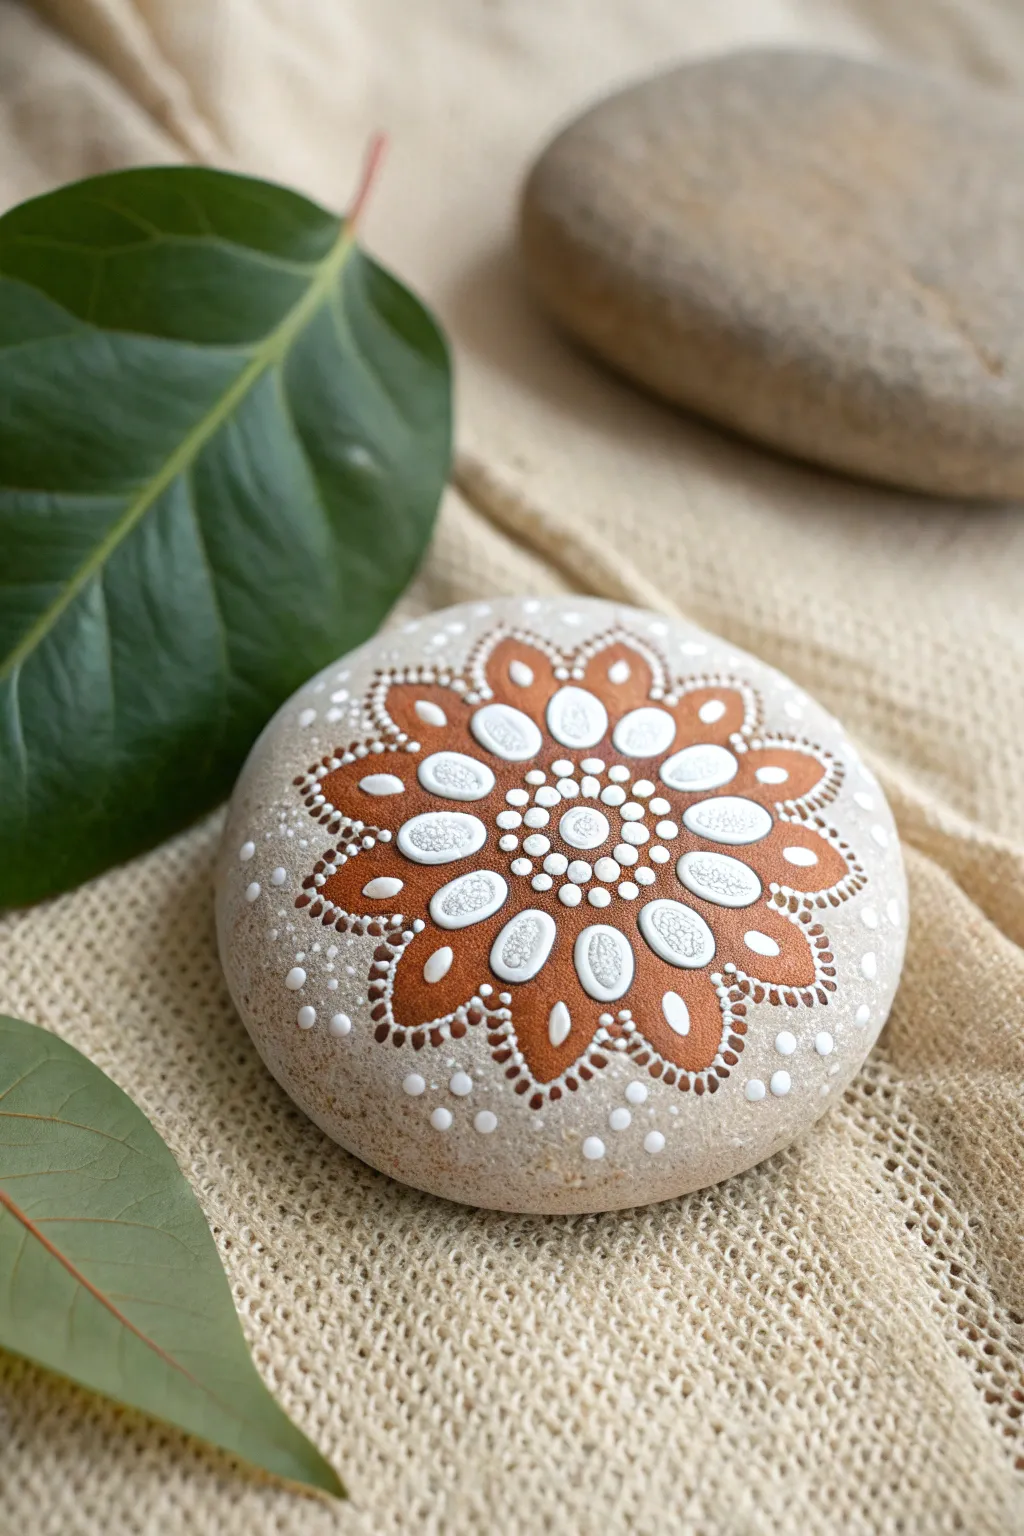
This stunning rock painting project uses a palette of warm terracotta, cream, and deep forest green to create a soothing, symmetrical design. The repeating concentric circles build up slowly from the center, resulting in a mesmerizing piece of art that looks impressive but is founded on simple dotting techniques.
Step-by-Step Tutorial
Materials
- Smooth, round river rock (approx. 4-5 inches diameter)
- Acrylic paints: Black (or very deep forest green), terracotta orange, cream/off-white, beige/tan, metallic copper (optional)
- Dotting tools (various sizes from flat-end stylus to larger acrylic rods)
- Small liner brush
- Pencil and eraser
- Compass or round stencils (optional)
- Matte or satin clear sealant spray
Step 1: Preparation and Base Coat
-
Clean the stone:
Begin by scrubbing your stone with soapy water to remove any dirt or oils. Let it dry completely in the sun or with a hairdryer. -
Paint the background:
Mix a small amount of black with deep green to create a rich, dark base color. Paint a large circle on top of the stone, leaving the natural grey stone visible around the edges. Apply a second coat for opacity if needed. -
Mark the center:
Once the base is fully dry, visualize the absolute center of your painted circle. You can lightly mark this with a white chalk pencil or just eyeball it if you feel confident.
Consistency is Key
If your paint forms peaks (like a meringue) when you lift the tool, it’s too thick. Add a single drop of water or flow medium to smooth it out.
Step 2: The Central Core
-
First central dot:
Using your largest dotting tool, place a generous dot of terracotta paint right in the center. -
First ring of dots:
Switch to a smaller tool. Place small terracotta dots closely around the large central dot. They should be touching or nearly touching the center to form a tight cluster. -
Cream highlight ring:
Using a slightly larger tool than the previous step, dot a ring of cream paint around the terracotta cluster. Try to keep the spacing even between each dot. -
Beige expansion:
Create the next ring using beige or tan paint with a medium-sized tool. These dots should sit in the ‘valleys’ between the cream dots of the previous row. -
Terracotta definition:
Add a ring of terracotta dots, slightly larger again. This helps pull the viewer’s eye back to the central color theme.
Metallic Magic
Swap the beige paint for a metallic copper or bronze. When the light hits the finished stone, those specific rings will shimmer beautifully.
Step 3: Expanding the Pattern
-
Major white ring:
Using a medium-large tool, create a prominent ring of bright white or cream dots. This serves as a visual break between the center and the outer rim. -
Dark spacing ring:
Use a very small tool to place tiny terracotta dots in the gaps between the large white dots to add intricate detail without cluttering the design. -
Large terracotta features:
Select a large tool. Place substantial terracotta dots spaced evenly around the perimeter of your current design. Leave enough gap between them for future detailing. -
Walking the dots:
Dip a small tool in white paint. Place a dot above a large terracotta one, then continue placing smaller dots down the side of it until you reach the bottom. Repeat on the other side to frame the large dot. -
Outer rim detail:
I like to finish the main structural elements with a final ring of medium beige dots at the very edge of the dark background circle.
Step 4: Final Details and Sealing
-
Top dots:
Once the large terracotta dots are dry, place a smaller cream dot on top of each one creates a ‘double dip’ effect that adds dimension. -
Micro-dot fillers:
Use your smallest stylus or a toothpick to fill any awkward empty black spaces with tiny white ‘dust’ dots. This evokes a starry night feel. -
Scalloped edge:
Using a liner brush and terracotta paint, carefully paint a thin, scalloped line connecting the outermost dots, giving the mandala a lacelike border against the grey stone. -
Dry thoroughly:
Allow the stone to cure for at least 24 hours. The thick dots take much longer to dry than standard brushstrokes. -
Seal to protect:
Finish by spraying a light coat of matte or satin varnish over the top to protect your intricate work from scratches or fading.
Place your finished mandala stone on a desk or in a garden pot to add a touch of handcrafted serenity to your space


Black Base With Bright Dots
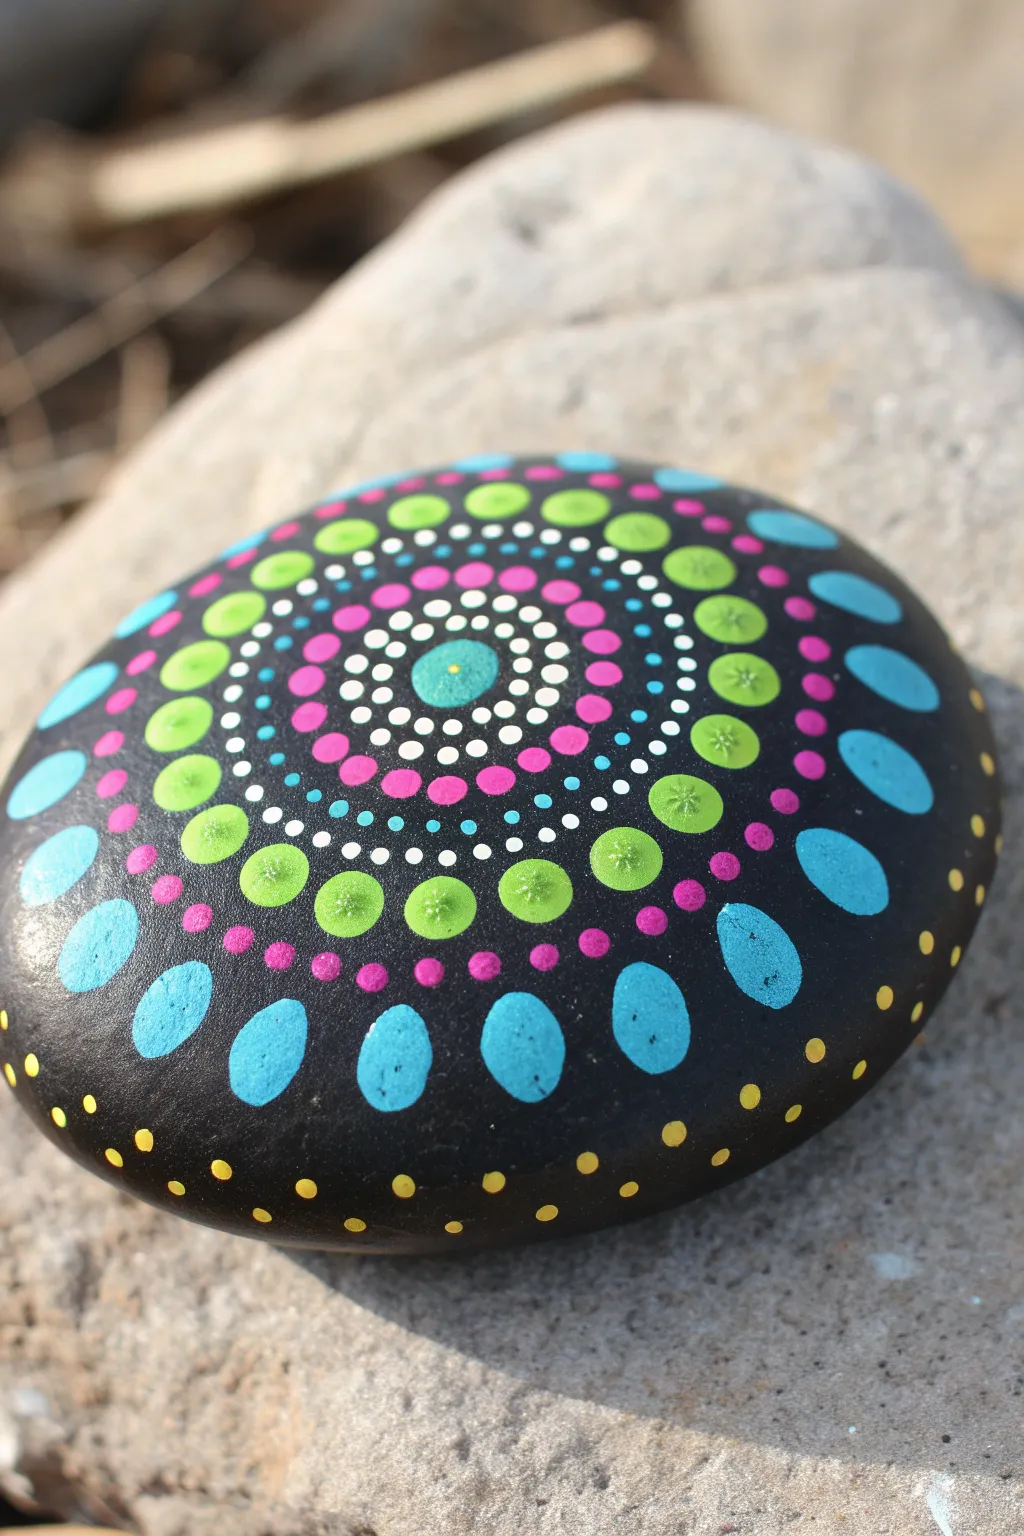
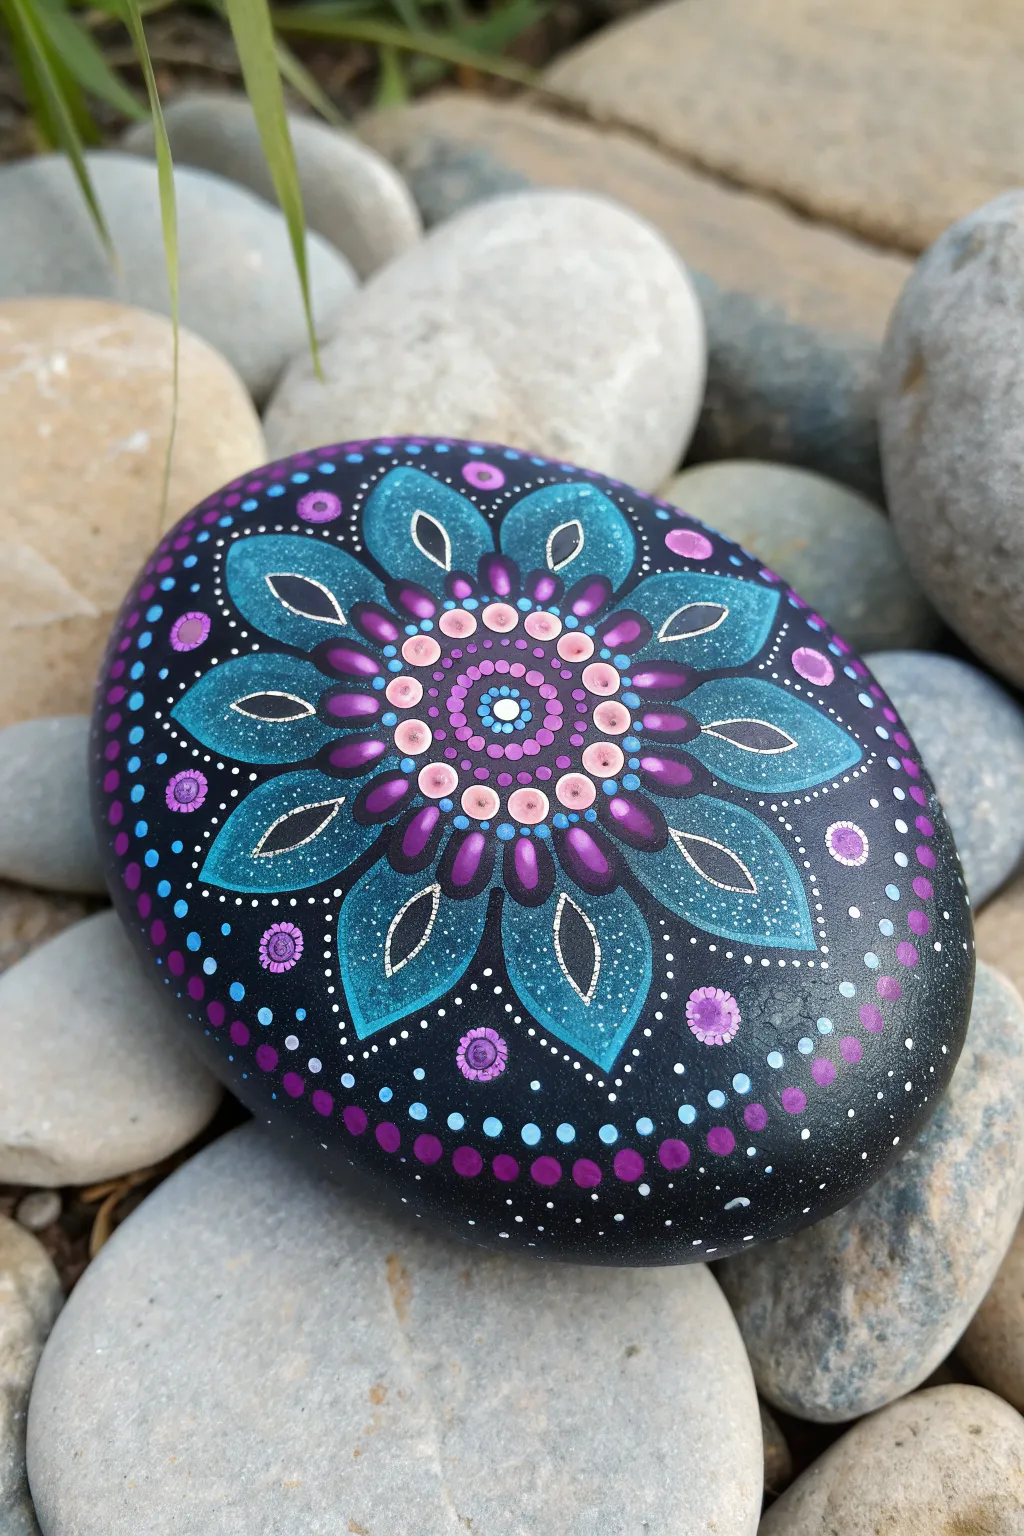
This striking mandala design uses a high-contrast black background to make vibrant neon hues pop with incredible intensity. The pattern grows outward from a central teal dot, utilizing concentric rings of color to create a mesmerizing, hypnotic effect perfect for decoration or meditation.
Step-by-Step
Materials
- Smooth, round river rock (approx. 4-5 inches wide)
- Black acrylic paint (matte or satin finish)
- Acrylic paints: Teal, Magenta/Pink, White, Lime Green, Bright Yellow
- Dotting tools (various sizes from fine needle to large dowel)
- Cotton swabs or damp cloth (for mistakes)
- Spray sealer or varnish (glossy)
Step 1: Base Preparation
-
Clean surface:
Begin by washing your stone thoroughly with soap and water to remove any dirt or oils. Let it dry completely before starting. -
Apply base coat:
Paint the entire top surface of the rock with black acrylic paint. You may need two coats to ensure full opacity, allowing the first coat to dry before applying the second.
Oops! Smudged a dot?
Don’t panic! Wait for the mistake to dry completely, then paint over it with black base paint. Once that dries, re-dot correctly.
Step 2: Center & Core Rings
-
The center dot:
Using a medium-sized dotting tool, place a single teal dot directly in the center of your rock. This will be the anchor for your entire design. -
First white ring:
Switch to a very small dotting tool. Create a tight ring of tiny white dots immediately surrounding the central teal dot. Keep them close but not touching. -
Second white ring:
Create a second ring of slightly larger white dots around the first ring. Try to stagger these dots so they sit in the ‘valleys’ between the dots of the previous row. -
Pink ring:
Using a slightly larger tool again, dot a ring of bright magenta or pink around the white section. Space them evenly to maintain the circular shape. -
Teal dividers:
Between every pink dot in the previous ring, place a tiny teal dot to add intricate detail and fill the negative space.
Glow Up
Use UV-reactive or fluorescent acrylic paints for the neon colors. Under a blacklight, your mandala will literally glow in the dark.
Step 3: Expanding the Pattern
-
Lime green ring:
Select a medium-large tool and create a ring of lime green dots. These should be larger than the pink ones. Ensure they are spaced symmetrically around the perimeter. -
White accents:
Using your smallest tool, place a tiny white dot in the dark space between each large lime green dot, closer to the center. -
Inner dot walk:
This step adds depth. Place a tiny pink dot directly on top of each large lime green dot you just made. I like to let the green dry briefly so the pink sits cleanly on top. -
Teardrop ring:
The final major ring consists of large, elongated teal teardrops or ovals. Use a large tool to place a dot, then slightly drag the paint outward to create the oval shape. -
Border dots:
Using a small tool and bright yellow paint, add a final ring of small dots around the very outer edge of the design, spacing them between the large teal ovals.
Step 4: Final Details
-
Center intricate detail:
Return to the very first center teal dot. Add a tiny yellow dot right in the middle of it. -
Green accents:
Add a tiny, subtle starlike pattern to the center of the large green dots using a needle tool, or simply add a lighter green highlight dot. -
Dry and seal:
Allow the rock to dry for at least 24 hours. Once fully cured, finish your artwork with a spray varnish to protect the paint and give it a polished shine.
Display your vibrant creation on a desk or in the garden to add a splash of color to your day


Two-Color Mandala for Total Beginners
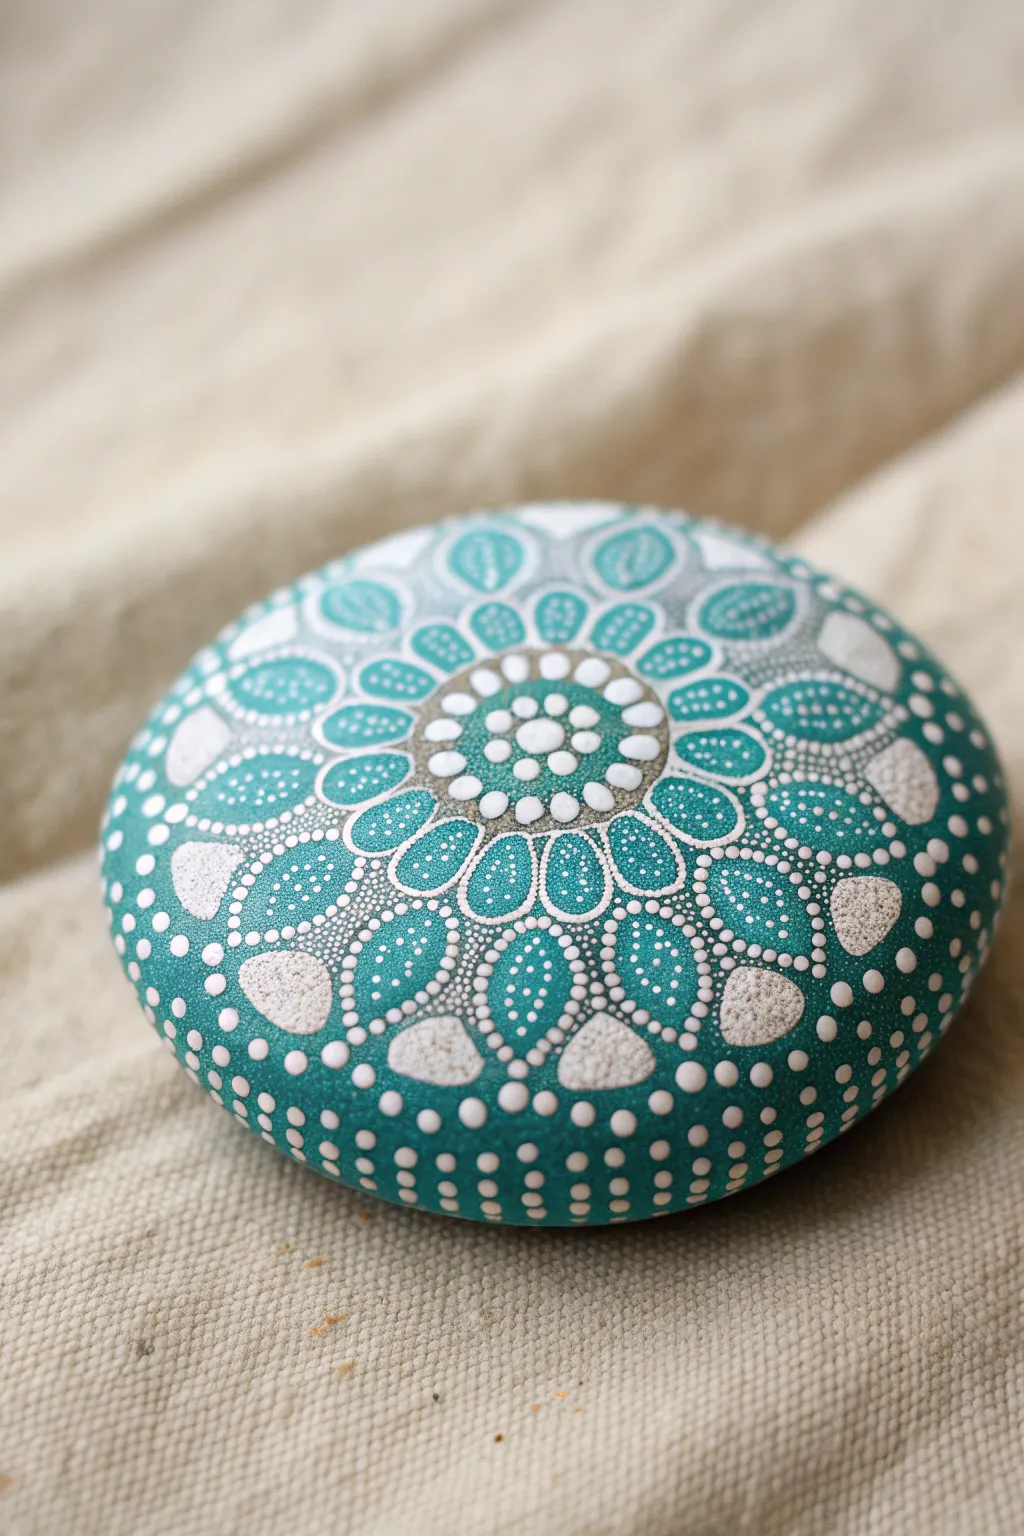
This project creates a stunning yet manageable mandala design using a refreshing teal and crisp white palette on a smooth stone. The pattern radiates outward in petal-like formations, combining solid dots with delicate dotted outlines for a textured, lace-like effect.
Step-by-Step Tutorial
Materials
- Smooth, round river rock (approx. 3-4 inches diameter)
- Acrylic paint: Teal (turquoise/blue-green) and Titanium White
- Gloss varnish or top coat (optional)
- Dotting tools set (various sizes from large to stylus)
- Damp cloth or paper towel
- Palette or small plate
Step 1: Base and Center
-
Prepare the Surface:
Ensure your rock is clean and dry. You can leave the natural stone color as the background for an organic look, or paint a solid light beige base coat if your rock is uneven in color. -
Paint the Central Dot:
Dip a medium-sized dotting tool into the white paint. Place a single, crisp dot in the exact center of the stone. -
Create the First Ring:
Using a smaller tool and teal paint, place a ring of small dots around the central white dot. Keep them evenly spaced and close to the center without touching. -
Add the Second Ring:
Switch to white paint and a slightly larger tool. Create a second ring of dots around the teal ones. Position each white dot in the space between two teal dots from the previous row.
Paint Consistency Pro-Tip
If your tiny dots have peaks or ‘Hershey’s Kiss’ tips, your paint is too thick. Thin it with a drop of pouring medium or water until it flattens into a perfect dome.
Step 2: Building the Petals
-
Start the Inner Petals:
Using your largest dotting tool and teal paint, place a ring of large dots around the center cluster. Think of these as the anchor points for your first layer of petals. -
Outline the Petals:
Switch to your smallest stylus tool and white paint. Carefully ‘walk the dots’ around each large teal dot. To do this, place a tiny white dot at the top of the teal circle, then continue placing tiny dots down each side until they meet at the base, forming a petal shape. -
Add Detail Inside the Petals:
Inside each large teal dot, add a small white dot near the top center to create a highlight effect. -
Create Spacing Dots:
Place a medium-sized white dot in the V-shaped crevice between each of the teal petals.
Step 3: Expanding the Design
-
Create the Second Petal Layer:
Aligned directly above the previous row’s white spacing dots, place a new ring of large teal dots. These should be larger than the first set if possible. -
Outline Second Layer:
Use the stylus and white paint to walk tiny dots around these new teal circles, just like before, creating a second tier of outlined petals. -
Fill the Gaps:
In the spaces between these new petals, add a teardrop shape or a large white dot. If you use a dot, gently drag the paint inward with a needle tool to create a pointed tail. -
Inner Petal Texture:
For added texture, take your smallest tool and add tiny white stippling (lots of little dots) inside the teal petals, fading from the top down.
Color Swap Level-Up
Try reversing the colors for the outer rim! Use a white base for the petals and outline them with tiny teal dots for a striking negative-space effect.
Step 4: Outer Rim and Finish
-
Border Dots:
Around the outer edge of your mandala, create a final ring of teal dots. Vary the sizes—alternating between medium and small—to fill the remaining surface area of the stone. -
Cascade Down the Sides:
Continue the pattern down the sides of the rock with rows of teal dots, gradually getting smaller as they reach the bottom, creating a waterfall effect. -
Final Highlights:
Using white paint, add a tiny ‘top dot’ onto the center of the largest teal dots on the outer rim. This layering adds dimension. -
Clean Up:
Check for any stray marks. If you make a mistake, wait for it to dry completely and scrape it off gently, or wipe it immediately with a damp cotton swab. -
Seal:
Allow the paint to cure for at least 24 hours. Apply a layer of gloss varnish to protect the artwork and make the teal color pop.
Enjoy the meditative process of watching your pattern grow loop by loop.


Rainbow Ring Mandala
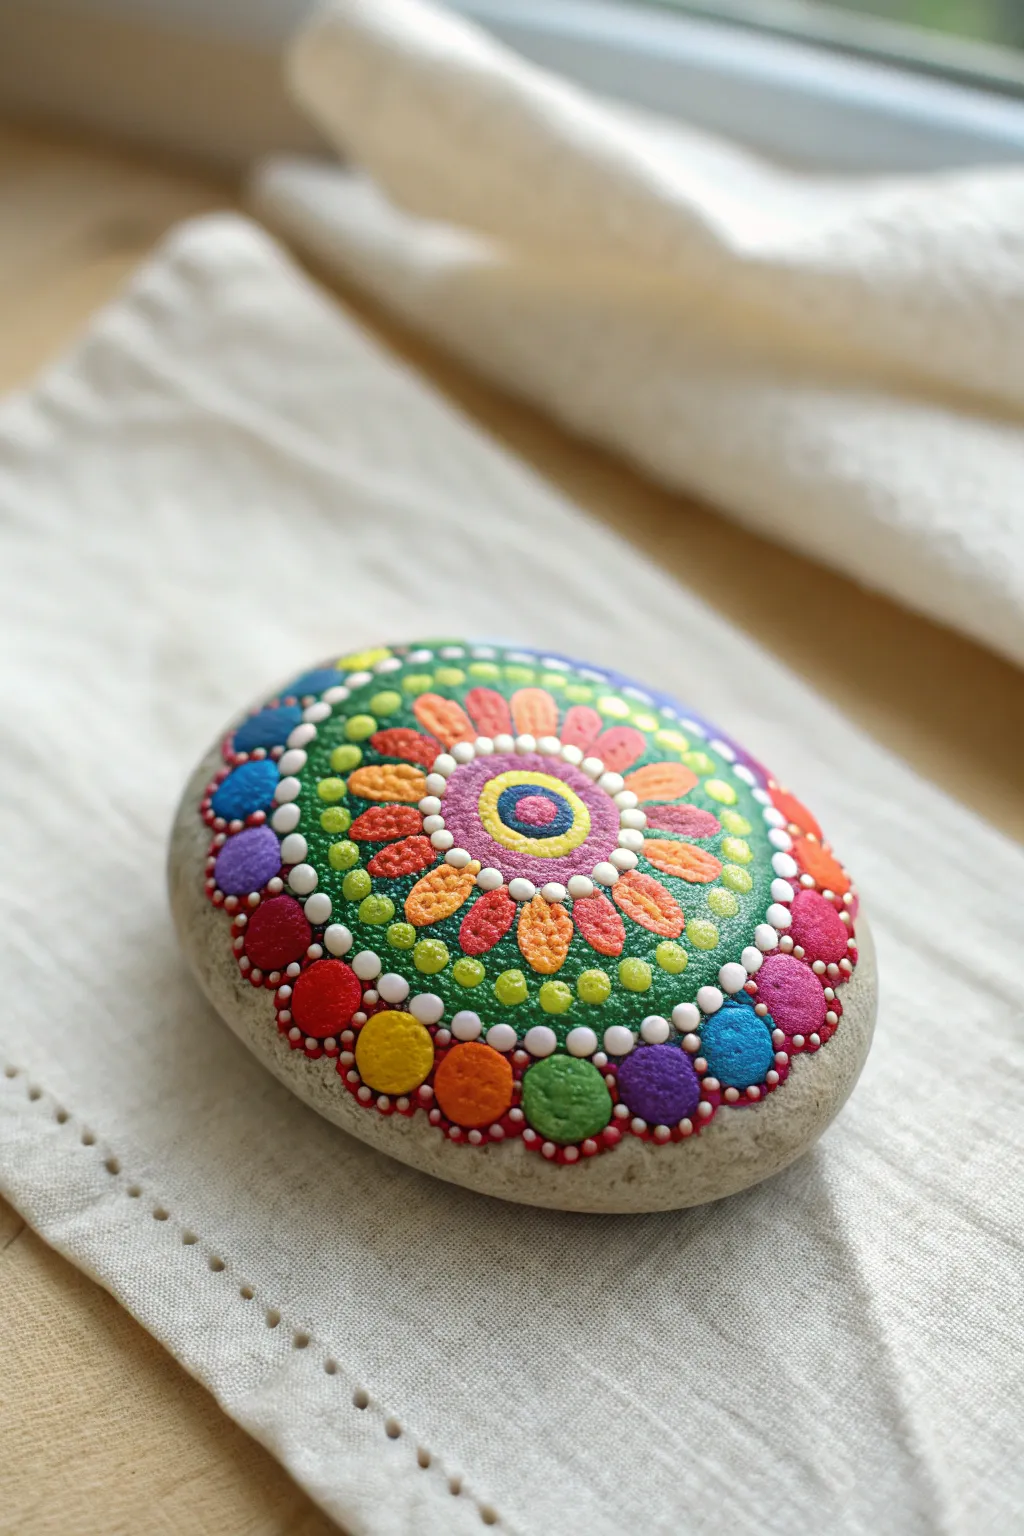
Brighten up any garden path or windowsill with this vibrant mandala stone, featuring expanding rings of rainbow dots that form a stylized flower. The design combines classic dotting techniques with petal shapes to create a cheerful, textured piece of art.
Step-by-Step
Materials
- Smooth, oval river rock (cleaned and dried)
- Acrylic paints (purple, dark blue, light blue, green, yellow, orange, red, pink, white)
- Set of dotting tools (various sizes)
- Fine detail paintbrush
- Palette or small plate
- Damp paper towel/rag
- Gloss varnish or clear sealant spray
Step 1: Creating the Center
-
Center Dot:
Begin by placing a medium-sized dark blue dot exactly in the center of your rock using a dotting tool. -
First Ring:
Using a smaller tool, place a ring of tiny yellow dots directly around the blue center dot. Keep them tight against the center. -
Expand with Pink:
Paint a solid ring of light pink/purple around the yellow dots. This creates a bold band rather than individual dots. -
Second Ring Details:
Once the pink band is dry, use a very small tool to add a ring of white dots along the outer edge of the pink band.
Paint Peaks Problem?
If your dots have pointy peaks, dip your finger in water and gently tap them down while wet, or thin your paint slightly with medium.
Step 2: Building the Flower Petals
-
Petal Outlines:
Surround the central motif with a series of elongated oval shapes to form petals. I like to alternate colors here—one orange, one pink—all the way around. -
Filling the Petals:
Fill these oval shapes in with solid color paint, ensuring the paint is opaque enough to hide the stone underneath. -
Green background:
Paint the area immediately surrounding the petals with a vibrant green. This creates a leaf-like background for the flower. -
Petal Accents:
Inside each orange and pink petal, add a column of three graduated dots in a lighter shade or white to give them dimension. -
Separating Dots:
Place a medium white dot between the tips of each petal on the green background.
Pro Tip: Grid Lines
Lightly sketch a cross or concentric circles with a white chalk pencil first to keep your mandala perfectly symmetrical.
Step 3: Adding the Rainbow Border
-
Outer Green Dots:
Create a ring of varying green dots around the entire flower shape, filling in the green background area completely. -
White Dotted Border:
Use a small tool to create a consistent ring of white dots that circles the entire green section. This creates a crisp separation for the final rainbow layer. -
Large Rainbow Dots:
Using your largest dotting tool, place big, bold dots around the white border. Follow the rainbow order: purple, blue, teal, green, yellow, orange, red, pink. -
Walking the Dots:
For each large rainbow dot, use a tiny tool to ‘walk the dots’ around it. Pick up white paint and make a semicircle of tiny dots hugging the outer edge of each large colored circle. -
Connecting the Colors:
Between each large rainbow dot, place a tiny white dot to bridge the gaps and unify the outer edge. -
Final Drying:
Allow the stone to dry completely for at least 24 hours to ensure the thick dots cure all the way through. -
Sealing:
Apply a coat of gloss varnish or spray sealant to protect your work and make the colors pop.
Now you have a brilliantly colored keepsake that captures the joy of a blooming garden
BRUSH GUIDE
The Right Brush for Every Stroke
From clean lines to bold texture — master brush choice, stroke control, and essential techniques.
Explore the Full Guide
Soft Pastel Mandala Rock
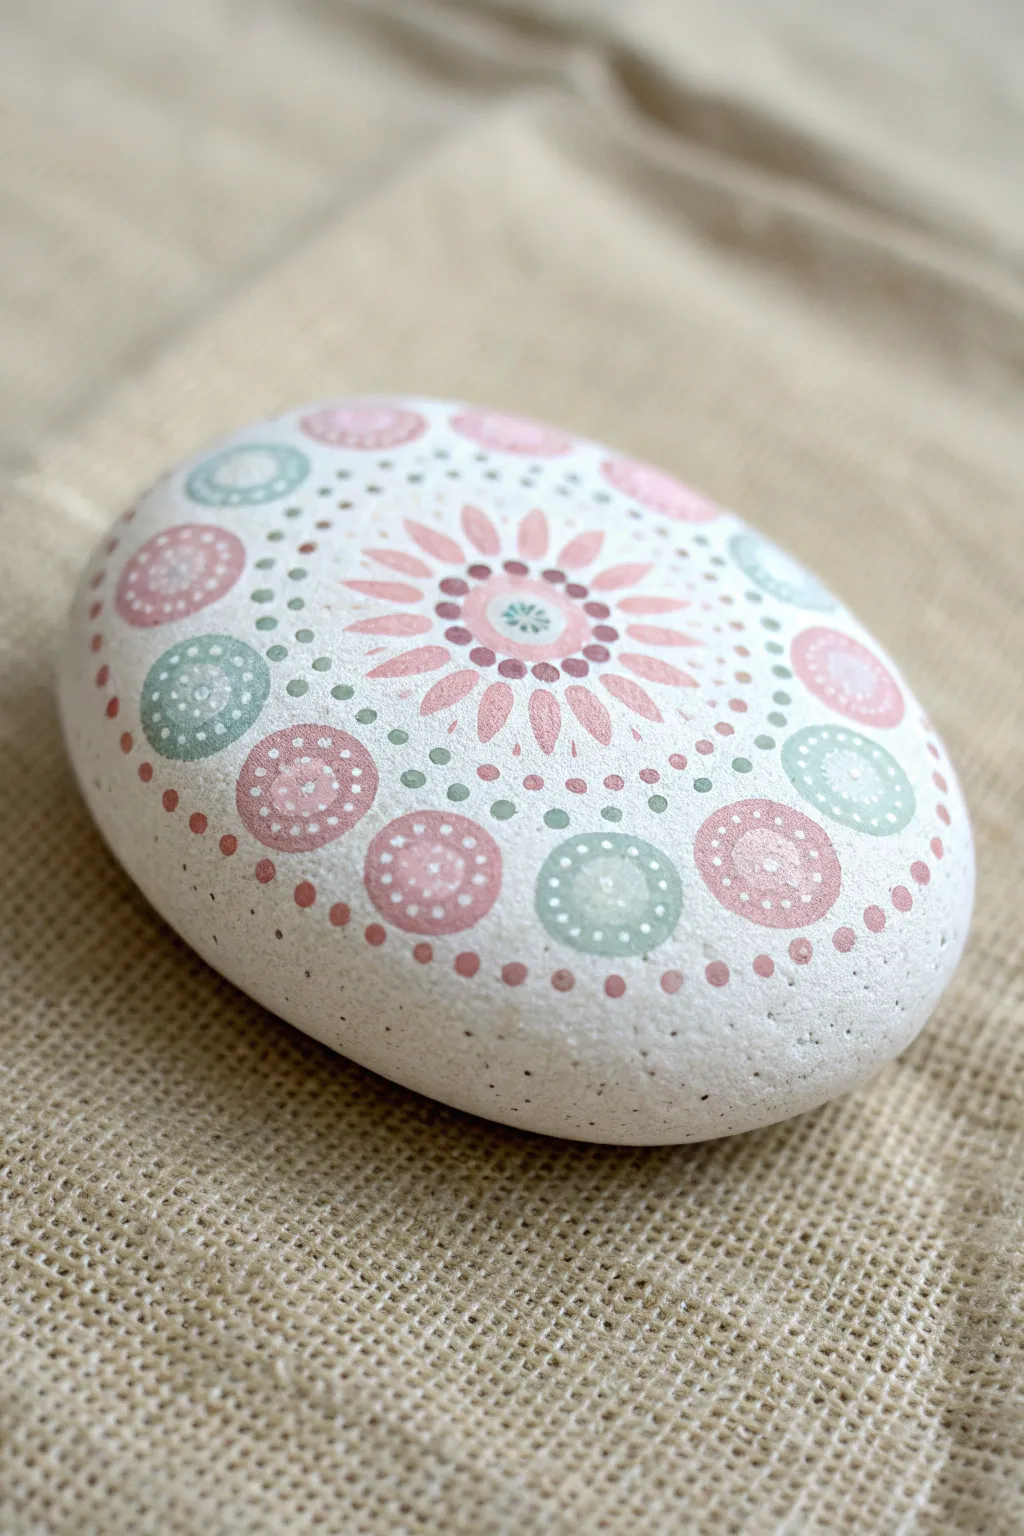
Embrace the soothing qualities of painting with this delicate mandala stone project, featuring muted pastels in dusty rose, sage green, and soft pinks. The design radiates outward from a central floral motif, combining freehand petals with precise dotting for a balanced, calming finish.
Step-by-Step Guide
Materials
- Smooth, oval river rock (light-colored or primed white)
- Acrylic paints: White, Dusty Rose, Pale Pink, Sage Green/Mint, Burgundy (for center accents)
- Dotting tools (various sizes, from fine to medium)
- Fine detail paintbrush (size 0 or 00)
- Acrylic matte varnish or sealant
- Palette or small dish for mixing
- Pencil (optional for guidelines)
- Damp cloth for clean-up
Step 1: Preparation and Center
-
Prepare the Surface:
Begin with a clean, dry rock. If your stone isn’t naturally white or light cream, apply two thin coats of white acrylic paint as a base to help the pastel colors pop. Allow this base to dry completely before starting the design. -
Mark the Center:
Find the rough visual center of your stone. Using a medium-sized dotting tool, place a single burgundy or deep rose dot right in the middle. -
Create the First Ring:
Switch to a smaller dotting tool. Dip it in pale pink paint and place a ring of small, evenly spaced dots immediately surrounding the central dot. -
Add the Petals:
Using your fine detail brush and pale pink paint, paint small, elongated petal shapes radiating outward from the central ring. Aim for about 12-14 petals depending on spacing. -
Petal Details:
Once the petals are dry, add a tiny dot of burgundy or deep rose at the base of each petal (closest to the center) using a fine dotting tool to add depth. -
Top Center Detail:
Go back to your very first central dot. If it’s dry, add a tiny white or pale mint dot right in the middle of it for a layered effect.
Pro Tip: Consistency Check
Pastel acrylics can sometimes be thick. Add a single drop of water or flow medium to your paint to ensure your dots stay round and don’t form ‘peaks’ when you lift the tool.
Step 2: Expanding the Pattern
-
Dotted Border:
Using a small dotting tool and sage green paint, create a ring of dots that encircles the tips of the flower petals. Keep the spacing tight for a neat border. -
Second Dotted Ring:
Create a second ring of dots immediately outside the green one, this time using white or a very pale cream color. This acts as a spacer. -
Large Circle Placement:
Select a larger dotting tool or use the back of a paintbrush. Alternating colors between dusty rose and sage green, place large, solid circles in a ring around your previous dotted border. Leave a little breathing room between them. -
Internal Circle Dots:
While the large circles dry, I like to mix a lighter version of my base colors. Use a small tool to place a ring of tiny white dots inside the perimeter of each large circle. -
Center Circle Accents:
Place a medium-sized dot in the center of each large circle. Use a contrasting color—pink inside the green circles, and green inside the pink circles. -
Filling the Gaps:
Look at the triangular gaps formed between the large circles near the center flower. Add a single, small sage green dot in each of these spaces to connect the design elements.
Level Up: Ombré Petals
For the central flower, load your brush with pink but dip the very tip in white before painting the petal. This creates a soft gradient with a lighter outer edge.
Step 3: Outer Rim and Finishing
-
Outer Chain:
Using the dusty rose paint, create a chain of medium-sized dots that runs along the outer edge of the large circles, framing the main design. -
Final Perimeter:
For the outermost layer, create a ring of small, widely spaced dots in pale pink or burgundy around the extreme edge of the design, fading out toward the side of the rock. -
Refining Details:
Check your large circles again. Add a tiny white highlight dot to the very center of the inner contrasting dots you painted earlier. -
Clean Up:
Inspect the rock for any accidental smudges. If the paint is dry, you can gently scrape off enclosed errors with a toothpick, or touch up the white background paint. -
Seal the Artwork:
Allow the stone to dry for at least 24 hours to ensure moisture is gone. Apply a coat of acrylic matte varnish to protect the delicate pastel finish without adding too much shine.
Place this serene stone on your desk or nightstand for a gentle daily reminder of calm
Mandala With Alternating Big and Tiny Dots
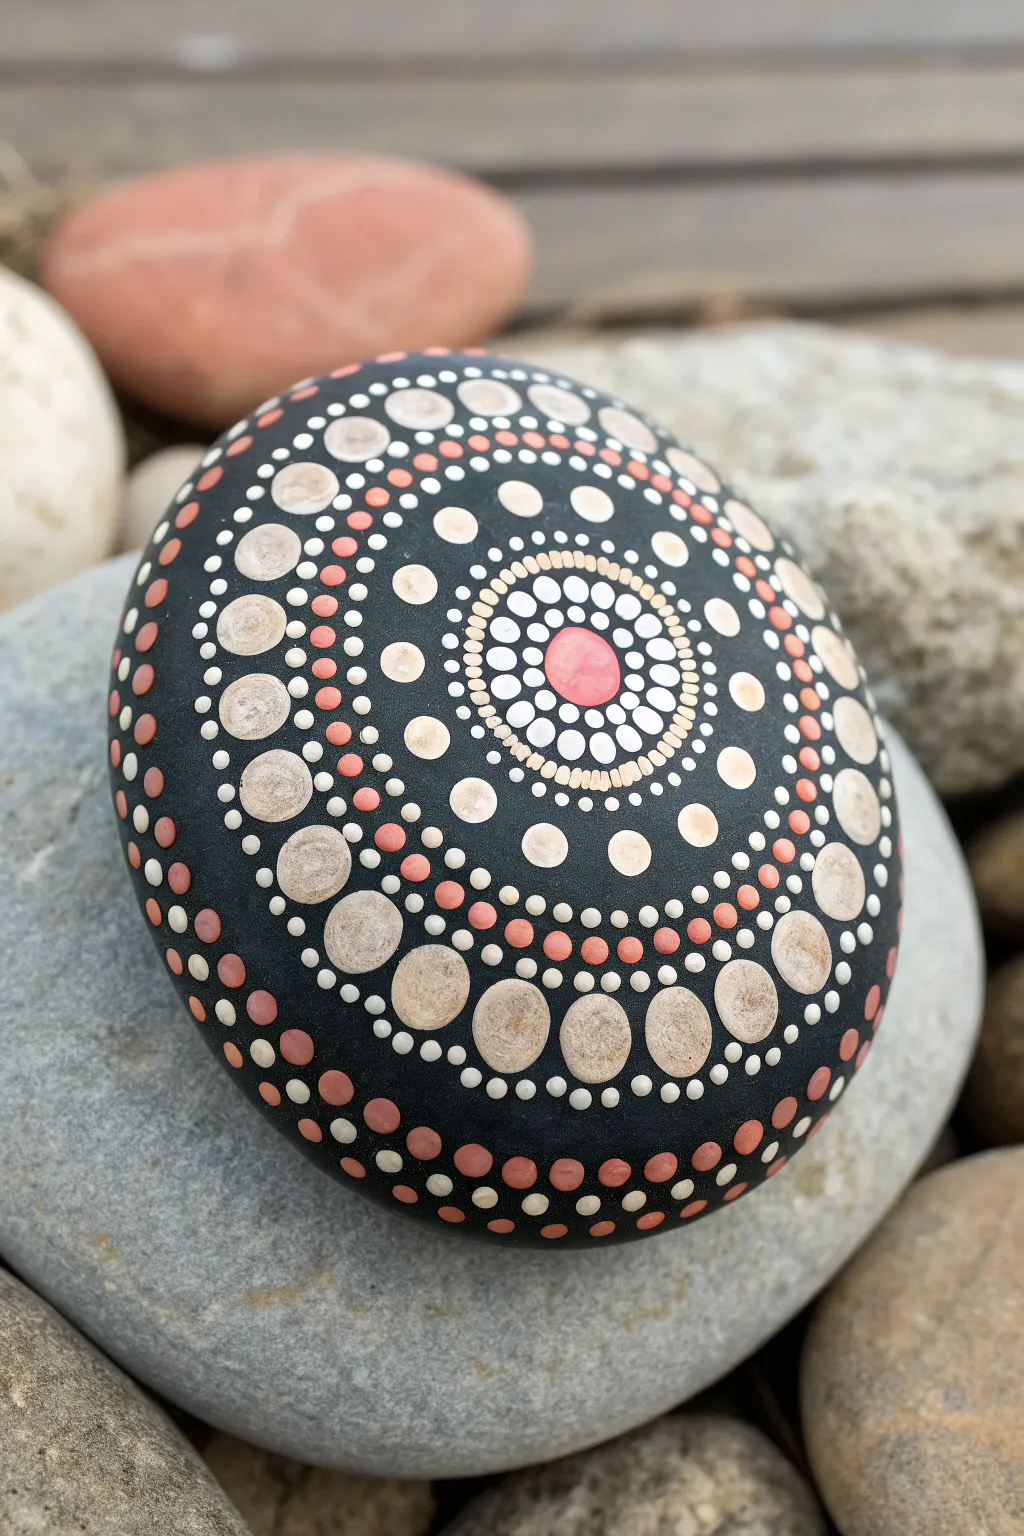
This striking mandala design relies on the high contrast between a deep matte black background and soft, earthy peach and white tones. The pattern is built through concentric circles of varying dot sizes, creating a satisfying rhythm that radiates from a single pink center point.
Detailed Instructions
Materials
- Smooth river stone (round or oval)
- Black acrylic paint (matte finish recommended)
- Acrylic paints: white, soft pink, peach/beige, terracotta/rust red
- Dotting tools (various sizes from stylus to larger flat-end rods)
- Gloss varnish or sealer
Step 1: Base and Center
-
Prepare the canvas:
Begin by washing and drying your stone thoroughly to remove any dirt or oils. Paint the entire surface with a coat of black acrylic paint. Let it dry completely, and apply a second coat if needed to ensure a solid, opaque background. -
Mark the center:
Once the black base is bone dry, use a medium-sized dotting tool to place a single, prominent soft pink dot in the absolute center of the stone. This will be the anchor for your entire mandala. -
First ring of white:
Using a smaller dotting tool, place small white dots around the central pink dot. Keep them close together but not touching, forming a tight ring. -
Second ring expansion:
Create a second ring of slightly larger white dots immediately outside the first ring. Try to place these new dots in the ‘valleys’ between the dots of the previous row for a honeycomb effect.
Step 2: Building the Core Pattern
-
The small dividers:
Using a very fine dotting tool or a toothpick, create a ring of tiny white dots. I find it helpful to space these out slightly to make room for the larger elements coming next. -
The beige circle:
Switch to your peach/beige paint and a medium-sized tool. Place a ring of dots around the previous white ring. These should be larger than the white ones, acting as a visual border for the intricate center. -
Double dotted border:
Using your smallest tool and white paint, create two concentric rings of very tiny dots closely hugging the beige circle. This adds a delicate, lacy texture. -
Large feature dots:
Now for the main structural ring: take a large dotting tool and the peach/beige paint. Place large, evenly spaced dots in a circle around the existing design. Leave enough space between them for two smaller dots.
Fixing Smudges
Did two wet dots accidental touch? Don’t panic. Let them dry completely, then paint over the mistake with black base paint. Once that dries, re-dot the area perfectly.
Step 3: Intricate Details
-
Inter-spacing dots:
Between each of the large beige dots you just painted, place two smaller terracotta/rust red dots. They should sit side-by-side in the gap. -
Walking the dots:
Above the pair of red dots, place a small white dot. Continue this pattern all the way around, creating a repeating sequence of big beige, two red, one white. -
Top layers:
Return to the large beige dots. Once they are dry to the touch, place a slightly smaller white dot on top of each one (off-center toward the middle creates a nice 3D effect, though centered works too). -
The outer rust ring:
Create a new ring further out using the terracotta paint. Place these medium-sized dots in the gaps between the large beige dots from the previous main layer. -
Connecting with white:
Use small white dots to connect the elements, placing them around the terracotta dots to frame them. -
Final border dots:
As the surface of the rock curves away, finish the design with a final ring of alternating terracotta and white dots near the edge of the visible surface. -
Walking dots technique:
If you have empty black space that looks too sparse, use a tiny tool to ‘walk the dots’ (dabbing repeatedly without reloading paint) around the largest beige circles to create a fading tail of tiny distinct specks. -
Sealing:
Allow the stone to cure for at least 24 hours. Apply a gloss varnish to protect the paint and make the colors pop against the black background.
Consistency Pro-Tip
For the most uniform dots, clean your tool tip with a damp paper towel every 3-4 dots. Paint buildup on the tool changes the dot size and shape over time.
Now display your beautiful stone on a desk or in the garden to admire the rhythm of your work

PENCIL GUIDE
Understanding Pencil Grades from H to B
From first sketch to finished drawing — learn pencil grades, line control, and shading techniques.
Explore the Full Guide
Layered Dots for a 3D Mandala Look
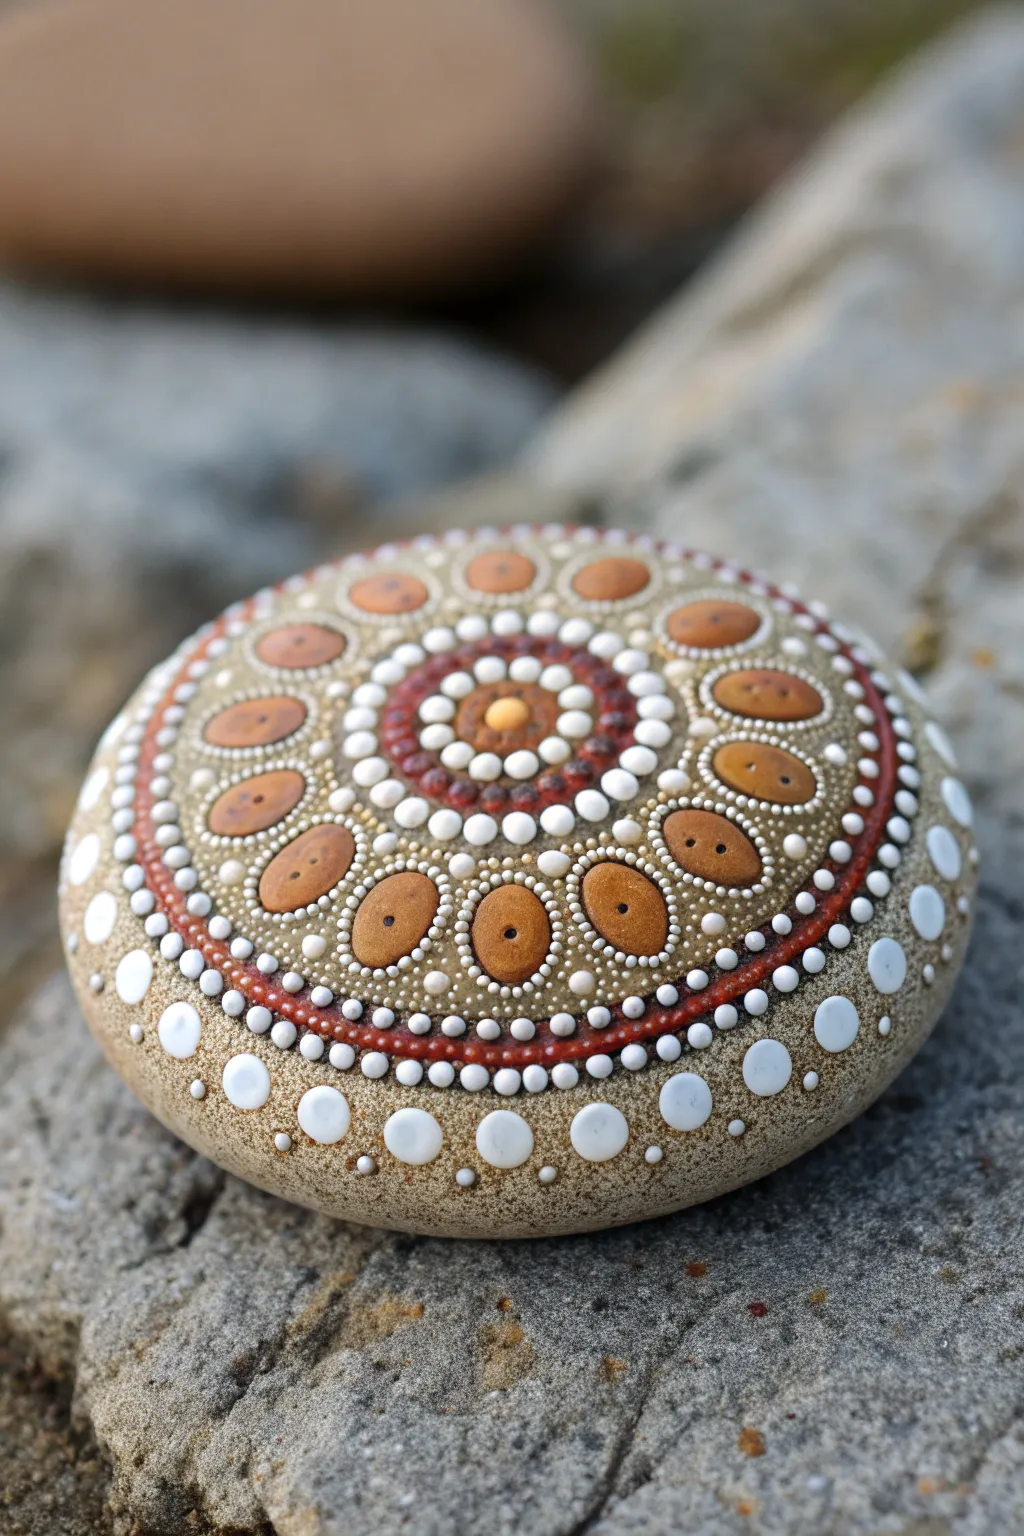
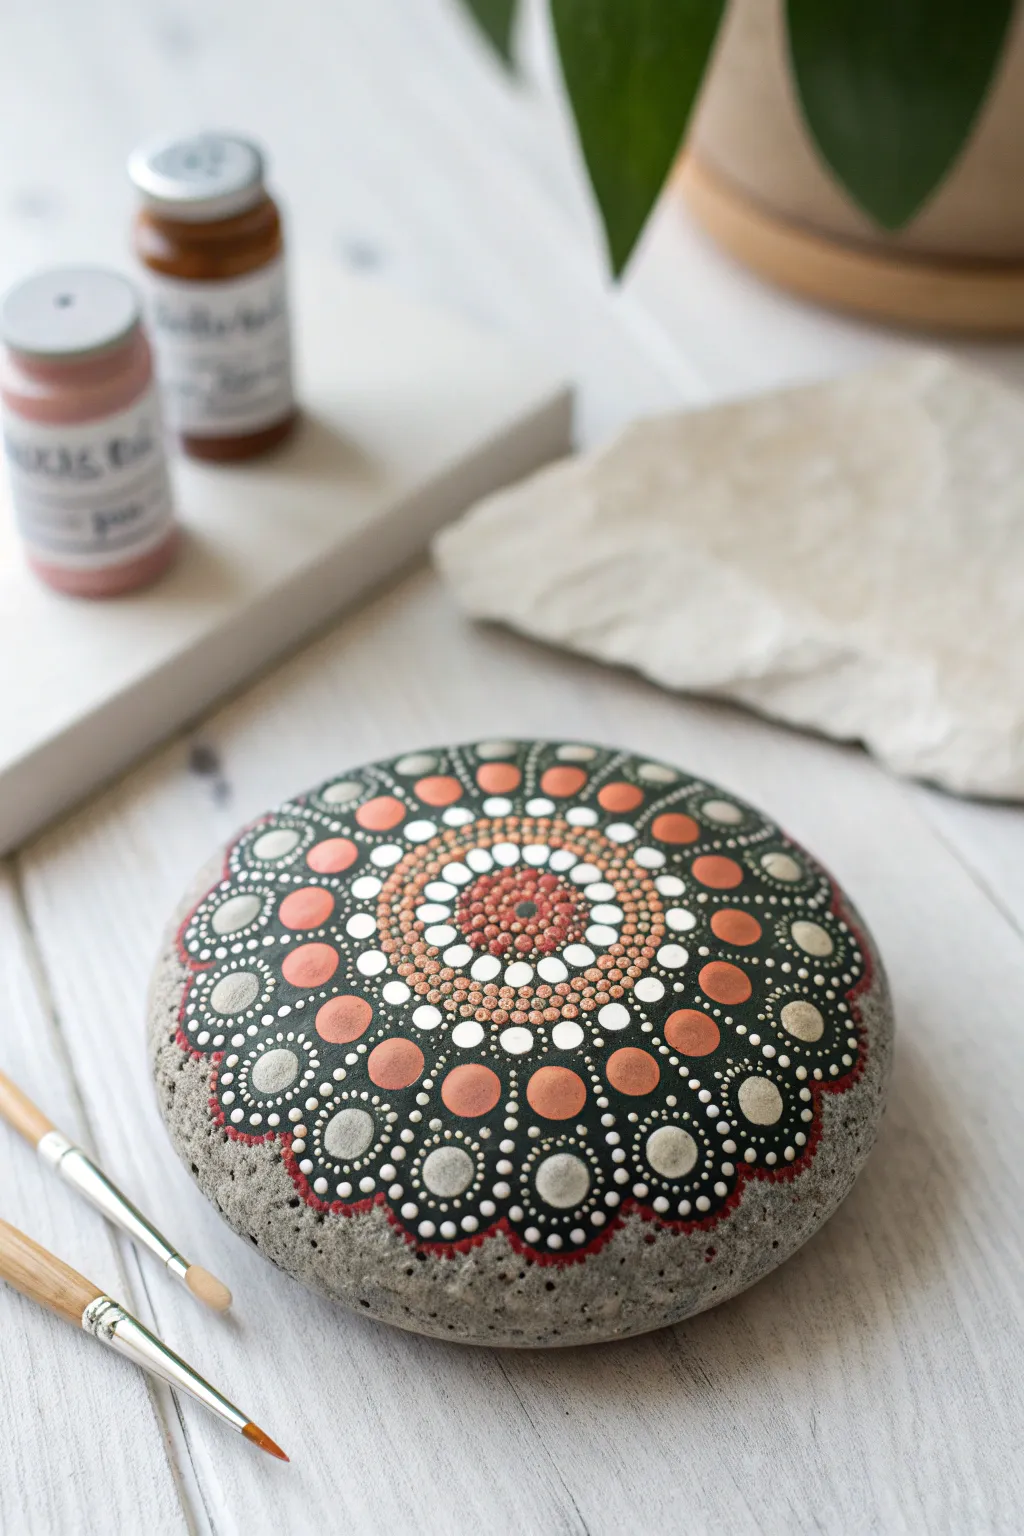
This soothing mandala design uses a warm palette of tans, whites, and burnt oranges to create a textured, radiating pattern. Through a process of careful layering and size variation, you’ll transform a simple garden stone into a mesmerizing 3D artwork.
Step-by-Step Tutorial
Materials
- Smooth, round river stone (approx. 3-4 inches diameter)
- Acrylic paints: White, Off-white/Cream, Burnt Sienna (rusty orange), Tan/Beige, Dark Brown
- Dotting tools (various sizes)
- Small detail paintbrush
- Matte or satin varnish (optional for sealing)
- Palette or small dish for mixing
- Damp cloth for clean up
Step 1: Setting the Center
-
Clean Your Stone:
Begin by washing your stone with warm soapy water to remove any dirt or oils. Let it dry completely before you start painting to ensure the acrylic adheres well. -
Establish the Center Point:
With a medium-sized dotting tool, place a single, prominent dot of yellow-tan paint in the absolute center of the stone. This will act as the anchor for your entire symmetry. -
Create the First Ring:
Around your central dot, use a slightly smaller tool to place a ring of tightly packed white dots. They should touch each other gently, forming a solid halo. -
Second Ring of Sienna:
Switch to Burnt Sienna paint. Using a medium tool, add a second ring of dots around the white halo. Space them slightly further apart to get ready for layering later. -
Layering the Center:
Once the Burnt Sienna dots are touch-dry, use a very small tool or a toothpick to place tiny white dots on top of each orange dot, instantly adding depth. -
Adding the Beige Spacers:
Between the Burnt Sienna dots on the outer edge, place small beige dots. This fills the negative space and expands the circular grid needed for the next layer.
Walking the Dots
To frame the ovals perfectly, dip your tool once and make multiple dots without reloading. The dots will naturally shrink, creating a tapered effect.
Step 2: Building the Petal Layer
-
Drafting the Main Ovals:
This is the most defining layer. Mix a warm tan color and use your largest dotting tool or the back of a paintbrush. Place large, evenly spaced dots in a ring around your current center. -
Shaping the Ovals:
While the paint is still wet, use a fine detail brush to gently drag the paint of these large dots slightly inward towards the center, giving them an oval or egg-like shape. -
Adding Central Detail:
Let the large tan ovals dry completely. Then, place two tiny black or dark brown dots in the vertical center of each oval to mimic seed pods. -
Framing with White:
Using your smallest dotting tool, walk tiny white dots around the perimeter of each tan oval. This ‘walking the dots’ technique frames each petal beautifully. -
The Secondary Red Ring:
Around the outer edge of your framed ovals, paint a continuous chain of small Burnt Sienna dots. This creates a bold border separating the inner pattern from the outer edge. -
Inner Highlighting:
Go back to the very center of the stone. If the central yellow dot is dry, add a tiny white highlight on top to make it pop.
Step 3: Outer Border & Finishing Touches
-
Creating the Outer White Chain:
Directly outside your red ring, add a ring of slightly larger white dots. Try to align these so they sit in the grooves between the red dots. -
The Final Large Dots:
For the outermost row, use your largest tool to stamp bright white dots around the edge of the stone. I like to space these widely to give the design breathing room. -
Adding Floating Accents:
In the spaces between your final large white dots, place strictly small, delicate white dots. These ‘floating’ dots soften the transition to the bare stone. -
Drying Time:
Allow the stone to sit undisturbed for at least 24 hours. The thick layers of paint in the larger dots take longer to cure than thin brushed acrylic. -
Sealing the Artwork:
Once genuinely dry, apply a coat of matte or satin varnish. This protects the textured surface from dust and handling without creating too much distraction from the pattern.
Top Dot Magic
Add ‘top dots’ of a lighter shade to your largest outer circles once dry. This simple trick adds immediate 3D volume to the edges.
Place your finished mandala stone on a desk or in a garden nook for a permanent moment of zen
Petal Mandala Made From Dot Clusters
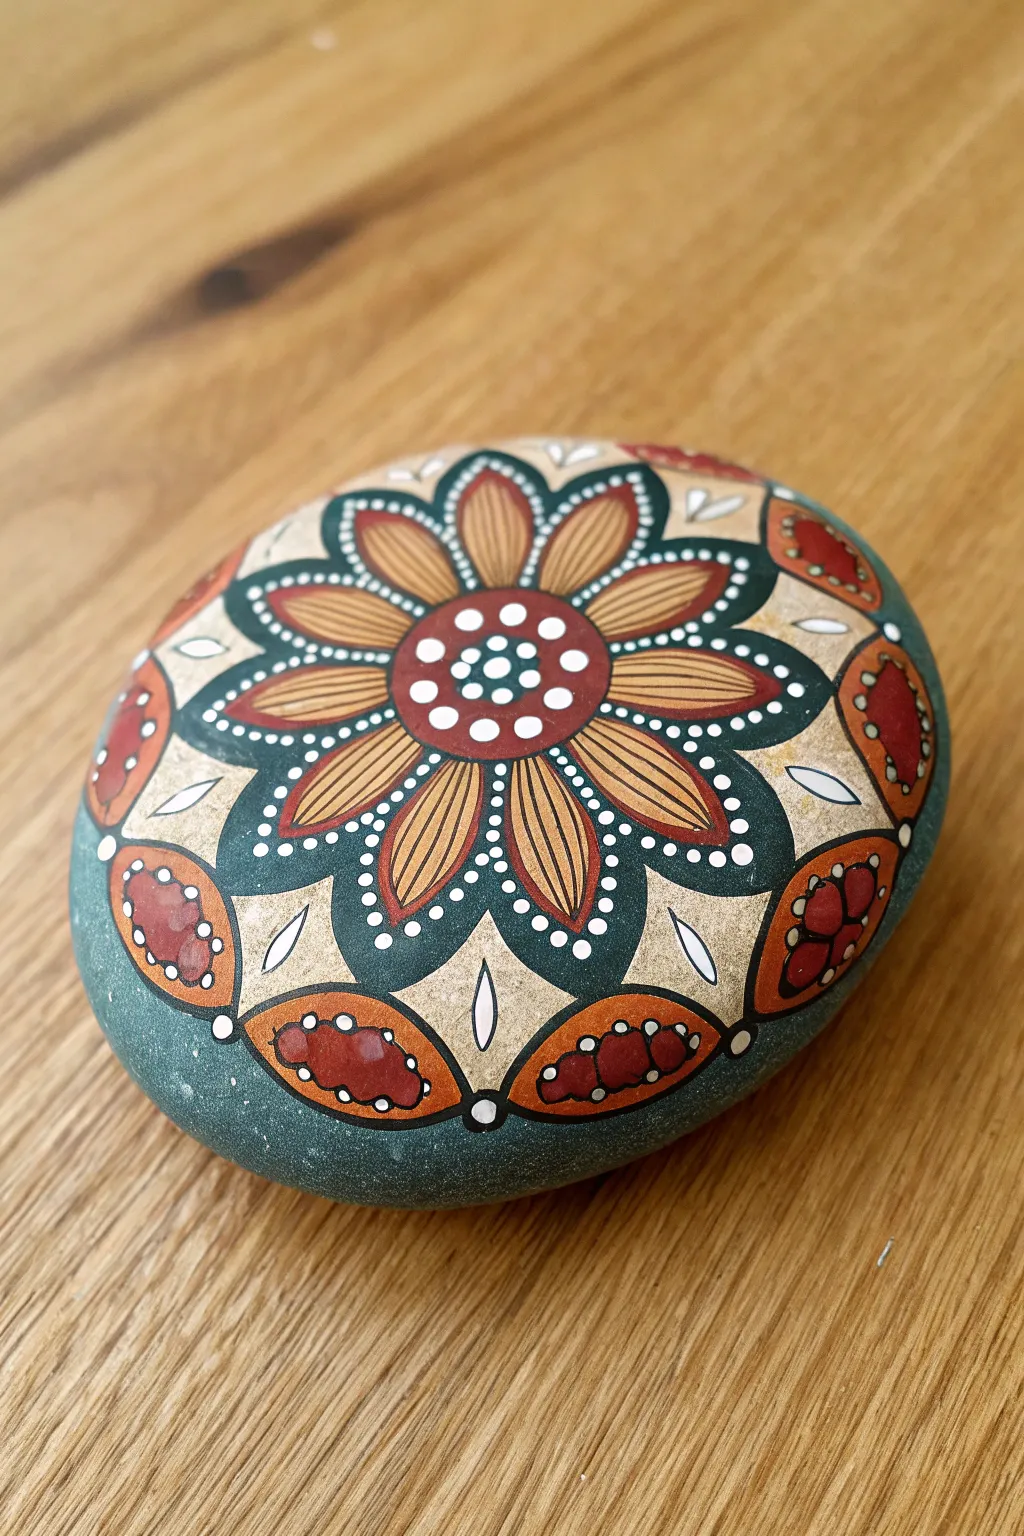
This elegant rock design moves beyond simple dots to incorporate structured linework and rich, earthy tones like burnt orange and deep teal. The pattern features a central flower motif surrounded by scalloped borders, creating a sophisticated look that feels both organic and precise.
Step-by-Step
Materials
- Smooth, round river rock (approx. 3-4 inches wide)
- Acrylic paints: Deep teal/forest green, burnt orange/terracotta, cream/off-white, deep red/maroon, and ochre yellow
- Fine liner brushes (sizes 00 and 0)
- Dotting tools (various sizes)
- White or light grey chalk pencil (optional for sketching)
- Gloss varnish or clear sealer
Step 1: Base and Center
-
Prepare the canvas:
Clean your rock thoroughly with soapy water and let it dry completely. Paint the entire surface with a base coat of the deep teal or forest green paint. You may need two coats for full opacity. -
Mark the center:
Find the approximate center of the rock. Use a medium-sized dotting tool to place a single burnt orange dot right in the middle. -
Create the central circle:
Paint a solid circle around your center dot using the deep red/maroon paint. This circle should be about the size of a large coin. -
Add the center dots:
Inside the red circle, use your smallest dotting tool and cream paint to create a ring of tiny dots around the central orange dot. Add a few extra tiny dots in the very center for texture.
Wobbly Lines?
If your fine lines are shaky, try thinning your acrylic paint slightly with a drop of water. Ink-consistency paint flows much smoother from a liner brush than thick paint from the tube.
Step 2: The Flower Motif
-
Outline the petals:
Using a fine liner brush and ochre yellow paint, draw eight long, almond-shaped petals radiating outward from the central red circle. -
Fill the petals:
Fill in these petal shapes with the ochre yellow paint. Try to keep the paint smooth and even. -
Detail the petals:
Once the yellow is dry, use a very fine liner brush with the deep red paint to draw a thin line down the center of each petal. -
Outline in white:
Carefully outline each yellow petal with a thin line of cream or off-white paint to make them pop against the dark background. -
Dotted borders:
Using a small dotting tool and cream paint, place a series of small dots outlining the shape of each petal, just outside the painted line.
Step 3: Outer Border and Accents
-
Create the outer scallops:
Between the tips of the yellow petals, paint curved, scalloped shapes using burnt orange paint. These should look like wider, shorter petals hugging the edge of the stone. -
Fill the scallops:
Fill these scalloped shapes with the burnt orange paint. Ensure the edges are crisp. -
Add the red centers:
Inside each orange scallop, paint three small, connected blobs using the deep red paint to mimic berries or smaller petals. -
Outline the border:
Outline the orange scallops with a fine black or dark brown line to define them, then add a final outline in cream paint. -
Add teardrop accents:
In the negative space between the main petals and the outer scallops, paint small, white teardrop shapes pointing outward. -
Final dot details:
Use your smallest dotting tool to add tiny white accent dots along the red shapes inside the orange scallops for extra sparkle. -
Seal the artwork:
Allow the paint to cure fully, preferably overnight. Apply a coat of gloss varnish to protect the design and give the stone a polished, ceramic-like finish.
Level Up: Metallic Pop
Swap the ochre yellow for a metallic gold paint. When the light hits the finished stone, the central flower petals will shimmer, adding a luxurious feel to the earthy palette.
Place this sophisticated stone on a desk or shelf to add a touch of handcrafted elegance to your space


Half-Mandala Along the Rock Edge
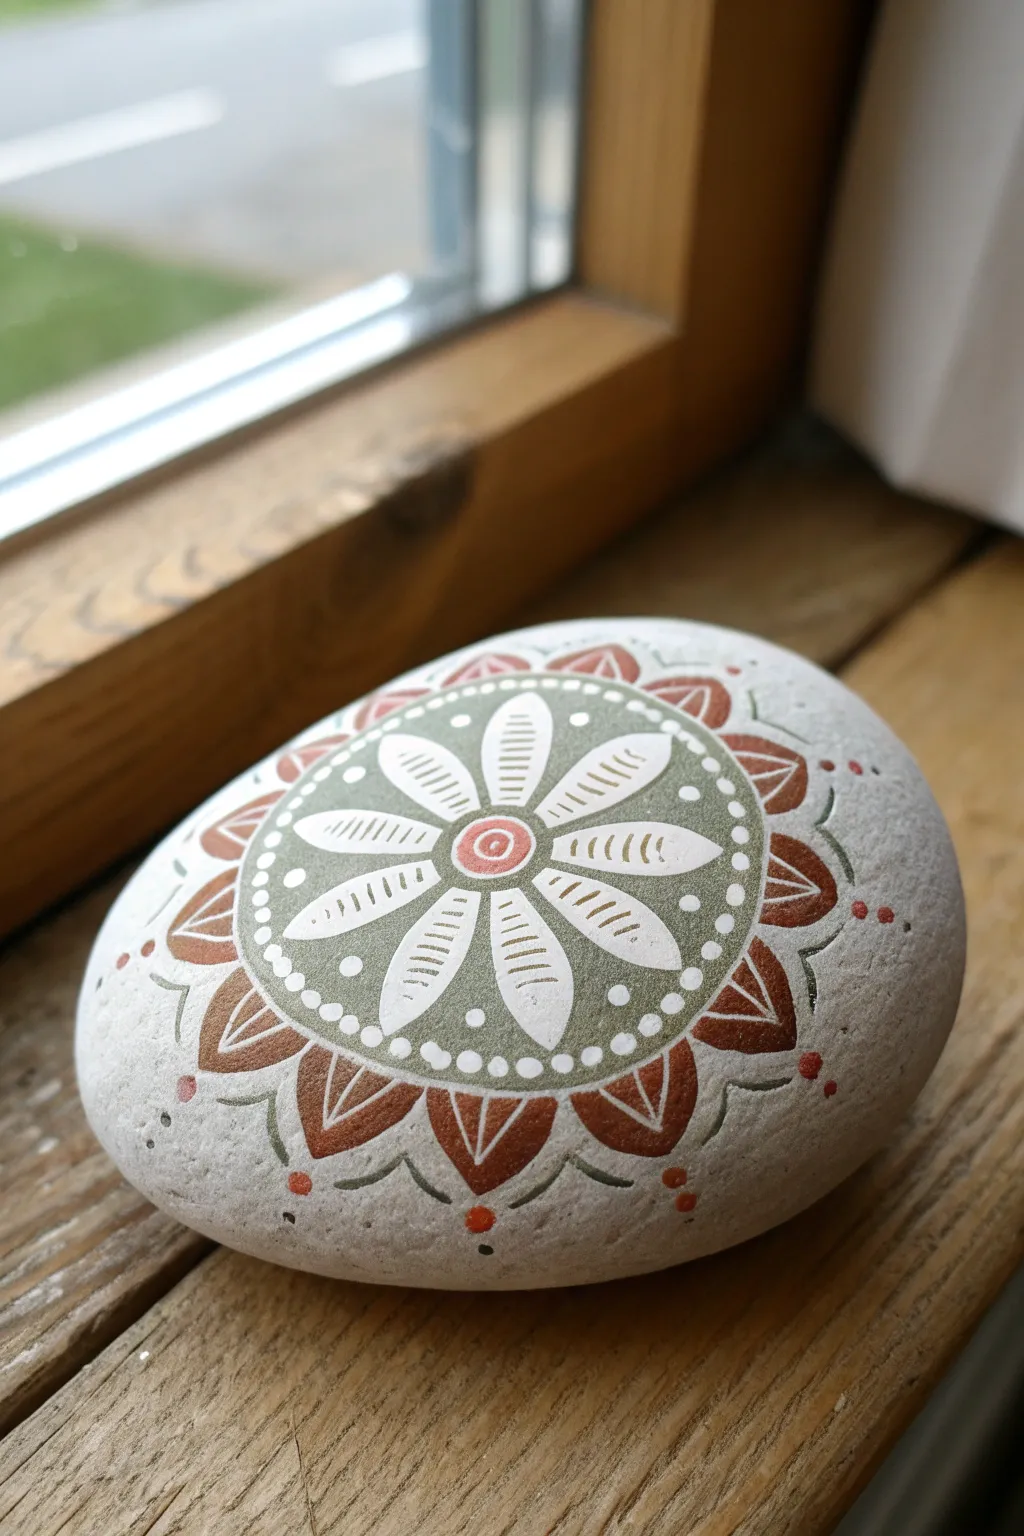
This project features a calming, nature-inspired palette of sage green and terracotta rust on a smooth river stone. The design creates a beautiful flower medallion that looks intricate but is built simply layer by layer using basic shapes.
How-To Guide
Materials
- Smooth, oval river rock (cleaned and dried)
- Acrylic paints (White, Sage Green, Terracotta/Rust, Dark Green)
- Fine detail paintbrushes (sizes 0 and 00)
- Pencil for sketching
- Compass or circular stencils (optional)
- Clear acrylic sealer (spray or brush-on)
- Dotting tool or toothpick
Step 1: Base and Center
-
Prep the surface:
Ensure your rock is completely clean and dry. If the surface is rough, give it a light sanding, but a naturally smooth stone works best for these fine lines. -
Sketch the main circle:
Using a pencil, lightly draw a medium-sized circle in the center of the rock’s face. This will define the sage green background area. -
Paint the background:
Fill in your sketched circle with sage green acrylic paint. You will likely need two coats to get a solid, opaque finish. Let this dry completely before moving on. -
Create the center dot:
Once the green is dry, paint a small terracotta circle right in the center. Inside that, add a tiny white ring and a central white dot.
Step 2: The White Petals
-
Outline the petals:
Using your finest brush and white paint, carefully outline eight long, teardrop-shaped petals radiating from the center dot. They should extend almost to the edge of the green circle. -
Fill the petals:
Fill in these petal shapes with solid white paint. Just like the background, I usually apply a second coat here to make the white really pop against the green. -
Add petal details:
Once the white paint is dry, use a very fine brush with the sage green (or a slightly darker green) to paint small horizontal dash lines across each petal, resembling leaf veins. -
Add dots between petals:
In the green spaces between the petal tips, add small white dots. Additionally, paint a ring of tiny white dots around the very outer edge of the green circle to frame it.
Steady Hands
Rest your pinky finger on the rock surface as you paint. This acts as an anchor, stabilizing your hand for those ultra-fine lines on the petals.
Step 3: The Outer Border
-
Draft the outer leaves:
Lightly sketch a ring of pointed leaf shapes or triangles surrounding the main green circle. These should point outward toward the rock’s edge. -
Paint the leaves:
Fill these triangular shapes with the terracotta/rust paint. Ensure the points are sharp and crisp. -
Detail the leaves:
Using white paint and a fine brush, draw a ‘V’ shape inside each rust leaf and a central line down the middle to mimic veins. -
Connect the design:
Use a dark green or grey paint to draw thin, curved lines connecting the rust leaves, creating a scalloped border effect. -
Add final flourishes:
Place a medium-sized rust dot at the tip of each scalloped point (between the main leaves). Then, add tiny graduated dots trailing off the design if you have extra space. -
Seal the artwork:
Allow the stone to dry for at least 24 hours. Apply a clear acrylic sealer to protect the paint from chipping and to give it a nice, finished sheen.
Metallic Touch
Swap the white vein details inside the terracotta leaves for metallic gold or copper paint to add a subtle shimmering elegance to the border.
Place your finished mandala stone on a windowsill or desk to bring a touch of earthy calm to your space
Spiral Mandala That Still Feels Easy
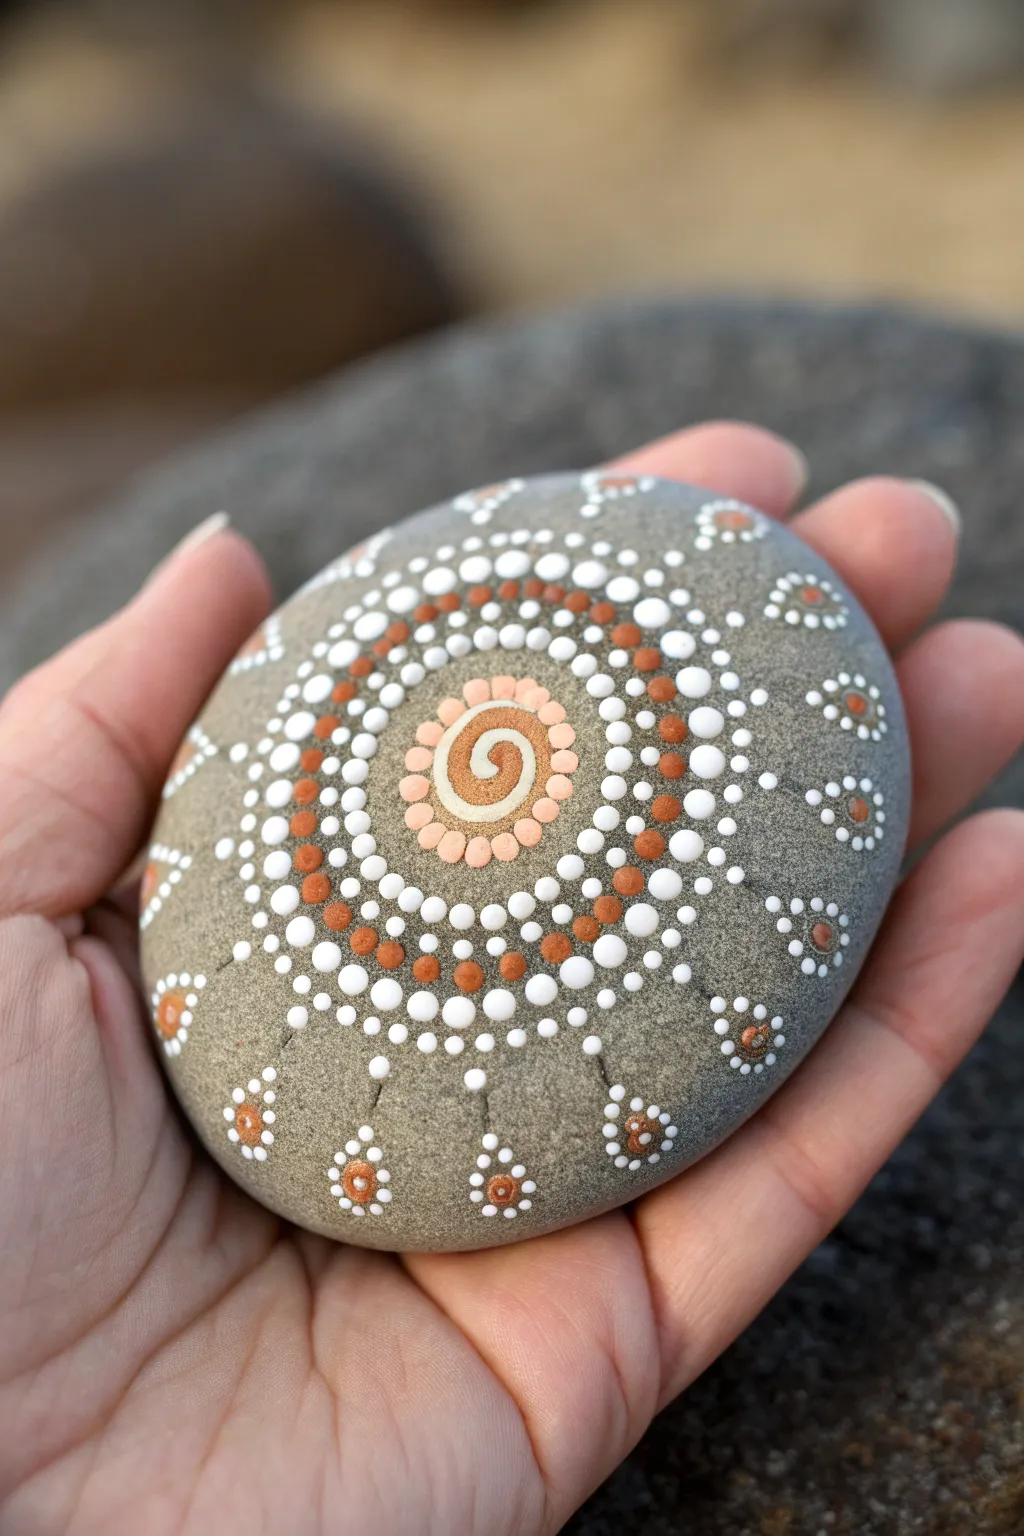
This soothing mandala design radiates outward from a central spiral, blending warm earthy tones of copper, rust, and peach with crisp white highlights. The natural grey stone background lets the warm colors pop, creating a grounded yet delicate piece of art.
Step-by-Step Guide
Materials
- Smooth, flat river stone (grey)
- Acrylic crafting paints: White, Dark Rust/Copper, Light Peach/Flesh tone
- Set of dotting tools (various sizes)
- Fine detail paintbrush (for the spiral)
- Damp cloth or paper towel
- Matte or Gloss varnish (optional)
Step 1: Setting the Center
-
Clean the canvas:
Before starting, ensure your rock is scrubbed clean with soap and water and completely dry. This helps the acrylic paint adhere properly to the stone surface. -
Paint the central spiral:
Dip a fine detail brush or the finest tip of your dotting tool into the light peach paint. Starting from the absolute center, paint a small, tight spiral moving outwards. -
Thicken the spiral line:
Gently go over your spiral line again to make it solid and opaque. It should be about the size of a dime when finished. Let this central element dry completely before moving on. -
Add spiral petals:
Using a small-medium dotting tool and the same peach paint, place a ring of dots directly around the spiral line. These dots should touch the spiral slightly, creating a flower-like border.
Paint Consistency
If your dots leave peaks (like a Hershey’s Kiss), your paint is too thick. Mix in a single drop of water or pouring medium to get it to self-level smoothly.
Step 2: Building the Inner Rings
-
First white ring:
Switch to white paint and a slightly smaller tool. Place a dot in the ‘V’ space between each of the peach petal dots you just created. This technique is often called ‘walking the dots’ or interspersing. -
Copper accents:
Load a medium-sized tool with the dark rust or copper paint. Place a ring of dots directly above the white ring. Try to keep the spacing consistent, aligning them with the white dots below. -
Expand with white:
Using a slightly larger tool than before, add another row of white dots outside the copper ring. These should be larger and bolder to start expanding the pattern outward. -
The gradient ring:
For the next row, alternate colors. Place a large rust/copper dot, leave a space, then place another. In the gaps between them, place a slightly smaller white dot. This creates visual interest and breaks up the concentric circles. -
Creating the main border:
Using your largest dotting tool involved so far, create a prominent ring of white dots. These serve as the boundary for the main central medallion.
Step 3: Outer Details and Flourishes
-
Filling the gaps:
Inside that large white border ring, use a tiny tool to add very small ‘filler’ dots in white. Place them in any large triangular gaps between the previous rust/white row and the new large white border. -
Top dots:
To give the design dimension, I like to add ‘top dots.’ once the base layer is dry. Place a tiny dot of light peach on top of the large copper dots in the main ring. -
Spacing the outer rays:
Move about half an inch away from the main mandala. Place single, medium-sized rust/copper dots spaced evenly around the stone’s perimeter. -
Framing the rays:
Using a small tool and white paint, place a ring of tiny dots around each isolated copper dot. Start at the top and work your way down the sides to create a teardrop or paisley shape. -
Connecting the design:
If there is too much empty space between the main mandala and the outer rays, add a single tiny white dot floating between them to bridge the gap. -
Final drying:
Acrylics on stone dry fairly quickly, but leave the rock undisturbed for at least an hour to ensure the thickest dots are solid all the way through. -
Seal the stone:
Once fully cured (wait 24 hours to be safe), brush on a layer of varnish to protect your beautiful work from chipping and to deepen the stone’s natural color.
Make It Glow
Use metallic copper or gold paint instead of flat rust color. When the finished stone catches the sunlight, the metallic rings will shimmer beautifully.
Place this stone on your desk or in your garden for a daily reminder of balance and creativity
Off-Center Mandala for Irregular Rocks
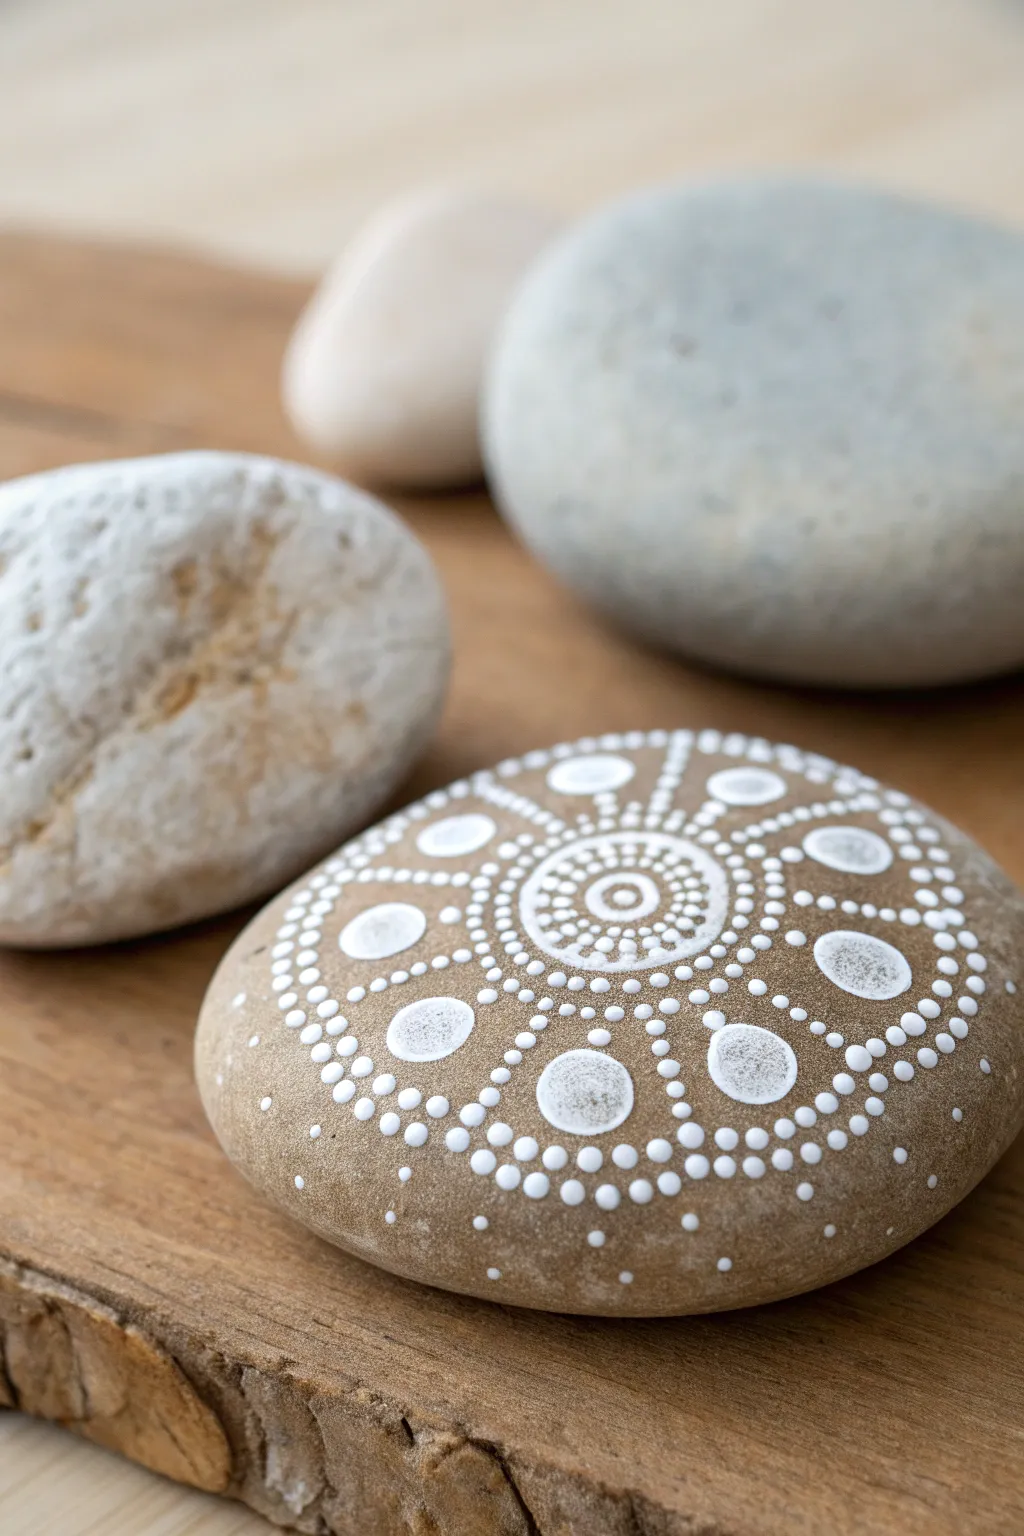
Embrace the natural soothing tones of stone with this monochromatic masterpiece. Using only white detailed dotwork on a smooth beige rock, you’ll create an intricate radial design that feels both organic and elegant.
Step-by-Step
Materials
- Smooth, flat river rock (beige or tan colored)
- White acrylic paint (high flow or fluid acrylics work best)
- Set of dotting tools (various sizes)
- Damp cloth or paper towel
- Cotton swabs (for cleanup)
- Clear acrylic sealer (spray or brush-on)
- Palette or small plate
Step 1: Establishing the Center
-
Clean the surface:
Begin by washing your stone with mild soap and water to remove any dirt or oils. Let it dry completely before starting, as moisture can affect paint adhesion. -
The central anchor:
Load a medium-sized dotting tool with white paint. Place a single, crisp dot in the center of your stone. This will serve as the anchor for your entire radial design. -
First ring:
Using a much smaller tool, create a tight ring of tiny dots immediately surrounding your central anchor dot. Try to keep the spacing even. -
Second ring:
Size up slightly to a small-medium tool. Place a second ring of dots around the first, maintaining a circular shape. -
Third ring separation:
For the third ring, select a medium tool again. Place these dots slightly further out to create a bit of negative space between this ring and the previous one.
Paint Consistency
If your dots leave peaks (like a Hershey’s Kiss), your paint is too thick. Mix in a drop of pouring medium to help it self-level.
Step 2: Building the Radial Spokes
-
Marking the major points:
Imagine a clock face. Using a large dotting tool, place a large guide dot at 12, 3, 6, and 9 o’clock positions, several millimeters away from your central cluster. Then, place one large dot evenly between each of those, giving you eight distinct points. -
Connecting rays:
Using your smallest tool, create straight lines of tiny dots connecting the central cluster outward to each of those eight large dots. This forms the ‘spokes’ of your wheel. -
Highlighting the large dots:
Allow the eight large dots to dry slightly. Once tacky, use a smaller tool to place a fresh dot of white paint directly on top of each one, but don’t cover the edges. This creates a dimensional, tiered effect. -
Creating the arches:
Between each ‘spoke’ line, create a gentle arch of medium-sized dots that connects two adjacent spokes. I find it easiest to start the arch in the middle and work my way to the sides.
Step 3: Filling the Outer Pattern
-
Large outer circles:
In the spaces created by your new arches, place a very large dot of white paint. You might need to swirl the tool slightly to get a nice, round pool of paint. -
Framing the outer circles:
Take a small tool and dot a frame around the top half of these new large circles. Follow the curve of the large dot carefully. -
Adding intermediate details:
Look for triangular gaps between your spokes and arches. Fill these voids with a single medium dot or a trio of tiny dots to make the design feel dense and rich. -
Extending the perimeter:
Continue the pattern outward by adding another row of dots that follows the contour of your outer frames. Use a walking-the-dots technique where the dots get progressively smaller as they trail off. -
Balancing the design:
Step back and look at the stone. If there are awkward gaps near the edge of the stone, add small clusters of three tiny dots to soften the transition to the bare rock. -
Drying time:
Let the stone sit undisturbed for at least 24 hours. Because some of the dots are thick and pooled, they need time to dry all the way through. -
Sealing:
Once fully cured, apply a coat of clear acrylic sealer to protect your work from scratches and UV fading.
Try Top-Dots
Add depth by placing smaller dots of a lighter shade (or metallic gold) on top of the largest white dots once they are completely dry.
Now you have a serene, tactile piece of art that invites calm just by looking at it
Mandala Ladybug Rock
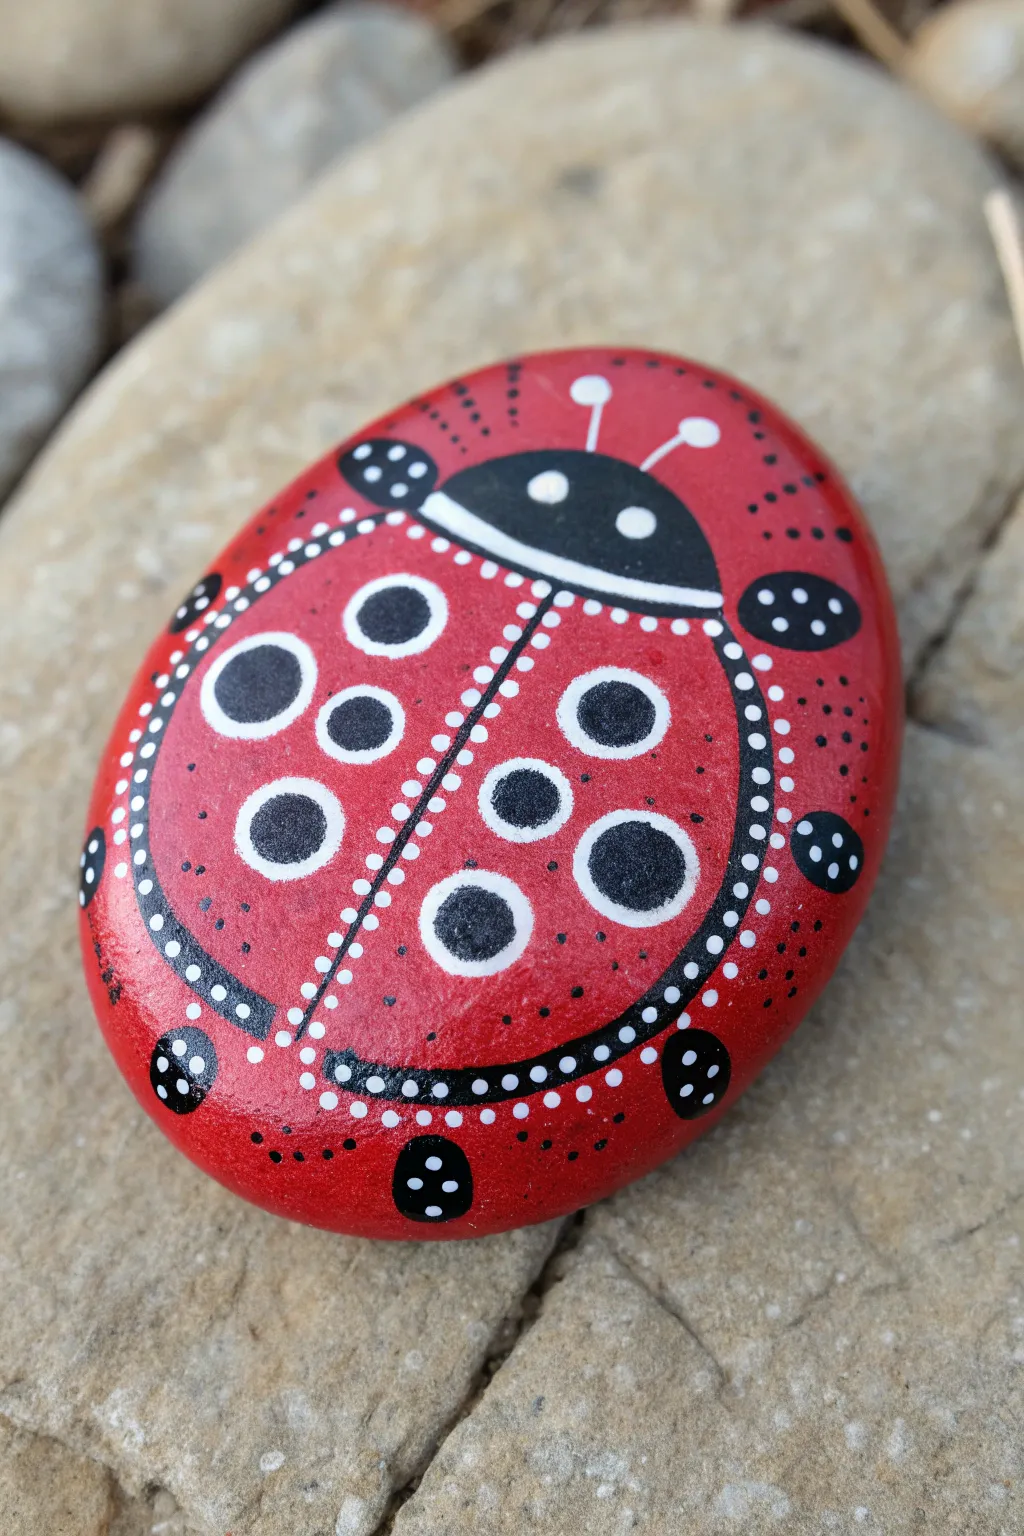
Transform a simple river stone into a cheerful garden friend with this stylized ladybug design. By combining bold block colors with delicate dotting techniques, you’ll create a whimsical piece that bridges the gap between traditional rock painting and dot mandalas.
Step-by-Step Tutorial
Materials
- Smooth, oval river rock
- Red acrylic paint (bright scarlet)
- Black acrylic paint
- White acrylic paint
- Fine detail paintbrush (size 0 or 00)
- Medium flat paintbrush
- Dotting tools (various sizes) or improvised tools like toothpicks and brush ends
- Acrylic spray sealer (gloss finish)
Step 1: Base Coating
-
Clean the surface:
Begin by washing your rock with soap and water to remove any dirt or oils, then let it dry completely. -
Apply the red base:
Using your medium flat brush, paint the entire top surface of the rock with bright red acrylic paint. You may need two or three coats to get a solid, opaque coverage, letting each layer dry in between. -
Outline the head:
Visualize the top third of your rock as the ladybug’s head. Use a pencil to lightly sketch a curved line separating the head area from the body. -
Paint the head:
Fill in the head section with black acrylic paint, carefully following the curve you sketched.
Dotting Consistency
Reload your dotting tool with paint after every singe dot. This ensures every dot in your line is exactly the same size and shape.
Step 2: Main Markings
-
Create the centerline:
Draw a straight line down the center of the red body, starting from the black head and stopping about a half-inch from the bottom edge of the rock. -
Curve the wings:
From the bottom of that center line, paint a curved line outward on both sides to define the bottom edge of the wings, leaving a small red gap at the very bottom. -
Add the wing spots:
Paint six large black circles on the red wings—three on each side—trying to keep them roughly symmetrical. -
Paint the legs:
Using a smaller brush, add six small black semi-circles along the outer perimeter of the rock to represent the legs (three on each side). -
Add the lower spots:
Paint two additional black semi-circles near the bottom edge of the rock, below the wing line. -
Outline the body:
Use a fine liner brush and black paint to carefully outline the entire perimeter of the wings, refining the shape.
Step 3: Dotting Details
-
Isolate the spots:
Dip a medium-sized dotting tool or the end of a paintbrush handle into white paint. Place a ring of white dots around every large black circle on the wings. -
Line the center:
Using a smaller dotting tool, apply a row of white dots down both sides of the black centerline separating the wings. -
Outline the perimeter:
Continue with the small white dots along the curved black line that defines the bottom and outer edges of the wings. -
Detail the head:
Add two distinct white dots to the black head area for eyes. I find using a slightly larger tool for the outer eye and a pin for the pupil works best. -
Head stripe:
Paint a thin white curved line separating the black head from the red body, acting as a ‘neck’ collar. -
Spot the legs:
Using your smallest dotting tool or a toothpick, add three tiny white dots inside each of the black leg and bottom semi-circles. -
Add antennae:
paint two thin white lines extending from the top of the head for antennae, topping each with a small white dot. -
Final tiny dots:
Fill in the negative red space around the large spots with very tiny black dots to add texture and depth. -
Seal the rock:
Once all paint is thoroughly dry (give it at least 24 hours), spray the rock with a clear gloss sealer to protect it and make the colors pop.
Oops, a smudge!
If you smear a dot or make a mistake, let it dry completely rather than wiping it wet. Once dry, paint over the error with the base color and try again.
Place your finished ladybug in a potted plant or on a porch step to bring a smile to anyone who visits
Mandala Beetle Rock Variation
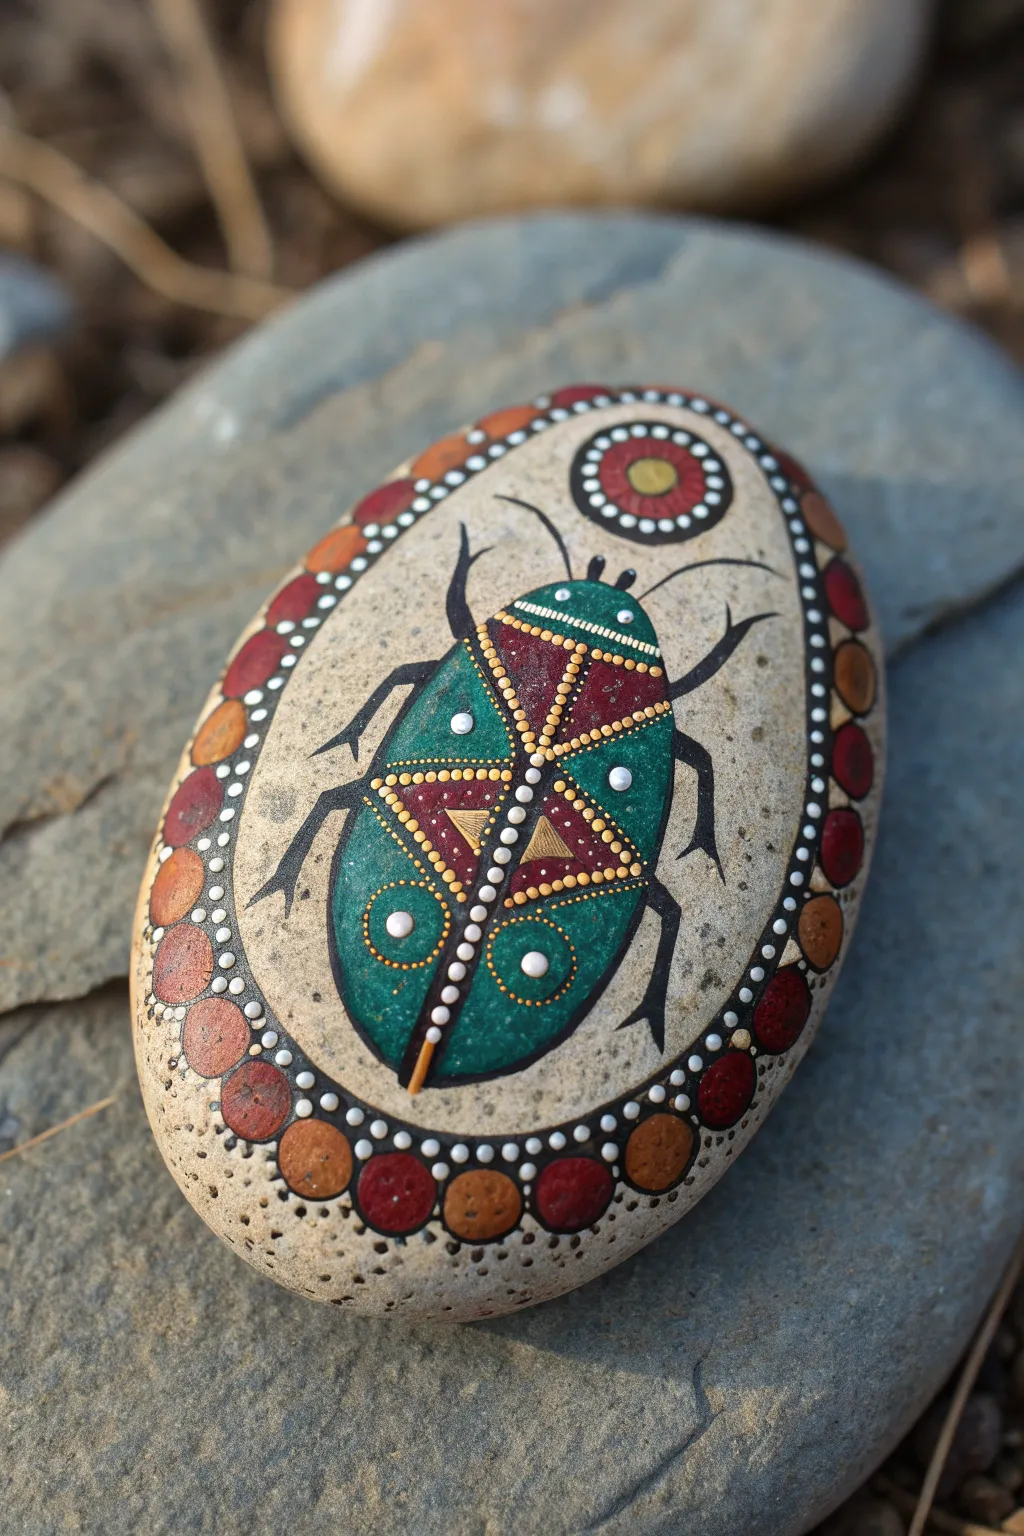
This project transforms a simple smooth river rock into artwork featuring a stylized, geometric beetle. The design combines crisp line work with mandala-inspired dotting to create a vibrant, textured finish that almost looks like jewelry.
Step-by-Step Guide
Materials
- Smooth, oval river rock (approx. 4-5 inches)
- Acrylic paints (Teal/Emerald Green, Dark Red/Burgundy, Metallic Gold, Black, White, Cream/Off-White, Orange)
- Fine detail brushes (sizes 0 and 00)
- Dotting tools or stylus set (various sizes)
- Pencil and eraser
- Matte or satin spray sealer
- Palette or small tray for mixing
- Damp cloth for clean up
Step 1: Preparation and Base Sketch
-
Clean the canvas:
Begin by scrubbing your rock with soap and water to remove any dirt or oils. Let it dry completely in the sun or with a hair dryer to ensure the paint adheres properly. -
Sketch the outline:
Lightly sketch the beetle’s shape using a pencil. Draw a large almond shape for the body down the center, a smaller rounded section for the head at the top, and indicate the wing division line down the middle. Don’t worry about the legs yet. -
Mark the border:
Sketch a light guideline around the perimeter of the stone where your decorative dot border will go. This helps keep your spacing even later on.
Step 2: Painting the Beetle Body
-
Block in base colors:
Paint the main body sections with your teal or emerald green acrylic. Use a burgundy red for the triangular shapes near the top of the wings. Apply two thin coats for opaque coverage, letting the first layer dry before adding the second. -
Add triangular details:
Inside the burgundy triangles, paint smaller inset triangles using metallic gold. This adds a nice shimmer that contrasts with the matte stone. -
Outline the anatomy:
Using your thinnest liner brush and slightly watered-down black paint, carefully outline the entire beetle body. Paint a thick black line down the center to separate the wings, and define the division between the head and thorax. -
Paint the legs and antennae:
Extend the black paint to create the legs. Paint the front legs reaching forward, and the middle and back legs angling downward. Add two curved feelers (antennae) extending from the head. -
Create the head motif:
Above the beetle’s head, paint a small circular design. Start with a red circle, outline it in black, and add a gold center dot.
Uneven Dots?
If your paint consistency is too thick, dots will have peaks. Mix in a single drop of water or pouring medium to the paint puddle so the dots settle into perfect flat domes.
Step 3: Mandala Dotting Details
-
Primary body dots:
Using a small dotting tool or toothpick, apply a row of tiny gold dots along the inner edges of the wing sections and outlining the red triangles. Space them closely for a beaded look. -
The spine:
Along the thick black center line, place a graduated row of white dots. Start with larger dots near the head and make them progressively smaller as you go down toward the tail. -
Large accent dots:
Dip a medium-sized dotting tool into white or light cream paint. Place a few prominent dots symmetrically on the green wing sections to create distinct focal points. -
Tiny filler dots:
Switch to your smallest tool or a needle tip. Add tiny orange or gold micro-dots scattered around the green wings to add texture and intricate detail.
Make it Sparkle
Replace the standard gold paint with 3D metallic dimensional fabric paint for the dots. This adds actual physical texture that catches the light beautifully.
Step 4: The Decorative Border
-
Main border circles:
Along your outer pencil guideline, paint a chain of solid circles, alternating between orange, red, and burgundy. I find it helpful to paint the ‘North, South, East, West’ points first to ensure the pattern fits evenly. -
Border outline:
Once the colored circles are dry, outline the entire chain with your thin black liner brush, connecting them into a single undulating band. -
Inner border dots:
Using white paint and a small dotting tool, place a dot in the ‘valley’ between each large border circle on the inner side of the band. -
Outer border texture:
Dip a toothbrush or stiff brush into thin black paint and flick it very gently near the bottom edge of the stone for a speckled, earthy effect, or use a tool to create tiny black stippling dots near the border. -
Final sealing:
Allow the stone to dry for at least 24 hours. Finish by spraying a clear matte varnish over the rock to protect the acrylics from scratching or fading.
Place this little gem in a potted plant or on your desk as a colorful paperweight
Negative Space Mandala on a Natural Stone
Embrace the natural beauty of stone with this warm, negative-space inspired design. By combining rusty copper tones with crisp white dots on an unpainted background, you create a harmonious piece that feels organic and grounded.
How-To Guide
Materials
- Smooth, round river stone (light beige or tan color)
- Acrylic paint: Rust/Copper (matte or metallic)
- Acrylic paint: Titanium White
- Set of dotting tools (various sizes)
- Fine detail paintbrush (size 0 or 00)
- Damp cloth or paper towel
- Cotton swabs (for cleanup)
- Palette or small plate
- Matte spray varnish (optional)
Step 1: Preparation and Center
-
Clean the canvas:
Begin by washing your stone with soapy water to remove any dirt or oils. Let it dry completely. Unlike many mandala rocks, we won’t be applying a base coat; the natural stone color is an integral part of this design. -
Find the center:
Visually locate the center of your stone. Using your white paint and a medium-sized dotting tool, place a single crisp dot right in the middle. -
The first ring:
Switch to a slightly smaller dotting tool. Dip it in white paint and create a tight ring of small dots around your center dot. Aim for them to touch each other gently, forming a flower-like center cluster. -
The second ring:
Using the same small tool, create a second ring of white dots around the first cluster. Space these slightly further apart so they sit in the ‘valleys’ between the dots of the previous row.
Wobbly Hand Fix
If a dot smears or isn’t round, wait for it to dry completely. Then, scrape it off gently with a wooden toothpick or craft knife to restart on the bare stone.
Step 2: Painting the Petals
-
Outline the petals:
Load your fine detail brush with the rust/copper paint. Paint twelve petal shapes radiating outward from your center dot cluster. The petals should be rounded at the top and taper slightly toward the center. -
Fill the shapes:
Carefully fill in each petal outline with the rust paint. Ensure the coat is opaque; you might need a second layer if the stone’s texture shows through too much. -
Refine the edges:
Go back over the edges of your petals with the detail brush to ensure they are smooth and symmetrical. The tips should be rounded, not pointed. -
Inner petal details:
Once the rust paint is effectively dry to the touch, take a medium dotting tool and white paint. Place a large white oval or teardrop shape inside the wide part of every rust petal. -
Texturing the white:
While the white paint inside the petals is still wet, you can use a clean, dry tool to gently dab it, giving it that slight textured or ‘crackled’ look seen in the photo, or simply let it dry smooth for a cleaner finish. -
Base dots:
At the base of each rust petal (closest to the center), place a tiny white teardrop or dot using your smallest tool. This connects the petal visually to the center cluster.
Step 3: Border and Finishing Touches
-
Dotted outlines:
Using a very small dotting tool and white paint, carefully walk the dots around the outer edge of each rust petal. This outlines the color block with delicate white pearls. -
Outer flourishes:
Between the tips of the petals, in the V-shaped space on the bare stone, paint three tiny white dots in a triangle formation or a small line radiating outward to fill the negative space. -
Scattered atmosphere:
I like to soften the hard edge of the mandala by adding random sized white dots drifting away from the main design. Place larger dots near the petals and gradually smaller ones further out. -
Drying time:
Allow your rock to dry undisturbed for at least 24 hours. The thick dots take longer to cure than the flat paint. -
Seal (Optional):
If you plan to keep the rock outside, apply a matte spray varnish. A glossy finish might distract from the natural stone texture, so matte is best.
Add Some Glimmer
Mix a tiny amount of gold metallic powder into your rust paint or use a metallic copper paint to make the petals catch the light beautifully.
Now you have a serene, nature-inspired piece that celebrates the simplicity of stone and the intricacy of mandalas
Galaxy Background Mandala Rock
This striking mandala design combines the allure of deep galaxy colors with the tranquility of a blooming flower. The contrast between the dark, stippled background and the shimmering teal petals creates a mesmerizing, jewel-like effect perfect for any garden or desk display.
Detailed Instructions
Materials
- Smooth, oval river rock (palm-sized)
- Black acrylic paint (matte or satin)
- Acrylic paints: Teal/Turquoise, Metallic Silver, Deep Purple, Lavender, Light Pink, Magenta
- Dotting tool set (various sizes)
- Fine liner brush (size 00 or 000)
- White or light grey chalk pencil for sketching
- Clear spray sealant (glossy finish)
Step 1: Base and Sketching
-
Prepare the Canvas:
Start with a clean, dry rock. Apply two even coats of black acrylic paint to the entire top surface, allowing the first coat to dry completely before adding the second for solid, opaque coverage. -
Sketch the Grid:
Once the black base is bone dry, lightly use a chalk pencil to find the center of your rock. Draw a small cross to mark the center, then lightly sketch 8 evenly spaced radiating lines outward like a compass. -
Outline Petal Shapes:
Using your chalk guidelines, lightly sketch eight large petal shapes. They should start a bit away from the center (leaving room for the inner mandala) and extend outwards.
Uneven Dots?
If your dots have peaks or ‘Hershey’s Kiss’ tips, paint consistency is too thick. Mix in a singular drop of water or pouring medium to smooth it out.
Step 2: Painting the Flower
-
Fill the Petals:
Load a small flat brush with teal or turquoise paint. Carefully fill in the eight sketched petals. You may need two coats to make the color pop against the black background. -
Add Glitter Effect:
Before the teal paint is fully cured, or by mixing on your palette, add a tiny touch of fine silver glitter medium or metallic paint to the petals for that subtle shimmer seen in the photo. -
Define Petal Edges:
Using a very fine liner brush and black paint, carefully outline each teal petal to clean up the edges and separate them distinctly from the background. -
Silver Accents:
With your finest brush and metallic silver paint, draw a thin almond shape inside each teal petal. This ‘skeleton’ detail adds elegance and dimension.
Add Depth
Apply a second, smaller dot of a lighter color on top of your larger dried dots (like white on pink) to create a ‘top dot’ 3D effect that pops.
Step 3: The Central Mandala
-
The Center Dot:
Place a large dot of white or very light blue in the absolute center of the rock using a large dotting tool. -
First Ring:
Using a smaller tool, place a ring of small turquoise dots immediately around the center white dot. -
Magenta Gradient:
Create the next ring using magenta or deep pink dots. As I work outward, I like to slightly increase the size of the dotting tool for each subsequent ring to build volume. -
Soft Pink Ring:
Add a ring of soft light pink dots around the magenta ring. Keep the spacing tight and consistent. -
Purple Highlights:
Between the base of the teal petals (in the negative space), paint teardrop shapes using deep purple. Point the narrow end toward the center. -
Petal Base Dots:
At the very base of each teal petal, place a single, medium-sized light pink dot to connect the flower to the center mandala.
Step 4: Galaxy Background Details
-
Spaced Outer Dots:
Dip a medium tool in magenta. Place one dot in the black space between the tips of the teal petals. -
Surrounding Flower Dots:
Using a smaller tool and lavender paint, dot a semi-circle ‘crown’ around the magenta dots you just placed. -
Tiny White Stars:
Load a small tool or toothpick with white paint. Add tiny dots randomly around the outer edges of the black background to create a stippled, starry night effect. -
Gradient Trail:
Create a trail of dots following the curve of the rock’s edge using shades of purple, blue, and teal, getting smaller as they fade out. -
Final Cleanup:
Once all paint is perfectly dry, gently wipe away any visible chalk guidelines with a damp cotton swab. -
Seal the Artwork:
Finish by spraying the rock with a clear gloss sealant. This protects the paint from chipping and gives it that polished, wet-stone look.
Place this cosmic creation in a sunny spot and watch the metallic accents sparkle throughout the day


Have a question or want to share your own experience? I'd love to hear from you in the comments below!