I love how Cinco de Mayo gives us permission to go all-in on color, pattern, and that sparkly fiesta energy. Here are my favorite Cinco de Mayo painting ideas—starting with the classics everyone craves and ending with a few playful twists you can totally make your own.
Papel Picado Banner Border
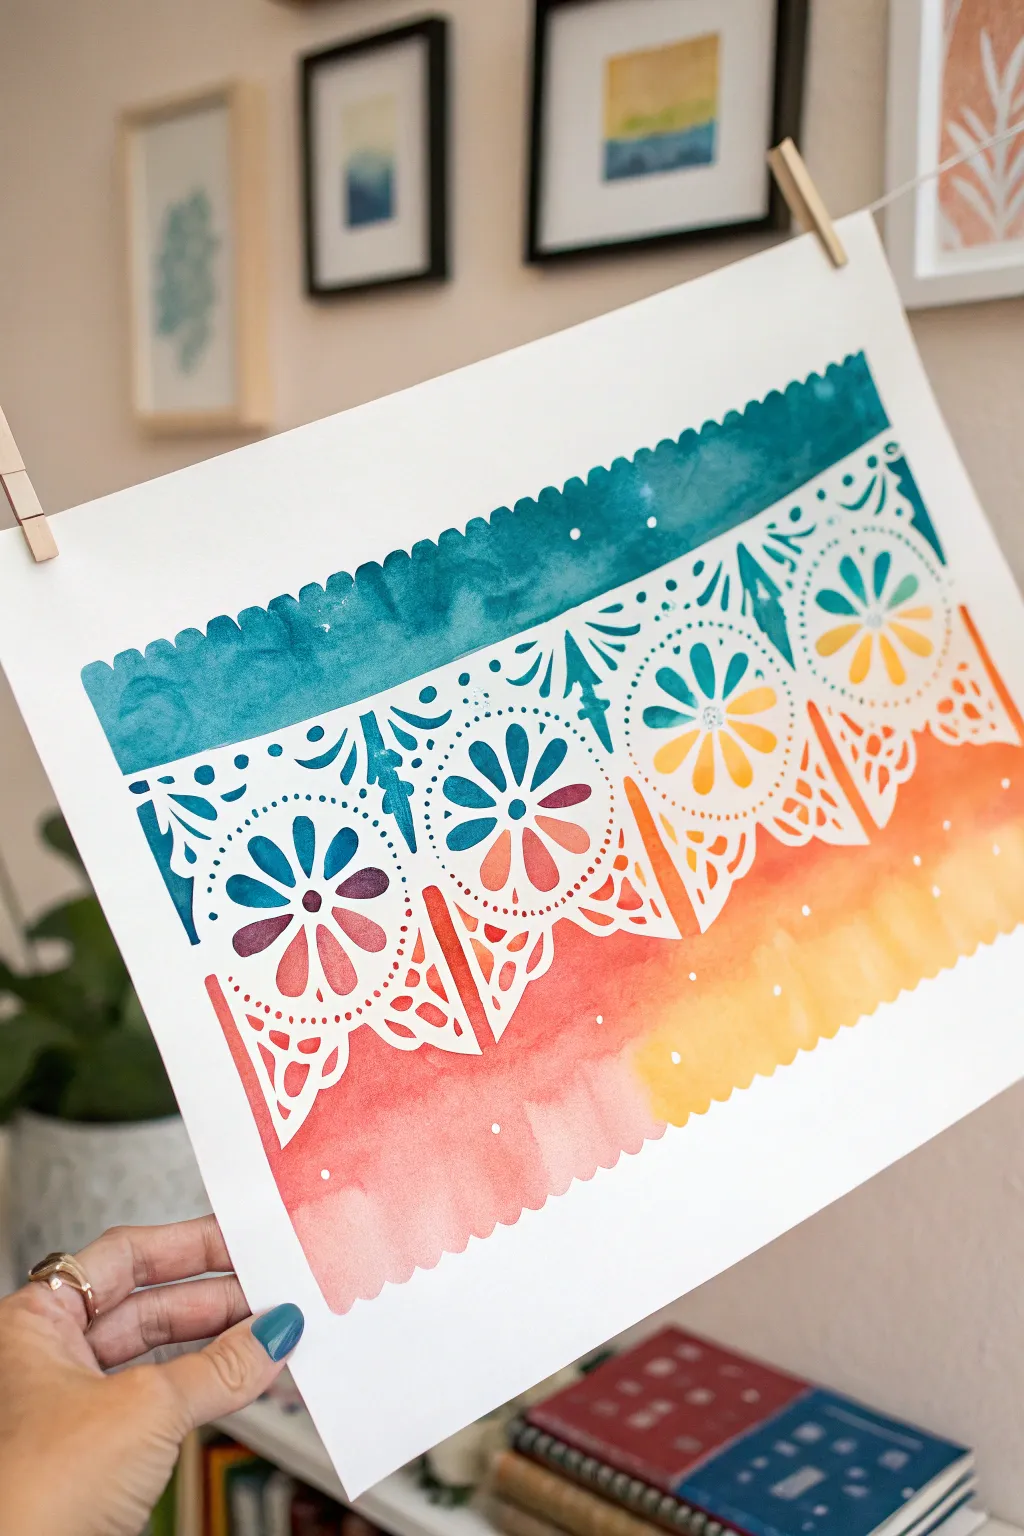
Capture the vibrant spirit of Cinco de Mayo with this festive watercolor project that mimics the intricate look of traditional cut paper banners. Using masking fluid as your secret weapon, you will create crisp, delicate white patterns against a glowing, sunset-colored wash.
How-To Guide
Materials
- Cold press watercolor paper (140 lb)
- Masking fluid (drawing gum)
- Fine liner brush or dip pen (for masking)
- Watercolor paints (Turquoise, Magenta, Orange, Yellow)
- Large round watercolor brush (size 10 or 12)
- Clean water jar
- Paper towels
- Rubber cement pick-up eraser (or clean finger)
Step 1: Planning and Masking
-
Sketch the layout:
Begin by lightly sketching two horizontal bands across your paper with a pencil. The top band (about 2-3 inches wide) will be the turquoise section, and the larger bottom section will be the warm gradient. Draw scalloped edges along the top and bottom of your design area. -
Outline the panels:
Divide the main center section into vertical rectangular panels that slant slightly, resembling flags hanging on a string. Inside each panel, sketch a large central flower or starburst motif. -
Add decorative details:
Fill the space around the flowers with classic papel picado shapes: little triangles, teardrops, and dots. Keep these shapes varying in size to mimic the cut-out look. -
Prepare the masking fluid:
Shake your masking fluid bottle gently. Dip your fine liner brush into a bit of dish soap before dipping it into the fluid; this protects the bristles and makes cleanup much easier. -
Apply masking to the design:
Carefully paint over all your pencil lines and decorative shapes with the masking fluid. This is the most crucial step—everywhere you put this fluid will remain bright white paper in the end. -
Refine the edges:
Don’t forget to mask the scalloped edges at the very top and bottom of the banner. I like to add tiny masked dots floating above and below the main design for extra texture. -
Let it dry completely:
Wait until the masking fluid is perfectly dry. It should feel transparent and tacky but not wet. Do not rush this, or you risk smearing the fluid into the paper fibers.
Use A Ruling Pen
For ultra-fine, consistent lines when applying masking fluid, try using a ruling pen instead of a brush. It holds fluid well and creates sharp edges.
Step 2: Painting the Wash
-
Mix your colors:
Prepare puddles of your paint on a palette. You want a deep turquoise for the top and a spectrum of magenta, red-orange, and yellow for the bottom. -
Wet the paper:
Using your large round brush, apply clean water over the entire masked area. The paper should be glisten, but not hold standing pools of water. -
Paint the top band:
Load your brush with the turquoise paint and lay it across the top strip of the banner. Let the color bleed unevenly to create that interesting, watery texture. -
Begin the warm gradient:
Rinse your brush and pick up the magenta or deep red. Start painting just below the turquoise band, letting the colors touch but not muddy each other too much. -
Transition to orange:
While the red is still wet, introduce the orange paint below it. Tilt the paper slightly to encourage the pigments to flow together naturally. -
Finish with yellow:
Complete the gradient by blending the orange into a bright yellow at the bottom scalloped edge. The colors should look like a vibrant sunset. -
Add splashes (optional):
If you want more texture, you can tap a wet brush loaded with clean water or contrasting color over the drying wash to create ‘blooms’ and spots. -
Allow for drying time:
Set the painting aside to dry completely. The paper must be bone dry before you touch it again, otherwise, the paper might tear during the reveal.
Step 3: The Big Reveal
-
Check dryness:
Touch the back of the paper. If it feels cool to the touch, it still contains moisture. Wait until it is room temperature. -
Remove the mask:
Using a rubber cement pick-up eraser or a clean, dry finger, gently rub the edges of the masking fluid. Peel and rub it away to reveal the crisp white paper underneath. -
Clean up lines:
Once all the fluid is removed, use a soft eraser to gently lift any visible pencil sketch lines that might show through the white areas.
Salt Texture
While the watercolor wash is still wet, sprinkle a pinch of table salt on the paint. It absorbs pigment as it dries, creating a frosted, starry texture.
Hang your beautiful artwork with clips or frame it to bring a permanent splash of fiesta color to your walls


Mariachi Musician Silhouette
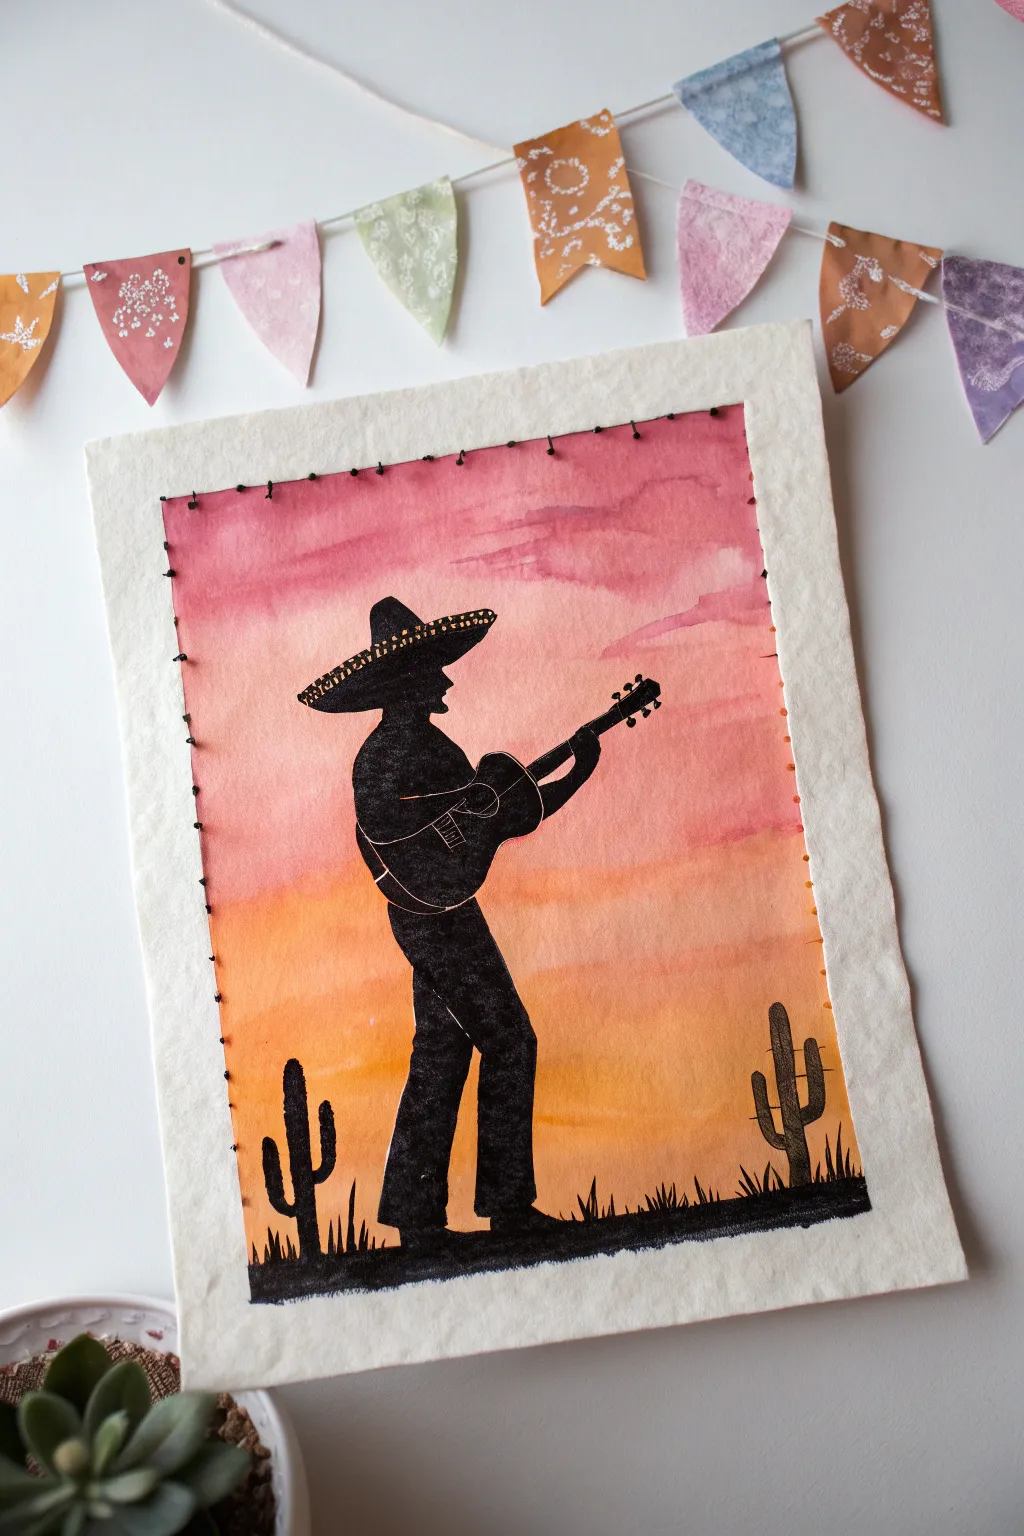
Capture the musical spirit of Cinco de Mayo with this striking silhouette art piece. This project combines a warm, watercolor-washed sunset background with a crisp black figure, accented by a unique hand-stitched border that adds delightful texture.
How-To Guide
Materials
- Heavyweight watercolor paper or mixed media paper
- Watercolor paints (pinks, oranges, yellows)
- Wide flat wash brush
- Black acrylic paint or black India ink
- Fine liner brush and medium round brush
- Black embroidery floss
- Embroidery needle
- Pencil and eraser
- Ruler
- Mariachi silhouette template (optional)
Step 1: Setting the Scene
-
Prepare your paper:
Cut your watercolor paper to your desired size. Leave a generous 1-inch border of white space around the area where you intend to paint; you can mark this boundary lightly with a pencil and ruler. -
Mix your sunset colors:
On your palette, prepare three distinct puddles of watercolor: a deep rose or magenta, a warm orange, and a golden yellow. Keep them fairly watery for a smooth wash. -
Paint the sky gradient:
Using a wide flat brush, start at the top of your marked rectangle with the deep rose color. As you move down, switch to the orange, blending the wet edges where the colors meet. Finish with the yellow at the bottom horizon line. -
Create texture:
While the paint is still damp but not soaking wet, use your brush to drag a little extra pigment horizontally across the sky to create soft cloud streaks. -
Dry completely:
Let the paper dry fully. If the paper buckles, you can press it under a heavy book overnight once it is bone dry.
Step 2: Painting the Silhouette
-
Sketch the outline:
Lightly sketch the mariachi figure holding a guitar in the center. Don’t forget to include the saguaro cactus shapes on either side and a grassy ground line. -
Fill the ground:
Using black acrylic paint or ink, fill in the ground strip at the very bottom first to establish a solid base for your composition. -
Paint the cacti:
Using a smaller round brush, paint the cacti silhouettes. Be careful to keep the edges sharp against the sunset background. -
Outline the musician:
With a fine liner brush, carefully trace the outline of the musician, paying close attention to the sombrero’s brim and the guitar’s neck. -
Fill the figure:
Switch to a slightly larger brush to fill in the body of the musician with solid black. Ensure the coverage is opaque; you might need a second coat of acrylic once the first dries. -
Add delicate details:
Once the black paint is dry, use a very fine white gel pen or a tiny brush with white acrylic to add the subtle details: the guitar strings and the decorative pattern on the sombrero. -
Detail the guitar body:
Add a thin white outline to define the guitar’s shape against the musician’s body, so the instrument doesn’t get lost in the silhouette. -
Refine the grass:
Use your finest brush to flick quick, upward strokes along the ground line to simulate blades of grass.
Clean Lines Pro Tip
For a perfectly crisp rectangle edge, tape off the borders with artist’s masking tape before painting. Peel it off slowly only after the paint is 100% dry.
Step 3: The Stitched Finish
-
Mark stitching holes:
Along the pencil border you drew in phase one, use a ruler to mark small dots every half-inch around the painted rectangle. -
Pierce the paper:
Place the paper on a soft surface (like a corkboard or foam mat) and gently poke holes through your marks using your embroidery needle. Pre-punching makes sewing much cleaner. -
Thread the needle:
Cut a length of black embroidery floss. I prefer using just two or three strands rather than the full six to keep the look delicate. -
Stitch the border:
Sew a simple running stitch or backstitch around the border, connecting the painted area to the white frame. Secure the ends with tape or a small knot on the back of the paper.
Level Up: 3D Elements
Glue tiny real sequins or beads onto the sombrero rim instead of painting the white dots for a textured, sparkling effect that catches the light.
Display your artwork near a window or festive bunting to let those warm colors shine


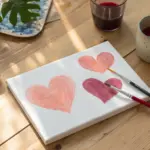
Calavera-Inspired Animal Portrait

Blend traditional sugar skull aesthetics with feline charm in this vibrant watercolor illustration. This project combines folk art symmetry with playful floral motifs to create a unique, celebratory piece of wall art.
Detailed Instructions
Materials
- Cold press watercolor paper (140lb/300gsm)
- Watercolor paint set (focus on teal, orange, crimson, and ochre)
- White gouache or white gel pen
- Round watercolor brushes (size 6 for washes, size 0 or 1 for details)
- Pencil (HB) and kneaded eraser
- Palette for mixing
- Two cups of water
- Paper towels
Step 1: Sketching the Framework
-
Map the face shape:
Start by lightly sketching a wide, soft heart shape for the cat’s head. Keep the chin slightly pointed and the cheeks round. Add two large triangular ears on top. -
Place facial features:
Draw faint guidelines for the eyes about halfway down the face. Sketch two large almond shapes for the eyes, leaving space for the nose bridge. Add a small triangle for the nose and a ‘W’ shape for the mouth below it. -
Add decorative elements:
Lightly pencil in the folk art details: a sunburst pattern on the forehead, swirls on the cheeks, and the floral wreath framing the bottom of the portrait.
Steady Hands
For the thin whiskers and delicate swirls, rest your pinky finger on a dry part of the paper to stabilize your hand while painting.
Step 2: Applying Base Colors
-
Paint the ears:
Mix a vibrant teal and paint the outer edges of the ears. While that dries, mix a soft peach-pink and fill the inner ear triangles, leaving the very center untouched for now. -
Fill the eyes:
Using your teal mix, carefully paint the iris of each eye. Leave a small white circle in the upper right of each iris for a highlight. -
Define the nose and mouth:
Use a deep crimson or reddish-brown to paint the cute triangular nose. Use a diluted version of this color to outline the mouth and the bottom edge of the chin. -
Paint the forehead details:
Switch to a warm orange and fill in the triangular patterns on the forehead. Alternating with red stripes can add nice contrast here.
Muddy Colors?
If your orange and teal are bleeding into brown where they touch, ensure the first color is bone-dry before painting a neighbor.
Step 3: Developing the Floral Border
-
Paint the main flower:
At the bottom center, paint the large red flower petals. Use a wet-on-dry technique so the edges stay crisp. Fill the center with yellow ochre. -
Add leaves and vines:
Using your teal color, paint the leafy vines curving up the sides of the cat’s face. Vary the pressure on your brush to create tapered leaf shapes—press down for the belly of the leaf and lift for the tip. -
Incorporate accent foliage:
Paint the smaller, fern-like sprigs in orange and red interspersed among the teal vines. This balances the warm and cool tones throughout the composition.
Step 4: Refining Details and Linework
-
Enhance the eyes:
Once the teal iris is dry, paint a deep black or indigo pupil in the center. Outline the entire eye shape with a thin line of orange or rust to make the teal pop. -
Add facial markings:
Using a fine liner brush (size 0), paint delicate red swirls on the cheeks and small orange dots under the eyes and on the snout for texture. -
Paint the whiskers:
With a steady hand and thin brush, paint three long, sweeping whiskers on each cheek using a reddish-brown tone. -
Detail the forehead flower:
Above the cat’s head, paint the floating floral motif. Create a teal center and radiate orange petal shapes outward, keeping them loose and playful.
Step 5: Final Touches
-
Add white highlights:
Here I like to use white gouache for opacity. Add tiny dots inside the colored patterns on the forehead and the center of the bottom flower. -
Create texture on the face:
Stipple tiny dots of pale teal or gray on the white parts of the face (forehead and cheeks) to suggest fur texture without coloring it in completely. -
Review and clean up:
Erase any visible pencil lines that weren’t covered by paint. Add a few floating hearts or dots in the background to fill any empty negative space.
Frame your festive feline to bring a touch of colorful spirit to any room


Huichol-Inspired Dot Pattern Fiesta Heart
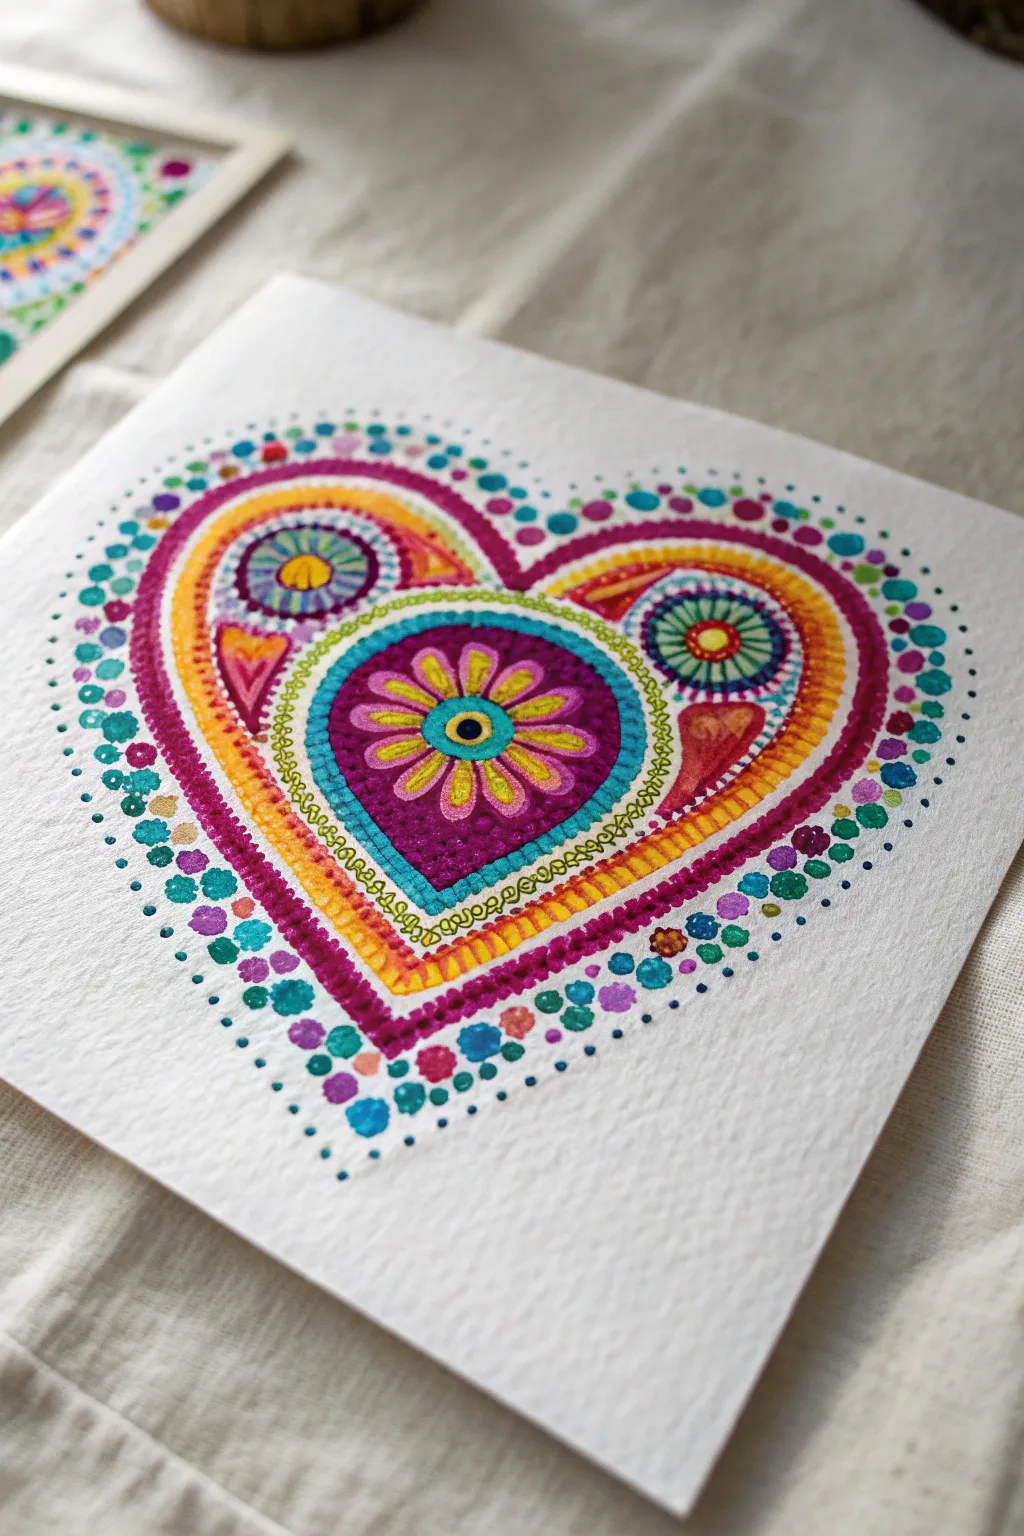
Celebrate color and tradition with this vibrant heart design that mimics the intricate beadwork of Huichol art. Using precise dots and rich layers of acrylic paint, you’ll build a textured, mesmerizing pattern perfect for Cinco de Mayo decor.
How-To Guide
Materials
- Heavyweight watercolor paper or textured cardstock (square format)
- Pencil for sketching
- Acrylic paints (Magenta, bright yellow, orange, deep purple, teal, lime green)
- Set of dotting tools or stylus (various sizes)
- Fine liner brush (size 0 or 00)
- Palette for mixing
Step 1: Sketching and Base Layers
-
Create the heart outline:
Begin by lightly sketching a large, symmetrical heart in the center of your square paper. Leave a generous margin around the edges for the radiating dot patterns later. -
Sketch internal zones:
Inside the main heart, lightly draw a smaller, central heart shape. Then, sketch two circles in the upper lobes of the larger heart—one on the left, one on the right—to serve as focal points for the circular patterns seen in the reference. -
Paint the central heart:
Fill the innermost small heart with a deep purple acrylic paint. Apply the paint smoothly and opaque; you may need two thin coats for full coverage. -
Define the outer bands:
Paint a thick band of warm yellow following the curve of the main heart’s outer edge. Inside of that, paint a band of magenta. These will act as the colorful tracks for your dot work. -
Fill the detail zones:
Paint the two circular areas in the upper lobes with teal or light blue backgrounds. Add teardrop shapes beneath these circles in orange or red to fill the remaining negative space within the heart.
Perfect Circles
If you don’t have dotting tools, use the flat end of a drill bit, a pencil eraser, or a toothpick. The paint consistency should be like heavy cream.
Step 2: Central Flower and Patterns
-
Paint the flower center:
Once the deep purple center is fully dry, painting a small teal circle right in the middle. Add a tiny black dot in its center to create the eye of the flower. -
Add flower petals:
Using bright yellow paint and a small round brush, paint eight elongated petals radiating from the teal center. Let the yellow dry, then carefully outline each petal with magenta using your finest liner brush. -
Decorate the upper circles:
Move to the teal circles in the upper lobes. I find it easiest to start from the center: paint a small yellow dot, then ring it with red. Use a fine brush to draw radiating spoke lines in green or blue, creating a wheel-like effect. -
Detail the orange teardrops:
On the orange teardrop shapes you painted earlier, add a smaller, inverted triangle or heart shape inside using a contrasting color like pink or red.
Step 3: The Dotting Process
-
Start the inner border:
Dip a small dotting tool into white or pale green paint. Create a line of tiny, closely spaced dots outlining the central purple heart, separating it from the outer bands. -
Add texture to the bands:
On the wide yellow band, use an orange or red paint to make small vertical dashes or ‘stitch’ marks all the way around. This mimics the look of threads or distinct bead rows. -
Dot the magenta band:
Switch to a medium-sized dotting tool. Apply a row of evenly spaced teal or blue dots directly onto the magenta band. Try to keep the pressure consistent so every dot is the same size. -
Create the external halo:
Now, work outside the main heart. Start with a row of medium purple dots that hug the very outer edge of the entire heart shape. -
Expand the aura:
Add a second row of dots outside the purple one, using a bright teal color. Ideally, position these dots in the gaps between the previous row’s dots (brick-lay pattern) if space permits. -
Vary dot sizes:
Continue adding concentric rows of dots moving outward, switching colors (green, pink, blue) for each row. Gradually increase the size of the dots and the spacing as you move further away from the heart to create a radiating energy effect. -
Final scattered accents:
For the outermost edges, stop making perfect rows. Instead, scatter a few loose dots in varying sizes to make the pattern dissolve naturally into the white background.
Add 3D Shine
Once the acrylic paint is completely dry, carefully apply a drop of clear drying craft glue or 3D dimensional glaze over the largest dots to make them look like real glass beads.
Now you have a stunning, intricate piece of art that captures the festive spirit of the season.
BRUSH GUIDE
The Right Brush for Every Stroke
From clean lines to bold texture — master brush choice, stroke control, and essential techniques.
Explore the Full Guide
Textured Sarape Stripe Abstract
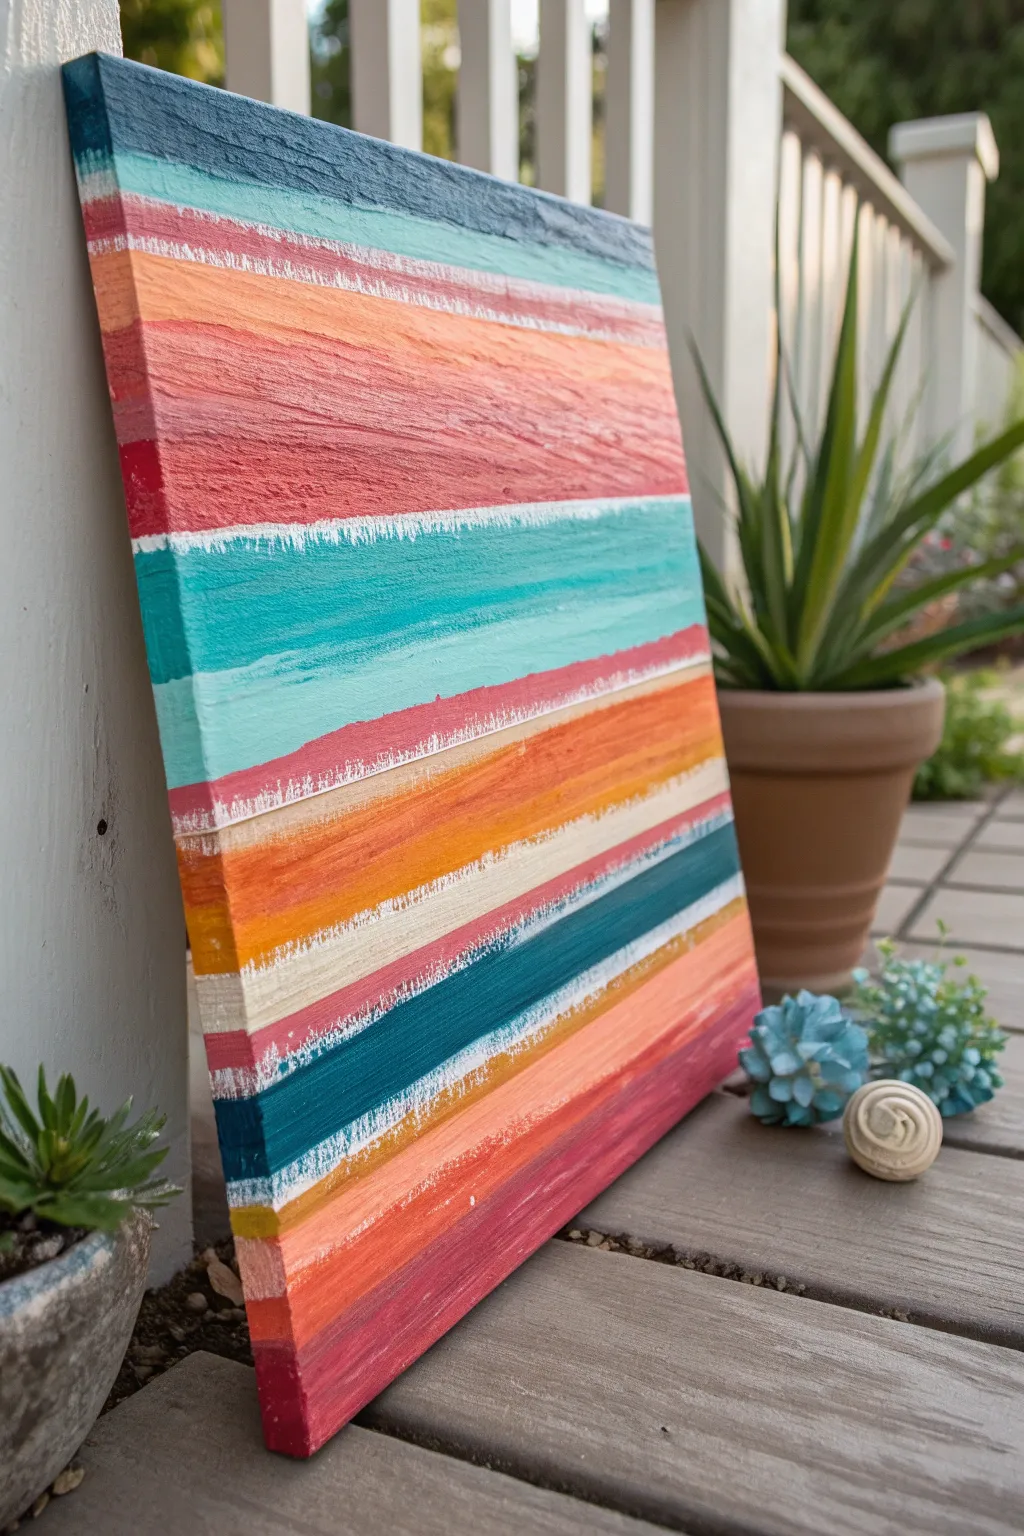
Capture the vibrant energy of a Cinco de Mayo celebration with this abstract painting inspired by traditional Sarape blankets. This project focuses on bold horizontal bands of color and a unique, tactile finish that mimics woven fabric.
Step-by-Step Tutorial
Materials
- Stretched canvas (11×14 or similar)
- Acrylic paints (Teal, Turquoise, Salmon Pink, Coral, Deep Red, Orange, Mustard Yellow, Cream/Off-White)
- Texture medium (Modeling paste or heavy gel medium)
- Palette knife (medium size)
- Flat paintbrush (1-inch width)
- Small round brush (for touch-ups)
- Palette or paper plate
- Painter’s tape (optional)
Step 1: Building the Foundation
-
Prepare the canvas:
Start with a clean, dry canvas. If you want ultra-crisp lines between your major color blocks, you can apply strips of painter’s tape horizontally, but looking at the reference, a freehand approach adds to the rustic, woven charm. -
Mix the texture base:
Scoop out a generous amount of texture medium onto your palette. You will be mixing your acrylic colors directly into this paste to give every stroke body and dimension. -
Deep teal top:
Mix a dark teal acrylic paint with the texture paste. Using your palette knife, spread a thick band across the very top edge of the canvas. Don’t smooth it out perfectly; leave ridges to catch the light. -
Lighter teal transition:
Clean your knife and mix a lighter, more turquoise shade with the paste. Apply this directly below the dark teal, blending the seam slightly but keeping the bands distinct. -
Add warm tones:
Switch to your warm palette. Mix a salmon pink with the texture paste and apply a wide band below the teals. Follow this with a deeper terracotta or red band.
Knife Know-How
When applying the textured paint, hold your palette knife at a low angle. Dragging it flatly creates the best ridges and mimics fabric weave.
Step 2: Layering the Stripes
-
Create the central band:
The middle of the canvas features a vibrant turquoise block. Mix your brightest cyan or turquoise with a little less texture paste here if you want it to recede slightly, or keep it thick for uniformity. -
Apply the orange section:
Below the central turquoise, apply a wide band of bright orange mixed with paste. Let the bottom edge of this stripe be a bit uneven. -
Add mustard accents:
In the lower third, introduce a band of mustard yellow. This color helps transition between the bright oranges and the deeper base colors. -
Anchor with dark blue:
Near the bottom, apply a strong, dark teal or petrol blue stripe. This visual weight balances the dark stripe at the very top. -
Finish the bottom edge:
Complete the bottom edge with a final band of warm red or coral, ensuring the paint wraps around the sides of the canvas for a finished look. -
Let it cure:
This is crucial. Because the paint is mixed with heavy paste, it needs significant drying time. I often let this sit overnight to ensure the ridges are firm.
Step 3: Distressing and Detailing
-
Prepare the dry brush:
Once the textured stripes are completely dry to the touch, load a flat brush with a small amount of cream or off-white paint. Wipe most of it off onto a paper towel until the brush is almost ‘dry’. -
Highlight the ridges:
Gently drag your dry brush horizontally across the painting. The white paint will catch only on the raised ridges of the texture paste, creating a weathered, woven appearance. -
Focus on transitions:
Pay special attention to the areas where colors meet. Adding a bit more dry-brushing here mimics the white fringe often found on Sarape blankets. -
Soften the colors:
If any color feels too loud, lightly dry-brush over it to mute the saturation and give it a sun-baked look. -
Add separation lines:
Use a small brush with the cream paint to dab thicker, irregular lines between some of the major color bands. This shouldn’t be a solid line, but a broken, organic one. -
Final assessment:
Stand back and look at the overall balance. If the white highlights seem too stark in one spot, you can glaze over them with a watered-down version of the underlying color.
Fringe Benefits
To really sell the blanket look, glue actual white yarn or thick string to the short sides of the canvas before painting for 3D fringe.
Display your textured masterpiece outdoors or in a bright room to let the natural light emphasize those beautiful ridges
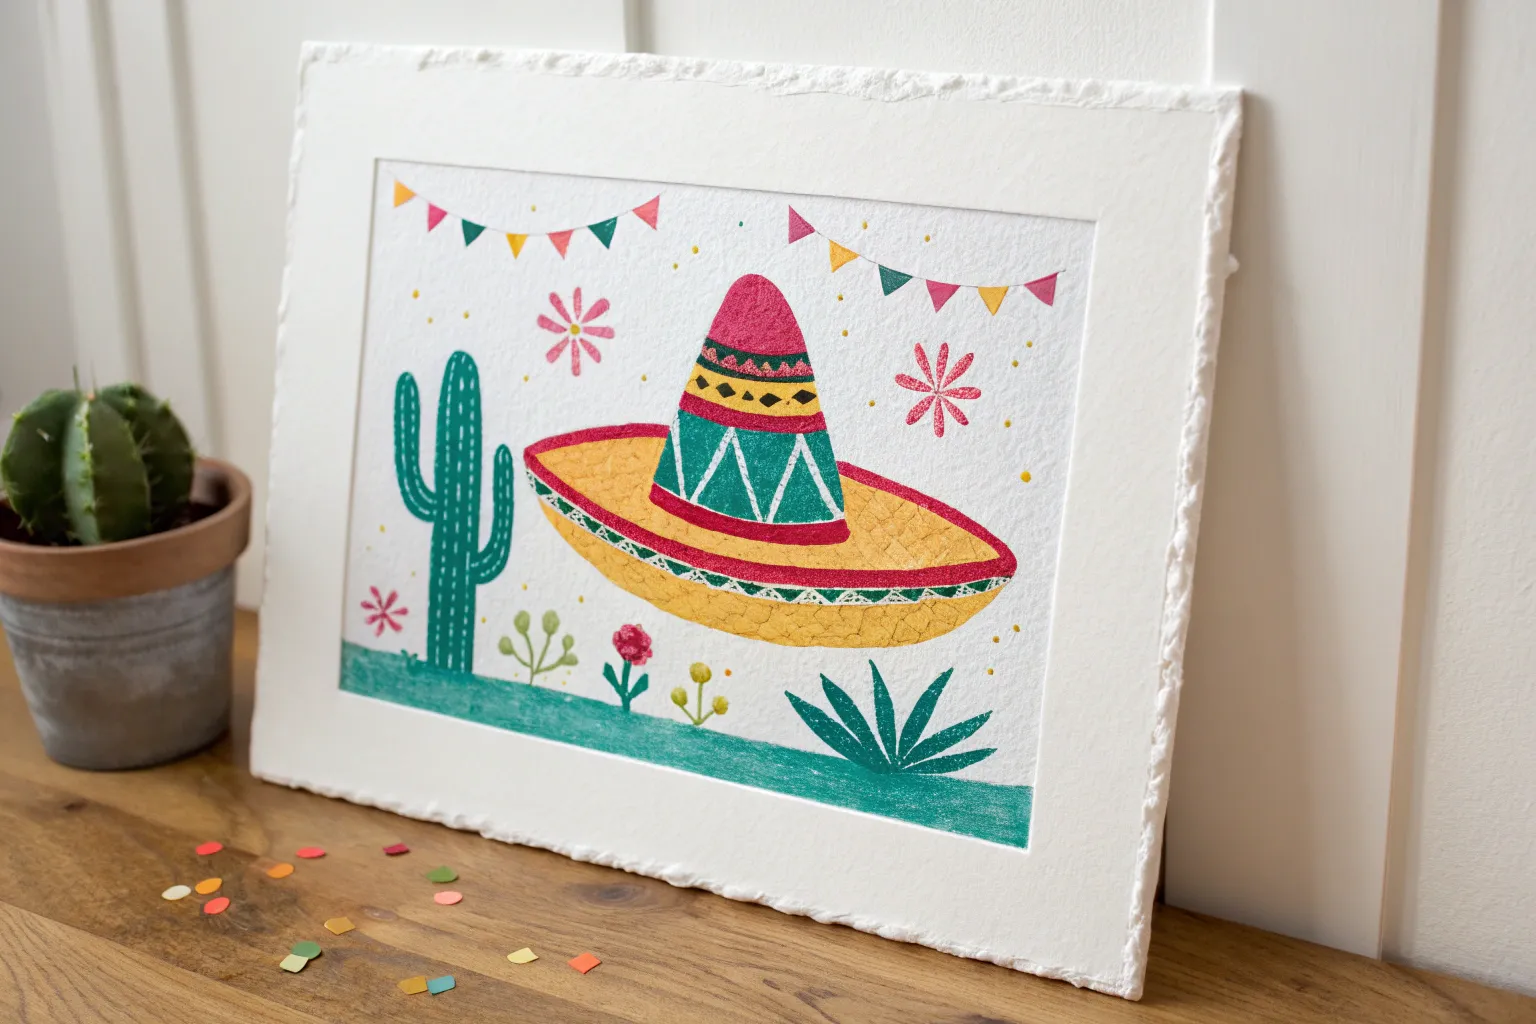
Mixed-Media Fiesta Collage Painting

Capture the festive spirit with this delightful mixed-media cactus painting, framed by joyful paper bunting. The main artwork features a stylized saguaro surrounded by folk-art florals, painted on textured paper with frayed edges to give it a handmade, rustic feel.
Detailed Instructions
Materials
- Heavyweight watercolor paper (300gsm cold press)
- White acrylic paint or gesso
- Goauche or opaque watercolor paints (teal, green, pink, yellow, orange)
- Round paintbrushes (sizes 2, 4, and 6)
- Colored construction paper or tissue paper (pink, yellow, orange, teal)
- String or thin twine
- Scissors and glue stick
- Small confetti pieces (optional)
Step 1: Preparing the Surface
-
Texture the edges:
Begin by tearing a rectangular piece of heavy watercolor paper to size, roughly 5×7 or 8×10 inches. To achieve the soft, frayed look seen in the example, gently scrape the torn edges with the blade of your scissors or a distressing tool. -
Prime the background:
Apply a thin, even coat of white acrylic paint or gesso over the entire surface of the paper. This seals the fibers and allows the colorful paint on top to sit vividly on the surface without soaking in too quickly. -
Let it cure:
Allow the base coat to dry completely. It should feel smooth and chalky to the touch before you begin sketching.
Step 2: Painting the Cactus
-
Sketch the outline:
Using a very light pencil, draw a central saguaro cactus shape. Include a main vertical body and four curved arms—two on each side, asymmetrical in height. -
Blocking in color:
Mix a deep teal-green gouache. Using a size 6 round brush, fill in the entire cactus shape. Don’t worry about perfect coverage; a slightly translucent or streaky look adds character. -
Adding definition stripes:
While the base layer is dry, mix a slightly lighter or bluer shade of teal. Paint thin vertical stripes down the length of the main body and along the curve of each arm to suggest ribs. -
Painting the spines:
Switch to your smallest brush (size 2). Using the base teal color, add tiny, short strokes along the outer edges of the cactus and along the internal vertical stripes to create the prickly spines. -
Highlighting details:
Add small dots of white or very pale mint green along the vertical ribs between the spines for extra texture.
Fray Your Edges
If you don’t have a distressing tool, wet the edges of the paper with a clean brush and water, wait 30 seconds, and then gently rub the damp paper edge with your thumb.
Step 3: Adding Floral Accents
-
Top blossom:
At the very top of the cactus, paint a burst of petals in alternating orange and pink. Make them pointy and radiating outward like a starburst. -
Floating foliage:
Around the upper half of the cactus, paint free-floating sprigs of leaves using a light teal or mint color. Keep strokes loose and simple. -
Side flower:
On the left side, paint a circular flower head with pink petals and a yellow center. Use small dab strokes for the petals. -
Bottom vines:
Anchor the composition by painting vine-like stems curving up from the bottom corners towards the cactus. Use a brownish-green for the stems. -
Tulip shapes:
Attach small tulip-shaped buds to these bottom vines using red, yellow, and soft pink gouache. Vary the angles so they look organic. -
Final dots:
Dip the end of a paintbrush handle into dark grey or black paint. Stamp tiny dots randomly around the cactus to fill empty negative space.
Add Metallic Pop
Once the gouache is dry, use a gold gel pen or metallic watercolor to outline the flower petals or add highlights to the cactus spines for a sparkling finish.
Step 4: Creating the Festive Background
-
Cut the bunting:
While the painting dries, cut small triangles out of your colored construction or tissue paper. They should be roughly 1-2 inches wide. -
Stringing the garland:
Arrange the triangles along a piece of twine or string. Glue the top edge of each triangle over the string so they hang down like flags. -
Arrange the scene:
Place your finished dry painting on a wooden surface or table. Drape the paper bunting garland across the top corners of your styling area. -
Scatter confetti:
Finish the look by sprinkling handmade paper confetti—snipped from your leftover construction paper—around the edges of the painting for a true fiesta vibe.
Now step back and admire your vibrant creation, ready to brighten up any festive celebration

Have a question or want to share your own experience? I'd love to hear from you in the comments below!