A plain mud vase is basically a blank canvas with the most gorgeous earthy texture built in. Here are my favorite mud vase painting ideas—from classic patterns you’ll actually finish to bolder techniques that turn simple clay into a real statement piece.
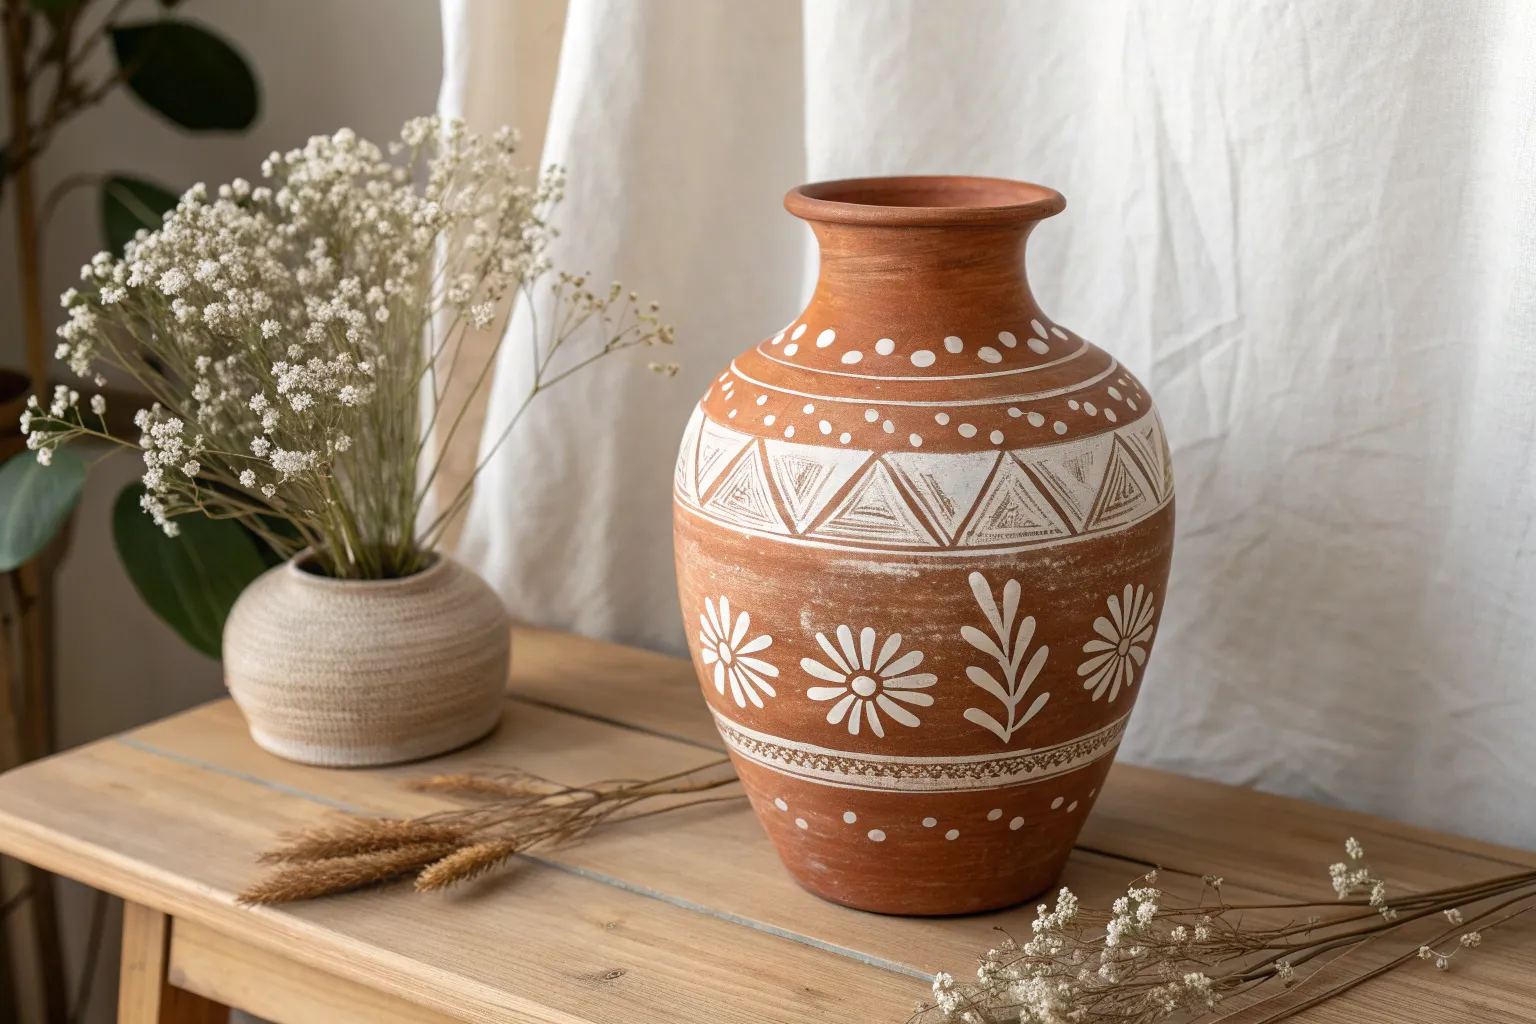
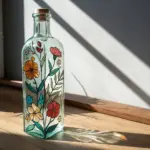
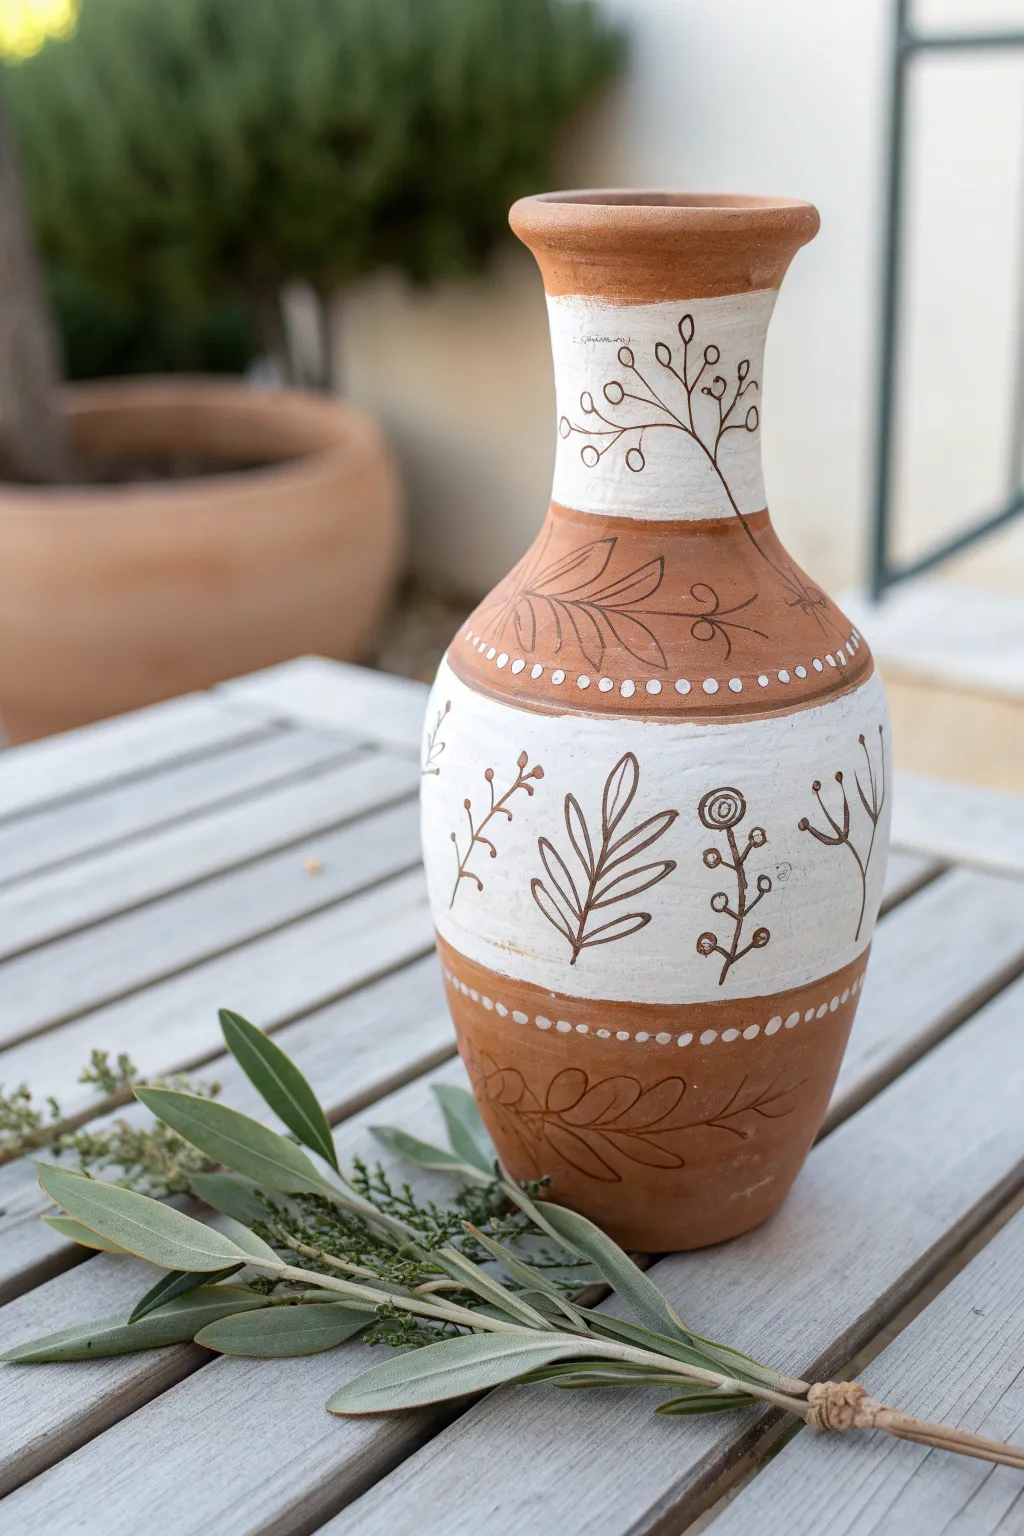
Classic White Florals on Terracotta
Embrace the natural beauty of terracotta with this minimalist white floral design that stands out beautifully against the warm, earthy clay background. This project combines simple folk art vibes with elegant botanical lines for a timeless piece of home decor.
Step-by-Step
Materials
- Terracotta vase (clean and dry)
- White acrylic paint (heavy body preferred)
- Small round paintbrush (size 2 or 4)
- Fine liner brush (size 0 or 00)
- Pencil for sketching
- Palette or small dish
- Water cup and paper towels
- Matte spray sealant (optional)
Step 1: Preparing the Base
-
Prepare the surface:
Ensure your terracotta pot is completely clean and dry. If it’s a new garden pot, wipe it down with a damp cloth to remove any loose red dust that could muddy your white paint. -
Plan the composition:
Visualize wherein the central vine will travel. It should start near the bottom centered area and snake its way gracefully upwards, branching out to fill the rounded belly of the vase. -
Lightly sketch the design:
Using a pencil, very lightly draw the main central stem line. Don’t press hard, as graphite can sometimes smear on terracotta; you just need a faint guide for your brush.
Paint Soaks In Too Fast?
Terracotta is thirsty! If it absorbs your first layer instantly, prime just the area you plan to paint with a clear matte medium first to seal the pores.
Step 2: Painting the Main Elements
-
Paint the central stem:
Load your liner brush with thinned white acrylic paint. It should be an inky consistency. Carefully trace your pencil line, starting from the bottom and pulling the brush upwards to create a flowing main stem. -
Add secondary branches:
While the paint is still wet on your palette, add smaller offshoot stems coming from the main vine. Vary their lengths and directions to make the plant look organic rather than stiff. -
Outline the flower heads:
Switch to your small round brush. Identify the spots for your main blooms—typically near the ends of the branches. Paint small circles to mark the centers of the flowers. -
Petal formation:
Paint the petals by pressing the belly of the round brush down near the center circle and pulling outward. Aim for 7-9 rounded petals per flower for a classic daisy look. -
Refine the petals:
Go back over the petals if the terracotta shows through too much. Heavy body acrylic covers best here, but apply thin layers to avoid a gloopy texture. -
Create the leaves:
Using the round brush again, paint simple leaf shapes along the vine. I like to use a ‘press and lift’ motion: touch the tip to the stem, press down to widen the leaf, and lift up to create a pointed tip.
Step 3: Detailing and Borders
-
Add leaf veins:
Once the white leaf shapes are dry, you can leave them solid white for boldness, or if you prefer the look in the image, carefully paint a thin line of the terracotta color (or leave negative space) down the center. -
Highlight the centers:
If you want a touch of detail, mix a tiny drop of yellow or gold paint and place a small dot in the very center of each white flower, or keep it stark white for a monochrome look. -
Paint the neck border:
Near the neck of the vase, create a dotted border. Dip the non-brush end (the handle) of your paintbrush into the white paint and stamp even dots in a horizontal ring. -
Add a dividing line:
Just below your dotted neck border, use your liner brush to paint two thin parallel horizontal lines encompassing a row of smaller dots or dashes. -
Create the base border:
Repeat the dotting technique near the very bottom of the vase to ground the design. These dots should mirror the size of the ones at the neck. -
Adding texture detail:
For the specific look in the photo, you can use a sharp tool or a fine brush with brownish-grey paint to add tiny scratches or lines inside the petals and leaves, giving them a wood-cut appearance. -
Upper neck accent:
If there is space, paint a small, simple sprig of leaves on the upper neck of the vase, isolated from the main vine, to fill the blank space.
Added Dimension
Mix baking soda into your white acrylic paint before applying the flower petals. This creates a puffy, textured 3D effect that feels like real ceramic relief.
Step 4: Finishing Touches
-
Clean up mistakes:
If you smudged any white paint, wait for it to dry completely, then carefully scrape it off with a craft knife or paint over it with a mix of burnt sienna and orange to match the clay. -
Final dry:
Let the vase sit undisturbed for at least 24 hours to ensure deep drying, especially since terracotta is porous. -
Seal the work:
To protect the white paint from chipping or yellowing, take the vase outside and spray it with a matte clear acrylic sealer.
Place your new vase near a sunny window where the white details can catch the light


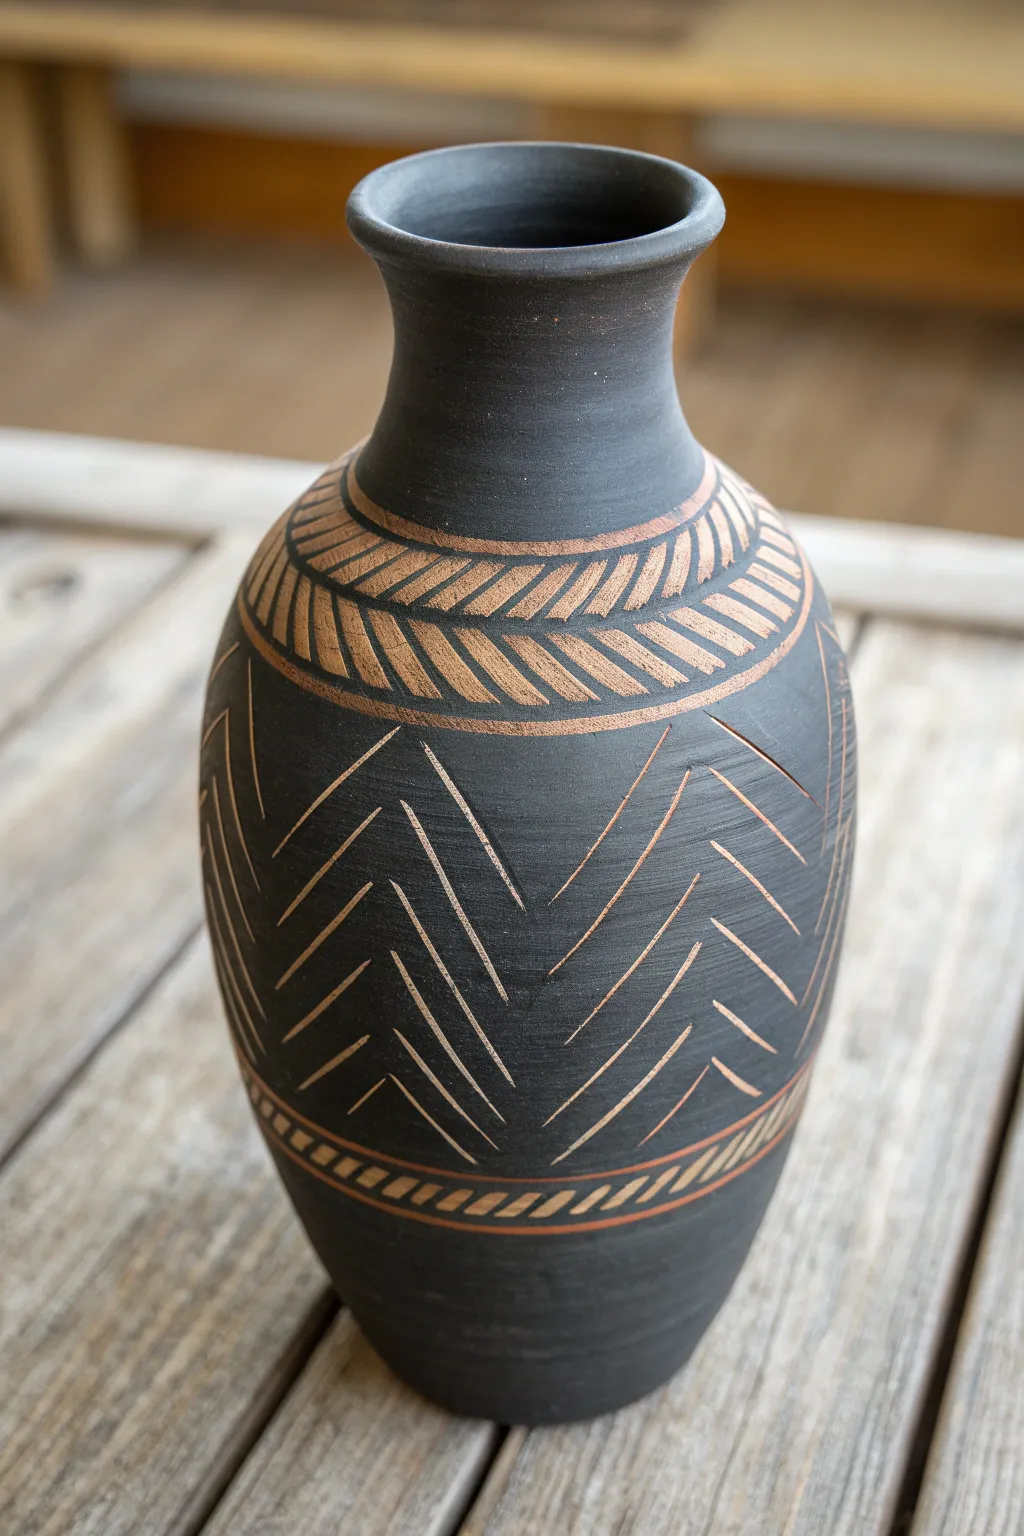
Bold Black-and-White Geometric Bands
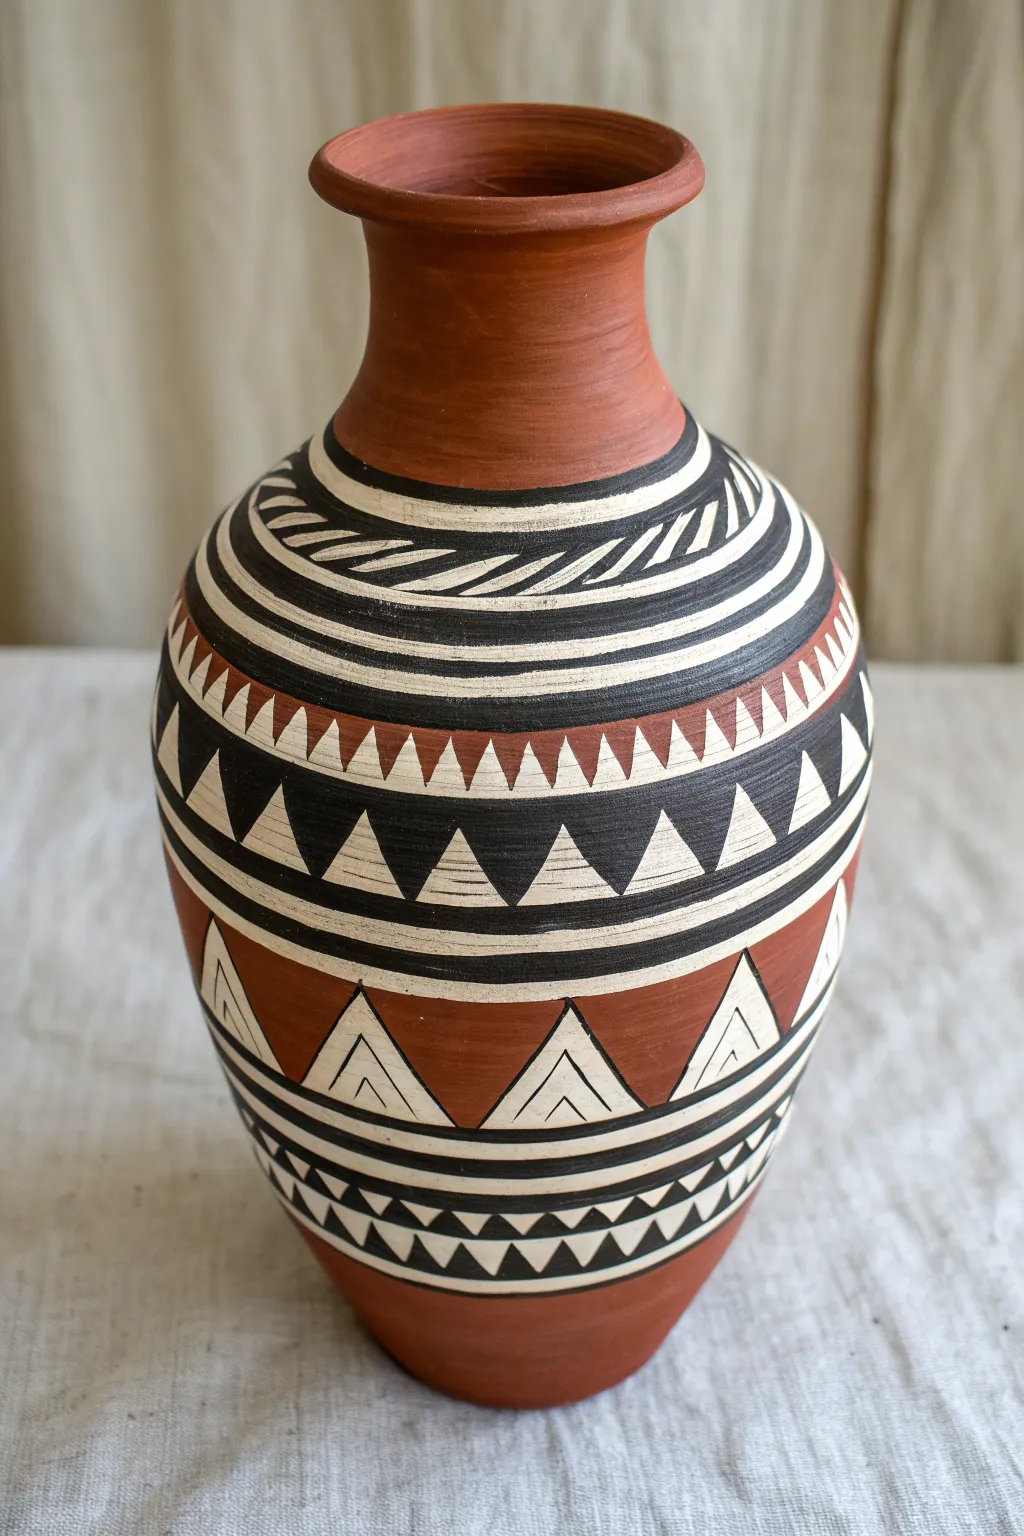
Transform a plain terracotta vessel into a stunning statement piece featuring intricate black, white, and earthy red bands. This design relies on high-contrast geometric patterns like zigzags, triangles, and parallel lines to create a rhythmic, almost woven visual texture.
Step-by-Step Guide
Materials
- Bisque-fired terracotta vase (approx. 10-12 inches tall)
- Acrylic paints: Carbon Black, Titanium White, Red Oxide (or Burnt Sienna)
- High-density foam sponge
- Flat brushes (various widths: 1-inch, 1/2-inch)
- Fine liner brush (sizes 0 and 00)
- Pencil for sketching
- Measuring tape (flexible fabric tape works best)
- Matte spray varnish or sealer
- Palette and water cup
- Lazy Susan or turntable (optional but helpful)
Step 1: Preparation and Base Sections
-
Clean surface:
Begin by wiping down your terracotta vase with a damp sponge to remove any dust or kiln residue. Let it dry completely before applying any paint. -
Mark horizontal zones:
Using a pencil and a flexible measuring tape, lightly mark the main horizontal divisions around the circumference of the vase. You will need distinct zones for the neck, the shoulder, the main body, and the lower triangular section. -
Paint the neck and base:
Leave the very top rim and the neck natural terracotta. Paint the lowest section of the vase with a layer of Red Oxide to define the bottom boundary, blending it slightly downwards if needed. -
Establish the main black bands:
Using a 1-inch flat brush, paint the broad black band around the widest part of the belly. Don’t worry about perfect edges yet; we will refine them later. -
Add secondary black bands:
Paint the thinner black bands above and below the main belly band. Leave strips of bare terracotta visible between these black areas where the white patterns will eventually go.
Step 2: Designing the Geometric Patterns
-
Create the white stripe foundation:
Using a smaller flat brush, paint crisp white bands bordering your black sections. Apply two coats if the terracotta color shows through too strongly. -
Sketch the triangles:
Lightly use your pencil to draw the large sawtooth triangles in the central black band. Aim for consistent spacing, though slight irregularities add to the hand-painted charm. -
Paint the white triangles:
Fill in the sketched triangles on the central black band using Titanium White. I find a small angle brush helps transform those corners into sharp points. -
Fill the lower triangular zone:
In the lower Red Oxide section, outline largel triangles in black, then fill the negative space with white, leaving the Red Oxide triangles pointing upward intact. -
Detail the lower triangles:
Using your fine liner brush and black paint, add the internal ‘V’ shapes inside the white triangles on the lower band to echo the larger shape.
Wobbly Lines?
If your horizontal bands are uneven, place the vase on a Lazy Susan. Hold your brush hand steady against a stack of books and rotate the table instead of your hand.
Step 3: Fine Details and Finishing Touches
-
Detail the upper shoulder:
Move to the shoulder area (just below the neck). Paint a series of slanted hatch marks or stylized feather shapes in white against a black background band. -
Add the sawtooth row:
In the band directly above the central black section, paint a row of small, sharp reddish-brown triangles pointing downward. Use Red Oxide mixed with a tiny drop of white for opacity. -
Line work:
Taking your finest liner brush loaded with slightly thinned black paint, carefully outline the horizontal borders between your different patterned zones to crisp up the design. -
Refine the striping:
Go back over the thin horizontal black and white stripes on the upper half of the vase. Ensuring these are parallel adds necessary structure to the busy geometric patterns. -
Touch up errors:
Inspect the vase for any smudges or uneven paint density. Use a tiny brush to correct the points of your triangles or cover accidental splashes. -
Seal the artwork:
Once the paint is fully cured (give it at least 24 hours), spray the entire vase with a clear matte varnish to protect the design and deepen the contrast of the black.
Level Up: Texture
For an authentic aged look, lightly sand the finished, dry paint with fine-grit sandpaper before sealing. This reveals hints of the terracotta clay underneath.
Place your finished vase near a window where the light can highlight the crisp contrast of your geometric handiwork


Easy Dot Art Mandala Collar
Transform a plain terracotta vessel into a striking piece of decor using geometric precision and earthy tones. This design features a captivating band of sun-like mandalas bordered by delicate dot work, creating a harmonious blend of tribal pattern and modern symmetry.
Step-by-Step Tutorial
Materials
- Tall terracotta or clay vase (cleaned and dried)
- Acrylic craft paints (Terra cotta/rust, dark hunter green, cream or off-white, light beige)
- Fine liner brushes (sizes 00 and 0) for details
- Small flat brush (size 4 or 6) for bands
- Dotting tools (various sizes, or use brush ends/toothpicks)
- Pencil and flexible ruler or measuring tape
- Matte spray varnish
Step 1: Preparation and Mapping
-
Clean surface:
Ensure your clay vase is completely free of dust and oil. Wipe it down with a slightly damp cloth and let it dry fully so the paint adheres properly. -
Define the zones:
Using a pencil and measuring tape, lightly mark horizontal rings around the vase. You need distinct sections: the neck, the upper shoulder (for dots), the wide main band (for mandalas), and a lower border area. -
Sketch the primary band:
Within the widest band on the shoulder, use your pencil to draw large, evenly spaced circles. These will become the sun-like mandala motifs. Leave a small gap between each circle for the triangular separators. -
Draw the grid:
Inside each circle, lightly draw a smaller inner circle. Then, divide the outer ring into equal segments like slicing a pie—this grid will guide your painting later.
Uneven Circles?
If freehand circles look wonky, trace the mouth of a small cup or a spice jar lid directly onto the clay for perfect round perimeters every time.
Step 2: Painting the Mandala Band
-
Base coat the shapes:
Paint the background of the main band in a light beige or cream color, working carefully around your penciled circles. This creates a high-contrast base for the dark green lines. -
Fill the sun centers:
Mix a rust or terra cotta shade slightly darker than the vase’s natural clay. Paint the inner circle of each mandala with this color. -
Outline the geometry:
Load a fine liner brush with dark hunter green paint. Carefully trace over the pencil lines of the large circles and the pie-slice segments. Keep your hand steady to maintain crisp lines. -
Add radial details:
Inside the outer ring of the mandala (the ‘rays’), paint small green arches or tick marks near the outer edge to define the petal shapes. -
Paint the separators:
In the triangular spaces between the circles, paint stylized leaf or fan shapes using the green liner, making sure they point toward the neck and base. -
Dot center highlights:
Using a very small dotting tool, place a cluster of four tiny white dots in the very center of each rust-colored sun. -
Rim the circles:
Add a ring of tiny green dots around the perimeter of every rust center to add texture and separate it from the outer rays.
Level Up: 3D Texture
Mix your acrylic paint with a tiny pinch of baking soda or use ‘puff paint’ for the large white dots to give them actual raised relief you can feel.
Step 3: Neck and Lower Borders
-
Create the neck pattern:
Moving up to the neck, paint a thin green line to separate it from the shoulder. Above this line, create rows of small black or dark green dots that get progressively smaller as they go up. -
Texture the lower band:
Below the main mandala section, paint a textured beige band. I find stippling with an old, dry brush works well here to create that rough, sandy look. -
Add the green belt:
Paint a solid, medium-width band of dark hunter green below the textured beige section. Ensure the edges are smooth and parallel to the vase base. -
Apply large statement dots:
Dip a large dotting tool or the back end of a paintbrush into cream paint. Press firmly onto the green band to create a row of large, evenly spaced white dots. -
Detail the transition:
Paint a very thin green line right above the green belt. Add tiny black dots along this line for a delicate finish. -
Base perforation effect:
For the bottom-most section of the vase, use a small tool to paint tiny, sparse dark dots that mimic accidental clay pits or textures, grounding the design. -
Seal the work:
Once all paint is thoroughly dry (give it at least an hour), spray the entire vase with a matte varnish to protect the design without adding unnatural shine.
Now step back and admire how simple geometric shapes have created a sophisticated, museum-worthy piece for your home

Two-Tone Color Block Base Coat
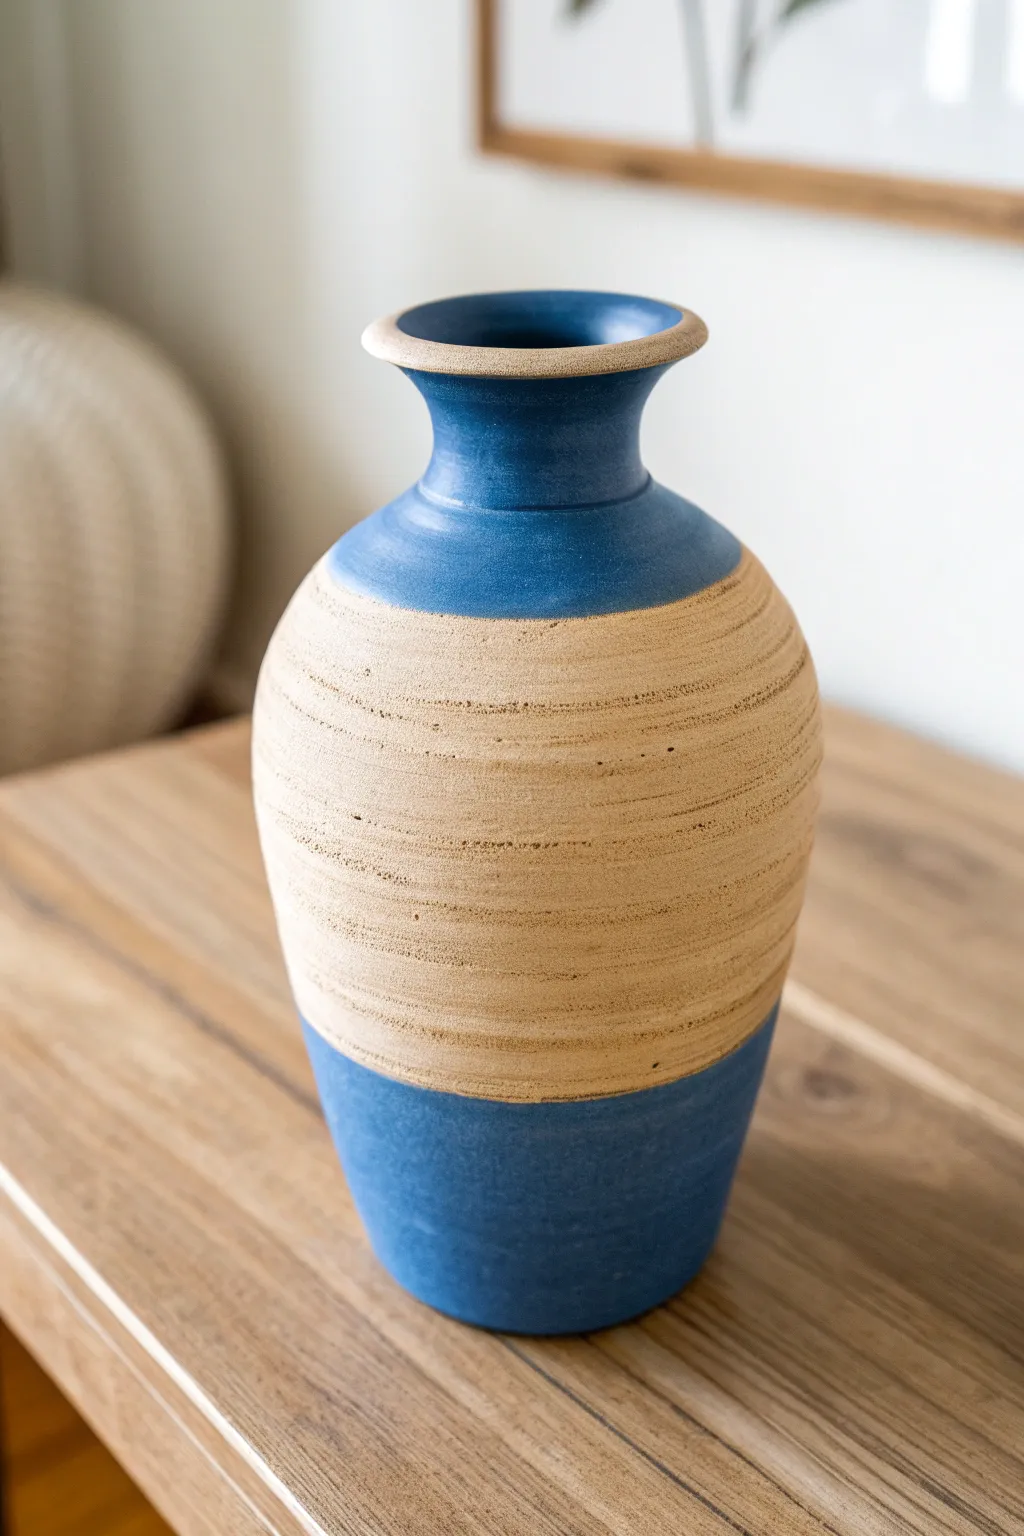
Achieve a sophisticated, modern pottery look with this simple color-blocking technique that mimics the appearance of partially dipped stoneware. By combining a textured, raw-clay effect for the center with sleek matte blue for the accents, you create a piece that feels both earthy and refined.
Detailed Instructions
Materials
- Terracotta or smooth ceramic vase (clean and dry)
- Matte acrylic craft paint (Denim Blue)
- Acrylic paint (Sand or Light Beige)
- Baking soda (to add texture)
- Painter’s tape (multi-surface or delicate)
- Medium flat paintbrush
- Small round detail brush
- Plastic palette or paper plate
- Mixing stick
- Pencil (optional)
- Matte spray sealer
Step 1: Preparation and Base Texture
-
Clean surface:
Begin by wiping down your vase with a damp cloth to remove any dust or oils, ensuring a completely dry surface before you start. -
Mix textured paint:
On your palette, mix your sand/beige acrylic paint with baking soda in a 1:1 ratio. The consistency should feel fluffy and slightly gritty, like mousse. -
Apply the middle band:
Using the flat paintbrush, apply this textured mixture generously around the center of the vase. Don’t worry about perfect edges yet; you just want to cover the middle third. -
Create striations:
While the beige paint is still wet, drag the bristles of your brush horizontally around the vase to create those distinct grooves and ridge lines shown in the photo. -
Extend to the rim:
Use the same beige textured mix to paint the very top rim of the vase, ensuring a cohesive look between the top edge and the center band. -
Dry completely:
Allow this initial textured layer to dry thoroughly. The baking soda mix can take a bit longer than regular paint, so give it at least an hour.
Bleeding Lines?
If paint bleeds under the tape due to the texture, wait for it to dry, then use a small stiff brush dipped in the beige paint to ‘erase’ the blue smudge.
Step 2: Color Blocking
-
Mark your lines:
Once the base is rock hard, lightly mark where you want your blue sections to start and stop using a pencil if you need a guide. -
Tape the boundaries:
Apply painter’s tape horizontally over the dry beige section to protect it. Press the edges of the tape down firmly into the textured grooves to prevent paint bleed. -
Paint the bottom section:
Load your flat brush with the denim blue matte paint and cover the entire bottom third of the vase. -
Paint the neck:
Apply the same blue paint to the neck of the vase, painting carefully just below the beige rim you created earlier. -
Detailing the junction:
I prefer to remove the tape while the blue paint is still slightly tacky; this prevents the paint from peeling up in chunks. -
Touch-ups:
If the tape didn’t seal perfectly over the texture, use your small detail brush to refine the line where the blue meets the beige.
Level Up: Faux Glaze
Mix a tiny drop of gloss medium into the blue paint only. This creates a realistic contrast between a ‘glazed’ ceramic bottom and the raw, matte texture of the center.
Step 3: Finishing Touches
-
Second coat:
Inspect the blue sections. If the coverage looks streaky, apply a second coat of blue once the first is dry for a truly opaque, dipped look. -
Clean the rim:
Use the small brush to neaten up the beige rim at the top, ensuring there is a crisp separation between the beige lip and the blue neck. -
Seal the work:
Once completely dry, take the vase to a well-ventilated area and apply a light coat of matte spray sealer. -
Final cure:
Let the sealer cure for 24 hours before handling the vase heavily or placing it on delicate furniture.
Place your new vase on a wooden shelf or counter to let those earthy tones really shine in the light
BRUSH GUIDE
The Right Brush for Every Stroke
From clean lines to bold texture — master brush choice, stroke control, and essential techniques.
Explore the Full Guide
Soft Ombre Fade on Clay
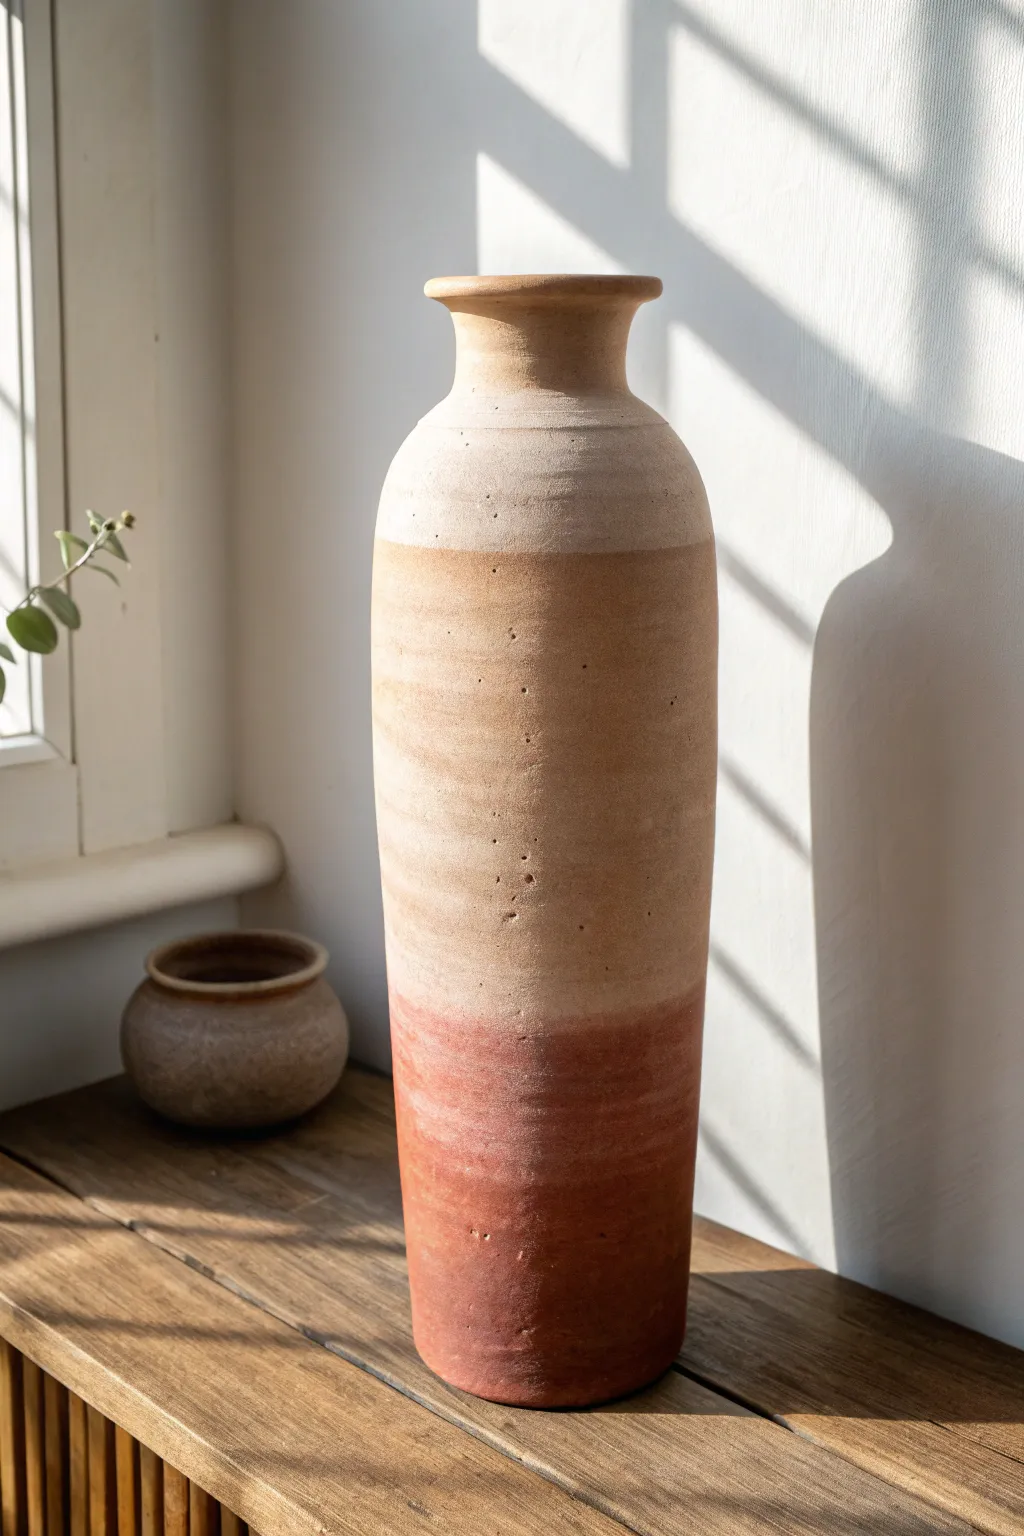
Capture the warmth of sun-baked earth with this subtle ombre technique that blends raw clay textures with soft color transitions. This project transforms a simple vessel into an organic statement piece that looks like it has been weathering in the desert sun for decades.
How-To Guide
Materials
- Tall cylindrical vase (terracotta or ceramic with a matte finish)
- Baked clay or terracotta textured paint (or baking soda/plaster mixture)
- Acrylic paints: Burnt Sienna, Raw Sienna, Beige, and Cream/White
- Large flat paint brushes (chip brushes work well for texture)
- Sea sponge or dabber sponge
- Paper towels
- Palette or mixing plate
- Matte spray sealer
Step 1: Preparation & Base Coat
-
Clean the surface:
Begin by wiping down your vase thoroughly to remove any dust or oils. This ensures the paint adheres properly to the porous surface. -
Prepare the texture mix:
If you aren’t using pre-mixed textured paint, create your own ‘mud’ paint. Mix your beige acrylic paint with baking soda or plaster of Paris in a 1:1 ratio until it resembles a thick, gritty paste. -
Apply the textured base:
Using a chip brush, apply this beige texture mix over the entire vase. Don’t smooth it out too perfectly; brush horizontally to create subtle rings and ridges that mimic wheel-thrown pottery. -
Dry completely:
Allow this base layer to dry fully. Since the mixture is thick, give it at least an hour or two. It should feel rough and chalky to the touch when ready.
Sponge Technique
Don’t wipe the sponge when blending; use a pouncing or stippling motion. This mixes the wet borders without creating streaks.
Step 2: Creating the Ombre Sections
-
Mix the darkest tone:
On your palette, squeeze out a generous amount of Burnt Sienna. If it’s too vibrant, mix in a tiny drop of black or brown to deepen it into a rich, rusty clay color. -
Paint the bottom third:
Apply this dark Burnt Sienna mixture to the bottom third of the vase. Use horizontal strokes, ensuring solid coverage right down to the base. -
Mix the middle tone:
Create a transition color by mixing Raw Sienna with a little bit of the beige base color. You want a warm, sandy tan shade. -
Paint the middle section:
Apply this warm tan color to the middle section of the vase, stopping just short of your dark bottom section and leaving space at the top.
Level Up: Aged Look
Rub a pinch of actual dry garden soil or gray pigment powder into the texture crevices before sealing for an authentic excavated feel.
Step 3: Blending the Gradient
-
Soften the mid-line:
While the paints are still slightly tacky, take a clean, slightly damp sea sponge. Gently dab along the line where the dark red meets the tan middle section. -
Work the transition:
I like to stamp the sponge up and down slightly, dragging a tiny bit of the dark paint up and the light paint down until the hard line disappears into a soft blur. -
Paint the top section:
Mix a very light cream color (Beige plus plenty of White) for the top third and the neck of the vase. -
Apply the top color:
Paint the upper section, including the rim. Bring this color down to meet the middle tan section. -
Blend the upper transition:
Using a clean area of your sponge, repeat the dabbing technique between the tan middle and the cream top. Keep the pressure light to maintain the texturing underneath.
Step 4: Distressing & Finishing
-
Add faux imperfections:
Once the ombre is mostly dry, load a stiff bristle brush with a tiny amount of diluted dark brown paint. Flick the bristles to spatter tiny speckles onto the surface, concentrating slightly on the middle section. -
Create distinct pockmarks:
Use the handle end of a paintbrush or a toothpick to gently poke a few small indentations into the surface if the paint is still soft, simulate natural clay blemishes. -
Dry brush highlights:
Dip a dry brush into pure white paint and wipe almost all of it off on a paper towel. Very lightly whisk the brush horizontally around the neck and the widest part of the vase to catch the texture ridges. -
Seal the work:
To protect the dusty finish without making it shiny, spray the entire vase with a matte clear sealer. Two light coats work better than one heavy coat.
Place your vase in a sunlit spot to highlight the rich transition of earth tones you have created
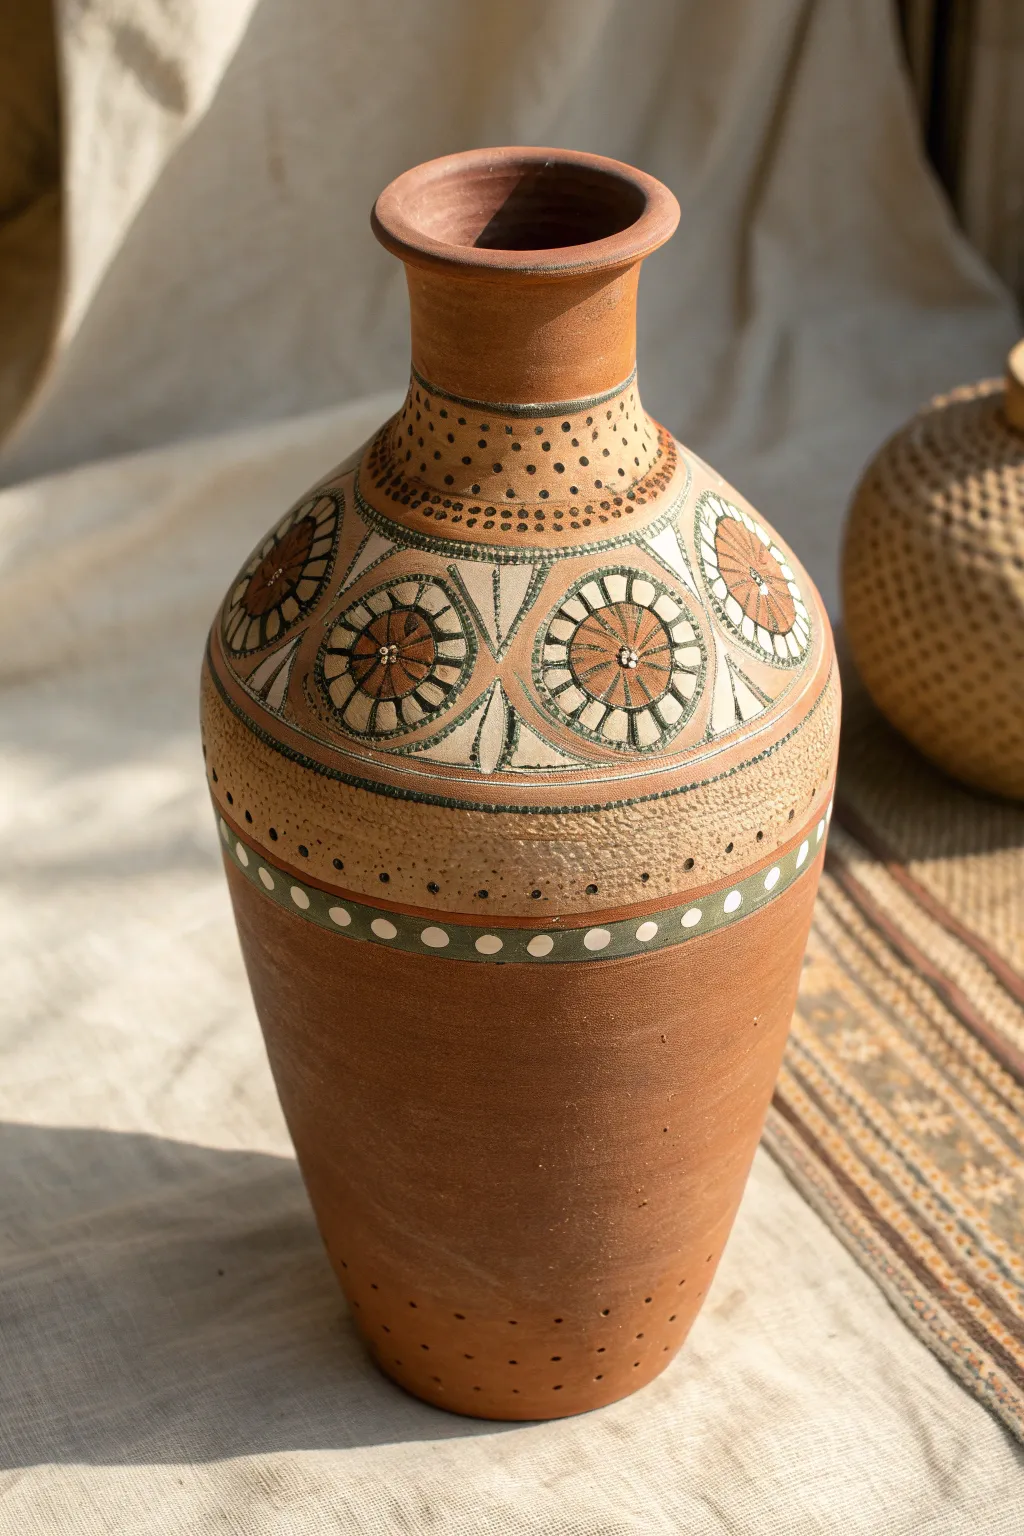
Terracotta + Gold-Look Line Accents
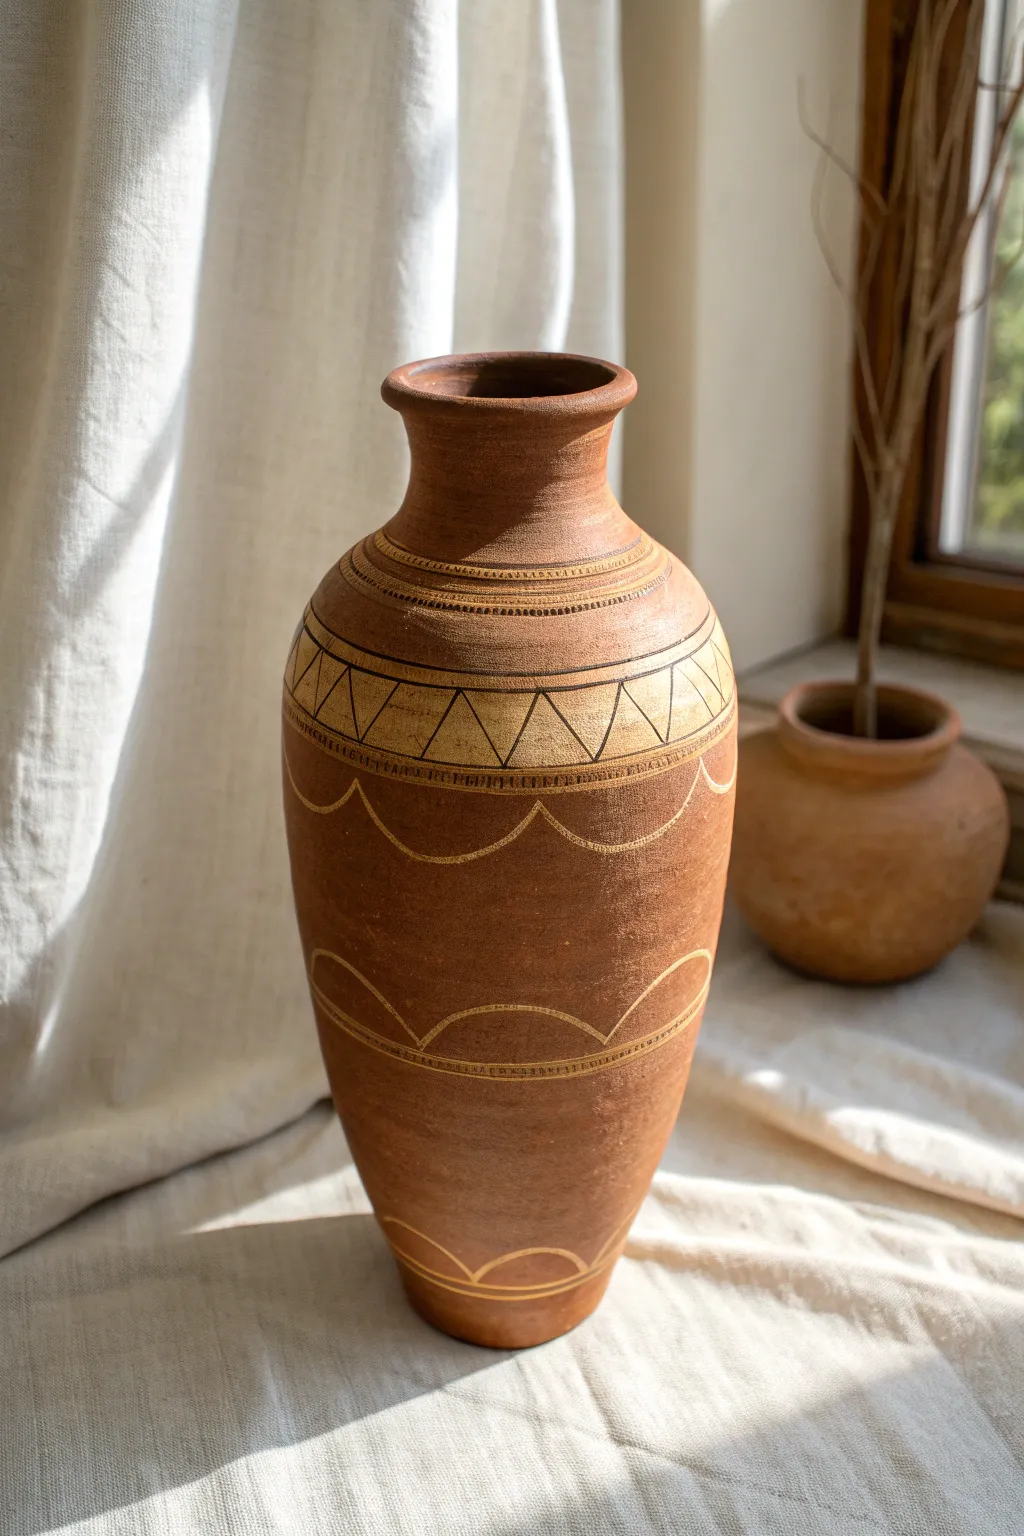
Transform a simple flea market vase into a stunning, anthropological-inspired piece using nothing but rich terracotta textures and delicate metallic accents. This project mimics the look of etched pottery by layering fine gold lines over a warm, earthy base for a sophisticated finish.
Step-by-Step Guide
Materials
- Tall ceramic or glass vase (thrifted is fine)
- Baking soda or plaster of paris
- Terracotta or burnt sienna acrylic paint
- Deep brown or umber acrylic paint (optional, for shading)
- Fine-tip gold paint pen (oil-based works best)
- Medium flat paintbrush
- Soft sponge or foam brush
- Matte clear sealant spray
Step 1: Creating the Faux-Terracotta Base
-
Prep your surface:
Clean your chosen vase thoroughly with soap and water to remove any grease or dust. Dry it completely to ensure the paint adheres well. -
Mix your texture medium:
In a small bowl, mix your terracotta-colored acrylic paint with baking soda. Start with a ratio of about 1 part baking soda to 2 parts paint. You want a fluffy, mousse-like consistency. -
Apply the first coat:
Using a flat paintbrush, apply a generous layer of the textured paint mixture to the vase. Don’t worry about being too smooth; visible brushstrokes add to the handmade pottery look. -
Stipple for stone effect:
While the paint is still wet, take a dry sponge and gently dab or ‘stipple’ over the surface. This breaks up the brush lines and creates that authentic, grainy clay texture. -
Dry thoroughly:
Let this base layer dry completely. Baking soda paint can take a bit longer than plain acrylic, so give it at least an hour or two. -
Add depth (optional):
If your color looks too flat, I occasionally mix a tiny drop of dark brown paint into the terracotta mix and dry-brush it randomly around the neck and base for an aged effect. -
Seal the base:
Apply a very light coat of matte clear sealant spray. This is crucial because it creates a smooth barrier so your gold pen glides over the granular texture without getting clogged.
Step 2: Drafting the Pattern
-
Analyze the zones:
Visually divide your vase into horizontal bands. Notice how the original design has a denser pattern at the neck, a geometric triangle band at the shoulder, and wider, swooping curves on the body. -
Mark the bands:
You can lightly use a pencil to mark the horizontal rings where your patterns will sit. If you are confident, you can freehand this, but light guide marks help keep things level. -
Detailing the neck:
Start at the very top. Use your gold paint pen to draw tight, concentric circles around the neck of the vase. Vary the spacing slightly to make it look hand-thrown. -
Drawing the triangle band:
Just below the shoulder, draw two parallel horizontal lines about an inch apart. Inside this band, draw a zigzag line to create a row of triangles. -
Adding triangle details:
Inside the triangles pointing down, lightly shade them in with the gold pen using horizontal hatch marks, or leave them solid if you prefer a bolder look.
Clean Lines on Texture
Is the rough surface wrecking your paint pen? Draw with a very light hand. Pushing down destroys the felt tip; letting it glide preserves the nib.
Step 3: Adding the Swooping Curves
-
The upper scallop:
Below your triangle band, draw a series of wide, U-shaped scallops. Connect them end-to-end so they wrap around the entire circumference. -
Echo lines:
To give the scallops visual weight, draw a second curved line right above the first one, creating a double-line effect. This mimics the look of carved clay. -
The middle divider:
Moving down to the lower third of the vase, draw another set of parallel horizontal rings. You can add tiny vertical hash marks inside these rings for extra detail. -
The lower scallop:
Repeat the scallop pattern near the bottom of the vase, but invert the curves so they look like hills or rainbows rather than hanging drapes. -
Final touches:
Inspect your lines. If the texture caused the pen to skip, go back and carefully fill in those gaps to ensure the gold looks solid and continuous. -
Final seal:
Once the gold ink is fully dry, finish with one last coat of matte sealant to protect your design from scuffs.
Wobbly Hand Fix
Can’t draw a straight circle? Set the vase on a lazy susan or turntable. Hold your pen hand steady in one spot and slowly rotate the vase instead.
Place your new vase near a window where the sunlight can catch those subtle gold reflections.

PENCIL GUIDE
Understanding Pencil Grades from H to B
From first sketch to finished drawing — learn pencil grades, line control, and shading techniques.
Explore the Full Guide
Folk-Inspired Stick Figures and Motifs
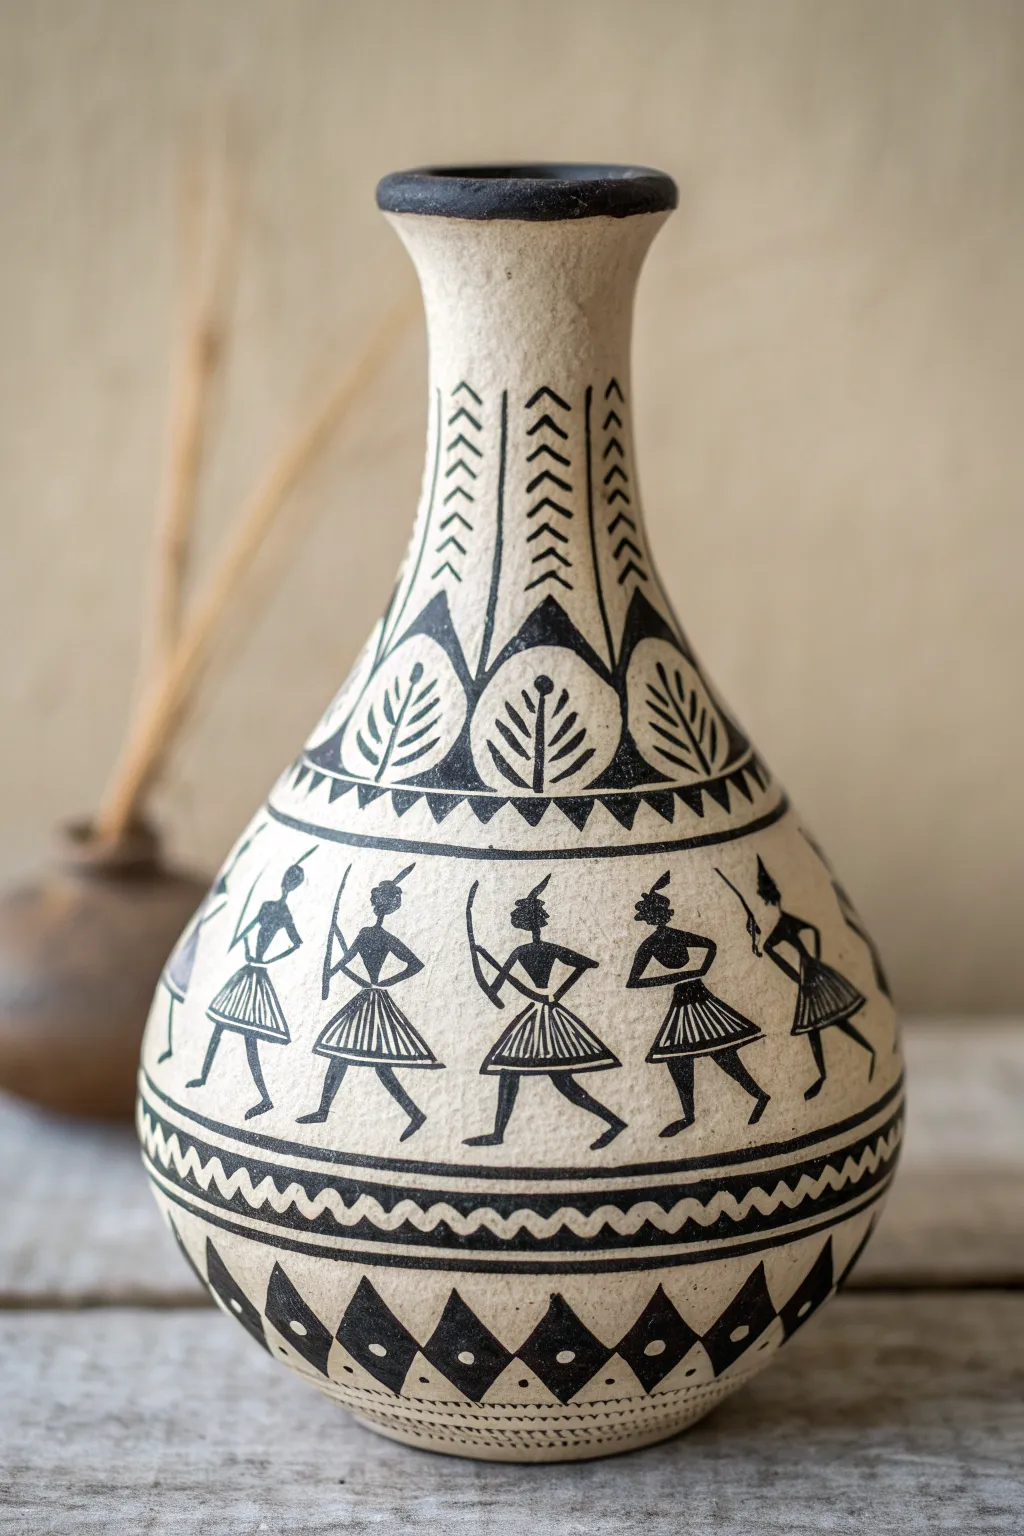
Bring the timeless charm of traditional tribal art to your home with this striking hand-painted vase. The design features rhythmic geometric patterns and lively dancing stick figures, echoing the simplicity and spirit of ancient Warli mud paintings.
Step-by-Step Tutorial
Materials
- Terracotta or ceramic vase (tear-drop or bottle shape)
- Beige or cream matte acrylic paint (for the base)
- Black acrylic paint
- Sponge dabber or wide flat brush
- Fine liner brush (size 0 or 00)
- Round brush (size 2)
- Pencil
- Matte spray varnish
Step 1: Faux Mud Base
-
Prepare the surface:
Clean your vase thoroughly with warm soapy water to remove any dust or oils. Let it dry completely before starting. -
Apply the base coat:
Using a sponge dabber, apply a coat of beige or cream acrylic paint. The dabbing motion creates a slight texture that mimics a traditional mud wall better than a brushstroke would. -
Build opacity:
Let the first layer dry for about 20 minutes. Apply a second or third coat until you have a solid, opaque background with a soft, matte finish.
Steady Hand Trick
Rest your pinky finger against the dry surface of the vase while painting fine lines. This acts as an anchor and stabilizes your hand for straighter strokes.
Step 2: Sectioning the Design
-
Mark horizontal bands:
Lightly use a pencil to draw horizontal rings around the vase. You need a band at the neck, a wider band at the shoulder for leaves, a central wide band for the figures, and narrower bands at the bottom for geometric borders. -
Sketch the neck patterns:
In the neck area, lightly sketch vertical lines to create segments. Inside these segments, draw stacked chevron arrows pointing upward. -
Outline the shoulder motifs:
Below the neck, sketch large, inverted teardrop shapes or ‘spade’ shapes that will house the leaf patterns. -
Draft the figures:
In the central band, sketch the stick figures. Use two triangles joined at the tip for the body (like an hourglass), lines for limbs, and a simple circle for the head. Position them so they look like they are dancing or marching in a line.
Step 3: Painting the Motifs
-
Darken the rim:
Using the round brush and black paint, carefully paint the very top rim of the vase solid black for a bold finish. -
Paint the neck chevrons:
Switch to your fine liner brush. Carefully paint the vertical separating lines on the neck, then fill in the stacked chevron arrows with confident, short strokes. -
Fill the leaf motifs:
Paint the outline of the spade shapes on the shoulder. Inside each, paint a central stem and small, angled dashes on either side to create a stylized fern or leaf look. Fill the negative space between these shapes with solid black triangles. -
Create the heavy divider line:
Paint a thick black line separating the leaf section from the figure section. Add a row of small, solid black triangles hanging from this line, pointing downwards. -
Detail the figures:
Paint the heads of the figures as solid circles. For the bodies, outline the hourglass shape and fill the bottom triangle with vertical stripes to represent skirts or clothing. -
Add limbs and props:
With the liner brush, add the arms and legs. Draw simple lines for tools or sticks in their hands, keeping the lines fluid to suggest movement. -
Execute the lower borders:
Paint two parallel lines below the figures. In the space between them, add a wavy line (rickrack pattern) that runs the circumference of the vase. -
Finalize the base:
For the very bottom section, paint a row of large diamonds. Fill the top and bottom corners of each diamond with black, leaving a lighter diamond shape in the center, or dot the centers for extra detail.
Add Primitive Key
Mix a tiny bit of baking soda into your beige base paint. This adds a gritty, authentic texture that makes the vase look like real sun-baked clay.
Step 4: Finishing Touches
-
Review and refine:
Check for any uneven lines or pencil marks that are still visible. You can carefully erase stray pencil marks once the paint is 100% dry. -
Seal the artwork:
Once the paint has cured for at least 24 hours, take the vase outside and spray it with a matte clear varnish to protect the design without adding unwanted shine.
Place your finished vase near a window where natural light can highlight the rhythmic patterns and earthy textures
Blue-and-White Ceramic Illusion
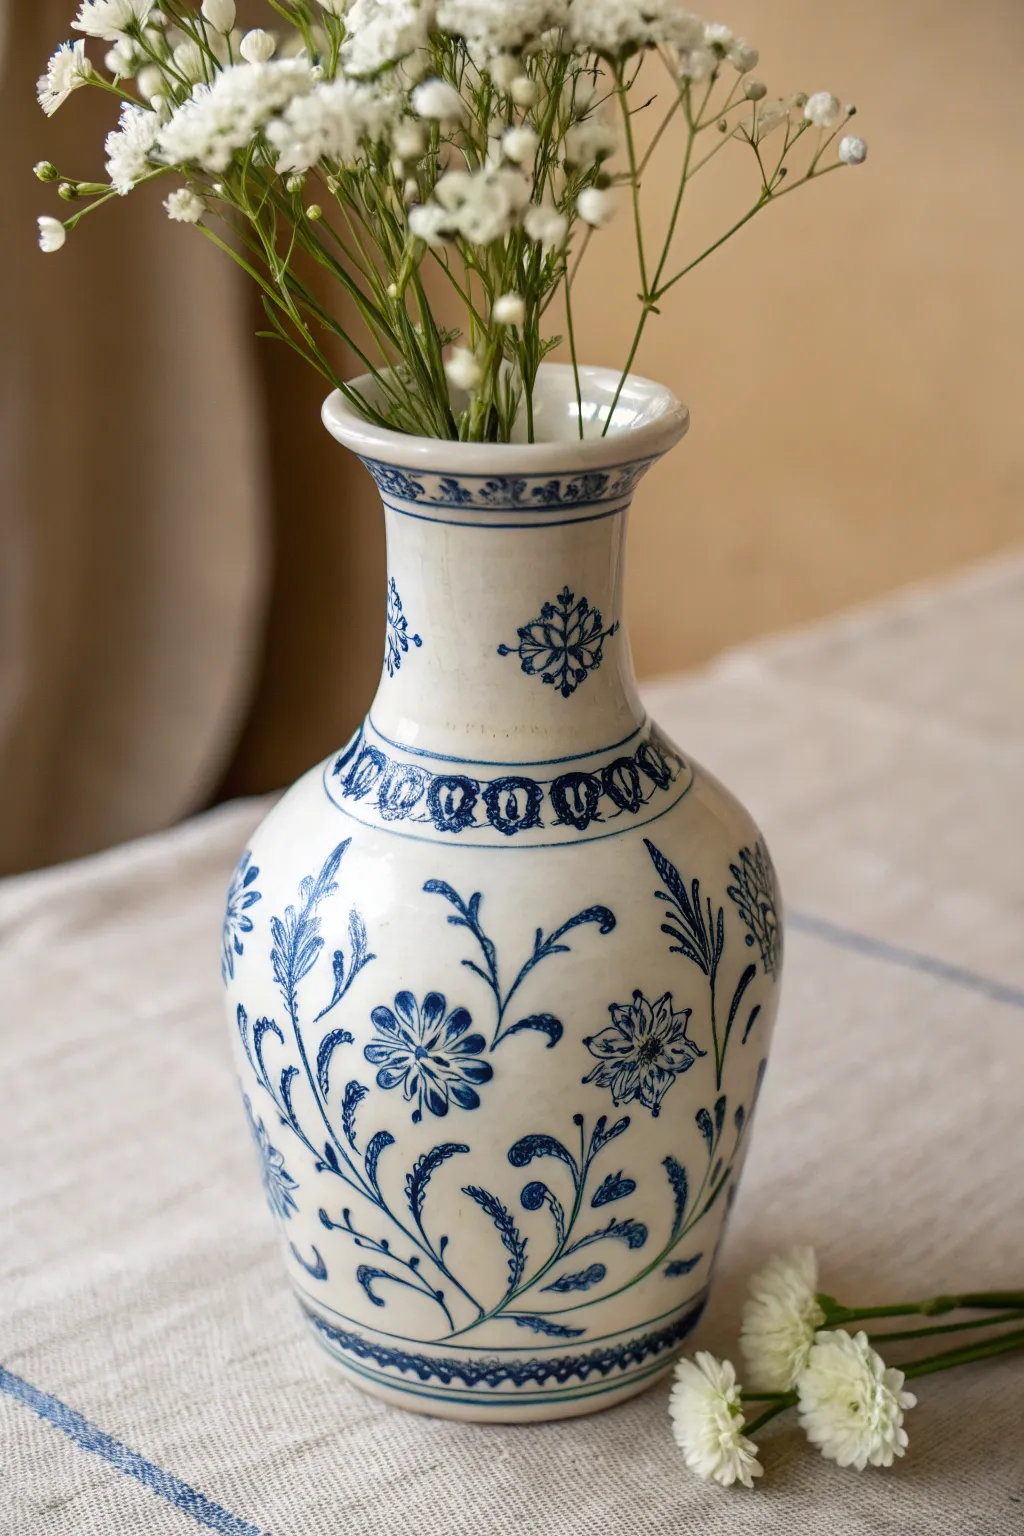
Transform a simple terracotta or clay vessel into a stunning replica of antique blue-and-white porcelain. This project uses high-gloss finishes and precise brushwork to mimic the classic elegance of Delftware or Chinese ceramics.
Step-by-Step
Materials
- Clean terracotta or clay vase
- High-gloss white spray paint (enamel preferred)
- Fine-grit sandpaper (400 grit)
- Cobalt blue acrylic paint
- Navy blue acrylic paint
- Fine liner brush (size 0 or 00)
- Small round brush (size 2)
- Clear high-gloss spray sealant
- Pencil
- Water cup and palette
Step 1: Base Preparation
-
Surface smoothing:
Begin by lightly sanding your clay vase with fine-grit sandpaper to remove any large bumps or rough patches. Since we are aiming for a porcelain look, the smoother the surface, the more convincing the illusion will be. -
Initial priming:
Wipe away all sanding dust with a damp cloth. Apply a thin, even coat of high-gloss white spray paint. Keep the can moving to avoid drips, as gloss paint is unforgiving with runs. -
Building opacity:
Allow the first coat to dry completely according to the manufacturer’s instructions. Apply a second and potentially third coat until the clay color is entirely hidden and you have a bright, shiny white surface. -
Curing time:
Let the white base cure for at least 24 hours. This is crucial because if the base is soft, your brush might drag through it or the blue paint might bleed.
Step 2: Structured Layout
-
Marking bands:
Using a pencil very lightly, draw guide rings around the neck and the shoulder of the vase. These will serve as boundaries for the decorative geometric borders seen in the reference. -
Sketching the motif:
Lightly sketch the main floral stems flowing upward from the bottom. Don’t press hard; you just need a faint path to follow so your composition remains balanced.
Slippery Paint?
Painting on gloss can be tricky. If the paint beads up, mix a tiny drop of dish soap into your acrylics to break the surface tension and help it adhere.
Step 3: Painting the Design
-
Mixing the blues:
Squeeze out your cobalt blue and navy blue onto the palette. I like to slightly water down the navy blue to an ink-like consistency, which helps the liner brush glide smoothly over the glossy surface. -
Neck details:
Start at the top rim. Using the liner brush and navy blue, paint the delicate scrollwork pattern around the lip. Keep your wrist loose to create fluid, organic curves. -
Shoulder geometric band:
Move to the shoulder ring. Paint the repeating oval or chain-link pattern. Ensure the spacing is roughly even, but don’t worry about perfection; slight variations add to the hand-painted charm. -
Central icon:
Paint the small, diamond-shaped geometric flower motif on the center of the neck. Use the very tip of your size 0 brush to get sharp points on the petals. -
Main stems:
Switch to your main floral design on the body. Using the navy mix, paint the long, sweeping stems first. Use varying pressure—press down for thicker lines and lift up for hairline ends. -
Adding leaves:
Along the stems, add small, fern-like leaves. Use a ‘flick’ motion with the brush to taper the ends of each leaf sharply. -
Painting blossoms:
For the chrysanthemum-style flowers, start from the center and stroke outward. Use the cobalt blue for the petals to give them a slightly brighter tone than the dark stems. -
Layering depth:
Once the blue petals are dry, go back in with the darker navy and the fine liner brush to add tiny details, outlining select petals or adding dots to the flower centers for contrast. -
Base border:
Finish the painting phase by adding the double ring border near the bottom of the vase to ground the design.
Aged Antique Look
To make it look like an antique excavated piece, rub a little diluted brown paint into the crevices of the handles or base before the final seal.
Step 4: Final Glaze
-
Drying period:
Allow the blue acrylic paint to dry fully. On a glossy surface, acrylics can take a bit longer to set than on porous paper, so give it a few hours. -
Sealing the illusion:
Spray the entire vase with a clear high-gloss sealant. This unifies the sheen of the painted areas with the white background, completing the glass-like porcelain effect.
Place your fresh flowers inside and enjoy the timeless elegance of your new faux-ceramic creation


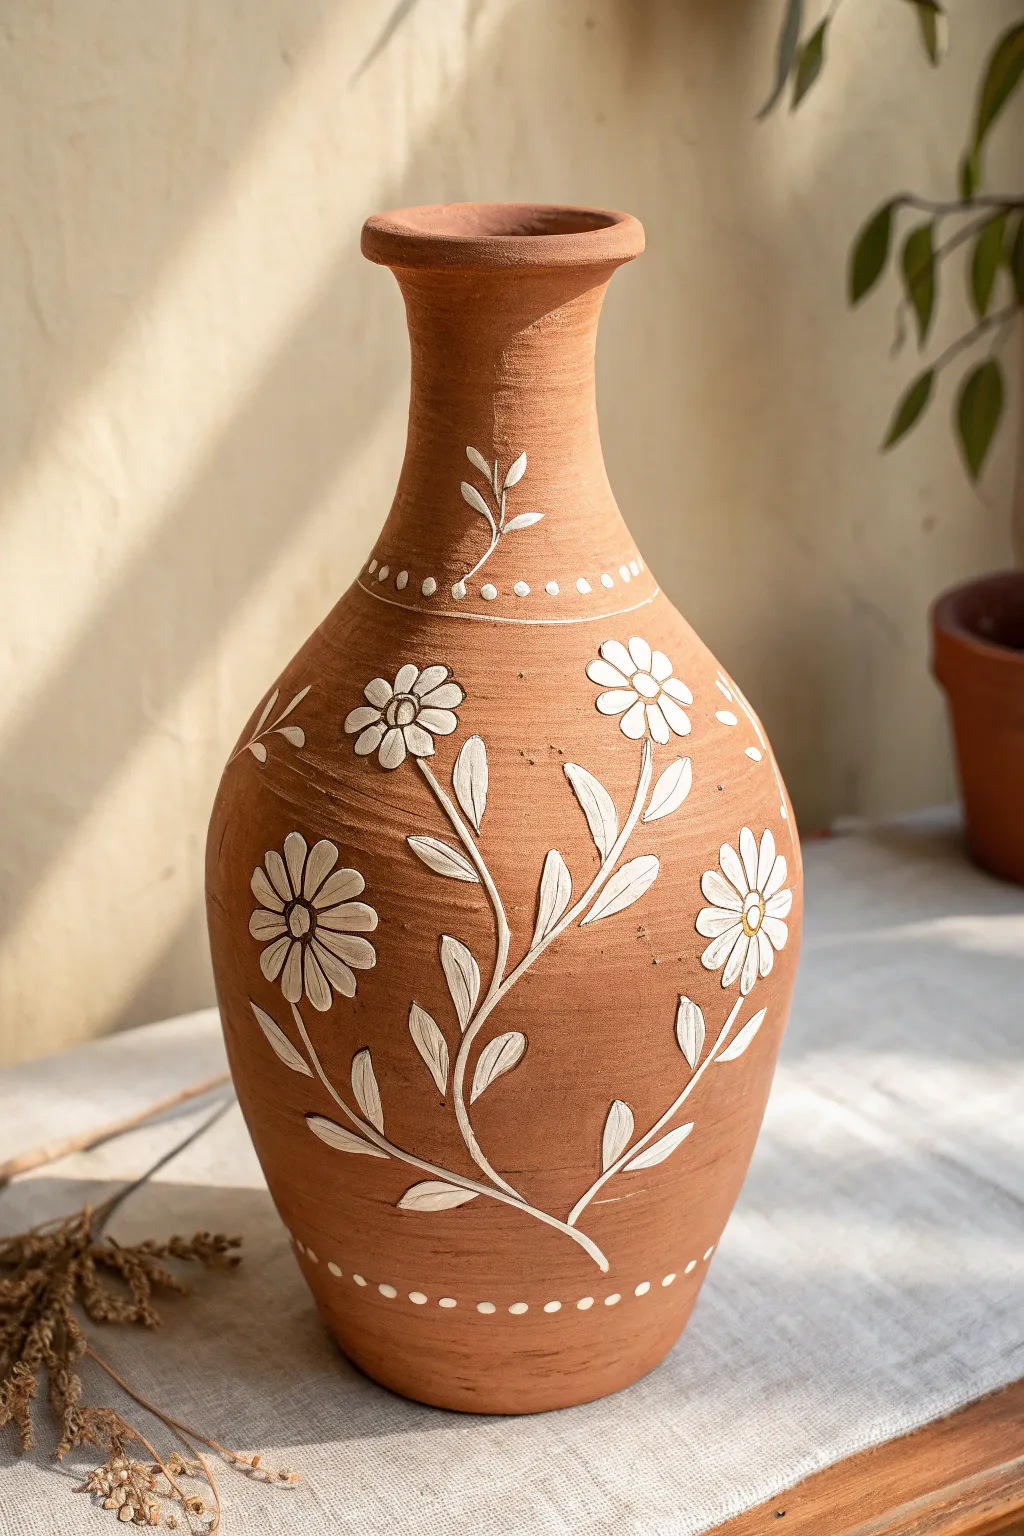
Leafy Botanicals With Simple Shading
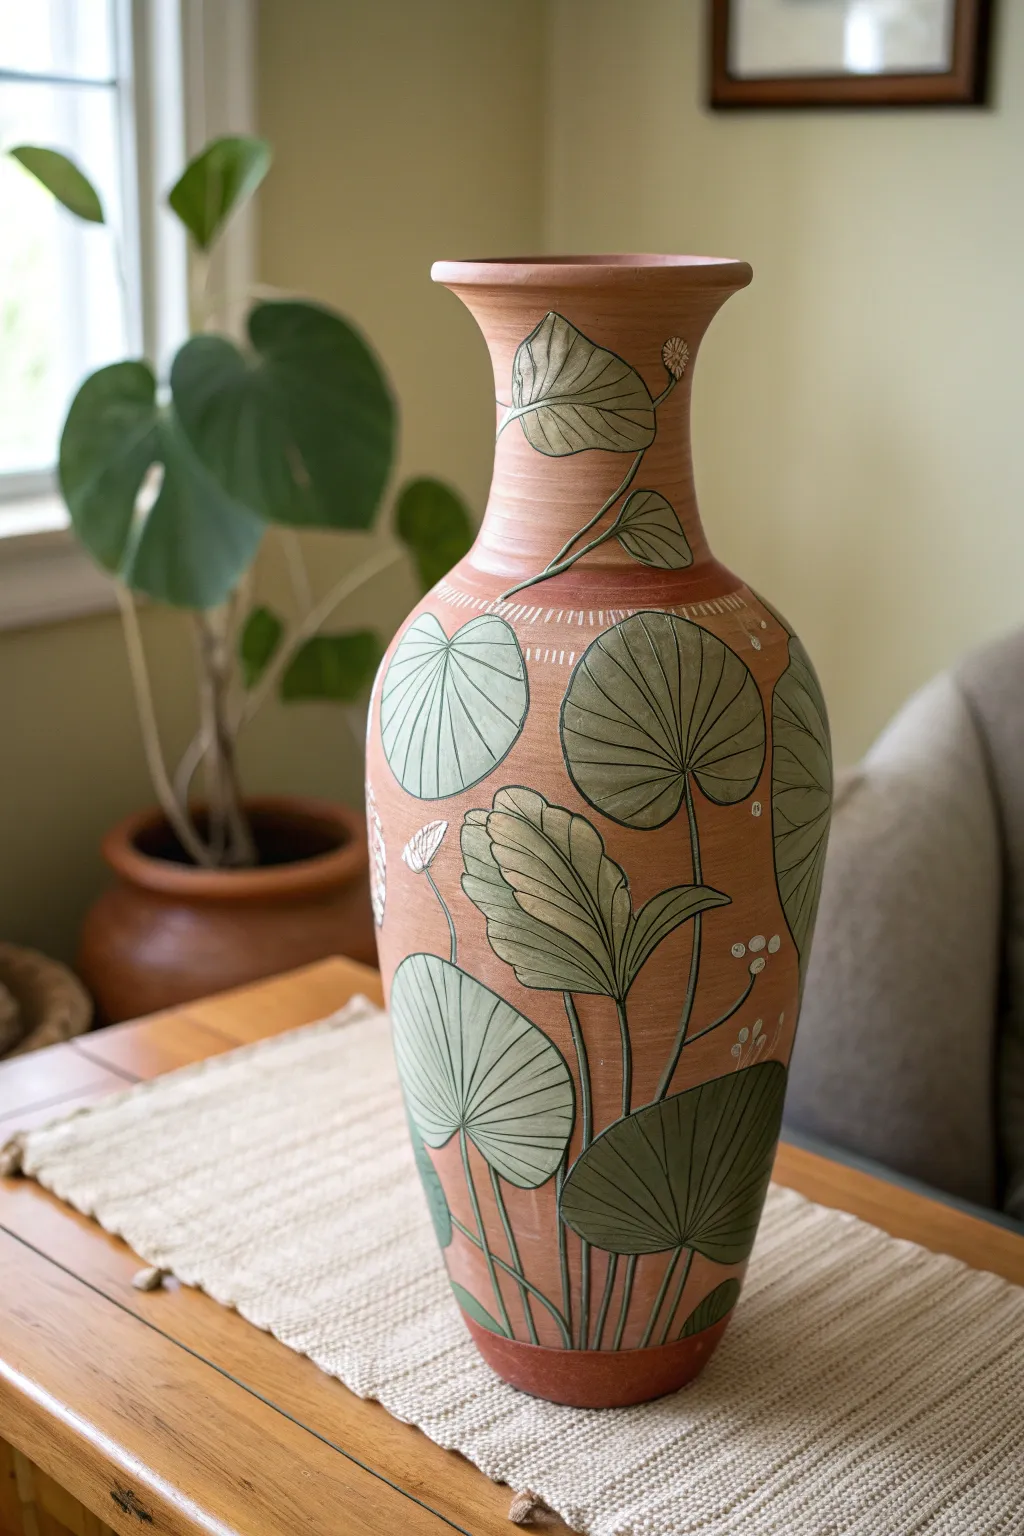
Transform a plain clay vessel into an earthy masterpiece by combining illustrative painting with subtle etching techniques. This project celebrates natural textures, using muted greens and creamy whites to create a layered, organic garden design that feels both modern and timeless.
Detailed Instructions
Materials
- Tall terracotta or earthenware vase (unglazed preferred)
- Pencil or white chalk pencil
- Acrylic craft paints (Sage Green, Olive Green, Cream/Off-White, Dark Brown)
- Small round brushes (Size 2 and 4)
- Fine liner brush (Size 0 or 00)
- Carving tool or sturdy needle tool (for etching)
- Matte spray varnish or sealant
- Water cup and paper towels
- Palette or paper plate
Step 1: Planning & Sketching
-
Clean the Surface:
Wipe down your terracotta vase with a slightly damp cloth to remove any kiln dust or oils. Let it dry completely so the pencil marks will take well. -
Map Out Stems:
Using a pencil or chalk pencil, lightly sketch the main flow of your stems. Start from the bottom base and curve them upwards, allowing them to intersect naturally. -
Add Leaf Shapes:
Draw large, rounded shapes for the lily-pad style leaves and elongated oval shapes for the standard foliage. Vary the sizes, placing larger leaves near the broad section of the vase and smaller ones near the neck. -
Detail the Veins:
Lightly sketch the internal vein structures within each leaf. For the round leaves, these should radiate from a central point; for the oval leaves, draw a central line with angled offshoots.
Paint Soaking In?
Raw terracotta is very thirsty. If your paint looks streaky or transparent, paint a layer of clear acrylic medium or watered-down white glue on the shapes first to seal the pores before adding color.
Step 2: Base Painting
-
Mix Your Greens:
Create two shades of green on your palette. Mix Sage Green with a touch of Cream for a lighter, opaque shade, and keep the Olive Green pure or darken it slightly with a drop of Brown. -
Fill Large Leaves:
Paint the large, round lily-pad leaves using the lighter Sage Green mixture. Use a size 4 brush and work carefully around your pencil lines, leaving a tiny gap of raw clay between the sections if possible. -
Paint Accent Leaves:
Switch to the Olive Green for the elongated, textured leaves. If the paint feels too thick on the porous clay, I usually dampen my brush slightly to help it glide. -
Add Cream Accents:
Locate a few specific leaves or flower buds near the top and bottom to highlight in Cream or White. This creates visual balance and brightens the earthy palette. -
Second Coat:
Terracotta absorbs paint quickly. Once the first layer is dry to the touch, apply a second coat to ensure the colors look solid and crisp against the reddish background.
Step 3: Defining & Etching
-
Outline the Stems:
Using a dark brown or dark green mix and your fine liner brush, paint the long, thin stems connecting all your leaves. Keep your hand steady and use long strokes. -
Outline the Leaves:
Outline each painted leaf shape with a very thin line of dark paint. This mimics the look of cloisonné or leaded glass and separates the green form from the clay body. -
Etch the Veins:
While the paint is fully dry (or even slightly tacky), take your carving or needle tool and gently scratch through the paint to reveal the clay underneath. Trace your original vein sketches. -
Create Texture:
For the darker leaves, you can scratch small, repetitive hash marks or stippling to give them a rougher, more organic texture compared to the smooth round leaves. -
Decorative Neck Detail:
Paint a ring of small white dashes or dots around the neck of the vase where it begins to narrow. This frames the artwork nicely.
Antique Wash
Dilute brown paint with lots of water and wash it over the entire finished piece, then wipe it back immediately with a rag. The dark pigment will settle into your etched lines for an aged look.
Step 4: Finishing Touches
-
Add Flower Buds:
Paint small, white oval buds at the tips of a few stray stems. Add tiny dots of yellow or brown at the base of these buds for dimension. -
Clean Up Lines:
If any paint went outside the lines, use a clean, stiff brush dipped in water to gently scrub the excess away, or careful scrape it off with your needle tool. -
Seal the Work:
Once the vase is completely dry (wait at least 24 hours), spray it with a clear matte sealant. This protects the acrylic from peeling and seals the raw clay surface.
Now you have a stunning, handcrafted vessel that brings a touch of the botanical garden into your home
Garden Herb Labels on Mud Vases
Transform a simple terra cotta vessel into a charming piece of garden decor with this layered painting technique. The natural clay provides a warm backdrop for crisp white bands and delicate, hand-drawn leafy illustrations.
Step-by-Step Guide
Materials
- Terra cotta vase or large pot
- White acrylic craft paint (chalk finish works well)
- Medium flat paintbrush (1/2 inch to 1 inch)
- Fine liner or round brush (size 1 or 2)
- Brown acrylic paint (burnt umber or sienna)
- Pencil for sketching
- Matte spray sealer (optional)
- Ruler or measuring tape
- Painters tape (optional)
Step 1: Preparation & Base Layers
-
Clean surface:
Begin by wiping down your terra cotta vase with a damp cloth to remove any dust or manufacturing residue. Let it dry completely so the paint adheres properly. -
Plan your bands:
Decide on the placement of your painted sections. For this design, you need a white band around the neck and a larger white band around the main body, leaving the natural clay exposed at the rim, shoulder, and base. -
Mark the lines:
Using a pencil and a ruler, light mark the horizontal boundaries of your white bands to keep them relatively straight. If you aren’t confident in your freehand abilities, apply painters tape along these lines. -
Paint the neck:
Load your flat brush with white acrylic paint. Apply the first coat to the neck section, stopping just before the flared rim and ending at the shoulder curve. -
Paint the body:
Move to the main body of the vase and paint the larger central band. Don’t worry if the coverage is slightly streaky on the first pass; terra cotta is very absorbent. -
Apply second coat:
Once the first layer is dry to the touch (usually 15-20 minutes), apply a second coat of white paint to ensure a solid, opaque background for your illustrations.
Steady Hand Trick
Rest your pinky finger on a dry part of the vase while painting fine lines. This acts as an anchor, giving you much more control over the brush pressure.
Step 2: Adding the Details
-
Mix the line color:
While the white bands dry fully, prepare your brown paint. You want a shade that complements the natural clay color—burnt umber works beautifully. -
Thin the paint:
Add a tiny drop of water to your brown paint. This helps the paint flow more smoothly off a fine liner brush, which is crucial for getting crisp, thin stems. -
Sketch the neck designs:
Lightly sketch your botanical designs onto the white neck band with a pencil. Draw simple vertical stems branching out into small, circular berries or buds. -
Paint neck botanicals:
Using your fine liner brush and the thinned brown paint, carefully trace over your pencil lines on the neck. Keep your hand steady and use only the tip of the brush. -
Decorate the shoulder:
On the exposed terra cotta shoulder (between the two white bands), freehand some horizontal leaf patterns. Draw a long horizontal stem with leaves fanning out, adding small curlicues for texture. -
Body botanical sketch:
Move to the large white band on the body. Pencil in a variety of plant shapes—try a mix of tall stemmed flowers, leafy ferns, and branched twigs to create a wildflower meadow effect. -
Paint body botanicals:
Go over your body sketches with the liner brush and brown paint. I find it helps to rotate the vase as you work to prevent smudging wet paint with your hand. -
Base floral details:
Repeat the horizontal leaf motif on the bottom section of exposed clay, mirroring the style you used on the shoulder.
Step 3: Refining & Finishing
-
Add detail dots:
Dip the handle end of a small paintbrush into your white paint. Use this to stamp a row of small, uniform dots along the top and bottom edges of the shoulder clay band. -
Lower dot border:
Repeat the dotting process along the top edge of the bottom clay section. These dotted lines act as a frame, tying the white painted sections and natural clay together. -
Clean up sketch lines:
Once all paint is completely dry, gently erase any visible pencil marks. Be careful not to scrub too hard over the matte paint. -
Seal the work:
If you plan to use this outdoors or near water, apply a coat of matte spray sealer to protect your handiwork from moisture and fading.
Paint Bleeding?
If paint seeps under your tape, let it dry, then gently scrape the excess away with a craft knife or touch it up with a small brush and the background color.
Now step back and admire how a few simple brushstrokes turned plain clay into a custom work of art
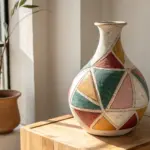
Modern Terrazzo Speckle Pattern
Transform a plain ceramic or clay vase into a trendy piece of decor with this easy faux terrazzo technique. By layering irregular painted shapes over a speckled base, you’ll achieve the high-end look of polished stone without the weight or cost.
Detailed Instructions
Materials
- Plain ceramic or terra cotta vase (clean and dry)
- White or cream spray primer
- Cream or beige acrylic craft paint (matte finish)
- Acrylic paints in earth tones (terracotta, burnt sienna, sage green, olive green, dark brown)
- Black liquid acrylic paint or ink
- Old toothbrush
- Small flat synthetic brush
- Small round detail brush
- Matte clear sealant spray
- Paper plate or palette
- Water cup and paper towels
- Cardboard box (for spraying)
- Latex gloves
Step 1: Preparation & Base Coat
-
Clean surface:
Begin by wiping down your vase with a damp cloth to remove any dust or oils. If the vase is glossy, give it a light sanding with fine-grit sandpaper to help the paint adhere better. -
Prime the vase:
Set up your vase inside a cardboard box in a well-ventilated area. Apply a thin, even coat of white spray primer. Rotate the vase to ensure full coverage and let it dry according to the can’s instructions. -
Apply base color:
Once primed, use a wide flat brush to paint the entire vase with your cream or beige acrylic paint. This creates the ‘stone’ background color. -
Add a second coat:
Allow the first coat to dry for about 20 minutes. Apply a second coat to ensure the color is solid and opaque, hiding any brushstrokes. -
Create fine speckles:
Dilute a small amount of black or dark brown paint with water until it’s inky. Dip an old toothbrush into this mixture. -
Splatter technique:
Hold the toothbrush near the vase and run your thumb across the bristles to flick tiny specks onto the surface. Rotate the vase to get even coverage. This mimics the sandy texture of real terrazzo.
Paint looking transparent?
Yellow and orange pigments are often naturally translucent. If your terracotta shapes look streak, let them dry fully and dab on a second layer just over those specific spots.
Step 2: Painting the Stone Chips
-
Mix your palette:
Pour dollar-coin-sized puddles of your earth tone paints (terracotta, sage, burnt sienna) onto your palette. Keep them separate for now. -
Paint large shapes:
Using a small flat brush, paint irregular, angular shapes using your terracotta color. Think of scattered geometric shards—triangles with soft corners or uneven trapezoids. Space them out generously. -
Add secondary colors:
Switch to your sage green paint and add similar irregular shapes in the empty spaces. Vary the sizes; some should be the size of a fingernail, others smaller like a grain of rice. -
Layer darker tones:
Use the dark brown or burnt sienna to add the smallest ‘chips.’ I find it helpful to place some of these very close to the lighter shapes to create a sense of density. -
Refine the shapes:
Go back with your detail brush and sharpen the edges of any shapes that look too round. Real terrazzo chips are broken stone, so they rarely have perfect curves. -
Add depth:
Select a few of your larger shapes and mix a tiny bit of white into their original color. Paint a small highlight on one side of the shape to give it slight dimension. -
Check balance:
Step back and look at the vase from a distance. If any area looks too empty, add a few tiny dots or small shards to balance the composition.
Step 3: Finishing Touches
-
Dry completely:
Let the painted design dry for at least 2 hours. If you painted the shapes thickly, give it extra time to ensure moisture doesn’t get trapped. -
Seal the work:
Take the vase back to your spray box. Apply a light coat of matte clear sealant. This protects the paint from chipping and unifies the sheen of the different colors. -
Apply final coat:
After the first sealing coat is dry to the touch, apply a second coat for durability. Let this cure overnight before handling extensively or adding flowers.
Add some sparkle
For a luxe twist, mix metallic gold or copper paint into your rotation. Paint a few of the small shards with the metallic shade to catch the light like real quartz.
Place your favorite dried botanicals inside and enjoy the modern, artistic touch this vase adds to your room
Painted Mosaic Tile Effect With Outlines
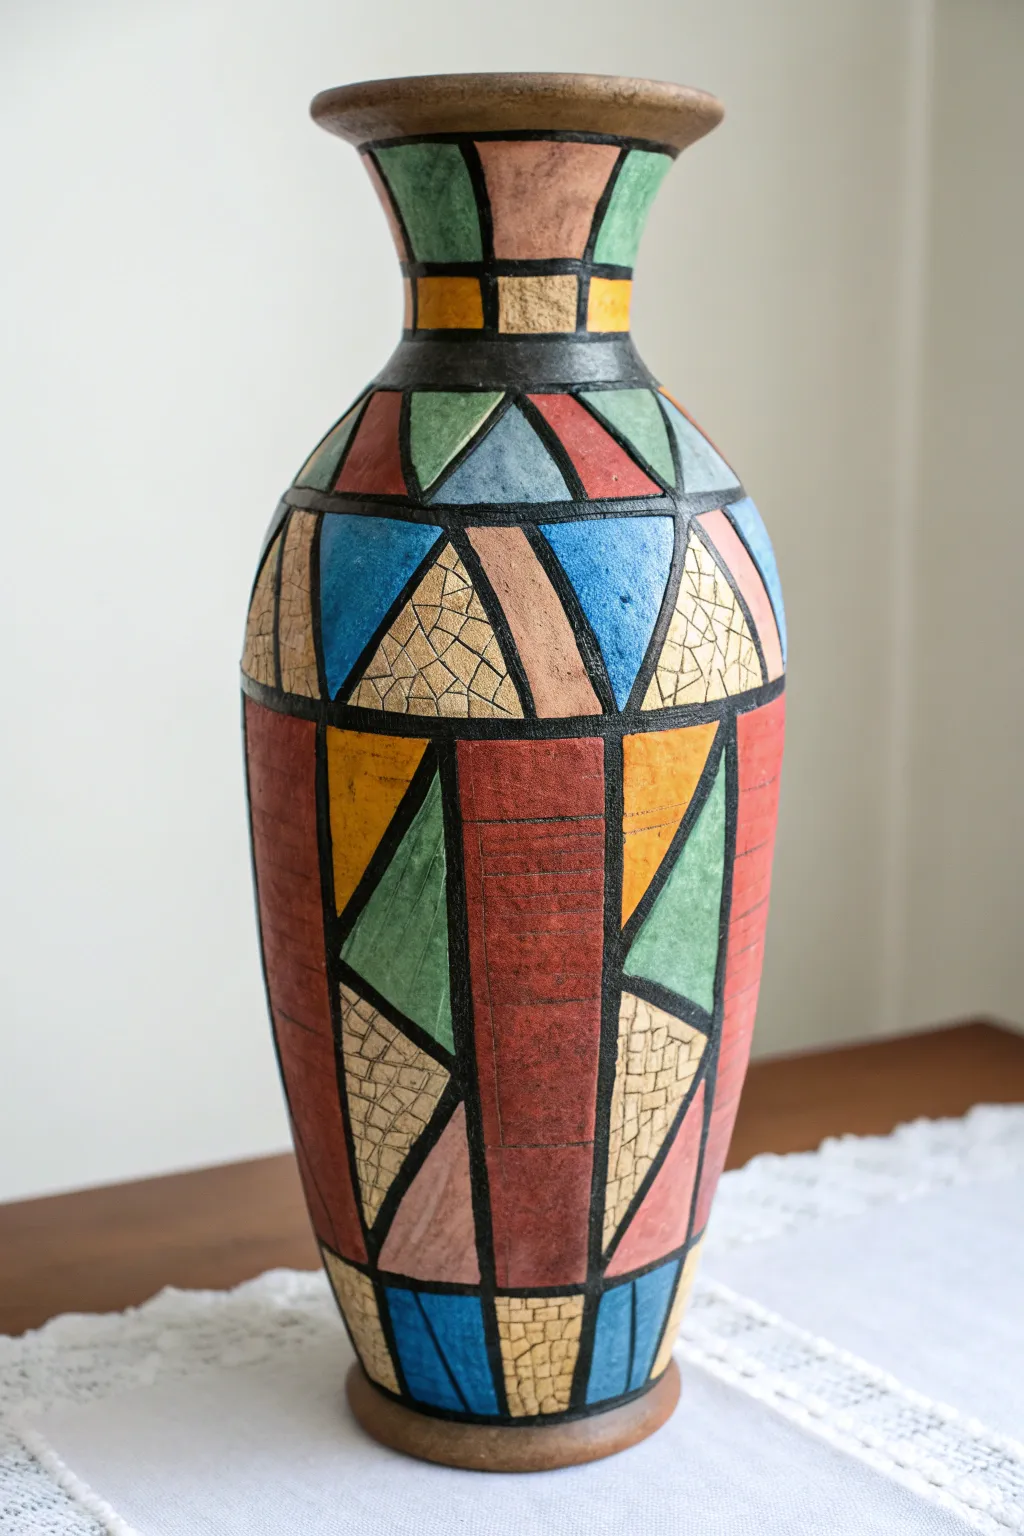
Transform a plain ceramic or glass vessel into a striking piece of decor that mimics the look of stained glass or mosaic tile work. By combining bold black outlines with textured paint effects and earthy jewel tones, this project achieves a sophisticated, artisan finish.
How-To Guide
Materials
- Tall vase (ceramic, terra cotta, or glass)
- Black liquid leading or dimensional fabric paint (puffy paint)
- Acrylic paints (rust red, teal, ochre yellow, light blue, dusty pink, cream)
- Small flat brush
- Fine detail brush
- Texture medium or fine sand (optional)
- Clear matte sealer spray
- Pencil and eraser
- Ruler or flexible measuring tape
Step 1: Planning and Outlining
-
Clean surface:
Begin by thoroughly cleaning your vase with soap and water or rubbing alcohol to remove any oils or dust. Let it dry completely. -
Plan vertical sections:
Using a pencil, lightly mark horizontal rings around the vase to divide it into sections. Look at the image: there is a ring at the neck, one at the shoulder, one at the widest point, and one near the base. -
Draft the geometry:
Sketch your geometric shapes within these bands. Focus on creating large triangles and trapezoids that intersect. Don’t worry about perfection; a hand-drawn look adds to the charm. -
Apply the lead lines:
Trace over your pencil lines using black liquid leading or black dimensional fabric paint. Squeeze the bottle with consistent pressure to create raised, uniform lines that simulate grout or lead calm. -
Dry the outlines:
Allow the black lines to dry fully, usually for at least 4-6 hours. They must be hard to the touch so you don’t smudge them while painting the inner sections.
Steady Hands
Rest your painting hand on a stack of books or a coffee mug while drawing lines. This stabilizes your wrist and results in much straighter, cleaner lead lines.
Step 2: Adding Color and Texture
-
Mix textured paint:
To achieve the ‘mud’ or stone look, mix a small amount of texture medium or fine sand into your acrylic paints. I find this helps the paint grip better and look more authentic. -
Paint the red sections:
Start with the rust red color. Identify the large vertical rectangular shapes and a few triangular accents, then fill them in using a small flat brush. Apply the paint thickly. -
Add the blues:
Move on to your teal and light blue shades. Paint the triangular sections near the shoulder and base, being careful to butt the paint right up against the raised black lines without going over them. -
Incorporate yellow and ochre:
Fill in the remaining triangular spaces with ochre yellow. If the color looks too flat, dab a tiny bit of brown into the wet paint to create a mottled, stone-like appearance. -
Paint the neck:
The neck uses a repeating pattern of green and pink trapezoids. Use a smaller brush here to stay neat within the tighter confines of the leading. -
Create the crackle effect:
For the cream-colored sections, we want a specific ‘cracked tile’ look. First, paint the section solid cream and let it dry. -
Detail the crackle:
Using a very fine detail brush and watered-down brown or dark ochre paint, carefully draw tiny, jagged web patterns over the dry cream paint to simulate crazing or mosaic grout lines.
Step 3: Finishing Touches
-
Create the horizontal texture:
Look closely at the tall red sections in the reference image—they have faint horizontal scratches. While the red paint is tacky (or by adding a second thin coat), gently drag a stiff, dry brush horizontally across it to create these striations. -
Touch up lines:
Inspect your work. If any paint accidentally got onto the black raised lines, use a fine black marker or a tiny bit of black paint to cover the mistake and sharpen the grid. -
Paint the rims:
Finish the top rim and the very bottom edge of the vase with a solid brown or bronze color to frame the artwork. -
Seal the vase:
Once all paint is completely dry (wait 24 hours to be safe), take the vase to a ventilated area. Spray it with a clear matte sealer to protect the paint and unify the sheen.
Metallic Accent
For a refined twist, gently rub a small amount of gold wax or metallic paint over the black raised lines after they are dry to give the ‘lead’ an antique bronze finish.
Place your new geometric vase in a spot with good natural light to highlight the rich textures you’ve created
Rustic Mud-Dipped Texture Band
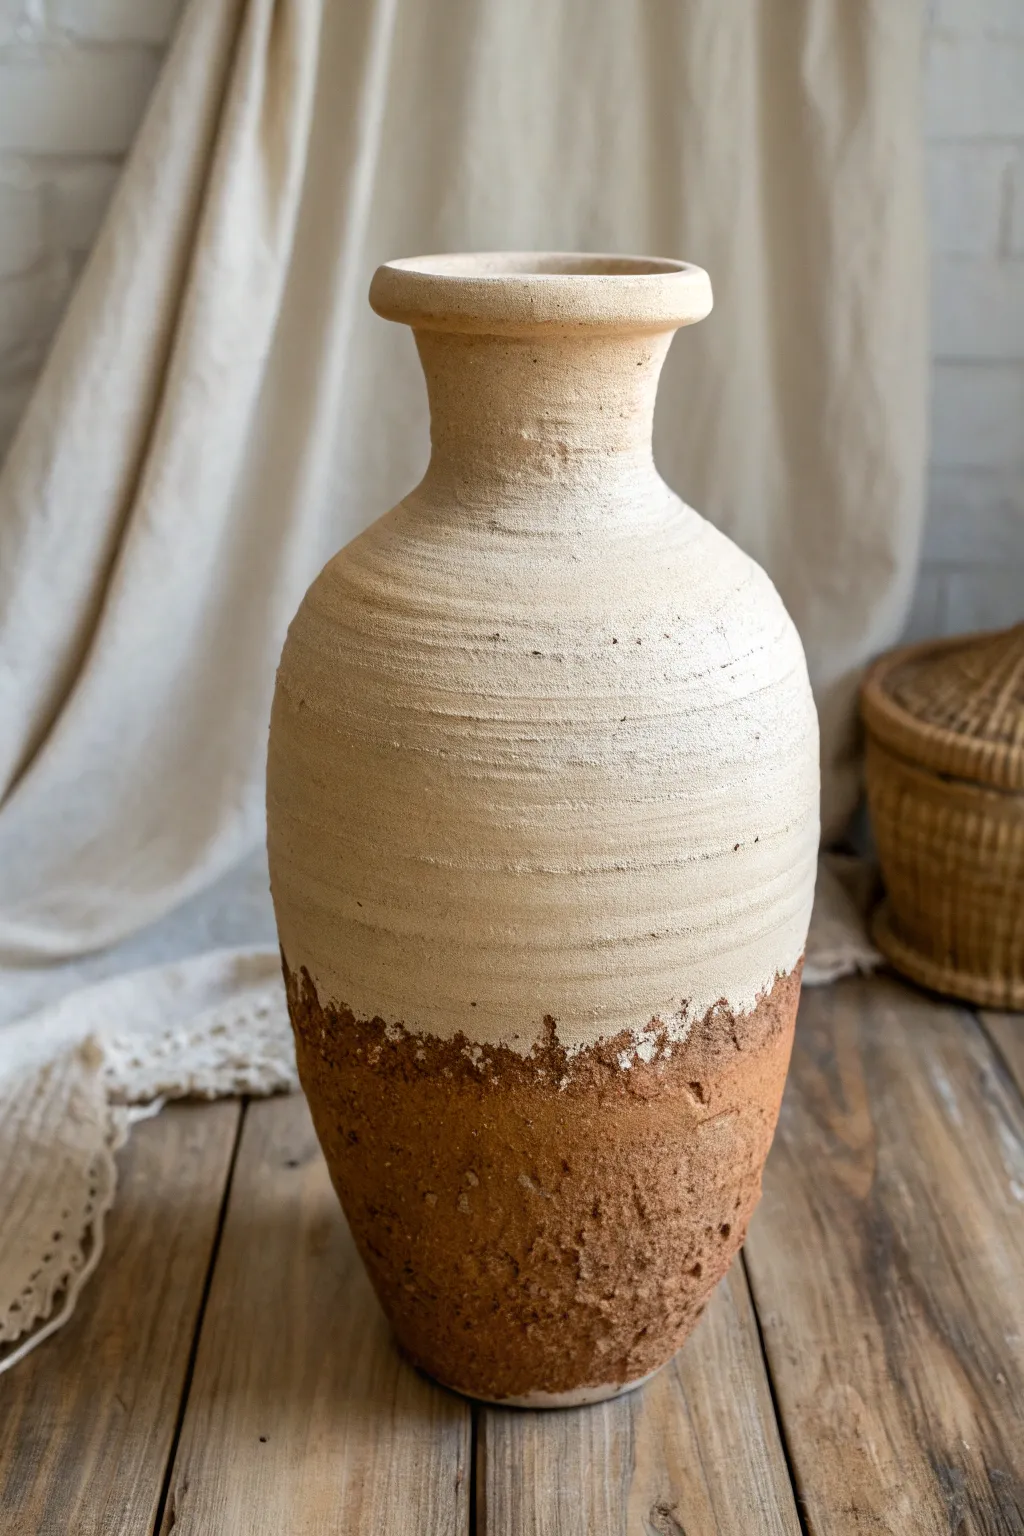
Transform a plain ceramic vase into an aged, archaeological treasure with this two-tone textural technique. By combining paint with baking soda and real soil, you’ll create a striking contrast between smooth, creamy ceramics and raw, earthy sediment.
Step-by-Step Guide
Materials
- Tall ceramic vase (thrifted or new)
- Matte cream or off-white acrylic paint
- Burnt sienna or reddish-brown acrylic paint
- Baking soda
- Garden soil or fine sand
- Mod Podge or white PVA glue
- Medium flat paintbrush
- Stippling sponge or old stiff-bristled brush
- Two mixing containers
- Paper plate or palette
- Drop cloth
Step 1: Base Preparation
-
Clean surface:
Begin by thoroughly cleaning your vase with soapy water and drying it completely to ensure your texture paste adheres properly. -
Mix texture paint:
In a mixing container, combine your cream acrylic paint with baking soda. Aim for a 1:1 ratio until the mixture reaches a fluffy, mousse-like consistency. -
Apply base coat:
Brush the baking soda paint mixture over the entire vase. Don’t worry about perfect smoothness; thick horizontal brushstrokes add character. -
Create ridges:
While the paint is still wet, drag your brush horizontally around the circumference of the vase to create subtle striations and ridges similar to wheel-thrown pottery. -
Dry completely:
Let this base layer dry fully. Depending on the thickness of your paint, this usually takes about an hour or two.
Secrets of the Soil
For the most authentic color, bake your garden soil in the oven at 200°F for 20 mins first. This dries it out and kills bacteria.
Step 2: Creating the Mud Mix
-
Prepare the earth mixture:
In a separate cup, mix your burnt sienna acrylic paint with a generous amount of Mod Podge or PVA glue. -
Add texture:
Stir in your garden soil, sand, or dried coffee grounds. You want a thick, gritty paste that holds its shape but is still spreadable. -
Adjust color:
If the soil darkens the mix too much, add a touch more orange or red paint to maintain that warm, terracotta hue seen in the reference.
Step 3: Application and Blending
-
Map the line:
Visualize where you want your ‘mud line’ to start. It should be roughly the bottom third of the vase. -
Apply the mud:
Use a stippling sponge or an old brush to dab the brown texture paste onto the bottom section of the vase. -
Build thickness:
Apply the paste thickly at the very bottom, creating a heavy, encrusted look that mimics dried earth. -
Create the transition:
As you move upward toward the cream section, use less paste on your applicator. -
Distress the edge:
Instead of a straight line, dab unevenly at the border. Allow some higher peaks and lower valleys to make the mud look like it was naturally dipped. -
Refine the texture:
While wet, press a dry paper towel or sponge gently into the brown paste to pull up peaks and create an even rougher surface. -
Add dry brushing:
Here I prefer to take a tiny amount of the original cream paint and lightly dab it right at the transition line to soften the contrast slightly.
Texture Sliding Off?
If the mud paste is sliding down the vase, your mix is too wet. Add more dry soil or a teaspoon of baking soda to stiffen the paste instantly.
Step 4: Sealing
-
Dry time:
Allow the vase to dry overnight. The thick mud texture needs significantly longer to cure than standard paint. -
Seal the work:
Once bone dry, spray the entire piece with a matte clear sealer. This prevents the soil particles from flaking off over time.
Now you have a stunning, earth-inspired vessel that brings organic warmth to your decor shelf
Sgraffito Scratch-Through Painted Layer
This project transforms a simple vessel into a stunning piece of faux-ancient pottery using the sgraffito technique. By layering dark matte paint over a lighter base and scratching intricate patterns through the top coat, you reveal the warm earth tones underneath for a striking contrast.
Step-by-Step Tutorial
Materials
- Ceramic or terracotta vase (smooth surface)
- Terracotta or warm ochre acrylic paint (base coat)
- Matte black or dark charcoal chalk paint (top coat)
- Medium flat paintbrush
- Foam brush
- Sgraffito tool, etching needle, or a sharp wooden skewer
- Pencil (optional)
- Ruler or measuring tape
- Clear matte sealer spray
Step 1: Base Preparation
-
Clean the surface:
Begin by wiping down your vase with a damp cloth to remove any dust or oils. Let it dry completely to ensure the paint adheres properly. -
Apply the warm base color:
Using a flat paintbrush, cover the entire vase with your terracotta or warm ochre acrylic paint. This color represents the ‘reveal’ layer that will show through your scratches later. -
Ensure opacity:
Allow the first coat to dry, then apply a second coat if necessary. You want a solid, opaque layer of warm color without any of the original vase showing through. -
Let it cure:
Let this base layer dry thoroughly—I usually give it at least an hour. If the base is tacky, the top coat might drag it up when you start scratching.
Pro Tip: Tool Selection
Don’t have professional pottery tools? A metal cuticle pusher or the back of a small paintbrush works perfectly for wider lines, while a needle creates fine details.
Step 2: Applying the Sgraffito Layer
-
Apply the dark top coat:
Using a foam brush for a smooth finish, apply a layer of matte black or dark charcoal chalk paint over the entire terracotta base. -
Wait for the perfect texture:
This is the most critical timing step. You want the black paint to be ‘leather hard’—dry to the touch but not fully cured so it scratches away cleanly without chipping. -
Test the dryness:
Touch an inconspicuous area near the bottom. If it’s cool and dry but your fingernail leaves a slight indent, it’s ready for carving.
Step 3: Carving the Design
-
Mark your boundaries:
Lightly scratch two horizontal rings around the neck area to define the upper band of the pattern. You can use a ruler to help keep the spacing consistent. -
Carve the diagonal hatch marks:
Inside the neck band, use your sgraffito tool to scratch diagonal lines. I find it easiest to work in small sections, slanting the lines towards the center to create a chevron-like feather pattern. -
Define the lower band:
Move near the bottom of the vase and scratch two more horizontal rings to create a footer border. Fill this with simple diagonal dashes similar to a rope texture. -
Plan the main chevron pattern:
For the large central section, lightly mark broad triangular peaks (zig-zags) around the body of the vase. These will serve as guides for your detailed lines. -
Execute the main lines:
Begin scratching long, confident diagonal lines following your guide marks. Leave a small gap between each line to keep the black negative space visible. -
Add inverted details:
Create the opposing side of the chevron by scratching diagonal lines that meet your previous ones at the peak, forming a series of large V-shapes. -
Refine the lines:
Go back over any lines that look too thin. Varying the pressure on your tool can create interesting variations in line width, mimicking authentic pottery. -
Clear debris:
As you work, paint crumbs will accumulate. Gently blow them away or use a very soft, dry brush to sweep them off without smearing the black paint.
Troubleshooting: Flaking Paint
If the black paint chips off in chunks rather than scratching smoothly, it’s too dry. Mist the painted surface very lightly with water and wait 2 minutes before trying again.
Step 4: Finishing Touches
-
Clean up edges:
Inspect your design for any ragged edges where the paint didn’t scratch cleanly. Use the tip of your tool to tidy up these spots. -
Final cure:
Allow the vase to sit for 24 hours to let the paint fully harden. This ensures the darker layer won’t smear during sealing. -
Seal the work:
Spray the entire vase with a clear matte sealer to protect the finish and prevent the exposed paint edges from chipping over time.
Display your new sgraffito vase in a well-lit spot to let those warm terracotta lines really glow
Drippy Paint Pour Down a Mud Vase
Recreate the stunning organic beauty of a kiln-fired drip glaze using simple paints on a ceramic or bisque vase. This project mimics the unpredictable elegance of melting glaze with a textured, layered approach that brings rustic charm to any shelf.
Step-by-Step Guide
Materials
- Bisque color or terracotta vase (matte finish)
- Acrylic paints (Cream, Sage Green, Beige/Tan, Gloss Medium)
- Baking soda or plaster powder (for texture)
- Paintbrushes (medium flat brush and fine liner)
- Squeeze bottle or plastic spoon
- Spray matte sealant
- Palette for mixing
Step 1: Base Preparation
-
Clean surface:
Begin by wiping down your vase with a damp cloth to remove any dust or oils. This ensures your paint adheres properly and lasts longer. -
Create the base texture:
Mix a dollop of tan/beige acrylic paint with a teaspoon of baking soda. This creates a gritty, stone-like texture that mimics raw clay. -
Apply base coat:
Paint the bottom third of the vase with your textured tan mixture. Don’t worry about being perfect; an uneven finish adds to the handmade pottery look. -
Speckle effect:
Once the base is semi-dry, flick a stiff toothbrush loaded with watered-down brown paint lightly over the tan section to create tiny clay speckles.
Step 2: The Middle Layer
-
Mix creamy white:
Prepare a warm cream or off-white acrylic paint. Add a tiny amount of baking soda here as well, but less than the base layer for a smoother contrast. -
Paint the mid-section:
Apply this cream color starting from just above the tan section, extending up to the neck of the vase. I like to overlap the tan slightly to blend the transition. -
Feather the edge:
While the paint is wet, use a dry brush to gently feather the meeting point between the cream and tan so there isn’t a harsh straight line. -
Dry completely:
Let the vase sit for at least an hour. The base layers must be fully dry before we attempt the drip technique.
Paint Running Too Fast?
If your drips are racing to the bottom, your paint is too thin. Let it sit exposed to air for 10 minutes to thicken, or mix in a tiny bit more heavy body acrylic.
Step 3: The Drip Technique
-
Prepare the drip glaze:
Mix sage green acrylic paint with a gloss medium or pouring medium. You want a consistency like heavy cream—thick enough to hold shape, but fluid enough to run. -
Paint the neck:
Start by painting the entire neck and rim of the vase with your glossy green mixture using a flat brush. -
Load the drip tool:
Pour some of your green mixture into a squeeze bottle or load up a plastic spoon heavily. -
Start the drips:
Position your tool at the shoulder of the vase (where it starts to curve downward). Squeeze or pour a small bead of paint and let gravity pull it down. -
Vary drip lengths:
Move around the circumference. Release more paint for long drips that reach the bottom, and less paint for short drips that stop midway. -
Connect the top:
Use a brush to smooth the connection between where your drips started and the painted neck, ensuring the green looks like one cohesive poured layer. -
Add dimension:
While the green drips are wet, you can carefully drag a clean, damp liner brush through the center of a few drips to reveal a hint of the cream color underneath, creating a translucent glaze effect.
High-Gloss Finish
For an ultra-realistic ceramic look, wait until the green paint is fully dry, then brush a layer of high-gloss varnish specifically over the green drips only.
Step 4: Finishing Touches
-
Rim detail:
Use a detail brush to paint a very thin, dark brown line along the absolute top edge of the rim to mimic the raw clay showing through the glaze. -
Dry vertically:
Let the vase stand undisturbed for several hours. Because the drip layer is thick, it needs significant time to cure. -
Seal only the bottom:
Since the green paint already has gloss medium, use a matte spray sealant only on the bottom tan and cream sections to maintain the contrast between ‘matte clay’ and ‘glossy glaze’.
Place your new faux-ceramic masterpiece in a sunny spot where the light can catch the glossy texture of the drips
Negative-Space Patterns That Show Raw Clay
This project transforms a plain terracotta vessel into a striking piece of decor by contrasting deep midnight blue paint against the warm, raw clay. The design features bold leaf motifs framed in cream-colored arches, topped with a playful geometric band.
Detailed Instructions
Materials
- Terracotta vase (clean and dry)
- Acrylic paint: Midnight Blue or Navy Blue
- Acrylic paint: Cream or Off-white (optional for lighter sections)
- Pencil
- Medium flat brush (approx. size 6-8)
- Small round detail brush (size 0 or 1)
- Dotting tool or back of a paintbrush
- Palette or paper plate
- Water cup and paper towels
- Clear matte varnish (spray or brush-on)
Step 1: Planning and Base Work
-
Surface Preparation:
Ensure your terracotta vase is free of dust and completely dry. If the surface feels slightly rough, you can lightly sand it with fine-grit sandpaper, but wiping it with a damp cloth is usually sufficient. -
Establish the Design Bands:
Visualize the vase in three horizontal sections: the neck/shoulder, the main body, and the base. Using your pencil, lightly draw a horizontal guideline just below the neck where the pattern will start, and another one below the main body curve where the leaf pattern will end. -
Sketch the Leaf Arches:
Around the widest part of the vase, pencil in large, vertical oval or pointed arch shapes. These will house the leaf designs. Try to space them evenly around the circumference; aiming for 4-5 arches usually works well depending on the vase size. -
Add the Upper Circles:
Between the neck ring and the top of your arches, sketch a row of touching circles. These should sit like a necklace around the shoulder of the pot. -
Determine the Lighter Backgrounds:
Notice how the leaf patterns sit on a slightly lighter, creamy clay tone in the reference image. If you want this effect, paint inside your pencil arches and inside the shoulder circles with a very watered-down wash of cream acrylic. Wipe it back immediately with a paper towel to create a stained, weathered look rather than a solid paint layer.
Steady Hand Tip
For cleaner lines on curved surfaces, rest your pinky finger against the dry part of the vase while you paint. This stabilizes your hand and acts as a pivot point.
Step 2: Painting the Main Features
-
Outline the Circles:
Load your medium round brush with midnight blue paint. Carefully paint thick outlines around the pencil circles you drew on the neck. Ensure the lines are consistent in width. -
Define the Arch Borders:
Moving to the main body, use the same blue to paint the triangular spaces *between* the arches. This negative painting technique defines the shape of the arches without outlining them directly. Fill these triangular gaps solidly with blue. -
Create the Stem:
Inside one of your lighter arch spaces, switch to your small detail brush. Paint a vertical curved line up the center to act as the main stem of the plant design. -
Paint the Leaves:
Using the medium brush, press and lift to create leaf shapes branching off the central stem. Start wide at the base of the leaf and taper to a sharp point. Aim for about 3-4 leaves on each side of the stem. -
Add Stem Details:
Once the stem is dry, use your small brush or a dotting tool to add tiny blue dots running up along the side of the central stem line for extra texture. -
Repeat the Pattern:
Continue this process for every arch around the vase: draw the stem, paint the leaves, and add the detail dots. I find it easiest to do all the stems first, then all the leaves, to keep the flow consistent.
Level Up: Sgraffito
Instead of painting the stem dots, paint the stem thick blue and use a toothpick to scratch the dots out while wet, revealing the clay underneath.
Step 3: Final Details and Finish
-
Upper Neck Dots:
Dip a small dotting tool or the handle end of a paintbrush into the blue paint. Add a single small dot in the center of the terracotta space above the circle band on the neck. -
Lower Body Dots:
Below the main leaf design, where the vase tapers down, add rows of decorative dots. Start with a row of larger dots just beneath the arches. -
Graduated Dot Sizes:
Add 2-3 more rows of dots below the first one. Try to stagger them like bricks and make them progressively smaller as you move downward toward the base. -
Cleanup:
Check for any smudges or uneven lines. If you made a mistake on the raw clay area, you can sometimes gently scrap it away with a craft knife or cover it with a tiny dab of paint mixed to match the terracotta color. -
Sealing:
Allow the paint to cure for at least 24 hours. To protect the design and the raw clay, apply a coat of clear matte varnish. This keeps the rustic look while making the vase easier to dust later.
Now step back and admire how the simple blue motifs bring an elegant, handcrafted energy to your pottery collection
Galaxy Night Sky on Earthenware
Transform a plain earthenware vase into a dreamy celestial landscape featuring a gradient galaxy background and delicate clouds. This project layers acrylics to create depth, capturing the magic of a star-filled evening.
How-To Guide
Materials
- Earthenware or terracotta vase (clean and dry)
- Acrylic paints (dark blue, violet, magenta, white, black)
- Flat shader brushes (medium and large)
- Small round detail brush (size 0 or 1)
- Small piece of sea sponge or kitchen sponge
- Palette or paper plate
- Cup of water
- Paper towels
- Matte or glossy varnish (optional)
Step 1: Creating the Gradient Base
-
Prep the surface:
Ensure your vase is free of dust and oil. If the surface is very porous, you might want to apply a base coat of white primer or gesso first to make the colors pop, though painting directly on the raw clay works for a more muted, earthy look. -
Paint the dark base:
Squeeze out a generous amount of dark blue paint mixed with a tiny drop of black. Using your largest flat brush, paint the bottom third of the vase using vertical strokes to simulate the darkness of the horizon. -
Apply the mid-tone violet:
Where the dark blue ends, introduce a rich violet color. While the blue paint is still slightly wet, blend the violet upwards into the middle section of the vase, smoothing the transition line so there are no harsh stripes. -
Add the glowing horizon:
Mix magenta with a little white to create a soft, dusty pink-purple. Apply this to the center band of the vase, blending it downward into the violet and upward toward the neck. -
Darken the neck:
Return to your dark blue and violet mix. Paint the neck and the very top rim of the vase, blending it downwards into the lighter purple section to create a vignetted evening sky effect. -
Smooth the transitions:
With a slightly damp, clean brush, gently go over the areas where colors meet. Work horizontally or with soft cross-hatching motions to create a seamless hombre effect from dark to light and back to dark. I find a soft, feathery touch works best here to avoid lifting the paint. -
Let it dry completely:
Allow the base coat to dry fully for at least 30 minutes before moving on to the details. The surface must be dry to prevent the clouds from turning muddy.
Blending Secret
Keep a spray bottle of water nearby. misting your paints lightly keeps the acrylics wet longer, making those smooth galaxy gradients much easier to achieve.
Step 2: Painting the Clouds and Landscape
-
Sponge the clouds:
Dip a small piece of sponge into white paint, then dab most of it off onto a paper towel until it’s almost dry. Gently tap cloud shapes just above the horizon line in the lighter purple section. -
Add cloud dimension:
While the white is still tacky, lightly dab a tiny bit of grey or diluted violet onto the bottom edges of the clouds to give them shadow and volume. -
Paint the grassy textural base:
Using a medium brush and dark blue paint (darker than your base), create the silhouette of a grassy field at the very bottom. Use short, upward flicking motions to simulate tall grass blades fading into the night. -
Refine the grass:
Switch to your small detail brush. Mix a slightly lighter blue-grey and add fine, individual blades of grass over the dark base layer to create texture and depth in the foreground.
Constellation Craze
Personalize the sky by painting real constellations. Look up a star chart or use your zodiac sign’s pattern for a meaningful hidden detail.
Step 3: Adding the Stars
-
Create distant stars:
Load a toothbrush or stiff brush with watered-down white paint. Run your thumb over the bristles to flick a fine mist of tiny stars across the upper two-thirds of the vase. Practice on paper first to control the splatter size. -
Paint prominent stars:
Using your smallest detail brush and pure white paint, carefully place individual dots for larger stars. Cluster some together and leave other areas spacious for a natural look. -
Draw the starbursts:
Select a few of the larger white dots to turn into twinkling stars. Paint a thin vertical line and a thin horizontal line crossing through the center of the dot to create a four-pointed star shape. -
Add finishing touches:
Inspect the vase for any areas that need a highlight. You can add tiny dots of white among the grass blades to look like fireflies or dew reflecting the starlight. -
Seal the artwork:
Once the paint is completely cured (wait 24 hours just to be safe), apply a coat of varnish. A matte finish preserves the earthy feel, while gloss will make the galaxy colors appear deeper and more vibrant.
Place your finished vase near a window or soft lamp to let those painted stars truly shine.
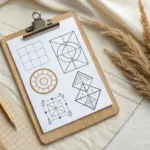
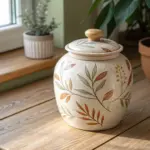

Have a question or want to share your own experience? I'd love to hear from you in the comments below!