A painted mantel can change the whole vibe of a room faster than almost anything else—suddenly your fireplace looks intentional, refreshed, and totally “you.” Here are my favorite painted mantel ideas—starting with timeless classics and building toward bolder, more artsy looks.
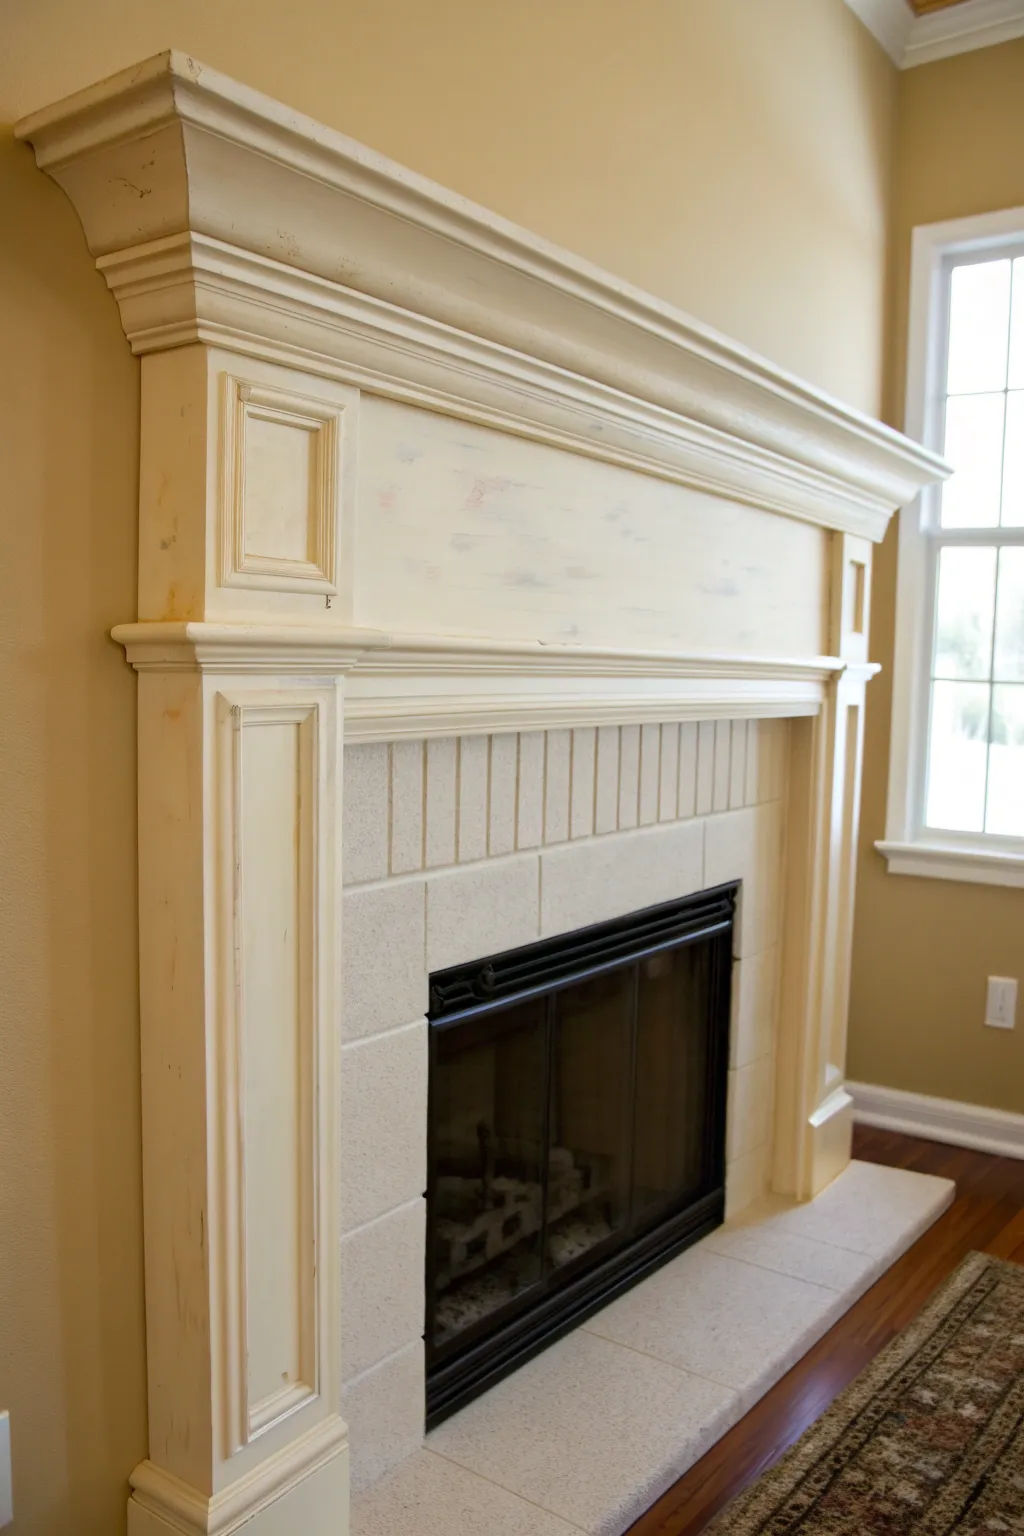
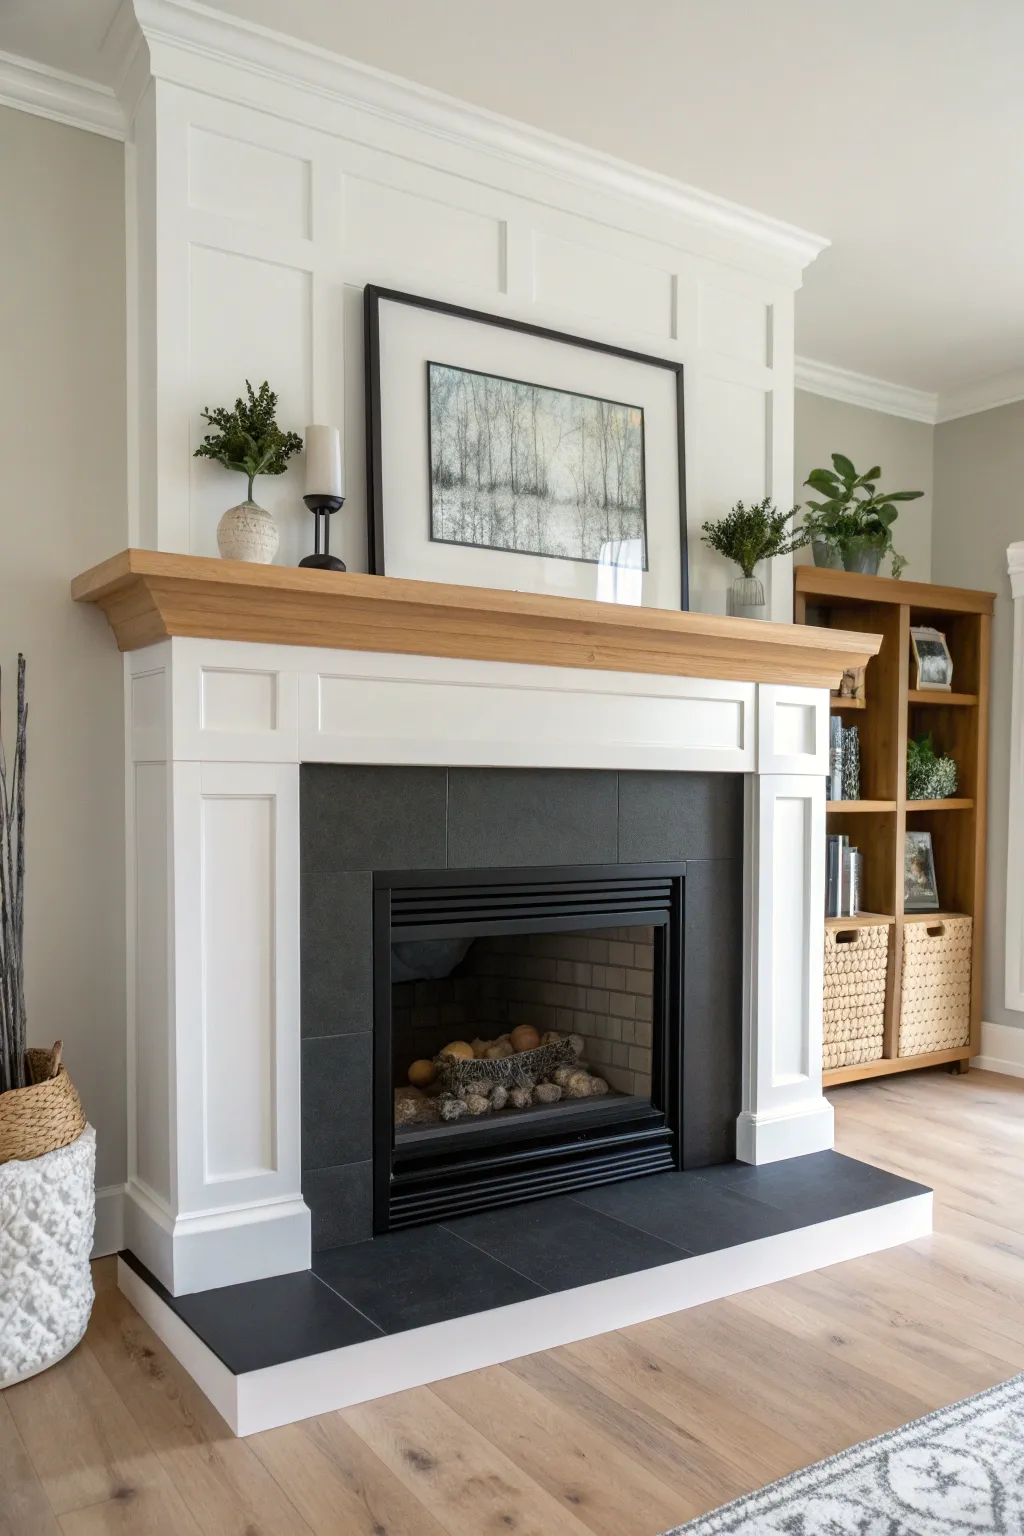
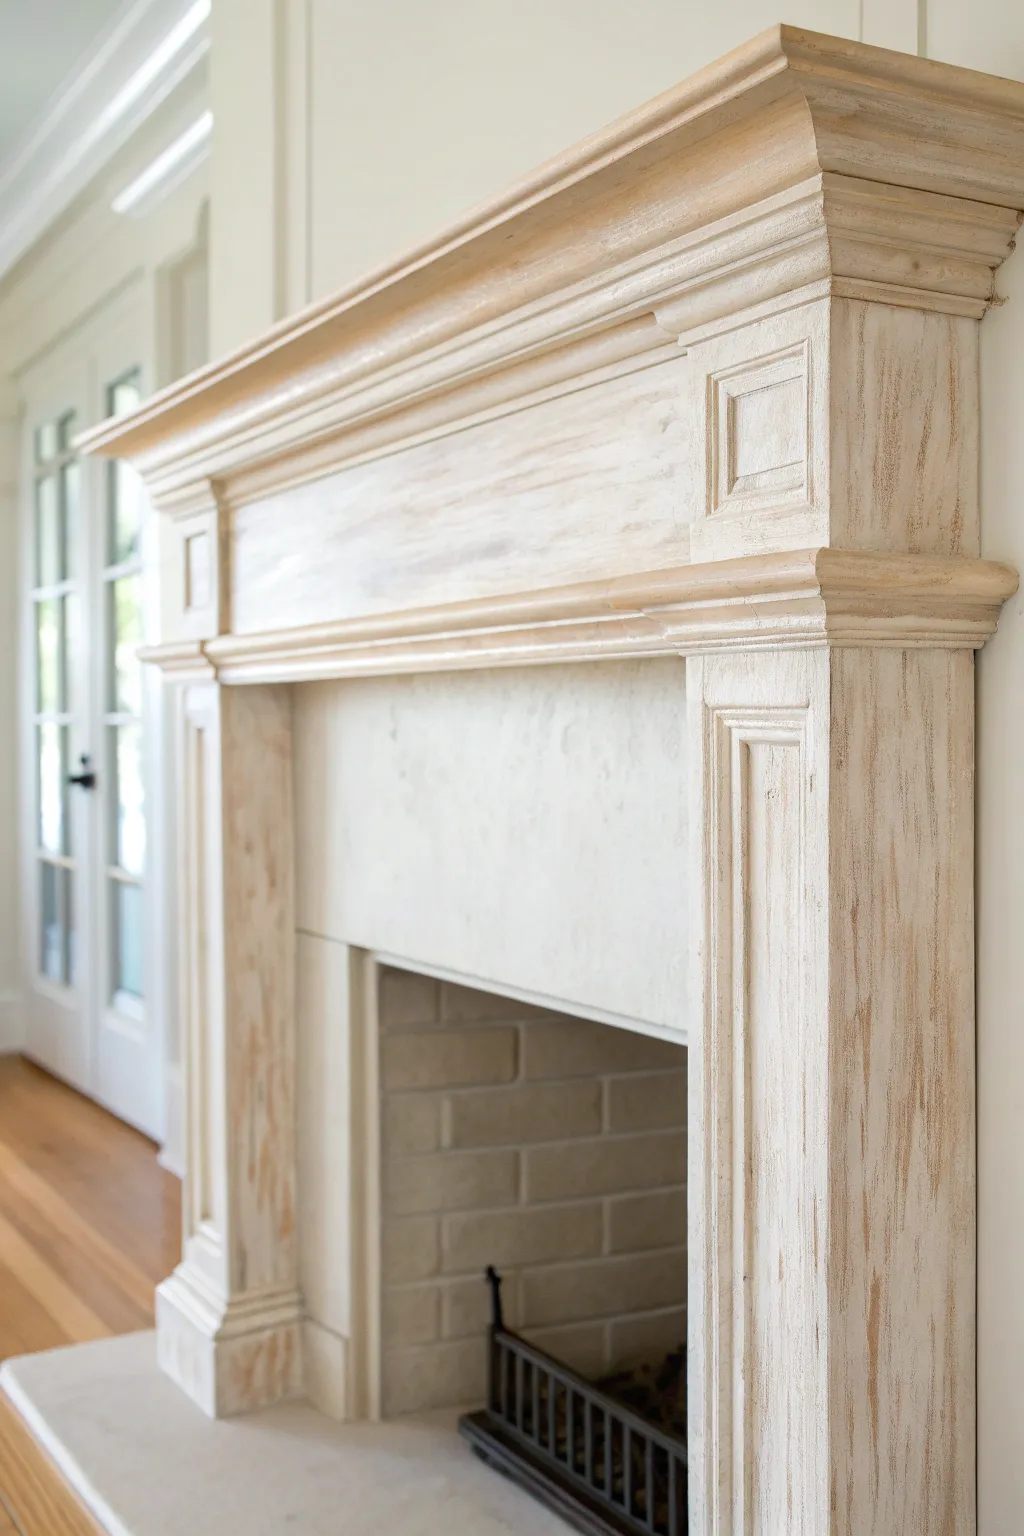
Crisp White for a Clean Classic

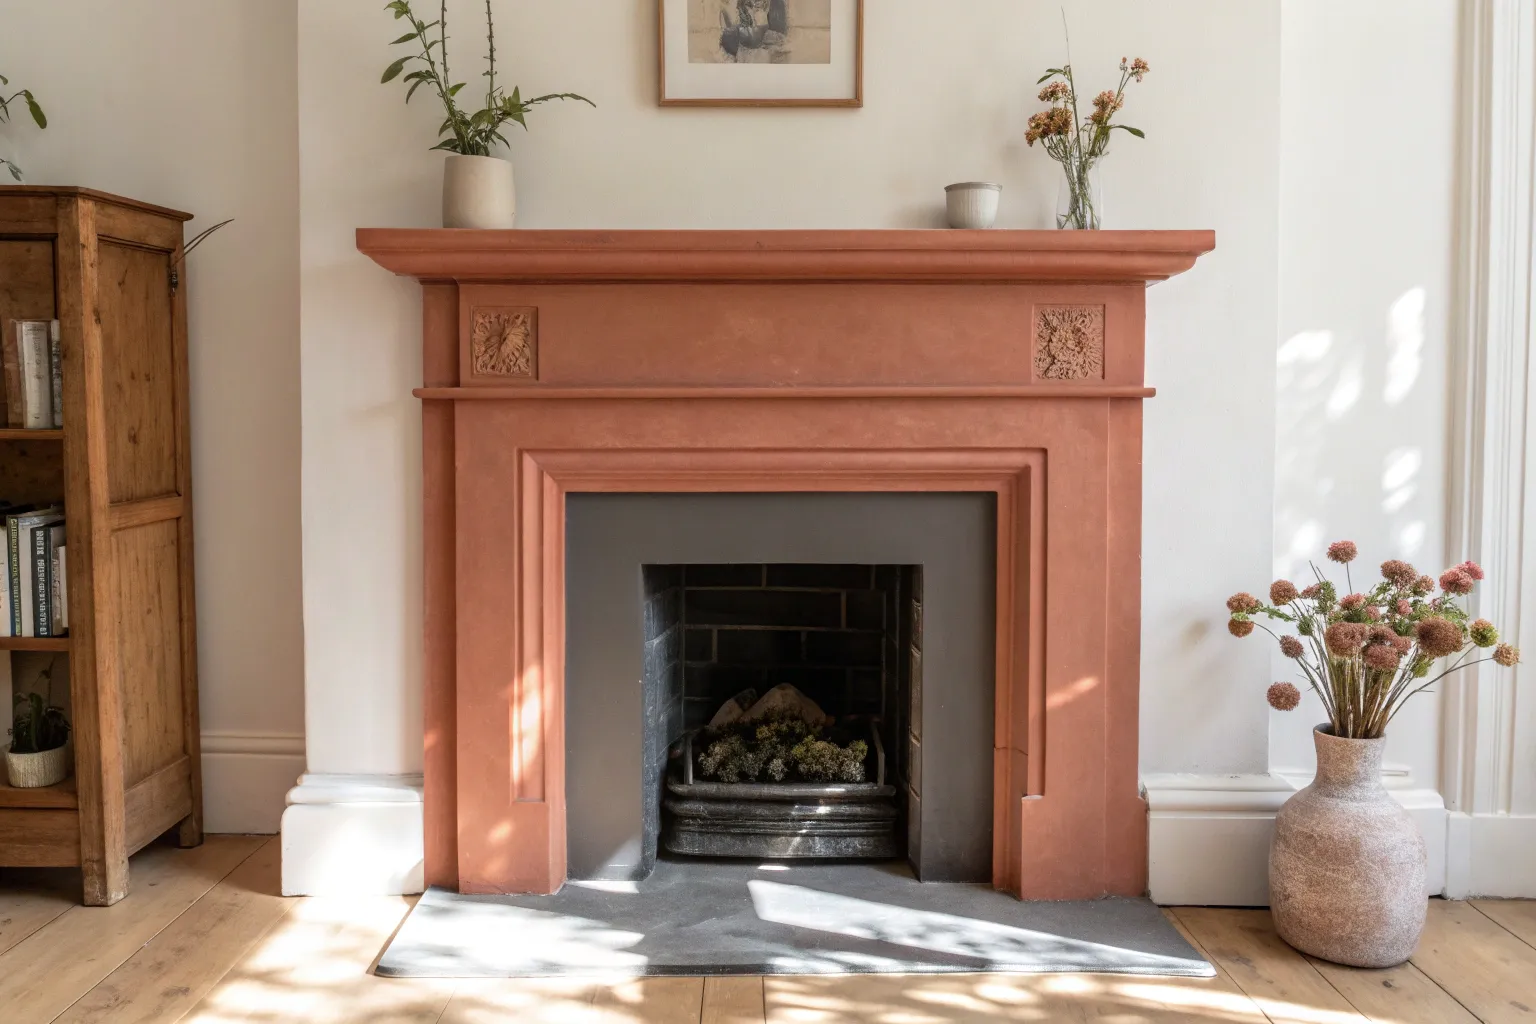
Transform a dated or basic fireplace into a sophisticated focal point with a crisp white finish and contrasting black surround. This project balances classic architectural details with modern simplicity, creating a bright and airy anchor for your living space.
Step-by-Step Tutorial
Materials
- High-quality bonding primer (oil-based or shellac-based)
- White semi-gloss or satin interior trim paint (e.g., a warm white like White Dove)
- High-heat black spray paint or brush-on paint (matte or satin finish)
- TSP substitute or degreaser
- Fine-grit sandpaper (220-grit)
- Tack cloth
- Painter’s tape (various widths)
- Drop cloths and plastic sheeting
- Sash brush (2-inch angled)
- Mini foam roller and tray
- Caulk and caulk gun
- Wood filler
Step 1: Preparation & Cleaning
-
Assess the surface:
Begin by inspecting your existing mantel. If it’s previously painted, check for peeling. If it’s varnished wood, you’ll need to ensure your primer is heavy-duty enough to stop bleed-through. -
Deep clean everything:
Scrub the entire wood surface and the tile or brick surround with a TSP substitute. Soot, wax, and unseen grease will ruin a paint job instantly, so be thorough here. -
Protect the area:
Lay down drop cloths to protect your hardwood floors. Use plastic sheeting to tape off the walls surrounding the mantel to prevent accidental roller marks. -
Sand for adhesion:
Lightly scuff sand all wood surfaces with 220-grit sandpaper. You aren’t trying to strip the finish, just creating ‘teeth’ for the primer to grab onto. -
Fill imperfections:
Use wood filler on any deep gouges or nail holes. Once dry, sand these spots flush. Run a bead of caulk along any gaps where the wood molding meets the wall for a seamless built-in look. -
Dust removal:
Vacuum up the sanding dust, then wipe everything down with a tack cloth. Even a little dust can create a gritty texture in your final finish.
Step 2: Painting the Surround
-
Mask the mantel:
Before painting the white wood, tackle the messy black surround first. Tape off the inner edges of the wooden mantel and the floor hearth very carefully. -
Apply high-heat paint:
If painting a metal insert or firebox, use high-heat spray paint. Apply in short, light bursts to avoid drips. If painting stone or tile surround, a high-heat brush-on paint works well. I find two thin coats are always better than one thick, drippy one. -
Detail the firebox:
Don’t forget the interior brick if it looks sooty. A fresh coat of high-heat matte black paint inside the firebox makes the whole fireplace look brand new.
Brushwork Pro-Tip
Add a conditioner like Floetrol to your latex paint. It slows drying time, allowing the paint to level out more smoothly and eliminating visible brush strokes.
Step 3: Priming & Painting the Woodwork
-
Prime the wood:
Apply a coat of high-quality bonding primer. Use an angled sash brush to get into the fluted columns and detailed floral squares first, then roll the flat panels. -
Sand the primer:
Once the primer is fully dry, do a very light sanding pass with fine-grit paper to knock down any raised grain or brush strokes. Wipe clean with a tack cloth. -
Cut in the topcoat:
Open your white semi-gloss paint. Using your angled brush, carefully paint the intricate details—the crown molding, the fluting, and the rosettes. Watch closely for drips pooling in the corners of the recessed panels. -
Roll the flat surfaces:
Use a mini foam roller to paint the broad, flat sections of the legs and the mantel shelf. This provides a smooth, sprayed-on look without brush marks. -
Apply the second coat:
Allow the first coat to dry according to the can’s instructions usually 4 hours. Apply a second coat using the same method: brush details first, then roll flats. -
Remove tape and touch up:
Score the edge of your painter’s tape with a utility knife before pulling it off to prevent peeling your fresh paint. Use a small artist’s brush to touch up any tiny spots where the black meets the white.
Styling Level-Up
Mirror the mantel’s texture in your decor. Use dried natural grasses (like the pampas grass shown) to add vertical height that complements the fluted columns.
Step back and admire how a simple color change has completely revitalized the architectural character of your room
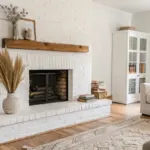

Soft Off-White for a Warm Blend
Transform a standard mantel into a charming focal point by layering soft off-white tones with subtle distressing. This technique mimics the look of aged wood, bringing warmth and character to your fireplace surround.
How-To Guide
Materials
- Sandpaper (120-grit and 220-grit)
- Tack Cloth
- Painter’s Tape
- Bonding Primer (high-adhesion)
- Soft Cream Chalk-Style Paint
- Warm White Latex Paint (Satin finish)
- Small Foam Roller
- 2-inch Angled Sash Brush
- Clear Wax or Matte Polycrylic Sealer
- Lint-free Rags
- Sanding Sponge
Step 1: Cleaning and Prep
-
Protect the area:
Begin by taping off the wall around the mantel and the tile surround carefully with painter’s tape. Lay down a drop cloth to catch dust and drips. -
Scuff sand the surface:
Before painting, take your 120-grit sandpaper and give the entire existing mantel a thorough scuff sand. You aren’t trying to remove all the old finish, just creating ‘tooth’ for the new paint to grip. -
Clean dust thoroughly:
Wipe away the sanding residue with a damp rag. Follow this immediately with a tack cloth to pick up those tiny particles that love to ruin a smooth finish. -
Apply bonding primer:
Using your sash brush for corners and the foam roller for flat areas, apply a coat of high-quality bonding primer. This ensures your paint won’t peel later. -
Let primer cure:
Allow the primer to dry completely according to the manufacturer’s instructions. If you notice any rough spots, give them a quick pass with 220-grit paper.
Bleed-Through Blues?
If stains or wood tannins bleed through your white paint (appearing pink or yellow), stop and apply a shellac-based primer like BIN over the spot before repainting.
Step 2: Painting the Base Layers
-
Brush the corners first:
Dip your sash brush into the Warm White latex paint. Work into the intricate moldings, corners, and recessed panels first to ensure full coverage in the tricky spots. -
Roll the flat surfaces:
Switch to your foam roller for the columns and the main breast of the mantel. Apply the paint in long, smooth strokes to avoid roller marks. -
Dry and recoat:
Let this first coat dry for at least 4 hours. Apply a second coat using the same method—brush then roll—to get a solid, opaque base. -
Dry overnight:
It is crucial to let this base layer cure well, so I recommend leaving it overnight before moving on to the decorative layer.
Step 3: Adding Depth and Distressing
-
Dry-brush the accent color:
Dip just the tips of your brush into the Soft Cream chalk-style paint and offload most of it onto a paper towel. Lightly drag the brush over raised moldings and edges. -
Feather the color:
Focus the cream color unevenly to create a naturally aged look, feathering it out so there are no hard lines where the cream meets the white. -
Distress the edges:
Once dry, take a damp sanding sponge and gently rub the high points of the molding and corners. This reveals subtle bits of the base coat or wood underneath. -
Vary the pressure:
Rub harder in areas that would catch natural wear, like corner edges, and use a lighter touch on flat surfaces for realistic aging.
Glazed Goodness
Mix a tiny drop of brown paint with glazing medium and brush it into the deep crevices of the molding. Wipe off the excess immediately to create shadowy depth.
Step 4: Sealing and Finish
-
Wipe down again:
Use a clean tack cloth to remove any dust created during the distressing process. -
Apply sealer:
Brush on a thin coat of clear matte Polycrylic or rub on clear furniture wax with a lint-free rag. -
Buff the wax:
If using wax, wait about 15 minutes and then buff it gently to a soft sheen. -
Remove tape carefully:
Score the edge of the painter’s tape with a utility knife before pulling it off to prevent peeling your fresh paint.
Step back and admire the soft, welcoming glow your new mantel brings to the room


Black Mantel for Instant Drama
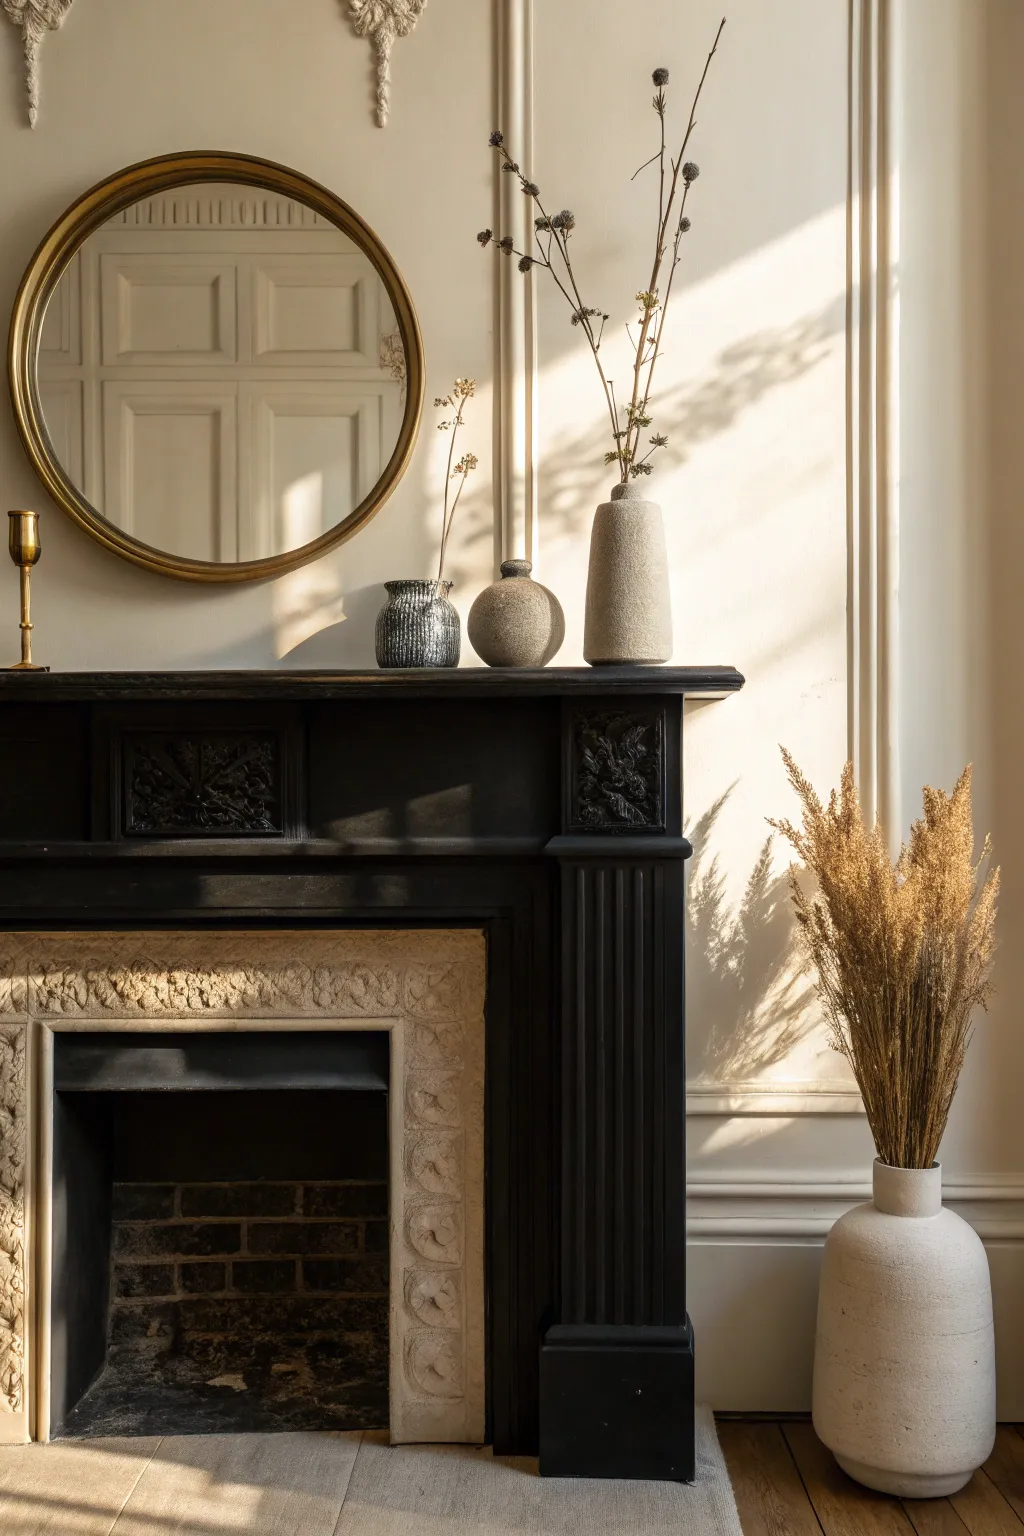
Transform a traditional fireplace into a stunning modern focal point by embracing the depth and sophistication of matte black paint. This comprehensive guide walks you through refinishing a detailed wooden mantel to achieve a velvety, dramatic finish that contrasts beautifully with lighter stone surrounds.
Detailed Instructions
Materials
- High-quality interior wood paint (Matte Black or soft Charcoal)
- Bonding primer (specifically for glossy or varnished surfaces)
- Painter’s tape (delicate surface and standard)
- Drop cloths and plastic sheeting
- Sanding sponges (medium and fine grit)
- Tak cloth
- Degreaser or heavy-duty cleaner (TSP substitute)
- Angled sash brush (1.5-2 inch)
- Mini foam roller and tray
- Small artist brushes (for intricate crevices)
- Latex caulk and gun (optional for gap filling)
- Wood filler and putty knife
Step 1: Preparation & Cleaning
-
Protect the surrounding area:
Begin by laying down drop cloths to protect your floor. Use painter’s tape to carefully mask off the wall around the mantel and the inner stone hearth. If your stone is porous, secure plastic sheeting over the opening to prevent any accidental splashes. -
Clean the surface:
Scrub the entire wooden mantel with a degreaser or TSP substitute. Old fireplaces often harbor hidden soot and wax buildup that will repel paint, so be thorough. -
Rinse and dry:
Wipe down the wood with a clean, damp cloth to remove any cleaning residue. Allow the wood to dry completely before moving forward. -
Address imperfections:
Inspect the wood for deep scratches or dents. Fill these with wood filler, smoothing it out with a putty knife. Let the filler cure according to the manufacturer’s instructions.
Step 2: Sanding & Priming
-
Scuff sand the surface:
Using a medium-grit sanding sponge, light sand all flat surfaces to de-gloss the old finish. This creates ‘tooth’ for the primer to grip. -
Detail sanding:
Switch to a fine-grit sponge or folded sandpaper to gently sand the carved details, fluted columns, and corbels. You want to dull the shine without erasing the intricate shapes. -
Remove dust:
Vacuum up the sanding dust, then wipe everything down with a tak cloth. Even tiny dust motes will show up in a smooth black finish, so cleanliness is key. -
Apply bonding primer (Flat areas):
Use a mini foam roller to apply a thin, even coat of bonding primer to the flat vertical legs and the mantel shelf. Avoid overloading the roller to prevent stippling texture. -
Prime the details:
Use an angled sash brush to work primer into the grooves of the fluted columns and the decorative frieze. Watch for drips pooling in the carvings and brush them out immediately. -
Caulk gaps (Optional):
Once the primer is dry, check for any gaps where the mantel meets the wall or where joints have separated. Run a thin bead of latex caulk, smoothing it with a wet finger for a seamless look.
Sticky Situation?
If chipping occurs on old varnish despite sanding, use a shellac-based primer. It seals almost anything (even old smoke stains) and creates an unbreakable bond for your black topcoat.
Step 3: Painting the Finish
-
Stir the paint:
Thoroughly stir your matte black paint. Matte finishes have flattening agents that can settle at the bottom, so ensure it’s mixed well to avoid uneven sheen. -
Cut in the edges:
Start by using your angled brush to paint the edges where the mantel meets the wall and the inner firebox surround. Keep a wet edge to avoid lap marks. -
Tackle the carvings first:
Paint the intricate carvings and corbels with the brush first. Using a dabbing motion can help get paint into deep crevices, followed by light strokes to smooth it out. -
Roll the flats:
Immediately follow up by rolling the large flat surfaces with the mini foam roller. This evens out the texture and blends the brushwork. I find working in sections—one leg, then the top—helps maintain a consistent finish. -
Check for holidays:
Look closely at the fluted columns; use a small artist brush to touch up any deep grooves that the sash brush might have missed. -
Allow to dry:
Let the first coat dry completely. Dark pigments take longer to cure, so be patient. Consult the can for specific recoat times. -
Apply the second coat:
Repeat the painting process for a second coat. This layer will deepen the color to a true, rich black and ensure opaque coverage. -
Remove tape:
While the final coat is still slightly tacky (not wet, but not fully cured), carefully peel away the painter’s tape at a 45-degree angle to ensure a crisp line.
Level Up: Texture Contrast
Make the details pop by using a Satin finish on the carved frieze and fluted columns, while keeping the main flat surfaces Matte. The subtle sheen difference highlights the craftsmanship.
Step back and admire how this bold change instantly anchors your room with timeless elegance


Charcoal Gray for a Modern Neutral
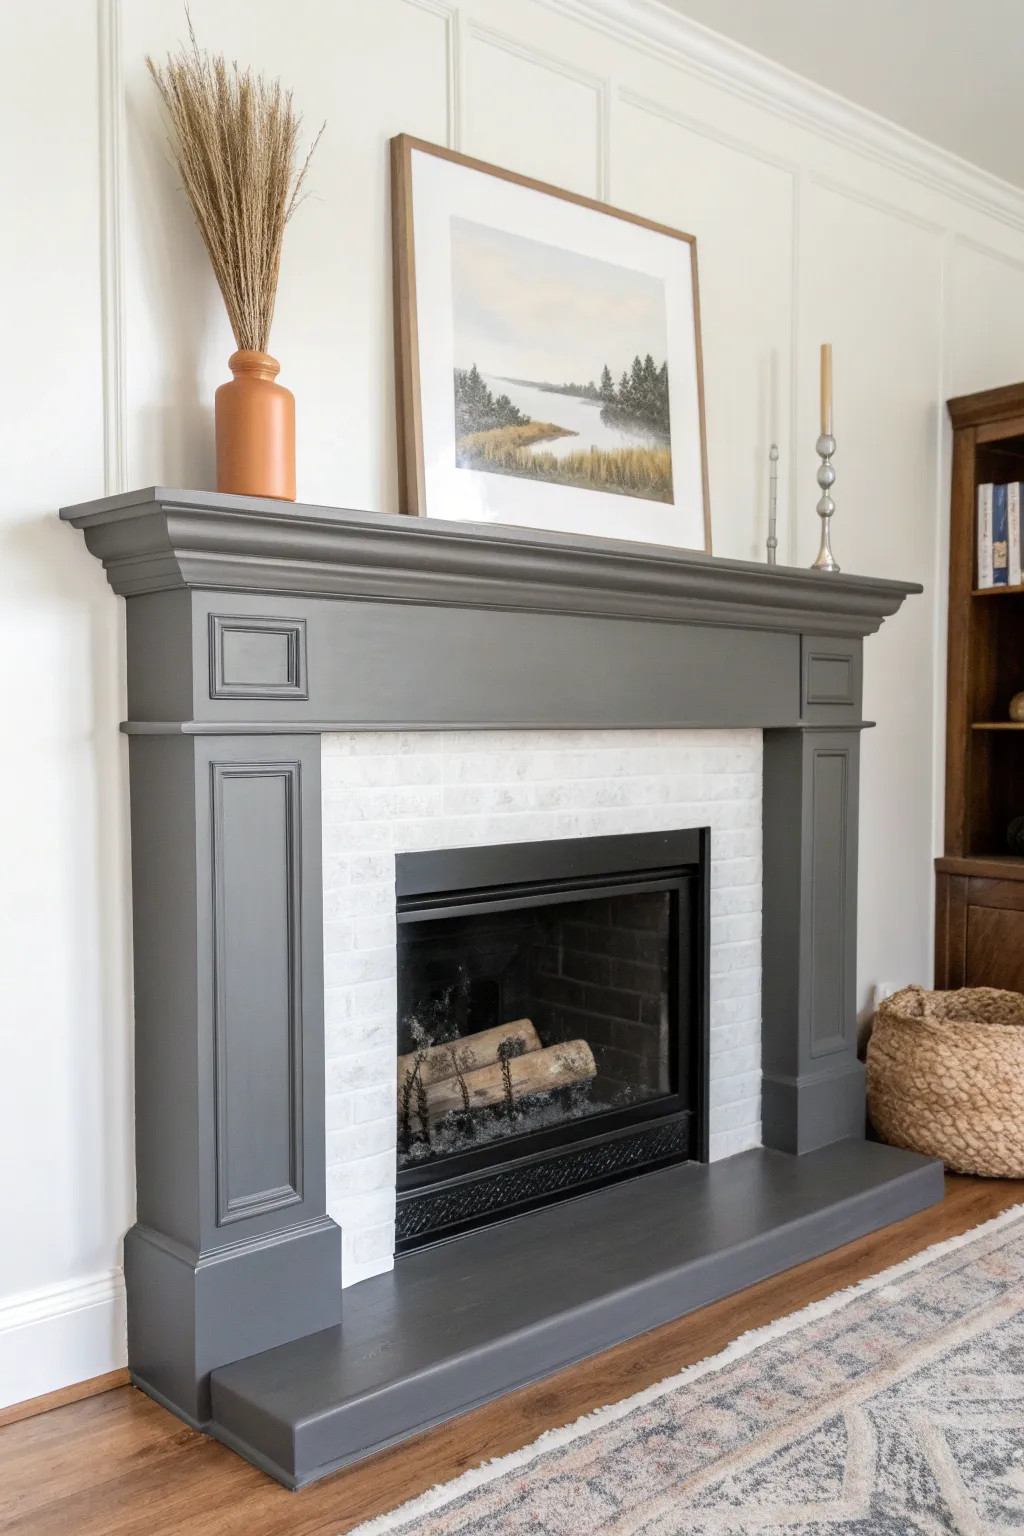
Transform a dated or basic fireplace into a sophisticated focal point using a rich, modern charcoal gray. This finish creates a striking contrast against white walls and brick, instantly updating your living space with a custom designer look.
Step-by-Step
Materials
- High-quality interior paint (Charcoal gray, satin or eggshell finish)
- High-quality stain-blocking primer
- Degreaser or TSP substitute
- Sanding sponges (medium and fine grit)
- Tack cloth
- Painter’s tape
- Drop cloth
- 2-inch angled sash brush
- 4-inch foam roller and tray
- Wood filler (if repairing holes)
- Putty knife
- Caulk and caulk gun (optional)
Step 1: Preparation & Repairs
-
Protect the area:
Lay down your drop cloth to protect the flooring. Use painter’s tape to carefully mask off the wall areas touching the mantel and the inner surround where the mantel meets the brick or tile. Press the tape edges down firmly to prevent bleed-through. -
Clean thoroughly:
Wipe down the entire mantel surface with a degreaser or TSP substitute. Fireplaces often accumulate soot and unseen grime that can prevent paint adhesion, so scrubbing this clean is vital. -
Fill imperfections:
Inspect the wood for nail holes, dents, or deep scratches. Overfill these slightly with wood filler using a putty knife, as the filler will shrink slightly when drying. -
Deteriorated caulk check:
Check the seams where the wood pieces join. If the old caulk is cracking or peeling, scrape it out and apply a fresh bead of paintable caulk, smoothing it with a damp finger. -
Sand the surface:
Once repairs are dry, scuff-sand the entire mantel using a medium-grit sanding sponge. You aren’t trying to remove all the old finish, just creating a ‘tooth’ for the new paint to grab onto. -
Remove dust:
Vacuum up the sanding dust, then wipe the surface with a tack cloth to catch any remaining fine particles. A dust-free surface is the secret to a professional finish.
Sticky Situation
If paint peels up with the tape, your paint may have dried too long bridging the tape line. Use a sharp utility knife to gently score the edge of the tape before pulling.
Step 2: Priming
-
Apply primer to details:
Using your angled sash brush, apply a stain-blocking primer to the intricate recessed areas, corners, and molding profiles first. -
Prime flat surfaces:
Switch to the 4-inch foam roller for the larger flat panels and legs. The foam roller helps eliminate brush strokes and provides a smoother base. -
Light sanding:
After the primer is fully dry (check the can for timing), lightly run a fine-grit sanding sponge over the surface to knock down any raised grain or bubbles. Wipe clean with the tack cloth again.
Step 3: Painting
-
Cut in the first coat:
Stir your charcoal paint well. Start by brushing the paint into the recessed grooves, corners, and along the taped edges. I use a light hand here to avoid paint pooling in the corners. -
Roll the flat areas:
While the brushed areas are still wet (if possible), roll the flat surfaces with the foam roller to blend the textures. Work in long, smooth strokes. -
Dry and assess:
Allow the first coat to dry completely. Dark colors often look streaky or patchy after just one coat, so don’t worry if coverage isn’t perfect yet. -
Apply second coat:
Repeat the cutting-in and rolling process for the second coat. This layer will provide the true depth and richness of the charcoal color. -
Remove tape:
While the final coat is still slightly tacky (not fully cured), carefully peel away the painter’s tape at a 45-degree angle to ensure a crisp line. -
Final cure:
Let the paint cure for at least 24-48 hours before placing any decor items like vases or frames on the mantel shelf to prevent sticking.
Smooth Finish Tip
Add a paint conditioner like Floetrol to your latex paint. It slows down drying time, allowing brush and roller marks to level out and disappear for a spraying-like finish.
Enjoy the dramatic and cozy atmosphere your new modern mantel brings to the room
BRUSH GUIDE
The Right Brush for Every Stroke
From clean lines to bold texture — master brush choice, stroke control, and essential techniques.
Explore the Full Guide
Navy Blue for a Tailored Look
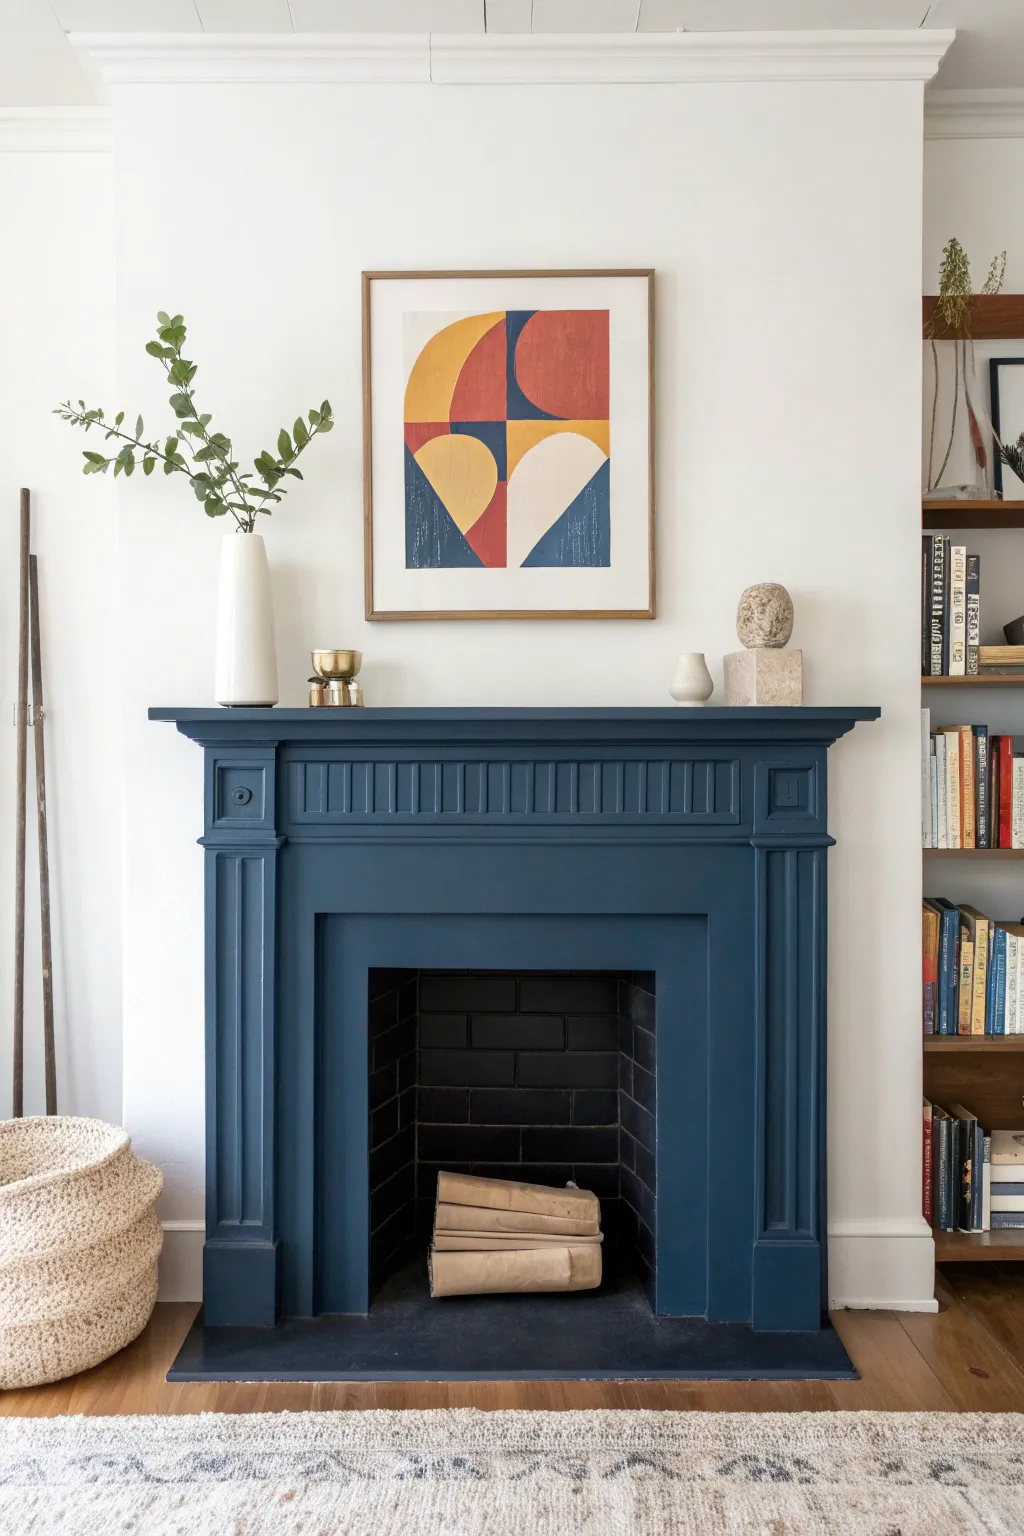
Transform a dated or plain fireplace surround into a sophisticated focal point with a coat of rich navy paint. This project creates a stunning, tailored look that anchors the room and beautifully highlights your decor.
Detailed Instructions
Materials
- High-quality interior paint (satin or semi-gloss finish) in Navy Blue
- Primer (bonding primer if painting over varnish/finished wood)
- Medium-grit sandpaper (120-150 grit)
- Fine-grit sandpaper (220 grit)
- Tack cloth or microfiber rags
- Painter’s tape
- Drop cloth
- Wood filler (if repairs are needed)
- Caulk and caulk gun
- Angled sash brush (2-inch)
- Small foam roller (optional for flat areas)
- Mild degreasing cleaner (like TSP substitute)
Step 1: Preparation
-
Clear the area:
Remove all items from your mantel and pull back any rugs. Lay down a drop cloth to protect your flooring from dust and paint drips. -
Clean thoroughly:
Scrub the entire mantel surface with a mild degreaser or TSP substitute to remove soot, dust, and oils. Let it dry completely. -
Repair imperfections:
Inspect the wood for nail holes or deep scratches. Fill these with wood filler, slightly overfilling to account for shrinkage. -
Sand the surface:
Once the filler is dry, sand the entire mantel with medium-grit sandpaper. You want to scuff the existing finish to help the new paint adhere, not necessarily remove all old paint. -
Remove dust:
Vacuum up the sanding dust, then wipe the surface meticulously with a tack cloth. Any leftover dust will create a gritty finish. -
Caulk gaps:
Run a thin bead of finish caulk where the mantel meets the wall to create a seamless look. Smooth it with a wet finger and let it cure. -
Tape off edges:
Apply painter’s tape carefully along the wall, the floor, and the inner firebox surround to ensure crisp, clean lines.
Sticky Situation?
If paint peels up with the tape, carefully score the edge of the tape with a sharp utility knife before pulling to break the seal.
Step 2: Priming
-
Apply primer:
Using your angled brush, cut in the corners and details first, then fill in flat areas. If the wood is dark or stained, a bonding primer is essential here. -
Check for bleed-through:
Allow the primer to dry according to the can’s instructions. If you see wood tannins bleeding through, apply a second coat of stain-blocking primer. -
Light sanding:
Once the primer is fully dry, lightly sand with fine-grit sandpaper to knock down any brush strokes or raised grain. Wipe clean with a tack cloth.
Step 3: Painting
-
First coat details:
Stir your navy paint thoroughly. Start by painting the detailed moldings, grooves, and corners with your angled sash brush. -
First coat flats:
Paint the larger flat surfaces, brushing in the direction of the wood grain. I prefer to work in sections to keep a wet edge and avoid lap marks. -
Dry time:
Let the first coat dry completely. Dark colors like navy take longer to cure, so be patient. -
Assess coverage:
Inspect the finish. You will likely see streaks or unevenness after one coat—this is normal for deep colors. -
Second coat:
Apply the second coat using the same method: details first, then flat areas. Use a light hand to lay off the paint smoothly without overworking it. -
Third coat (if needed):
For the richest navy depth, a third thin coat might be necessary depending on your paint brand.
Add Depth
For a truly custom look, paint the inner brick firebox a matte black using high-heat paint to make the navy casing pop even more.
Step 4: Finishing Touches
-
Remove tape:
While the final coat is still slightly tacky (not wet, but not fully cured), carefully peel off the painter’s tape at a 45-degree angle. -
Touch ups:
Check for any small bleeds or missed spots. Use a small artist’s brush for tiny corrections. -
Cure time:
Allow the paint to cure for at least 48 hours before placing any heavy objects back on the mantel to prevent sticking.
Now enjoy the cozy and dramatic atmosphere your new navy fireplace brings to the living space
Deep Teal for Cozy and Bold
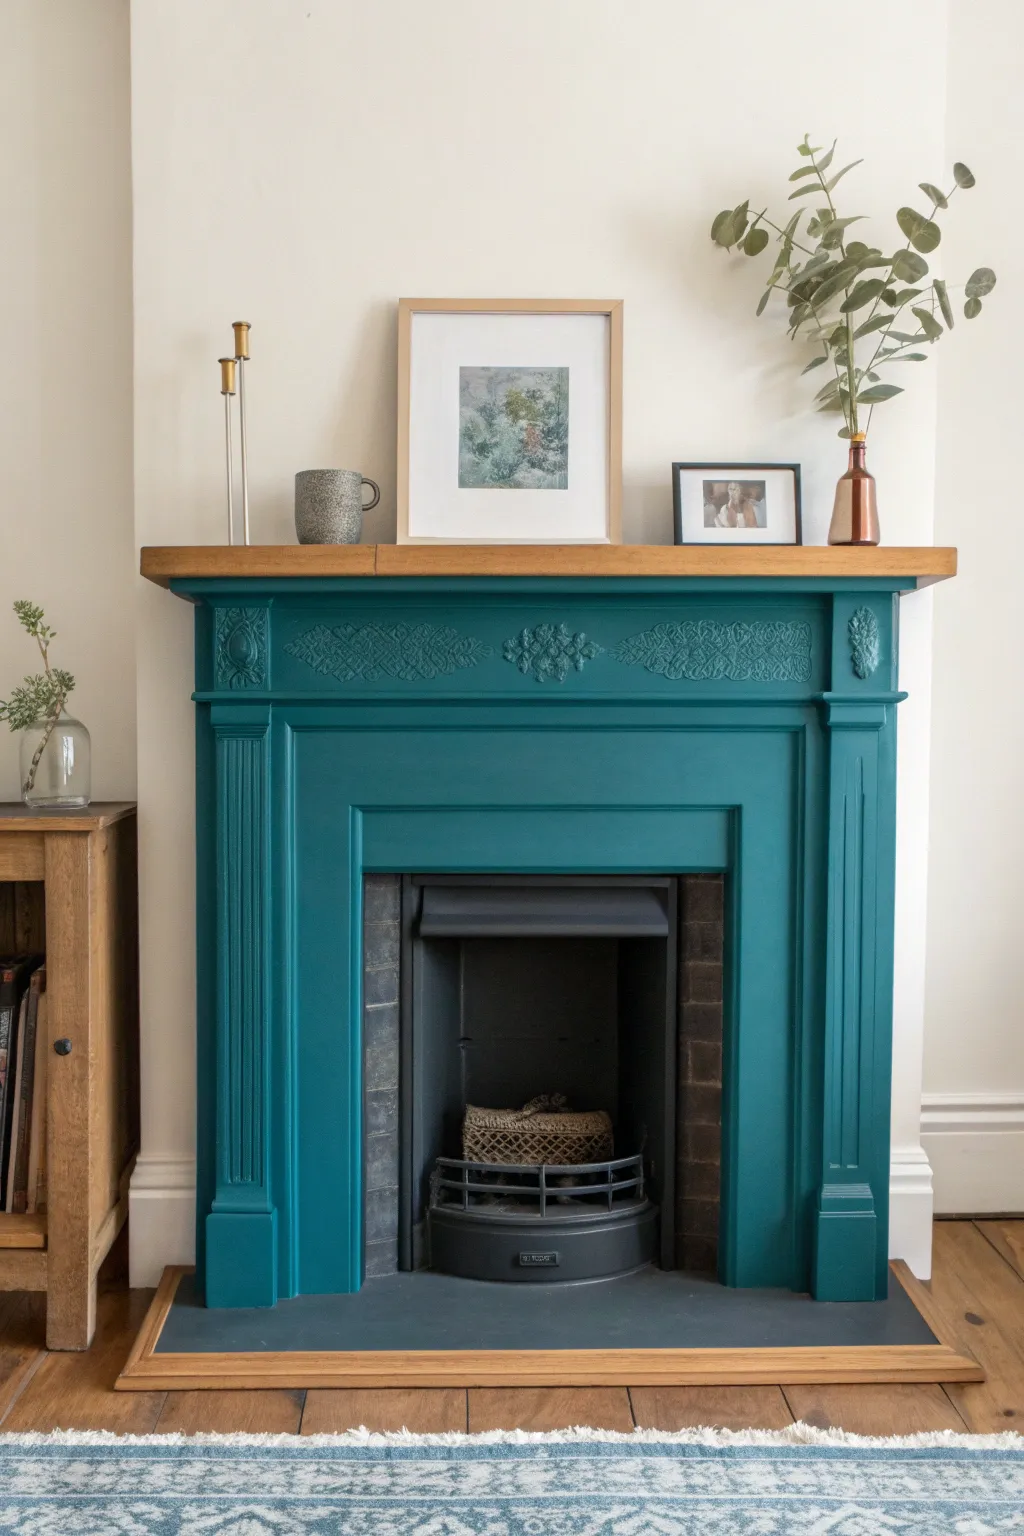
Transform a dated or standard fireplace surround into a stunning focal point with a coat of rich, deep teal paint. This project creates a bold statement piece that balances moody sophistication with warm wood tones, perfect for adding character to any living space.
Step-by-Step Guide
Materials
- Fireplace surround (wood or MDF)
- Deep teal interior paint (eggshell or satin finish)
- Wood stain (medium oak or similar warm tone)
- Clear matte polyurethane varnish
- Heat-resistant black paint (for interior metal/brick, if needed)
- Sandpaper (80, 120, and 220 grit)
- Tack cloth
- Painter’s tape
- Drop cloths
- Screwdriver (to remove shelf if possible)
- Primer (high-adhesion, suitable for wood)
- 2-inch synthetic angle sash brush
- 4-inch foam roller and tray
- Fine detail brush
- Wood filler (if repairs are needed)
- Caulk and caulk gun (paintable)
Step 1: Preparation and Cleaning
-
Protect the area:
Begin by laying down drop cloths to protect your flooring and hearth. Use painter’s tape to meticulously mask off the walls surrounding the mantel and the hearth floor tiles. -
Clean surfaces:
Thoroughly clean the entire mantelpiece using a degreaser or TSP substitute to remove soot, dust, and any furniture polish residue. This is crucial for paint adhesion. -
Remove the shelf:
If your mantel has a removable top shelf that you intend to leave natural wood, unscrew or pry it off carefully. If it’s fixed, you will need to sand it in place later. -
Sand the structure:
Sand the main body of the mantel with 120-grit sandpaper to scuff the existing finish. This gives the primer something to grip onto. Wipe away dust with a tack cloth.
Uneven Coverage?
If the ornate carvings look gloopy or lose definition, you’ve applied too much paint. Use a dry brush to wick away excess paint from deep crevices immediately after application.
Step 2: Restoring the Wood Elements
-
Strip the top shelf:
For the top shelf (and hearth border if applicable), sand heavily with 80-grit sandpaper to remove old varnish or paint down to bare wood. -
Smooth the grain:
Once stripped, switch to 120-grit and finally 220-grit sandpaper on the bare wood areas to create a silky smooth surface ready for staining. -
Apply stain:
Using a lint-free cloth or brush, apply your chosen wood stain to the shelf. Wipe off excess stain after a few minutes to achieve the desired depth of color. -
Seal the wood:
Once the stain is completely dry, apply two thin coats of clear matte polyurethane varnish, lightly sanding with 220-grit paper between coats for durability. -
Protect the finished wood:
If you couldn’t remove the shelf, carefully mask off the newly finished wood with high-quality painter’s tape to protect it from the teal paint.
Step 3: Prime and Paint
-
Fill gaps:
Inspect the joints of the mantel body. Apply paintable caulk to any seams where the wood meets the wall or where trim pieces join, smoothing it with a wet finger. -
Apply primer:
Brush a coat of high-adhesion primer over the entire body of the mantel. I like to use a stain-blocking primer here to prevent old wood tannins from bleeding through later. -
Sand the primer:
Once the primer is fully dry, lightly sand it with 220-grit sandpaper to smooth out brush strokes, then wipe clean with a tack cloth. -
Paint the details:
Dip your angle sash brush into the deep teal paint. Start by painting the intricate molded details, grooves, and corners first. Use a fine detail brush for very tight carvings to avoid paint pooling. -
Paint flat surfaces:
Use the foam roller or the flat of your brush to paint the larger, smooth vertical and horizontal sections. Maintain a ‘wet edge’ to avoid lap marks. -
Apply second coat:
Allow the first coat to dry according to the can’s instructions (usually 4–6 hours). Apply a second coat for full, rich opacity and true color depth. -
Optional: Paint the insert:
If your metal insert or brick surround looks worn, apply heat-resistant black paint to potential hot zones to create a sharp contrast with the teal. -
Finishing touches:
Remove the painter’s tape carefully while the final coat is still slightly tacky to ensure a crisp line. Reattach the wood shelf if you removed it earlier.
Add Depth
For an antique look, apply a dark wax over the dried teal paint, focusing on the carvings. Buff it gently to leave shadow in the recesses while highlighting the reliefs.
Step back and enjoy the striking contrast of your revamped fireplace centerpiece

PENCIL GUIDE
Understanding Pencil Grades from H to B
From first sketch to finished drawing — learn pencil grades, line control, and shading techniques.
Explore the Full Guide
Sage Green for a Calm Cottage Feel
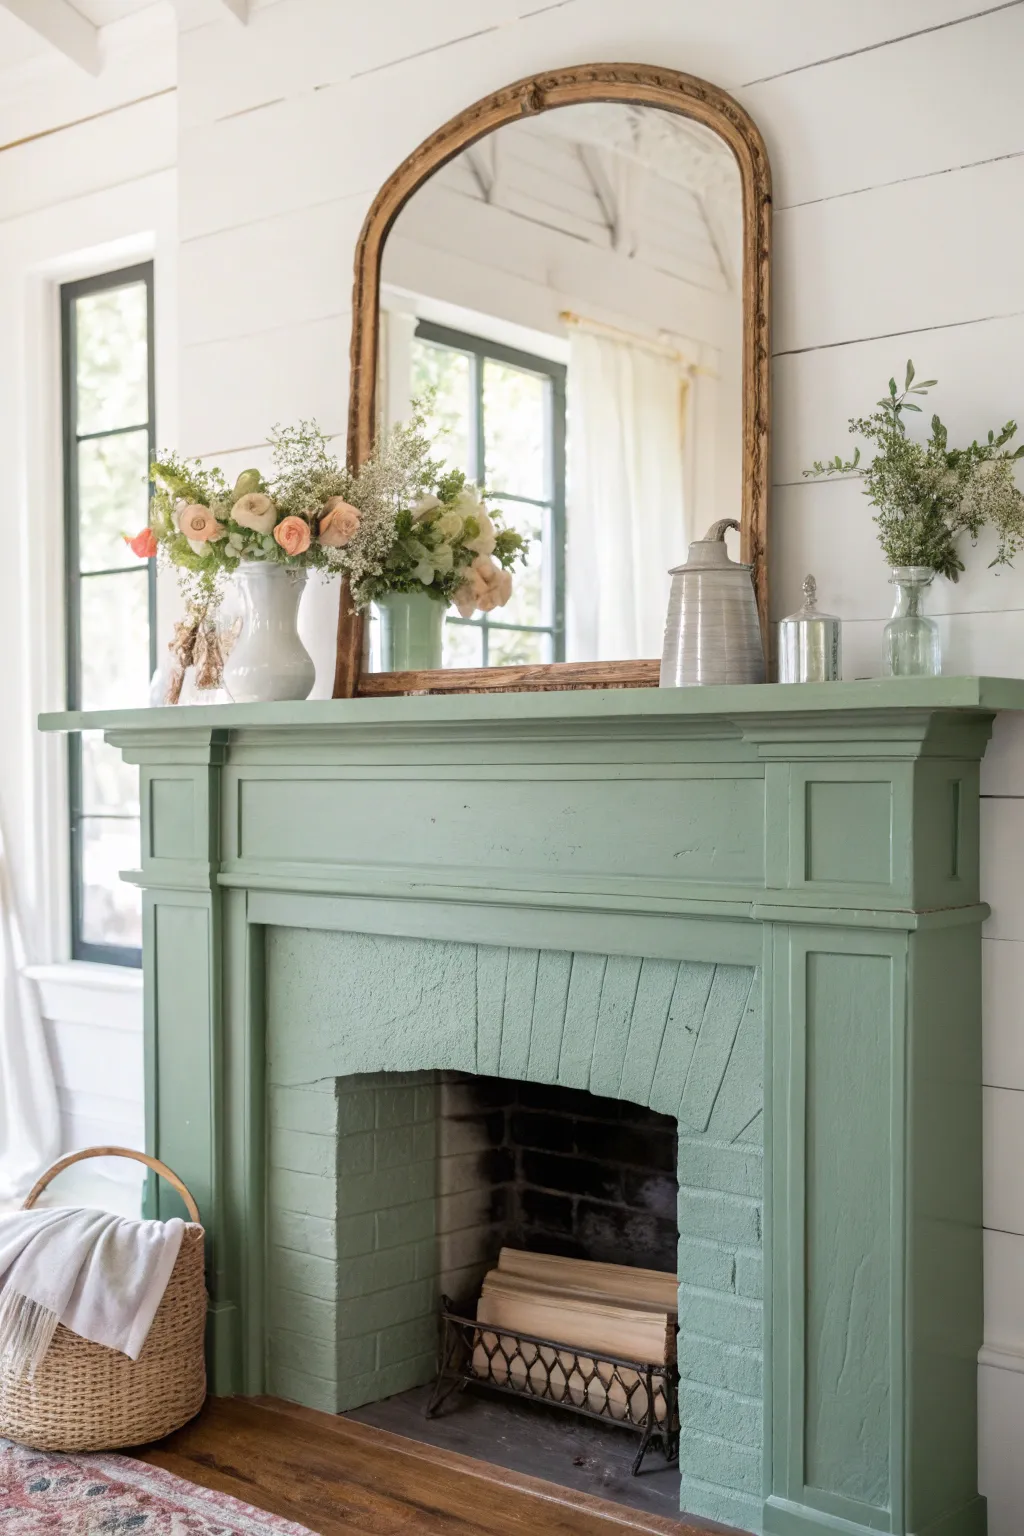
Transform a dated or basic fireplace into a serene focal point with this monochromatic sage green makeover. The unified color across both the wood mantel and brick surround creates a calm, modern cottage aesthetic that feels both fresh and timeless.
How-To Guide
Materials
- High-quality sage green paint (satin or semi-gloss finish)
- Primer (bonding primer for brick/wood)
- TSP substitute or degreaser
- Wire brush
- Medium and fine-grit sandpaper (120 and 220)
- Painter’s tape
- Drop cloths
- Angled sash brush (2-inch)
- Small roller with 3/8-inch nap cover
- Caulk and caulk gun (paintable)
- Tack cloth
- Vacuum with brush attachment
Step 1: Preparation & Cleaning
-
Clear the area:
Remove all decor, logs, and fireplace tools from the mantel and hearth area. Lay down drop cloths to protect your flooring, taping the edges to the floor so they don’t shift while you work. -
Clean the brick:
Scrub the brick surround thoroughly using a wire brush to remove loose mortar or soot. Vacuum up the debris with a brush attachment to ensure all crevices are clear of dust. -
Degrease surfaces:
Wash both the wood mantel and the brick with a TSP substitute or heavy-duty degreaser. This step is crucial for removing years of soot or furniture wax that could prevent paint adhesion. -
Sand the wood:
Lightly sand the wooden parts of the mantel with 120-grit sandpaper to scuff the existing finish. If the old finish is glossy, ensure you dull the shine completely. -
Remove dust:
Vacuum the wood and brick again, then wipe the wood down with a tack cloth to capture any remaining fine dust particles. -
Masking tape:
Apply painter’s tape carefully along the walls, the floor, and the inner firebox opening where you don’t want paint to go. Press the tape edges firmly to prevent bleed-through.
Bleed-Through Blues?
If soot stains bleed through your primer on the brick, stop immediately. Switch to a shellac-based primer for just those spots to seal the stain permanently before top-coating.
Step 2: Priming & Repair
-
Inspect and caulk:
Check for gaps where the wood meets the wall or where trim pieces join. Fill these gaps with paintable caulk, smoothing the bead with a damp finger for a seamless look. -
Prime the brick:
Using a bonding primer and a thick-nap roller, coat the brick surround. Use an old brush to jam primer into the deep mortar lines where the roller can’t reach. -
Prime the wood:
Apply the same primer to the wooden mantel structure. I find a smoother finish is achieved here by using a high-quality brush rather than a roller for the detailed trim work. -
Light sanding:
Once the wood primer is fully dry, give it a quick, gentle pass with 220-grit sandpaper to knock down any raised grain or brush marks, then wipe clean.
Step 3: Painting
-
Cut in the edges:
Start with your sage green paint and an angled sash brush. Carefully paint along the taped edges, inside corners, and detailed molding profiles first. -
Paint the brick mortar:
Before rolling the face of the bricks, use a brush to paint the mortar lines. Work in small sections so the paint doesn’t dry before you roll the surface. -
Roll the brick:
Use the roller to cover the face of the bricks. The nap of the roller should help deposit paint into the texture, but watch out for drips pooling in the mortar lines. -
Paint the wood:
Brush or roll the flat wood surfaces. Use long, even strokes with your brush on the trim to mimic the grain direction and minimize texture. -
Dry and assess:
Allow the first coat to dry according to the manufacturer’s instructions. Brick usually absorbs a lot, so you will likely see patchy areas at this stage. -
Apply second coat:
Repeat the painting process for a second coat on both materials to ensure full opacity and true color depth. A third light coat might be needed on deep mortar joints. -
Remove tape:
While the final coat is still slightly tacky (not wet, but not fully cured), carefully peel away the painter’s tape at a 45-degree angle to ensure crisp lines.
Style It Up
Use an arched wood mirror to echo the warm texture, and place fresh greenery in ceramic pitchers for that cohesive cottage vibe depicted in the photo.
Enjoy the calming atmosphere your newly refreshed mantel brings to the room
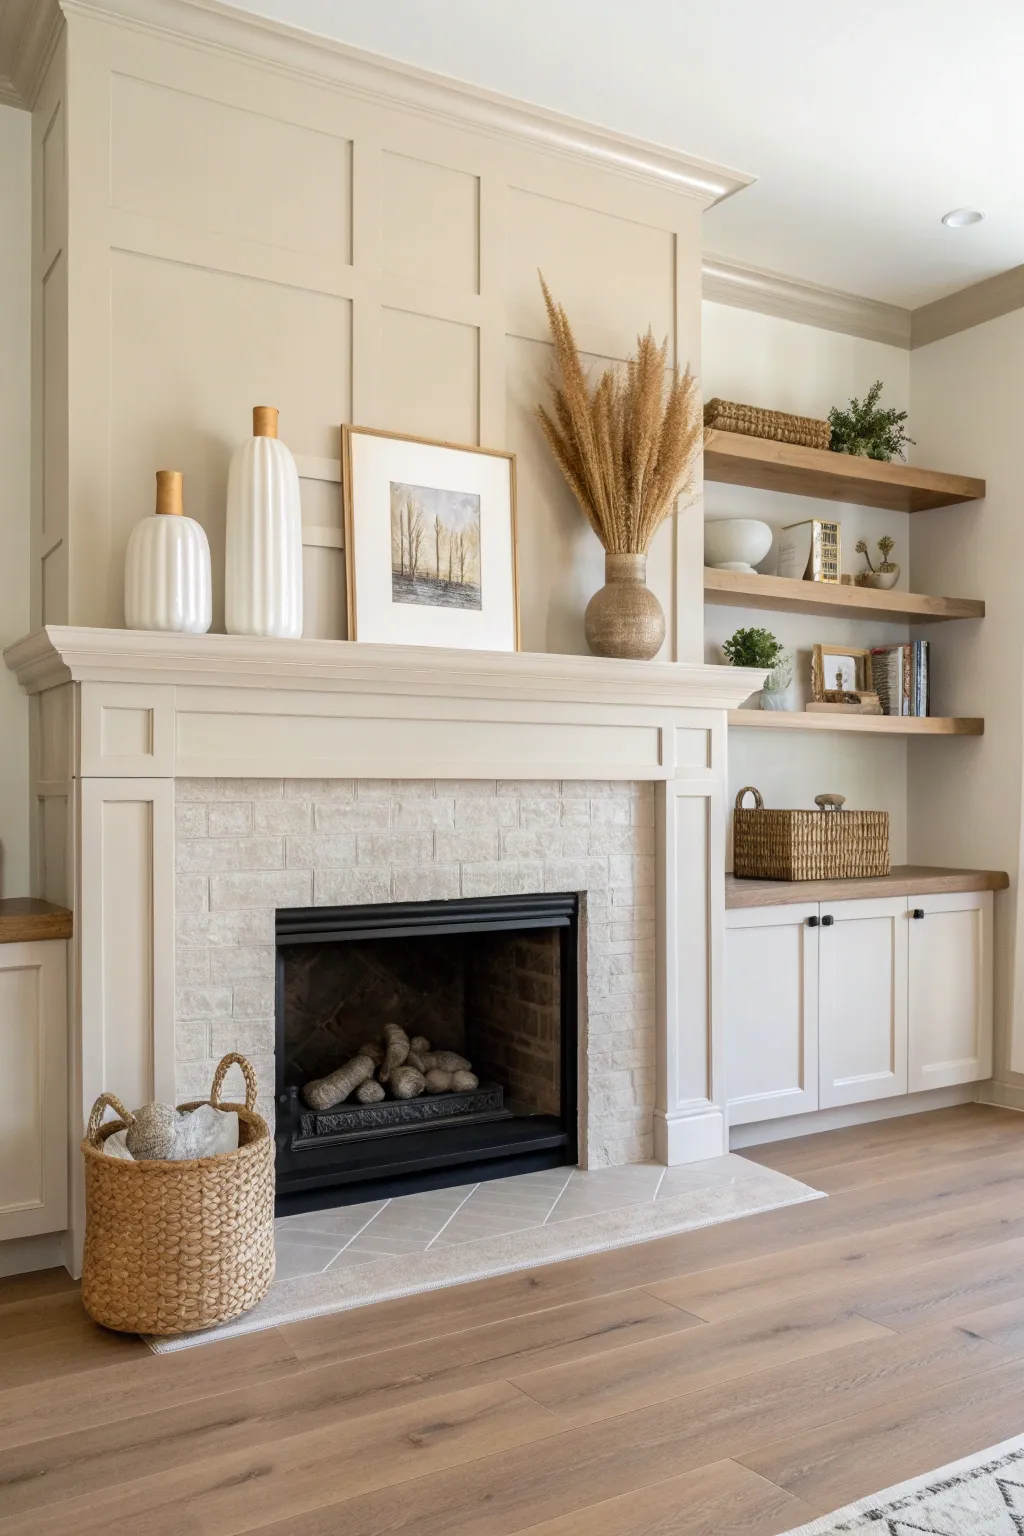
Greige for an Easy Whole-Room Match
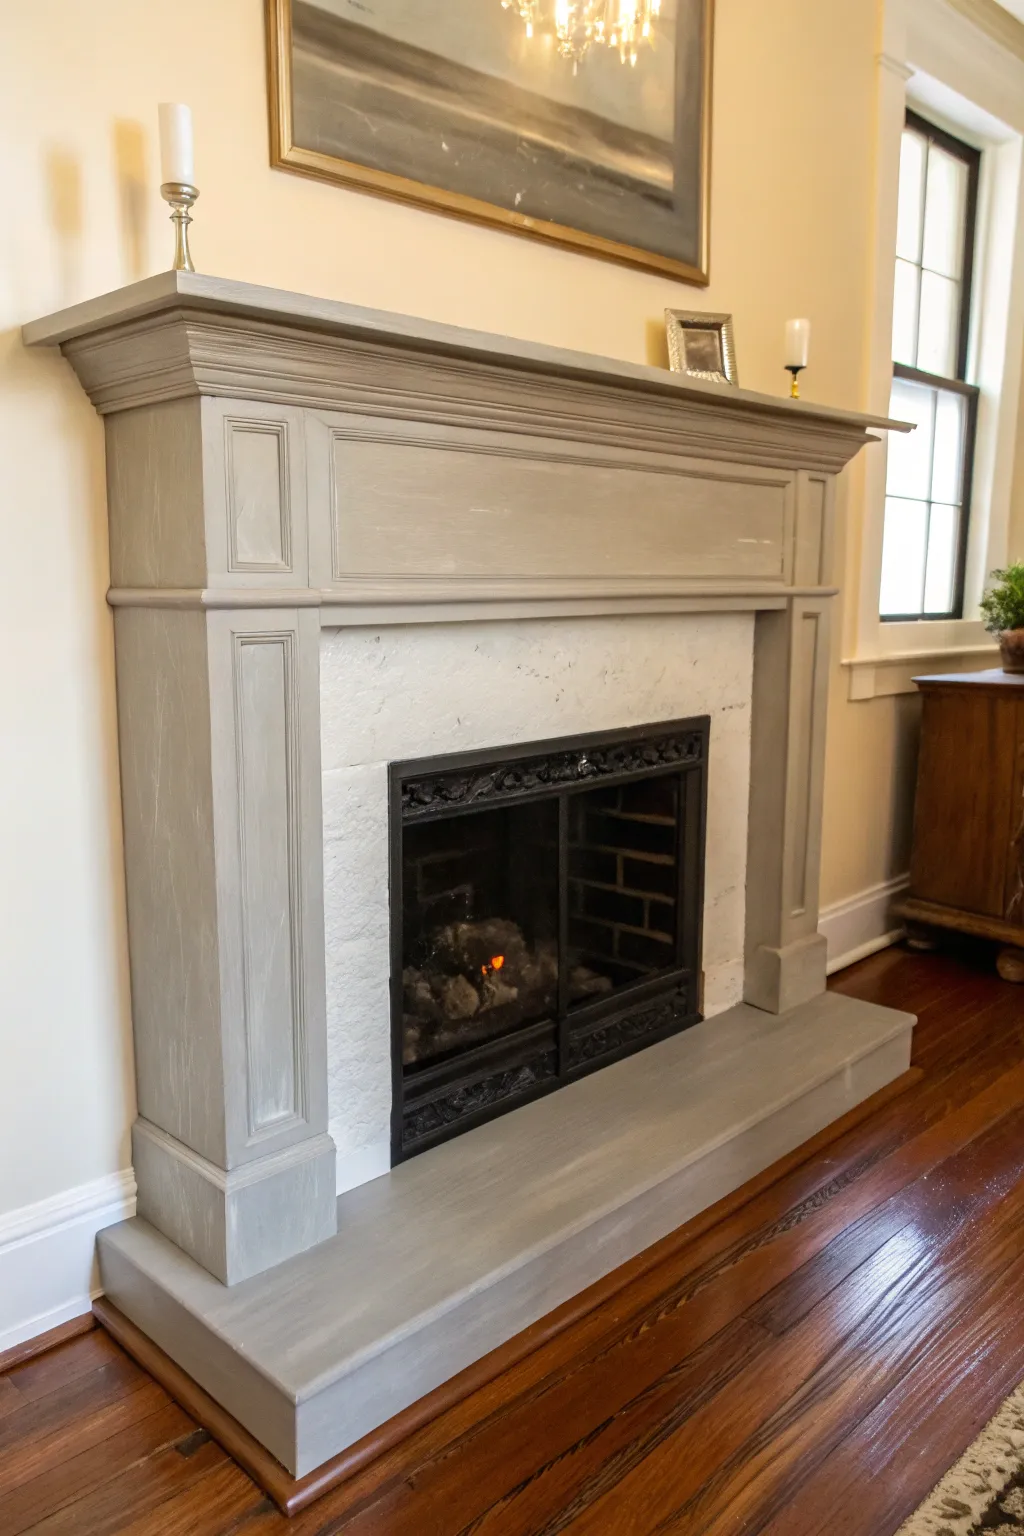
Transform a dated or basic fireplace mantel into a sophisticated focal point with a versatile greige finish. This project uses subtle distressing and layering techniques to create a lived-in, custom look that bridges the gap between gray and beige seamlessly.
Detailed Instructions
Materials
- High-quality bonding primer
- Greige interior latex paint (satin or semi-gloss finish)
- White chalk paint or glaze (optional for whitewash effect)
- Painter’s tape
- Drop cloths
- Medium-grit sandpaper (120-150 grit)
- Fine-grit sandpaper (220 grit)
- Tack cloth
- 2-inch angled sash brush
- 4-inch foam roller
- Small paint tray
- Wood filler (if needed for repairs)
- Degreaser or TSP substitute
Step 1: Preparation & Cleaning
-
Protect the surrounding area:
Lay down drop cloths to cover the hearth and flooring completely. Use painter’s tape to carefully mask off the walls where they meet the mantel and the stone surround around the firebox opening. -
Clean surface thoroughly:
Scrub the entire mantel with a degreaser or TSP substitute. Fireplaces accumulate soot and dust over time, and paint won’t adhere properly to grime. -
Repair imperfections:
inspect the wood for deep scratches or holes. Apply wood filler to these areas, smoothing it over with a putty knife, and allow it to dry completely. -
Sand for adhesion:
Scuff sand the entire surface using medium-grit sandpaper. You aren’t trying to remove old finishes entirely, but rather creating a ‘tooth’ for the primer to grip. -
Remove dust:
Wipe down the entire mantel with a damp cloth followed by a tack cloth to ensure absolutely no dust remains in the crevices or molding details.
Sticky Situation?
If paint peels when removing tape, the layers might be stuck. Always score the tape edge with a sharp blade before pulling, and pull slowly at a 45-degree angle away from the paint.
Step 2: Priming & Base Coat
-
Apply bonding primer:
Using your angled sash brush for corners and the foam roller for flat areas, apply a thorough coat of bonding primer. This is crucial if you are painting over varnished wood. -
Sand the primer:
Once the primer is fully dry, very lightly sand the surface with fine-grit sandpaper to knock down any brush strokes or texture from the roller. -
First coat of greige:
Stir your greige paint well. Begin painting the detailed molding and recessed areas first using the angled brush, working the paint into the corners. -
Paint the flat surfaces:
While the detailed areas are still wet, use the foam roller or brush to paint the large, flat panels and legs. Maintain a wet edge to avoid lap marks. -
Assess coverage:
Let the first coat dry completely according to manufacturer instructions. Don’t worry if it looks slightly streaky; the second coat will unify the color.
Add Dimension
Mix 1 part dark gray paint with 4 parts glazing medium. Brush into the molding crevices and wipe away the excess with a rag to make the architectural details pop.
Step 3: Finishing Touches
-
Apply second coat:
Apply the second coat of greige paint, following the same order: details first, flat surfaces second. Aim for smooth, long strokes. -
Create a subtle texture (Optional):
To achieve the slightly weathered look seen in the photo, I like to take a nearly dry brush with a tiny amount of lighter paint or glaze and lightly drag it vertically over the flat surfaces while the base is tacky. -
Inspect the reveals:
Check the deep corners of the molding for paint pooling or drips. Smooth these out immediately with your brush tip. -
Remove tape:
Carefully score the edge of the painter’s tape with a utility knife before pulling it away. This prevents the dried paint from peeling off with the tape. -
Final cure:
Allow the mantel to cure for at least 48 hours before placing any heavy decor items or using the fireplace, ensuring the finish hardens fully.
Enjoy the warmth and elegance your newly updated mantel brings to the living space


High-Gloss Finish to Highlight the Shape
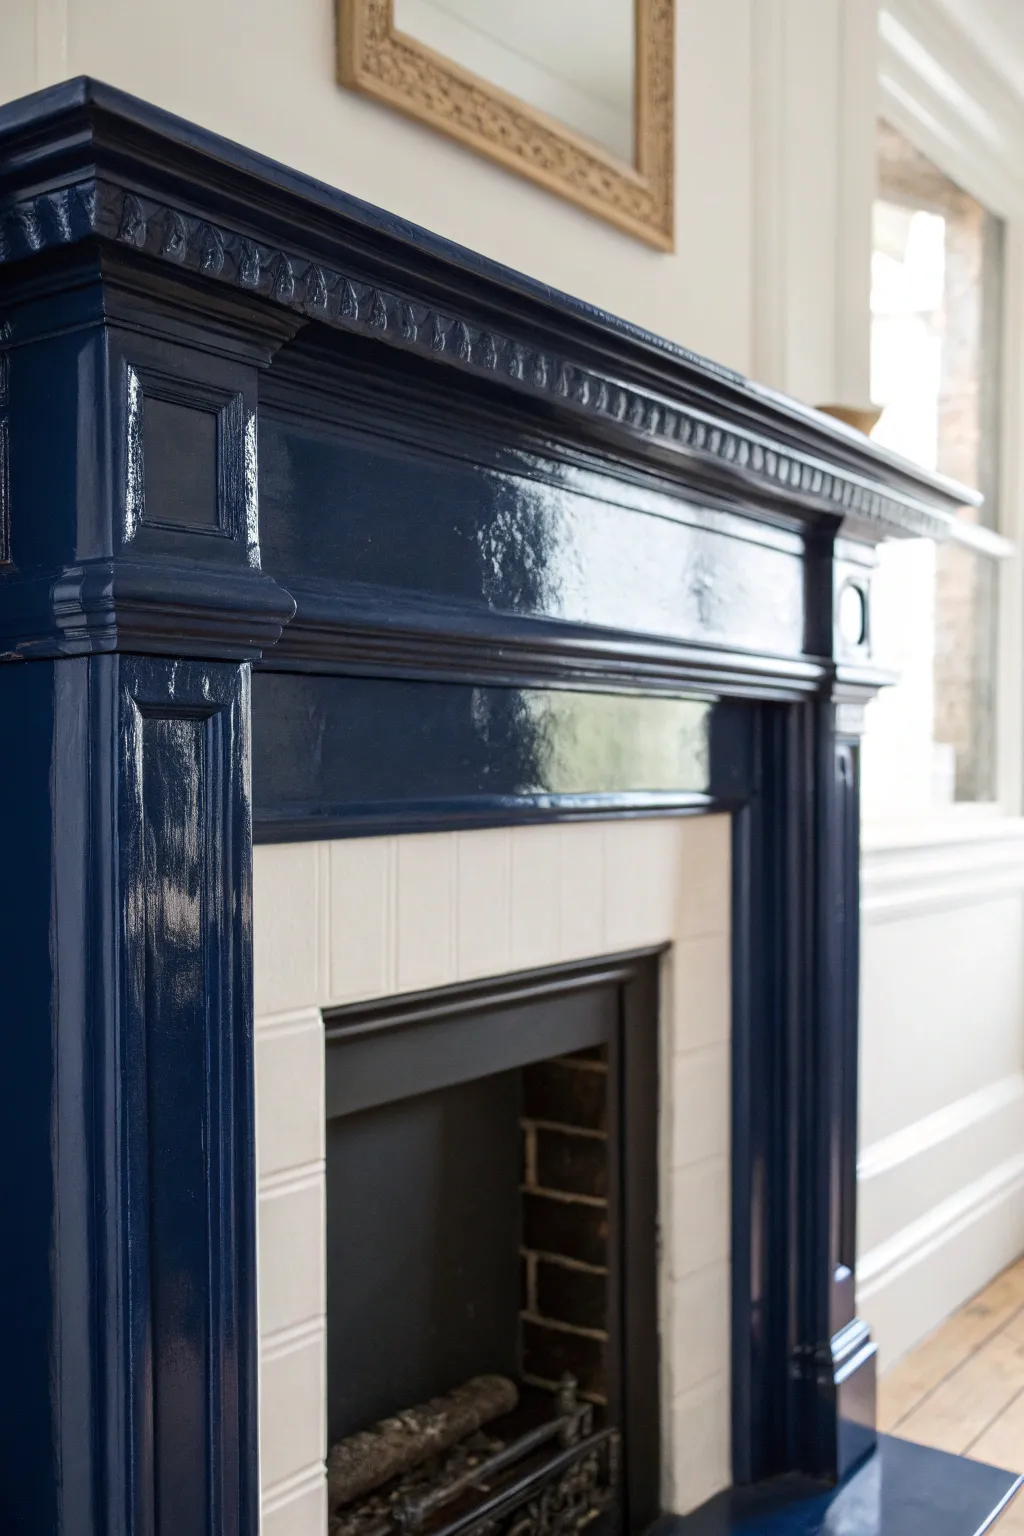
Transform a standard fireplace mantel into a striking focal point with an intense, high-gloss navy blue finish. This project leverages the reflective power of high-gloss enamel to accentuate every curve, flute, and piece of dentil molding, giving the piece a sophisticated, lacquered appearance.
Step-by-Step Tutorial
Materials
- High-gloss enamel paint (Deep Indigo/Navy)
- Bonding primer (oil-based recommended for adhesion)
- Degreaser or TSP substitute
- Fine-grit sandpaper (220-grit)
- Medium-grit sandpaper (120 or 150-grit)
- Tack cloths
- High-quality angled sash brush (synthetic specifically for gloss)
- Small foam roller and tray
- Painter’s tape
- Wood filler
- Caulk and caulk gun
- Drop cloths
Step 1: Preparation & Surface Cleaning
-
Protect the area:
Lay down drop cloths extensively around the hearth and secure them with tape. Apply painter’s tape meticulously to the wall edges, the inner tile surround, and the floor where it meets the mantel legs. -
Clean deeply:
Scrub the entire wooden surface with a degreaser or TSP substitute. Old fireplaces often harbor soot and wax buildup that will repel paint, so really work into the crevices of the molding. -
Fill imperfections:
Inspect the wood for dings, deep scratches, or nail holes. Fill them with wood filler, leaving it slightly mounded to account for shrinkage as it dries. -
Caulk the seams:
Check the joints where the mantel meets the wall or where trim pieces join. Run a thin bead of finish caulk along these gaps to ensure a seamless, built-in look once painted.
Brush Maintenance Tip
Keep a small cup of solvent (water or mineral spirits, depending on paint base) handy. Dip your brush occasionally to prevent paint from drying and clumping in the bristles.
Step 2: Sanding & Priming
-
Initial sanding:
Once the filler is dry, sand the flat areas with medium-grit paper. For the detailed dentil molding and fluting, I find folding a small piece of sandpaper helps get into the grooves without losing the profile. -
Remove dust:
Clear away all sanding dust. Vacuum the molding first, then wipe everything down with a tack cloth to pick up the finest particles. -
Apply bonding primer:
Brush on a coat of high-quality bonding primer. This is crucial for glossy finishes as it provides the ‘tooth’ the topcoat needs. Don’t worry about brush strokes yet; just get it covered. -
Sand the primer:
After the primer cures fully, lightly sand it with fine-grit (220) sandpaper. This step knocks down any ridges and is the secret to a mirror-like finish later. -
Final dust off:
Wipe the surface with a fresh tack cloth again. Any speck of dust left behind will show up magnified in the high-gloss paint.
Step 3: Painting the Color
-
Cut in the details:
Dip your angled sash brush into the high-gloss navy paint. Start by painting the intricate areas first—the dentil molding under the shelf and the fluting on the legs. -
Watch for drips:
High-gloss paint tends to be thinner and can run easily. Check back on the vertical grooves frequently for the first few minutes to catch and smooth out any drips before they tack up. -
Roll the flats:
Use a small foam roller for the flat front panels and sides. This applies the paint evenly without leaving brush marks, which is essential for that wet-look finish. -
Tip off the paint:
Immediately after rolling, run a dry brush lightly over the wet surface from top to bottom. This ‘tipping off’ process pops any tiny bubbles and aligns the finish. -
Allow long cure times:
Let the first coat dry significantly longer than the can says—often overnight. Glossy paints stay tacky longer, and rushing this can ruin the texture. -
Sand between coats:
Very gently scuff the surface with 220-grit paper. You aren’t removing paint, just creating microscopic scratches for the next layer to grip. -
Apply the second coat:
Repeat the painting process for the second coat. Focus heavily on maintaining a wet edge, working quickly so you don’t brush back into drying paint, which pulls the finish. -
Paint the hearth:
If your hearth is paintable (wood or concrete), apply the same high-gloss finish here to ground the mantel visually. -
Remove tape:
The moment the final coat is tacky but not fully dry, carefully peel away the painter’s tape at a 45-degree angle to ensure a crisp clean line.
Mirror Finish Upgrade
For an ultra-lacquered look, add a paint conditioner like Floetrol to your mix. It slows drying time, allowing the paint to self-level completely flat.
Step back and admire how the light dancing off those glossy surfaces completely redefines the character of your room
Matte Finish for a Soft Contemporary Look
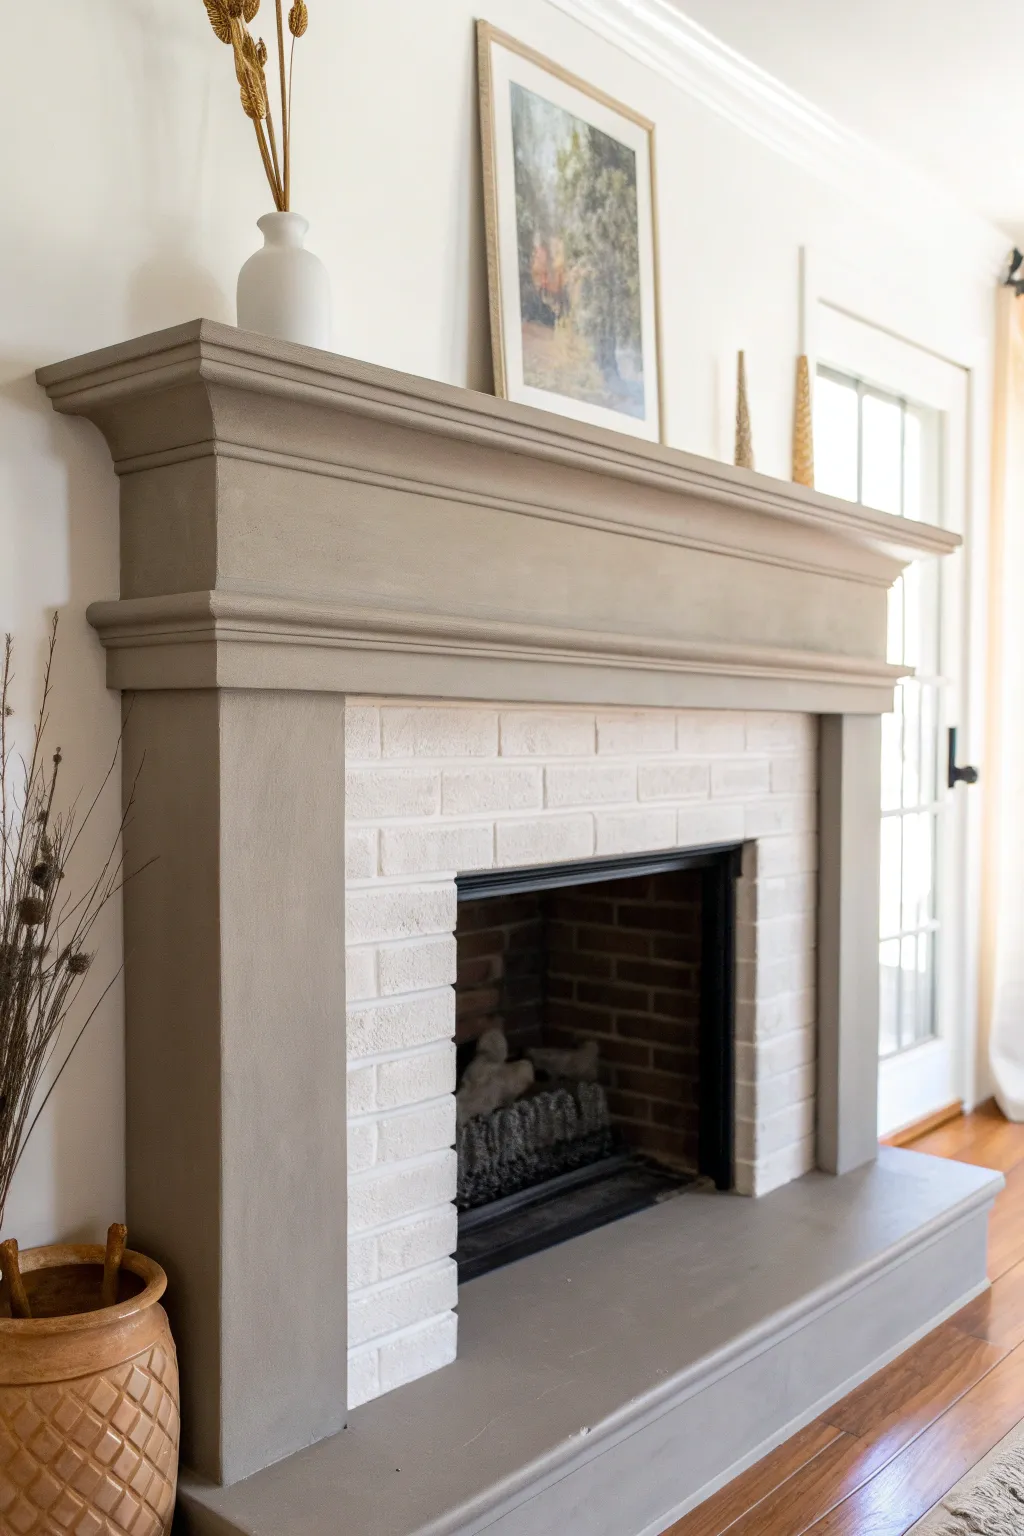
Give your fireplace a modern yet timeless update with this soft, matte grey finish. The clay-like tone brings a sophisticated warmth to the room while the flat sheen keeps the look grounded and contemporary.
Detailed Instructions
Materials
- High-quality interior paint (matte or flat finish, putty/greige color)
- Bonding primer (if painting over finished wood or laminate)
- Painter’s tape
- Drop cloth
- Degreaser or TSP substitute
- Sandpaper (120 and 220 grit)
- Tack cloth
- Angled sash brush (2-inch)
- Mini foam roller (4-inch) and tray
- Wood filler or spackling paste (if needed)
- Caulk and caulk gun
Step 1: Prep Work
-
Clear and clean:
Remove all decor from the mantel and hearth. Wipe down the entire surface thoroughly with a degreaser or TSP substitute to remove soot, dust, and any oils. -
Protect the area:
Lay down a drop cloth to protect your flooring. Use painter’s tape to carefully mask off the surrounding unwanted areas, particularly where the mantel meets the wall and the brick fireplace surround. -
Fill imperfections:
Inspect the woodwork for any nail holes, gouges, or deep scratches. Fill these with wood filler or spackling paste. Allow the filler to dry completely according to package instructions. -
Sanding:
Sand the entire mantel using 120-grit sandpaper. You aren’t trying to remove all old paint, but you do need to scuff up glossy surfaces to help the new paint adhere. Smooth out your filled areas during this step. -
Remove dust:
Vacuum up the sanding dust, then wipe the whole piece down with a tack cloth to ensure a perfectly clean surface for painting.
Sticky Situation
If your painter’s tape keeps tearing as you remove it, lightly score the edge where the tape meets the paint with a sharp utility knife to break the seal before pulling.
Step 2: Priming
-
Apply primer:
Apply a coat of high-quality bonding primer. Use your angled brush for the corners and intricate molding details first. -
Roll the flat surfaces:
Switch to the mini foam roller for the larger flat sections of the legs and the shelf top. This helps avoid brush strokes. -
Check for gaps:
Once the primer is dry, inspect the joints. If you see gaps between the molding and the wall or between pieces of trim, apply a thin bead of caulk and smooth it with a wet finger. Let the caulk cure fully.
Step 3: Painting
-
First coat – details:
Stir your matte grey paint thoroughly. Using the angled sash brush, begin painting the intricate crown molding, the grooved details, and the inner corners where the roller won’t reach. -
First coat – flats:
While the brushed edges are still wet, use the foam roller to cover the flat vertical legs and the horizontal shelf. Maintain a ‘wet edge’ to prevent lap marks. -
Light sanding:
Allow the first coat to dry completely. I like to lightly run a piece of 220-grit sandpaper over the flat surfaces to knock down any bumps, then wipe away the dust. -
Second coat:
Apply a second coat using the same method: cut in details with the brush first, then roll out the flat areas. A matte finish is unforgiving with texture, so keep your strokes smooth. -
Final inspection:
Check for any light spots or missed crevices. If the original color is still showing through, a third light coat may be necessary for full opacity.
Style Upgrade
For a subtle custom look, mix a tiny amount of plaster or baking soda into the final coat of paint to give the mantel a slight stone-like texture.
Step 4: Finishing Up
-
Remove tape:
While the final coat is still slightly tacky (not fully cured), carefully peel away the painter’s tape at a 45-degree angle. This prevents the dried paint from peeling up with the tape. -
Touch ups:
Use a small artist’s brush to touch up any tiny spots where the tape might have pulled paint or where coverage is thin near the wall. -
Cure time:
Let the paint cure for at least 48 hours before placing any heavy decor objects, like vases or frames, back onto the mantel shelf.
Enjoy the calm, sophisticated atmosphere your newly painted mantel brings to your living space
Satin Finish to Make Trim Details Pop
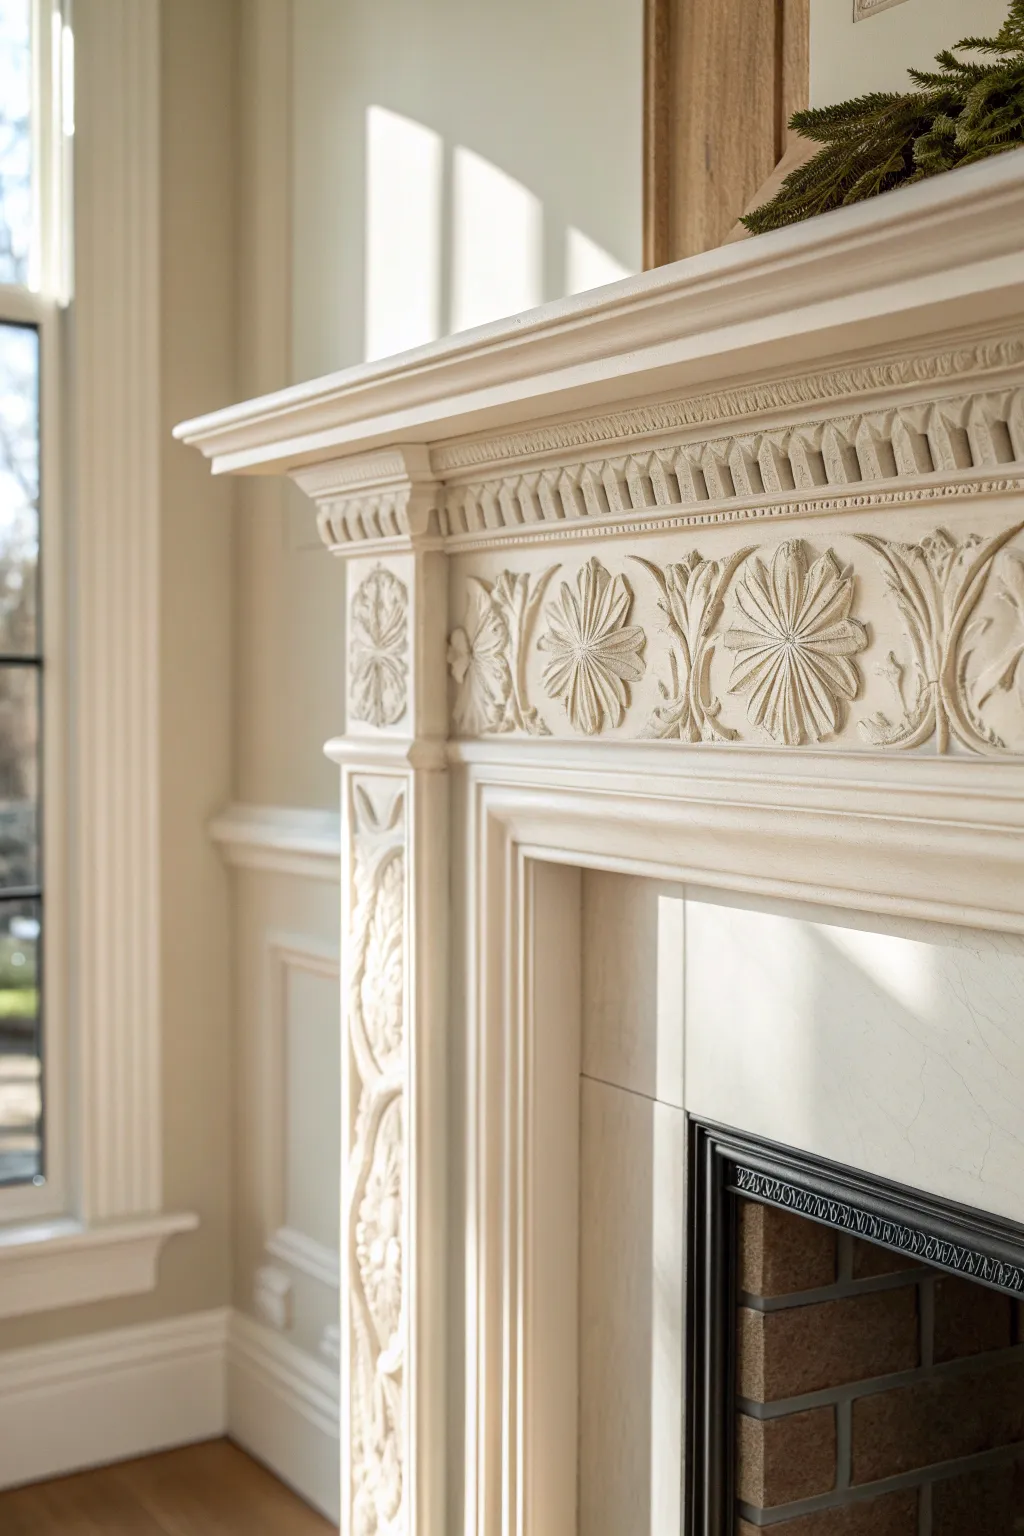
Transform an ordinary or dated fireplace mantel into a stunning architectural feature using a soft satin finish that highlights intricate molding. This technique enhances depth and shadow without the harsh glare of high gloss, giving carved details the attention they deserve.
How-To Guide
Materials
- High-quality interior trim paint (Satin sheen, warm cream/off-white)
- Bonding primer (stain-blocking)
- TSP substitute or degreaser
- Fine-grit sanding sponges (220-grit)
- Painter’s tape
- Drop cloths
- Sash brush (2-inch, angled)
- Mini foam roller (4-inch)
- Small artist brushes (for deep crevices)
- Wood filler (if repairs are needed)
- Caulk and caulk gun
- Tack cloths
Step 1: Preparation & Cleaning
-
Protect the area:
Begin by laying down drop cloths to protect your hearth and flooring. Use painter’s tape to carefully mask off the wall around the mantel leg and the firebox insert, ensuring crisp lines later. -
Degrease the surface:
Mix a TSP substitute with warm water according to package directions. Scrub the entire mantel thoroughly, paying special attention to the deep crevices of the floral motifs where dust and soot love to hide. -
Rinse and dry:
Wipe the surface down with clean water to remove any cleaning residue. Allow the wood to dry completely before moving forward. -
Repair imperfections:
Inspect the woodwork for nail holes or dents. Fill these with wood filler, letting it overfill slightly to account for shrinkage during drying. -
Gap management:
Check the seams where the mantel meets the wall. If there are visible gaps, run a thin bead of paintable caulk along the edge and smooth it with a damp finger for a seamless look.
Floetrol implies flow
Add a paint conditioner like Floetrol to your latex paint. This slows drying time, allowing brush strokes to level out completely for that silky, sprayed-on look.
Step 2: Sanding & Priming
-
Scuff sand the surface:
Using a 220-grit sanding sponge, lightly scuff the entire mantel. The sponge is crucial here because it conforms to the curved floral reliefs and dentil molding better than rigid sandpaper. -
Remove dust:
Vacuum the mantel surface with a brush attachment to pull dust out of the carvings. Follow up with a tack cloth to pick up the finest particles. -
Apply bonding primer:
Apply a coat of high-quality bonding primer. Start with your angled sash brush to work the primer into the intricate details first. -
Roll the flat surfaces:
While the detailed areas are wet, use the mini foam roller on the flat legs and shelf top to smooth out brush marks and create an even base. -
Check for bleed-through:
Once the primer is dry, look for any brownish stains bleeding through. If you spot them, spot-prime those specific areas again to seal the tannins.
Step 3: Painting & Finishing
-
Stir the satin paint:
Gently stir your satin paint to ensure the flattening agents are evenly distributed. Do not shake the can vigorously, as this introduces bubbles that ruin a smooth finish. -
Paint the detailed relief:
Dip your angled sash brush and begin painting the floral carvings and dentil molding. Apply thin coats to avoid pooling paint in the deep recessed areas, which can obscure the design. -
Feather the edges:
As you work out from the details, feather the paint edges onto the flat surfaces so you don’t end up with hard ridge lines when you switch tools. -
Smooth the flat areas:
Switch to your mini foam roller for the broad, flat sections of the legs and mantel shelf. Roll in long, continuous strokes to achieve a factory-like finish. -
Detail check:
I like to keep a small artist’s brush handy during this stage. Use it to quickly catch any drips that might settle at the bottom of the vertical fluting or floral emblems. -
Apply the second coat:
Allow the first coat to dry according to the manufacturer’s instructions (usually 4-6 hours). Apply a second coat using the same method: details first, then flat surfaces. -
Remove tape:
While the final coat is still slightly tacky (not fully cured), carefully peel away the painter’s tape at a 45-degree angle to prevent peeling the fresh paint.
Lost details?
If paint pools in the tiny flower crevices, don’t brush it out. Use the corner of a dry rag or a dry artist brush to wick up the excess immediately.
Step back and admire how the light catches the subtle sheen of your beautifully refreshed mantel
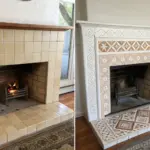
Two-Tone Mantel and Surround Contrast
This project combines the clean elegance of a classic white fireplace surround with the warmth of a natural wood shelf. The striking contrast between the bright millwork, the organic wood tones, and the deep charcoal tile creates a sophisticated focal point for any living room.
Step-by-Step Tutorial
Materials
- Solid wood beam or mantle shelf (white oak or similar)
- MDF or poplar boards for the surround and overmantel
- Crown molding
- Slate or ceramic 12×24 tiles (charcoal/black)
- Thinset mortar and notched trowel
- Grout (charcoal or black)
- Construction adhesive
- Brad nailer and 1-inch to 2-inch nails
- Wood filler and caulk
- Primer and semi-gloss white paint
- Matte polyurethane or wood wax
- Sandpaper (120, 220, and 320 grit)
- Tile saw
Step 1: Prepping and Tiling the Surround
-
Prepare the surface:
Ensure the wall and floor area around your fireplace insert is clean, flat, and free of debris. If you are tiling over brick, you may need a cement backer board for a smooth surface. -
Dry fit the tiles:
Lay out your charcoal tiles to determine the best placement. For this look, use a simple grid pattern directly around the firebox and for the hearth extension on the floor. -
Cut the tiles:
Using a wet saw, cut the tiles to fit perfectly around the fireplace insert opening. Measure twice to ensure the reveal is even on all three sides. -
Apply mortar:
Spread thinset mortar using a notched trowel. I find working in small sections helps prevent the mortar from drying out before you can place the tiles. -
Set the tiles:
Press the tiles firmly into the mortar. use spacers to keep your grout lines consistent, though this modern look works well with very tight grout lines. -
Grout the joints:
Once the mortar has set (usually 24 hours), apply charcoal grout to match the tile color. Wipe away excess haze with a damp sponge.
MDF vs. Poplar Pro Tip
Use poplar for the trim pieces (rails and stiles) and MDF for the flat panels. Poplar is harder and resists dents better, while MDF provides a perfectly smooth surface for painting.
Step 2: Building the White Surround
-
Build the legs:
Construct two hollow pillars (legs) using MDF or poplar. These should anchor the design and sit flush against the tiled surround. -
Add detailing:
Use trim pieces to create the recessed panel look on the front of the legs. This ‘shaker style’ detail adds depth without being overly ornate. -
Construct the overmantel frame:
Above where the wooden shelf will sit, build out the wall with board and batten style paneling to extend the fireplace structure to the ceiling. -
Install crown molding:
Cap the very top of the overmantel structure with crown molding where it meets the ceiling for a seamless built-in appearance.
Tape Before Painting
If you’ve already installed the wood shelf, cover it completely with painter’s tape and plastic sheeting before painting the white surround. Splatter on raw wood is very hard to remove.
Step 3: The Floating Wood Shelf
-
Sand the wood beam:
Sand your solid wood shelf extensively, starting with 120 grit and moving up to 220 grit for a silky smooth feel. -
Seal the wood:
Apply a clear matte polyurethane or a natural wood wax. Avoid heavy stains; you want the natural grain and blonde tone to contrast with the white paint. -
Install the shelf:
Mount the shelf securely on top of the side legs. Use construction adhesive and long screws driven from the inside of the hollow legs up into the bottom of the shelf so no fasteners are visible.
Step 4: Finishing Touches
-
Fill and caulk:
Fill all nail holes in the white woodwork with wood filler. Caulk every seam where the wood meets the wall or other trim pieces for a professional finish. -
Prime the woodwork:
Apply a high-quality primer to all the raw wood or MDF parts (excluding the natural wood shelf). Let it dry completely. -
Sand the primer:
Lightly sand the primed surface with 320-grit paper to knock down any raised grain or brush marks. -
Paint the surround:
Apply two coats of semi-gloss white paint. Use a high-density foam roller for the flat areas and a high-quality sash brush for the corners to minimize brush strokes. -
Clean and style:
Once the paint is fully cured, give the tiles one last wipe down and style your mantle with greenery and framed art to complete the look.
Enjoy the cozy ambiance created by your stunning, custom-built fireplace focal point
Monochrome Mantel and Wall Color Drench
Transform a standard fireplace into a towering architectural statement with this monochromatic painting technique. By drenching the mantel, overmantel, and trim in a single dusty taupe hue, creating a seamless, high-end built-in look.
Detailed Instructions
Materials
- High-quality interior latex paint (satin or semi-gloss finish) in a brownish-taupe
- Stain-blocking primer
- Painters tape (multi-surface)
- Drop cloths or masking paper
- Sanding sponge (medium grit)
- Tack cloth
- Wood filler (stainable/paintable)
- Caulk gun and paintable acrylic latex caulk
- 2-inch angled sash brush
- 4-inch foam roller or mini microfiber roller
- Small artist brush (for tight corners)
- Paint tray and liners
- Degreaser cleaner (like TSP substitute)
Step 1: Preparation & Repairs
-
Clear and clean:
Remove all objects from the mantel and hearth. thorough clean the wood surfaces with a degreaser or TSP substitute to remove any soot, dust, or furniture polish residue that could prevent paint adhesion. -
Protect the perimeter:
Lay down heavy paper or drop cloths on the floor, taping them securely to the baseboards. Carefully tape off the stone surround and the inner firebox brickwork to keep them paint-free, pressing the tape edge down firmly. -
Fill imperfections:
Inspect the woodwork for nail holes, dents, or gaps in the molding joints. Use wood filler for holes and paintable caulk for any gaps between trim pieces or where the wood meets the wall, smoothing the beads with a damp finger. -
Sand for adhesion:
Once the filler is dry, go over the entire wood surface with a medium-grit sanding sponge. You don’t need to strip the old finish completely, but scuffing the surface is crucial for the primer to grip. -
Remove dust:
Vacuum up the sanding dust, then wipe every nook and cranny with a tack cloth. Any remaining dust will create a gritty finish.
Step 2: Priming the Surface
-
Prime the details:
Using your angled sash brush, apply a stain-blocking primer to all the recessed areas, molding profiles, and corners. This prevents tannins or old stains from bleeding through. -
Roll the flat areas:
Switch to your mini roller to prime the large flat panels of the overmantel and the legs of the fireplace. Keep the coat even and watch for drips. -
Let it cure:
Allow the primer to dry completely according to the manufacturer’s instructions. I usually like to give this extra time—often overnight—to ensure a really hard base. -
Light send:
Run a fine-grit sanding sponge very lightly over the primed surface to knock down any raised grain or brush marks, then wipe clean with a tack cloth again.
Fixing Sticky Surfaces
If the paint feels tacky days later (blocking), dust it lightly with talcum powder. In the future, give each coat significantly more drying time before recoating to prevent moisture trapping.
Step 3: Painting
-
Cut in the intricate molding:
Dip your angled brush into your taupe paint and start with the most difficult areas: the inside edges of the square molding panels and the decorative trim under the mantel shelf. -
Paint the returns:
Continue brushing the paint onto the sides (returns) of the mantel and the crown molding at the top, ensuring smooth strokes that follow the wood grain. -
Roll the main panels:
Use the foam or microfiber roller to apply paint to the large center panel and the flat vertical surfaces. Work in small sections, always rolling into a wet edge to avoid lap marks. -
Check for drips:
Immediately inspect corners and grooves for pooling paint. Use a dry brush to feather out any drips before they start to tack up. -
Apply the second coat:
After the first coat is fully dry (usually 4-6 hours), apply a second coat using the same method: brush the details first, then roll the flats. This creates the deep, saturated color key to the monochrome look. -
Detail work:
If you have very sharp corners or ornate carvings that the sash brush missed, use a small artist brush to dab paint into those tiny recesses. -
Remove tape:
While the final coat is still slightly tacky (not wet, but not fully cured), carefully peel away the painter’s tape at a 45-degree angle to ensure a crisp line against the heavy stone.
Level Up: Glazing
Add depth to the molding by mixing a small amount of dark umber paint with clear glaze. Brush it into crevices and wipe the high points for an antique, architectural feel.
Step back and admire how the uniform color creates a stunning, monolithic focal point in your room
Painted Mantel with Built-Ins to Match
Transform a plain fireplace into a stunning architectural focal point with this custom paneled mantel and matching built-ins. This project combines classic wainscoting details with a warm beige palette to create a cohesive, high-end look that anchors the entire living room.
Step-by-Step Guide
Materials
- 1×4 MDF or poplar boards (for stiles and rails)
- Base cap molding
- Crown molding
- Pine boards (for shelves and bench top)
- Beige satin interior paint (e.g., Sherwin Williams Accessible Beige)
- White-washed brick veneer panels or tile
- Wood stain (light oak or walnut)
- Construction adhesive
- Brad nailer and 1.5-inch nails
- Wood filler and spackling
- Caulk and caulk gun
- Sandpaper (120 and 220 grit)
- Circular saw or miter saw
- Paint sprayer or high-quality roller and angled brush
- Stock cabinets (for the base)
Step 1: Building the Framework and Mantel
-
Install the base cabinets:
Begin by setting your stock base cabinets on either side of the fireplace opening. Remove the baseboards where they will sit to ensure a flush fit against the wall, shim them until level, and screw them securely into the wall studs. -
Construct the fireplace surround:
Build the main box legs and header for the mantel using 1×6 or 1×8 lumber depending on your desired depth. Secure these directly to the wall framing around the firebox, ensuring everything is perfectly plumb. -
Add the mantel shelf:
Create the heavy mantel shelf by stacking molding or building a hollow box beam. Attach this firmly to the top of your surround structure. This shelf serves as the visual break between the firebox and the upper paneling. -
Apply the brick veneer:
Install the white-washed brick veneer or tile on the firebox surround area below the mantel shelf. Use tile adhesive or mastic, applying it with a notched trowel, and let it set overnight before grouting if necessary.
Uneven Wall Woes?
Walls are rarely perfectly straight. If gaps appear between your boards and the wall, use backer rod in larger gaps before caulking to ensure a seamless painted finish.
Step 2: Creating the Upper Paneling
-
Plan the grid layout:
Measure the space from the mantel shelf to the ceiling. Sketch a grid pattern for your board and batten style paneling to ensure the squares are evenly sized. -
Install vertical stiles:
Cut your vertical 1×4 boards to length. Apply construction adhesive to the back and nail them into the wall studs, starting with the outer edges and filling in the middle pieces according to your layout. -
Install horizontal rails:
Measure the distance between your vertical stiles carefully. Cut the horizontal 1×4 rails to fit snugly between the verticals to create the square grid pattern, nailing them securely into place. -
Add crown molding:
Finish the top of the structure where it meets the ceiling with crown molding. This integrates the built-in unit with the room’s existing architecture for a seamless look.
Hidden Tech
Before paneling above the mantel, run conduit or an outlet box behind the drywall. This lets you mount a Frame TV or artwork light later without messy visible cords.
Step 3: Floating Shelves and Finishing
-
Install shelf cleats:
For the side alcoves, screw study wooden cleats into the wall studs where you want your floating shelves to sit. Ensure these are perfectly level. -
Build the hollow shelves:
Construct hollow box shelves using the pine boards. Slide these boxes over the wall cleats and secure them with finish nails through the top and bottom of the shelf into the cleat. -
Prep for paint:
Fill all nail holes with wood filler and caulk every seam where wood meets wood or wood meets wall. This step is crucial for achieving that professional, built-in appearance. -
Sand until smooth:
Once the filler is dry, sand all wood surfaces with 220-grit sandpaper. I always run a tack cloth over everything afterward to remove even the finest dust. -
Prime the structure:
Apply a high-quality primer to all raw wood and MDF parts. Do not primer the floating shelves or the cabinet tops if you plan to stain them. -
Paint the mantel and cabinets:
Apply two coats of beige satin paint to the mantel, upper paneling, and lower cabinet bases. A sprayer gives the smoothest finish, but a shed-less roller works well too. -
Stain the wood accents:
Stain the floating shelves and the countertop above the base cabinets with a light oak or walnut stain. Seal them with a matte polyurethane for protection. -
Clean the brick:
Wipe down the brick veneer to ensure no paint splatter made its way onto the textured surface.
Now step back and admire how this elegant, monochromatic structure completely redefines the character of your room
Painted Mantel with Subtle Distressed Edges
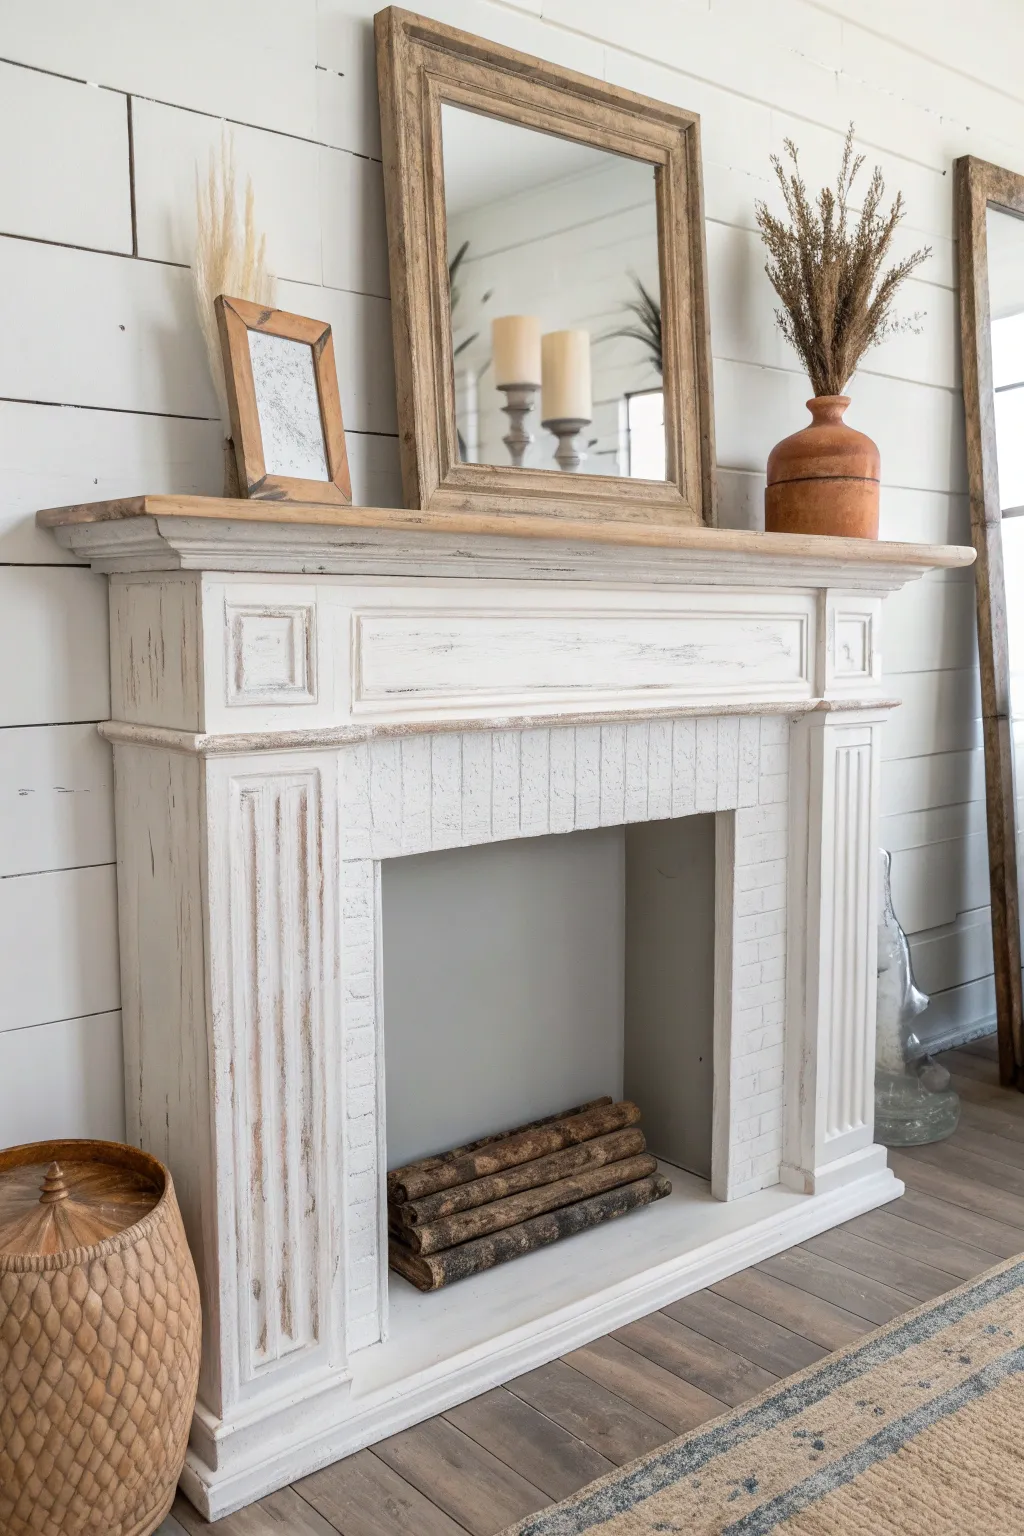
Transform a plain wall into a cozy focal point by building and finishing this charming faux fireplace mantel. The design features classic fluted columns and a chippy, white-washed finish that adds instant character and a sense of history to any room.
Step-by-Step Guide
Materials
- Pine boards (1×6, 1×8, 1×10 for structure)
- Plywood sheet (for backing)
- Decorative trim molding (crown, baseboard, fluted casing)
- Faux brick paneling or textured wallpaper
- Pylex or construction screws
- Wood glue
- Miter saw
- Nail gun and brad nails
- Sandpaper (80, 120, and 220 grit)
- Chalk paint (white)
- Dark wax or antique glaze
- Paintbrushes (chip brush and clean lint-free cloths)
- Candle wax or petroleum jelly (for resist technique)
- Stain (medium walnut or similar)
Step 1: Building the Structure
-
Cut the Main Components:
Begin by measuring your desired dimensions for the mantel height and width. Cut your pine boards to create two vertical legs and a horizontal header box that will connect them. I typically make the legs about 8-10 inches wide and the header slightly taller for dramatic effect. -
Assemble the Frame:
Use wood glue and pocket hole screws or construction screws to attach the vertical legs to the horizontal header. Ensure everything is square before the glue sets to keep your structure stable. -
Add the Top Shelf:
Cut a piece of creating a mantel shelf that overhangs the structure by at least 2 inches on the front and sides. Secure this to the top of your header box using nails and glue. -
Install the Firebox Backing:
Cut a piece of plywood to fit the opening between the legs. This will serve as the backing for your faux firebox area. Attach it securely from the back of the frame. -
Line the Firebox:
Cut your faux brick paneling to fit the sides and back of the inner firebox area. Glue and nail these pieces in place to create the illusion of a masonry hearth.
Pro Tip: Texture Trick
Use a dry brush technique on the brick paneling. Dip your brush, wipe most paint off, and drag it across the textured surface to highlight the ‘brick’ without filling gaps.
Step 2: Adding Detail & Trim
-
Attach Fluted Casing:
Cut lengths of fluted casing to run vertically down the front of each leg. This detail adds that classic architectural column look essentially for the style we are aiming for. -
Create the Header Detail:
Frame the front of the horizontal header with decorative molding. You can create a rectangular box shape using simple molding strips to mimic a traditional frieze panel. -
Install Base and Crown:
Wrap baseboard trim around the bottom of the legs to give the mantel a grounded look. Add a small piece of crown molding or cove molding directly under the mantel shelf for a polished transition. -
Sand Rough Edges:
Give the entire piece a quick sanding with 120-grit paper to smooth out any splintered wood from the cuts and prepare the surface for finishing.
Step 3: The Distressed Finish
-
Stain the Mantel Shelf:
Apply a medium walnut stain to the top shelf. Wipe off excess stain and let it dry completely. This natural wood tone will provide a beautiful contrast to the white paint. -
Apply the Base Stain Coat:
Lightly stain the edges, corners, and raised details of the main body where you want wood to show through later. You don’t need to stain the whole thing, just the high-traffic areas. -
Apply Wax Resist:
Once the stain is dry, rub a candle or a little petroleum jelly over the stained areas (corners, fluted ridges, edges). This prevents the paint from adhering strongly to these spots, making distressing much easier. -
Paint the Mantel Body:
Paint the entire body of the mantel (excluding the stained shelf) with white chalk paint. Don’t worry about perfect coverage; a slightly streaky application adds to the aged aesthetic. -
Paint the Firebox:
Paint the faux brick paneling inside the firebox white as well, ensuring you get into the mortar lines for a cohesive, built-in look. -
Distress the Finish:
When the paint is dry to the touch, use 220-grit sandpaper or a sanding block to gently rub the areas where you applied the wax resist. The white paint should flake off easily, revealing the dark stain underneath. -
Soften the Contrast:
If the white feels too bright, apply a very light coat of clear wax mixed with a drop of dark wax, working it into crevices and wiping it back immediately to create subtle shadows.
Level Up: Hearth Extension
Build a shallow wooden platform platform painted to match the mantel base. Place it on the floor in front to mimic a raised hearth extension for extra realism.
Style your new focal point with wood logs and candles to enjoy the warmth of a fireplace without the heat
Limewashed Look on a Painted Mantel
Transform a standard painted or wooden mantel into a stunning architectural feature that mimics the soft, weathered texture of French limestone or bleached oak. This technique uses layered glazes and dry-brushing to create depth and an elegant, old-world patina without sanding down to bare wood.
Step-by-Step Tutorial
Materials
- High-quality latex primer (if starting with dark wood)
- Chalk-style paint in a warm off-white (base color)
- Chalk-style paint in a light beige/tan (glaze color)
- Clear mixing glaze medium
- Water
- 2-inch synthetic angle sash brush
- Large chip brushes (natural bristle)
- Lint-free cotton rags
- Fine-grit sandpaper (220-grit)
- Matte clear sealer (polyurethane or wax)
- Painter’s tape
- Drop cloths
Step 1: Preparation & Base Coat
-
Clean surface:
Begin by thoroughly cleaning the mantel with a degreaser or TSP substitute to remove any soot, dust, or oils. Let it dry completely. -
Protect surroundings:
Apply painter’s tape to the wall edges and the hearth floor. Lay down drop cloths to catch any drips. -
Scuff sand:
Lightly sand existing glossy finishes with 220-grit sandpaper to give the new paint something to grip. Wipe away dust with a damp cloth. -
Apply base coat:
Brush on a coat of the warm off-white chalk paint. This serves as your ‘limestone’ foundation. Don’t worry about perfect smoothness; slight brush strokes add character later. -
Check coverage:
Allow the first coat to dry. If the original color is showing through significantly, apply a second coat of the off-white paint and let it dry overnight.
Step 2: Creating the wash
-
Mix the glaze:
In a plastic container, mix one part beige/tan paint with four parts clear glazing medium. Add a splash of water to thin it to a heavy cream consistency. -
Wet the surface:
Work in small sections (like one leg or the header). Lightly mist the area with water using a spray bottle before applying glaze. -
Brush on glaze:
Using a chip brush, apply the glaze mixture liberally over the dampened section, working it into crevices and moldings. -
Wipe back:
Immediately take a damp, lint-free rag and gently wipe away the excess glaze. Leave more glaze in the corners and recessed details to simulate years of age. -
Feather out:
As you wipe, use a dry chip brush to feather the glaze on flat surfaces, creating soft, linear streaks that mimic wood grain or stone striations. I find this step crucial for avoiding harsh rag marks.
Keep it Moving
Work quickly with glaze. If a section starts to dry before you’ve blended it, mist it lightly with water to reactivate the paint and smooth out the transition.
Step 3: Adding Texture & Detail
-
Dry brushing details:
Once the glaze layer is dry to the touch, dip just the tips of a dry chip brush into your original off-white base color. -
Off-load paint:
Dab the brush onto a paper towel until almost no paint comes off. It should be barely there. -
Highlight edges:
Lightly drag the dry brush over raised moldings and edges. This ‘hits the high points’ and creates the dusty, limed look characteristic of aged stone. -
Detail moldings:
Use a small artist’s brush to add tiny amounts of the darker glaze into the deepest crevices of the decorative trim for extra definition. -
Blend inconsistencies:
Stand back and look for areas that seem too heavy or too stark. Use a slightly damp polishing cloth to buff and blend these areas while the top layers are still curing.
Faux Stone Texture
For a grittier stone feel, mix a tablespoon of baking soda or plaster of paris into your base coat paint. It adds physical texture that catches the glaze beautifully.
Step 4: Finishing
-
Full cure:
Allow the entire mantel to dry for at least 24 hours. The glaze extends drying time significantly compared to standard paint. -
Seal the work:
Apply a coat of matte, water-based polyurethane or a clear furniture wax. Matte is essential here; any sheen will ruin the raw stone effect. -
Buff (if waxing):
If you chose wax, wait 15 minutes and buff it gently with a clean cloth to harden the finish without adding shine. -
Clean up:
Carefully remove the painter’s tape, pulling away from the fresh finish to avoid peeling.
Step back and admire how a few layers of paint have given your room a sophisticated, historic focal point to enjoy.
Geometric Color-Block on the Mantel Face
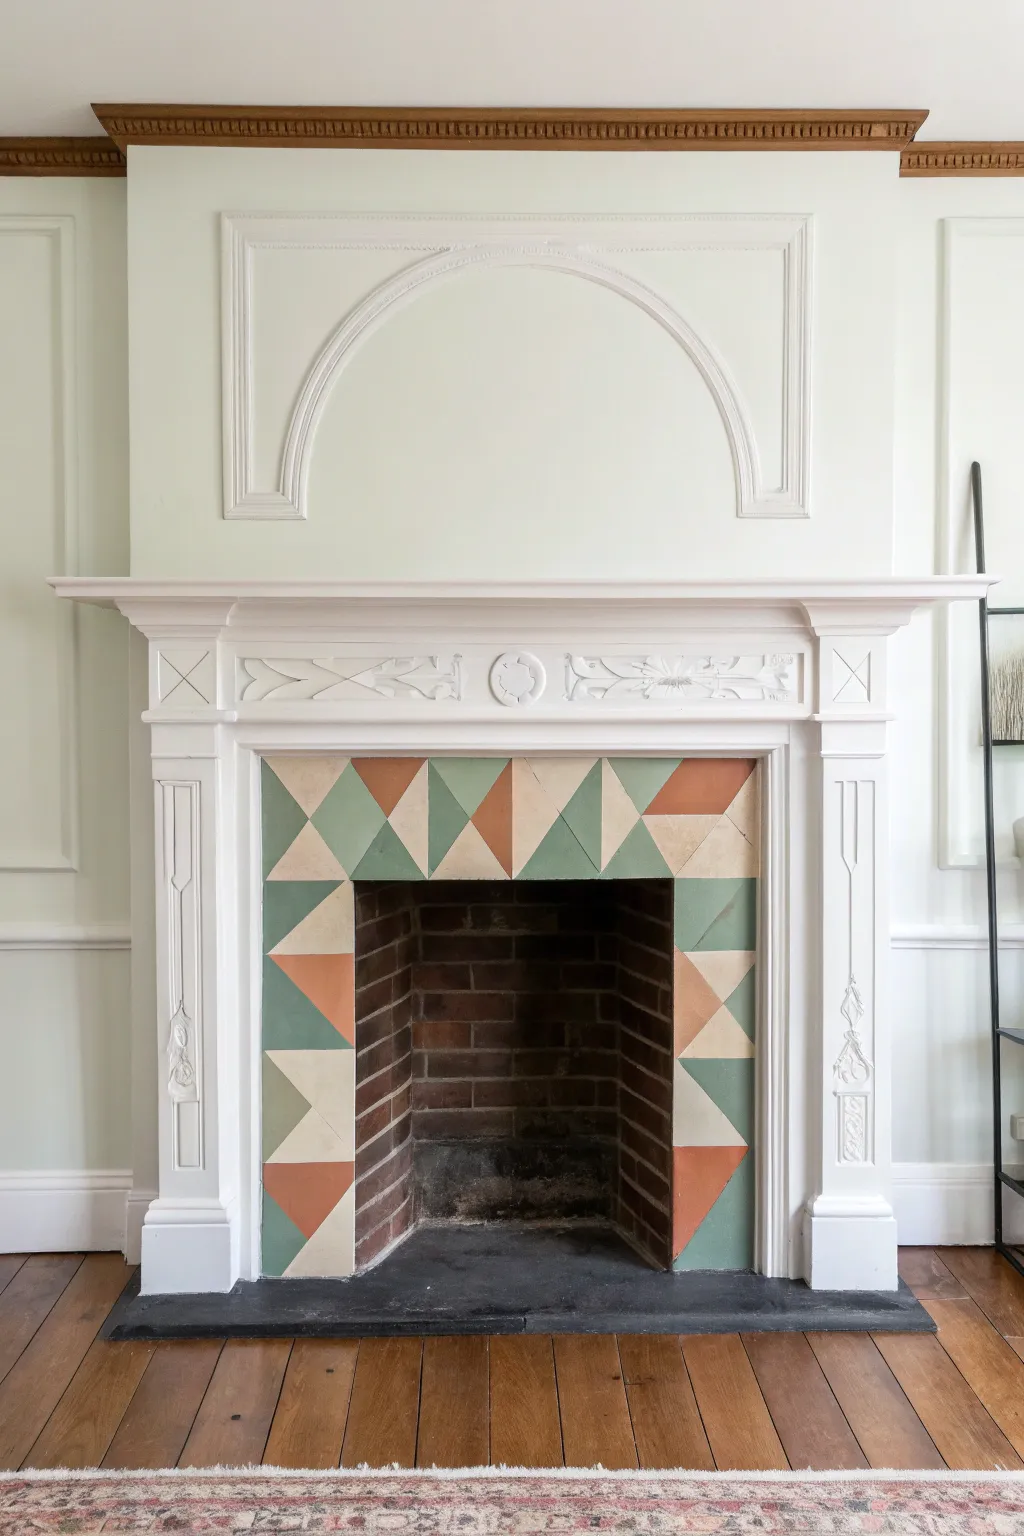
Transform a plain fireplace surround into a stunning focal point with this clever geometric paint treatment. By simulating the look of triangular tiles using only paint and tape, you can achieve a custom, high-end design that perfectly bridges traditional architecture with modern color-blocking.
Detailed Instructions
Materials
- High-quality painter’s tape (multi-surface)
- Small foam roller
- Small angled sash brush (1.5 inch)
- Latex interior paint in three colors (Cream/Base, Sage Green, Terracotta)
- Measuring tape
- Long straight edge or level
- Pencil
- Sandpaper (220-grit)
- Primer (bonding primer if painting over tile)
- Drop cloth
- Damp rag
Step 1: Preparation and Base Coat
-
Clean the Surface:
Begin by thoroughly cleaning the fireplace surround to remove any soot, dust, or grease. Use a degreasing cleaner or TSP substitute, then wipe down with a damp rag to ensure a perfectly clean substrate. -
Protect the Area:
Lay down a drop cloth over the hearth and tape off the inner edge of the firebox brick and the outer edge of the wooden mantel pilasters to protect them from stray paint. -
Sand and Prime:
Lightly scuff the surface with 220-grit sandpaper to help adhesion. If you are painting over existing glossy tile or stone, apply a coat of bonding primer and let it cure fully according to the manufacturer’s instructions. -
Apply the Base Color:
Paint the entire surround with your lightest color, which in this case is a warm cream. This will serve as the background triangles later. -
Add a Second Coat:
Once the first coat is dry to the touch, apply a second coat of the cream paint to ensure solid, opaque coverage. Allow this base layer to cure for at least 24 hours before applying any tape.
Step 2: Mapping the Grid
-
Measure the Width:
Measure the horizontal width of your surround facing. Divide this number to determine a square size that fits evenly across the space without leaving awkward slivers at the ends. For this look, aim for squares roughly 6-8 inches wide. -
Mark the Grid:
Using a pencil and a long straight edge, lightly draw a grid of squares adhering to your calculated measurements across the top and down both legs of the surround. -
Draw Diagonals:
Inside each penciled square, draw a single diagonal line connecting opposite corners. Vary the direction of the diagonal (top-left to bottom-right vs. bottom-left to top-right) based on a planned pattern to create the distinctive ‘pinwheel’ or random geometric effect seen in the photo.
Seal for Sharpness
Before adding color, paint a thin layer of your base color over the tape edge. This seals gaps so any bleeding is the base color, keeping your main lines razor sharp.
Step 3: Painting the Colors
-
Tape the First Set:
Apply painter’s tape along the penciled lines to isolate the triangles meant for your second color (the Sage Green). Remember, you can only tape off triangles that don’t touch each other directly to prevent smudging, so you will work in batches. -
Seal the Tape Edges:
I always like to run a fingernail or a credit card firmly along the edge of the tape to ensure a tight seal. For extra crisp lines, lightly brush a tiny amount of the *base* color (cream) over the tape edge first to seal it. -
Paint the Green Triangles:
Using a small foam roller or brush, fill in the exposed triangle sections with the Sage Green paint. Apply two light coats rather than one heavy one to avoid ridges. -
Remove Tape While Damp:
Carefully peel back the tape while the green paint is still slightly tacky. Pull the tape away from the painted area at a 45-degree angle. -
Tape the Second Set:
Allow the green sections to dry completely. Then, apply fresh tape to mask off the areas for the third color (Terracotta). Tape over the dry base and green sections as needed to define the sharp points of the new triangles. -
Paint the Terracotta Triangles:
Apply the Terracotta paint to the designated masked areas using the same method as before. Be mindful of the corners where colors meet to keep the geometry sharp. -
Final Tape Removal:
Remove the tape gently to reveal the full three-color geometric pattern. -
Touch Up:
Inspect the lines for any small bleeds. Use a tiny artist’s brush and the appropriate paint color to clean up any imperfections or jagged edges.
Peeling Paint?
If paint peels up with the tape, your base coat hadn’t cured long enough or the tape was too sticky. Score the tape line gently with a utility knife before pulling.
Step back and enjoy the modern architectural interest you’ve added to your room with just a little paint and precision.


Have a question or want to share your own experience? I'd love to hear from you in the comments below!