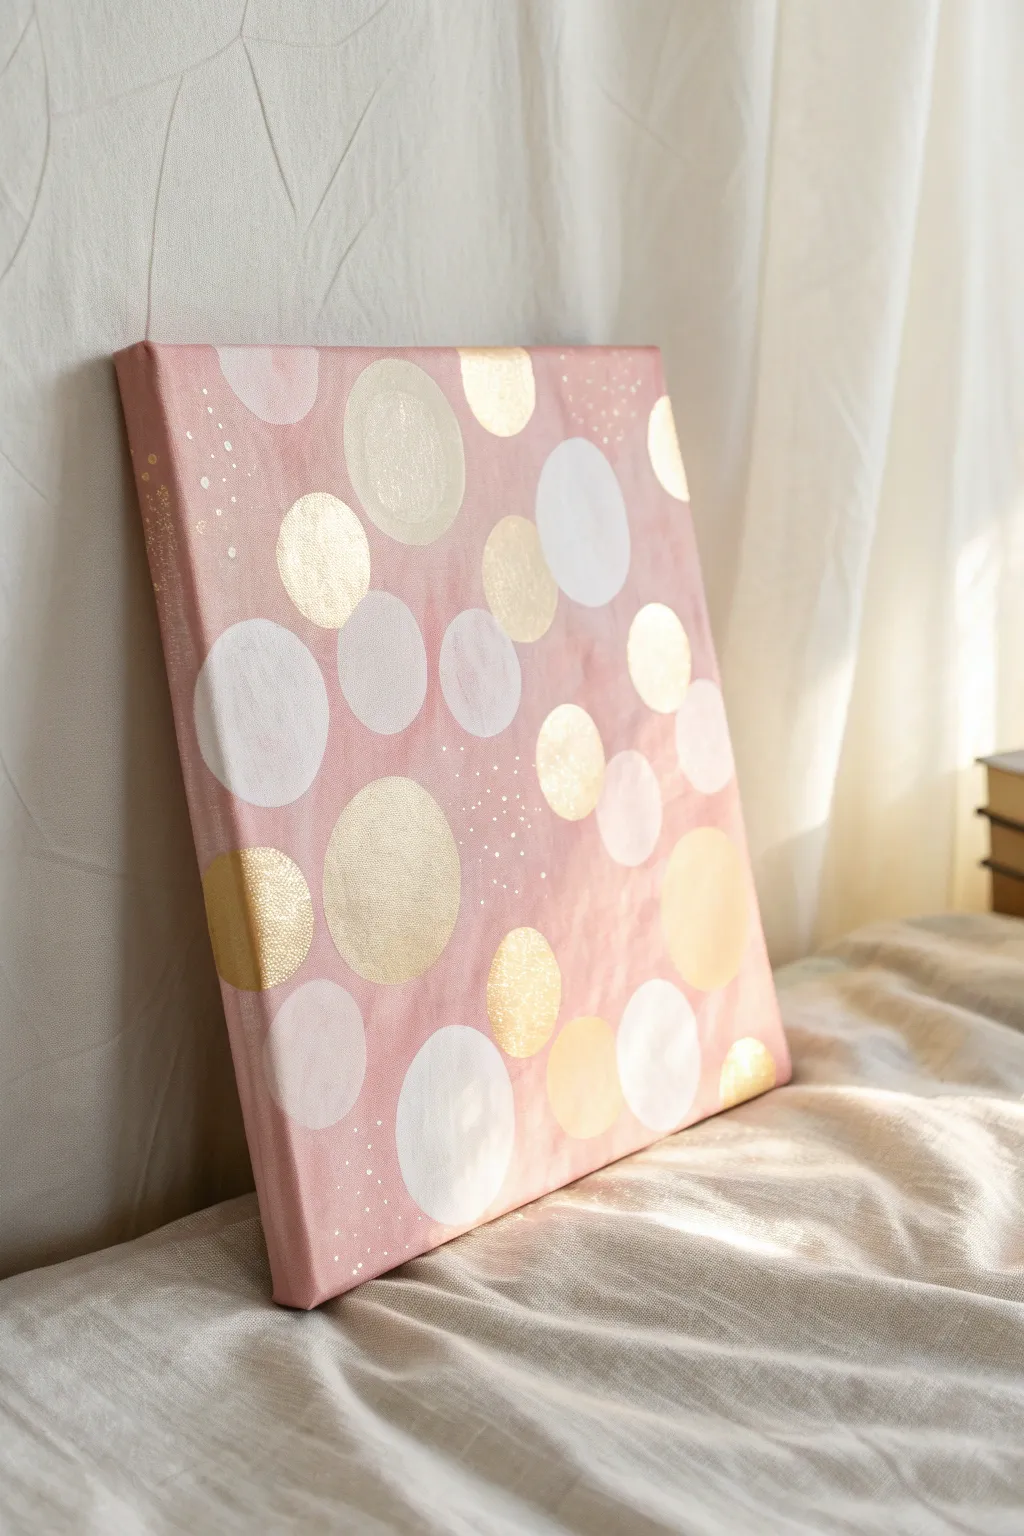
Pink is one of my favorite colors to paint with because it can be soft and romantic or bold and dramatic with just a tiny shift in tone. Here are pink canvas painting ideas you can start today, from classic dreamy skies to playful, unexpected textures.
Cotton Candy Cloud Sky
Capture the magic of a pastel sunset with this fluffy cloudscape painting that uses soft pinks, peaches, and deeper purples. This small canvas project focuses on building layers to create depth and volume, resulting in a serene, dreamlike scene that looks good enough to eat.
Detailed Instructions
Materials
- Small square canvas (e.g., 8×8 or 10×10 inches)
- Acrylic paints (Titanium White, Primary Red, Magenta, Cadmium Yellow, Ultramarine Blue, Burnt Umber)
- Flat brush (1/2 inch) for background
- Filbert brushes (various sizes) for cloud shapes
- Small round brush for details
- Palette or paper plate
- Cup of water and paper towels
Step 1: Setting the Scene
-
Mix the background gradient:
Start by mixing a very pale, warm peach color. Combine a large amount of Titanium White with a tiny touch of Cadmium Yellow and a speck of Primary Red. You want this to be the brightest part of the sky. -
Apply the light horizon:
Using your flat brush, paint the central third of the canvas with this peach mixture. Brush horizontally, ensuring smooth coverage. -
Deepen the upper sky:
Mix a soft lavender-grey for the very top of the sky. Add a small drop of Ultramarine Blue and a touch of Burnt Umber to your white and magenta mix. Blend this downwards from the top edge into the peach section while the paint is still wet to create a seamless gradient. -
Paint the canvas edges:
Don’t forget to wrap your sky colors around the sides of the canvas. This creates a finished, gallery-ready look without needing a frame.
Muddy Clouds?
If your pinks are turning brown, clean your brush more often. Acrylics dry fast, but wet-on-wet mixing on the canvas can turn muddy if you overwork it. Let layers dry first.
Step 2: Building the Cloud Structure
-
Mix your shadow color:
Create a deep, muted raspberry color for the cloud underbellies. Mix Magenta with a little Ultramarine Blue and a tiny touch of Burnt Umber to de-saturate it slightly. -
Block in the main shapes:
Switch to a medium filbert brush. Using the raspberry mix, roughly tap in the locations of the darkest clouds. Focus on the bottom left corner and the large cloud mass on the right side. -
Create a mid-tone pink:
Mix a vibrant bubblegum pink by adding more white to your magenta. You want this value to sit between your dark raspberry and the light sky. -
Form the cloud bodies:
Apply the bubblegum pink above and around your dark shadow areas. Use a circular, scrubbing motion (scumbling) with the filbert brush to create fluffy, irregular edges rather than stiff lines. -
Add distant clouds:
Using a very pale, watered-down version of your lavender mix, paint faint, flat cloud streaks in the center distance to create atmospheric perspective.
Scumbling Technique
Use an old, worn-out brush for the fluffiest texture. A brush with splayed bristles creates natural, airy cloud edges much better than a brand new, sharp brush.
Step 3: Adding Fluff and Volume
-
Mix the highlight color:
Create a very pale, creamy pink. It should be mostly Titanium White with just a whisper of the pink mix. This will be the sunlight hitting the cloud tops. -
Highlight the tops:
With a clean filbert brush, tap thick paint onto the upper curves of your cloud formations. Think of the light coming from the center-left, illuminating the top-right edges of the clouds. -
Blend the transition:
While the paint is tacky, gently blend the bottom edge of your white highlights into the mid-tone pinks. Do not blend the top edge; keep that crisp against the sky to define the shape. -
Refine the shapes:
If your clouds look too uniform, break up the edges. Use a smaller brush to add tiny tufts and bumps to the main cloud masses, making them look more organic. -
Add reflected light:
Mix a warm, pale orange (yellow + red + white). Glaze this subtly onto the lower-left sides of the clouds, suggesting the warmth of the setting sun reflecting off the vapor.
Step 4: Final Details
-
Deepen the darkest shadows:
Return to your darkest purple-red mix. I sometimes like to add a tiny bit more blue here for contrast. tuck this color into the deepest creases of the clouds, especially in the bottom left corner. -
Soften distant edges:
Check the clouds further away in the background. If they look too sharp, glaze over them with a very thin layer of the sky color to push them back visually. -
Final bright pops:
Using a small round brush and pure Titanium White, add tiny dots and dashes of highlights on the very tips of the fluffiest clouds for maximum dimension. -
Varnish (Optional):
Once fully dry (wait at least 24 hours), apply a satin or gloss varnish to make the pinks pop and protect your artwork.
Step back and admire your soft, glowing sky, perfect for brightening up a small corner of your room

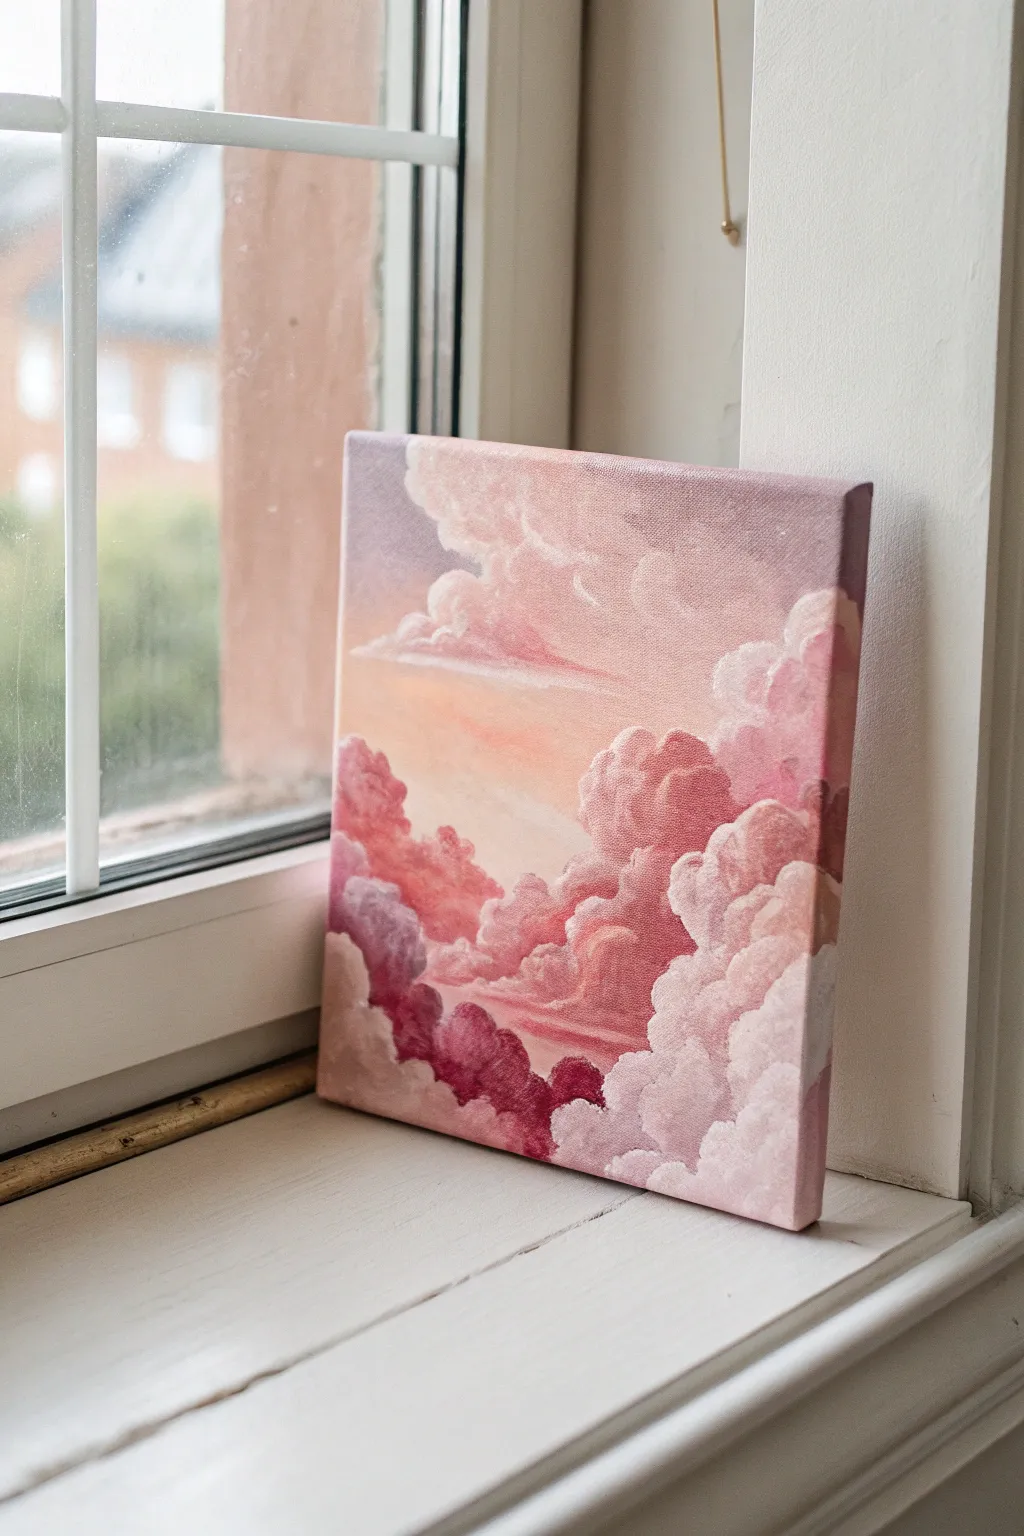
Pink Ombre Sunset Over Water
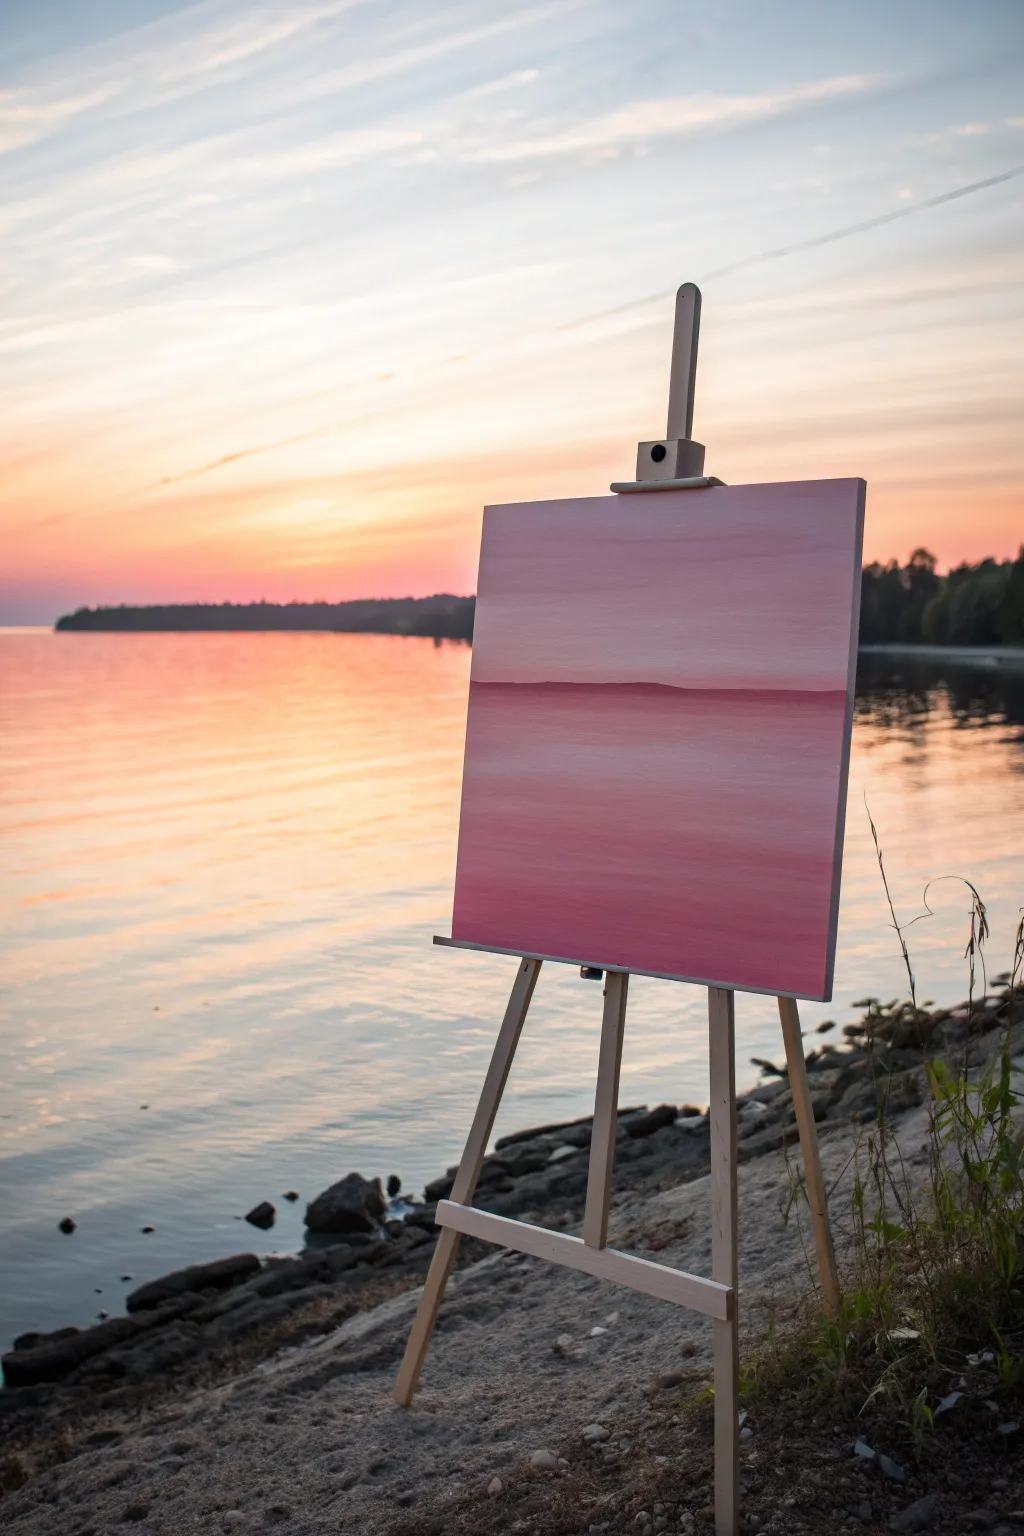
Capture the serenity of twilight with this monochromatic study in pinks. Using a simple gradient technique, you’ll create a soft, dreamlike horizon that perfectly balances the sky and water.
Step-by-Step Guide
Materials
- Square stretched canvas (e.g., 16×16 or 20×20)
- Acrylic paints: Titanium White, Quinacridone Magenta, Light Pink, Deep Violet (or Paynes Grey)
- Wide flat brush (2-3 inch)
- Medium flat brush (1 inch)
- Small round detail brush
- Palette or mixing plate
- Water cup and paper towels
- Painters tape (optional)
Step 1: Creating the Sky
-
Establish the horizon line:
Decide where you want your horizon to sit. For this composition, aim slightly below the vertical center. You can lightly mark this with a pencil or a piece of painter’s tape to keep it straight. -
Mix your lightest pink:
On your palette, create a very pale, almost white pink. Mix a large amount of Titanium White with just a tiny touch of Light Pink or Magenta. -
Apply the top layer:
Using your wide flat brush, paint the top third of the canvas with horizontal strokes. Ensure the paint is applied smoothly and evenly. -
Mix a medium sky tone:
Add a little more Light Pink to your previous mixture to deepen the color slightly. It should be distinct from the top layer but still soft. -
Blend the sky gradient:
Paint the middle section of the sky, slightly overlapping with the wet paint of the top section. Use long, horizontal strokes to blend the two colors seamlessly. -
Paint the lower sky:
Deepen your pink mix again, perhaps adding a speck of Magenta. Paint the area just above your horizon line, blending upward into the medium tone.
Step 2: The Water and Horizon
-
Define the water base:
For the water section below the horizon, mix a darker, more saturated pink. Combine Magenta with a small amount of White. It should be darker than the sky to create weight. -
Paint the water gradient:
Apply this darker pink starting at the bottom of the canvas. As you work your way up toward the horizon, gradually mix in a little more white to lighten the water near the line. -
Smooth the transition:
Clean your wide brush and dry it slightly. Run the brush back and forth horizontally across the entire water area to soften brushstrokes and create a glassy effect. -
Let the background dry:
Allow the entire canvas to dry completely to the touch. This prevents the sharp horizon line we act next from muddying into the background. -
Mix the horizon color:
Create a deep, dusty purple-pink. Mix your Magenta with a touch of Deep Violet or a tiny bit of Paynes Grey. This needs to be the darkest value on the canvas. -
Paint the distant land:
Using the medium flat brush, paint a straight line across the horizon. Above this line, create subtle, low-lying shapes to represent distant land or hills. -
Refine the land shape:
Keep the land silhouette relatively flat, with only very gentle rises and falls. The goal is maintain a calm, minimalist aesthetic. -
Add the reflection:
I like to take a slightly watered-down version of the dark horizon color and paint a faint, blurry line just below the land to suggest a shadow on the water. -
Adding surface texture:
Take your small round brush and your medium pink water color. Add a few very thin, short horizontal lines over the darker bottom water area to suggest gentle ripples. -
Final softening:
If the ripple lines look too sharp, lightly feather over them with a clean, dry flat brush to integrate them into the water’s surface.
Streak Fix
If acrylics dry too fast and leave streaks while blending the sky, mist the canvas lightly with a spray bottle of water to keep the paint workable for longer.
Glistening Waters
Mix a tiny amount of iridescent mixing medium into the pink paint used for the water section to give the ‘ocean’ a subtle, realistic shimmer.
Step back and enjoy the calming simplicity of your new pink sunset seascape

Crescent Moon in Pink Clouds

Soft dreamy pinks meet a glowing crescent moon in this ethereal painting that looks perfect in a bedroom or reading nook. The layered cloud technique creates a rich, pillowy texture that brings the celestial scene down to earth.
Step-by-Step
Materials
- Rectangular stretched canvas (e.g., 16×20 inch)
- Acrylic paints: Titanium White, Mars Black, Rose Pink or Magenta, Yellow Ochre, metallic Gold
- Large flat wash brush
- Medium filbert brush (rounded tip)
- Small round detail brush
- Palette or paper plate
- Cup of water
- Paper towels
- Pencil
- Circular object (like a plate) for tracing
Step 1: Preparation and Background
-
Prepare the palette:
Squeeze out generous amounts of Rose Pink, Titanium White, and a tiny dot of Mars Black onto your palette. You’ll want to pre-mix a ‘dusty rose’ shade by adding that tiny bit of black and some white to your pink to desaturate it slightly. -
Apply the base coat:
Using your large flat wash brush, cover the entire canvas with your mixed dusty rose color. It doesn’t need to be perfectly even; slight variations in tone will add depth to the sky later. -
Let it dry:
Allow the base coat to dry completely to the touch. This usually takes about 15-20 minutes for acrylics, but you can use a hair dryer to speed it up. -
Sketch the moon:
Once dry, place your circular object slightly off-center on the canvas. Lightly trace a circle with a pencil. Then, freehand an inner curve inside that circle to create a crescent moon shape.
Uneven Clouds?
If your clouds look too stiff, use a dry, clean brush to verify gently swirl the boundaries between colors while the paint is still wet. This softens harsh lines immediately.
Step 2: Painting the Clouds
-
Mix cloud colors:
Create three shades of pink on your palette: a dark maroon-pink (pink + black), a medium bubblegum pink, and a very pale pastel pink (lots of white + pink). -
Paint dark cloud bases:
Use the medium filbert brush to dab the dark maroon-pink color across the bottom section of the canvas and partially behind where the moon sits. Keep the top edges of these shapes irregular and bumpy. -
Add medium tones:
While the dark paint is still slightly tacky, load your brush with the medium pink. Dab this color right above the dark areas, blending the bottom edge into the dark color but keeping the top fluffy and distinct. -
Highlight the cloud tops:
Switch to a clean brush or wipe yours well. Load it with the palest pastel pink (almost white). Paint the rounded tops of the clouds using a circular scrubbing motion (scumbling) to make them look soft and billowy. -
Create background wisps:
Mix a very translucent, watery light pink. Paint faint, diagonal, wispy clouds in the upper right corner to balance the composition, keeping them much softer than the bottom clouds. -
Add pure white accents:
For the ultimate fluffiness, take pure Titanium White on the tip of your filbert brush and highlight just the very peaks of the largest cloud formations.
Add Some Sparkle
For a mixed media twist, use gold leaf adhesive and real gold leaf flakes on the crescent moon instead of metallic paint. It catches the light much more dramatically.
Step 3: The Moon and Stars
-
Base the moon:
Using the small round brush, fill in the crescent shape with a mix of Titanium White and a very small touch of Yellow Ochre. This creates a pale, realistic ivory base. -
Texturize the moon:
While the moon base is wet, dab in tiny spots of pure white and very faint grey to create a cratered texture. Don’t blend it smooth; let the brushstrokes mimic the moon’s surface. -
Add metallic sheen:
Once the moon’s underlayer is dry, glaze over the lower curve of the crescent with a thin layer of metallic Gold paint to give it a magical glow. -
Paint larger stars:
Dip the back end of your paintbrush handle into the metallic Gold paint or pale yellow. Dot a few larger ‘stars’ around the moon and in the clear patches of sky. -
Splatter tiny stars:
Water down a bit of white or gold paint until it’s inky. Load a brush, hold it over the canvas, and tap the handle against another brush to spray fine speckles of stardust across the sky.
Now step back and admire your dreamy celestial creation

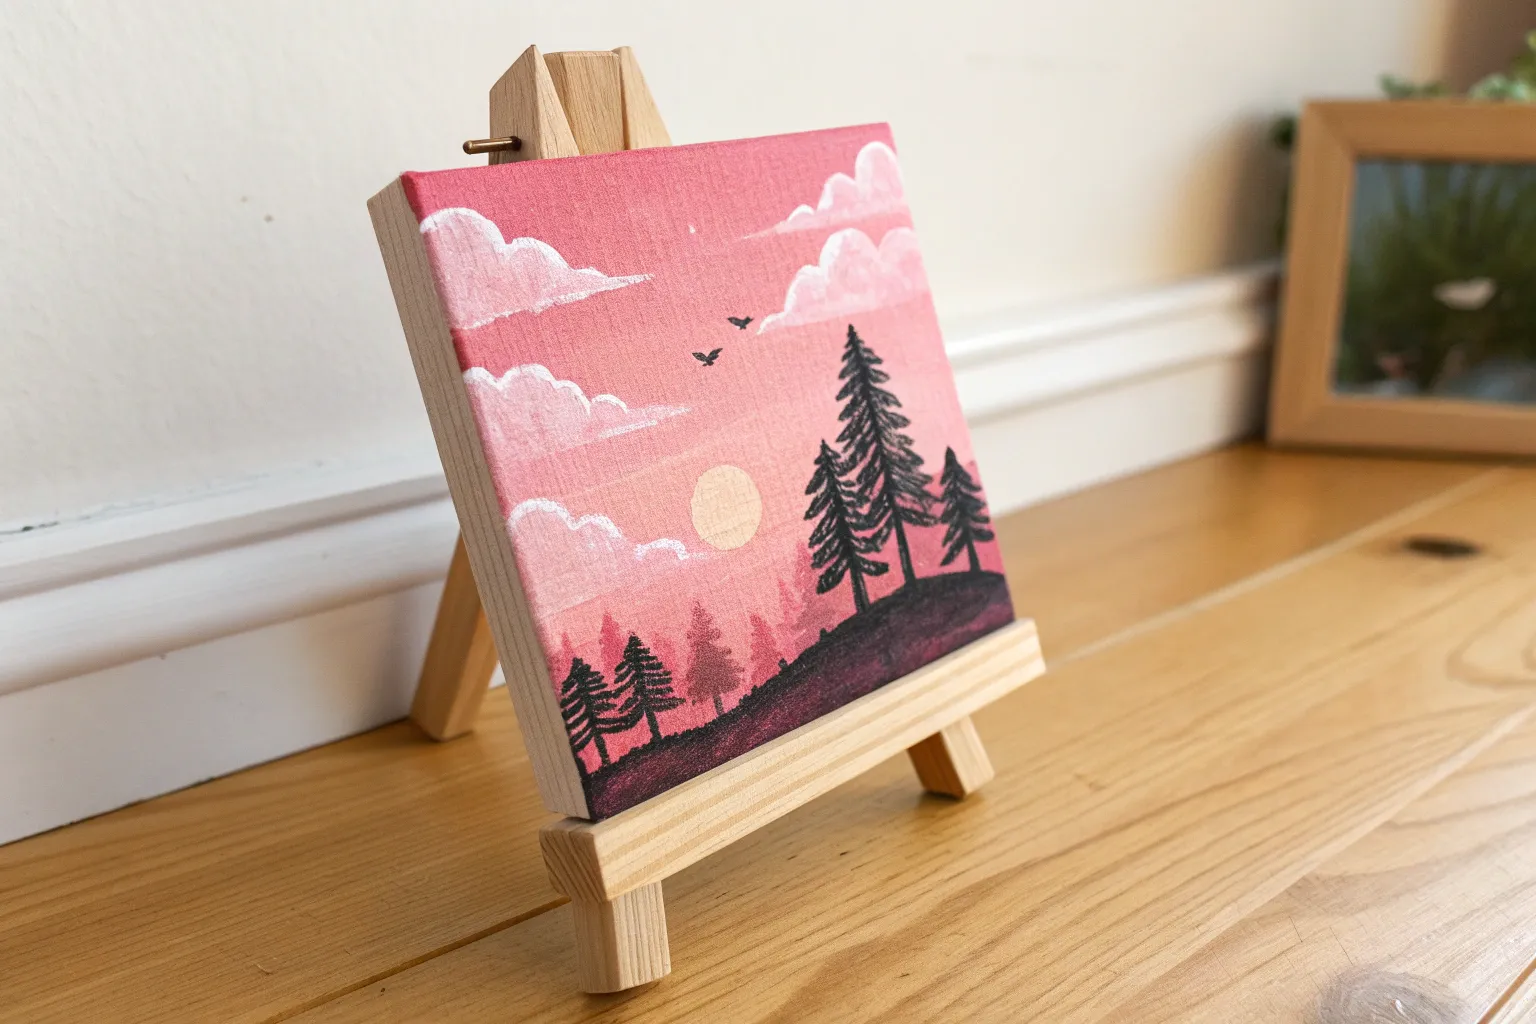
Pink Sky With Black Tree Silhouette
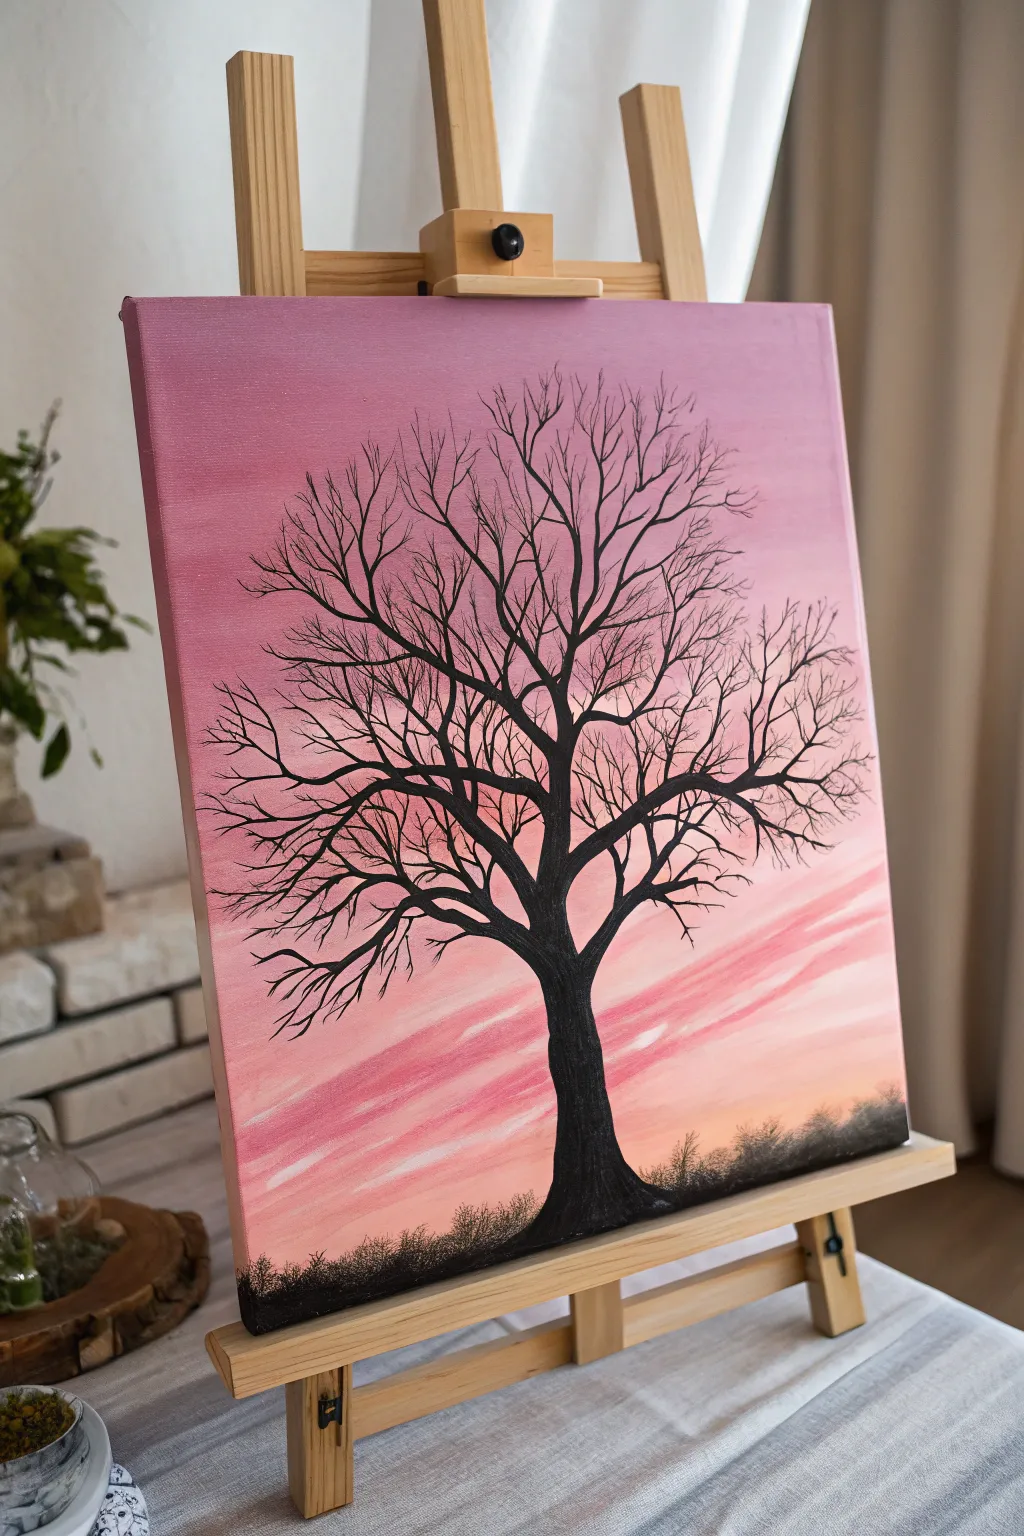
This striking acrylic painting captures the serene beauty of a winter evening with a bold black tree silhouette set against a dreamy pink gradient sky. The contrast between the soft, blended background and the sharp, intricate branches creates a captivating focal point for any room.
Detailed Instructions
Materials
- Stretched canvas (e.g., 11×14 or 16×20 inches)
- Acrylic paints: Titanium White, Magenta or Deep Pink, Cadmium Red (just a touch), Dioxazine Purple (optional for darkening), and Mars Black
- Large flat brush (1-2 inch) for background blending
- Medium filbert or round brush for cloud streaks
- Small round brush (size 2 or 4) for the tree trunk
- Fine liner brush (size 0 or 00) for branches
- Palette
- Cup of water and paper towels
- Easel (optional but helpful)
Step 1: Painting the Gradient Sky
-
Prepare your palette:
Squeeze out generous amounts of White and Magenta. Add smaller amounts of Cadmium Red and a tiny dot of Purple if you want a cooler tone at the very top. -
Mix the darkest pink:
Create a deep mauve-pink color by mixing Magenta with a very small touch of Purple and a little White. This color will be for the top section of the canvas. -
Apply the top layer:
Using your large flat brush, paint horizontal strokes across the top third of the canvas. Ensure full coverage, wrapping the paint around the edges for a professional finish. -
Mix the mid-tone pink:
Add more White to your original mixture to lighten it. Blend this new shade directly on the canvas below the dark strip, working wet-on-wet to create a smooth transition. -
Create the horizon glow:
Clean your brush thoroughly. Mix a pale coral pink using mostly White, a touch of Magenta, and a tiny speck of Red. Paint the bottom third of the canvas with this light, glowing color. -
Refine the blend:
While the paint is still wet, use long, smooth horizontal strokes to feather the boundaries between the dark, medium, and light sections. The goal is a seamless ombre effect. -
Add soft clouds:
Take a clean brush with just a bit of Titanium White. While the bottom pink layer is tacky but not fully dry, gently streak in some diagonal, wispy clouds near the horizon line to add movement. -
Let it dry completely:
Allow the background to dry fully before starting the silhouette. This is crucial to keep the black paint sharp and opaque.
Fixing thick branches
If a twig gets too thick, don’t panic. Let the black dry fully. Mix the exact pink background color again and carefully paint over the mistake to ‘erase’ or thin the line.
Step 2: Creating the Silhouette
-
Establish the ground line:
Using Mars Black and a medium brush, paint a low, slightly uneven horizon line at the very bottom of the canvas. Stipple or tap the brush along the top edge of this black strip to mimic the texture of distant grass or bushes. -
Outline the trunk:
Switch to a small round brush. Start from the center of your ground line and paint the trunk, making it wide at the base and tapering gradually as you move up towards the center of the canvas. -
Fill the trunk:
Fill in the trunk shape with solid black paint. I like to add a second coat here if the first one looks streaky against the light background. -
Paint the main boughs:
From the top of the trunk, split the tree into two or three primary thick branches. Let them curve naturally outward and upward, avoiding perfectly straight lines. -
Branch out further:
From each main bough, extend secondary branches that are slightly thinner. Remember the rule of thumb: branches always get thinner the further they are from the trunk. -
Switch to the liner brush:
For the delicate upper canopy, use your finest liner brush. Thin your black paint slightly with a drop of water to make the ink flow smoother for long, thin lines. -
Add intricate twigs:
Fill the upper space with many fine twigs. overlapping them creates density and realism. Use quick, light flicks of your wrist to keep the ends of the twigs sharp and pointed. -
Detail the base:
Return to the grassy area at the bottom. Use the liner brush to pull up tiny, individual blades of grass or weeds from the black ground line to break up the solid block of color. -
Final check:
Step back and look for any bald spots in the canopy. Add a few extra tiny twigs to balance the composition if one side feels heavier than the other.
Level Up: Birds
Add 2-3 tiny ‘V’ shape silhouettes in the distance near the horizon to represent birds flying home, adding life to the stillness.
Sign your initials in the corner with a tiny brush and enjoy the peaceful vibe of your new artwork
BRUSH GUIDE
The Right Brush for Every Stroke
From clean lines to bold texture — master brush choice, stroke control, and essential techniques.
Explore the Full Guide
Pink Night Sky With Stars
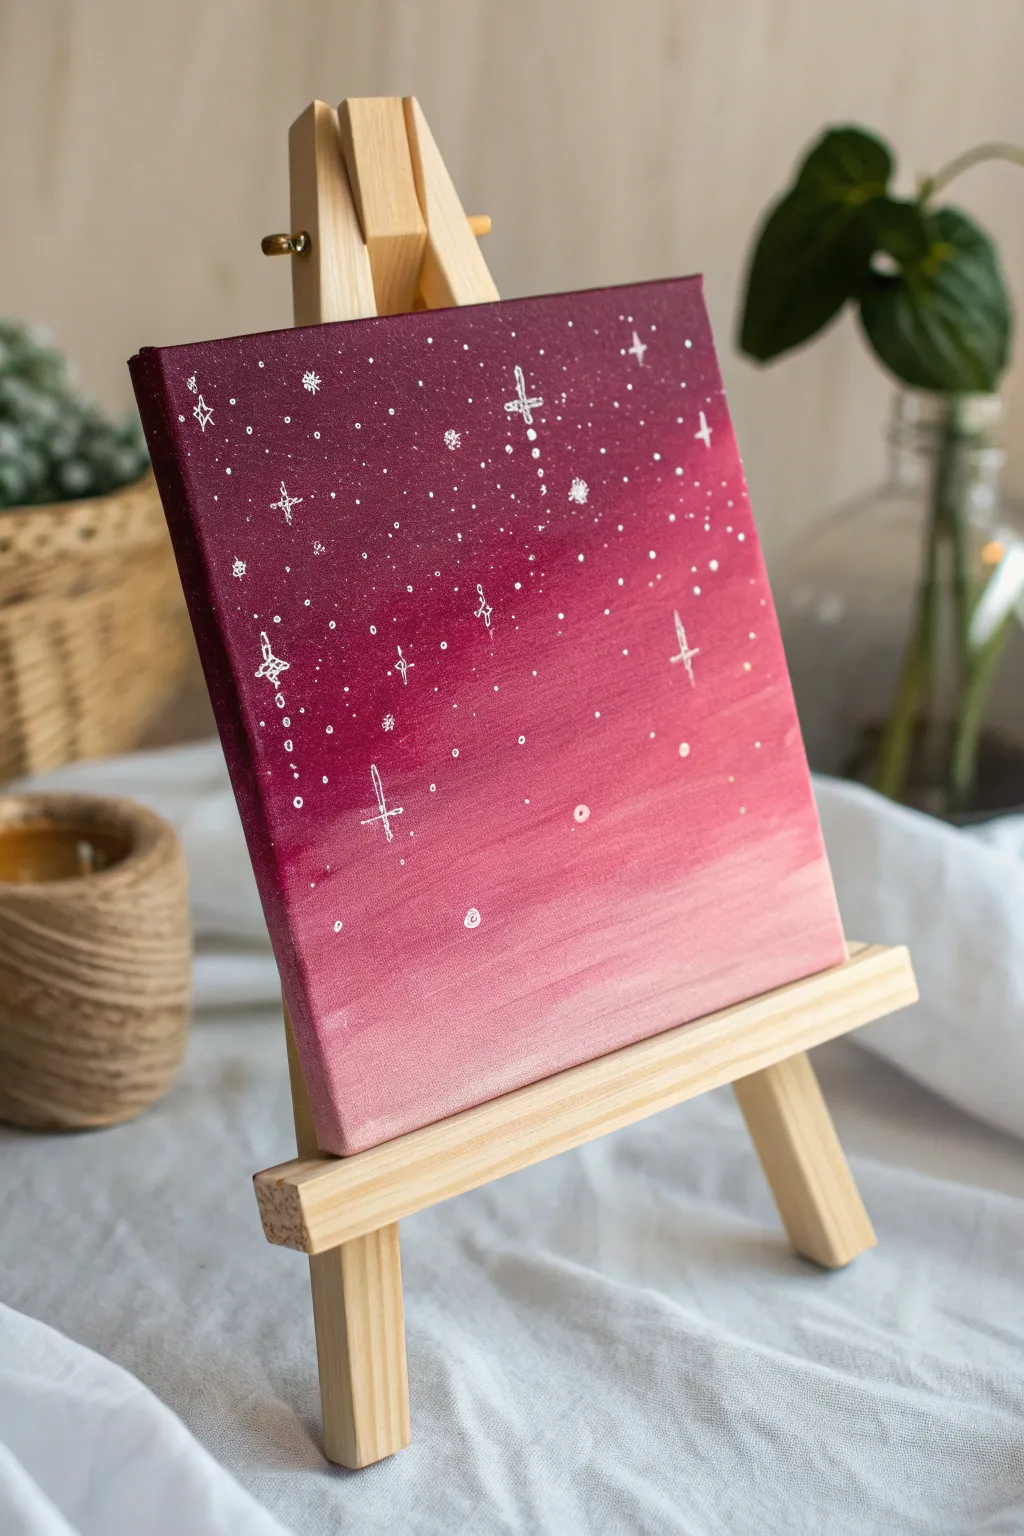
Capture the dreamy transition of dusk with this celestial-themed painting that blends deep berry tones into soft blush pinks. This project combines smooth gradients with simple white line art for an enchanting starry night effect.
Step-by-Step Tutorial
Materials
- Square canvas (approx. 8×8 or 10×10 inches)
- Acrylic paints: Dark burgundy/maroon
- Acrylic paints: Magenta
- Acrylic paints: Titanium White
- Large flat brush (1 inch)
- Small round detail brush (size 0 or 00)
- White gel pen or white paint marker (fine tip)
- Cup of water
- Paper towels
- Palette or paper plate
Step 1: Creating the Gradient Base
-
Prepare your palette:
Squeeze out your dark burgundy, magenta, and white paints onto your palette. You will also want to mix a mid-tone by combining the burgundy and magenta, and a light pink by mixing magenta with a generous amount of white. -
Start at the top:
Dip your large flat brush into the darkest burgundy color. Paint a horizontal band across the top third of the canvas using long, smooth strokes from left to right. -
Blend the middle section:
Without washing your brush completely—just wipe off the excess—dip into your magenta paint. Apply this just below the burgundy line, overlapping the wet edges slightly to encourage blending. -
Smooth the transition:
Use clean, horizontal strokes to work the magenta into the burgundy while both are still wet, creating a seamless fade between the dark top and the brighter middle. -
Add the lightest tone:
Wipe your brush clean again. Pick up your lightest pink mixture (white with a touch of magenta). Paint the bottom third of the canvas, working your way up to meet the pure magenta section. -
Final gradient blend:
With a slightly damp brush, gently stroke horizontally across the area where the light pink meets the magenta to create a soft, foggy transition. I find that using very light pressure here prevents brush streaks. -
Let it dry completely:
This background needs to be perfectly dry before you add stars, or the white ink will bleed into the pinks. Allow it to sit for at least 20-30 minutes.
Step 2: Adding the Celestial Details
-
Test your tool:
Whether you are using a white gel pen, a paint marker, or a fine brush with thinned white paint, test the flow on a scrap piece of paper first to ensure smooth lines. -
Draw the primary stars:
Start by drawing 5 to 7 larger, four-pointed ‘cross’ stars scattered randomly across the darker, upper portion of the canvas. Keep the lines thin and delicate. -
Add variation:
Vary the size and style of your stars. Draw a few tiny asterisks (six-pointed stars) and some simple diamond shapes near the gradient transition zone. -
Create distant stardust:
Gently tap the tip of your pen or brush to create tiny dots. Focus the highest concentration of these dots at the very top of the canvas, gradually reducing their frequency as you move down into the lighter pink area. -
Incorporate playful elements:
Draw a few small, unique shapes like spirals, tiny circles, or hollow rings to add a whimsical touch to your galaxy. -
Enhance the larger stars:
Return to your largest cross-shaped stars and carefully add a tiny dot in the center of each, or extend the vertical line slightly to make them look like glimmering sword-shapes. -
Review and refine:
Take a step back to look at the overall balance. If the top looks too empty, add more micro-dots. Keep the bottom quarter largely clear of stars to maintain the dawn effect. -
Seal (Optional):
If you want to protect your work, wait 24 hours for the paint marker or gel pen to cure fully, then apply a gentle coat of spray varnish.
Clean Lines
If your gel pen skips over the textured canvas, switch to a white acrylic paint marker or use a liner brush with slightly watered-down white acrylic paint for smoother flow.
The Milky Way Effect
Use an old toothbrush dipped in watered-down white paint. Run your thumb over the bristles to flick a fine mist of ‘stars’ over the dark section for instant depth.
Enjoy the calming atmosphere your new starry pink sky brings to the room
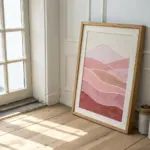
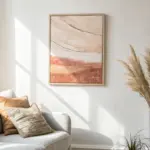
Pink Mountain Range Layers

Capture the serene beauty of distant peaks with this layered mountain landscape, featuring a stunning gradient that moves from deep burgundy to soft blush. The monochromatic pink palette creates a modern, calming atmosphere perfect for a statement wall.
How-To Guide
Materials
- Large stretched canvas (e.g., 36×48 inches)
- Acrylic paints: Titanium White, Alizarin Crimson, Burnt Umber, Mars Black
- Large flat wash brush (2-3 inch)
- Medium angle shader brush
- Small liner brush or fan brush (for trees)
- Palette or disposable plates
- Water cup and paper towels
- Easel or drop cloth for floor working
Step 1: Atmospheric Sky & Background
-
Prepare the palette:
Start by squeezing out a generous amount of Titanium White. Mix a tiny dot of Alizarin Crimson and a speck of Burnt Umber into a large pile of white to create a very pale, warm dusty pink. -
Paint the sky:
Using your large wash brush, cover the top 15% of the canvas with horizontal strokes. While the paint is wet, blend in subtle streaks of pure white to mimic soft, high-altitude clouds. -
First mountain layer:
Mix a slightly darker shade of pink by adding a touch more crimson and umber to your original mixture. Paint the silhouette of the furthest mountain range just below the sky. -
Fill and fade:
Fill in the shape of this first range. As you paint downward, add a little water to your brush to make the paint more translucent, fading it out before you reach where the next layer will start.
Chalk It Out
Before painting, lightly sketch your ridge lines with white chalk. It allows you to plan the composition and wipes away easily with water if you need to adjust.
Step 2: Building the Ranges
-
Darken the mix:
For the second range, add more Alizarin Crimson and a hint of purple or blue if you want a cooler tone, though sticking to warm browns keeps it monochromatic. -
Create overlapping shapes:
Paint the next ridge line, ensuring it overlaps the previous one. Note how the mountains in the photo aren’t jagged triangles; they are rolling, soft waves. Keep your wrist loose. -
Third layer depth:
Mix a medium rose color. Paint the third layer of mountains. I find it helpful to vary the height of the peaks here—make one side slope down dramatically to create visual interest. -
Texture transition:
As you move into these middle layers (ranges 3 and 4), switch to a slightly drier brush technique near the top edges to suggest rocky texture, but keep the main body of the mountain smooth. -
Intensifying the color:
For the fifth layer, your mix should be a bold, berry pink. Use the angle shader brush to cut a crisp top edge against the lighter majestic pink mountains behind it. -
The transition zone:
Paint the body of this fifth layer. This is often the largest section in the middle of the canvas, acting as a bridge between the misty background and the foreground.
Step 3: Foreground & Details
-
Deep maroon mix:
For the bottom-most mountain layers, mix Alizarin Crimson with Burnt Umber and a tiny touch of Mars Black. You want a rich, deep wine color, not a flat black. -
Paint the nearest ridge:
Apply this dark mix to the final large mountain shape at the bottom. The contrast between this dark value and the pale sky is what gives the painting its massive sense of scale. -
Tree placement:
Using your smallest liner brush or a fan brush turned vertically, start indicating treelines along the ridge of this darkest layer. -
Painting pine trees:
Create the trees by painting a vertical line for the trunk, then tapping small, downward-sloping branches outward. Keep these silhouetted against the lighter pink layer behind them. -
Varying tree sizes:
Ensure the trees aren’t all the same height. Group them in clusters, with some tall ‘hero’ trees standing out and smaller saplings filling the gaps. -
Foreground density:
Fill the very bottom edge of the canvas solidly with your darkest mix, blending the bottoms of the trees into this shadow so they feel rooted in darkness. -
Final assessment:
Step back 10 feet from the canvas. Check your gradients; if a transition looks too harsh, you can use a clean, slightly damp brush to glaze a thin layer of the lighter color over the edge.
Color Harmony Tip
Mix a large base color first (White + Red) then separate it into cups. Add progressive amounts of Black/Brown to each cup to ensure perfect tonal harmony.
Hang your masterpiece in a well-lit room and enjoy the tranquil depth of your mountains

PENCIL GUIDE
Understanding Pencil Grades from H to B
From first sketch to finished drawing — learn pencil grades, line control, and shading techniques.
Explore the Full Guide
Simple Pink Rose Close-Up
Capture the delicate beauty of a rose in full bloom with this close-up canvas painting project. You’ll layer soft whites and deep dusty pinks to create a realistic sense of depth and unfolding petals.
Step-by-Step Guide
Materials
- Square stretched canvas (approx. 16×16 or 20×20 inches)
- Acrylic paints (Titanium White, Alizarin Crimson, Burnt Sienna, Yellow Ochre)
- Assorted synthetic brushes (large flat shader, medium filbert, lush round brush for blending, fine liner)
- Palette for mixing
- Water cup and paper towels
- Pencil for sketching
- Acrylic fluid medium or glazing liquid
Step 1: Planning and Foundation
-
Prepare the Canvas:
Begin by priming your canvas if it isn’t pre-primed. Once dry, mix a very faint, watery wash of Yellow Ochre and Titanium White to tone the canvas, removing the harsh stark white. Let this dry completely. -
Map Out the Center:
Using a pencil, lightly sketch the tight spiral of the rose’s center. It doesn’t need to be perfect circles; focus on the overlapping, tightly packed shapes. -
Sketch Outer Petals:
Continuing with your pencil, draw the large, unfolding petals radiating outward. Ensure these petals are larger and more open than the center, extending all the way to the canvas edges to create that cropped, macro effect.
Step 2: Creating Depth and Base Colors
-
Mix Your Palette:
Prepare three main pools of color: a deep shadow pink (Alizarin Crimson + tiny touch of Burnt Sienna), a mid-tone dusty pink (Alizarin + White), and a highlight shade (mostly White + tiny dot of Alizarin). -
Block in Shadow Areas:
Using a medium filbert brush, paint the deepest crevices between the petals with your shadow mix. Focus on the triangular gaps and the dark undersides of the curling petals. -
Establish the Mid-tones:
Apply the mid-tone pink to the main body of the petals. Don’t worry about smooth blending yet; just get the color down to define the flower’s general shape. -
First Layer of Highlights:
Roughly paint the top edges of the petals where the light hits with your lightest pink mixture. This helps you begin visualizing the three-dimensional form early on.
Muddy Pinks?
If your pinks look dull or brown, stop mixing! Clean your water jar and brush completely. Muddy colors often come from dirty rinse water or over-mixing on the canvas.
Step 3: Refining and Blending
-
Softening the Transitions:
Now, mix a little glazing liquid into your paints to increase transparency. Use a soft round brush to blend the boundary where the shadow meets the mid-tone, creating a soft, velvet-like gradient. -
Deepening the Core:
Return to the center spiral. Glaze a concentrated layer of Alizarin Crimson into the heart of the rose to create that intense, inviting depth that draws the eye in. -
Adding Warmth:
I like to wash a very thin glaze of Yellow Ochre over some of the outer petals’ mid-sections. This subtle warmth mimics sunlight filtering through the translucent flower structure. -
Defining Petal Edges:
Clean up the edges of your petals with the pale highlight color. Use the side of a flat brush to create crisp, curling lips on the petals. -
Texturing the Petals:
Using a drier brush technique, lightly drag some white paint over the larger petals. This mimics the subtle veining and texture found in real rose petals. -
Background Integration:
Paint the negative space in the corners with a soft, neutral cream or very pale gray-pink, blending it slightly into the outer petal edges so the flower feels connected to the background rather than cut out.
Smooth Gradients
To get that soft, unparalleled petal look, use a ‘mop’ style makeup brush (clean and cheap) to gently buff out wet paint transitions. It eliminates harsh brushstrokes instantly.
Step 4: Final Details
-
Enhancing Contrast:
Look at the project from a distance. If it looks flat, use a fine liner brush with your darkest crimson mix to sharpen the deepest shadows right under the petal overlaps. -
Brightest Whites:
Apply pure Titanium White sparingly to the very tips of the petals that are catching the most light. These small accents will make the painting pop. -
Smoothing Out:
If any brushstrokes look too rough, take a clean, slightly damp soft brush and gently whisk over those areas to soften the texture, giving the rose a dreamy, romantic feel. -
Drying and Comparison:
Allow the painting to dry fully. Check for any chalky areas—sometimes acrylics dry darker. You may need one final pass of bright pink glaze to restore vibrancy.
Step back and admire the soft layers you have built, creating a bloom that will last forever
Cherry Blossoms on a Pink Wash
Capture the delicate elegance of spring with this soft and romantic cherry blossom study. By building up layers of translucent washes and detailed brushwork, you’ll create a piece that feels both realistic and dreamily artistic.
Detailed Instructions
Materials
- Stretched canvas (rectangular format)
- Acrylic paints (Titanium White, Alizarin Crimson, Burnt Umber, Raw Sienna, Sap Green, Deep Violet)
- Wide flat brush (2-inch)
- Medium filbert brush (#6)
- Small round brush (#2)
- Fine liner brush (#0 or #00)
- Slow-drying medium or glazing liquid
- Paper towels
- Palette
- Water cup
Step 1: Setting the Atmosphere
-
Prepare the canvas:
Begin by ensuring your canvas surface is clean. If it’s not pre-primed, apply a coat of gesso and sand lightly for a smooth texture. -
Mix the background wash:
On your palette, mix a generous amount of Titanium White with a tiny speck of Alizarin Crimson and a touch of Raw Sienna to create a very pale, warm creamy-pink base. -
Apply the base layer:
Using the wide flat brush, cover the entire canvas in this pale mixture. Don’t worry about being perfectly smooth; subtle brushstrokes add character. -
Create soft clouds:
While the base is still slightly tacky, mix a slightly deeper pink using more Crimson and a drop of water or glazing liquid. Use a scumbling technique (circular scrubbing motions) to add random patches of darker pink, creating a mottled, watercolor-like effect. -
Blend and soften:
Clean your large brush and dry it well. Gently sweep over the wet paint to blur the edges of your darker pink patches, ensuring there are no harsh lines in the background.
Soft Edges Tip
To get that dreamy background look, use a dry, clean makeup sponge to dab the background paint while wet. It creates a softer blur than a brush can achieve.
Step 2: Structuring the Branches
-
Sketch the placement:
Using a very diluted mix of Burnt Umber and your liner brush, lightly sketch the main diagonal line of the branch coming from the bottom-left corner and reaching toward the top right. -
Block in the wood:
Switch to your small round brush. Mix Burnt Umber with a tiny bit of Deep Violet to get a rich, dark brown. Paint the main branches, varying the pressure to make the lines thick and thin. -
Add branch details:
Mix a lighter grey-brown using White and Raw Sienna. Add highlights to the top edges of the branches to suggest cylindrical volume and bark texture. -
Paint twigs and nodes:
Use the liner brush to pull out tiny, thin twigs from the main branch. Add small knobby bumps where later flower clusters will attach.
Level Up: Texture
Mix a little modeling paste into your white paint for the petals. Impasto strokes add physical texture, making the flowers pop off the canvas.
Step 3: Painting the Blossoms
-
Map flower locations:
Decide where your main flower clusters will sit. I like to group them in odd numbers—three near the top, a cluster in the middle, and a few near the base. -
Base the petals:
Using the filbert brush and a mix of White with the tiniest hint of pink, paint the five-petal shapes. Keep the paint somewhat translucent so the background influences the tone. -
Add petal shadows:
Mix a slightly darker, cool pink. Paint the centers of the flowers and the areas where petals overlap to create depth. -
Define petal edges:
With Titanium White and a clean round brush, add crisp highlights to the outer tips of the petals that are catching the light. -
Paint the buds:
For the unopened buds, use a deeper rose color (Crimson + White). Paint small tear-drop shapes attached to the twigs. -
Detail the sepals:
Mix Sap Green with a little Burnt Umber. Paint the tiny leaf-like structures (sepals) at the base of the buds and flowers.
Step 4: Refining Details
-
Add the center filaments:
This step brings the flowers to life. Using your finest liner brush and a mix of Deep Violet and Crimson, paint very fine lines radiating from the center of each open bloom. -
Dot the anthers:
Mix a bright Raw Sienna or yellow ochre. Carefully place tiny dots at the end of each filament you just painted. -
Add fresh leaves:
Paint a few small, emerging leaves near the buds using Sap Green mixed with a touch of Raw Sienna for warmth. Keep them small, as cherry leaves appear after flowers. -
Final highlights:
Check the painting for contrast. Add a final dab of pure white to the brightest part of the petals and a few tiny highlights on the flower buds. -
Optional glaze:
If the colors feel too separated, you can apply a very thin glaze of water and pink over the shadow areas once the painting is completely dry to unify the tones.
Step back and admire the gentle warmth your new floral artwork brings to the room


Pink Peony Bouquet, Loose Style
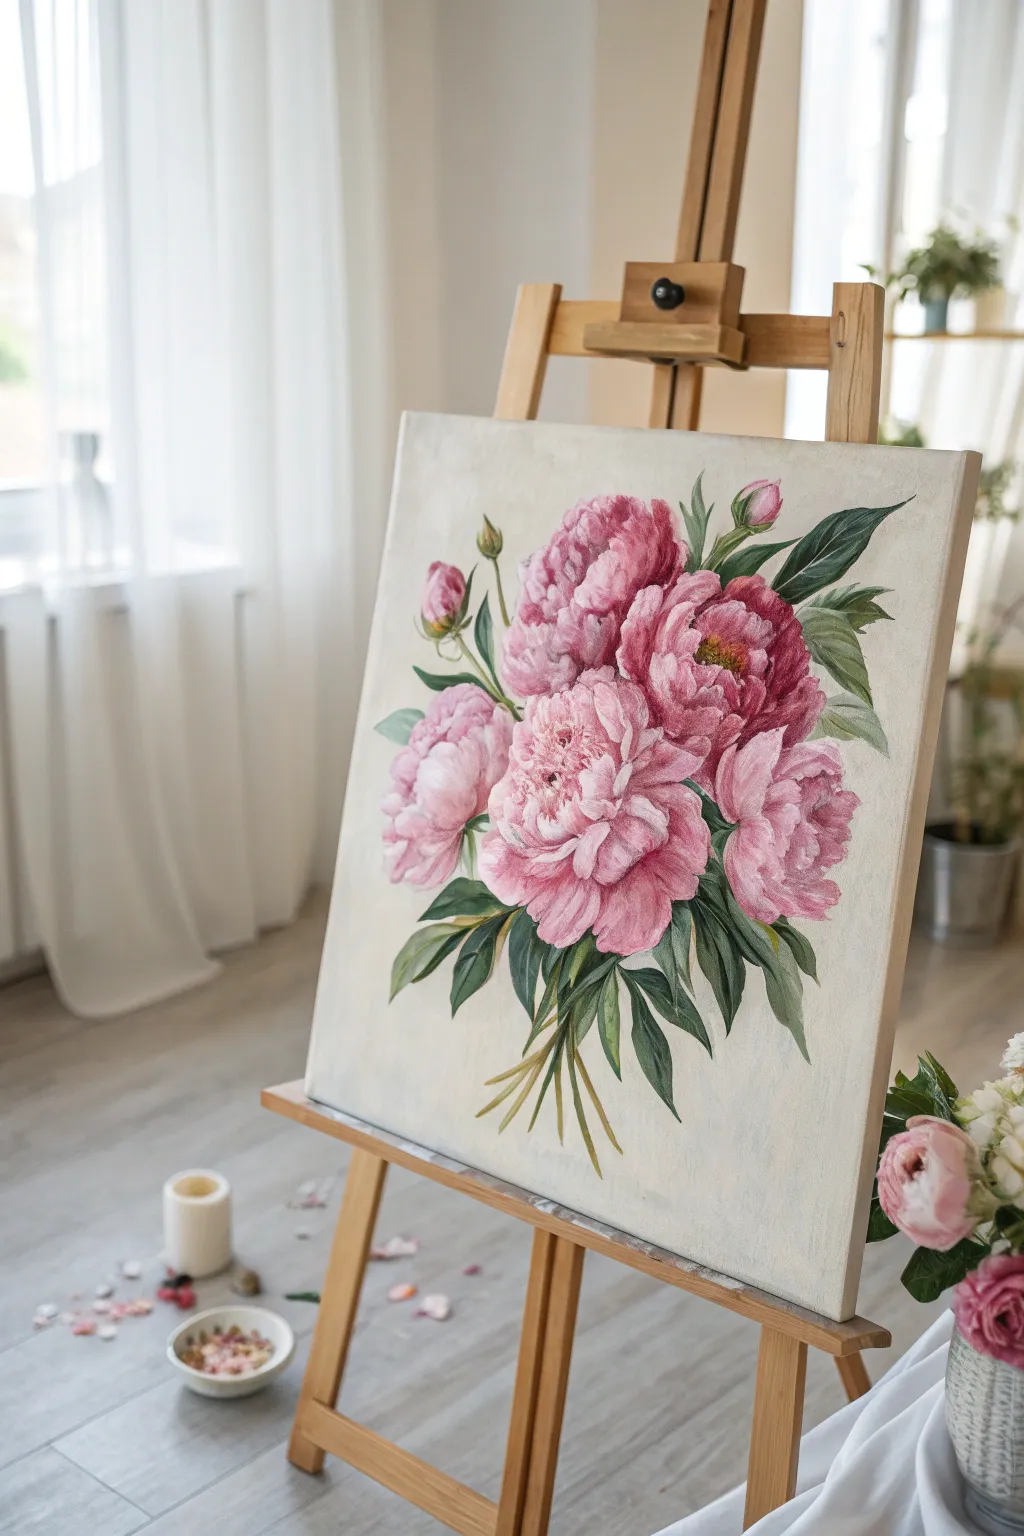
Capture the romantic elegance of a lush peony bouquet with this acrylic painting tutorial, focusing on soft pink tones and gentle brushwork. The loose, painterly style emphasizes the fluffy texture of the petals, creating a dreamy floral centerpiece for any room.
Step-by-Step Tutorial
Materials
- Square stretched canvas (approx. 20×20 inches)
- Acrylic paints: Titanium White, Alizarin Crimson, Cadmium Red, Hooker s Green, Sap Green, Yellow Ochre, Burnt Umber
- Gesso (optional, for priming)
- Large flat brush (1 inch)
- Medium filbert brush (size 6 or 8)
- Small round brush (size 2)
- Palette for mixing
- Water cup and paper towels
- Pencil for sketching
Step 1: Preparation and Sketching
-
Prepare the background:
Mix a large amount of Titanium White with a tiny dot of Yellow Ochre and a whisper of Burnt Umber. Use your large flat brush to coat the entire canvas in this warm, off-white cream color. Let it dry completely. -
Sketch the composition:
Using a pencil very lightly, map out the placement of your flowers. Draw large, loose circles to represent the main peony heads—position three closer to the center and a few smaller buds extending outward. -
Add stem lines:
Sketch the stems gathering at the bottom center to form the bouquet shape. Don’t worry about perfect lines; these are just guides for your leaves later.
Muddiness Troubleshoot
If your pinks look muddy or brown, stop and clean your water and brush thoroughly. Green residue on your brush will instantly dull your vibrant pinks.
Step 2: Painting the Blooms
-
Block in the base pinks:
Mix Alizarin Crimson with plenty of Titanium White to create a soft, dusty pink. Using the filbert brush, fill in the sketched circles with loose, curved strokes. Keep the paint somewhat thin here to establish the shadow shapes. -
Define the flower centers:
Create a slightly darker pink by adding a touch more Alizarin Crimson and a tiny bit of Cadmium Red. Apply this color to the center of your blooms and the bottom areas of the flower heads to create depth. -
Building petal layers:
Mix a lighter, brighter pink using White and a touch of Cadmium Red. I like to layer this over the darker base while it’s still slightly tacky, using short, curved strokes that mimic the cupped shape of peony petals. -
Adding highlights:
Load your brush with pure Titanium White mixed with the tiniest hint of pink. Apply these highlights to the very tops and outer edges of the petals where the light would hit, keeping your wrist loose for a natural fluttery look. -
Painting the buds:
For the smaller buds, use the darker pink mix for the bulb shape, and then add a single swipe of the highlight color on one side to make them look round. -
Flower centers:
Mix Yellow Ochre with a tiny bit of White. Using the small round brush, stipple small dots into the deep center of the open peonies to suggest pollen.
Step 3: Foliage and Stems
-
Block in the leaves:
Mix Hooker’s Green with a little Burnt Umber for a deep, natural green. Use the filbert brush to paint the leaf shapes, pressing down to widen the stroke and lifting up to create a point. -
Adding leaf variety:
Mix Sap Green with a little White to create a lighter, fresher green. Paint a few leaves with this shade, or add highlights to the tops of the existing dark leaves to show dimension. -
Painting the stems:
Switch to your small round brush or the edge of your flat brush. Use a mix of Sap Green and Yellow Ochre to paint the stems, letting them cross over each other naturally at the bottom gathering point. -
Refining edges:
Look for spaces where the background shows through the bouquet. You can tidy these up with your background cream color if needed, or paint small ‘phantom’ leaves using a very watery green mix.
Level Up: Texture
Mix a modeling paste or heavy gel medium into your highlight white paint. Use a palette knife to apply this to the petal tips for real 3D texture.
Step 4: Final Details
-
Deepen shadows:
Mix Alizarin Crimson with a touch of Green to create a deep, chromatic dark. Use the small round brush to add tiny, deep shadows between the tightest petals in the center of the flowers. -
Brightest whites:
Take pure white paint and add final, crisp highlights to the curling edges of the most prominent petals. This brings the flowers forward. -
Review and sign:
Step back from your easel to check the balance. If one side feels heavy, add a small floating petal or extra leaf. Once dry, sign your meaningful work in the corner.
Hang your soft pink masterpiece in a well-lit spot to enjoy the eternal spring it brings to your space
Butterflies in Pink and Gold Accents
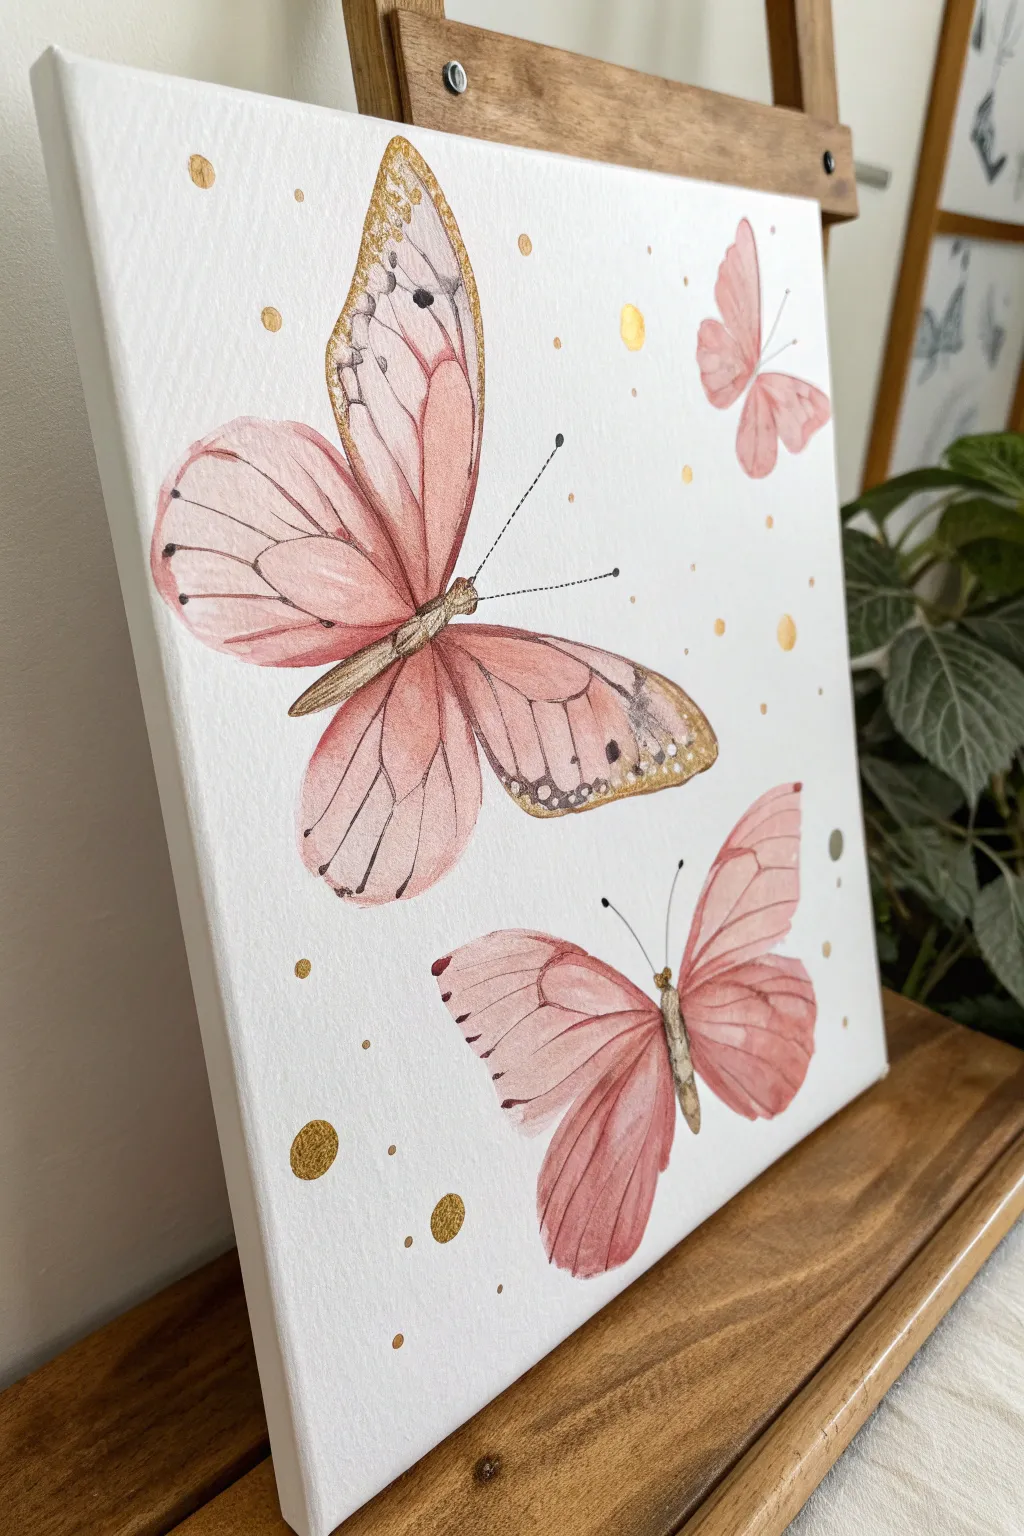
Capture the delicate beauty of fluttering wings with this gentle canvas project that pairs soft watercolor-style washes with striking metallic flair. The combination of blush pink tones and scattered gold accents creates a dreamy, ethereal piece perfect for a nursery or chic office space.
Detailed Instructions
Materials
- Stretched canvas (rectangular, approx. 11×14 or similar)
- Acrylic paints (Titanium White, blush pink, dark brown/black)
- Watercolor medium (to thin acrylics) or high-flow acrylics
- Gold metallic paint or gold leafing pen
- Pencil for sketching
- Round brushes (sizes 2, 6, and a fine liner brush)
- Palette
- Water bonding cup
Step 1: Sketching the Layout
-
Prepare your canvas:
Ensure your stretched canvas is clean. If it’s a raw canvas, apply a coat of gesso first. For this airy look, a pure white background works best, so touch up the background with white acrylic if needed before starting. -
Map out positions:
Visualize the composition featuring one large focal butterfly in the upper-left center, a medium one in the lower right, and a small one floating in the top right. Lightly mark their center bodies with a pencil. -
Draw the wings:
Sketch the wing shapes lightly. The large butterfly should have elongated top wings and rounded bottom wings. Keep lines faint so they won’t show through the translucent paint later. -
Refine the shapes:
Add the wing vein details to your sketch for the main butterflies. These guide lines will be crucial when you start applying the translucent color washes.
Bleeding Lines?
If your vein lines are fuzzy, the pink base layer was too wet. Let it dry completely, then re-paint the veins with a drier brush.
Step 2: Painting the Wings
-
Mix your blush tone:
Combine pink acrylic with a generous amount of white. To achieve the watercolor look seen here, mix this color with a glazing medium or plenty of water until it’s very fluid and semi-transparent. -
Wash the first layer:
Using a size 6 round brush, fill in the wing shapes with the watery pink mix. Don’t worry about perfect evenness; the pooling of pigment actually enhances the textured, organic feel. -
Deepen the edges:
While the first layer is still slightly damp, add a tiny drop of darker pink or light brown to your mix. Touch this to the outer edges of the wings and near the body to create a soft gradient. -
Let it dry completely:
Wait for the base layers to dry fully. If you rush this steps, the defining lines you add next will bleed and look muddy. -
Paint the bodies:
Mix a soft brown with a touch of gold. Paint the segmented bodies of the butterflies. For the largest butterfly, make the body slightly thicker and textured.
Pro Tip: Texture
Add a tiny pinch of salt to the wet pink paint on the canvas. When dry, brush it off for a stunning, mottled texture.
Step 3: Adding Details & Gold
-
Define the veins:
Switch to your fine liner brush. Using a thinned dark grey or charcoal paint (not harsh black), gently trace the vein lines over the pink wings. Keep your hand loose for a natural look. -
Add wing spots:
Dip a small brush into dark grey and gently dab small dots along the outer edges of the large butterfly’s wings. Varied pressure creates more natural-looking sizes. -
Apply gold wing accents:
Using gold paint or a gold leaf pen, add shimmer to the tips of the wings. I personally like to concentrate the gold heavily on the upper tip of the large butterfly for that dipped-in-gold effect. -
Paint the antennae:
With your finest brush and black paint, draw the delicate antennae. Use a quick, flicking motion to ensure the lines remain razor-thin and end with small dot tips.
Step 4: Finishing Touches
-
Create the splatter effect:
This artwork features charming golden freckles. Dip a brush into your gold paint, then tap the handle against another brush to splatter droplets across the white space. -
Add larger gold dots:
Review the composition and paint a few deliberate, larger gold circles (confetti style) in the empty white areas to balance the spacing. -
Review and refine:
Step back and check the balance. If the pinks faded too much upon drying, add a second thin glaze to the centers of the wings to boost the vibrancy.
Hang your shimmering butterfly trio in a bright spot where the light can catch those metallic details
Pink Hearts as a Modern Pattern
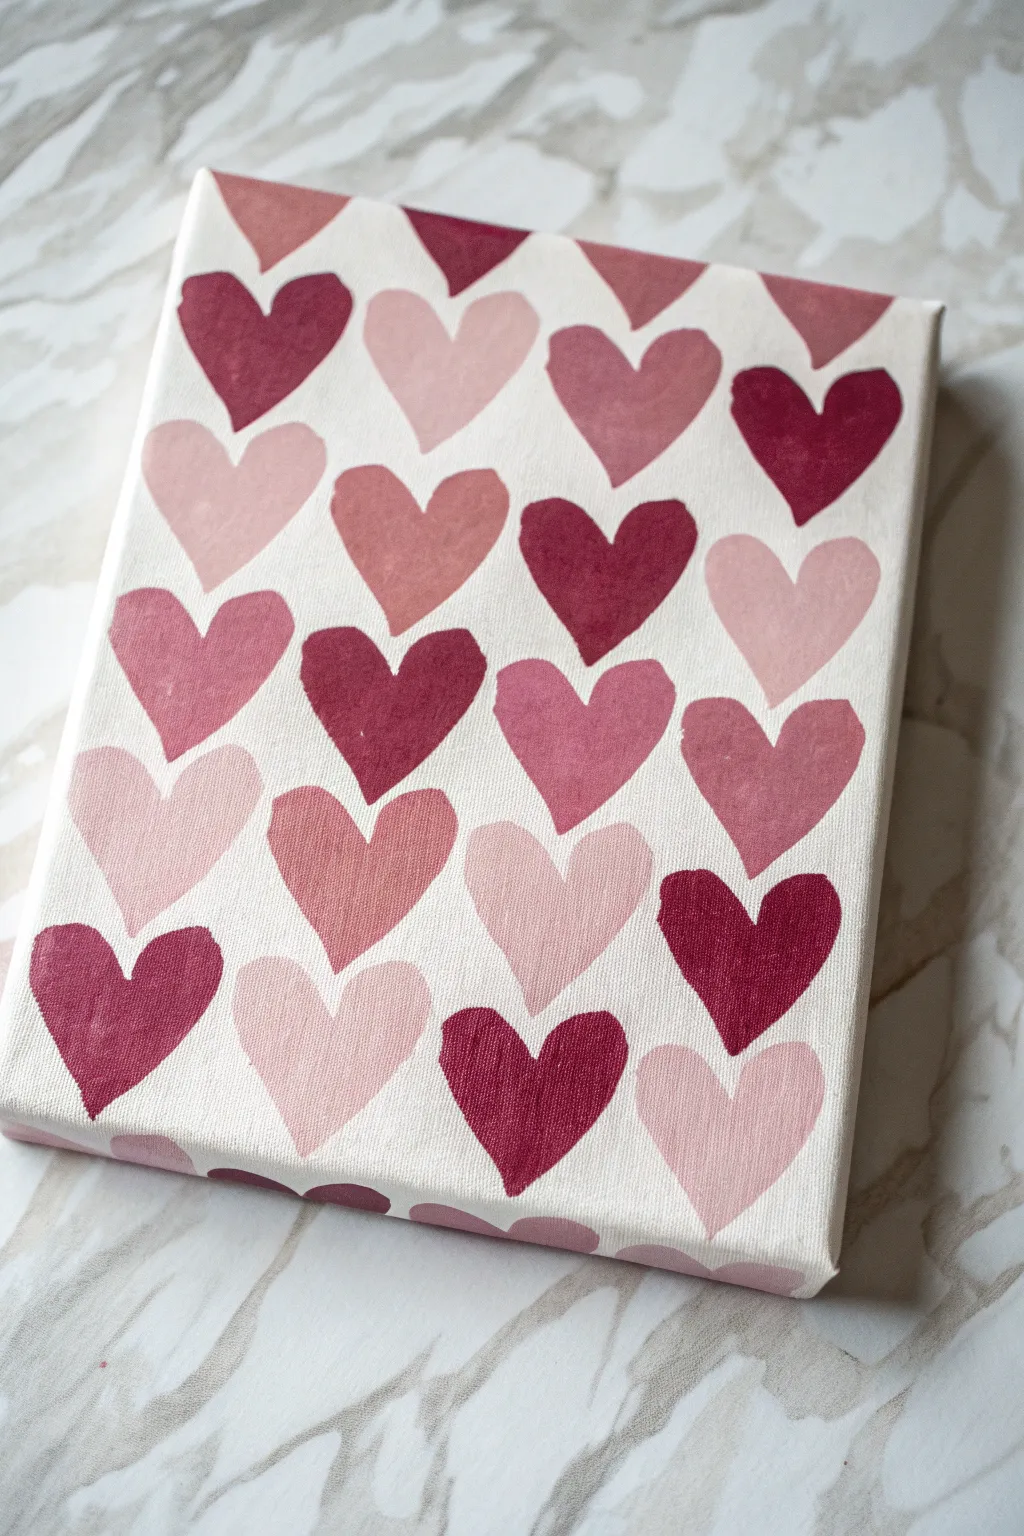
Embrace a charmingly imperfect aesthetic with this hand-painted canvas featuring repeating hearts in a gradient of pinks. The design combines the structure of a grid with the softness of organic brushstrokes for a modern, love-struck look.
Step-by-Step Tutorial
Materials
- Stretched canvas (e.g., 8×10 or 11×14)
- Acrylic paints (Titanium White, Magenta, Red Oxide, Alizarin Crimson)
- Small to medium flat paintbrush (size 6 or 8)
- Palette or paper plate for mixing
- Pencil
- Ruler
- Paper towel
- Cup of water
Step 1: Planning and Mixing
-
Prep your canvas:
Start with a clean, dry canvas. If your canvas isn’t pre-primed, apply a coat of gesso and let it dry completely to ensure a smooth painting surface. -
Create a loose grid:
Using a ruler and a pencil with a very light touch, mark out a grid on your canvas. Spacing the rows and columns about 2 inches apart works well for medium canvases, but adjust based on your desired heart size. -
Mark the heart centers:
Within each grid square, place a tiny dot roughly where the center of the heart should be. This helps keep the overall pattern aligned without feeling too rigid. -
Prepare your palette:
Squeeze out your base red and magenta paints along with a large dollop of white. You want to create at least four distinct shades for variety. -
Mix your lightest shade:
Mix a large amount of white with just a tiny dot of red or magenta to create a very pale blush pink. This will be your lightest value. -
Mix mid-tones:
Create two medium shades: a classic bubblegum pink and a dustier, mauve-leaning pink (add a touch of Red Oxide or brown if needed) to add sophistication. -
Prepare the darkest shade:
For the deepest hearts to pop, use your Alizarin Crimson or dark magenta straight from the tube, perhaps mixed with a tiny bit of blue or brown to deepen it further.
Step 2: Painting the Pattern
-
Start with the darkest hearts:
Dip your flat brush into the darkest red shade. Paint scattered hearts across the canvas, skipping spaces randomly. I find it easiest to paint one side of the heart like a comma stroke, then mirror it for the other side. -
Paint the bottom edge:
Don’t forget the bottom row. Paint half-hearts or partial shapes going off the edge of the canvas to create the illusion that the pattern continues infinitely. -
Switch to medium tones:
Clean your brush thoroughly. Move to your mid-tone pinks and fill in more of the empty grid spots, ensuring you distribute the colors evenly so no two identical colors are right next to each other. -
Add the blush hearts:
Fill in the remaining empty spaces with your lightest blush pink. The contrast between these pale hearts and the deep crimson ones is what gives the piece depth. -
Refine the shapes:
Step back and look at your hearts. If any look too thin or lopsided, carefully widen the curves with a little extra paint. The beauty is in the handmade variation, so don’t stress over perfect symmetry. -
Wrap the edges:
Extend the design onto the sides of the canvas. If a heart gets cut off at the front edge, paint the rest of the shape wrapping around the side for a polished, gallery-ready finish. -
Final touches:
After the paint is touch-dry, check for any pencil marks that might be showing through the lighter hearts. If visible, simply dab a second coat of paint over those specific areas. -
Erase guidelines:
Once the painting is 100% dry (give it a few hours), gently erase any visible pencil grid lines in the the white negative space between hearts.
Stroke Technique Tip
For smooth hearts, use two simple strokes: press the brush down to start the curve, then lift pressure as you pull toward the bottom point.
Level Up: Metallic Pop
Mix a small amount of gold leaf paint or iridescent medium into one of your pink shades to make a few random hearts shimmer in the light.
Hang your lovely new canvas on a gallery wall or prop it on a shelf to add warmth to any room
Abstract Pink Wave Strokes
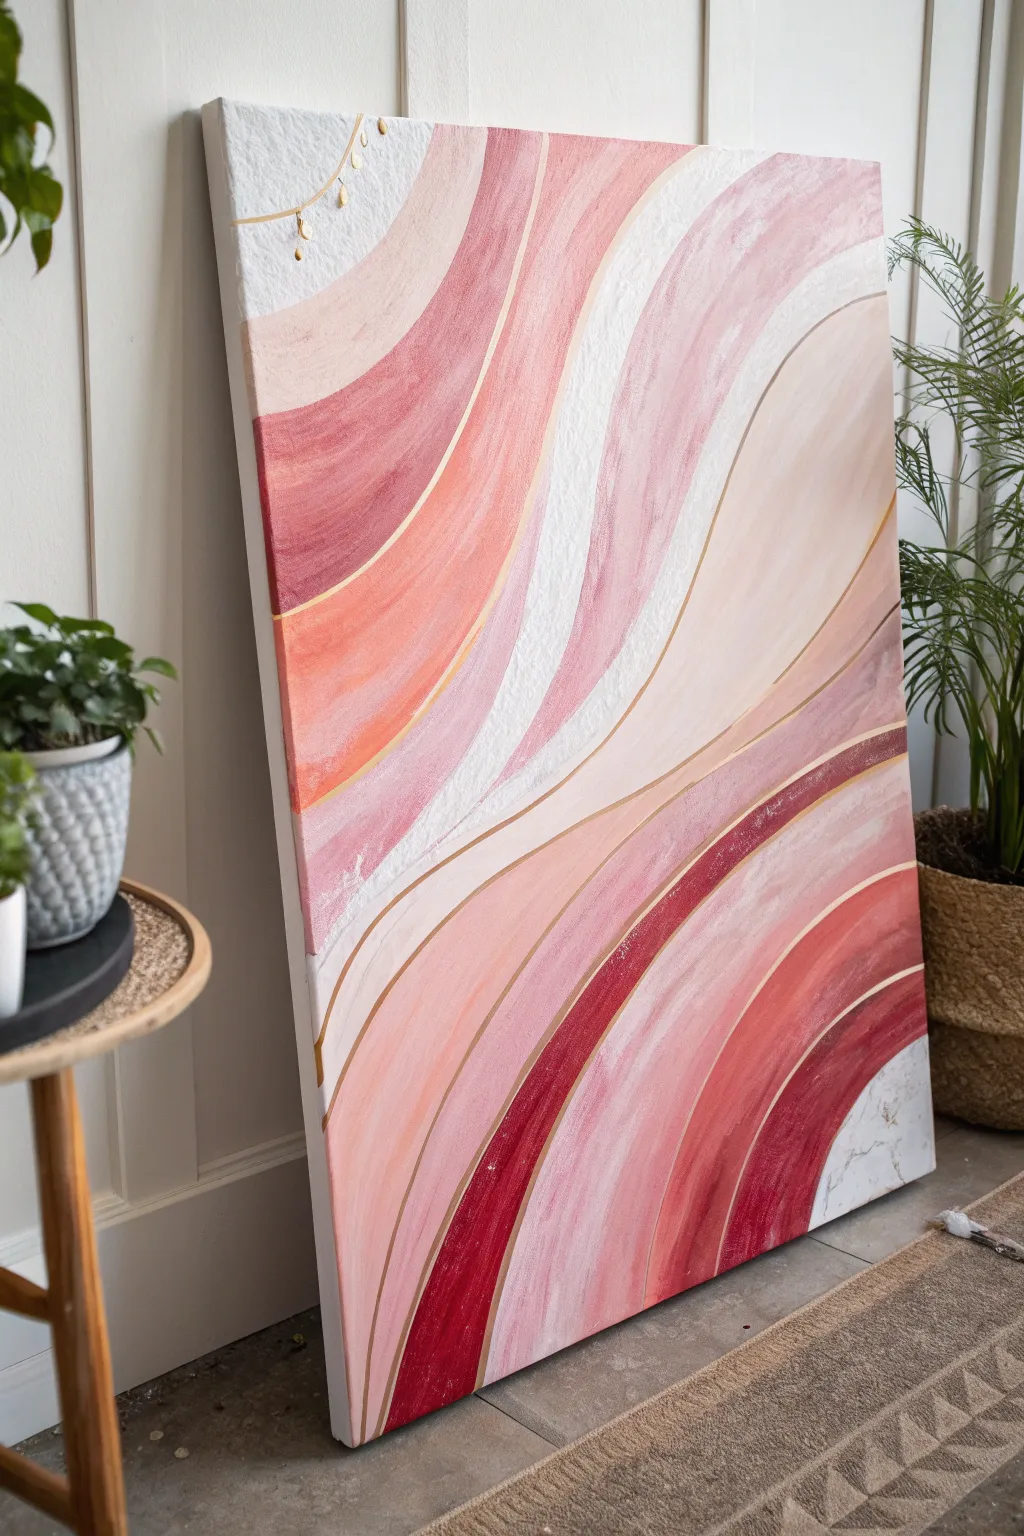
Capture the fluid beauty of sunset hues with this stunning abstract wave painting. Featuring sweeping bands of blush, coral, and deep crimson separated by elegant gold leaf lines, this piece adds a modern, warm focal point to any room.
Step-by-Step Guide
Materials
- Large rectangular stretched canvas (e.g., 24×36 inches)
- Acrylic paints (Titanium White, various shades of pink, coral, heavy body deep red, maroon)
- Metallic gold paint or liquid gold leaf
- Gold leaf pen or fine liner brush
- Gesso (optional, for priming)
- Texture paste or modeling paste
- Set of flat brushes (1-inch, 2-inch) and a fine detail brush
- Palette knife
- Pencil
- Painter’s tape or masking tape (optional for planning)
Step 1: Preparation and Sketching
-
Prime the canvas:
If your canvas isn’t pre-primed, apply a coat of gesso to ensure a smooth painting surface. Even on pre-primed canvas, a fresh layer can help the paint glide better. Let this dry completely. -
Sketch the wave motion:
Using a pencil, lightly draw the flowing, organic lines that will separate your color bands. Start from the top left and curve downwards towards the bottom right to create a cascading effect. Keep the lines smooth and continuous. -
Plan your color map:
Lightly mark which sections will be which color. Looking at the reference, aim for a balanced mix: deep burgundy at the bottom, graduating into lighter corals, blush pinks, and finally white at the top center loops.
Steady Gold Lines
If you struggle with shaky hands for the gold lines, use a gold paint marker instead of a brush. The felt tip offers much more control for long, continuous curves.
Step 2: Applying Texture and Base Colors
-
Create the textured corner:
In the top left corner section, apply modeling paste using a palette knife. Spread it unevenly to create a rough, stony texture. Let individual peaks remain to catch the light later. -
Mix your palette:
Prepare your acrylics. You’ll need to mix several intermediate shades. Create a soft blush by mixing a tiny dot of red into a large amount of white. Mix a coral by adding a touch of yellow or orange to your pink. -
Paint the lightest bands:
Start with the white and very pale pink sections, particularly the large sweeping curve in the middle. Use a wide flat brush to apply the paint in long, smooth strokes following the curve of your penciled lines. -
Apply mid-tone pinks:
Move on to the coral and dusty pink sections. When applying these adjacent to the wet white edges, you can choose to blend them slightly for a soft look, or let them dry for hard edges. For this specific style, distinct bands are preferred. -
Deepen the tones:
Paint the lower bands with your darker reds and maroons. These stronger colors anchor the composition at the bottom. Apply a second coat if the first looks streaky. -
Add the marble detail:
In the bottom right corner, paint the section white. While wet, use a fine brush with a tiny amount of grey paint to create thin, trembling veins to mimic marble.
Step 3: Refining and Gilded Details
-
Clean up edges:
Once the main color blocks are tacky or dry, inspect the boundaries between colors. Use a smaller flat brush to sharpen any wobbly edges so they flow smoothly. -
Textured gold accents:
Return to your textured white corner (top left). Using your gold paint and a fine brush, add small dots and a unifying curved line that interacts with the texture bumps. -
Prepare for gold lines:
Ensure the entire painting is 100% dry before this step. Creating the separation lines requires a steady hand over a dry surface to prevent smudging. -
Paint the gold dividers:
Using a very fine liner brush loaded with metallic gold paint or liquid gold leaf, carefully trace over the pencil lines where the color bands meet. I find that pulling the brush towards you rather than pushing it away helps maintain a consistent line width. -
Thicken select gold lines:
To create visual variety, go back and slightly thicken some parts of the gold lines, particularly where the curves are most dramatic. This mimics the look of gold inlay.
Level Up: Resin Finish
Pour a coat of clear art resin over the finished, dried painting. This creates a glass-like finish that makes the gold leaf shimmer and the colors look incredibly deep.
Step 4: Final Touches
-
Highlights and depth:
Mix a slightly lighter version of your deep red and dry-brush it into the center of the dark bands. This adds a subtle sense of volume so the distinct bands don’t look completely flat. -
Check the texture:
If the white textured area at the top needs more definition, lightly dry-brush pure white over the highest points of the dried paste to make them pop against the shadows. -
Seal the painting:
Once fully cured (wait at least 24 hours), apply a satin or gloss varnish. This will protect the paint and make the gold elements shine brilliantly.
Now step back and admire how the golden curves catch the light
Pink Color-Block Minimal Canvas
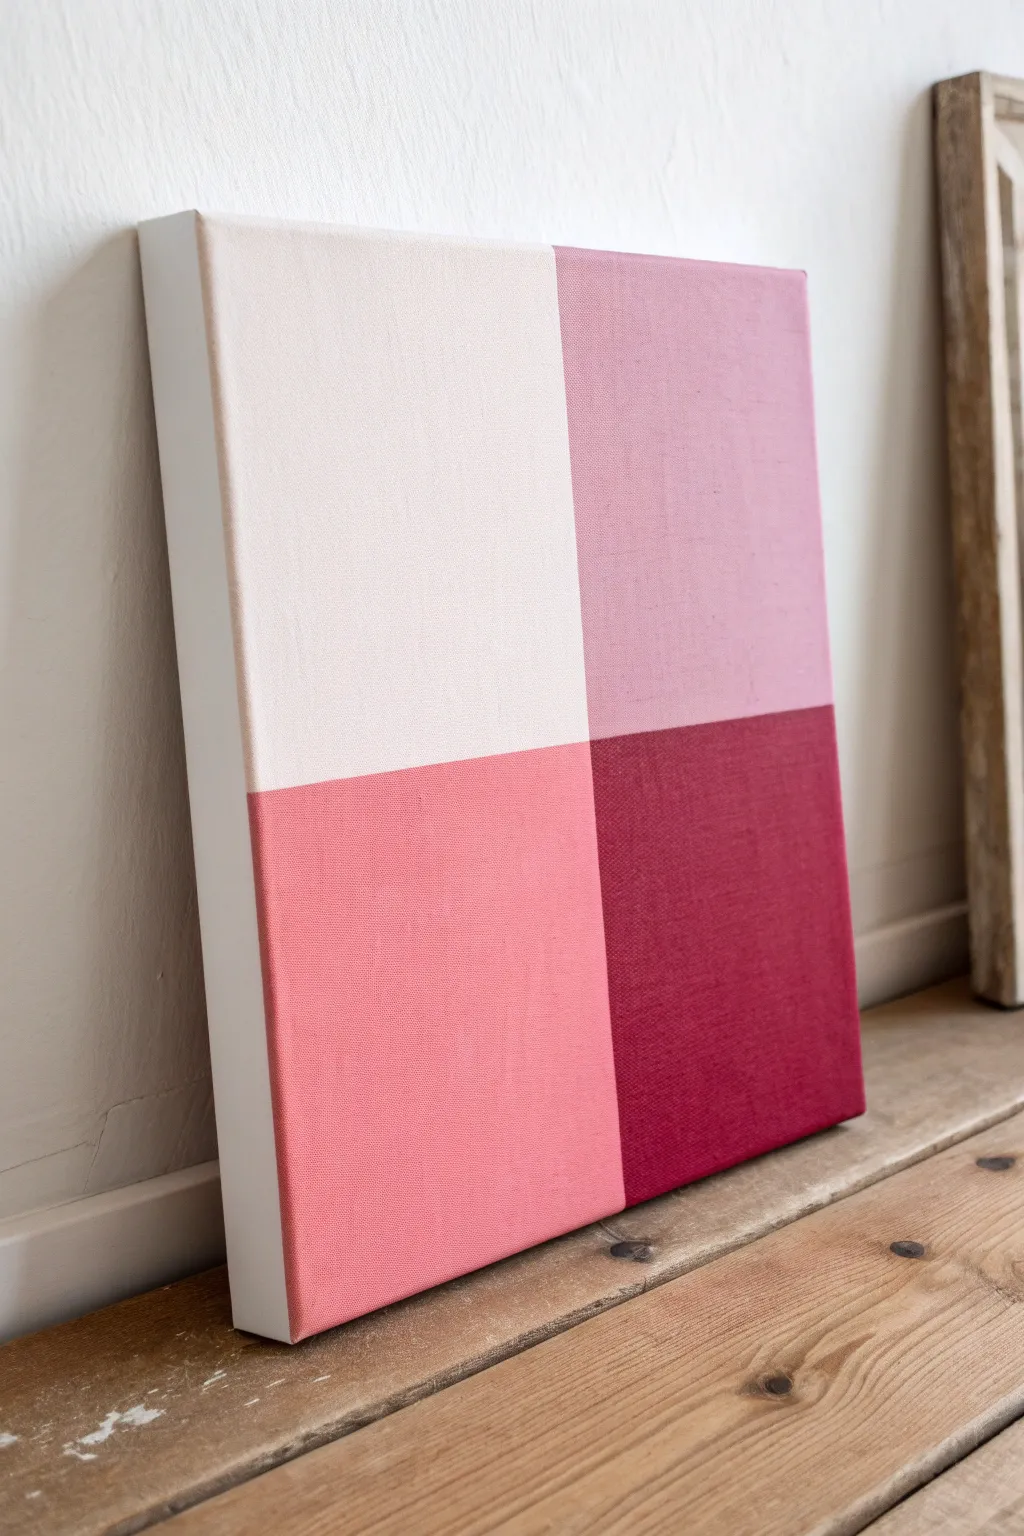
Embrace the elegance of minimalism with this four-quadrant color study, featuring a gradient of blush to deep berry tones. This project relies on crisp lines and careful color mixing to create a balanced, modern statement piece.
Step-by-Step
Materials
- Square stretched canvas (12×12 or 16×16 inches recommended)
- Acrylic paints: Titanium White, Alizarin Crimson, Cadmium Red, and Burnt Umber
- Painter’s tape or masking tape (low-tack is best)
- Wide flat synthetic brush
- Ruler or T-square
- Pencil
- Palette knife for mixing
- Palette or disposable plate
- Hairdryer (optional, to speed up drying)
Step 1: Planning and Taping
-
Surface Preparation:
Begin by ensuring your canvas surface is clean and dust-free. If the canvas feels rough, apply a thin coat of gesso and let it dry, then sand it lightly for a smoother finish. -
Measuring the Center:
Use your ruler to find the exact midpoint of the top edge and the bottom edge of the canvas. Make a small, light mark with your pencil at these points. -
Horizontal Marks:
Repeat this process for the left and right edges, finding the exact vertical center marks. -
Connecting the Lines:
Lightly draw a cross that connects your marks, creating four equal quadrants on the canvas. Use a light hand so the graphite doesn’t smudge into the paint later. -
First Tape Application:
Apply a strip of painter’s tape along the vertical line. Position it so the edge of the tape sits exactly on your pencil line, covering the right side of the canvas. -
Second Tape Application:
Apply a horizontal strip of tape along the horizontal line, covering the bottom half. Press down firmly on all edges of the tape to prevent paint bleed.
Step 2: Color Mixing and Painting
-
Mixing the Lightest Tone:
For the top-left quadrant, mix a large amount of Titanium White with just a tiny drop of Red or Alizarin Crimson. You want a very pale, nearly white blush tone. -
Applying the First Color:
Paint the top-left quadrant using your flat brush. Use long, smooth strokes. Paint right up to and slightly over the tape edges to ensure a crisp line. Extend the paint around the outer edge of the canvas for a finished look. -
Mixing the Mid-Tone Pink:
For the top-right quadrant (which is currently taped off), create a dusty rose shade. Mix White with Alizarin Crimson and a tiny dot of Burnt Umber to desaturate the pink. -
Wait and Reveal:
Allow the first quadrant to dry completely. Carefully peel back the vertical tape strip only. -
Re-Taping for the Second Quadrant:
Once the first quadrant is fully dry to the touch, apply a fresh strip of tape vertically over the painted edge you just finished to protect it. -
Painting the Second Tone:
Paint the top-right quadrant with your dusty rose mixture. Again, ensure even coverage and paint the side edges of the canvas. -
Mixing the Vibrant Pink:
For the bottom-left quadrant (the salmon pink), mix Cadmium Red with Titanium White. I like to add a touch of yellow if the red feels too cool, essentially aiming for a soft coral. -
Preparing the Bottom Half:
Remove the horizontal tape once the top sections are fully dry. Apply fresh tape horizontally across the bottom edge of the top painted sections to protect them. -
Painting the Third Quadrant:
Apply the vibrant pink/coral paint to the bottom-left quadrant. Keep your brush strokes horizontal for a uniform texture. -
Mixing the Deepest Tone:
For the final bottom-right quadrant, mix Alizarin Crimson with a little Burnt Umber. Add very little to no white to keep it rich and deep maroon. -
Final Painting Step:
Paint the remaining bottom-right quadrant with your deep maroon mixture, ensuring full opacity.
Bleeding Lines?
To prevent bleeding, paint a thin layer of the *base* color (or matte medium) over the tape edge first. This seals the gap before you apply the new color.
Step 3: Refining
-
The Final Reveal:
Once all paint is completely dry, slowly peel off the remaining tape at a 45-degree angle. This prevents the paint from chipping. -
Touch Ups:
Inspect your lines. If any paint bled under the tape, use a small detail brush and the appropriate color to enact careful corrections.
Add Texture
Mix a modeling paste into your acrylics before painting. Use a palette knife instead of a brush to apply the color for a raised, sculptural color-block effect.
Hang your new geometric artwork in a spot that receives soft lighting to highlight the subtle color shifts
Textured Pink Palette Knife Swirls
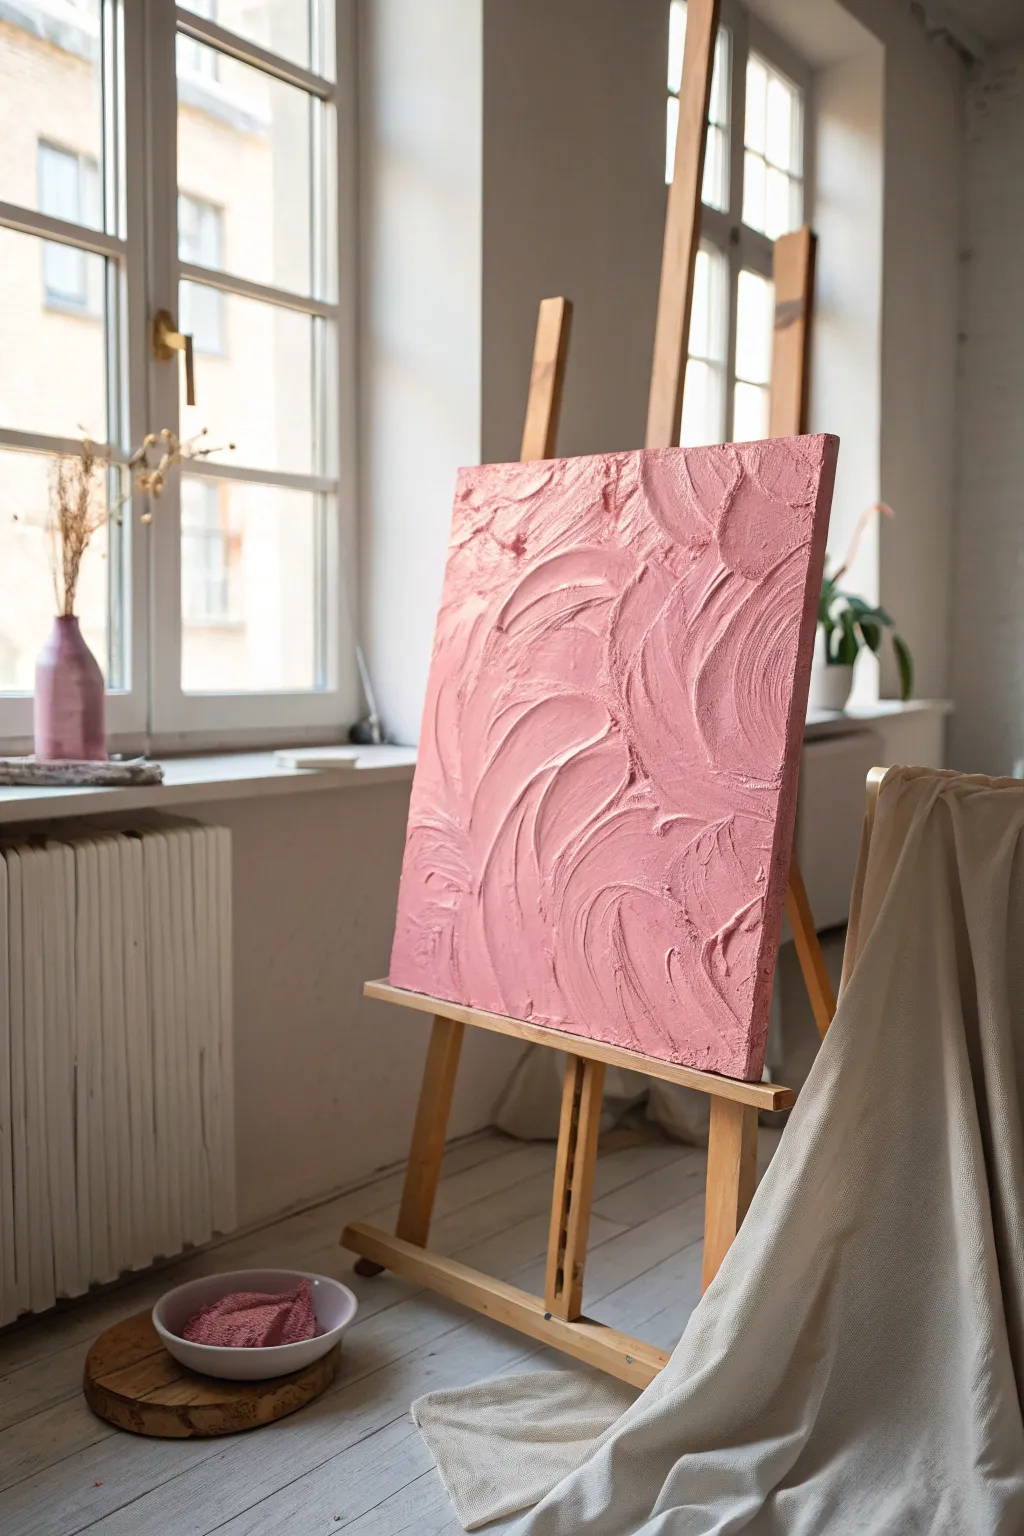
Embrace the soothing beauty of minimalism with this heavily textured canvas featuring sweeping, abstract arcs in a monochromatic dusty pink hue. The thick, sculptural relief creates captivating shadows that change with the light, turning a simple color into a dynamic statement piece.
How-To Guide
Materials
- Large square canvas (e.g., 20×20 inches)
- White gesso
- Modeling paste or heavy structure gel (large tub)
- Dusty pink acrylic paint (or rose madder mixed with white and a touch of raw umber)
- Large angled palette knife or trowel
- Small round palette knife
- Mixing bucket or large palette
- Drop cloth
Step 1: Preparation and Base
-
Prime the Surface:
Even if your canvas is pre-primed, apply a fresh coat of white gesso to ensure a sturdy, grippy surface for the heavy texture paste. -
Mix the Color:
In your mixing bucket, combine a generous amount of modeling paste with your pink acrylic paint. You want a consistent, opaque color. -
Adjust the Hue:
If the color feels too bright or bubblegum-like, add a tiny dot of raw umber or grey to mute it down to that sophisticated dusty rose shade seen in the image. -
Check Consistency:
Stir until the color is uniform. The mixture should feel like thick frosting—stiff enough to hold peaks but spreadable.
Keep It Clean
Wipe your palette knife clean with a rag between every 2-3 strokes. Dried bits on the knife can drag through wet paste and ruin smooth arcs.
Step 2: Creating the Texture
-
Apply the Base Layer:
Using the large trowel or knife, spread a thick, even layer of the colored paste over the entire canvas, about 1/4 inch deep. -
Start the Arcs:
Starting near the top right corner, use the flat edge of your large knife to carve a sweeping, C-shaped motion downwards. -
Vary Pressure:
Press harder on one edge of the knife as you sweep to create a ridge where the paste piles up, defining the edge of the swirl. -
Build the Composition:
Move to the center and left side, creating opposing swirls. Think of them as large, loose overlapping scales or petals. -
Layering Movements:
Don’t be afraid to overlap wet strokes. Allow a new swirl to cut slightly into a previous one to create depth and layering. -
Refine Edges:
Use the smaller palette knife to sharpen the high ridges of the texture if they look too soft. -
Add Surface Noise:
Lightly tap the flat side of the knife against flatter areas of the paste to create a rough, stucco-like micro-texture between the main ridges. -
Check the profile:
Look at the canvas from the side. Ensure your ridges are high enough (around 1/2 inch) to cast good shadows.
Gilded Edges
Once fully dry, lightly dry-brush metallic gold acrylic paint only on the very highest ridges to make the texture pop.
Step 3: Finishing and Drying
-
Clean Edges:
Run a clean knife or finger along the outer edges of the canvas to remove any overhanging globs of paste. -
Initial Dry:
Lay the canvas flat to dry. Because the paste is thick, do not hang it vertically yet, or the pattern might slide. -
Inspect for Cracks:
After about 4 hours, check for cracking. If hairline cracks appear, smooth a tiny bit of extra colored paste over them with a damp finger. -
Full Cure:
Let the piece cure completely for at least 24-48 hours. The thickest ridges may take even longer to harden fully.
Hang your textured masterpiece in a spot with side-lighting to maximize the dramatic shadows of your work
Pink Drips on a Soft Gradient
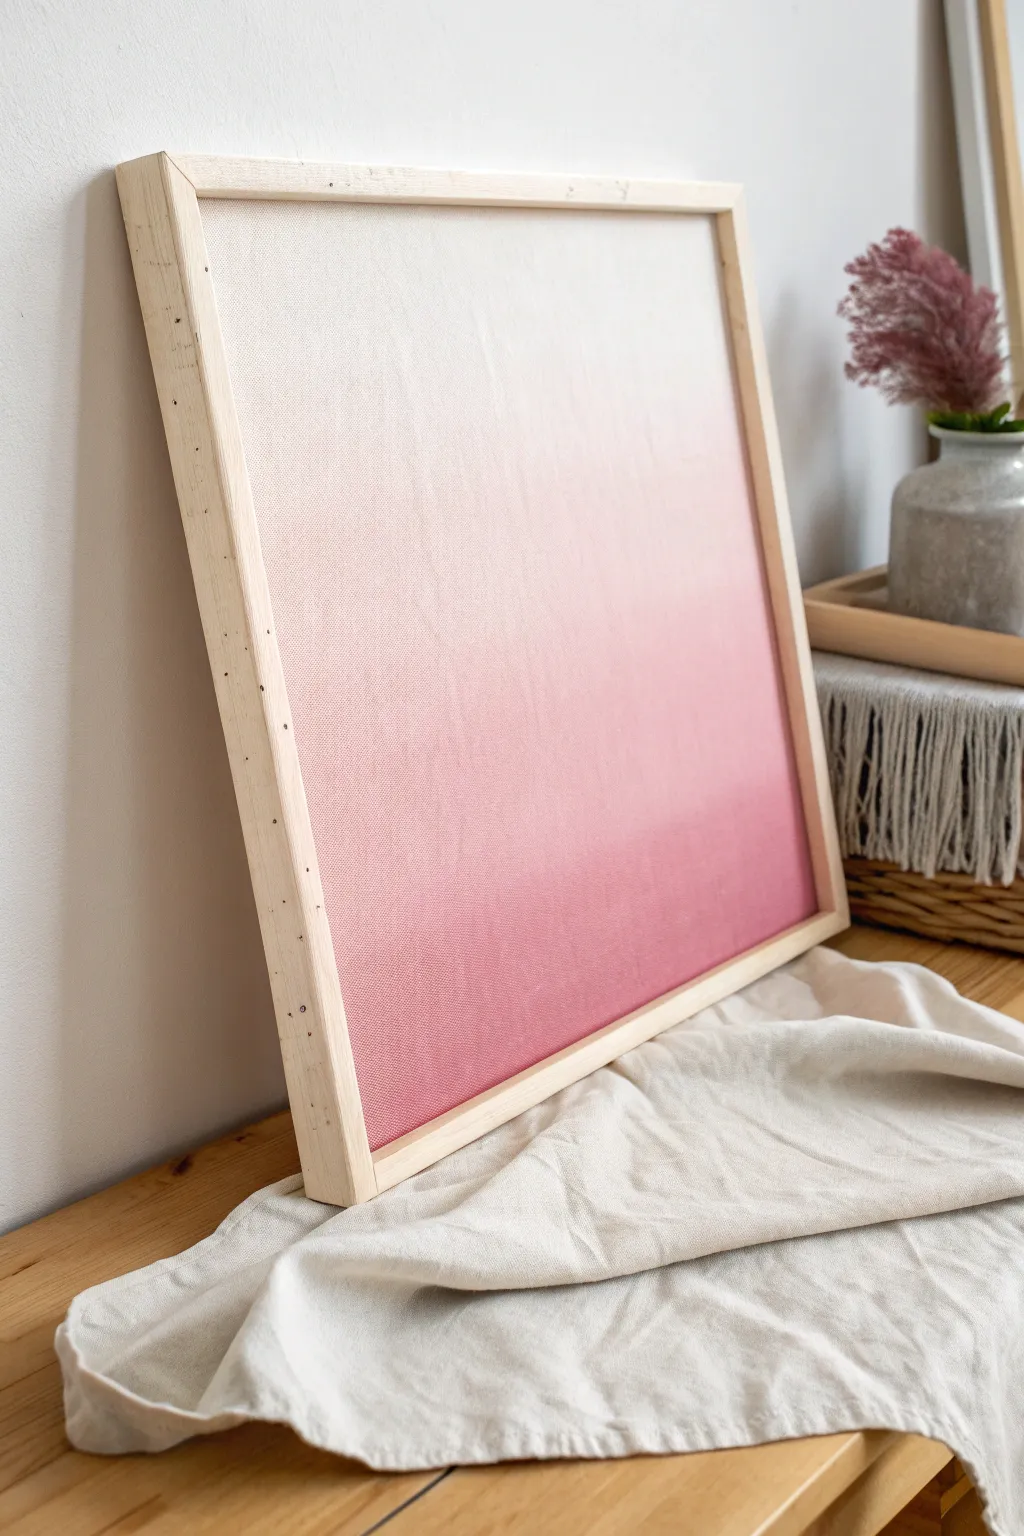
Achieve a professional and calming aesthetic with this seamless gradient art piece that transitions from creamy white to deep rose. This project relies on careful blending techniques to create a flawless fade that looks like it was printed rather than painted.
Step-by-Step
Materials
- Square stretched canvas (approx. 16×16 or 20×20 inches)
- Light wood floating frame (or pine wood strips to build one)
- Acrylic paints: Titanium White, Cream or Unbleached Titanium, Light Pink, Deep Rose/Mauve
- Slow-drying medium or retarder (essential for blending)
- Large flat synthetic wash brush (2-3 inches wide)
- Two medium flat brushes
- Spray bottle with water (mister setting)
- Palette or paper plate
- Drop cloth
Step 1: Base Preparation
-
Prime the Surface:
If your canvas isn’t pre-primed, apply a coat of gesso. Even if it is pre-primed, apply a thin layer of Titanium White mixed with a tiny drop of retarder over the entire surface. This wet base helps colors glide rather than stick immediately. -
Prepare Your Palette:
Squeeze out generous amounts of your four main colors: Cream, Titanium White, Light Pink, and Deep Rose. It is better to have too much paint than to run out mid-blend. -
Mix an Intermediate Shade:
Create a mid-tone by mixing the Light Pink with a little White. You want a distinct step between your lightest pink and your white.
Step 2: Applying the Gradient
-
Paint the Top Band:
Using a clean medium flat brush, apply a band of the Cream/White mixture across the top 2-3 inches of the canvas. Keep the strokes horizontal. -
Add the Second Tier:
Immediately below the white band, brush on a band of pure Titanium White. While both are wet, use long horizontal strokes to gently merge them. -
Introduce the Light Pink:
Switch to a new brush or clean your current one thoroughly. Apply a band of your Light Pink/White mix below the pure white section. -
The First Blend:
Take your large wash brush—make sure it’s slightly damp but not dripping. Lightly brush across the seam where the white and light pink meet. Use a soft, feathery touch to blur the line. -
Apply the Mid-Pink:
Paint the next section down with the pure Light Pink. This should take up the middle portion of the canvas. -
Extend the Gradient:
Clean your large brush again. Blend the transition between the pale pink mix and the pure Light Pink using those same long, horizontal sweeping motions. -
Deepen the Tone:
For the bottom third, apply the Deep Rose hue. Apply it heavily at the very bottom edge to ensure full opacity. -
Final Horizontal Pass:
Work swiftly to blend the Deep Rose up into the Light Pink. If the paint feels sticky, mist it very lightly with your spray bottle, but don’t let water beads run. -
Smoothing the Whole Surface:
Once all bands are on, take the large wash brush (clean and barely damp) and do one final, very gentle sweep from one side of the canvas to the other, moving slowly from top to bottom to eliminate distinct brush marks.
Pro Tip: The Wet Edge
Work quickly! Acrylics dry fast. Using a ‘retarder’ medium extends drying time, keeping the paint workable longer for that buttery smooth transition.
Step 3: Finishing Touches
-
Paint the Edges:
Don’t forget the sides of the canvas. Wrap the corresponding color around the edge—white at the top, dark pink at the bottom—so it looks finished from all angles. -
Let it Cure:
Allow the painting to dry flat in a dust-free area for at least 24 hours. Acrylics with retarder take longer to dry than standard acrylics. -
Seal the Work:
Once fully dry, apply a coat of matte varnish. A glossy finish might reflect too much light and ruin the soft, ethereal effect of the gradient. -
Frame It:
Place the canvas into a light wood floating frame. I usually secure the canvas from the back with offset clips or small screws, ensuring an even gap around the perimeter.
Troubleshooting: Visible Lines
If you see hard stripes forming, your brush is too dry. Mist the canvas lightly with water and use a clean, dry soft brush to feather the edges immediately.
Hang your new masterpiece in a bright room to let the soft gradient really shine
Glowing Streetlamp in a Pink Fog
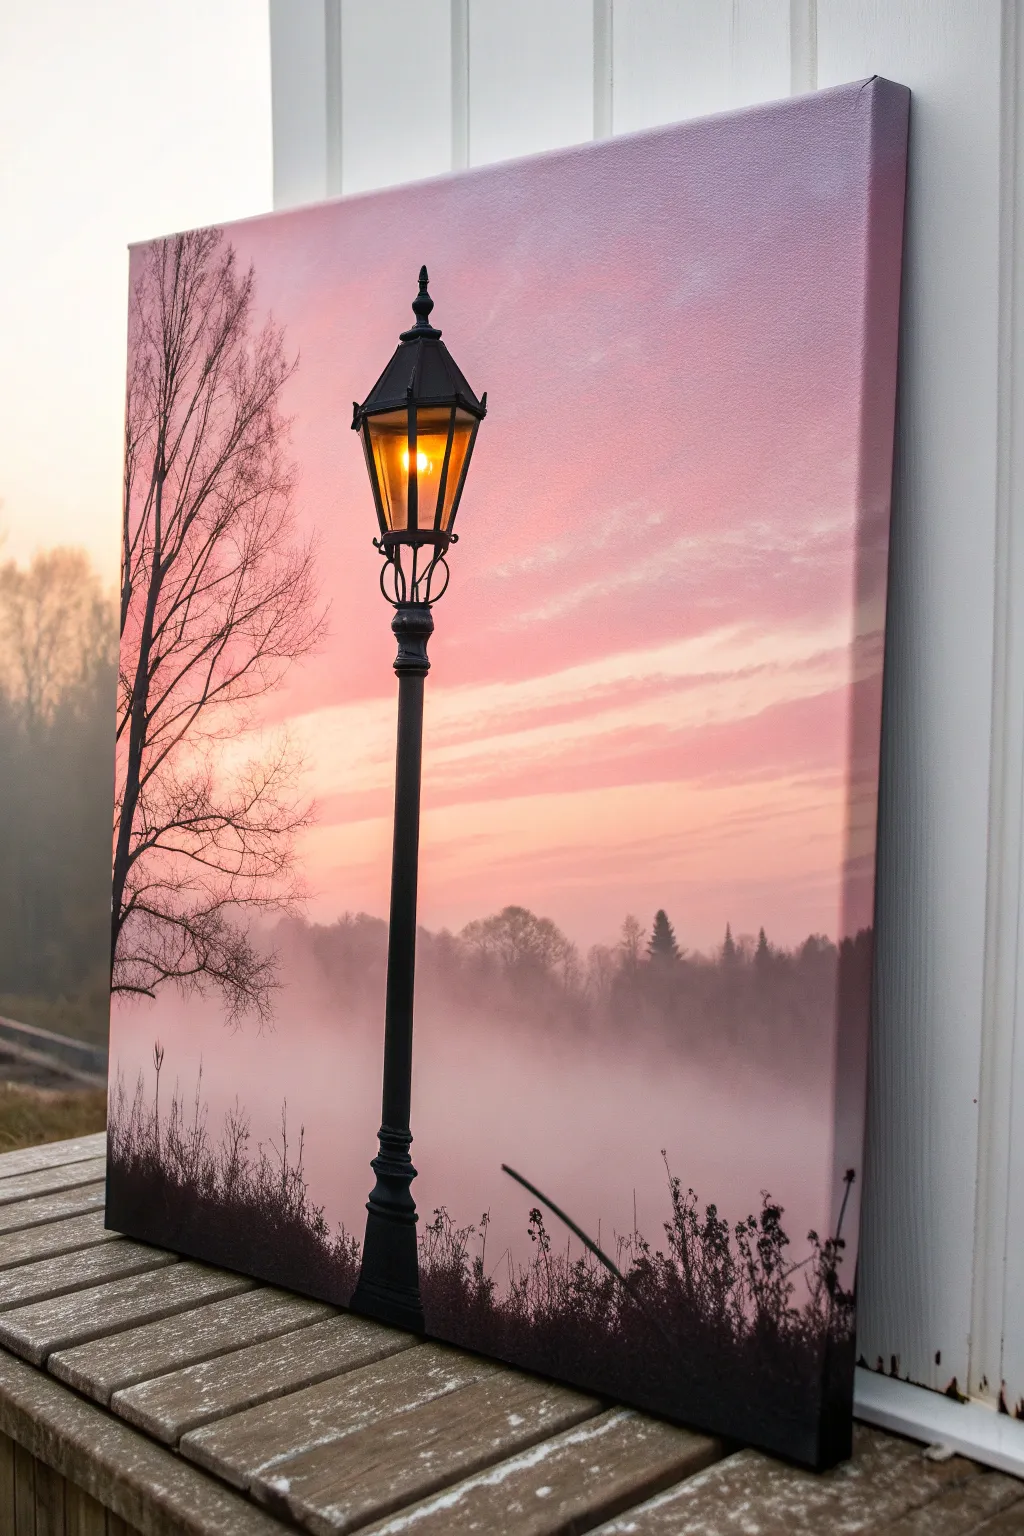
Capture the serene beauty of a misty evening with this atmospheric acrylic painting project. You’ll create a glowing streetlamp standing sentinel over a soft, pink landscape, perfect for adding a touch of romance and mystery to any room.
Detailed Instructions
Materials
- Square stretched canvas (24×24 inches recommended)
- Acrylic paints: Titanium White, Magenta or Alizarin Crimson, Cadmium Yellow, Raw Umber, Carbon Black, Lamp Black
- Large flat brush (2 inch)
- Medium flat brush (1 inch)
- Small round brush (size 2 or 4)
- Fine liner brush (size 00)
- Ruler or straight edge
- Chalk or pastel pencil for sketching
- Palette knife (optional for mixing)
- Water cup and paper towels
Step 1: Creating the Atmospheric Background
-
Prepare the gradient palette:
Mix a large amount of Titanium White with a tiny touch of Magenta to create a very pale, soft pink. On another part of your palette, mix a slightly deeper, cooler pink using White, Magenta, and the tiniest speck of raw umber to desaturate it. -
Paint the upper sky:
Using your large flat brush, apply the slightly deeper pink mixture to the top third of the canvas. Use broad, horizontal strokes to ensure smooth coverage. -
Blend the horizon:
While the top paint is still wet, load your brush with the very pale pink mixture. Paint the middle and bottom sections of the canvas, blending upwards into the darker pink to create a seamless Ombré effect representing the sky and fog. -
Add cloud streaks:
Mix a soft purple-grey using White, a touch of Magenta, and a dot of Black. Using the edge of a clean flat brush, dry-brush faint, horizontal streaks across the middle section to simulate thin cloud layers. -
Create the distant treeline:
Mix a ‘foggy grey’ by combining White with a small amount of Black and a touch of the pink mix. It should be just slightly darker than your background. -
Paint ghostly trees:
Using a medium flat brush or a rounded filbert, dab in the shapes of distant trees along the lower third of the canvas. Keep the edges soft and blurry so they look like they are receding into the mist. -
Build intermediate layers:
Add a slightly darker grey layer of trees just below the first one. This step adds depth to the fog, making the landscape feel vast.
Fixing Wobbly Lines
If your lamp post edges look uneven, wait for the black paint to dry completely. Then, use the background pale pink color to ‘cut back’ into the line and straighten it out.
Step 2: Painting the Foreground Elements
-
Sketch the lamp post:
Once the background is fully dry, use a ruler and a piece of chalk to lightly draw a vertical line where your lamp post will stand. Sketch the lantern shape at the top. -
Paint the main tree silhouette:
Mix Carbon Black with a little water to improve flow. Using a small round brush, paint the large, bare tree on the left side. Start with the trunk and extend jagged, thin branches upward and outward. -
Detail the branches:
Switch to your fine liner brush for the thinnest twigs on the tree. Let your hand shake slightly to create natural, organic lines. -
Block in the lamp post:
Using the medium flat brush and pure Carbon Black, paint the vertical post of the lamp. Use the ruler as a guide if you need a steady hand, or freehand it for a more rustic look. -
Paint the lantern frame:
Use the liner brush to carefully paint the black metal framework of the lantern head, including the finial on top and the ornate scrollwork beneath the lantern box. -
Add foreground vegetation:
Along the very bottom edge, use the small round brush to stipulate dark, shadowy grasses and weeds. Use quick, upward flicking motions to mimic tall grass blades.
Pro Tip: Glowing Effect
To make the lamp really shine, gently dry-brush a very faint circle of yellow-orange glaze around the outside of the lantern glass onto the pink sky.
Step 3: Adding the Warm Light
-
Base the glowing glass:
Mix Cadmium Yellow with a little White. Paint the glass panes inside the black lantern frame. -
Intensify the bulb:
Mix a tiny amount of pure White into the center of the yellow panels to create a ‘hot spot’ where the bulb would be. -
Create the orange glow:
Glaze the edges of the glass panes with a thin wash of orange (Yellow mixed with a dot of Magenta). This makes the light look warm and inviting against the cool pink background. -
Add final highlights:
I like to add tiny touches of white or light grey on the black metal of the lamp post itself, specifically on the side facing the viewer, to suggest moonlight or reflection.
Step back and admire the peaceful solitude of your misty evening scene.
Fairy Light Bokeh on a Pink Background
Soft pink hues meet the warmth of gold in this playful yet sophisticated abstract piece. Reminiscent of fairy lights twinkling in the distance, this canvas combines matte and metallic finishes for a dreamy, textured look.
Step-by-Step
Materials
- Square stretched canvas (e.g., 16×16 or 20×20 inches)
- Acrylic paints: Dusty pink, Titanium White, Cream/Off-White
- Metallic Gold acrylic paint (high shine)
- Wide flat brush (for background)
- Round foam pouncers/sponges (assorted sizes: 1, 2, and 3 inches)
- Small round detail brush (size 2 or 4)
- Paper palette or plates
- Water cup and paper towels
- Optional: Gold leaf and adhesive size (for extra shine)
Step 1: Setting the Scene
-
Prepare the base:
Start by mixing your dusty pink acrylic paint with a tiny touch of white to soften it. Using your wide flat brush, cover the entire front and sides of the canvas with smooth, even strokes. -
Add tonal variation:
While the base pink layer is still slightly wet, mix a slightly lighter version involving more white. Randomly blend this into areas of the canvas to create a subtle, cloudy effect rather than a flat block of color. -
Let it cure:
Allow this background layer to dry completely. If the weave of the canvas is still showing through too much, apply a second coat for a more opaque, professional finish.
Twist for Crisp Edges
When lifting the foam pouncer, give it a tiny quarter-turn twist. This breaks the suction and prevents that common peaked texture in the center of the circle.
Step 2: Creating the Bokeh
-
Organize your palette:
Squeeze out separate puddles of titanium white, cream, a very pale baby pink, and your metallic gold. -
Select your sponges:
Gather your assortment of round foam pouncers. The variety in sizes is key to the depth of the bokeh effect. -
Start with white circles:
Dip a medium-sized foam pouncer into the titanium white. Press it gently onto the canvas, giving it a slight twist as you lift to ensure a crisp edge. -
Vary the opacity:
Create a few more white circles. For some, reload the sponge fully; for others, stamp off some paint on paper first to create a semi-transparent, ‘faded’ look. -
Layer in the pinks:
Switch to a different sized pouncer and dip into the pale pink or cream. Stamp these circles randomly, aiming to overlap just the edges of some white circles to create depth. -
Introduce the gold:
Now for the glamour. Using a clean pouncer, dip into the metallic gold paint. Stamp several gold circles throughout the composition, balancing them so the eye travels across the whole canvas. -
Create focal points:
Choose two or three gold circles to be your standout elements. For these, you might want to apply a second coat of metallic paint once the first is dry to make them truly opaque and shimmering. -
Partial circles:
Don’t forget the edges. Stamp some circles so they ‘fall off’ the side of the canvas, wrapping the design around the frame for a finished gallery style. -
Fix imperfections:
If any circle edges look messy or uneven, use your small detail brush with the matching paint color to carefully round them out. -
Check balance:
Step back five feet. Look for any large empty pink spaces that feel unbalanced and fill them with a small circle in a shade that provides contrast.
Uneven Paint Coverage?
If sponge circles look patchy, don’t overload with paint next time, which causes slipping. Instead, let the first layer dry and stamp a second thin layer over it.
Step 3: Fairy Dust Details
-
Mix watery paint:
Take a small amount of white paint and mix in a drop or two of water to make it fluid, like ink. -
Paint tiny specks:
Dip the tip of your small round brush into this fluid white mixture. Dot tiny specks and constellations of points around the larger circles. -
Vary dot density:
Cluster these tiny dots near the edges of some circles, as if the light is dissolving, and leave other areas of the background open. -
Add gold sparkle:
Repeat the previous step using watered-down gold paint. These tiny metallic flecks will catch the light beautifully when hung. -
Final dry:
Let the entire painting sit undisturbed for at least 24 hours to ensure the thicker areas of paint on the circles are fully hardened.
Hang your shimmering creation in a room that catches natural sunlight to really make those metallic accents pop
Pink Galaxy With Nebula Clouds
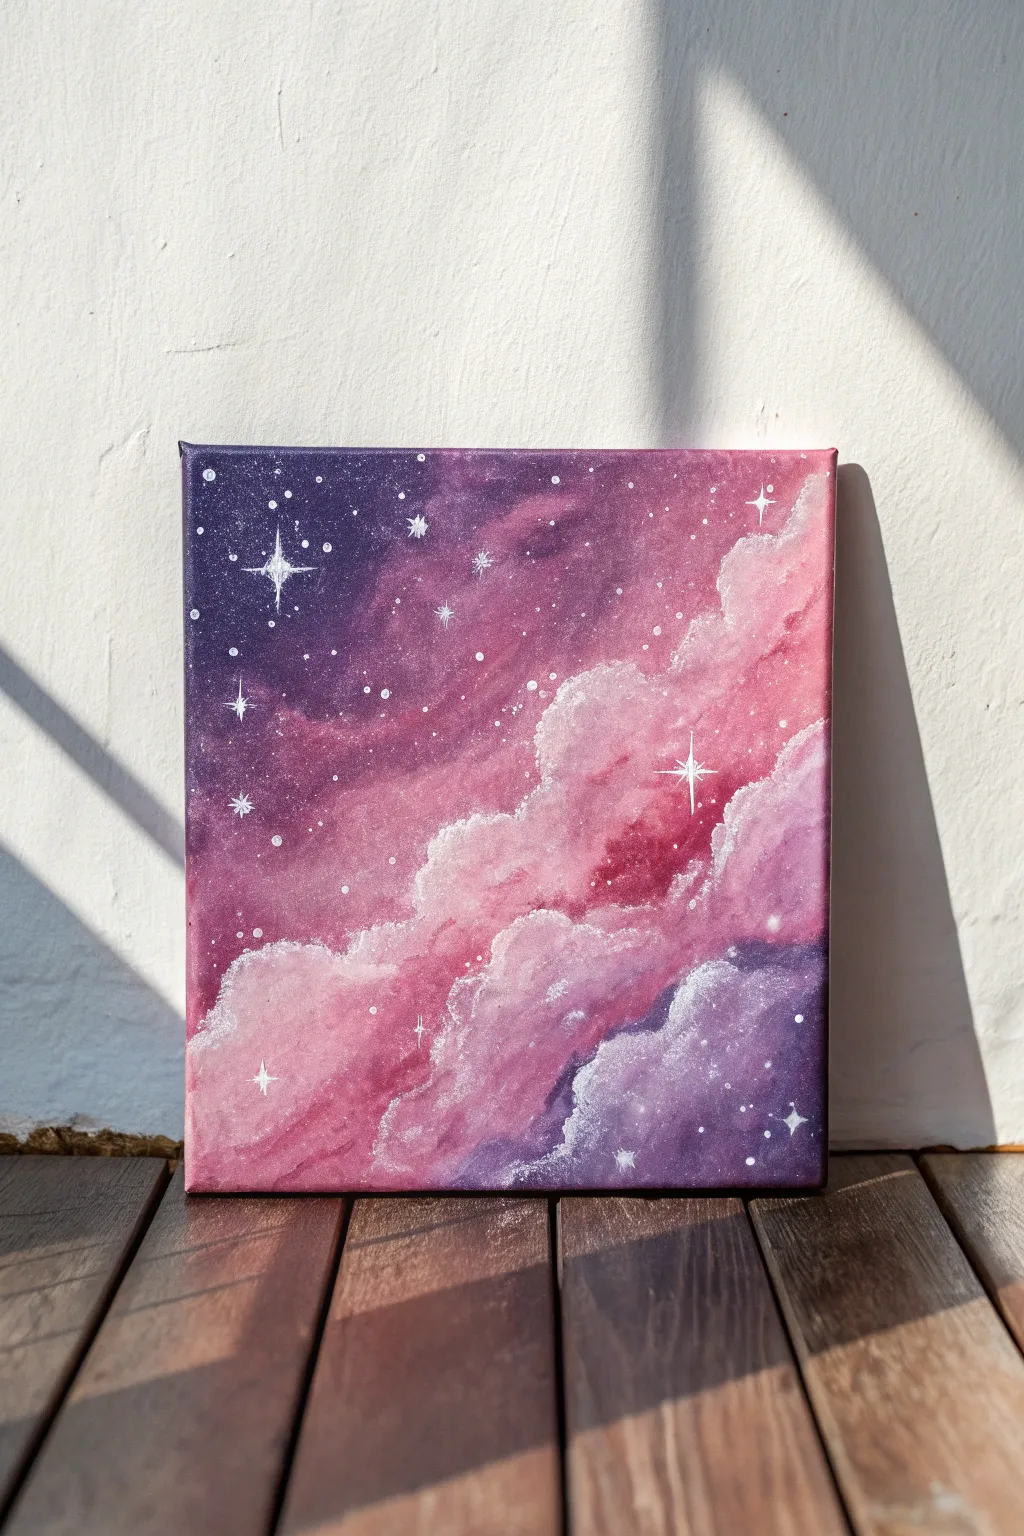
This ethereal galaxy painting captures the magic of deep space with soft, billowy clouds of rose and magenta set against deep indigo. The dreamy blend of colors and sparkling stars makes for a calming piece that looks far more complex than it actually is.
How-To Guide
Materials
- Square canvas (stretched or panel)
- Acrylic paints: Titanium White, Magenta/Rose Pink, Deep Violet/Purple, Indigo or Black
- Large flat brush (for background)
- Medium filbert or round brush (for clouds)
- Small detail brush (liner brush)
- Old toothbrush (optional for stars)
- Sponge (natural or kitchen sponge chunk)
- Palette
- Water cup and paper towels
Step 1: Setting the Background
-
Prime the Base:
Start by painting the entire canvas with a layer of Deep Violet mixed with a tiny touch of black or Indigo. This creates the deep space backdrop that will peak through the clouds later. -
Establish the Gradient:
While the base is still slightly wet, blend pure Deep Violet into the top left and bottom right corners. Keep the center area a bit lighter to prepare for the nebula. -
Add the First Glow:
Mix a small amount of Magenta with your Deep Violet. Using strokes that move diagonally from bottom-left to top-right, lay down a broad, translucent path where your galaxy will flow.
Softer Edges
If your clouds look too stiff, use a clean, slightly damp brush to gently smudge the edges while the paint is still wet. This feathers the paint for a gas-like effect.
Step 2: Painting the Nebula Clouds
-
Sponge the Base Clouds:
Dampen your sponge slightly and dip it into the Magenta paint. Gently dab cloud-like shapes along the diagonal path you established, keeping the edges soft and irregular. -
Building Layers:
Mix Magenta with a little White to create a medium pink. Dab this lighter color on top of the magenta clouds, concentrating on the upper edges where the ‘light’ would hit the cloud formations. -
Define the Cloud Tops:
Using a smaller sponge piece or a scruffy brush, apply an even lighter pink (mostly White with a dot of Magenta) to the very crests of the cloud billows. This creates that fluffy, three-dimensional look. -
Deepening Shadows:
To make the clouds pop, add shadows underneath the bright pink fluff. Use thin, watered-down Deep Violet to glaze the undersides of the cloud masses. -
Creating the Wisps:
Switch to a dry brush technique. Take a clean, dry filbert brush with a tiny amount of light pink paint and lightly sweep it outward from the cloud edges to create faint, dusty trails.
Step 3: Adding the Sparkle
-
Splatter the Stars:
Dilute pure Titanium White paint with water until it reaches an ink-like consistency. Dip a toothbrush (or firm brush) in it and flick the bristles to spray tiny stars across the canvas. -
Concentrate the Galaxy:
Add a few extra splatter stars specifically along the diagonal pink nebula path to simulate a dense cluster of stars within the galaxy. -
Paint Major Stars:
Use your finest detail brush to paint a few larger, distinct stars. Simply place a small white dot where you want the star to be. -
Create the Flares:
For the brightest stars, paint a vertical line through the dot, followed by a shorter horizontal line through the center to create a four-point sparkle shape. -
Add Subtle Glints:
I like to add tiny ‘x’ shapes or simple crosses on a few medium-sized stars to give them a twinkling effect without the full flare. -
Highlight the Cloud Edges:
Using the detail brush and pure white, carefully outline the very top ridges of a few central clouds. This ‘silver lining’ makes the nebula look illuminated. -
Final Adjustments:
Step back and check the balance. If the purple background looks too flat, glaze over dark areas with a very thin wash of dark blue or purple to deepen the contrast.
Too Many Splatters?
If you accidentally flick a giant blob of white paint onto your galaxy, don’t wipe it! Wait for it to dry completely, then paint over it with your background purple.
Once dry, display your cosmic creation where the light can catch those bright white starbursts
Neon-Style Pink Outline Florals
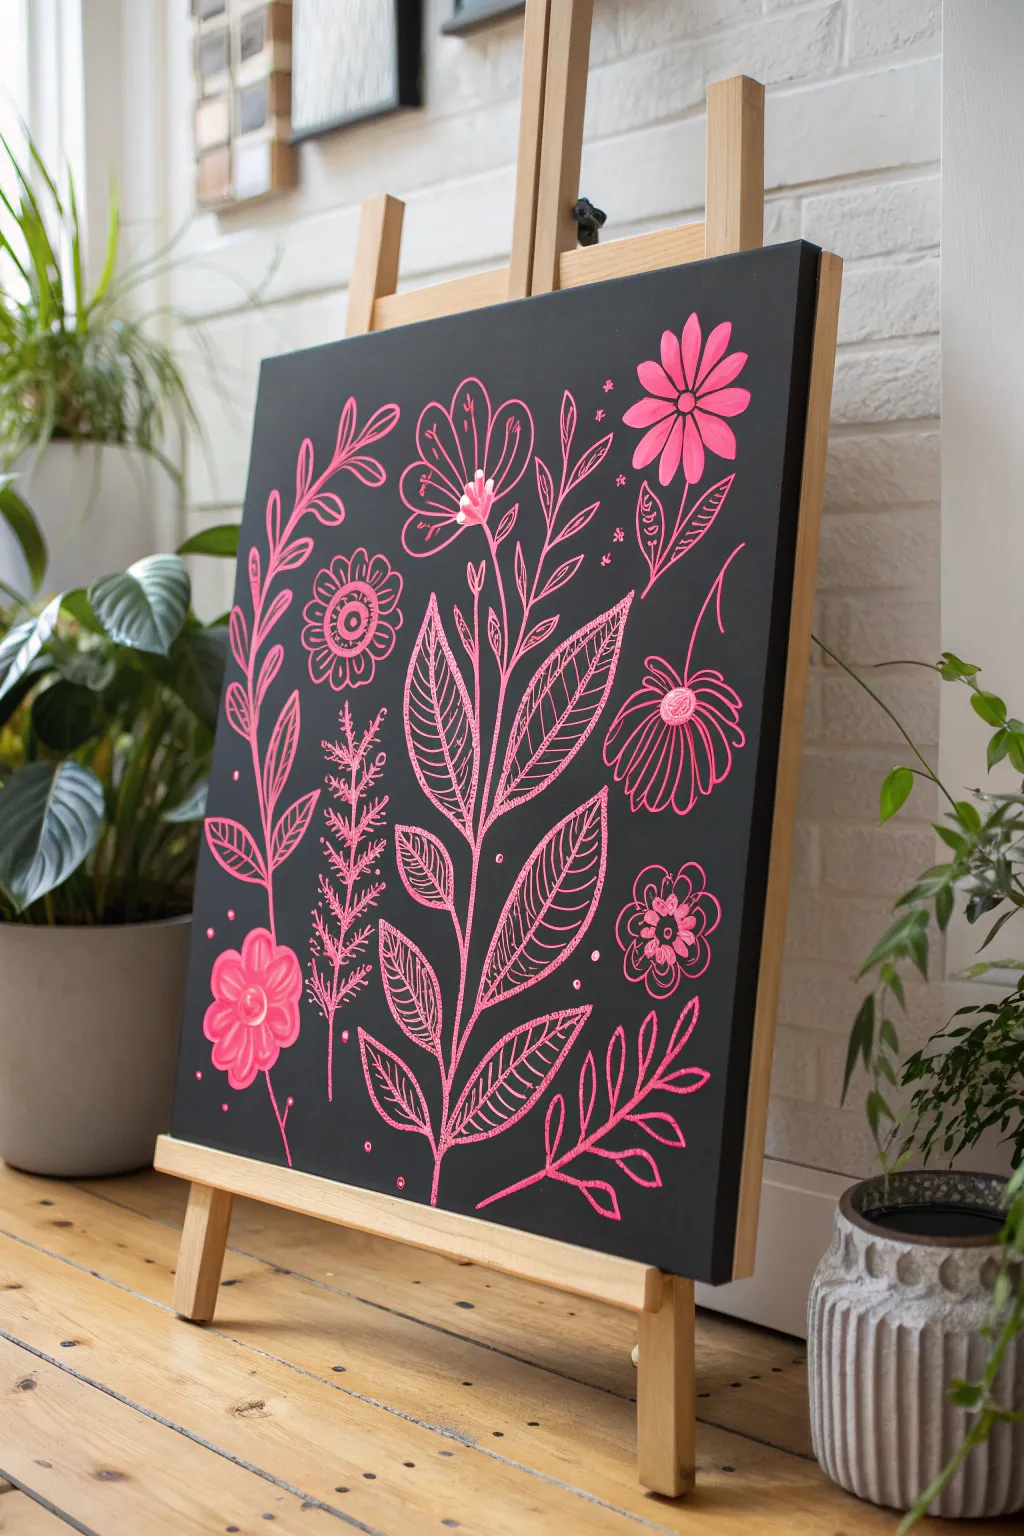
Achieve a striking, modern look by pairing a deep matte black background with vibrant neon pink floral illustrations. This high-contrast piece mimics the effect of a neon sign or a chalkboard drawing but with the permanence of acrylics.
Step-by-Step Guide
Materials
- Stretched canvas (square or rectangular)
- Black acrylic gesso or matte black acrylic paint
- Wide flat brush or foam brush (for background)
- Neon pink acrylic paint or pink paint marker (medium tip)
- Round detail brushes (sizes 0, 1, and 2)
- White or pink chalk pencil
- Palette
- Water cup and paper towels
Step 1: Preparing the Dark Base
-
Set the Stage:
Begin by coating your entire canvas with black acrylic gesso or matte black paint. Use a wide flat brush to ensure smooth, even coverage. -
Check the Edges:
Don’t forget to paint the sides of the canvas black as well, giving the piece a finished, professional look without needing a frame. -
Double Coat for Depth:
Allow the first layer to dry completely, then apply a second coat if you can see any canvas texture showing through. A solid, opaque black is crucial for making the pink pop. -
Full Dry:
Let the background cure fully before moving on; any wet black paint will muddy your vibrant pink lines.
Brightness Boost
For maximum neon impact, paint your design in white first. Let it dry, then layer the transparent neon pink over the white lines. The color will vibrate off the canvas.
Step 2: Drafting the Composition
-
Plan the Focal Point:
Using a chalk pencil, lightly sketch a large, central stem that reaches from the bottom center toward the top. This will be the anchor for your floral arrangement. -
Balance the Layout:
Sketch smaller floral elements in the corners and sides. Place a large daisy-like flower in the top right and a smaller rosette in the bottom left to create diagonal balance. -
Sketch Leaf Motifs:
Draft various leaf shapes—some broad and veined, others fern-like and delicate—filling the negative space around your main stems. -
Refine the Lines:
Step back and check your sketch. Since chalk is easily wiped away with a damp cloth, take this time to adjust any shapes until the composition feels full and lively.
Shaky Lines?
If brush control is difficult, switch to a pink acrylic paint marker. You’ll get the same opaque look with the control of a pen, making intricate details much easier.
Step 3: Painting the Main Stems
-
Load the Brush:
Load a size 1 or 2 round brush with neon pink paint. I prefer to thin the paint slightly with a drop of water to help it glide smoothly over the canvas grain. -
Outline the Central Flower:
Paint the main central stem and the large leaf shapes attached to it. Use confident, sweeping strokes to keep the lines clean. -
Define the Veins:
Inside the large central leaves, paint fine lines for the veins. Leave small gaps between the veins and the outer leaf outline to keep the drawing airy. -
Paint Secondary Stems:
Move outwards to trace the curling fern-like stems on the left side and the thinner branches on the right.
Step 4: Adding Floral Details
-
Top Right Daisy:
Paint the petals of the large flower in the top right corner. Start from the center and pull your brush outward to get a tapered tip on each petal. -
Bottom Left Rosette:
Create the rounded flower at the bottom left. Fill the petals solidly with pink, or leave them as outlines depending on how much visual weight you want in that corner. -
Intricate Center Details:
Switch to your smallest size 0 brush. Add tiny dots, circles, or cross-hatching inside the flower centers to add texture and visual interest. -
Fern Feathers:
For the fern-like plant on the left, use short, quick flicks of the wrist to create the feathery leaves along the stem.
Step 5: Highlights and Polish
-
Layering for Opacity:
Neon pigments can be transparent. Once your first layer of pink is dry, go back over the main lines with a second coat to ensure the color is solid and bright. -
Adding White Accents:
Mix a tiny amount of white into your pink paint to create a lighter tint. Use this to add small highlight dots on the flower centers or tips of the leaves for dimension. -
Stardust Filler:
If there are empty black spaces that feel too heavy, add tiny dots, small stars, or floating circles to fill the void without cluttering the design. -
Clean Up:
Once the paint is completely dry, use a slightly damp cloth or cotton swab to gently wipe away any visible chalk sketch lines.
Hang this vibrant piece in a well-lit spot to fully appreciate the electric contrast between the neon hues and the dark background
Pink Mixed-Media Collage Texture
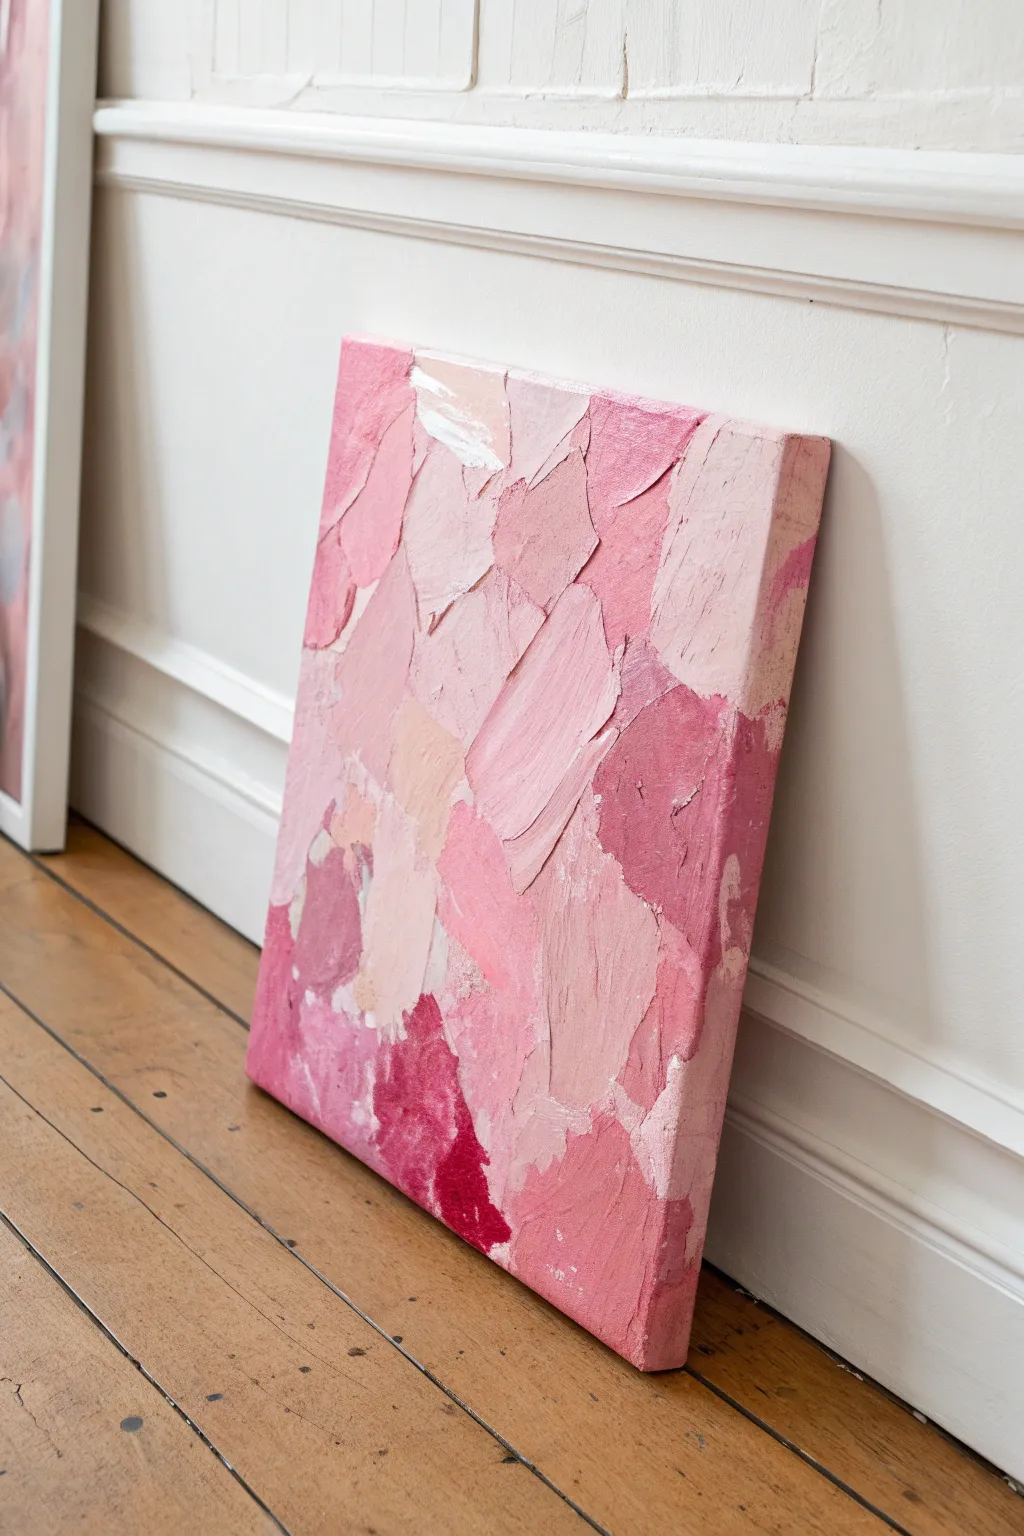
Embrace the warmth of pink with this richly textured, abstract canvas art that mimics the look of layered stone or torn paper. By combining modeling paste, collage elements, and a limited soft palette, you’ll create a tactile piece that adds dimension to any minimalist wall.
Step-by-Step Tutorial
Materials
- Stretched canvas (12×14 or similar)
- Heavy body acrylic paints (Titanium White, Portrait Pink, Magenta, Quinacridone Red)
- Modeling paste (heavy or flexible)
- Palette knives (assorted sizes, trowel shape is best)
- Tissue paper or thin cardstock scraps
- Matte gel medium
- Wide flat synthetic brush
- Mixing palette or paper plate
- Sandpaper (fine grit)
Step 1: Base Preparation
-
Prime the surface:
Begin by applying a thin, even coat of Titanium White acrylic mixed with a tiny drop of Portrait Pink to the entire canvas. -
Paint the edges:
Don’t forget to wrap this base color around the sides of the canvas, ensuring a polished look even if you decide not to frame it later. -
Create collage material:
Paint a separate sheet of paper or cardstock with random swatches of your pinks and whites, letting the colors smudge together. -
Tear shapes:
Once dry, rip this painted paper into jagged, irregular shapes roughly 2-3 inches in size, mimicking the shards of stone seen in the reference.
Keep it Clean
Wipe your palette knife clean between every single application of color. Muddy mixing on the knife will destroy the crisp, distinct look of the jagged ‘stone’ facets.
Step 2: Building Texture
-
Apply the first paper layer:
Use matte gel medium to adhere your torn paper shapes onto the canvas, scattering them randomly but leaving gaps between them. -
Seal the paper:
Brush a layer of gel medium over the top of the adhered paper scraps to seal them down completely and prevent lifting during the next steps. -
Mix the paste:
Scoop a generous amount of modeling paste onto your palette and mix it with Titanium White until you have a thick, frosting-like consistency. -
Rough application:
Using a palette knife, apply thick swipes of the white paste mixture over the empty spaces of the canvas, slightly overlapping the paper edges. -
Dry time:
Let this initial heavy texture layer dry completely, which may take up to 2-3 hours depending on the thickness.
Add Sparkle
Mix a small amount of iridescent medium or pearl white acrylic into your lightest pink shade. It adds a subtle shimmer that mimics quartz veins in rock.
Step 3: Color Blocking
-
Mix a pale blush:
Prepare a very pale pink by mixing a large amount of white with a speck of Portrait Pink. -
Mix a dusty rose:
Create a mid-tone dusty rose color using Portrait Pink and a tiny touch of Magenta to deepen it. -
Mix a deep berry:
Prepare your darkest value using Magenta mixed with Quinacridone Red for a rich, berry hue. -
Apply the pale tones:
With a clean palette knife, spread the pale blush mixture over the upper left quadrant and random sections of the center, creating flat, blocky shapes. -
Add mid-tones:
Apply the dusty rose mixture adjacent to the pale areas, allowing the knife marks to create distinct ridges and boundaries between colors.
Step 4: Refining Details
-
Layer the darks:
Use the deep berry mix sparingly near the bottom edge and occasionally in small gaps to anchor the composition. -
Create distinct planes:
When applying paint, press the flat side of the knife down and lift sharply to create the smooth, slate-like ‘facets’ that give the piece its geometric feel. -
Blend edges gently:
Where two wet colors meet, lightly drag the knife across the seam to blur them slightly, but keep most edges hard and defined. -
Add pure white highlights:
Dab a small amount of unmixed Titanium White onto the highest ridges of the texture to catch the light. -
Dry brushing:
Once the heavy paint is semi-dry, use a dry brush with a tiny bit of pale pink to lightly skim over the roughest textures, highlighting the grit. -
Side clean-up:
Check the sides of your canvas again; carry the adjacent colors over the edge or repaint them a solid pale pink for a finished gallery wrap style.
Hang your textured masterpiece in a spot with good natural light to let the shadows play across the surface
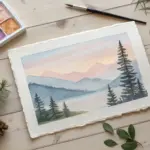
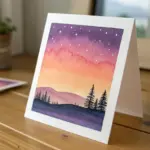


Have a question or want to share your own experience? I'd love to hear from you in the comments below!