Whenever I need a design that’s instantly recognizable and endlessly customizable, I reach for a sugar skull. Below are my favorite sugar skull design ideas—from classic Día de los Muertos details to playful twists you can make totally your own.
Classic Symmetrical Calavera Face
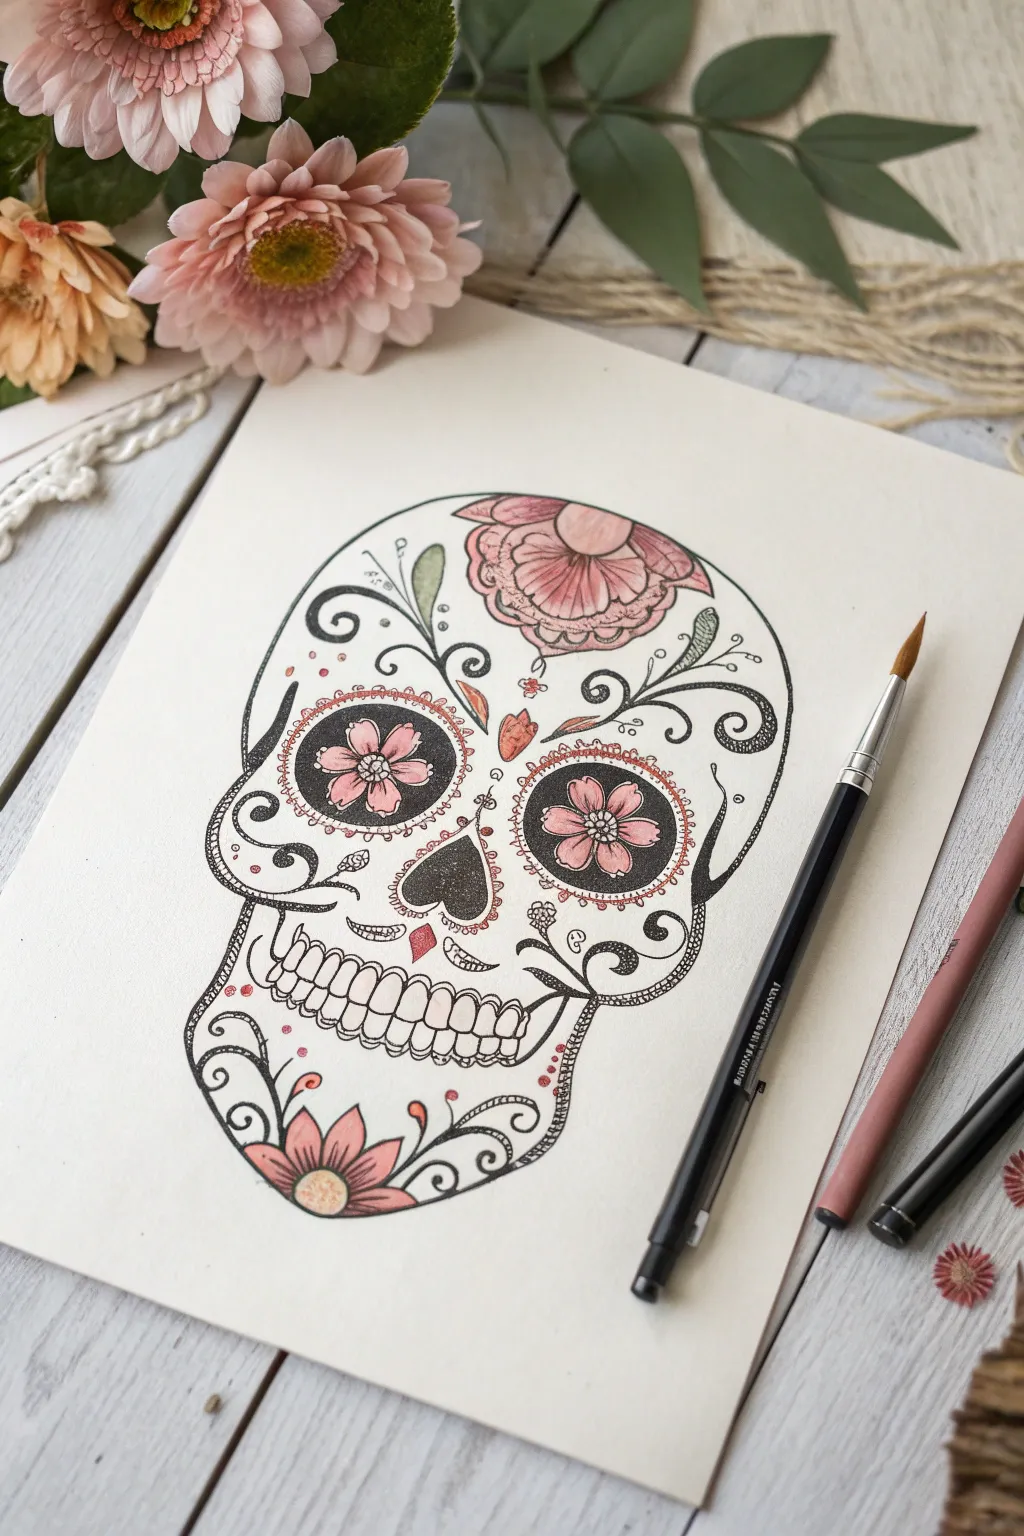
This elegant sugar skull design blends the stark beauty of traditional pen-and-ink linework with soft, romantic washes of pink watercolor. The symmetrical layout features classic floral eyes and trailing vines, creating a piece that feels both festive and delicately artistic.
Step-by-Step Guide
Materials
- Hot press watercolor paper (smooth texture)
- Pencil (HB or 2H)
- Soft eraser
- Waterproof fine liner pens (0.1mm, 0.3mm, 0.5mm)
- Watercolor paints (Pink/Rose, Oxide Red, Sap Green)
- Round watercolor brush (size 4 or 6)
- Small detail brush (size 0 or 1)
- Clean water jar and paper towels
Step 1: Sketching the Skeleton
-
Establish the symmetry:
Begin by lightly drawing a vertical centerline down the middle of your paper. This axis is crucial for keeping the skull’s features balanced. -
Outline the cranium:
Sketch the main shape of the skull. Start with a large, rounded dome for the top, tapering inwards around the temple area, and curving back out for the cheekbones. -
Shape the jaw:
Extend the lines down from the cheekbones to form the jaw. Unlike a realistic skull, give this Calavera a slightly squared-off, stylized chin to leave room for bottom floral elements. -
Place the features:
Lightly sketch two large circles for the eye sockets, an upside-down heart shape for the nose cavity, and a horizontal band with vertical dividers for the teeth.
Smudge Alert
Even waterproof pens can smudge if the watercolor is applied too vigorously. Use a dabbing motion rather than scrubbing when painting over ink lines.
Step 2: Inking the Foundation
-
Trace the main outline:
Using your 0.5mm fine liner, go over your pencil outline. Use confident, single strokes where possible to keep the line quality clean and smooth. -
Detail the eye sockets:
Switch to a 0.3mm pen. Inside the large eye circles, draw smaller flower petals radiating from the center. Add a scalloped lace edge around the outside perimeter of the eye sockets. -
Define the nose and teeth:
Ink the nose cavity, filling it in with stippling or solid black if you prefer a higher contrast look. For the teeth, ink the individual shapes carefully, rounding the tops and bottoms slightly to make them look organic. -
Add floral embellishments:
Sketch a large, half-open rose on the forehead, slightly off-center or perfectly centered depending on your preference. Draw swirling vines and leaves that extend from the flower down the sides of the temples. -
Chin details:
At the chin, draw a smaller floral motif with leaves curving upwards along the jawline. I find that mirroring these curves perfectly helps anchor the design. -
Erase pencil marks:
Wait until the ink is completely dry—give it a few extra minutes just to be safe—then gently erase all underlying pencil guidelines.
Step 3: Adding Color & Texture
-
Prepare the watercolor:
Mix a watery, pale wash of your rose or pink paint. We want the color to be translucent and delicate, not opaque. -
Paint the eye petals:
Using your small detail brush, carefully fill in the flower petals inside the eye sockets. Leave tiny slivers of white paper between petals to keep them distinct. -
Color the main florals:
Apply the same pink wash to the large forehead rose and the flower on the chin. While the paint is wet, you can drop in a tiny bit of concentrated color at the base of the petals for a soft gradient. -
Green accents:
Mix a very desaturated, pale sap green. Paint select leaves on the forehead vines and chin vines. Keep the color application loose; it doesn’t need to fill the lines perfectly. -
Decorative dots:
Dip your smallest brush into a slightly darker red or oxide mixture. Add tiny colored dots around the eye sockets and near the nose for extra texture.
Gold Leaf Glamour
For a stunning mixed-media effect, apply tiny dots of gold leaf adhesive to the center of the flowers and add gold foil accents.
Step 4: Final Inking Touches
-
Stippling shadows:
Once the paint is bone dry, use your 0.1mm pen to add stippling (tiny dots) inside the petals and leaves to create depth and shading. -
Enhance the perimeter:
Thicken the outer skull outline in key areas, particularly under the cheekbones and at the bottom of the jaw, to give the illustration visual weight. -
Final decorative swirls:
Look for empty spaces on the cheeks or forehead. Add small, delicate flourishes, spirals, or tiny circles with the 0.1mm pen to balance the composition without overcrowding it.
Step back and admire the delicate balance between the stark black ink and the soft, inviting watercolors you’ve created


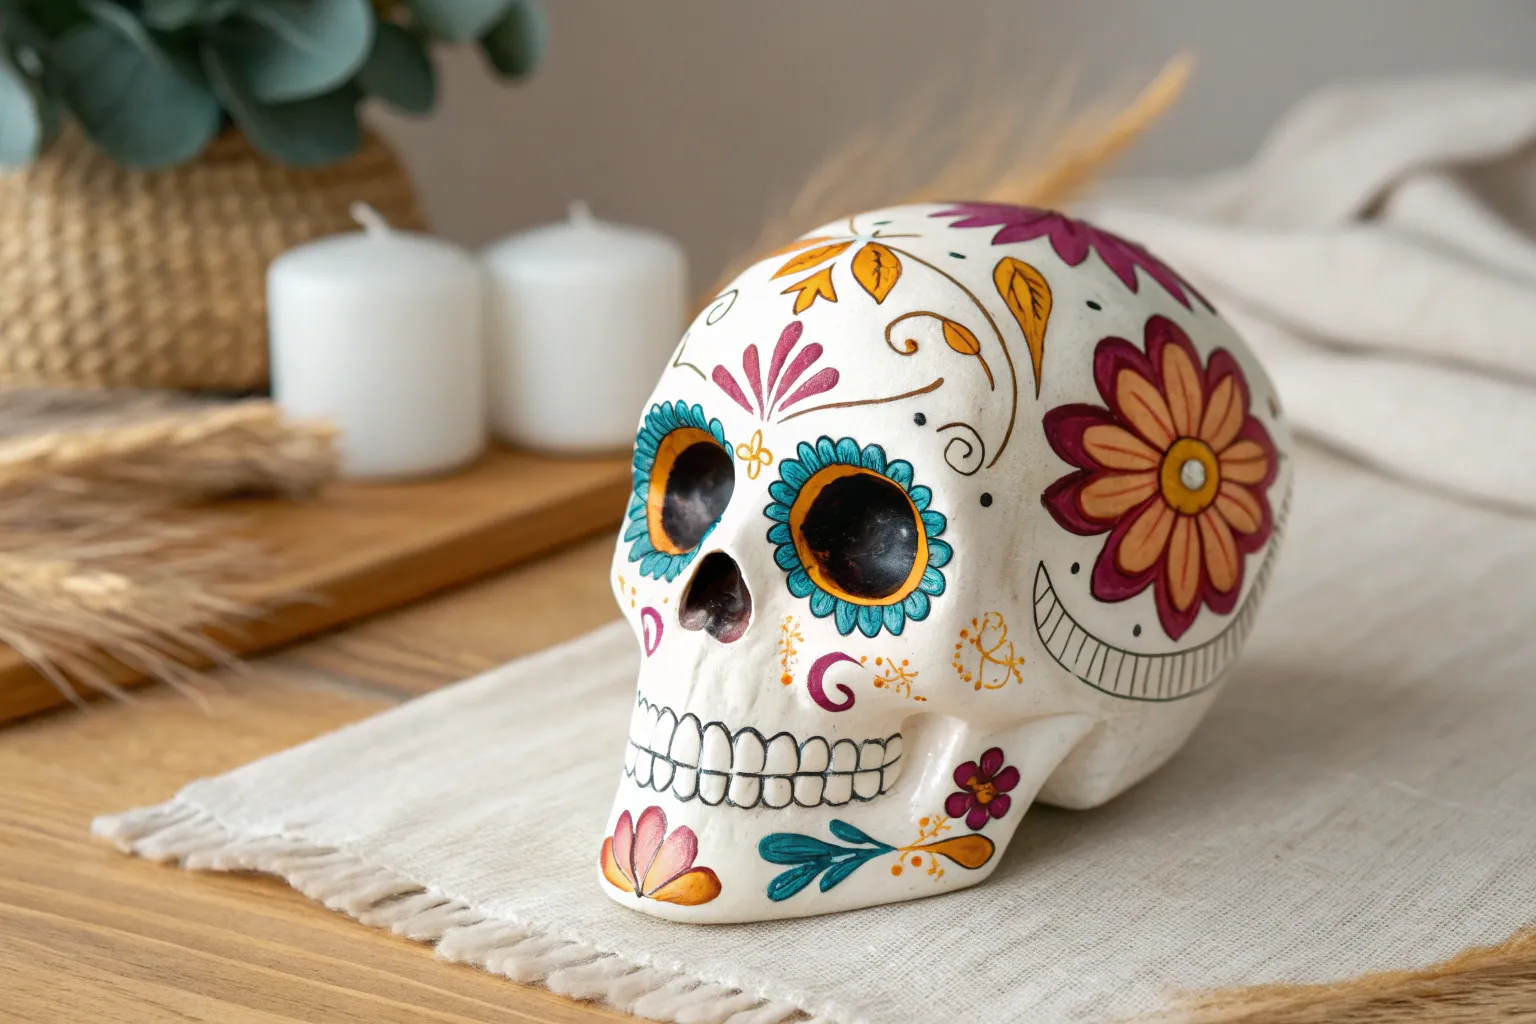
Marigold Flower Eye Sockets

This delicate illustration blends the traditional Dia de los Muertos iconography with soft, botanical realism. Featuring large marigold blooms as eye sockets and surrounding floral accents, the design feels organic and grounded rather than strictly geometric.
Step-by-Step
Materials
- Heavyweight drawing paper (Bristol or mixed media paper)
- Fine liner pens (sizes 0.1, 0.3, and 0.5)
- Graphite pencil (HB or 2B) and eraser
- Colored pencils (shades of orange, yellow, peach, and muted green)
- Blending stump or cotton swab (optional)
Step 1: The Foundation Sketch
-
Outline the Skull Shape:
Start with your graphite pencil. Draw a large, rounded cranial shape that tapers down into the cheekbones and jaw. Keep your lines very light so they can be erased later. -
Place Facial Features:
Draw an upside-down heart shape for the nose cavity in the center. Below that, sketch a wide, U-shaped jawline. Add two large circles where the eyes will go—make these larger than normal eye sockets to accommodate the marigold design. -
Sketch the Eye Marigolds:
Inside each large eye circle, draw a smaller oval for the pupil area. Then, sketch petal shapes radiating outward from that center pupil to the edge of the socket, creating a full flower effect within the skull. -
Map Out Surrounding Flora:
Lightly sketch the stems and flowers that surround the skull. Place a large bloom at the bottom center and a medium one on the right. Add sweeping, curved stems on the left that reach up toward the temple.
Natural Petal Tip
Marigolds have ruffled edges, not smooth curves. When inking petals, wiggle your pen slightly to create organic, uneven edges for realism.
Step 2: Inking the Details
-
Ink the Eyes:
Using a 0.5 fine liner, trace the flower petals inside the eye sockets. For the center pupil area, stipple (dot) the inside to create a dark, textured depth rather than coloring it solid black. -
Define the Nose and Teeth:
Outline the nose cavity. Instead of filling it in completely, use cross-hatching or stippling to darken it, leaving small white gaps for texture. Draw the teeth as individual, somewhat rectangular shapes, adding small root lines above them. -
Detail the Forehead:
Switch to a thinner 0.1 pen. Draw the central flower on the forehead and the small decorative dots and swirls around the temples. Keep these lines delicate. -
Ink the Outer Flowers:
Outline the surrounding botanical elements. For the leaves, add central veins. For the large marigolds, use jagged, natural lines for the petal tips to mimic their ruffles. -
Add Stippling Shading:
I find that adding tiny dots around the cheekbones and jawline really helps define the 3D shape of the skull without harsh lines. Focus the dots where shadows would naturally fall. -
Erase Basics:
Wait at least 15 minutes for the ink to fully cure, then gently erase all your underlying graphite pencil lines.
Step 3: Adding Color
-
Base Layers for Marigolds:
Take a light yellow colored pencil and fill in all the flower petals—both the eye sockets and the surrounding blooms. Apply significantly less pressure near the tips of the petals. -
Deepen the Oranges:
Layer a vibrant orange pencil over the yellow, focusing on the centers of the flowers and the base of the petals. Leave the tips yellow for a glowing gradient effect. -
Tint the Skull Details:
Use a peach or soft terracotta pencil to gently color the flower on the forehead and the decorative elements on the chin. Keep the bone of the skull pure white. -
Color the Greenery:
Use a muted, grey-green pencil for the leaves and stems. Press harder on the lower side of the leaves to create a shadow, and fade out toward the top edge. -
Darken the Eye Centers:
Use a dark grey or black pencil to lightly shade over your stippled ink in the eye centers and nose. This pushes those areas further back in space. -
Final Polish:
Review your drawing. If you want smoother gradients in the petals, use a blending stump or a white colored pencil to burnish the orange and yellow layers together.
Ink Smearing?
If your fine liner smears when you color over it, it isn’t waterproof. Let it dry overnight, or switch to alcohol markers for the black lines.
Now you have a vibrant, nature-inspired piece that honors the tradition with a soft artistic touch


Rose Crown and Forehead Bouquet
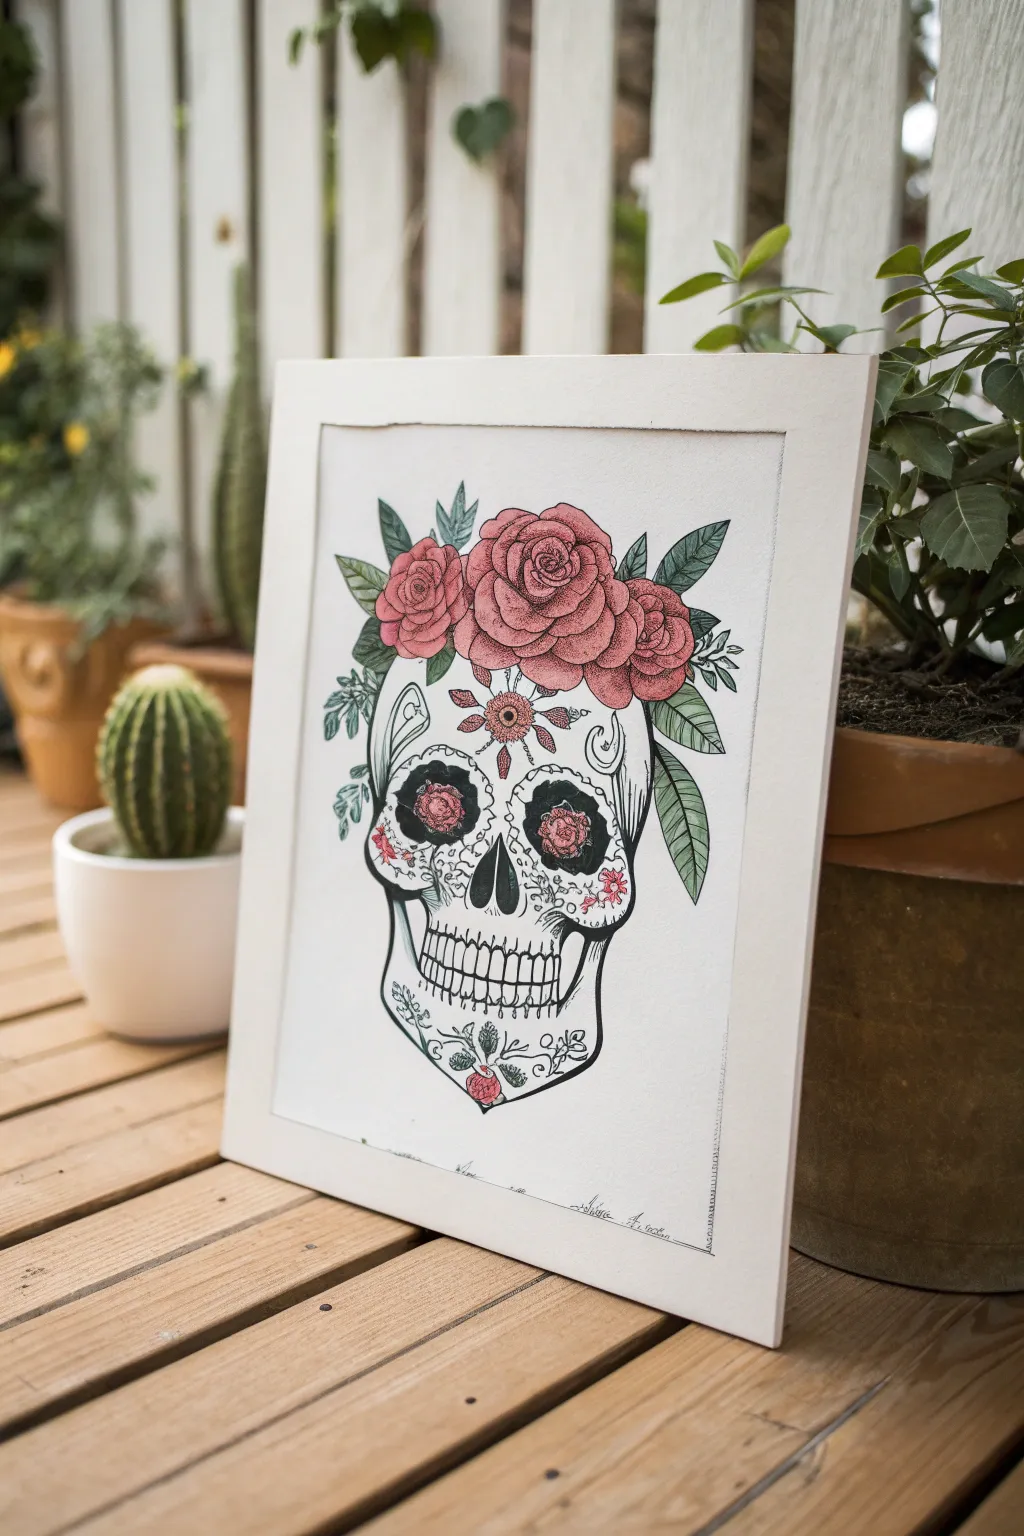
This elegant ink and watercolor illustration balances bold linework with delicate stippling to create a sophisticated sugar skull design. The vibrant rose crown adds a splash of classic color to the monochrome skull, making it a perfect piece of framed decor for your home.
Detailed Instructions
Materials
- Heavyweight watercolor paper or mixed media paper (smooth texture preferred)
- Pencil (HB or 2H)
- Eraser
- Fine liner pens (sizes 0.1, 0.3, and 0.5, waterproof)
- Black brush pen or thick marker
- Red and green watercolor paints or alcohol markers
- Small round paintbrush (if using watercolors)
- Ruler
Step 1: Sketching the Foundation
-
Outline the skull shape:
Begin by lightly sketching the general outline of the skull in the center of your paper. Focus on the cranium’s roundness and the narrower jawline, leaving ample space at the top for the floral crown. -
Map distinct facial features:
Draw large, slightly irregular circles for the eye sockets. Add an inverted heart shape for the nose cavity and sketch the horizontal line where the teeth will eventually go. -
Draft the floral crown:
Sketch three large circles across the forehead to represent the main roses. Add smaller leaf shapes radiating outward from these blooms to frame the top of the skull. -
Detail the roses:
Refine the circles into rose shapes by drawing a tight spiral in the center and adding overlapping petal layers working outward. Keep the lines organic and slightly wavy. -
Add decorative elements:
Lightly pencil in the internal designs: a flower or sunburst on the forehead, small floral motifs inside the eye sockets, and vine-like scrolls on the chin and jaw.
Stippling Patience
Keep your hand relaxed when stippling. If you dot too forcefully or quickly, you’ll create ‘tails’ or dashes instead of clean round dots. Take breaks to accurate density.
Step 2: Inking and Linework
-
Trace the main outlines:
Using a 0.3 or 0.5 fineliner, carefully trace over your pencil lines. Start with the roses and leaves, as they overlap the skull’s forehead, then move to the skull’s outer boundary. -
Define the teeth:
Draw the individual teeth along the jawline. Instead of perfect rectangles, give them slightly rounded roots and edges for a more natural, skeletal look. -
Fill the dark voids:
Switch to a thicker marker or brush pen to fill in the nose cavity and the dark centers of the eye sockets. Leave negative space for the floral designs inside the eyes if you planned them. -
Erase pencil guides:
Once the ink is completely dry—I usually wait at least 15 minutes to be safe—gently erase all underlying pencil marks to reveal a clean line drawing.
Vintage Vibe
For an aged, antique look, wash the background with weak tea or diluted coffee before you start drawing, or use cream-colored paper instead of stark white.
Step 3: Shading and Color
-
Start stippling the flowers:
Using your 0.1 fineliner, add shading to the roses using stippling (tiny dots). Concentrate the dots deeply in the center of the spirals and at the base of petals where shadows would naturally fall. -
Shade the skull contours:
Apply stippling to the skull itself to give it dimension. Focus the dots around the temples, under the cheekbones, and around the eye sockets to create a rounded, 3D effect. -
Color the roses:
Paint the roses with a soft red watercolor wash or marker. If using watercolor, keep the paint somewhat transparent so the ink stippling shows through clearly. -
Add greenery:
Fill in the leaves with a muted sage or forest green. Once the first layer is dry, add a slightly darker green along the veins for contrast. -
Enhance eye details:
Add touches of red to the floral centers within the eye sockets and the small decorative buds on the cheeks to tie the color palette together. -
Final ink touches:
Review your drawing. If the coloring has dulled any black lines, go back over them with your 0.3 pen to make them pop again.
Frame your finished piece in a simple mount to let the intricate details shine


Ornate Filigree and Scrollwork Cheeks
Capture the delicate balance of edgy and elegant with this intricate sugar skull illustration. Using fine liners on textured paper, you’ll build up layers of scrollwork and stippling to create a piece that feels both organic and ornate.
Step-by-Step Guide
Materials
- Heavyweight textured paper (deckle-edge watercolor paper or handmade cotton rag)
- HB or H graphite pencil
- Kneaded eraser
- Fine liner pens (sizes 005, 01, 03, and 05)
- Black ink marker or brush pen (for filling larger dark areas)
- Ruler (optional, for symmetry guidelines)
Step 1: Sketching the Bones
-
Prepare your paper:
Select a piece of textured paper with a deckled edge for that rustic, vintage look. If your paper is large, tear it gently against a straight edge rather than cutting it to maintain the fibrous border. -
Map the skull shape:
Using your graphite pencil with very light pressure, draw a basic oval shape for the cranium and a squarer shape below for the jaw. Don’t press hard; we want these lines to disappear later. -
Define facial features:
Sketch two large, slightly inverted teardrop shapes for the eye sockets. Add an upside-down heart shape for the nose cavity and mark a gentle curve for the mouth line. -
Draft the main decorative elements:
Lightly pencil in the large flower on the forehead. Sketch the sweeping scrolls that start from the temples and curve around the eyes. I find it easiest to work on both sides simultaneously to keep things somewhat symmetrical. -
Outline the teeth:
Draw the teeth along the mouth curve. Keep them rounded and somewhat uniform, but allow them to get smaller as they recede toward the jawline.
Ink Bleeding Issues?
Textured rag paper is thirsty! If your ink feathers (spreads), switch to pigment-based liners rather than dye-based ones, and use quicker strokes.
Step 2: Inking the Outlines
-
Establish the boldest lines:
Switch to your 05 fine liner. Trace the main outline of the skull, the eye sockets, and the nose cavity. Use a confident, steady hand to navigate the paper’s texture. -
Refine the scrollwork:
With an 03 pen, ink the major swirls on the cheeks, chin, and forehead. Focus on creating smooth, continuous curves that taper slightly at the ends. -
Detail the forehead flower:
Ink the petals of the central flower using the 01 pen. Add secondary lines inside the petals to suggest texture and depth. -
Ink the teeth:
Carefully outline each tooth with the 01 pen. Add small ‘gum’ arches above the top row and below the bottom row to anchor them into the skull.
Add Metallic Flair
Once the black ink is dry, use a gold or silver gel pen to trace inside the scrollwork or add tiny metallic dots to the flower center for subtle shine.
Step 3: Filling and Shading
-
Fill the dark cavities:
Use a brush pen or thicker marker to fill the nose cavity completely black. For the eyes, leave a small rim of white or decorative patterns around the very edge, but fill the center deeply black. -
Add orbital patterns:
Inside the eye sockets (before the solid black center), draw a ring of small circles or U-shapes with the 005 pen to mimic traditional sugar skull icing details. -
Stipple the shading:
Using the 005 pen, start stippling (drawing tiny dots) in areas where shadows would naturally fall—under the cheekbones, at the bottom of the skull, and near the temples. -
Texturize the dark areas:
If you look closely at the eye sockets, the black isn’t flat. Add white gel pen dots or simply stipple densely with black ink fading into the white rim to create a gradient effect. -
Thicken decorative lines:
Go back over the main scrolls. Add thickness to the outer curves of the swirls to give them a calligraphy-like weight variation.
Step 4: Final Touches
-
Erase pencil marks:
Wait until the ink is completely dry—textured paper can hold wet ink longer than smooth paper. Gently roll the kneaded eraser over the drawing to lift the graphite. -
Assess contrast:
Step back and look at your drawing. If the skull looks too flat, add more stippling density to the lower jaw and around the flower to make the features pop. -
Add subtle cracks:
With your finest 005 pen, draw very faint, shaky lines near the temples or sutures of the skull to suggest age and bone texture.
This striking monochromatic piece is now ready to be framed or displayed as part of your seasonal decor
BRUSH GUIDE
The Right Brush for Every Stroke
From clean lines to bold texture — master brush choice, stroke control, and essential techniques.
Explore the Full Guide
Mandala Forehead Medallion
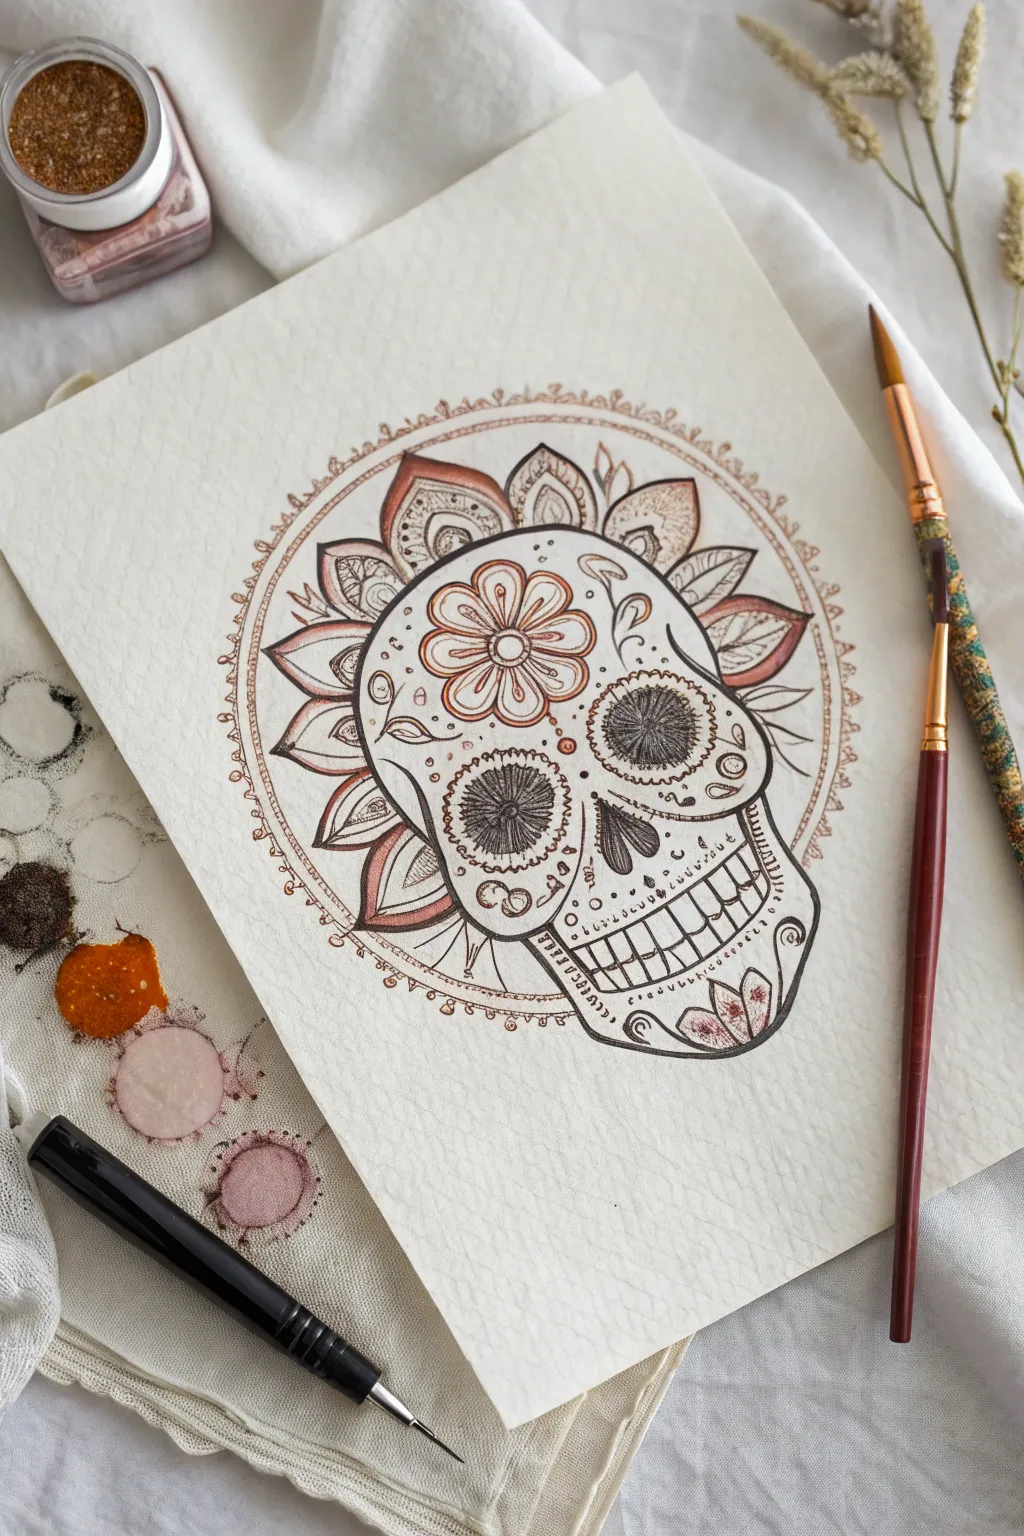
This elegant take on the sugar skull tradition merges fine liner precision with soft, earthy watercolor washes. The central focus is the intricate flower medallion on the forehead, radiating outward into a halo of delicate petals that frame the skull’s silhouette.
Detailed Instructions
Materials
- Cold press watercolor paper (300 gsm)
- Fine liner pen (0.1mm and 0.3mm, black, waterproof)
- Watercolor paints (Burnt Sienna, Sepia, Deep Red)
- Round sable brush (size 2 or 4)
- Small mixing palette or ceramic dish
- Gold or bronze metallic pigment/watercolor (optional)
- Graphite pencil (HB) and kneaded eraser
Step 1: Drafting the Structure
-
Light circle guide:
Begin by lightly sketching a large circle in the center of your page to define the outer boundary of the mandala halo. Inside this, sketch the general outline of the skull, slightly angled to the right for dynamic viewing. -
Defining the features:
Map out the large, hollow eye sockets, the inverted heart shape for the nose cavity, and the jawline. Ensure the forehead is spacious enough to accommodate the central medallion later. -
Sketching the halo:
Around the top curve of the skull, lightly draw the radiating petal shapes. These should fan out like a crown, following the curve of your initial circle guide.
Keep It Steady
Rest your wrist on a clean sheet of scrap paper while drawing the fine ink details. This prevents hand oils from smudging the paper and keeps your lines crisp.
Step 2: Inking the Outlines
-
Central flower focus:
Switch to your 0.3mm fine liner. Draw the flower on the forehead first, starting with the center circle and adding rounded petals. This anchors the ‘medallion’ concept. -
Skull contours:
Ink the main outline of the skull. Use a steady hand but don’t worry about clinical perfection; a slightly organic line adds character. -
The eyes and nose:
Outline the eye sockets and the nose cavity. Inside the eye sockets, draw the center pupils and the radiating iris lines—these should look like sunbursts. -
Detailing the halo:
Ink the floral elements surrounding the skull. Use a mix of larger, pointed petals and smaller, rounded scallop shapes tucked between them. -
Outer rim decoration:
Draw the outermost circle that frames the entire composition. Add small, decorative loops or ‘pearls’ along this line to give it a jewelry-like finish. -
Erase pencil marks:
Once the ink is completely dry—give it a few minutes—gently erase all the graphite guidelines with your kneaded eraser.
Step 3: Adding Texture & Detail
-
Stippling the eyes:
Using the 0.1mm pen, add density to the eye sockets. Draw fine lines radiating from the center pupil outward, creating a dark, textured iris effect that contrasts with the white bone. -
Decorative micro-patterns:
Fill the space around the forehead flower with small swirls, dots, and teardrop shapes. This is where I find the design really comes to life. -
Jaw and cheek accents:
Add small lines or cracks along the jawbone and cheekbone areas to suggest contour and age. Draw the teeth clearly, adding small roots above them. -
Halo intricacies:
Go back to the flower crown and add internal details—veins inside the leaves and small concentric semi-circles inside the rounded petals.
Color Bleeding?
If the watercolor bleeds into the ink, your fine liner might not be fully waterproof or dry yet. Test your pen on a scrap piece first, or let the ink cure for an hour.
Step 4: Watercolor Application
-
Mixing earth tones:
Prepare a watery mix of Burnt Sienna and a touch of Sepia. We want a muted, vintage palette rather than bright primaries. -
Painting the forehead flower:
Carefully paint the petals of the central forehead medallion. Use the tip of your round brush to keep the color within the lines, leaving the center white or pale. -
Tinting the halo:
Apply the reddish-brown mix to selected petals in the outer halo. Alternating painted petals with unpainted ones creates a nice rhythm. -
Shadowing the bone:
Dilute your paint significantly with water. Wash a very faint shadow along the right side of the skull and under the cheekbones to give it dimension. -
Metallic accents:
If you have gold or bronze pigment, mix a small amount and apply it to the centers of the flowers and the small decorative dots on the chin and cheeks. -
Final outer ring:
Trace the thin outer circle with your brush using the Sepia tone. This frames the artwork and ties all the warm colors together.
Allow the piece to dry completely before framing it, enjoying the intricate interplay of line and wash you have created
Dotwork Beading and Icing-Like Texture
Capture the intricate beauty of Día de los Muertos with a striking black and white relief print. This project uses traditional linocut techniques to create a bold, graphic sugar skull design featuring delicate floral motifs and ornamental details.
Step-by-Step
Materials
- Soft-cut lino block (approx. A4 size)
- Linocut carving tools (V-gouge, U-gouge, and knife)
- Black block printing ink (water-based or oil-based)
- Rubber brayer (roller)
- Glass or acrylic sheet for rolling ink
- Pencil and tracing paper
- Heavyweight white printmaking paper or cardstock
- Wooden spoon or baren
- Light colored wooden frame (for display)
Step 1: Design and Transfer
-
Draft your skull:
Begin by sketching the skull outline on a piece of paper the same size as your lino block. Focus on the classic silhouette: a rounded cranium and a distinct jawline. -
Add floral details:
Sketch a large flower on the forehead specifically to act as a focal point. Add swirling vines and leaves radiating from it to fill the upper space. -
Draw the eyes and nose:
Create two large circular sockets for the eyes and an upside-down heart shape for the nose. Inside the eye sockets, draw smaller flower petals to mimic the look of traditional sugar icing. -
Refine the mouth:
Draw the teeth as a grid of elongated rectangles. I like to curve the line slightly upwards at the ends to give the skull a subtle, friendly grin. -
Transfer to lino:
Trace your final design onto tracing paper with a soft pencil. Flip the tracing paper over onto the lino block and rub the back firmly to transfer the graphite image. -
Reinforce the lines:
Go over the transferred faint lines on the block with a permanent marker or dark pencil so you can clearly see what needs to be carved.
Patchy Prints?
If your black areas look speckled or salty, you likely didn’t use enough ink or pressure. Apply a barely thicker layer of ink and press down much harder with your spoon.
Step 2: Carving the Block
-
Outline the main shapes:
Using a fine V-gouge tool, carve carefully along the main outlines of the skull, eyes, and nose. Always carve away from your body for safety. -
Carve the negative space:
Switch to a wider U-gouge to clear away the large background area surrounding the skull. You want the background to be white, so remove the top layer of lino completely here. -
Detail the eyes:
Carve out the petals inside the eye sockets. Leave the center of the eye and the lines between the petals raised so they will print black. -
Create the decorative dots:
Use a small U-gouge or a specialized dot tool to scoop out tiny circles around the eye sockets and on the chin. This mimics the ‘beading’ texture of sugar skulls. -
Add texture to the flower:
Carve fine lines inside the forehead flower petals to suggest veins or shading. Keep these cuts shallow and controlled. -
Clear the interior whites:
Remove the lino inside the nose cavity and the teeth, leaving the outlines raised. Be very precise around the teeth to keep them distinct. -
Clean up stray ridges:
Check the background areas for any high ridges of lino that shouldn’t be there and shave them down so they don’t catch ink.
Add a Splash of Color
Once the black ink is fully dry, use watercolor or diluted acrylics to hand-tint the flowers and eyes for a mixed-media look that really pops.
Step 3: Inking and Printing
-
Prepare the ink:
Squeeze a small line of black block printing ink onto your glass or acrylic sheet. Roll the brayer back and forth until the ink sounds like ‘velcro’—a sticky, sizzling noise. -
Ink the block:
Roll the brayer over your carved block. Apply the ink in thin, even layers, rolling in different directions to ensure full coverage on the raised surfaces. -
Position the paper:
Carefully align your printmaking paper over the inked block and lower it down gently. Once it touches the ink, do not shift it. -
Burnish the print:
Using a clean baren or the back of a wooden spoon, rub the back of the paper firmly in circular motions. Press harder over the solid black areas to ensure a deep transfer. -
Reveal the artwork:
Slowly peel back one corner of the paper to peek at the transfer. If it looks solid, peel the rest of the paper off the block to reveal your print. -
Dry and frame:
Let the ink dry completely (water-based takes an hour; oil-based may take a day or two). Once dry, mount it in a simple light wood frame to let the contrast shine.
Hang your finished print near a window or mount it as part of a seasonal gallery wall to celebrate the artistry of the tradition

PENCIL GUIDE
Understanding Pencil Grades from H to B
From first sketch to finished drawing — learn pencil grades, line control, and shading techniques.
Explore the Full Guide
Bold Teeth Patterns: Piano Keys, Zippers, Stitches
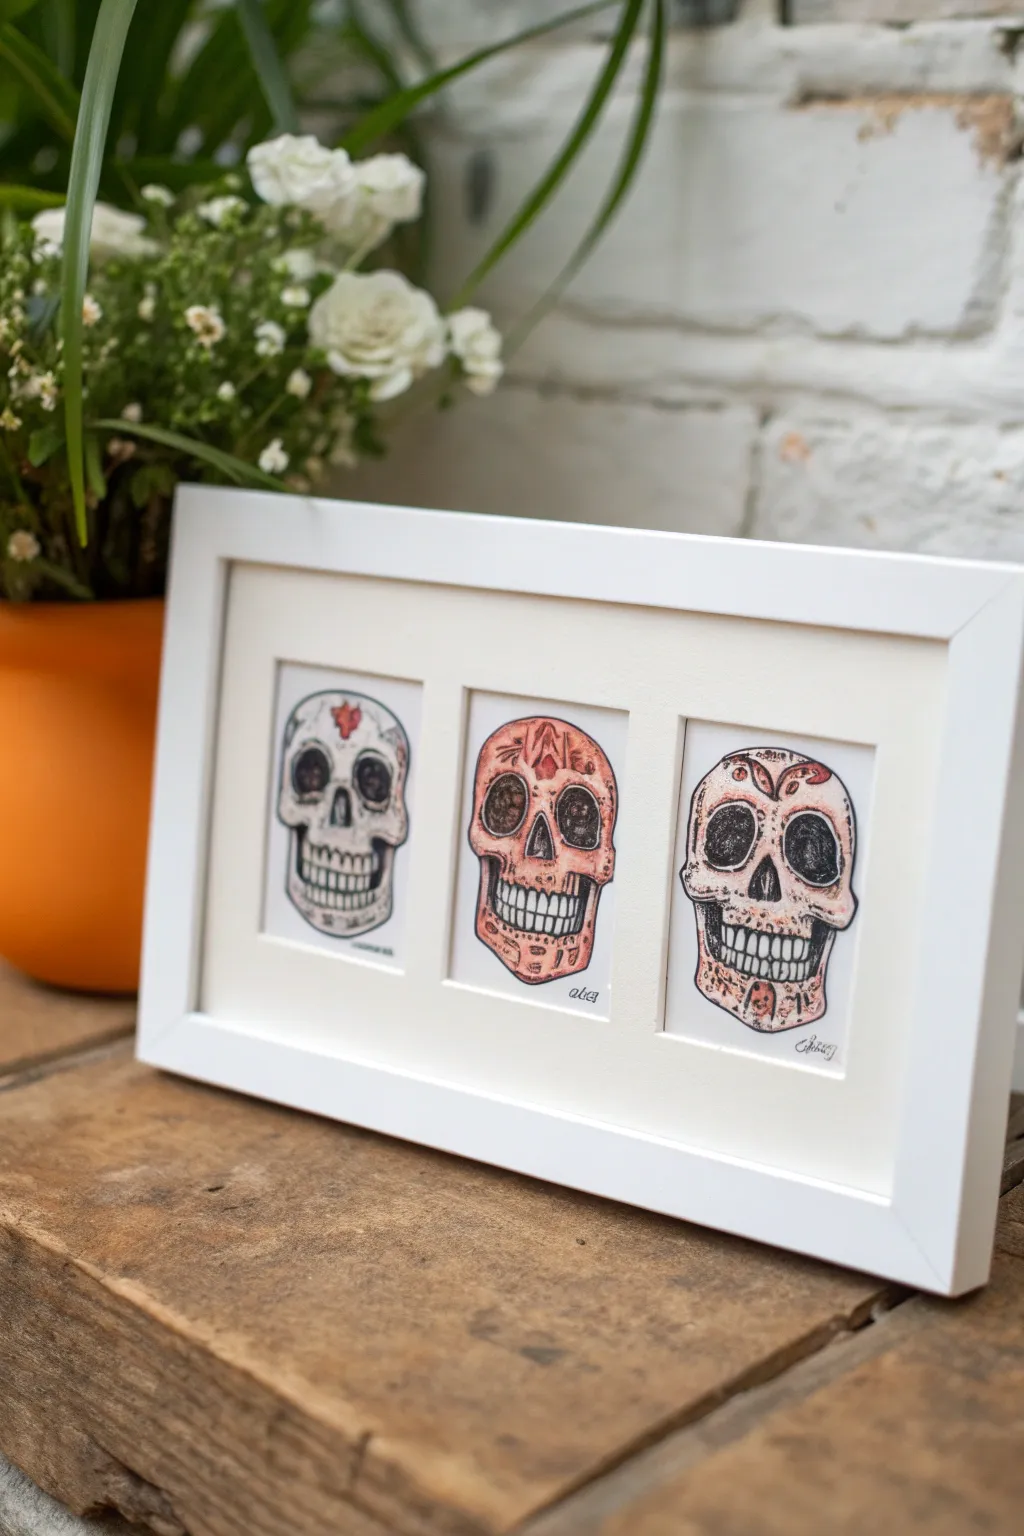
Capture the spirit of Dia de los Muertos with this striking triptych featuring three unique sugar skull designs. By combining precise ink lines with loose, rusty-orange washes, you’ll create a cohesive set of mini-artworks that balance edgy details with traditional folk art charm.
How-To Guide
Materials
- Heavyweight mixed media paper or hot press watercolor paper
- Fine liner pens (0.1mm, 0.3mm, and 0.5mm, waterproof ink)
- Watercolor paints (Burnt Sienna, Red Oxide, or diluted brown ink)
- Small round watercolor brush (size 2 or 4)
- Pencil (HB) and soft eraser
- Ruler
- Three-window mat opening frame (white)
- Craft knife or scissors
Step 1: Sketching the Foundations
-
Prepare your paper:
Measure the openings of your frame mat. Cut three pieces of mixed media paper slightly larger than these openings to ensure you have room to tape them down later. -
Outline the basic shapes:
Lightly sketch a basic skull outline on each paper piece using your HB pencil. Aim for a slightly elongated cranial shape and a distinct jawline, keeping all three roughly the same size for uniformity. -
Define the features:
Sketch large, hollow eye sockets and an inverted heart or triangular shape for the nose cavity on each skull. Place them symmetrically in the upper center of the face. -
Draft the teeth designs:
This is the focus of the piece. For the left skull, draw simple vertical rectangular teeth. For the center skull, sketch smaller, more numerous teeth. For the right skull, draw longer, slightly curved teeth to mimic a stitched or piano-key effect.
Ink Confidence
Don’t stress about perfect symmetry. Small wobbles in your ink lines actually make the skulls look more like natural bone and less like plastic.
Step 2: Inking the Details
-
Outline the contours:
Using a 0.5mm pen, trace the main outer perimeter of the skulls. Use a slightly shaky or textured line rather than a perfect curve to give it an organic, bone-like feel. -
Fill the dark voids:
Switch to a 0.3mm pen to outline the eyes and nose. Cross-hatch the interiors densely to create deep shadows, leaving small specks of white for a weathered texture. -
Detail the first skull:
On the left skull, ink the teeth clearly. Add a small cross symbol on the forehead and simple scalloped lines around the eye sockets. -
Detail the center skull:
On the center skull, allow the teeth lines to extend slightly into the jaw and upper lip, creating a ‘sewn shut’ appearance. Draw geometric shapes like diamonds or triangles on the forehead. -
Detail the right skull:
For the right skull, ink the teeth with emphasis on the gaps between them. Add floral-inspired swirls or petal shapes above the eyes. -
Add texture and shading:
Use the 0.1mm pen to add stippling (dots) and fine hatching around the temples, under the cheekbones, and around the teeth to create depth and curvature. -
Erase pencil lines:
Once the ink is completely dry, gently erase the visible pencil guidelines to clean up the artwork.
Coffee Stain Hack
No watercolors? You can achieve this exact rusty-brown antique look by painting with strong brewed coffee or tea layers instead.
Step 3: Adding Color & Wash
-
Mix a rusty wash:
Dilute Burnt Sienna or Red Oxide watercolor with plenty of water. You want a translucent, tea-stained color rather than opaque paint. -
Apply the base wash:
I prefer to loosely brush this wash over the entire skull, intentionally going slightly outside the lines in some spots for a relaxed, artistic look. -
Deepen the shadows:
While the first layer is still damp, drop slightly more concentrated pigment into the areas you stippled earlier—around the eyes, under the cheekbones, and near the jawline. -
Accentuate elements:
Use a stronger mix of red or orange paint to fill in specific symbols, like the forehead cross or the floral petals, to make them pop against the bone color. -
Splatter texture:
Load your brush with watery brown paint and tap it against your finger to flick tiny speckles across the paper. This creates an aged, gritty texture.
Step 4: Assembly
-
Dry completely:
Allow the paper to dry fully. If the paper has buckled from the water, place it under a heavy book overnight to flatten it. -
Align and mount:
Place your mat face down. Position your drawings face down over the openings, ensuring the skulls are centered. Secure them with masking tape or framing tape. -
Final framing:
Clean the glass of your frame, insert the matted artwork, and close the backing. Your triptych is ready for display.
Hang your trio of skulls in a well-lit spot to show off the delicate ink work against the warm wash
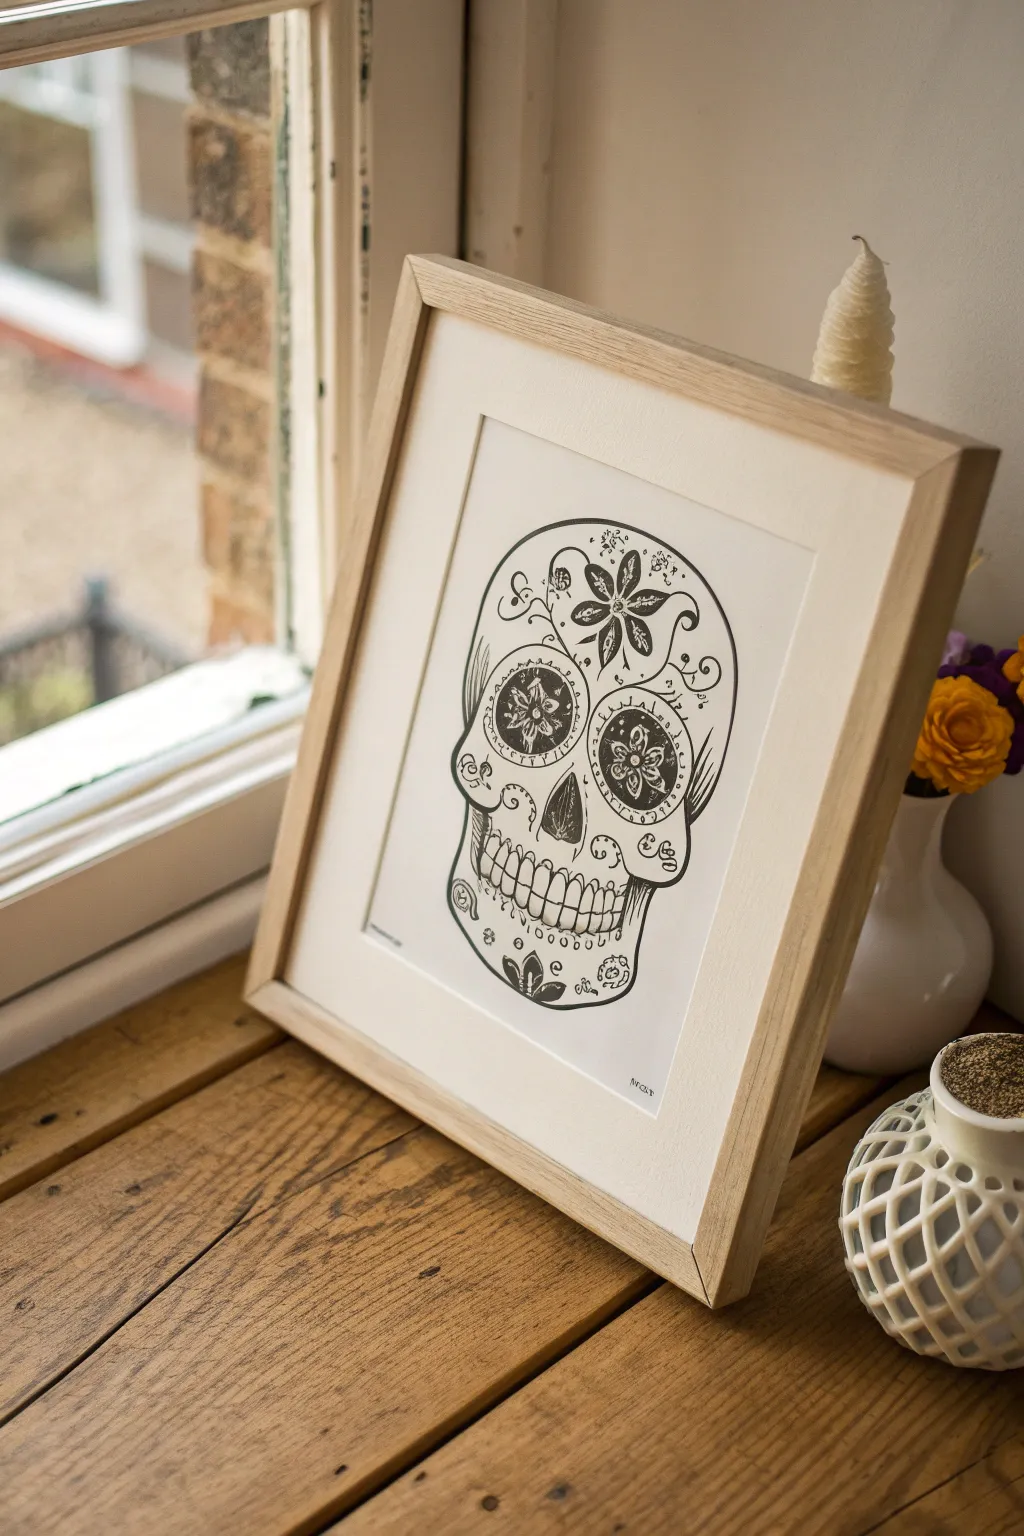
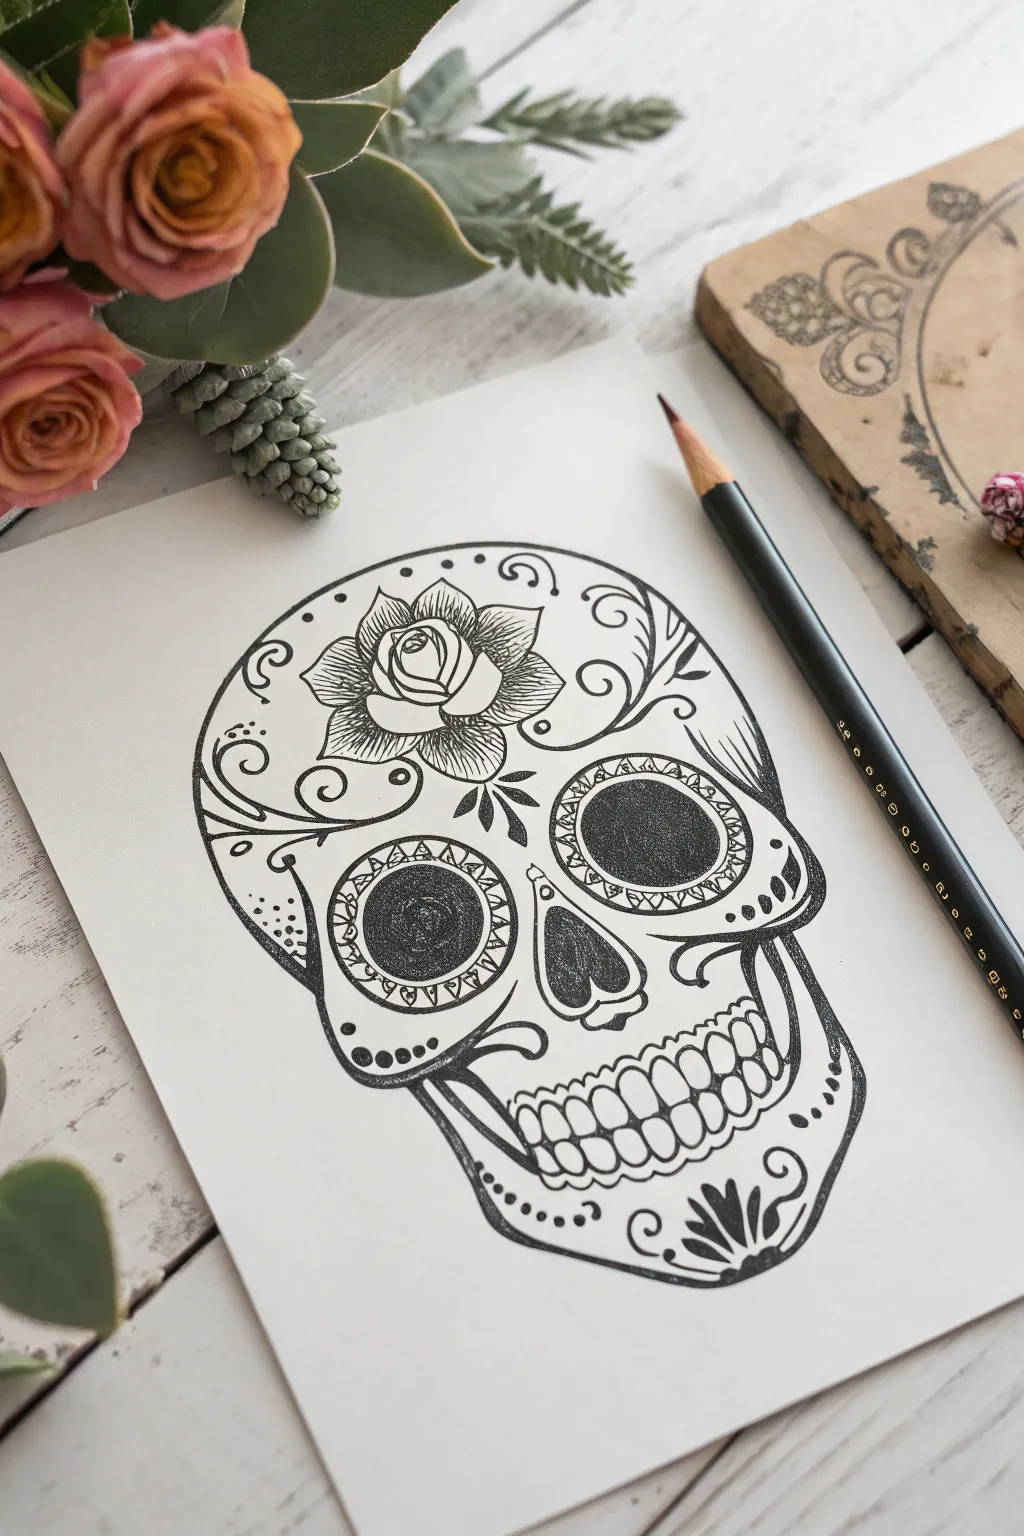
Black-and-White Line Art for Coloring
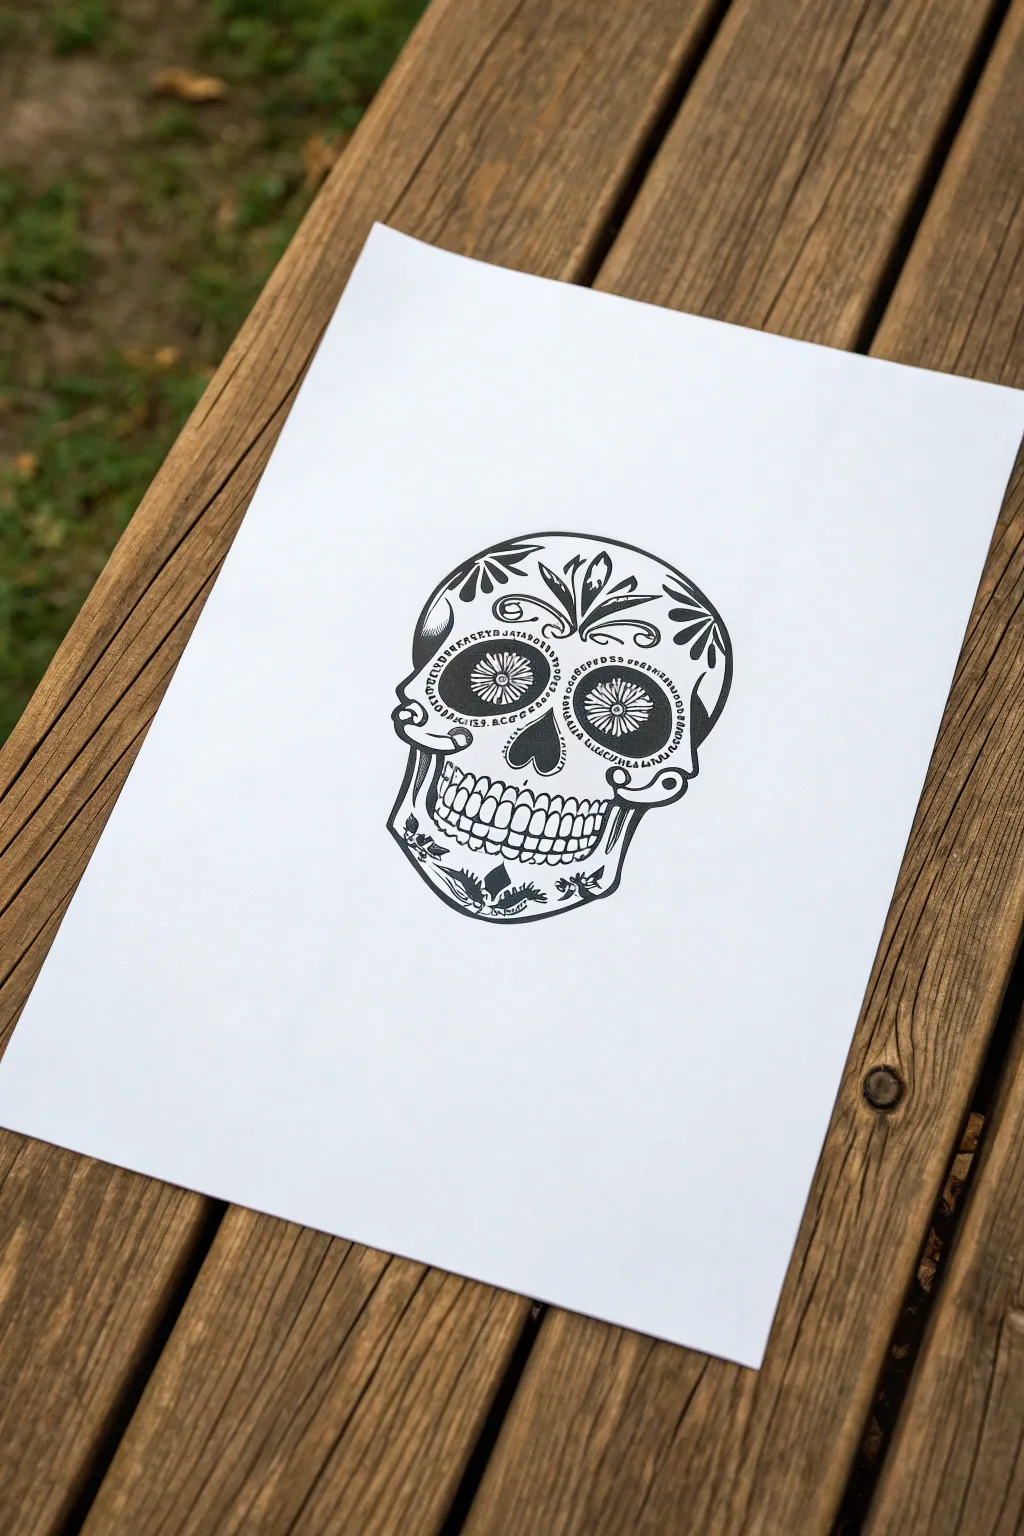
Capture the bold, graphic essence of Dia de los Muertos with this crisp black-and-white sugar skull illustration. This project focuses on clean linework and decorative symmetry, perfect for coloring or displaying as a stark piece of art.
Step-by-Step Tutorial
Materials
- High-quality white drawing paper or cardstock
- Pencil (HB or H)
- Eraser
- Fine liner pens (0.3mm, 0.5mm, and 0.8mm)
- Ruler (optional, for symmetry guidelines)
Step 1: Sketching the Framework
-
Establish the head shape:
Begin by lightly sketching the outer contour of the skull in pencil. Aim for a rounded cranium that tapers slightly inwards where the cheekbones will be, before squaring off at the jaw. -
Mark the center line:
Draw a faint vertical line down the center of the skull shape. While perfect symmetry isn’t required, this guide helps ensure the eyes and nose are evenly placed. -
Place the features:
Sketch two large, circular sockets for the eyes about halfway down the cranium. Below that, draw an inverted heart shape for the nose cavity. -
Draft the jaw:
Define the upper and lower teeth area. Sketch a curved horizontal band for the teeth, ensuring the jawline curves upwards towards the cheekbones.
Smudged Lines?
If you accidentally smudge wet ink, don’t panic. Turn the smudge into a deliberate shadow or extend a decorative swirl to cover it.
Step 2: Detailing the Features
-
Create the floral eyes:
Inside each eye socket, draw a smaller circle in the center. Surround this center circle with petal shapes radiating outward to fill the socket, resembling a marigold or daisy. -
Add eye details:
Draw a ring of small dots or dashes around the outer edge of the eye sockets to create a decorative border. -
Draw the teeth:
Sketch the individual teeth within the mouth band. Keep them somewhat uniform but slightly organic. I find it helpful to start with the two center teeth and work outwards to maintain symmetry. -
Embellish the forehead:
Above the eyes, sketch a central floral motif—perhaps a sprout or leaf shape. Add sweeping curves moving from the center towards the temples.
Step 3: Inking the Outlines
-
Trace the main shape:
Using a 0.5mm specific fine liner, carefully trace the outer boundary of the skull. Use confident strokes to keep the line smooth. -
Outline interior features:
Ink the outlines of the eye sockets, nose cavity, and the band of teeth with the same pen. Don’t fill anything in yet; just establish the boundaries. -
Ink the chin designs:
Trace the floral or leafy patterns you sketched on the chin area. These curves soften the stark jawline.
Color Pop
Make copies of your line art on heavy paper and use watercolors to tint just the flower petals, leaving the skull bone white.
Step 4: Filling and Refining
-
Fill the dark voids:
Switch to a thicker 0.8mm pen to fill in the nose cavity completely black. For the eyes, fill the background of the socket black, leaving the petals and center circle white for contrast. -
Add cheek scrollwork:
With the 0.3mm pen, draw the decorative swirls on the cheekbones. These spiral shapes act like the hinges of the jaw and add elegance. -
Refine the teeth:
Go back over the teeth lines with the 0.3mm pen. Add tiny vertical lines at the gum line to suggest root depth without over-shading. -
Thicken key lines:
Review your outer contour. Adding a slightly thicker line weight to the very bottom curve of the jaw or the underside of cheekbones can suggest weight and shadow. -
Add forehead florals:
Ink the floral designs on the forehead. You can fill parts of the leaves black or use hatching lines to create texture inside them. -
Final clean up:
Wait at least 15 minutes to ensure the ink is totally dry, then gently erase all remaining pencil guidelines to reveal the stark black-and-white graphic.
Your finished sugar skull is now ready to be framed or used as a striking coloring page


Pastel Sugar Skull With Soft Gradients
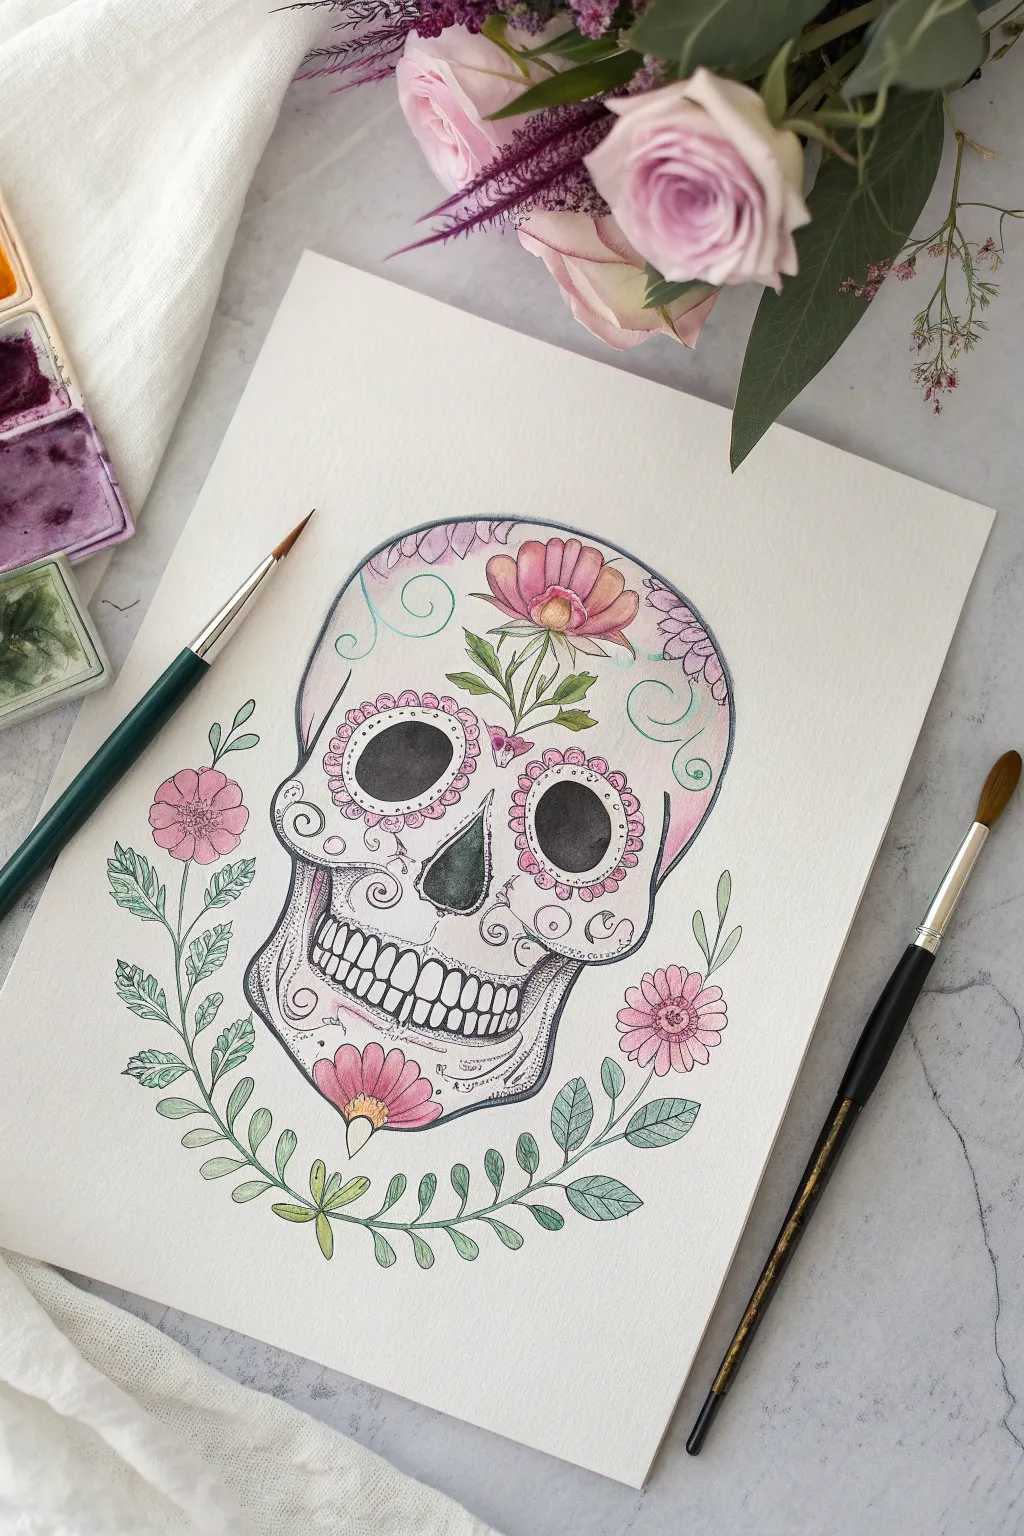
Capture the delicate beauty of Dias de los Muertos with this soft, pastel-hued sugar skull illustration. This project combines gentle watercolor gradients with fine ink details to create an artwork that feels both festive and elegantly floral.
How-To Guide
Materials
- Cold press watercolor paper (300 gsm)
- Pencil (HB) and kneaded eraser
- Waterproof fine liner pens (black, 0.1mm and 0.3mm)
- Watercolor paint set (focus on rose madder, sap green, cobalt teal, and violet)
- Synthetic watercolor brushes (Size 4 round and Size 0 or 00 detailer)
- Jar of clean water
- Paper towels
- White gel pen (optional for highlights)
Step 1: Sketching the Foundation
-
Draft the skull outline:
Begin by lightly sketching the general shape of the skull in the center of your paper. Aim for a slightly elongated cranium and a narrower jawline, keeping your pencil strokes very faint so they don’t show through the transparent paint later. -
Map out facial features:
Sketch two large, slightly slanted ovals for the eye sockets, an upside-down heart shape for the nose cavity, and a wide, grinning mouth area with teeth marked out individually. -
Add floral embellishments:
Draw the main flower on the forehead, centering it like a crown. Add smaller floral motifs around the cheeks and chin, and sketch the winding leafy vines that will frame the bottom of the skull. -
Refine the sketch:
Go over your lines to firm up the design, adding the scalloped edges around the eye sockets and small decorative swirls on the temples. Use your kneaded eraser to lift up any heavy graphite, leaving only a ghost image to guide your painting.
Clean Edges Pro Tip
For the crispest eye sockets, paint the black areas first and let them dry fully before painting the surrounding pink scallops. This prevents dark pigment from bleeding into pastel zones.
Step 2: Applying Soft Washes
-
Base wash for the skull:
Mix a very dilute wash of watered-down violet or cool grey. With your larger round brush, lay down a pale shadow on the sides of the skull and under the cheekbones to give it volume, leaving the center of the face bright white. -
First floral layers:
Dilute a rose madder or soft pink pigment. Paint the petals of the forehead flower and the cheek elements. I like to drop in a tiny bit of concentrated color at the base of the petals while they are still wet to create a soft gradient. -
Painting the greenery:
Using a light sap green, carefully fill in the leaves on the forehead stem and the laurel-like branches beneath the skull. Keep the paint watery to maintain that translucent, pastel look. -
Filling the eye sockets:
While the flowers dry, mix a dark grey or soft black watercolor. Carefully fill in the eye sockets and the nose cavity, ensuring the edges are crisp against the scalloped borders. -
Layering color:
Once the first pink layer is dry, come back with a slightly stronger pink mix to add depth to the bottom of the flower on the chin and the scallops around the eyes.
Warped Paper?
If your paper starts buckling from the water, let the painting dry completely, then place it under a heavy book overnight. This will flatten the fibers back out without damaging your art.
Step 3: Inking and Detailing
-
Outline the main shapes:
Ensure the paper is completely bone-dry. Using your 0.3mm waterproof pen, carefully trace the outline of the skull, the teeth, and the main leaves. Use a steady hand and break the line occasionally for a more organic feel. -
Detailing the eyes:
Switch to your finer 0.1mm pen to draw the intricate scalloped lace pattern around the eye sockets. Add small dots or circles inside the scallops for extra texture. -
Stippling shadow:
Use stippling (tiny ink dots) to add shading to the skull. Concentrate the dots under the cheekbones, around the teeth roots, and at the temples to deepen the shadows without using more paint. -
Defining the flowers:
Ink the floral outlines. Add fine lines radiating from the center of the flower petals outward to suggest texture and form. -
Vine details:
Draw the central veins in the green leaves. Keep these lines very thin and light to prevent the delicate greenery from looking too heavy. -
Final decorative touches:
Add the final whimsical swirls on the forehead and cheeks with your fine pen. If you want extra sparkle, use a white gel pen to add tiny highlights on the black eye sockets or the tips of the pink petals.
Allow the ink to set for at least an hour before framing this beautiful piece of folk art
Papel Picado-Inspired Cutout Patterns
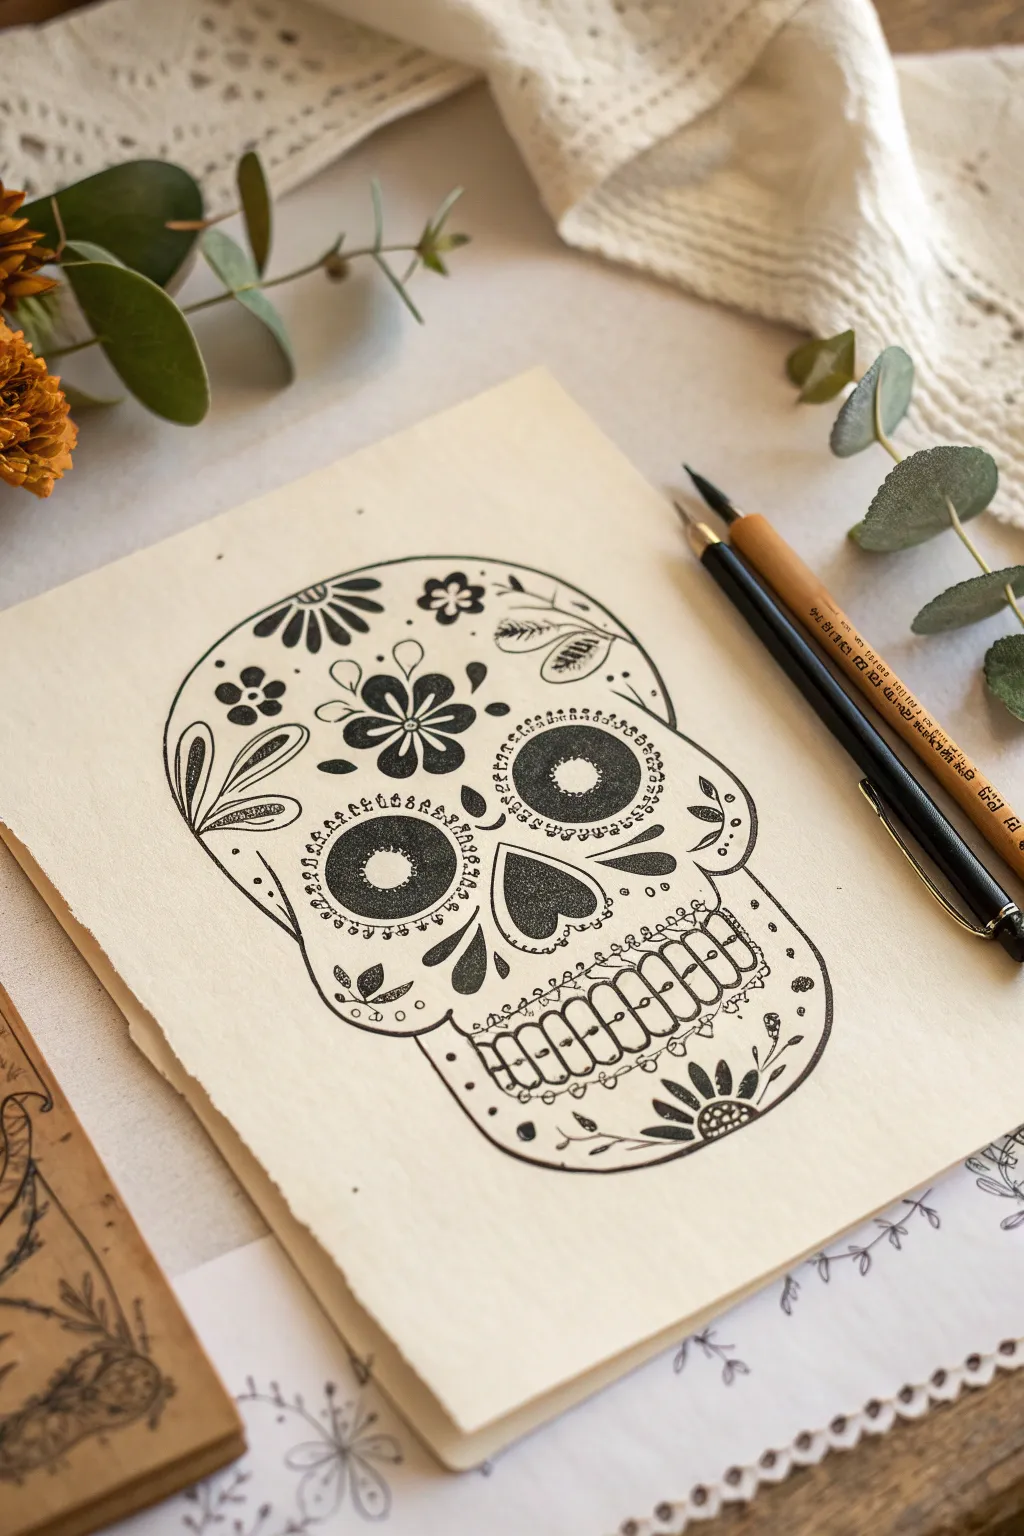
This project features a beautifully detailed, monochromatic sugar skull illustration that balances bold shapes with delicate, folksy patterns. Using fine liners on textured paper, you’ll create striking contrast and organic floral motifs inspired by traditional calavera designs.
Step-by-Step Tutorial
Materials
- High-quality textured paper (e.g., cold press watercolor paper or handmade cotton paper)
- HB pencil for sketching
- Kneaded eraser
- Black drawing ink or high-quality fineliner pens (sizes 0.1, 0.3, 0.5, and a brush pen)
- Dip pen with a flexible nib (optional, for authentic ink variation)
- Ruler (optional for symmetry)
Step 1: Planning the Structure
-
Reference Lines:
Begin by lightly drawing a vertical centerline down the middle of your paper. This is crucial for symmetry. Mark the top of the skull, the bottom of the jaw, and the approximate location of the eyes and nose. -
Basic Silhouette:
Sketch the outer contour of the skull. Start with a large, rounded dome for the cranium. Taper it inwards slightly at the temples, then flare out for the cheekbones. -
Jaw and Chin:
Extend lines down from the cheekbones to form the upper jaw. Draw a U-shape for the chin, keeping the jawline slightly angular to give it structure. -
Feature Placement:
Draw two large circles for the eye sockets. In the center, sketch an upside-down heart shape for the nasal cavity. Below the nose, lightly mark a horizontal band where the teeth will eventually go.
Nib Know-How
If using a dip pen, vary your pressure: press harder on downstrokes for thick lines and lighter on upstrokes for thin hair-lines.
Step 2: Drafting the Motifs
-
Central Blossoms:
Sketch a large flower with five rounded petals in the center of the forehead. Add smaller floral elements or leaves branching out to the sides for balance. -
Eye Ornamentation:
Inside the large eye sockets, draw smaller concentric circles. Around the perimeter of the sockets, sketch small scallops or dots to create a decorated frame. -
Cheek Details:
In the hollows of the cheeks (just below the cheekbones), sketch tear-drop shapes or swirling leaf patterns pointing inward toward the nose. -
Chin Garden:
At the very bottom on the chin, draft a small semi-circle flower or sunburst design to anchor the composition.
Metallic Magic
Once the black ink is dry, use a gold or silver gel pen to accent the centers of the flowers and the teeth highlights.
Step 3: Inking the Outlines
-
Tracing the Perimeter:
Using a 0.5mm pen or a medium nib, carefully ink the main outline of the skull. Use a confident, steady hand to create smooth curves. -
Defining the Eyes and Nose:
Ink the main eye socket circles and the upside-down heart nose. For the inner pupils (the smaller circles), fill the space between the pupil and the socket edge with solid black or stippling (lots of tiny dots) for texture. -
Solid Black Accents:
Fill in the nose cavity completely with black ink. This creates a strong focal point and anchors the skull’s face.
Step 4: Adding Detail and Texture
-
Floral Inking:
Switch to a finer tip (0.3mm). Ink the flower on the forehead. For the petals, leave the centers open but darken the connections where the petals meet the center. -
Creating the Teeth:
Draw the individual teeth in the jaw band. Instead of perfect rectangles, give them slightly rounded corners. Add small roots or gum lines above them. -
Decorative Borders:
Around the eye sockets, ink the small scalloped edges. Add a ring of tiny dots or small triangles to frame the eyes, mimicking embroidery stitches. -
Leaf Veins:
Ink the leaf shapes on the cheeks and temples. Add a central line to each leaf and tiny diagonal veins for a natural look. -
Stipple Shading:
Use your thinnest pen (0.05 or 0.1mm) to add stippling shading. Focus on the bottom edges of the eye sockets and the sides of the cranium to give the skull dimension.
Step 5: Finishing Touches
-
Cleanup:
Wait until the ink is completely dry—I usually give it at least 15 minutes to be safe. Gently erase all remaining pencil guidelines with your kneaded eraser. -
Enhancing Contrast:
Look at the drawing from a distance. If certain lines feel too thin, go over them again to thicken the stroke weight, especially on the outer edge of the skull. -
Final Dots:
Add tiny decorative dots in any empty negative spaces on the forehead or chin to make the design feel dense and festive.
Step back and admire the stark, graphic beauty of your handmade calavera illustration
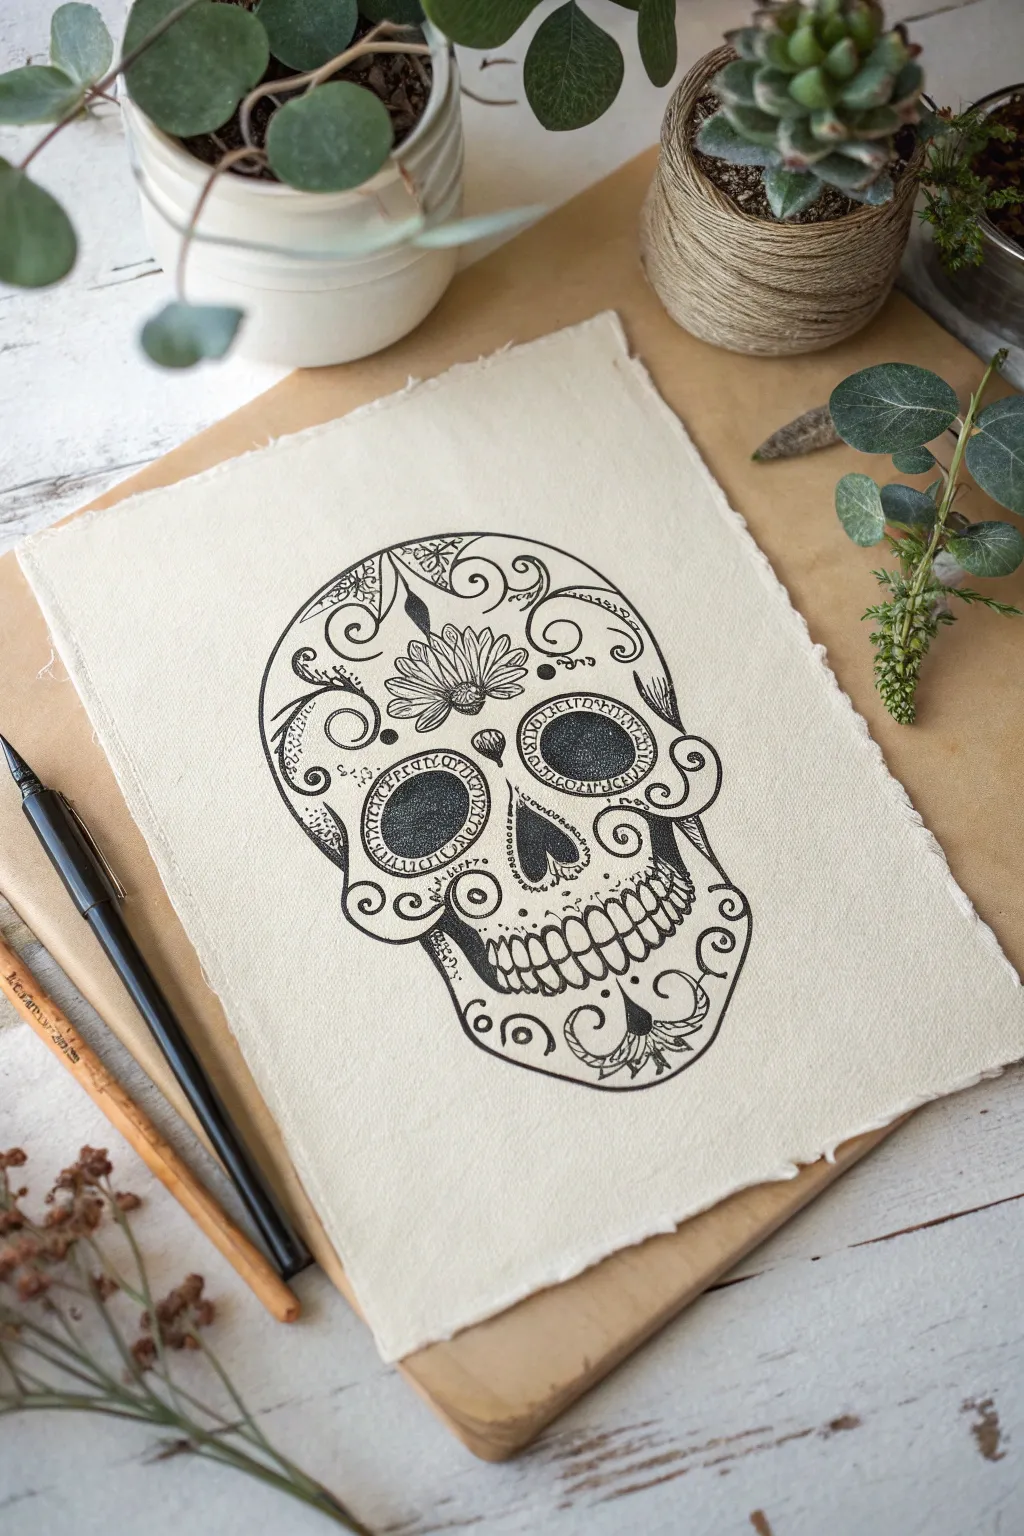
Lace Overlay for a Delicate Look
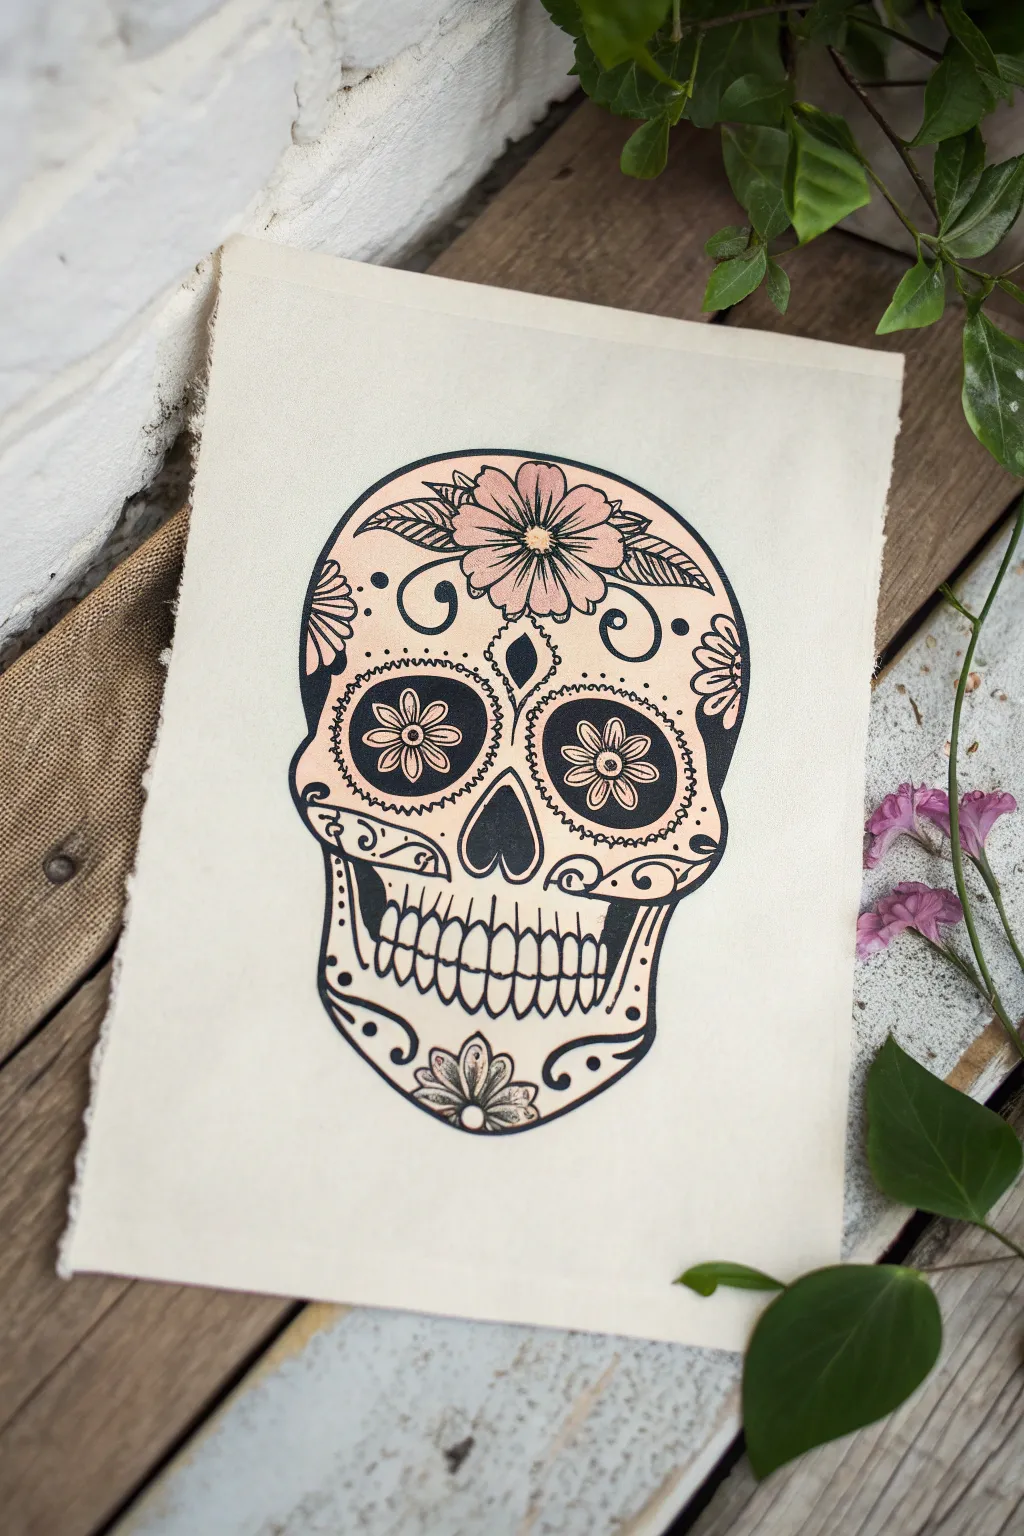
Blend edgy iconography with gentle textures in this mixed-media project, featuring bold black linework softened by pastel floral details. Using a durable canvas sheet as your base creates a lovely, rustic backdrop that feels both modern and handcrafted.
How-To Guide
Materials
- Heavyweight unprimed canvas sheet or textured watercolor paper (approx. 8×10 inches)
- Pencil and eraser
- Fine-point black permanent marker or archival ink pen (0.5mm)
- Medium-point black permanent marker (1.0mm) or black acrylic paint marker
- Pastel peach or dusty rose acrylic paint
- Small round paintbrush (size 2 or 4)
- Reference image or skull stencil (optional)
- Painter’s tape or clips
Step 1: Preparation and Base Sketch
-
Secure the surface:
Since canvas sheets can curl, tape down the corners of your fabric or paper to a flat work surface. This ensures stability while you are sketching and inking. -
Outline the skull shape:
Using a pencil with a very light hand, sketch the basic cranium and jawline. Aim for a slightly elongated oval for the top and a squared-off U-shape for the jaw. -
Map facial features:
Lightly mark the center usage line. Draw two large circles for the eye sockets, an inverted heart shape for the nose, and a horizontal grid for the mouth area. -
Plan floral elements:
Sketch a large flower centered on the forehead. Add smaller petal shapes inside the eye sockets and a small floral motif at the very bottom of the chin. -
Detail the embellishments:
Fill in the remaining negative space with swirls, dots, and leaf shapes. Drawing these lightly now allows you to adjust the symmetry before committing to ink.
Bleed Prevention
Work on unprimed canvas? Apply a clear matte medium over your pencil sketch first. This seals the fibers, ensuring your ink lines stay razor-sharp.
Step 2: Adding Color
-
Prepare the pastel tone:
Mix your peach or dusty rose acrylic paint with a tiny drop of water. You want the consistency to be smooth enough to flow into the fabric weave without bleeding. -
Fill the forehead bloom:
Carefully paint the petals of the main forehead flower. I find that leaving a tiny gap between the paint and your pencil line helps keep the eventual black outline crisp. -
Color the eyes:
Paint the small flower petals inside the eye sockets. This contrast against the future black background creates that classic sugar skull depth. -
Add accent spots:
Apply the same soft pink to the cheek swirls, the chin flower, and selected side petals. Let the paint dry completely before moving to the ink stage to prevent smudging.
Step 3: Inking and Definition
-
Outline the main shape:
Using your medium-point black marker, trace the outer perimeter of the skull. A slightly thicker line here helps separate the subject from the background. -
Define the eyes and nose:
Fill in the negative space of the eye sockets (around the pink flowers) and the nose cavity with solid black. This is where the design really starts to pop. -
Line the teeth:
Switch to your fine-point pen for the teeth. Draw the vertical separation lines first, then curve the tops and bottoms to make them look like individual teeth rather than a grid. -
Trace floral details:
Carefully outline your painted pink areas with the fine-point pen. Add small center lines to the petals for texture. -
Incorporate delicate patterns:
Trace the swirls, dots, and scalloped edges around the eyes. Use stippling (small dots) around the eye sockets to create a lacy, bordered effect. -
Check line variations:
Go back over key curves—like the cheekbones or the main forehead flower—to thicken the lines slightly on the shadow side, adding graphical weight.
Go Metallic
Swap the pastel pink paint for metallic gold or copper leafing paint. The shimmer against the matte black ink creates a stunning, luxurious contrast.
Step 4: Finishing Touches
-
Erase guidelines:
Once you are certain the ink is 100% dry, gently run a clean eraser over the design to remove any visible pencil marks. -
Optional distressing:
For a more rustic feel, you can lightly fray the edges of the canvas sheet by pulling at a few horizontal threads.
Display your finished piece in a simple wooden frame or pinned to a mood board for a touch of artistic edge
Geometric Sugar Skull With Faceted Shapes
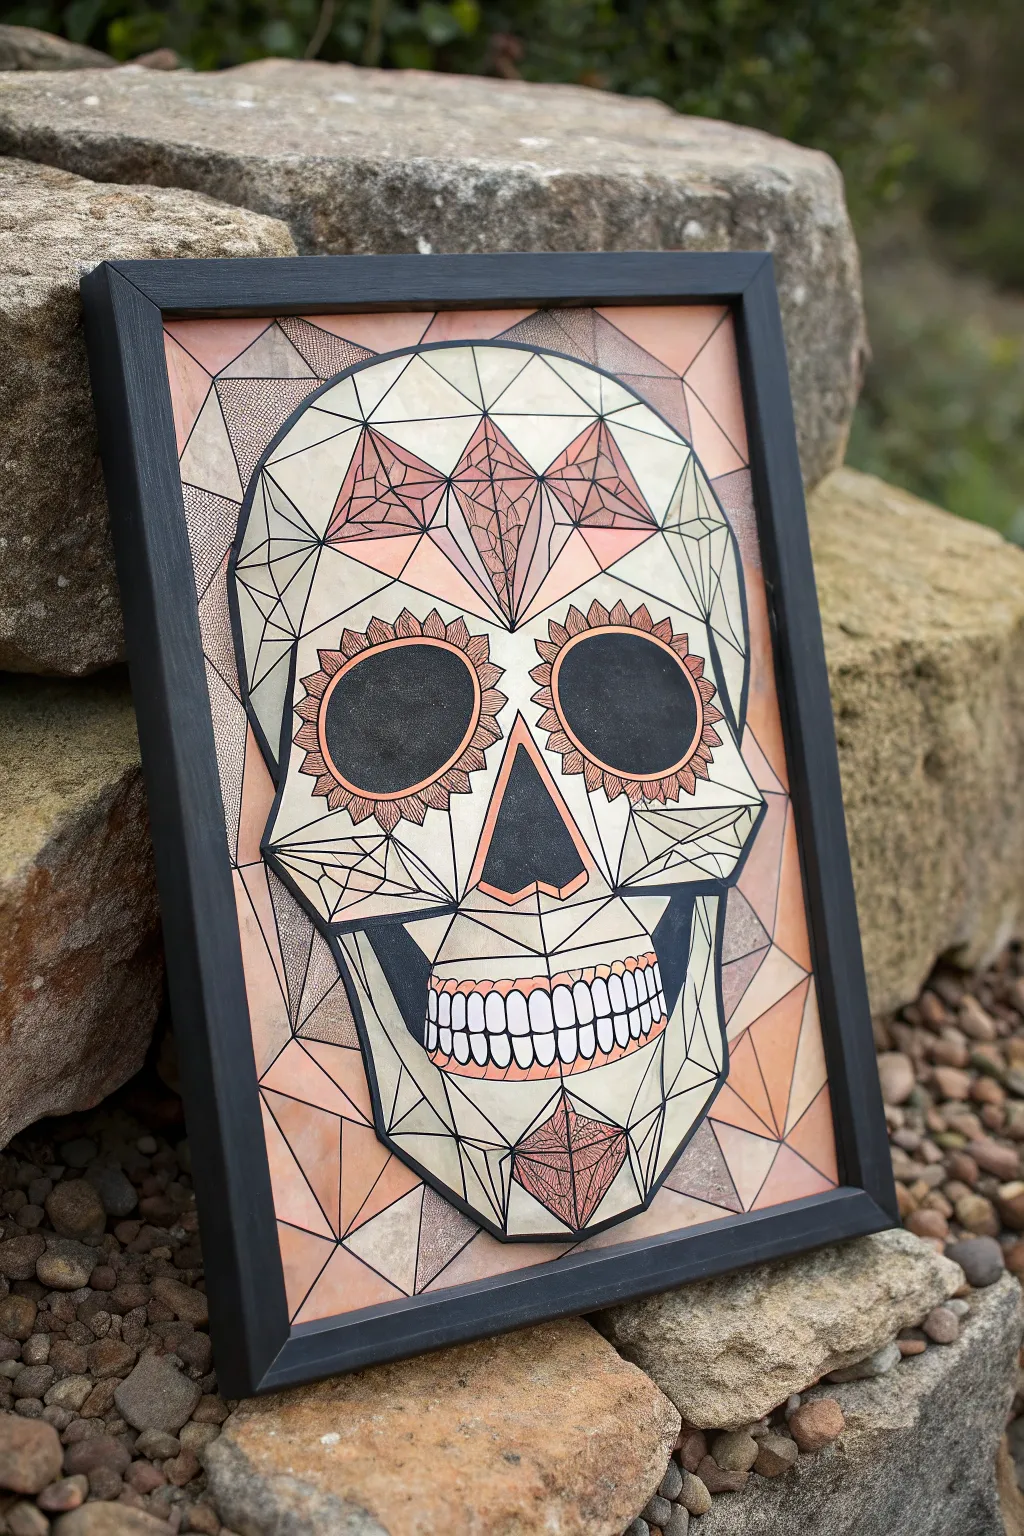
This striking project combines the traditional Day of the Dead iconography with a modern, low-poly aesthetic. By breaking the skull down into geometric planes and filling them with soft washes and intricate patterns, you create a piece that feels both edgy and organic.
Step-by-Step Tutorial
Materials
- Heavyweight mixed media paper or hot-press watercolor paper
- Pencil and eraser
- Ruler or straight edge
- Black fine-liner pens (various sizes like 0.1, 0.3, and 0.5)
- Black thick marker or brush pen
- Watercolor paints or gouache (blush pinks, creams, and terracotta)
- Small round brushes (size 2 and 4)
- Patterning stencils (optional)
- Black wooden frame
Step 1: Planning and Sketching
-
Map the Base Shape:
Start lightly with a pencil to establish the overall outline of the skull. Focus on the jawline and the cranium shape first, keeping the lines fairly angular rather than perfectly round to suit the geometric theme. -
Place Facial Features:
Draw two large circles for the eye sockets and an inverted triangle for the nasal cavity. Sketch a wide, horizontal rectangle for the mouth area, slightly curved to follow the jaw. -
Create the Facets:
Using your ruler, begin diving the skull’s surface into triangles and polygons. Connect the corners of the eyes to the nose, and the cheekbones to the jaw. Think of this as drawing a wireframe mesh over the face. -
Add Decorative Elements:
Within the large eye sockets, draw flower petal shapes bordering the edges. On the forehead, sketch diamond or kite shapes that will later hold intricate patterns. -
Background Geometry:
Extend the geometric web into the background. Draw lines radiating from the skull to the edges of the paper, creating shards of background space that mirror the facets on the skull.
Step 2: Inking and Definition
-
Outline the Main Structure:
Switch to a thicker black marker or a 0.5 fine liner. Carefully trace over your main structural pencil lines—the skull outline and the major facets. Use the ruler to keep these lines perfectly crisp. -
Detail the Eyes and Nose:
Ink the floral eye details. Fill the very center of the eye sockets and the nose cavity with solid black ink. This high contrast anchors the entire piece. -
Draw the Teeth:
Inside the mouth area, carefully draw individual teeth. Instead of realistic roots, keep them somewhat blocky and uniform. Outline the gums with a gentle curve above the teeth. -
Erase Guidelines:
Once the ink is completely dry—give it a few minutes to be safe—gently erase all the underlying pencil sketches so your paper is clean for painting.
Straight Edge Secret
Use a clear plastic ruler when inking over your pencil lines. Being able to see underneath the ruler prevents you from accidentally overshooting intersections.
Step 3: Coloring and Texturing
-
Mix Your Palette:
Prepare watered-down washes of your paints. You want subtle, earthy tones: a pale cream for the bone, a blush pink, and a deeper terracotta or rust color. -
Wash the Background:
Paint the background geometric shapes first. Alternate between blush pink and bare paper or cream, creating a stained-glass effect behind the skull. -
Paint the Skull Facets:
Fill the geometric shapes on the skull with the pale cream wash. Variation is good here; let some facets be slightly darker than others to imply depth and shadow. -
Accentuate the Features:
Paint the flower petals around the eyes and the detailed forehead diamonds with the terracotta or darker pink mix. I like to layer the color a bit heavily here to make these decorative elements pop.
Metallic Pop
Use gold or copper metallic ink for the tiny patterns inside the forehead diamonds or the petals around the eyes to catch the light.
Step 4: Final Details
-
Add Micro-Patterns:
Once the paint is dry, use your finest 0.1 pen to draw tiny textures inside specific facets. Try stippling (dots) in the background shards or fine hatching lines inside the forehead diamonds. -
Thicken Key Lines:
Go back over the outermost perimeter line of the skull with your thickest marker. A bold contour line helps separate the subject from the background. -
Frame the Piece:
Carefully place your finished dry artwork into a simple black wooden frame. The dark frame complements the heavy ink lines and solid black eye sockets perfectly.
Hang your geometric masterpiece on a bright wall where the sharp lines can really stand out.
Watercolor Blooms With Crisp Ink Lines
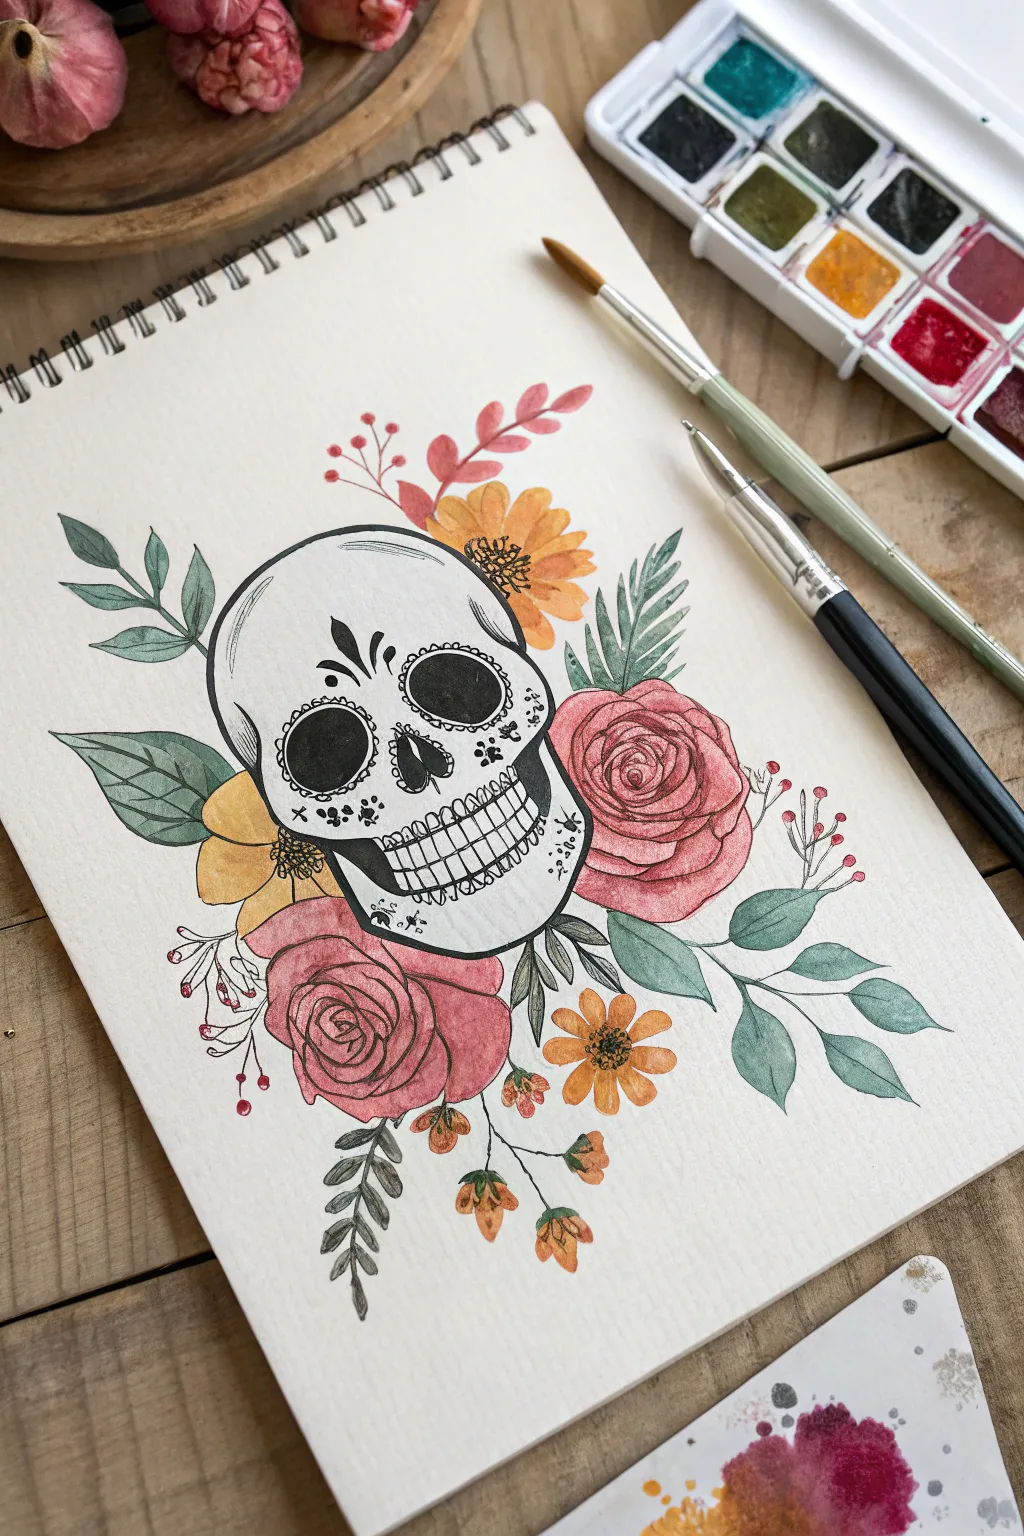
This project combines the delicate translucency of watercolor with the boldness of black ink linework to create a striking sugar skull composition. The result is a beautifully balanced illustration where crisp details pop against soft, loose floral washes.
How-To Guide
Materials
- Cold press watercolor paper or sketchbook (300 gsm recommended)
- Pencil (HB or H) and eraser
- Waterproof fine liner pen (0.3mm or 0.5mm)
- Watercolor paint set
- Round watercolor brushes (size 4 and 8)
- Clean water and paper towel
Step 1: Sketching the Foundation
-
Map out the skull shape:
Begin by lightly sketching the outline of the skull in the center of your page. Focus on a slightly angled cranium shape, defined cheekbones, and the jawline. -
Draft the eye sockets and nose:
Sketch two large, slightly teardrop-shaped ovals for the eyes. In the center, below the eyes, draw an upside-down heart shape for the nasal cavity. -
Add floral placement:
Lightly sketch circles and ovals around the skull to indicate where your main flowers will go. Place two large rose shapes at the bottom and right side, and a few smaller daisy-like flowers tucked in between. -
Sketch the leaves:
Draw flowing lines extending outward from the flowers to represent stems and leaves. Vary the leaf shapes, using some rounded petals and some fern-like sprigs for texture.
Ink Confidence
Don’t outline every single watercolor splash. Leaving some color outside the lines creates a breezier, more artistic look.
Step 2: Painting with Watercolors
-
Paint the roses:
Mix a diluted watery red or crimson. Paint the rose shapes loosely, starting with a darker concentration in the center and using clean water to pull the color outward to the petal edges for a soft gradient. -
Add golden blooms:
Using a warm yellow-orange, paint the daisy-like flowers. Keep the wash loose and translucent, allowing the white of the paper to show through occasionally for highlights. -
Fill in the greenery:
Mix a muted sage green. Paint the leaves using the tip of your round brush for the stems and pressing down to create the wider leaf bodies. I like to vary the green saturation here so some leaves look closer than others. -
Add tiny accent buds:
Dip a small brush into red or orange and dab tiny dots on the ends of the finer stems to create small berries or buds. -
Let it dry completely:
This is crucial: allow the watercolor layer to dry 100% before touching it with a pen. If the paper is cool to the touch, it’s still damp.
Metallic Magic
Use a gold gel pen or metallic watercolor paint for the skull’s filigree details or the flower centers to add a subtle shimmer.
Step 3: Inking the Details
-
Outline the skull:
Using your waterproof fine liner, trace over your skull pencil lines with a confident, solid stroke. Thicken the line weight slightly on the shadowed side (the bottom right) of the skull. -
Detail the facial features:
Fill in the eye sockets and nose cavity with solid black ink. Leave small white scalloped edges around the eyes for that classic sugar skull look. -
Draw the teeth:
Ink the teeth carefully, drawing the vertical lines first, then the horizontal gum line. Add small triangular gaps between the teeth near the roots for realism. -
Add decorative skull elements:
Draw the filigree, swirls, and flower petal shapes on the forehead and chin. Use stippling (tiny dots) to create shading on the cheeks and temples. -
Define the flowers:
Instead of outlining every petal, use broken, sketchy lines to suggest the edges of the roses and daisies. Focus on the centers of the flowers, adding intricate stamen details. -
Ink the leaves:
Draw centralized veins on the larger leaves. For the fern-like sprigs, use quick, short strokes to capture their feathery texture. -
Clean up:
Once the ink is fully set, gently erase any remaining visible pencil marks to leave a clean, professional finish.
Now you have a vibrant piece that perfectly balances macabre themes with floral beauty
Tattoo-Style Shading and Bold Outlines
Capture the spirit of Día de los Muertos with this striking sugar skull illustration, characterized by its clean linework and deep tattoo-style shading. This project focuses on high contrast and floral elements, centering a beautifully detailed rose on the forehead for a centerpiece that pops against the white paper.
Step-by-Step Guide
Materials
- Smooth white heavyweight drawing paper or cardstock (A4 or letter size)
- HB graphite pencil
- Kneaded eraser
- Fine liner pen (0.1mm or 0.3mm)
- Medium felt-tip marker or brush pen (black)
- Ruler (optional for symmetry)
Step 1: Drafting the Foundation
-
Map the skull shape:
Start lightly with your HB pencil. Sketch a large, inverted egg shape to define the cranium and jaw. Refine the jawline to be slightly narrower than the top, creating that classic skeletal silhouette. -
Position facial features:
Draw a faint vertical center line and a horizontal line about halfway down. Sketch two large, somewhat circular shapes for the eye sockets on either side of the vertical line, and an upside-down heart shape for the nose cavity just below them. -
Sketch the forehead rose:
Place a detailed rose right on the center of the forehead. Start with a tight spiral in the middle and fan out overlapping petals. Ensure the petals extend slightly beyond the top curve of the skull for a natural, organic look. -
Outline the mouth:
Draw the mouth line across the lower third of the skull. Sketch individual teeth, making the center ones largest and tapering smaller toward the sides. Add slight curves to the roots of the teeth to imply gum lines without drawing them explicitly.
Pro Tip: Line Weight
Make the outer perimeter line twice as thick as the interior detail lines. This “holding line” contains the design visually.
Step 2: Adding Decorative Elements
-
Draft the eye socket designs:
Inside each eye socket, draw a smaller inner circle for the deepest shadow. In the ring between the inner circle and the outer edge, sketch a pattern of small triangles or scallops to create a decorative flower-like border. -
Add swirling vines:
From the sides of the rose, extend vine-like swirls that curl out towards the temples. I like to let these follow the curve of the skull’s outline to enhance the shape’s volume. -
Detail the chin and cheeks:
Add a teardrop shape or small floral motif on the chin. Sketch curved lines along the cheekbones to simulate depth, perhaps adding a few dots or smaller swirls near the jawline for balance. -
Refine pencil lines:
Go over your sketch one last time to firm up the shapes you want to keep. Gently erase any confusing stray marks or heavy guidelines so your inking path is clear.
Step 3: Inking and Shading
-
Outline the main shape:
Switch to your medium felt-tip marker. Trace the outer perimeter of the skull first, using a deliberate, steady hand to create a bold, uninterrupted line. -
Ink the rose:
Use the finer 0.1mm or 0.3mm pen for the rose. Carefully outline the petals. Add very fine hatching lines at the base of the petals where they overlap to suggest depth and curvature. -
Fill the dark voids:
Use the medium marker or a brush pen to completely fill in the inner circles of the eye sockets and the nose cavity. Solid black is crucial here for that high-contrast ‘tattoo’ look. -
Ink the decorative patterns:
Trace the decorative ring around the eyes and the swirling vines on the forehead. Vary your line weight slightly—thicker on the outer curves, thinner on the inner spirals. -
Define the teeth:
Outline the teeth with the fine liner. Keep these lines relatively thin to distinguish them from the heavy skull outline. Add tiny ‘c’ shapes at the gum line for dimension. -
Apply stippling shading:
To create the gradient texture seen in the reference, use the fine liner to add stippling (tiny dots). Concentrate the dots heavily near the outer edges of the skull and cheekbones, fading them out as you move inward. -
Add leafy accents:
Ink the small leaves emerging from behind the rose. Use solid black for the veins or half of the leaf to increase contrast against the white forehead. -
Finalize decorative touches:
Ink the pattern on the chin and the decorative dots along the jawline. Ensure these small elements are symmetrical. -
Cleanup:
Wait at least 5-10 minutes for the ink to dry completely. Gently erase all remaining pencil guidelines with the kneaded eraser to reveal the crisp black-and-white artwork.
Level Up: Coffee Stain
Before drawing, lightly stain the paper with tea or diluted coffee and let it dry. This gives the drawing an instant vintage parchment vibe.
You have now created a bold, intricate piece that perfectly balances macabre themes with floral elegance
Personal Tribute Details: Names and Icons
This project combines intricate line art with soft, earthy shading to create a sugar skull that feels both vintage and organic. By blending gentle floral motifs with a classic skull silhouette, you can craft a piece that serves as a beautiful tribute or a striking seasonal decoration.
Step-by-Step Tutorial
Materials
- High-quality watercolor paper or heavy mixed-media cardstock
- Pencil (HB for sketching)
- Eraser
- Fine liner pens (Black, size 0.3mm and 0.5mm)
- Colored pencils (muted pink, sage green, terracota, brown)
- Small blending stump or cotton bud
Step 1: Sketching the Foundations
-
Map out the skull outline:
Begin by lightly sketching the large cranium shape, tapering down towards the jawline. Don’t worry about perfect anatomy; this is stylized. The jaw should be somewhat squared but rounded at the corners. -
Locate the features:
Draw large, slightly teardrop-shaped ovals for the eyes. Below them, sketch an upside-down heart for the nose cavity. -
Draft the mouth:
Sketch a horizontal curve for the mouth line. Instead of individual teeth, draw a grid-like structure within a slightly gaping jaw shape to suggest the teeth. -
Add floating elements:
Lightly pencil in vines extending from the bottom corners and sides. Add circular guides for the flower heads on the left and bottom right.
Paper Texture Tip
Using cold-press watercolor paper adds a subtle grain that grabs the pencil pigment beautifully, creating that rustic, textured look seen in the photo.
Step 2: Adding the Details
-
Decorate the eyes:
Draw scalloped petals around the perimeter of the eye sockets to create a marigold effect. Inside the socket, leave the center blank for shading later. -
Initial floral motifs:
Sketch a five-petaled flower on the forehead and smaller circular embellishments around the temples. Connect them with thin scrolling lines. -
Incorporate icons:
Add small personal touches like the music notes near the bottom vine and the star above the skull. These tribute details add character to the piece. -
Refine the vines:
Flesh out your vine sketches by adding small, leaf-shaped ovals along the stems. Keep the movement fluid and curved.
Step 3: Inking the Design
-
Outline the main shape:
Using the 0.5mm pen, go over the outer contour of the skull. Use confident, smooth strokes to keep the line weight consistent. -
Detail with fine lines:
Switch to the 0.3mm pen for the interior details. Carefully trace the eye scallops, the flowers, and the vine leaves. -
Add texture marks:
Add tiny dots or stippling inside the petals and near the cheekbones to suggest texture. Ink the music notes and the star. -
Erase:
Once the ink is totally dry—give it a few minutes—gently erase all underlying pencil marks to reveal a clean linework base.
Antique Finish
After drawing, lightly brush the edges of the paper with a tea-stained sponge or distress ink to give the entire piece an aged, parchment-like appearance.
Step 4: Applying Soft Color
-
Shade the eye sockets:
Use a dark brown pencil to fill the eye sockets. Press harder near the edges and lighter toward the center to create depth. -
Color the flowers:
Take a muted pink pencil and softly color the flower petals on the forehead and the surrounding vines. Keep the pressure light for a vintage feel. -
Add greenery:
Use sage green for the leaves on the vines. I like to leave a tiny sliver of white paper showing on some leaves to act as a highlight. -
Skull shading:
With a terracotta or light orange pencil, lightly shade the edges of the skull, the cheekbones, and the grid of the teeth. -
Blend the colors:
Use a blending stump to gently smudge the colored pencil areas. This softens the pencil strokes and gives the shading a smooth, painted look. -
Final contrast:
Go back with your brown pencil and deepen the shadows under the cheekbones and inside the nose cavity for extra dimension.
Now you have a charming, handcrafted sugar skull illustration ready to frame or gift
Double-Exposure Skull Filled With Silhouettes

Create beautiful, handmade stationery featuring a classic sugar skull design with a striking block print aesthetic. This project utilizes soft-cut lino blocks and handmade cotton paper to achieve a rustic, textured finish perfect for Día de los Muertos greetings.
Detailed Instructions
Materials
- Soft-cut lino block (4×6 inch)
- Lino carving tools (V-gouge and U-gouge)
- Black water-based block printing ink
- Brayer (rubber roller)
- Handmade cotton rag paper (deckled edge)
- Pencil and tracing paper
- Inking plate or glass pane
- Baren or wooden spoon
Step 1: Design Transfer
-
Draft your design:
Sketch a sugar skull outline on tracing paper. Include traditional elements like floral eye sockets, a heart on the forehead, and vine details near the jaw. Keep lines thick enough for easy carving. -
Transfer to block:
Place your tracing paper face down onto the soft-cut lino block. Rub the back firmly with a bone folder or the back of a spoon to transfer the graphite image onto the surface. -
Reinforce lines:
Go over the transferred lines on the block with a permanent marker. This ensures your guide doesn’t smudge while you are carving and helps visualize the positive space.
Patchy Print?
If your print looks salty or patchy, your paper might be too textured. Try lightly misting the paper with water before printing to help it absorb the ink into the fibers better.
Step 2: Carving the Block
-
Outline the skull:
Using a fine V-gouge tool, carve carefully around the outer perimeter of the skull first. I like to carve away from myself to maintain safety and control. -
Carve the details:
Switch to a smaller cutter for intricate areas like the teeth and the floral patterns inside the eyes. Remember, anything you carve away will remain white; the raised surface will be black. -
Clear large areas:
Use a wider U-gouge to clear out the negative space inside the eye sockets, the nose cavity, and the background surrounding the skull. Leave the surface smooth to avoid unwanted ink pickup. -
Refine the edges:
Go back in with your smallest tool to clean up any jagged edges around the flower petals and the vines at the bottom to ensure crisp lines. -
Test proof:
Make a quick rubbing with a crayon on scrap paper to check your carving. If any areas look messy, trim them down further before inking.
Level Up
After the black ink dries completely, use watercolors or gouache to hand-paint the floral details in the eyes and forehead for a vibrant pop of color typical of sugar skulls.
Step 3: Printing the Card
-
Prepare the paper:
Fold your handmade cotton rag paper to create a card format. The textured, deckled edge adds a lovely vintage feel that complements the print. -
Roll the ink:
Squeeze a small line of black block printing ink onto your inking plate. Roll the brayer back and forth and lift it occasionally to create a velvety, even layer of ink with a ‘hissing’ sound. -
Ink the block:
Roll the inked brayer over your carved block. Apply the ink in multiple thin layers rather than one thick one to prevent it from filling in the fine details of the teeth and eyes. -
Position the paper:
Carefully place the folded paper on top of the inked block (or place the block face down onto the paper if you prefer). Align it centrally to leave a nice border of paper showing. -
Apply pressure:
Using a baren or the back of a wooden spoon, rub the back of the paper firmly in small circular motions. Apply extra pressure over the solid black areas to ensure a good transfer. -
Reveal the print:
Slowly peel the paper back from one corner. Check the transfer as you lift; if it’s too light, you can lay it back down and rub more, provided it hasn’t shifted. -
Dry the print:
Lay the finished card flat to dry completely. Water-based inks usually dry within an hour, but giving it a bit longer ensures it won’t smudge.
Enjoy sending out your custom, hand-printed cards that celebrate a vibrant tradition with artistic flair
3D Illusion Sugar Skull With Trompe-l’Œil Highlights
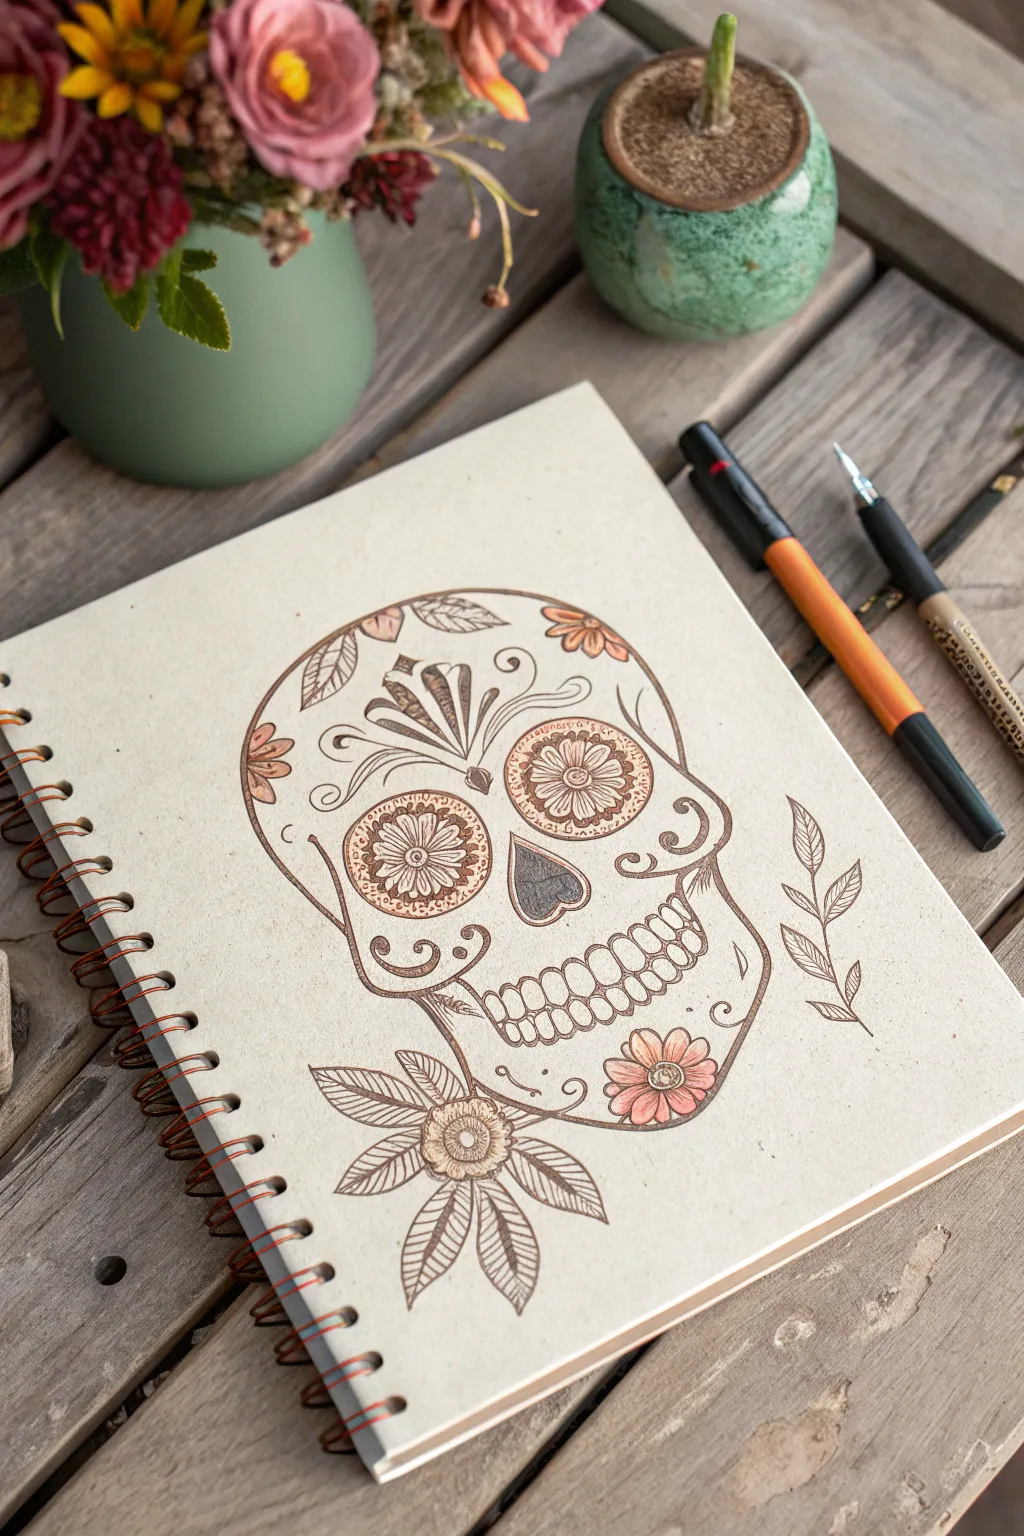
Capture the charm of vintage botanical illustrations with this detailed sugar skull drawing. Using fine liners and warm ink washes, you’ll create a piece that feels like a discovery from an old explorer’s sketchbook, complete with delicate floral accents and ornate linework.
How-To Guide
Materials
- Spiral-bound sketchbook with cream or off-white mixed media paper
- Fine liner pens (Black and Sepia, sizes 0.1mm, 0.3mm, 0.5mm)
- Fountain pen or dip pen with burnt orange ink
- Pencil (HB) and kneaded eraser
- Small watercolor brush (round size 2 or 4)
- Diluted brown ink or watercolor (Burnt Umber/Sepia)
Step 1: Structure and Sketch
-
Establish the Head Shape:
Begin lightly with your HB pencil. Draw a large, inverted egg shape for the skull, making the top cranium round and spacious while tapering slightly towards what will be the jaw. -
Map Facial Features:
Mark the center line vertically. Place two large circles for the eye sockets halfway down the shape. Below that, sketch an upside-down heart for the nose cavity. -
Define the Jaw and Cheekbones:
refine the outline by indenting the sides slightly just below the eye sockets to create cheekbones. Box out the jawline below, giving it a squared-off but rounded finish. -
Sketch the Mouth:
Draw a horizontal curve for the mouth line. Sketch huge, rectangular tooth shapes along this line—about six to eight on top and bottom—curving them slightly to follow the jaw’s shape.
Vintage Ink Flow
If using a dip pen, vary pressure on downstrokes. This spreads the nib tines, creating line weight variation typical of old-world calligraphy.
Step 2: Ornate Details
-
Design the Eyes:
Inside the large eye sockets, draw flower petals radiating from the center like a daisy. Add a small circle in the very center for the pupil area. -
Add Forehead Adornments:
Sketch a central ornate design on the forehead. Think of a stylized fountain or fan shape with teardrop petals rising up from the space between the eyes. -
Incorporate Floral Elements:
Draw small flowers on the temples and chin. Add a large, loose flower with pointy leaves at the bottom left, seemingly tucked behind the jaw. -
Add Scrolling Vines:
Fill the empty spaces on the cheeks and cranium with swirling lines and leaf shapes. Include a sprig of leaves floating freely to the right of the skull for composition balance.
Step 3: Inking and Definition
-
Outline with Sepia:
Using a 0.3mm sepia or dark brown fine liner, carefully trace your main pencil lines. Keep your hand relaxed to allow for slight organic wobbles that mimic old etchings. -
Thicken Key Lines:
I find that going back over the outer perimeter and the eye sockets with a slightly thicker 0.5mm pen adds necessary weight and depth to the illustration. -
Detail the flower petals:
Switch to your 0.1mm pen. Inside the flower petals of the eyes and the chin, draw tiny radiating lines from the center outward to create texture and shading. -
Hatch the Nose Cavity:
Fill the nose cavity using a cross-hatching technique. Don’t make it solid black; overlay diagonal lines to create a textural, dark gray value. -
Erase Guidelines:
Once the ink is completely dry, gently gently lift off the graphite sketch using your kneaded eraser.
Antique Paper Hack
Prep your page with a light wash of diluted coffee before drawing. The warm, mottled background instantly ages your artwork by 100 years.
Step 4: Color and Wash
-
Apply Orange Accents:
Using your fountain pen with burnt orange ink (or a colored fine liner), color select details like the center of the forehead design, the cheek scrolls, and the centers of the smaller flowers. -
Wash the Large Flower:
With a damp brush and a tiny drop of diluted brown ink, create a pale wash over the large flower leaves at the bottom left. The goal is a vintage, tea-stained look, not vibrant color. -
Shade the Teeth:
Use the very tip of your brush with the faintest amount of brown wash to touch the top of each tooth near the gum line, giving them dimension without outlining them fully. -
Stipple for Texture:
Take your finest pen again (0.1mm) and add tiny stippling dots around the edges of the skull and near drawing intersections to simulate the grain of aged paper.
Now you have a beautifully aged, intricate sugar skull design that looks like a treasure from the past.


Have a question or want to share your own experience? I'd love to hear from you in the comments below!