There’s something instantly joyful about starting a rock with a bright yellow base—it’s like painting on a tiny piece of sunshine. Here are my favorite yellow rock painting ideas to help you turn simple stones into cheerful little characters, gifts, and garden pops of color.
Classic Bumblebee Stripes
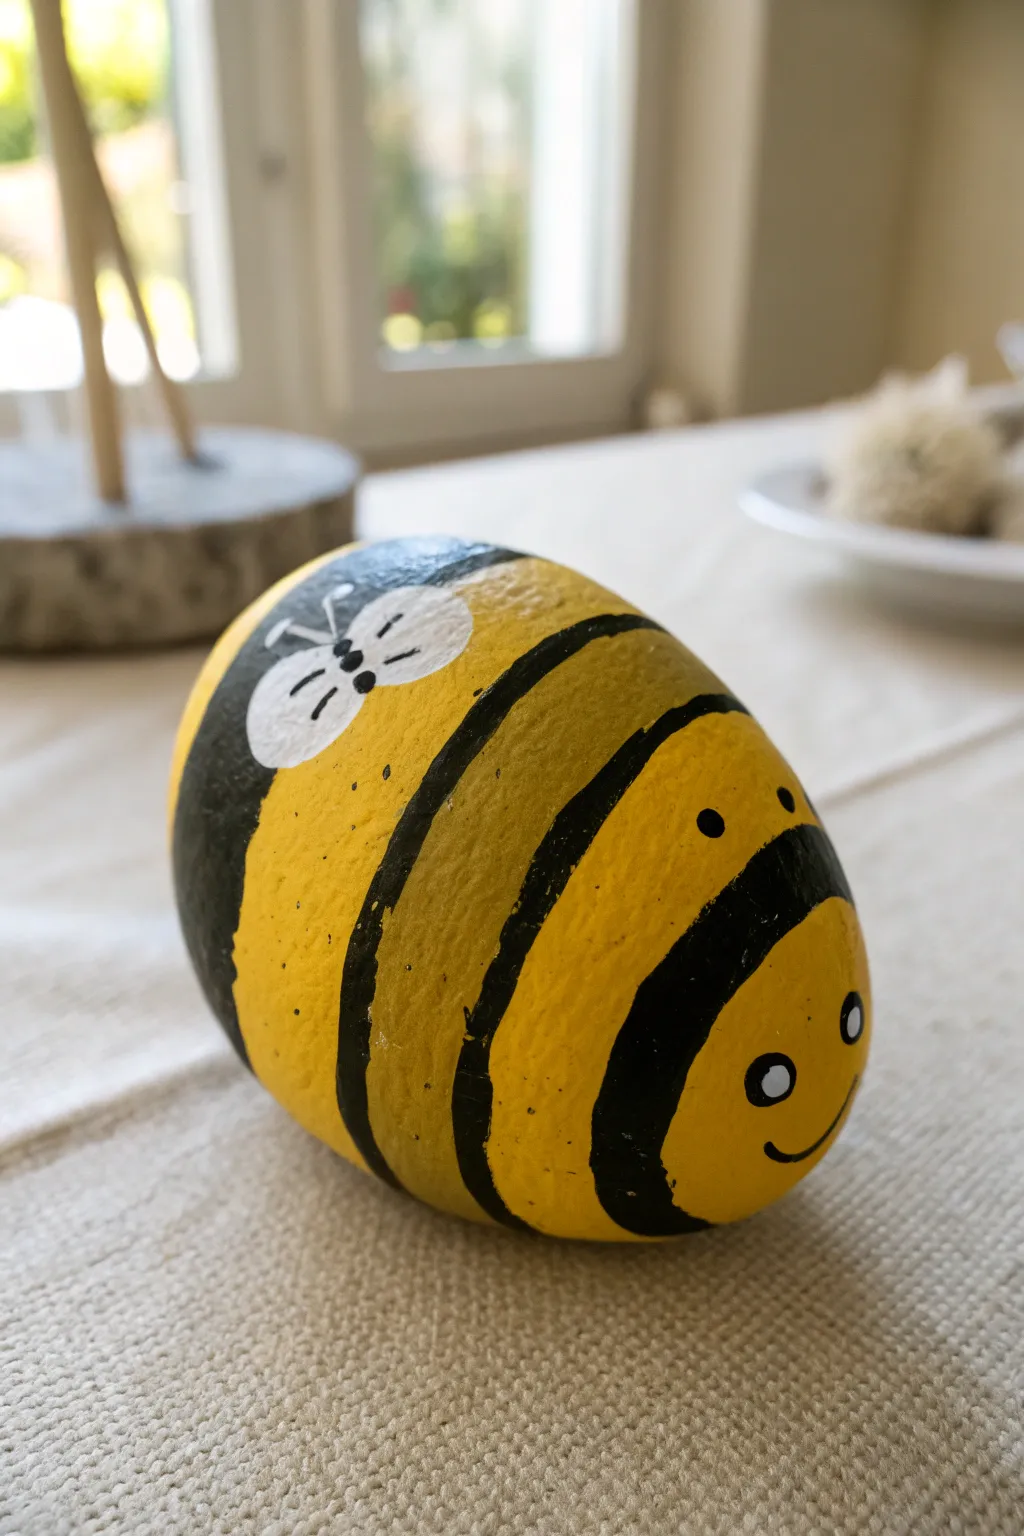
Transform a smooth, oval river stone into an adorable garden companion with this classic bumblebee design. Its cheerful stripes and friendly face make it a perfect beginner-friendly project that instantly brightens up any tabletop or flower pot.
How-To Guide
Materials
- Smooth, oval-shaped river rock (palm-sized is ideal)
- Acrylic paint (bright yellow, black, and white)
- Medium flat paintbrush
- Small round detail paintbrush
- Fine-point paintbrush or dotting tool
- Cup of water and paper towels
- Clear acrylic sealer spray (matte or gloss)
- Pencil (optional)
Step 1: Base Coloring
-
Clean the Stone:
Begin by washing your rock with soap and water to remove any dirt or oil. Let it dry completely so the paint adheres properly. -
Base Coat:
Using your medium flat brush, paint the entire top surface of the rock with bright yellow acrylic paint. You don’t need to paint the very bottom if it will be sitting flat. -
Second Layer:
Yellow paint can be semi-transparent, so once the first coat is dry to the touch, apply a second coat to get that solid, vibrant lemony color seen in the photo. -
Dry Time:
Allow the yellow base to dry completely before moving on. If the yellow is wet, the black stripes will smudge and turn muddy.
Smooth Stripes Tip
Struggling with wobbly lines? Use thin strips of masking tape or washi tape to mask off the yellow areas before painting the black stripes for crisp, sharp edges.
Step 2: Adding the Stripes
-
Plan the Stripes:
Visualize where the stripes will go. You’ll need a large black section at the back for the ‘tail’, and two thick curved stripes across the middle. -
Paint the Tail:
Start at the back end of the rock. Use the medium brush to paint a wide, curved black section covering the rear of the bee. -
Middle Stripe:
Move slightly forward, leaving a yellow gap, and paint a thick black band that curves over the rock’s body. -
Front Stripe:
Paint a second black stripe closer to the front, again curving slightly to follow the rock’s shape. This defines the separate sections of the bee’s body. -
Clean Edges:
Go back over the edges of your black stripes with a smaller brush to make sure they are relatively smooth, though a little rustic charm is perfectly fine.
Step 3: Face and Wings
-
Start the Wings:
Locate the yellow space just in front of the black tail section. Dip a medium round brush in white paint and press down firmly to create two oval shapes resembling petals for the wings. -
Wing Details:
Once the white wing ovals are dry, switch to your finest detail brush or a black paint pen. Draw a tiny ‘v’ or antennae shape between the wings and add small black ticks on the white ovals for texture. -
Paint the Eyes:
On the front yellow section (the face), use the handle end of a paintbrush or a dotting tool dipped in white paint. make two medium-sized white dots for eyes. -
Eye Pupils:
I like to wait just a moment for the white to set, then add a smaller black dot inside each white circle. Place the pupils slightly off-center for a goofy, cute look. -
Outline the Eyes:
Carefully trace a very thin black circle around the white part of the eyes using your finest brush to make them pop. -
Draw the Smile:
Using the fine liner brush and black paint, sweep a simple, curved line underneath the eyes to give your bee a happy grin. -
Cheek Dimples:
Add tiny little tick marks at the ends of the smile to emphasize the cheerful expression. -
Seal the Deal:
Once the entire rock is completely dry (give it a few hours), spray it lightly with a clear acrylic sealer to protect it from weather if it’s living outside.
Level Up: Glitter Wings
For a magical touch, mix a tiny bit of iridescent glitter into your white paint for the wings, or paint over them with a pearlescent glaze once dry.
Now you have a happy little bee ready to nestle into your garden beds or sit on your desk


Sweet Little Chick
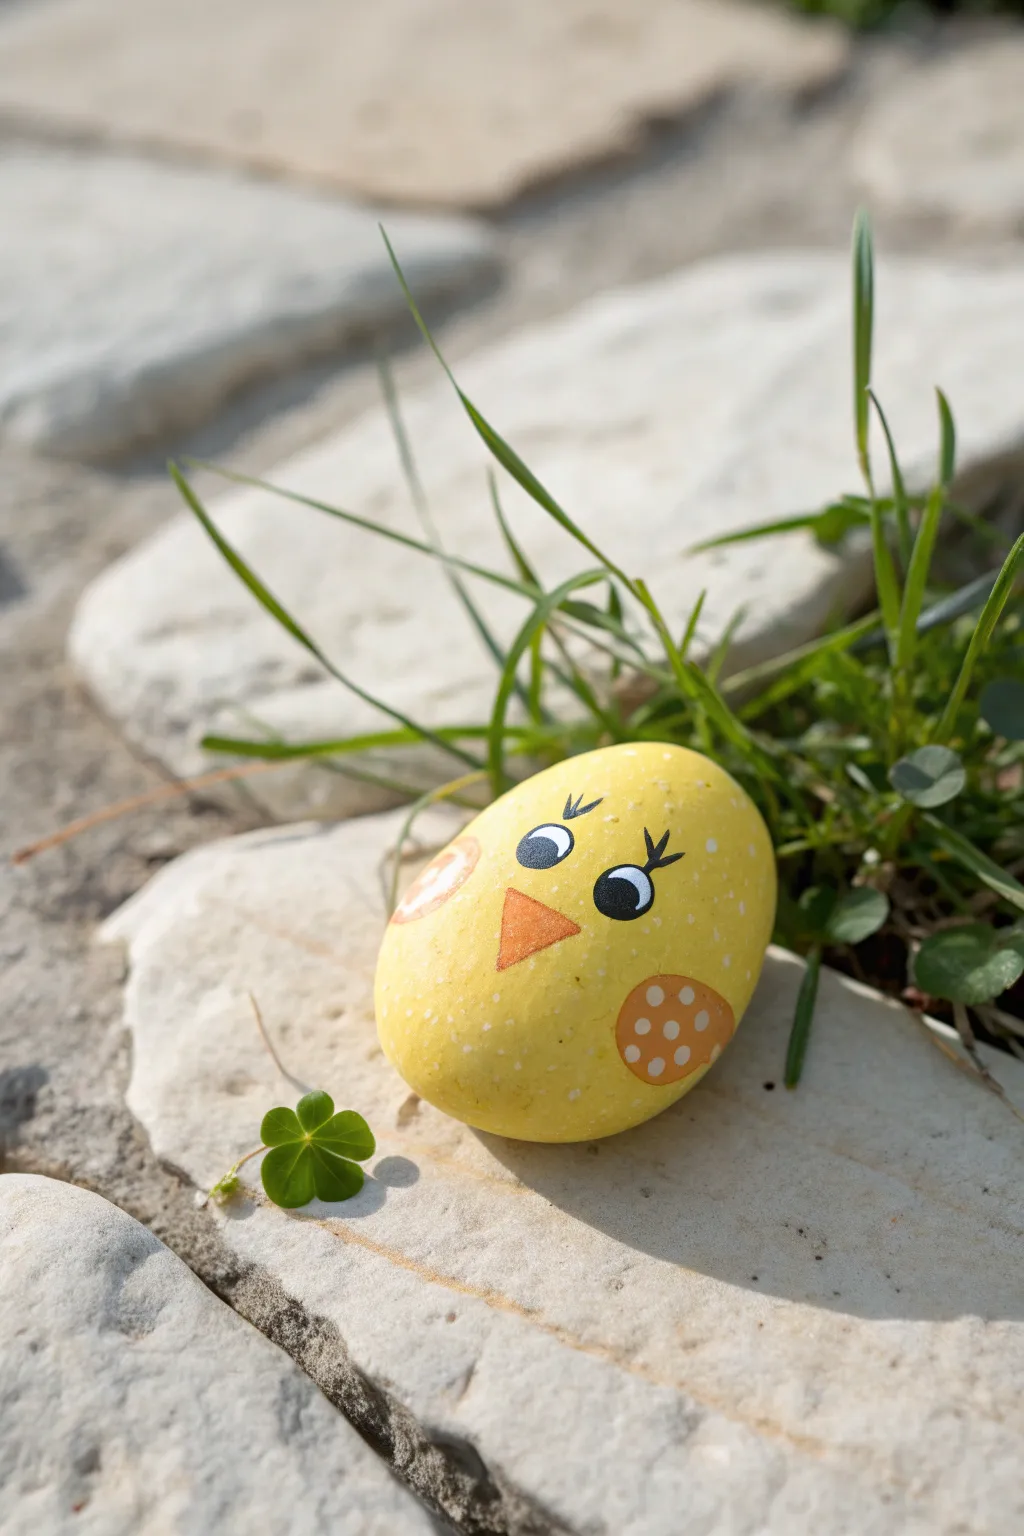
Transform an ordinary smooth stone into an adorable spring companion with this bright and cheerful painting project. This simple yet eye-catching design features bold eyes, rosy dotted cheeks, and a sunny yellow coat that captures the essence of a baby chick.
Detailed Instructions
Materials
- Smooth oval stone (river rock)
- Acrylic paint: Bright Yellow, Orange, White, Black
- Paintbrushes: Medium flat brush, small detail brush
- Dotting tool (or toothpick/brush handle)
- Pencil for sketching
- Clear acrylic sealer (matte or glossy)
- Water cup and paper towels
Step 1: Base Coat
-
Clean surface:
Begin by washing your stone with warm soapy water to remove any dirt or grease. Dry it thoroughly before starting, as moisture can prevent the paint from adhering properly. -
Prime the stone:
If your rock is dark, you might want to apply a layer of white paint first. This helps the yellow pop later on, though on lighter stones you can skip straight to color. -
Apply yellow base:
Using your medium flat brush, cover the entire top surface of the rock with bright yellow acrylic paint. Paint in smooth, even strokes. -
Add a second coat:
Let the first layer dry completely to the touch. Apply a second coat of yellow to ensure full, opaque coverage where no stone texture shows through.
Step 2: Facial Features
-
Draft the face:
Once the yellow base is fully dry, lightly sketch the placement of the eyes, beak, and cheeks with a pencil. This helps ensure your chick’s face is symmetrical before you commit with paint. -
Paint the eyes:
Using white paint and a small round brush, fill in two large circles for the eyes. You may need two thin layers to get a solid bright white against the yellow. -
Add the beak:
Mix a tiny bit of orange paint. In the center, just below the eyes, paint a small inverted triangle for the beak. -
Create the cheeks:
Paint large, soft partial circles on the lower sides of the face using the orange paint to create rosy wing-like cheeks. -
Detail the pupils:
Switch to black paint and a detail brush. Add smaller black circles inside the white eye shapes, positioning them slightly toward the center for a cute, cross-eyed look. -
Add eye contour:
Carefully outline the top half of the white eyes with a very thin black line to define the eyelids. -
Draw eyelashes:
I find using a fine liner brush works best here. Flick three small, distinctive eyelashes extending from the top of each eye contour. -
Highlight the eyes:
Dip the very tip of a brush handle or dotting tool into white paint. Add a tiny white dot (catchlight) near the top edge of each black pupil to bring the chick to life.
Paint Consistency
If your black paint is too thick for fine eyelashes, thin it with a single drop of water. It should flow like ink for crisp lines.
Step 3: Final Touches
-
Dot the cheeks:
Using a clean dotting tool or toothpick dipped in white paint, add a pattern of small polka dots inside the orange cheek areas. -
Add texture speckles:
To give the yellow feathers some depth, take a mostly dry brush with a tiny amount of white paint and lightly stipple or fleck random spots across the yellow body. -
Dry completely:
Allow the entire rock to sit undisturbed for at least an hour until all the paint layers are completely cured. -
Seal the artwork:
Apply a coat of clear acrylic sealer over the detailed side. This protects your chick from weather if you plan to hide it outside.
Make a Nest
Glue a small tuft of yellow craft feathers to the top of the rock or paint a few jagged lines on the bottom to look like a cracking eggshell.
Now you have a cheerful little chick ready to brighten up a garden path or hide for someone to find


Smiley Face Rock
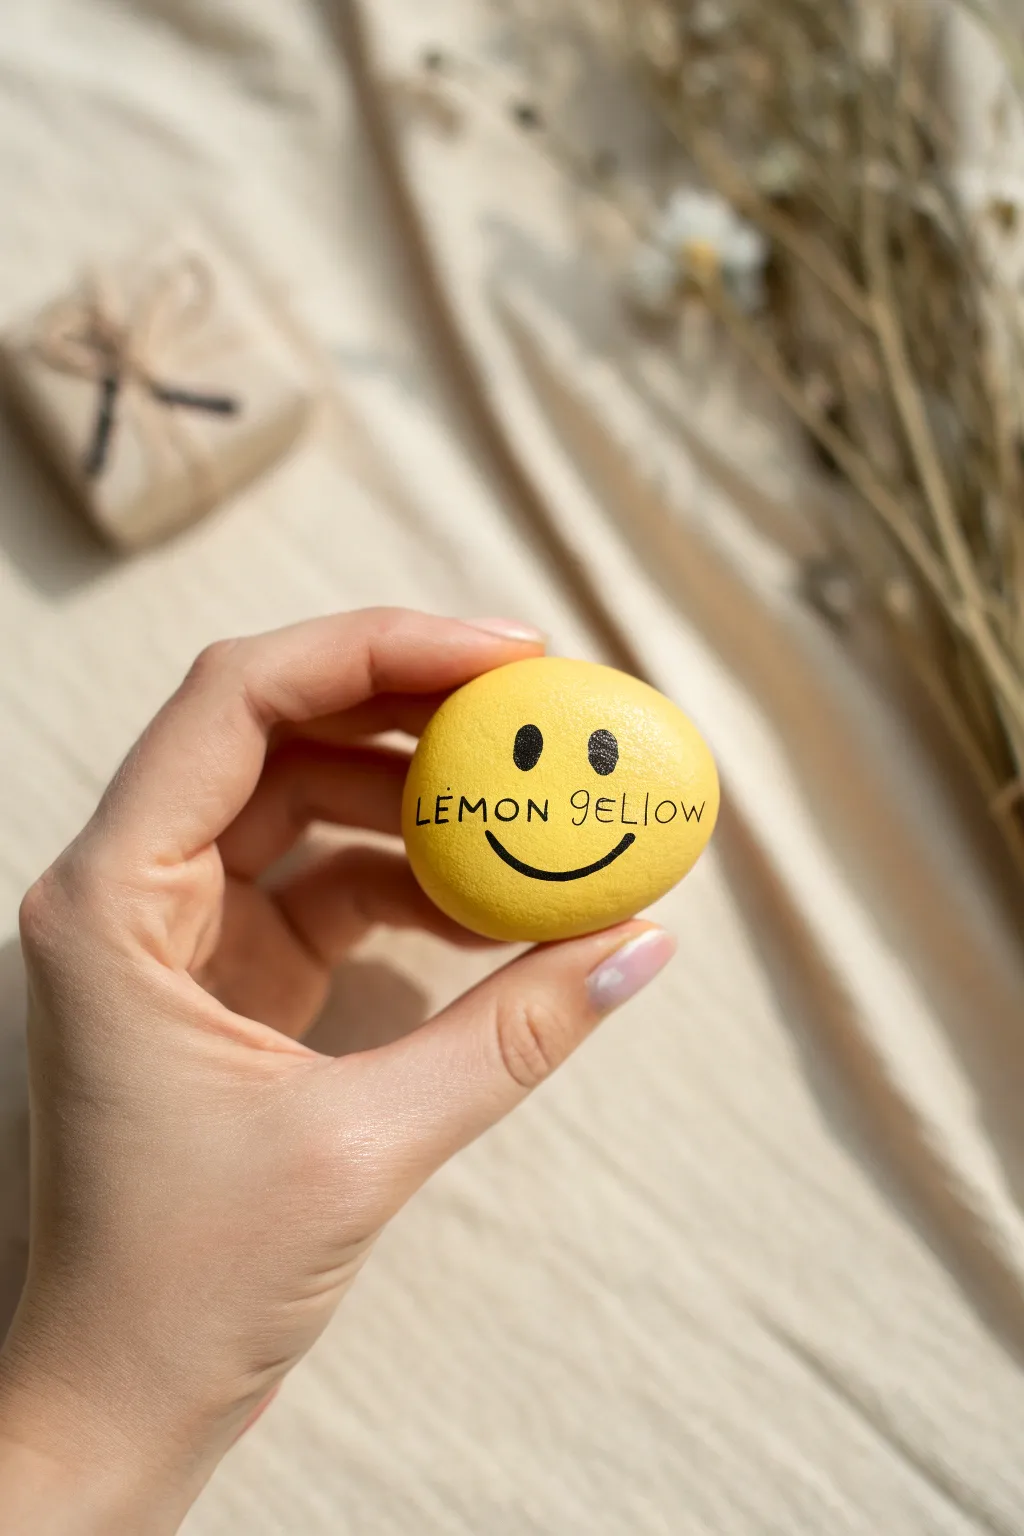
Brighten someone’s day with this impossibly cheerful lemon-themed rock painting. This simple project transforms a humble stone into a vibrant pocket-sized companion featuring a classic smiley face and handwritten text.
How-To Guide
Materials
- Smooth, round river rock (palm-sized)
- Lemon yellow acrylic paint
- White acrylic paint (priming)
- Black fine-tip paint pen or permanent marker
- Flat paintbrush (medium size)
- Clear matte or satin sealant spray
- Pencil (optional)
- Water cup and paper towels
Step 1: Preparation & Base Coat
-
Clean your canvas:
Start by scrubbing your rock with warm soapy water to remove any dirt or oils. Rinse it thoroughly and dry it completely with a towel or let it sit in the sun for a bit. -
Prime the surface:
Since rocks are dark, paint a thin base coat of white acrylic paint first. This ensures your yellow layer on top will look vibrant rather than muddy. Let this dry fully. -
Apply the first yellow layer:
Using your flat brush, paint the entire rock with your lemon yellow acrylic paint. Brush in one direction for a smoother finish. -
Add a second coat:
The first yellow coat might look streaky, so once dry, apply a second layer. I find two coats usually gives that solid, sunny coverage shown in the photo. Allow this to dry completely before touching it.
Ink Smearing?
If your black marker smears when sealing, switch to a water-based paint pen instead of a standard permanent marker, or apply a brush-on sealer very gently.
Step 2: Designing the Smile
-
Sketch the placement:
Lightly use a pencil to mark where you want the eyes and mouth. The eyes sit slightly above the center line, while the smile curves well below it. -
Outline the text area:
Pencil in the words ‘LEMON YELLOW’ horizontally across the middle of the face, right between the eyes and the mouth. Keep the letters small and somewhat whimsical. -
Draw the eyes:
Take your black paint pen or fine marker and color in the two oval eyes. Make sure they are solid black and slightly vertical in shape. -
Create the smile:
Draw the simple curved line for the mouth. Start from the left, swoop down, and curve back up to the right. Keep the line thickness consistent. -
Refine the features:
Go over the eyes and mouth one more time if the yellow background is showing through. The black should be bold and opaque.
Make It Glossy
Swap the matte spray for a high-gloss resin or heavy varnish. It will give the rock a polished, hard candy-like appearance that really pops
Step 3: Lettering & Finishing
-
Write the first word:
carefully write ‘LEMON’ on the left side of the face. Use capital letters but keep the style casual, like handwriting. -
Write the second word:
Write ‘YELLOW’ on the right side. Notice in the example image, the ‘Y’ is stylized almost like a backwards ‘P’ or a loop—try mimicking that for character. -
Review the details:
Look closely at your lettering. If any lines look shaky or faint, carefully re-trace them with your ultra-fine pen to sharpen everything up. -
Let the ink set:
Give the ink at least 15 minutes to dry completely. Smudging happens easily at this stage if you rush to seal it. -
Seal the artwork:
Take the rock outside or to a well-ventilated area. Hold your spray sealant about 10 inches away and apply a light, even mist to protect the paint without making the ink run. -
Final cure:
Let the sealant cure according to the can’s instructions, usually overnight, before handling your cheerful new creation.
You have now created a sunny, durable piece of art perfect for gifting or hiding


Sunglasses Face Rock
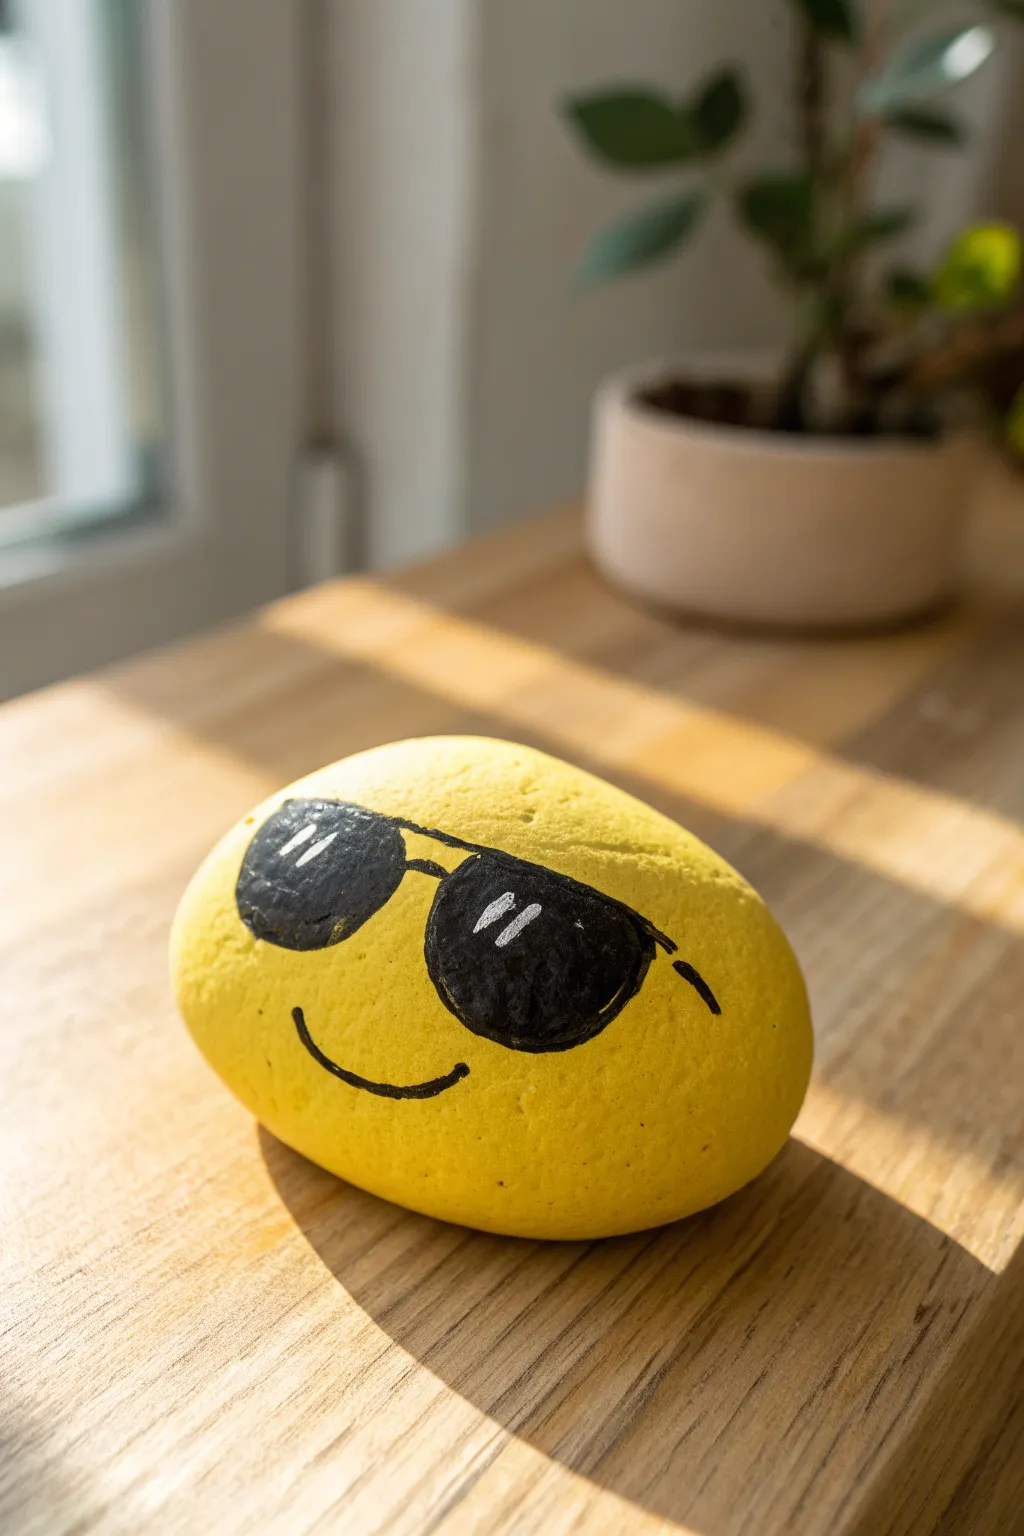
Bring a little bit of sunshine indoors with this cheerful yellow rock featuring sleek black sunglasses. It is a simple yet high-impact design that radiates cool vibes and positivity from any desk or windowsill.
Detailed Instructions
Materials
- Smooth, round river rock (palm-sized)
- Yellow acrylic paint (bright, primary yellow)
- Black acrylic paint or black paint marker (fine tip)
- White acrylic paint or white paint marker (extra fine)
- Flat paintbrush (medium width)
- Detail paintbrush (thin round)
- Pencil for sketching
- Clear sealant spray or varnish (gloss or matte)
Step 1: Base Coat
-
Clean the Stone:
Begin by washing your rock thoroughly with soap and water to remove any dirt or oils. Let it dry completely before starting to ensure the paint adheres properly. -
Prime the Surface (Optional):
If your rock is very dark, you might want to apply a quick coat of white acrylic paint first. This helps the yellow pop, but it isn’t strictly necessary for lighter stones. -
Apply First Yellow Layer:
Using your flat paintbrush, cover the entire top and sides of the rock with bright yellow acrylic paint. Paint in smooth, even strokes. -
Dry and Repeat:
Allow the first coat to dry to the touch. Yellow pigment is often translucent, so you will likely need a second or even third coat to get that solid, opaque look. -
Final Base Dry:
Once you are happy with the coverage, let the yellow base dry completely. It must be bone dry before you sketch on top, or the pencil will dig into the paint.
Step 2: Sketching the Face
-
Outline the Lenses:
Using a pencil very lightly, sketch the shape of the sunglasses. Draw two large, rounded ‘D’ shapes turned on their sides, slightly angled towards each other. -
Connect the Bridge:
Draw a small horizontal line connecting the two lens shapes to create the bridge of the sunglasses. -
Add the Earpieces:
Sketch a small line extending outward from the top outer corner of each lens to represent the arms of the glasses. -
Mark the Smile:
Below the glasses, lightly draw a simple, gentle upward curve for the smile. Keep it slightly off-center or perfectly centered depending on the personality you want to give it.
Smooth Strokes
If using a brush for the black sunglasses, thin your paint slightly with a drop of water. Ink-like consistency flows better and creates sharper edges than thick paint.
Step 3: Painting the Details
-
Fill the Lenses:
Using black acrylic paint and a detail brush, or a black paint marker, carefully fill in the two large lens shapes you sketched. -
Refine the Edges:
I usually go back over the edges of the lenses to make sure they are crisp and smooth curves. Take your time here. -
Paint the Bridge and Arms:
Go over the bridge line connecting the eyes and the small side arms with your black paint or marker. -
Draw the Smile:
Trace over your pencil smile line with black. A paint marker offers excellent control for thin lines like this, preventing wobbly strokes. -
Dry the Black Paint:
Let the black areas dry completely. This is crucial because wet black paint will easily smudge into the yellow or turn grey if you add white too soon.
Glazing Up
Use a high-gloss Mod Podge or resin only on the black lenses after sealing. This makes the glasses look like real plastic against the matte yellow stone.
Step 4: Highlights and Finish
-
Add First Reflection:
To make the sunglasses look shiny, add a small diagonal dash of white paint in the upper right corner of the left lens. -
Add Second Reflection:
Repeat the process on the right lens, ensuring the white dash is in the same relative spot (upper right) so the lighting looks consistent. -
Secondary Glint:
For extra realism, add a much smaller dot or shorter line just below the main white dash on each lens. -
Final Cleanup:
Check your yellow background. If any black smudged, you can carefully touch it up with a tiny bit of yellow paint once the mistake is dry. -
Seal the Rock:
Once the entire rock is 100% dry, take it outside and spray it with a clear acrylic sealer. This protects the paint from chipping and gives it a nice finished sheen.
Place your cool new creation in a sunny spot to start your day with a smile
BRUSH GUIDE
The Right Brush for Every Stroke
From clean lines to bold texture — master brush choice, stroke control, and essential techniques.
Explore the Full Guide
Heart Eyes Face Rock
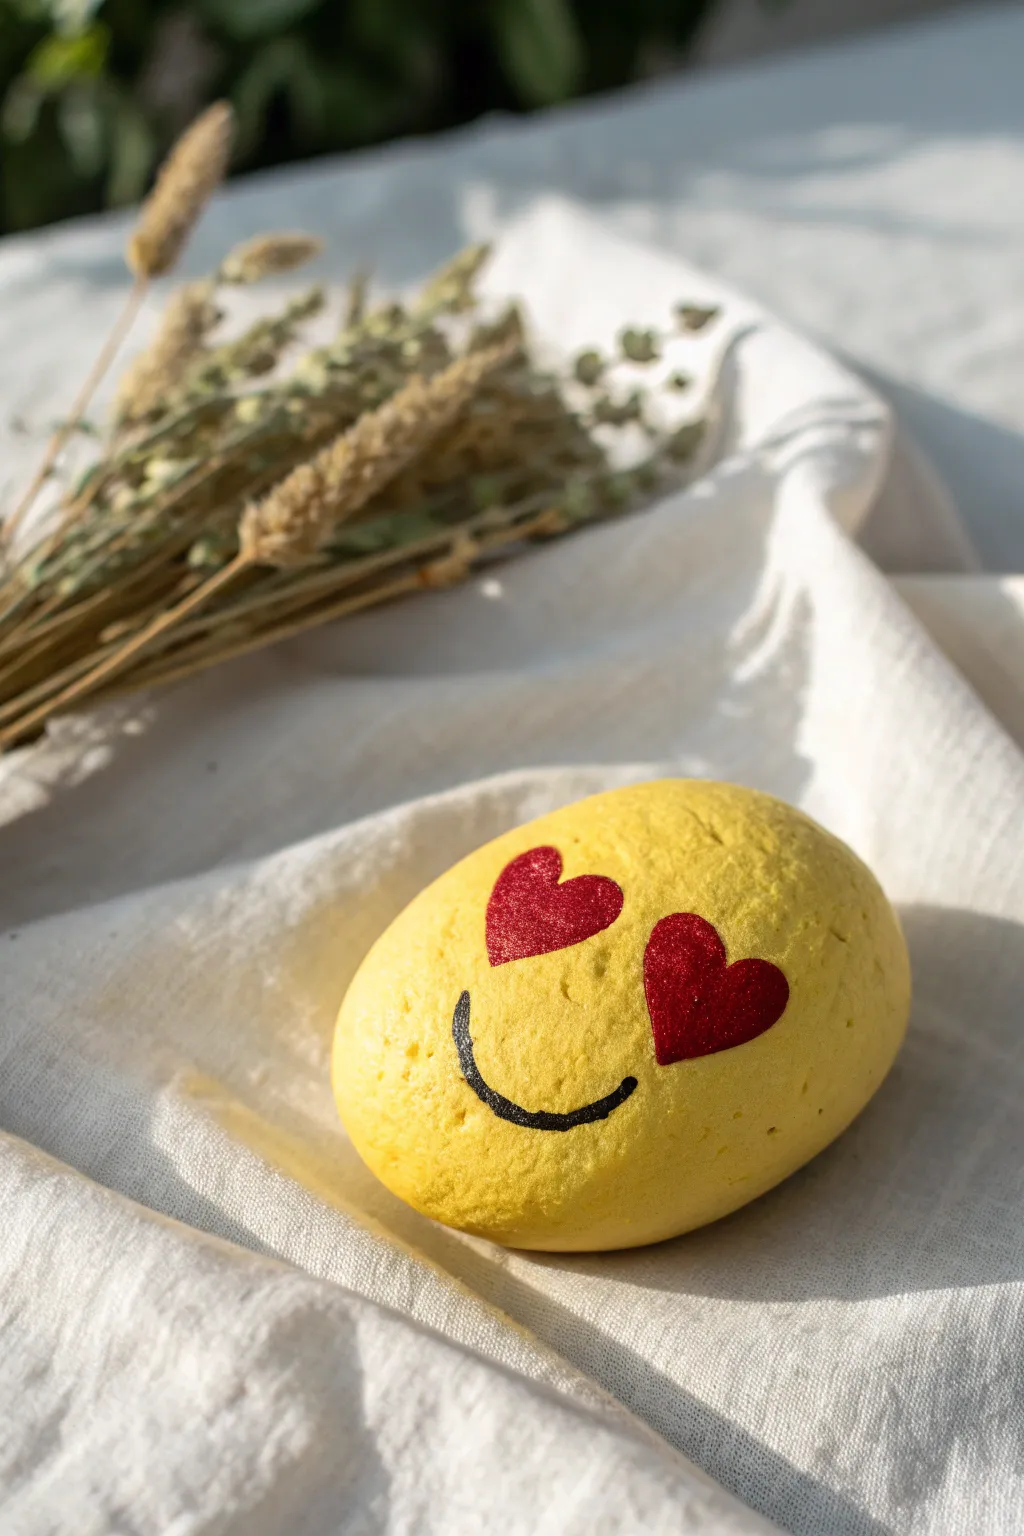
Capture that feeling of adoration with this cheerful heart-eyes emoji painted rock. The bright yellow base and bold red hearts make this a simple yet expressive project perfect for gifting to someone special.
Step-by-Step
Materials
- Smooth, oval river rock
- Yellow acrylic paint (bright, sunny shade)
- Red acrylic paint
- Black acrylic paint or black paint pen
- Wide flat paintbrush
- Small round paintbrush
- Fine detail brush or liner brush
- Clear sealant spray (gloss or matte)
- Palette or paper plate
- Cup of water and paper towels
Step 1: Base Coat Application
-
Clean and prep:
Begin by washing your rock with warm, soapy water to remove any dirt or oils that might prevent the paint from sticking. Dry it completely with a towel. -
First yellow layer:
Load your wide flat brush with bright yellow acrylic paint. Apply a smooth, even coat over the entire top surface of the rock. -
Let it dry:
Allow this first layer to dry completely. Yellow paint can be semi-transparent, so you want to avoid dragging wet paint around. -
Second yellow layer:
Apply a second coat of yellow paint to ensure full coverage. If the rock’s natural color still peeks through, a third coat might be necessary for that solid, emoji-skin look. -
Inspect the surface:
Check for any streaks or uneven spots. I like to smooth out any ridges with a slightly damp brush before the final coat dries.
Smoother Base Coats
To make yellow pop without endless layers, paint a coat of white gesso or white acrylic first as a primer.
Step 2: Painting the Heart Eyes
-
Positioning the eyes:
Visualize where the eyes should go. They should sit slightly above the vertical center of the rock, spaced evenly apart. -
Outline the hearts:
Using a small round brush dipped in red paint, carefully outline two heart shapes. It helps to paint a ‘V’ shape first for the bottom point and then curve the tops. -
Fill them in:
Fill the inside of the heart outlines with the same red paint. Work steadily to keep the edges crisp. -
Check opacity:
If the yellow background shows through the red, let the first layer of hearts dry and apply a second coat for a bold, vibrant crimson. -
Dry time interpretation:
Ensure the red paint is fully dry before moving on, as you don’t want to accidentally smudge the hearts while working on the mouth.
Step 3: Adding the Smile & Finishing
-
Draft the smile:
If you are nervous about freehanding, you can very lightly sketch the curve of the smile with a pencil first. -
Paint the mouth:
Use a fine liner brush with black paint, or a black paint pen for easier control. Draw a simple, U-shaped curve centered below the eyes. -
Refine the line:
Thicken the line slightly if needed to match the boldness of the hearts, tapering the ends just a bit for a clean finish. -
Final drying:
Let the entire rock sit undisturbed until all paint is completely dry to the touch. -
Seal the deal:
Take the rock to a well-ventilated area and apply a light coat of clear sealant spray. This protects the paint from chipping and gives it a finished sheen.
Add Some Sparkle
Mix a tiny pinch of red glitter into the paint for the hearts to give the eyes a shimmering, love-struck effect.
Place this sunny little creation on your desk or give it to a friend to brighten their day
Winky Face Rock

Brighten up your garden or desk with this cheerful, sunny personality captured on stone. This simple yet expressive winky face design uses bold yellow coverage and crisp black lines to create an instant mood booster.
How-To Guide
Materials
- Smooth, oval-shaped river rock
- Bright yellow acrylic paint
- Black acrylic paint or a black fine-tip paint pen
- White acrylic paint (priming)
- Flat paintbrush (medium)
- Fine detail paintbrush (round)
- Clear sealant spray or varnish
- Palette or paper plate
- Water cup and paper towels
Step 1: Preparing the Base
-
Clean the stone:
Begin by thoroughly scrubbing your rock with warm water and a little dish soap to remove any dirt or oils. Let it dry completely before painting. -
Apply a white primer:
To make the yellow truly pop, paint a base layer of white acrylic paint first. Without this, the yellow might look muddy or translucent against the dark stone. -
Let the primer dry:
Wait until the white coat is completely dry to the touch. This usually takes about 15-20 minutes depending on how thick you applied it. -
First yellow coat:
Apply your first layer of bright yellow paint using a flat brush. Use long, smooth strokes to minimize brush ridges. -
Assess coverage:
Yellow can be a tricky pigment for opacity. If the white is still peeking through, let the first coat dry and simply add a second or even third coat until the color is solid and vibrant. -
Check for smoothness:
Ensure there are no clumps of paint. A smooth surface is crucial for drawing the clean facial features later.
Smooth Operator
Sanding the raw stone with fine-grit sandpaper (around 220 grit) before washing it creates the perfect silky surface for painting details.
Step 2: Drawing the Face
-
Plan the placement:
Visualize where the face will sit. The eyes should be slightly above the vertical center, spaced comfortably apart. -
Paint the open eye:
Using a fine detail brush dipped in black paint (or a paint pen), draw a simple solid black dot on the left side for the open eye. -
Create the winking eye:
On the right side, paint a downward-curving festive arch for the winking eye. Start thin and press slightly harder in the middle of the stroke. -
Add lashes to the open eye:
With the very tip of your brush, flick three small lines upward from the top of the solid dot eye to create eyelashes. -
Add lashes to the winking eye:
Repeat the process on the winking eye, adding three small flicks radiating from the center of the arch. -
Form the smile:
Paint a wide, generous ‘U’ shape for the smile. I find it helpful to mark the two endpoints first and then connect them with a swooping line. -
Add the cheek lines:
At the very ends of the smile, add tiny, almost vertical tick marks to give the mouth deeper expression and cheek definition. -
Paint the nose:
Add two small dots right in the center of the face, slightly below the eyes, to form a cute button nose. -
Refine the lines:
Go back over any black lines that look pale or shaky, thickening them slightly if needed to ensure bold contrast.
Step 3: Finishing Touches
-
Allow to cure:
Be patient and let the black details dry completely. If you seal it while the paint is wet, the black will smear across the yellow. -
Seal the artwork:
Apply a coat of clear sealant or varnish. This protects the paint from chipping and gives the rock a professional, finished sheen.
Wobbly Lines?
If you struggle with brush control for the face, swap the paint for an acrylic paint marker. It offers the precision of a pen with paint durability.
Enjoy your cheerful new creation sitting on your shelf or hiding in the garden

PENCIL GUIDE
Understanding Pencil Grades from H to B
From first sketch to finished drawing — learn pencil grades, line control, and shading techniques.
Explore the Full Guide
You Are My Sunshine Quote

Brighten someone’s day with this cheerful yellow painted stone featuring the classic lyric ‘You Are My Sunshine’. Its smooth, matte finish and bold lettering make it a simple yet heartwarming keepsake or garden decoration.
Step-by-Step Guide
Materials
- Smooth, round river rock (approx. 2-3 inches)
- Acrylic paint (bright yellow)
- Fine grit sandpaper (optional)
- Wide flat paintbrush
- Posca paint pen (black, fine tip) or fine script liner brush
- Graphite pencil
- Matte spray sealant or brush-on varnish
- Soap and water for cleaning
- Paper towel
Step 1: Preparing the Base
-
Clean the stone:
Start by washing your river rock thoroughly with warm soapy water to remove any dirt, oil, or grit. Dry it completely with a paper towel. -
Check for smoothness:
Run your fingers over the surface. If there are any rough patches that might interfere with your writing later, gently sand them down with fine-grit sandpaper until smooth. -
Apply the first coat:
Using a wide flat brush, apply an even coat of bright yellow acrylic paint to the top surface of the rock. -
Let it dry:
Allow the first layer to dry completely to the touch. Yellow pigment is often semi-transparent, so patience here ensures a solid color later. -
Apply second coat:
Paint a second layer of yellow to achieve full opacity. If you can still see the dark stone underneath, a third thin coat might be necessary. -
Full cure:
Let the yellow base coat dry thoroughly, preferably for at least an hour, to ensure the surface is hard enough to write on without denting the paint.
Step 2: Adding the Typography
-
Draft the layout:
Use a graphite pencil to lightly sketch out your text placement. Center the words ‘YOU ARE’ at the top, ‘MY’ in the middle, and ‘SUNSHINE’ at the bottom. -
Lettering style:
Aim for a casual, handwritten sans-serif font. Notice how the letters in the image are slightly loose and playful rather than rigid. -
Ink the first line:
Using your black fine-tip paint pen, carefully trace over the pencil lines for ‘YOU ARE’. Keep your pressure even to avoid ink puddles. -
Center the middle word:
Write the word ‘MY’ in the center. I find it helpful to make these letters slightly larger or looser to fill the central space nicely. -
Draw the heart:
To the right of the word ‘MY’, draw a small, simple heart. Fill it in solid black. -
Complete the quote:
Ink the final word ‘SUNSHINE’. Because it is a long word, ensure you start far enough to the left to fit all letters without cramping the end. -
Thicken the strokes:
Go back over your letters to slightly thicken the strokes, giving them a bolder look that stands out against the bright yellow background. -
Erase guidelines:
Once the black ink is absolutely dry (give it 15 minutes to be safe), very gently erase any visible pencil marks with a soft eraser.
Paint Opacity Tip
Yellow can be streak-prone. Paint a base coat of white first; this makes top layers of yellow pop vividly with fewer coats.
Step 3: Finishing Touches
-
Inspect for touch-ups:
Look closely at your letters. If the yellow shows through the black ink anywhere, add a delicate second layer of ink. -
Seal the artwork:
To protect your design from chipping or fading, apply a coat of matte spray sealant or brush-on varnish. -
Dry and display:
Allow the sealant to cure according to the manufacturer’s instructions before placing the rock in your garden or gifting it.
Add Some Sparkle
Mix a tiny amount of gold glitter into your sealing, top-coat varnish to give the ‘sunshine’ theme a subtle, shimmering effect in the sunlight.
Now you have a little pocket of sunshine ready to brighten any corner of your home
Be Kind Kindness Rock
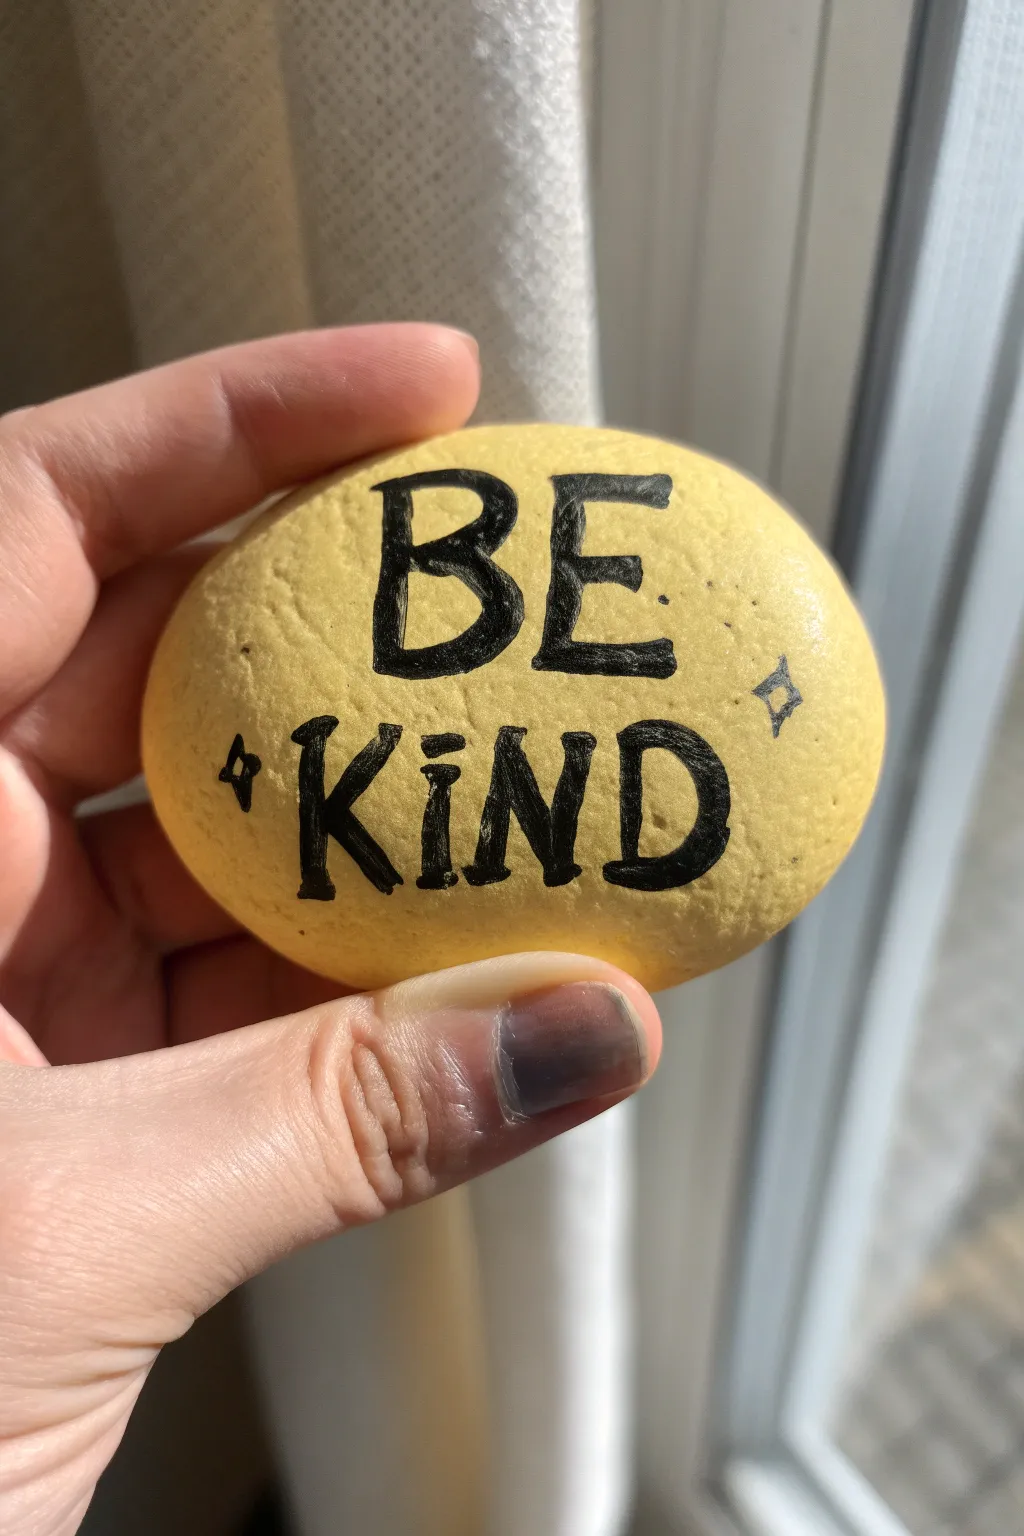
Spread a little positivity with this bright and cheerful kindness rock featuring bold lettering on a sunny yellow background. Its simple message and vibrant color make it a perfect token to leave in a park or garden for a stranger to find.
How-To Guide
Materials
- Smooth, oval river rock (approx. 2-3 inches)
- Yellow acrylic paint (matte or satin finish)
- White acrylic paint (for base coat)
- Flat paintbrush (medium size)
- Black paint pen (fine or medium tip) or thin liner brush with black acrylic paint
- Pencil (optional)
- Clear spray sealer or varnish (gloss or matte)
Step 1: Preparation & Base Coat
-
Clean the stone:
Start by washing your rock with warm soapy water and scrubbing away any dirt or grit. Let it dry completely before you begin painting. -
Apply a white primer:
To make the yellow really pop, paint a base layer of white acrylic paint over the top surface of the rock. Let this layer dry fully. -
Paint the yellow background:
Using your flat brush, apply a coat of bright yellow acrylic paint over the white base. Use long, smooth strokes to minimize brush marks. -
Add a second coat:
Yellow paint can sometimes be translucent, so apply a second coat once the first is dry to ensure solid, opaque coverage. -
Dry completely:
Set the rock aside and allow the yellow paint to cure completely. It must be bone dry, or the pen nib might scratch the paint later.
Paint Pen Clogged?
If your black pen stops flowing, scribble on a scrap piece of paper or press the nib down gently on cardboard to re-saturate the tip with ink.
Step 2: Lettering & Details
-
Draft the layout:
Lightly sketch the words ‘BE KIND’ in pencil. Center ‘BE’ on the top half and ‘KIND’ on the bottom half to balance the design. -
Outline the ‘B’:
Using your black paint pen, carefully distinctive block letter shape for the ‘B’. Keep the lines relatively thin at first. -
Thicken the ‘B’:
Go back over your lines to thicken them, adding slight serifs or varying the line weight to give it a hand-lettered feel. -
Outline the ‘E’:
Draw the ‘E’ next to the ‘B’, making sure the height matches. Leave a little breathing room between the letters. -
Bold the ‘E’:
Thicken the strokes of the ‘E’ to match the weight of the ‘B’, filling in any shaky lines to make them solid and bold. -
Start the second word:
Move to the bottom line. Outline the letters ‘K’ and ‘I’, ensuring they are centered under the word above. -
Finish the word ‘KIND’:
Complete the phrase by outlining and filling in the ‘N’ and ‘D’. Stand back occasionally to check your spacing. -
Refine the text:
Review all your black letters. I find that going over the strokes a second time creates a deeper, darker black contrast against the yellow. -
Add the sparkle:
Draw a small diamond-shaped starburst (a four-pointed star) on the left side of the text, between the two lines. -
Balance the design:
Add a second matching diamond starburst on the right side to frame the message perfectly.
Add Some Texture
After sealing, add tiny dots of white paint inside the thickest parts of the black letters to create a cute ‘highlight’ or reflection effect.
Step 3: Finishing Touches
-
Erase pencil marks:
If any pencil lines are still visible and the paint marker is 100% dry, gently erase them. -
Apply sealer:
Take the rock to a well-ventilated area and spray it with a clear acrylic sealer. This protects your art from the elements if you plan to hide it outdoors.
Now you have a beaming ray of sunshine ready to brighten someone’s day


Simple Sun With Rays
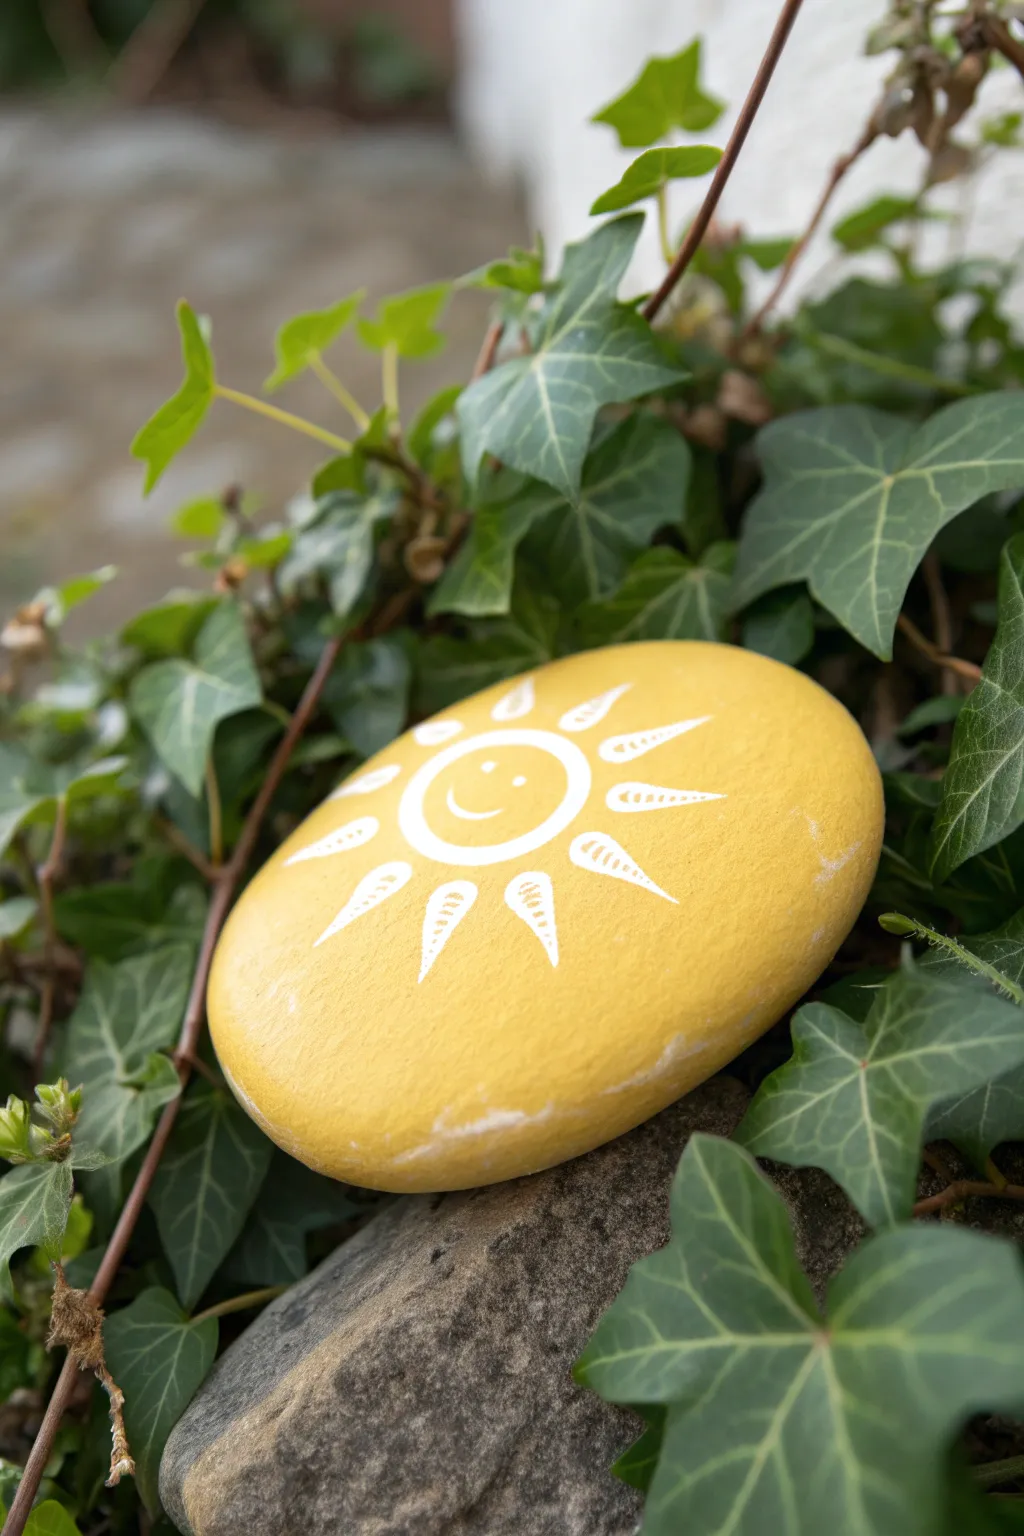
Brighten up your garden or windowsill with this cheerful, minimalist design that radiates positivity. A simple coat of sunny yellow provides the backdrop for a clean, white line drawing of a smiling sun, making it a perfect project for beginners.
Step-by-Step Tutorial
Materials
- Smooth, oval-shaped river rock
- Yellow acrylic paint (bright, sunny shade)
- White paint pen (fine or extra-fine tip)
- Wide flat paintbrush
- Pencil (optional)
- Clear spray sealer or varnish (matte or satin)
- Soap and water for cleaning
Step 1: Preparation & Base Coat
-
Clean surface:
Begin by washing your rock thoroughly with soap and warm water to remove any dirt or oils. Scrub it gently, then let it dry completely before starting. -
First layer:
Using a wide flat paintbrush, apply a generous coat of yellow acrylic paint to the top surface of the rock. Don’t worry about the underside yet. -
Smooth coverage:
Brush in long, even strokes to minimize texture. If the paint seems thin, that’s normal for yellows; let it dry fully before assessing. -
Second layer:
Apply a second coat of yellow paint once the first is dry to the touch. This will make the color opaque and vibrant. -
Final touches:
Check for any streaks or uncovered spots. I like to add a third thin coat if needed to get that really saturated, sunny look. Allow the base to cure completely for at least an hour.
Step 2: Drawing the Sun
-
Center circle:
Shake your white paint pen well. Start by drawing a simple circle in the center of the rock; keep the line weight consistent. -
Drawing the face:
Inside the circle, add two small dots for eyes. Below them, draw a simple, curved upward line for a classic smile. -
Planning rays:
Visualize roughly 9 to 10 rays spacing evenly around the circle. If you are nervous, you can mark their positions lightly with a pencil first. -
Main ray shape:
Draw the first ray as an elongated triangle shape pointing away from the circle, but leave the base of the triangle open. -
Continuing the pattern:
Work your way around the sun, drawing similar triangular spikes. The tips should be sharp, while the sides curve slightly inward. -
Adding details:
Inside each ray, draw three to four small horizontal lines. These little hash marks add texture and make the rays look like they are shimmering. -
Refining lines:
Go back over your white lines a second time if the yellow background is showing through too much. This creates a crisp, sticker-like effect.
Paint Pen Won’t Flow?
If the tip feels dry, press it gently onto a scrap piece of paper (not the rock) to pump fresh ink into the nib without making a puddle on your art.
Step 3: Sealing & Finishing
-
Drying time:
Allow the paint pen ink to dry completely. This is crucial because wet ink will smear instantly when sealed. -
Sealing:
Take the rock to a well-ventilated area. Hold your spray sealer about 10-12 inches away and apply a light, misting coat. -
Final coat:
Once the first mist is dry, apply a slightly heavier second coat of sealer to protect your painting from weather and wear.
Pro Tip: Brighter White
Yellow can be a strong color to cover. For the brightest white lines, let the first pen layer dry and trace over it again for pop.
Place your little sun in a shady garden spot to bring instantaneous warmth and cheer
Sunflower On Yellow Pop
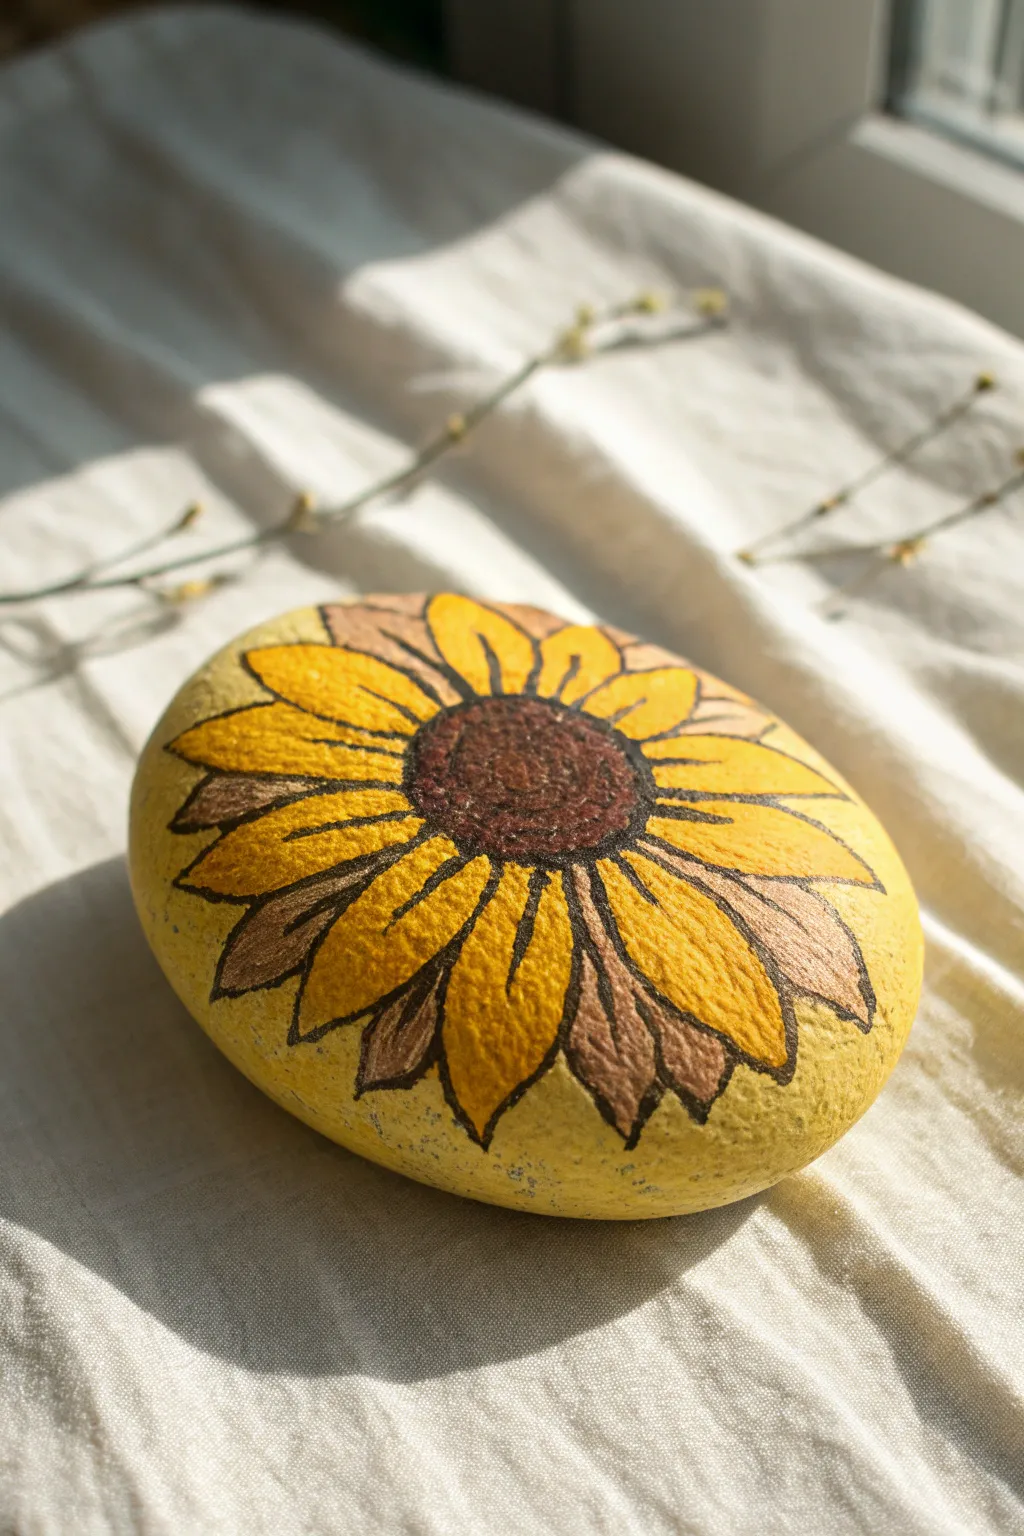
Brighten up your garden or windowsill with this sunny yellow rock featuring a bold, graphic sunflower. The warm base color makes the petals pop, while distinct black outlines give it a wonderful illustrative quality.
How-To Guide
Materials
- Smooth, oval river rock
- Yellow acrylic paint (bright yellow and golden yellow)
- Brown acrylic paint (dark brown and light brown/bronze)
- Black acrylic paint or extra-fine paint marker
- Flat paintbrush (medium)
- Detail paintbrush (fine)
- Pencil
- Clear sealant sketch (gloss or matte)
Step 1: Base and Sketch
-
Clean the surface:
Begin by washing your stone with warm soapy water to remove any dirt or oils. Let it dry completely in the sun or with a towel. -
Apply the base coat:
Using a flat brush, paint the entire top surface of the rock with a bright, sunny yellow. The goal is a solid, opaque background, so you may need two coats. Allow full drying time between layers. -
Sketch the center:
Once the yellow base is perfectly dry, use a pencil to lightly draw a medium-sized oval in the center of the rock. This will be the seed head. -
Outline the petals:
Sketch radiating petals around the center oval. Draw them slightly pointed at the tips, layering some behind others to create fullness. Don’t worry about perfection; organic shapes look best.
Step 2: Painting the Flower
-
Fill the center:
Paint the central oval with dark brown acrylic paint. Dab the paint on gently to create a slightly textured surface. -
Paint primary petals:
Using a golden yellow shade that is slightly darker than your background color, fill in the top and side petals. Leave a tiny gap between the paint and your pencil lines so you don’t lose your guide. -
Add bronze accents:
For the bottom three or four petals, use a light brown or bronze metallic paint. This creates a shadow effect and adds visual weight to the bottom of the design. -
Second pass on petals:
If the yellow petals look too transparent against the yellow background, add a second layer of golden yellow to ensure they stand out. -
Detail the center:
Mix a tiny bit of lighter brown or tan. Using the very tip of a brush, stipple small dots into the center of the dark brown oval to mimic the texture of seeds.
Uneven Lines?
If your hand shakes while outlining, try resting your pinky finger on a dry part of the rock for stability. A paint marker is often easier to control than a brush.
Step 3: Defining Details
-
Prepare for outlining:
Ensure all paint layers are completely dry to the touch. This is crucial to prevent the black ink or paint from dragging or bleeding. -
Outline the center:
Using a fine liner brush with black paint or a black paint pen, carefully trace the outline of the central brown oval. -
Outline the petals:
Trace the outer edges of every petal. Keep your hand steady, but allow line thickness to vary naturally for an artistic feel. -
Add the central vein:
Draw a single line down the center of each petal, starting from the flower center and stopping about three-quarters of the way down the petal. -
Add texture lines:
Add smaller, shorter flicking lines branching off the center vein or coming from the base of the petal to suggest folds and texture. -
Check contrast:
Step back and look at your rock. If any outlines look too thin or faint, go over them one more time to make the design bold. -
Seal the artwork:
Once the black work is fully cured (give it at least an hour), apply a coat of clear spray sealant to protect your rock from the elements.
Pro Tip: Depth
Mix a tiny drop of orange into your yellow paint for the petals closest to the center. This slight gradient adds instant 3D depth to the flower.
Now you have a permanent piece of sunshine to keep for yourself or hide for a neighbor to find
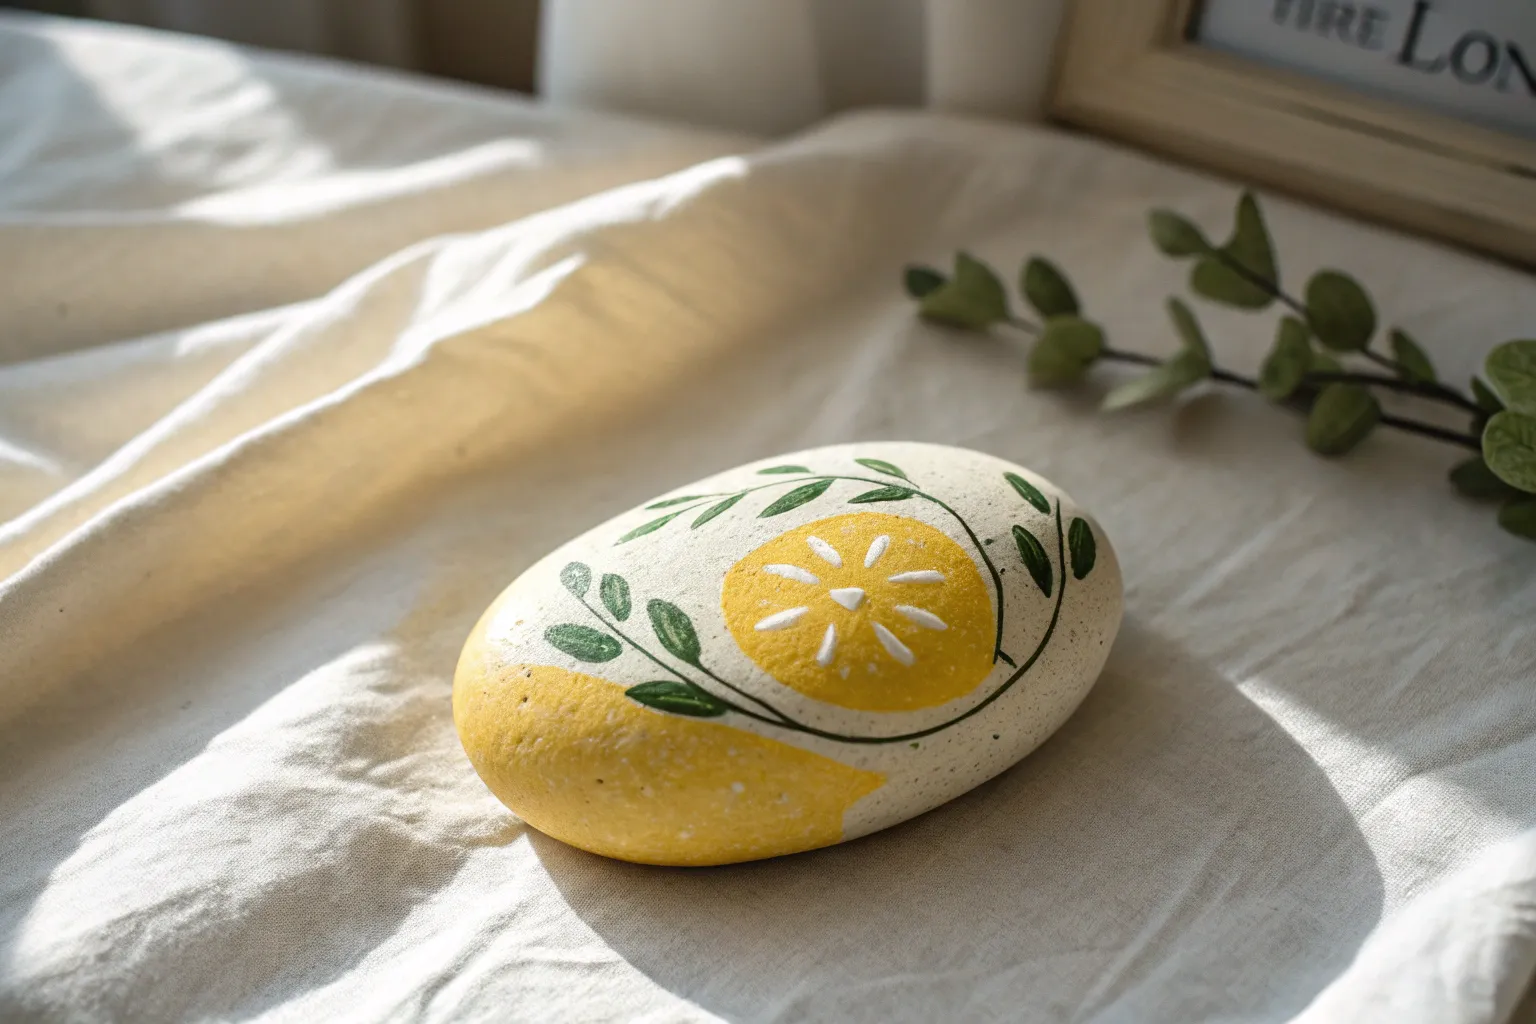
Lemon Slice Rock
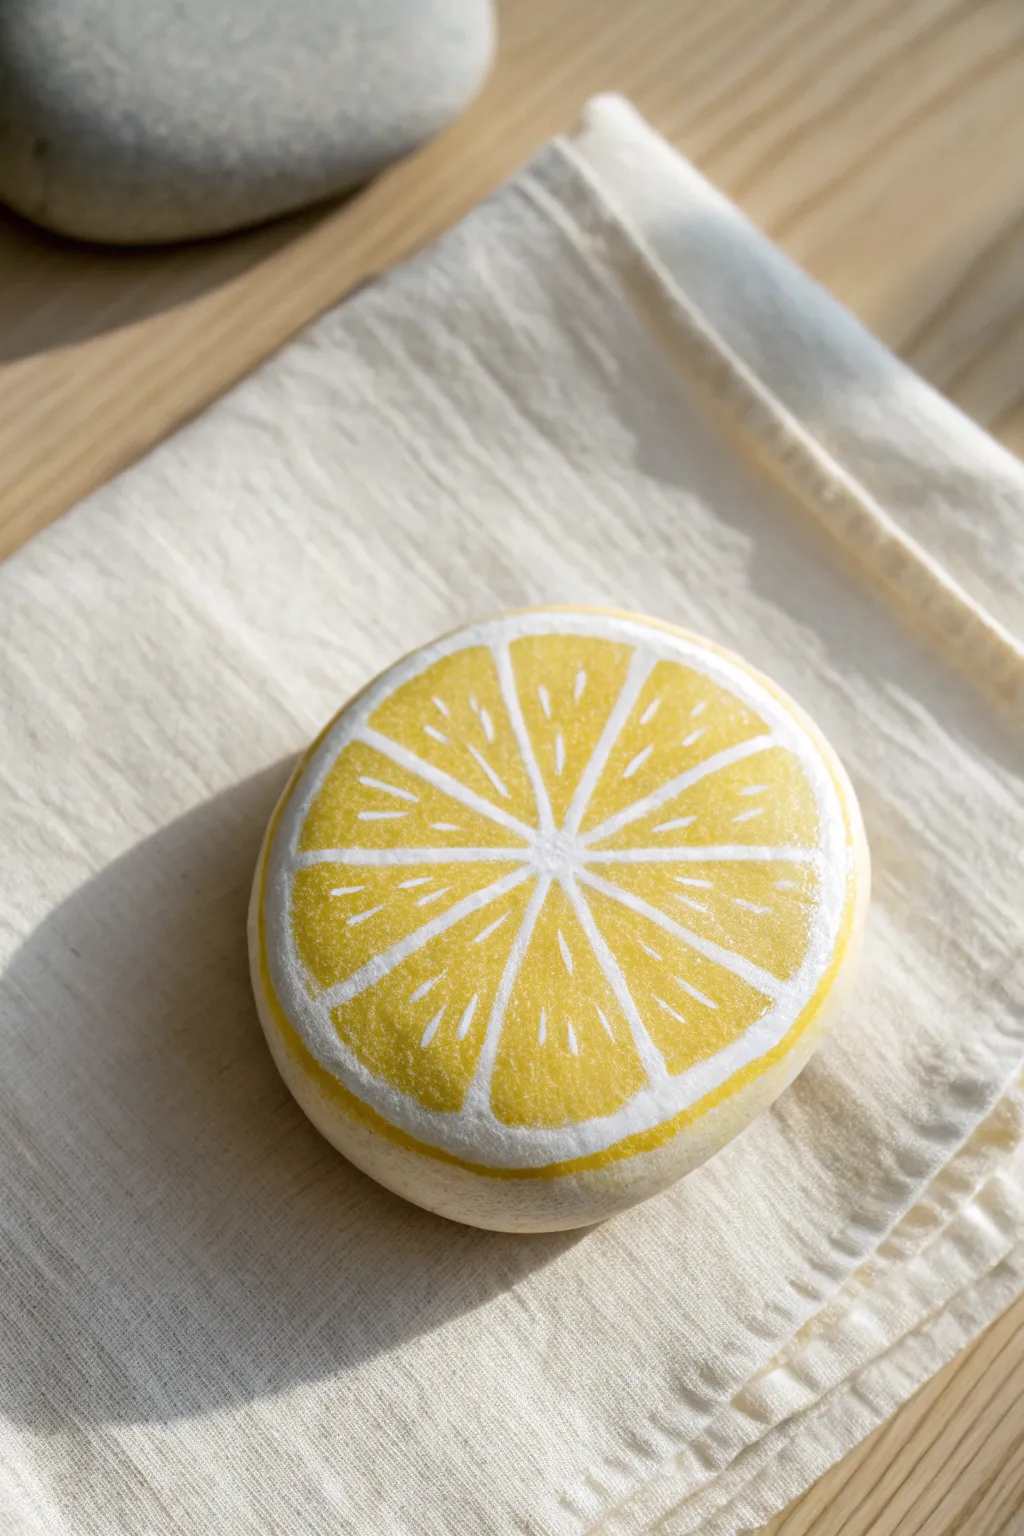
Transform a simple round stone into a sunny slice of citrus that never spoils. This cheerful project uses layering techniques to capture the juicy texture of lemon pulp, making it a perfect accent for a kitchen shelf or garden pot.
Step-by-Step
Materials
- Smooth, round river rock (flat on top helps)
- White acrylic paint or gesso
- Yellow acrylic paint (bright lemon yellow)
- Ochre or darker yellow acrylic paint
- Flat shader brush (size 6 or 8)
- Fine liner brush (size 0 or 1)
- Small round brush (size 2)
- Matte or satin varnish
Step 1: Base Preparation
-
Clean the Stone:
Begin by washing your stone thoroughly with soap and water to remove any dirt or oils that might repel the paint. Let it dry completely. -
Prime the Surface:
Using your flat shader brush, apply an even coat of white acrylic paint or gesso over the top surface of the rock. -
Build the Opacity:
One coat likely won’t be enough. Let the first layer dry, then apply a second or third coat until you have a solid, bright white circle. This white background is crucial for making the yellow pop later.
Step 2: Mapping the Design
-
Outline the Rind:
Once the white base is bone dry, use a pencil to lightly sketch a circle about 1/4 inch in from the edge of your white background. This gap will become the white pith. -
Mark the Center:
Place a small dot in the very center of your circle. -
Sketch the Segments:
Draw straight lines radiating from the center dot to your inner circle, dividing the lemon into typically 8 to 10 equal wedges. These will become the juicy segments. -
Round the Corners:
Inside each wedge, sketch the shape of the fruit segment by rounding off the corners slightly, ensuring there is a gap of white space between each segment and the central point.
Juicy Texture Trick
When painting the pulp texture, use a ‘stippling’ motion with a dry brush. This tiny dotting action creates a more realistic fruit texture than smooth strokes.
Step 3: Painting the Fruit
-
Base Yellow Layer:
Load a round brush with your bright lemon yellow. Fill in each fruit segment carefully, leaving the white ‘pith’ lines visible between the wedges and around the outer rim. -
Paint the Outer Peel:
Using the same yellow, paint a thin ring around the very outer edge of the white base to represent the lemon’s skin. I find a liner brush works best for this delicate curve. -
Add Texture Depth:
Mix a tiny amount of ochre or darker yellow into your bright yellow. Using a very fine brush, paint tiny, short streaks near the outer curve of each segment, flicking inward. -
Create Juicy Highlights:
Clean your fine brush and pick up some pure white paint. Paint tiny, irregular dashes and tear-drop shapes inside the yellow segments to mimic glistening juice sacs. -
Layering for Realism:
Go back over some of the white highlights with a very watery wash of yellow. This pushes some details back into the pulp while keeping others bright on the surface.
Uneven Lines?
If your segment lines look shaky, thicken the white pith slightly. Irregularity actually looks more organic and natural than geometrically perfect lines.
Step 4: Finishing Touches
-
Refine the Pith:
If your yellow paint strayed into the white lines, use your white paint and liner brush to clean up the dividing lines between segments, keeping them crisp. -
Brighten the Center:
Add a tiny, slightly transparent dab of white right at the center point where all the segments meet to soften the convergence. -
Paint the Sides:
Don’t forget the rest of the rock. Paint unpainted sides of the stone with a creamy off-white or light beige to mimic the exterior rind texture. -
Seal the Artwork:
Once the paint is fully cured (give it at least an hour), apply a coat of matte or satin varnish to protect your work and unify the sheen.
Now you have a refreshing piece of summer decor that looks good enough to squeeze
Yellow Butterfly Wings
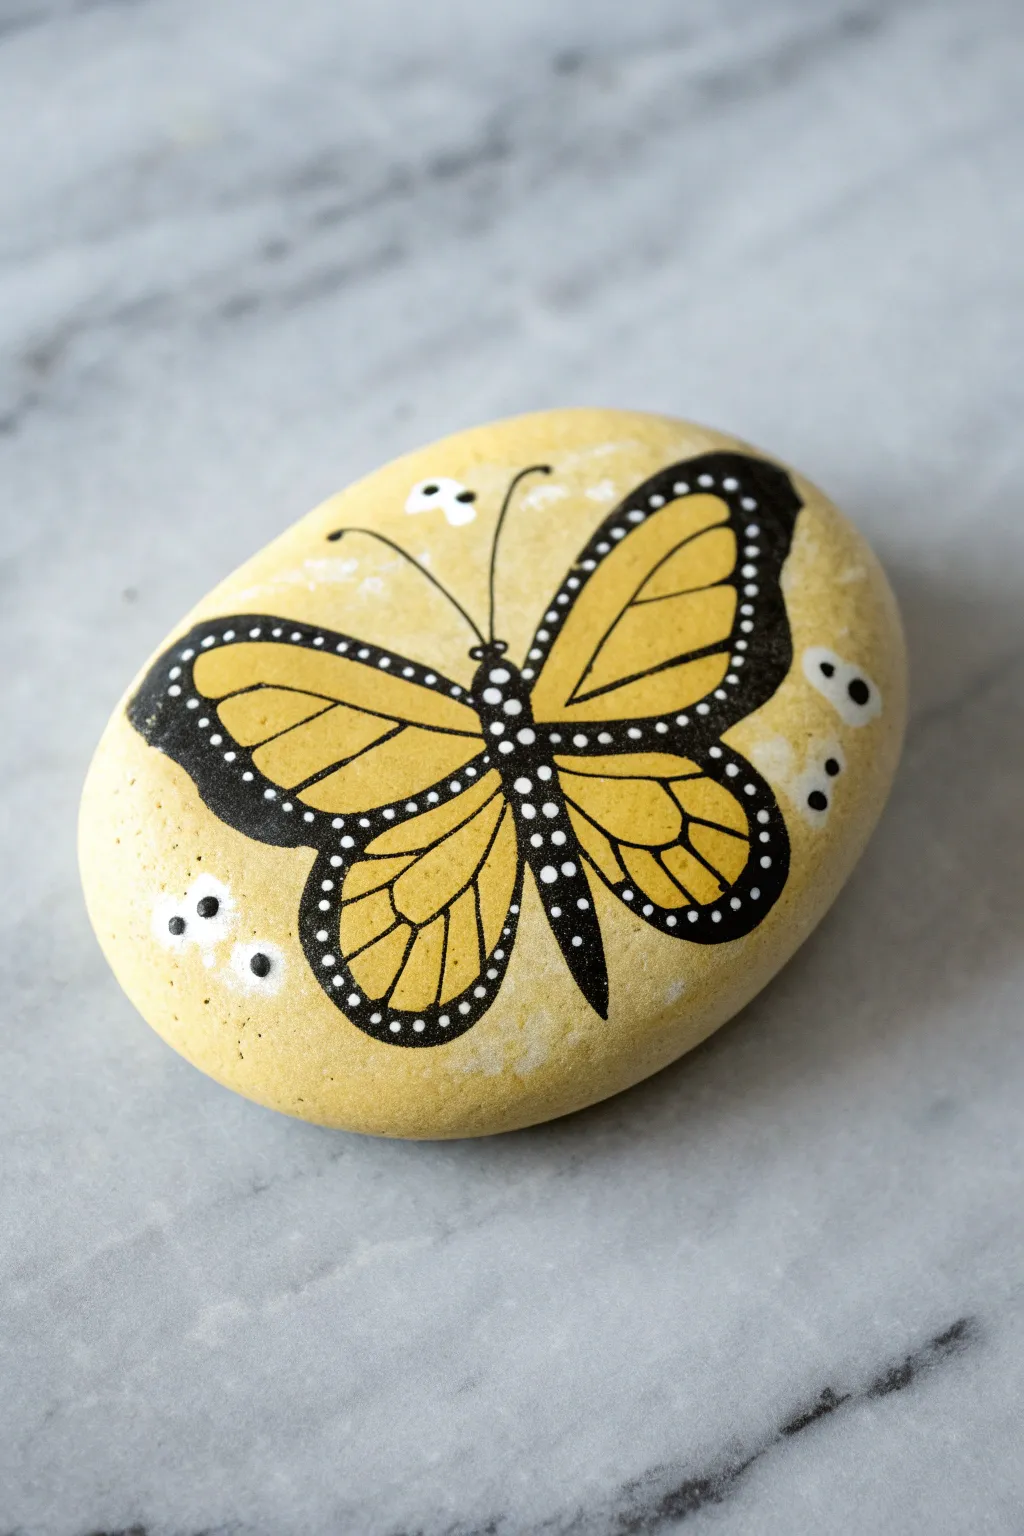
Transform a smooth, rounded stone into a vibrant piece of garden art with this cheerful yellow butterfly design. The bright golden background makes the bold black wing patterns pop, creating a stunning contrast that fits perfectly in a flowerbed or on a desk.
How-To Guide
Materials
- Smooth, oval-shaped river rock
- Yellow acrylic paint (bright daffodil or sunflower shade)
- Black acrylic paint or fine-point black paint pen
- White acrylic paint or white paint pen / dotting tool
- Flat paintbrush (medium size)
- Fine detail paintbrush (size 0 or 00)
- Pencil
- Spray sealer or varnish (gloss or matte)
Step 1: Base Coat Preparation
-
Clean the surface:
Begin by scrubbing your rock with warm soapy water to remove any dirt or oils. Let it dry completely before starting, as paint won’t adhere well to a damp surface. -
Apply the first layer:
Using your medium flat brush, coat the entire top surface of the rock with bright yellow acrylic paint. Brush in one direction for a smooth finish. -
Add opacity:
Let the first coat dry fully. Apply a second—and possibly third—coat of yellow until the color is solid and you can no longer see the natural stone color through the paint. Allow this base to cure completely.
Step 2: Sketching the Outline
-
Draw the body:
Lightly sketch a thin, elongated oval shape in the center of the rock using a pencil. This will be the butterfly’s body. -
Outline the wings:
Sketch two large upper wing shapes extending outward from the top of the body, and two slightly smaller, rounded lower wings extending from the bottom. Aim for symmetry, but don’t worry if it’s not perfect. -
Mark inner details:
Inside each wing section, lightly draw the ‘cells’ or segments that will remain yellow. These look like elongated teardrops or rounded geometric shapes.
Uneven Coverage?
If your yellow base looks streaky, resist adding thick globs. Instead, apply multiple thin layers, letting each one dry fully in between.
Step 3: Painting the Structure
-
Fill the body:
Load a fine brush with black paint or use a black paint pen to fill in the central body shape. Taper the bottom into a sharp point. -
Outline the wings:
Trace over your pencil lines for the outer edges of the wings with black paint. Make this outer line thick, as it needs to hold white dots later. -
Create the veins:
Carefully paint the thin lines that separate the inner yellow sections. I find using a paint pen here gives me much steadier lines than a brush. -
Thicken key areas:
Go back and thicken the black borders where the upper and lower wings meet the body, creating a solid framework for the design. -
Add antennae:
From the top of the head, paint two very thin, curved lines extending outward for the antennae. Add tiny dots at the very tips.
Add Some sparkle
Mix a tiny amount of gold glitter into your final sealant coat or trace the interior yellow wing segments with metallic gold ink for extra shine.
Step 4: Detailing and Finishing
-
Dot the borders:
Dip a mechanical pencil tip or a very fine dotting tool into white paint. Carefully place small white dots along the thick black outer border of the wings. -
Decorate the body:
Add a vertical row of tiny white dots down the center of the black body to give it texture and dimension. -
Add background accents:
In the negative yellow space around the butterfly, paint clusters of three dots: two larger white dots with black centers, and smaller decorative white dots nearby. -
Clean up edges:
If any yellow paint got smudged or if pencil lines are visible, touch them up carefully with a little fresh paint. -
Seal the work:
Once the paint is absolutely dry (give it a few hours), spray the entire rock with a clear sealant to protect your artwork from chipping or fading.
Place your finished rock in a sunny spot to enjoy the cheerful yellow color every day
Goldfish On Yellow Background
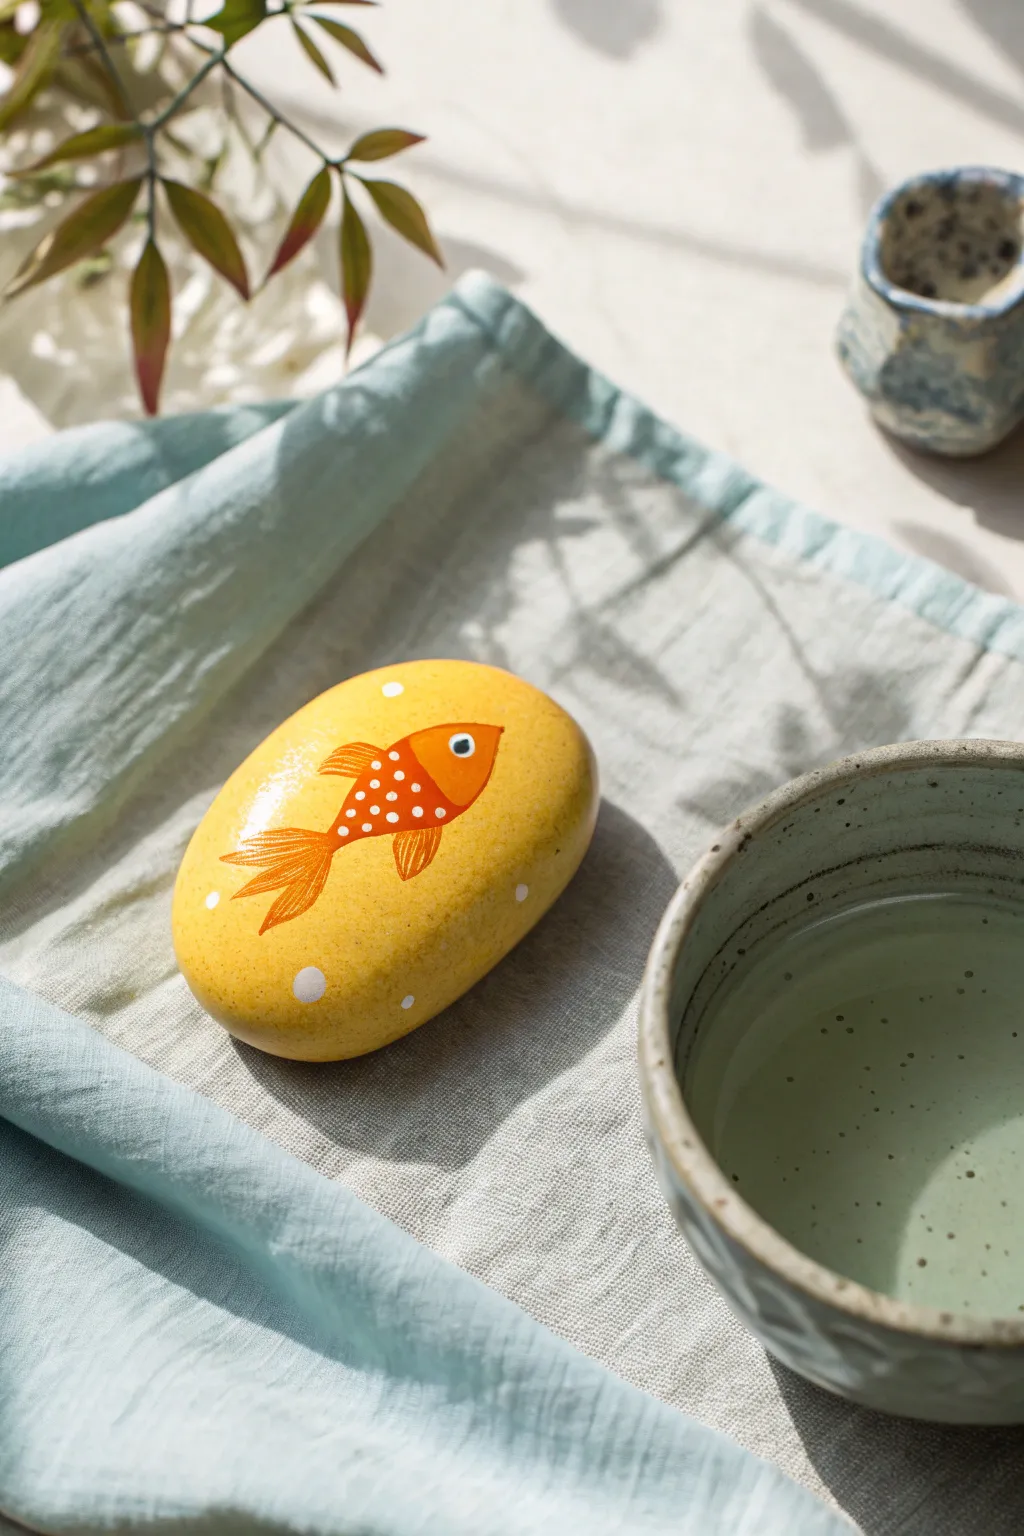
Bring a splash of aquatic joy to your garden or desk with this vibrant yellow painted rock featuring a playful orange goldfish. The bright, sunny background and simple folk-art style make this a cheerful project perfect for beginners.
Step-by-Step
Materials
- Smooth, oval river rock (palm-sized)
- Acrylic paint (sunny yellow, bright orange, white, black)
- Flat paintbrush (medium size)
- Fine detail paintbrush (round size 0 or 1)
- Dotting tool or toothpick
- Pencil
- Acrylic sealer (glossy or matte)
Step 1: Base Preparation
-
Clean the Stone:
Begin by thoroughly washing your rock with warm soapy water to remove any dirt or grease. Let it dry completely in the sun or with a cloth. -
Base Coat Application:
Using your medium flat brush, apply a layer of sunny yellow acrylic paint over the entire top surface of the rock. -
Build Opacity:
Yellow paint can be transparent, so you will likely need two or three coats. Allow the paint to dry fully between layers to ensure a smooth, opaque finish. -
Smooth the Surface:
Check for distinct brush strokes. If the texture is rough, you can lightly sand it with very fine sandpaper before the final yellow coat.
Uneven Dots?
If your white dots look messy or have peaks, lightly tap the wet paint with a damp finger to flatten them, or practice on paper first to get the paint consistency right.
Step 2: Painting the Goldfish
-
Sketch the Outline:
Once the yellow base is bone dry, lightly sketch a simple fish shape with a pencil. Draw an oval body and a fan-shaped tail extending to the left. -
Fill the Body:
Use a small round brush loaded with bright orange paint to fill in the main oval body of the fish. -
Paint the Tail:
Extend the orange paint to create the tail. Use sweeping strokes that start from the body and flick outward to mimic the flow of fins. -
Add Side Fins:
Create a small, triangular pectoral fin on the lower side of the fish’s body using the same orange paint. -
Let it Dry:
Pause here and let the orange silhouette dry completely. This prevents the next details from muddying the colors.
Step 3: Adding Details
-
Detail the Face:
Define the head area by painting a curved line about a third of the way down the body. You can use a slightly darker orange or simply leave the line as a separator for the pattern. -
Paint the Eye:
Using the handle end of a paintbrush or a large dotting tool, place a single white dot near the front of the face. -
Add the Pupil:
Once the white eye dot is dry, add a tiny black dot in the center using a toothpick or fine tip brush. -
Create Body Patterns:
Dip a fine brush or toothpick into white paint. Add rows of small white dots across the orange body, stopping at the curved line of the head. -
Highlight the Fins:
Mix a tiny bit of yellow into your orange to create a lighter shade, or use a thin wash of white. Gently paint fine lines along the tail and side fin to suggest ribbing. -
Add Bubbles:
Using a dotting tool or the back of a brush, scatter a few white dots of varying sizes around the fish on the yellow background.
Add Some Sparkle
Mix a tiny amount of gold glitter or metallic medium into the orange paint for the fish’s body to give your goldfish a shimmering, magical scale effect.
Step 4: Finishing Touches
-
Dry Completely:
Let the rock sit undisturbed for at least 24 hours to ensure all layers of paint have cured. -
Seal the Artwork:
Apply a coat of clear acrylic sealer. I prefer a glossy finish for this project to make the fish look ‘wet,’ but matte works too.
Place your little swimmer near a potted plant or on a windowsill to catch the light
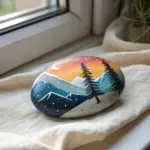
Yellow Sunset Silhouette Scene
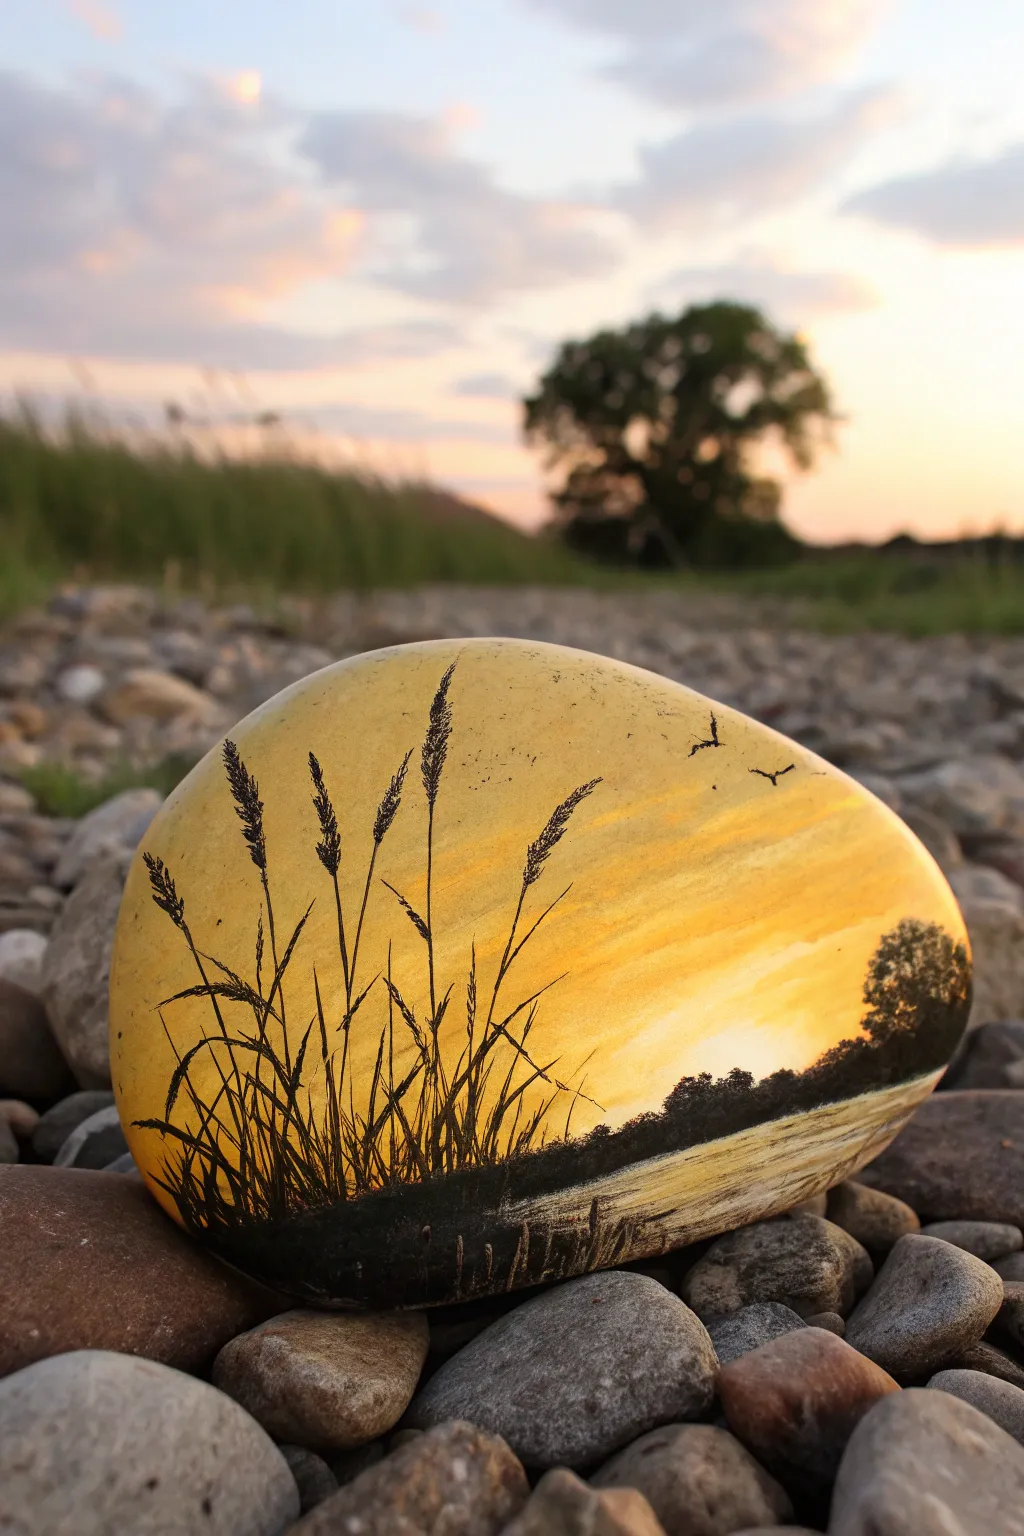
Capture the serene beauty of golden hour with this stunning painted rock project that blends warm gradients with crisp silhouettes. By using the stone’s smooth surface as a canvas, you’ll create a glowing sunset scene featuring delicate reed grasses and distant trees.
Step-by-Step Tutorial
Materials
- Smooth, oval river rock (medium to large size)
- Acrylic paints (Titanium White, Cadmium Yellow, Yellow Ochre, Burnt Sienna, Mars Black)
- Gesso (optional but recommended)
- Wide flat brush (for background)
- Small round brush (size 1 or 2)
- Detail liner brush (size 00 or 000)
- Palette or wax paper
- Cup of water and paper towels
- Clear spray sealer (matte or gloss)
Step 1: Preparing the Canvas
-
Clean and Dry:
Begin by thoroughly scrubbing your rock with soap and water to remove any dirt or oils. Let it dry completely before starting, as moisture trapped inside can affect paint adhesion. -
Base Coat:
Apply a thin layer of white gesso or white acrylic paint to the top surface of the rock. This primes the stone and ensures your yellow hues will appear bright and luminous rather than muddy.
Smooth Strokes
For the thinnest grass lines, add a drop of water to your black paint until it has the consistency of heavy cream. This helps the paint flow off the liner brush without skipping.
Step 2: Painting the Glowing Sky
-
Mixing the Lightest Tone:
On your palette, mix a large amount of Titanium White with a tiny dot of Cadmium Yellow. You want a very pale, buttery cream color. -
Sun Area:
Using your flat brush, paint an oval or circular area on the right side of the rock with your pale cream mix. This will act as the source of light in your sunset. -
Adding Vibrancy:
Load your brush with pure Cadmium Yellow. While the previous layer is still slightly wet, paint around the light source, blending outward toward the left and top edges. -
Create the Gradient:
Mix a little Yellow Ochre into your yellow. Apply this slightly darker, golden tone to the far left side and the very top of the rock to create depth in the sky. -
Streaky Clouds:
Wipe your flat brush so it’s mostly dry. Pick up a tiny bit of white and drag it horizontally across the yellow areas to create faint, wispy cloud streaks. Let the background dry completely.
Glow Up
Mix a tiny amount of metallic gold paint into your yellow sunset gradient. When the light hits the finished rock, the sky will have a genuine, shimmering twilight glow.
Step 3: Creating the Distant Landscape
-
Horizon Line:
Mix Mars Black with a touch of Burnt Sienna to create a warm, dark brown. Using a small round brush, paint a low, uneven horizon line near the bottom right quarter of the stone. -
Stippling Trees:
Using the tip of your brush, gently stipple (tap) tiny dots of black paint along the horizon line to simulate distant tree clusters. Make the trees slightly larger on the far right edge. -
Water Reflection:
Clean your brush and pick up a translucent amount of Yellow Ochre or diluted brown. Paint very faint horizontal lines below the black tree line to suggest a shoreline or reflection on water.
Step 4: Detailing the Foreground
-
Foreground Base:
Load your brush with pure Mars Black. Paint a solid, sweeping curve along the bottom left edge of the rock, anchoring your composition. -
Tall Reeds:
Switch to your liner brush (size 00 or 000). To paint the grass, dilute your black paint slightly with water so it flows like ink. Pull long, thin strokes upward from the black base, varying their heights. -
Adding Seed Heads:
At the top of the taller stalks, use tiny, stippling motions to create fuzzy, textured seed heads. I find it helps to dab the brush in a narrow oval shape to mimic wheat or tall grass. -
Leaves and Blades:
Paint shorter, curved blades of grass intersecting the main stalks. Let some lines cross over others to create a natural, tangled look. -
Flying Birds:
Using the very tip of your finest brush, add two or three tiny ‘V’ shapes in the sky on the right side to represent birds flying toward the sunset.
Step 5: Finishing Touches
-
Review and Refine:
Step back and look at your rock. If the black silhouettes look patchy, apply a second coat of black to the thickest parts once the first layer is dry. -
Sealing:
Once the paint is cured (usually after 24 hours), take the rock outside and apply a clear spray sealer to protect your artwork from chipping and UV fading.
Place your finished sunset stone on a shelf or hide it in a garden for someone to discover
Black Mandala Over Yellow Base
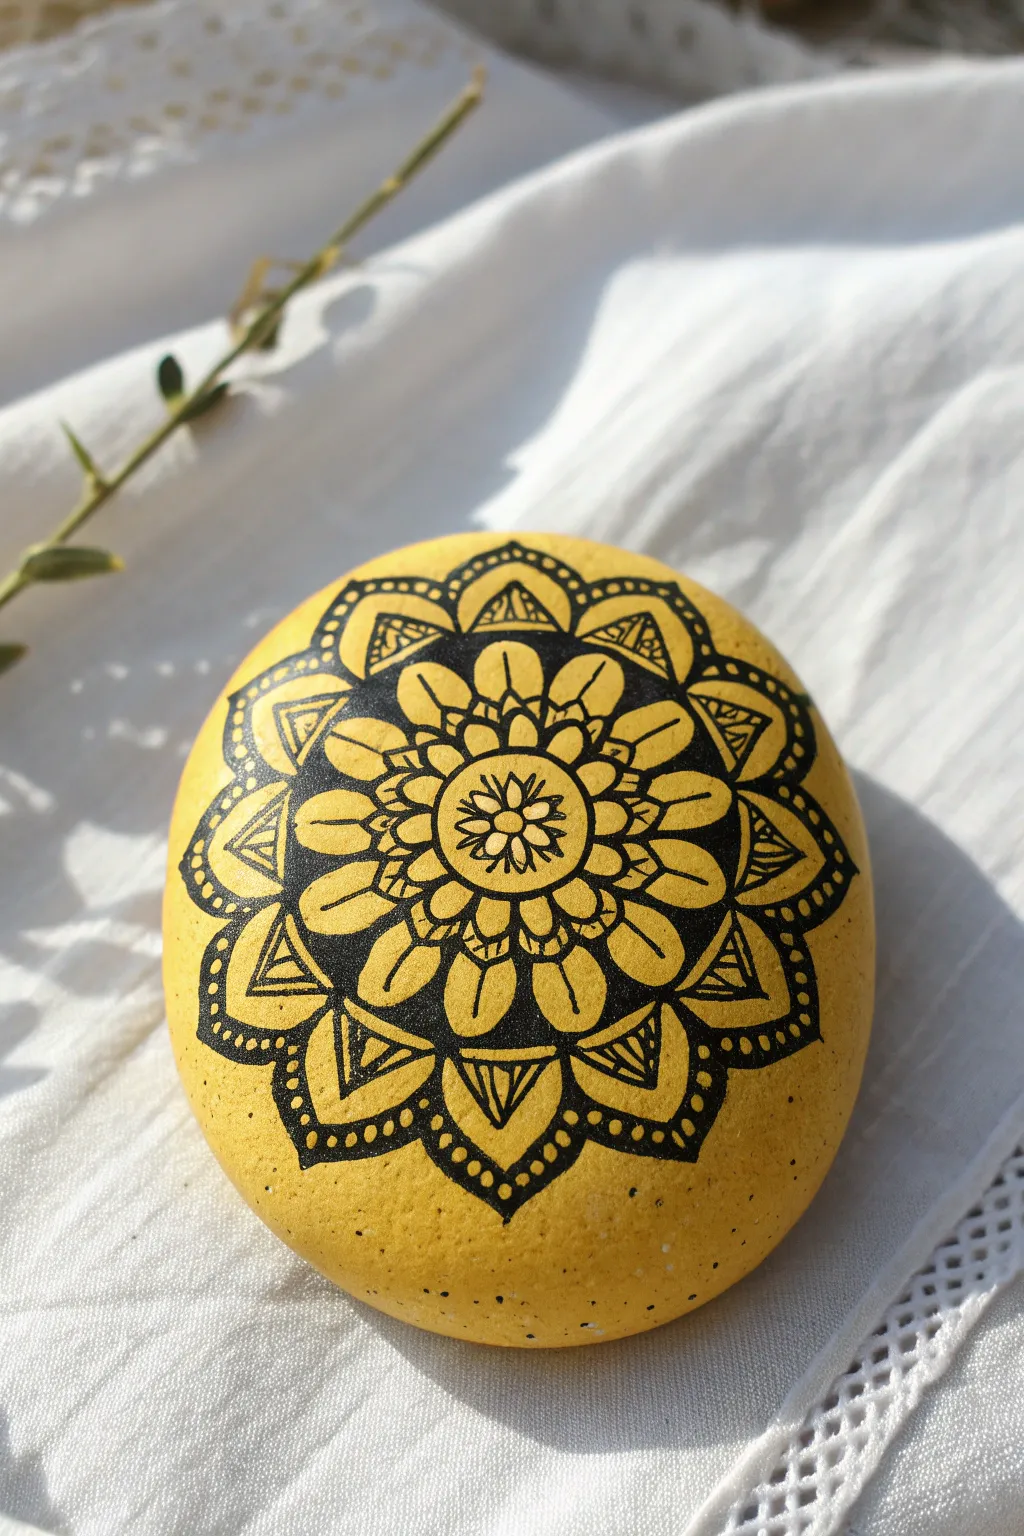
This project transforms a simple smooth stone into a radiant piece of art using just two colors. The high contrast of bold black ink against a sunny yellow background creates a striking mandala that looks complex but is built from simple, repetitive shapes.
Step-by-Step
Materials
- Smooth, round river rock (approx. palm-sized)
- Acrylic paint: Bright Yellow or Golden Yellow
- Wide flat paintbrush
- Pencil and eraser
- Black Posca pen or fine-liner acrylic paint marker (0.5mm or 0.7mm tip)
- Black ultra-fine tip marker (optional, for tiniest details)
- Compass or circle stencil (optional)
- Clear spray sealant (matte or glossy)
Step 1: Base Preparation
-
Clean the stone:
Before you begin, scrub your rock with warm soapy water to remove any dirt or oil. Let it dry completely in the sun or with a hairdryer. -
Apply the first yellow coat:
Using a flat paintbrush, cover the entire top surface of the rock with bright yellow acrylic paint. Brush in one direction for a smoother finish. -
Let it dry:
Wait for the first layer to become touch-dry. Acrylics dry quickly, but give it at least 15 minutes to be safe. -
Add a second coat:
Apply a second layer of yellow paint, brushing perpendicular to your first strokes to eliminate brush marks and ensure opaque coverage. -
Inspect the surface:
For this design, you want a very solid background. If you can still see the grey of the rock, I usually add a third coat just to be sure the yellow really pops.
Ink Smearing?
If your pen tip gets clogged with dried acrylic, scribble on a piece of scrap paper to clear it. Ensure the yellow base is 100% dry before drawing.
Step 2: Drafting the Guide
-
Find the center:
Once the paint is rock-hard dry, gently mark the center point of the stone with a pencil. -
Draw concentric circles:
Lightly sketch three or four concentric circles radiating from your center dot. You can freehand this for an organic look or use a compass. -
Mark quadrants:
Lightly draw a vertical and horizontal line crossing through the center, dividing your circles into four pie slices. This helps keep the petals symmetrical.
Add Golden Accents
Use a metallic gold paint pen to add tiny dots inside the black filled areas for a subtle shimmer that catches the sunlight.
Step 3: Drawing the Mandala Core
-
Start the center flower:
With your black fine-liner pen, draw a small circle around your center dot. Inside this circle, draw eight tiny seed-shaped petals. -
Outline the first ring:
Draw larger, round petals around the center circle. Aim for about 8 to 10 petals in this first layer. -
Fill the gaps:
Color in the negative space between these first petals with solid black ink. This creates immediate contrast against the yellow. -
Add inner details:
Inside each of these round petals, draw a small teardrop shape or a simple line to add texture.
Step 4: Expanding the Design
-
Create the second petal layer:
Draw a larger ring of pointed petals. Start each new petal from the valley between two petals of the previous row. -
Thicken the outlines:
Go over the outline of these new petals a second time to make the black lines bolder and more defined. -
Add the triangular border:
For the outer ring, draw wide, inverted triangles or fan shapes that point outward toward the edge of the stone. -
Detail the border:
Inside each outer triangle, draw a smaller triangle. Fill the space between the small and large triangle with little stripes or hatching lines. -
Decorate with dots:
To finish the border, place a row of uniform black dots along the outer curve of the final layer of shapes.
Step 5: Finishing Touches
-
Erase guidelines:
Wait at least an hour to ensure the ink is totally set. Then, very gently erase any visible pencil marks. -
Clean up edges:
If any yellow paint smudged or if pencil lead dulled the color, do tiny touch-ups with your paint brush. -
Seal the artwork:
Spray the rock with a clear sealant. Use light misting coats rather than one heavy coat to prevent the ink from bleeding.
Place your finished mandala stone in a garden pot or on a sunny windowsill to enjoy the cheerful contrast
Geometric Pattern In Yellow and Black
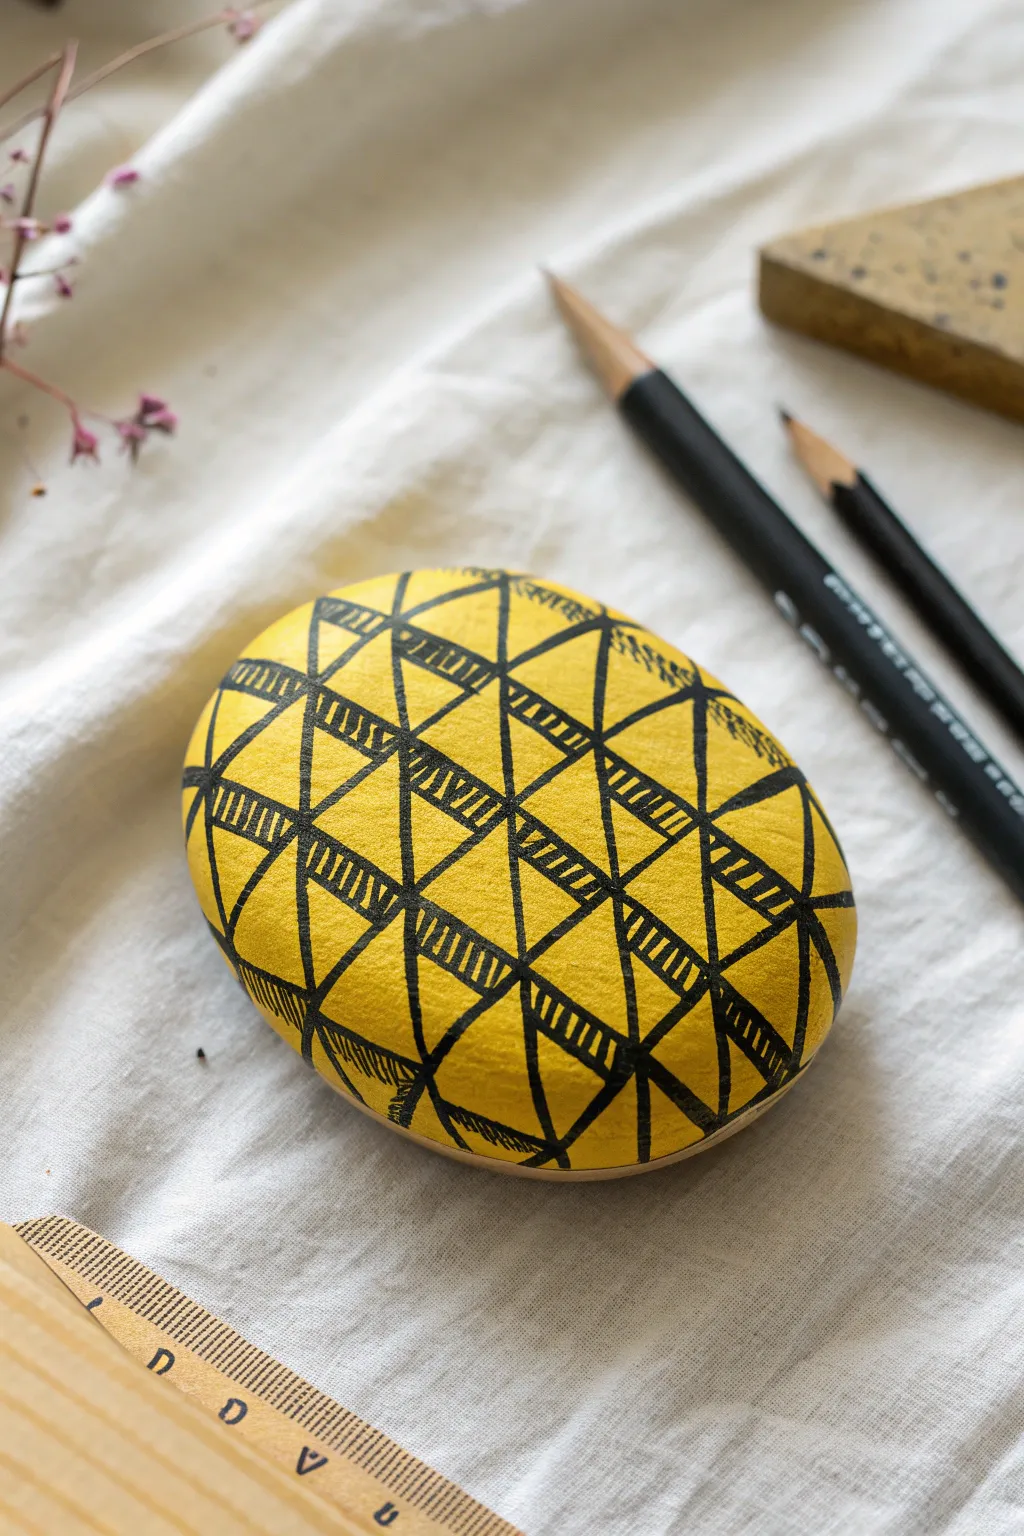
Transform a simple smooth stone into a striking piece of decor with this bold geometric design. By combining vibrant yellow paint with crisp black lines in a repeating triangle motif, you will create an artwork that feels both modern and delicately hand-drawn.
Step-by-Step Guide
Materials
- Smooth, oval river rock (flat surface is best)
- Yellow acrylic paint (bright, opaque shade)
- Wide flat paintbrush
- Fine liner paintbrush or black acrylic paint marker (0.5mm or 0.7mm recommended)
- Pencil (HB or lighter)
- Ruler or straight edge
- Eraser
- Clear matte or gloss varnish (optional)
Step 1: Base Preparation
-
Clean the surface:
Begin by washing your stone thoroughly with soap and warm water to remove any dirt or oils. Let it dry completely before starting, as moisture will prevent the paint from adhering properly. -
Apply the first coat:
Using your flat paintbrush, apply a generous coat of yellow acrylic paint to the top surface of the rock. Don’t worry about the bottom just yet. -
Let it cure:
Allow the first layer to dry fully. Acrylics dry darker, so wait to see the true coverage. -
Add coverage:
Apply a second or third coat of yellow paint until the rock’s natural color is completely hidden and the yellow looks solid and bright. Ensure the paint is completely dry before moving to the next phase.
Uneven Lines?
If your hand shakes while drawing lines, brace your pinky finger against the dry part of the stone or the table. This acts as an anchor and stabilizes your drawing hand for straighter strokes.
Step 2: Grid Construction
-
Mark vertical guides:
Using a pencil and ruler, lightly sketch a series of evenly spaced vertical lines across the face of the rock. These will define the width of your triangles. -
Mark horizontal guides:
Draw faint horizontal lines perpendicular to your vertical ones. This creates a grid of rectangles that will help keep your triangles uniform. -
Sketch the zig-zags:
Within your grid, sketch diagonal lines connecting the corners of your grid boxes to form rows of triangles. Alternate the direction for each row to create a continuous zig-zag pattern. -
Refine the shapes:
Check the proportions of your pencil triangles. If any look lopsided or too large, erase and adjust them now before committing with ink.
Pro Tip: Marker Choice
Use ‘Posca’ or similar acrylic paint pens rather than standard permanent markers. Permanent markers often turn purple or bleed when you apply varnish over them, while paint pens stay crisp and black.
Step 3: Inking the Design
-
Outline the main grid:
Using your fine black paint marker or a liner brush with black acrylic, trace over your pencil lines to define the main triangle shapes. Keep your hand steady and use confident strokes. -
Thicken slightly:
If I want a bolder look, I sometimes go over the main structural lines a second time to make them slightly thicker than the interior details. -
Identify fill areas:
Plan out which triangles will get the hatched shading. In this design, notice how ‘downward’ pointing triangles often get the shading while ‘upward’ ones stay solid yellow, or vice versa, creating a checkerboard feel. -
Start the hatching:
In your first chosen triangle, draw closely spaced, parallel diagonal lines. Ensure the lines don’t cross the border of the triangle. -
Vary line weight:
Keep these hatching lines slightly thinner than your main outline grid to add visual depth and prevent the design from looking too heavy. -
Complete the pattern:
Continue filling the alternating triangles across the entire surface of the rock. Work from one side to the other to avoid smudging wet ink with your hand.
Step 4: Finishing Touches
-
Cleanup:
Once you are absolutely certain the black ink is dry, gently erase any visible pencil guide lines that are peeking through. -
Touch ups:
If any yellow paint was accidentally covered by a stray black mark, use a tiny amount of yellow paint on a fine brush to carefully cover the mistake. -
Seal the work:
Apply a coat of clear varnish spray or brush-on sealer to protect the paint from chipping and to give the rock a professional finish.
Place your finished geometric rock on a desk or shelf as a cheerful pop of color that draws the eye
Yellow Night Sky With Tiny Stars
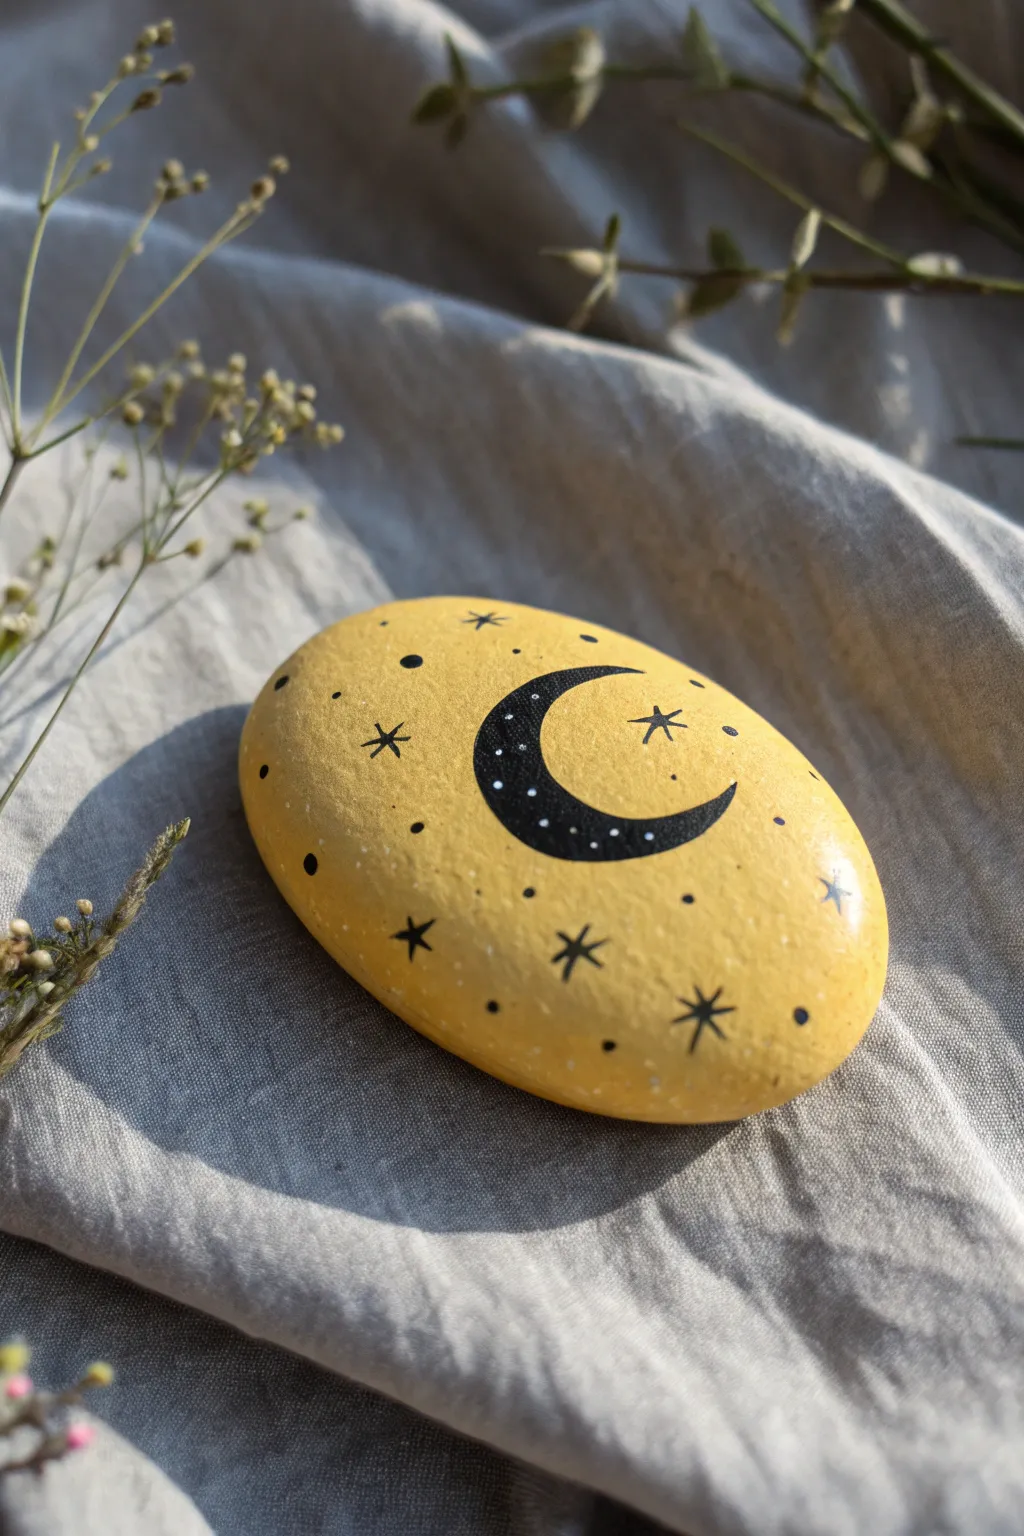
Brighten up your rock collection with this cheerful twist on a night sky theme. This project combines a sunny yellow base with bold black celestial motifs for a striking, high-contrast finish that really pops.
Detailed Instructions
Materials
- Smooth, oval river rock
- Yellow acrylic paint (bright, sunny shade)
- Black acrylic paint
- White acrylic paint or white paint pen (fine tip)
- Wide flat paintbrush
- Fine detail paintbrush (size 0 or 00)
- Pencil (optional)
- Gloss varnish or sealant
Step 1: Base Coat
-
Clean surface:
Begin by washing your stone with warm soapy water to remove any dirt or oils. -
Dry thoroughly:
Wipe the rock down and let it air dry completely before applying any paint. -
Apply first layer:
Using your flat brush, coat the entire top surface of the rock with bright yellow acrylic paint. -
Build opacity:
Allow the first coat to dry, then add a second or even third layer until the yellow is solid and opaque. -
Smooth finish:
Check for any brush strokes and smooth them out while the paint is still wet for a professional look.
Starry Precision
If you struggle painting thin lines for stars, switch to an ultra-fine tip black permanent marker tailored for smooth surfaces.
Step 2: Moon & Stars
-
Sketch the moon:
Once the yellow base is fully dry, lightly sketch a crescent moon shape in the center using a pencil. -
Fill the moon:
Load your fine detail brush with black paint and carefully fill inside your pencil lines to create the crescent moon. -
Refine edges:
Go back over the edges of the moon slowly to ensure crisp, clean curves. -
Paint large stars:
Using the very tip of your detail brush, paint simple cross shapes (+) scattered around the moon. -
Add diagonals:
Add smaller diagonal blending lines (x) through the centers of your crosses to turn them into eight-pointed stars. -
Vary sizes:
Try to make some stars slightly larger and others smaller to create depth and visual interest. -
Add stardust:
Dip the back end of your paintbrush handle into black paint and dot it onto the rock to make perfect circular dots. -
Fill gaps:
Place these dots randomly in the empty spaces between the stars and moon.
Step 3: Finishing Details
-
Moon details:
Wait for the black moon to dry completely, then take a fine white paint pen or a toothpick with white paint. -
Add sparkle:
Gently tap tiny white dots inside the black area of the crescent moon to mimic distant stars. -
Dry completely:
I like to set the rock aside for at least a few hours to ensure all paint layers are cured. -
Seal it:
Apply a coat of gloss varnish to protect your artwork and give the stone a polished, ceramic-like shine.
Glow Up
Use glow-in-the-dark paint specifically for the tiny white dots inside the moon so your rock lights up when the lights go out.
Place your finished sunny night sky rock on a desk or windowsill to add a touch of magic to your day


Have a question or want to share your own experience? I'd love to hear from you in the comments below!