Valentine’s face painting is my favorite kind of wearable art—sweet, flirty, and easy to tailor from tiny cheek details to full-on statement masks. I pulled together a mix of classic crowd-pleasers and a few unexpected designs so you can paint something that feels perfectly you.
Classic Cheek Heart
Capture the essence of romance with this simple yet striking classic cheek design. This look features a bold, saturated red heart with a high-shine finish that sits beautifully against fresh, natural skin.
Step-by-Step Tutorial
Materials
- Red face paint (water-activated or cream-based)
- Small flat synthetic brush (size 2 or 4)
- Fine liner brush
- Clear lip gloss or face-safe gloss (non-sticky)
- Setting spray
- Micellar water and cotton buds (for cleanup)
- Optional: Red lip liner
Step 1: Preparation & Mapping
-
Prep the canvas:
Begin with clean, moisturized skin. If you are wearing foundation, ensure it is well-set with powder so the face paint grips properly without sliding around. -
Choose placement:
Look straight into a mirror and smile slightly to find the apple of your cheek. For this look, aim for the high part of the apple, just below the outer corner of the eye. -
Mark the top curve:
Using a fine liner brush loaded with a small amount of red paint (or a red lip liner for extra control), lightly mark two small dots where the top arches of the heart will go. -
Mark the bottom point:
Place a third dot lower down and slightly angled towards the center of your face to define the bottom tip of the heart. -
Connect the outline:
Gently connect your dots, drawing two curved lines from the top dots down to the bottom point to form the heart shape. This initial outline doesn’t need to be perfect as we will fill it in.
Step 2: Filling & Refining
-
Switch brushes:
Move to your small flat synthetic brush. This shape helps spread the product evenly and creates sharper edges than a round brush. -
Load the paint:
Activate your red face paint with a little water until it reaches a creamy, lipstick-like consistency. Avoid making it too watery, or it will drip. -
Fill the center:
Start painting from the center of the heart outwards, ensuring solid opacity. I find that dabbing the paint on rather than dragging it creates a richer color payoff. -
Sharpen the dip:
Use the edge of your flat brush to carefully define the ‘V’ shape at the top center of the heart, ensuring it is crisp and distinct. -
Refine the edges:
Go back over the outer perimeter of the heart. If your hand is shaky, rest your pinky finger on your chin for stability while you paint the clean curves. -
Check symmetry:
Step back from the mirror. If one side looks slightly fuller than the other, carefully add slivers of paint to balance them out. -
Clean up mistakes:
If you went outside your intended line, dip a cotton bud in micellar water and rotate it against the mistake to lift the pigment cleanly without smearing. -
Let it set:
Allow the red paint to dry completely. This is crucial—if it’s still wet, the next step will turn into a messy blur.
Smudge Control
If the red paint bleeds into the fine lines of your skin, use a tiny amount of translucent powder around the edges before painting to create a barrier.
Step 3: Finishing Touches
-
Apply setting spray:
Lightly mist the area with setting spray to lock the red pigment in place and prevent bleeding. -
Prepare the gloss:
Take a clear, face-safe gloss. Squeeze a small amount onto the back of your hand rather than applying directly from the tube to keep your applicator clean. -
Add the shine:
Using a clean finger or a separate brush, gently tap the gloss over the dry red heart. Do not drag; just tap it on to create a glass-like finish. -
Highlight (Optional):
For extra dimension, you can add a tiny dot of white face paint near the top curve to look like a reflection, though the gloss usually does this naturally.
Cupid’s Arrow
Level up by drawing a gold or silver arrow piercing through the heart using metallic liquid liner for a playful, struck-by-love effect.
Now you have a sweet, glossy accent perfect for a romantic date or a festive celebration


Glittery Heart Pop
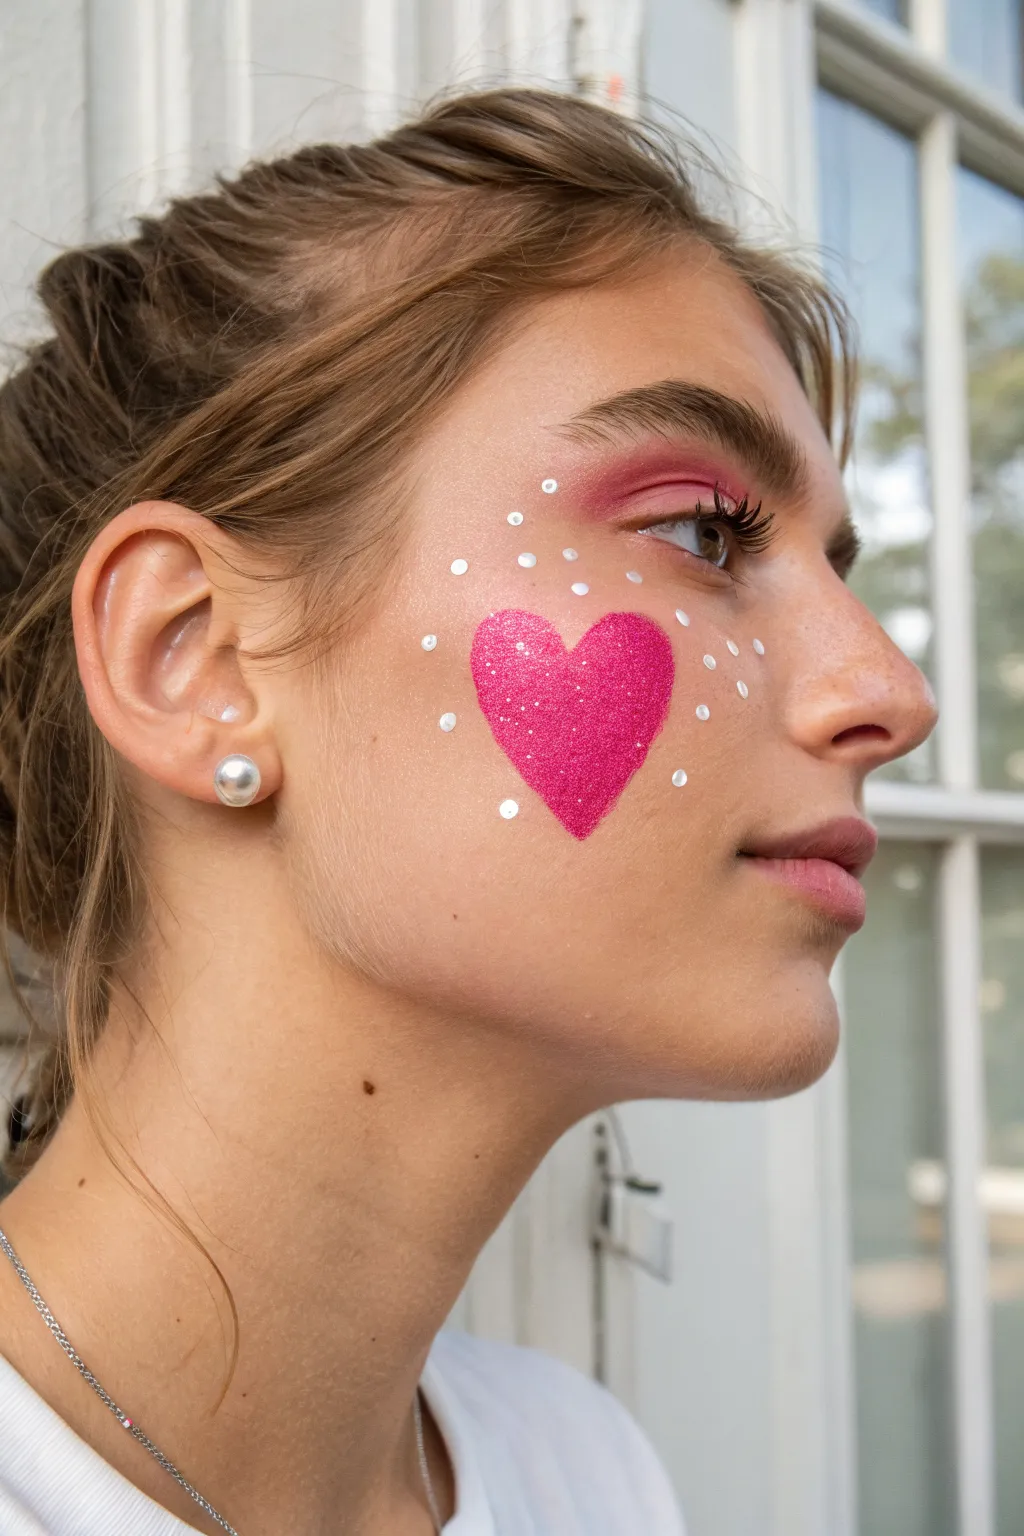
Capture the playful spirit of Valentine’s Day with this striking yet simple makeup look featuring a bold, glitter-packed heart. The contrast between the matte hot pink heart and delicate scattered gems creates a dimensional pop art effect that catches the light beautifully.
Step-by-Step
Materials
- Hot pink face paint (water-activated or cream)
- Fine cosmetic-grade bio-glitter in hot pink
- Small flat synthetic brush
- Small round detail brush
- Iridescent white/silver sequins or flat-back gems (approx. 2-3mm)
- Eyelash glue or skin-safe adhesive
- Tweezers or a wax pencil picker
- Setting spray
- Pink eyeshadow (matching the paint)
- Fluffy blending brush
Step 1: Preparation & Base
-
Prepare the canvas:
Start with a clean, moisturized face. If you plan to wear foundation or concealer, apply that now and let it set completely so the face paint glides on smoothly without mixing with your base makeup. -
Map the placement:
Look straight into a mirror to decide where the heart should sit. The ideal placement is high on the cheekbone, just under the outer corner of the eye, ensuring it’s visible even in profile. -
Outline distinct shape:
Using a small round detail brush dampened with water (if using water-activated paint), lightly sketch the outline of your heart. Keep the bottom point sharp and the top curves rounded for a classic cartoon shape.
Sticky Situation
To pick up tiny sequins easily without tweezers, use a slightly moistened cotton bud or a dedicated wax pencil tool. It grabs the gem instantly and releases it onto the glue effortlessly and precisely.
Step 2: Painting the Heart
-
Fill the center:
Switch to a small flat synthetic brush. Load it generously with hot pink face paint and fill in the heart shape, working from the center outward to keep the edges crisp. -
Build opacity:
Let the first layer dry for about 30 seconds. If the pink looks streaky, apply a second thin layer. I find using a patting motion rather than dragging helps build solid, vibrant color here. -
Clean the edges:
If any lines look wobbly, use a clean angle brush with a tiny bit of makeup remover (or concealer) to sharpen the perimeter of the heart.
Step 3: Adding the Glitter
-
Apply adhesive base:
Once the paint is dry to the touch, tap a very thin layer of eyelash glue or specific glitter primer directly over the pink heart. Do this quickly so it doesn’t dry before the next step. -
Pack on the sparkle:
Dip a dry flat brush into your hot pink cosmetic glitter. Press—don’t sweep—the glitter onto the tacky glue to ensure maximum density and minimal fallout. -
Secure the glitter:
Gently tap the glitter down with your finger to ensure it’s fully adhered to the glue. Blow away any loose particles that may have fallen onto the jawline.
Patchy Paint?
If your face paint is cracking or looking patchy, you likely used too much loose water. Mix the paint into a creamy consistency—like melted chocolate—before applying for the smoothest, boldest coverage.
Step 4: Gemstone Accents
-
Dot the glue:
Using your lash glue wand or a toothpick, place tiny dots of adhesive on the skin surrounding the heart. Create a random, scattered pattern that radiates outward. -
Place the sequins:
Use tweezers or a wax picker to place the iridescent white sequins onto your glue dots. Vary the spacing—some close to the heart, some further away—to mimic a starry sky or confetti explosion. -
Check symmetry:
Step back and look at the overall balance. Add one or two stray sequins further out towards the temple or lower cheek if the design feels too clustered.
Step 5: Eye Coordination
-
Wash of pink:
To tie the look together, take a fluffy blending brush and sweep a matching matte pink eyeshadow across the entire eyelid. -
Intensify the crease:
Deepen the color slightly in the socket line, blending upwards toward the brow bone for a soft, romantic haze that mirrors the cheek design. -
Define lashes:
Curl your lashes and apply a coat of black mascara to structure the eye without overpowering the pink tones. -
Final set:
Close your eyes and mist the entire face with setting spray to lock the face paint and glitter in place for the whole day.
You are now ready to sparkle with a look that is equal parts sweet and bold


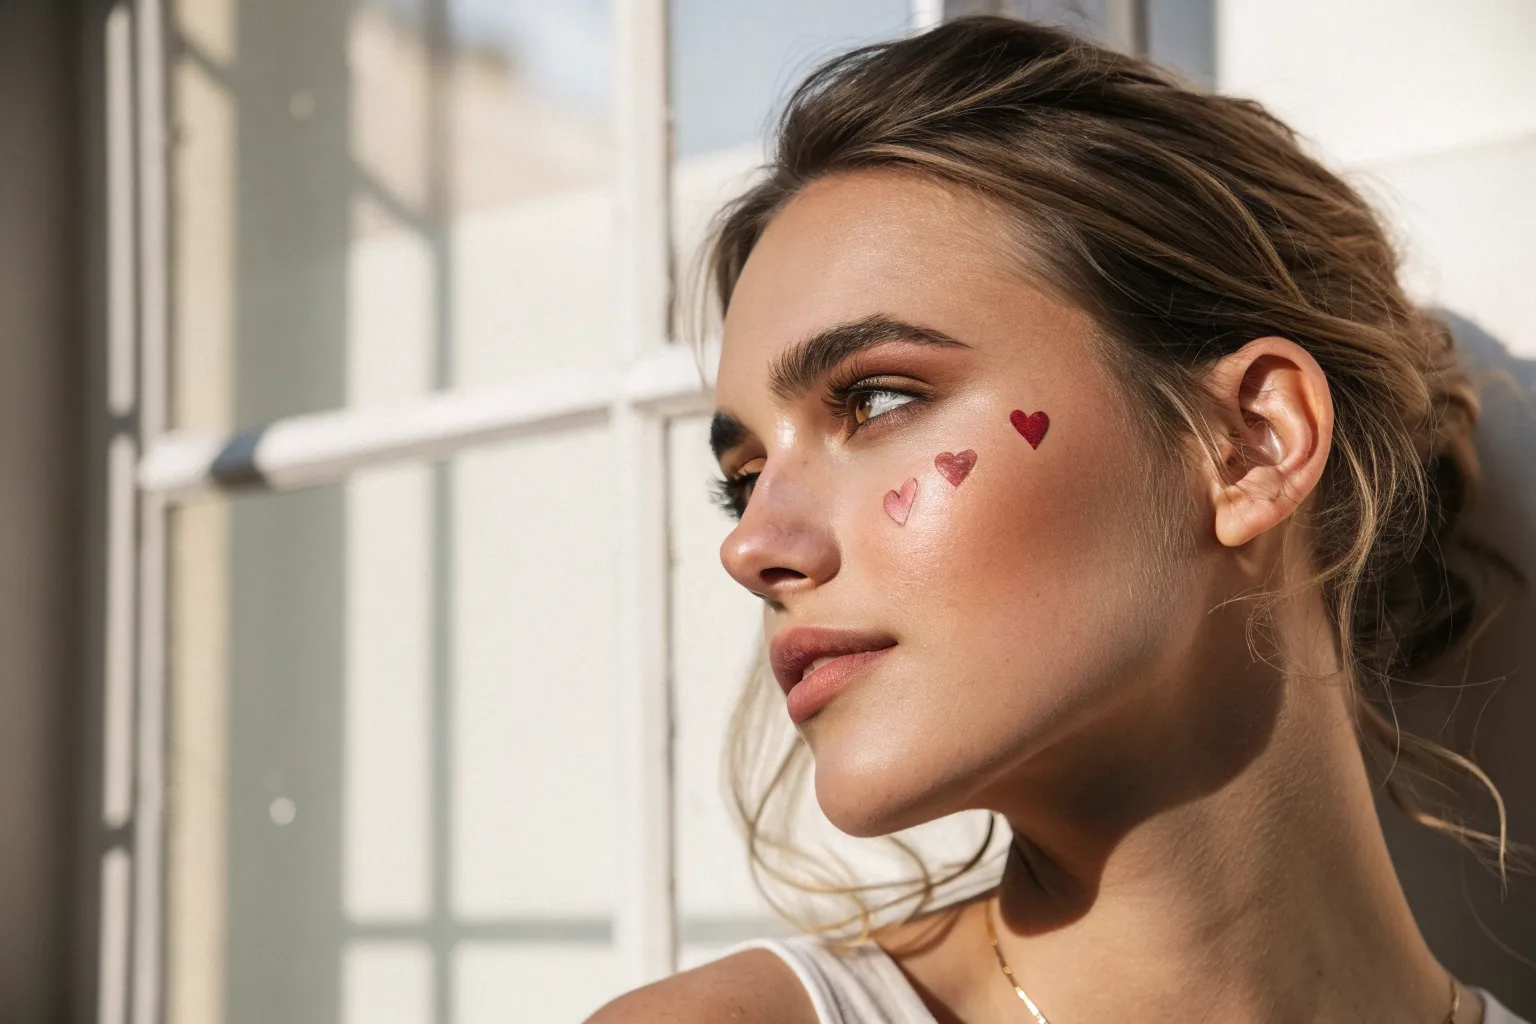
Cascading Heart Trail
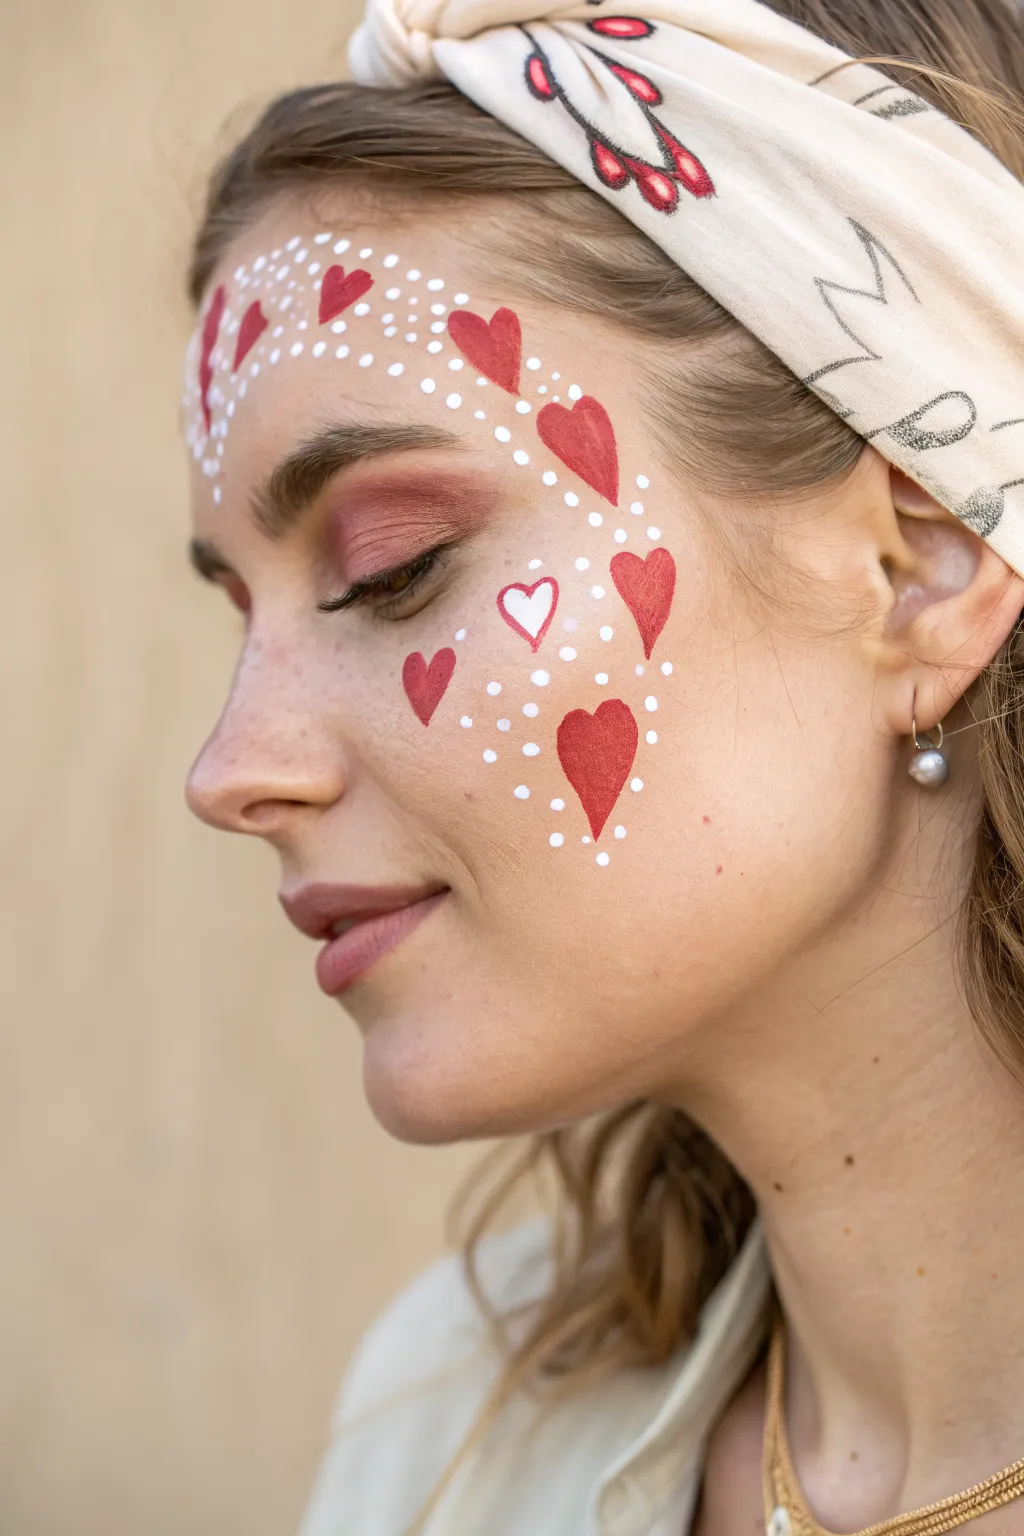
Sweeping gently from the forehead down to the cheek, this romantic design combines bold red hearts with delicate white stippling. It’s a soft, dreamy look that mimics a trail of floating love notes, perfect for a subtle yet festive Valentine’s vibe.
Step-by-Step Guide
Materials
- Red water-activated face paint (e.g., Tag or Wolfe FX)
- White water-activated face paint
- Medium round brush (size 4 or 5)
- Small round brush (size 1 or 2) for details
- Eyeshadow primer (optional)
- Soft pink or mauve eyeshadow
- Cup of clean water
- Spray bottle with water
- Paper towels
Step 1: Base Prep
-
Prepare the skin:
Start with a clean, dry face. Ensure no heavy oils are on the skin where you intend to paint, as this can cause water-activated paints to separate. -
Apply eyeshadow:
Before laying down the paint, apply a soft wash of mauve or dusty pink eyeshadow over the eyelid and blend it slightly outward toward the temple. This creates a cohesive color story with the red hearts.
Clean Lines Only
If your red hearts have shaky edges, don’t wipe them off. Wait for them to dry, then use a damp Q-tip to gently erase and refine the shape.
Step 2: Heart Formation
-
Load the red paint:
Spritz your red face paint cake with a little water and swirl your medium round brush until you have a creamy, lipstick-like consistency. -
Paint the anchor heart:
Start with the largest heart on the cheekbone, roughly below the outer corner of the eye. Press the brush down to create the rounded top of one lobe, lift to drag the tail, and repeat for the other side to form a classic heart shape. -
Start the forehead cascade:
Move up to the forehead. Paint 2-3 medium-sized hearts near the hairline, angling them slightly to follow the natural curve of the brow bone. -
Connect the trail:
Paint a medium-sized heart on the temple area, bridging the gap between the forehead and the cheek. Vary the angles slightly so they look like they are tumbling or falling. -
Add smaller solid hearts:
Reload your brush if the paint gets dry. Fill in gaps with slightly smaller red hearts, specifically placing one lower down on the cheek. -
Create the hollow heart:
Clean your brush thoroughly. Load it with white face paint to a thin, inky consistency. On the apple of the cheek, carefully paint the outline of a heart without filling it in.
Add Some Glamour
While the white dots are still slightly damp, gently press cosmetic-grade glitter or small rhinestones over them for a sparkling 3D effect.
Step 3: Detailing & Dots
-
Load the detail brush:
Switch to your smallest round brush (size 1 or 2). Load it with the creamy white paint. Ensure the bristles form a sharp point. -
Outline the flow:
Instead of outlining the hearts themselves, visualize a flowing ‘S’ curve or ribbon shape that encompasses the hearts. -
Stipple the top section:
Begin dotting around the forehead hearts. Concentrate the dots heavily between the hearts to create a sense of density, like a milky way of stars. -
Fade out the edges:
As you move away from the main line of hearts on the forehead, space the white dots further apart so they appear to fade into the skin. -
Bridge the temple:
Continue the dot trail down through the temple area. I find it helps to use a mix of tiny dots and slightly larger dots here for organic texture. -
Cluster around the cheek:
Surround the large cheek hearts and the hollow white heart with a generous scattering of dots. -
Add final sparkle:
Place a few deliberate white dots right next to the red hearts, or even slightly overlapping them if the red is completely dry, to add dimension. -
Set the look:
Allow everything to dry completely. If you expect a long day of wear, you can lightly mist with a barrier spray, keeping your eyes closed.
Now you have a whimsical, flowing design ready for a romantic celebration


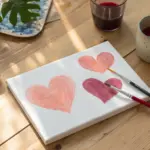

Heart Freckles and Blush
Embrace a naturally flushed, romantic aesthetic with this fresh-faced Valentine’s look. Combining soft, rosy eyeshadow with scattered heart motifs creates a dreamy style that feels both playful and sophisticated.
Detailed Instructions
Materials
- Lightweight foundation or tinted moisturizer
- Concealer
- Soft pink powder blush
- Rosy-pink cream eyeshadow
- Fluffy blending brush
- Brow gel (clear or tinted)
- Red lipstick or face paint
- Metallic pink face paint or liquid highlighter
- Peach/coral cream blush
- Fine detail brush or heart stamping tool
- Freckle pen or light brown eyebrow pencil
- Setting spray
Step 1: Base and Glow
-
Prep the canvas:
Begin with a clean, moisturized face. Apply a lightweight foundation or tinted moisturizer to even out the skin tone while keeping freckles visible. -
Conceal lightly:
Dot a small amount of concealer under the eyes and blend outwards to brighten the area without creating a heavy mask. -
Groom the brows:
Brush eyebrow hairs upward using a clear or tinted brow gel to create a fluffy, natural shape that frames the eyes.
Heart Shape Fix
If a painted heart looks lopsided, wait for it to dry completely. Then, use a small angled brush dipped in a tiny bit of concealer to carve out and sharpen the edges.
Step 2: Soft Focus Eyes
-
Apply base shadow:
Unlike heavy contoured looks, sweep a soft rosy-pink cream eyeshadow across the entire eyelid using a fluffy brush. -
Blend the crease:
Buff the edges of the eyeshadow upward towards the brow bone for a diffused, watercolor effect that softens the gaze. -
Add inner corner light:
Dab a tiny amount of shimmery highlighter on the inner corners of the eyes to wake them up.
Step 3: The Romantic Flush
-
Initial blush placement:
Apply a generous wash of soft pink powder blush high on the cheekbones, blending it slightly into the temple area. -
Intensify the color:
Layer a slightly deeper rose tone just on the apples of the cheeks to create dimension and that ‘just pinched’ look. -
Highlight high points:
Using a liquid highlighter, tap along the tops of the cheekbones, down the bridge of the nose, and on the cupid’s bow for a dewy finish.
Glitter Upgrade
Make the metallic heart pop by pressing loose cosmetic glitter over it while the paint is still tacky. Use a flat brush to pack it on for maximum sparkle.
Step 4: Heart Details
-
Paint the red hearts:
Using a fine detail brush and red face paint (or a matte liquid lipstick), carefully paint small hearts scattered across the cheekbone area. -
Vary sizes and angles:
Keep the scattered hearts organic by painting some slightly tilted and varying the sizes—one larger near the temple, smaller ones on the jawline. -
Create the metallic heart:
Mix a metallic pink pigment or use a shimmer face paint to create a focal heart on the upper cheek, ensuring edges are crisp. -
Add a soft peach heart:
For variety, paint a softer, peach-toned heart lower on the cheek using a cream blush products for a more translucent texture.
Step 5: Finishing Touches
-
Define the lashes:
Apply a single coat of brown or black mascara to define the lashes without removing focus from the blush work. -
Enhance freckles:
I like to take a freckle pen or sharp brow pencil and dot extra faux freckles across the nose and cheeks, overlapping the blush for realism. -
Tint the lips:
Press a sheer berry or pink lip stain onto the lips with your finger for a blurred, bitten lip effect. -
Set the look:
Mist the face with a dewy setting spray to melt the powders into the skin and ensure your hearts stay put all day.
Now you are ready with a whimsical look perfect for a romantic date or a fun celebration
BRUSH GUIDE
The Right Brush for Every Stroke
From clean lines to bold texture — master brush choice, stroke control, and essential techniques.
Explore the Full Guide
Cupid Arrow Detail
Embrace a playful, romantic vibe with this delicate face painting design features a crimson heart pierced by a crisp white arrow. The look combines soft, flushed makeup with precise line work for a sweet Valentine’s Day statement.
Step-by-Step
Materials
- White liquid eyeliner or white face paint
- Red face paint or matte red liquid lipstick
- Fine detail brush (size 0 or 00)
- Small angled brush
- Rosy cream blush
- Setting spray (optional)
- Makeup sponge
Step 1: Set the Stage
-
Prep the canvas:
Begin with clean, moisturized skin. Apply a light base of foundation or tinted moisturizer if desired, but keep the texture natural to let skin show through. -
Flush the cheeks:
Take your rosy cream blush and apply it generously to the apples of your cheeks, blending upwards towards the temples. You want a soft, romantic flush that will serve as the background for your artwork. -
Define the eyes:
Sweep a coordinating pink or rose eyeshadow across the eyelids to tie the whole color palette together. Groom the brows normally.
Sharpen Your Lines
Make a mistake? Dip a pointed cotton swab in micellar water to act as an eraser. It cleans up edges perfectly without ruining your base.
Step 2: Paint the Heart
-
Position the heart:
Locate the apple of your cheek, slightly towards the center of the face. This is where your main red heart will sit. -
Outline the shape:
Using a fine detail brush dipped in red face paint (or the applicator of a matte liquid lipstick), carefully draw the outline of a small heart. Keep the shape classic and symmetrical. -
Fill with color:
Fill in the heart completely with the red pigment. I prefer using short, dabbing motions to ensure opacity without smearing the edges. -
Refine the edges:
Go back with your fine brush to sharpen the point at the bottom and the curves at the top, ensuring they are crisp against the skin.
Step 3: Adding the Arrow
-
Load your white:
Clean your fine detail brush thoroughly or switch to a dedicated white eyeliner brush. Load it with white face paint or liquid liner. -
Draw the entry point:
Start drawing a straight white line emerging from the upper left side of the red heart. This represents the arrow shaft entering the heart. -
Create the arrowhead:
At the end of this upper line, draw a small ‘V’ shape pointing away from the heart to form the triangular tip of the arrow. -
Draw the exit point:
Imagine a straight diagonal line passing through the heart. Resume drawing the white line from the bottom right side of the heart, extending down towards the jawline. -
Form the fletching spine:
Ensure the bottom line matches the angle of the top line so the arrow looks straight. Extend it far enough to add the feathers. -
Add feather details:
At the end of the bottom line, paint small, angled dashes on either side of the shaft. Create about three or four pairs of these dashes to mimic the fletching of an arrow.
Paint Cracking?
If your white paint cracks when smiling, mix a tiny drop of moisturizer into the paint before applying. This adds flexibility for facial movement.
Step 4: Finishing Details
-
Add floating hearts:
Above the main red heart, slightly to the right, paint two tiny white ‘V’ shapes or miniature hearts. They should look like they are floating upwards. -
Brighten the highlights:
If the white paint has dried a bit translucent, carefully layer a second coat over the arrow and mini hearts to make them pop brightly against the skin. -
Set the look:
Once all paint is completely dry, mist the face lightly with a setting spray to lock the design in place for the day.
Now you are ready to wear your heart on your cheek with this charming look
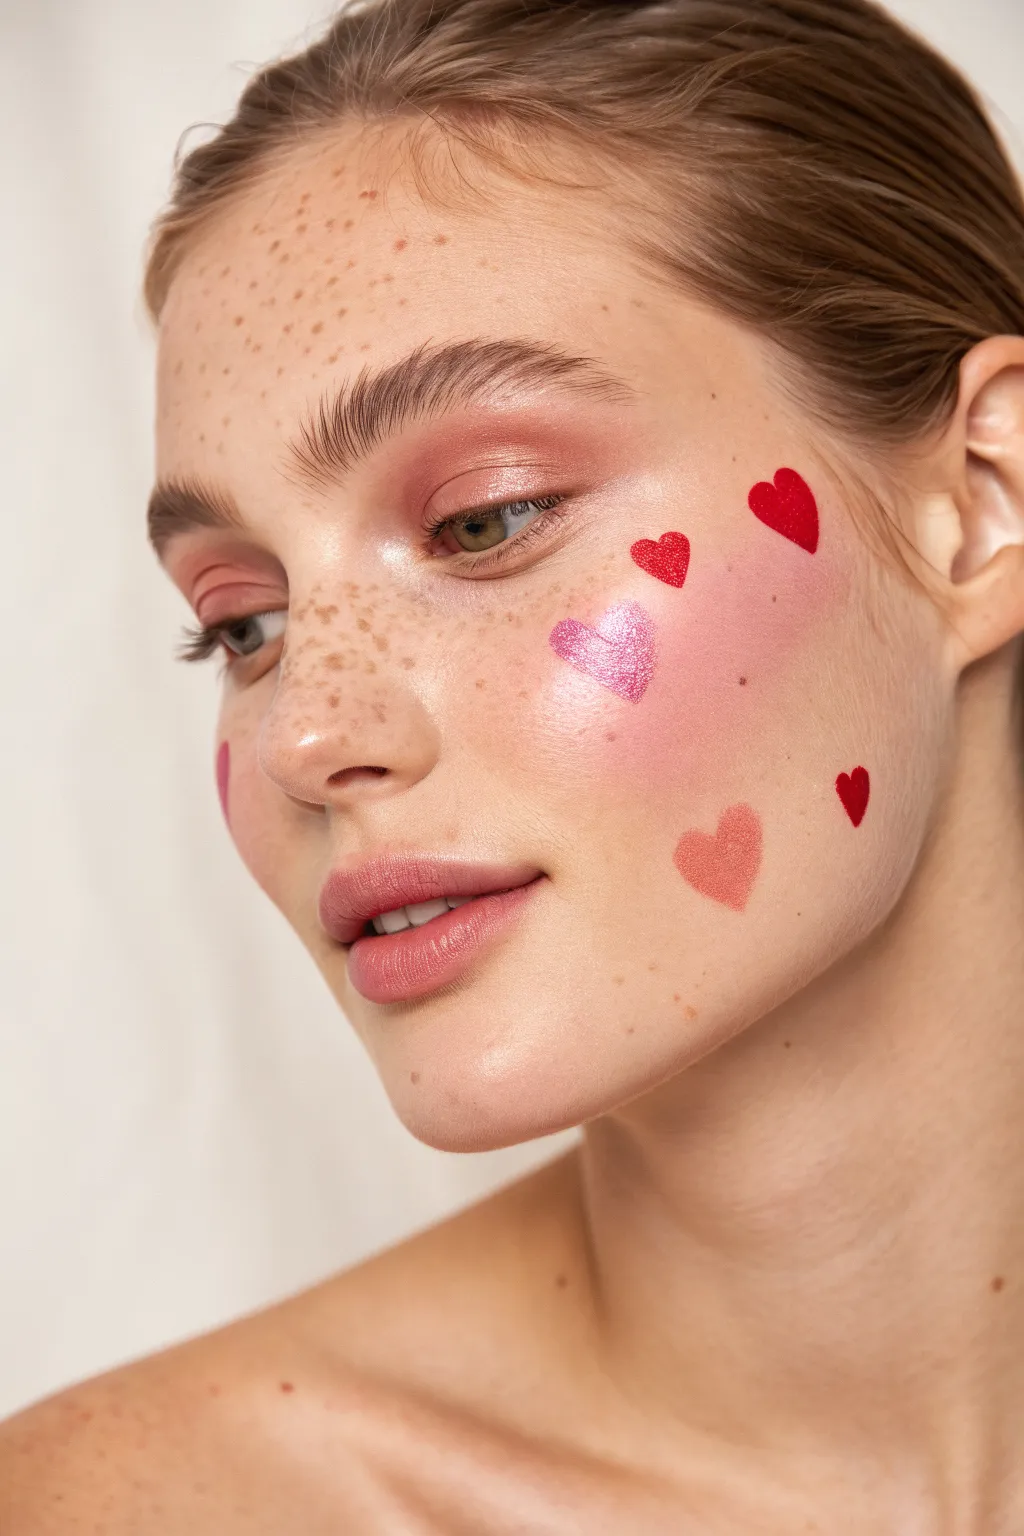
Sweet Heart Wing Liner
For a subtle yet romantic Valentine’s look, try this delicate arrangement of floating hearts. This design pairs a classic sharp wing with a whimsical arch of pink hearts that follow the natural curve of your brow bone.
Step-by-Step Guide
Materials
- Lightweight foundation or tinted moisturizer
- Concealer (optional)
- Translucent setting powder
- Eyeshadow primer
- Soft peach or nude matte eyeshadow
- Pink liquid eyeliner or water-activated face paint
- Fine-point detail brush (if using paint)
- Black liquid eyeliner pen (felt tip or brush tip)
- Black mascara
- Lash curler
- Spoolie brush for brows
Step 1: Base & Prep
-
Prime the lid:
Start with a clean, moisturized eyelid. Apply a thin layer of eyeshadow primer all over the lid up to the brow bone to ensure your hearts don’t smudge later. -
Apply base shadow:
Sweep a soft peach or nude matte eyeshadow across the entire lid. This creates a clean canvas that mimics the natural skin tone while hiding any veins or discoloration. -
Groom the brows:
Brush your eyebrows upward and outward with a spoolie. Since the hearts will follow the brow line, having a neat shape is helpful as a guide.
Wonky hearts?
Don’t panic! If a heart looks messy, wait for it to dry completely. Flake it off with a clean spoolie or cover mistakes with a tiny dot of concealer.
Step 2: Creating the Wing
-
Map the angle:
Looking straight into a mirror, visualize a line extending from your lower lash line up toward the end of your eyebrow. Mark a tiny dot where you want the wing to end. -
Draw the wing tip:
Using your black liquid liner, draw a thin line from the outer corner of your eye connecting to your guide dot. Keep this line extremely fine for a sharp finish. -
Connect to the lash line:
Draw a second line from the tip of the wing back toward the center of your lash line. This creates a small, empty triangle at the outer corner. -
Fill the triangle:
Carefully fill in the triangle shape with the black liner. -
Line the lashes:
Extend the black line inward along your upper lash line. Taper it so it becomes incredibly thin as it reaches the inner corner of the eye.
Step 3: Painting the Hearts
-
Test your color:
If I’m using a new pink liner or paint, I always test it on the back of my hand first to check opacity. You want a solid pink, not a watery one. -
Place the center heart:
Identify the highest point of your crease or orbital bone. Paint your first small pink heart here, ensuring it sits clearly above the crease so it’s visible when your eye is open. -
Creating the heart shape:
To make the heart easy, gently press the tip of your brush or liner down and slightly to the left, then lift. Repeat mirroring on the right side to join them at the point—like a ‘v’ shape. -
Work outward:
Paint the next few hearts moving toward your temple. Follow the curve of your eyebrow tail, spacing them evenly, about half a centimeter apart. -
Work inward:
Now paint the hearts moving toward the inner corner of the eye. Notice in the photo how the spacing gets slightly tighter near the nose. -
Check symmetry:
Step back from the mirror. If you are doing both eyes, check that the arches are roughly symmetrical in height.
Make it sparkle
After the pink paint dries, tap a tiny amount of clear glitter glue over just the center heart and press on a small iridescent rhinestone.
Step 4: Finishing Touches
-
Curl lashes:
Wait until the black liner is 100% dry. Gently squeeze your lashes with an eyelash curler, holding for a few seconds at the base. -
Apply mascara:
Apply a coat of black mascara to the upper lashes, focusing on defining and separating them rather than thick volume. -
Clean up edges:
If any heart looks wonky, use a cotton swab dipped in a tiny bit of micellar water to clean the edge, then pat dry. -
Highlight (optional):
Dab a tiny amount of highlighter on the inner corner of the eye to brighten the look without distracting from the hearts.
Now you have a gaze full of love ready to charm everyone you see

PENCIL GUIDE
Understanding Pencil Grades from H to B
From first sketch to finished drawing — learn pencil grades, line control, and shading techniques.
Explore the Full Guide
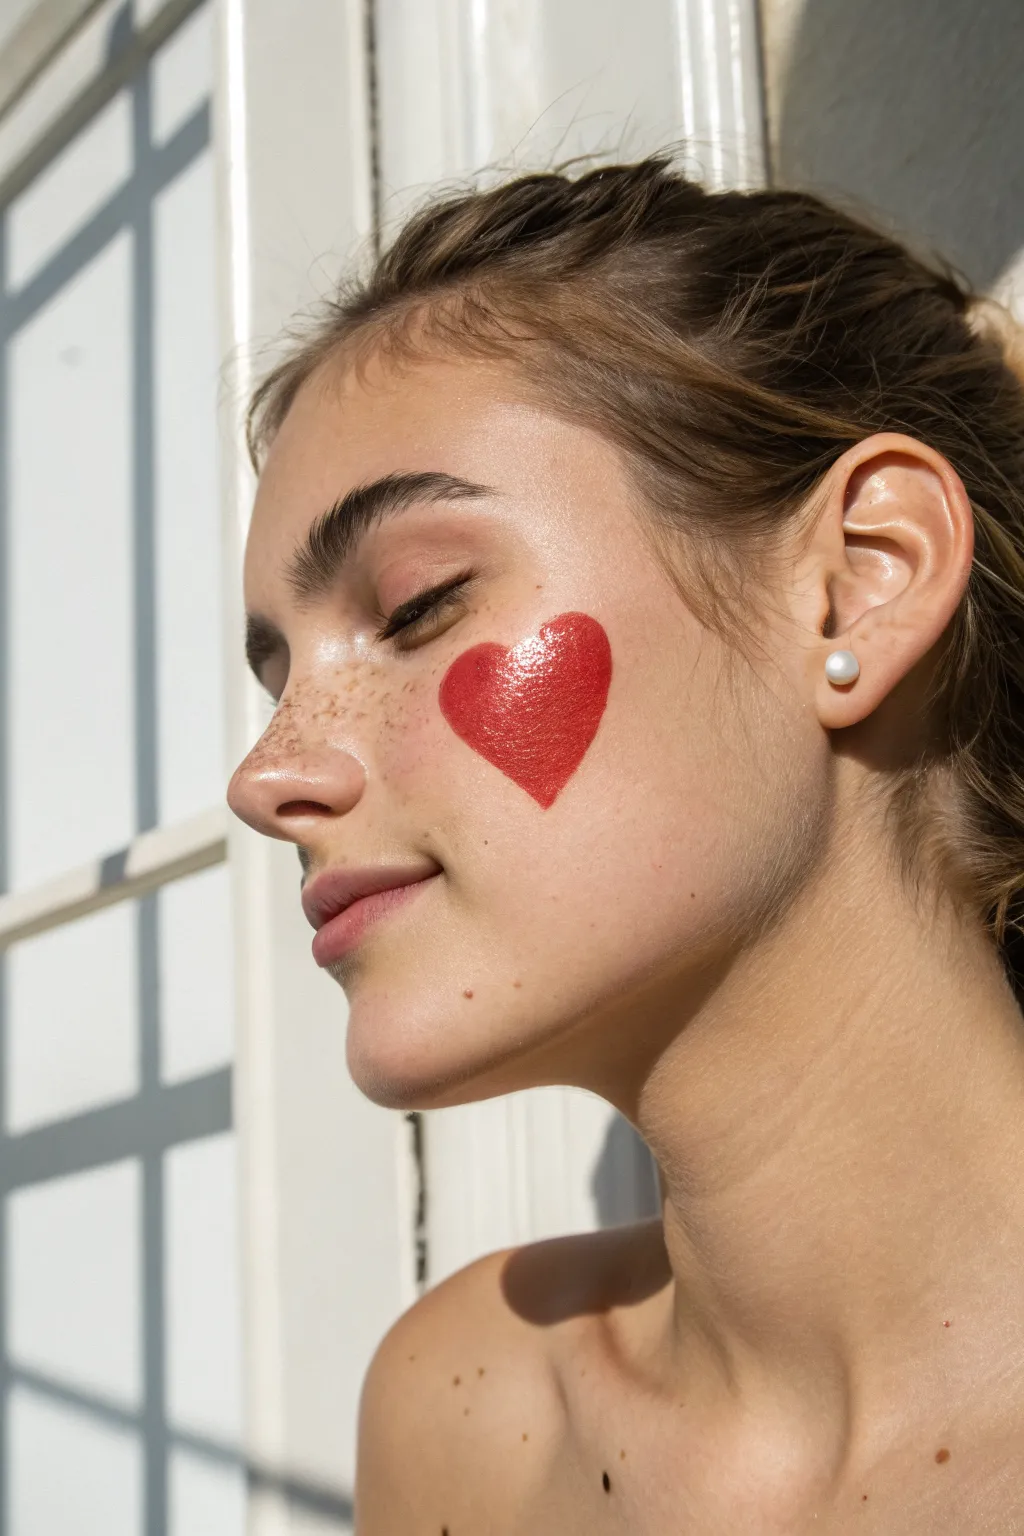
Half-Face Heart Mask
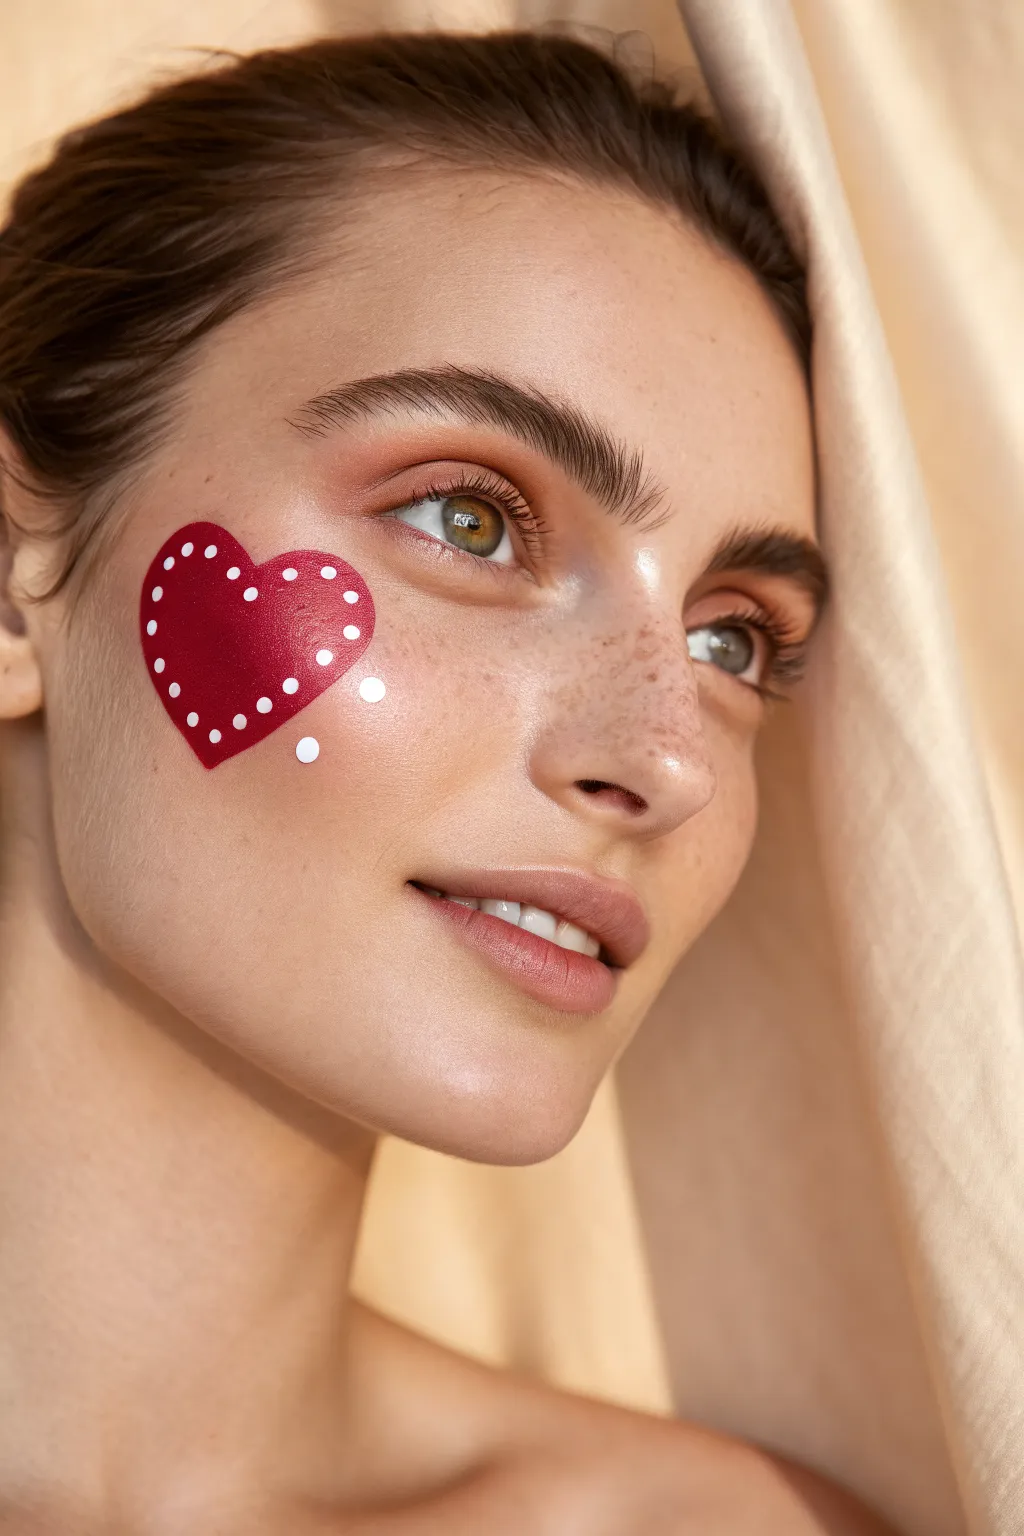
This minimal yet striking design centers on a vibrant red heart adorning the cheekbone, bordered by delicate white dots. It pairs beautifully with a fresh, dewy complexion for a romantic look that isn’t overbearing.
Step-by-Step Tutorial
Materials
- High-quality red face paint (water-activated or cream)
- White face paint (highly pigmented)
- Flat shader brush (size 6 or 8)
- Fine detail brush (size 0 or 1)
- Small dotting tool or the back of a thin paintbrush
- Pointed cotton swabs (for cleanup)
- Setting spray (optional)
- Warm-toned blush/bronzer for contouring
Step 1: Base Preparation
-
Prep the skin:
Start with clean, moisturized skin to ensure your paint glides on smoothly without catching on dry patches. -
Apply base makeup:
Apply a light layer of foundation or concealer to even out the skin tone, keeping the finish dewy and natural. -
Warm the complexion:
Sweep a warm bronzer or blush across the upper eyelids and cheekbones to create a cohesive, romantic glow that complements the red paint. -
Groom the brows:
Brush eyebrows upward with a clear gel to frame the face neatly before you begin the focal design.
Uneven Dots?
If your white dots look transparent or messy, your paint is likely too watery. Let it dry completely, then simply re-dot over the same spot with a thicker, creamier paint mix.
Step 2: Painting the Heart
-
Outline the shape:
Load your flat shader brush with red face paint. Using the sharp edge of the brush, carefully trace the outline of a heart on the high point of one cheekbone. -
Check placement:
Step back from the mirror to ensure the heart is angled slightly towards the hairline, following the natural lift of your cheek. -
Fill the interior:
Using the flat side of the same brush, fill in the heart shape with smooth, even strokes. -
Layer for opacity:
If the red looks streaky, let the first layer dry for a minute before applying a second coat for solid, punchy color. -
Refine the edges:
Use a damp pointed cotton swab to clean up any wobbly lines, ensuring the curves of the heart are crisp and symmetrical.
Step 3: Adding Details
-
Prepare the white paint:
Activate your white face paint with just enough water to create a creamy consistency that won’t drip. -
Test the consistency:
I like to dab a test dot on the back of my hand first to make sure the white is opaque enough to sit on top of the red. -
Begin dotting:
Using a dotting tool or the handle end of a detail brush, place small white dots along the perimeter of the heart. -
Maintain spacing:
Keep the spacing between dots consistent, placing them just inside the red border rather than strictly on the edge. -
Add floating accents:
Paint two or three slightly larger white dots floating just outside the bottom curve of the heart to add movement to the design. -
Vary the sizes:
For the interior dots, try to keep them uniform, but allow the floating exterior dots to be slightly bigger for visual interest.
Make It Sparkle
While the paint is still slightly tacky, gently press cosmetic-grade biodegradable red glitter into the center of the heart for a textured, jewel-encrusted effect.
Step 4: Finishing Touches
-
Let it set:
Allow the painted design to dry completely for about five minutes to avoid accidental smudging. -
Highlight the skin:
Apply a cream highlighter to the nose bridge, inner eye corners, and the unpainted cheekbone to amplify the dewy effect. -
Apply mascara:
Finish with a coat of lengthening mascara to balance the bold cheek art without overpowering it. -
Set with spray:
Mist a fine setting spray over the face, holding the bottle at arm’s length, to lock the design in place for the day.
Now you have a sweet, modern Valentine’s look that creates a lovely statement piece
Valentine Crown of Hearts
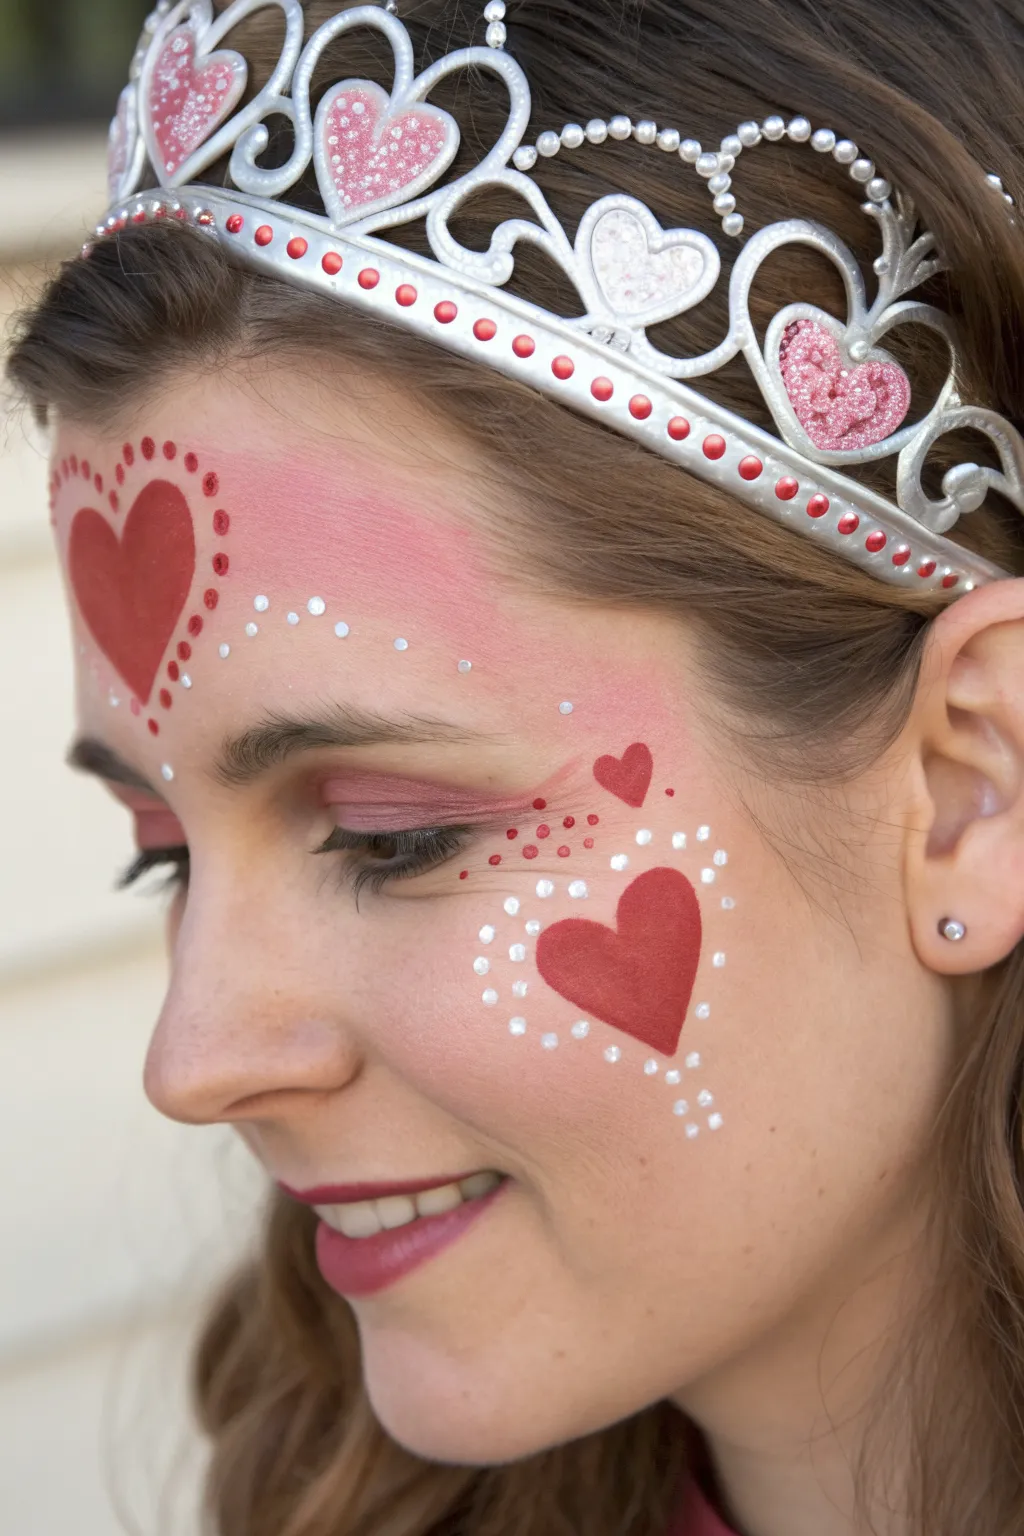
Transform into royalty with this sweet and romantic face paint design that frames the face with loving details. Featuring bold red hearts on the forehead and cheek, soft pink blending, and delicate white accents, this look pairs perfectly with a glittering tiara.
Detailed Instructions
Materials
- Red face paint (high pigment)
- White face paint
- Pink face paint (shimmer or matte)
- Flat brush (medium size)
- Round brush (size 2 or 3 for outlines/dots)
- Makeup sponge
- Water cup
- Paper towels
- Cosmetic glitter gel (optional)
- Silver toy tiara with heart gems
Step 1: Base and Pink Wash
-
Prepare the canvas:
Ensure the face is clean and dry. Use a slightly damp sponge loaded with soft pink paint to create a gentle wash across the forehead. -
Create the forehead band:
Swipe the sponge horizontally across the forehead, staying just above the eyebrows, to create a soft pink background for the main heart. -
Cheek flush:
Using the same sponge, lightly tap some pink color onto the high points of the cheekbones, blending it outward towards the hairline for a rosy glow. -
Eye details:
With a smaller brush or the edge of your sponge, extend a bit of the pink color onto the eyelids, creating a soft eyeshadow effect that connects with the cheek design.
Step 2: Painting the Hearts
-
Forehead heart outline:
Load a medium flat brush with bright red face paint. On the left side of the forehead, paint a large, classic heart shape, slightly tilted outward. -
Fill the forehead heart:
Fill in the outline smoothly with the red paint, ensuring opaque coverage. I find that doing two thin layers is better than one thick, crackly layer. -
Cheek heart placement:
Move to the cheek on the same side. Paint a similar but slightly smaller red heart on the apple of the cheek, tilting it downwards towards the nose. -
Floating accent heart:
Using a smaller round brush and red paint, add a tiny, floating heart just above the cheekbone, near the outer corner of the eye. -
Tiny dot accents:
While you have red on your small round brush, add a cluster of tiny red dots trailing from the small floating heart towards the nose.
Smudge Control
If your red paint bleeds into the white dots, your brush was too wet. Let the red layer dry completely before adding white, and use a ‘stamp’ motion for dots.
Step 3: Delicate White Details
-
Load the detail brush:
Clean your round brush thoroughly and load it with creamy white face paint. Ensure the consistency is inky so the dots stay round. -
Frame the forehead heart:
Carefully paint a series of small white dots following the curve of the large red heart on the forehead. Leave a tiny gap between the red edge and the white dots. -
Swirls and trailing dots:
Paint a delicate line of white dots that act as a ‘string’ or swoop connecting the forehead design down toward the nose bridge. -
Cheek heart framing:
Surround the large cheek heart with white dots, just like you did on the forehead. Vary the size slightly, making the dots at the top point a little larger. -
Eye highlights:
Add a few scattered white dots near the outer corner of the eye to bridge the gap between the forehead and cheek designs. -
Lip finish:
Apply a coat of berry-colored or red lipstick to balance the boldness of the red face paint hearts. -
Crown the look:
Place the silver tiara on the head, positioning it so the central heart gem aligns nicely with the painted forehead heart.
Sparkle Upgrade
While the red paint is still slightly damp, tap cosmetic-grade loose red glitter onto the centers of the hearts for a dazzling, 3D gem effect.
Now you have a regal and heartwarming look ready for any Valentine’s celebration


Queen of Hearts Frame
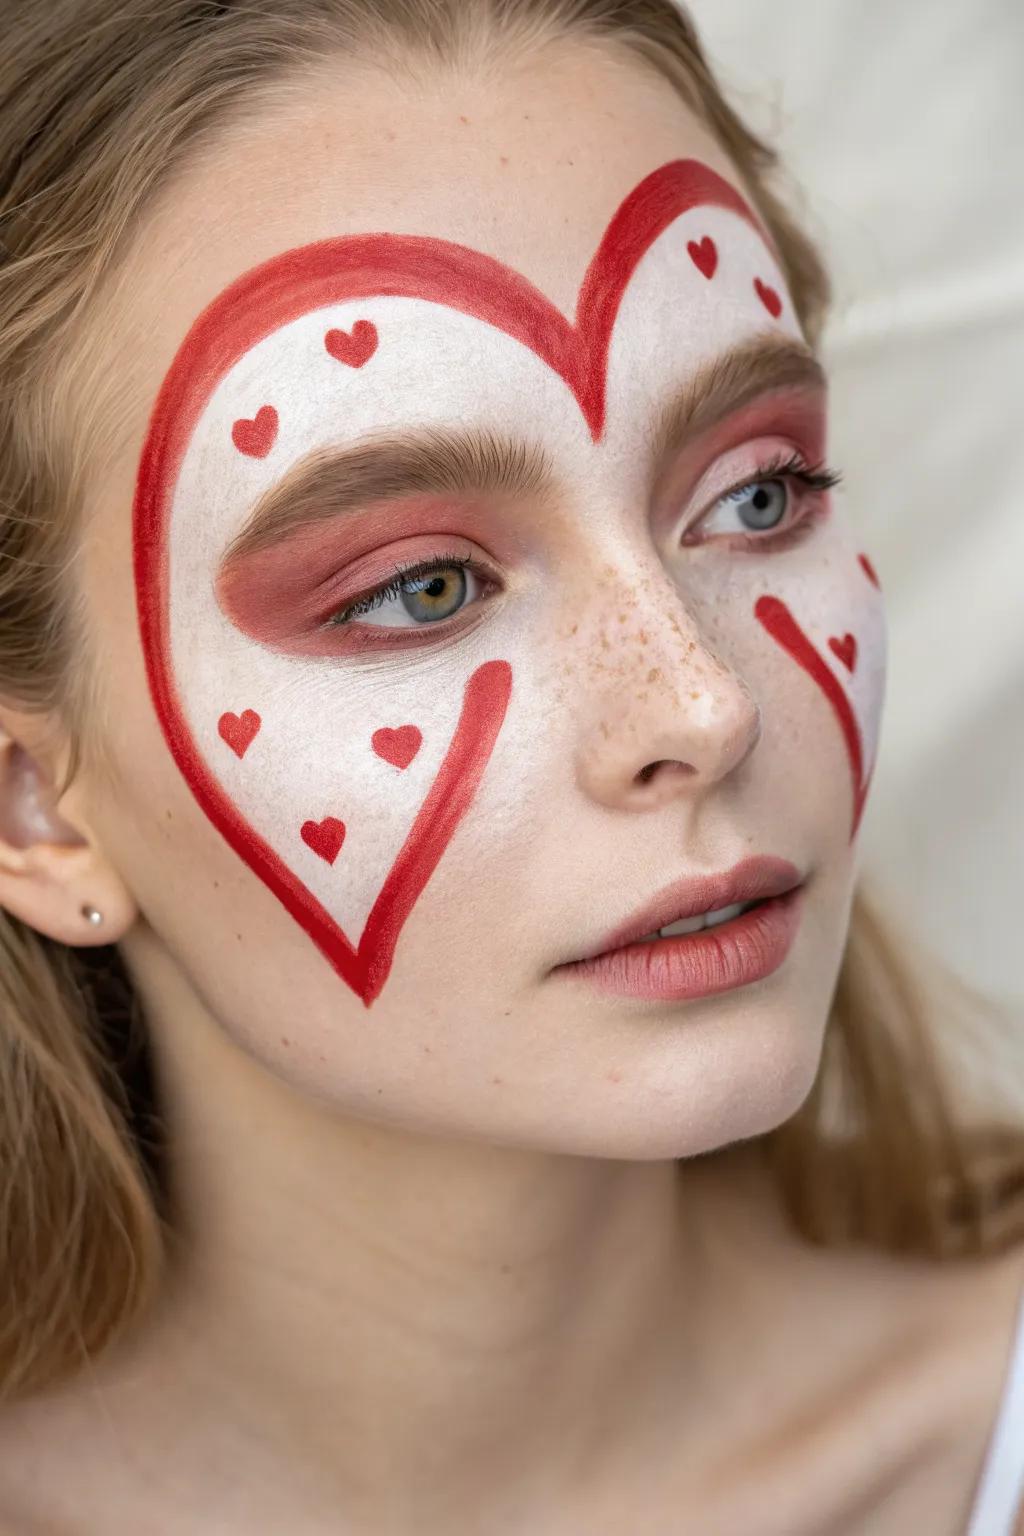
Transform yourself into royalty with this romantic, avant-garde look that frames the face in a large, graphic heart. The design combines bold reds with stark white negative space and delicate heart details for a striking Valentine’s statement.
Step-by-Step
Materials
- White face paint or white cream makeup foundation
- Red face paint (water-activated preferred)
- Red eyeshadow
- Fluffy eyeshadow blending brush
- Small flat synthetic brush
- Fine detail line brush
- Translucent setting powder
- Pink or nude lip liner
- Red lipstick
Step 1: Creating the Base
-
Outline the main shape:
Start with a clean, moisturized face. Using a thin brush and a very light wash of red paint or a nude pencil, sketch the large heart outline. The top curves should sit high on the forehead, dipping down between the brows, while the bottom point should end on the cheek. -
Check symmetry:
Before filling anything in, step back and look straight into a mirror to ensure the heart lobes on the forehead are relatively symmetrical and framing your eyes nicely. -
Fill the white base:
Using a flat foundation brush or sponge, fill the inside of your heart outline with white face paint. Apply this in thin layers to avoid cracking. -
Build opacity:
Let the first white layer dry, then stipple on a second layer to get a solid, opaque coverage that hides the natural skin tone, especially over the eyebrows. -
Set with powder:
Lightly dust translucent setting powder over the white areas. This locks the creaminess in place and provides a smoother surface for the eyeshadow you’ll apply next.
Clean Lines Pro-Tip
Rest your pinky finger on a dry part of the face (or use a powder puff as a shield) while painting the red borders to keep your hand steady for crisp lines.
Step 2: Eyes & Shading
-
Apply base shadow:
Load a fluffy eyeshadow brush with a soft red or dark pink matte eyeshadow. Begin applying this over the eyelid, concentrating the color on the outer corners. -
Extend the color:
Sweep the red eyeshadow upwards toward the brow bone and slightly outward, following the natural curve of your eye socket. This softens the stark white background. -
Blend the edges:
Use a clean blending brush to diffuse the edges of the red shadow so it fades seamlessly into the white paint rather than having a harsh stop. -
Define the crease:
Add a slightly darker red shade into the crease of the eyelid for depth, blending it thoroughly to maintain a soft, romantic haze.
Level Up: Glossy Finish
Once the paint is fully dry, dab a tiny amount of clear gloss or balm onto the center of the eyelids and the high points of the cheekbones for an editorial, dewy shine.
Step 3: Graphic Details
-
Outline the perimeter:
Switch to a medium round brush and red face paint. Carefully trace the outer perimeter of your heart shape with a thick, bold red line. -
Define the widow’s peak:
Pay close attention to the center point on the forehead; make the V-shape sharp and distinct as it dips between the eyebrows. -
Add the inner frame:
I find it helpful to paint the scrolling red line on the opposite cheek now. Start near the ear and sweep a thick red curve down towards the jawline, mimicking the bottom curve of a heart. -
Paint mini hearts:
Using your finest detail brush, paint small floating hearts inside the white zones. Scatter them randomly—some near the temples, some on the cheeks. -
Vary the sizes:
Make sure the little hearts aren’t all uniform; paint a few tiny ones and a few slightly larger ones to create visual interest. -
Enhance freckles:
If your natural freckles were covered by the white paint, use a watered-down brown paint or a freckle pen to dot faux freckles across the nose and cheeks for a natural touch.
Step 4: Finishing Touches
-
Mascara application:
Apply a coat of black mascara to top and bottom lashes to define the eyes against the red shadow. -
Line the lips:
Outline your natural lip shape with a pink or nude lip liner, heavily blurring the edges inward. -
Apply lip color:
Dab a rose or soft red lipstick onto the center of the lips and press them together, creating a diffused, ‘bitten’ lip look rather than a sharp full pout.
Now you are ready to break hearts with this stunning and artistic framing concept.
Rose and Heart Combo
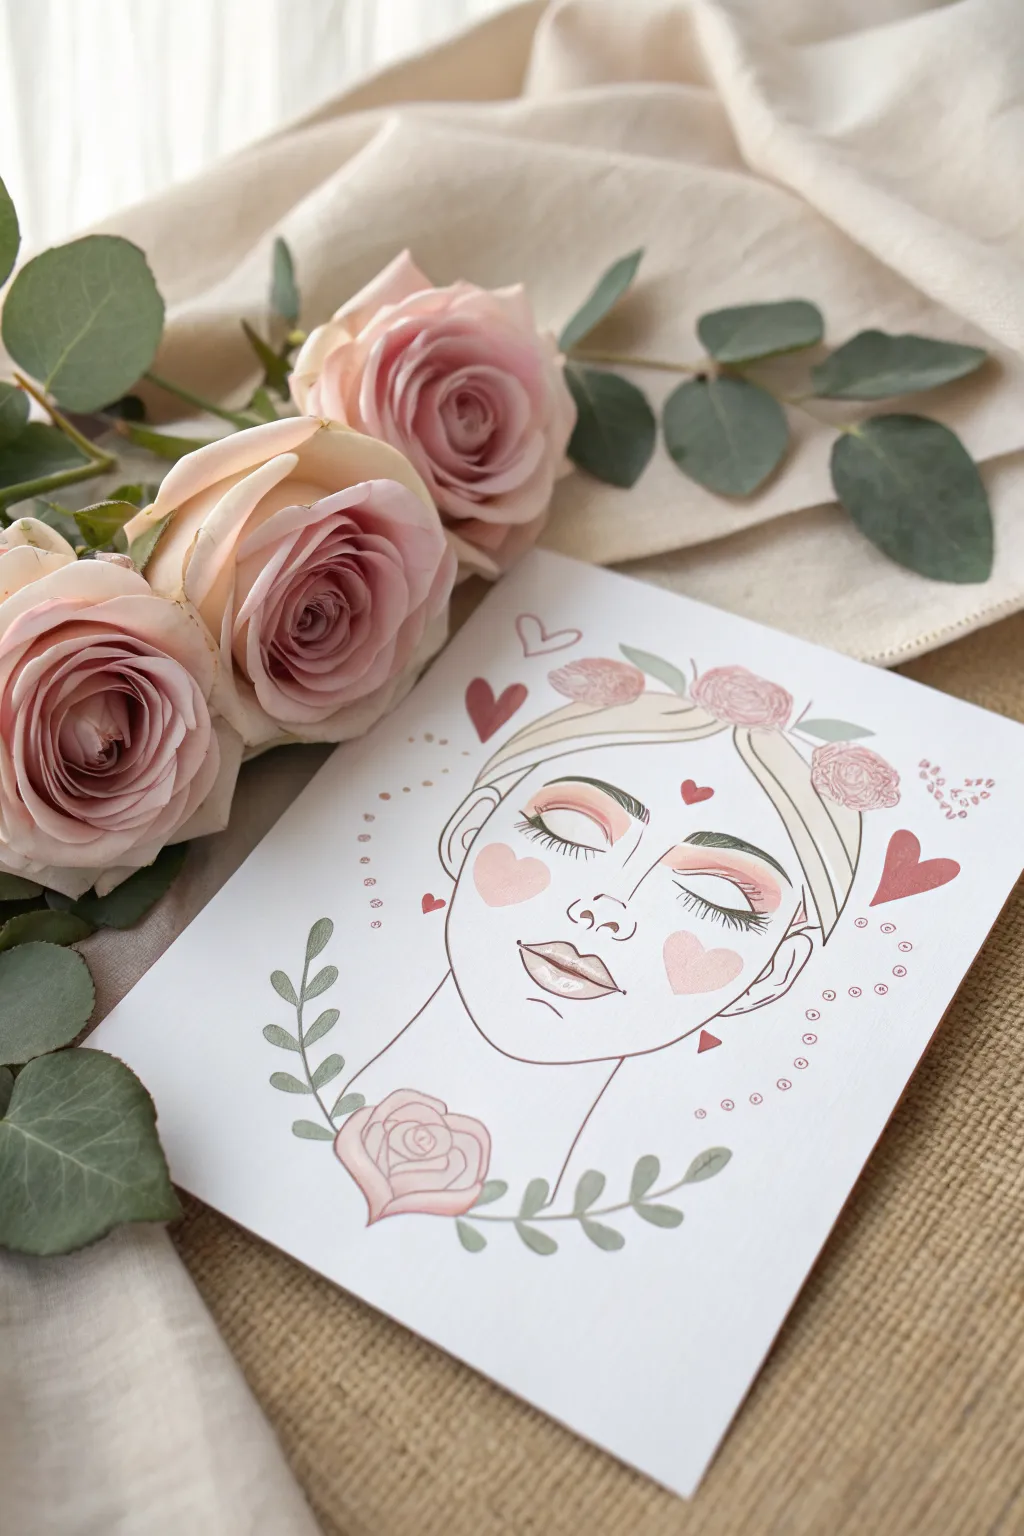
This charming illustration combines delicate line work with soft pink accents to create a dreamy, romantic portrait perfect for a Valentine’s card or wall art. The minimalist style features calming closed eyes, floral adornments, and whimsical heart details that float around the subject.
Step-by-Step Guide
Materials
- Heavyweight watercolor paper or mixed media cardstock
- Fine liner pens (black, 0.3mm and 0.5mm)
- Watercolor paints or alcohol markers (soft pink, peach, sage green, darker rose)
- Small round brushes (size 2 and 4)
- Pencil (HB)
- Eraser
- White gel pen (optional for highlights)
Step 1: Sketching the Foundations
-
Outline the face shape:
Start by lightly sketching an oval shape for the face with your pencil. Taper it slightly towards the chin for a gentle, feminine jawline. -
Map out facial features:
Draw faint horizontal guidelines for the eyes, nose, and mouth. Sketch two curved arches for the closed eyelids, a small button nose, and full lips. -
Add hair and accessories:
Sketch the hairline sweeping across the forehead. Add a headband shape resting on the hair, positioning three circular shapes for the roses—one on each side and one slightly off-center. -
Draft the neck and decorative elements:
Draw two curved lines extending down for the neck. At the base of the neck, sketch a large central rose. Add curving vines with leaves extending from this bottom rose upwards on both sides to frame the face.
Clean Lines Pro-Tip
When drawing the long lashes, rotate your paper so your hand moves in a natural arc away from your body. This helps keep the curves smooth and consistent.
Step 2: Inking the design
-
Trace the main lines:
Using your 0.5mm black fineliner, carefully go over your pencil lines for the face contour, neck, and hair. Keep your hand steady but allow for slight variations in line width for character. -
Detail the eyes:
Switch to a finer 0.3mm pen. Draw the closed eyelids with a slightly thicker line, then add long, sweeping eyelashes curving downwards. I find drawing these quickly creates a more natural taper. -
Refine the floral elements:
ink the roses using concentric, wavy lines to suggest petals. Draw the leaves on the vines with a simple pointed oval shape, connecting them to the central stem. -
Erase pencil guides:
Wait until the ink is completely dry to avoid smudging, then gently erase all visible pencil marks to leave a clean black-and-white drawing.
Step 3: Adding Color
-
Paint the skin flush:
Mix a very dilute peach or pale pink watercolor. Apply two soft heart shapes on the cheeks for blush and lightly wash over the eyelids to give them warmth. -
Color the lips:
Use a dusty rose shade for the lips. Leave a tiny sliver of white paper unpainted on the lower lip to simulate a glossy highlight. -
Fill in the roses:
Paint the roses in the hair and at the neck with a soft pink. You don’t need to stay perfectly inside the lines; a loose watercolor style adds to the charm. -
Paint the leaves:
Using a muted sage green, carefully fill in the leaves on the framing vines and the leaves tucked into the headband. -
Add floating hearts:
With a slightly darker pink or red, paint small hearts floating around the head. Vary their sizes and angles to make them look like they are dancing. -
Create decorative dots:
Using the tip of your brush or a marker, create trailing lines of small pink dots swirled around the face to frame the portrait further.
Level Up: 3D Elements
Instead of painting the roses, glue small dried pressed flowers or paper cut-outs onto the headband and neck for a beautiful mixed-media texture.
Step 4: Final Touches
-
Deepen the shadows:
Once the first layer of pink is dry, add a second, slightly darker layer of pink to the centers of the roses and the crease of the eyelids for subtle depth. -
Add highlights:
If you have a white gel pen, add tiny dots to the tops of the cheeks or the nose tip for extra sparkle. -
Optional metallic accents:
For a Valentine’s twist, you might trace over the floating hearts with a gold pen or add gold dots among the pink ones.
Allow your artwork to dry completely before writing a sweet message on the back or framing it for a loved one
Butterfly Hearts Design
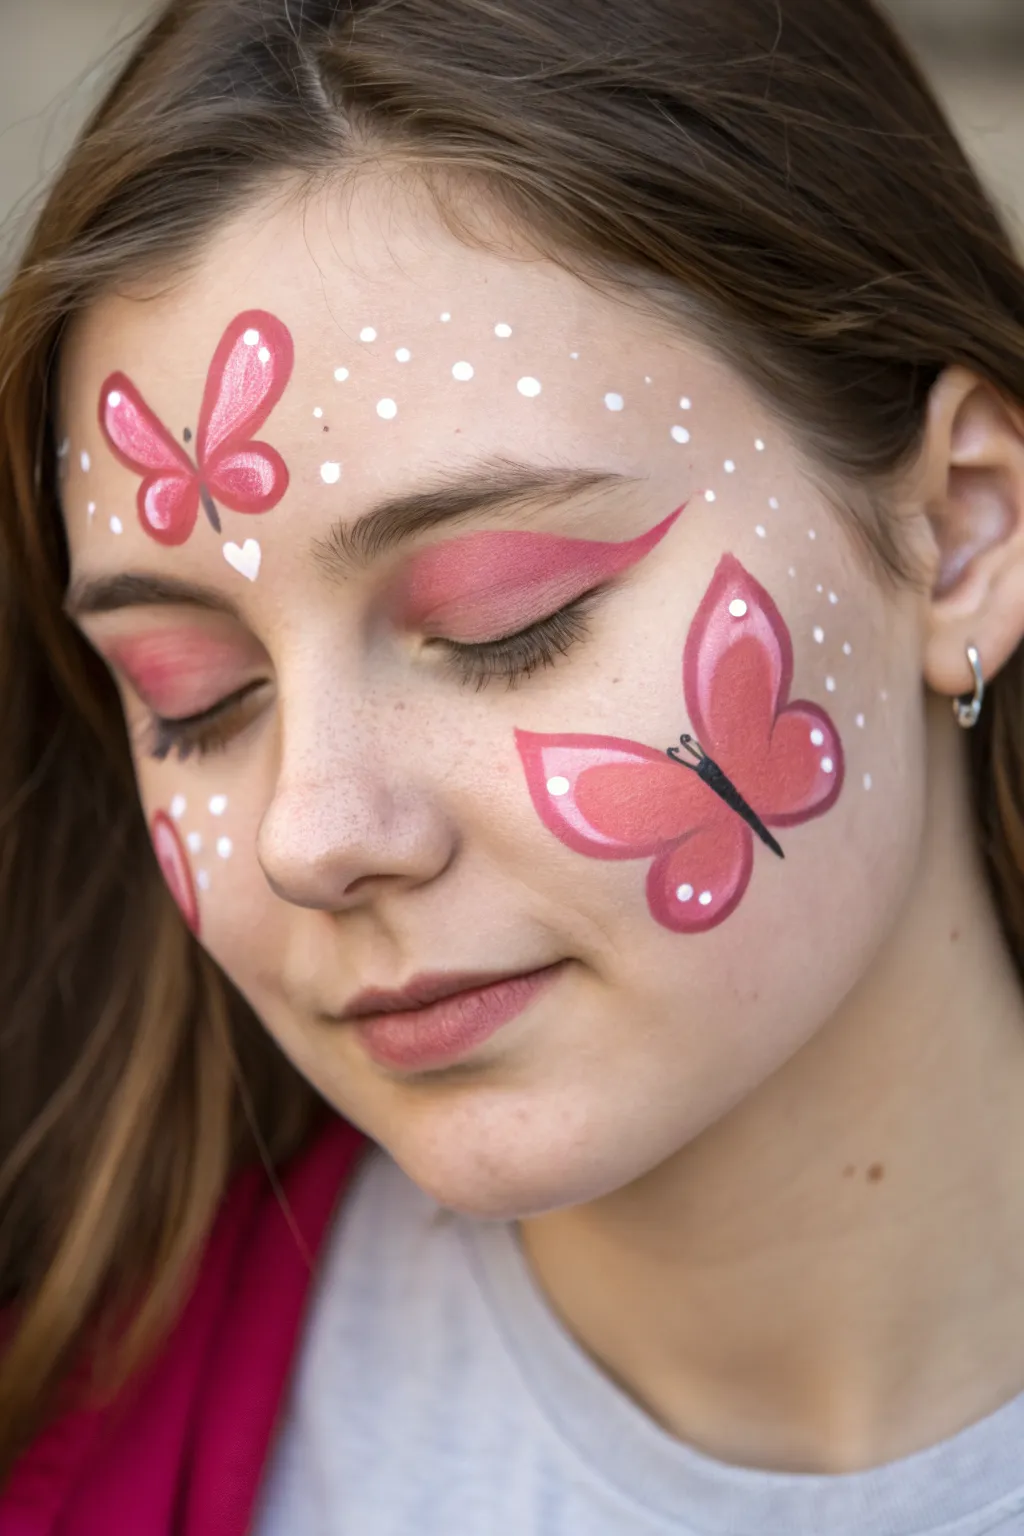
Transform a simple makeup look into a romantic masterpiece with this delicate butterfly design featuring heart-shaped wings. Soft pinks and crisp white dots create a dreamy, ethereal effect that is perfect for a subtle yet festive Valentine’s Day style.
Detailed Instructions
Materials
- Face paint palette (pinks, reds, whites, black)
- Pink eyeshadow or blush
- Medium round brush
- Fine liner brush
- Fluffy eyeshadow brush
- Small blending sponge or applicator
- Setting spray (optional)
- Makeup wipes or cotton swabs
Step 1: Base and Eyes
-
Prep the canvas:
Begin with a clean, dry face. If the skin is oily, a light dusting of translucent powder can help the paint adhere better. -
Apply the eyeshadow base:
Using a fluffy eyeshadow brush, sweep a vibrant pink eyeshadow across the eyelids. Extend the color outward toward the temples in a soft, winged shape to create a cohesive background for the butterflies. -
Deepen the crease:
Load a slightly darker pink or rose shade onto a smaller brush and blend it into the crease of the eyelid to add dimension. -
Add the winged liner:
Take a fine liner brush loaded with deep pink face paint or a pink liquid eyeliner. Draw a sharp, dramatic wing extending from the outer corner of the eye, following the upward angle of the eyeshadow.
Fixing Shaky Lines
If your black lines wobble, wait for them to dry completely. Then, use a damp angled brush with a tiny bit of skin-tone foundation to gently clean up the edges.
Step 2: Forehead Butterfly
-
Outline the upper wing:
Load a medium round brush with pink face paint. On the forehead above the left eyebrow, paint a tear-drop shape that angles outward to form the top wing. -
Create the lower wing:
Directly below the first shape, paint a smaller, rounded tear-drop shape that connects at the center point. This mimics the look of a heart cut in half. -
Fill and highlight:
Fill the shapes with a lighter pink tone, leaving the darker outline visible. While the paint is still slightly damp, blit the center with a touch of white to create a soft gradient. -
Add the body:
Using a fine liner brush and black paint, draw a very thin, small body between the wings and add two delicate antennae curving upward. -
Paint a central heart:
Place a small, solid white heart directly between the eyebrows, slightly below the butterfly wings, to anchor the design.
Glitter Upgrade
Before the paint dries fully, press cosmetic-grade iridescent glitter onto the wet white dots or the center of the butterfly wings for a sparkling finish.
Step 3: Cheek Butterfly
-
Position the main butterfly:
On the left cheekbone (the model’s left, viewer’s right), visualize the placement. The butterfly should look like it is resting on the cheek. -
Paint the large upper wing:
Using the same pink mixture, paint a large, elongated tear-drop shape extending upward toward the temple. -
Paint the lower wing:
Add a smaller, rounder wing below the first one. Together, these two shapes should strongly resemble a tilted heart. -
Add inner details:
I like to take a light pink or white on a smaller brush and paint a smaller ‘tear-drop’ inside each wing section to create depth and a layered look. -
Define the body:
With the black liner brush, draw a thin black line for the thorax where the wings meet. Add a small head and two fine antennae. -
Draw the third butterfly:
On the opposite cheek, near the jawline, paint a partial butterfly wing peeking onto the face to balance the composition.
Step 4: Magical Details
-
Start the dot work:
Load a small round brush or the back of a brush handle with opaque white face paint. Begin placing dots around the forehead butterfly. -
Create flow with dots:
Continue adding white dots of varying sizes across the forehead, moving down towards the bridge of the nose. Varying the pressure will give you differnt sized dots. -
Accentuate the cheek:
Add a cluster of white dots around the large cheek butterfly, letting them trail off towards the ear like magical dust. -
Highlight the wings:
Add tiny white dots directly onto the pink wings of the butterflies for extra sparkle and texture. -
Final touches:
Check for symmetry and clean up any smudges with a damp cotton swab. Mist lightly with setting spray if you need the design to last all day.
Now you have a lovely, heart-inspired butterfly look ready to charm everyone you meet
Valentine Rainbow With Heart Ends
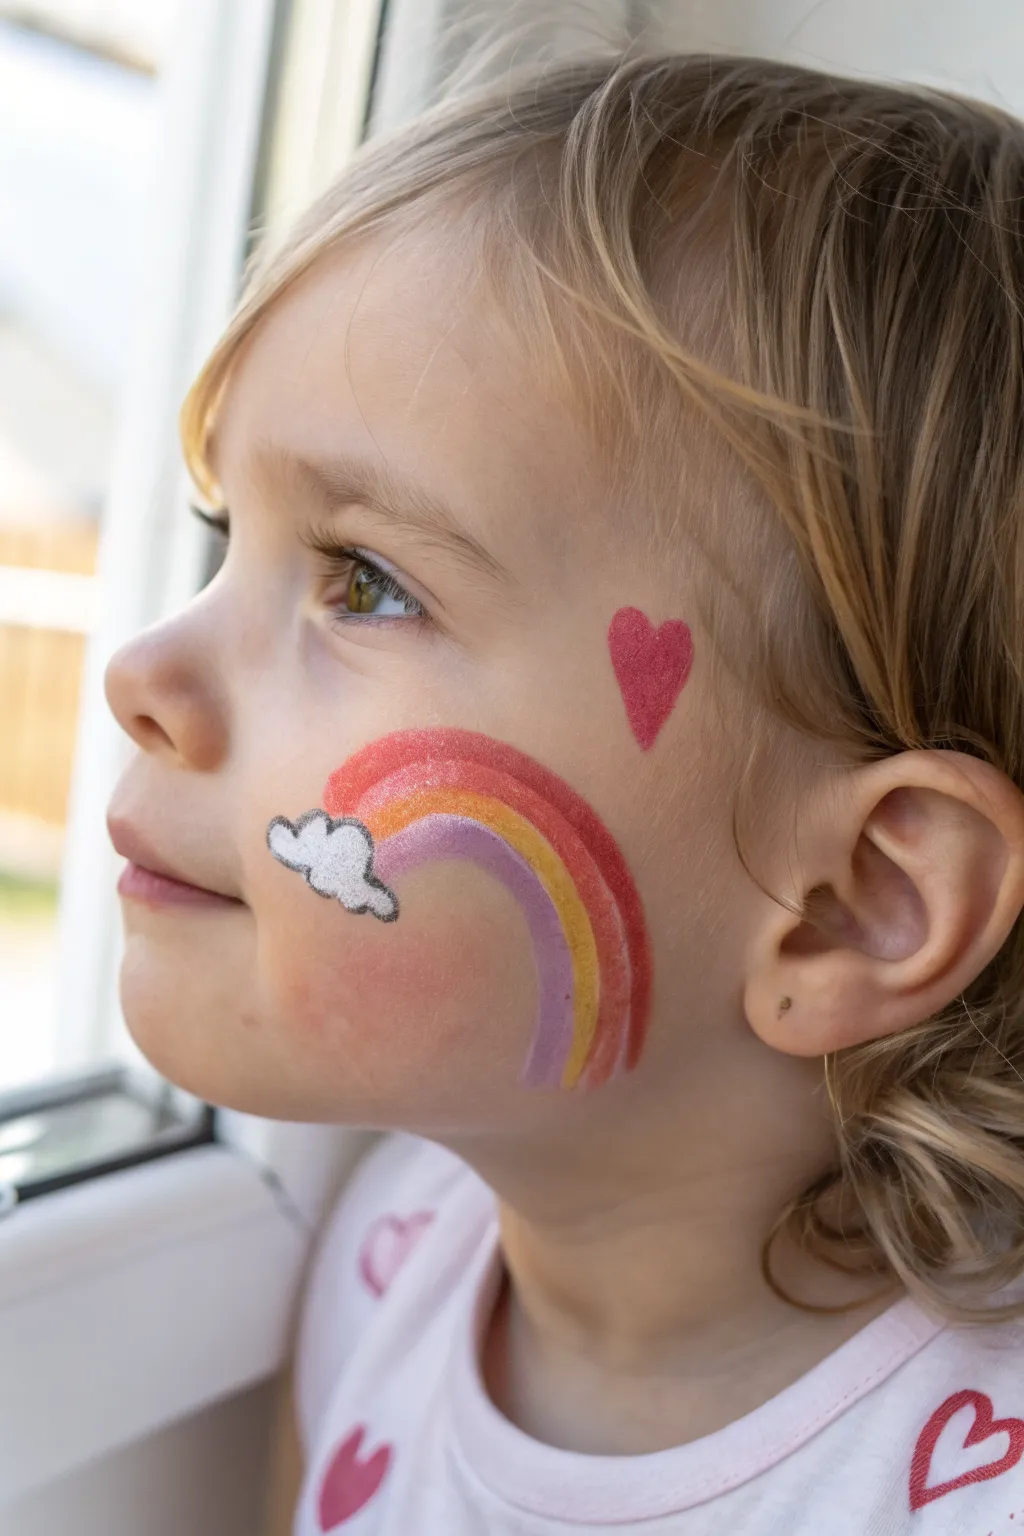
Brighten up a sweet face with this charming rainbow design that sweeps elegantly across the cheek. Anchored by a soft, glittering cloud and topped with a simple red heart, it’s a perfect, quick design for Valentine’s Day festivities.
Step-by-Step Guide
Materials
- White face paint
- Red face paint
- Orange face paint
- Yellow face paint
- Purple or violet face paint
- Black face paint (fine liner)
- Small round brush (size 1 or 2)
- Medium filbert brush or flat brush
- Cup of water
- Cosmetic glitter dust (optional)
- Sponge or paper towel
Step 1: Painting the Cloud Base
-
Position the Cloud:
Visualize the starting point for your design just above the corner of the mouth on the cheek. This is where the cloud will sit. -
Outline the Shape:
Load a small round brush with white face paint. Carefully draw a fluffy, scalloped cloud shape. It doesn’t need to be perfectly symmetrical; a few bumps vary in size to look natural. -
Fill with White:
Using the same brush, fill in the entire cloud shape with solid white paint. Ensure the coverage is opaque so it stands out against the skin tone. -
Add Glitter:
While the white paint is still slightly tacky, I like to gently tap a tiny bit of cosmetic glitter onto the cloud for a magical shimmer.
Step 2: Creating the Rainbow Arc
-
Plan the Curve:
Imagine a gentle curve starting from the top edge of your white cloud and arching back toward the middle of the ear. -
Paint the Red Stripe:
Load a medium filbert or round brush with red paint. Start at the top edge of the cloud and paint the outermost arch of the rainbow in a smooth, confident stroke. -
Clean Your Brush:
Rinse your brush thoroughly between colors to keep the rainbow bright and muddy-free. -
Add the Orange Stripe:
Load the brush with orange paint. Paint a stripe directly underneath the red one, following the exact same curve. -
Add the Yellow Stripe:
Next, apply the yellow stripe underneath the orange. Try to keep the width of each stripe relatively consistent. -
Finish with Purple:
Complete the rainbow with a purple or violet stripe on the innermost curve. Ensure this line meets the cloud neatly. -
Define the Ends:
Make sure the rainbow stripes appear to be emerging from behind the cloud rather than sitting on top of it.
Pro Tip: One-Stroke Magic
Use a flat ‘split cake’ face paint brush loaded with multiple colors at once. This lets you paint the entire rainbow arc in a single, smooth swoop.
Step 3: Final Details and Outlining
-
Paint the Heart:
Locate a spot slightly above and to the right of the rainbow’s peak, closer to the outer eye area. Paint a simple, classic red heart shape here using a small brush. -
Outline the Cloud:
Load a very fine liner brush (size 1) with black face paint. With a steady hand, outline the bumps of the white cloud. -
Vary Line Weight:
When outlining, try to vary the pressure slightly to create a dynamic line—thicker in some crevices and thinner on the tops of curves. -
Check for Gaps:
Look closely at where the rainbow meets the cloud. If there are gaps, you can extend the black outline slightly to cover the transition. -
Let it Dry:
Ask the model to keep their face still for moment to allow the thicker layers of paint to set completely.
Troubleshooting: Shaky Lines
If your hands are shaking, rest your pinky finger gently on the child’s chin or cheekbone (dry areas only) to stabilize your hand while painting details.
This sweet and colorful design is sure to bring a smile to anyone’s face this Valentine’s season
Heart Web (Edgy Romance)
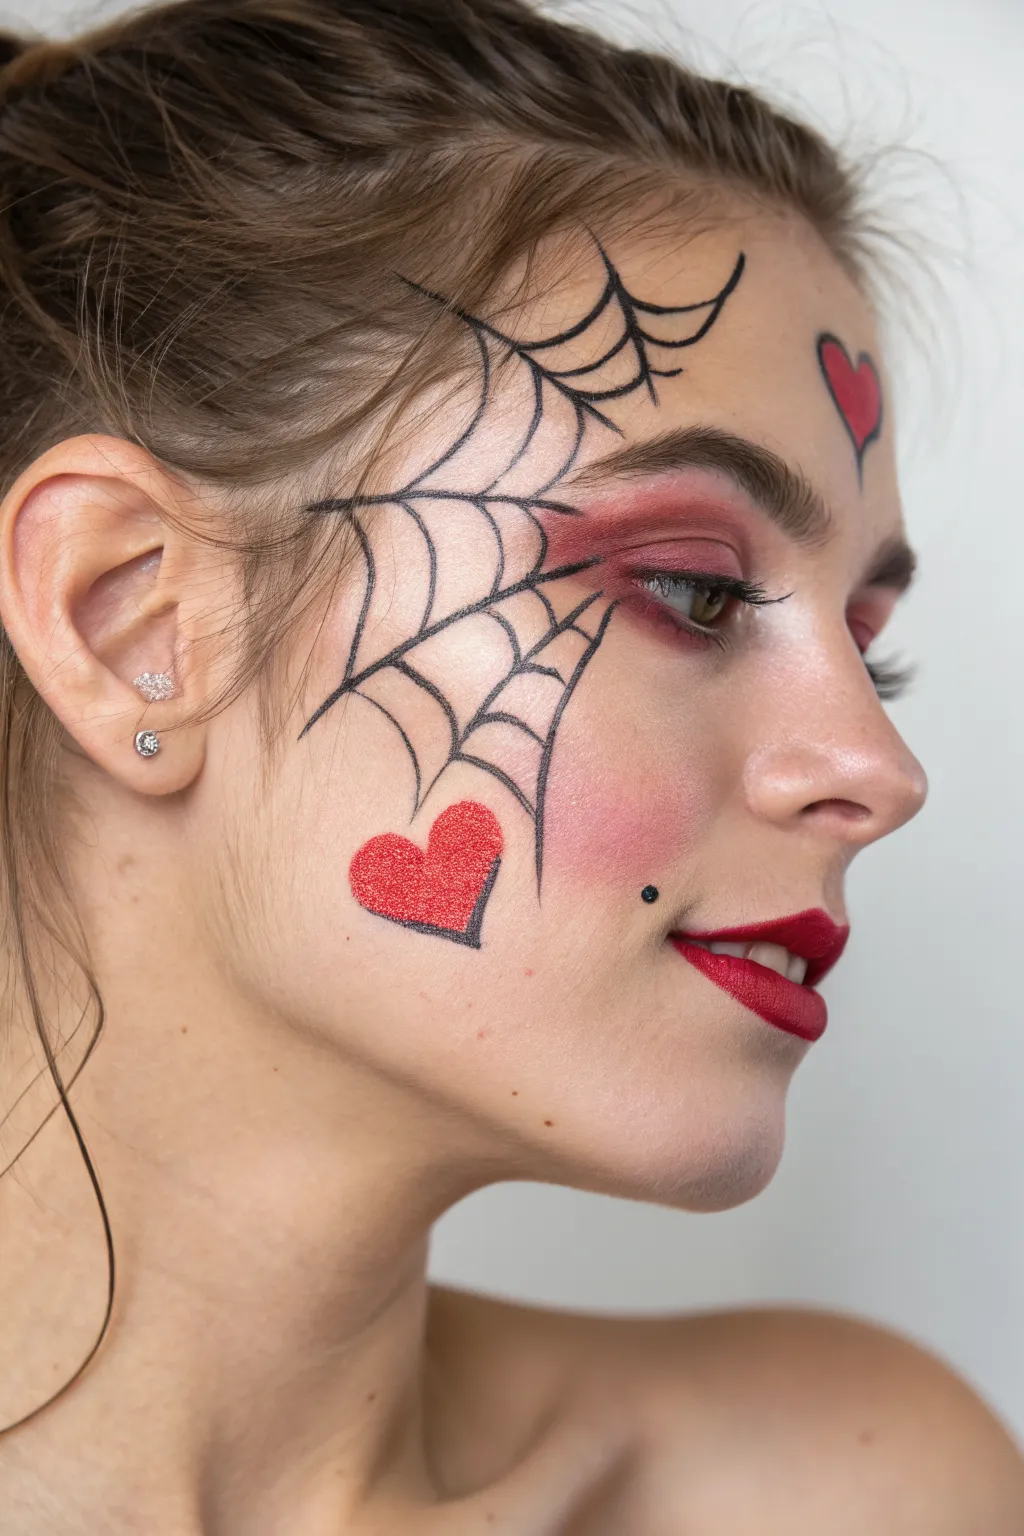
Blend sweet romance with a touch of spooky elegance in this edgy Valentine’s look. Featuring a bold spiderweb design emanating from the eye and paired with striking red accents, this face paint style is perfect for those who want something unconventional yet alluring.
How-To Guide
Materials
- Matte black face paint (water-activated)
- Red face paint or cream makeup
- Fine detail brush (size 0 or 1)
- Medium round brush
- Red eyeshadow (matte)
- Fluffy blending brush
- Black eyeliner pencil or liquid liner
- Red lipstick (matte or satin)
- Setting spray (optional)
- Flat shader brush
Step 1: The Smoky Base
-
Prep the canvas:
Start with clean, moisturized skin. You can apply your regular foundation and concealer base first if you desire a flawless complexion, as this design sits mostly on top of standard makeup. -
Apply initial red shadow:
Load a fluffy blending brush with a deep red matte eyeshadow. Sweep this generously across the eyelid, extending it outward toward the temple and slightly upward past the crease. -
Deepen the crease:
Using a slightly denser brush, pack more red pigment into the outer corner and crease of the eye to create depth. The color should look blown out and soft at the edges. -
Define lower lash line:
Take a smaller pencil brush with the same red eyeshadow and smudge it under the lower lash line, connecting it to the outer corner for a continuous, smoky effect.
Shaky Hands?
Rest your pinky finger lightly on the cheekbone while painting the web lines. This creates an anchor point, giving you much more stability and control for fine details.
Step 2: Weaving the Web
-
Map the anchor lines:
Using a fine detail brush loaded with black face paint (inky consistency), draw the main radial lines of the spiderweb. Start from the outer corner of the eye and extend them outward—one up toward the brow, one toward the temple, and two or three angling down toward the cheek. -
Connect the curves:
Begin connecting these radial lines with scalloped, curved horizontal lines to form the web structure. Start closer to the eye and work your way outward. -
Refine the line weight:
Go back over your black lines if needed to ensure opacity. I like to keep the ends of the radial lines tapered—lift the brush gently at the end of the stroke for a sharp point. -
Add floating strands:
For a wispy effect, extend a few curved lines slightly beyond the main web structure on the forehead, making it look like the web is attaching to the hairline.
Pro Tip: Texture
For the hearts, dab a tiny bit of red glitter over the wet paint before outlining. It adds dimension and catches the light beautifully without overpowering the graphic lines.
Step 3: Heartfelt Details
-
Paint the cheek heart:
Locate the lowest strand of your spiderweb on the cheek. Using a flat brush and red face paint, paint a distinct heart shape appearing to hang from or sit just below the web. -
Outline the heart:
Once the red paint is dry, use your fine liner brush and black paint to outline the red heart. This gives it a sticker-like, graphic quality that matches the web. -
Create the forehead heart:
Paint a similar red heart above the eyebrow on the same side, or near the temple area. Keep this one slightly smaller to balance the composition. -
Outline the upper heart:
Carefully outline this second heart in black as well. Ensure the lines are crisp and connect cleanly at the top and bottom points.
Step 4: Finishing Touches
-
Add the beauty mark:
Place a single, small black dot on the cheek, near the corner of the mouth but slightly lower. This adds a classic retro feel to the edgy design. -
Lash definition:
Apply black mascara or false lashes to the upper eye to define it against the red shadow. A thin line of black eyeliner on the upper lid can also help ground the look. -
Paint the lips:
Apply a vibrant red lipstick that matches the tone of your face paint hearts. Use a lip brush for precision, focusing on a sharp cupids bow. -
Set the look:
If you plan on wearing this out, a light mist of setting spray held at arm’s length will help lock the eyeshadow and water-based paints in place.
Now you are ready to capture hearts with this stunningly intricate look
Stained-Glass Heart Mosaic
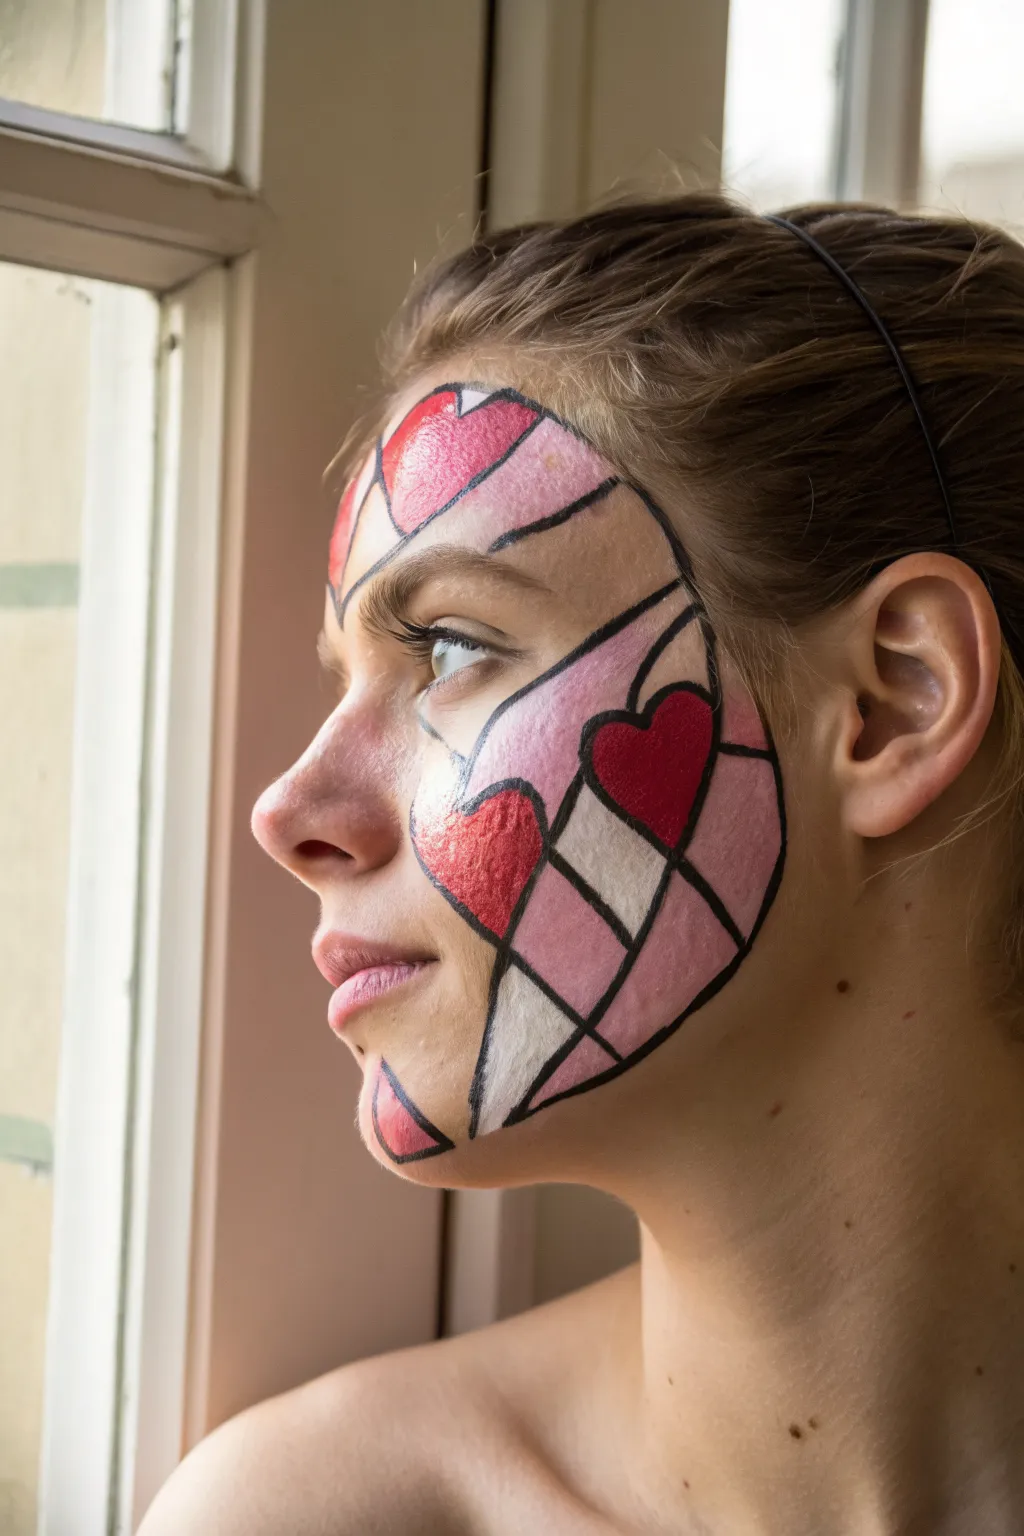
Transform your face into a work of art with this elegant design inspired by classic stained-glass windows. This look combines geometric precision with romantic heart motifs for a sophisticated Valentine’s style.
Step-by-Step Guide
Materials
- Water-activated face paints: Black, Bright Red, Pink, White
- Round brush (size 2 or 3) for outlines
- Flat brush (size 4 or 6) for filling
- Cup of water
- Paper towels
- Makeup setting spray (optional)
Step 1: Mapping the Framework
-
Load the black paint:
Begin by activating your black face paint with a little water until it reaches an inky consistency. Load your size 2 or 3 round brush, ensuring the tip is sharp. -
Define the outer curve:
Start near the top of the forehead, slightly off-center. Draw a sweeping curve that comes down past the eye, hugs the cheekbone, and ends near the jawline. -
Create the eye arch:
From the initial line on the forehead, draw a second curve that arches over the eyebrow and connects to the cheekbone area, creating a large enclosed space around the eye socket. -
Divide the space:
Inside the cheek area, paint two to three diagonal lines intersecting each other to create a grid of diamonds and triangles. Don’t worry about perfect symmetry; irregular shapes look more authentic to stained glass. -
Draw the heart outlines:
Select two or three larger ‘panes’ in your grid to turn into hearts. Carefully paint the outline of a heart within these chosen sections, letting the black lines connect to the grid borders. -
Add forehead details:
Extend the design upward onto the forehead by adding a few more geometric lines and perhaps another partial heart shape near the hairline.
Clean Lines Secret
When re-lining the black grid at the end, roll your brush tip slightly as you drag. This keeps the bristles together and creates a sharper, more fluid line.
Step 2: Filling the Panes
-
Prepare the red paint:
Clean your brush thoroughly or switch to a small flat brush. Load up a vibrant, bright red paint with a creamy consistency. -
Fill the heart shapes:
Carefully fill in the heart outlines you created earlier. Use the flat edge of the brush to get crisp lines against the black borders. -
Mix a soft pink:
Load your brush with pink face paint. If you only have red and white, I like to mix them on a palette to get a customized bubblegum shade. -
Paint the background panes:
Select several geometric shapes surrounding the hearts and fill them with the pink paint. Leave a few spaces empty for contrast. -
Add white highlights:
Detailed work is key here. Clean your brush and load it with bright white paint. Fill in the remaining empty geometric shapes. -
Texture technique:
For a dappled glass effect, you can gently stipple the paint rather than stroking it on smoothly, giving it a bit of texture.
Step 3: Refining and Sealing
-
Re-line the black:
Once the color fills are dry (this usually takes about a minute), reload your thin round brush with black paint. -
Sharpen the borders:
Go over the original grid lines. The colored paint often overlaps the black lines during the filling stage, so re-tracing them makes the ‘lead’ look crisp and raised. -
Thicken intersections:
Slightly thicken the black lines where they intersect or meet corners. This mimics the soldered joints of real stained glass. -
Check edges:
Inspect the outer perimeter of the design and clean up any stray smudge marks with a damp q-tip or folded paper towel. -
Set the look:
Close your eyes and lightly mist the design with a setting spray to prevent smudging throughout the day.
Add Glazing Effects
After the paint dries, add a tiny dot of clear lip gloss or a swipe of biodegradable glitter gel on the geometric shapes to make them look like shiny glass.
Now you have a stunning, artistic face paint design perfectly suited for Valentine’s celebrations


Have a question or want to share your own experience? I'd love to hear from you in the comments below!