A plain tabletop is basically a blank canvas, and a little paint can turn it into the kind of piece that makes your whole room feel more you. Here are my favorite DIY painted tabletop design ideas—starting with the classics and sliding into the really fun, show-off finishes.
Crisp Stripes With Painter’s Tape
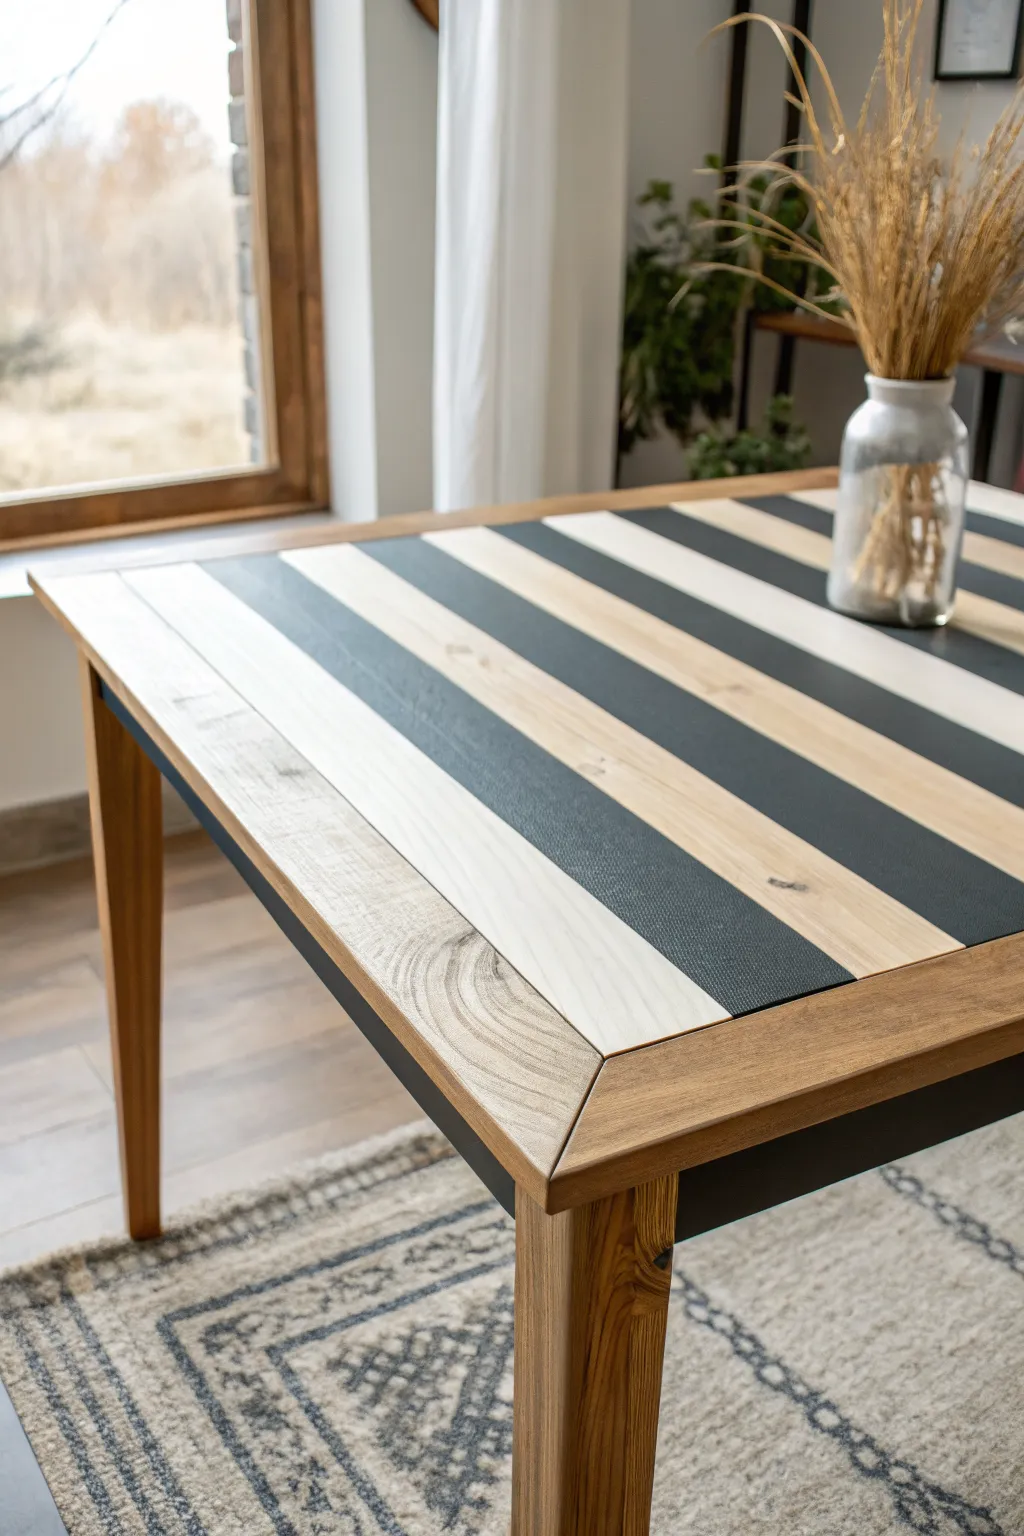
Transform a plain wooden table into a striking focal point with this crisp, high-contrast striped design. By combining natural wood tones with matte black and creamy white paint, you achieve a look that feels both modern and rustic.
Step-by-Step Guide
Materials
- Rectangular wooden dining table (solid wood top preferred)
- Orbital sander with 80, 120, and 220-grit discs
- High-quality painter’s tape (multi-surface)
- Measuring tape and pencil
- Matte black furniture paint (chalk or mineral style)
- Creamy off-white furniture paint (or whitewash)
- Water-based polyurethane satin topcoat
- Small foam rollers
- Angled sash brush (2-inch)
- Utility knife or razor blade
- Tack cloth
- Clear matte wood sealer (optional)
- Plastic drop cloth
Step 1: Preparation & Sanding
-
Assess the Surface:
Begin by inspecting your table top. If it has a heavy varnish or existing sealer, you’ll need to strip it completely back to raw wood to ensure the stain and paint adhere correctly. -
Heavy Sanding:
Use your orbital sander with 80-grit sandpaper to remove the old finish. Move slowly with the grain, ensuring you strip away all previous coatings until the bare wood is exposed. -
Refining the Grain:
Switch to 120-grit paper to smooth out the roughness left by the coarser grit. Finish with 220-grit for an ultra-smooth surface that feels soft to the touch. -
Clean Up:
Vacuum up all the sawdust carefully. Wipe the entire surface with a tack cloth to grab any remaining fine dust particles, which is crucial for a crisp paint line later. -
Define the Frame:
If your table doesn’t have a separate physical border, measure and mark a 2-3 inch border around the perimeter to act as a frame. Tape off the inner edge of this frame so you don’t accidentally paint the border area.
Step 2: Taping the Design
-
Calculate Stripe Width:
Measure the width of the interior rectangle (inside your border). Decide how many stripes you want and divide the total width by that number to get exact stripe dimensions. -
Marking Guides:
Using a pencil, make small tick marks at the top and bottom of the table interior to guide where your painter’s tape will go. -
Apply the Tape:
Run long strips of painter’s tape connecting your marks. Remember to place the tape on the *outside* of the area you intend to paint, or you will end up with thinner stripes than planned. -
Seal the Edges:
Run a credit card or a plastic putty knife firnly over the edges of the tape. This is the secret to preventing bleed-through. -
The Sealing Trick:
I like to brush a very thin layer of clear matte sealer (or the base wood color) over the tape edges first. This creates a barrier so if anything bleeds under, it’s clear, sealing the tape perfectly for the colored paint.
Bleed-Through Blues?
If paint seeps under the tape, let it dry fully. Then, create a sharp edge by gently scraping the excess paint away with an X-Acto knife or razor blade held at a low angle.
Step 3: Painting & Finishing
-
Paint the Black Stripes:
Identify which stripes will be black. Using a small foam roller, apply your matte black paint. Use thin, even coats rather than one thick one to avoid ridges. -
Paint the White Stripes:
Apply the creamy white paint to the designated lighter stripes. Depending on the opacity you want, you might need 2-3 coats to cover the wood grain fully. -
Leave Natural Stripes:
Ensure you leave the designated ‘natural’ stripes completely unpainted. The contrast works best when raw wood is visible next to the solid colors. -
Remove Tape:
Carefully peel off the painter’s tape while the final coat of paint is still slightly tacky—don’t wait for it to dry completely hard, or it might chip. -
Touch Ups:
Inspect your lines. If any paint bled onto the natural wood stripes, use a razor blade to gently scrape it away or a tiny piece of sandpaper to buff it out. -
Seal the Surface:
Once the paint is fully cured (check your can, usually 24 hours), apply a water-based polyurethane topcoat over the entire table top, including the frame. -
Final Coat:
Lightly sand with a high-grit finishing pad between topcoats, then apply a second or third layer of polyurethane for durability against dining spills.
Distressed Finish
For a more rustic, lived-in look, lightly sand the painted stripes with 220-grit paper before sealing. Focus on edges where wear would naturally occur.
Now you have a stunning, custom dining table that perfectly balances bold design with natural warmth
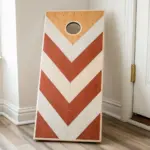


Classic Chevron Tabletop Pattern
Transform a plain round table into a statement piece with this striking chevron pattern that mimics the look of inlaid wood. The high-contrast combination of creamy white paint and warm terracotta stain creates a modern yet rustic vibe perfect for any living space.
Step-by-Step
Materials
- Round wooden table (sanded to bare wood)
- Painter’s tape (various widths, 1-inch recommended)
- Ruler or straight edge
- Pencil
- Cream or off-white chalk paint
- Terracotta or reddish-brown wood stain (or thinned acrylic paint)
- Fine-grit sandpaper (220 grit)
- Foam brushes or small synthetic bristle brushes
- Clear matte polycrylic sealer
- Lint-free rags
- Protractor (optional, for finding angles)
Step 1: Preparation & Mapping
-
Clean the Surface:
Begin by ensuring your table surface is completely clean, dry, and sanded down to bare wood if it was previously finished. Wipe away all dust with a tack cloth or damp rag. -
Find the Center:
Locate the exact center of your round table. Draw a light pencil line straight down the middle, dividing the circle into two equal semi-circles. This is your primary guide. -
Mark Vertical Guidelines:
Parallel to your center line, draw additional vertical guide lines across the table. Space these about 4-6 inches apart, depending on how wide you want your chevron ‘planks’ to appear. -
Draft the Chevron Angle:
Decide on your chevron angle—45 degrees is standard. Starting at the center line, lightly sketch the zigzag pattern across the table to visualize the layout before taping.
Tape Sealing Trick
Before applying your dark stain, paint a thin layer of clear matte medium over the tape edges. This blocks bleed-under perfectly.
Step 2: Taping the Design
-
Apply the First Tape Lines:
Apply strips of painter’s tape along your pencil sketches to mask off the areas that will remain the natural wood or stain color initially. Press the edges down firmly with a credit card or thumbnail. -
Create the Zig-Zag:
Work section by section. The key is to tape off every *other* stripe in the chevron pattern. You want to expose the wood for the stain first, while protecting the areas that will become white later. -
Seal the Tape Edges:
To prevent bleeding, lightly brush a tiny amount of clear sealer or your base cream paint over the edges of the tape. This creates a barrier so your crisp lines stay crisp.
Uneven Lines?
If paint bleeds under the tape, wait for it to dry, then use a small artist’s brush and the opposing color to carefully touch up the errors.
Step 3: Staining & Painting
-
Apply the Wood Stain:
Using a foam brush or rag, apply your terracotta wood stain to the exposed wood sections. Wipe off excess stain quickly to achieve that warm, semi-transparent look that shows the grain. -
Let it Dry:
Allow the stain to dry completely according to the manufacturer’s instructions. If you rush this, the tape for the next step won’t stick properly. -
Reverse the Tape:
Carefully peel off the tape. Now, you need to tape *over* the stained areas you just created. This is tedious, but precision here makes the final reveal worth it. -
Paint the Cream Stripes:
Apply the cream chalk paint to the newly exposed raw wood sections. I find that two thin coats provide better coverage and a smoother finish than one thick, gloopy coat. -
Remove Tape While Wet:
Peel up the painter’s tape slowly while the second coat of paint is still slightly tacky. Pulling at a 45-degree angle away from the paint line helps prevent chipping.
Step 4: Distressing & Finishing
-
Sand for Texture:
Once everything is bone dry, take your 220-grit sandpaper and lightly distress the surface. Focus on the edges of the table and areas within the stripes to mimic wear and tear. -
Clean Up Dust:
Vacuum or wipe away all the sanding dust thoroughly. Any leftover grit will get trapped in your final clear coat. -
Seal the Deal:
Apply a coat of clear matte polycrylic over the entire table surface. This protects your hard work from coffee cup rings and scratches. -
Final Coat:
After the first coat dries, lightly sand with very fine paper, wipe clean, and apply a second coat of sealer for a durable, professional finish.
Now you have a stunning, custom table that looks like expensive inlaid joinery for a fraction of the cost
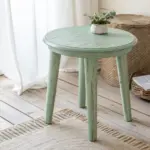
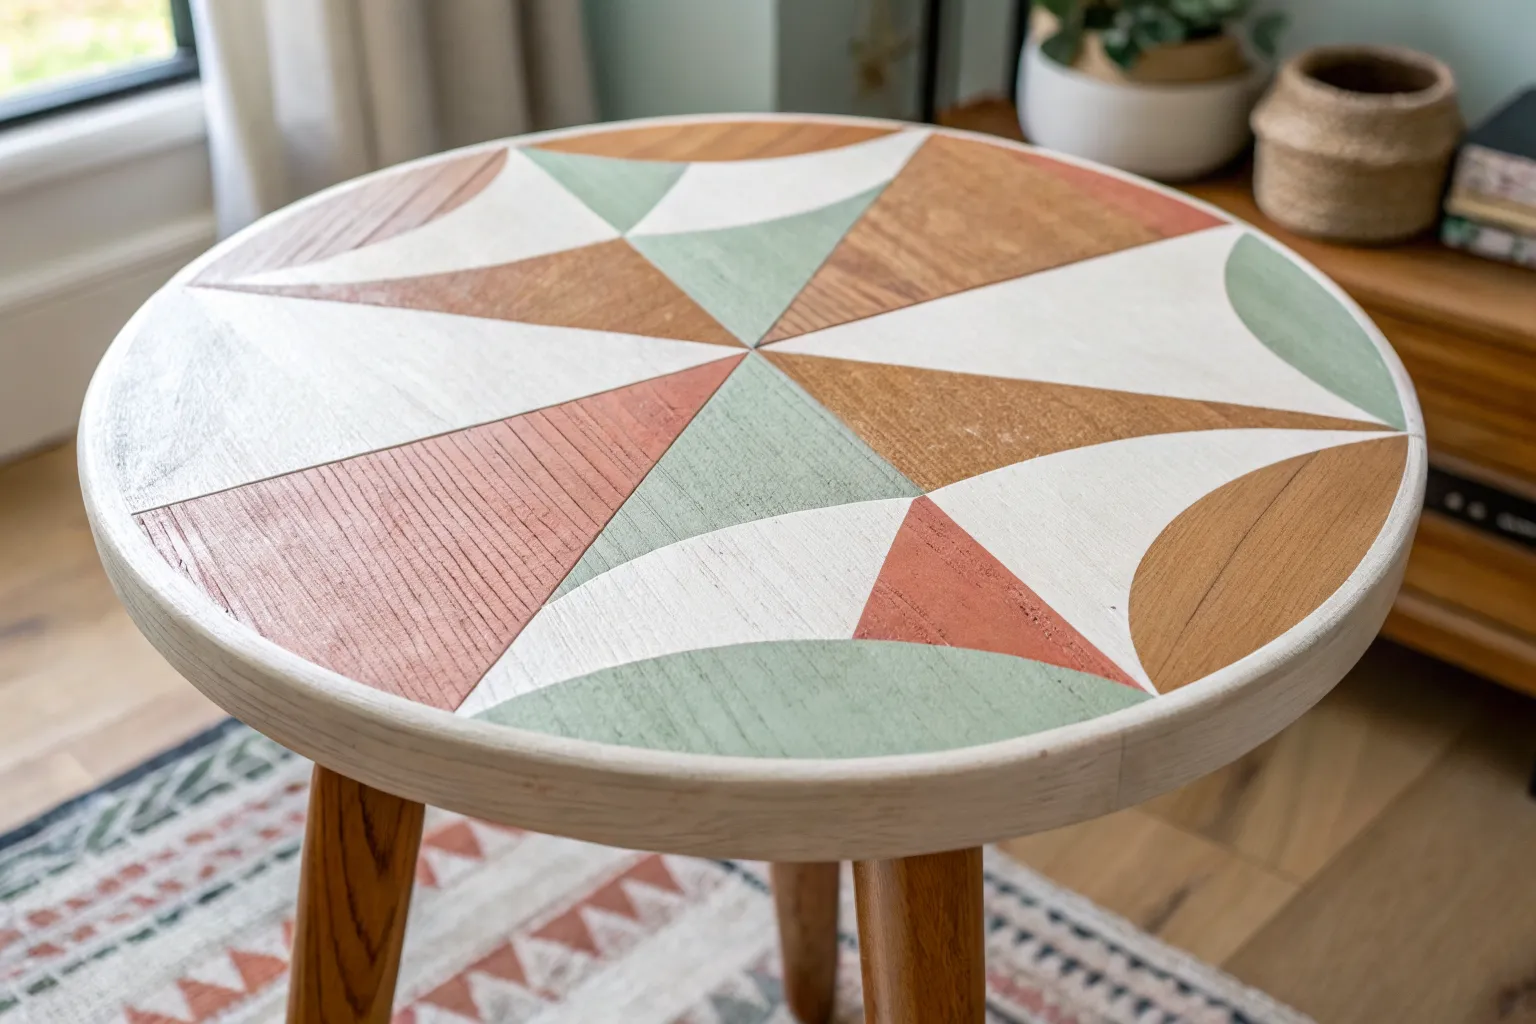
Modern Color-Block Grid Design
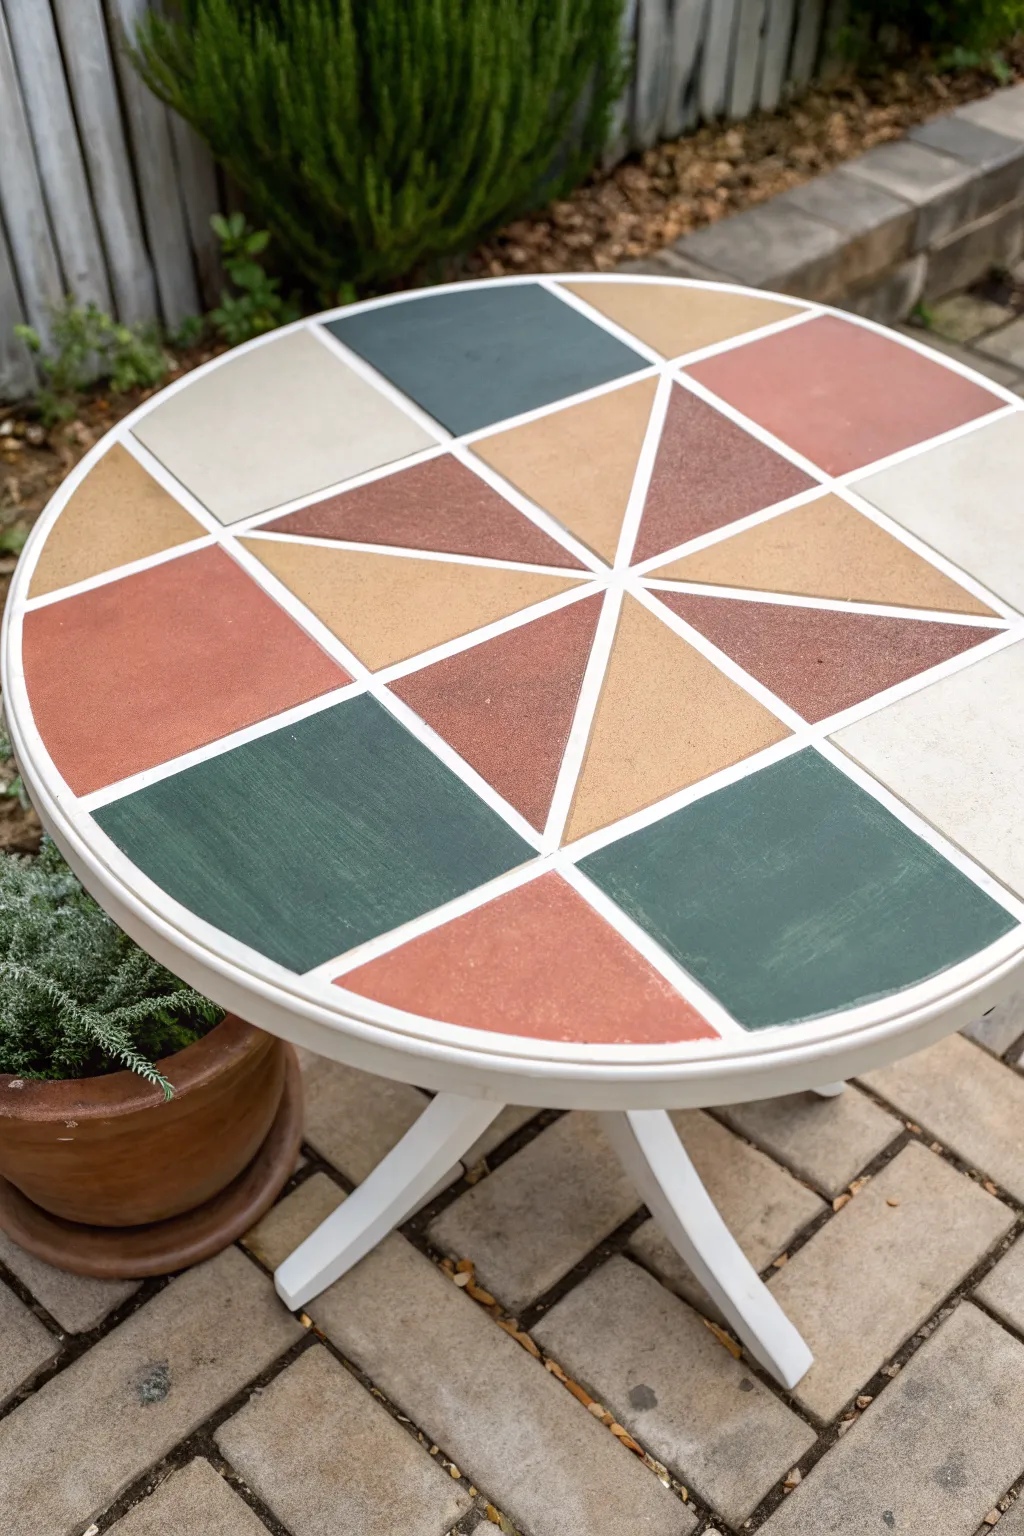
Transform a plain round table into a statement piece with this modern, geometric color-block design. Using a palette of soothing earth tones like terracotta, sage green, and wheat, you’ll create a sophisticated mosaic effect that looks professionally tiled.
Step-by-Step Tutorial
Materials
- Round wooden or metal side table
- Sandpaper (120 and 220 grit)
- Primer (bonding primer if surface is glossy)
- White or cream latex paint (for base/grout lines)
- Acrylic or chalk paints in terracotta, deep sage green, and wheat/mustard
- Painter’s tape (various widths, 1/4 inch is best for grout)
- Ruler or straight edge
- Pencil
- Small foam rollers
- Small angled paintbrush
- Clear polyurethane sealer (matte or satin finish)
Step 1: Preparation & Base Coat
-
Clean and Sand:
Start by giving the entire table a thorough cleaning with soapy water to remove any grease or grime. Once dry, scuff sand the surface with 120-grit sandpaper to ensure the paint adheres well, then wipe away the dust. -
Prime the Surface:
Apply a coat of quality primer to the entire table, including the legs and underside. If your table was previously varnished or is made of laminate, use a high-adhesion bonding primer. -
Apply the Base Color:
Paint the entire table in your chosen ‘gout’ color—in this case, a clean white or soft cream. Use a foam roller for the flat top to get a smooth, brush-free finish. -
Second Coat:
Let the first coat dry completely according to the can’s instructions. Apply a second coat of white to ensure full opacity, providing a stark contrast for the geometric shapes later.
Pro Tip: Custom Grids
Don’t stress the math. Use a square piece of cardboard as a template to trace your grid squares, rotating it around the center point for consistency.
Step 2: Mapping the Grid
-
Find the Center:
Measure the diameter of your table to locate the exact center point. Mark this lightly with a pencil. -
Draw the Primary Cross:
Using a long straight edge, draw a large ‘plus’ sign through the center point, dividing the circle into quarters. Extend lines all the way to the edges. -
Create the Inner Square:
Mark a point about halfway out from the center on each of your four cross lines. Connect these four points to create a diamond/square shape in the middle of the table. -
Extend the Grid:
Draw lines perpendicular to your initial cross lines, intersecting at the corners of your central diamond. This creates the basic grid structure shown in the image. -
add diagonals:
Draw diagonal lines specifically within the central diamond, crossing from corner to corner through the center point. This creates the eight triangular sections in the middle.
Step 3: Taping & Painting
-
Tape the Lines:
Apply thin painter’s tape (1/4 inch works best) directly over your pencil lines. Press the edges of the tape down firmly with your thumbnail or a credit card to prevent paint bleed. -
Seal the Tape:
I always brush a tiny amount of the white base paint over the tape edges. This seals the tape, meaning any paint that sneaks under is white and won’t show against the white background. -
Plan Your Palette:
Before painting, plan which sections get which color to ensure they are balanced. Notice how the image mirrors colors: opposite triangles and squares often share the same hue. -
Paint the Greens:
Start with your deep sage green. Fill in the large outer square sections as shown in the reference. Use a small brush for corners and a mini roller for the flat centers. -
Paint the Terracotta:
Move on to the terracotta shade. Apply this to the large outer sections adjacent to the green ones, and select opposing triangles in the center starburst pattern. -
Paint the Earthy Yellow:
Fill the remaining shapes with the wheat or mustard yellow tone. Apply two coats for each color if necessary to get a solid, opaque look. -
The Reveal:
Here is the satisfying part: peel off the tape while the paint is still slightly tacky, not fully cured. Pull the tape away at a 45-degree angle for the crispest lines.
Level Up: Faux Texture
Add stone texture spray paint lightly over your colored sections before removing the tape to make the ’tiles’ look like real slate or ceramic.
Step 4: Finishing Touches
-
Touch Up:
Inspect your grid lines. If any color bled onto the white ‘grout’ lines, use a tiny amount of white paint on a fine detail brush to clean it up. -
Light Sanding:
Once everything is bone dry (give it 24 hours), very lightly pass over the surface with 220-grit sandpaper to knock down any raised ridges where the paint met the tape. -
Seal the Surface:
Apply a coat of clear polyurethane sealer. A matte finish looks very modern, while satin offers a bit more durability. Roll it on carefully to avoid bubbles. -
Final Coat:
After the first coat of sealer dries, apply a second and final coat to ensure the table top is waterproof and ready for mugs and plates.
Now you have a stunning, custom piece of furniture that brings a warm, artisanal vibe to your patio or living room


Painted Buffalo Plaid Tabletop
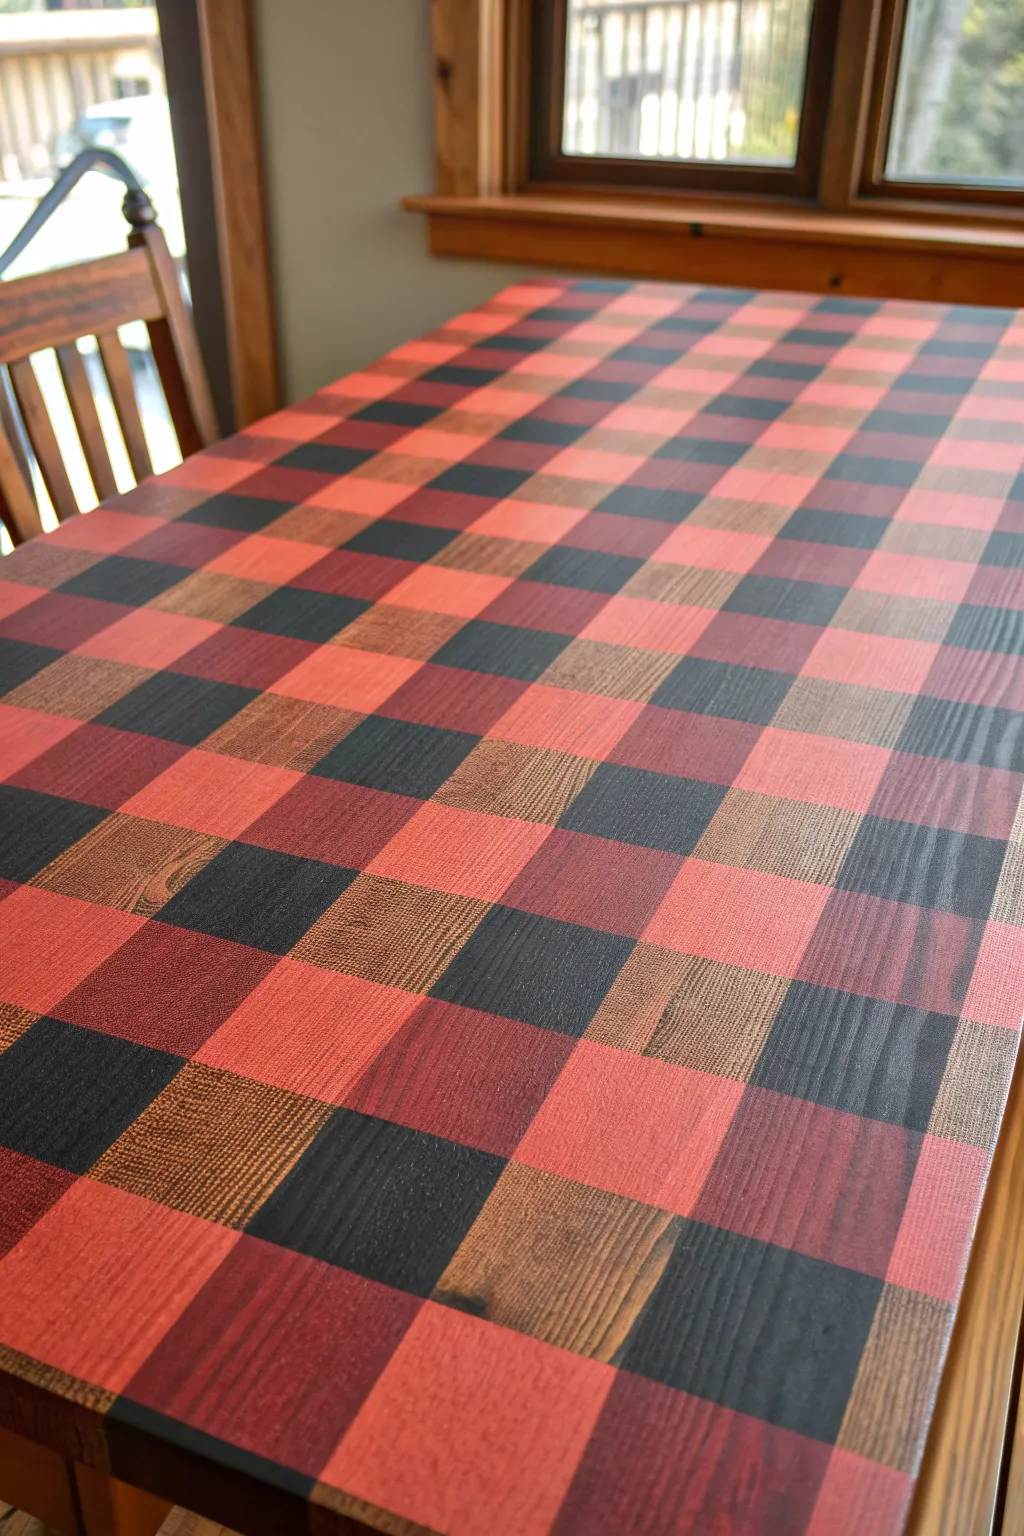
Transform an ordinary wooden table into a cozy cabin statement piece with this classic buffalo check design. By using semi-transparent stains or washes instead of opaque paint, you retain the table’s beautiful wood grain for an authentic, textured finish.
Step-by-Step
Materials
- Bare wood table top (sanded)
- Painter’s tape (1-inch width or desired plaid scale)
- Red wood stain (or watered-down red latex paint)
- Black wood stain (or watered-down black latex paint)
- Dark charcoal or deep brown stain (for the mixing/overlay areas)
- Foam brushes or staining sponges
- Measuring tape and pencil
- Clear polyurethane topcoat (matte or satin)
- Rags for wiping excess stain
- Straight edge or long ruler
Step 1: Preparation and Base Coat
-
Surface Prep:
Begin by sanding your tabletop down to bare wood. This is crucial because you want the stain to penetrate; if there is existing varnish, the pattern won’t soak in correctly. Wipe away all dust with a tack cloth. -
Apply the Red Base:
Apply your red stain over the entire tabletop. This serves as the lightest color in the buffalo plaid pattern. Use a foam brush to apply it evenly with the grain. -
Wipe and Dry:
After letting the red stain sit for the manufacturer’s recommended time (usually 5-15 minutes), wipe off the excess with a clean rag. Allow this base coat to dry completely, preferably overnight, to prevent bleeding later.
Bleeding Lines?
If stain bled under the tape, don’t panic. Use a craft knife to gently scrape the excess surface pigment, or use a small artist’s brush with mineral spirits to carefully erase the errant smudge.
Step 2: Creating the Grid
-
Measure the Stripes:
Decide on the width of your plaid squares. Using your tape width as a guide makes this easier (e.g., 2-inch tape for a 2-inch stripe). Mark your measurements lightly with a pencil along the edges of the table. -
Video Vertical Stripes:
Run long strips of painter’s tape vertically across the table. Use a spacer block or a spare piece of tape to ensure the gaps between the tape strips are exactly the same width as the tape itself. -
Seal the Edges:
Press down firmly on all tape edges. I like to run a credit card over the tape lines to ensure a tight seal, which prevents the stain from creeping underneath.
Step 3: First Dark Layer
-
Staining Vertical Stripes:
In the exposed vertical wood rows, apply a medium-dark stain. A mixture of equal parts red and black stain creates that perfect ‘middle’ tone found in real flannel. Apply lightly. -
Wipe and Remove:
Wipe off the excess stain from the vertical stripes immediately. Carefully peel back the tape while the stain is still slightly damp to avoid bridging, then let the table dry completely.
Go Diagonally
For a more dynamic look, rotate your grid 45 degrees. Tape your initial lines diagonally across the table corners instead of straight across. It creates a diamond pattern that feels high-end.
Step 4: The Cross Pattern
-
Tape Horizontal Stripes:
Once dry, tape off the table horizontally, perpendicular to your first set of lines. Use the same spacing method: one width of tape, one open space, repeated across the surface. -
Protecting the Red:
At this point, you will have exposed squares of original red and exposed squares of the mixed/darker tone you just created. We are aiming to darken specific areas. -
Applying the Mid-Tone Again:
Apply that same mid-tone (red/black mix) stain across the entire horizontal open stripe. This will turn the red squares into the mid-tone, and the already-stained squares into a darker tone.
Step 5: Defining the Intersection
-
Identifying the Black Squares:
For the true buffalo plaid look, the squares where the vertical and horizontal stripes intersect need to be the darkest. These areas have now received two coats of the mid-tone, but they might need a boost. -
Black Accent Squares:
While the horizontal tape is still on, look for the squares that cross your previous vertical lines. Carefully dab true black stain only onto these specific intersecting squares to make them fully dark. -
Final Reveal:
Remove all the tape carefully. You should now see a pattern of red squares, mid-tone brownish-red squares, and solid black squares.
Step 6: Finishing Touches
-
Dry Time:
Allow the entire table to cure for at least 24 to 48 hours. Oil-based stains take time to harden, and rushing this step can ruin the clear coat. -
Protective Coat:
Apply a clear polyurethane topcoat. A satin or matte finish looks best for this rustic style. Apply in long, even strokes with the grain. -
Sand and Repeat:
Once the first coat is dry, lightly sand with 220-grit sandpaper to remove any dust nibs. Wipe clean, then apply a second and third coat for durability.
Now you have a warm, custom piece of furniture that brings a cozy woodland feel to your dining space
BRUSH GUIDE
The Right Brush for Every Stroke
From clean lines to bold texture — master brush choice, stroke control, and essential techniques.
Explore the Full Guide
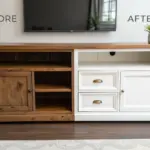
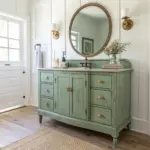
Two-Tone Wood-and-Paint Contrast Top
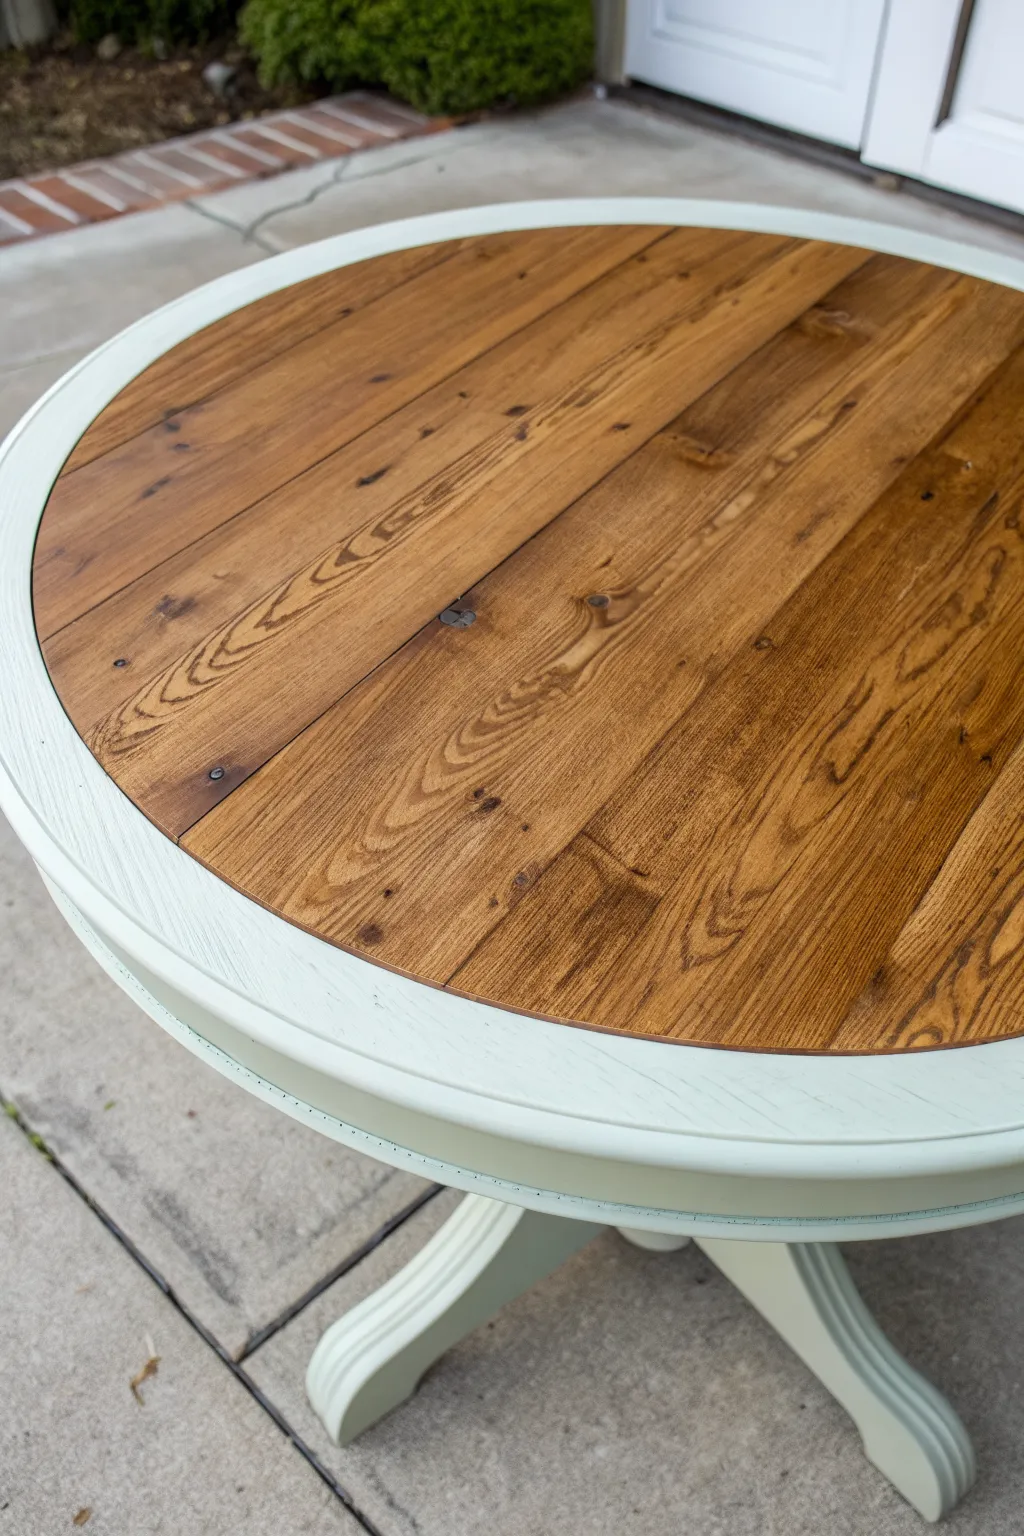
This project transforms a standard round table into a stunning centerpiece by highlighting the natural beauty of wood against a crisp, painted frame. The two-tone look creates instant visual interest, combining rustic warmth with farmhouse elegance.
Step-by-Step Guide
Materials
- Round wooden table (solid wood top preferred)
- Orbital sander
- Sandpaper (80, 150, and 220 grit)
- Chemical stripper (optional, for heavy varnish)
- Painter’s tape (high-quality edging tape)
- Plastic drop cloths or kraft paper
- Wood stain (warm brown tone like Early American or Provencal)
- Chalk paint or mineral paint (light sage or cream)
- Paintbrushes (one sash brush, one flat brush)
- Lint-free rags
- Polyurethane topcoat (matte or satin)
- Clean tack cloths
Step 1: Preparation and Stripping
-
Assess the surface:
Examine your table closely. If it has a very thick, glossy varnish, you might want to start with a chemical stripper to save on sanding time. If the finish is thin, you can go straight to sanding. -
Sand the tabletop:
Using an orbital sander with 80-grit paper, remove the old finish from the entire tabletop. Work slowly and evenly to avoid gouging the wood. -
Smooth the surface:
Progress to 150-grit sandpaper to smooth out the scratches from the coarser paper. Finish with 220-grit for a silky-smooth surface ready to accept stain. -
Clean dust thoroughly:
Vacuum up all the sanding dust from the table and surrounding area. Wipe the entire piece down with a tack cloth to ensure absolutely no debris remains.
Step 2: Staining the Center
-
Isolate the rim:
This is crucial for the two-tone look. If your table has a distinct structural rim, decide where your line will be. Tape off the outer rim section that you plan to paint later. -
Apply the stain:
Using a lint-free rag or a staining sponge, apply your chose warm brown stain to the central circle of the table top. Work with the grain of the wood, rubbing it in deep. -
Wipe away excess:
After letting the stain sit for 5-10 minutes (check your can’s instructions), wipe away any unabsorbed liquid. This prevents the finish from becoming tacky. -
Let it cure:
Allow the stain to dry completely. I usually let this sit overnight to ensure the color is fully set before moving to the next phase. -
Seal the stained wood:
Apply a coat of polyurethane over the stained center now. This protects your fresh stain from accidental paint splatters in the next steps.
Bleed-Through Blues?
If stain bled under the tape onto the rim area, don’t sand! Use a shellac-based primer on the bleed spots before painting to lock the discoloration inside.
Step 3: Painting the Frame
-
Reverse tape:
Once the sealer on the center is dry, carefully cover the stained wood with kraft paper and tape down the edges perfectly along the rim line. Press the tape firmly to prevent bleed-through. -
Prep the base:
Rough up the legs and the rim (if you haven’t sanded them to bare wood) with 150-grit sandpaper so the paint adheres well. Wipe clean. -
First coat of paint:
Apply your light sage or cream chalk paint to the rim and the pedestal base. Use a sash brush to get into the curves of the pedestal legs easily. -
Sand between coats:
Once the first coat is dry, lightly hand-sand with a fine-grit sanding sponge to knock down any brush strokes or raised grain. -
Second coat:
Apply a second coat of paint for full, opaque coverage. Watch for drips around the curves of the pedestal legs. -
Remove tape carefully:
While the final coat of paint is still slightly tacky (not fully dry), slowly peel back the painter’s tape at a 45-degree angle. This ensures a crisp line without peeling up dried paint.
Add Rustic Depth
For more character, use a dry-brush technique with dark wax or glaze over the dried chalk paint. It accentuates the carved details on the pedestal base.
Step 4: Finishing Touches
-
Inspect the transition:
Check the line where the stain meets the paint. If there was minor bleeding, use a tiny artist’s brush to touch it up. -
Apply final topcoat:
Apply 2-3 coats of polyurethane over the entire tabletop (painted rim included) to seal the gap between paint and stain and provide a durable surface. -
Seal the legs:
Finish by applying a wax or poly topcoat to the painted base legs for protection against shoe scuffs.
This refinished table will anchor your dining space with a beautiful balance of natural texture and clean color
All-Over Stencil Lace Look
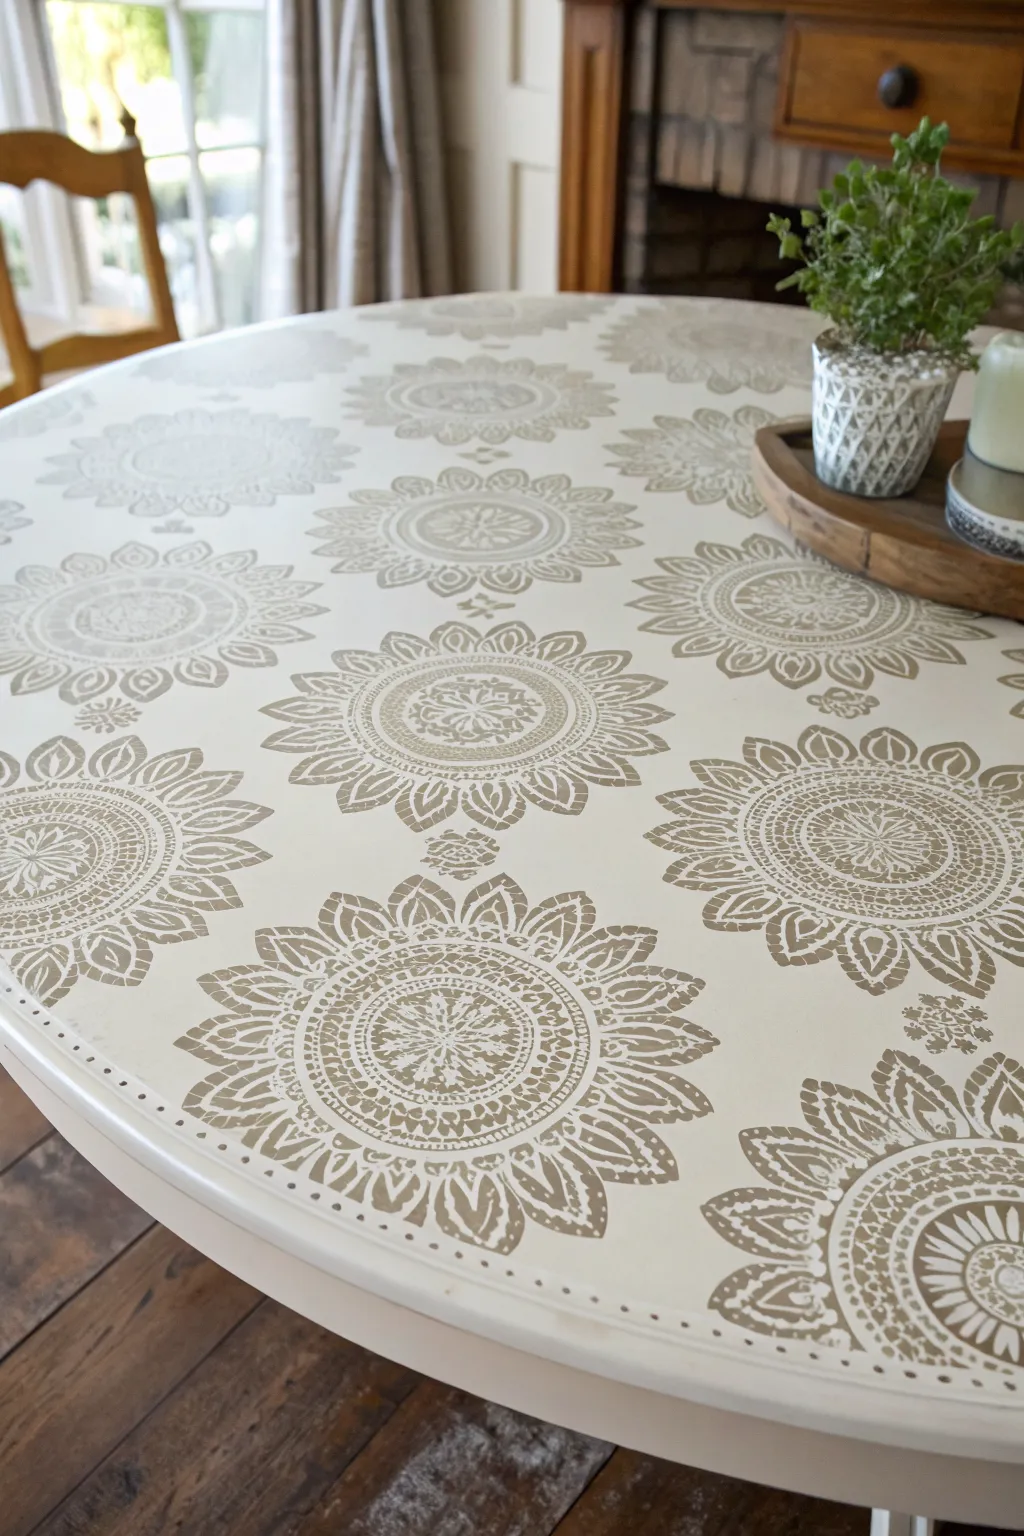
Transform a plain table into a bohemian centerpiece with this delicate, lace-inspired makeover. Using a large mandala stencil and a soft color palette, this project creates an intricate, hand-painted look that feels both vintage and fresh.
Step-by-Step
Materials
- Round wooden dining table
- Sandpaper 120-grit and 220-grit
- Tack cloth
- Chalk paint (Cream/Off-White for base)
- Chalk paint (Taupe/Beige for stencil)
- Large Mandala stencil (approx. 10-12 inches)
- Small foam roller
- Stencil brush
- Painter’s tape
- Measuring tape
- Pencil
- Matte polycrylic sealer
- Small artist brush
Step 1: Cleaning and Base Coat
-
Clean the surface:
Begin by thoroughly cleaning your table to remove any grease, wax, or furniture polish. A solution of TSP or degreaser works best for this to ensure the paint adheres properly. -
Sand the existing finish:
Scuff sand the entire tabletop using 120-grit sandpaper. You don’t need to strip it to bare wood, just create enough ‘tooth’ for the new paint to grip. -
Remove dust:
Wipe away all sanding dust with a tack cloth. Any remaining dust particles will create bumps in your smooth finish. -
Apply base coat:
Paint the entire tabletop with your creamy off-white chalk paint. Use long, smooth strokes to minimize brush marks. -
Apply second coat:
Once dry, apply a second coat of the base color for solid, opaque coverage. I find chalk paints dry quickly, but give it at least 2 hours before moving on.
Step 2: Planning the Layout
-
Find the center:
Using your measuring tape, locate the exact center of the round table and mark it lightly with a pencil. -
Dry fit the stencil:
Place your mandala stencil over the center mark to visualize the pattern. Plan out where the surrounding circles will go to ensure even spacing. -
Mark grid lines:
Lightly draw faint pencil guidelines radiating from the center like wheel spokes to help keep your concentric circles of stencils aligned.
Bleeding Lines?
If paint bleeds under the stencil, wait for it to dry completely. Then, take a small artist brush and your base cream color to carefully ‘erase’ and touch up the fuzzy edges.
Step 3: Stenciling the Design
-
Start in the center:
Secure the stencil directly over your center mark using painter’s tape. -
Load the roller:
Pour a small amount of taupe paint onto a paper plate. Load your foam roller and then roll it off onto paper towels until it feels almost dry. This prevents bleed-under. -
Apply the stencil paint:
Roll over the stencil with light, even pressure. Build up the color in thin layers rather than one heavy coat. -
Reveal the center:
Carefully lift the stencil straight up to reveal your first design. Allow this to dry to the touch before placing the stencil nearby. -
Stencil the outer ring:
Move the stencil to the outer area, aligning it with your ‘spoke’ guidelines. Repeat the stenciling process for a ring of mandalas around the center one. -
Fill the gaps:
If there are large empty spaces between main motives, use a smaller portion of the stencil or a smaller brush to add tiny flourish details, like the small floral accents seen in the image.
Pro Tip: Less is More
The biggest secret to crisp stenciling is a ‘dry’ roller. Roll onto a paper towel until no wet paint comes off before touching the stencil surface.
Step 4: Finishing Touches
-
Add the border dots:
Using the handle end of a small artist brush or a dotting tool, dip it in the taupe paint and create a dotted border around the very edge of the table rim for a finished look. -
Distress lightly (Optional):
If you want a worn look, very lightly run 220-grit sandpaper over the dried stencil work to soften the edges. -
Seal the surface:
Apply a coat of matte polycrylic sealer to protect your work. Use a high-quality synthetic brush and apply securely in one direction. -
Final cure:
Apply two additonal coats of sealer, sanding lightly between coats with fine sandpaper for a buttery smooth finish that can handle dinner plates.
Now you have a stunning, custom piece of furniture ready for your next gathering

PENCIL GUIDE
Understanding Pencil Grades from H to B
From first sketch to finished drawing — learn pencil grades, line control, and shading techniques.
Explore the Full Guide
Faux Tile Squares Painted by Hand
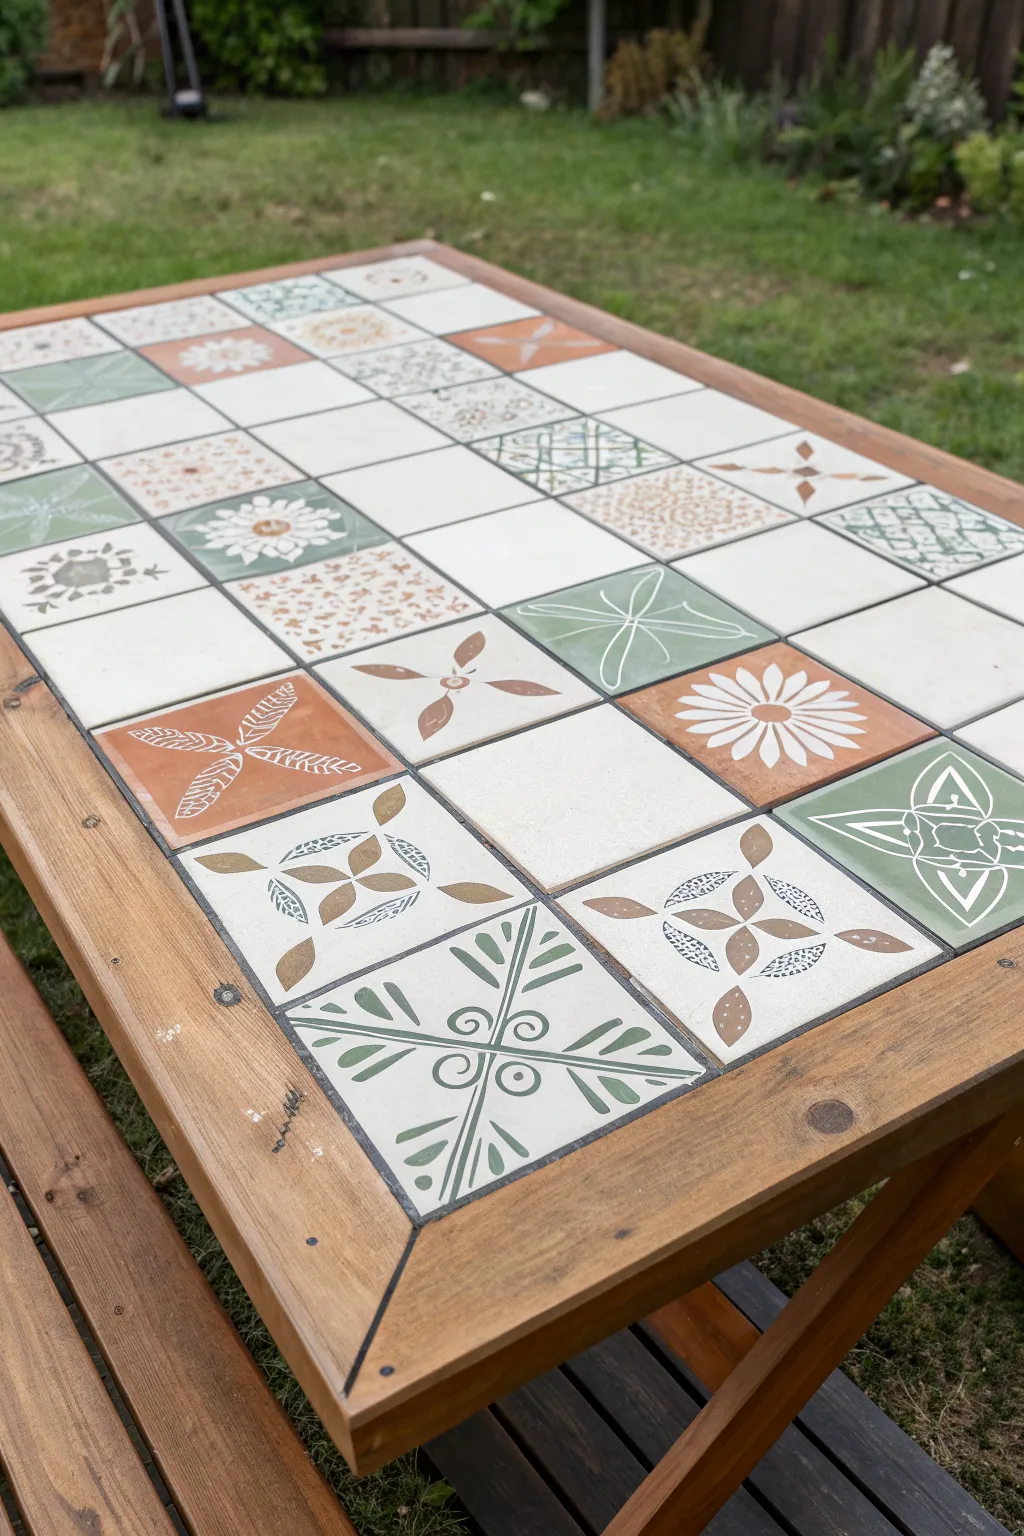
Transform an ordinary wooden table into a Mediterranean-inspired centerpiece with this clever paint technique. By taping off a grid and hand-painting simple botanical and geometric motifs, you can achieve the look of expensive ceramic tiles without the weight or cost.
Step-by-Step Tutorial
Materials
- Wooden table (sanded and clean)
- Painter’s tape (1/4 inch or similar thin width)
- Ruler or T-square
- Pencil
- Exterior chalk paint or acrylic paint (Cream/Off-white base)
- Acrylic paints (Terracotta, Sage Green, Dark Grey/Charcoal)
- Assorted stencils (geometric and floral) – optional but helpful
- Fine detail paintbrushes
- Small foam roller
- Clear exterior polyurethane sealer (matte or satin)
- Sandpaper (120 and 220 grit)
Step 1: Preparation & Base Coat
-
Sand the surface:
Begin by sanding the entire table top with 120-grit sandpaper to remove old varnish or rough spots, ensuring a smooth surface for the paint to adhere to. Wipe away all dust with a damp cloth. -
Apply the base color:
Using a small foam roller, apply two coats of your cream or off-white base paint across the entire table top. Allow full drying time between coats according to the manufacturer’s instructions. -
Measure the grid:
Decide on the size of your ’tiles’—4×4 inches or 6×6 inches usually works best. Mark these intervals lightly with a pencil along the edges of the table. -
Tape the grout lines:
Run long strips of thin painter’s tape across the table connecting your marks, creating a grid. Press the tape down firmly to prevent paint bleed. The area under the tape will become your faux grout lines later.
Bleeding Lines?
If paint bleeds under the tape, let it dry completely. Then, lay a straight edge over the error and scrape the excess away gently with a craft knife or razor blade.
Step 2: Painting the Tile Patterns
-
Plan your layout:
Sketch a quick map of which squares will be solid colors and which will have patterns. The example uses a mix of solid white squares, terracotta backgrounds, sage green backgrounds, and intricate line drawings. -
Paint solid background squares:
Fill in specific squares with your accent colors (terracotta and sage green). Use a flat brush and accurate strokes near the tape edges. You may need two coats for full opacity. -
Draft the complex patterns:
For the intricate geometric designs, place a stencil over a white square and lightly trace the design with a pencil, or freehand the center points if you are confident. -
Detail the green florals:
Using a fine liner brush and sage green paint, create the four-point leaf designs. Start from the center and pull the brush outward to create the petal shapes. -
Add terracotta accents:
Switch to terracotta paint to add details like the central dots in the floral patterns or the alternating petals in the radial designs. -
Create the grey line work:
For the high-contrast tiles, use a dark grey or charcoal paint. Paint thin, deliberate lines for stems, swirls, and geometric borders. I find resting my pinky on the table helps stabilize my hand for these fine lines. -
Fill the ‘negative space’ patterns:
For designs that look like white flowers on a colored background (like the large white daisy on terracotta), carefully paint the colored background around the white shape, rather than painting white on top. -
Add texture details:
Use a very fine brush or a dotting tool to add stippling or small dots to mimicking the texture of stone or mosaic within some of the larger shapes.
Seal the Tape First
Paint a thin layer of your BASE color over the tape edges first. This seals the gaps, so if anything bleeds, it matches the grout anyway.
Step 3: Finishing Touches
-
Remove the tape:
Wait until the paint is dry to the touch but not fully cured. Slowly peel back the painter’s tape at a 45-degree angle to reveal the crisp ‘grout’ lines underneath. -
Touch up edges:
If any paint bled under the tape, use a tiny brush and your base cream color to tidy up the straight lines. -
Sand for distress (optional):
For a weathered, antique tile look, very lightly scuff the painted surface with 220-grit sandpaper, focusing on the edges of the tiles. -
Clean surface:
Wipe the table down one last time with a lint-free cloth to remove any sanding dust. -
Seal the project:
Apply 2-3 coats of clear exterior polyurethane, letting it dry completely between layers. This is crucial for protecting your artwork from weather and spills.
Enjoy your beautiful, custom-designed table that brings a touch of artistic flair to your outdoor dining space
Faux Marble Veining Made Simple
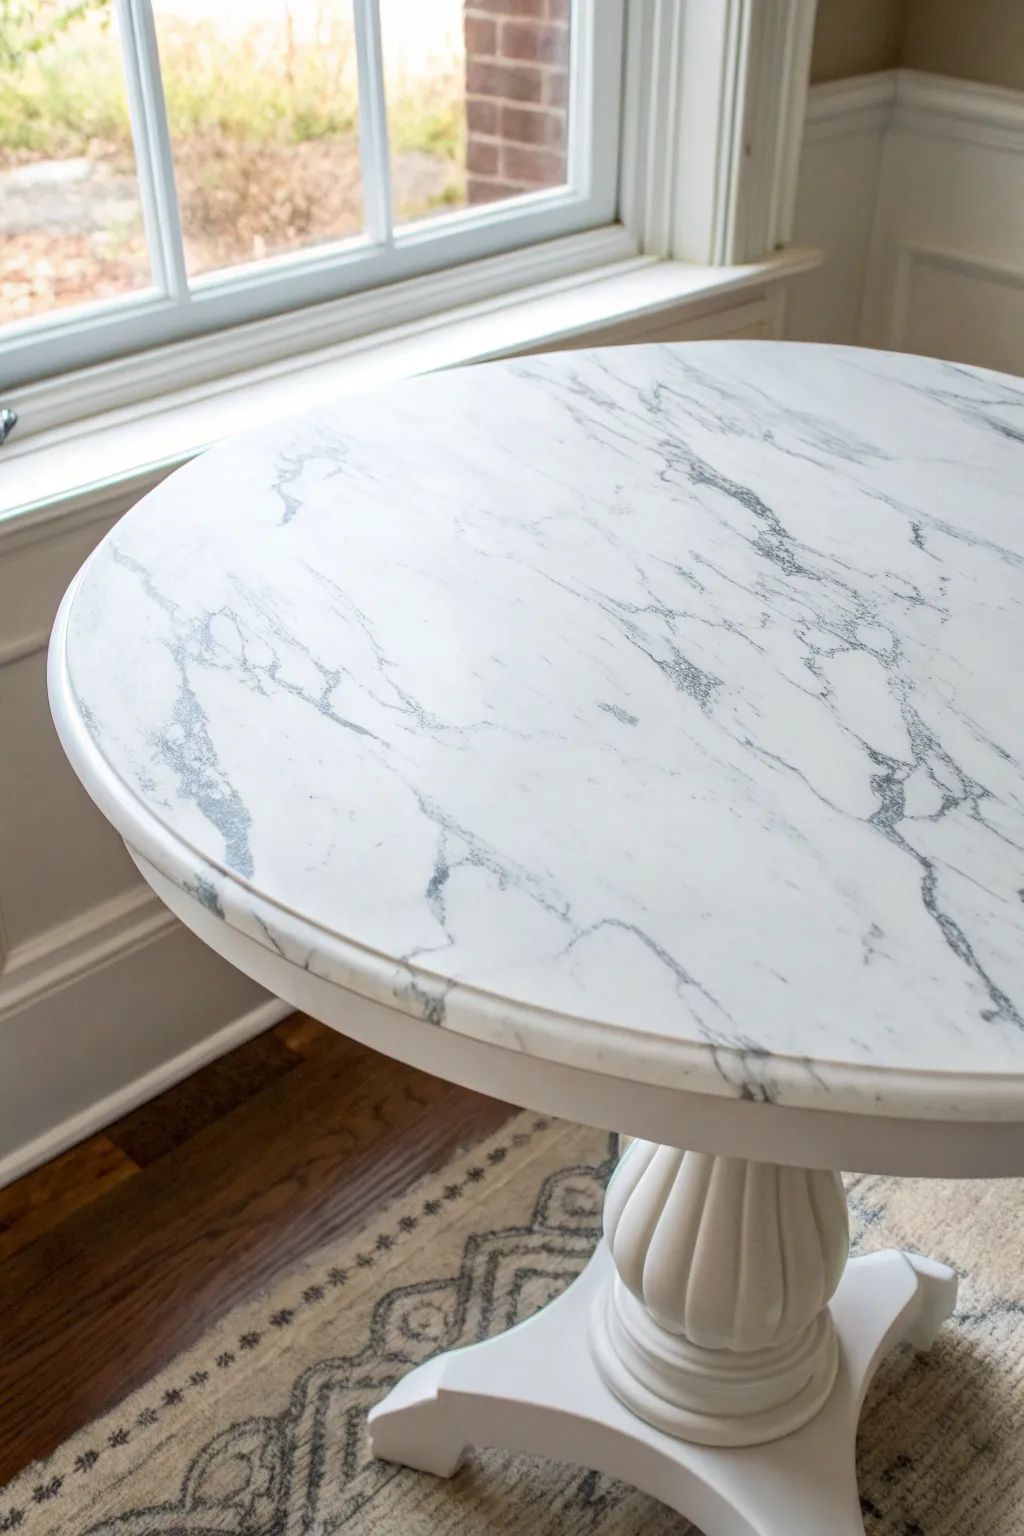
Transform a plain or dated tabletop into a luxurious statement piece with this surprisingly achievable faux marble technique. By layering soft grey glazes and creating organic vein lines, you can mimic the depth and sophistication of real Carrara marble for a fraction of the cost.
Step-by-Step Guide
Materials
- Round wooden table (sanded and cleaned)
- White satin or semi-gloss latex paint (base coat)
- Grey acrylic craft paint (charcoal or dark grey)
- Sample pot of white latex paint (for blending)
- Clear glazing medium
- Floetrol (optional, for flow)
- Feather (turkey or goose feather works best)
- Fine liner brush
- Soft synthetic blending brush (1-2 inch)
- Sea sponge (natural)
- Water spray bottle
- paper towels
- Polycrylic topcoat (satin or gloss finish)
Step 1: Base Preparation
-
Clean and Sand:
Begin by thoroughly cleaning your table surface to remove any grease or wax. Scuff sand the existing finish with 220-grit sandpaper to give the new paint something to grip onto, then wipe away all dust with a tack cloth. -
Apply the Base Coat:
Apply a coat of bright white satin or semi-gloss latex paint using a high-quality brush or foam roller to minimize texture. Let this dry completely according to the can’s instructions. -
Second Coat for Opacity:
Apply a second coat of white to ensure a solid, opaque background. This pristine white canvas is crucial for the marble effect to look realistic. Allow this to cure fully, preferably overnight.
Fixing Heavy Lines
Veins look too thick? While the paint is still wet, spritz heavily with water and dab with a clean paper towel. This lifts the pigment, leaving a faint ‘ghost’ vein that adds great depth.
Step 2: Creating the Veining
-
Mix the Glaze:
Create your ‘vein paint’ by mixing one part grey acrylic paint with two parts clear glazing medium. For a smoother flow, you can add a tiny drop of water or Floetrol. You want a translucent, ink-like consistency. -
Wet the Surface:
Working in small sections (about 1/4 of the table at a time), lightly mist the white base with water. This helps the vein lines bleed slightly, preventing them from looking too stark or drawn-on. -
Draft the Major Veins:
Dip the tip of a feather or a fine liner brush into your grey glaze mix. Drag it across the damp surface with a trembling hand motion; avoid straight lines, letting the tool wiggle to create natural, jagged paths. -
Soften the Edges:
Immediately use a dry, soft blending brush to gently pat or lightly sweep over portions of the veins. This feathers the harsh edges into the background, creating that ‘subsurface’ look typical of real stone. -
Add Minor Veins:
Connect smaller, fainter veins branching off from the main arteries. Use even less paint here so they appear to be deeper within the stone. -
Sponge for Texture:
Dampen a natural sea sponge and dip it into a very diluted grey glaze. Lightly pounce it in random open areas to create subtle clouding or mottling, which breaks up the stark white background without overwhelming the design. -
Blot Excess:
If any area looks too dark or heavy, quickly blot it with a damp paper towel or rag to lift the pigment before it dries. Marble is rarely perfect, but it shouldn’t look muddy. -
Repeat Across the Table:
Move to the next section of the table, ensuring your major veins connect fluidly from the previous section. I find it helpful to stand back occasionally to ensure the overall pattern feels balanced.
Feather Technique
Twist the feather as you drag it. The changing orientation of the bristles creates unpredictable, organic widths that a brush simply can’t replicate.
Step 3: Refining and Sealing
-
Intensify Selected Areas:
Once the first layer is dry, go back with a slightly darker grey mix and a fine brush. Accentuate just a few key parts of the main veins to add definition and sharp contrast. -
Mist and Blur:
Lightly mist these new accents with water and soften them with your blending brush, ensuring they sit visually on top of the ghost veins you created earlier. -
Brighten with White:
Mix white paint with a bit of glaze. Use a small brush to run thin lines of white specifically through or alongside the darkest grey veins. This ‘highlight’ creates a visual break and adds realism. -
Full Dry Time:
Allow your faux marble artwork to dry for at least 24 hours. The paint needs to be completely moisture-free before sealing. -
First Sealed Coat:
Apply a thin layer of water-based Polycrylic using a soft synthetic brush. Use long, smooth strokes and avoid overworking it to prevent bubbles. -
Sand and Finish:
Once the first coat is dry, lightly sand with 400-grit sandpaper to smooth any nibs. Wipe clean, then apply one or two final coats of Polycrylic for a durable, rock-hard finish.
Enjoy your high-end custom furniture piece without the heavy price tag or weighting issues of real stone


Terrazzo Speckles on a Painted Base
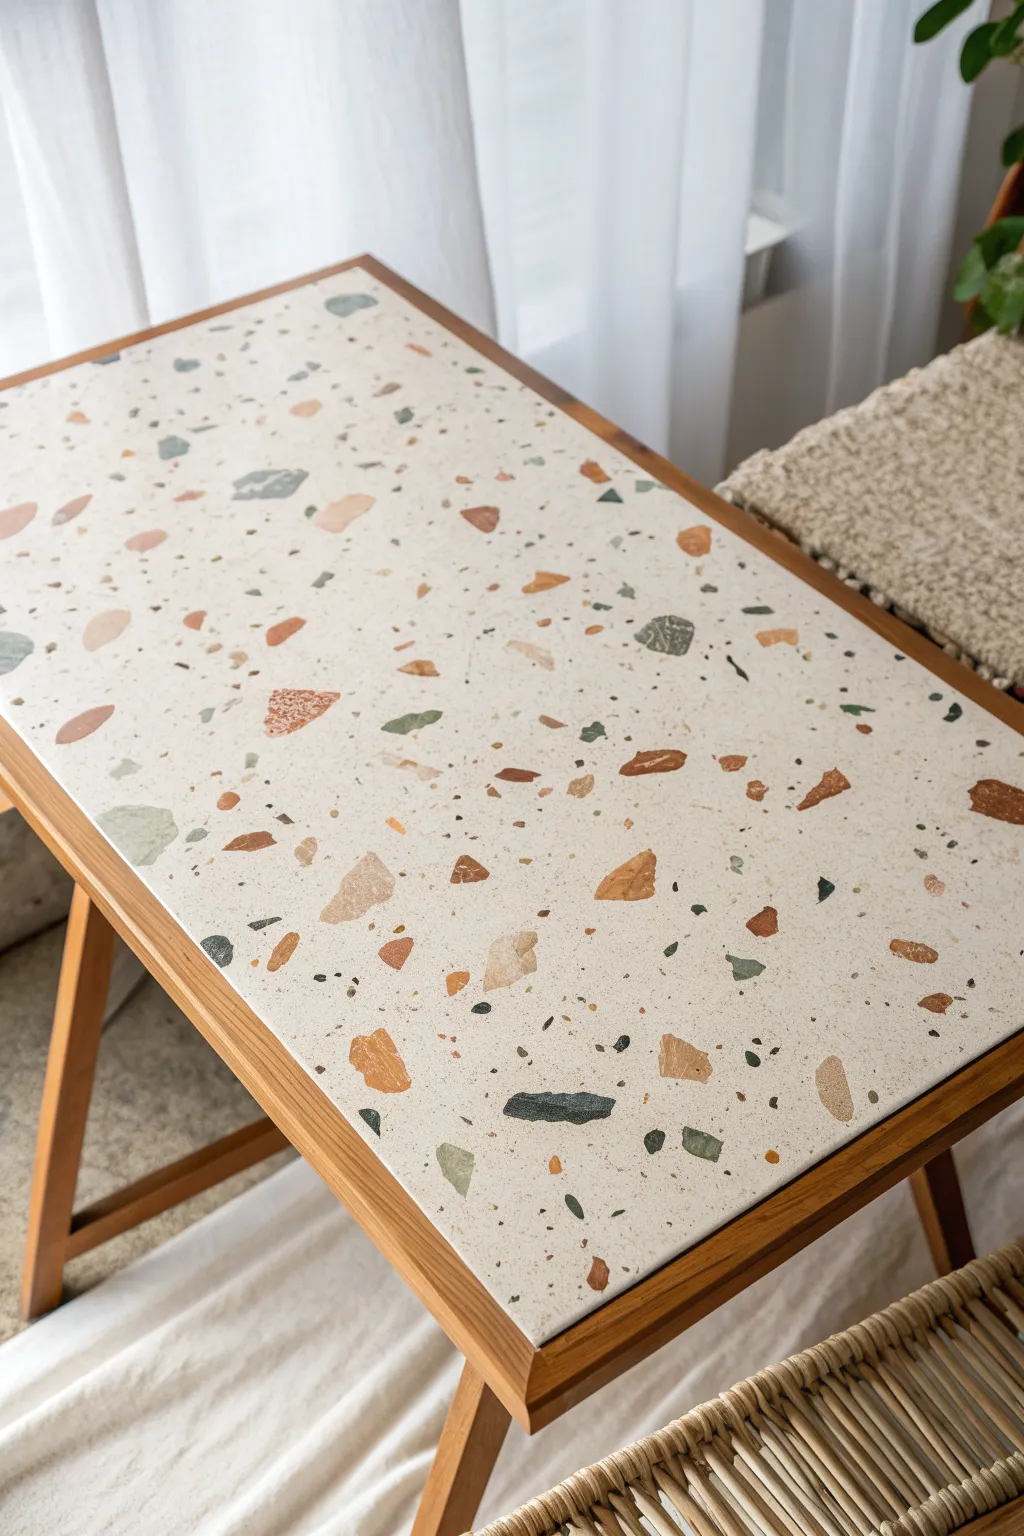
Transform a plain wooden table into a trendy statement piece with this faux terrazzo painting technique. By layering irregular shapes over a creamy base, you can achieve the sophisticated look of polished stone chips without the heavy price tag.
Step-by-Step
Materials
- Wooden table or tabletop
- Sandpaper (120 and 220 grit)
- Primer suitable for wood
- Cream or off-white acrylic latex paint (base coat)
- Acrylic craft paints (terracotta, slate blue, mustard yellow, beige, dark grey)
- Small flat artist brushes (various sizes)
- Small round detail brush
- Palette or paper plate
- Water-based polyurethane sealer (matte or satin)
- Lint-free cloth
- Pencil (optional)
Step 1: Preparation and Base
-
Prepare the surface:
Begin by sanding the entire tabletop with 120-grit sandpaper to remove any old glossy finish or rough spots. Wipe away all dust with a damp, lint-free cloth. -
Apply primer:
Roll or brush on a coat of high-quality primer to ensure your paint adheres well. Let this dry completely according to the manufacturer’s instructions. -
Smooth the primer:
Once the primer is dry, lightly sand it with 220-grit sandpaper for a super smooth finish, then wipe away the dust again. -
Paint the base color:
Apply your creamy off-white base coat. Use a roller for the smoothest application to avoid brush strokes. -
Second coat:
Allow the first coat to dry, then apply a second coat of the base color to ensure solid, opaque coverage. Let this cure for at least 24 hours before starting the design.
Shape Variety Tip
Real terrazzo is chaotic. Ensure your painted shapes range from the size of a quarter down to a grain of rice. Don’t be afraid of sharp, triangular shards.
Step 2: Creating the Chips
-
Plan your palette:
Pour small amounts of your acrylic craft paints onto a palette. The key to the look in the photo is an earthy mix: slate blue, terracotta, camel, and dark grey. -
Paint large shapes first:
Starting with one color, like the terracotta, use a small flat brush to paint irregular, angular shapes scattered randomly across the surface. Avoid perfect circles or squares. -
Rotate the table:
Walk around the table as you work to ensure the pattern looks random from all angles and doesn’t have a distinct ‘top’ or ‘bottom’. -
Add secondary colors:
Switch to your next color (e.g., slate blue) and paint similar irregular shapes, placing them in the empty spaces. Vary the sizes, making some quite large and others medium. -
Incorporate neutrals:
Add your beige and lighter tan shapes. These should be subtle and help bridge the gap between the bold colors and the background. -
Layering shapes:
It’s okay if a few shapes slightly overlap others once the under-layer is dry, mimicking the depth of real stone, but keep most separated. -
Vary edges:
I like to use the edge of a flat brush to create sharp, jagged corners on some ‘chips’ while keeping others slightly more rounded for variety.
Step 3: Detailing and Sealing
-
Add the ‘sand’ specks:
Using a very small round brush or even the handle end of a brush, dot tiny specks of dark grey and black into the remaining negative space. -
Create fine texture:
Mix a little water into your darkest grey paint and dip an old toothbrush in it. Run your thumb over the bristles to flick a very fine mist of speckles over the surface. Practice on paper first to control the splatter. -
Final inspection:
Step back and look for any large bald spots. Fill them in with medium-sized chips or extra speckles to balance the composition. -
Dry completely:
Allow your artwork to dry for at least 24 hours. Acrylics need to be fully dry before sealing to prevent smearing. -
First seal coat:
Apply a thin coat of water-based polyurethane using a high-quality synthetic brush or foam roller. Do not overwork it, as this can create bubbles. -
Sand and seal again:
Once the first coat is dry, lightly sand with 220-grit paper, wipe clean, and apply a second coat for a durable, tabletop-ready finish.
Fixing “Patterning”
If your chips look too organized or grid-like, break up the visual lines by painting a very large, odd-shaped chip right in the middle of the ‘row’ to disrupt the eye.
Enjoy your durable and stylish new surface that brings artistic flair to any room
Soft Ombre Fade Across the Top
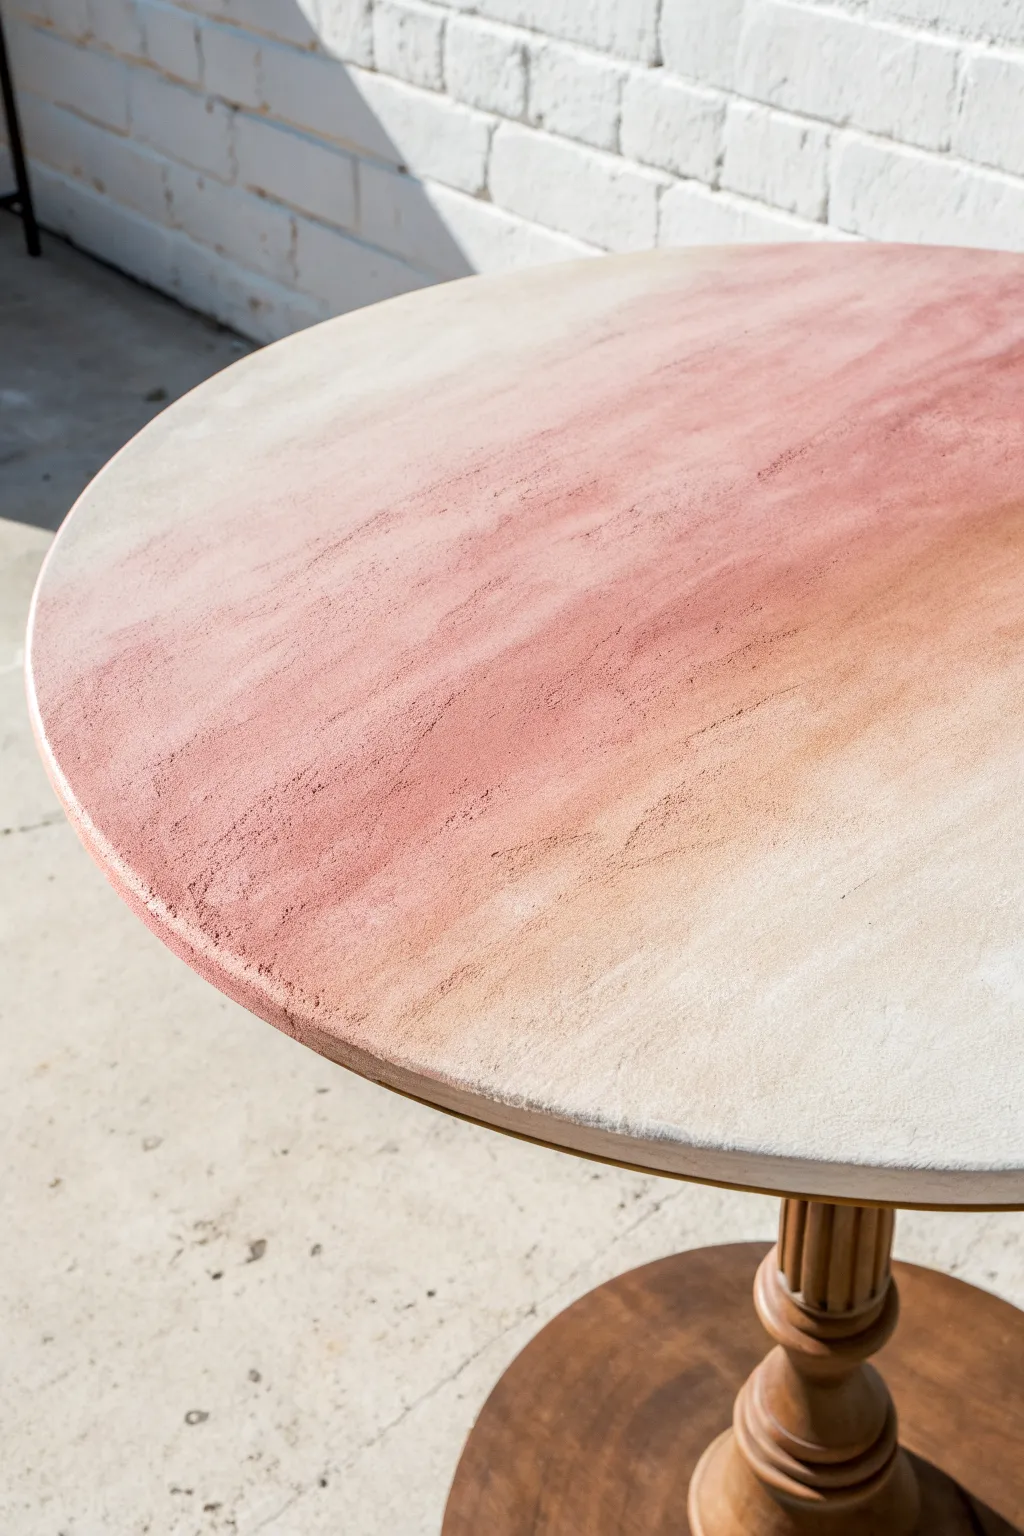
Transform a plain wooden table into a piece of art with this textured ombre technique. The result mimics the look of weathered sandstone, featuring a soft gradient that fades from creamy beige to a warm, dusty rose.
Step-by-Step Guide
Materials
- Round wooden pedestal table
- Sandpaper (120 and 220 grit)
- Clean cloth or tack cloth
- Primer (stain-blocking)
- Stone-effect spray paint or texture medium
- Chalk paint (Cream/Beige)
- Chalk paint (Dusty Rose/Terracotta)
- Chalk paint (Soft Peach/Light Orange)
- Large synthetic blending brush
- Soft rag or sponge for blending
- Clear matte polycrylic sealer
Step 1: Preparation and Base
-
Clean surface:
Begin by thoroughly cleaning the tabletop to remove any grease, dust, or old wax polish using a mild degreaser and a cloth. -
Scuff sand:
Lightly sand the existing finish with 120-grit sandpaper to create a ‘tooth’ for the new paint to adhere to; you don’t need to strip it completely. -
Wipe down:
Remove all sanding dust with a tack cloth or a damp rag, ensuring the surface is perfectly clean. -
Prime the surface:
Apply a coat of stain-blocking primer to prevent tannins from the wood bleeding through your light colors later on. -
Add texture:
To achieve that stone-like feel, spray the top with a stone-effect spray paint or apply a texture medium. Let this base layer dry completely according to the manufacturer’s instructions.
Blending trouble?
If your gradient looks muddy, stop blending! Let it dry completely, then simply dry-brush the original colors back over the muddy area to re-establish the fade.
Step 2: Creating the Ombre Gradient
-
Establish the light side:
Pour your cream or beige chalk paint into a tray. Paint roughly one-third of the table in a crescent moon shape on one side. -
Apply the dark tone:
On the opposite side, paint a crescent shape using your darkest color, the dusty rose or terracotta shade, covering another third of the surface. -
Bridge the gap:
Mix a small amount of the peach/light orange paint with the cream to create a transition color. Fill the empty middle strip with this shade. -
Begin the wet blend:
While all paint is still wet, take a clean, slightly damp brush. Use long, sweeping strokes to feather the transition where the cream meets the middle color. -
Blend the dark side:
Switch to a fresh brush (or clean the previous one) and blend the boundary where the middle color meets the dusty rose. -
Misting technique:
I find a spray bottle of water helps here; lightly mist the paint if it starts to dry too quickly, allowing for smoother dragging of the colors. -
Create directional texture:
Instead of blending perfectly smooth, use a dry chip brush to drag through the wet paint in one direction. This creates those linear striations that look like sedimentary rock. -
Softening edges:
Use a soft, lint-free rag to gently dab any areas where the brush strokes look too harsh, creating a clouded effect. -
Dry and assess:
Let the first layer dry. The stone texture underneath will catch the paint differently, enhancing the natural look. -
Dry brush highlights:
Once dry, dip a dry brush lightly into the cream paint, offload most of it on a paper towel, and lightly whisk it over the dark rose section to highlight the texture peaks.
Add metallic veins
Mix gold dragging paint with glaze. Use a feather or thin liner brush to trace delicate ‘quartz’ veins through the transition zones for a luxury stone look.
Step 3: Finishing Touches
-
Check the rim:
Ensure the gradient wraps naturally over the edge of the table. You can use your rag to smudge the colors down the side for a seamless look. -
Light sanding:
Once fully dry, very gently run a 220-grit sandpaper over the surface to knock down any rough high points while leaving the visual texture. -
Seal for protection:
Apply 2-3 coats of clear matte polycrylic sealer to protect your finish without adding unwanted shine. -
Final cure:
Allow the table to cure fully for at least 24 hours before placing any objects on top.
This sophisticated, sun-baked finish brings a warm, organic elegance to any room in your home
Botanical Border With Leafy Stencils
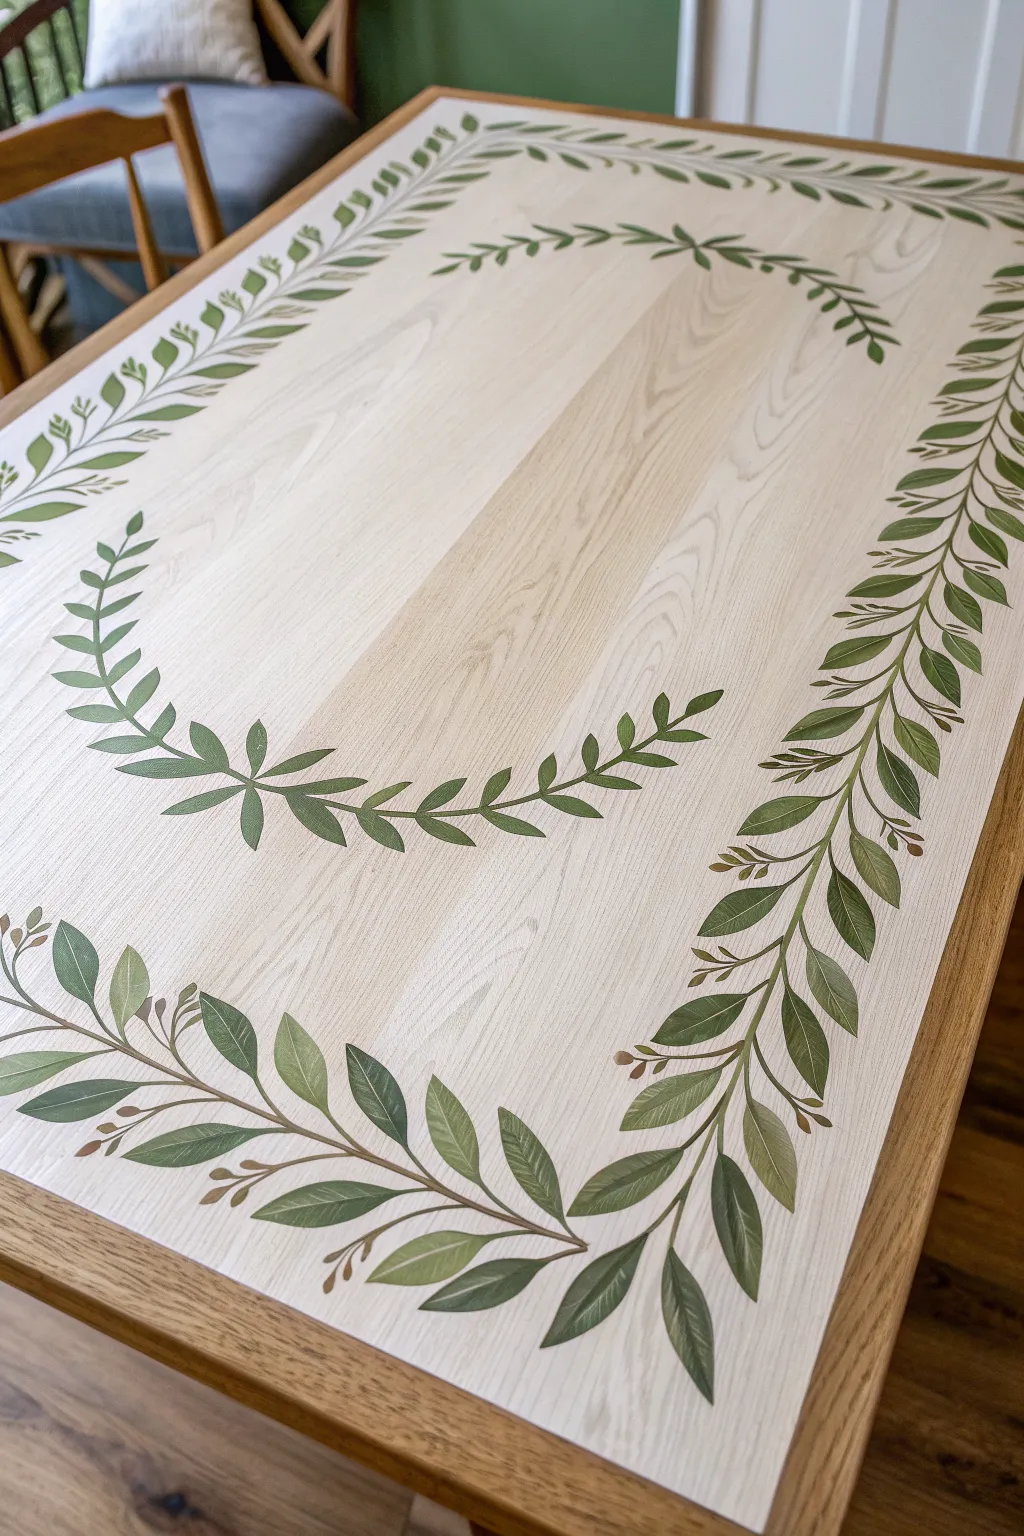
Transform a plain table into a cottagecore dream with this delicate botanical border design. Using natural wood tones as a canvas, this project layers soft greens and subtle browns to create an elegant, vine-wrapped focal point.
Step-by-Step Tutorial
Materials
- Light wood dining table (or wood veneer surface)
- Sandpaper (120 and 220 grit)
- Primer suitable for wood/laminate
- Base coat paint (cream or off-white, optional if keeping wood look)
- Leafy vine stencil (large rectangular border style)
- Laurel wreath stencil (curved style)
- Stencil adhesive spray
- Painter’s tape
- Acrylic craft paints (Deep Olive Green, Sage Green, Forest Green, Espresso Brown)
- Stencil brushes (various sizes)
- Small detail brush
- Paper towels
- Clear matte or satin polychrylic sealer
Step 1: Preparation
-
Clean surface:
Begin by thoroughly cleaning your table surface with a degreaser to remove any oils, wax, or furniture polish that could repel paint. -
Light sanding:
Scuff the surface gently with 220-grit sandpaper. You aren’t trying to strip it completely, just creating a ‘tooth’ for the paint to grab onto. -
Wipe down:
Use a tack cloth or damp lint-free rag to remove every speck of dust. A clean surface is critical for crisp stencil lines. -
Optional base coat:
If your table’s existing finish is damaged or too dark, apply a coat of primer followed by a cream-colored base paint. If you love the natural light wood like in the photo, skip this and paint directly onto the wood.
Less is More
The #1 mistake is too much paint on the brush, which causes bleeding under the stencil. Your brush should feel almost dry to the touch before it hits the table.
Step 2: Planning the Layout
-
Measure and mark:
Find the exact center of your table. Use a measuring tape and a pencil to lightly mark reference points for where the outer border and the inner wreath will sit. -
Dry fit:
Lay your stencils out on the table without paint to finalize placement. Use small pieces of painter’s tape to mark the corners or edges of where the stencils should go.
Step 3: Stenciling the Outer Border
-
Secure the stencil:
Apply a light mist of stencil adhesive to the back of your border stencil. Let it get tacky for a moment, then press it firmly onto the table along your markings. -
Load the brush:
Dip your stencil brush into your primary greenery color (Sage Green mixed with a touch of Forest Green). Offload most of the paint onto a paper towel until the brush feels almost dry. -
Apply base green:
Using a vertical dabbing or swirling motion, apply the paint through the stencil. Keep the layer light; transparency makes the leaves look more realistic. -
Add dimension:
While the stencil is still in place, load a smaller brush with a darker green. Gently dab this color near the base of the leaves and stems to create shadow and depth. -
Move and repeat:
Carefully lift the stencil straight up. Reposition it to continue the border pattern around the table edge, ensuring the vines connect seamlessly.
Watercolor Effect
Mix a tiny drop of glazing medium into your acrylic paint. This creates a sheer, watercolor-like translucency that lets the wood grain peek through the leaves.
Step 4: Creating the Inner Wreath
-
Position the inner design:
Place your curved laurel stencil in the center. I find it helpful to tape off any parts of the stencil I don’t want to use to avoid accidental paint transfer. -
Paint the inner leaves:
Repeat the stenciling process with your greens. Vary the pressure slightly so some leaves appear lighter and others more saturated. -
Add brown accents:
With a very small brush, stencil the stems or tiny berries in Espresso Brown. This breaks up the green and adds a rustic touch.
Step 5: Detailing and Sealing
-
Freehand touch-ups:
Once the precise stenciling is done and the stencils are removed, use a fine detail brush to hand-paint thin connections between vines if there are gaps. -
Soften edges:
If any lines look too harsh or ‘stenciled’, you can feather them out slightly with a clean, slightly damp brush while the paint is fresh. -
Full cure:
Allow the painted design to dry completely, ideally overnight. Acrylics need to harden before the final step. -
Seal the surface:
Apply 2-3 thin coats of clear polycrylic sealer. This is crucial for a dining table to protect your artwork from spills and daily wear. Lightly sand with high-grit paper between coats for a buttery smooth finish.
Now you have a stunning, custom piece of furniture ready for your next dinner party
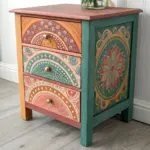
Radial Mandala Medallion Centerpiece
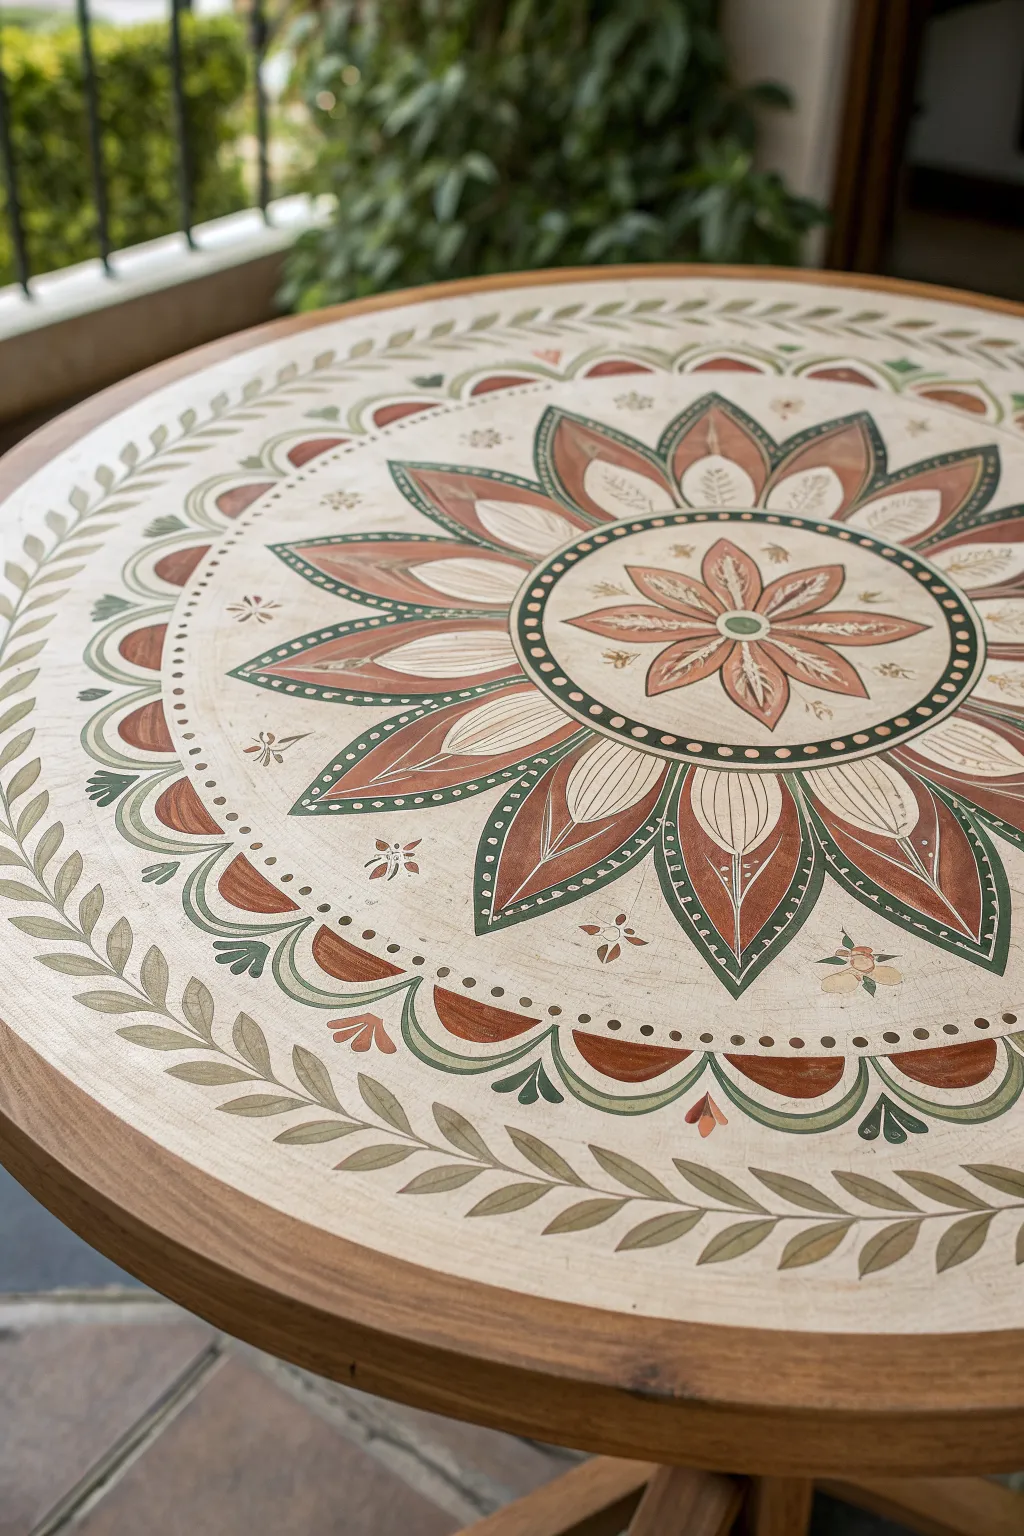
Transform a plain wooden table into a stunning focal point with this hand-painted mandala design featuring earthy tones and organic floral motifs. The rhythmic pattern of leaves and petals creates a calming, centered aesthetic perfect for a sunroom or patio.
Step-by-Step Guide
Materials
- Round wooden table (pre-sanded)
- White or cream chalk paint (base)
- Acrylic craft paints (terracotta, sage green, forest green, deep brown)
- Clear matte polyurethane sealer
- Pencil and eraser
- Large compass or string and thumbtack
- Protractor and ruler
- Assortment of paintbrushes (1-inch flat, medium filbert, fine liner)
- Painter’s tape (optional)
- Sandpaper (220 grit)
Step 1: Preparation and Mapping
-
Prep the Surface:
Clean your wooden table thoroughly to remove dust or oils. If the wood is dark or uneven, apply a light, solid coat of cream chalk paint as your canvas, but for this specific look, aim for a ‘whitewashed’ effect where some wood grain shows through. -
Find the Center:
Measure the exact center of the table and mark it lightly with a pencil. This point is crucial as the entire radial design will spin out from here. -
Draw Concentric Rings:
Using a large compass (or a string tied to a pencil and tacked to the center), draw a series of concentric circles. You will need a small inner circle for the central flower, a medium ring for the main petals, a separating band, an outer ring for the scalloped border, and a final ring near the edge for the vine border. -
Divide into Sections:
Use a protractor to divide your circle into even segments—12 or 16 usually works best for this level of detail. Draw light straight lines from the center to the edge to act as guidelines for petal symmetry.
Wobbly Lines?
Don’t panic! If a painted line isn’t perfect, thicken the line slightly to correct it, or embrace the imperfection. Hand-painted folk art relies on organic variations for charm.
Step 2: Painting the Core Design
-
Sketch the Motifs:
Lightly sketch the central 8-pointed flower, the large pointed petals extending from it, and the scalloped semi-circles in the outer band. Taking time to sketch now saves headache later. -
Base Coat the Large Petals:
Mix a muted terracotta color. Using a medium filbert brush, fill in the large, pointed petals of the main mandala ring. Apply the paint somewhat thinly to maintain that hand-crafted, vintage feel. -
Add Green Accents:
While the terracotta dries, switch to sage green. Paint the outer scalloped shapes that frame the main petals. I like to use a slightly darker forest green for the thin outlines to make the shapes pop. -
Paint the Center Flower:
Return to the center circle. Paint the small central 8-petal flower using a wash of the terracotta, keeping the very center dot dark green. -
Detail the Main Petals:
Inside the large terracotta petals, paint a smaller, white teardrop shape. Use a fine liner brush to add a central vein line in brown or dark red.
Add Texture
Mix a small amount of baking soda into your cream base paint before applying. This creates a subtle, grainy limestone texture that mimics authentic ceramic tiles or plaster.
Step 3: Borders and Fine Details
-
Create the Dot Border:
Around the central medallion circle, use the handle end of a paintbrush dipped in dark brown or black paint to stamp a perfect ring of small dots. -
Paint the Vine Border:
Moving to the outermost edge, paint a continuous vine stem in sage green. Add small, simple leaves branching off the stem in a repeating pattern, alternating sides. -
Enhance with Outlines:
Using your finest liner brush and thinned dark green or brown paint, carefully outline the large petals and the scalloped sections. This definitive line work gives the piece its illustrative quality. -
Add Decorative Fillers:
Look for empty negative spaces between the main petals. Paint small motifs like tiny butterflies, dots, or mini-flowers to fill these gaps without overcrowding the design. -
Distress (Optional):
Once fully dry, lightly run 220-grit sandpaper over the painted design. This mimics the weathered look seen in the photo, making the table feel like an antique find. -
Seal the Surface:
Protect your artwork with 2-3 coats of clear matte polyurethane. This is especially important for a table surface that might hold drinks or plants.
Now you have a custom piece of furniture that brings a warm, artisanal touch to your living space.
Loose Abstract Brushstroke Statement Top
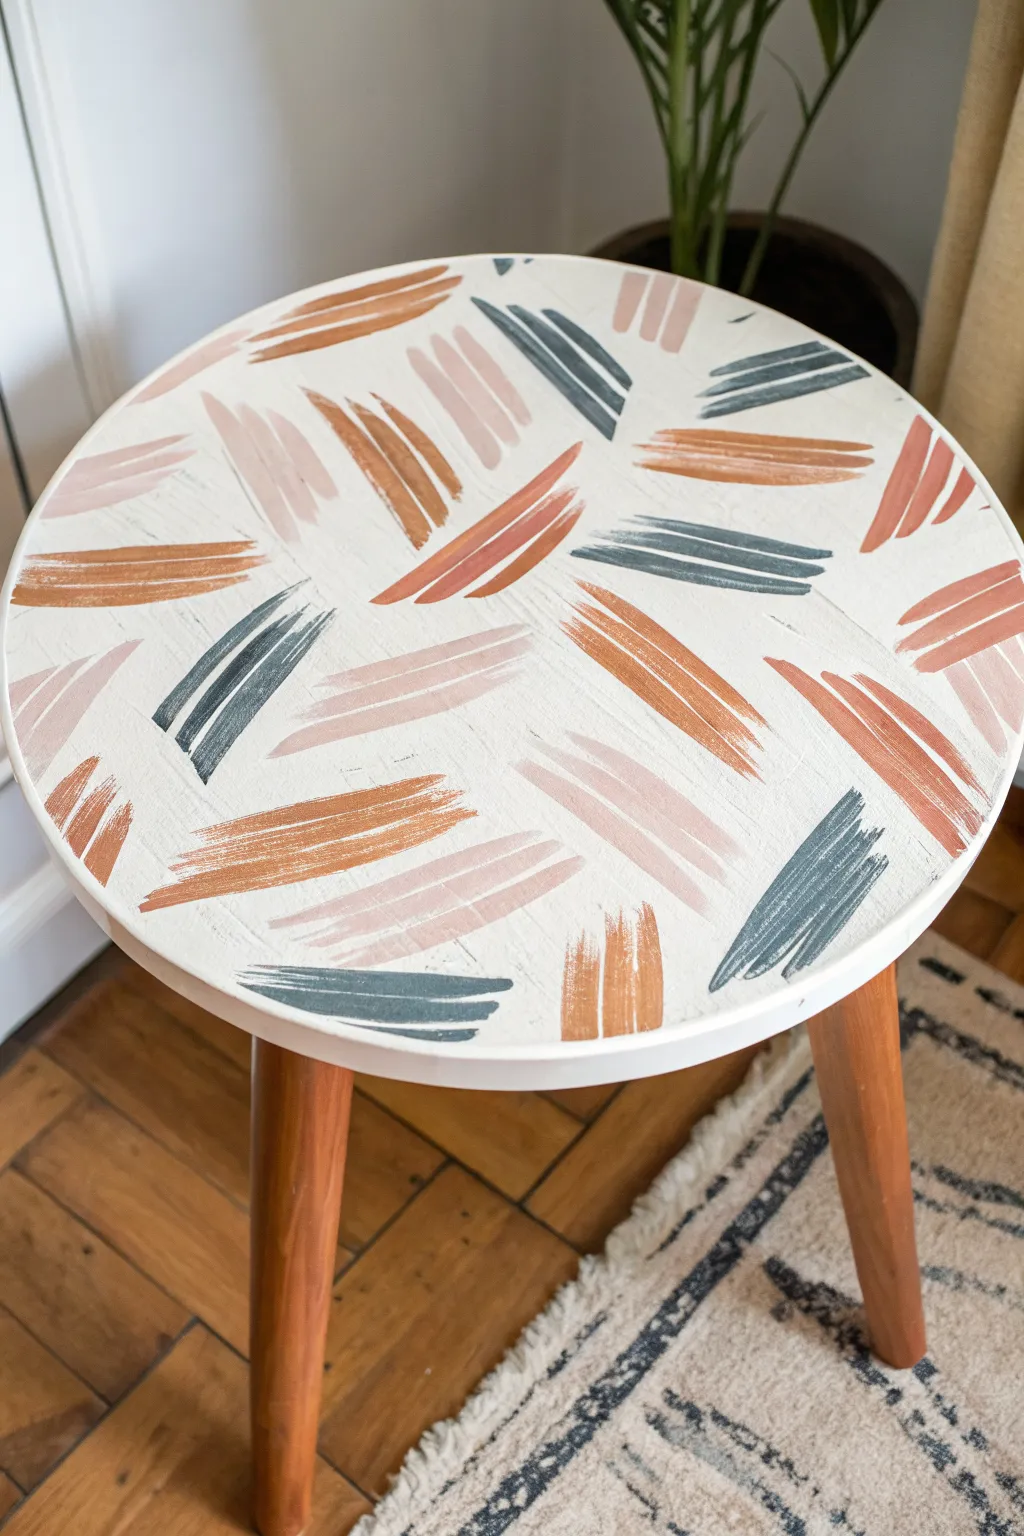
Transform a plain side table into a warm, abstract statement piece with this loose brushstroke technique. Using a palette of earth tones and soft greys against a crisp white background creates a modern, airy design that mimics textile patterns.
Step-by-Step
Materials
- Small round wooden side table
- Sandpaper (120 and 220 grit)
- Primer (water-based)
- White or cream chalk paint (base coat)
- Acrylic craft paints (terracotta, slate blue, blush pink, ochre)
- Flat shader brushes (1-inch width to capture the stroke texture)
- Small mixing palette or paper plate
- Clear matte polycrylic sealer
- Clean rag or tack cloth
Step 1: Preparation & Base Coat
-
Prep the surface:
Begin by removing any old finish or shine from your table top. Use 120-grit sandpaper to scuff the entire surface, ensuring the paint will adhere properly. -
Smooth it out:
Follow up with 220-grit sandpaper to create a silky smooth base. This is crucial because any bumps will show through the flat brushstrokes later. -
Clean thoroughly:
Wipe away all sanding dust using a damp rag or a tack cloth. A dusty surface will ruin the crispness of your base coat. -
Prime the top:
Apply a coat of water-based primer. This prevents tannins from the wood bleeding through your white background and ensures true color vibrancy. -
Apply the first base layer:
Paint the entire top surface with your white or cream chalk paint. Use long, even strokes to minimize texture. -
Add a second coat:
Once dry, apply a second coat of the base color to ensure full opacity. Let this cure completely for at least 2-4 hours before starting the design.
Dry Brush Pro Tip
Don’t overload your brush with paint. A slightly drier brush creates those lovely textured, feathered ends that make the style look organic and hand-painted.
Step 2: Creating the Abstract Pattern
-
Plan your palette:
Pour small amounts of your terracotta, slate blue, blush pink, and ochre paints onto your palette. Keep them separate to maintain clean colors. -
Test your stroke technique:
Practice on a piece of cardboard first. The goal is to set the flat brush down, drag it for about 2-3 inches, and lift off quickly to create a feathered edge. -
Start with the darkest color:
Dip your clean flat brush into the slate blue. Paint groups of 3 or 4 parallel strokes in random spots across the table, varying the angle for each group. -
Add warmth with terracotta:
Switch to a clean brush and the terracotta paint. Fill in some empty spaces with directional clusters of strokes, aiming them perpendicular to nearby blue clusters for contrast. -
Incorporate the mid-tones:
Introduce the ochre or deep tan color. I like to overlap these slightly near the edges of the other clusters to make the pattern feel cohesive rather than floating. -
Soften with blush pink:
Use the blush pink to fill the remaining larger gaps. These lighter strokes help bridge the darker colors and keep the overall look airy. -
Layering for depth:
Go back with your original colors and add single strokes on top of other dried clusters. This layering mimics a woven textile look. -
Check the balance:
Step back and look at the table from a distance. If an area looks too white, add a small, faint single stroke of blush or tan.
Step 3: Sealing & Protection
-
Let the art dry:
Allow the painted design to dry overnight. Acrylics dry fast to the touch, but you want them fully hardened before sealing. -
Apply sealer:
Gently brush on a coat of clear matte polycrylic. Do not over-brush, as you don’t want to reactivate and smear the artwork. -
Sand lightly:
Once the first coat of sealer is dry, very lightly sand with 220-grit paper to knock down any raised grain or dust nibs. -
Final coat:
Apply a second and final coat of polycrylic for durability against coffee cups and coasters.
Level Up: Texture
Mix a teaspoon of baking soda into your acrylic paints before applying deep strokes. It adds a gritty, ceramic-like texture that feels amazing to the touch.
Place your newly painted table near a window where the natural light can highlight those beautiful, intentional brushstrokes
Galaxy Night-Sky Painted Tabletop
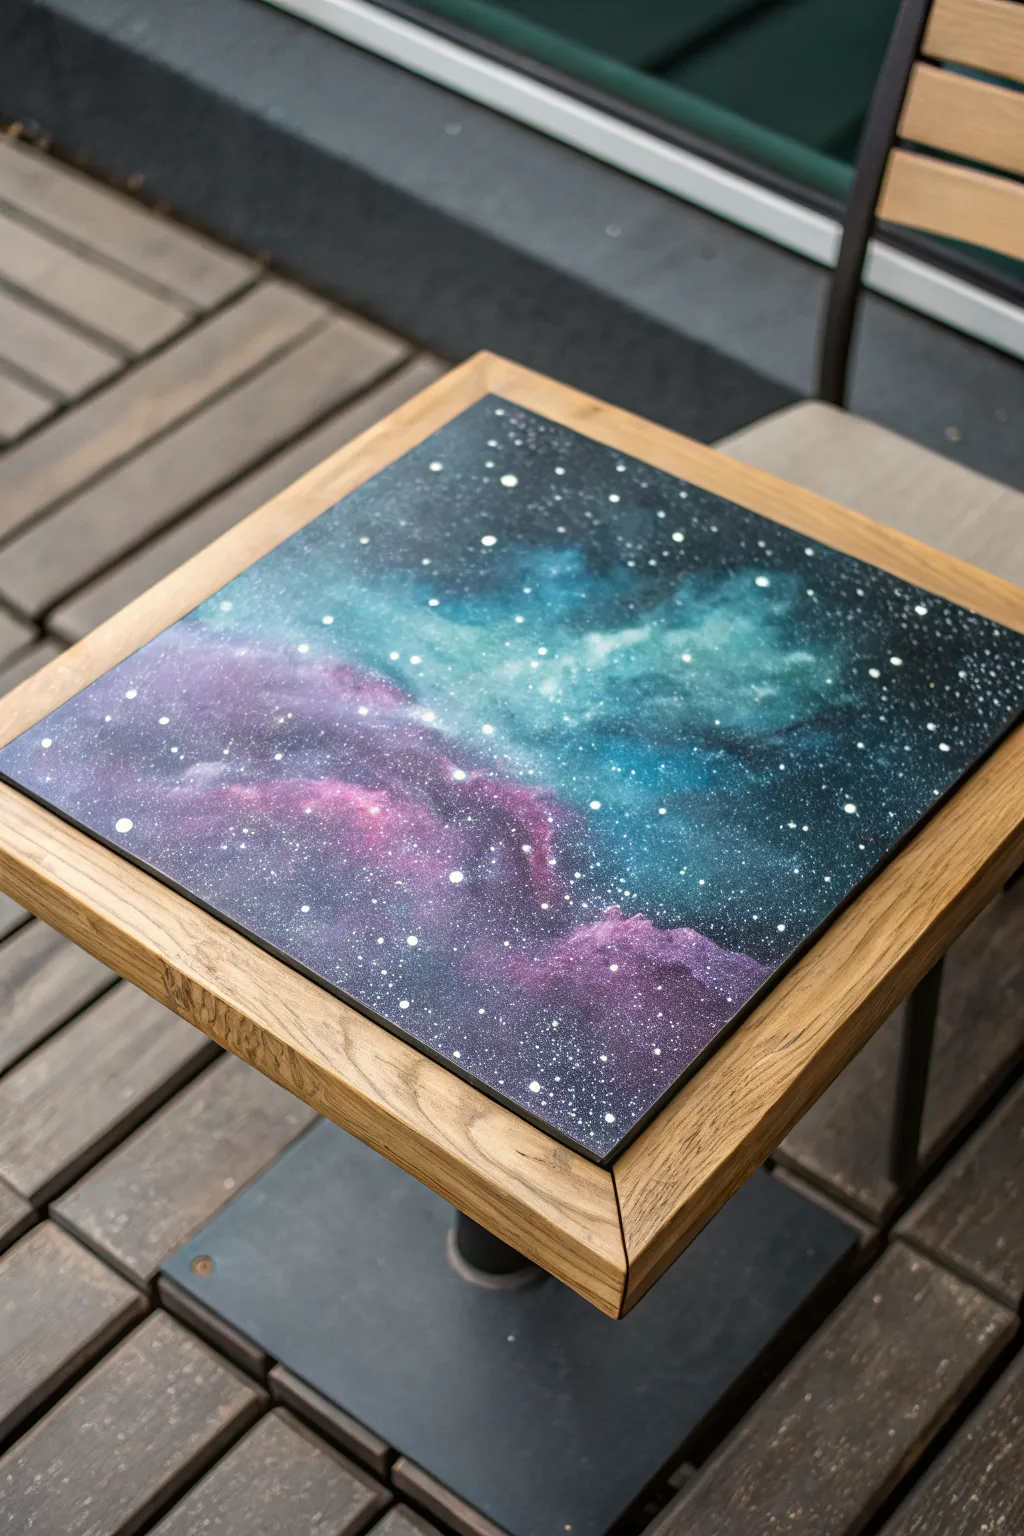
Transform a plain table into a portal to deep space with this stunning galaxy paint pour and splatter technique. The swirling blend of teal, magenta, and deep indigo creates a nebulous effect that looks far more complex than it actually is.
Step-by-Step Tutorial
Materials
- Small wooden table (square top preferred)
- Sandpaper (120 and 220 grit)
- Painters tape
- Black acrylic paint or primer (base coat)
- Acrylic paints: Navy Blue, Turquoise/Teal, Magenta/Purple, Titanium White
- Sponge applicators (natural sea sponge is best)
- A few small detail brushes
- Old toothbrush
- Clear polyurethane topcoat (matte or satin finish)
- Drop cloth or newspapers
- Paper plate or palette
Step 1: Preparation & Base
-
Prepare the workspace:
Lay down your drop cloth in a well-ventilated area. This project can get a little messy during the star-splattering phase, so ensure you have ample coverage around the table. -
Sand the surface:
Lightly sand the existing tabletop with 120-grit sandpaper to remove old varnish or rough spots. Follow up with 220-grit for a smooth finish, then wipe away all dust with a damp cloth. -
Tape the edges:
Using painter’s tape, carefully mask off the wooden frame or edge of the table. Press the tape down firmly to prevent paint from bleeding onto the natural wood border shown in the image. -
Apply the black base:
Paint the entire center square with a solid coat of black acrylic paint or primer. This provides the deep, infinite background of space. Let this dry completely before moving on.
Nebula Nuance
Use a natural sea sponge rather than a synthetic kitchen sponge. The irregular texture of the natural sponge creates much more realistic organic cloud shapes.
Step 2: Creating the Nebula
-
Sponge on the navy:
Dampen a sponge slightly and dip it into navy blue paint. Dab it randomly over the black background, leaving some areas of pure black visible. This creates depth. -
Add the teal clouds:
Using a clean section of the sponge (or a new one), pick up the turquoise paint. Dab this diagonally across the table, creating a ‘cloud’ shape. Use a light hand to blend the edges into the navy and black. -
Layer the magenta:
Introduce the purple or magenta tones. Sponge these into the areas adjacent to the teal, allowing them to slightly overlap. This creates a transition color where the two meet. -
Soften the transitions:
While the paints are still tacky, use a very slightly damp clean sponge to dab the borders between colors. This helps achieve that misty, gaseous look typical of a nebula. -
Intensify the highlights:
Go back in with brighter teal and magenta in the centers of your colored clouds to make them pop. I like to let the first layer dry briefly so these highlights sit on top without getting muddy. -
Let it dry:
Allow the colorful nebula layer to dry completely. If the paint is wet when you add stars, the white might absorb the color and look dull.
Star Control
Test your toothbrush splatter technique on a piece of cardboard first. If large blobs land on your galaxy, quickly dab them up with a damp paper towel.
Step 3: The Starfield
-
Prepare splatter paint:
Mix a small amount of titanium white paint with a few drops of water. You want a consistency similar to heavy cream—thin enough to splatter, but thick enough to be opaque. -
Splatter the stars:
Dip an old toothbrush into the thinned white paint. Hold it over the table and run your thumb across the bristles to flick tiny specks of paint onto the surface. -
Create star clusters:
Focus your splattering more heavily along the diagonal path of the teal and purple clouds. Real stars tend to look denser inside the nebula gases. -
Hand-paint major stars:
Using a fine detail brush or a toothpick, dot a few larger, distinct stars throughout the galaxy. Vary the sizes slightly to create a sense of distance. -
Add a lens flare (optional):
For a magical touch, create a tiny cross shape over one or two of the largest stars to mimic a twinkling effect.
Step 4: Finishing Up
-
Remove the tape:
Once the paint is fully dry to the touch, slowly peel back the painter’s tape at a 45-degree angle to reveal the crisp line between the galaxy and the wood frame. -
Clean up edges:
If any paint seeped under the tape, carefully scrape it away gently with a craft knife or touch it up with a bit of sandpaper. -
Apply the first coat of sealant:
Brush on a thin layer of clear polyurethane topcoat. This protects your artwork from coffee spills and scratches. A matte or satin finish looks best for space scenes to avoid glare. -
Sand and recoat:
Once the first coat is dry, lightly sand with fine 220-grit paper, wipe clean, and apply a second coat for a durable, professional finish.
Now you have a functional piece of furniture that doubles as a window into the cosmos, perfect for your morning coffee
Topographic Contour Line Design
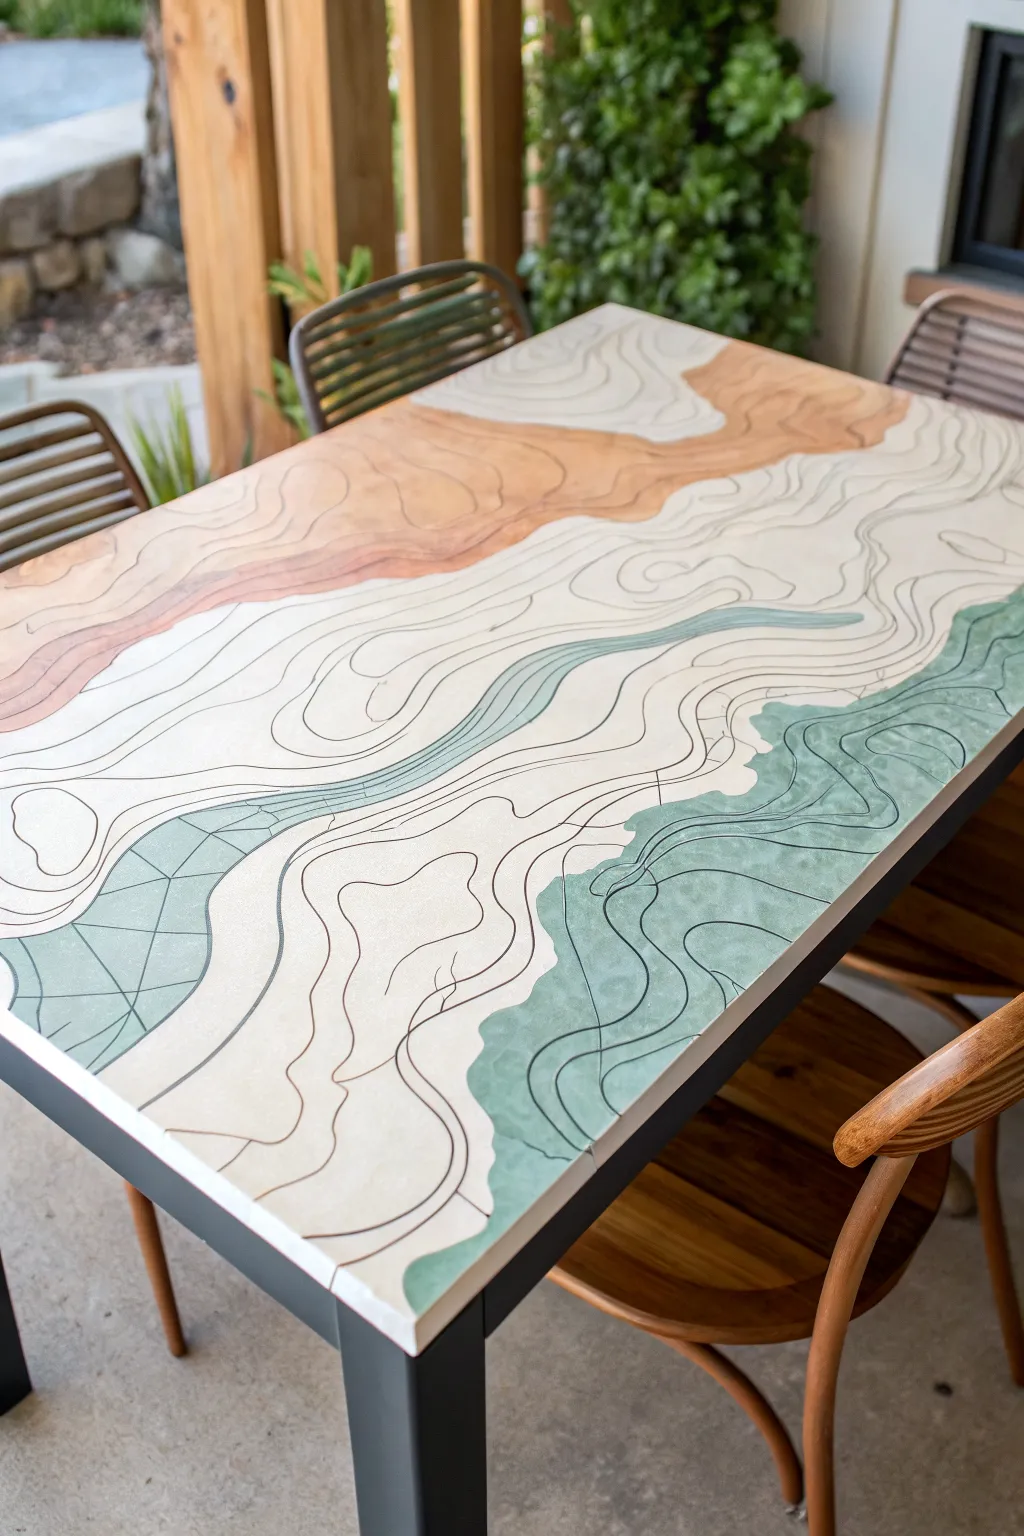
Transform a plain table into a striking piece of geographical art with this topographic map design. Using organic shapes and a muted, earthy palette, you will create a layered visual effect that mimics the rolling hills and valleys of a landscape.
Step-by-Step
Materials
- Wooden dining table or coffee table (clean surface)
- Sandpaper (120 and 220 grit)
- Primer (bonding primer for furniture)
- Chalk paint or acrylic latex paint (Cream/Off-White)
- Chalk paint or acrylic latex paint (Terracotta/Clay)
- Chalk paint or acrylic latex paint (Sage Green/Teal)
- Pencil
- Fine-grit sanding block
- Paintbrushes (2-inch synthetic flat brush and small detail brushes)
- Black or Dark Grey paint pen (fine tip/oil-based)
- Water-based matte polyurethane sealer
- Lint-free tack cloth
Step 1: Preparation & Base Coat
-
Clean and Sand:
Begin by thoroughly cleaning the tabletop to remove grease or polish. Scuff sand the entire surface with 120-grit sandpaper to create a ‘tooth’ for the paint to grip, then wipe away dust with a tack cloth. -
Prime the Surface:
Apply a coat of bonding primer across the entire top. This ensures your topographic artwork lasts and doesn’t chip. Let it dry completely according to the manufacturer’s instructions. -
Apply the Cream Foundation:
Paint the entire tabletop with your base cream or off-white color. This will serve as the lightest elevation layer. Two thin coats are usually better than one thick coat for a smooth finish. -
Smooth the Base:
Once the cream base is fully dry, lightly run a fine-grit sanding block over the surface to knock down any brush strokes, creating a perfectly flat canvas.
Smudged Ink Lines?
If your paint pen smears when sealing, the ink wasn’t fully dry. Wait longer, or spray the first coat of sealer lightly instead of brushing it to drag less ink.
Step 2: Mapping the Landscape
-
Draft the Zones:
Using a pencil, lightly sketch large, organic blobs to define your three main color zones. Imagine a diagonal flow: clay tones in the upper left corner, cream remaining in the center channel, and green accumulating in the bottom right. -
Paint the Terracotta Zone:
Fill in the upper left section with the terracotta paint. Don’t worry about perfect edges yet; focus on solid coverage. Use a jagged, wavy motion with your brush to keep the boundary looking natural rather than geometric. -
Paint the Sage Zone:
Apply the sage green paint to the bottom right section. I find it helpful to vary the opacity slightly in some areas to mimic the texture of the earth, though a solid block of color works beautifully too. -
Refine the Boundaries:
Once the colored zones are dry, use a smaller brush to refine the meeting points between the colors. The edges should look like wobbly coastlines, not straight lines.
Step 3: Drawing the Contours
-
Sketch Contour Lines:
With your pencil, lightly draw winding, concentric lines radiating outward from your color blobs. These lines should mimic elevation changes; keep them irregular and flowing like spilled water. -
Plan the ‘River’:
Draw a few long, sweeping lines running through the central cream channel. These can act like a riverbed or valley floor, connecting the top and bottom sections visually. -
Trace with Paint Pen:
Take your black or dark grey paint pen and carefully trace over your pencil lines. Keep your hand relatively loose; trembling lines actually add to the authentic map aesthetic. -
Cross Boundaries:
Ensure some of your contour lines cross from the cream section into the colored sections. This integrates the design so the colored patches don’t feel like stickers floating on top. -
Vary Line Weight:
For added depth, go over certain major elevation lines a second time to thicken them slightly, leaving the intermediate lines thinner. -
Touch Up:
Check the surface for any pencil marks that are still visible and gently erase them, being careful not to smudge the fresh ink.
Add Topographic Labels
For extra realism, use a tiny stencil or fine pen to add small elevation numbers (like “1200” or “450”) along a few of the major contour lines.
Step 4: Sealing and Protection
-
First Seal Coat:
Wait at least 24 hours for the paint pen to cure fully. Then, apply a thin layer of water-based matte polyurethane using a soft synthetic brush or foam applicator. -
Light Sanding:
After the first coat dries, very lightly sand with 220-grit paper to remove any raised grain or dust nibs. -
Final Protection:
Apply two more thin coats of polyurethane. This is crucial for a dining or coffee table that will see spills and daily use.
Now you have a durable, custom piece of furniture that invites guests to trace the landscapes while they dine
Trompe-l’Oeil 3D Shadow Blocks
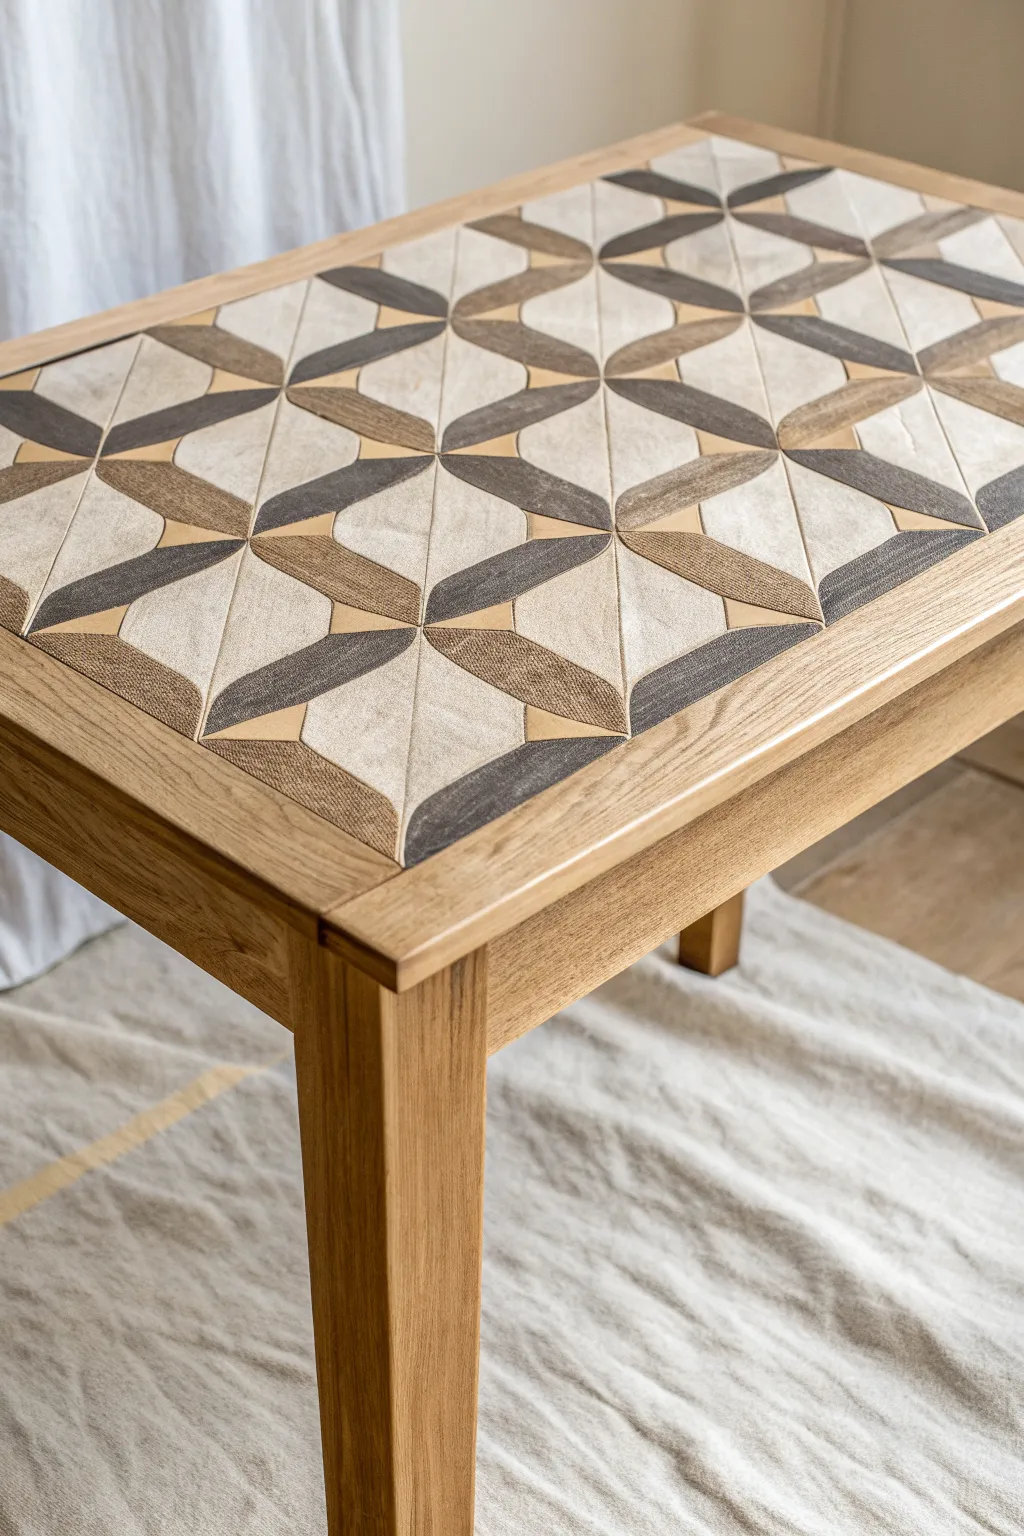
Transform a plain wooden table into a masterpiece of optical illusion with this geometric faux parquetry design. By carefully layering shades of beige, brown, and charcoal, you’ll create a stunning 3D effect that mimics the look of expensive inlaid wood veneers.
Detailed Instructions
Materials
- Wooden table (sanded and clean)
- Painter’s tape (high quality, various widths if possible)
- Acrylic or chalk paints (colors: Cream, Tan, Medium Brown, Dark Brown, Charcoal)
- Pencil and long ruler
- Protractor or angle ruler
- Synthetic angled paint brushes (small to medium)
- Small flat artist brushes for details
- Matte clear polyurethane sealer
- Fine grit sandpaper (220 grit)
- Tracing paper (optional for template creation)
Step 1: Preparation & Grid Layout
-
Prepare the surface:
Begin by sanding the table top completely smooth with 220-grit sandpaper to remove any old finish or rough spots. Wipe it down thoroughly with a tack cloth or damp rag to ensure no dust remains. -
Find the center:
Measure the length and width of your table to locate the exact center point. Mark this lightly with a pencil, as your entire geometric pattern will radiate from here to keep the design symmetrical. -
Draft the diamond grid:
Using a long ruler, draw a grid of large diamonds across the surface. To replicate the reference, these diamonds should form the foundational structure where the curved petals interact. Light pencil lines are best so they are easy to cover later. -
Create a petal stencil:
On a stiff piece of cardstock or tracing paper, draw the ‘petal’ shape—essentially an elongated oval with pointed ends that fits exactly along the sides of your diamond grid. Cut this out carefully to use as your master template. -
Trace the pattern:
Place your stencil onto the grid, aligning the points of the petals with the grid intersections. methodically trace the shapes across the entire table top. The pattern consists of four petals meeting at a central point, creating a secondary star-like shape in the negative space.
Grain Direction Trick
When painting the faux wood grain, alternate the direction of your brush strokes for adjacent shapes. This mimics how real wood pieces reflect light differently.
Step 2: Painting the 3D Illusion
-
Tape the first zone:
To get crisp lines, you’ll need to paint in sections. Tape off all the ‘Cream’ colored sections first—these appear to be the ‘highest’ points in the 3D relief. These are usually the large kite shapes between the petals. -
Apply the light base:
Paint the taped-off sections with your Cream paint. I prefer to apply two thin coats rather than one thick one to minimize brush strokes. Let this dry completely before peeling the tape. -
Mask the medium tones:
Once the cream sections are dry, tape off the petal shapes that will be painted in the Medium Brown and Tan tones. Refer to the pattern: half of each petal is usually lighter (Tan) and the other half darker to create the shadow effect. -
Paint the petal gradients:
Apply the Tan paint to the top-facing or ‘lit’ sides of the petals. Use the Medium Brown for the side of the petal that would be in partial shadow. This contrast is critical for the trompe-l’oeil lifting effect. -
Define the deepest shadows:
Identify the petal segments that represent the deepest recesses or the darkest wood grain. Mask these carefully and paint them with the Dark Brown or Charcoal color. Realism comes from the variation, so don’t be afraid to mix a tiny drop of black into your brown for depth. -
Add wood grain texture:
This step brings the work to life. Mix a glaze using clear medium and a slightly darker version of your base colors. Using a dry, stiff-bristled brush, lightly drag it through the painted sections to simulate wood grain direction. Ensure the ‘grain’ runs in realistic directions—usually lengthwise along the petal.
Step 3: Details & Sealing
-
Paint the dividing lines:
In the reference image, there are very thin, light lines separating the geometric shapes, mimicking grout or a bevel. Using a very fine liner brush and a steady hand (or a ruler as a guide), paint these thin separation lines in a pale beige or off-white. -
Touch ups:
Inspect the table for any paint bleed or uneven edges. Use your small artist brush to tidy up intersections where the points meet. A sharp clean line is essential for the marquetry look. -
Create the border:
Tape off the outer perimeter of the design to create a clean frame. Paint this plain wood border in a color that matches the rest of the table legs, or stain it if you left the wood bare. -
Let it cure:
Allow the paint to cure fully for at least 24 hours. Acrylics dry to the touch quickly but need time to harden before sealing. -
Apply final sealer:
Finish with 2-3 coats of a matte or satin clear polyurethane. A glossy finish tends to ruin the trompe-l’oeil effect by reflecting too much light, so matte is usually the best choice to mimic raw wood.
Level Up: Texture Medium
Mix a clear impasto gel or texture medium into your paint for specific sections. This adds a physical ridge to the ‘raised’ areas, making the 3D effect tangible.
Now you have a sophisticated focal point that brings artistry and dimension to your room without the cost of real inlaid wood


Have a question or want to share your own experience? I'd love to hear from you in the comments below!