When I’m sketching a cute bedroom, I’m really drawing a little sanctuary—soft textures, tiny personal details, and a mood you can almost feel. Here are my favorite cute bedroom drawing ideas to help you build a cozy scene that looks warm, lived-in, and totally yours.
One-Point Perspective Bedroom Wall
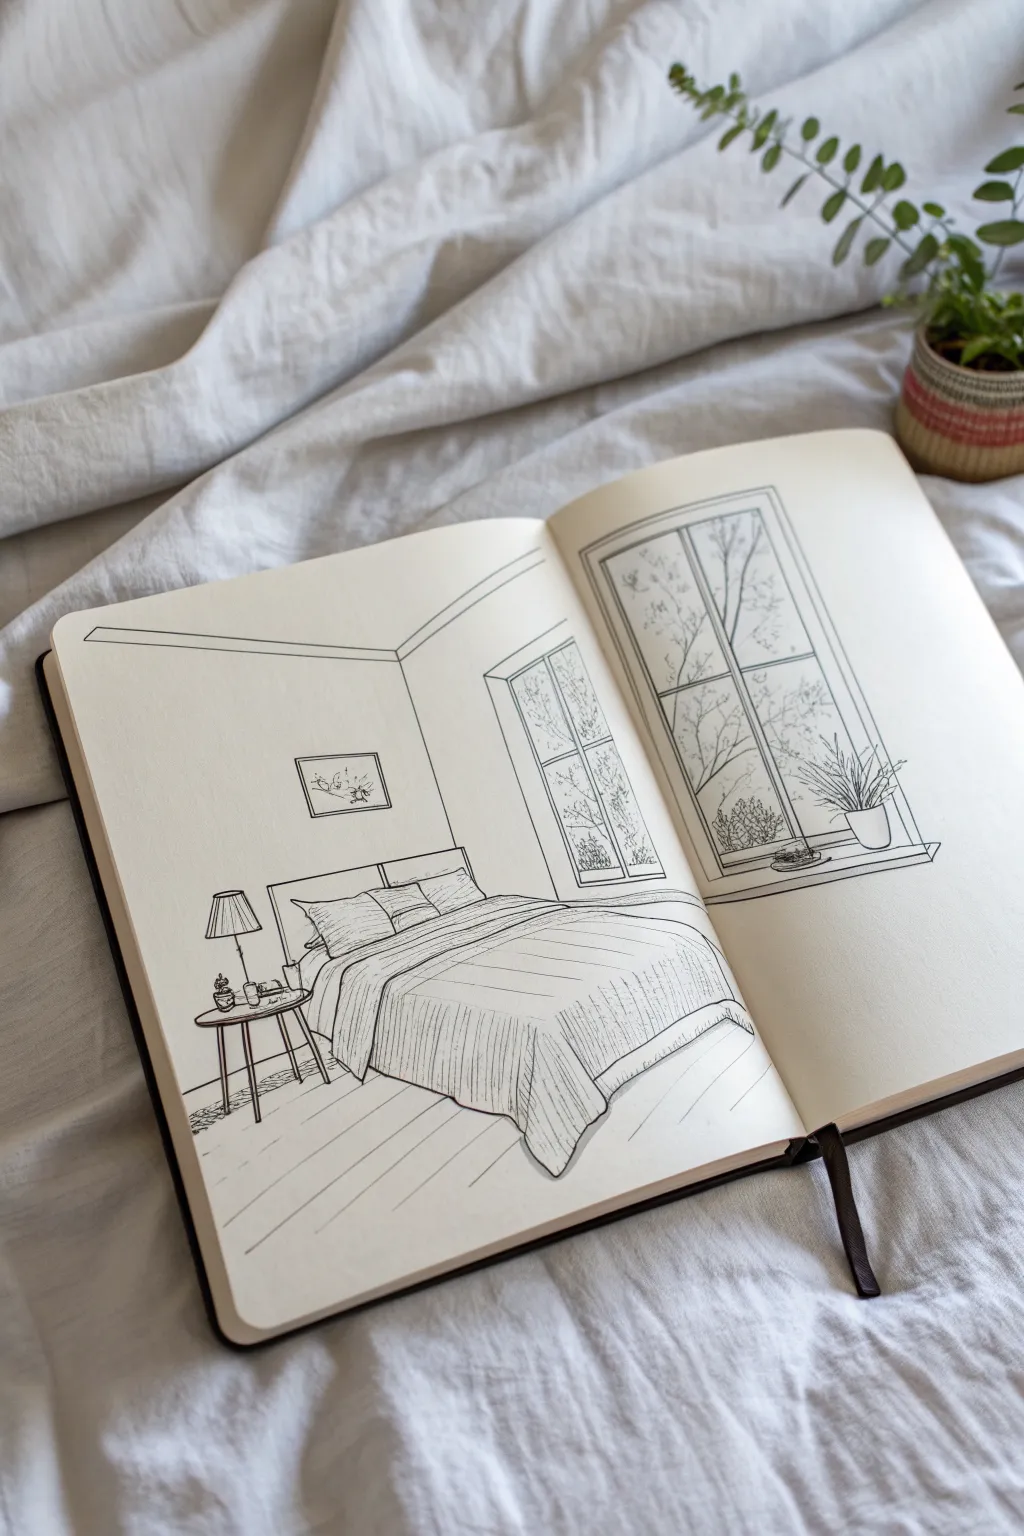
Capture the serenity of a quiet morning with this beautifully simple line drawing of a bedroom interior. This project focuses on clean linework and basic perspective to create a welcoming, airy space right in your sketchbook.
Step-by-Step Tutorial
Materials
- Sketchbook (heavyweight paper preferred)
- HB or 2H graphite pencil
- Fine liner pens (sizes 005, 01, and 03)
- Clean eraser
- Ruler or straight edge
Step 1: Planning the Space
-
Establish the corner:
Begin with your pencil by lightly drawing a vertical line slightly to the left of the page center to represent the corner of the room. From the top of this line, angle a long line upward to the left and another to the right to create the ceiling edges. -
Block in the bed:
Draw the basic rectangular box for the bed base in the lower center. Angle the sides slightly towards your vanishing points (conceptually off-page) to give it depth, ensuring the bed looks like it sits firmly on the floor. -
Outline the windows:
On the right-hand wall, sketch two large vertical rectangles for the windows. Make the one closest to the corner slightly narrower due to perspective, and the one on the far right wider and more prominent. -
Add furniture placement:
Lightly sketch an oval shape to the left of the bed for the nightstand tabletop and drop vertical lines for legs. Add a small rectangle on the wall above the bed for the framed art.
Step 2: Inking the Structure
-
Define the walls:
Switch to an 03 fine liner to ink the main structural lines of the room—the corner, ceiling, and floor lines. Use a ruler if you want perfect precision, but a slightly wavering hand-drawn line adds character. -
Window frames:
Using an 01 pen, carefully draw the window frames. Draw a smaller rectangle inside each window outline to create the thickness of the frame, and add a simple cross-bar for the sash. -
Create the headboard:
Ink the simple rectangular shapes behind the pillows to form a minimalist headboard. Keep these lines clean and parallel to the wall. -
Draw the bedding:
Outline the fluffy duvet and pillows. Instead of straight lines, use soft, curvy organic lines to suggest soft fabric. I like to overlap the pillows slightly to make the bed look lived-in.
Keep it Loose
Don’t connect every single line perfectly. Leaving small gaps where lines meet (like on the floorboards or corners) adds airiness and keeps the sketch from feeling rigid.
Step 3: Adding Texture and Detail
-
Texturing the duvet:
With an 005 or 01 pen, add vertical hatching lines down the side of the bedspread. These lines should curve slightly with the drape of the fabric to show volume and softness. -
Floorboards:
Draw diagonal lines across the floor area to represent wooden planks. Don’t draw every single line from wall to edge; breaking them up occasionally keeps the floor from looking too busy. -
Nightstand details:
Ink the small oval table and its spindly legs. Add tiny items on top—a cactus, a cup, or a book—using very simplified shapes. -
Window scene:
Sketch faint, spindly tree branches inside the window panes using your finest pen (005). Keep these lines thin and broken to suggest they are outside and distant. -
Finishing touches:
Add a potted plant on the window sill with spiky leaves. Finally, ink the small framed picture above the bed with a few abstract scribbles inside to suggest artwork. -
Cleanup:
Once the ink is completely dry—give it a few minutes to be safe—gently erase all your pencil guidelines to reveal the crisp black-and-white illustration.
Add Warmth
Use a light grey marker or a wash of watercolor to add simple shadows under the bed and inside the window frames for instant 3D depth.
Close your sketchbook knowing you’ve created a peaceful interior scene that invites relaxation


Sunlit Window Cozy Corner
Capture the serene essence of a cozy bedroom corner with this minimalist line drawing. This project focuses on simple perspective and clean ink lines to recreate a peaceful, sunlit window scene directly onto your sketchbook pages.
Step-by-Step Tutorial
Materials
- Spiral-bound sketchbook (heavyweight paper preferred)
- HB or 2B graphite pencil
- Kneaded eraser
- Fine liner pens (0.1mm, 0.3mm, and 0.5mm)
- Ruler or straight edge
Step 1: Setting the Scene
-
Establish the layout:
Open your sketchbook to a fresh spread. Lightly mark the center fold, as your drawing will span across both pages. On the right page, sketch a large rectangle for the main window frame, tilting the top and bottom lines slightly downward toward the left to create a subtle perspective. -
Draft the window panes:
Inside your main window rectangle, draw a smaller rectangle to create the frame thickness. Use your ruler to lightly mark a vertical center line and two horizontal dividers, creating a six-pane window grid. -
Position the furniture:
On the left page, sketch the basic forms of the furniture. Draw a slanted rectangle near the bottom center for the bed or sofa framing. Add a small oval table shape in the bottom left corner. -
Add wall decor:
Above the furniture on the left page, sketch a square frame for the wall art. Place it high enough that it balances the composition with the window on the right.
Step 2: Refining Shapes & Adding Details
-
Detail the window frame:
Go back to the window on the right. Thicken the lines of the internal grid to give the wood framing some weight. Add a thin line beneath the window to suggest a sill or floor molding. -
Sketch the plants:
At the bottom right corner of the window, sketch the rough outlines of potted plants. Use loose, organic shapes for the leaves—some spiky and tall, others drooping over the pot’s edge. -
Define the furniture structure:
Refine the furniture on the left page. Draw vertical lines along the side of the bed frame to simulate texture or slats. Start shaping the small side table with simple, angled legs. -
Flesh out the wall art:
Inside the wall frame on the left, sketch a series of small, indistinct shapes to represent a botanical print or abstract artwork. Keep these loose; they don’t need to be perfect.
Wobbly Lines?
Don’t stress straight lines! If your window frame is uneven, simply go over it again loosely. This creates a charming ‘architectural sketch’ style rather than a mistake.
Step 3: Inking the Drawing
-
Ink the main structural lines:
Switch to your 0.5mm fine liner. Carefully trace the straight lines of the window frame and the main furniture outlines. Use a ruler if you want perfectly crisp edges, or freehand it for a more organic, sketchy look. -
Ink the details:
Using a thinner 0.3mm pen, trace the internal window panes, the wall art frame, and the side table. Keep your hand relaxed to avoid shaky lines. -
Draw the foliage:
For the plants next to the window, use a 0.1mm or 0.3mm pen. Use quick, flicking motions to create the leaves, allowing lines to cross slightly for a natural, bushy appearance. -
Texture the bed frame:
With the 0.1mm pen, draw the vertical hatching lines on the side of the bed structure. I find that varying the spacing slightly keeps it from looking too mechanical. -
Finish the wall art:
Ink the small shapes inside the picture frame using your finest pen point. Stippling (small dots) or tiny scribbles work well here to suggest detail without cluttering the drawing.
Add Instant Depth
Use a light grey marker or diluted ink wash to add simple shadows on just one side of the window frame and furniture legs. It instantly makes the drawing pop off the page.
Step 4: Final Touches
-
Erase pencil marks:
Wait at least 5-10 minutes for the ink to dry completely. Gently rub your kneaded eraser over the entire drawing to lift all graphite guidelines. -
Add weight and shadow:
Look at where objects touch the ground or overlap. Use the 0.5mm pen to thicken the specific lines at the base of the plant pots and the furniture legs to ground them. -
Review contrast:
Step back and assess your sketch. If the window feels too light, go over the outer frame one more time to make it pop against the white page.
Now you have a charming, permanent record of a peaceful morning scene right in your sketchbook


Plants on Shelves and Hanging Vines
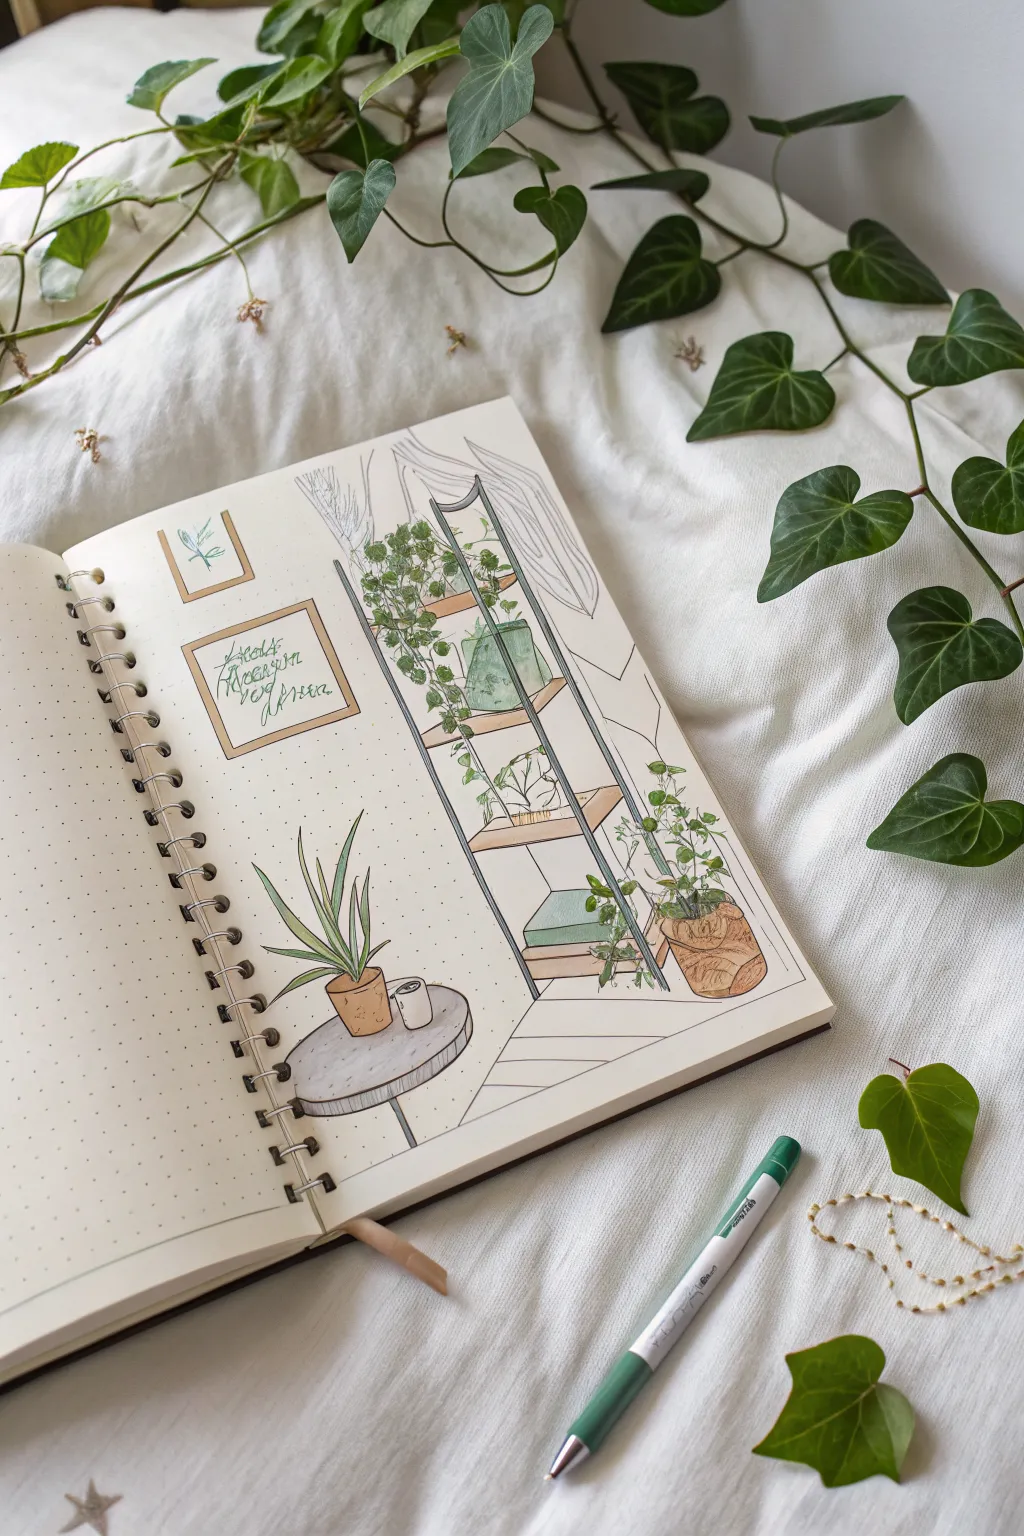
Transform a blank dot-grid page into a serene, leafy sanctuary with this cozy plant corner illustration. Using simple line work and soft green accents, you’ll create a charming indoor scene featuring a tall shelf unit and potted favorites.
How-To Guide
Materials
- Dot grid notebook or journal
- Pencil (HB or lighter)
- Eraser
- Fine liner pens (0.1mm, 0.3mm, 0.5mm)
- Light green marker or watercolor paint
- Medium green marker or watercolor paint
- Brown/tan marker (for pots and wood)
- Light grey marker (for shading)
- Ruler
Step 1: Setting the Perspective
-
Establish the corner:
Begin by drawing a vertical line roughly in the center of the right page to represent the corner of the room. From the bottom of this line, angle two lines outward to create the floor meeting the walls. -
Draft the shelving unit:
Sketch a tall, narrow rectangle perspective-leaning against the right wall. Use your ruler to mark horizontal lines for four or five shelves within this frame. -
Add the side table:
To the left of the shelves, lightly sketch an oval for the tabletop of a small round table. Add a single vertical stem and a simple base for the legs. -
Box out wall art:
Above the side table, lightly block out two rectangular frames for wall art—one smaller square above a slightly larger one.
Grid Guide
Use the dots! Count spaces (e.g., 4 dots wide for the shelf) to keep perspective consistent without complex measuring tools.
Step 2: Building the Elements
-
Define the shelf structure:
Go over your shelf sketch with cleaner lines, giving the metal frame a little thickness. Draw triangular brackets or supports under the wooden planks if you want extra detail. -
Sketch the snake plant:
On the small table, draw a simple cylindrical pot. Erupting from inside, sketch tall, flame-shaped leaves for a snake plant (Sansevieria). -
Add shelf pottery:
Fill the tall shelf with various pots. Try a large rounded pot on the bottom, a rectangular one in the middle, and smaller ones up top. Don’t worry about the leaves yet, just get the containers placed. -
Draft the hanging vines:
From the top shelves, draw long, wavy guidelines cascading down the side of the unit. This will be the path for your vining plants. -
Ink the structural lines:
Using a 0.3mm or 0.5mm fine liner, carefully ink the furniture, pots, and wall frames. Use a ruler for straight edges like the shelves and frames, but freehand the pots for a more organic look.
Step 3: Adding Foliage and Detail
-
Leaf out the vines:
Along your wavy guidelines, draw small, heart-shaped leaves or tiny ovals. Cluster them densely near the pot and space them out as the vine hangs lower. -
Fill the floor plant:
For the large pot on the bottom shelf, draw a bushy plant structure. Add varying sizes of leaves to create depth and volume. -
Detail the snake plant:
Add vertical stripe details inside the tall leaves on the side table to mimic the variegated pattern of a snake plant. -
Letter the artwork:
Inside the larger wall frame, pencil in a short, inspiring quote or simply some abstract scribles that mimic cursive writing, then ink over it gently. -
Erase pencil marks:
Once the ink is completely dry, gently erase all your pencil guidelines to clean up the page.
Make It Grow
Add a ‘macrame’ plant hanger descending from the top of the page using simple knotted line patterns to fill empty upper corner space.
Step 4: Color and Shading
-
Color the greenery:
Using your green markers or paint, fill in the leaves. I prefer not to color them solid; leaving small white specs adds a nice highlight effect. -
Warm up the wood:
Use a tan or light brown marker to color the shelf planks, the pots, and the legs of the side table. -
Add subtle shadows:
Take a light grey marker and add shadows underneath the pots, under the table, and along one side of the shelf frame to ground the furniture. -
Final touches:
If you used watercolor, let everything dry. Then, use your finest pen (0.1mm) to add tiny texture marks on the pots or wood grain on the shelves.
Enjoy seeing your personal plant sanctuary come to life on the page


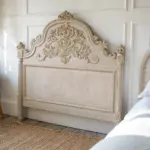
Mini Photo String Above the Bed

Transform the blank space above your headboard into a dreamy gallery with this layered twine and wood display. Combining rustic jute texture with cheerful, personalized mini-prints, this project brings warmth and personality to any bedroom.
Step-by-Step Tutorial
Materials
- Thick natural jute twine or hemp cord
- Wooden star shapes (approx. 2-3 inches, pre-drilled or plain)
- Mini wooden clothespins (natural finish)
- A variety of 4×6 or square cardstock prints (photos, graphic art, drawings)
- Sticky command hooks (clear) or small finishing nails
- Scissors
- Hot glue gun and glue sticks (if stars aren’t pre-drilled)
- Ruler or measuring tape
- Pencil
Step 1: Planning and Preparation
-
Measure the Wall Space:
Start by measuring the width of your headboard. You’ll want the display to extend slightly beyond the edges of the bed frame, so add about 6-10 inches to your total width measurement to determine where your mounting points will be. -
Select Your Prints:
Curate a collection of about 14-16 images. Aim for a mix of styles: graphic shapes like hearts or stars, soft abstract landscapes, and perhaps a few line drawings. Keeping the color palette consistent (muted pinks, blues, and yellows) ties the look together. -
Cut the Twine:
Cut three lengths of jute twine. The top decorative strand should be the longest to allow for a dramatic swag. The two lower strands should be slightly shorter but still long enough to drape gently between your mounting points.
Step 2: Creating the Star Garland
-
Layout the Stars:
Lay your longest piece of twine on a flat surface. Arrange your wooden stars evenly along the middle section of the rope, spacing them about 4-6 inches apart. -
Thread or Glue:
If your wooden stars represent beads with holes, thread the twine through them. If they are flat shapes, apply a small dot of hot glue to the back of each star and press the twine firmly into the glue. I like to hold each one for ten seconds to ensure a secure bond. -
Secure the Spacing:
Once the stars are attached, ensure they won’t slide by adding a tiny dab of clear glue at the entry and exit points if you threaded them, or simply let the hot glue fully cure if you pasted them.
Twine Won’t Hang Straight?
If the twine is twisting and making photos flip around, try rubbing the string with beeswax to stiffen it, or attach a small piece of double-sided tape behind the bottom of each photo to stick it to the wall.
Step 3: Assembly and Hanging
-
Mark Wall Points:
Using your pencil, lightly mark three points on the wall for each side of the display. You want three distinct tiers, spaced vertically about 5-6 inches apart. -
Install Hooks:
Attach your command hooks or hammer in small finishing nails at your marked points. Ensure the hooks are facing appropriately to catch the twine. -
Hang the Top Tier:
Tie loops at the ends of your star-studded twine and hook them onto the highest set of wall mounts. Adjust the tension so the stars hang in a gentle, symmetrical curve. -
Hang the Lower Tiers:
Repeat the process for the middle and bottom strands of twine. These should hang parallel to the top strand but can have slightly deeper swags for a relaxed look. -
Secure the Ends:
Allow the excess twine on the sides to dangle down vertically, gathering them slightly for a macramé-inspired tassel effect on the far left and right. You can knot them together looseley to keep them tidy.
Add Fairy Lights
Make the display magical at night by intertwining a battery-operated copper wire LED string light along the top star garland for a soft, warm glow.
Step 4: Curating the Display
-
Clip the First Row:
Take your wooden clothespins and begin attaching your art prints to the middle strand of twine. Space them evenly, leaving a small gap between each card. -
Clip the Bottom Row:
Attach the remaining prints to the lowest strand. Try to stagger the images slightly relative to the row above so the visual weight feels balanced. -
Adjust Angles:
Step back and look at the display. Tweak the prints so they hang straight down, or intentionally tilt a few for a casual, ‘tossed’ appearance. -
Final Trim:
If the dangling twine ends on the sides look too uneven, give them a quick trim with your scissors to neaten the final silhouette.
Step back and enjoy the cozy, personalized atmosphere you’ve created above your bed
BRUSH GUIDE
The Right Brush for Every Stroke
From clean lines to bold texture — master brush choice, stroke control, and essential techniques.
Explore the Full Guide
Sleepy Pet on the Blanket
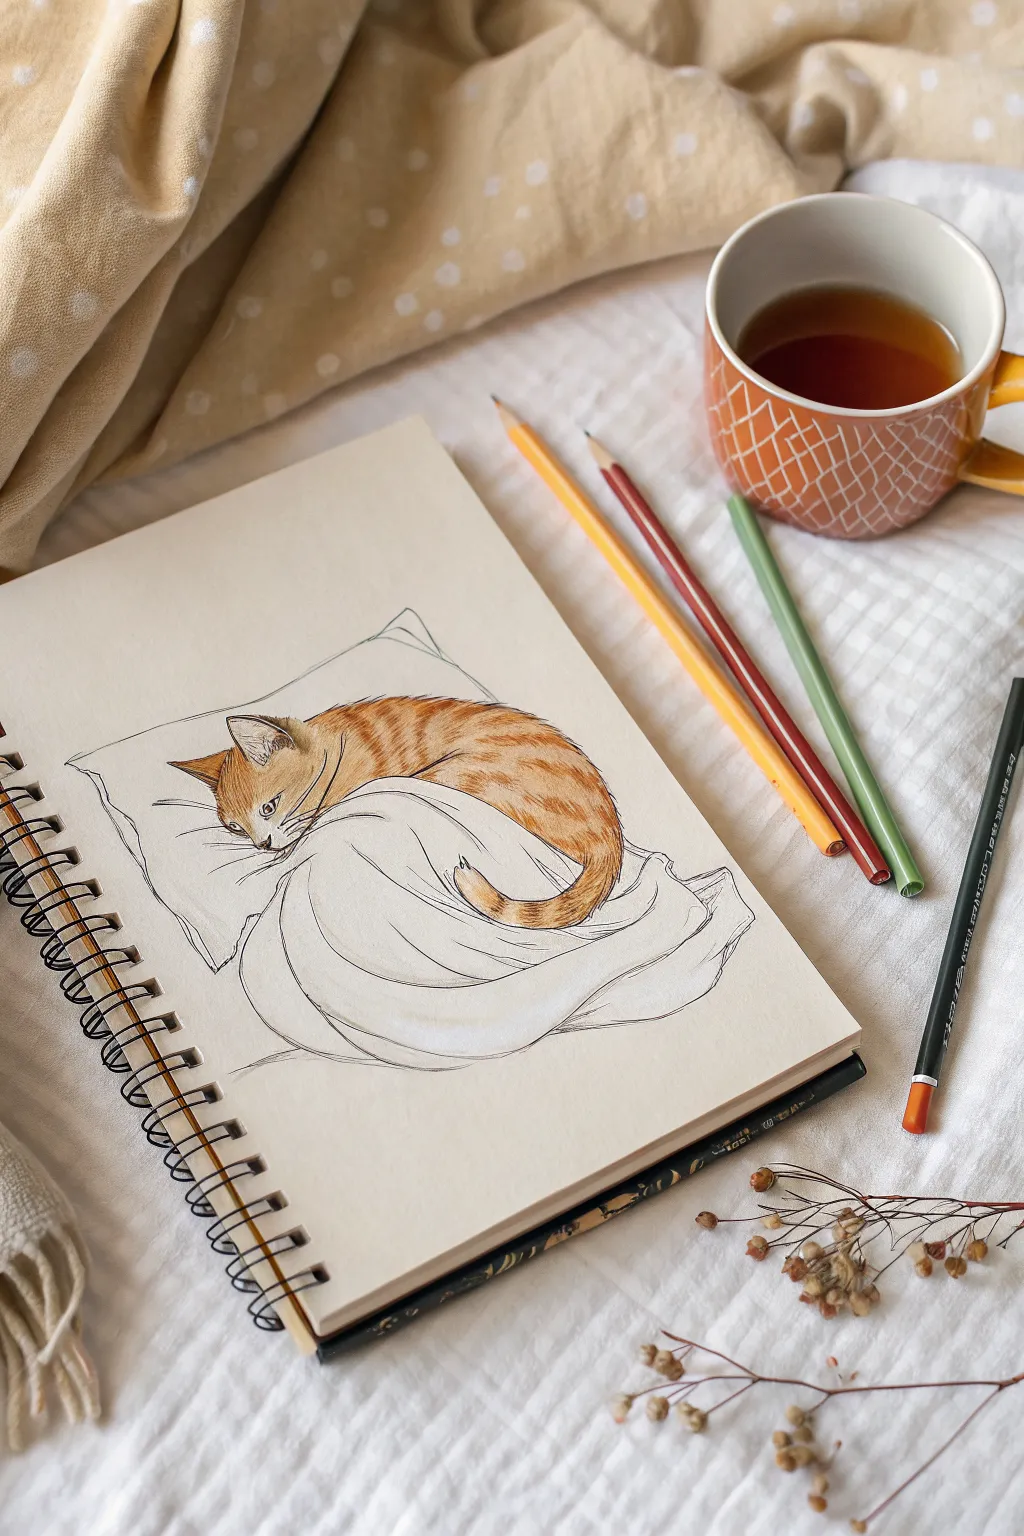
Capture the peaceful essence of a lazy afternoon with this delicate sketch of a sleeping ginger cat. Using fine liners and warm colored pencils, you’ll create a cozy illustration that radiates softness and comfort.
Step-by-Step Guide
Materials
- Spiral-bound sketchbook with smooth, heavyweight paper
- HB or 2B graphite pencil for initial sketching
- Fine liner pen (0.1mm or 0.3mm, black or dark sepia)
- Colored pencils: Golden yellow, Orange, Burnt Sienna, Cream/White
- Soft green colored pencil (optional for shadows)
- Kneaded eraser
- Pencil sharpener
Step 1: Laying the Foundations
-
Map the simple shapes:
Start with a light graphite sketch. Draw a large oval shape for the cat’s curled body and a smaller circle for the head, tucked closely into the larger oval. -
Define the bedding:
Lightly sketch irregular, wavy lines around and under the cat to suggest the folds of a soft pillow or duvet. Keep these lines loose and fluid to convey softness. -
Refine the cat’s outline:
Connect the head circle to the body oval, refining the curve of the back. Sketch the triangular ears—one perked up, one slightly flattened against the pillow. -
Add facial features:
Place the closed eye as a slanted, peaceful line. Mark the nose and mouth lightly, ensuring the muzzle looks relaxed against the bedding. -
Sketch the tail:
Draw the tail wrapping tightly around the body, ending with a soft curve near the paws or tucked under the chin. -
Ink the structural lines:
Using your fine liner, carefully go over the graphite lines. Use broken, feathery strokes for the fur to suggest texture, while keeping the bedding lines smooth and continuous. -
Clean up the sketch:
Once the ink is completely dry, gently erase all graphite guidelines with a kneaded eraser to leave a clean, crisp drawing.
Uneven Shading?
If your pencil strokes look scratchy, use a white colored pencil or a colorless blender to smooth out the pigment for a creamy, painting-like finish.
Step 2: Bringing in Color and Texture
-
Base coat of yellow:
Lightly shade the entire cat with a golden yellow pencil. Apply very little pressure here; you just want a warm undertone, not a heavy waxy layer. -
Mark the tabby stripes:
Take your orange pencil and start drawing the tabby stripes. Follow the curve of the cat’s body, wrapping strokes around the spine to emphasize the 3D volume. -
Deepen the fur tones:
Layer burnt sienna over the darker areas of the stripes and shadows, particularly where the tail meets the body and around the ears. -
Create fur texture:
Sharpen your pencils to a fine point. I like to add short, directional strokes in the orange and brown areas to mimic individual hairs, rather than just smooth shading. -
Highlight the face:
Leave the muzzle and chin area lighter or white. Use a cream or white pencil to blend the edges where the orange fur meets the white patches, softening the transition. -
Shadow the bedding:
Use a very light gray or a whisper of soft green to add shadows in the folds of the bedding. Keep the center of the pillow white to maintain brightness. -
Add final contrast:
Go back in with your fine liner to re-emphasize the darkest crevices, like the ear interiors or the line where the cat sinks into the pillow. -
Refine the whiskers:
With a steady hand, draw the long whiskers with quick, confident flicks of your pen. Make sure they curve naturally rather than sticking out straight.
Fur Direction Tip
Always draw pencil strokes in the direction the fur grows. On the back, stroke toward the tail; on the face, stroke outward from the nose.
Now you have a serene little companion living in your sketchbook pages
Pastel Palette With Soft Shading
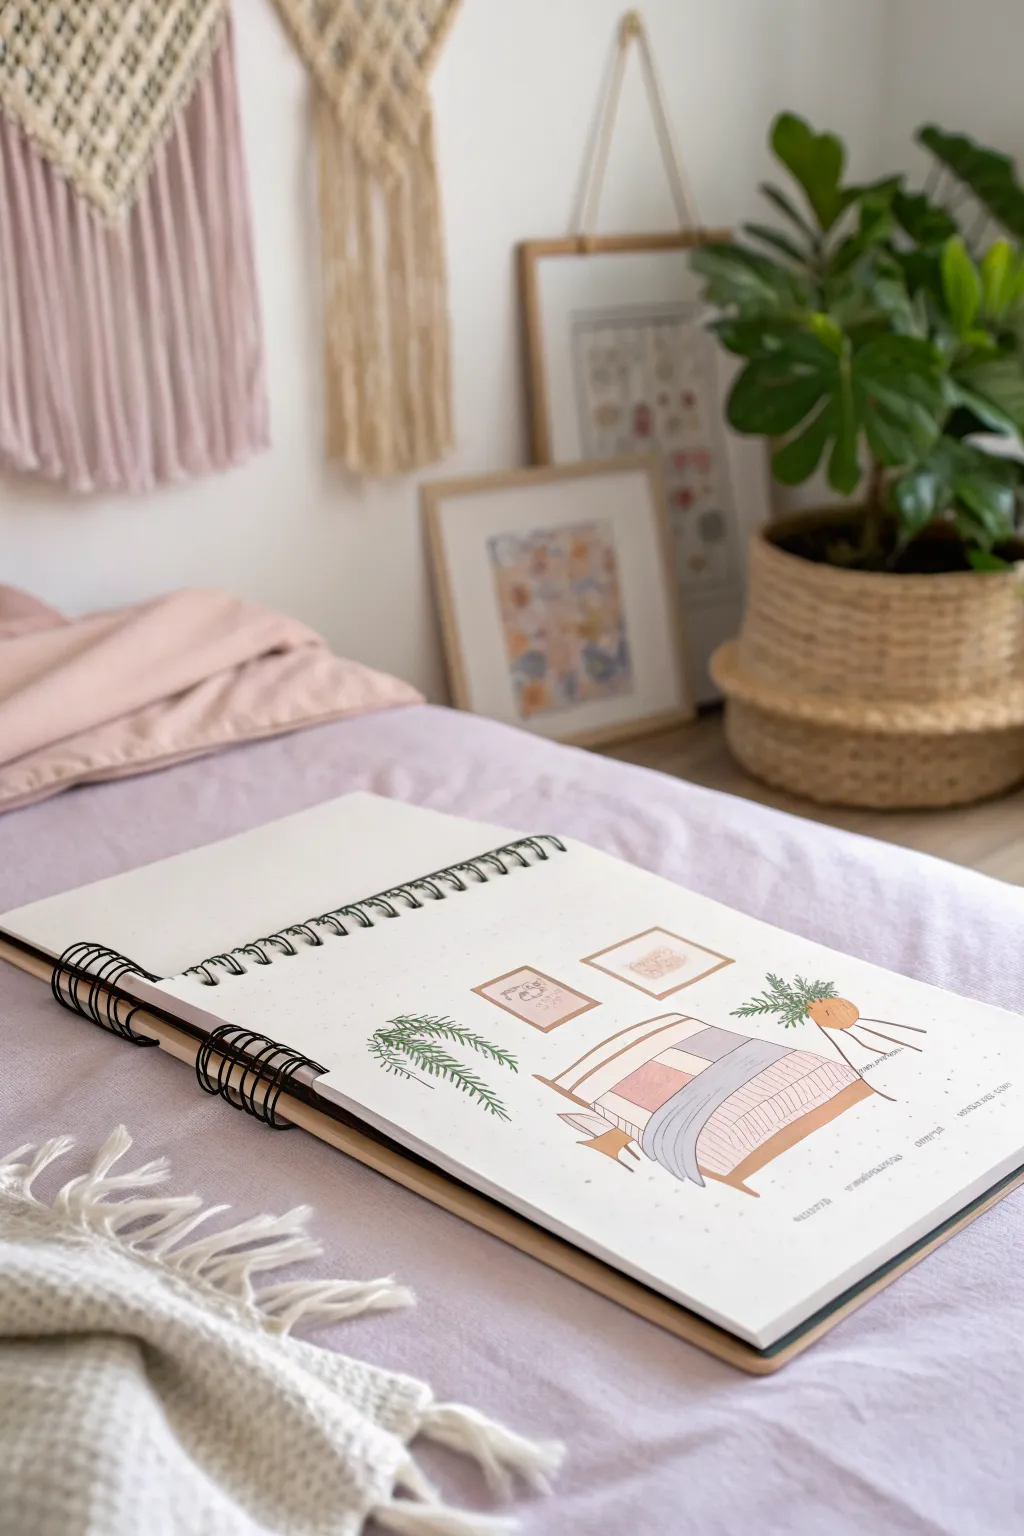
Capture the cozy essence of a bedroom sanctuary with this soft, illustrative sketch. Using fine liners and pastel markers, you’ll create a charming interior scene complete with hanging plants and gallery wall art.
Detailed Instructions
Materials
- A5 or A4 Sketchbook (smooth, heavyweight paper)
- Pencil (HB or 2H)
- Eraser
- Fine liner pen (Black, 0.3mm and 0.1mm)
- Alcohol-based markers or colored pencils (Pastel pink, soft lavender, light wood brown, sage green)
- Ruler
Step 1: Planning the Layout
-
Establish the horizon:
Start by lightly penciling a horizontal line about one-third up from the bottom of your page to represent the floor line, though for this floating style illustration, we won’t draw the full floor, just ground the furniture. -
Outline the bed frame:
Draw a simple rectangular box in perspective for the bed frame. Keep the lines loose. Angle the foot of the bed slightly towards the viewer to create depth. -
Sketch the headboard:
Add a rectangle at the top end of your bed frame for the headboard. You can make it simple and wooden or upholstered—in the example, it’s a sleek, modern design. -
Position the wall decor:
Above the headboard, lightly sketch two squares or rectangles for the wall art. Place them slightly off-center or staggered for a casual look. -
Add plant guidelines:
To the left of the bed, sketch a curved line indicating where the hanging plant vines will fall. On the right, sketch a circle for a pot on a stand.
Keep it Loose
Don’t connect every single line perfectly. Leaving small gaps in lineart creates a breezy, architectural sketch style.
Step 2: Inking the Lines
-
Ink the bed and bedding:
Using your 0.3mm fine liner, go over your pencil lines for the bed. Draw the pillows with soft, rounded corners rather than sharp edges to make them look fluffy. -
Detail the duvet:
Draw the duvet cover, adding a curved fold where it turns down. Sketch a second layer for a throw blanket draped casually over the foot of the bed. -
Draw the frames:
Ink the two frames above the bed. You can use a ruler here if you want crisp edges, but a freehand line adds to the hand-drawn charm. -
Ink the plant stand:
On the right, draw the pot and the three thin legs of the plant stand. Add tufts of leaves spiky and upright coming out of the pot. -
Create the hanging plant:
For the hanging plant on the left, draw a central stem and add small, repeating tear-drop leaves along it. Let the vines hang down naturally. -
Erase pencil marks:
Once the ink is completely dry—give it a minute to be safe—gently erase all your underlying pencil sketches.
Step 3: Adding Pastel Color
-
Color the headboard:
Take your light wood brown marker and fill in the headboard and the legs of the bed. Use long strokes to simulate wood grain. -
Shade the pillows:
Color the pillows with a soft pastel pink. Leave a tiny sliver of white at the top edges to suggest light hitting them. -
Color the bedding:
Use a soft lavender or grey-blue for the main duvet. I like to leave some white space in the center of the bed to make the fabric look reflective and airy. -
Fill the frames:
Add a touch of the wood brown to the frames themselves. Inside the frames, scribble very abstract shapes in pinks and blues to represent artwork without needing high detail. -
Greenery details:
Use your sage green marker for the plants. For the hanging vine, just dab the color over the leaves; you don’t need to stay perfectly inside the lines. -
Plant pot color:
Color the pot on the stand with an ochre or terracotta shade to contrast with the pastels.
Pattern Play
Use the 0.1mm pen to add a tiny polka dot or grid pattern to the duvet cover for extra visual interest.
Step 4: Final Textures
-
Texturize the throw:
Using a 0.1mm pen, add tiny vertical hatching lines on the throw blanket at the foot of the bed to give it a ribbed texture. -
Add wood grain:
Draw very fine, broken lines on the headboard and bed frame to suggest wood texture. -
Shadows and depth:
Use a light grey marker to add a simple shadow on the floor beneath the bed legs and the plant stand to ground the furniture.
Now you have a serene little interior sketch to inspire your next room makeover

PENCIL GUIDE
Understanding Pencil Grades from H to B
From first sketch to finished drawing — learn pencil grades, line control, and shading techniques.
Explore the Full Guide
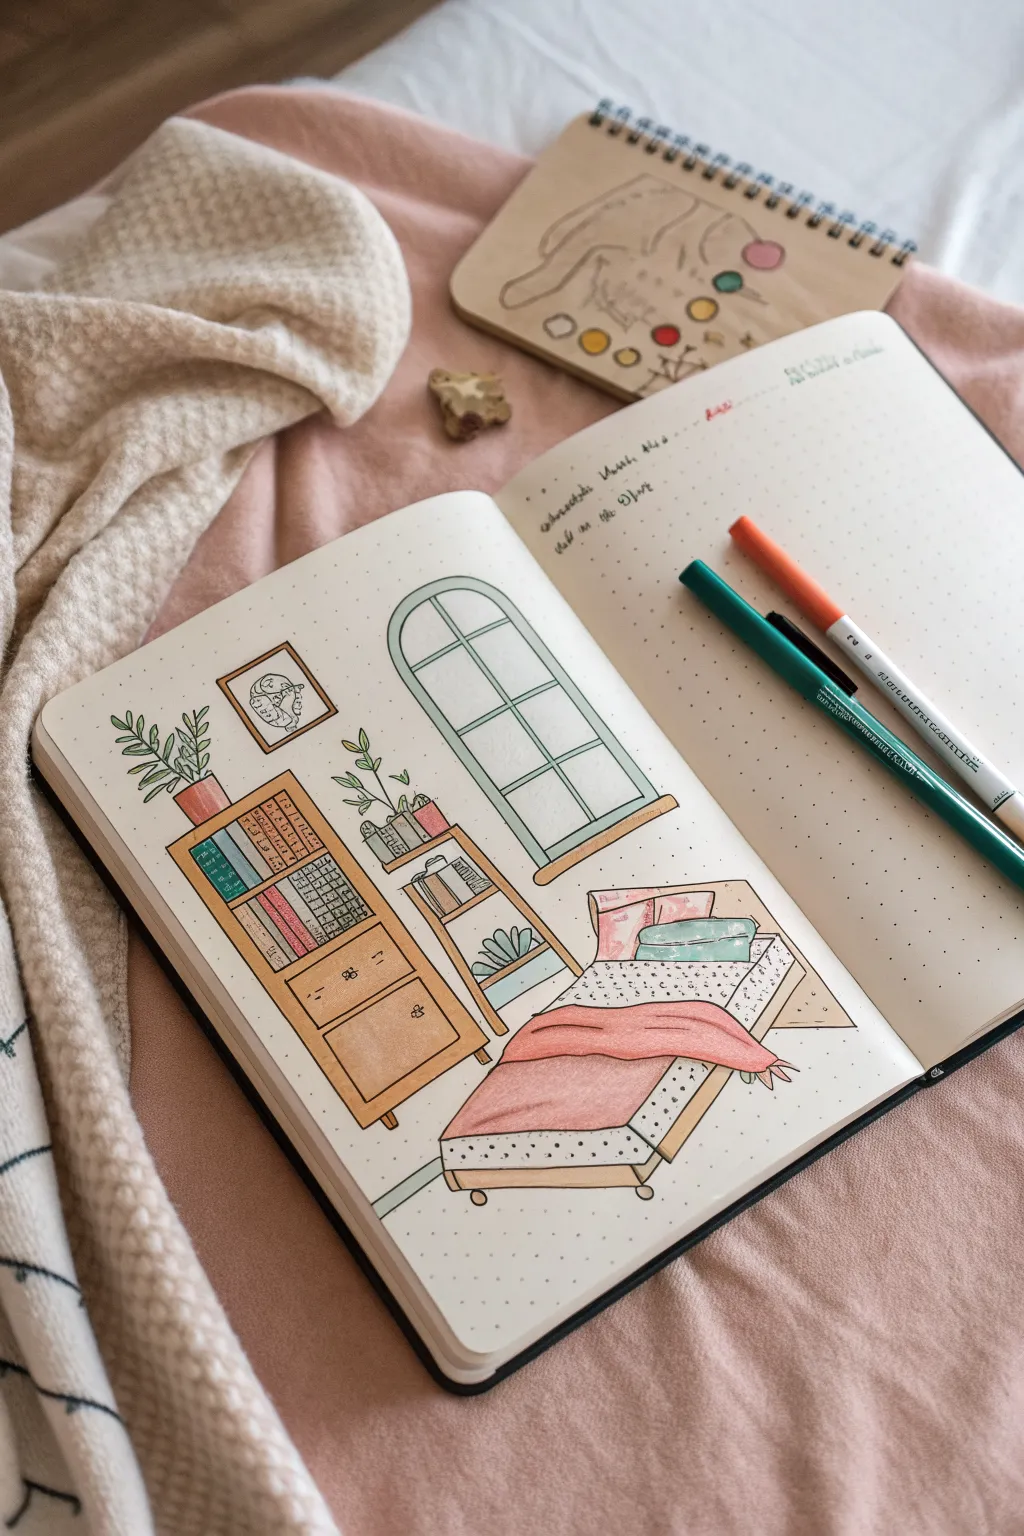
Dollhouse Cutaway Bedroom View

Capture the charm of a tiny, perfect bedroom with this cutaway-style illustration. Using clean lines and soft markers, you’ll create an inviting interior scene perfect for your bullet journal or sketchbook.
How-To Guide
Materials
- Dotted or blank notebook
- Pencil and eraser
- Fine liner pen (01 or 03 size, black)
- Alcohol markers or brush pens (muted orange/wood tone, teal/mint, soft pink)
- Small ruler
Step 1: Planning the Layout
-
Establish the floor line:
Begin by lightly sketching a horizontal line across the bottom third of your page with a pencil. This will serve as the floor where all your furniture will sit, keeping the perspective grounded. -
Rough in furniture shapes:
Sketch basic geometric blocks to represent the furniture. Draw a tall rectangle on the left for the bookshelf, a small open shelving unit next to it, and a low, angled rectangle on the right for the bed. -
Sketch the window:
Center a large arch shape on the back wall above the open shelving. Add a grid inside the arch to create the window panes, sketching a slightly wider frame around the outside for depth. -
Add decorative elements:
Lightly pencil in the fun details: a framed picture above the tall bookshelf, plants sitting on top of the furniture, and stacked pillows on the bed. Don’t worry about perfection yet; these are just guides.
Clean Edges
When coloring large areas like the cabinet, lift your marker as little as possible. Continuous wet ink blends better than dry layers.
Step 2: Inking the Lines
-
Outline the main structures:
Switch to your fine liner pen. Trace over the pencil lines for the furniture bodies and the window frame. Use your ruler here if you want crisp, straight edges for the cabinets and shelves. -
Inking the details:
Freehand ink the softer elements like the plant leaves, the messy throw blanket on the bed, and the picture frame. Wobbly lines here actually add to the cozy, hand-drawn aesthetic. -
Add texture and patterns:
Draw small vertical lines on the book spines to separate them. Add the polka dots or small dashes to the bed frame and mattress area to simulate fabric texture. -
Erase pencil guides:
Wait a moment for the ink to fully set so it doesn’t smear. Then, gently erase all the underlying pencil sketches to leave a clean, crisp black-and-white drawing.
Inking Mishaps?
If a line goes crooked, don’t restart. Turn the mistake into a new feature, like a rug wrinkle or a hanging vine.
Step 3: Adding Color
-
Color the wood elements:
Take a muted orange or light brown marker. Fill in the tall bookshelf, the open shelving unit, and the window sill. I find coloring in long, even strokes helps mimic the grain of wood. -
Fill in the greenery:
Use a teal or muted green marker to color the window frame and the plant leaves. Use the fine tip of the marker for the small leaves to stay inside the lines. -
Add soft pink accents:
Color the throw blanket, the planter pot on the tall shelf, and one of the pillows with a soft pink maker. This warms up the color palette instantly. -
Detail the books:
Alternate colors for the books on the shelf. Leave some white, and color others with your green, pink, and orange markers to create a cohesive look that matches the room decor. -
Color the bedding:
For the mattress, you can leave it white to let the polka dots stand out, or add a very faint gray shadow at the bottom. Color the second pillow in teal to tie it back to the window. -
Window glass effect:
Leave the window panes white to keep the drawing bright, or use a very pale blue marker to add just a hint of sky peeking through.
Step 4: Finishing Touches
-
Deepen shadows:
Go back with your wood-tone marker and add a second layer of ink to the sides of the bookshelf and under the shelves. This simple layering creates dimension without needing a new color. -
Highlight the floor:
Draw a very thin line of green or gray right under the furniture legs to ground them, suggesting a floor without needing to color the whole carpet. -
Final assessment:
Check your drawing for any missed spots. If you want more contrast, slightly thicken the outer perimeter lines of the main furniture pieces to make them pop off the page.
Now you have a charming little interior scene ready to decorate your journal spread


Have a question or want to share your own experience? I'd love to hear from you in the comments below!