
If you’ve got a plain barrel sitting by a downspout, you’ve already got the perfect 3D canvas for decorated painted barrels. Here are my go-to painted barrel ideas for turning a practical container into bold, lovable garden art you’ll actually want to show off.
Giant Sunflower Wrap
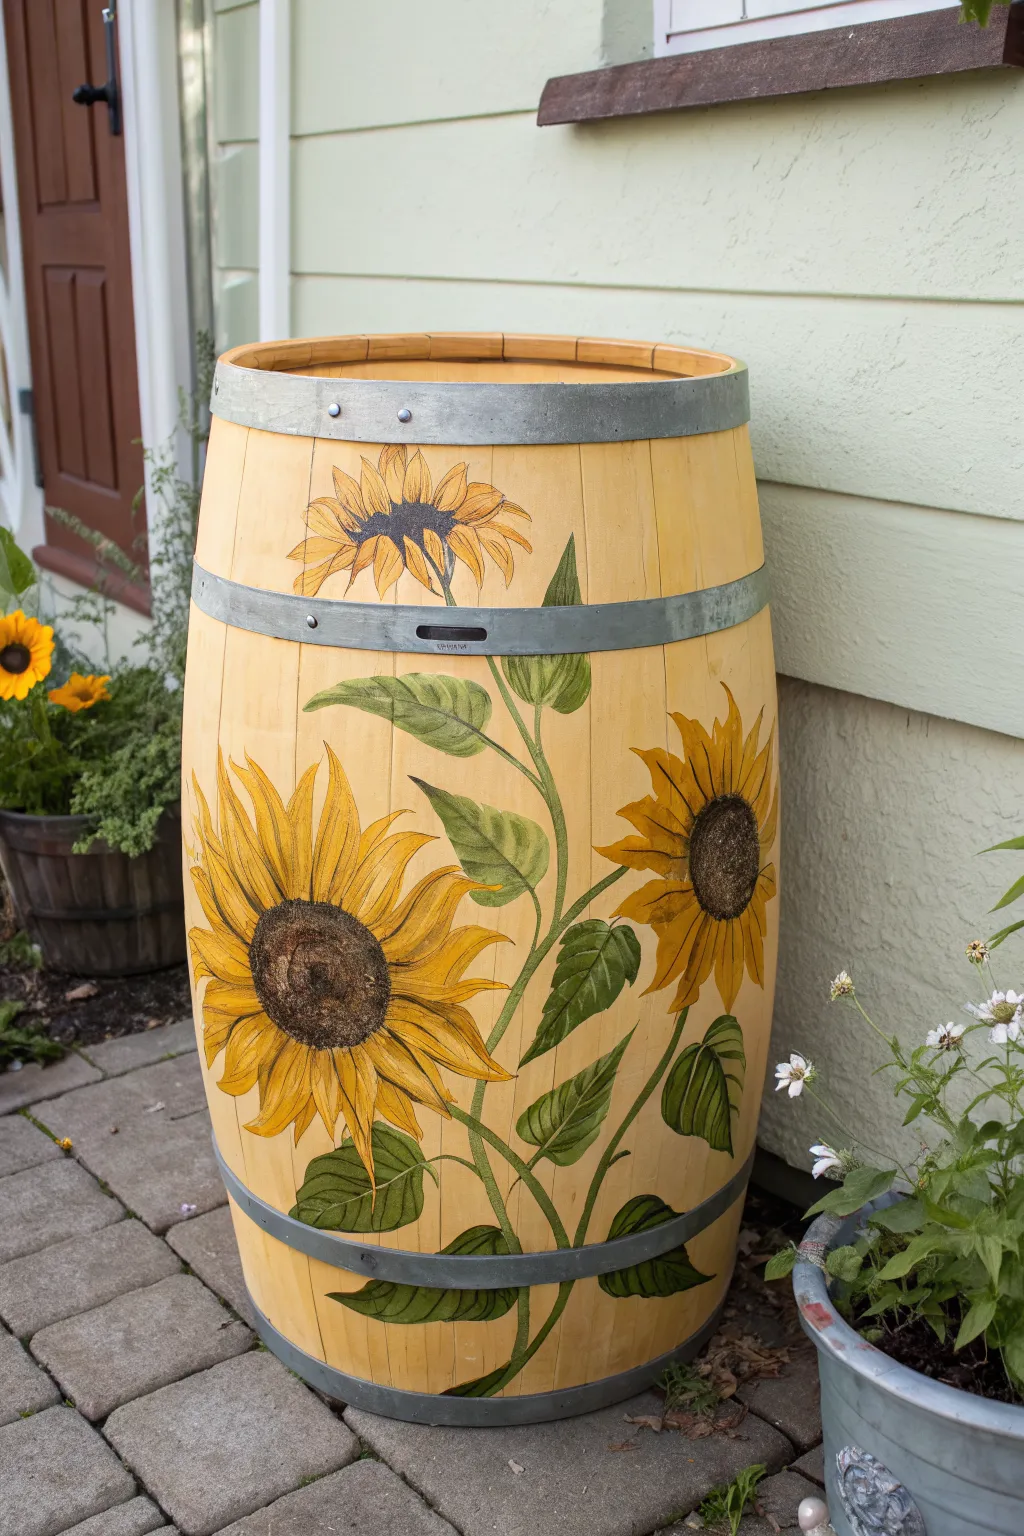
Transform a plain wooden barrel into a radiant garden feature with this cheerful sunflower design. The warm yellow background and sweeping floral vines create a rustic yet vibrant look that brightens up any patio corner.
Detailed Instructions
Materials
- Wooden barrel (clean and dry)
- Sandpaper (120 and 220 grit)
- Exterior primer (white or light grey)
- Exterior acrylic paints (pale butter yellow, cad yellow, ochre, amber/brown, forest green, lime green)
- Painter’s tape
- Various paintbrushes (large flat brush, medium filbert, fine liner)
- Pencil or chalk
- Clear outdoor polyurethane sealer (satin or matte)
- Rags or tack cloth
Step 1: Preparation and Base Coat
-
Prepare the surface:
Begin by sanding the entire exterior of the wooden barrel with 120-grit sandpaper to remove rough splinters and old finish. Follow up with 220-grit for a smooth painting surface, then wipe away all dust with a tack cloth. -
Protect the hardware:
Carefully apply painter’s tape over the metal hoops. Press the edges down firmly with your fingernail or a credit card to prevent paint from bleeding onto the metal. -
Prime the wood:
Apply a coat of exterior primer to the wooden staves. This ensures your yellow base coat will look true to color and adhere properly to the wood grain. -
Apply the background color:
Using a large flat brush, paint the entire wood surface with a pale butter yellow. Use long, vertical strokes that follow the direction of the wood grain. Let this layer dry completely before assessing if a second coat is needed for opaque coverage.
Natural Texture
Don’t over-mix your greens. Load your brush with both dark and light green simultaneously. One stroke will create natural streaking that looks just like real leaf variegation.
Step 2: Sketching and Blocking
-
Sketch the composition:
Lightly draw your sunflower design directly onto the yellow base using a pencil or chalk. Plan for one large bloom near the bottom, a medium one slightly higher on the opposite side, and a smaller bud near the top rim. Connect them with a winding main stem. -
Block in the flower centers:
Mix a dark brown using amber and a touch of deep green. Paint the large, circular centers of your sunflowers. Keep the edges slightly uneven to mimic the texture of seeds. -
Paint the first layer of petals:
Using a filbert brush and cadmium yellow, paint the base shape of the petals radiating outward. Don’t worry about shadows yet; just establish the general silhouette of the flower. -
Base the greenery:
Fill in the stems and leaf shapes with a mid-tone forest green. Ensure the leaves curve naturally around the barrel’s contour to give the design movement.
Bee Friendly
Paint a tiny, realistic bumblebee or ladybug resting on one of the petals or leaves. It adds a whimsical surprise that rewards viewers who look closely at your work.
Step 3: Adding Dimension and Detail
-
Shadow the petals:
Mix a little ochre or light orange into your yellow. Paint streaks near the base of each petal (where it meets the center) and along one edge of the petals to create depth and separation. -
Highlight the petals:
Add a touch of white to your brightest yellow. Apply highlights to the tips and upper curves of the petals where the sunlight would naturally hit the flower. -
Texturize the centers:
Dip an old, stiff brush or a sponge into black and dark brown paint. Stipple (dab repeatedly) over the brown centers to create the fuzzy, seeded texture typical of sunflowers. -
Detail the leaves:
With a fine liner brush and a mix of lime green and white, paint the veins on your leaves. I find it helpful to start the vein at the stem and lift the pressure as I pull outward to the leaf tip. -
Refine the edges:
Use a small brush to clean up any messy intersections where green leaves overlap yellow petals. Crisp edges will make the painting look much more professional.
Step 4: Finishing Touches
-
Remove the tape:
Carefully peel off the painter’s tape from the metal hoops. Do this slowly at a 45-degree angle to avoid peeling up any adjacent paint. -
Clean the hardware:
If any paint seeped onto the metal bands, gently scrape it off with a fingernail or use a damp rag while the paint is still relatively fresh to clean up the metal look. -
Seal the artwork:
Apply two or three thin coats of clear outdoor polyurethane sealer over the entire barrel, including the metal hoops if desired. Allow ample drying time between coats according to the manufacturer’s instructions. -
Final cure:
Let the barrel cure in a dry, covered area for at least 24-48 hours before exposing it to heavy rain or filling it with soil.
Now you have a stunning, durable piece of garden art that captures the warmth of summer all year round

Bold Garden Florals and Leaves
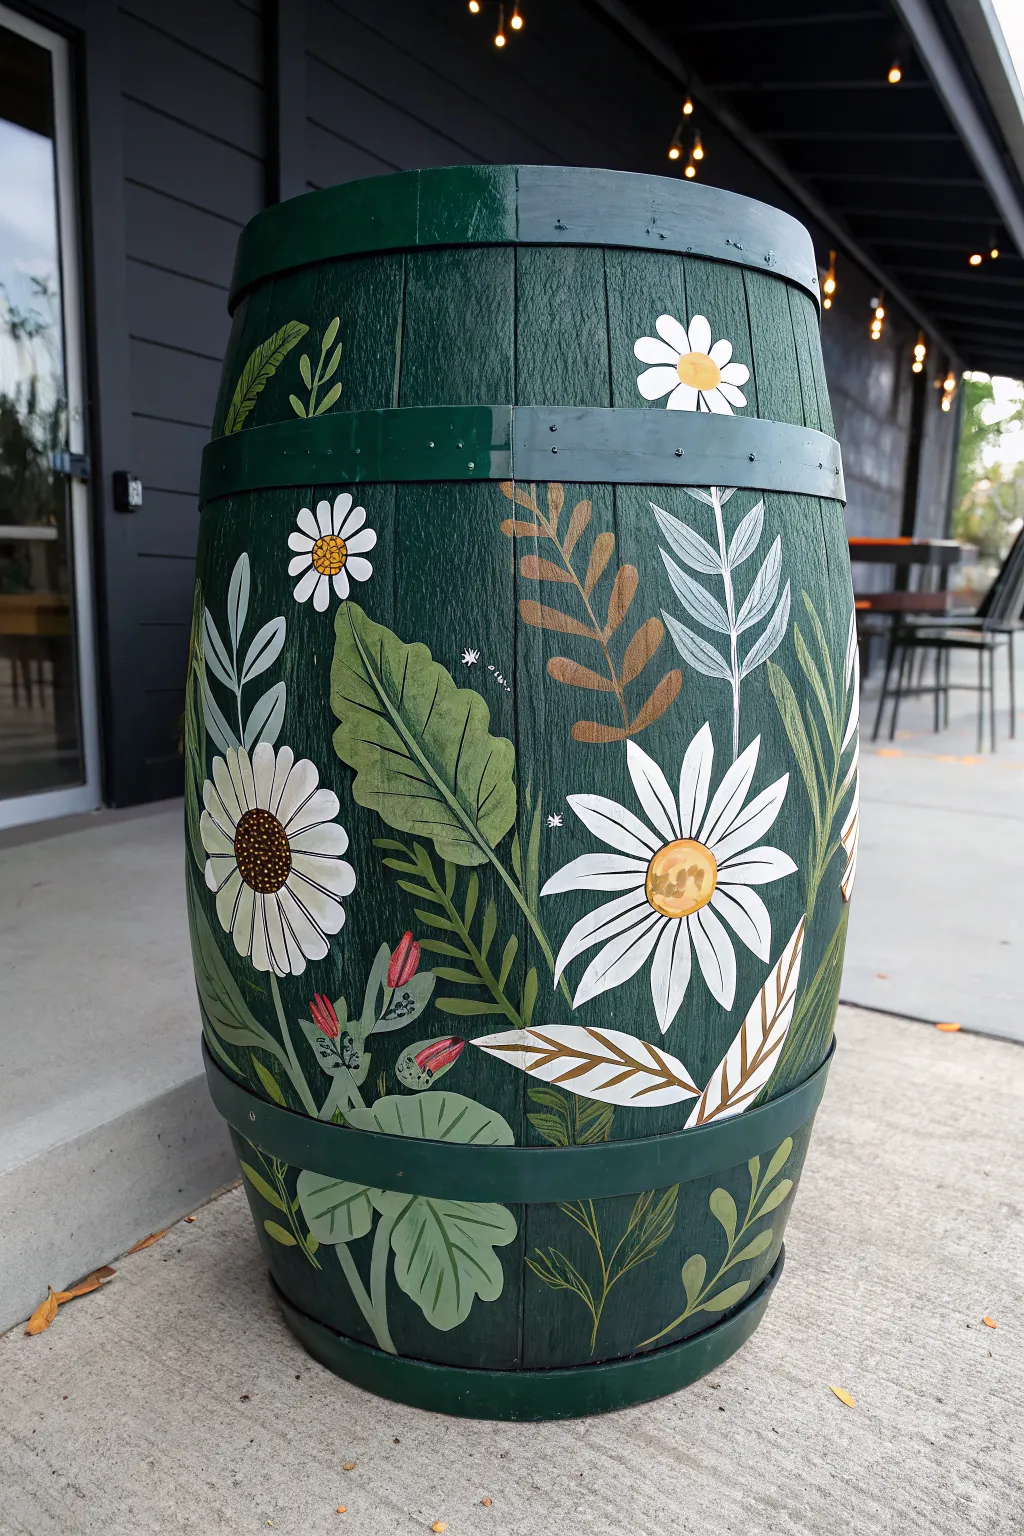
Transform an ordinary wooden barrel into a lush garden statement piece featuring stark white daisies and oversized tropical foliage against a deep forest green backdrop. This project uses bold, contrasting colors to create a modern yet rustic planter that looks perfect on a patio or porch.
How-To Guide
Materials
- Wooden barrel (whiskey or garden style)
- Sandpaper (medium and fine grit)
- Tack cloth
- Outdoor primer (white or gray)
- Exterior latex or acrylic paint (Deep Forest Green base)
- Acrylic craft paints (White, Cream, Mustard Yellow, Brown, Sage Green, Mint Green, Dark Green)
- Assorted paintbrushes (2-inch flat brush, various rounds, fine liner)
- White chalk or chalk pencil
- Clear outdoor sealant (polyurethane or spar urethane, matte or satin finish)
- Painter’s tape (optional for metal bands)
Step 1: Preparation & Base Coat
-
Sand the surface:
Begin by sanding the entire exterior of the barrel. Use medium-grit sandpaper to remove rough splinters and old finishes, then switch to fine-grit to smooth the wood grain. Wipe away all dust with a tack cloth. -
Prime the wood:
Apply a coat of outdoor primer to the entire barrel, including the metal bands. This ensures your dark green base coat adheres properly and lasts through weather changes. Let it dry completely according to the can’s instructions. -
Apply the base color:
Paint the entire barrel with your Deep Forest Green exterior paint using a 2-inch flat brush. Work in the direction of the wood grain. -
Add a second coat:
Once the first coat is dry, apply a second coat of green to ensure solid, opaque coverage. Don’t forget to paint the metal hoops green as well, so the floral design can float seamlessly over them later.
Uneven Wood Texture?
If the wood grain makes painting straight lines difficult, slightly thin your paint with water. This helps the brush glide over ridges rather than skipping.
Step 2: Drafting & Foliage
-
Sketch the layout:
Using a white chalk pencil, lightly sketch large leaf shapes and circle placements for flowers directly onto the dried green paint. Vary the angles and overlap some elements to create a natural, organic flow. -
Block in large leaves:
Mix a sage green shade and use a medium round brush to paint the large, broad leaves. Don’t worry about veins yet; just focus on getting a solid shape filled in. -
Paint fern fronds:
Using a medium brown paint, create the fern-like foliage. Paint a central stem first, then use a swift, lifting motion to create the leaflets branching off the sides. -
Add stylized branches:
With mint green or a lighter olive tone, paint the smaller, vertical leafy branches. I find it easiest to paint the central stem and then press the belly of the brush down to create almond-shaped leaves. -
Create ghost leaves:
For depth, mix a bit of your base green with white to create a translucent, pale grey-green. Paint a few feathery leaves with this color to make them look like they are receding into the background.
Step 3: Flowers & Details
-
Paint flower petals:
Using titanium white and a round brush, paint the daisy petals. Start from the outside edge and pull your stroke inward toward the empty center to get a tapered petal shape. -
Layer the petals:
Allow the first layer of white to dry, then add a second coat to the petals to make them pop against the dark background. Add smaller, filler flowers with simple five-petal shapes elsewhere. -
Add flower centers:
Fill the centers of the large daisies with mustard yellow. While the yellow is still wet, dab in a little brown or orange on the bottom edge to create a shadowed, 3D effect. -
Detail the large leaves:
Switch to your fine liner brush. Mix a dark green (darker than your sage leaf color) and paint thin veins onto the large broad leaves you painted earlier. -
Add crisp white accents:
Use the liner brush and pure white paint to add veins to the ‘ghost’ leaves and small highlights on the brown ferns. You can also add tiny white starbursts or dots in empty spaces for whimsy. -
Draw button centers:
For the smaller white flowers, use a fine tip to stipple (dot) brown and yellow centers, giving them a pollen-like texture.
Layering Pro-Tip
Paint foliage that ‘sits behind’ others first. Start with the ghost leaves, then green leaves, and save the bright white flowers for the very last top layer.
Step 4: Finishing Touches
-
Clean up chalk lines:
Once all paint is perfectly dry to the touch, use a damp cloth to gently wipe away any visible chalk sketch lines. -
Check opacity:
Step back and look for any areas where the dark green background is showing through the white petals too much. Touch up with a final dab of white if needed. -
Seal the barrel:
Apply two coats of clear, outdoor-rated spar urethane over the entire barrel. This will protect your artwork from UV rays and moisture, keeping the colors vivid for seasons to come.
Now you have a stunning, hand-painted barrel ready to brighten up your garden corner


Climbing Vine and Trellis Illusion
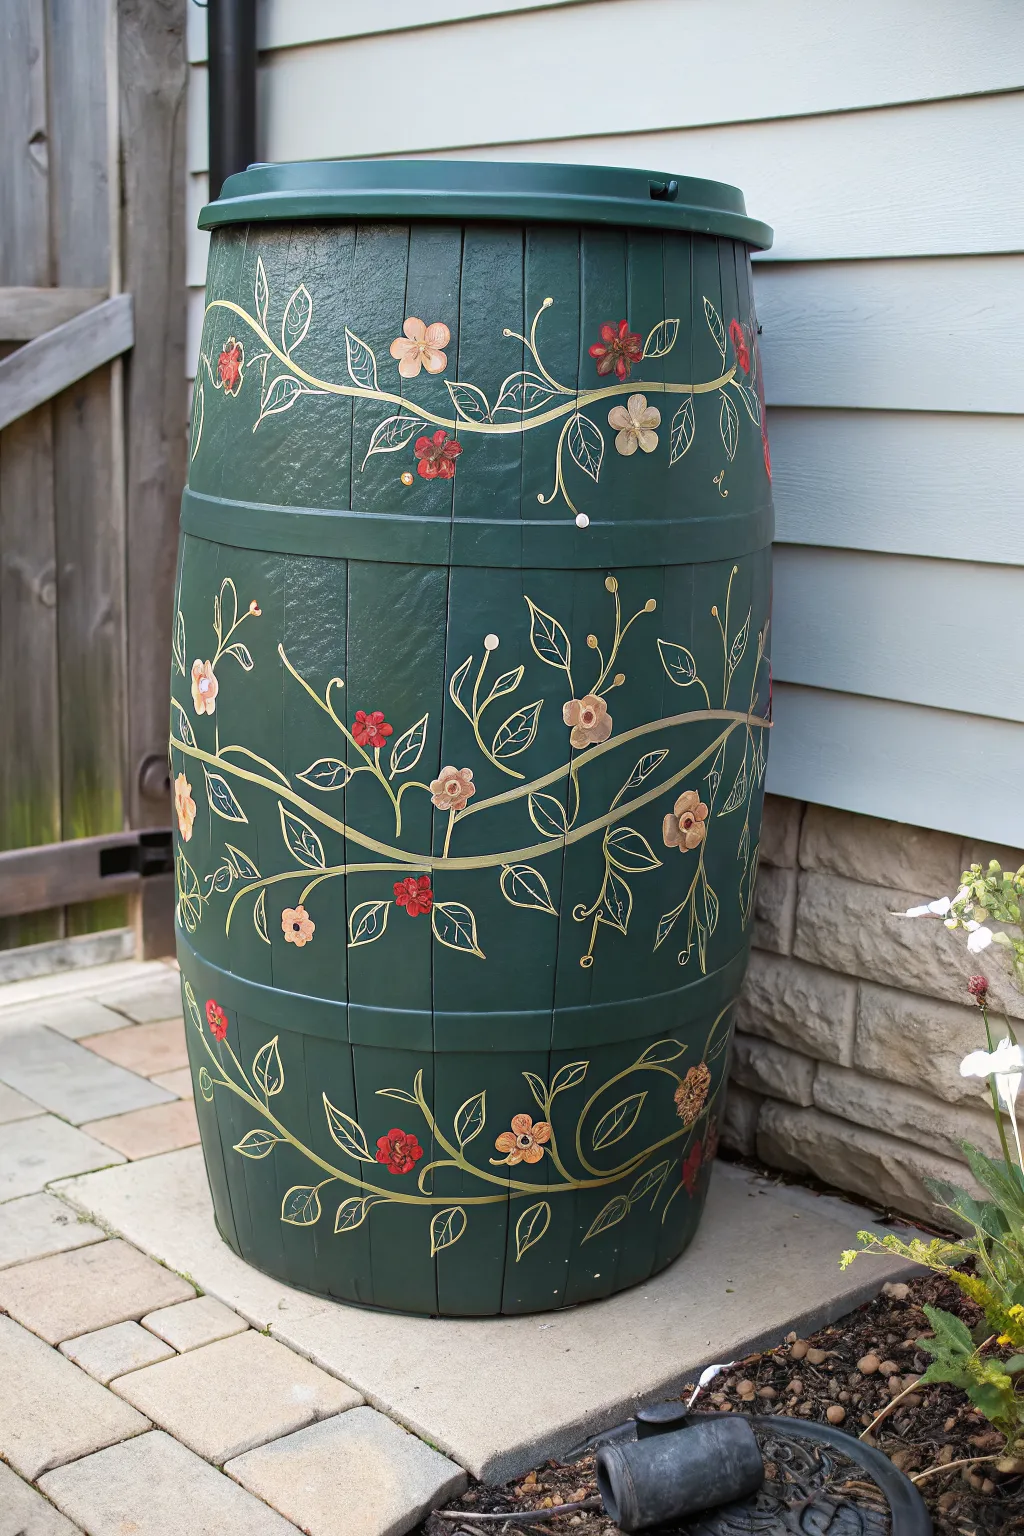
Transform a utilitarian plastic rain barrel into a stunning garden feature with this climbing vine design. The deep hunter green backdrop provides the perfect canvas for delicate gold stems and warm-toned wildflowers that seem to grow right up the side.
How-To Guide
Materials
- Plastic rain barrel (hunter green preferred)
- Sandpaper (medium grit, around 120-150)
- Isopropyl alcohol and cleaning rags
- Outdoor-safe acrylic craft paints (metallic gold, cream/off-white, terra cotta red, peach, soft orange)
- Paintbrushes: Fine liner brush (size 0 or 1), round brush (size 4), and a flat brush (size 6)
- Chalk or a white charcoal pencil
- Spray-on clear acrylic sealer (outdoor formula, satin or matte finish)
- Paper plate or palette
Step 1: Preparation and Base
-
Clean the surface:
Begin by thoroughly washing your rain barrel with soap and water to remove any garden dirt or grime. Let it dry completely. -
Scuff sanding:
Lightly sand the exterior surface of the barrel. You aren’t trying to remove the green color, just creating a slight ‘tooth’ so the paint adheres better to the smooth plastic. -
Final wipe down:
Wipe the entire barrel down with a rag dampened with isopropyl alcohol. This removes sanding dust and any invisible oils that could cause the paint to peel later. -
Plan the vine path:
Using a piece of chalk or a white charcoal pencil, loosely sketch the main S-curve lines of your vines. Aim for three distinct horizontal bands of vines that wrap around the barrel’s circumference.
Brush Control Secret
Add a few drops of water to your acrylics to reach an ink-like consistency. This helps the paint flow smoothly for long vine lines without dragging.
Step 2: Painting the Vines
-
Mix the vine color:
On your palette, mix a small amount of cream paint with the metallic gold. This creates a color that shimmers but has enough opacity to show up clearly against the dark green. -
Paint the main stems:
Using a round brush (size 4), paint over your chalk guidelines. Use long, confident strokes to create fluid, winding vines rather than short, choppy lines. -
Add secondary branches:
Switch to a finer brush if needed and add smaller off-shoot stems branching away from the main vines. Vary the direction—some pointing up, some curling down—for a organic look. -
Review the flow:
Step back to look at the barrel as a whole. I find it helpful to walk around it to ensure the vines look connected and balanced from all angles before the paint dries.
Make It 3D
Glue small, flat decorative stones or glass gems into the center of the largest flowers using waterproof E6000 adhesive for extra sparkle in the sunlight.
Step 3: Blossoms and Leaves
-
Paint the leaves:
Using your fine liner brush and the gold/cream mix, paint the outlines of leaves attached to the stems. Keep the centers of the leaves unpainted so the dark green barrel shows through. -
Base coat flowers:
Identify spots for your main flowers. Using the flat brush, dab on simple 5-petal shapes in peach and soft orange. Don’t worry about details yet; just get the color down. -
Add accent flowers:
interspersed among the larger blooms, paint smaller 3-petal flower clusters using the terra cotta red paint. -
Layering petals:
Once the base flower coats are dry, add a second layer of paint to the petals. For the peach flowers, add a touch of white to the tips for dimension. -
Detailing the centers:
Using the tip of a small brush or the non-brush end handling, dot the centers of the flowers. Use gold for the red flowers and dark red or brown for the peach flowers. -
Leaf veins:
Go back to your leaf outlines. Very delicately, add a central vein line inside the larger leaf shapes using the fine liner brush. -
Curlicue accents:
Fill in any empty negative spaces by adding tiny, whimsical curlicues or tendrils coming off the main vines in gold.
Step 4: Sealing and Protection
-
Refine and dry:
Check for any smudges or thin spots and touch them up. Wipe away any remaining exposed chalk lines with a damp cloth. Allow the paint to cure for at least 24 hours. -
Apply sealer:
Spray the entire barrel with a clear outdoor acrylic sealer. Hold the can 10-12 inches away and use sweeping motions to avoid drips. -
Second coat:
Wait for the first coat to dry according to the can’s instructions, then apply a second coat for maximum weather resistance.
Now your garden has a functional piece of art that looks beautiful rain or shine.
Ombre Sunset Gradient Background
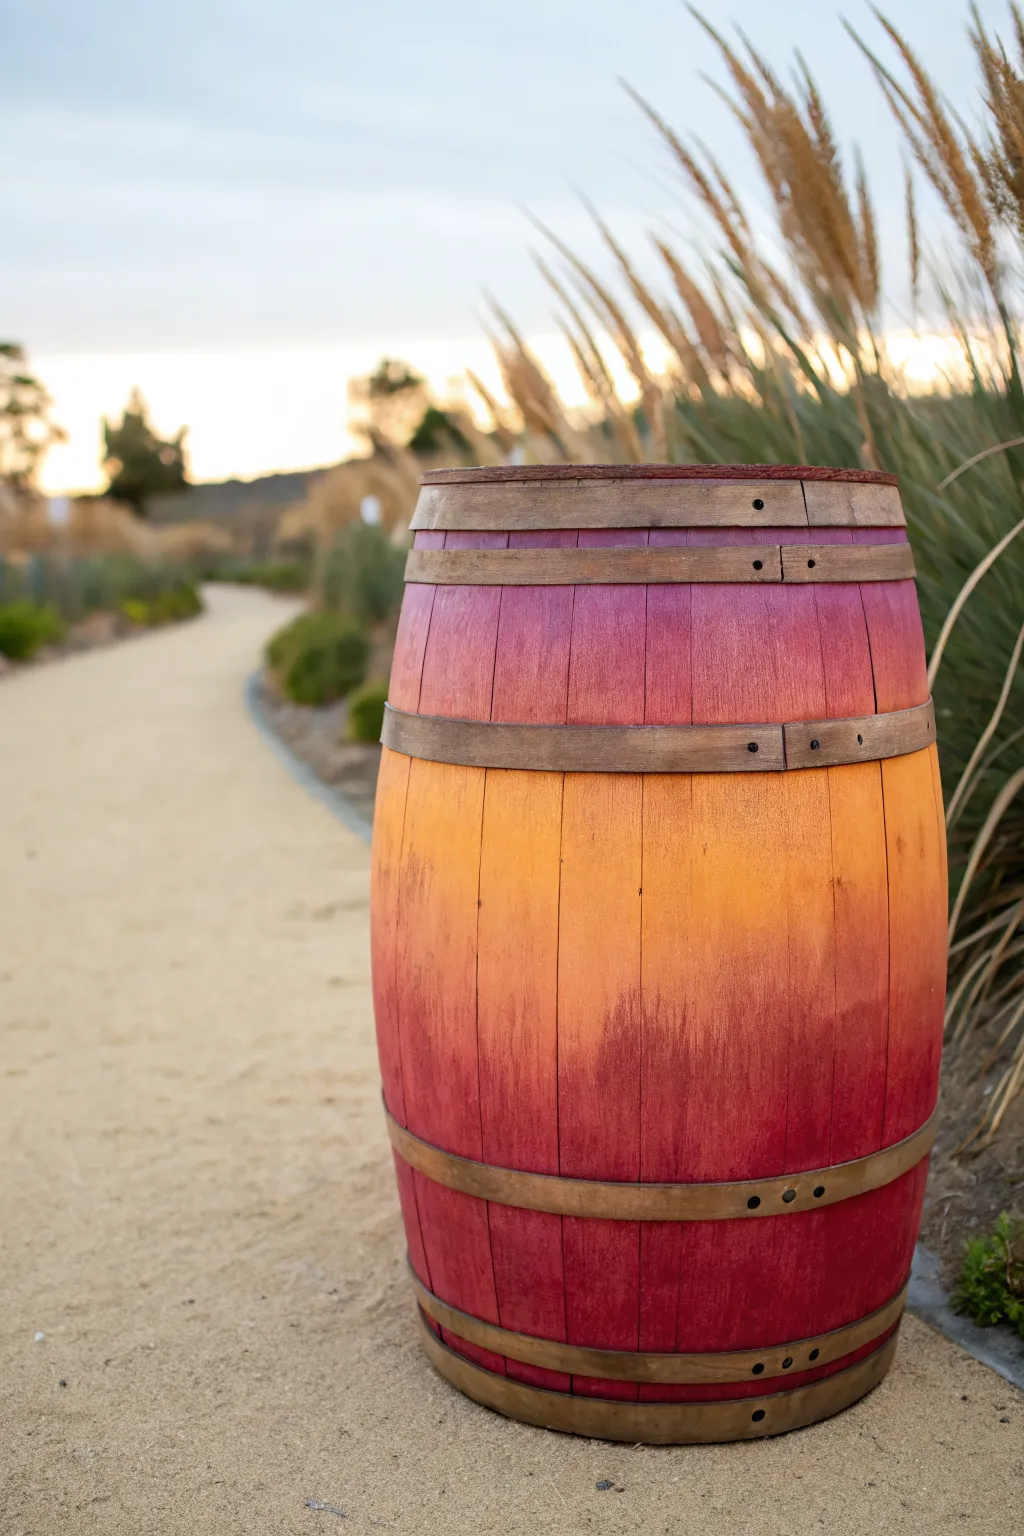
Transform a rustic wooden barrel into a stunning piece of outdoor decor with this warm, sunset-inspired gradient. The seamless transition from deep burgundy to soft violet captures a twilight sky, making it a perfect accent piece for weddings, gardens, or vineyard-style patios.
Detailed Instructions
Materials
- Full-size wooden wine barrel
- Sandpaper (80-grit and 120-grit)
- Painter’s tape (blue or green)
- Exterior primer (white or clear)
- Exterior latex or acrylic paints (Deep Burgundy, Burnt Orange, Golden Yellow, Magenta/Violet)
- 2-inch synthetic bristle brush
- 4-inch foam roller
- Two paint mixing containers
- Water spray bottle (for blending)
- Exterior polyurethane sealer (satin finish)
- Clean rags
Step 1: Preparation
-
Clean surface:
Begin by thoroughly cleaning the barrel to remove any dirt, cobwebs, or vineyard dust using a mild soap solution and a stiff brush, then let it dry completely in the sun. -
Sand the wood:
Use 80-grit sandpaper to remove rough splinters and old finish from the wooden staves, working with the grain. Follow up with 120-grit for a smoother surface suitable for painting. -
Mask the hardware:
Carefully apply painter’s tape over all the metal hoops. Ensure you press the tape edges down firmly with your thumbnail or a plastic card to prevent paint from bleeding onto the metal rings. -
Prime the wood:
Apply a coat of exterior primer to the exposed wooden areas. This step is crucial for ensuring the vibrant colors pop and don’t soak too deeply into the porous wood.
Blending Trouble?
If paint dries too fast while blending, keep a spray bottle of water handy. A quick mist re-wets acrylics, allowing you to rework the gradient without adding more paint.
Step 2: Creating the Sunset Ombre
-
Apply the base burgundy:
Start at the very bottom of the barrel. Paint the lowest section with your Deep Burgundy, covering about the bottom third of the barrel’s height solid opaque. -
Start the transition:
While the top edge of the burgundy is still wet, mix a small amount of Burnt Orange into the Burgundy on a palette or plate to create a transitional brick color. -
Blend upward:
Apply this transitional brick color directly above the solid burgundy line. Use long, vertical brush strokes to feather the two colors together where they meet. -
Add the orange center:
Paint the middle section of the barrel with pure Burnt Orange. Leave a bit of space between this and the lower section, then use your brush to drag the wet orange paint down into the transition zone. -
Introduce the yellow highlight:
Add a band of Golden Yellow right in the center of the orange section. I find that lightly misting this area with water helps the yellow blend softly outward into the orange without creating harsh lines. -
Begin the upper transition:
Above the orange section, start introducing your Magenta or Violet paint. Initially, apply it lightly so it mixes with the wet orange below to create a coral or salmon hue. -
Paint the top violet:
Fill the remaining top section of the barrel with your Magenta or Violet shade, ensuring solid coverage up to the top rim. -
Final blending pass:
With a clean, slightly damp brush, gently softly stroke vertically up and down over the areas where colors meet to smooth out the gradient one last time. -
Remove tape:
Once the paint is tacky but not fully hard (usually about an hour later), carefully peel off the painter’s tape at a 45-degree angle to reveal the clean metal bands.
Metal Hoop Hack
Instead of taping, you can rub candle wax or vaseline on the metal hoops before painting. Any stray paint will wipe right off the metal once you’re done.
Step 3: Finishing Touches
-
Clean up metal bands:
Inspect the metal hoops for any paint seepage. If you find spots, use a razor blade or damp rag to gently scrape or wipe them away before the paint fully cures. -
Distress (optional):
For a more weathered look like the reference photo, you can lightly sand certain spots of the painted wood once dry to let some grain texture show through. -
Seal the barrel:
Apply two coats of exterior satin polyurethane over the entire barrel, including the metal bands. This protects the wood from UV fading and moisture damage.
Place your barrel along a garden path or patio edge to enjoy that golden hour glow all day long
BRUSH GUIDE
The Right Brush for Every Stroke
From clean lines to bold texture — master brush choice, stroke control, and essential techniques.
Explore the Full Guide
Crisp Stenciled Patterns for Clean Lines
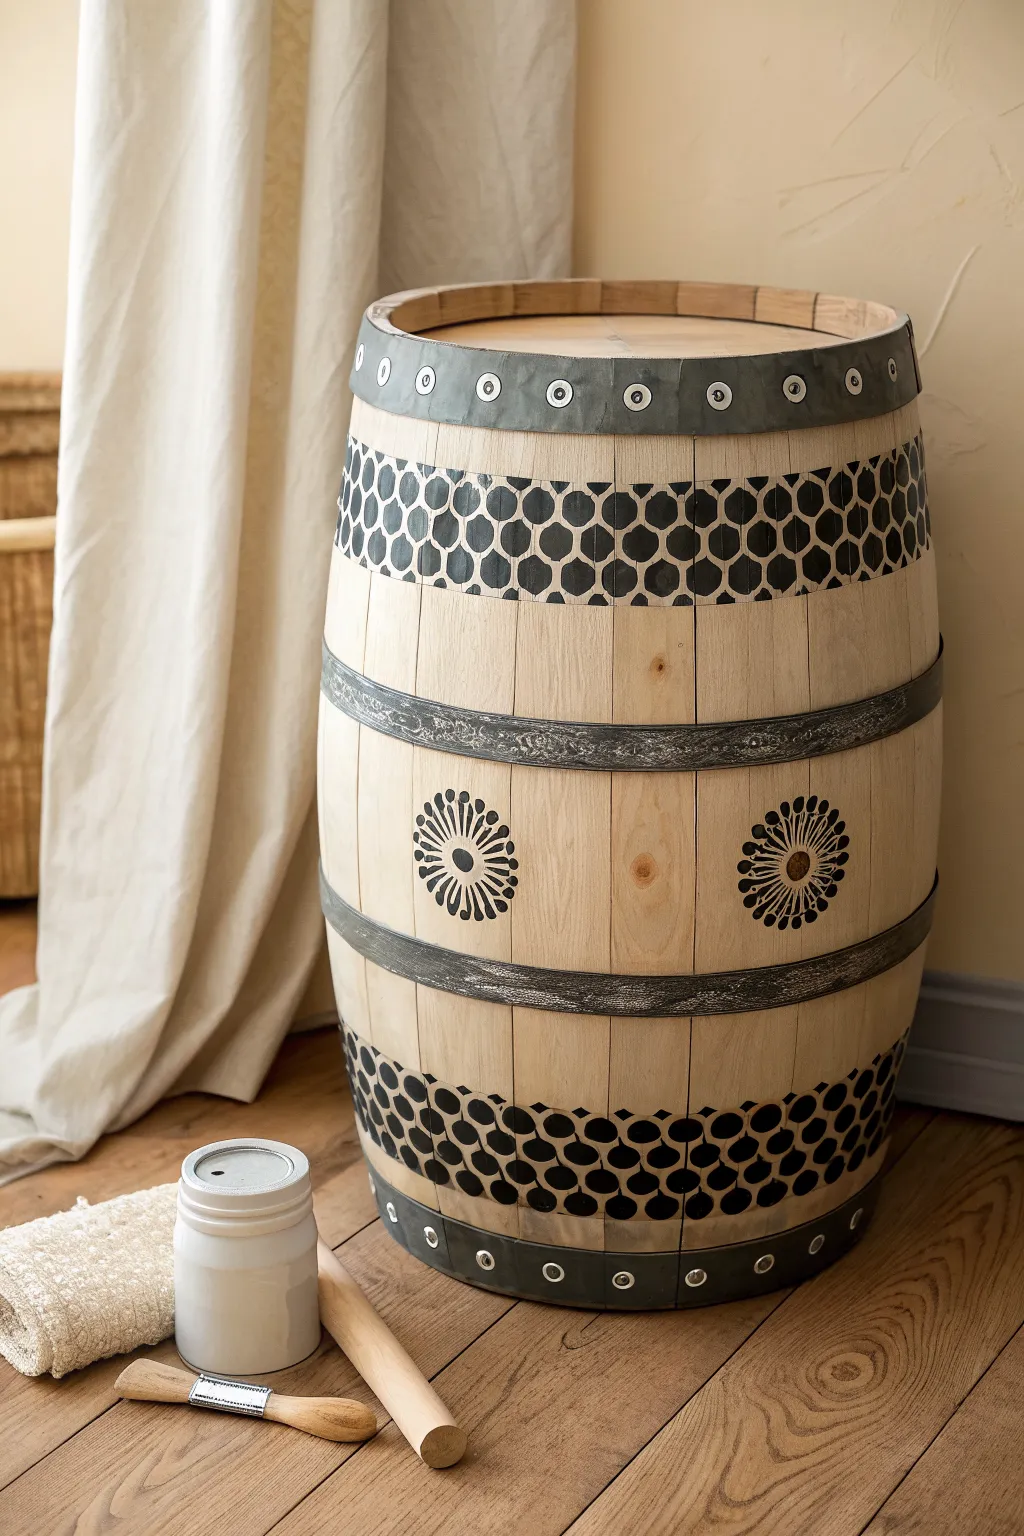
Transform a plain wooden barrel into a striking piece of decor with crisp, high-contrast stenciling. The natural wood grain paired with bold black geometric patterns creates a modern yet rustic look perfect for any corner of your home.
Step-by-Step Guide
Materials
- Clean wooden barrel (unfinished or sanded)
- Black acrylic paint or chalk paint
- Honeycomb pattern stencil
- Floral medallion stencil (medium size)
- Stencil brushes or high-density foam rollers
- Painter’s tape
- Measuring tape
- Fine-grit sandpaper (220 grit)
- Matte clear coat sealer (spray or brush-on)
- Cleaning cloth
- Pencil
Step 1: Preparation
-
Clean and Sand:
Start by ensuring your barrel is free of dust and debris. If the wood feels rough, give it a quick all-over sanding with 220-grit sandpaper to create a smooth surface for the stencils. Wipe away all dust with a damp cloth or tack cloth. -
Map Out Your Zones:
Using a measuring tape, determine where your pattern bands will sit. You need a zone at the very top (just under the metal hoop) and a matching zone at the bottom. Mark the boundaries lightly with a pencil so your stencil placement stays straight. -
Protect the Hardware:
Apply painter’s tape carefully over the metal hoops (rings) of the barrel. This ensures you don’t accidentally get black paint on the metal while stenciling near the edges.
Bleed Patrol
Is paint seeping under the stencil? Your brush is too wet. Offload more paint onto a paper towel until it feels dry to the touch before applying.
Step 2: Stenciling the Geometric Bands
-
Position the Top Stencil:
Take your honeycomb or hexagon pattern stencil and align it just below the top metal hoop. Secure it firmly with painter’s tape on all four sides to prevent slipping. -
Load Your Brush:
Dip your stencil brush or foam roller into the black paint, then offload most of the paint onto a paper towel. The brush should be almost dry; too much paint leads to bleeding under the stencil edges. -
Apply the Paint:
Using a pouncing motion (tapping straight up and down), apply the black paint through the stencil. I like to do a light first pass and build up coverage gradually rather than globbing it on all at once. -
Continue the Pattern:
Carefully lift the stencil and move it horizontally to continue the band around the circumference of the barrel. Align the pattern using the registration marks or the last painted shapes as a guide. -
Repeat for the Bottom:
Once the top band is complete and dry to the touch, repeat the exact same process for the bottom section of the barrel, creating a symmetrical border just above the bottom metal hoop.
Metallic Accent
After the black paint dries, dry-brush a tiny amount of metallic gold or bronze onto the center of the floral medallions for a subtle pop.
Step 3: Adding the Floral Motifs
-
Find the Center:
Locate the vertical center of the barrel, in the wide open space between the central metal hoops. Measure the circumference and mark evenly spaced spots for your floral motifs—usually three or four around the barrel works best. -
Secure the Medallion Stencil:
Place your floral medallion stencil over one of your center marks. Tape it down securely, ensuring the stencil lies flat against the curve of the barrel. -
Pounce the Details:
Using a smaller stencil brush for better control, pounce the black paint into the floral design. Pay special attention to the intricate edges of the petals to keep them crisp. -
Rotate and Repeat:
Carefully remove the stencil and rotate the barrel to the next marked position. Repeat the stenciling process for each floral motif until you have encircled the barrel.
Step 4: Finishing Touches
-
Touch Up Imperfections:
Inspect your work closely. If any paint bled under the stencil, use a small piece of sandpaper to gently scratch it away, or use a tiny brush with a wood-colored paint to correct mistakes. -
Sand for Distressing (Optional):
If you want the design to look slightly aged and integrated into the wood, lightly run fine-grit sandpaper over the dried black paint. This softens the stark black just a touch. -
Seal the Project:
To protect the raw wood and your artwork, apply a clear matte sealer over the entire barrel. This will prevent staining and lock in your design without adding unwanted shine.
Now you have a stunning, custom storage piece that looks professionally designed and fits beautifully into any room.
High-Contrast Silhouette Landscape

Transform a rustic wooden barrel into a stunning piece of nature-inspired decor with this high-contrast painting technique. This project combines a dreamy, pastel sunset gradient with crisp black silhouettes to create a serene woodland scene perfect for a garden or porch.
Step-by-Step Tutorial
Materials
- Wooden whiskey or wine barrel
- Sandpaper (80 and 150 grit)
- Painter’s tape
- Exterior primer (white)
- Exterior acrylic paints (Cool Teal, Soft Pink, Lavender, Black)
- Wide flat brush (2-3 inch) for blending
- Medium round brush
- Fine liner brush
- Sea sponge (optional)
- Clear outdoor sealant (matte or satin)
- Tack cloth
Step 1: Preparation & Base Coat
-
Surface Prep:
Begin by thoroughly sanding the entire barrel to remove any rough splinters or old varnish. Start with 80-grit sandpaper for aggressive smoothing, then finish with 150-grit for a paint-ready surface. -
Clean and Mask:
Wipe away all sawdust with a tack cloth to ensure the paint adheres properly. Careful mask off the metal bands (hoops) with painter’s tape if you intend to paint them a specific color later, or simply keep them clean. -
Prime the Wood:
Apply a solid coat of white exterior primer over the entire wooden surface between the bands. A white base is crucial here because it allows the pastel sunset colors to pop vibrantly without the wood grain muddying them. -
Paint the Hoops:
While the wood primer dries, paint the metal bands. In this design, they match the top sky color, so apply a clean coat of Cool Teal to all the metal hoops. Let this dry completely before moving to the gradient.
Step 2: Creating the Sunset Gradient
-
Top Sky Color:
Start at the very top of the barrel with your Cool Teal paint. Using a wide flat brush, paint the top third of the barrel, brushing horizontally. -
Middle Horizon Color:
Apply the Soft Pink point in the middle section of the barrel. Don’t worry about blending just yet; simply get the color onto the wood, slightly overlapping the bottom edge of the teal. -
Blending the Transition:
While both paints are still wet, use a clean, slightly damp brush to work the area where the teal and pink meet. Brush back and forth horizontally to create a smooth, hazy transition. I find that adding a tiny touch of white paint here helps merge the colors seamlessly. -
Add Depth:
Near the bottom third, mix a little Lavender into your pink to deepen the color as it approaches the darkening ground. Blend this downwards, leaving the very bottom section dark or ready for the black silhouette layer. -
Drying Time:
Allow this gradient background to cure fully—overnight is best—so your black details stay crisp and sharp.
Smooth Blending Trick
Keep a misting bottle of water handy. A very light spritz on the wood before applying the ombre colors keeps the acrylics wet longer, making blending much easier.
Step 3: Painting the Silhouettes
-
Establish the Ground:
Using black exterior paint, fill in the bottom 4-6 inches of the barrel to create the solid ground. You can make the top edge of this black section uneven to mimic terrain. -
Draft the Trees:
Lightly sketch the vertical lines for your tree trunks using a piece of chalk or a pencil. Position a large, dominant tree on the right side and a smaller, thinner tree on the left. -
Paint the Trunks:
With a medium round brush and black paint, draw the central trunk lines. Make the large tree trunk thicker at the base and taper it as it reaches near the top metal band. -
Create Pine Branches:
Starting from the top of the tree, use a small flat brush or fan brush to dab on the branches. Use a jagged, downward motion to mimic the texture of pine needles. Keep the top branches narrow and widen them as you move down the tree. -
Foreground Vegetation:
Along the bottom black strip, use a fine liner brush to flick upwards, creating tall grasses, reeds, and smaller saplings. Vary the height and direction of these strokes to make it look natural. -
Distant Trees:
For added depth, mix a dark grey (black with a touch of white) and paint smaller, faint tree shapes right at the horizon line where the pink meets the black ground. This creates atmospheric perspective. -
Add Birds:
In the open sky area on the left, use your finest detail brush to paint two or three small bird silhouettes. Keep the shapes simple—just arched wings and a tiny body.
Trouble with Texture?
If the wood grain makes painting fine pine needles difficult, switch to a stiff stencil brush and stipple (dot) the paint on instead of stroking it.
Step 4: Finishing Touches
-
Clean Up:
Once the artwork is dry, peel off any painter’s tape. If any paint bled onto the metal bands, gently scrape it off or touch up the teal paint on the hoops. -
Protect Your Work:
Apply at least two coats of a clear, non-yellowing exterior sealant. A matte or satin finish looks best for this style, preserving the rustic aesthetic while protecting the art from UV rays and rain.
Now step back and admire your peaceful forest scene that brings a touch of wilderness right to your doorstep

PENCIL GUIDE
Understanding Pencil Grades from H to B
From first sketch to finished drawing — learn pencil grades, line control, and shading techniques.
Explore the Full Guide
Koi Pond and Lily Pad Scene
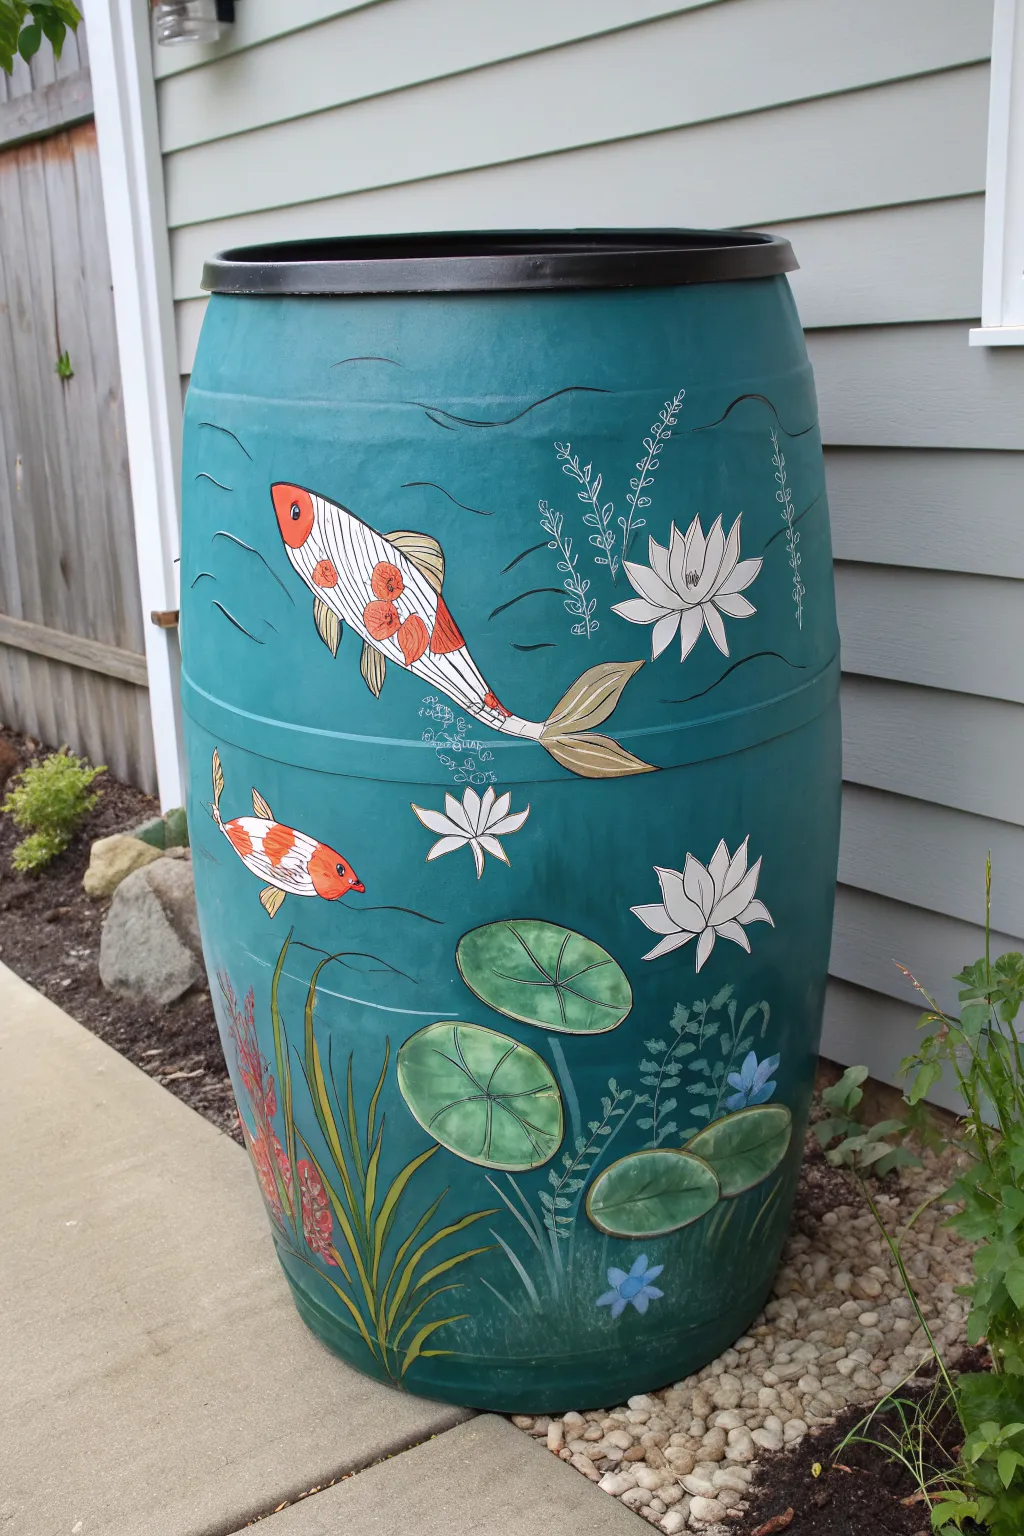
Transform a standard plastic rain barrel into a peaceful garden feature with this aquatic mural. The vibrant teal background sets a calming stage for graceful koi fish and floating lily pads, bringing a specialized touch of art to your water conservation efforts.
Step-by-Step Guide
Materials
- 55-gallon plastic rain barrel
- Sandpaper (120-grit and 220-grit)
- Plastic primer spray paint (dark grey or black recommended)
- Exterior acrylic latex paint (Teal/Turquoise base)
- Acrylic craft paints (White, Orange, Red, Black, Green shades, Gold/Yellow)
- Assorted brushes (2-inch flat, medium round, fine liner)
- Pencil or chalk
- Clear UV-resistant acrylic sealer (spray or brush-on)
- Painters tape (optional for protecting hardware)
Step 1: Preparation & Base Coat
-
Clean surface:
Scrub the entire exterior of the barrel thoroughly with warm soapy water to remove any grease, dirt, or manufacturing residues. Rinse well and let it dry completely. -
Sand for adhesion:
Lightly sand the plastic surface using 120-grit sandpaper. You don’t need to gouge the plastic, just scuff it enough to remove the shine so the primer grips better. -
Prime the barrel:
Apply a coat of plastic-bonding primer. A dark primer is helpful here if your topcoat is dark, but a standard grey works well too. Allow this to cure according to the can’s instructions. -
Apply base color:
Using a 2-inch flat brush or a roller, apply your teal exterior paint. You will likely need two coats to get full, opaque coverage. I prefer to let the first coat dry overnight before adding the second for maximum durability.
Chalk It Up
Sketch your design with regular chalkboard chalk first. If you make a mistake with placement, it wipes right off with a damp rag without damaging the teal base coat.
Step 2: Sketching & Outlining
-
Map out the positions:
Using a piece of chalk or a light pencil, loosely sketch the large koi fish—one swimming upward near the top and a smaller one swimming left near the middle. Sketch large ovals for the lily pads near the bottom. -
Add floral elements:
Draw the outlines of the water lilies (lotus shapes) and the vertical grasses sprouting from the bottom. Don’t worry about perfect details yet; just get the placement right. -
Block in white areas:
Paint the body of the koi fish and the petals of the water lilies with white acrylic paint. This acts as a secondary primer so your bright oranges and greens will pop against the dark teal background.
Metallic Shimmer
Mix a tiny drop of metallic gold paint into your orange for the koi scales. It makes the fish catch the sunlight beautifully when the barrel is outside.
Step 3: Painting the Koi
-
Detail the large koi:
Once the white base is dry, use a fine liner brush with black paint to draw the scales in a cross-hatch or net pattern on the large fish’s body. -
Add color spots:
Paint bright orange patches over the scale pattern on the fish’s back. Ensure the black lines still show through slightly, or re-line them if needed. -
Paint fins and tail:
Use a mix of beige or diluted gold ochre for the tail and fins. Add thin black lines to show the ribbed texture of the fins. -
Small fish details:
Repeat the process for the smaller koi, using more red and orange tones. Add a small black dot for the eye on each fish.
Step 4: Flora & Environment
-
Paint lily pads:
Fill in the large oval sketches with a medium green. Once dry, add a lighter green center and paint radial lines extending outward to create the leaf veins. -
Highlight the lilies:
Go back to your white water lilies. Add very subtle grey shading at the base of the petals to give them depth, keeping the tips bright white. -
Create underwater grass:
Using a long, thin round brush, paint long, flowing strokes of grass starting from the bottom rim. Use a mix of dark olive and bright lime green to create dimension. -
Add delicate vegetation:
Paint the smaller, fern-like plants floating in the water using a very fine brush and a pale blue-green or white color. -
Water movement lines:
Using thin black paint, add wavy horizontal lines throughout the teal background. Focus these around the fish and plants to simulate gentle ripples in the water.
Step 5: Finishing Touches
-
Add bubbles:
Dip the end of a paintbrush handle into white paint and dot small clusters of bubbles near the fish tails and moving upward. -
Final outlines:
If any edges look messy, use your fine liner brush with black paint to crisply outline the lily pads, flowers, and fish for a slightly illustrative look. -
Seal the artwork:
Wait at least 24-48 hours for all paint to fully cure. Apply two to three coats of a clear, UV-resistant non-yellowing sealer to protect your hard work from the sun and rain.
Place your finished barrel under a downspout and enjoy the splash of color in your garden on the next rainy day
Painted Raindrops and Drip Motifs
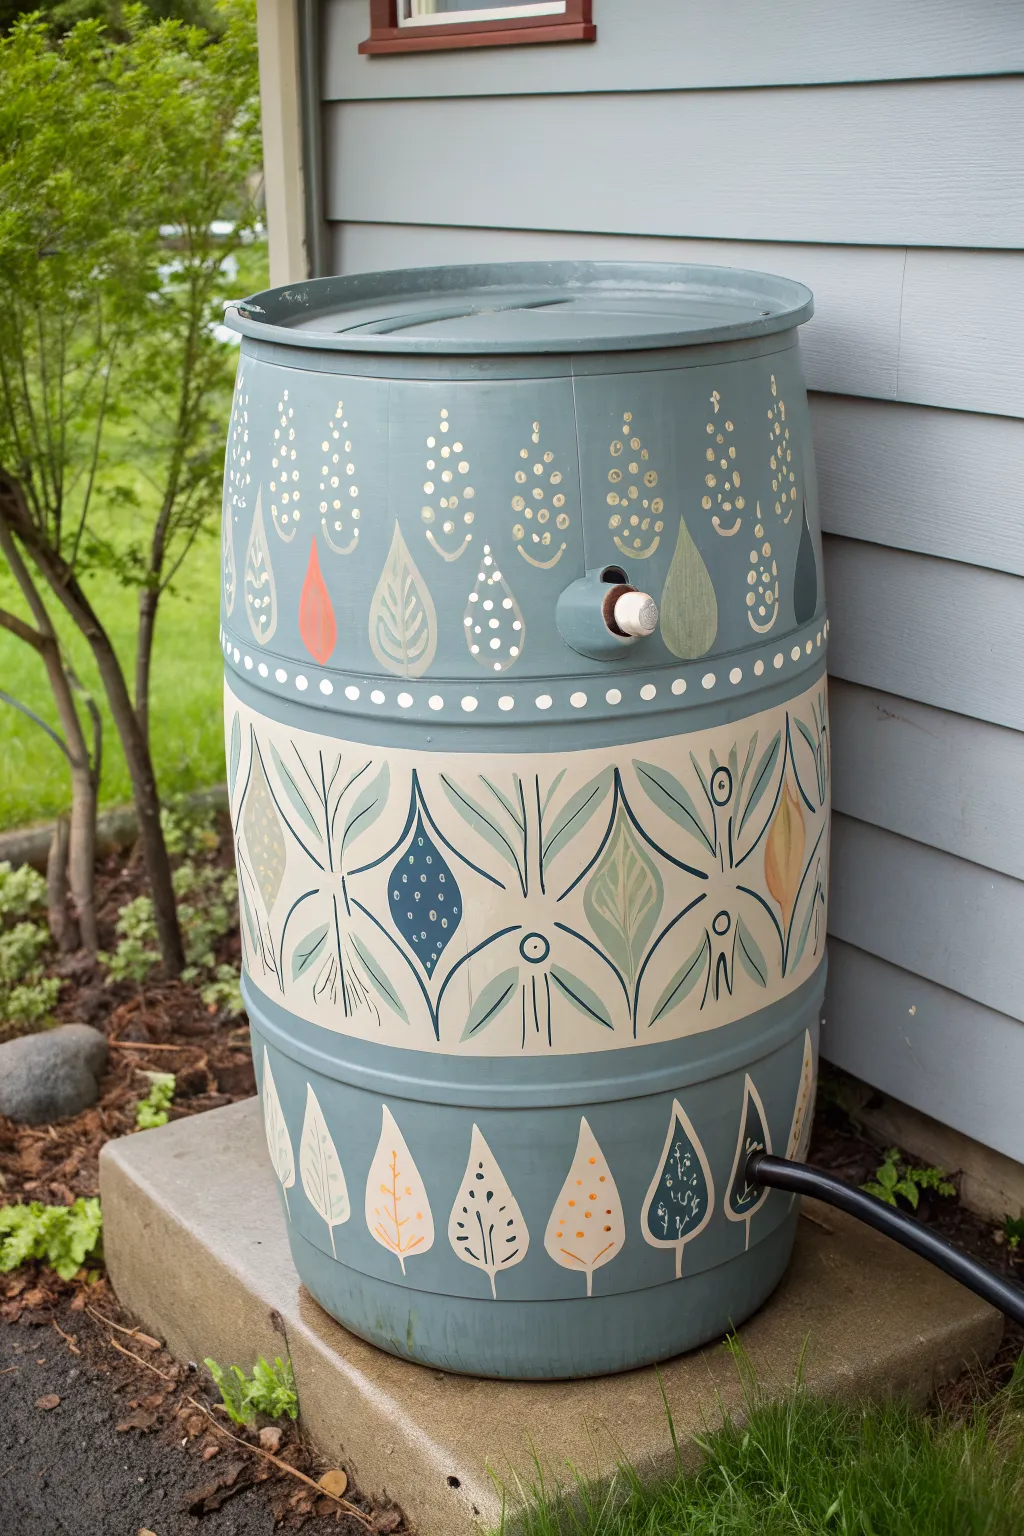
Transform a standard plastic drum into a charming garden feature with this folk-art inspired design featuring stylized raindrops, leaves, and geometric florals. The soft blue-grey hues mixed with earthy oranges and creams create a soothing, organic look that blends beautifully with outdoor greenery.
Step-by-Step
Materials
- 55-gallon plastic rain barrel (clean and sanded)
- Exterior primer for plastic (spray or brush-on)
- Exterior latex or acrylic paints (Colors: Slate Blue base, Cream/Off-white, Burnt Orange, Teal, Sage Green)
- Painter’s tape (1-inch width)
- Assorted paintbrushes (1-inch flat brush, #4 round brush, fine liner brush)
- Pencil or chalk for sketching
- Measuring tape
- Clear outdoor polyurethane sealer (matte or satin finish)
- Stencil (optional, for leaf shapes)
Step 1: Preparation and Base Coat
-
Clean and sand:
Begin by thoroughly cleaning the exterior of the barrel with soapy water to remove any oils or residue. Once dry, lightly scuff the entire surface with fine-grit sandpaper to help the paint adhere. -
Apply primer:
Coat the entire barrel with a plastic-specific primer. This is a crucial step to prevent peeling later. Allow it to cure fully according to the manufacturer’s instructions. -
Paint the background:
Apply two coats of the slate blue exterior paint as your base color. This murky blue tone sets the mood for the rainy theme. Let the paint dry completely between coats.
Drips & Slips
If paint bleeds under your tape, wait for it to fully dry. Then, use a small flat brush with the background color to carefully touch up and straighten the line.
Step 2: Creating the Central Border
-
mark the center band:
Locate the middle section of the barrel, often defined by the barrel’s natural molding lines. Use painter’s tape to mask off a wide horizontal band around the circumference. This will become the cream-colored decorative strip. -
Paint the band cream:
Fill in the masked area with your cream or off-white paint. You may need three thin coats to get solid coverage over the darker blue, ensuring no streaks remain. -
Remove tape and add dots:
Peel off the tape carefully. Use the end of a paintbrush handle or a round sponge dabber dipped in cream paint to stamp a row of evenly spaced dots along the upper edge of this new cream band.
Steady Hand Tip
For steady lines on a curved surface, rest your pinky finger on the dry part of the barrel while holding the brush. This anchors your hand and improves control.
Step 3: Painting the Upper Motifs
-
Sketch the droplet shapes:
Using chalk or a pencil, sketch rows of teardrop shapes on the upper blue section. Alternating their sizes creates a whimsical, falling rain effect. -
Fill with solid color:
Paint select teardrops in burnt orange, sage green, and teal. Leave plenty of space between them for the detailed stippling work. -
Add stippled droplets:
For the remaining sketched droplets, don’t fill them in solid. Instead, use a fine brush to create the outline and fill the shape using tiny dots of cream paint. This mimics the look of rising bubbles or light reflecting on water. -
Paint vertical stems:
In between the teardrops, paint vertical lines of small dots that resemble tall flower spikes or lupines rising toward the rim.
Step 4: Detailing the Center Band
-
Outline the trellis pattern:
On the cream central band, use a liner brush with dark teal paint to draw a repeating diamond or ‘ogee’ trellis pattern. Try to keep the lines fluid and organic rather than rigid. -
Paint central leaves:
Inside each diamond shape, paint a vertical leaf or seed pod shape. Alternate the fill colors between sage green, dark teal, and a translucent wash of the burnt orange. -
Add veining details:
Once they are dry, switch to a very fine liner brush and cream paint to add delicate veins inside the teal and green leaves on the center band. -
Add dark accents:
Use the dark teal color to add small circles and dots at the connection points of your trellis lines, giving the design a structured, botanical feel.
Step 5: Finishing the Lower Section
-
Create the heavy leaf border:
On the bottom blue section, paint a row of large, wide leaves standing upright. Use a variety of your palette colors: paint some cream, some orange, and some dark teal. I find alternating the colors creates a nice visual weight at the base. -
Detail the bottom leaves:
Just like the top section, add decorative details to these leaves. Paint veins on the solid leaves and use the stippling (dot) technique to fill inside the outlines of others. -
Seal the artwork:
Allow the barrel to cure for at least 24 to 48 hours. Finally, apply two coats of clear outdoor polyurethane to protect your hard work from sun and rain damage.
Now you have a functional piece of art ready to harvest water for your garden


Mosaic-Style Painted Tile Patches
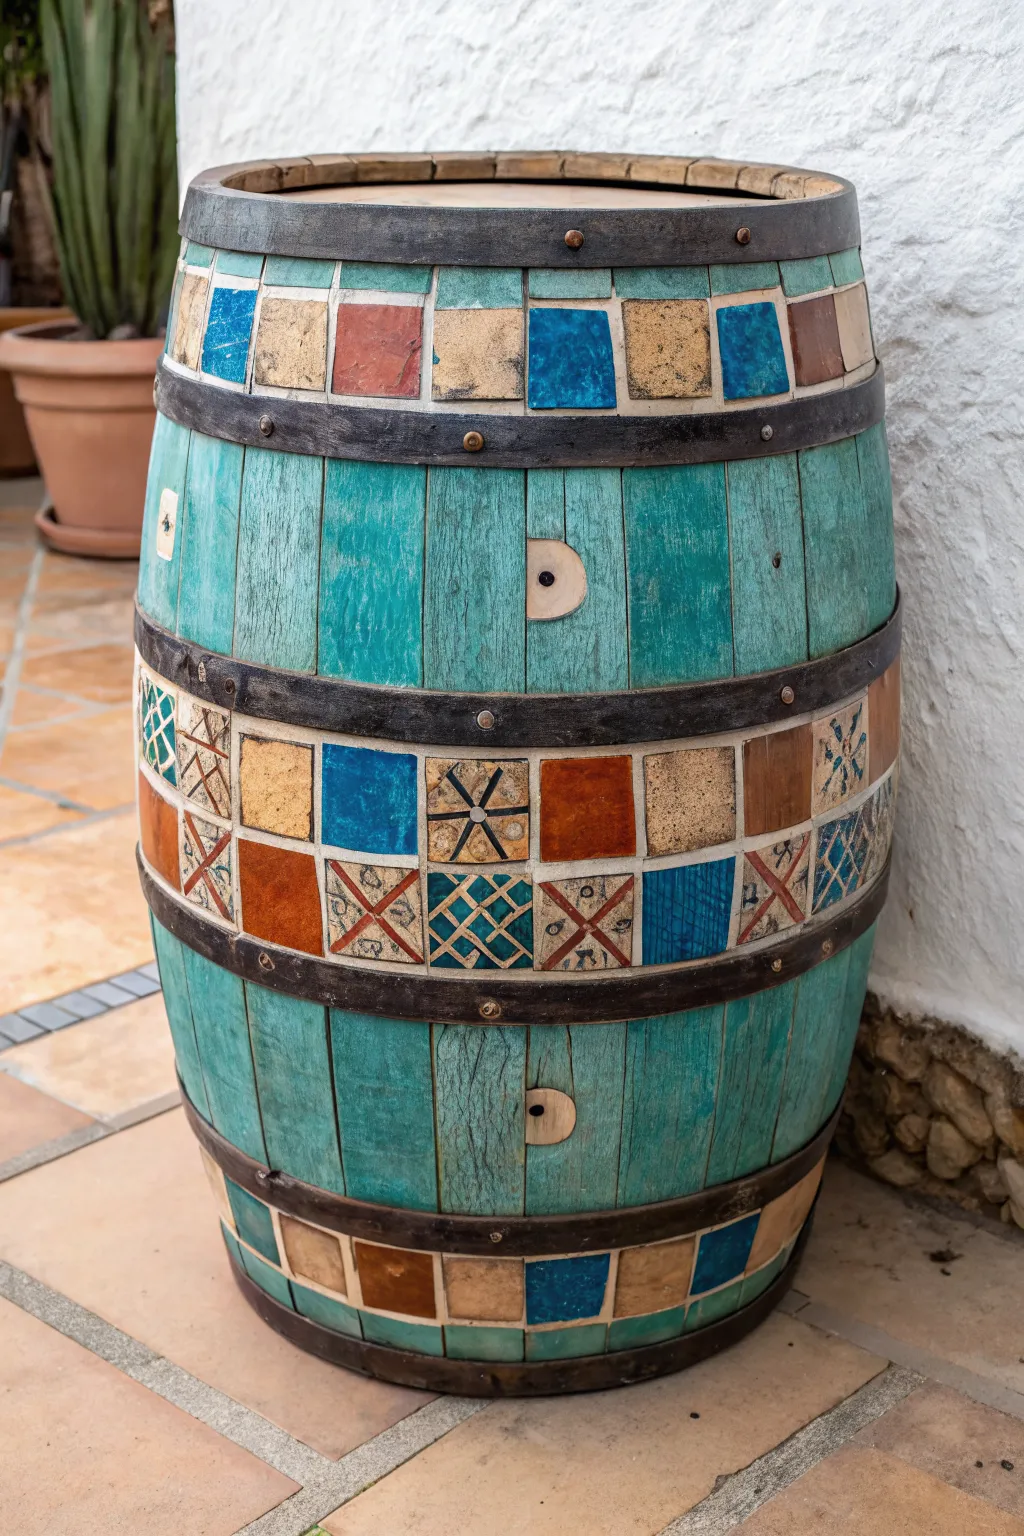
Transform a rustic wooden barrel into a stunning statement piece that mimics the look of aged teal wood and intricate ceramic tiling. This project combines clever painterly techniques with geometric stencils to achieve a rich, mosaic-style aesthetic without using a single actual shard of pottery.
Step-by-Step
Materials
- Wooden barrel (wine or whiskey size)
- Sandpaper 120-grit and 220-grit
- Teal or turquoise chalk paint
- Cream or off-white acrylic paint
- Terracotta or burnt orange acrylic paint
- Dark navy blue acrylic paint
- Painter’s tape (various widths)
- Square tile stencils (approx. 3-4 inches)
- Small stencil brushes or sponge pouncers
- Detail liner brush
- Dark wood stain or antiquing glaze
- Matte clear coat sealer
- Metallic espresso or dark bronze paint (for hoops)
- Rags and water container
Step 1: Preparation and Base Coat
-
Clean the surface:
Begin by thoroughly cleaning your barrel to remove dust, cobwebs, or grime. Use a damp rag and let it dry completely before moving on. -
Sand the wood:
Lightly sand the entire exterior using 120-grit sandpaper to rough up any existing varnish. Focus on smoothing out splinters but don’t worry about removing all the character marks. -
Paint the wood slats:
Apply a liberal coat of teal or turquoise chalk paint to the wooden staves. Paint vertically with the grain, ensuring the color gets into the grooves between the wood pieces. -
Distress the color:
Once the teal paint is dry to the touch, use a damp rag or fine-grit sandpaper to rub away paint in random areas, especially near the edges of usage marks, to reveal the raw wood underneath. -
Paint the metal hoops:
Using a smaller brush, carefully paint the metal bands with metallic espresso or dark bronze paint. I find it helpful to slide a piece of cardstock under the hoop edge to protect the fresh teal paint.
Step 2: Creating the Tile Bands
-
Mark the tile zones:
Identify the sections where you want the mosaic bands to go. Typically, the areas between the top two hoops and the middle two hoops work best. Tape off these horizontal sections to keep your edges clean. -
Base coat the tiles:
Paint the background of these designated bands in a solid cream or off-white color. You may need two coats here to cover the wood grain sufficiently. -
Create the grid:
Using a pencil and a ruler, lightly draw vertical lines to divide the white bands into even squares or rectangles, mimicking the layout of individual tiles. -
Paint solid blocks:
Select random squares in your grid and paint them solid colors—alternate between terracotta, teal, and navy blue. Leave about half of the squares cream as a base for patterns. -
Stencil geometric designs:
Place your small square stencils over the remaining cream squares. Lightly dab navy or terracotta paint over the stencil with a sponge pouncer. Less paint is more here to prevent bleeding. -
Hand-paint accents:
For a truly authentic look, use a detail liner brush to add simple X’s, diamonds, or freehand lines on a few tiles. Imperfection adds to the charm. -
Define the grout lines:
Once the designs are dry, take a very fine brush with diluted grey or brown paint and carefully trace the grid lines between your squares to create the illusion of grout.
Bleeding Lines?
If paint bleeds under your stencil, wait for it to dry completely, then touch it up with a small brush and your base cream color. A Q-tip works for tiny errors.
Step 3: Finishing Touches
-
Apply an antique wash:
Mix a small amount of dark brown paint or glaze with water. Brush this wash over the entire barrel, including the painted tiles, then immediately wipe it back with a clean rag to dirty up the bright colors. -
Detail the hardware:
If your barrel bands have rivets or bolts, highlight the very tops of them with a tiny dab of copper or lighter bronze paint to make them pop. -
Seal the barrel:
Finish the project by applying two coats of matte clear sealer over the entire surface. This protects your artwork from moisture and UV rays if you plan to keep it outdoors.
Faux Grount Hack
Instead of painting grout lines with a brush, use a silver or grey permanent marker and a ruler. It gives you more control and perfectly straight edges.
Now you have a beautifully custom piece that adds Mediterranean flair to your patio or living room
Hand-Lettered Labels, Names, and Numbers
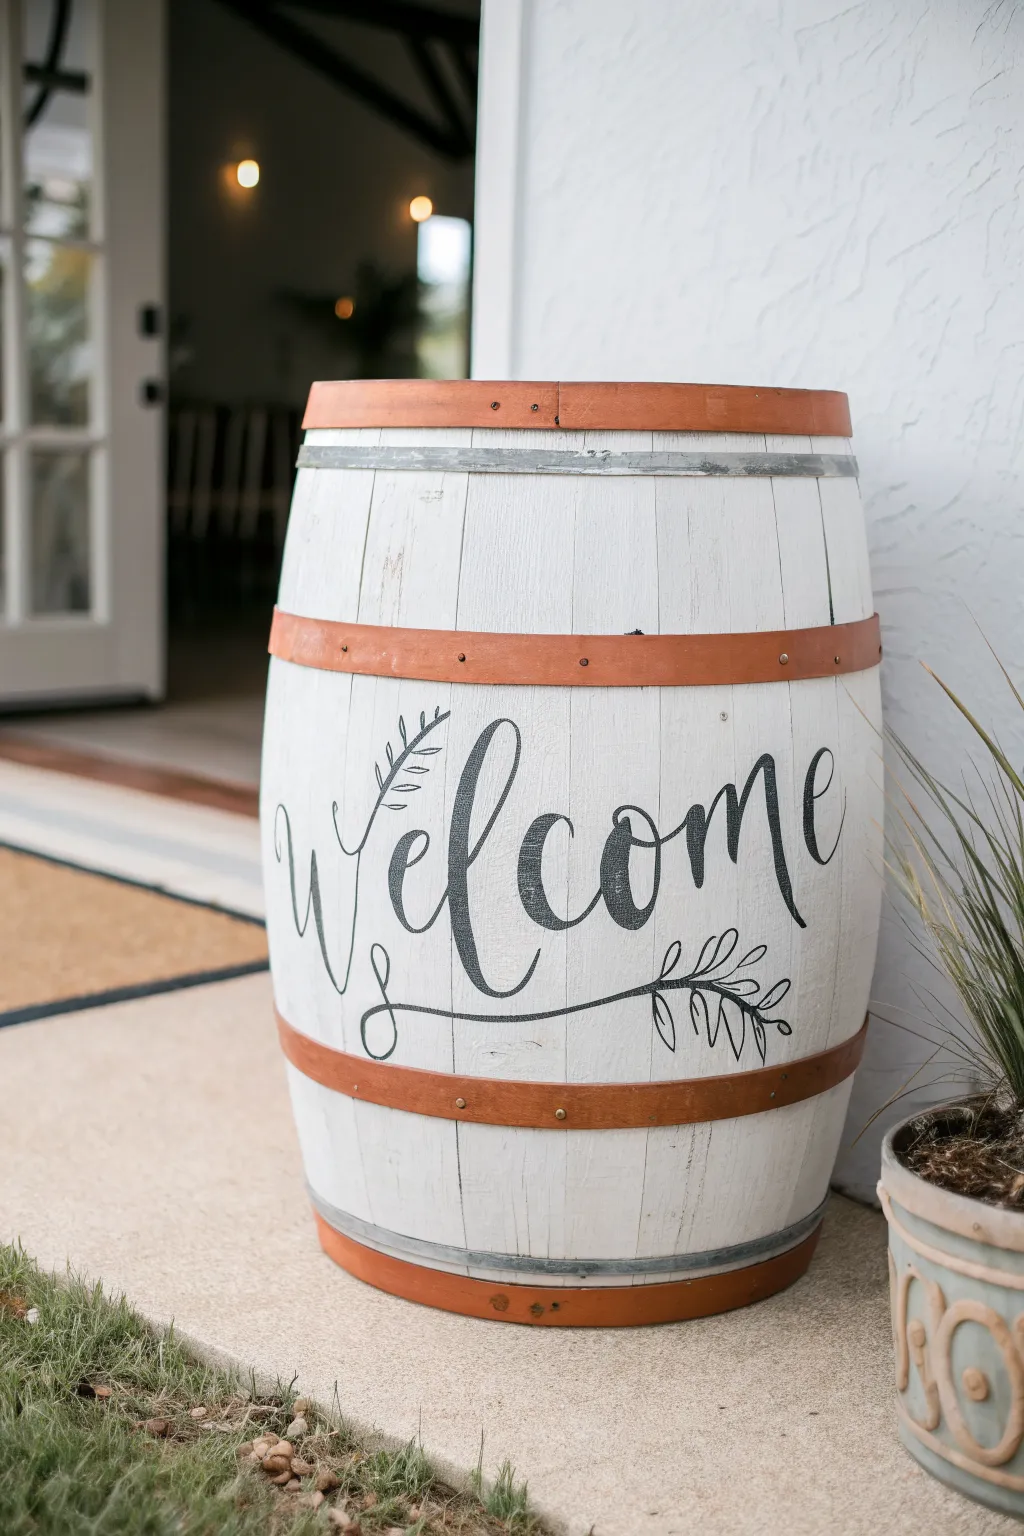
Transform an ordinary wooden barrel into a charming entryway staple with a crisp white finish and elegant hand-lettering. This project balances rustic texture with modern calligraphy to create a warm greeting for all your guests.
Step-by-Step Guide
Materials
- Wooden whiskey or wine barrel
- Sandpaper (80 and 150 grit)
- Tack cloth
- Exterior primer (white)
- Exterior latex paint (creamy white or whitewash style)
- Painter’s tape (blue or green)
- Metallic copper or bronze craft paint
- Black acrylic paint or outdoor craft paint
- Assorted paintbrushes (2-inch sash brush, small detail brushes)
- Pencil or chalk
- Graphite transfer paper (optional)
- Stencil (optional)
- Clear outdoor polyurethane sealer (matte or satin)
Step 1: Preparation & Base Coat
-
Clean the Surface:
Begin by thoroughly cleaning the barrel to remove any dirt, cobwebs, or grime. Use a stiff brush and mild soapy water, then rinse and let it dry completely in the sun for at least 24 hours. -
Sand the Wood:
Smooth out rough splinters using 80-grit sandpaper initially, followed by 150-grit for a smoother finish. You don’t need it perfectly smooth, as the wood grain adds character, but knock down any sharp edges. -
Remove Dust:
Wipe the entire barrel down with a tack cloth to remove all sanding dust. This ensures your paint adheres properly to the wood surface. -
Prime the Surface:
Apply a coat of exterior primer over the wooden staves. I find that skipping the metal bands at this stage saves cleanup time later, but getting a little primer on them isn’t the end of the world. -
Apply White Paint:
Once the primer is dry, paint the wooden sections with your creamy white exterior paint. Use a 2-inch brush and work with the vertical grain of the staves. Two thin coats are better than one thick one.
Clean Lines Hack
If you struggle painting straight lines on the curved bands, use a flat-edge artist brush and minimal paint. Resting your pinky on a dry spot stabilizes your hand.
Step 2: Painting the Bands
-
Tape Off Wood:
Allow the white paint to cure overnight. Then, carefully apply painter’s tape to the white wood right along the edge where it meets the metal bands to protect your fresh paint job. -
Paint the Metal:
Using a smaller flat brush, apply the metallic copper or bronze paint to the barrel hoops. You may need 2-3 coats to get full opacity over the dark metal. -
Remove Tape:
Peel off the painter’s tape while the metallic paint is still slightly tacky to prevent it from pulling up dried chips of paint.
Step 3: Lettering & Details
-
Draft the Design:
Determine the center of the barrel’s ‘belly’ visually. Lightly sketch your ‘Welcome’ text and the decorative leafy flourishes using a pencil or chalk. If you aren’t confident freehanding, tape a printed design over transfer paper and trace it onto the wood. -
Outline the Text:
Load a fine liner brush with black paint. Carefully outline your letters first, establishing the shape of the script. -
Fill the Letters:
Switch to a slightly larger round brush to fill in the thickened downstrokes of your calligraphy. Keep the paint fluid but not watery to avoid distinct drips running down the barrel curve. -
Add Flourishes:
Paint the botanical stems extending from the ‘W’ and the ‘e’. Use a very light touch for the tips of the leaves and the thin stems to keep them delicate. -
Second Coat on Text:
Once the first layer of black is dry, inspect the lettering. If the wood grain is showing through too much, apply a second coat to make the black pop against the white background. -
Clean Up Edges:
Use a small brush with a tiny bit of white paint to touch up any areas where your black lettering might have wobbled outside your sketch lines.
Seasonal Switch
Paint the back side of the barrel with a different design, like a pumpkin or snowman, so you can simply rotate the barrel when the seasons change.
Step 4: Sealing
-
Final Dry Time:
Let all painting dry for at least 24 hours to ensure moisture is fully evaporated from the layers. -
Apply Sealer:
Apply a coat of clear outdoor polyurethane sealer over the entire barrel, including the bands. This protects the wood from UV rays and moisture, ensuring your welcome sign lasts for seasons.
Place your finished barrel by the front door and enjoy the instant curb appeal upgrade
Modern Geometric Color-Block Bands

Transform a rustic wooden barrel into a striking piece of modern decor with this geometric makeover. By combining the natural wood grain with crisp, angled bands of charcoal, burnt orange, and cream, you’ll create a sophisticated accent piece perfect for an industrial or contemporary space.
How-To Guide
Materials
- Wooden barrel (cleaned and sanded)
- Painter’s tape (various widths recommended)
- Acrylic or chalk paint (Charcoal Black, Burnt Orange, Cream/Off-White)
- Ruler or straight edge
- Pencil
- Flat paintbrushes (1-inch and 2-inch)
- Detail brush
- Clear matte varnish or polyurethane
- Sandpaper (medium and fine grit)
- Damp cloth
Step 1: Preparation & Base Layout
-
Surface Prep:
Begin by thoroughly sanding the entire barrel to remove rough splinters and old finish. Wipe it down with a damp cloth to remove all dust, ensuring a smooth surface for the paint to adhere to. -
Defining the Horizontal Bands:
Identify the natural metal hoops or horizontal grooves on your barrel. Use wider painter’s tape to mask off the specific horizontal rings you plan to paint solid colors—specifically the top two rings and the bottom two rings. -
Center Section Planning:
Locate the large central ‘belly’ band of the barrel. This is where the geometric pattern will live. Find the vertical seams of the wood staves; these will act as helpful guides for your pattern repeats.
Step 2: Painting the Horizontal Accents
-
Top Rings – Dark:
Apply Charcoal Black paint to the uppermost metal hoop or wood band. Use a smaller flat brush to keep the edges clean against the raw wood. -
Top Rings – Orange:
Paint the second band down in Burnt Orange. Apply two coats if necessary to get a rich, opaque color that contrasts well with the pale wood. -
Bottom Rings:
Repeat this process on the bottom section, mirroring the top or alternating colors. In the reference, there is a thick Charcoal band at the very bottom and a thinner Orange band above it. -
Drying Time:
Allow these horizontal bands to dry completely before moving on. This prevents smudging when you start taping the intricate center section.
Seal Tape Edges
Before painting colors, brush a tiny amount of clear matte medium over the tape edges. This seals the gap and ensures super crisp lines.
Step 3: Creating the Geometric Pattern
-
Marking the Angles:
On the central band, use a ruler to lightly draw diagonal lines. Aim for a chevron-style layout where lines meet at a center point. I find it helpful to mark the halfway point of the barrel’s height first to ensure symmetry. -
Taping the Diagonals:
Apply painter’s tape along your pencil lines. Remember that you are taping *off* the areas you want to remain raw wood or paint a different color later. Press the edges of the tape down firmly to prevent bleed. -
Painting the First Color – Cream:
Select specific diagonal sections to be Cream. Paint these areas using a flat brush, stroking away from the tape edge to minimize seepage. Let this dry to the touch. -
Painting the Second Color – Charcoal:
Identify the sections that will be dark. Paint these Charcoal Black, ensuring they align with your pattern (typically parallel to your cream lines or opposing them for contrast). -
Painting the Third Color – Orange:
Fill in the remaining designated geometric shapes with Burnt Orange. The variety in color placement creates that dynamic ‘moving’ visual effect. -
The Reveal:
Once the paint is tacky but not fully hardened, carefully peel back the tape at a 45-degree angle. This reveals the crisp lines between the painted shapes and the raw wood negative space.
Metallics & Stains
Replace the Burnt Orange with Gold or Copper paint for a luxe look, or use wood stain instead of paint for the dark sections to keep the grain visible.
Step 4: Finishing Touches
-
Touch-ups:
Inspect your lines. If any paint bled under the tape, use a small detail brush or a craft knife to gently scrape away excess paint, or touch up with the appropriate color. -
Metal Hardware:
If your barrel has visible screws or bolts (like the brass ones in the image), use a tiny brush to clean them off or polish them so they stand out as metallic accents. -
Sealing the Work:
Apply a clear matte varnish over the entire barrel, including the unpainted wood sections. This unifies the sheen and protects the raw wood from moisture and staining.
Now you have a unique statement piece that perfectly balances modern design with rustic charm
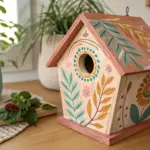
Barrel Face With Planter “Hair”

Transform a plain wooden barrel into a charming garden character with a splash of teal paint and some simple hand-painted details. The overflowing greenery serves as a wild, natural hairdo for this serene face, making it a delightful focal point for any patio or garden corner.
Step-by-Step Guide
Materials
- Wooden barrel (half or full size)
- Sandpaper (medium and fine grit)
- Teal exterior paint or stain
- Paintbrushes (large flat brush, medium round brush, fine liner brush)
- Black acrylic paint or paint pen
- White exterior acrylic paint
- Pink or coral acrylic paint
- Clear outdoor sealant spray
- Potting soil
- Trailing plants (like creeping jenny or ivy) and upright fillers
Step 1: Preparation and Base Coat
-
Clean the surface:
Start by thoroughly cleaning your wooden barrel. Use a stiff brush and soapy water to remove any dirt, moss, or loose wood fibers, then let it dry completely in the sun. -
Sand for smoothness:
Give the exterior a good sanding, focusing on rough patches where the face will go. You don’t need it glass-smooth, but removing splinters helps the paint glide on easier. -
Apply the teal base:
Using a large flat brush, apply your teal exterior paint to the wooden staves. Paint vertically along the grain. Depending on the opacity, you might need two coats for a rich, solid color. -
Handle the metal bands:
Decide if you want to paint the metal hoops or leave them rusty for a rustic touch. In this project, leaving them natural provides a nice contrast to the fresh teal paint.
Use a Stencil Helper
Nervous about free-handing the eyes? Cut a simple curve out of cardstock to use as a tracing guide. This ensures both eyes have the exact same arch.
Step 2: Painting the Face
-
Pencil in the features:
Lightly sketch the facial features with a pencil. Place the eyes about halfway down the top section of the barrel, ensuring they are symmetrical across the vertical wooden slats. -
Paint the eyelashes:
With black paint and a fine liner brush (or a black outdoor paint pen), trace your pencil lines for the closed eyelids. Add four to five curved lashes extending outward from the corner of each eye. -
Add the nose:
Draw a simple, small ‘L’ shape or a curved line for the nose. Keep it subtle and centered between the eyes. -
Create the smile:
Paint a small, simple ‘U’ shape for the mouth. Keeping the stroke thin prevents the face from looking too cartoonish. -
Rosy those cheeks:
Dip a medium round brush or a sponge dobber into pink or coral paint. Press gently to create round cheek circles just below the eyes. If the coverage is streaky, let it dry and dab a second layer.
Step 3: Decorative Flourishes
-
Add ‘falling’ leaves:
Using white paint and a small round brush, paint a vine descending from the top rim near the right eye. Paint teardrop shapes along a central stem to mimic hanging foliage. -
Paint bottom flowers:
Near the bottom of the barrel, add simple five-petal daisy shapes using white paint. Space them out randomly for a casual pattern. -
Add subtle accents:
To give the design depth, paint a few small white dashes or dots around the flowers or near the cheeks to look like highlights or magic sparkles. -
Seal the artwork:
Once all paint is bonedry, spray the entire painted surface with a clear outdoor sealant. This protects your hard work from rain and UV fading.
Paint Bleeding?
If paint bleeds into the wood grain, switch to paint pens for lines. Their fluid is thicker and less likely to travel along the wood’s natural capillaries.
Step 4: Planting the ‘Hair’
-
Prepare for planting:
Ensure your barrel has drainage holes in the bottom. Fill the interior with high-quality potting soil to within a few inches of the rim. -
Select your greenery:
Choose plants that mimic hair texture. I love using fine textures like asparagus fern for volume ensuring a fluffy look. -
Add the spilling effect:
Plant trailing varieties like ivy or creeping jenny near the front edge so they drape over the barrel’s ‘forehead,’ blending the real plants with your painted vines. -
Water and settle:
Give the new plants a good drink of water to settle the soil. Arrange the trailing vines slightly to frame the painted face perfectly.
Now you have a whimsical personality adding life to your garden that will smile back at you every day
Two-Barrel Character Couple Display
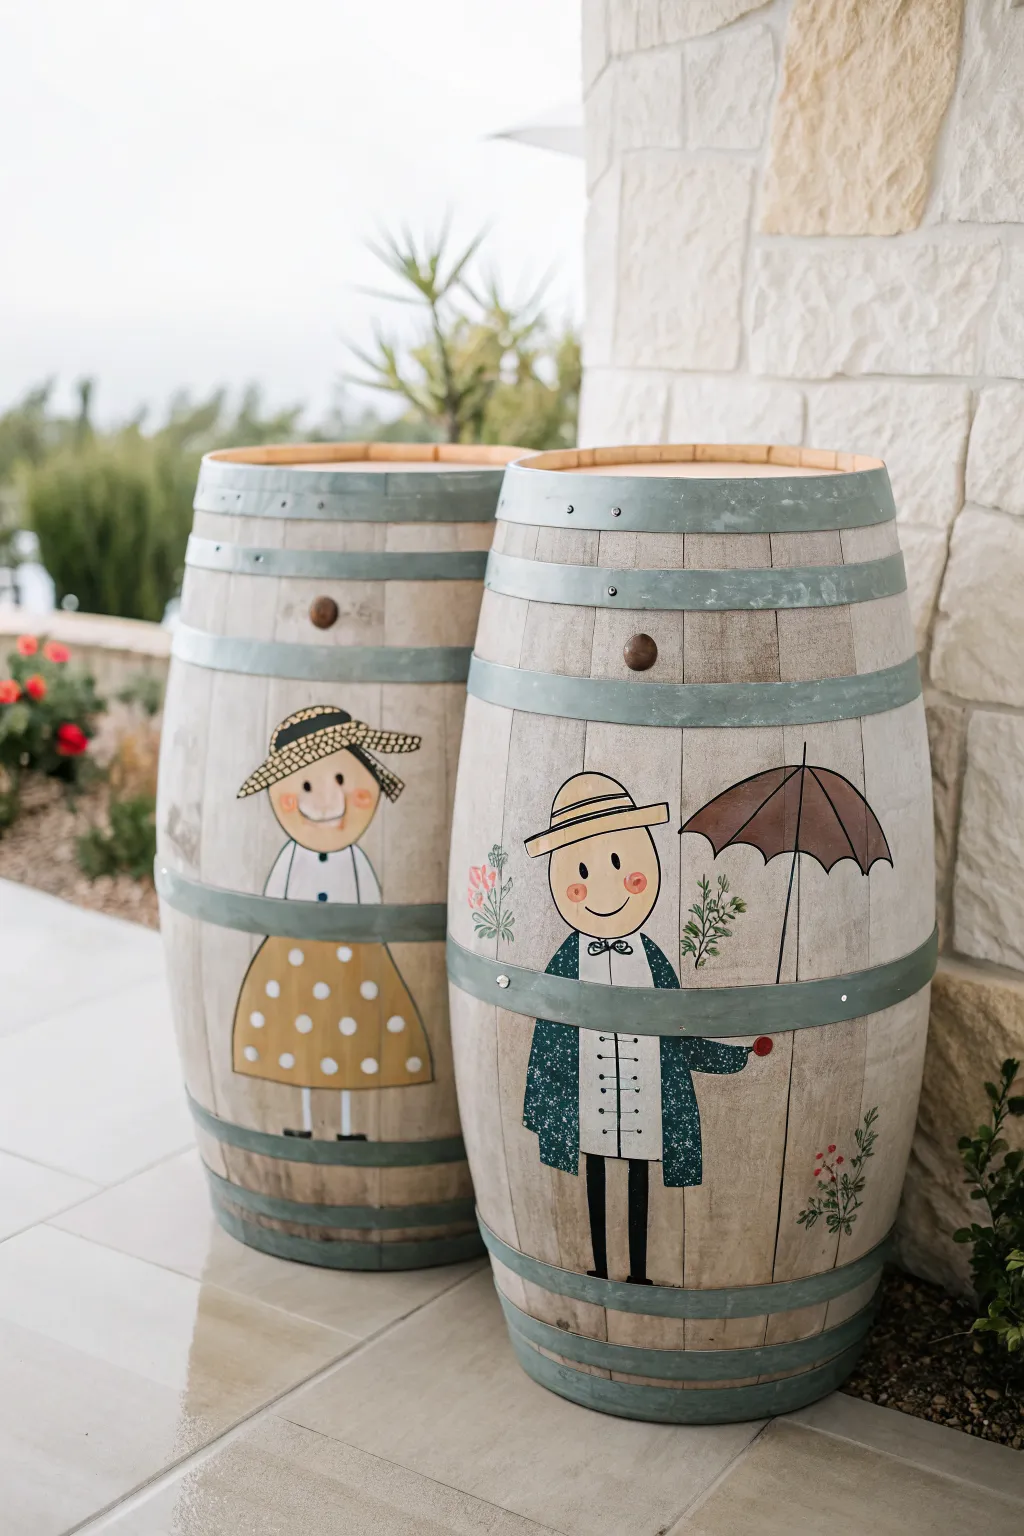
Transform a pair of rustic wine barrels into a charming couple full of folk-art personality. This project uses the natural wood grain as a backdrop for two stylized characters, creating a warm, inviting display for a porch or garden venue.
Step-by-Step
Materials
- Two full-sized wooden wine barrels (clean and dry)
- Sandpaper (medium and fine grit)
- White or cream acrylic paint (for base shapes)
- Assorted acrylic paints (mustard yellow, teal/dark green, brown, black, red, pink)
- Set of paintbrushes (1-inch flat, medium round, fine liner)
- Pencil and eraser
- Painter’s tape or masking tape
- Clear outdoor sealant/varnish (matte or satin finish)
- Palette for mixing
- Paper towels and water cup
Step 1: Preparation & Planning
-
Prepare the surface:
Before painting, lightly sand the areas of the barrel where the figures will go. You don’t need to strip the whole barrel, just smooth out the rough wood grain on the front face to ensure the paint adheres well. -
Clean the wood:
Wipe down the sanded areas with a damp cloth to remove all sawdust. Let the wood dry completely; moisture trapped under the paint can cause peeling later. -
Map out the positions:
Decide which barrel will be the ‘male’ and which will be the ‘female’. Position them side-by-side to ensure the figures will be at compatible heights. The metal hoops on the barrel are excellent guides—use the space between the top two hoops for the faces and the large middle section for the bodies.
Use the Hoops
Don’t fight the barrel hoops! Incorporate them into the design as belts or natural separation lines between the head and body to simplify proportioning.
Step 2: Sketching the Characters
-
Draft the female figure:
On the first barrel, use a pencil to lightly sketch a large oval for the head just underneath the top metal hoop. Draw a trapezoid for the torso, and a wide bell shape for the skirt in the section below the middle hoop. -
Draft the male figure:
On the second barrel, sketch a similar oval head. Draw a rectangular torso that extends down past the middle hoop to look like a long coat. Add simple stick-figure legs at the bottom. -
Add accessories:
Sketch a wide-brimmed hat on the female. For the male, add a bowler hat and sketch a large umbrella shape to his right side. -
Base coat the shapes:
Using white or cream paint and a flat brush, fill in the skin areas (faces) and the shirt areas. This primer layer prevents the wood color from changing your final paint colors.
Fixing Wobbly Lines
If your black outlines get too thick or shaky, wait for them to dry, then come back with the original background color to “cut in” and sharpen the edges.
Step 3: Painting the Details
-
Paint the female’s outfit:
Mix a warm mustard yellow and fill in the skirt shape. While that dries, paint her hat in a straw color or light tan, adding a checkered or woven pattern with thin brown lines once dry. -
Paint the male’s attire:
Use a deep teal or dark green for his long coat. I like to mix a tiny bit of black into the green to make it look like heavy wool. Paint his trousers black. -
Detail the umbrella:
Paint the umbrella canopy in a chocolate brown. Use a liner brush with black paint to add the ribs and the handle shaft. -
Add facial features:
Using a small round brush, add rosy pink circles for cheeks on both faces. Use a fine liner brush and black paint to draw simple stick-eyes, eyebrows, and smiling mouths. -
Create clothing patterns:
Once the yellow skirt is fully dry, use white paint to dab polka dots across it. For the male figure, add small black lines for buttons and pockets on his coat.
Step 4: Finishing Touches
-
Outline the figures:
To make the characters pop against the wood, use a fine brush with black paint to loosely outline the main shapes—the hats, the coats, and the dresses. A sketchy, non-perfect line adds to the folk-art charm. -
Add floral accents:
Paint small sprigs of greenery or simple flowers around the figures. A few green leaves near the man’s shoulder or a flower by the woman feel like sweet, organic additions. -
Initial drying:
Allow the painted barrels to dry for at least 24 hours in a dry, dust-free environment. -
Seal the artwork:
Apply two coats of clear outdoor polyurethane or sealant over the painted areas. Extend the sealant slightly past the paint onto the bare wood to ensure the edges are fully protected from weather.
Place your newly decorated couple by the entryway to greet guests with a smile
Glow-at-Dusk Fireflies and Star Details
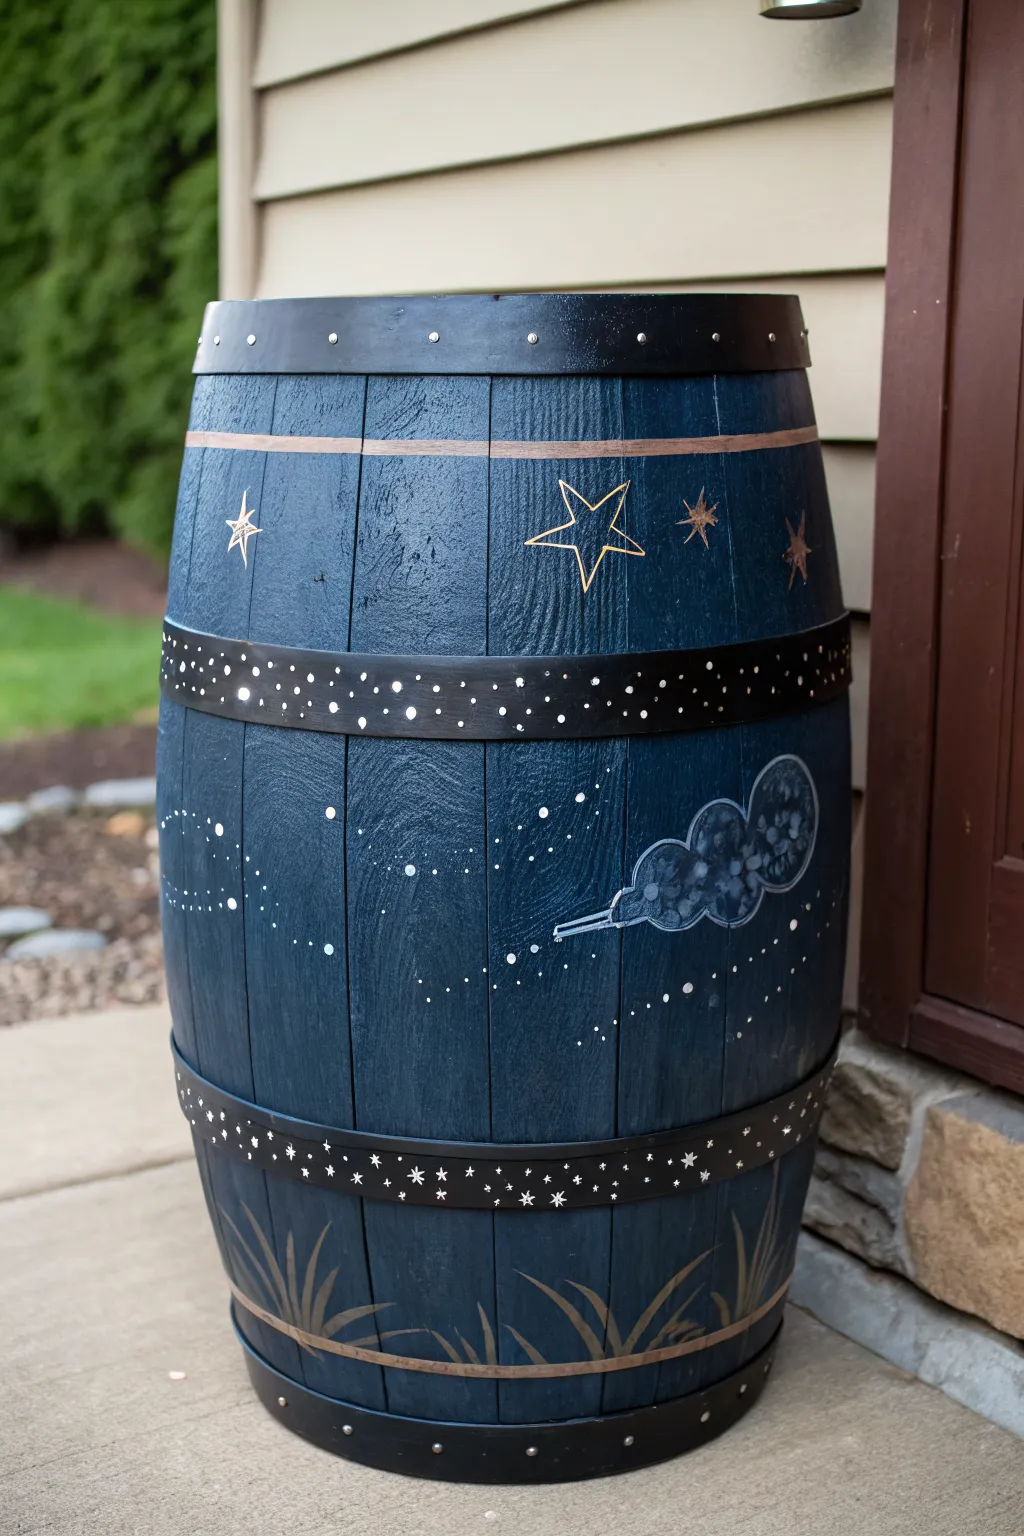
Transform a plain wooden barrel into a magical evening scene featuring glowing fireflies and stardust. This deep navy design captures the charm of twilight with metallic accents and playful constellations that are perfect for a garden patio.
Step-by-Step Guide
Materials
- Wooden barrel (clean and dry)
- Sandpaper (medium and fine grit)
- Exterior primer (gray or wood-toned)
- Exterior acrylic latex paint: Deep Navy Blue, Black
- Acrylic craft paints: Metallic Gold, White, Silver, Light Grey
- Glow-in-the-dark paint (optional/top coat)
- Paintbrushes: 2-inch for base, assorted round/detail brushes
- Painter’s tape
- Chalk or pastel pencil (for sketching)
- Exterior clear sealant (polycrulic or varnish)
Step 1: Preparing the Canvas
-
Sand the surface:
Begin by sanding the entire barrel to remove rough splinters and old finish. Use medium grit first, then switch to fine grit to smooth the wood grain, wiping away dust with a damp cloth afterward. -
Prime the wood:
Apply a coat of exterior primer over the wood staves. This ensures your dark blue topcoat adheres properly and looks rich rather than soaking into the porous wood. -
Apply the base color:
Using a wide brush, paint the wooden staves with the Deep Navy Blue exterior paint. Work with the grain of the wood, ensuring full coverage. You will likely need two coats for a solid, opaque night-sky look. -
Paint the hoops:
Carefully paint the metal bands (hoops) of the barrel with black exterior paint. If you have a steady hand, you can freehand this; otherwise, use painter’s tape to protect your fresh navy paint.
Uneven Lines?
If your straight lines on the hoops look shaky, clean them up by outlining the edge with a metallic permanent marker instead of a brush.
Step 2: Creating the Night Sky
-
detail the upper bands:
Once the black hoops are dry, use a small detail brush and silver or white paint to add dots. Create a random stipple pattern on the middle hoop to look like distant stars. -
Decorate the lower band:
On the bottom black hoop, paint small five-point stars and tiny dots using white paint to continue the celestial theme. -
Sketch the firefly jar:
roughly halfway up the barrel on the right side, lightly sketch a tilted mason jar shape using chalk. It should look like it’s pouring its contents out towards the left. -
Paint the jar smoke:
Mix a very watery light grey or white paint. gently dry-brush inside the jar sketch and flowing out of it in a cloud shape. Is should look wispy and translucent, not solid. -
Add jar details:
Outline the rim and body of the jar with fine white lines to give it glass-like definition. -
Create the firefly swarm:
Inside the grey ‘cloud’ and spilling out across the barrel, paint clusters of dots. Use white for the center of the lights and dab a little glow-in-the-dark or pale yellow paint over them once dry.
Step 3: Adding Celestial Accents
-
Paint the gold stars:
In the open blue space near the top, paint large outline stars using metallic gold paint. I find a thin liner brush works best for these crisp geometric shapes. -
Add solid stars:
Intersperse the outlined stars with smaller, solid gold or bronze starbursts to add variety to your galaxy. -
Connect constellations:
On the left side of the barrel, paint tiny white dots in patterns and connect them with hair-thin lines to mimic constellations.
Glow Up
Mix phosphorescent powder into your white paint for the fireflies. They will charge in the sun and glow brightly when dusk falls.
Step 4: Grounding and Sealing
-
Paint the grass:
At the very bottom of the blue section, just above the lowest hoop, use gold or bronze paint to create tall grass blades. Use quick, upward flicking strokes to give the grass natural movement. -
Add a dividing line:
Paint a thin horizontal copper or gold stripe on the wood, just below the top metal hoop, to frame the upper section of the artwork. -
Let it cure:
Allow the entire barrel to dry for at least 24 hours to ensure all paint layers are hardened. -
Seal the project:
Apply two coats of clear exterior sealant. This protects your handiwork from rain and UV fading, keeping your night sky vibrant.
Place your finished barrel in the garden to watch the stars come out at twilight


Have a question or want to share your own experience? I'd love to hear from you in the comments below!