
When you’re planning a diversity mural, the goal is simple: make people feel seen, safe, and connected the second they walk by. Here are my favorite diversity murals ideas—starting with the classic crowd-pleasers and moving into more unexpected, studio-fun approaches.
Many Hands, One Heart
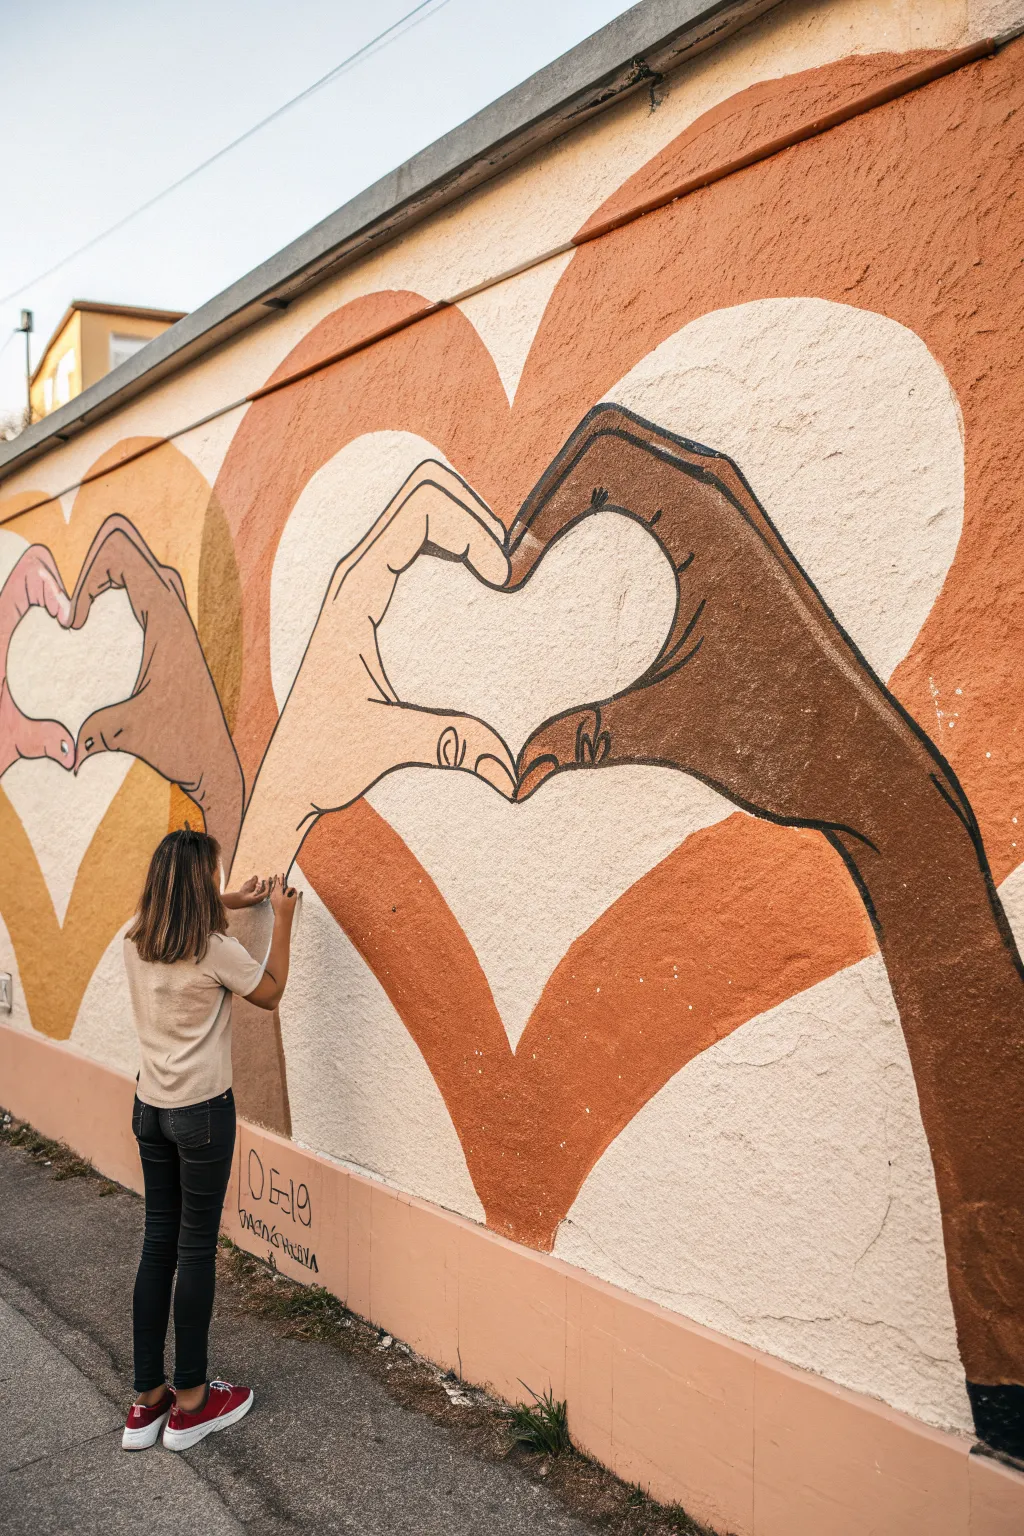
This heartwarming mural project transforms an ordinary wall into a symbol of connection, featuring a repeating motif of diverse hands forming heart shapes. Using a warm, earthy color palette and bold outlines, the design creates a powerful visual rhythm that celebrates inclusivity and love.
Step-by-Step Guide
Materials
- Exterior masonry primer (white)
- Exterior latex or acrylic mural paints (terracotta, sand/beige, dark brown, medium brown, light skin tone, black)
- Large paint rollers and trays
- Assorted paintbrushes (2-inch sash brushes for fills, fine liner brushes for details)
- Chalk or charcoal specific for sketching
- Measuring tape
- Level
- Ladder or step stool
- Painters tape
- Reference image of hands forming a heart
Step 1: Preparation & Layout
-
Prime the Surface:
Begin by cleaning the wall surface thoroughly to remove any dirt or loose debris. Roll on a solid coat of white exterior primer to ensure your colors pop and adhere properly to the textured masonry. -
Establish the Baseline:
Once the primer is fully dry, use a measuring tape and level to mark a horizontal line along the bottom third of the wall. This will serve as the anchor point for the bottom of the large background hearts. -
Mark Heart Spacing:
Measure the total width of your wall and divide it by the number of hearts you want to feature. Mark the center point of each heart along your baseline to ensure even spacing across the mural. -
Sketch the Big Hearts:
Using chalk, draw the large, wide heart shapes first. These should touch or slightly overlap at the edges to create a continuous flow perfectly. -
Sketch the Hands:
Inside each large heart, sketch the two hands coming together. It helps to draw the negative space (the small heart shape between the fingers) first, then build the fingers and wrists around that central void.
Step 2: Blocking Colors
-
Background Fill – Terracotta:
Start with the outermost layer of the large hearts. Use a 2-inch brush or small roller to fill these broad areas with a warm terracotta or burnt orange paint, carefully cutting in around your chalk lines. -
Background Fill – Sand:
Paint the inner heart shape (the immediate background behind the hands) with a light sand or cream color. This lighter value provides high contrast so the hand details will stand out clearly. -
Paint the First Hand:
Select a light skin tone paint for the left hand. Fill in the shape completely, ensuring the paint gets into the crevices of the textured wall for solid coverage. -
Paint the Second Hand:
Use a deep brown paint for the right hand to represent a darker skin tone. Apply two coats if necessary to achieve an opaque, rich finish without streakiness. -
Repeat the Process:
Move to the next heart section and repeat the color blocking. I like to switch the hand colors in the next section (e.g., medium brown on left, light tan on right) so the mural represents a wide spectrum of diversity.
Scaling Up Without Stress
Make paper templates of the hands first. Trace around them on the wall so every pair is identical in size and shape without needing to freehand each one.
Step 3: Detailing & Outlining
-
Allow to Cure:
Let all your color blocks dry completely. The wall should feel cool and dry to the touch before you attempt any linework to prevent colors from muddying. -
Outline the Background Hearts:
Using a smaller brush and black paint, carefully trace the outer edges of the large terracotta hearts to separate them distinctly from the wall background. -
Outline the Hands:
Switch to a fine liner brush loaded with black paint. Outline the main silhouette of the hands with a steady, flowing motion. -
Add Finger Details:
Paint the defining lines for the fingers and knuckles. Pay attention to where the thumbs overlap and how the index fingers curve to touch, creating the top of the inner heart. -
Add Fingernails:
Paint the small curved shapes of the fingernails. This small detail adds a lot of realism and helps orient the viewer to the position of the hands. -
Refine Edges:
Walk back a few feet to inspect your lines. If the wall texture caused any jagged edges, go back in with your liner brush to smooth them out for a crisp, illustrated look. -
Seal the Work:
For longevity, especially on an outdoor wall, apply a clear UV-resistant topcoat over the entire mural once the paint has cured for at least 24 hours.
Add Personal Flourishes
Invite community members to sign their names or write short messages of unity inside the terracotta borders of the large hearts for a collaborative touch.
Step back and admire how this simple gesture of hands creates a powerful message of unity for your community


Puzzle Pieces That Fit Together
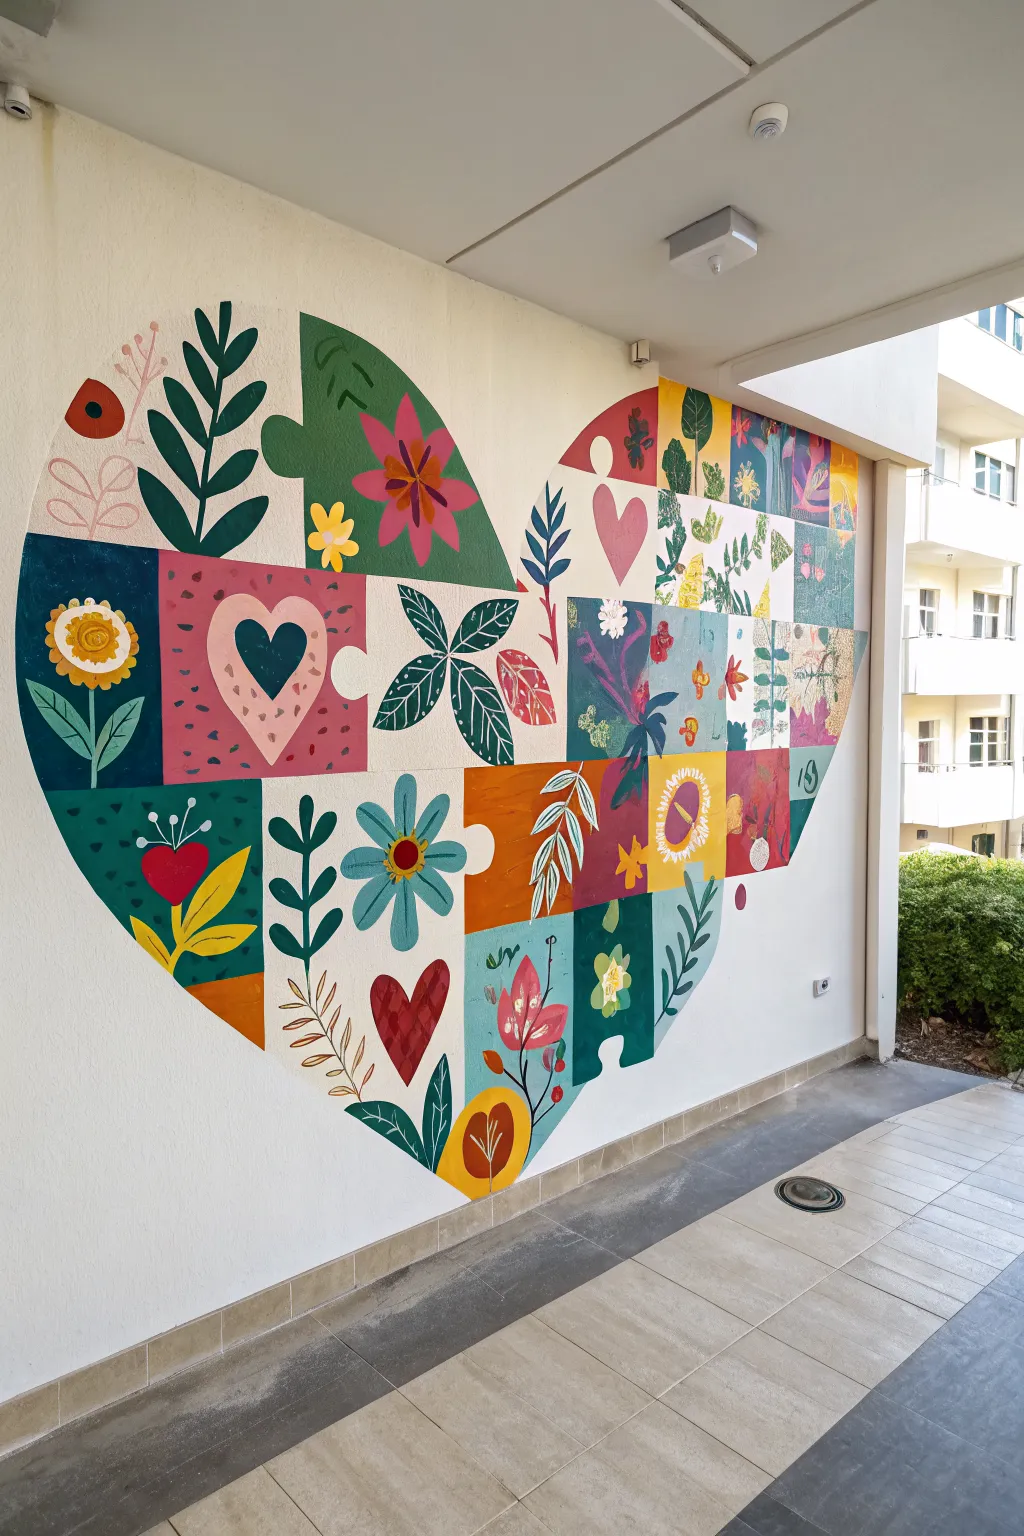
Transform a plain exterior or hallway wall into a vibrant symbol of community with this heart-shaped puzzle mural. Featuring distinct botanical vignettes interlocked together, this project is perfect for group collaboration where each participant can design their own ‘piece’ of the whole.
Step-by-Step
Materials
- Exterior acrylic latex paint (various colors)
- White exterior primer
- Chalk or charcoal stick for sketching
- Painter’s tape (various widths)
- Projector (optional but recommended for the outline)
- Assorted brushes (2-inch sash brushes for filling, round and liner brushes for details)
- Drop cloths
- Ladder or step stool
- Clear exterior sealant (optional)
Step 1: Planning and Preparation
-
Surface Prep:
Begin by cleaning the wall thoroughly to remove dust and grime. If the existing paint is glossy, give it a light sanding to help the new paint adhere. -
Prime the Area:
Roll on a coat of white exterior primer over the general area where the heart will go. This ensures your colors will pop against the beige background and provides a consistent texture. -
Outline the Shape:
Project the heart outline onto the wall to get the symmetry right, or sketch it freehand using chalk. Using a string anchored at the center point can help create even curves for the top arches. -
Grid the Puzzle:
Draw the internal puzzle grid. Start by drawing a vertical and horizontal grid, then modify the lines to include the classic puzzle ‘knobs’ and ‘holes.’ Make them large enough to paint inside comfortably—about 12 inches square is a good minimum size.
Community Tip
Assign specific puzzle pieces to different community members or students. Let them choose their motif within a pre-selected color palette to ensure unity.
Step 2: Color Blocking
-
Plan the Palette:
Select a diverse color palette. Notice the image uses deep teals, burnt oranges, mustard yellows, and soft pinks. Mapping these out beforehand prevents two identical colors from touching. -
Paint Background Squares:
Start filling in the background color of each puzzle piece. Use a 2-inch angled sash brush to cut in the edges of the curved puzzle lines carefully. -
Apply Second Coats:
Most vibrant colors, especially yellows and reds, will need a second coat. Allow the first layer to dry completely before applying the second to avoid lifting the paint. -
Clean Up Edges:
Once the color blocks are dry, touch up any areas where colors might have bled over the puzzle lines. A crisp separation between pieces is key to the effect.
Level Up: Texture
Mix a small amount of sand or texture additive into the paint for specific flowers (like the sunflower centers) to add a tactile 3D element to the wall.
Step 3: Adding the Motifs
-
Sketch the Designs:
Lightly sketch a botanical or abstract design into each colored block. Vary the scale—use a mix of large single flowers, clusters of small leaves, and geometric hearts. -
Paint Large Elements:
Paint the largest shapes first, like the big pink flower petals or the large green leaves. I find using a flat brush helps create those smooth, sweeping leaf shapes. -
Layering Details:
Add secondary colors on top of dry base shapes. For example, add the dark center to the yellow sunflower or the veins on the large leaves. -
Fine Lines and texture:
Switch to a thin liner brush. Add delicate stems, tiny dots (stippling) on the flowers, or dashes in the background of a square to create visual texture. -
Leaf Accents:
Don’t forget the ‘floating’ greenery. Some puzzle pieces in the design feature leaves that don’t sit on a flat background color but float on white or cream; paint these directly onto the unpainted primer sections.
Step 4: Finishing Touches
-
Reference Check:
Step back and look at the mural from a distance. Check for any blank spaces or areas that feel unbalanced and add small filler flowers or dots as needed. -
Erase Chalk Lines:
Use a damp sponge to gently wipe away any visible chalk or charcoal sketch lines that haven’t been covered by paint. -
Seal the Work:
If the mural is exposed to direct elements, apply a clear, non-yellowing exterior sealant to protect the colors from UV fading and weather damage.
Now you have a stunning, collaborative piece of art that celebrates how different elements fit together perfectly


Community Quilt Block Mural
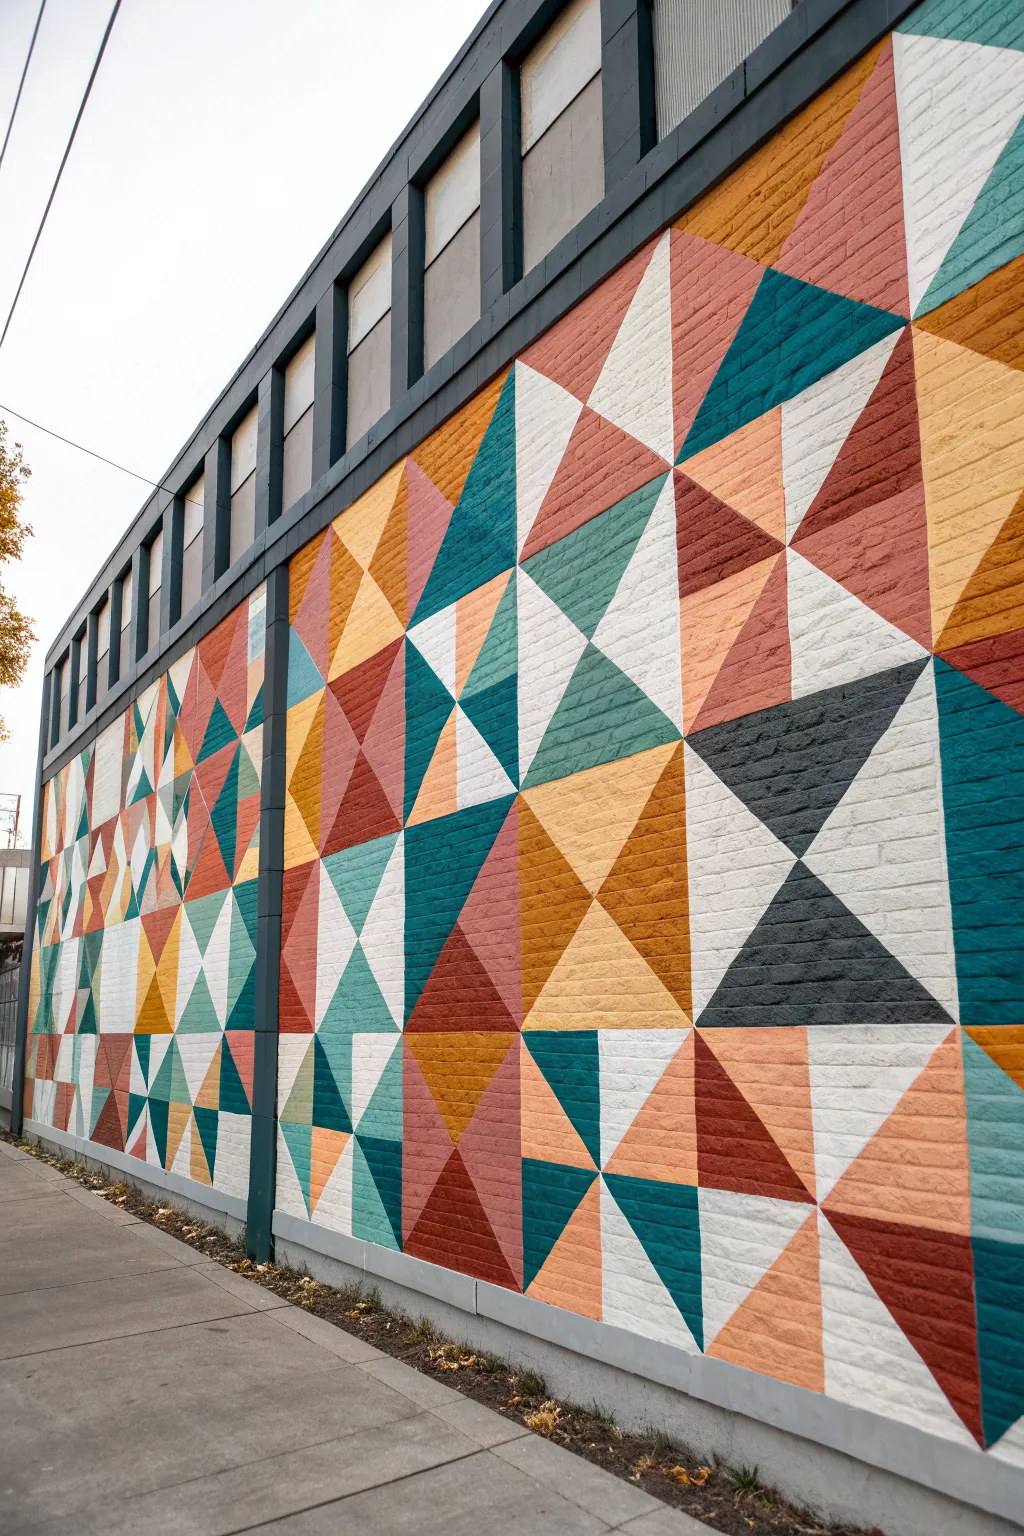
Transform a plain brick exterior wall into a vibrant tapestry of color with this large-scale geometric mural. Using a quilt-inspired pattern of interlocking triangles, this design symbolizes community connection through bold shapes and earthy modern tones.
Detailed Instructions
Materials
- Exterior masonry primer
- Exterior latex paint (Eggshell or Satin finish)
- Colors: White/Off-White (Base), Teal, Rust Red, Mustard Yellow, Blush Pink, Dark Grey, Muted Blue-Green
- Pressure washer or stiff scrub brush
- Chalk line reel (Blue chalk is best as red can stain)
- Painter’s tape (2-inch width for rough surfaces)
- Assorted paint rollers (9-inch for large areas, 4-inch for details)
- Extension pole for rollers
- Angle sash brushes (2.5 inch) for edging
- Ladders or scaffolding
- Measuring tape
- Spirit level or laser level
- Drop cloths
- Graph paper and pencil for planning
Step 1: Preparation and Planning
-
Map your grid:
Before touching the wall, measure your total wall dimensions and sketch the design on graph paper. The pattern is built on a square grid where each square is bisected diagonally to form triangles; decide on a grid size (e.g., 2ft x 2ft squares) that fits your wall proportionally. -
Clean the surface:
Thoroughly clean the brick wall using a pressure washer to remove dirt, moss, and loose debris. If you don’t have a pressure washer, a stiff brush and soapy water work, but ensure the wall dries completely for at least 24-48 hours before painting. -
Prime the brick:
Apply a high-quality exterior masonry primer over the entire surface. Use a thick nap roller (3/4 inch or higher) to ensure the primer gets into all the mortar joints and textured crevices. -
Apply the base coat:
Once the primer is dry, roll on two coats of your lightest color (the off-white or cream) over the entire wall. This acts as the background for the lighter triangles and ensures your grid lines are easy to see later.
Seal the Deal
Running a bead of clear paintable caulk along the tape edge on rough brick creates the absolute sharpest lines possible.
Step 2: Drafting the Design
-
Snap vertical lines:
Using your measuring tape and level, mark the intervals for your grid along the top and bottom of the wall. Have a partner help you snap vertical chalk lines connecting these marks to create your columns. -
Snap horizontal lines:
Repeat the process horizontally to complete the square grid. Double-check a few intersections with your level or a speed square to ensure your grid remains true. -
Mark the diagonals:
Reference your graph paper design to see which way the diagonal lines cut through each square. Snap these diagonal chalk lines carefully; in this pattern, note how four diagonals often meet at a central point to create ‘star’ or ‘pinwheel’ effects. -
Label the colors:
Take a piece of chalk or a pencil and lightly write the color code (e.g., ‘T’ for Teal, ‘M’ for Mustard) inside each triangle directly on the wall. This simple step prevents major mistakes once you start painting.
Community Hands
Assign specific colors to different community groups. Let kids handle the lower triangles while adults tackle the ladder work.
Step 3: Painting the Pattern
-
Tape the edges:
Apply painter’s tape along the outside of the lines for your first color group. Since you can’t tape adjacent shapes simultaneously, tackle one color at a time or non-touching shapes first. Press the tape firmly into the mortar joints. -
Seal the tape:
I usually brush a very thin layer of the *base color* (the white) over the tape edge first. This bleeds beneath the tape filling any brick gaps, ensuring your colored paint sits on top for a crisp line. -
Paint the dark triangles:
Start with your darkest colors, like the deep grey or rust red. Use a 4-inch mini roller for the center of the geometric shapes and an angled sash brush to carefully cut in near the tape or chalk lines. -
Fill the mid-tones:
Move on to the teal, mustard, and blush tones. Apply two coats for solid coverage, especially on rough brick which soaks up pigment. -
Remove tape and refine:
Pull the tape while the paint is still slightly tacky to avoid peeling. Once dry, tape off the remaining neighboring sections and repeat the painting process until the quilt is complete. -
Touch up lines:
On brick, even the best tape job might have small bleeds. Go back with a small artist’s brush and your base colors to hand-paint sharp edges where necessary, especially deep in the mortar grooves.
Step back and admire how the individual geometric shapes come together to form a unified, welcoming masterpiece


Unity Tree With Multicolor Leaves
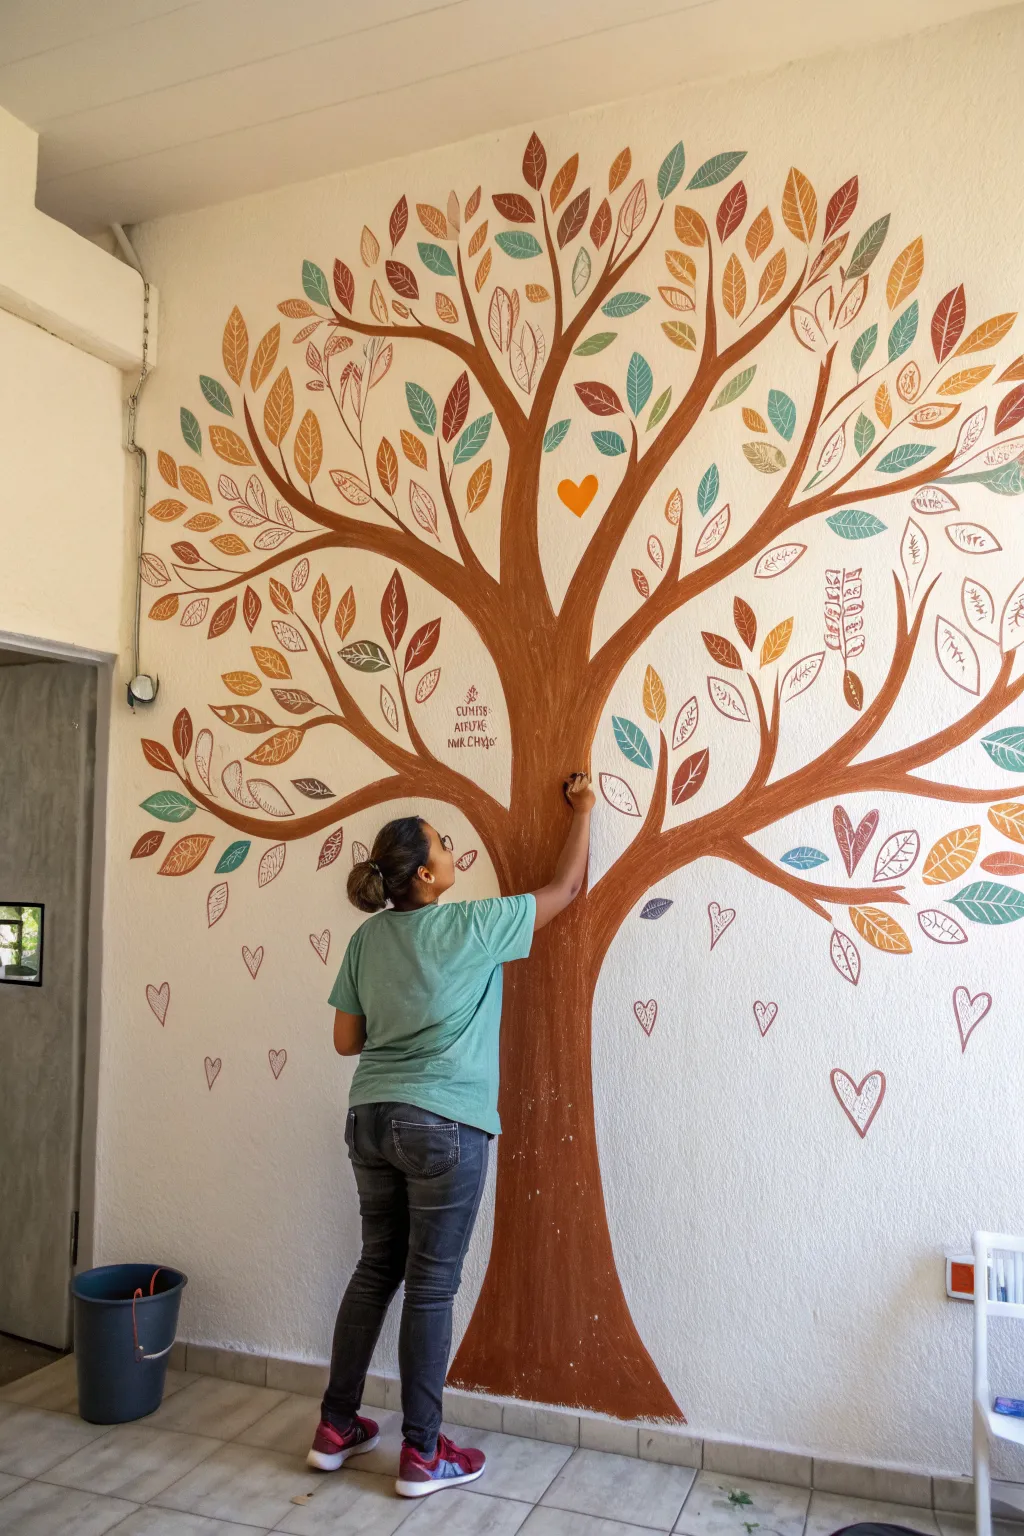
Transform a blank wall into a flourishing symbol of community with this expansive tree mural. Featuring a sturdy brown trunk and a canopy of stylized, multicolored leaves, this project invites creativity through its mix of solid shapes and delicate line work.
Step-by-Step
Materials
- Interior latex wall paint (white for base if needed, brown for trunk)
- Acrylic craft paints (various autumn colors: oranges, reds, yellows, teals, greens)
- Pencil and large eraser
- Assorted paintbrushes (2-inch sash brush, 1-inch flat brush, fine liner brushes)
- Painter’s tape and drop cloth
- Step ladder
- Chalk (optional, for drafting)
Step 1: Preparation and Drafting
-
Prepare the workspace:
Clear the area against the wall and lay down a drop cloth to protect the floor from drips. If the wall needs a fresh coat of white base paint, apply that now and let it dry completely. -
Sketch the trunk skeleton:
Using a pencil or a piece of light-colored chalk, lightly sketch the main vertical line of the trunk. Start wide at the floor (roots) and narrow it slightly as you go up, stopping about two-thirds of the way up the wall. -
Branch out:
From the top of your trunk sketch, draw major branches splitting off to the left and right. Aim for a natural, organic look where branches taper toward the ends. -
Fill in the canopy:
Add secondary and tertiary twigs extending from the main branches. Let them reach wide across the wall to create a full, rounded canopy shape without being perfectly symmetrical. -
Position the leaves:
Lightly sketch leaf shapes scattered along the branches. Vary the sizes, but keep a consistent simple almond or tear-drop shape for unity. Don’t worry about detailing them yet.
Step 2: Painting the Structure
-
Paint the trunk base:
Dip a 2-inch sash brush into your brown latex paint. Start at the bottom, using long, vertical strokes to fill in the main trunk. The sash brush angle helps cut clean edges. -
Extend the branches:
Switch to a 1-inch flat brush as you move into the thicker branches. Continue with the brown paint, ensuring the transition from trunk to branch feels smooth and seamless. -
Detail the twigs:
For the thinnest tips of the branches, use a smaller round brush. A steady hand is key here; I sometimes rest my pinky on the dry wall for balance as I pull the brush outward. -
Apply a second coat:
Once the first layer of brown is dry to the touch, assess the coverage. Apply a second coat to the trunk and thick branches to ensure a solid, opaque finish.
Chalk It Up
Use chalkboard chalk for your initial sketch instead of pencil. It wipes away easily with a damp cloth if you make a mistake and doesn’t leave permanent indentations.
Step 3: Adding Color and Details
-
Block in solid leaves:
Select about half of your sketched leaves to be solid colors. Use your acrylic craft paints to fill these in, distributing colors like teal, ochre, rust, and sage green evenly across the tree so no single color clumps together. -
Paint outline leaves:
For the remaining leaves, use a fine liner brush and the same color palette to paint only the outlines. This creates visual lightness and contrast against the solid shapes. -
Add internal patterns:
Once the outline leaves are dry, go back with a contrasting color or a darker shade and add simple interior details like veins, dots, or cross-hatching to a few of them. -
Create the falling hearts:
Near the base of the trunk and floating in the negative space, paint small, simple heart outlines. These represent the love growing from the community roots. -
Include a focal heart:
Choose a spot on the main trunk or a central branch to paint a solid, bright orange or yellow heart. This serves as a sweet focal point or a ‘carving’ on the tree. -
Add text or dedication:
If desired, use a fine liner brush with dark paint to add a small quote, date, or dedication near the lower branches, keeping the lettering delicate. -
Final touch-ups:
Stand back to view the whole mural. Erase any visible pencil lines and use a small brush with white paint to clean up any edges on the leaves or trunk.
Community Hands
Turn the ‘solid’ leaves into handprints. Have community members dip their hands in paint and press them along the branches for a truly collaborative canopy.
Step back and admire how the individual leaves come together to form one strong, beautiful tree
BRUSH GUIDE
The Right Brush for Every Stroke
From clean lines to bold texture — master brush choice, stroke control, and essential techniques.
Explore the Full Guide
Interactive Photo-Spot “Wings of Inclusion”

Transform a blank outdoor wall into an engaging photo opportunity with this large-scale wing mural. Featuring a warm, earthy palette and intricate feather detailing, these wings are designed to make anyone standing between them feel like they are taking flight.
Step-by-Step Tutorial
Materials
- Exterior acrylic latex paint (Light Peach/Beige for base coat)
- Exterior acrylic paints (Dark Brown, Medium Brown, Tan, Cream, Gold/Ochre)
- Large paint rollers and extension pole
- Assorted synthetic bristle brushes (2-inch sash, 1-inch flat, fine liner)
- Chalk or charcoal for sketching
- Measuring tape and level
- Reference image printout
- Step ladder
- Painter’s tape
- Drop cloths
- Clear exterior sealant (optional)
Step 1: Preparation and Base Layer
-
Prepare the surface:
Clean the wall surface thoroughly to remove dirt and debris. If the wall is textured stucco like the reference, ensure you use a high-nap roller to get into the crevices during priming. -
Apply the background:
Roll on the light peach or beige base color across the entire designated area. Apply two coats if necessary for full opacity, allowing 2-4 hours of drying time between coats. -
Establish the center point:
Measure the total width of your working area and mark the precise center point at about shoulder height (roughly 5 feet off the ground) to ensure the wings will fit an average adult. -
Sketch the primary shape:
Using chalk or charcoal, sketch the large, sweeping curve of the upper wing bones first. Mirror this shape on the other side of your center point to ensure symmetry. -
Outline feather tiers:
Sketch the descending layers of feathers. Start with the small, rounded coverts near the top bone, moving down to the medium secondary feathers, and finally the long, pointed primary flight feathers at the bottom.
Grid Method for Symmetry
To get perfectly symmetrical wings, draw a 1-foot grid in chalk on the wall first. Copy your reference image square by square rather than freehanding the curves.
Step 2: Blocking and Coloring
-
Paint the upper bone structure:
Fill in the top structural curve of the wing with a golden-ochre or tan tone. Use a 2-inch sash brush to cut crisp edges against the background wall. -
Block in the darkest feathers:
I like to establish my contrast early, so use your darkest brown paint to fill in the tips of the bottom-most flight feathers and the outer edges of the wing shape. -
Apply mid-tones:
Fill the middle sections of the long feathers with a medium brown, blending slightly into the wet dark brown edges if possible, or wait for it to dry for a hard-edge graphic look. -
Paint the upper feathers:
Use a cream or light tan shade for the smaller, rounded feathers near the top of the wing. These should look lighter to suggest sunlight hitting the top surface. -
Add the decorative spine details:
Along the main upper bone of the wing, paint a series of small, cream-colored circles or ovals. This decorative element adds a stylized, almost jewelry-like effect to the anatomy. -
Layer the inner feathers:
Work on the tiered rows of feathers inside the wing shape. Alternate between lighter tans and medium browns to distinguish the layers, ensuring each row overlaps the one below it visually.
Step 3: Detailing and Dimension
-
Define the quills:
Using a smaller flat brush and a dark brown or black mix, paint the central shaft (rachis) down the center of each large feather. This anchors the feather shape. -
Add feather barbs:
With a fine liner brush, add quick, directional strokes extending from the central shaft of each feather. These striations mimic the texture of individual barbs. -
Highlight the edges:
To make the feathers pop, use your lightest cream color to highlight the top edge of each feather. This separates them from the feather behind it and creates a sense of layering. -
Refine the outlines:
Go back over the main exterior outlines of the wings with a steady hand and dark paint to clean up any rough edges from the blocking phase. -
Add ground elements:
At the base of the wall, near the center, paint simple, wispy grasses or weeds using thin vertical strokes in brown and tan. This grounds the mural and adds a touch of organic realism. -
Touch up the center:
Paint a small, diamond-shaped geometric marker or heart exactly in the center gap between the wings. This serves as a helpful visual cue for where subjects should stand. -
Seal the work:
Once the paint has cured for at least 24 hours, apply a clear exterior UV-resistant sealant to protect the colors from fading in the sun.
Add Metallics
For the circular details on the upper wing bone, use exterior metallic gold paint. It catches the sunlight beautifully and makes photos pop.
Now you have a stunning, interactive piece of art that invites the community to become part of the picture.


Have a question or want to share your own experience? I'd love to hear from you in the comments below!